MikeU48
-
Posts
111 -
Joined
-
Last visited
Content Type
Profiles
Forums
Gallery
Events
Everything posted by MikeU48
-
 I got a question for you guys and gals (just in case). The original instruction call for the plastic gun deck (comes as 3 separate sections) not to be glued to the hull sides. I, of course) glued the 3 sections together so I could install the oak veneer deck. After the hull sides were glued together I had to spread the top of the hull sections to drop the gun deck down on its supports. There are small retainer clips above the supports that rest on the top edge of the gun deck once it's on the support ledge. It's pretty snug around the edges of the gun deck where it meets the hull but a few places are not as snug. AND now for the question. Should I now glue the one piece gun deck to the hull sides?
- 209 replies
-
- 3
-

-
- constitution
- revell
- (and 1 more)
-
Hey Hal and Good OLD Lou, Thanks for the advice. I was just following the instructions and what you say makes sense. There are 22 Carronades on the spar deck with one larger cannon ( like the ones on the gun deck) near the bow which I assume was the chase gun. I will pull the two from the front gun deck and leave the doors open to serve as a Taco Bell Drive thru... he he he Javlin Thanks for the comment
- 209 replies
-
- 3
-
-
- constitution
- revell
- (and 1 more)
-
Well, actually Lou, you referred me to the HiSmodel site to see the cloth sails they offered for the Conny. Not only did I decide to buy the sails but the cannon carriages as well (sorry I don't know all the correct naval ship terms but I think you get my drift) Your correct in saying I need the carriages for the Carronades. They have a flat bottom without sides to them. I like your suggestion of rigging the cannons by the main deck opening and will do that. Insofar as painting the Captain's Quarters I will probably pass. The great plan is to have a plexiglass case built for it and I highly doubt anyone will dare move it to look thru the back windows...lol
- 209 replies
-
- 3
-
-
- constitution
- revell
- (and 1 more)
-
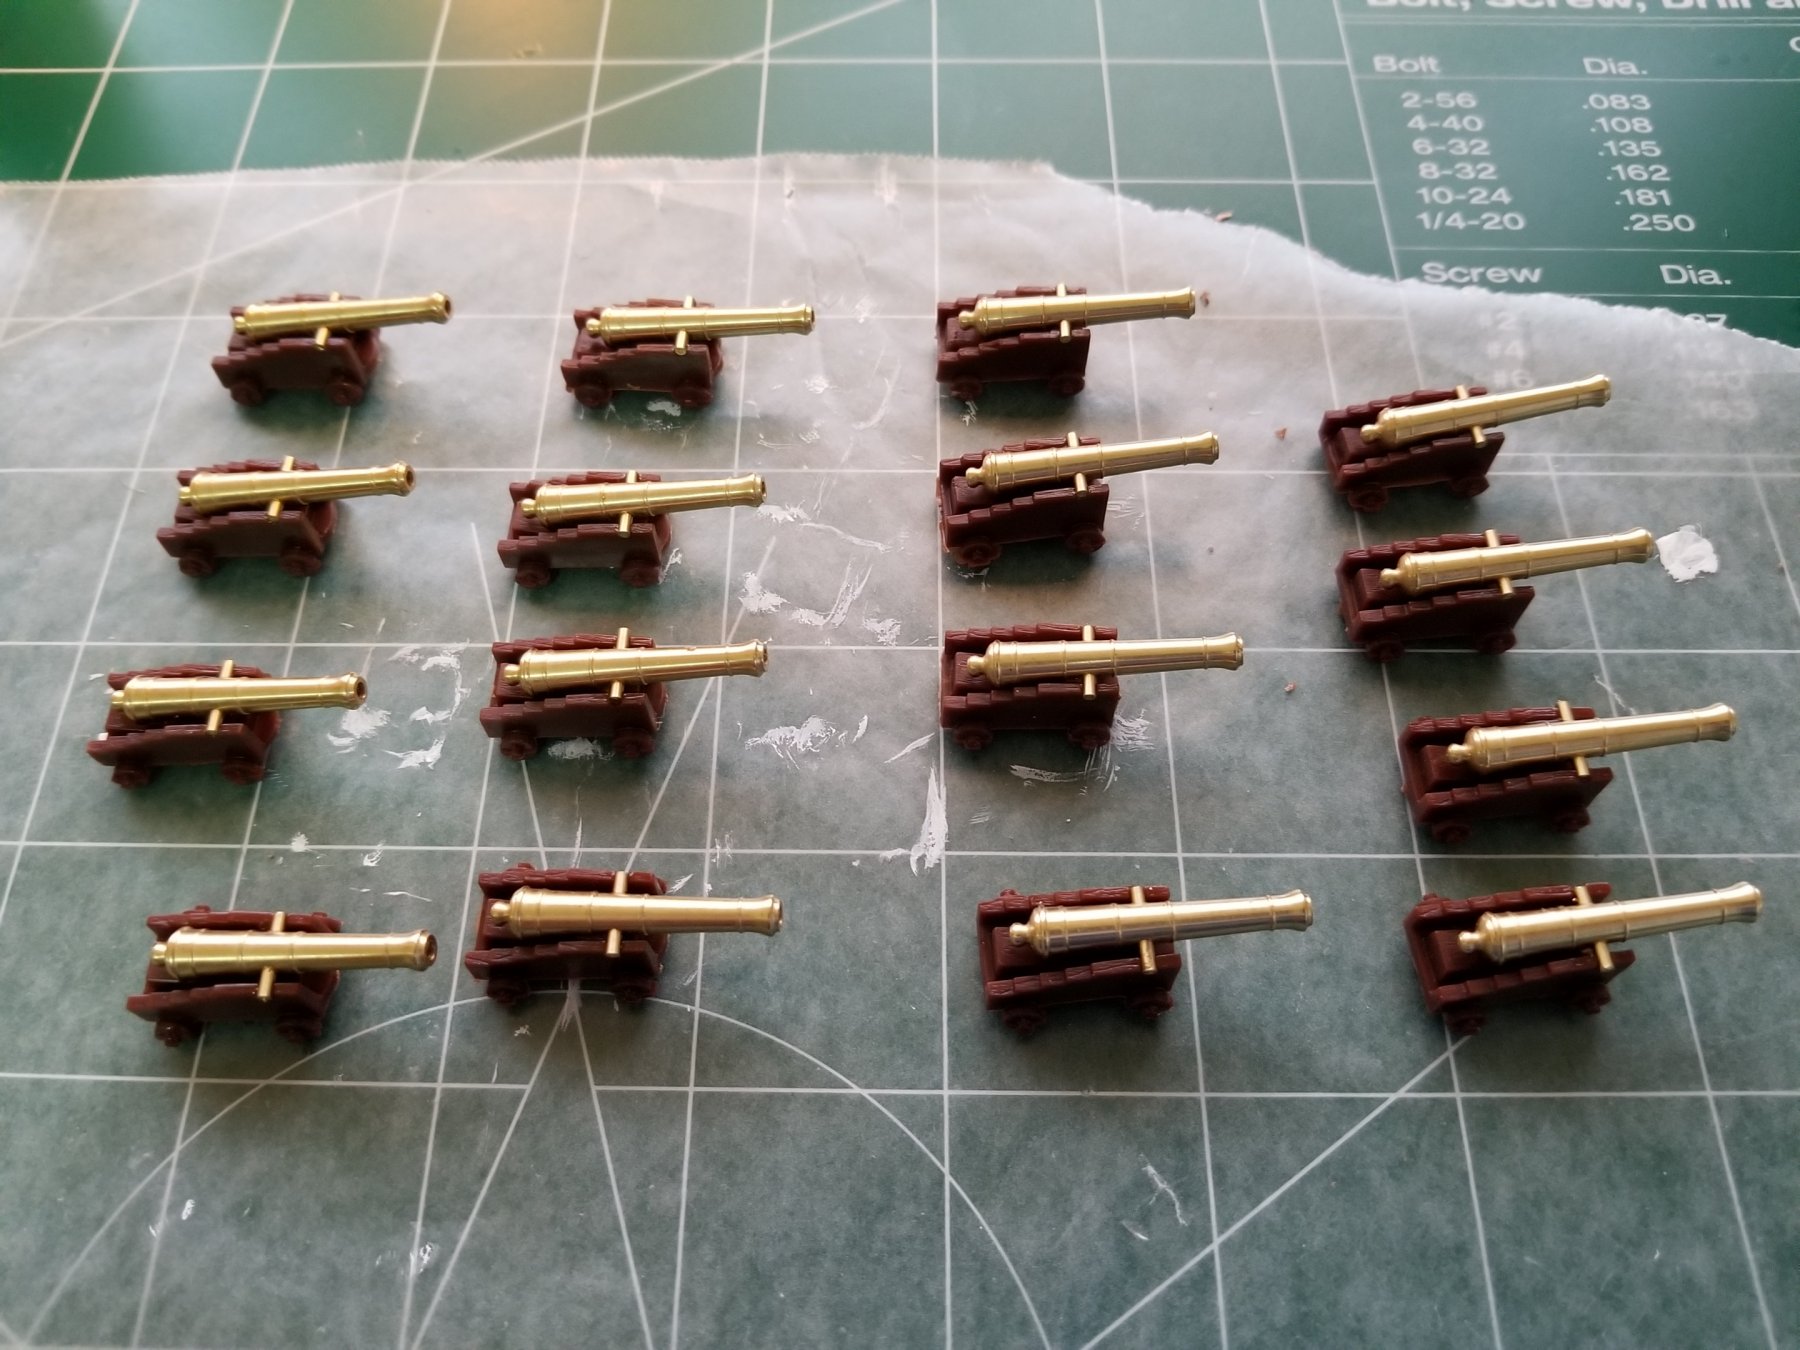
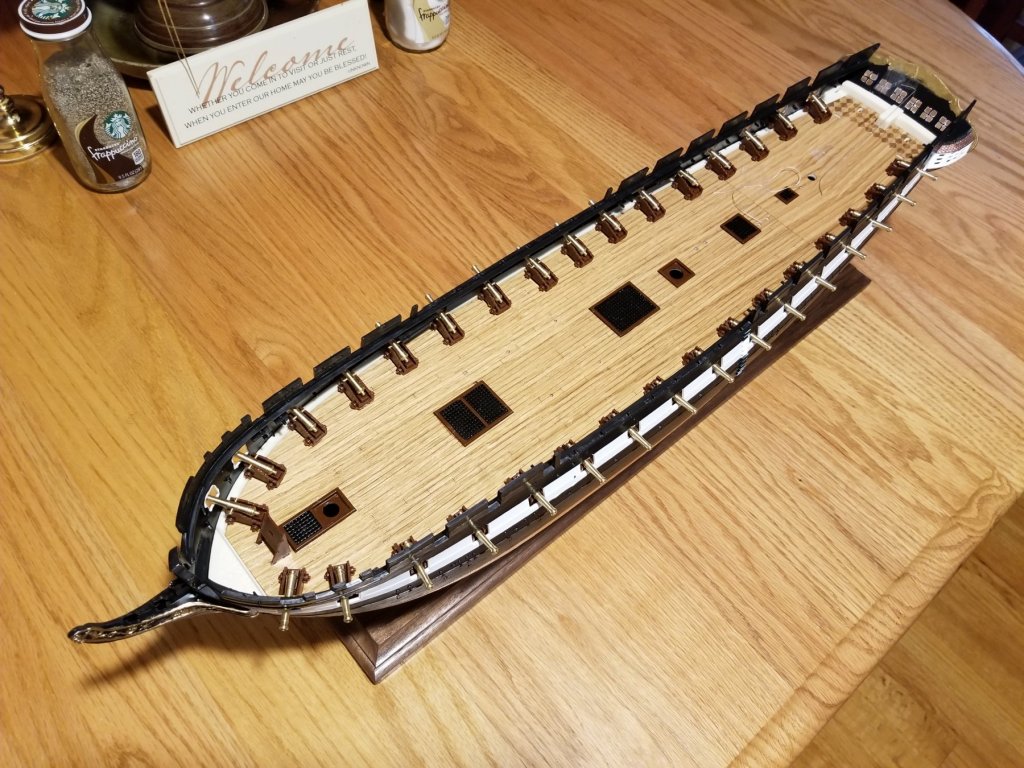
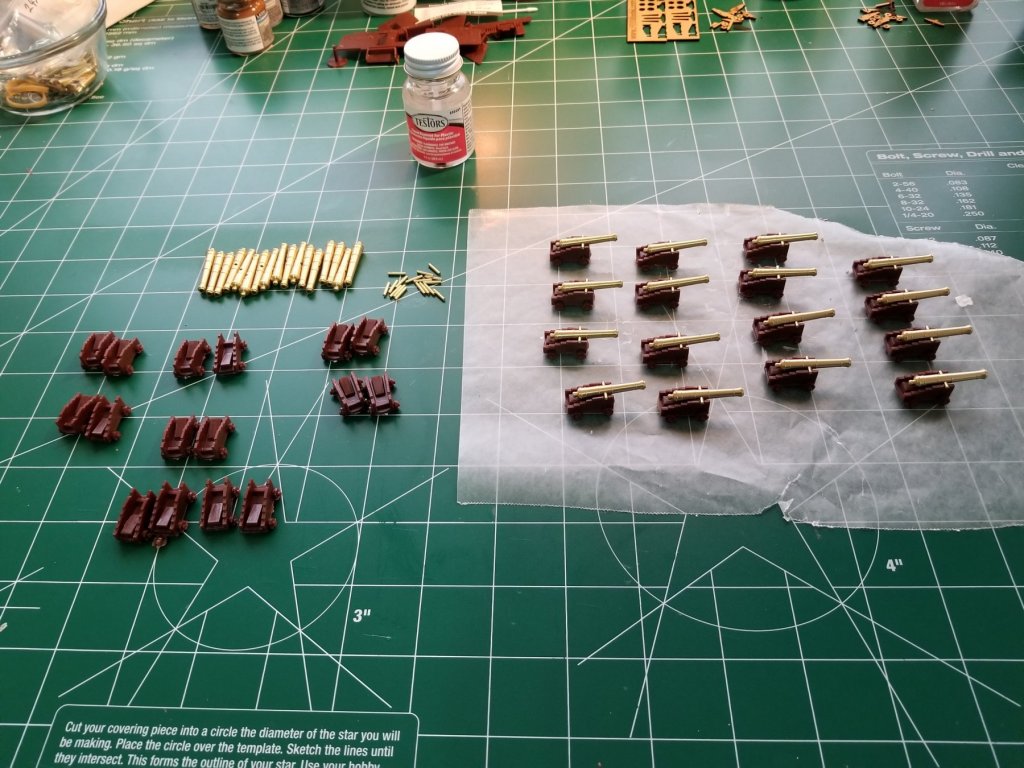
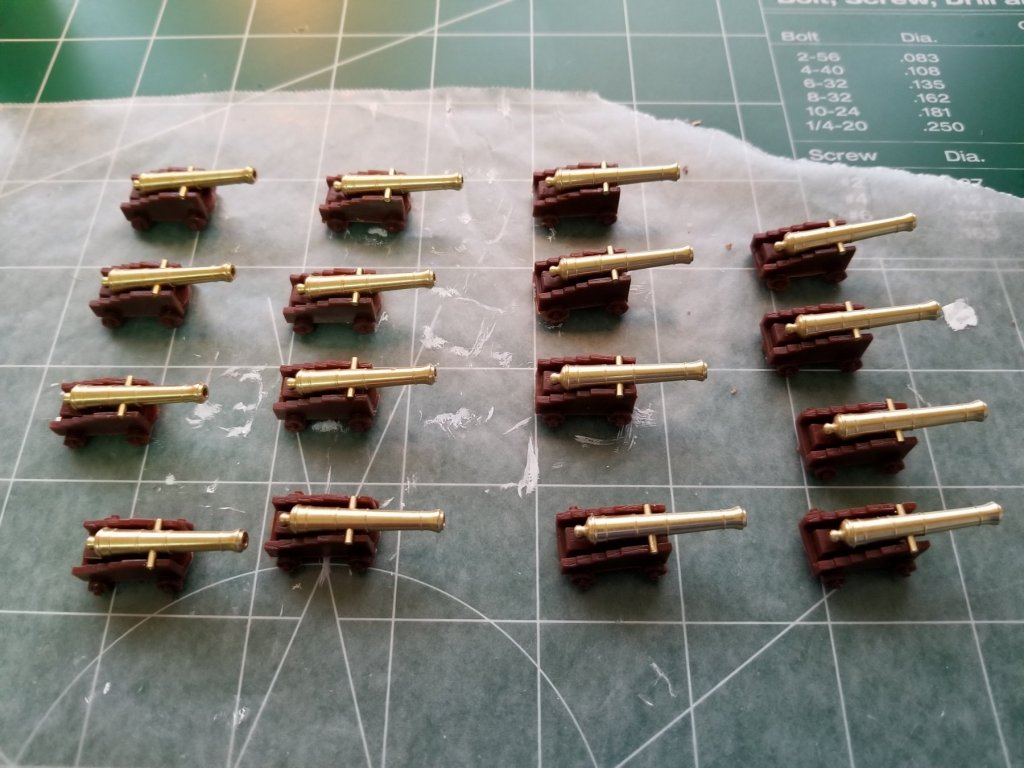
32 cannons mounted to carriages and temporarily place on deck for effect. Man those were heavy....


- 209 replies
-
- 6
-
-
- constitution
- revell
- (and 1 more)
-
Mornin Lou, Just going to leave the cannons brass cause I like the look and YOU MADE ME buy them so there...he he he. I also got the gun carriages from HiSModel but just realized they are the type that go on the gun deck not the upper deck where you will see them. Sent him an email to exchange for the correct ones. At least I don't have to assemble those little suckers and paint them so I'll be finished with the lower deck in a few dazes. Don't see the need to paint the inside of the captains quarters or run the ropes between all the guns on the lower deck. Again...who will see all that detailed work? Not ME...
-
Well I never knew places were available to do that NOT that I have all but one ship and THAT'S under construction...lol Nice to actually start the assembly line going. Cannon assembly crew hard at work as we speak. They should have it done before their lunch break. Heavy suckers...
- 209 replies
-
- 5
-
-
- constitution
- revell
- (and 1 more)
-
Saw this on Model Expo for those of you who have a drydock crammed with ships that will never be launched...Interesting https://modelexpo-online.com/Recycle-Hobbies
- 209 replies
-
- 1
-
-
- constitution
- revell
- (and 1 more)
-
Hey CDW, When I first saw them I fell in love with the look. The last Conney I started in 1991 I painted the deck black, then topped it with a tan. The idea was to lightly sand the deck till the black showed thru. I think that's where I quit...lol I also fell in love with the cloth sails on this website. Needless to say, they are sitting in my hobby room patiently waiting to drive me crazy.... Check it out: I have Lou to thank for this site. AND I mean that sincerely Lou. https://www.hismodel.com/uss-constitution-united-states-revell-1-96 Also look at the top of the page for the Photogallery. There are 3 builders of the Constitution that are just fantastic.
- 209 replies
-
- 2
-
-
- constitution
- revell
- (and 1 more)
-
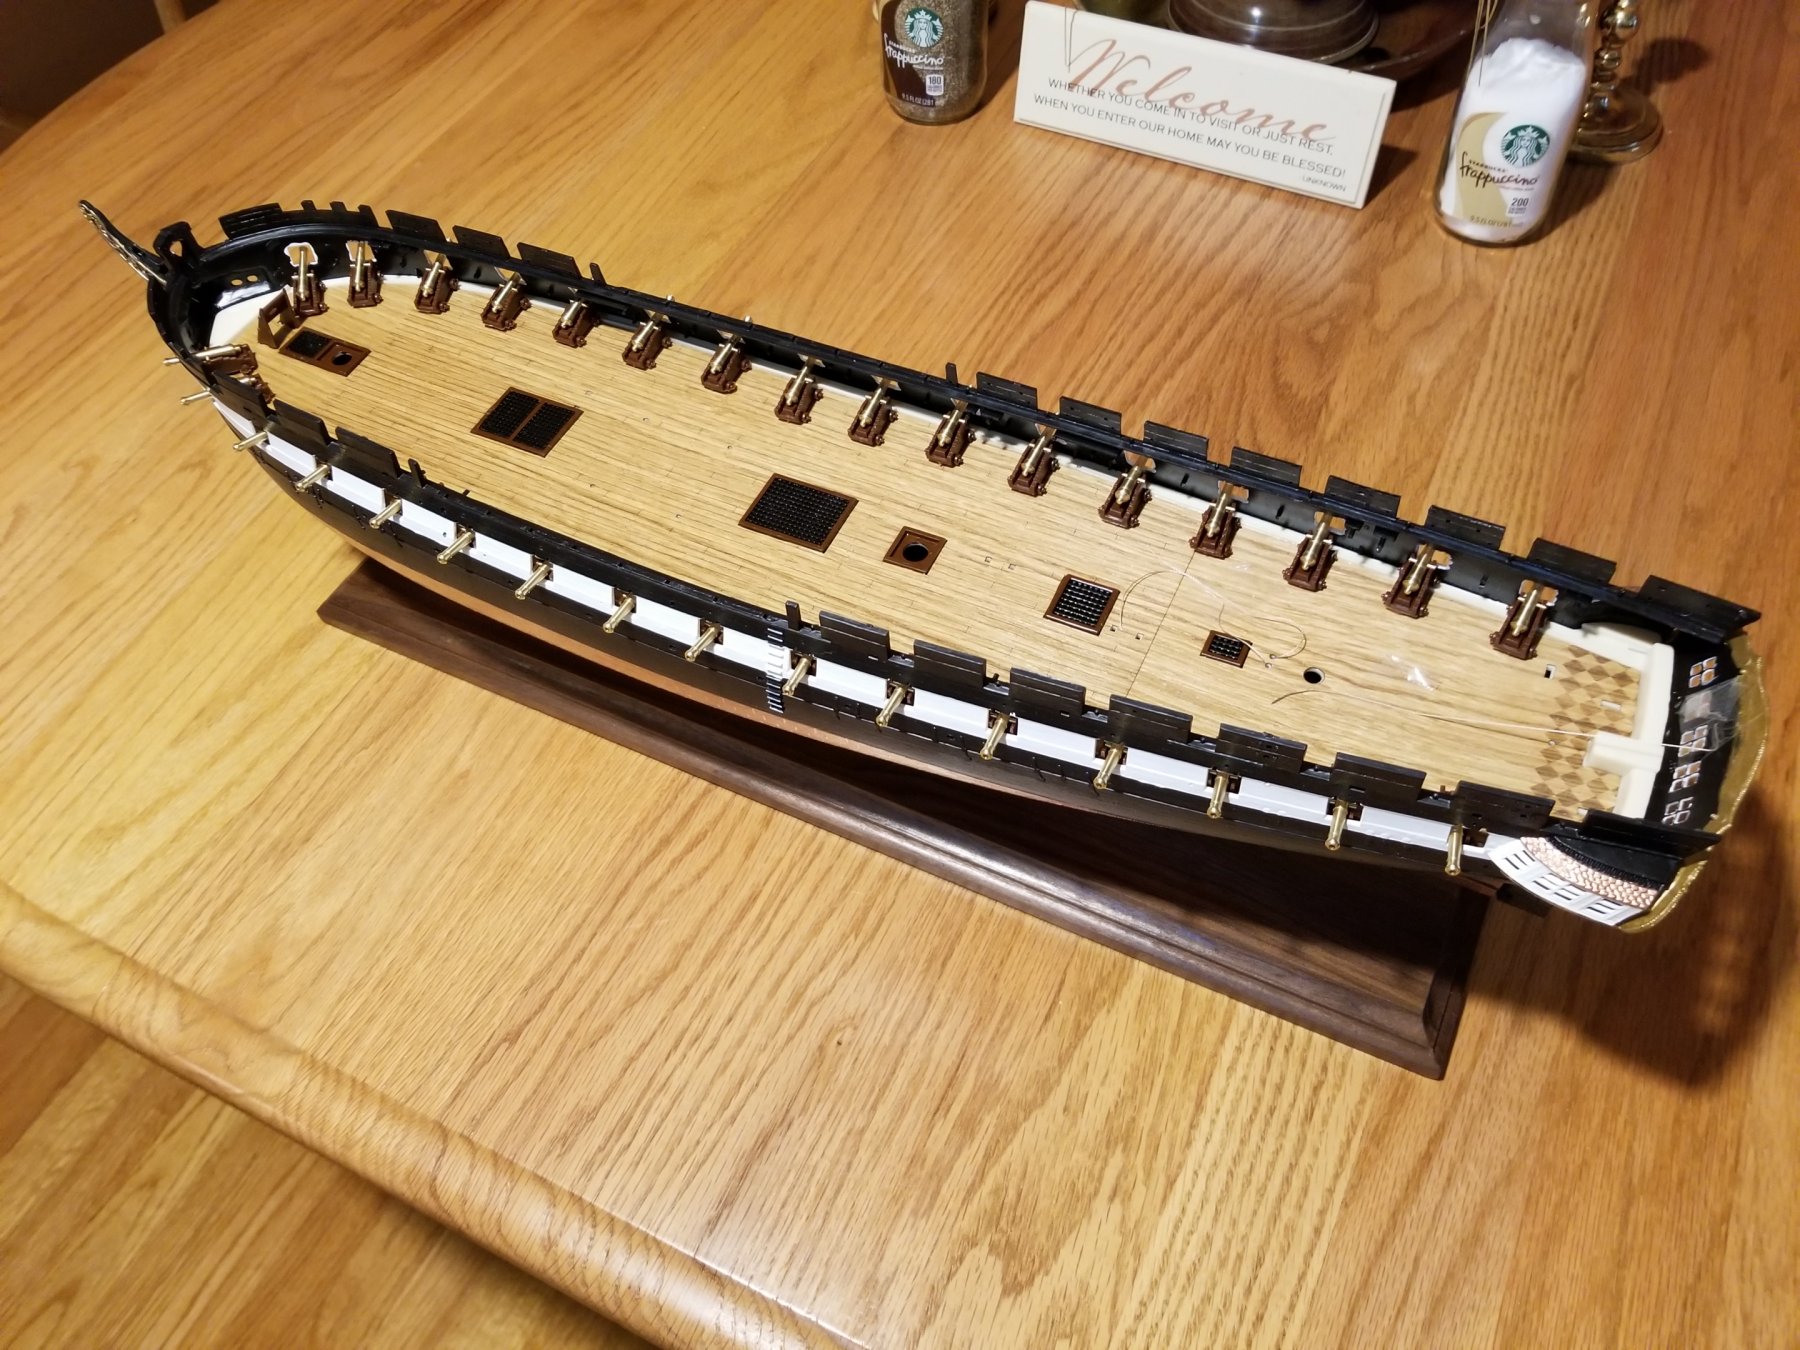
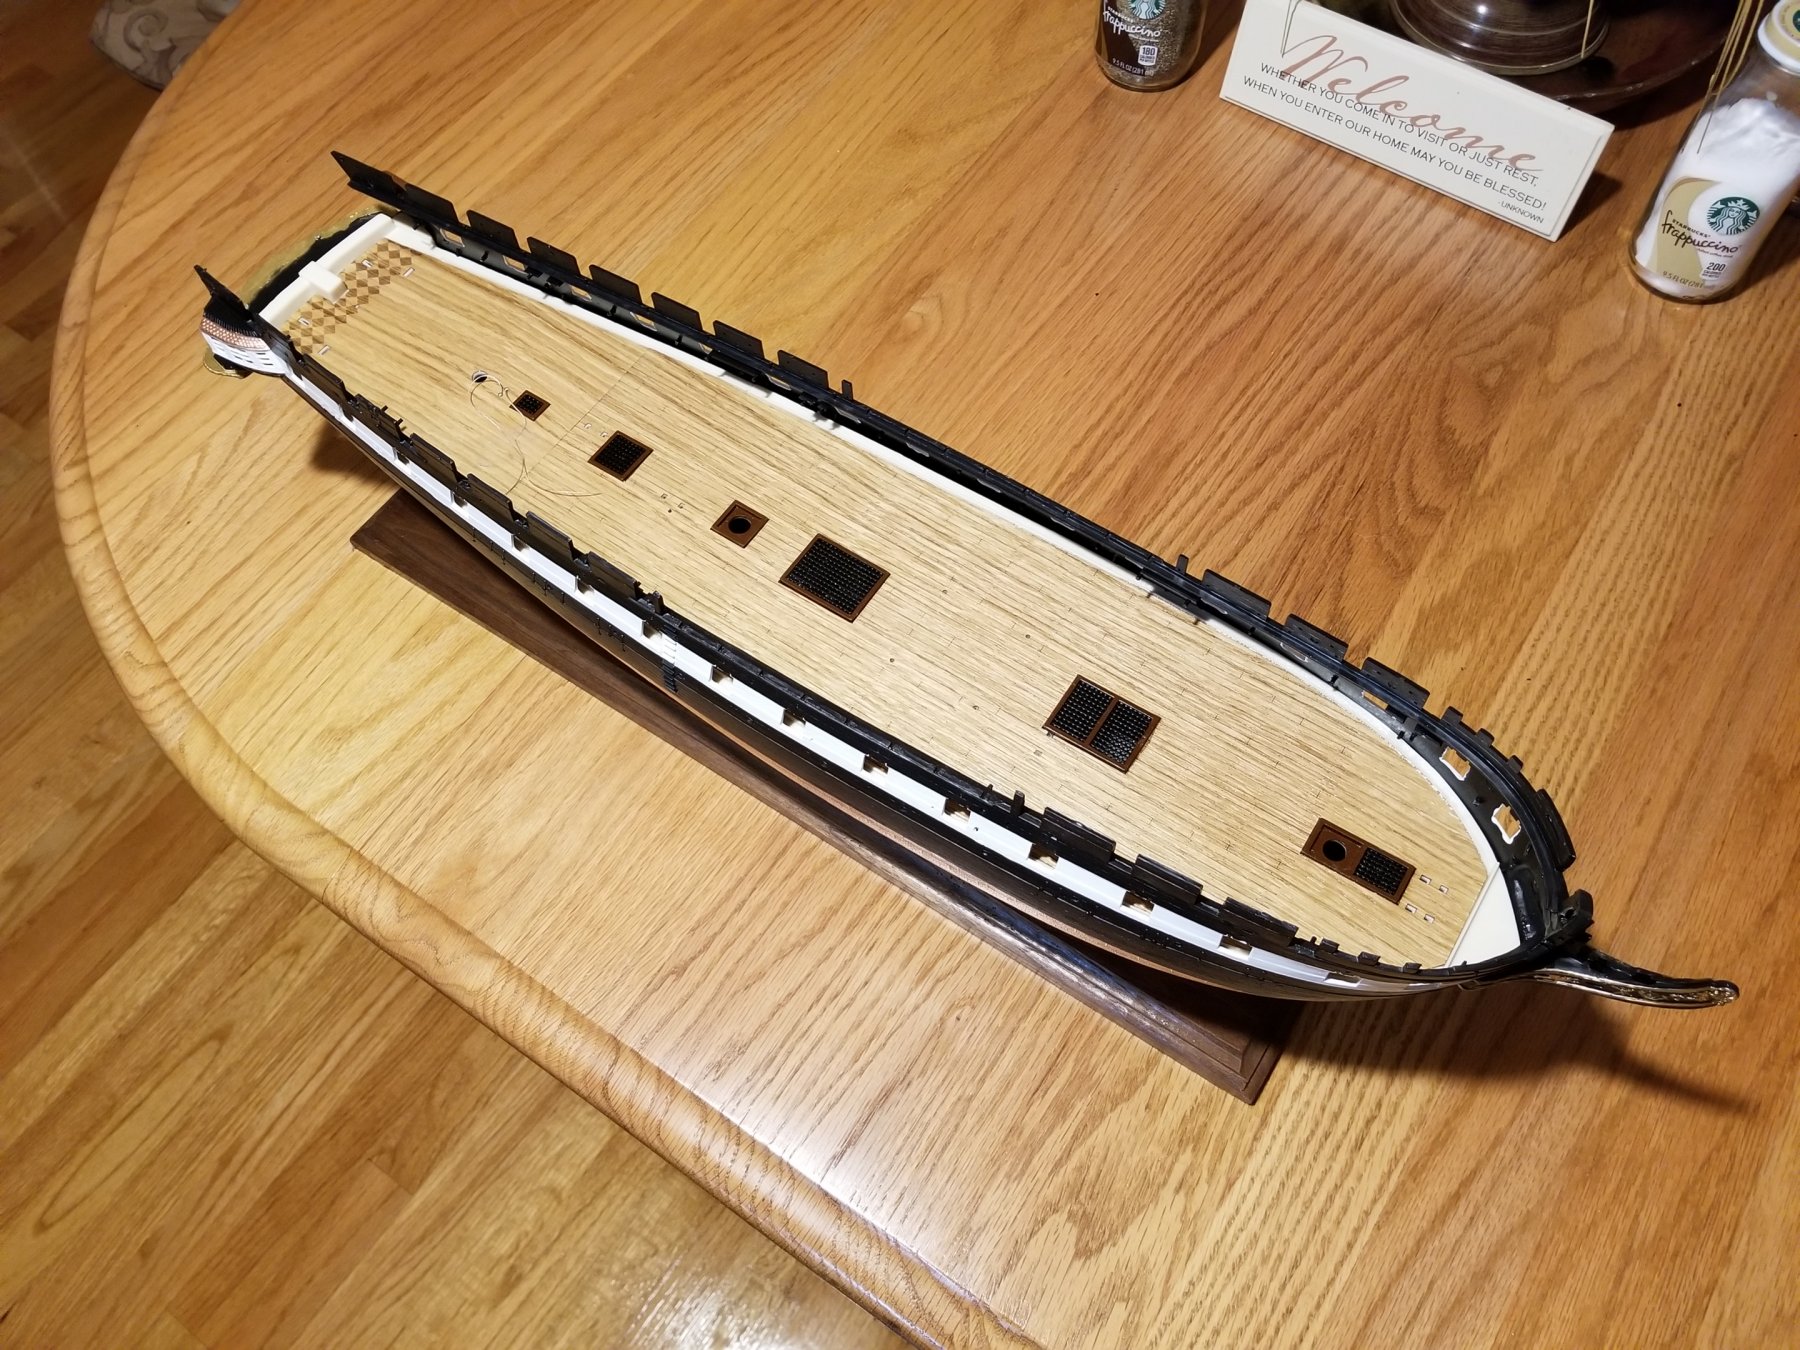
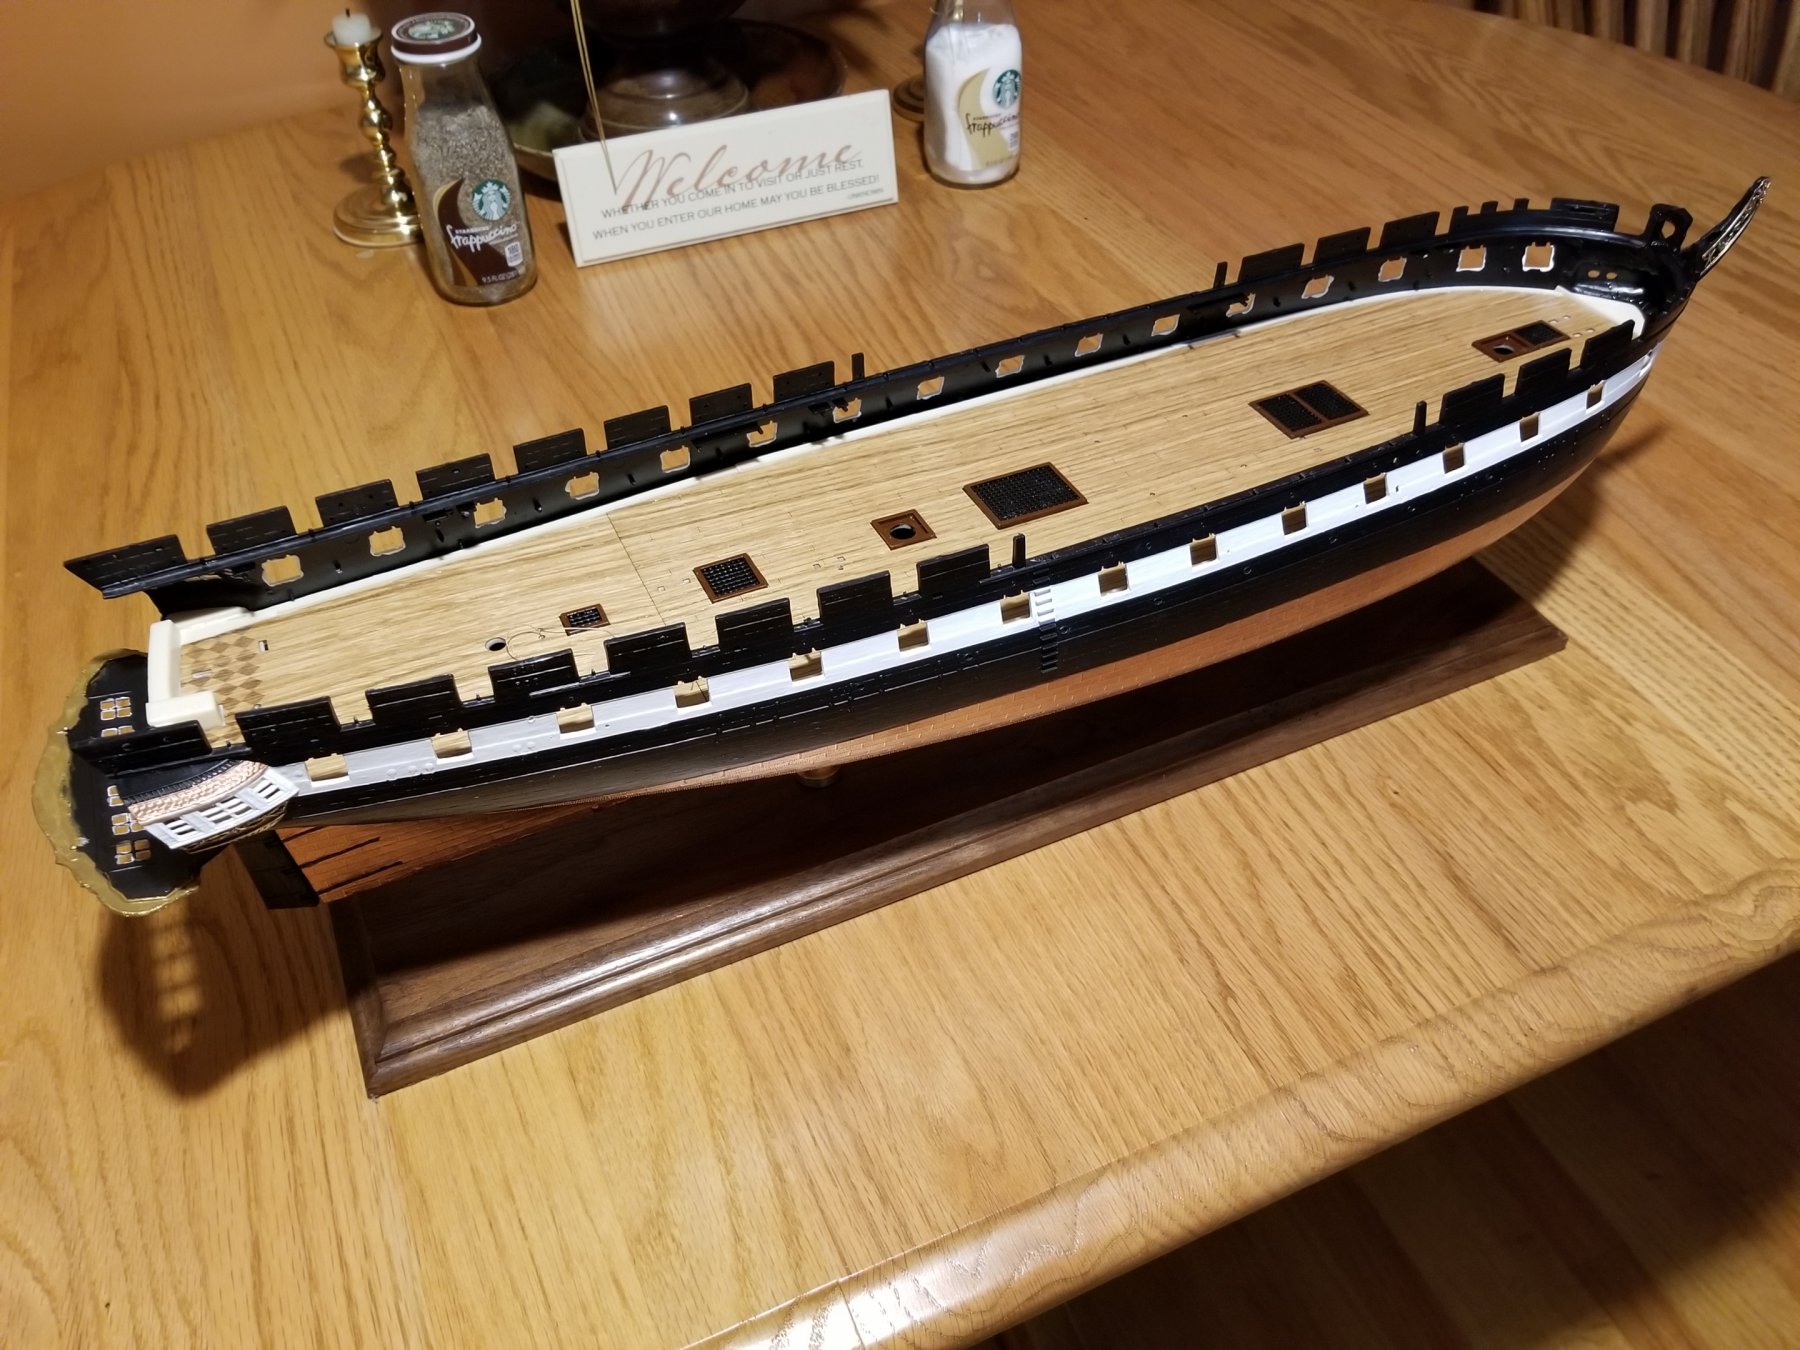
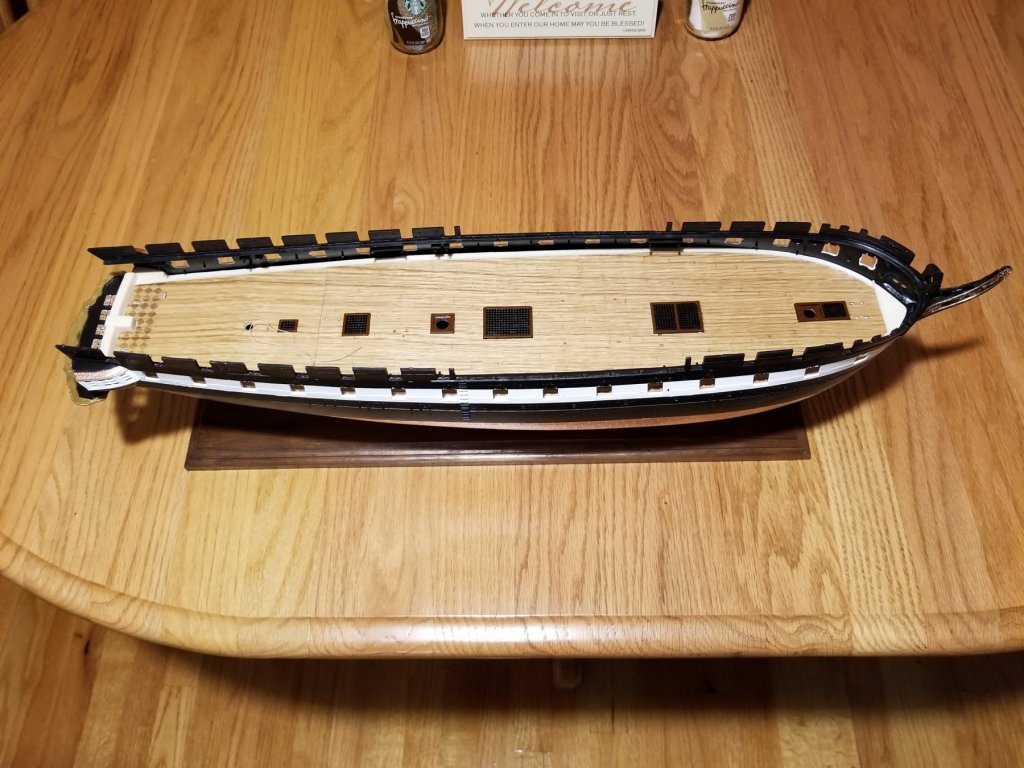
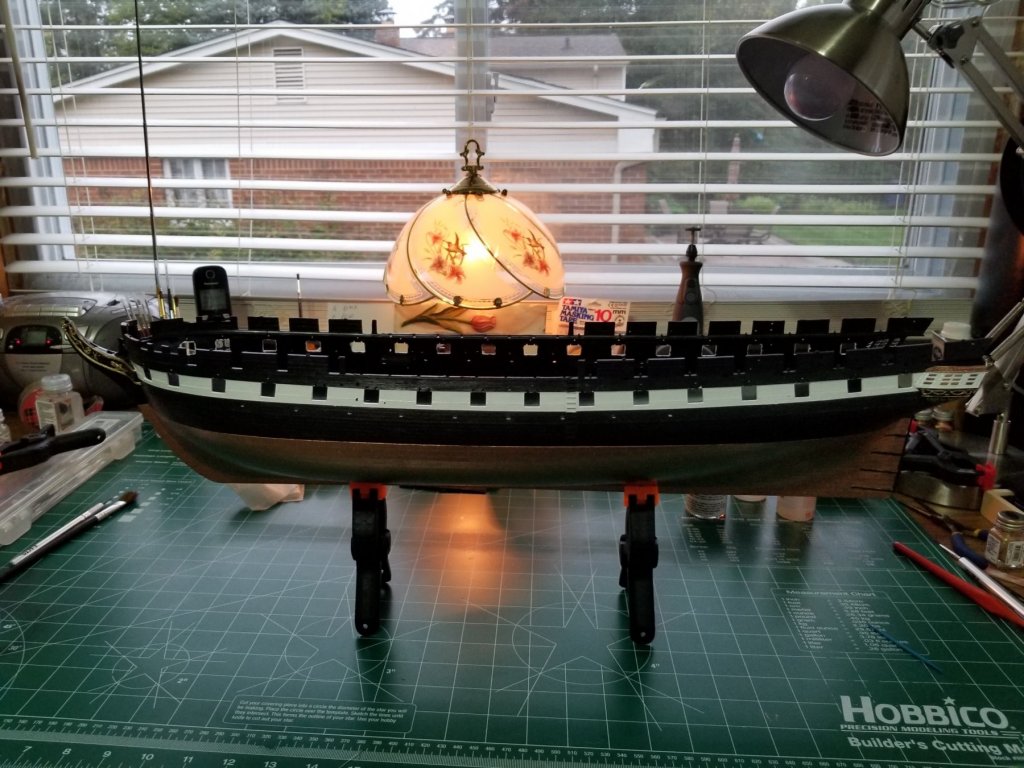
OK....done for the weekend. Gun Deck in the hull. I'm a happy man at this point. Transom doesn't get glued until the main deck goes in. (that's why it's hanging down in the back)


- 209 replies
-
- 9
-
-
- constitution
- revell
- (and 1 more)
-
Thanks OC, A lot of the credit goes to you and the tips you gave me. Acrylics are soo much easier to work with. Thanks again for your advise. Much appreciated.
- 209 replies
-
- 2
-
-
- constitution
- revell
- (and 1 more)
-
Hey Lou, I used bolts instead of screws because there was nothing in the hull to screw into. Plus the cavity in the bottom of the hull looked like it was shaped for bolts. Nothing was mentioned in the instructions about using bolts as an alternative mounting method so... Anyway, I agree it looks so much better mounted on the nice wood so as to enjoy the fruits of my labors as I progress.
- 209 replies
-
- 3
-
-
- constitution
- revell
- (and 1 more)
-
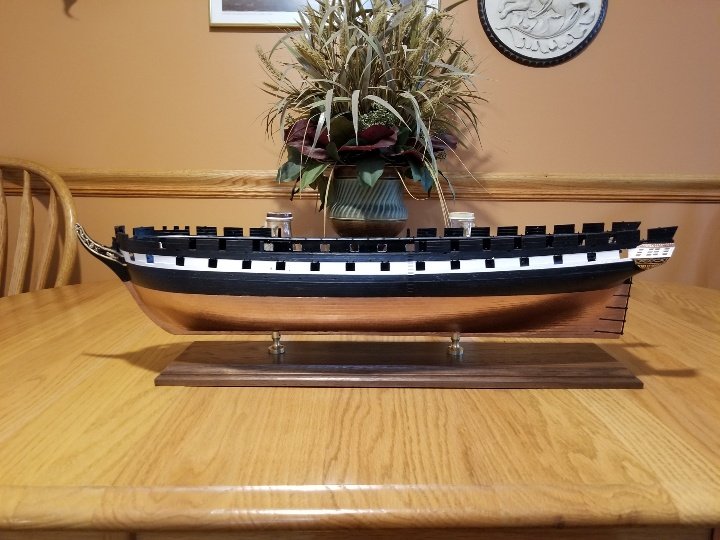
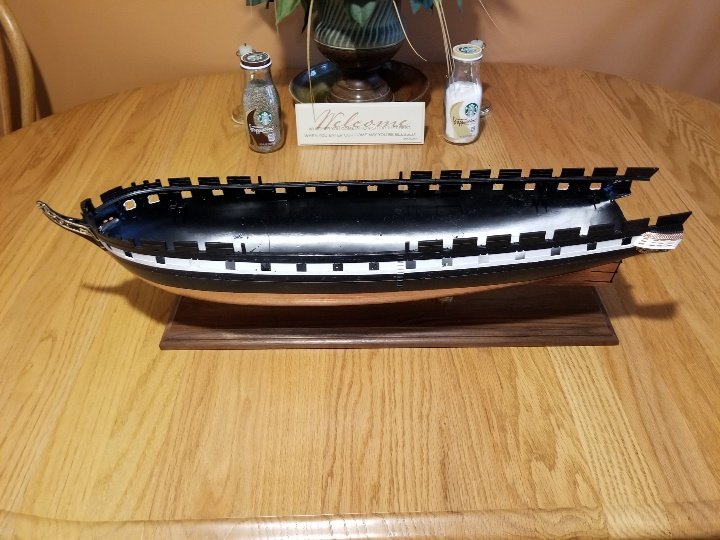
Conny mounted!!! NOW it looks like I'm building a ship!!! Just need to assemble the rudder and run a line then I can drop the gun deck in place and take a day off. How hard can that be????
- 209 replies
-
- 6
-
-
- constitution
- revell
- (and 1 more)
-
Thanks Lou. The only way I know of is for the model to be upright while assembling. Plans are to cover the wood base with microfiber cloths...
- 209 replies
-
- 1
-
-
- constitution
- revell
- (and 1 more)
-
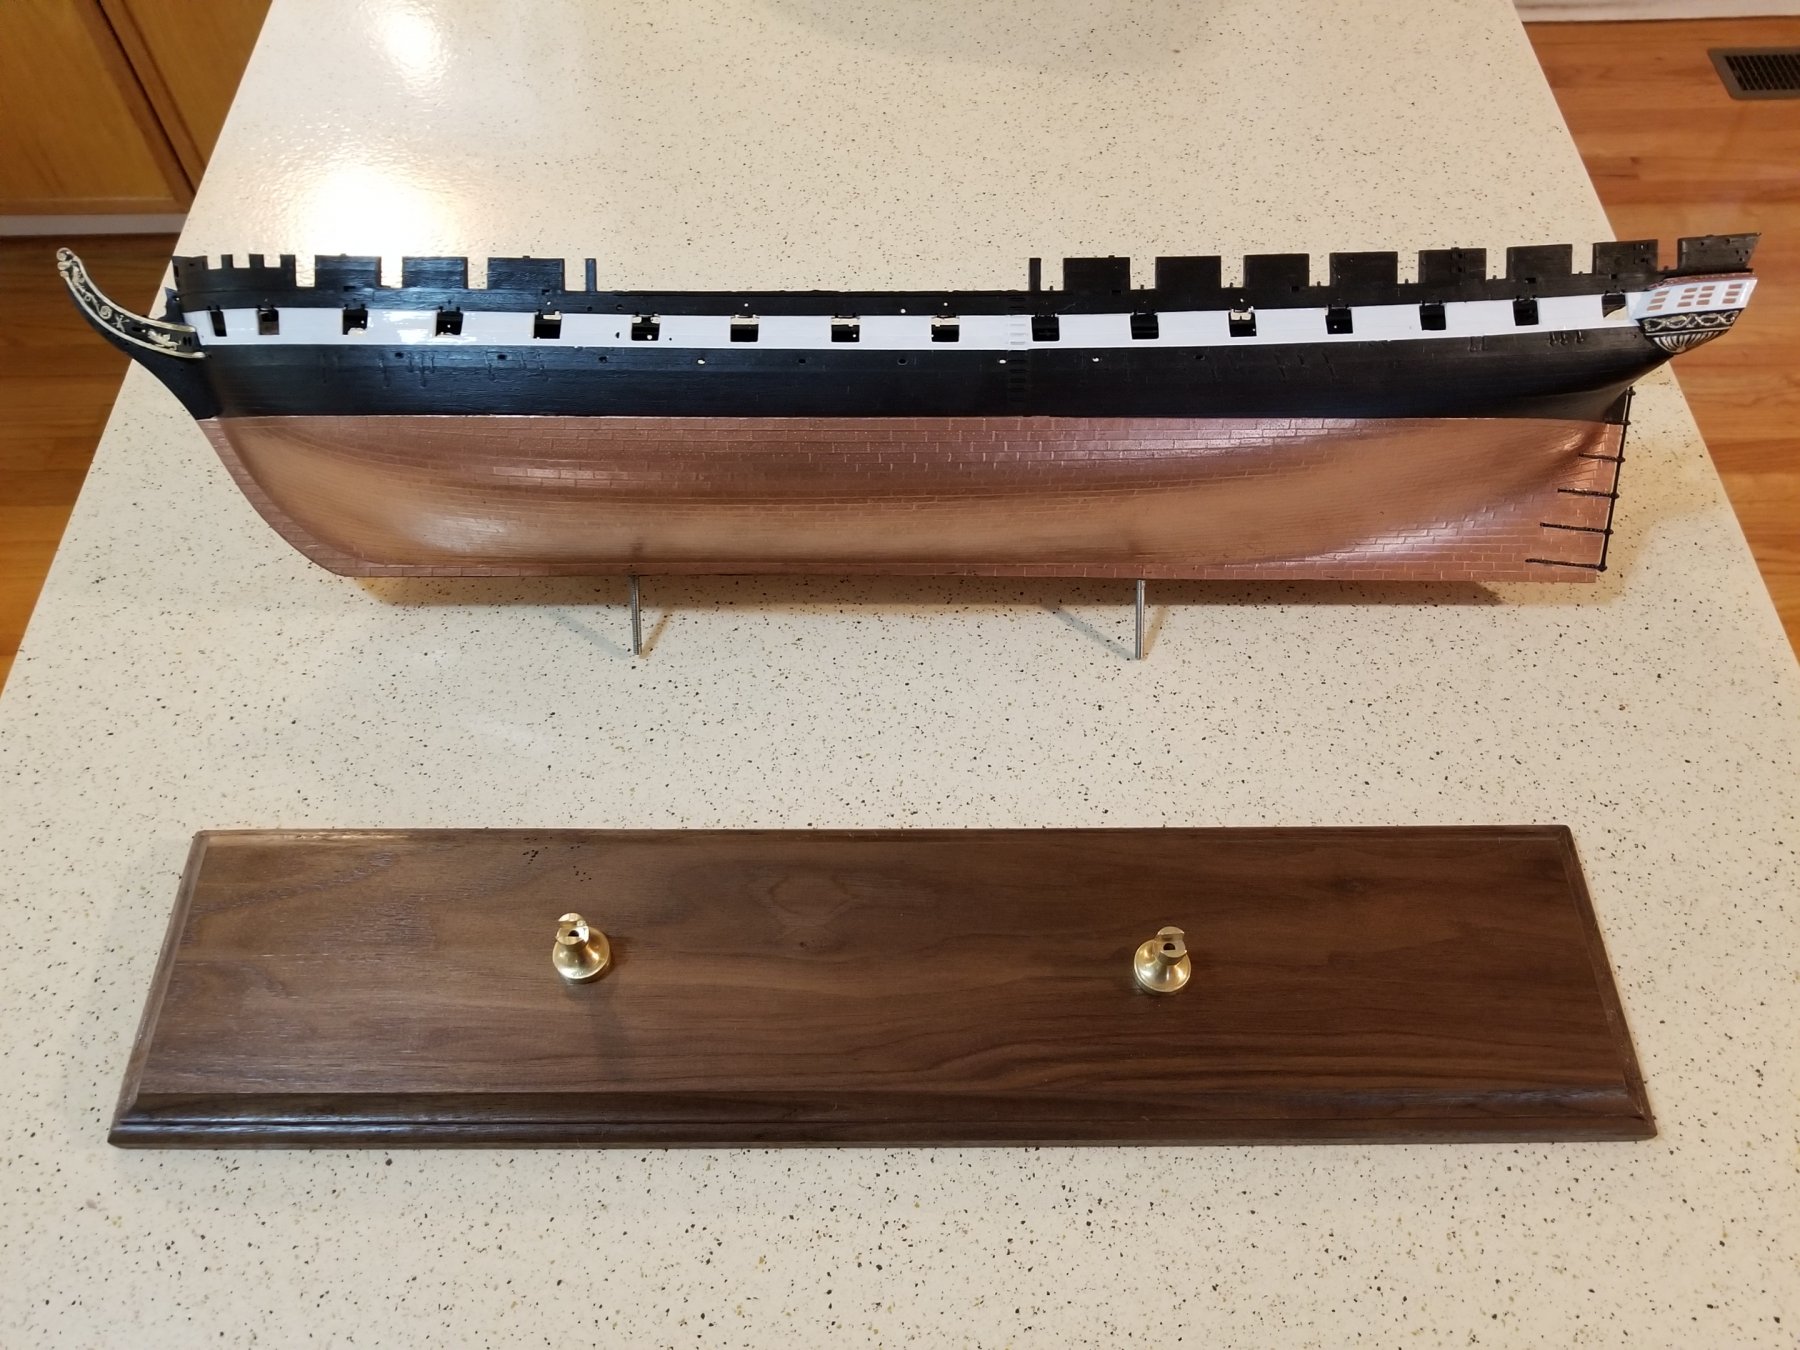
Next step is to mount the hull to the display board with pedestals. Had to grind the slotted section of the pedestal to about 1/2 their height so that the hull would rest flush with the bottom part of the slot. Also, need to widen the slot a little. I have nothing else to do right??? lol Got the base and pedestals from Model Expo. Thanks to Hubac's suggestion, I got the cordless Dremel and has worked great for grinding the pedestal down. Also great for polishing my teeth and removing hemorrhoids. I have to remember to polish my teeth first...My bad..... The base came unfinished so I put 2 coats of semi-gloss poly on it as I still had a can from spraying the Oak decks.

- 209 replies
-
- 6
-
-
- constitution
- revell
- (and 1 more)
-
Thanks Richmond. Repainted several times...lol Just needed the practice with a small brush and a steady hand. Not easy at 70...he he he
- 209 replies
-
- 1
-
-
- constitution
- revell
- (and 1 more)
-
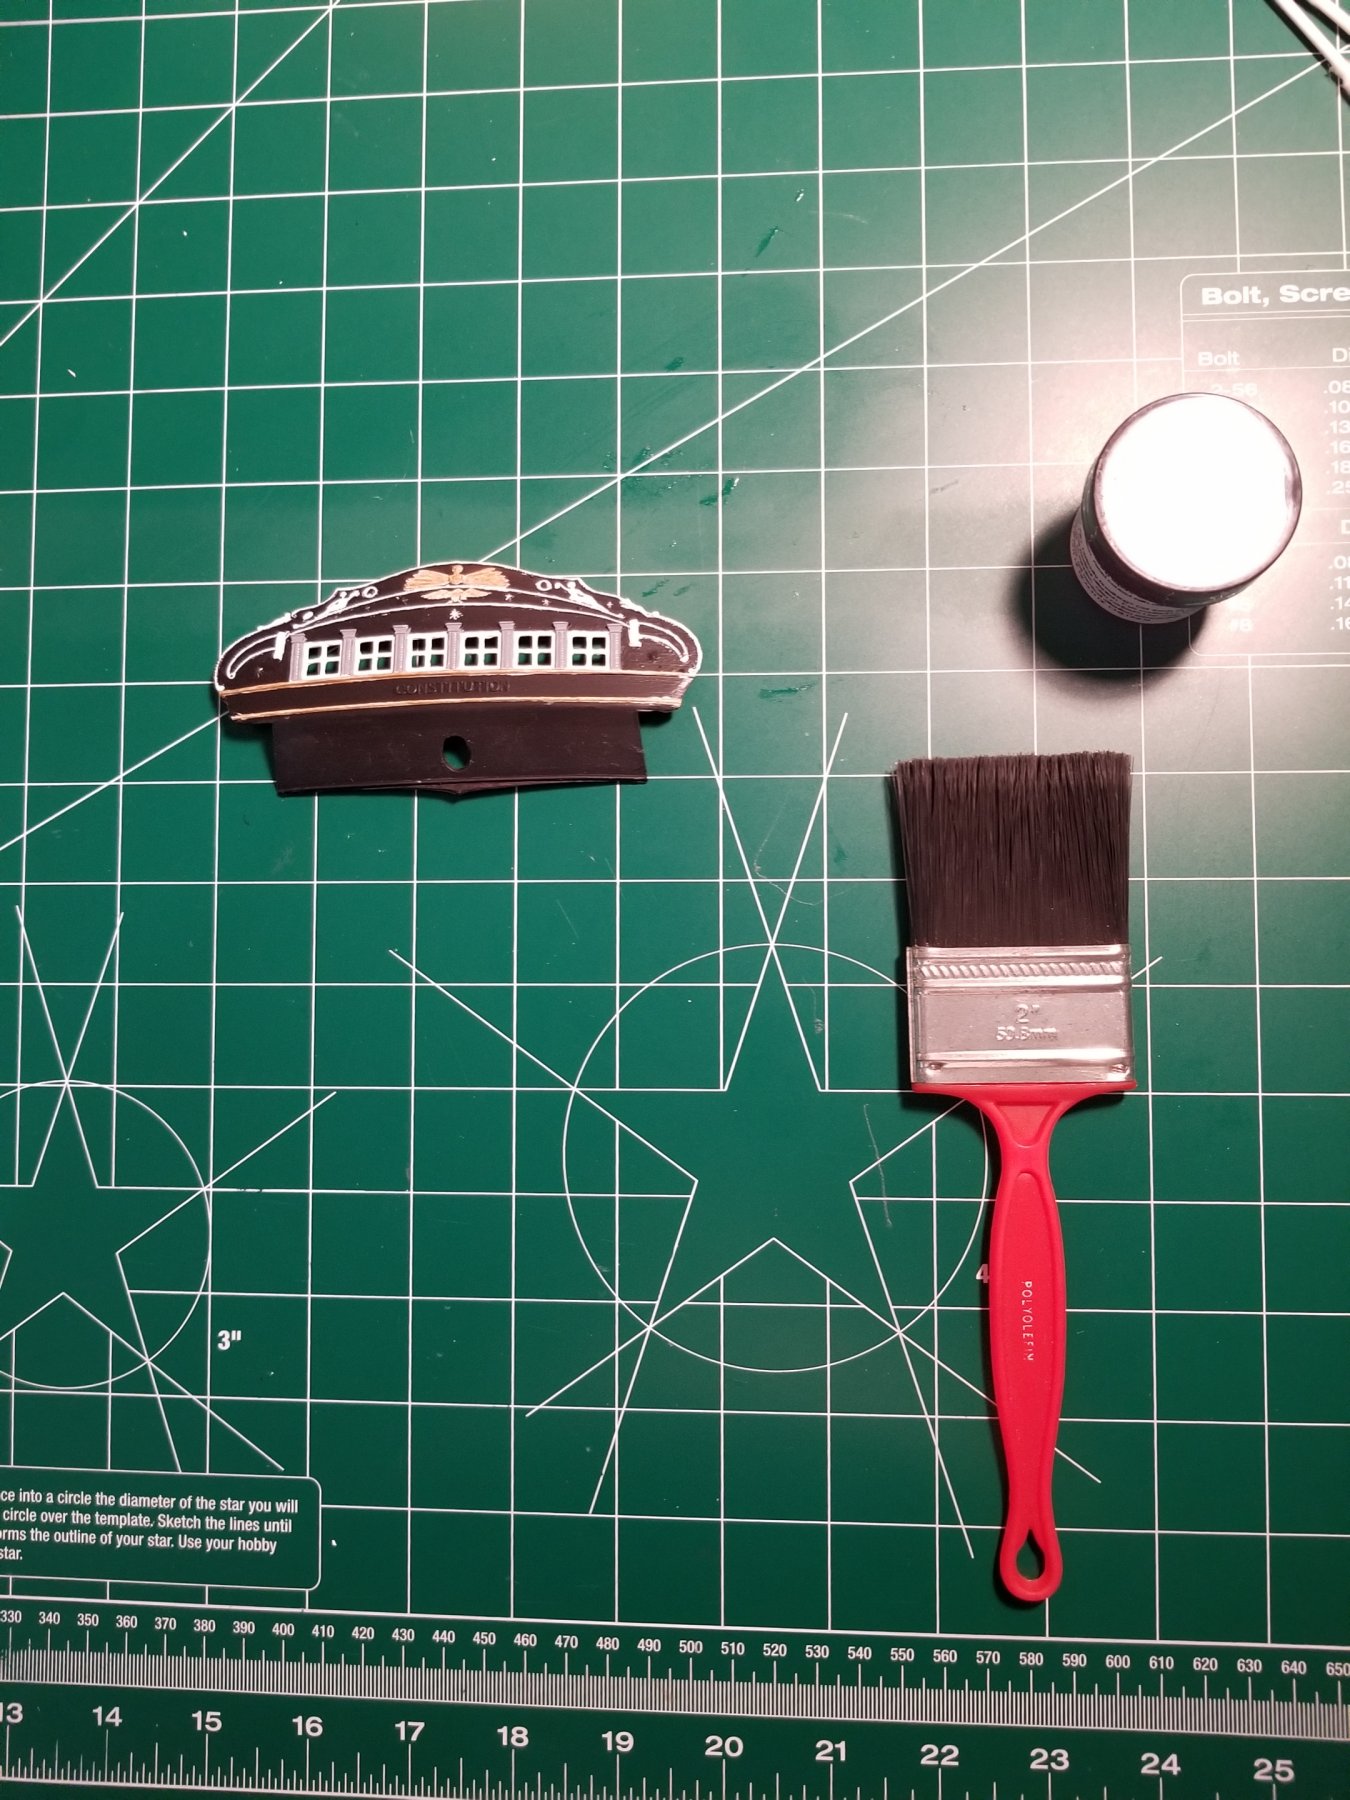
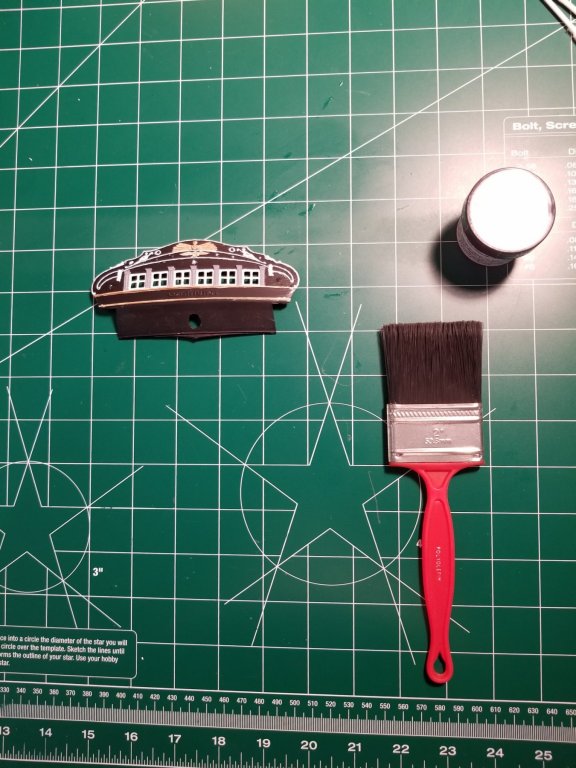
As I said, I've been busy on many different fronts on the Conny. First of all, I want to thank Lou and OC for the painting tips. Switching to acrylics was super. I like the water clean up and the ease of painting compared to the thicker enamel paints. Using the paint lid really helped control how much paint I got on the tip of the brush. I think the transom is done but I will probably use an Exacto knife to square out the window corners. The windows were primed and painted with enamel (which was before I learned about Acrylics) All the rest of the transom was initially paint with the black acrylic to get rid of the dull finish I had after using ELO paint remover to get ride of previous screw ups.....lol Other than the window touch up I think I'm done with the transom. Now I'm all caught up with my work progress reports. Yippee!!!

- 209 replies
-
- 9
-
-
- constitution
- revell
- (and 1 more)
-
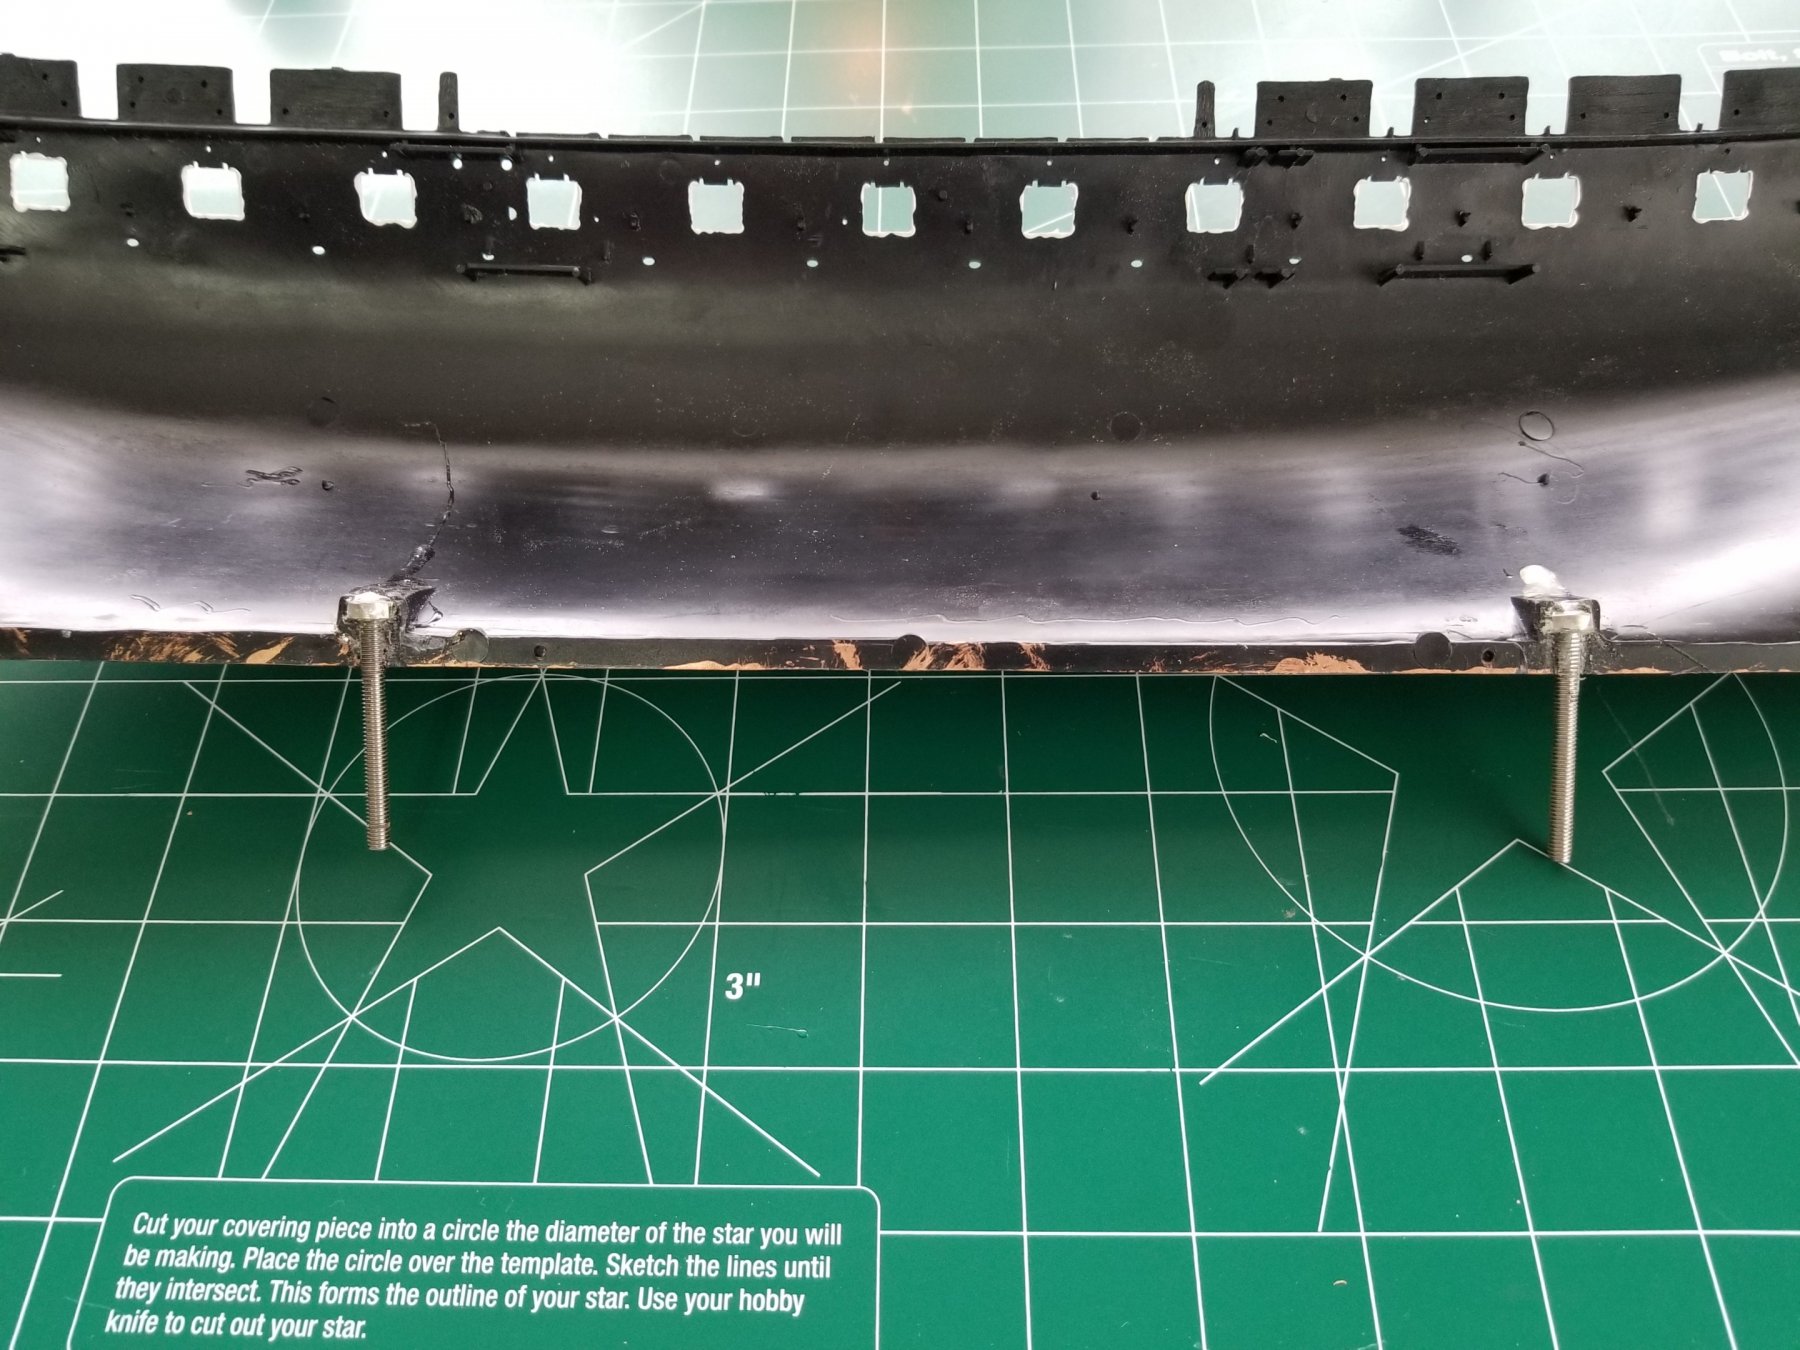
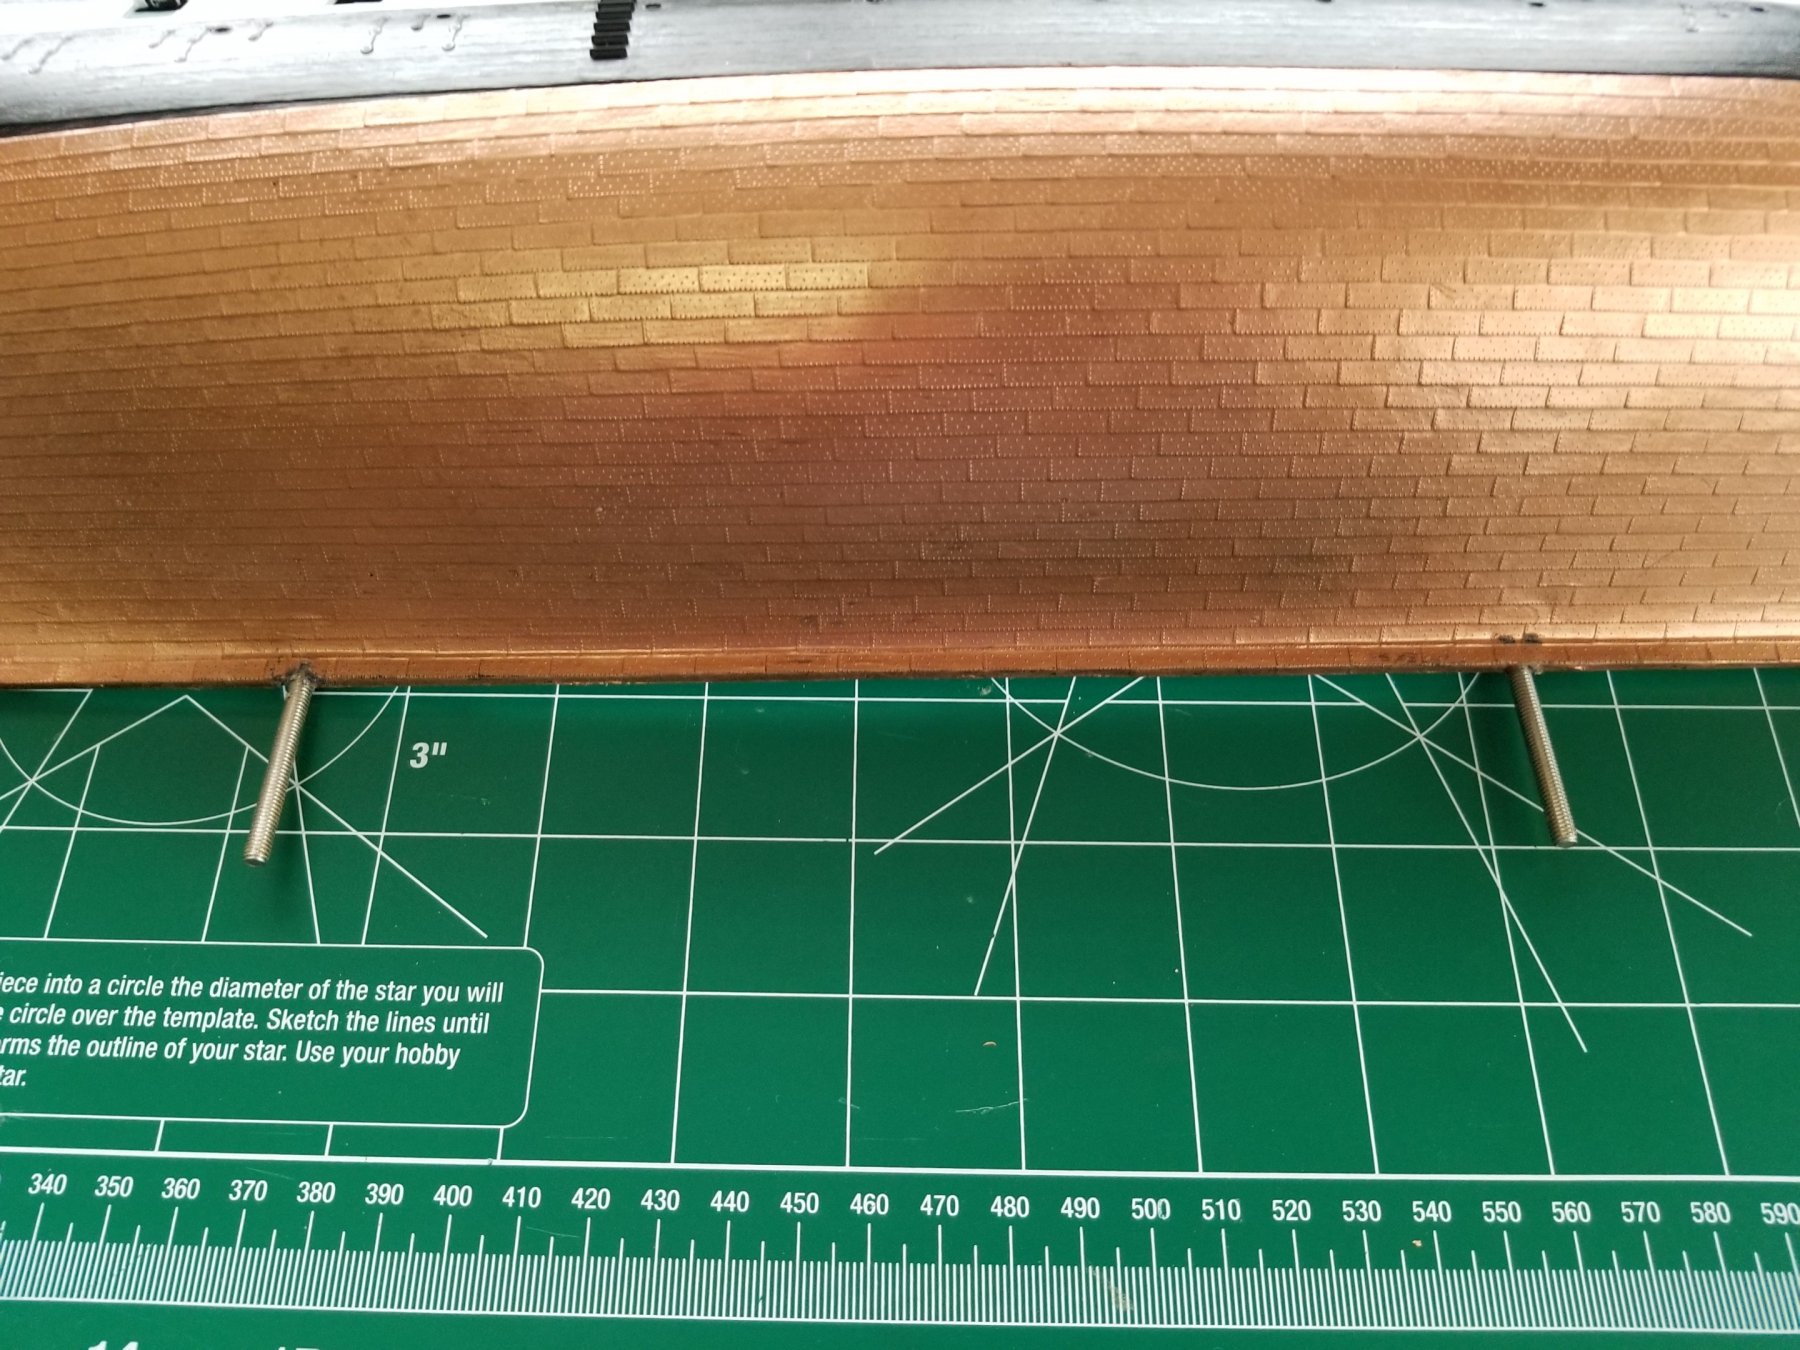
Now... the moment of truth. Time to glue the hull halves together. The instructions called for clothespins or paper clamps. Really??? I bought some decent clamps online instead. They worked well on the front and rear of the hulls where the flat spots were and by the bolts that were glued into the hulls for the pedestals but I had gaps between the bolts that clamps wouldn't grip to. What to do... I decided to use Testors liquid glue on the front and rear of the hulls as there are flat spots there that the clamps would hold pretty well. After those sections dried I mixed up some 5-minute epoxy and laid a bead inside the hull where I had just used the Testors... (ALL gluing was done inside the hull) Once that set up I used some Testors glue on the inside where the two bolts were (and clamps). Now for the gaps. Mixed up some 5-minute epoxy and ran a bead in the gaps and held that area for 5 minutes with my fingers. Thank God my nose didn't itch...lol Removed the clamp's front and back and let everything dry overnight.
- 209 replies
-
- 6
-
-
- constitution
- revell
- (and 1 more)
-
TIme to get the hulls ready for mating. I can't stand the funky stand that came with the Connie so I decided to go with brass pedestals and a nice wooden base. Went to Ace Hardware and got some bolts that fit the slots in the bottom of the hulls. Epoxied them in.


- 209 replies
-
- 4
-
-
- constitution
- revell
- (and 1 more)
-
Thanks guys...It's been a labor of love. I built this model 40 years ago and ended up giving it to my brother and it has since found it's way to the dump many years ago. Hard to dust without a case. My bride bought the model for me for a wedding present in 1991 and I started it with her son but life got in the way and that one also ended up at the dump. I think I got as far as painting the decks. This time I'm resolved to finish it and put it in a display case. Too old to worry about dusting much of anything. My IDEAL dusting job is to glue everything down and use a leaf blower with the windows open...lol
- 209 replies
-
- 1
-
-
- constitution
- revell
- (and 1 more)
-
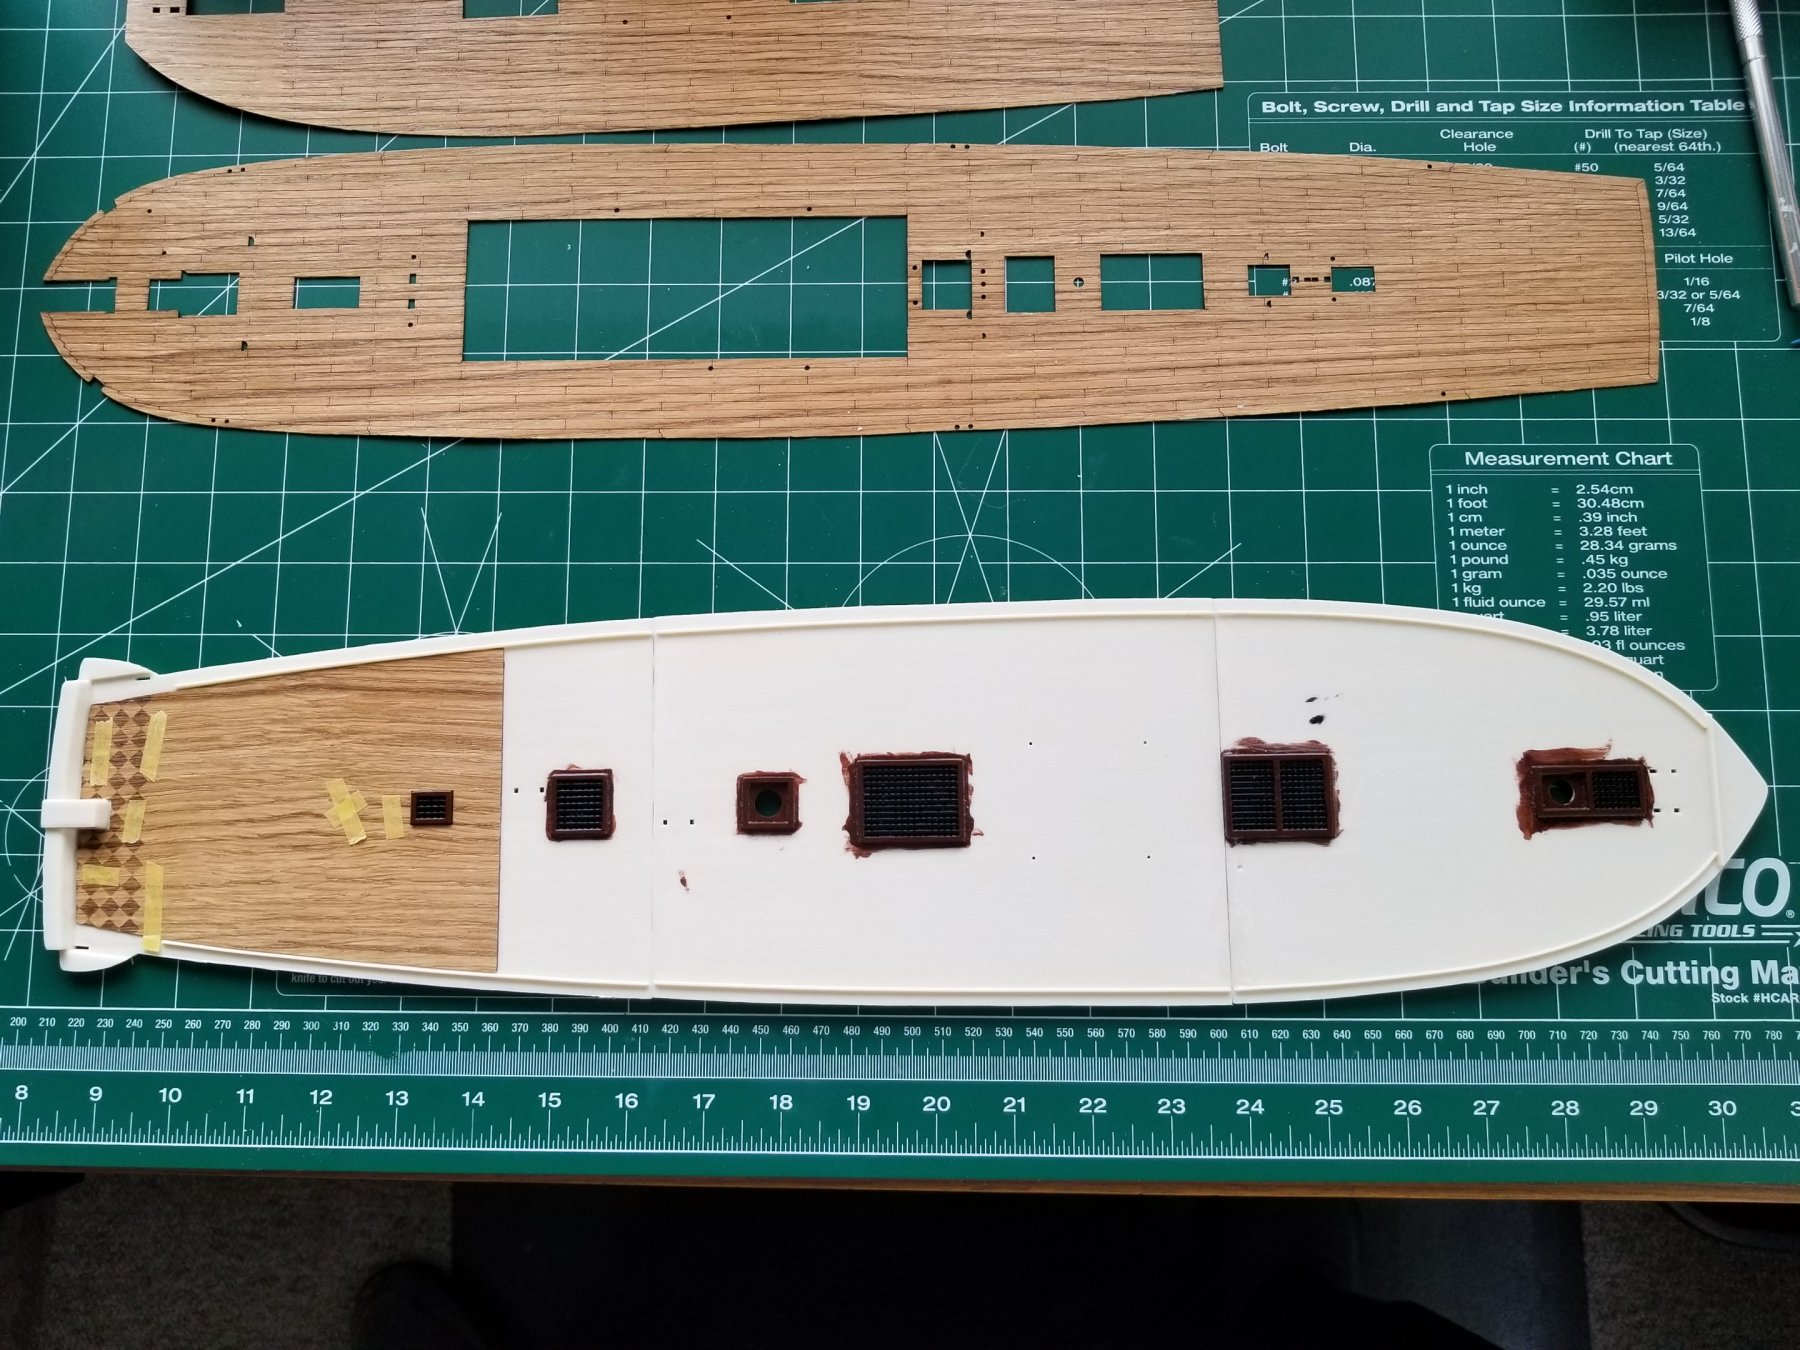
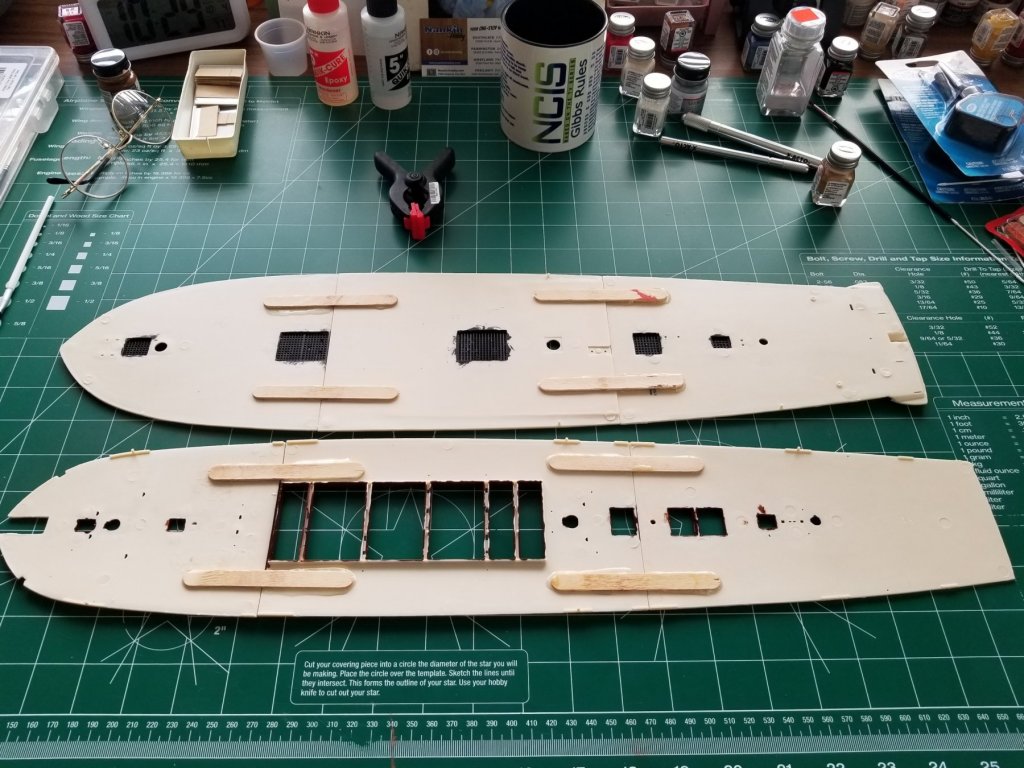
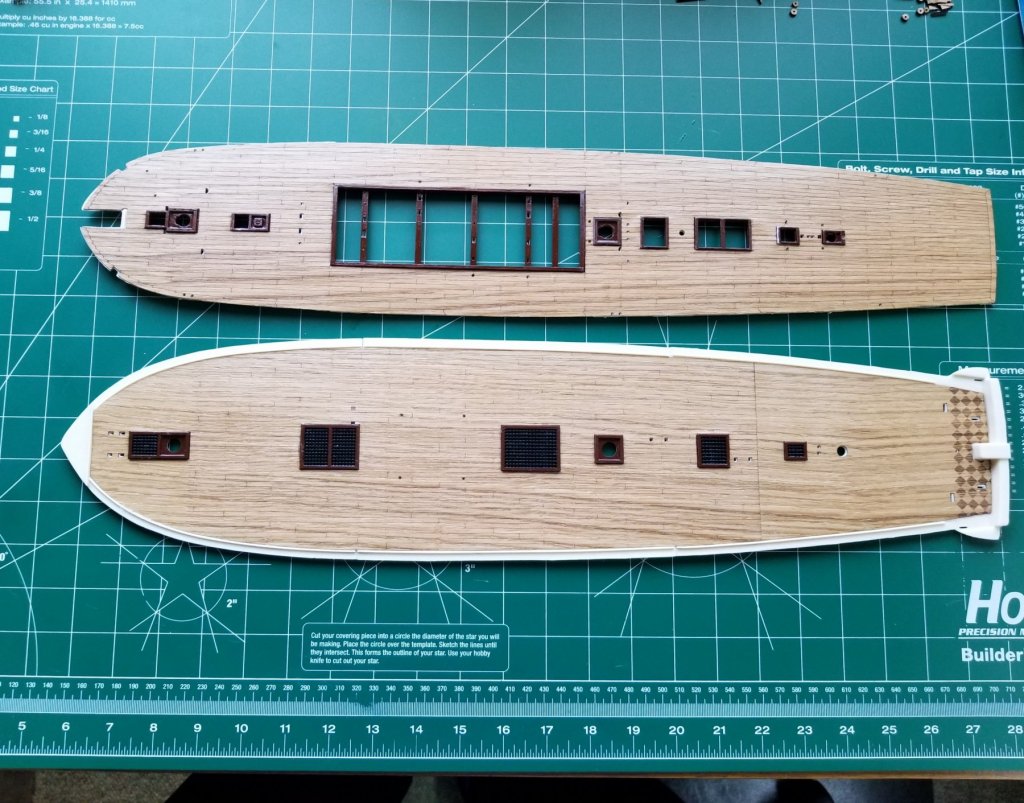
You may have thought I was asleep at the wheel but I've been busy working as you will see. Time to glue the Oak Venner decks from HisModel to the plastic decks. The instructions for the Connie do not call for the decks to be glued together but for the Oak decking, it is a must. I found that the different sections of plastic decking were different thicknesses so I used popsicles sticks and where necessary I used plastic shims (from a cut up cassette tape box) to make up the difference as best as possible. I went with 30- minute expoy as that gave me more work time than the other two types of glue mentioned in the PDF file from HisModel. Now time to get real. Got out the 30-minute epoxy and read the directions. Hummm "for large areas working time is reduced to under 10 minute" Yikes!!! Decided to do the small piece for the gun deck back by the Captains cabin first. Used a small spatula and brush to spread it around and try for a thin but adequate coating... Holes in the oak deck taped so epoxy does ooze all over the place. That went fairly well being a small piece. Now for the bigger areas....Not too nervous...lol Needless to say got expoy all over my hands a some on the deck but had a rag with thinner next to it and that saved the day. Opps....pics not loaded and have to leave shortly. Will edit and post tomorrow... Edit: Venner glued on decks finally!!!


- 209 replies
-
- 5
-
-
- constitution
- revell
- (and 1 more)
-
You're absolutely right Lou... We STILL got it!!! Also thanks for the painting tip of using the paint in the cap. That and using a fairly dry brush has really helped me. I decided NOT to use a tiny haired brush. . .
- 209 replies
-
- 5
-
-
- constitution
- revell
- (and 1 more)
-
Well, guys ....this is weird. When I take my build pics on my cell phone I always save them on my computer in a Conny folder. They are all on the horizontal view. I checked my camera settings on the phone and there's no option to change the orientation. The pic is saved based on the orientation of the cell phone when you take the pic. Just for the hell of it I checked the pics I had saved on the cell and for some strange reason, a lot of the pics were the wrong orientation. I got the wrong ones rotated on the cell phone and resent them to my computer then I put them in the Conny folder (Again, the Conny folder had the right horizontal orientation on all pics) Anyway, I resaved the pics here and wala...horizontal pics....WOOWHOOO!!!!!
- 209 replies
-
- 1
-
-
- constitution
- revell
- (and 1 more)
-
OC, I always use my cell to take pics horizontally because you get more vertical. When I download load the here they get changed automatically to vertical. All the pics except the last two were downloaded several times before they stayed on the horizontal. It's only the last two that are stubborn.
- 209 replies
-
- 2
-
-
- constitution
- revell
- (and 1 more)
-
Lou, I thought that on my first pic posts. Even tried flipping them from horizontal to vertical in my photo program to see if this forum flips them but no joy. Kept trying and deleting and it finally kept the horizontal view initially so I don't think it's the length of the photo. Even tried the photo edit here and reduced the pic size and again no joy. Maybe someone else has some pointers. Sure would like to post them as taken. (horizontally).
- 209 replies
-
- 2
-
-
- constitution
- revell
- (and 1 more)