DONATION DRIVE - SUPPORT MSW - DO YOUR PART TO KEEP THIS GREAT FORUM GOING!
×


Shore thing
-
Posts
72 -
Joined
-
Last visited
Content Type
Profiles
Forums
Gallery
Events
Everything posted by Shore thing
-
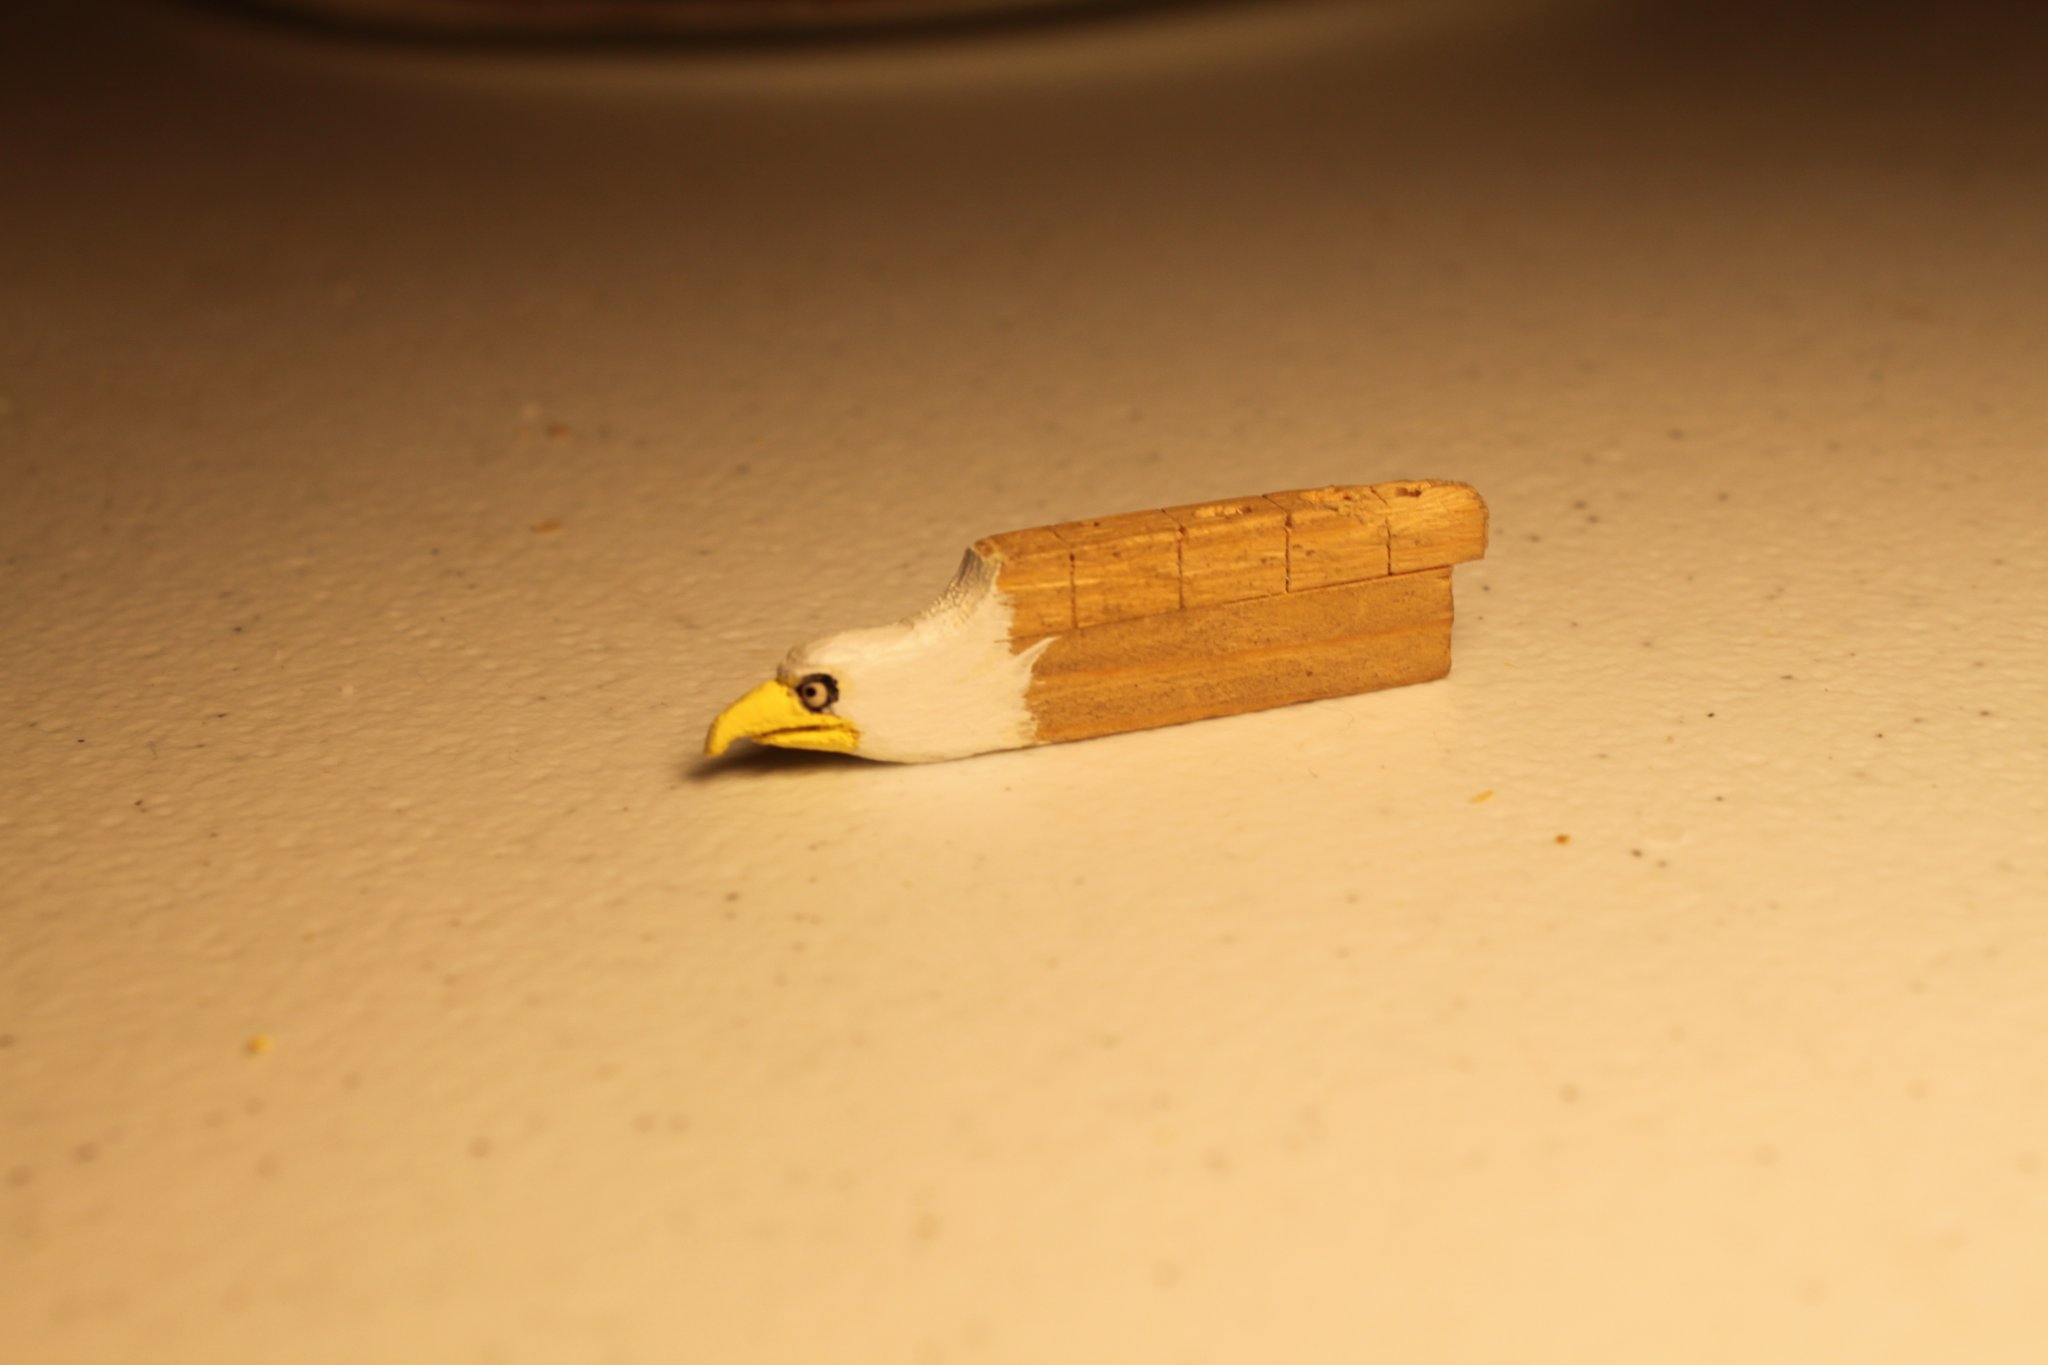
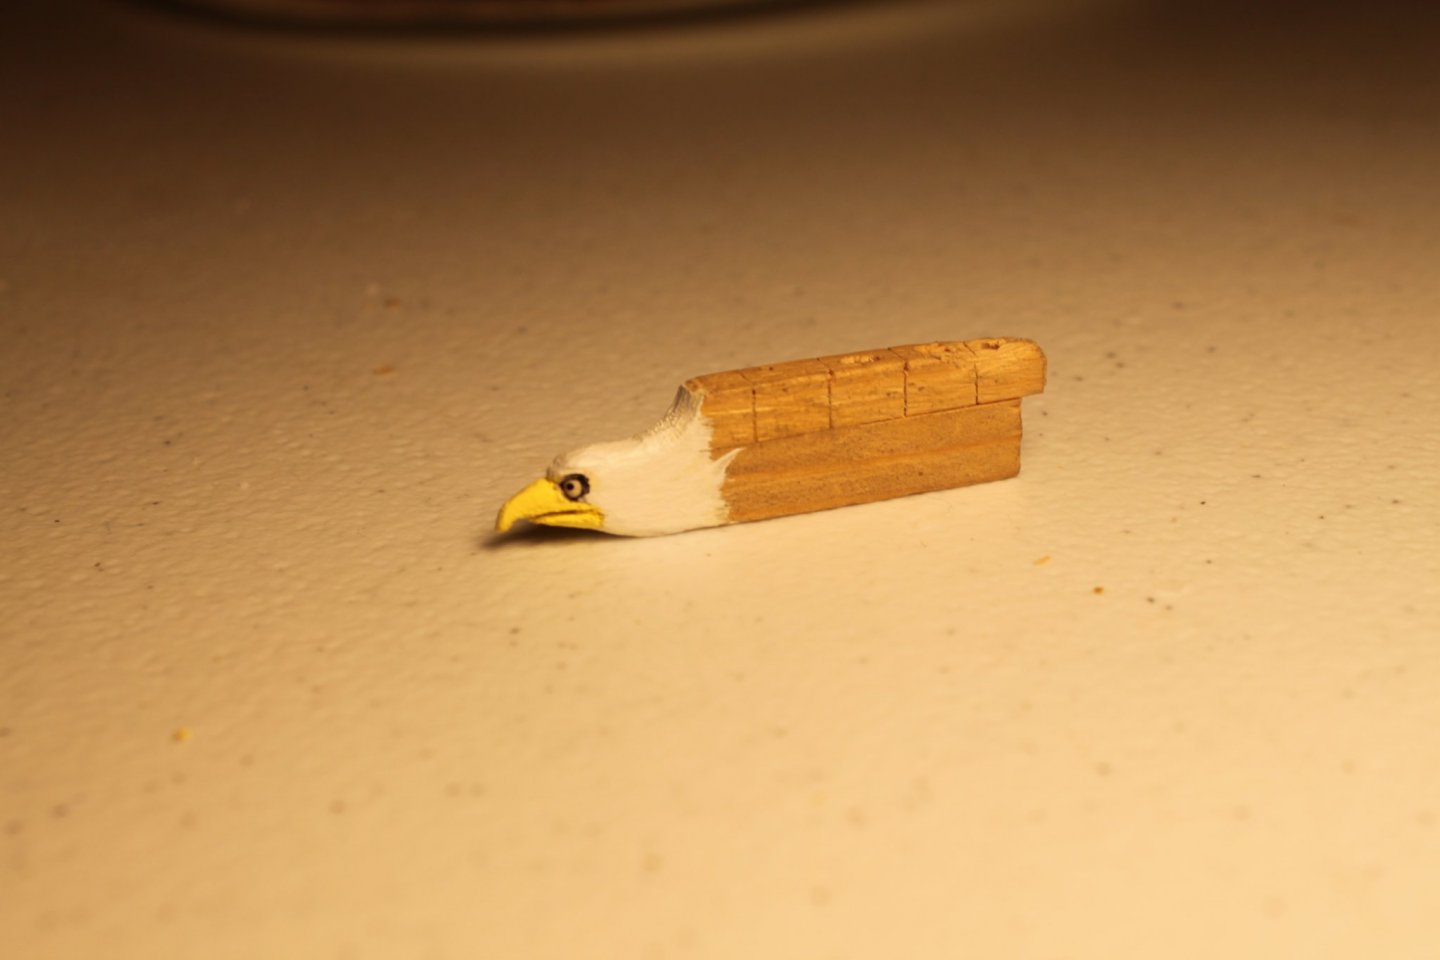
And the fun continued. On one cold and rainy day, I didn't feel like working on the model. Instead I decided to sit on the sofa and watch mindless TV. It wasn't long before the boredom of that got the best of me. I grabbed a small piece of scrap wood and an Exacto knife. A few hours later, some paint and one small cut on my finger I had this. The figurehead for my Skipjack. I used a small drill bit (twisted by hand) to bore out the eye sockets and then inserted some small balls of baked Sculpey clay to make the eyes. I love it. Despite the cost to my finger.

- 82 replies
-
- 10
-

-
- skipjack
- wye river models
- (and 2 more)
-
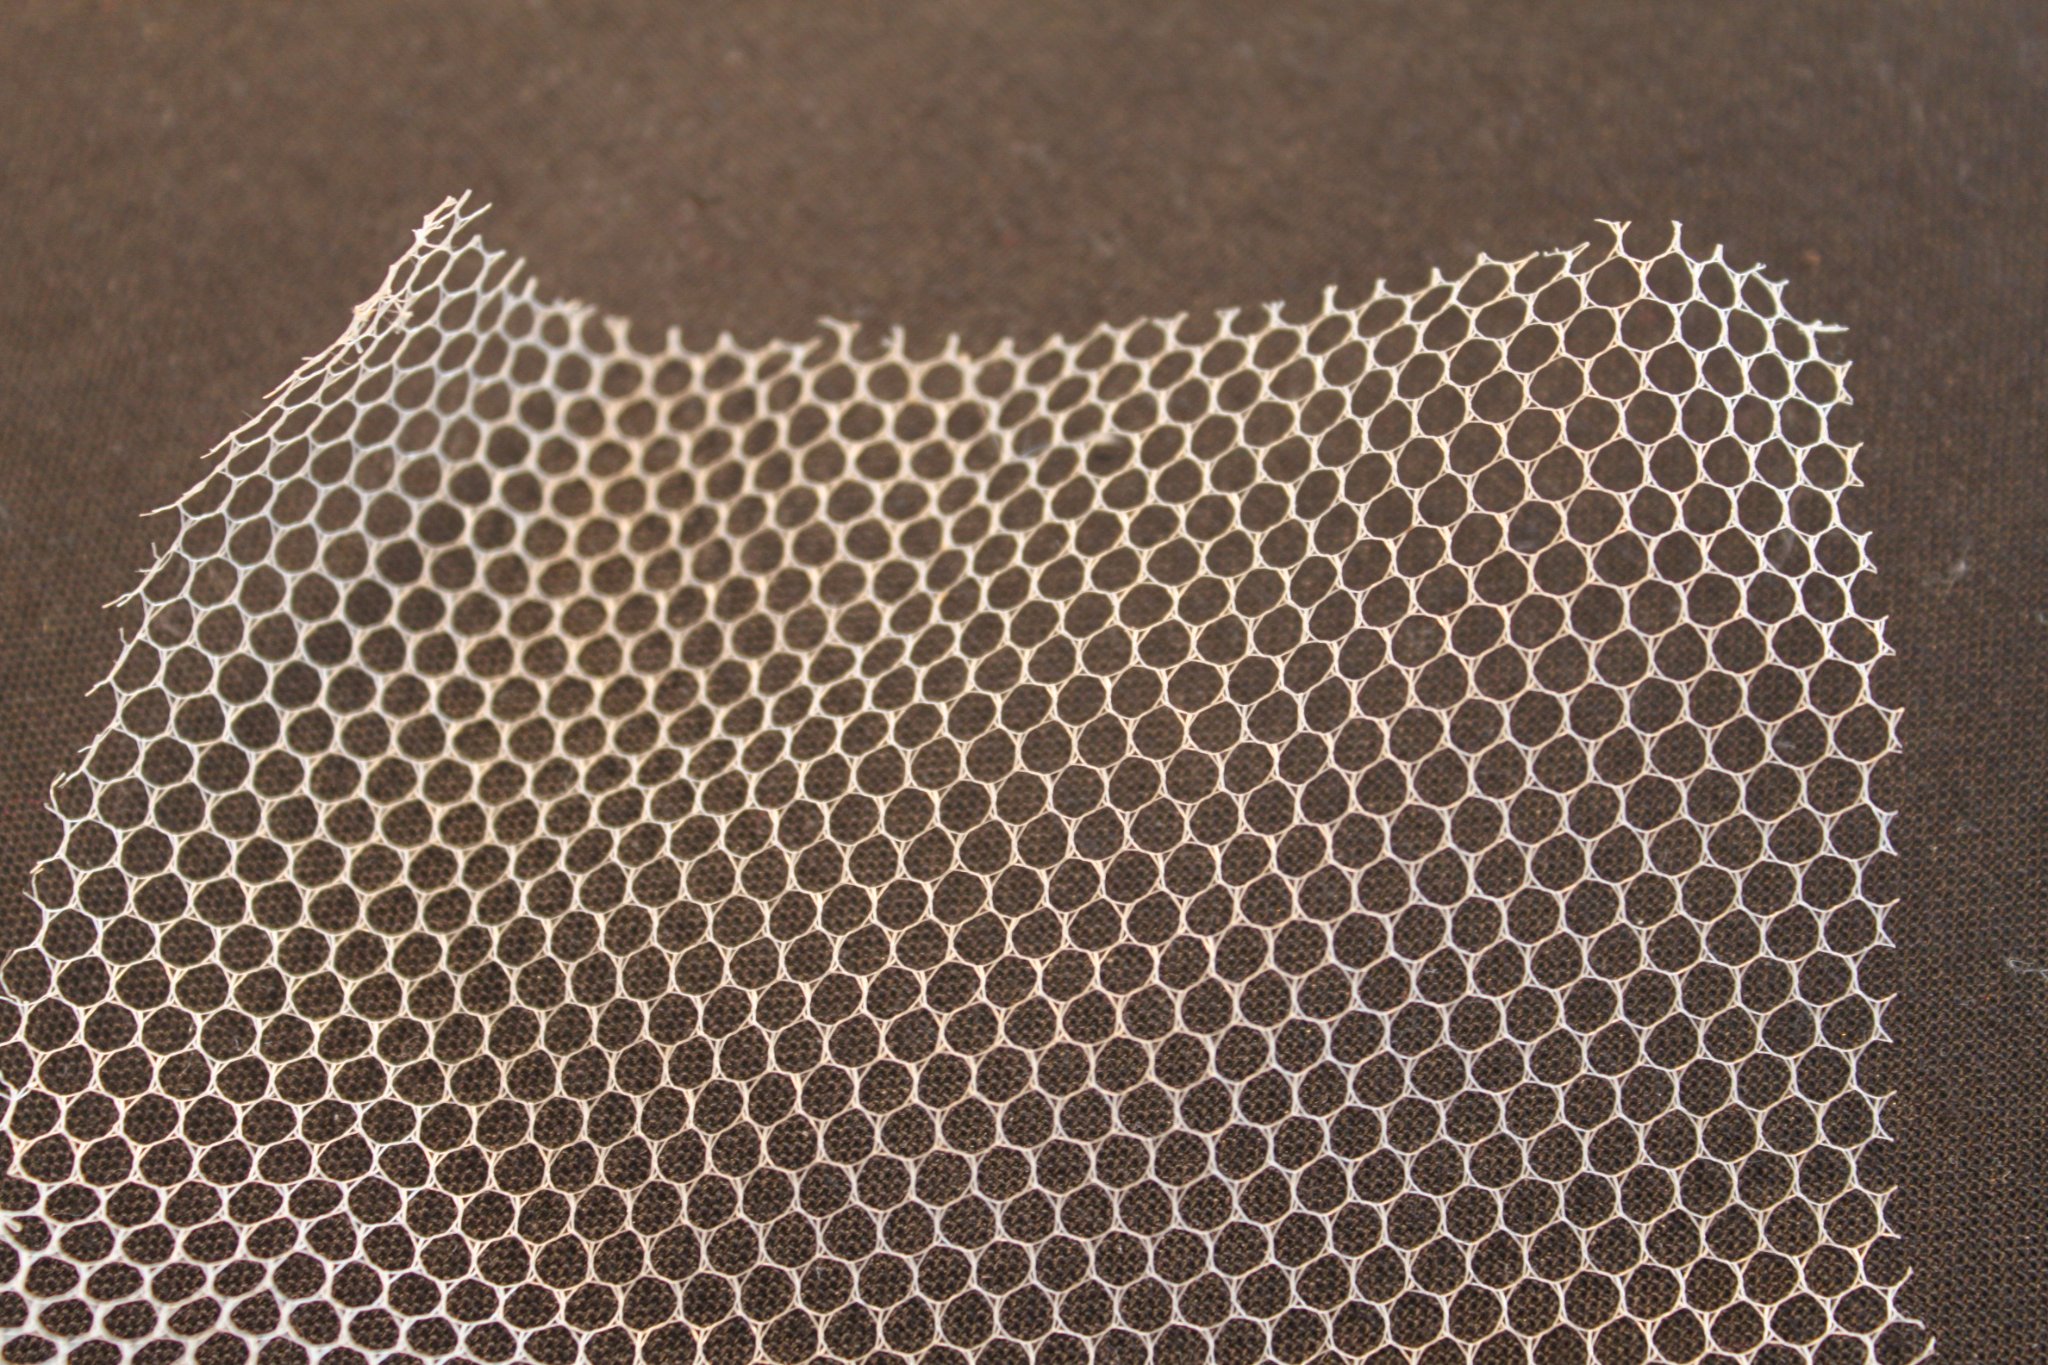
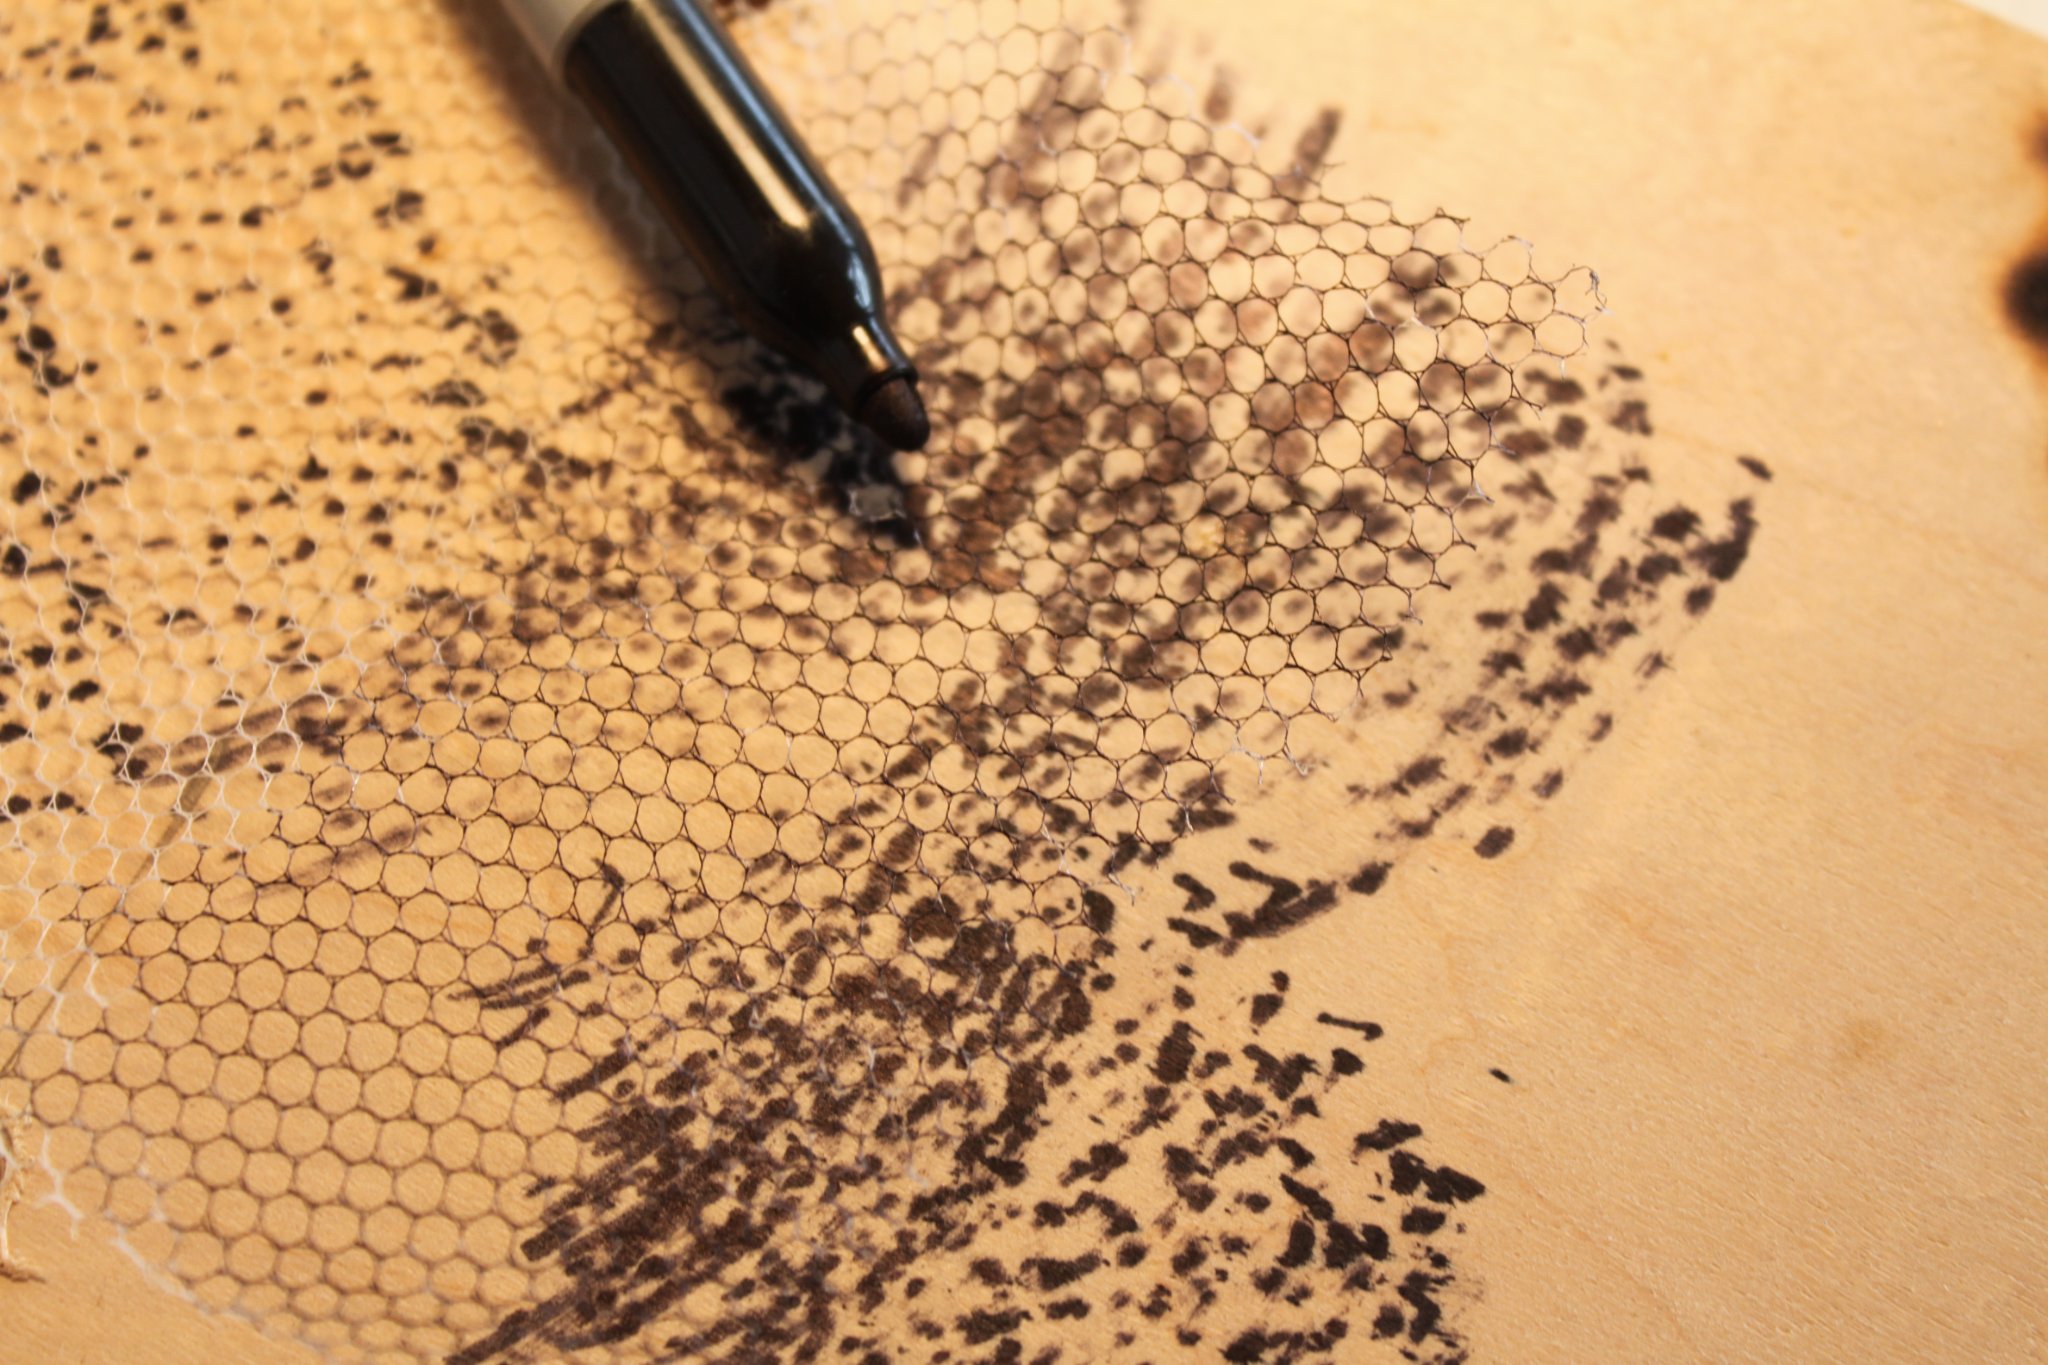
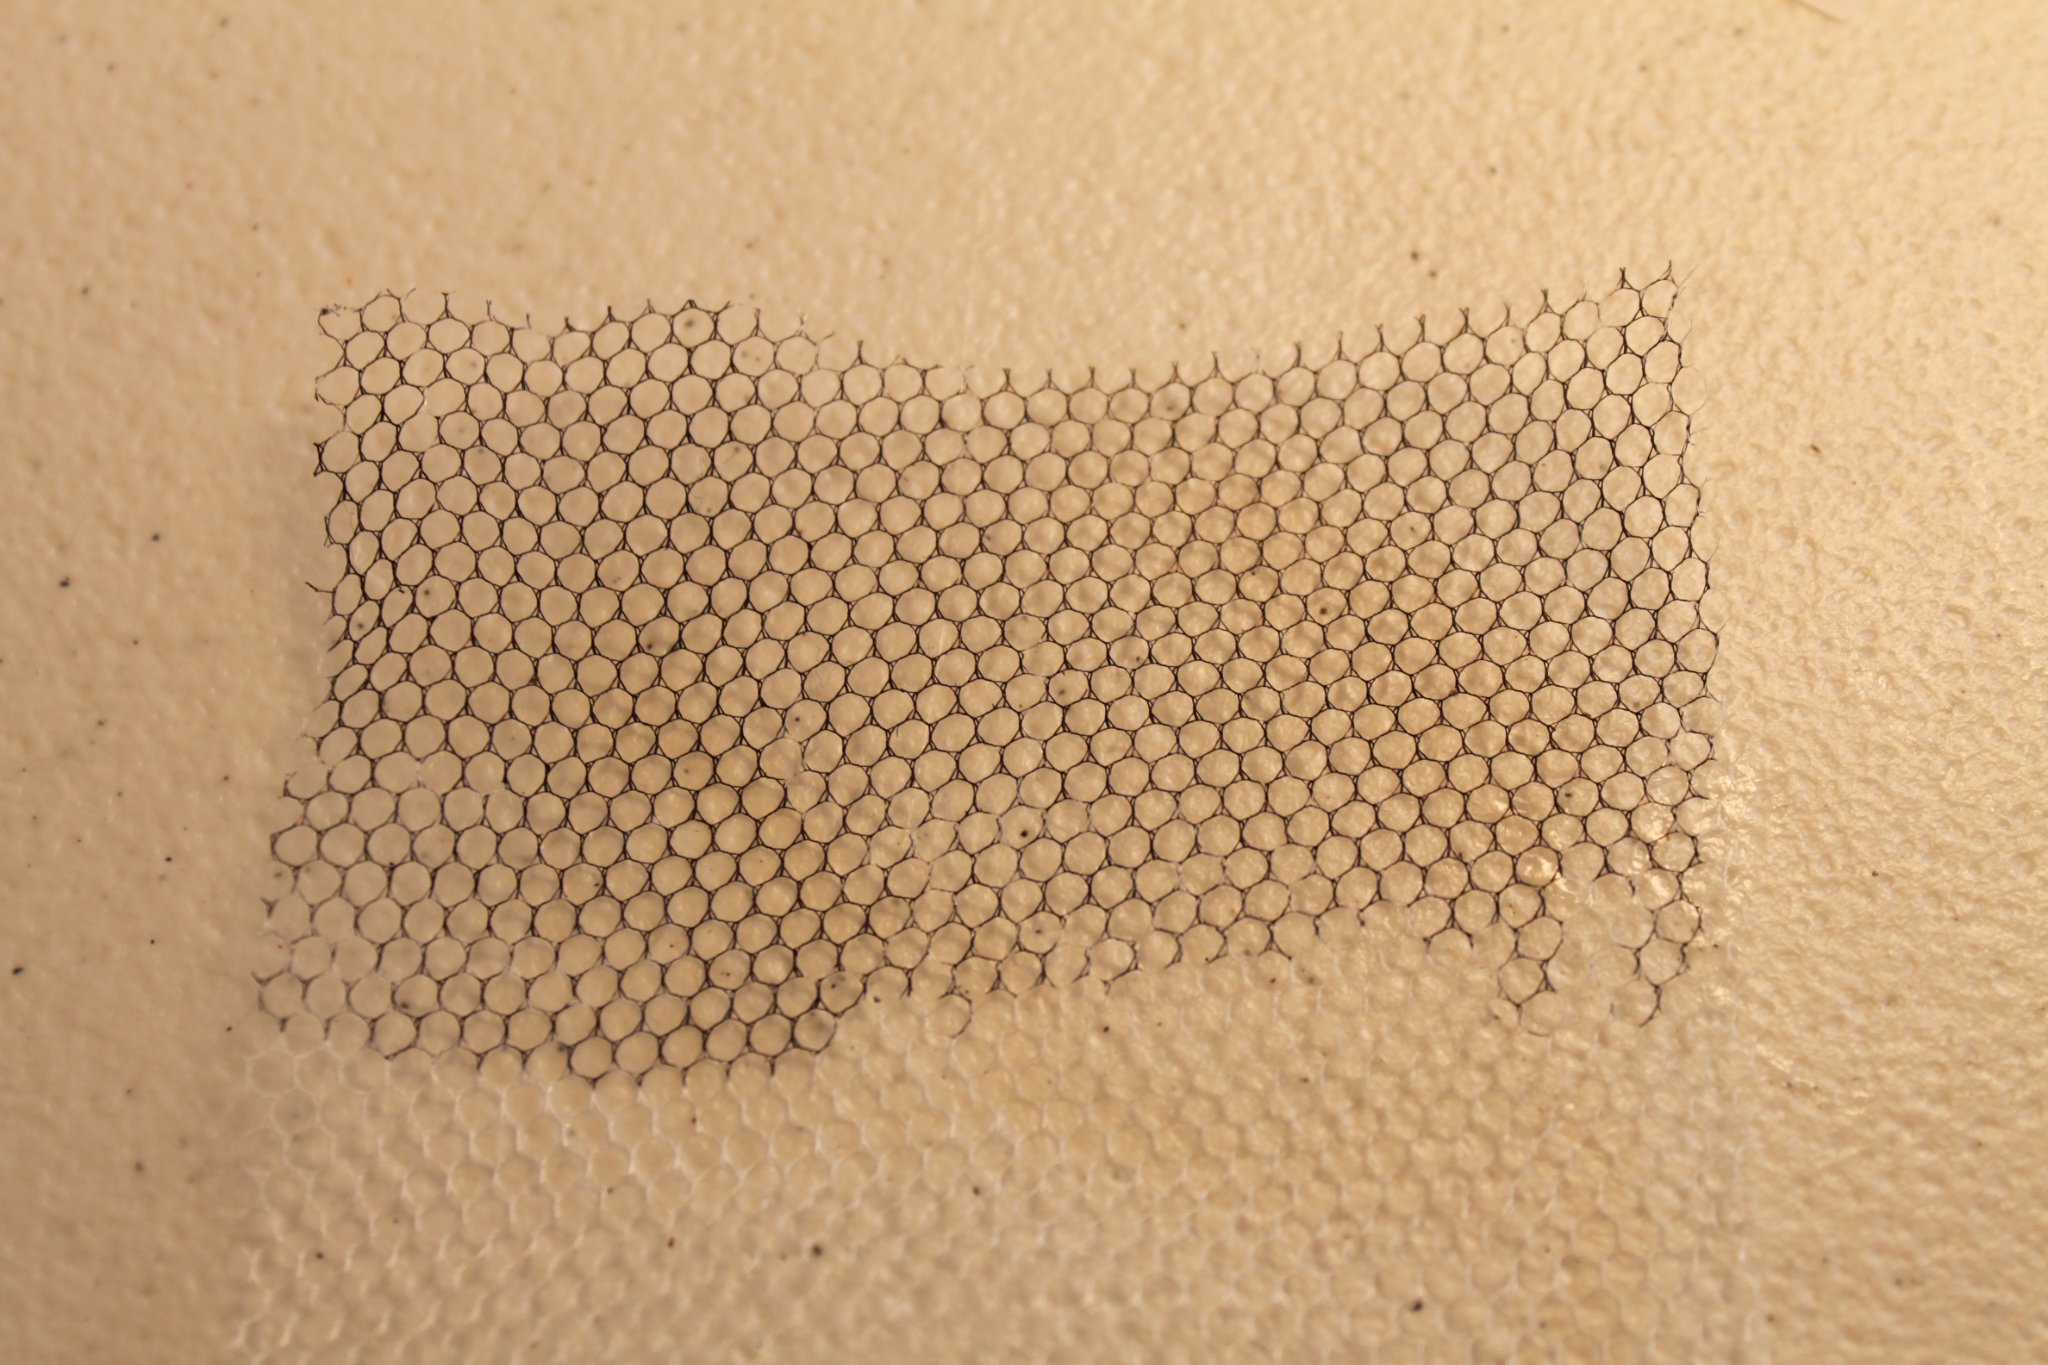
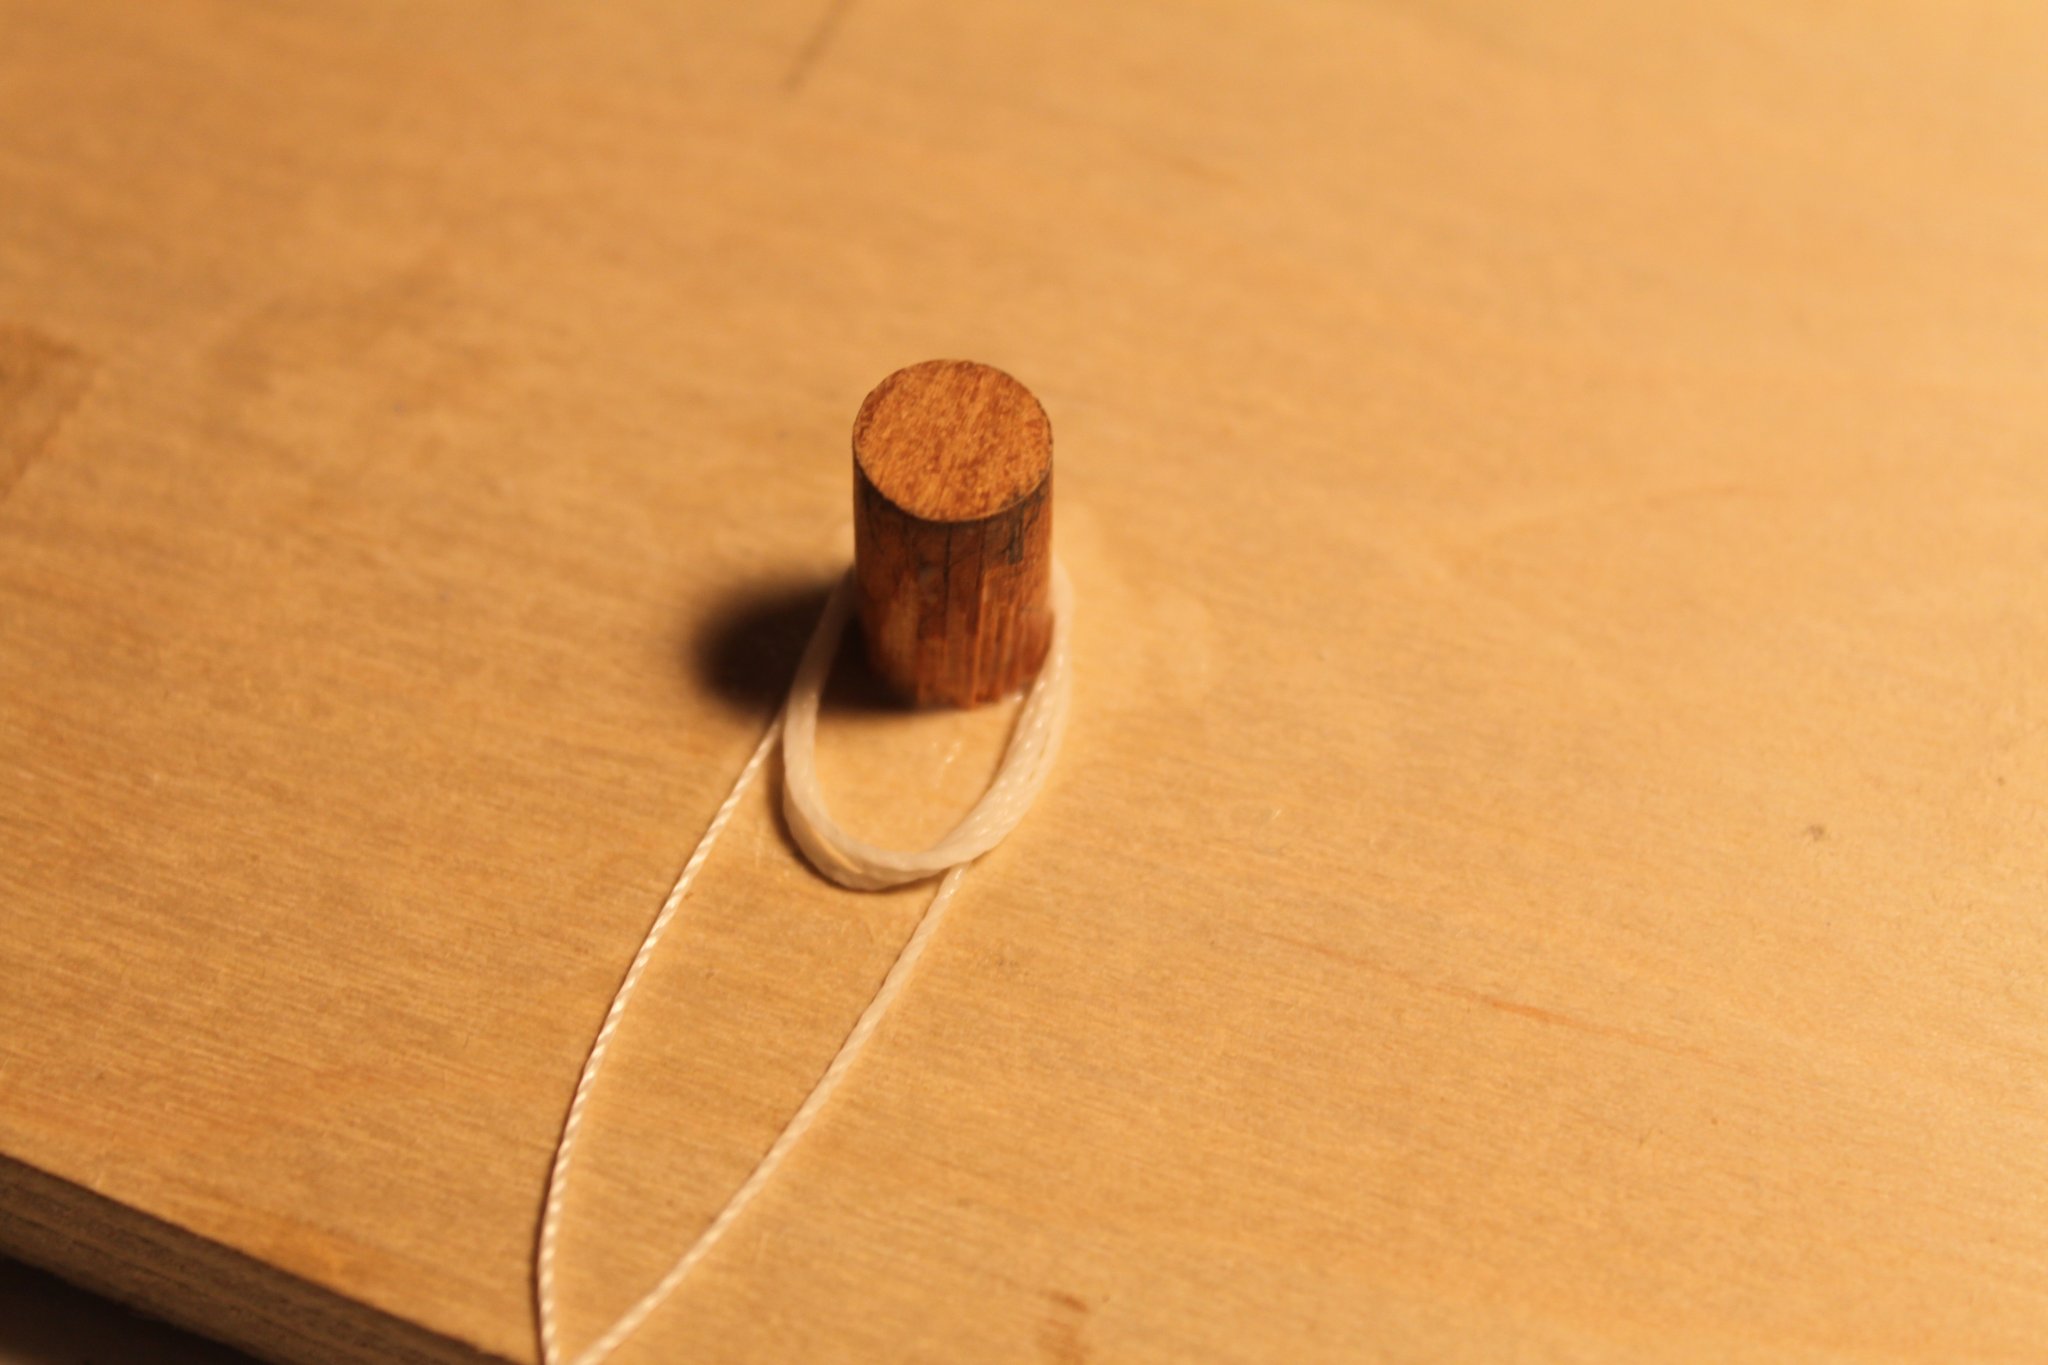
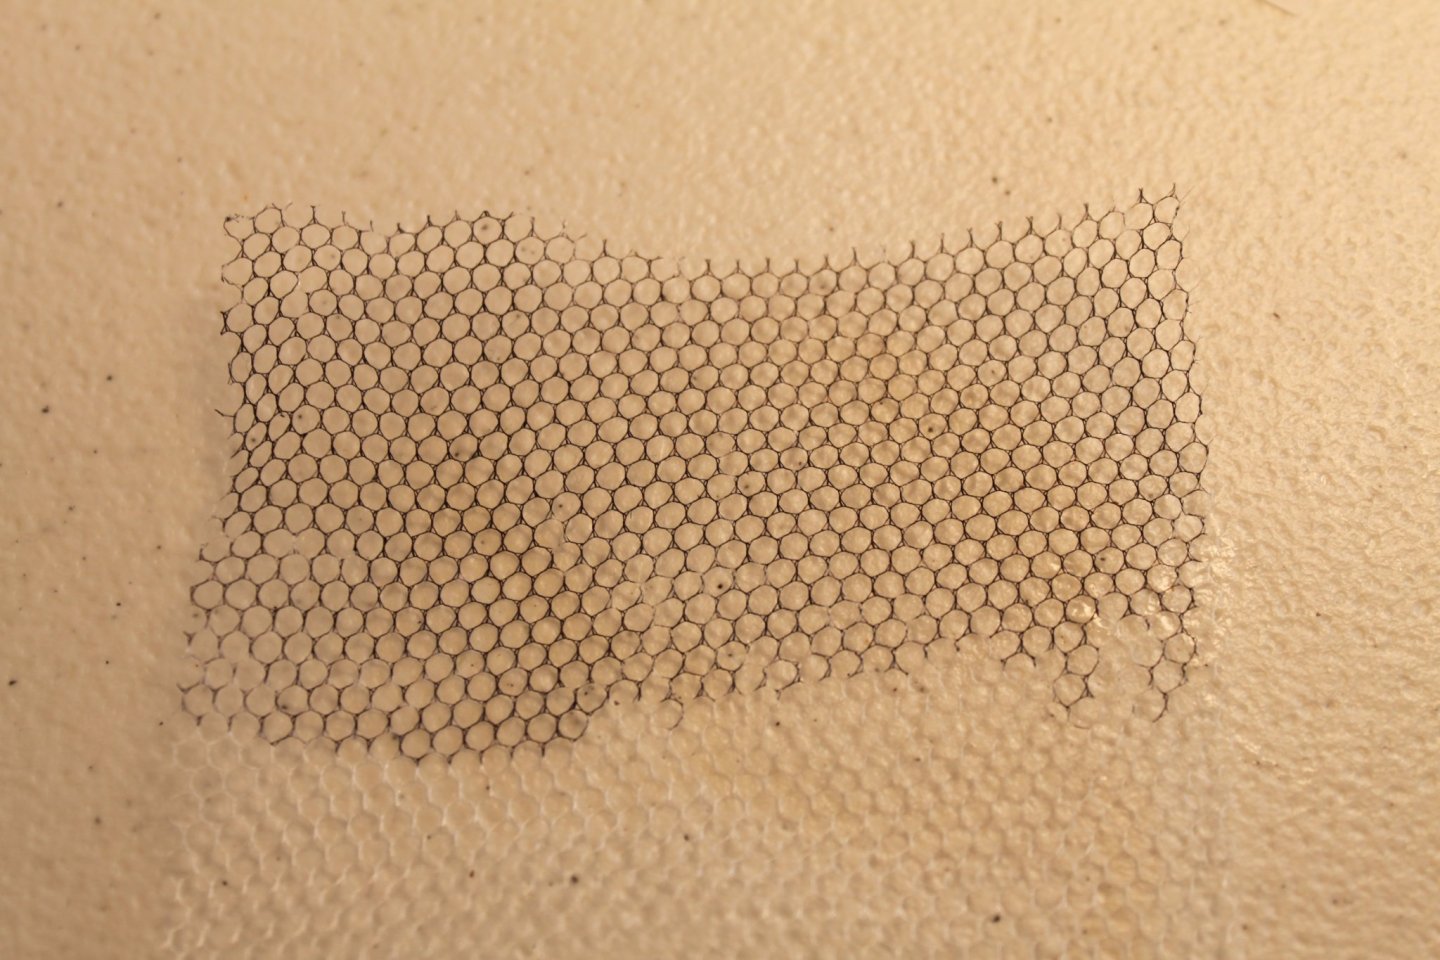
Included in the kit was a small piece of wedding vail. I was to paint it black and then attach it to the dredges to replicate the chain netting that would have been on them. As I said before, the split rings that they gave me (stainless steel) were so small and strong that there was no way I would ever get them around the brass rod. Getting the very fragile wedding vail on them was even less likely. I used a sharpie the "paint" the vail. And sewed it to the dredges. In hind sight, I should have made more of a "bag" shape to it. And I didn't add any teeth to the dredge either. We all have a point where we are satisfied with our efforts. This is mine.


- 82 replies
-
- 4
-
-
- skipjack
- wye river models
- (and 2 more)
-
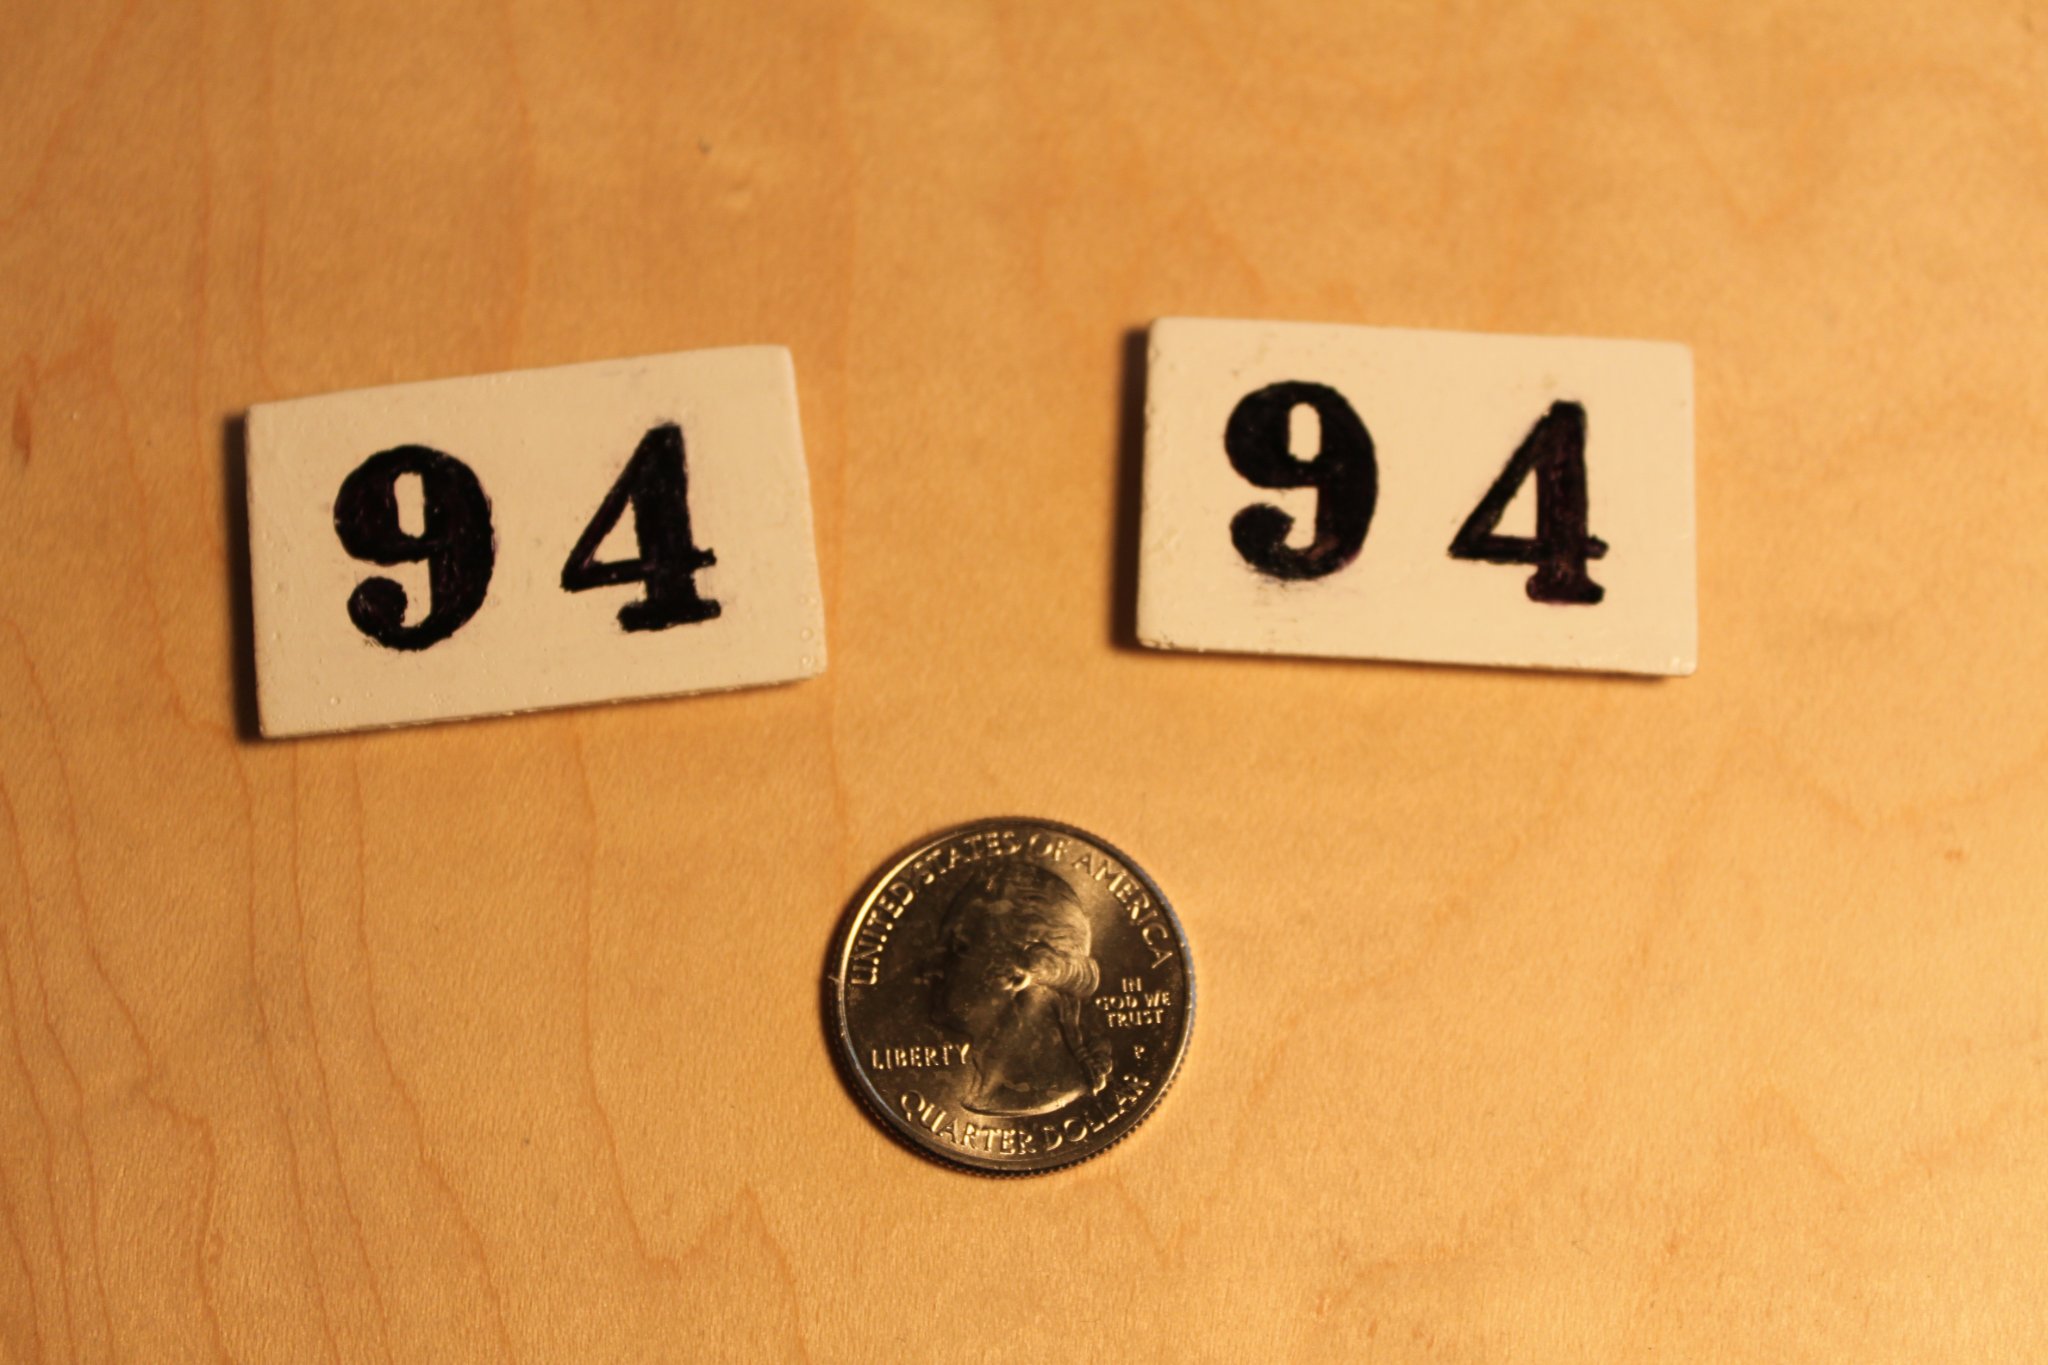
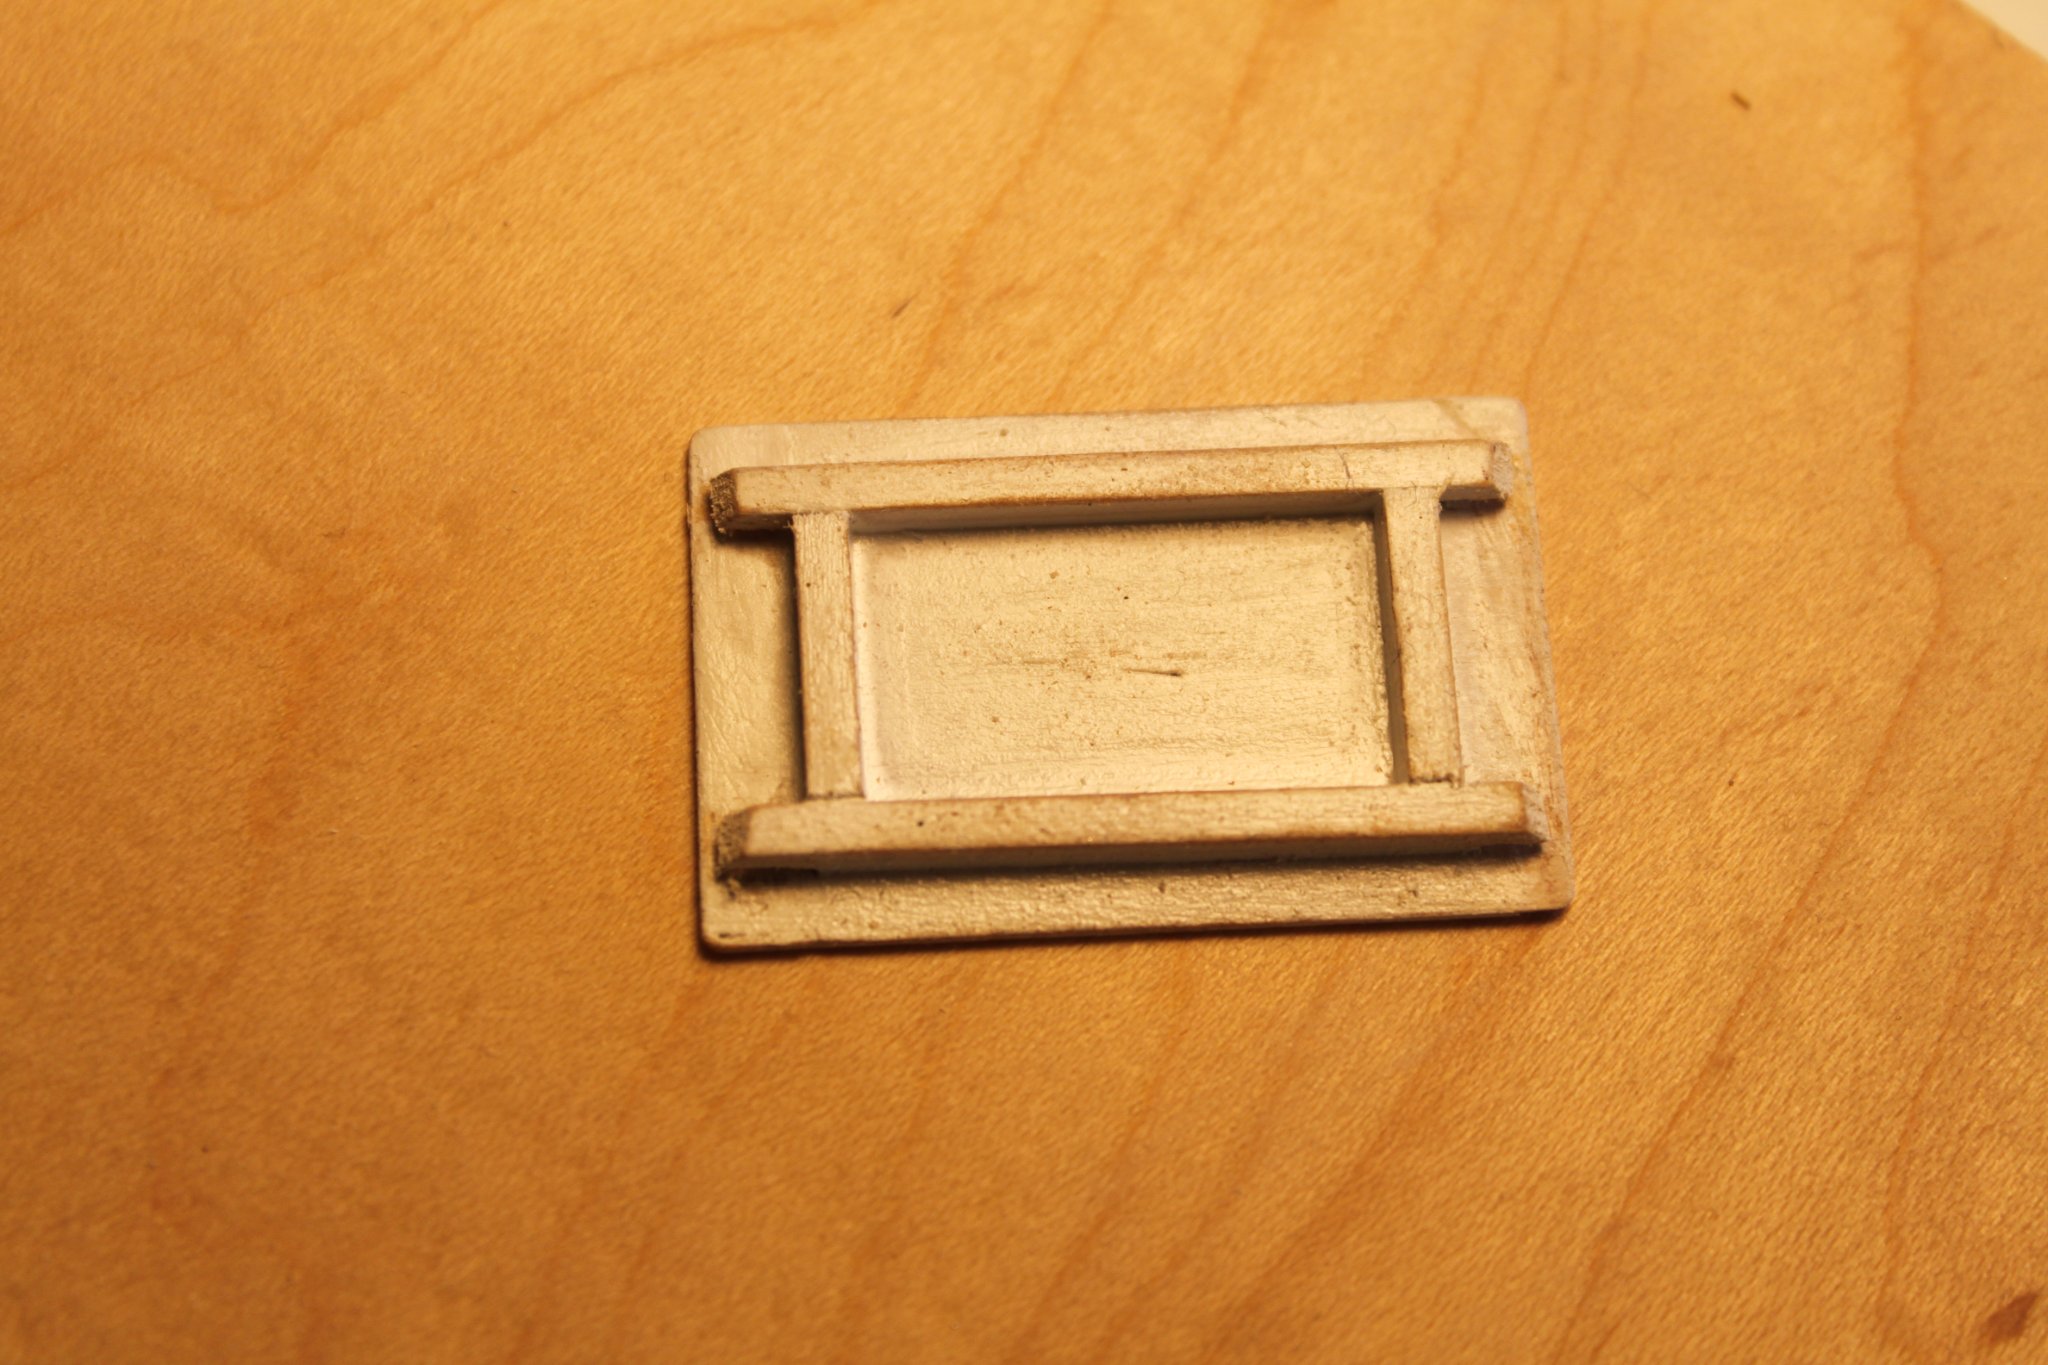
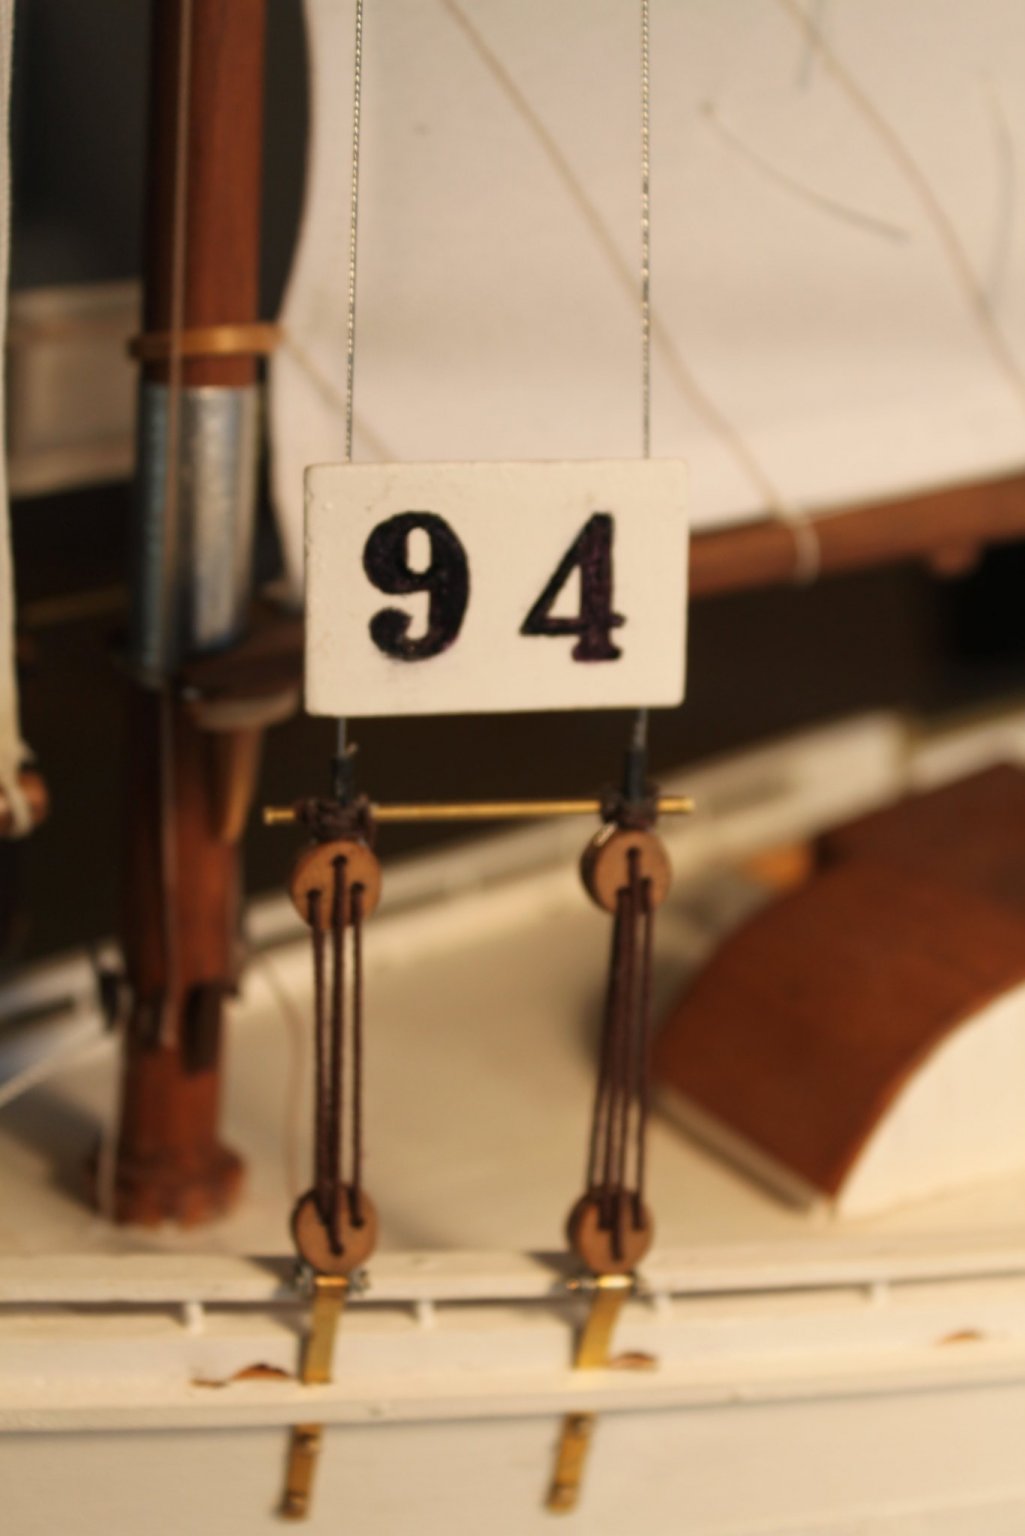
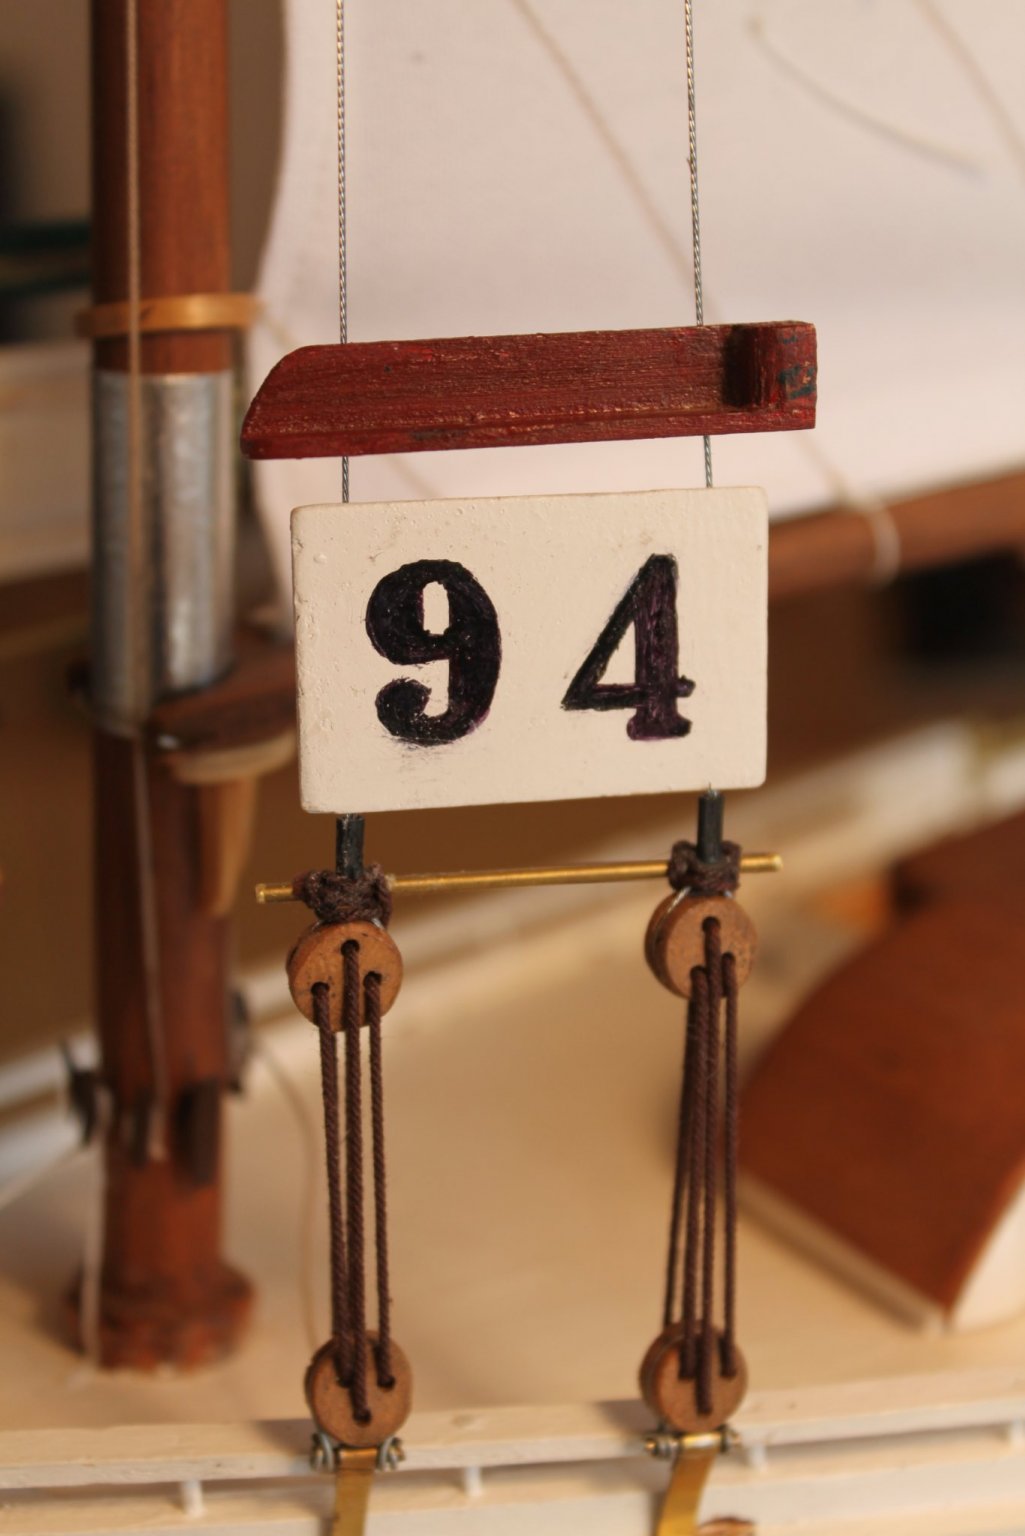
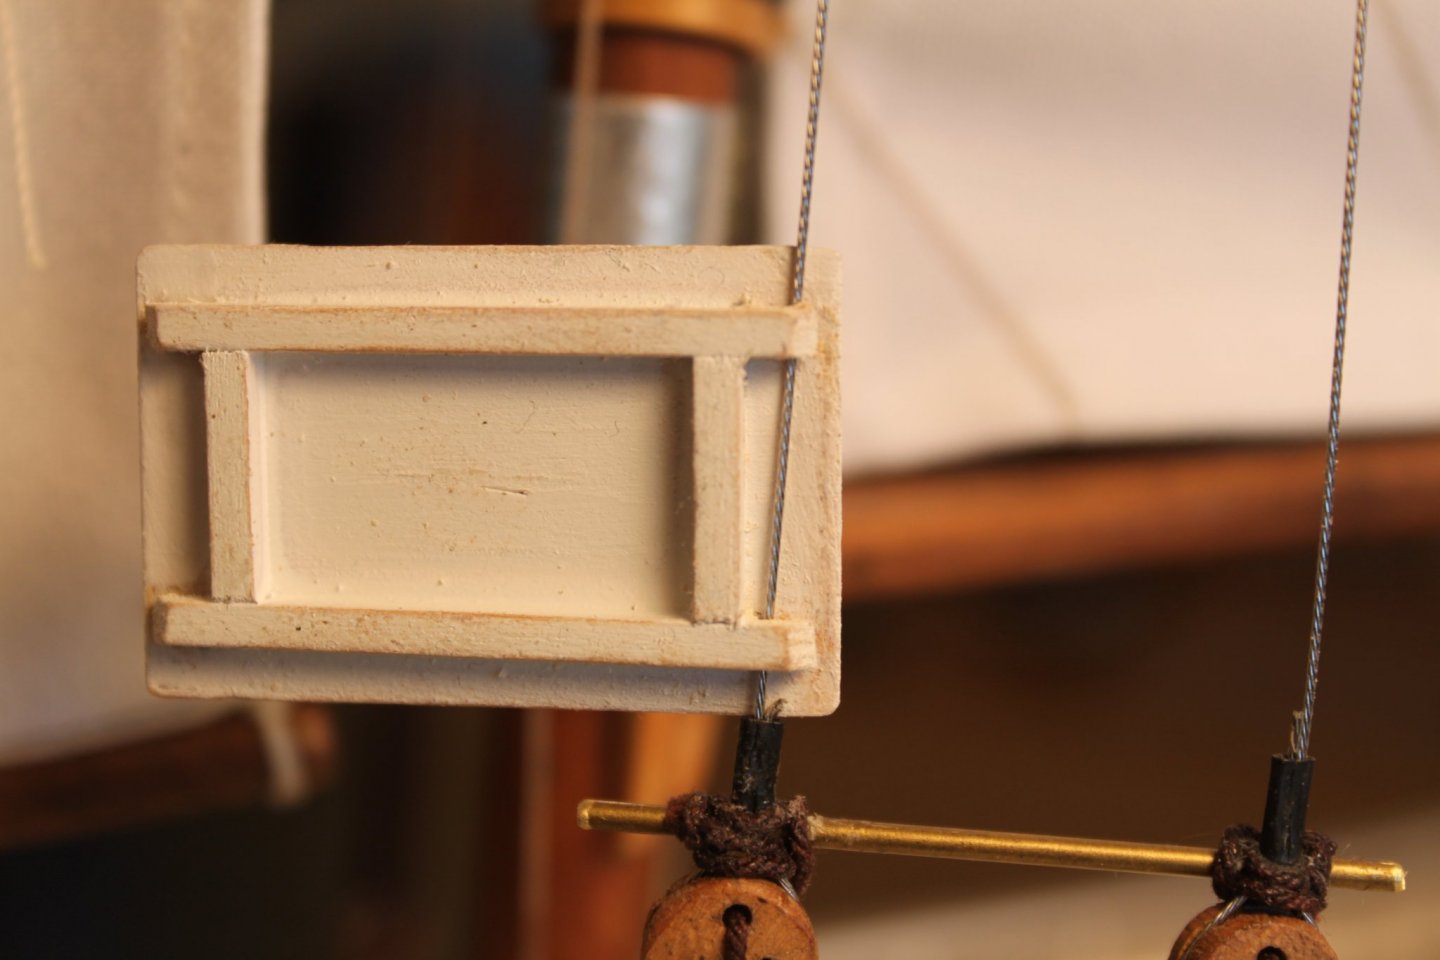
So many details, on to the next. A cross bar was added to the shrouds just above the dead eyes. I'm not exactly sure what purpose it served but on some of the boats I've seen, there are vertical cleats on it with spare lines hanging on them. The dredging license was next. I cut two thin pieces of wood to the size stated in the directions. Then I had to figure out how to mount them to the wire shrouds. My approach was to attach battens to the back side of them and cut small saw kerfs where the battens met the back of the license board. Everything was then painted and the number drawn on with a stencil and fine point marker. The significance of the number is that it is the year my daughter was born. That should give you all a hint as to which name I chose. The shroud wires were then slipped into the kerfs and glued. I mounted the port and starboard sidelights that had been previously made in the same manner.


- 82 replies
-
- 3
-
-
- skipjack
- wye river models
- (and 2 more)
-
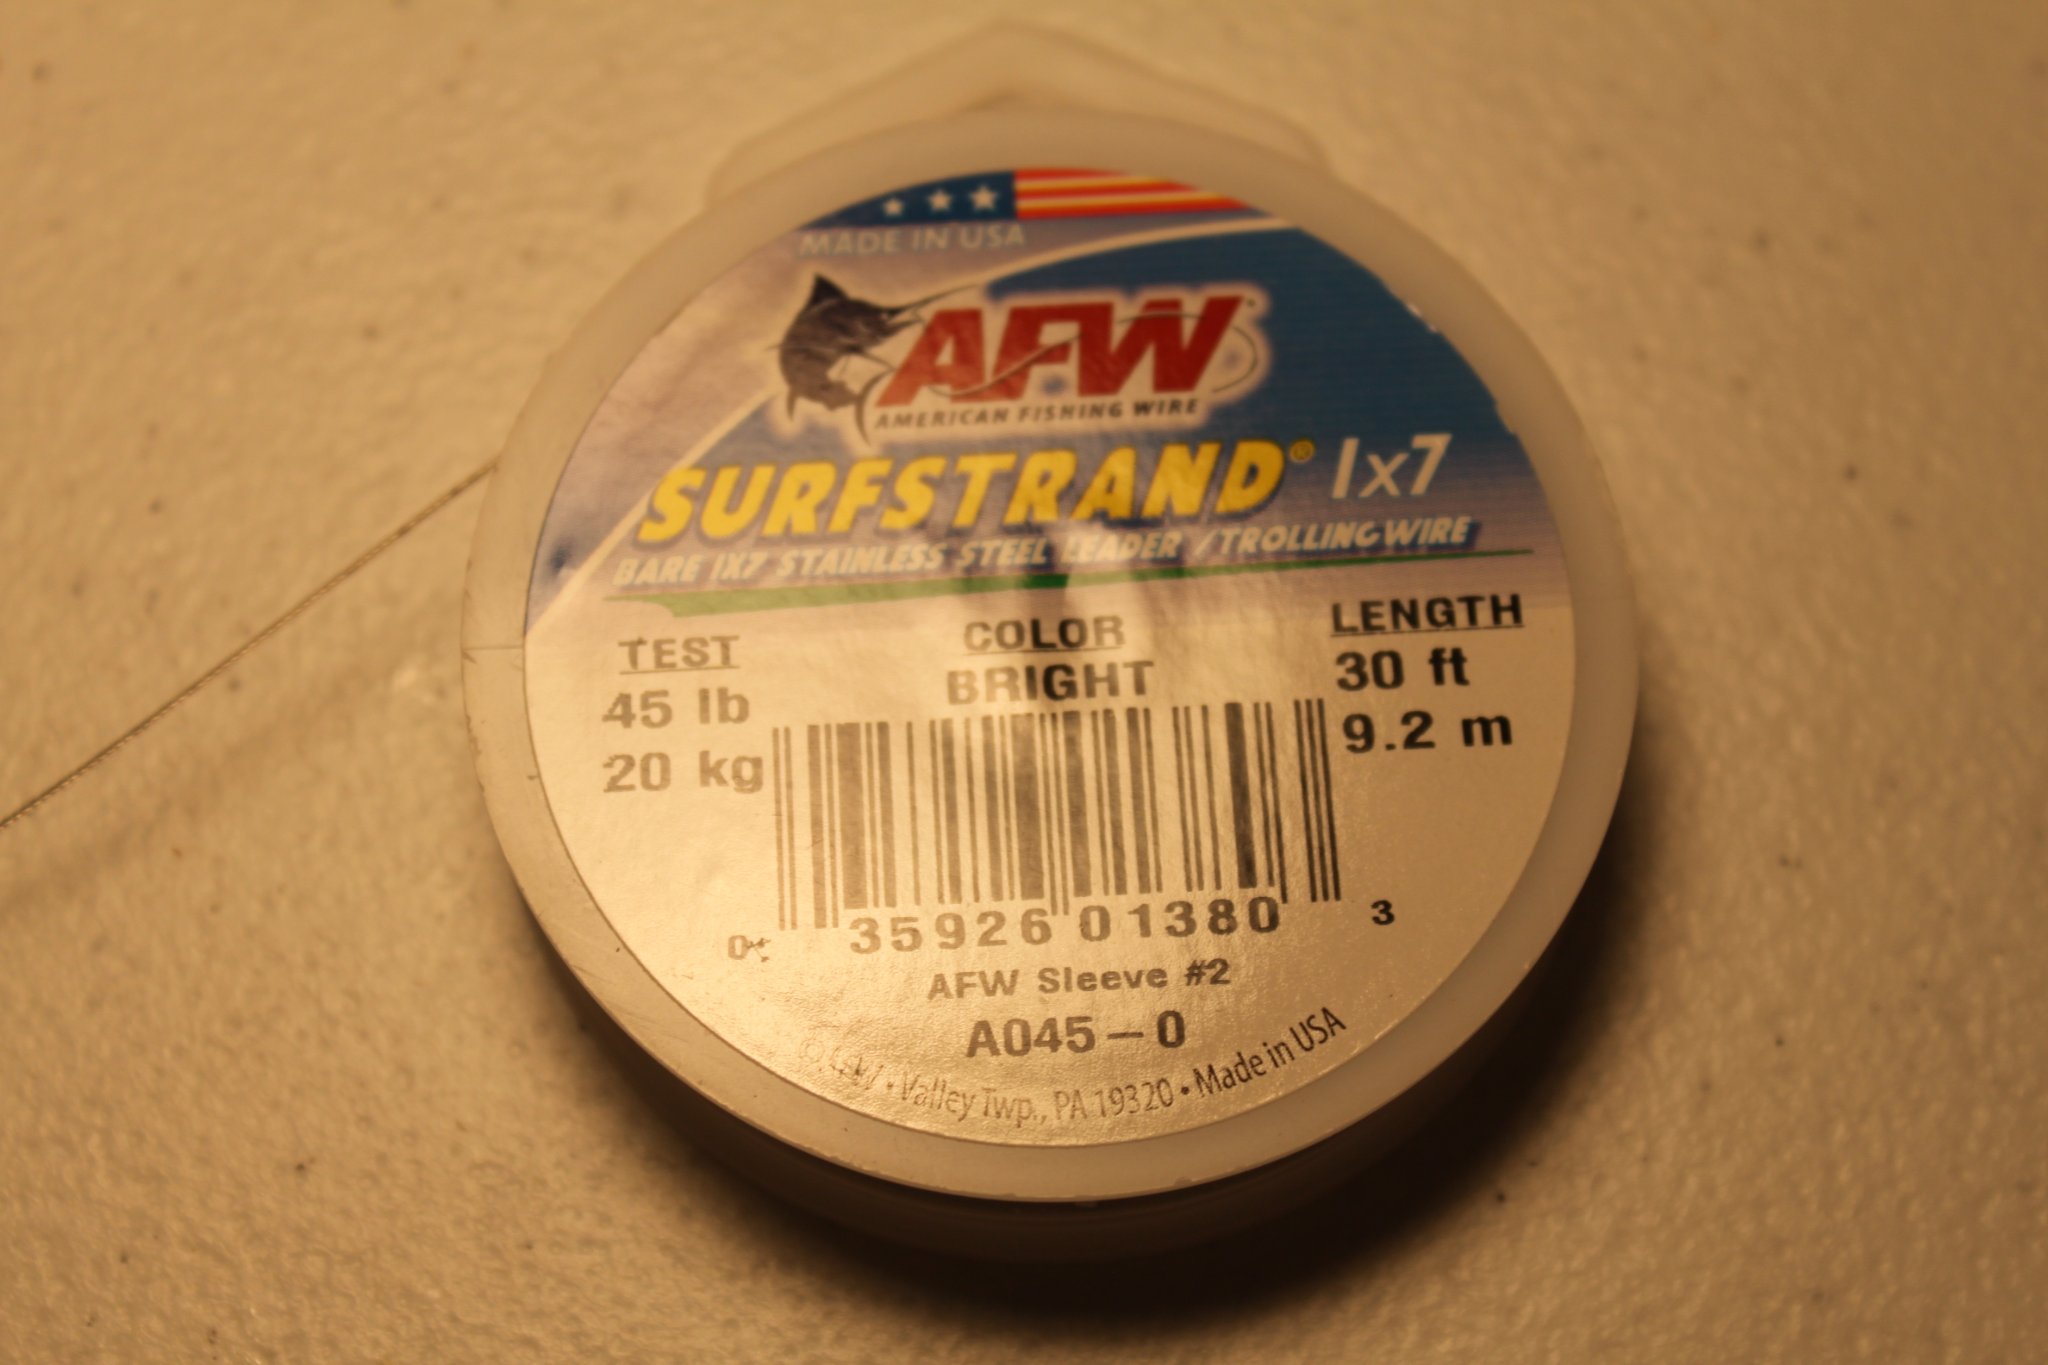
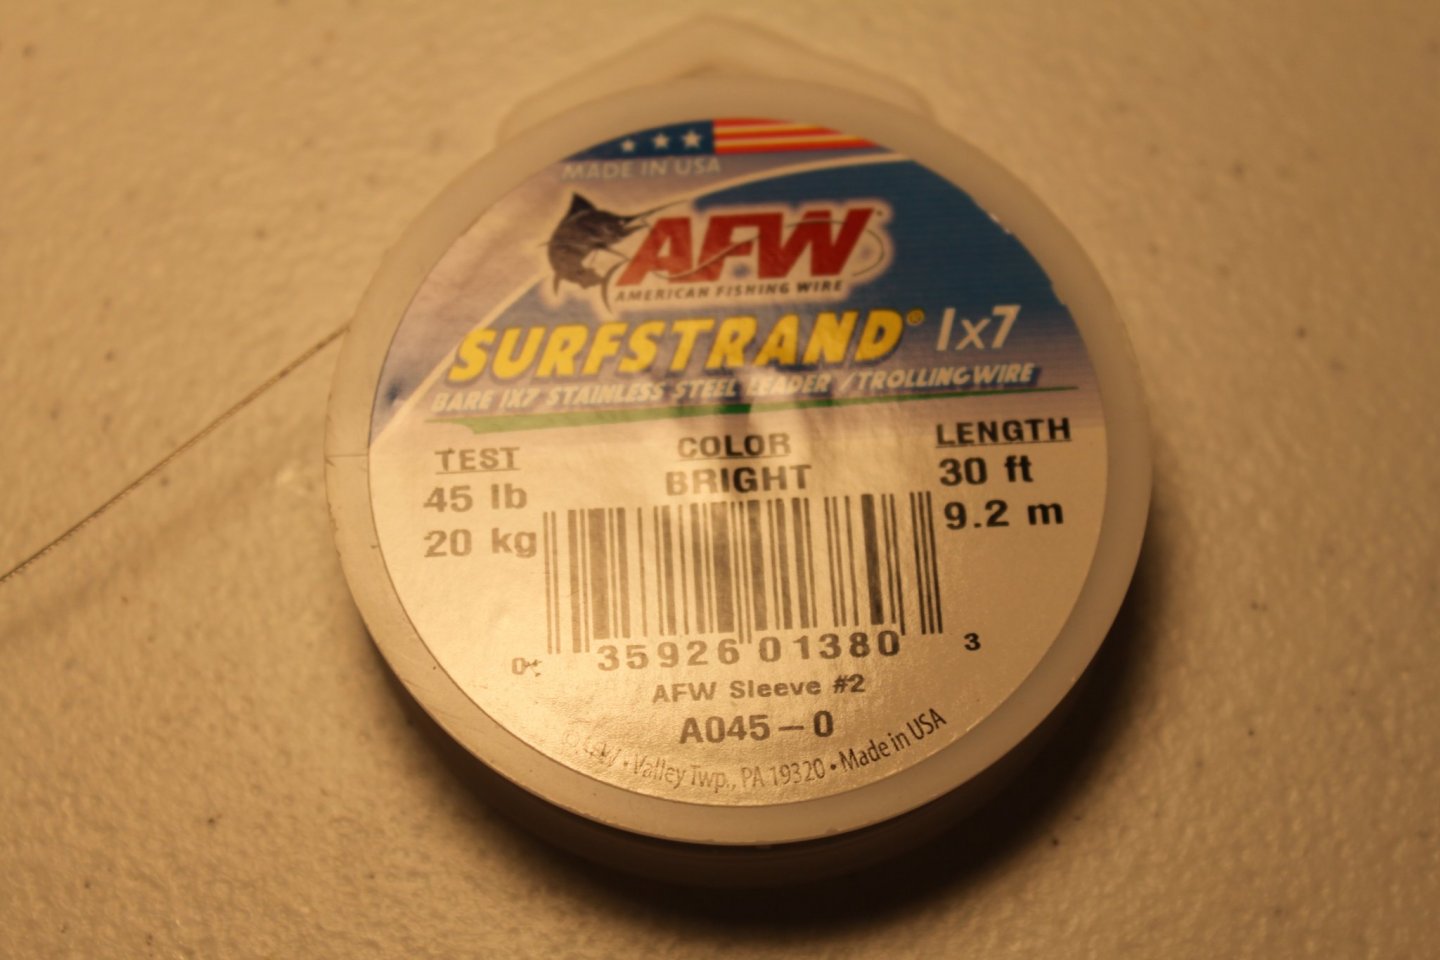
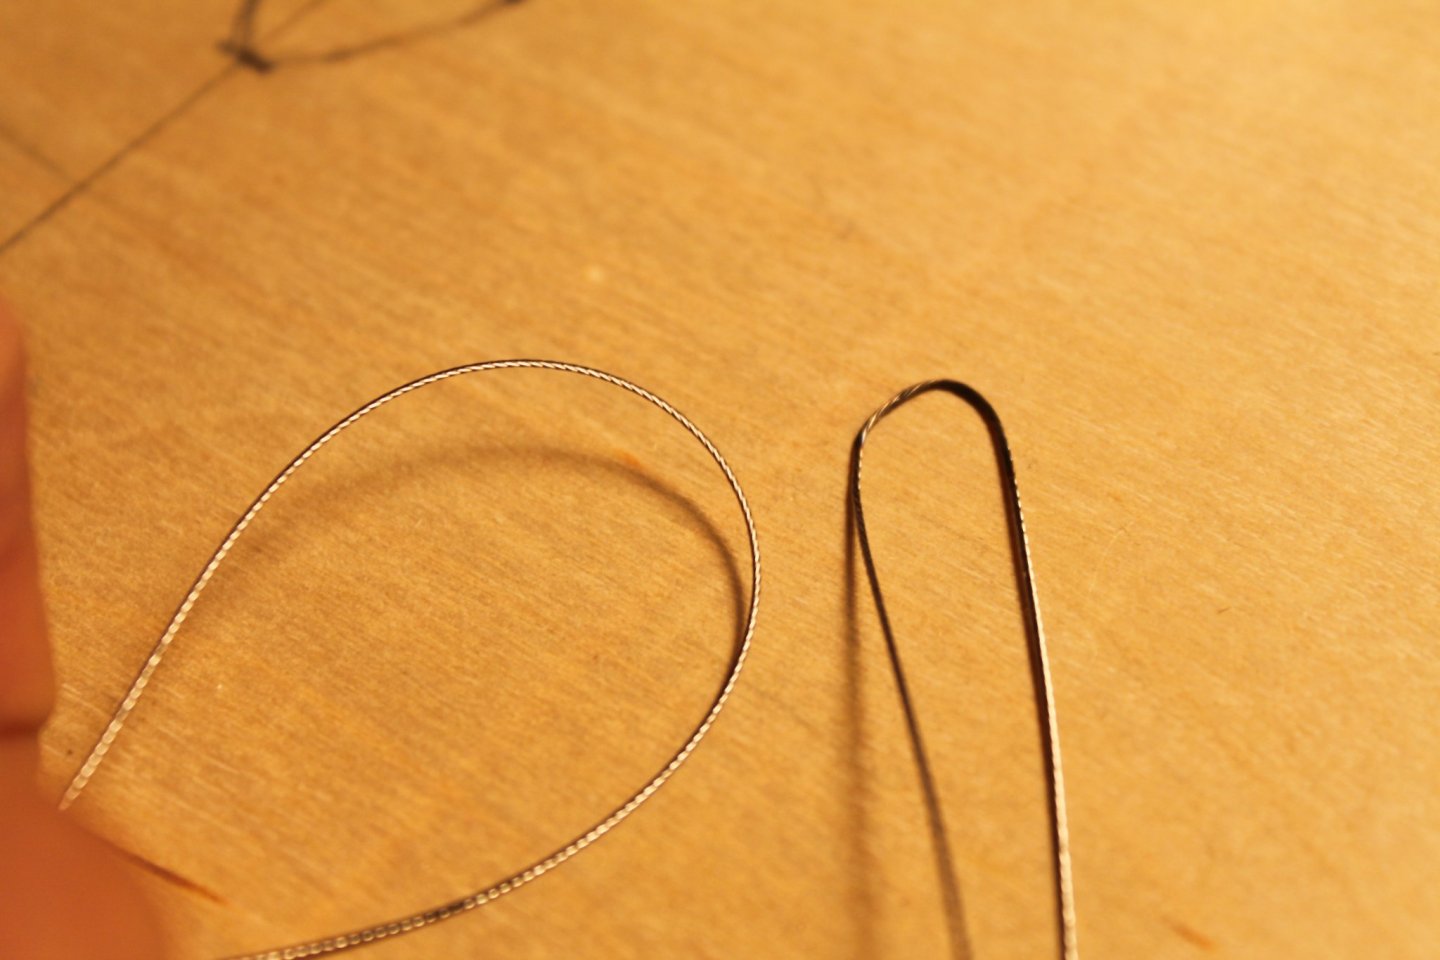
Now that my picture posting issue is (mostly) resolved, i can post again. OK, so were was I? That's right, I was making improvements. The wire I chose to replace the rope I used to make the fore and jib stays was the same one that Mahuna used when he built "Kathryn" One of the problems he had was that the wire was kind of springy and wouldn't bend tight enough for the small radiuses that it had to go around. Since it's been so long since I was here, I've forgotten how he solved the issue. My approach was to bend it as close to the radius that I needed and then heat it with my mini torch. Once heated, it stayed in the shape I had bent it. It did become a little discolored from the heat but that didn't really matter since it wouldn't show that easily. lightly sanding it with 400 grit paper helped bring the shine back. I was worried that the heat may have made the wire brittle but it didn't. It was surprisingly malleable. I bent it back and fourth to test it's strength. It held up well enough for my needs. Once that problem was solved I rigged the wire around the dead eyes and hounds. During this process I was also making rope accent details. They were wrapped around forms and lathered with watered down white glue. then left to dry. So glad to be back posting picture and sharing my build. Dinners ready so I have to go. See ya soon. Reed

- 82 replies
-
- 3
-
-
- skipjack
- wye river models
- (and 2 more)
-
With the help of member, robdurant and moderator mtaylor, I now seem to be able to post pictures again. yep, it worked again. Thanks guys.
- 82 replies
-
- 2
-
-
- skipjack
- wye river models
- (and 2 more)
-
OH SHUCKS!!!! It's been a while since I've posted pictures. Add to that, I had to get a new computer and now my pictures aren't showing. I'll see if I can figure it out. May take a while.☹️
- 82 replies
-
- 2
-
-

-
- skipjack
- wye river models
- (and 2 more)
-
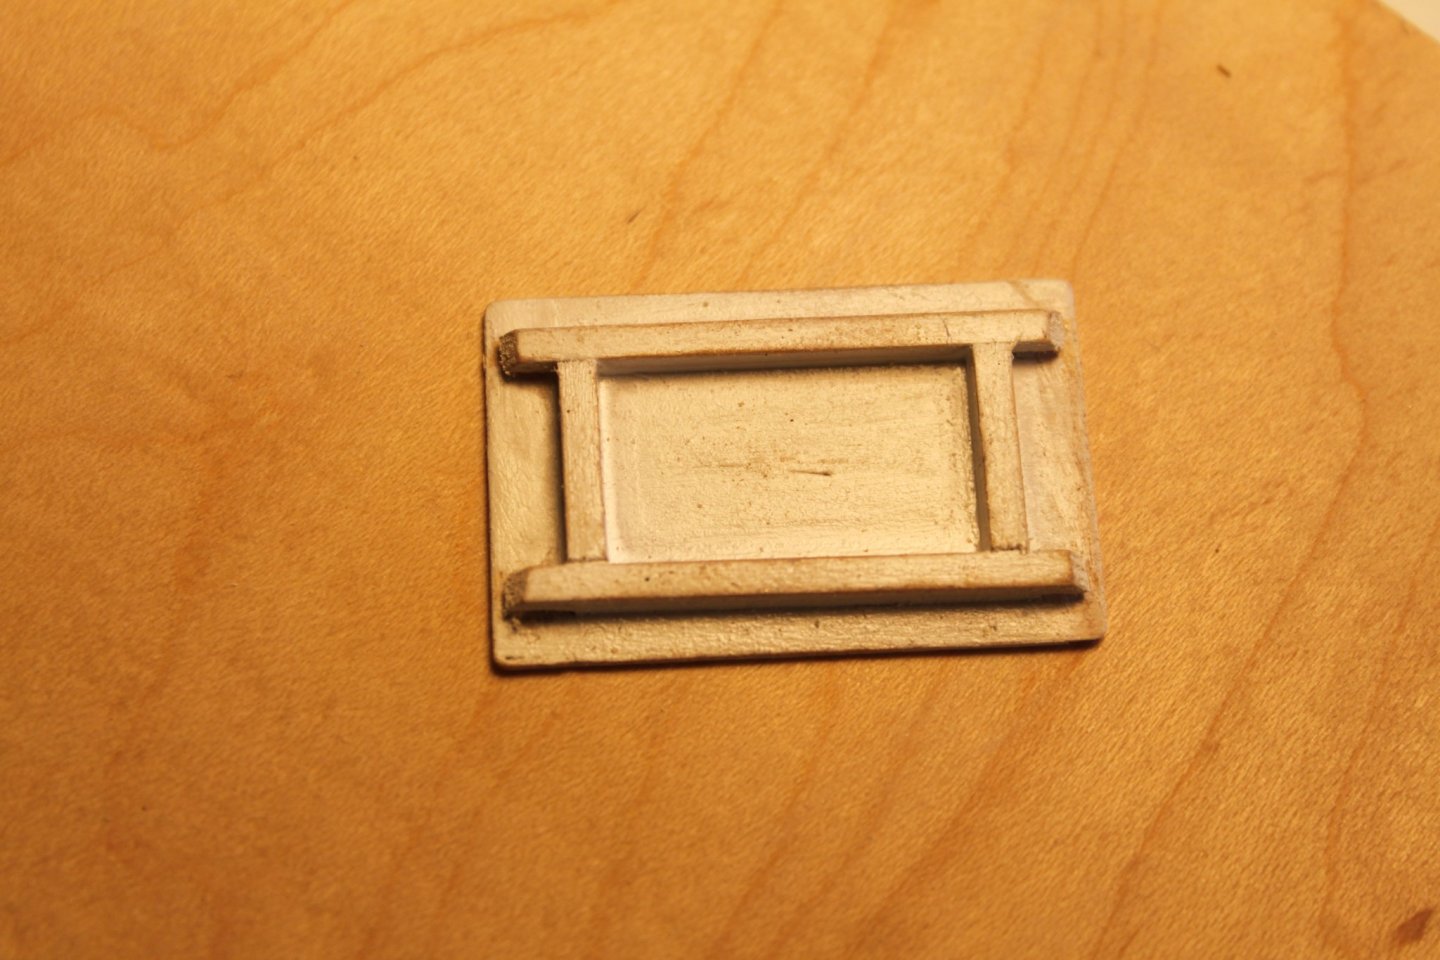
Wow, I cannot believe it’s been two years since I entered my last post. For some reason, the older I get, the faster time seems to fly by. With that said, I would like to apologize to all the people who may have been following this thread for suddenly dropping off the site. The good news is it wasn’t because of heath or family issues. Thank God. The reason is that I only work on this model sporadically. I am clearly not as much of a modeling enthusiast as many of you and only seem to find the time to work on it during the winter months. After my last post, I spent a little more time working on my model with not much advancement to speak of. Before I knew it, March had arrived. In our area (Maryland’s eastern shore) the term “In like a Lion, out like a Lamb” is a perfect description of the month of March. In March, the earliest spring flowers start to bloom and gardening begins. That’s usually when the model gets put aside only to collect dust until the weather forces me back indoors. When that happened last year, the wife and I decided that we have had enough of Maryland’s inclement weather. Plans were made and a trip to Florida for the coldest months (January and February) was taken. We returned in mid-March and the yearly routine began anew. Unfortunately, the model never made it off the mantel. This year Covid put an end to any plans we may have had to escape winter, so I made a New Years resolution to finish my model. Since then, I have been working backwards. [img]https://i.imgur.com/dd6JZ52.jpg[/im Rigging and jib removed. The rigging was stripped in order to replace the poorly fashioned blocks with ones I bought from Syren. They look so much better. Hounds were attached to support the shrouds instead of weaving them through holes in the mast like the directions suggested. I am also replacing some of the rope rigging that would have been steel cable, with steel cable. I’m going to make one, maybe two more attempts to re-make the winder frame look more realistic. Working with metal is definitely one of my weaknesses. If I can’t get it right, then I’ll attempt to make one out of wood and then paint it black. After that, hanging the Yall, making a base and painting a name on the trail boards will be all that is left to do. [img]https://i.imgur.com/dd6JZ52.jpg[/img] Hounds added.

- 82 replies
-
- 2
-
-
- skipjack
- wye river models
- (and 2 more)
-
Windless improvement Some of the Skipjacks I've seen have windlesses on their samson post. Rosie Parks Nathan The kit gave me two map tacks to use as the windless. I was unhappy with the look from the minute I installed them. Paint wasn't going to make them look any better. It was time to improve them. I took a 1/4 dowel and put it in a drill. Then I formed the concave detail using a rattail file. Brass was used to make gears and handles. A gold paint pen gave the wood a metalic look. So here it is. Still not completely real looking but better. Reed
- 82 replies
-
- 7
-
-
- skipjack
- wye river models
- (and 2 more)
-
looks like you got that SketchUp dead on. Nice!! Reed.
- 82 replies
-
- 3
-
-
- skipjack
- wye river models
- (and 2 more)
-
Hope this isn't too far off topic. We had guests visiting for the weekend so we took them to the Chespeake Bay Maritime Museum in St. Michaels. They have a number of vintage work and pleasure boats as well as some very interesting exhibits. In particular, they have a couple of Skipjacks and a Bugeye. I was most interested in seeing the Rosie Parks. To my surprise, she had been stripped of her boom, mast, Yawl and most of her riggings. I soon found that the reason for this was to make repairs to the mast. It had developed some severe cracks at it's base. Unfortunately, even though it was sitting next to the door, I forgot to bring my camera and had to make do with my cell phone. The mast after it was repaired. It was coated with a very sticky substance. Don't know why. You can see the "V" cut and the new wood that was added to the base of the mast. The cut off piece is sitting on the ground next to it. I'm sorry I didn't get as many pictures that I should have in order to show the repair better. Another point of interest is the two coins in the bottom of the mast. One of them has the date that the boat was built. The other has the date that the boat was restored. I don't know if it was a common practice to do this when a boat was built. It also appears that repairs were made to the mast in other areas and that the hounds were replaced. The square ends are the top. They had another Skipjack. I like comparing the boats to see how they differ. This one has a hook and a pully for the anchor rode. It also has two chain stays on each side of the bowsprit. The davits are heavier than any others I've seen. Three inch pipe. And of course another Yawl that's drastically different from the ones in this thread. The Bugeye Edna Lockwood She's a bit bigger than the Skipjacks. Not many extras on her bowsprit. Heres a close up of how a real mast hoop is made. We couldn't get into the small boat shed. A dog club was having a scent searching contest and they were hidding the packets throughout the shed. Those dogs wasted no time finding them. This was outside the main door. I love the rudder on this little sneak boat. They have a building that is dedicated to oystering. Inside it is another Skipjack. The E. C. Collier. She is a static display that you can walk on and explore. The hull is open (cut away) on the lower back side and can also be explored. It gives good insight to how the hull was constructed. Once again the dog people were setting up. I only had a few minutes to snap a couple shots. In addition to the boat, there are a number of artifacts on display. There's no doubt that dredging for oysters was hard work. Long days on a pitching boat in the middle of winter would have been tough even if trimming the sails was all you had to do. Add in deploying and hauling in a dredge and then sorting the catch for hours at a time would have worn down even the strongest man. Now imagine that you had to haul those dredges with one of these. P.S. Ron. I vaguely remember a discussion about early winders in another thread. Here's a couple pictures of one. Although they may have been repositioned for the sake of display, the handles are the same length and not offset. You would have felt that the "New technology" was a God send. Last but not least. They have a building dedicated to modeling. There is a number of nicely done cased models on display. They also have programs for the public. Bugeye. Thanks for joining me on our trip to the Chesapeake Bay Maritime Museum. Reed
- 82 replies
-
- 8
-
-
- skipjack
- wye river models
- (and 2 more)
-
Yawl boat improvemets Unlike building a boat such as the Kathryn that is documented and surveyed, this Skipjack is unidentified. That gives me a degree of license to choose between some of the differant styles of components that were on the various boats. The Yawl is one of them. As previously posted, this is the picture of the Yawl that the kit had me build. The Lady Katie's yawl. and the Nathans. As can be seen, the Nathan's yawl has more deck on the bow than the Lady Katie. In that respect it looks more like the yawl I built. The kit had me using two eye bolts that were screwed into the deck for the attachment points of the blocks that lift the yawl. In reality, unless those bolts were very long and anchored into the keelson, the weight of the boat would have either ripped them out of the deck or taken the deck with them. That logic is demonstrated in both the pictures of the yawls. They both have the blocks mounted to the keelson in order to provide the strength neccessary to lift the yawl. For that reason I wanted to make the mountings on my yawl more structurally sound. Since I had built the yawl without taking this into consideration I would need to make a couple of holes in the decks of my yawl. I hastily scratched out a rough outline of a square hole on the fore deck and hustled (after taking a picture) off to the shop. Approximately 1/10 of a second after the drill bit broke through the planking, the thought "OH NO!!!" exploded in my head. Not only did I forget to implement the basic rule of "measure twice, cut once" but I totaly forgot to measure AT ALL!!! A minute later my fears were confirmed. The hole wasn't going to line up with the davit that the yawl would hang from. In a split second I had just un- improved the tiny boat. Major surgery would be required. A section of deck was removed and the hole cut in the appropriate location. New planking was glued, filled, sanded and stained. Previously to making my error of the day, I had also been working on the padding for the bow. I used a piece of three strand cotton string to make the padding. The following pictures tell the story. It was then dry fit. After the repairs were completed and the stain dry, a small hole was drilled in the keelson through the middle of the holes in the deck. Pins were cut and bent to eventually hold the blocks at the correct height in the deck after they are rigged. Here's a few pictures of the yawl now that it's actually been improved. Hopefully my next "improvement" will go a little smoother. Reed
- 82 replies
-
- 6
-
-
- skipjack
- wye river models
- (and 2 more)
-
Ron, Thank you for the info and the offer. As far as the rigging goes, I am going to look through my fishing tackle to see if I have any wire leader that might work for the shrouds, fore and jib stays. I think it would look good if I actually used wire. We'll see. I bought some tan rope from Chuck and may change it out from the white when I re-rig everything. I am somewhat reluctant to put much of anything I haven't made on the model. The only things (hardware) I've used from the kit is the prop, steering wheel, some (plastic-yuk) cleats and parts from the bobbins. The blocks are an issue un to themselves. I also bought some double and single, "build them yourself" blocks from Chuck. At first I thought that they would look "too real" for my model considering that most of what I've built only looks "close to real". The good news is, I did such a poor job assembling them that I actually managed to make them look just right. LOL!!! The first thing that happened was that I fat thumbed them and managed to break some of the sheaves out of the frames. DOH!!! It's even harder to glue those tiny pieces correctly when you do that. The second problem I had was getting them together before the CA (thin) dried. I ended up switching to medium. No matter how carful I was to just use the smallest amount, I still managed to get it into the slots that the metal straps should fit into. I had to drill some holes in the ends and use a piece of brass wire to make the straps. OH WELL, they'll have to do. And besides, they're much better than my first attempt. Sooner or later I'm going to have to accept this model for what it is, a first attempt. It's getting dangerously close to being a first and second build, all in one. I'm going to give carving and painting the trail boards a shot. I still haven't decided what to name her. I was going to surprise my wife and name it after her. (Jan) She suggested that I name it after my daughter. (Alexandra) One would certainly be easier than the other. If I fail miserably, I may take you up on the offer. Thanks again. Reed.
- 82 replies
-
- 7
-
-
- skipjack
- wye river models
- (and 2 more)
-
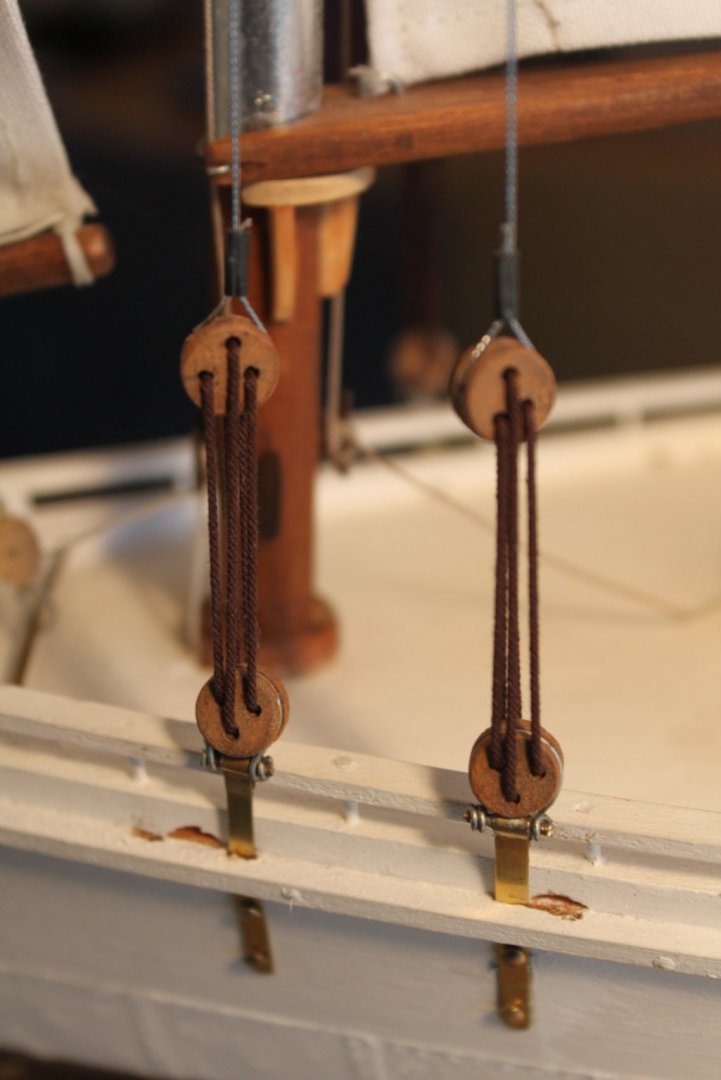
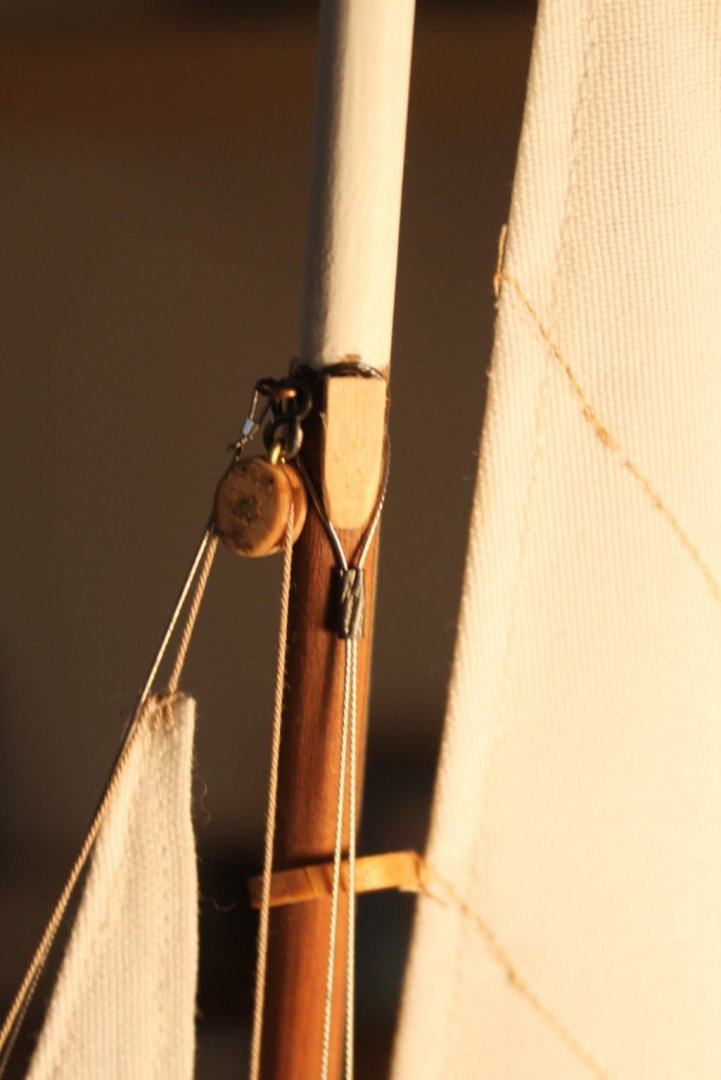
Blocks and rigging. Since I decided not to use most of the hardware included in the kit, blocks became another thing on the list to make. The directions showed me a way to make blocks that "resembled" the real thing. Not knowing what kind and size block was used in the various locations created a problem. So did trying to make them to scale. My effort to make them was less than perfect. From a distance they give the appearance of blocks where one would expect to see them. Up close, not so much. The same goes for the deadeyes I made. Made a few rope coils to add here and there. I continued on and began to rig the sails using the blocks I had. The kit gave me two coils of line. One was a black plastic cord. The other was a white of some type. The white line looked good but the black didn't. The black was to smooth and shinny. I some how managed to lose the materials list so I didn't know what it was intended to be used for. I assumed that it was meant for the shrouds and perhaps the starboard and port stays for the bowsprit. It would be replaced. The Lady Katie has chain for the bowsprit stays as well as the bobstay and jib stay below the bowsprit. An additional length of chain was purchased from a fabric store and used for the stays. There was only 12' of white line supplied. It was determined that there probably wouldn't be enough. I bought a small spool of white line from Hobby Lobby. It was very close in appearance to the line that was supplied with the kit. Some black line was also purchased. It would be used for the shrouds. I also considered using it to rig the Yawl boat to the davits in order to introduce some contrast. Here is where I am at with the model at this point in time. This is also the point that I discovered this site. Up until now I have just been going along following the directions and building the model. When I got to this point, I started to become dissatisfied with the way the sail was hanging. That lead me to a "web search". Now I gotta tell ya, I'm not very good at searching. Not being a very good speller doesn't help. I'm so bad at searching that I rarely find what I'm looking for. For example, the other day I googled, "GOOGLE", and "BING" popped up....LOL!! My search was for ideas of how to make a sail look like it was full of air. To my surprise a link to a thread on this site popped up. Not only was I thrilled to find the thread but I was thrilled to find the site. All of a sudden I had a long list of companies that sold the modeling supplies that I couldn't buy at my local hobby and craft stores. In addition, there was also all the forums that discussed the finer points of model building. I spent hours reading through the various threads admiring the beautiful work and craftsmanship displayed within the pages. The down side was that seeing all the beautiful work stimulated the disease that has lived within me for all the years that I have been a craftsman. The disease that makes me my own worst critic. The disease that makes me feel that almost everything I've ever built, could have been better. From here on my build log will focus on the improvements I am attempting to make to the completed work. The blocks and "A" frame will be foremost. Proper rigging of the sails and using the correct block for the location will also be a consideration. Other then making the afore mentioned improvements, a few other things remain to be done. The list consists of making and mounting the keel board. It was left off until the end of the build so that it wouldn't be damaged during the building process. Hanging the Yawl is another thing on the list. It needs to have the rudder removed and the hull repaired. It also needs to have a hole cut in the fore deck so that the lifting block can be fastened to the keelson. The directions have me connecting it to the deck. In reality, without structural support below, the weight of the boat would just rip the deck off. Some touch up of the paint job will be needed. And finally, the trail boards and a stand need to be made. The trail boards will be a challenge as fine carving and painting are required. As of now, a name hasn't been chosen. I am leaning towards using drift wood as a stand. I hope to find a piece that will let me mount the boat in a way that makes it look like it's riding up a wave. Reed.
- 82 replies
-
- 6
-
-
- skipjack
- wye river models
- (and 2 more)
-
Tim, Thank you for the kind words. I really appreciate them. Ron, Thank you for the link, photos and the CAD drawing. It will be a great help as I attempt to improve my frame. The pictures and the drawing clearly show that the height is much taller than what was given in the kits directions. One thing I have noticed is that most of the winders I've seen are the same while there are several different configurations of frames. Kathryn's seams to be slightly simpler than others and should be easier to make......Famous last words. As you, I have also been following this thread. Franks skills are undeniable. I truly believe that his model will look better than the real boat ever did. If that build is not "museum quality", then I don't know what is. I am also very glad that he and his wife were able to overcome the issue that kept him from the build. Good to see him posting up dates again. His build (amongst others) is a primary reason why I am now striving to better mine. However, I must concede that I will most likely never be that good......But I'll have fun trying. Reed
- 82 replies
-
- 4
-
-
- skipjack
- wye river models
- (and 2 more)
-
I think I have figured out why I'm having such a hard time with the dredge winders "A" frame. Stopped by the Lady Katie today to have a look at how it was rigged. While I was there I noticed that the engine box and "A" frame are a bit taller than the 36" the directions told me to make them. I didn't have a tape measure with me and I wasn't about to go aboard uninvited. From my vantage point on the dock and roughly eight feet away, they both appeared to be at least 42", if not more in height. That explains why the scale of what I made looks so off to me. Looks like I'll be making the "A" frame AGAIN!! Reed.
- 82 replies
-
- 1
-
-
- skipjack
- wye river models
- (and 2 more)
-
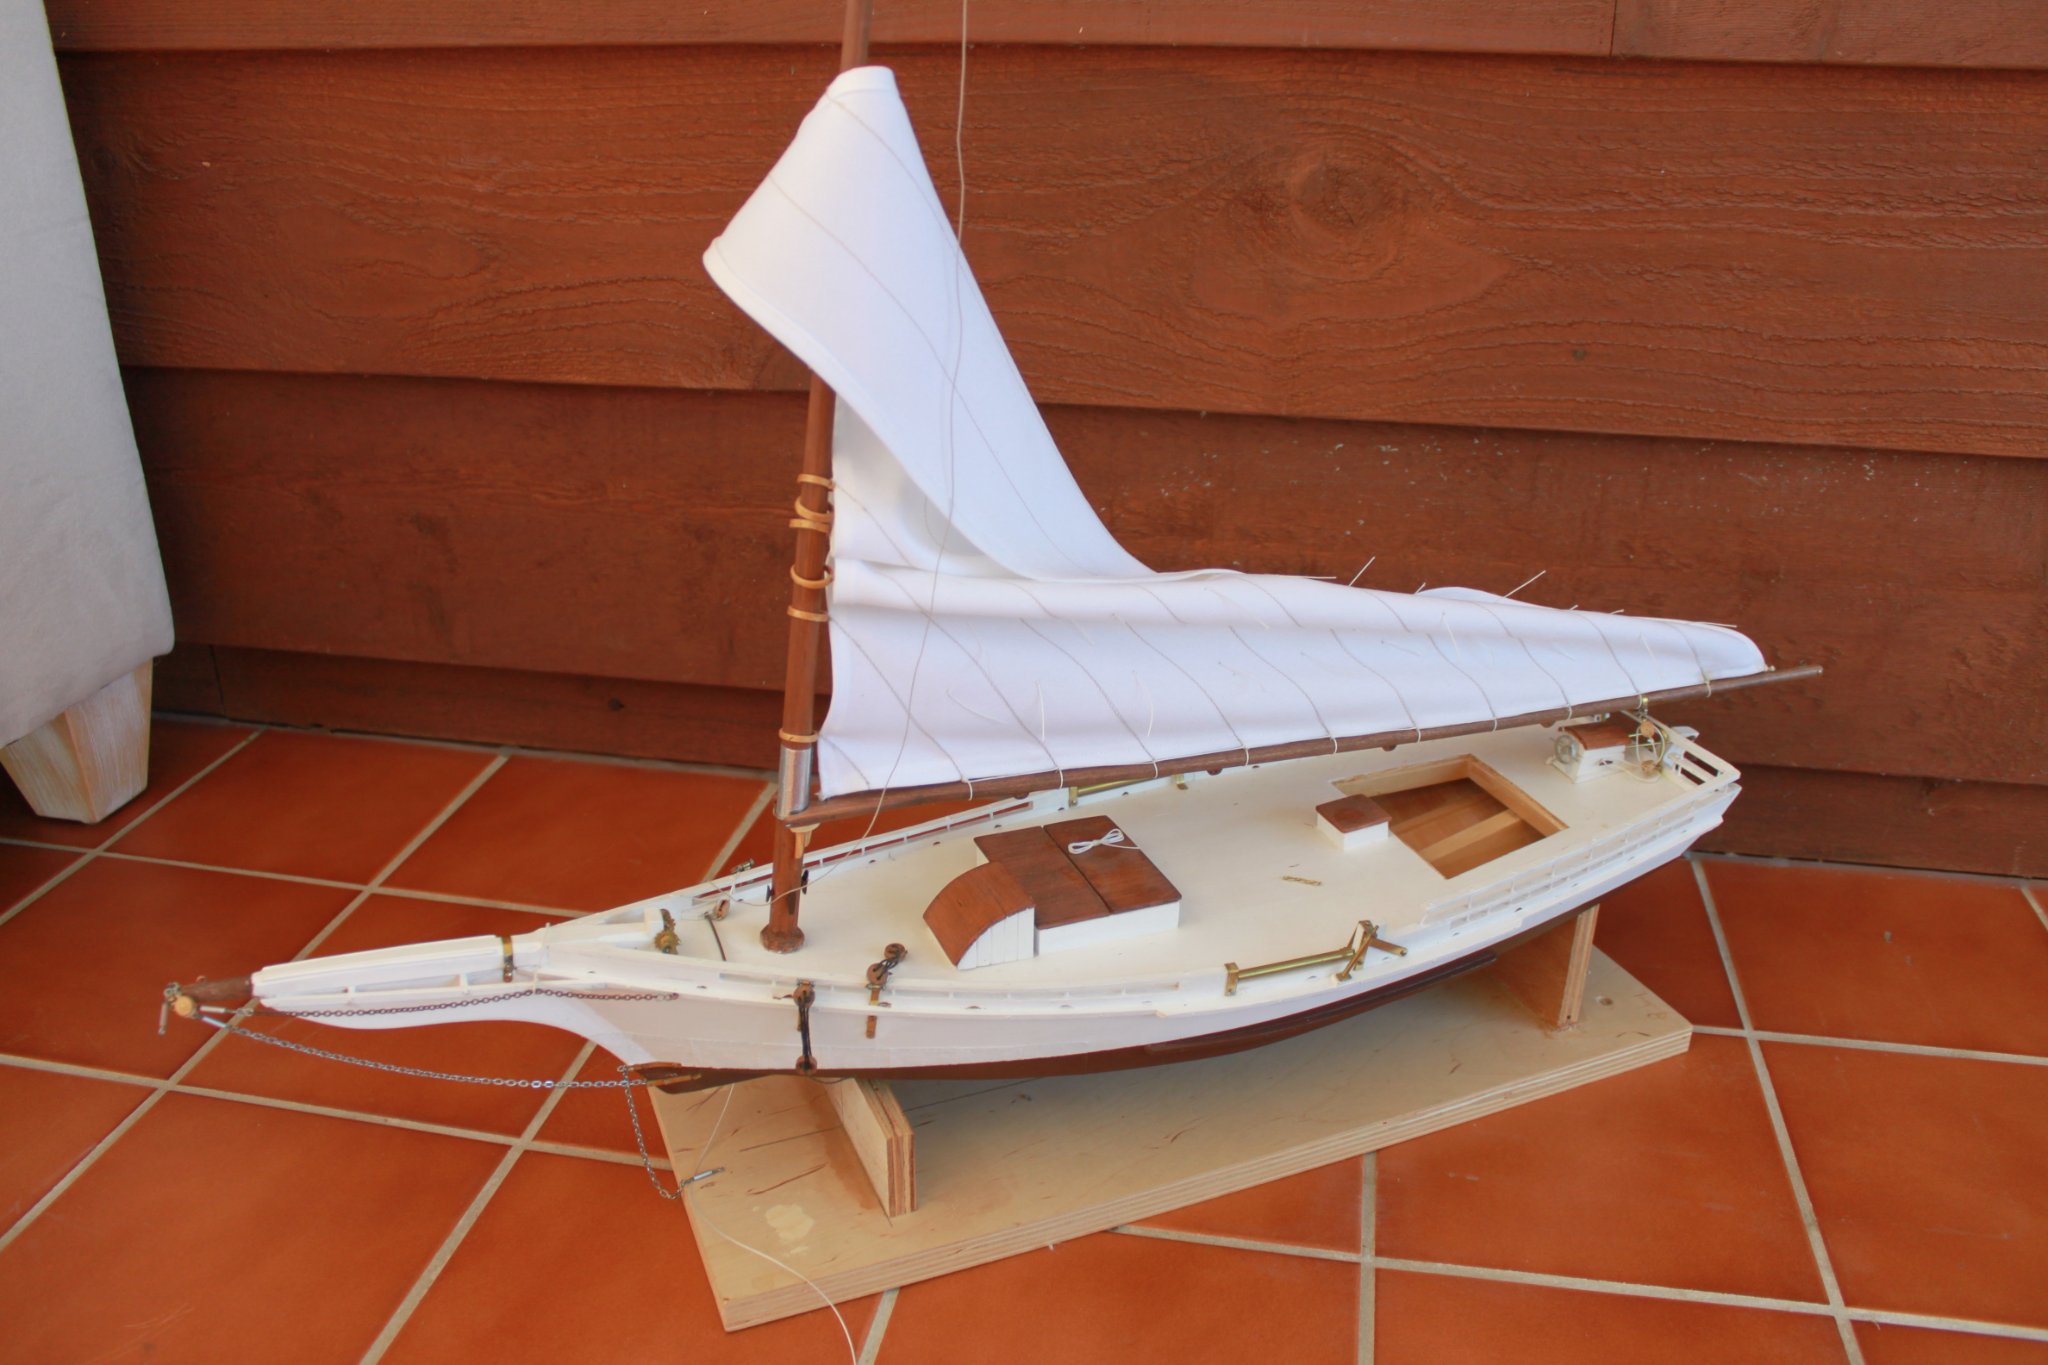
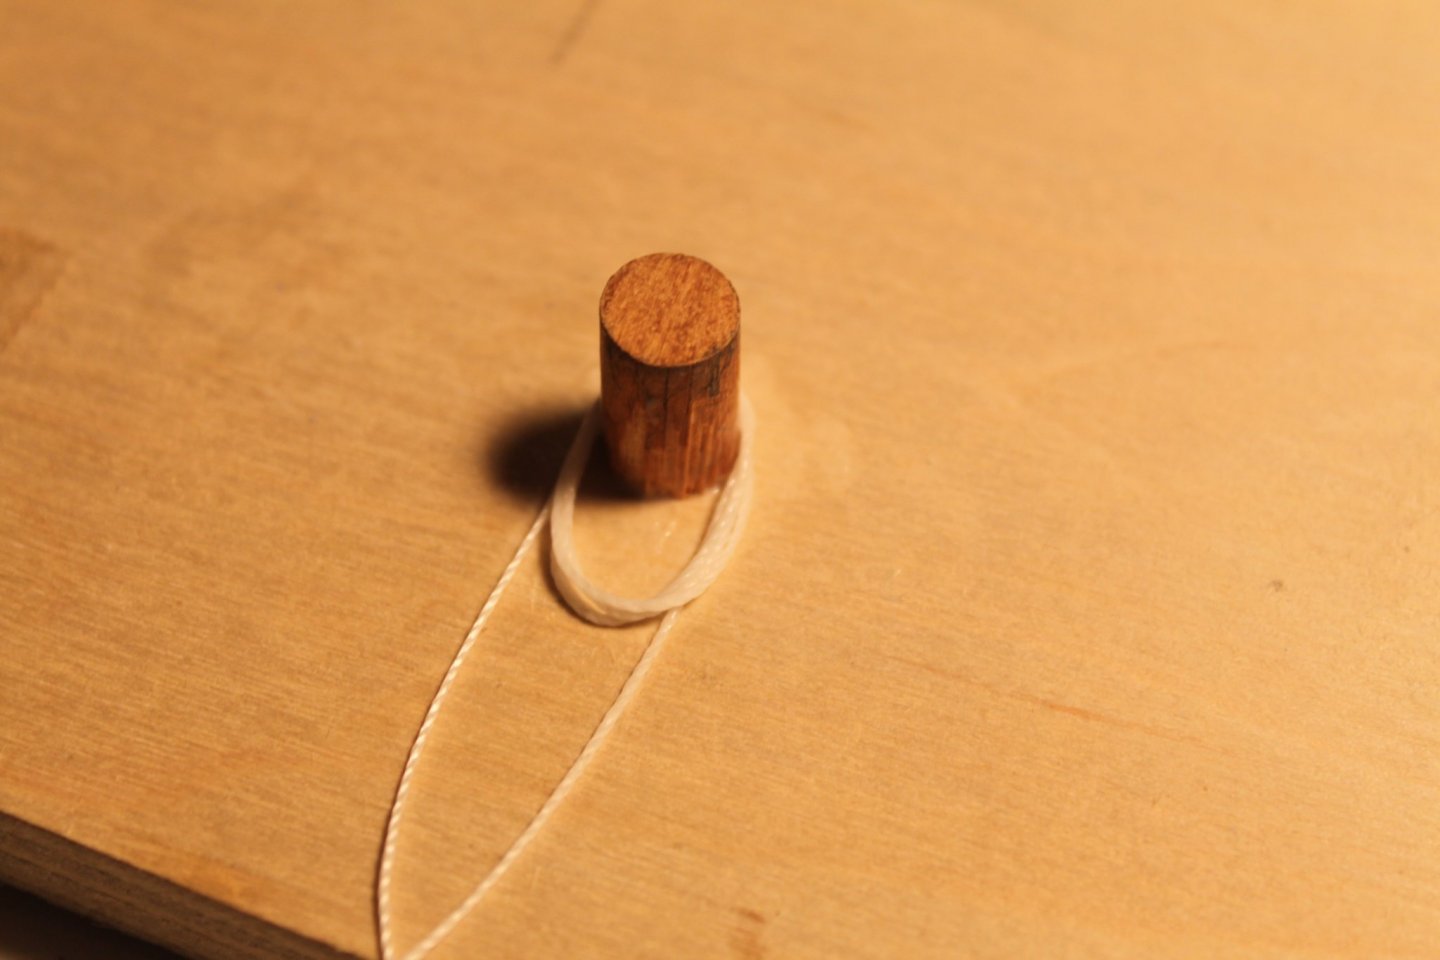
With the majority of the small parts made, it was time to start mounting them along with the mast. Holes were pre drilled and brass brads were cut off short to be used as both physical and decorative fastners. The mast had been pre fit and all that was left to do was to glue it into place. The boat was adjusted on the stand so that the water line was level. A brad was inserted into the bottom end of the mast, trimmed to a 1/4" and then sharpened. Glue (PVA) was applied to the inside of the mast hole and the mast wedges. Once again using the level, the rake of the mast was set so that the top of it fell directly over the center of the hold. With some force, the mast was pushed downward so that the sharpened brad sunk into the keelson and held it firmly. After the glue had dried, the boom was dropped over the mast. A block that rested on the lazy board of the Yawl davits was used to hold the boom at the correct height. Both were then temperately tied in place. Rigging for the boom lift and fore stay were added to aid in holding the mast from flexing. At this point a pattern could be made for the sails. Construction paper was used to make the patterns. The next challenge was to learn how to sew. Although I had spent many hours watching my mother sew when I was (much) younger, I had never actually done it myself. Fortunately I have some life long friends that live a few miles away. Scott is a friend I have known since third grade. His wife Barb is a friend I have known since high school. They both became high school sweethearts and eventually married. I had the honor of being a groomsman in their wedding. Over the years we enjoyed our shared interest of boating, fishing and crabbing while dreaming of living in a waterfront home on the Chesapeake Bay. Seven years ago, Scott retired early and he and Barb finally made the dream come true when they purchased a home in Cambridge. My wife Jan and I followed four years later when she retired from the school system. But I digress. I gave Barb a call and she was more than willing to show me the basics of sewing and lend me her machine. After practicing on some scrap material, I jumped right in and produced the sails. The instructions told me to sew lines an 1 1/2" apart in the sail. They should follow the top edge of the sail and be sewn with a darker thread. This is supposed to simulate the seams that would be in a sail that is as large as the ones Skipjacks have. The mast hoops would then be sewn at the intersections of those lines and the side of the sail that abuts the mast. In hind sight, I wish that I would have sew the lines closer together because they only created 10 intersections. That only allowed me to use 10 mast hoops. All the pictures I have seen of the mast hoops on Skipjacks shows at least 14 or 15 of them.....OH WELL, what's done is done. Reef points were sewn in and trimmed as well. Reed
- 82 replies
-
- 7
-
-
- skipjack
- wye river models
- (and 2 more)
-
Thanks Ron. To be honest with you, it looks a little better in the pictures than it does in person. I burned through a lot of metal before I got to a point where I was somewhat happy. Keeping the width of the metal to scale has been tricky since I don't have a good way of cutting it. I need more practice, a good drill press and a milling machine..........And more practice. And more practice. And more practice. Reed
- 82 replies
-
- 1
-
-
- skipjack
- wye river models
- (and 2 more)
-
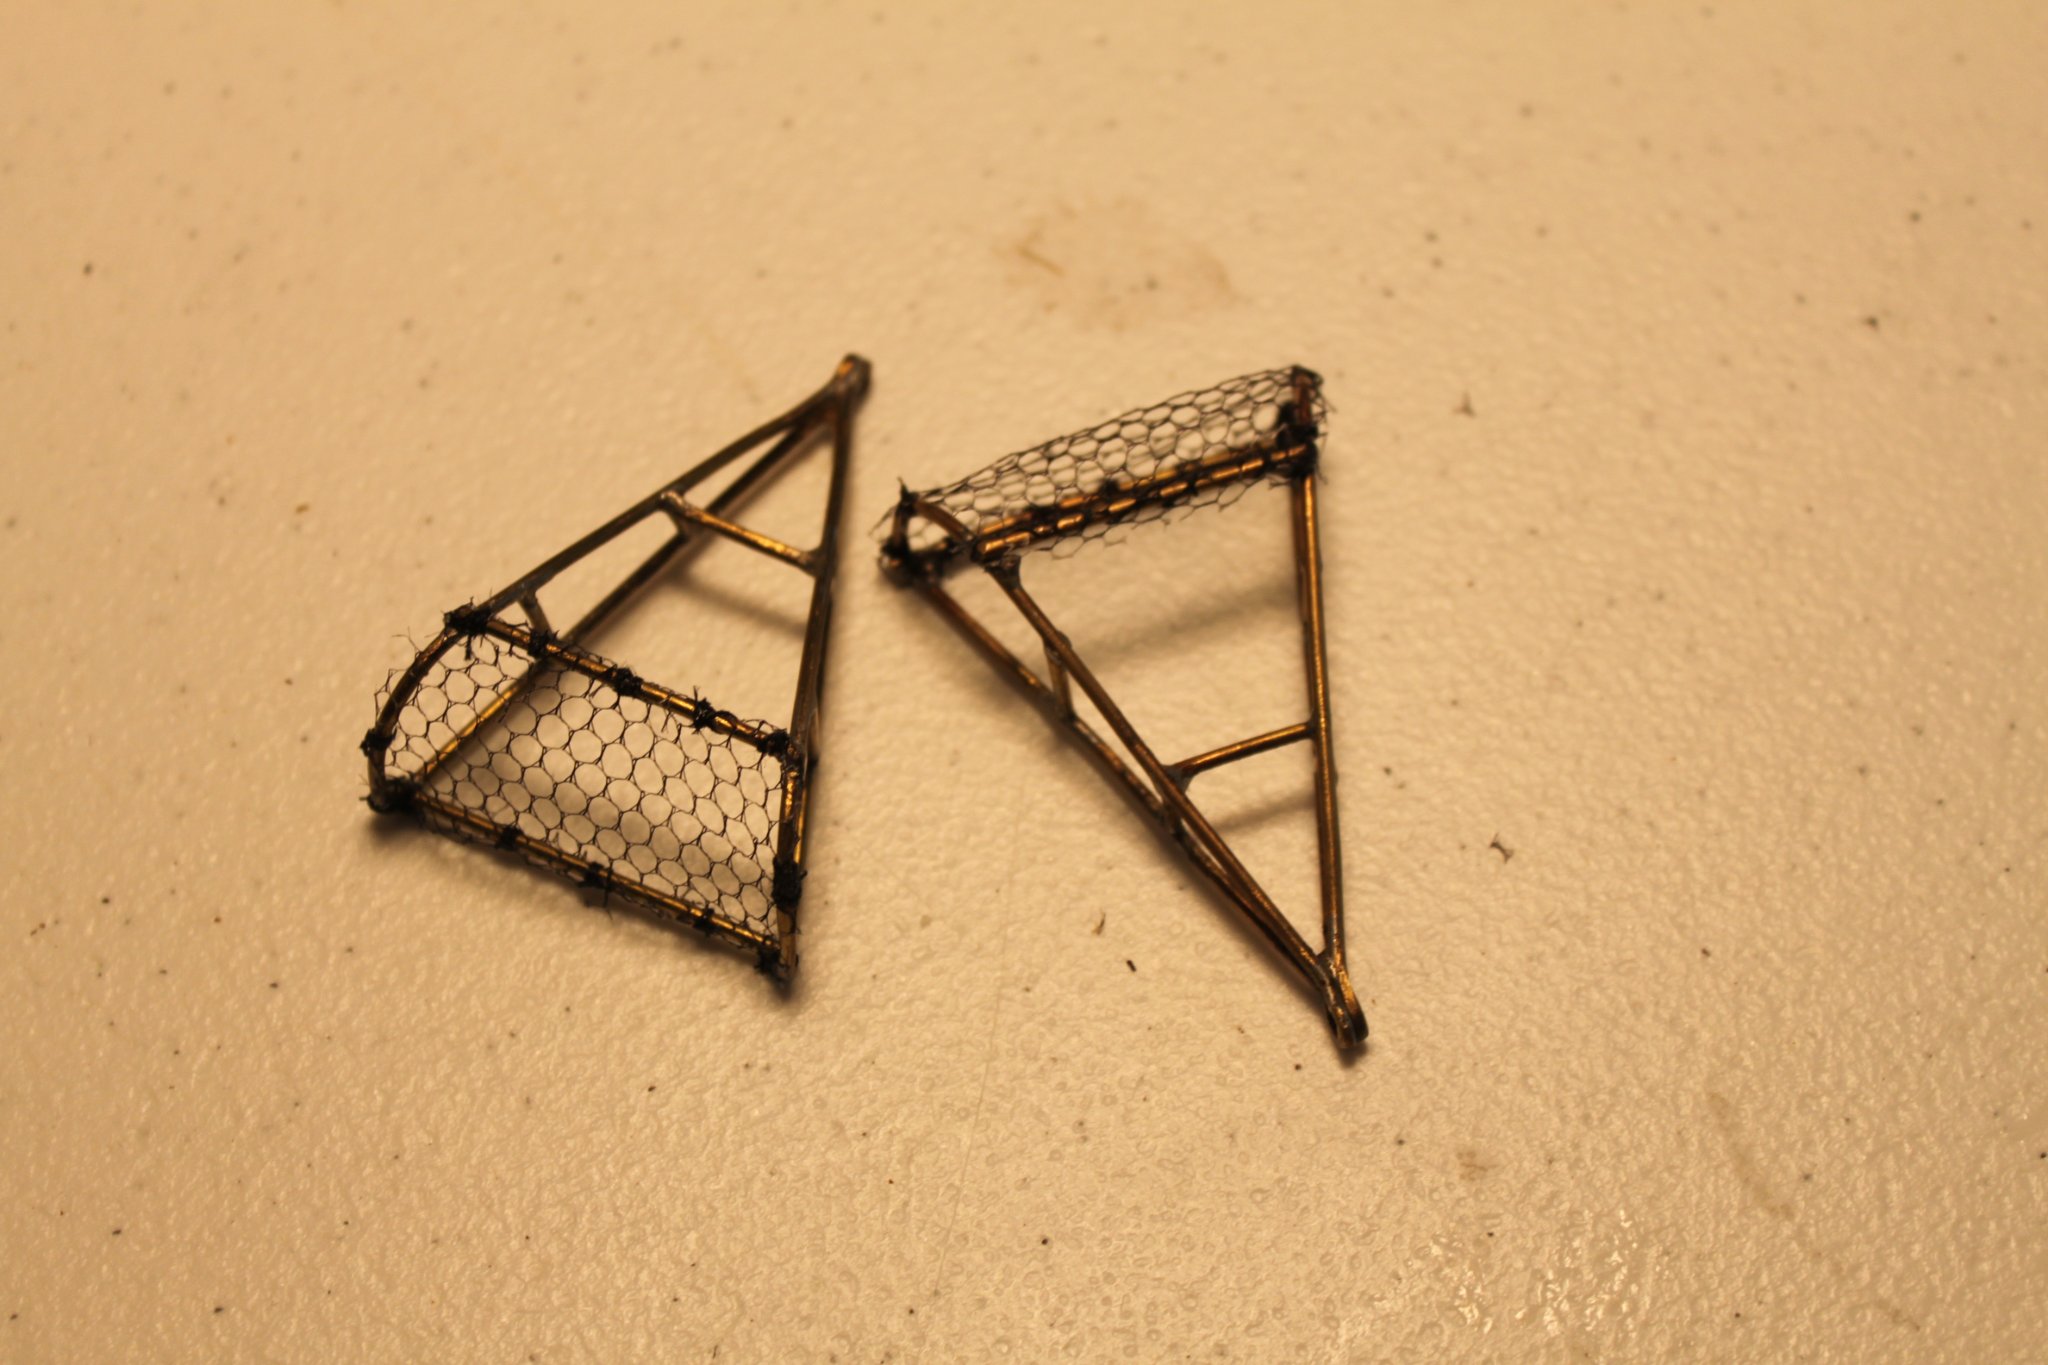
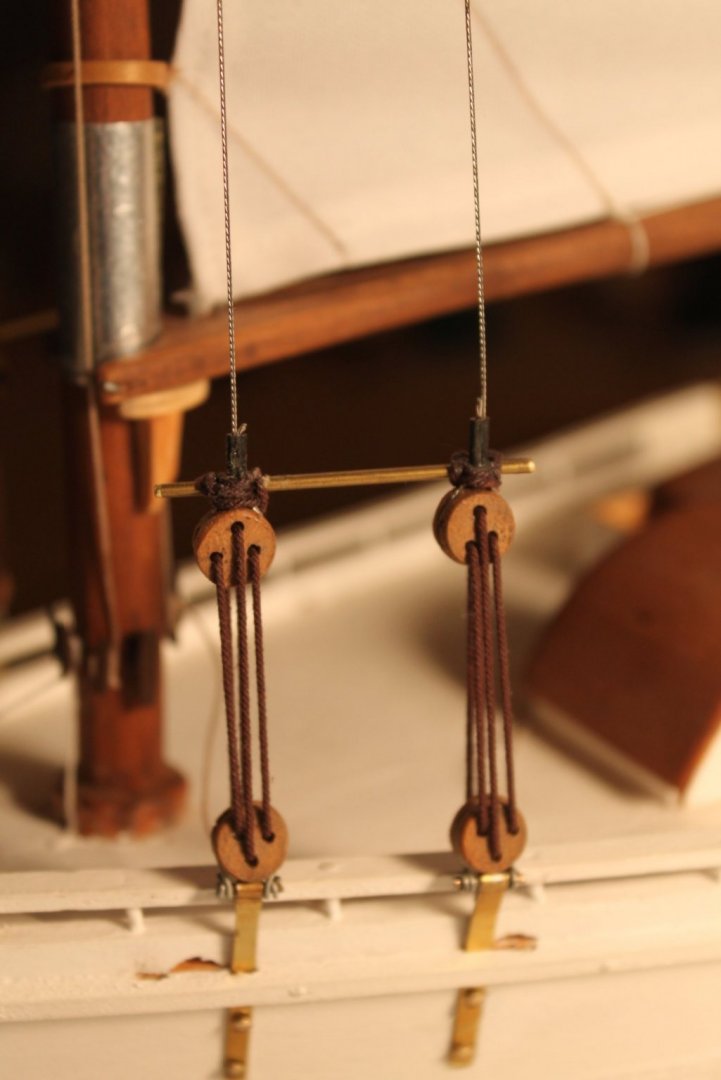
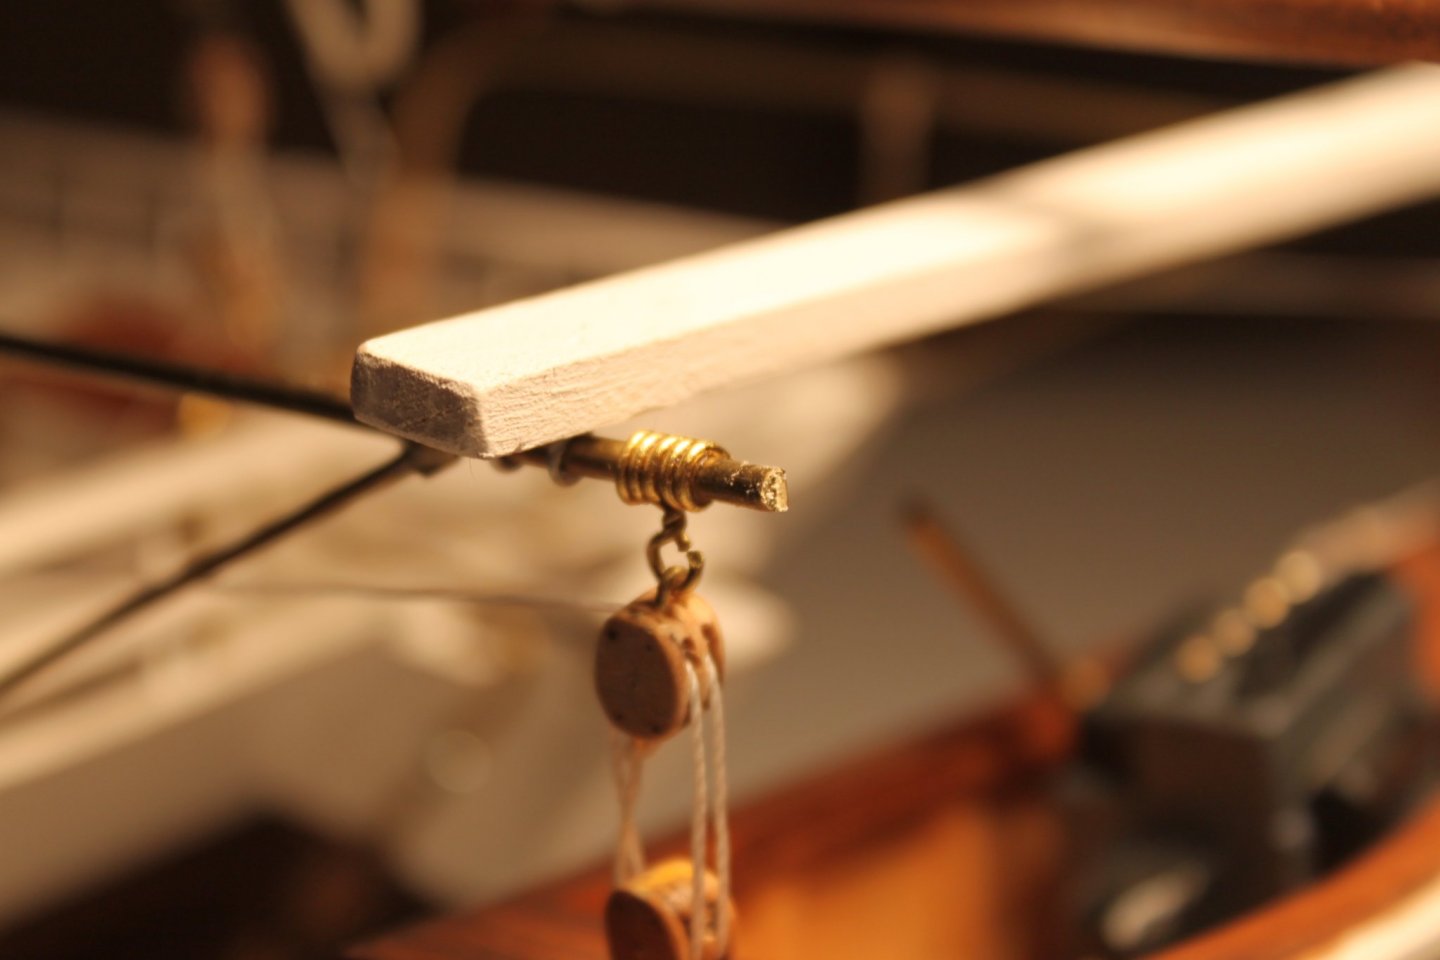
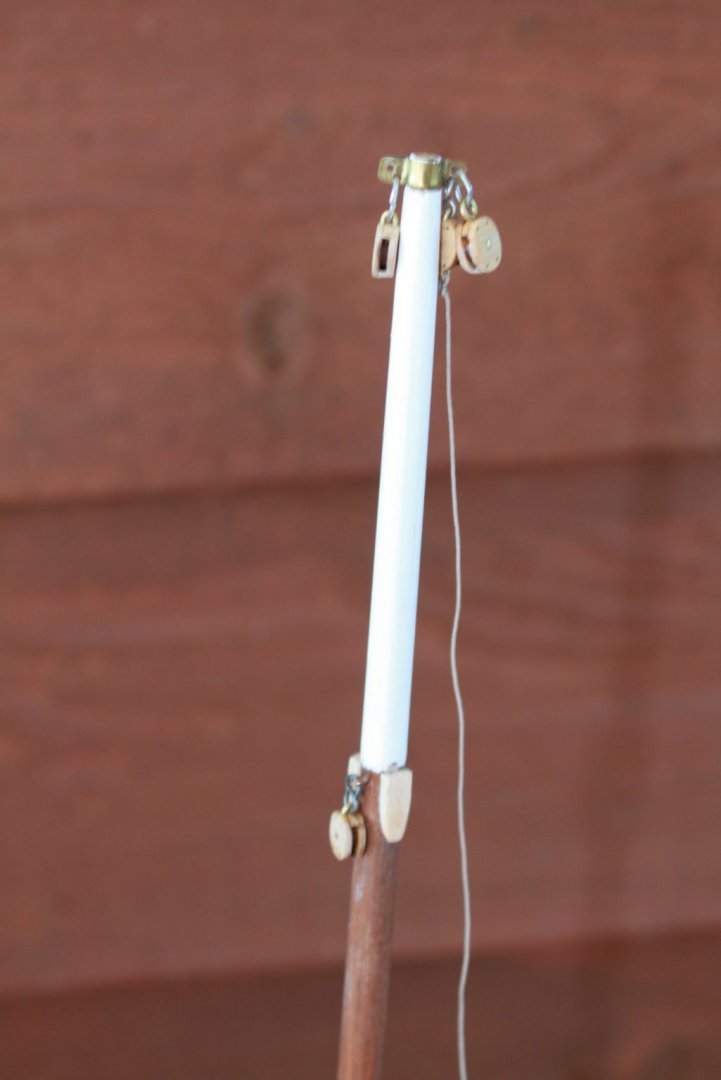
Although the kit supplied me with a hardware pack, not everything was included. It would be up to me to make a number of metal parts. I also decided not to use most of the parts supplied because they were intended to be painted and I wanted them in bright brass. The first thing I attempted was the roller assembly. Per the instructions, I used a 1/4" brass tube to make the main roller. a 3/16" dowel was inserted into it and then it was cut to lenght. The dowel gave a place for a couple of brads to be inserted into the ends of the roller and act as attachment points. Cutting sheet brass, bending, drilling and soldering it was a challenge as I have never worked in this medium before. Let alone making very small things out of it. Several attemps were made before reasonable success was achieved. Here are some of the parts before assembly. Final assembly after the painting was finished. The list of small parts that needed to be made is long. Not choosing to use the parts from the kit made it even longer. Here's a list of most of them. Bowsprit fitting, bowsprit gammon, mast fitting, bobstay and deadeye chain plates, rudder horns, steering rods, davits for the yawl, the winders "A" frame, turnbuckels, boom fittings for attaching blocks, jib and main sheet travelers, dredges, deadeyes and blocks. Some of but not all of the many parts. This is how I made the turnbuckels. They turned out "OK". I think I can do better now that I've seen some of the techniques used on this site. One of these days I may choose to remake them.......maybe. After gaining some confidence building the smaller parts, I moved on to the davits. They are seen with the bowsprit fitting and bobstay chain plates. I made a simple jig to bend the davits. I will probably need to adjust the bend to get them to sit correctly on the transom. Next was the dredges. There is generally a bit more bracing on them but I think that these are a fair representation. I may try to add some teeth to the bottom bar. The soldering iron I have isn't very good. It takes a long time to get the metal hot enough to melt the solder. These larger pieces seem to wick the heat away. I switched over to a small torch but then I ended up melting the other joints lose. Eventually I figured out that wrapping a wet piece of paper towel around them would keep them cool. The kit gave me wedding vail to act as the chain netting on the back of the dredges. I have to paint it black and then figure out how to attach it. The tiny split rings they gave me are going to be very difficult to use. I'll be looking for an alternative method. Suggestions are always welcome. The "A" frame has been the most frustrating part for me to build.The first one turned out so bad I just threw it away. The second one has turned out better but I'm still not happy with it. For some reason they don't have brass in 1/8" angle at either of the hobby stores I shop at and I don't really have a good way to make it. I decided to use 1/8" square tube even though that's not what the winder is made of. This time I made a jig to make the cuts. I used a piece of 1/16" rod that was bent and inserted it into the brass tube. This made holding the joint together much easier as it was soldered. It's also very strong. Besides not haveing the correct material for the legs, I couldn't get a piece narrow enough for the top bar. Another problem was previously stated. I think the winder is a little bit to big. Even though I built the frame to the size stipulated in the plans, I think it's to short. When I look at the picture of Lady Katies frame, it appears to be higher than the engine box. For now I've set it aside in order to address other issues. Reed.
- 82 replies
-
- 9
-
-
- skipjack
- wye river models
- (and 2 more)
-
Ron, Thank you for your input. Good info. The ice shields would have been an absolute "Must have" on these boats. As you know, the weather here in Maryland varies wildly. The western part of the state (mountainous) has many days of below freezing temps and gets feet of snow each year. The eastern shore is a bit more temperate as it is surrounded by the ocean to the east and the bay to the west. In my life time I have only seen the main body of the bay freeze solid from shore to shore a handful of times. Last year was one of them. However, it is not uncommon for the tributary rivers, creeks and harbors to skim over many times each winter. Breaking through the skim ice on their way to open waters would have destroyed the hulls in no time if it were not for the shields. I have seen the mast painted to the boom but never any color on any of the survivors (only a few) I've viewed. I guess it was just easier to keep on rolling white whenever these boats got a fresh coat of paint in later years. Had I known the paint schemes you mentioned, I would have used the slate. At this point, I'll probably just leave it the way it is. I am aware of the protective planking used to protect the decks. The Lady Katie has them. She uses a modern day equivalent, Plywood. The kit gave me material to make them and advised me to do so. I haven't decided if I will or not but regardless, it would be one of the last applications as the boards need to be fit around the winder after it's installed. Once again, Thank you for your knowledge and all the "likes". Reed
- 82 replies
-
- 2
-
-
- skipjack
- wye river models
- (and 2 more)
-
A question. Why is it that the Willie L, Bennett seems to be (other then the un named Wye River Models kit I bought) the only Skipjack model for sale?
-
Thanks Tim. I read the same thing about the carpenters. I also read that it might have been exaggerated to a large degree as many of the boats have been credited to ship builders. On the other hand, I firmly believe that a skilled carpenter may have been able to build a boat, especially one from the Eastern Shore. Combine the fact that boats were as much a part of life as houses were, with a good set of plans and some help or direction from a ship builder and anything is possible. I would also suggest that a good many carpenters supplemented their income working the waters and farms of the area when building was slow. I know for a fact that carpenters (and cabinetmakers.... me ) will usually build you anything your willing to pay for. I can remember many a time when I was building cabinets one week and framing a deck (or some other carpentry related structure) the following. Gotta pay the bills! Reed
- 82 replies
-
- 2
-
-
- skipjack
- wye river models
- (and 2 more)
-
Since this kit does not specify exactly which Skipack this is, it has been hard to do historical research pertaining to it. I have not been able to find a picture of a boat that combines all the features such as railings, rudder, cabins and deck configurations that are on this model. Combine that with the fact that not much is known about so many of them, coming up with the correct paint scheme for this particular boat has been impossible. After several years of reading about them and seeing a number of them either in photos or in person, what I deduced is, they are mostly white .... I am sure that some of them had unique paint jobs at one time. It's more than likely that some had natural or stained decks, hatch, hold and cabin roofs. The majority of these boats never again looked as good as they did the day they sailed away from the shipyard. These were working boats not fancy sailling yachts. They took a beating. Not only from the harsh environment that is the Chesapeake in winter but from the rigors of dragging a dredge and having tons of Oytsers dumped on their decks. I would think that in most cases, a fresh coat of white paint was hastily slapped on them so they could be pressed back into service as quickly as possible. I recently saw a few pictures of the "Lady Katie" after her restoration was completed in 2015. She was beautiful. To look at her today in 2019, one might think that she hadn't seen paint in more than a decade. The pictures in the instructions show this model as being painted white and then aged to look like a hard worked boat. It was complete with rust stains running down the sides and muddy oysters on the deck. Along with the intimadation of a kit that was "a box of sticks", the paint job was also an intimadation.The closest thing that I have ever done that could be concidered "fine painting", is the finishes I've put on the cabinetry I've built. With that in mind, I decided that I would paint it to look like a brand new boat. That's also the reason I chose to leave the metal fittings bright brass. I wanted the boat to have a little "Bling" to it. To further illustrate my point, a plaque will be made and mounted to the base that says "Maiden Voyage" on it. I preceded to paint the hull white useing some interior flat cieling paint. About half way down I realized that I had neglected to add the ice shields. Metal tape was cut into squares and stuck to the hull in an overlaping pattern. A nail set was used to press the appearance of nails into it. I didn't try to have the nails in a perfectly spaced pattern. Anyone who has ever tried to nail a flat sheet of metal over a curved surface knows that it buckels. Here and there an extra nail or two needs to be thrown in to draw it tight. I had concidered staining the deck and initially taped it off but changed my mind. Instead, I chose to stain the mast, booms and the tops of the deck features. I think it gives a nice contrast to the white hull and deck. The bottom was painted a muddy brown. Then a light coat of clear matte acrylic was sprayed on everything to seal the finish. Here's a couple pictures of the finished paint job. The mast, boom and all the deck fittings are just dry fit. Metal parts, sails and rigging are up next. Reed.
- 82 replies
-
- 8
-
-
- skipjack
- wye river models
- (and 2 more)
-
Thank you Jack. WOW, -6, That's COLD!!! Our forecast is for this cold snap to end starting tomorrow. Supposed to be in the low 50s by Sunday and near 60 by Tuesday. Hope the same applies to you.....or at least something much warmer than negative numbers. Reed.
- 82 replies
-
- 1
-
-
- skipjack
- wye river models
- (and 2 more)
-
Harry, Your mast rings look great. So does the rest of the model. Thanks for posting the pictures. I sure hope your enjoying your summer. We are in the middle of a deep freeze. It's 19* f....or in terms you go by, -7C. In fact, the river behind our house is frozen shore to shore. The Canada Geese are mad. They thought they were coming to a warmer location when they flew south last fall. I told them to keep on going but they didn't listen. LOL. Reed.
- 82 replies
-
- 4
-
-
- skipjack
- wye river models
- (and 2 more)