HOLIDAY DONATION DRIVE - SUPPORT MSW - DO YOUR PART TO KEEP THIS GREAT FORUM GOING! (Only 13 donations so far - C'mon guys!)
×


HakeZou
-
Posts
325 -
Joined
-
Last visited
Content Type
Profiles
Forums
Gallery
Events
Everything posted by HakeZou
-
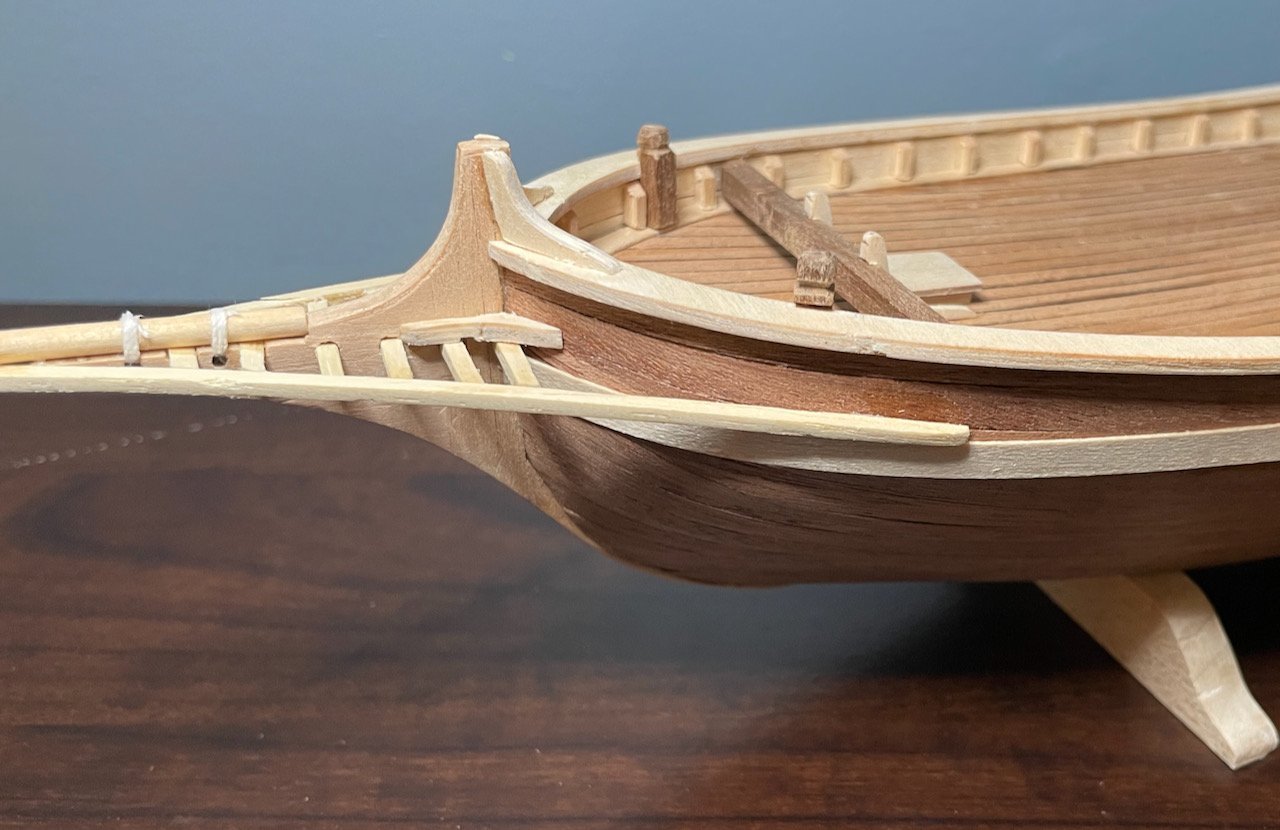
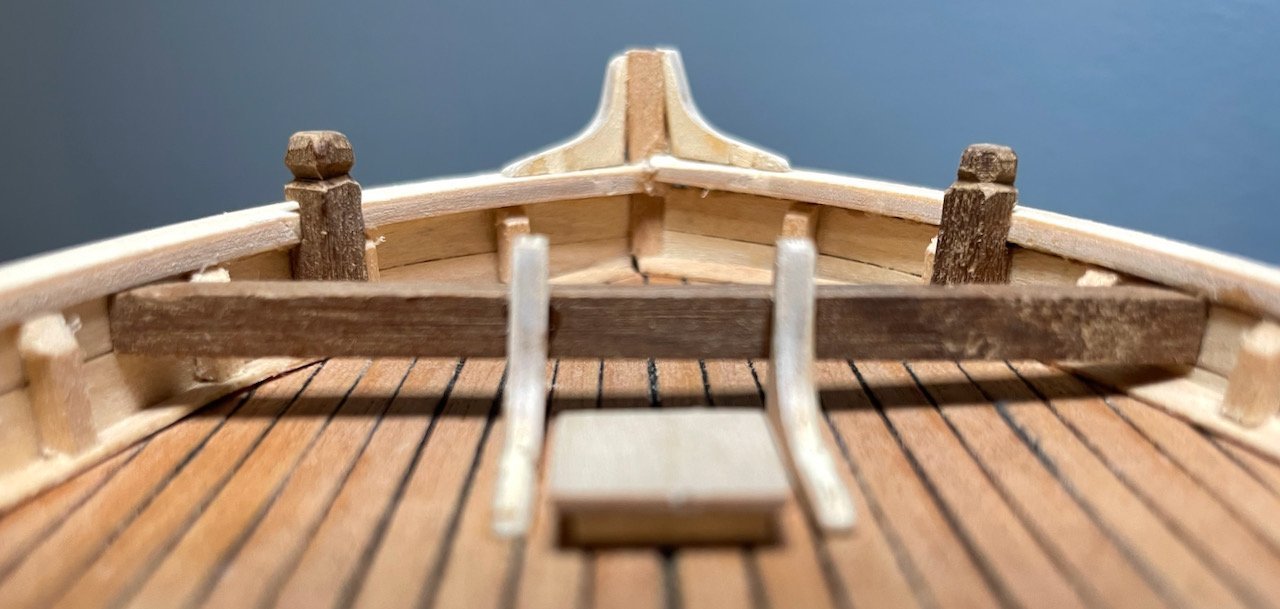
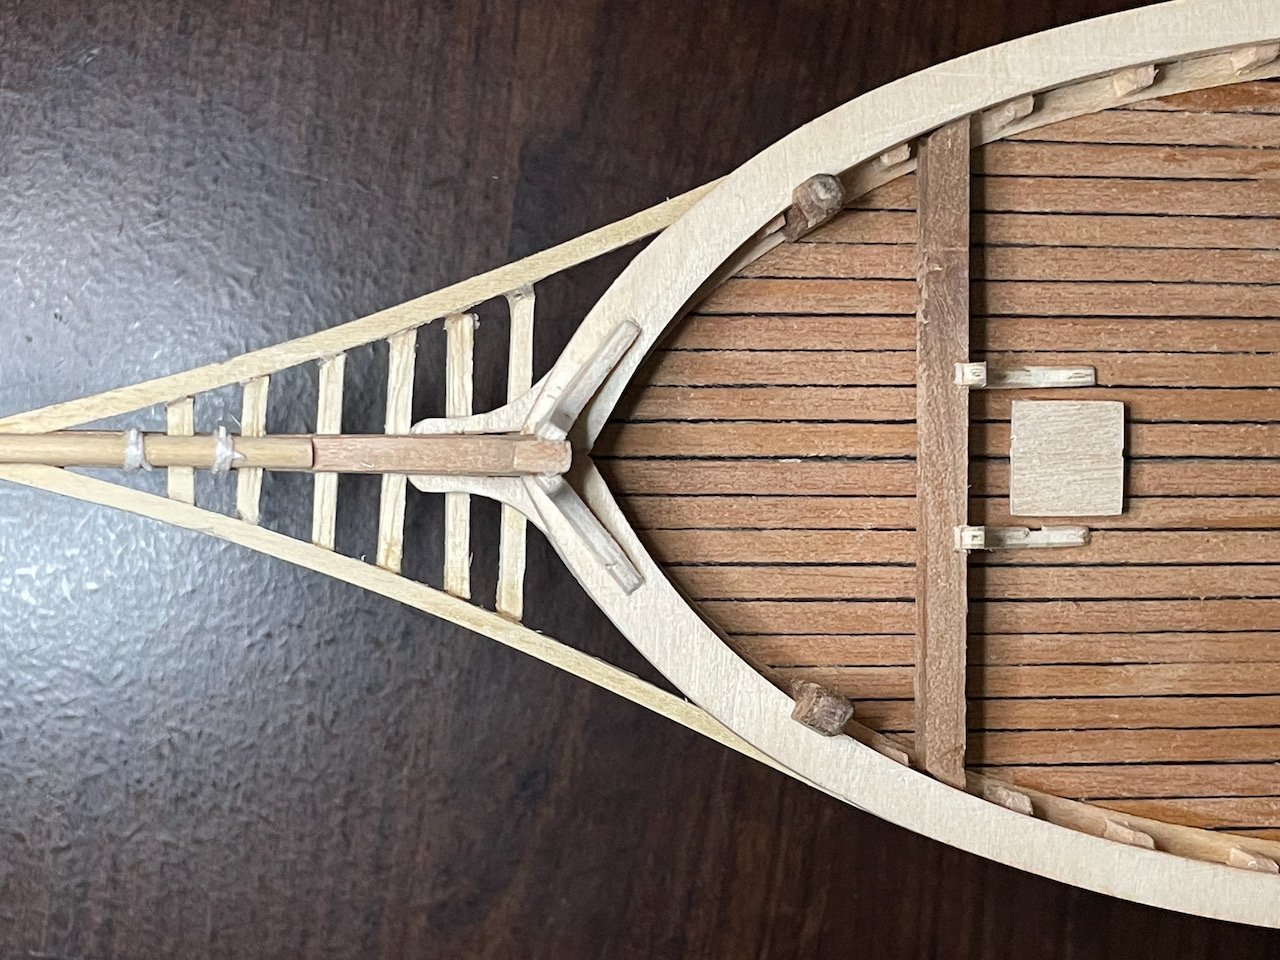
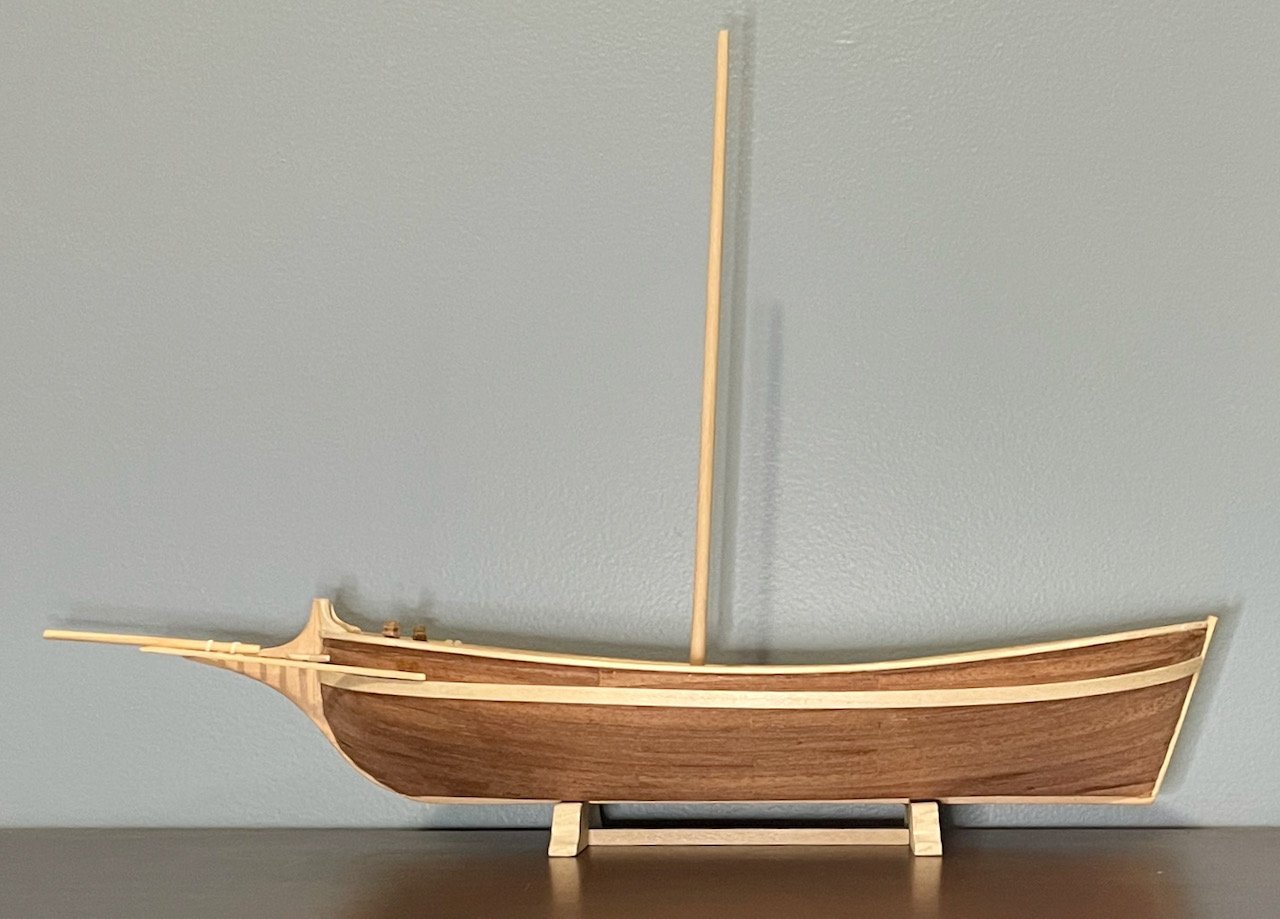
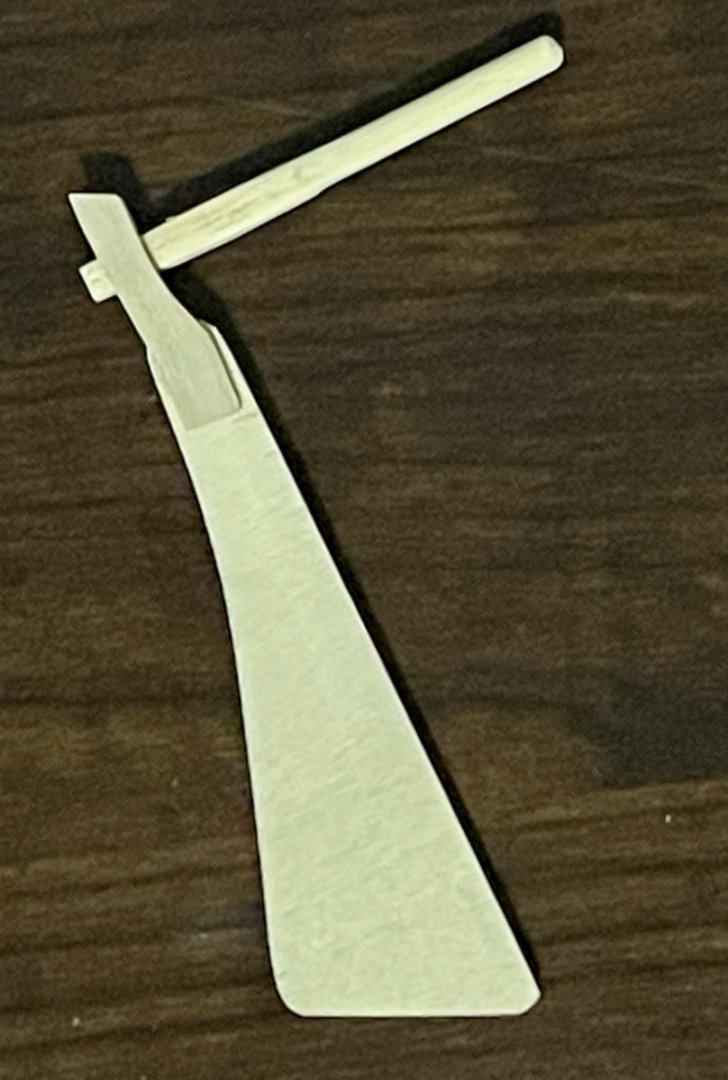
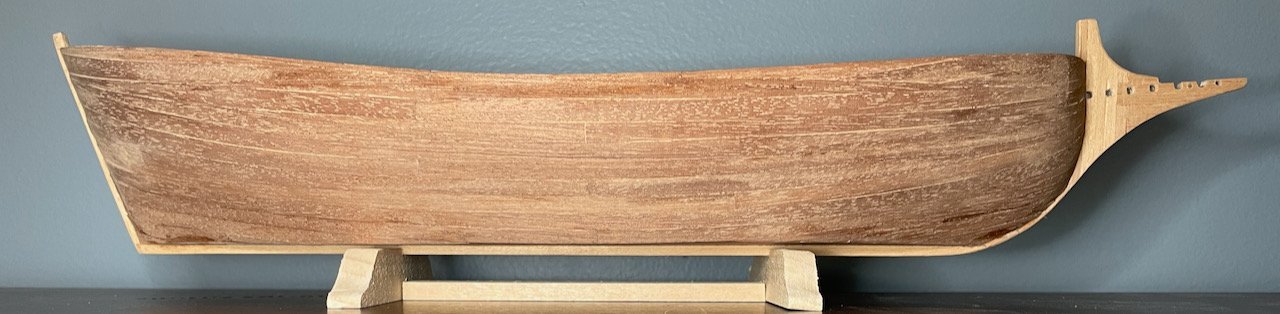
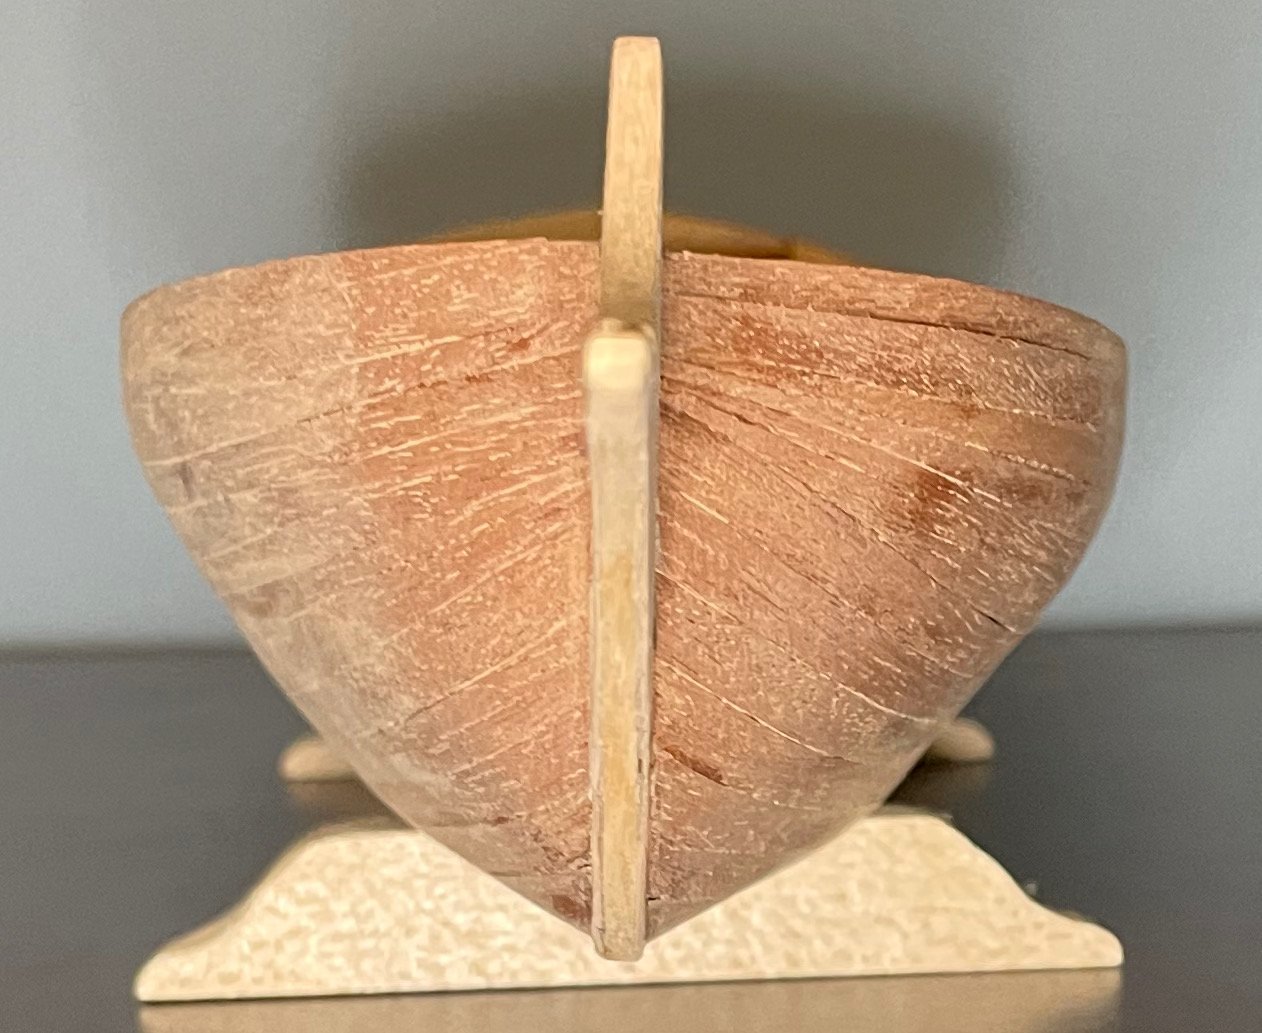
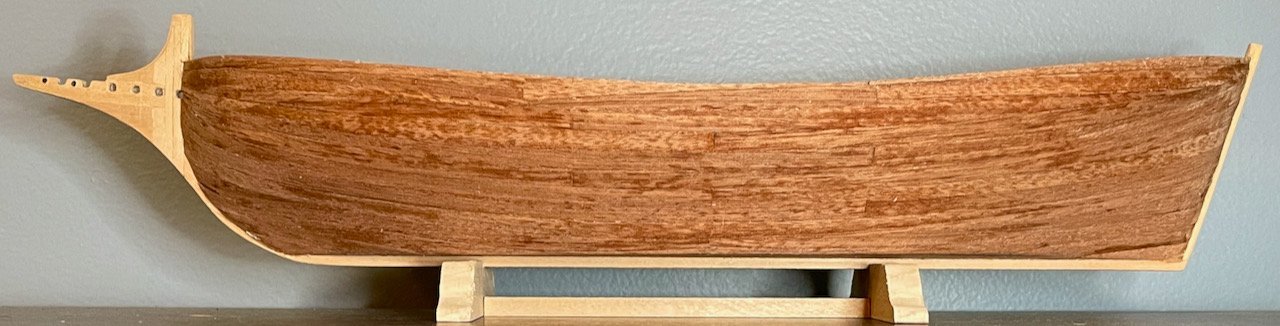
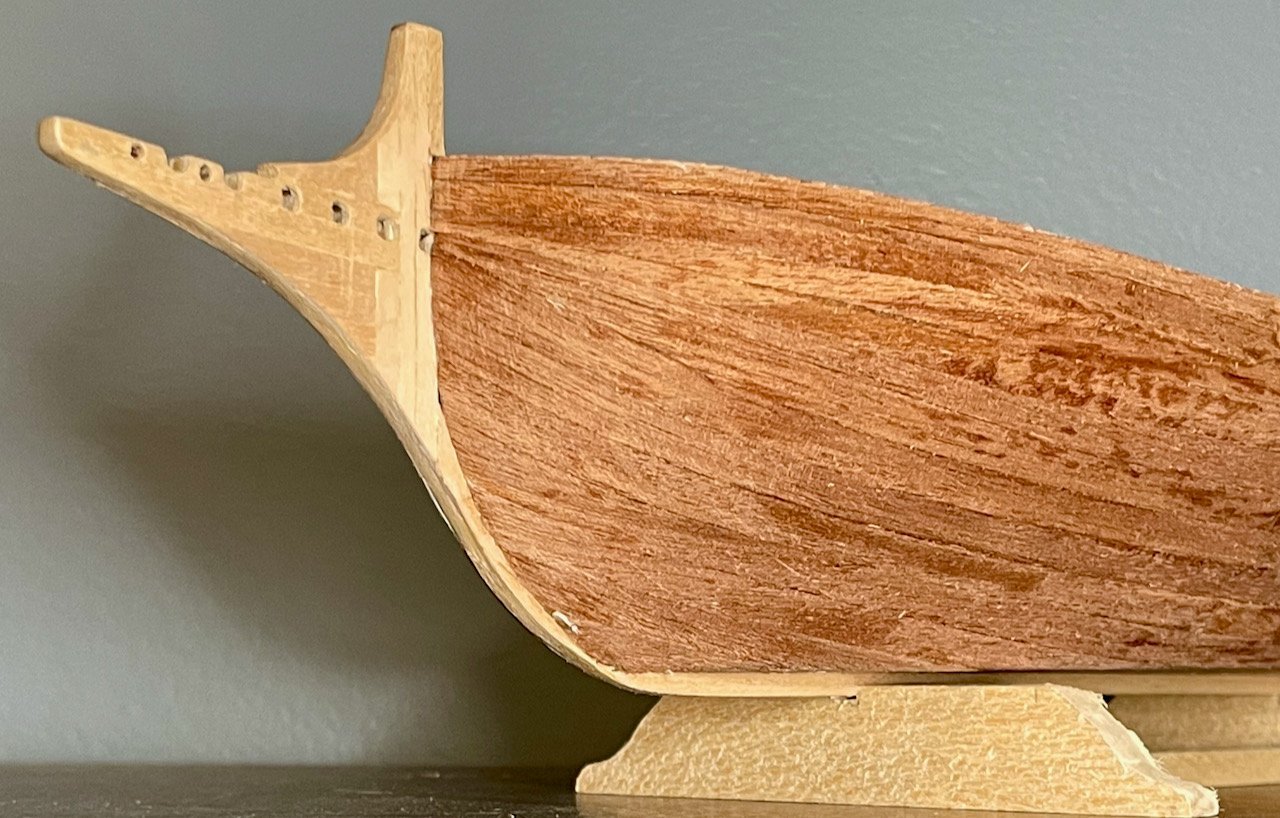
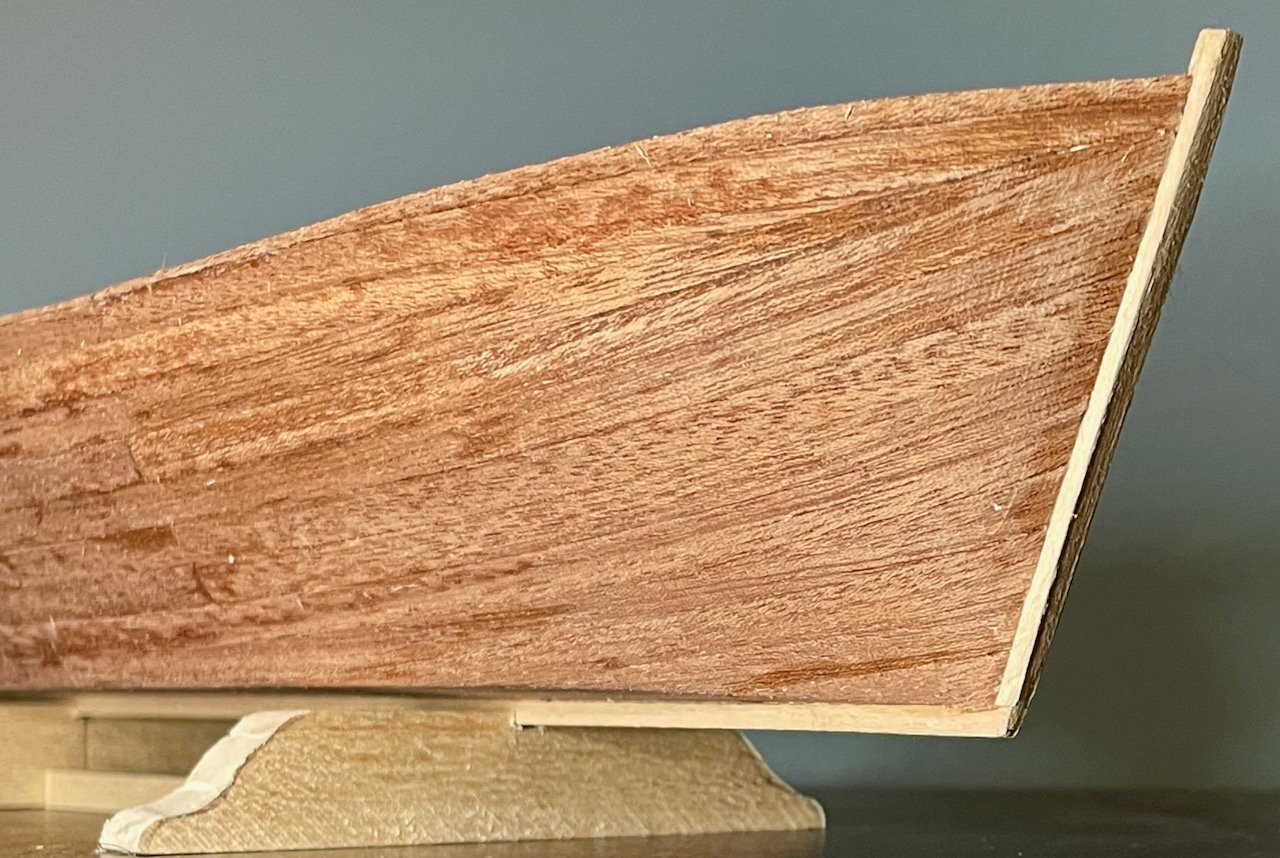
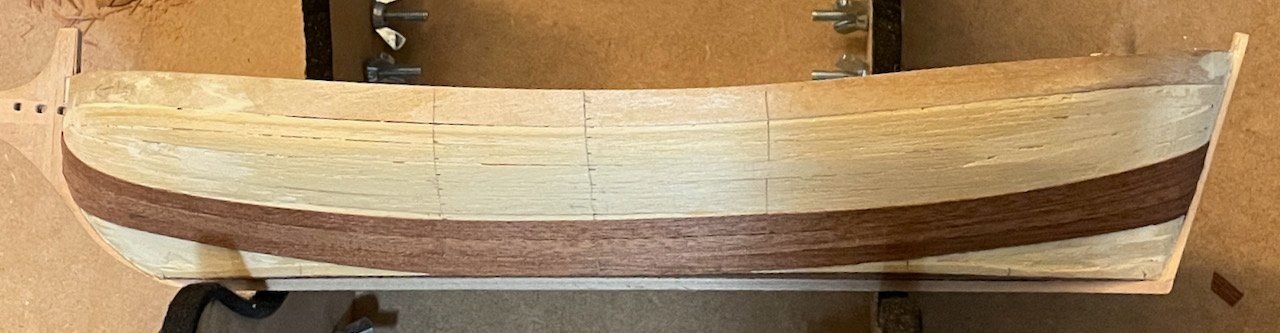
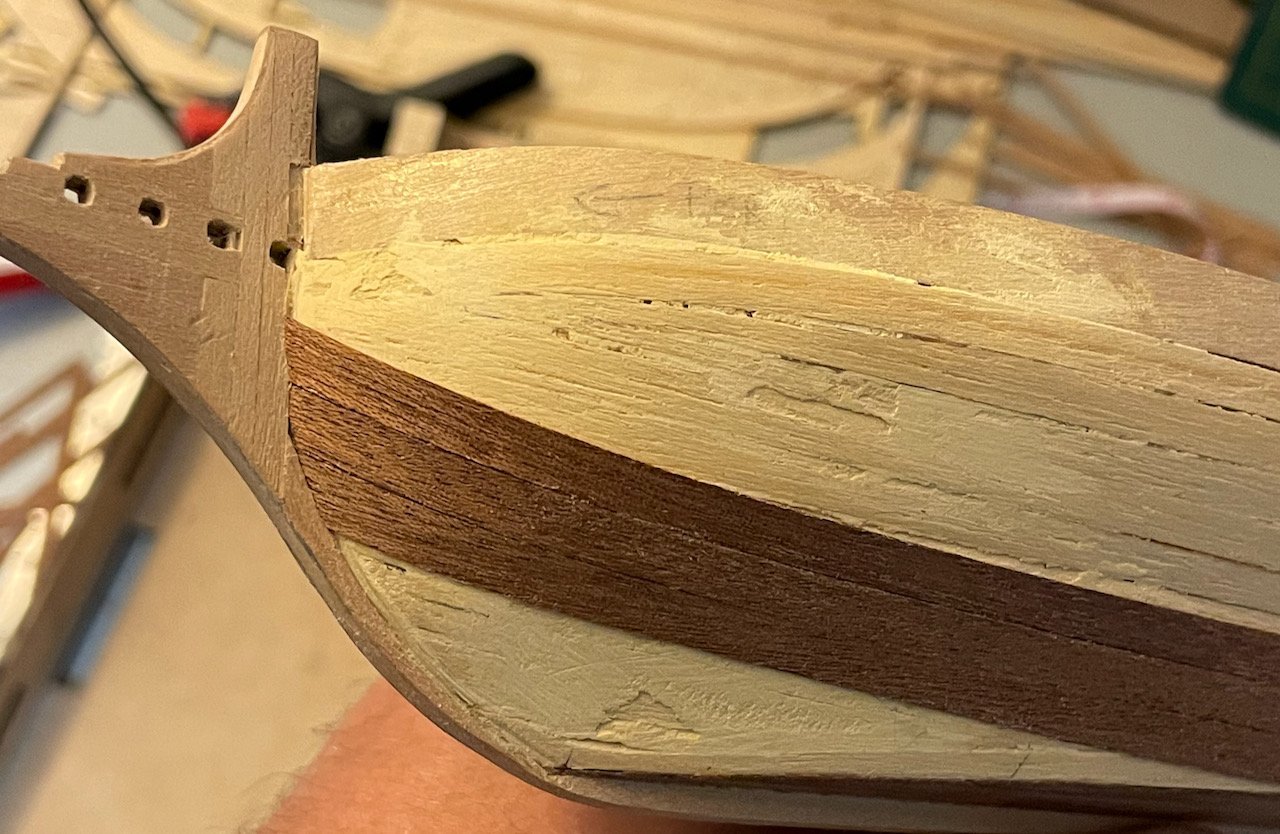
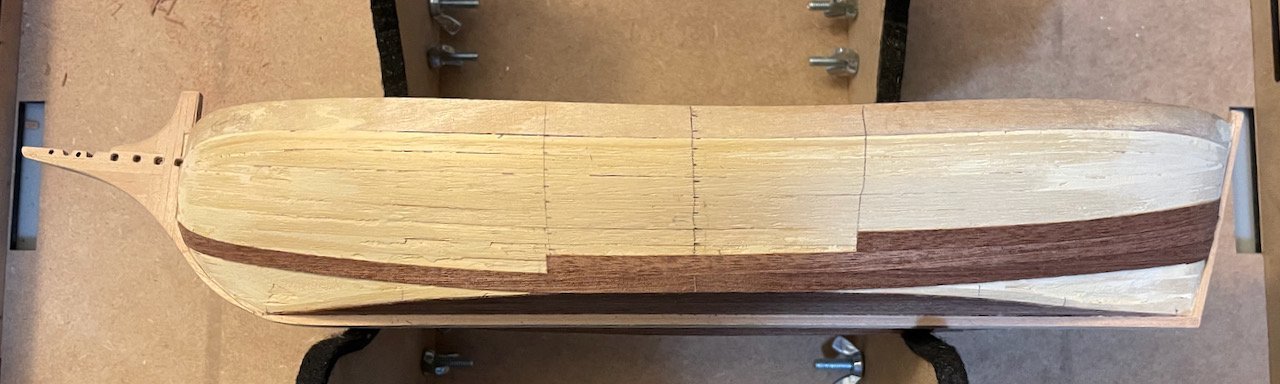
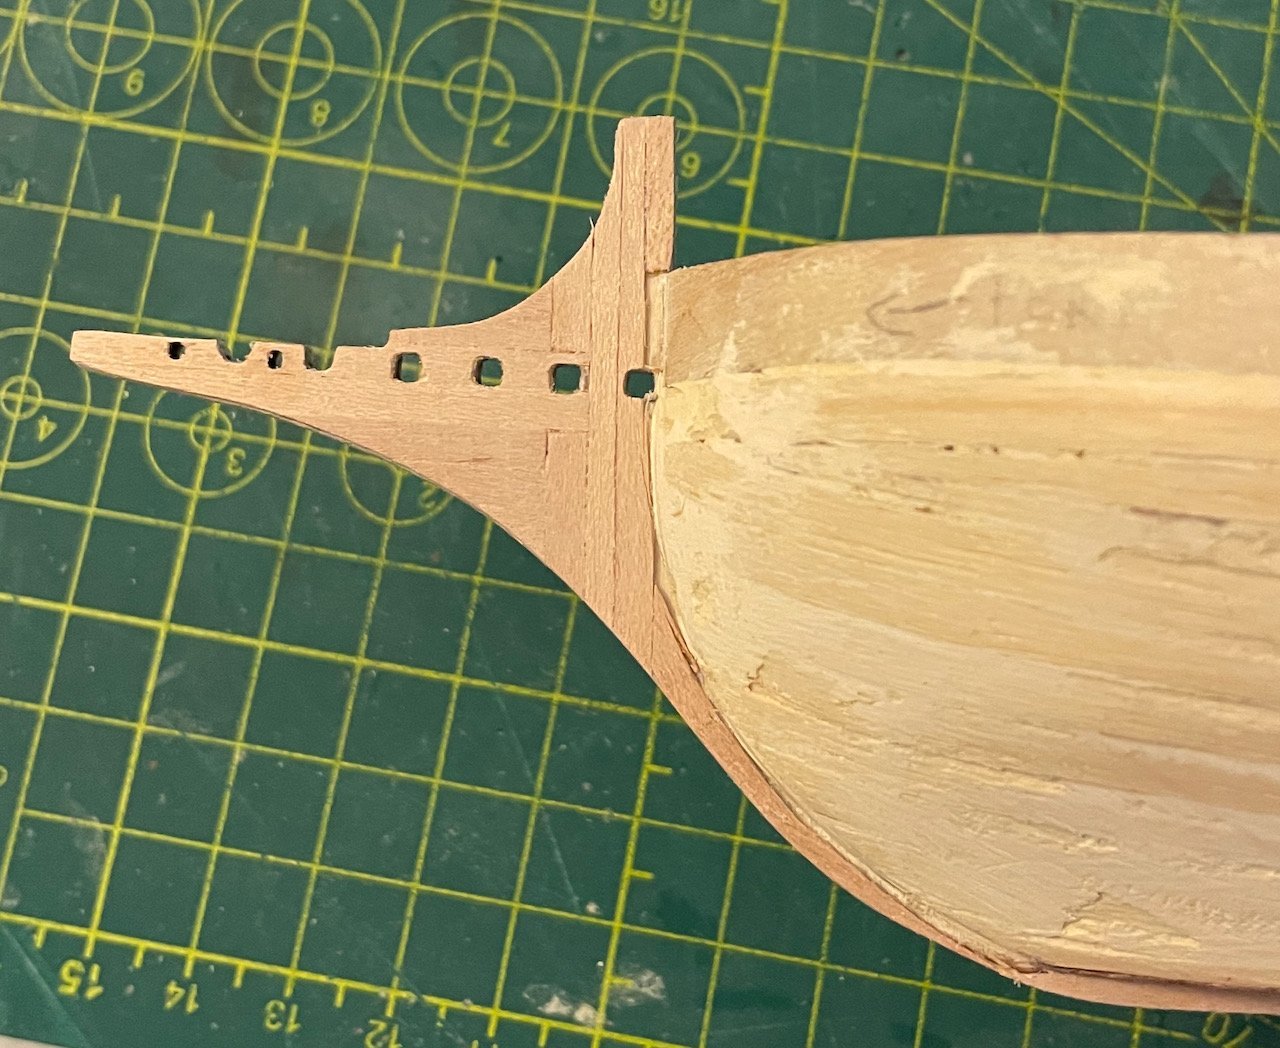
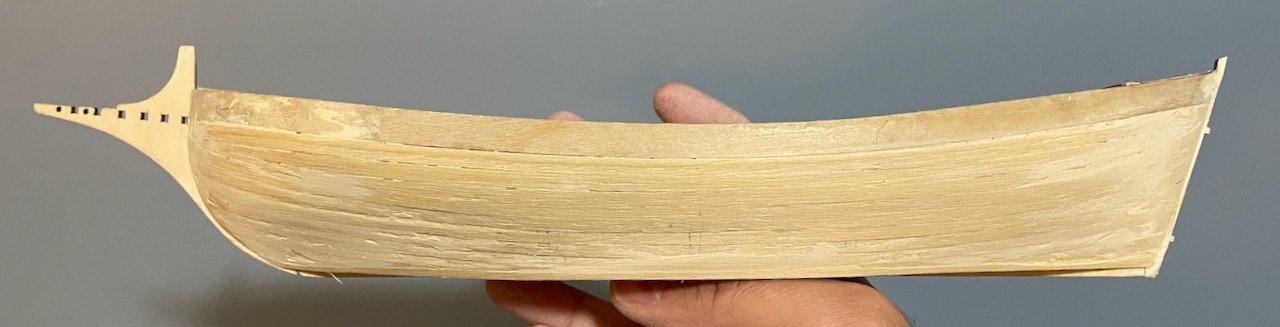
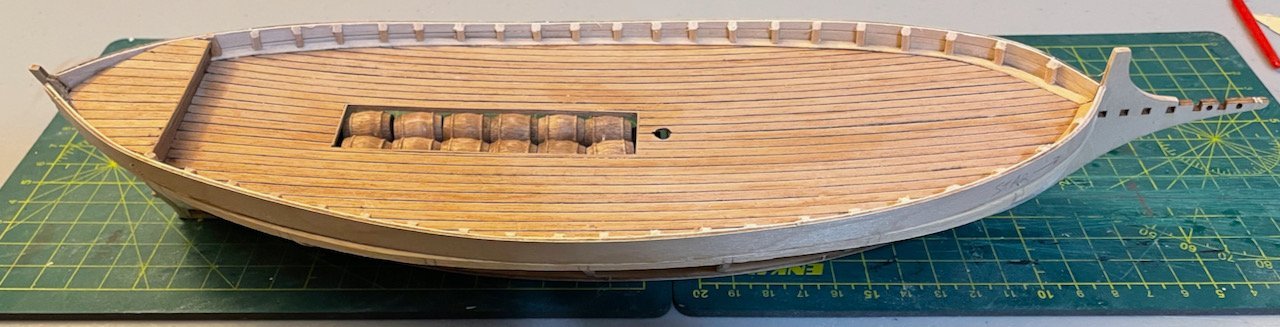
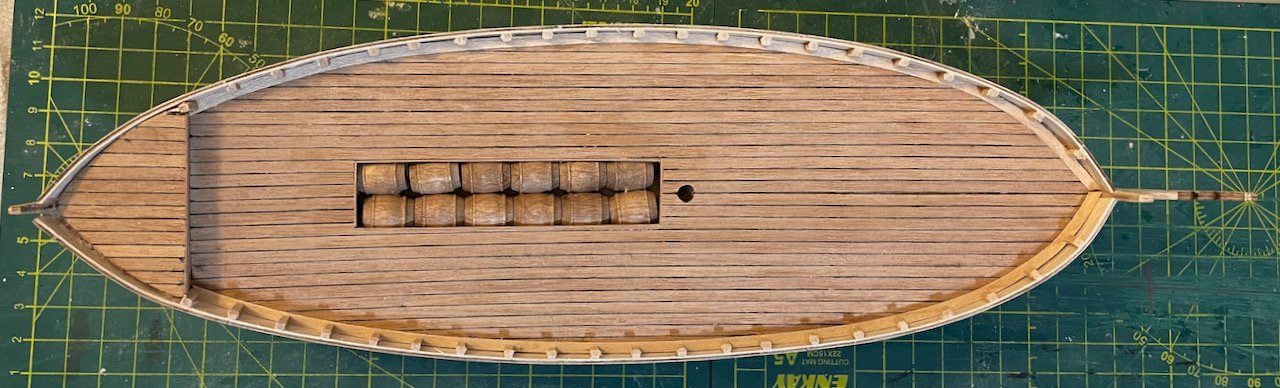
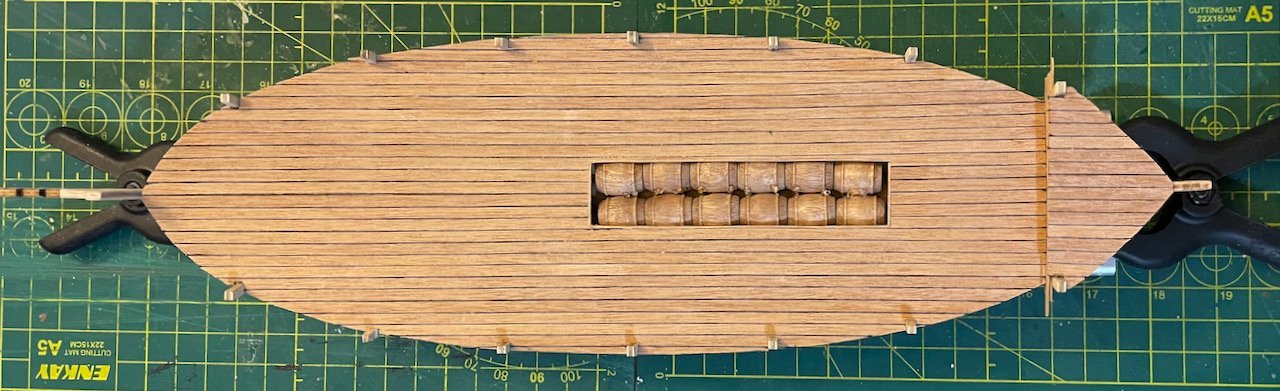
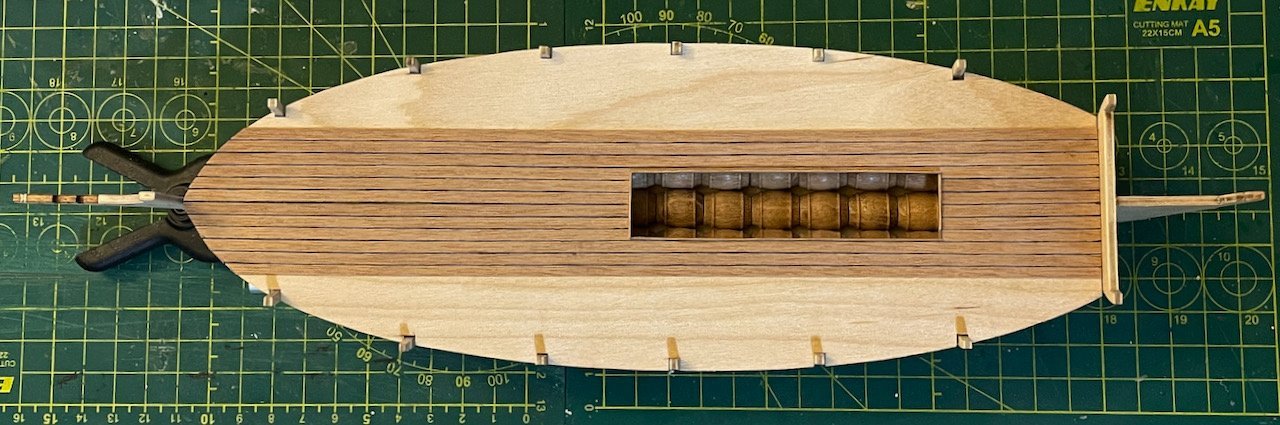
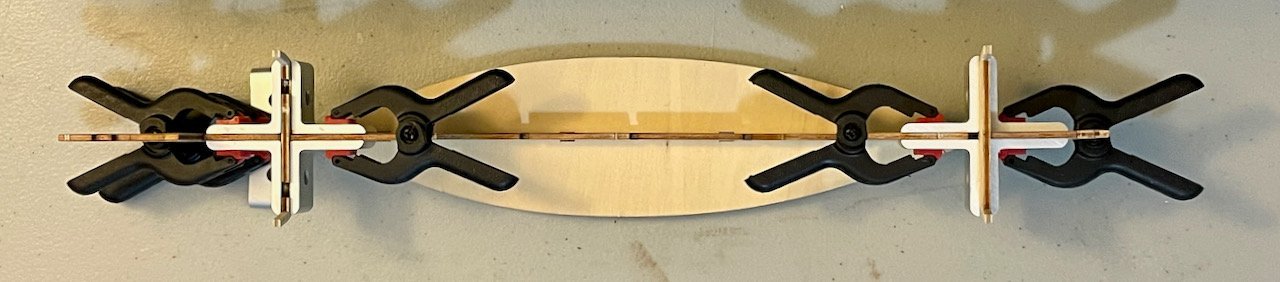
The last two evenings, I've enjoyed several hours of distraction and, perhaps, a bit of procrastination. This has allowed me to make some impressive looking progress! In reality, though, there are a lot of preformed pieces involved, so things went more quickly than they might have otherwise. First, a profile shot of the model as she stands now. The rub strip is leftover wood from another kit...I think it might be birch? I like the contrast with the sapele on the hull. Just so I can use it as a reference while working on the deck fittings, I also put the mast in place. It's not installed yet, but does fit nicely and give a good perspective. Many of the measurements in the inventory list seem generous and I suspect that's true with the mast too—it just seems too tall for a lateen rig. After installing the rub strip, I started working on the rudder. The pieces came together quickly, since the blade and the splices are pre-cut plywood. I shaped the tiller out of a 3x3 piece of obechi that came with the kit. I think I probably need to keep sanding down the tiller, since the handle portion still seems a bit too thick. The big challenge I've run into here is that I'm planning to add hardware in a different way than the kit's plans. Originally, the tiller and the sternpost portion of the spine had tabs sticking out, with the idea that they would be glued together. I think that would look fine if they were painted, but I'm now committed to not painting this ship and have sanded off the tabs. I bought a thin plate of brass, thinking I could cut some strips from that. Unfortunately, I don't have adequate equipment for that task, so I'm holding off on installing the rudder until I have a solution for the hardward. Right now, I'm considering four options: 1) connecting eyebolts as hinges; 2) painting aluminum foil with brass paint, then using that for the metal braces and hinges, with a short piece of brass wire as the hinge pin; 3) picking up some brass foil and doing the same solution as #2; or 4) using aluminum or brass foil for the braces and eyebolts for the hinges. In the meantime, I got started on the deck fittings, which I've broken into three stages: the bow, midships, and the aftdeck. Since the rudder is involved in everything on the aftdeck, I started at the other end. First up were a pair of knees to support the stempost and beakhead, along with the splash guards. These are all pre-cut plywood, so just needed to be cleaned up and installed. Next, I did the forward bitts. Since there's so much light-colored wood up front, I replaced the 3x3 obechi with some 4x4 walnut that I had sitting around. I have mixed feelings about these, but they're small enough that they were a pain to shape. So, once the glue sets, I am planning to sand down the tops a bit more, to round the heads and make sure they match each other better. Third, I made the athwartship beam out of the same 4x4 walnut. The two support pieces are pre-cut plywood, so I just had to clean them up and adjust them a little bit to accept a slightly oversized beam. Finally, the forward hatch consists of two pre-cut plywood pieces. With the beam in place, you can really see how much the deck warped! The more I look at this photo, the more I want to just replace the starboard bitt... Next steps: install the midship deck fittings, then solve the problem with the rudder hardware.
- 59 replies
-
- 6
-

-

-
- Billing Boats
- Le Martegaou
- (and 1 more)
-
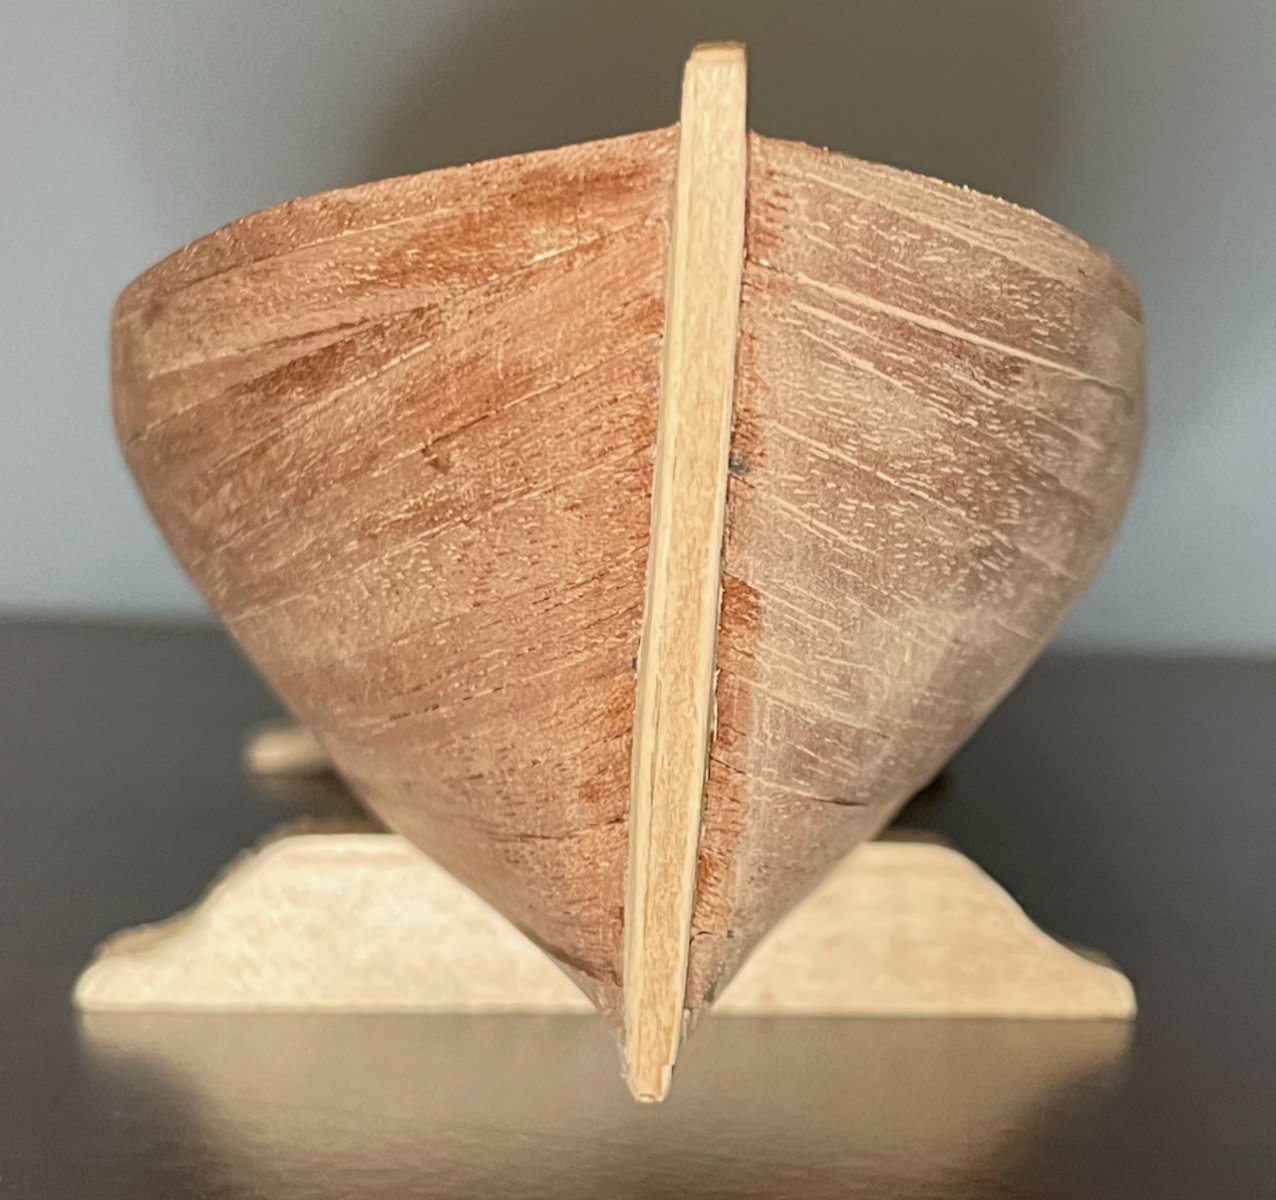
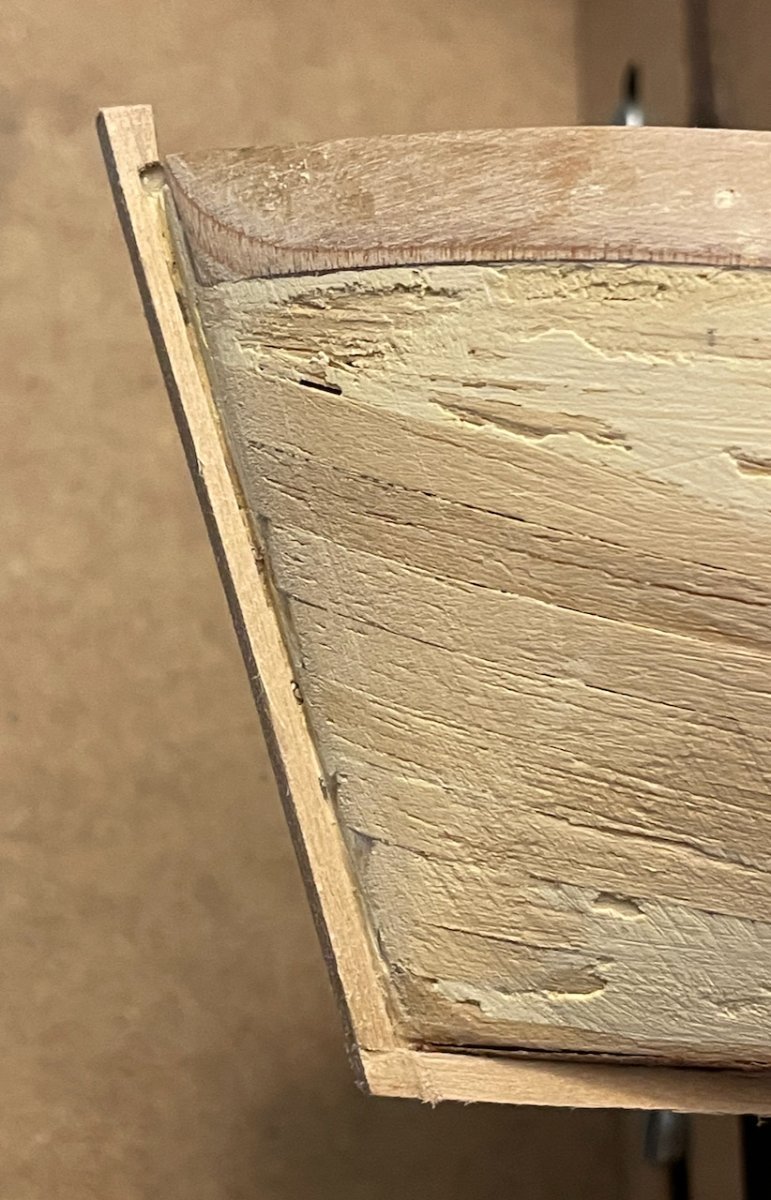
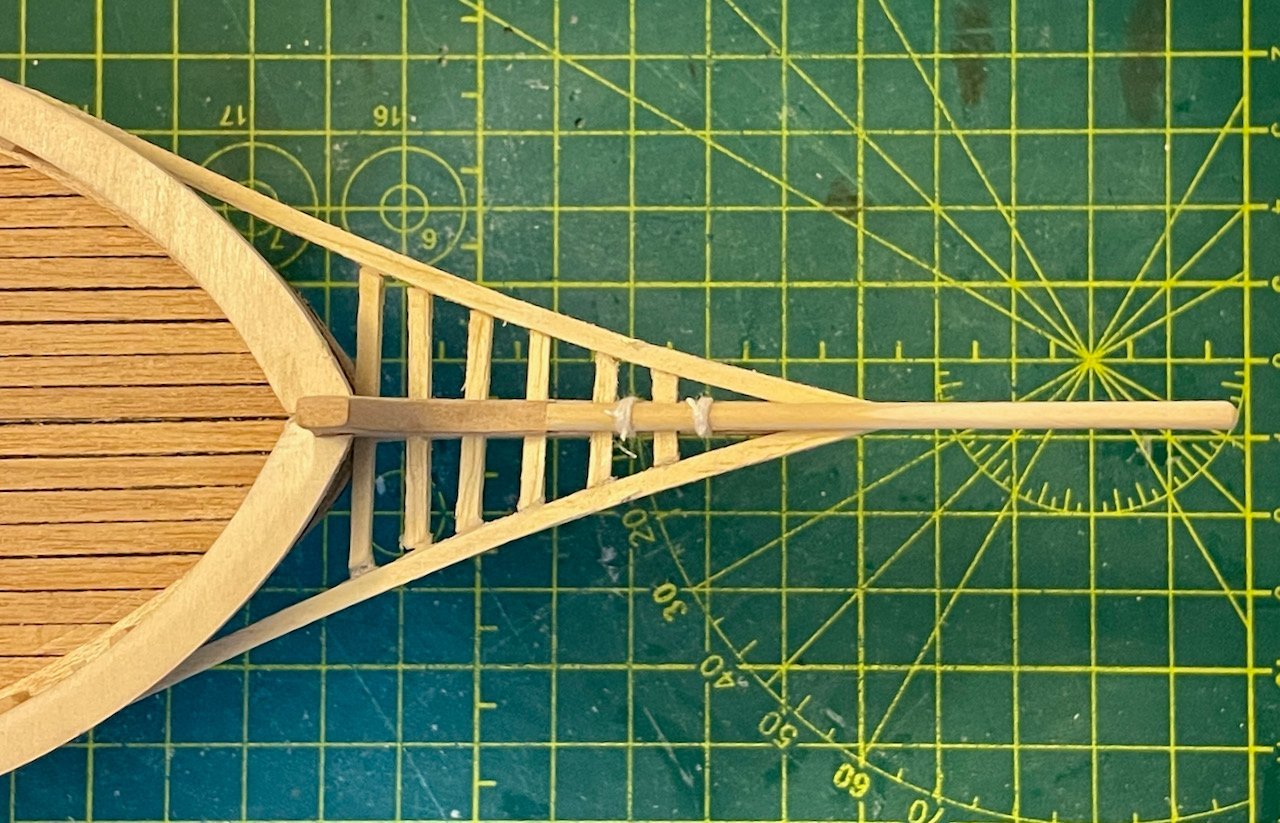
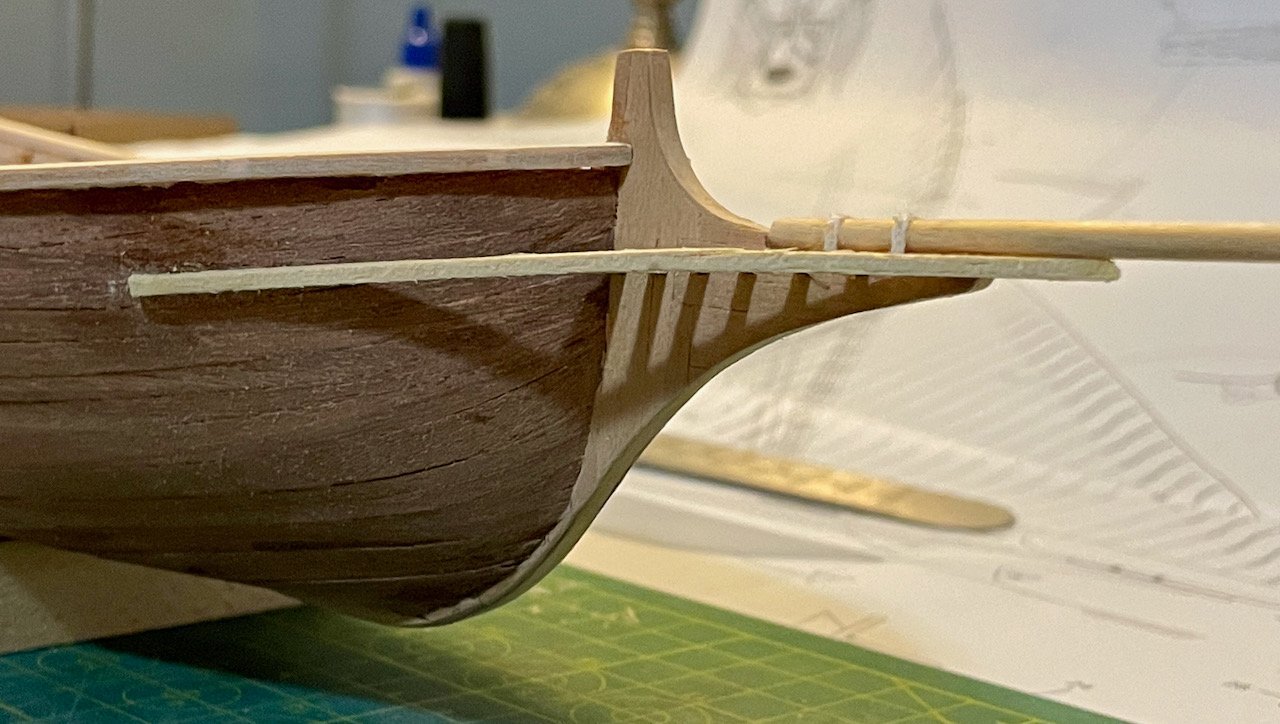
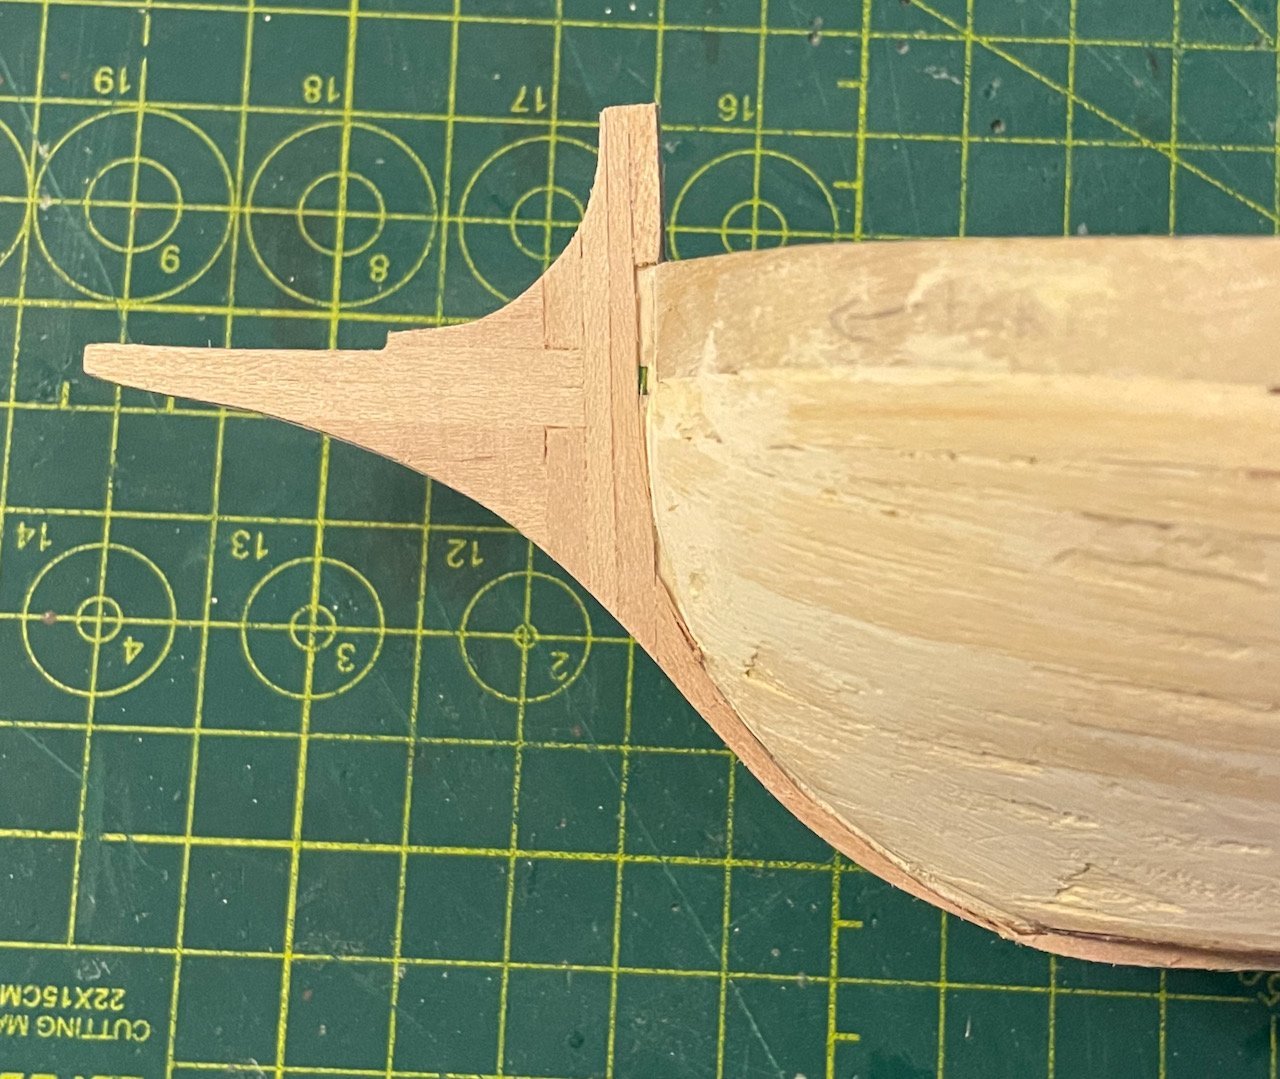
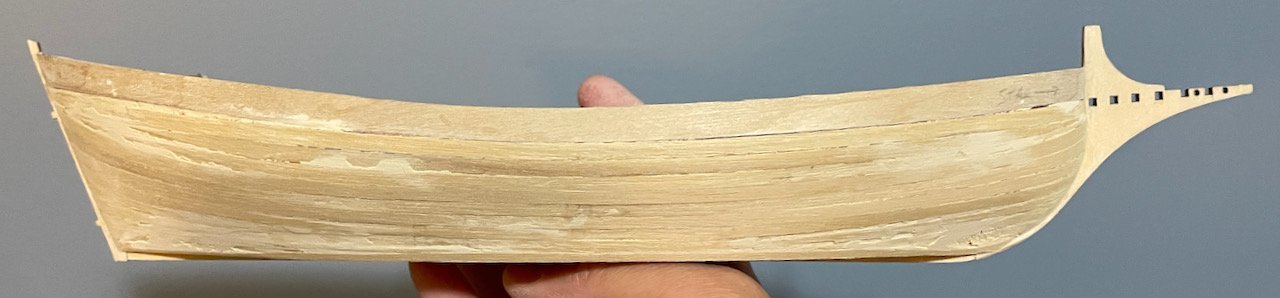
I've done a bit more work over the last couple of days. At this point, the instructions essentially say, look at the drawings for the rest of the kit. So, I'm mostly on my own to solve the necessary problems. And there have been problems. My plan is to finish the exterior of the ship first, then work on the deck fixtures. First up, the cap rails. Although I've covered up the rest of the plywood, I'm not sure how to do that well with these. So, I sanded them down to get them as clean looking as possible. I'm generally happy with the look...except that I snapped one in half! While I was able to glue it back together and to get both of them solidly in place, there's still a crack showing. I filled it as best I could with sawdust and wood glue, but I'd be happy to take any suggestions on how I can hide that better. After installing the cap rails, I turned my attention to the beakhead. This ended up being more of a challenge than I expected. I realized pretty quickly that the bowsprit needed to be attached before the long pieces on the side. So I took a bit of time to shape that. (To others building the kit, note that the inventory calls for the bowsprit to be 140mm long, but the drawings show it at 70mm. Given the size of the sail, I think 70mm is the better size.) The bowsprit is both glued on and tied into place with two ropes that run through predrilled holes. I used a common whipping knot for the ropes. There's a bit of clean-up to do on the side pieces, but hopefully I can make it look better soon. Next steps: Clean up the beakhead, then install the rub rails.
- 59 replies
-
- 7
-
-
-
- Billing Boats
- Le Martegaou
- (and 1 more)
-
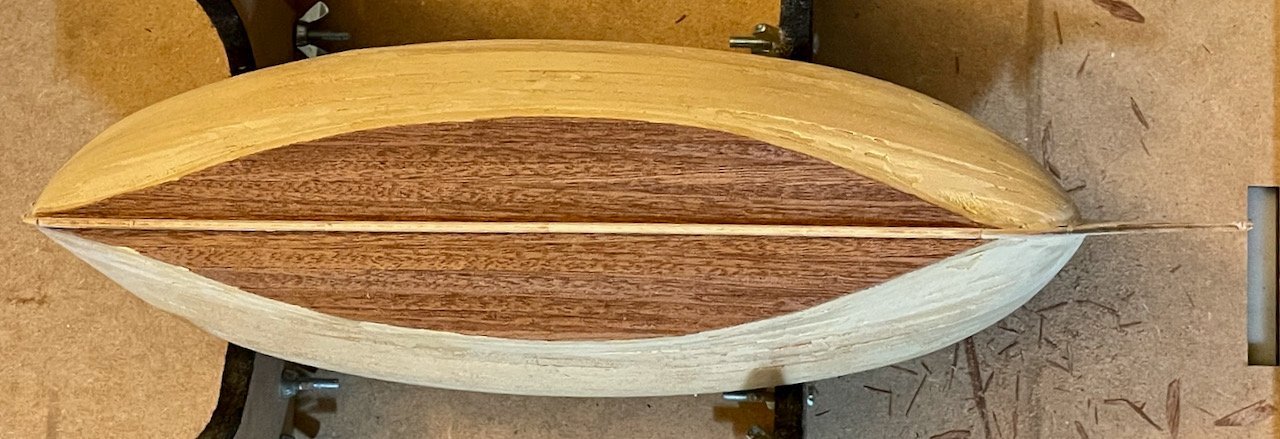
The lining of the starboard hull is finished! The job isn't perfect, but I can confidently say that this is the best hull I've done yet. Evidently, I did not manage to fair the hull exactly the same on both sides, so I didn't get the planks to line up symmetrically. However, other than that, both sides are looking pretty good. I can't wait to see how this looks once there's finish on it! Next steps: assembling the rest of the exterior—cap rails, beakhead, rub strips, then the rudder.

- 59 replies
-
- 4
-
-
- Billing Boats
- Le Martegaou
- (and 1 more)
-
Thanks, RDDP! I hope that the San Juan is coming along well! I think OcCre calls for contact cement when doing any kind of final planking for the hull or deck. A quick search for contact cement on MSW will help you find other people's opinions. As for me, I just use wood glue, though I use a fairly wet brush to thin it a bit. Some folks actually mix wood glue and water in a more precise way, but I'm not sure of the preferred ratio.
- 59 replies
-
- 2
-
-
- Billing Boats
- Le Martegaou
- (and 1 more)
-
The second layer of the hull on the port side came together much more quickly than I expected. Once I got in the routine, things started to go a bit quicker and an unexpected day off work gave me a bit of extra time. I still need to go over this with fine sandpaper, but I'll wait to do that until I've finished the starboard side (which I haven't started yet). A couple photos to mark this milestone: a full-length shot and then one each from the forward and aft quarters. Looking carefully at the photos, there are a couple spots that I'm going to have to inspect before the hull is completely finished. Next step: lining the starboard side of the hull.
- 59 replies
-
- 4
-
-
- Billing Boats
- Le Martegaou
- (and 1 more)
-
Thanks, @BobG! I'm definitely making it more challenging than it needs to be, but hopefully that pays off in the end. At the very least, I have no doubt that I'll achieve my goal of improving my skills. After another hour-and-a-half or so last night, I finished off the first three strakes on the port side. Since I'm following the natural curves, I haven't needed to use any thumbtacks or anything else to hold the planks in place while the glue dries, nor have I needed to bend these planks. I have just slotted them into the rabbet lines and then laid them in place, smoothing them out with my thumbs. It has been nice that these strakes could be full width from end to end. But these will probably be the only ones for which I can say that, since I'm approaching the upper curve of the hull and the angles will be changing. A few shots of the finished strakes. First, a full-length shot of the hull, then details of the planks going into the stempost and sternpost rabbet lines.

- 59 replies
-
- 3
-
-
- Billing Boats
- Le Martegaou
- (and 1 more)
-
It's been a couple of weeks since I posted my last update. In part, that's because things have been very busy at work. But it's also because I've been struggling a bit with the Martegaou. I finished lining the starboard side of the prow and moved onto the second layer of the hull. This has been more of a challenging problem than I anticipated. At first, I was going to work from the sheer strake downward. But the bulwark has a bit of an awkward curve and I had a hard time getting the planks to line up without some significant edge setting. I thought I had things going okay...until I pulled the clamps off and saw how badly misaligned the planks actually were. So, I pulled them off and decided to work from the bottom upward. After some frustrations with tick strips (an issue of not being able to measure accurately enough since I don't have calipers...yet), I just started sliding a plank around until I found a natural line on which it would lie perfectly flat. It's a more intuitive approach than using tick strips, but this has worked pretty well for me on previous models. Now that I had a strategy, the challenge was shaping the planks. I've never actually done planking with a rabbet line, but I'm so grateful that I am this time! As I'm sure all of the experienced builders know, rabbet lines are incredibly helpful! At first, I tried shaping a plank that stretched from the stempost rabbet line to the sternpost one. But, I soon found that too challenging. However, I solved that problem by making each strake from two planks. The butt joints will be aligned so that they alternate among the three center frames, ensuring the joints aren't too matchy-matchy. As you can see in the photo the bottom strake is finished and the after planks for the next two strakes are on (port-side only). I actually did the three after strakes first, so that I could be sure the forward plank on the bottom strake stayed true, ensuring that it lay flat against two planks, rather than just one end. I forget where I read that you should treat each plank as a project in itself, but this has been a helpful mindset to have. The after planks haven't been too difficult, but it took at least an hour to shape that one forward plank perfectly. It's taken a few attempts, but now I'm rolling on the second layer of the hull. This will definitely take some time, but I'm glad to finally have a solid start on this step.
- 59 replies
-
- 3
-
-
- Billing Boats
- Le Martegaou
- (and 1 more)
-
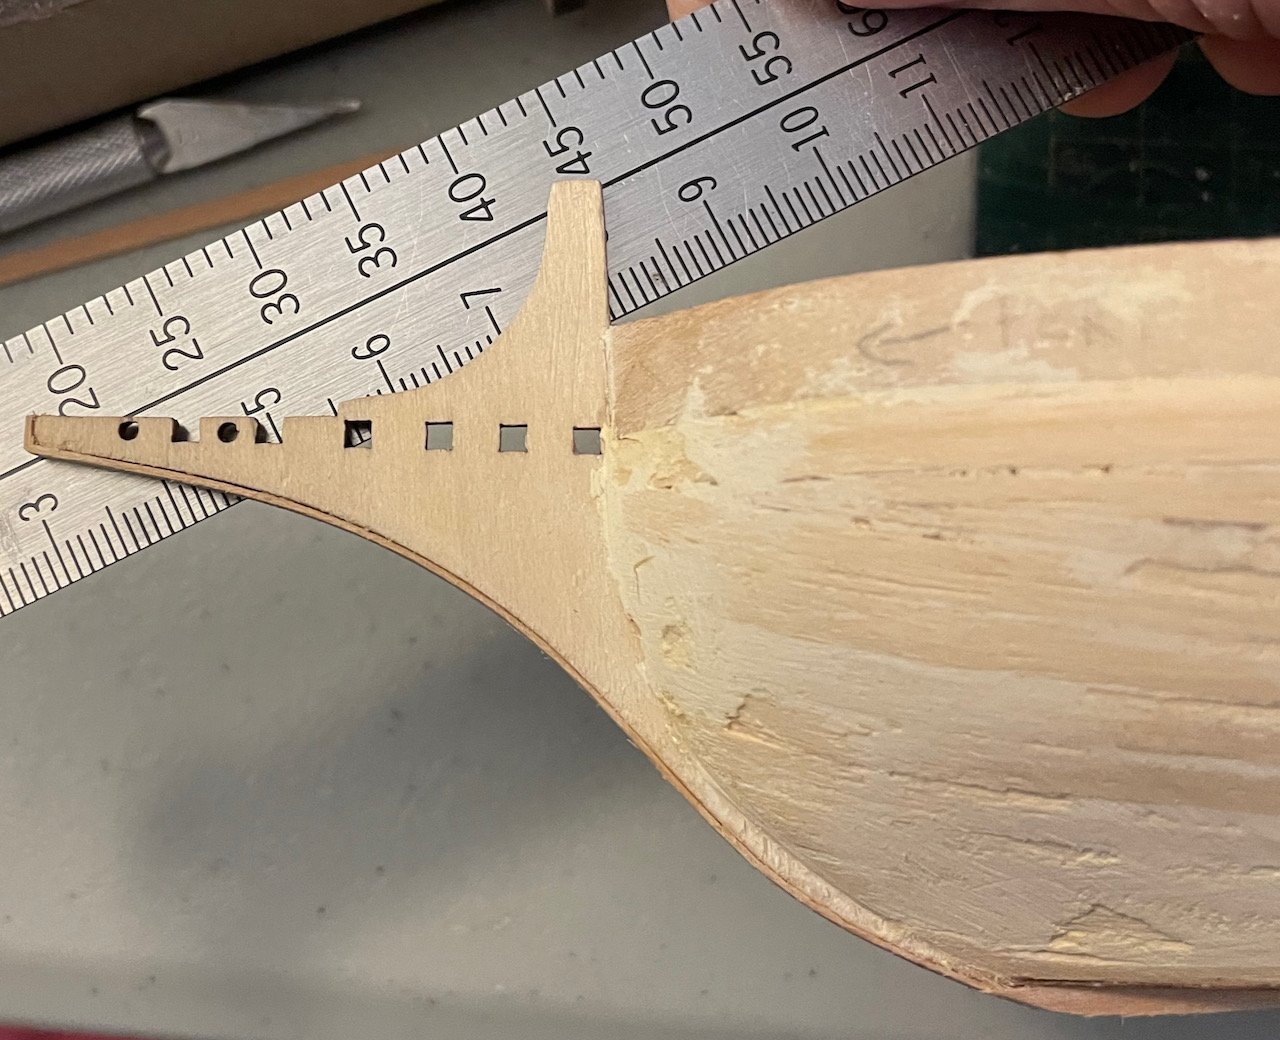
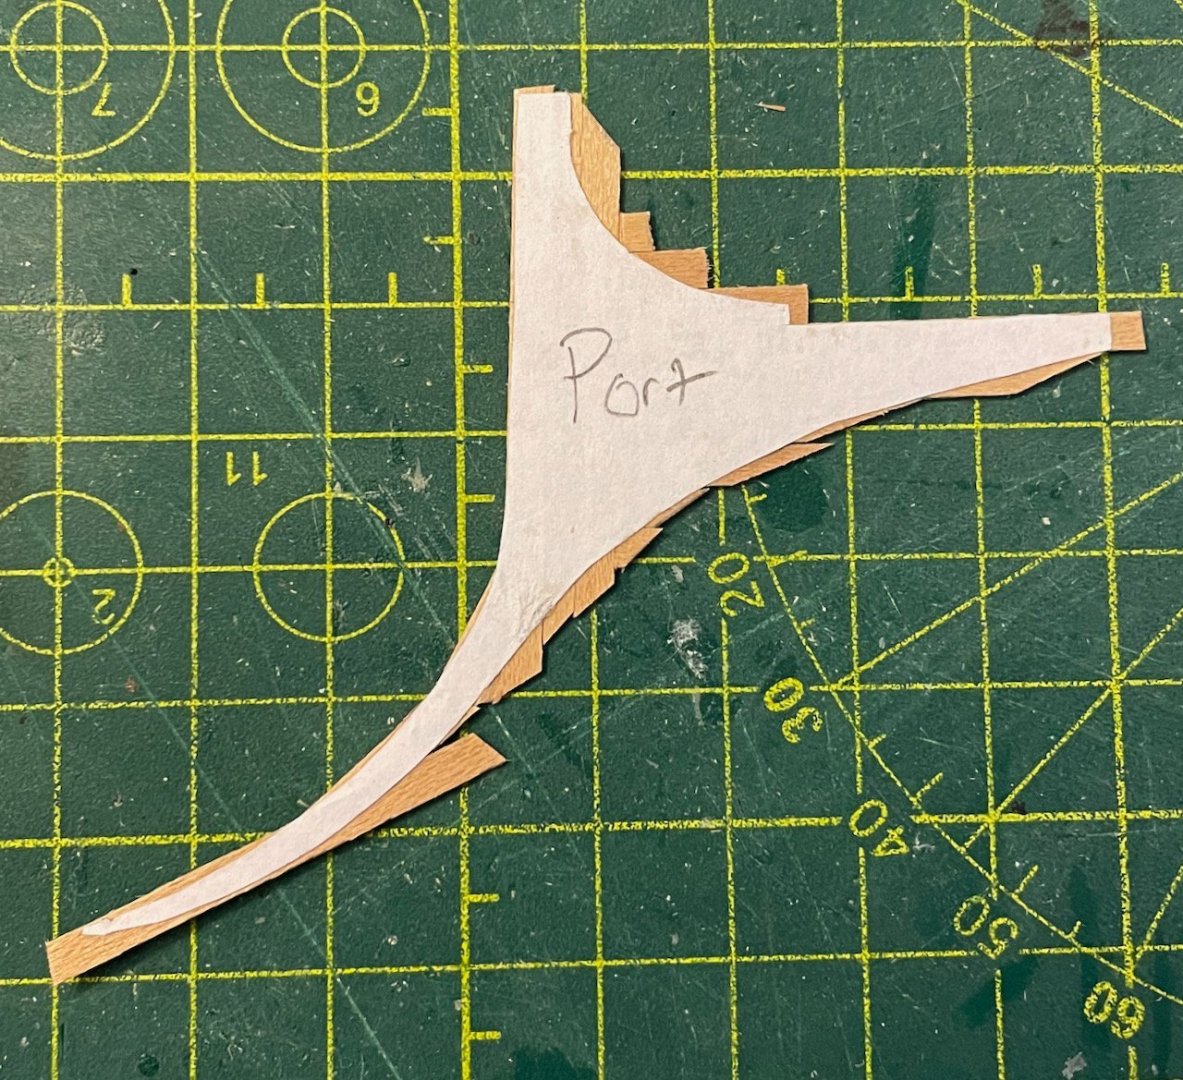
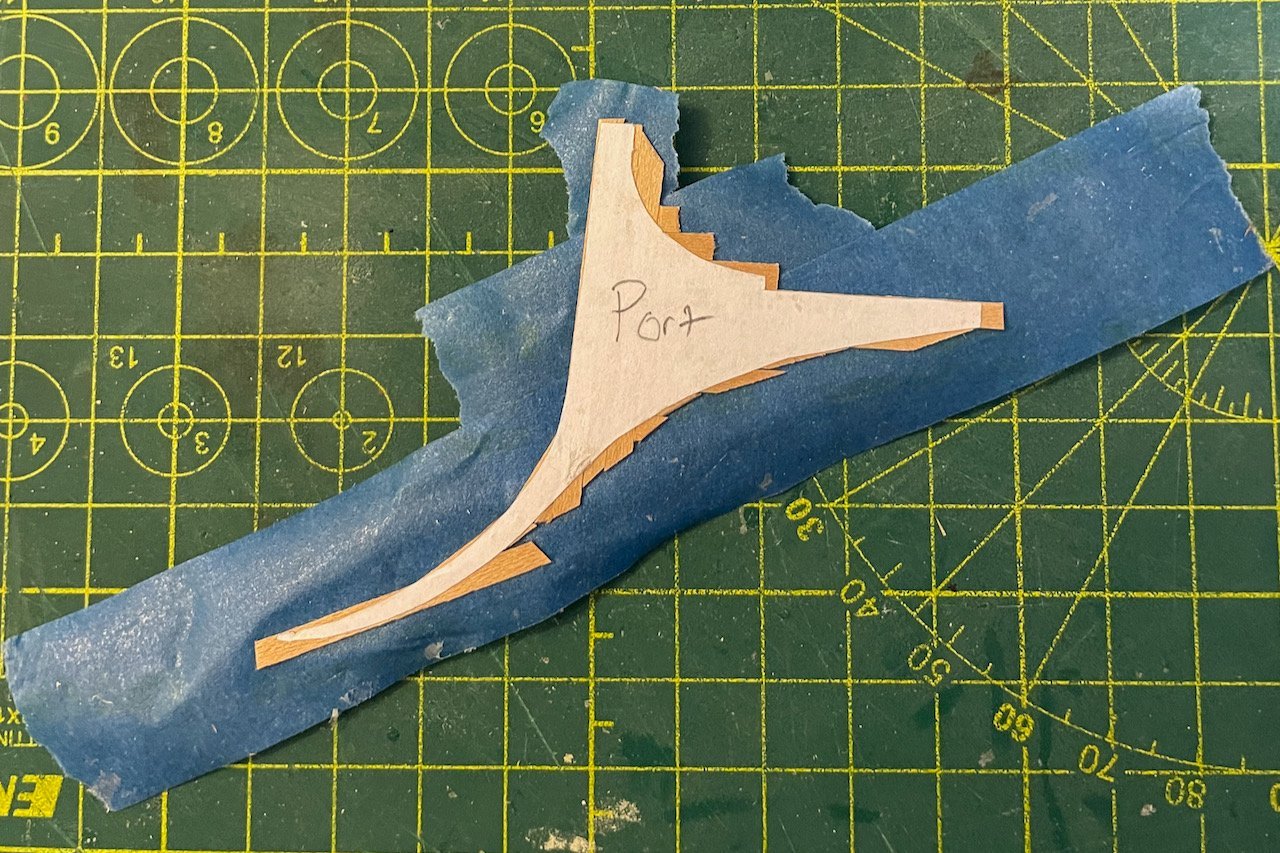
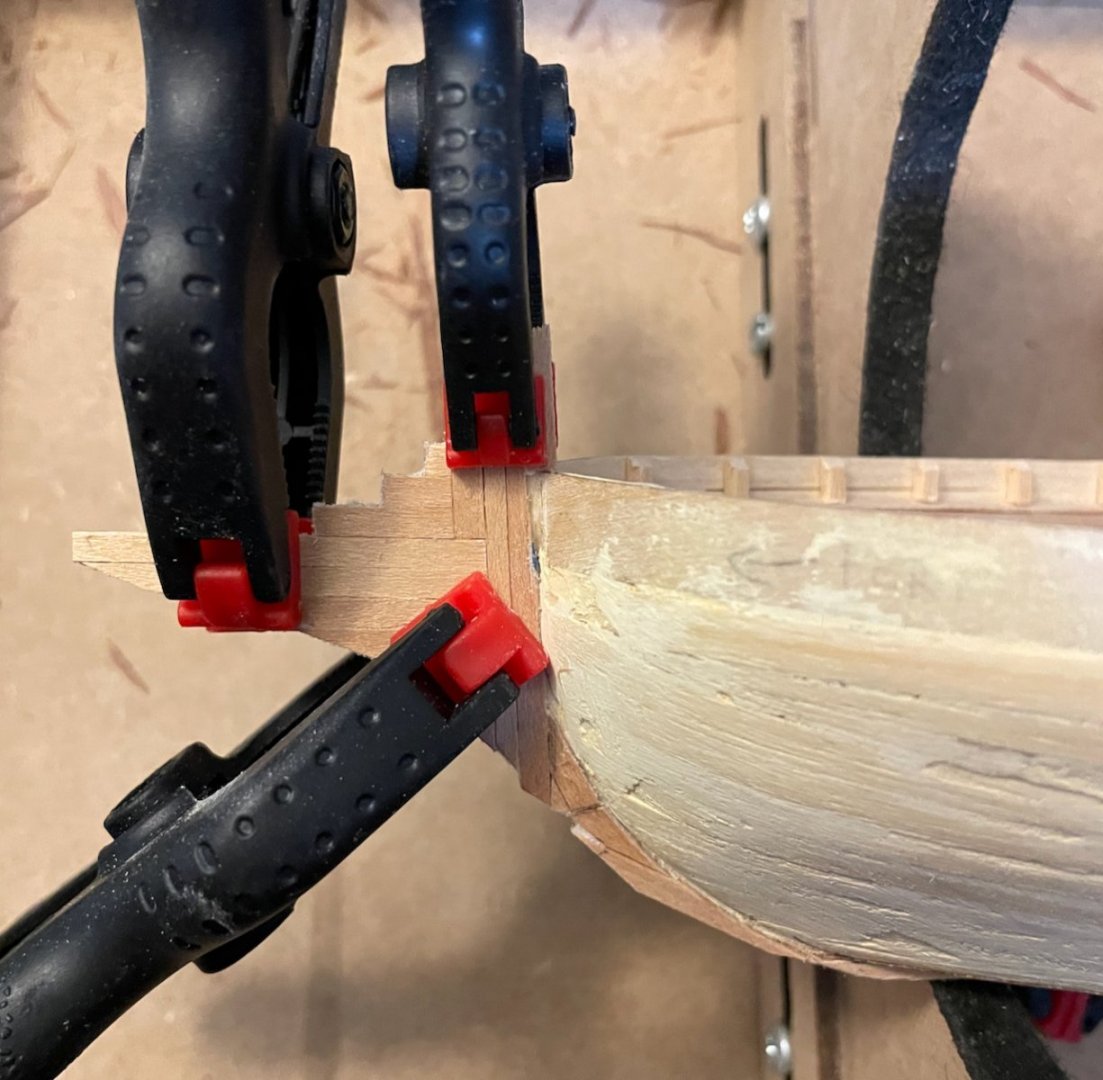
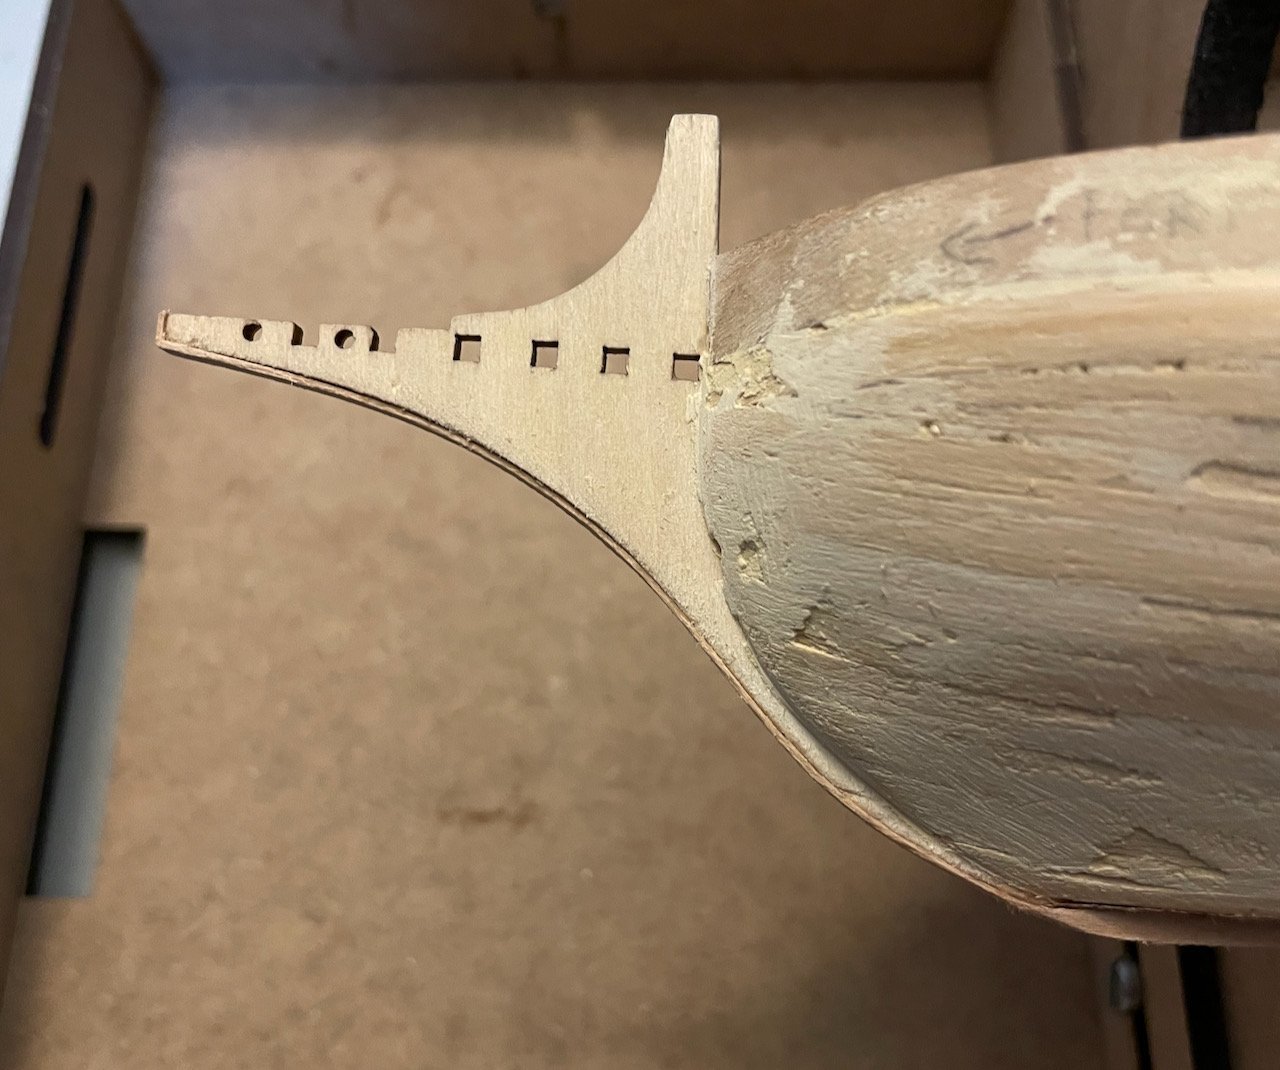
After a busy and stressful week of work, I decided to completely take Saturday off and not do anything work-related. I got a bit of work done in the yard, but also spent a lot of time working out my strategy for lining the stem of the ship. After a couple of failed attempts, I ended up finding a strategy that worked pretty well, I think. At the very least, I have lined the port side, so I just have to do this for the starboard side now. I started off by taking a photo of the stem with a ruler pressed against the backside. I pulled this photo into Powerpoint, set the slide size to 8.5"x11" figured out how to reset the ruler in Powerpoint to metric, and then drew a 1cm line. I dragged the 1cm line on top of the ruler, then resized the photo until they matched. Next, I printed off the image at 100% size. After carefully cutting out the stem, I had a template for the port side. (I intended to do one for the starboard side at the same time, but was careless and tore off part of that one. I'll have to reprint the file so I can make the starboard template.) Now it was time to glue the planks onto the template, ensuring that I had a bit of overhang that could be sanded to fit. I started with the two vertical pieces for the stempost, did the two horizontal pieces for the head, and then added addition pieces to fill the curves. The bits at the bottom (I referred to them as Long Island, since the assembly vaguely resembles New York) required very careful placement to ensure they would cover everything that was needed. Before trimming the overhang, I applied painter's tape to the outboard side to ensure that it held it together. I was very careful trimming along the curve where the rabbet line needs to be, but left most of the overhang elsewhere. This would ensure that it could slide into place against the hull. Finally, I sanded off the paper template, removed the painter's tape, and glued the assembly onto the stem. I left it overnight with some clamps holding it in place. Since I woke up early this morning, I wandered down to the basement and finished up the port side of the stem. First, I sanded off all of the overhang, then sanded down the surface. Finally, I added the final touches. I used my Exacto knife to clean up the rabbet line a bit. I drilled two holes that will eventually be used for the ropes tied around the bowsprit. Then, I used a square file to open up the holes for the transverse pieces of the beakhead. While doing this, I grabbed the 2x2 plank these pieces will be made from and tested the fit until it could just barely slide in. Once I start lining the hull, I may need some additional tweaks to the rabbet line. And I'd really like to smooth out the more visible joints, but overall, I'm pretty happy with how this turned out. Now I just have to do it again on the other side!

- 59 replies
-
- 6
-
-
- Billing Boats
- Le Martegaou
- (and 1 more)
-
RDDP: Enjoy that San Juan Felluca! That looks like a great kit that will help you push your skills to the next level. I haven't had a lot of time to work on the Martegaou this week, but have made some progress on lining the keel, sternpost, and stempost. If I were painting, I wouldn't worry about doing this, but since my goal is to not need paint, I want to cover up the bare plywood—especially the cut ends that show the plywood layers. I have some leftover .6mm walnut strips from a previous kit and am using those, since they complement the sapele so nicely. I've finished lining the keel, so a quick before-and-after comparison to show what my goal is. The after photo is a bit too thick, but I'll sand that down later. After trying out my ideas on the keel, which won't be visible once the ship is on its display stand, I moved to the sternpost, which will be simpler than the stempost. After trimming the side planks down to size, I cut out toothpicks on the forward side. These will serve as rabbet lines once I'm ready to apply the second layer to the hull. The second photo shows me testing a sapele strip to confirm that the rabbet line is big enough. Next up will be lining the stempost and the prow. In this photo you can see the strip covering the cut edges of the plywood on the bottom and forward sides. The curve should be an interesting challenge!
.jpeg.9ce3729b6fb90010d39c1fd60a317959.jpeg)

- 59 replies
-
- 3
-
-
- Billing Boats
- Le Martegaou
- (and 1 more)
-
Thanks, RDDP! I have a substantial stock of .6mm-thick sapele leftover from building the Endurance, so will be using that. I'm also planning to use some lighter colored wood (boxwood? I can't remember...) to cover up the plywood on the stempost, sternpost, and keel. I've already lined the flat bottom with sapele, though I still have a bit of clean-up work to do on that.
- 59 replies
-
- 2
-
-
- Billing Boats
- Le Martegaou
- (and 1 more)
-
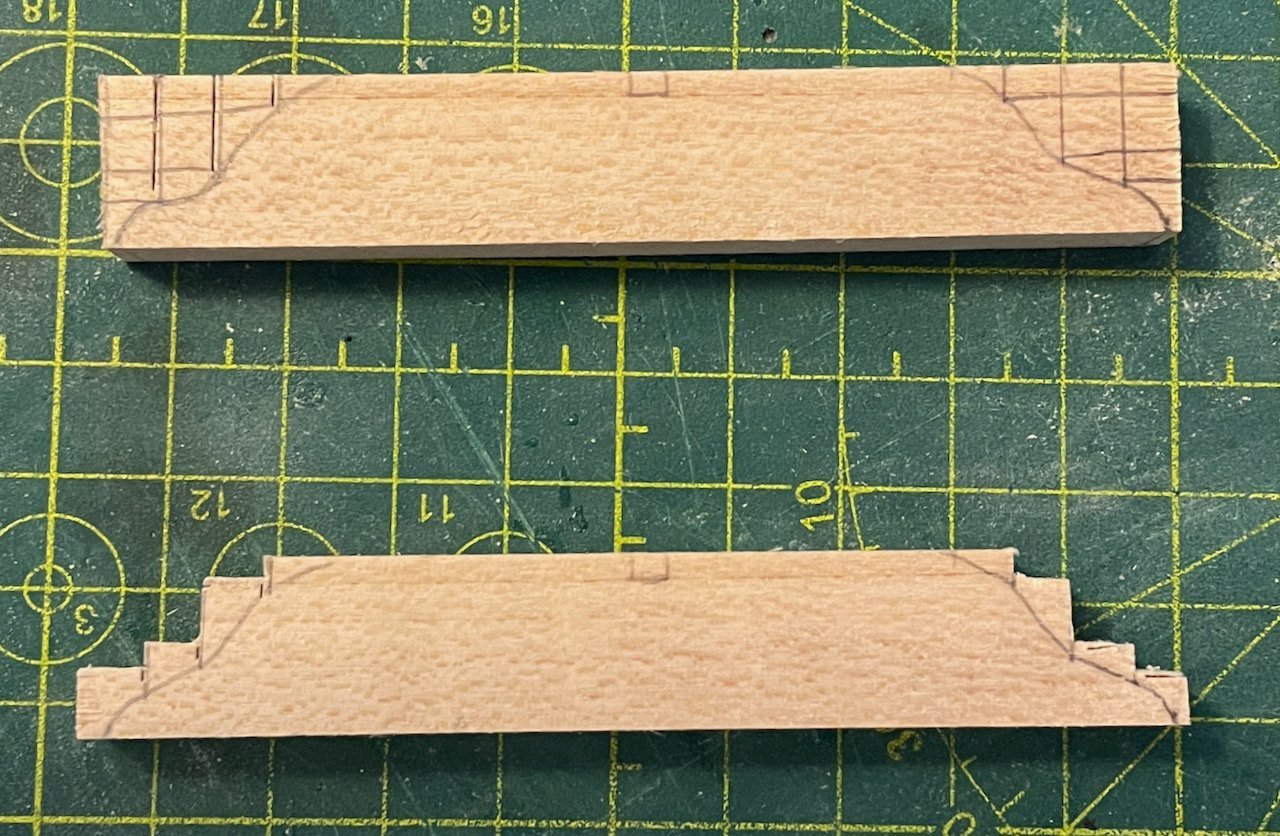
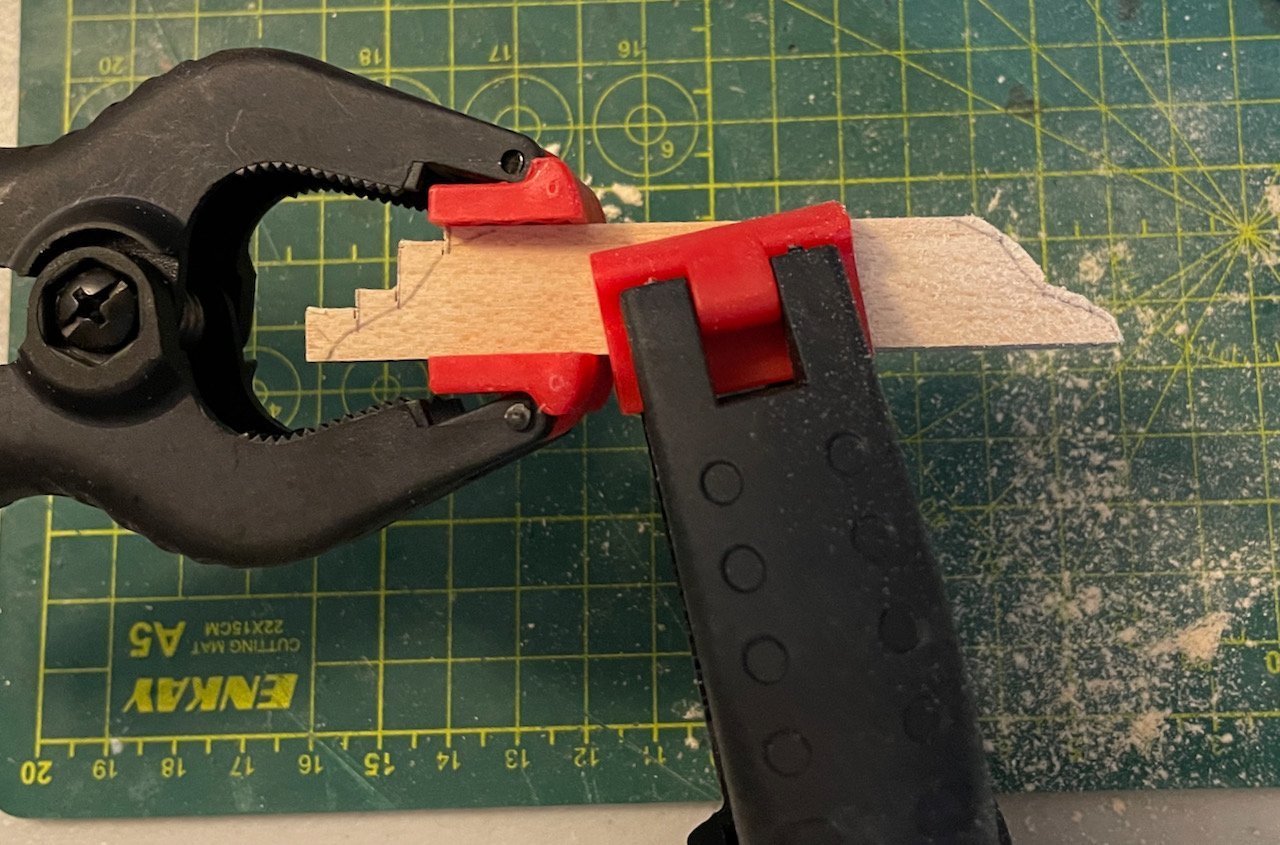
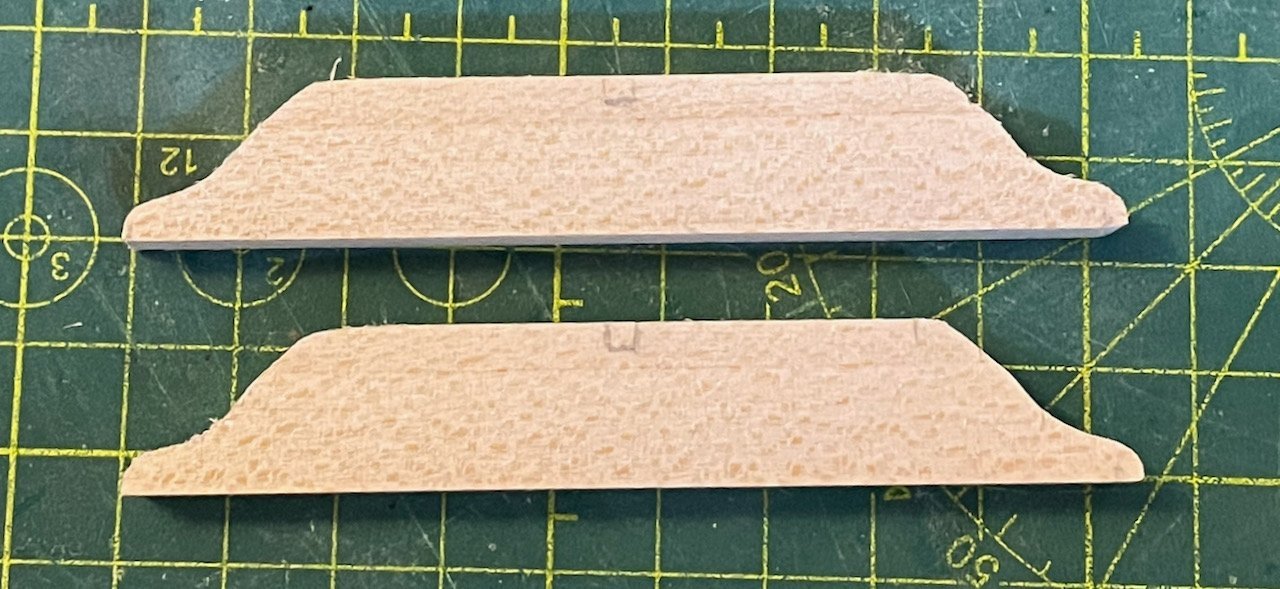
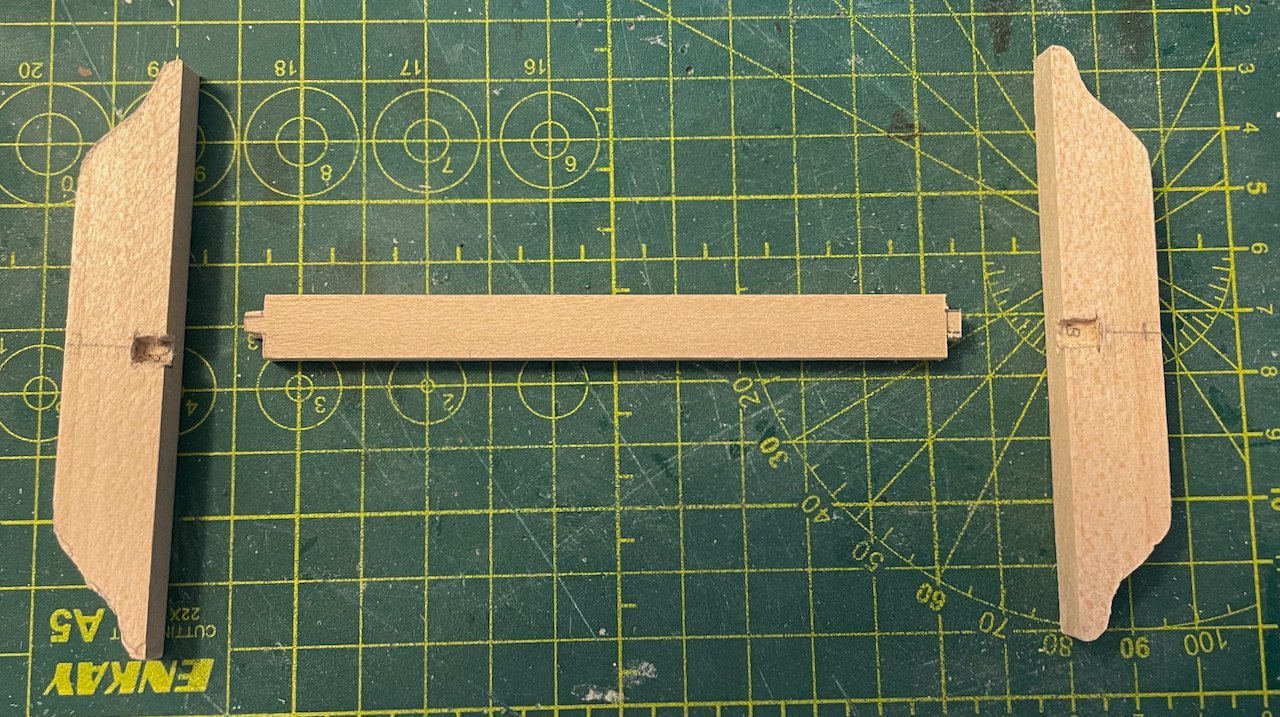
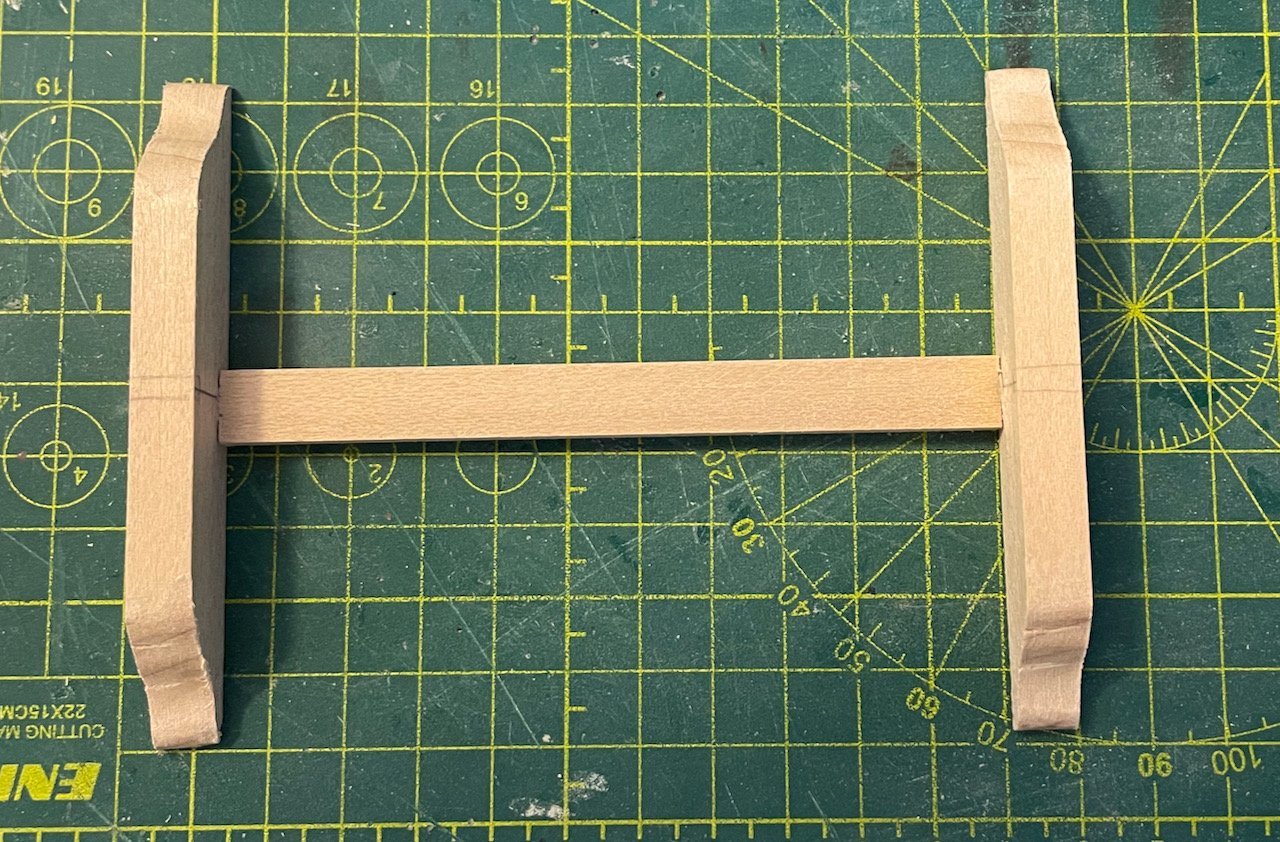
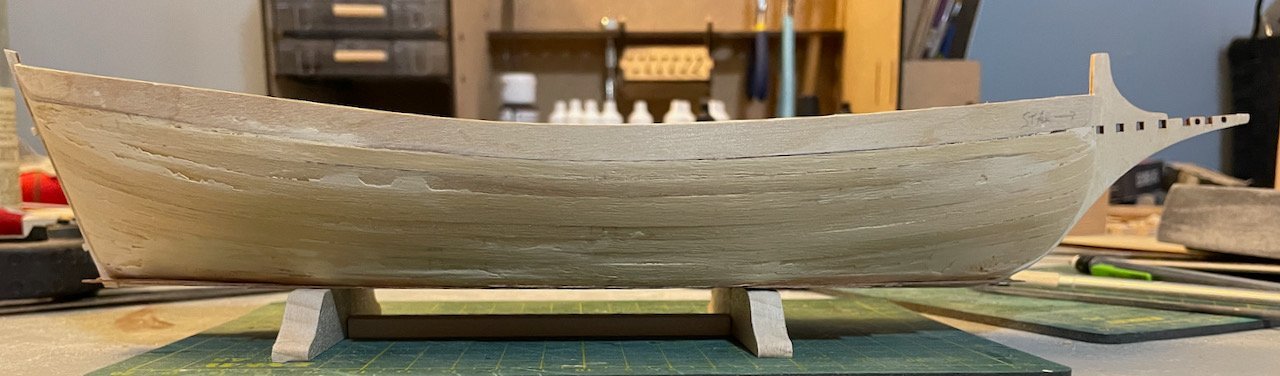
I wasn't intending to get a second work session in today, but I got a late start making a birthday cake tonight and I had to do something while the cake cooled enough to frost it. After looking at my hand and arm in the photos from earlier today, I figured it was a good time to build the display stand. The materials and a pattern for a simple stand come with the Martegaou kit. The materials are a long block of 8x15mm obechi, which is cut in half to make the two ends, and another long block of 5x10mm obechi, which connects the ends. The plans in the kit include a pattern for the ends, but there are no further instructions. I started off by marking the length of the top and bottom. Then, taking measurements from the plans, I drew a grid to help me free-hand the curves. The vertical lines are 5mm apart; the horizontal lines mark the spots where the vertical lines intersect the curves. (The horizontal lines aren't quite straight, but the points of intersection are accurate.) Once everything was sketched on to the wood, I used a saw to cut along the vertical and horizontal lines. Next, I needed to smooth out the curves. I ended up using a combination of sanding sticks, sanding blocks (a nice set from OcCre that I received as a gift), and my Dremel tool. To ensure that the ends matched, I clamped them together while I did this, regularly flipping one of the blocks until all four curves matched. Next, I considered how to attach the middle piece to the ends. A butt joint would be the easiest approach, of course, but I worried about stability. A mortise-and-tenon joint seemed like a much sturdier option, though I had never tried to make one before. So, I got ambitious. After carefully measuring things, I used my Exacto knife to carve a mortise into each end. Then, I measured a tenon to match each mortise, using the saw to cut off the unnecessary bits. Since I wasn't perfectly consistent between the two ends, I marked each joint with a letter; you might notice the "A" and "B" inside the mortises and there are matching letters on the ends of the tenons. I still need to do finish sanding, so nothing is glued yet. But I did take a moment to enjoy the successful fit. Finally, I cut out the tracks for the Martegaou's keel. After cleaning those with a square file, I couldn't resist setting the ship in place.
- 59 replies
-
- 6
-
-
- Billing Boats
- Le Martegaou
- (and 1 more)
-
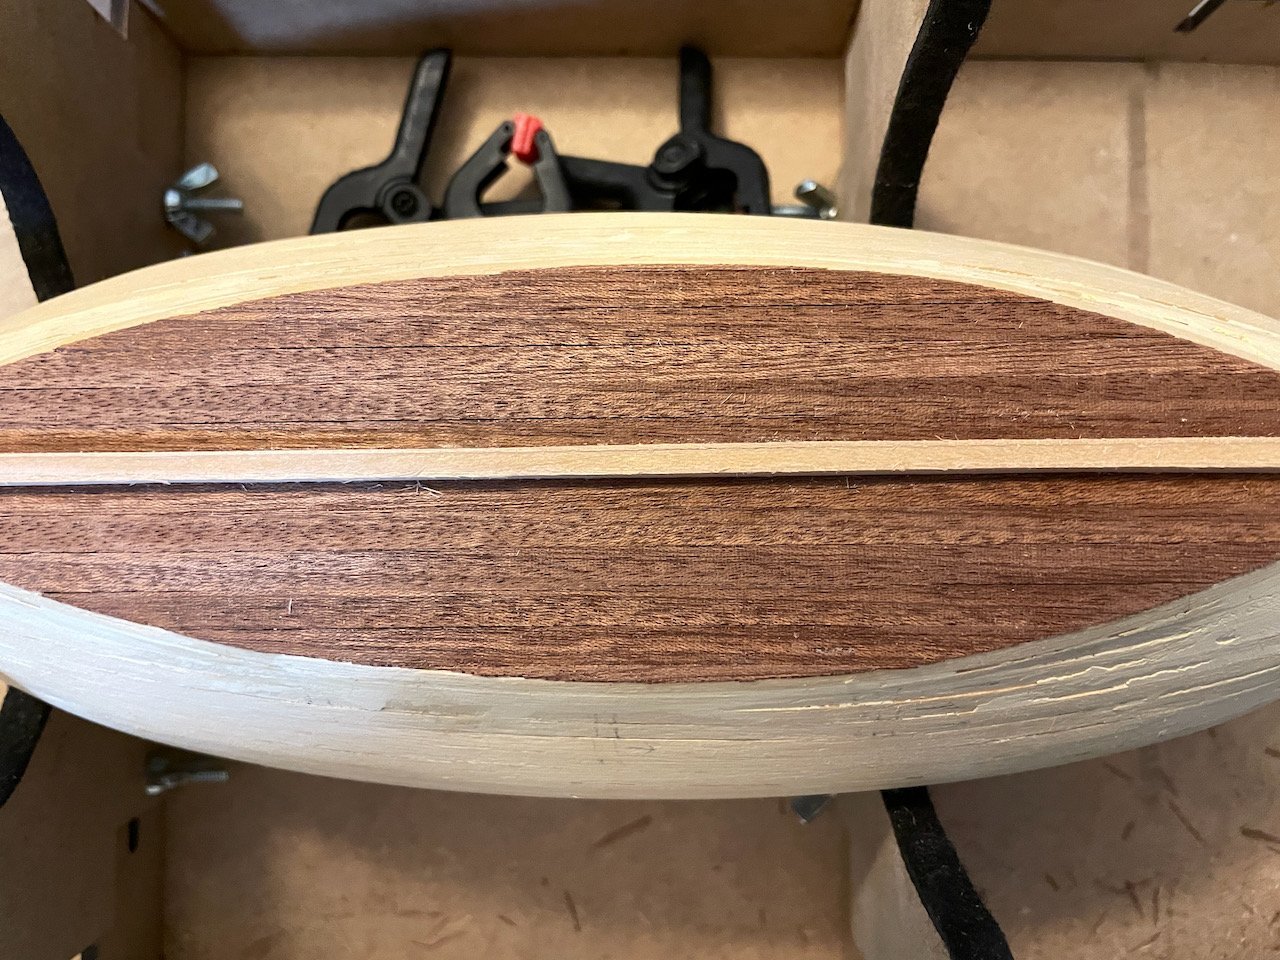
Throughout the remainder of last week, I finished up the first layer of the hull. Yesterday, I applied the wood filler and this morning I sanded it down. I think I've done a pretty good job of fairing the hull, so will start working on the second layer soon. Prow (left) and stern (right) . Port (top) and starboard (bottom).

- 59 replies
-
- 4
-
-
- Billing Boats
- Le Martegaou
- (and 1 more)
-
Just a quick update this evening. I've started working on the first layer of the hull. Since I'm planning to add a second layer, I haven't been too precious about things. I'm still taking my time and making sure that there will be a good base, but I will definitely need both a lot of sanding to fair the hull and wood filler for the gaps. Over the last few days, I've installed the garboard strake and the top four strakes. Should be four more strakes to go, plus stealers.
- 59 replies
-
- 2
-
-
- Billing Boats
- Le Martegaou
- (and 1 more)
-
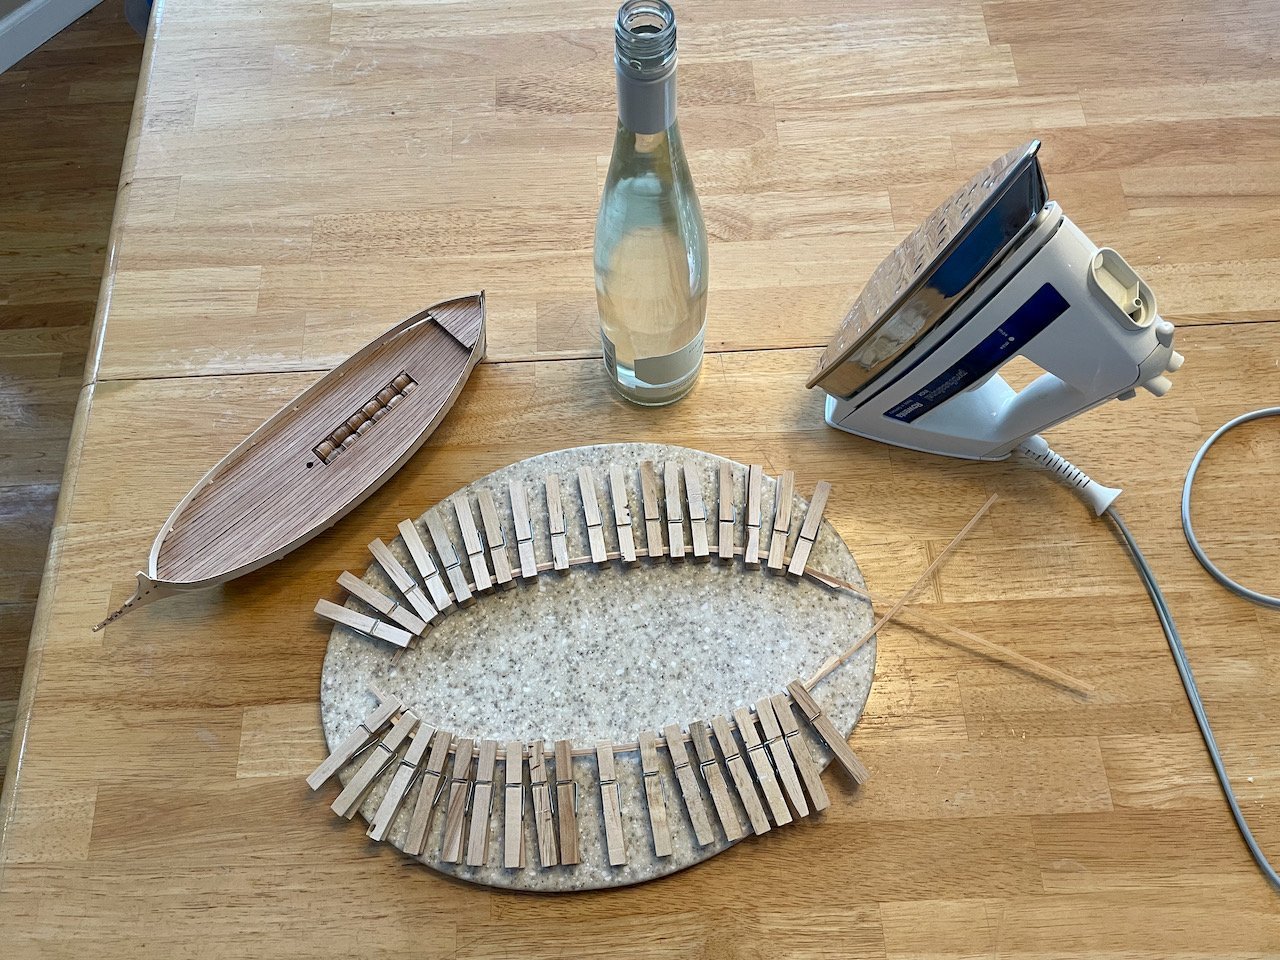
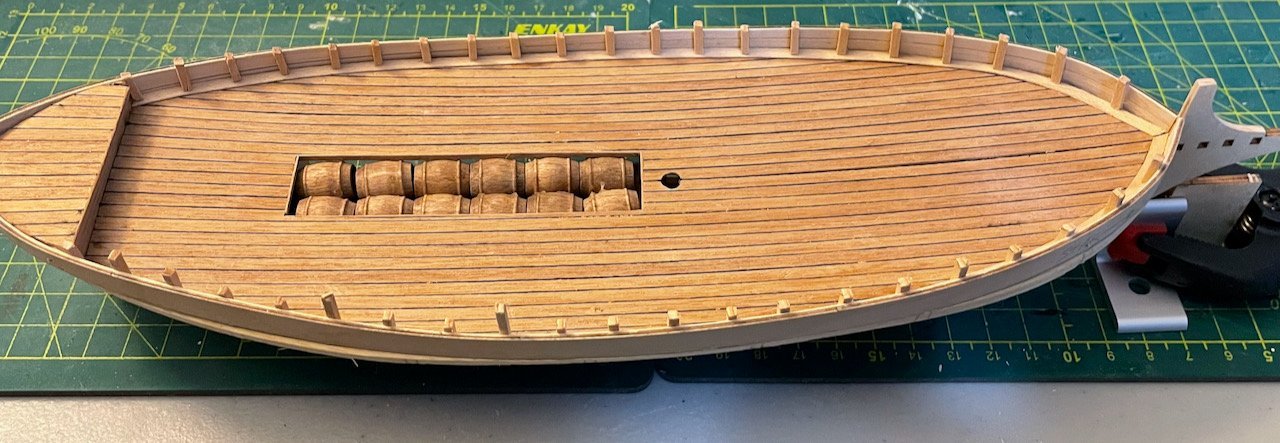
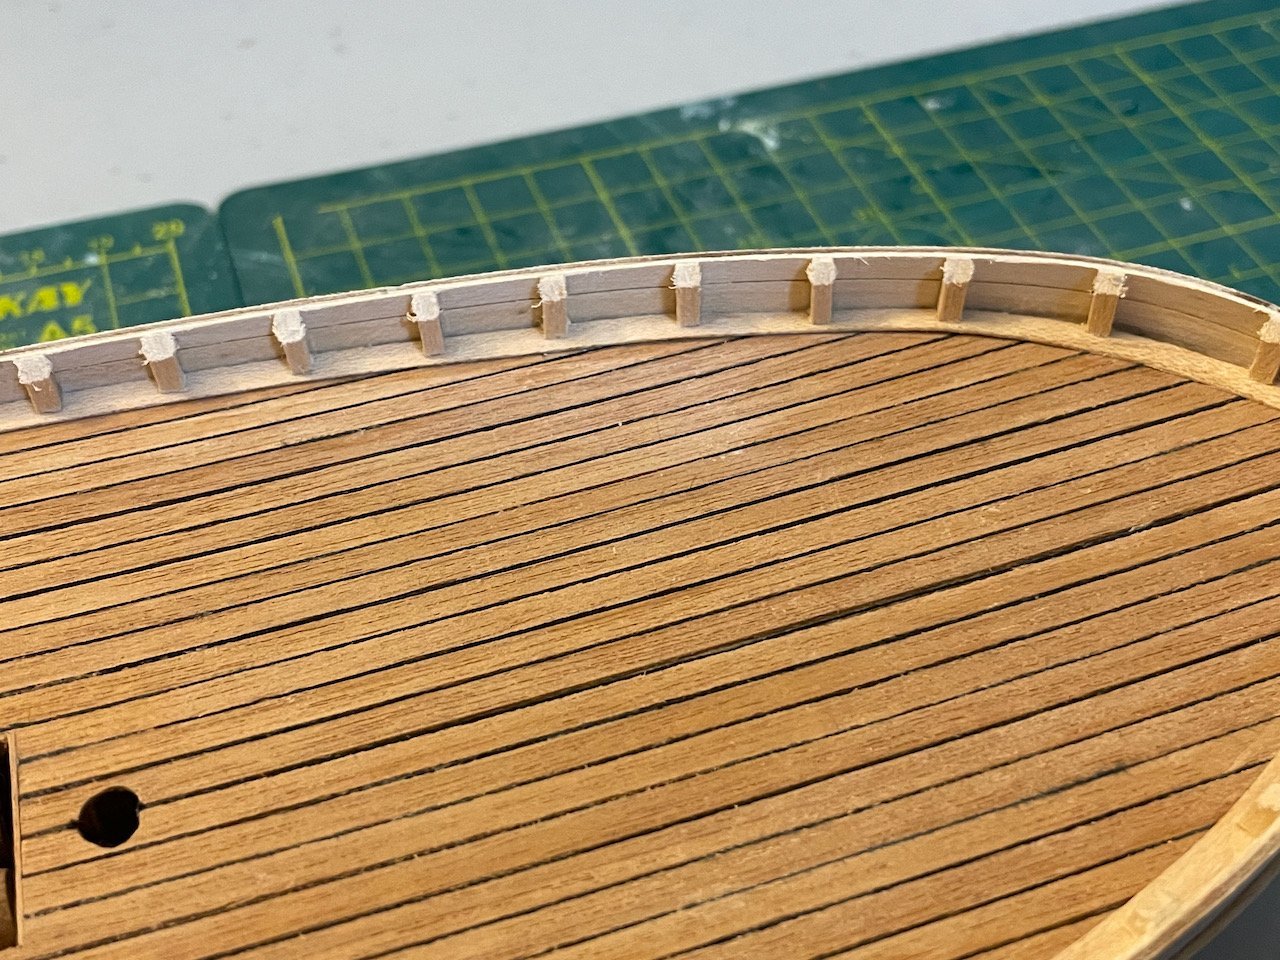
Ahhh... Starting to feel much better about my Martegaou now! Over the last three days, I've worked on the edging for the deck and the timberheads. (And thanks to a Zoom conference today, I could get a lot of work done while listening to the presentations!) I started off by soaking two .6x3mm planks for about 18 hours in my favorite wine bottle. I knew I was going to need some serious edge-setting, so I wanted them thoroughly soaked and as flexible as possible. I used an iron to help steam the wood as I bent it. Once it was close to the right shape, I used as many clothespins as possible to clamp the planks to the plywood pieces that will eventually be the caprails. Then I left them clamped like that for about 24 hours. Once I felt confident the edging planks were ready, I removed the clothespins and trimmed them down to the necessary shape. I went bit-by-bit, using CA glue to ensure that everything locked into place quickly and firmly. Then, I cut some 2x2mm pieces for the timberheads. Following the plans in the Ancre book, I noted that there were 19 timberheads down the length of the main deck. I had to round off a decimal in my measurement and, over 19 pieces, those decimals added up to 20th. I also placed timberheads against the bulkhead on the front of the aft deck; these are covering up some big gaps that were, conveniently, almost exactly 2mm! Then, it was just a matter of sanding down the timberheads. I also sanded the tops of the timberheads at an approximately 45º angle. The result? Very satisfying. This has really lifted my mood with this ship! Next steps: Add edging to the aft deck. Then on to the first layer of the hull.
- 59 replies
-
- 4
-
-
- Billing Boats
- Le Martegaou
- (and 1 more)
-
A little more progress has happened. Since I'm waiting on some planks to soak, I thought I'd go ahead and write my update now. The key update is that I've finally gotten the blasted bulwarks on. I'm not sure why I struggled so much with these...maybe it's an issue of design, maybe it's that I'm trying to do too much with this build...probably some of both. But they're on! One of my new acquisitions for working on this kit is the Model Shipways electric plank bender. Generally speaking, I like it and I definitely found it helpful while shaping the bulwarks. It comes with a mold that is helpful for both curves and twists, and these bulwarks need both. Once the bulwarks were shaped, I went ahead and lined their in-board side with some .6mm strips from my stock. Those needed shaping, too, to account for the curve and a certain degree of edge-setting. Clamping the bulwarks in place while the glue set was a frustrating process and required a few attempts. What finally worked was using binder clips with an extra loop inside (see photo below if that description isn't clear). At the bow, I used some pushpins along the curve, then clamped a couple pieces of wood around the stempost to hold the forward end of the bulwarks in place. At the stern...ugh. After some futility, I ended up just using CA glue and holding them in place with my fingers. After getting the bulwarks installed, I trimmed off the tops of the frames. I'll replace these with new timberheads after I've laid the edging around the deck. From overhead, the line of the bulwarks looks pretty good to me. Looking fore and aft, the flaws are a bit more visible. At the front, there's a slight misalignment, due in part to the warping of the deck. I plan to reduce the effect of this by sanding the bulwarks down to match each other. At the stern, the various gaps will take a little more work to resolve. Given everything that will be built up back here, I don't think these will be too much of a problem in the final product. I will also be doing a second planking on the hull (though the kit doesn't call for it), so that will also let me use some wood filler, then cover it up on both the in-board and out-board sides. Overall, I'm feeling better about this model now than I was a week or two ago, but the frustrations continue to be significant.


- 59 replies
-
- 4
-
-
- Billing Boats
- Le Martegaou
- (and 1 more)
-
Some slow progress this week, thanks in part to a nasty cold that laid me flat for a few days. I'm continuing to do some prep work before reattaching the bulwarks. I picked up some balsa blocks to fill out the bow and stern. I've sanded the ones up front to an almost final shape. The aft ones still need to be cleaned up. Next steps: finish fairing the balsa blocks and frames, then attach the bulwarks. Prepare the edging boards for the decks.
- 59 replies
-
- 1
-
-
- Billing Boats
- Le Martegaou
- (and 1 more)
-
The Endurance22 expedition found the wreck of the Endurance! For those building their models, the photos and videos from that expedition should give you some interesting research materials. Here is the press release from Endurance22 and here is the photo/video dump from the expedition. Note that you have to download the mp4 videos in order to watch them, but the "Wreck AUV 4k Footage V2" footage is STUNNING!
-
@tkay11, thanks for joining along! I don't have a copy of that Ancre book yet, but it looks really fantastic! The other links are helpful, too. I'd stumbled across Kondzik's build, but hadn't found Javier Baron's yet—his work is really fantastic! The video is nice, but my Italian is so poor that I remain partial to this one. Thanks for sharing the resources and recommendations!!
-
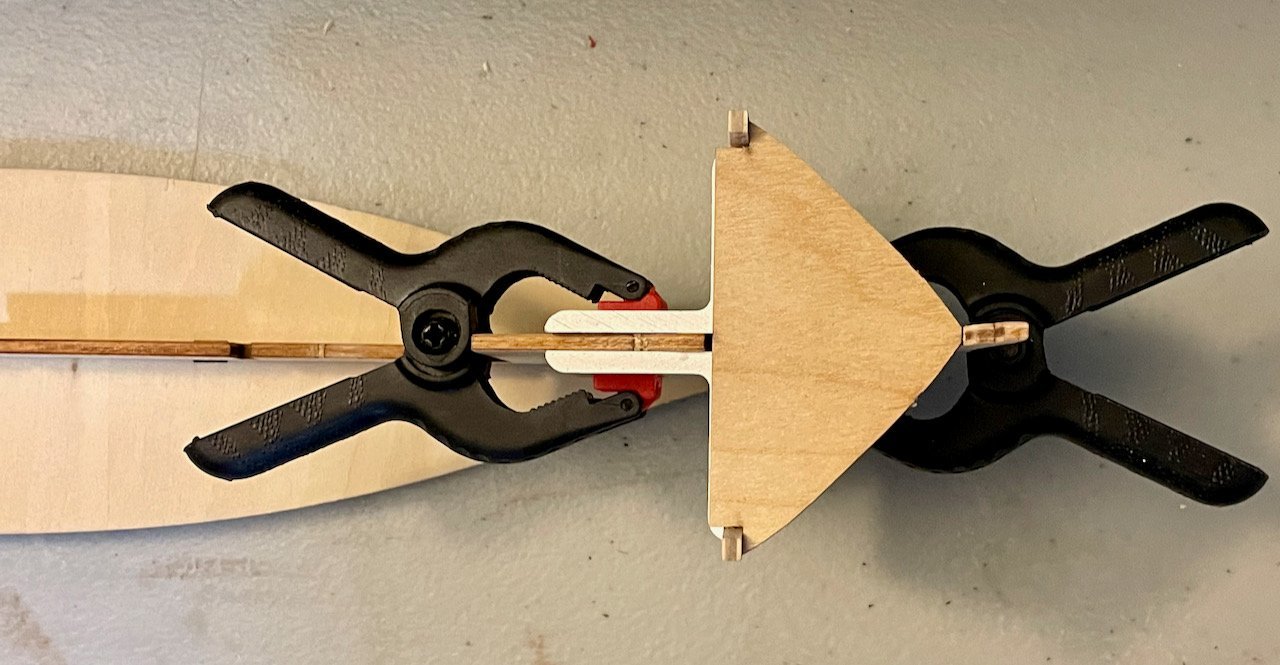
After a week away from my Martegaou, my feelings of frustration are finally dying down. So, I went back down to the basement this evening to reassess things. The heart of the problem is with frame #7 (the leftmost frame in the following photos). As can be seen in the following photo (which I've previously posted), frame #7 comes up at a significant angle, so the top posts are significantly wider (about 7–8mm) than the after edge of the main deck, which abuts the frame. For this to work, the bulwarks have to make some pretty incredible contortions to avoid leaving a gap at the point where the main deck abuts frame #7. I tried to make that work a week ago, but once I had installed the bulwarks and the shear strakes, I knew there was just no way to continue moving forward. So tonight, I removed the bulwarks and shear strakes that I had foolishly tried to wrestle into submission. After cleaning them up, I went to work sanding down frame #7, to ensure a smoother line from the main deck to the aft deck (the red box is focusing the attention on that line). After a bit of testing with the bulwarks, I think I'm in better shape now and can try moving forward again.. Looking ahead, I'm still hoping to do this build without paint. Once the bulwarks are installed, I'm going to remove the posts coming up from the frames. I'll line the bulwarks and the edges of the deck with a lighter colored wood from my stockpiles, then install timberheads from something similar.
.jpeg.5e73fd38d8013dfa9a8240100bda0c7c.jpeg)
- 59 replies
-
- 3
-
-
- Billing Boats
- Le Martegaou
- (and 1 more)
-
Hi RDDP, as I understand the customs here, it's best not to take over other people's buildlogs (and I don't think your previous post did that, especially since we're working on the same project). Regarding your rigging question: I was just looking at the rigging plans the other day. The numbers in circles each represent one attachment point of one rope. So, look for each number to appear two or three times in the plans (three times if it runs through an intermediate point). I'm not at home so don't have the plans in front of me, but if I recall correctly, rope #2 is the one for adjusting the antenne (the long yard holding the main sail). You'll tie this rope around the front end of the antenne, below the front corner of the sail, then you'll tie off one end on the port side and the other on the starboard (I think on belaying pins in both cases). Just look for that number 2 and you'll find the correct places to tie off the ends of the ropes. In order to get a better understanding of how rigging works with lateen sails, I highly recommend this video. *** As for my Martegaou build, I've reached a point of pretty massive frustration. Two key issues: 1) When the kit arrived, the plywood sheet with the deck planks was badly warped. I tried to iron it flat, but never got it stay flat. I was hoping that I had it flat enough that it would be okay once I installed it on the frames. Not so much...it's putting enough tension on the frames to twist the spine a bit. 2) The main deck tapers at its aft end and is significantly narrower than the front edge of the aft deck. I started fairing the frame in hopes of getting the bulwarks on and stabilizing things. But I just can't figure out how to get the bulwarks on without having massive gaps at the bulkhead connecting the main and aft decks. Right now, I'm not quite sure what to do, but my goal of making a ship that doesn't need to be painted doesn't seem very likely anymore. I'll be spending some time this week brainstorming some solutions...hopefully my next post will be a little more positive!
- 59 replies
-
- 1
-
-
- Billing Boats
- Le Martegaou
- (and 1 more)
-
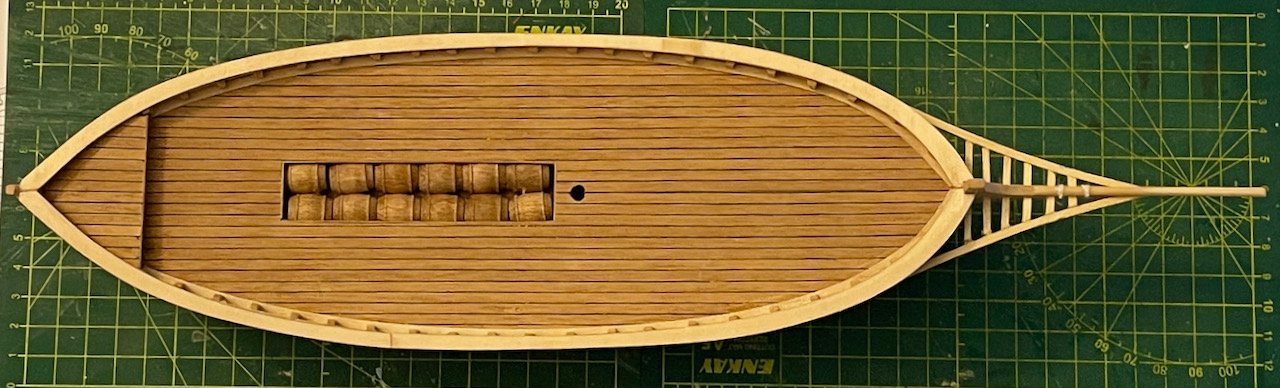
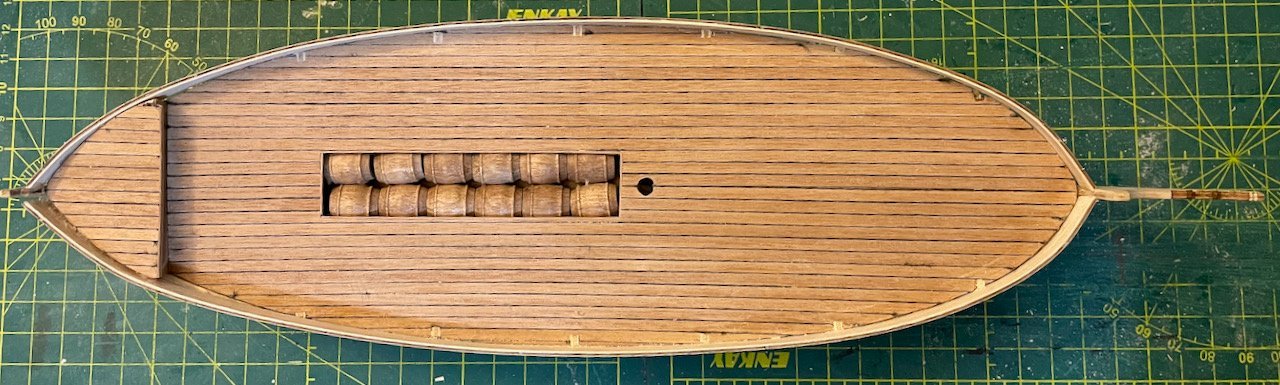
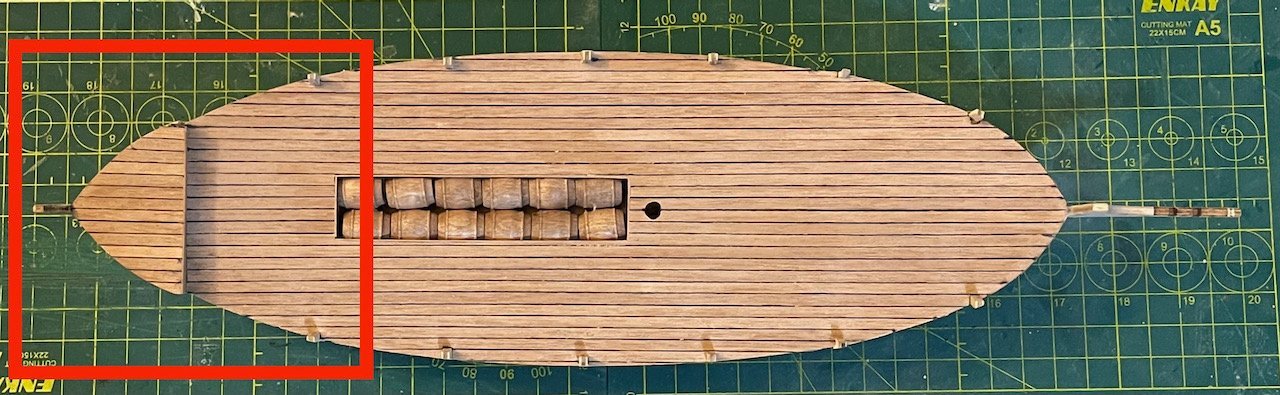
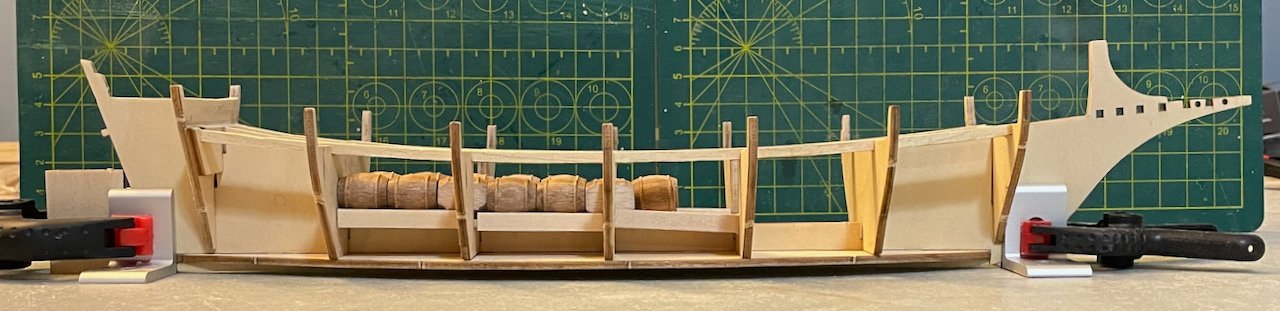
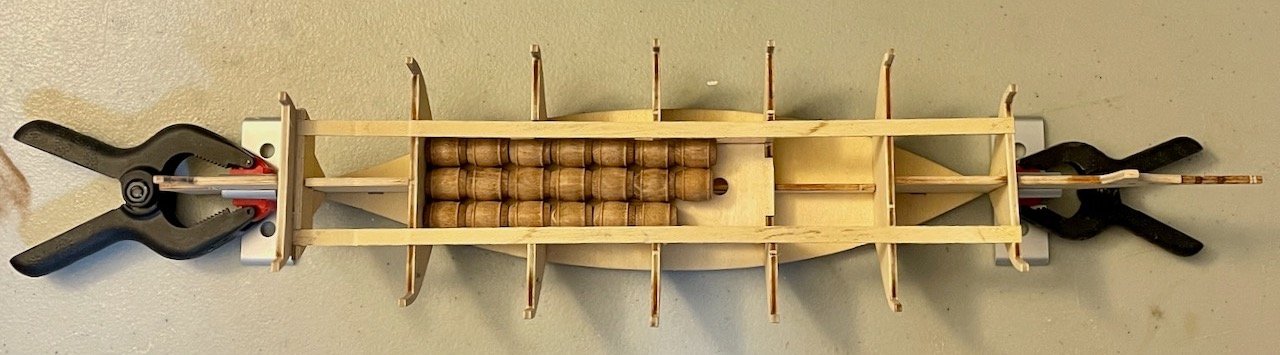
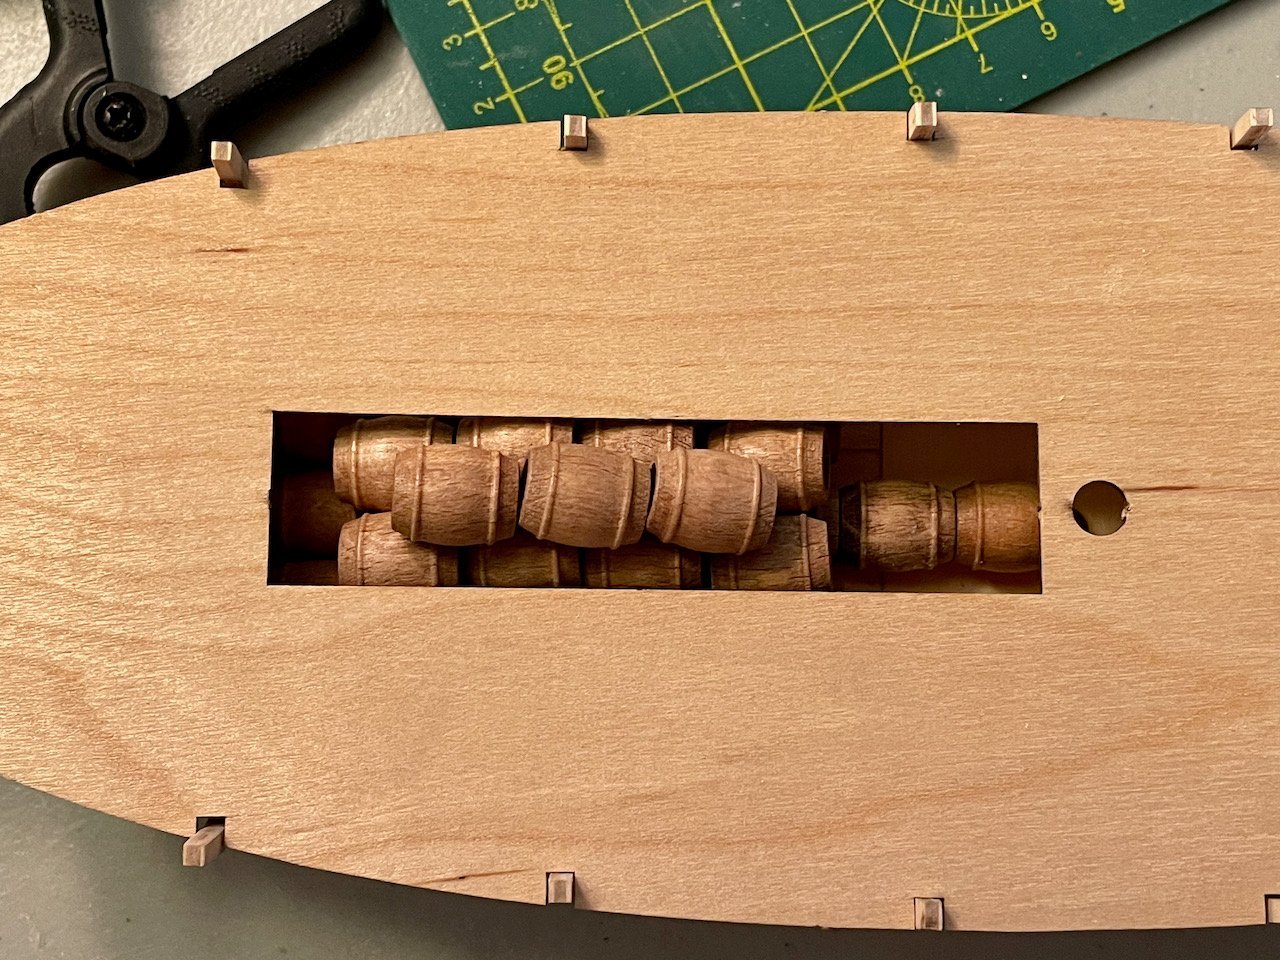
And just like that, the decks have been planked! I'm really happy with the effect of the black thread as caulk. The second layer of wine barrels is in place, too, and I lined both the edges of the cargo hatch and the bulkhead between the main and aft decks. So far, I've done a rough clean-up of the edges, but there's still quite a bit of clean up to do. A few quick notes: 1) The wild angle of the main deck on the aft bulkhead is nothing to worry about; the deck is just sitting in place and is still badly warped. Once that's glued in place, it should be fine. 2) In the second photo, especially, you'll note CA glue drying on the wine barrels; all of that was placed in such a way as to be hidden under the third layer. 3) When I set the aft deck in place I knocked loose one of the planks lining the bulkhead...didn't see that until after I'd taken the photo, but it's fixed now. Next steps: clean up and install the decks; finish working out plans for lining the hull.

- 59 replies
-
- 3
-
-
- Billing Boats
- Le Martegaou
- (and 1 more)
-
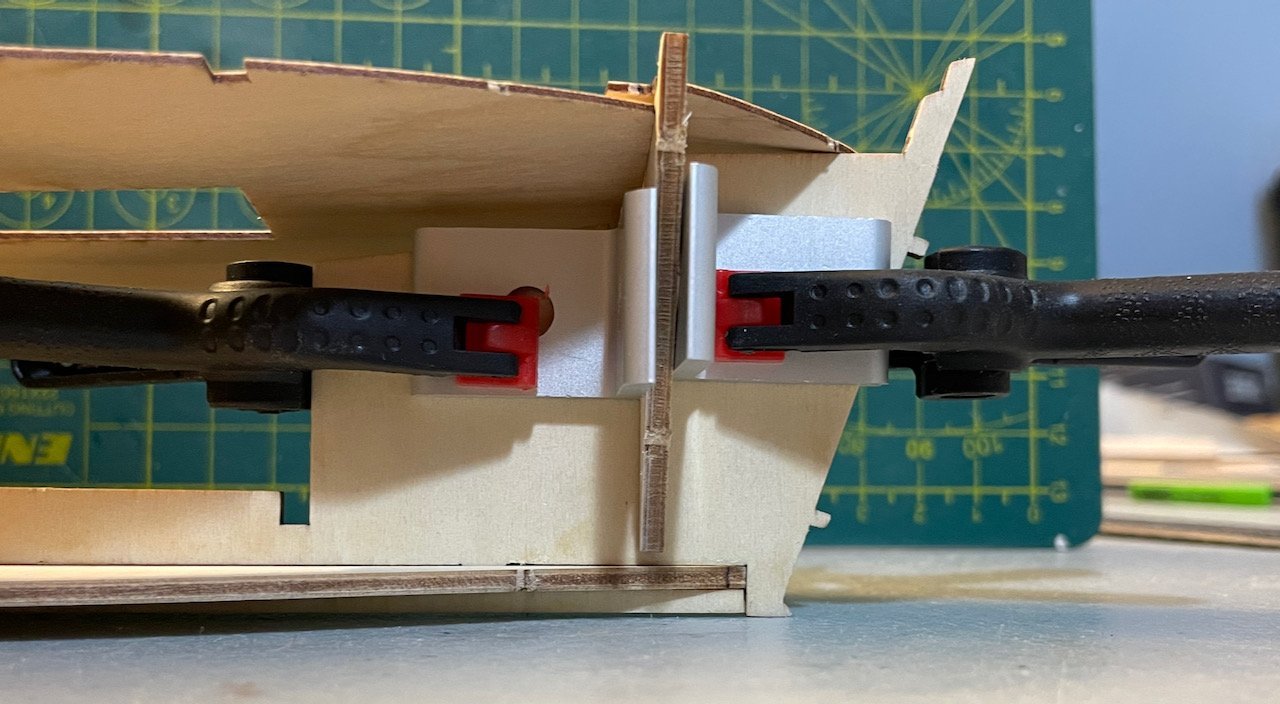
Thanks, Bob! I don't think I've ever been so careful about fairing the frames...usually I've charged on ahead and only realized too late that there was a problem! A sign that I'm learning as I go, I guess. RDDP: I'm so glad you found your way over here! And I'm even happier to see how your build is coming along! By now, with the hull and deck planked, you're probably through the worst of the pain and misery from misaligned frames. (And your frames #7 and 8 don't look bad at all—I've definitely had much worse alignment in similar places!) There may be a lot of wood filler on the hull, but this is your first kit, right? The more kits you build, the better your skills get (to quote the advice another MSW gave me during my Endurance build). You're doing great and that wood filler will look fine once it's sanded smooth and you've painted the hull. The brackets are just 1-inch corner braces that I ordered online. You should be able to find something comparable at your local hardware store or your favorite mega-retailer on the web. I hope you'll start a buildlog for your Martegaou, so we can all see your progress! Finally, a quick update. I spent a bit of time this afternoon and evening working on the deck. Despite going after it with an iron, it's still frustratingly curved, though I think it'll be fine once it's installed. While preparing my first pair of deck planks, my eye happened to land on a spool of black cotton thread. And then I got an idea... Not an original idea, of course, since others here on MSW have done the same. But an idea to try a new technique. Rather than using pencil on the side of the planks to simulate caulk, I laid a piece of black thread between each of them to more accurately represent the caulk. With how dark the obeche planks are, I'm really liking the look so far! An overhead shot of the deck (still just dry-fit on the frames), then a detail that shows the caulk effect better. Next steps: Finish planking the decks; work out plans for planking the hull.
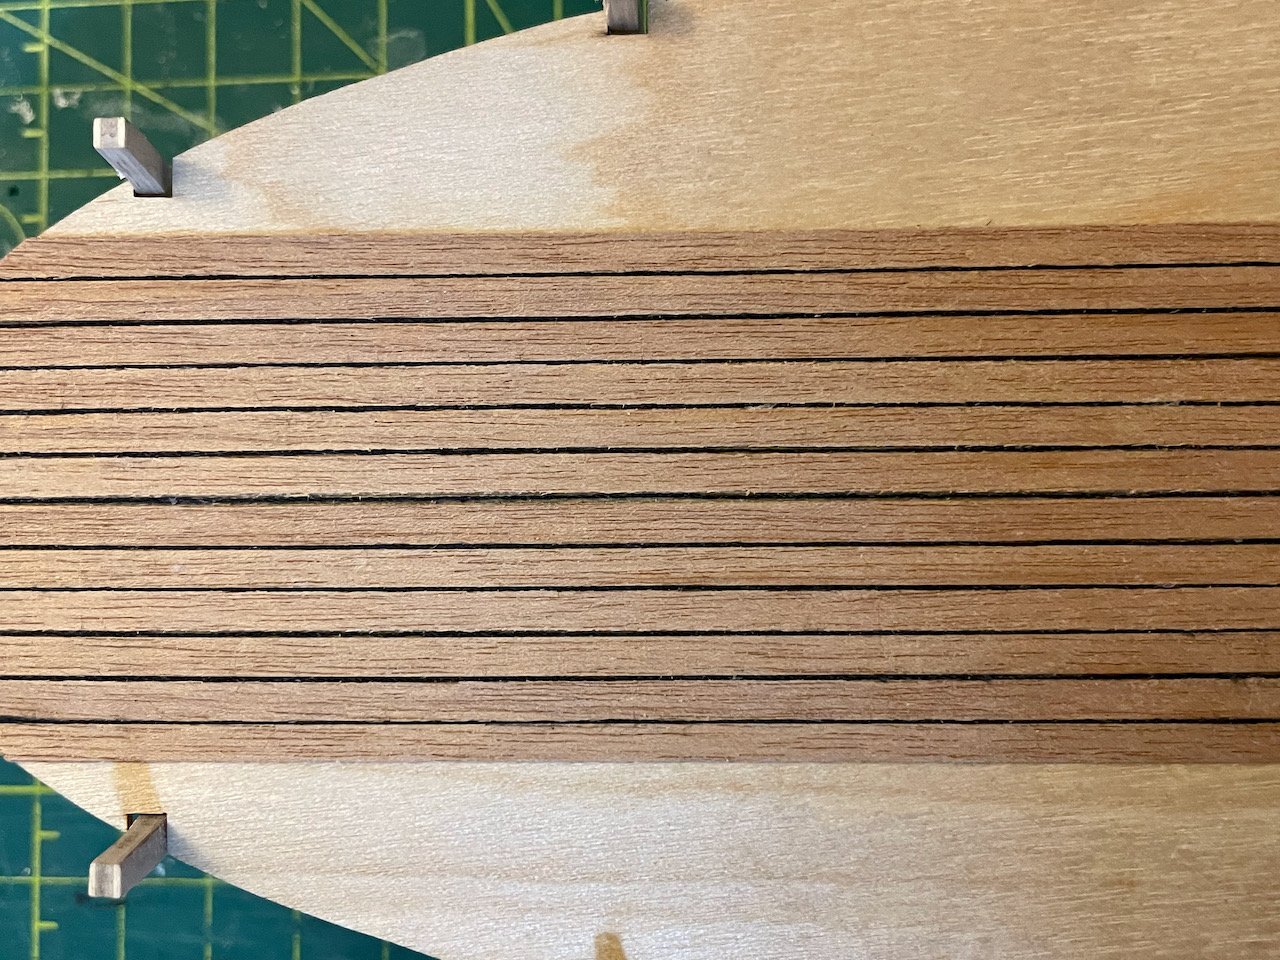
- 59 replies
-
- 4
-
-
- Billing Boats
- Le Martegaou
- (and 1 more)
-
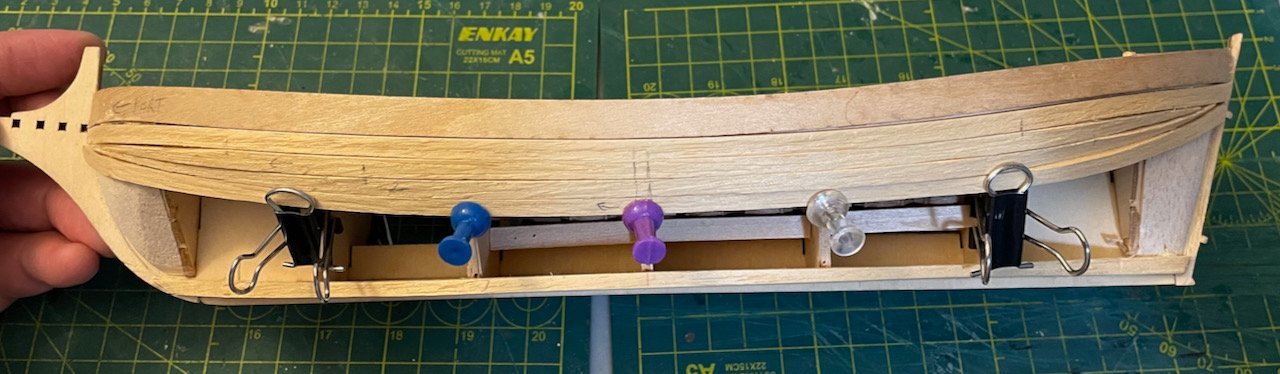
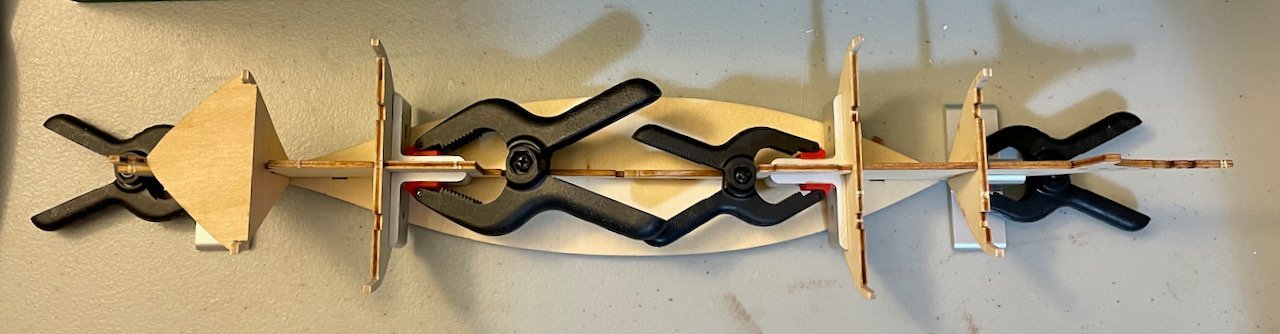
Just a short post after a long session working on the Martegaou. I installed the long support pieces that run along the tops of the frames and underneath the deck. This was a lot more challenging than I expected! The cut-outs in the frames line up nicely, which is very helpful. The two planks, however where not cut equally. The inventory list indicates that they are supposed to be 3x5mm, but one was closer to 3.25x5mm and the other was 3x6mm. After sanding them down to fit, I started working on shaping them to follow the curve of the deck. This was my first chance to try out my new electric plank bender (one of the ones that's basically a soldering iron with a large, round piece on the tip). With such thick wood, it was slow going, but eventually I got the curve almost exactly right. I also used CA glue so they would set in place more quickly. Then I encountered another challenge: I had a LOT of fairing to do. I'm not sure if this is because the frames weren't cut perfectly level, they fit so loosely on the spine, or maybe I just did a poor job of installing them. Frames #6, 7, and 8 were particularly problematic with the port side 2, 4, and 3mm higher than the starboard! I have a small spirit level that's about two inches long, which came in handy here. Using that, I spent a few hours going back and forth, checking every frame with the level and then sanding the frames and support pieces until everything ran smoothly and evenly. After looking at these photos, I realized that I had forgotten to install the last barrel in the first layer. Not quite sure how I missed that while spending so much time staring at the skeleton of the ship! Next steps: prepare and plank the decks; do some planning ahead for planking the hull (more on this in another post).
- 59 replies
-
- 4
-
-
- Billing Boats
- Le Martegaou
- (and 1 more)
-
Thanks, Portsoy and Grey! Portsoy, your question about the color of the funnel and air vents is an interesting one (and one I didn't really think about myself!). I don't have a confident answer, but when I compare black-and-white photos of the Endurance and the Discovery, the funnels don't seem to match in color (of course, this assumes that the Discovery's funnel is the same color now as then). I'm looking at this photo of the Discovery, in which the funnel looks darker than in these photos of the Endurance (one, two, three). Note that photos one and two of the Endurance were taken in London, about a month apart; photo one looks like raw metal to me and photo two looks painted, though that may be a trick of lighting. In photo three, the funnel is clearly darker in color than the lifeboats, so it must not have been painted pure white. Not much of an answer, but hopefully the photos are something for you to chew on! I'm still learning a lot, having only built five kits now, and I think that being honest about my mistakes and challenges is crucial to the learning process. It certainly sets up opportunities for others to offer advice and suggestions that have been helpful more often than not. I pulled up your introduction post and saw that you are particularly drawn to working boats. That's where I started, too. The kits I did before the Endurance were much smaller and simpler, and gave me a nice start at facing the challenges of woodworking (in which I was almost completely inexperienced). As a first kit, I think the Endurance would get pretty frustrating, but OcCre has made the kit pretty accessible to those of us without a lot of experience. Once you get to your Endurance (and any kits before that!), I hope you'll start a buildlog. These logs have helped me talk through the challenges I've come across and the MSW community has always come through with tips, suggestions, and encouragement. As for the historical information and links: I'm really happy to leave bread crumbs for others to follow as they build their versions of the kit. We're fortunate in this case that so many of Frank Hurley's photos and film reels survived the expedition!
-
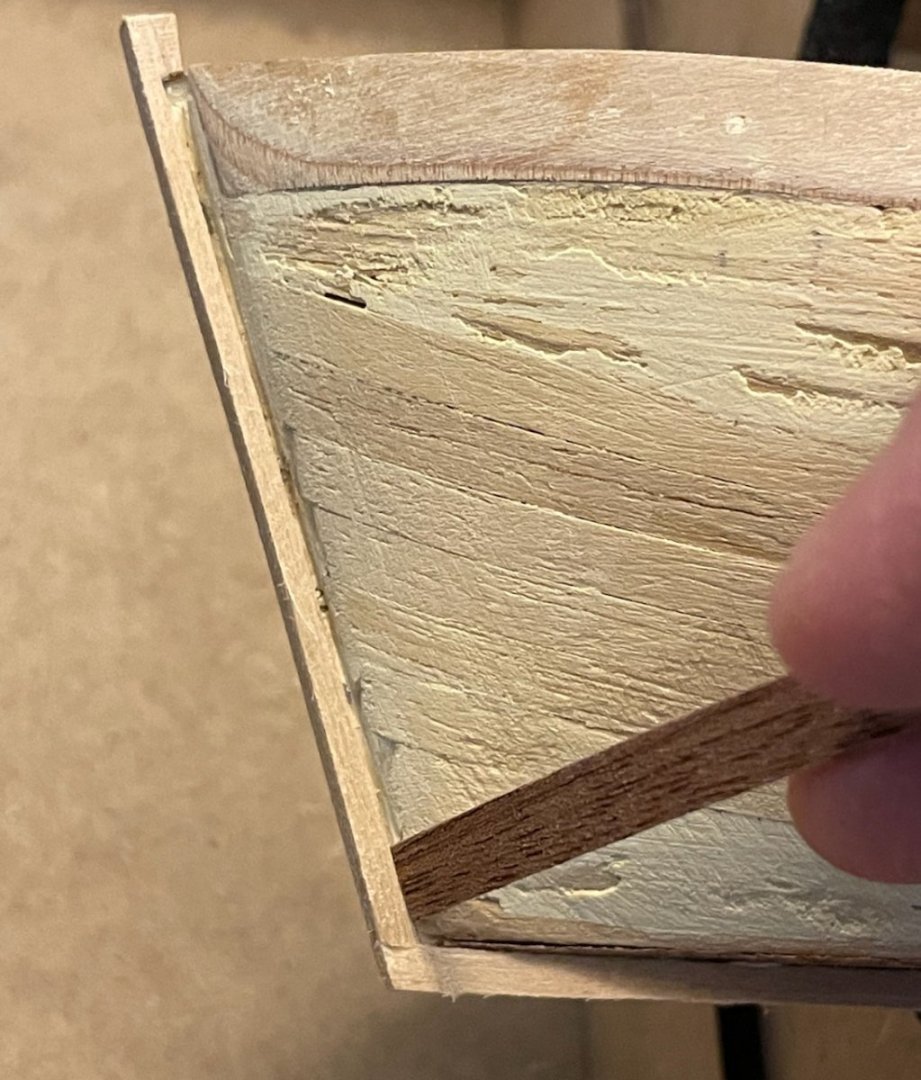
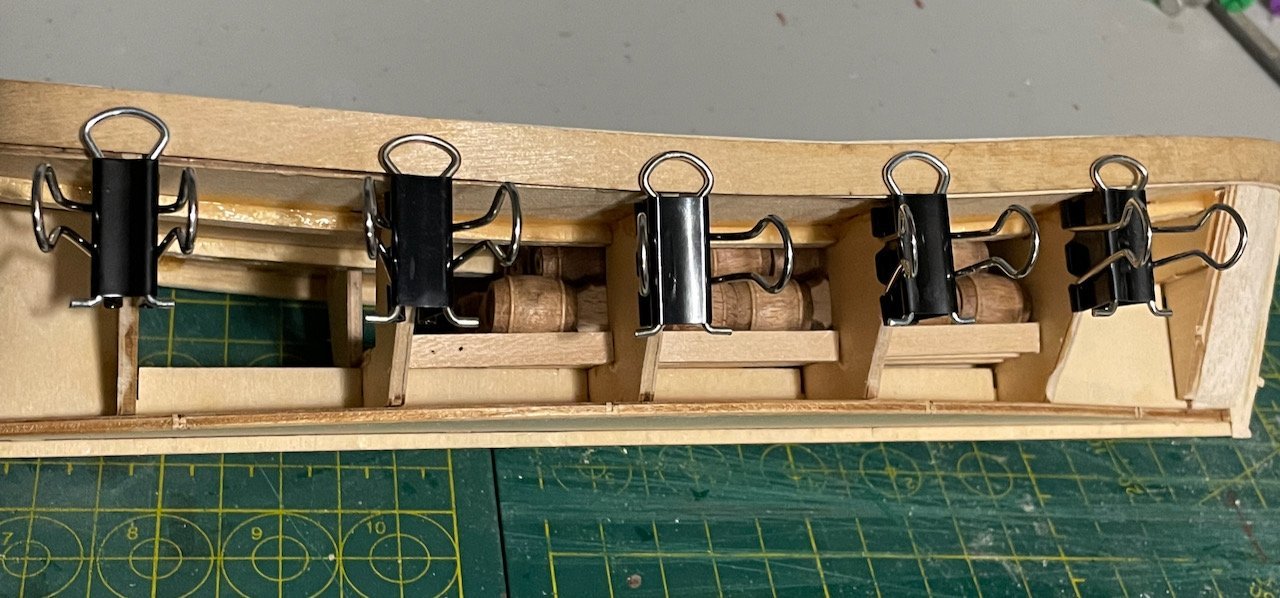
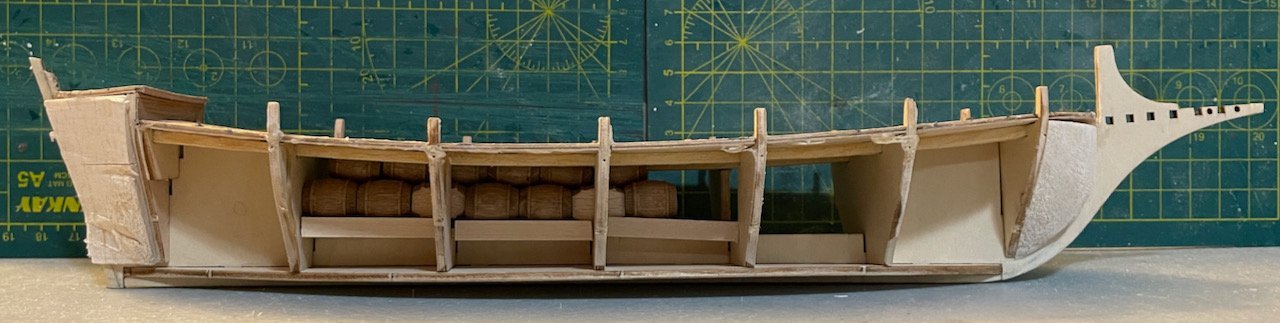
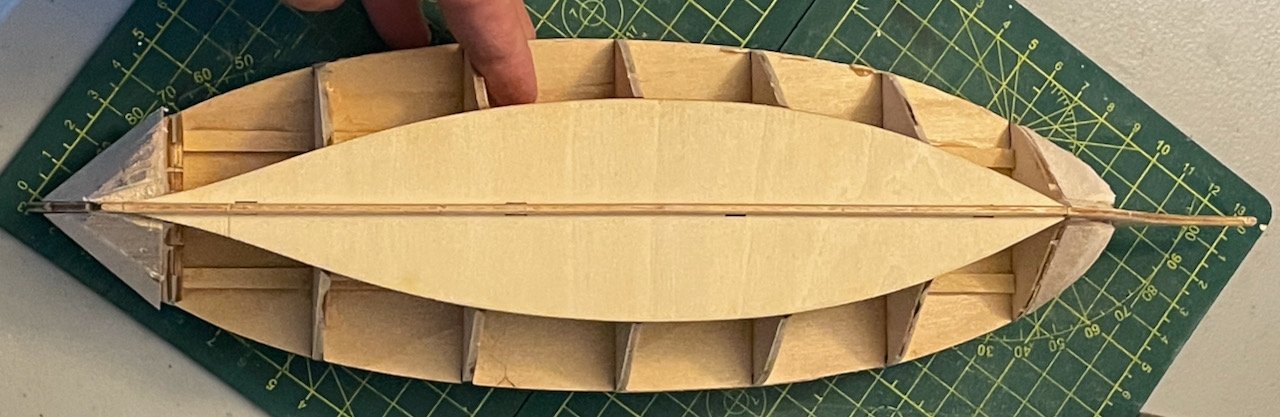
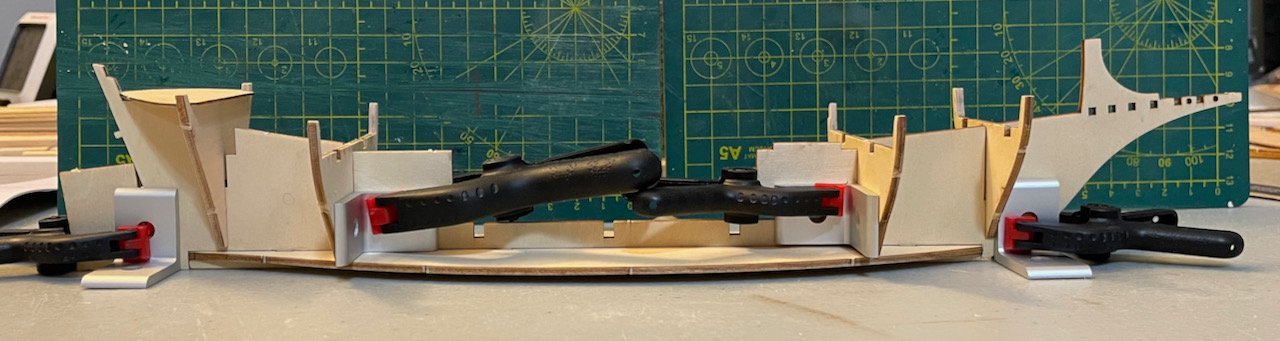
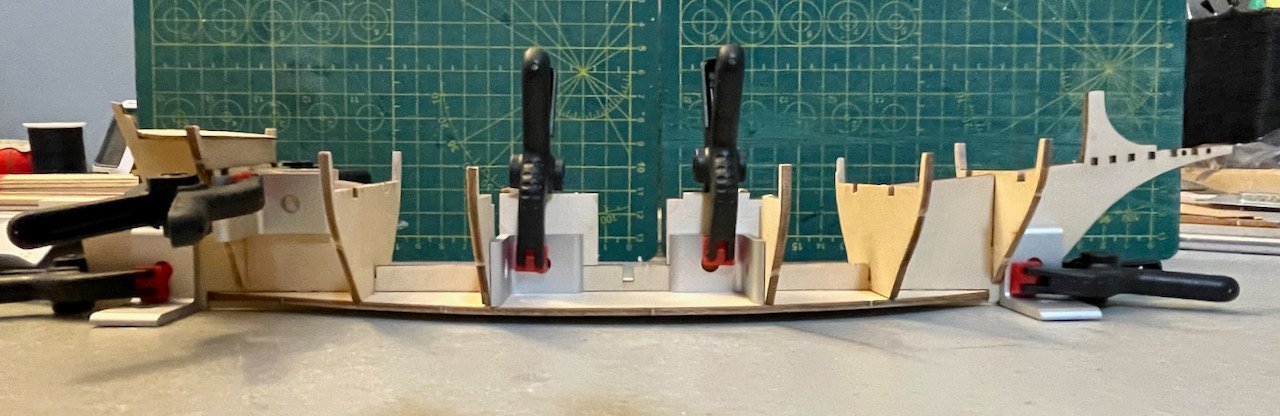
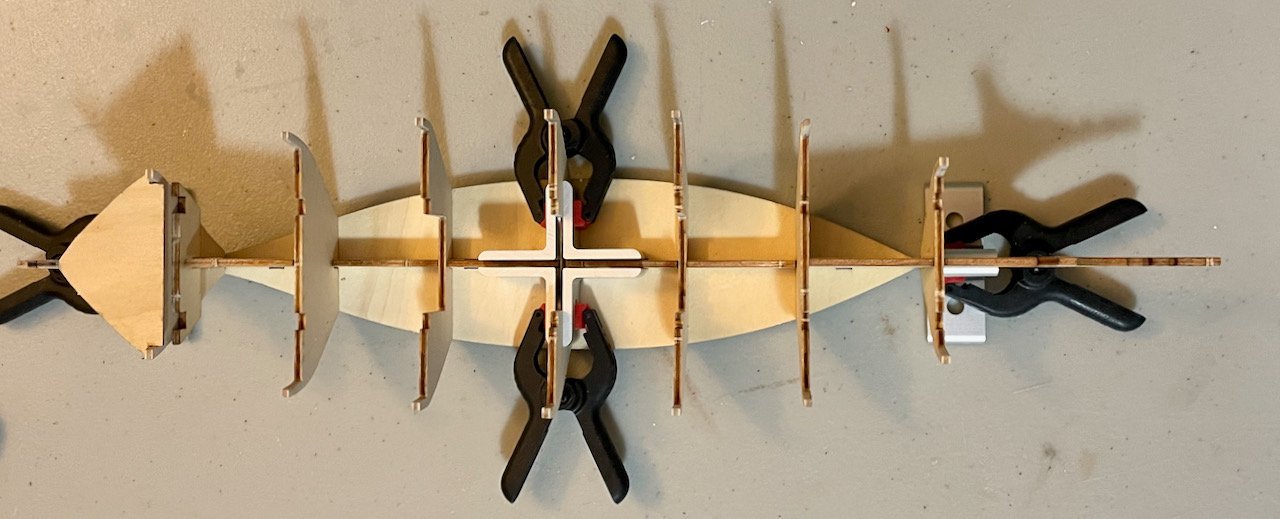
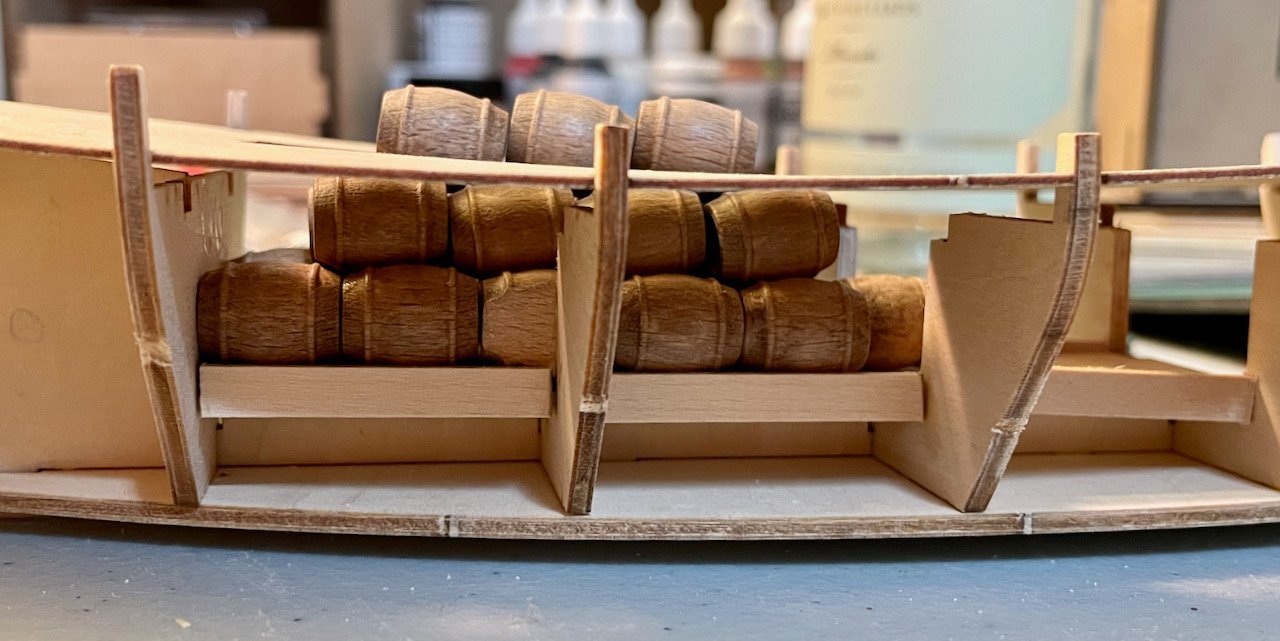
Another big storm in the Midwestern US—8 inches of heavy, wet snow fell here—so another day with a lot of time to myself in the basement. In between sessions of working from home, I installed the keel and the frames. Frames #1 and 7 were the trickiest ones, so I started with them, using 4 brackets and 2 clamps on each. I left the aftdeck in place (dry-fit) the whole time to ensure that frame #7 didn't move around at all. I'm finding that the slots are generally on the loose side, so there are lots of opportunities for the frames to wiggle around before the glue sets. I also spent a lot of time putting the main deck on and taking it back off, ensuring that each frame was aligned correctly. When I got to frames #3 and 5 (6th and 7th photos), I realized that I had completely missed frame #8, which abuts frame #7; that's why there is suddenly an extra set of clamps and brackets at the after end. A long series of photos here as I gradually worked my way toward frame #4 in the middle. After shoveling snow, I went back down to the basement and decided to work out the cargo hold. This went much easier than I expected! The mast step, which stretches from frame #3 to frame #4, is a piece of 2mm thick plywood. I extended that backward to frame #6 with some leftover 5x2mm planks. After a quick test, I added some side rails to keep the barrels from rolling off. Back when the kit first arrived, I took some measurements to figure out how I would install the barrels: there will be three layers of 21, 14, and 6, respectively. I mounted the center line of barrels for the bottom layer and discovered that I needed a couple of minor adjustments. In order to leave space for the mast, I had to sand down the forward-most barrel in that center line. Once I started laying the outer lines, I realized that I would have to either sand down some barrels or sand back the bulkheads. Since the bottom layer won't actually be visible, it was an easy call to just sand down some of the barrels; in the first photo, you'll notice that the third barrel in the bottom row has been sanded flat on the side facing the camera. Just before I wrapped up for the evening, I decided to test out the final effect, so I tossed on a few barrels for the second and third layers, then laid the main deck in place. Next steps: finishing mounting the first layer of wine barrels; install the support pieces on top of the frames.

- 59 replies
-
- 3
-
-
- Billing Boats
- Le Martegaou
- (and 1 more)