HOLIDAY DONATION DRIVE - SUPPORT MSW - DO YOUR PART TO KEEP THIS GREAT FORUM GOING! (89 donations so far out of 49,000 members - C'mon guys!)
×


albergman
-
Posts
73 -
Joined
-
Last visited
Content Type
Profiles
Forums
Gallery
Events
Everything posted by albergman
-
 Hi Yves Glad to hear you like my models ... thanks. Actually. I don't collect brass steam trains ... so, apologies if I gave you that impression. I did scratch build a display model of the British "Flying Scotsman" and am working on another but no brass locos. AH!! You probably got the idea from seeing Flying Scotsman in the background of one my photos? As far as fabrication goes I did expand on this topic over on my Billings Dragon build and someone also asked me about some small parts here. If there's something specific you're interested in I'd be pleased to help so just let me know. I'm afraid I've already posted pictures of all the boats and half-hulls I've ever built (although many more pictures are available) and at present I'm back doing car models. Cheers Frank
 -
Buck Thanks first for showing interest in my Trojan powerboat model. I've just skimmed through this build and kept getting more and more amazed at the finish you were achieving on the boat ... truly astonishing! I'll be going back when time permits to study your technique as it's the first time I've come across a finish that will stick to cocobolo and I have a whole model made of the stuff!! Cheers Frank
- 515 replies
-
- 4
-

-
- artesania latina
- whaleboat
- (and 1 more)
-
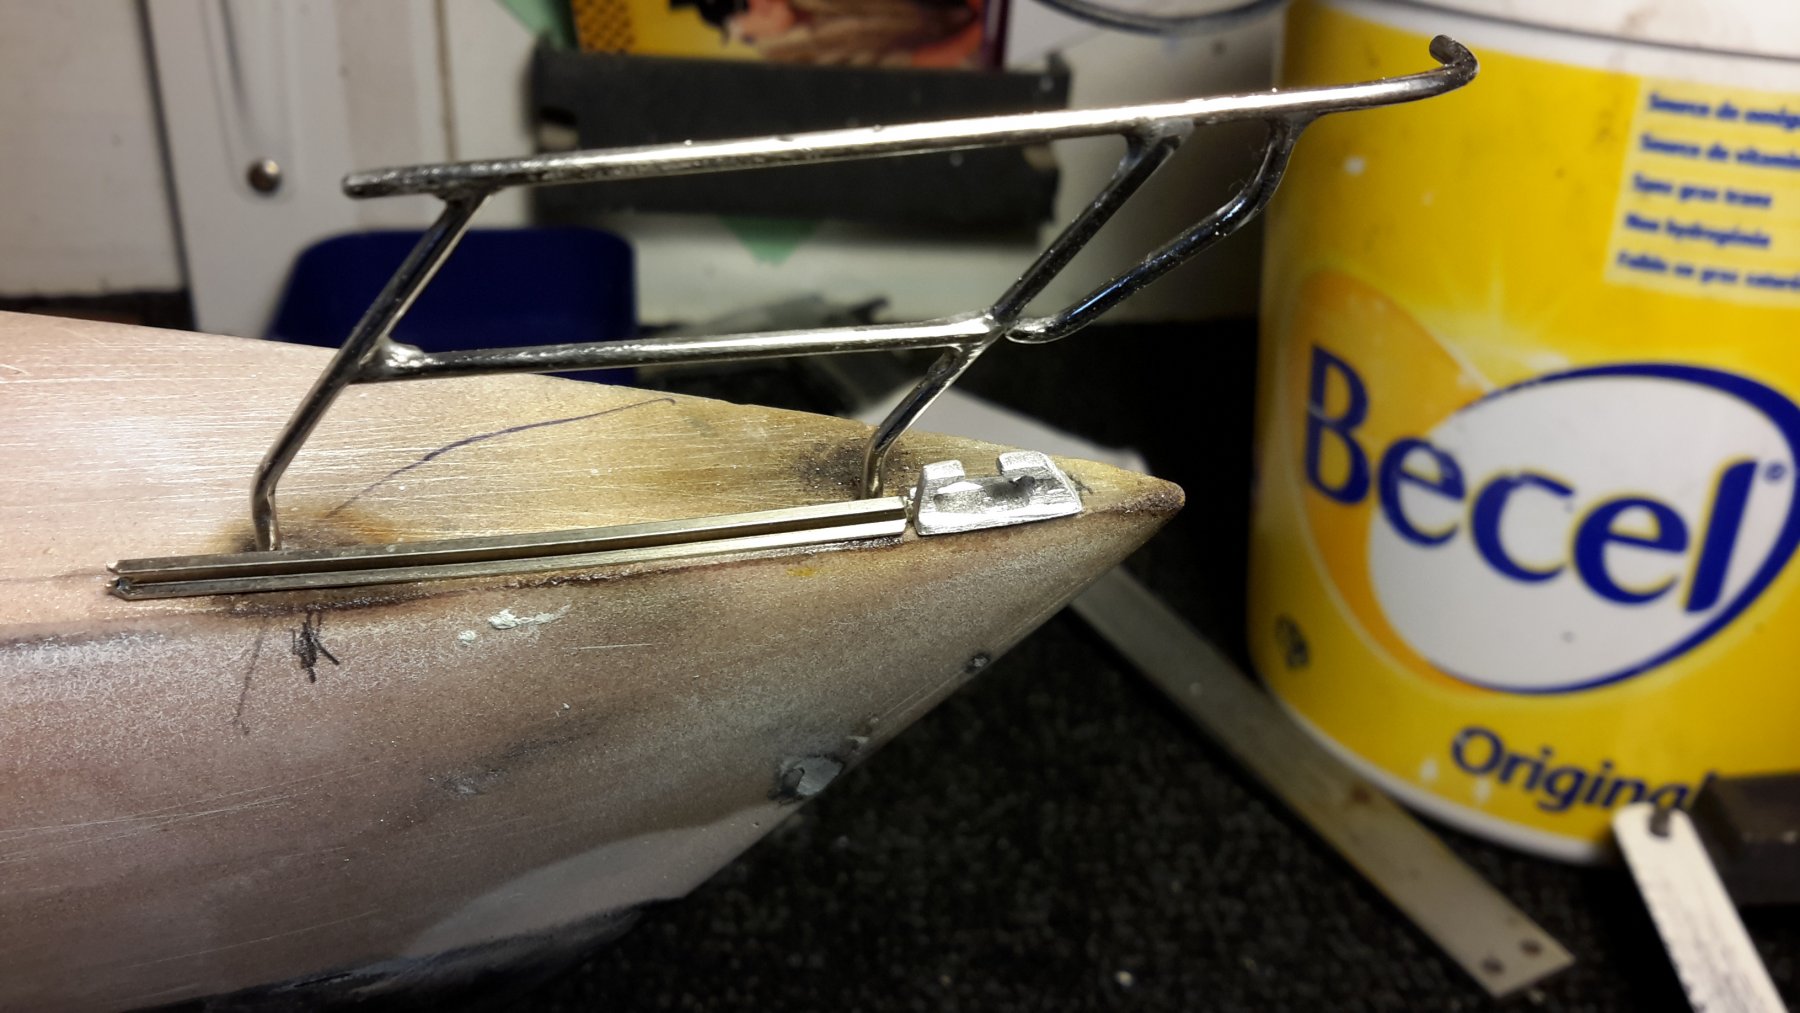
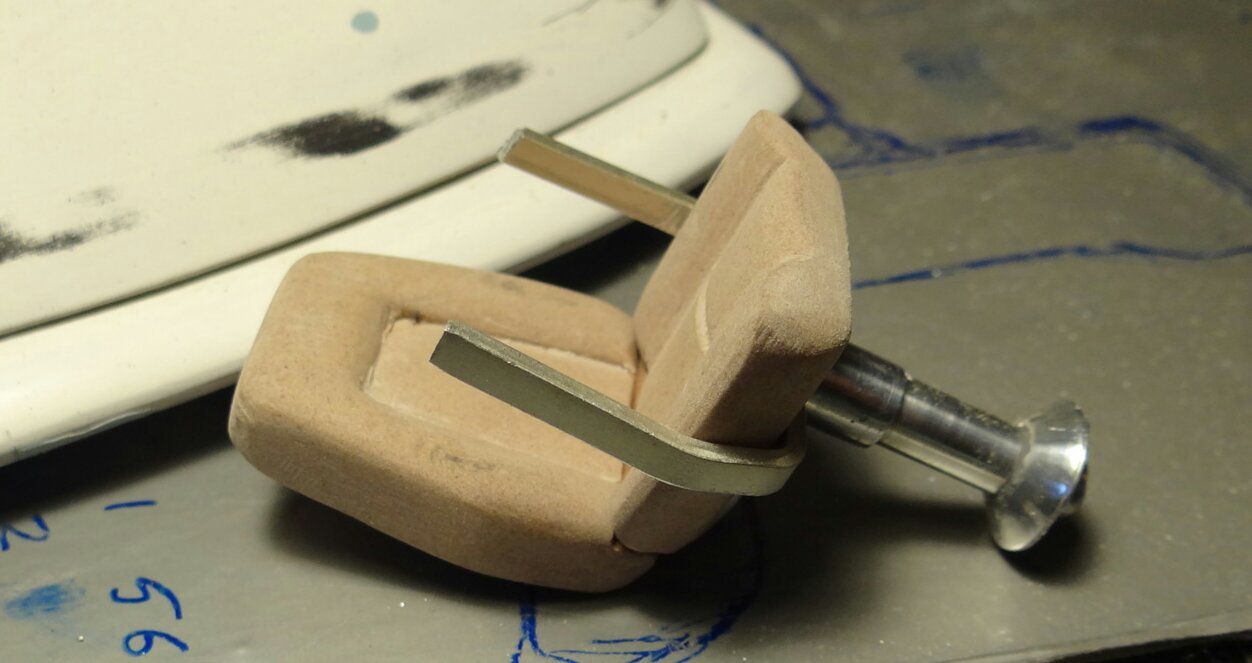
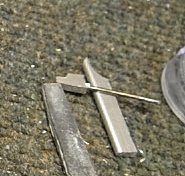
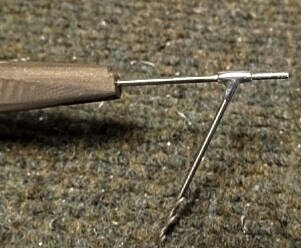
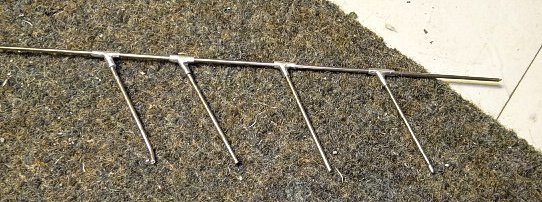
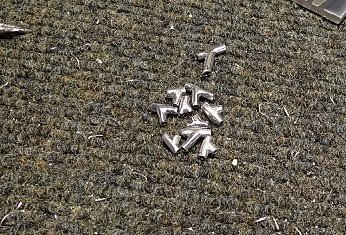
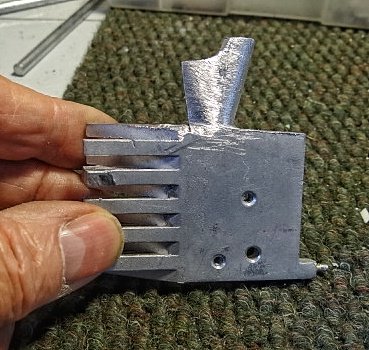
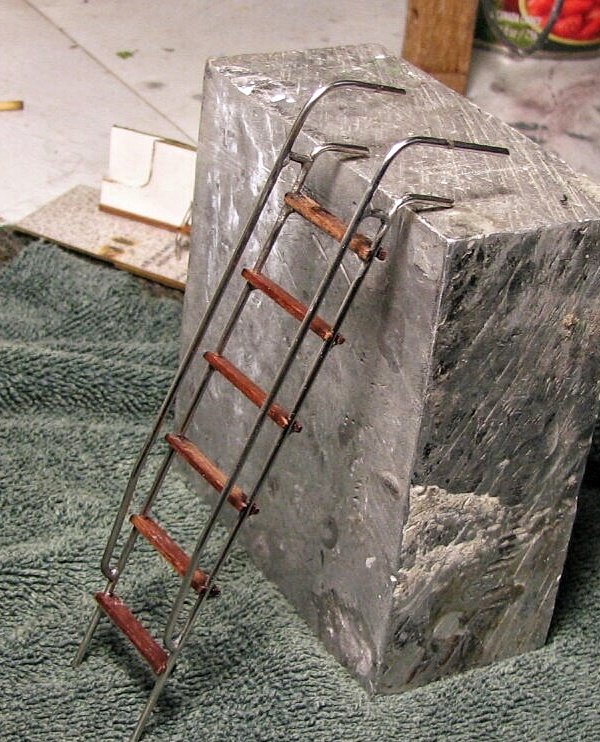
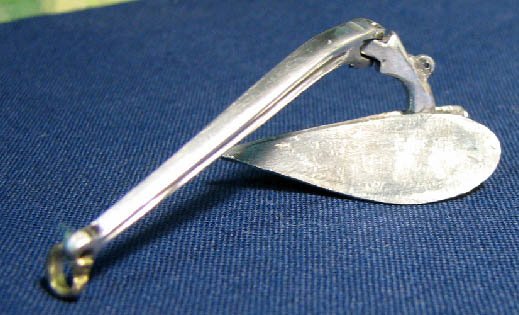
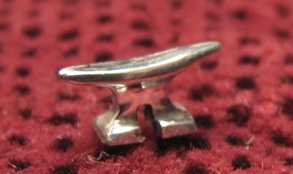
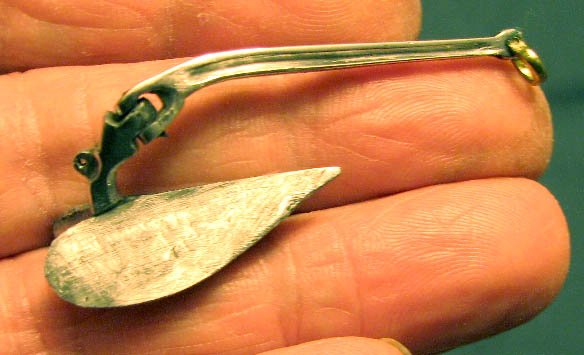
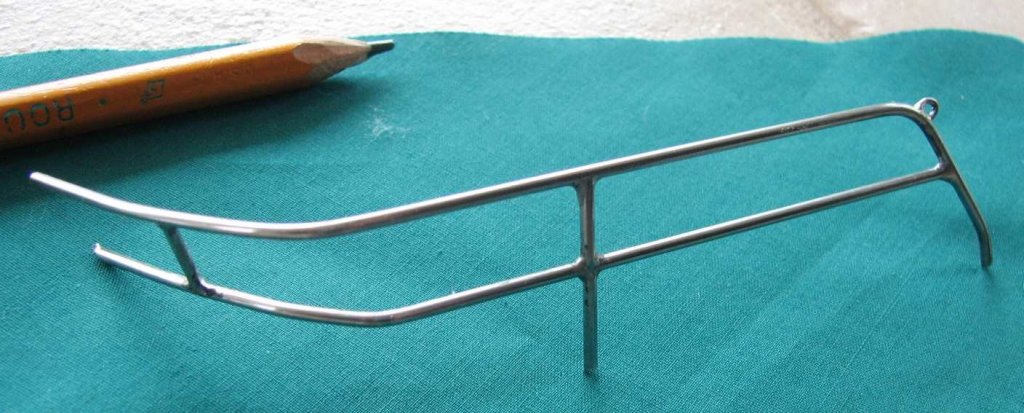
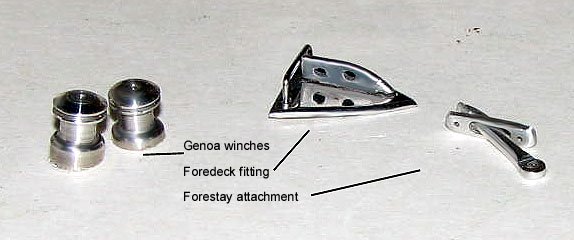
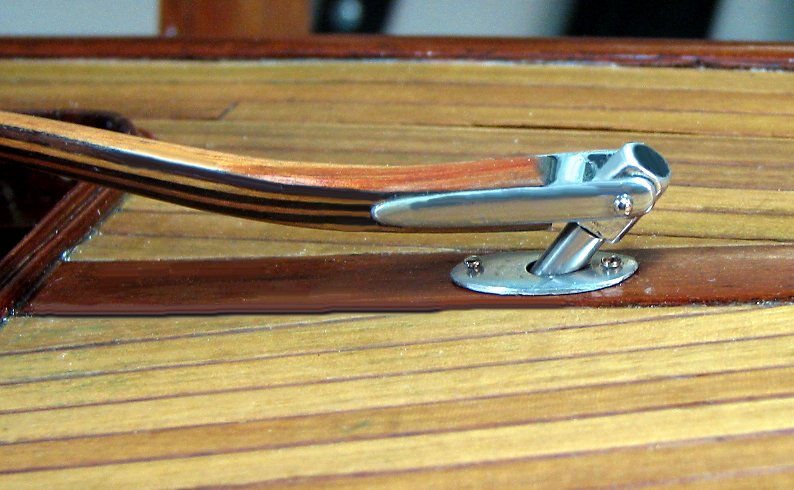
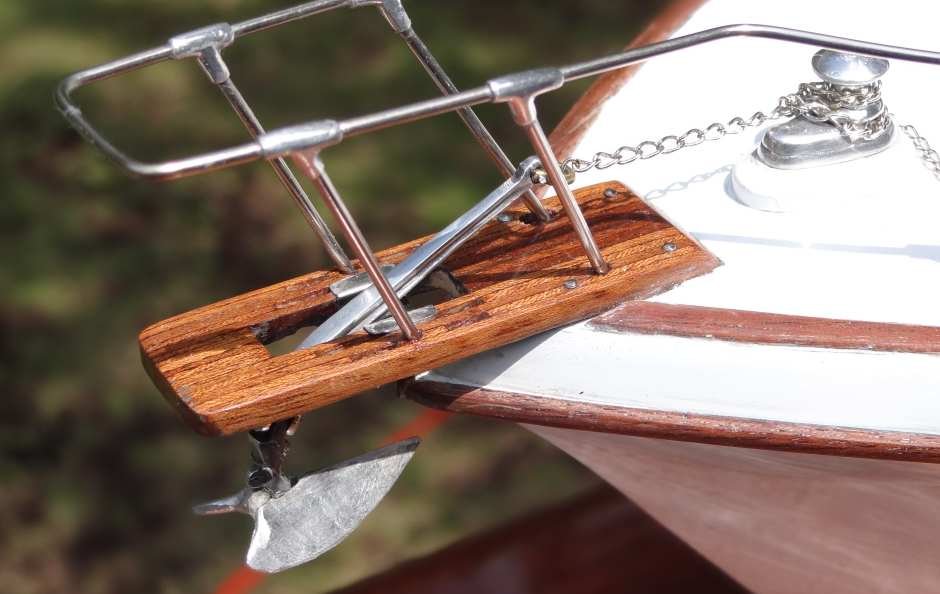
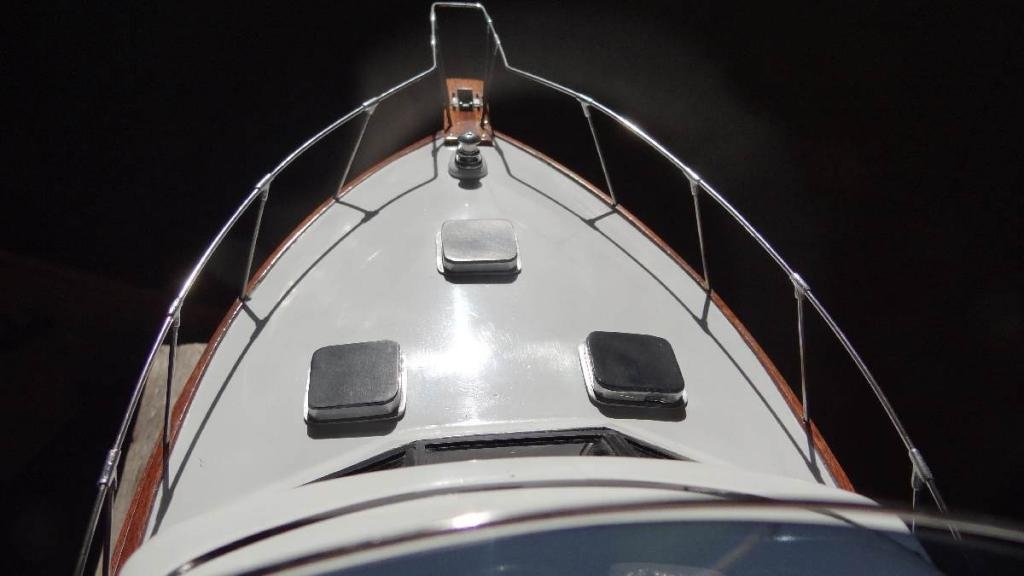
Hi Salty Thanks for the compliments. The fittings were hacksawed from a piece of aluminium scrap ... in this case a heat sink from an old computer. I'd just cut them to give me enough "meat" to make the piece. First I drilled the hole that runs horizontally (the rod above is in that hole) then, using a cardboard template, I'd mark the requisite angle then run a drill in till it finds the first hole. Now i crazy glued the rough piece to a tool I made with a handle.and proceed to shape it with files then polish. Initially I was going to silver solder each stanchion to the rail but the logistics of getting every angle right scrapped that idea so by default I had to fabricate the fittings. I worked out a way of doing it and got it down to less than a half hour each. When the time came to install the rail I built a jig on the foredeck using those handy Arborite panels which would hold the rail at the right height and correct fore and aft. I slid 4 fittings onto the straight rail the started bending it by hand to fit into the jig. Once the bow pulpit shape was done it was a simpler job to coax the right curve into the rest of it. I then snipped off pieces of stainless at the right lengths and slid them into the fittings which were still loose on the rail. A drop of CA on each end secured everything and it was surprisingly stable. I could even lift the model with it! The same process was used for the bridge deck rail. This one was more complex as it is one continuous piece and has to follow the lines of the glasswork (under masking tape here). The "start" and "finish" uprights had to end up at the perfect distance apart to accept the stainless ladder. Note to self: make sure every fitting is on the rail before you start bending! The bridge ladder ... Now there was a challenge!! The CQR was filed out of scraps as well and I really went to town on it. In fact, it was made for the model of my own sailboat but I hadn't got around to installing it there so, when I needed an anchor I gave him mine. Cheers Frank


- 18 replies
-
- 9
-
-
- honey bear
- fishing
- (and 1 more)
-
Hello from the Colonies ... Ontario, Canada
albergman replied to albergman's topic in New member Introductions
Hi Stan Wow, another fan!! I did put a short build up in the "build log" area. HERE I thought if anyone was interested enough I could tell more of the story. Building something like this (well, the way I do it ) things are pretty crude under the skin if you know what I mean. Some may find that off putting. I tend to use whatever does the job. As for drawings ... there were NONE available. I scoured the inter-web and found enough images and a video that gave me views at a long enough distance for reasonably accurate dimensions. Captured selected images, enlarged to the size I wanted, converted the images to "line drawings" and printed them. Below is what I made up from images. I had access to the real boat of course (belongs to my best friend) and I took maybe 1,000 images and videos!! If you want to explore this further maybe we could start expanding that build log. Thanks for your interest. I appreciate it. Frank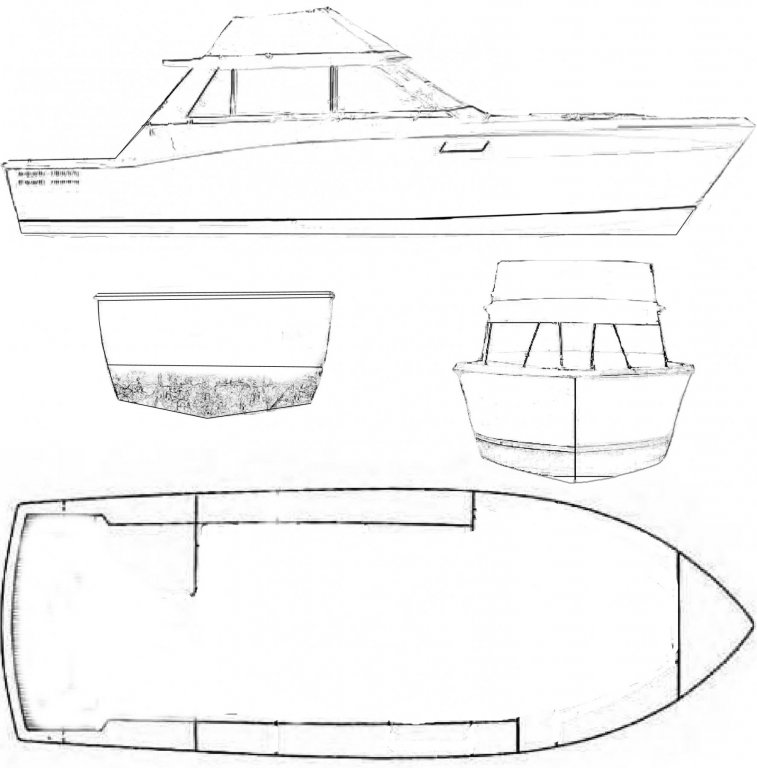
-
Hello from the Colonies ... Ontario, Canada
albergman replied to albergman's topic in New member Introductions
Hello Nils Thanks for the welcome. Yes, the boat belongs to my dearest friend (for 65 years now) who just loves and cares for this boat. He's always had fast power boats and I've always sailed. Frank -
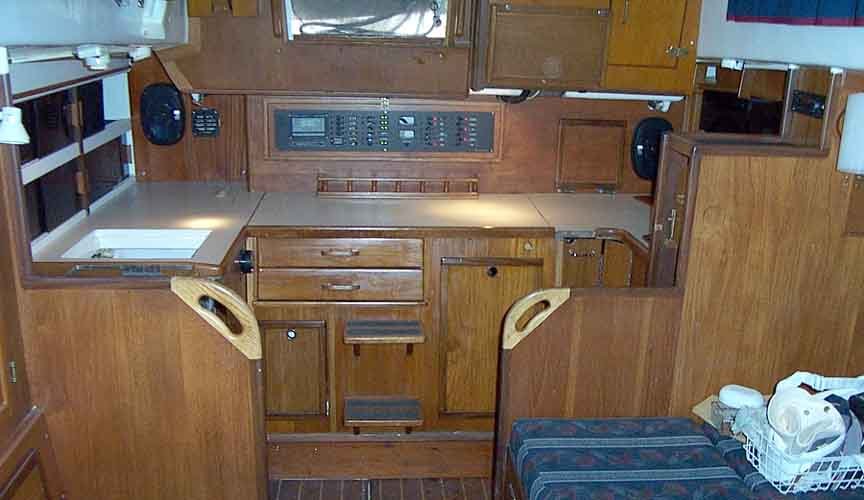
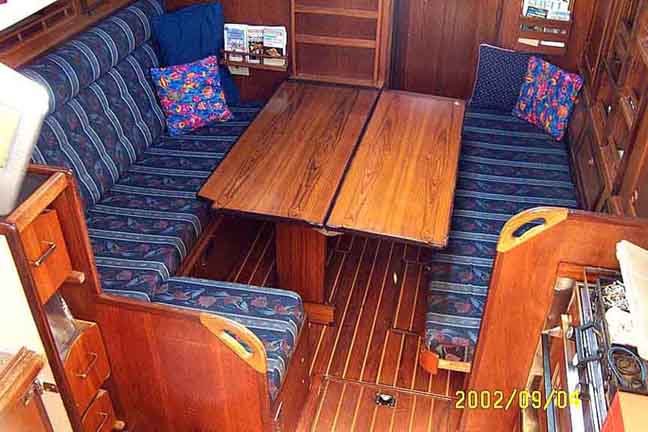
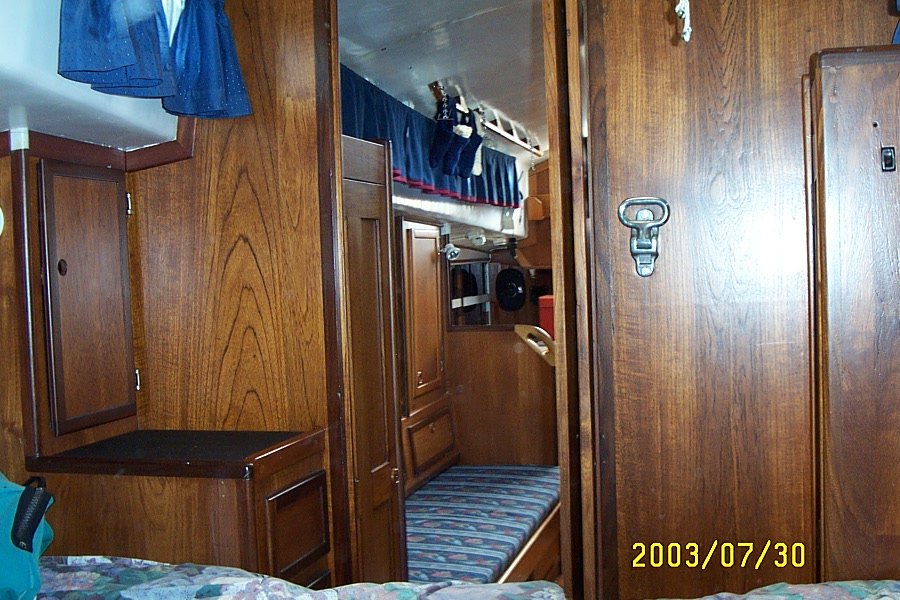
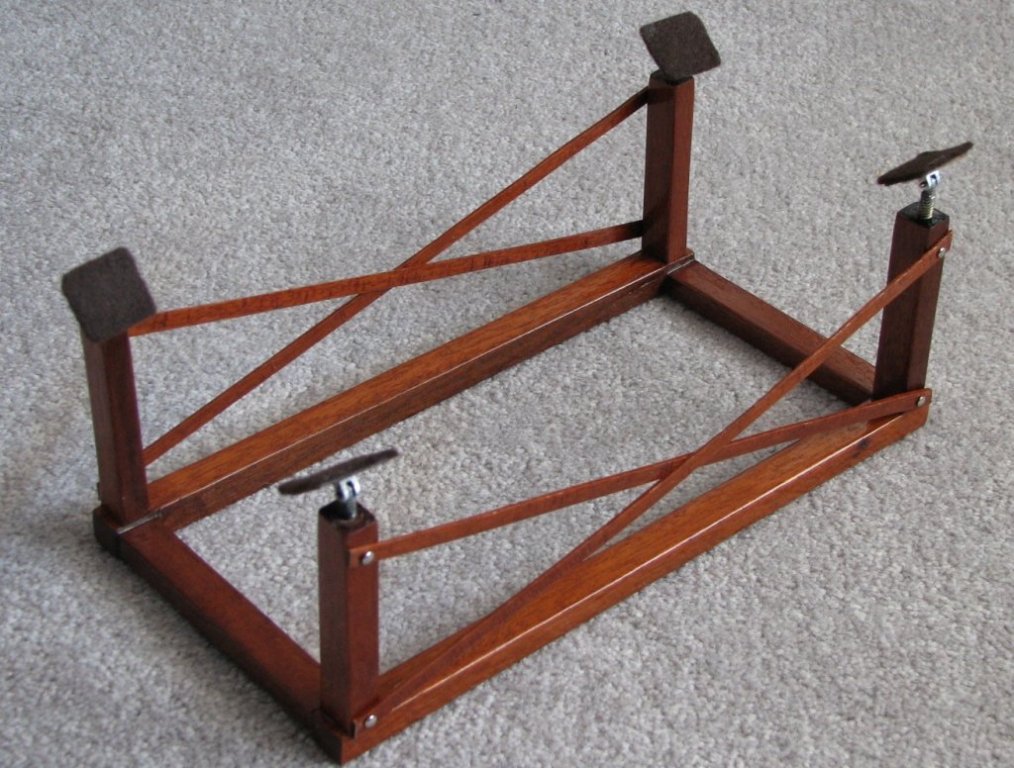
I'm not surprised Patrick that you enjoy doing the interiors ... why else would you tackle it eh? It must give great pleasure to create such a miniature world. As much as I'd (maybe) like to do it, just for the fun of it (I built almost all of the interior of the real boat), I know it would go back on the wall and nobody would (or could) ever see it. Besides, the model is a solid mass of blocks and Bondo fillers under the skin and it would be a nightmare to hollow it out. Here's what's "behind the curtain". As it is I've got too many (car) projects in the mill so there's no point in starting this one. Thanks for the encouragement though. The cynical side of me says ... this guy just wants company in his Lilliputian world I do have plans to rebuild a fair bit of the Alberg as the metalwork is starting to tarnish and its solder too. I've switched to stainless steel rod and silver solder so that's the main focus and. yes, I will start a build log. Frank
-
Hello from the Colonies ... Ontario, Canada
albergman replied to albergman's topic in New member Introductions
Hi Derek Thanks for the welcome. It truly is an international group we have here! I'll see you around the forum. Frank -
Hi Keith Thanks for looking in and taking the time to comment. I'm still feeling a bit of a fish-out-of-water here as my modelling direction seems so different to anything else I've seen so far. In all my scratch building I get the most satisfaction from the process ... how can I make that and what can I make it from? That sometimes means I don't always spend as much time getting obscure details just so. e.g. my wire wheels on a car might not have the correct number of spokes ... that kind of thing. It's a worthwhile objective and I truly admire builders like yourself and some others I've seen here who can strive for that level of perfection and have the skills to get it. Your Altair is just a fabulous piece of ... modelling doesn't do it justice ... a combination of art and engineering. Truly inspiring work Keith. I see you had an appropriate background too so that helps. I was a computer geek now going on 80 and I've got so much to learn and so many models I want to finish!! Cheers Frank
-
Hi Patrick Thanks for your interest. A fan you say!! So, do I have to start a fan club? Should we have jackets? Can I charge membership? I've already commented on your insanely small projects and have just read through your J-boat ... holey moley they're so tiny and so crammed with all the innards! Do you live in a telephone booth by any chance? Actually, you've got me thinking ... I'm about to take the half-hull of our own old Alberg 37 back to the shop for updates and I've always had an urge to do the entire interior so ... if you can do it in a 7" model it should be a piece of cake right? Maybe you'd like to do it for me? Cheers mate. Frank
-
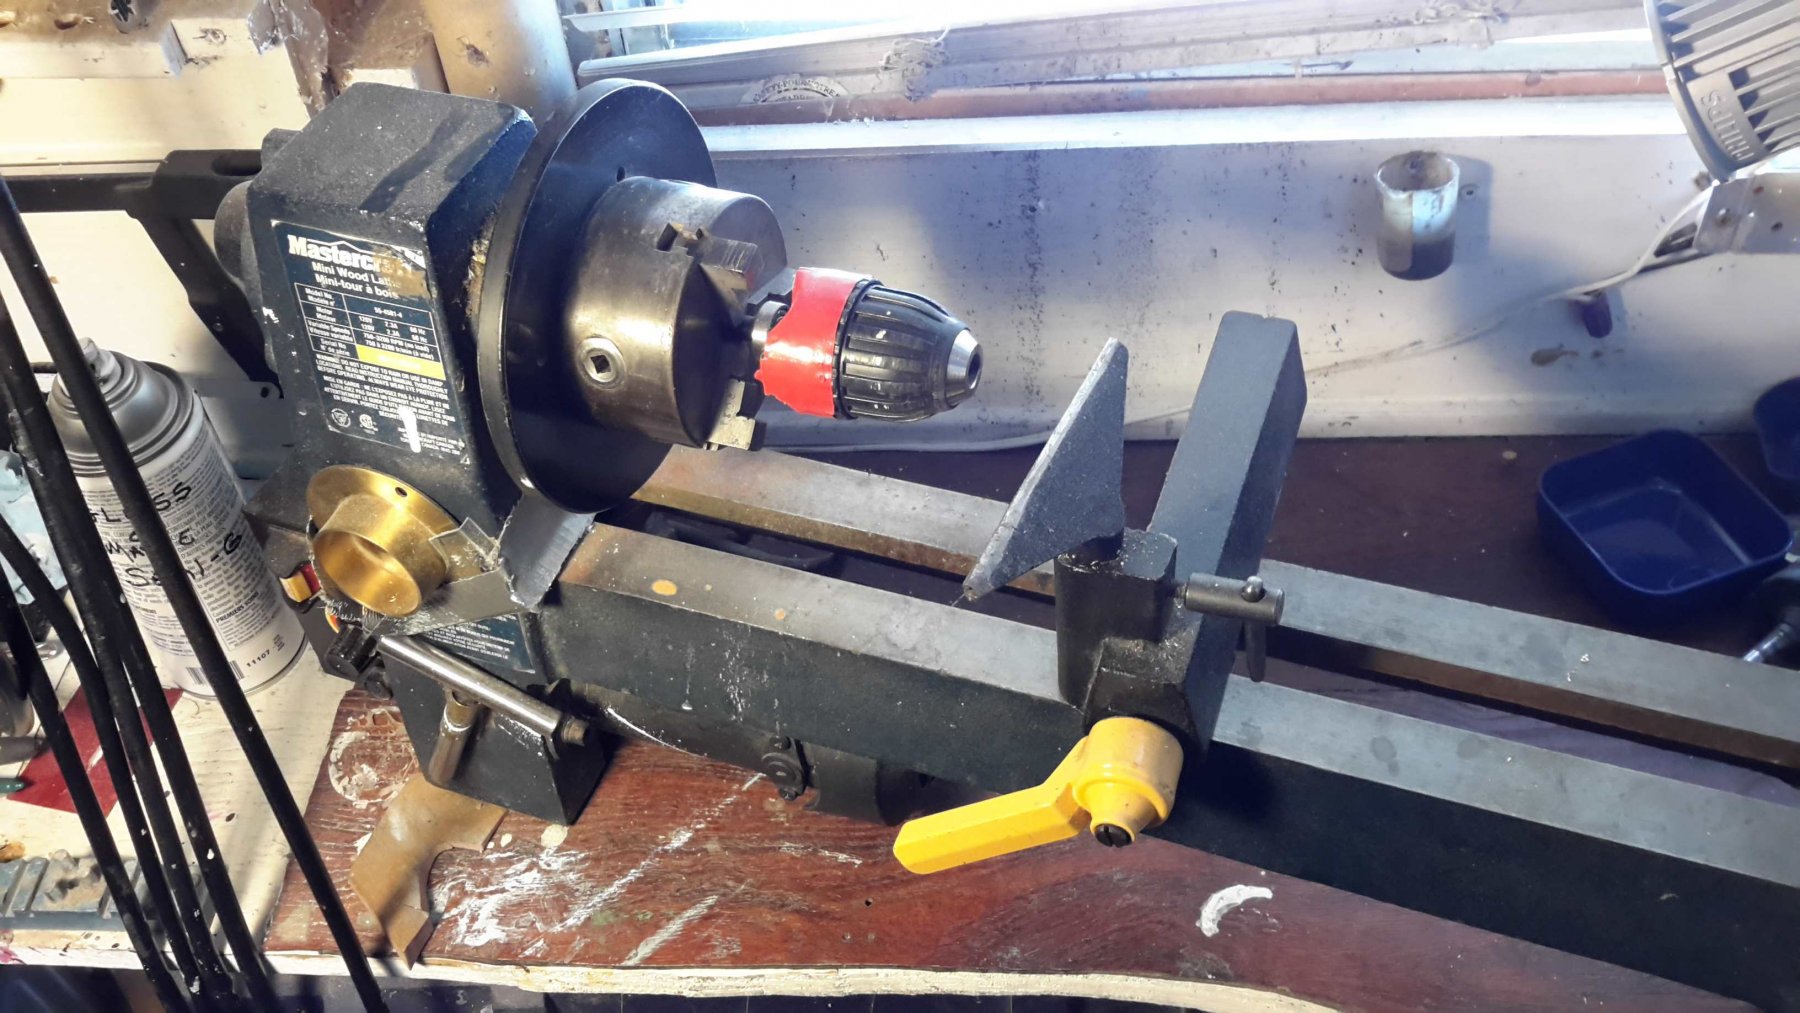
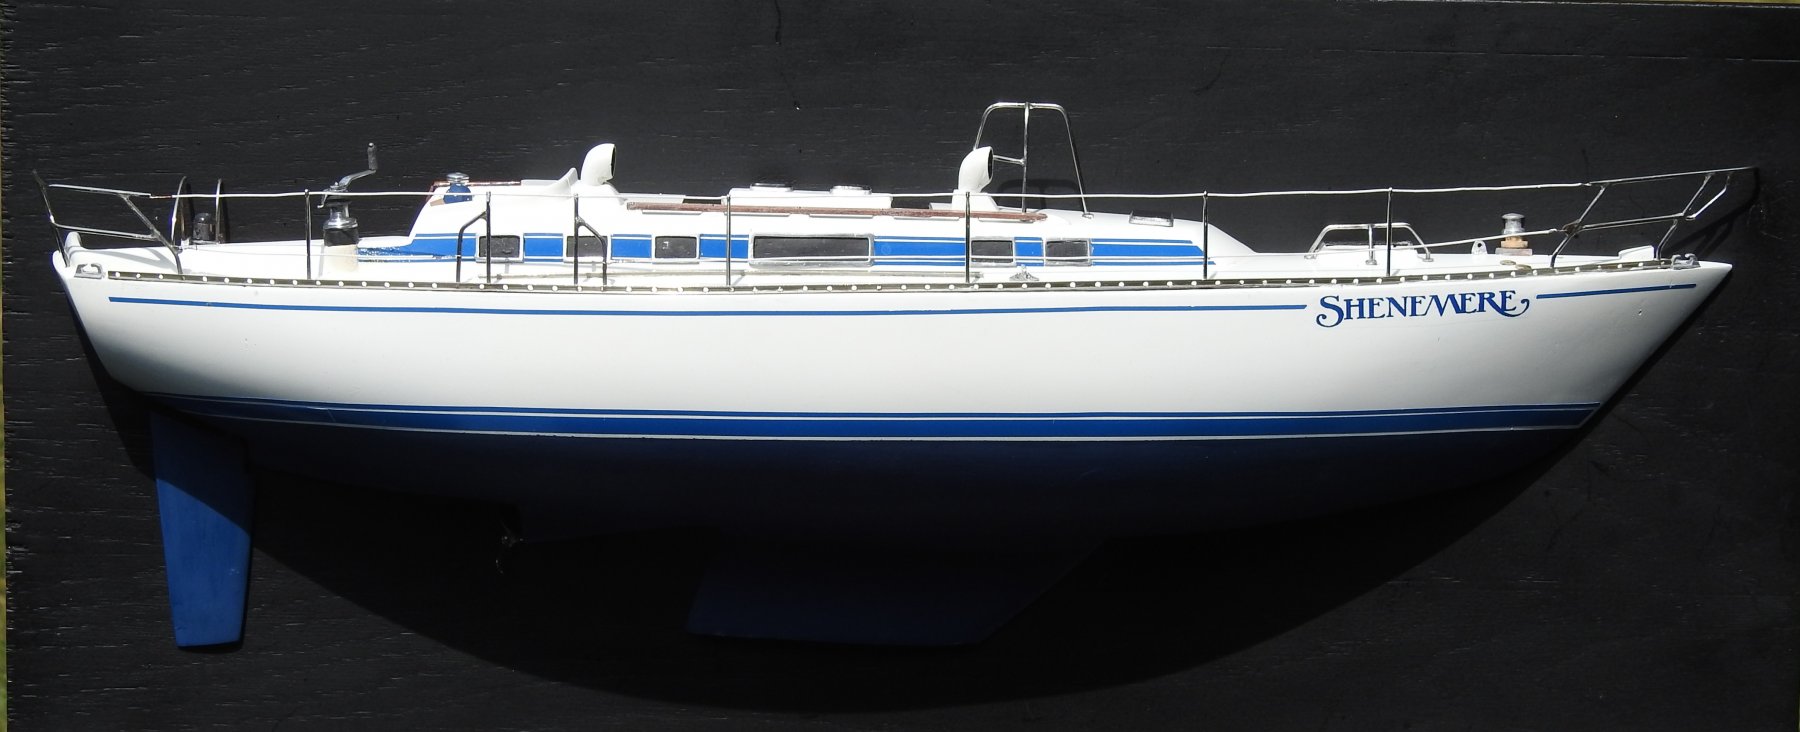
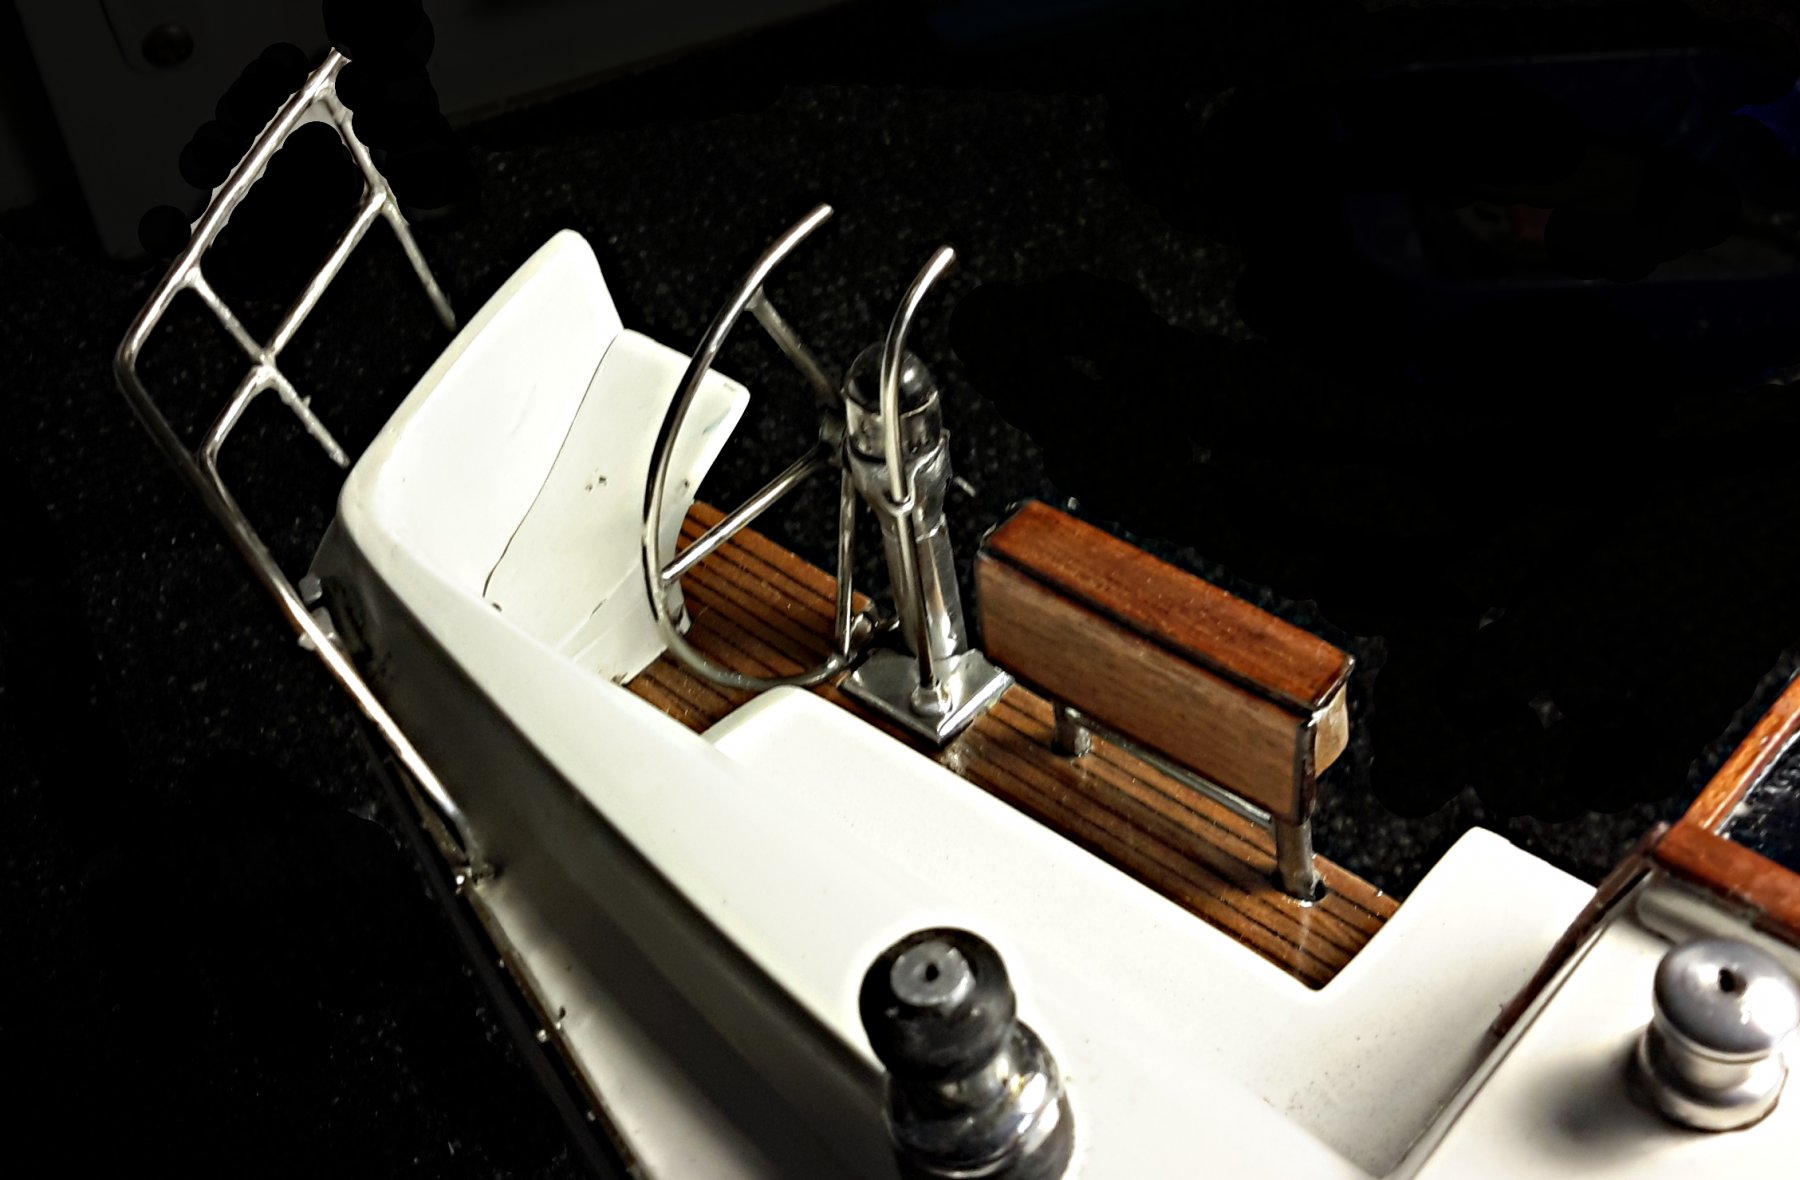
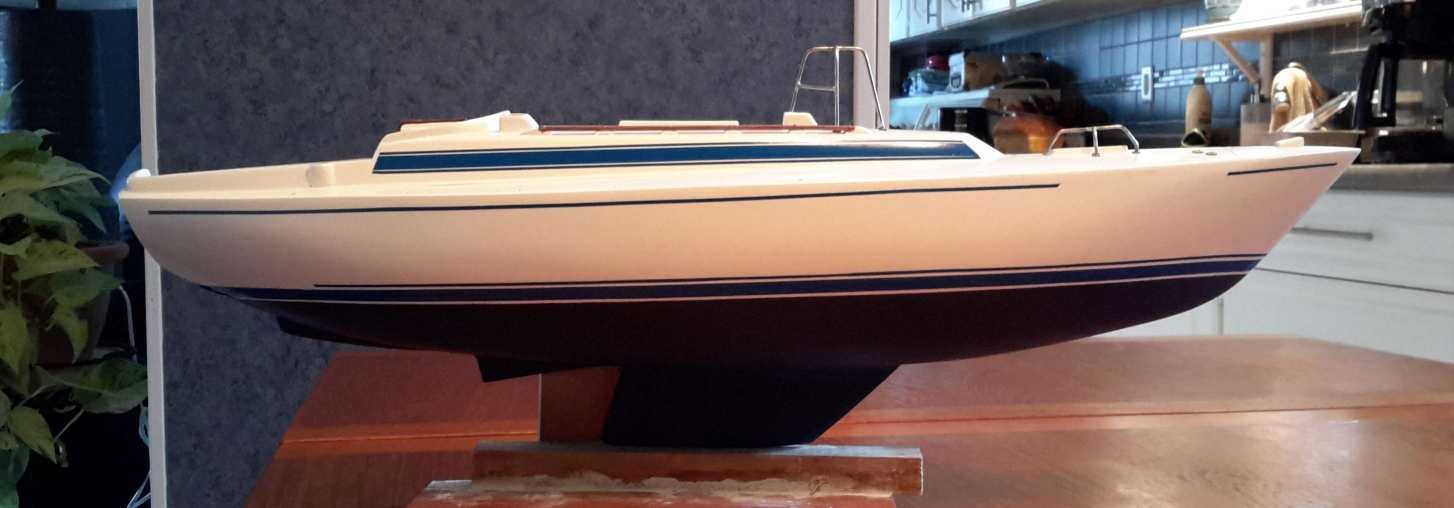
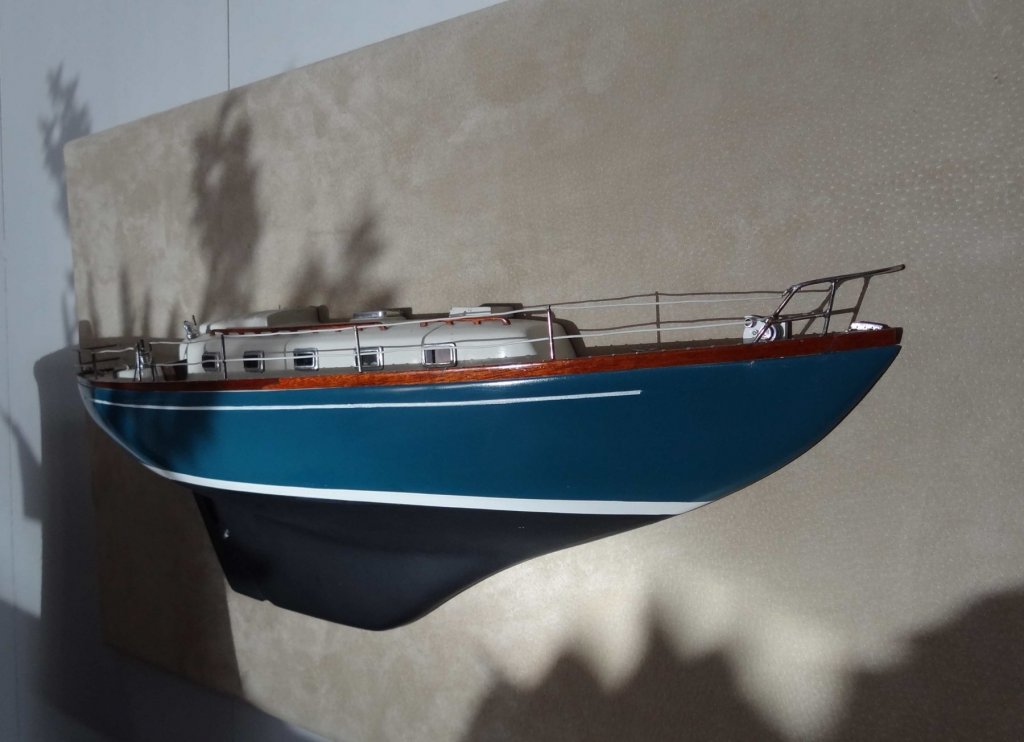
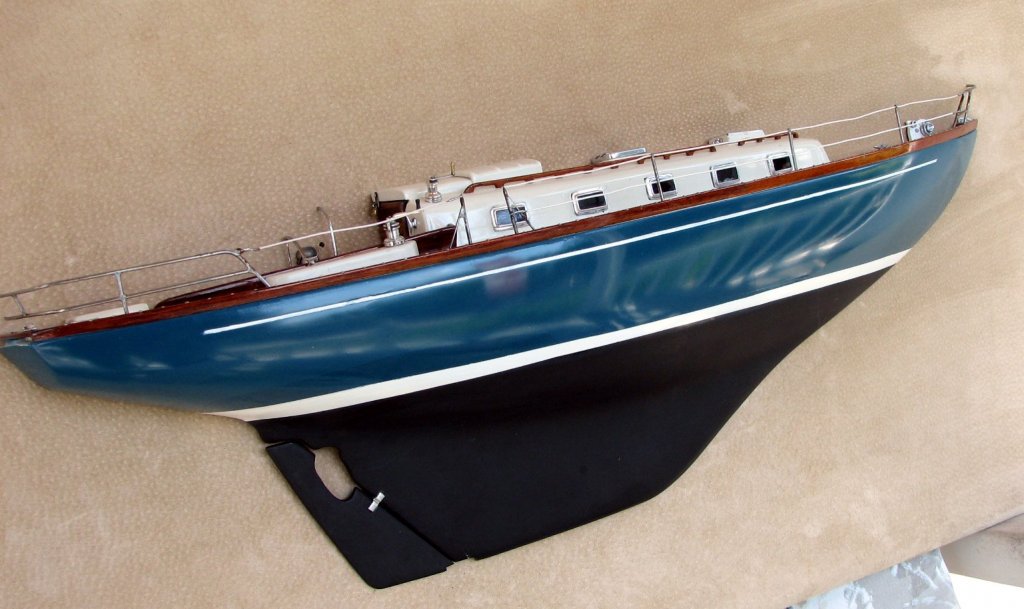
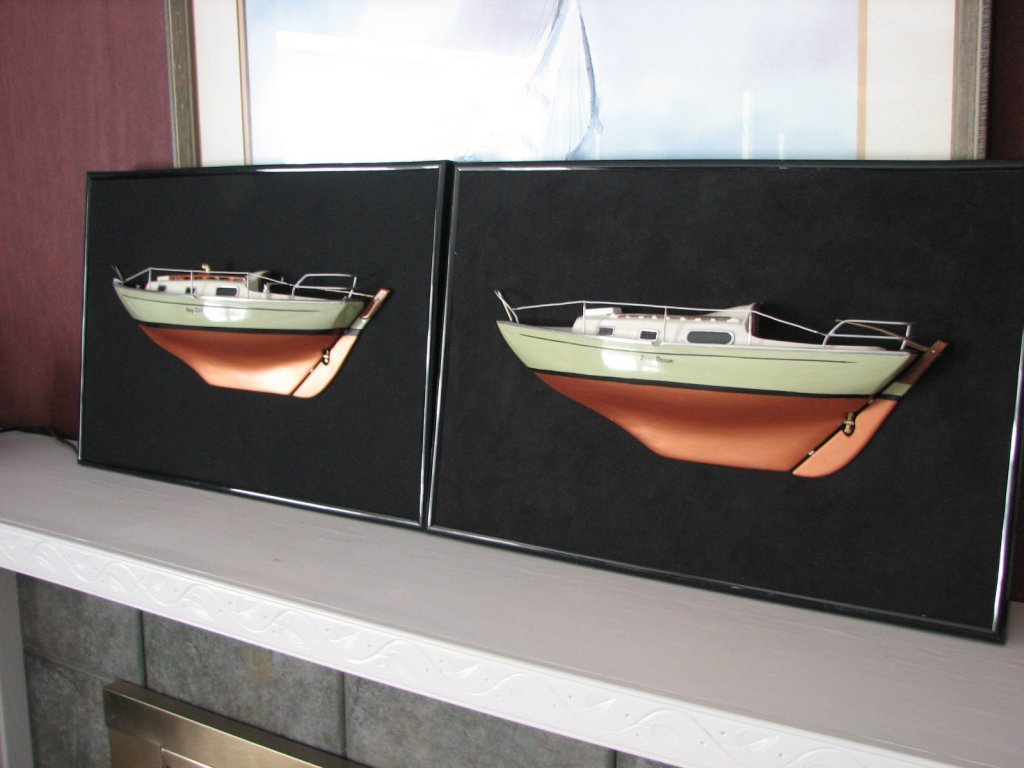
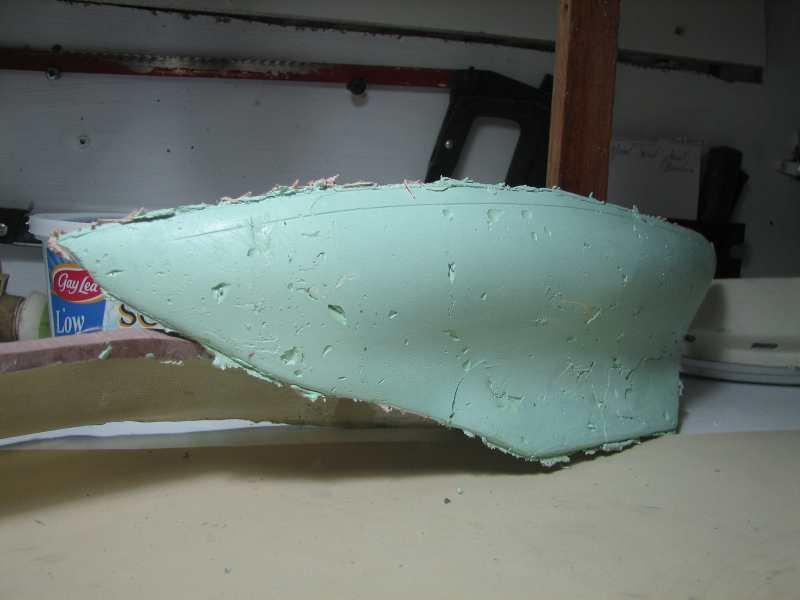
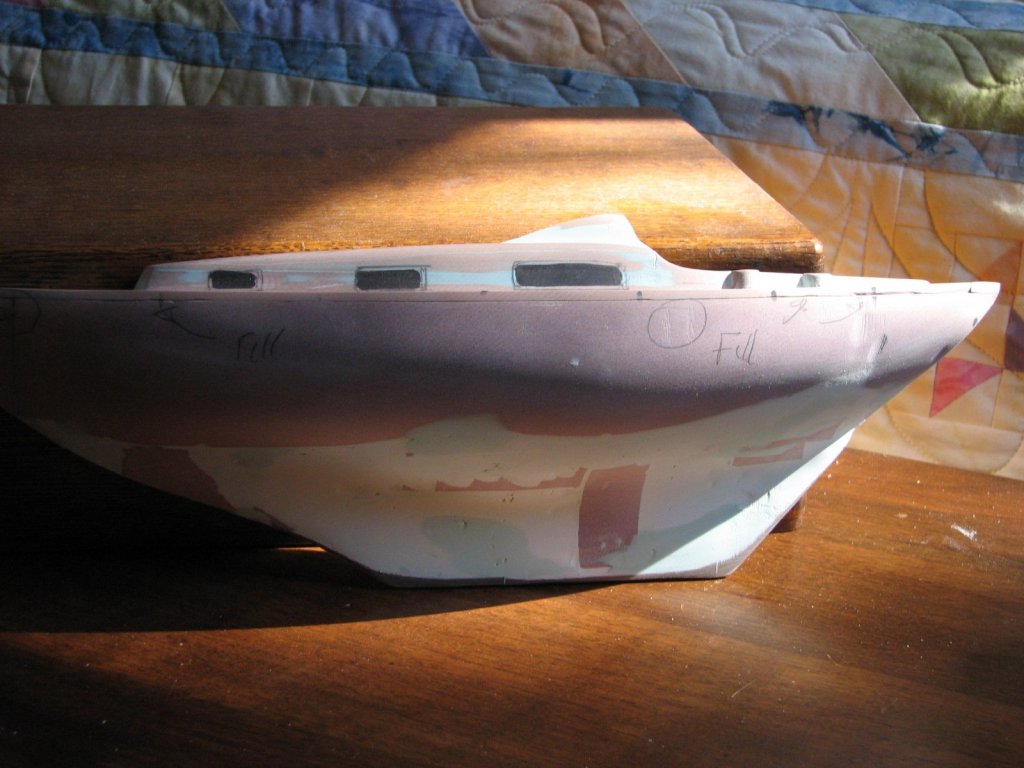
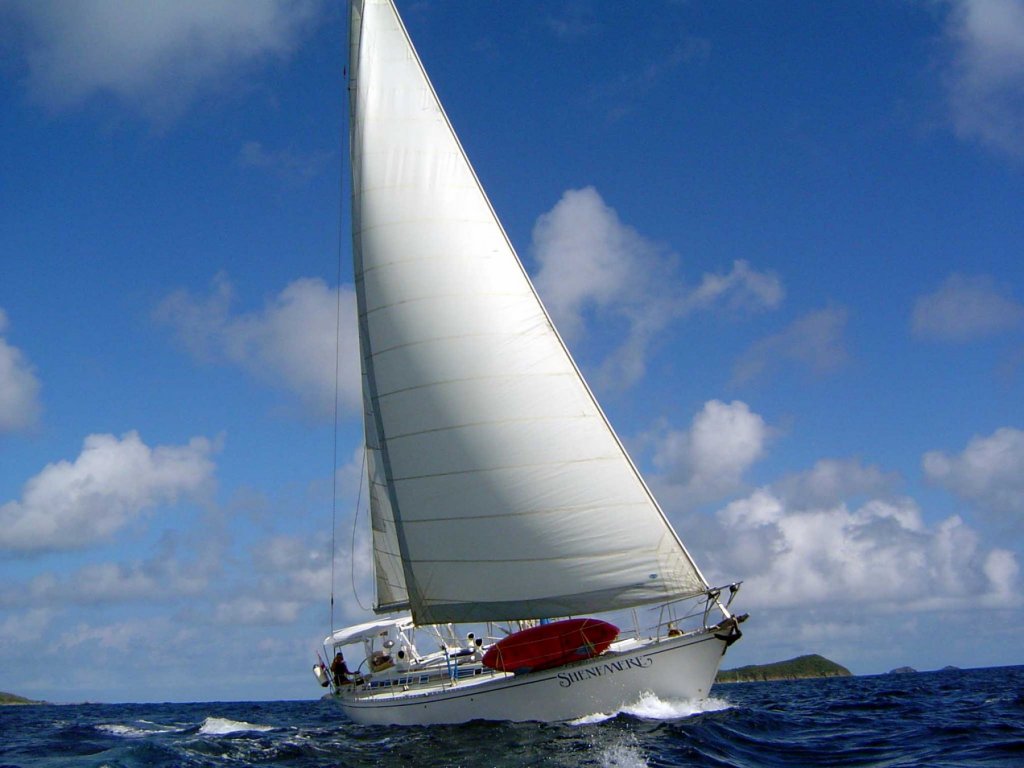
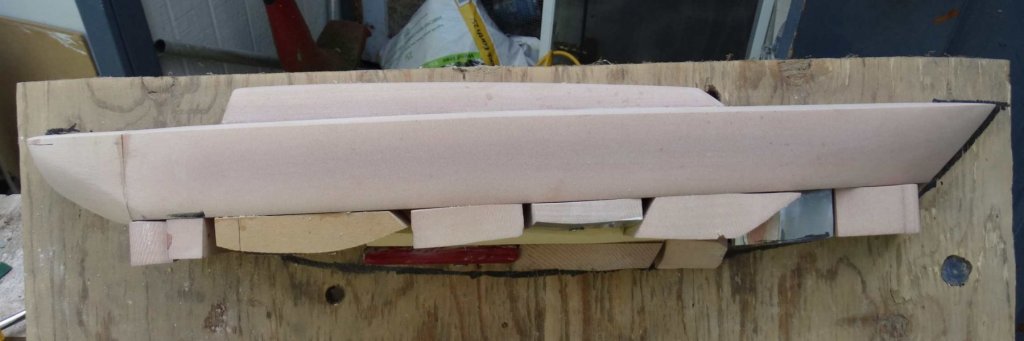
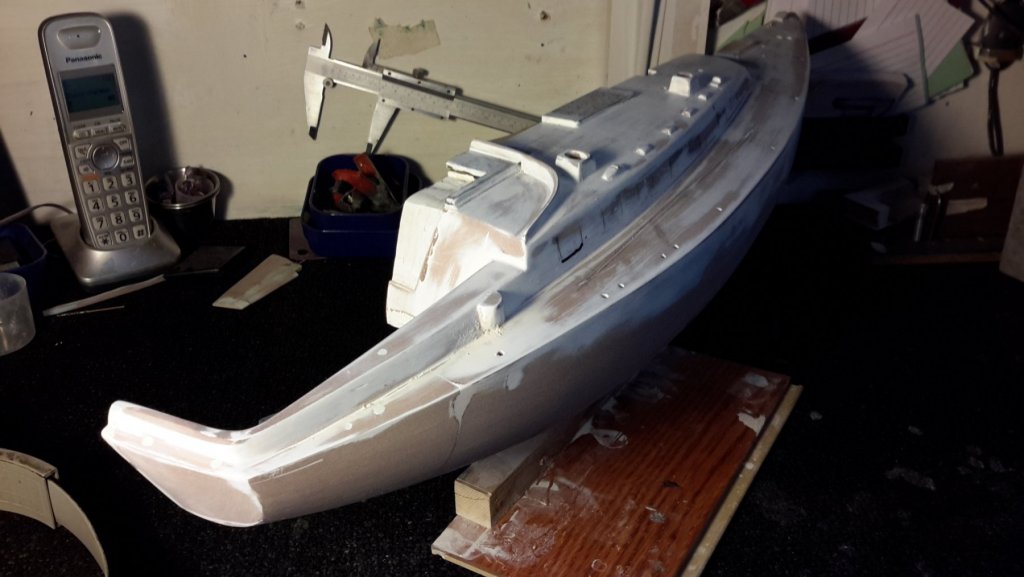
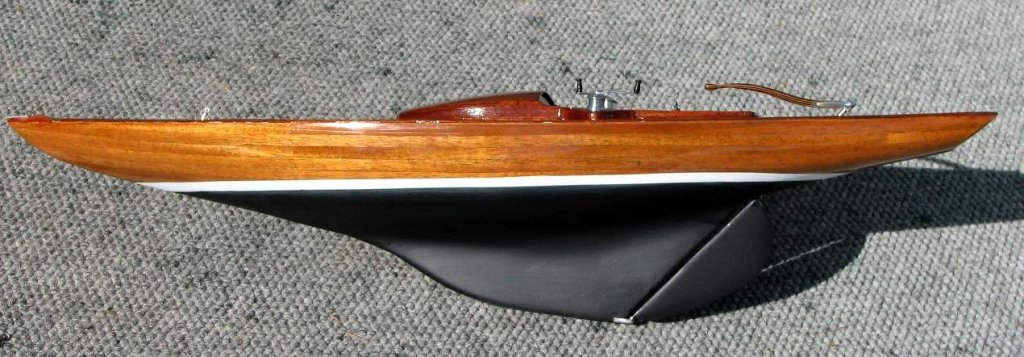
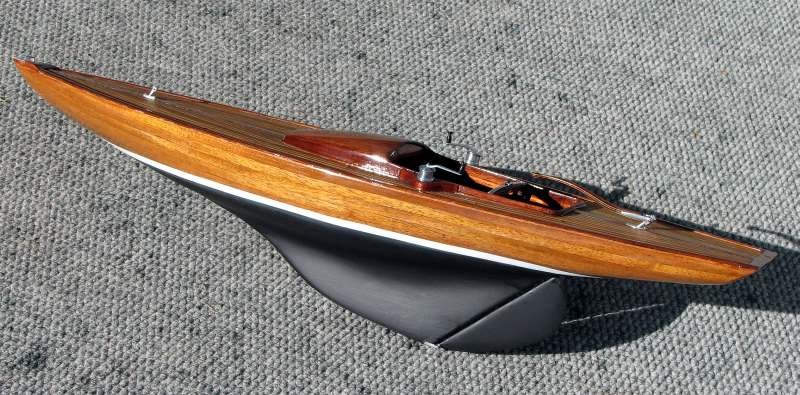
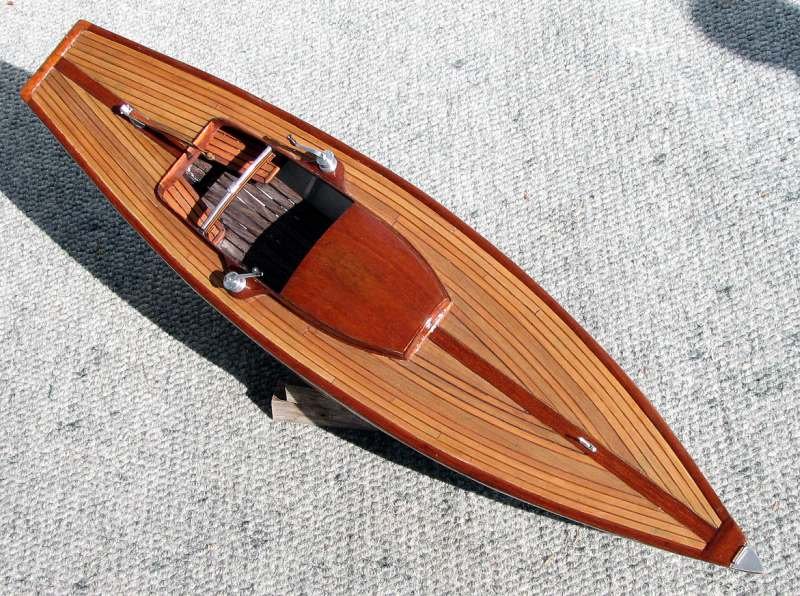
Here are the last of my maritime models and, in keeping with my different style of building, they're all half hulls. I like this format as it can be hung on a wall so I don't have to answer that awkward question from my wife ... "And where do you intend to put THAT". Well, it's an easier discussion! First up is a model of our own boat, an Alberg 37, which we've since sold. Ever since I took up scratch building I had intended to build this once I developed enough skills to reproduce it and, more importantly, all the metalwork. The hull is carved out of a block of Renshape and is at a 3/4" scale. Here are a few of the details I scratch built from salvaged metals. I've had some questions asked earlier about tools so I'll digress here for a moment. My "lathe" at the time was a hobbyist wood lathe with a 3 jaw chuck, a tool rest and I used cheap Chinese carving chisels which I would grind to custom shapes as needed. In the picture above I've got a chuck that I salvaged from a hand drill mounted into the 3 jaw chuck. This is my preferred setup when making tiny pieces as it gets your fingers away from the deadly, hard, spinning 3 jaws. Even though I now have a "proper" metal lathe I miss the flexibility offered by hand held tools. Anyone considering a metal lathe might want to keep in mind that all the turned metal pieces you can see e.g.steering binnacles and winches, were made by a hand held tool and are considerably more difficult (for me) to make with a metal lathe. OK ... moving on. Next up is up is our previous boat ... a Thunderbird 26. These are plywood hulls built to a Canadian design. On the real boat I removed the cabin and cockpit when I bought it and built a totally new cabin so if anyone thinks it doesn't look like a T-Bird ... that's why. I made this simple, smaller model (13") for one of our sons who was very fond of the boat as a child. Carved from Renshape. Cockpit details mostly fabricated using Arborite/Formica samples. My wife can be very indecisive when we go to a hardware store to pick out a colour for the new kitchen so the salesman is always happy to load us up with lots of samples! These are great for flat surfaces because of their perfect flatness, square and strong. CONTESSA 26's ... Two of them. Our friends who owned it had split up and they both wanted one. Both are 12" (maybe 13") models. The original is shaped as usual from Renshape I made a fiberglass mould from the first hull to save same time. then used auto-body repair paste (Bondo) to make the duplicate. Both friends are happy with their souvenir ... but still apart. BENETEAU 51 IDYLLE This yacht was owned by friends who have it in the charter business in the Caribbean. The real one ... The hull was fashioned from Renshape (mostly) and generous applications of fiberglass paste and Bondo ... needs must. My stash was getting very low so I was cobbling together all the biggest bits to create the mass I needed. She wasn't a pretty baby. But with generous dollops of Bondo and my power sanders I soon had a suitable shape ... It is "close" to 1/2":1' scale but definitely built to scale. I'll just put in couple of shots of the build ... I won't bore you with all the fabrication that was required but if anyone wants to see how pieces were made ... let me know. LOTS of pictures available. Thanks for looking in ... Frank


- 29 replies
-
- 19
-
-
Thanks Greg. It's actually just a miniature replica of the style used for real yachts here in Ontario. I don't think anyone ever finished one to this level though! LOL. Juhu ... thanks too. It was fun to look at many of the beautiful Dragons still maintained in pristine condition and choose what features to include. We should all be eternally grateful to Mr Ankers and others of that era for their purity of design. Great to some of those aesthetics coming back to modern yachts albeit in the super high end. Mike ... thanks. Not sure what you mean by cartridge paper? Could you expand on this for me? Frank
-
Hi Jack Appreciate the complement. As far as scale goes ... hmmm ... well the Dragon was a kit so I don't know what that was. I do always build to scale but not necessarily one you would have heard of LOL!! The choice is usually determined by whomever I'm building for ... "how long do you want it Dave?" kind of approach then I scale my drawings accordingly on the computer and print them. The Trojan powerboat was about 26" long and had an odd genesis. I knew I'd have to find stainless metal rod to do all of the one-inch railings required and until then I couldn't proceed. I finally found stainless welding rods at a decent size so their diameter (1.2 mm I think) became the requisite 1" rails and that decided the scale of the entire model. Frank
-
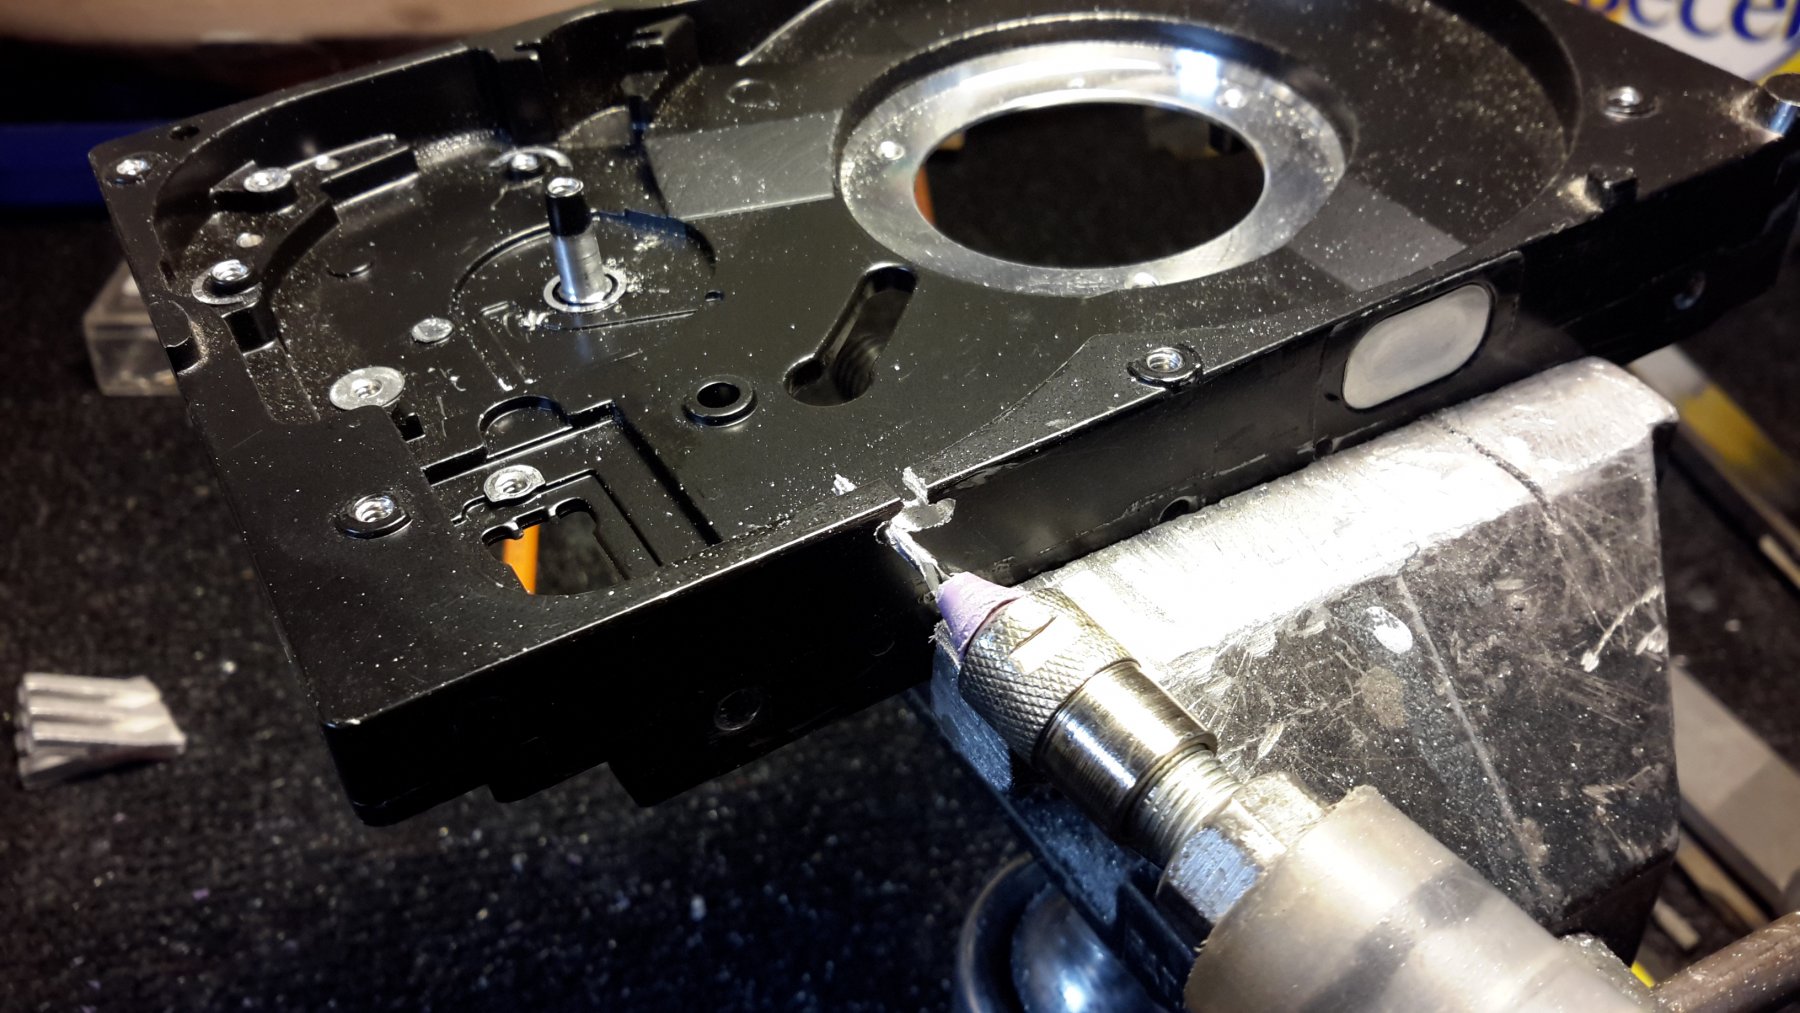
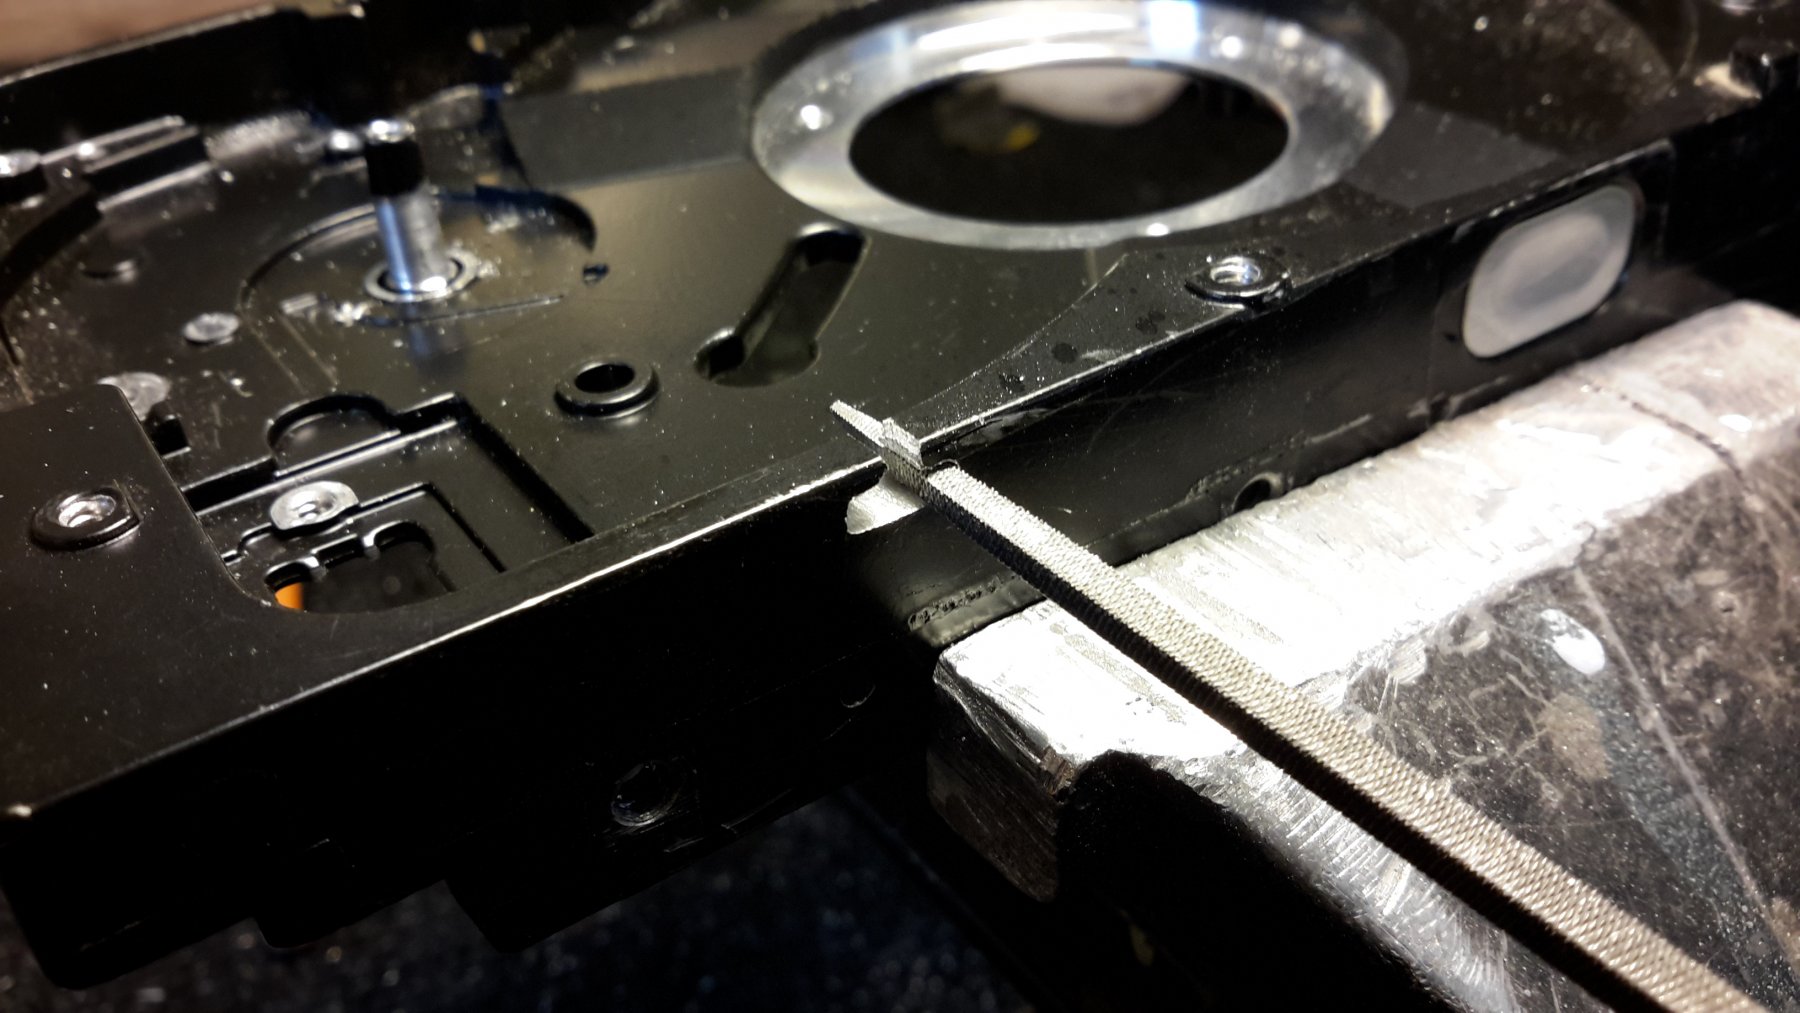
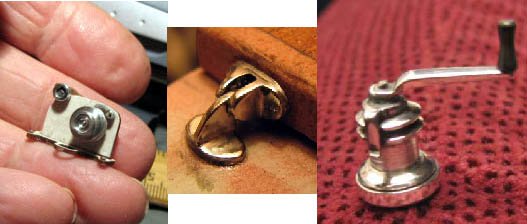
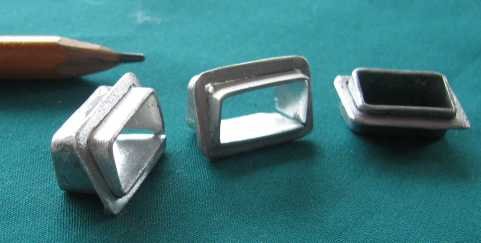
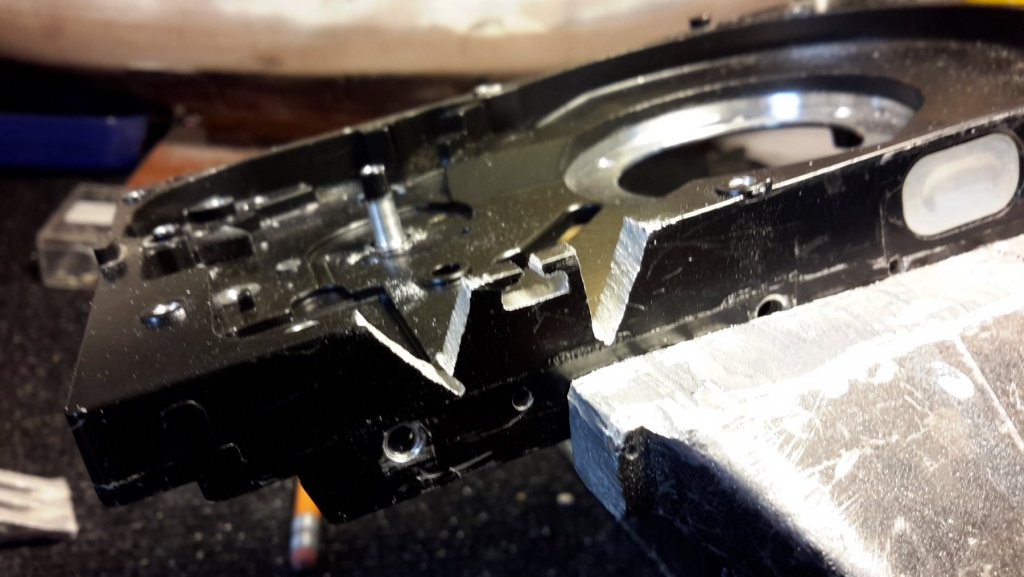
Hi Dan and thanks for the warm welcome and kind words. You're right on that I do feel a bit "out-of-place" maybe with my choice of subjects and my approach to model building. This is all something I just started in the last few years since I retired so I'm honing all new skills. Re: machinery and techniques ... I have a band saw and a collection (8 I think) of Dremels (Chinese knock-offs) all with flex-shafts and different tool-bits. In the last 6 months I bought a hobbyist metal lathe but that has only made some wire wheels for my latest racing car model. So, to answer your question it's all done with hacksaw and files ... maybe 200 by now, then wet-sanding the aluminium and working up to 1000 grit then metal polish. I dismantle and save all kinds of machinery ... old computers, hard drives, VCR's etc so I have a stash to sift through for something appropriate to make a part. Computer hard drives are a favourite as they are cast in a reasonably soft alloy that's nice to work with and polishes well. Here's a selection of pics showing how I made a pair of fairleads for a friend's half-hull Beneteau 51 using a hard drive chassis ... Dremeled out the rough shape with a rasp-type tool ... File to shape further ... Hacksaw the piece out ... Tiny pieces I usually Crazy Glue to an arborite sample so I can fine finish it These fittings aren't needed to be finely polished but enough to replicate the real part. Hope this is helpful Dan. Frank


-
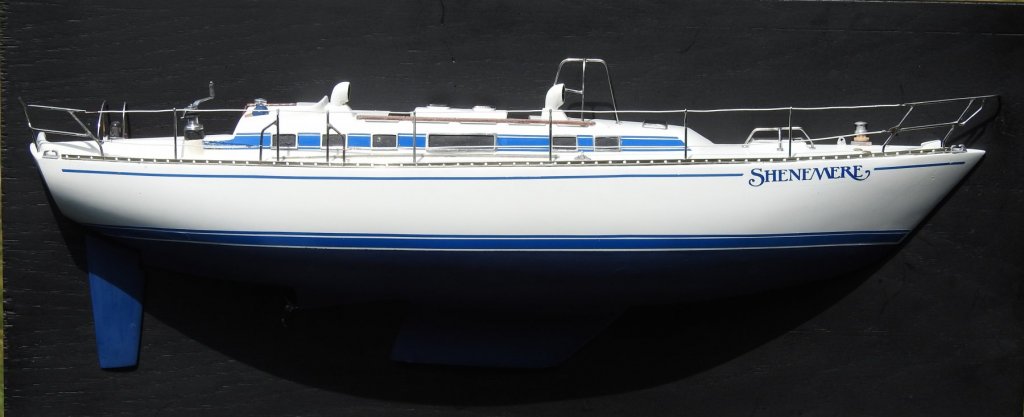
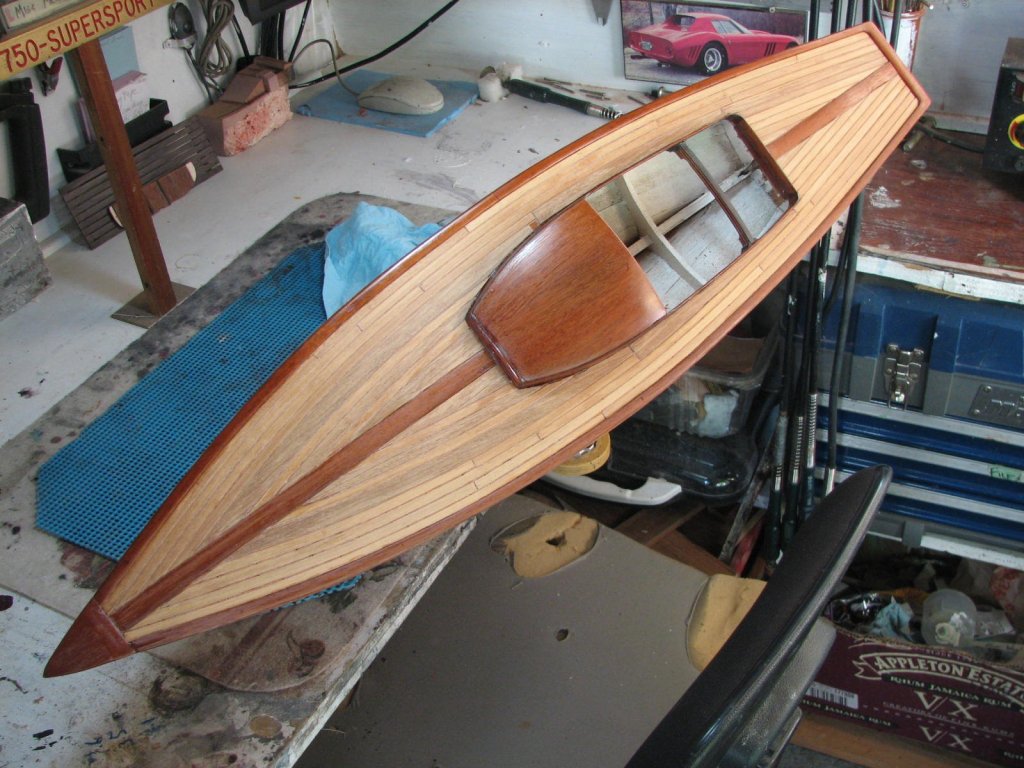
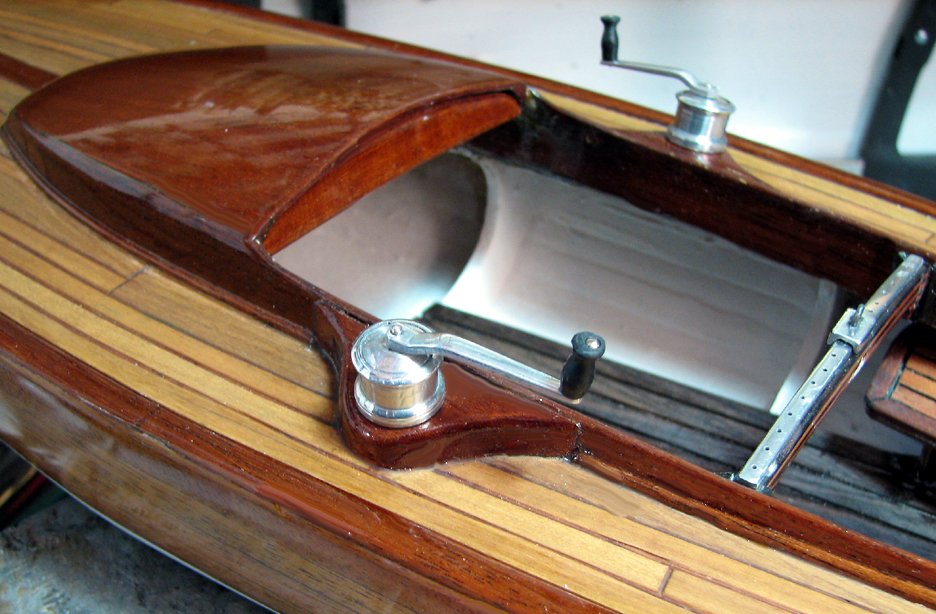
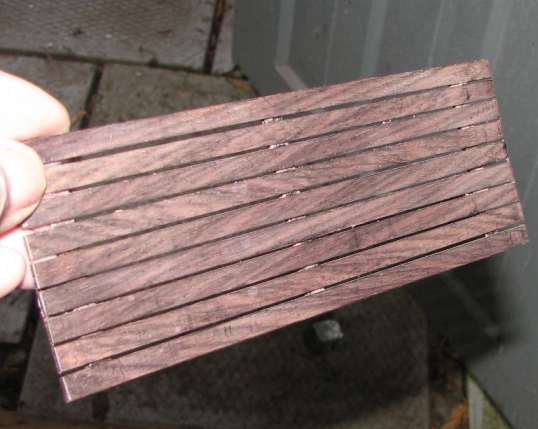
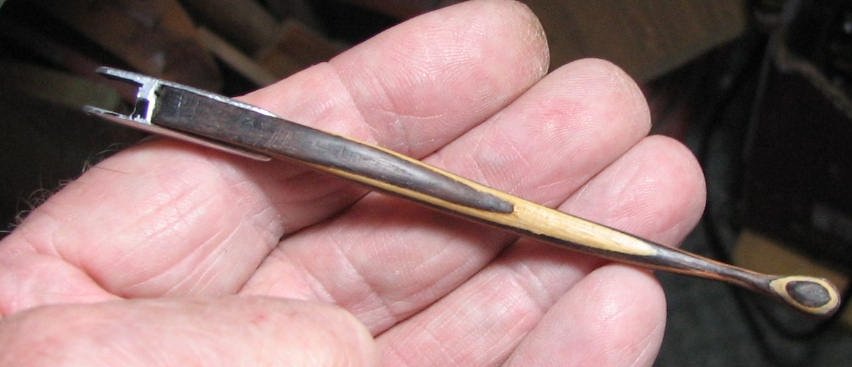
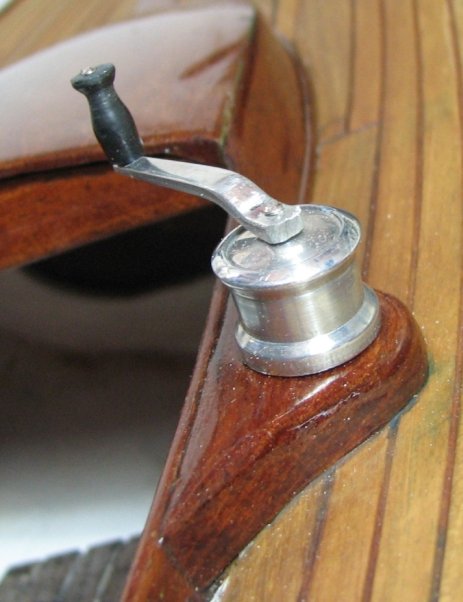
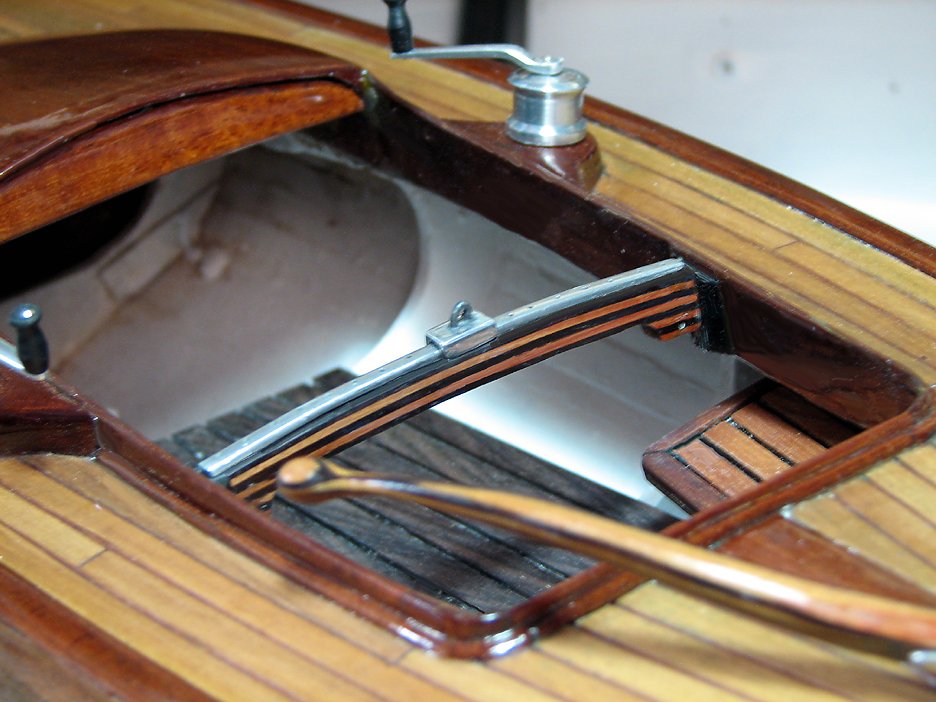
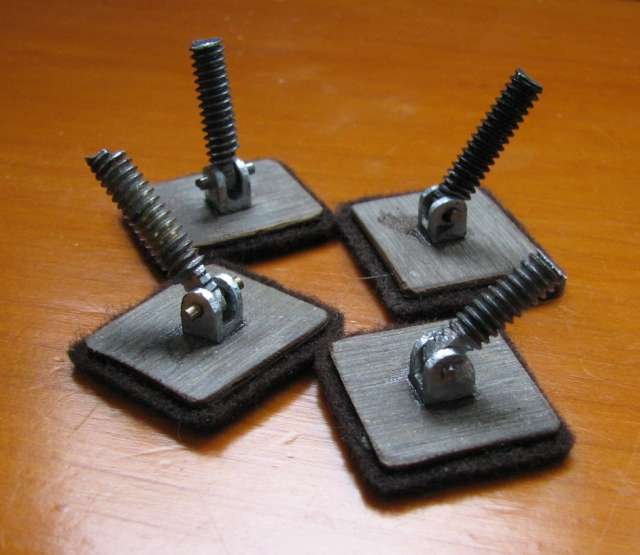
Hello again ... my second model posting. About 40 years ago my wife bought this kit for me and I put it together as well as I could. This was all pre-internet and I had nothing more to guide me than the instructions in the box. We were sailors ourselves so I had a pretty good idea how it should work! Anyway, I just assembled the hull, made a backing board for it and hung it on the wall where it stayed for about 35 years collecting dust. A few years after I retired I started scratch building as a hobby and decided to tart her up a bit. Here's how she looked when I started stage 2 ... By now we had the internet and I looked at many Dragons there and just chose what features I liked best and incorporated them into mine. I decided first to plank the deck as it just had the sheet of wood that came with the kit. Haven't a clue now what I used as caulking in case anyone wants to know. Have a feeling I scored the tiny gap i left between the planks with a fine triangular file and rubbed something in as caulk. Cut mahogany strips for a deck edge coaming and as a king plank of sorts. Made a little dog-house from a scrap of mahogany and added a raised coaming with scaled quarter-round around the cockpit and added some nice bases for the winches. I have a healthy supply of wood scraps so of many varieties so I included them whenever possible. This floor grating is from cocobolo strips ... Tiller uses alternating mahogany and "something else" ... pine maybe? bent and glued around pins on a board. Metal fittings scratch made from aluminum scraps. .... Winches and traveller are scratch built too ... Likewise a few deck fittings ... This was as far as I wanted to take the project as I had no interest in making it into a sailing model. Oh yes, I finished up the keel, made fittings to support a rudder then ran a tube through to which I attached the tiller ... sorry no pictures. However, good friends of ours make boat cradles for a living so I had to make something they'd approve of so some nice mahogany scraps were selected for the purpose. I had to make proper tilting supports too so they were scratched from small bolts. So that's where she stands today and has resumed her duties as an excellent dust collector!! Thanks for looking in. Frank


-
Thanks fellas for the comments. Not to everyone's taste here I know. Omega ... much admiration for tackling such tiny scaled models then packing so much into them! Frank
- 18 replies
-
- 6
-
-
- honey bear
- fishing
- (and 1 more)
-
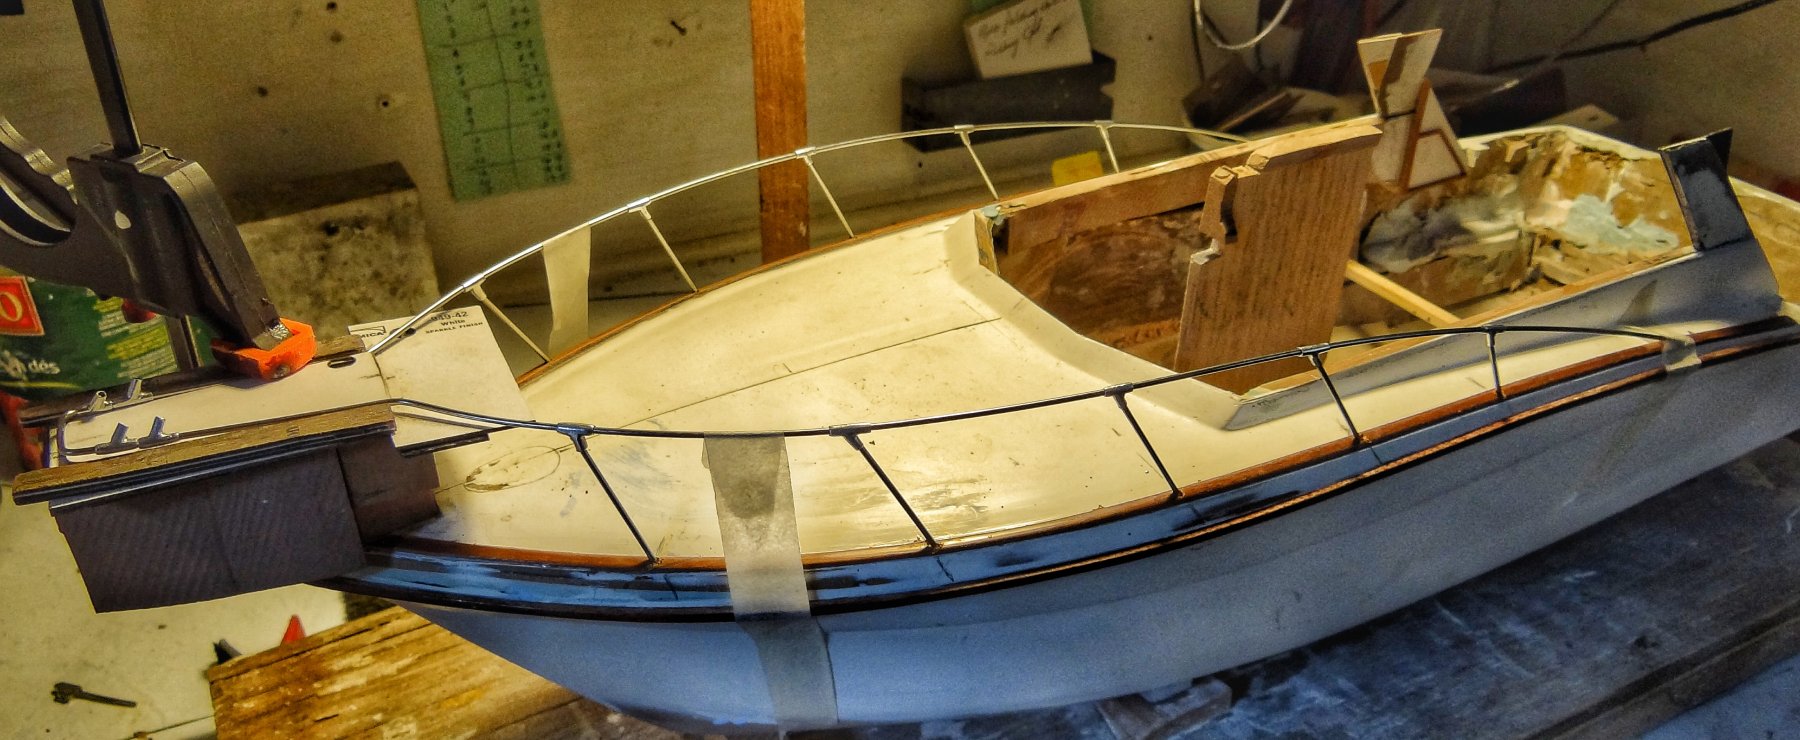
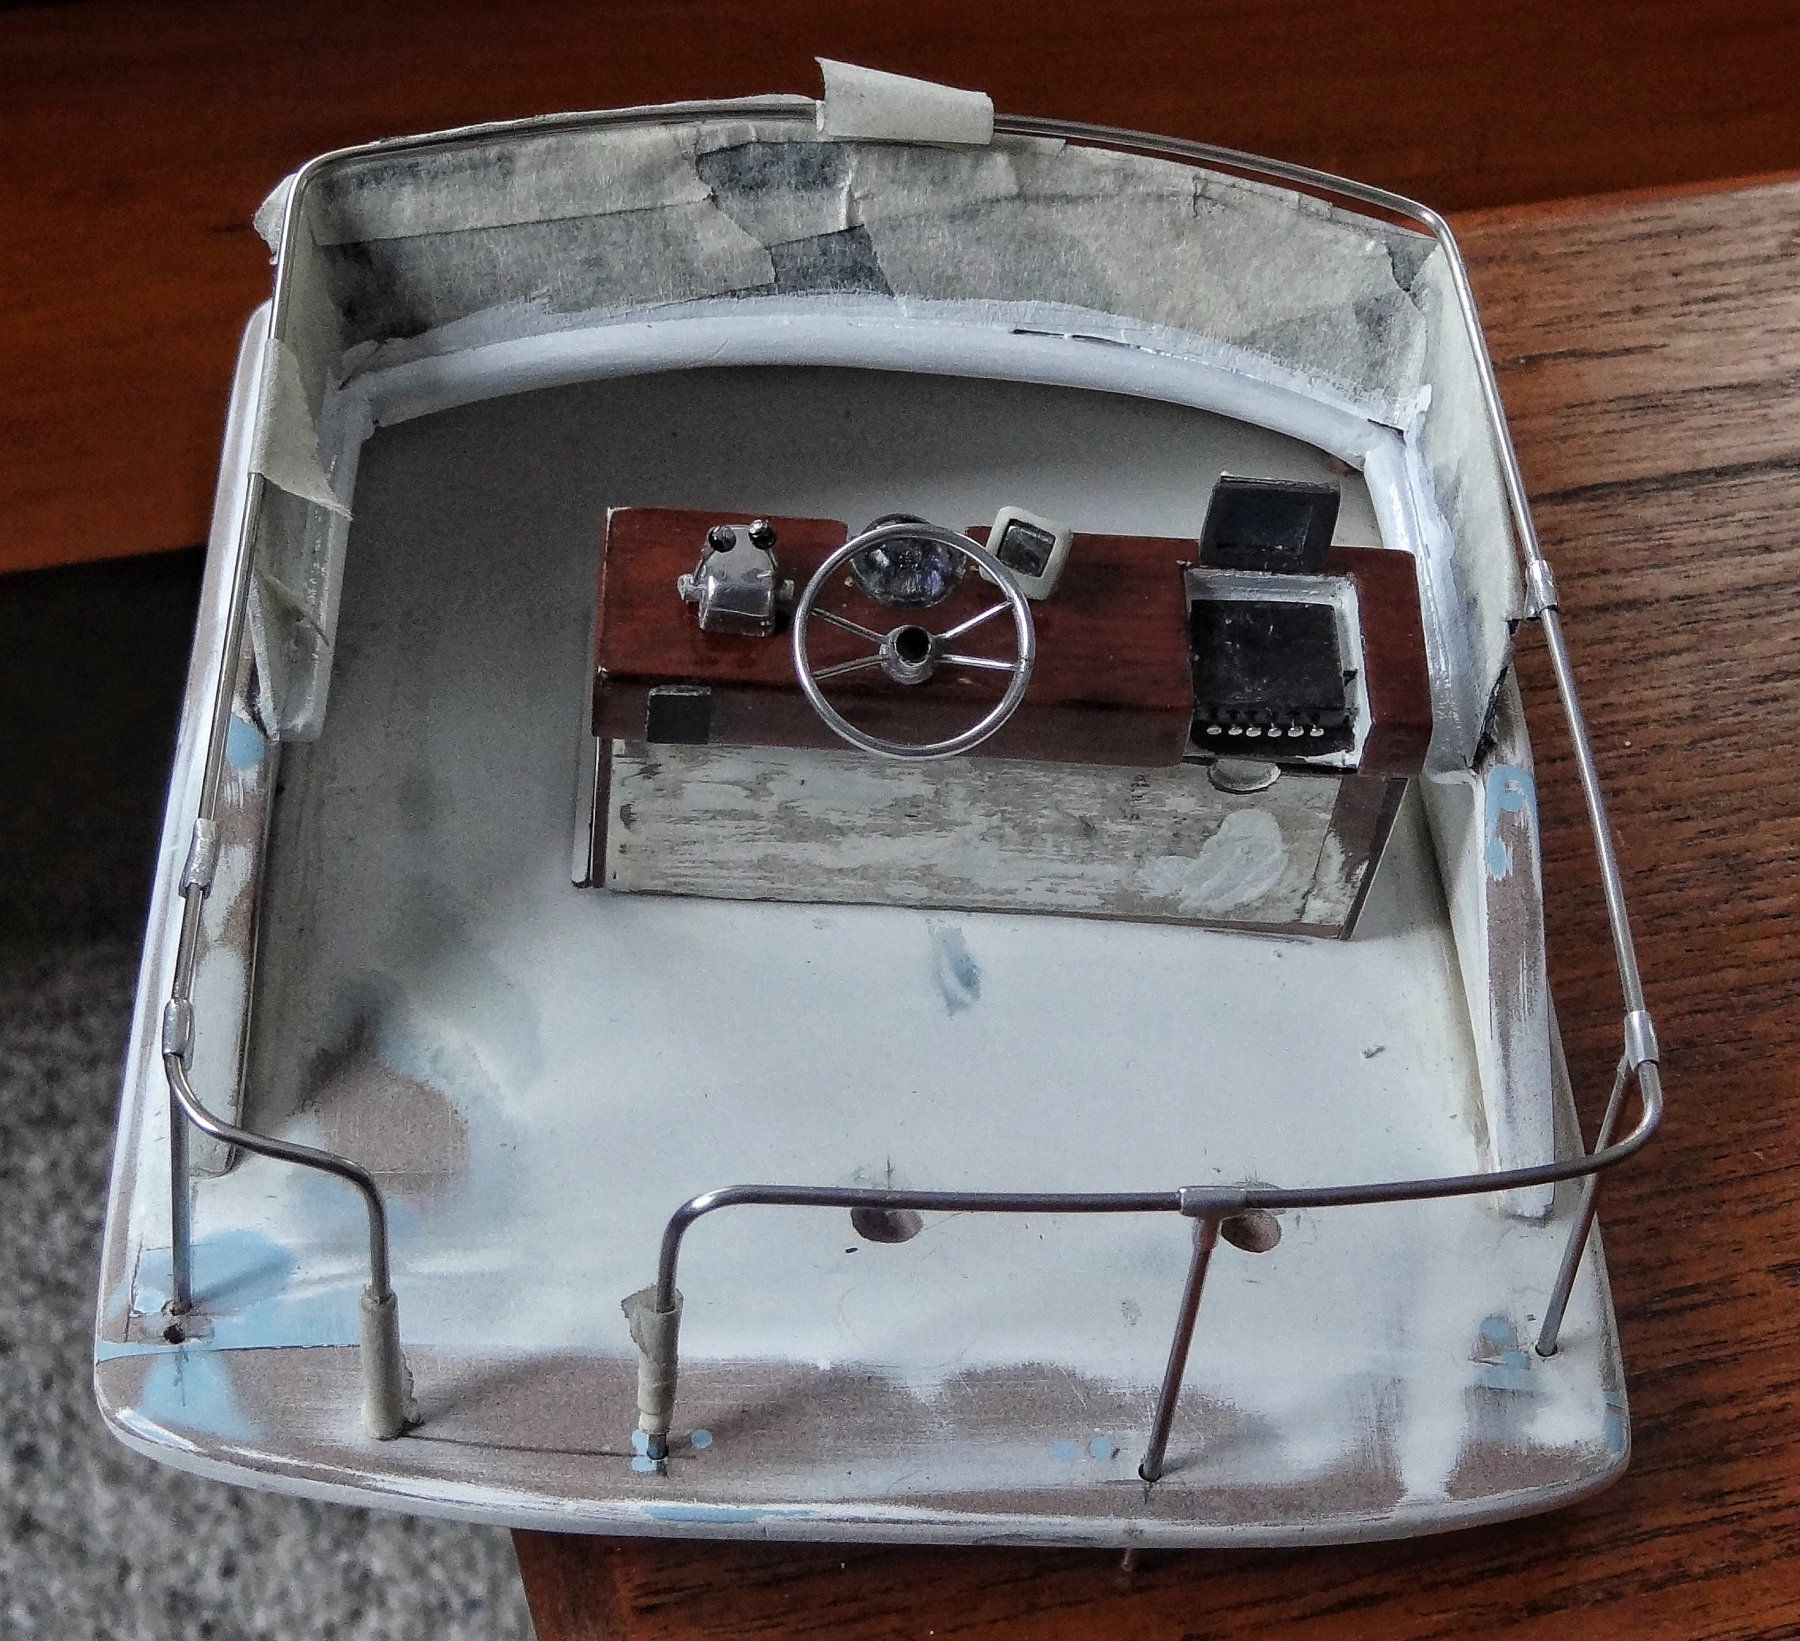
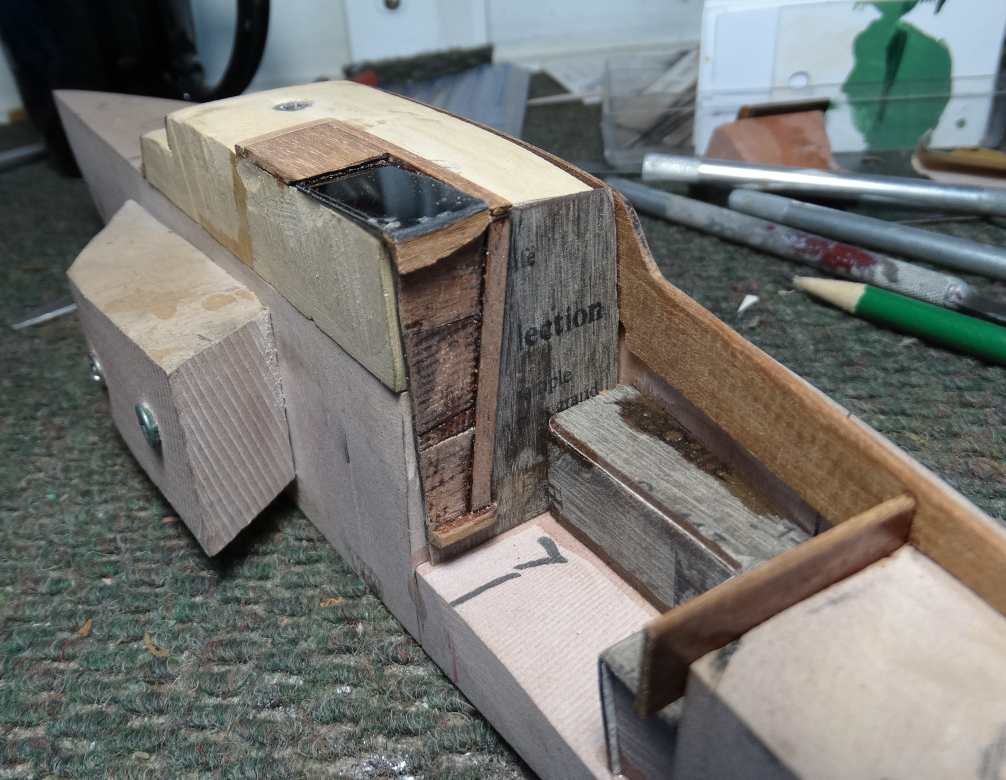
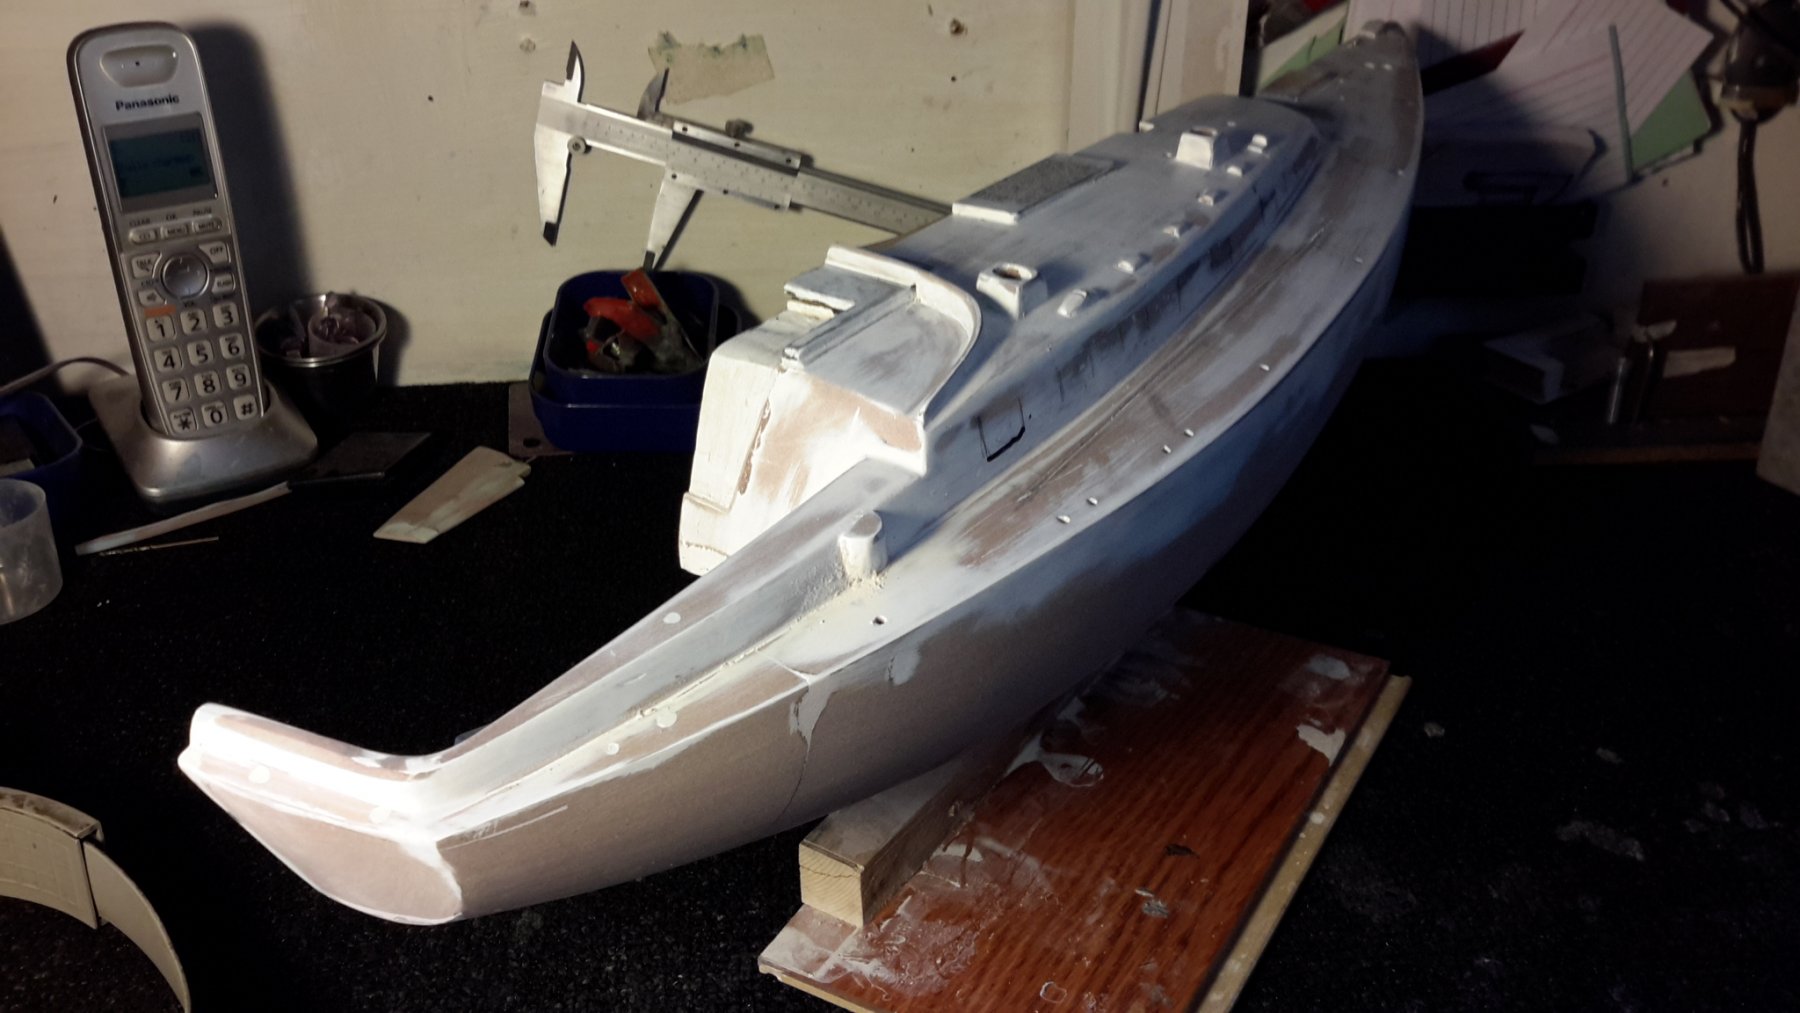
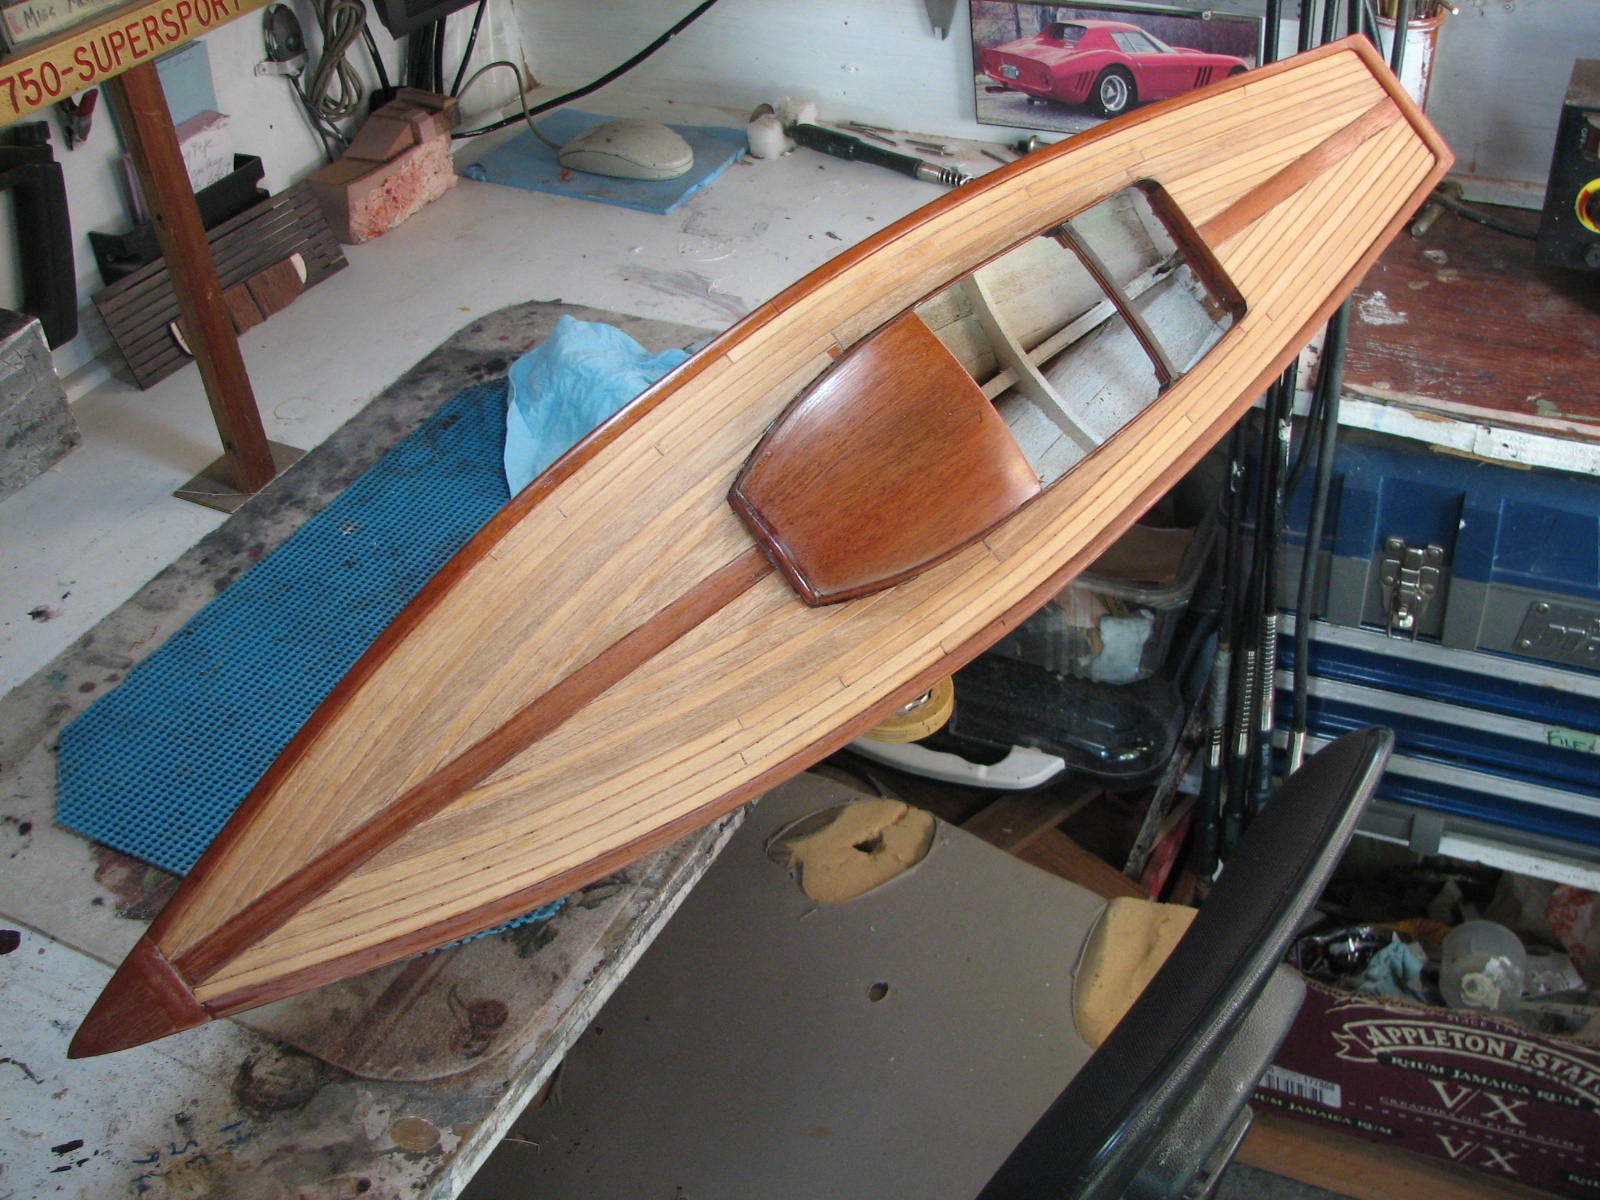
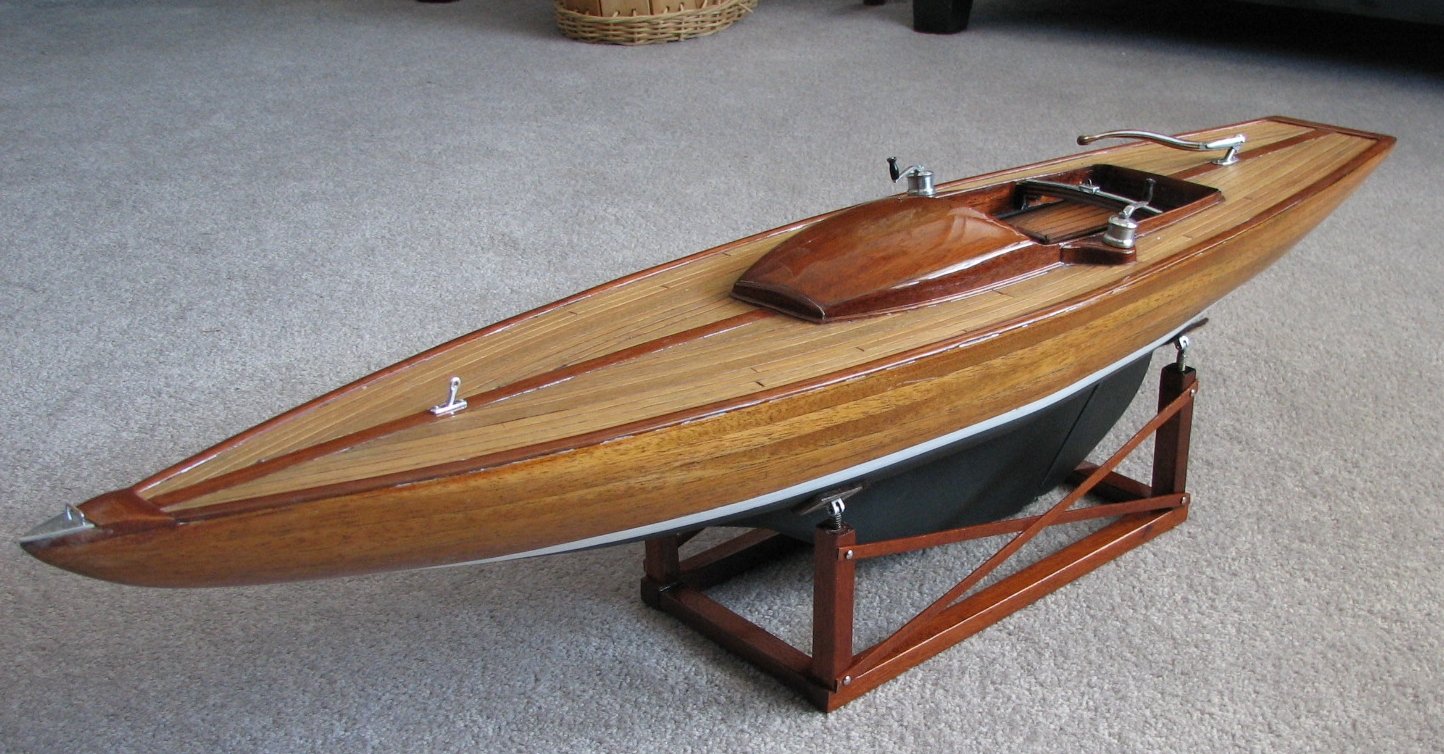
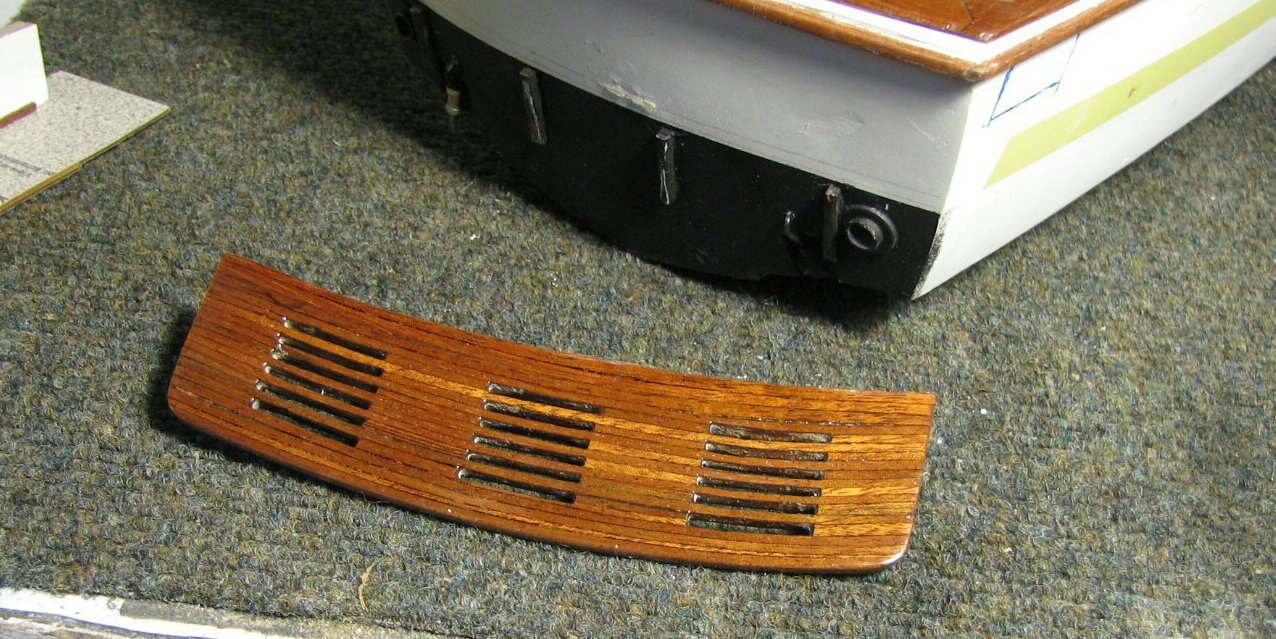
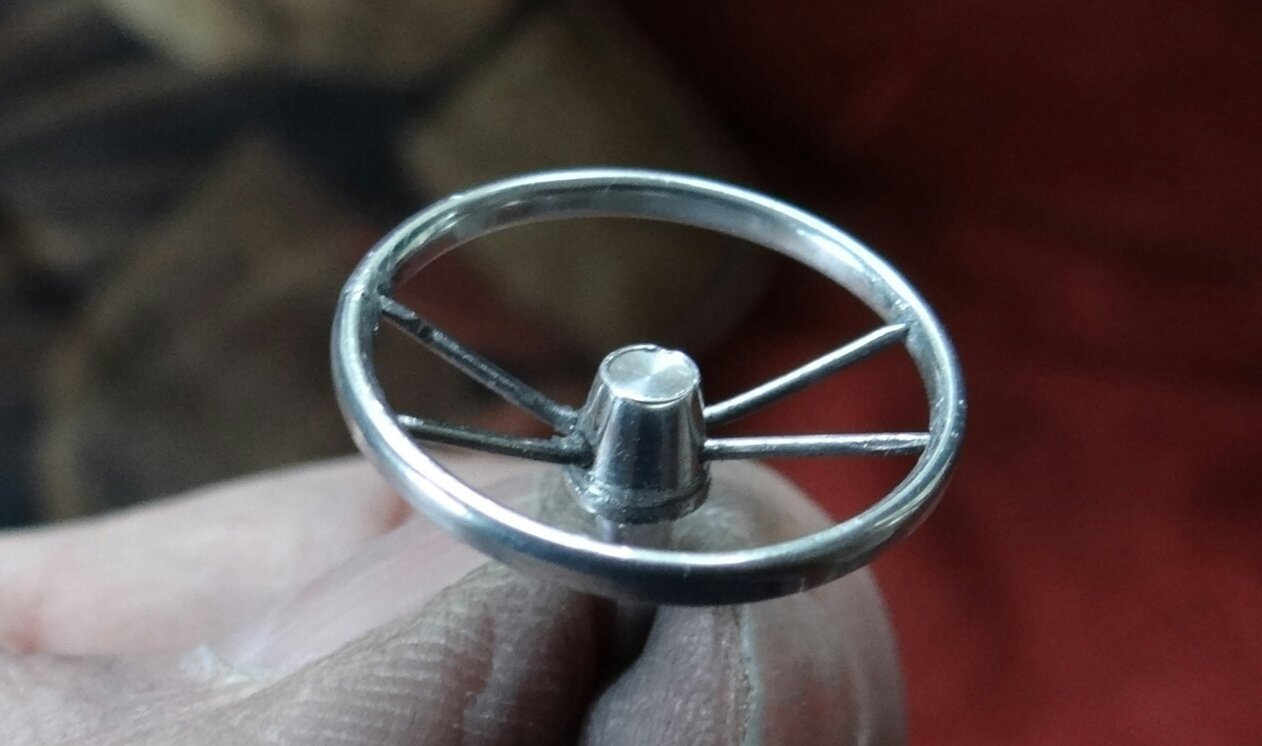
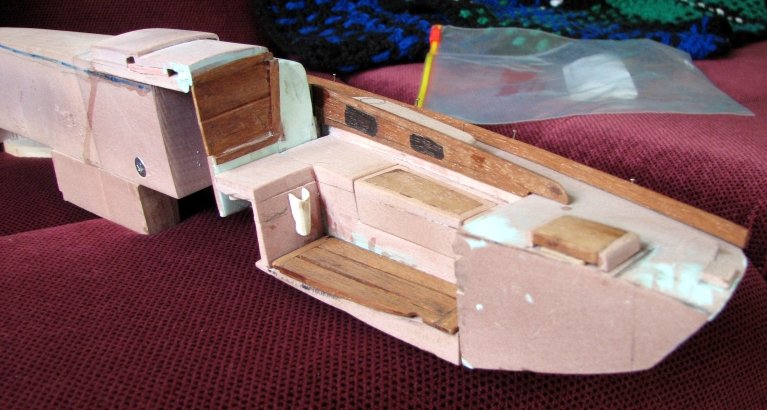
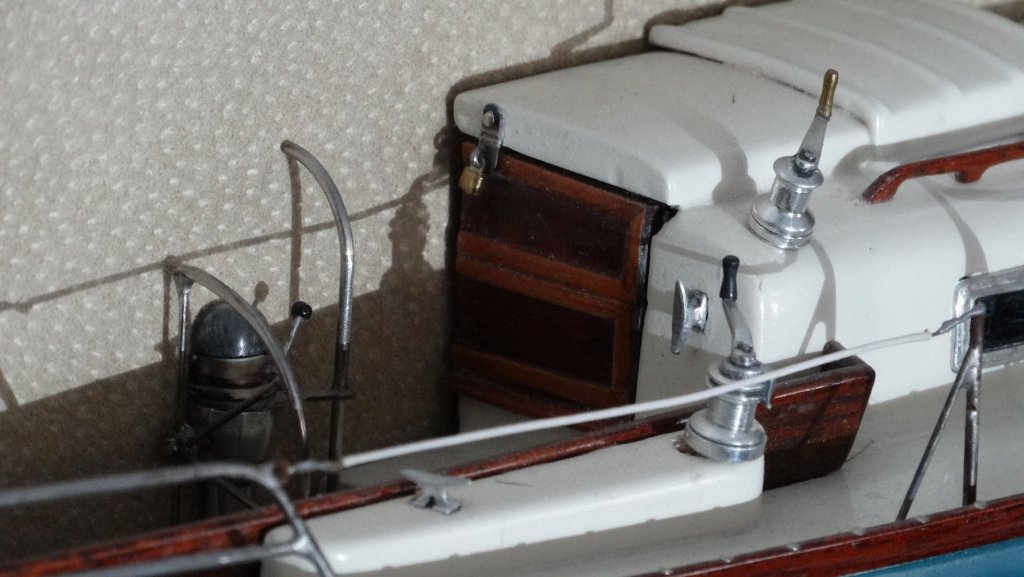
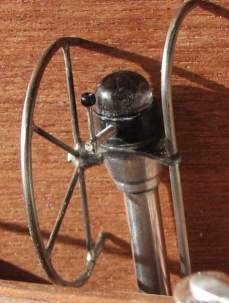
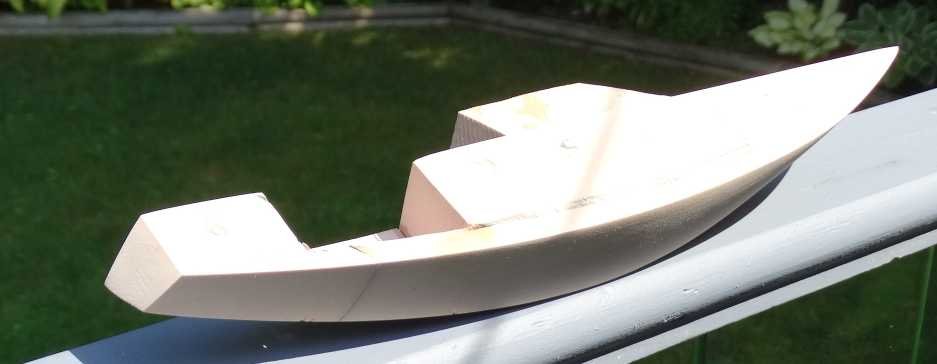
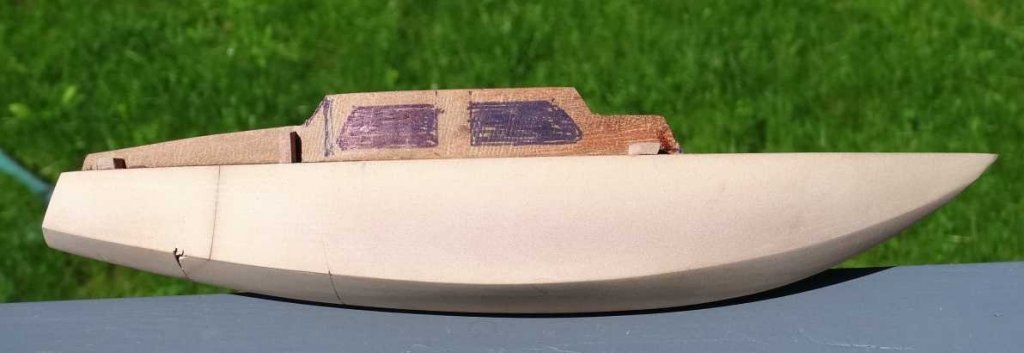
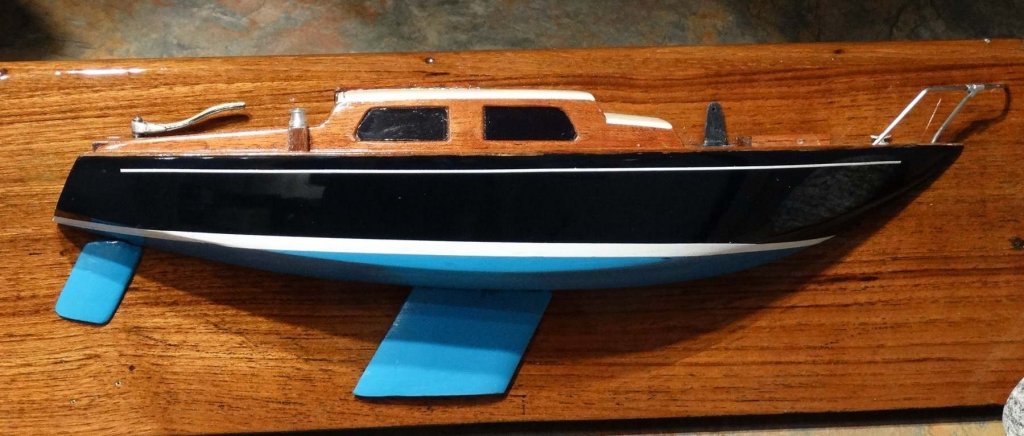
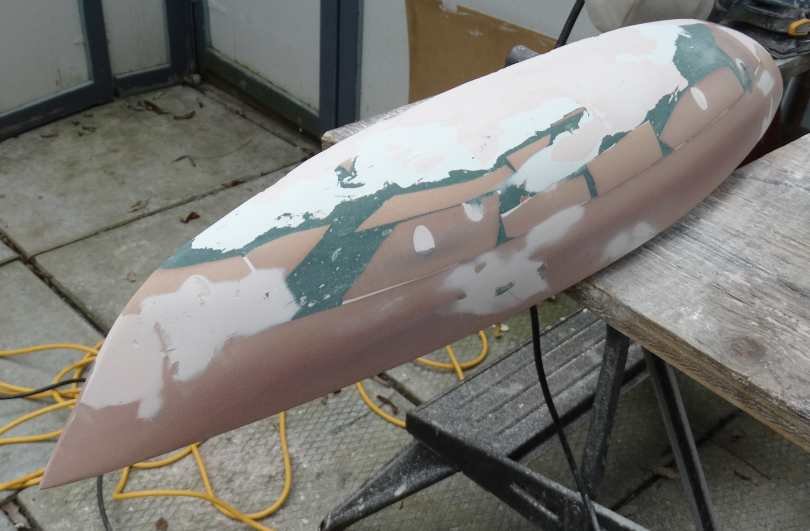
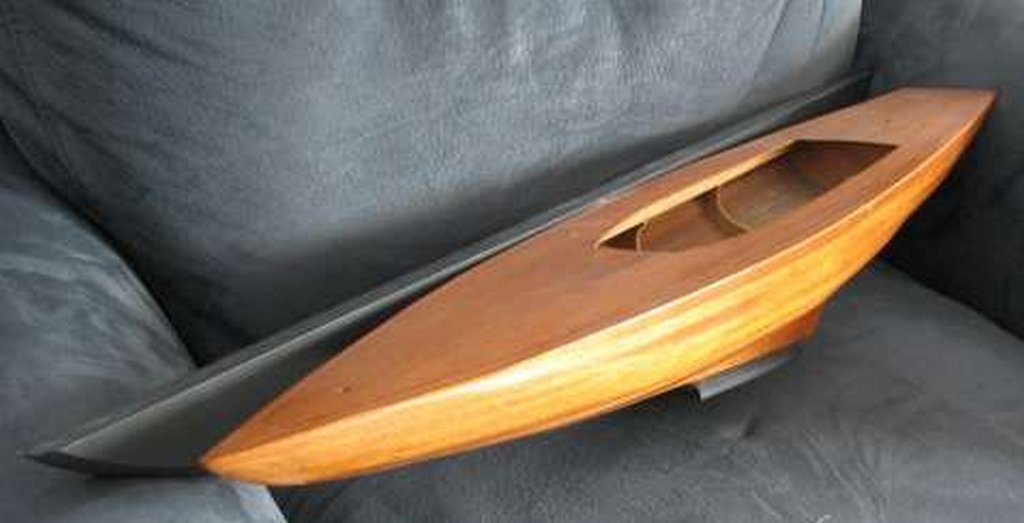
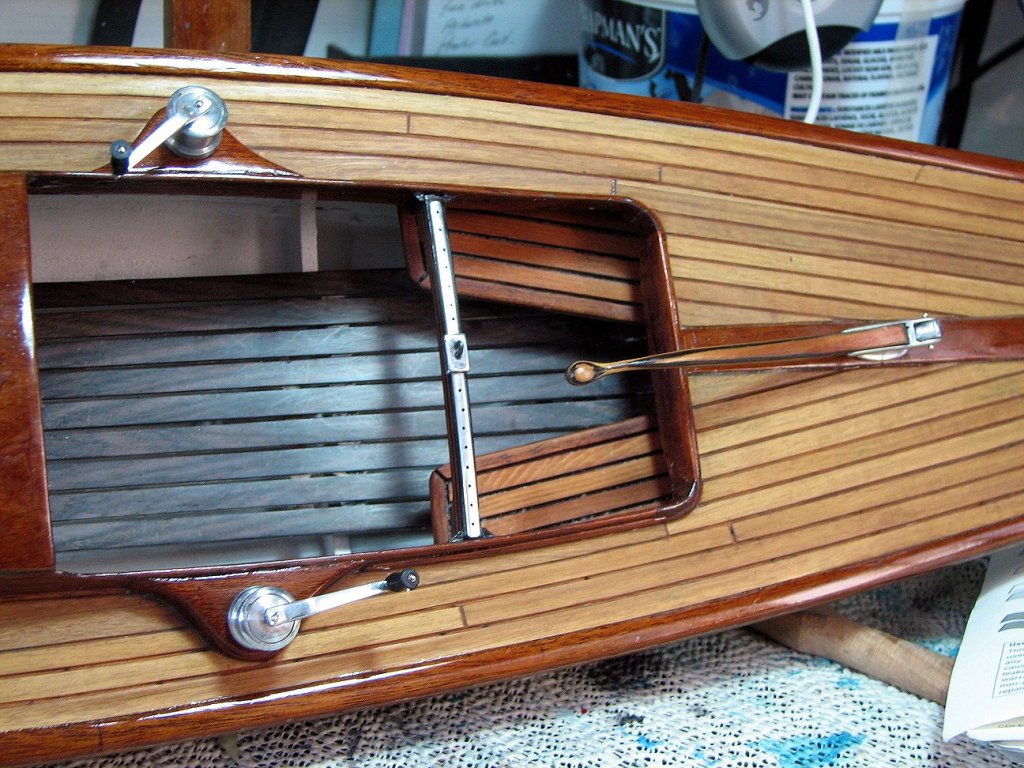
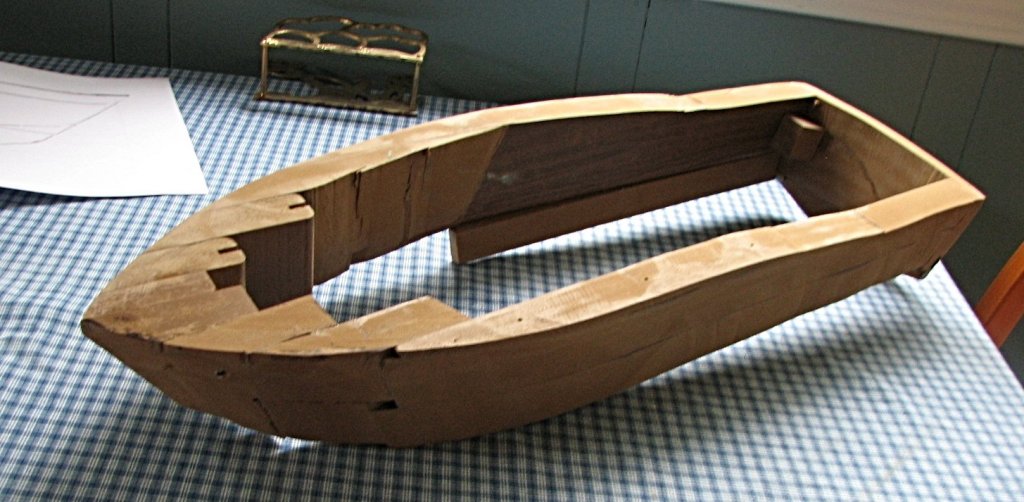
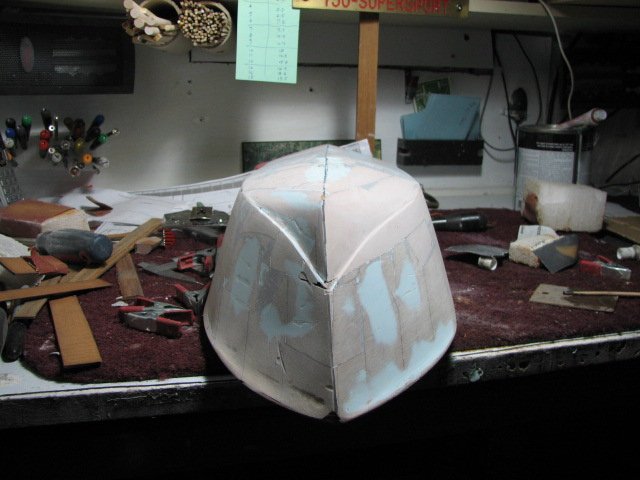
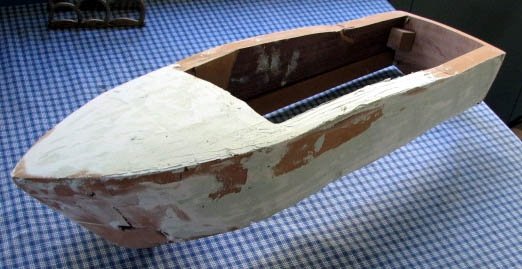
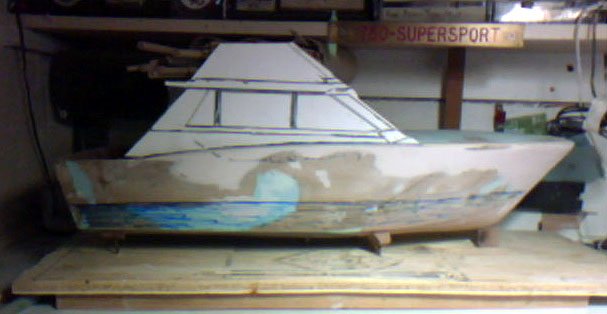
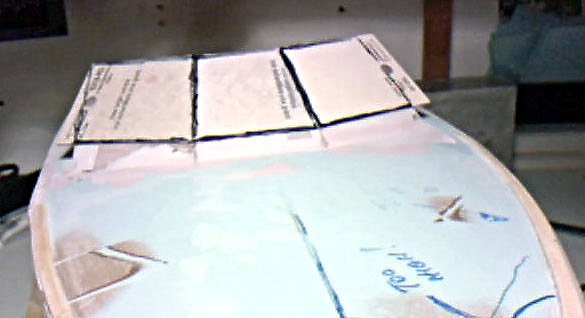
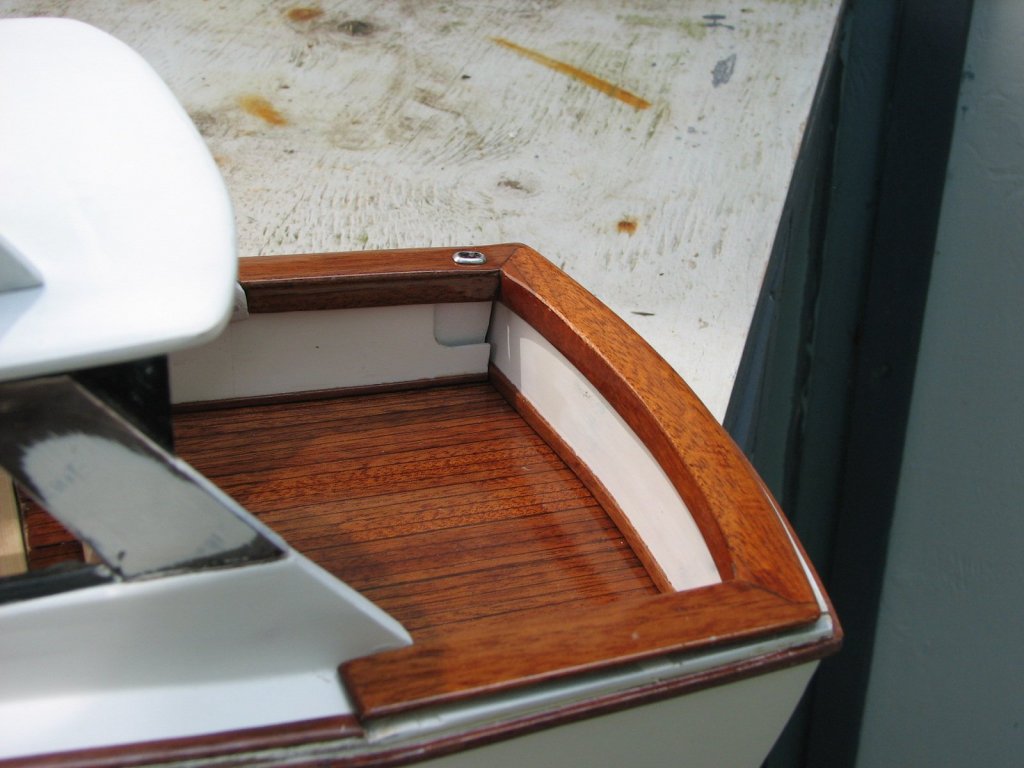
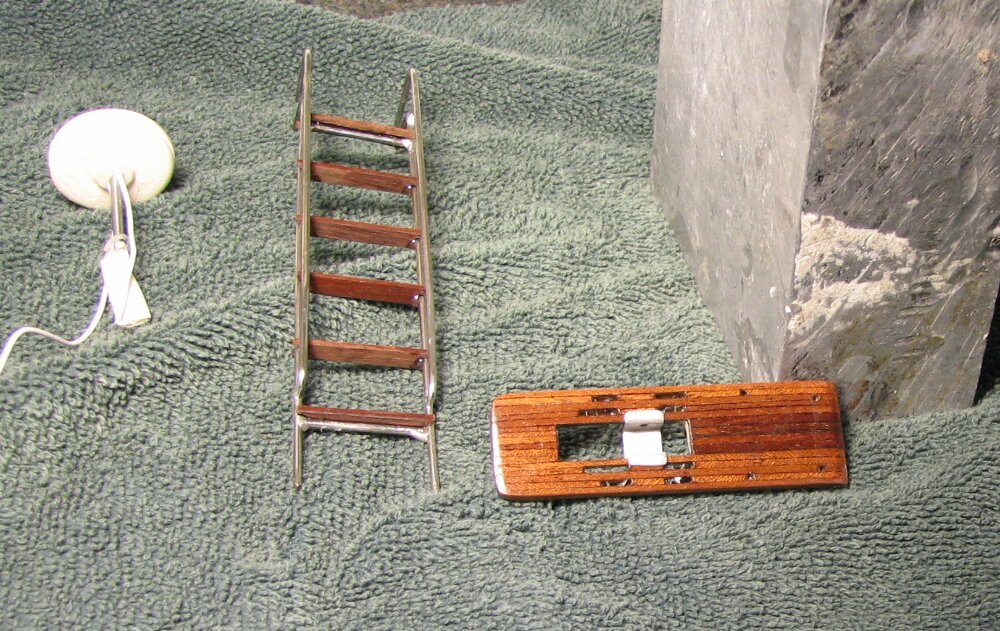
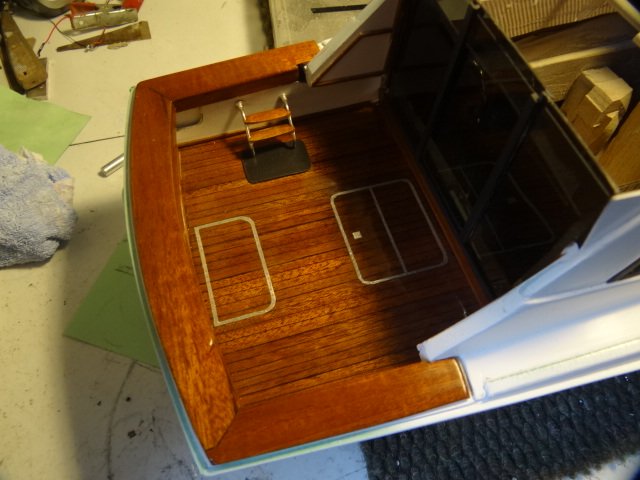
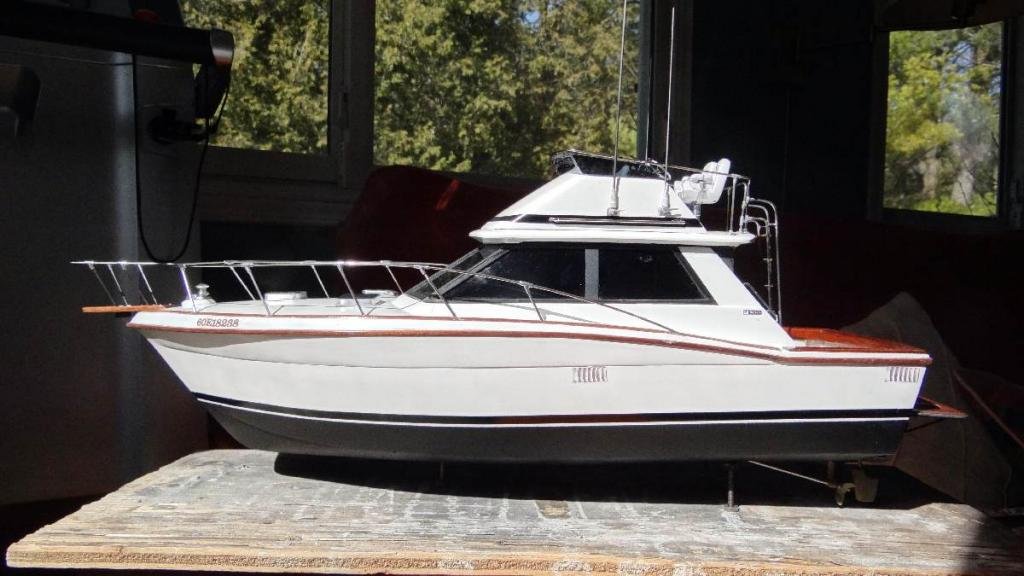
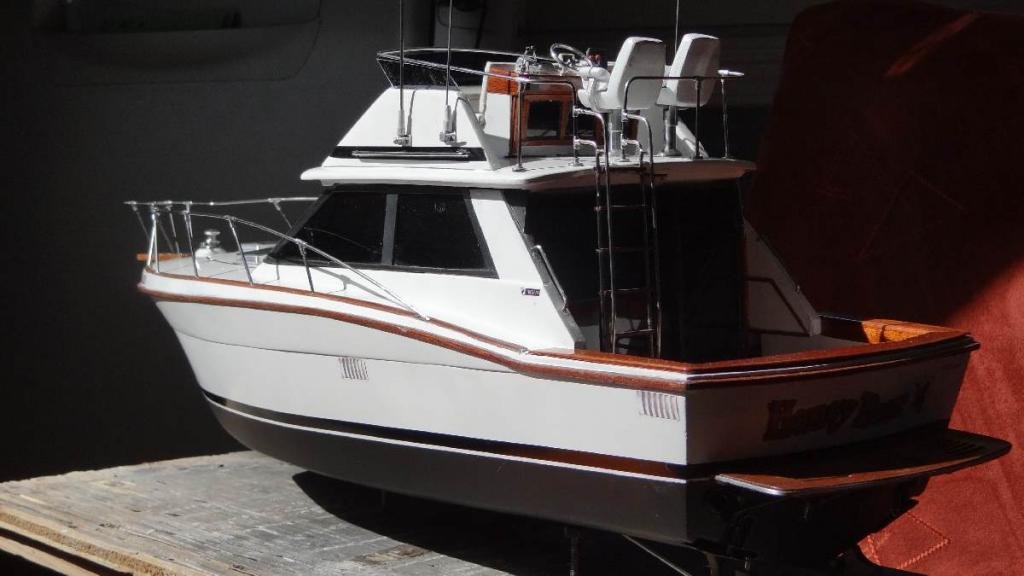
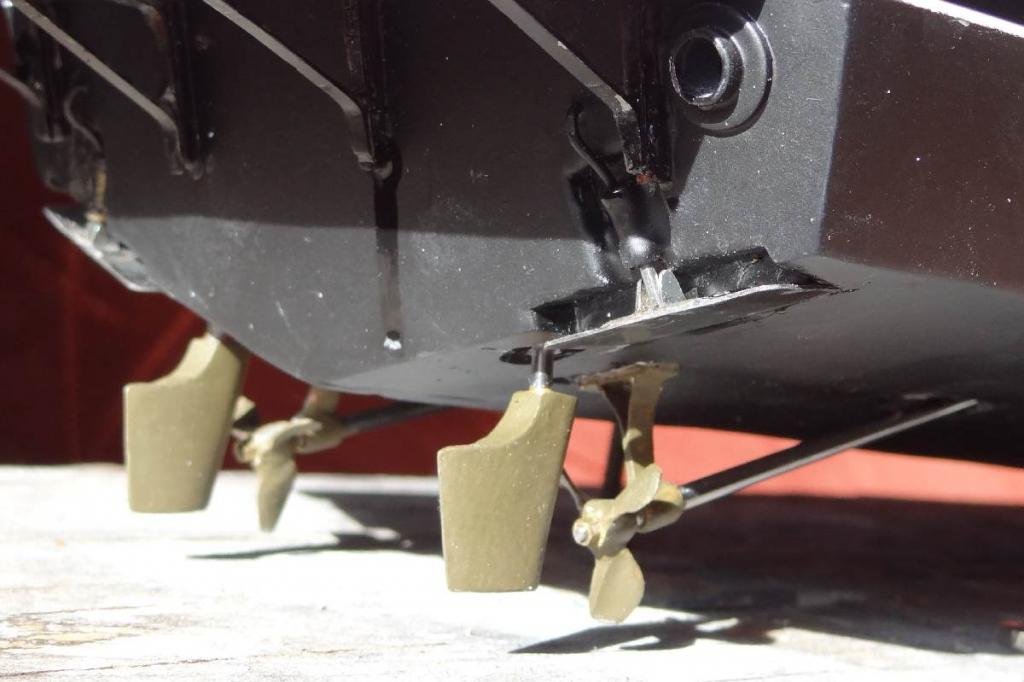
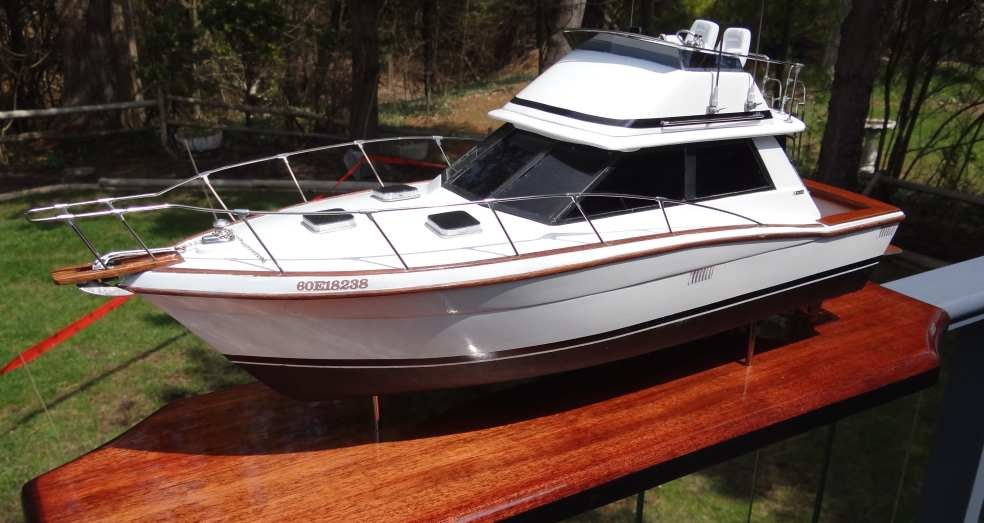
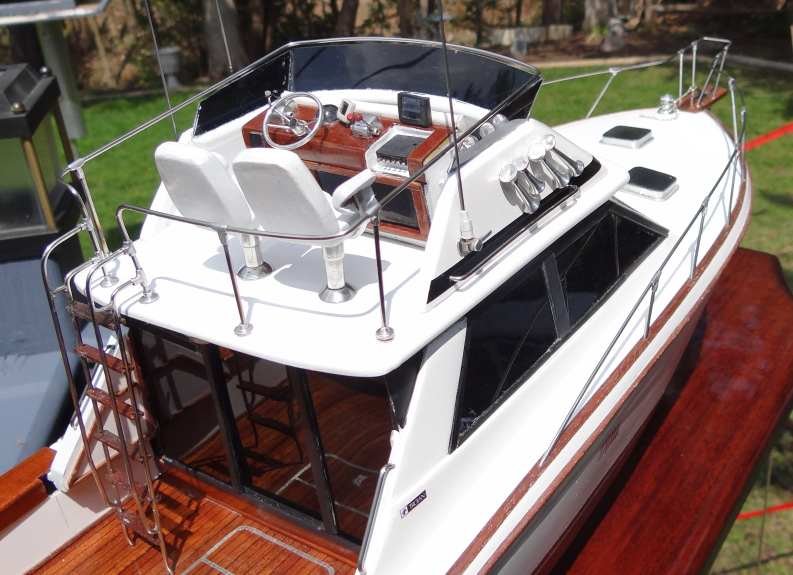
Hello there First Post here and stepping on stage with great trepidation as I've already seen many scratch builds posted and by-and-large with a great more attention to detail than I'm prepared to devote! Having said that I'm still pretty pleased with this model and its recipient, a life long friend, is ecstatic ... so there!! OK, I've only been scratch building for about 15 years and have only ever built one kit ... a Billings Dragon, and mostly scratch build racing cars from the 50's. When I felt my skills were adequate I did a half-hull of our own sailboat then a series of half-hulls for friends then eventually my oldest pal said he'd prefer a FULL hull instead (greedy b*gger) of his "baby", a Trojan 36 Sport Fisherman. No plans were available so I developed my own from various suitable photos on the inter-web and supplemented them with MANY visits to the boat where I photographed every inch of it with a tape measure stretched out for scale. I usually build in a composite called Renshape which, if you haven't heard of it, is a product made for pattern-making. It is very expensive but wonderful to work with as it takes fine details with ease. However, my supply had diminished and I wanted to get started. I had a brainwave (brain-fart?) one day when my neighbour was having a set of stairs made for him that used a new synthetic wood that looked remarkably like Renshape ... a true composite and waterproof. A few off-cuts were "liberated" one night ... and so it began. I screwed/glued together enough pieces to give me the requisite hull ... then went at it with whatever grinding tools I had at hand ... it wasn't pretty. Much Bondo and fillers were applied and eventually it resembled his hull. A deck was added and ever more fillers applied. The superstructure was filled in with cardboard and the complex shaping of windows began using those little Arborite/Formica samples. One doesn't realize how complex a hull shape can be until you try to replicate it! Coaming around the stern cut from mahogany plank. White panelling from more Arborite samples Swim platform assembled from tiny strips of mahogany Steering wheel from scrap aluminum (no I didn't have a machine lathe at this time) Seats fabricated from Renshape and aluminum scraps I practised silver soldering when many of the stainless metalwork was made ... Hand made all the 90 and 120 degree fittings needed for the handrails Aft deck in finished state OK, I won't bore you with any more detail but fire away if there are any questions. The finished model ... Thanks for looking in. Frank


- 18 replies
-
- 19
-
-
- honey bear
- fishing
- (and 1 more)
-
Hello from the Colonies ... Ontario, Canada
albergman replied to albergman's topic in New member Introductions
Thanks for the welcome gentlemen. I'll put up some more pics of the finished boat soon. Actually, I'm not clear on where to do that as there seems to be only "build logs" for scratchbuilds. I suppose I could just do a few on the build and let it run into the finished model unless someone has better ideas?? Keith ... thanks ... I've previously had a look through your J Class build as I've always been fascinated by them and their marvellous lines ... works of art in their own right and you've done a terrific job on yours. Someday ... if there's time!! I'm part way through Altair and seriously impressed with you attention to detail (something I'm lacking). Frank -
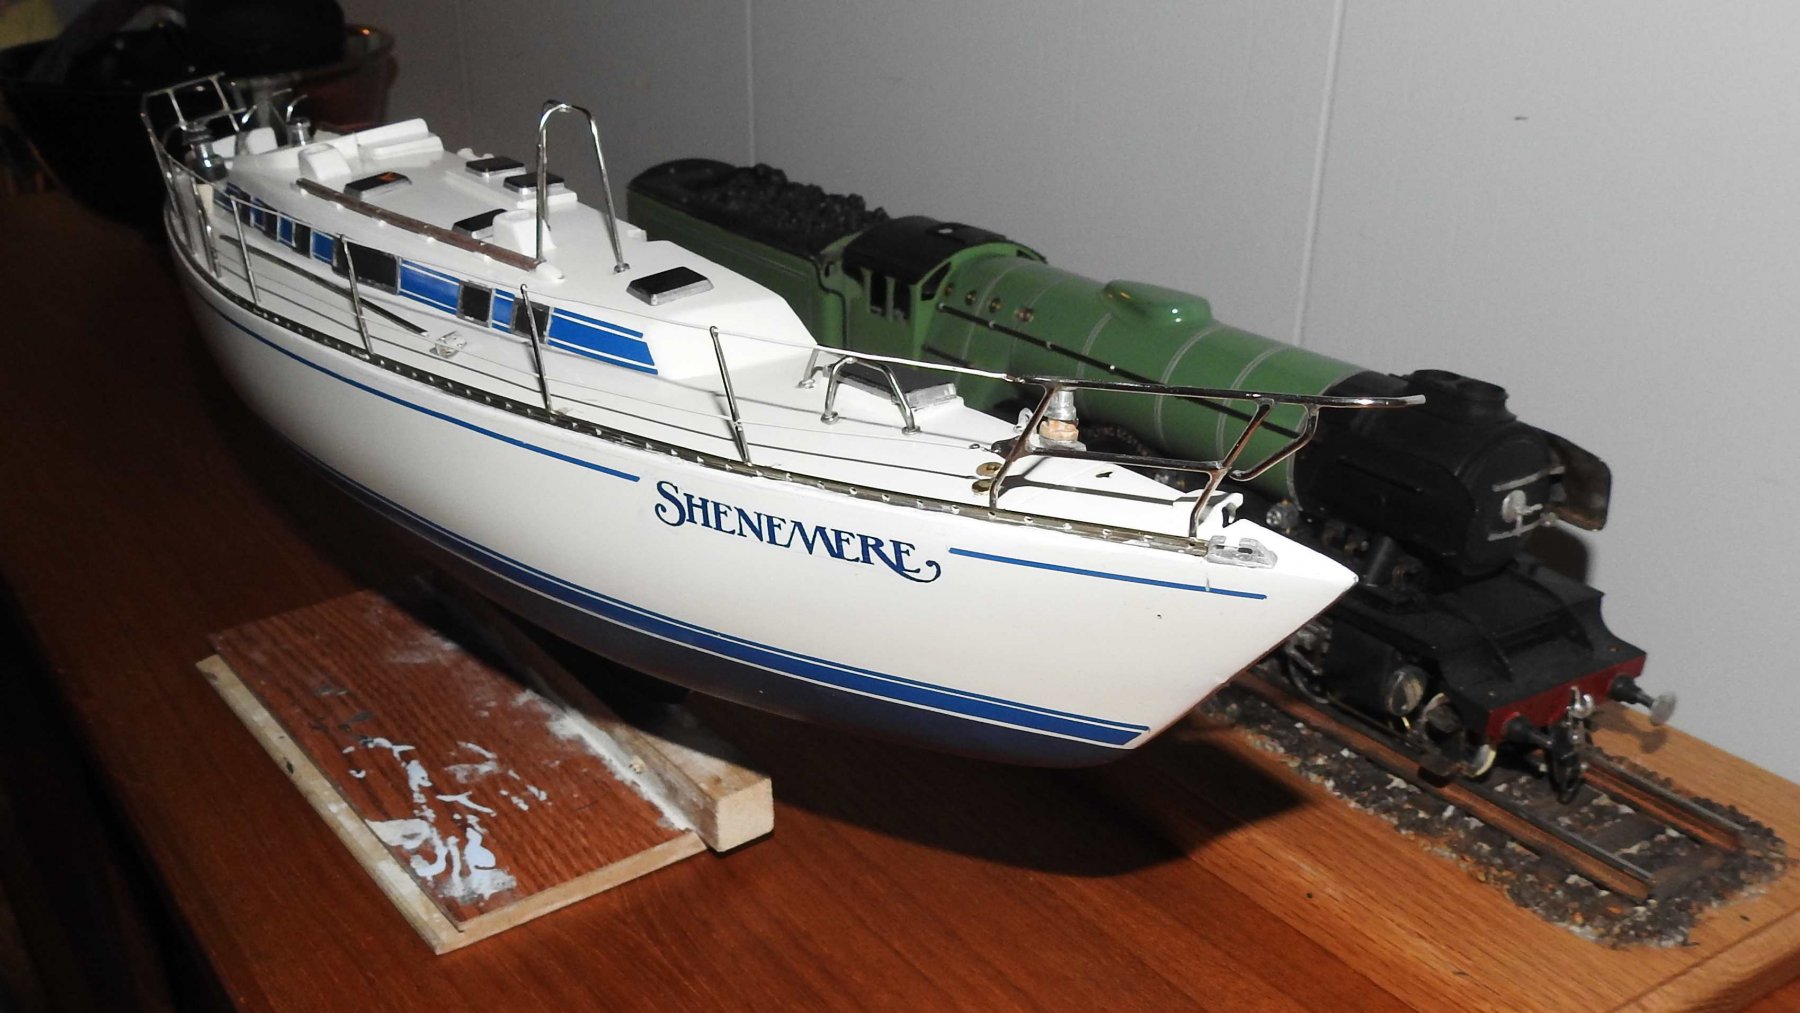
Hello Everyone I'm a scratchbuilder, retired and living in southern Ontario, Canada. I scratch models of mostly racing cars from my youth (think Fangio), a steam locomotive and several half hulls of modern sailing vessels owned by myself and friends. The most challenging model after the steam engine was a full-hulled model of a life-long friend's own Trojan 36 sport fisherman. This was completed from my own home made plans and from taking literally hundreds of photographs aboard the boat. I don't know if modern vessels have much interest here as I see mostly ships of a historic nature. Anyway, I have a goodly number of photos of the build (which I made into a nice book for my friend) and of the completed model and I'd be happy to share them if they are considered appropriate. Cheers Frank Smart