DJC
-
Posts
25 -
Joined
-
Last visited
Content Type
Profiles
Forums
Gallery
Events
Everything posted by DJC
-
 Hi Mark - nicely done! I am finishing up Bluenose and the Charles W Morgan both by Model Shipways I am thinking of the Jefferson Davis as my next ship and as I hav also built the Harvey (Artesania Latina) I am considering building this Admiralty style. Given that, I'd like to add tree nails (never done that before) - how did you do yours? Much thanks Dennis
 -
Hi Mark All I can say is Wow! looked you up after you gave me a few 'thumbs up' on my CWM build - I see that you too have had somewhat of a 'time machine' bull log - amazing how easy it is for our projects to languish in dry-dock - for me that happens when I get perplexed by something I haven't done before and become paralyzed while I search other's sites for solutions. This is a fantastic restoration. I am reading a few books I purchased through SeaWAtch Books on Dutch maritime ships and the Riksmusuem collection - love the weathered look. Assuming I finish The Morgan my next project is the 'Half Hull Merchant Ship' from NRG which I intend to plank with distressed wood, then I want to build a Dutch merchant ship. we shall see. Great Work! Dennis
-
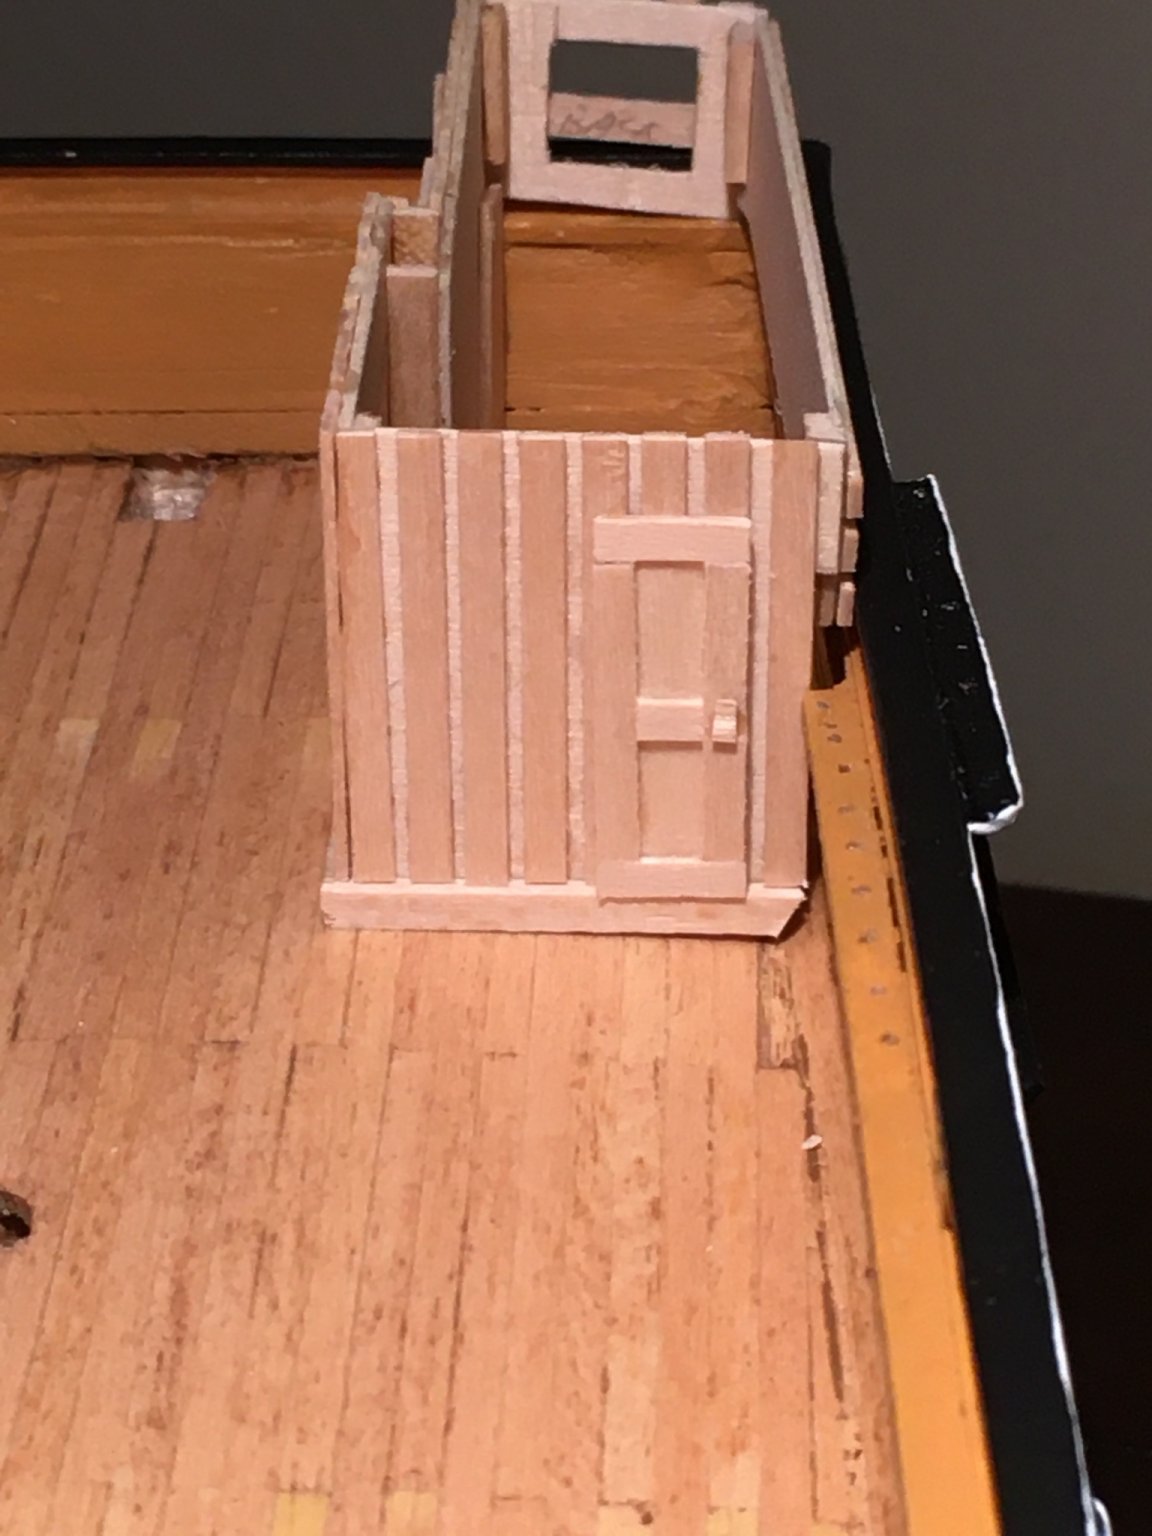
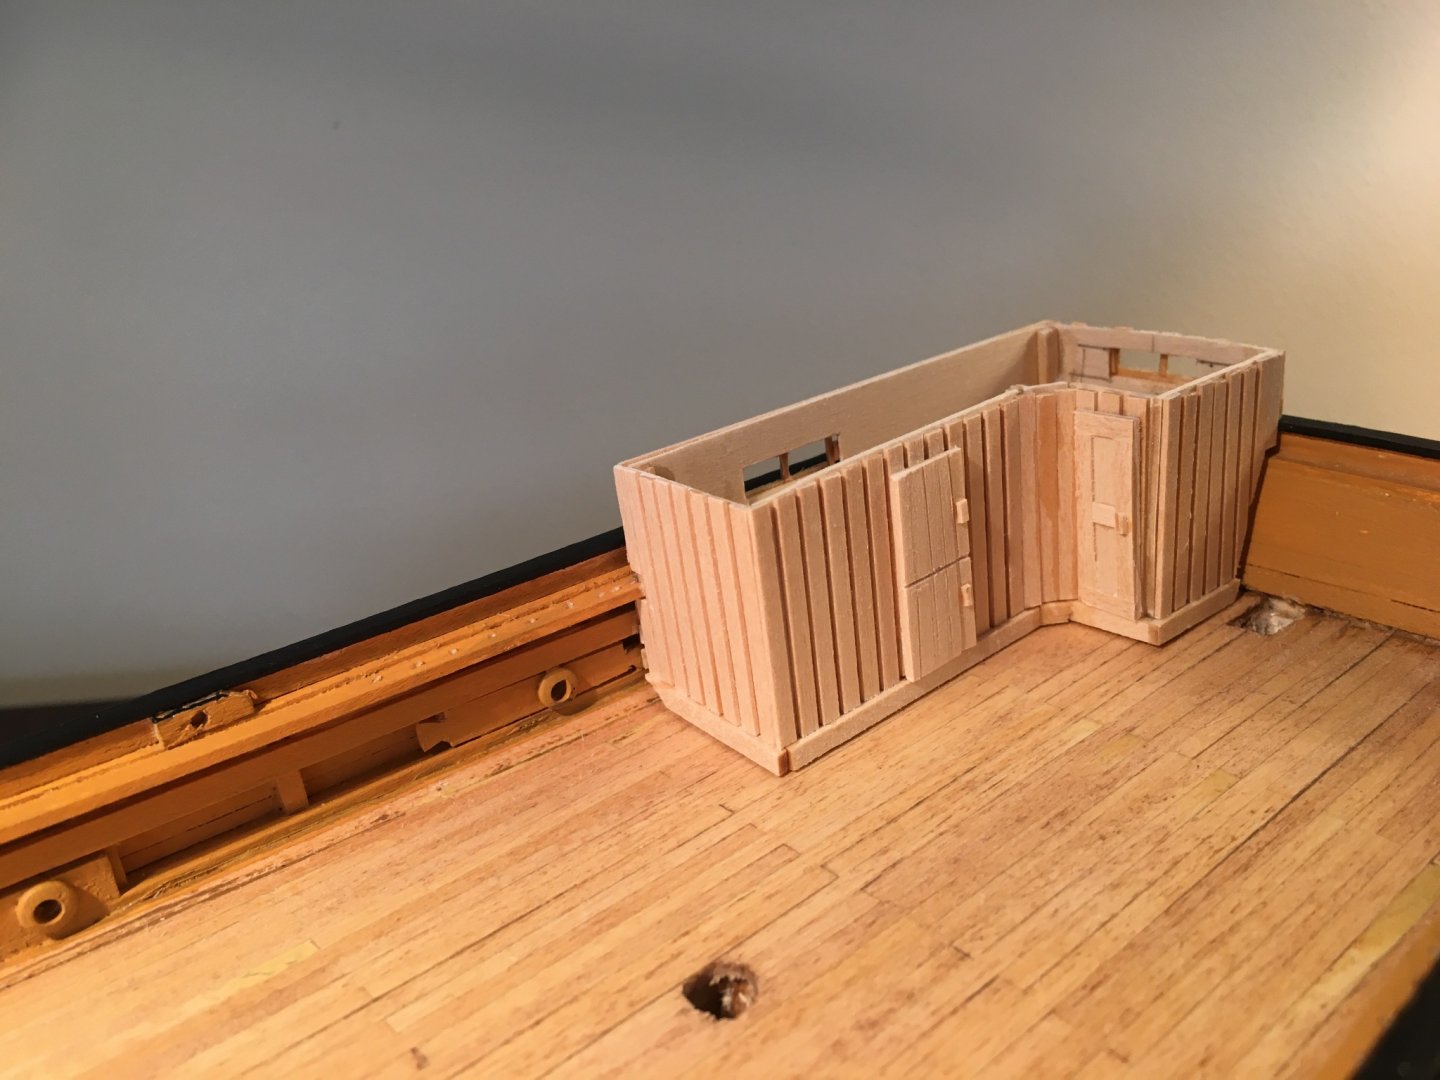
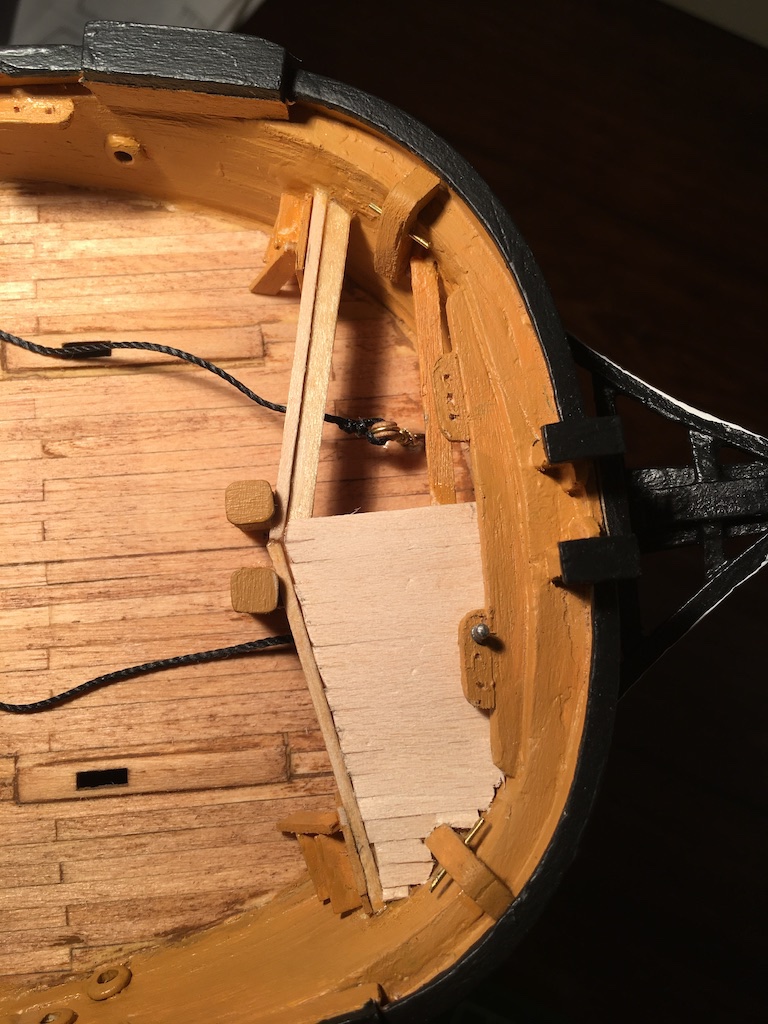
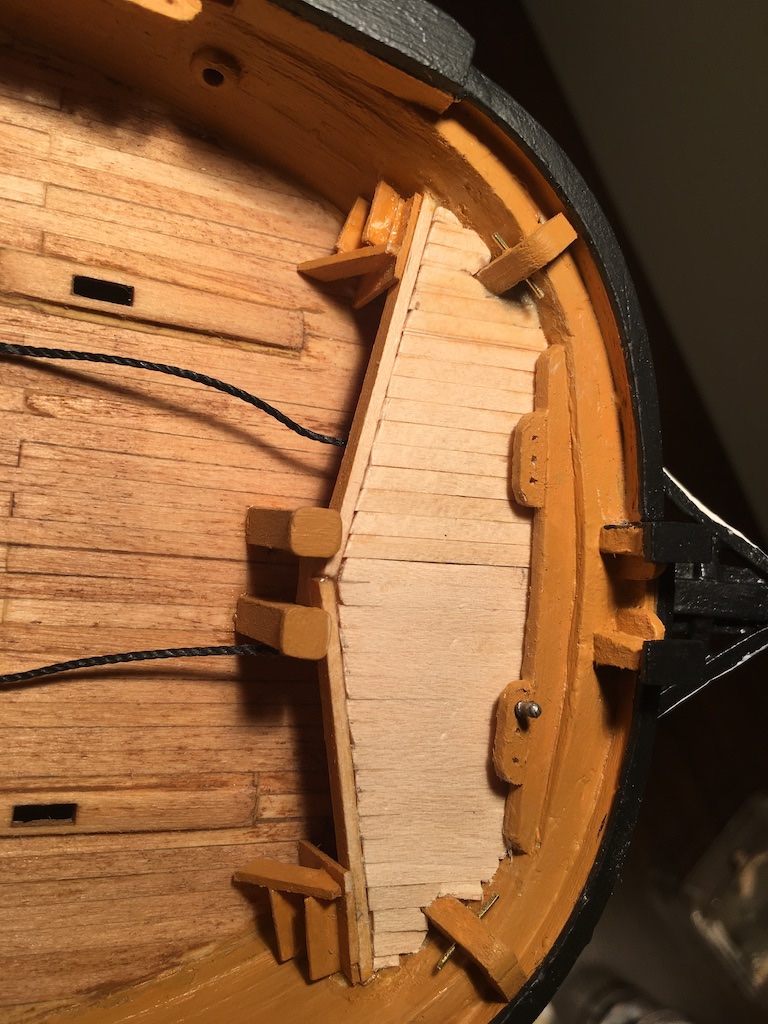
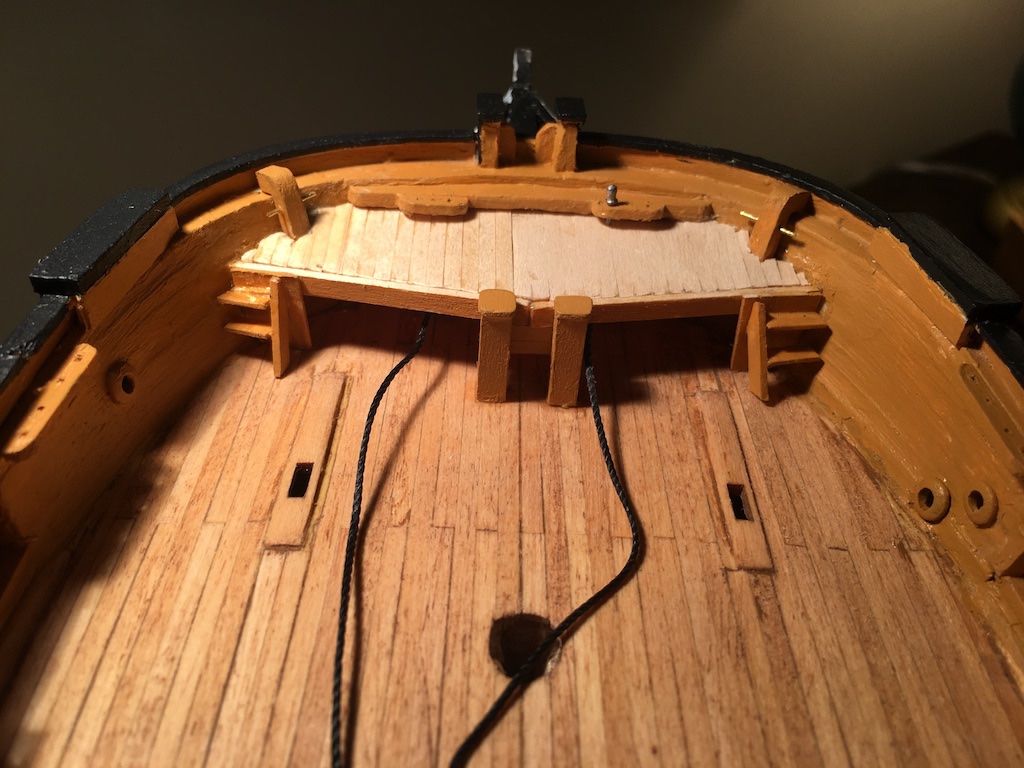
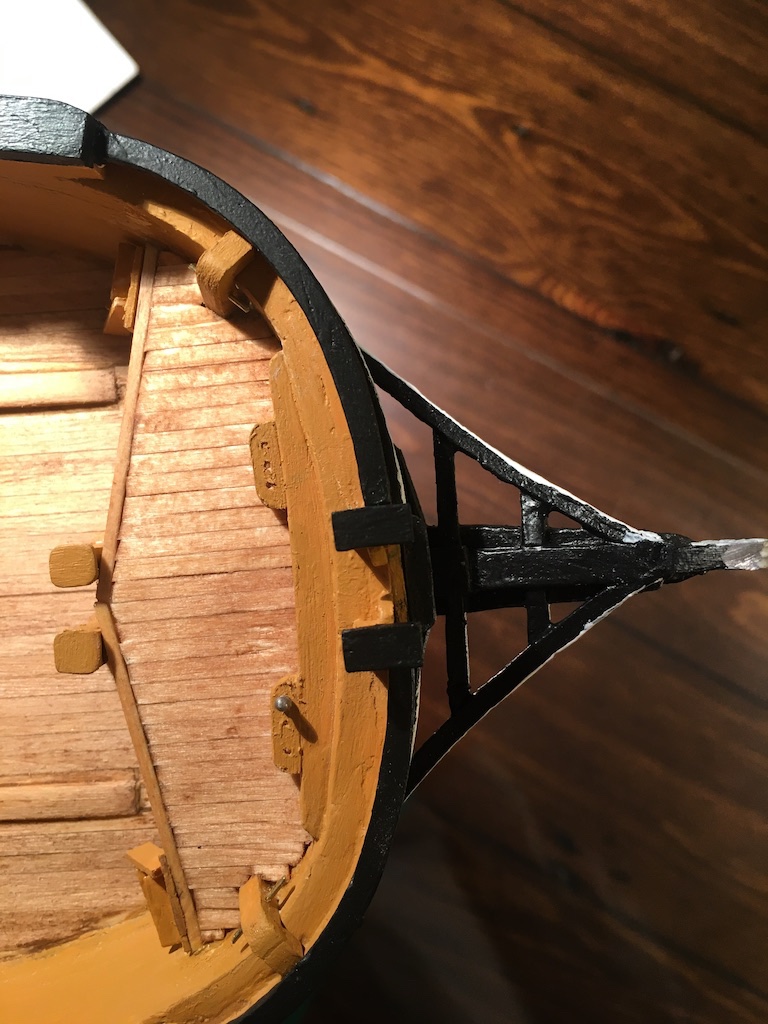
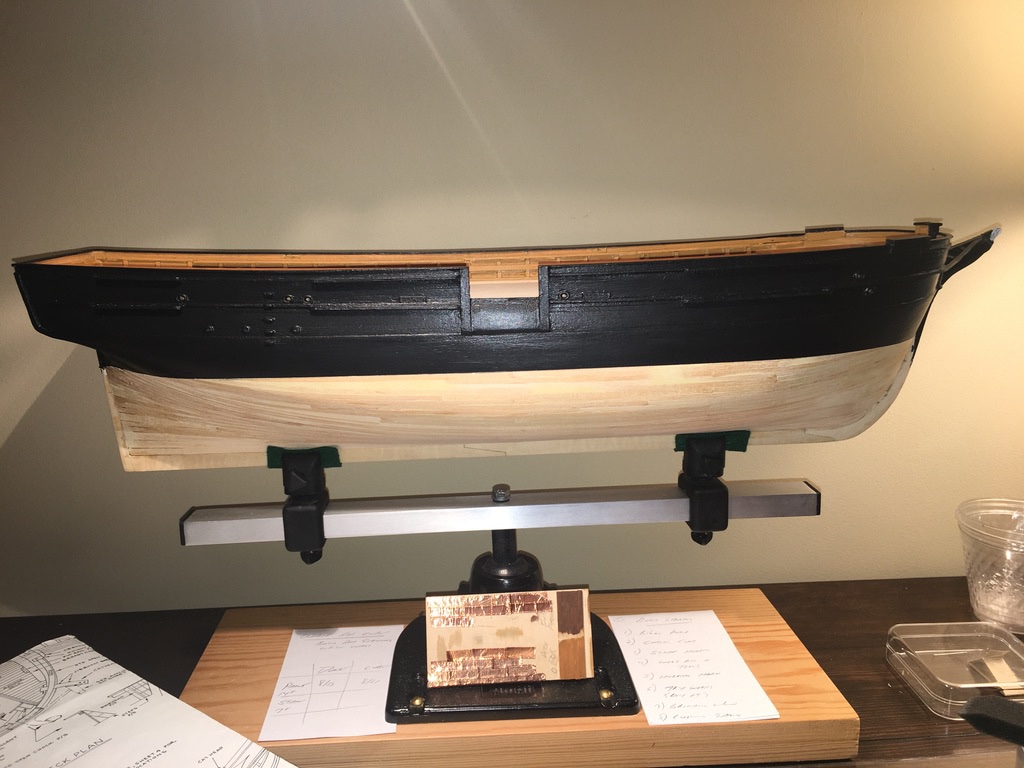
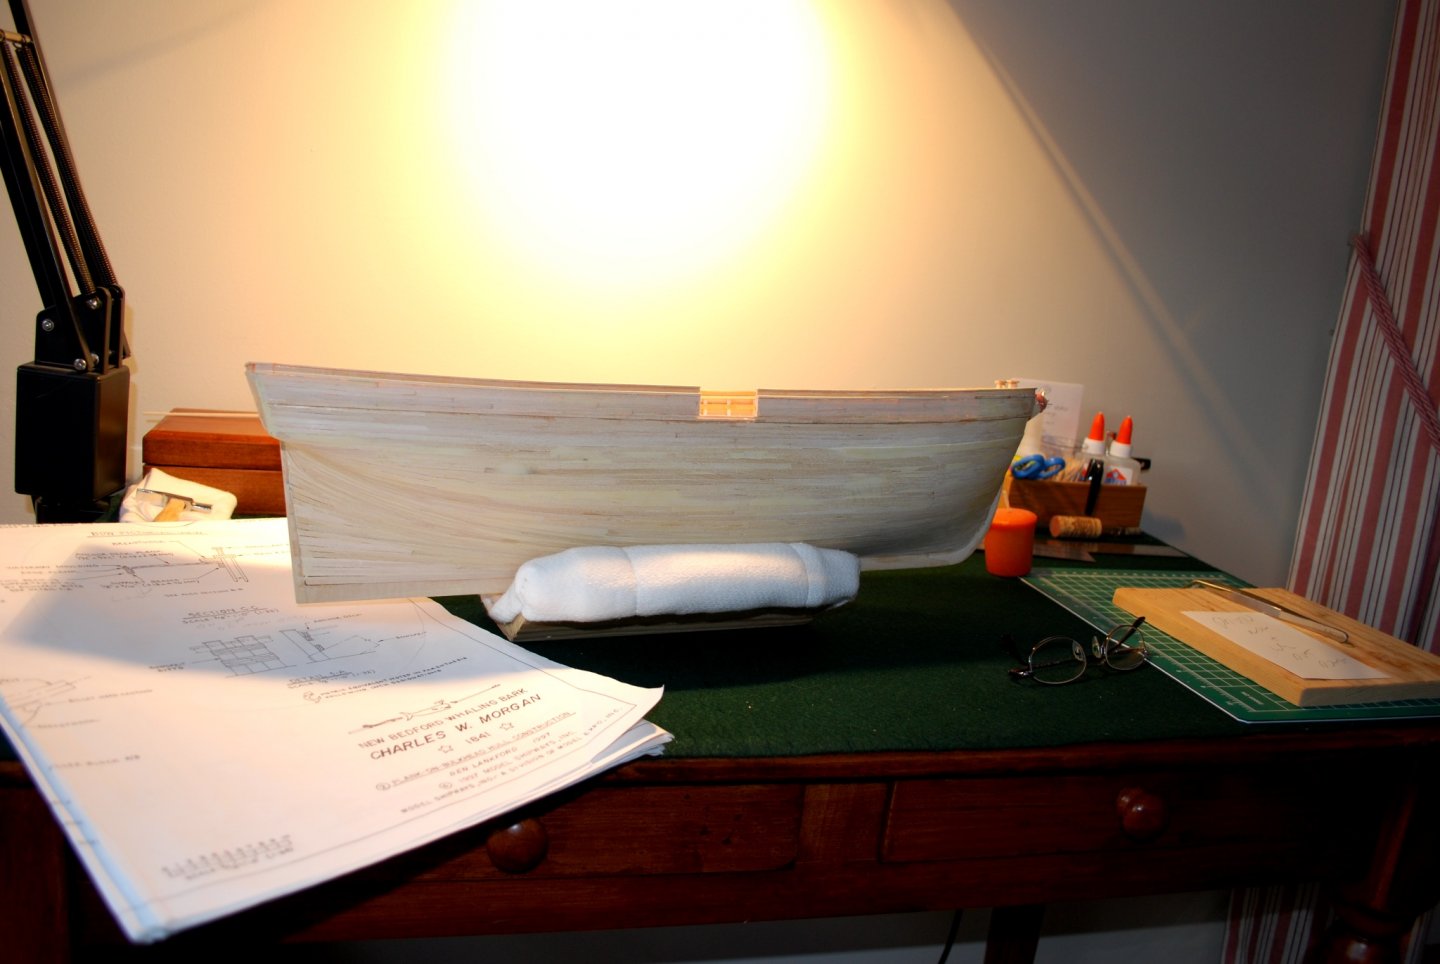
Progress continued with the building of the hurricane houses - tricky getting the cut-outs correct to fir into the rails and bulwarks. I tried making paper templates as some others did but resorted to approximations in some areas as I decided the juncture would never be seen. As you can see, it came out 'close enough' and I am satisfied with the overall fit. The port structure actually sits flush against the stern when pressed down as it will be when glued. I am thinking of adding styrene to the insides of all windows to simulate glass. Like building an addition on a house = amazing how rough the wood looks at first until the finish is applied and all is set in place (to come at a later time as my plan is to finish all the deck structures then dry fit all before final glue assembly to deck).


-
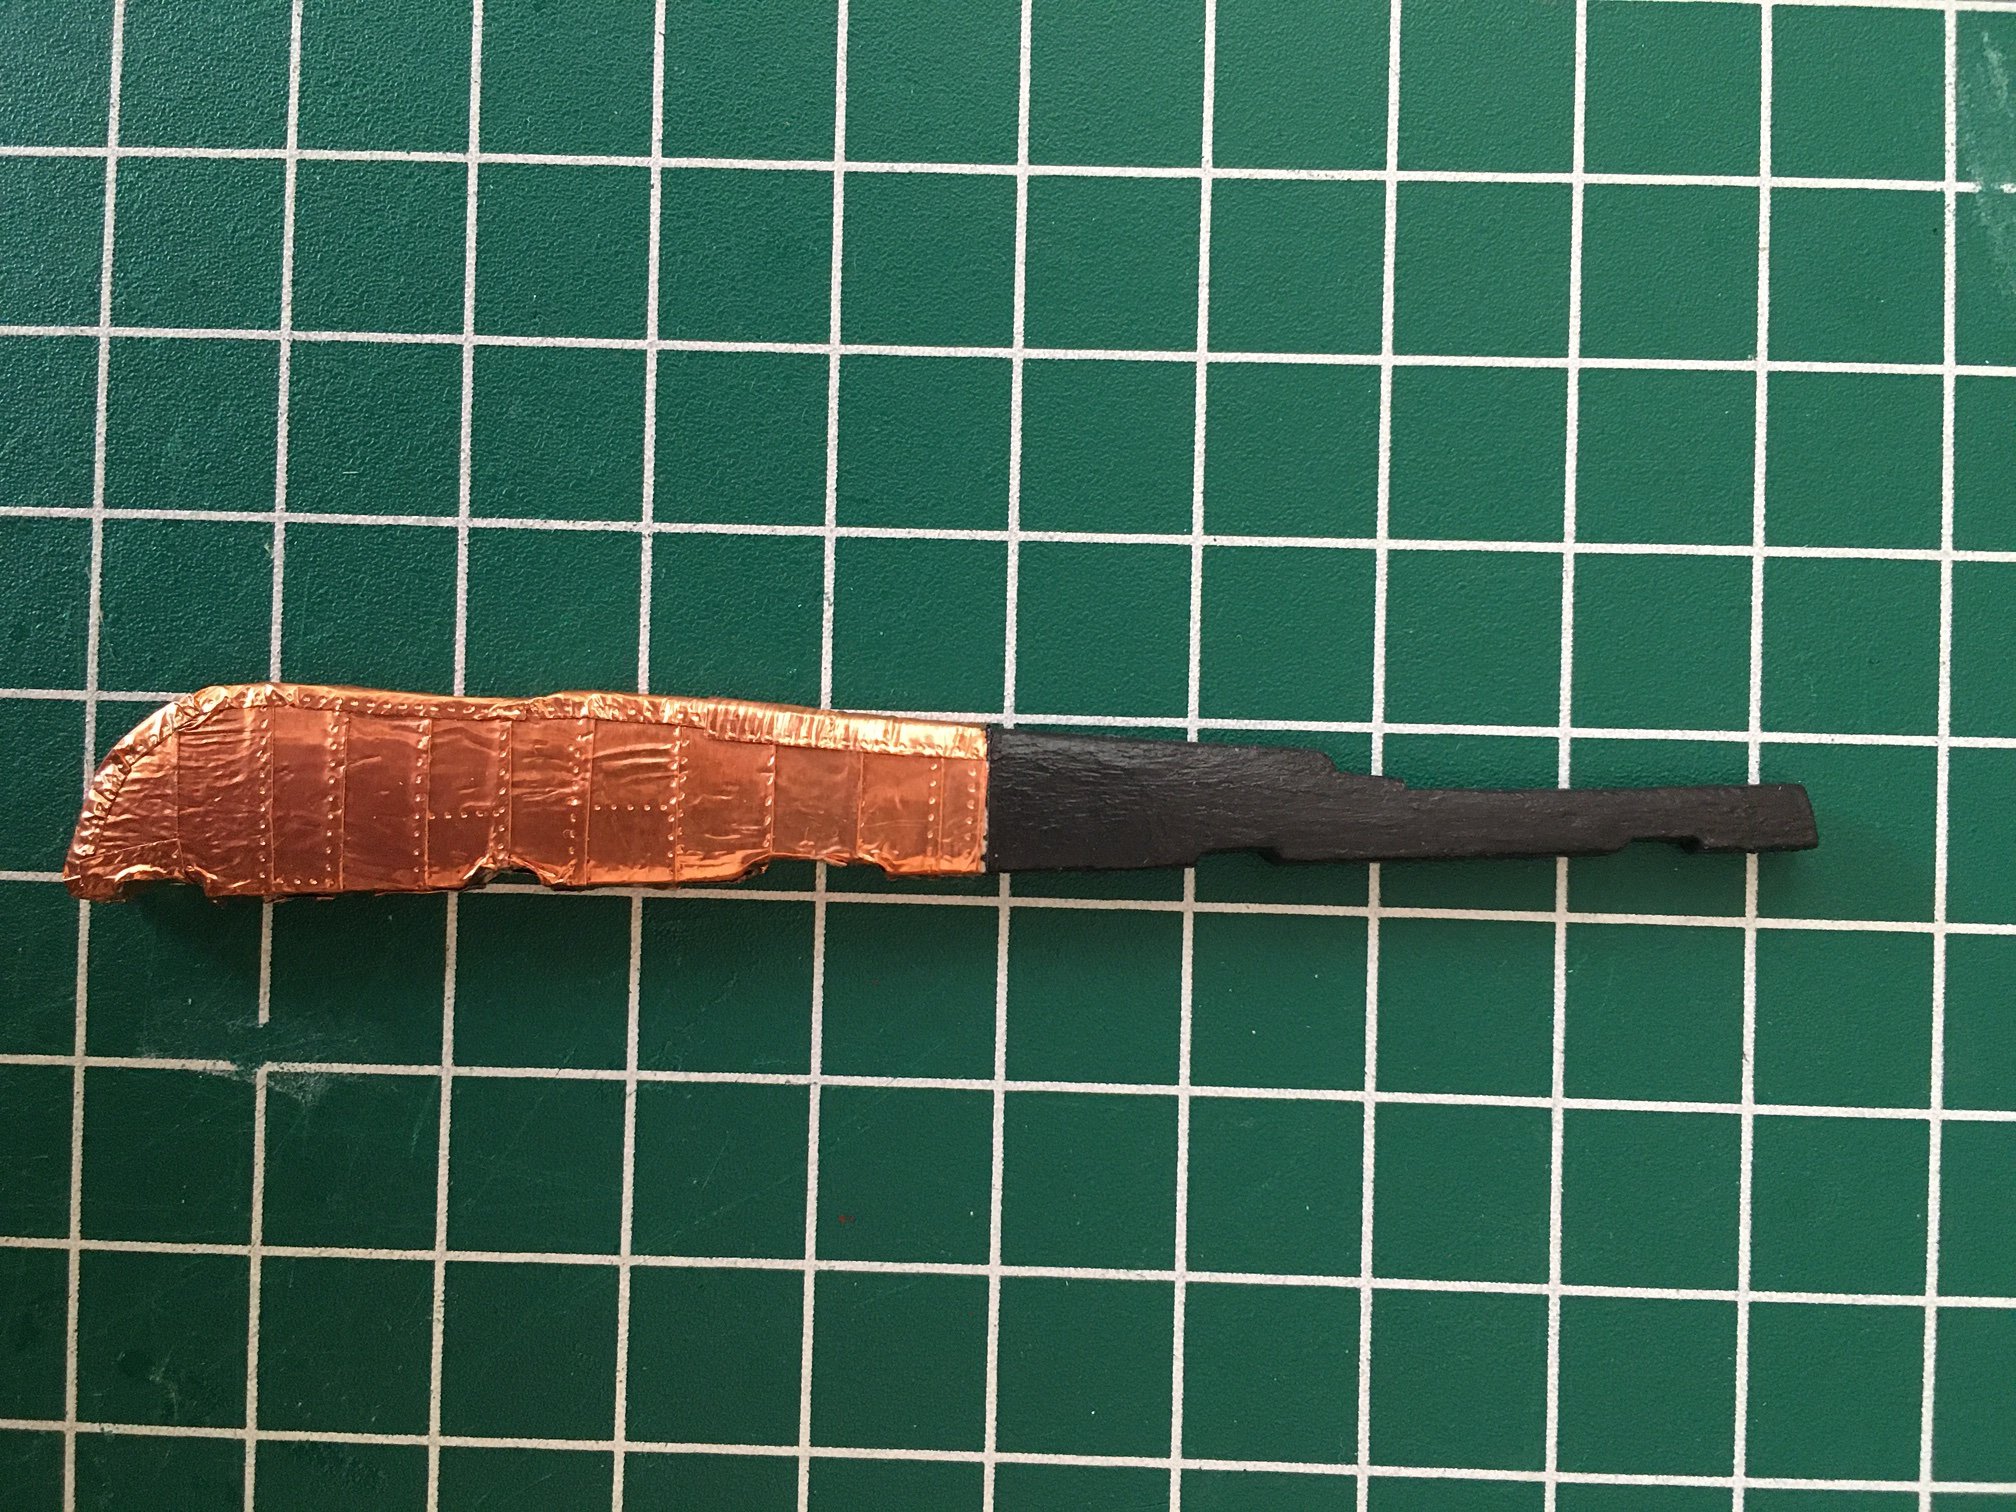
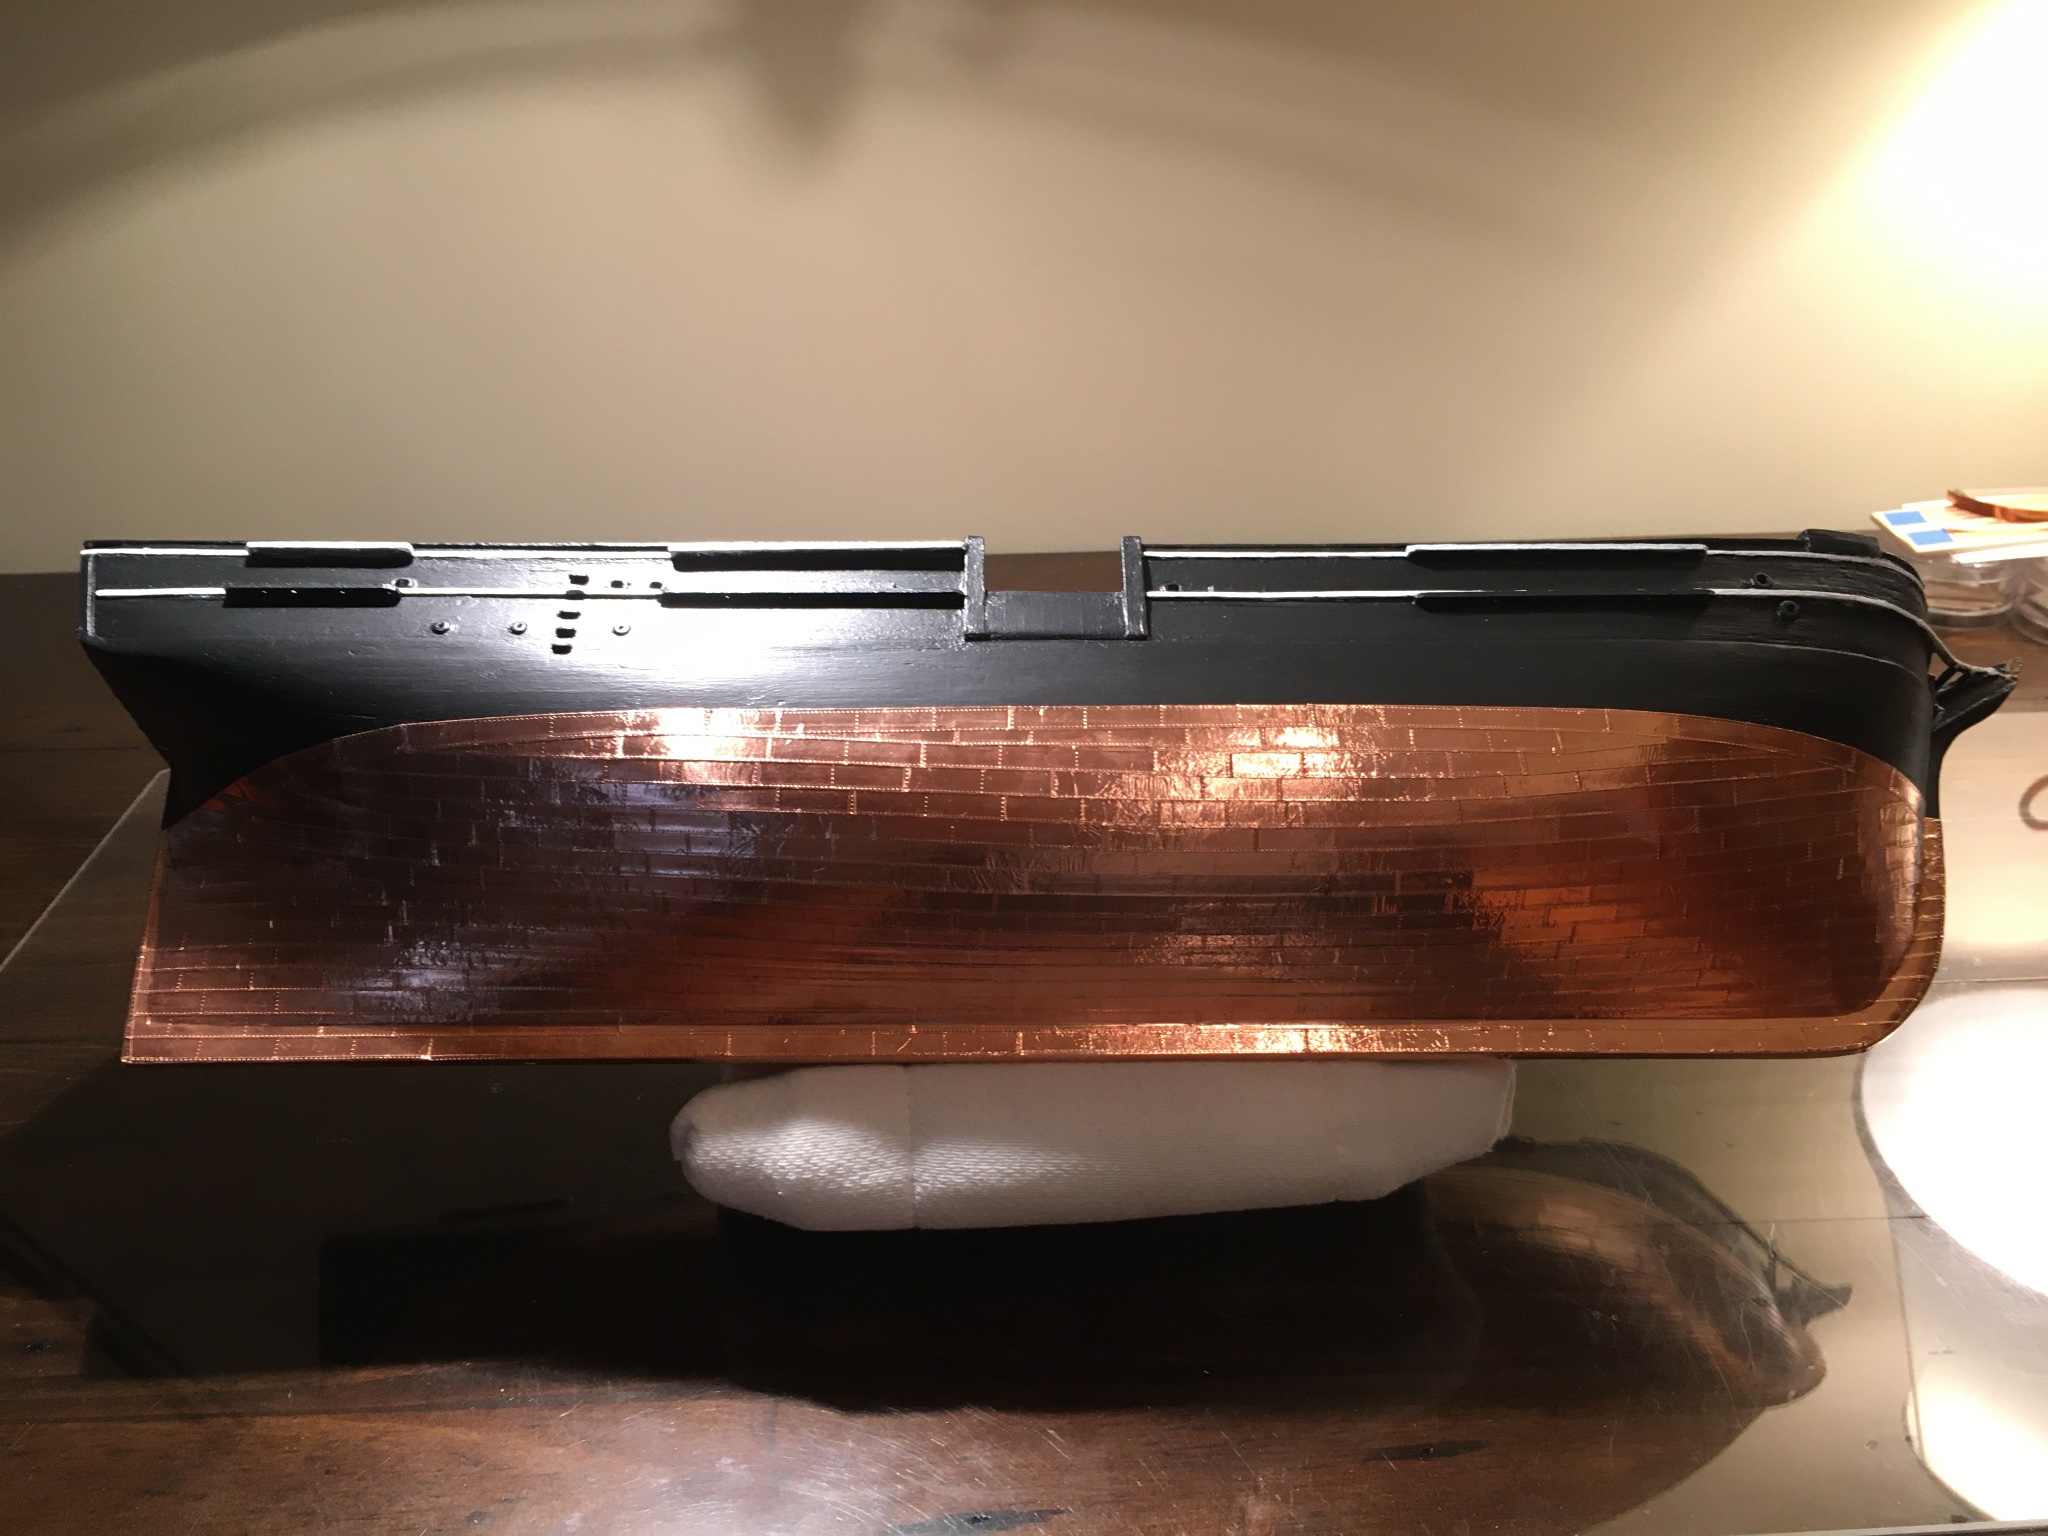
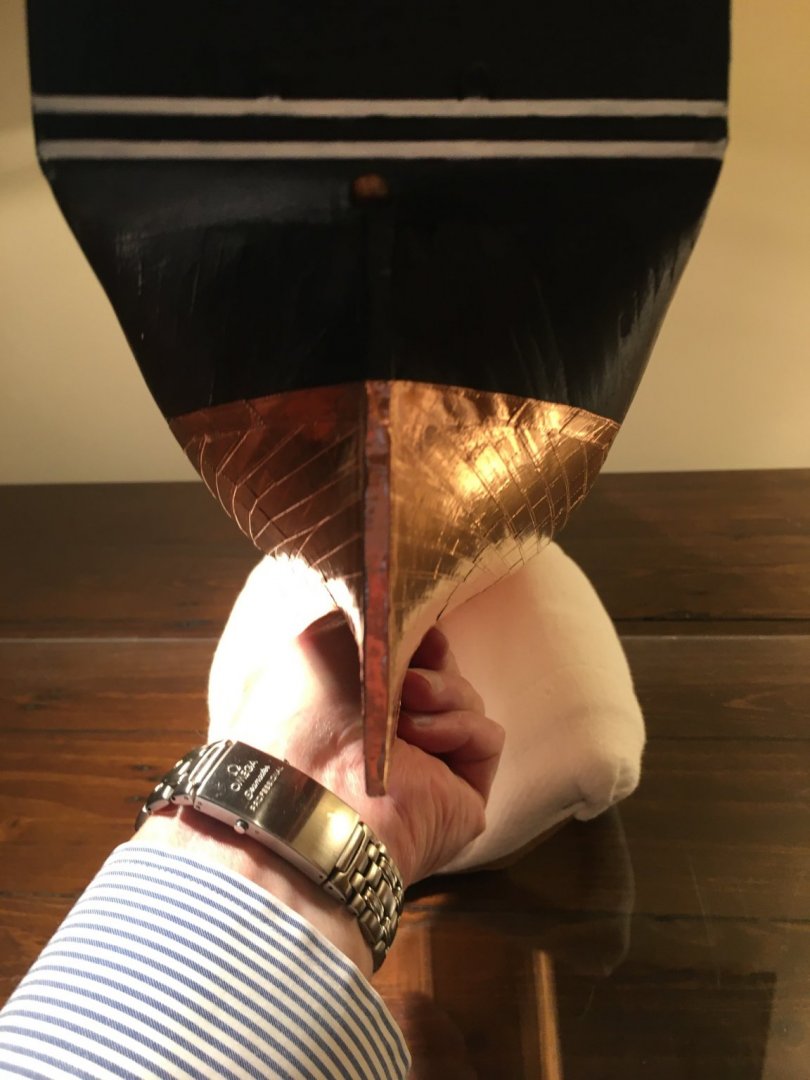
After the hullI proceeded to copper the rudder and realized halfway through that had runs out of coppering tape. Searching through my stock drawer I found a few packs of copper tape that I had ordered from Model Shipways as a back=up, relieved I brought them out only to find they did not match and the color was so off that it was unusable. Frantic, I retrieved from the trash bin some of the copper that I had stripped off the hull when I found a row that was not matching up at stem or stern. Luckily a few plates were unwrinkled and usable and I was able to complete the rudder. As I stepped back in relief, I realized - as you can see if you look closely - that I had laid the copper incorrectly with the bottom plates overlapping the top plates . Nothing to do now but to live with it and know (hope) that unless I tell anyone it will be a secret between me and Ms. Morgan!

-
Thanks 'Rookie" - agreed , however all models I have seen this site and elsewhere have simulated some level of rivet or flush nail - perhaps that is more of a correct term for what I had found in my research. I also agree about the AL supplied wood - my Harvey had planks about 1.5 times correct scale width - fine for a first model and easier to work with. I am building a Bluenose down in our Hilton Head home and am planking 'true to scale' with 4 bulwark butt shifts. We learn from our early endeavors then challenge ourselves to the next level of 'craftsmanship' - for me it is the journey...
-
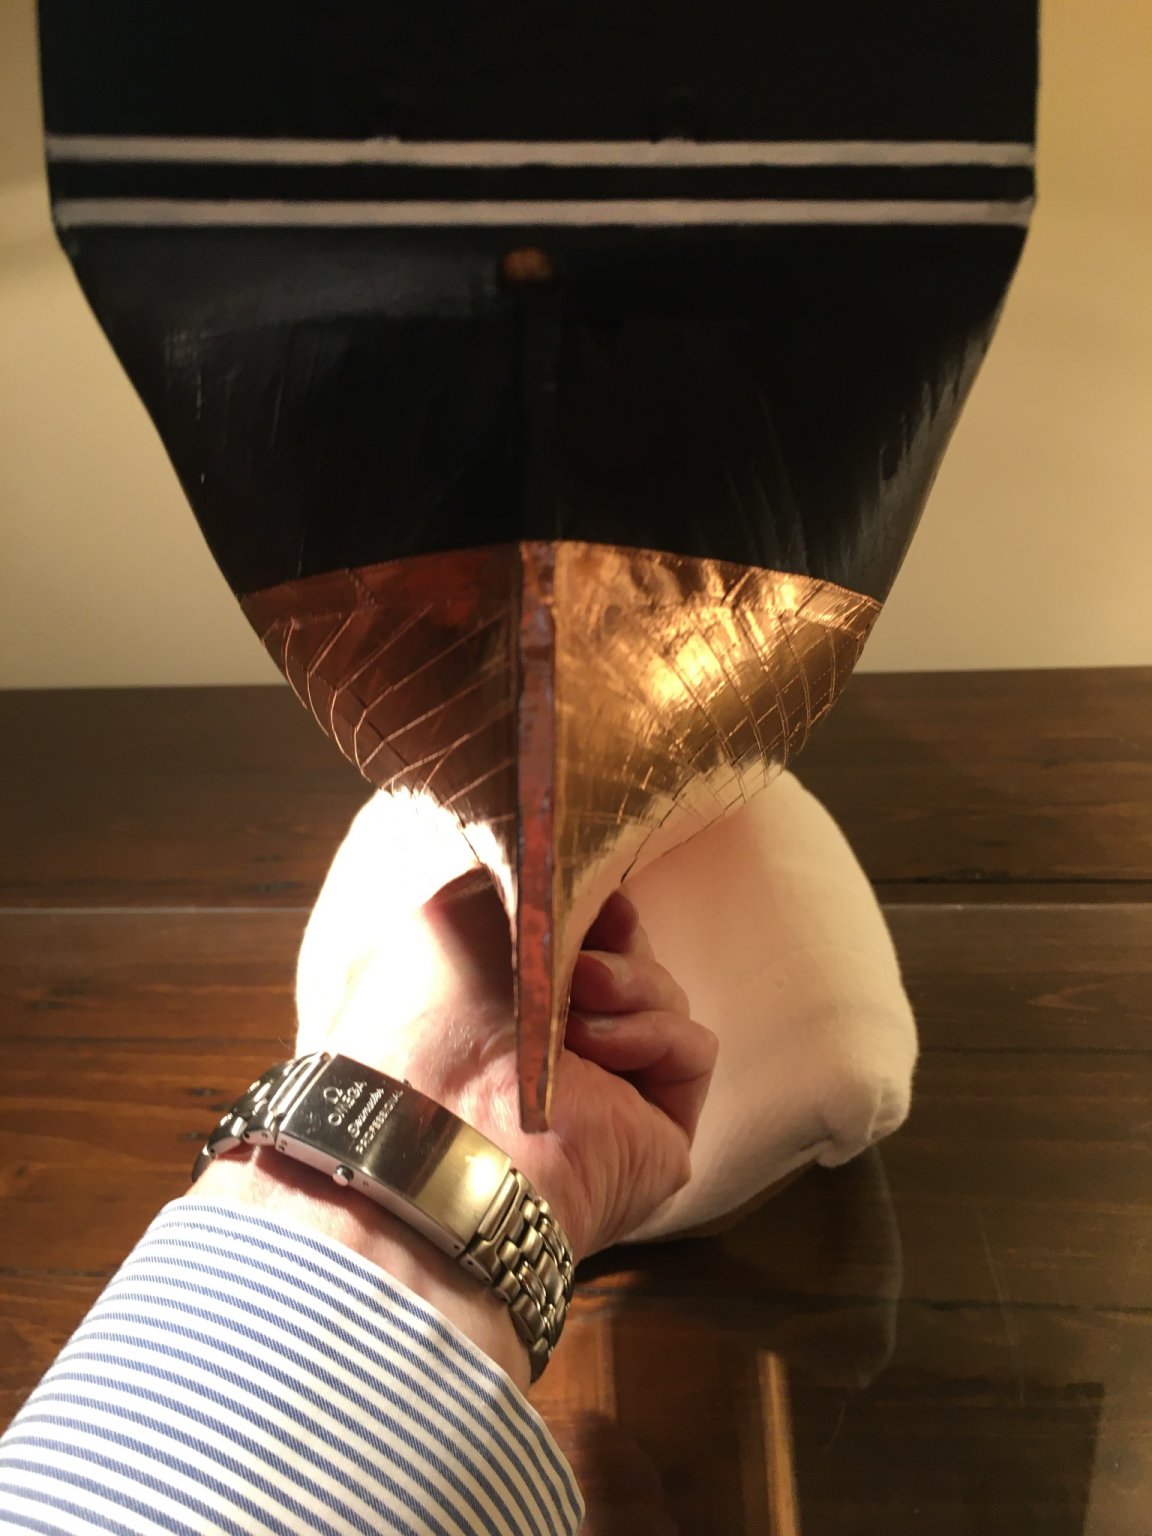
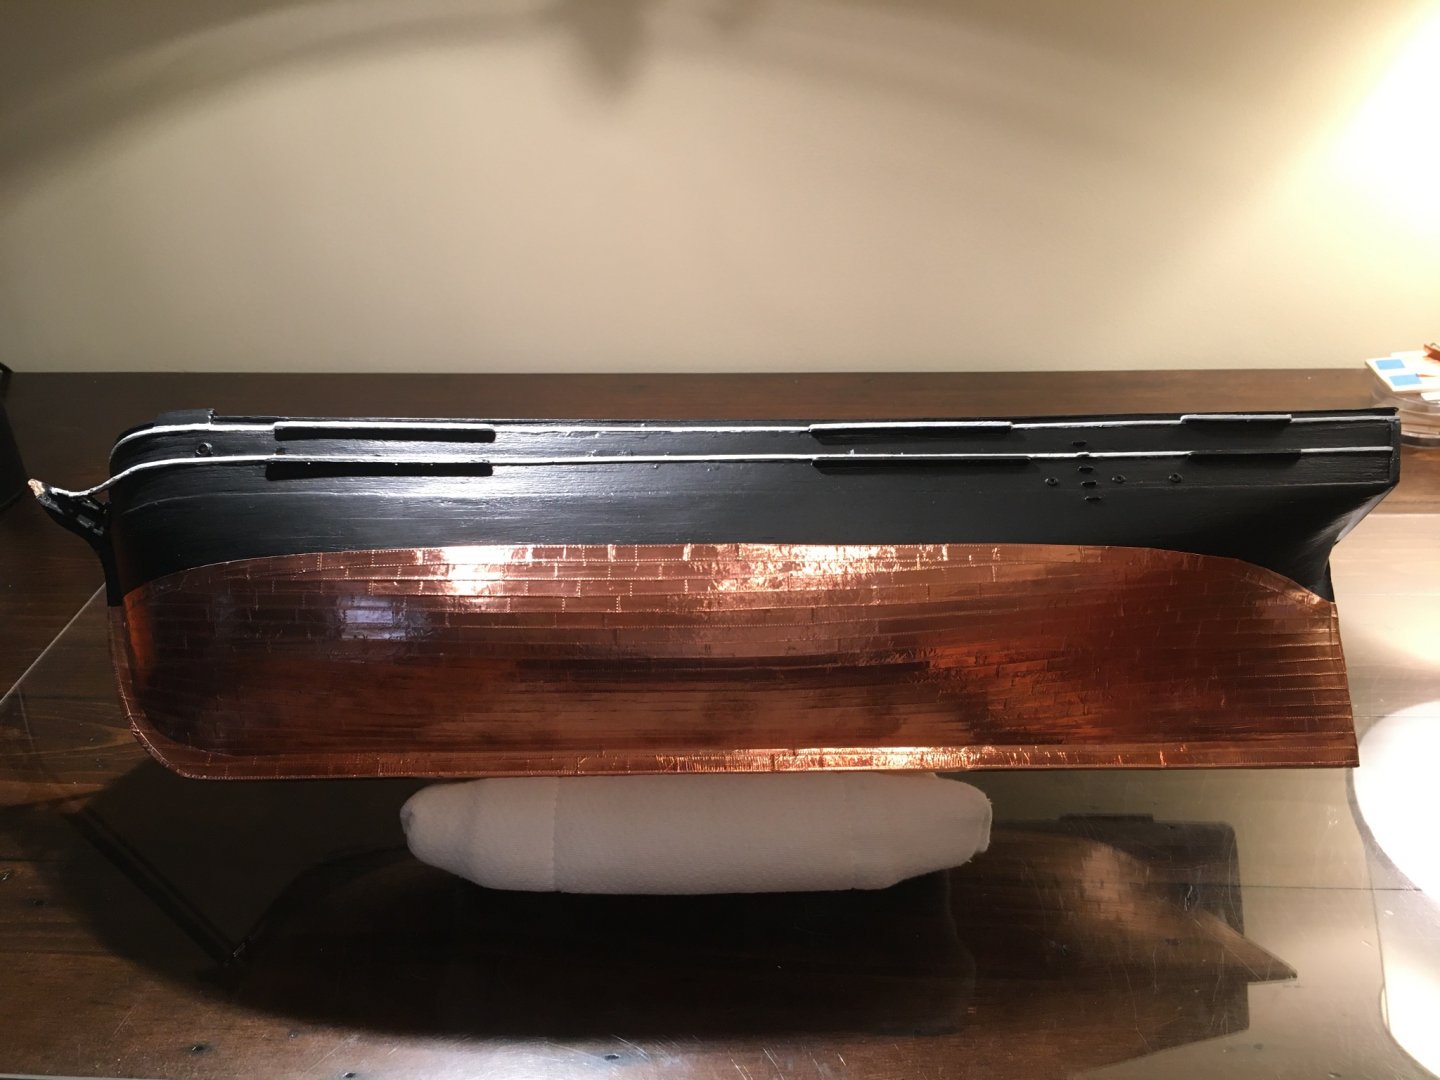
A few final coppering photos showing what I think are pretty solid row matches both stem and stern - at least I am happy with the results.

-
And then on to the Starboard side - but with me, at my current level of modeling skills, I coppered about a third of the way up and realized that I had mistakenly laid the rows on the Port side and they angled up way too sharply. So...I had to strip off all of the copper from both sides and begin again - what you saw in the last photo was the final version of the Port side. And if that was not trouble enough, as I progressed with the Starboard side I outpaced my skills and moved too quickly, this time my copper rows did not line up at all Stem or Stern and looked horribly wavy. So.."off with the Starboard" and starting from scratch at a slower more methodical pace was able to match my rows. Here is the completed Starboard side.

-
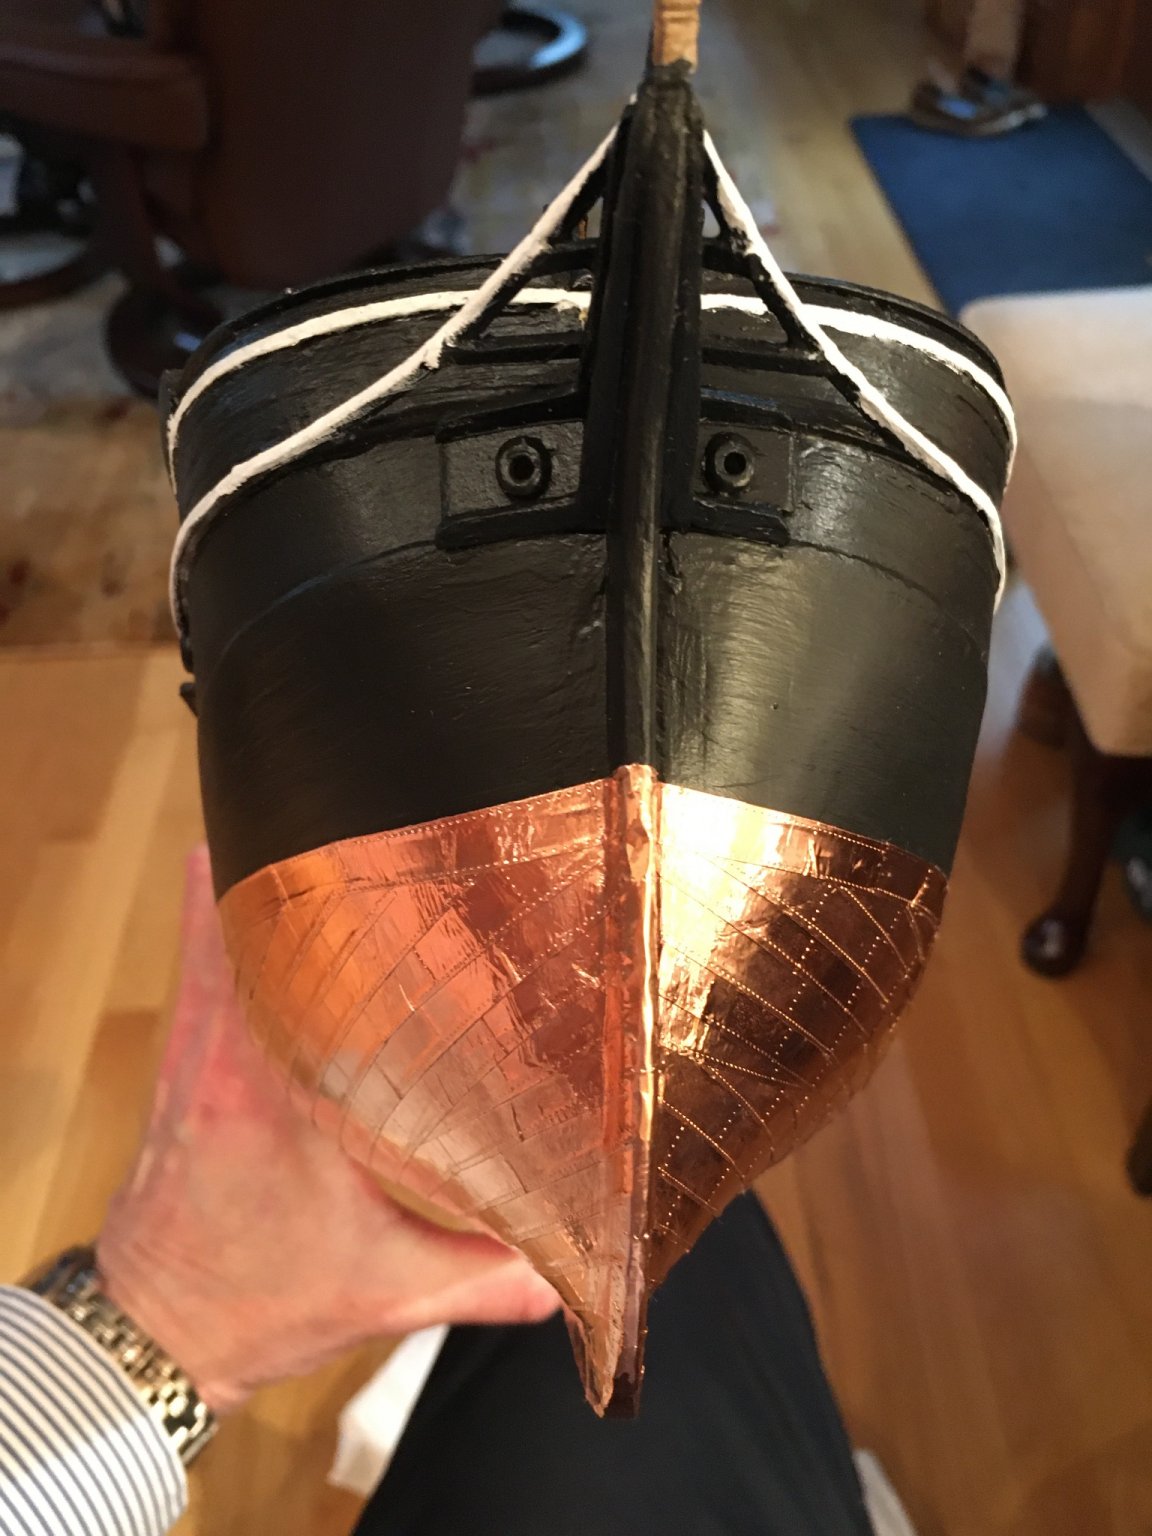
I began coppering the hull late summer 2020 - as with all of us, Covid has damped many of our plans as we had a full year of travel set up including Europe twice, Canada, The West Coast and multiple trips to NYC for Opera and Theater. Even though I am still working , we are - as our financial advisors put it - firmly in the 'go-go years', which at some time are followed by the 'slow-go' and then the 'no-go' years. Our goal is to have as many 'go-go' years as health and finances allow! After all we only get one trip around this sun! Here is the fully coppered Port Side - but - there is a saga to this... I followed the style of a few other modeler's and choose to lay my copper in continuous runs of 5 'plates' long rather than cut 5 single plates. I used the smallest pounce wheel from my Excel 3 wheel set and ran the simulated rivets (corrected to 'nail heads') on there TOP side of the plate (not the bottom) - after much research I concluded that the rivets ("nail heads" were 'pounded' into the plate thus giving a more smooth if not slightly concave appearance rather than pronounced and siting atop the plate. Many of you will disagree with this and that is OK - I think both methods look great and again ...this is a 'model'
-
Thanks so much for the 'thumbs up' and kind words - it's amazing to look back at the early photos and see the dates - I am taking more 'in progress photos' now to add a bit more to the 'how' of what I am doing.
-
My 'success' with aging my anchor chain and staining the deck provided the needed motivation to build out the anchor deck. I decided to attach the main mast stays now as it would be impossible to reach under the deck later but did not drill out the holes quite yet as the exact placement will not be known until the main mast is in place. I added a 'pull string' of thread to the end of the line and this will be easy to retrieve once the hole is drilled using a needle threader. For those of you keeping track - the time machine is still in Fall 2020 - continued great progress!
-
Next in line was to finish the deck - I choose to stain my deck rather than paint it the suggested weathered gray simply because I prefer the look of stained wood and have found that particularly with the soft basswood the stain absorbs irregularly and with a bit of wiping and finessing one can get the appearance of a well-worn deck. After experimenting with a few different stains on scrap basswood, I choose Minwax "Ipswich Pine" both for the color and for the Massachusetts connection.
-
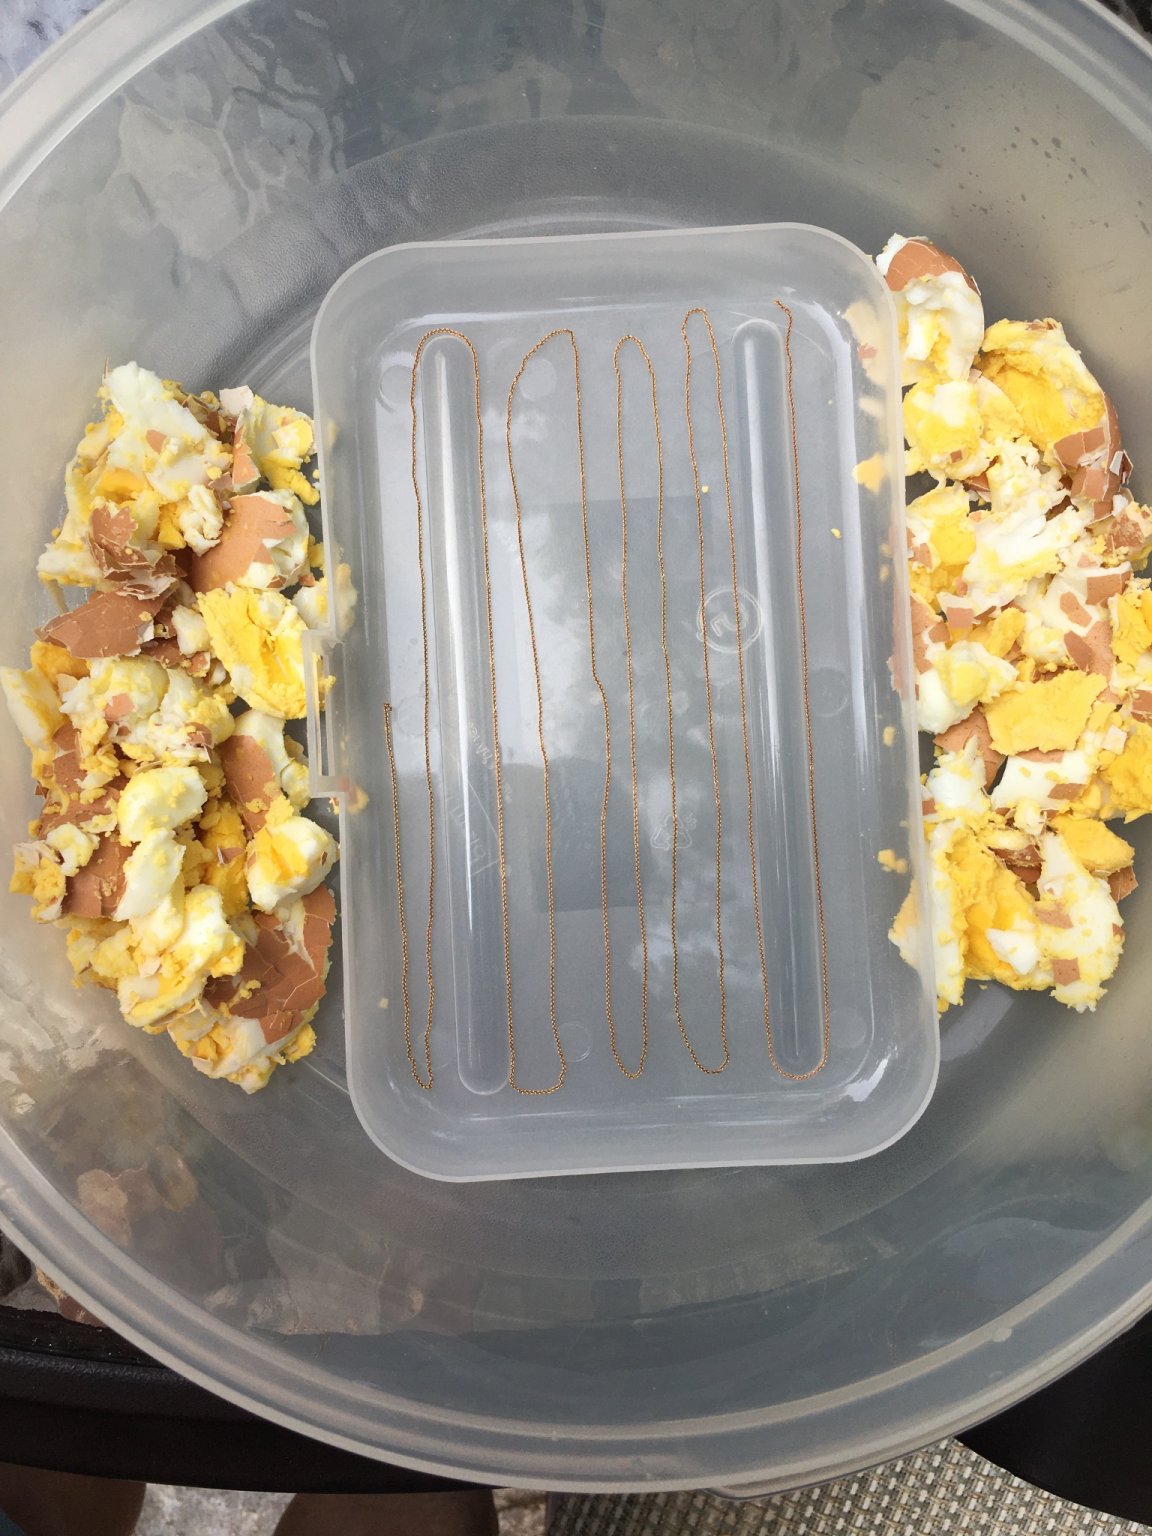
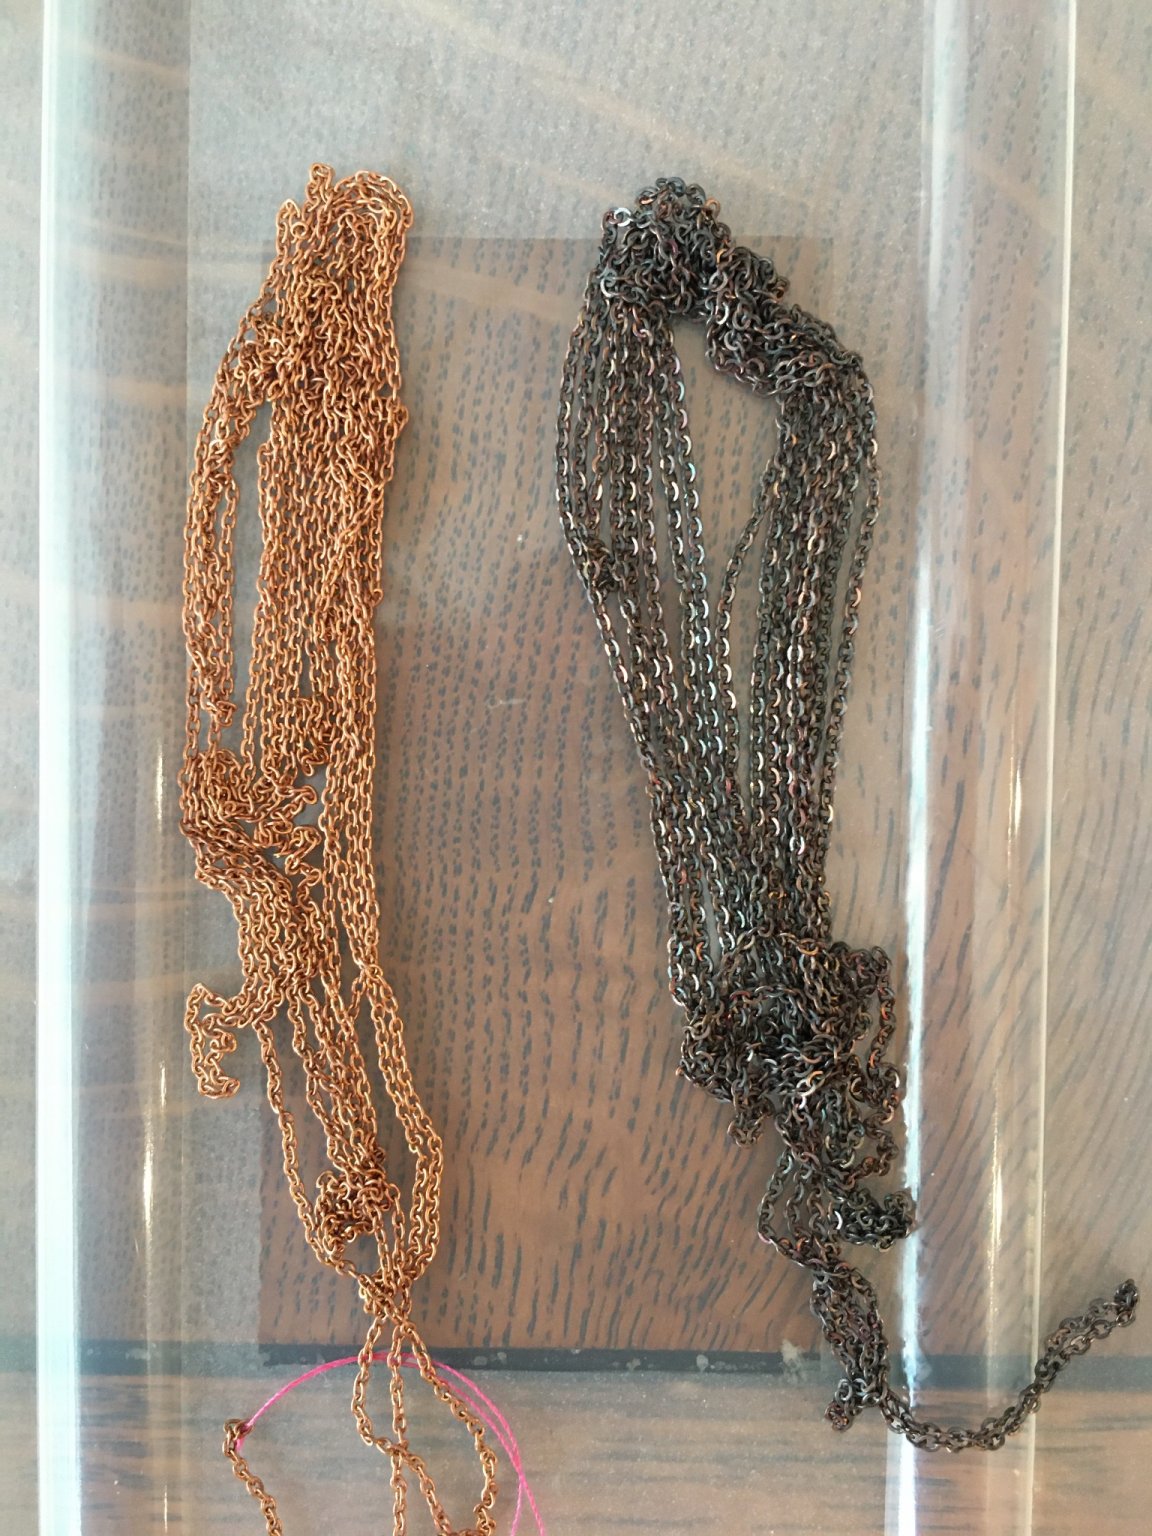
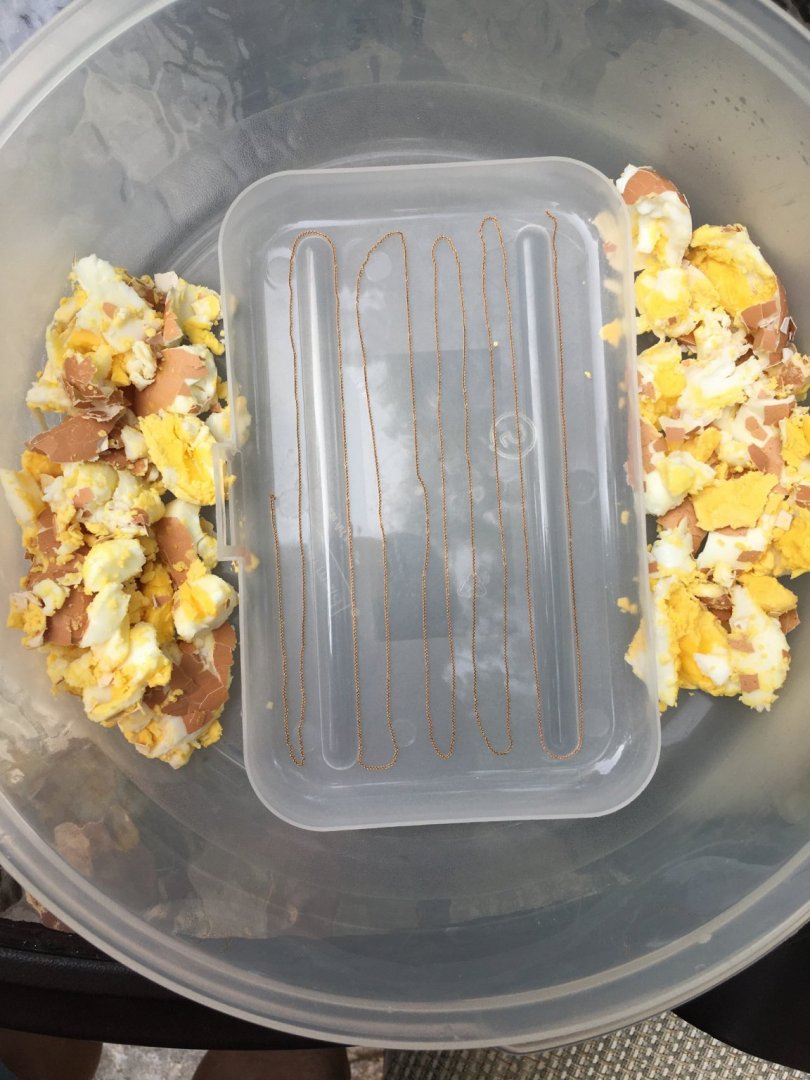
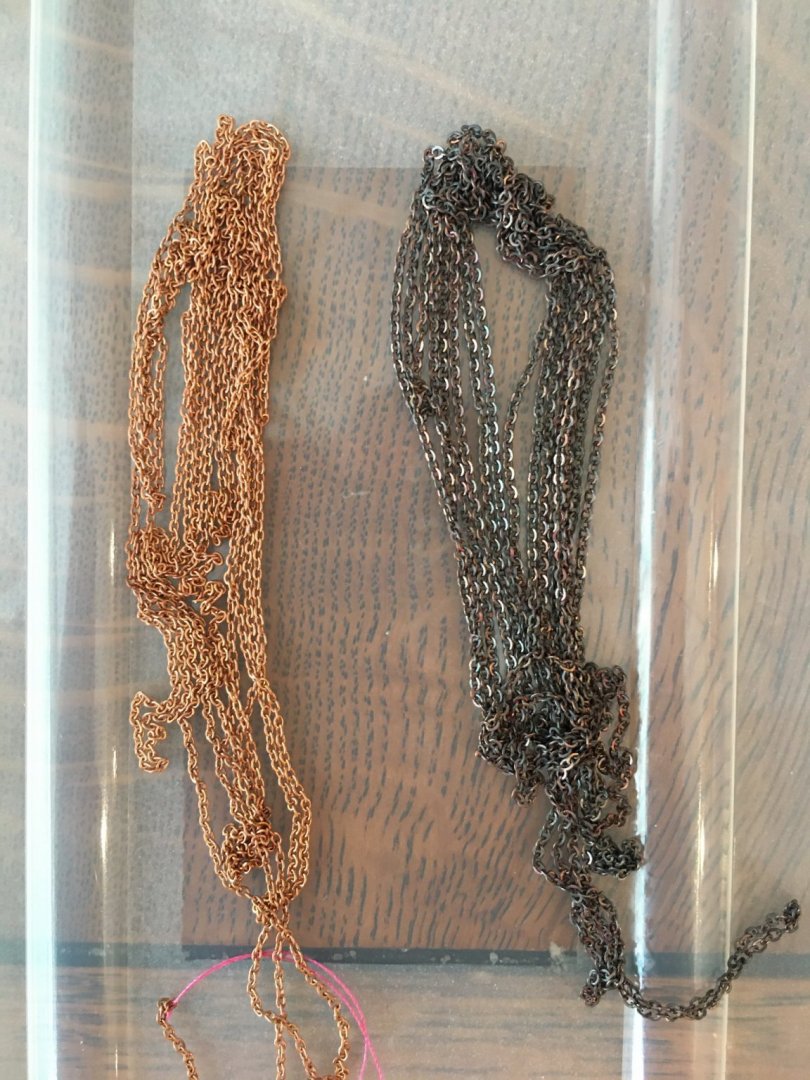
I decided to jump around a bit and began playing with the anchor chain. I wanted more of an aged look and scoured many modeling sites for blackened chain in the proper scale (could not find any), blackening products (none seemed satisfactory) and finally blackening/agin techniques. Many artists and modelers use liver of sulphur - but I found a simpler technique letting nature and time do the work for me. By sacrificing 3-4 hard boiled eggs placed in an airtight container with the chains loosely laid in the center (essential that the chain does not touch the egg) and allowing the concoction to rest overnight I was able to produce some chains - that to me - look seasoned by the sea and able to give a well worn look to this working ship. Here are the before and after photos.
-
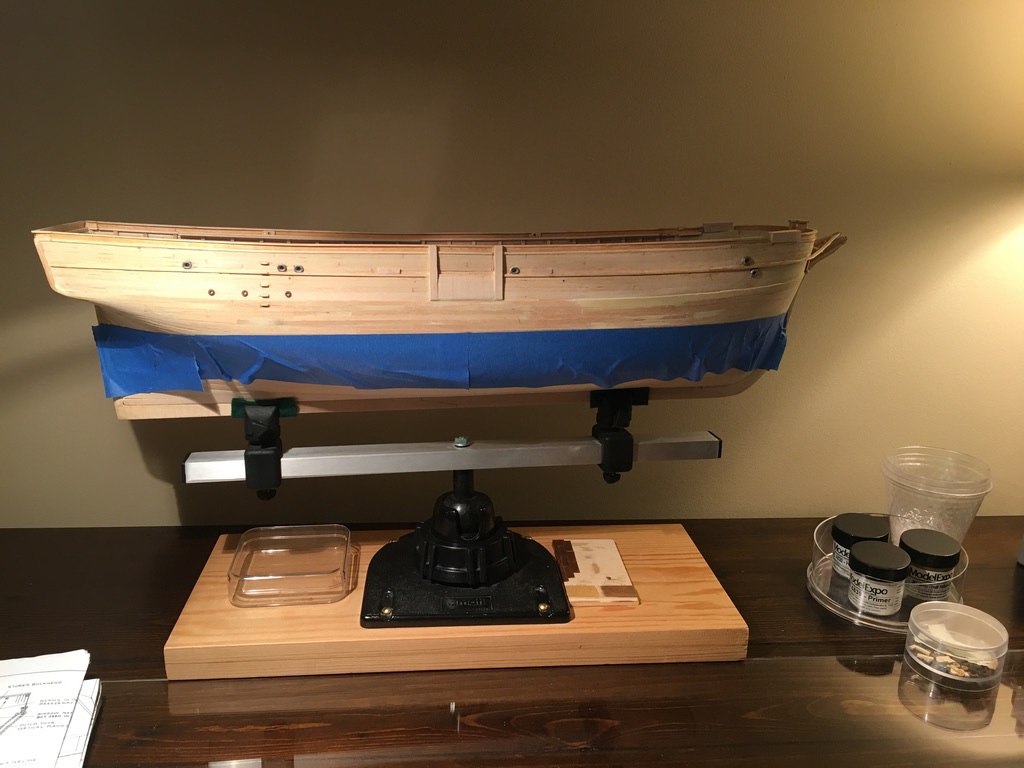
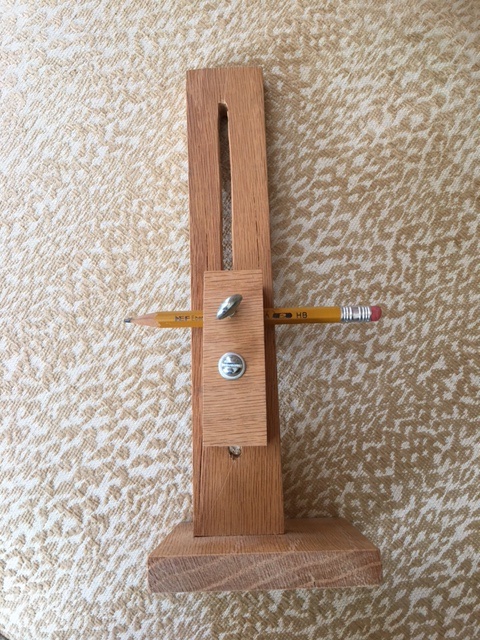
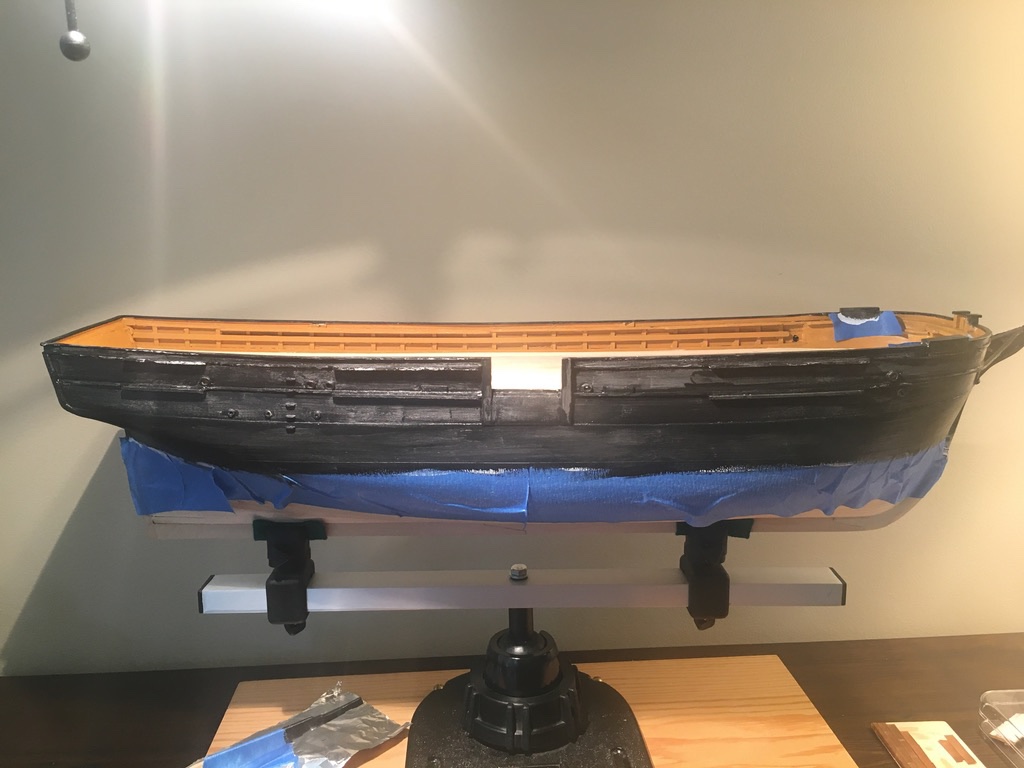
My momentum increased and I progressed to painting the hull - here you can see 1) masking off 2) 1st coat and 3) 3rd and final coat, and 4) the 'Mastini' water line marker jig that I built to get my lines correct . I know that many modelers prefer enamels and many airbrush but I went basic and used Model Shipways acrylic and a brush.
-
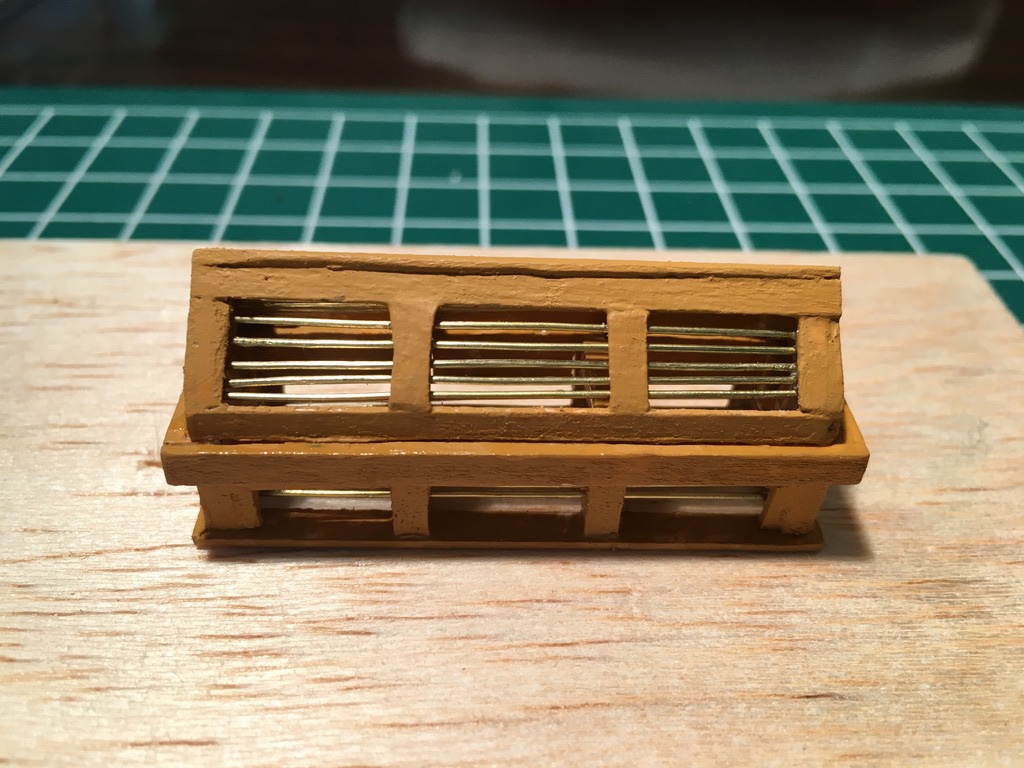
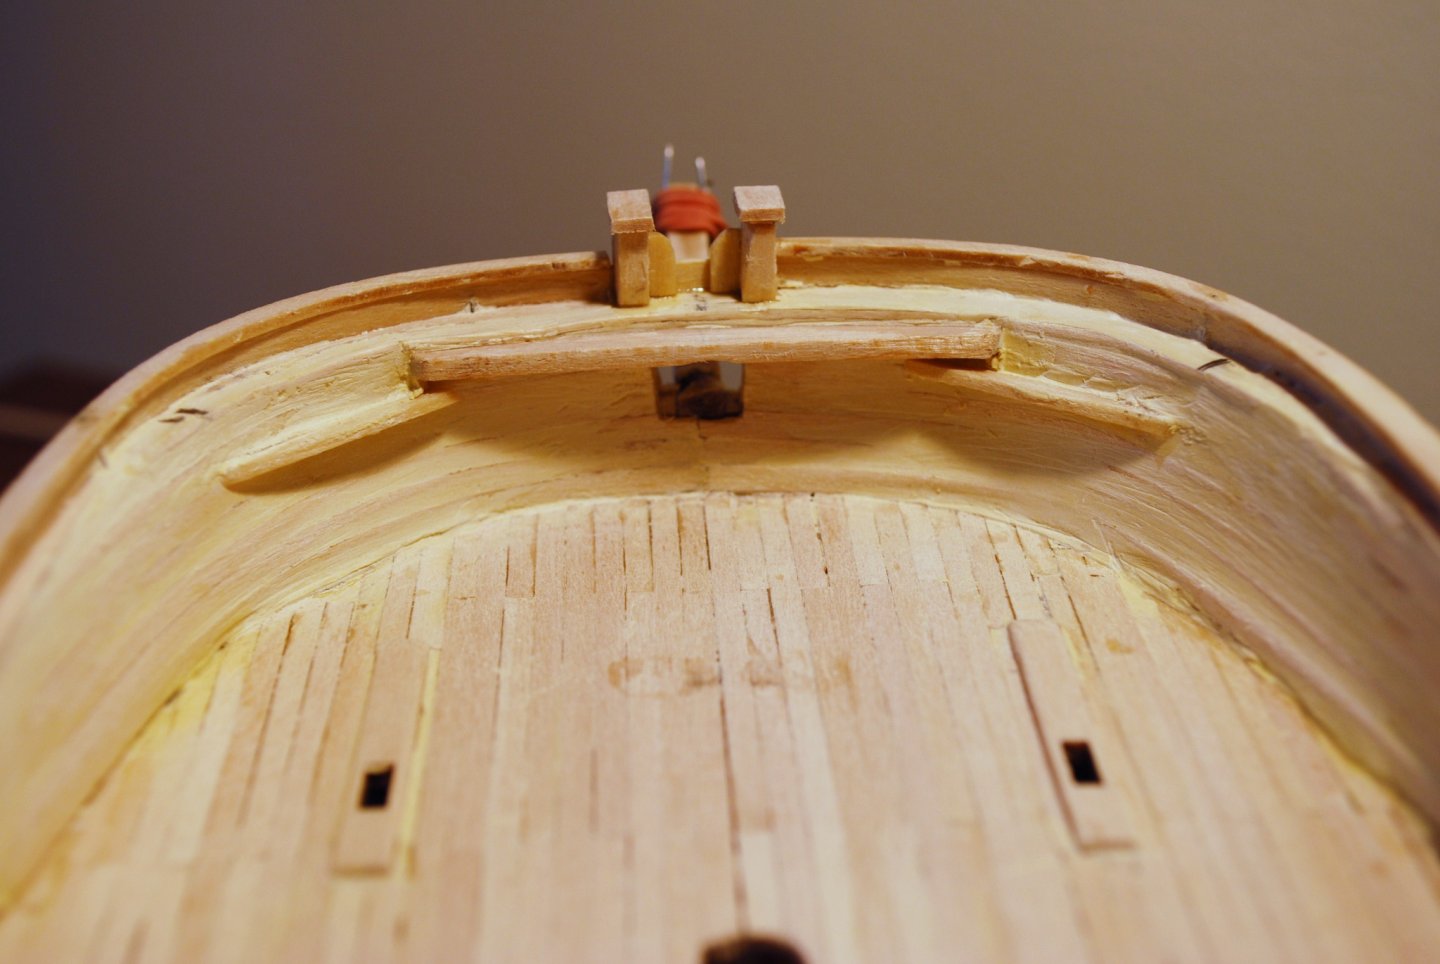
Back into the time machine and fast forward to September of 2020. Way back in 2014 I was beginning to craft the skylight (described in the Model Shipways as an 'interesting but tedious structure to build...") - and for me that it was. I once again let my inspiration (from some great skylights built by others here in our forum) exceed my skill as well as my confidence. I let The Morgan sit under a plexiglass case on my ship table only occasionally attempting to craft this small structure and each time failing to find a suitable way to jam 9 thin rods into the casing. Finally, I decided that a model is exactly that - a 'model' or representation as opposed to an actual truth - I found some other examples of 'simulating' the structure and followed the path of attaching fewer rods and only to the undersides of the top (not the sides) and not drilling them through. Rudimentary but 'good enough' for me at this stage of craftsmanship and more importantly - it got me 'unstuck' and able to move ahead with more work at a regular pace.
-
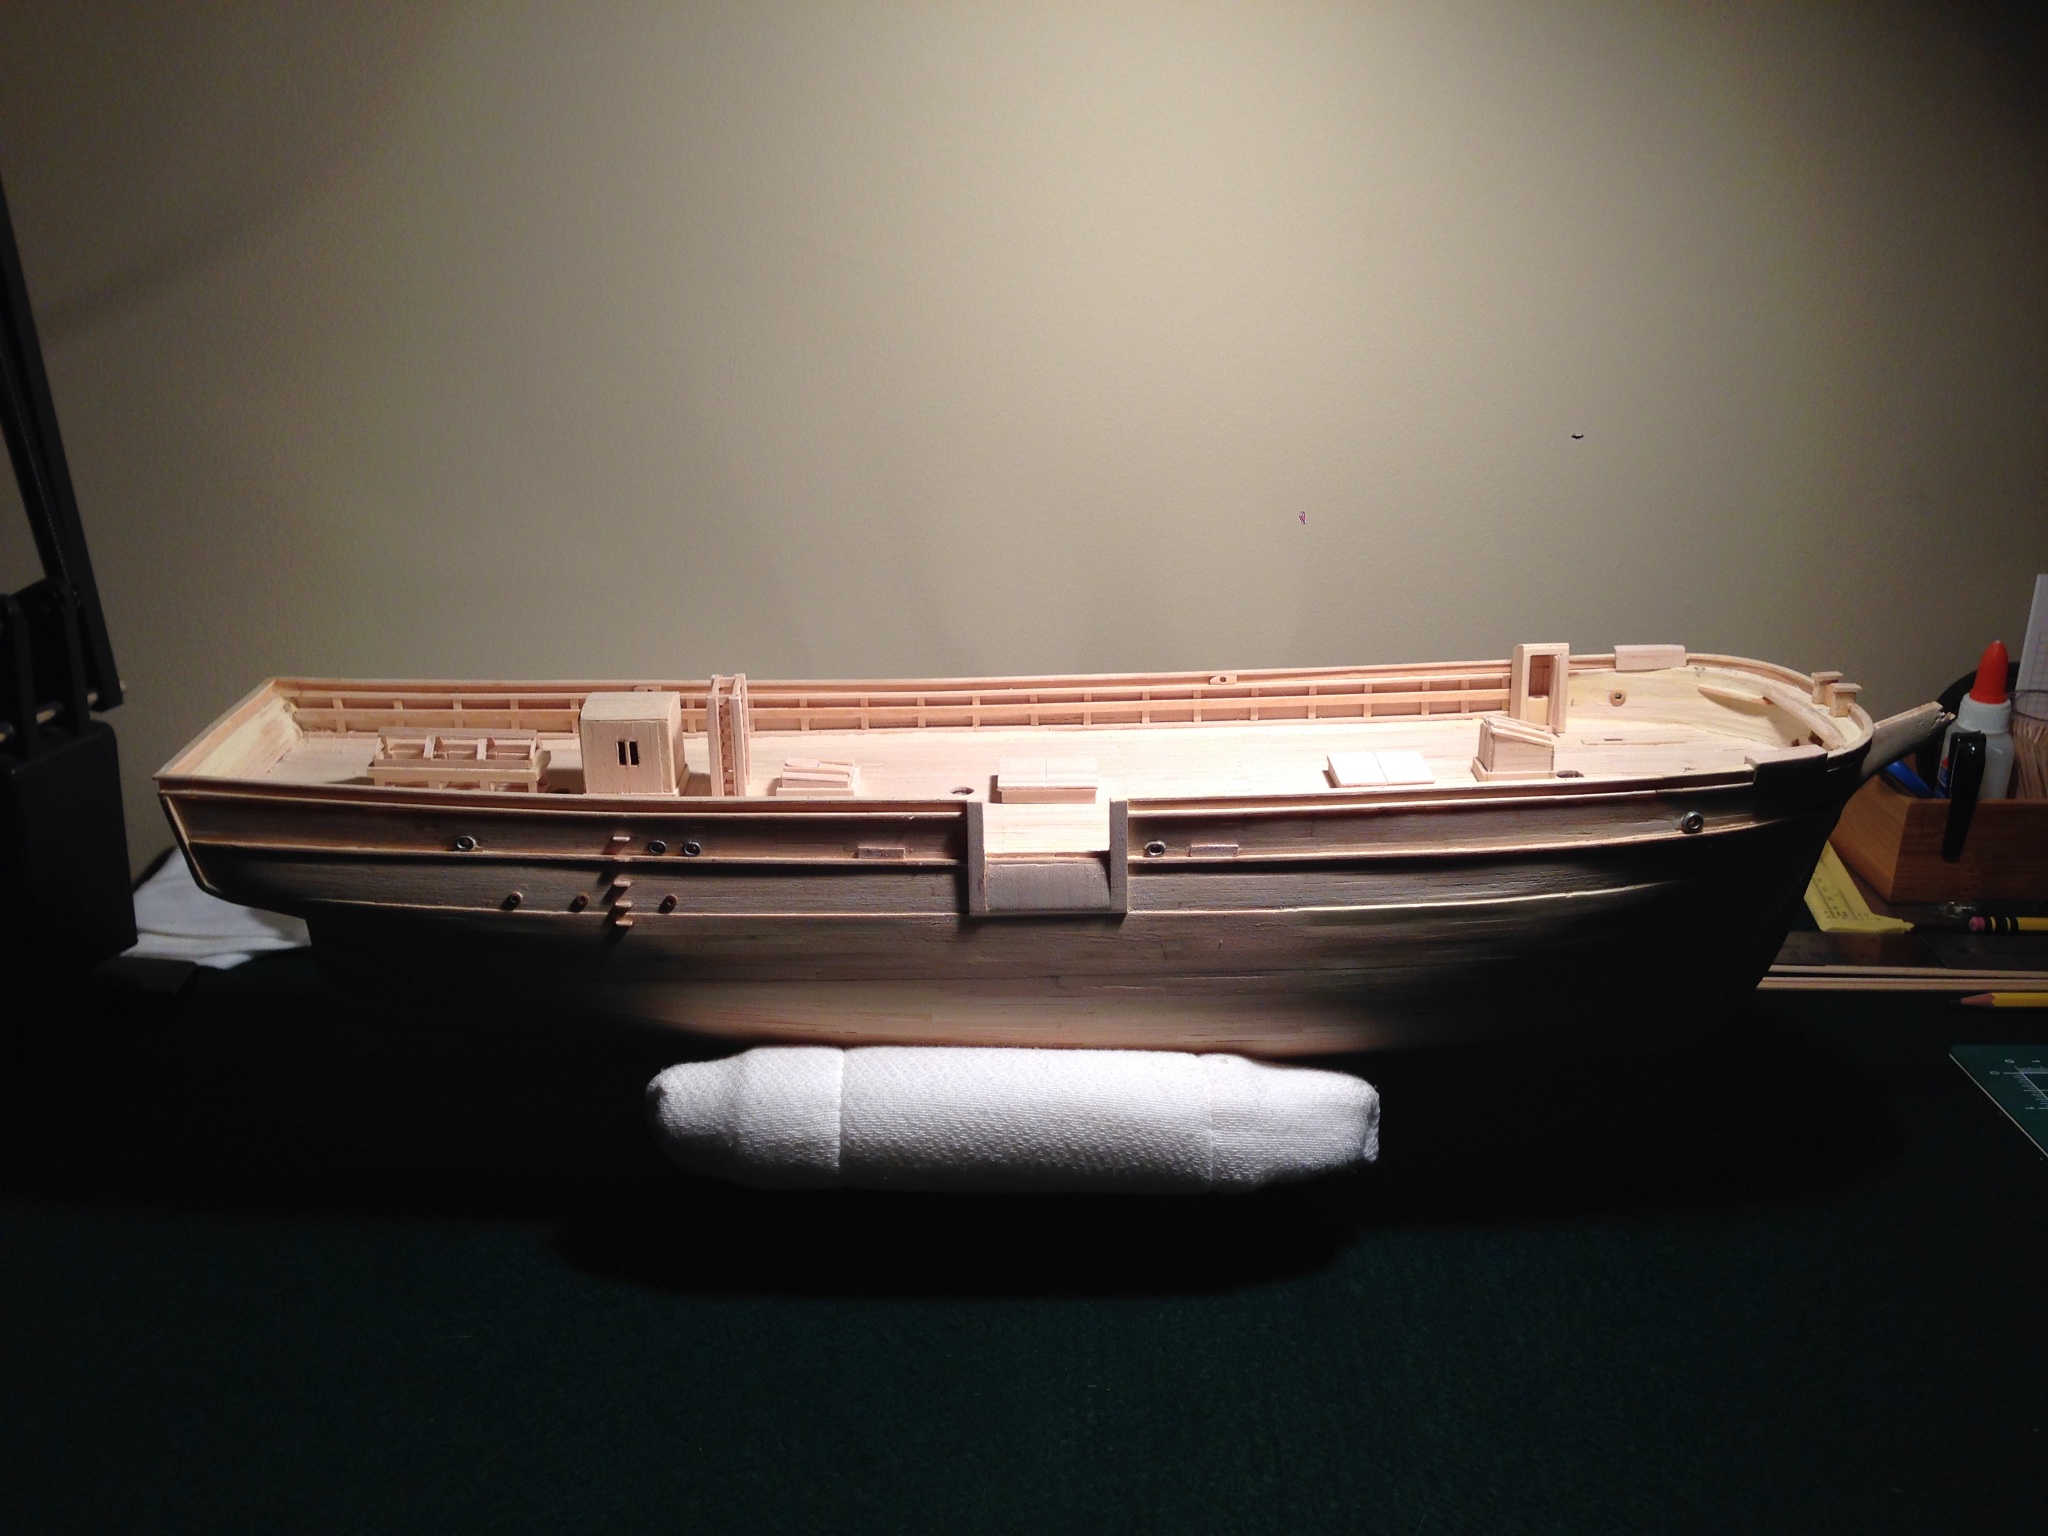
Well, fast forward now to May of 2014 - after 5 long years in dry dock I have finally returned to this hard-working lady! Again, sorry that I did not take photos of the step by step construction, but here are my 'early deck structures' sitting in place but not painted or attached.

-
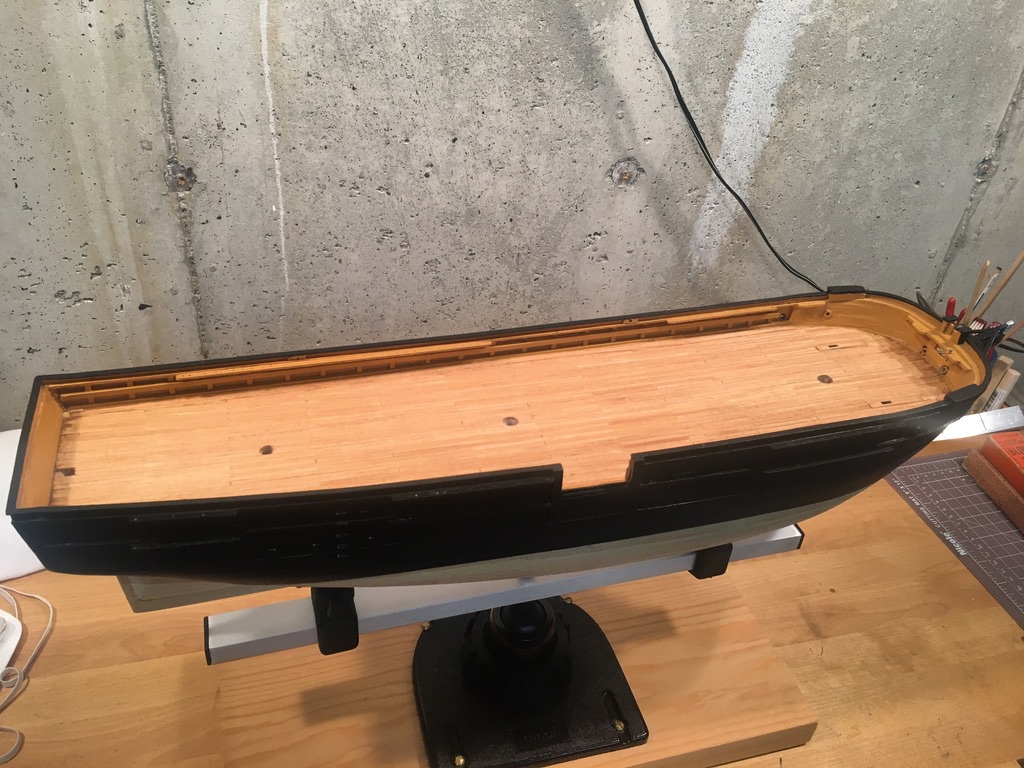
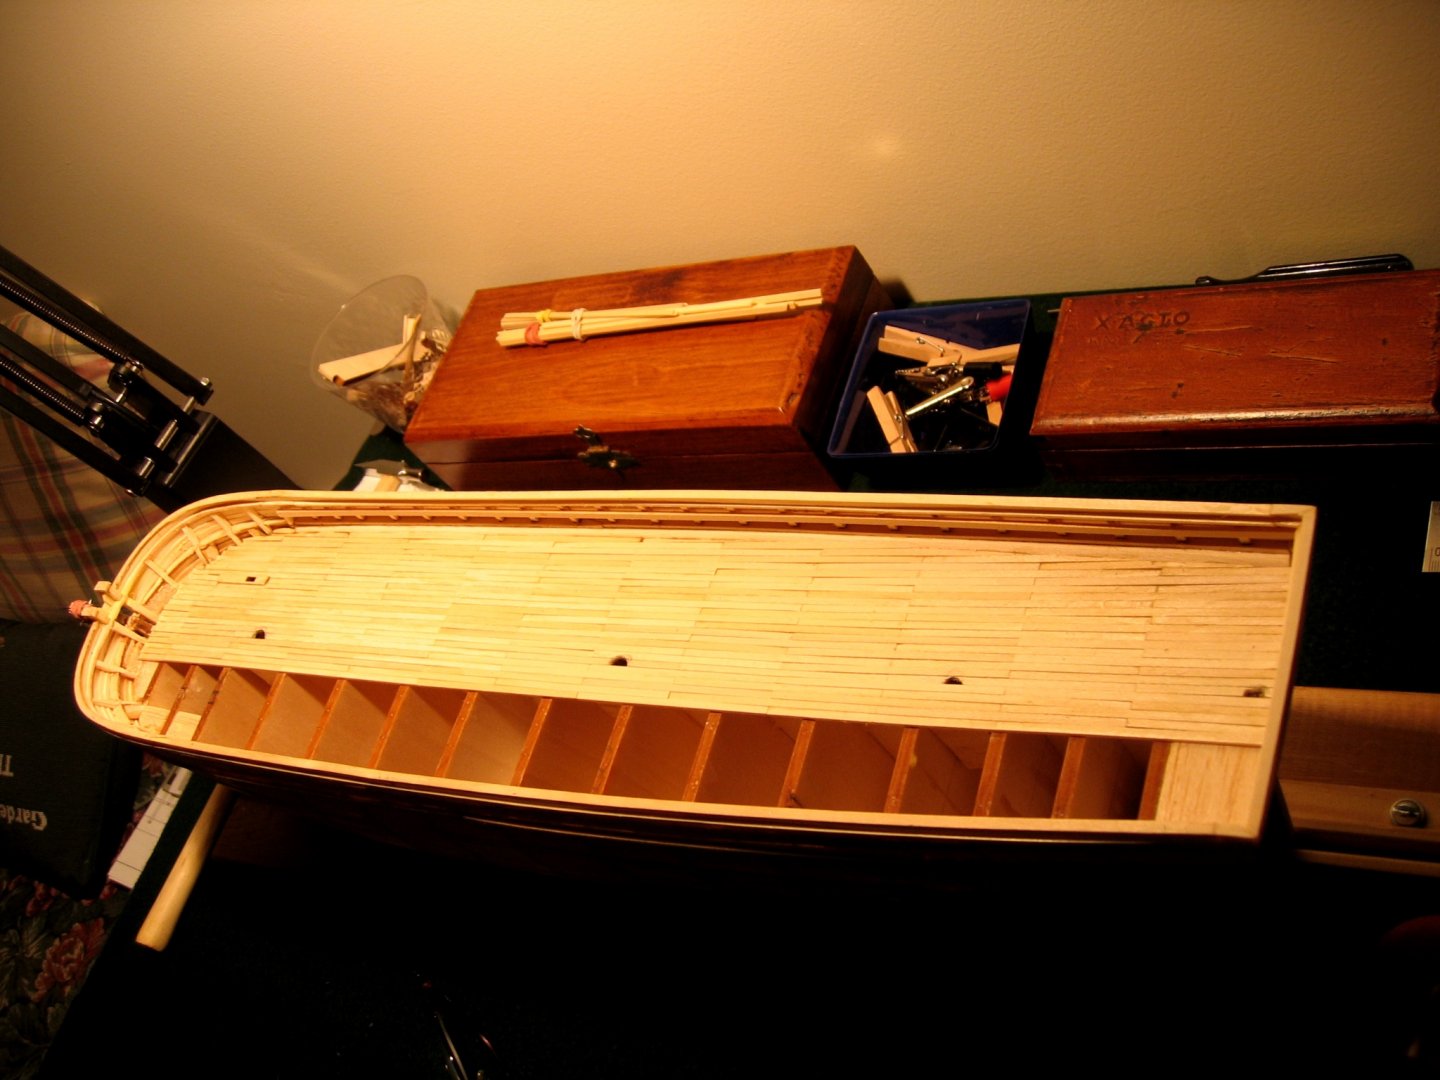
By February of 2009 (about 3 elapsed months working roughly 3 days a week) the hull is fully planked, sanded or filled where needed, and smoothed. Again I followed a tip from Mastini using small amounts of white glue applied with a Q-tip applicator between any larger gaps between strakes then sanding gently with 100 grit sandpaper. The glue picks up the sanding dust and fills the cracks quite seamlessly and with our adding any contrast or 'brighter spots' to the wood that can sometimes appear with too much wood filler. Sorry that I did not take any photos of the step-by-step planking process but there are so many good examples in our forums that mine would be superfluous.
-
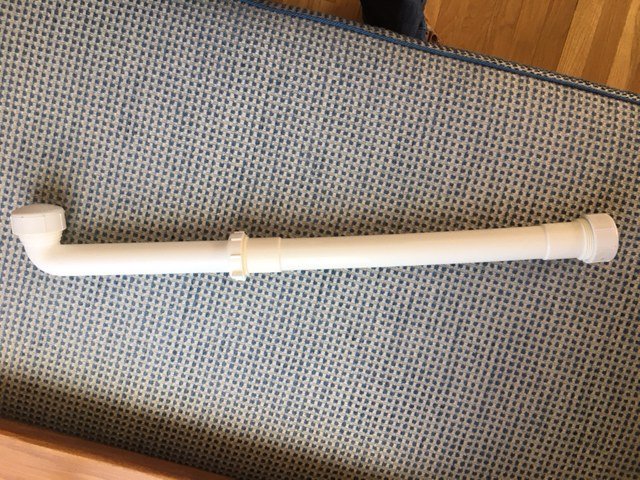
On now to planking the hull - I developed a routine/method that worked quite well in my schedule. Before dinner I placed enough planks to cover 4 rows of strakes on either side of the ship in this 'soaking jig' that I made from PVC piping. I would fill this with hot water, add the planks, then let it sit while we ate dinner and cleaned up. Afterwards I would empty the piping of water but leave the planks in the moist environment, taking them out 1 at a time to bend using ,my plank bender hot iron. I decided to plank 2 rows of strakes Port side followed by 2 rows of strakes Starboard side, then another 2 rows each side. My thought was twofold: 1) I wanted my plank ends to align as close together as possible both Stem and Stern, and 2) I believed this would eliminate any chance - however remote - of possible warping due to surface tension. I used CA to attach the strakes after bending and shaping.
-
Here is my finished bow interior - still looking a bit rough after fill with wood filler - to be sanded smooth at a later date. You will notice that the tip of the stem where the billet head will attach has some sharp looking object attached with rubber bands - these are dressmakers pins (an invaluable resource for many aspects of modeling) used here to keep our new kitten from chewing off any more of the stem head than she already did - I had to fabricate a replacement 'tenon' for the billet head to attach properly.
-
Decking complete - I was still learning the craft so I followed Mastini's suggestion and cut my planks to 40mm and 80mm - the result was a single shift in butt ends as you can tell by the lines - satisfactory with a nice result but not full shipwrights practice - I have since found a great resource "Deck Planking" by Ulises Victoria which I highly recommend (I am also building a model of The Bluenose and have followed true shipwrights practice for the deck and the hull with that model (build log to follow). Here is the link to the PDF on Model Shipworld's site: http://modelshipworldforum.com/resources/Framing_and_Planking/Deck_PlankingIIbuttshifts.pdf
-
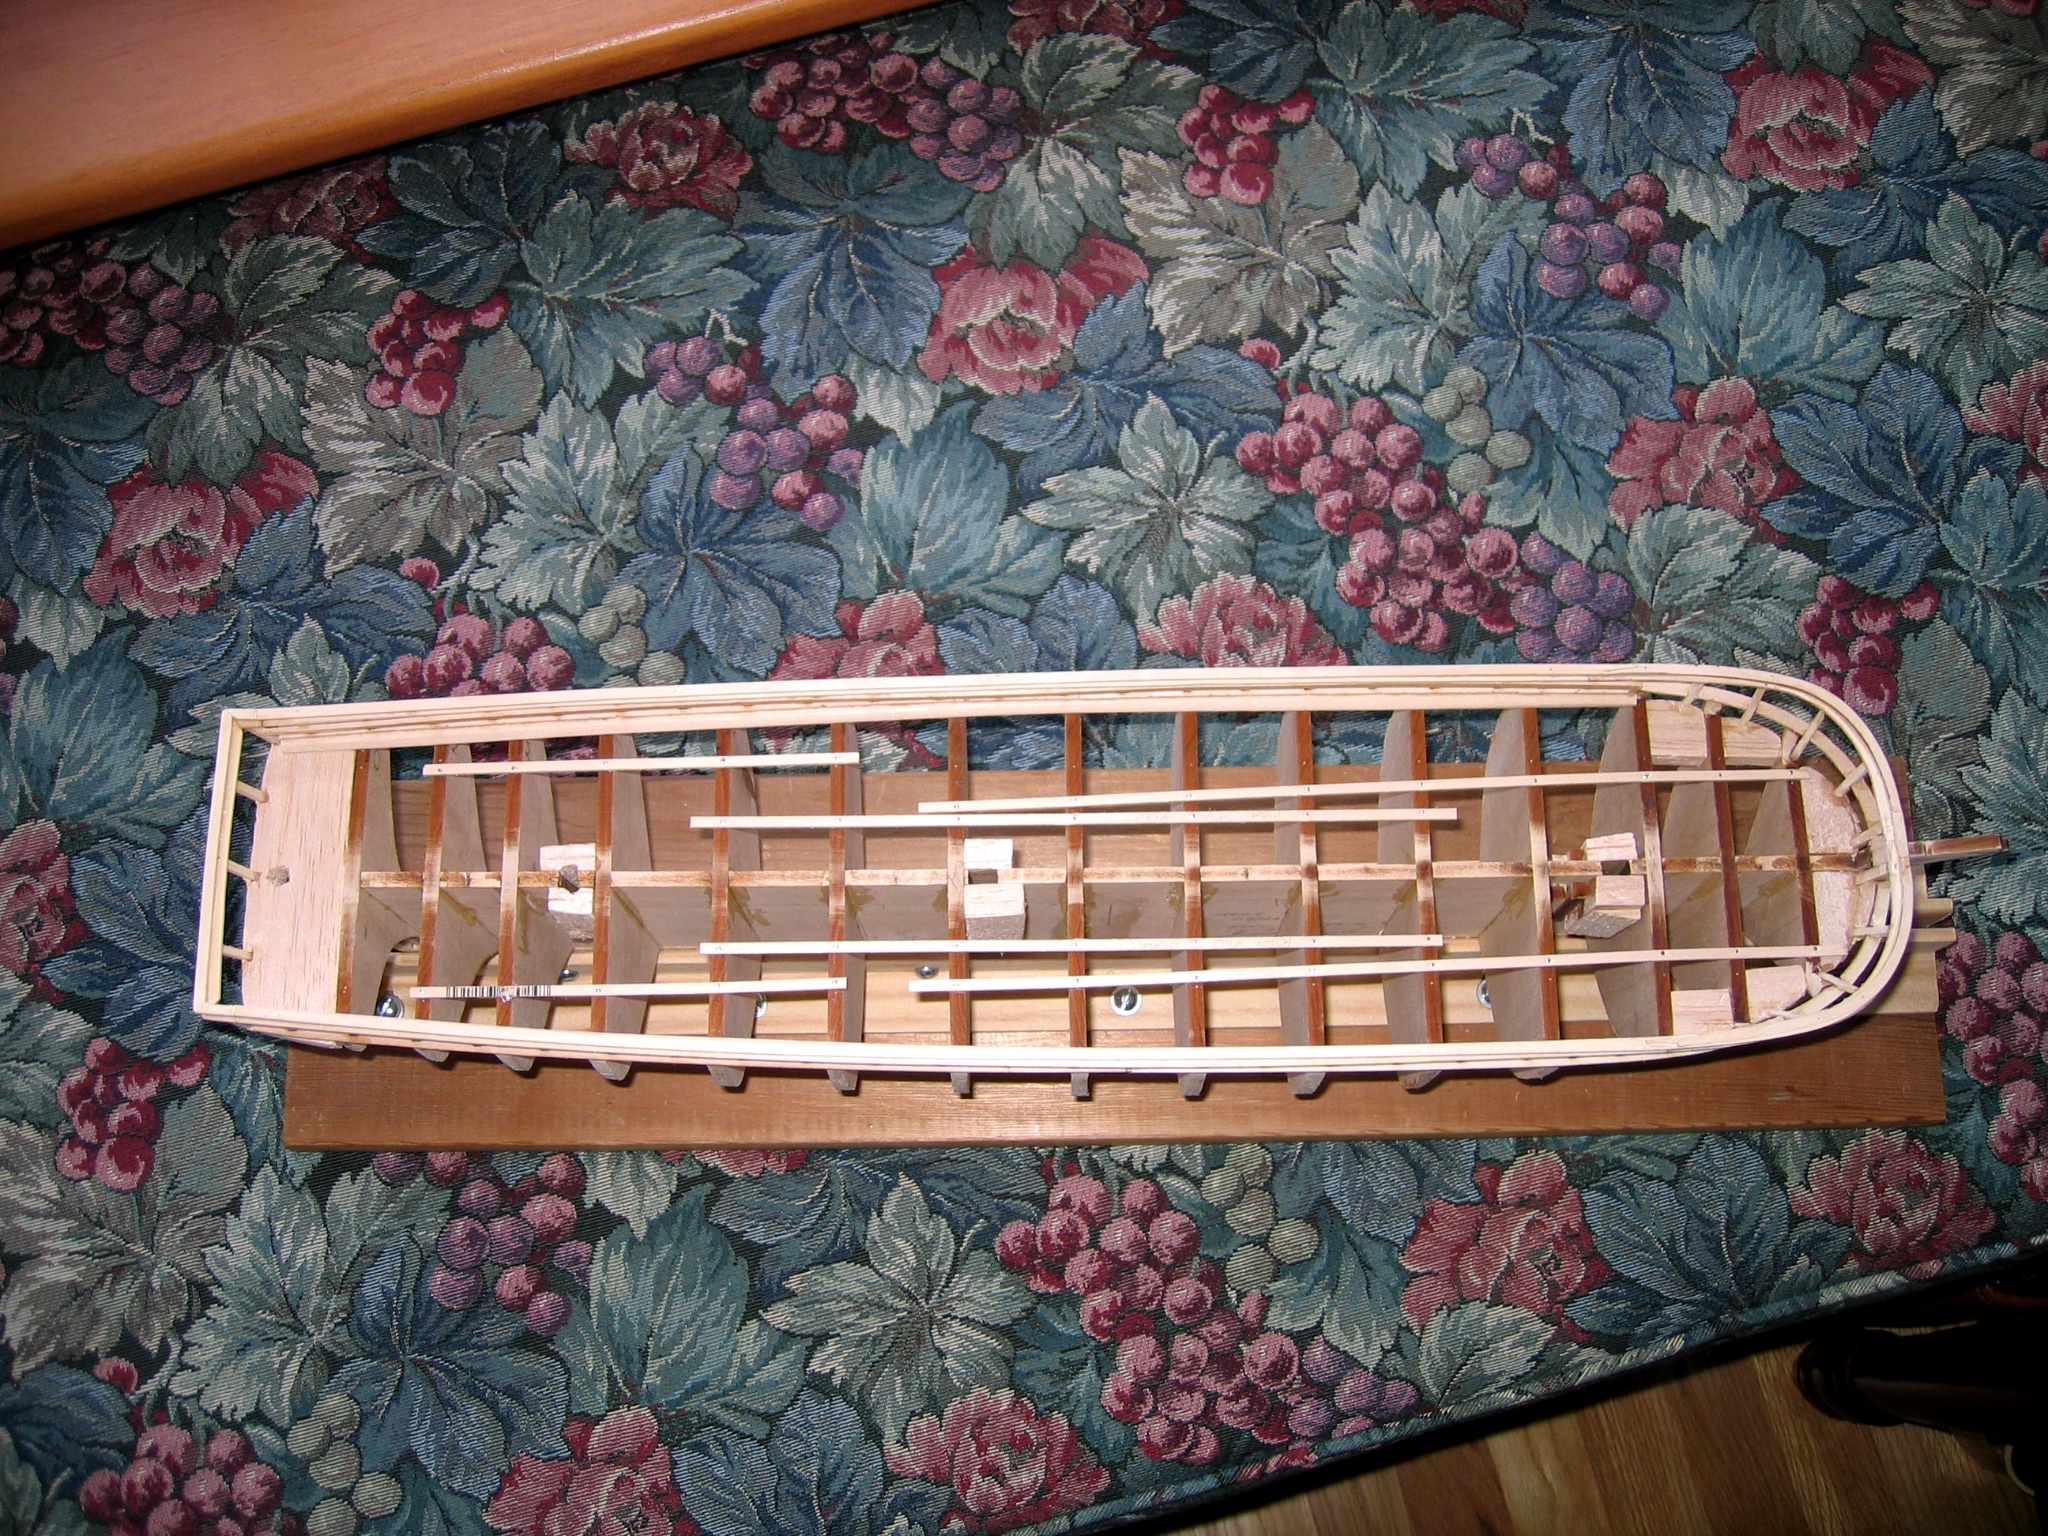
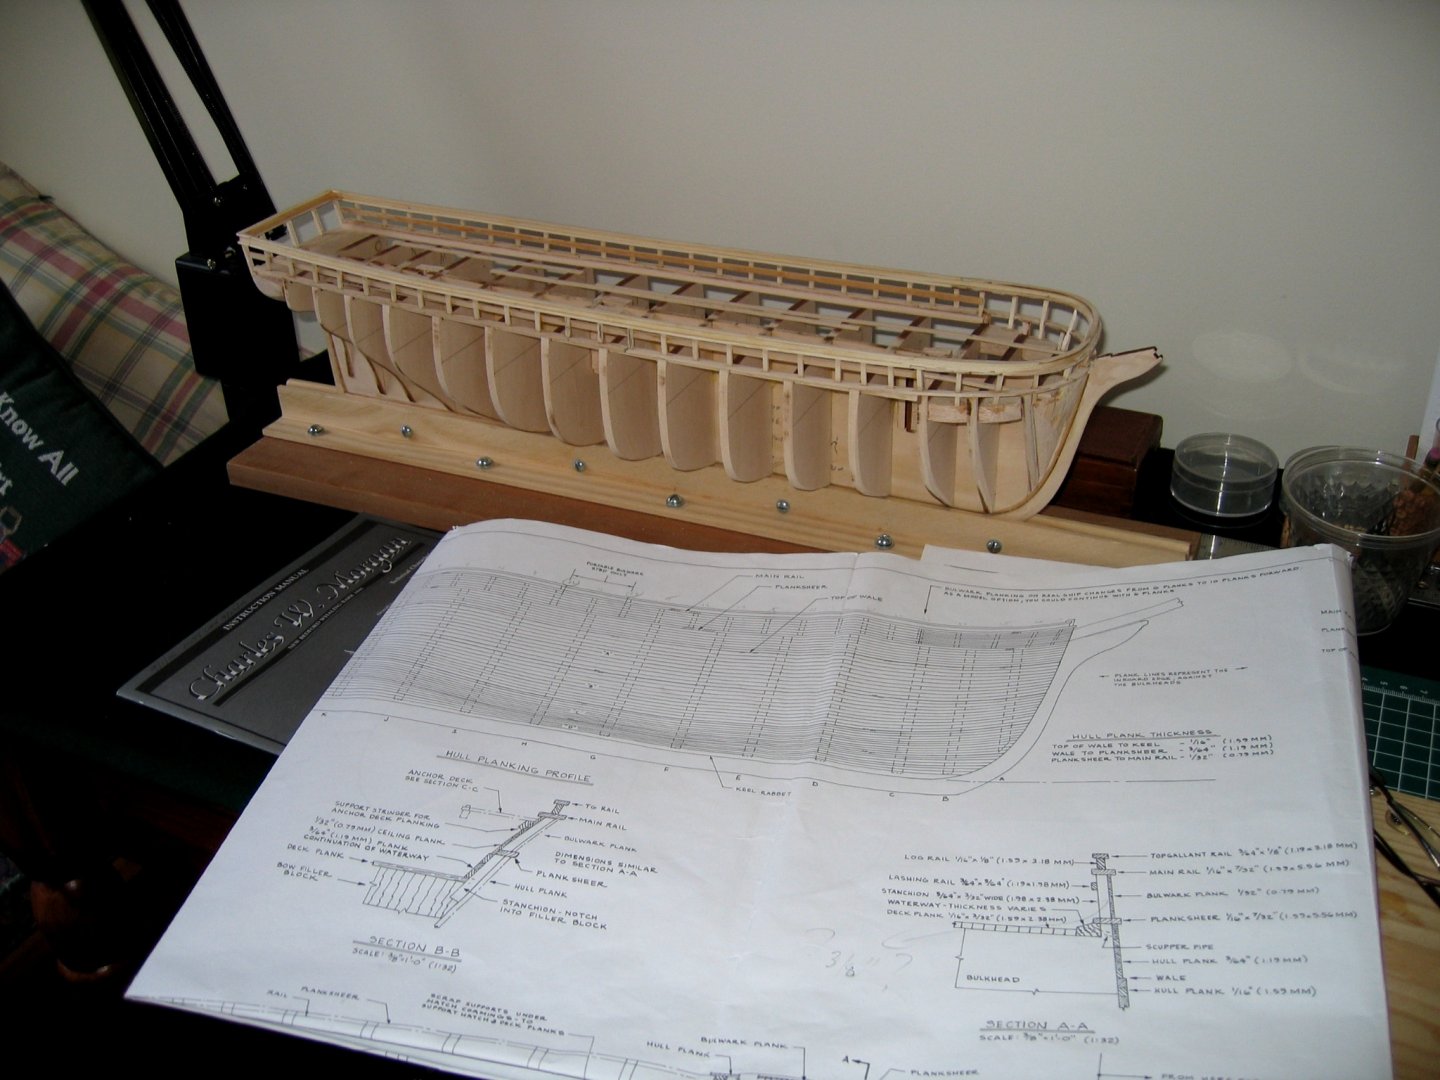
Bulkheads faired for a smooth and graceful hull planking profile, and ship sitting upside down on the Amati Keel Clamper. I thoroughly enjoyed the build up to this step - especially the fairing and shaping. In between my "Harvey" and now "The Morgan" I completed a half hull "Endeavor" from Blue Jacket Ship Crafters also attached here (Hope this is ok)


-
Mast supports in place, battens laid out to fair the deck.

-
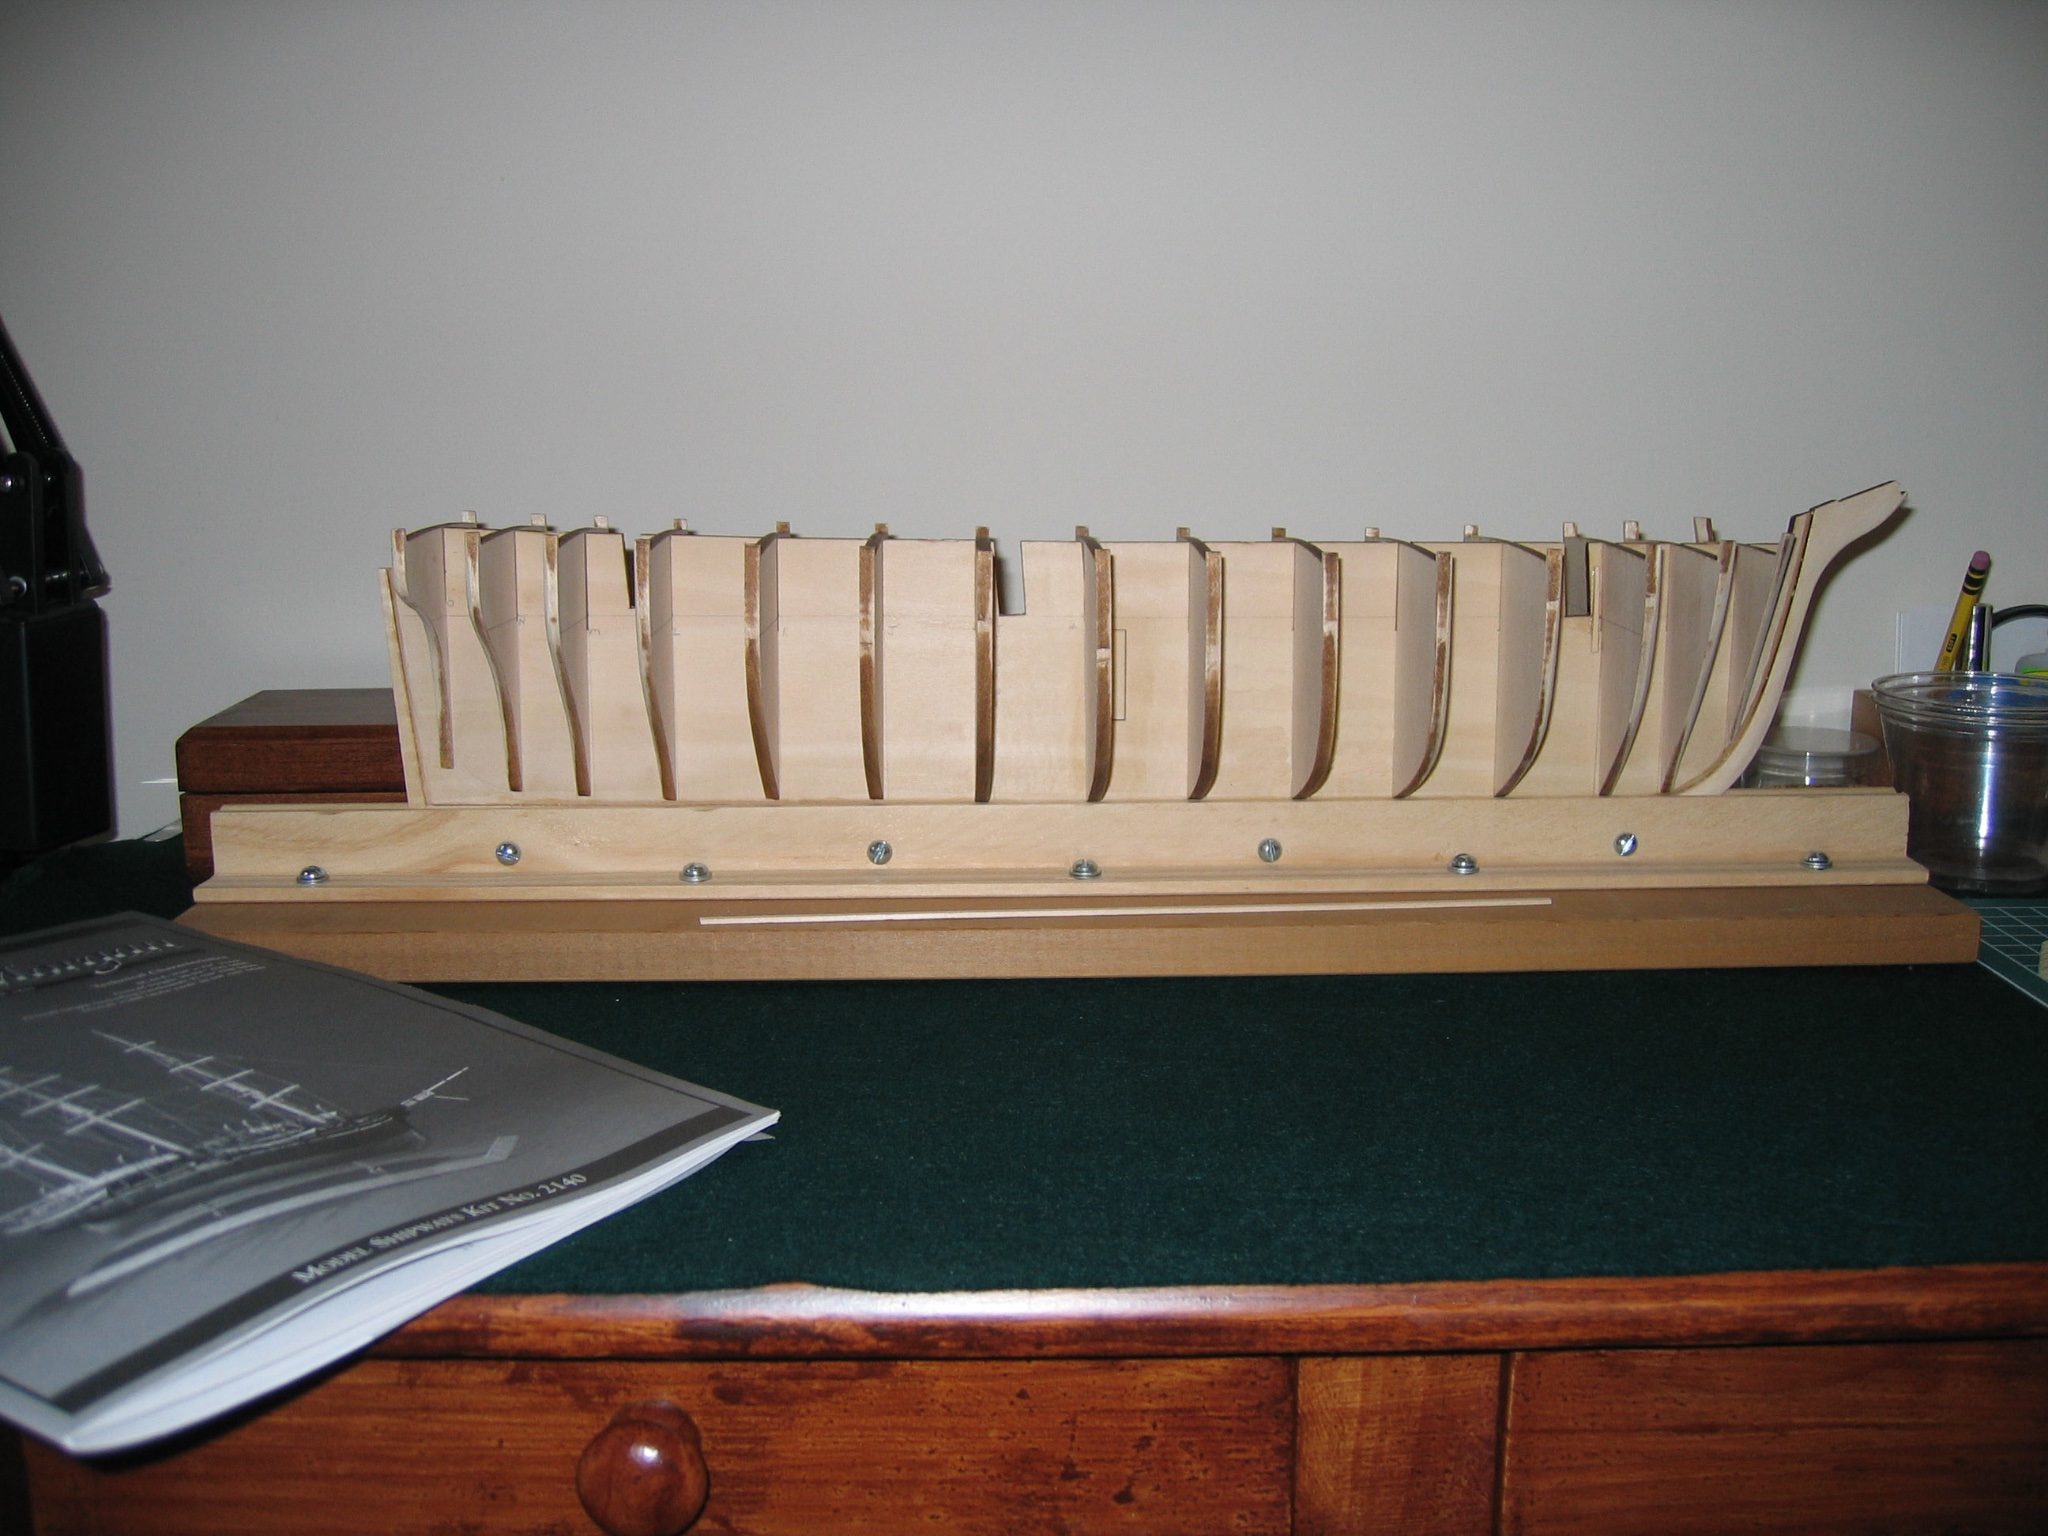
January 2007, Stern counter formed and framed, rails and planksheer completed.
-
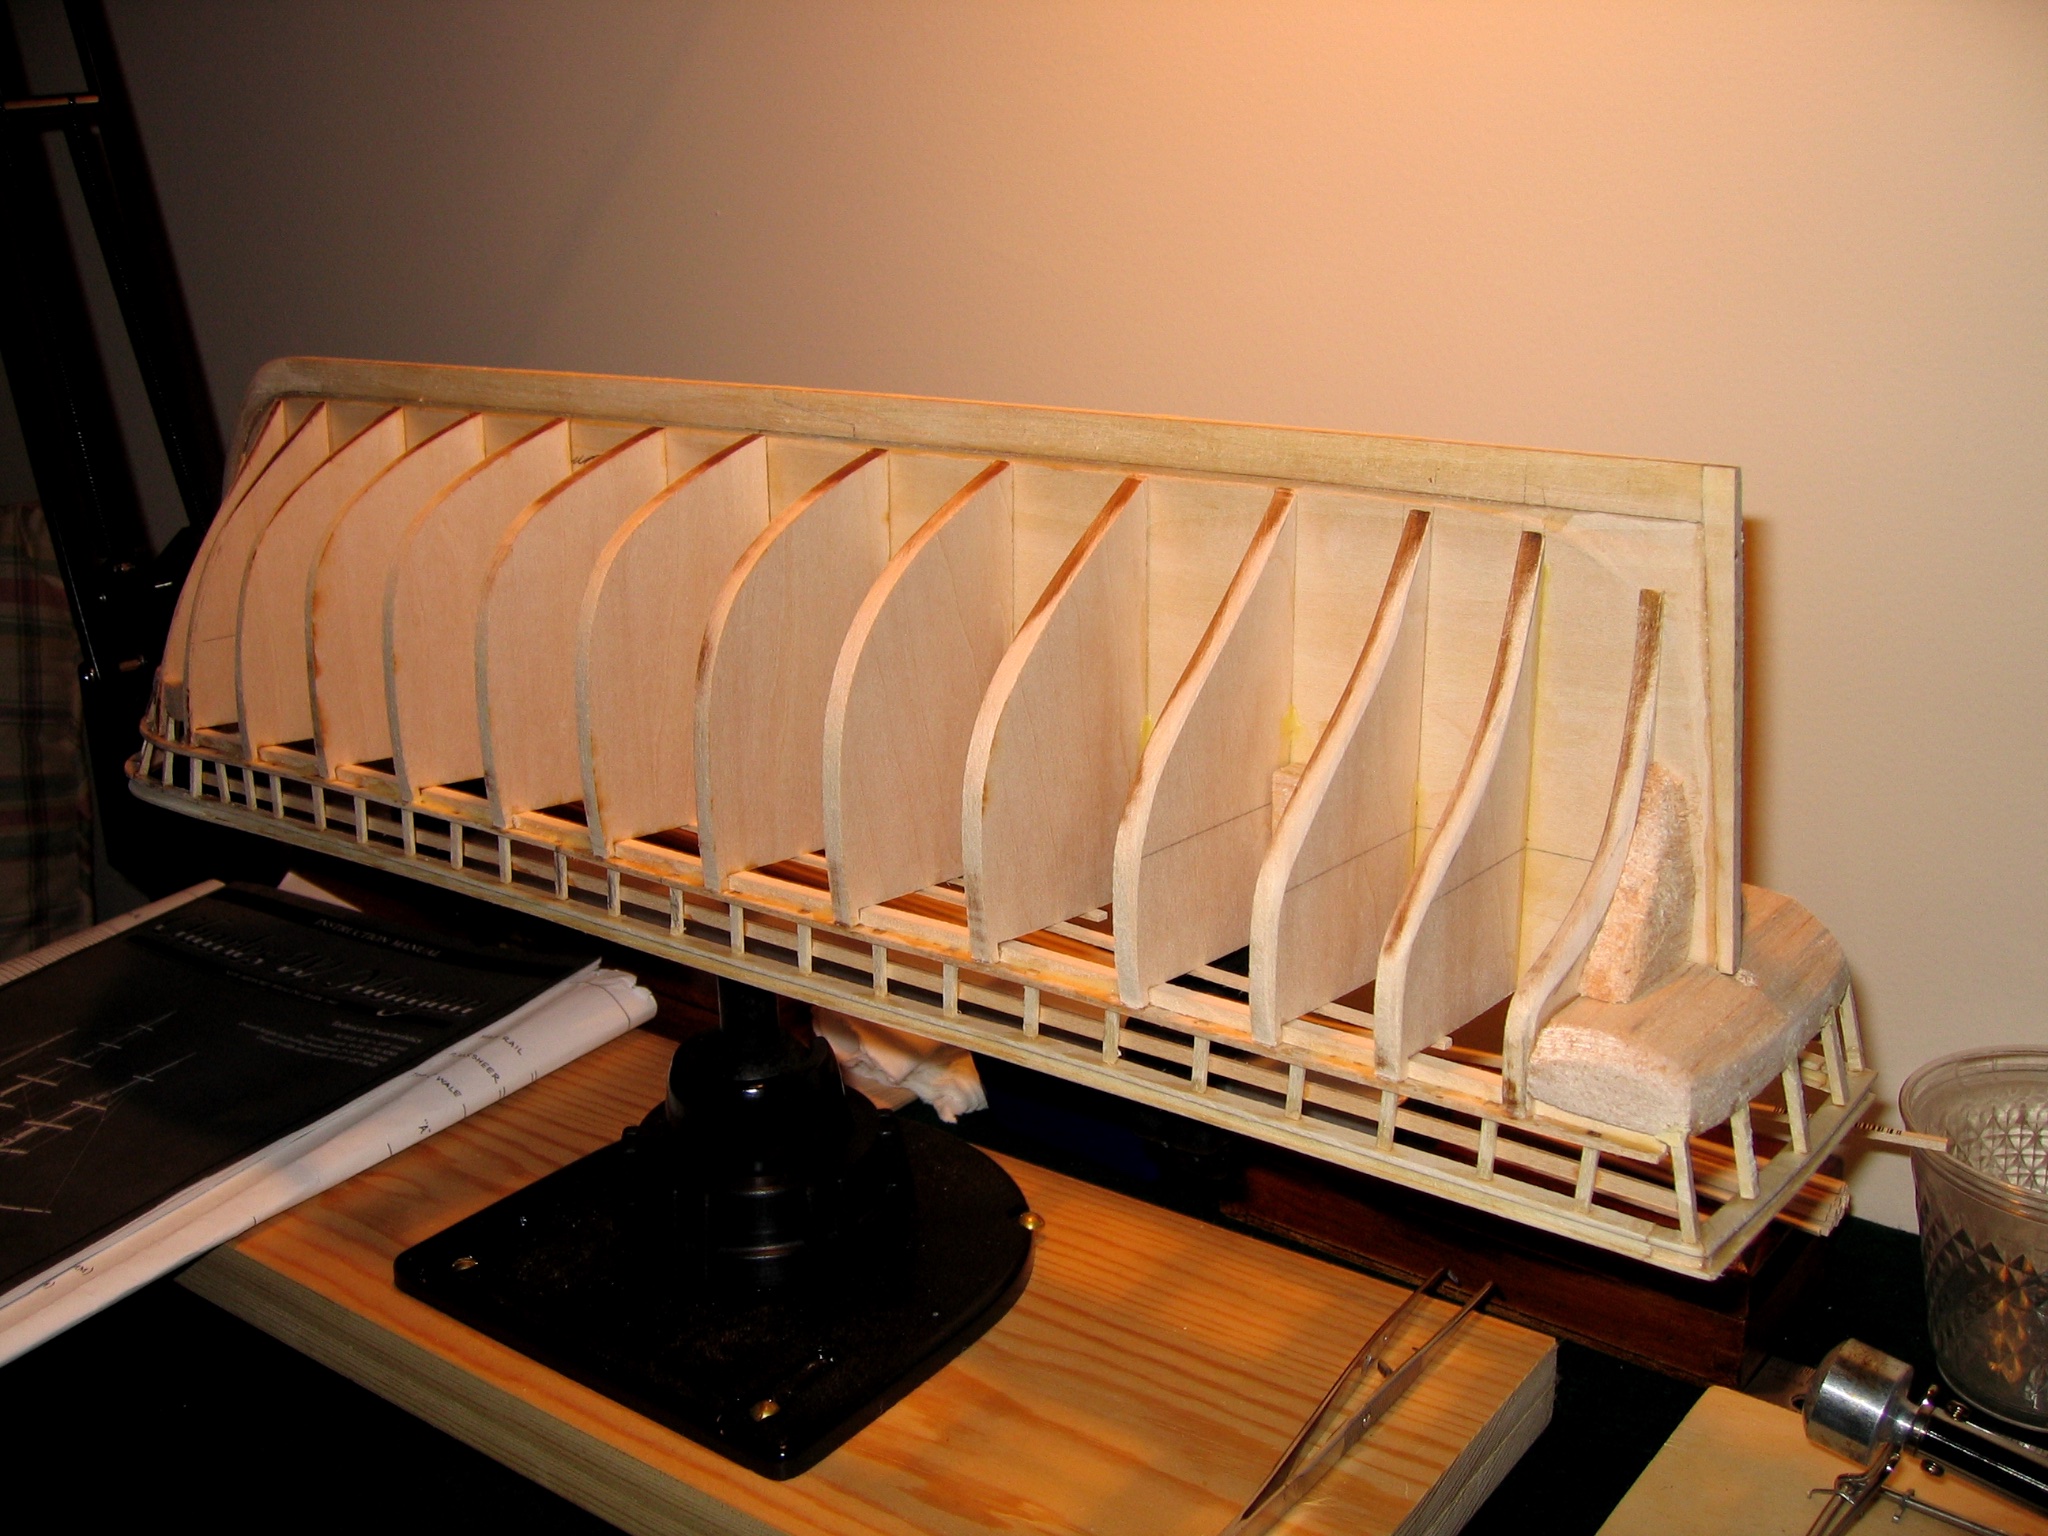
September 22, 2006, keel laid. Bulkhead construction completed November, 2006. I built the 'keel jig' after a design by the great Frank Mastini ("Ship Modeling Simplified" - a fantastic 'first book' for any modeler).

-
I have always loved the lines of historic ships, despite being a 'certified land lubber' who gets sea sick easily. My first model was Artesania Latina's Harvey, built over an 18 month period from 2005-2006. My enthusiasm far exceeded my nascent skill set as I progressed next to the Charles W. Morgan , which many of you know to be quite a demanding 'built almost from scratch' model other than the keel, bulkheads and Britannia pieces. I began working on the Morgan in earnest in late 2006 and worked in her on and off through 2009 when I became stuck on how to fabricate the detailed and delicate skylight. Failed attempts led to frustration and the old whaler went into dry dock until my interest rekindled patience and perseverance with some spotty work in 2013-2014, then dry dock once more. In September 2020 I finally mastered the skylight (at least my version of it) and have been working steadily since then, now having fully painted and coppered the hull and built most all of the decks structures. I will be adding my photos to date shortly and offer this build log in the hopes that it brings another perspective to our forum and all of the great modelers whose Morgan's have been a source of inspiration and teachings for me. As well, I hope to add a spot of lightning-hearted humor as I document my failures as well as my small successes, seasoned liberally with a dash of prose here and there. All comments welcome - I teach in MBA programs both here in MA and in Luxembourg and am a firm believer in 'The Brain Trust' where the collective wisdom of the group far exceeds that of any one individual."
-
Hi Bruce - fantastic build log - I am about to start coppering the hull - have been kit bashing and making some parts from scratch, buying others - what did you use for pins? they doing look at all like the supplied and not very attractive Britannia pins. Thanks much