


Avi
-
Posts
323 -
Joined
-
Last visited
Content Type
Profiles
Forums
Gallery
Events
Everything posted by Avi
-
I did. Like all other paints. I am glad it is helpful. I wish I had time to do more now, but hopefully end of summer will give me the opportunity.
-
My apologies to everyone for no updates in several months. We have been going through home renovations and preparing for a move, which has sucked up every bit of available time (and then some). I hope to get back to building the hatches and coamings by end of the summer and then moving ahead with the gundeck. I rather do miss it!
-
Oh, now that is an interesting idea. I did a search on their page for "gratings", got this. I assume one of the first few?
-
Oh even better! I can use a whole piece of paper and glue the coaming pieces to it. Then what it all dries, just cut out the middle.
-
Those are two good ideas. I thought about a spare piece of plank across the corners. Those are pretty thin, but I think still thick enough that they would make it not flush to the deck. Paper, however, would be great. For those hatches that have gratings, I can make it a little wider, so it also would provide corner support for the gratings. Another alternative is cross supports. I can use spare plank and literally cut across the middle to middle, for those that have gratings. But I like the corner idea. I can do it for all of them. I don’t think I bought wood coloured paint. The blackening is a good idea. So what did you do in the end? Just leave it shiny brass?
-
Might as well make the coamings in the meantime. Or try. 😁 The grating is ¾” square, the coaming wood is 1/16”, so the whole thing is 7/8” square. I cut strips 7/8” long, then used the mitre box to cut 45’ angle on each end, and sanded where necessary. the question now is how to connect them. The wood is too narrow for a pin - it probably would split it - so glue is the usual fallback. Unfortunately, the tiny surface of the attachment angles means it doesn’t have a lot to hold onto, and the long relative length of the attached pieces puts too much torque. I suspect, although am unsure, that if I could do all four pieces at once, they would support each other, but I don’t quite know how I would do that. I might try painting the sides white and varnishing the top, and then gluing them together and to the deck. The deck should provide plenty of surface.

-
As far as I can tell, 3 of the gratings are intended for the gundeck, 3 for the spardeck, plus the big triangle shaped one for just behind the bowsprit. I’ll attach a picture of them on the deck but not attached (and no coamings yet; that’s next). The painting guide says, “gundeck hatch coamings - white - sides white; tops natural wood.” That’s easy enough once I construct them. But then, “wood gratings - natural wood - valspar varnish.” Needless to say, the gratings are not wood, but are photo etched brass. so do I leave them brass? Paint them something that looks like it might be wood?
-
Aha! I’d missed the sheet of PE parts when I searched earlier. I’d forgotten that they were stored in a different container. I imagine if I’d been looking for something obviously larger, like the transom, I would have realized immediately there was somewhere I didn’t look. Thanks Kurt.
-
That’s really helpful, thank you. I didn’t see anything like that, but I’ll do another detailed search later today.
-
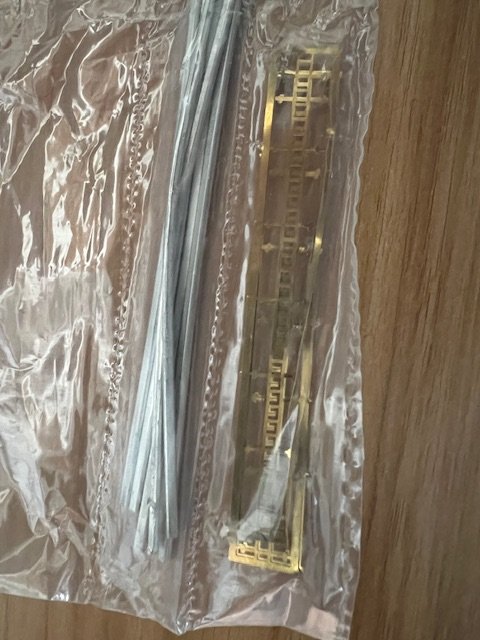
Hi Kurt. That explanation helped. I see what you’re referring to now in your post. I’m not sure I know what the PE gratings are. Are they squares, ready to place? Those strips in the picture I posted, that need to be combined? BJ has two different wooden gratings on their website, this and this. But that’s clearly not what’s in the kit.
-
There is some description of the gratings and pictures from @KurtH here post #5. Kurt, I didn’t quite understand what the “brass ones with holes are” and what you ordered of walnut?
-
I messaged privately but not publicly. And I need to comment here so I get posting notifications. Welcome to our club!
-
Do you see description on a specific post there @JSGerson? I couldn’t find anything. On the other hand, the discussion about shot for the lockers will be very helpful.
-
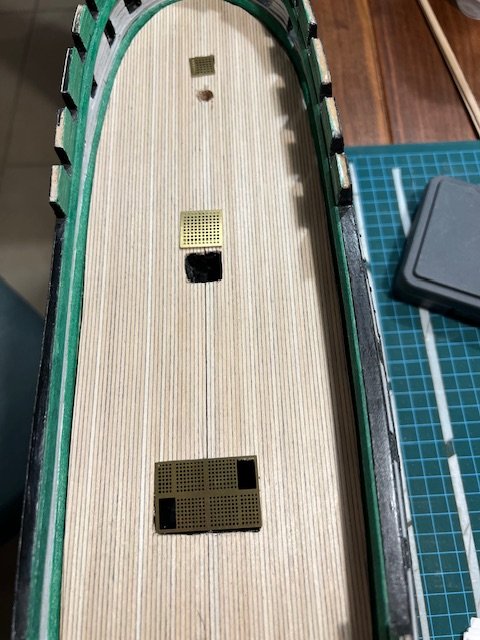
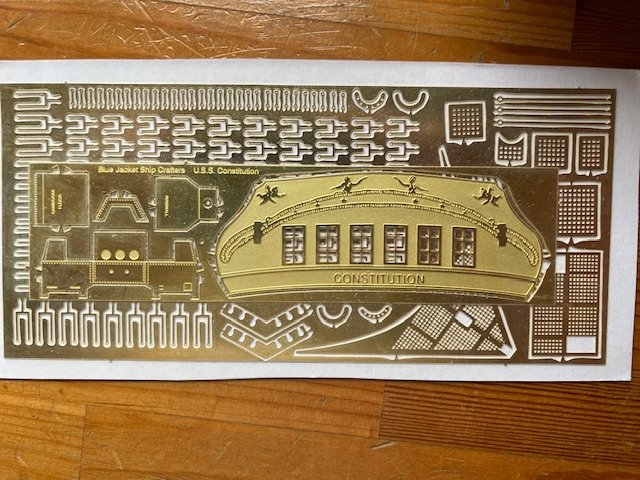
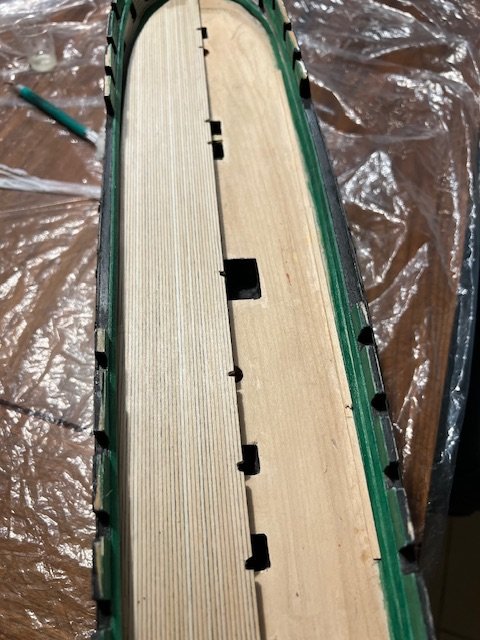
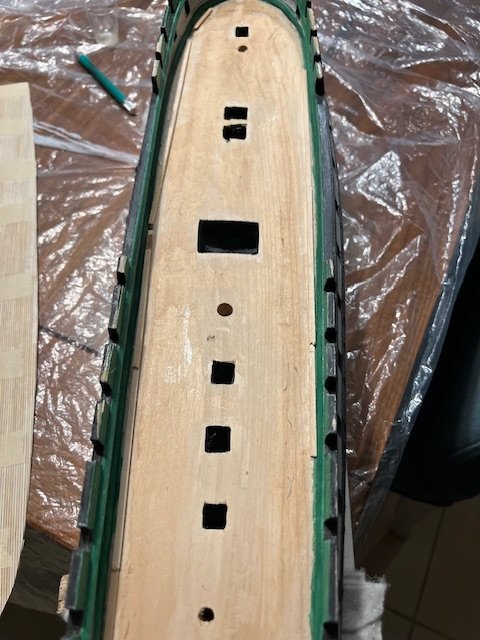
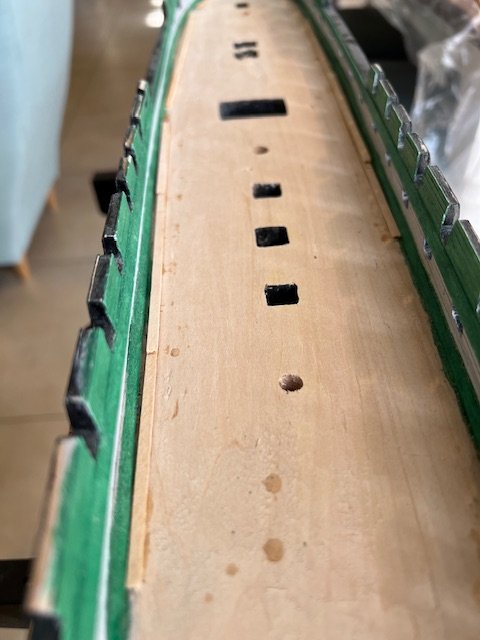
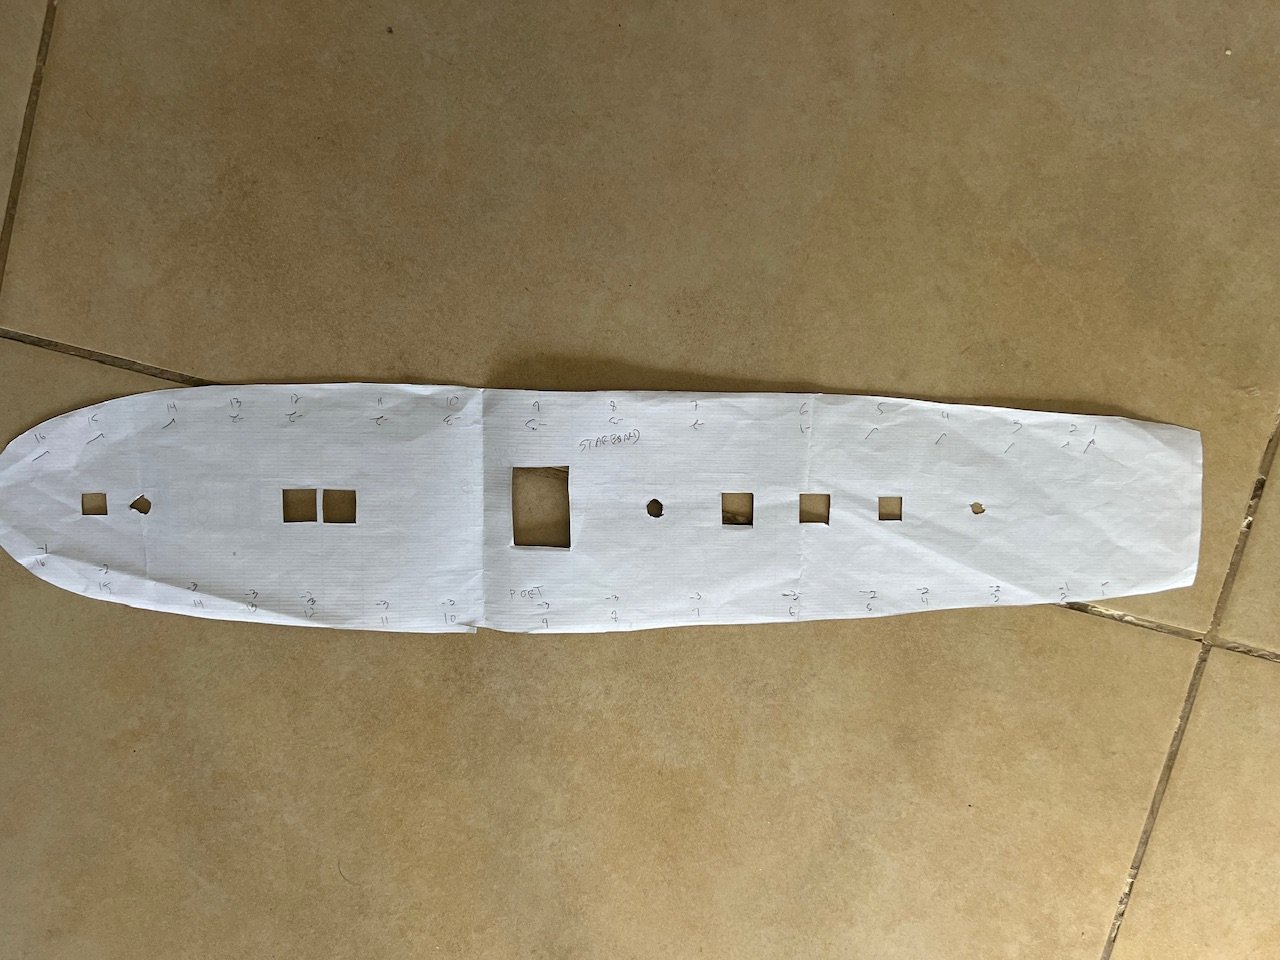
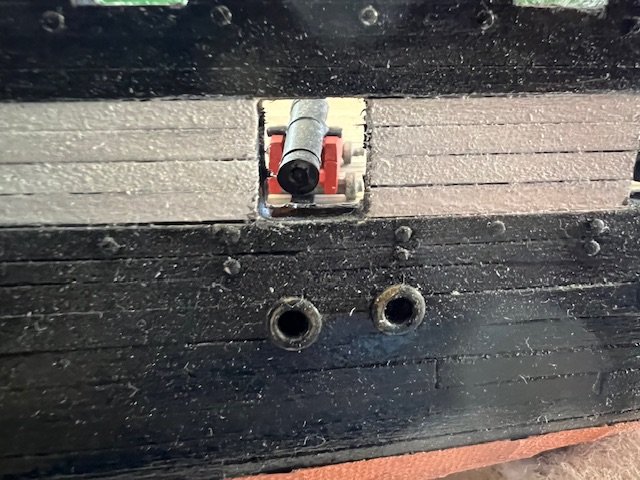
I cut out the hatches and drilled the holes in the planking for the masts. Some of the planking cut loose in the process, so I glued it back. For the hatches, I marked the outside, felt by tapping where it definitely was hollow on the other side, and drilled small holes in each of the four corners. That made it easier to use a keyhole saw to cut the quadrilateral shapes. It then required some fine trimming with an xacto knife. At the end, the black paint inside the hatches had gotten marked up, so I repainted parts of them. For the masts, I used progressively larger drill bits to ensure I wasn’t veering from the existing holes in the main hull, which had measured correctly. I had to look back at the supplies list to see the diameters of each mast to know what size I was targeting. They all worked out well in the end. Interestingly, despite a relatively short session, this may be the one in which I used the most tools and did the most activities in a long time: drill, keyhole saw, knife, sander, pliers, glue, paint. Usually a session is dedicated to one or two activities, like cutting and gluing, or painting, etc. Next to shape the hatch coamings. It isn’t clear from the guide if there is wood dedicated for this, or if I use spare planks. EDIT: the parts list shows W1370 1/16x1/16x24” for the gundeck hatch coming (along with lots of other things), and W1371 3/32x1/16x24” for spardeck hatch coamings. The other confusing part is the grates. There are 7 hatches on the gundeck (including the very large main hatch), and another 6 on the spardeck. The parts list shows 7 gratings supplied as part of the photo etched brass parts. Is there a plan as to which hatches should get gratings and which should not? The plans show 2 on the gundeck plus the main hatch, and 3 on the spardeck, but hard to tell if that is an actual plan. Or is this more “do what you want”? Also, what exactly are these “photo etched brass gratings”? I don’t see anything that looks like a grating. Is it the pic below?
-
Thanks @schooner I was worried about something similar. I drilled holes into the carriages to have the option, but it didn’t inspire confidence in me. So I took a piece of spare planking, cut it to length, painted it black, glued it between the two trucks. Once on the deck you cannot see it, but it gives a large surface for glue contact. I’m hopeful that will work.

-
Once it all has a day or two to set, I’ll get to work on the gundeck itself. I need to cut open the hatches and holes for the masts, then build coamings around the hatches. Then comes the various furniture and some rooms, the shot lockers and the knees. I haven’t decided if I’ll do just the hanging knees or lodging knees too. That’s a long way away. I did spend some time reviewing the directions in chapter 9 for the spardeck. As usual, lots of detail, not a lot of explanation or direction. I’m hopeful I’ll figure it out well enough.
-
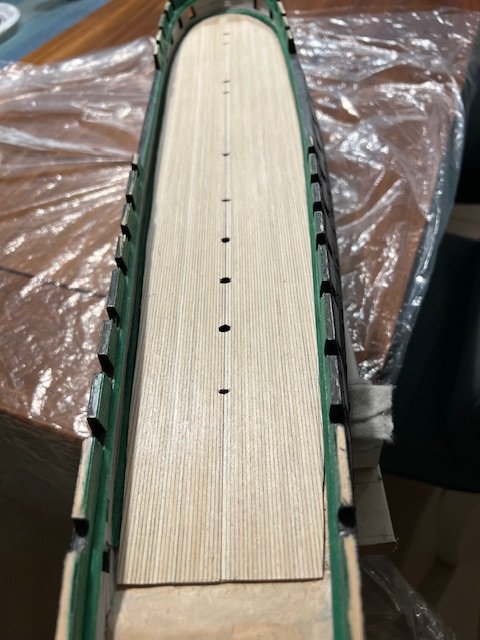
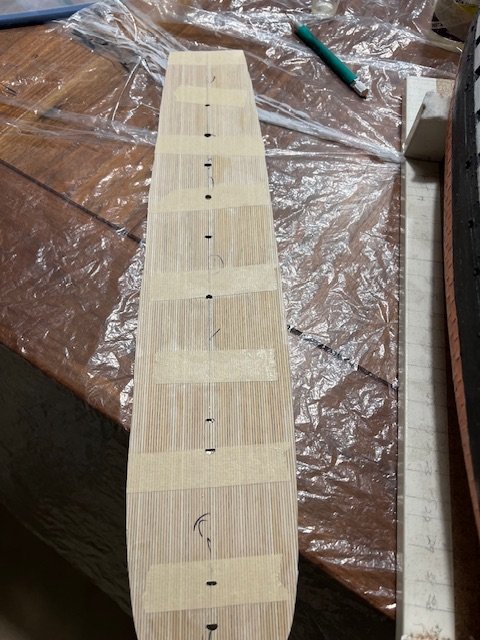
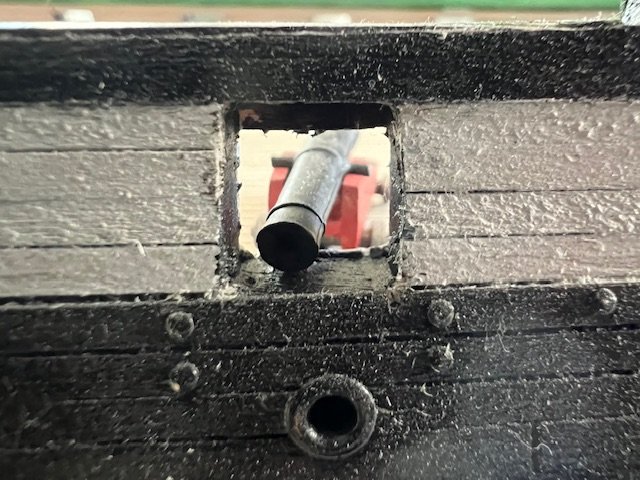
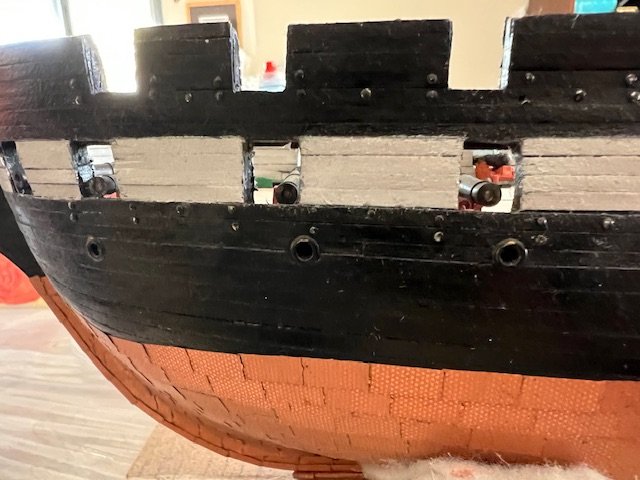
Coming back to an earlier post, I decided to use satin varnish on the decking. I put on a coat, waited an hour, put on another. Looks great. I found that the wood just didn’t stick well to the “deck surface of the hull”. So I put a coat of sander sealer on it, as well as on the back of the glued up decking. Once it dried, I put a layer of contact cement on the hull deck and on the back of the glued up decking, waited a few minutes for it to dry, and made contact. I got lucky, the last bit in the last tube of contact cement was just enough. It worked quite well. Before gluing it on, I folded the decking in half (since it’s two pieces taped together), marked where all of the various hatch openings are and the three holes for the masts. I then used the jeweler’s saw to cut a small hole in each. I have the template, but this ensures that I get an accurate cut location. It’s always easier to expand a good hole than dig for the right location that _should_ be there. And the gundeck planking is in place. once done, I took a cannon and put it in each gun port, just to see. Fits just right.
-
Finally got around to raising my deck. Actually I just realized. I’m moving homes soon, redoing the new place. Most people put down tiles here, but we really like wood so we are putting down wood planks. If we will be walking on wood planking, can I call it the deck? So we can have the living deck and sleeping deck? Need to see what my wife has to say about that. I took some leftover planking, placed it at the edge, placed the decking, and checked. Rinse wash repeat. Some areas took one run of thicker wales, some took planks, some both, etc. but the heights are right now. Here it is prior to laying down decking. I’m going to varnish it first and then glue it down, then cut the various holes for hatches down to lower decks, masts, etc.
-
On the planking height issue, I worked out a system. I took one of the templates and marked each gun, port 1 (aft) through 16 (forward) and starboard 1 through 16. I then marked each gun position as ok (✔️) or -3 to +3. Where -/+ 1 = a little off, -/+2 = a lot off, -/+3 = so far off that it gets stuck on the gunport. As you can see from the attached picture, I’ve got no +, all ok or -, and quite a few -3 in a row on each side. To my mind, that argues for raising the deck there by a plank or two, rather than working with each gun.
-
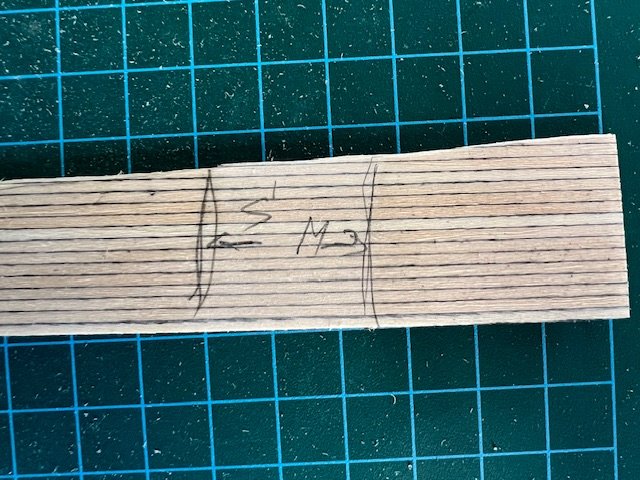
Also about the deck planking. The painting guide says to leave it “natural wood, no paint.” Since I have the glued up decking, with the lines between, that makes sense. But I didn’t want to leave it completely exposed, and it makes things harder to glue to it, so I plan to varnish it. I wasn’t sure if the varnish would affect the colour too much (it shouldn’t, but always test), so I varnished a spare piece of deck planking; see picture. Right (M arrow) is matt varnish, middle is unpainted and unvarnished, left (S arrow) is satin varnish.
-
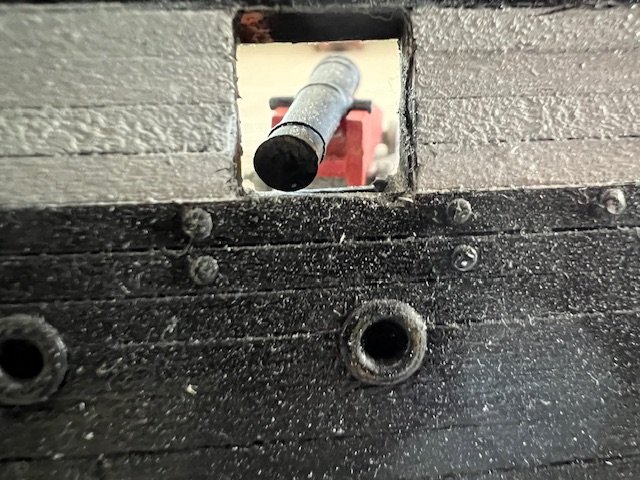
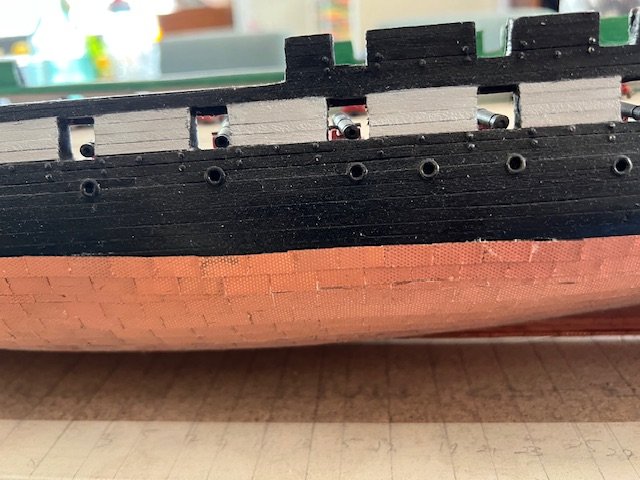
On to the next dilemma. The reason I stopped to build the guns before finishing the gundeck planking, was that I was concerned that the precise deck height vis a vis the gunports would be off. And I was right. I placed the decking, placed the guns loosely, and then checked. Most of the guns on the port side, and a few on the starboard side, are too low (or pointing on a slight downward angle). I’ll attach some pics below. I’ve got two choices: 1. raise the edge of the decking by putting planking underneath, so it looks the same on top but raise the guns, and slightly angles them 2. but a piece of planking underneath the outboard truck (the one closest to the hull) on those guns, so that they angle upwards appropriately. These are all gundeck, so I’m not really worried about the planking showing. And since I already have the planks across outboard to inboard trucks, I even can just put under there. This method would give me more precise control over each gun, but it also would require a lot of individual work, and still might show, and reduces some of the stability provided by the plank across the trucks. My original plan was to raise the deck planking by placing pieces of plank underneath, but I’m unsure which is the best approach. I will be thinking about this, and obviously looking for any feedback people have.
-
Shalom and happy Chanukah, Jerry. you think mine will be “museum quality”? Yours are beautiful. I almost kind of can see the point where I will get to where yours are. Almost. I’m just happy to get back to it, and not have too many egregious mistakes. Still, these ships are beautiful, aren’t they?
-
And to you, Jon. Still got the blessings in time before the last night. When my now-20 yr old was about 1.5, we visited Yorktown. I’ve got a picture of her sticking out of one of the cannons (looks more like a carronade), still remember her so excited saying, over and over, “cannon goes BOOM!” I think she expected to fly. These cannons are a bit smaller, but I can fit them in my home.
-
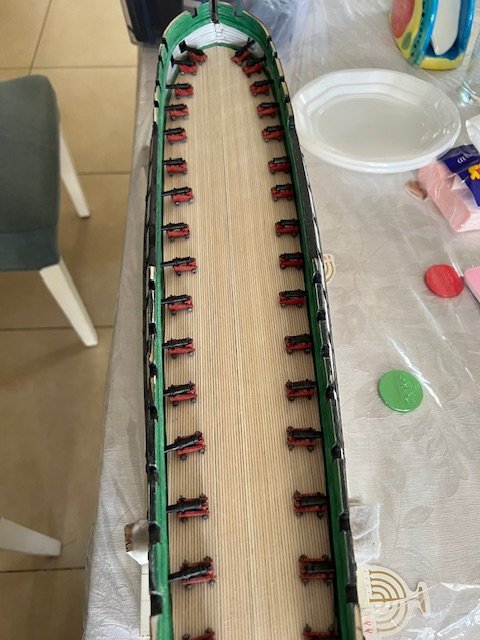
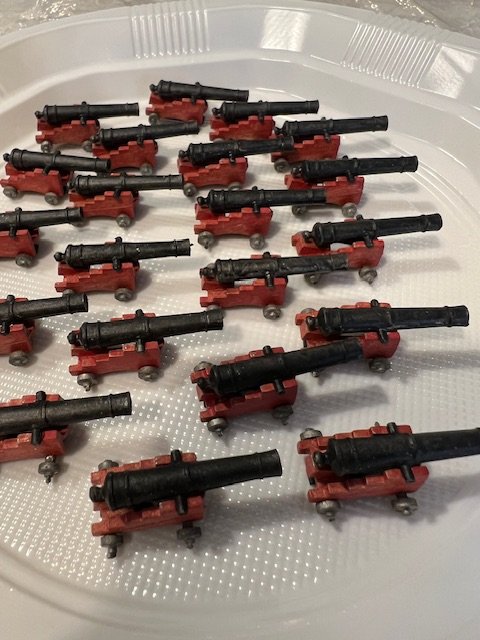
I haven’t posted in quite a while. Between the fall Jewish holidays, and then cutting my finger while preparing soup (did you know there’s enough room on your fingertip for 5 stitches? I didn’t before 😆) which killed my ability to do any fine work, it’s been a while. In any case, cannons are done. I put a plank between the two trucks, painted black, so it could support them and be glued solidly to the deck. It seemed better than the pin method, and wouldn’t be visible in the gun deck under the carriages. I originally used thick stuff below the wales (I had a few left), primed, painted, cut to 1.5cm lengths (those markings on the cutting board are very convenient), primed and painted the edges, and then attached. It turns out they are a bit too thick. The wheels were not touching the deck. Oops. Fortunately I only had done two carriages. I broke out the calipers (discovered that the battery was dead so had to replace it), measured the thick stuff (3/64”) and then regular planks (1/64”). Thick stuff too thick; plank too thin; double planks just right (we will call that the Goldilocks measurement). So I started again. Took two long planks, primed on all sides, let dry. Then bob smith super glue, let it dry. Paint black on both sides (actually 50/50 black and thinner, with 3 small drops of white mixed in so it is more greyish). Dry, then cut (again) to 1.5cm lengths. Some of them came apart (the glue must have been weaker or not as well spread), so re glue those. Finally prime and paint the ends and let dry. Attached to both trucks with glue, let dry. Last, glue the cannon on. I made sure to check which side is up, testing each cannon before gluing. I then applied glue to the trunnion bed in the carriage and to the back bottom of the cannon, where it will touch the quoin. Place and hold for 30 seconds with moderate pressure, next. I realized quickly that most of the time is spent holding those 30 seconds, so I started doing two at a time: place both carriages side by side, measure two cannon, glue into both sets of beds, glue onto the bottom of both cannon, place both and hold with two fingers on the same hand. Picture below.
-
I’m drilling the holes in now, before I mount the cannon barrels, as it is easier. It did occur to me that a better solution than pins may be a small strip of wood. You cannot visually see the gap between the bottom of the rear truck (axle) and the deck. I can cut some wood stock to the right thickness and same width as the axle, paint it same colour as the truck, and glue it in place there. That would give a much larger surface of attachment. In the meantime, drilling holes to leave options open for later.
