Avi
-
Posts
323 -
Joined
-
Last visited
Content Type
Profiles
Forums
Gallery
Events
Everything posted by Avi
-
Found a few planks that had come loose, good time to fix them up. Some of the bolt head nails also came out, so I put them back. Not too bad, fewer than ten. I redid those with medium CA. I think I might have done the spardeck topside heads with a slightly larger drill bit. That makes it easy to get them in, but loses the benefit of the wood pressure itself holding them in, and means that thin CA might not be enough. All in all, though, if I only had to redo ten, that’s pretty good. As discussed above, no wood sealer, just two coats of grey Vallejo primer thinned 50/50, sanded lightly with 2000 grit in between (no idea where my 1000 went). Letting it set overnight and then will start on actual colours.
-
The detail is really helpful @ERS Rich, thank you. I don't have a spray gun, not all that interested in getting one at this point. I will live fine with the hand painting with various brushes. I have mostly Vallejos, but have been thinning about 50/50, maybe a little more than that. So I will try the top coat with less thinner. I have plenty of planks on which to experiment.
-
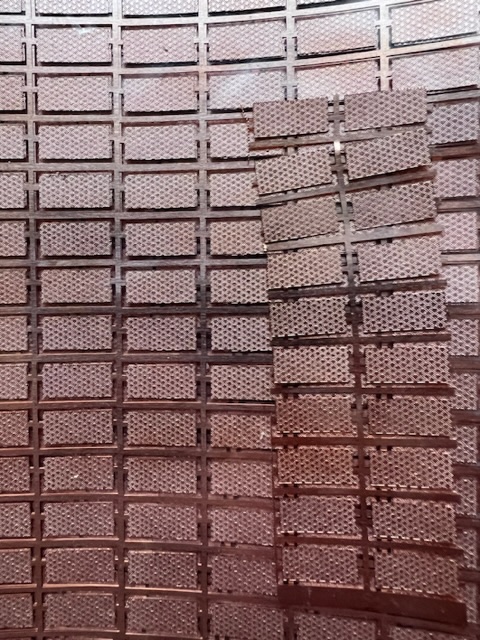
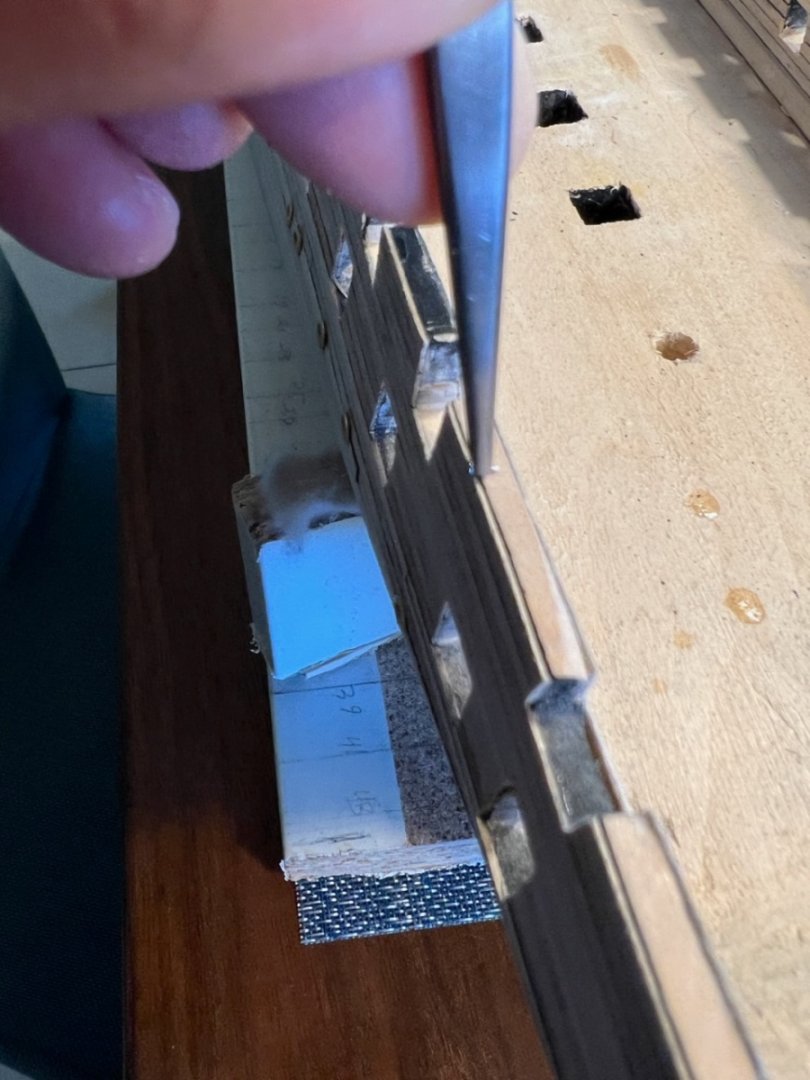
@JSGerson so you pressed the entire plate of copper on some coarse grained sandpaper (80 grit? Higher?), and then just pressed the teeth of the mitre saw just inside of each of the four edges? Is that it? What does that look like? Actually not sure how much I need it. I’ve got the copper plates from bluejacket, which have the texture on them already; see pic.
-
But poor aim. Both the bolt heads and the airports have some that are off, quite noticeably. Hopefully black paint will hide a lot of it. 😁
-
You are right about the backends of the eye-bolts, so it should be on the spardeck as well. I wasn't sure if I wanted to do it, but I think you are right. I took another look at my pictures from my visit in May, and they are there, although inverted. The gundeck are 3 on the plank below, 2 below that: On the spardeck, it's 2 below, and 3 below that: I might take your suggestion for drops of glue.
-
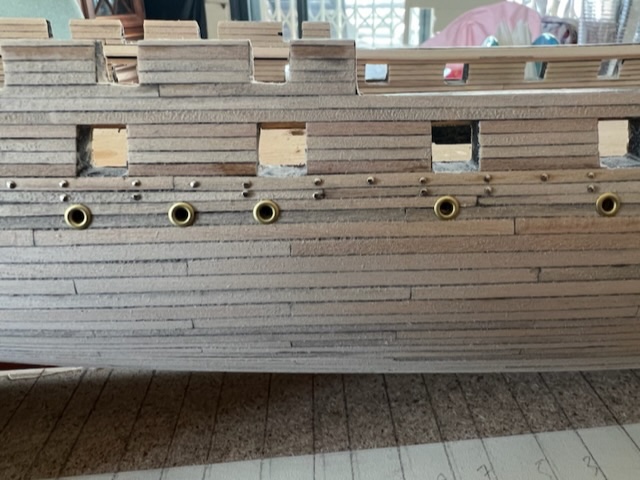
Finished the topsides bolt heads. I drilled each hole by hand, cleaned it a bit. For each bolt head, I dipped a needle (held by a cork, great idea from earlier, I think from @MrBlueJacket, and forgive me if I misplaced that credit) in thin CA. Dipped it in the hole, grabbed a shortened pin with angle head pliers, and pushed it in by hand. Some needed an extra tap with a light hammer (I used a tack hammer, but anything small enough will do). Some of them went in fairly easily, others simply refused over multiple tries until it went it. It is partially the size of the hole (I didn’t want them bigger, as the pins would be loose, even with CA), partially what the pin end was shaped into when I cut it short. Some are better than others. In the end, all went in. Picture of part of it is below. Word of advice for someone doing it: definitely get a pair of magnifying glasses with an LED light that head mounts, like Mighty Sight or similar. This would have been impossible without. I am not doing the inside yet. Going to spend next few months focused on painting exterior and coppering. Time to move on to priming.
-
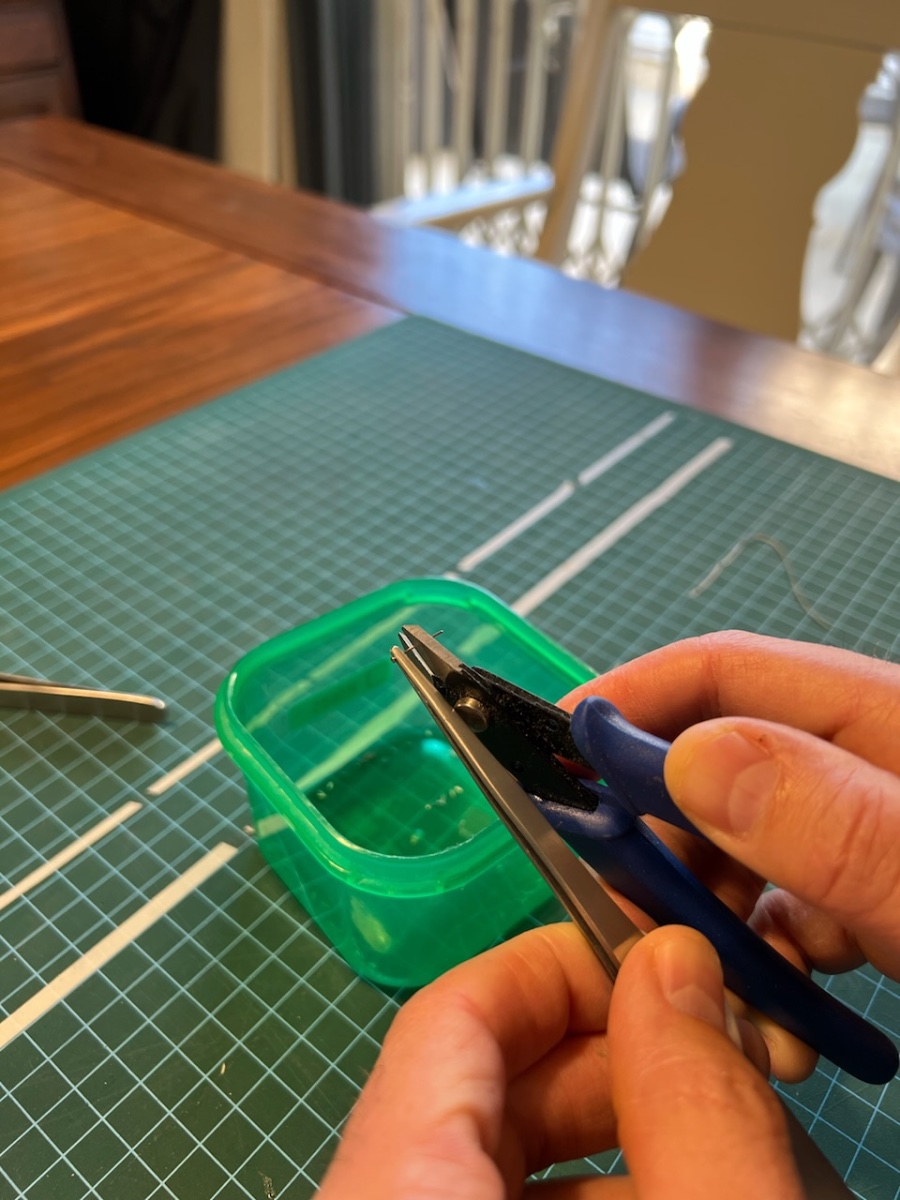
found the bolt heads, they’re just pins. But they definitely are way too long. If I stick them in, they’ll half be popping out of the other side. I’ll go to the local crafts store to see if I can find any that are much shorter. Spoke with @MrBlueJacket; he suggested cutting them to desired length, drill a pilot hole, tiny dollop of fast drying CA, and push it in. I started, it takes a loooong time to cut those pins. I held each one with a pair of tweezers, then used the edge cutters to cut them. I used a small food container to hold the tiny pins after they were cut, and a large one to capture the discarded ends as they went flying off. It wasn’t perfect - lots of sweeping to do afterwards - but caught most of them. You can see what the original one looks like against the bulwark, compared with the cut one.

-
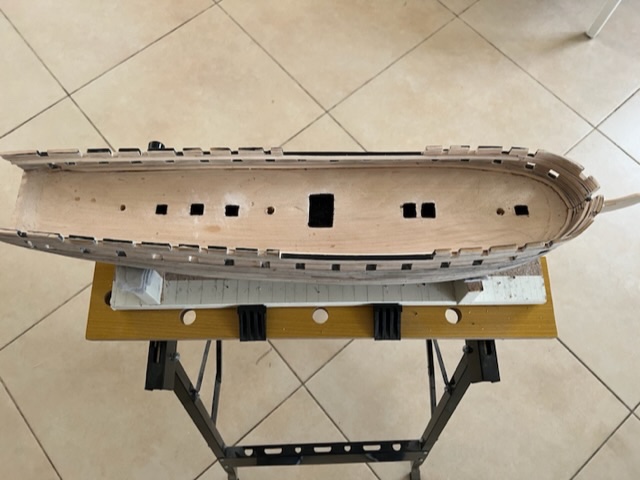
Airports are installed. I normally do all of my work on a work table, which is narrow and portable. However, one of the airports slipped out of my hand, and it took all of us a few minutes to find it on the floor. I moved my ship to the dining room table so any that fell would stay on the table. That paid off several times. I laid the side template on top of the hull, aligned it, and held it in place with clothespins. I then drilled holes through the blueprint markings into the planking. I used a very small bit by hand for the first pilot holes, then a larger one, then 3/64”, all by hand. Finally I did the 7/64” with my power drill on lowest setting. I then took the template to the other side and repeated. When done, I cleaned out each airport hole. I also needed to sand down again, and some planks came loose, so I glued them again. I used a toothpick to put some CA glue into each opening, then slid the airport cover onto another toothpick, slid it into the hole, pressed hard by hand, and then tapped it in with a tack hammer. I will admit they aren’t as aligned as I would like, but I’ll live with it. Besides, it all gets painted over soon. Next are scuppers. I’ve not the patience to go down the @JSGerson route and create them from brass rods. As he pointed out, they normally are closed, except when water pressure opens them. So I’m getting a sheet of copper, will cut it to shape of the covers, glue them into the right place and paint them. I do, however, think I’m going to paint the hull and the covers separately, then attach them, so they have a little more definition after painting. So airports done, scuppers coming after the hull painting (and I need to wait for the copper to arrive), so just the bolt heads to add before I can start painting. I ordered them from BlueJacket with my last order of planking, so they should be in my supply stock somewhere.
-
Thanks @JSGerson; I will look there. Very much appreciated! Wow. That’s quite the work. So you had the airports and drilled to countersink, but you manufactured scuppers? I like what you did, but I’m not sure I’ve got the wherewithal to replicate it.
-
Before painting, I’m going to drill out the airports and scuppers on each side. They get painted along with the planking, so might as well. I’ve got both the model shipways and the bluejacket plans and instructions. Both sets of plans show 17 airports in roughly the same locations. However, the MS plans also show 6 scuppers, which do not appear at all on the BJ plan. The pic from @ERS Rich above shows the scuppers with covers, as well as fittings for the airports. I’ll look in the instructions for both, and hope there’s info in the BJ plans along with parts. If not, I’ll have to improvise. Open to suggestions of course. After another check of the parts list, I don't see anything that looks like the airport fittings or the scupper fittings and covers, nor anything about either in the BJ instructions. Are they in the kit @MrBlueJacket? Or do I need to construct them out of something? EDIT: Aha, I found the airports. They were in the brass list. F0126, here. I’ll measure the diameters and get drilling. My calipers show 7/64” for the long part that is embedded, and 3/16” for the broad part that is on the outside of the hull. I still will need a solution for the scuppers.
-
This is much better. I did a combination of what @ERS Rich suggested and a suggestion from @MrBlueJacket much earlier in this log. No sealer, two coats of 50/50 thinned primer (Vallejo grey), lightly sanded with 1000 grit after each, then two coats of black, lightly sanded between first and second with the same 1000 grit. EDIT: I uploaded a higher resolution picture here so it’s clearer. and another after it fully dried overnight. @ERS Rich why is the paint so smooth and consistent looking in your picture? I’ve heard of people using high grit sandpaper on the final coat, but when I try that, even with 1000 grit, it just takes it off.
-
Yeah @ERS Rich that’s what I’m looking for. I also found that the planks almost distorted upwards in shape after sealing. I needed to sand them pretty strongly afterwards. So you’re suggesting the sealer followed by light steel wool and then paint? Is that different than what I did on the right? Any ideas why it looks off, like the paint isn’t smooth?
-
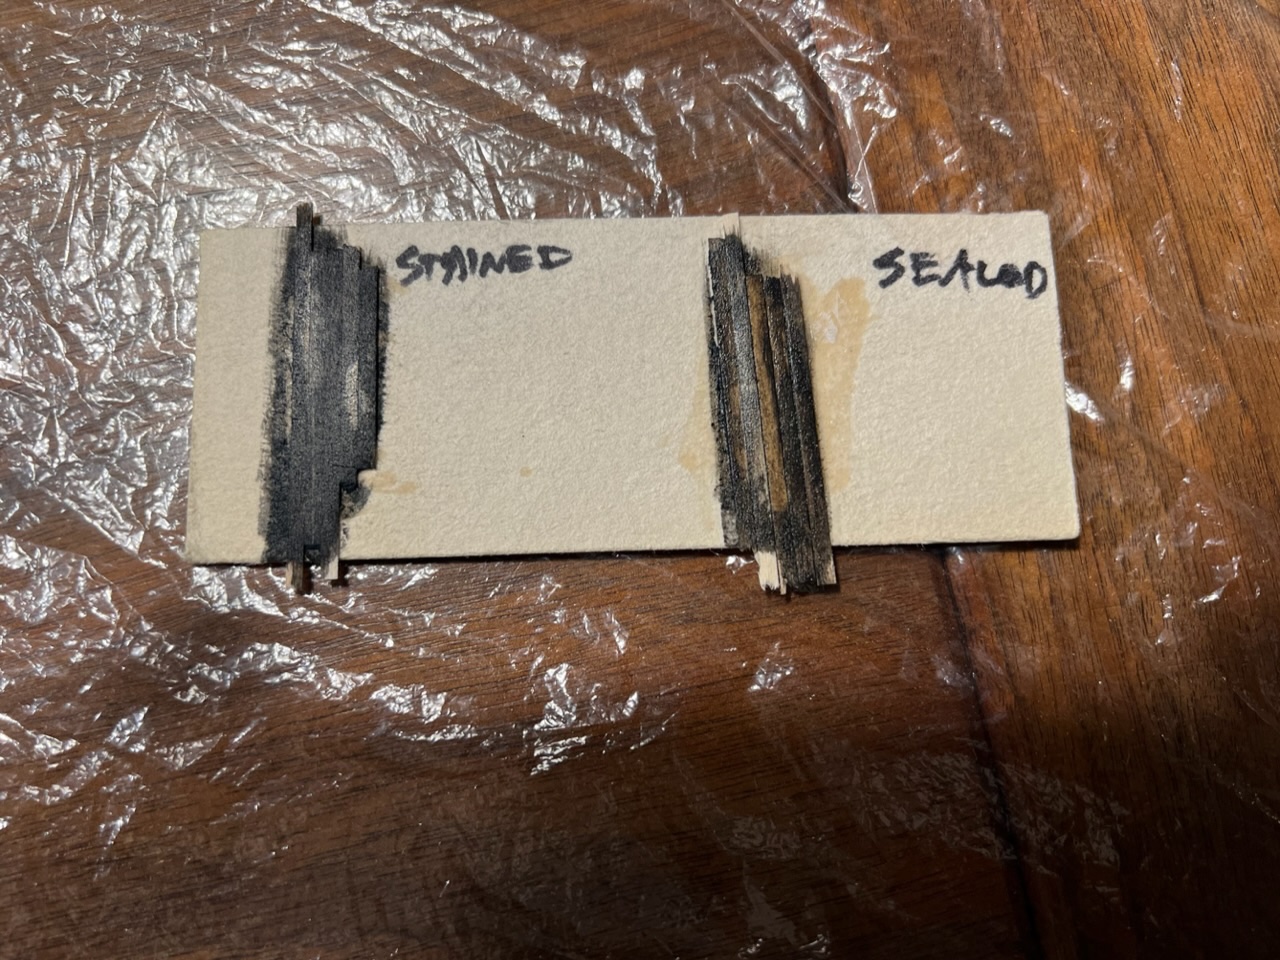
I sanded the sample after sealing, then painted both. First coat a few minutes drying, then second coat. to be honest, I’m not excited about either. The stained one is nicer… except where it didn’t take. My guess is that that is where the CA seeped into the pores from the bottom enough to prevent the paint from getting through from the top. the sealer just doesn’t look great. I might just need to prime and then paint, but I really was hoping not to.
-
I forgot that sealer raises the grain. If I seal before painting, am I going to need to sand again?
-
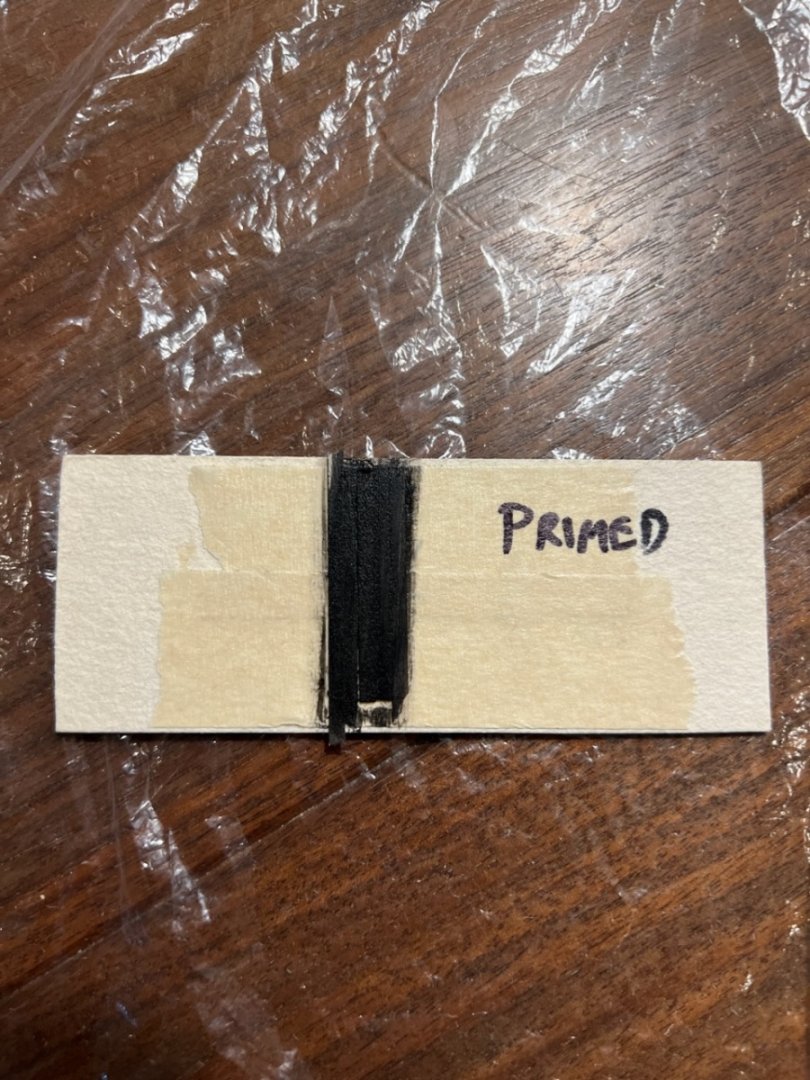
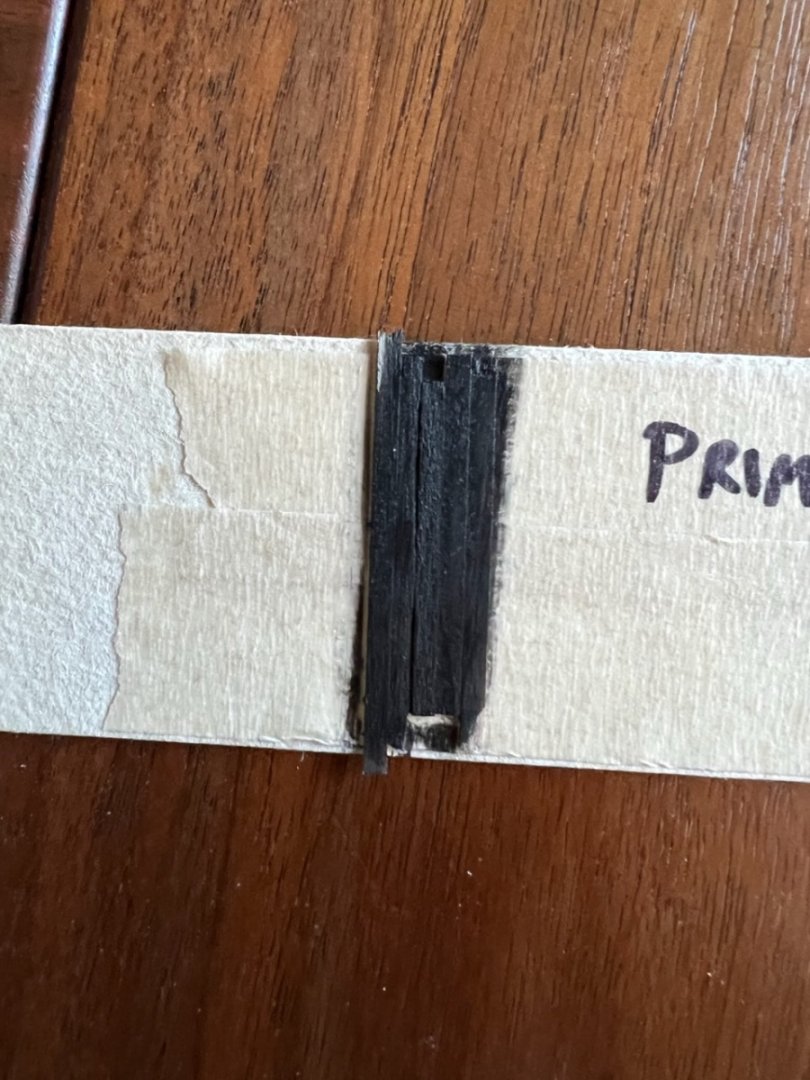
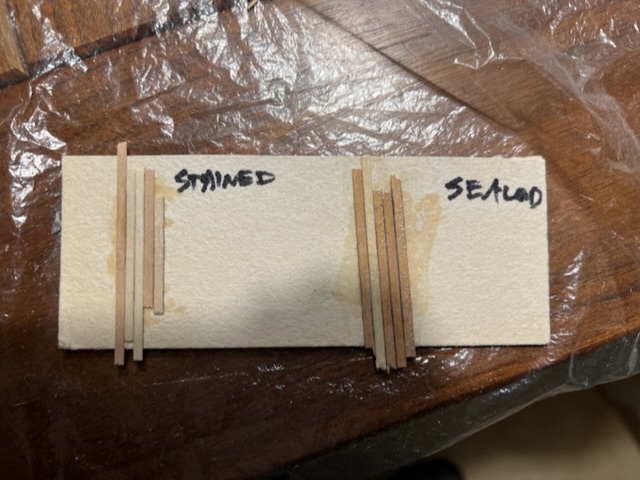
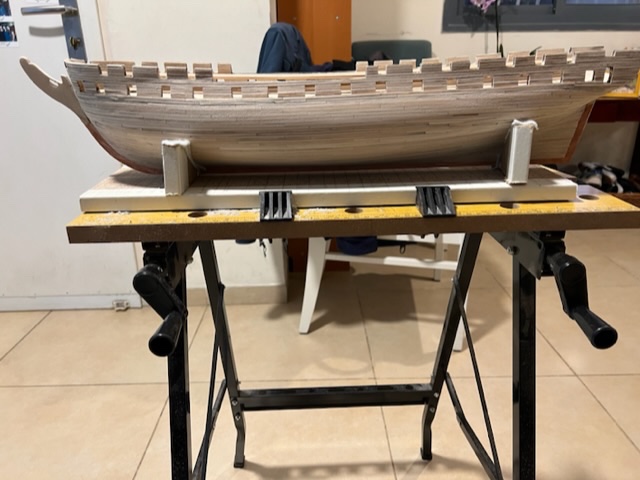
I cut out the excess from the gunports, sanded them somewhat. Then on to sanding the bulwarks and the planking outside the ship. The whole thing. I used 120, then 220, then 400. A picture of it is below. It’s amazing to feel what it is like when smooth! In some places I left a little texture around the gunports. I didn’t want the planking to disappear entirely. Next steps are marking the waterline, and painting the planks. Topsides will be black with the white gunport stripe (or maybe ochre; TBD). Below the waterline will be copper colour. In terms of topside, I’m still undecided between painting (sealer on the planks followed by paint), or staining (paint directly on the planks). I suspect the staining will bring out the wood better, but am unsure. So I ran an experiment. I took a piece of cardboard, glued (with CA, same as on the ship) five pieces of planking on left and five on right. I then sealed one set but not the other. When the sealer is dry, I’ll paint both black, and then I can compare and see.
-
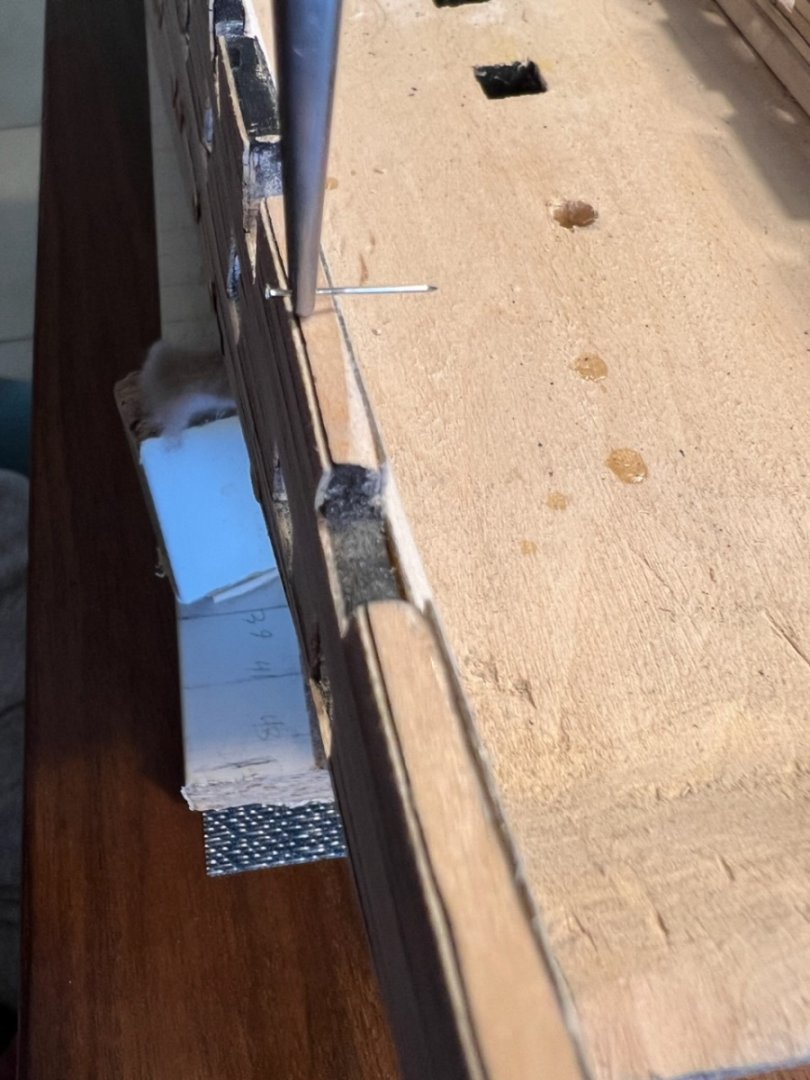
Leak of glue from under the plate to outside.
-
Will the glue itself react with the wax to discolour? does the concern with the leak lead to a preference for one kind or another?
-
Thank you all for the detailed feedback and suggestions. Based on the above, I am going to trim the ports, but try to leave at least a little in place, filling in with filler where necessary and sanding down. That should give it a smooth look. I will put together a quick long gun, just to see how each port works out. In terms of coppering, based on @KHauptfuehrer's report (and the difficulty in getting Weldbond here, not to mention getting copperleaf anywhere), I am going to avoid Weldbond. Contact cement is a bit of a challenge, as ventilation is fine where I work (great when I work outside in the summer). I think CA may be my best bet, especially as I have lots of it: thin, medium and thick. @MrBlueJacket what did you mean by letting it wick in? I would have imagine a single drop at the edge would stay there? Or is it so thin that it just travels along? My mainstay has been medium, although I have used thick when needed to good effect. For example, at the very tops of the bulwarks, there were a few places where I would have had to made the planks too thin for my taste to have them flush with the top of the carved hull. Instead, I let them extend above - the bond from medium CA below was quite weak - and then filled in the gap with thick CA and a spray of accelerator. Once it hardened, it was perfect. Also, in terms of accelerator, the stuff I have comes in a spray bottle. Do you apply it differently? Finally, does CA glue have the same problem with blackening that @KHauptfuehrer raised with Weldbond? For my plans, rather than poly on top of the copper, I have Renaissance Wax, which is supposed to do a great job preventing oxidizing and the copper turning green. I do want to be sure it doesn't react with whatever glue I use.
-
Going to ping a few folks here, hoping they have suggestions. Would appreciate input from @KHauptfuehrer @jfinan @MrBlueJacket My two open questions are: 1. How to adjust the planking per the above. 2. I’m close to ready to copper. What glue should I use? I see all of the warnings about CA causing it to oxidize quickly, which I want to avoid over the months I apply the sheets.
-
There are some good ideas in there @VTHokiEE It does have lids, but I planned to leave them open with the guns run out. I particularly like mocking up a cannon or two to place them and see. Maybe I’ll do that and see where I can afford to cut or fill in a bit more.
-
Happy New Year to everyone! I’ve spent a few days on this, and I’m stumped. How do I reconcile all of the above? Even if I’m willing to cut a little of the planks above the gundeck gunports, so they’re flush with the bottom of the spardeck waterways, that would leave nowhere on the bulkhead for the lodging knees to attach. There are issues both exterior and interior, both top and bottom, both gundeck gunports and spardeck gunports. I imagine if I spent many years building ships, I’d know how to do this right the first time around, but I need to figure out my ship for now. I’m very open to suggestions.
-
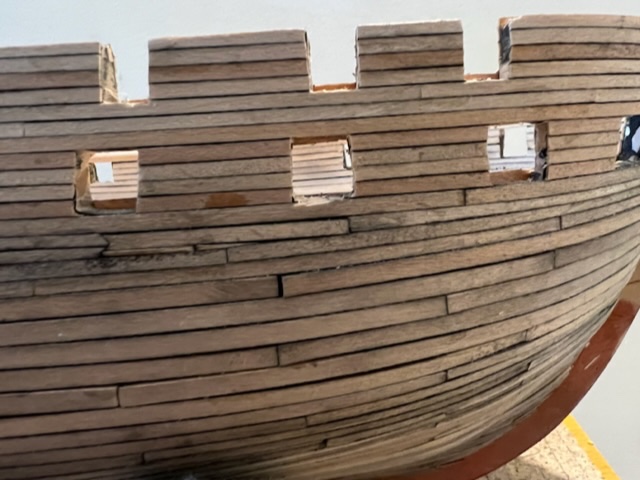
Planking basically is done, interior and exterior. I cut out all of the gunports on gundeck and spardeck, then shaved the sides of each one with a fresh sharp #11 xacto blade to get them right (changed blades multiple times). Some miscalculations on my part led to an interesting challenge. If you don’t get it exactly right (and I didn’t), you have a hard time reconciling all of the following: - four strakes per gunport on both decks - two strakes between top of waterway and bottom of gunports on gundeck - one strake between top of gunports on gundeck and bottom of spardeck waterway - one strake between top of waterway and bottom of gunports on spardeck the miscalculation led to some ports where I’ve got an extra plank hanging down from the top of the gunport on one side, and/or an extra one sneaking up from the bottom of the port on the other side. The pictures below show some examples. if I trim the hanging one, the gunport looks better but then the top is flush with the waterway above; if I trim the bottom one, it is missing a strake between it and the waterway below. If I do neither, I have a strange hanging plank. I probably could fill it with wood filler and then sand it on an angle, which is another option. Fortunately, only some of the ports have the issue. This leaves me with some possibilities: A. Trim and ignore the plank count between ports and waterways B. Fill in with wood filler and sand on an angle, ignoring plank count for ports for some C. Some combination of the above

-
As I slowly make my way up the interior bulwarks planking, I’ve come to several realizations. First, it’s hard to get the interior and exterior exactly aligned. I imagine this is more natural for those building plank of bulkhead, like MSW, as opposed to on a solid hull, but even slight variances in carving the hull can lead to big planking differences. I’m sanding down planks to shape it as best I can, but I can just hope that it is not overly visible. Second, where the planks from port and starboard meet at the bows need not be perfect. That all will be covered over anyways. I’m trying to get them just right anyways, and where there are gaps, I add small pieces of plank and sand them in, but it doesn’t matter too much. Third, getting the top of the gundeck interior bulwarks planks to finish just right below the spardeck waterway is nearly impossible. Instead, I’m pausing the gundeck bulwark planking, somewhere around the tops of the gunports, and going to do the spardeck waterways. It will be much easier to shape the thin planks to align just below the waterways than the other way around. According to Anatomy (pages 74-76), the spardeck waterways basically are flush with the long midships opening on both sides (what is that opening called?), with a “gunwale” laid over both, while being 2 strakes below the spardeck gunports. I’m not sure my spardeck opening and gunports are aligned quite that precisely, but should be close. My own pictures of the ship from visiting her in May show 1 strake below gunports, and 1 strake below the opening for the bowsprit. Either way, laying the waterways flush with the opening and 1 or 2 strakes below the gunports should be fine.
-
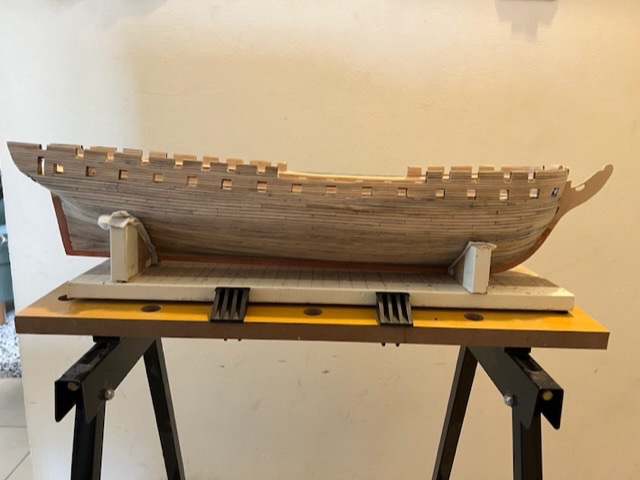
Before I move on to the finer work on the bulwarks and then coppering, I decided to check the mast holes. If they are off on angle, I always could drill a wider hole and then settle them in with some putty when I steep the masts. I took the wood, planted them in the holes… and it was perfect. Nothing here comes out right the first time, so I’m really surprised. I had my artistically inclined and talented daughter verify. Attached. on to planking the bulwarks.
-
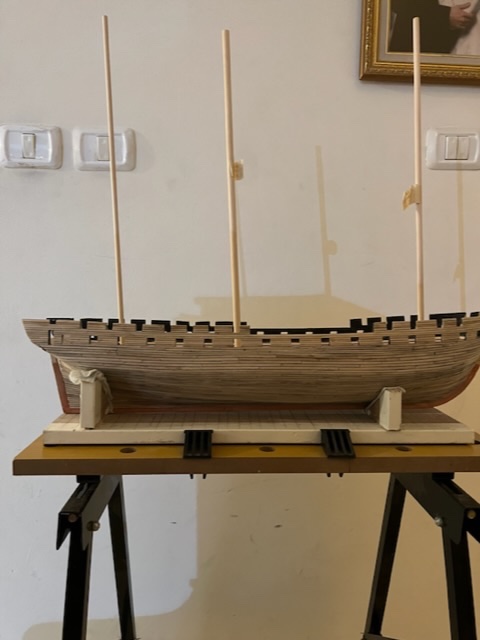
Sanded the joints, they look and feel much better. Used wood filler inside the chiseled out hatchways to smooth the bottoms, let them dry, then scraped and sanded them down. Finally put on a layer of sealer, which, when dry, will have a layer of black paint on them. i also drilled the holes for the masts. Getting the angle correct turned out to be brutally difficult. The foremast is 91°, mainmast 92°, mizzenmast 94°. Beyond the issue with that kind of precision using a drill, even a hand drill, and getting it centered port to starboard, getting the angle vs the keel is quite hard. I used a protractor, but you cannot set it down on the deck, as the deck is not perfectly parallel with the keel. In the end, I used a level, put pieces under each end until it was perfectly level, then attached the protractor to the level so that its bottom is level and midpoint aligned with the hole location, and then drilled. Hard but it looks like it succeeded. next steps will be painting the hatchways, and planking up the interior bulwarks.