


Avi
-
Posts
323 -
Joined
-
Last visited
Content Type
Profiles
Forums
Gallery
Events
Everything posted by Avi
-
Ok I am a bit frustrated. With the planks, I was able to smooth them down, especially at the edges, with sanding. I did it lightly, to keep some texture, but it worked. Obviously I cannot “sand” copper plates. They also are thinner and are metal, so there are sharper “edges and corners” that can get caught on something over time. No matter how good a job I may (or may not) have done in applying them with cement, there’s some edge or corner on many that won’t be 100% flush. While the wax did a good job sealing and protecting each copper plate itself, my hope was that the varnish would create something like a sheath over it. A few coats, a few hours drying in between, and I would end up with that protected smoother surface (“sheath”). That didn’t happen. I didn’t skimp on the varnish, but I didn’t get what I was hoping for. I can continue building, but I’m concerned about the fragility of the plates and their ability to get caught and yanked off. Open to suggestions.
-
Sure. This stuff. You can find it on Amazon too.
-
Two coats of wax on all of the copper - about 10 plates needed to be reinforced or remove and recemented - but waxing is done. Next is varnish. I’m sure the wax provides more than enough protection, but the sheer “pointiness” and “edginess” of the plates means something is going to get stuck on an edge or corner and yank a plate off, or bend it, no matter how long it’s been there. A few coats of varnish will provide a thin layer of sealant, like a tight raincoat or wetsuit, on the whole thing.
-
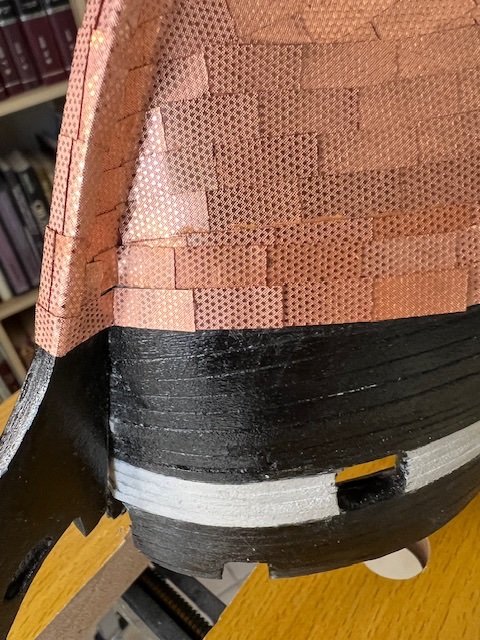
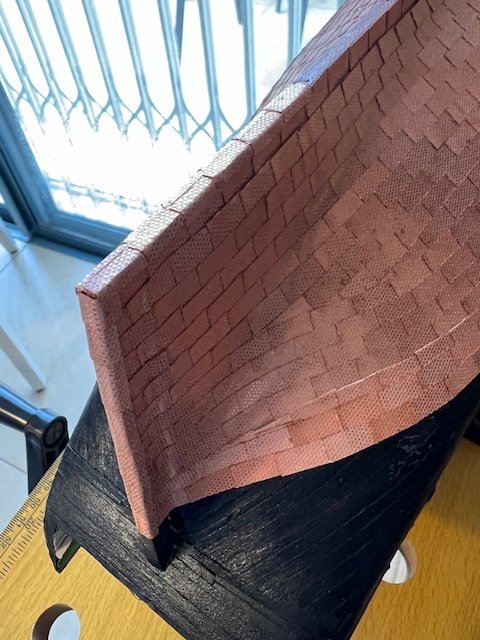
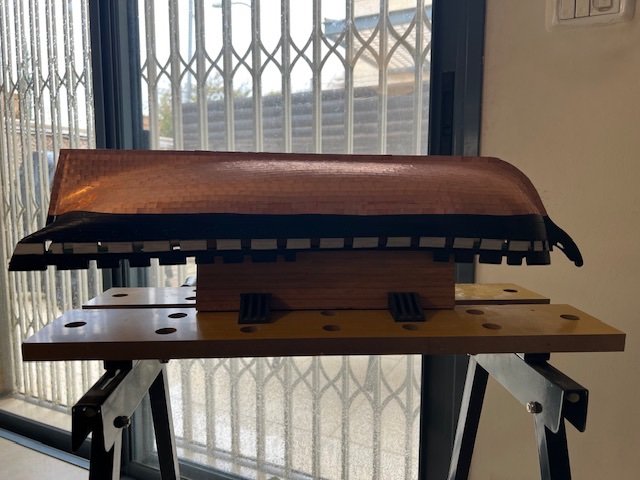
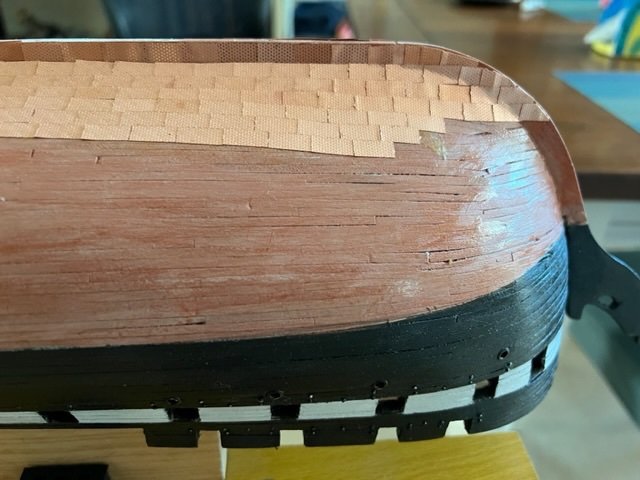
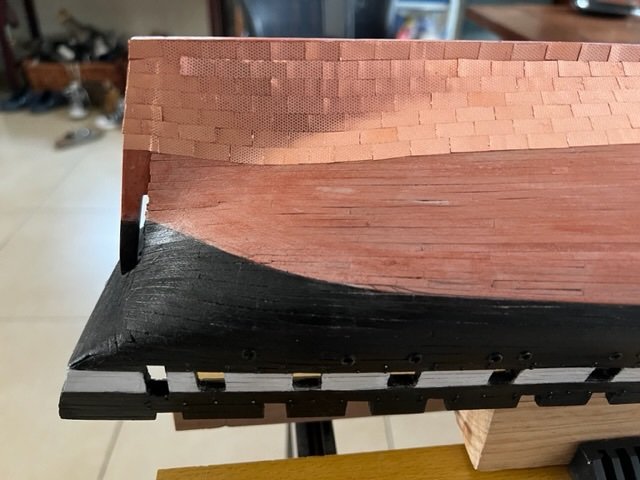
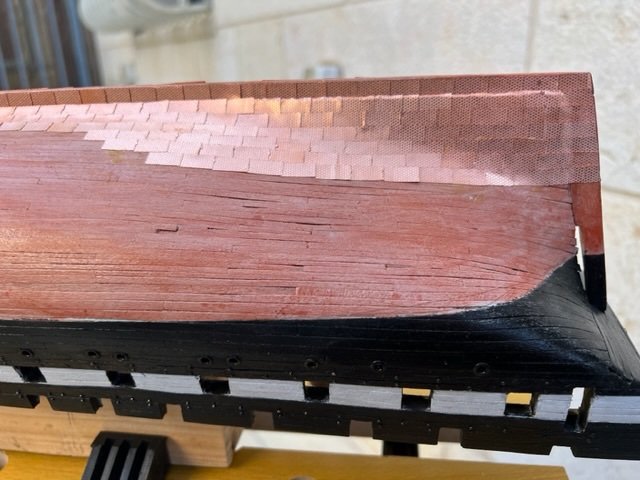
And coppering is complete! Picture of the rudder and false keel. The fully coppered side you see of the false keel is the bottom side. I didn’t fully copper the side facing the keel, as that will be attached anyways. Next steps, I plan to go through the ship and strengthen any plates that need it. Then I’ll wax (2-3 coats), varnish (2-3 coats), and attach false keel and plank. Finally, I’ll drill the holes for the stand. Get those in before I turn the ship back over and work on the decks.
-
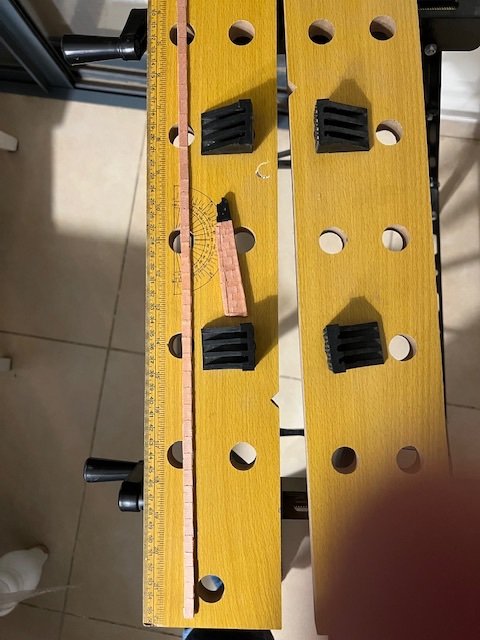
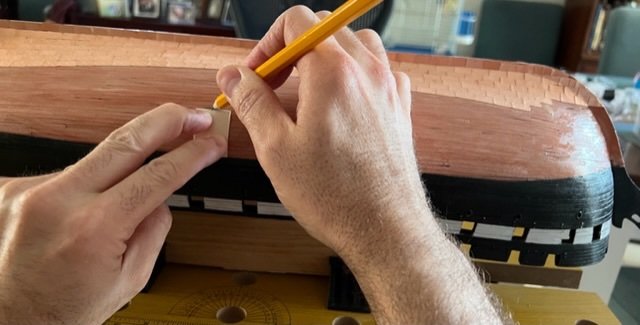
Placed the piece of wood for the false keel on the keel, measured it so that it extends from exactly where the stem curve starts to the end of the ship (technically, flush with the sternpost). Sawed it down to length and then sanded it. Then added a small angle so that it really is flush in line with the sternpost, which is angled to the keel, not 90°. Took the rudder, measured against the ship. Similar to the false keel, the bottom of the rudder is closer to 90°, which makes it stick down on an angle. Sanded it down until it’s aligned with and extends the keel. Used a long metal ruler to check it. Put on two coats of primer on each all over, paint is next. I’m painting the false keel copper, and the rudder copper until the waterline and then black above, which matches what I did on the hull. If I did it correctly, I will have one strake of copper over black paint, the rest over copper, just like the hull. It actually was interesting. I don’t think I’ve yet painted anything that the entire piece needed to be painted. I held the rudder from the top, primed the whole thing except for the handhold, waited for it to dry, did another coat. Only after that dried could I hold the now-primed part to paint my former handhold. Same thing for the false keel, except there I held it right in the middle.
-
Thanks @JSGerson That diagram you have is similar to one I’ve seen. As for 1/16”, the Bluejacket kit indeed comes with a piece of wood labeled “keel shoe” whose size is 1/16” x ¼” x 24”. I’ve got plenty of copper left, so I guess I can cover it and attach it.
-
Interestingly, I cannot get consistent info on the false keel (aka keel boot). I have a memory of seeing somewhere that it should be coppered independently and attached to the bottom of the keel, such that it doesn’t run smoothly into the stem (like the real keel does), ending just below it. But I’m not sure.
-
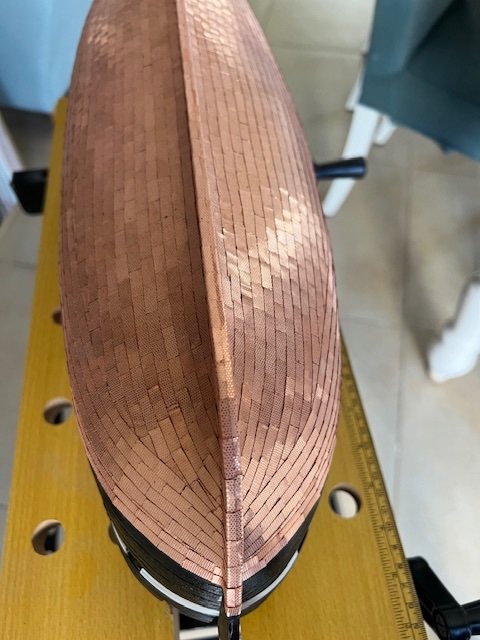
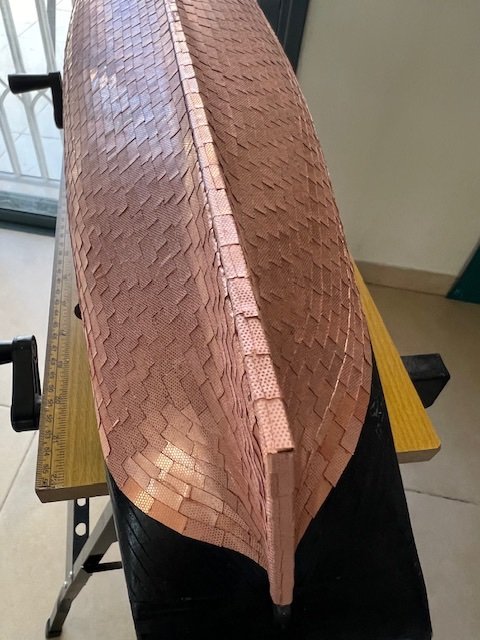
And finished coppering the hull! pics below. Per the directions, I put one plate on each side, slightly offset of the centerline, so one overlaps the other. Going down the keel was easy. I measured out the length of 10 plates and marked it with a pencil on the keel. Then I put a single plate in place, bent it to shape over the edge of the keel, marked the edge on the keel with a pencil, and shaped 19 more. Lay down contact cement on the keel until the length pencil mark, a little bit on the sides (over the edge of the existing plates), then put cement on my 20 plates. Wait a few minutes, and put the starboard side in place, then the port side. I usually put another layer of cement down after the starboard side, so that the edge of the plates got some. Since the port side plates overlap the starboard side, extra cement helps bind it. I had not taken pictures of this process; didn’t think about it until now. When I got to the stem, where it curves, I did each pair at a time. I laid down the first coat of cement on the stem up to the end of the copper line (and a bit on each side on existing plate edges). Wait for it to dry. Then I took one plate for starboard, placed it, then bent it down its centerline over the edge of the stem onto the starboard side of the ship. While holding it in place, I also pressed down to give it curve to match the curve of the stem. Repeat for the port side. Put cement on each of the two plates, wait for it to dry, press in place. Unlike the rest, because the stem has a curve (and a varying one at that), each plate is shaped a little differently. Hence, I did one pair at a time, tracking which plate is port and which starboard, and then moved on to the next. A bit slow, but it works. At the very end, I put one plate widthwise, across it, rather than the pairs. This gave it a nice closure, and avoided needing to cut really small pieces and attach them. I also trimmed it to match the edges of the plates on each side of the ship. On to coppering the false keel and the rudder!
-
First 12 pairs of copper covering stern and keel.
-
Starboard dressing belt is done. Interestingly (and somewhat unhappily), the gap between gunports and top of the dressing belt is smaller on the starboard side than port side. They are the same at stem and stern, but not amidships. I must have made an error when measuring the waterline curve, on top of which I put the border between black paint and copper paint. The difference is about 6-8mm. I considered removing the top strake, quick sand and paint, but decided to leave it. You really only notice it when actively comparing port and starboard, not each on its own. Since none of us had eyes like someone from the Mos Eisley Cantina, I’d rather it the way it is. Lighting is wrong for a picture now, so I’ll try over the next day or two. Update: here’s a pic. Not the greatest angle but will do for now. Next step is the long row of side by side plates, running from stern to stem, covering stern, keel and stem. On a different note, I took another look at the varnish-vs-wax question. I do like what wax does, but the complete hard layer of the varnish, especially given the ability to lay down 2 or 3 coats, will provide better physical protection to the copper. Given how easily they come off, that’s important to me. So I took my testing cardboard, attached 3 more plates with contact cement, put on wax, and then two coats of varnish on top of that. Let’s see how it turns out. Initial view is attached.
-
Quick update. Found time for a few sessions this week. I finished the dressing belt on the port side; hoping starboard next week. Then I’ll post some pics.
-
No disrespect at all. 😃 I don’t want it oxidizing and turning green. I’m somewhat ok with it darker, like a penny, but I think I still like the shiny copper. Either way, the wax is built specifically to prevent the changing colour, while clearly varnish speeds it up somewhat.
-
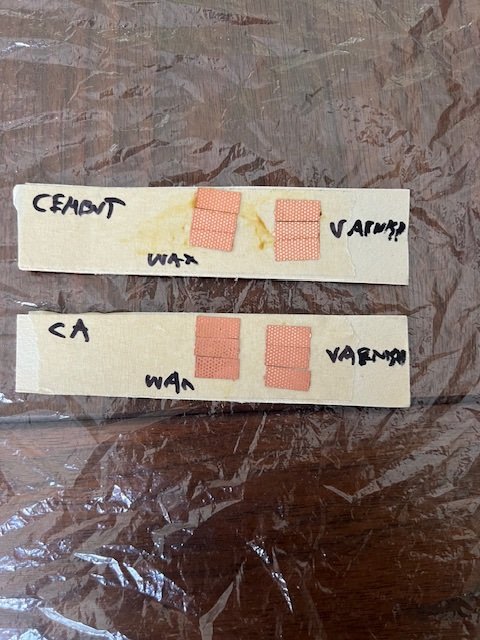
I haven’t been quite free to work on the ship, with everything going on around here (to put it mildly), not to mention keeping a business running. I found some time today to focus on it again for an hour, and found something interesting. I pulled out those copper plates on which I’d tried varnish and wax. Take a look. the varnish appears to have darkened the copper plates materially. This is only about 6-7 weeks since I did it, so it’s quite striking to see. Clearly, wax will be my choice for protecting the copper. That brings me back to my original plan. I will varnish the planking topsides, then put on the dressing belt overlapping it, and, when finished, wax the copper.
-
True. Although as the varnish is just brush and apply, it isn’t a big deal.
-
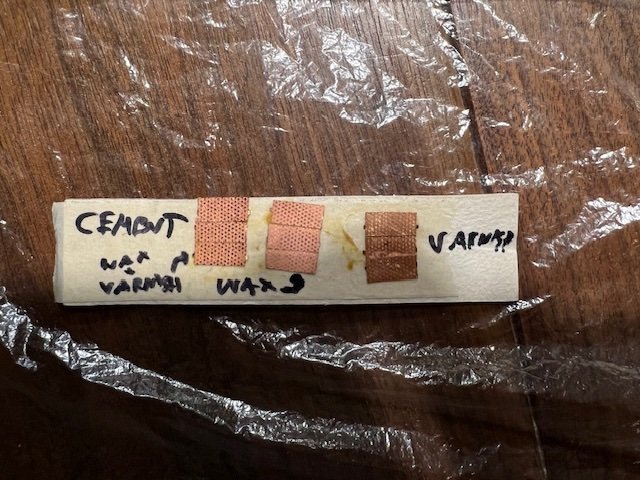
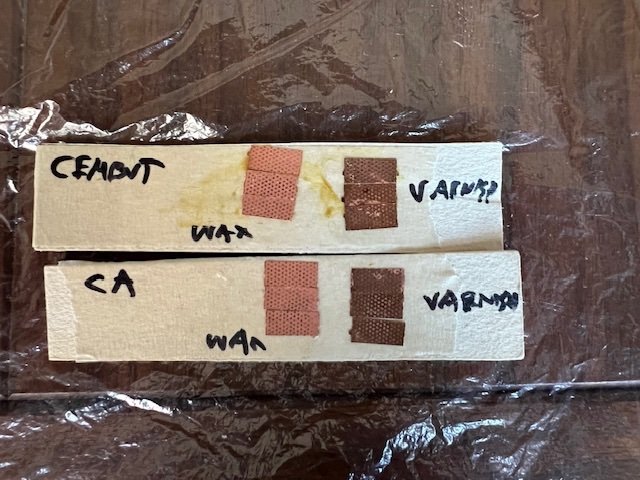
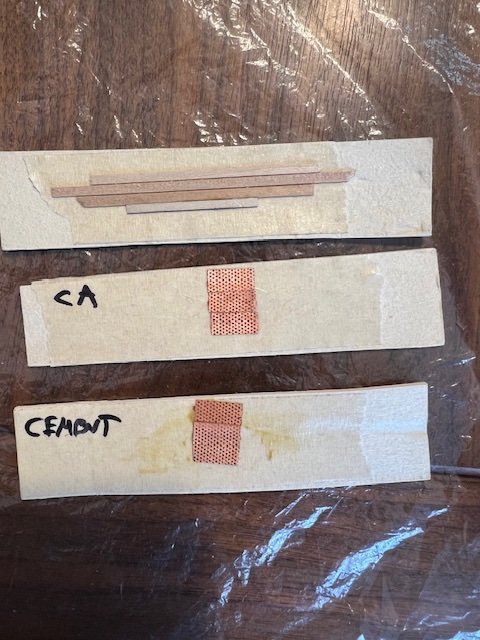
Two sets of two short rows of copper plates each, one with CA, one with contact cement. Intentionally messy, as described above, to see the effect of the coating on the copper but also on the glue. The right row in each set has two coats of Vallejo Satin Polyurethane Varnish. The left has Renaissance Wax. All look good, I don’t see any unexpected interaction or discoloration due to the glue and varnish or wax. Which means either should work fine. The BJ manual says 2-3 coats of varnish should help keep the plates in place “forever”; I wonder if it does add longevity and stability to them as an outer coat, and if the wax will do the same thing 🤷♂️ For the curious, here’s info about the wax.
-
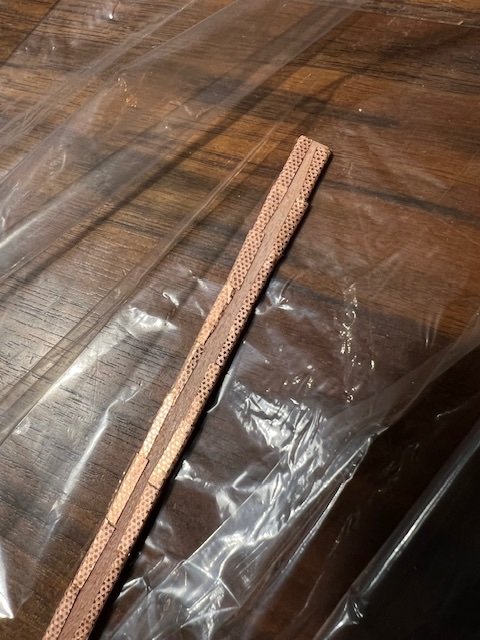
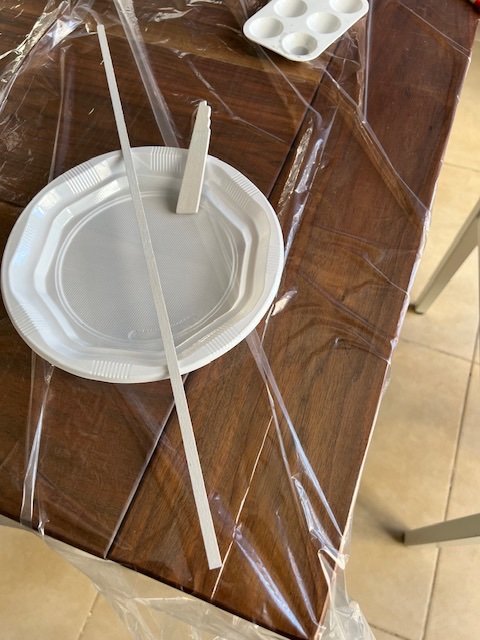
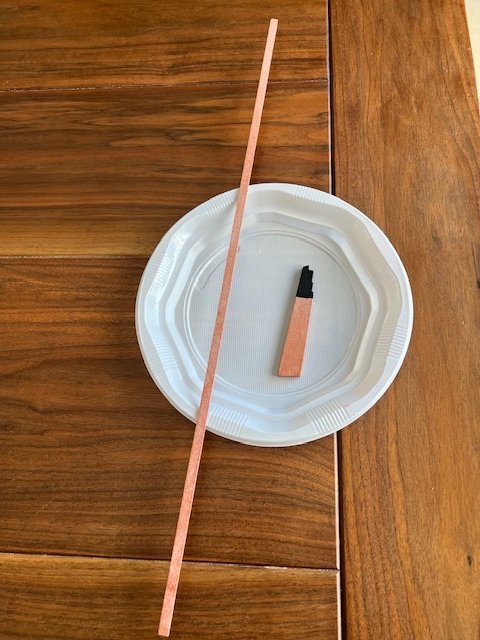
I finished the last strakes (with lots of narrow cutting) below the dressing belt (which is two strakes). As I said earlier, it will be much easier to varnish the black painted planks before putting on the last strake of copper, than trying to varnish right up against it. In order to see how it will look before I commit, I glued four loose planks onto a strip of cardboard (with masking tape as the surface on the cardboard, as CA tends to get absorbed deeply into the cardboard, leaving little to grip the planks). Once those are dry, I’ll prime, paint two coats, and then varnish. While I’m at it, I took two more cardboard strips with masking tape, and attached three copper plates, one set with CA, one with contact cement. These are *intentionally* messy. Once they dry, I’ll put on the museum wax. The goal is twofold: to see how the wax looks covering the copper, and to see how it looks when it interacts with the glue or cement. I have to assume some leaked in many places while coppering, so let’s see in advance what that looks like. Hence, the intentionally messy glue job. I probably won’t do the wax test until I’m ready to wax, ie after finishing: the dressing belt port and starboard; the layer covering the edge of the keel and stem overlapping the sides; the false keel; and the rudder. I let the planks dry, put on primer and two coats of black, followed by two coats of varnish. Looks pretty good. It’s what I expected, but always worth checking.

-
I should post some pics. I will when I get a chance. I finished the first very wide band of copper plating, up to the marked lines shown in this post. The last strake involved lots of lengthwise cutting thin and angled pieces to fit in. It was slow and labourious. Normally, I can put a layer of contact cement on the planks, then put on 30-40 plates. By the time the last plate is done, everything else has dried, and I can just apply them with pressure. Here, I need to cut and shape each piece, and I do not know the exact shape of the next one until the current one is in place. The pieces also are quite small and easy to lose. So I applied cement to the hull, wait for it to dry a few minutes, then cut and shape a plate, apply rubber cement to the back of it, blow it dry, apply it, then move on to the next. Eventually, I finished, and the next band or belt could be put in place. I repeated my technique from the current belt for the dressing belt. I got within almost a plate width of the dressing belt, then marked up the width of the dressing belt. The belt is two strakes wide, so I’m doing one on the copper paint, one above on the black. This follows the BJ guide on page 53, where the dressing belt is half above the waterline and half below. I painted to the waterline from above in black, below in copper, hence the positioning of the dressing belt. I’m now at the point where I need to cut those precise plates lengthwise to fill in to the marked line for the bottom of the dressing belt. I imagine that will take a few sessions. Before I apply the dressing belt, I plan to varnish the black paint on the hull. It will be easier than trying to get it precisely to the copper with getting it on the copper
-
Hi @g8rfan and welcome (from Florida? I’m guessing based on the “gator”). My apologies for the delay in posting. I haven’t been on here much as summer work and travel kept me from making progress worth posting. I also seem to have stopped getting alerts about notifications, so I’ll need to check. I don’t fully recall at the moment. At the time, I was having a very difficult job shaping it. Once I read that people just remove it and build it up later (based on the official - if challenged - BJ manual and posts here), I researched to see that it was doable, and then promptly forgot it until I got there. I’m still coppering, done about 85% of starboard and 60% of port sides, give or take, so I’m a long way to go. From the bit I do recall, using wood and putty to build up below and to the deck, then planking, but I’ll have to take serious research once I get there. I would check the build logs of the master builders on here, the great logs linked to from here.
-
Quick update. I’m still doing overlapping plates, but just barely. Essentially I’m trying to do butt ends, but without letting it leave any gap. In practice that means most are exactly butt ended or barely overlap. Every now and then I don’t get it quite right, and if you look up really close, you can see the gap. But since I painted it all copper underneath, using the Vallejo copper with real flakes in it, you just cannot tell without being within about an inch of it. Good thing I painted! I’ve done seven strakes: the one on the keel, and six more on the hull. The bow ends of the first three strakes are complete; the second set (strakes 4-6) go almost all the way, but stop 5-8 plates from the stem. I needed to figure out the curve and overlap and gore strakes. Following the plans from BJ and MS and advice here, I’ll be getting ready to create the first overlapping strake (does it have a name?). I’m basically measuring the length from top of the installed sheathing (7 strakes) to top of the target sheathing line (paint changes copper to black), and will mark out that distance from the target sheathing line towards the keel around the hull. This is easy to do with compass or similar tool. I’ll use that as the top of the current band of copper strakes. Ill plate upwards again until that line, cutting plates as needed to get the gore strakes. Once that is in place, I can put a new strake straight across, starting a new band. I don’t think I’ll need to do this more than once, plus the dressing belt. Some plans say twice, some not. This is what works for my ship. I will try to post some pictures, especially with the marked beginning of the new belt/band, when I can. UPDATE: Added some pictures.
-
Yeah that is a good idea. I’ve got it painted copper underneath, so the few places I did mess up the overlap, you cannot tell unless you know precisely what you are looking for. as for CA, I’m not convinced that the overlapping was causing the CA issues. I think it might have been either the smoothness of the underside of the copper plates, or the planks on the hull. either way, I’m going to try butt joining next run.
-
I did some work using contact cement. I found it to be a more solid hold in general, but really difficult to work with. It dries quite quickly, into a goopy rubber (well, it is rubber). That made applying it to the plates while the hull dried challenging. it also was challenging to do the overlap (higher plate over lower, forward over aft). That was the weakest point of contact even before; with contact cement, I end up with the overlapping plate having some contact cement on it, while the outside of the copper plate beneath has none. Didn’t make for the best seal. I did manage to do about 45-50 plates like that.
-
It does. What does “4x4 area” mean? Four rows by four plates across? I’ve been doing entire rows at a time. Also, what do you use to apply it?
-
@RossR I assuming you’re asking Mort? I’ve not tried contact cement yet.
-
I did one more strake on each side, using thick CA this time. It appears to have held better. I’ll still get contact cement tomorrow and try that too.
-
Some quick research shows lots of local places to pick up contact cement. I’ll pick up some, then try a strake with thick CA, followed by one with contact cement and see. My understanding is that contact cement requires putting coats on both sides, waiting about ten minutes, then applying brief pressure. I cannot imagine doing that one plank at a time @mort stoll; do you do a whole strake at once? Apply to a whole row on the hull, the 40 or so plates across, wait 10 mins, then apply them all?

