HOLIDAY DONATION DRIVE - SUPPORT MSW - DO YOUR PART TO KEEP THIS GREAT FORUM GOING! (Only 75 donations so far out of 49,000 members - C'mon guys!)
×


Wookiewithacamera
-
Posts
59 -
Joined
-
Last visited
Content Type
Profiles
Forums
Gallery
Events
Everything posted by Wookiewithacamera
-
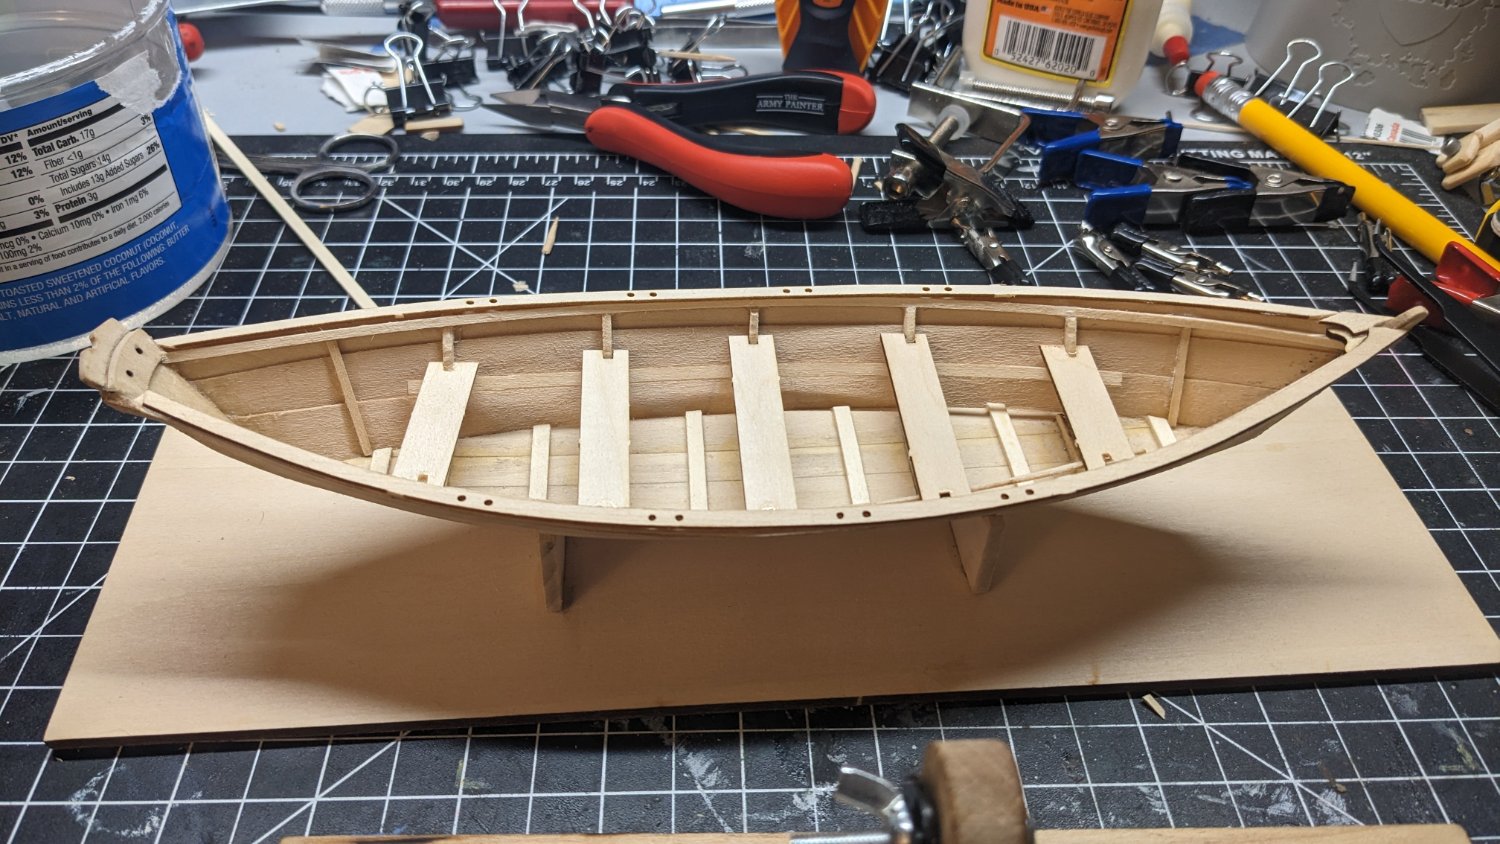
Did you scratch build the benches? My manual says nothing about benches except the seat supports built during the cabin step but nothing on top of them. I assume the iron is scratch as well? I didn't buy anything 3rd party as this is only my first true ship kit, aside from that dumb Dory. So I have no idea how to figure out if the included blocks are the right scale. I failed math 3 years in a row in high school and am trying not to go down that road. I hate the idea of plastic cleats as well. But I had considered just scratch building cleats and trying match the size as close as possible.
-
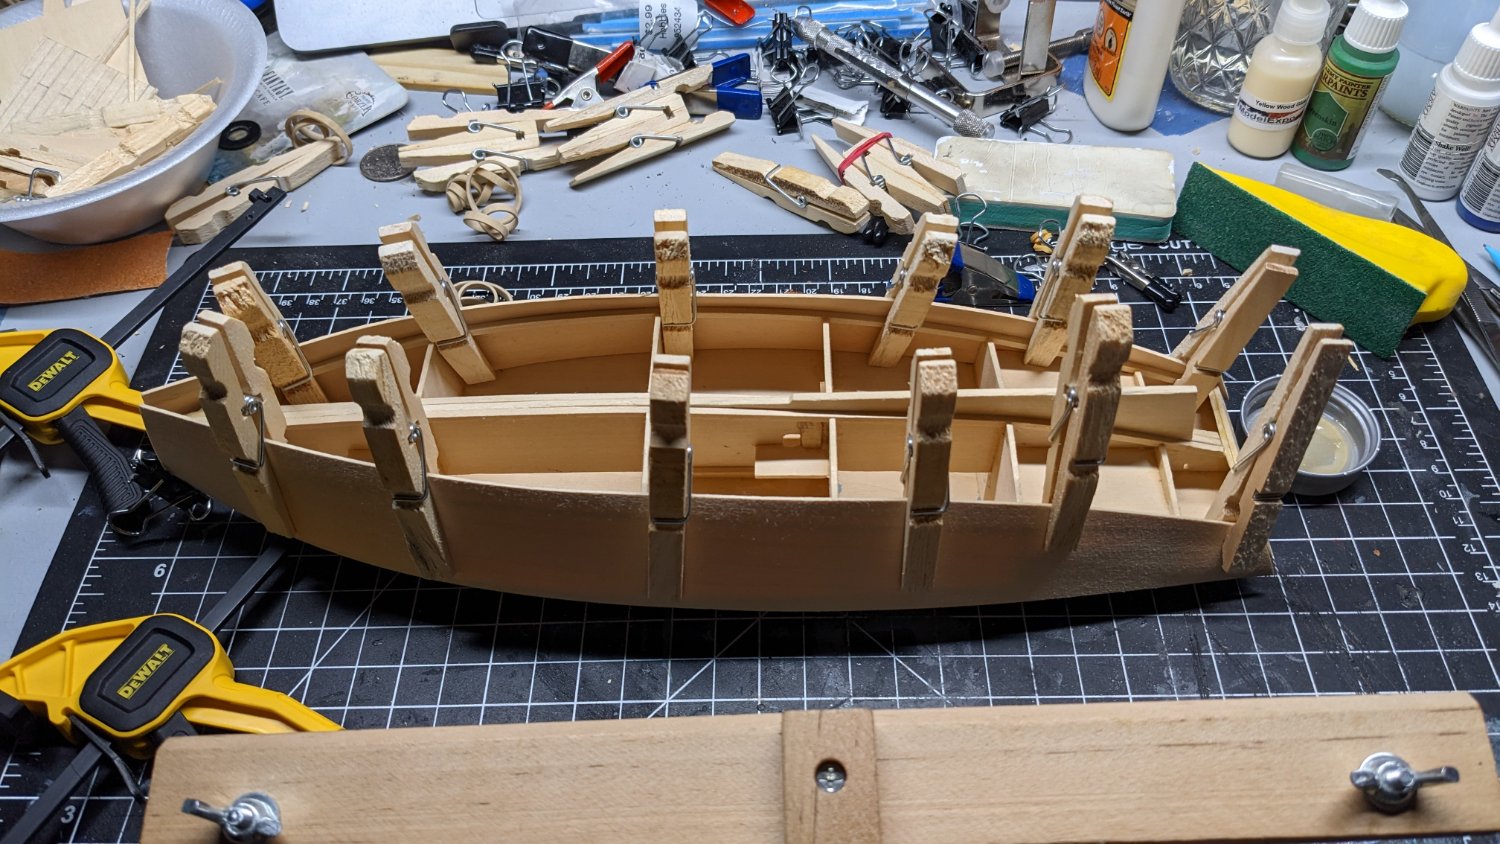
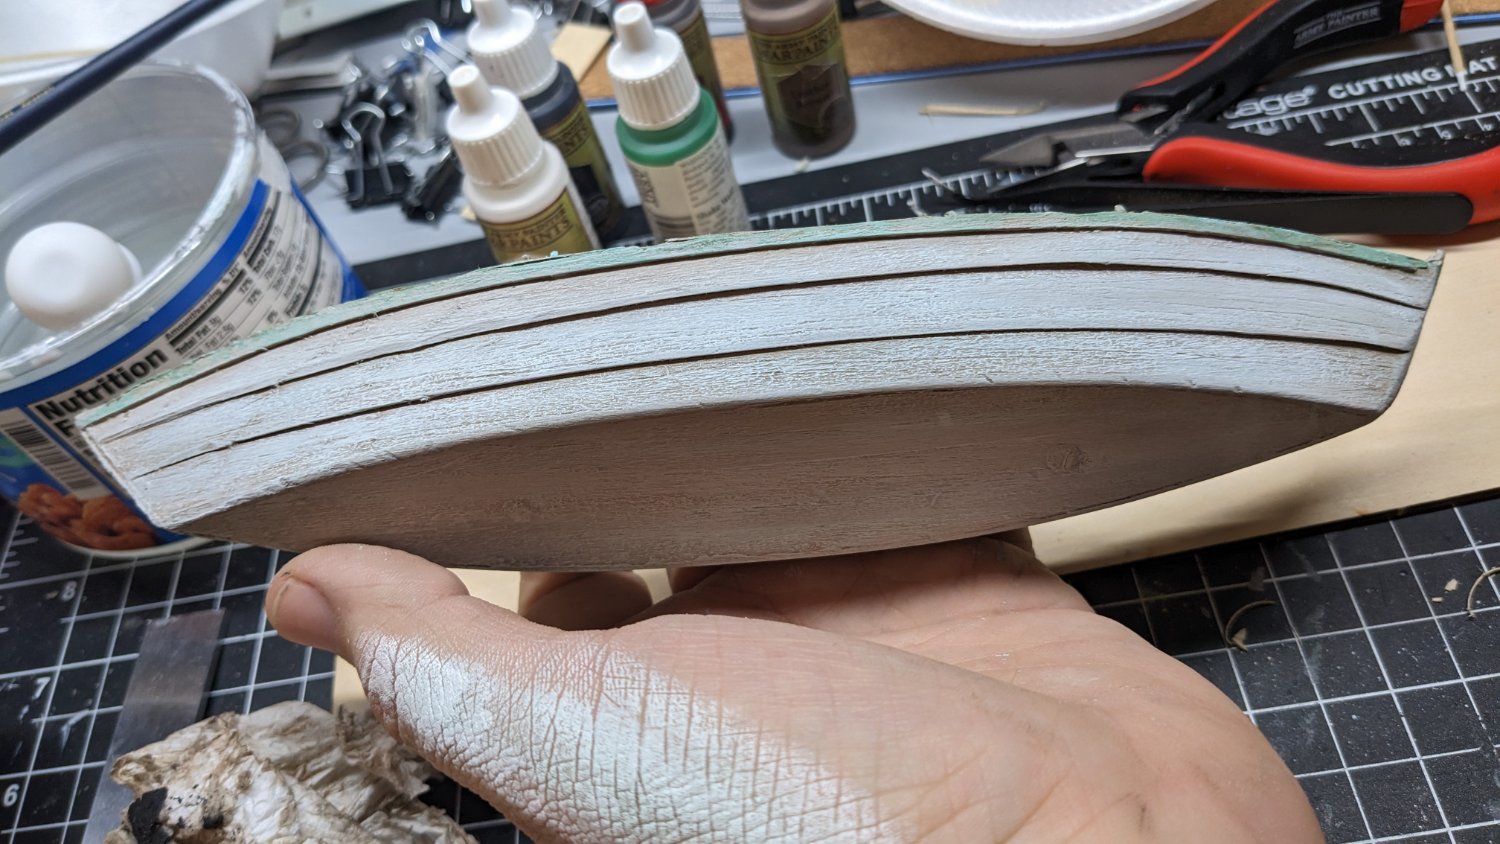
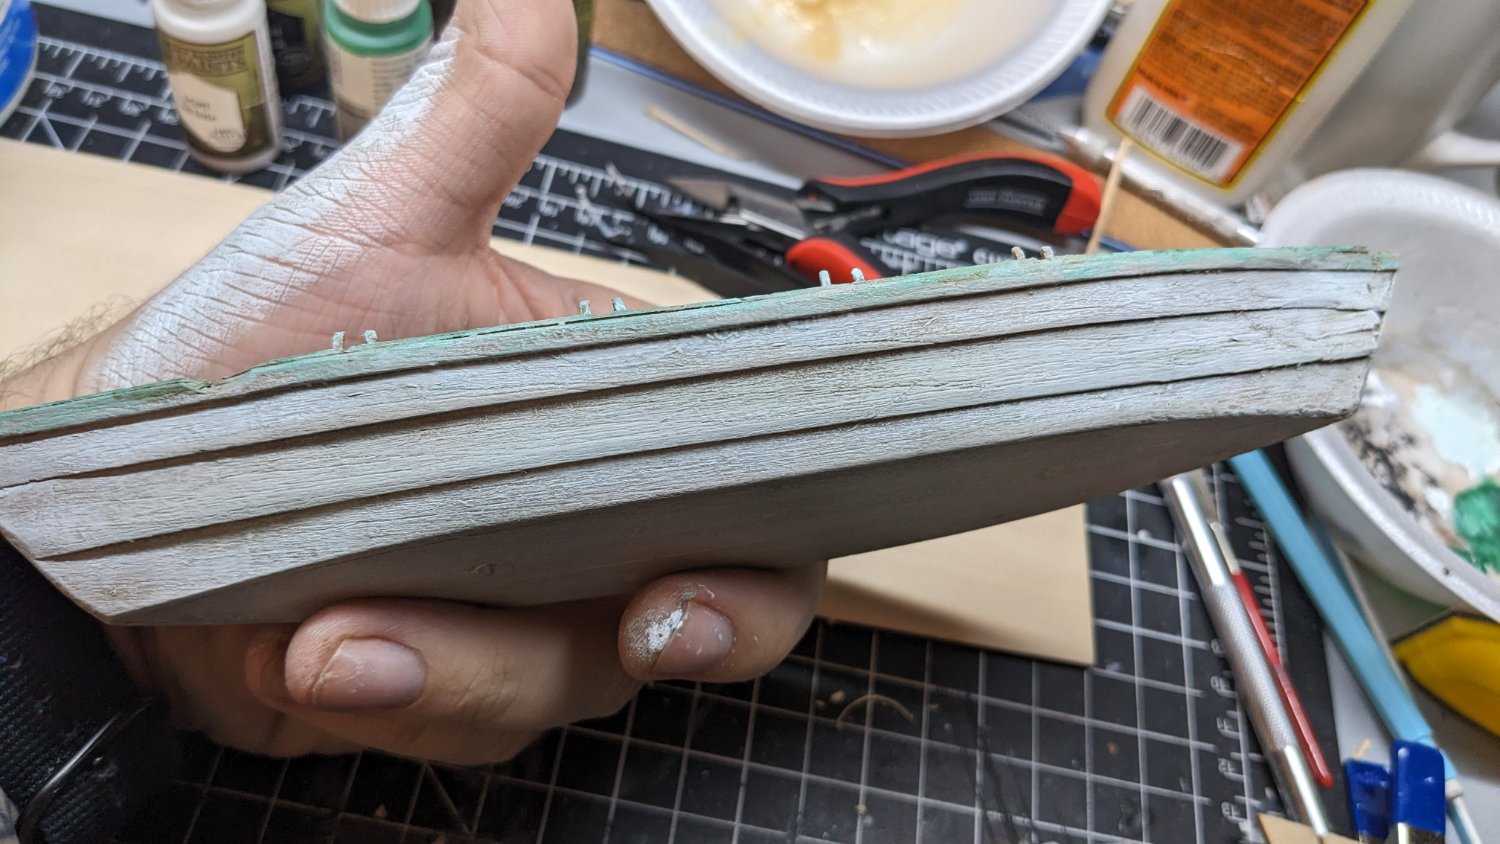
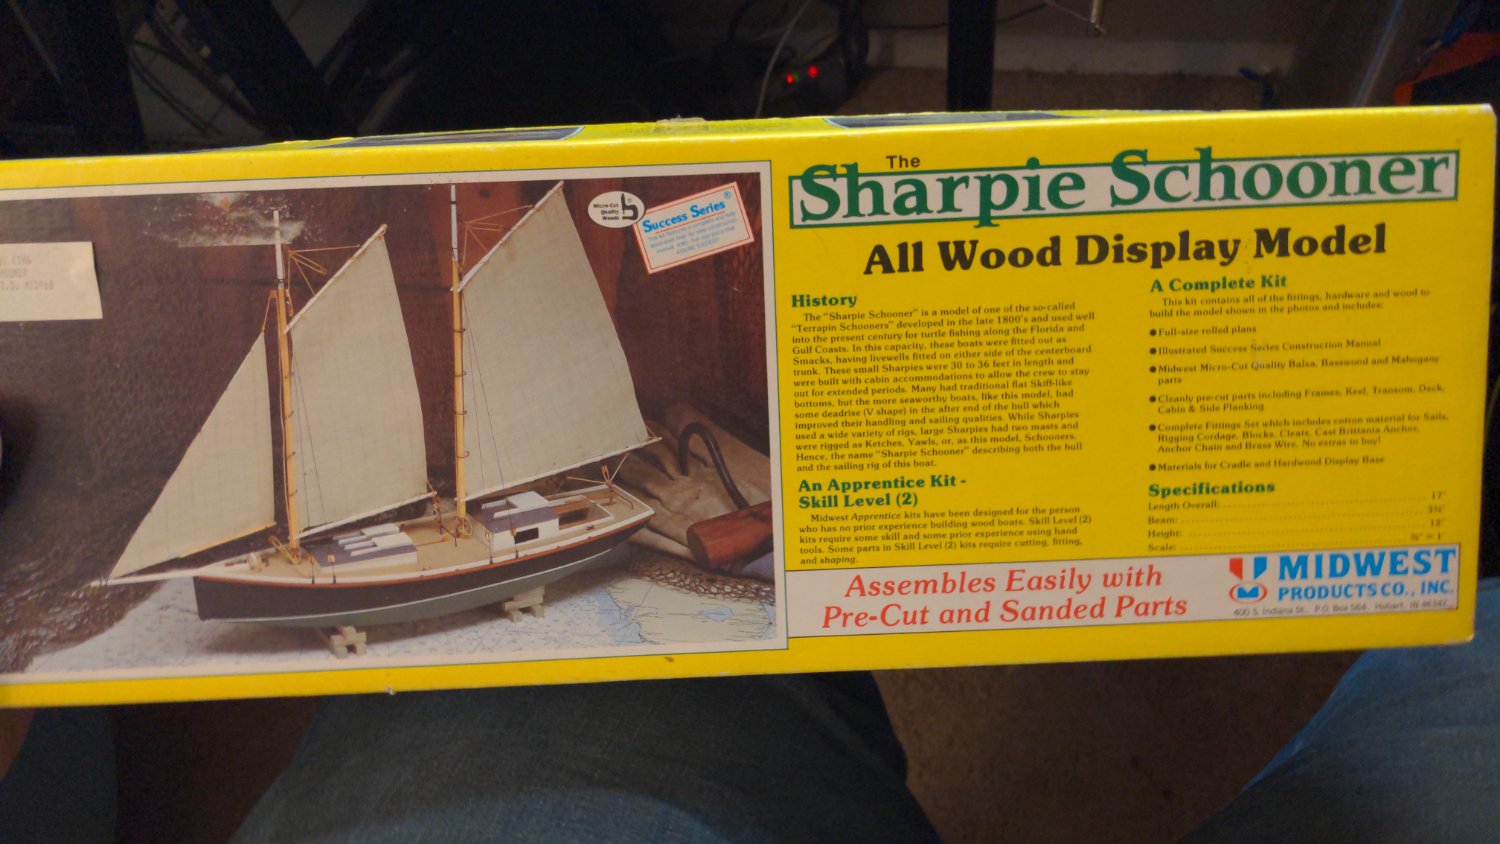
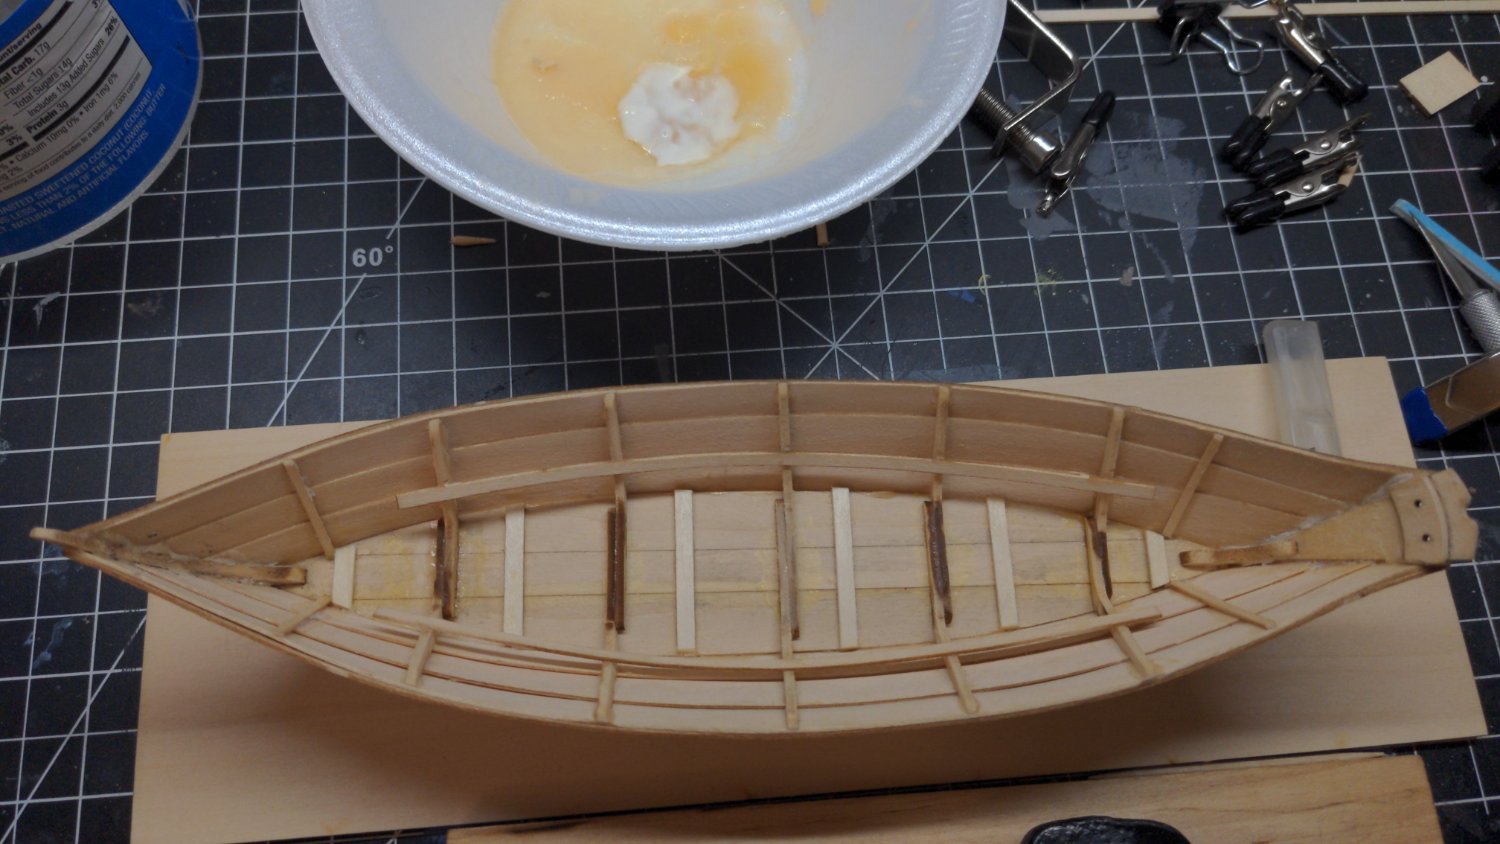
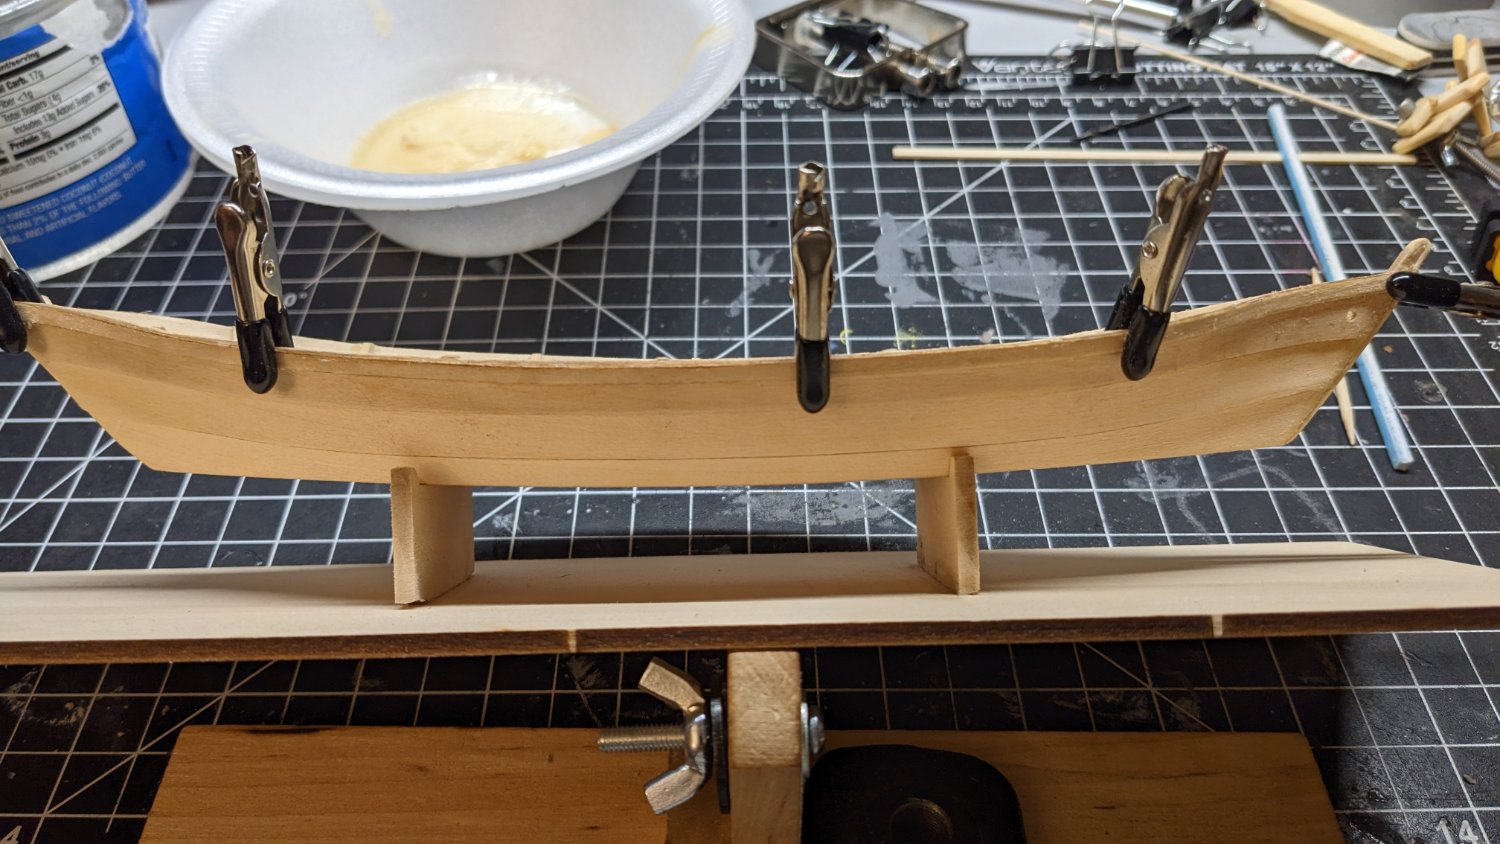
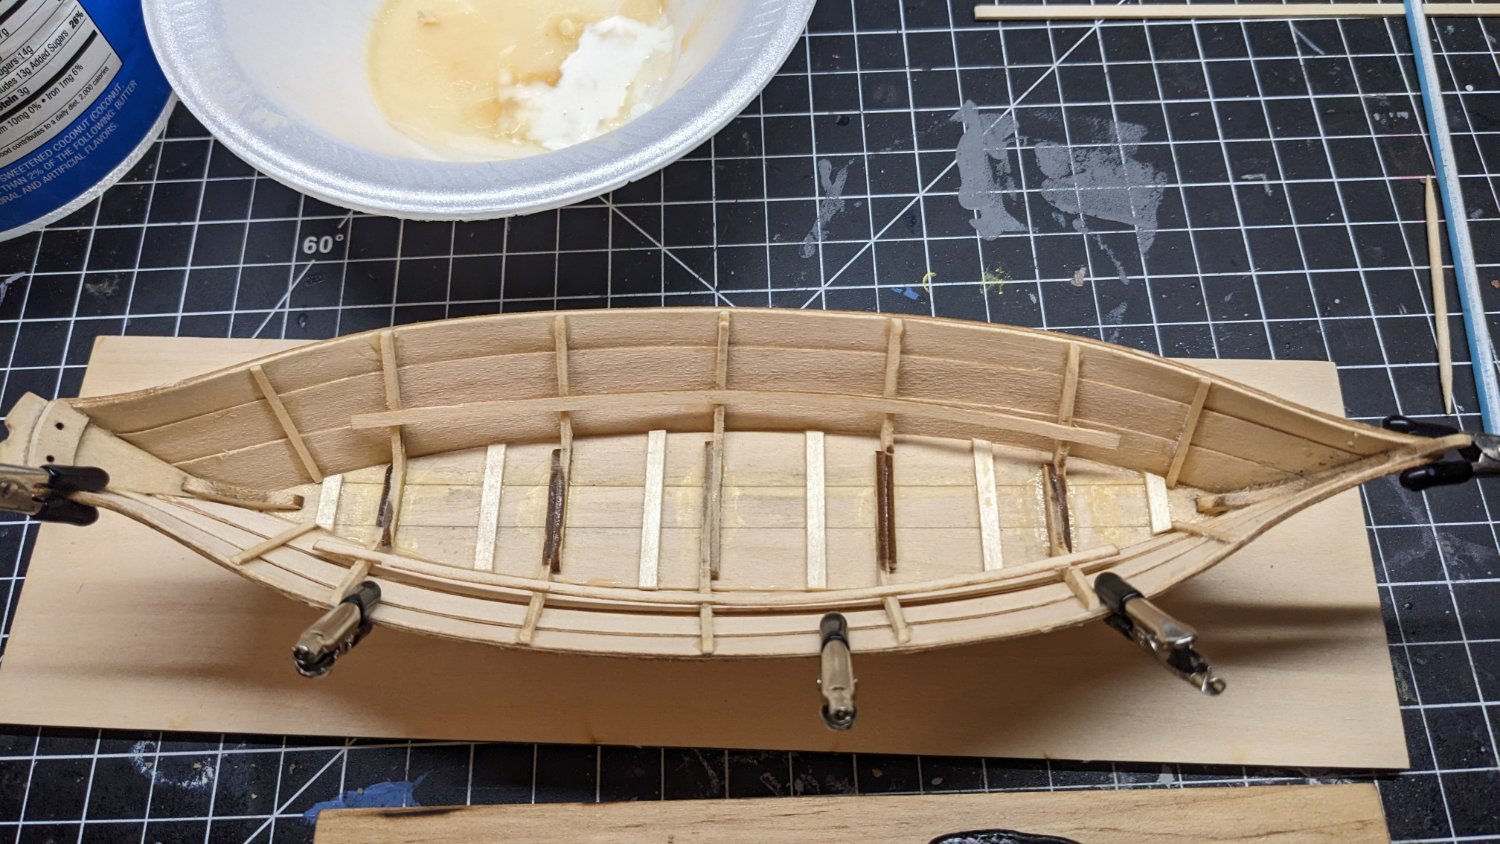
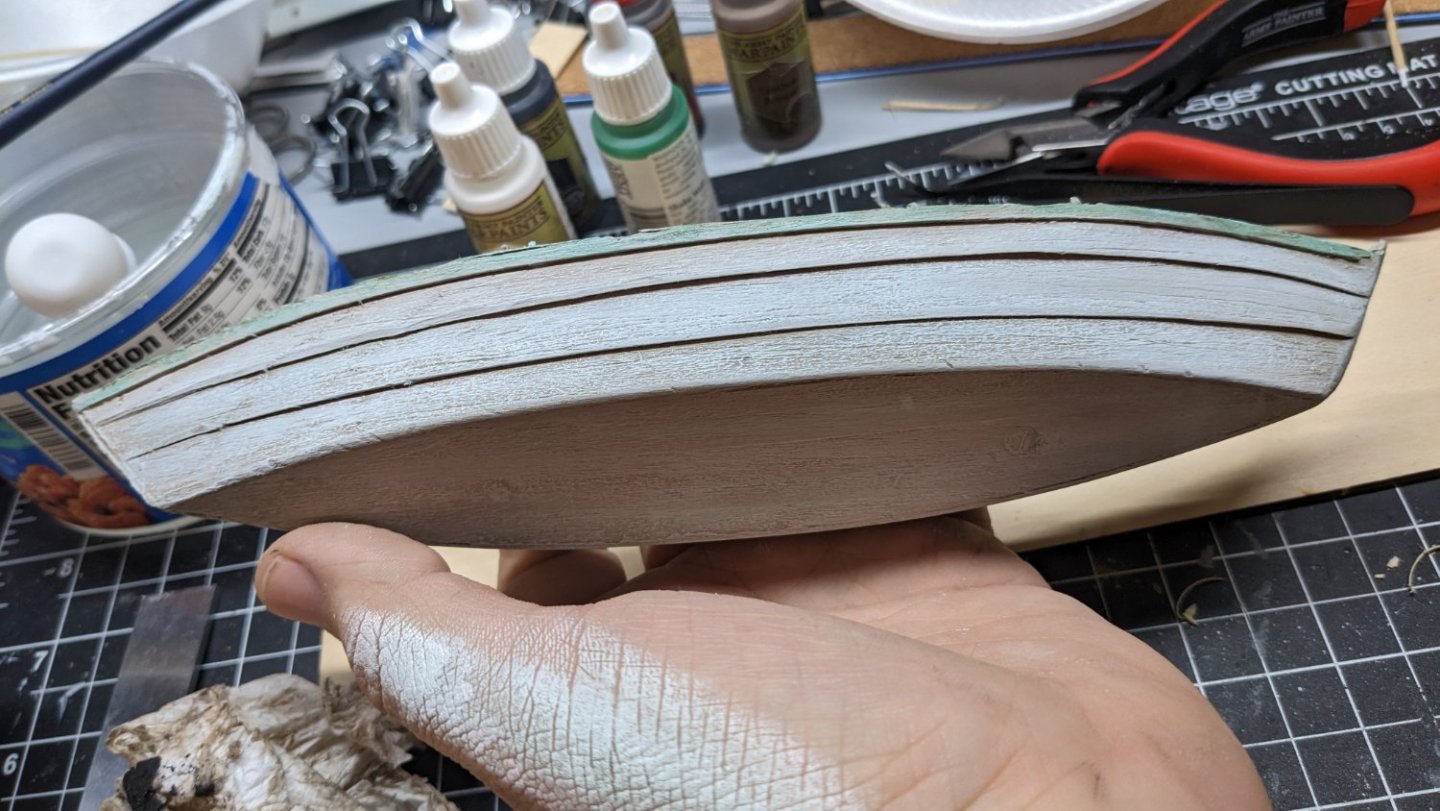
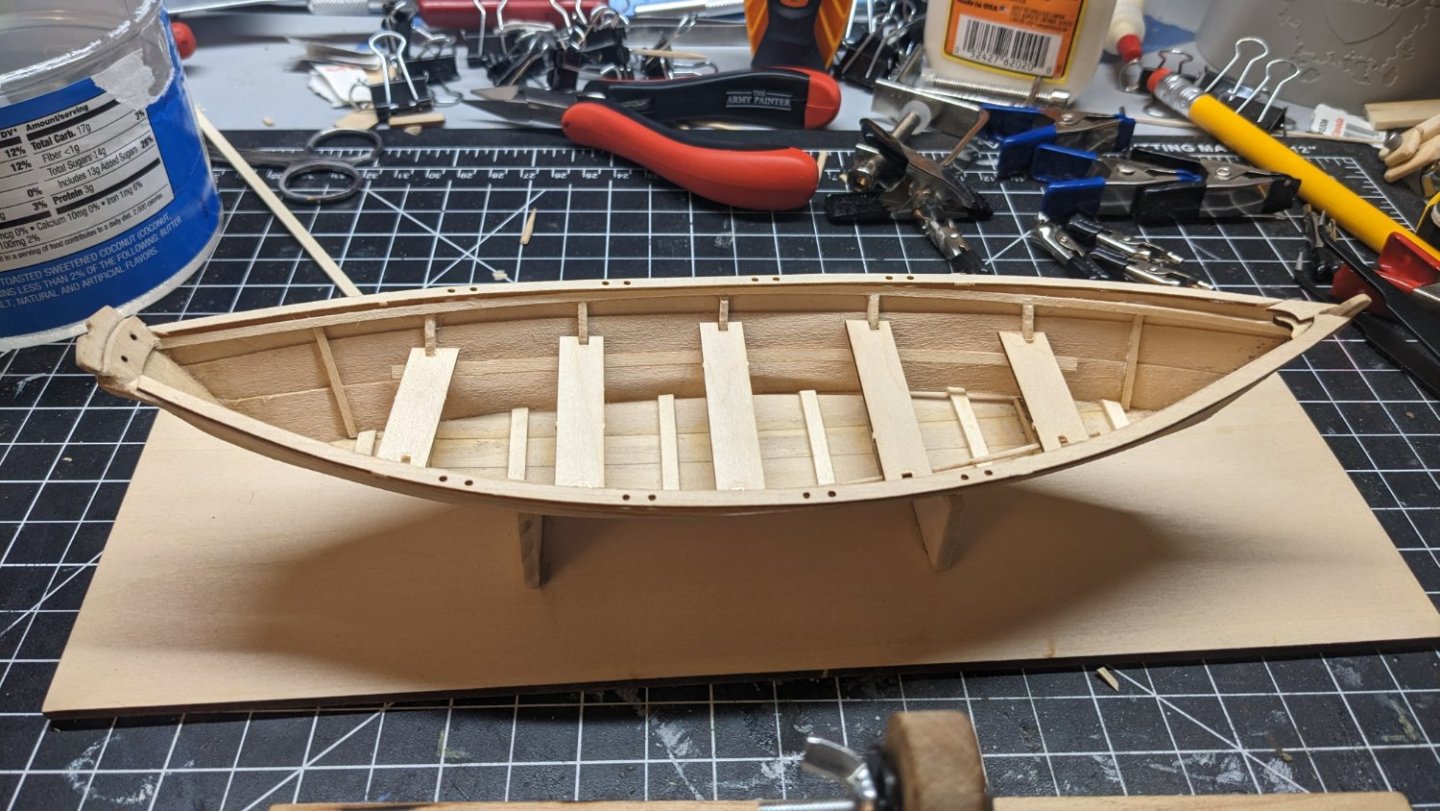
Log 7 The first time I checked my fairing, there didn't appear to be any adjustments needed. Using a thin 3/16" x 1" x 10" strip of excess cut off, I glanced down the frames and didn't " see" any hills or valleys. Concerned that I may have overlooked something, I checked again, despite my telling myself to have confidence. This time I put the side plank on and checked for light leak gaps. I found a few 1mm or 2mm gaps, mostly at the deck side of the frames. There were none at the chines. A few passes with file and it was gone. Pleased with it, I soaked my planks for about 2 minutes or less. I clamped these down with a handful of new long nose reversed clothes pins. I see now why long nose clamps are so widely used. They seem perfect for fitting over planking to clamp to the chines. But I am loving the lighter pressure of the clothes pins over my overly strong metal clips. Every time I use them they leave indentation, or cracks. A few of them have already broken through the rubber caps they came with. Seeing as they were free, I'm not surprised. So far I have thoroughly enjoyed this model, I've only had 1 or 2 issues, but they were easily solved in the moment. I am finding that previous knowledge and experience has sharpened my problem solving with wood- and what to avoid. Its gratifying to see this schooner unfold. Unlike my unpleasant first experience with the Dory. I almost feel like revisiting the Dory, but as a sailing dory, and maybe from a different company. Ive found the instructions to be far better with Midwest Products co, it's a shame they've ceased manufacturing kits. However the schooner is significantly easier. The Dory had fragile frames.

- 55 replies
-
- 4
-

-
- sharpie schooner
- Midwest Products
- (and 1 more)
-
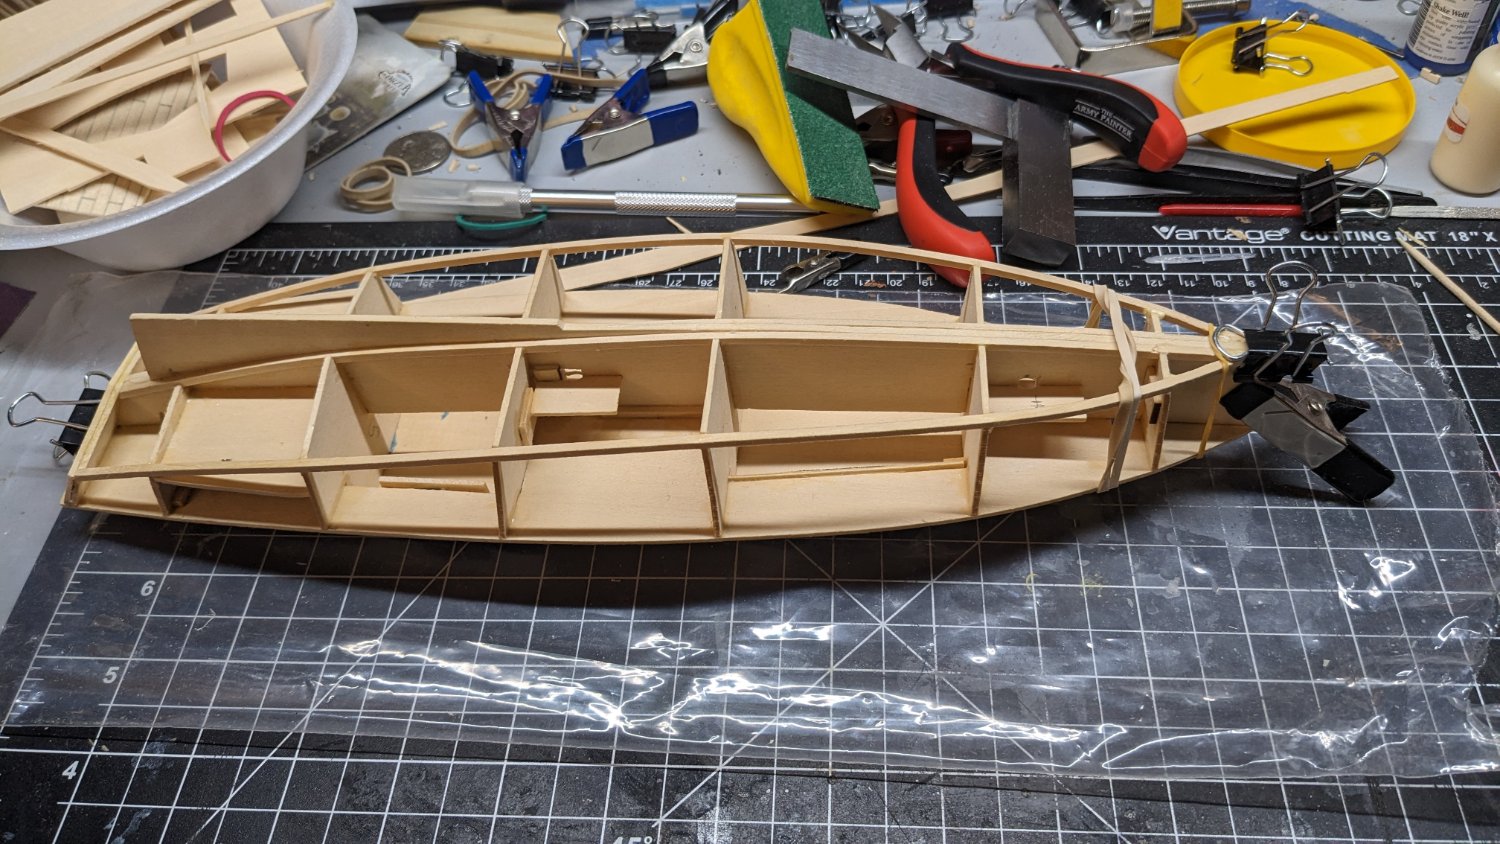
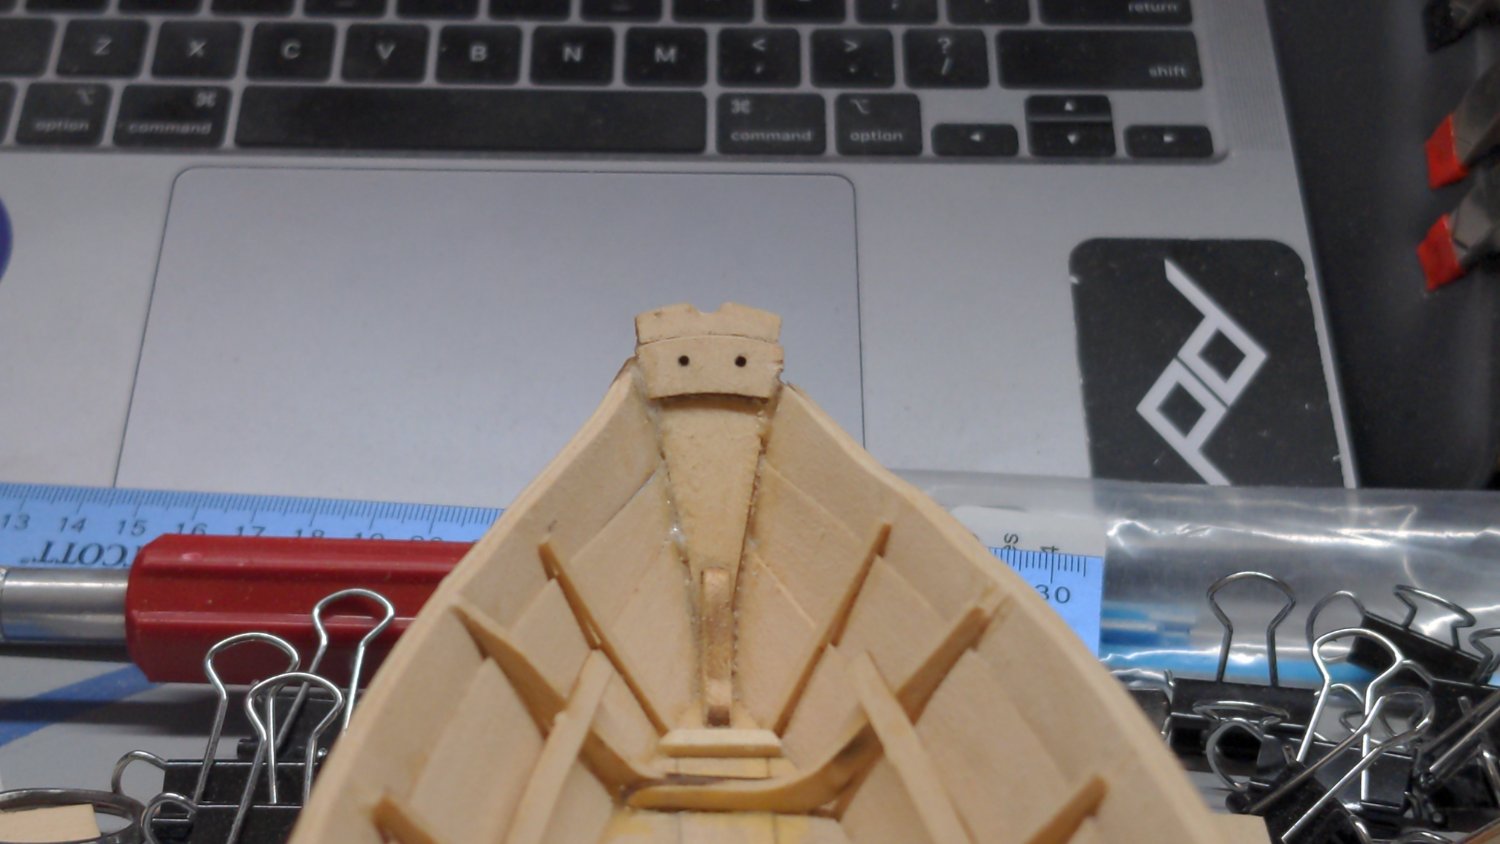
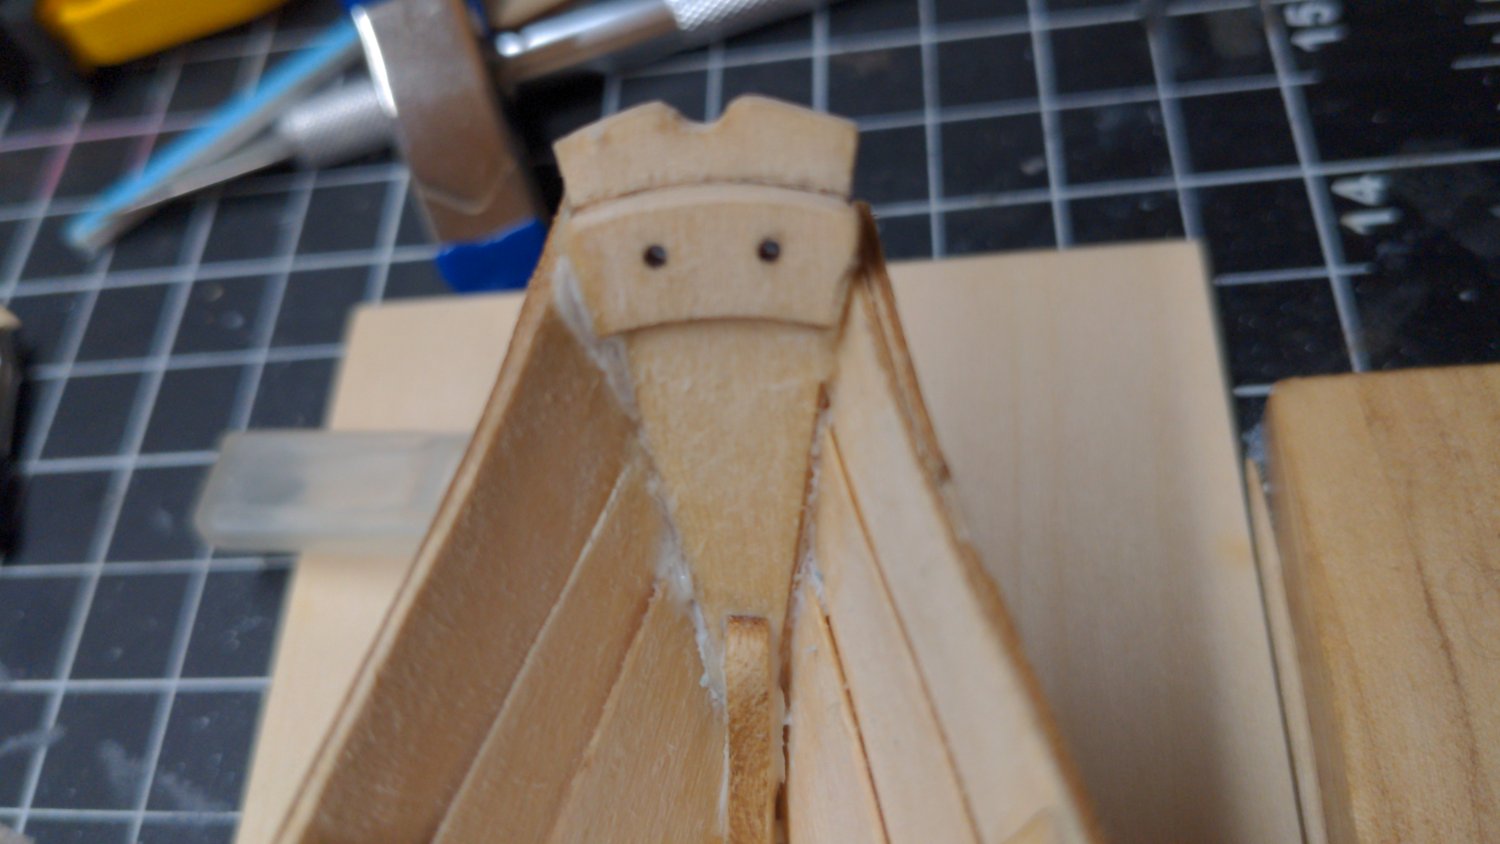
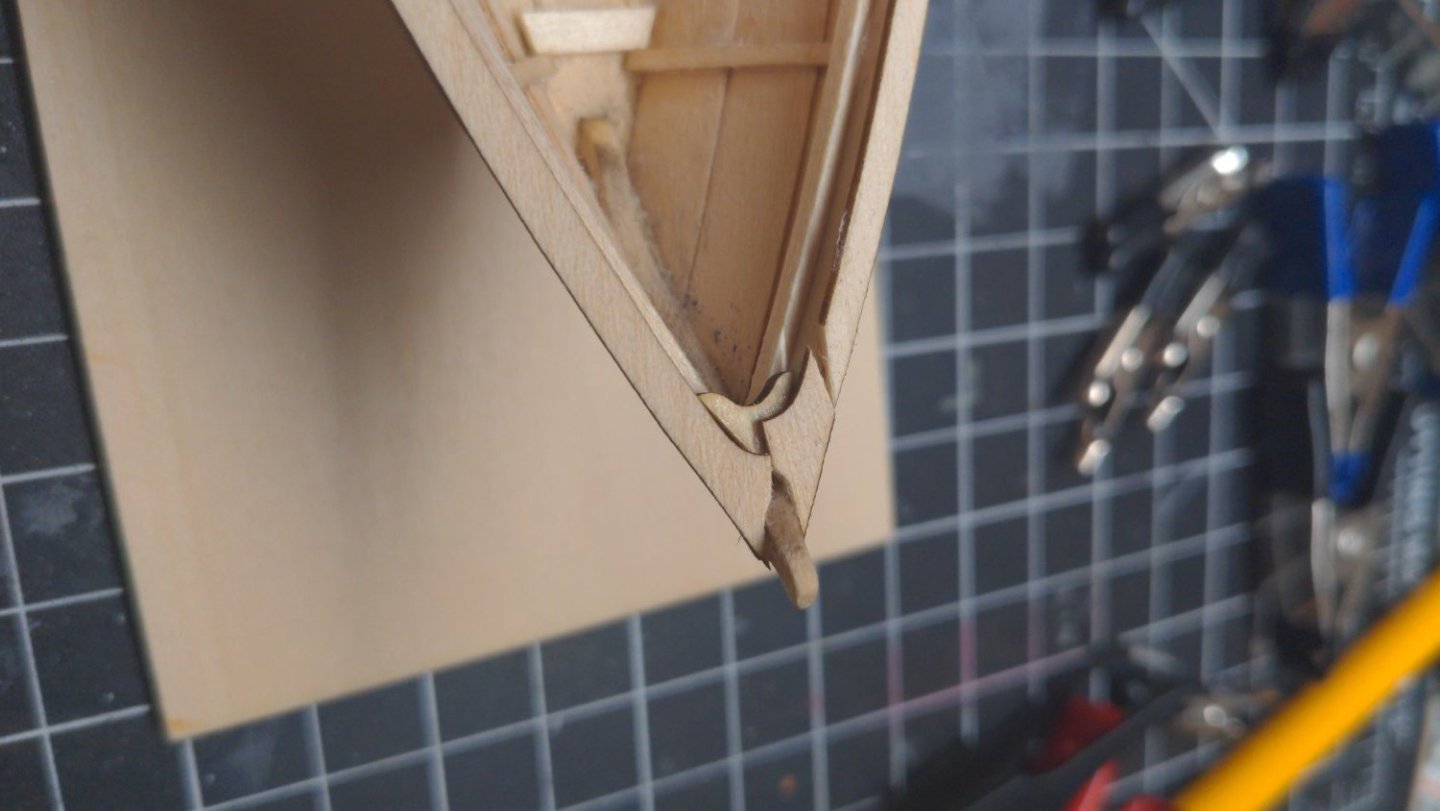
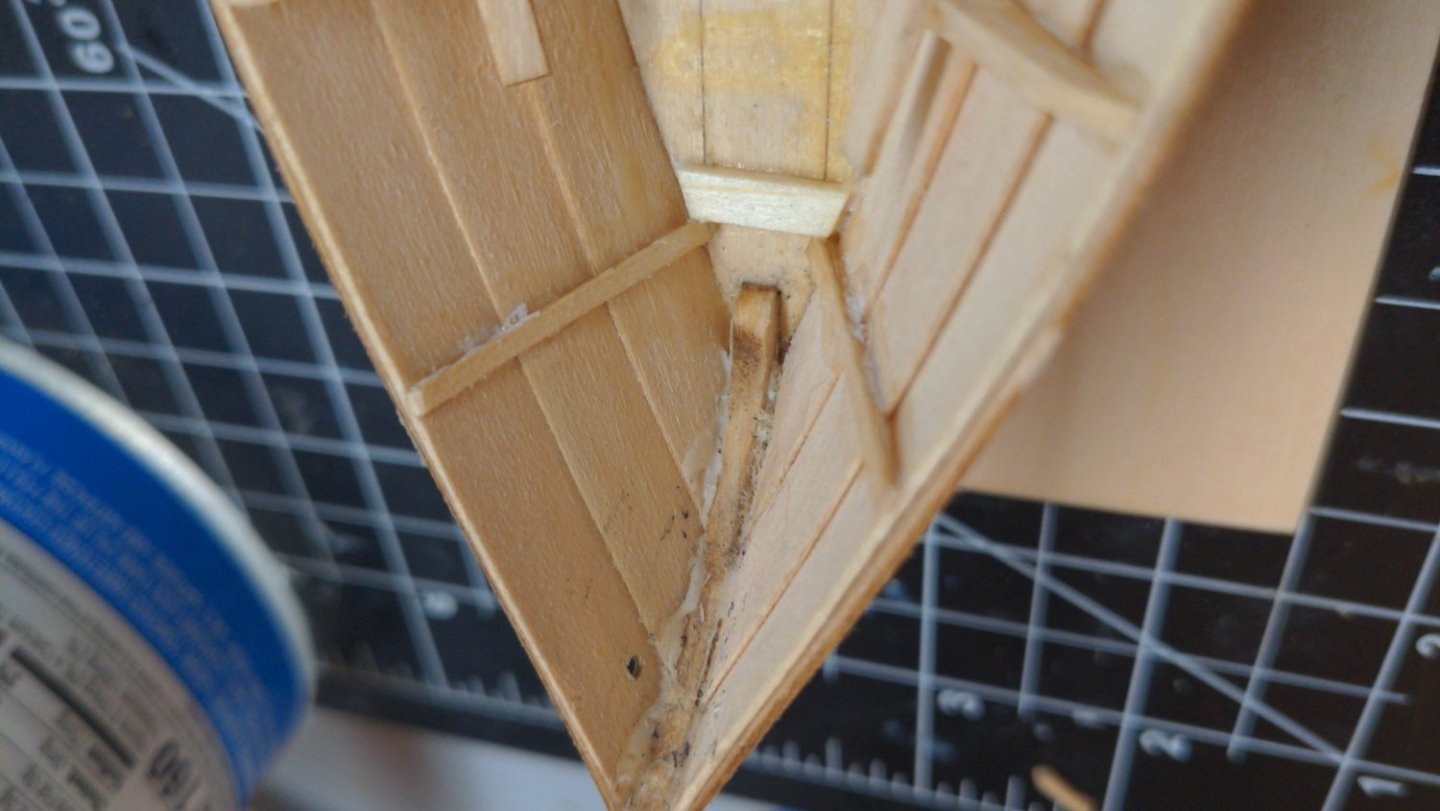
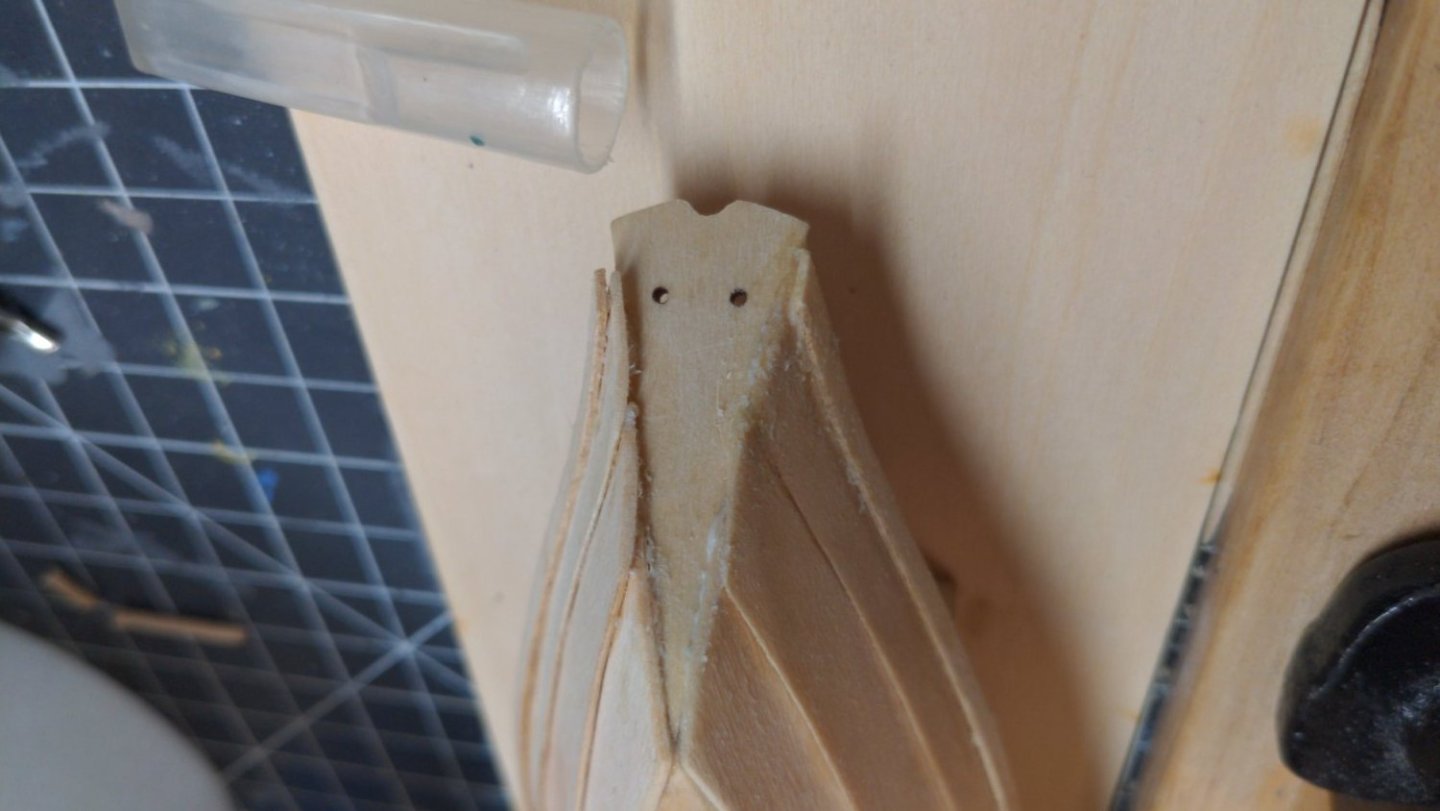
Log 6 Once the cabins have dried over night I moved on to finish the structural foundation. I glued the keel strips down, they were certainly finicky. Once they were trimmed up and glued down the chines strips and trimmed these at the transom. Later I realized I missed a crucial step. The instructions don't mention this, but the image vaguely hints at a gap between false keel/stem area and the chines. I cut the tips of the chines loose once more and trimmed them back further, to allow room later to bevel the keel strips into the 1/32" at the stem to accept the stem piece.

- 55 replies
-
- 4
-
-
- sharpie schooner
- Midwest Products
- (and 1 more)
-
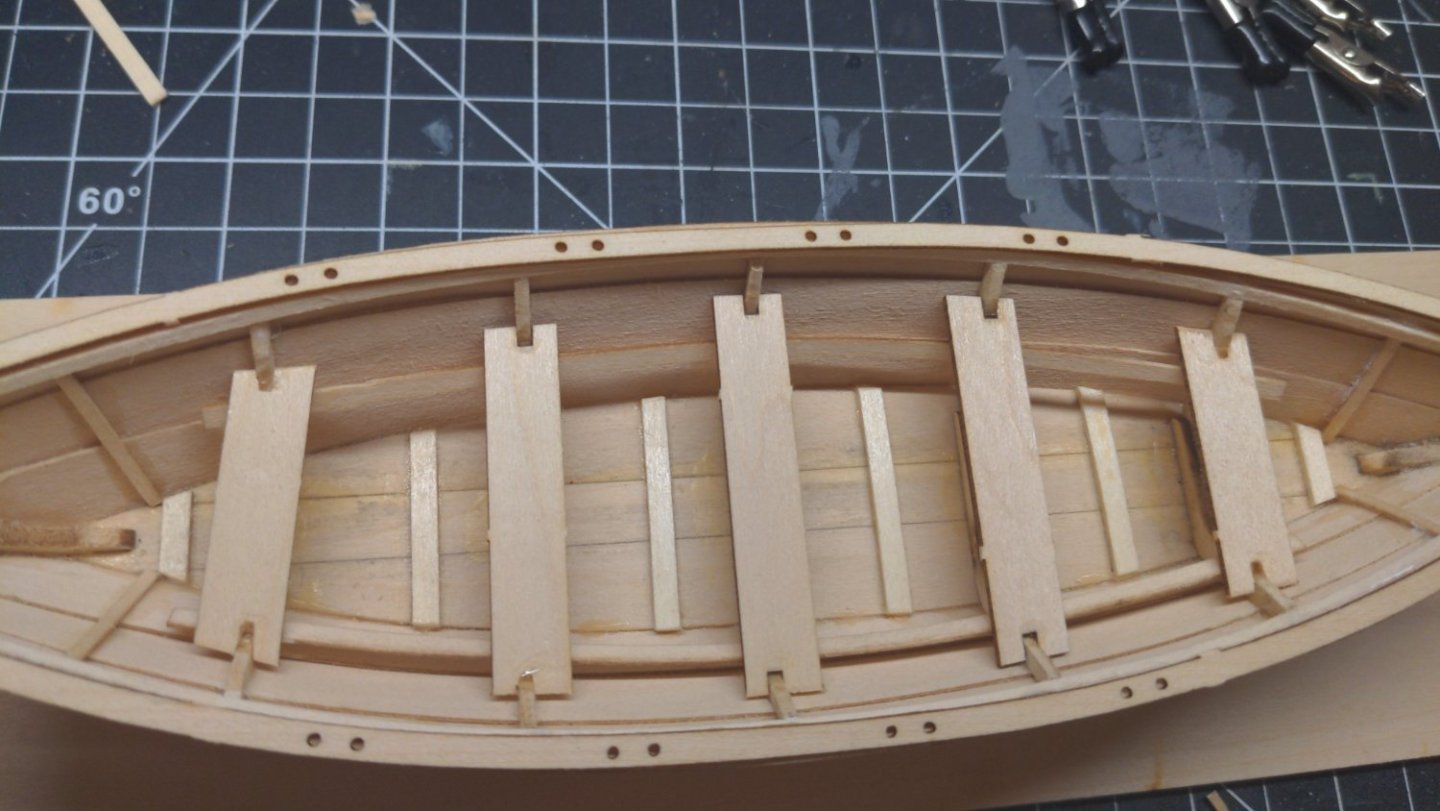
I noticed the instructions have me install seat supports in the area with the tiller, whatever it's called. But there is no step to install seats. Did pre-helm era schooners not have seats? Why install seats supports?
- 55 replies
-
- 1
-
-
- sharpie schooner
- Midwest Products
- (and 1 more)
-
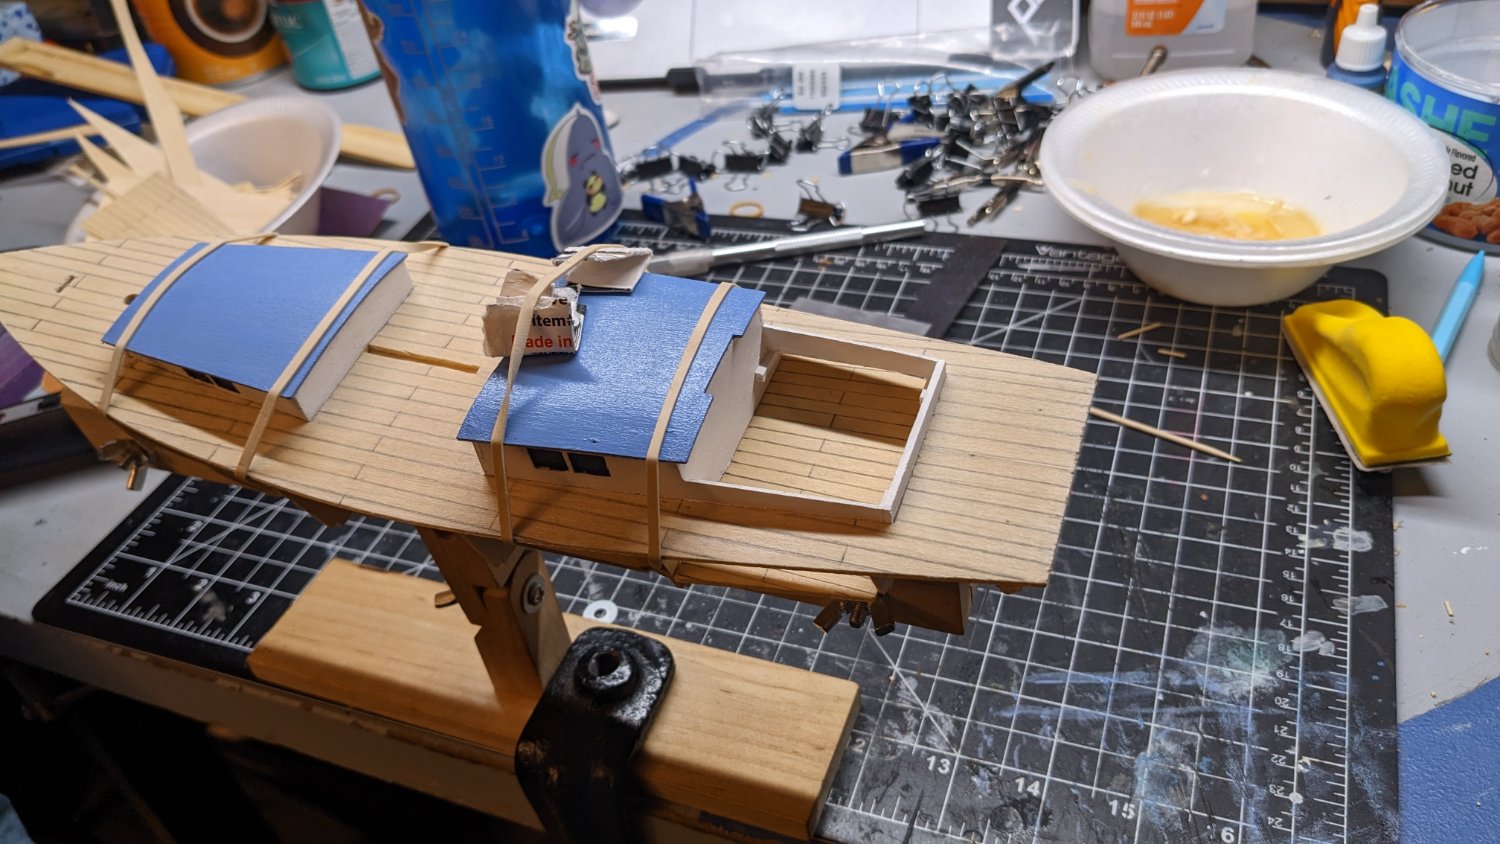
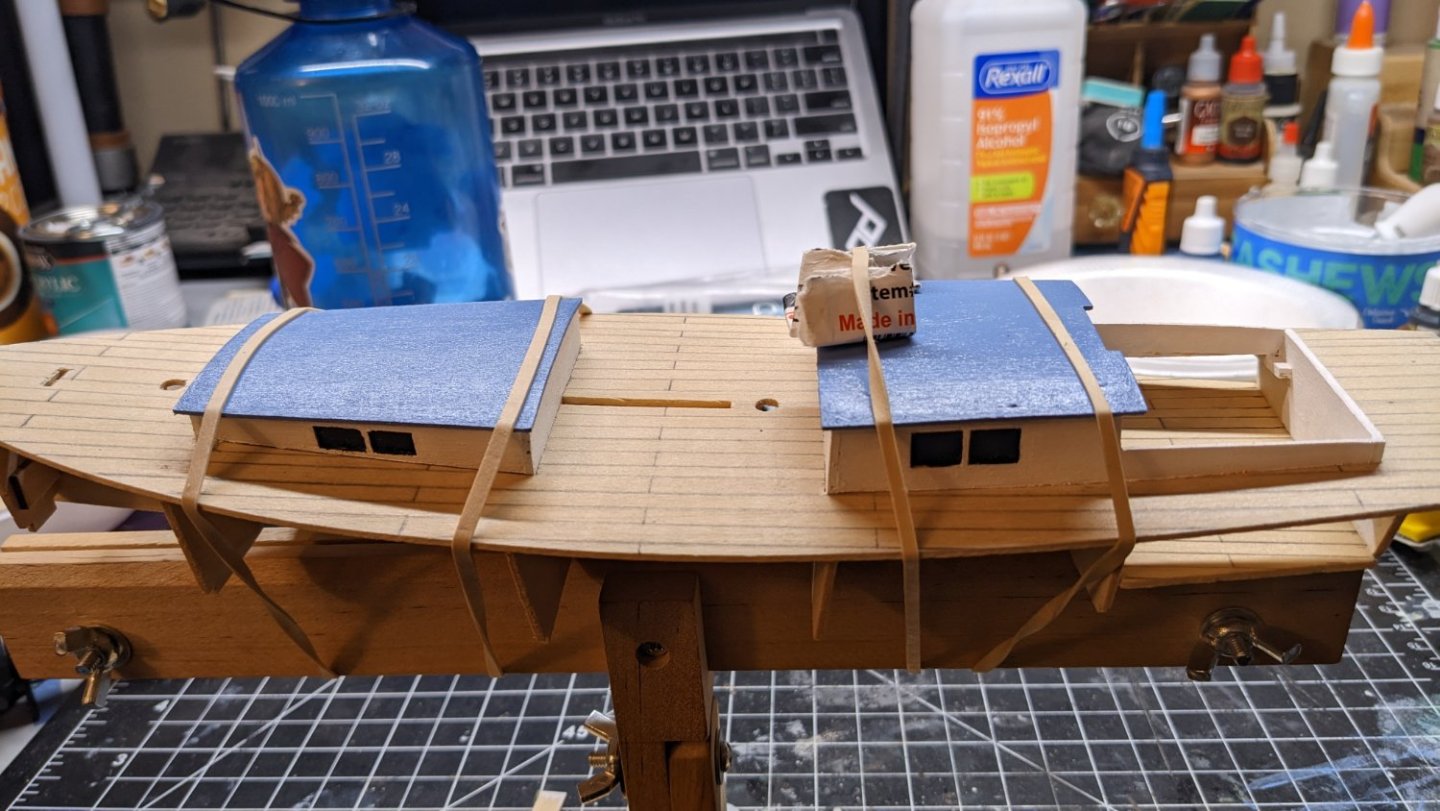
Log 5 After a lot of sanding and filling gaps, I've started the paint.The base colors for cabin and cargo hold has gone down, and glue has been applied. 2 coats of an off white, and 4 coats of medium blue. Later I will apply some white washes and green washes on top to bring down the brightness. I want this to look very well used. Well worked on, rather than newly pressure washed. Dry fitting

- 55 replies
-
- 3
-
-
- sharpie schooner
- Midwest Products
- (and 1 more)
-
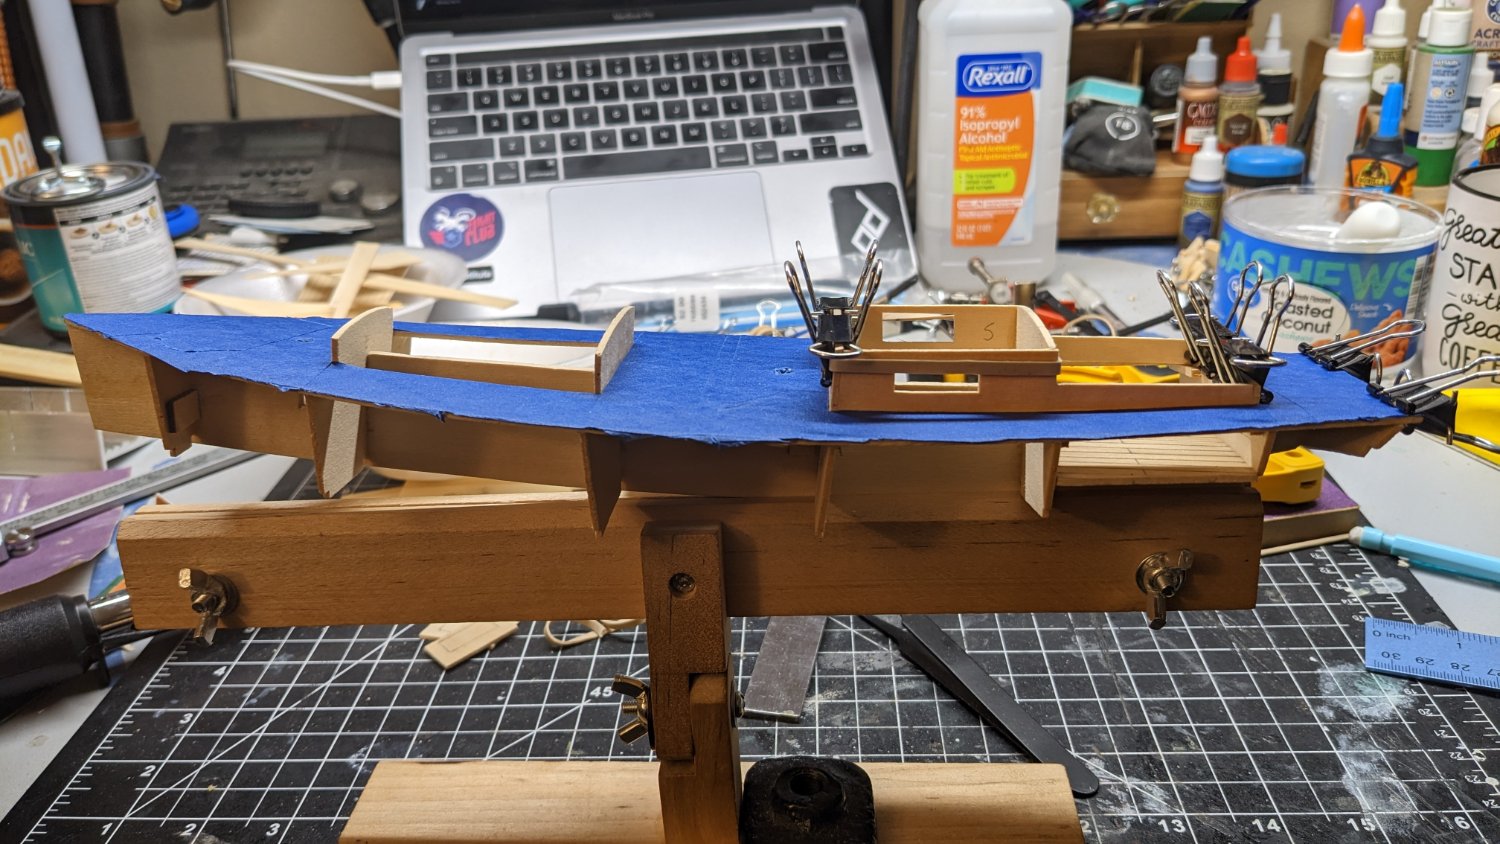
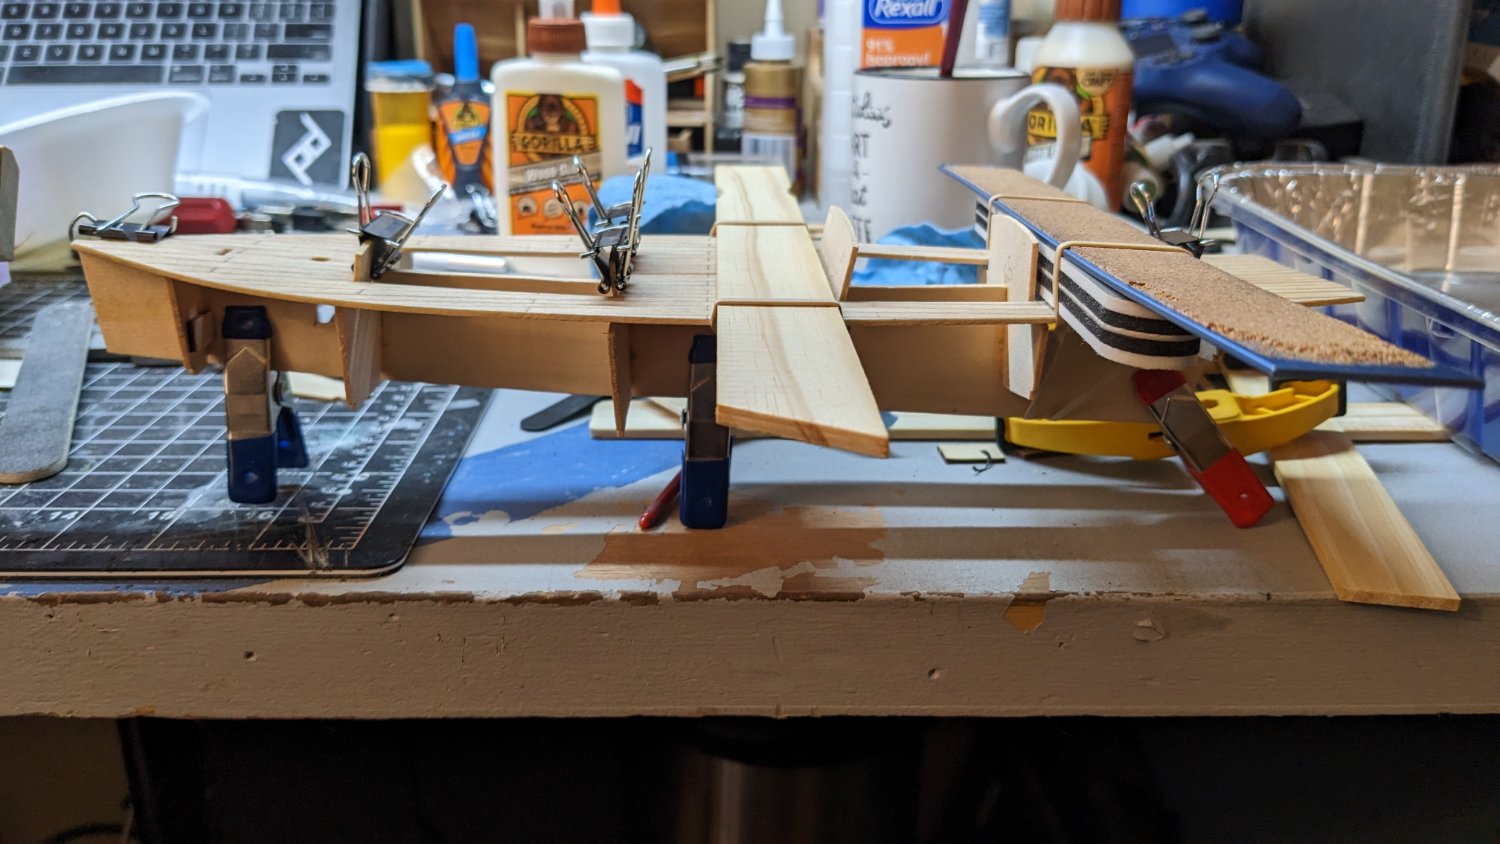
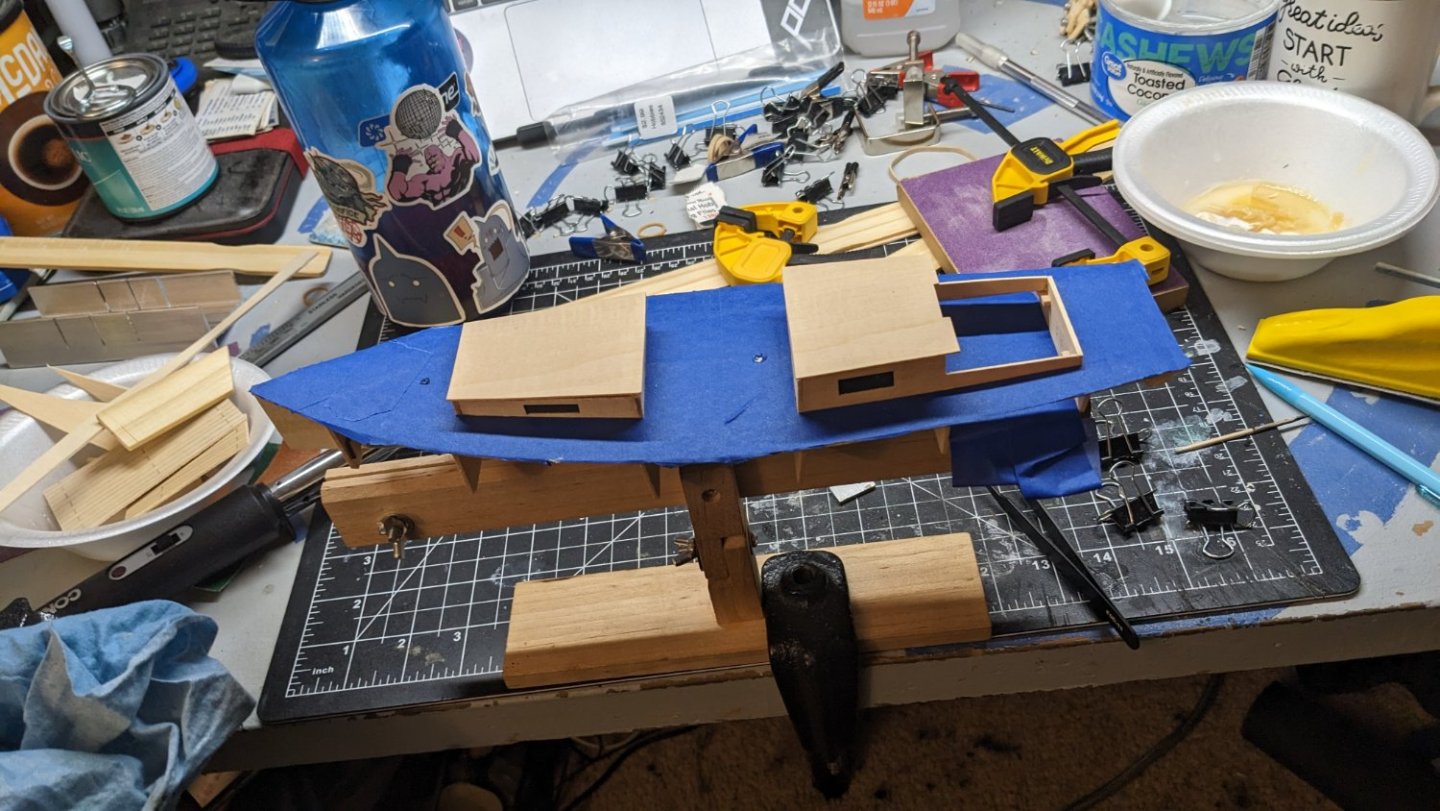
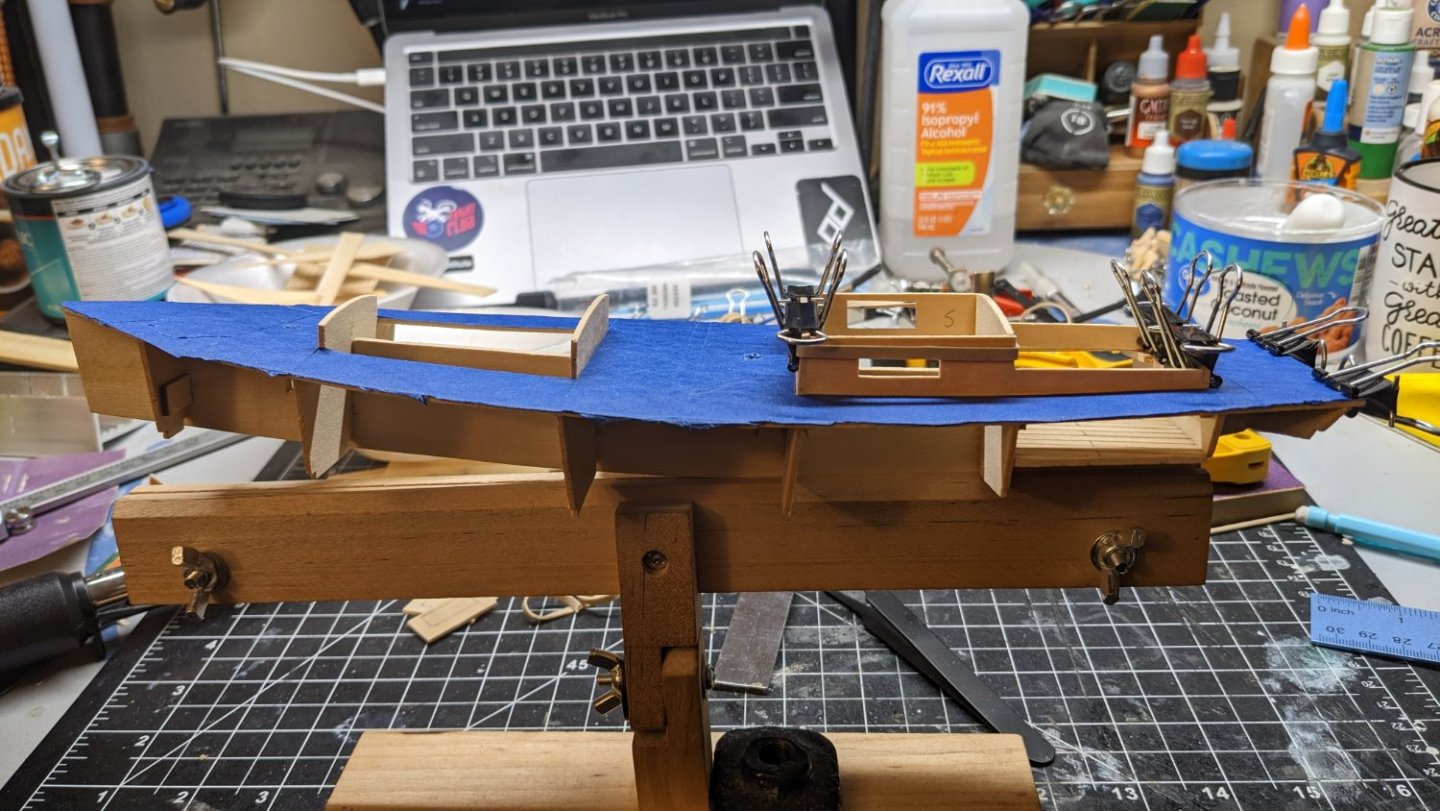
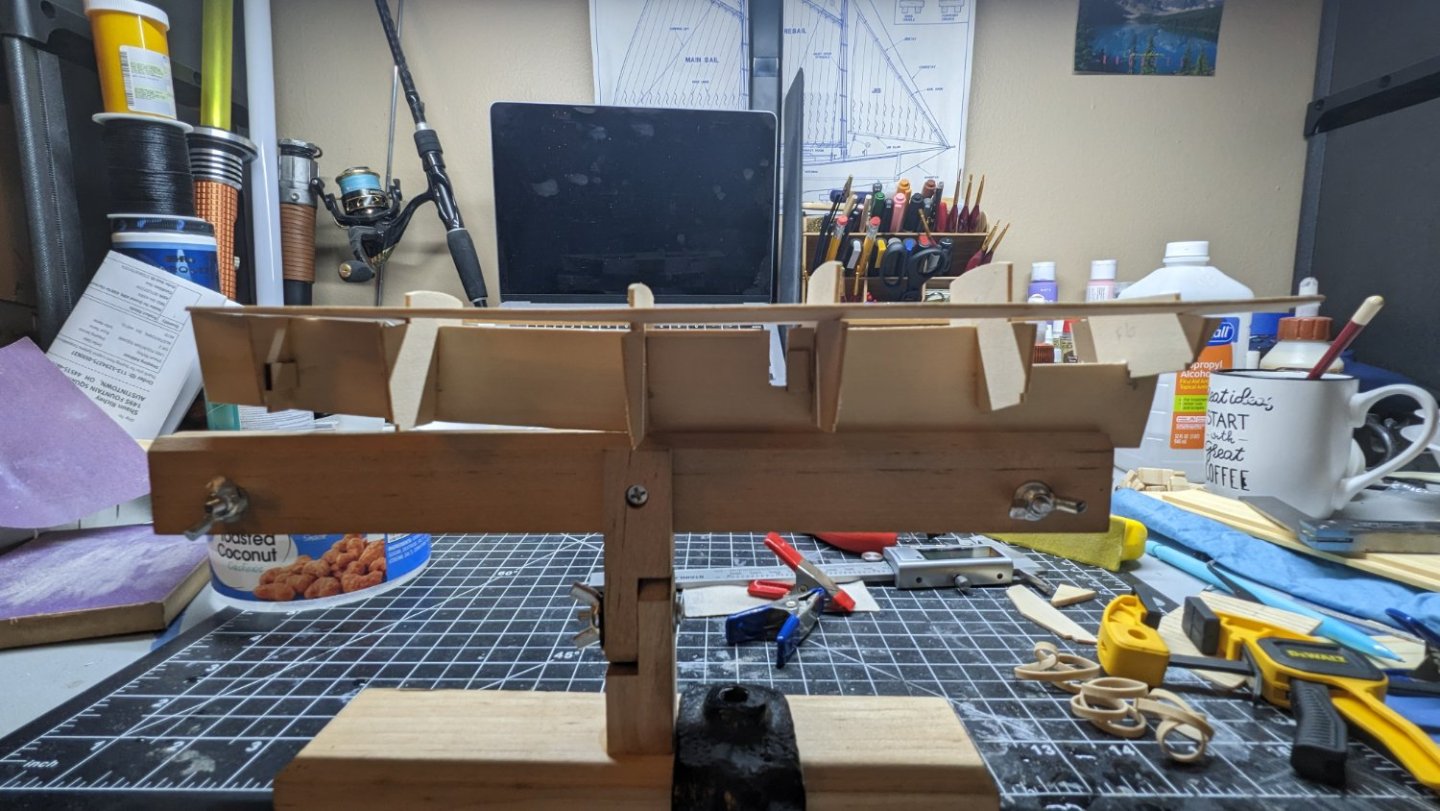
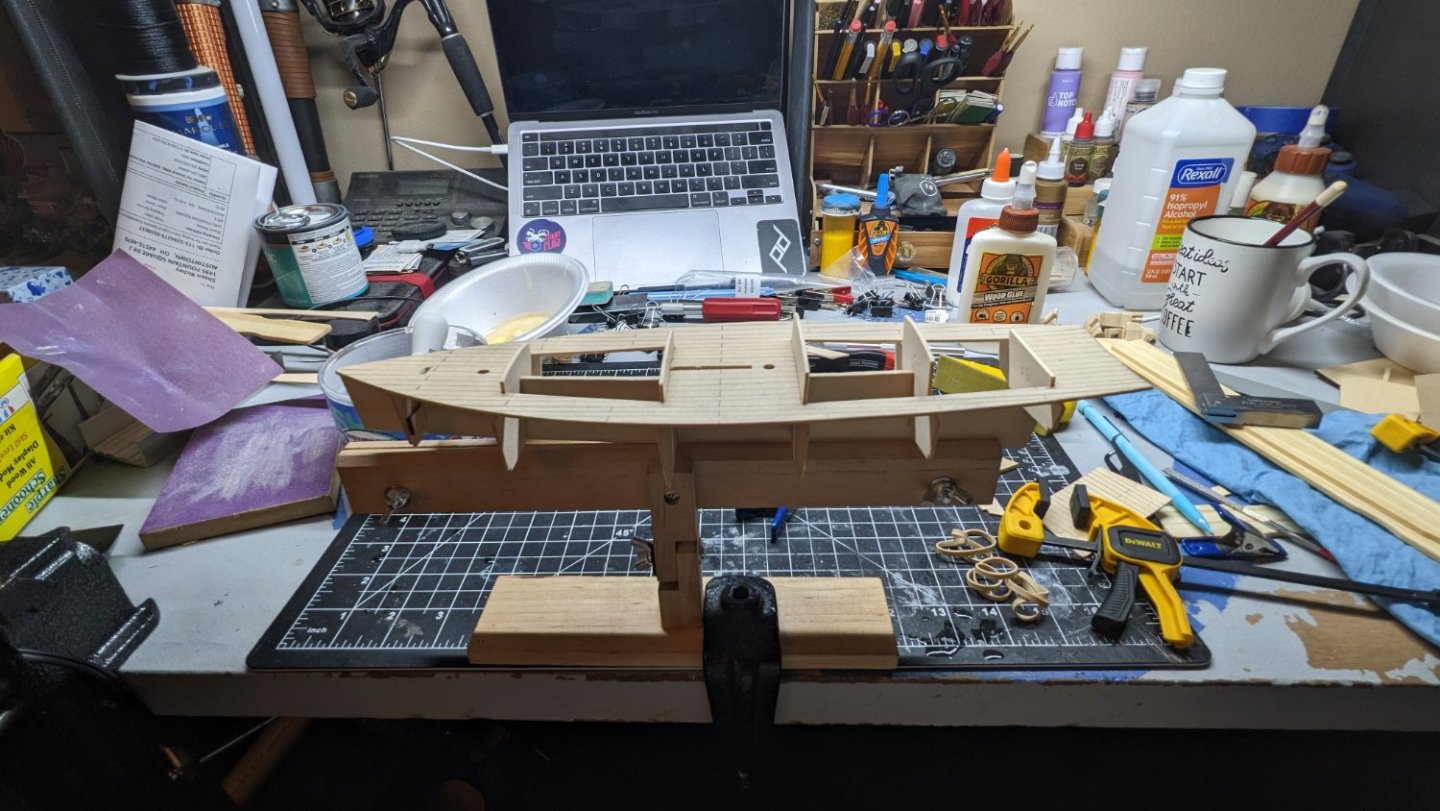
Log 4 After carefully working little by little on the deck, and adjusting the height of frames; the deck has gone down. The deck is now taped off, and ready to go forward. Midship to stern keel and frames have all been glued to the deck and is curing. A little reshaping and beveling on the transom and it's been glued and clipped. It's messy, but I know it will be covered by the cap. I've removed, cleaned up, and shaped the edges of the Cockpit cabin walls and glued them down and installed the underside cabin braces. I used the punch outs from the windows to trace the shape for blacking out later. The deck of the tiller foot well? has been glued and clipped. While this cures I'll be figuring out what colors I'll be using, as I have no stain or ink to make my own currently. I may do a pale-ish blue gray, with a white wash on the rooftops, and off white for cabin walls with a slight brown/green wash for washed up muck from marina shallows and wash up. She's starting to look like a ship and this pleases me.
- 55 replies
-
- 3
-
-
- sharpie schooner
- Midwest Products
- (and 1 more)
-
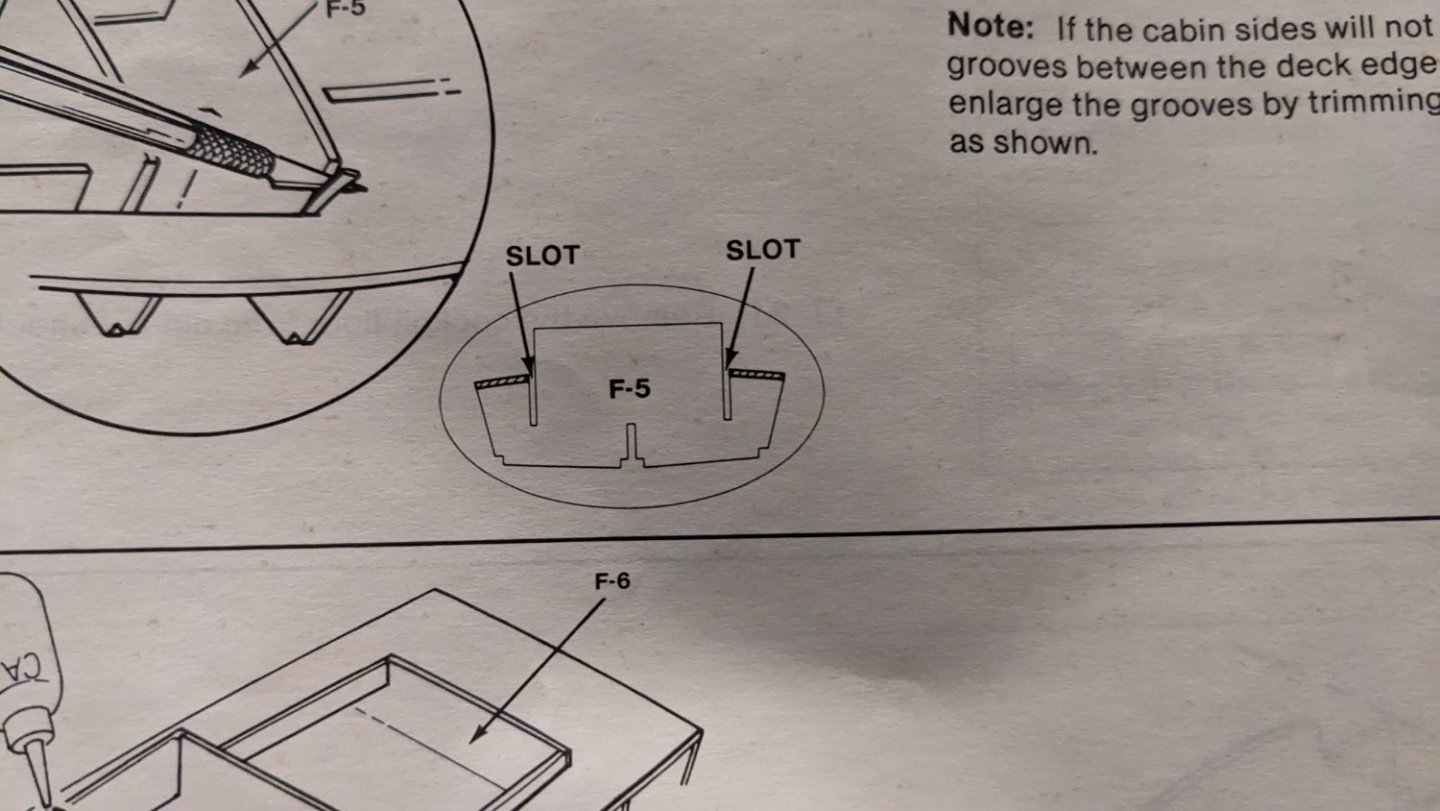
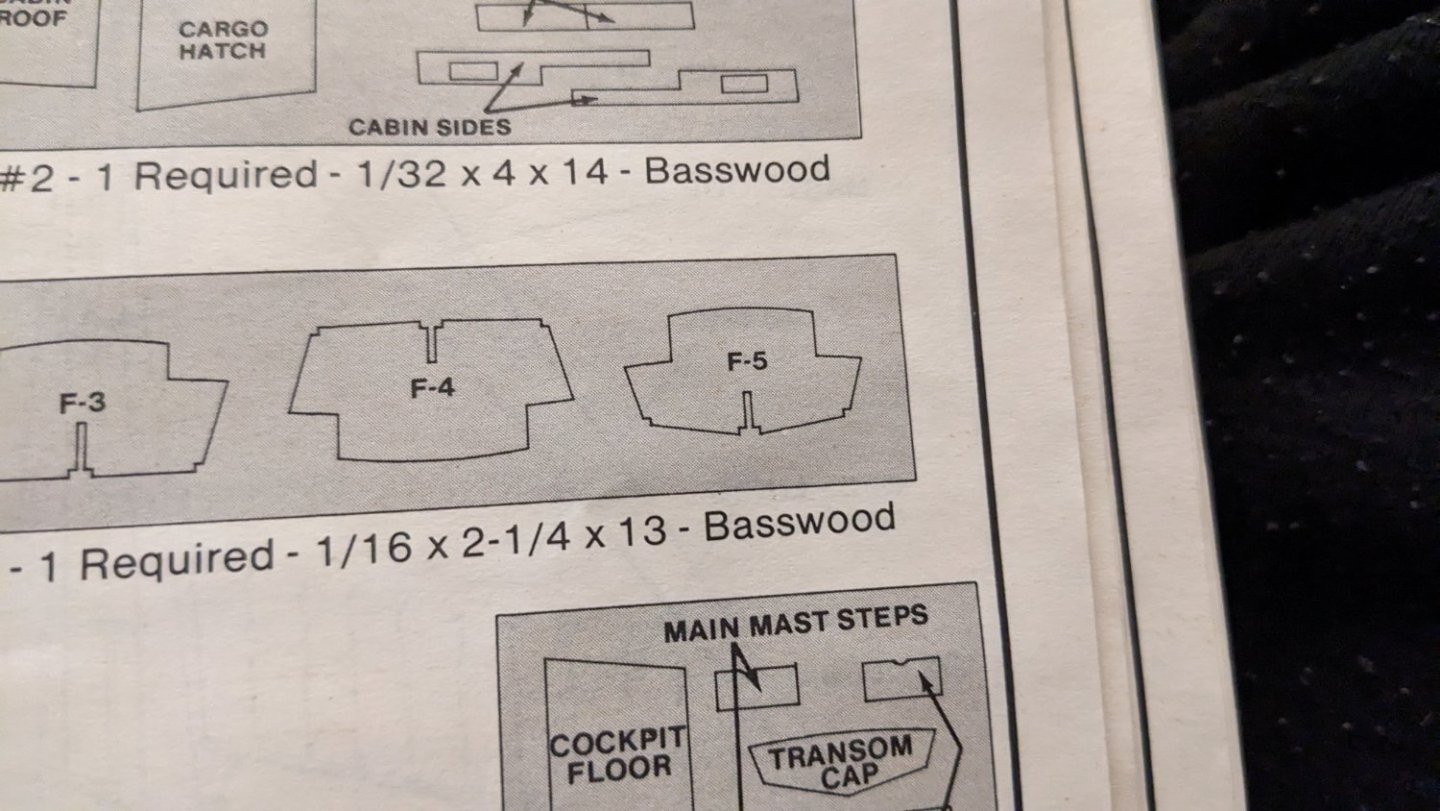
Log 3.5 After experimenting with various clamp points, rubber bands and paint sticks; I believe.. I found my issue. When mounting my F4 bulkhead I noticed it sits abit higher than the rest. At first I assumed this was natural due to the curvature requires in the deck. But this isn't the first time a slot hadn't been the right size for my keel. Usually it's too tight. The bulkhead is meant to sit at a slight slant, to make up and support the hatch structure above. This frame didn't want to sit at a slant despite how many times I adjusted before glueing and still doesn't. As the glue set, the bottom of the bulkhead straighted out, while the top held in by the deck, stayed curved. I believe this 1 or 2 mm height change is what is making my f5 bulkhead not want to line up with the deck. I soaked the deck this morning and affixed it to the framing to dry and hopefully take a bend. I noticed it had started to crack midship around the mast step, from being left unattended while drying. The edges were curving upward, as my kit parts tend to do, while the center line was dry. Thanks to the poly coat, it didn't crack all the way through, so it's minor, and I know I'll be reinforcing this area in a later step. After much thought, and a few beers, I came to a conclusion last night- If my poly coat is water-acrylic in nature, it "should" have some flexibility. So rather than puzzle at the solution, I decided to try and soak-bend the deck this morning. Even if it only takes a slight bend, that's better than the table-flatness it had prior. Once it dries, however, I'll sand down the flat sides of F4 where the deck is meant to rest, to try and get the deck closer to F5. I am very confident that this was my issue. Due to the trouble I had straightening the frames and their fragility, I am not going to try and remove and straighten F4 again. I will leave it in its current shape, and adapt around it. The other issue in the framing, I found later in the instructions.it mentions and shows slots in F5 during the cabin stage,but F5 has no additional slots.

- 55 replies
-
- 3
-
-
- sharpie schooner
- Midwest Products
- (and 1 more)
-
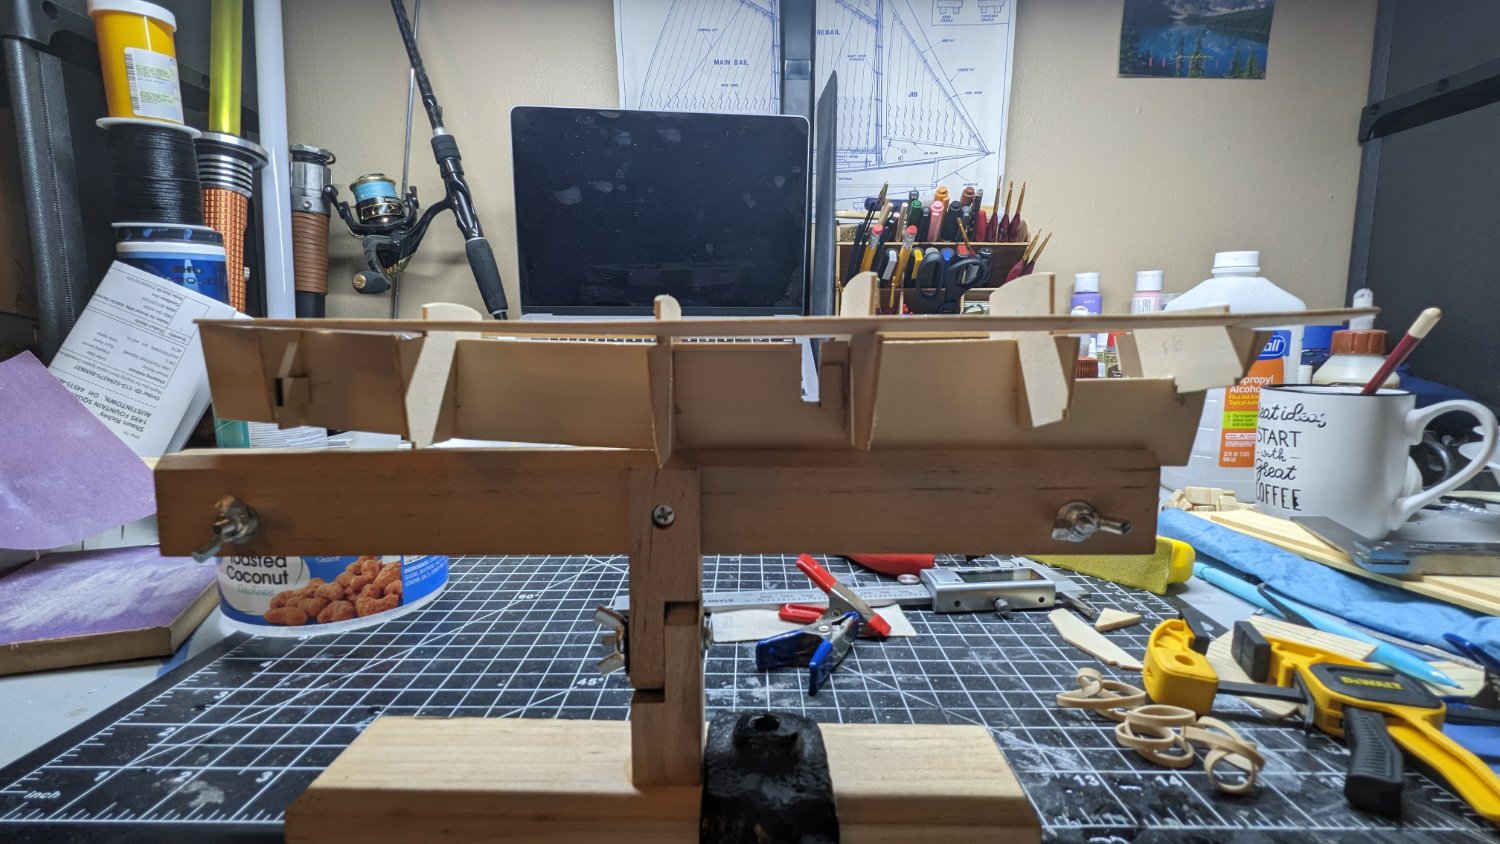
Log 3 I've finally started assembly after dealing with warped bulkheads. I've been following @hopeful build for tips and images of how it's supposed to be. But Ive run myself into a corner, unsure of how to remedy it. Following both instructions, Hopefuls logs, and tips from my book "ship building simplified"; I scribed and drew all plank lines and top coated the decking with 2 thin coats of polycrylic minwax. (I was hoping that it would darken the wood a tiny bit, for contrast to the planks. But it didn't. As I am too nervous to use minwax wood stain in my living room, as I have no respirator or ventilation.) However, this top coat flattened the curve in the deck. As you can see in the image, there is a lot of gaps. I've tried using rubber bands but ended up snapping keel parts, and having to repair them. All the bulkheads have been glued, and I am meant to glue down the deck. But I fear that won't happen until I can solve the lack of curve. Heat hasn't worked as it would have to be applied to both sides, and I have no idea what heat would do to polycrylic.
- 55 replies
-
- 3
-
-
- sharpie schooner
- Midwest Products
- (and 1 more)
-
That's the plan. I'll cut off the base stand arms, and build up with sand. I still have a bit of sand left over from miniatures bases. A few scattered bits of wood, and some of my static grass and it will be good
- 43 replies
-
- 3
-
-
- Lowell Grand Banks Dory
- Model Shipways
- (and 2 more)
-
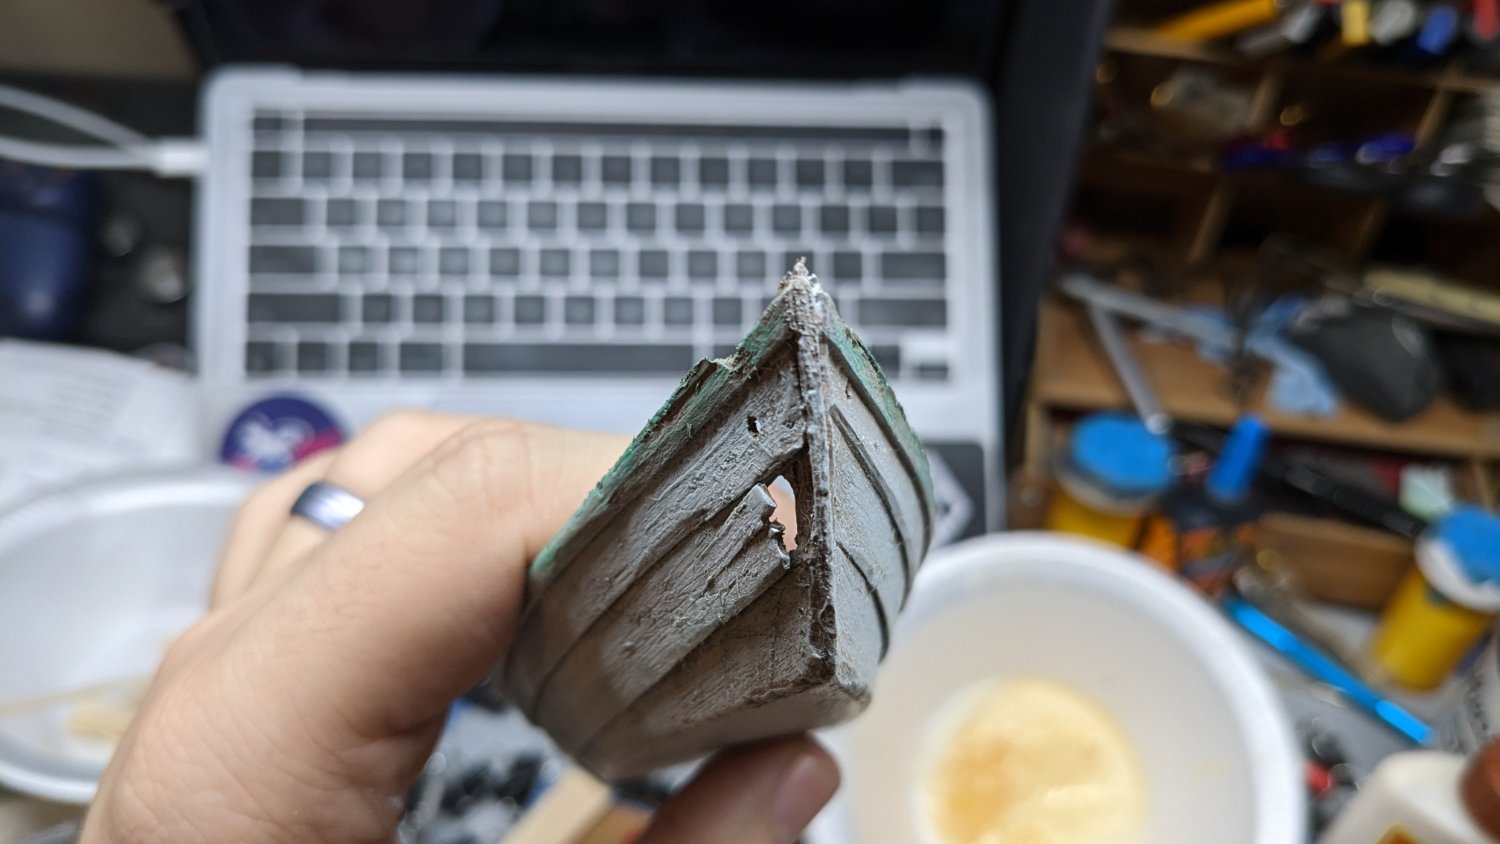
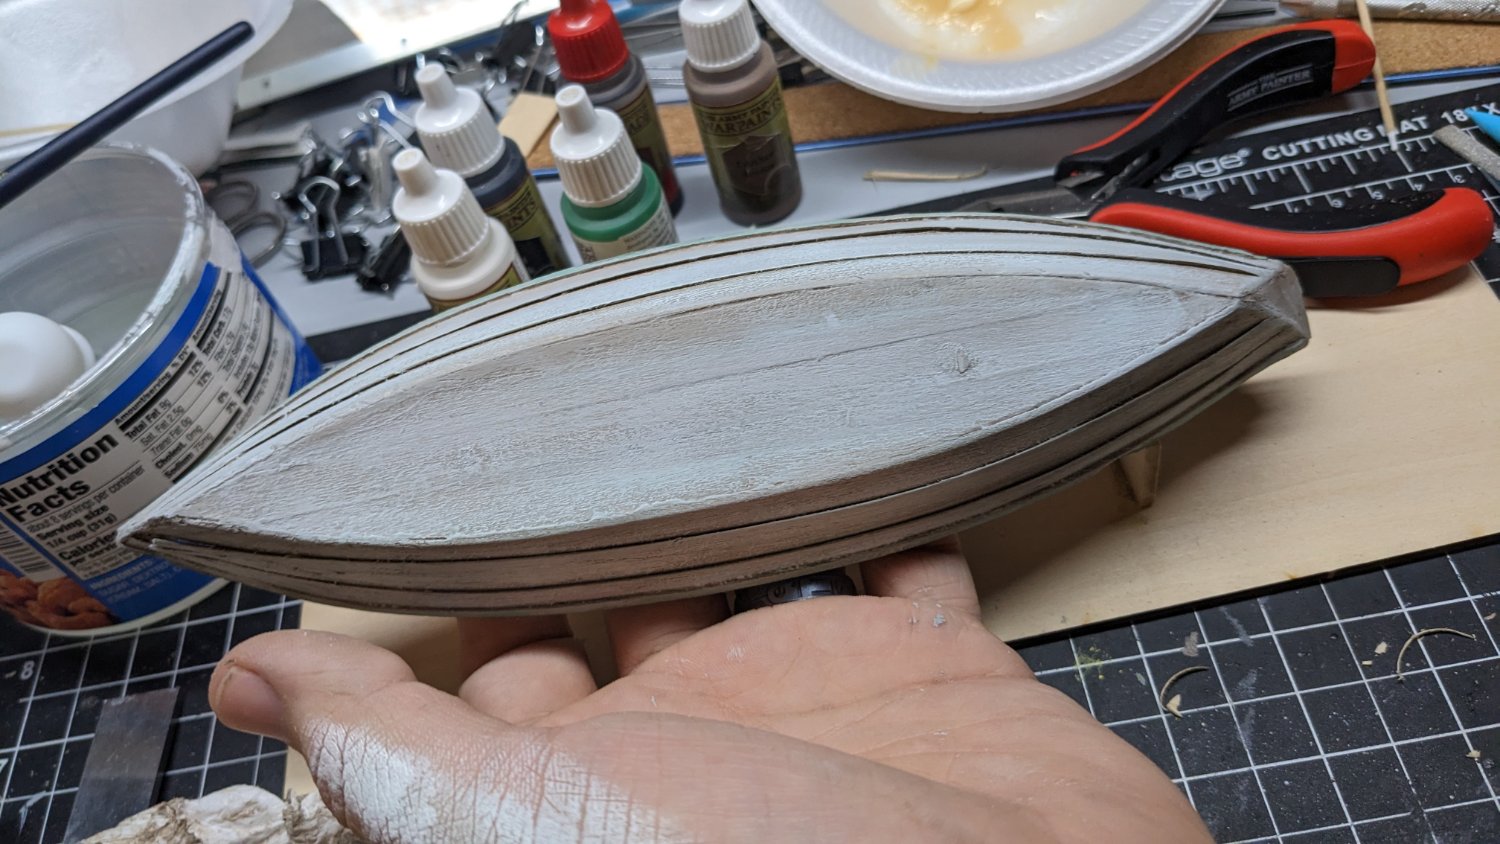
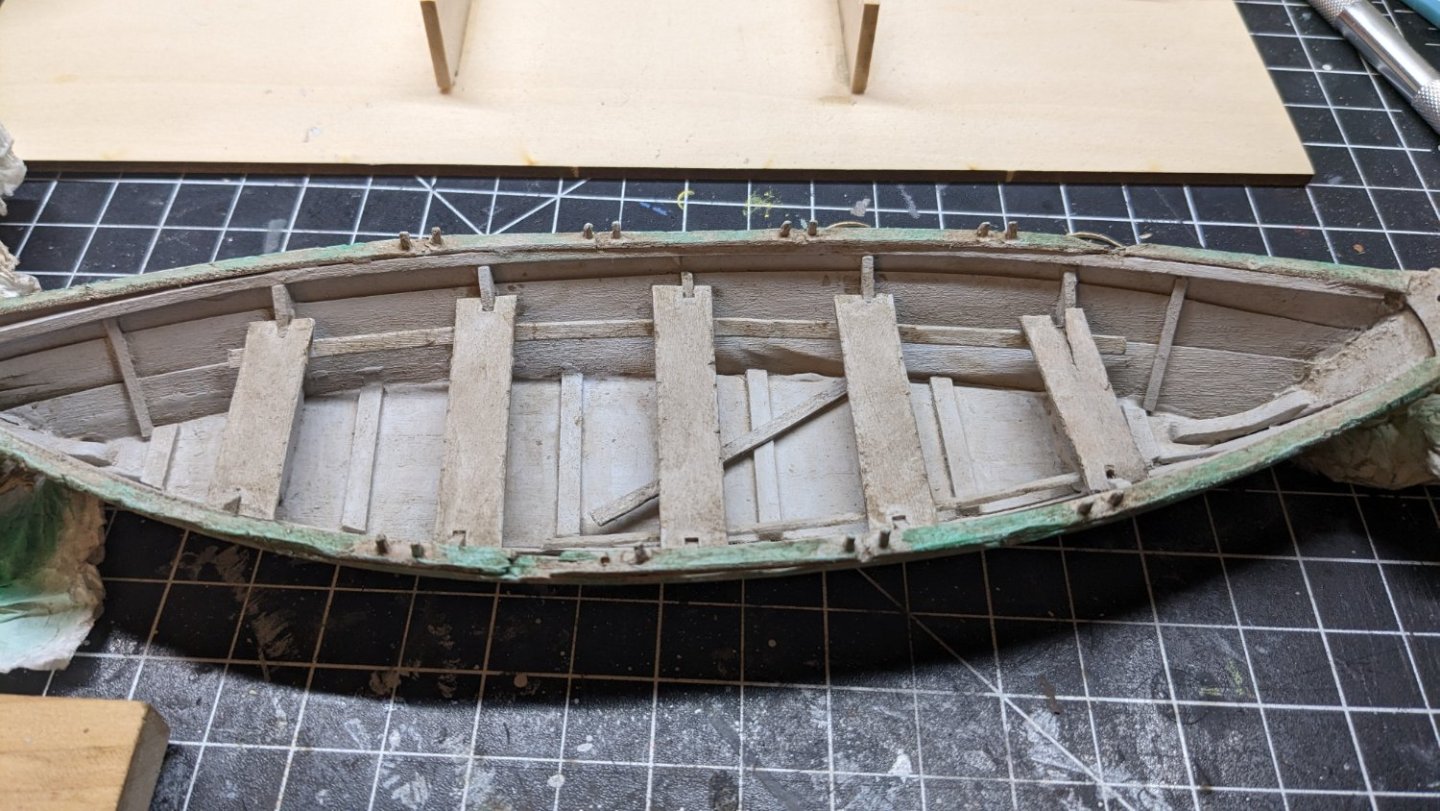
So after much thought. I took my disappointing Dory and made some changes. Since it was a rough build, chocked full of mistakes and irreversible damage, I made it a derelict Dory. She's now seen better days. Weathering, rotting, faded paint and damaged planks, battens, cap rail etc. All my mistakes and disappointments now harnessed for something I can now look ok with positive feelings. Wood was aged and cracked using a wire brush, oil washes applied, faded wood color, green tint, remnants of a green trim, brown wash, and white highlights. Had the wife not tossed out the box, I probably would have made one or two of the oars. I might still, from scratch. But I found my dremels' tip didn't open large enough for planks or dowels to use it as a lathe.


- 43 replies
-
- 5
-
-

-
- Lowell Grand Banks Dory
- Model Shipways
- (and 2 more)
-
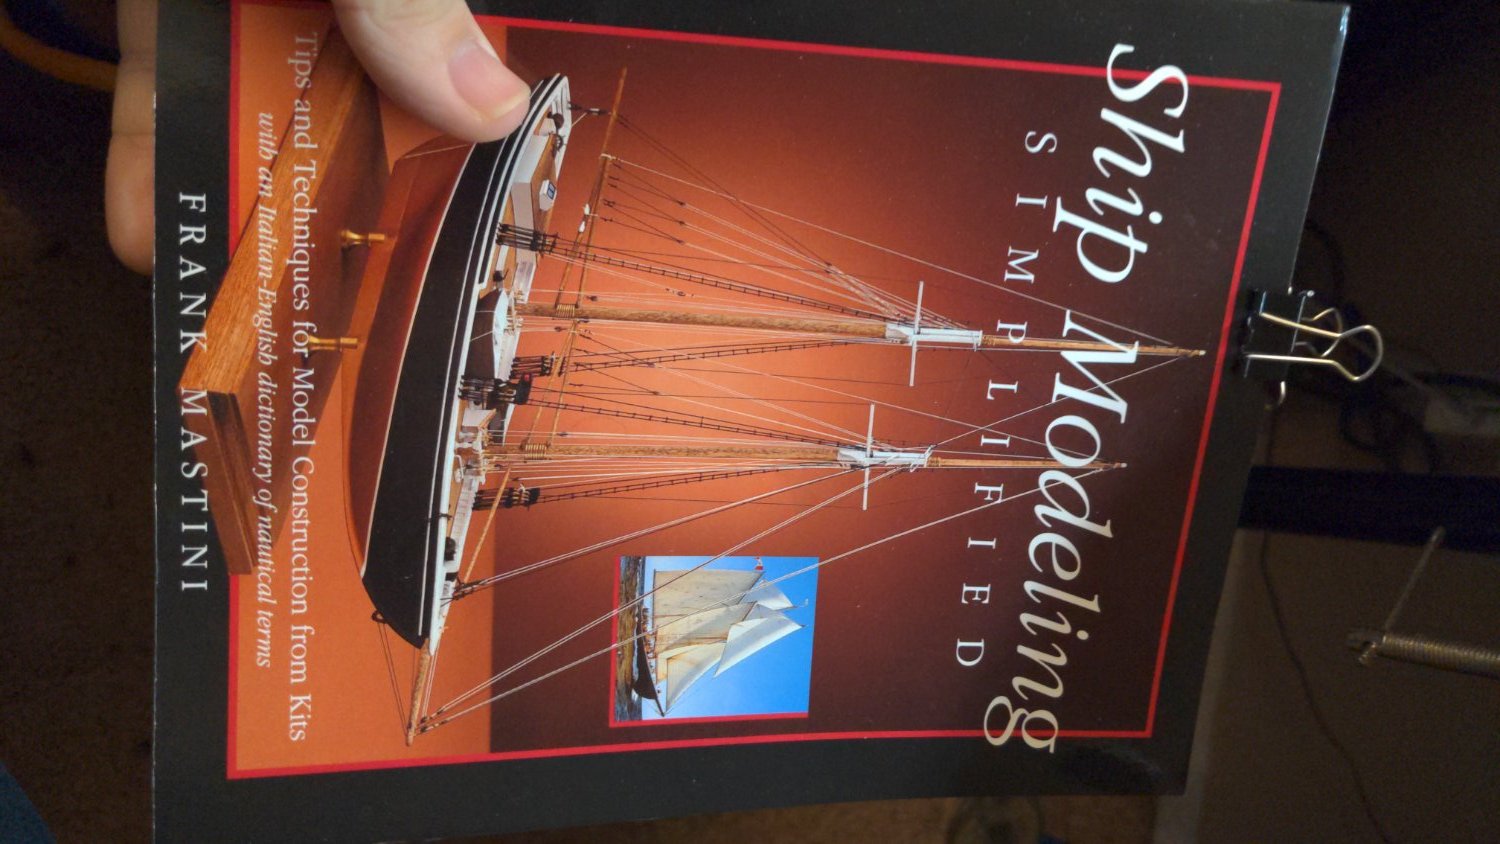
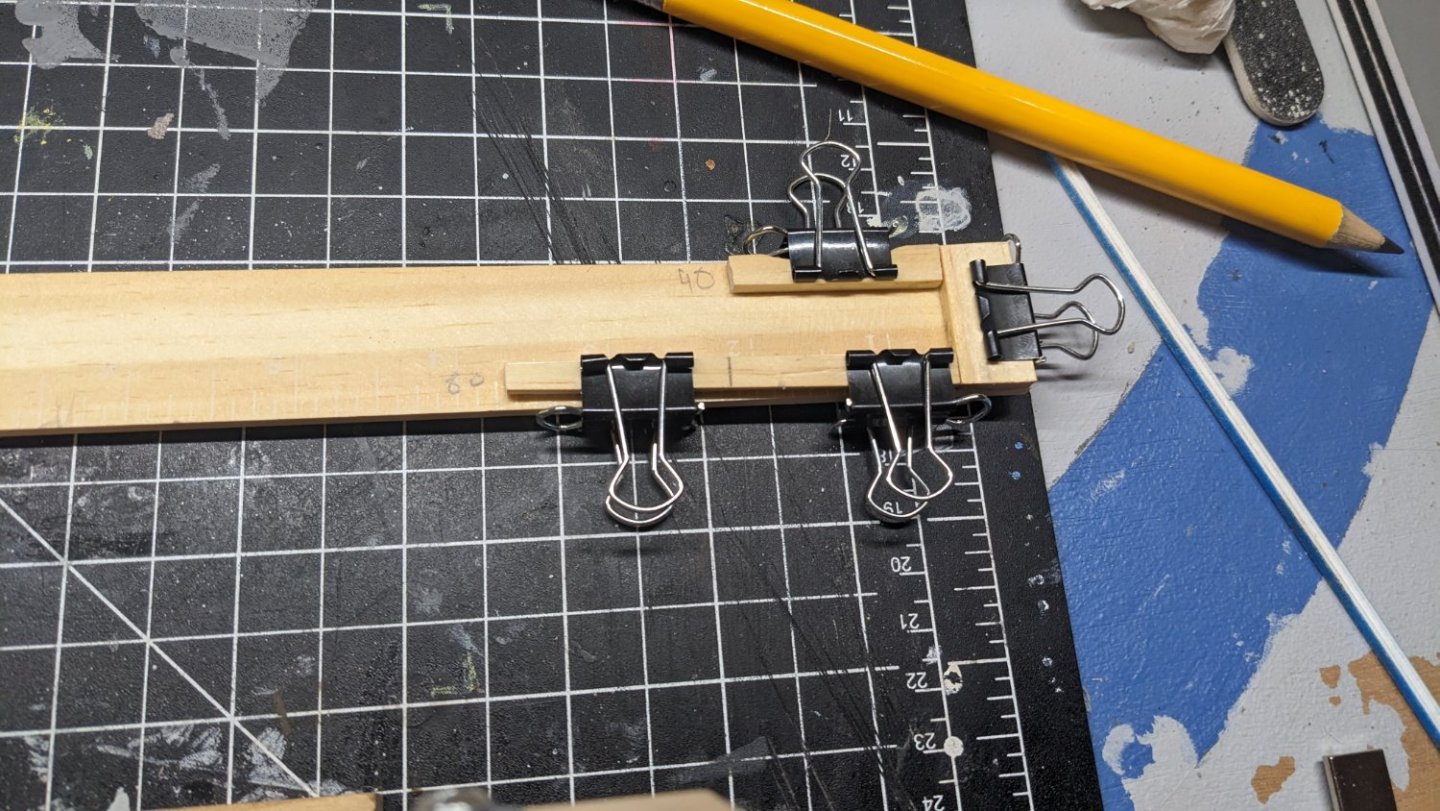
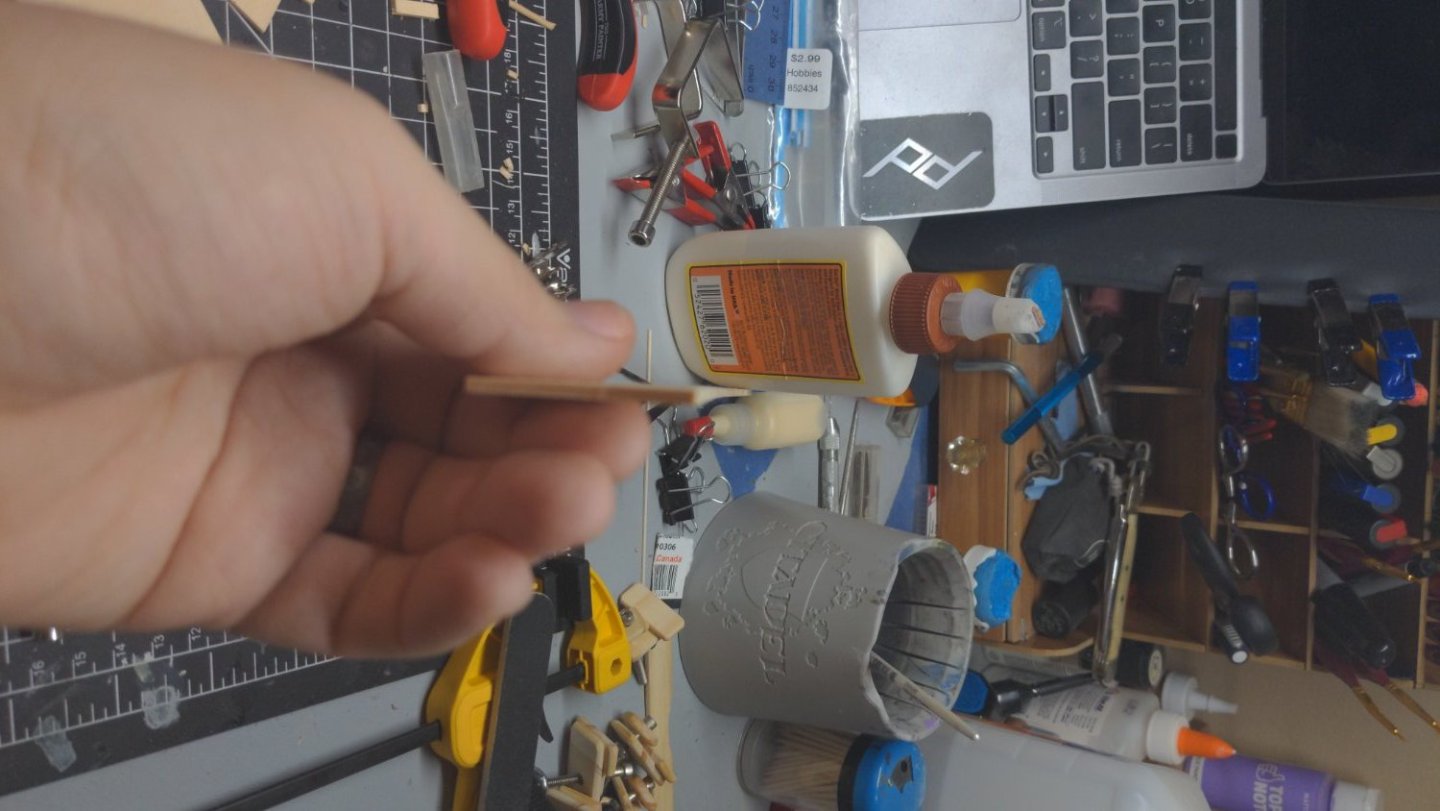
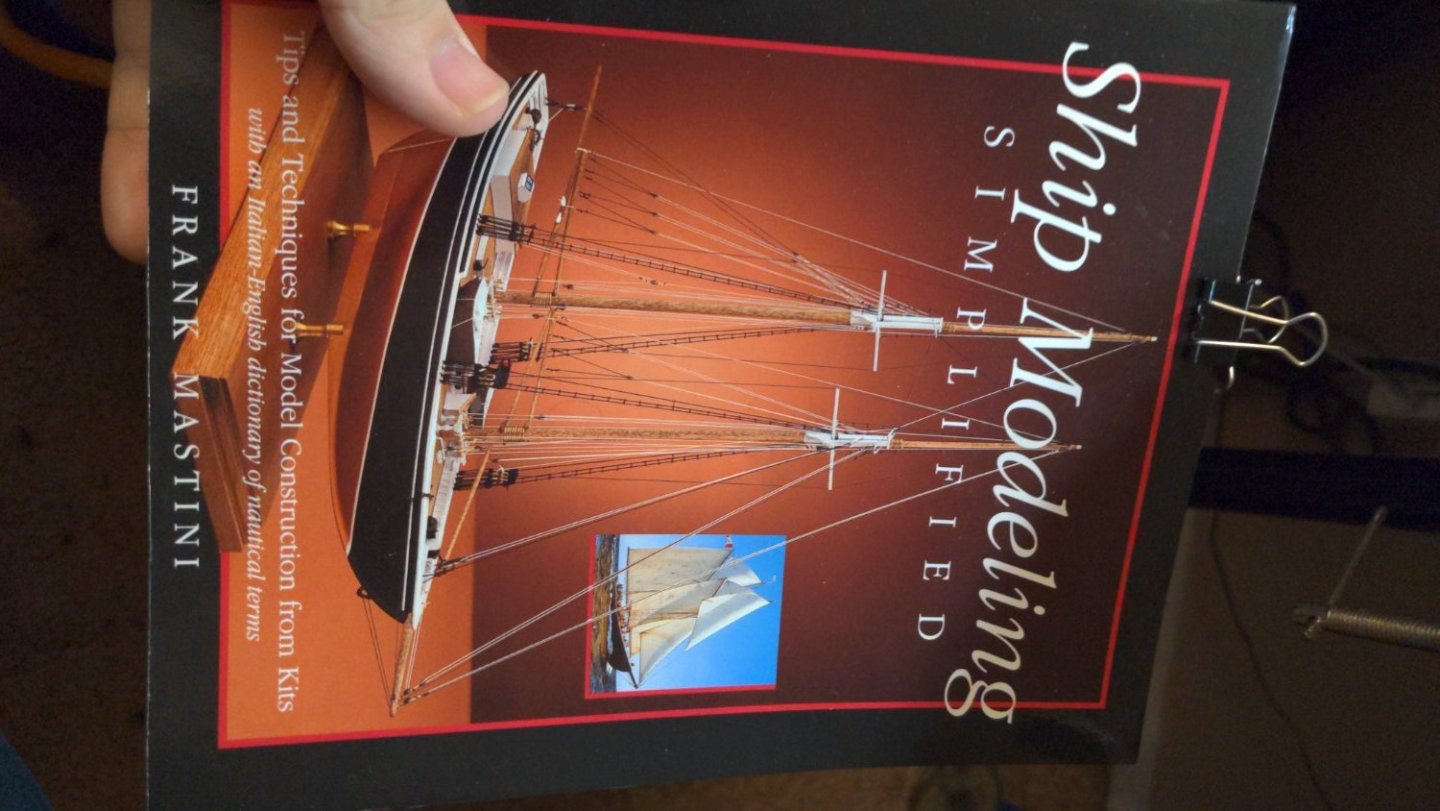
Log 2 Alol of the frame parts are still clamped while I wait to guarantee they are dry and straight. In the meantime I started working on the deck. As per recommendation, I opted not not to plank this deck, despite really wanting to. Instead I made a plank line jig, and started marking out the planks with a mechanical pencil. I eyeballed 3/16 using a caliper and made dots along the stern and bow. Trying to keep it as straight as possible I made the series of lines midship? Lengthwise along the LOA. (Overall length). Once that was done I used my makeshift jig to put further dots at staggering lengths starting at the stern, and connected them athwartship? Along the beam?(Across the width). This way not only are the length of planks indicated but so are individual staggered planks. I did this using the suggestion from the book Ship Modeling Simplified by Frank Mastini. This method was meant for actual decking, but I adapted it for deck lines for the most realistic look. I plan to order some Ronseal Matt Varnish in Antique Pine for the deck. I will also try and deck clear or Dark Oak, for the hull. For this first schooner I want to stick to a more natural finish. As I have a bad history of paint jobs. Most of my models have been colored plastic, with added weathering to hide the fact it was lnt painted. My millennium falcon is the only model I attempted primer/paint before weathering. I've never had paint stick to my primers or my clear comes out opaque due to humidity outside when spraying. While using a flat file to sand and clean up frame slots on the keel, one broke. Frame slot 4. I attempted to glue it back on, as it broke with the grain. Seeing as the manual has me blocking and reinforcing frames later, I reinforced this first by glueing left over spacers from the Dory kit. (Keel clamped against a thick paint stick)

- 55 replies
-
- 6
-
-
- sharpie schooner
- Midwest Products
- (and 1 more)
-
All I have is acrylic paints meant for airbrushing plastic and resin. Mostly Vallejo brand. I don't use anything oil or solvent based, as my work area is in the living room of my apartment, and there isn't a window nearby to set up a booth. I really wanted to get into airbrush for weathering models, but there's just no way to set up a booth here. Only top coats I have are Rust-Oleum clear matte rattle can. 😔 I recently found that all the frame pieces are slightly warped, so I soaked them and the keel for about 30-60 minutes. I've never worked with such thick wood before. When I took the pieces out and clamped them they were fine. But every time I unclamp them, if they sit open air for a few minutes they start blowing upwards at the edges. So I'm clamping again and probably going to have to leave them overnight. I have paint sticks and various clamps holding them down to the table.
- 55 replies
-
- 2
-
-
- sharpie schooner
- Midwest Products
- (and 1 more)
-
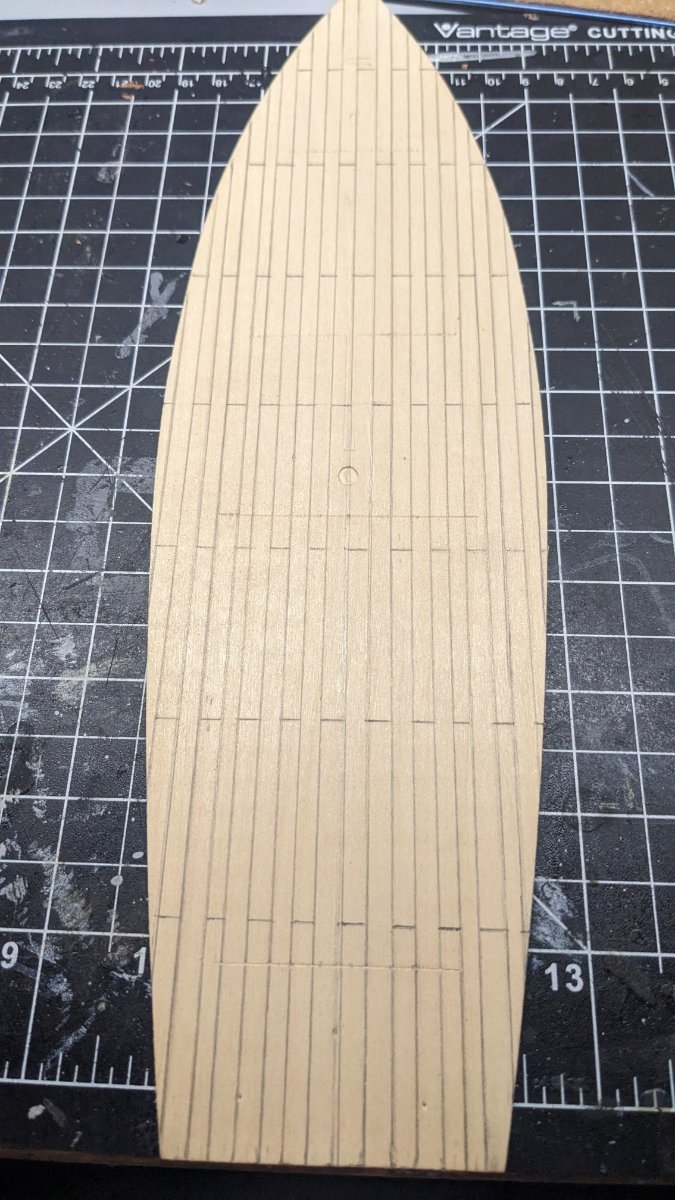
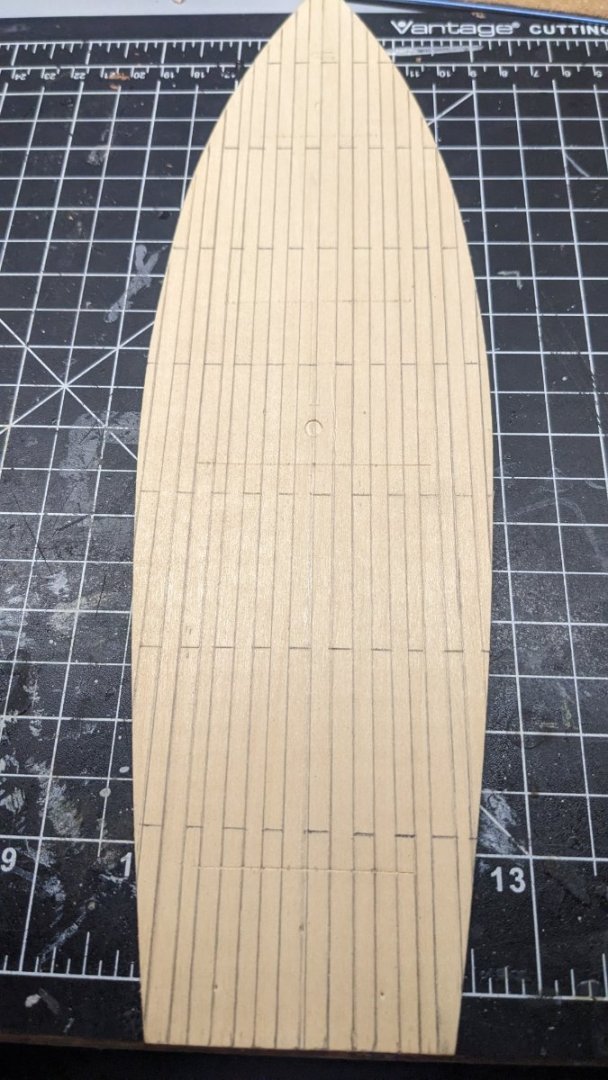
On the current step the instructions ask for scribing illusionary plank detail on the deck. This model is 3/8"=1' so I guess that's 1:32?. I saw online in a YouTube video that it's pretty unanimous to never scribe planks, put in the work and plank it. My question is, since I am terrible at math, can I plank this deck without screwing up the flow of hull planking and bulwarks/gunwales and such later? Its asking for 3/16 wide plank scribes. I have 1/16 popsicle craft sticks and basswood sheets. I followed a YouTube video and made a plank cutting jig at 40mm and 80mm so they stagger correctly. All pieces were trued up using my steel engineers square.
- 55 replies
-
- 3
-
-
- sharpie schooner
- Midwest Products
- (and 1 more)
-
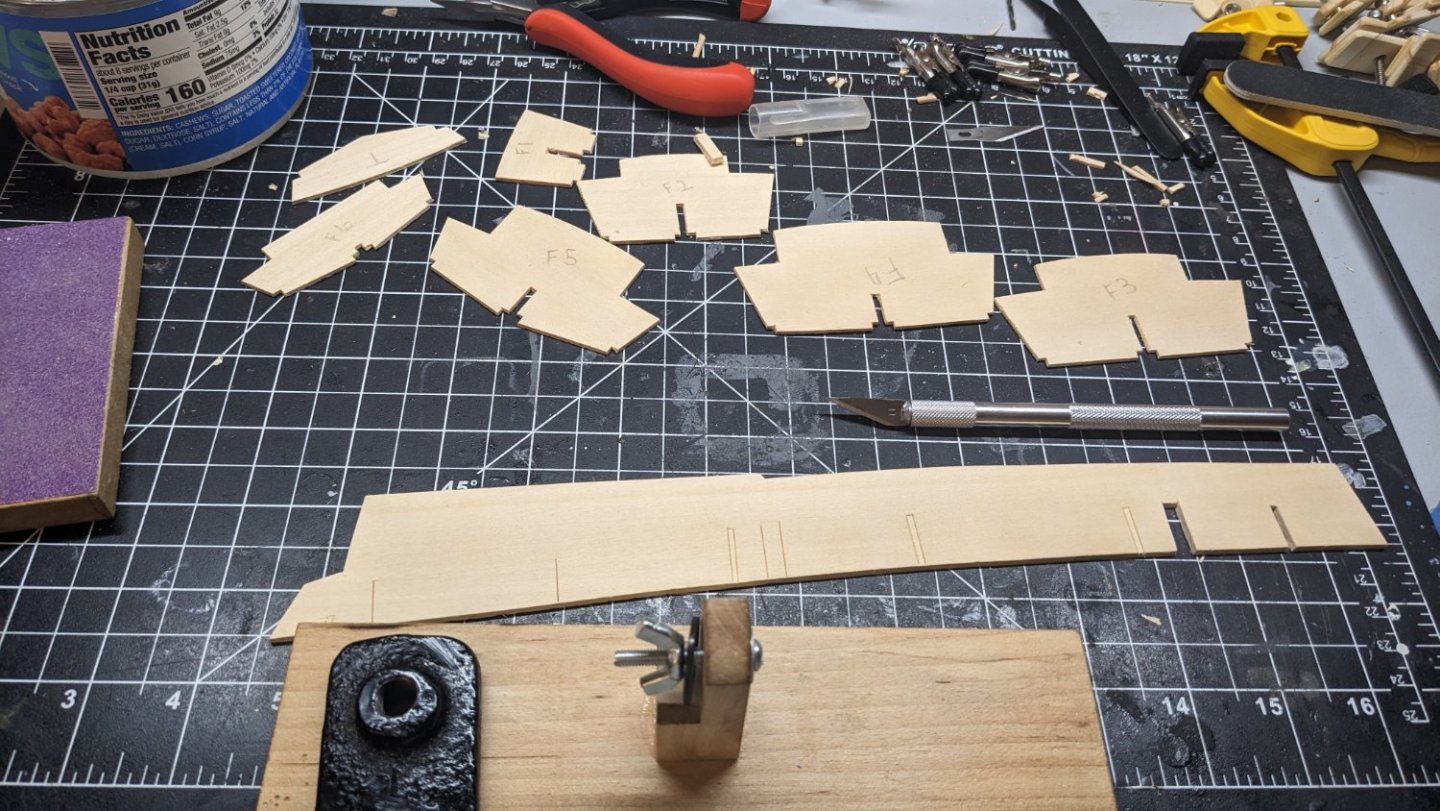
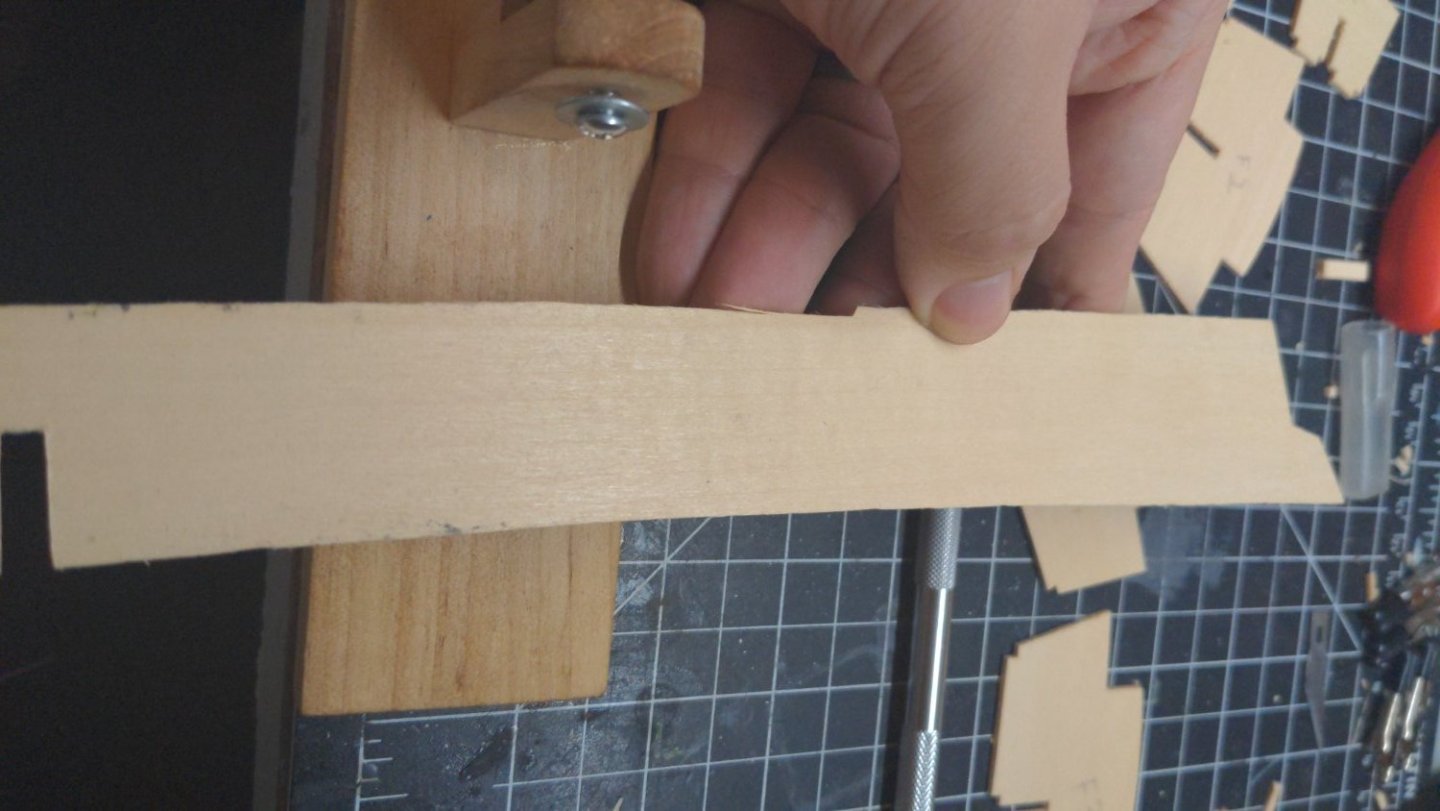
Log 1 After the exhausting battle with the Lowell Grand Banks Dory, I've found myself at the shores of the long awaited Sharpie Schooner. I found this kit on eBay for 45$. It came in good condition, and unless I overlooked something; nothing is missing. I started labeling and removing bulkheads from the sheets, and moved on to the keel. After 2 hours of cutting away at the slots in the keel, I hadn't made much progress. Feels like I'm treading water. So I went to browse others' builds and saw no mention of any issues. It would appear that the laser failed to cut my keel, as I am essentially scratch slotting it. The lines are barely visible, and not showing on the back of the sheet. My hand has cramped so I'll be waiting to start back up tomorrow. While I was looking through Hopes' build she mentioned straightness of the keel and it's bulkheads. So I checked mine quickly. She has a small warp near the stern, just below what appears to be the... Tiller slot. F4, F1 and F2 all appear to have a very slight rock to them as well. Tomorrow I will soak these rather thick parts for a few hours, and then put weight on them while they dry.
- 55 replies
-
- 6
-
-
- sharpie schooner
- Midwest Products
- (and 1 more)
-
I'm not entirely sure how to edit this thread as complete.
-
Log 9 - Rough Completion. After much thought I decided to give it a try and finish the Dory. At this point I never want to see a Dory again. Haha. As I thought before, the port and starboard sides not being lined up made it impossible to level the sheer. So I sanded off the char near the transom and stopped. I soaked the gunwales, and the cap rails. I applied the Breast book, but it looks nothing like the manual, and is far too small. I attempted to make one, but the wood snapped along the grain. So I ended up just using the included, tiny breast hook. When laying the cap rail, the stem shape didn't fit in the precut notches for the cap rail. Some slight sanding made it fit. When attempting to match the port side cap rail, the end snapped off. Just wanting to finish at this point I glued it down, but it doesn't meet the rest of the cap rail. I mounted some of the seats, but they all needed cutting, sanding and making new slots. As my frames broke many times in the first few steps, they ended up not being plumb for the last step. This was expected. I am still wondering if I should do the Pram next, or the schooner. I believe when I looked at the Pram, it was essentially a Dory style shape, flat bottom with a sail and rigging. Not feeling particularly motivated to do another flat bottom, when I don't have adequate clamps for the upside down building style. So I really think the schooner would be a better experience.
- 43 replies
-
- 4
-
-
- Lowell Grand Banks Dory
- Model Shipways
- (and 2 more)
-
Thanks, but there is no need. I already own the pram and sharpie Schooner. I placed a bid on the schooner awhile ago, and won and received it only recently. The pram was gifted to me for Christmas.
- 43 replies
-
- 2
-
-
- Lowell Grand Banks Dory
- Model Shipways
- (and 2 more)
-
I was holding the transom together for approximately 20 minutes and when I let go it pulled apart. This happened after regluing about 3 times. So I did super glue. I definitely consider the Dory a learning experience. I've learned that I need to pay attention to both sides when planking a Dory, to ensure that both sides are matching and even. I also think not putting a rolling bevel on my garboard strake may have started the issue early on. I am upset that I cannot finish what I started, that always bugs me. But the material cant be replaced at this point. The lessons I've learned will definitely be applied going forward in the hobby. I will not underestimate tiny things in the future.
-
Log 8.5 Continuing I've started to use a nail Emory board to sand the top edges together to be level across the entire sheer. Upon reaching the transom I remembered that the planks are approximately half a plank off from port - starboard. Which would require half of the starboard to be sanded off in order to be level with the port, which would make the Band, non-existent in the stern. As the instructions required adding bands, to sand them together. Which is understandable, but compiles the problems further. I am reaching the point of no return, I believe. The issues, even after fixing most, still continue to read their ugly head. Without completely manufacturing new parts (garboard, mid, sheer strakes, transom, band), I don't see much point in continuing the effort on the current parts. I don't plan giving up the hobby, but the current Dory seems to be further gone than originally thought. It says online that the Norwegian Sailing Pram planks like a Dory, but has a keel. While the thought of a keel is a pleasant change of pace. I don't know how I feel about it planking like a Dory. Mr Frank Mastini seems to think you should start on a quality model, that doesn't break bank, makes you happy, but isn't too large or ornate in the stern. This way if thinking makes me want to skip over the pram and start on my Midwest Products Co. Sharpie Schooner. I will continue reading and think on this further. Its time to grab some lunch so I don't add being grumpy to the list.


-
Log 8 - Repairs and a down hill struggle. I fixed the overall shape a little. But as expected the transom joints for all the planks came unbound. I ha e tried wood glue, watered down wood glue, and super glue. It looks terrible but I can't get it to stay together, because I have no way of clamping this area. I can't use my clips, as it will just put the canoe shape back in. All my binder clips don't open wide enough to accommodate for the transom width. The soaking of the bow also turned the glue seams white, not sure why. It looks very boogered up now. I knew I made a mistake buying a model I wasn't going to enjoy. I hate flat bottoms. I expected a keel structure. I don't know why flat bottom is considered easier. I've read a few chapters of my new book, and it suggested a small fishing schooner to start, so I learn keep assembly, planking and rigging. I'm not sure why I wasted money on the Dory and pram, when I'll never build a flat bottom again after these 2 kits. This is quite annoying. The super glue looks like it sort of started to hold, but it still looks really bad. Before the repair all my seams were clean and beautiful. But attempting to fix the canoe shape has really taken a toll. The yellowing on the bottom was me trying to use the included kit glue. After I finished the bottom I immediately switched to dry-natural gorilla wood glue.


-
I wasn't sure that would work. I had a feeling it would throw off the whole model since everything is cut to length now and the band is on. I had thought about that though. At first I thought it would need completely tore down.
-
Log 7. - Finish or not? After a little frustration and more vague instructions; I've managed to make a dent in the last few steps. The sheer strakes went down much easier after using the curling iron technique to add heat to the timber. This has made glueing much more compliant, with less spring back. My mini clamps didn't really turn out to be very useful, the smaller of the two clamping surfaces ended up too small; leaving unbalanced gripping. I will address that at a later time. The one thing that really irritates me about the strakes is that they don't line up across starboard and port sides, when looking down the bow. I've come to accept this is one of the forewarned "stacking issues" when planking. I know now to pay more attention to this when glueing. My transom is still a little off in it's alignment with the sheer, band; and soon, the cap rail. The side cleats, and seat risers have been installed. I couldn't really figure out where the placement was intended for the riser, so I went with aligning its top edge with the top edge of the garboard strake. This way the seat would sit just below the midway point. My overall profile is wrong, and I know it. I feel it's due to the clamps included in the kit. It has taken on more of a canoe shape, which is disheartening. But I am trying to just finish at this point, despite losing my motivation to. In my mind it should be scrapped. I am so frustrated that I've stopped for the day. I am hoping that the cap rail will go on. At this point i am concerned about it. The stem needed to be trimmed because of the shortness in the strakes, and beveled to match the original as much as possible. Another issue I ran into, the instructions did not specify what timber was intended for the false stem. There wasn't one in the kit, and it didn't specify a size if it was spare timber. So I ended up using the extremely small timber in the kit. I believe it was 1/16. However it was square, and not very wide. After beveling this part I can tell it wasn't quite wide enough.


- 43 replies
-
- 3
-
-
- Lowell Grand Banks Dory
- Model Shipways
- (and 2 more)
-
I was using cardstock but it was still damaging the finish. I was also having issues with them pulling the pieces apart, inward. Woke up this morning and the spring clamp had shot off of the transom and snapped off the end of the plank. Luckily, it broke right at the transom, so it was salvageable.
-
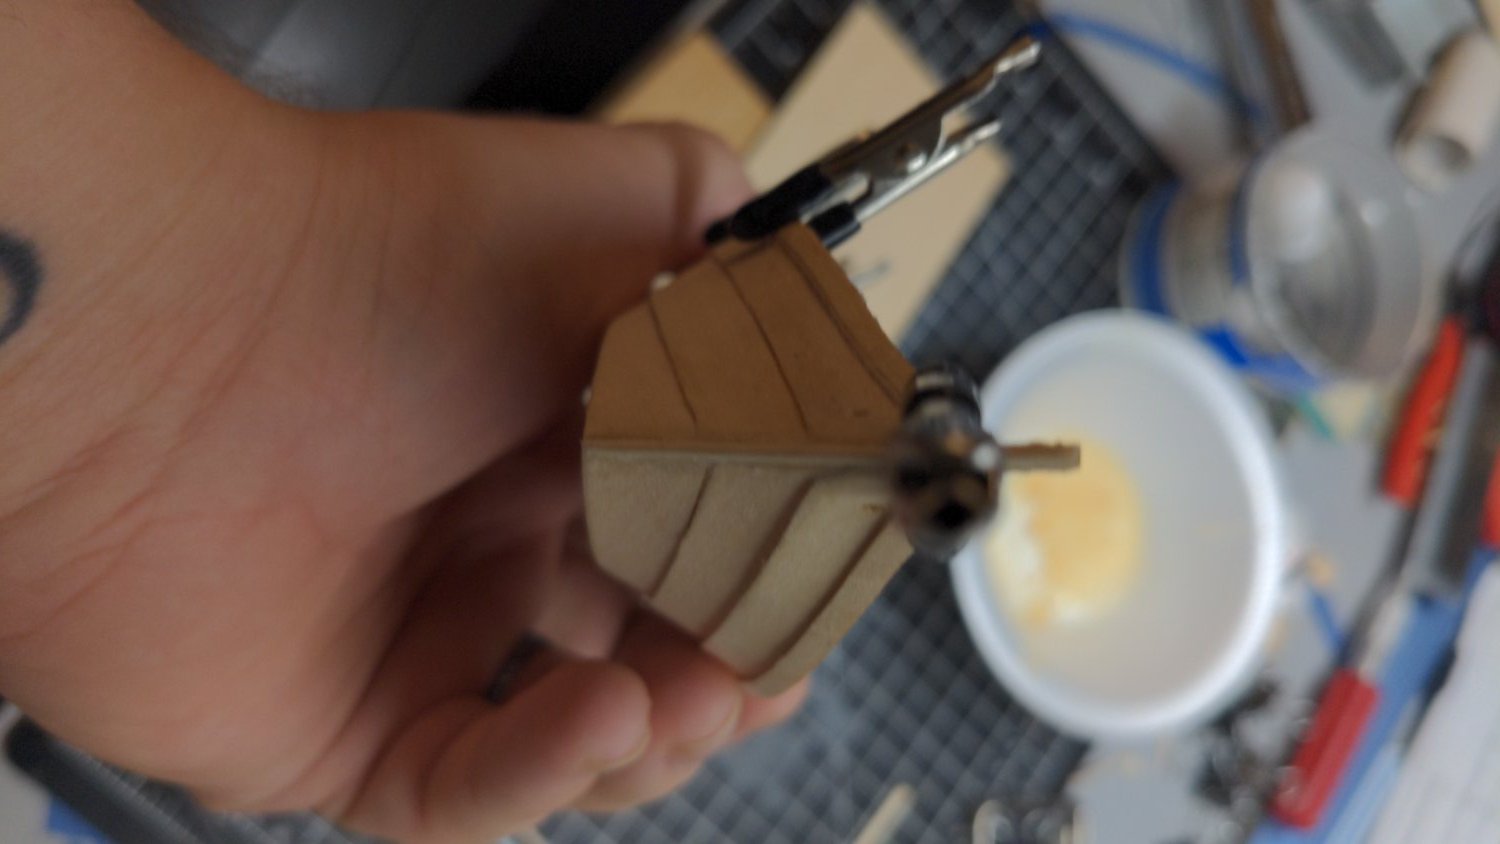
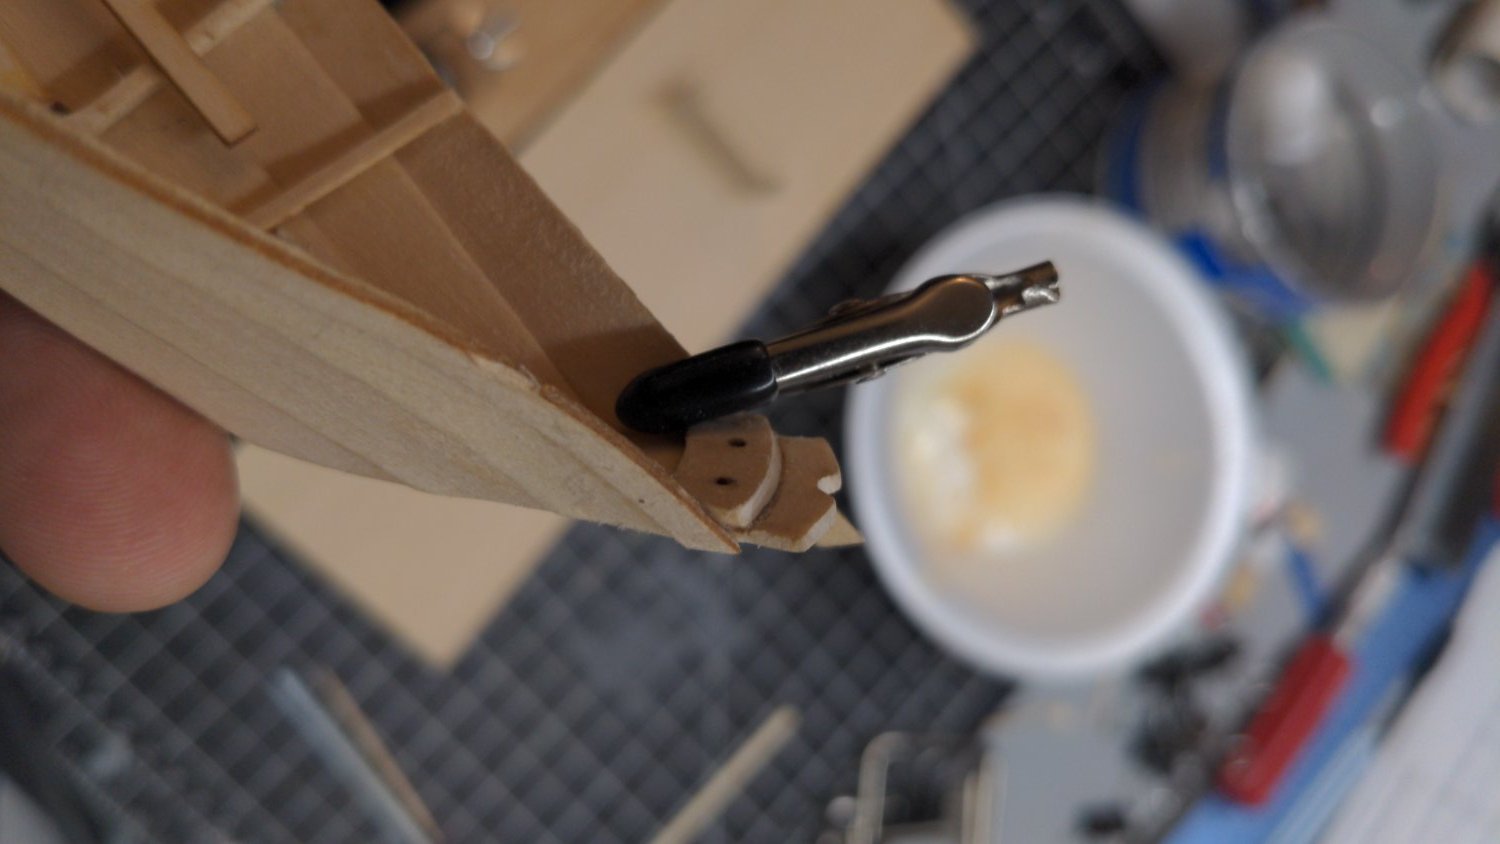
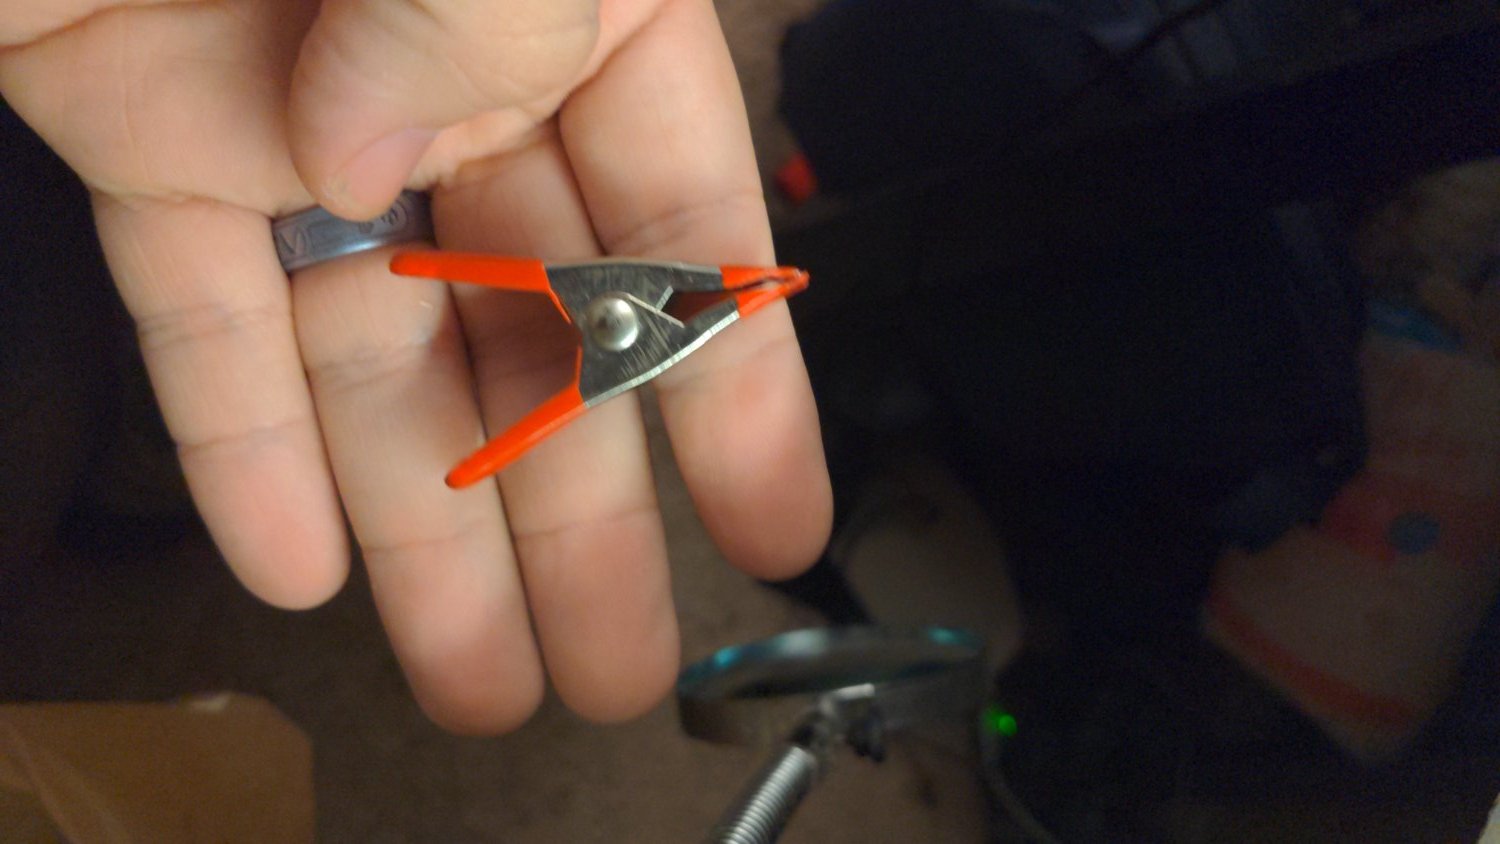
I got spring clamps with my kit, that are similar but maybe a bit harsher. They gave me steel with rubber tips. They dent my planks every time. I bought 2 mini bar clamps today when I picked up the material for my smaller ones. They still aren't quite small enough. These are what I'm making right now.

- 43 replies
-
- 2
-
-
- Lowell Grand Banks Dory
- Model Shipways
- (and 2 more)
-
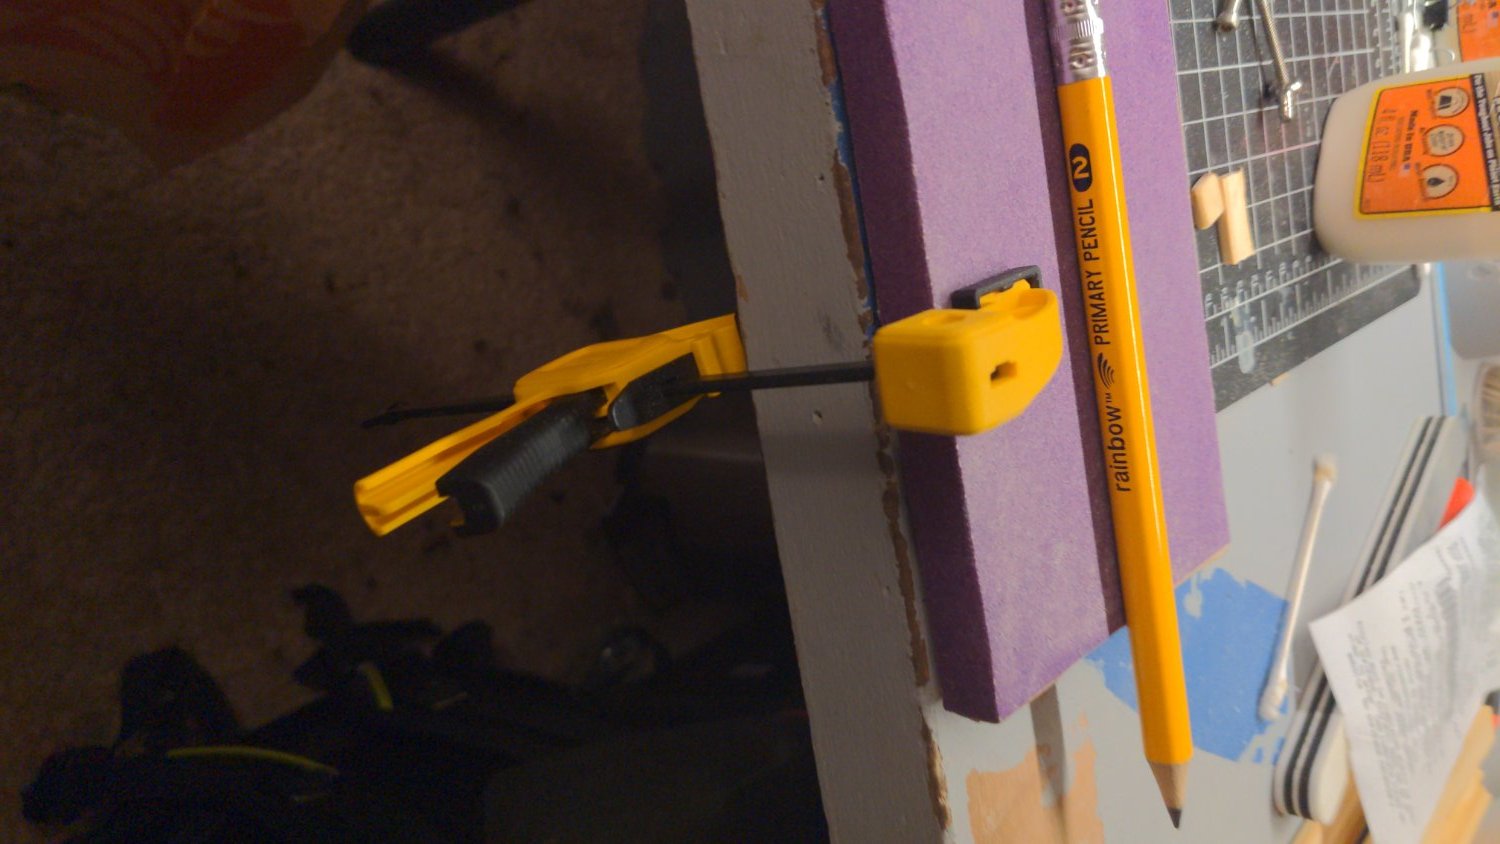
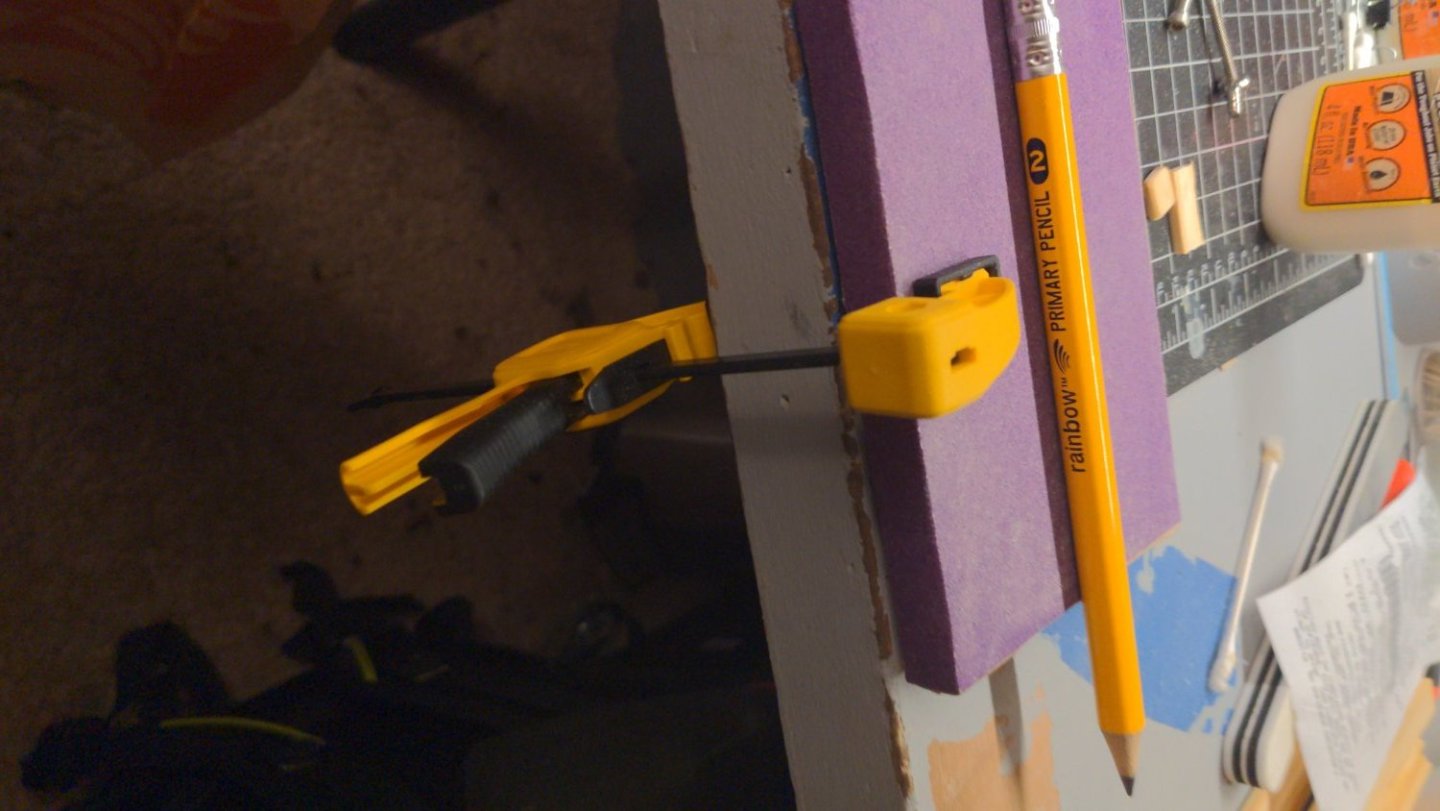
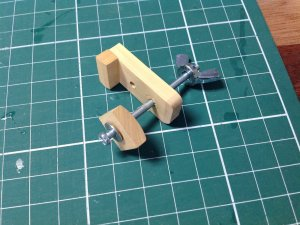
I recently purchased a curling iron, that I've started using as a cheap plank bender. My previous problem was improved, by better bending, with more shape then previous strakes. I am now regretting not getting one sooner. This has changed my outlook on planking. At first it was quite frustrating. Without an array of clamps, for small boats, I found myself unable to clamp things appropriately. This led to subpar bending. With the limited space I have on these upside down models, I was struggling with clamping planks. I bought materials today to construct my own micro plank clamps. I had made a few of the modified binder clip clamps, but have run into the issue of them no longer being good enough. I grabbed a handful of knurled head machine bolts, wings nuts, and some scrap wood. As the only places I could buy these micro clamps were ebay and alliexpress, with a month shipping time. The costs were also far too high, for such small parts. So I'll be crafting these clamps over the next few days, before continuing. I've also ordered a copy of Ship Model Building Simplified paperback, and Ship Model Builders Assistant, hoping to expand my knowledge a bit.
- 43 replies
-
- 2
-
-
- Lowell Grand Banks Dory
- Model Shipways
- (and 2 more)