JacquesCousteau
-
Posts
1,383 -
Joined
-
Last visited
Content Type
Profiles
Forums
Gallery
Events
Everything posted by JacquesCousteau
-
 I've been looking around for a good set of plans to scratch-build a Catalonian fishing boat, and I recently found that the AAMM sells Monographs for a large number of vessels, including a Catalan-type vessel: https://boutique.aamm.fr/monographies/plan-barque-catalane I wanted to ask if anyone has experience with using AAMM monographs, and what the contents are like. I'm familiar with Ancre monographs and the high level of detail that many have, and something like that--with drawings of every frame--would really be ideal for me, given that I don't have a ton of scratch-building experience. Would the AAMM monograph have the level of detail that I'm looking for, or does it provide more of a basic hull plan?
 -
Thanks, I've been really enjoying your Hawaiian canoe build, as well, it's very intricate! I'm looking forward to making some fishing implements when I can get back to the Canoa de Rancho build. Although I'm going to have to make the nets a lot smaller--even at 1:32 scale, they would be 10-20 feet long!
-
Thanks, this is incredibly interesting! The changes you made give the rig a much more elegant look--and what seems to be a much more accurate one.
- 61 replies
-
- 2
-

-
- ancre
- Santa Caterina
- (and 1 more)
-
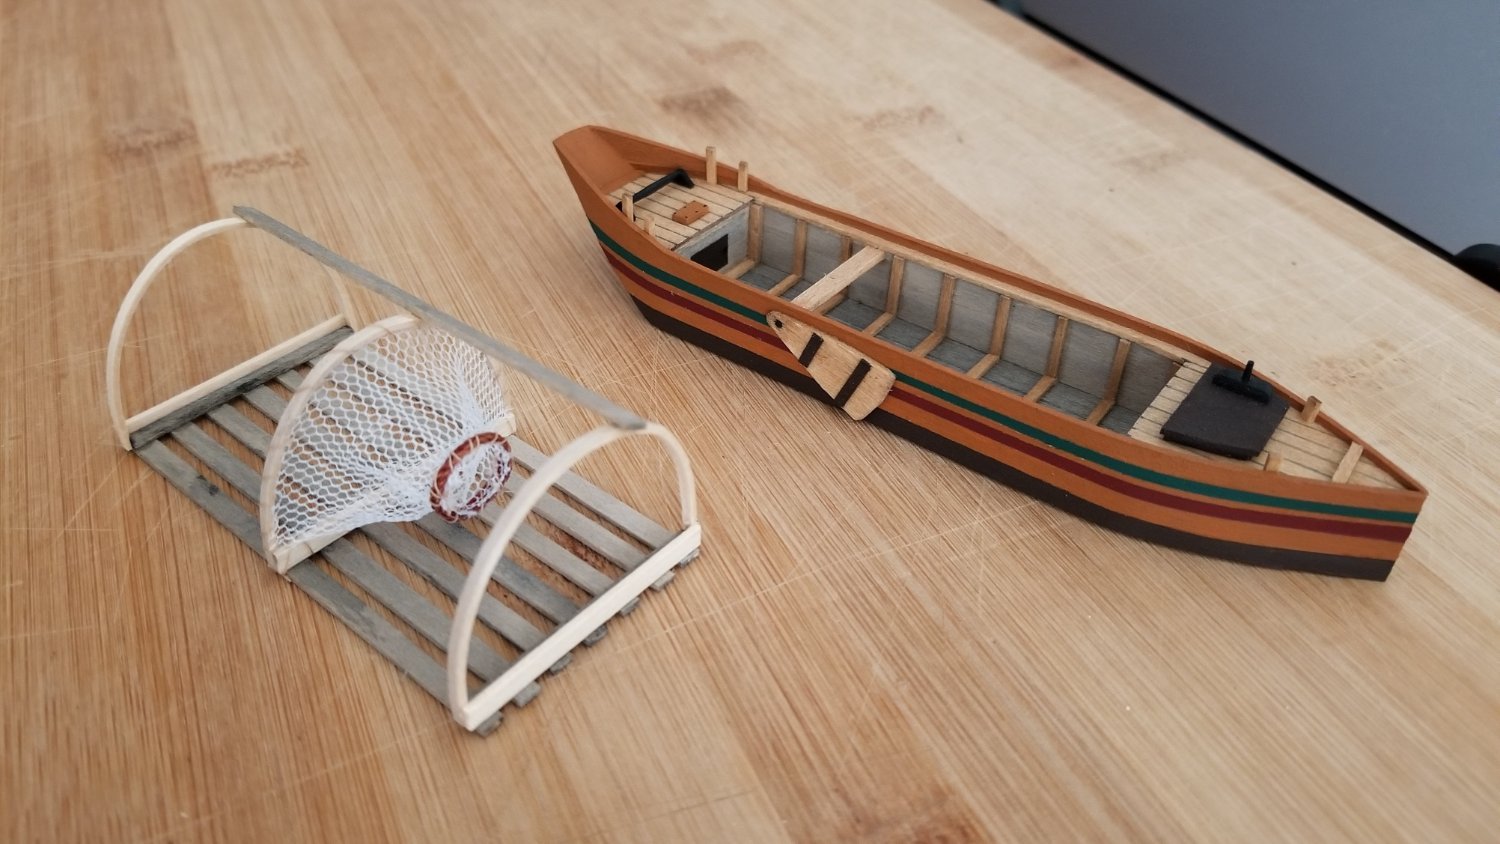
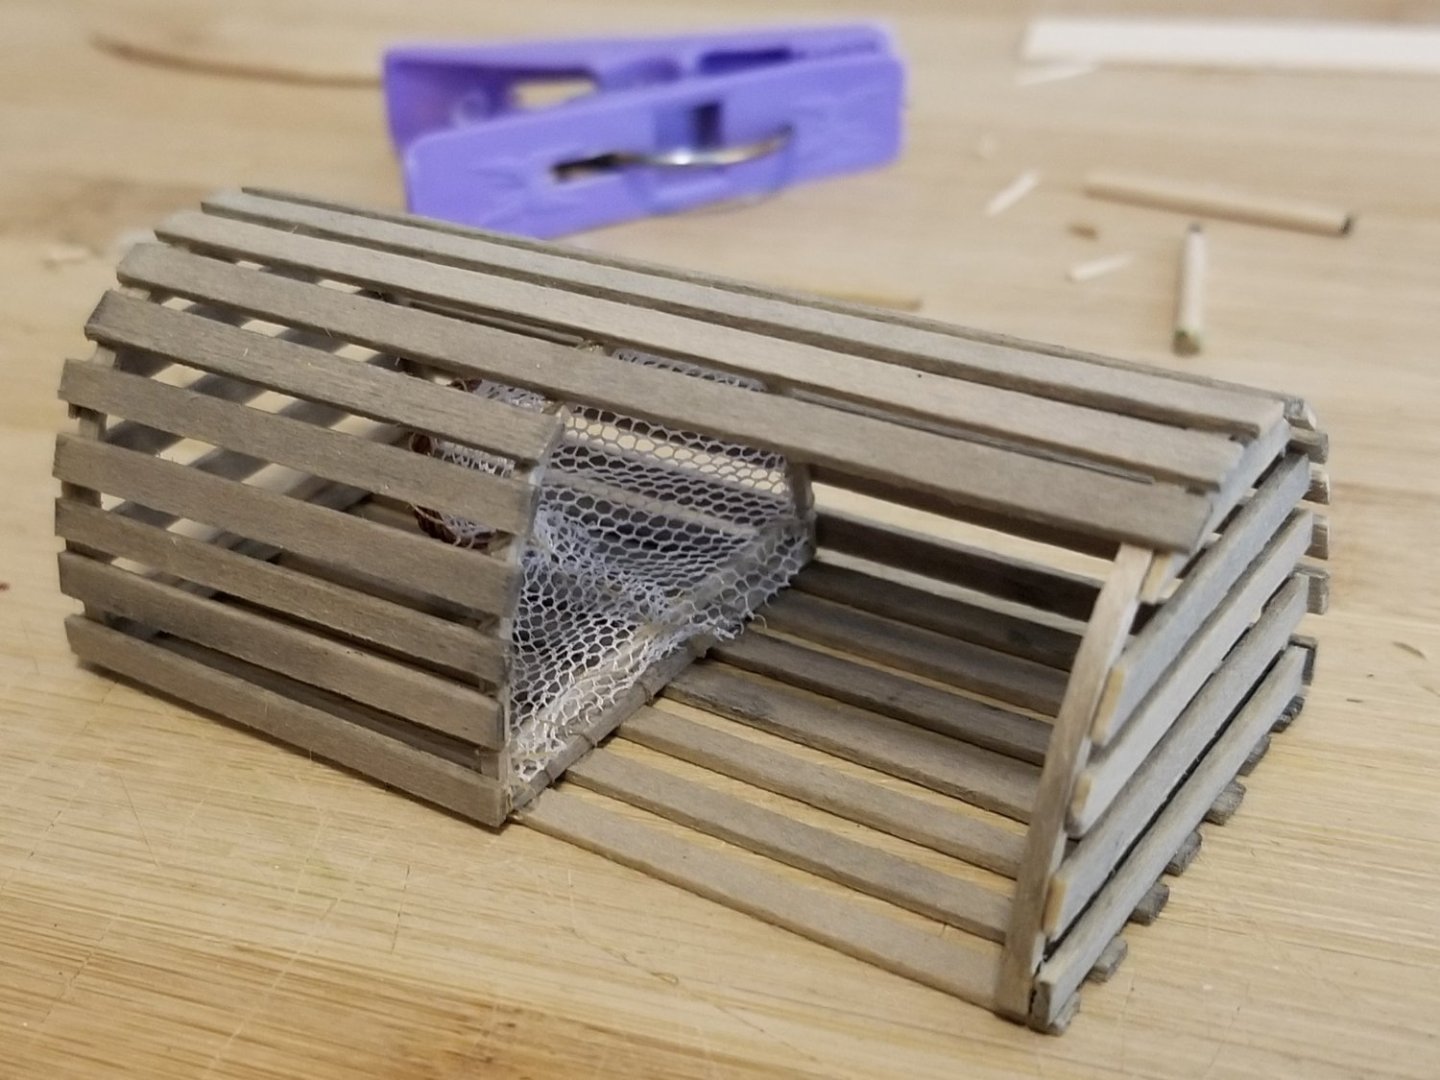
Not to derail my own build log, but the Christmas presents are coming along. I've finished the hull and deck furnishings (windlass, hatch, deckhouse with some sort of ventilation pipe, bitts) on the Ems Punt and gave it some seasonally appropriate stripes. I also made the rudder assembly, which uses bits of a staple inserted as pins to betyer secure the tiller and to attach the rudder to the hull. The rudder (and mast) will be left off for now for ease of transport, and will be attached once back in the US. Work on the lobster trap is also proceeding. This time I'm sewing rather than gluing the net funnels. Sewing them is still a bit tricky, but works better than the glue. I now just have the final funnel to make.

-
Congratulations! The lobster smack turned out great, and the whole collection together looks fantastic. Looking forward to following your Albatross build, and good luck with the dissertation draft!
- 38 replies
-
- 1
-
-
- Model Shipways
- Shipwright Series
- (and 2 more)
-
Very cool to see research informing your build! That said, I was under the impression that the corners of the frames were already removed to represent this detail. They're slightly angled where the garboard would meet the bottom, which forms a small space in the corners. But maybe there's a difference in what The Dory Book shows?
-
Wow, that looks great! You really did a fantastic job, the care put into the worksmanship is evident. It's also very interesting how different the rig looks compared with the monograph's rig--I'd love to hear a more systematic comparison, if you're up to write it. Really beautiful build, it makes me want to get the monograph myself (although it seems unlikely that I'll have the time or skills to build it for quite a while, and in any case, my main goal is a Catalonian vessel--I wish Ancre had a monograph for one of those, there are good plans available but the thought of working out the details of every piece from a plan sheet alone is daunting).
- 61 replies
-
- 1
-
-
- ancre
- Santa Caterina
- (and 1 more)
-
Looks like you're making great progress!
-
Thank you! I'm looking forward to getting back to the Canoa de Rancho either later this month or in January.
-
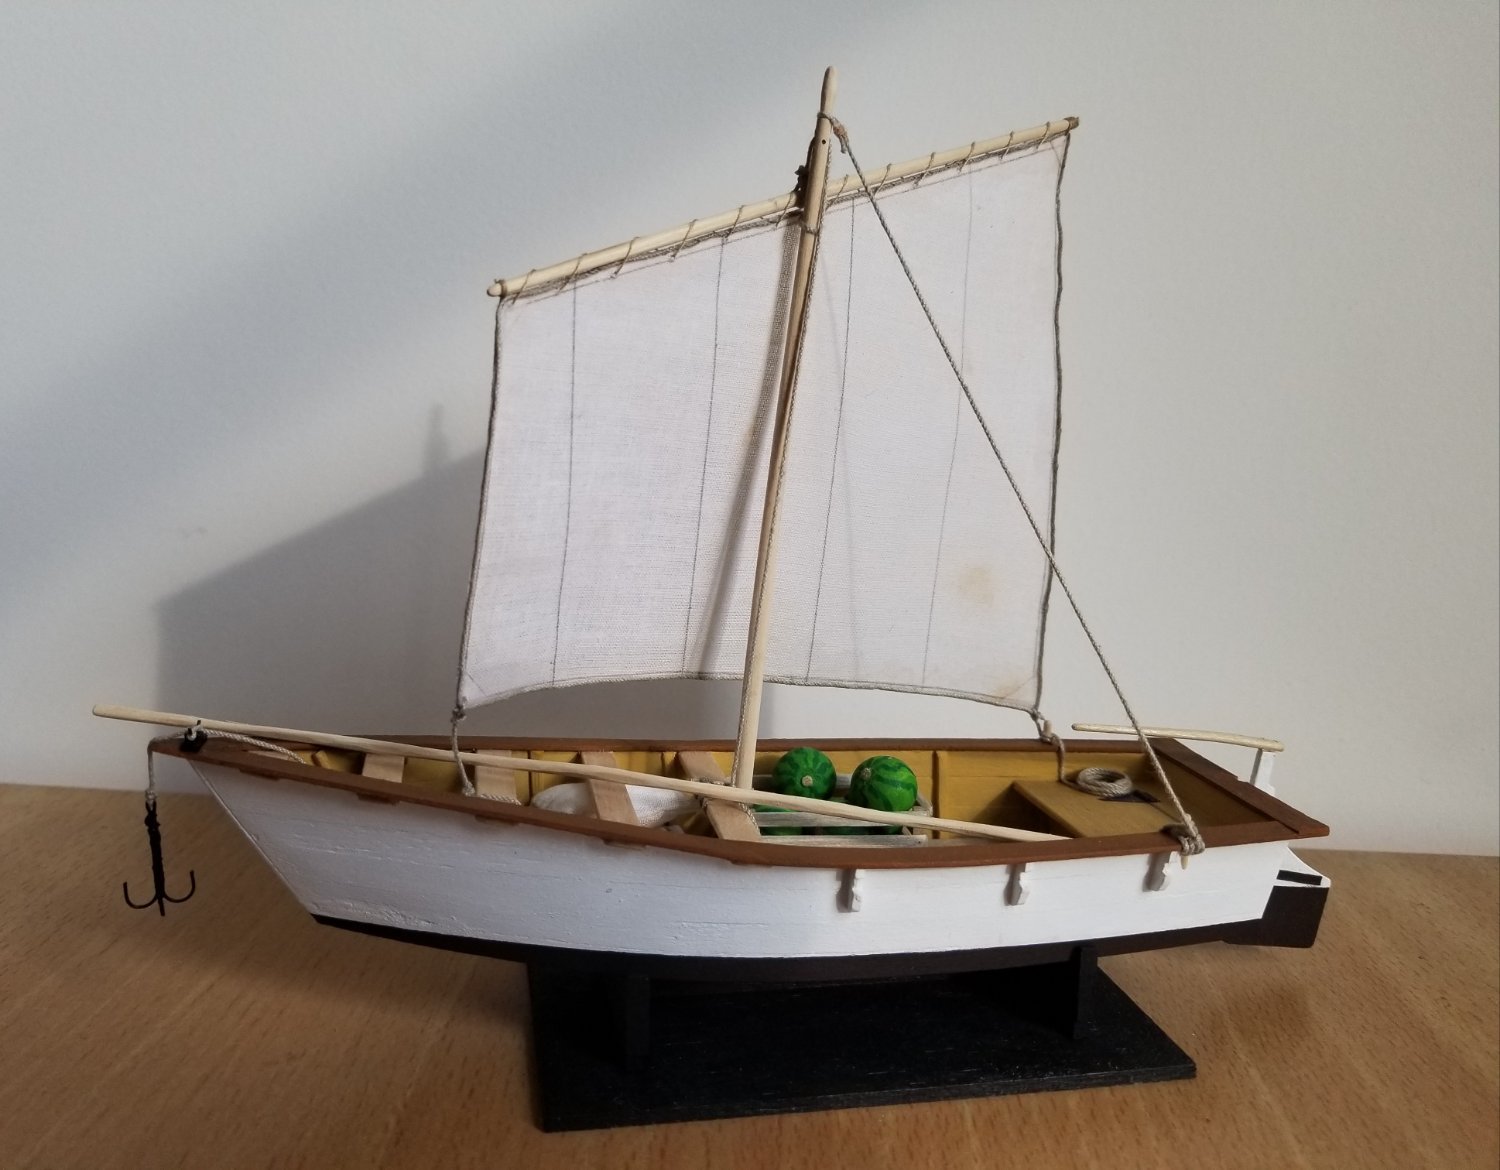
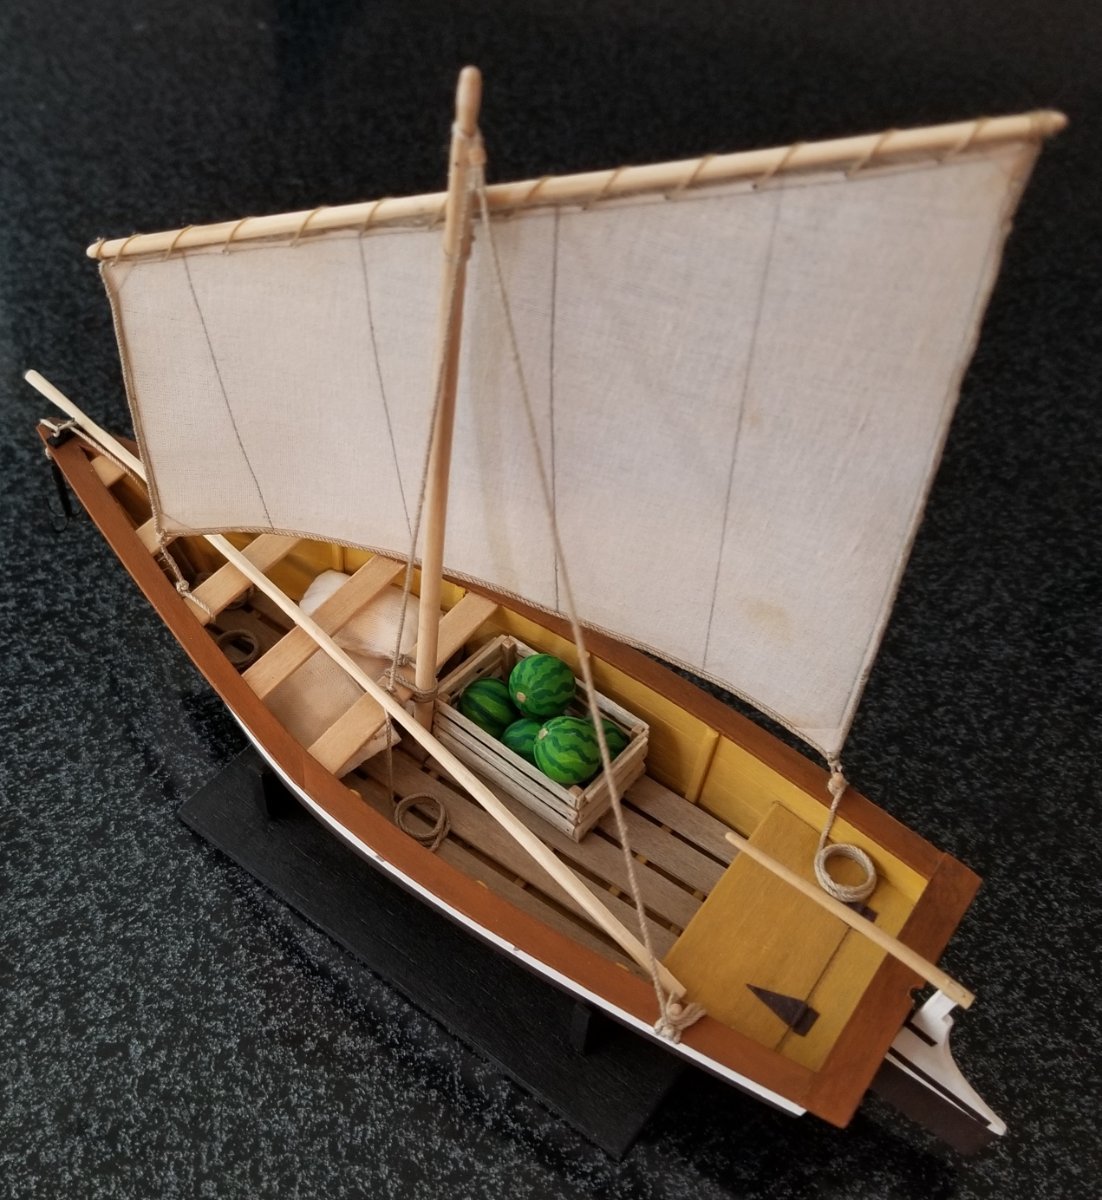
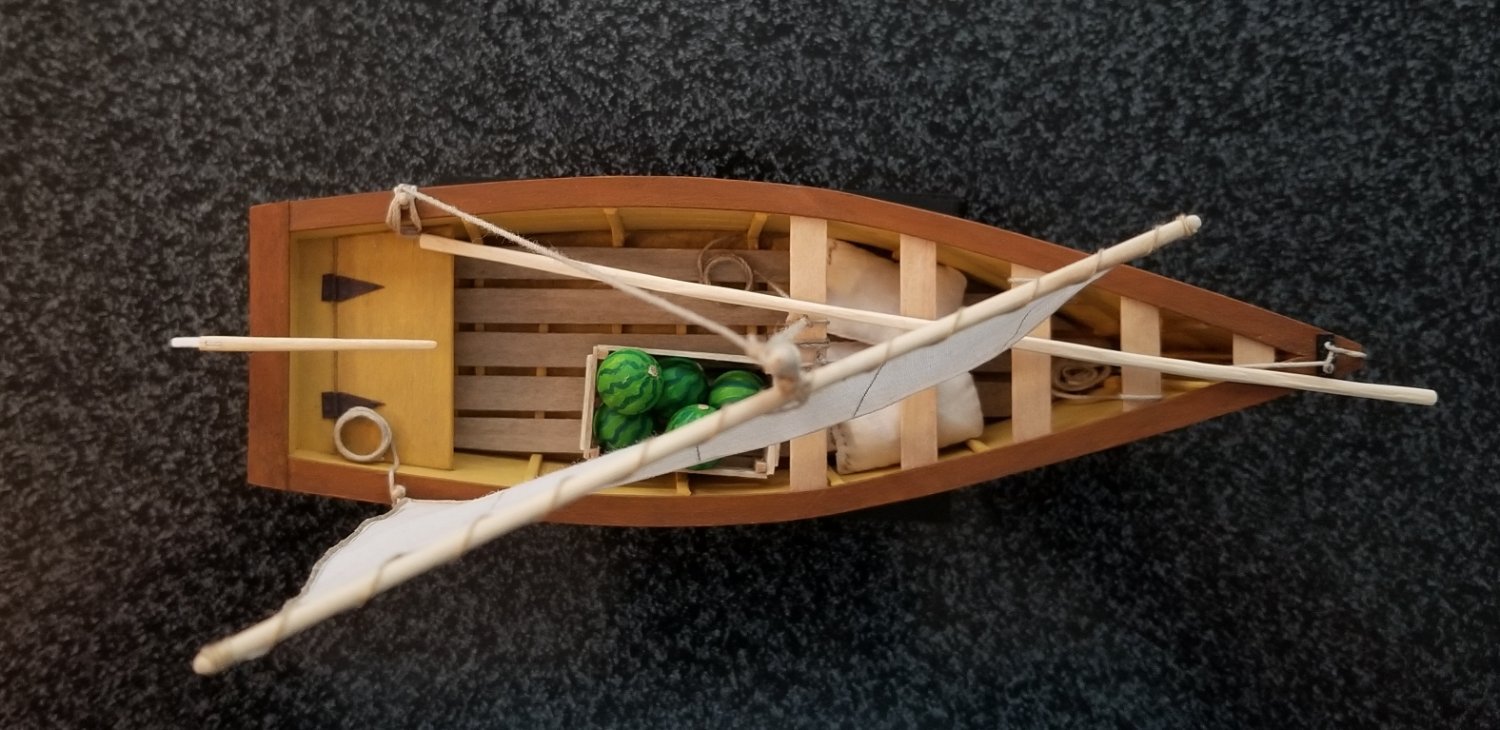
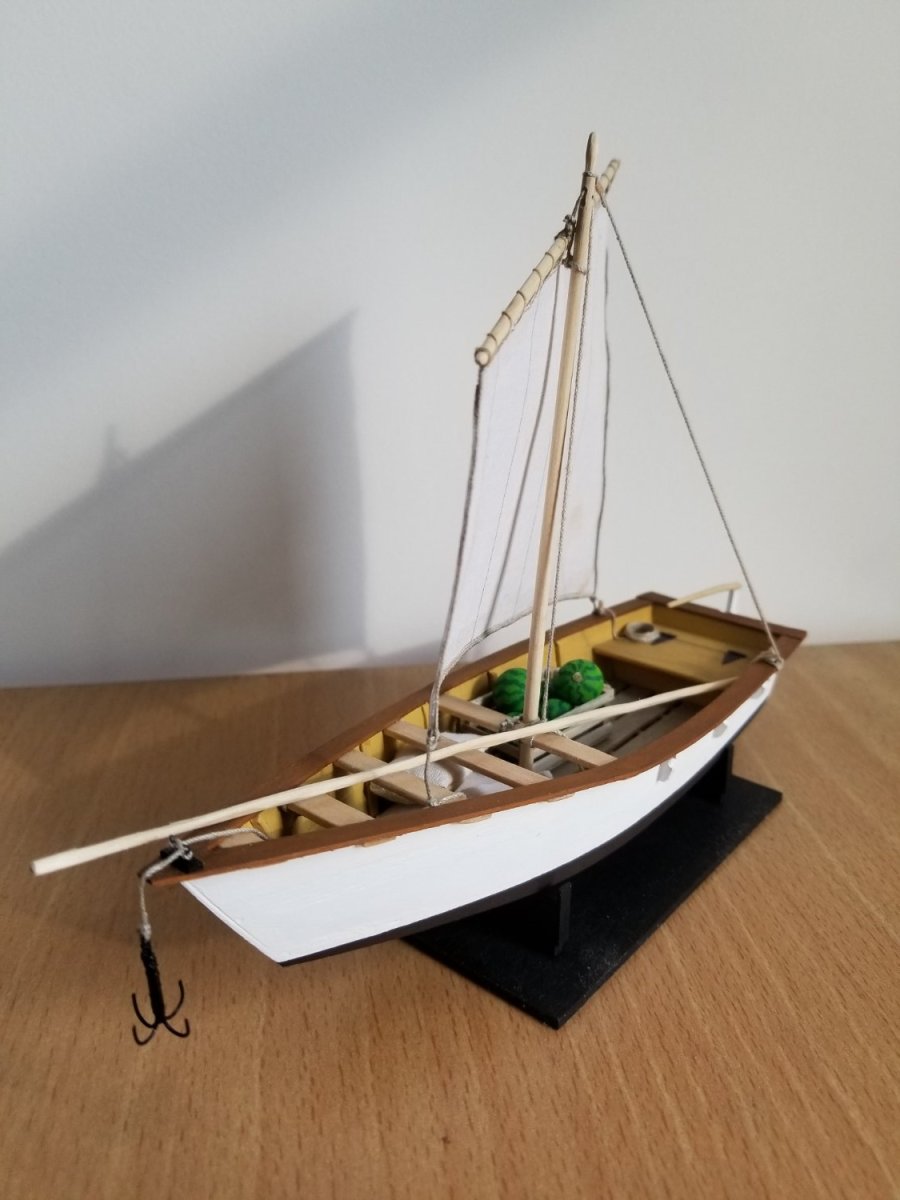
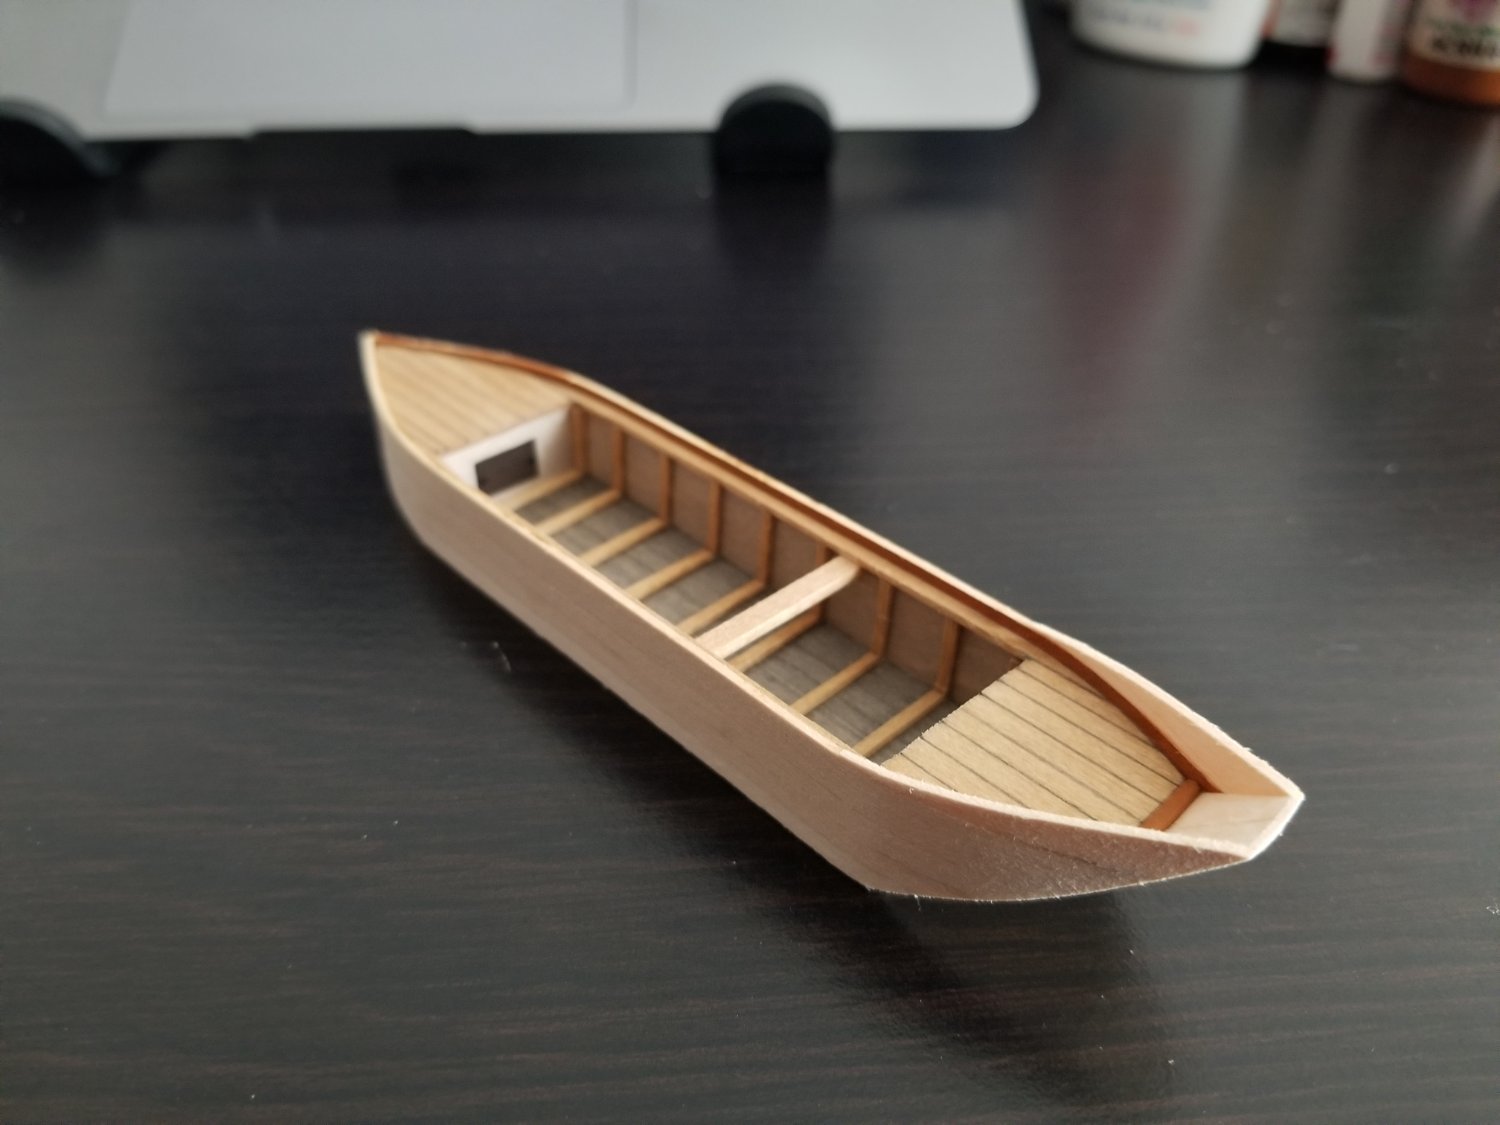
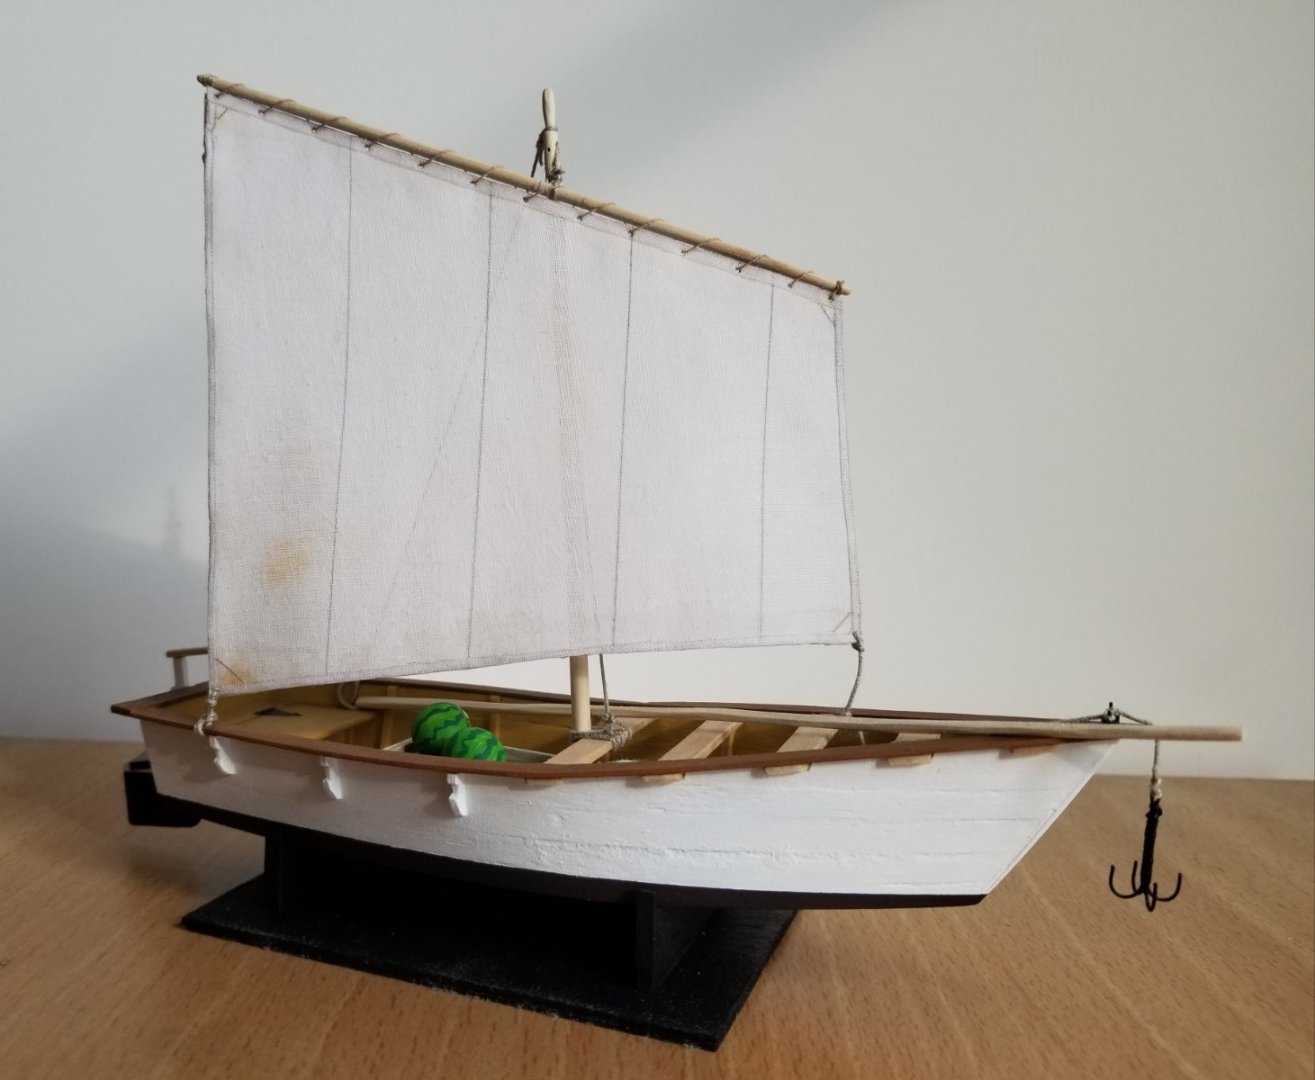
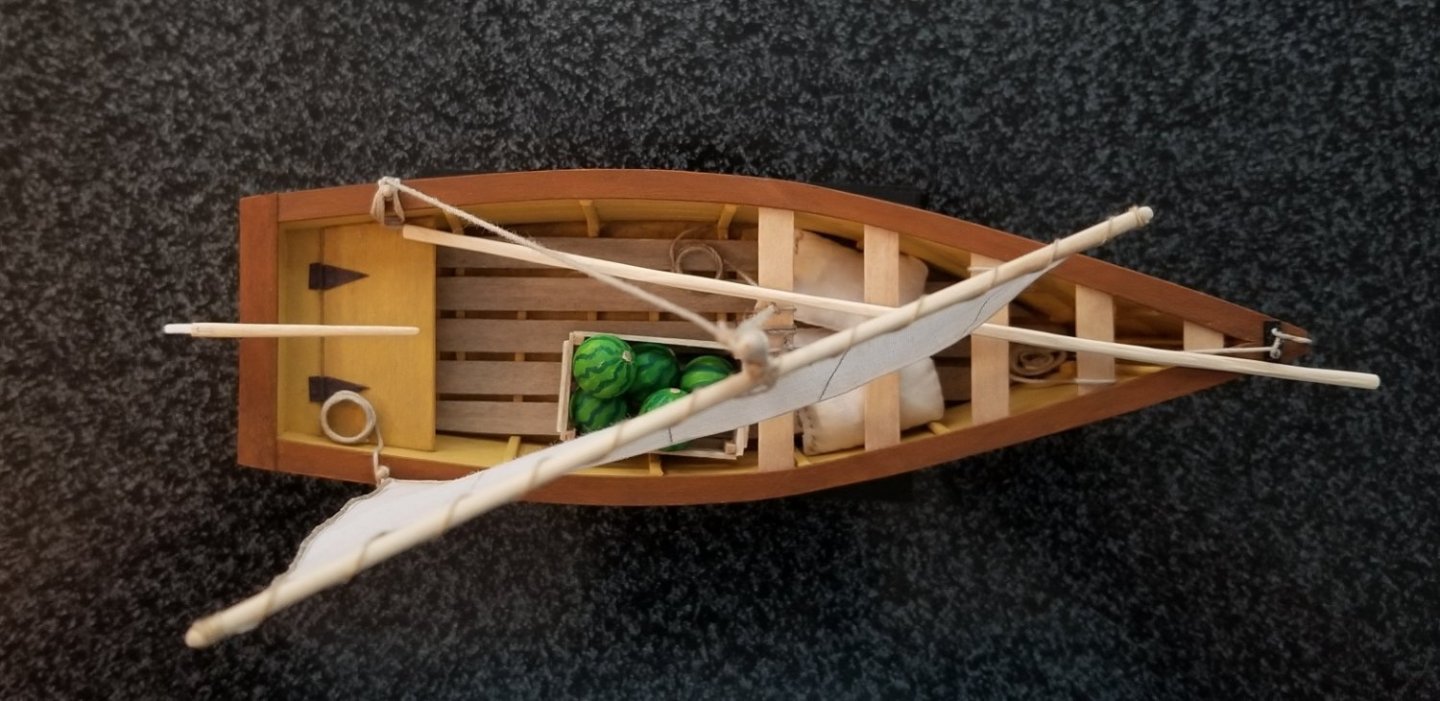
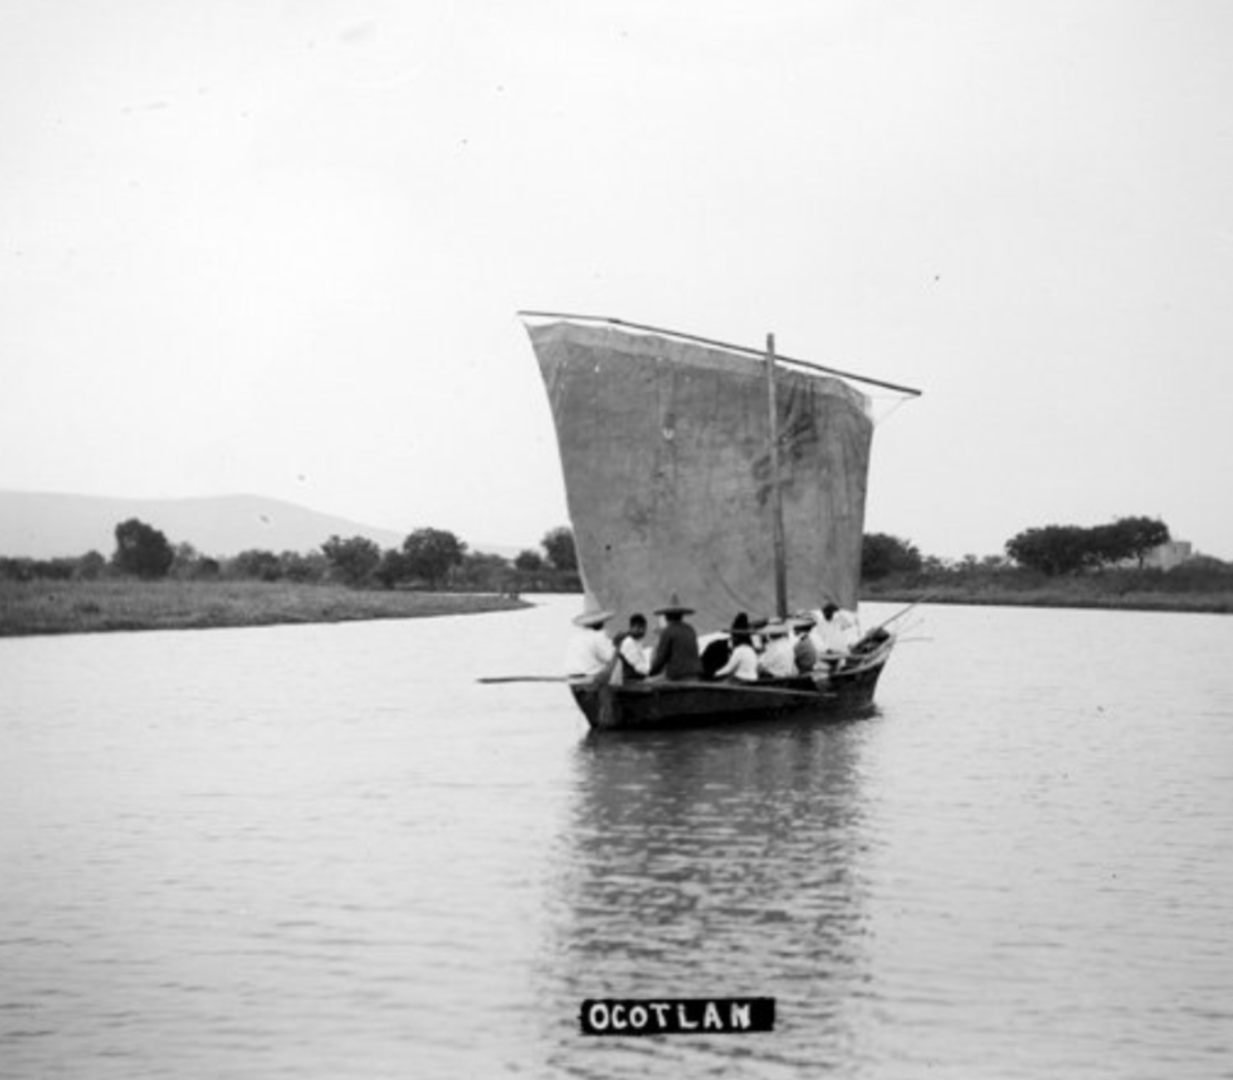
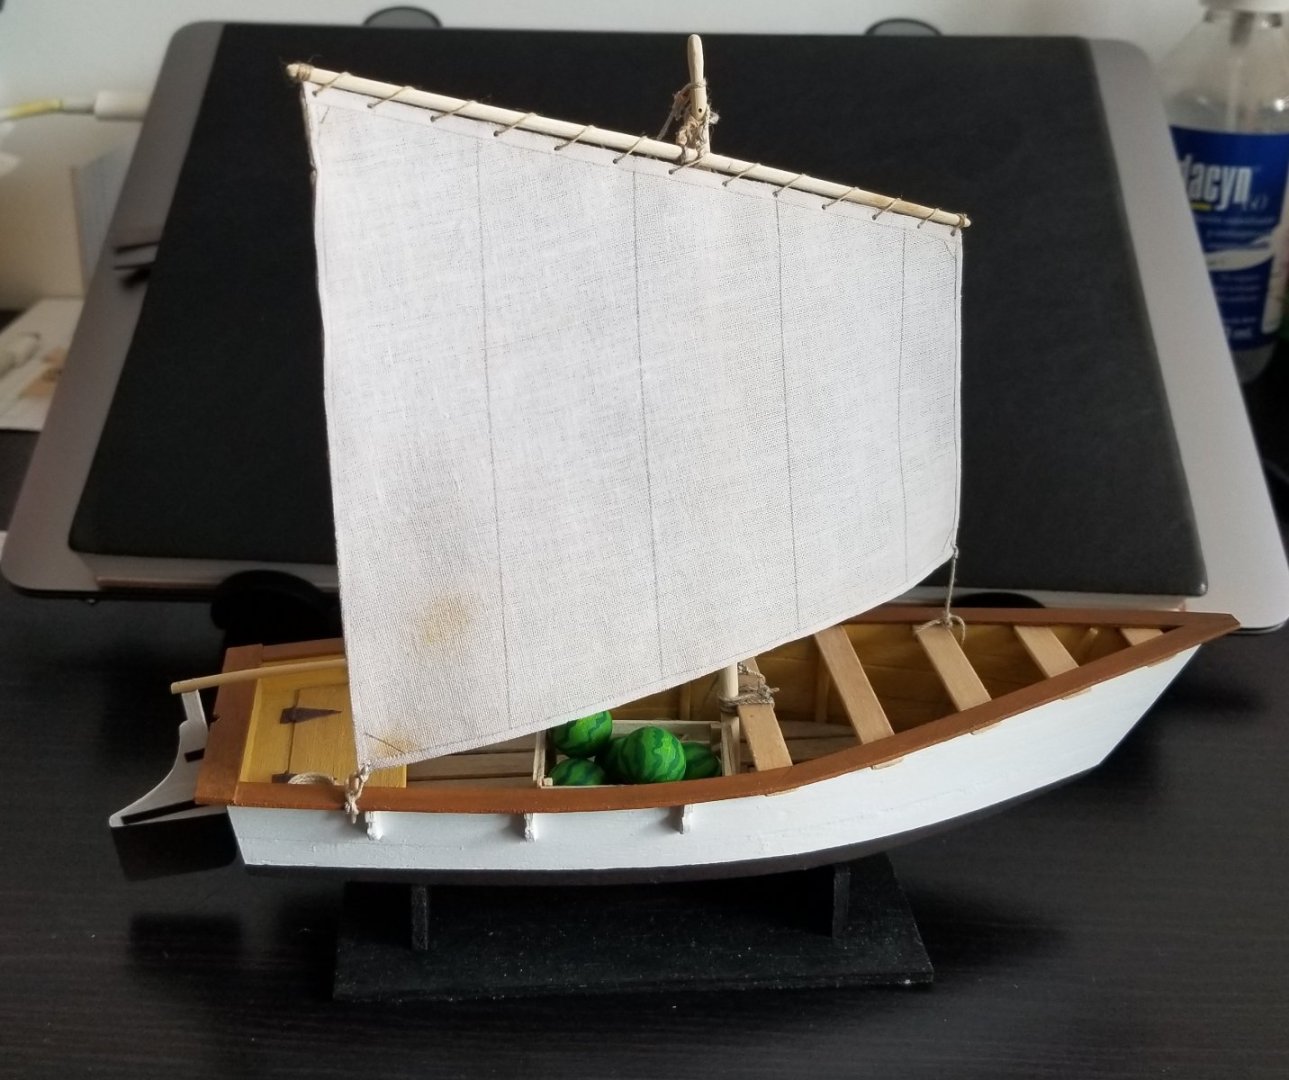
The Cargo Canoa (though not the Canoa de Rancho) is finished! There were just a few final steps. First, I hung the anchor off the bow. I had to guess at how the anchor cable would have been handled, as I haven't found any photos that show much detail. I made the cable in three parts--one part tied around a crossbeam and glued off on the floor planking, one part tied off at the anchor then run around the anchor support before also being glued off at the floor planking, and a big messy loop that was glued in place over the ends of the other lines. It's not pretty, but I think it works. Then, I redid the parrel more in line with what Wefalck showed, tying it off around the halyard's knot at the yard. This was quite difficult, as there was very little space for tying knots given the other lines and sail already in place. But, after several tries, I got it. I made the parrel a bit longer than the earlier attempt, following the example of several photos, and hung it down a bit further on the mast. The mast top now looks much cleaner than before. (The close-up photos also really highlight that I need to get my hands on better rope!) Overall, I'm quite pleased with how this build has turned out. It started out as what I thought would be a throwaway test bed made of coffee stir sticks, and turning it into a worthwhile model entailed finding out how to fix a twisted hull. It has quite a few inaccuracies, simplifications, and bits of shoddy worksmanship. I also might still reposition the pole and try to add a nameplate. But my skills improved throughout the build and I think that the cargo and anchor are a nice touch. I'm looking forward to applying the lessons learned on this build to the larger Canoa de Rancho once I'm able to get back to work on it.


- 286 replies
-
- 10
-

-
-
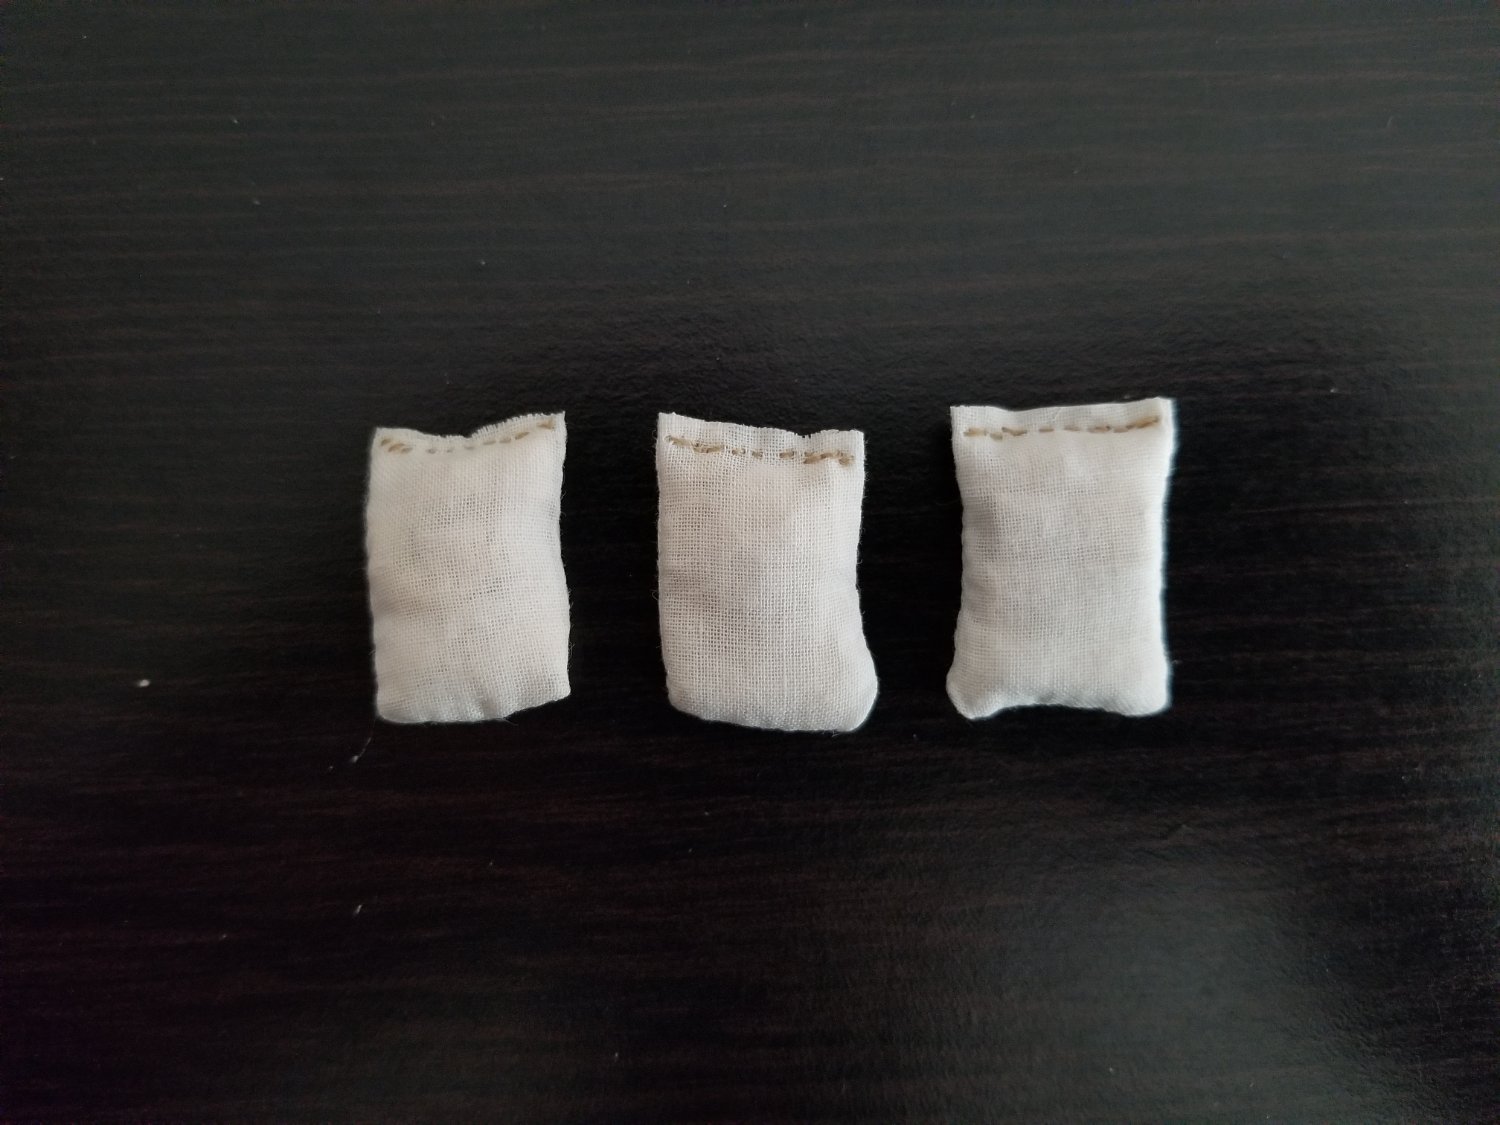
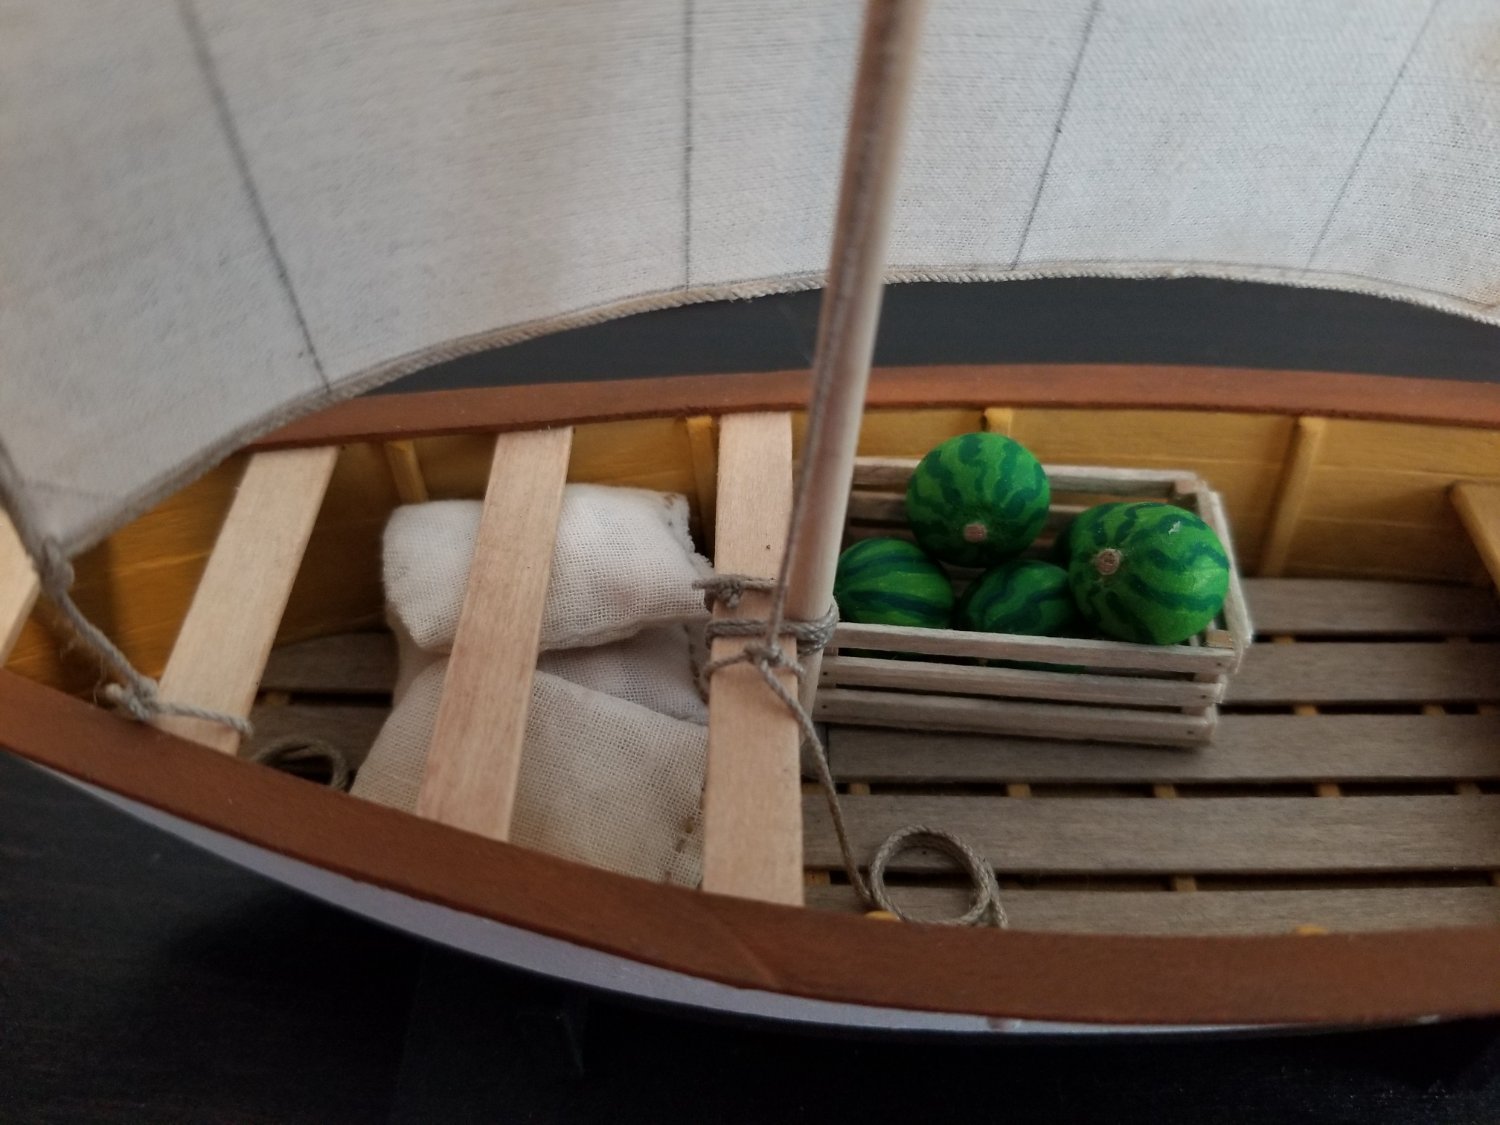
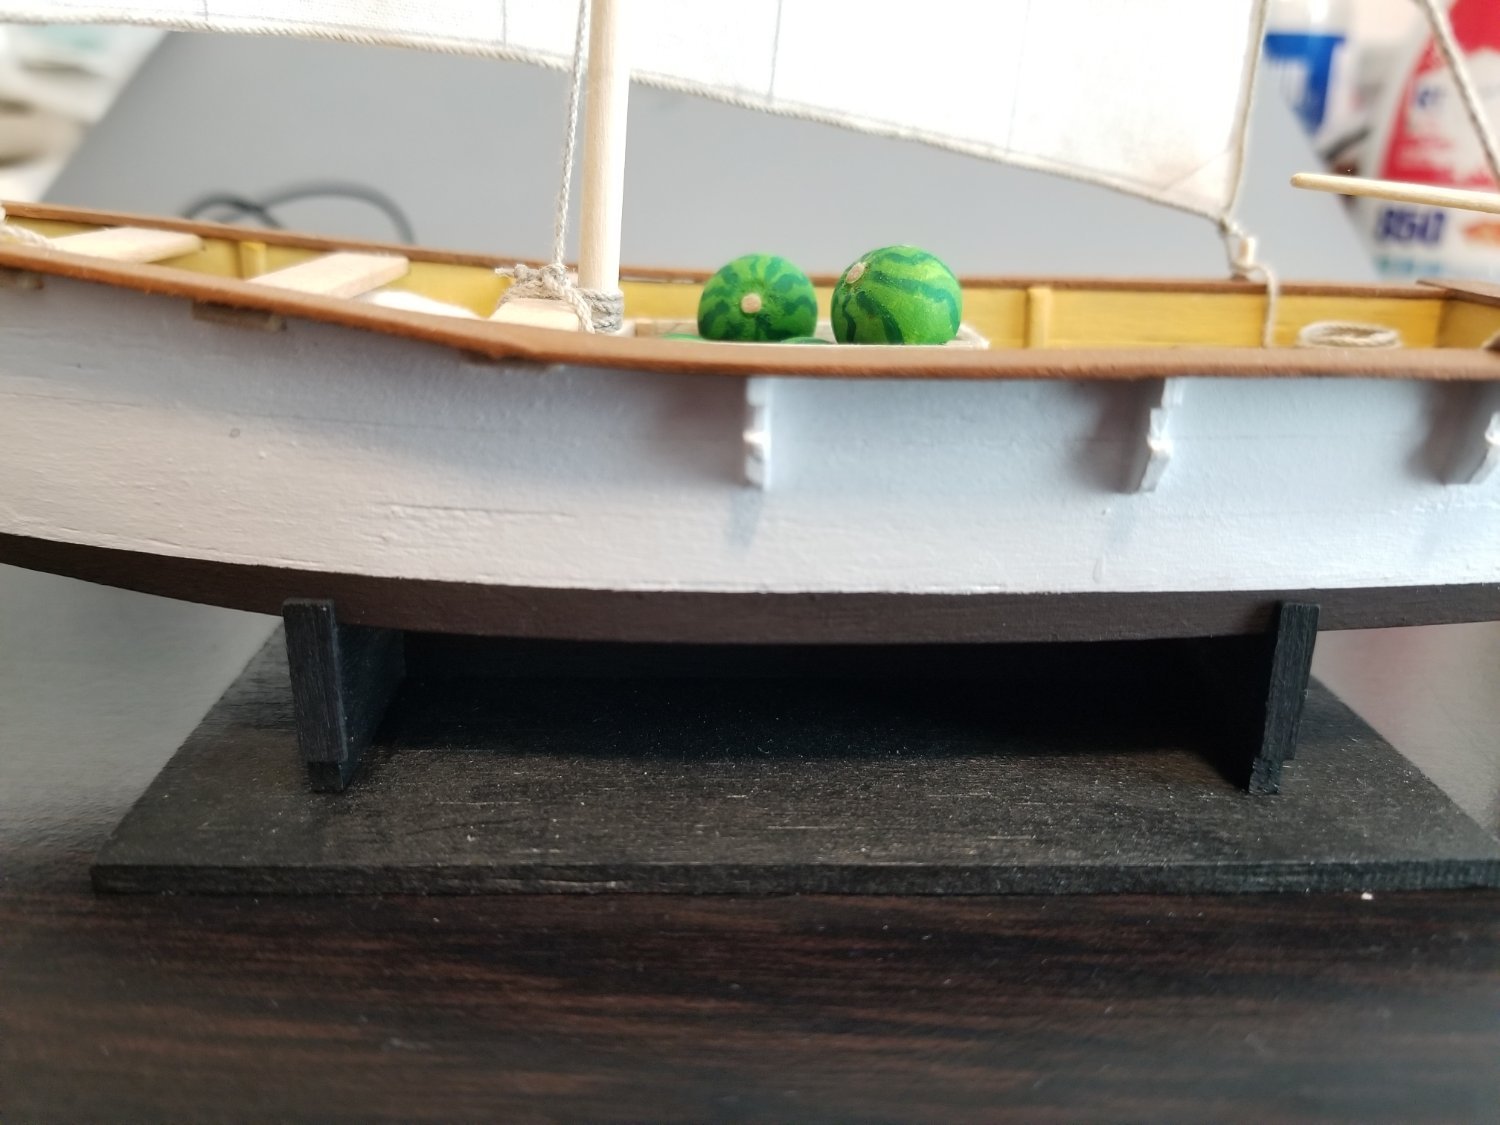
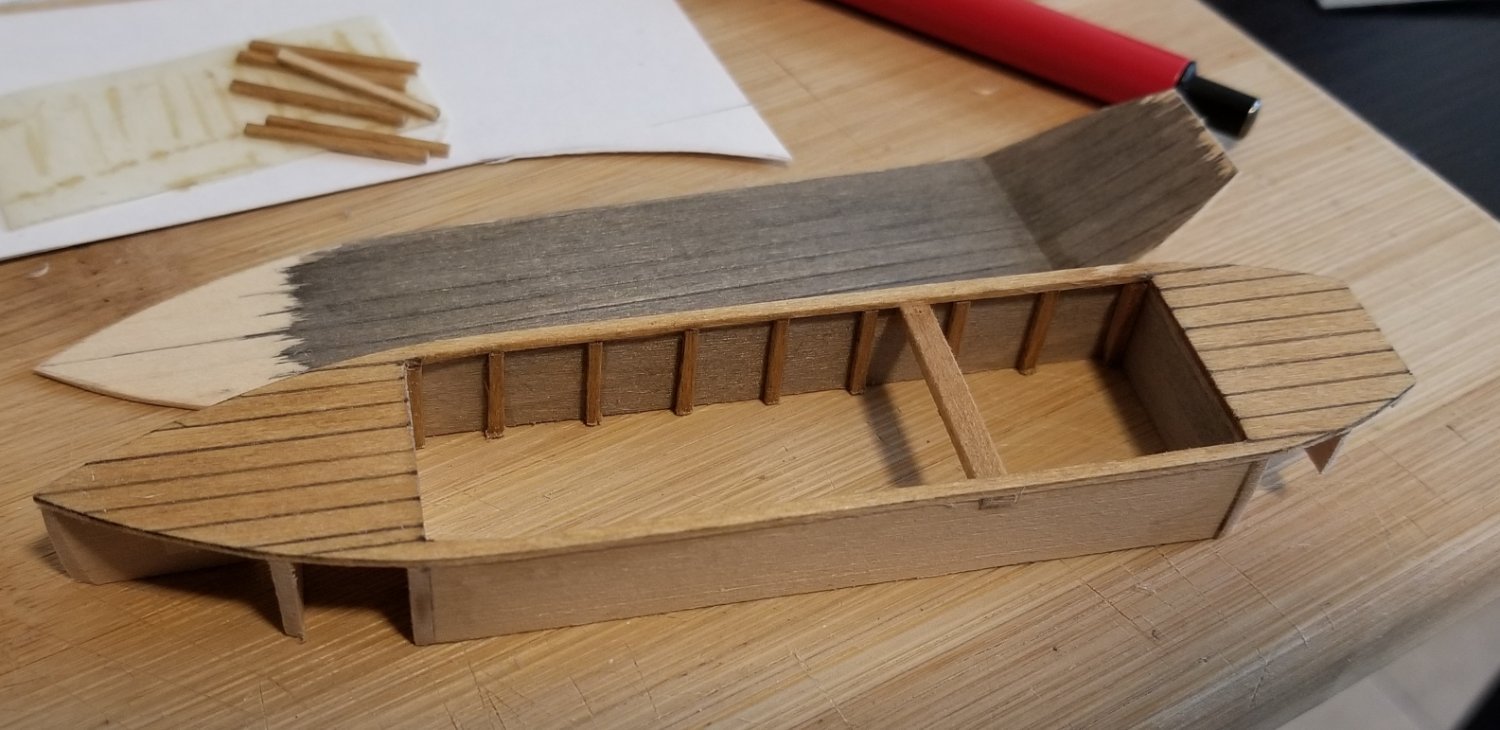
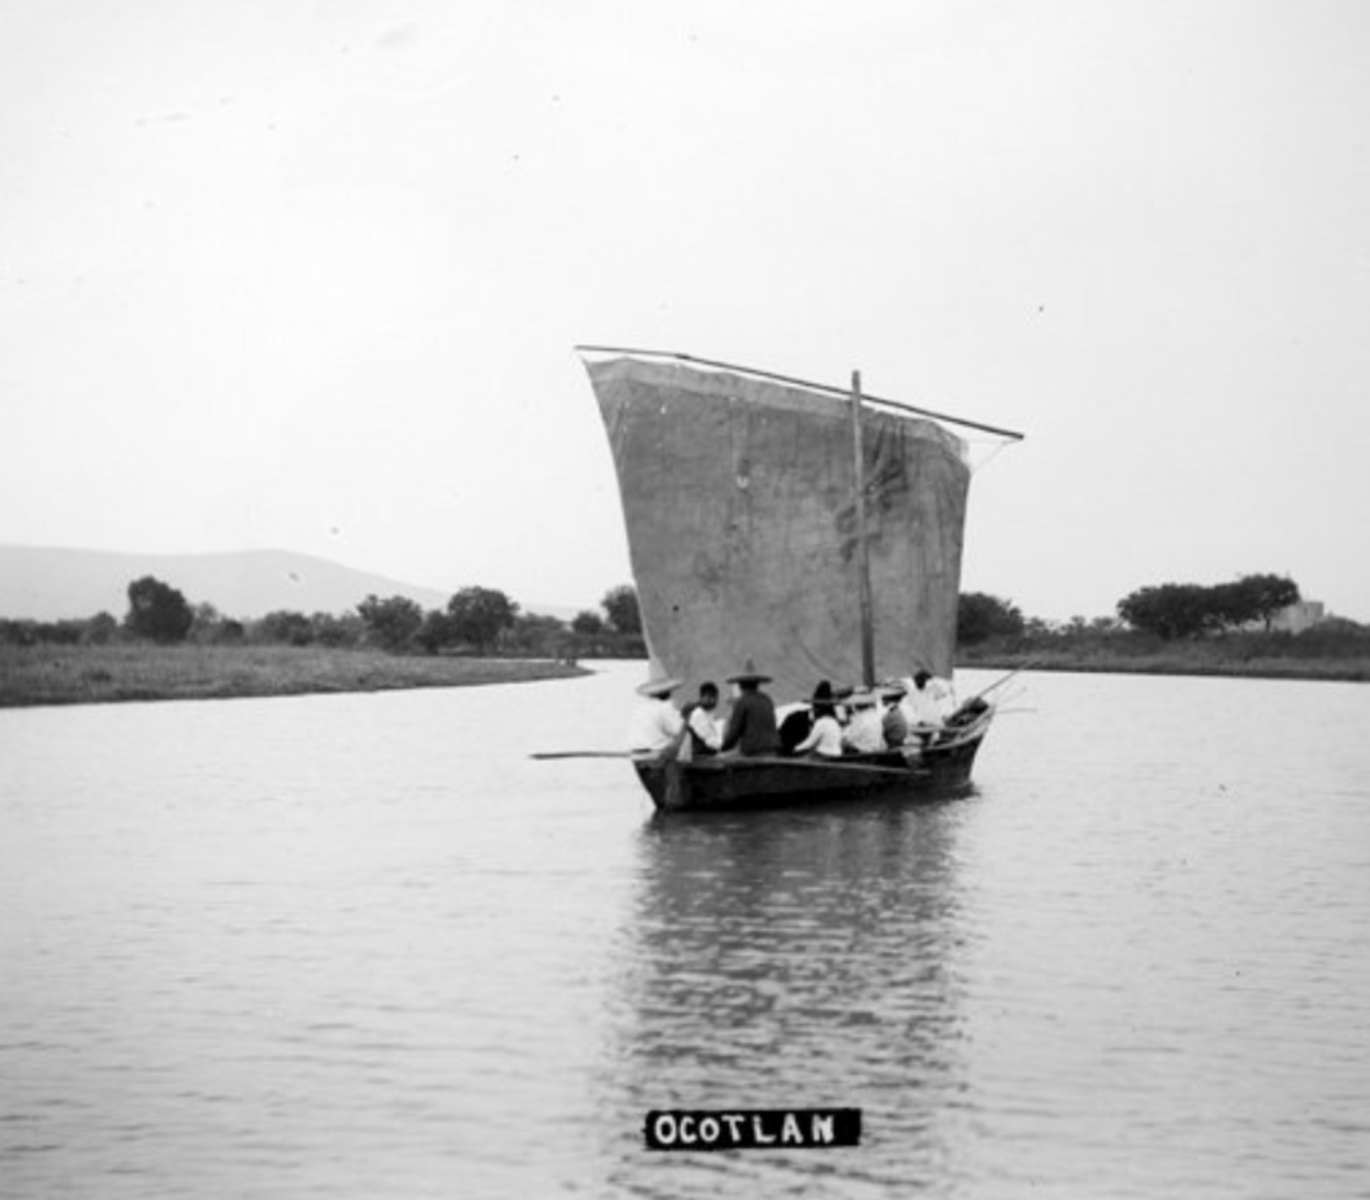
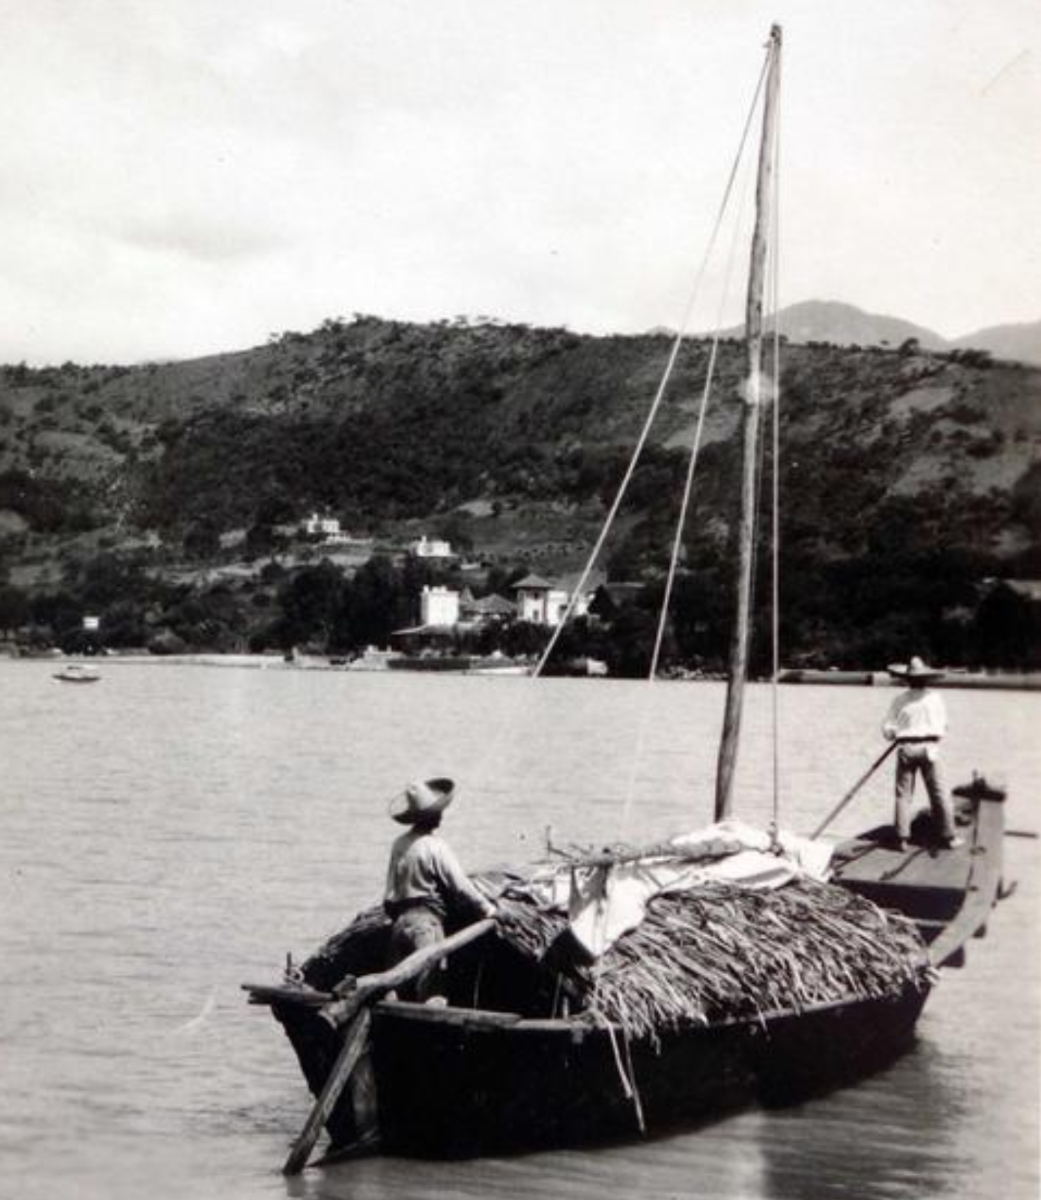
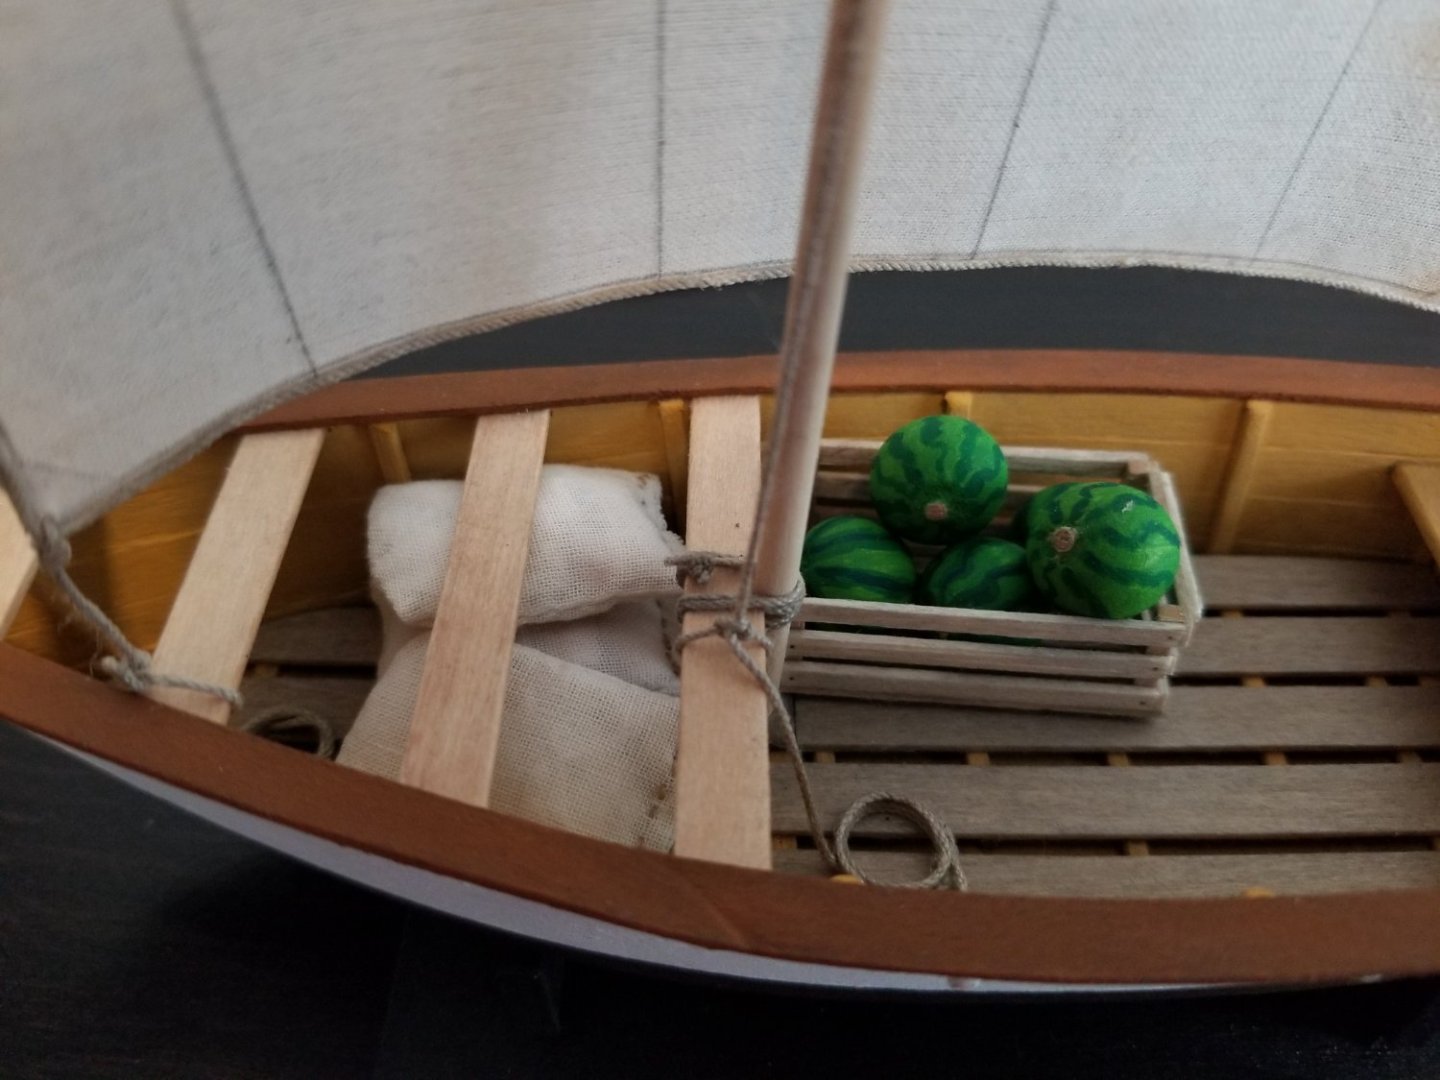
I've been working on a few additions to the Cargo Canoa. I already had the crate of watermelons, but needed something else, so I decided to make some sacks. Some photos show canoas laden with simple sacks of goods. I used the same cloth as the sail. My wife showed me how to use the sewing machine to sew together two layers of the cloth on three sides--she sewed the first and I did the next two. Then I inverted the sack so the seams were on the inside, stuffed it with scrap fabric, and hand-sewed it shut. I placed the sacks under the crossbeams just ahead of the mast. It would have been more accurate to fill the canoa with a lot more cargo. As the photo below shows, they could be quite heavily laden! But, I decided that a few sacks plus the watermelon crate was enough to add interest to the model, and make clear the vessel's purpose, without adding so much that the boat practically disappeared under a heavy load. https://www.mexicoenfotos.com/antiguas/jalisco/chapala/lago-de-chapala-MX14271628900172 These vessels were often poled (see above) and when not in use the pole was often placed over the crossbeams dangling over the bow like a bowsprit. To represent this, I whittled some mango. I left it a little rough-hewn. Finally, I added a few supports on the sides of the stand to turn it into more of a cradle, giving it a more stable base. As for the Ems Punt, I finished planking, added the raised bow, and painted. In order to get a smooth line, I painted over the tape with clear sealer first. Next to add the leeboards, deck furnishings, and mast.


-
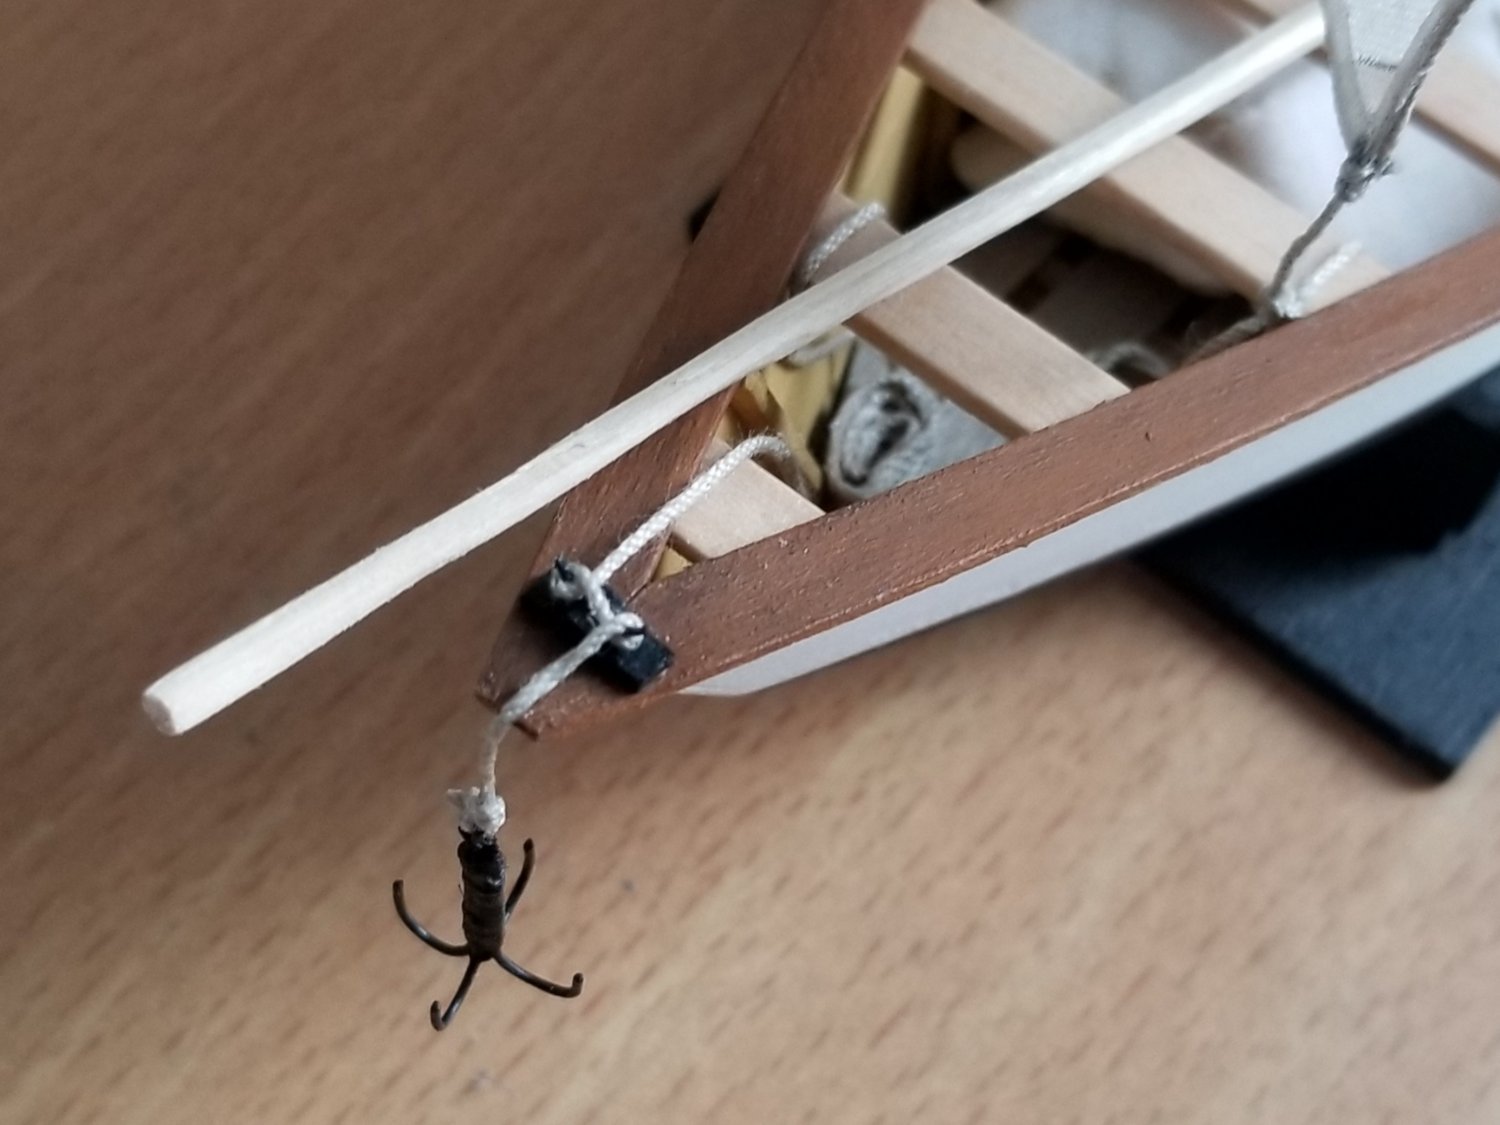
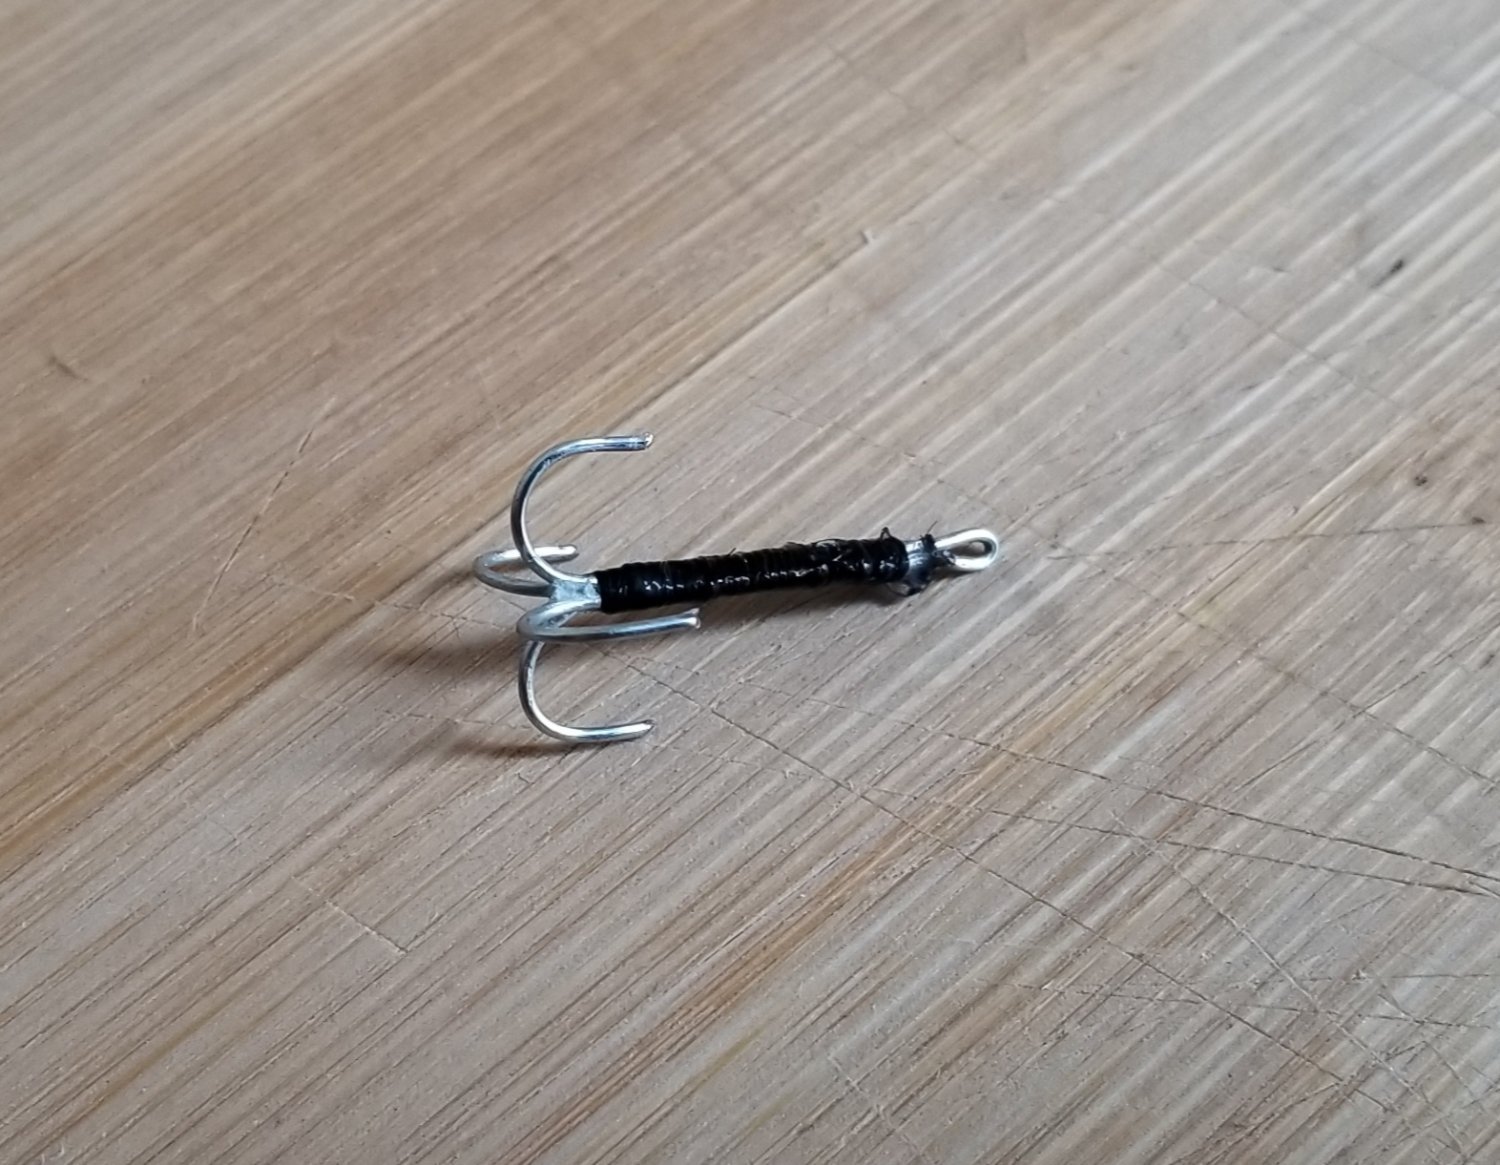
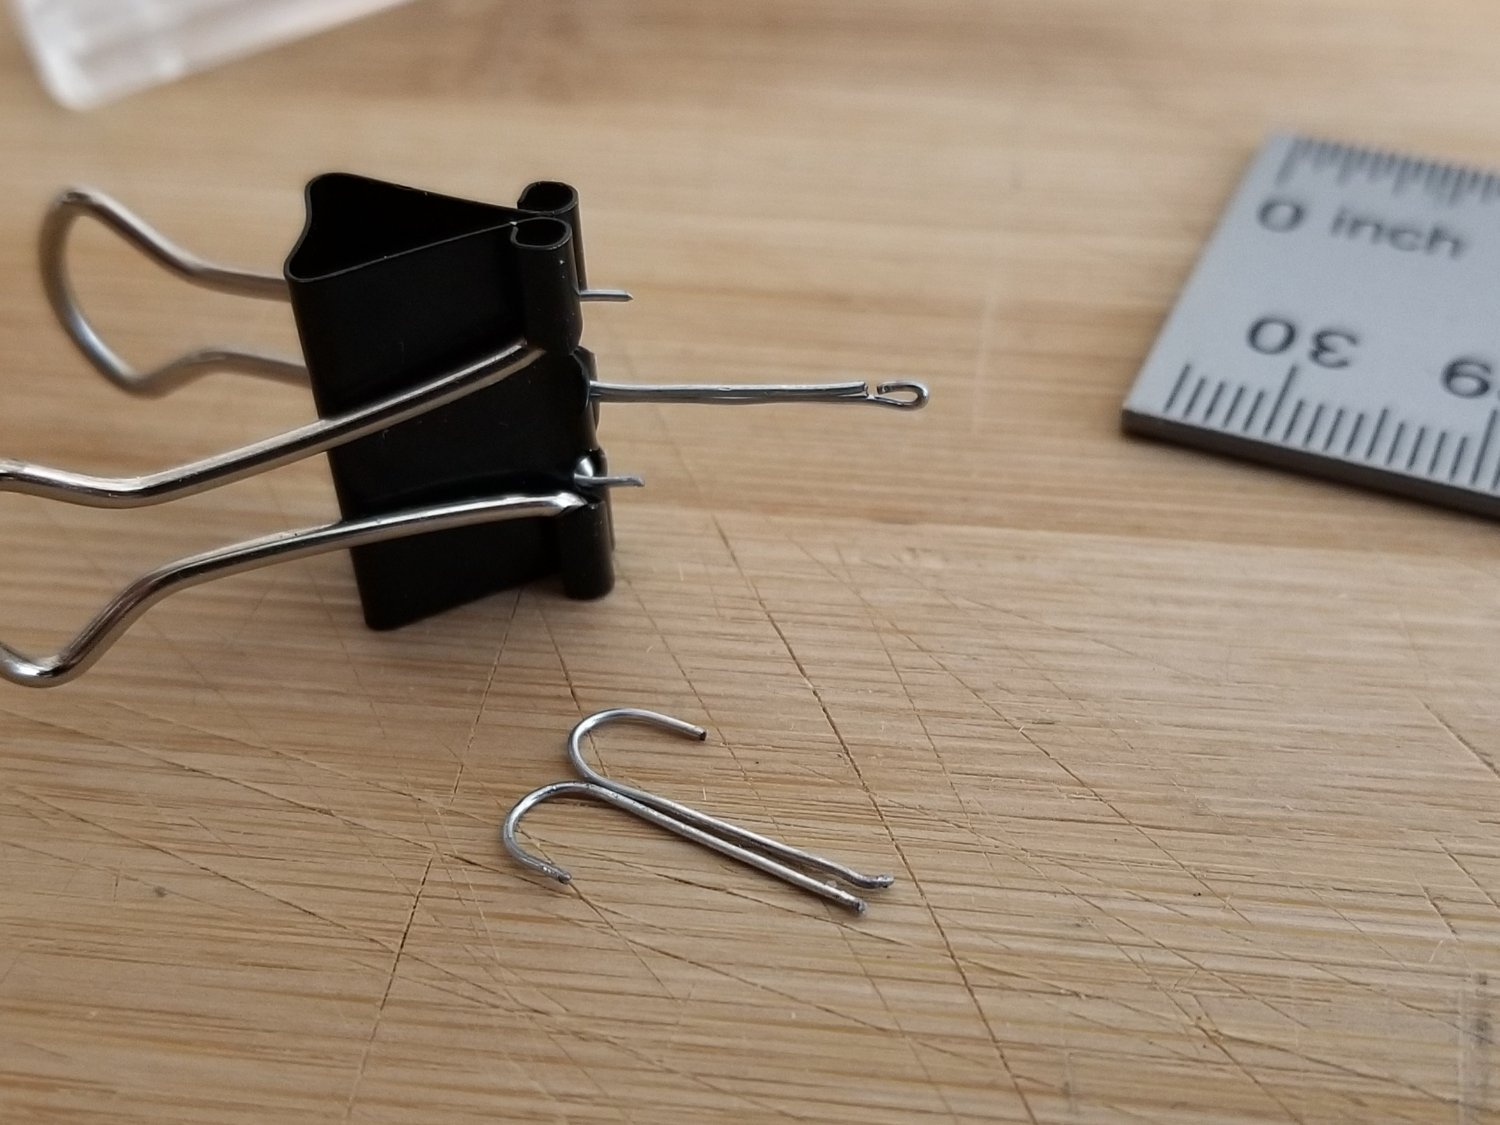
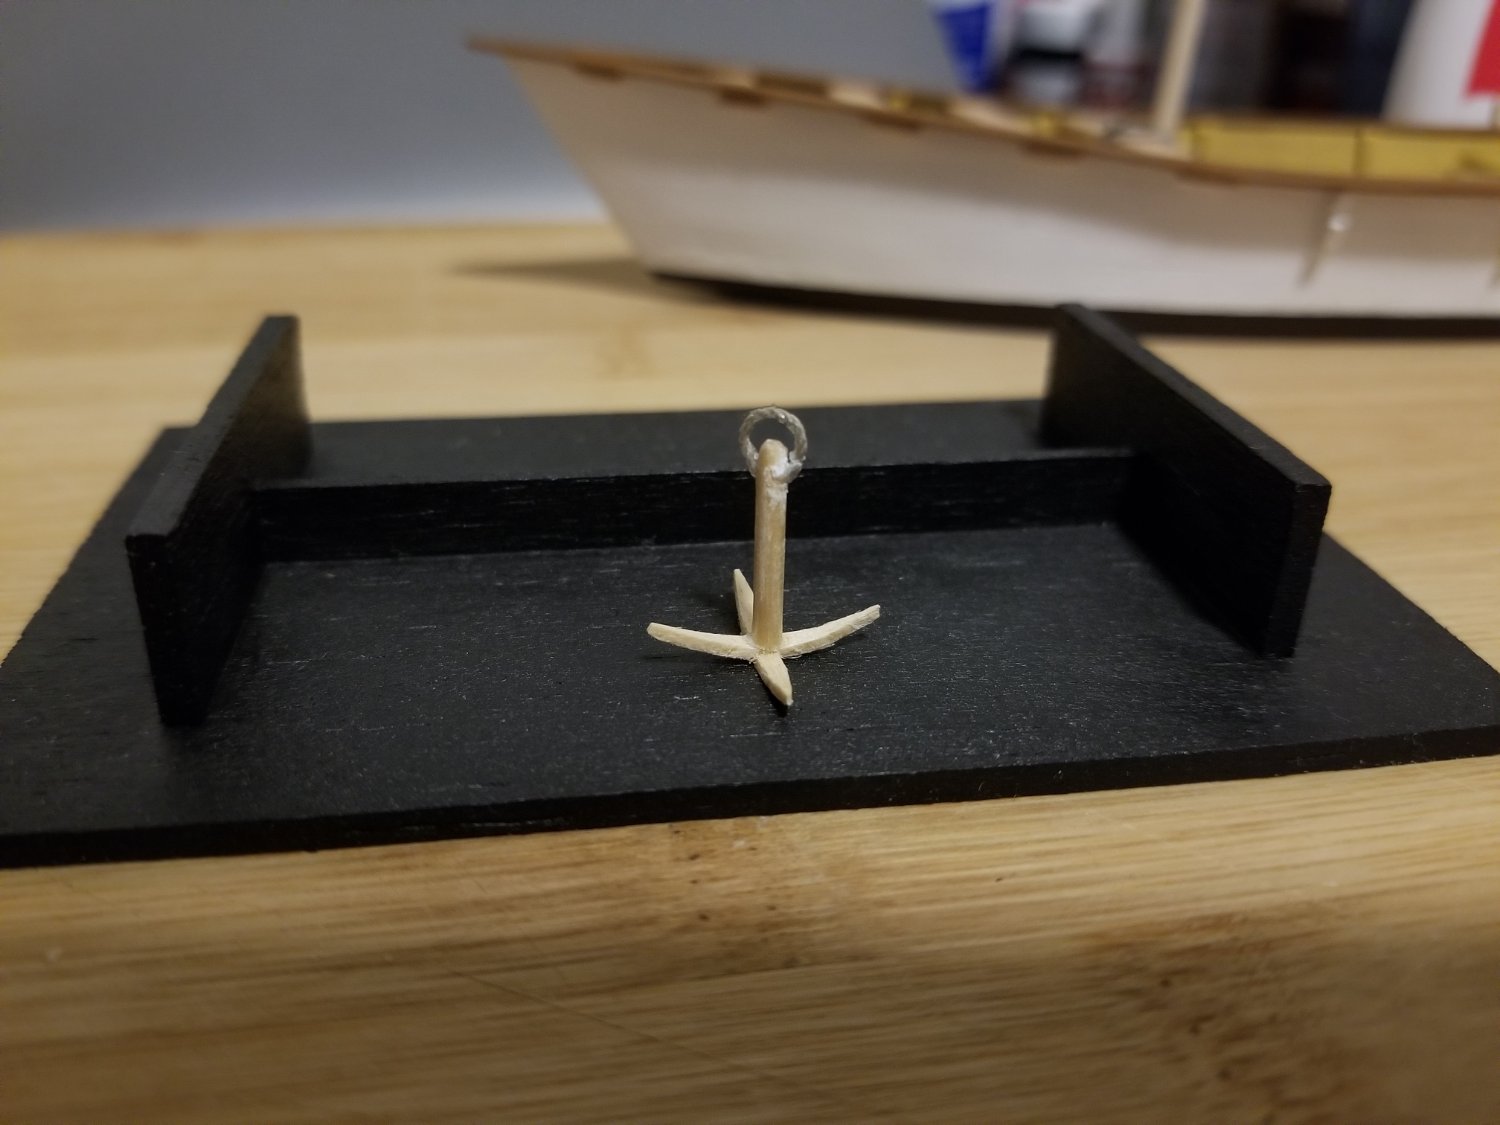
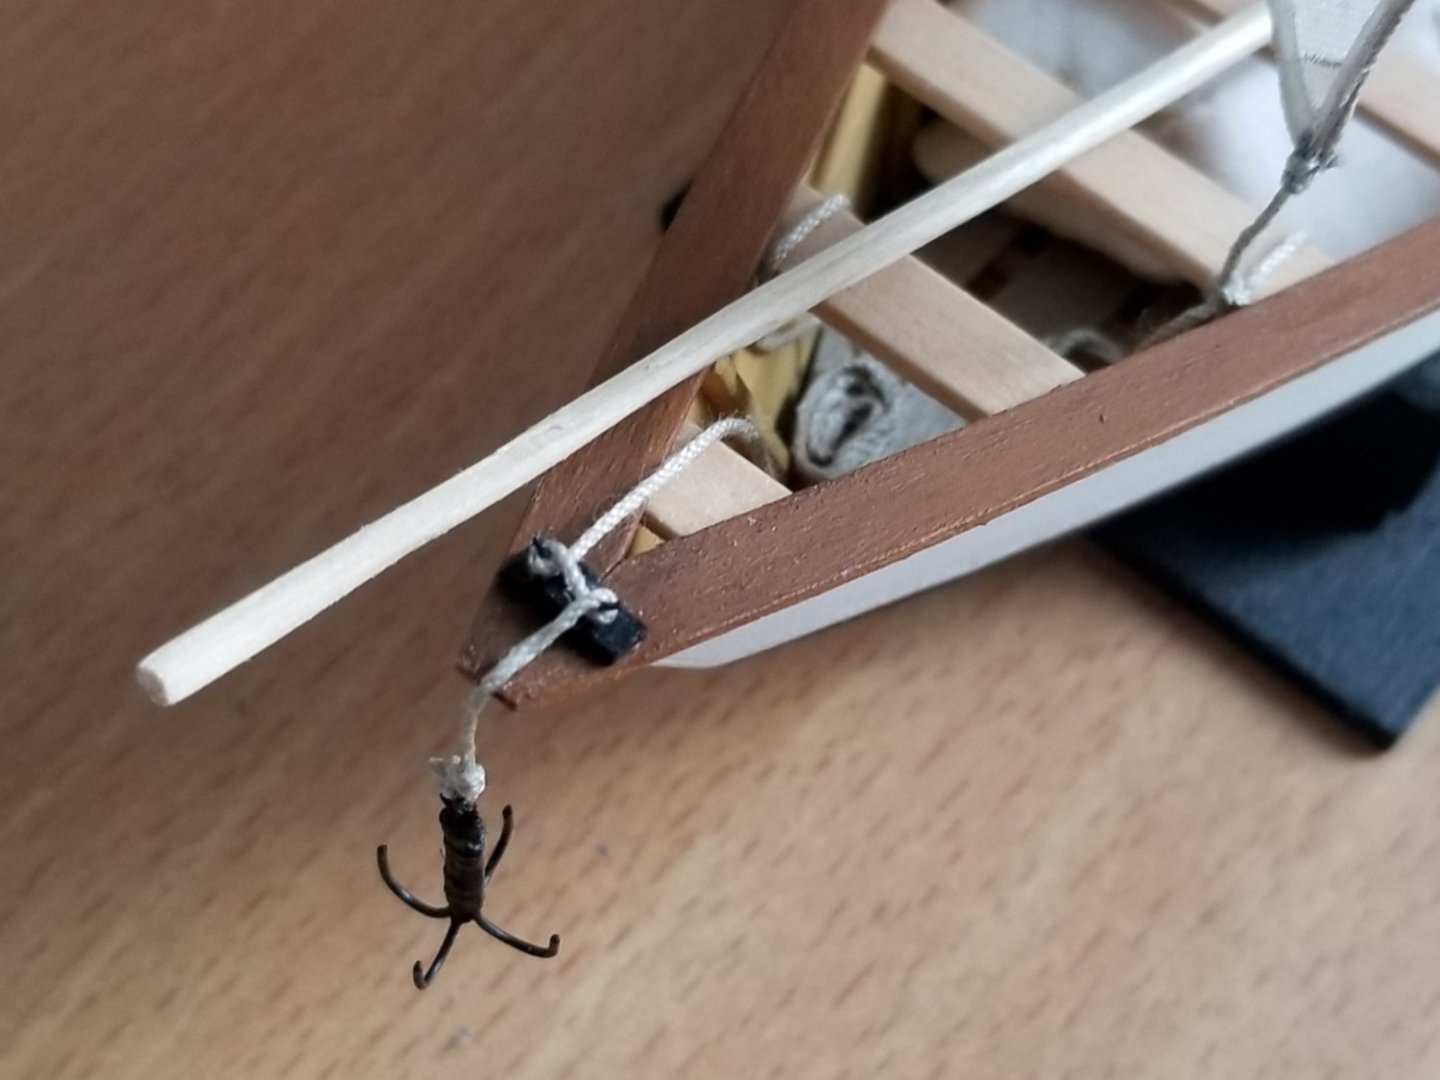
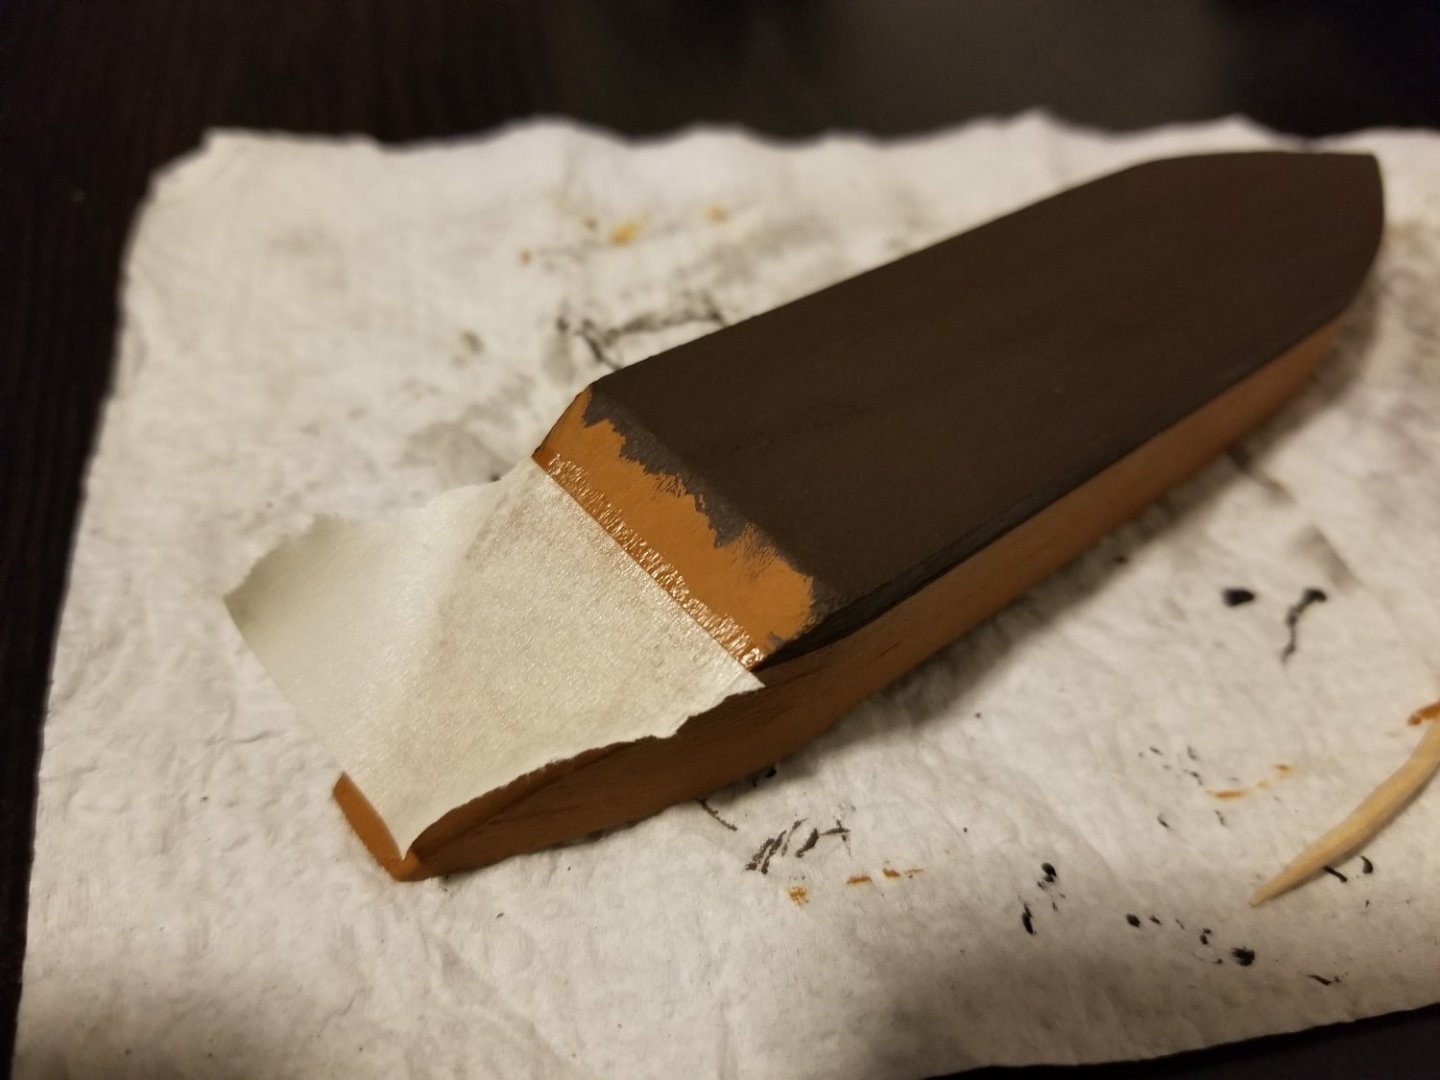
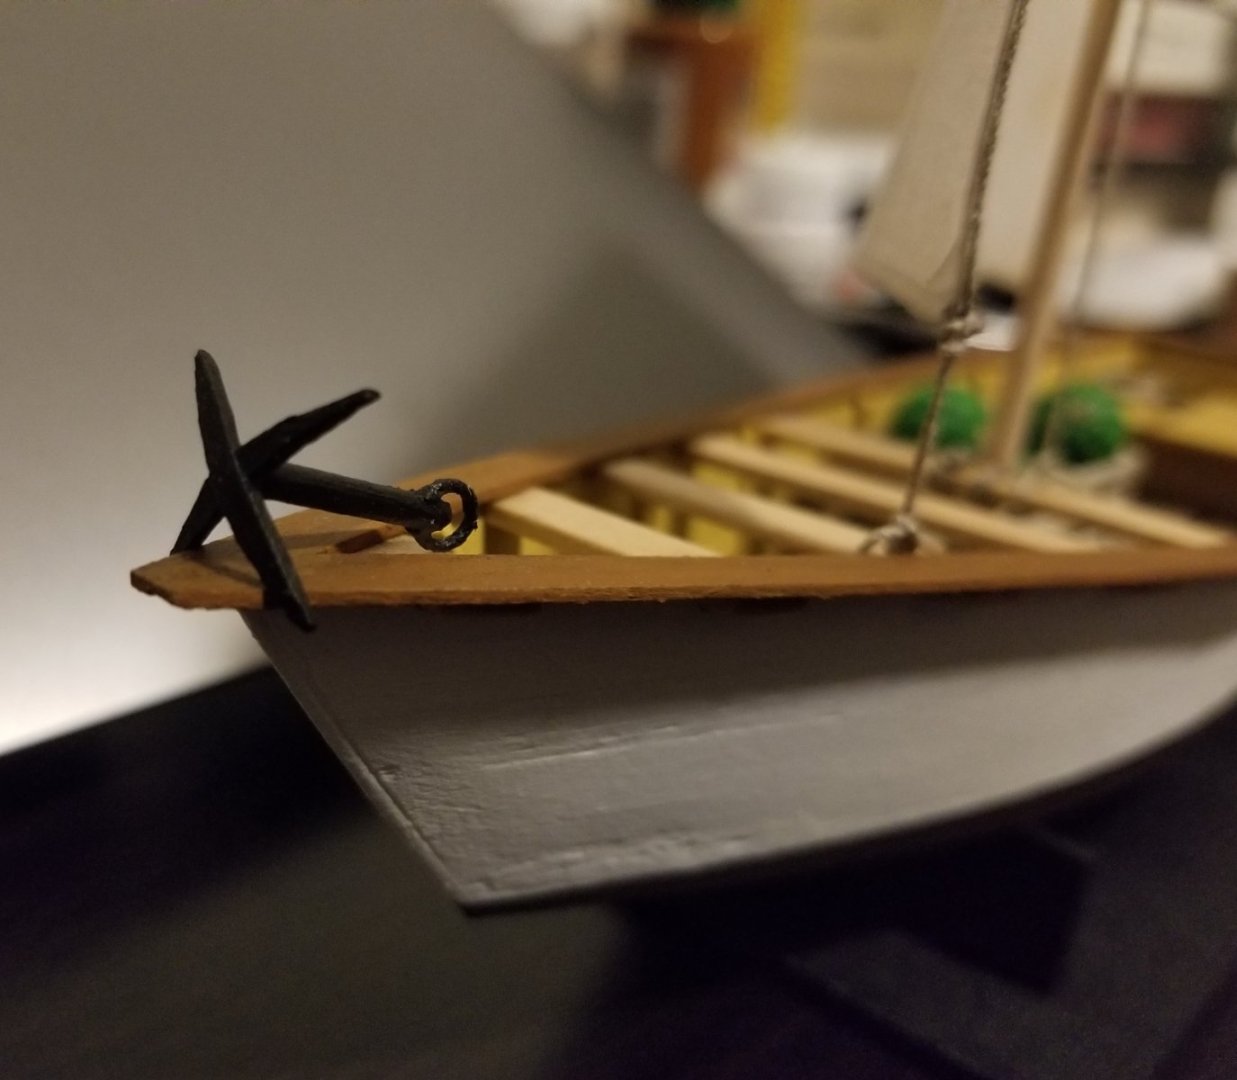
Thanks for the suggestions! I was able to remake the anchor, and while it's not perfect, it's much better than it was. I used wire from an old twist tie after cutting off the plastic. I was able to "cut" it by repeatedly bending it sharply at a point until it broke. I made four hooks, one longer than the rest with a loop at the other end. I superglued them together one at a time, using a clip to keep them from sticking to anything. The wire could be better formed, especially at the loop, but given my lack of tools (those are my only pliers at the moment below) I deemed the result acceptable. I then served the shank in thread. This was difficult to do near the "hooks" as they snagged the line a lot, so I wasn't able to use the thread to taper the shank's thickness as I would have liked. Finally I painted the anchor and anchor support. Although the acrylic won't stick well to the metal, once finished the anchor will just dangle so it shouldn't chip too much. As can be seen, the anchor is much improved over my first attempt. In the future, besides getting appropriate tools, I'd also like to try using thinner wire. As for the Ems Pünte: I really just came across it by chance. Given that the hull is basically a box, it was easier to build than a more curved hull, while also being more visually interesting at this scale than something like an Austrian Zille. I'm nearly done with the planking. Bending the planks required some creative clamping: Before attaching the uppermost plank, I'll need to paint its interior edge.


-
This is a very cool build! On the ship's wheel, if you're willing to consider other materials, card and wire might work? I just saw this post and thought it might be helpful:
- 346 replies
-
- 2
-
-
- Sophie
- Vanguard Models
- (and 1 more)
-
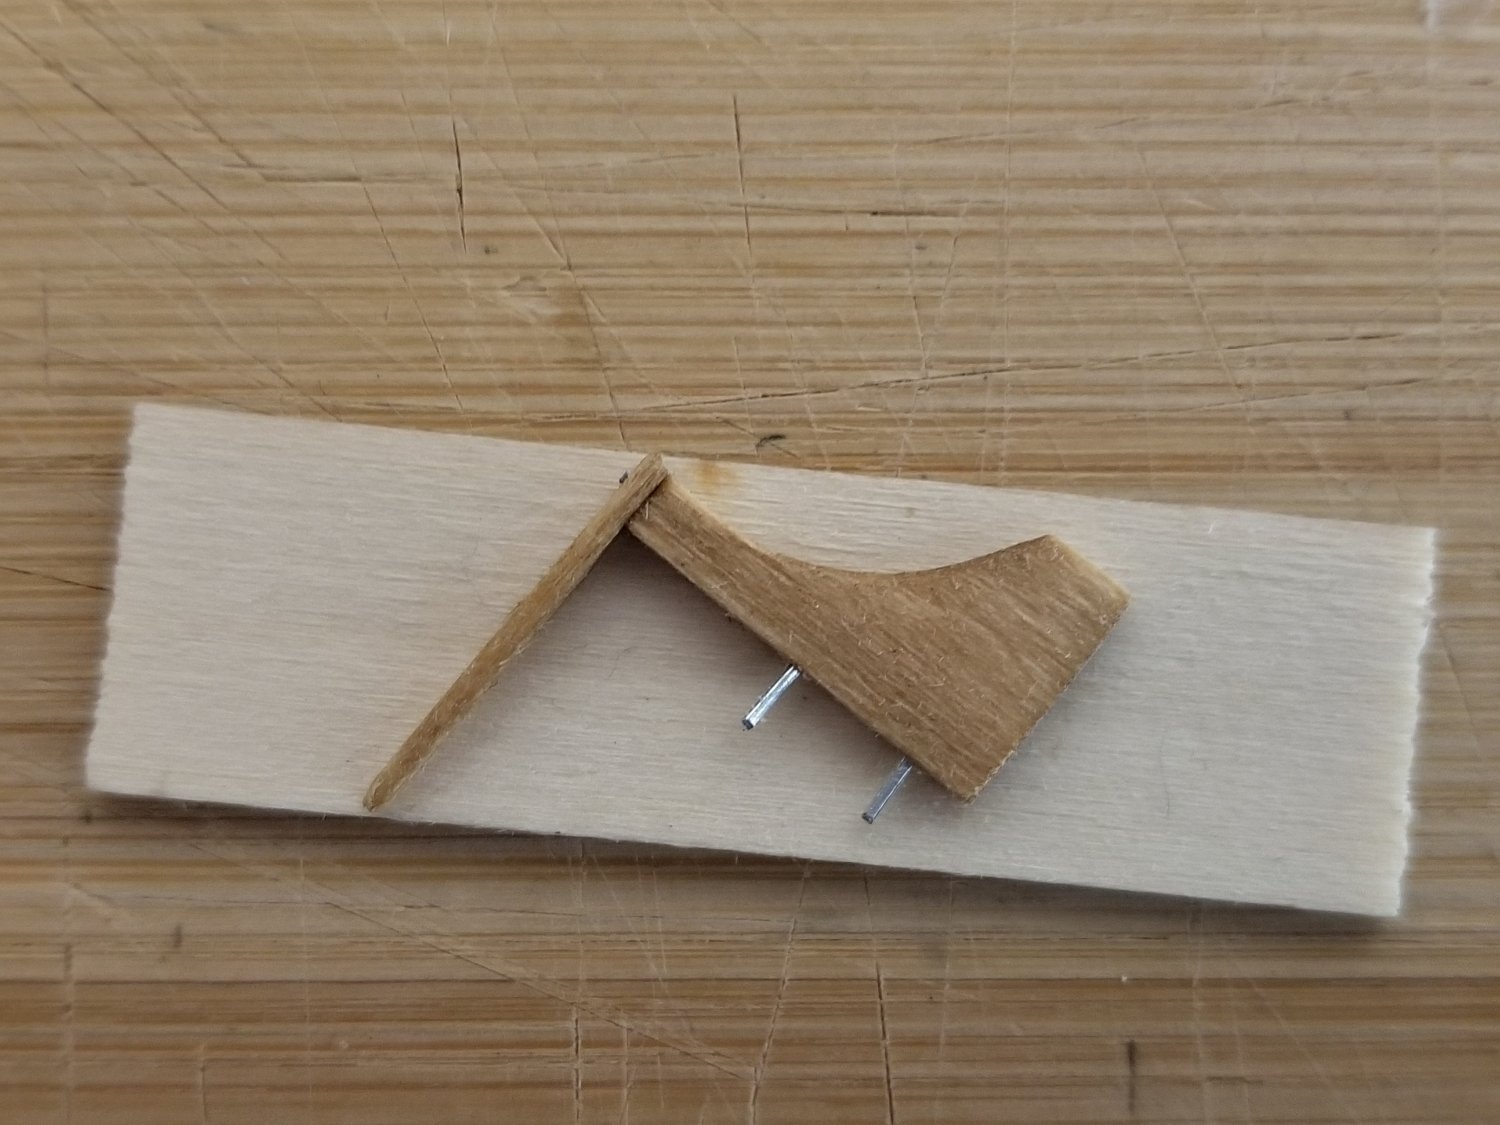
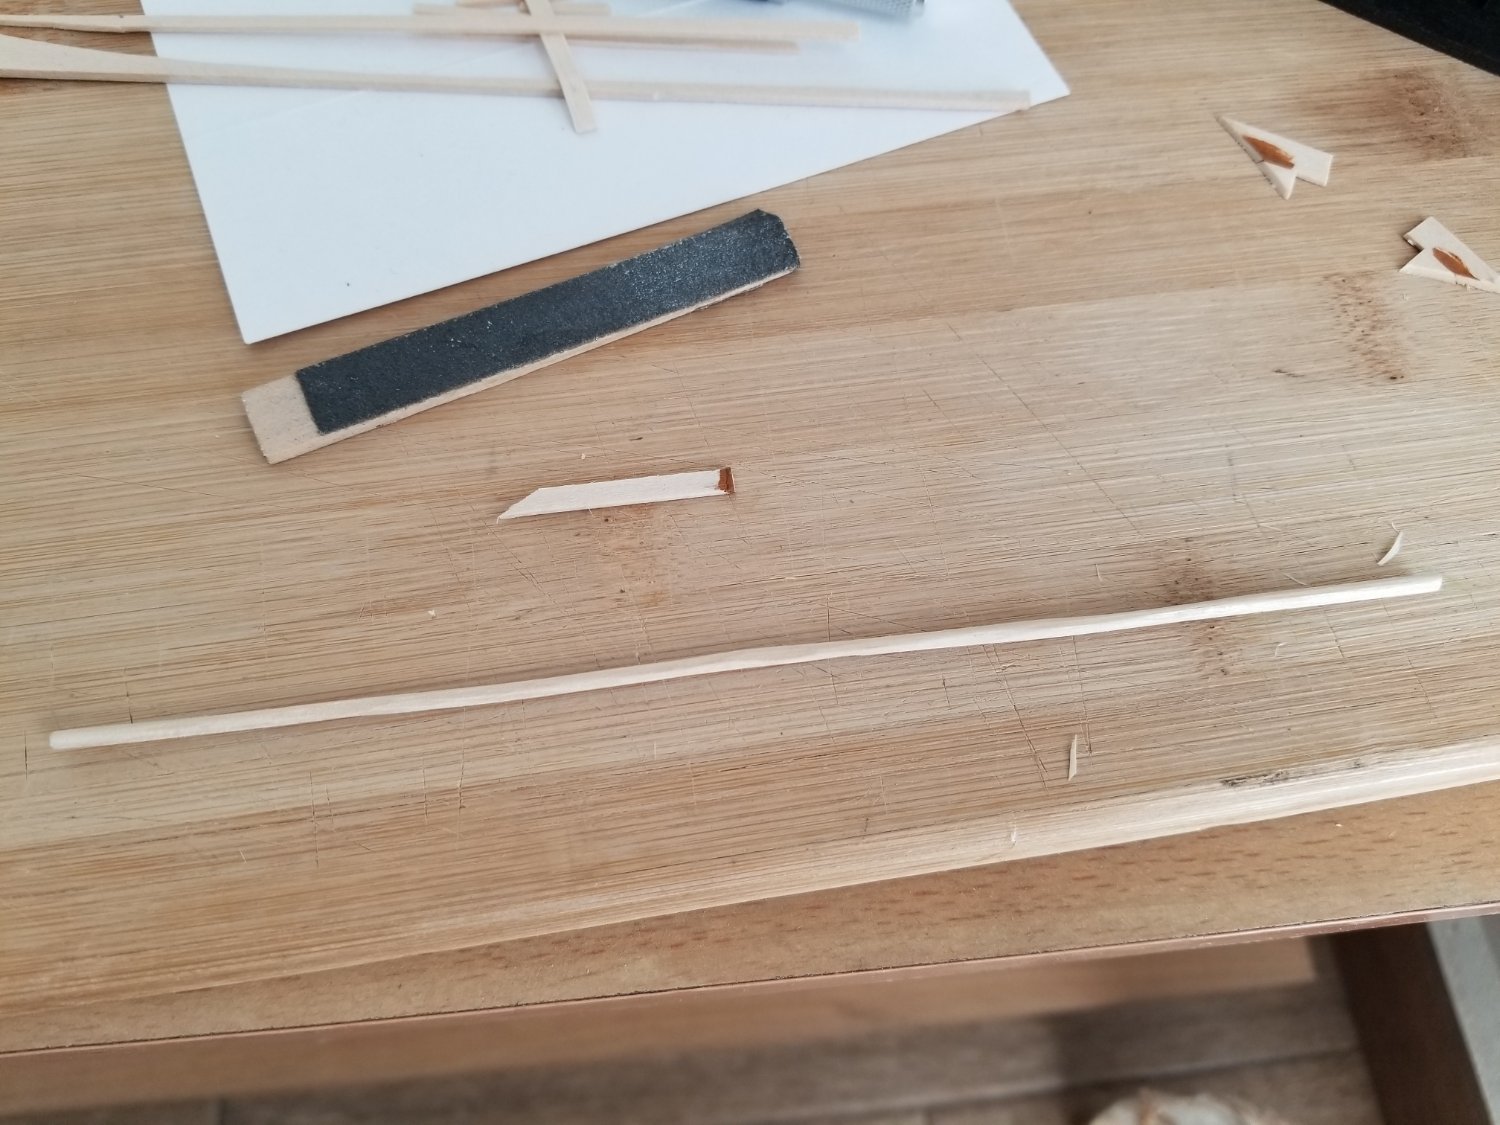
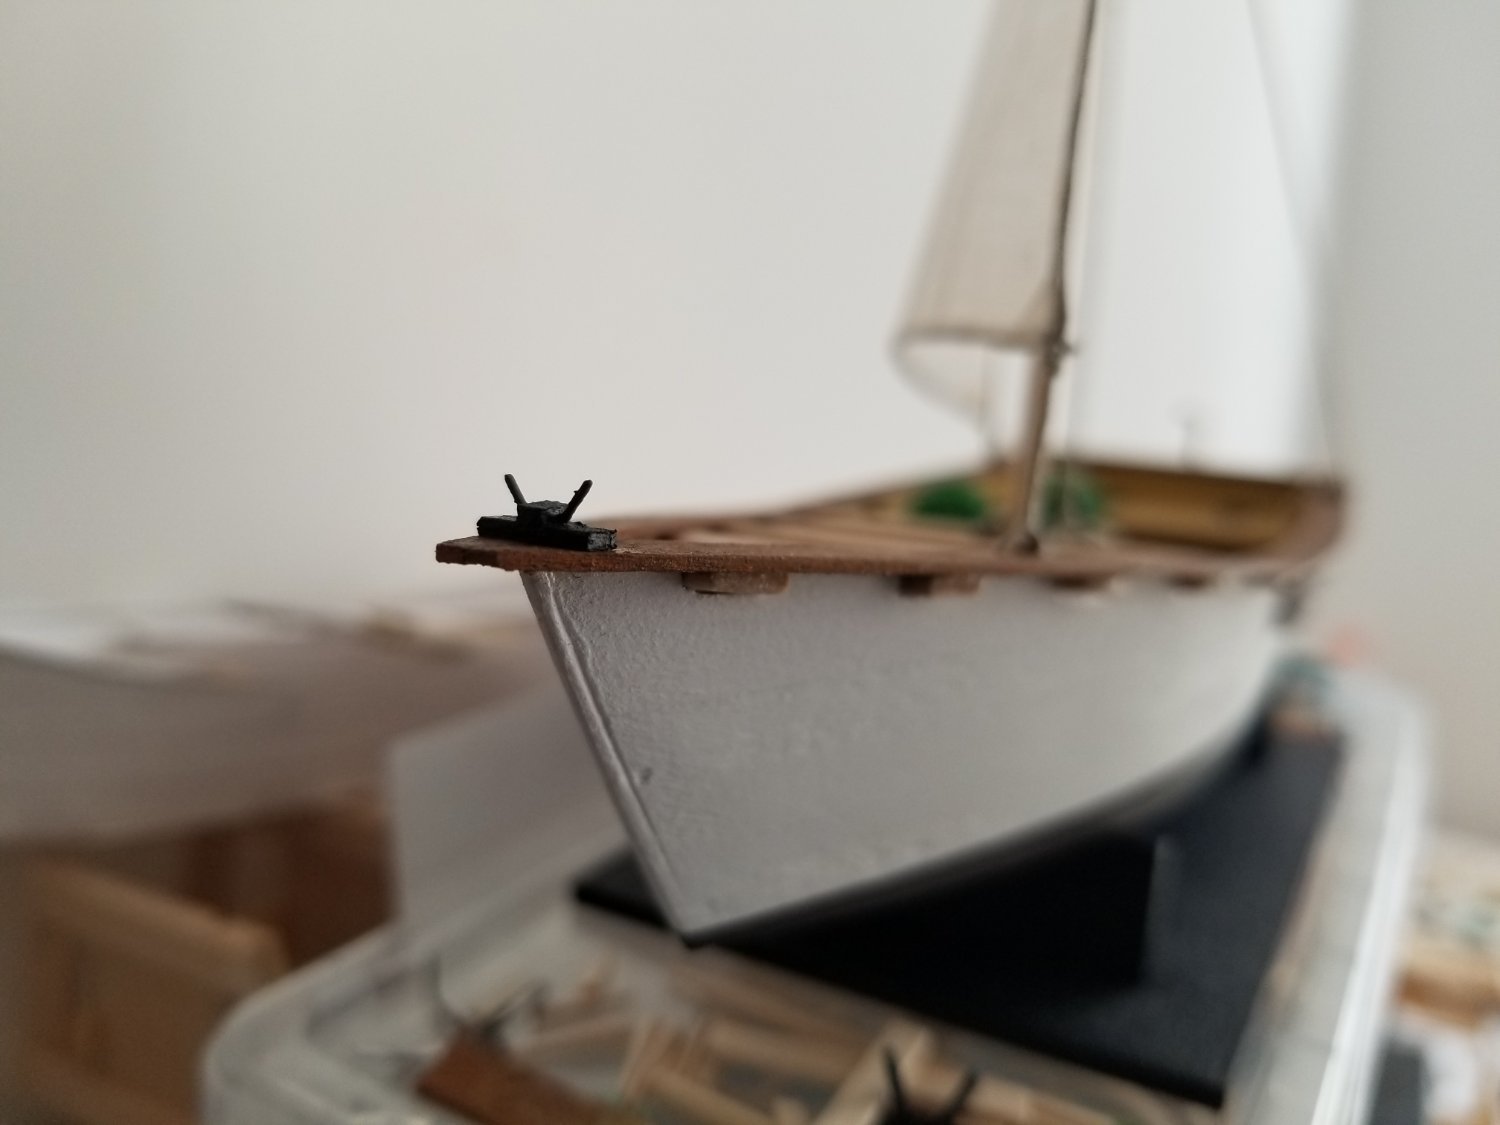
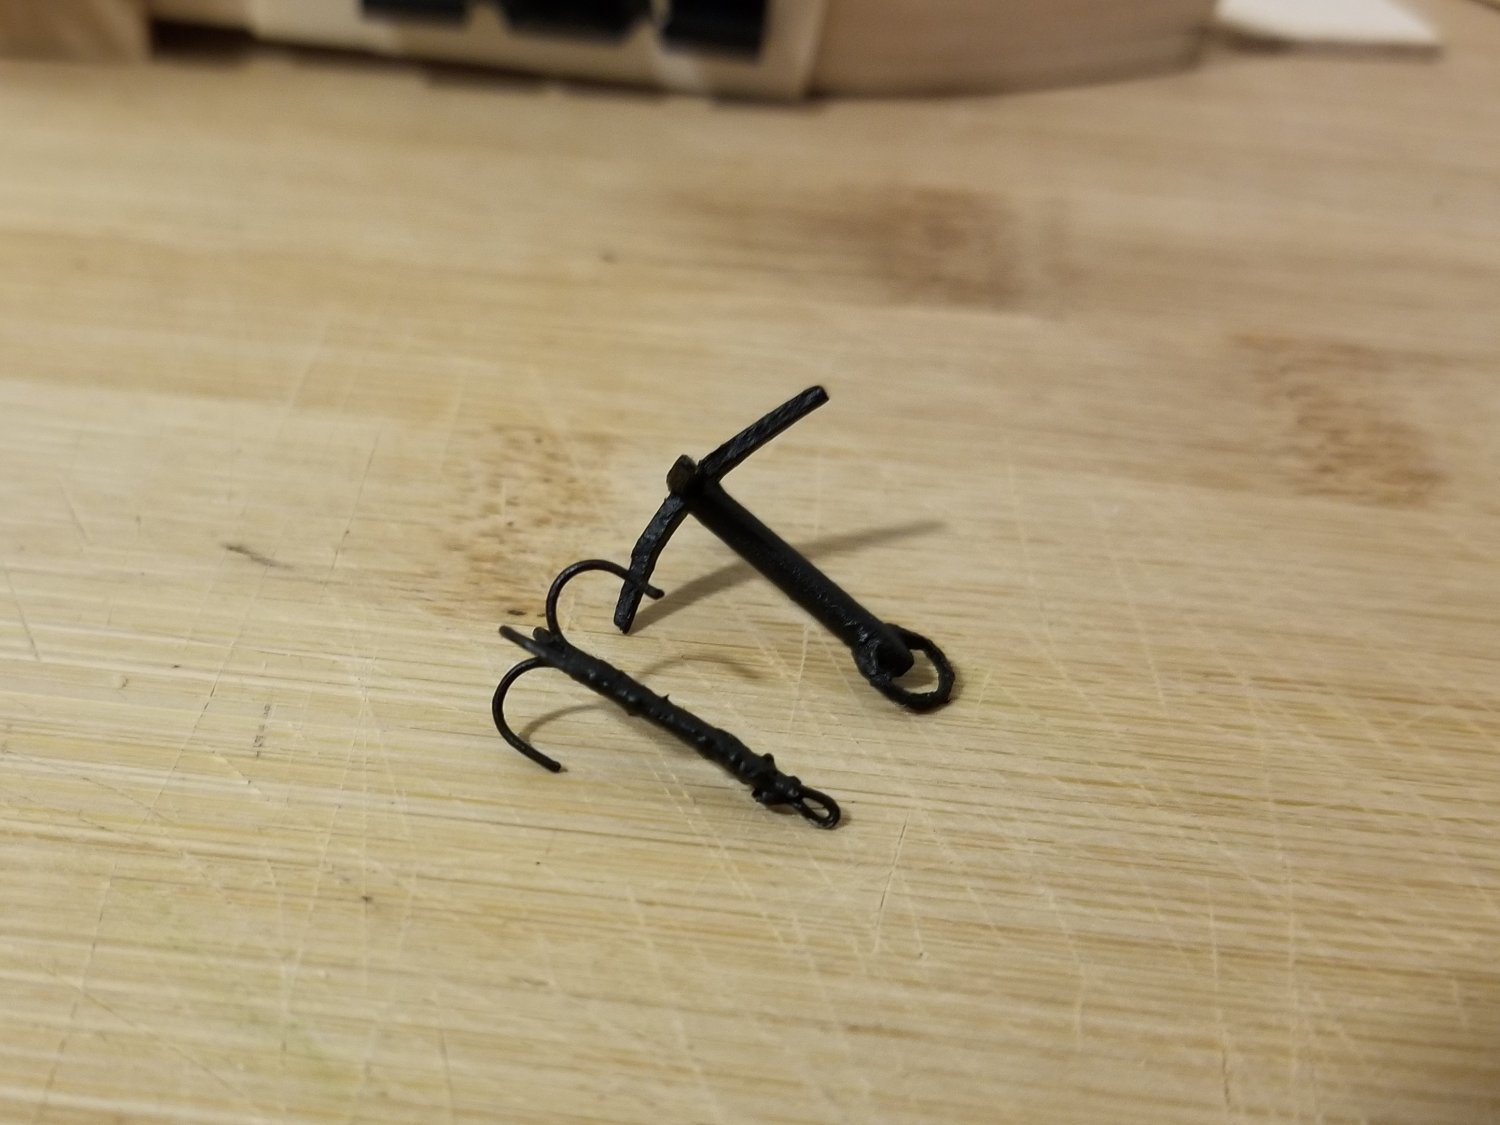
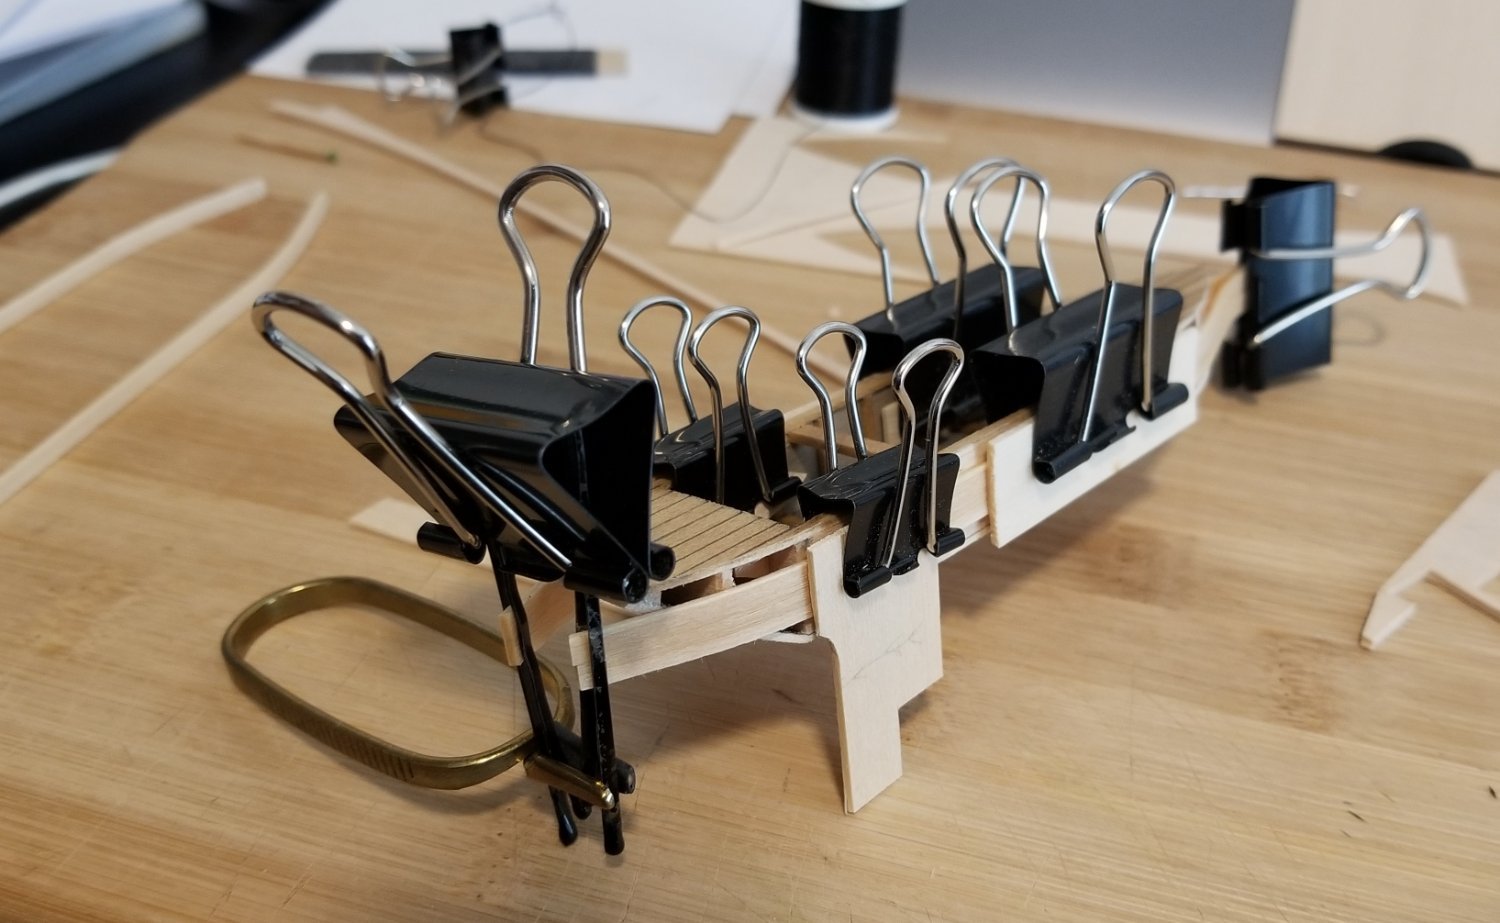
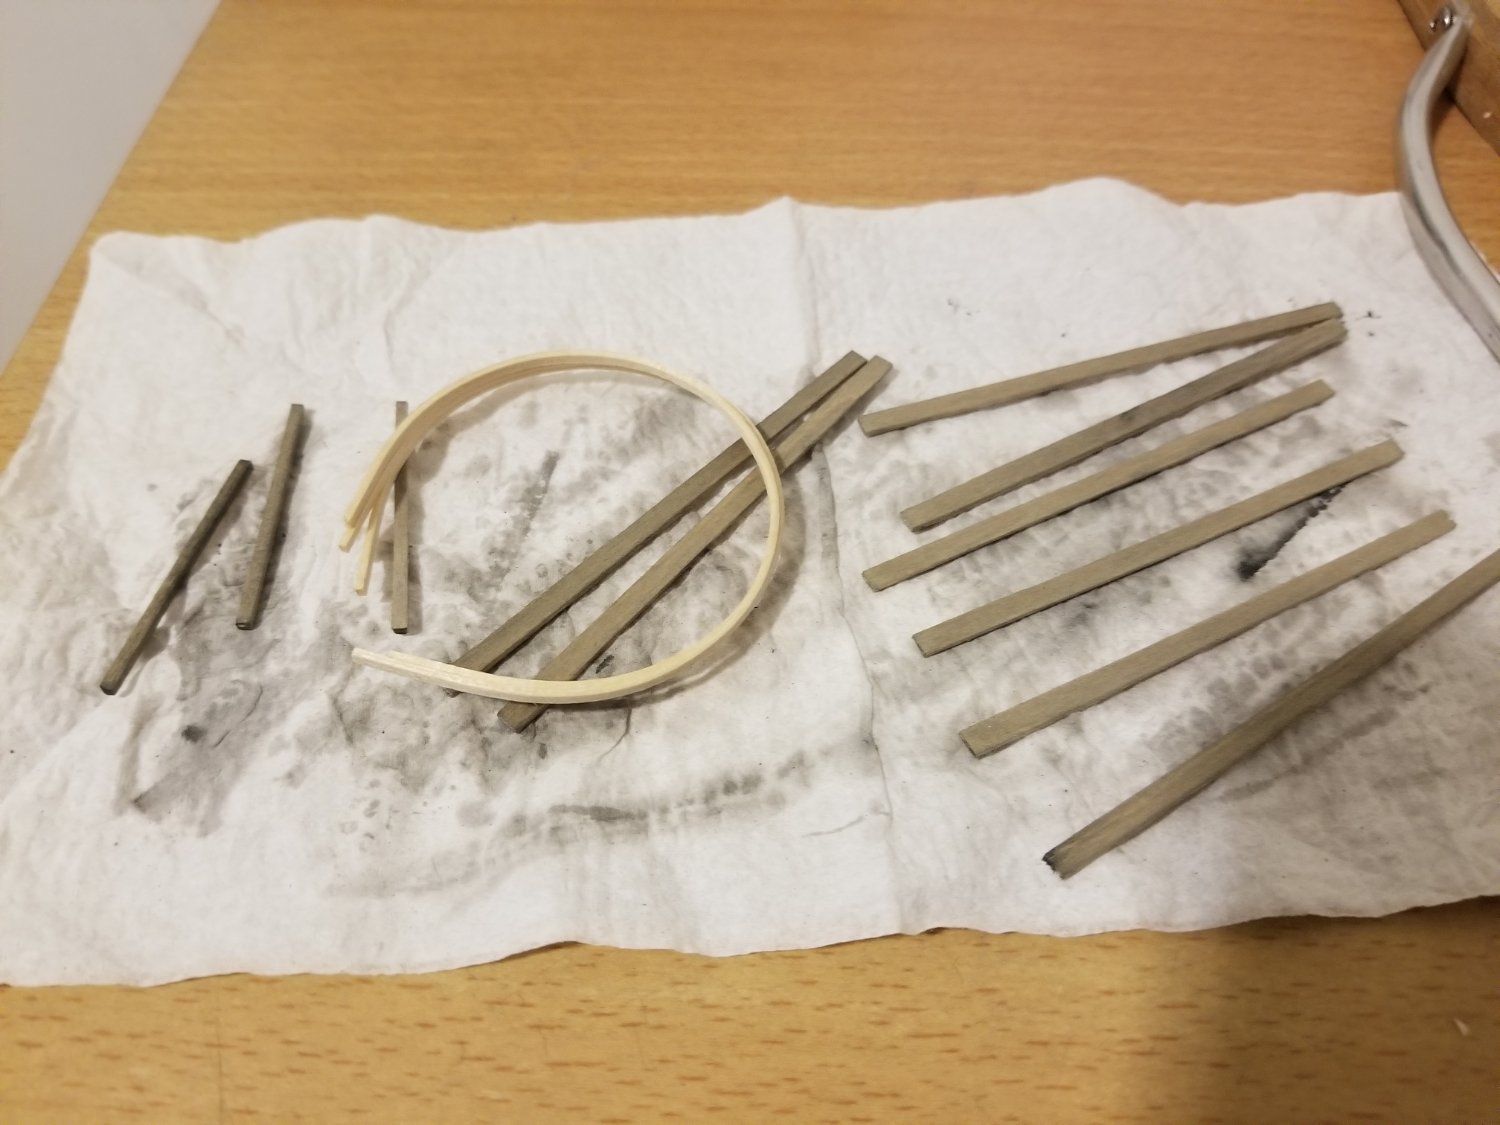
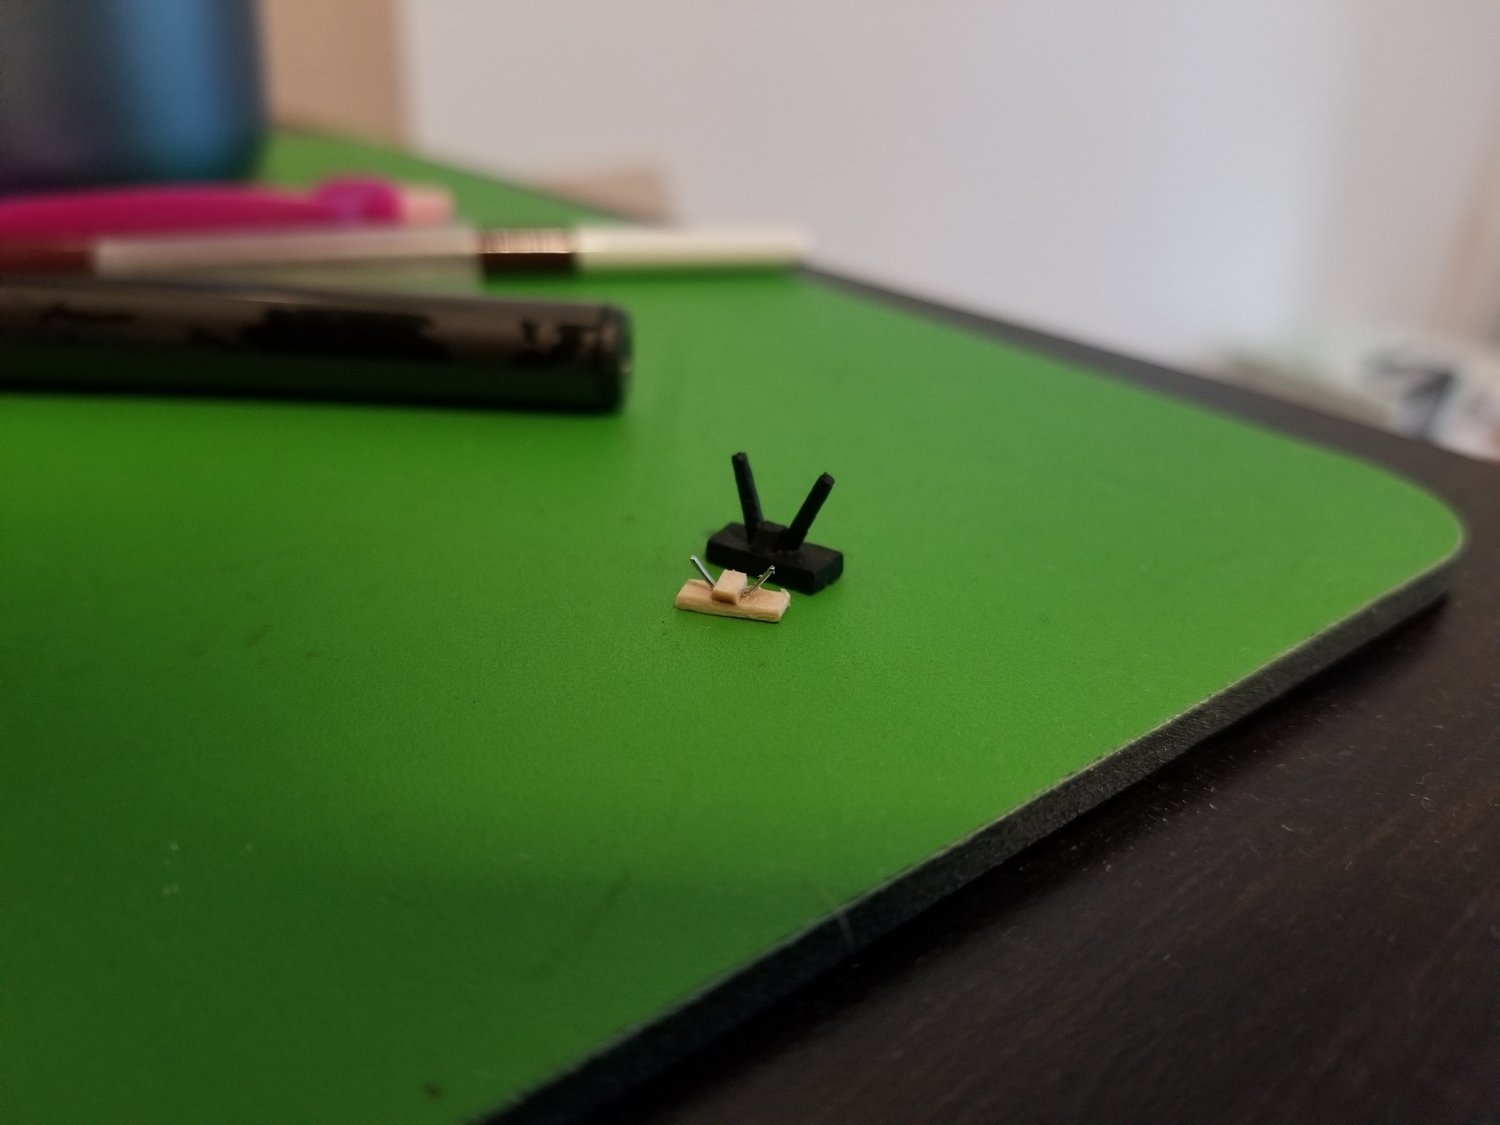
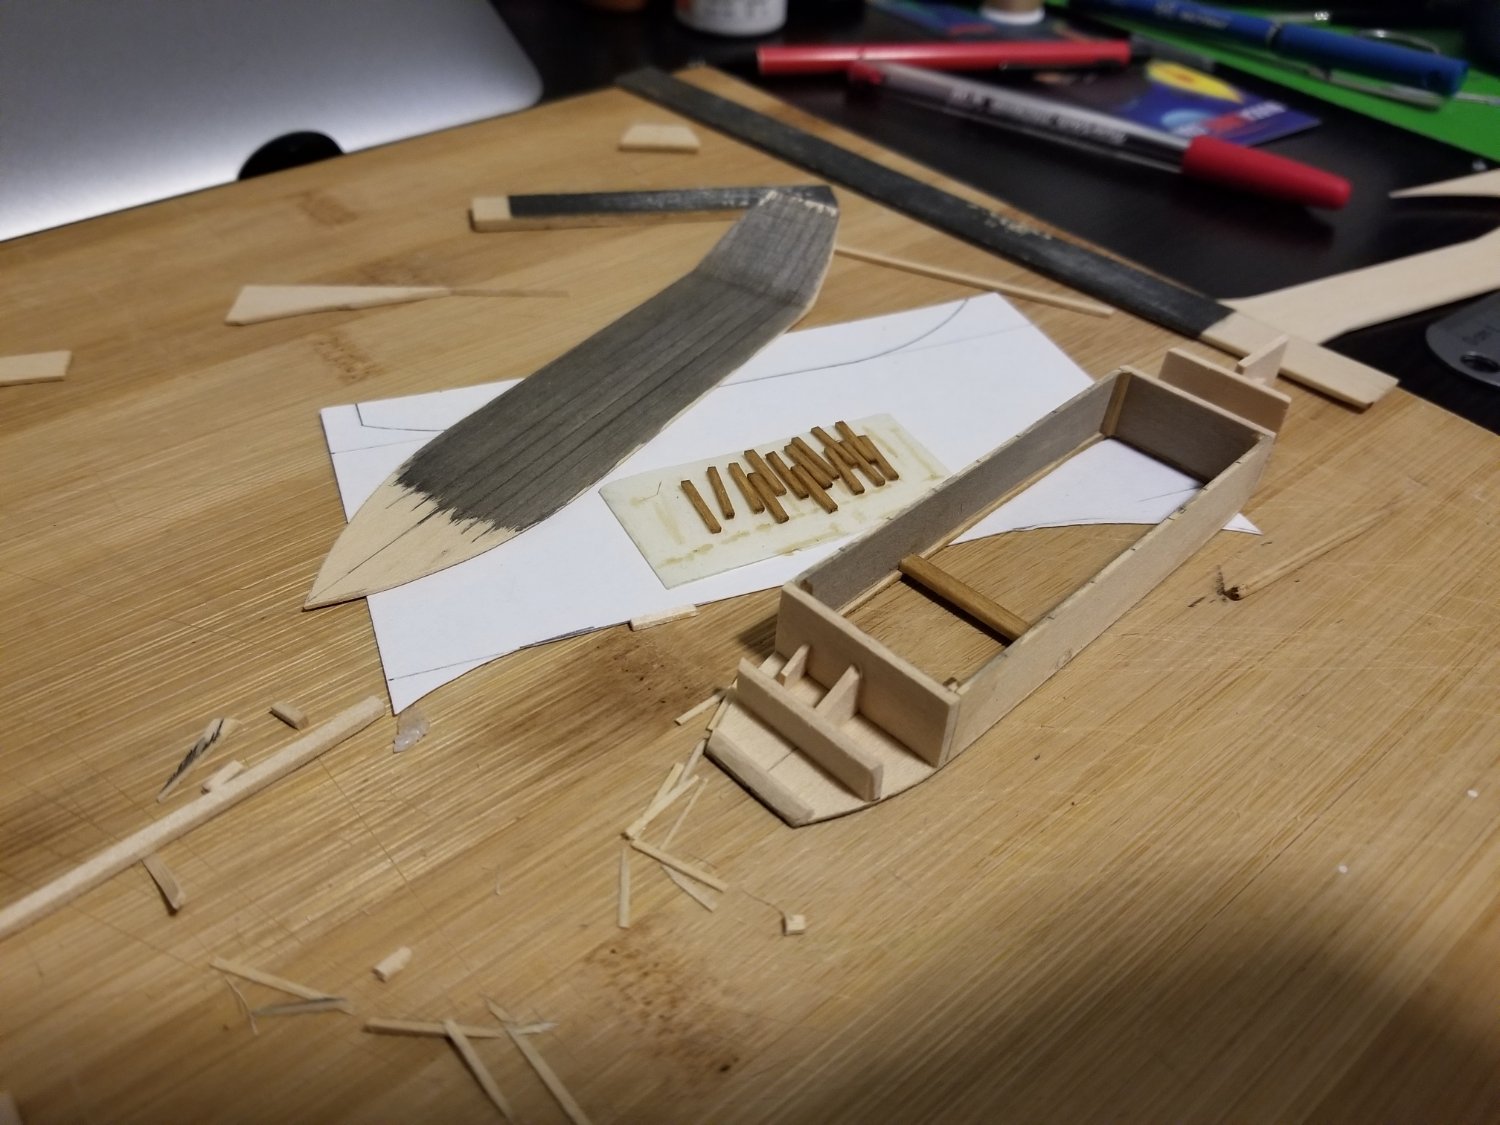
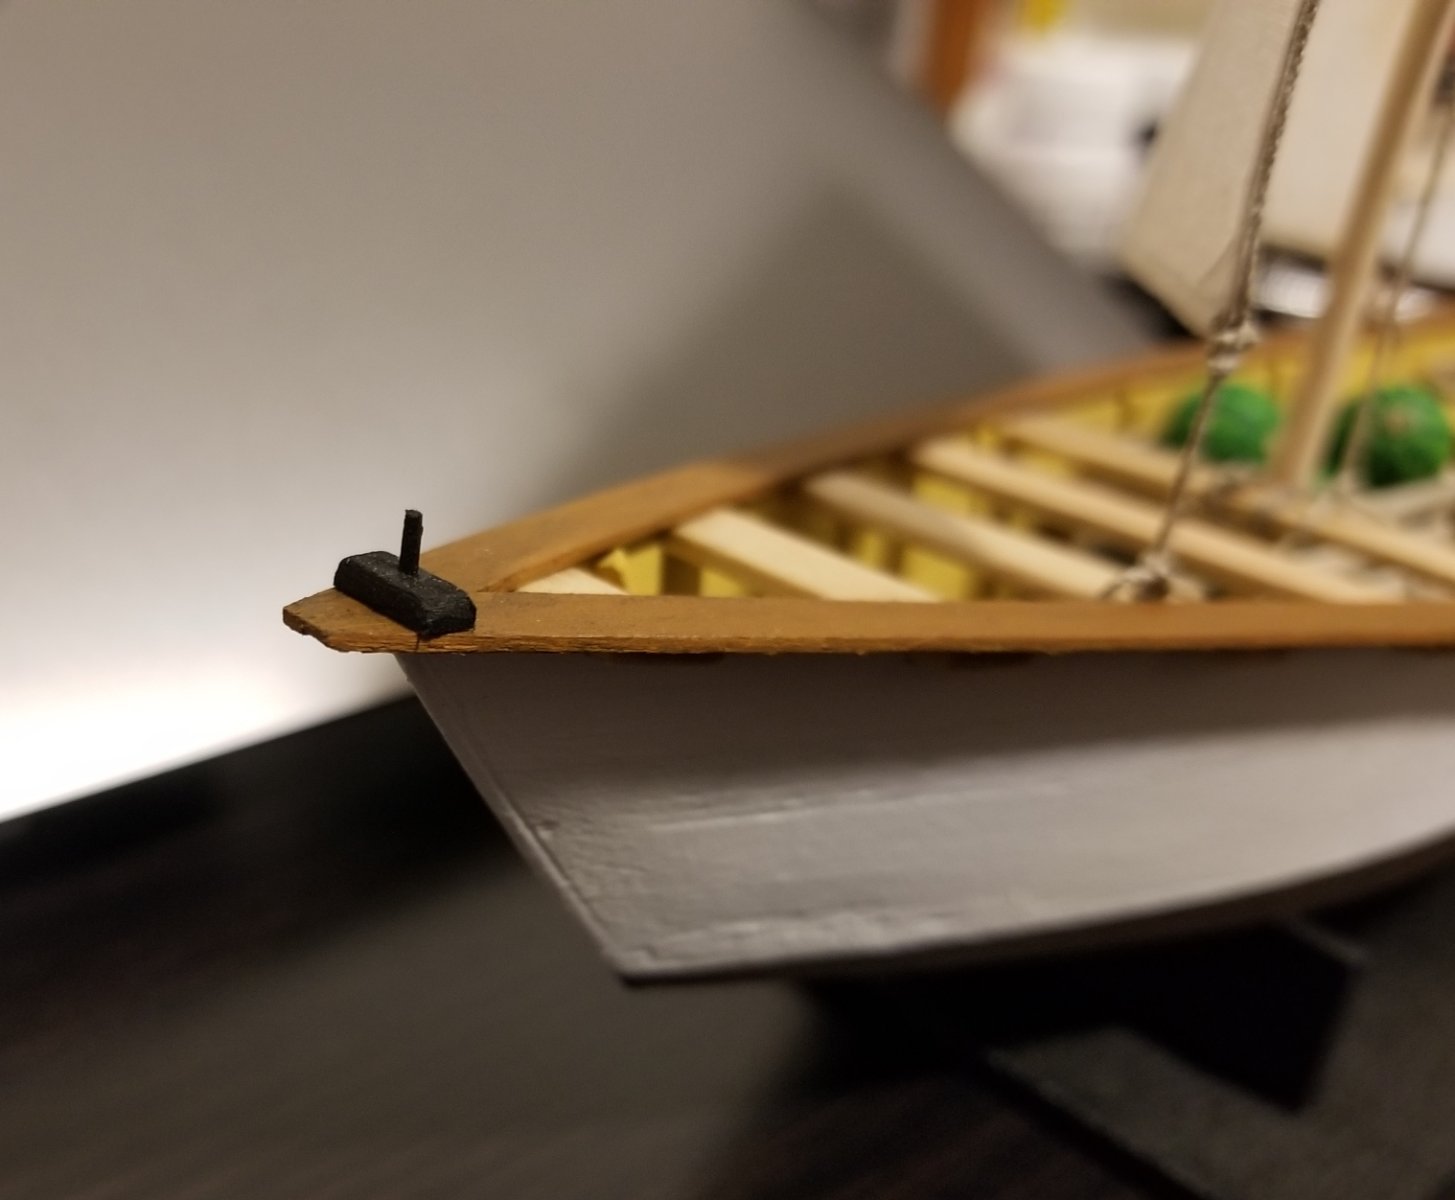
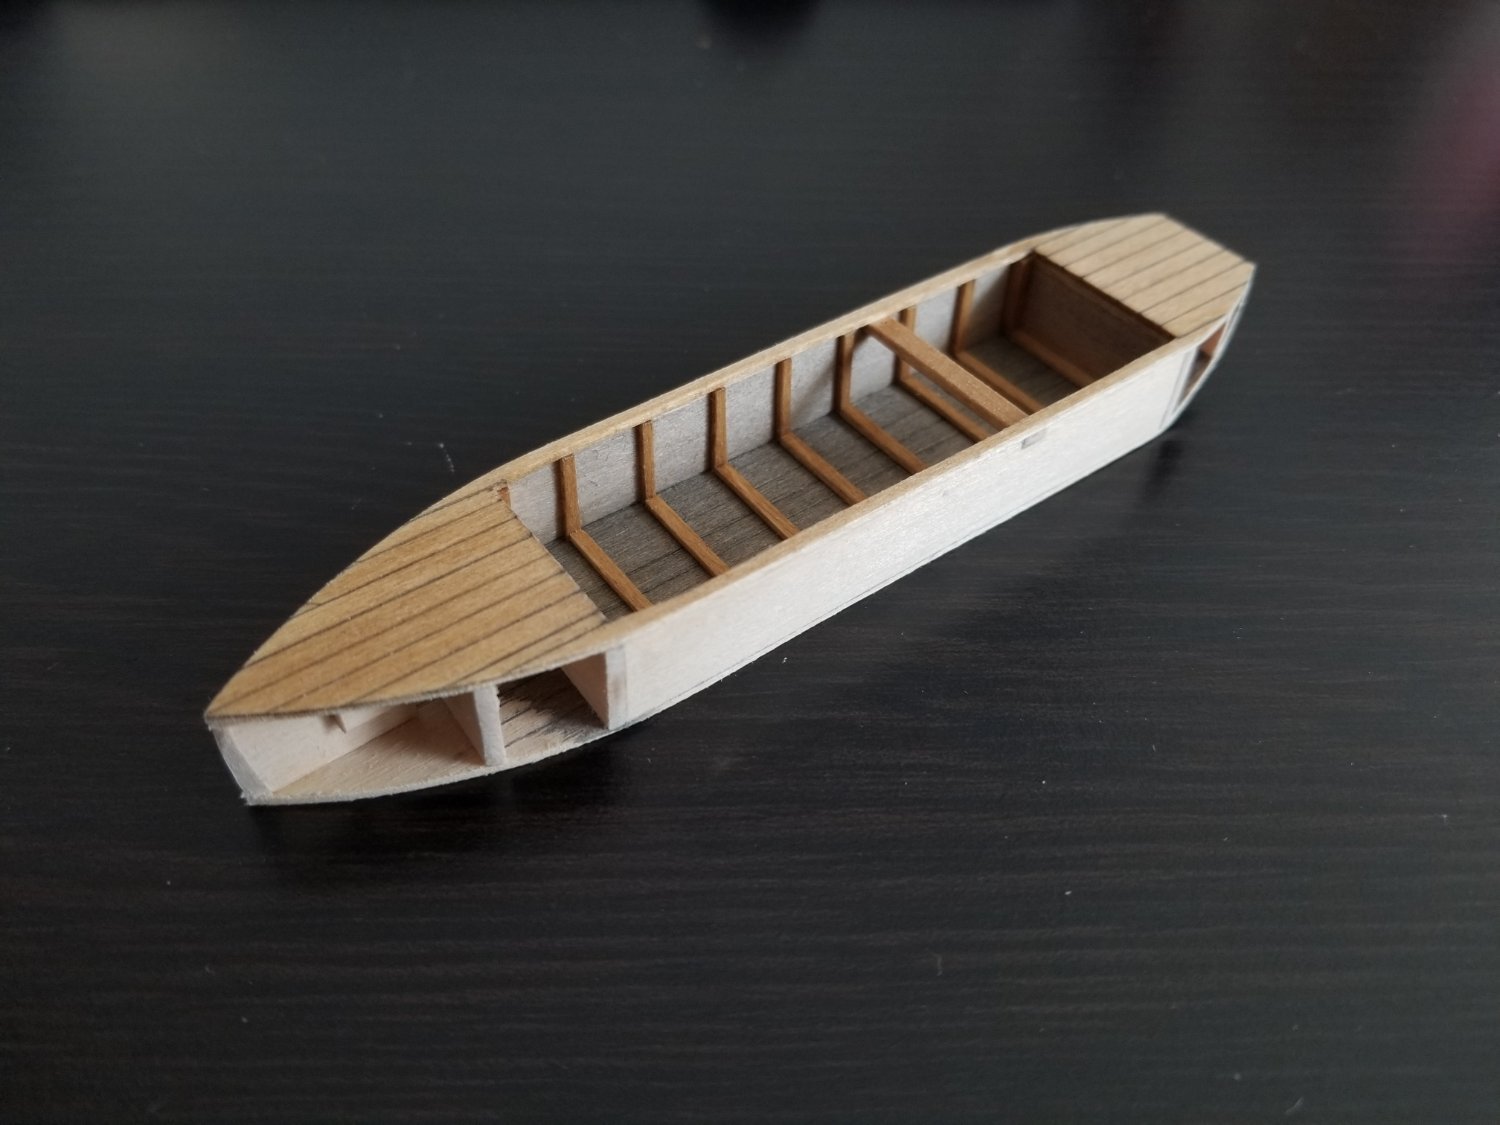
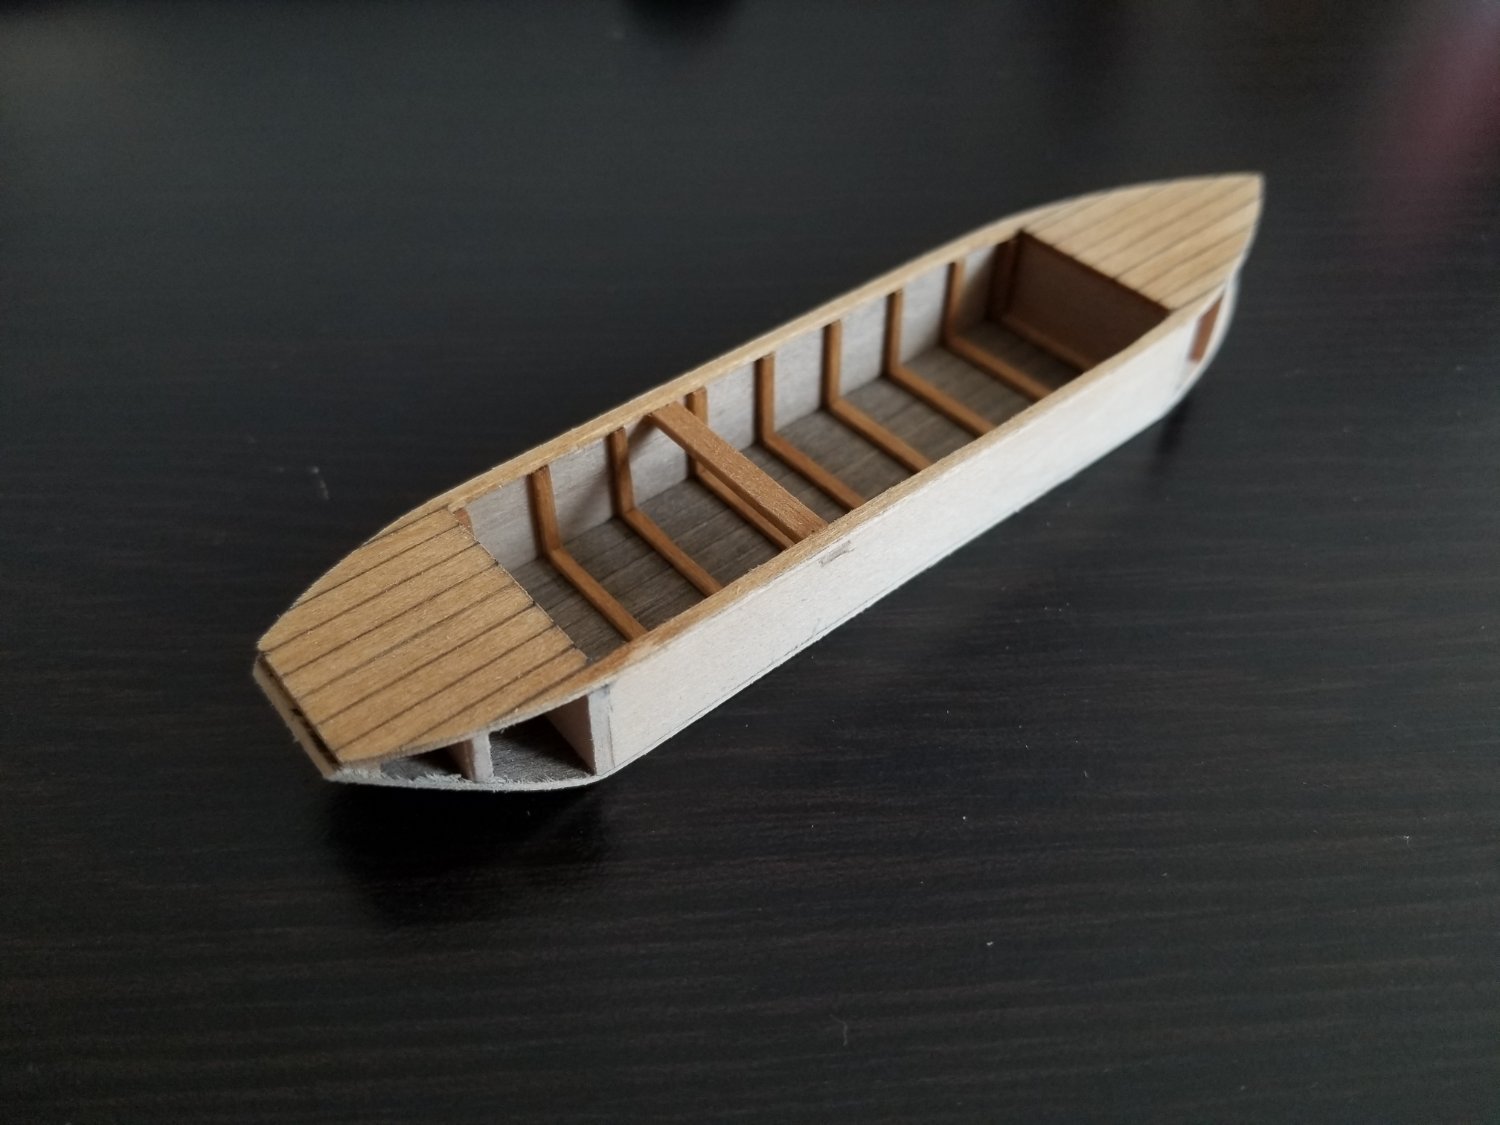
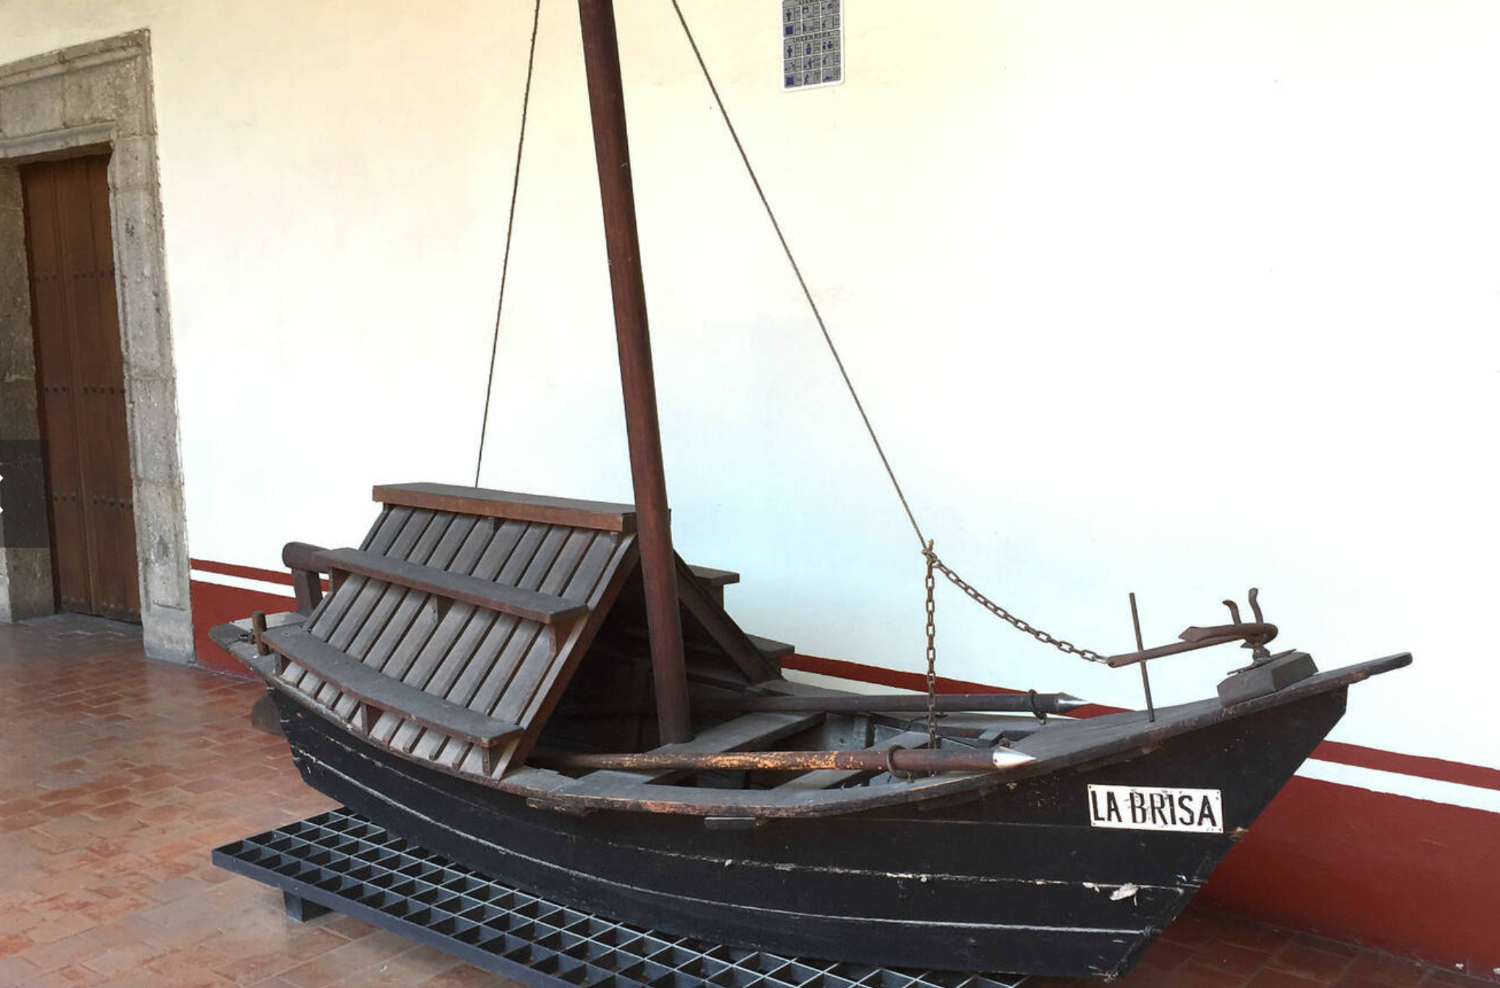
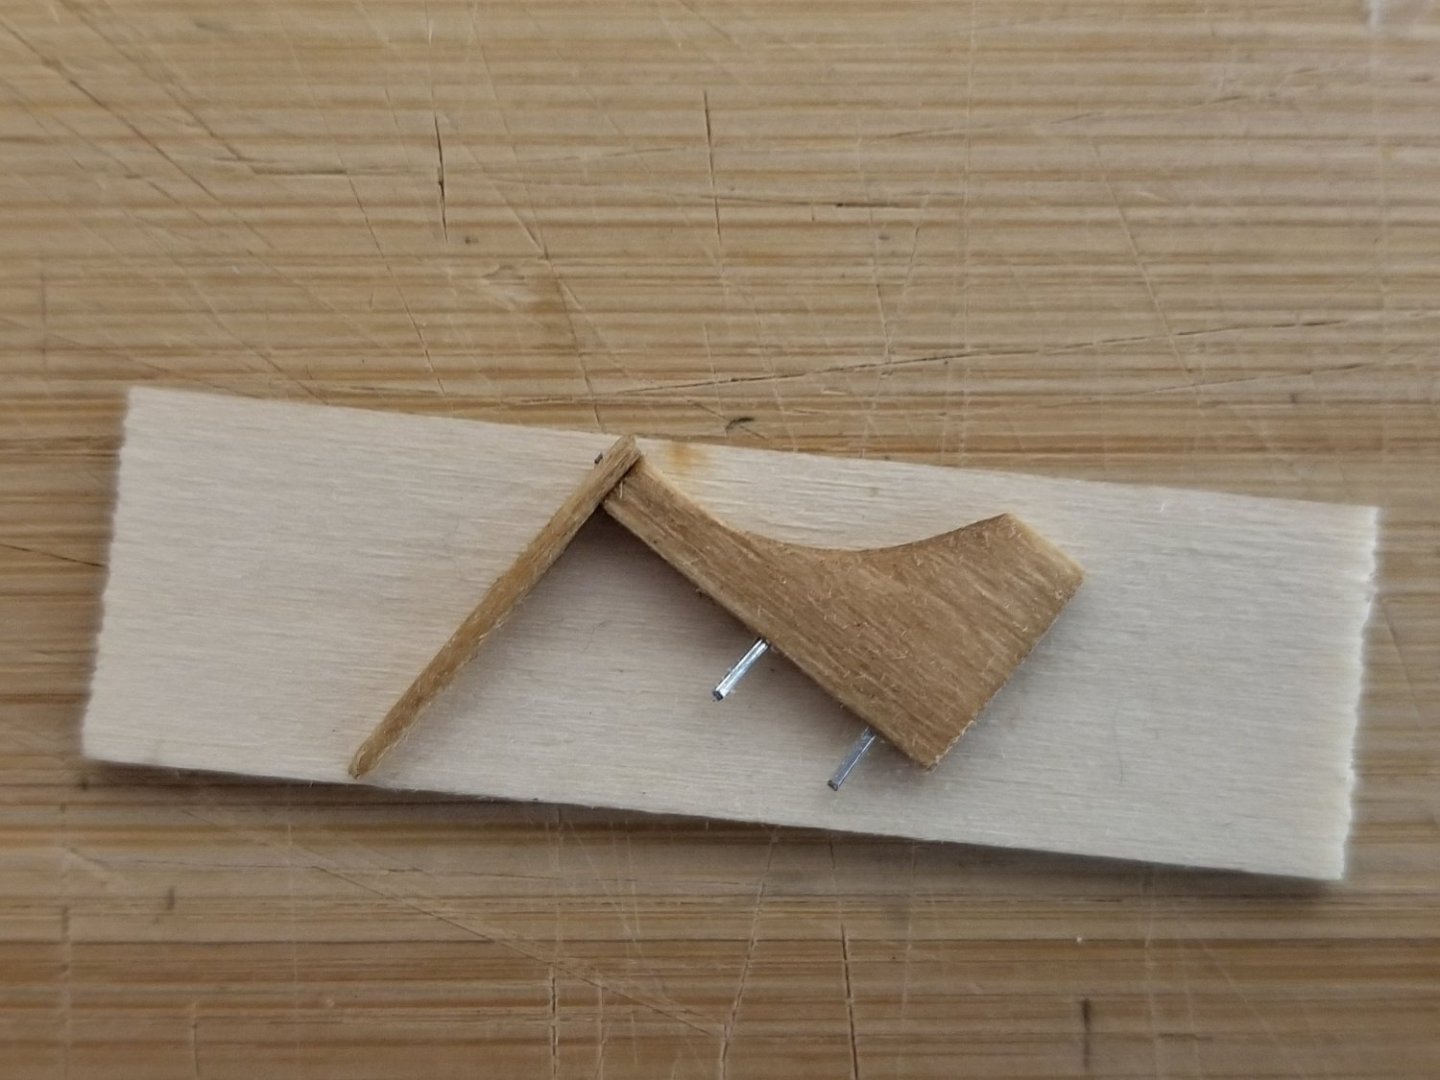
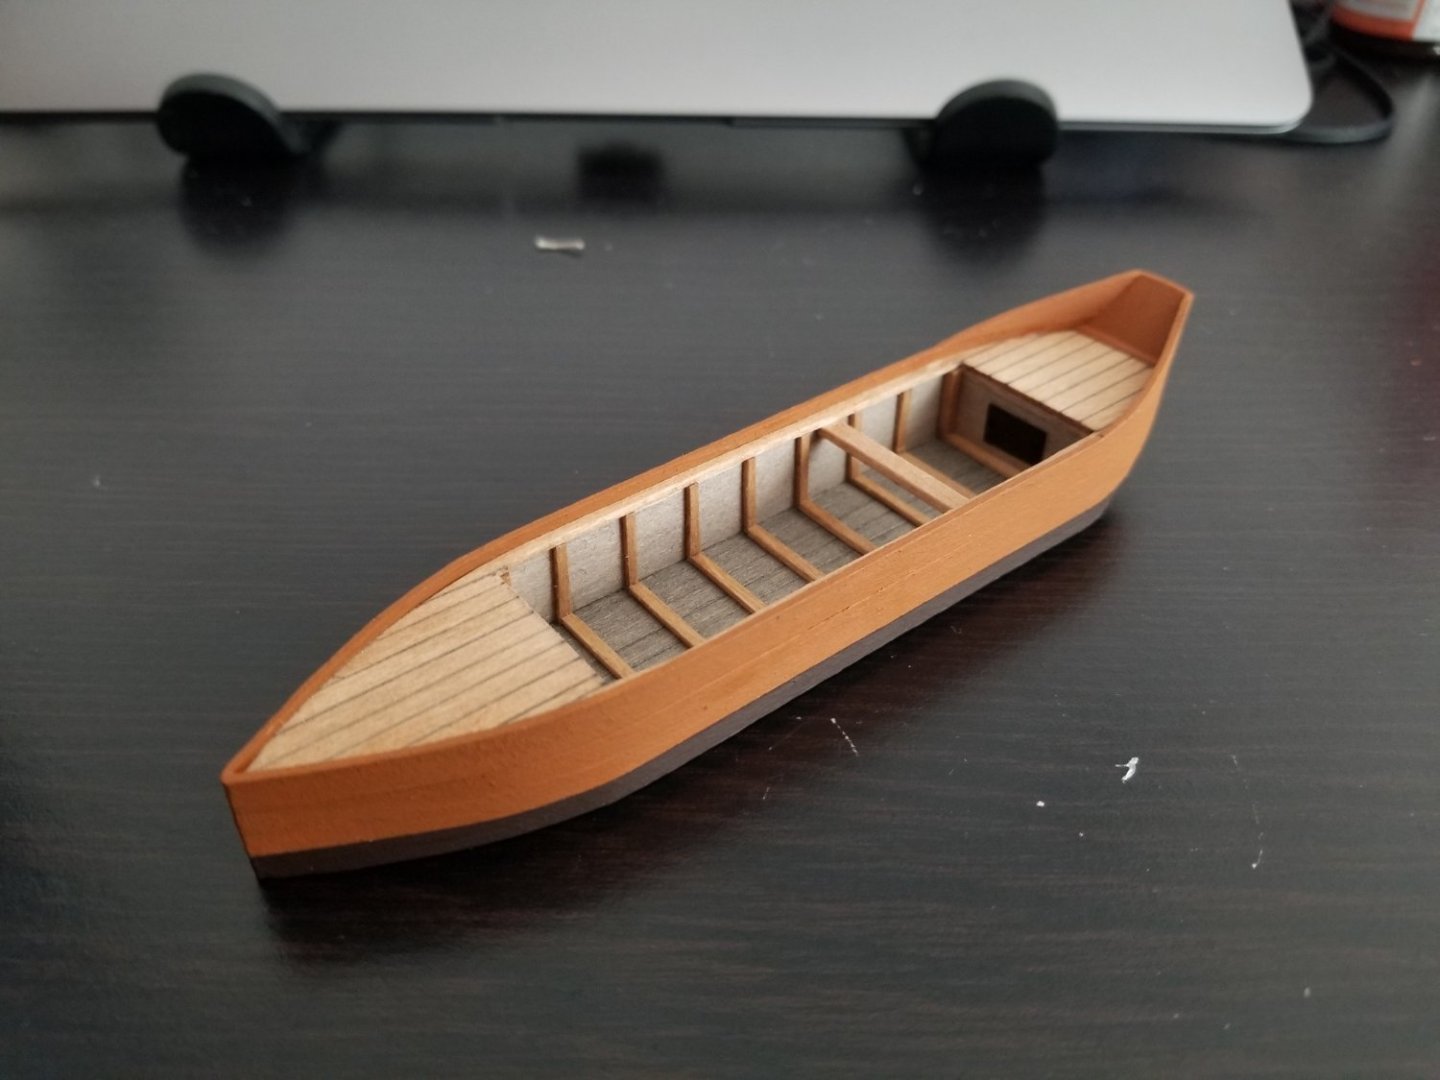
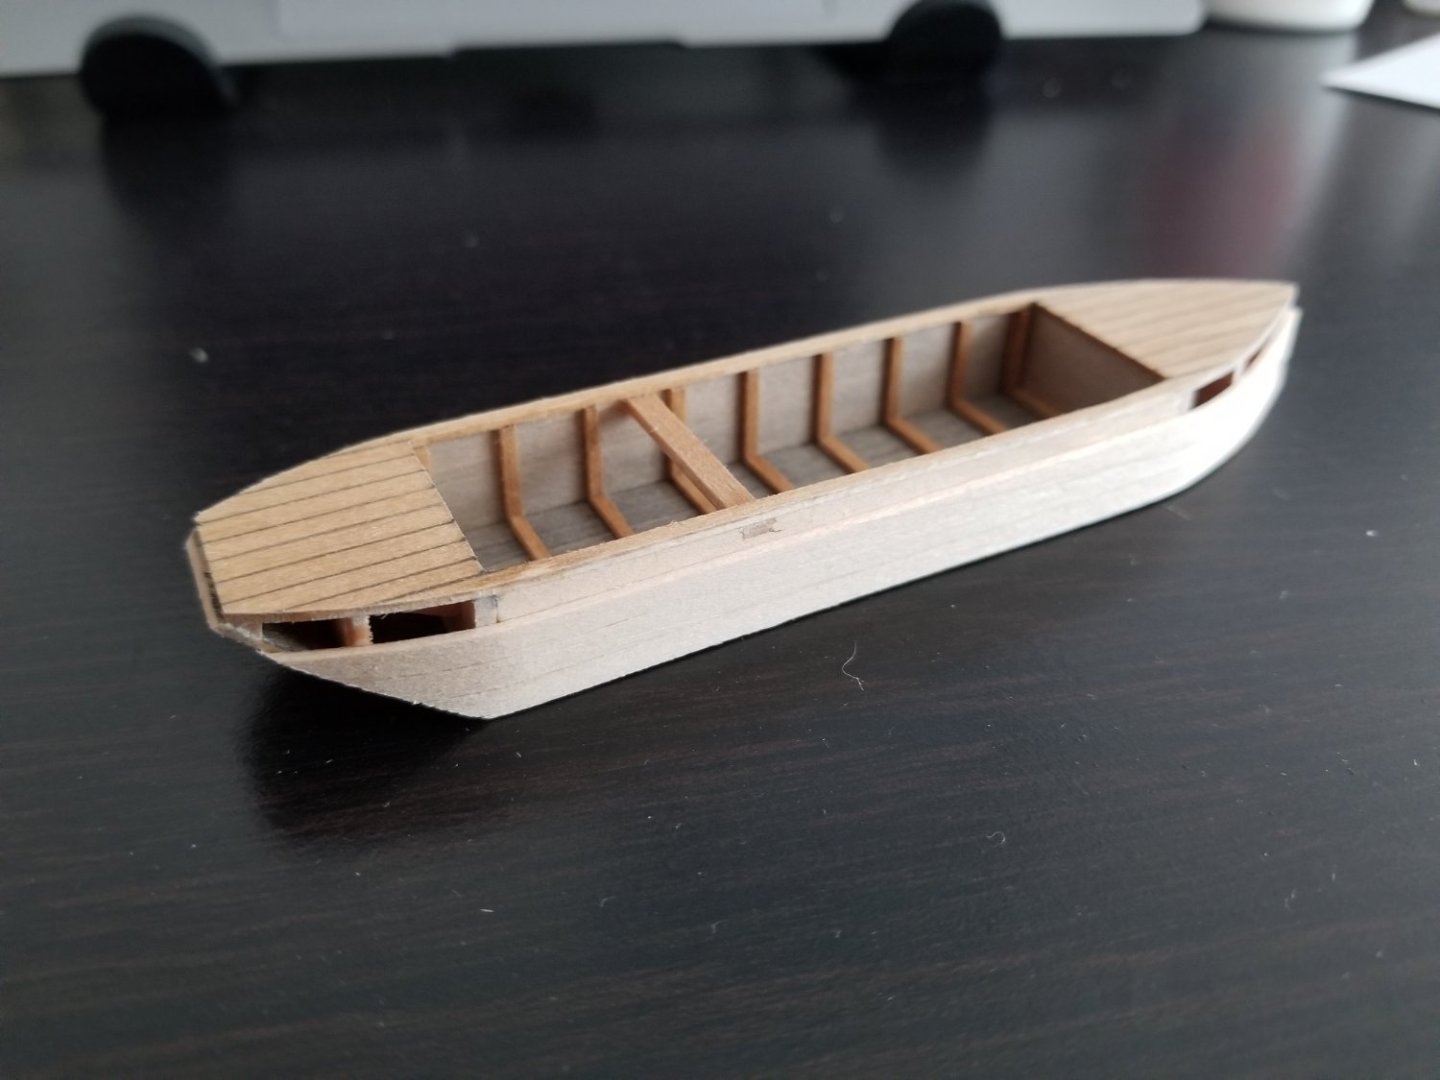
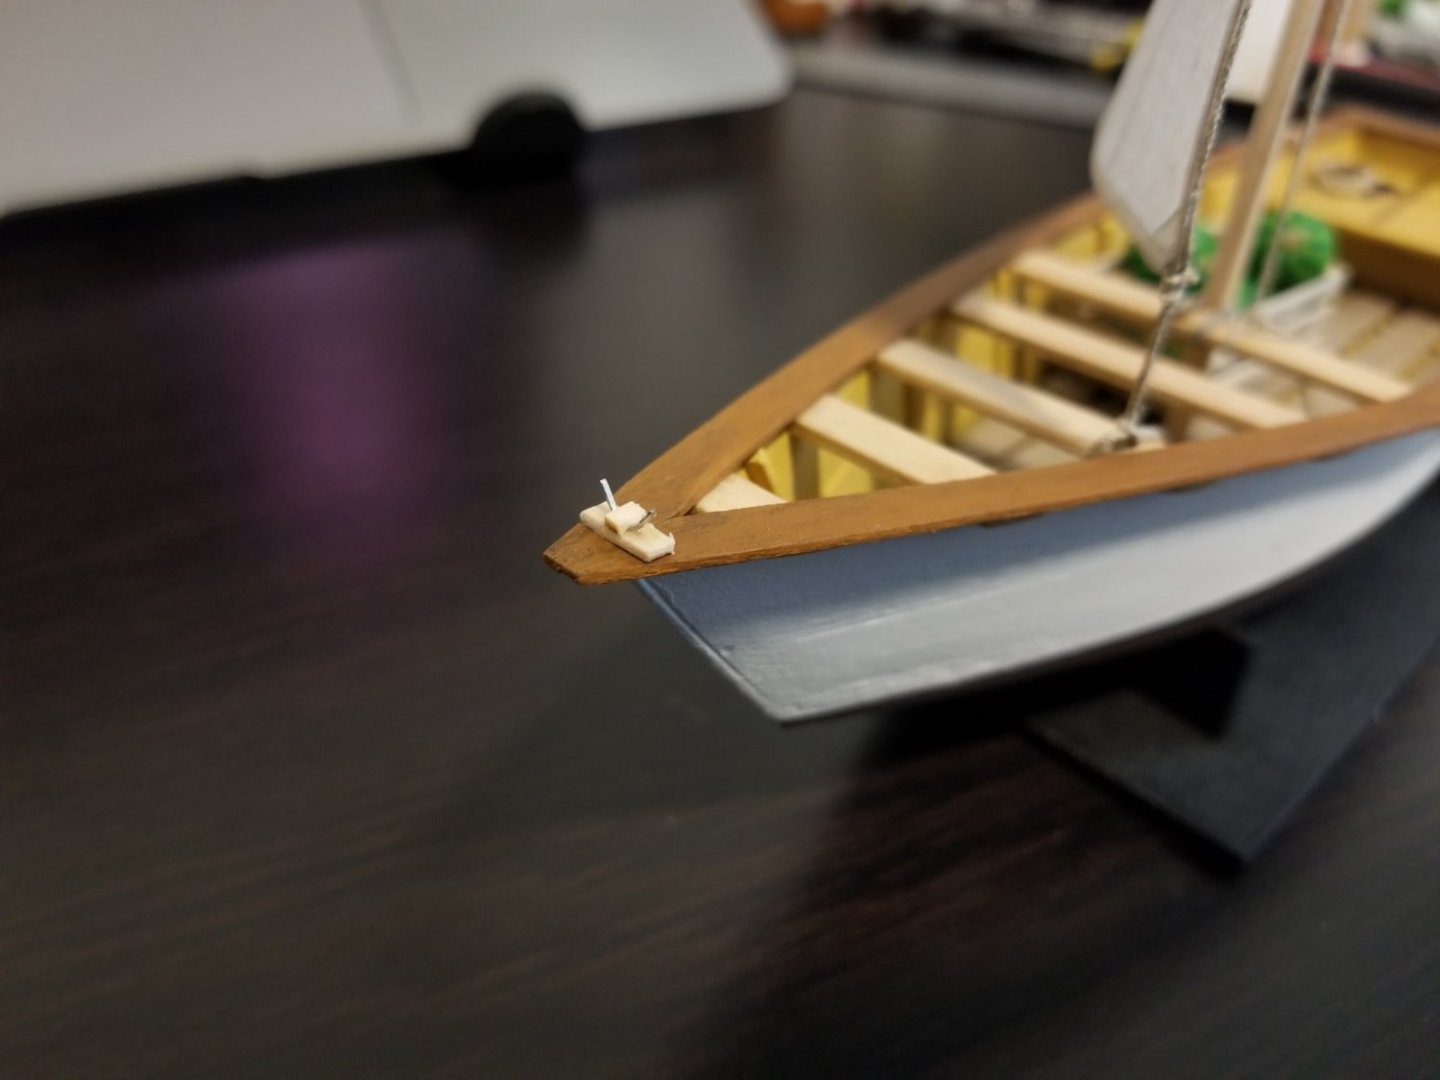
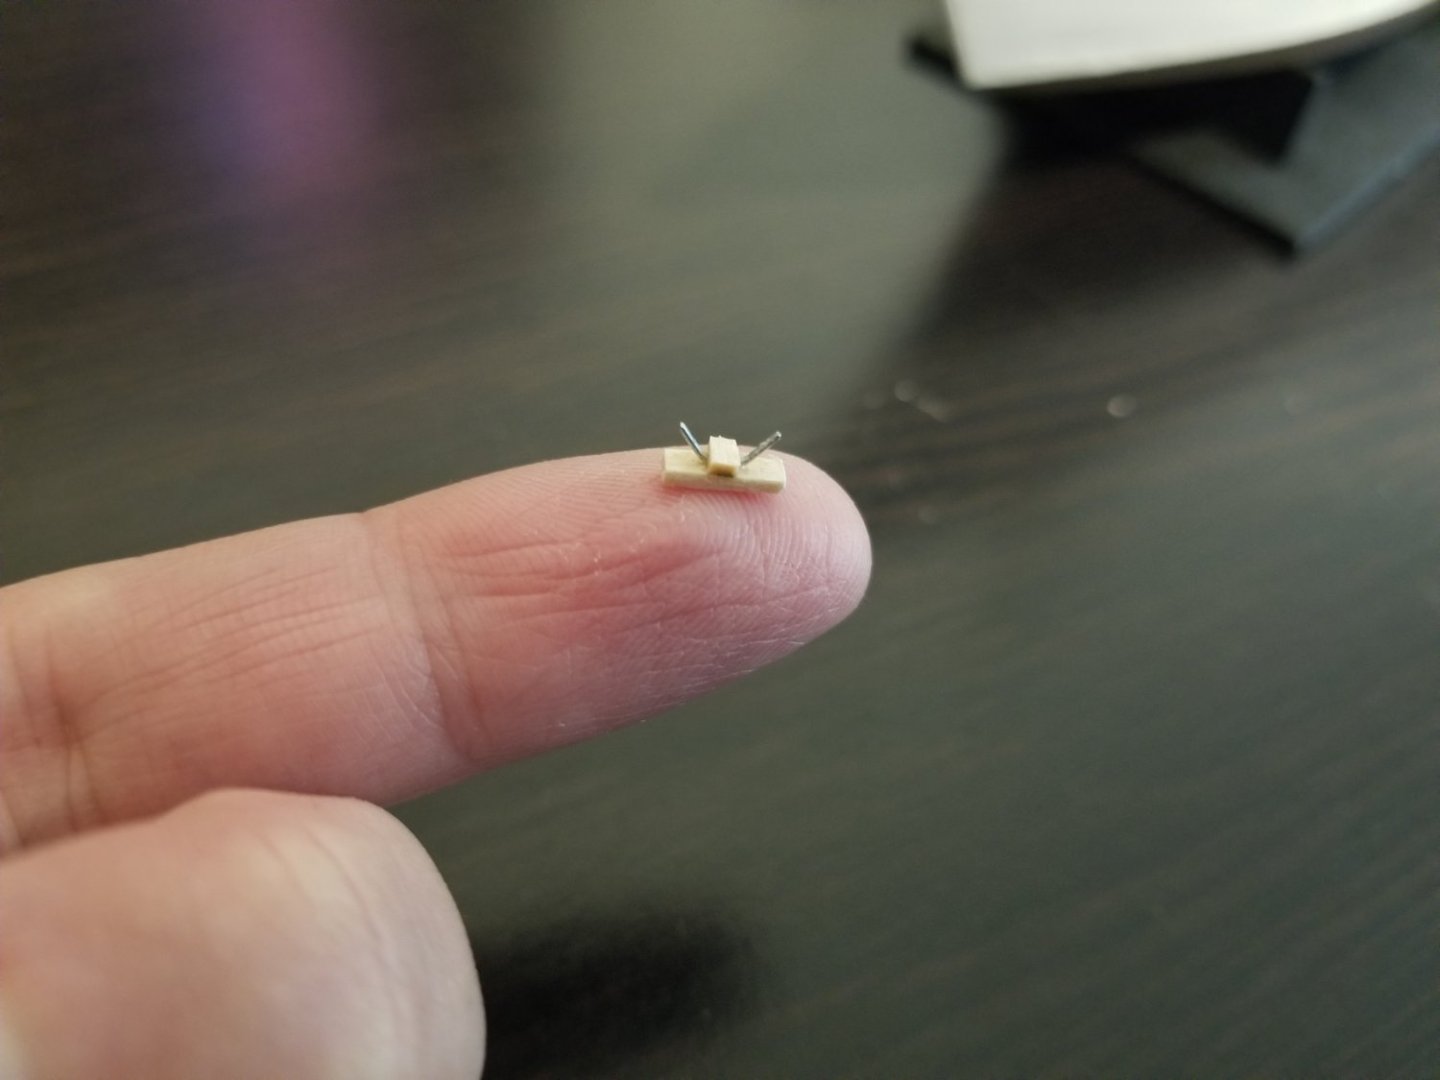
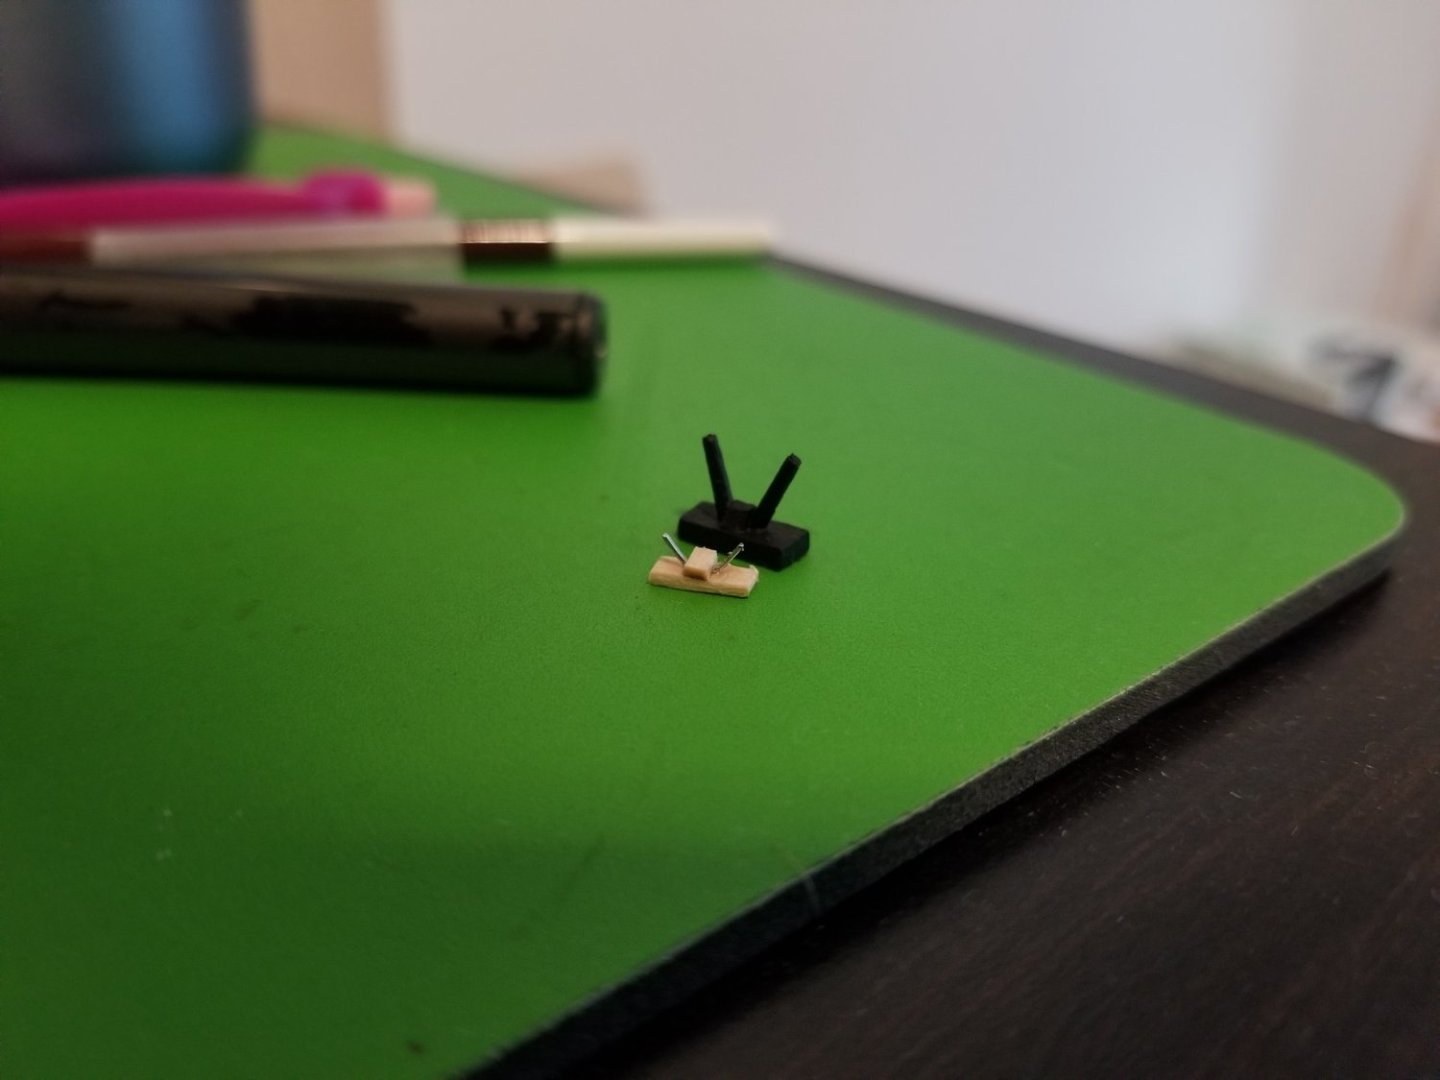
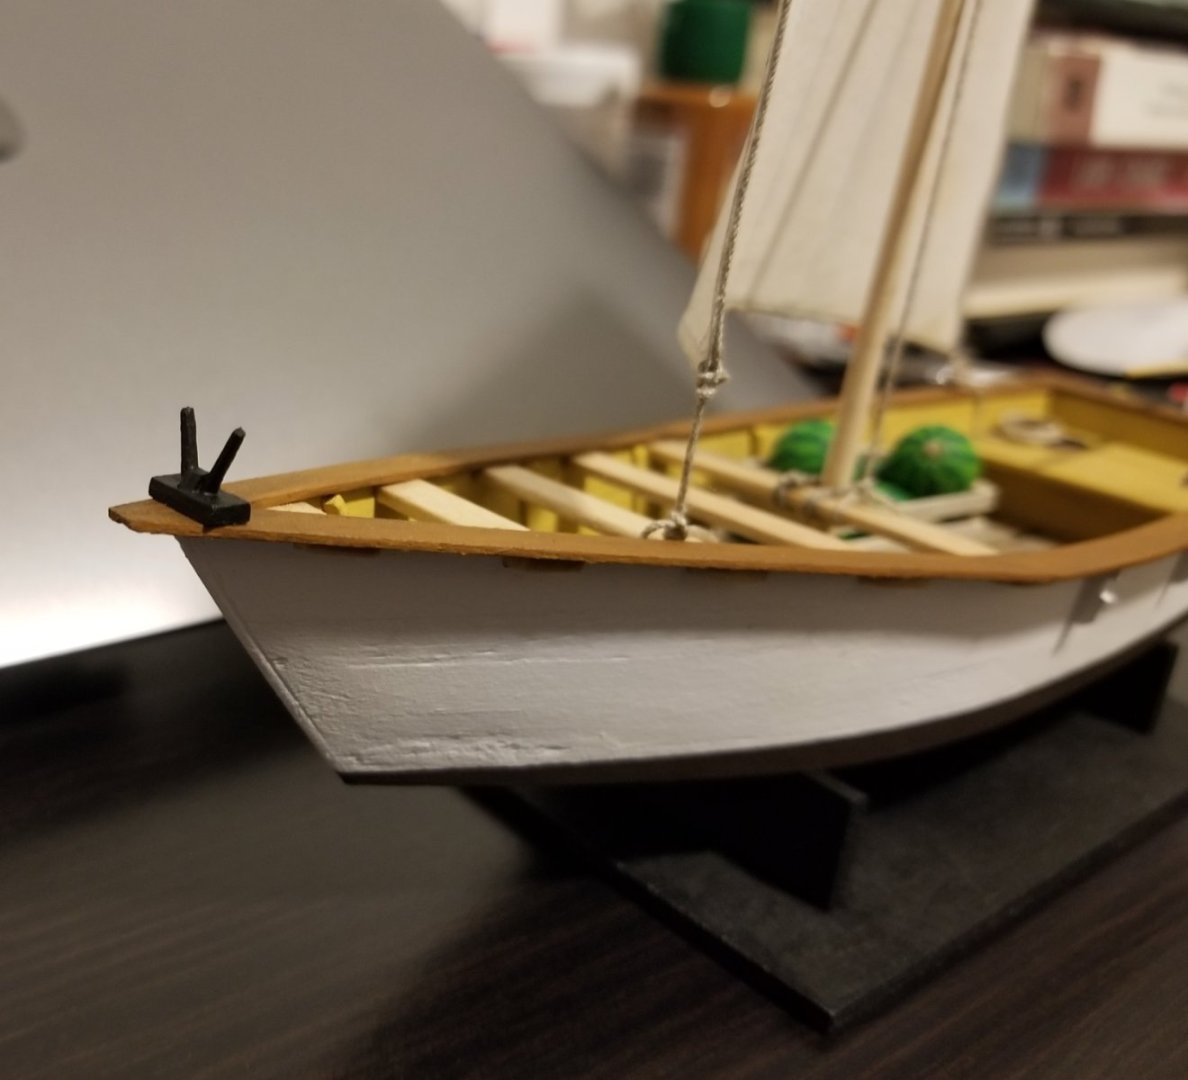
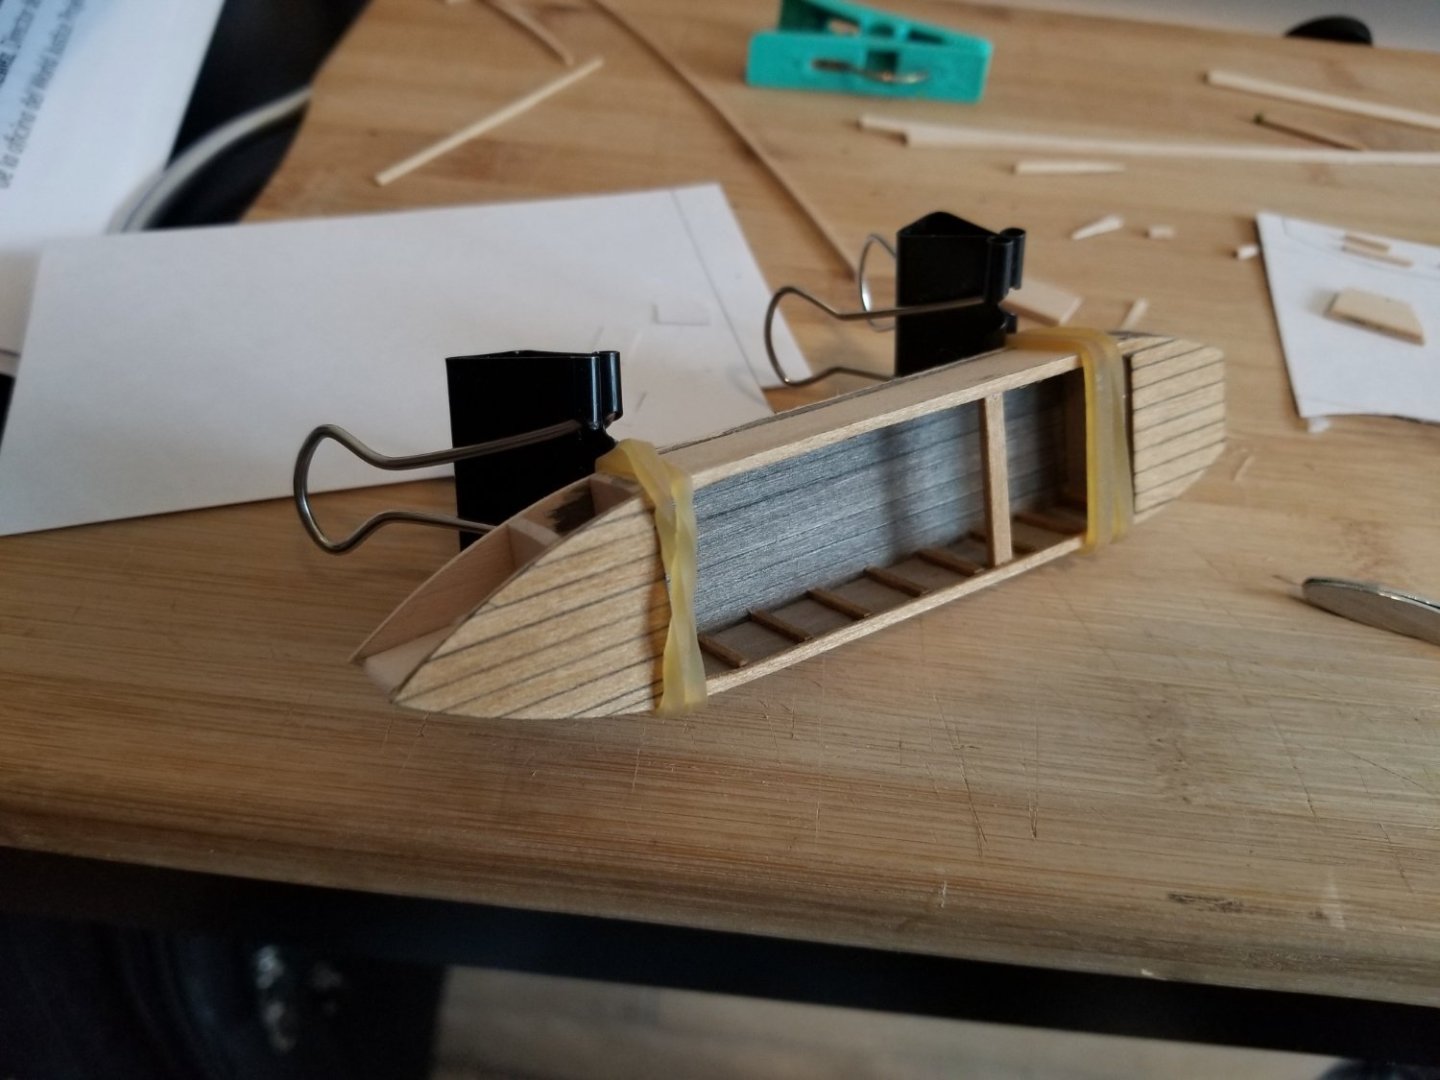
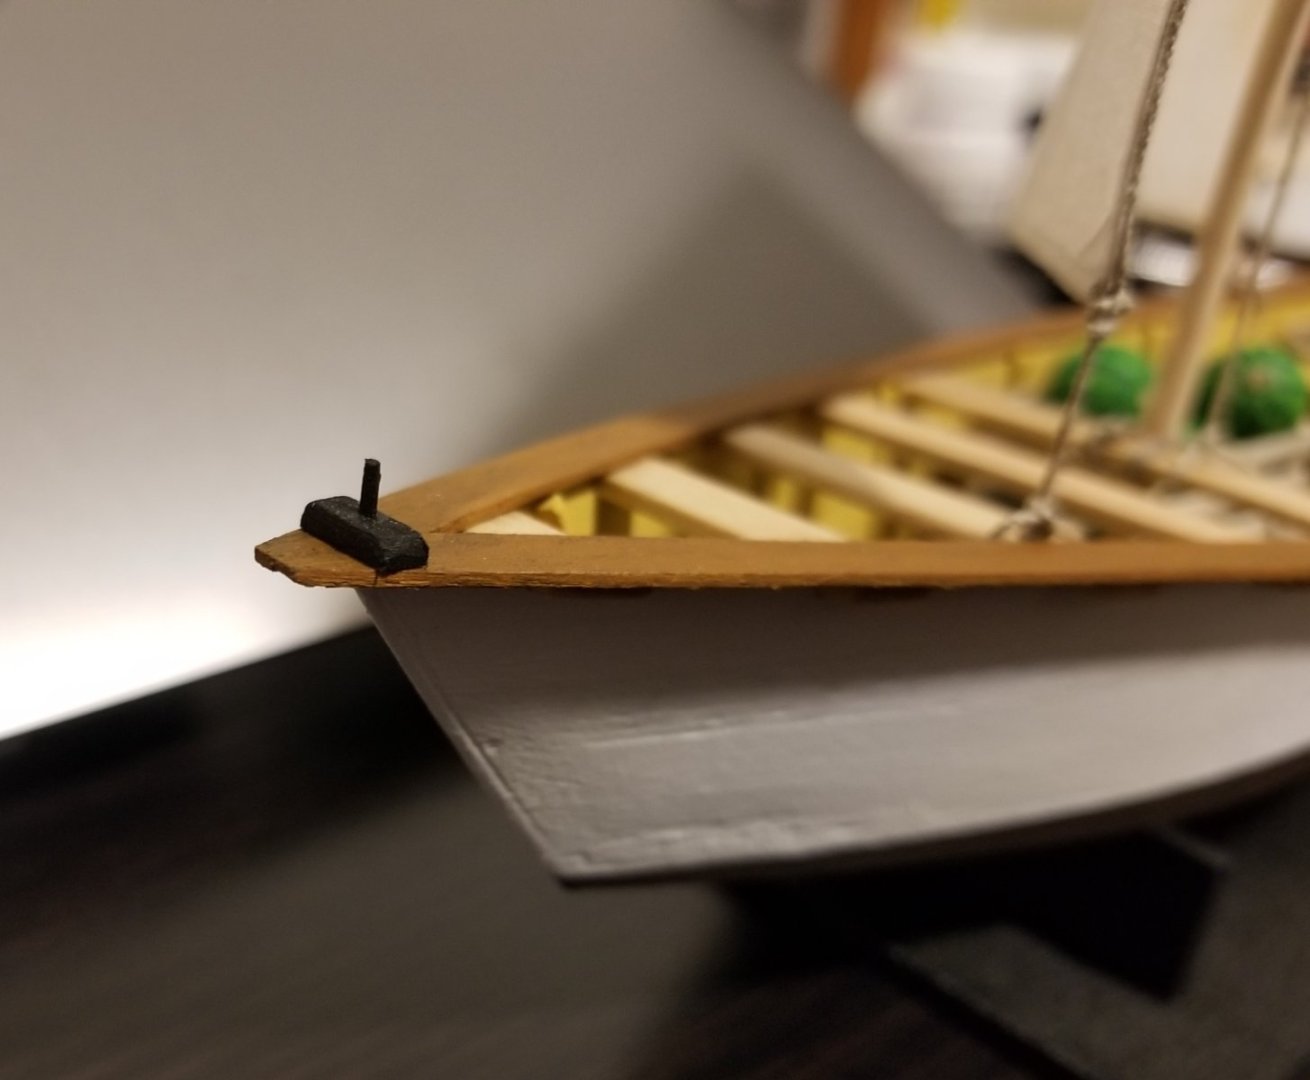
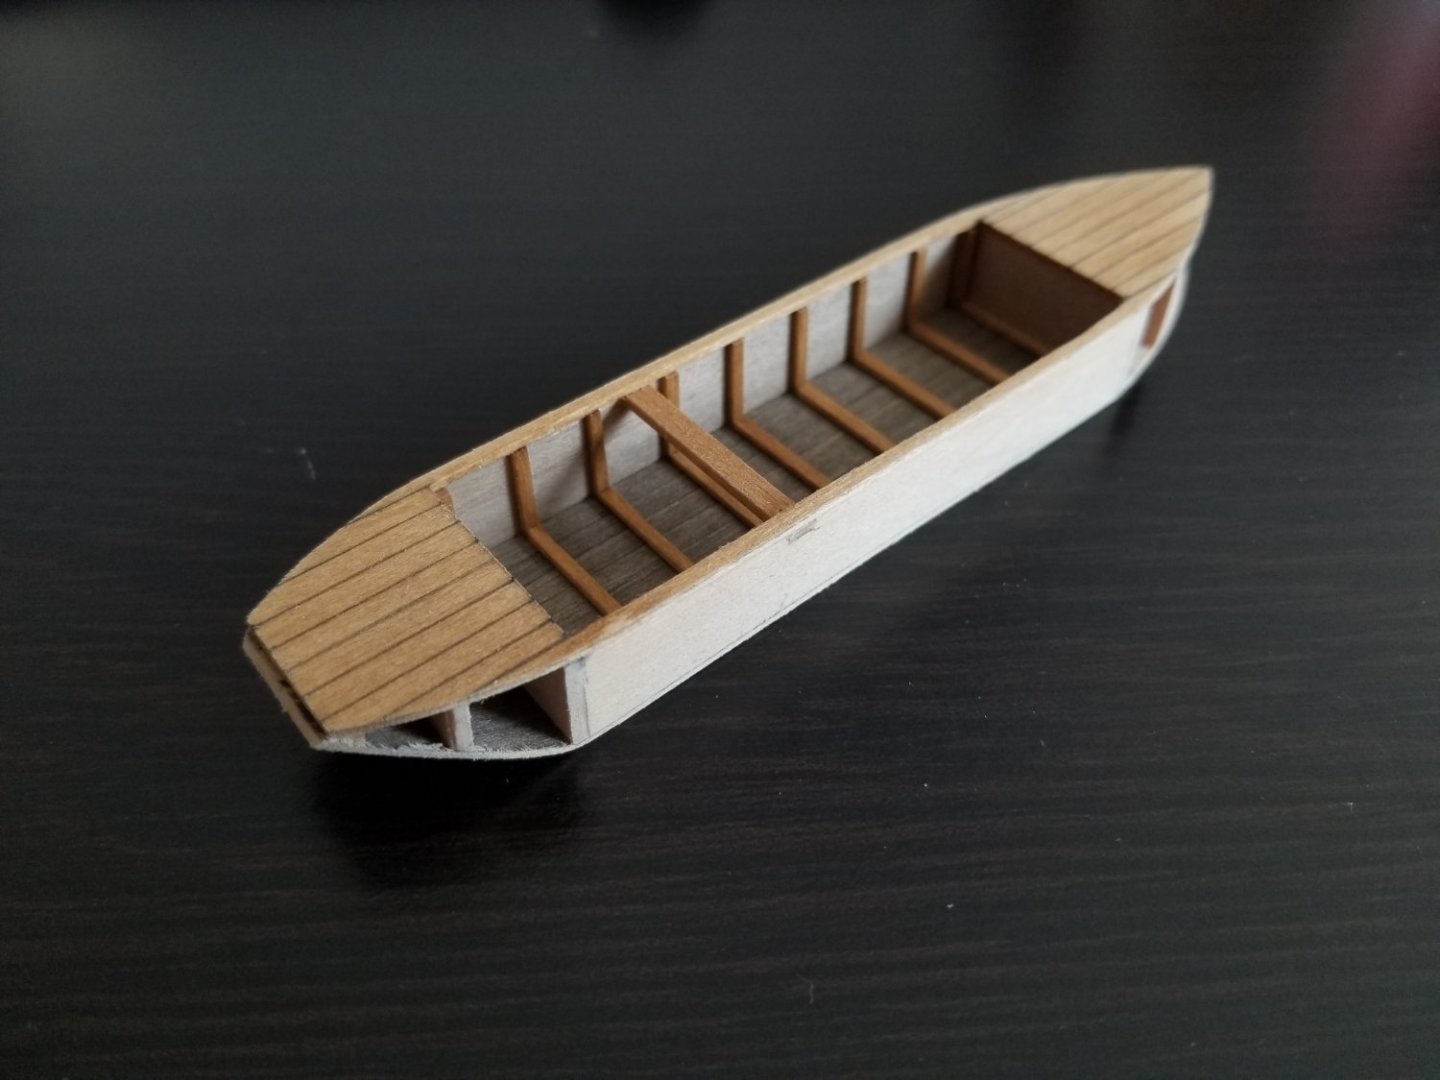
For the past few weeks, besides the work mentioned in previous posts, I've also been working on the Cargo Canoa's anchor. This has been a long, slow process. As Ramón Rubín notes, canoas usually had their anchor ready to drop at a moment's notice, which is confirmed by many photos. Given the canoa's dismal capabilities sailing to windward, if the wind changed to an unfavorable direction, it was preferable to drop anchor and wait for it to shift again. So, an anchor is necessary for this model, and from most photos, a simple grapnel would be most appropriate for a small vessel like the Cargo Canoa. However, I have no metal working skills, tools, or supplies, which has turned out to be a serious hindrance. For the anchor, I decided to try making one from wood, using curved basswood arms (made my bending a thin strip around a shot glass) and a toothpick for the stock. After my attempts at drilling a hole in the toothpick to tie it off only led to the toothpick shattering, I decided to glue a circle of thread, instead. Here we see the anchor before painting: Ultimately I am not happy with this anchor. The shaft is too thick, the arms aren't curved enough, and the loop at the top is too big. I'm going to try to redo it, but if anyone has any suggestions for how to go about this, I'm all ears. Photos of canoas also usually show an assemblage at the bow from which the anchor was hung. Both photos from: https://www.flickr.com/photos/nullboy/6386212181/in/album-72157628104176801/ Although it's hard to see details, some photos, as well as José María Sepulveda's drawing and the model in the Guadalajara regional museum, show a two-pronged structure. Although details are sketchy, I'm assuming the anchor cable was lightly tied around the prongs so as to be released quickly, as otherwise I'm not sure how the anchor could be left dangling at the bow. https://lugares.inah.gob.mx/es/museos-inah/museo/museo-piezas/10858-10858-canoa-la-brisa.html?lugar_id=480 My first attempt, way back in October, was an entirely self-inflicted failure: I made it from memory rather than actually looking at photos and gave it only one prong! My next attempt used thinned toothpicks for the prongs, on 1/16‐inch basswood. However, as can be seen below, it ended up a bit overly large. On the model it looks cartoonishly oversized. So, I made a third. This time I used a bit of a staple, which I "cut" by bending repeatedly at one point until it snapped, for the prongs, and used 1/32-inch basswood for the other parts. The support in the middle had a slot filed out in the middle so that it saddles the metal prongs. As can be seen, the resulting piece is tiny! But, it looks much better on the model. Now I just need to paint it and redo the anchor. However, I'm sharing build time with yet another project: Christmas gifts! I decided to make some nautical ornaments for family. For my parents, I'll be making a lobster trap ornament. It follows the process I used during the dory build, but at 1:12 instead of 1:24 scale, which makes it a bit easier to make. So far it's just some painted strips of basswood. For my brother: he's interested in early modern German history and is working on drawing an insanely elaborate DnD map based in part on the Holy Roman Empire. The map includes quite a few lakes and rivers, and shipping and fishing will apparently play a major role in the campaigns he's planning. He was curious about what sort of vessels might be used, so I decided to make him a model of some kind of German river vessel, something easy to build (no complex hull shapes!), that could be small and sturdy enough to hang on a tree, but complex enough to also be placed on a desk when it's not the holidays. After some searching, I decided to make an Ems Punt, a type of flat-bottomed, snub-nosed barge used on the Ems River. I haven't made a full build log, as it's not going to be as accurate or detailed as I try for in my other models, but it should make a nice ornament at least. I've found a range of lengths given for this type of vessel, so the scale is approximately 1:150. The model is 5 inches long. Here are some sites with info about this type of vessel: https://www.heimatverein-haren.de/schifffahrtsmuseum/freilichtausstellung-schwimmenden-museum/museumsschiff-haren-i/ http://www.emssaga.de/ems-puente/ I started with the deck, leaving a large space for the hold. To simply the build, I got rid of the sheer forewards, and the sunken cockpit aft. I glued some bulkheads to the bottom. In order to strengthen the hull and provide a sturdier planking surface amidships, I also added horizontal supports that effectively plank the interior of the hold. The bottom, which is distinctively angled up at the bow (the pointy end is the stern), cracked a bit at the angle, but held together enough with glue. I scribed planking along the bottom where the hold will be, and gave the interior of the hold a black wash. To simplify things, I reduced the number of frames, which are visible in the hold. With the top and bottom still separated, I added the vertical parts of the frames, using a square to make sure they lined up. I then glued the top and bottom together, using rubber bands to get a strong connection. I then added the floors. I've now faired the sides, and the hull is ready for planking, to be followed by deck fittings then the spritsail rig. I messed up and cut the bow too short--the bottom should extend further forward to match the wales, which will sweep up a bit at the bow--but I can just add an extra piece when the time comes.


-
Welcome! Looks like an interesting kit you're building. Although I'm certainly not an expert, I notice that the bulkheads still have a lot of char on the edge. You'll have a smoother time planking, and will have a better gluing surface, if you fair them more with a flexible sanding stick. You can use a batten (thin, flexible wood strip) to test for fairness: holding it across several bulkheads, it should be in contact with all of them with no gaps, while flowing smoothly without lumps. You may want to check out the planking resources here: https://thenrg.org/resource/articles For a double-planked hull, you can smooth out the first layer with a bit of putty (not too much, though) and sanding once you remove the nails. How are you bending your planks? Looking forward to following this build!
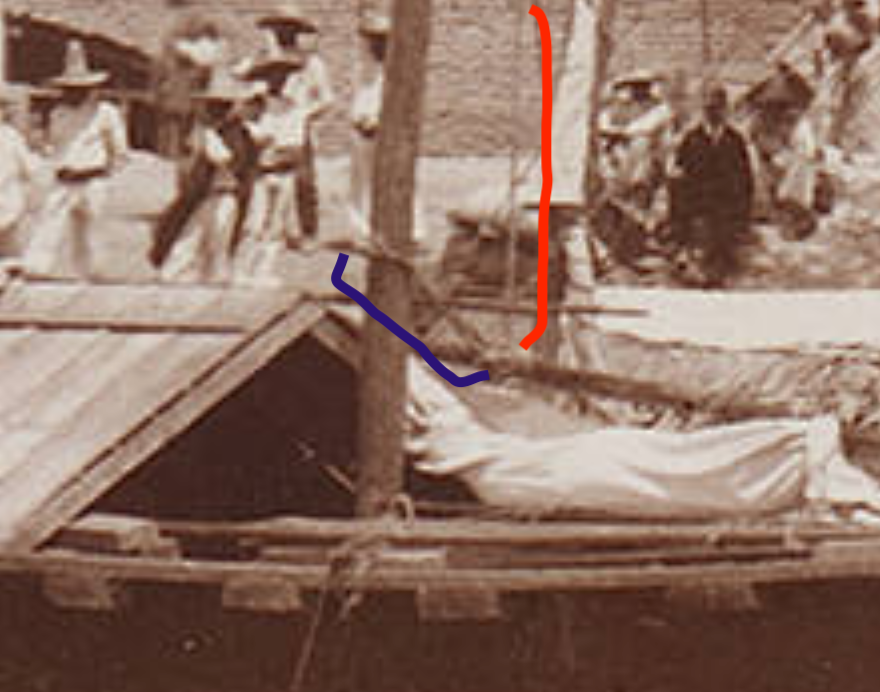
-
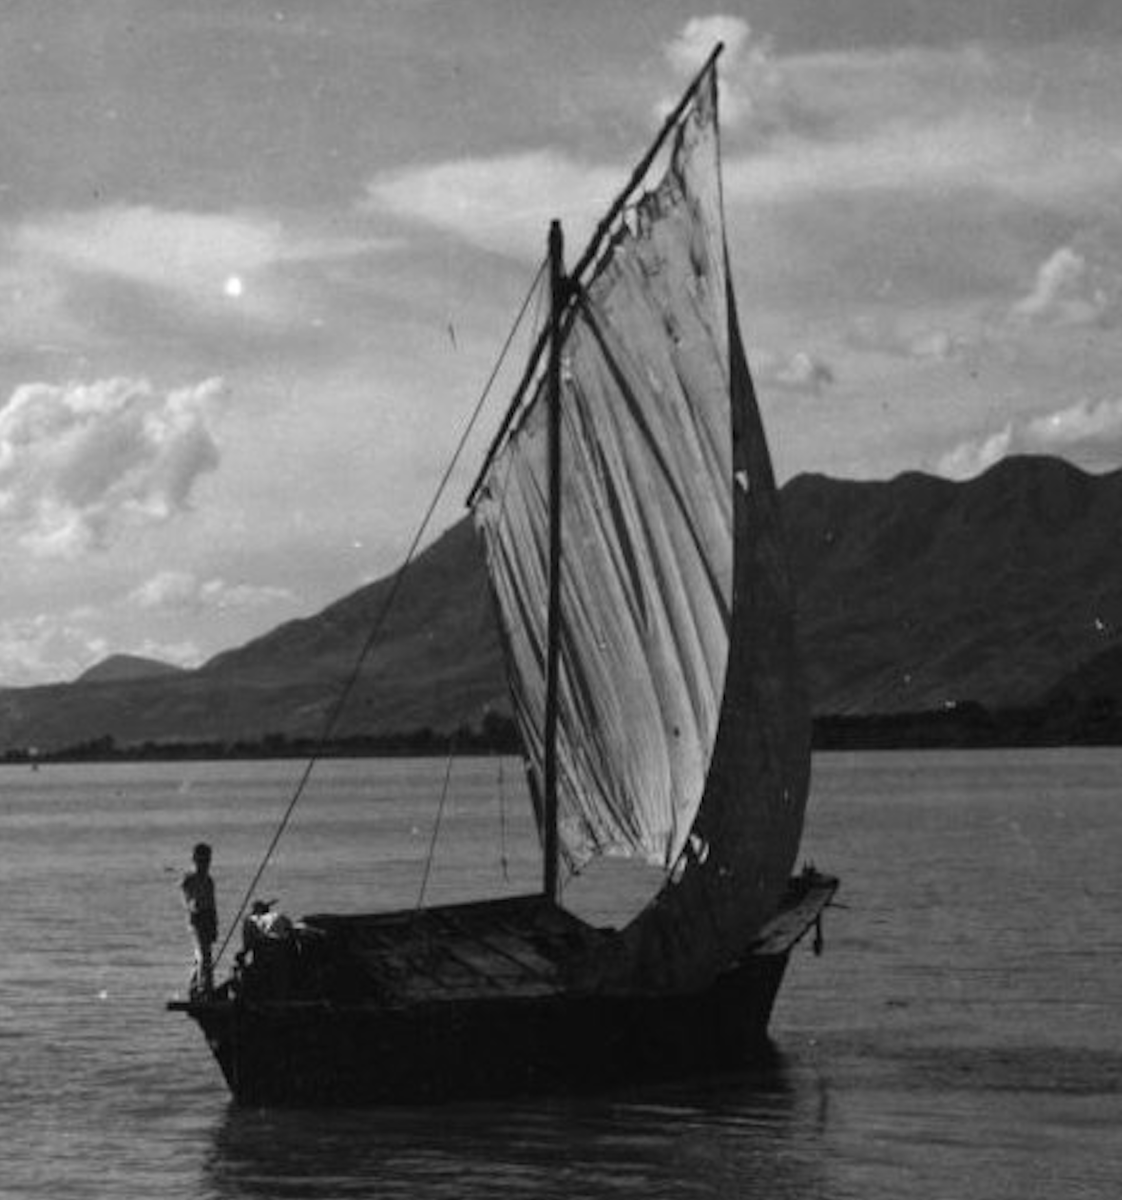
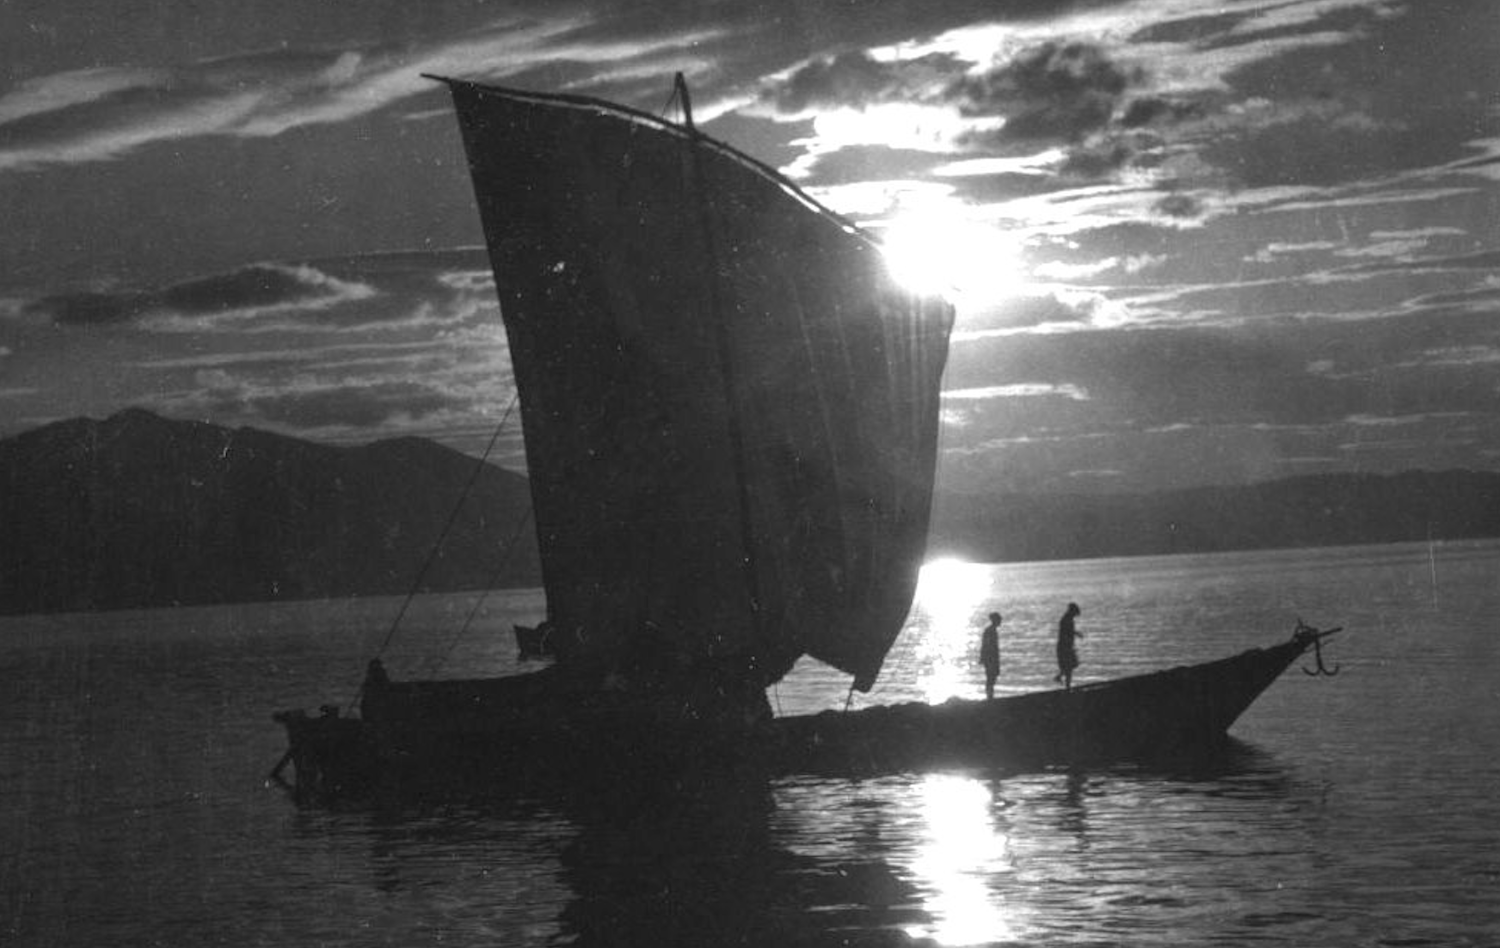
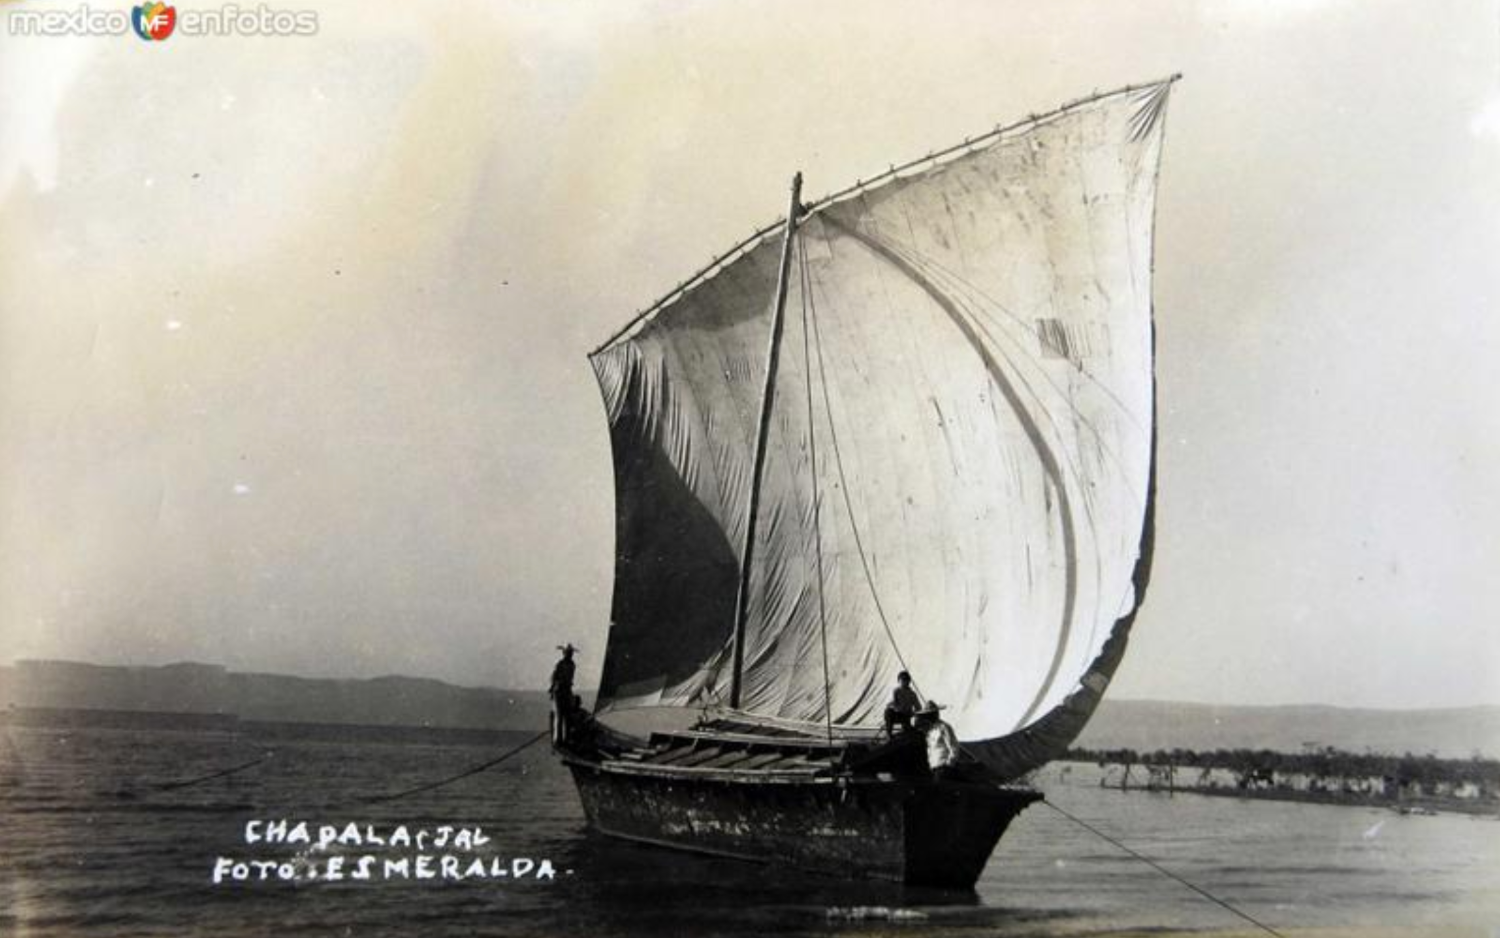
Thanks, this is very helpful! I haven't been following the book, as this rig seems to be different in a lot of respects. One of them is that the parrel seems very long, much more so than on a typical lateen rig, as seen in the photo in my post above (the one where I marked the halyard in red and the parrel in blue). Similarly, in the photo below, it's clear that the yard is at some distance from the mast, so any parrel (which I assume is hidden behind the sail) would have to be fairly long: (Source: https://www.mexicoenfotos.com/antiguas/jalisco/chapala/cargamento-de-entre-MX14652247742300/5 ) From photos like that, and with little knowledge of rigging in general, I assumed that the parrel was a separate line from the halyard. But, I think it would make more sense to tie it to the halyard rather than the yard itself. I'm not sure if I'll be able to redo it on the Cargo Canoa, although I think I'll give it a try--worst case, the parrel disappears and the rigging is slightly simplified compared to what it should be. I'll definitely get it right (or as close to right as can be determined) on the Canoa de Rancho. As for the rope connecting the sail to the yard, that's very good to know! I based my design on what I did for the dory's sail, but there the sail was meant to be hoisted and lowered as needed. Some photos do show some details of this point on the canoa. On larger canoas, they definitely had a half hitch at every grommet, as can be clearly seen below, so I was planning on doing that for the Canoa de Rancho: (Source: https://www.mexicoenfotos.com/antiguas/jalisco/chapala/un-velero-panorama-MX14561525002424 ) However, my first impression from photos was that smaller vessels (and maybe even some larger ones) just looped the rope around the yard. But, looking again at the photos below, I now have my doubts. As can be seen, some of the ropes connecting the sail to the yard are pretty angled, and look like they might be simple loops--which, earlier, made me think that I could just loop the rope. But other points along the yard seem like they could be a half hitch at every grommet. I'm now wondering if some of the angled ropes that I thought were simple loops are actually just the sail's bolt rope at points where it's come loose from a torn sail, with the rope holding the sail to the yard at those points not being connected directly to the sail, but to the bolt rope only. (If that makes any sense). (Source: https://www.flickr.com/photos/nullboy/6386212181/in/album-72157628104176801/ (Source: https://mediateca.inah.gob.mx/islandora_74/islandora/object/fotografia%3A141039 ) So on reconsideration, I think you are correct. That said, I think I'm going to have to live with this error on the Cargo Canoa, at least. Redoing the sail's connection to the yard would be very hard without redoing a lot of the other rigging, and I don't have much time until I leave. But, I'll definitely get it right on the Canoa de Rancho (assuming its hull doesn't get somehow crushed in my suitcase.... maybe I shouldn't joke about that).


-
Looks great!
-
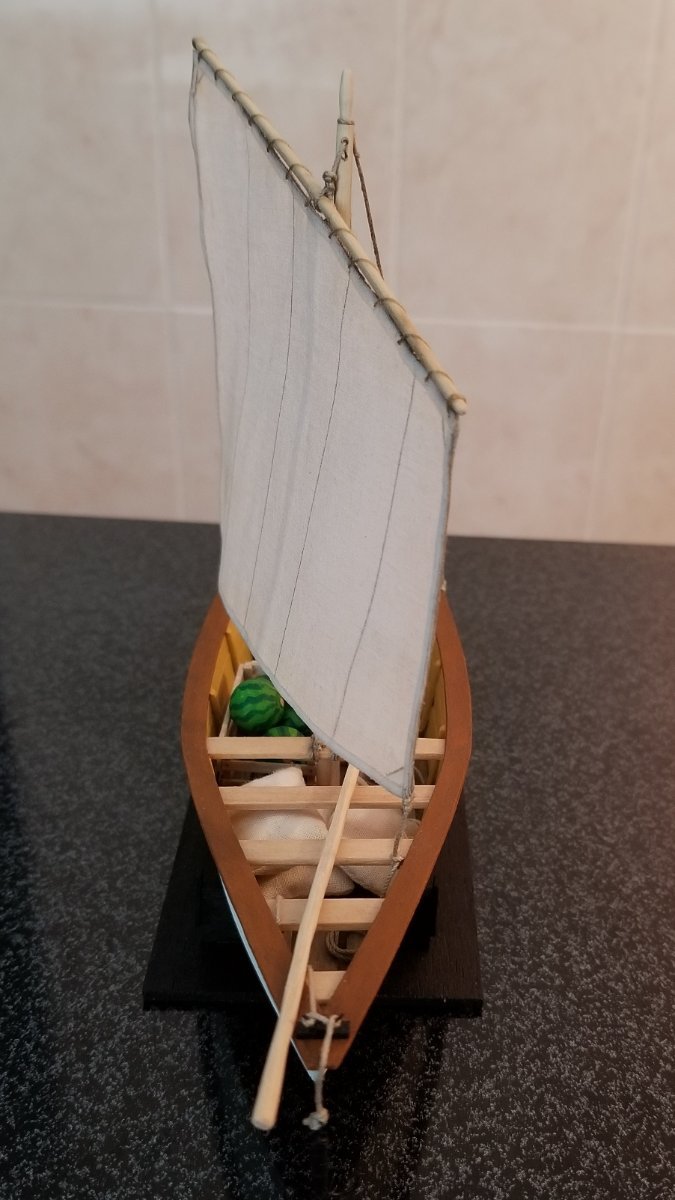
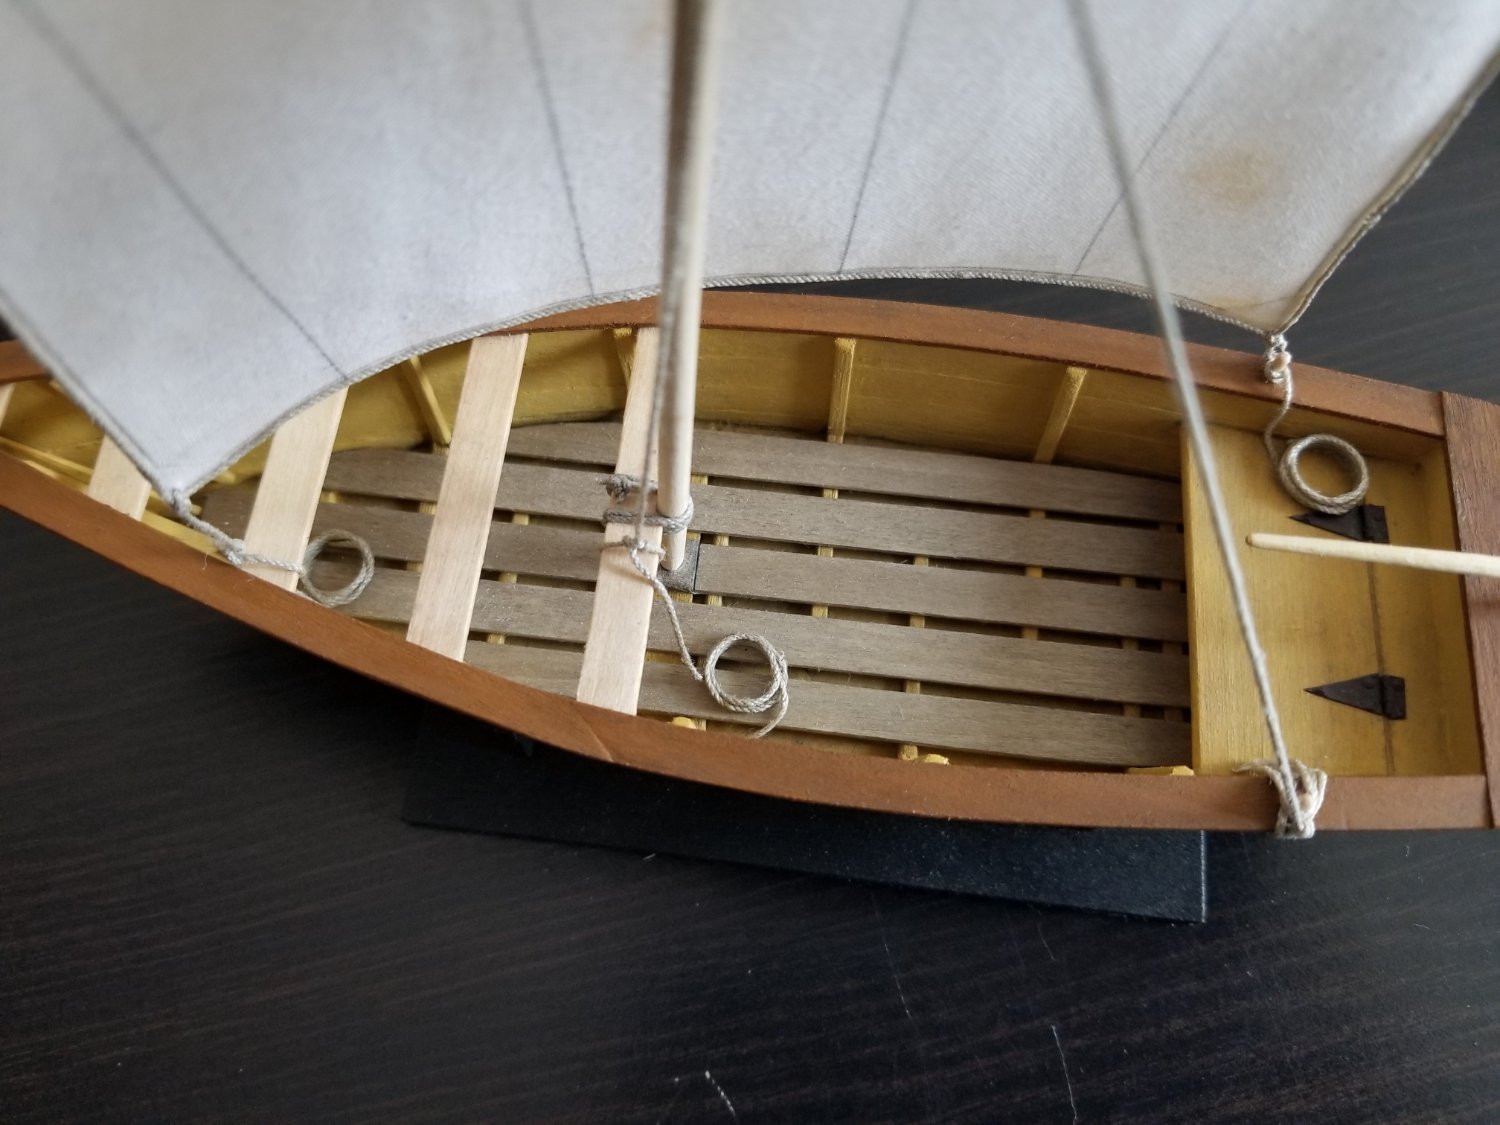
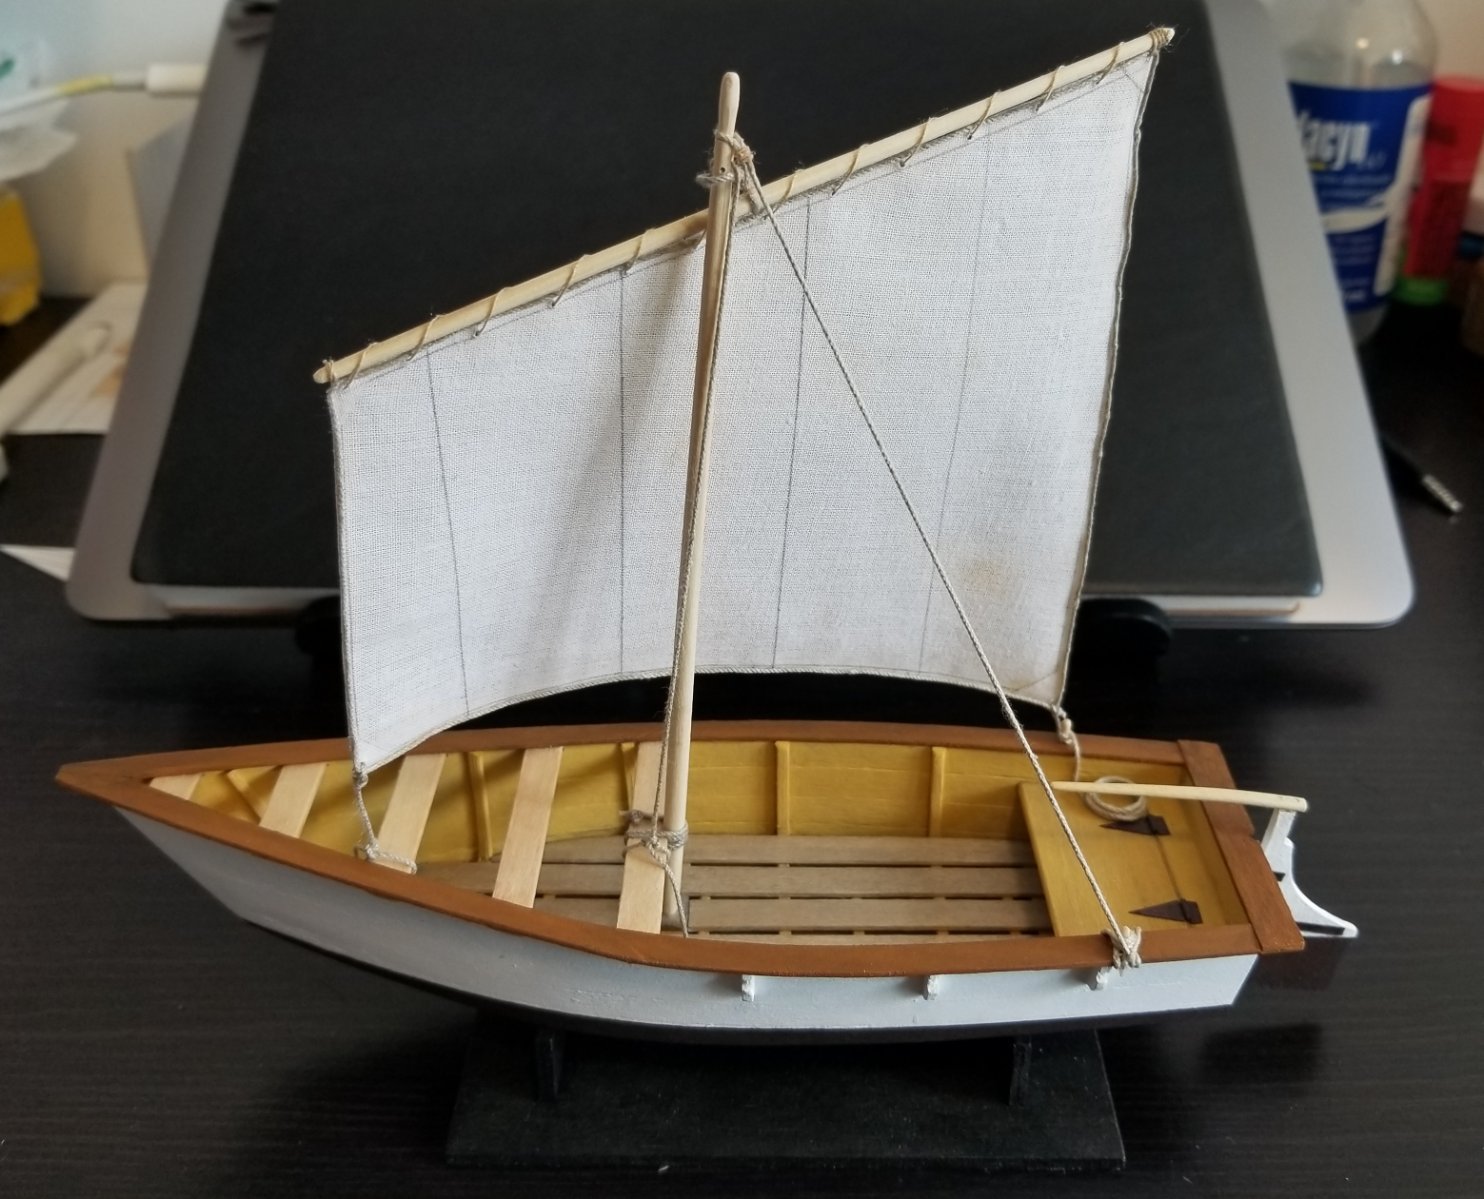
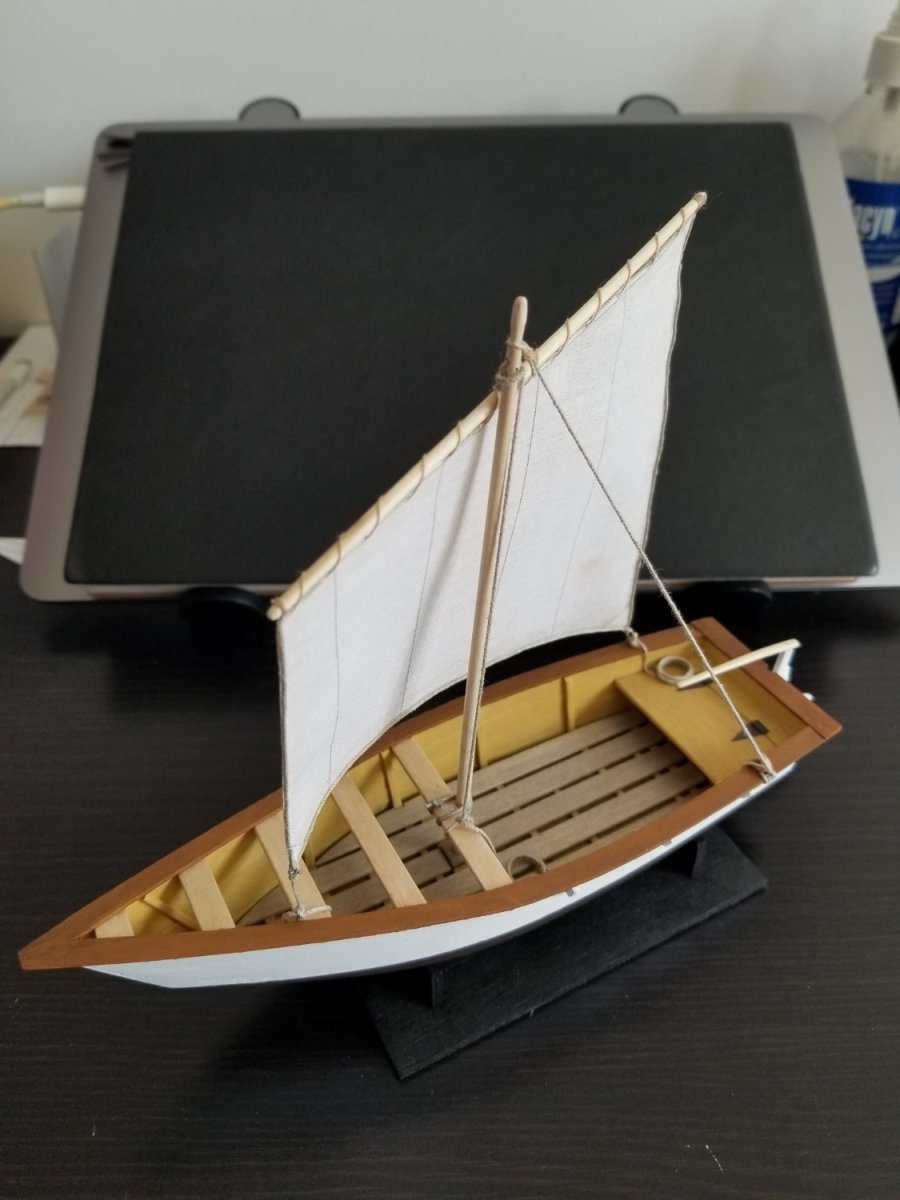
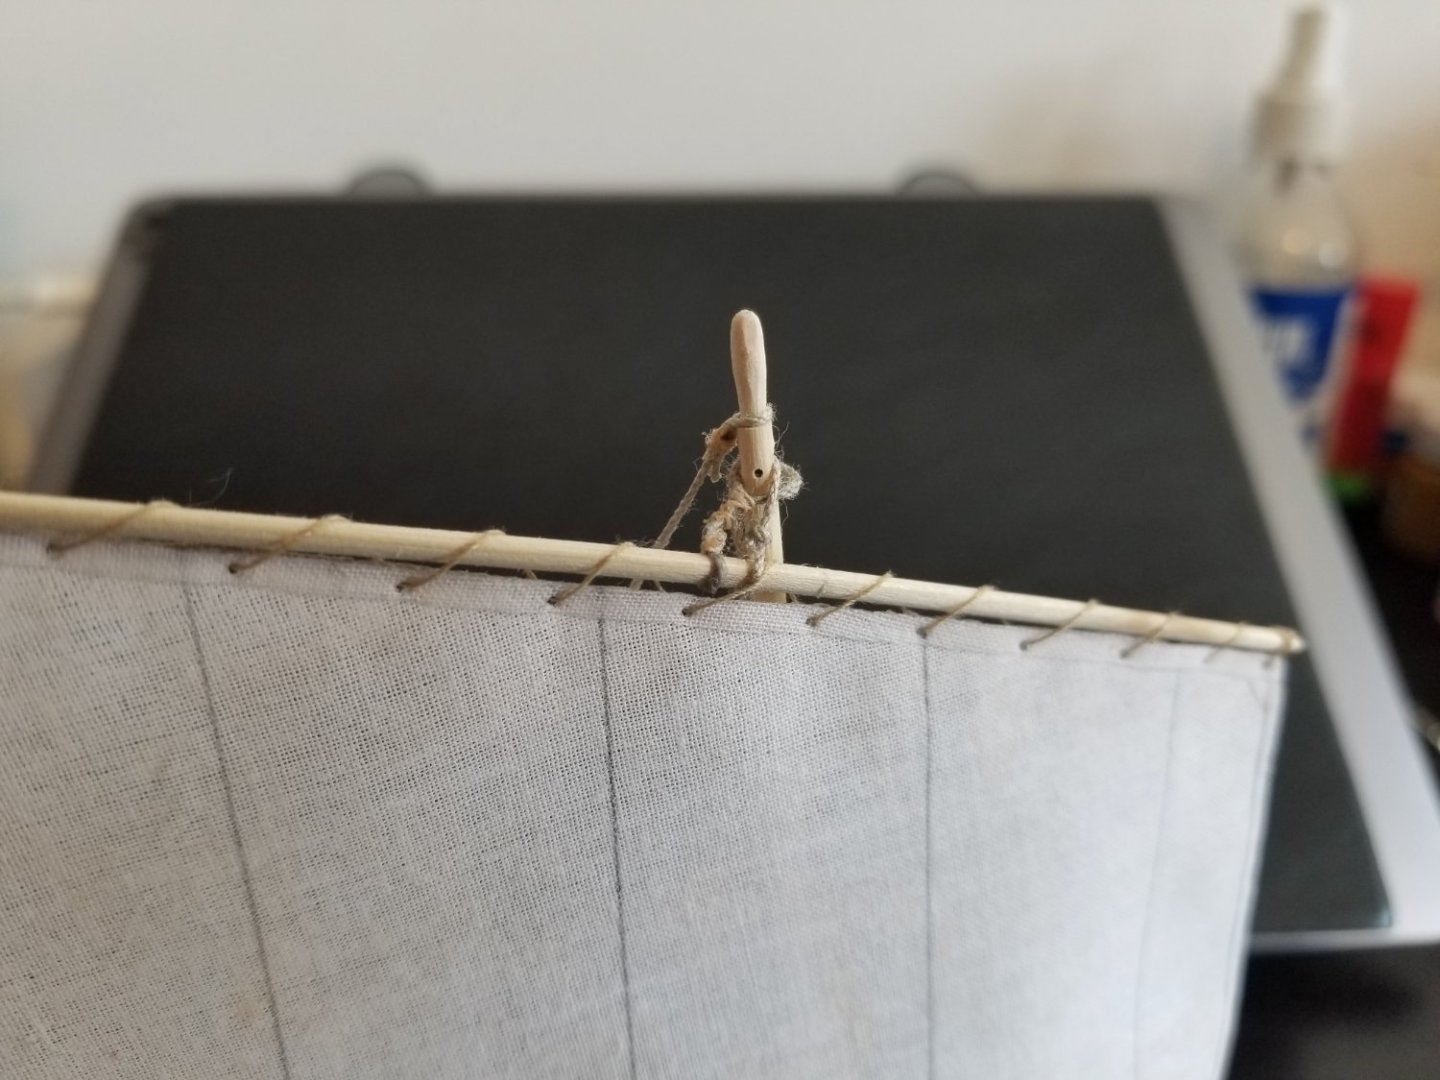
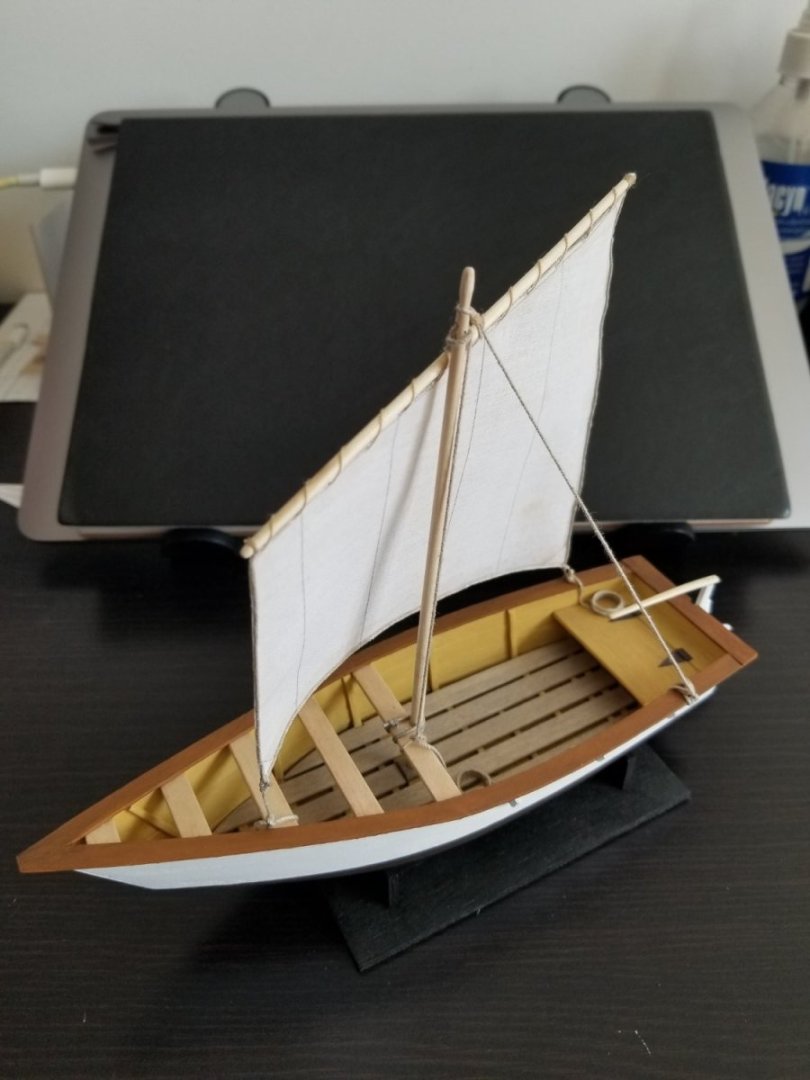
I've finished the Cargo Canoa's sail and rigging! It has been a good lesson in planning ahead. I was able to repair the sail from the issue mentioned in the previous post--the bolt rope is a bit wavier there than I would like, but I think the result is acceptable. I then lashed it to the yard. Midway through, I realized that I needed to tie on the halyard first, so I did that. I forgot to take pictures. Next, attaching the yard to the mast. After studying some photos earlier, I had realized that the yard isn't only held by the halyard, but also by a parrel of sorts (marked in blue in the following photo--the red marks the halyard). (Source: https://digitalcollections.smu.edu/digital/collection/mex/id/2308/rec/26) Unfortunately, I had already attached the stay, as it would have been much easier to make the parrel off the boat and then slide it onto the mast. Making it on the mast resulted in a very ugly parrel, especially as the serving was extremely hard to do in the tight space. As can be seen, with the halyard threaded through the (false) sheave in the mast and the yard raised, the top of the mast is a bit of an unholy mess. Thankfully it's less obvious on the port side, which is the side I plan on displaying. As I discussed way back around the start of this build, the running rigging is very simple, just a fore sheet and aft sheet. I added these after attaching the parrel--much easier than making the parrel, but still something that would be easier off the boat. The larger Canoa de Rancho will have more defined tie-off points, but for this smaller vessel, I decided to tie the fore sheet (and the halyard) off around the crossbeams, and the aft sheet at the starboard belaying pin. At each, I decided to make a simple loop with the excess rope. These loops were then glued in place. For the halyard and fore sheet, the loops were simply made in the end of the rope, which made it difficult to then glue them flat to the deck. For the aft sheet, I cut the line short, made a separate loop, and glued it over the top. This was much easier and I will definitely be doing this more often in the future. With that, the rigging is complete! Just a few steps to finish the Cargo Canoa: I need to figure out the anchor and its cable, make a few extra crates or something to represent cargo (a lone crate with five watermelons looks a little odd--a very small cargo), and add something to the stand to hold the boat in place better, as at the moment it's just sitting on top. The main takeaway from this for the Canoa de Rancho is to better plan out the rigging ahead of time--add the sheets before attaching the yard to the mast, make the parrel off the mast and before making the stays, and attach the halyard and parrel to the yard before adding the sail. Secondarily, when making rope coils, I should pay more attention to the direction of the coil and where the start and finish are--the aft sheet loop was intended to go a little further forward so as to not be on top of the hinge, but I looped the coil in the wrong direction and had to make do. Despite these issues, I'm happy with how the Cargo Canoa is turning out.


-
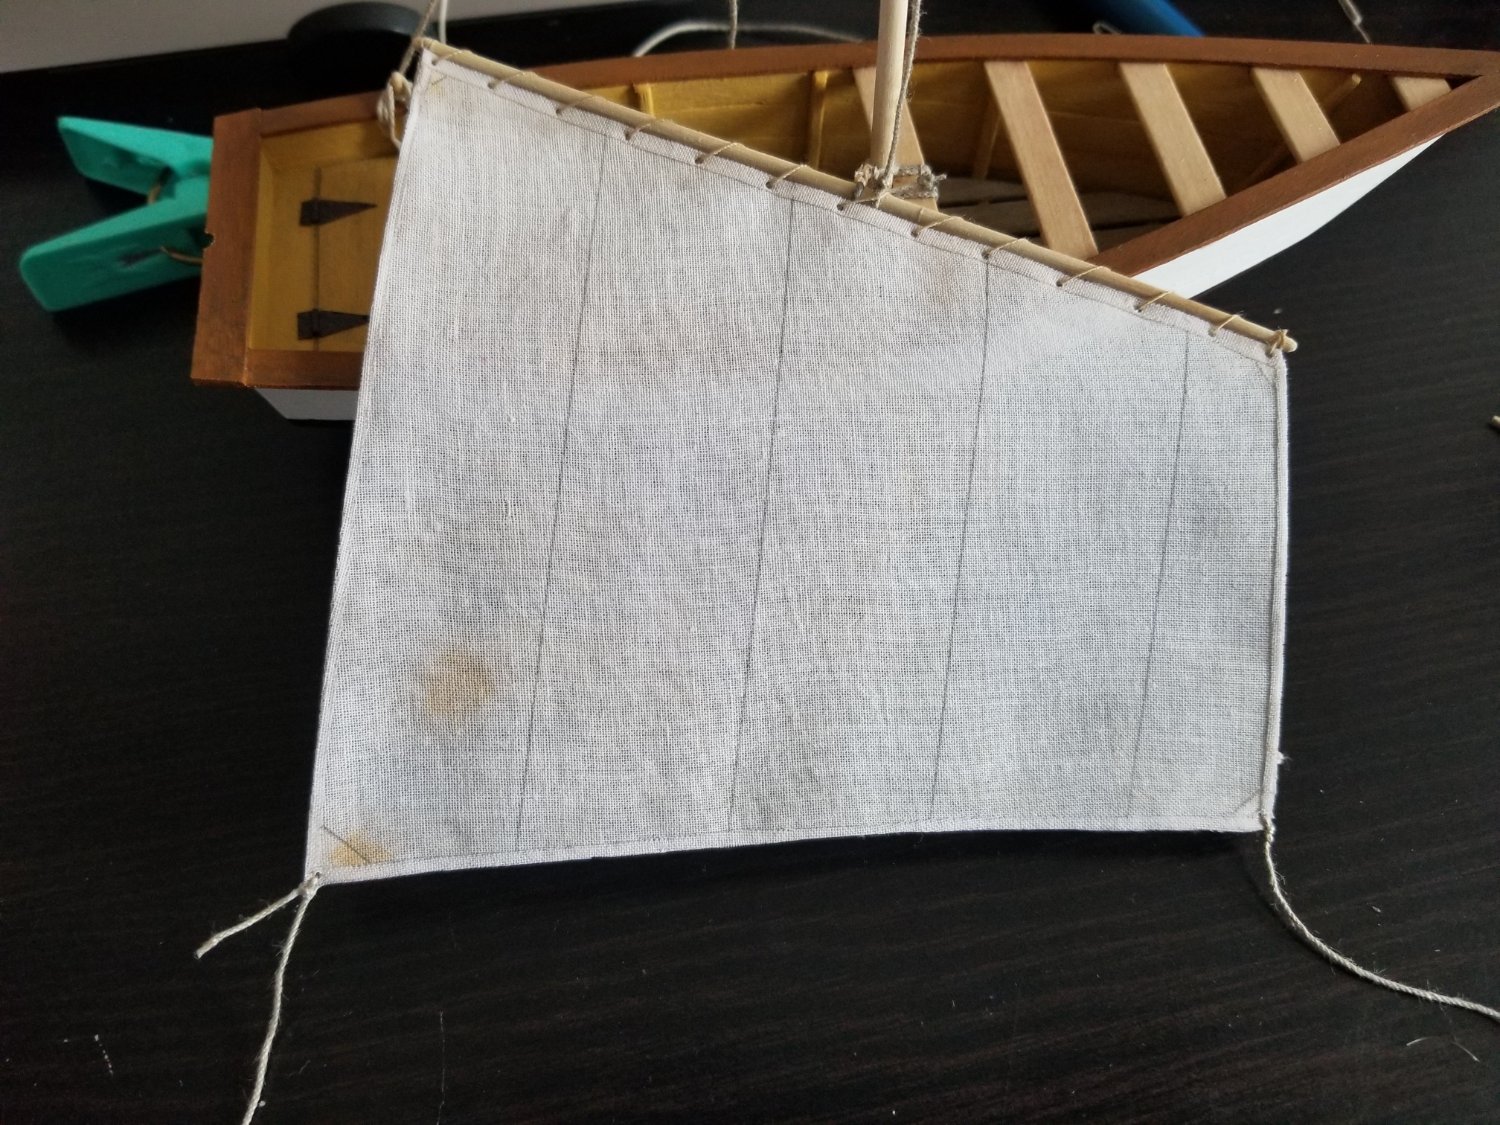
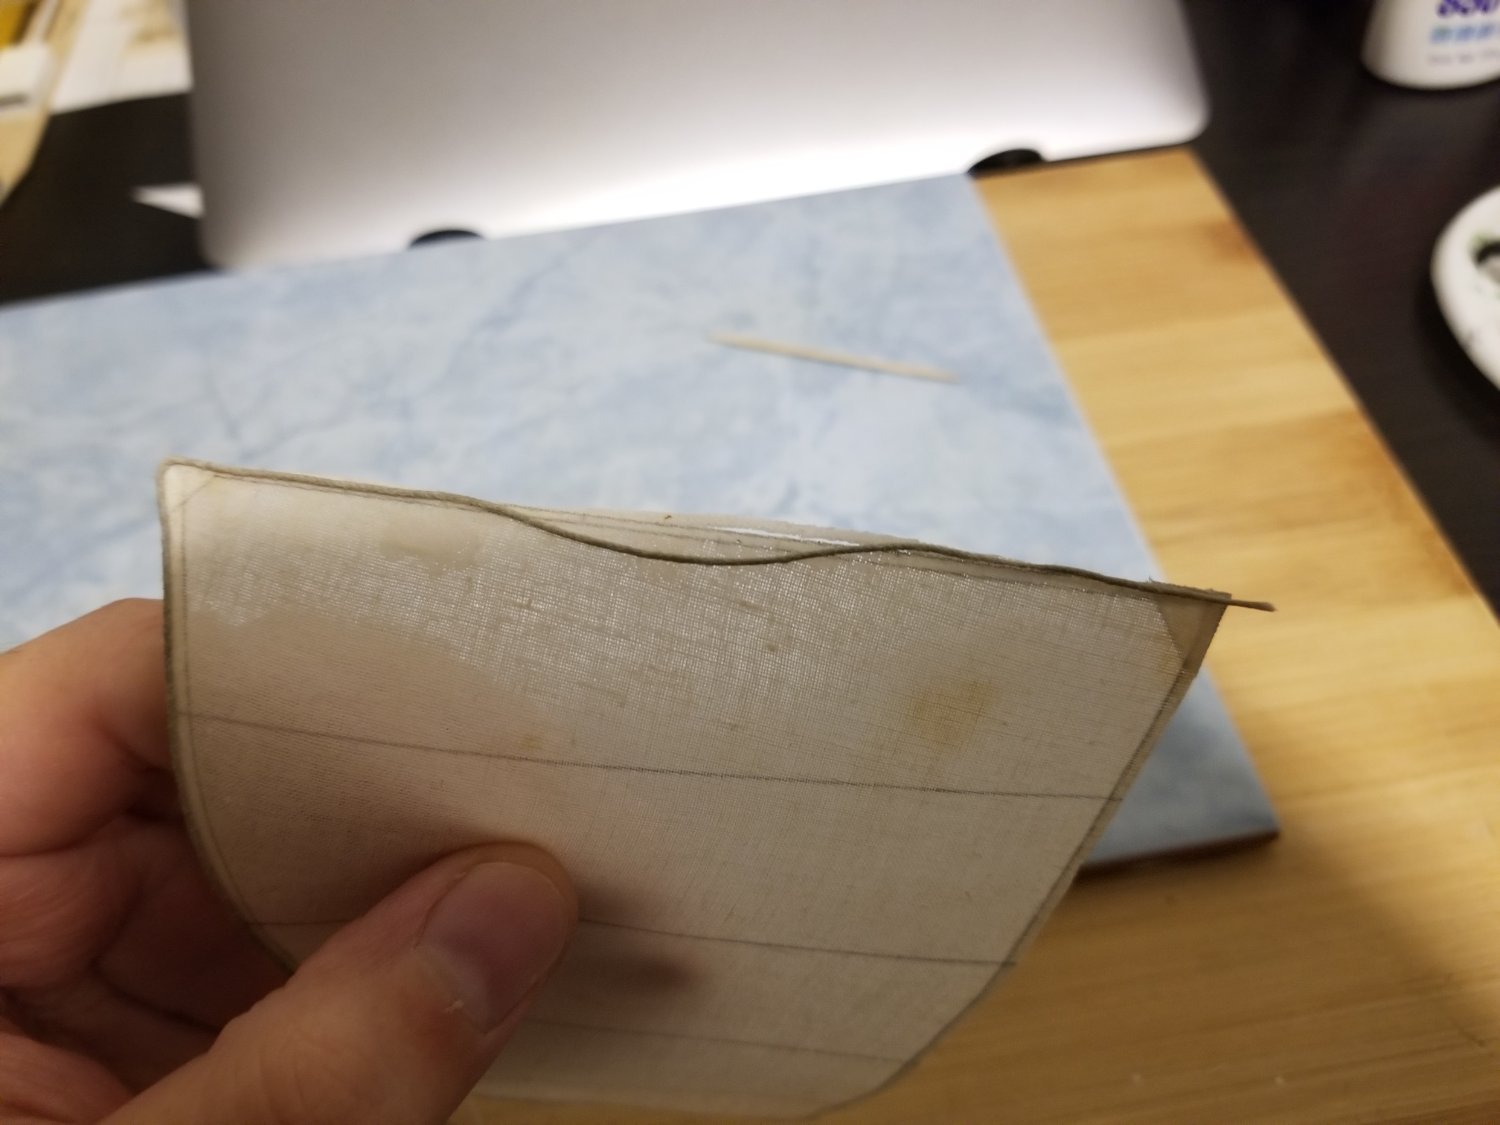
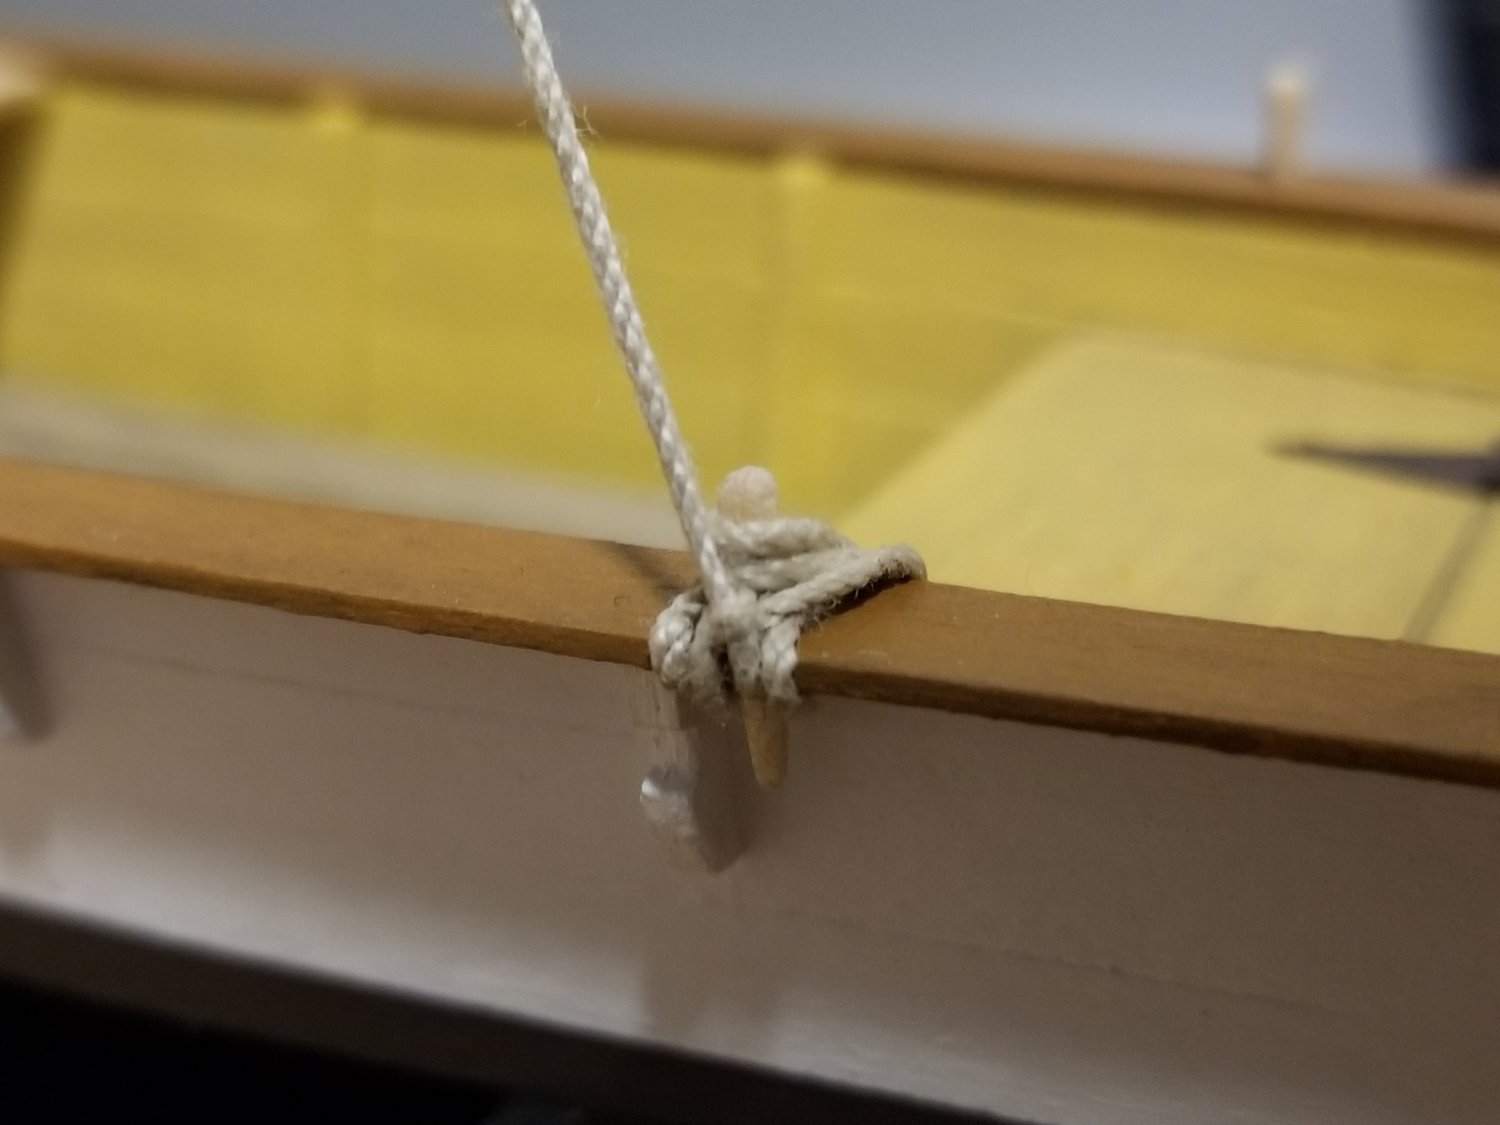
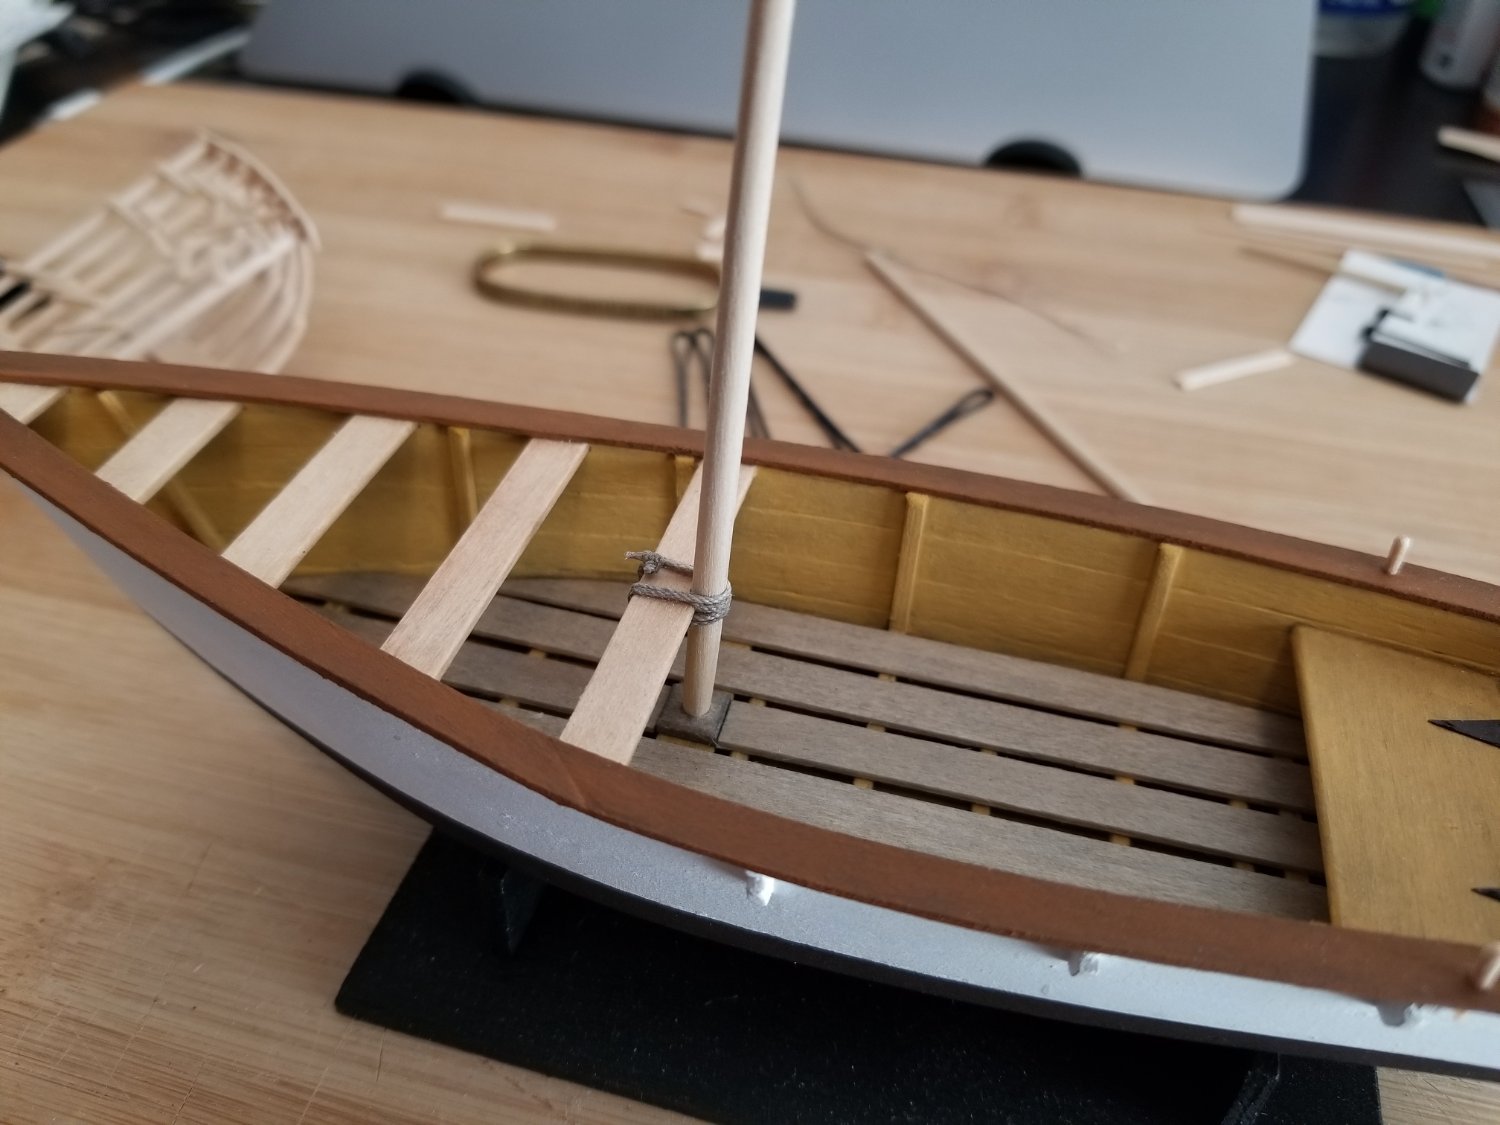
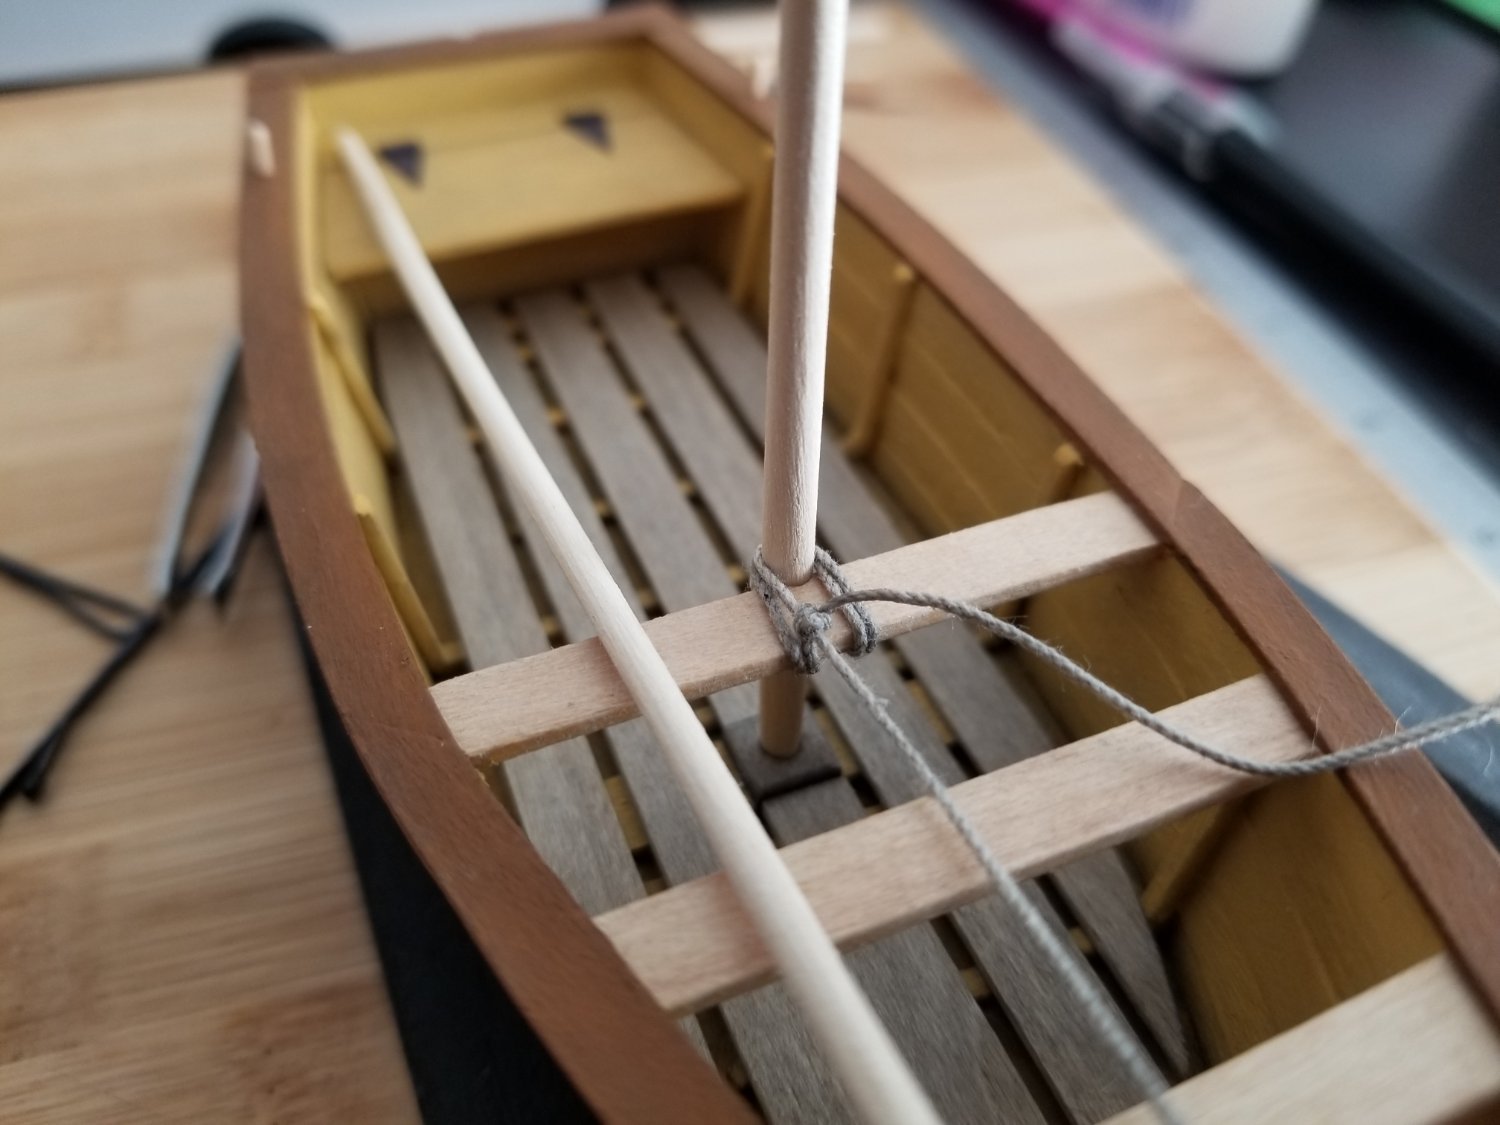
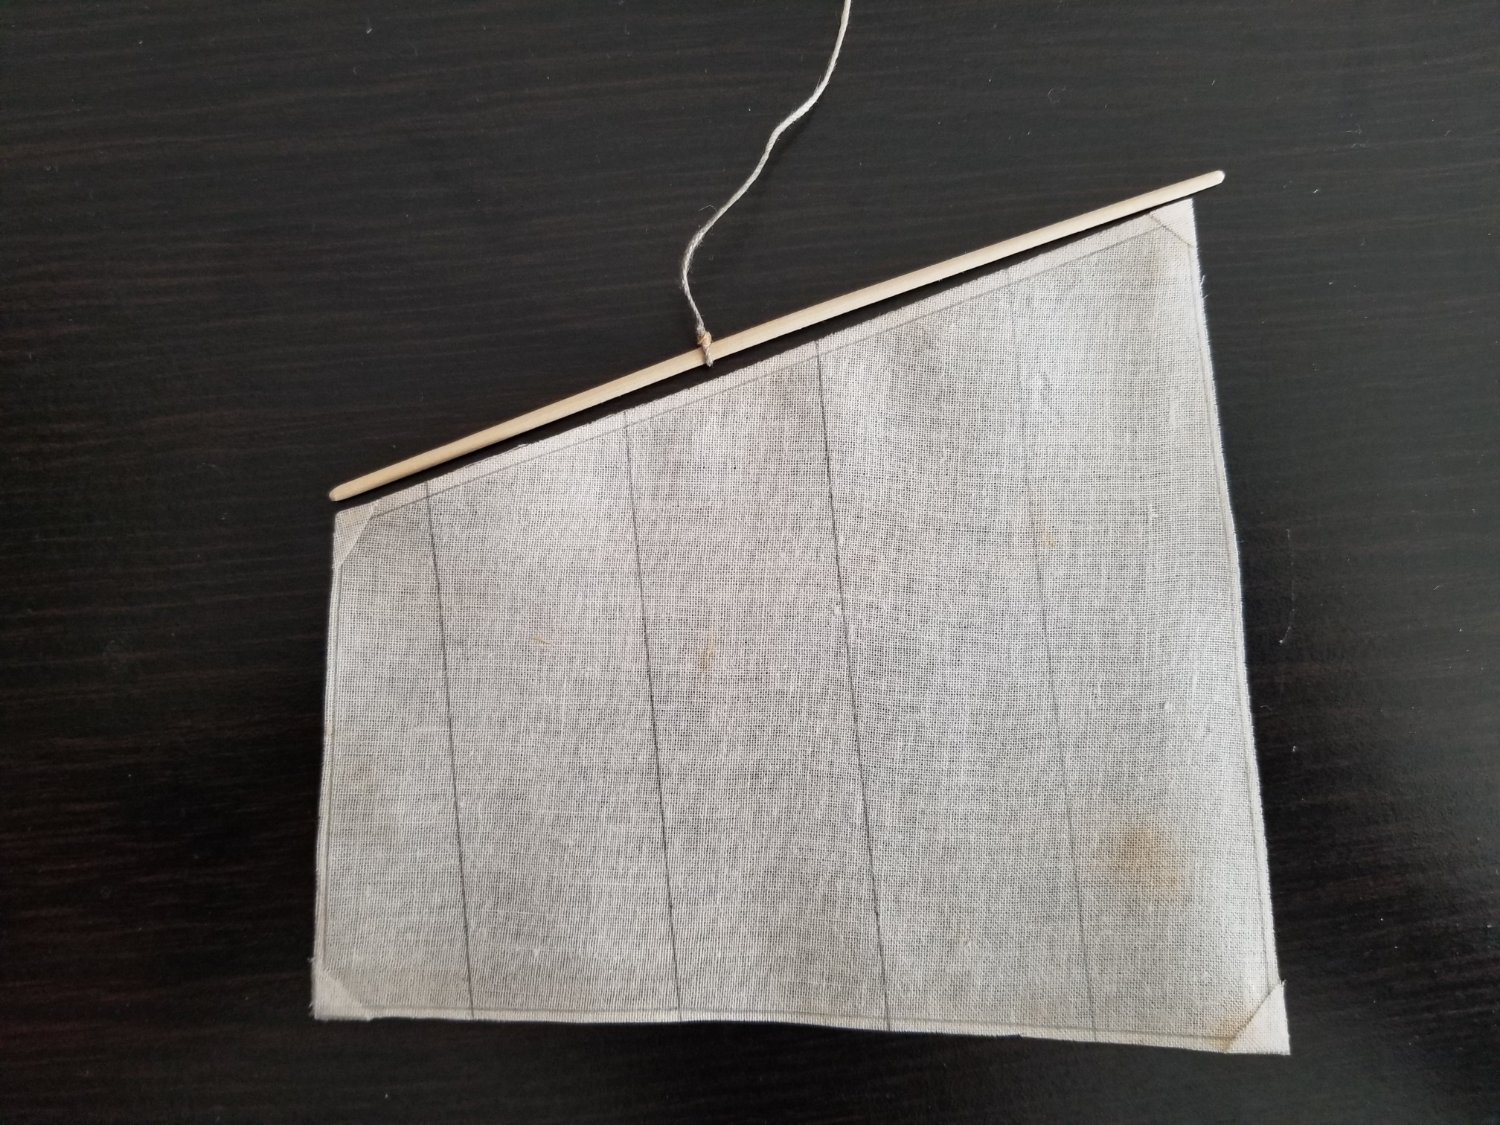
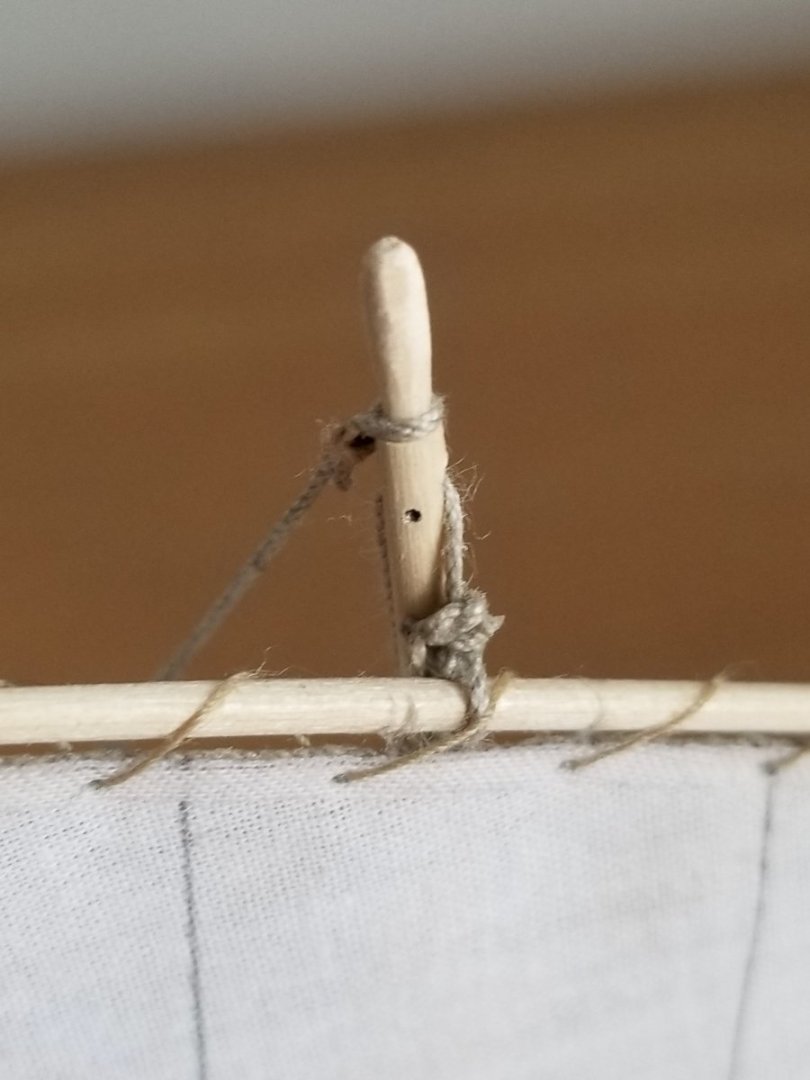
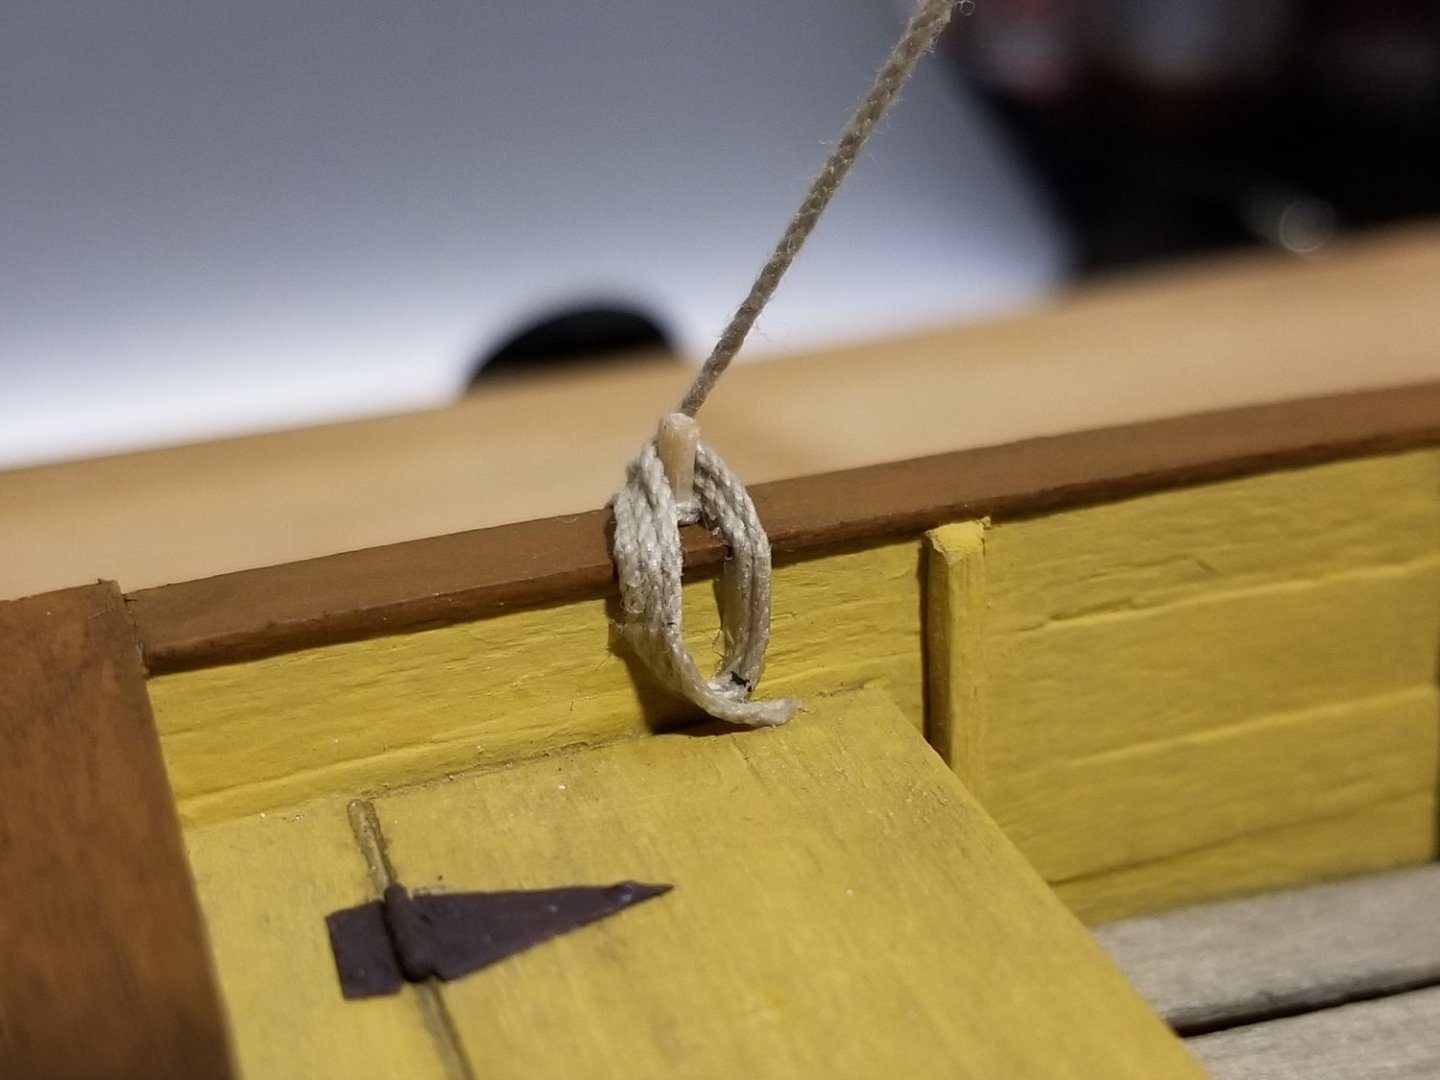
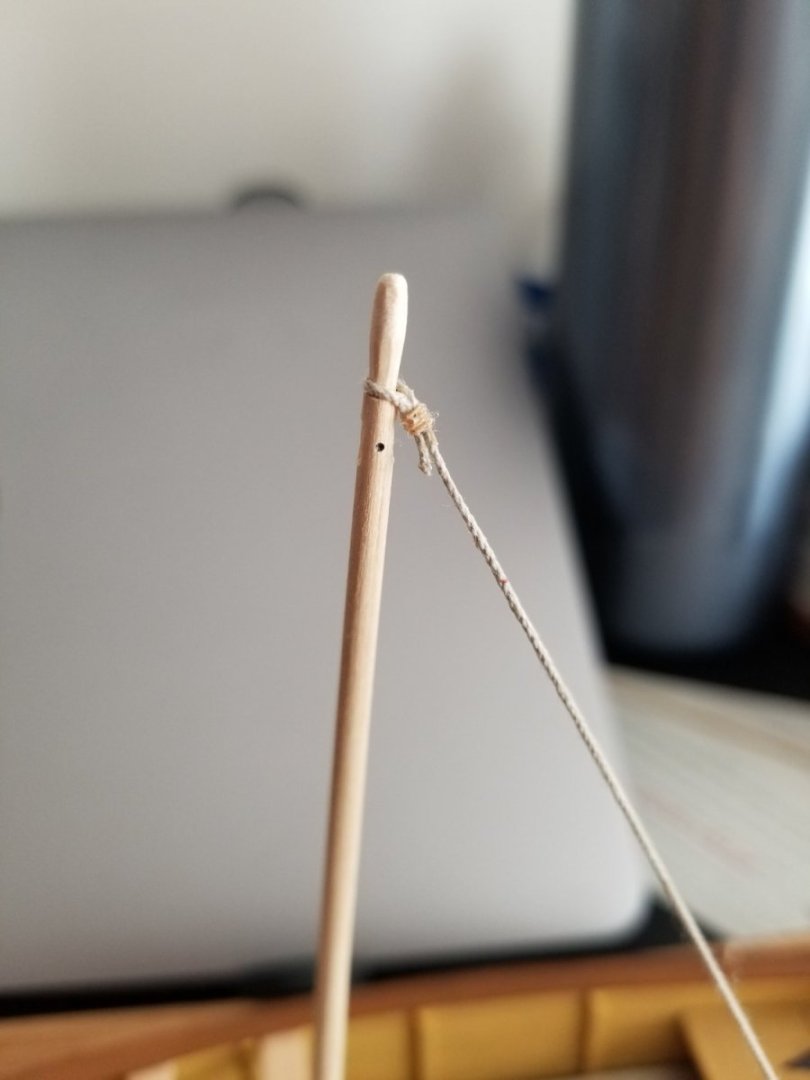
I've turned my attention to the Cargo Canoa. First up, I lashed the mast against the crossbeam. The rope I'm using is the same I used for the dory, dyed lightly in a black wash. It works, but I'm hoping to order something better once I'm in the US. The mast on these small vessels was readily removable, so I decided to just have the lashing knot in a visible place. As can be seen, I also made the yard, again from mango wood. I wasn't thinking and trimmed the loose ends too close-- I suspect there would be a bit more to work with. Oh well. Old photos show that the mast was supported by one or two stays running aft. Given that this is a pretty small vessel, I decided to do just one stay--that way, I could also tie off the sheet around the unused belaying pin. At the top of the mast, I experimented with serving the loop a bit: As for the belaying pin, the knot looks a bit clunky from the exterior: However, I'm happy with how I was able to loop the loose end and drape it in what looks to me like a convincing way when viewed from the inside. I've also been working on the sale, using the thinnest cotton fabric I could find. I dyed it lightly in a brown wash to give it a used look. Here it is with the yard, which I've also been working on: Unfortunately, disaster struck while adding the bolt rope. When I tried to move the sail to make sure it wasn't sticking, not only did the bolt rope come loose, but so did the edge reinforcement that I had glued on much earlier: In general, the watered down glue doesn't seem to be sticking very well. I was able to fix things with unthinned glue, but it seems to have left the sail a bit wavy. I'll see if I'm able to successfully attach the rest of the bolt rope, or if I need to redo the sail.


-
Nice job! Good problem-solving on the beckets, the provided rope is much too thick. Looking forward to following your next build!
-
That's really interesting, thanks! I actually just received my copy of Nuestra vela latina, it looks extremely useful for this sort of thing.
- 61 replies
-
- 2
-
-
- ancre
- Santa Caterina
- (and 1 more)