HOLIDAY DONATION DRIVE - SUPPORT MSW - DO YOUR PART TO KEEP THIS GREAT FORUM GOING! (Only 51 donations so far out of 49,000 members - C'mon guys!)
×


Greg Davis
-
Posts
805 -
Joined
-
Last visited
Content Type
Profiles
Forums
Gallery
Events
Everything posted by Greg Davis
-
 Cylinder casting update: My Model Expo account says that the replacement part request is still processing - it is now getting close to 2 weeks since I was told I would be receiving the parts soon!
 -
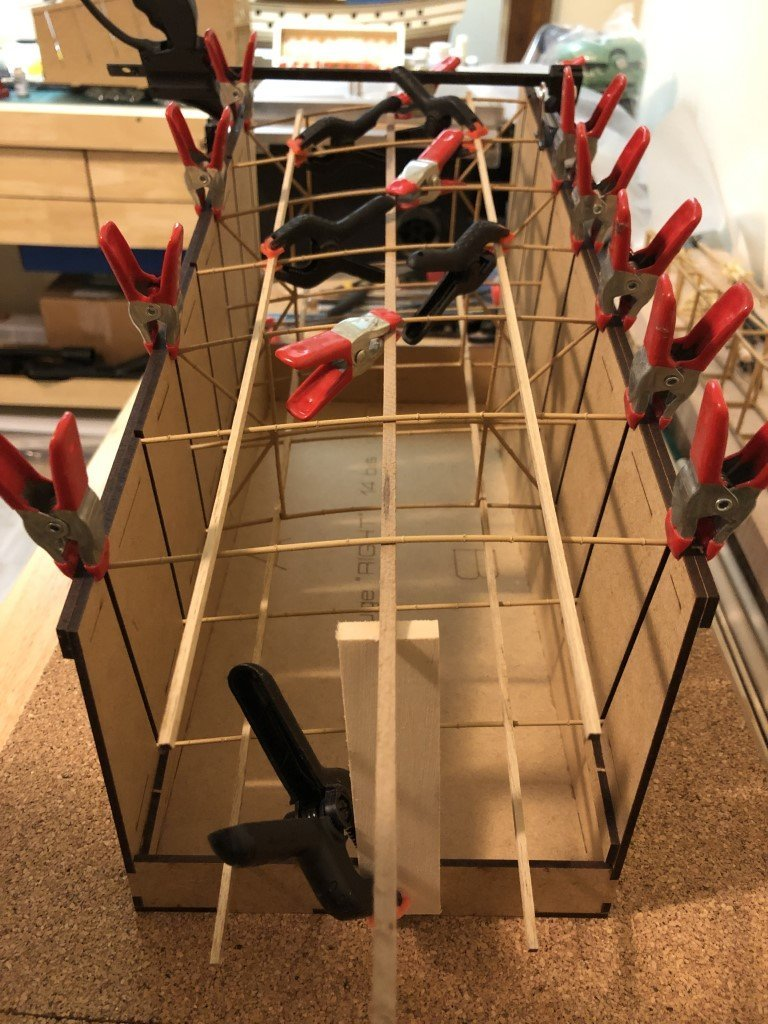
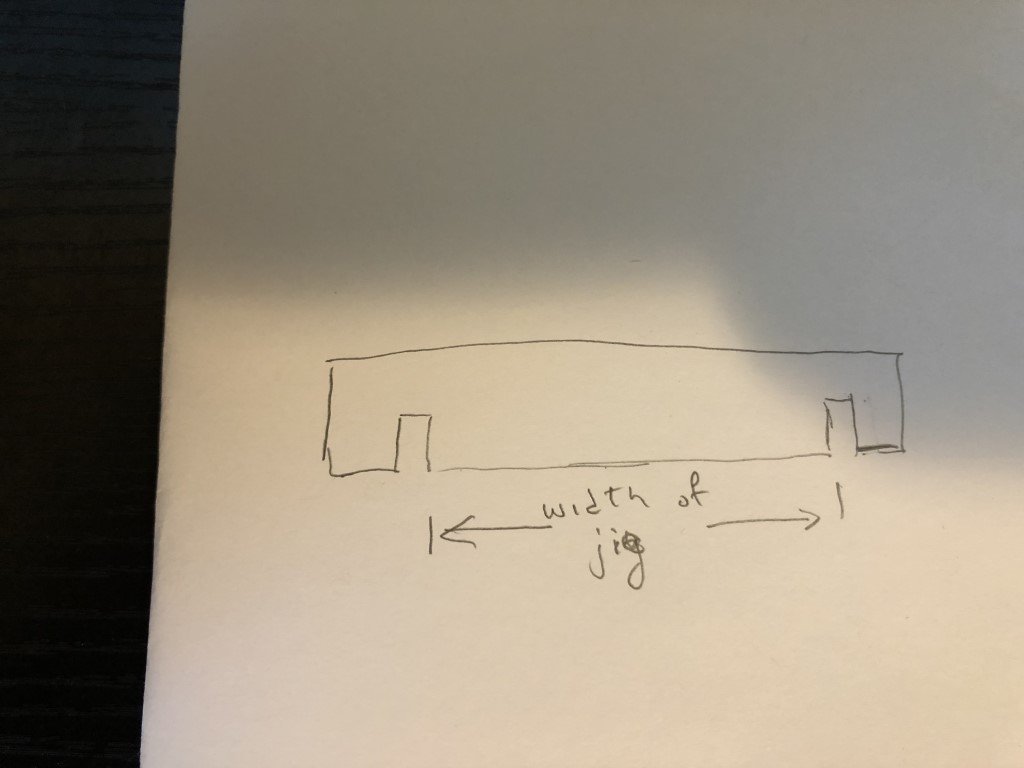
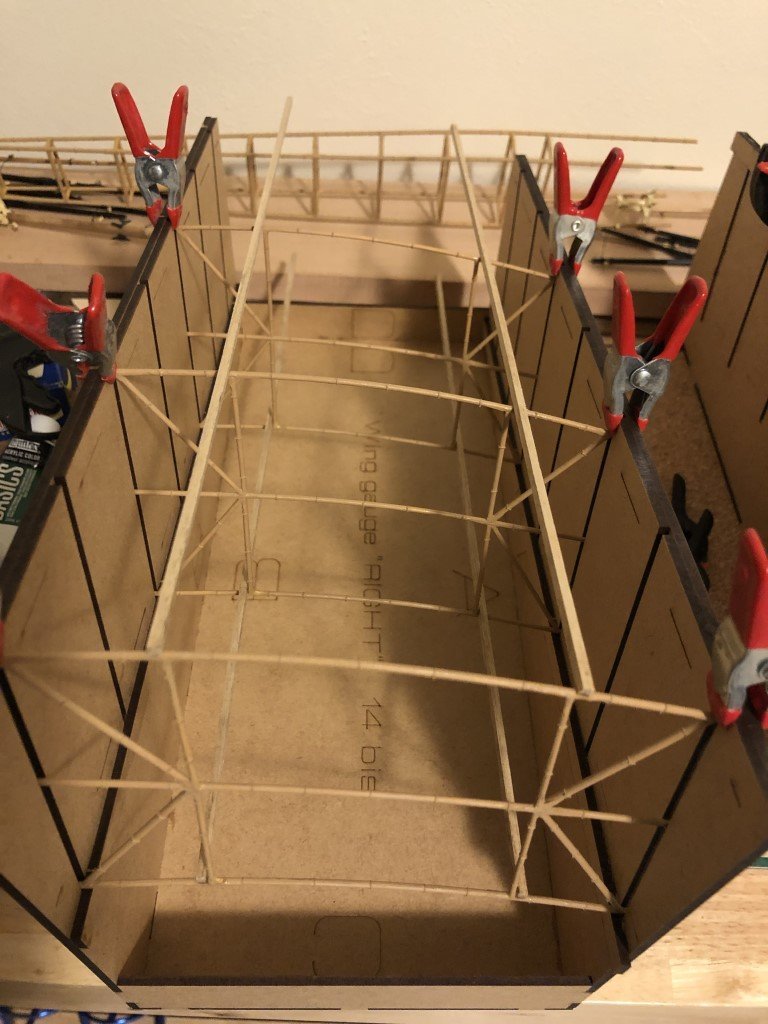
George - I didn't have problems with the lower ribs setting nicely in the jig; however, at the top there was a small issue. While I had done my best to have the jigs squared up nicely, there was still a bit of splaying going on at the top so that the top ribs didn't fit secure in the jig. So I used spring clamps to keep the heights of the ribs correct; but maybe most importantly, I used bar clamps to gently pull the top of the jig together. In this picture you can see a bar clamp at the outer end of the wing jig. The only issue using the clamp was that it was a little challenging to get enough clamping pressure for the clamp to stay in place but not too much to distort (or break) a rib. A better solution would be to have a pair of temporary spreaders that could be slipped onto each end of the jig. Something like this: This would be a nice addition to the laser cut parts for the jig! Greg
-
George - Great to hear you are making the model as well! Very interesting method for dealing with the ribs. I still am not sure I am satisfied with the ribs between the wing panels on mine. Currently I am thinking of removing them and replacing with ribs made from basswood. I've experimented with a few basswood ribs and they are holding the shape well. Once they have nodes and are painted, I don't think that the replacements will look different from the bamboo ones. I didn't come up short with bamboo dowels - I was supplied with enough to have left over material. Yes the fuel distributer installation looks to be challenging. When I get to that part (after the rest of the engine has been installed) I think that I will place a block under part G when adding the first couple of injection tubes. Hopefully it looks more tricky than it actually is! Greg
-
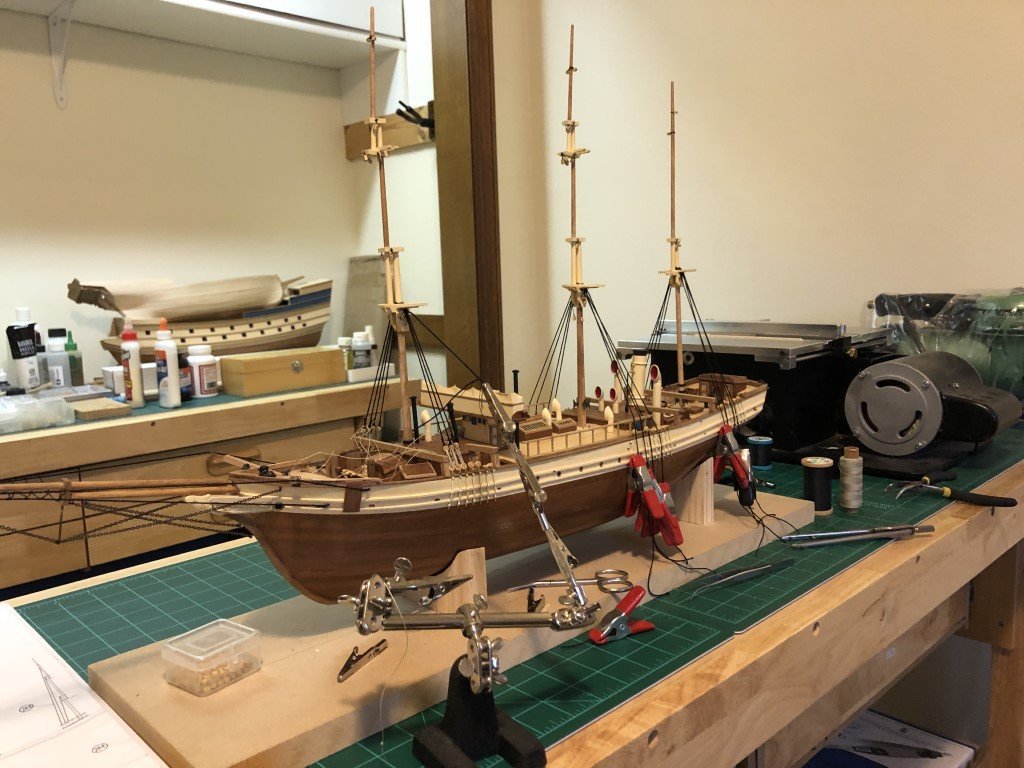
Finally got back to working on this ship. Since mid-November, I've been spending most of my building time on the new Model Airways Santos-Dumont 14bis kit: So back to Le Pouquoi-Pas? for a while - maybe straight to the end! The lower deadeyes are all attached, the masts are erected, and I started putting on the lower shrouds yesterday and today. It's nice to be reeving lanyards again.
- 123 replies
-
- 5
-

-
- Le Pourquoi-Pas
- Constructo
- (and 1 more)
-
It looks like this kit is going into a holding pattern for a bit. Much of the remaining work requires the engine to be in place, but the replacement cylinder has not made an appearance yet. While Ricardo, at Model Expo, said I should be getting it soon their website shows the request still processing; i.e., not shipping yet.
-
Canard is now complete. Nodes were added, wood painted, and then rigging was added. The canard 'nose' required some concentration to position / attach.
-
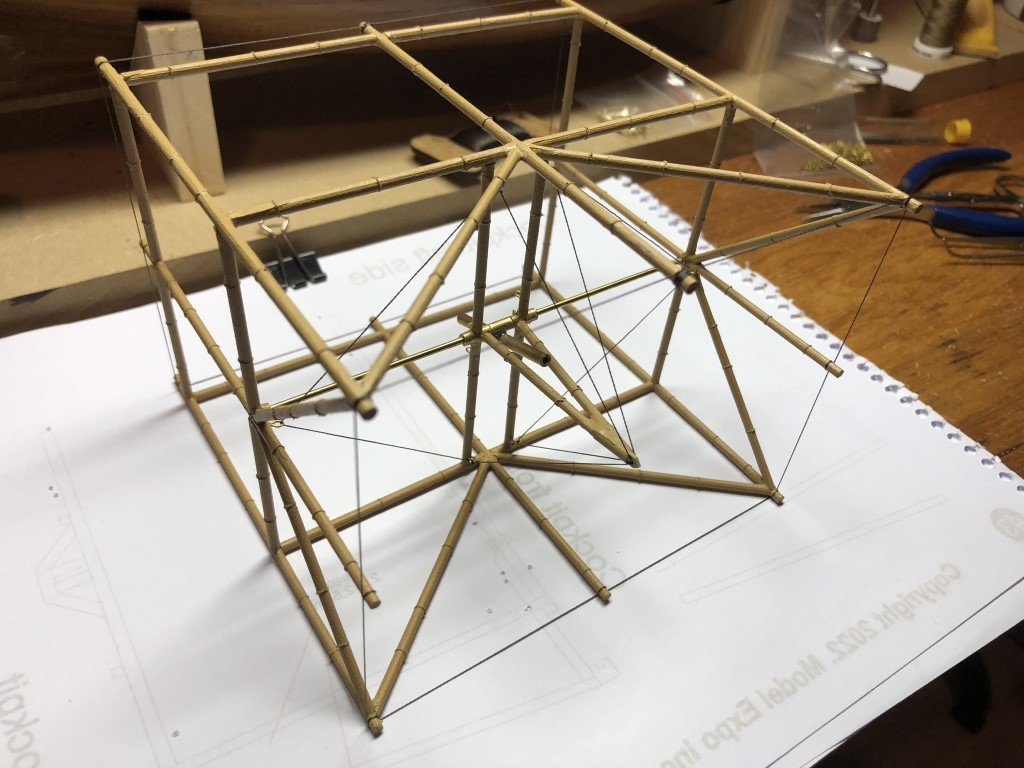
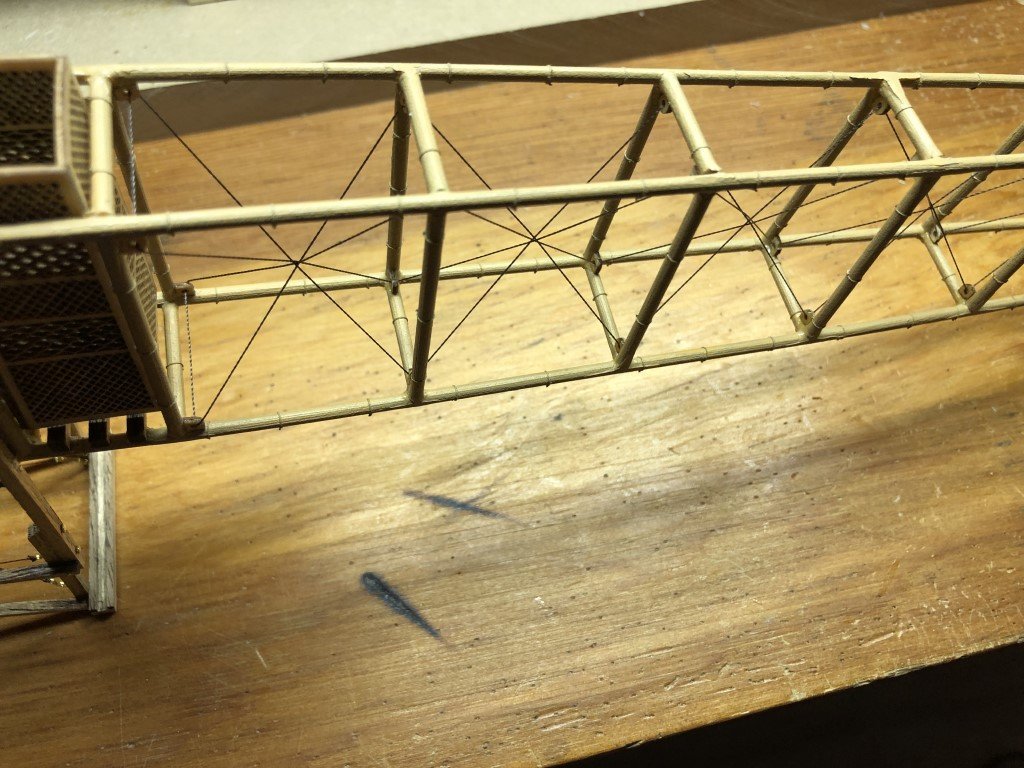
Last night and today I spent time rigging the fuselage / nacelle assembly. Here is the fuselage rigging - it is a pleasing amount of cross-bracing. This is what the lower portion of the nacelle now looks like: The 'turnbuckles' are photoetched brass and are very fragile. In the above picture the engine mounts can also be seen.
-
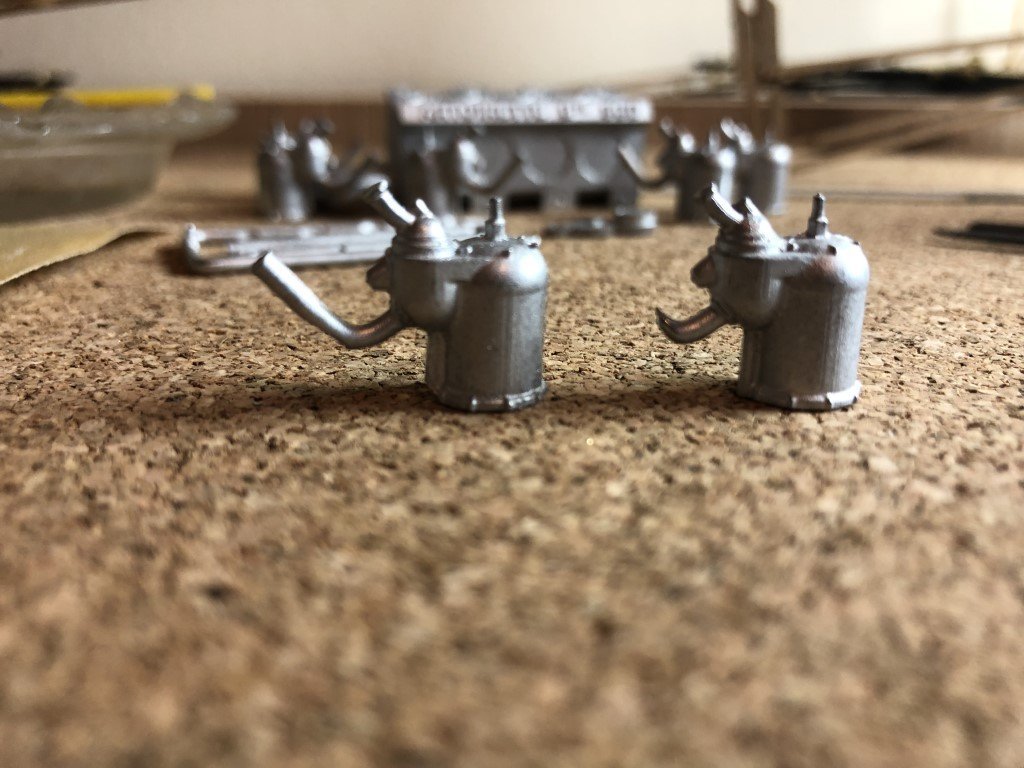
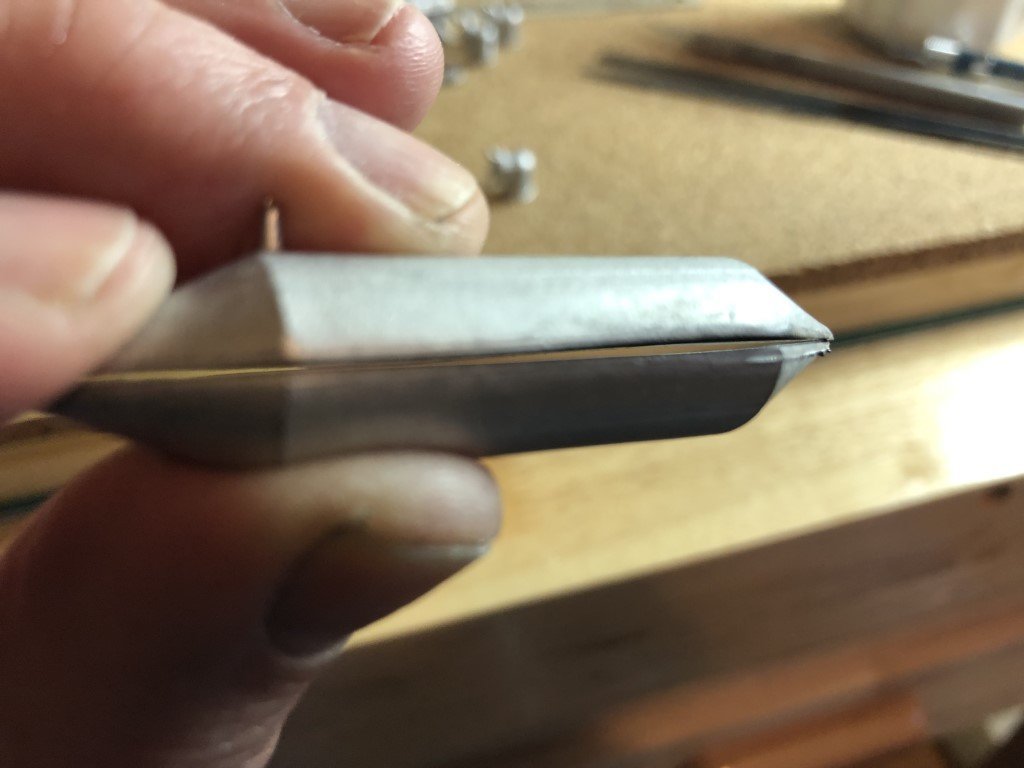
Yesterday and today I spent some time smoothing the engine casting and then started to paint the cylinders. Here are what the seven painted cylinder castings look like now: They seem to bear some resemblance to the ones pictured a post or two ago. Why seven pictured as the engine is a V8? Well, I need to have a replacement one sent to me as one of the castings had an incomplete exhaust pipe: I hope this can be supplied soon as, unlike the missing wood parts, I'm not as confident on repairing this piece - but if time goes on too long, I'll give it a go here as well. When I found this incomplete casting I went thru all the castings for the kit. In general I feel the castings are quite well done - for example the amount of detail on the cylinders is really nice and I don't think that one could ask for more in a soft metal kit casting. The only other casting disappointment was that of the fuel tank: I think the mismatch may be too extreme to be corrected via refacing. It very likely that after some facing, they will be joined and then the seam gaps will need to be filled. I see this as more of an inconvenience as compared with a fatal flaw since the fuel tank will be painted copper before adding it to the model.

-
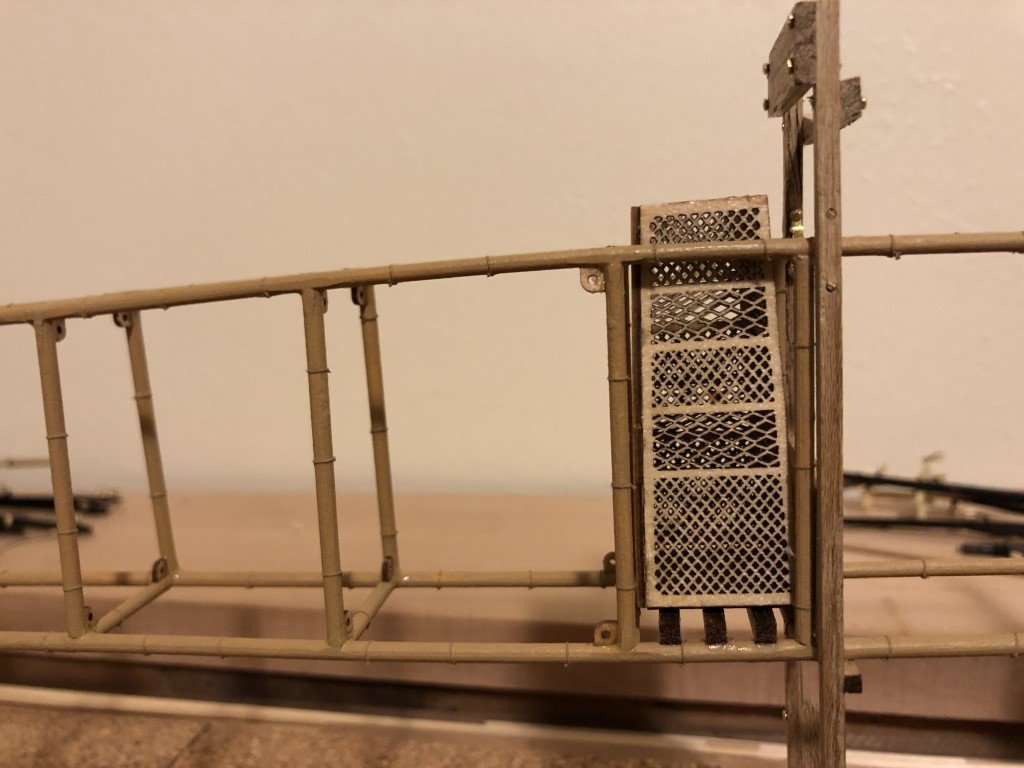
I also have assembled and installed the pilot basket. Really nice laser cutting on the basket weaves! It took a bot of coaxing to get the basket in place. I couldn't drop it straight down as the base was larger than the upper fuselage rectangular opening. I finally succeeded in putting it in from the side and the letting it rest on the basket mounts. Even this maneuver was tight and I wasn't sure it was even going to work. In retrospect, it would have been better to load the basket from below, hold it up with a clamp on a side piece, and then add in the basket mounts before dropping the basket into place. In the picture 'bracing anchors' can be seen in each of the cross-sectional slices. The fuselage bracing rigging will pass through the holes.
-
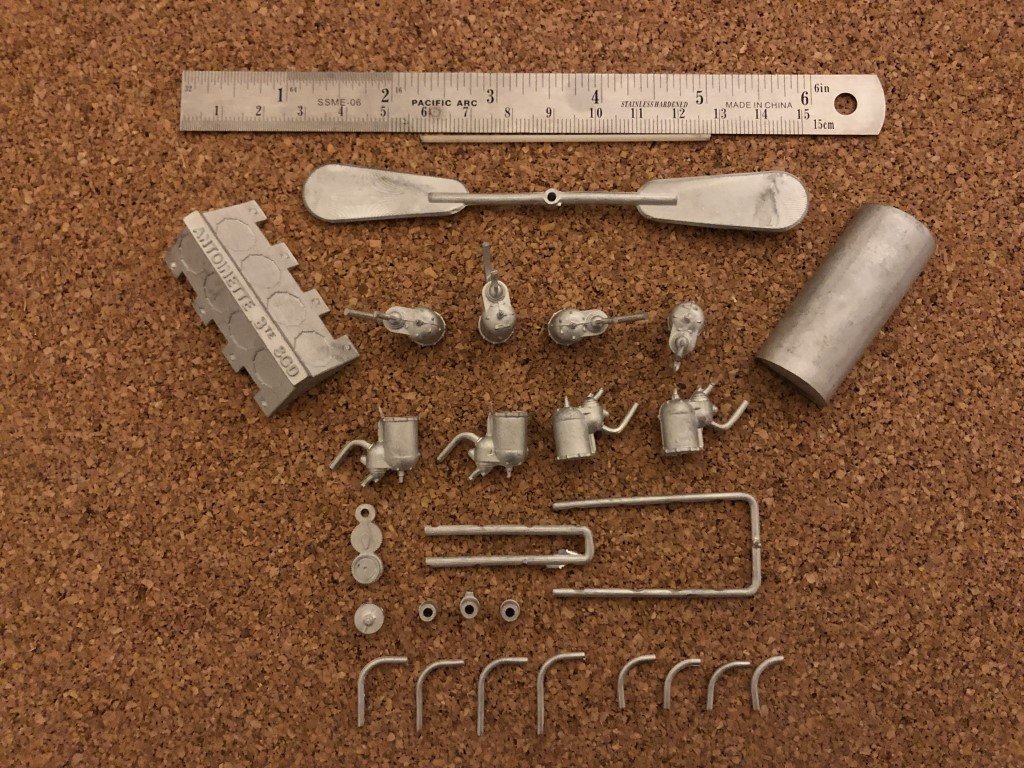
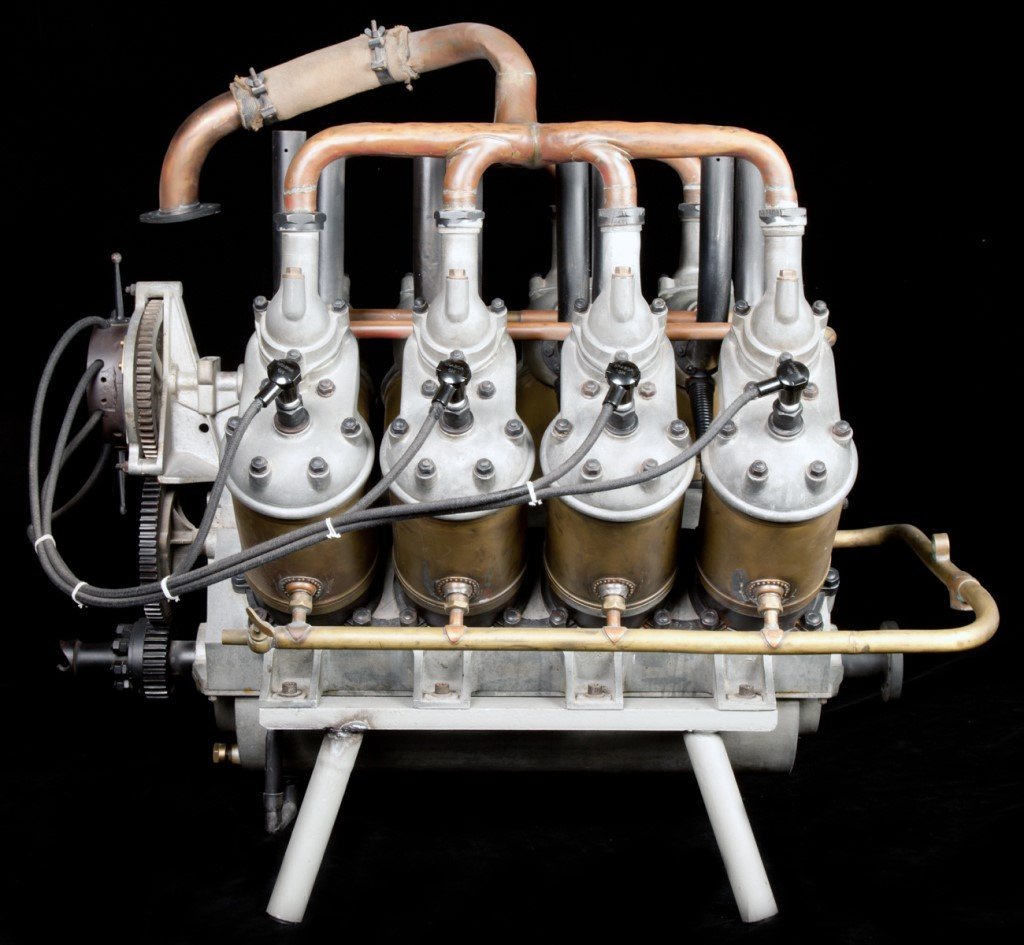
Been doing some miscellaneous work / jumping around a bit. I've drill holes and added most of the 'bolts' to the nacelle. Really the only major things left up front are related to getting the engine in place and a bit of rigging in the landing gear area. I will work on the engine portion before the rigging so that I have more places to put my hands for a while. The big issue right now is to be able to install the engine mounts. This a place in the instruction manual where things are a bit out of order / not well laid out. The instructions have the motor mounts being made on p21, before the fuselage is made p22 - 26. On page 26 the motor mounts are shown in place, but back on p21, one is instructed to use the motor to set the height of the mounts so the propeller shaft lines up properly. The engine assembly is addressed on p33. It would be really good if there was some cross-referencing placed in the instructions! Considerations from above have led me to starting the engine assembly. Here are the relevant castings as supplied. Compared to other Model Airways engines, there are very few parts to deal with. For the most part the casting don't have too much flash and/or mold lines to clean up. The engine, an Antoinette V8, was a liquid cooled, gas fueled (with fuel injection), 209lb engine, that produced 50hp. Here's a picture of an actual Antoinette V8 that is displayed at the National Museum of Science and Technology in Milan. I will be using this as a guide for painting parts of the model. Copper pipes and brass cylinders with a touch of black for the spark plug harness. The castings are already fairly close to the rest of the structure. Cleaning up and painting the castings is coming up next.
-
Sounds good - I think you will find that sheets 05 and 06 are exactly the same; each containing 4 spars, 2 for the top of a wing and 2 for the bottom of a wing. The longer spars are the bottom spars and the shorter are for the op of the wing. My guess is that you are OK with those parts. It's really the sheet 01 that you need; i.e., half of the parts for the nacelle. Hopefully they can get the parts into the country and then shipped to you soon!
-
Joon - I think that you are correct that there should be 8 sheets - but two are identical. Sheets 05 and 06 contain the spars and are exactly the same. Is it possible that you have either two 05's or two 06's? It was sheet 01 that was missing from my kit, and appears to be missing from many (all) kits at this time. I recommend that you contact Model Expo and ask for them to supply you with the parts you are missing. It is their policy to do so. I completely agree about the quality control issue on this model. I have numerous ship and plane kits from Model Expo and in the past I have had no problems with pieces being missing. I think the problem here is that the Santos Dumont 14 bis model was not actually manufactured by Model Expo, but instead by Nauticurso; however, I am surprised that when a kit was opened up for pictures of the content that no one compared with the instructions. Again, think about contacting Model Expo via the Parts Request link at the bottom of their web site's front page. Greg
-
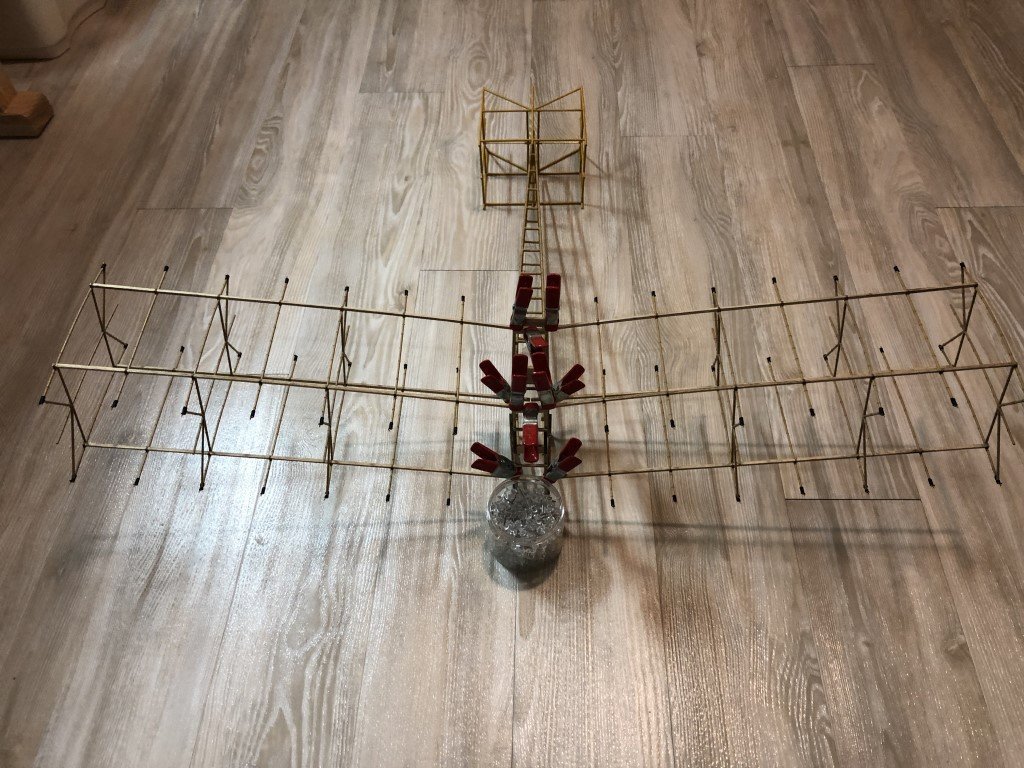
Before getting started on the drilling and pinning job, I couldn't resist clipping the wings in place to get an idea of what the overall project was looking like. From the front: From the back: The canard bamboo still needs its nodes and brownish paint. My wife says there is a slight color variation between the wings and the fuselage that needs attention! Now wondering about a display location for the finished product. In some ways, this takes up more space than a midsized ship model.

-
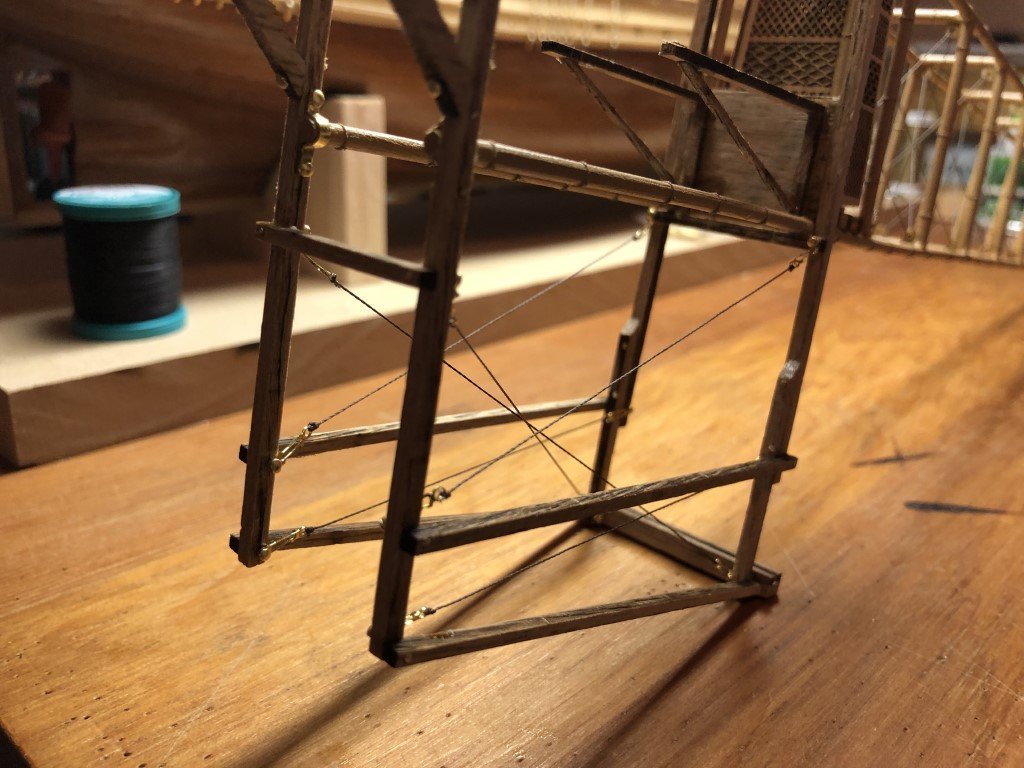
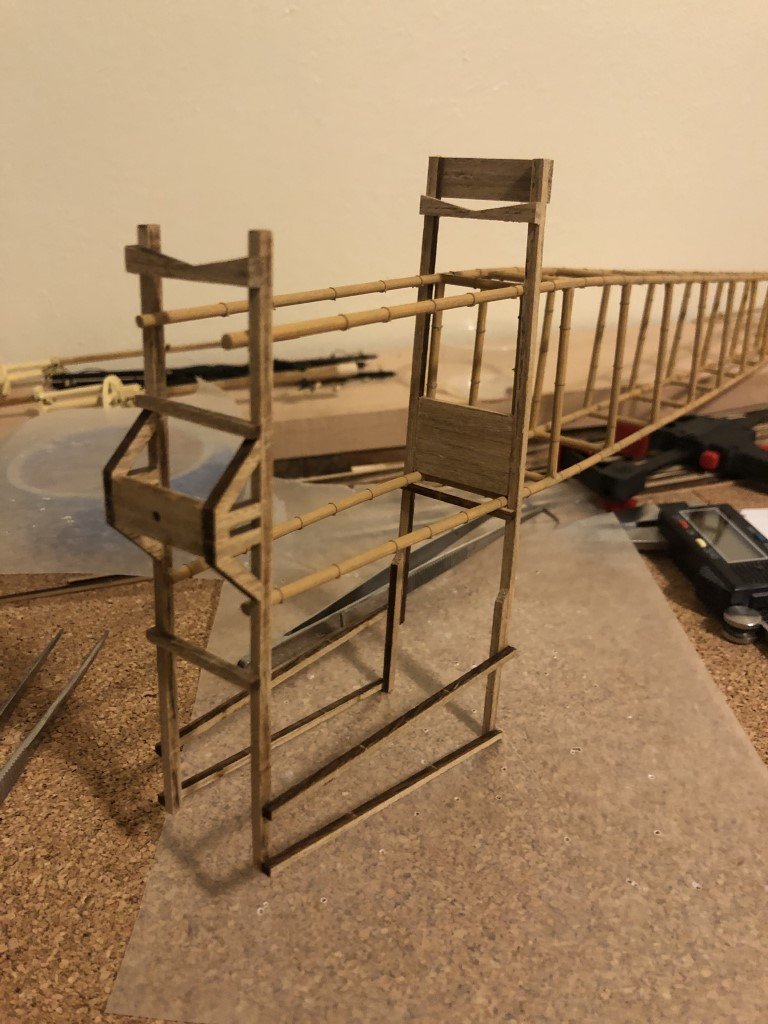
Last night / today I assembled the bulk of the nacelle. Here I have the front and back set perpendicular using 1-2-3 blocks and am attaching the stringers that connect them. The instructions seem to indicate that you just eyeball the location of these parts over the plans. No problem for the bottom stringer, but for the top I had marked the proper location first. After the structure was flipped over and the matching stringers were added (and the glue set up) I connected the nacelle to the fuselage. Note how the firewall rests on the lower part of the fuselage and then there is a piece below that clamps the bamboo in place. The instructions have you putting that piece on the nacelle before attaching to the fuselage. I was afraid that I would not be able to thread the bamboo thru, so I attached the strip once the bamboo was in place (and cemented). There was a little problem at this stage nevertheless, It turned out that the width of the firewall was no more than 0.5mm to narrow and/or the last crosspiece in the fuselage was just a bit to wide. Either way, I needed to detach the firewall on one side and then add in a very thin strip to fill the gap. The fix is on the left side of the picture and is nearly undetectable. Next up is drilling a lot of holes and placing pins to strengthen the joints. There is some other metal work about to happen as well, pieces that I believe represent turnbuckles and will be used to rig this part of the plane.

-
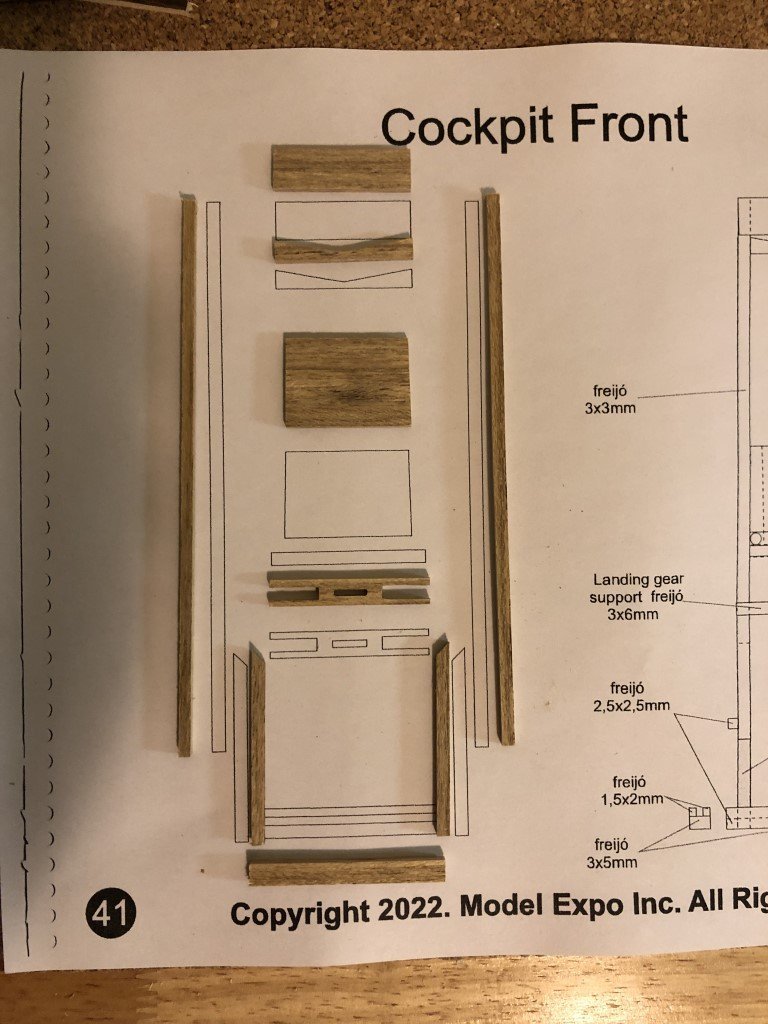
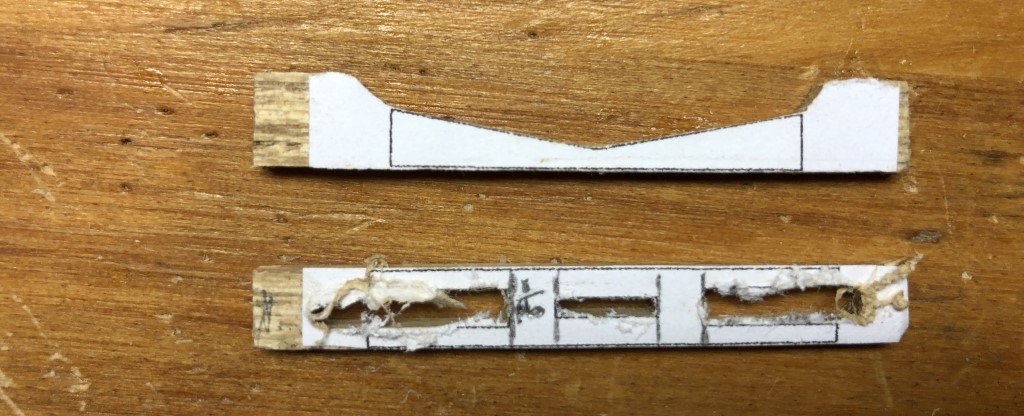
Today I figured I would give a shot at making the missing parts from scraps of wood that had held the spars. On one side of each spar sheet there was a strip of excess freijo that was just over 7mm wide. Here's what the recreated parts look like: The cockpit top (piece highest in the picture) is 9mm high and the firewall is 21mm high. To make these pieces 2 and 3 pieces, respectively, of the scrap material was edge glued to become large enough. After gluing the material up, I used the little bit of glue in the seam followed by sanding trick to simulate a single piece of wood. The result looks fine to me. The cockpit top is rectangular so it is formed easily. The firewall is trapezoidal, so some care is needed making sure the sides are cut at the correct angle. The side pieces are made from 3 x 3mm material, so no issues here, similarly, the 3 x 5mm bottom piece that will be part of the landing gear support is easy to make. Really, the only two parts that are a little challenging are the spar support and the landing gear support piece that is below the firewall. For these pieces, I rubber cemented photocopied patterns to wood and then cut and/or milled the shapes. The angled sides of the spar support were cut on a scroll saw and the three slots on the landing gear support were milled (and touched up lightly with a file to get the inside edges squared). At this point, I don't think that I will be in need of replacement parts from Brazil.
-
Now I'm feeling bad for Model Expo - the situation is starting to become humorous! Greg, Yes, we found out that most of the kits had the same issue as yours. The parts were already sent from Brazil (where this specific kit was manufactured, due to the wood.) using Fedex 2-day Delivery. Unfortunately, Brazilian customs officials are on strike and the parts are stuck in customs since December 4th. Freijo parts would take even longer. But as soon as it gets here, I assure you you'll get your parts! I apologize for all the inconvenient. Best, Ricardo I was able to recreate the missing parts today (see below) so I told Ricardo to send parts to others that may not have a way to make the parts themselves.
-
Joone - There doesn't seem to be a wooden part list in the kit like you would typically find in a Model Expo / Model Airways kit. By looking at the instruction manual you can decipher what each of the wooden parts are - this takes some cross referencing between the pictures / text and the full-size plans in the manual. In the past, with this company's kits, I have not had any missing parts so I did not have a concern when I didn't see a parts list. I was really surprised when I got to trying to build the nacelle and found that a number of parts were missing. Is there a missing sheet of parts in your kit as well? Please let me know if I may be able to answer other questions you have on the model. All the best, Greg
-
Once again my worry of getting the replacement / missing parts has gone up. Today I noticed that Model Expo now lists this model as not for sale and all the pictures that had been on the model's description page have been deleted. Circumstantially, it seems that my guess that all kits were not supplied with these parts may be actually true! I expect that Model Expo now needs to go back to Nauticurso in order to get a run of the missing parts made.
-
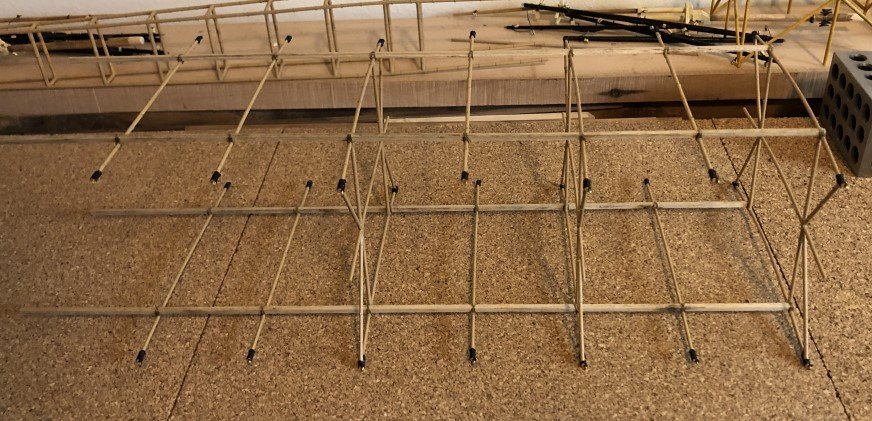
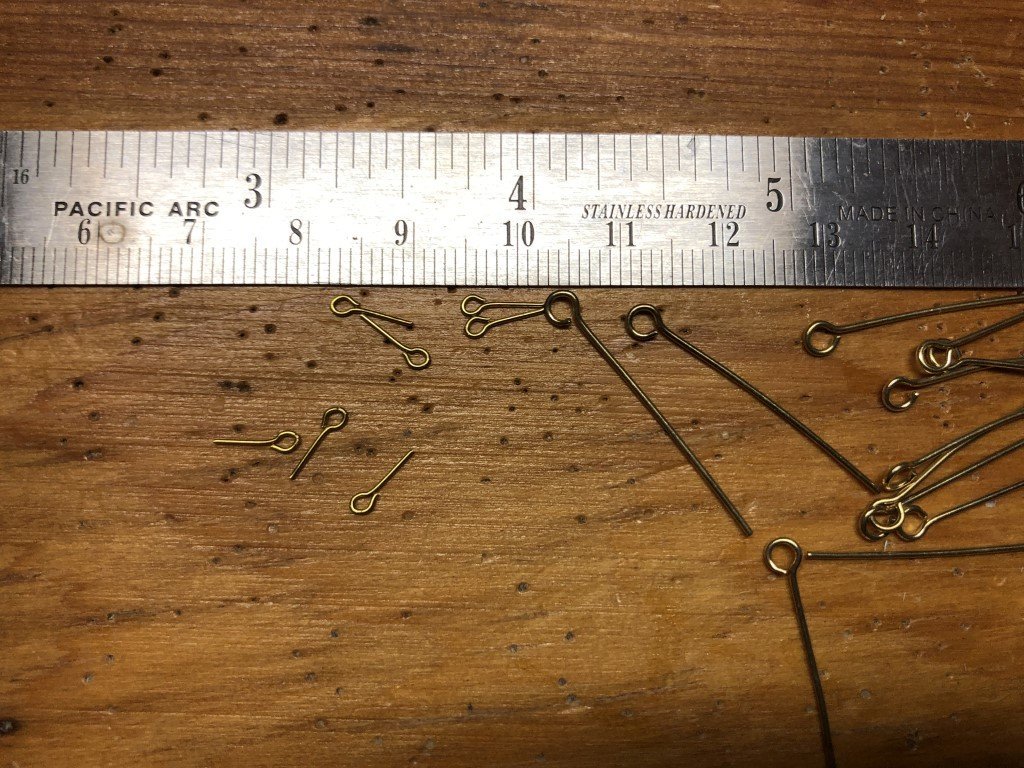
I've released the wings from their jigs and started attaching eyebolts to the tip of each top and bottom rib. I also decided to lash the ribs to the spars for some additional security. Since there apparently is little to no construction documentation of the actual plane, one would need to make a guess on the method joints were made. I read in one source that (some) joints were made with aluminum fixtures; but I have assumed these were bamboo to bamboo where a lug could be used. I also would guess that the spars and ribs could have been connected via metal straps. I doubt that they would have been bolted because there would not be a lot of rib material left after drilling a hole for a large enough bolt. I simply went with a light brown thread for the lashing - something that wasn't out of the question and at the same time wasn't too distracting. The left wing is done to this point: BY the way, I did substitute smaller eyebolts for the ones supplied in the kit. The supplied eyebolts are over 2 scale inches in diameter - I felt that was a bit too big. A total of diagonal reinforcements, made of bamboo, will be added to upper and lower wings between the spars and the most extreme ribs. After that is down, the wing panel will be ready for rigging - some of which can be done before attaching to the fuselage. Still debating about including the ailerons or not.
-
Mark - Thank you for the link. This is an interesting idea. I may give it a try on a couple of extra ribs and see if it would work here. The curve of the ribs is not as extreme as the bend that was needed on the Wa'a model. I have a feeling that it may be more easy to get the more extreme bend to stick. Greg
-
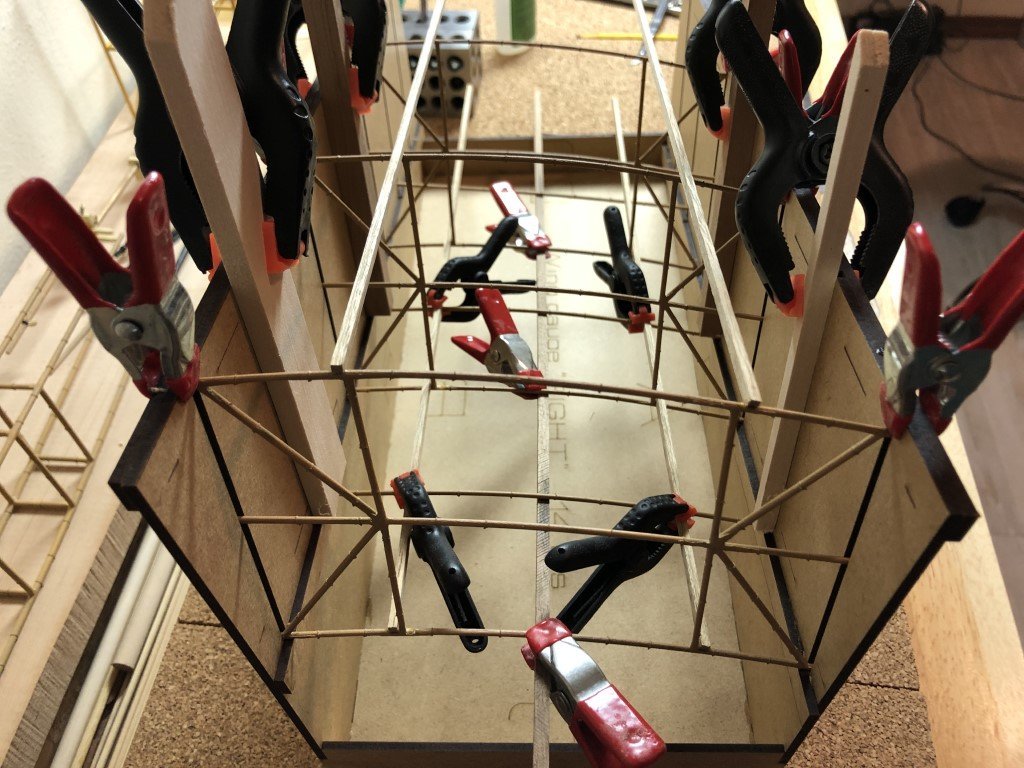
Over the last couple of days I focused on fabricating the 16 wing ribs that are not part of wing panels. They are all cut to the correct length, have their nodes added, and painted to match the rest of the work done to this point. After being soaked, the rib material had been in the rib bending jig for a couple of weeks. When I pulled them out of the jig, very few held any of the desired bend. I am hoping that the airfoil shape of the ribs will be held reasonably well by how they are attached to the spars. To do this, the mid-section of the ribs need to be pushed upward between the spars. My attempt to do so involves clamping a third spar at the point where the ribs have their maximum height. This temporary spar was clamped to the three corresponding ribs in the wing panels (and propped up at the end near the fuselage connection). Here is a picture of the lower ribs being added to the right wing. The extreme ends of the ribs are held down by wood strips clamped to the jig after the rib is threaded under and over the spars. The ribs can be pushed down under the two actual spars enough to get a glue stick between them. Finally, the rib is clamped to the spar until the joint dries. There's not a lot of room in there to position the clamps! The upper ribs were slightly easier to attach! I expect that the ends of these ribs will spring up outside the spars when the structure is removed from the jig. It will most likely look worse at the end near the fuselage, but this will get better when the four spars are connected to the fuselage. Unfortunately this will be the best that can be expected as the rigging has no opportunity to hold the rib shape. On to the left wing!

- 162 replies
-
- 11
-
-
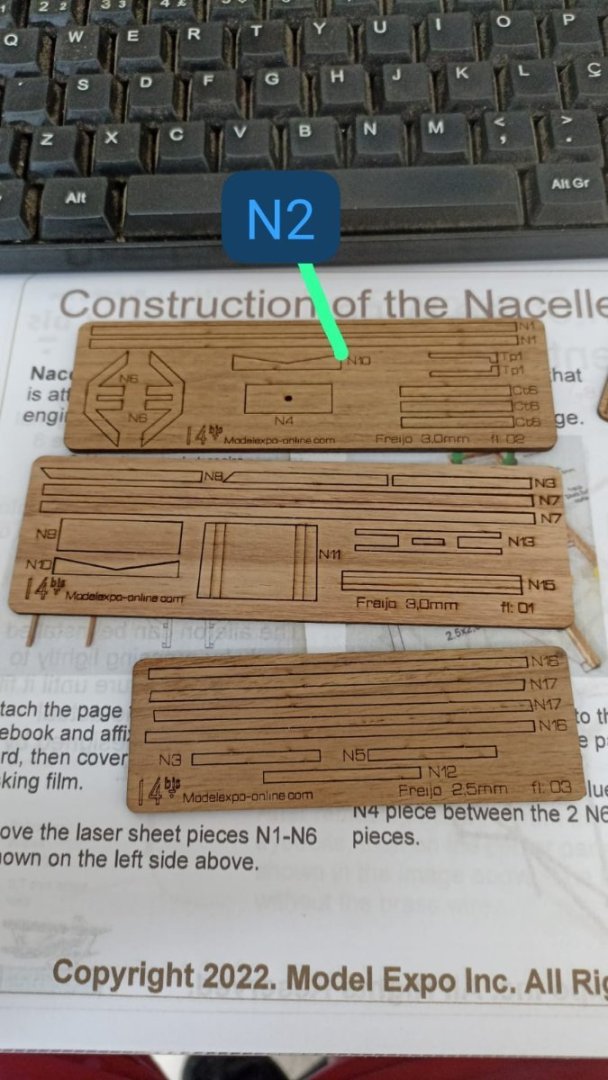
I received good news via e-mail today from Model Expo - Mr. Davis, Hope you are doing fine. We are checking your request for parts. It seems that your kit is missing one full sheet, with parts # N7 (two) Part # N8 (two) Part # N9 Part # N11 Part # N13 Part # N15. We are providing it. As for part #N2, it seems that it was printed wrong. It's the part #N10 in sheet 2 Please see image attached. Best Regards, Ricardo It is the sheet of parts in the middle of the picture that were missing from my kit and it looks like they will be getting to me soon!
-
I was looking at the pictures of the plane on the Model Expo web site today (where its been discounted another $20 from when I purchased it a couple of weeks ago). There is a picture with all the kit materials laid out. In this picture the replacement parts that I have asked them to send are not shown. I am now thinking that there may have been a quality control issue with the whole run of the model - I would not be surprised if all the kits are missing eight laser cut parts! So while I will continue to hope for the best, I'm not banking on getting the rest of the parts anytime soon. If worse comes to worse, there may be enough scrap freijo to construct the parts I will need.
-
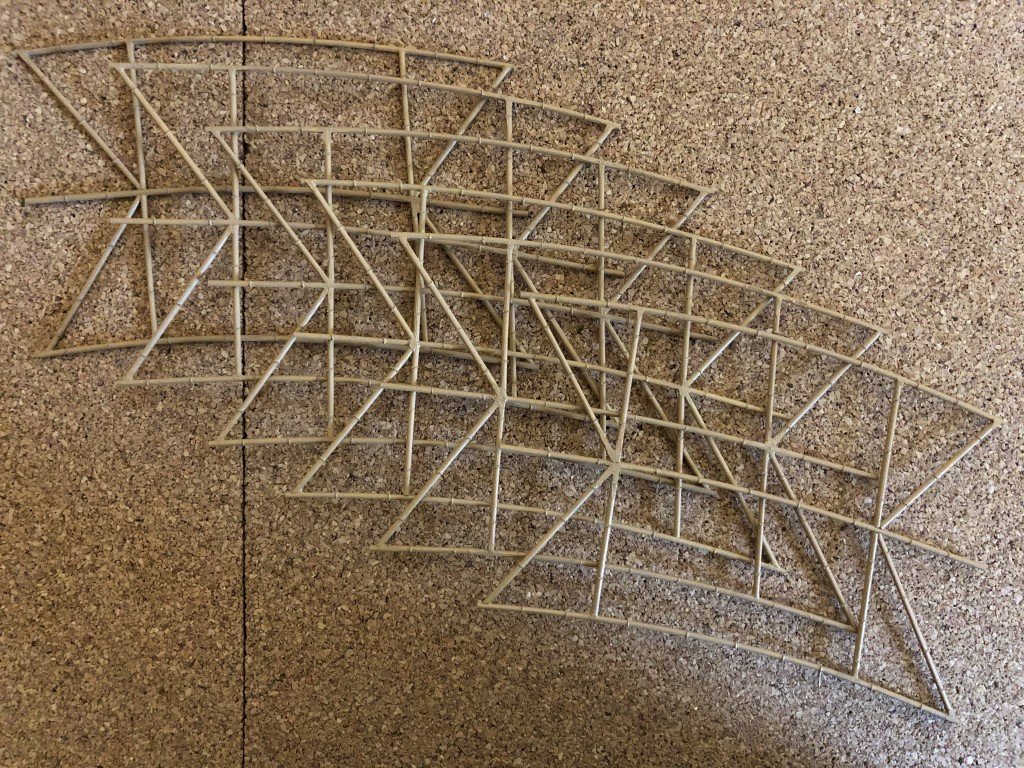
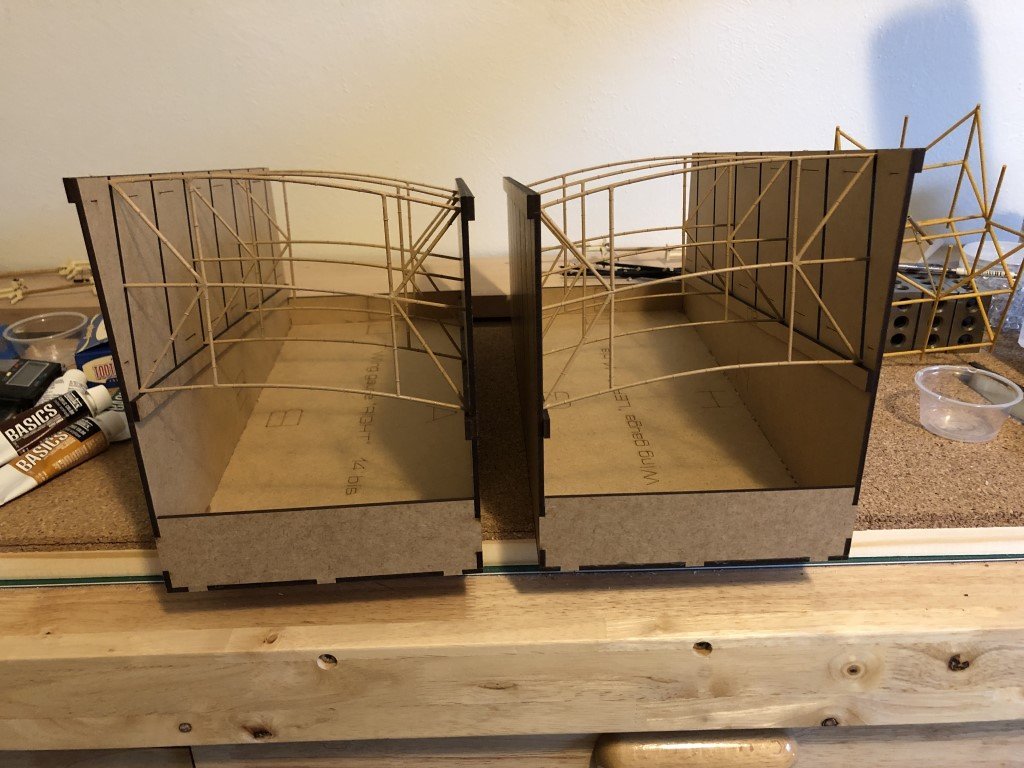
Here are the finished panels in the wing jigs The spars are 3 x 3 mm laser cut in a sheet of freijo. Not sure why Model Airways didn't just cut strips. Being laser cut, there was the residual char to clean up. The two sides flush to the sheet of wood didn't take long to clean up; the other two sides took longer. Because the spars have a square cross-section they can be released from the sheet, rotated 90 degrees and placed back into the sheet for the sanding / clean-up. This way I didn't need to worry about rounding the corners of the strips while sanding. Before and after Notice that the spars come in two lengths. The shorter ones go on the top wing and the longer on the bottom. They have been cut to take into account the finished wing's dihedral. While labled as A1 and A2 on the sheet, unfortuately (as far as I can see) there is no note of this / direction in the instruction manual and/or plan sheet. Perhaps Model Airways will make an edit for future runs of the model! I've attached the spars to one of the wings so far The next step will be to make up and attach eight additional ribs to the wing panel. They will go where the four slots are in the jig that do not hold wing panels.


- 162 replies
-
- 11
-
-
Wing panels are painted and ready to be loaded into the wing building jigs!