HOLIDAY DONATION DRIVE - SUPPORT MSW - DO YOUR PART TO KEEP THIS GREAT FORUM GOING! (Only 51 donations so far out of 49,000 members - C'mon guys!)
×


cdrusn89
-
Posts
1,915 -
Joined
-
Last visited
Content Type
Profiles
Forums
Gallery
Events
Everything posted by cdrusn89
-
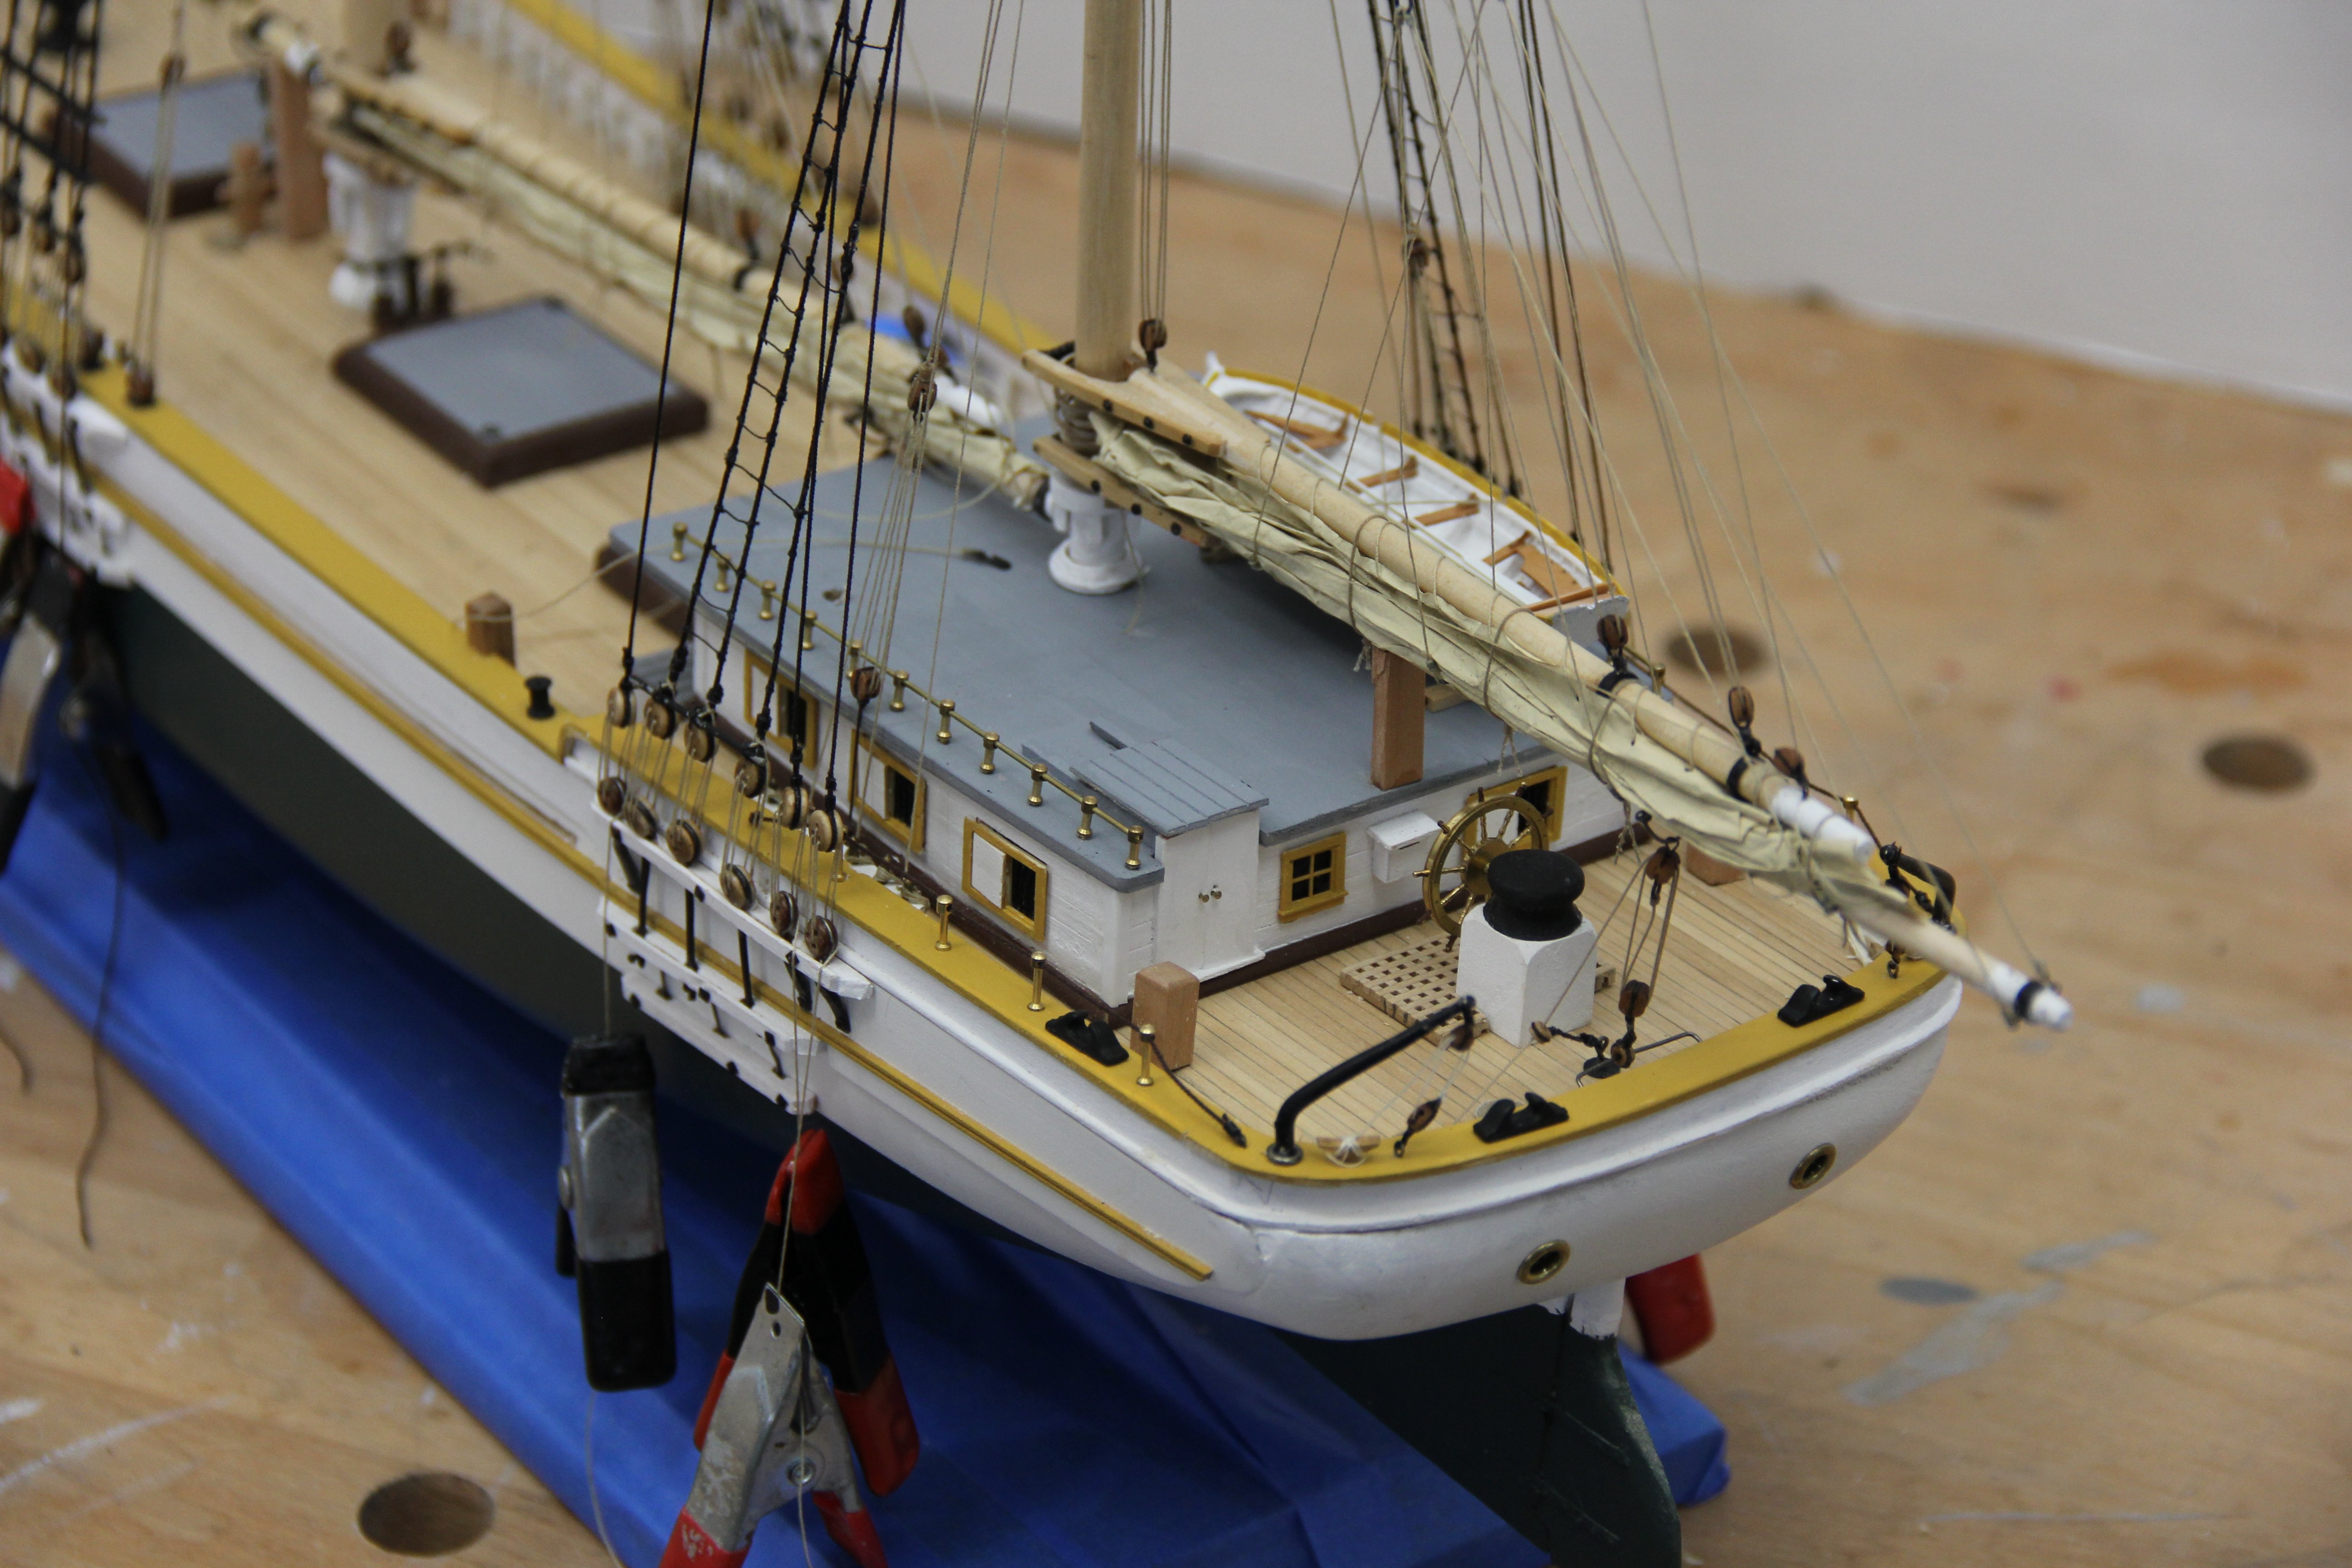
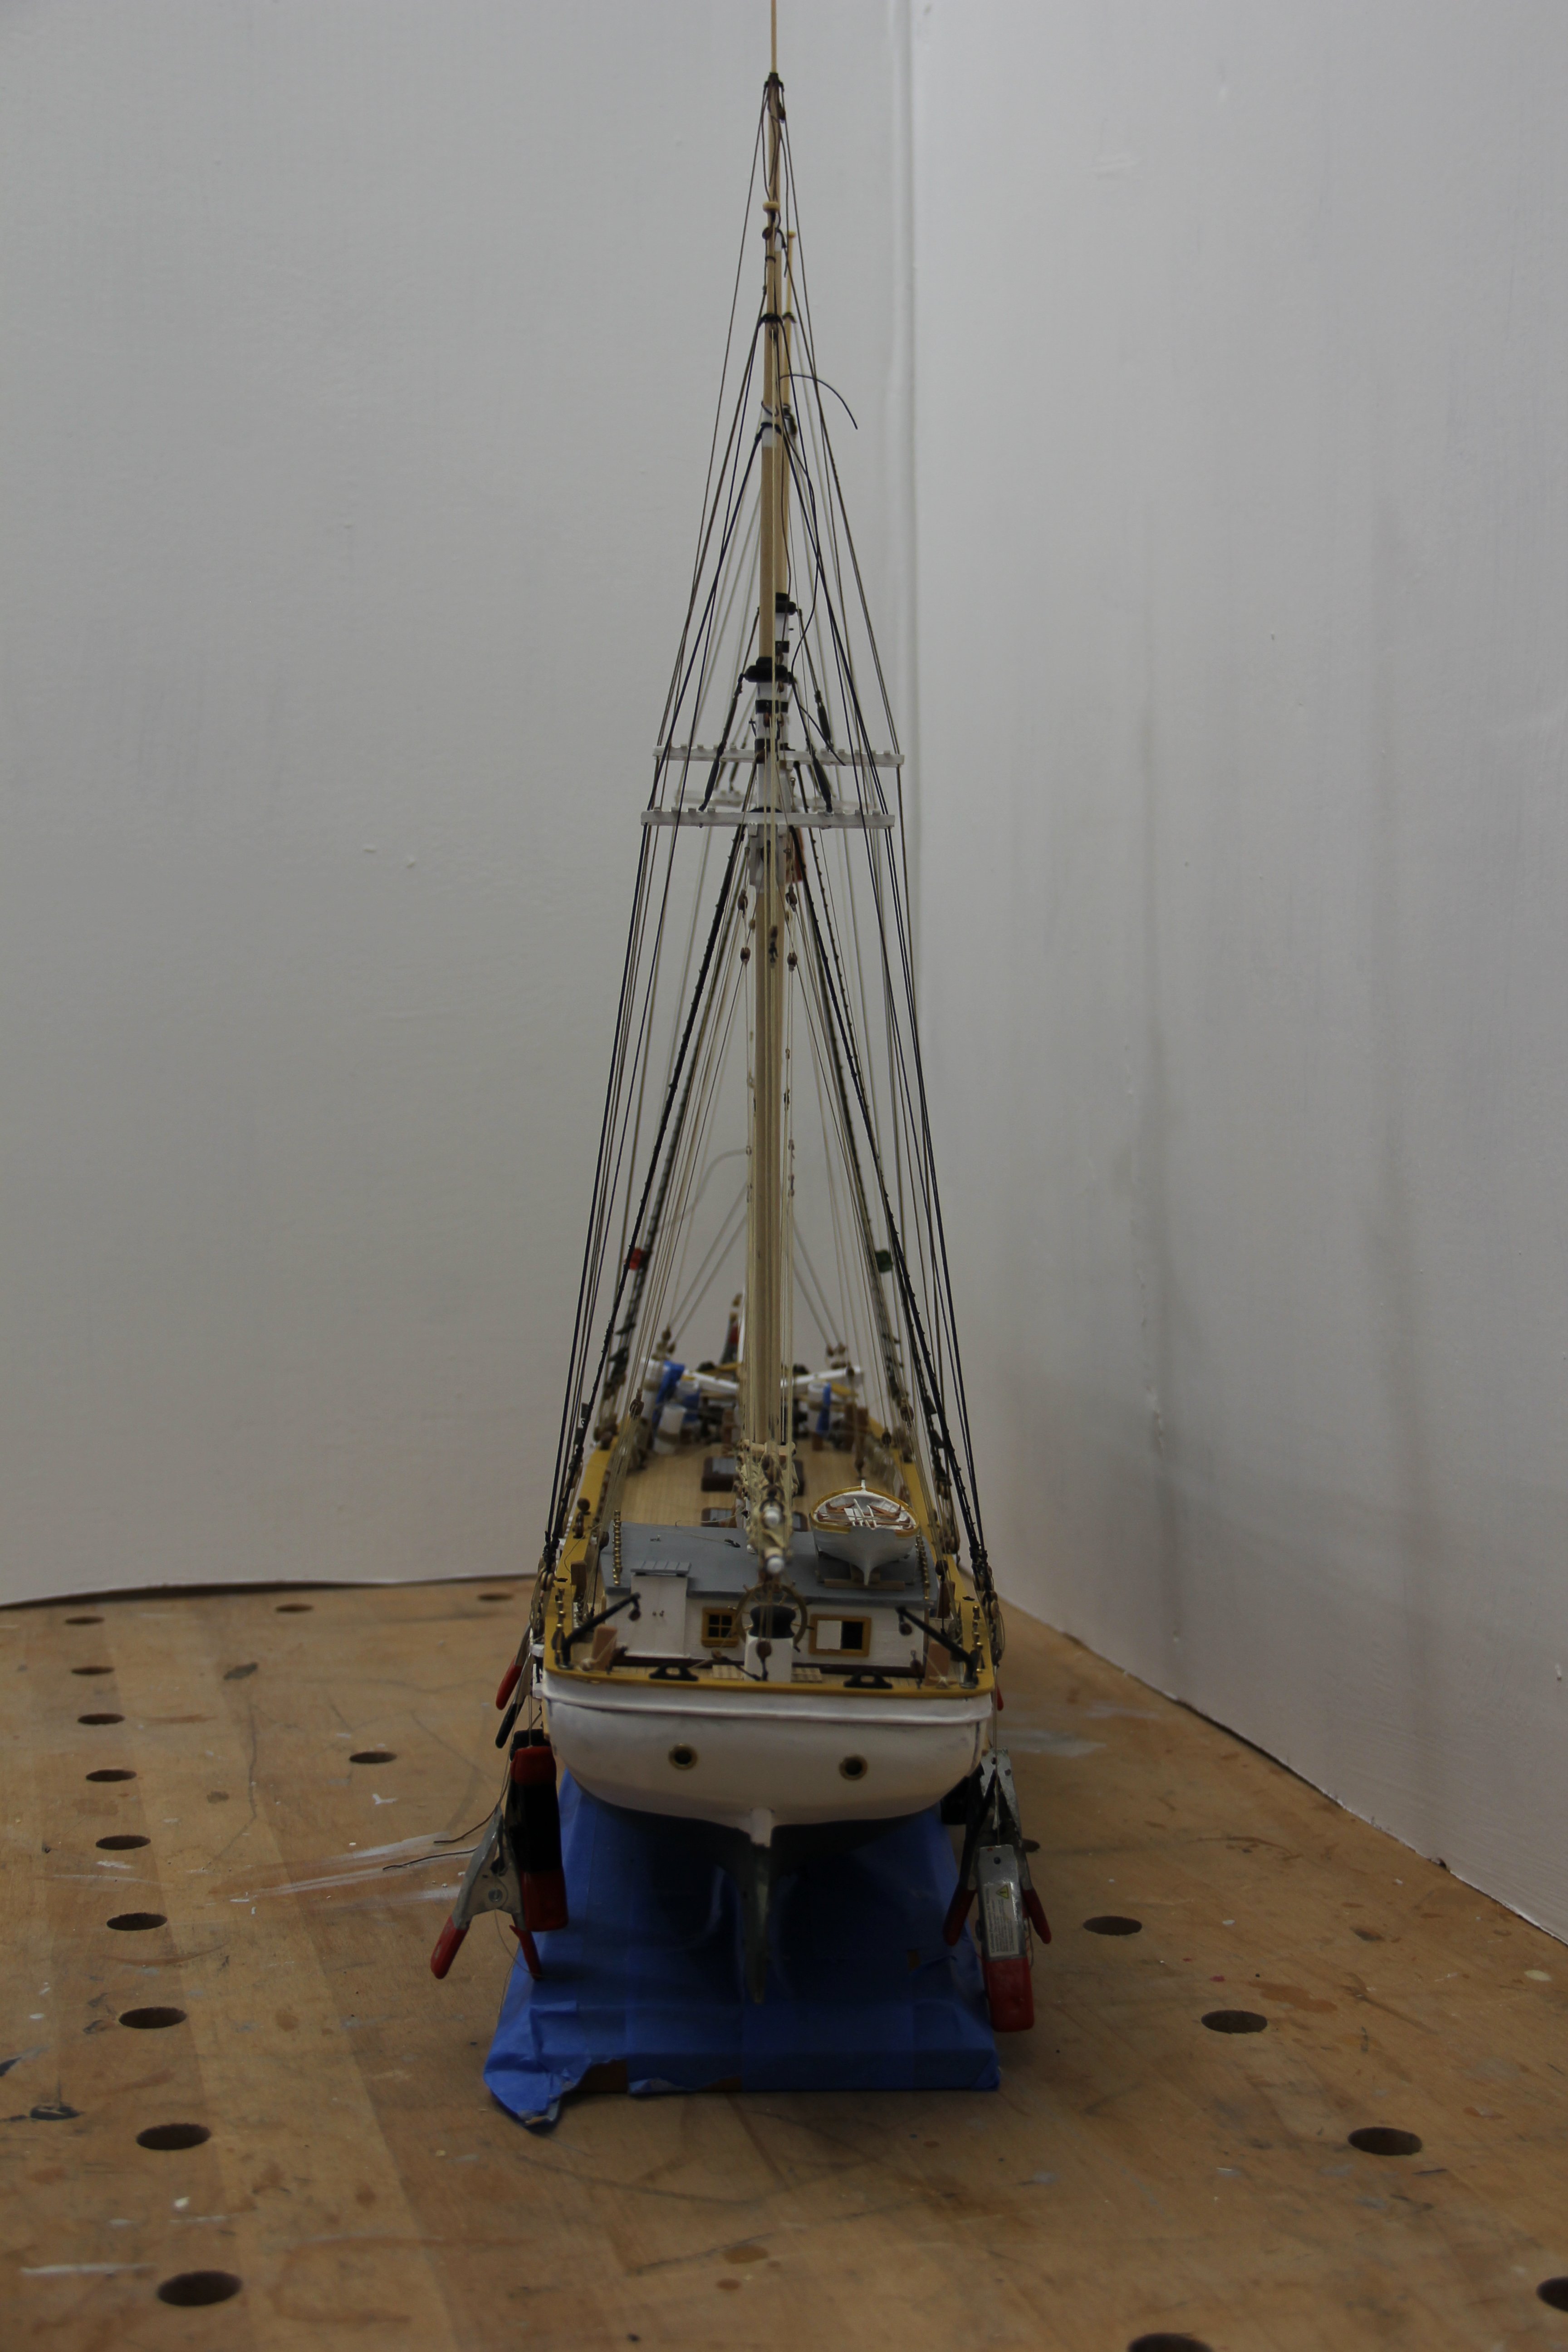
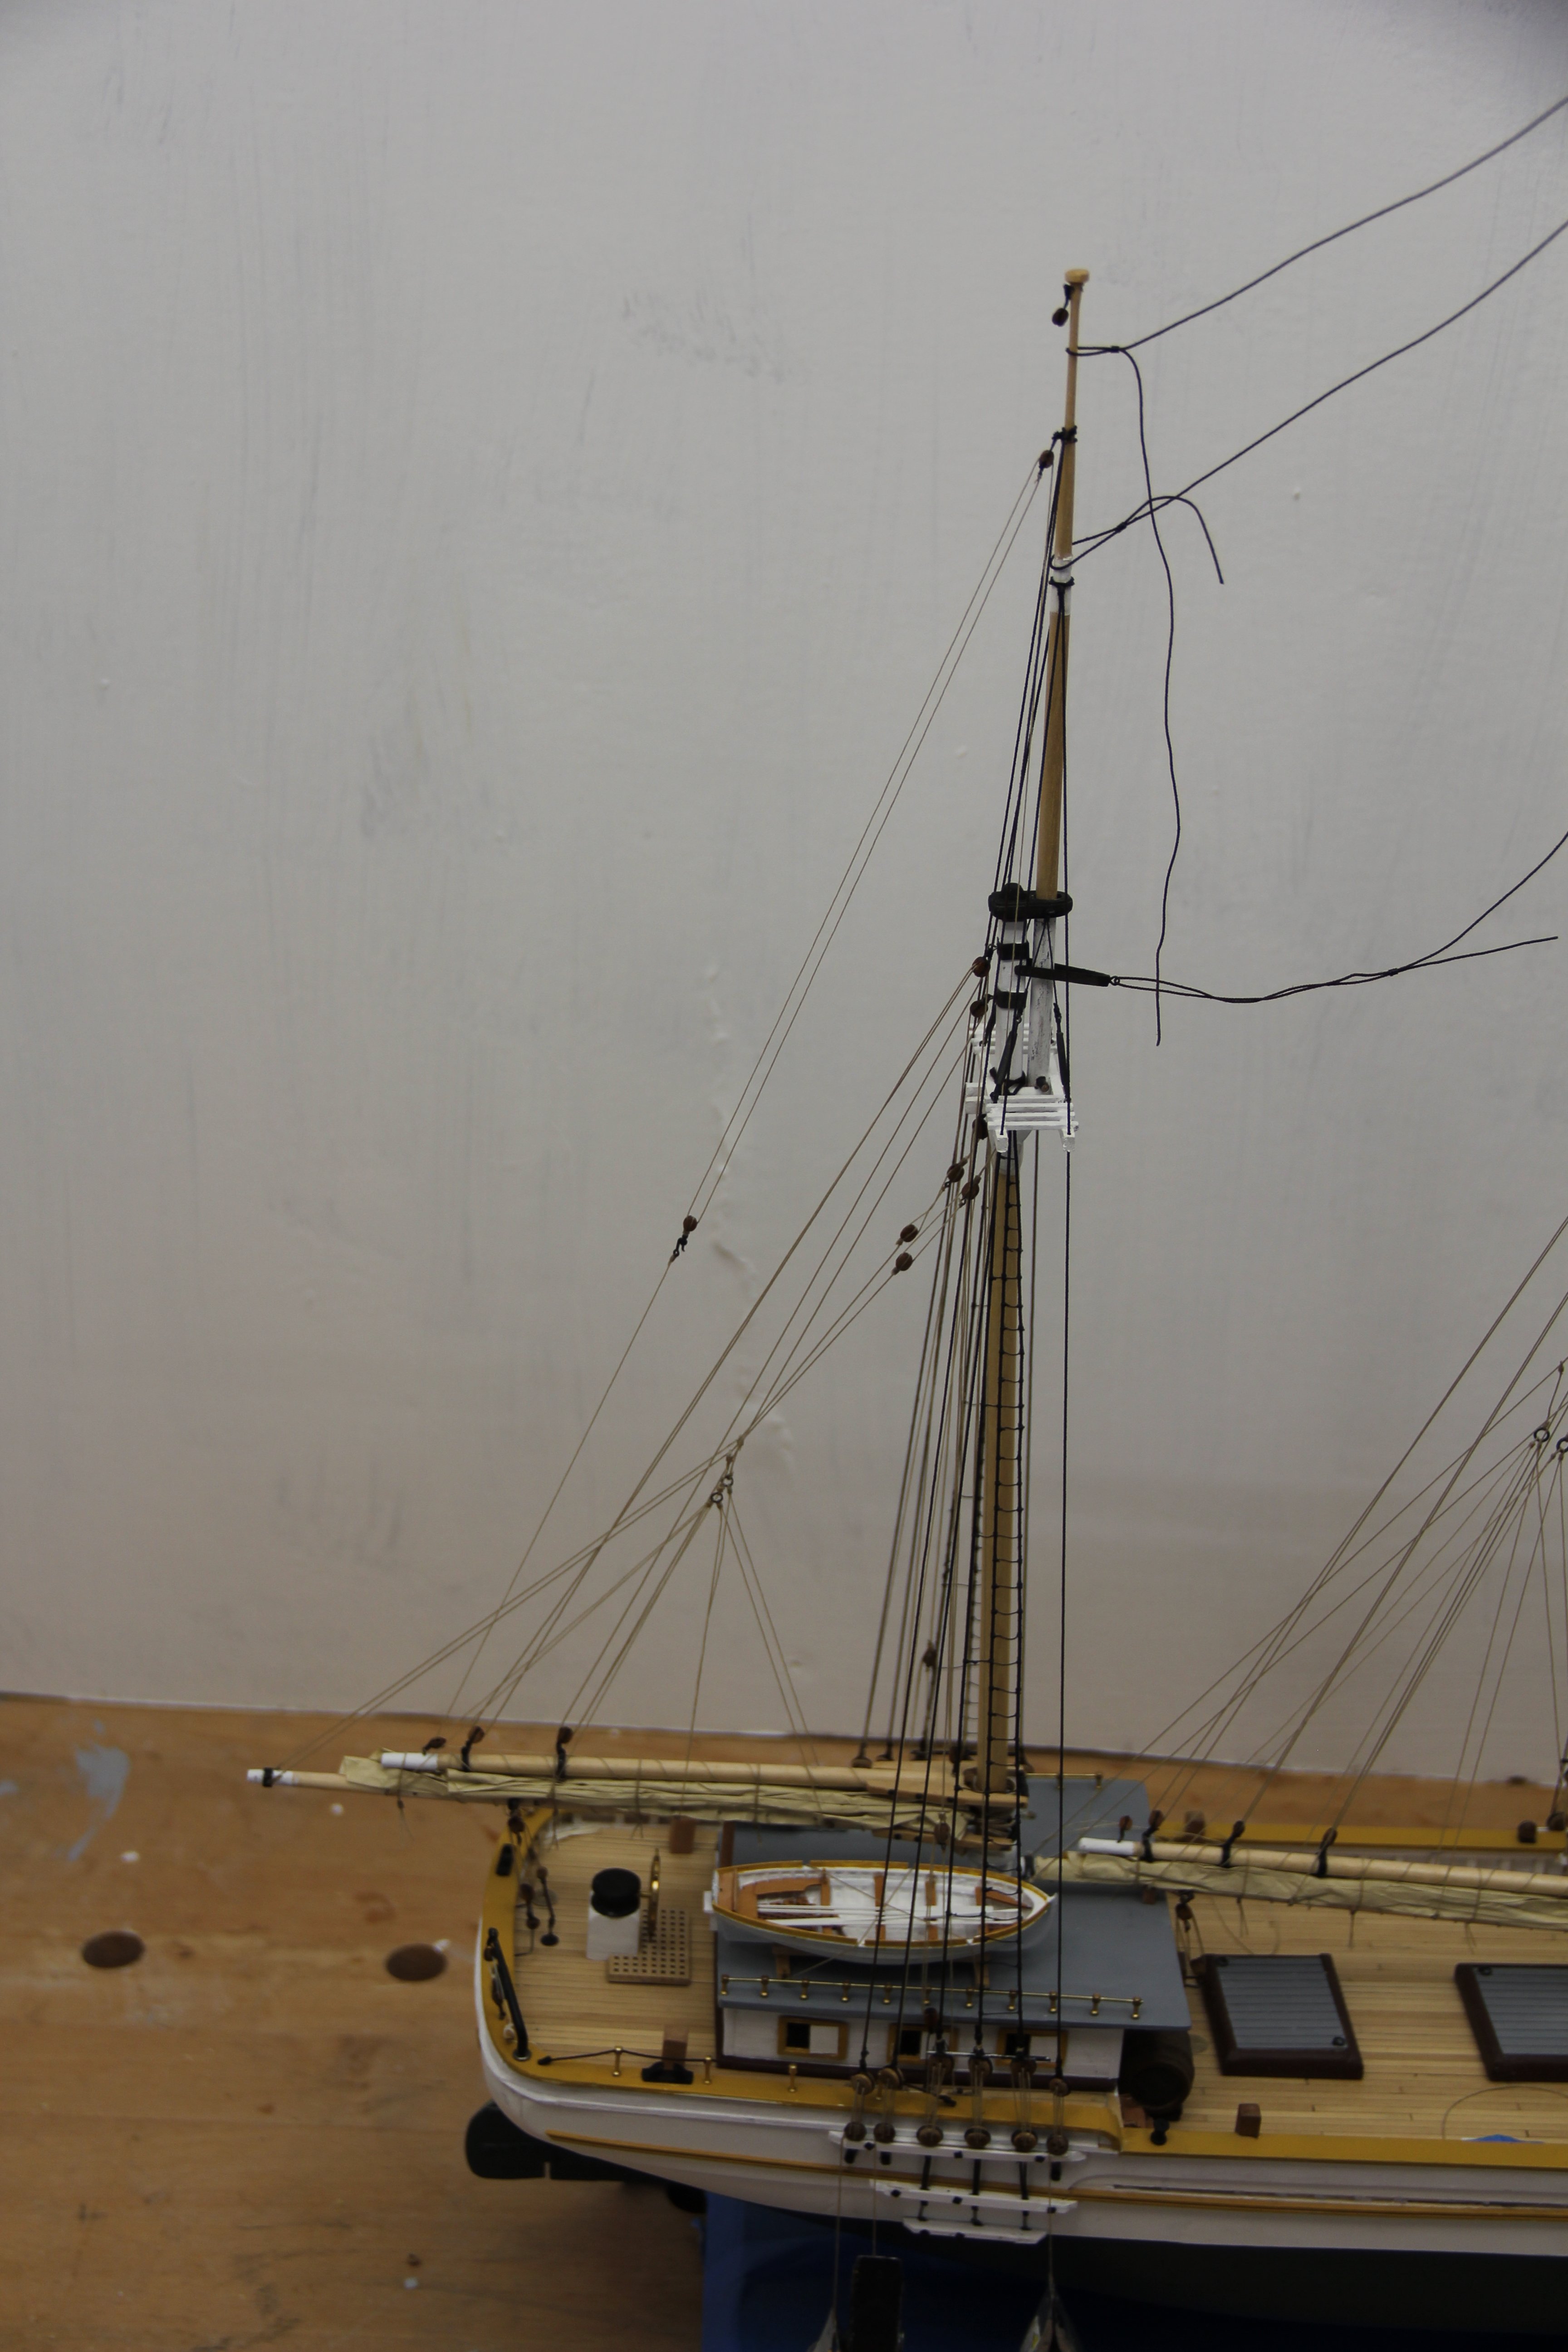
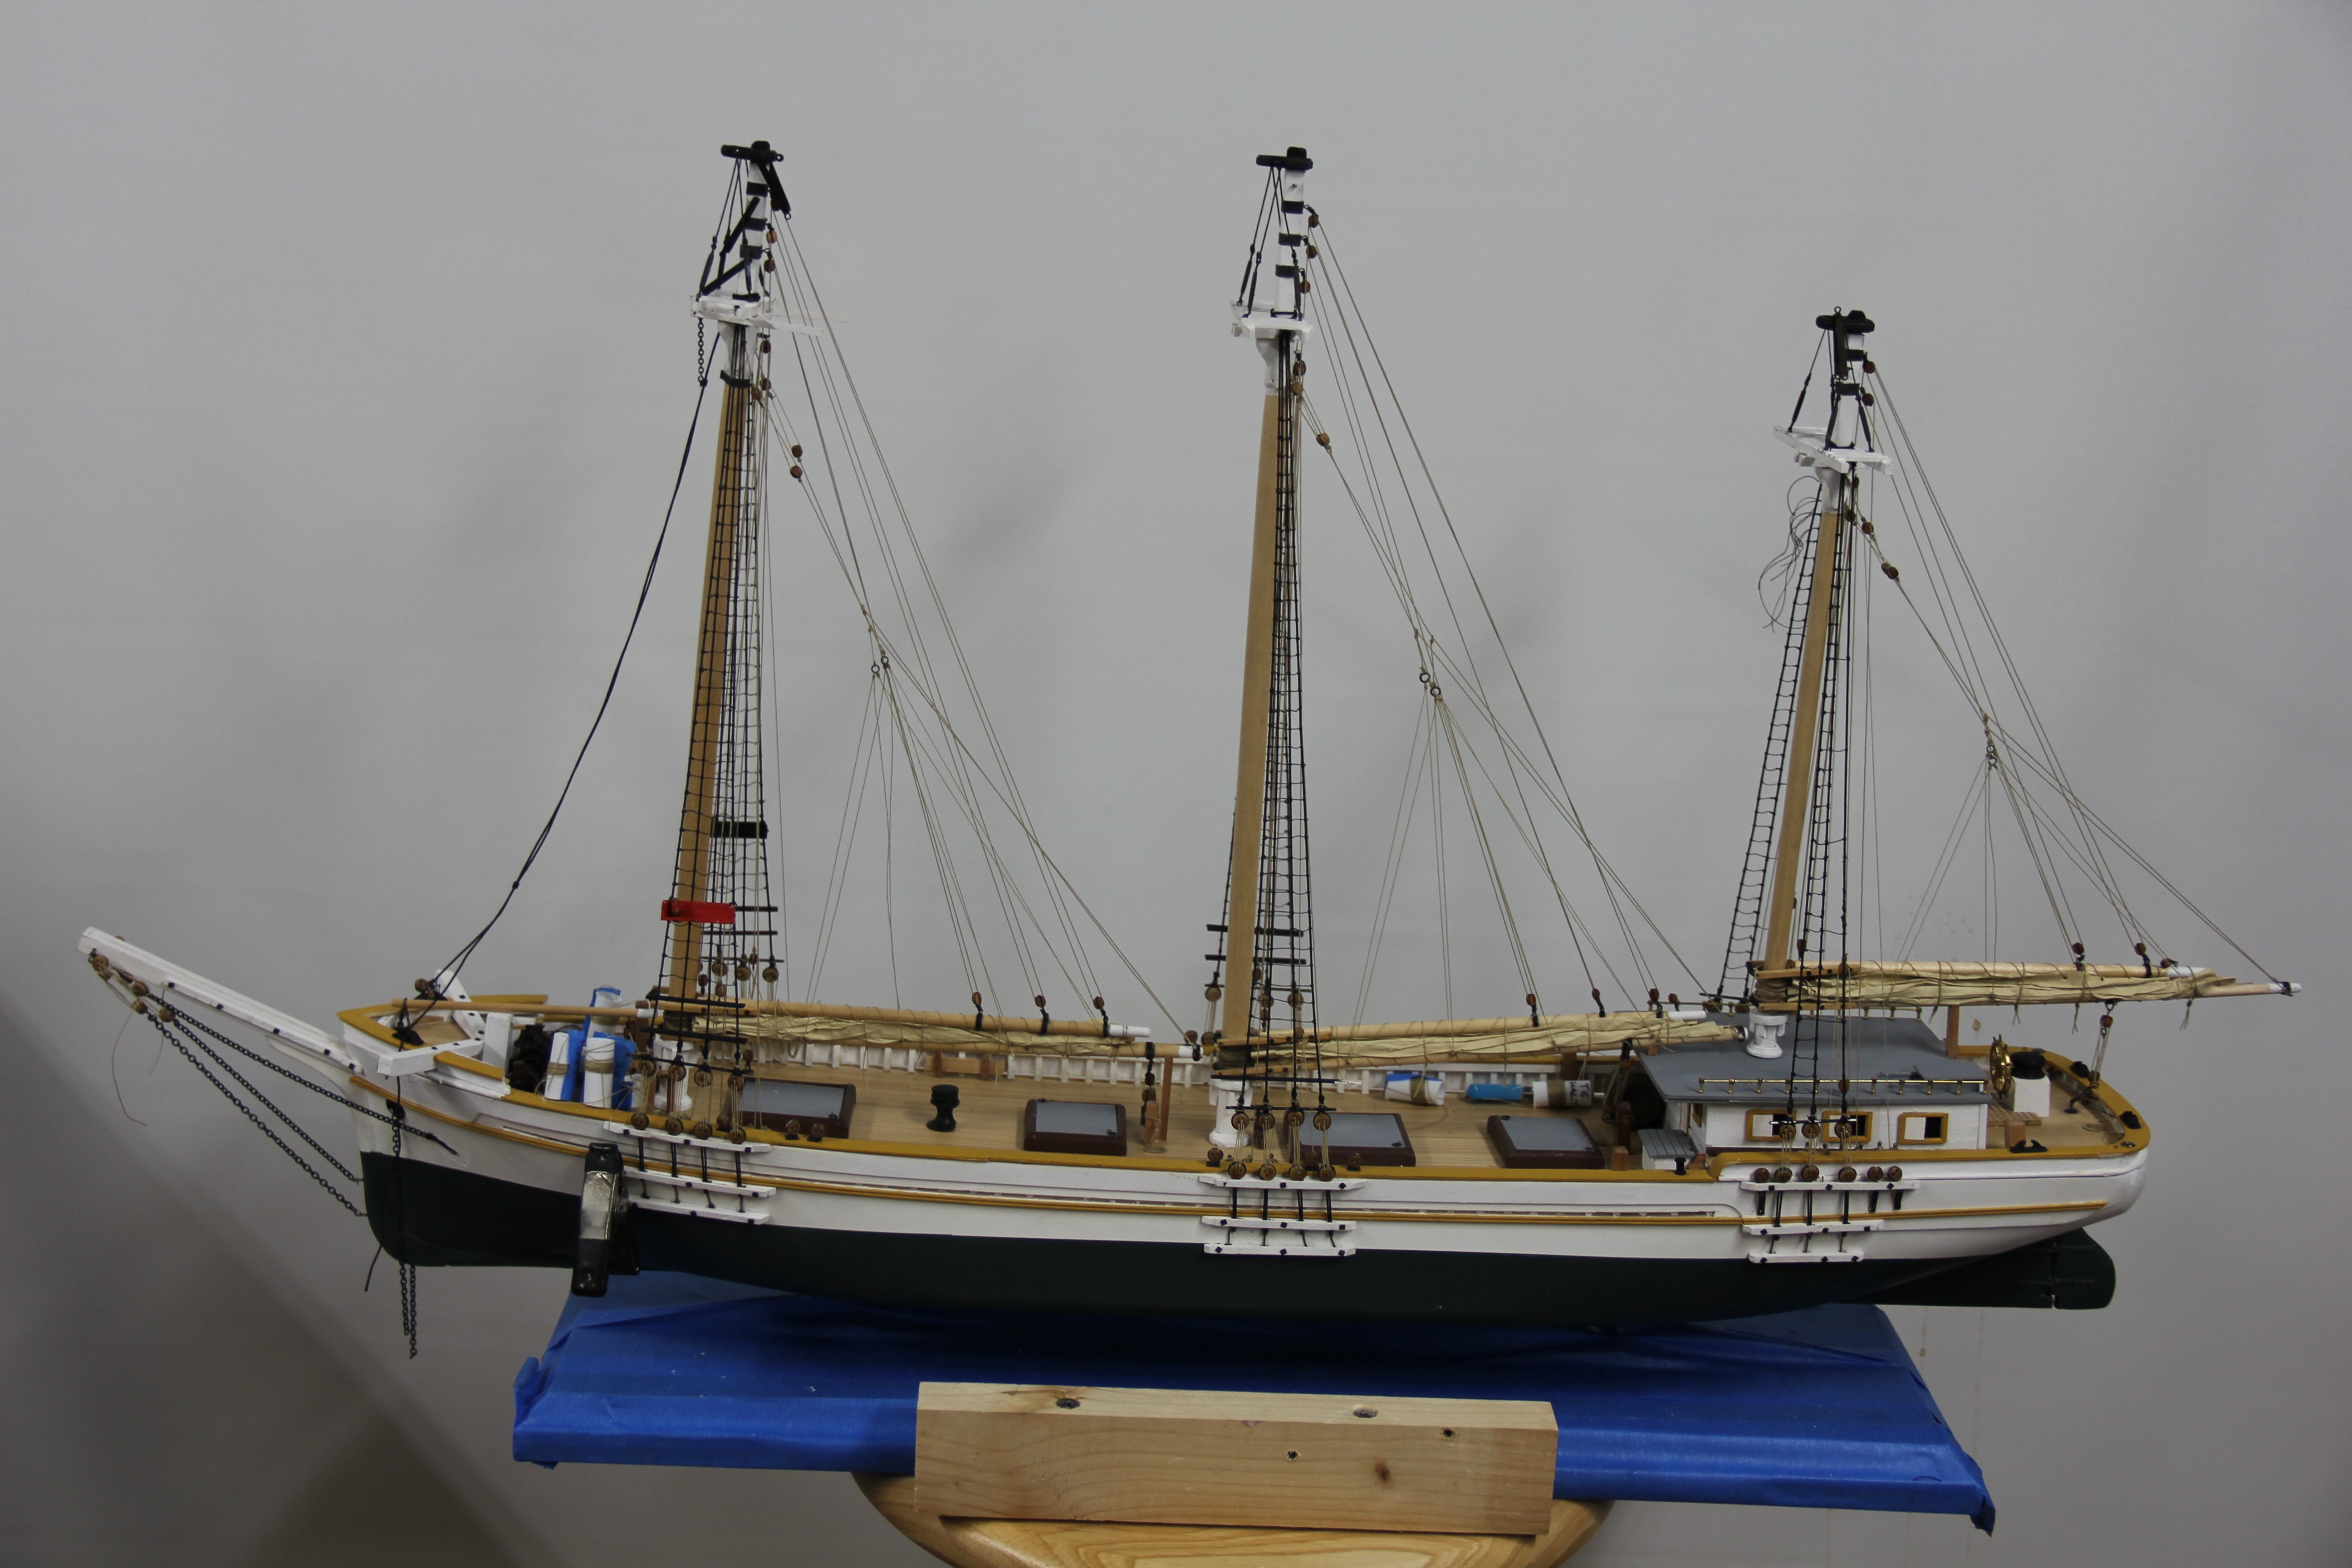
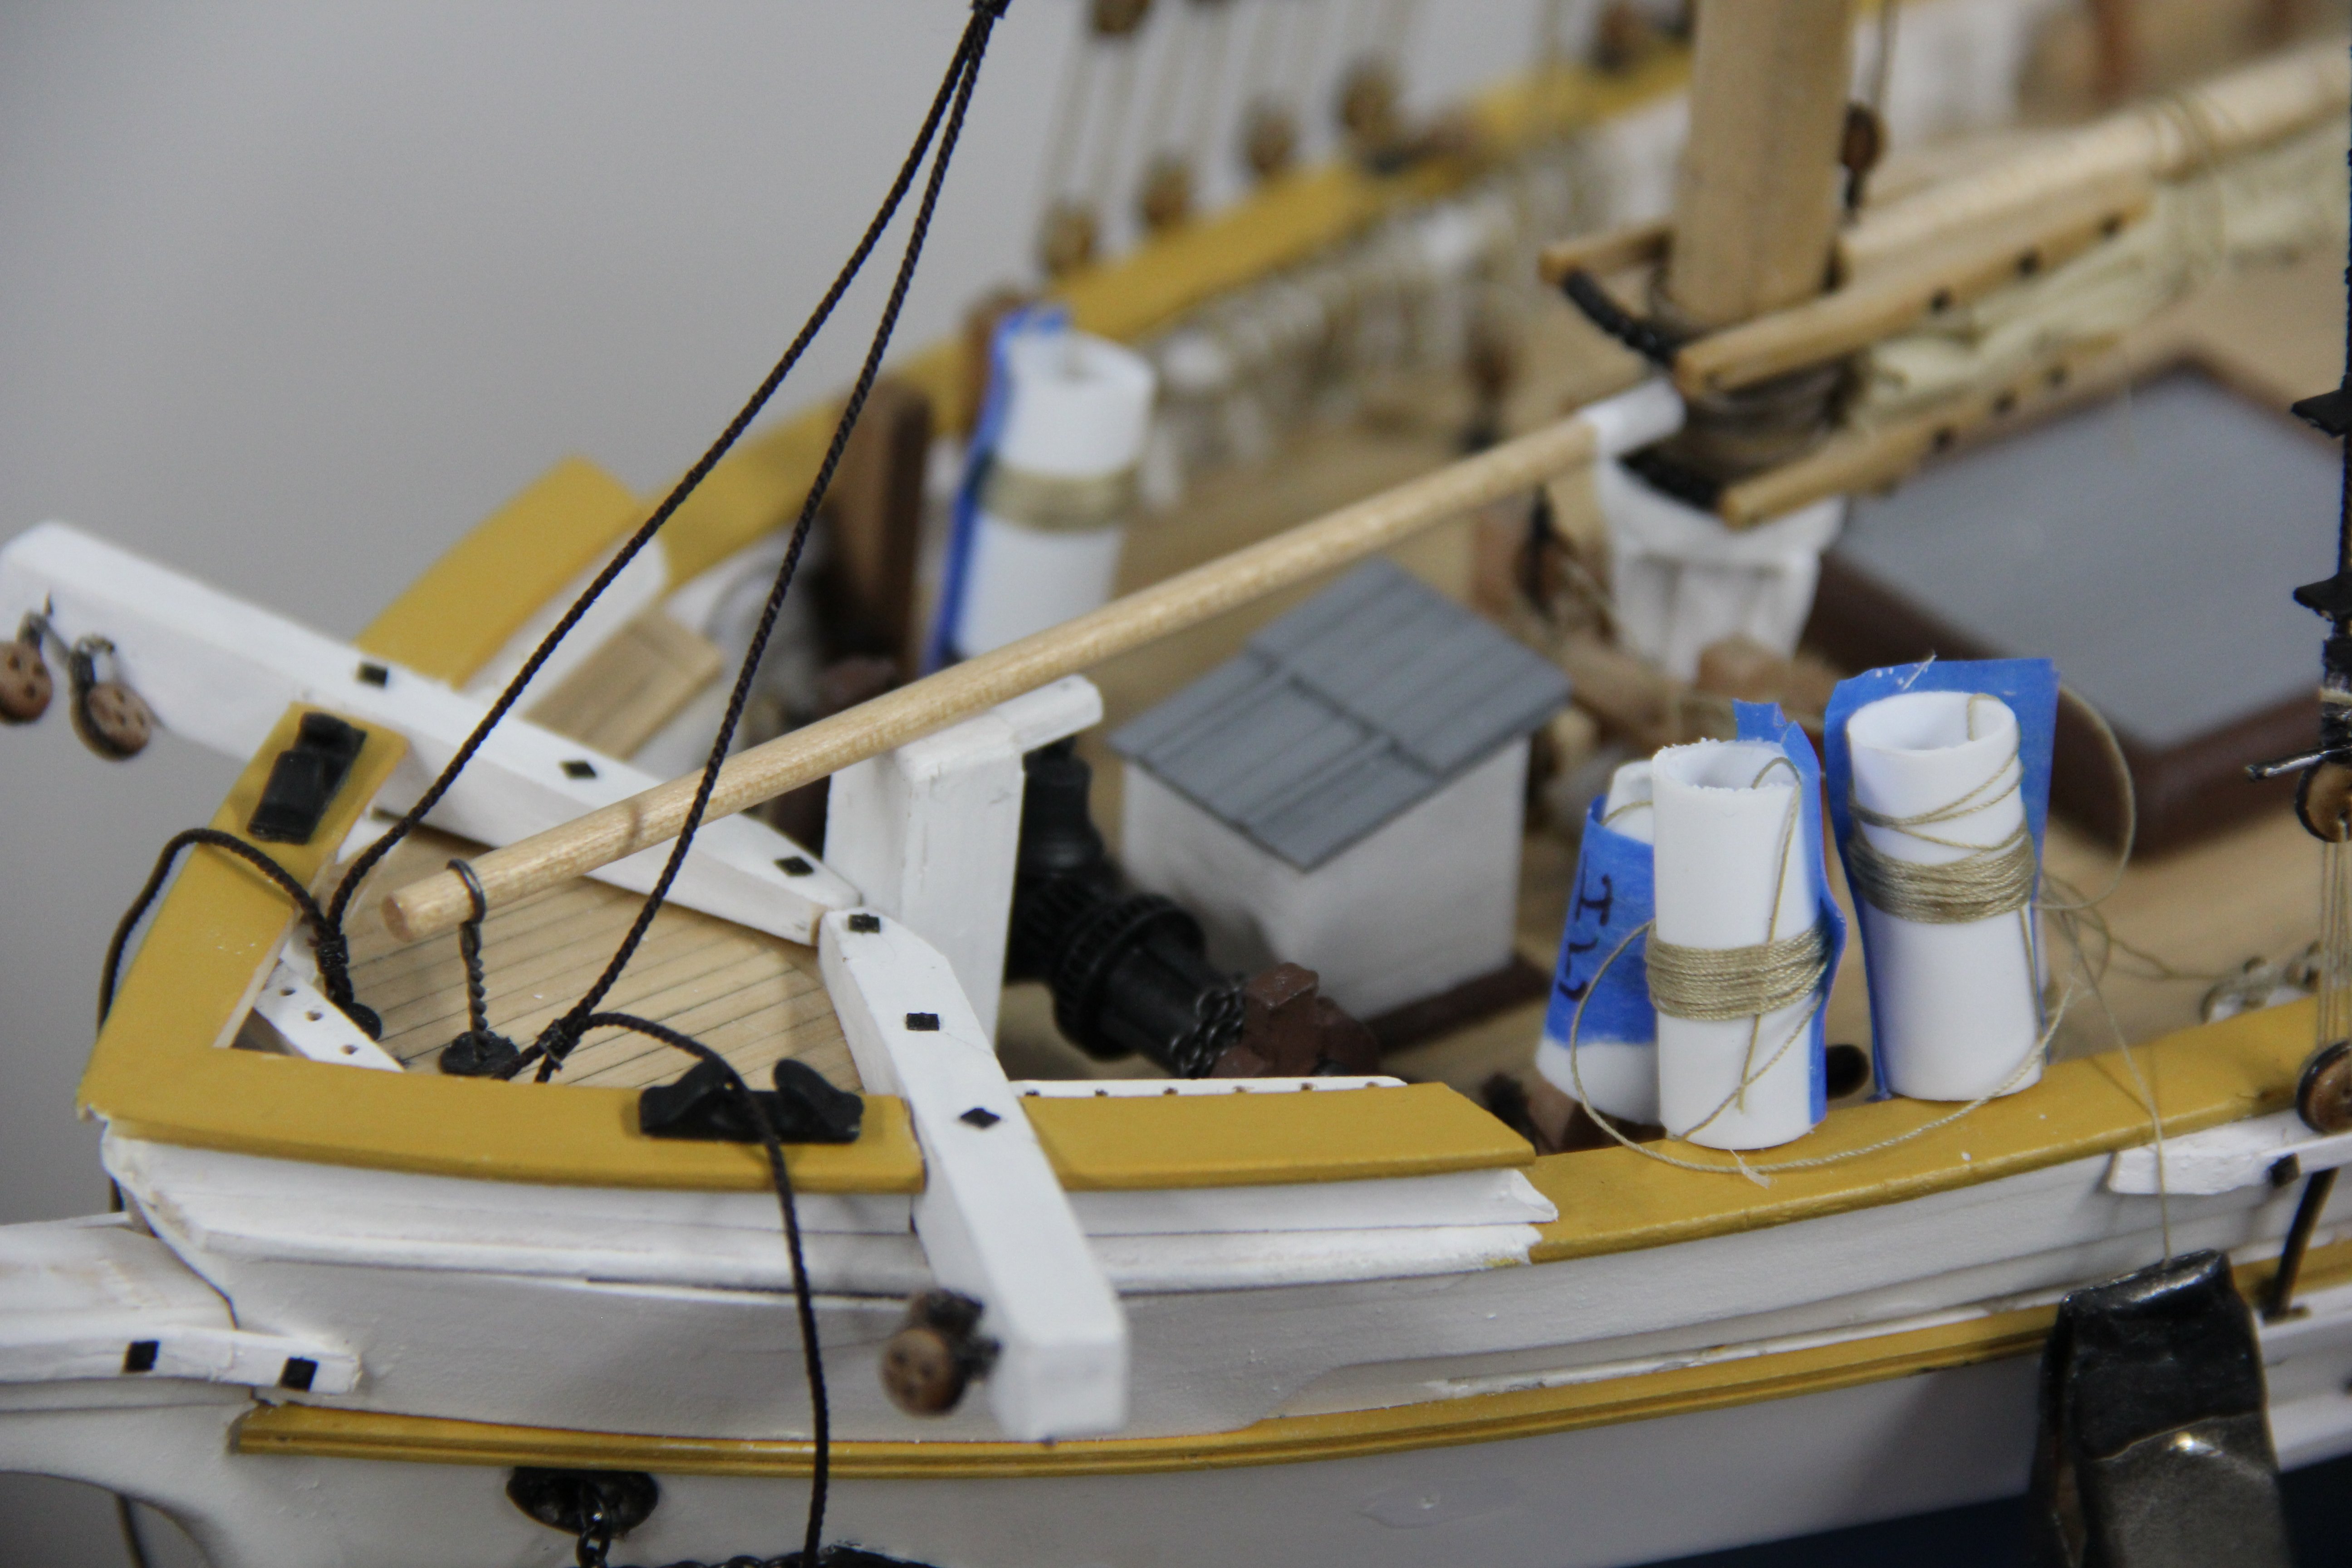
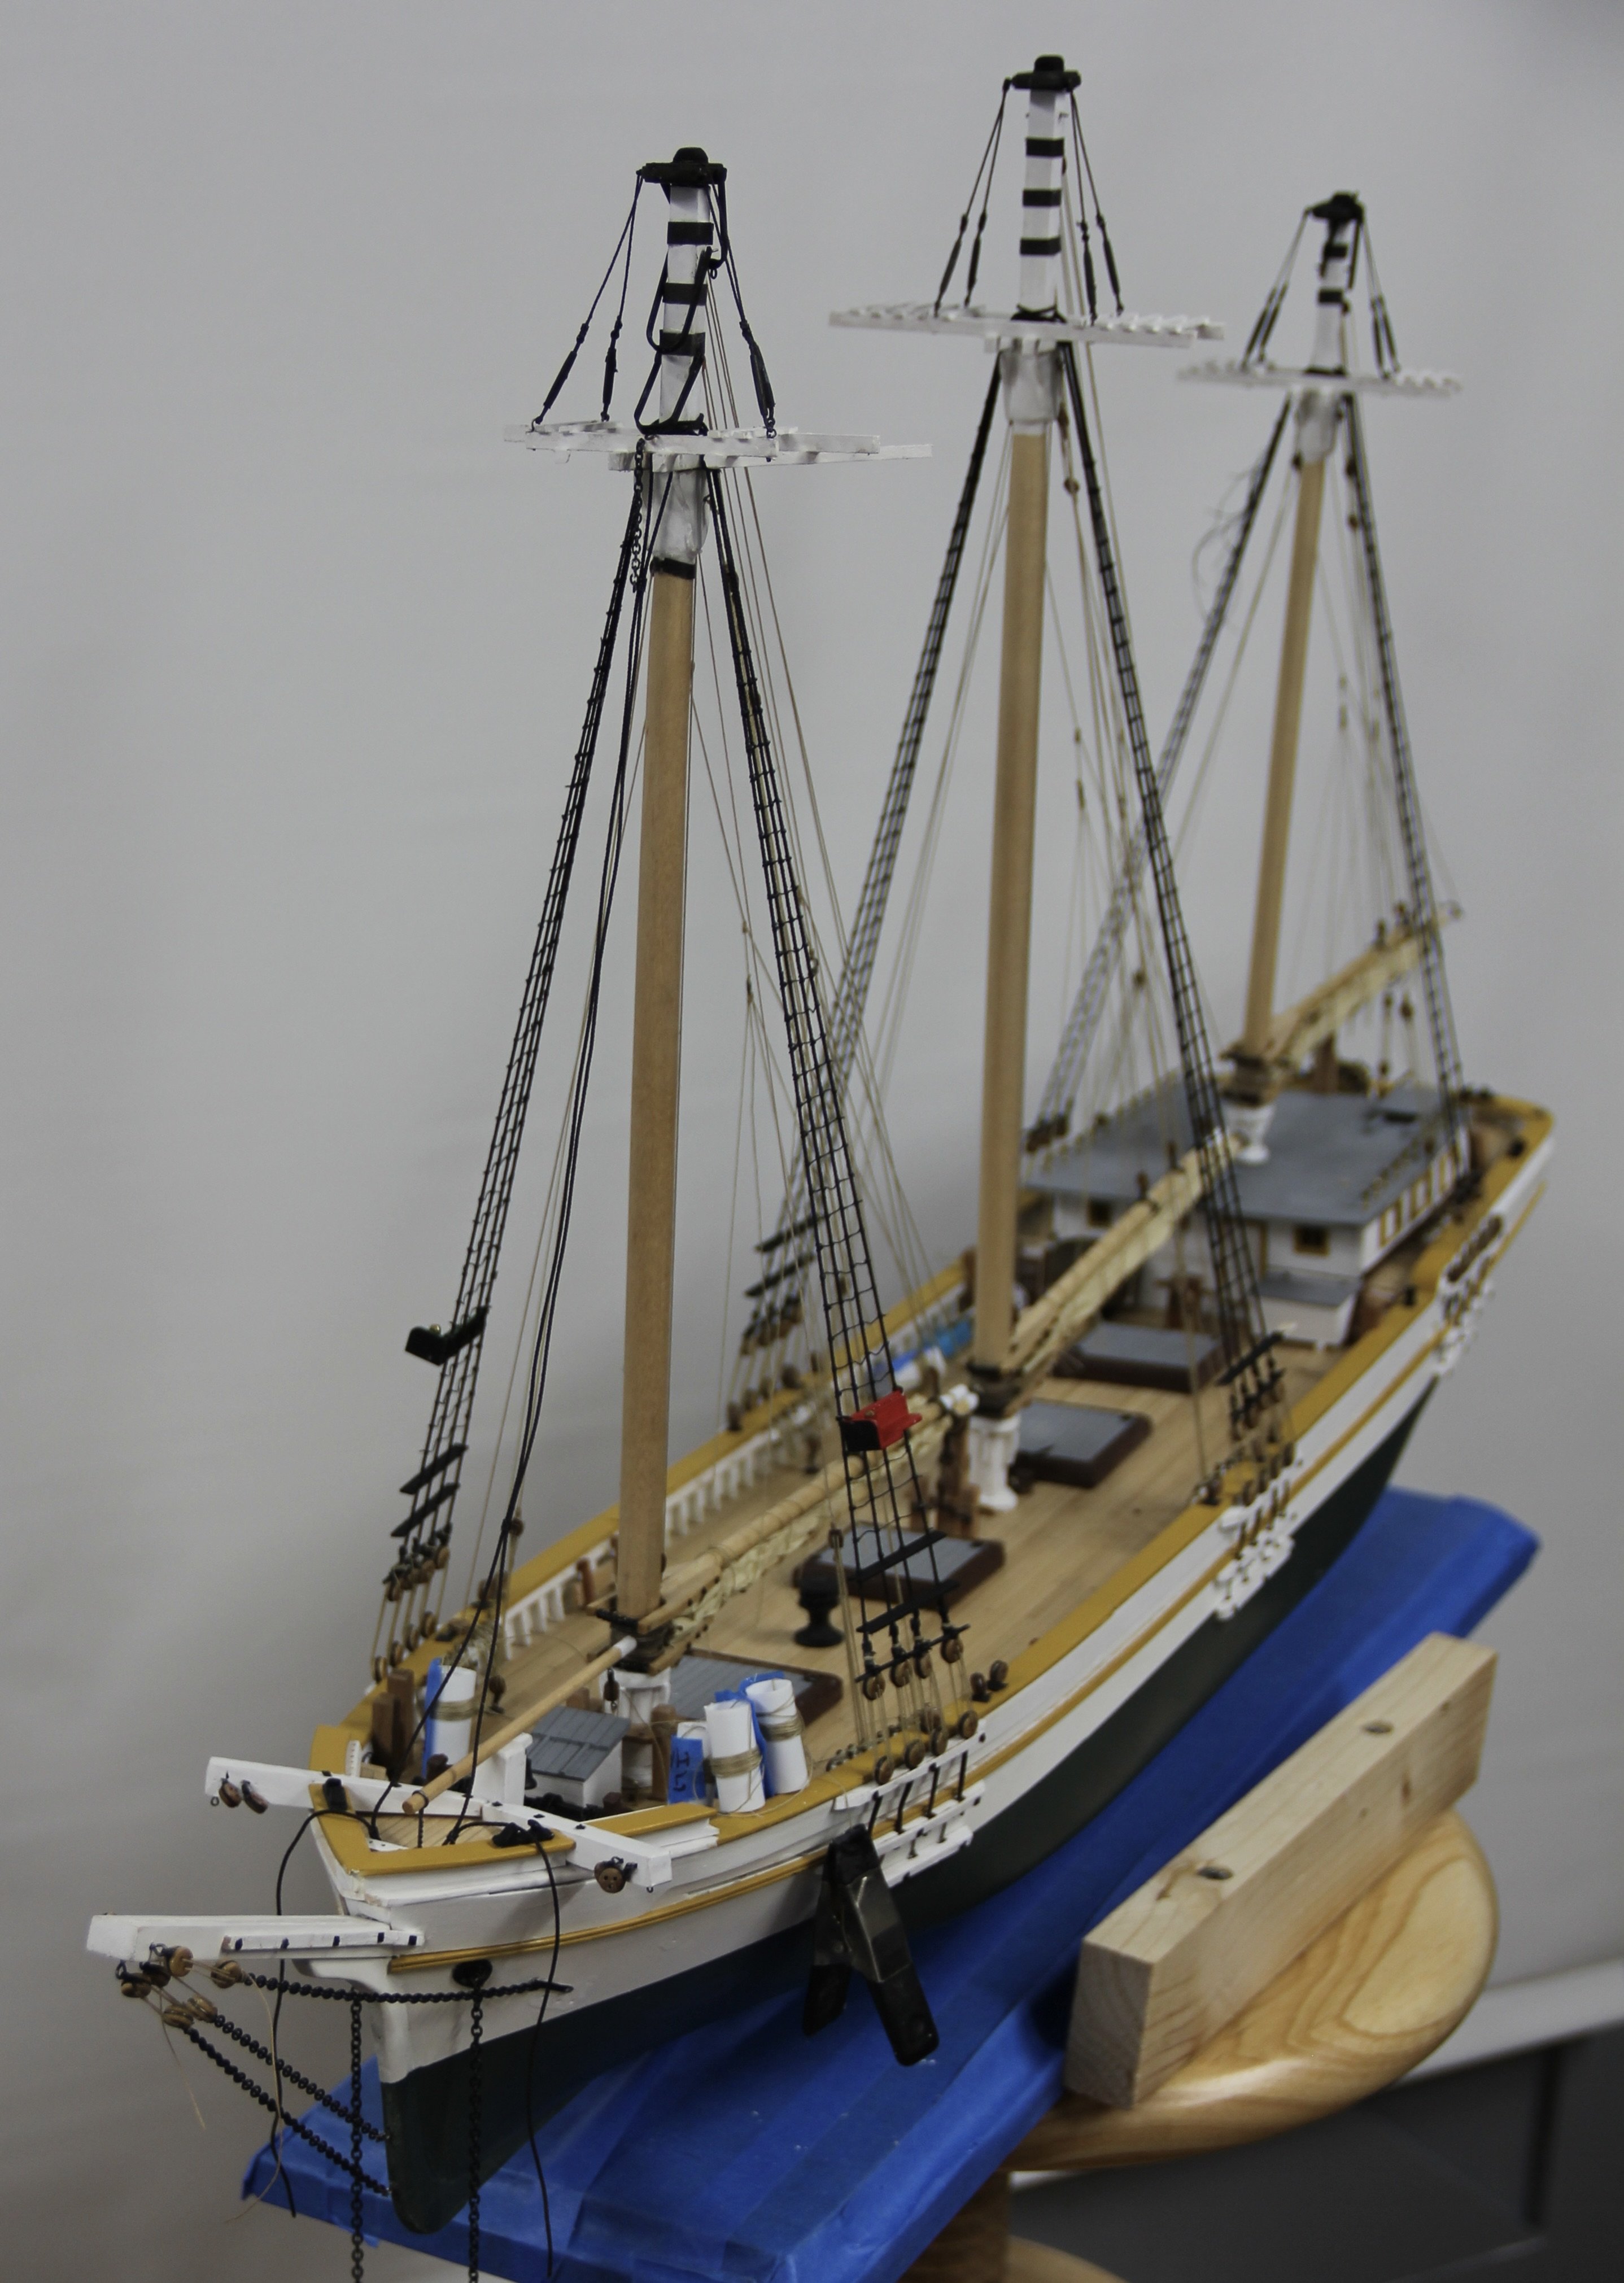
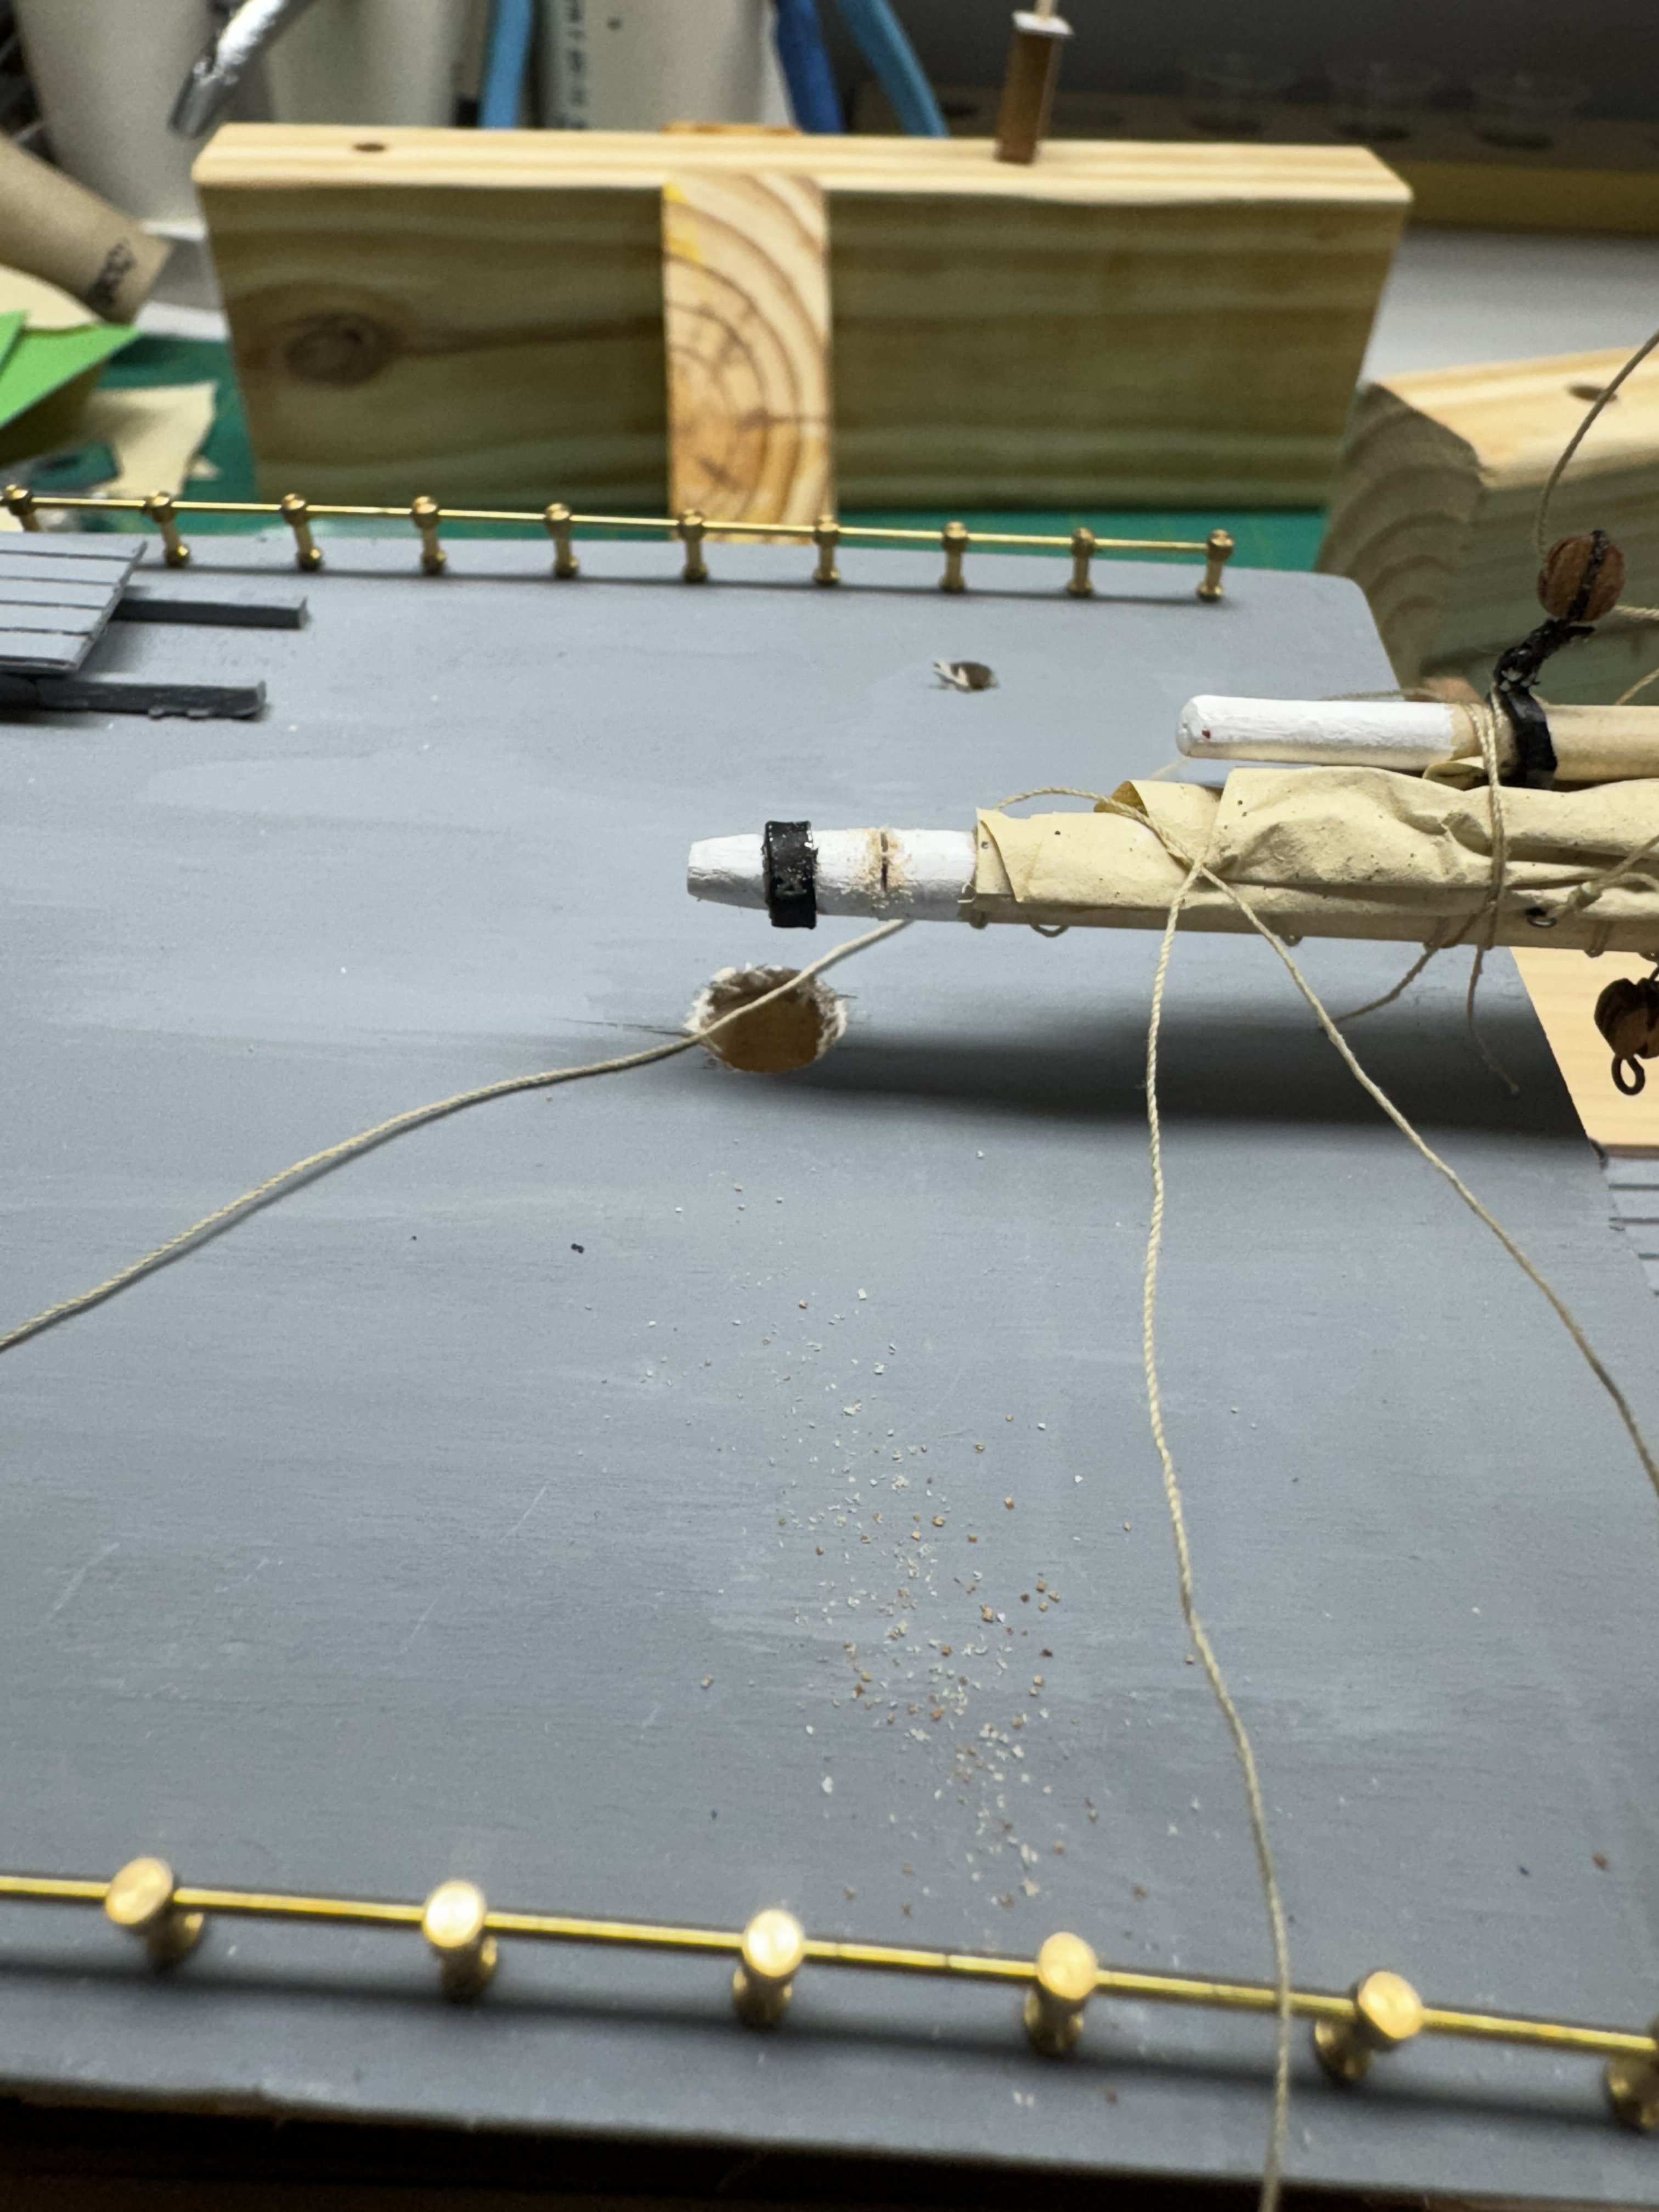
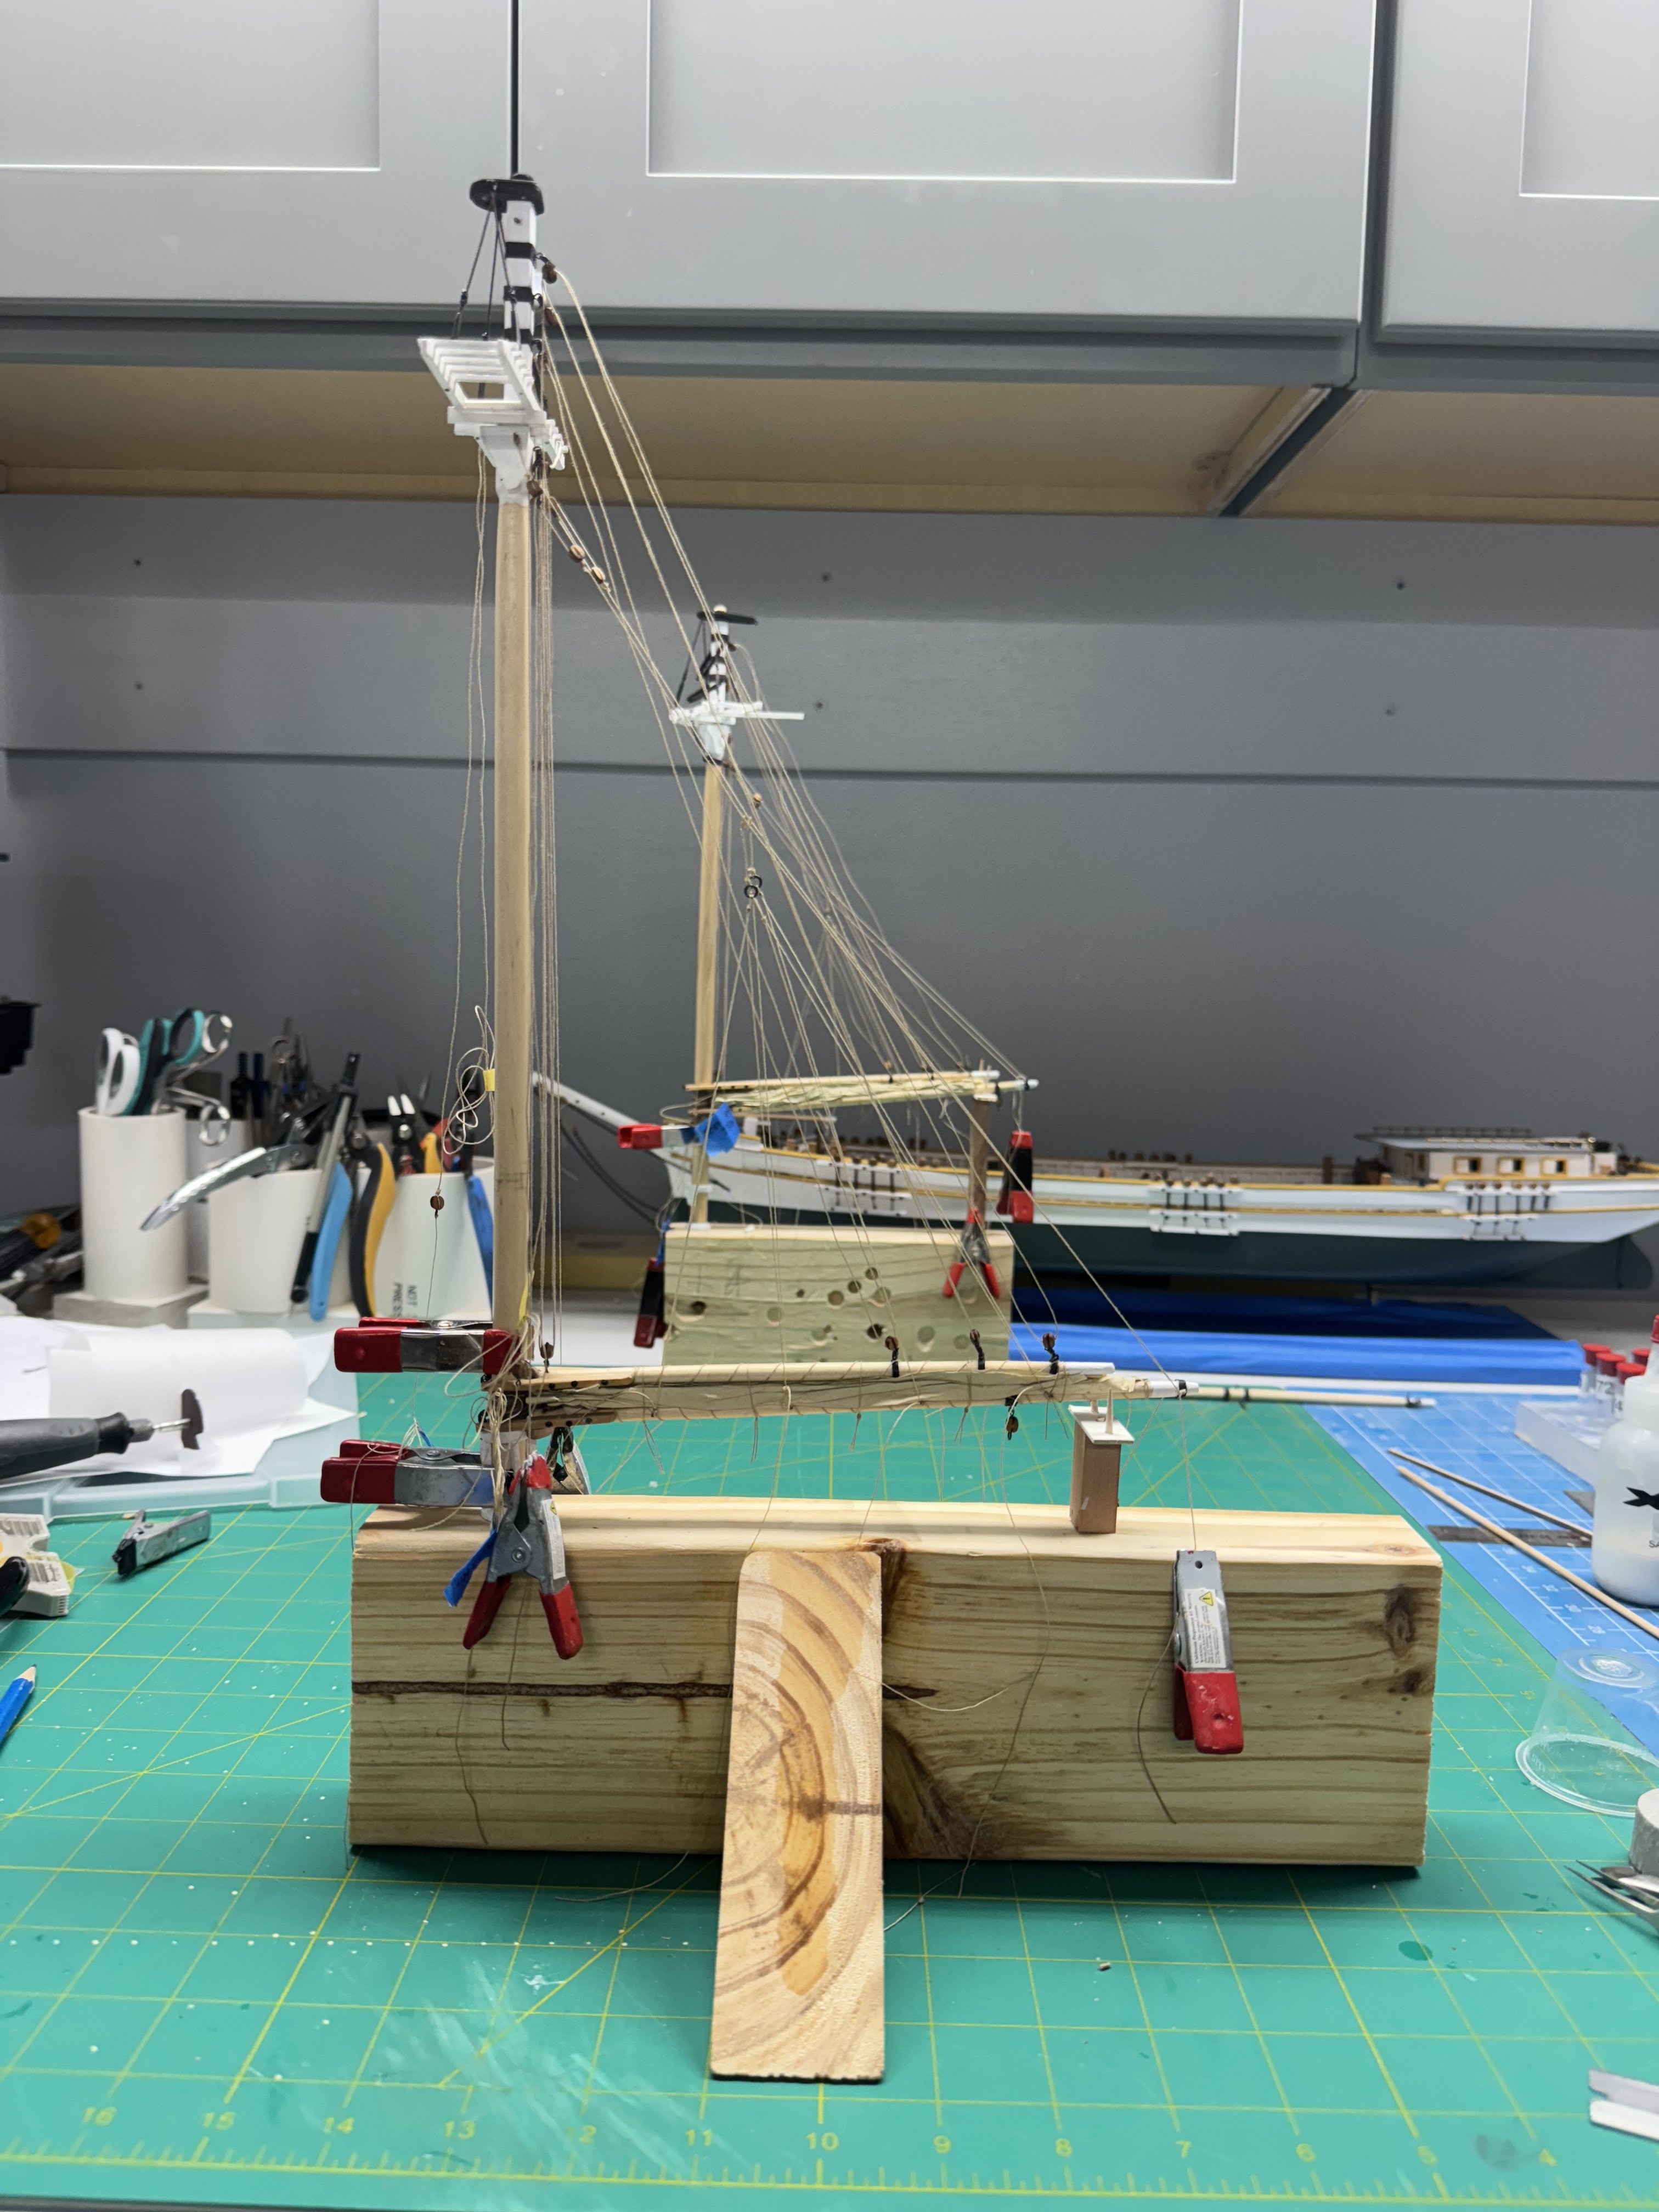
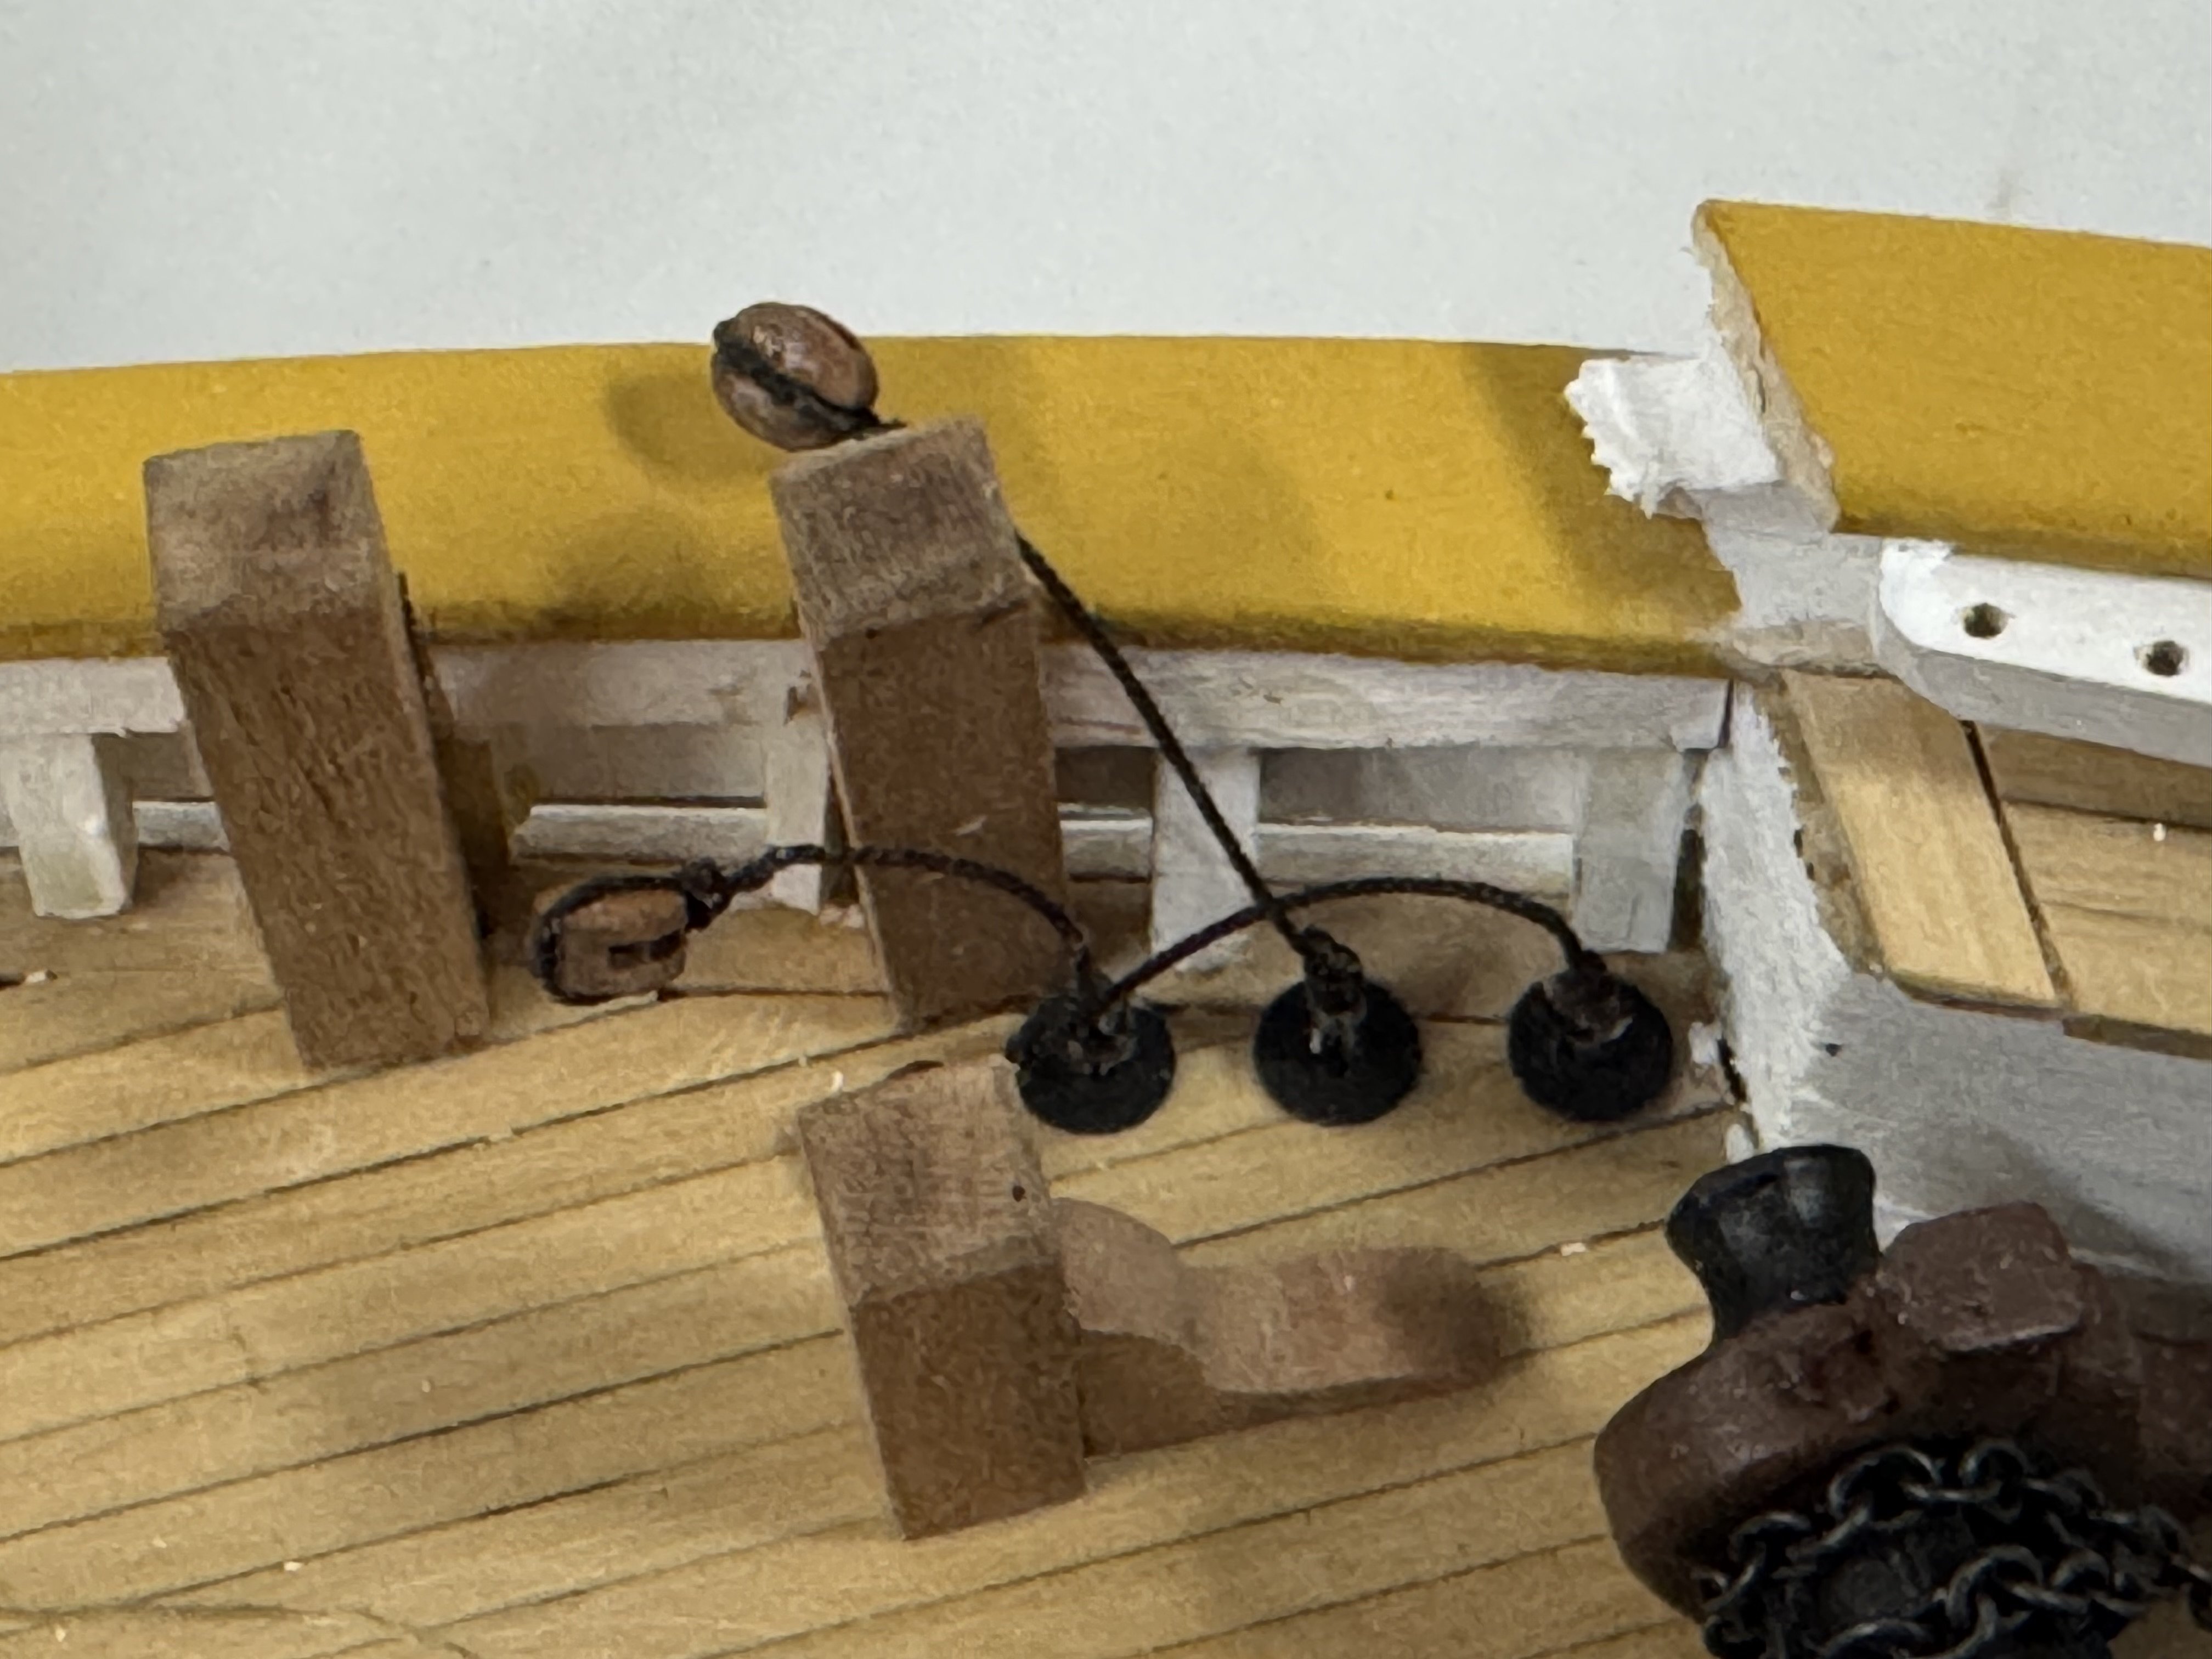
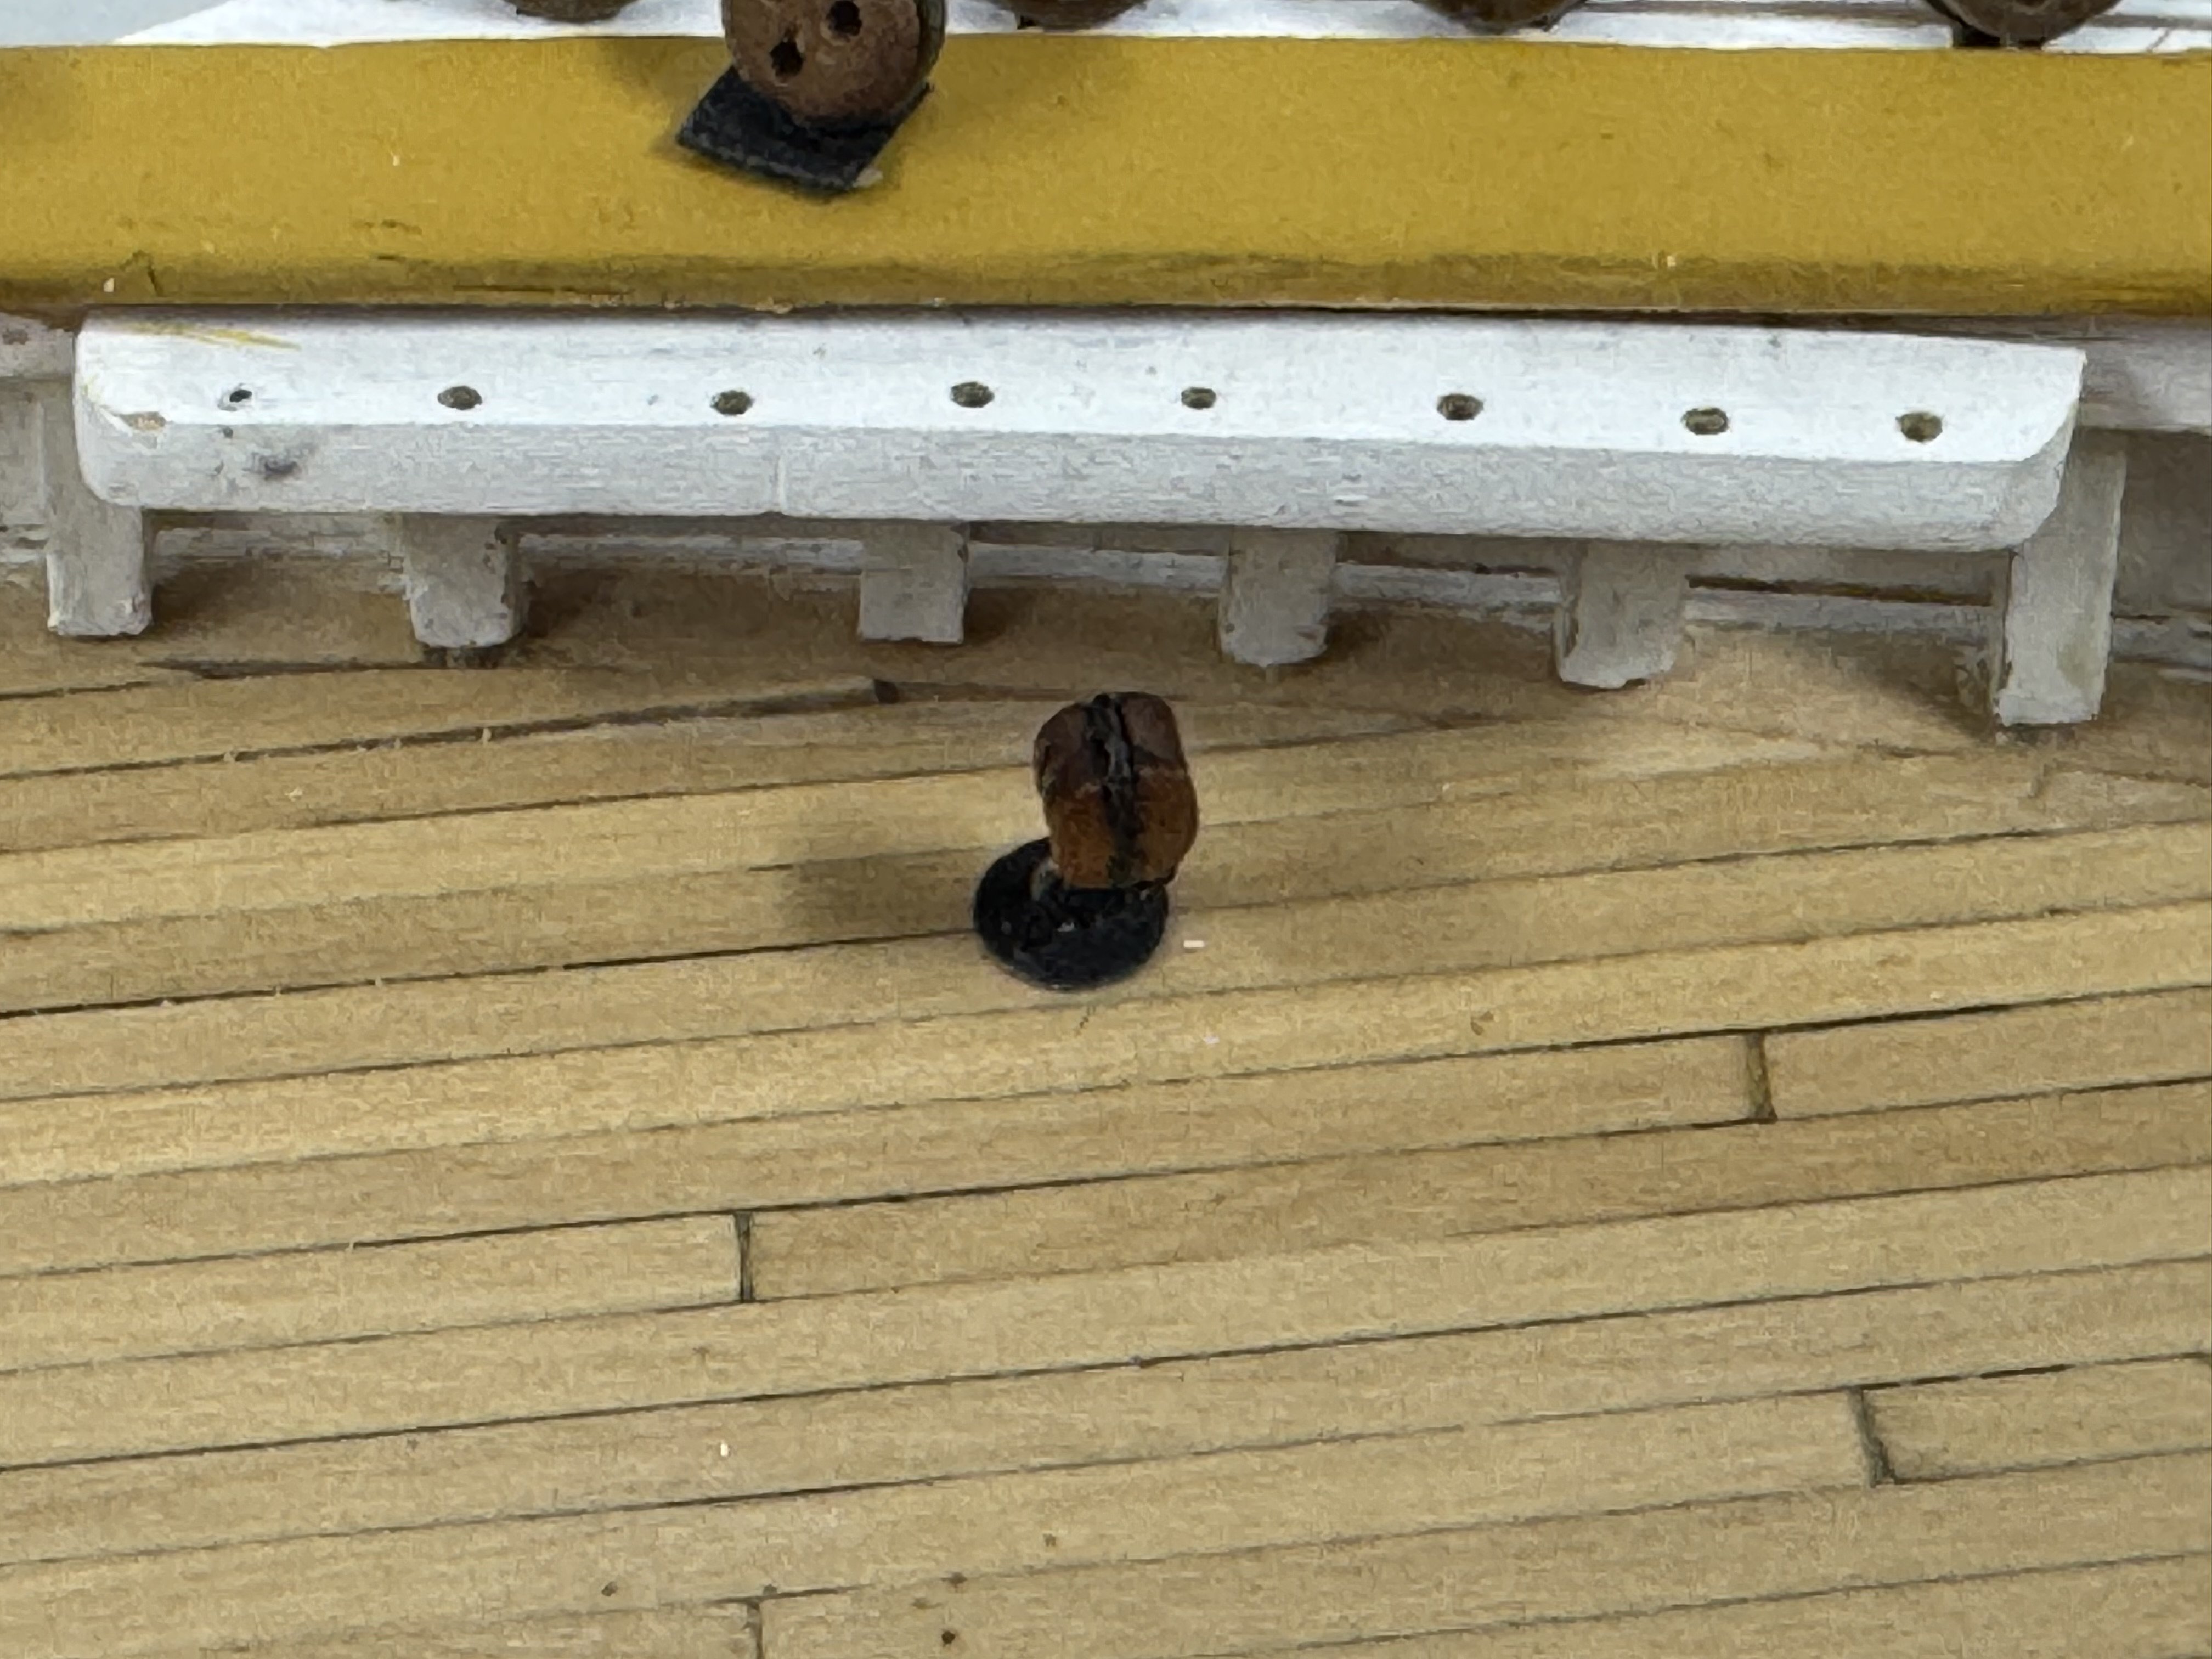
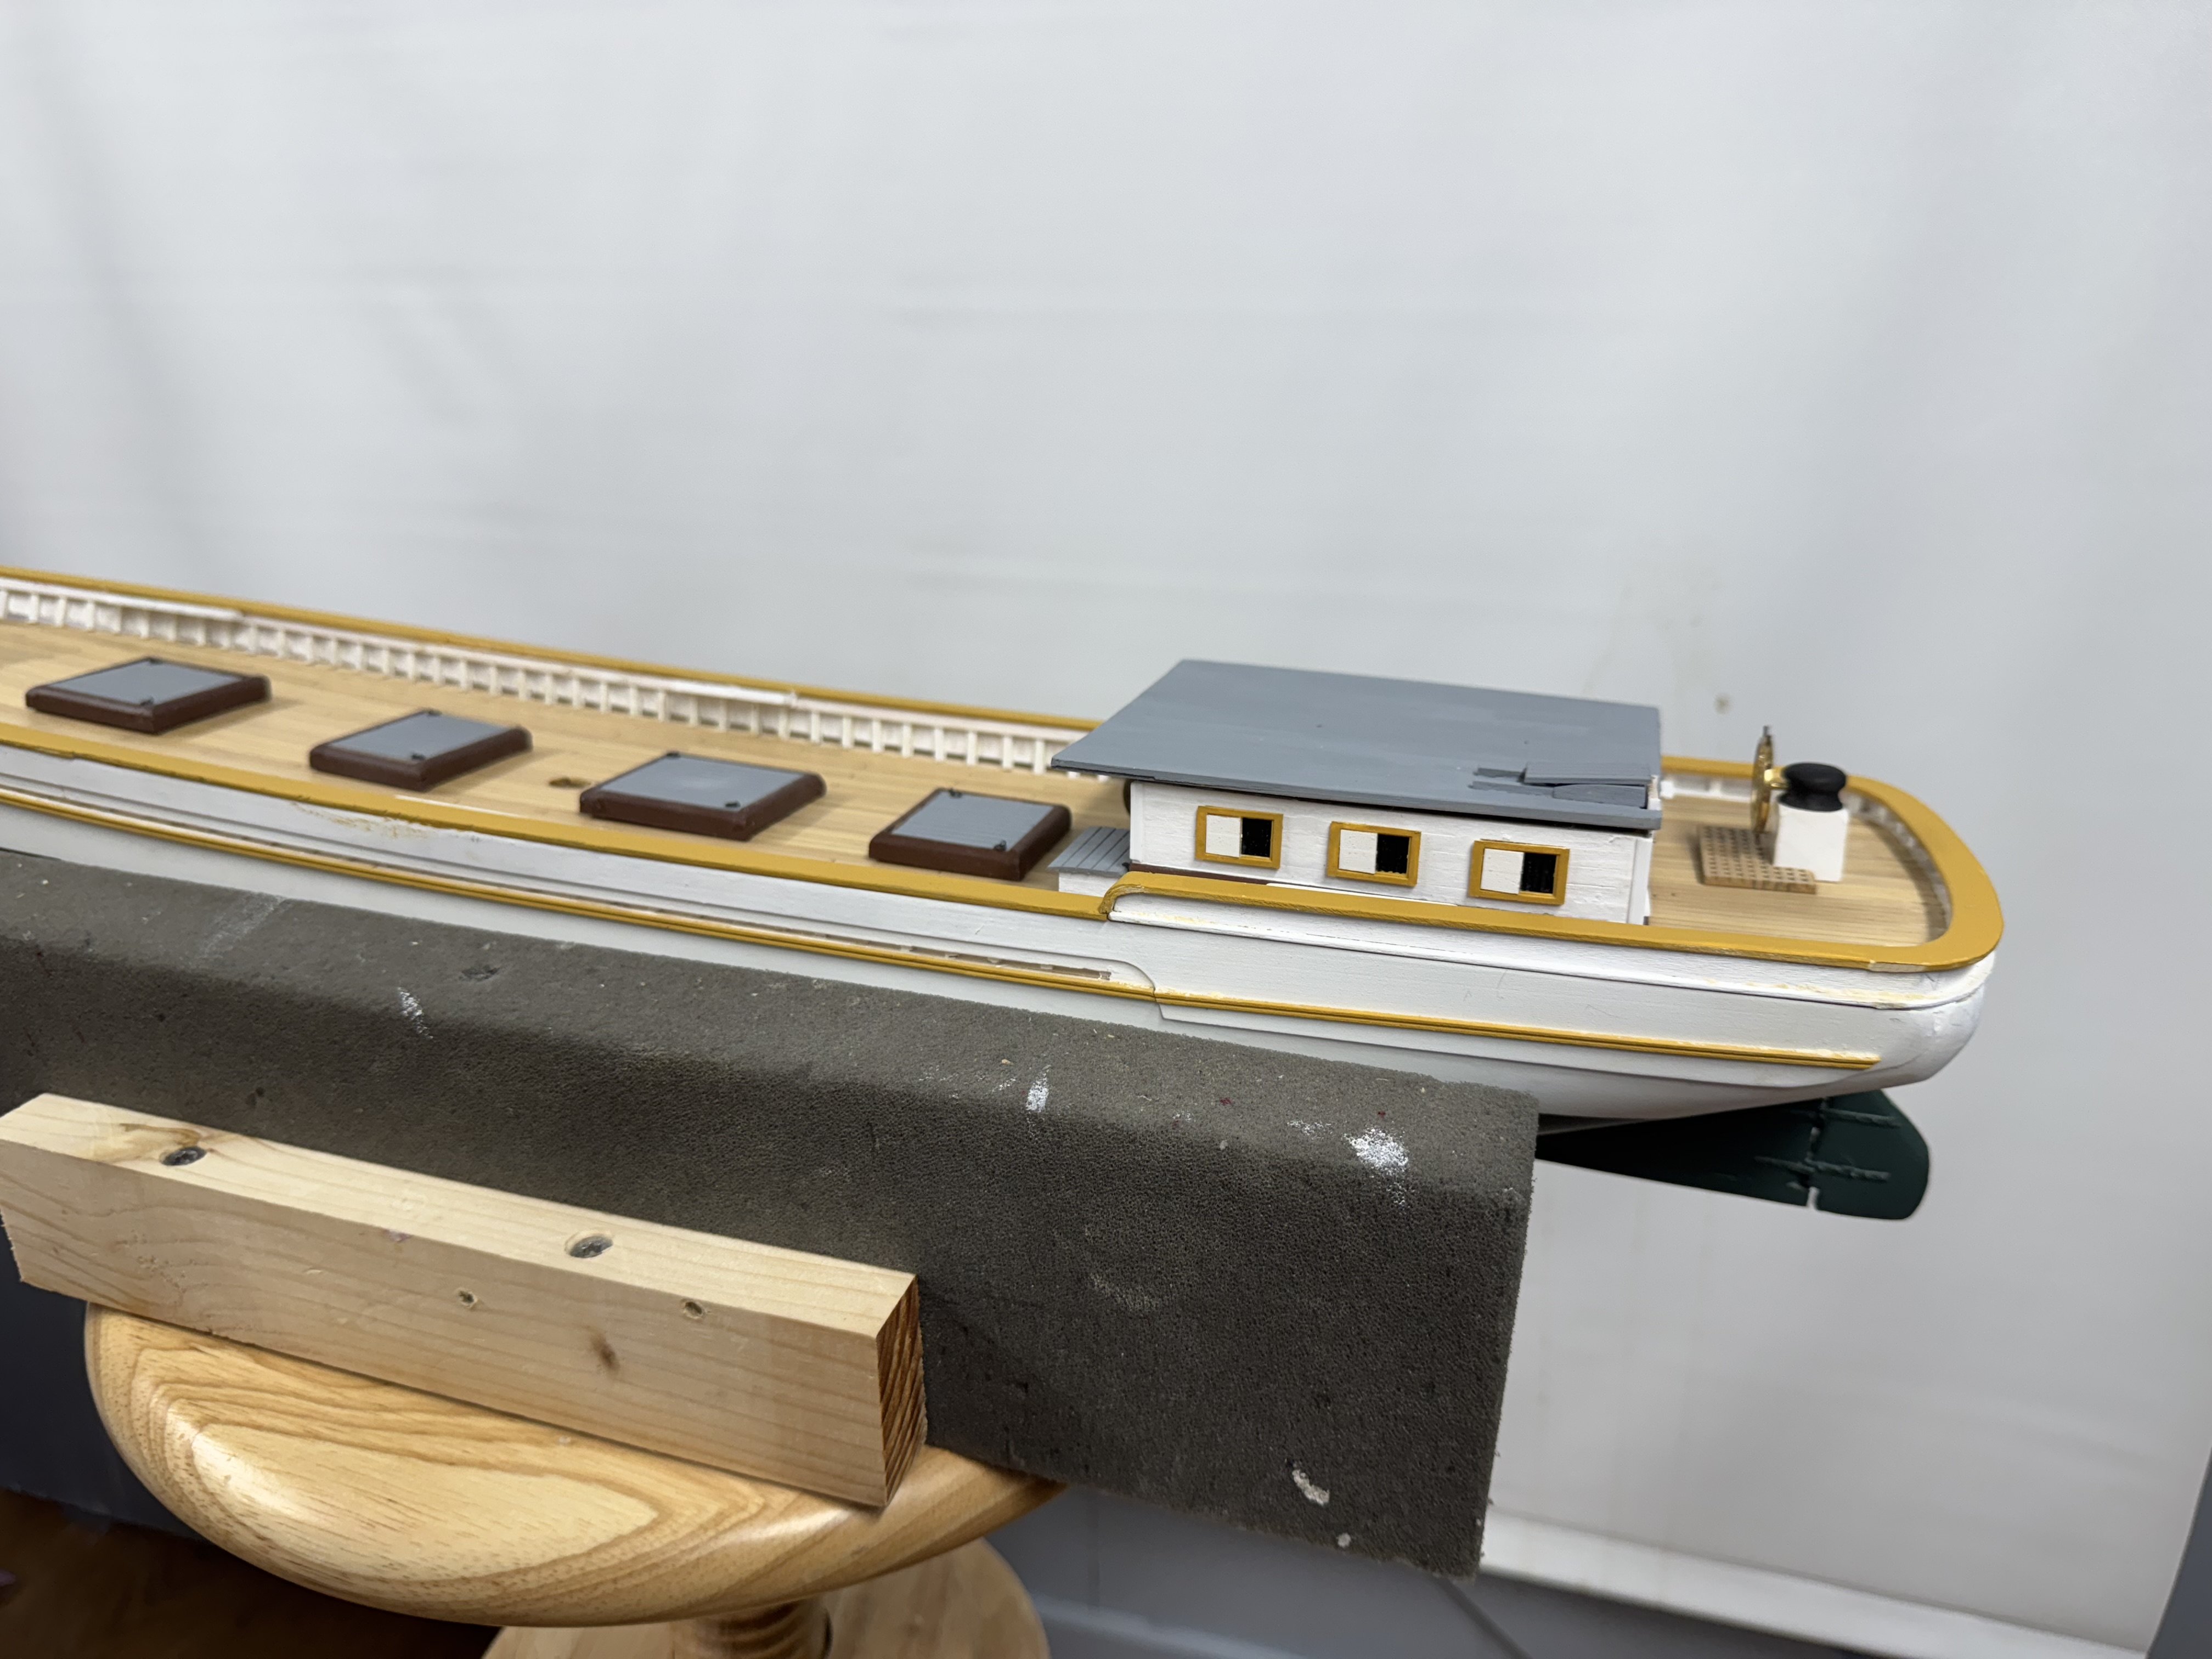
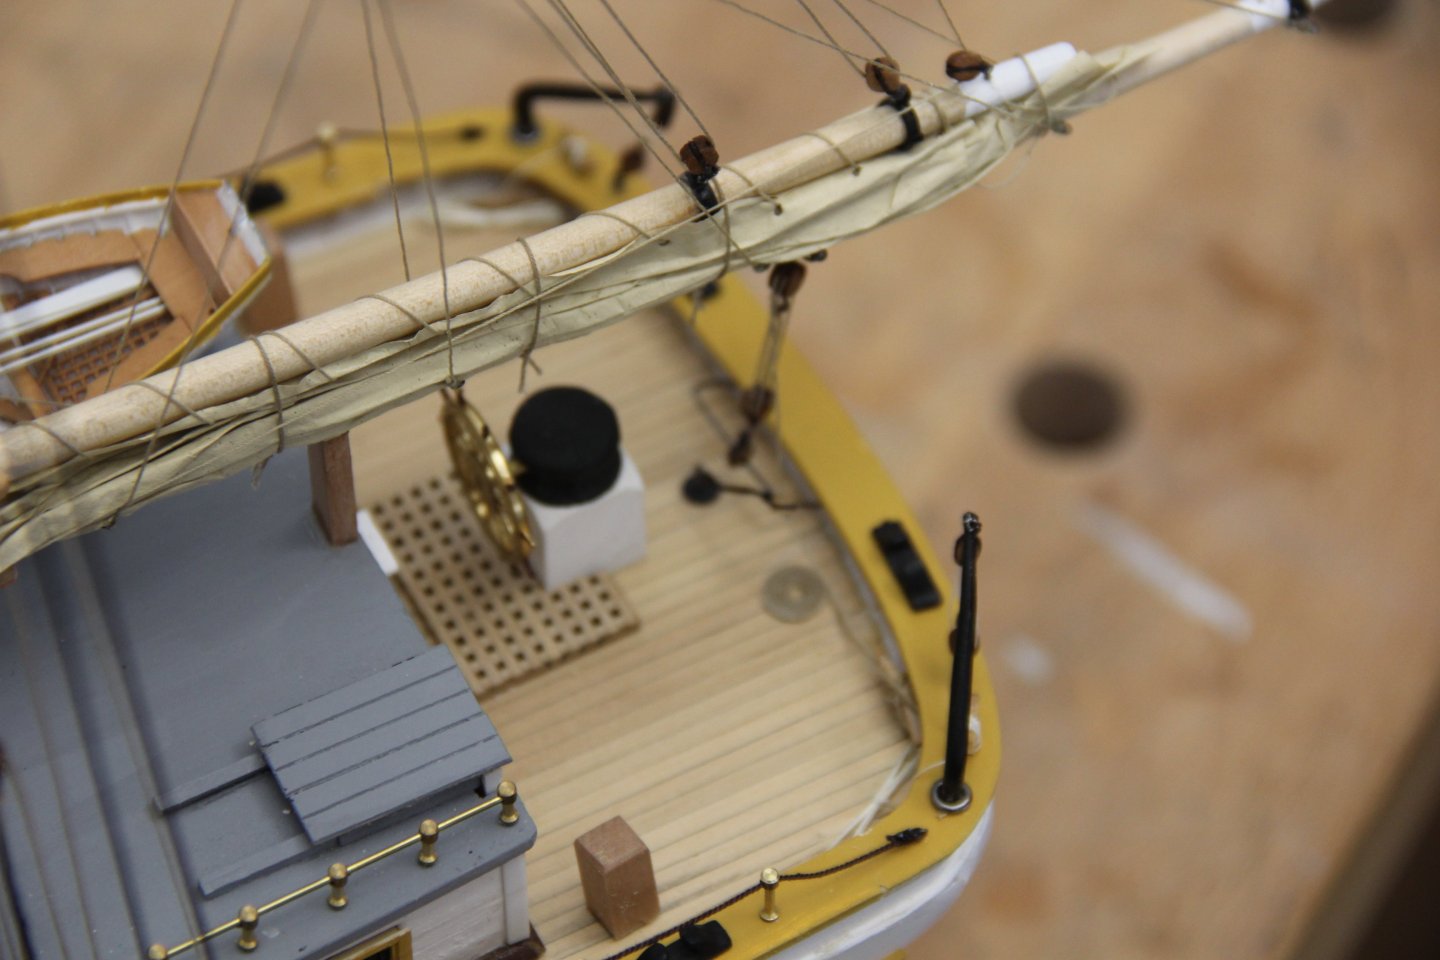
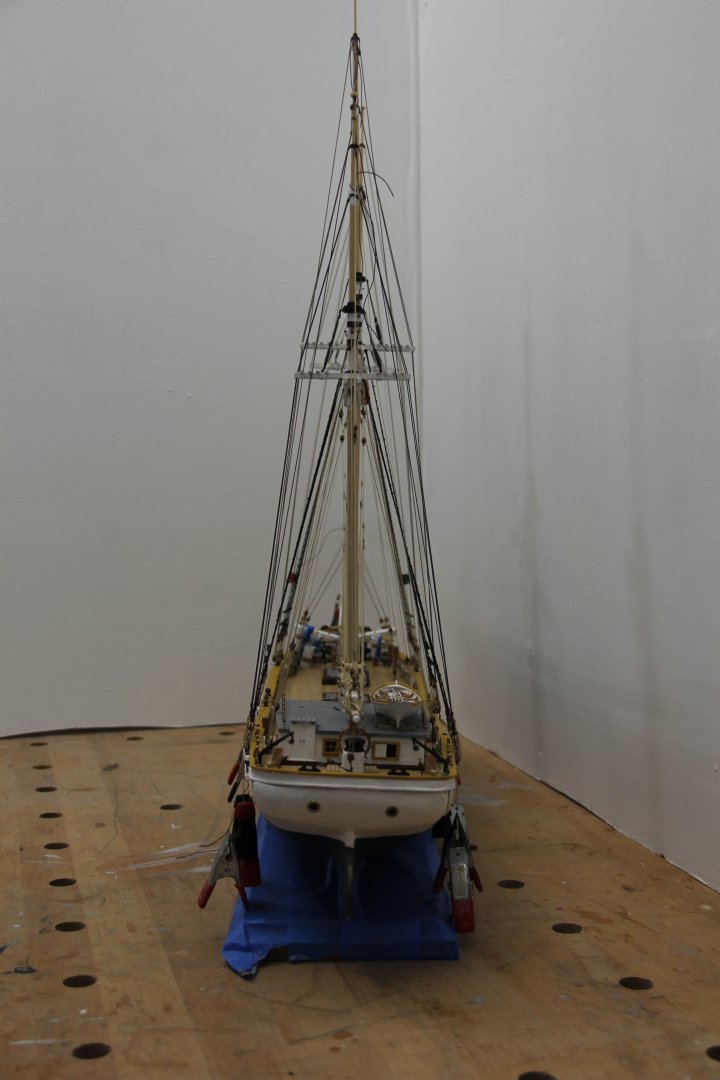
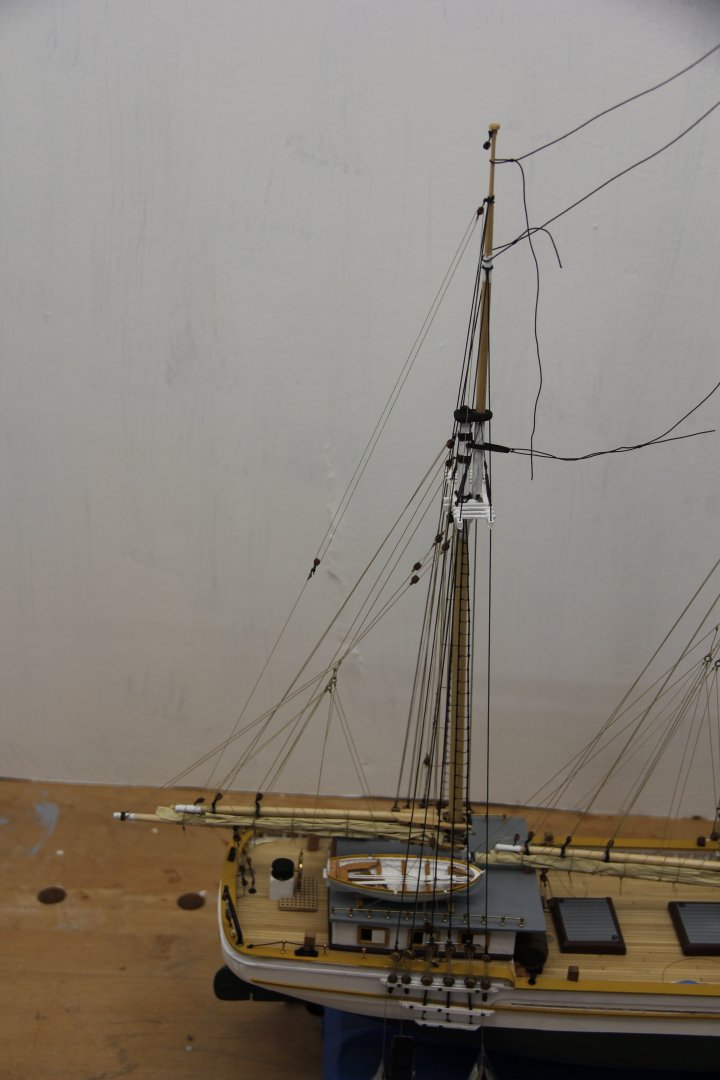
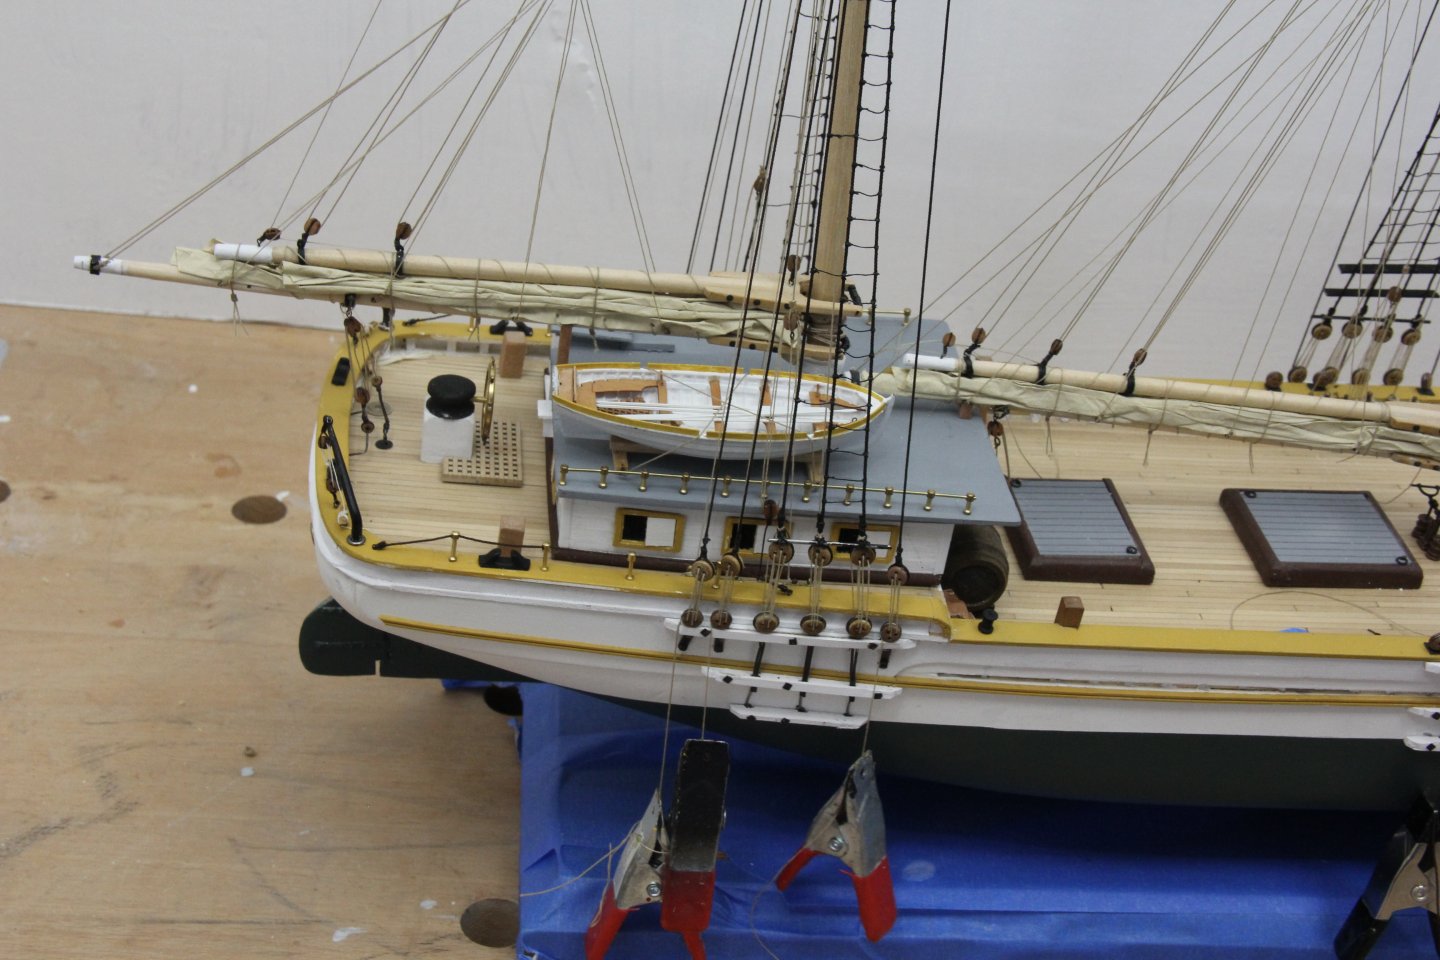
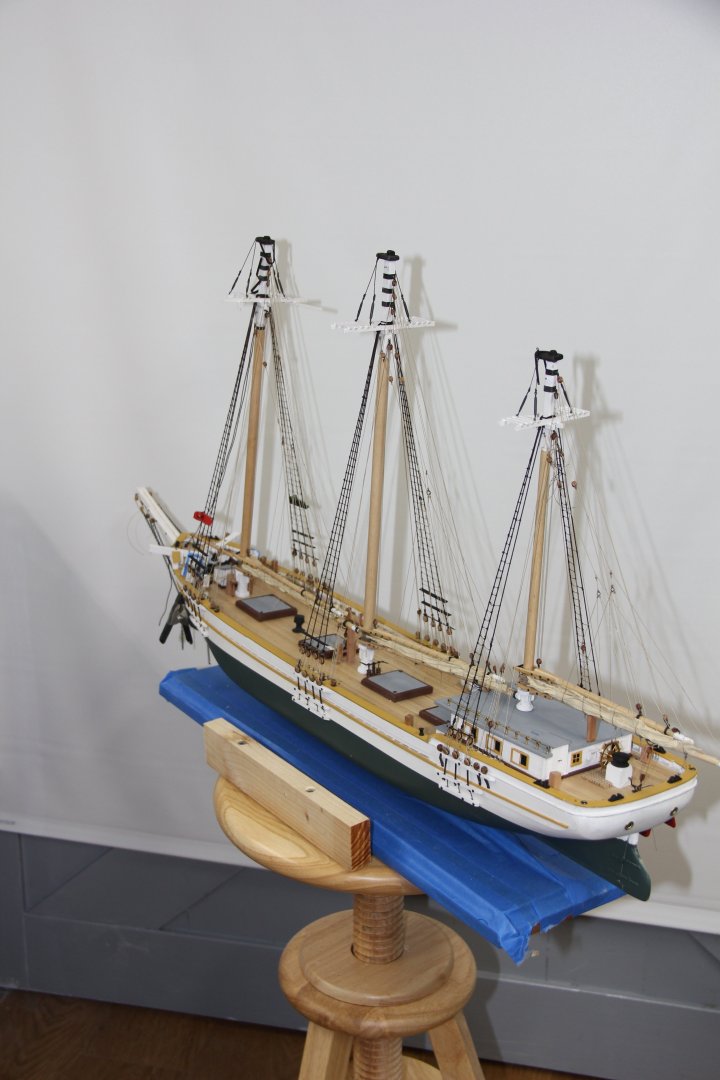
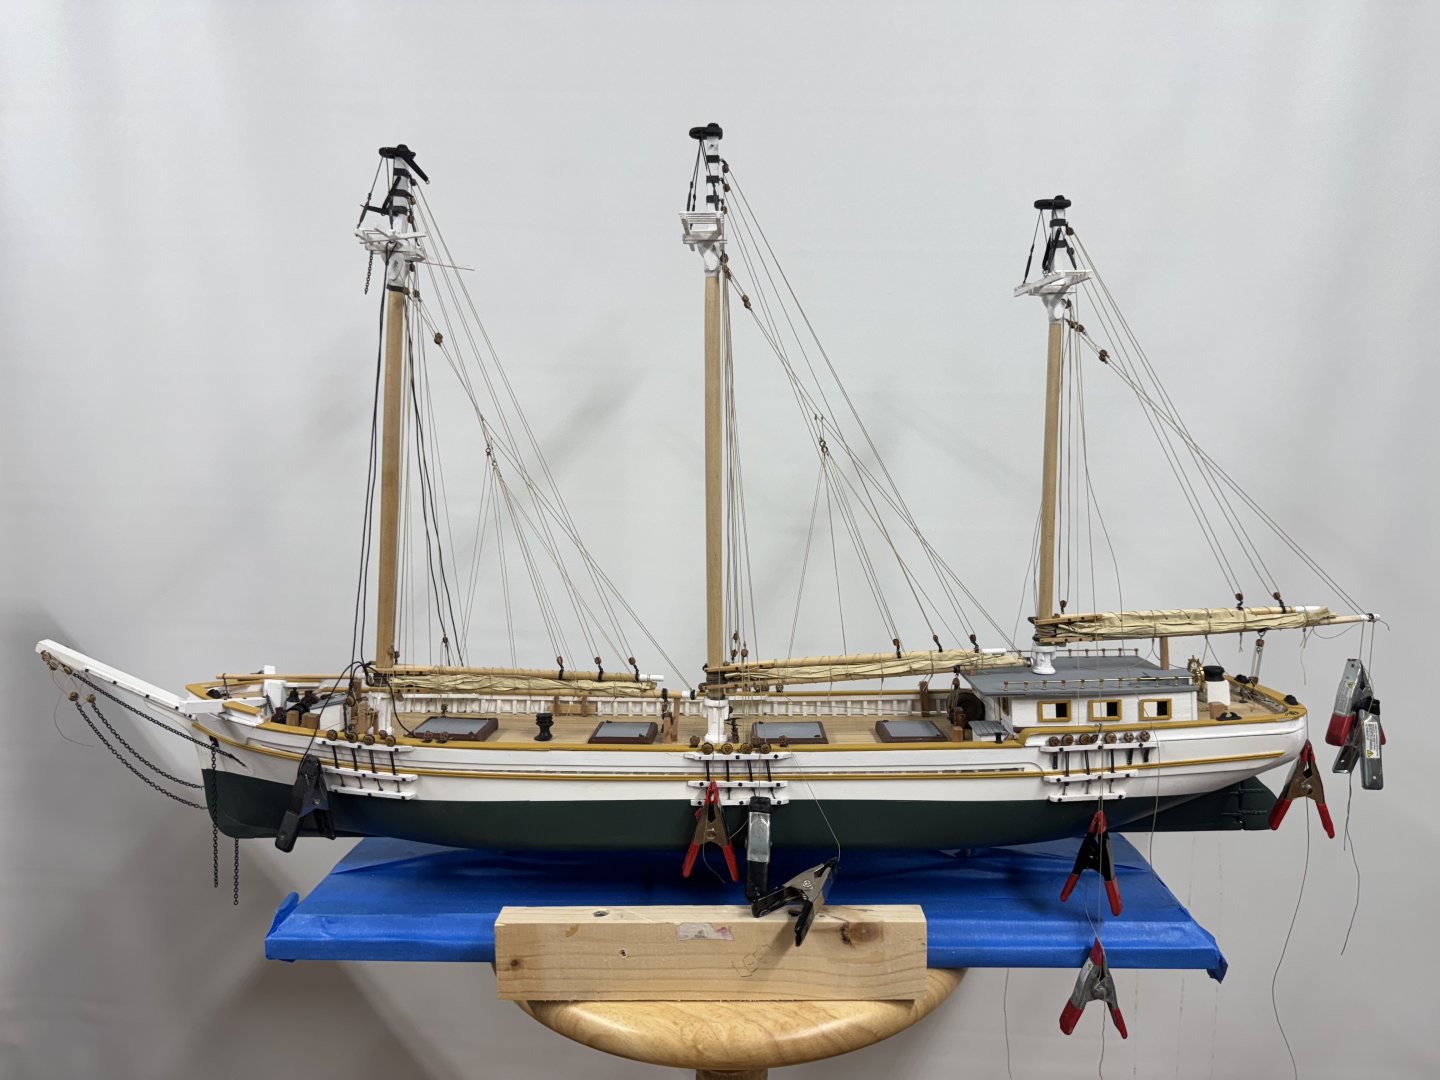
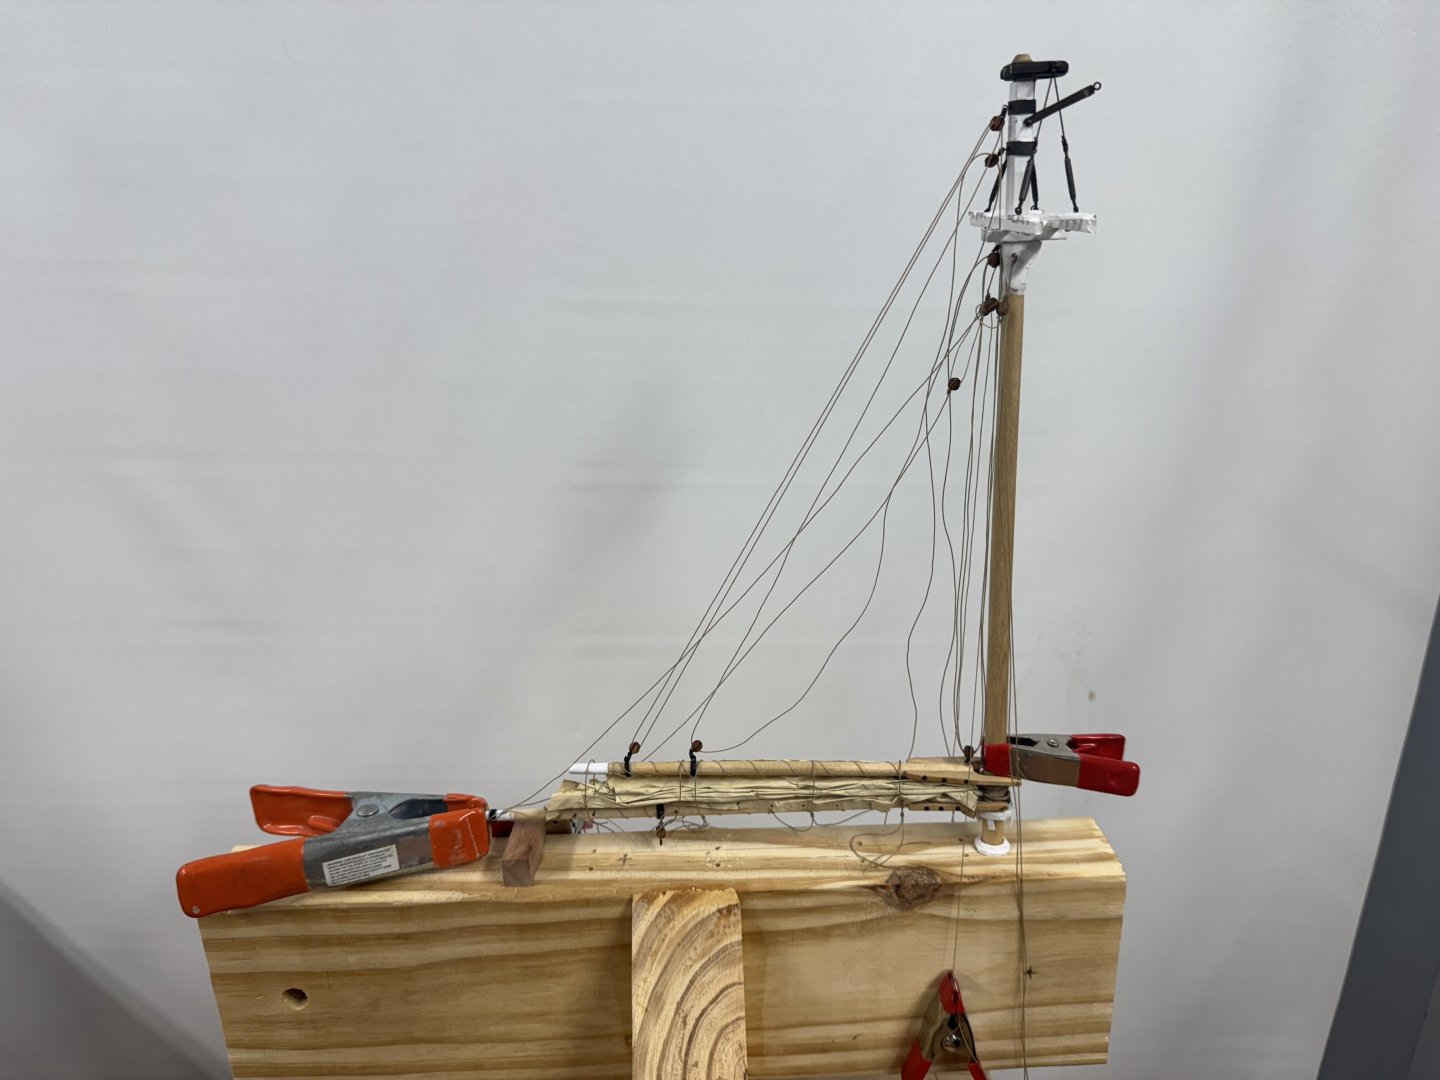
 Proceeding apace I decided to get the after end of the ship "finished", except for the final tensioning of the backstay/top mast shrouds and the inter-mast stays. I took the pictures in my make shift "photo studio" which I hope to use to take the pictures for the NRG model contest, assuming I get the Simpson finished by the end of the month. Pay no attention to the bottom surface. I have been promised a white sheet to cover up the wood working bench. So here is the mizzen mast with all the rigging that I intend to provide in place. The only new running rigging is the topsail halyard and down haul which you can see joined together aft of the throat/peak/topping lifts. I ran the down haul through the small block at the aft end of the gaff, along the boom and then down to the deck. I have a rope coil that will go on top of the cabin roof where the down haul line leads down from the boom. After i got the topmast shrouds/back stays connected and the deadeyes lashed up I added the railing along the stern rail. Next up was the boat and davits/tackle. Since there was no boat included with the kit I used a vanguard 1/64th, 3-D printed boat (18' cutter) which is probably too wide and too short to fit under the davits and not hit the stern. Given my unwillingness to pursue a different boat at this late date I decided to mount the boat on a skid on the cabin roof to starboard of the mizzen mast. I toyed with the notion of fabbing a cover from the left over sail material but gave up when I could not figure out the correct shape of the cover and not wanting to cover the work I had done on the boat interior. Here is an overall view of the stern from the quarter (the whole ship in this view is one of the required photos for the NRG contest). So with the boat on deck I turned to davits inboard and added a eyebolt and cleat to hold the boat tackle in place. It is hard to see but there are coils of the boat tackle on deck below the cleats. I used Bluejackets .005" white line for the boat tackle as it is the smallest line i have. Here is a shot of the "quarterdeck with the davits and tackle in place. Hard to get the camera to focus on the deck but you can see the white rope below the davit. And this is another required shot (directly astern). And yes I know the ship is listing slightly to starboard. That happened the last time I had to fiddle with the mounting screws. I am waiting until everything is DONE before I try and tackle that issue. But at least the masts seem to line up correctly and I had to drill the mast holes.
- 121 replies
-
- 6
-

-
- Lucia A Simpson
- AJ Fisher
- (and 1 more)
-
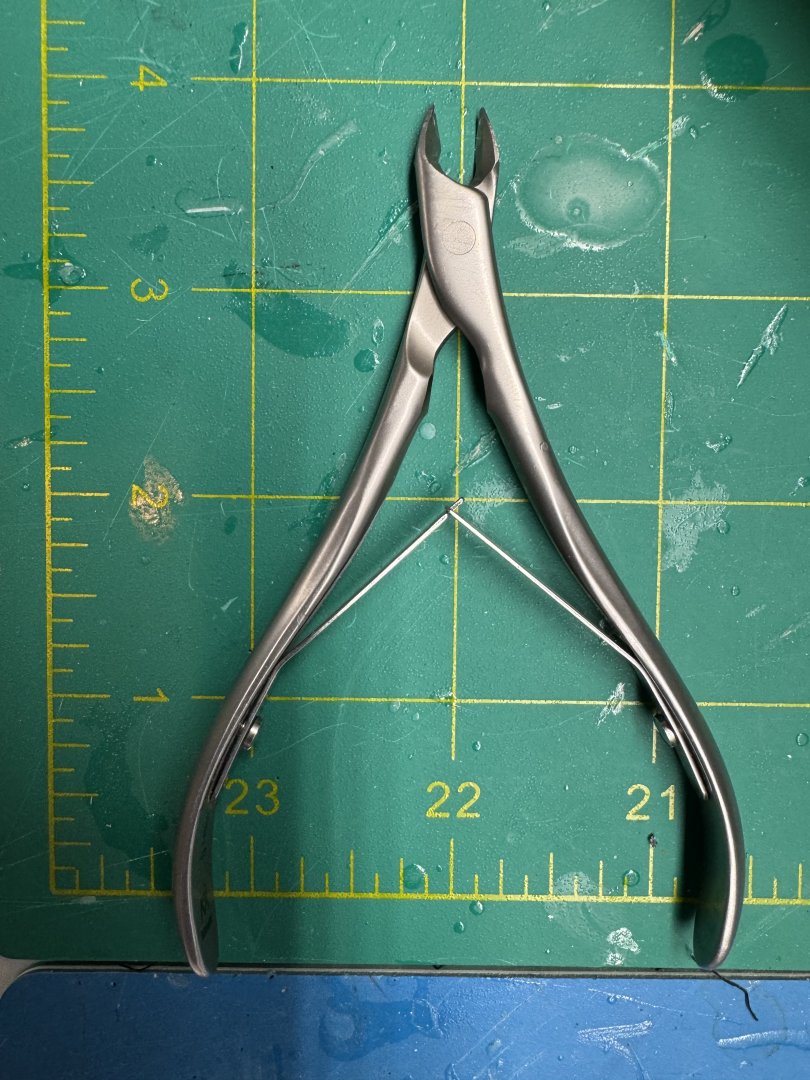
Tim, I use cuticle clippers. These are from West Germany and were about $45 when I bought them in 2019. They really stay sharp as long as all you cut is CA hardened rigging line.
- 121 replies
-
- 1
-
-
- Lucia A Simpson
- AJ Fisher
- (and 1 more)
-
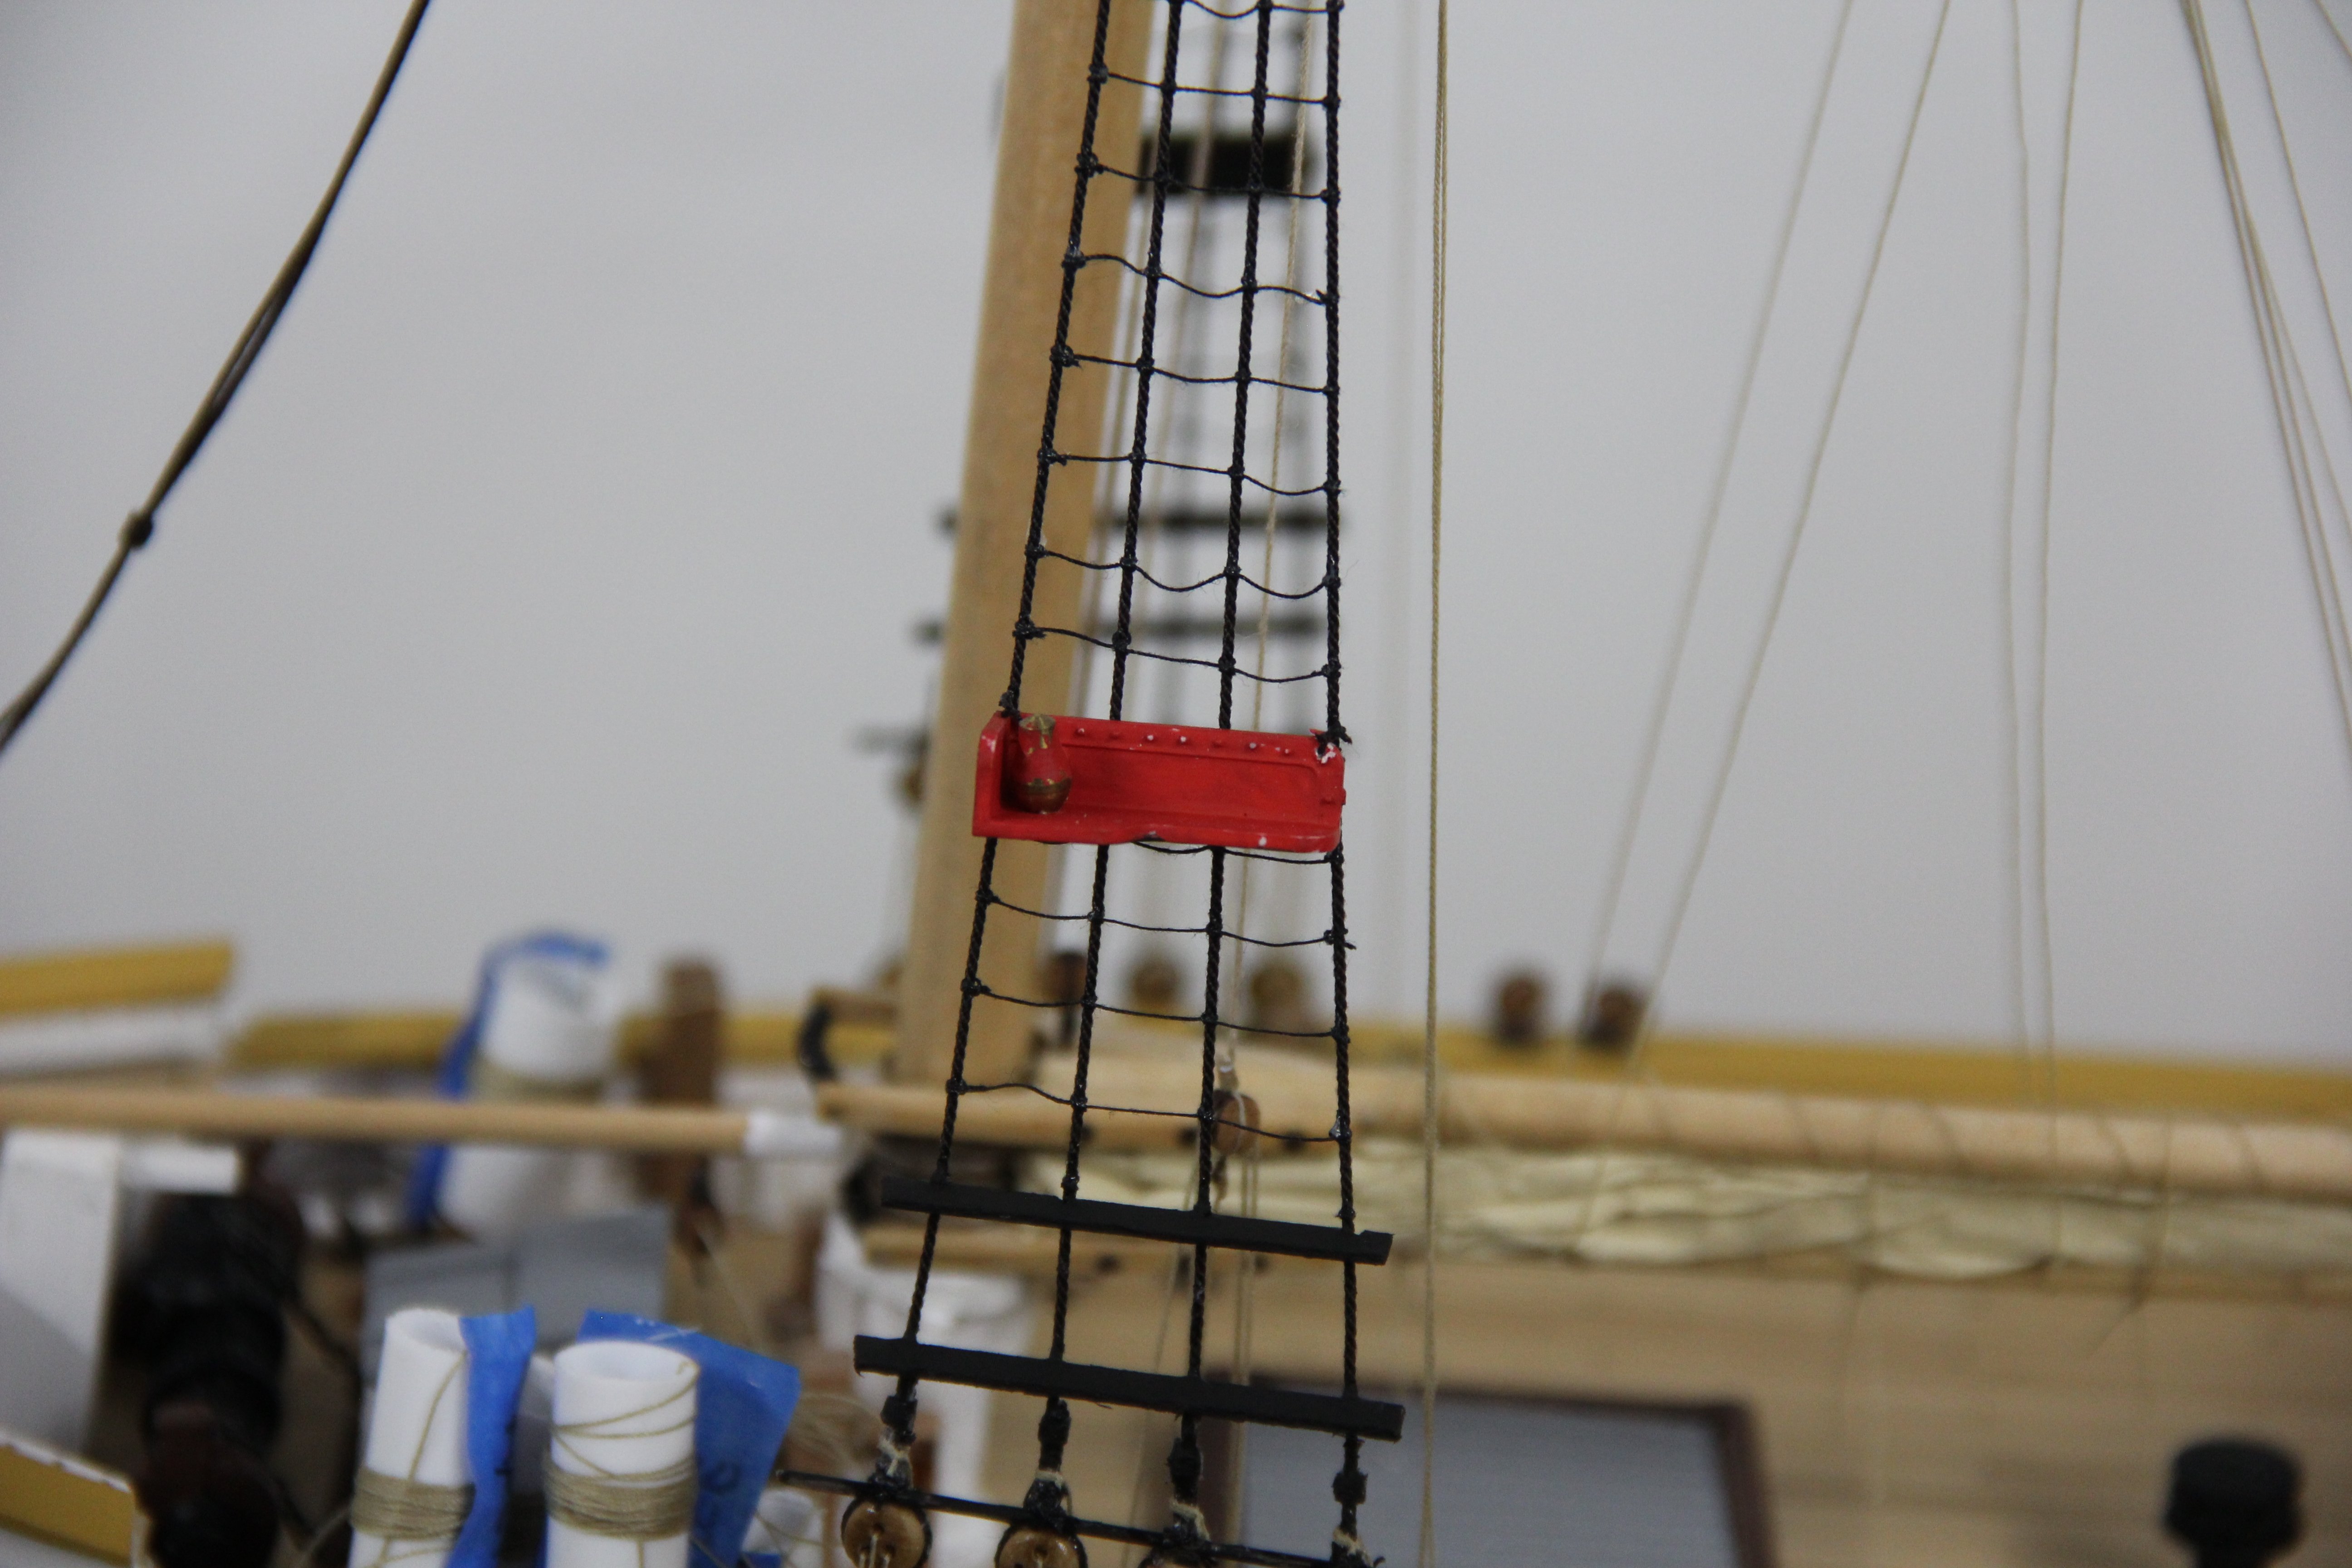
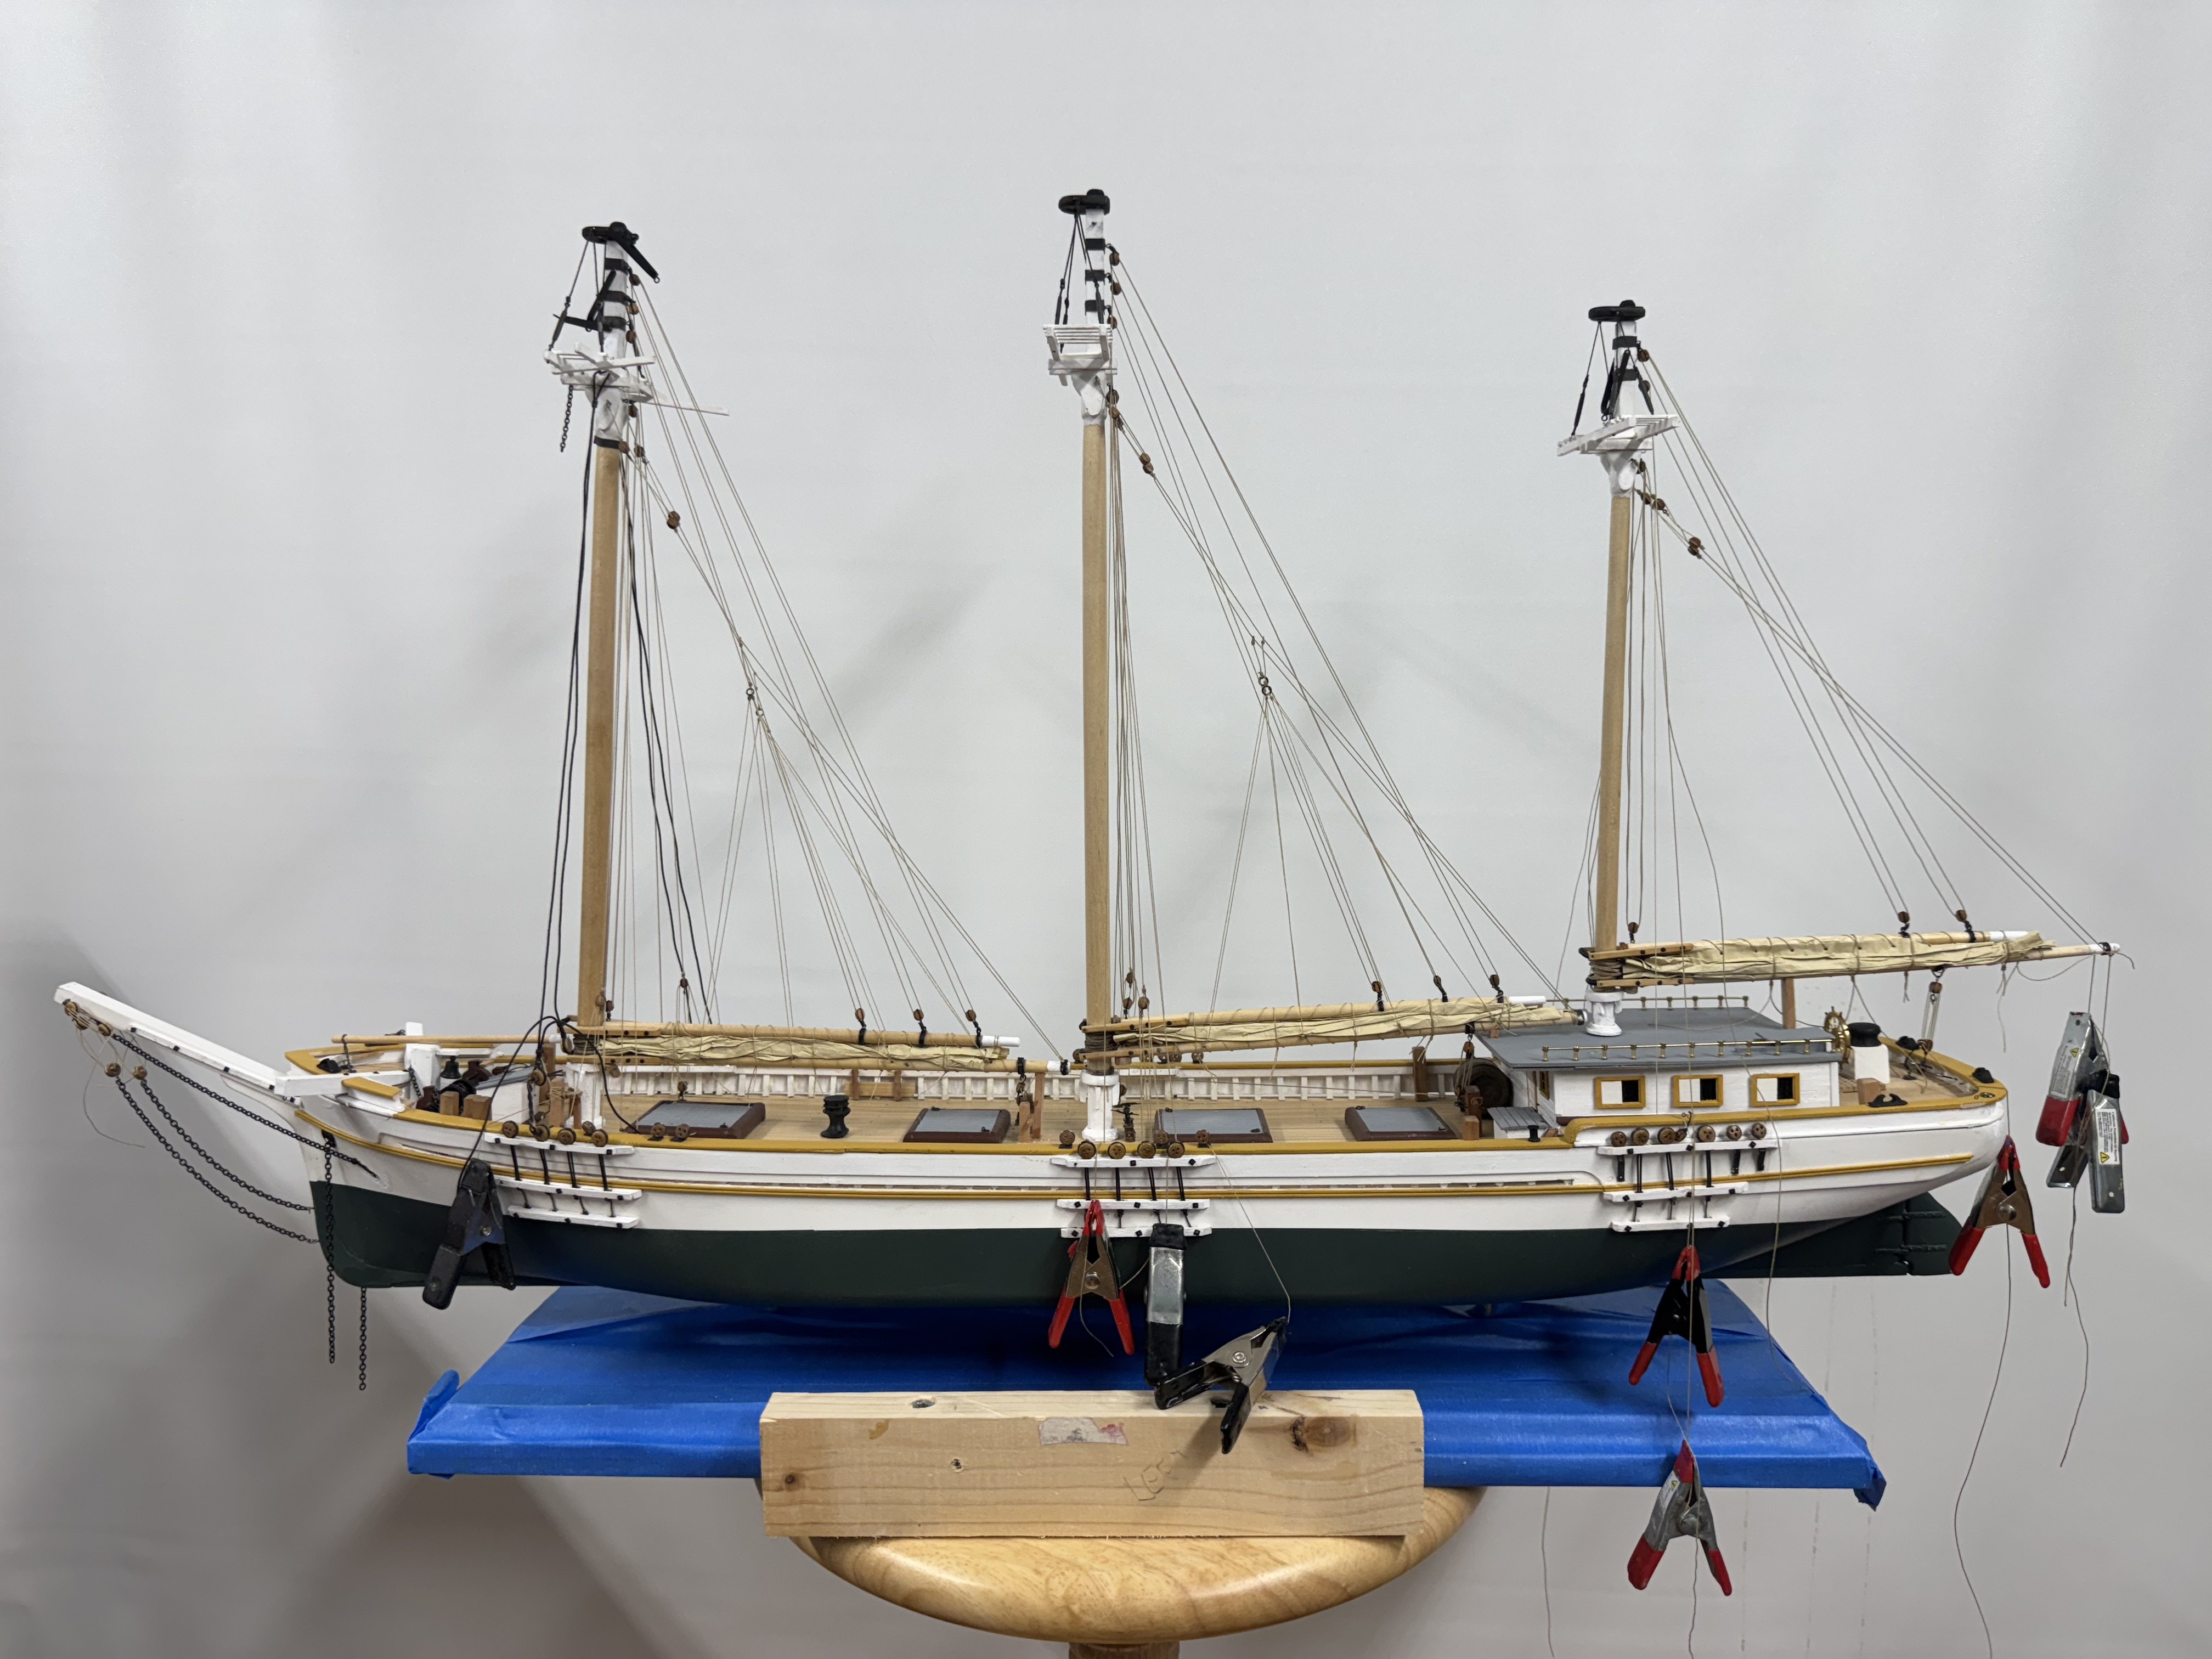
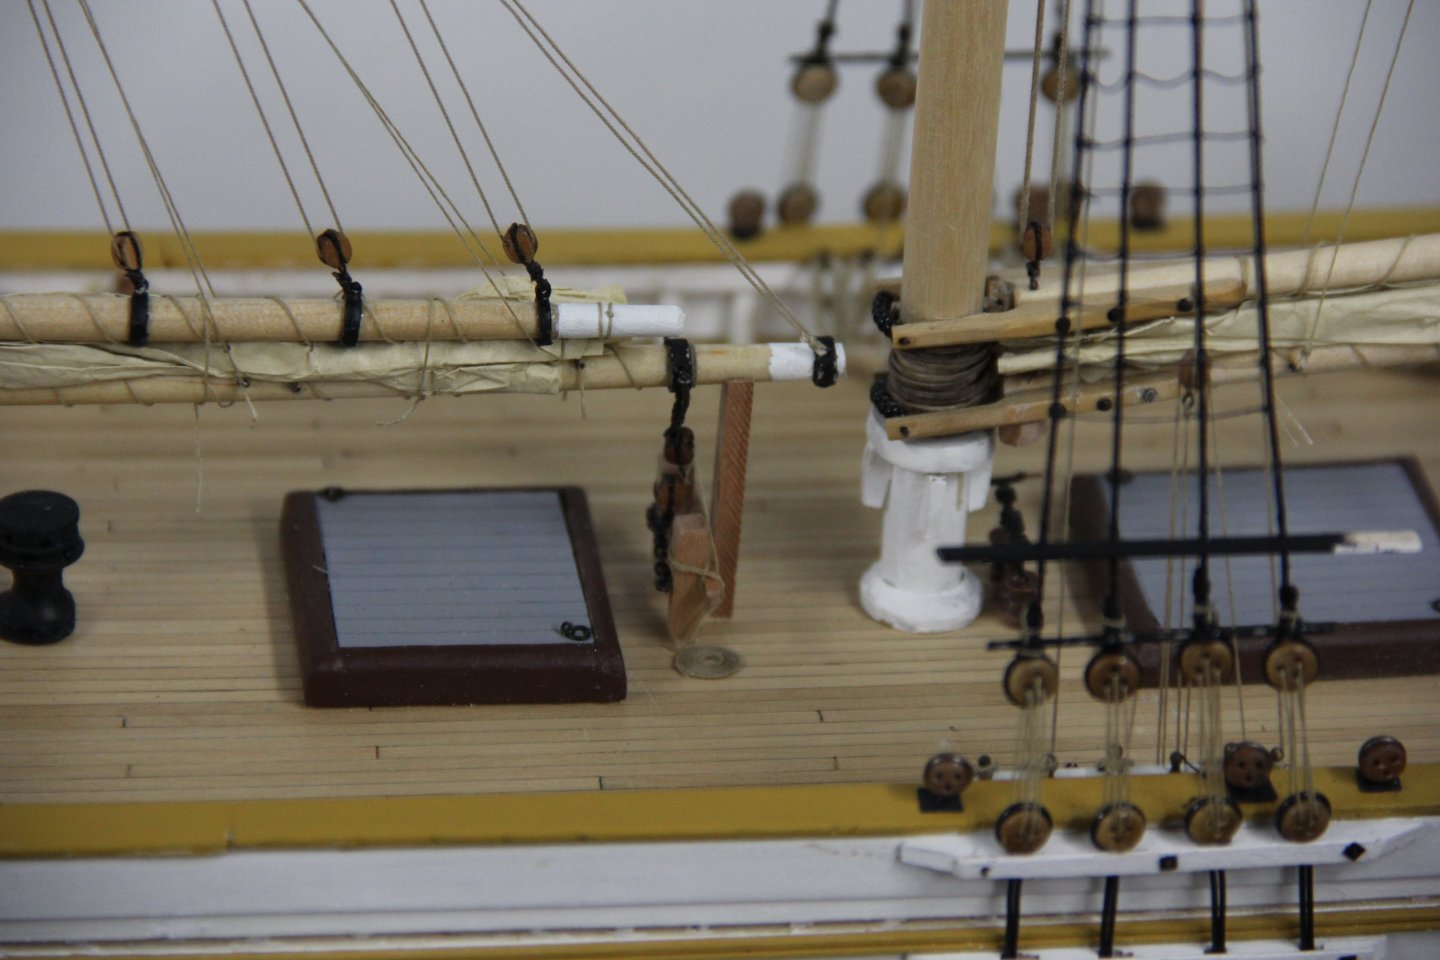
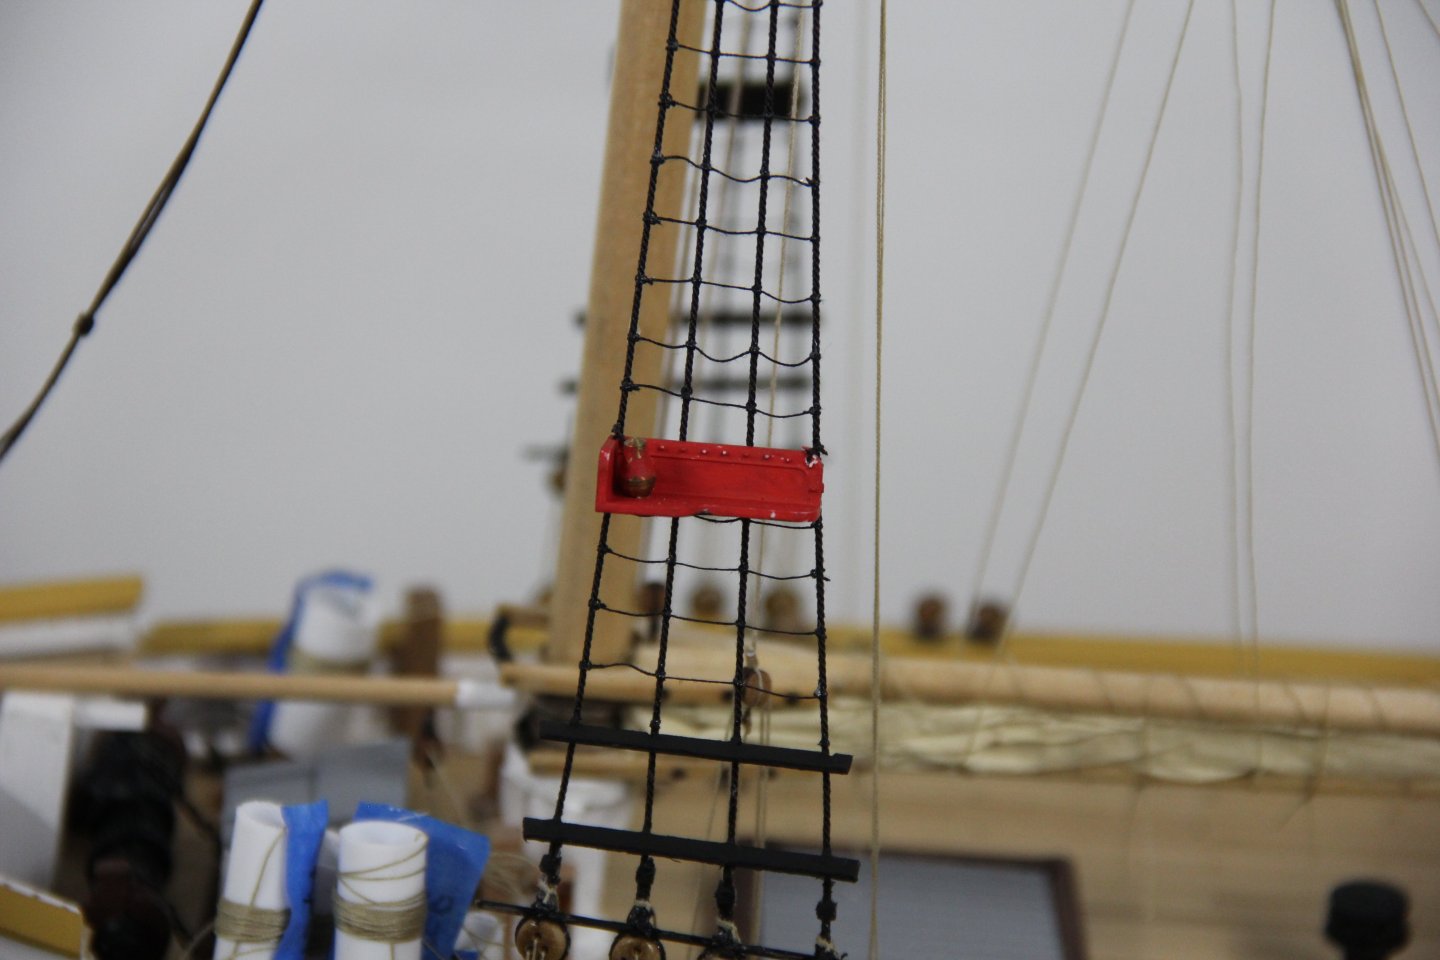
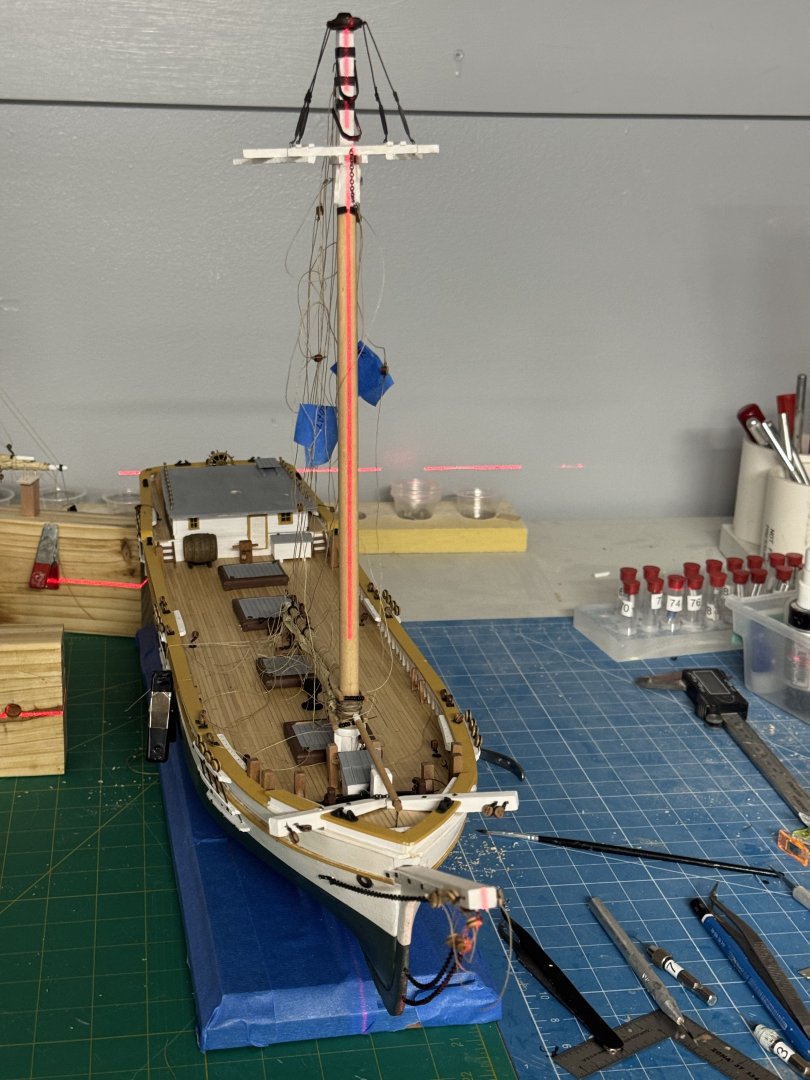
I know it has been like three weeks since I last posted but I have not been idle. I have all the lower shrouds and ratlines in place. I used the ratline spacing template I had from Sphinx which are 6mm apart. Since Simpson is the same scale I decided 6mm was "good enough". I used .030" Syren line for the shrouds. The plans said .027" but I decided to go a size larger (Syren comes in .025 and .030) and to use .005" black line for the ratlines (from Bluejackets). I have previously used Syren .008" line for the ratlines at this scale but like the .005 since I believe it is 100% cotton and ties better (and obviously) smaller knots (and is considerably cheaper). The instructions suggest gluing the ratlines on rather than tying them but the Bluejackets line comes on a regular thread spool and has a good bit of twist in it that does not fall out even after 4 days hanging with a weight on the end. I built a test jig to see if gluing was an option (for me). I coating the thread with dilute white glue and hung it up to dry. I had to have the jig on its side (and turn off the ceiling fan) to get the thread to "stick" and would only be able to do one ratline on each mast as touching anything before the glue dried caused movement of the ratline just placed. Soooo I decided to tie the standard clover leaf knots as I have done before. The mizzen ratlines are the easiest since there are only three shrouds and only every fifth ratline covers all three shrouds. Don't ask me how I know but it takes a mind shift when switching sides on the mizzen as the shrouds with ratlines every 6mm are on the left now, not the right. I added boom rests for all three booms since I needed something to "pull against" when tensioning the topping lifts and peak halyards. I find it hard to believe that the real ship did not have removable boom rests - probably not where I put them but there somewhere. I also rigged the boom sheets and added rope coils on deck after belaying the sheet lines as shown on the plans. I I added the side lights but used platforms and bulbs from Billings Boats. They are a bit larger than the Britannia metal parts that come with the kit but I think they look better. A sailor climbing the forward ratlines would have to step over either set. I finally got around to adding the capstan bars and stowage location. I populated all the pin rails except the three at the extreme bow including rope coils. I decided that the only running rigging on the Main and Mizzen top masts would be the top sail halyards and since these start at the becket of the block at the top of the mast I added them to the pin rail and coiled up a sufficient quantity of line so I will rig this "in reverse". I followed the same tactic with the five halyards at the fore mast. The lines are coiled up on plastic tubes and labeled with the sail (although the lines are pretty much all the same length). Here are two shots of the ship from the quarters.


- 121 replies
-
- 3
-
-
- Lucia A Simpson
- AJ Fisher
- (and 1 more)
-
All three lower masts are now on the hull. The Fore and Main peak and throat halyards and the topping lifts are in place and secured, at least by clamps after passing through the the respective pin board hole. When I got to the mizzen I realized that the pin rails there (and I think at the bow) are going to be a problem. The instructions call for 3/32" X 5/32" material for the pin rails. Those work out fine at the Fore and Main masts but because the bulwarks are shorter on the quarterdeck (13mm vs 5mm below the cap rail) the 3/32" thickness ( 2.5mm) leaves a pretty narrow opening below the bottom of the pin rail. There are similar measurements at the pin rails on the forecastle but there is no deckhouse getting in the way up there. I am in the process of fabbing new pin rails from 1/16" X 3/16 stock. Hopefully I can get these installed without messing up the deckhouse or the bulwark. I am not sure the additional 1/32" is going to "solve" the problem but it is a step in the right direction. It is not clear to me how anyone could use the pin rails as provided - even sticking the line in the pin rail hole and jamming a belaying pin to secure it would be problematic. And yes I recognize that the Fore mast is racked back too much. I hope to correct this to some extent when all the forward leading stays are in place and tightened.
- 121 replies
-
- 5
-
-
- Lucia A Simpson
- AJ Fisher
- (and 1 more)
-
Welcome aboard Mark. This is kind of a unique build log as to the best of my knowledge this is the only build log of a AJ Fisher kit although they have been in business a very long time (100 years). And as I have stated a few times this kit is not for a novice - there is not a single laser cut piece in the entire kit save the decking material. Everything is built the "old fashioned way" aka out of strips of basswood. I have the lower Fore Mast, boom and gaff in the hull and the halyards and topping lifts/lazy jacks in place. I decided I would mount all the lower masts before starting the shrouds and other standing rigging for the lower masts. I am not sure this is the "optimum" sequencing but if it isn't I will surely let you know. So I placed the lower Main Mast in the hole I drilled in the hull and - either the main mast hole is too far aft, the mizzen mast hole (or maybe the whole deckhouse) is too far forward or the boom is too long by about 9mm. Or at least that is how much I cut off. The main boom will just not have as long or tapered ending as the fore and mizzen. So i have shortened the boom (see cut mark above) and am working on getting a new band built and eyebolts installed as this is where the topping lifts terminate.

- 121 replies
-
- 3
-
-
- Lucia A Simpson
- AJ Fisher
- (and 1 more)
-
Fore mast is mounted on hull. I used the laser level to check that it is truly vertical and then added the glue and some pressure to keep it in place while the PVA dries. Tomorrow I will see how the rigging looks before adding the shrouds. I just "love" doing deadeyes.
- 121 replies
-
- 2
-
-
- Lucia A Simpson
- AJ Fisher
- (and 1 more)
-
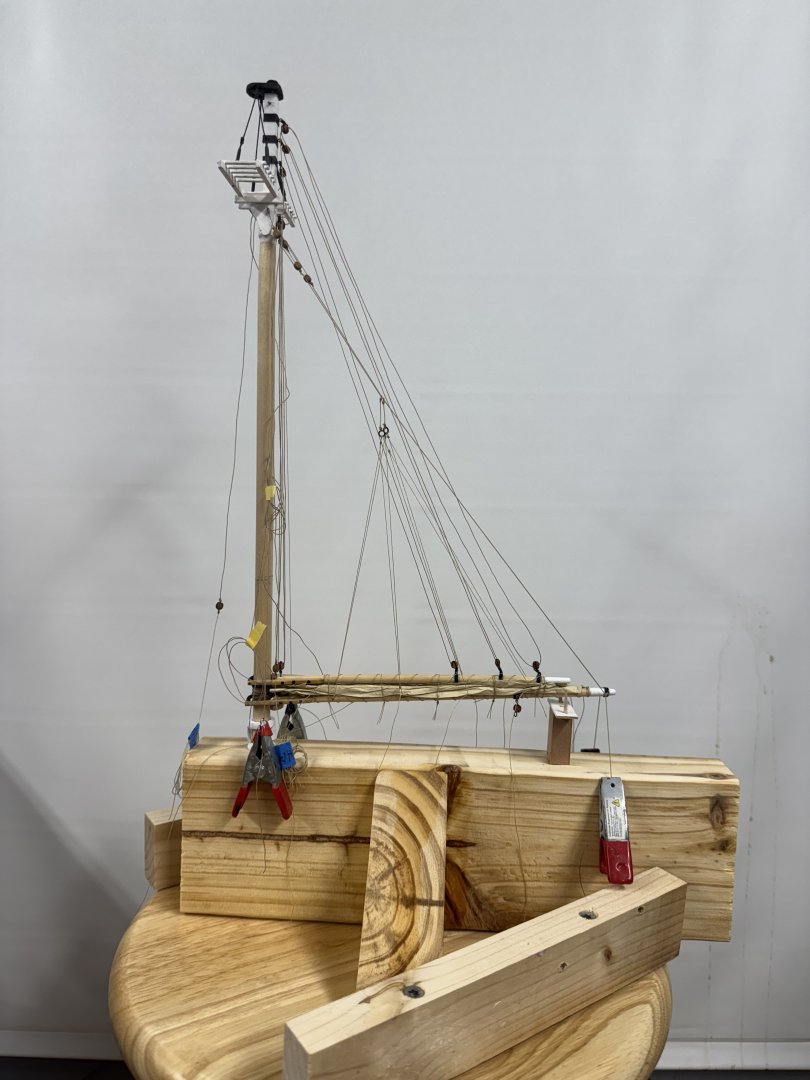
Mizzen mast is almost done. I have not rigged the lazy jacks yet and think I will wait until the mizzen mast is on the hull to do that. I "think" I have the boom at the correct height above the deck (top of deckhouse actually) on the mast stand but want to be sure it is in the correct place. I may have to rerig the fore mast as I originally rigged it with the boom a couple of inched too high. When I lowered it I think some of the lazy jacks may now be too short. Not really a big deal just disappointing that I was not smart enough to figure that out in the first place.
- 121 replies
-
- 1
-
-
- Lucia A Simpson
- AJ Fisher
- (and 1 more)
-
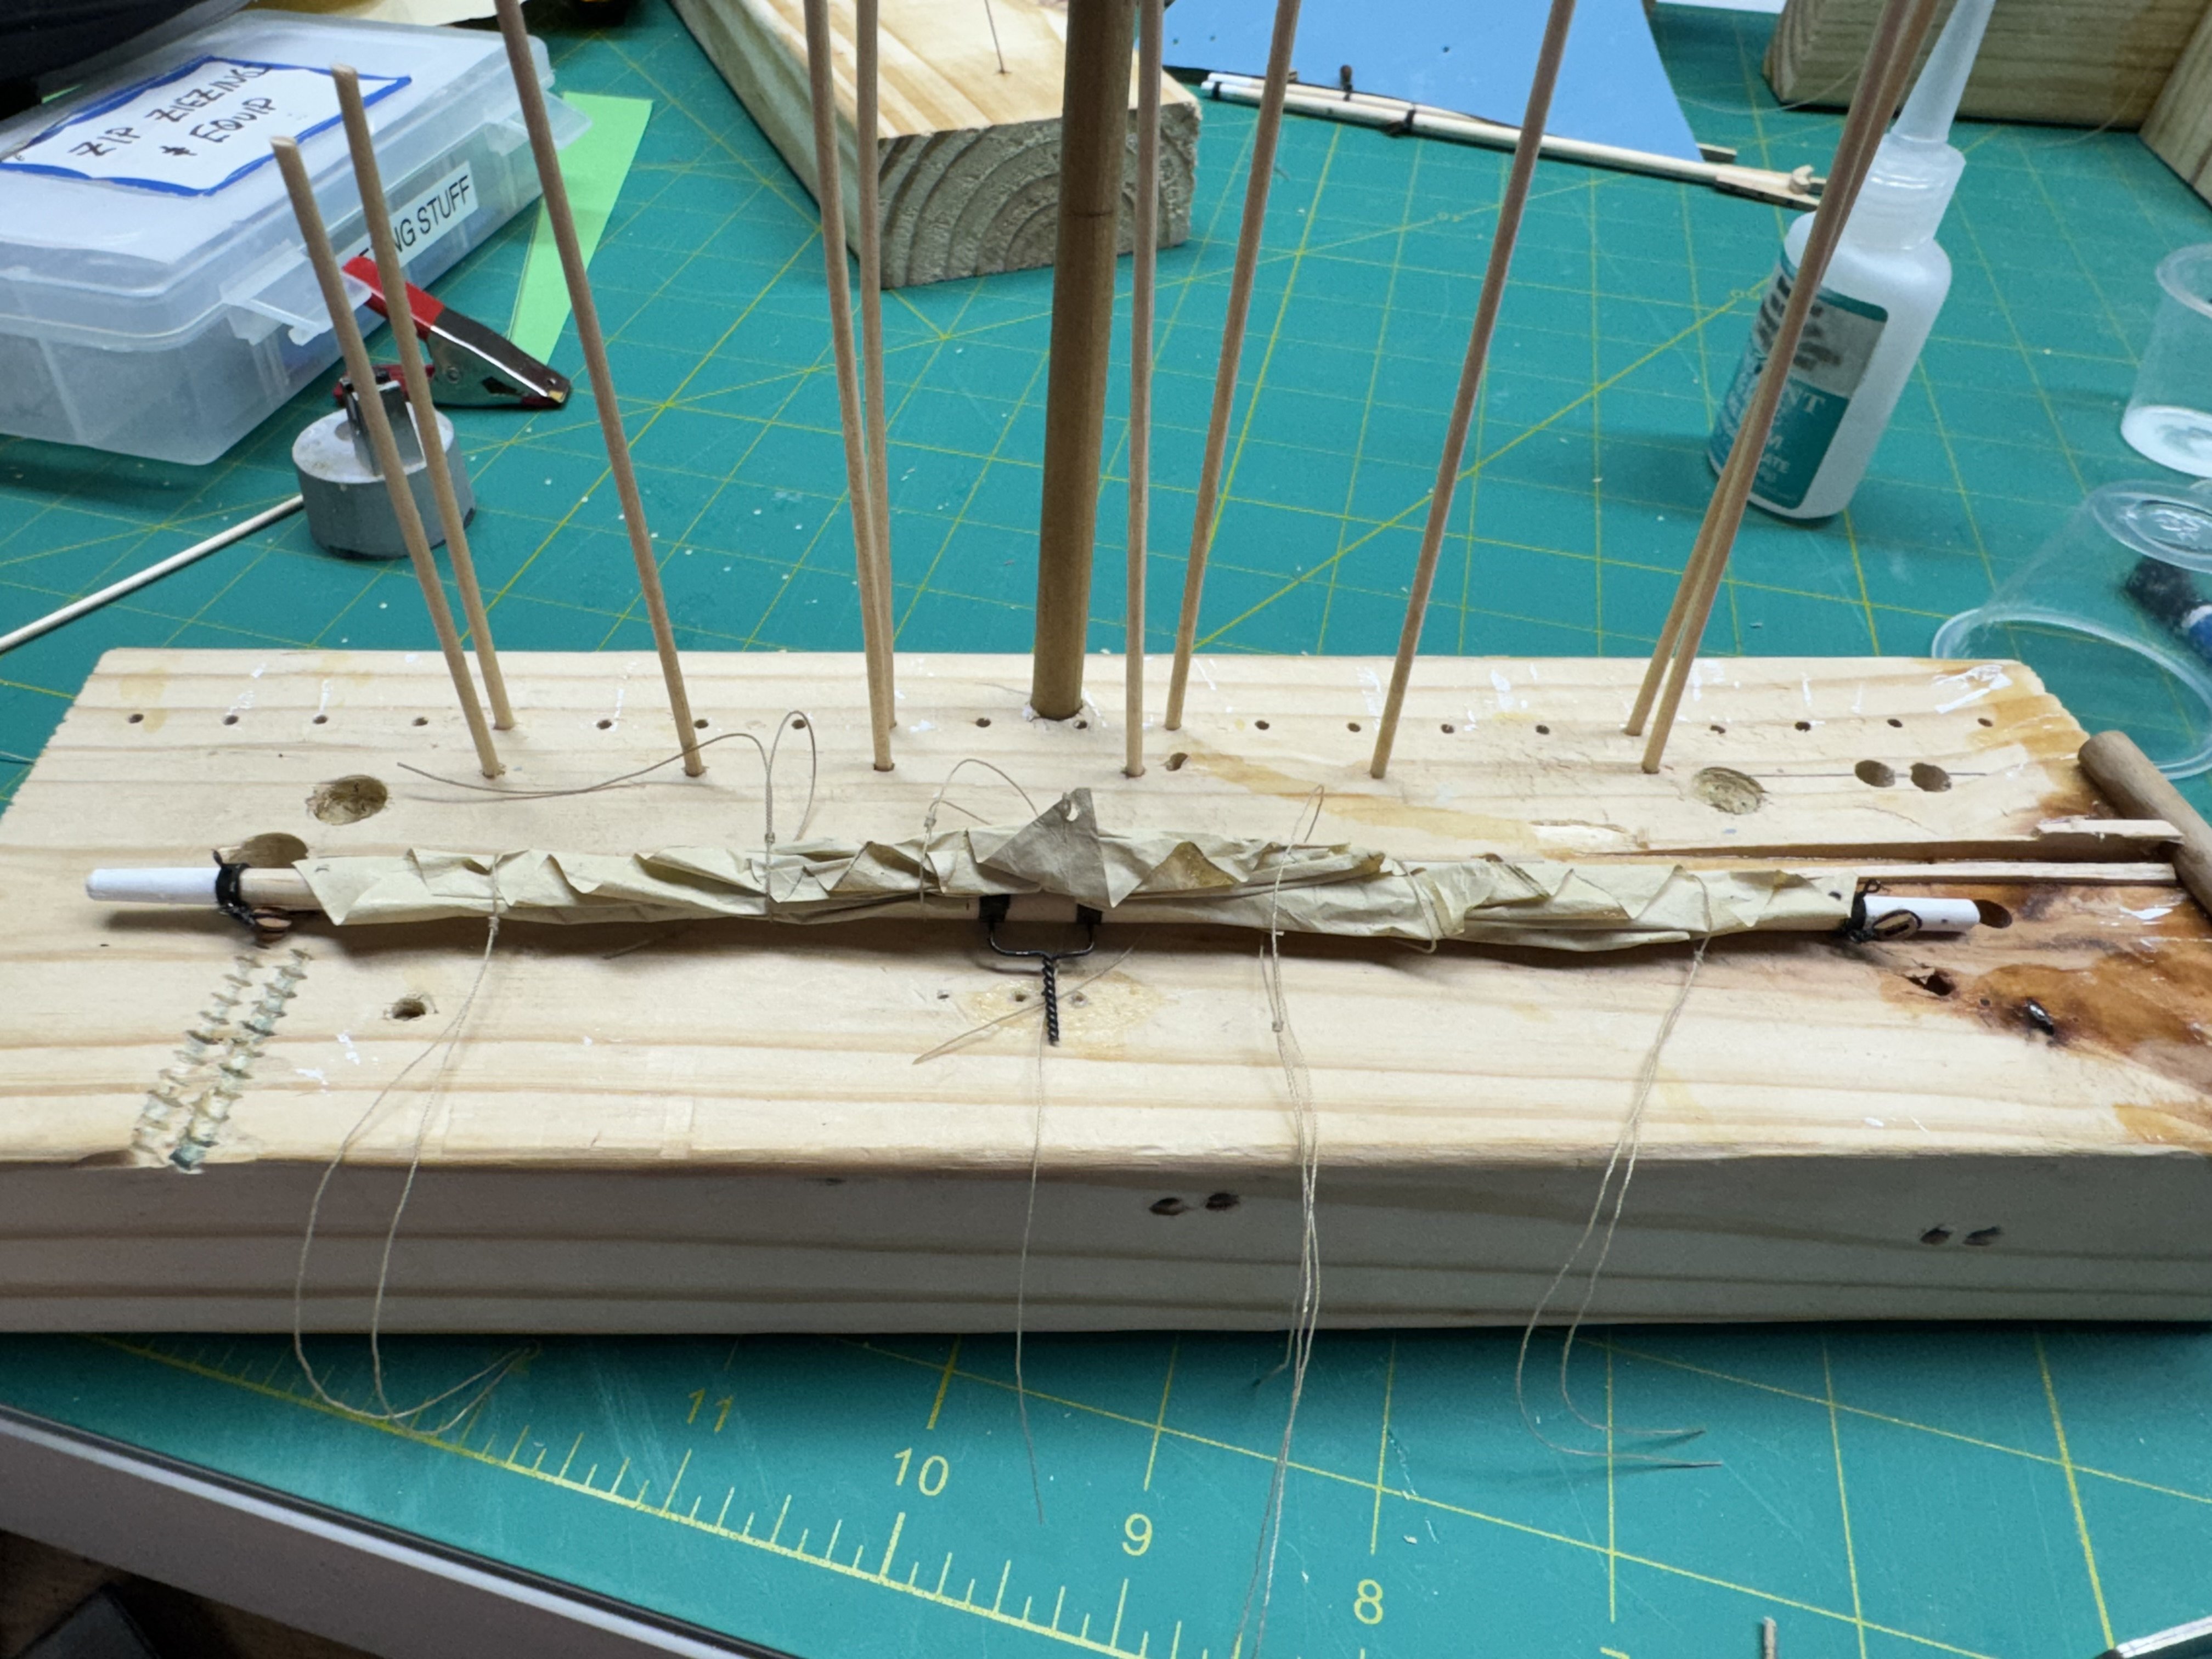
After several starts and restarts I finally got the raffee furled on the yard arm. not the neatest job but serviceable, at least for now. The potential fly in the ointment is that the fore stay has to pass through the raffee to connect to the fore top mast. I built a jig with a mast, yard arm and fore stay to try and furl the raffee on that but it proved unworkable, at least for me. I wonder just how the crew managed to furl the raffee since there are no foot ropes shown on the yard arm and there are no ratlines on the top mast stays/back stays. The only thing I can figure out is they used the yard lifts to tilt the yard so they could reach it, one side at a time, from the lower mast ratlines and trestle top. Must have been interesting in rough weather. Hopefully the skipper only used it in good weather and furled it well before rough weather. The jig I used is shown below, the vertical dowels acted like lazy jacks to keep the sail contained more or less over the yard arm. Now to the mizzen sail and once that is done it will be time to install the masts on the hull.

- 121 replies
-
- 4
-
-
- Lucia A Simpson
- AJ Fisher
- (and 1 more)
-
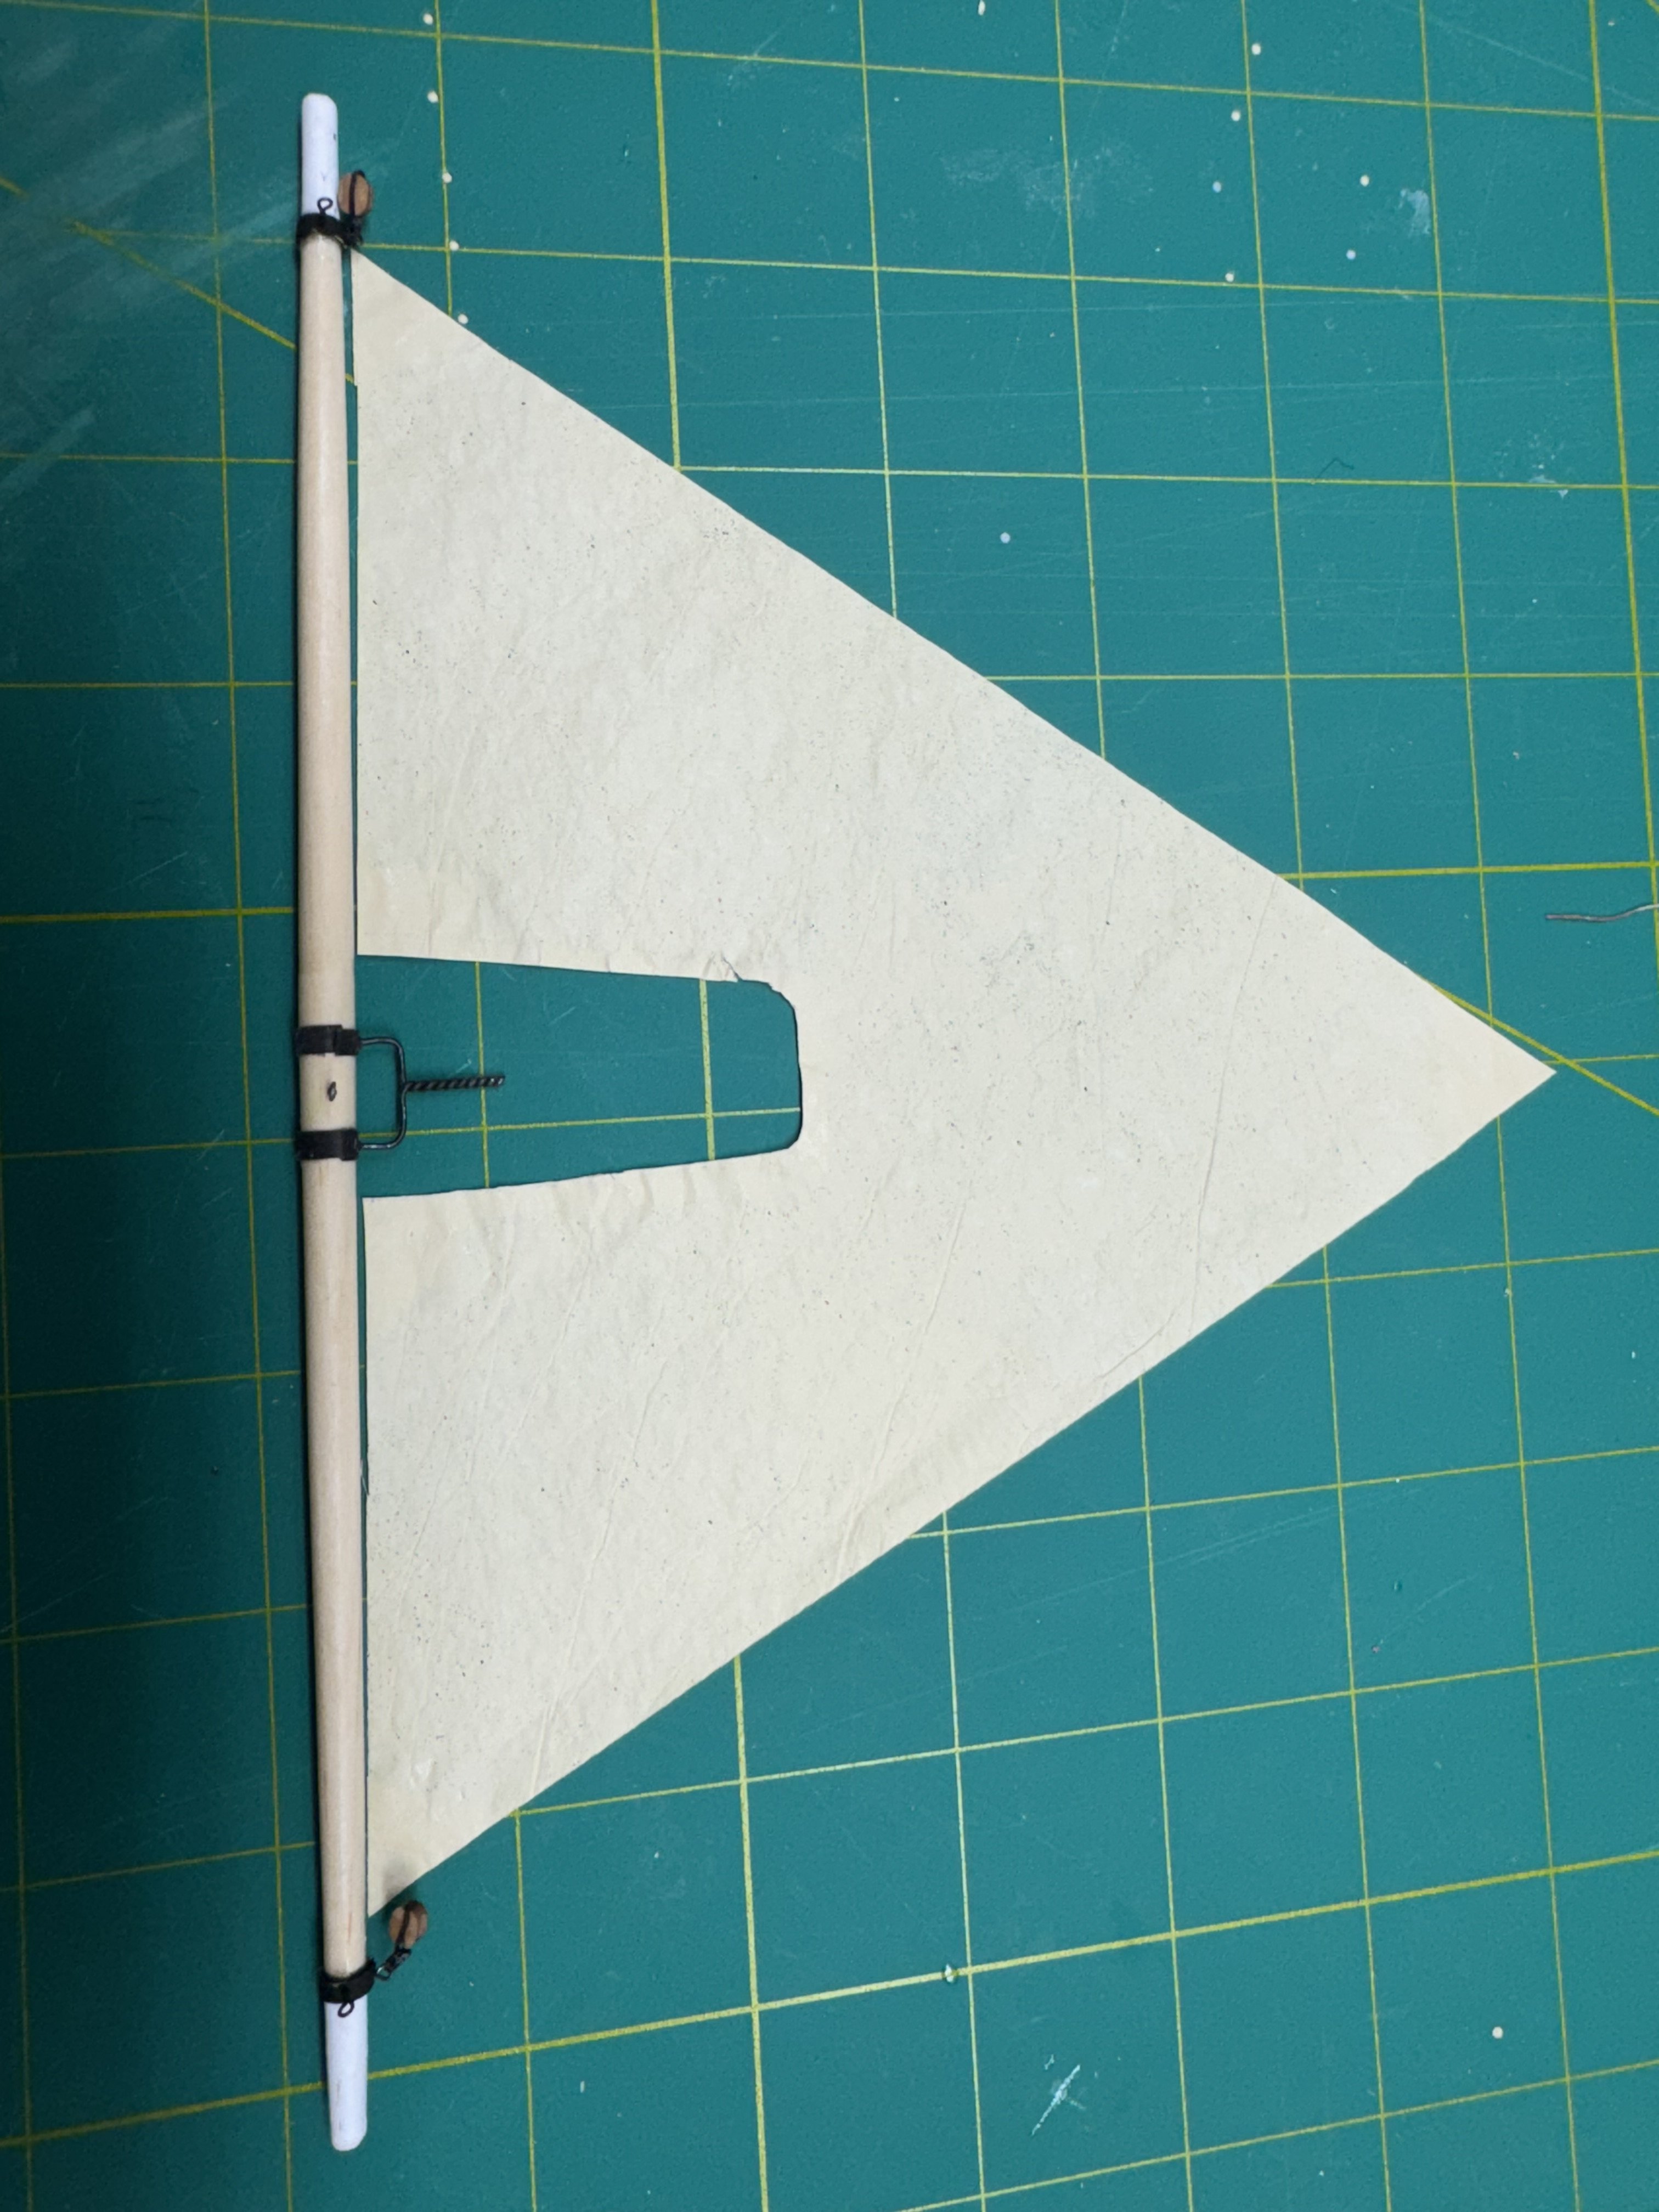
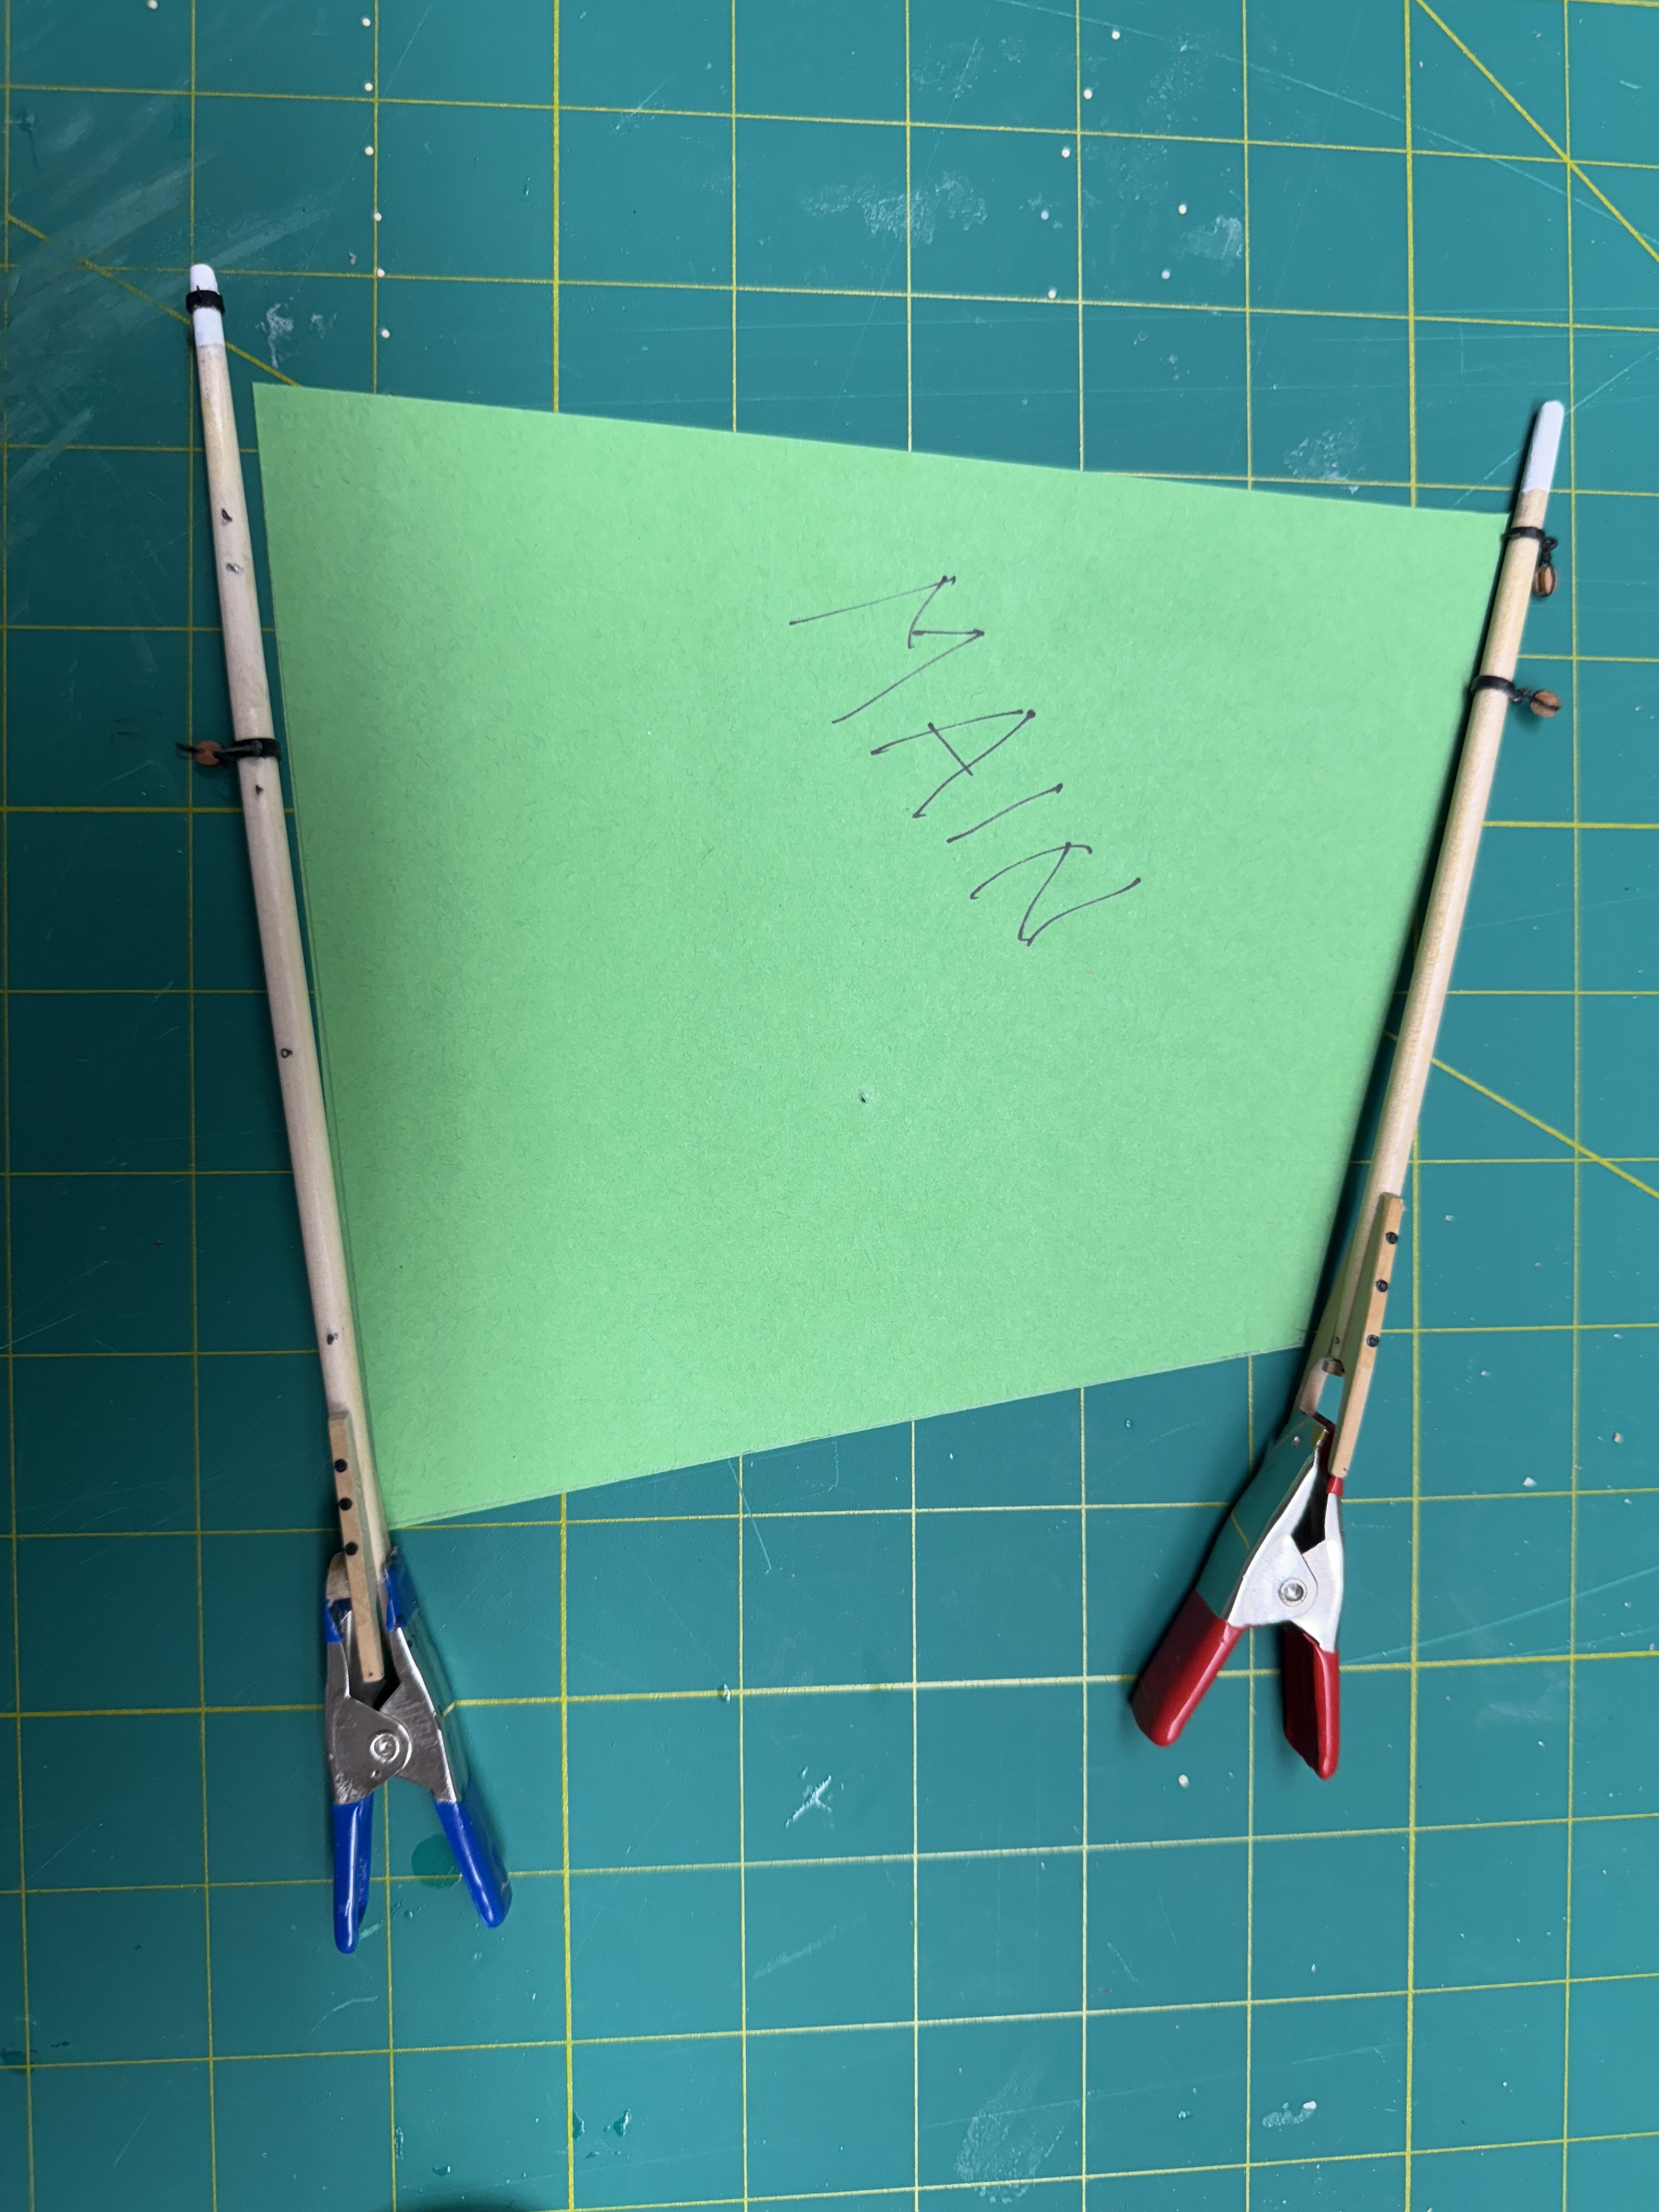
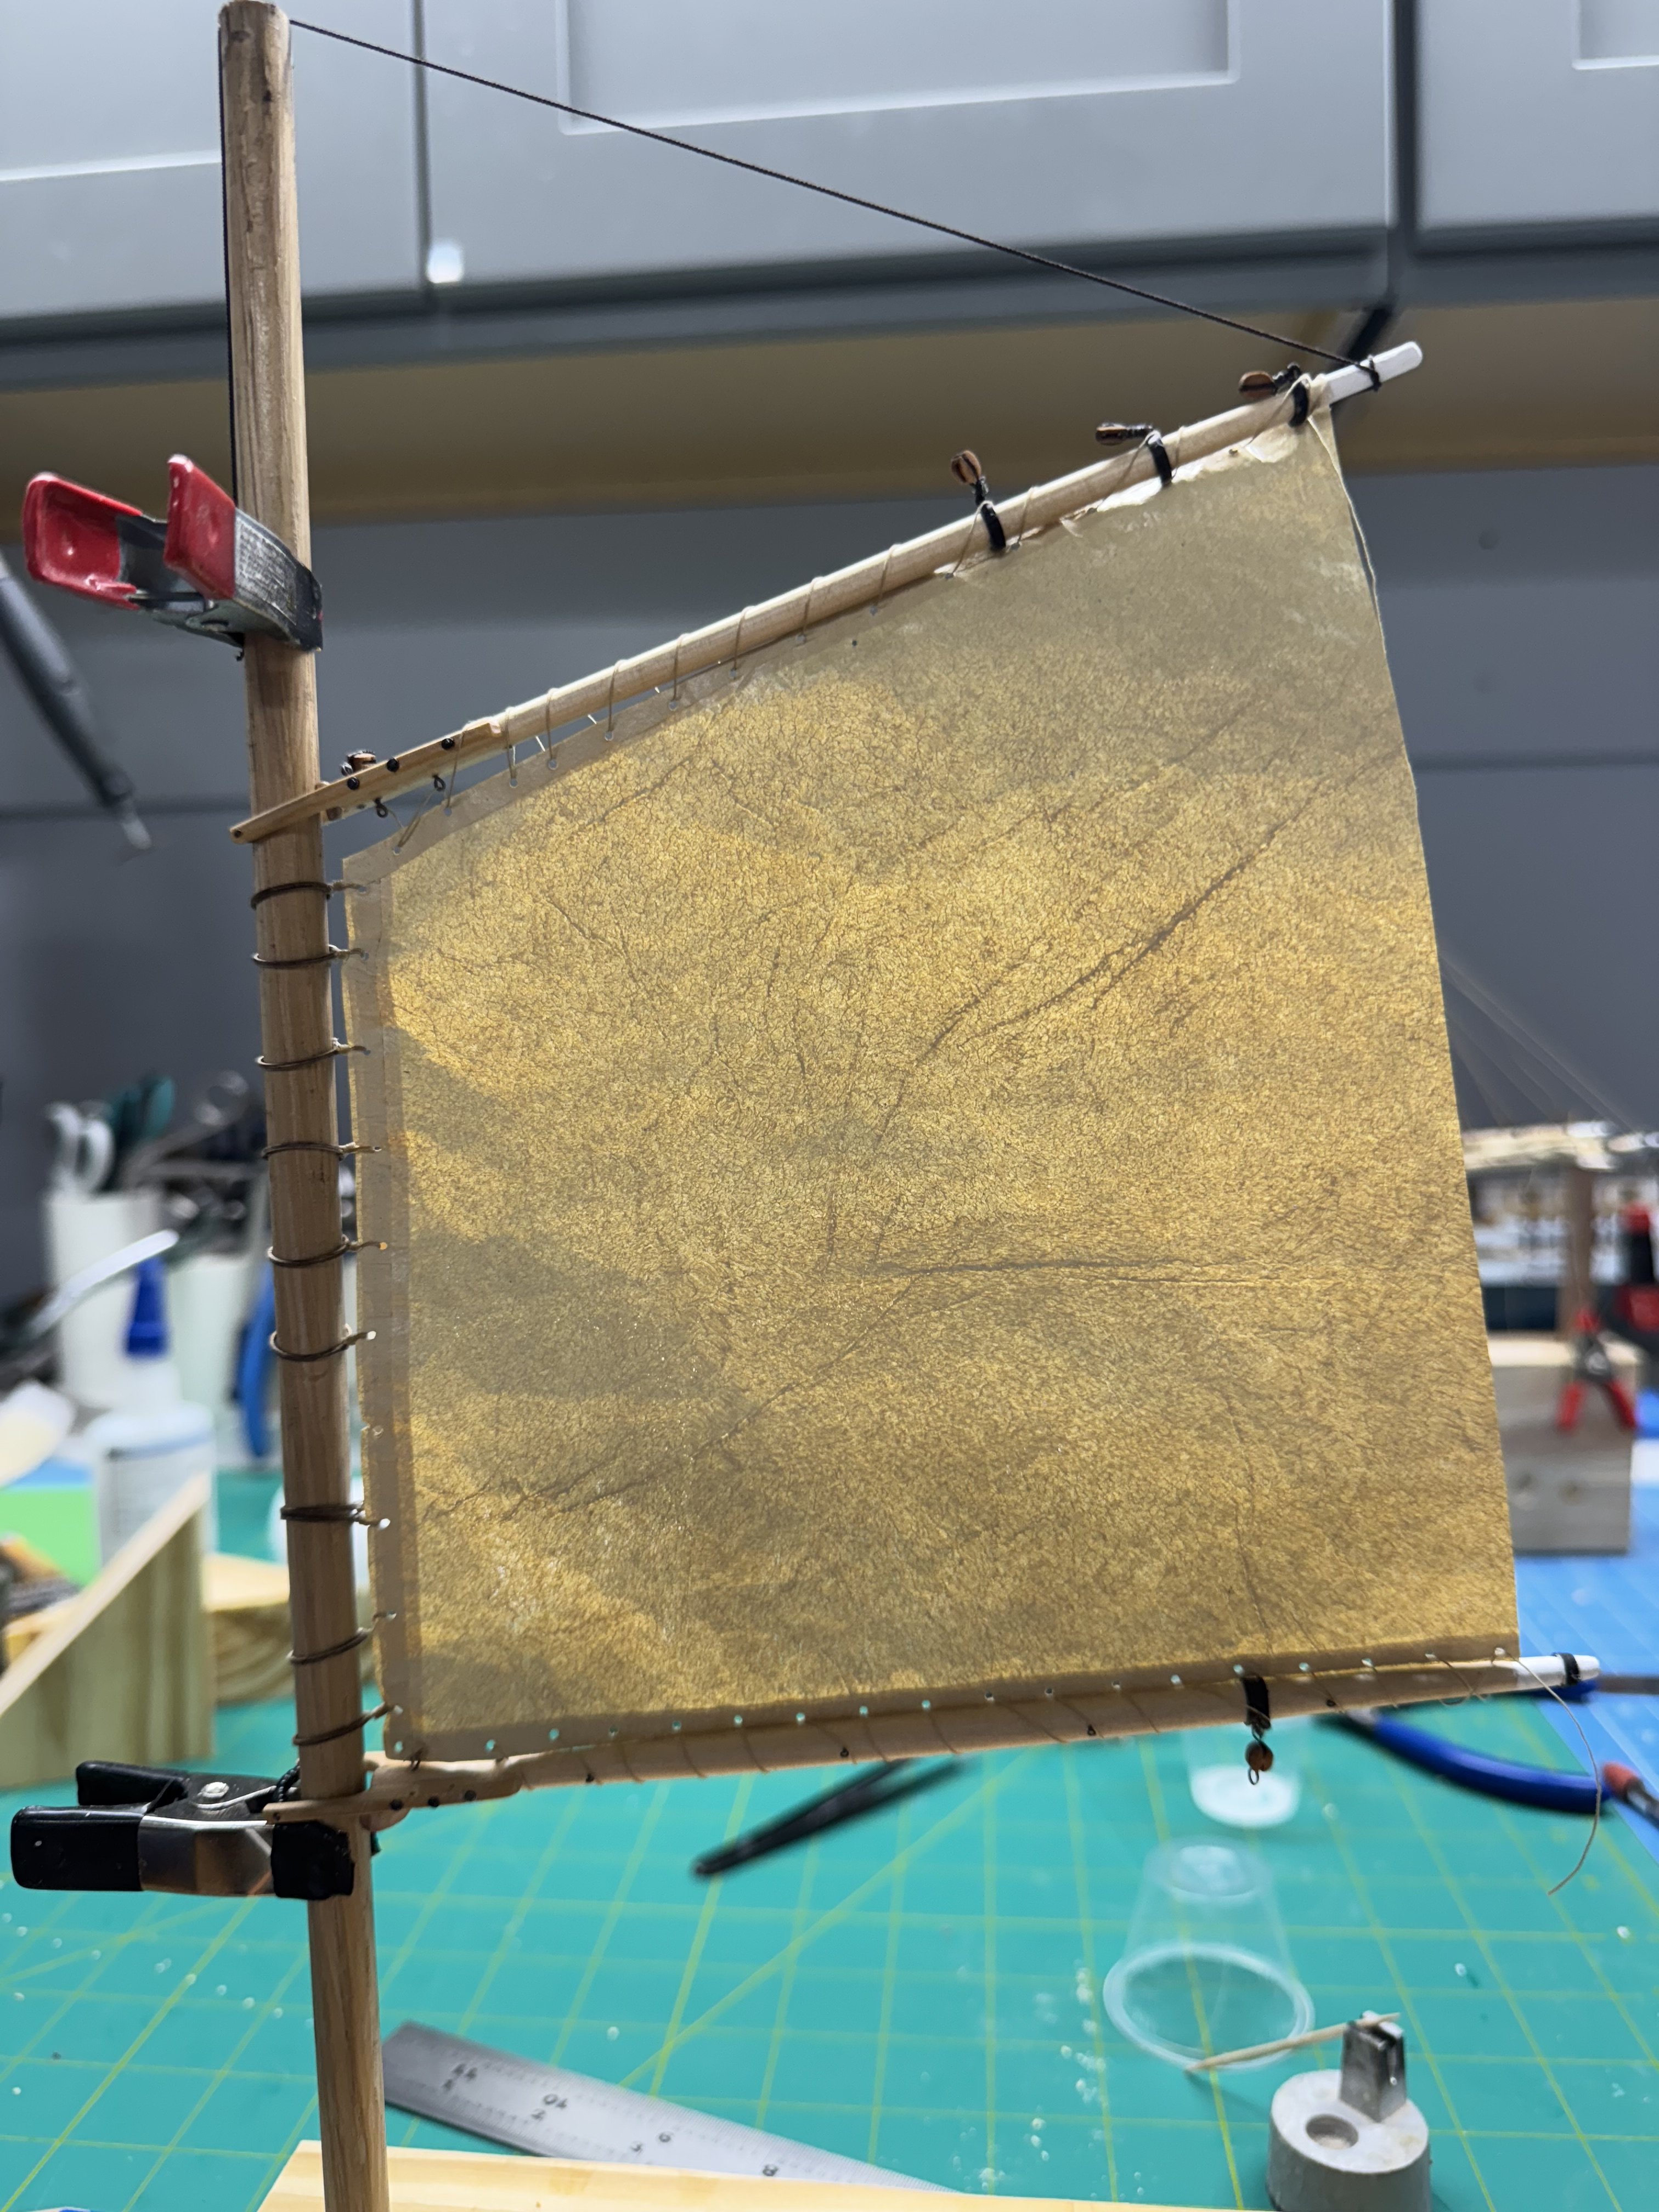
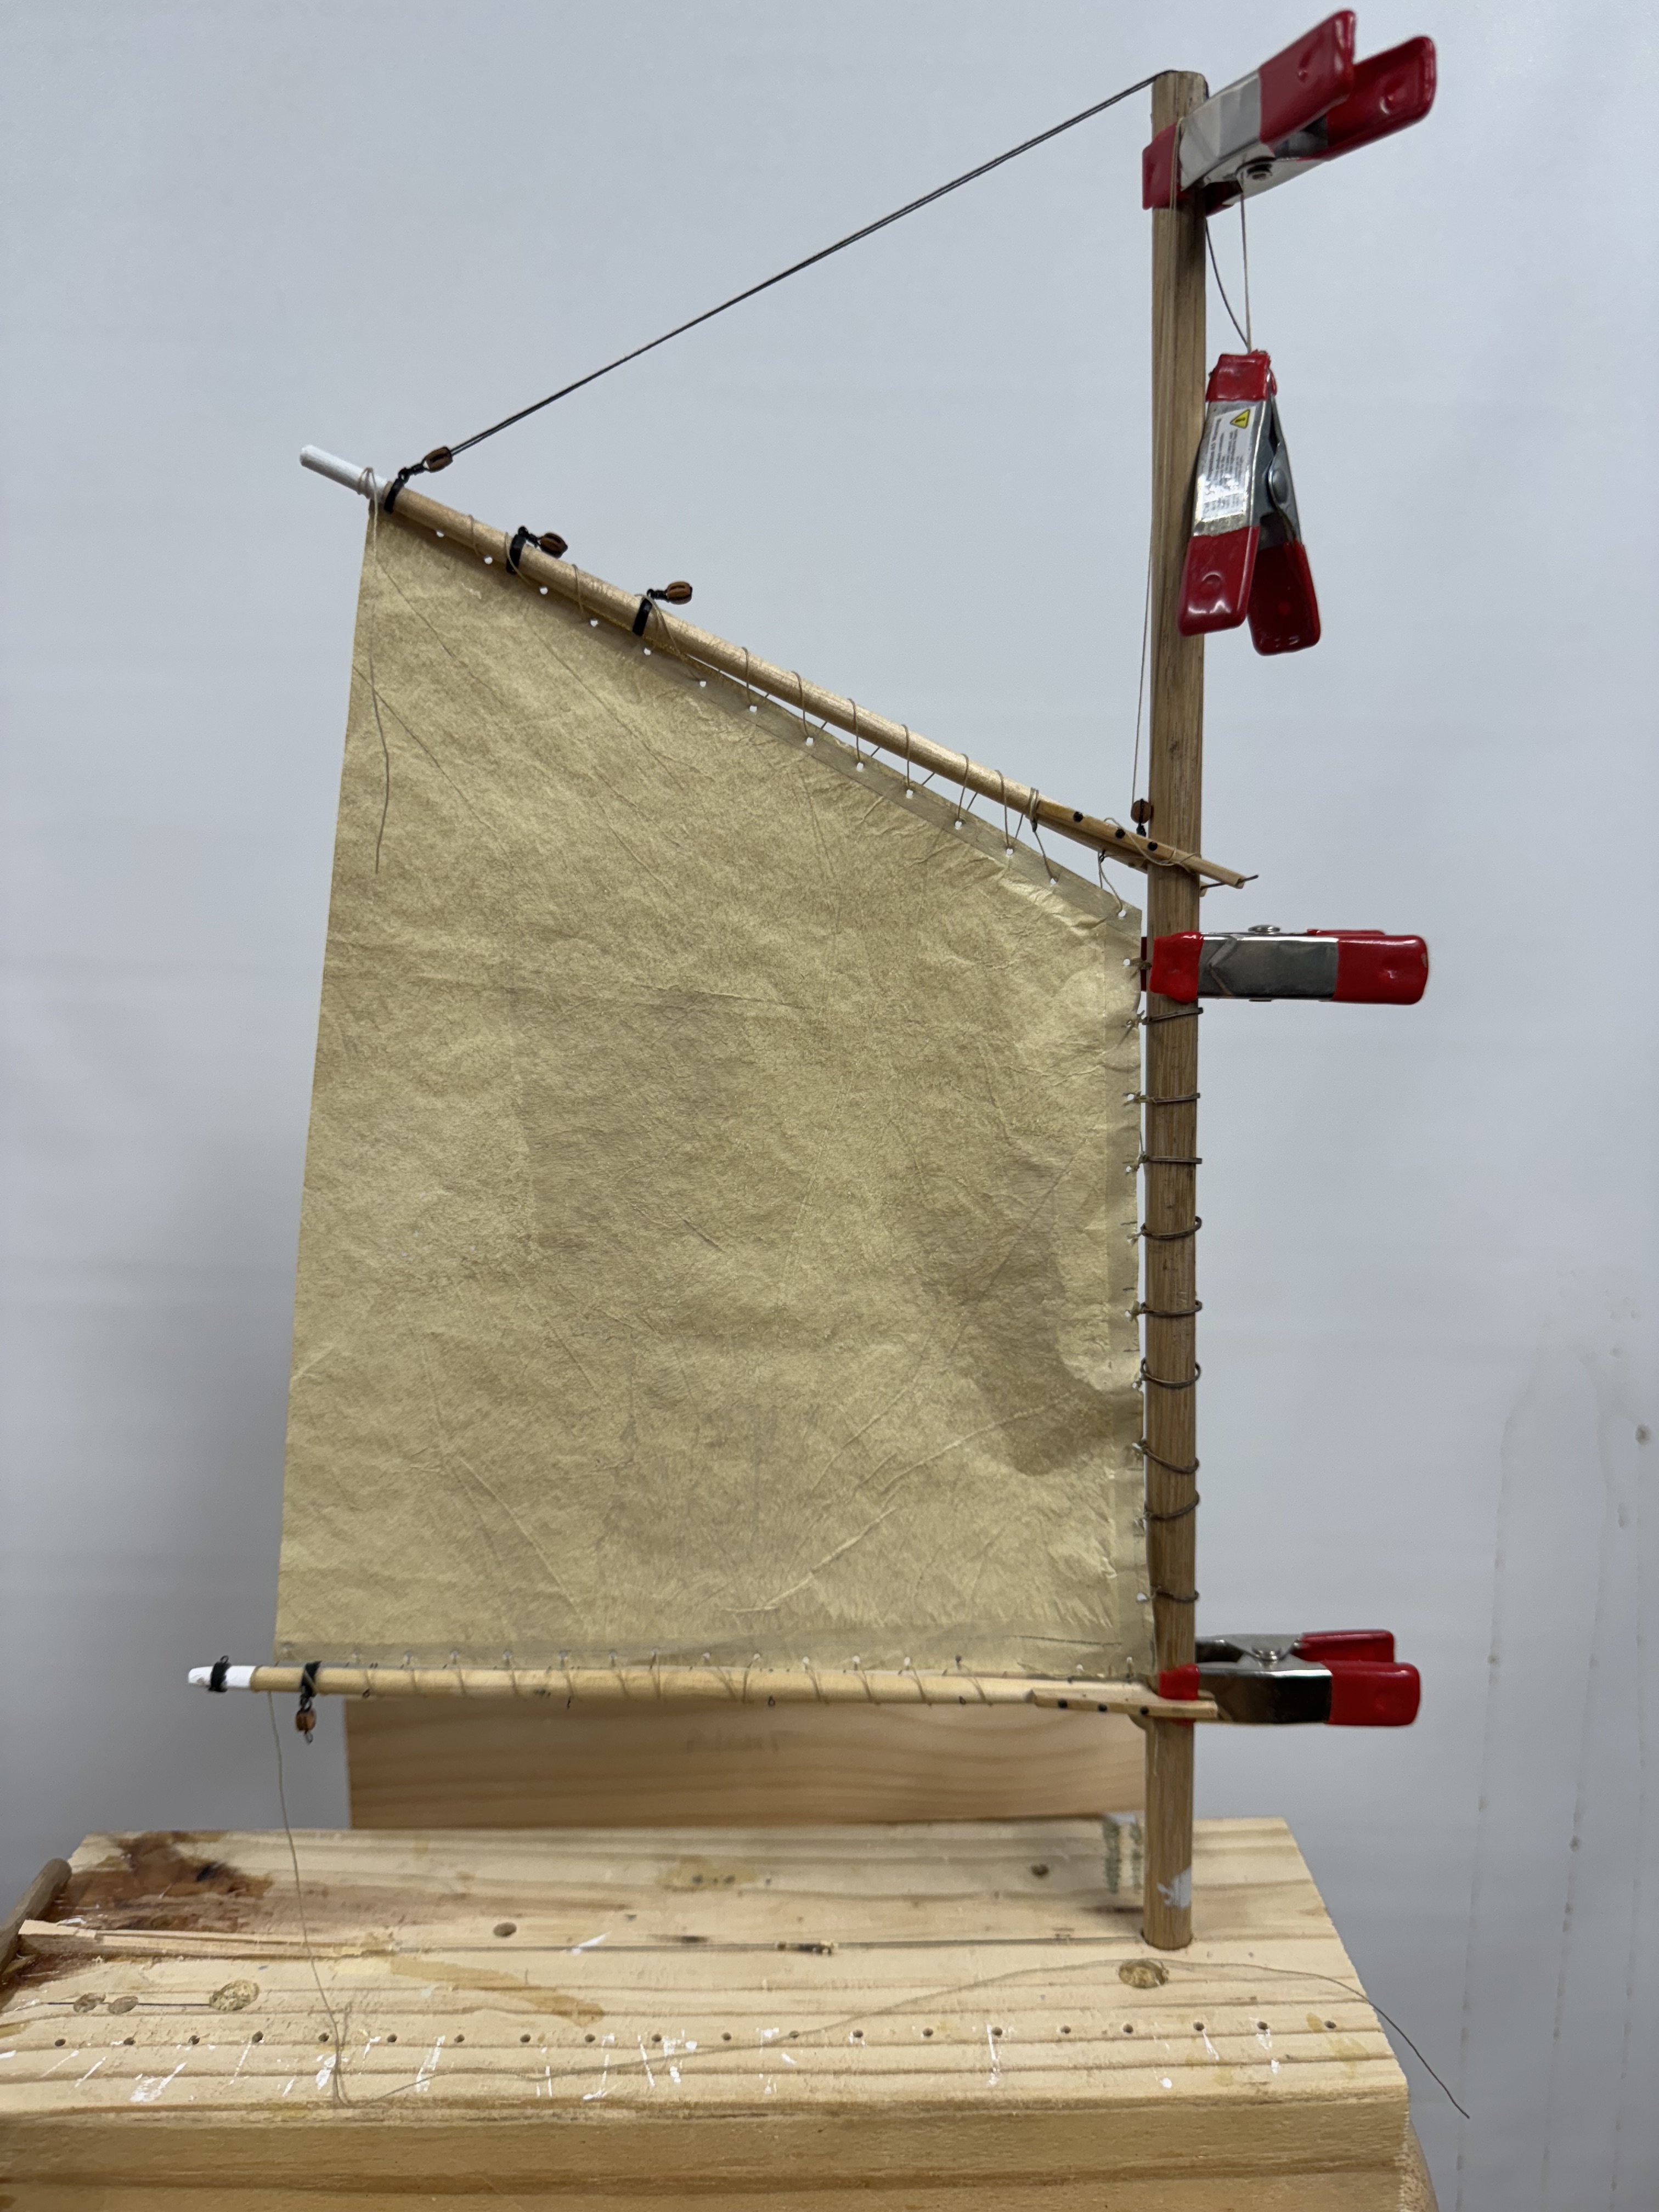
So here is the raffee sail (suitably shortened) and yard arm ready for punching the holes. I use a .5mm hole punch (made for putting holes in leather) to reduce the amount of "flashing" around the hole). And then mounting and, hopefully furling. For the mizzen sail I started with the template I made of the main and used the mizzen boom and gaff to figure out where it needed to be reduced to fit the mizzen spars. Cut the template as marked and here is the template for the mizzen sail.

- 121 replies
-
- 2
-
-
- Lucia A Simpson
- AJ Fisher
- (and 1 more)
-
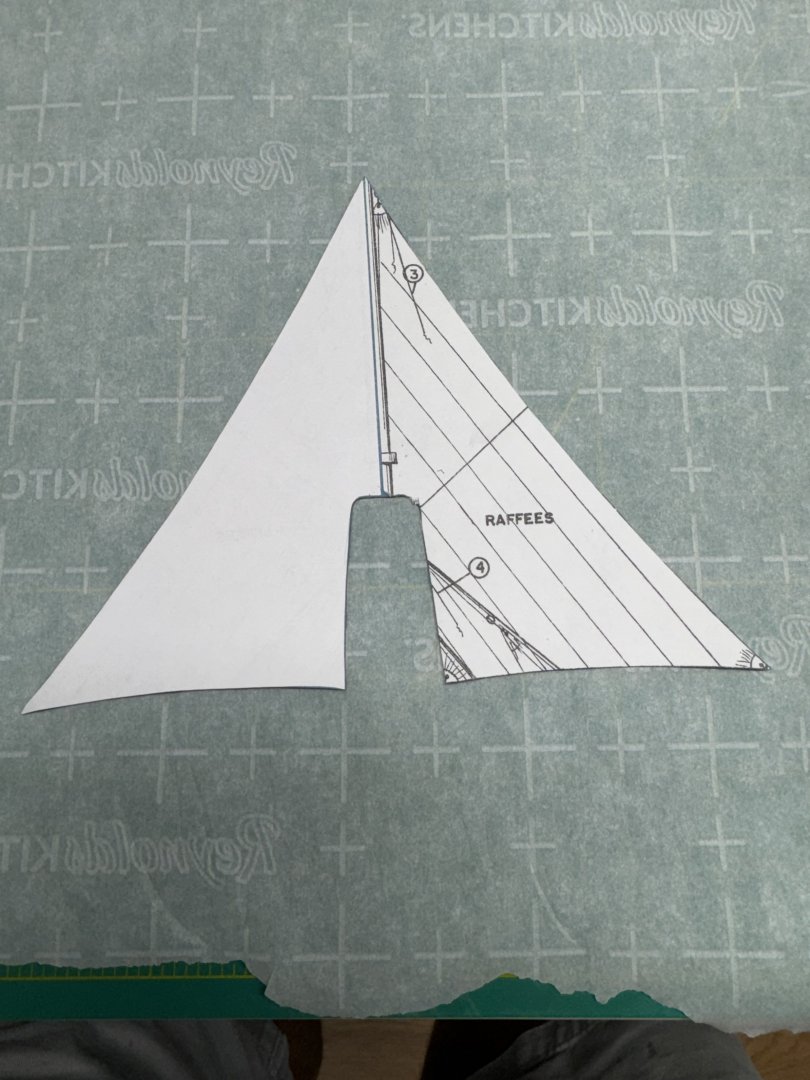
While working on the Raffees sail (aka top sail) I noticed a discrepancy between the top sail yard dimensions between what is shown on the sail plan and what it shown on the layout drawing. The sail plan shows a yard that is 4 7/8" from the mast centerline to the end of the yard. The arrangement drawing says that dimension is 4.5". Here is the template I made for the sail based on the sail plan (which only shows half of the sail). So i have to trim about .5" off the bottom of the sail to keep the ends inboard of the end of the yard arm. While the raffee sail was drying after cutting it out and applying the reinforcing parts I looked at the mizzen sail. The discrepancy was even more extreme for the mizzen sail. The mizzen boom, per the arrangement drawing is 7.5" from the mast center to the end. Measured on the sail plan the boom is only 6 1/8" long. I checked the mizzen boom on the hull and the sheet blocks match up so that is not going to a problem but the mizzen sail is going to have to be considerably longer at the foot than is shown on the plan to have the mizzen sail come close to utilizing the more or less entire boom as is do on the fore and main.
- 121 replies
-
- 2
-
-
- Lucia A Simpson
- AJ Fisher
- (and 1 more)
-
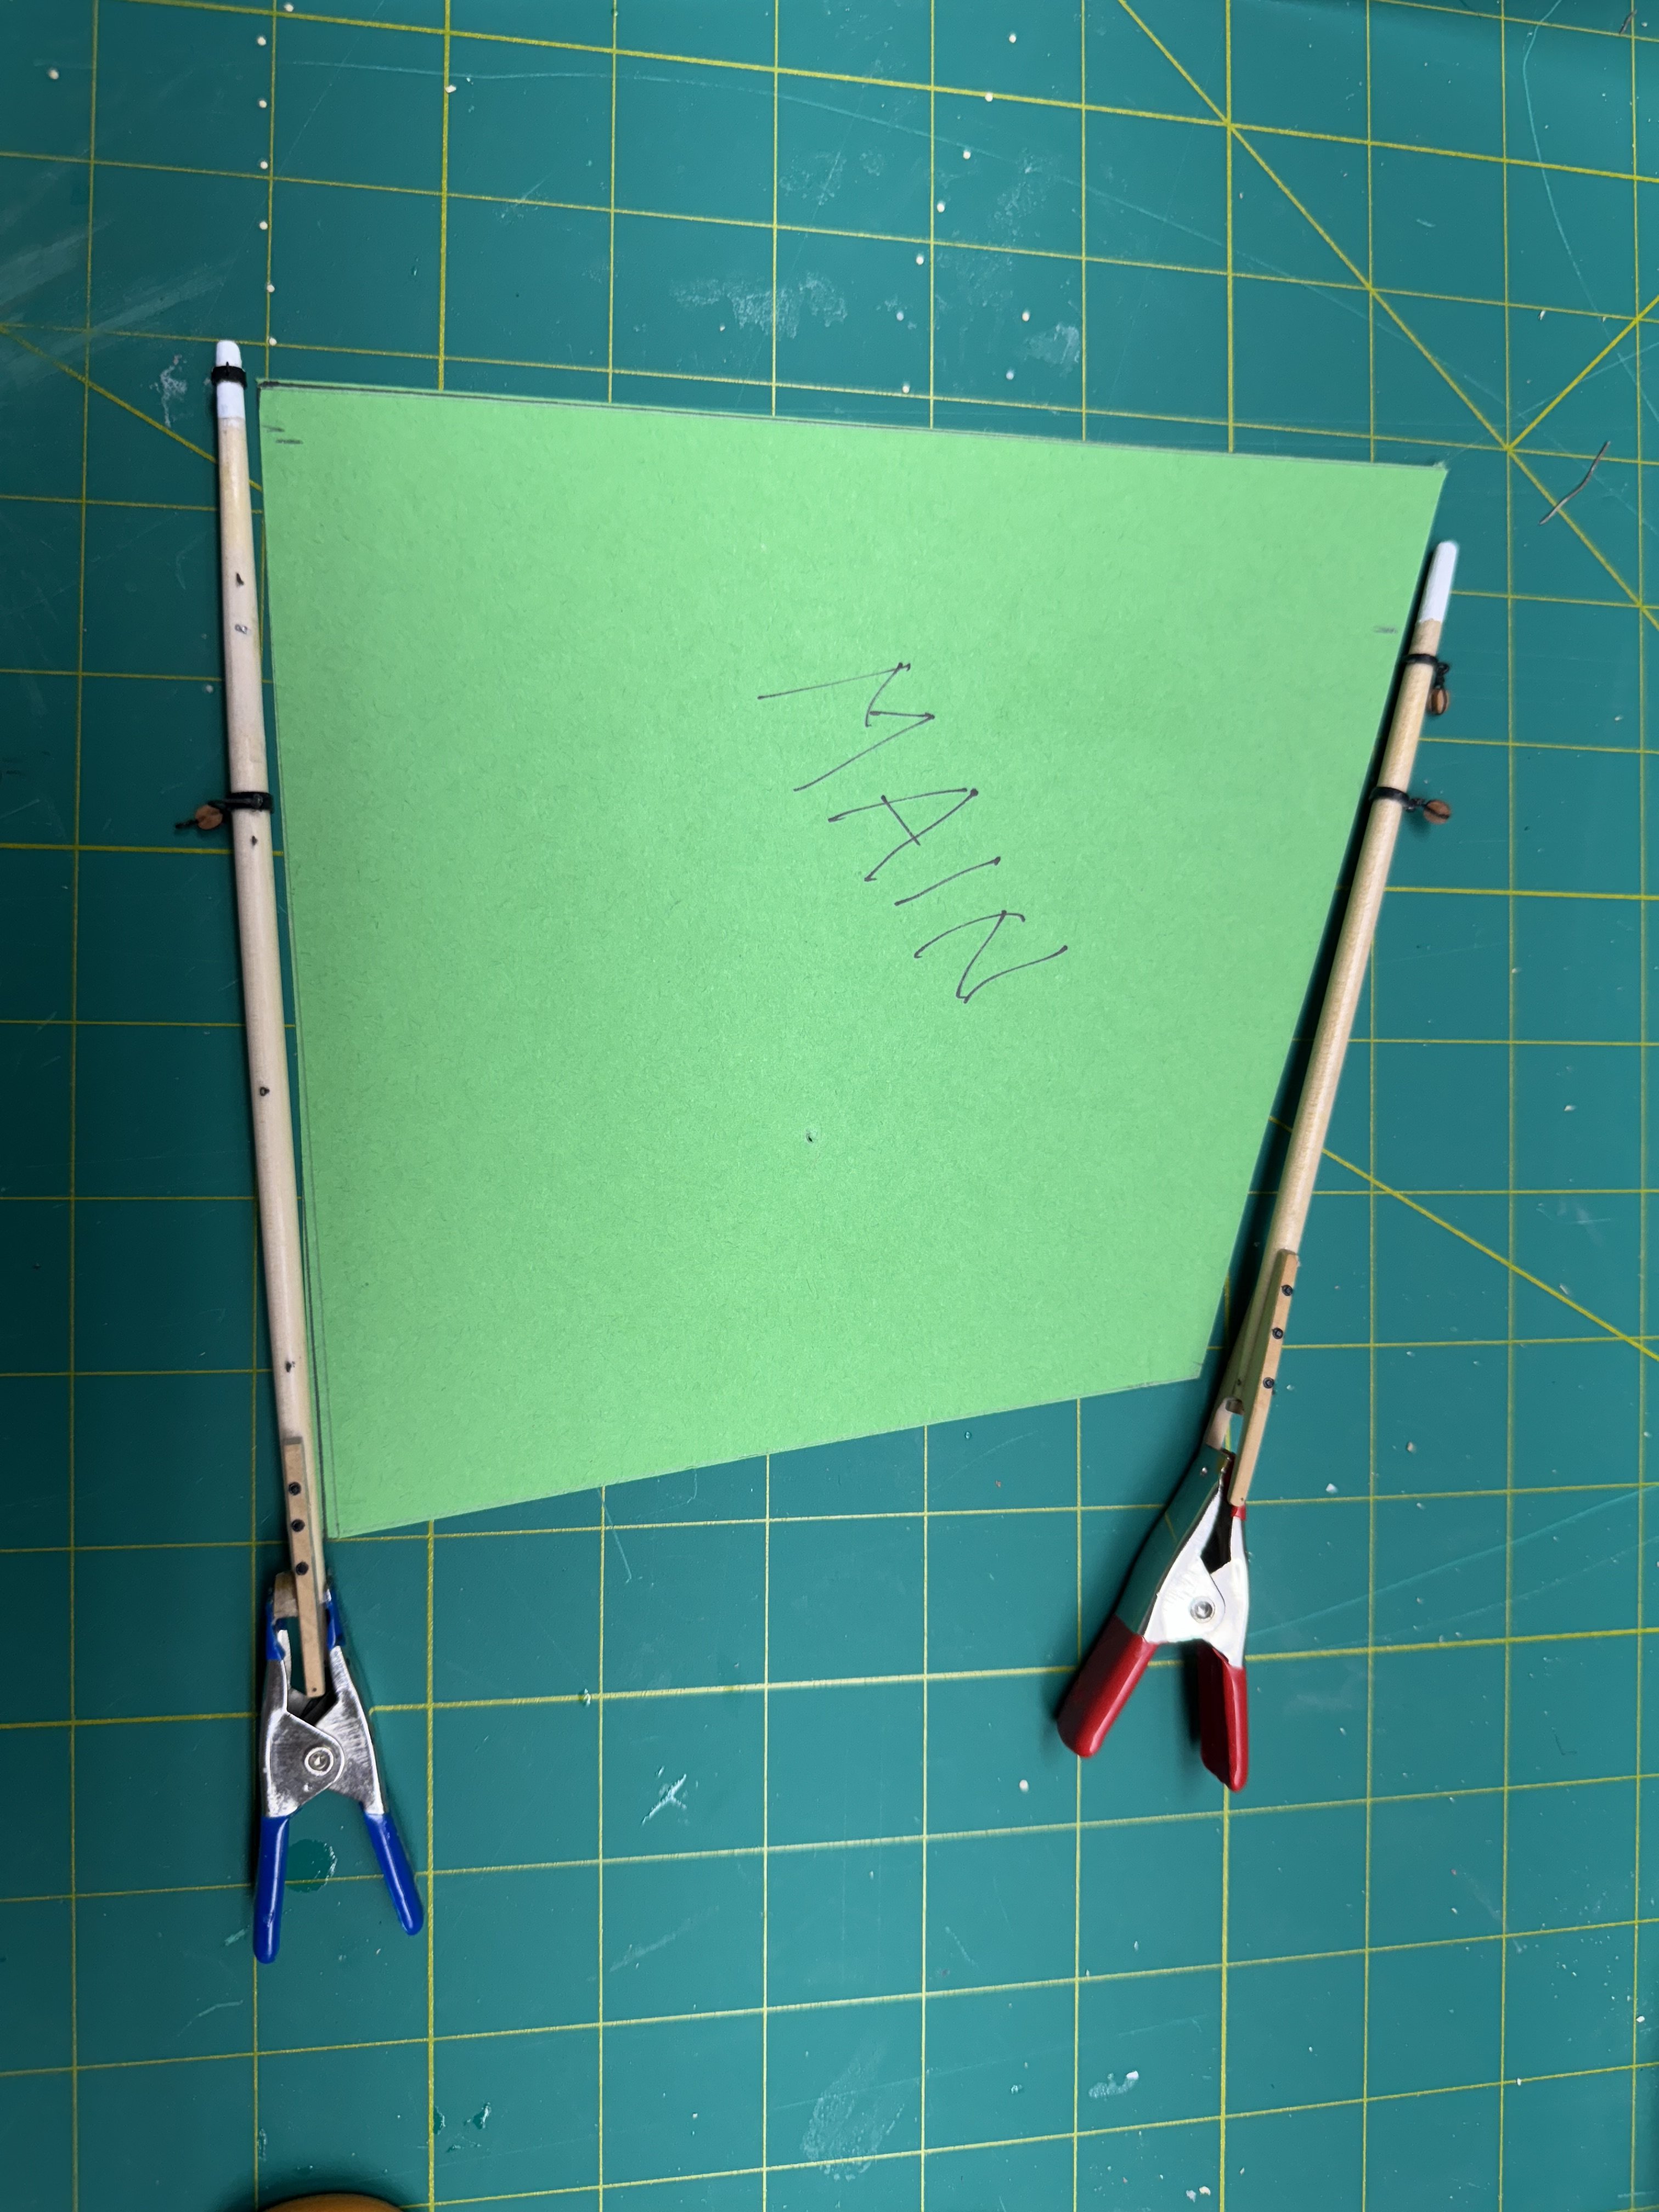
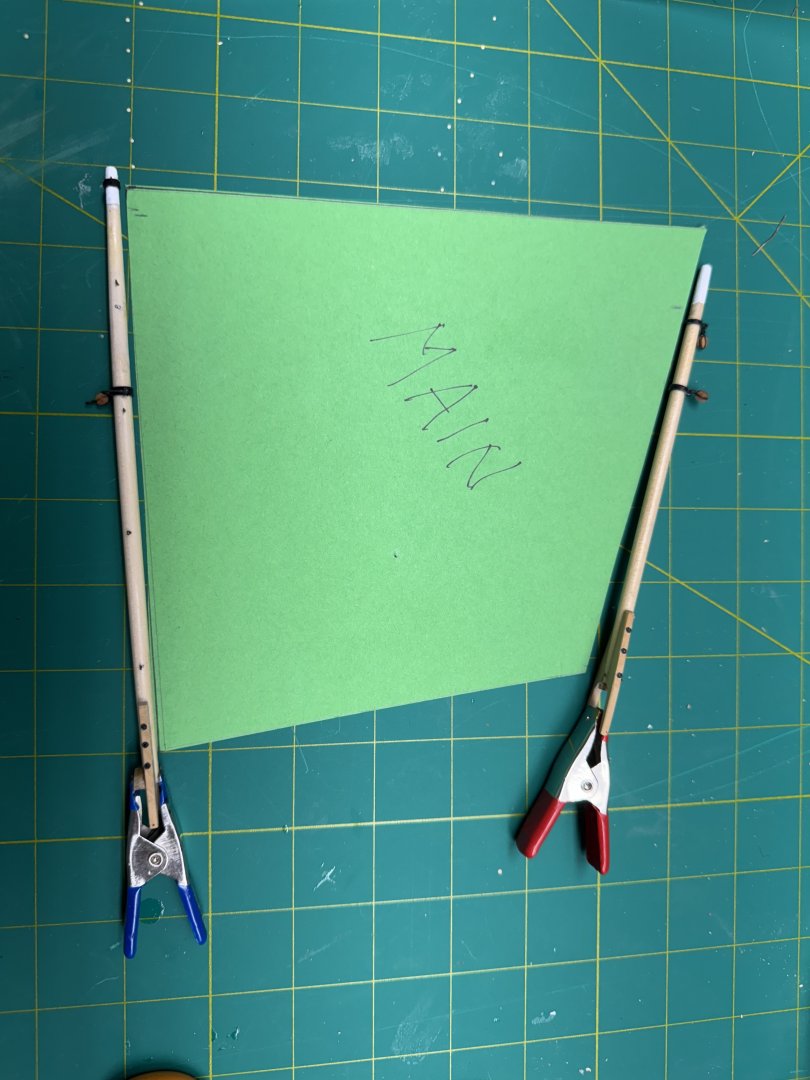
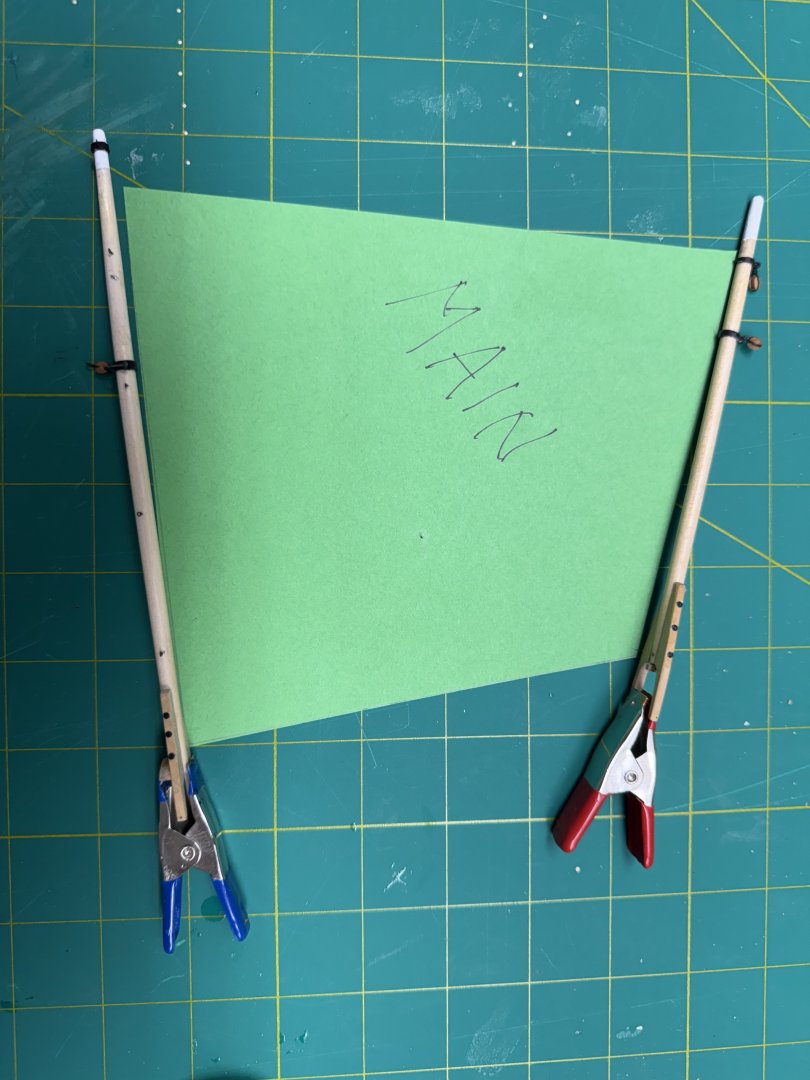
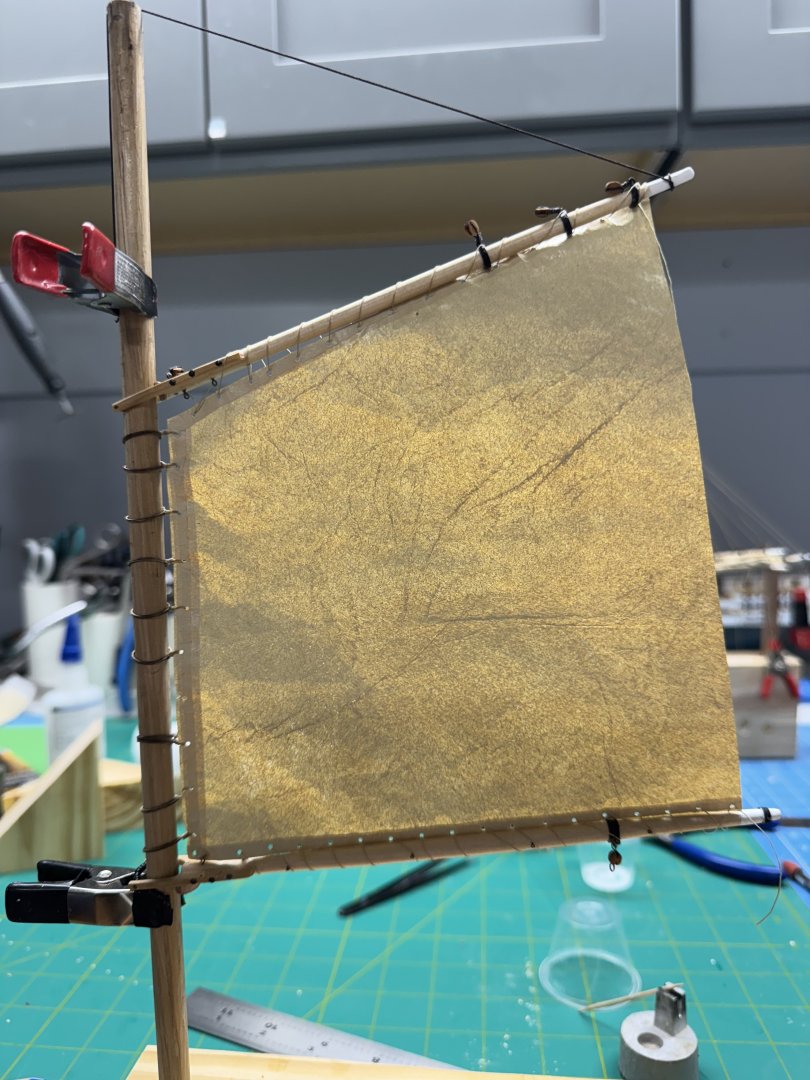
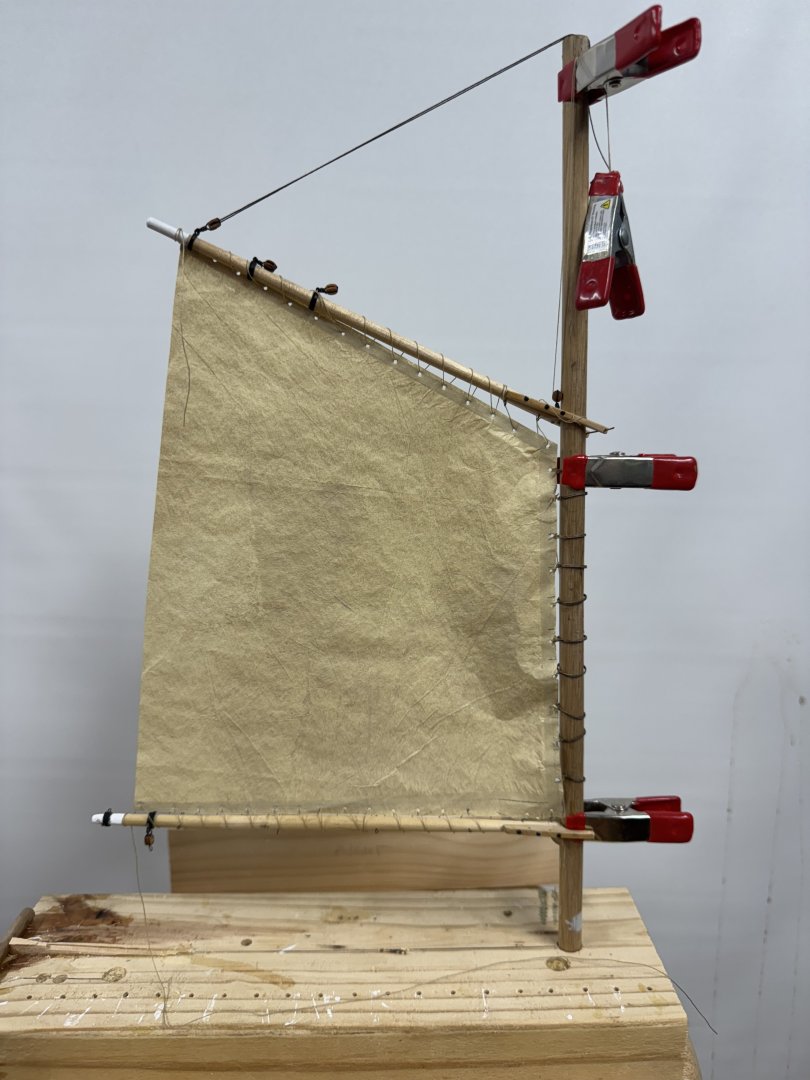
Main sail and mast completed to the same "degree" as the Fore. You can see my "mast support 2.0" here (the 1.0 version is in the background). I have learned that a 2X4 is not all that stable, especially when the sides are not sharp (as they generally aren't as purchased from Home Depot, etc.). Here is better shot of the main alone. I am going to work on the Top Sail (called Raffees on the sail plan) next as I anticipate the Mizzen sail to be a rinse and repeat of the Main/Fore.

- 121 replies
-
- 4
-
-
- Lucia A Simpson
- AJ Fisher
- (and 1 more)
-
Main sail is completed , attached to the spars and mounted on the "Furling jig". The sharp eyed will notice that one of the mast hoops has become detached from the sail. Not that hard to do (IMHO) but given it will be in the "middle of the pile" of mast hoops it is probably no big deal. I will have to use a smaller dowel for the Mizzen as that mast is 5/16" instead of 3/8" like the main and fore. Now to the "fun" getting the sail furled without doing further damage. After it is furled I will remove it (carefully), use some rubber bands to keep it "together" and transfer it to the real main mast, add the boom rest and mast coat and then start the throat and peak halyards and topping lifts just like on the fore mast.
- 121 replies
-
- 4
-
-
- Lucia A Simpson
- AJ Fisher
- (and 1 more)
-
I have adopted that technique for the main and mizzen masts.
- 121 replies
-
- 1
-
-
- Lucia A Simpson
- AJ Fisher
- (and 1 more)
-
I believe I have the lower Fore Mast about as complete as I can get it at this stage. The throat and peak halyards are rove and the block and becket/line are in place for the hauling end of each. The topping lists (there are two, one on each side) and lazy jacks are in place as well. All of the lines are still adjustable as the boom is not on the boom rest so all the lines have plenty of slack as they will all need to be elongated when the mast goes onto the hull. I have not yet connected the yard sling chain as I may need to remove the yard to add the furled sail. I had to fabricate a "yard truss" to hold the fore topsail yard (the only yardarm on the vessel) as the Britannia item was too flimsy (IMHO) and I wanted the ability to swivel the yard "out of the way" as was done when these vessels needed the extra clearance next to the pier. I am also considering putting the furled fore topsail on the yard but need to make a "test jig" as the sail has a "notch" in the center to clear the fore stay. I am not sure how all this is going to work out so I need a way to rig the sail, furl it then rotate the yard. I will do it "off ship" first then maybe transfer the furled sail to the real yardarm. The sail is only held at the head and at each end - no complicated lashings so this might actually work But first I need to get the other two masts completed to the same level as the Fore. Do not ask me how I know but drilling out the deck hole for the fore mast to the 1 3/4" depth shown on the plans will come perilously close to going out the bottom of the hull.


- 121 replies
-
- 4
-
-
- Lucia A Simpson
- AJ Fisher
- (and 1 more)
-
Thanks Jacques - I have had some practice, all the previous schooners I built (save the first one) have had furled sails on the masts (two ,three or four as the case may be).
- 121 replies
-
- 1
-
-
- Lucia A Simpson
- AJ Fisher
- (and 1 more)
-
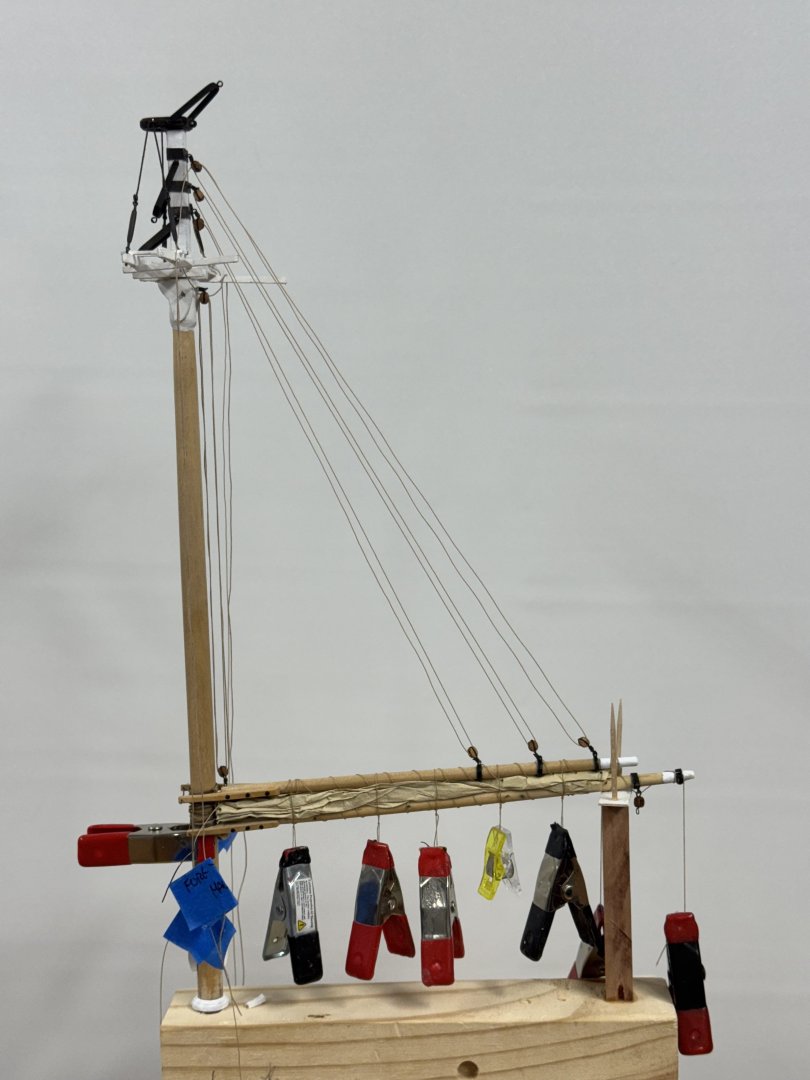
Following Tom Luria's methodology (seen on YouTube) I fabricated the Fore Sail for the Simpson, lashed it to the boom and gaff and added the mast hoops. Then I made a little stand with a spare piece of 3/8"dowel to simulate the mast and "hung it up". I did not add the reefing bands/ties or the panel lines since the sail will be furled and much of this detail would be lost. I also made the sail only about three quarters as tall as shown in the sail plan. Previous experience has shown (me) that the larger the sail the more difficult it is to get it furled "properly". Not to say that mine are properly furled, just enough to look more or less "presentable" IMHO. Continuing on with the fore mast I added the rest of the detail using laser board for the bands around the square section and the required blocks. I glued on the trestle trees, added the mast cap and rigged the spreader lifts (using turnbuckles instead of deadeyes - I just could not manage to get the 3mm deadeyes to "work" - too small for my old eyes and hands). I fabricated the "stay irons" from brass flat stock and brass eyebolts soldered into the brass stock. At least I remembered how to do that as it has been many years and models since I had to solder brass fitting together. With the fore mast more or less completed (I am sure I forgot something) I furled the sail and added it to the mast along with the mast cap and the boom rest. Then I rigged the throat and peak halyards - took a bunch of line with the gaff down on top of the boom. Next up are the topping lifts and lazy jacks - then on to the Main sail.
- 121 replies
-
- 6
-
-

-
- Lucia A Simpson
- AJ Fisher
- (and 1 more)
-
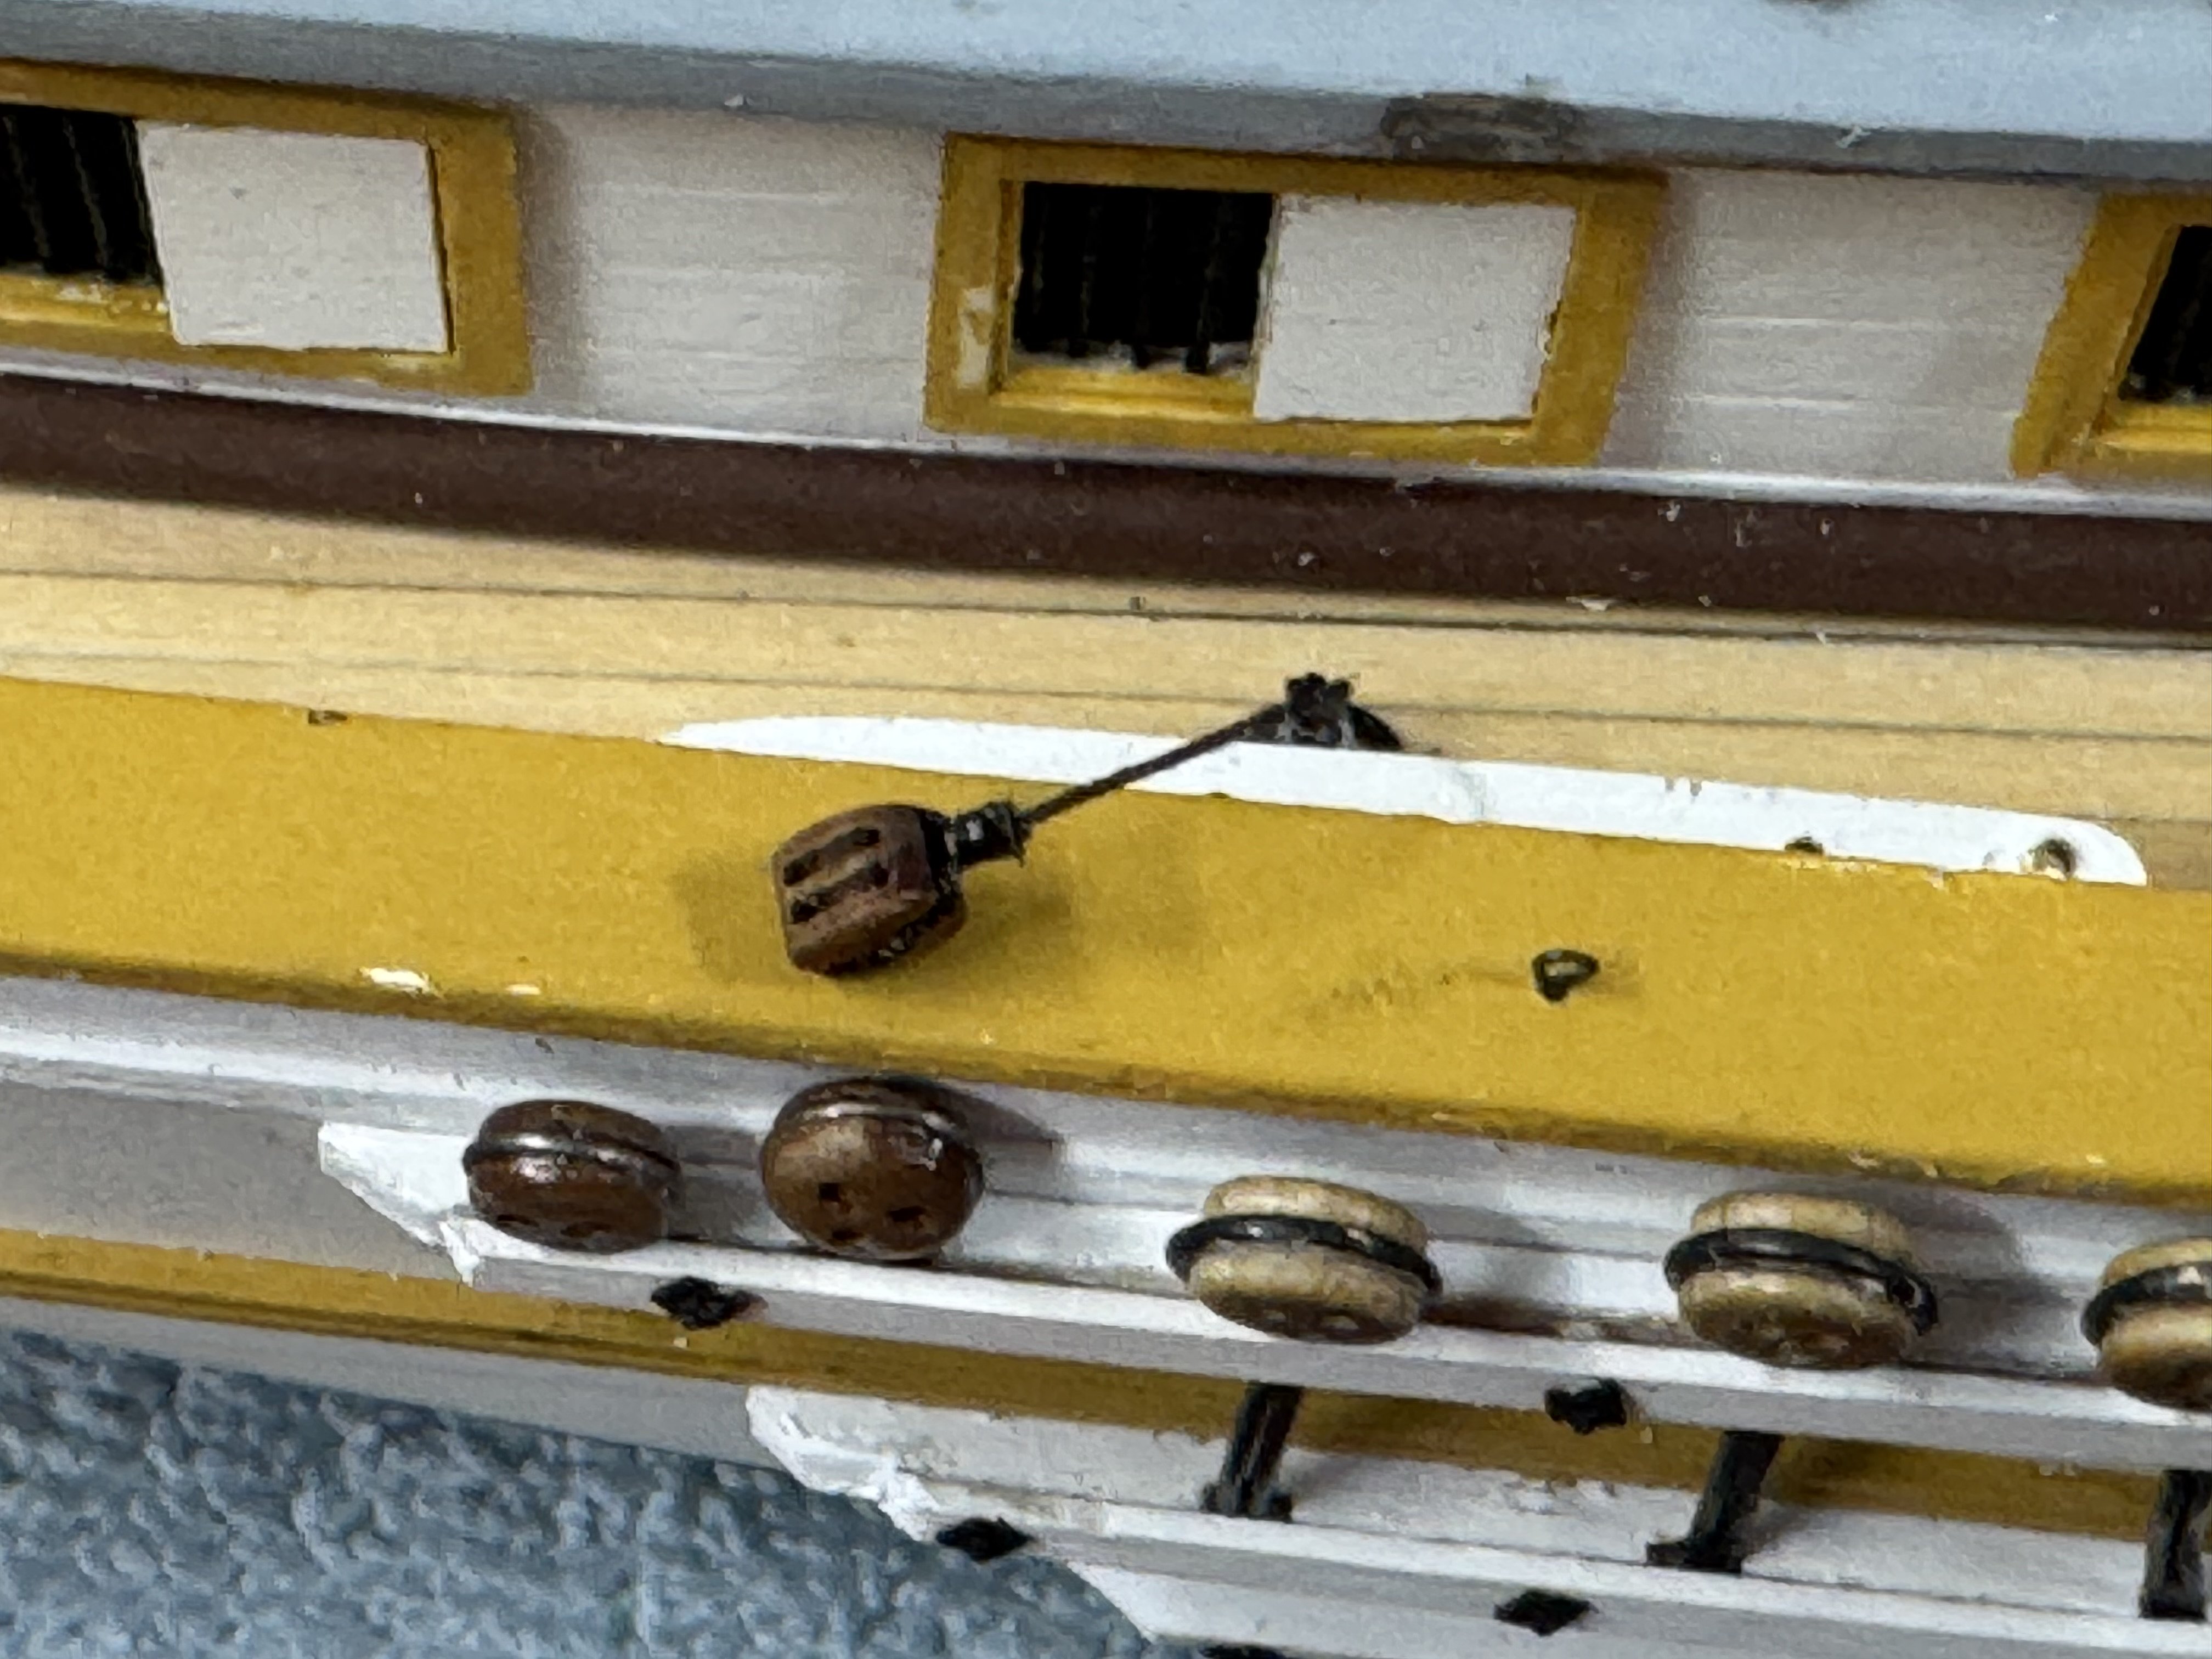
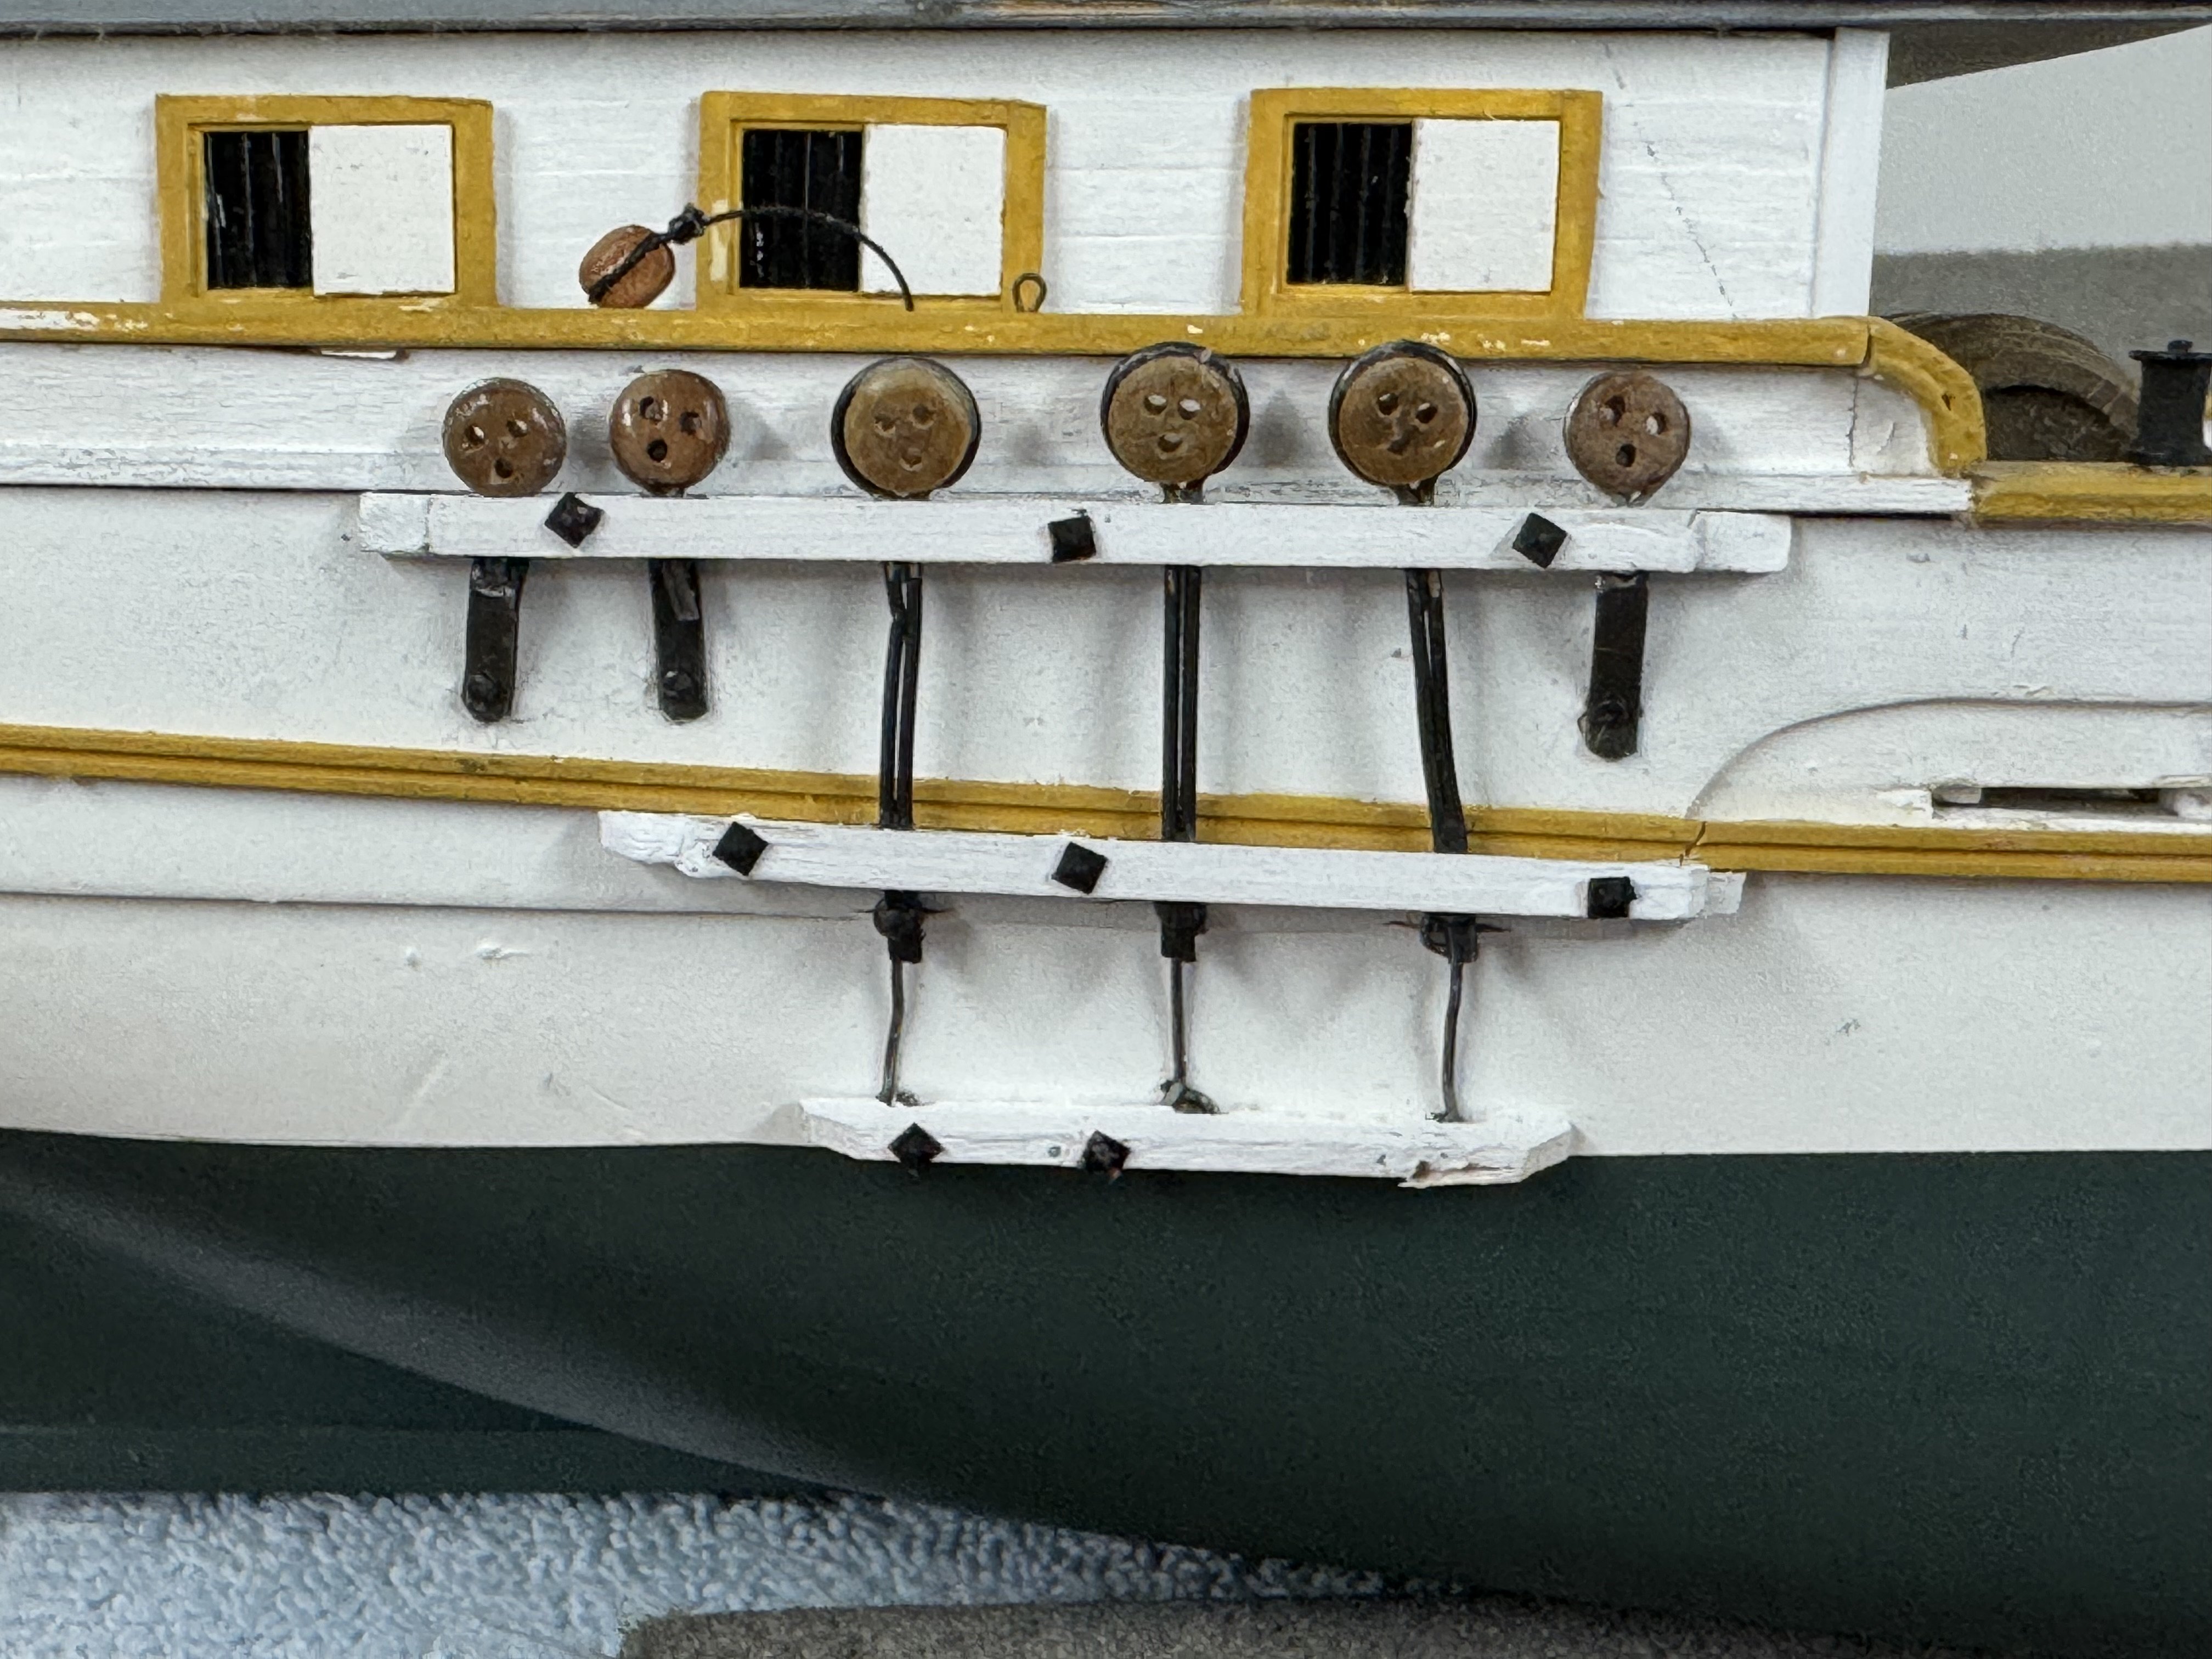
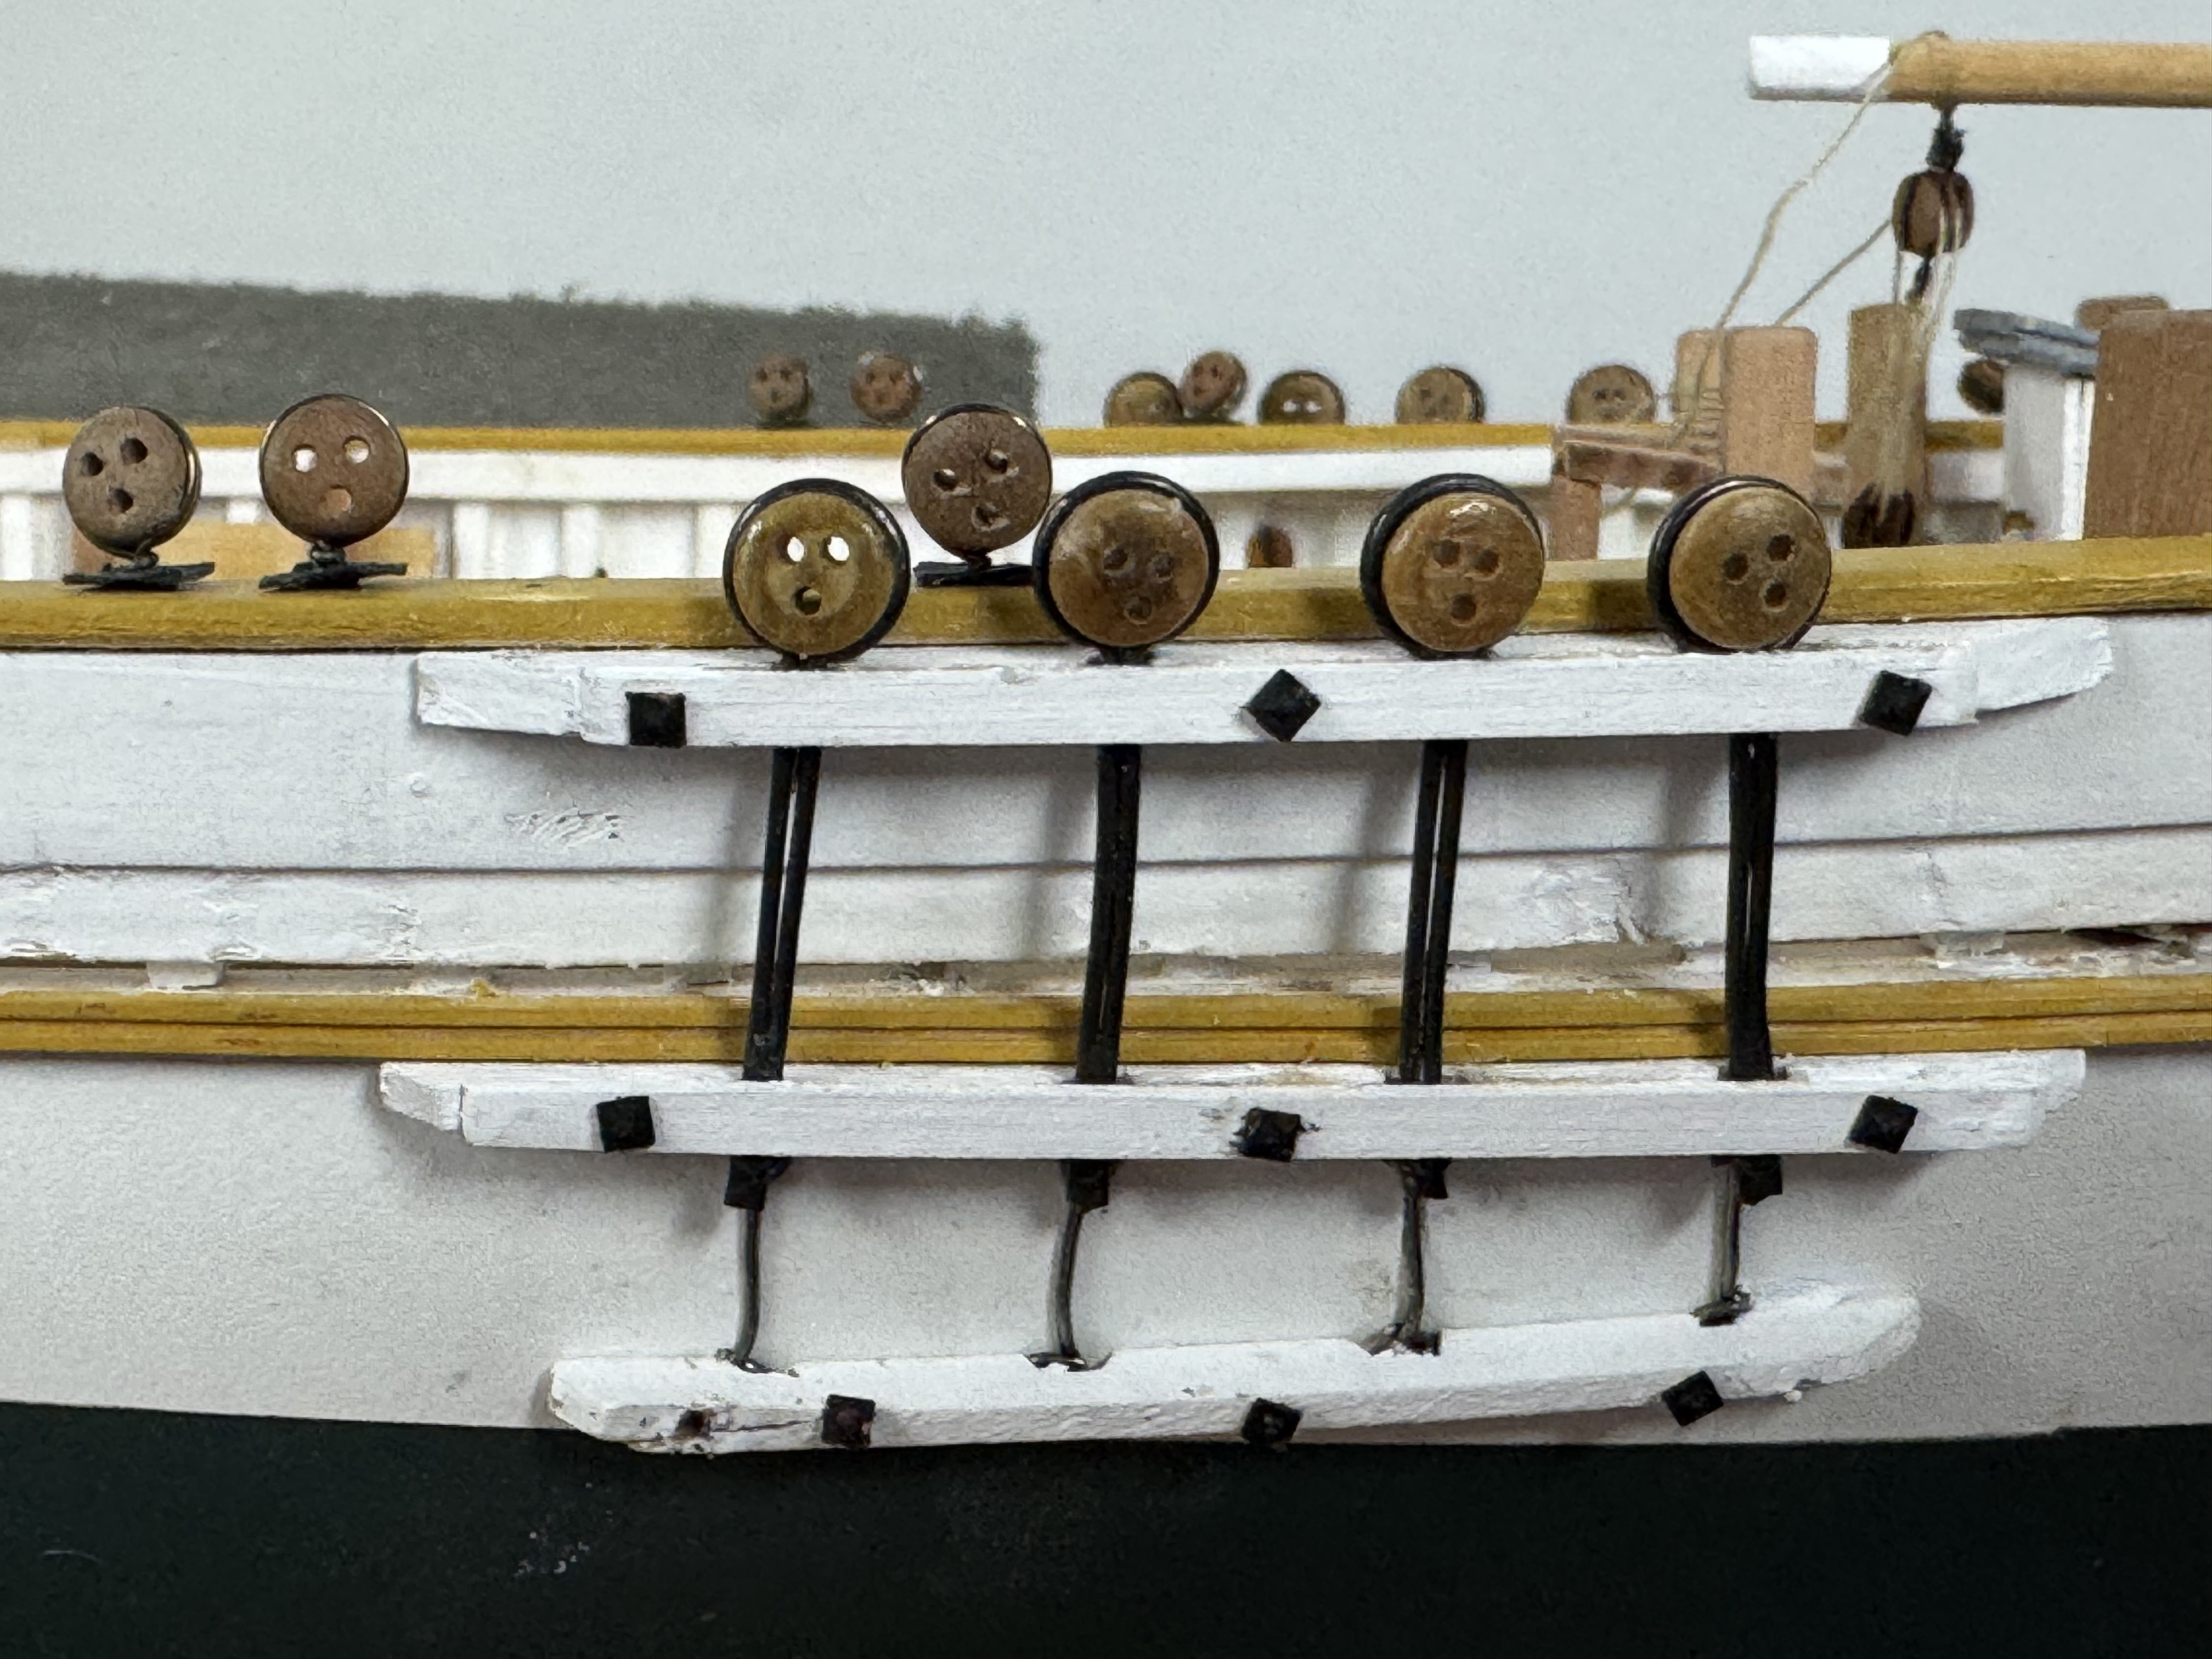
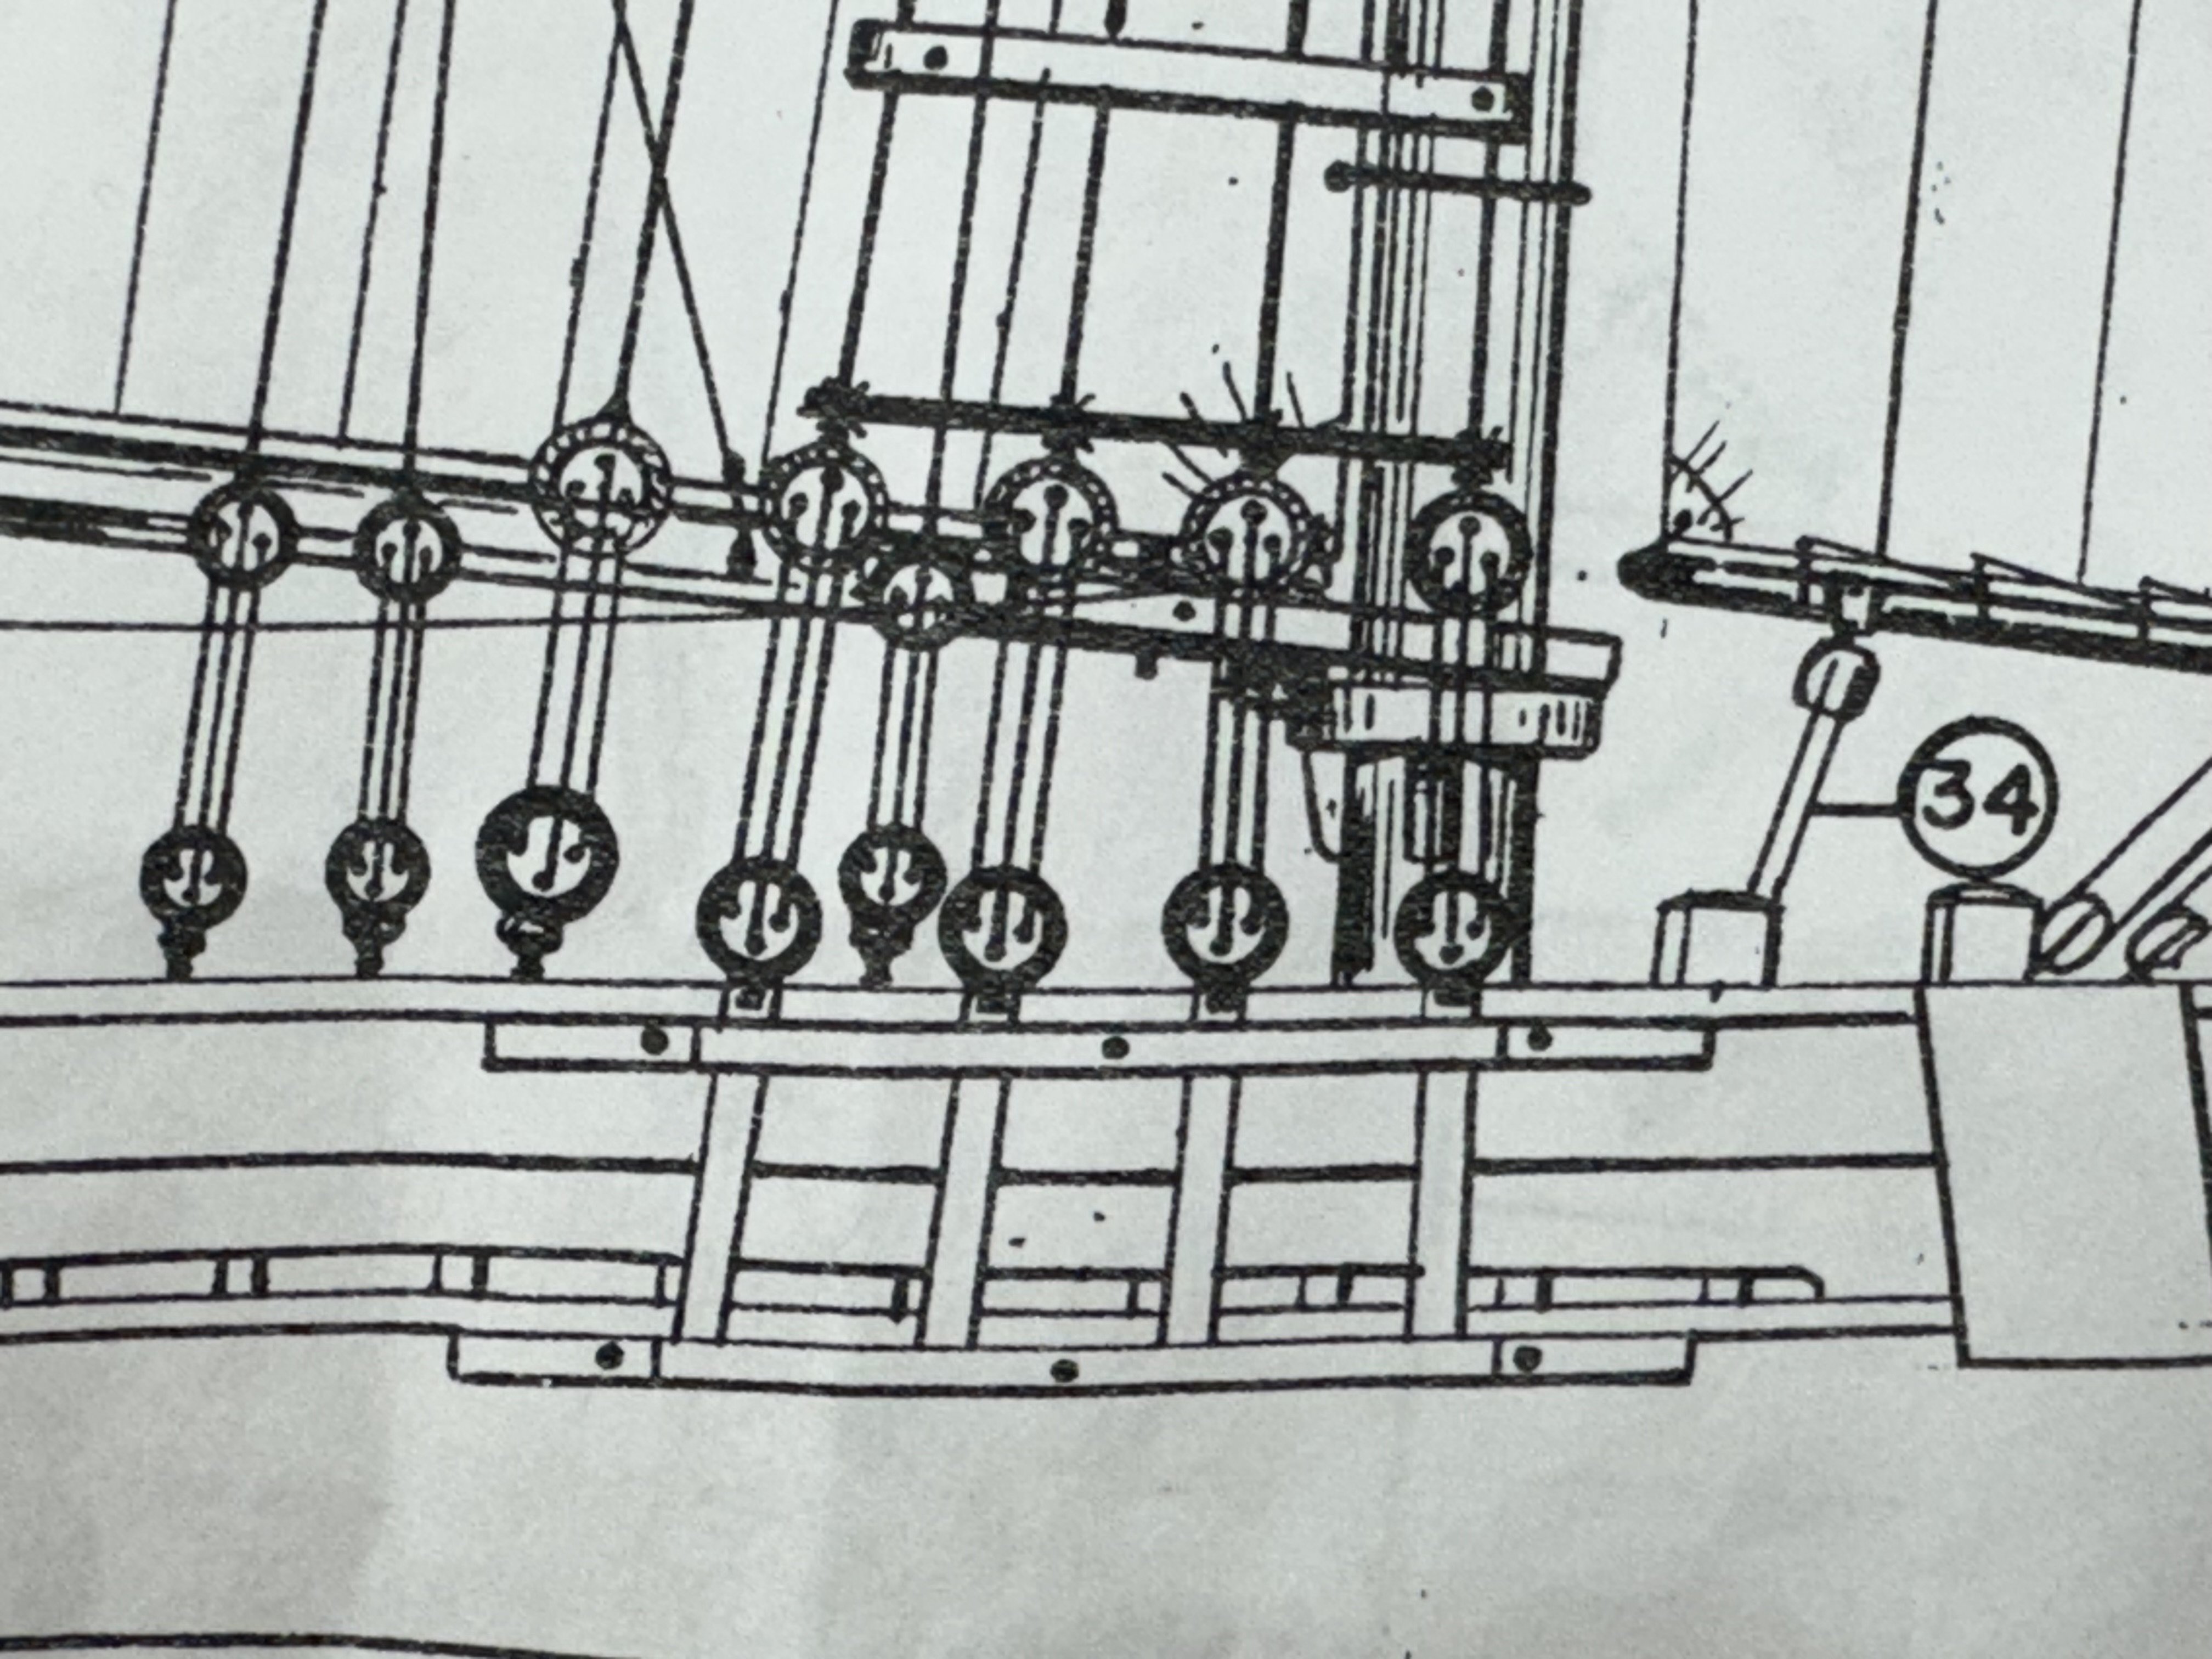
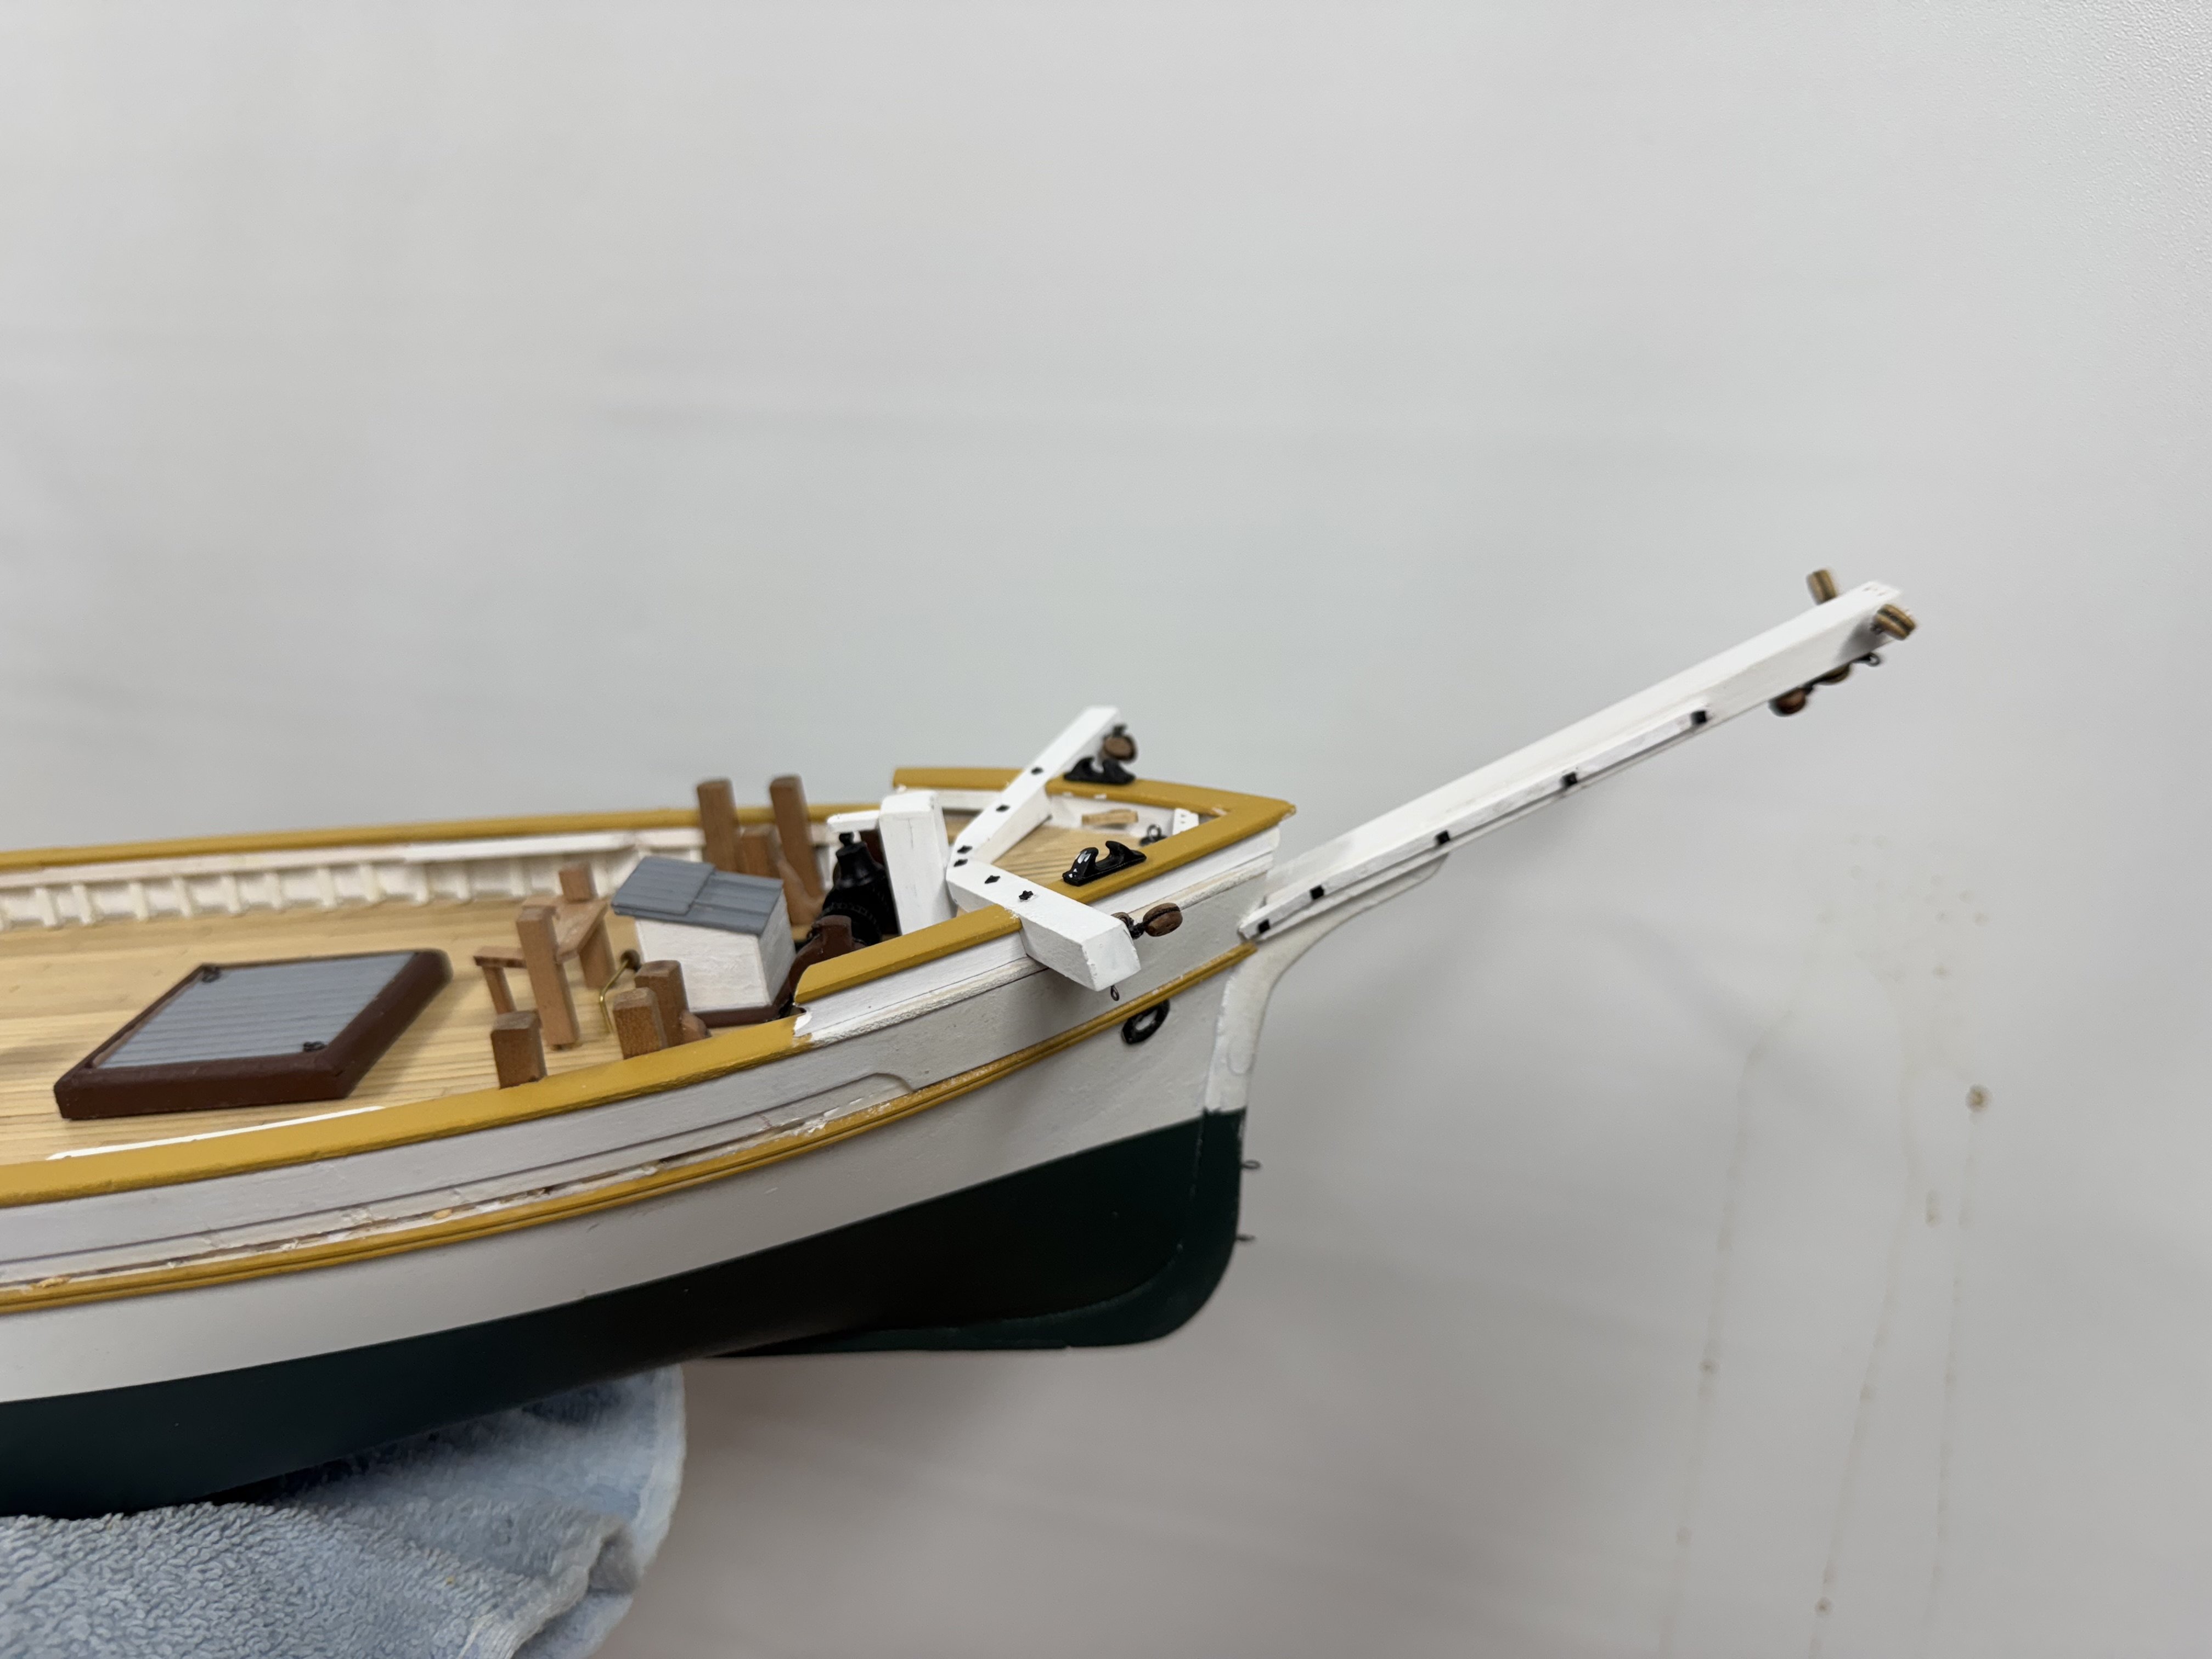
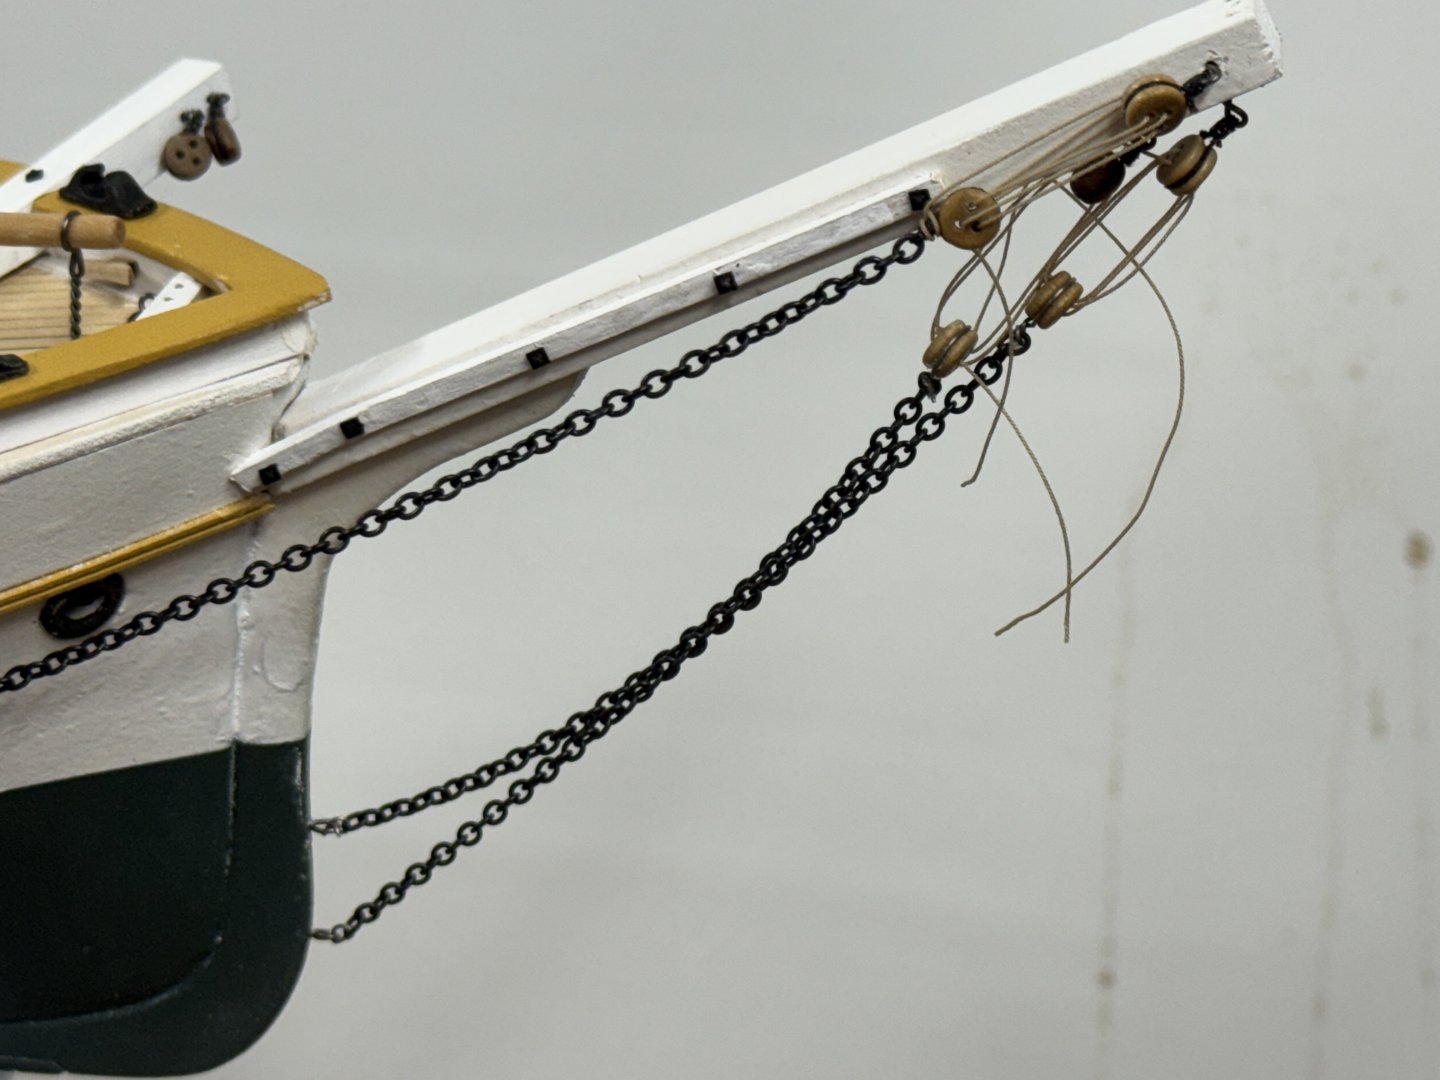
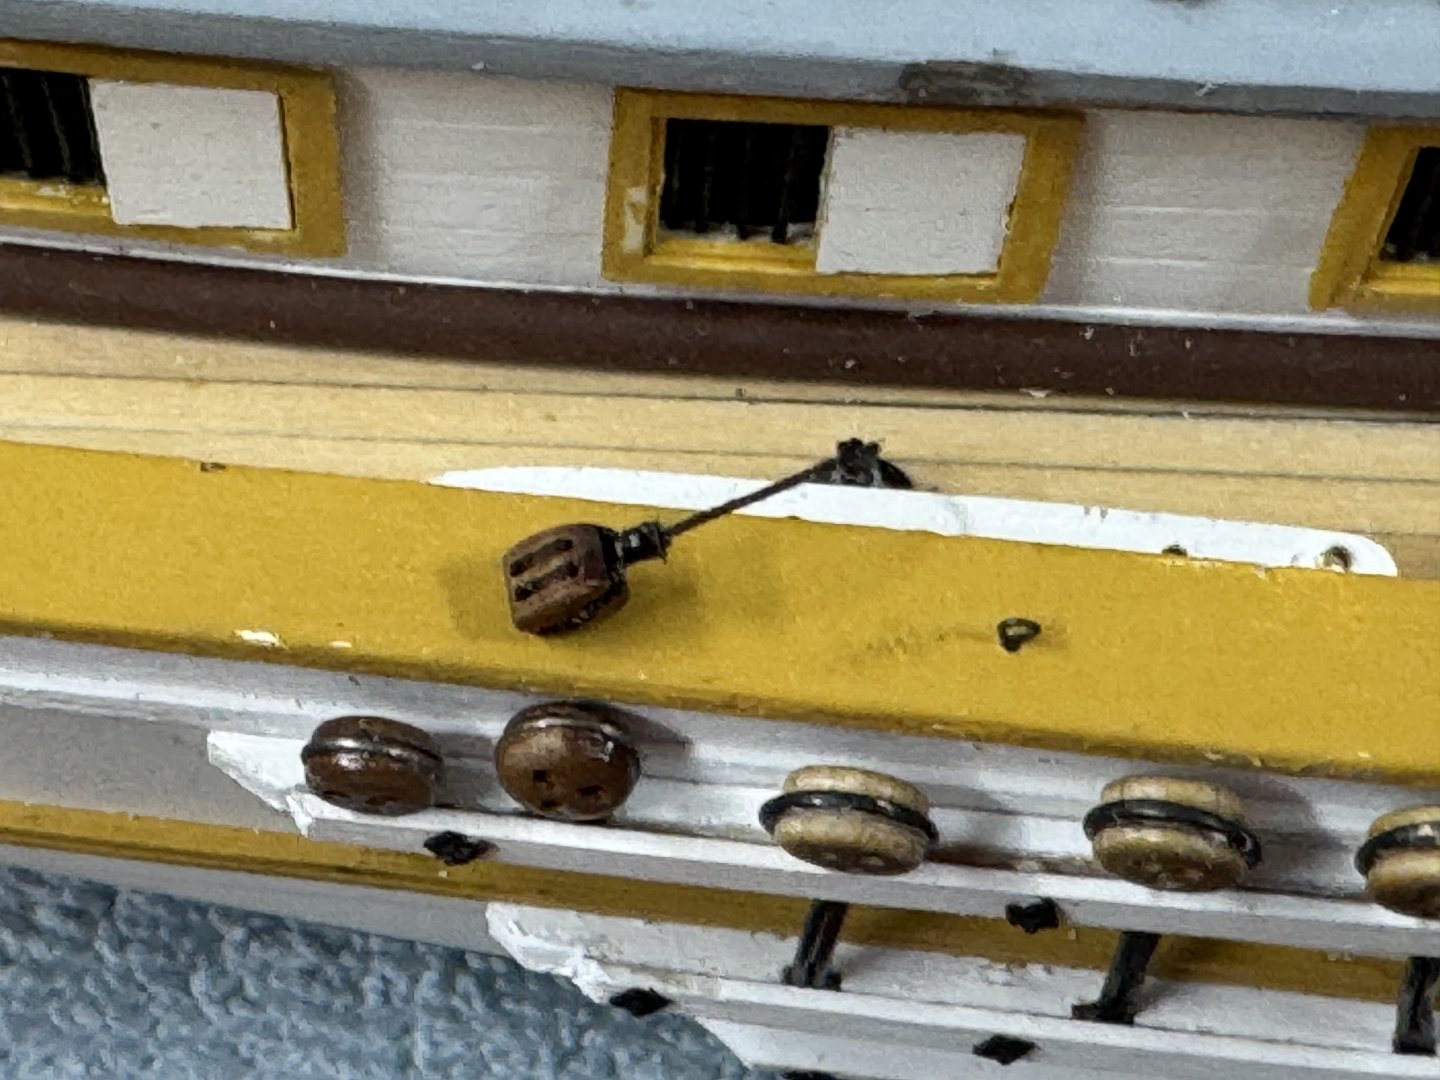
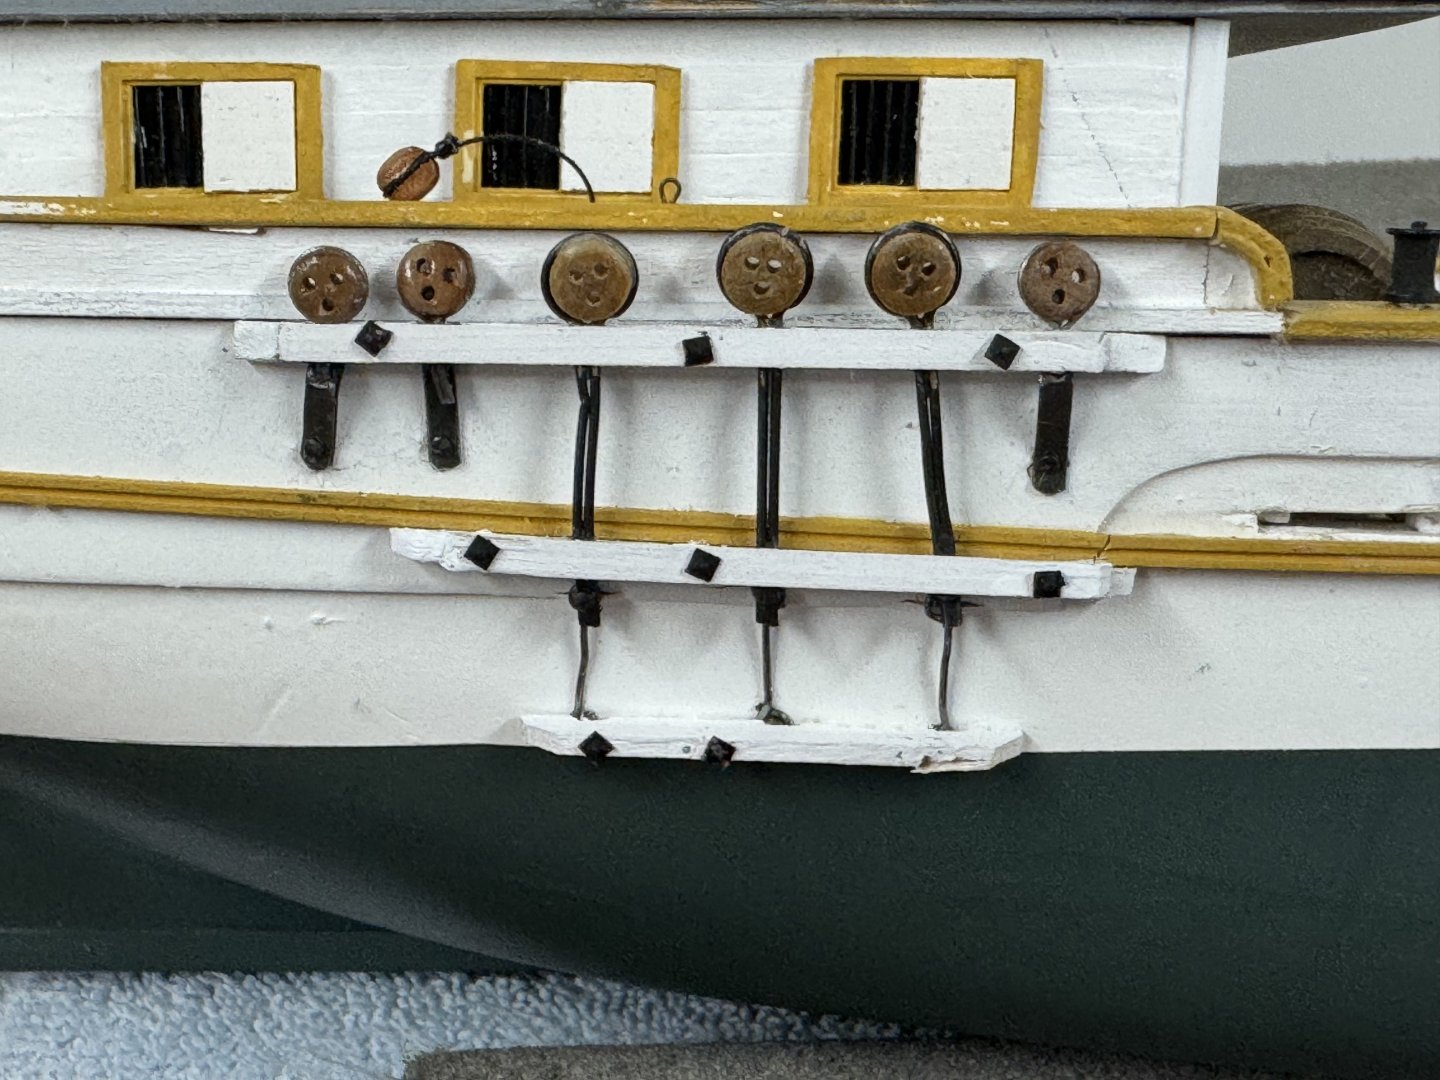
I think I have the hull completed as far as I can before turning my attention to the spars and rigging. I added the bowsprit shrouds (chain) and the martingales (also chain) but have not completely tightened the lashings (hence the sag). I do not want to tension anything untill all the standing rigging is more or less in place. At this point it is hard to tell what might influence what. I added the six head sail sheet blocks (three on each side). They form part of the hauling tackle for each jib (jib topsail, standing jib and flying jib). They are on pendants to make it easier to rig them. Not sure if I could really get at them if they were on the deck. Likewise I added the bottom blocks (doubles) on deck for the throat and peak halyards for the gaffs. I put the mizzen blocks on pendants as well since there isn't much room between the bulwark and deckhouse and the pin rail is also in the way. Channels and chainplates are in place on both sides along with the cap rail mounted deadeyes. This is the starboard side. Initially i was going to use the kit supplied lower links (although there were not enough and they looked to be too long but...) but they proved to be (for me) too difficult to remake and I chose to shift to 3/32" X 1/64" Britannia metal strips. If I had it to over again I would probably use those strips (or 1/16" X 1/64" ones) for the lower links instead of the 24 ga wire. Still some touch up to do and one bolt head appears to have carried away. One note on the cap rail mounted deadeyes, the fore mast arrangement is shown on the sail plan rather than with the rest on the arrangement drawing, but there is a "extra" deadeye which is not labeled, listed on the rigging table nor can I figure out where it might terminate. I have left it off. It is the sixth one (from the bow) in the drawing below. Now on to the spars and sails.


- 121 replies
-
- 2
-
-
- Lucia A Simpson
- AJ Fisher
- (and 1 more)
-
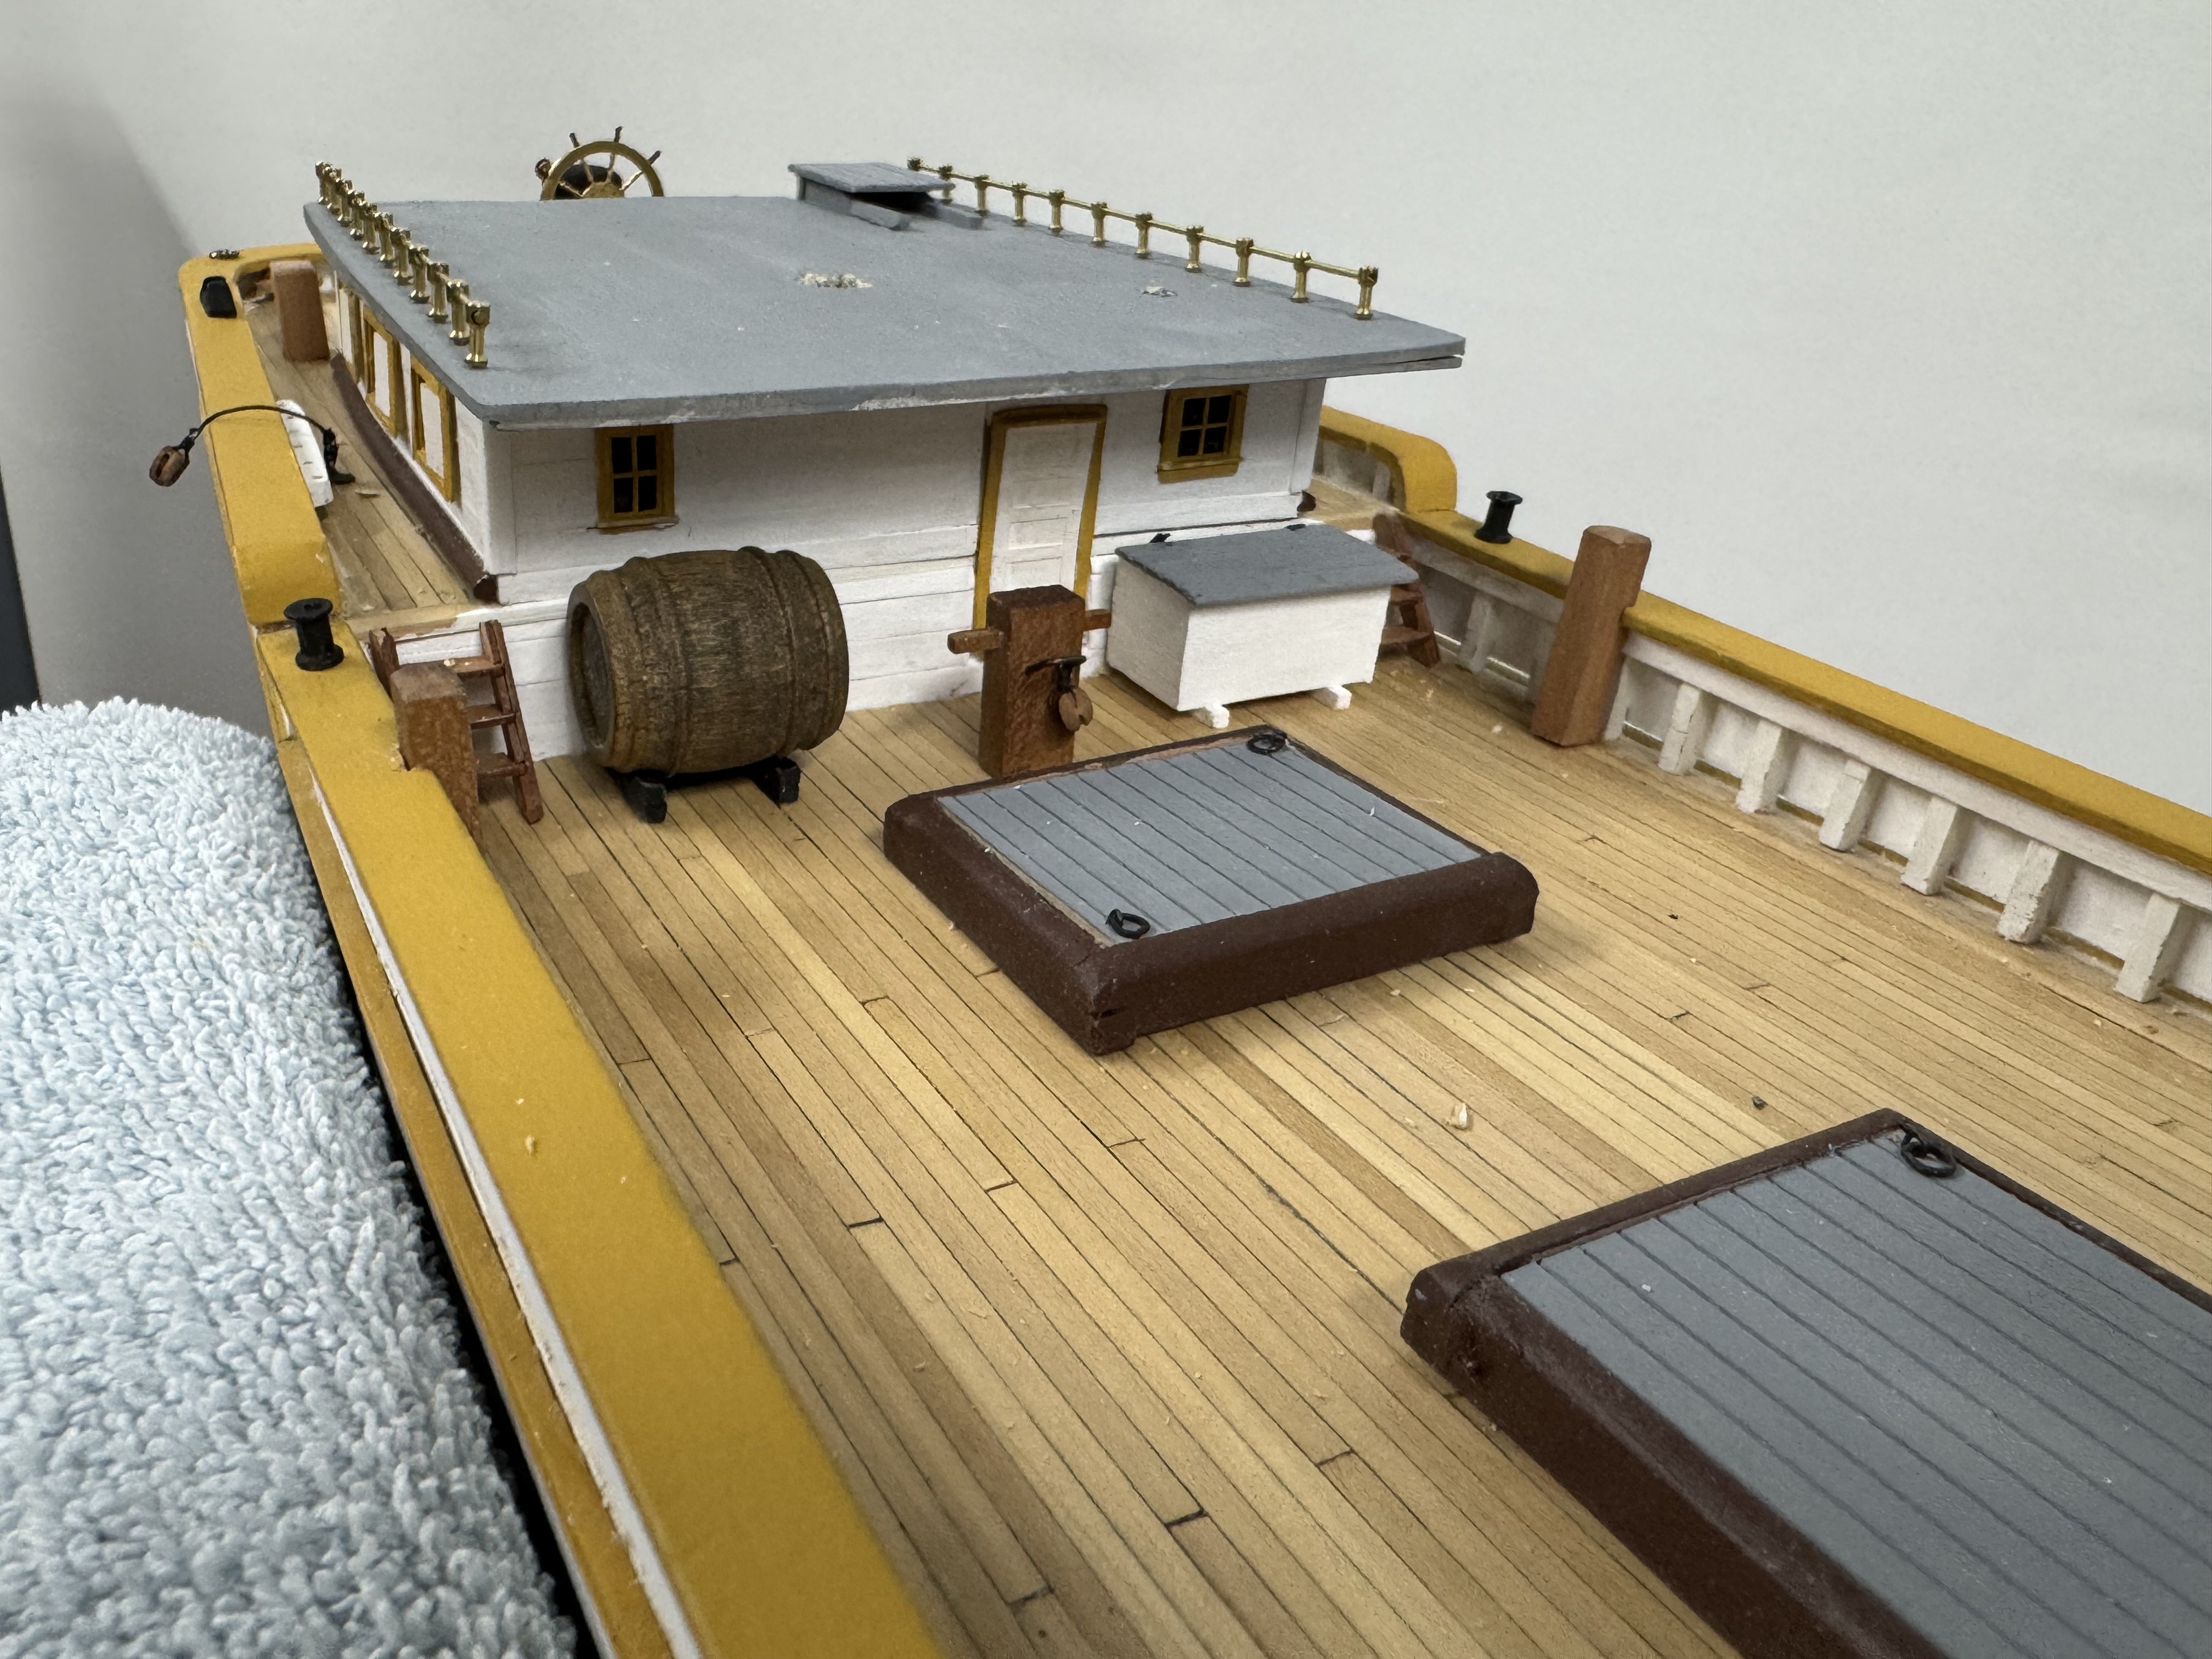
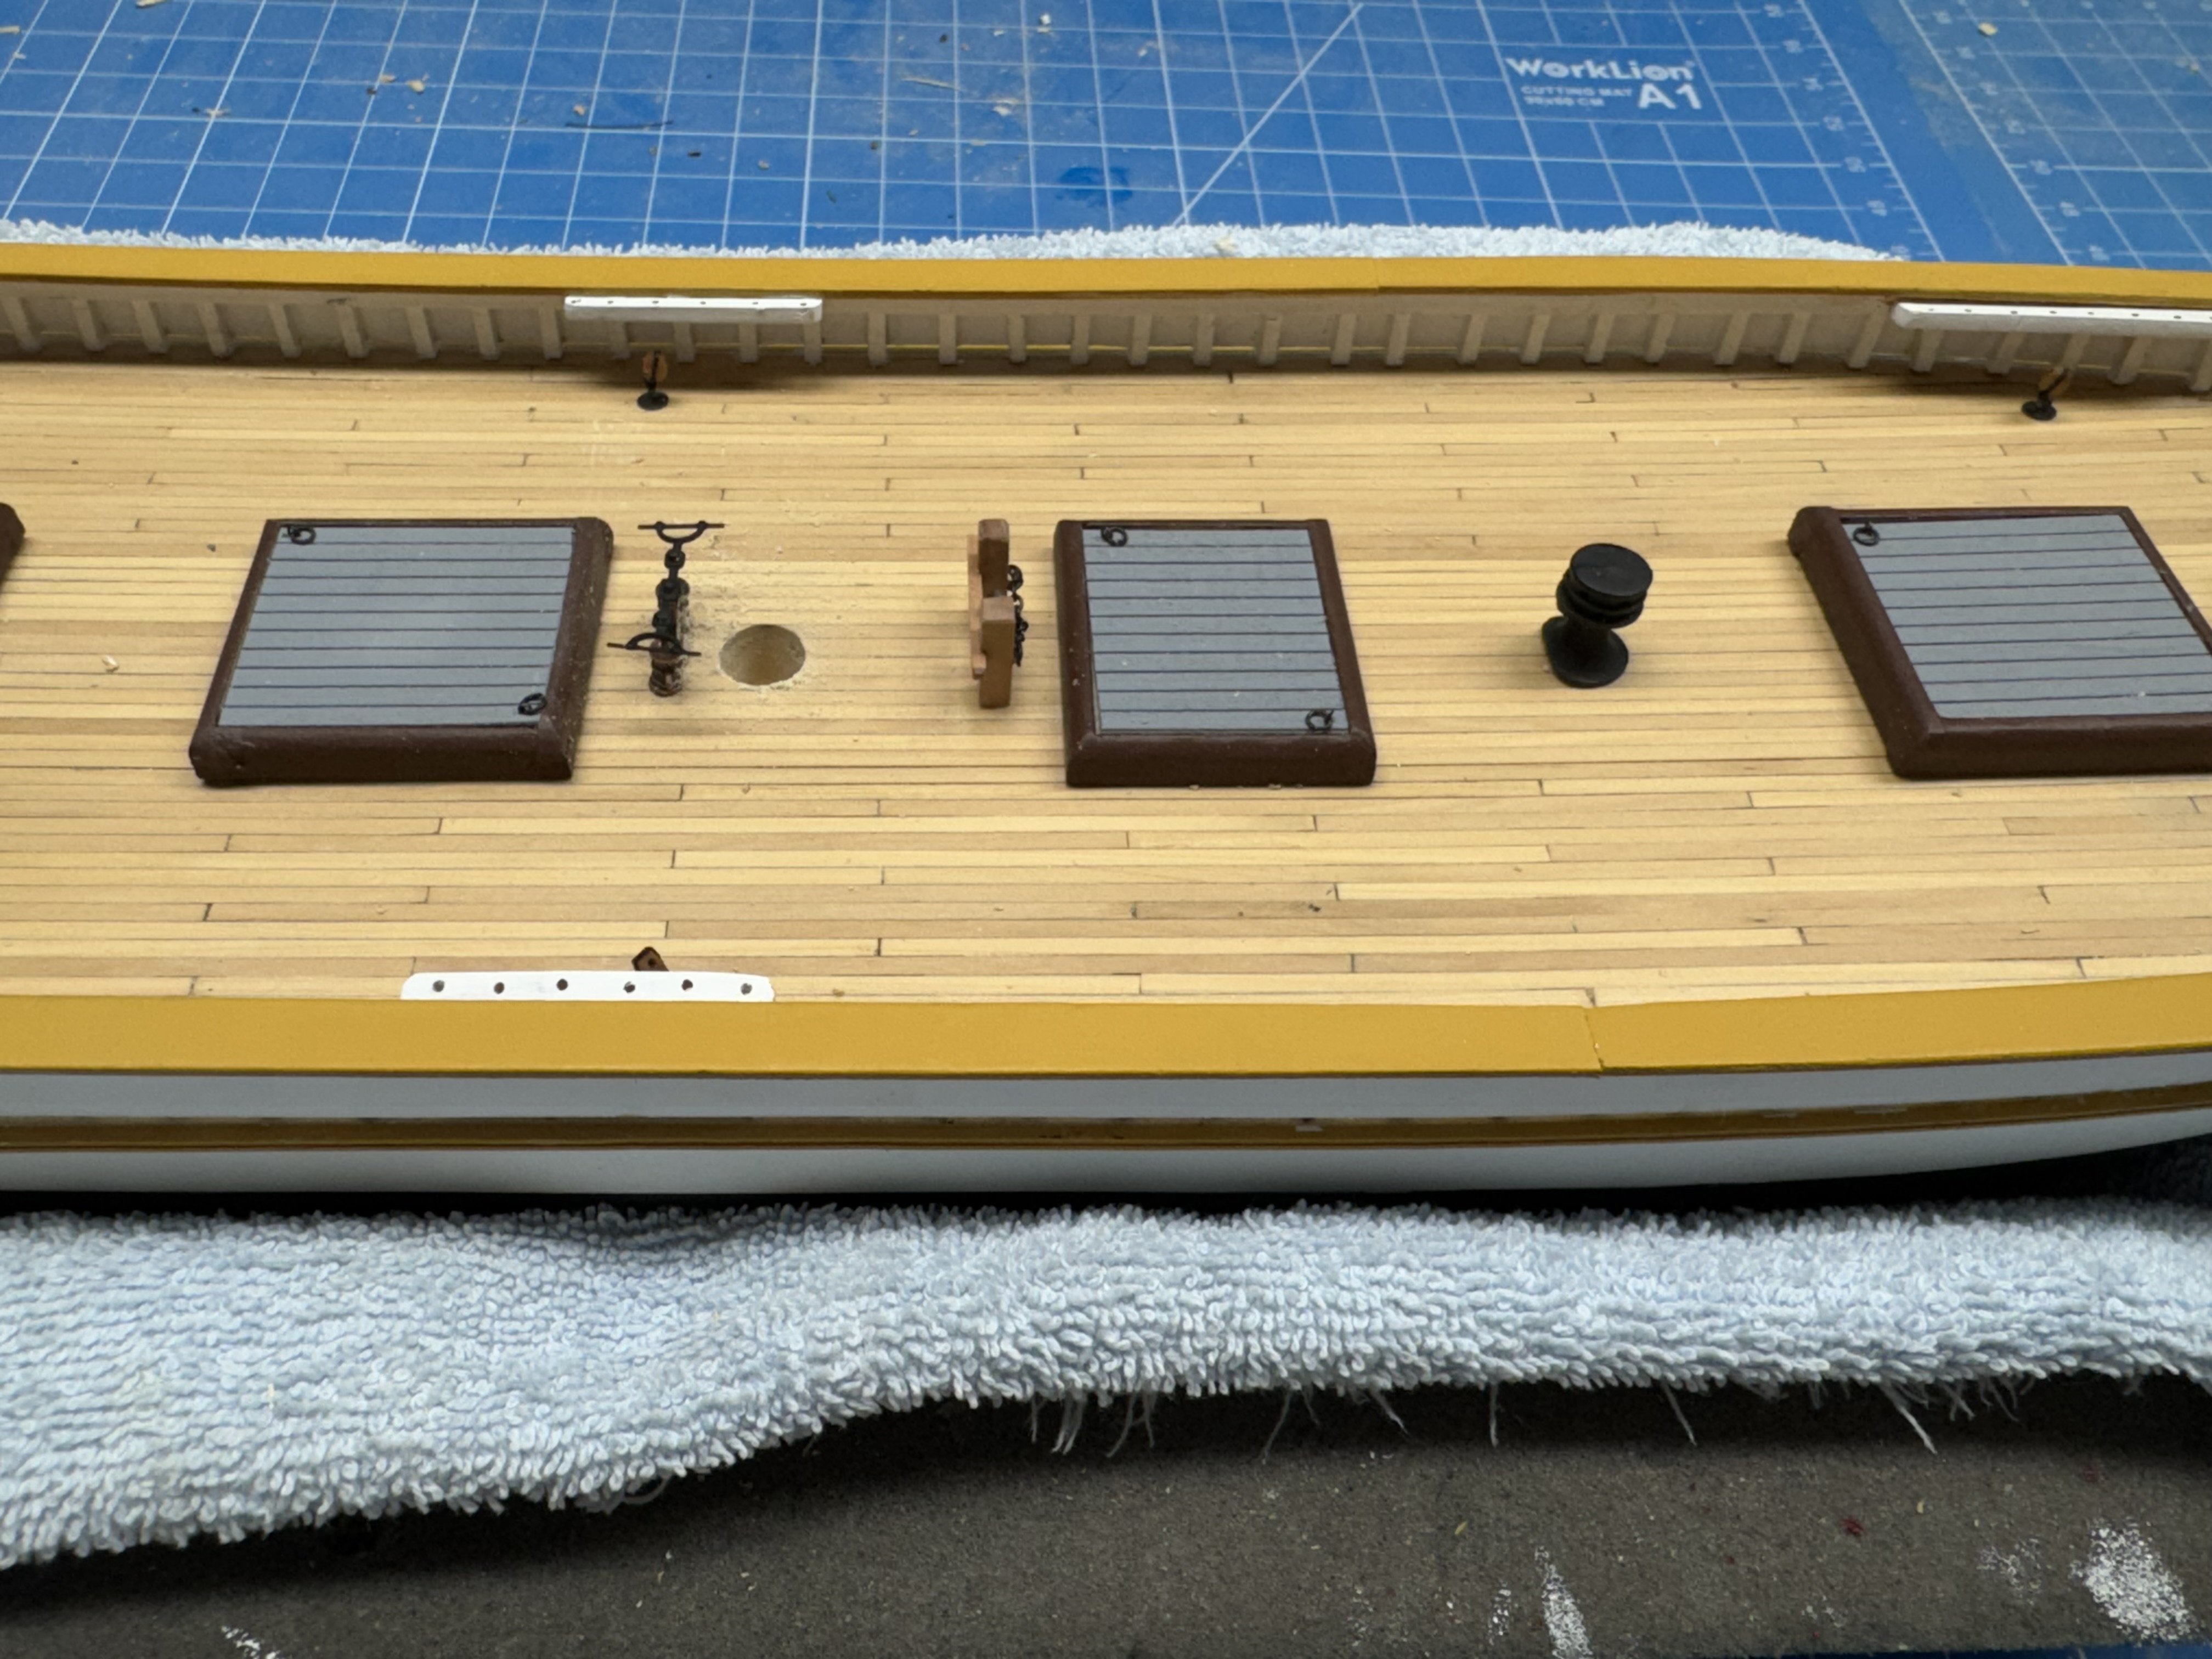
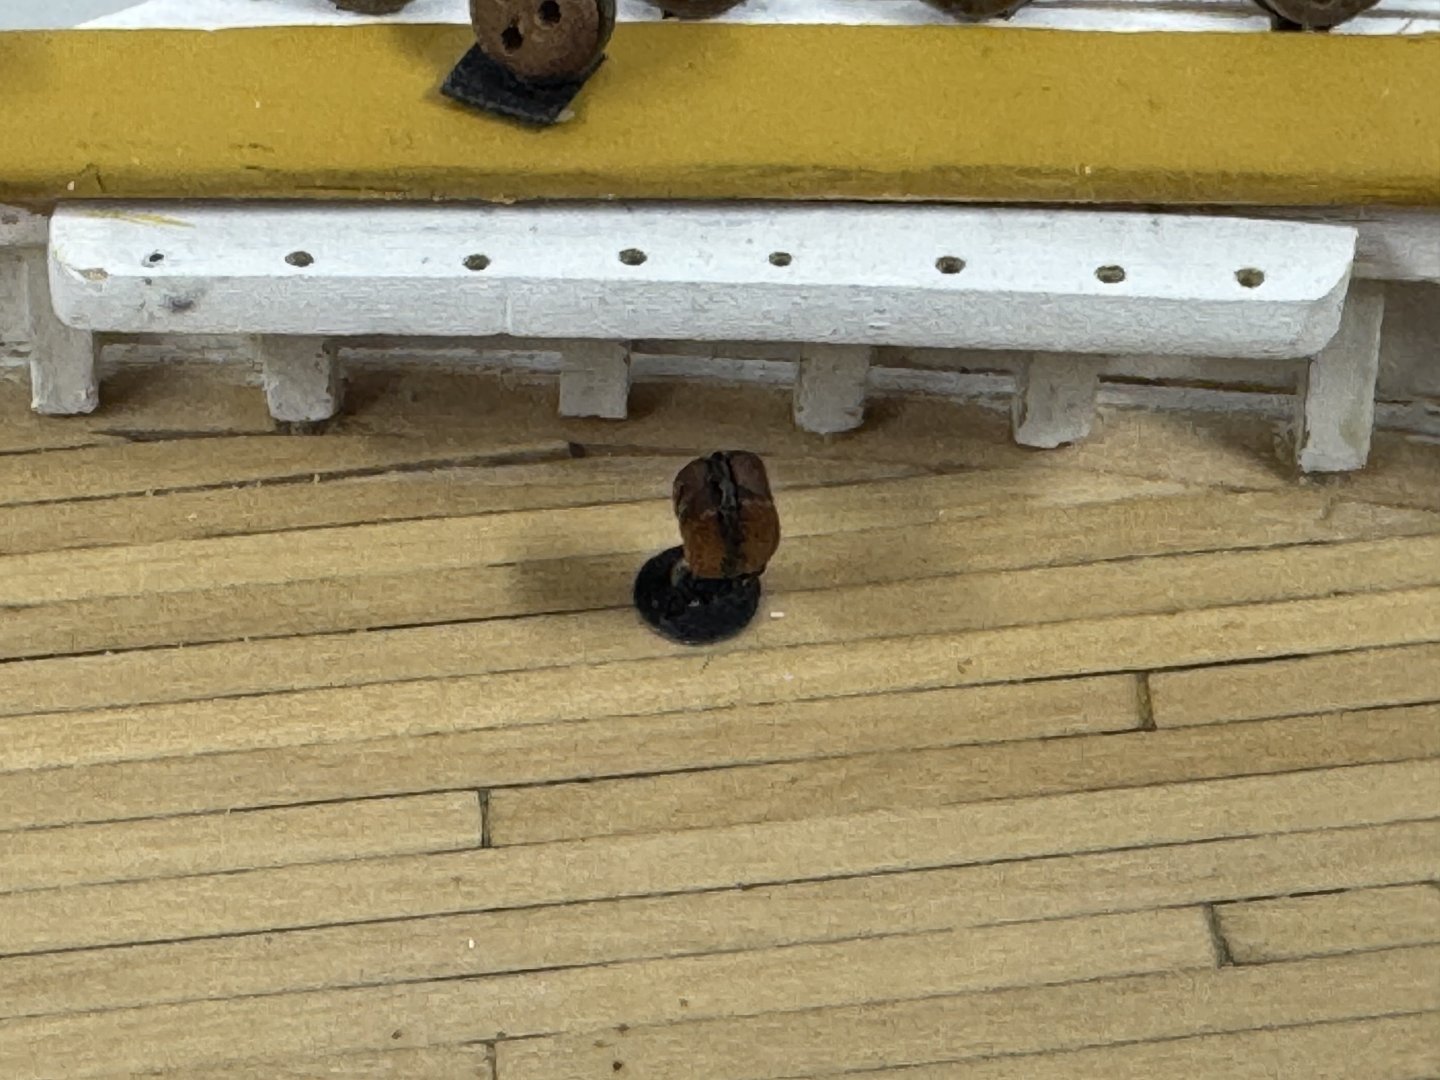
The hull and interior deck furnishing are essentially complete. I still need to add six 3mm single blocks that are part of the sheet tackle for the three foremost head sails that are going to eyebolts on deck just aft of the forward most pin rails. These are shown on the rigging drawing but all the drawing shows is the blocks sticking above the caprail - no way to tell how they are attached to the ship. So I will put eyebolts in the deck and pendants on the blocks so they will be above the caprail. The channels are all cut, slotted and painted so they are next along with the deadeyes and chainplates. There are six deadeyes (smaller 4mm size) on each side (three each on the main and fore masts) that appear to be attached to the caprail. The drawings says "Plain padeye fisher 135". I can only guess what a "plain padeye" looks like and the AJ Fisher catalog is no help as there are no padeyes listed and the Fisher 135 is missing - 134 and 136 are there; 134 is a cleat and 136 is a boat davit, I am going to cut some small squares out of black laserboard and call that a "plain padeye".


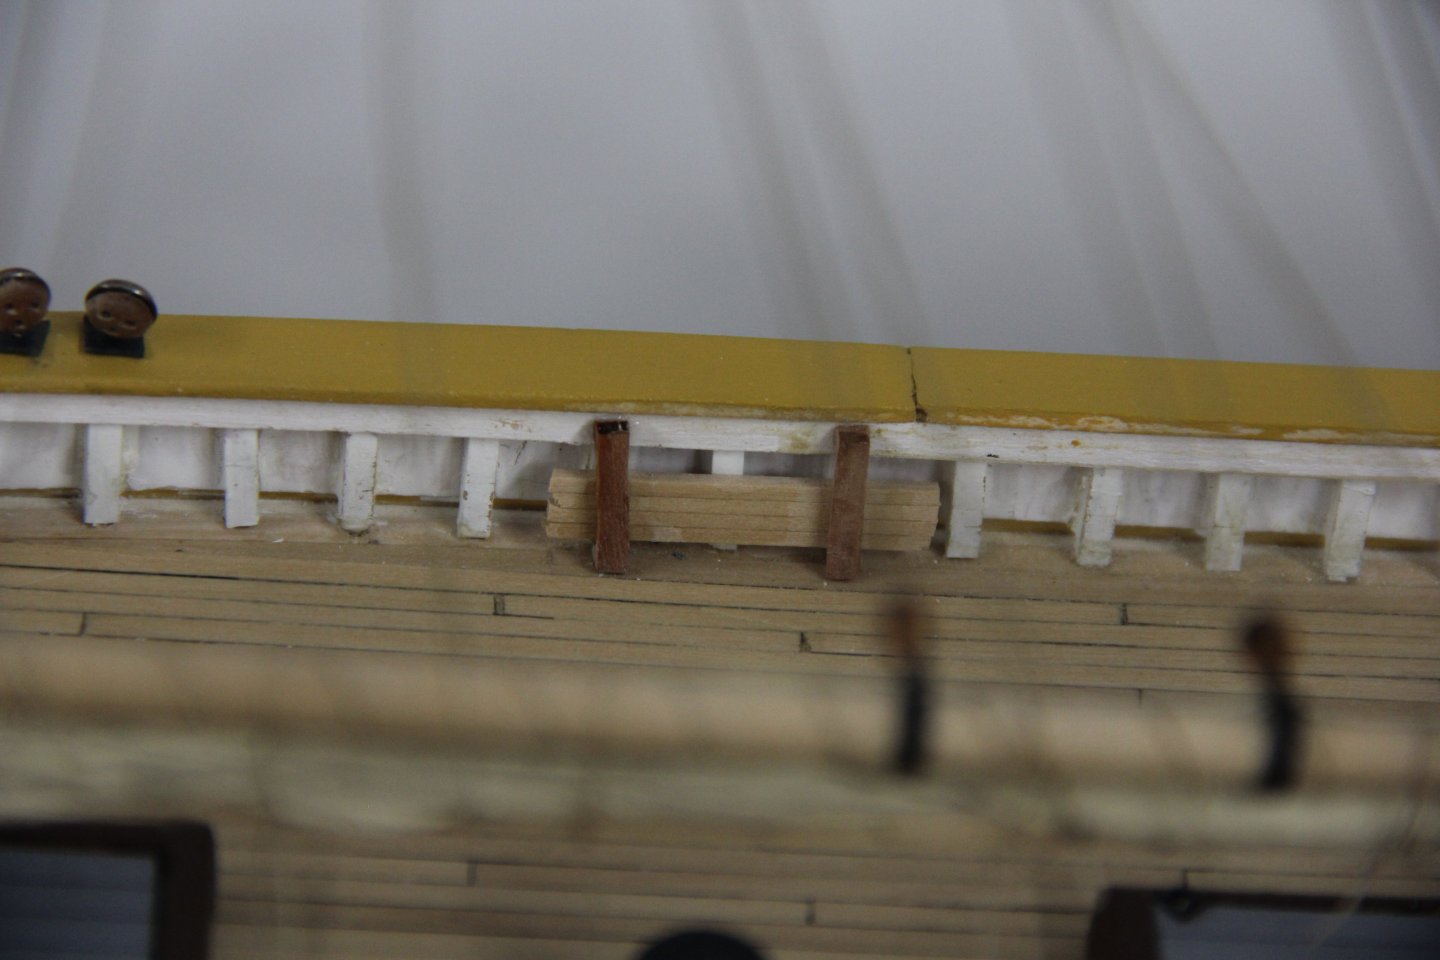
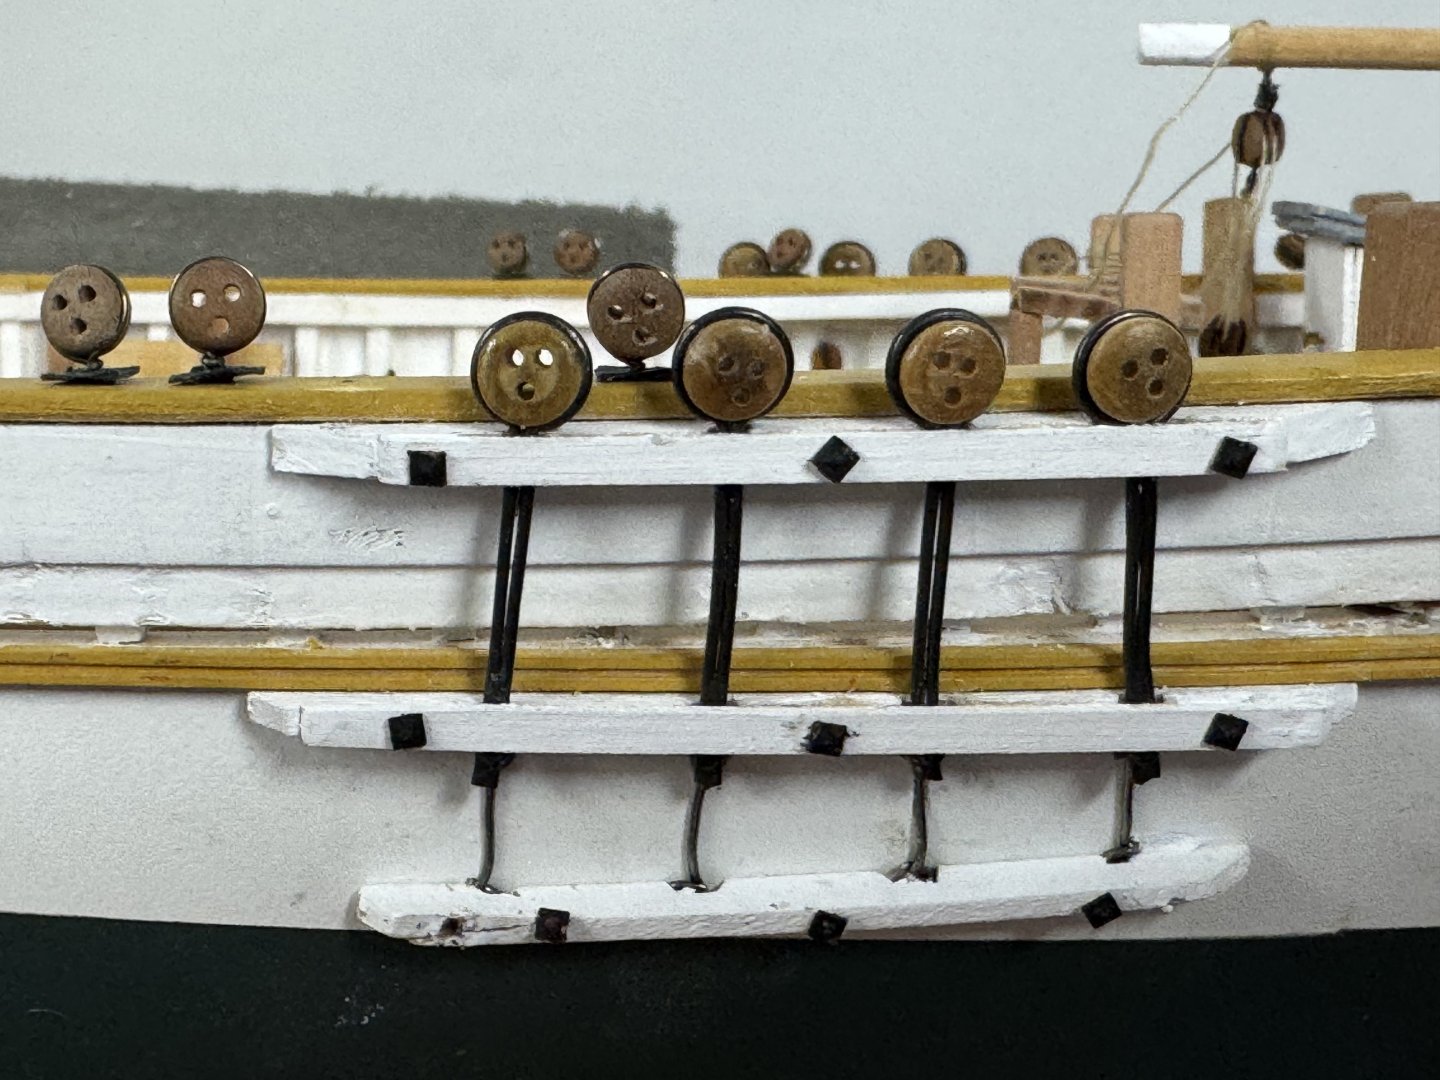
- 121 replies
-
- 5
-
-
-
- Lucia A Simpson
- AJ Fisher
- (and 1 more)
-
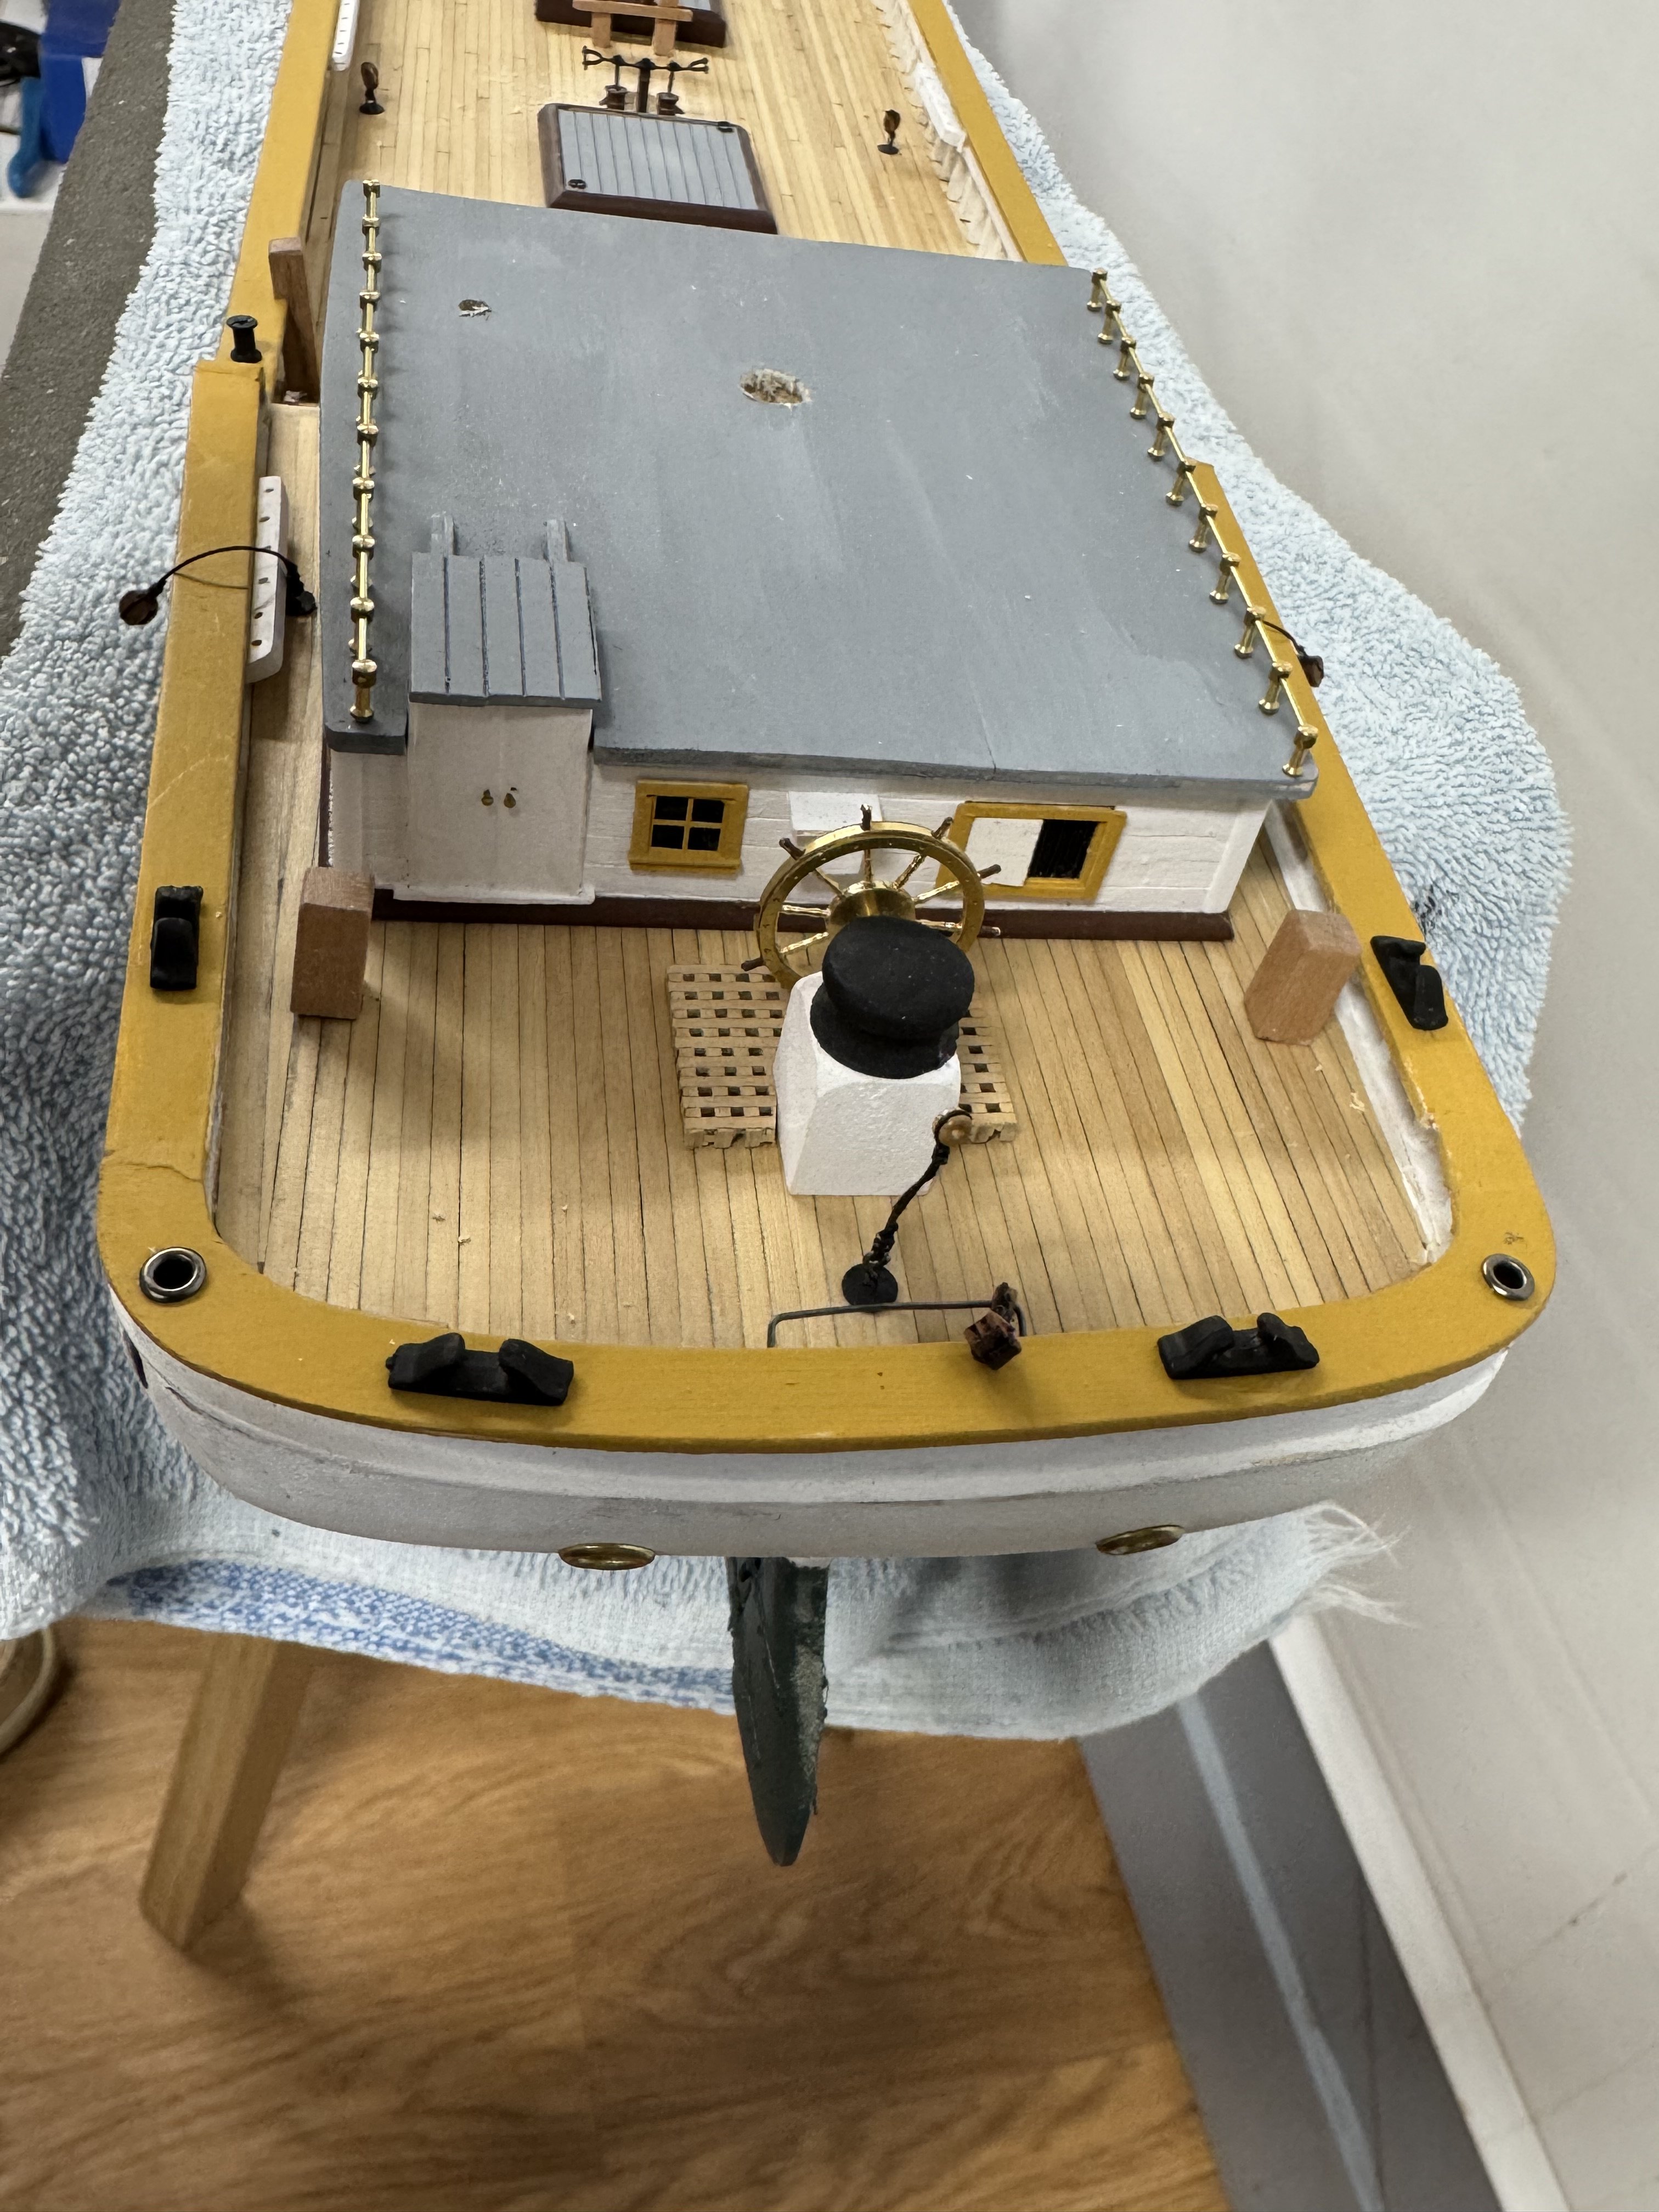
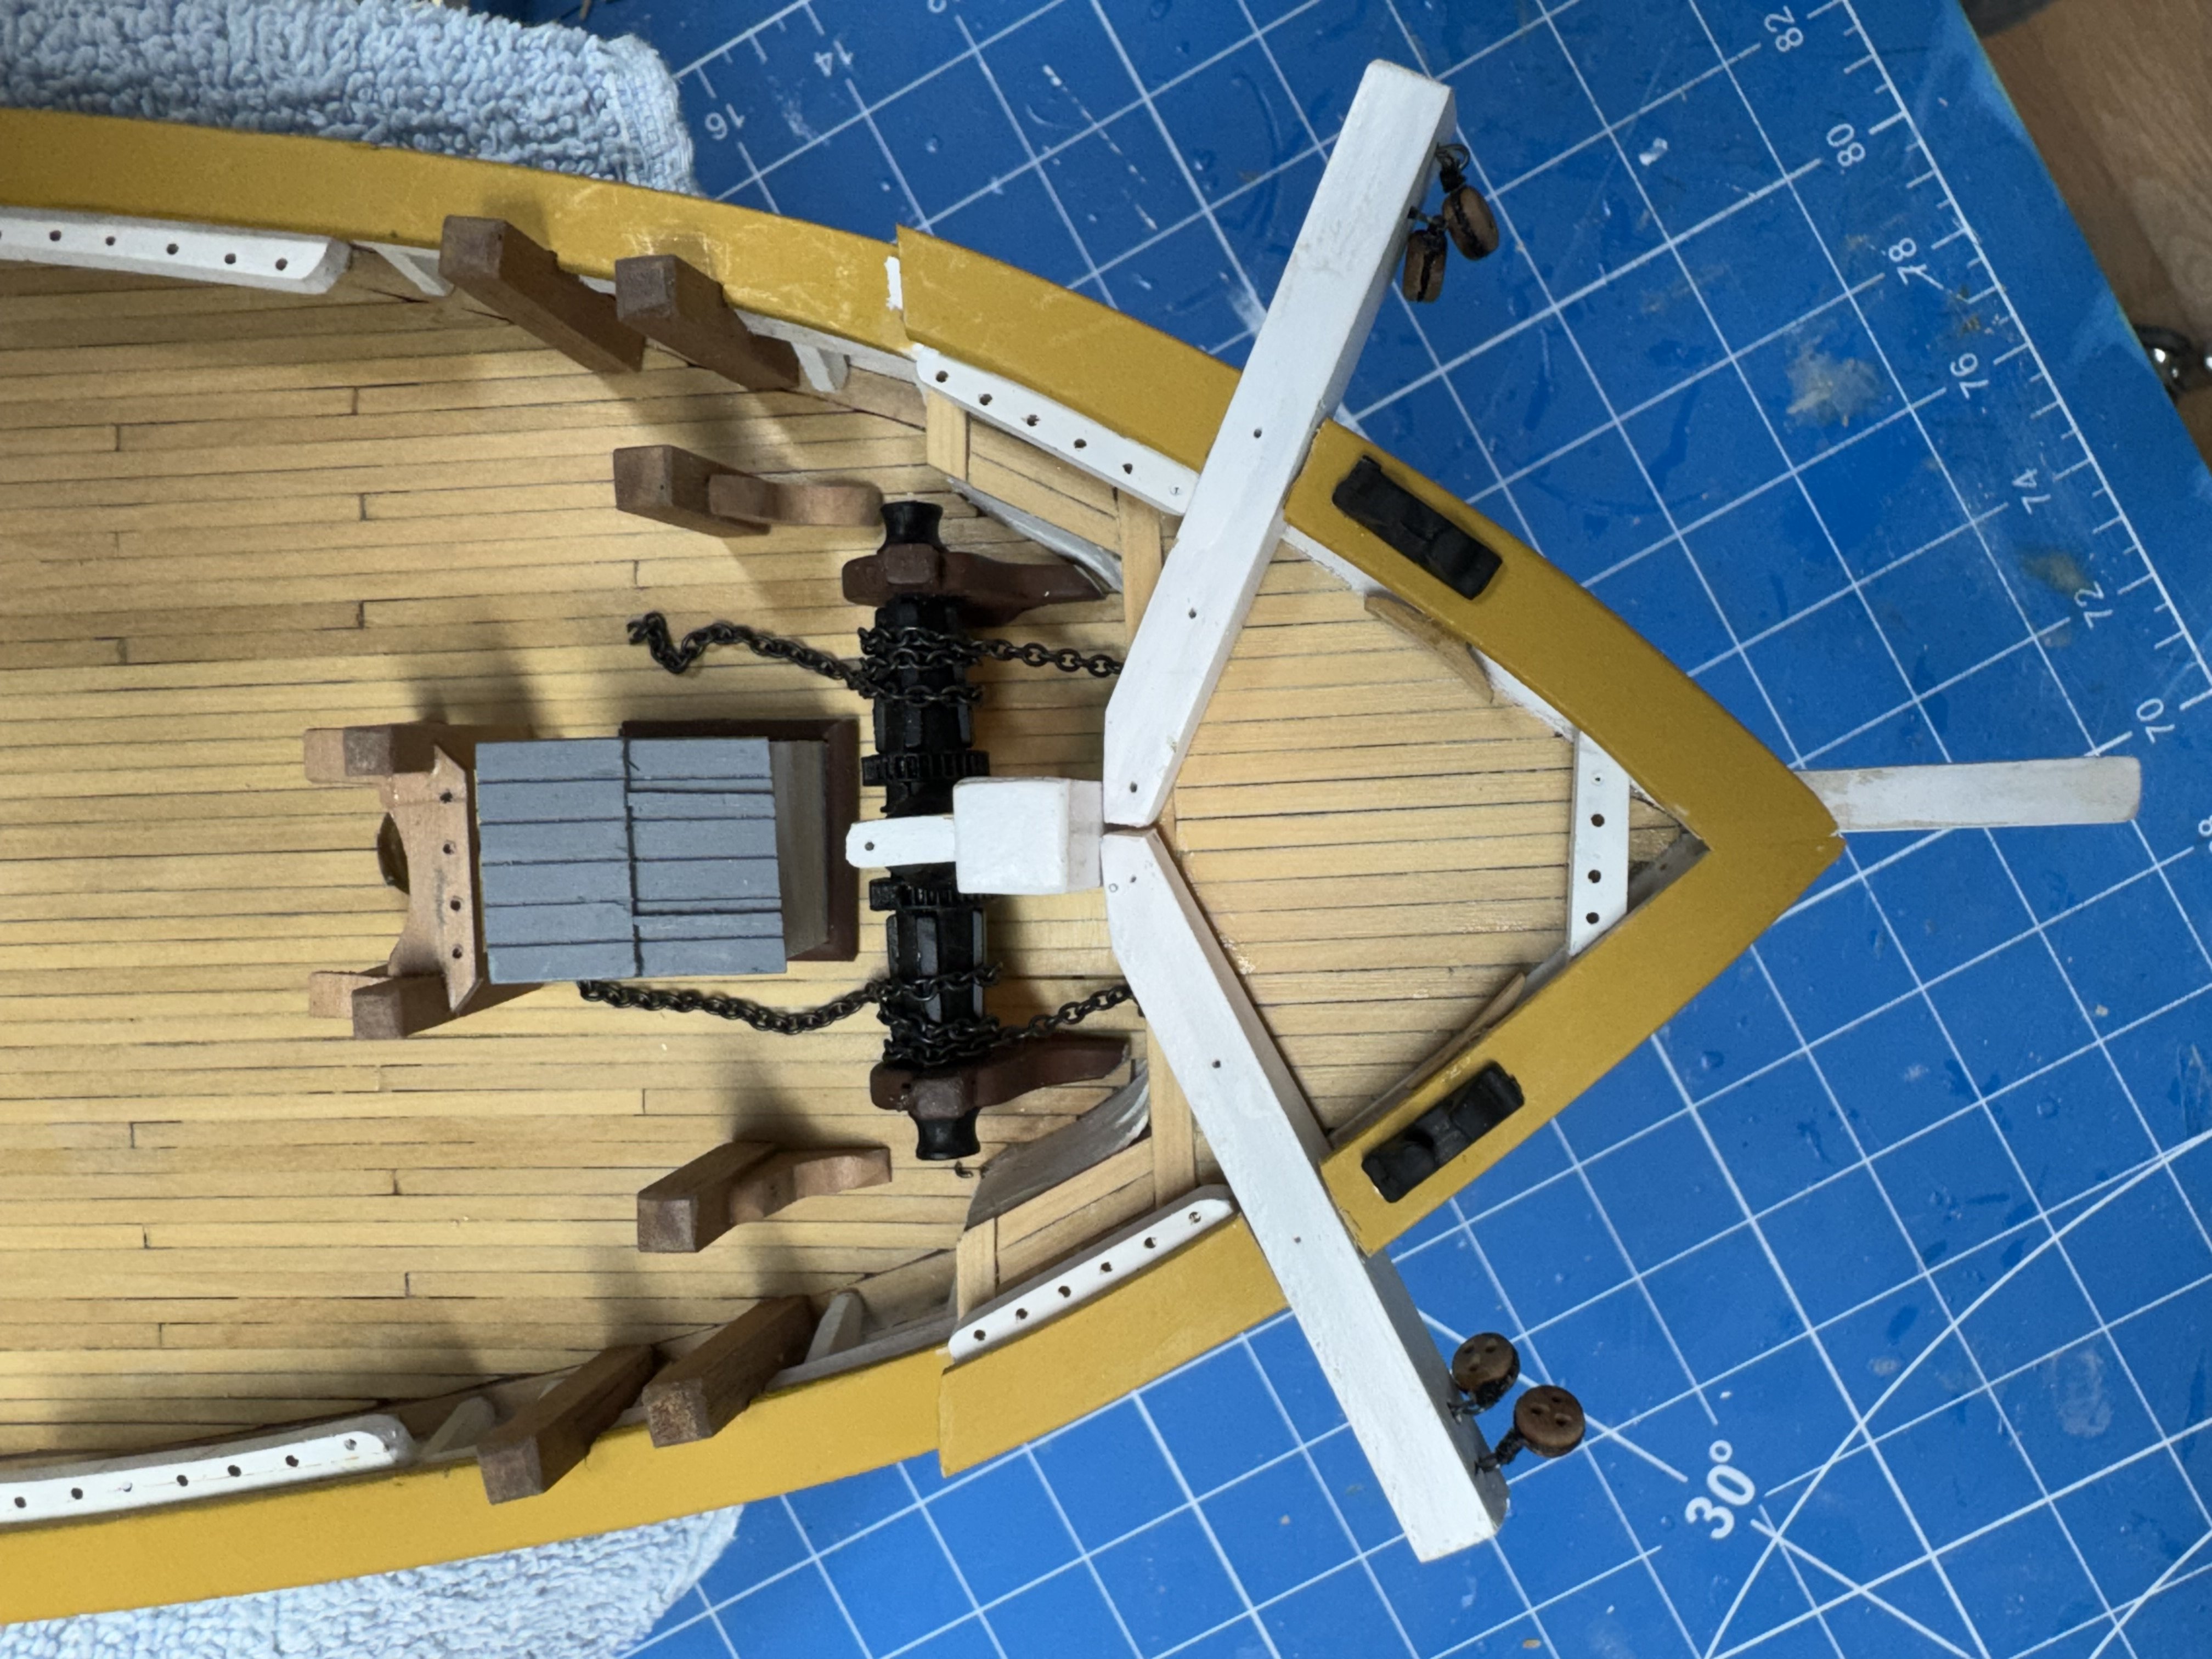
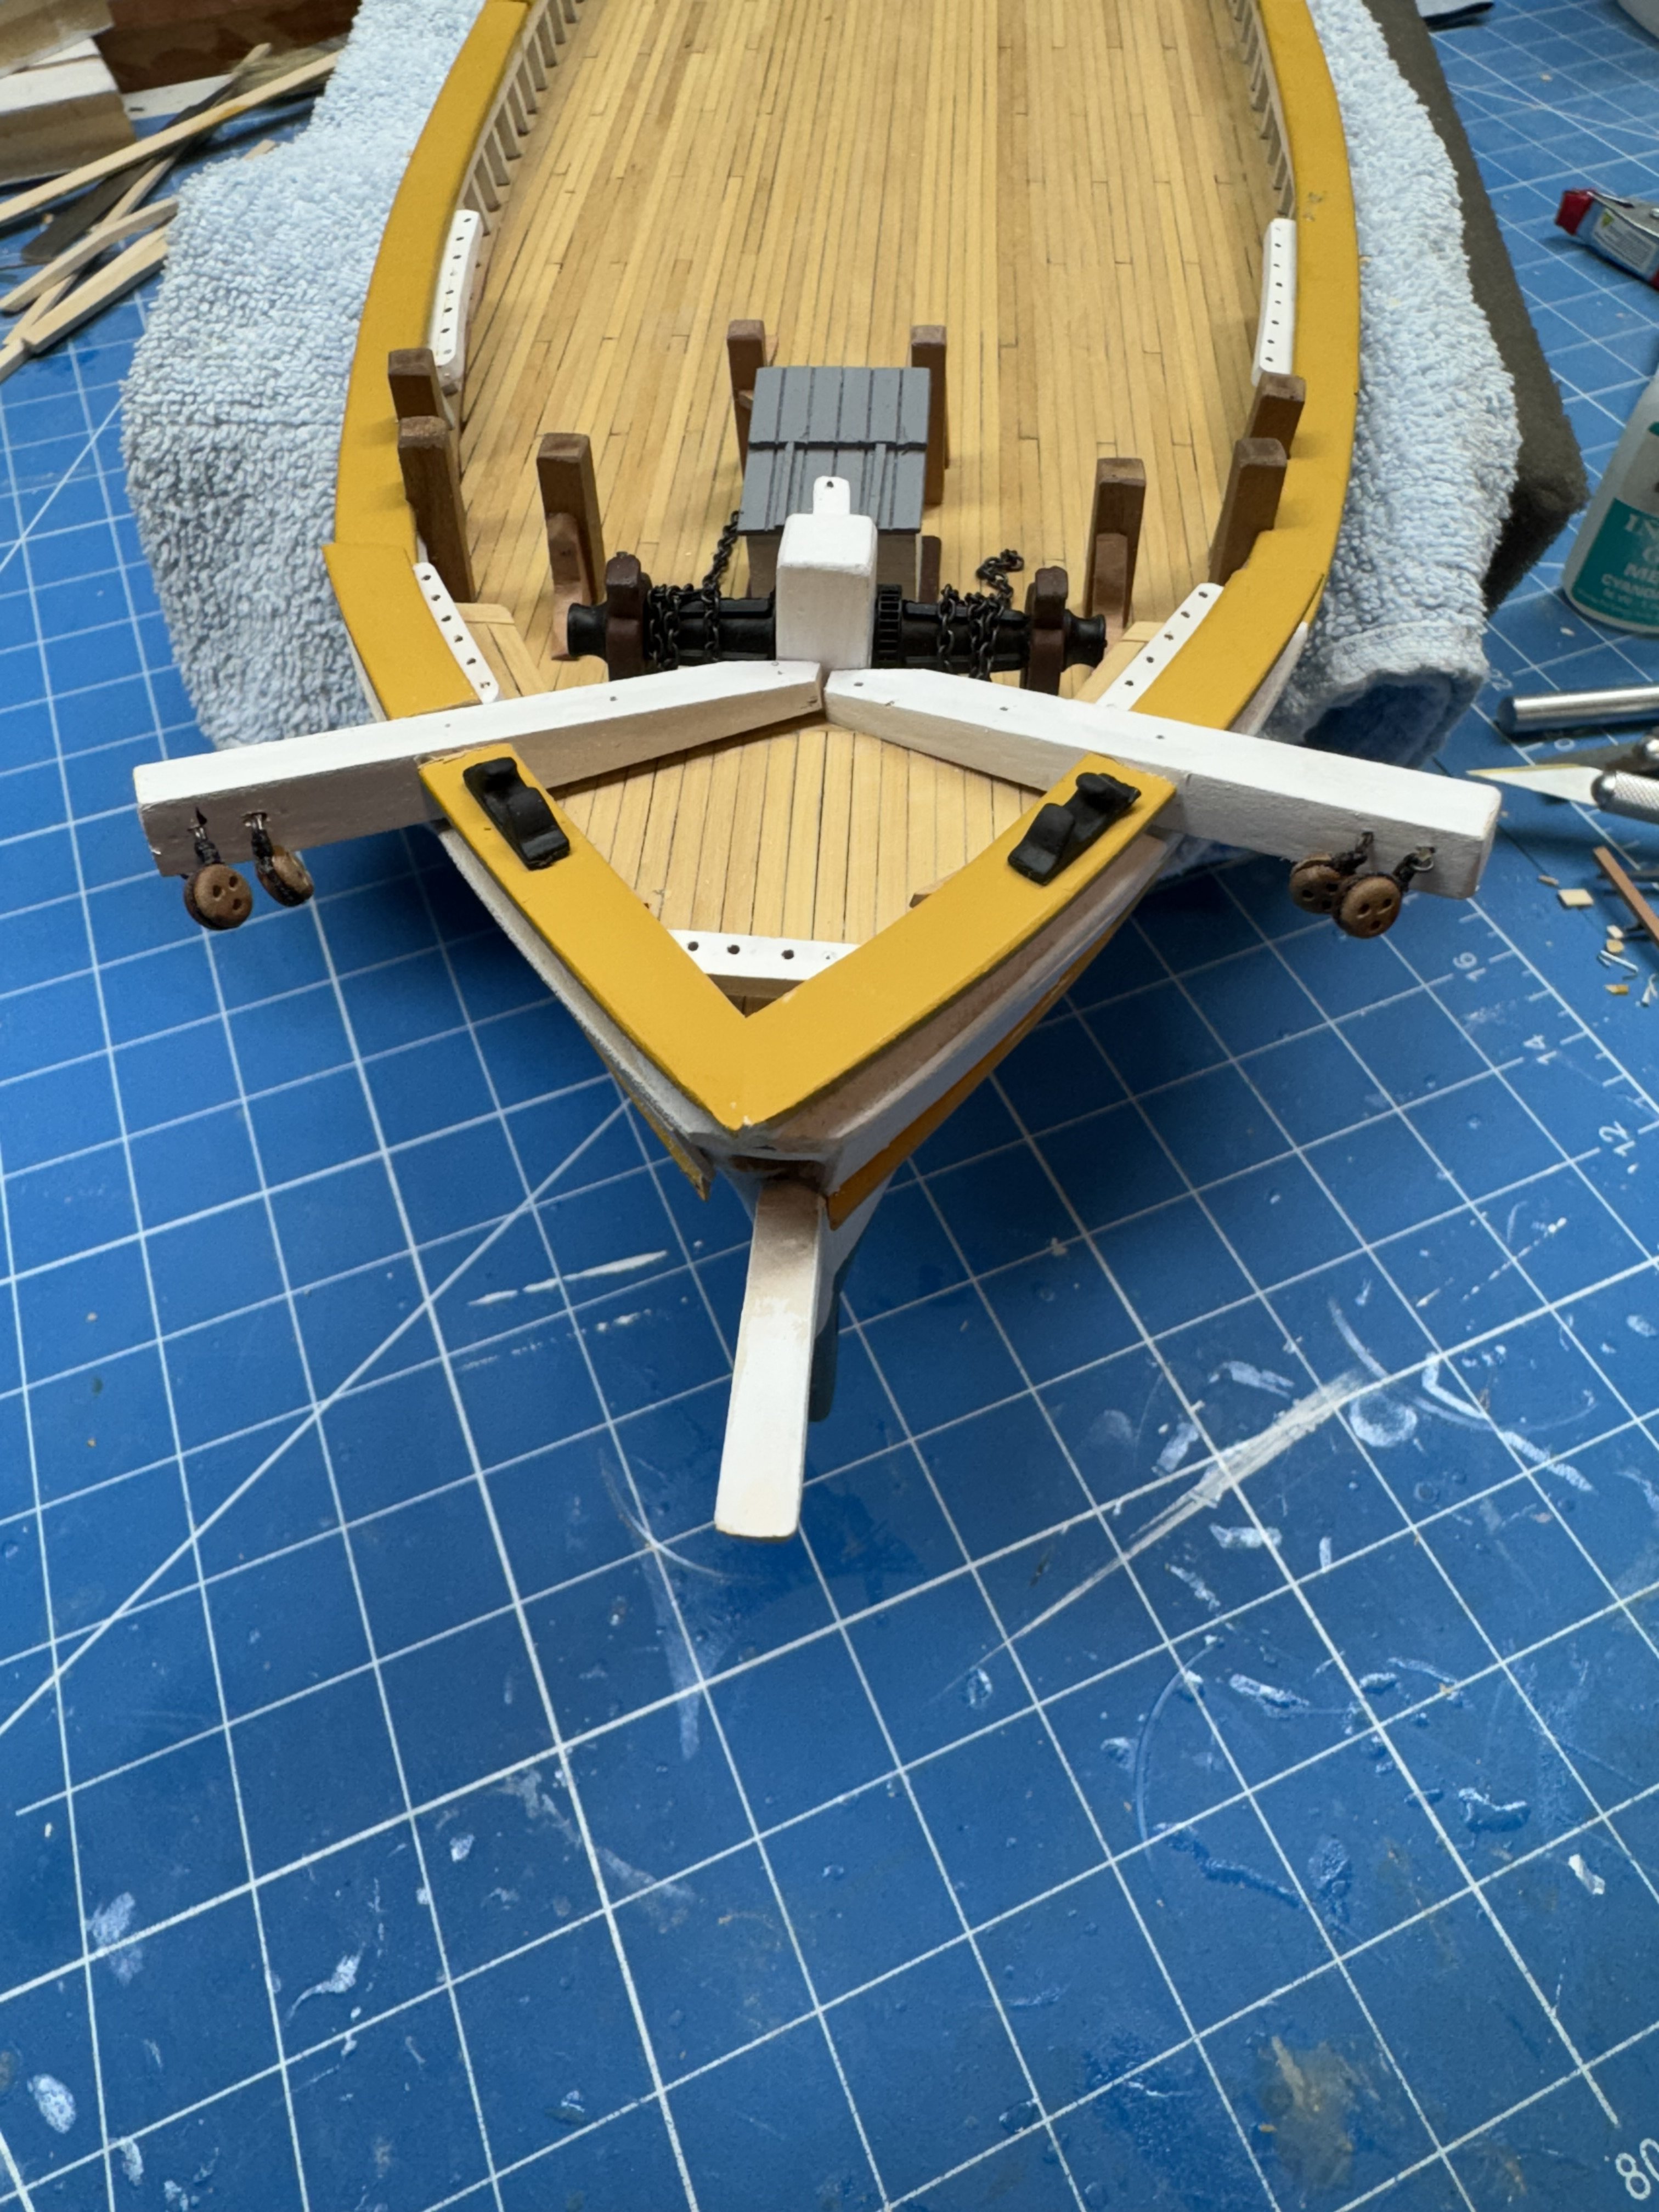
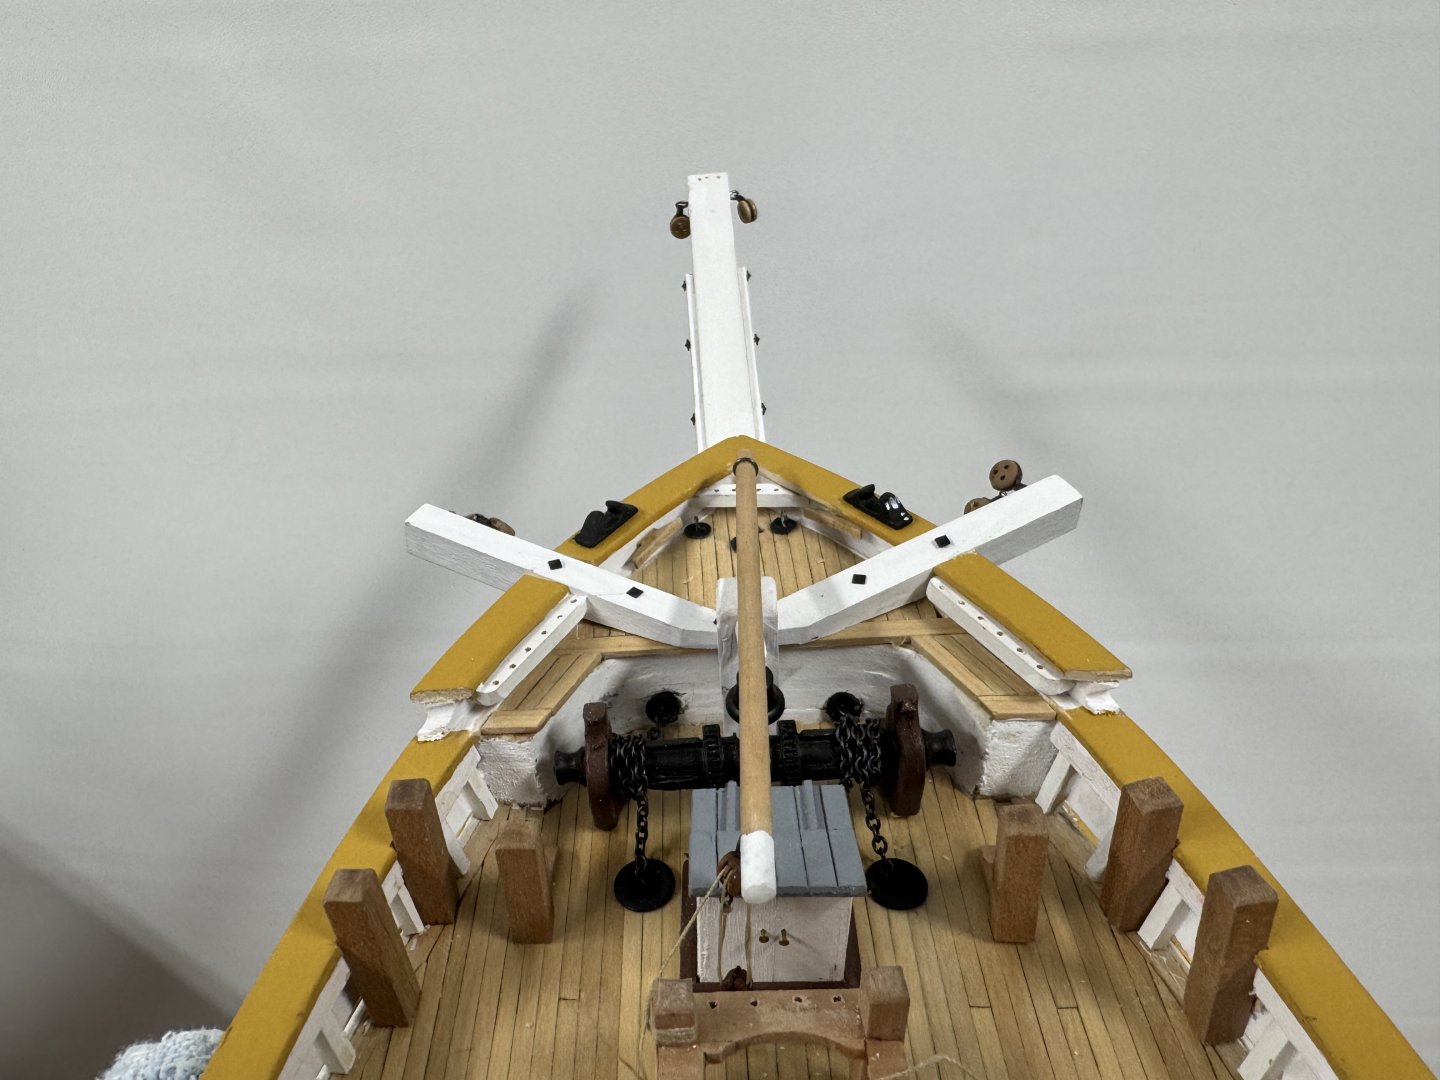
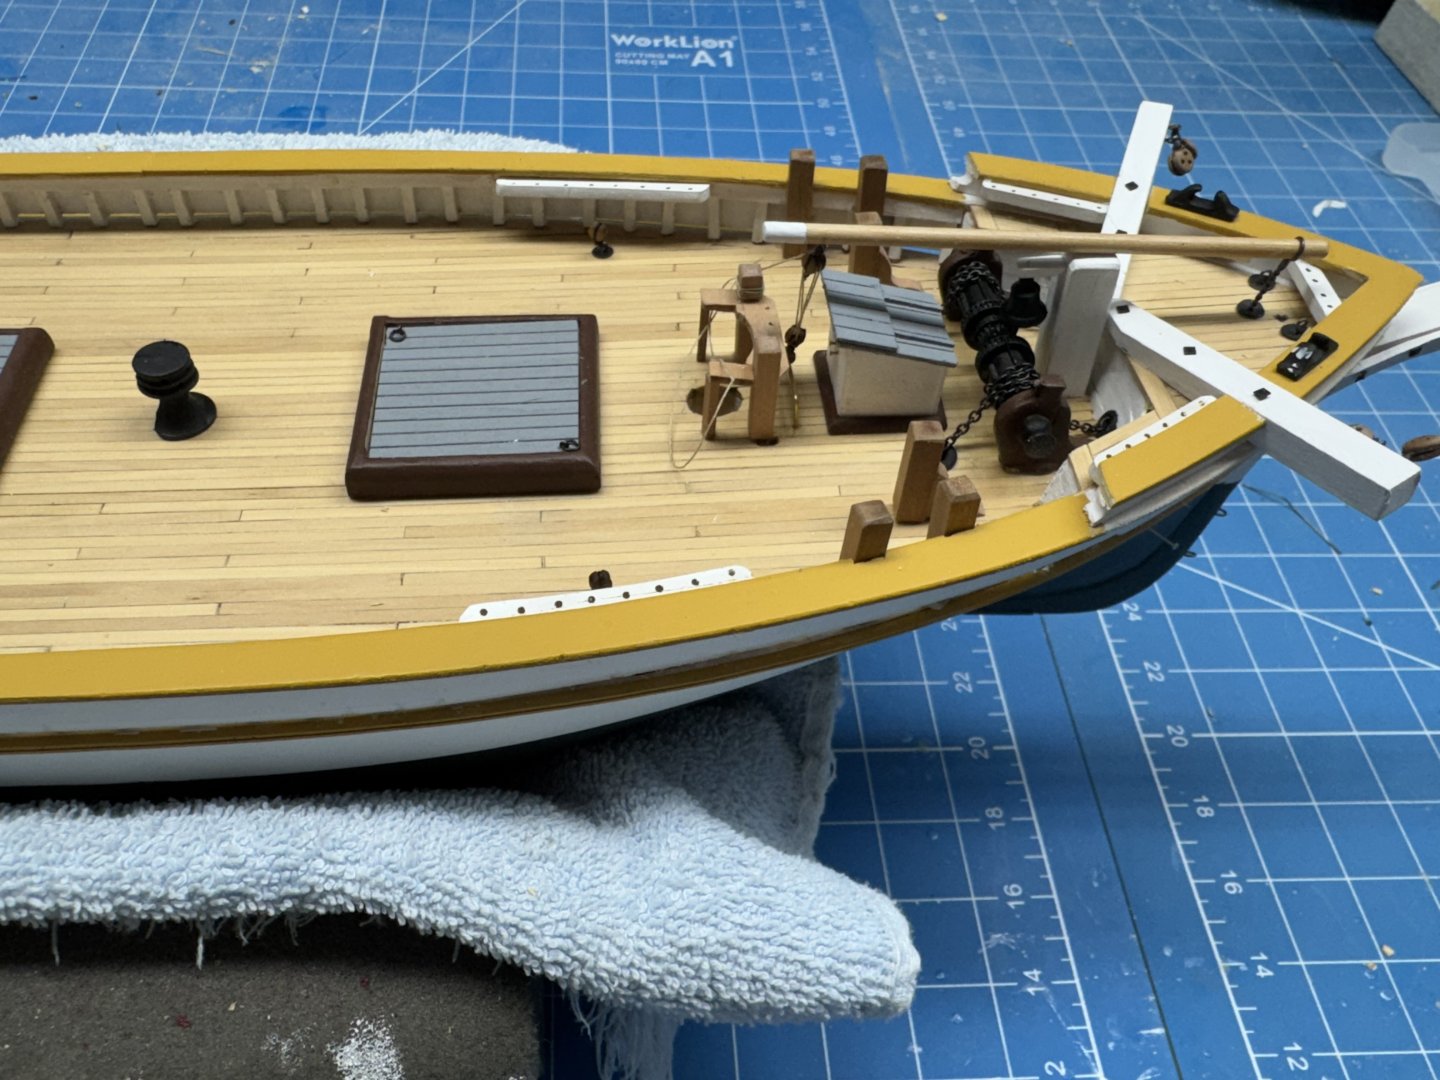
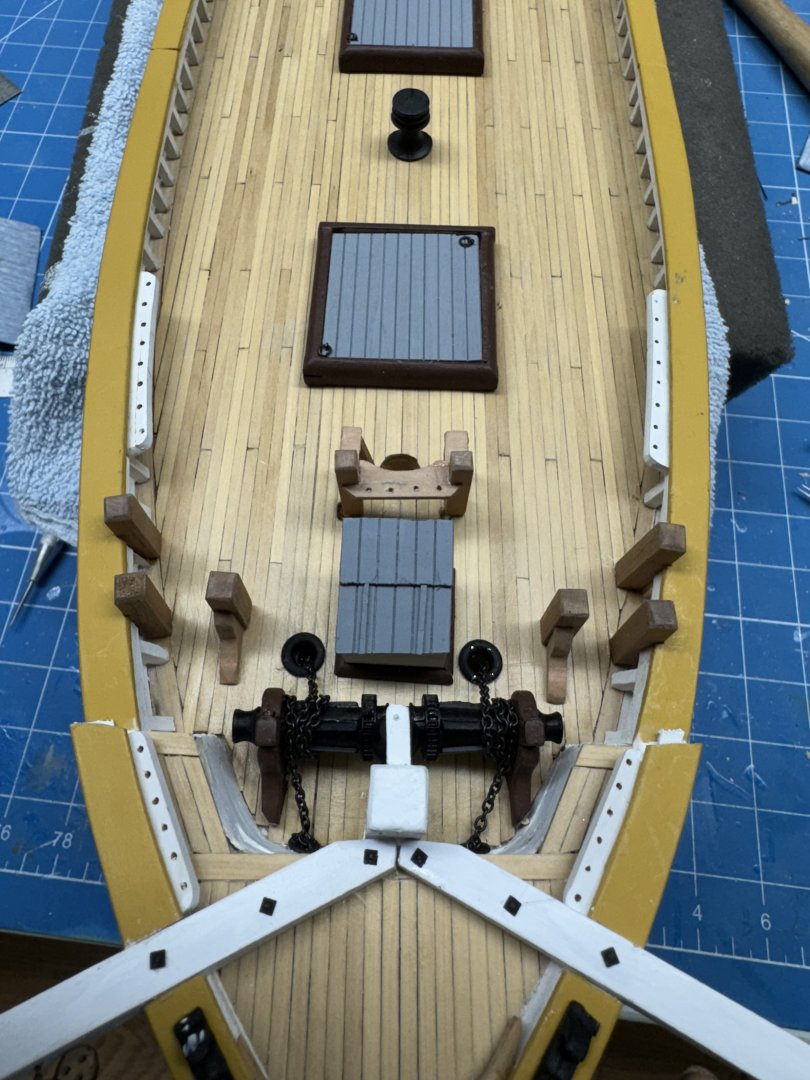
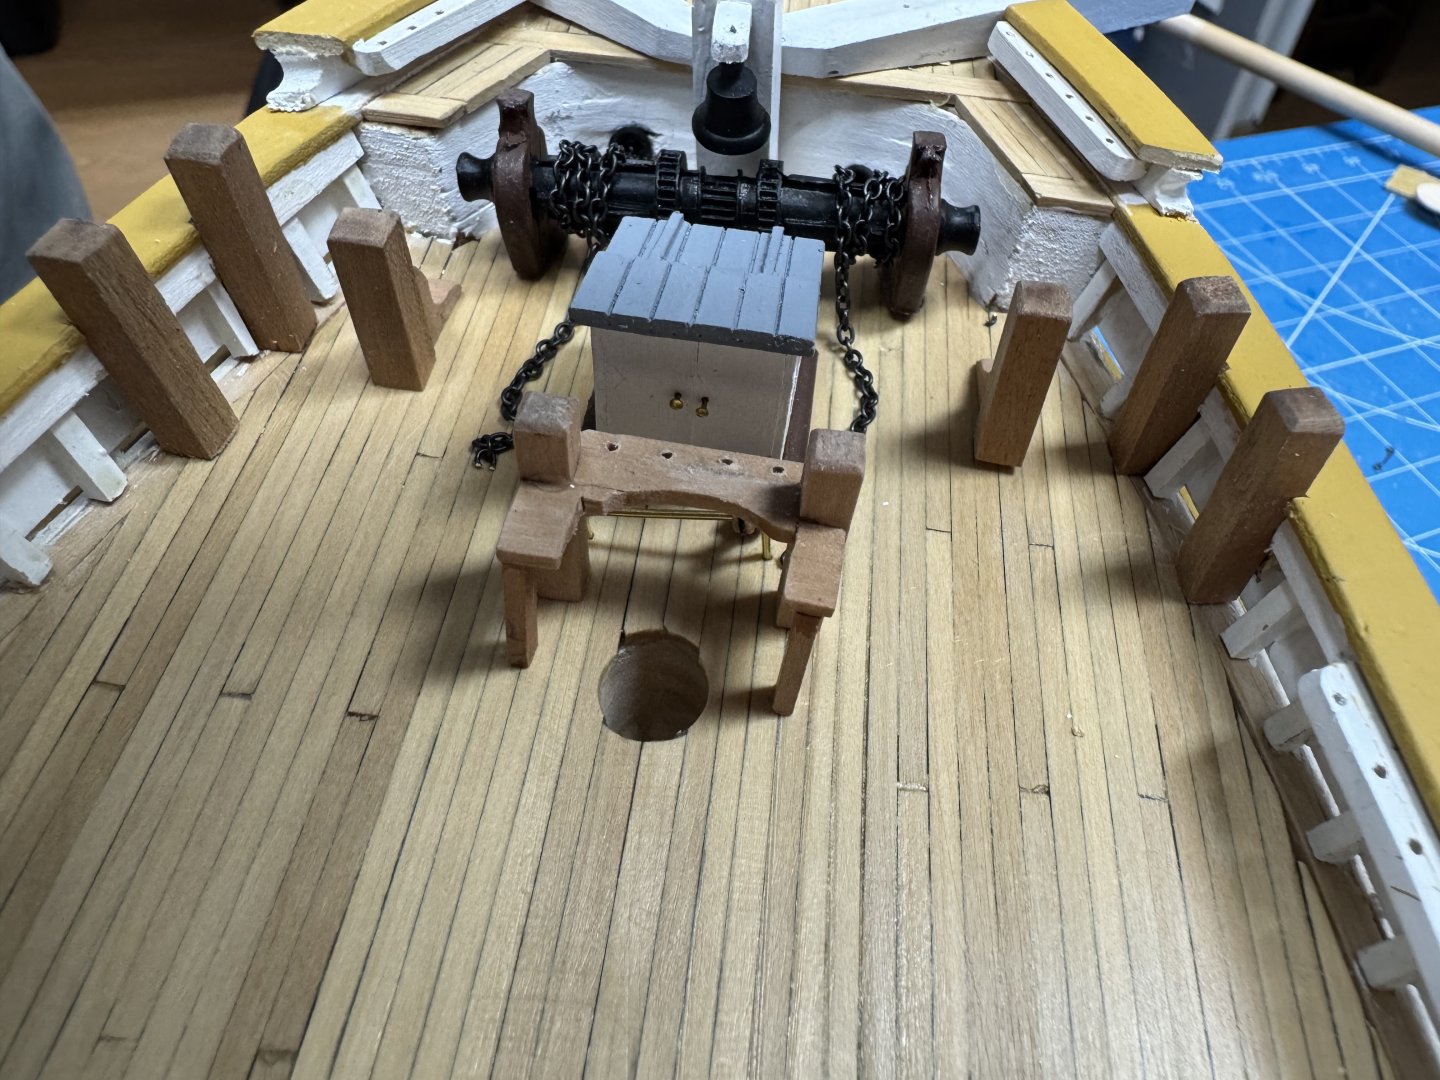
Since I am working my way aft I decided it was time to add the bowsprit. Hopefully I can keep from snapping it off while adding them rest of the "deck furniture". In addition to the bowsprit and the associated reinforcing piece down the side I added the bolt heads (square this time) to the catheads and the reinforcing piece. Also two hatches, the capstan and the eyelets that lead to the chain locker(s). While trying to accurately locate where the fore sheet bitts should go I discovered that while the drawing is correct (if you read it very closely) I had built the main and fore booms using the single drawing as a template and did not notice that the sheet blocks are in different locations. Now they are correct but it seems like there could have been separate drawings for the fore and main booms rather than "hiding" the differences in the dimensioning.

- 121 replies
-
- 3
-
-
- Lucia A Simpson
- AJ Fisher
- (and 1 more)
-
I guess it is time to start installing some of the "stuff" I have been working on for what seems like a long time. I decided to start at the bow and work aft. First up was the cat heads. Not much drama but you have to be careful when cutting the bulwark to avoid it being too large. I have marked the cat heads for installation of some more plastic bolt heads which are shown on the drawing. The bitts also require some surgery to the deck edge and the timberheads so the bitts will stand up vertically. I have not installed the eyelets to lead the anchor chain to the chain locker because I used the two provided in the kit to clean up the holes where the chain passes through the forecastle to the anchors. The basswood hull material will just NOT take a splinter free hole. I have more 3/16" eyelets on the way and will get to them shortly. Just to be on the safe side, the towing bitts by the forward hatch are just sitting there at the moment so they will not get in the way of drilling the eyelet holes.


- 121 replies
-
- 4
-
-
- Lucia A Simpson
- AJ Fisher
- (and 1 more)
-
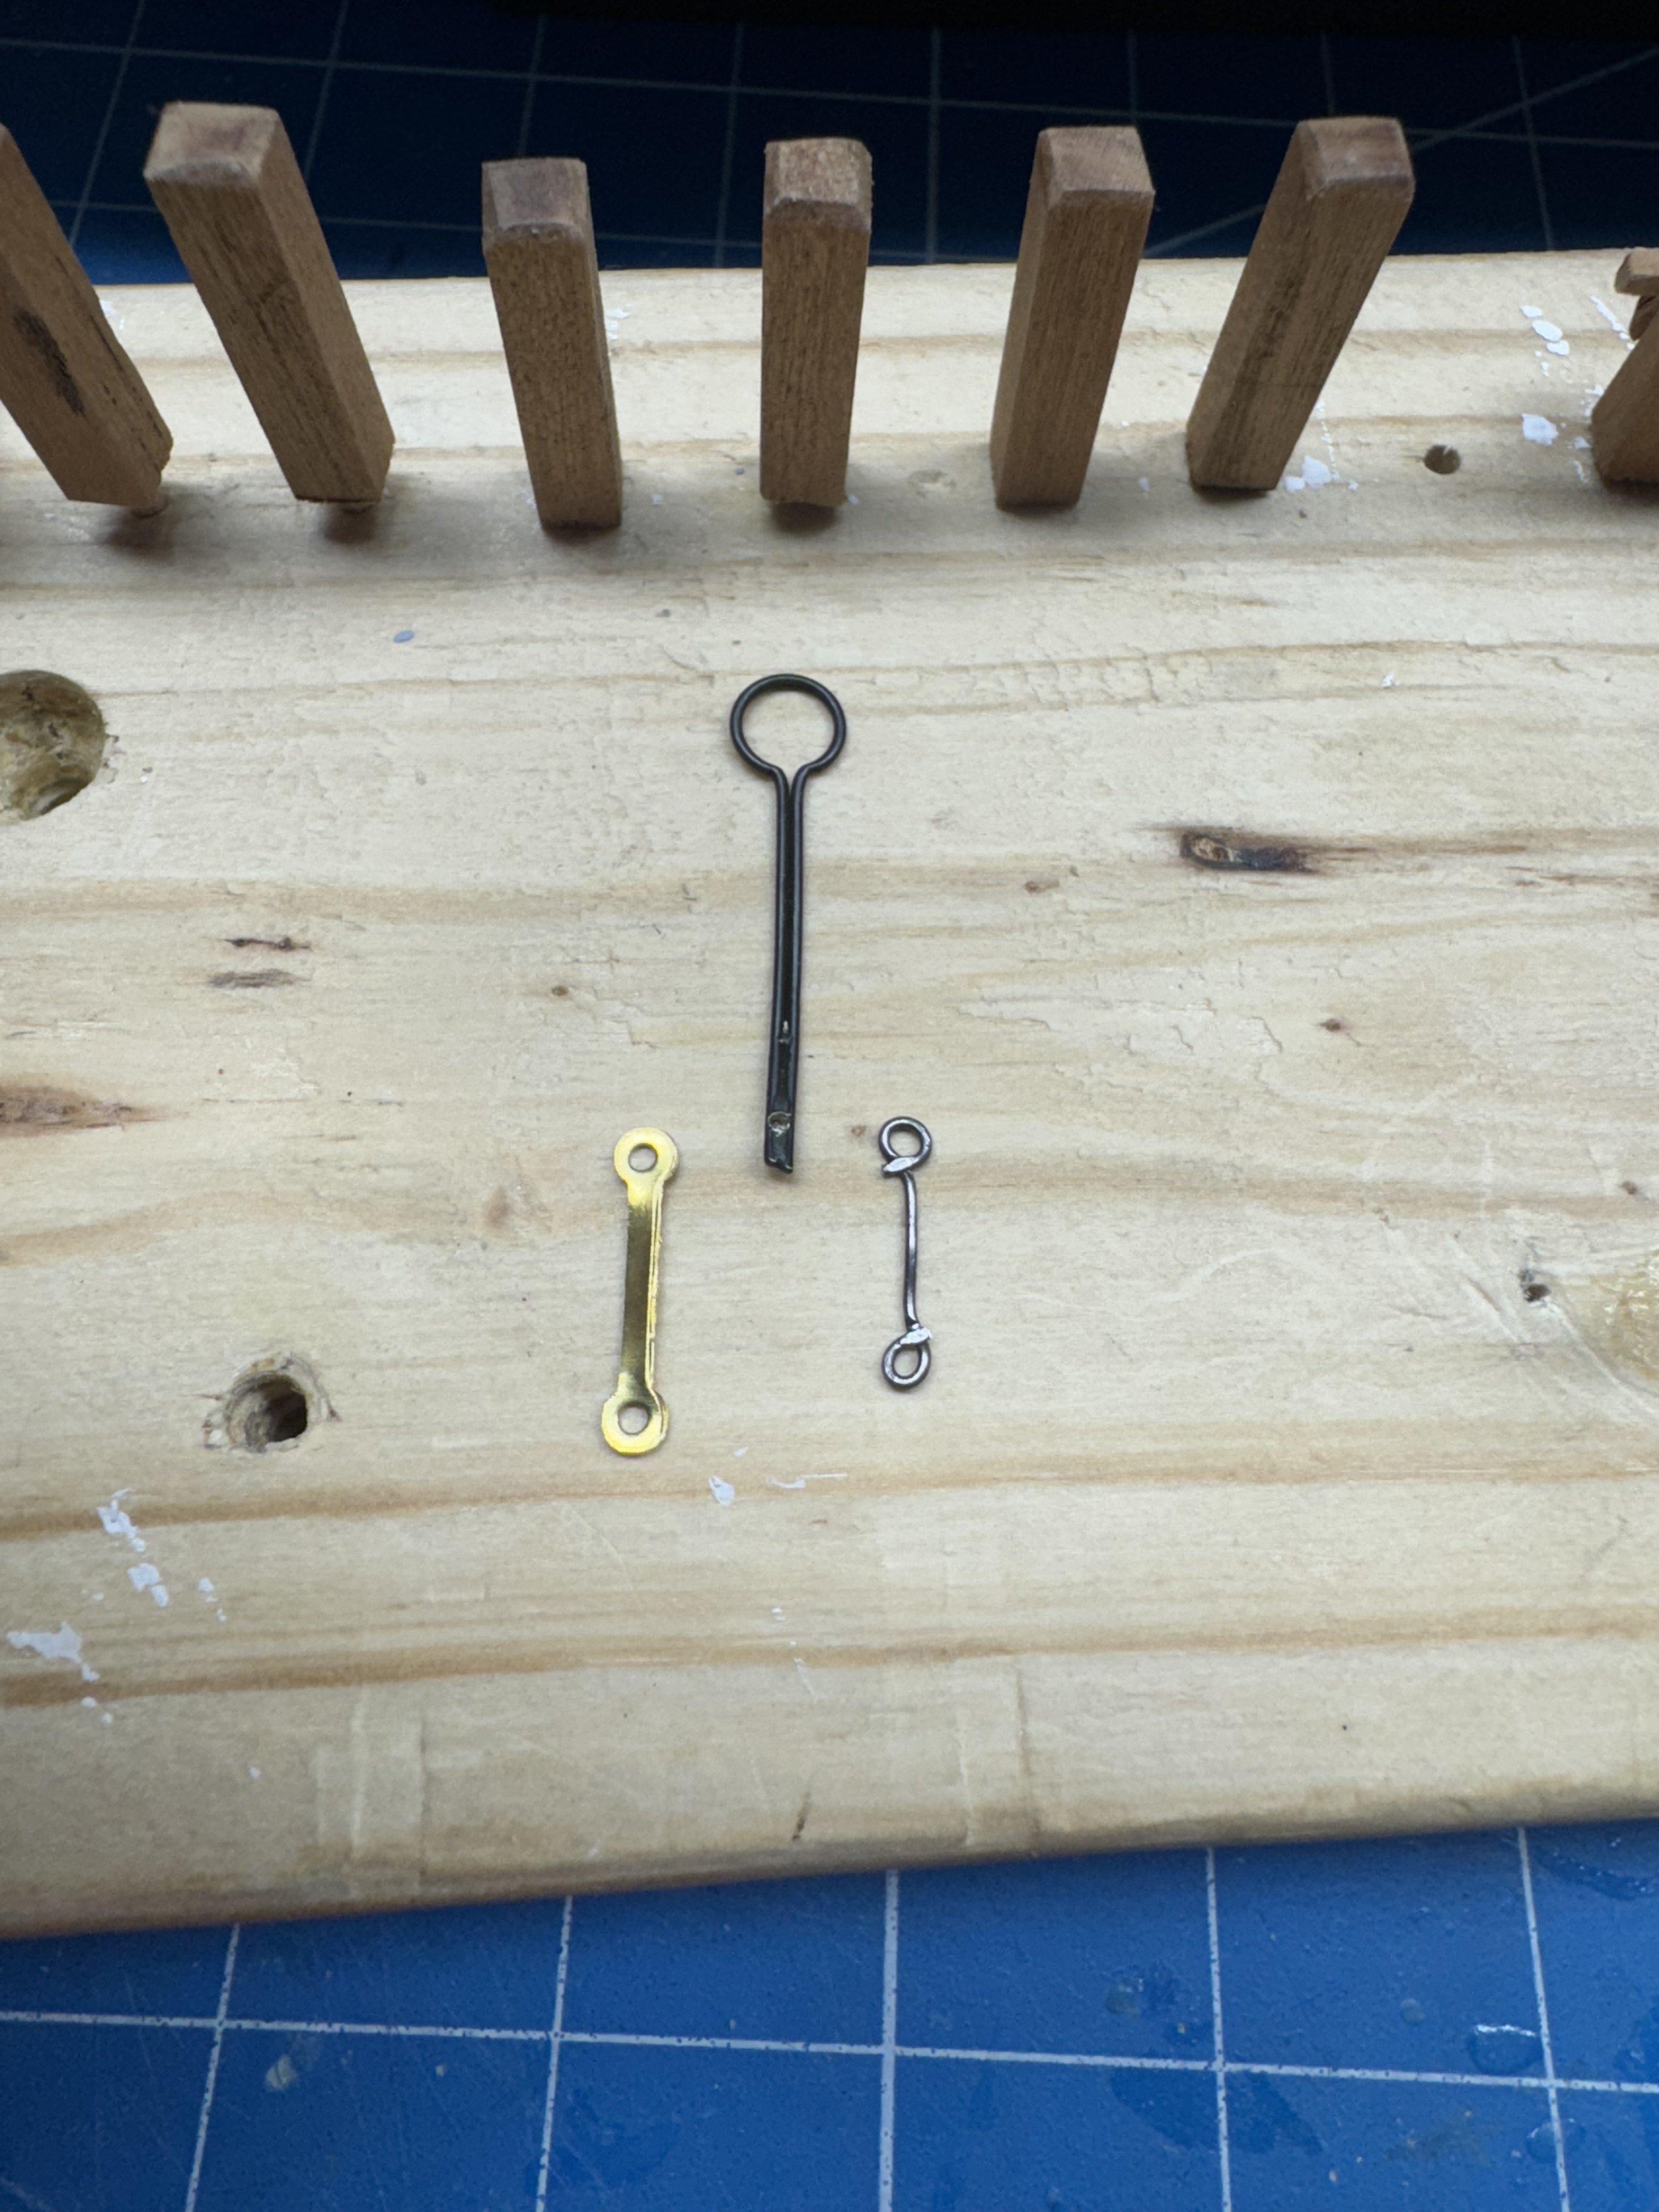
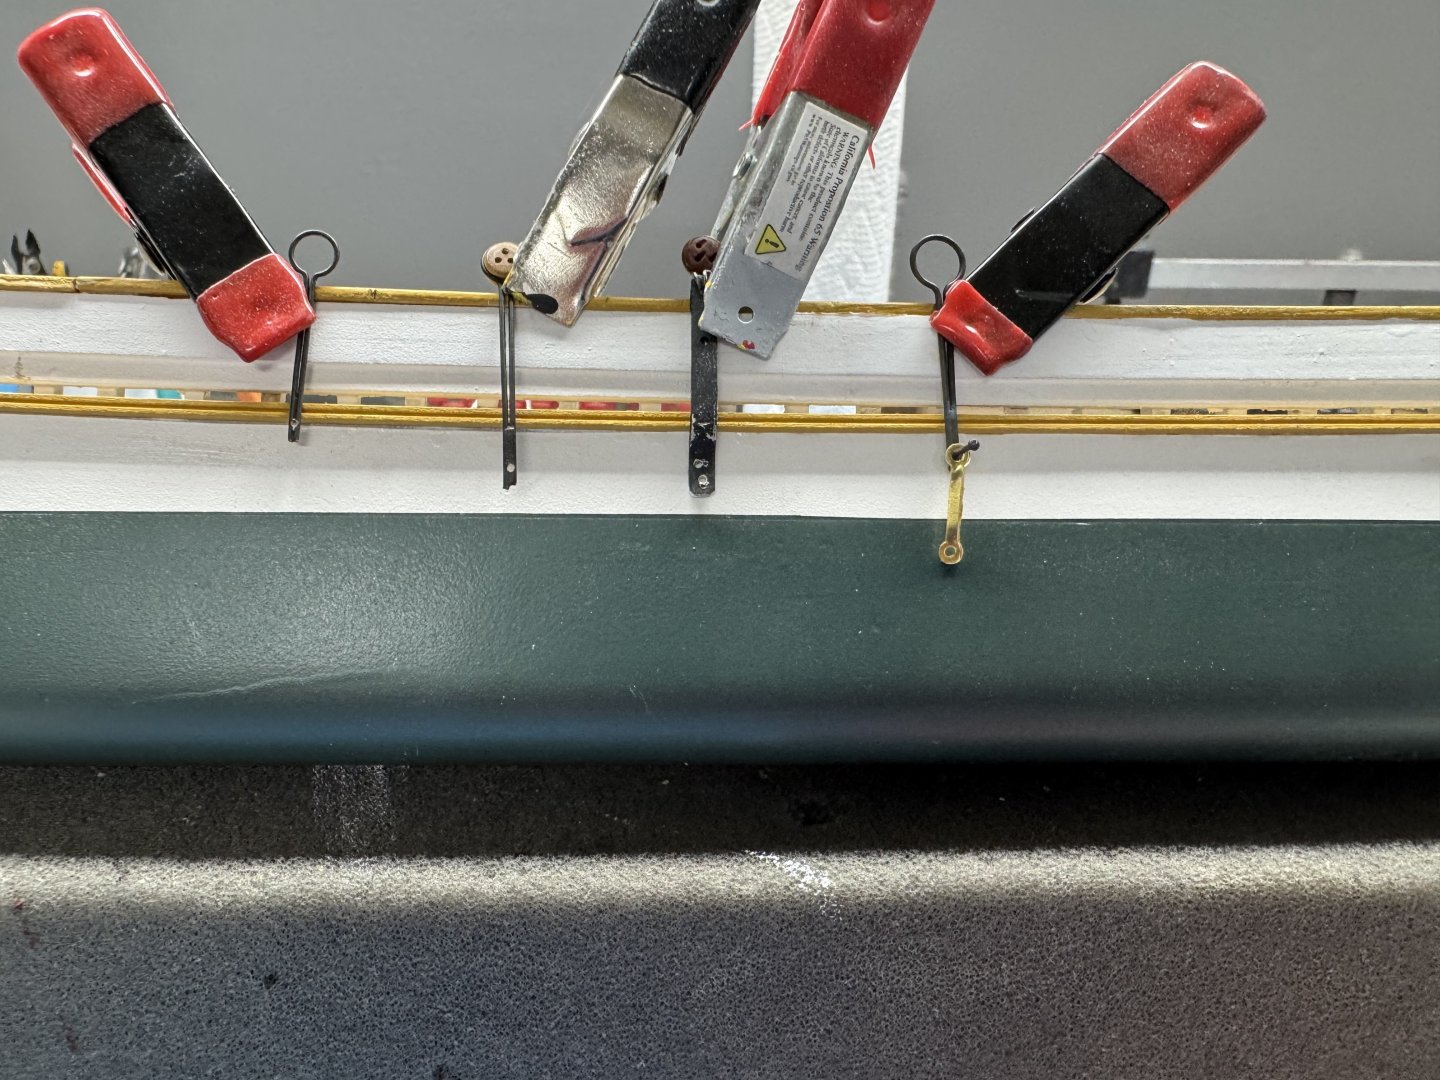
Thanks Rick!😀 After sleeping on it last night I decided that the brass backing links I re-purposed from a different Corel chainplate package were too over scale and looked for alternatives. I set up a little jig (two pieces of .039" piano wire set vertically into a 2 X 4) and tried making the backing links out of 24 gauge annealed steel wire. Actually I tried 22, 24 and 26 gauge wire but decided 24 gauge was "best". Here are the selected chainplate and the two alternative backing links. I made the replacement just a bit shorter (assuming I can replicate the length more or less exactly - yet to be established) so it will (in theory) hit the waterline the same as the drawing shows. One down and 21 left to go.


- 121 replies
-
- 2
-
-
- Lucia A Simpson
- AJ Fisher
- (and 1 more)
-
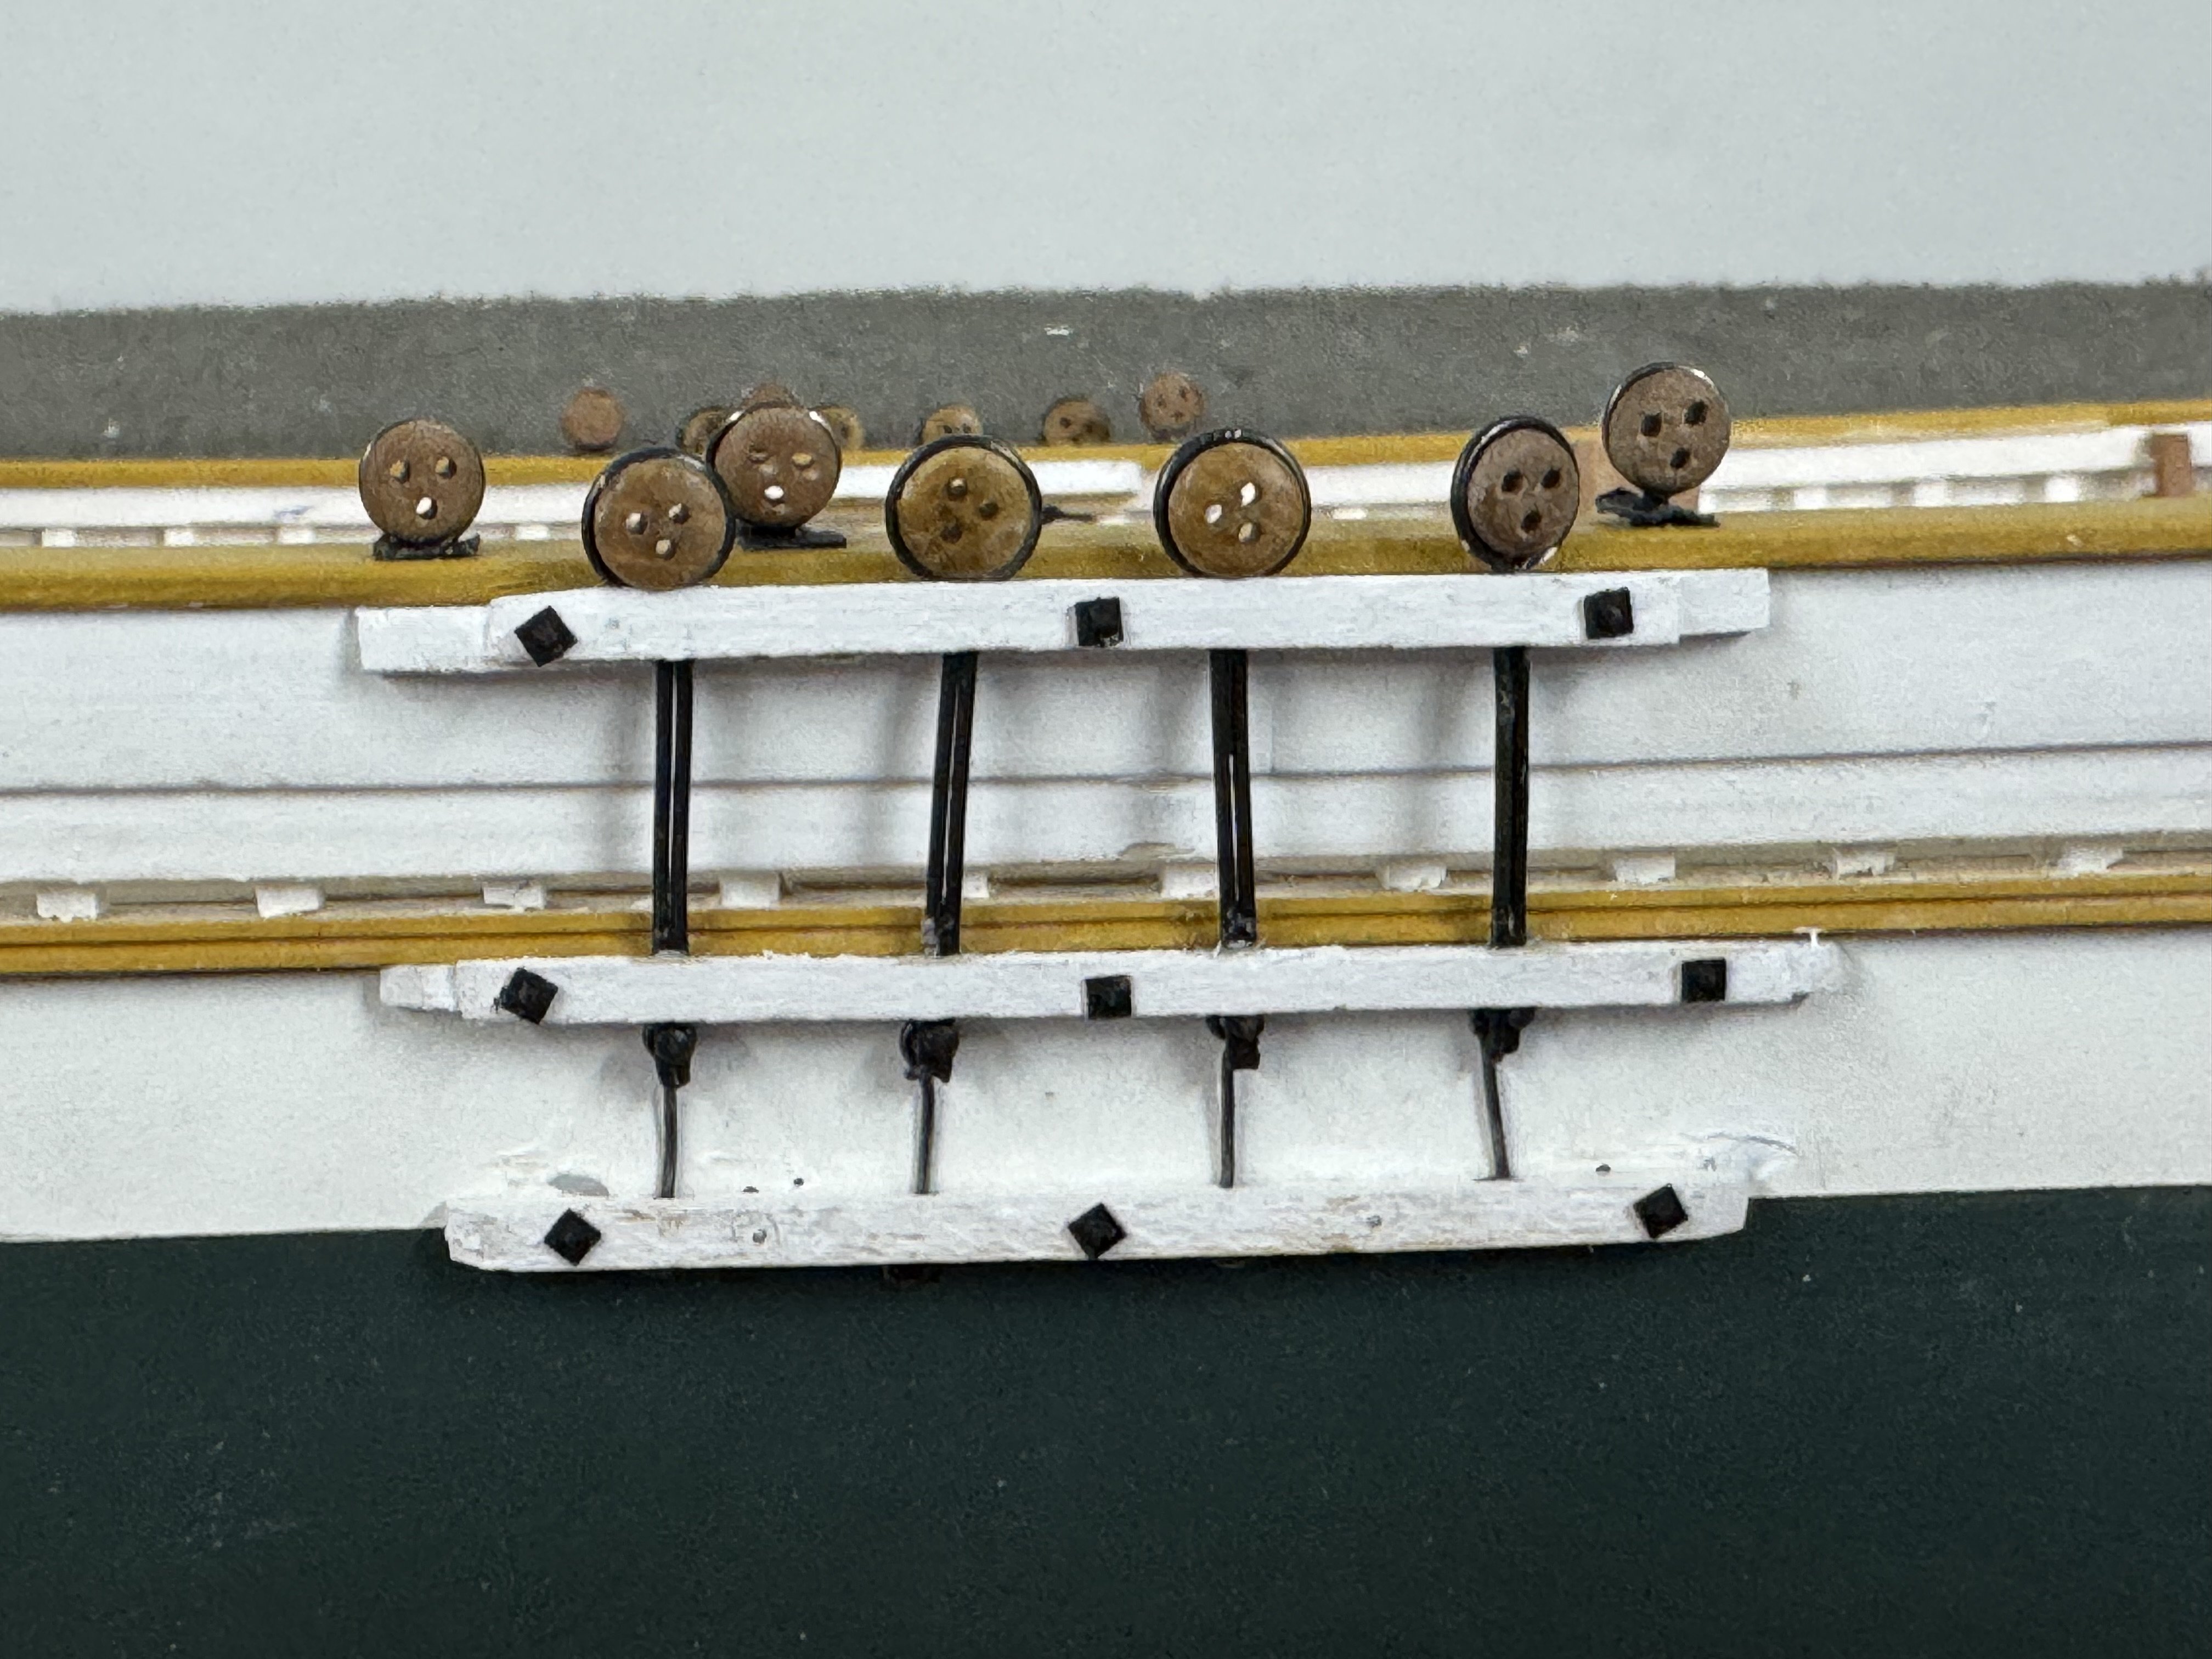
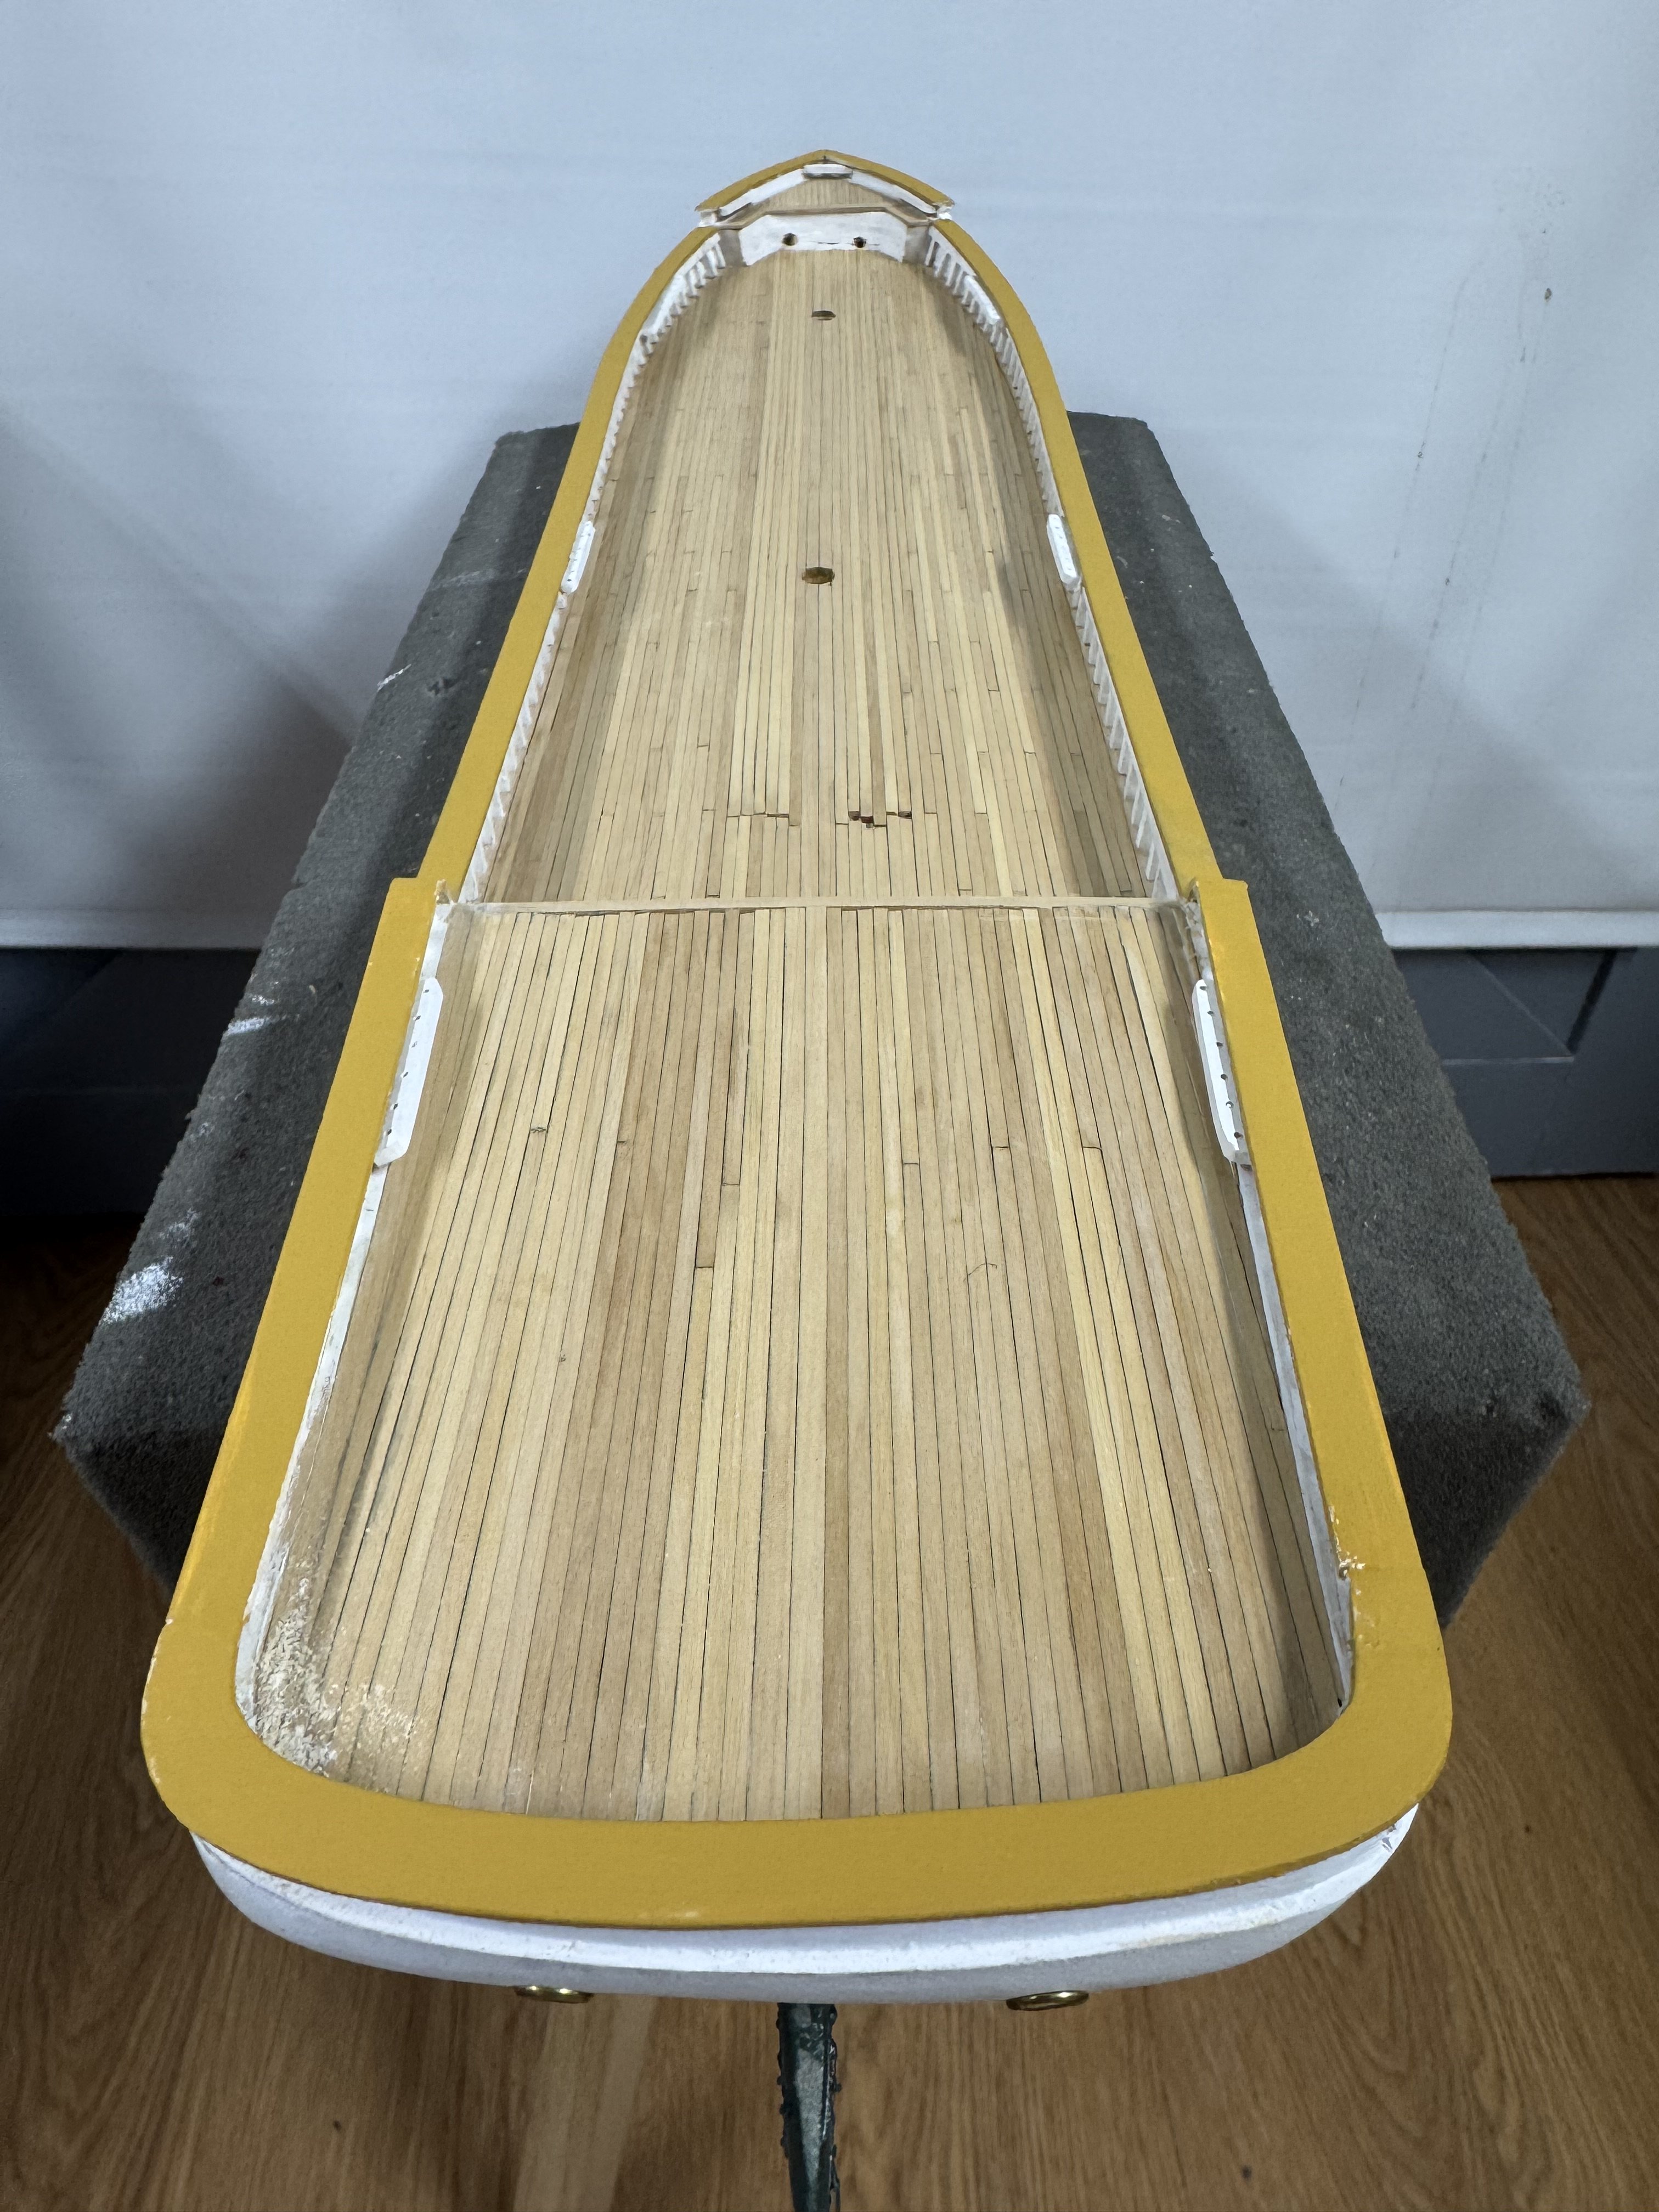
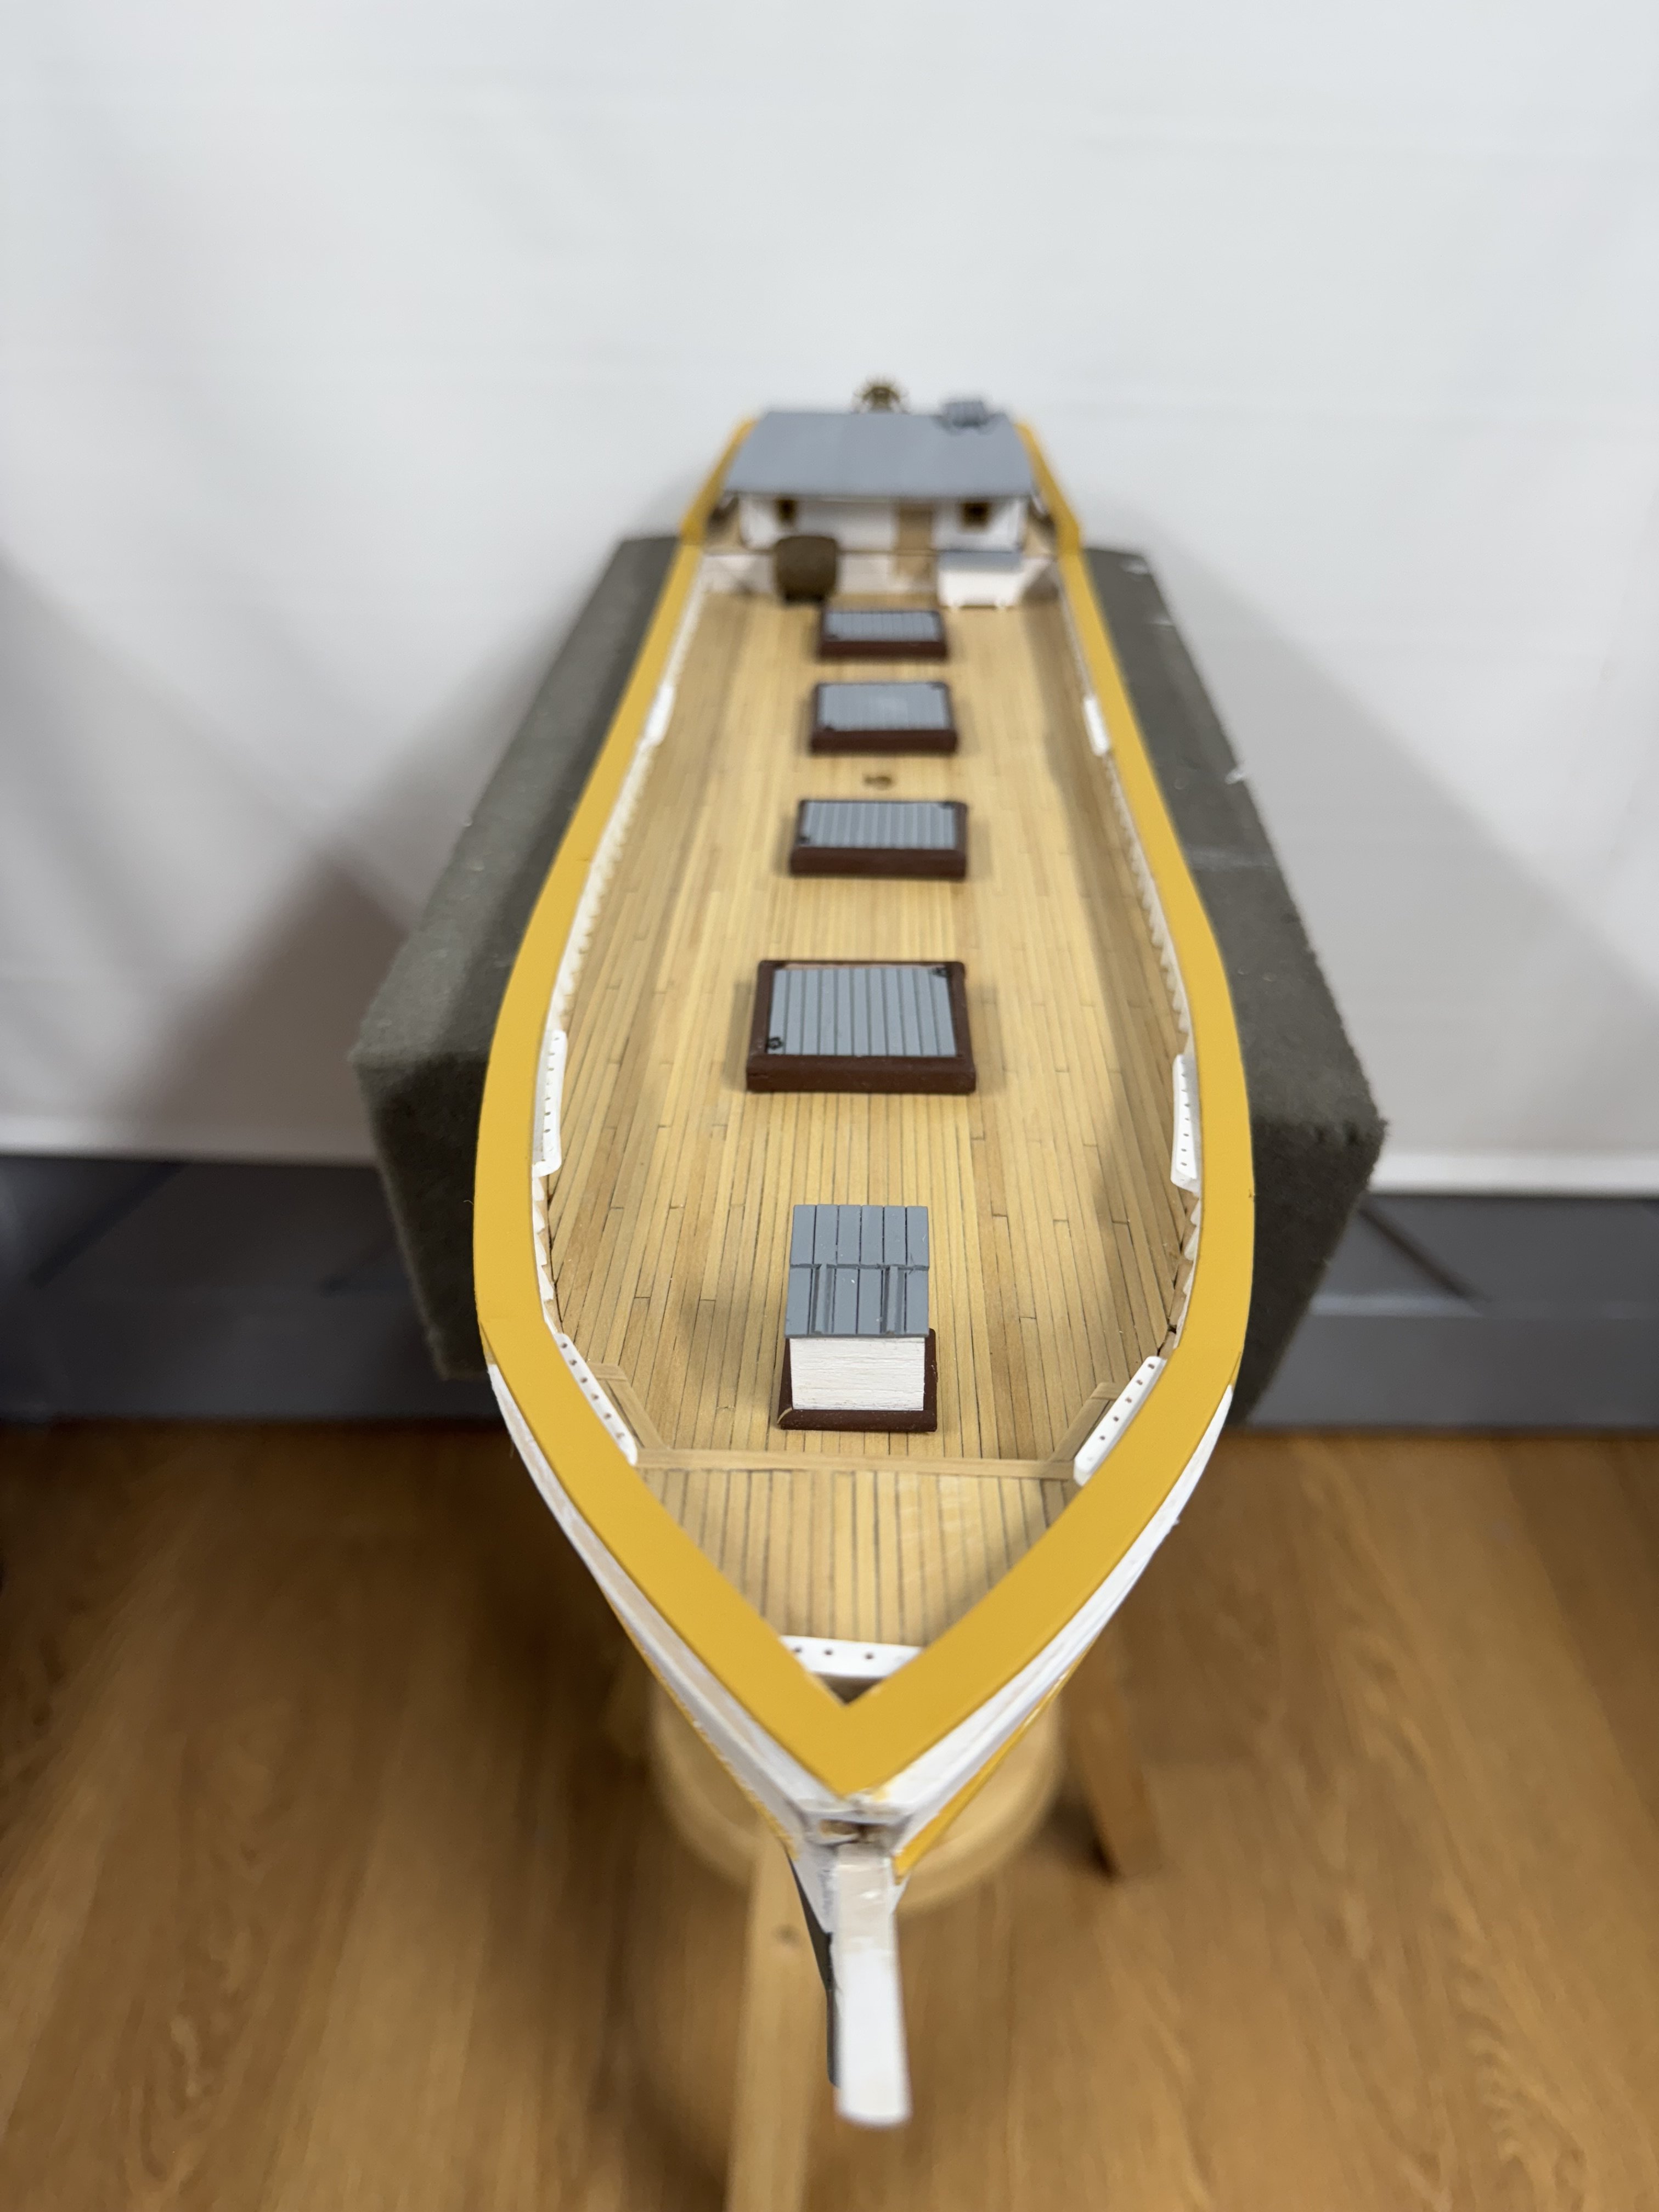
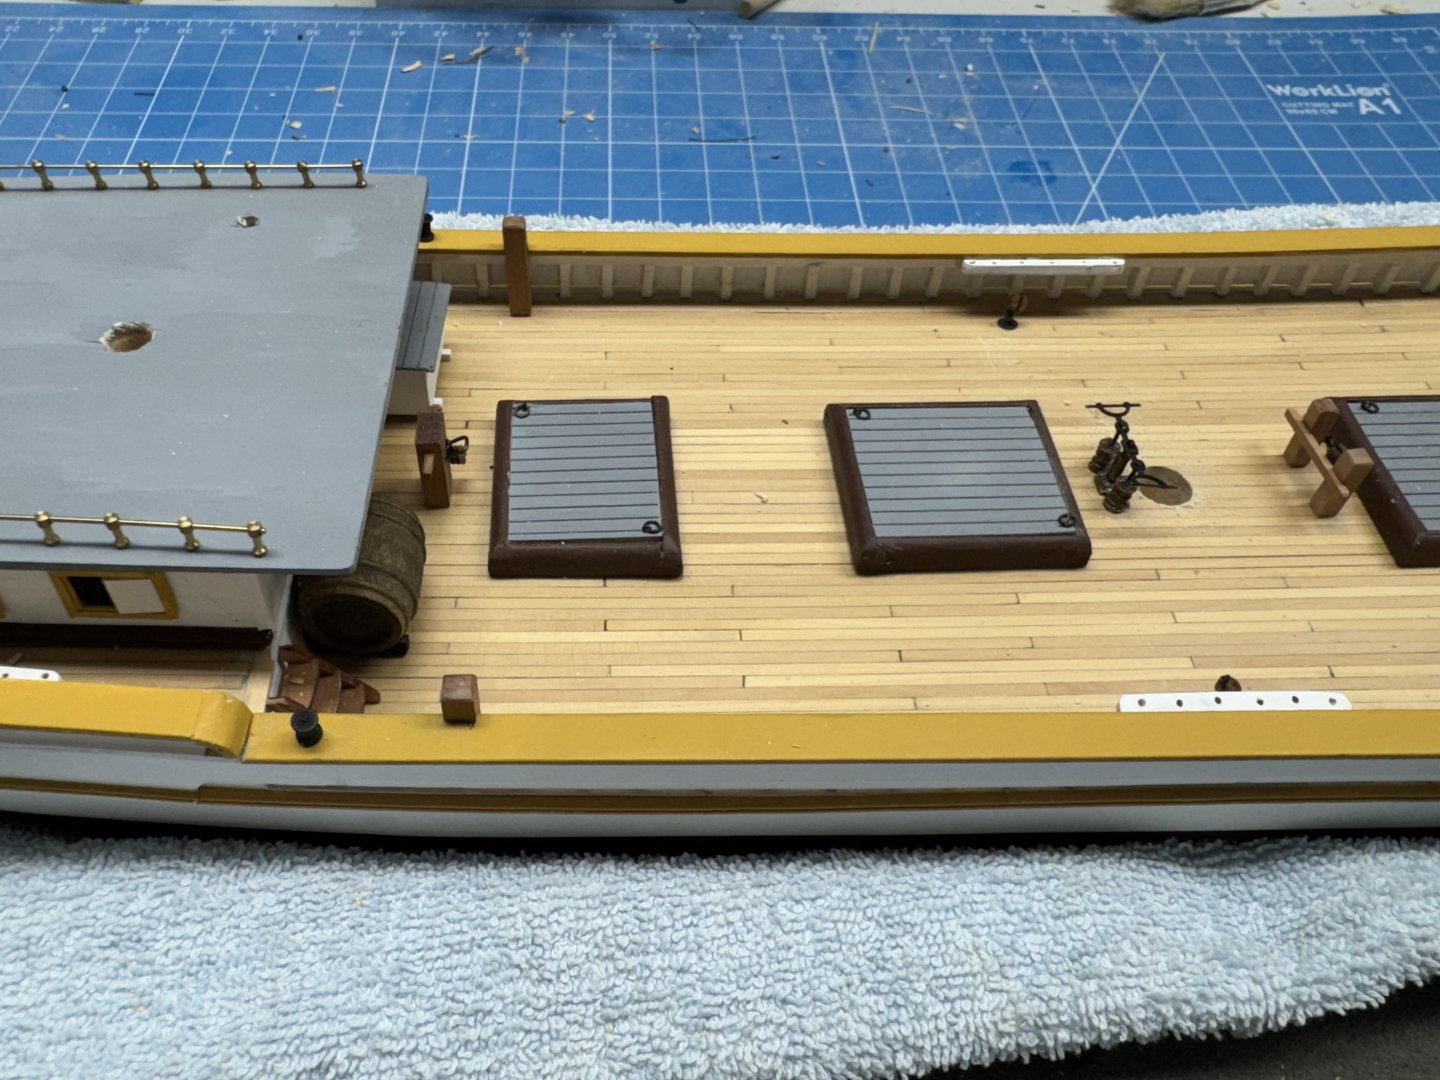
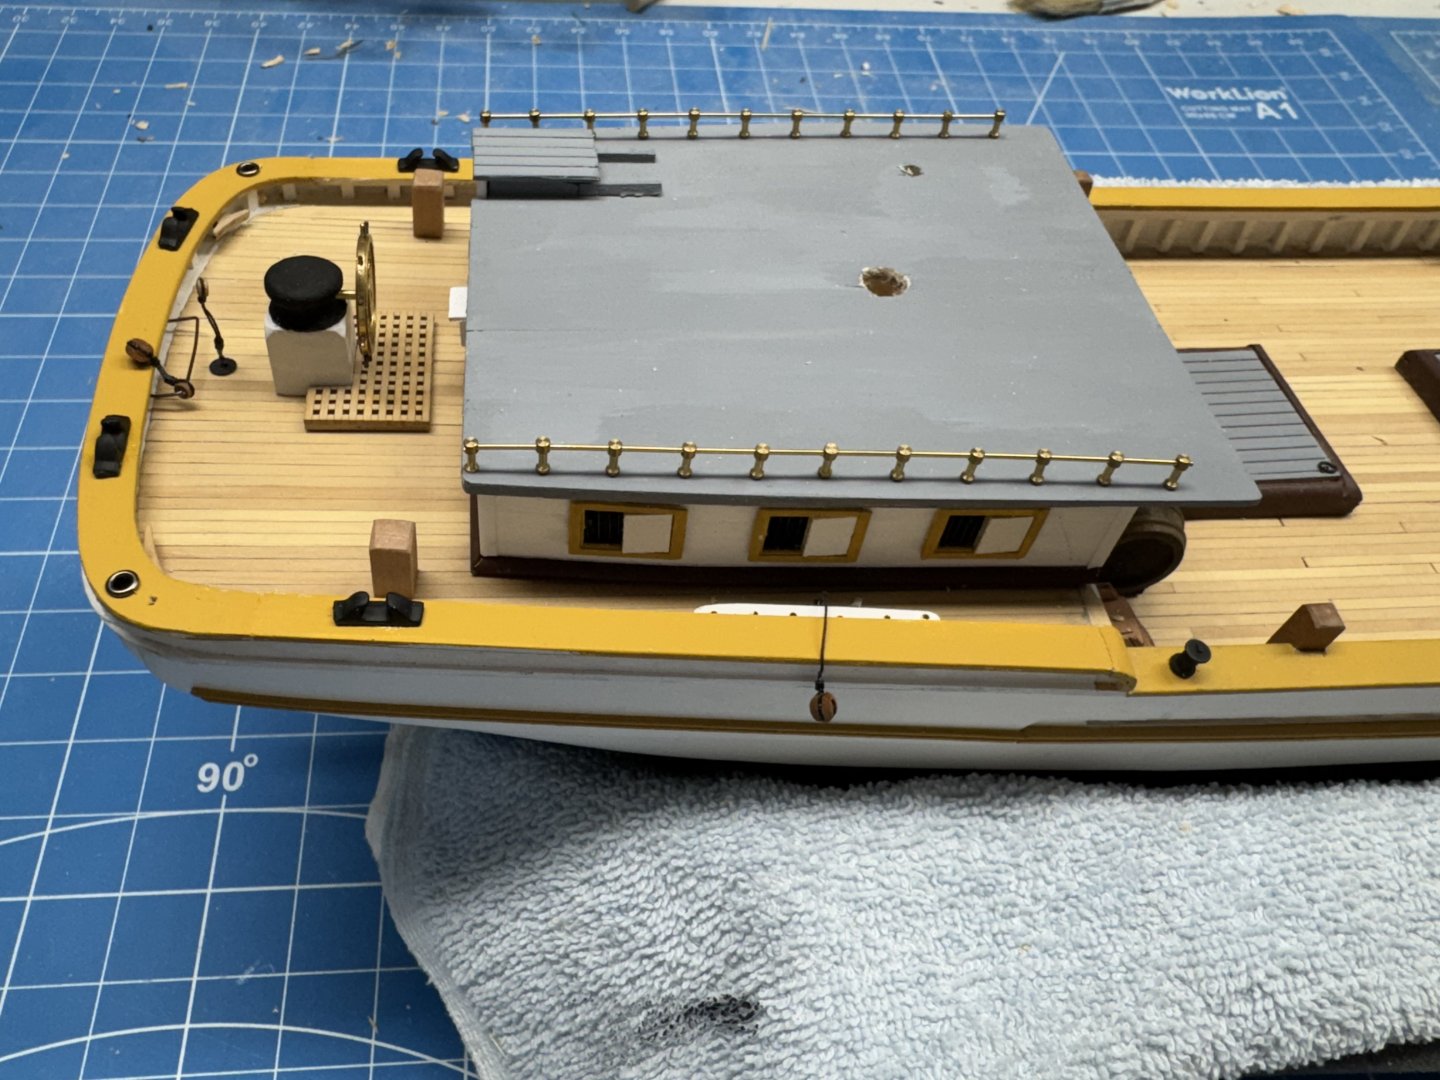
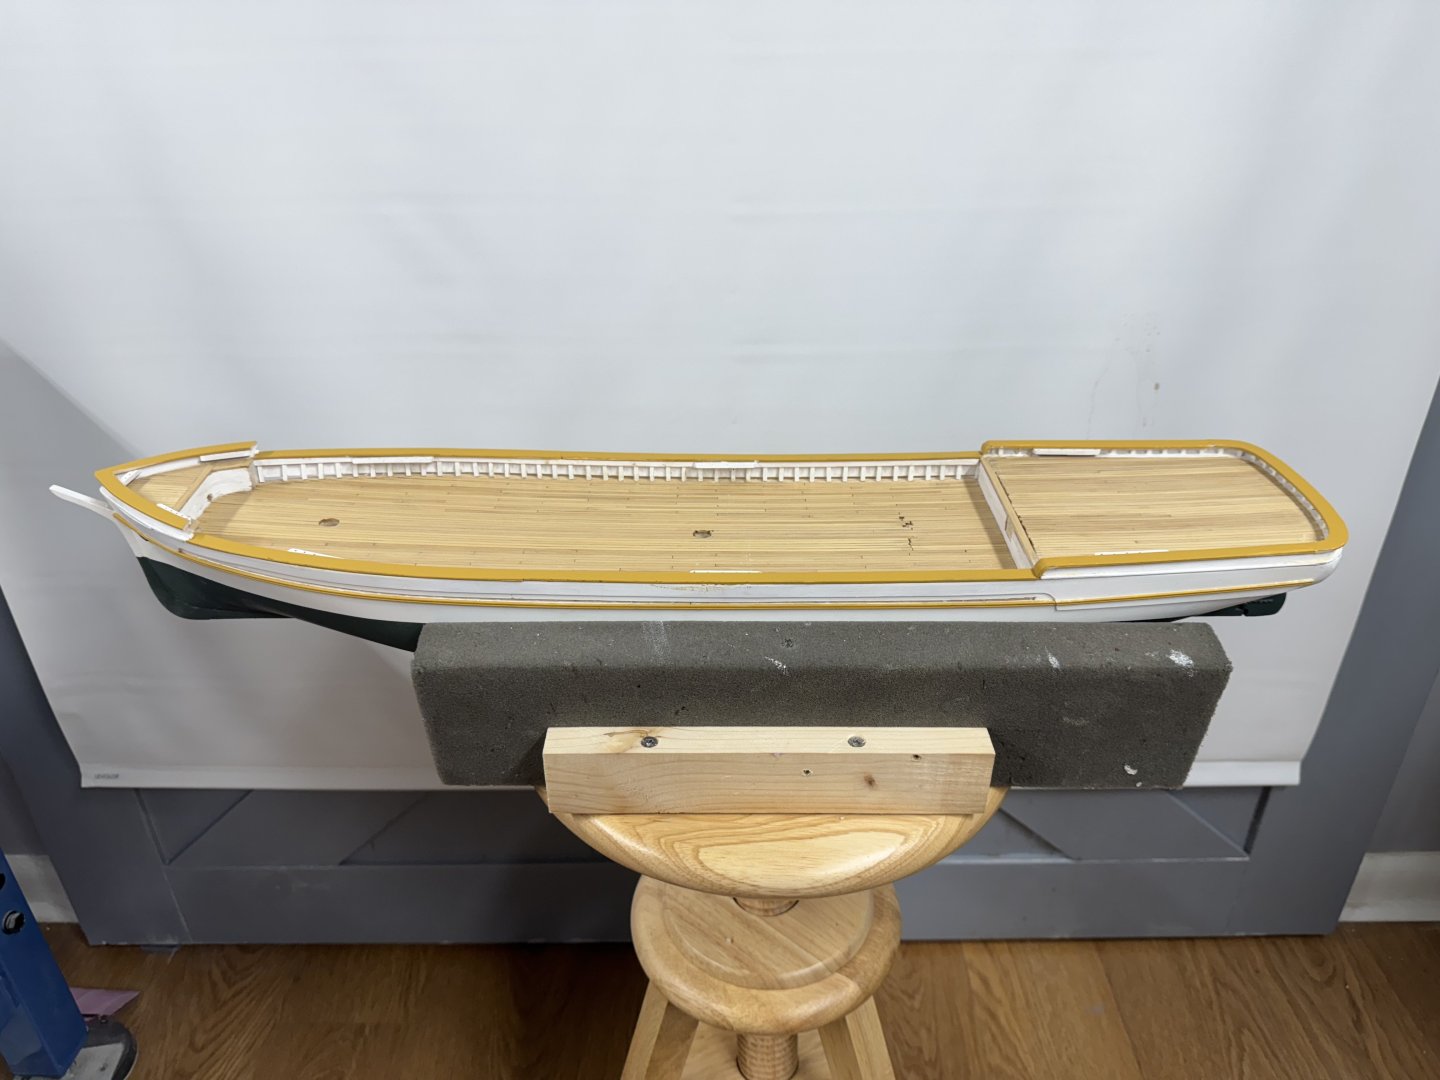
Back to the present. I got all the stern rail and bow splash rail completed and touch-up painted so I decided to take some whole model pictures. And some with what deck furniture is ready for "prime time".


- 121 replies
-
- 4
-
-
-
- Lucia A Simpson
- AJ Fisher
- (and 1 more)
-
It turns out I have several choices for replacement chainplates. Not sure why or when I got these but when looking through the various "fittings" sites i sometimes buy "stuff" "just in case". It would seem I must have visited the site with chainplates more than once as these all look like they are from the same vendor. I shortened and rebent the kit provided chainplate and drilled two holes (not very well) and that is second from the right. The other three are different sizes of the same design (from Corel I think). On the far right is a potential replacement backing link (suitably blackened/painted) because while the drawing says 22 required the kit only contains ten per the parts list. Any of the Corel chainplates are going to require an upsize in the deadeyes. The two on the left use 5mm and the one on the right 6mm. The kit "large" deadeyes are 5/32' = 4mm (3.968mm according to my converting calculator). I am going with the shortest of the Corel chainplates. I think I have just enough room to bend it down after it clears the molding strip since the channels will be mounted below the cap rail. The backing link is going to have to be on top of the chainplate but I do not see any other solution.
- 121 replies
-
- 2
-
-
- Lucia A Simpson
- AJ Fisher
- (and 1 more)