HOLIDAY DONATION DRIVE - SUPPORT MSW - DO YOUR PART TO KEEP THIS GREAT FORUM GOING! (Only 20 donations so far - C'mon guys!)
×


PqLear
-
Posts
51 -
Joined
-
Last visited
Content Type
Profiles
Forums
Gallery
Events
Everything posted by PqLear
-
 Quick update: move to DC is complete, but build, tools, supplies etc. are tucked away in storage for now, until I can find time and space to pick it back up again 😕 Aside from this blog, I didn't properly log/document where I left things off, which I regret now -- when I get back to it, I suspect it'll be a few weeks just go get back in the swing of things. Curious for thoughts how to best manage taking breaks like this? Advice?
- 24 replies
-
- 1
-

-
- HMS Vanguard
- Heller
- (and 2 more)
-
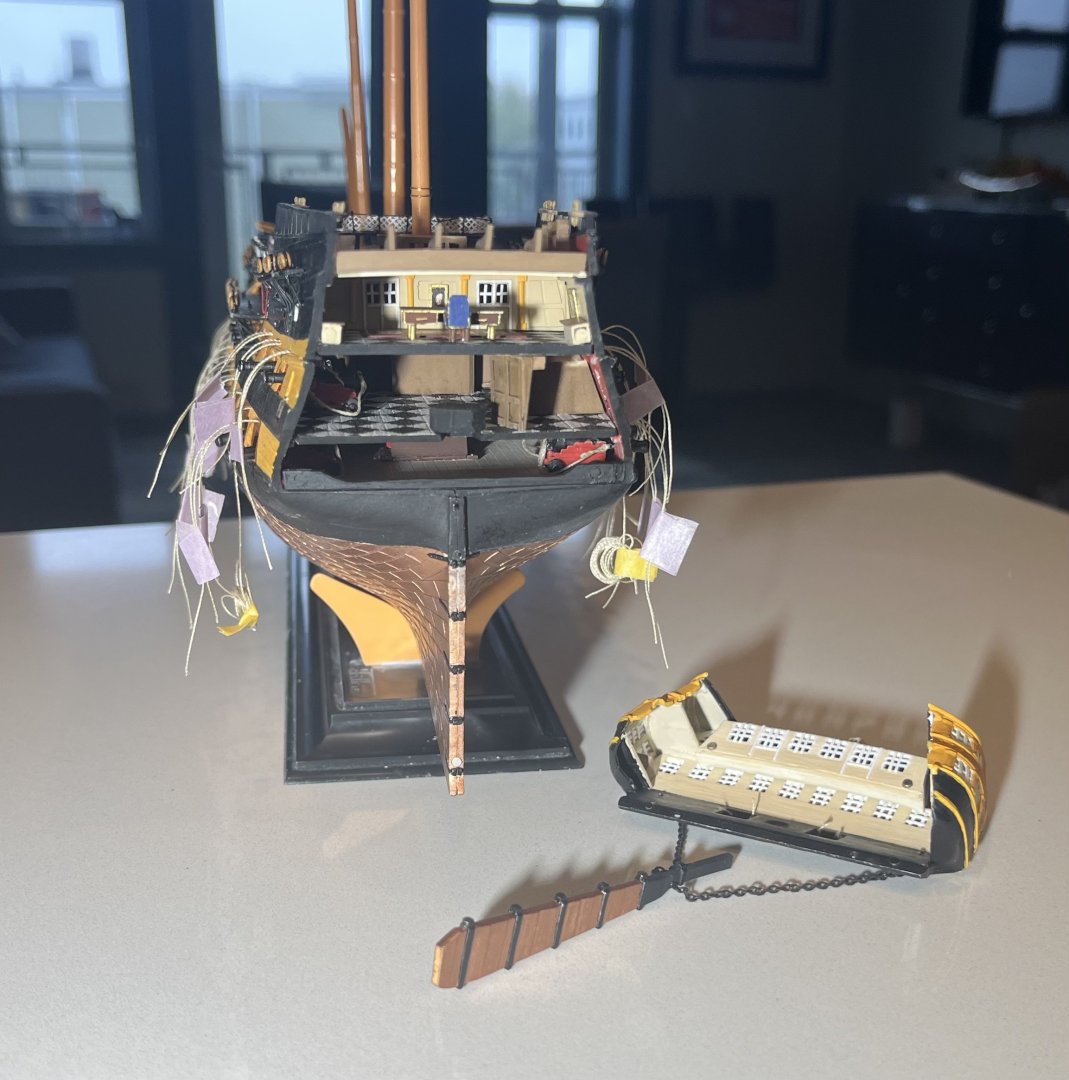
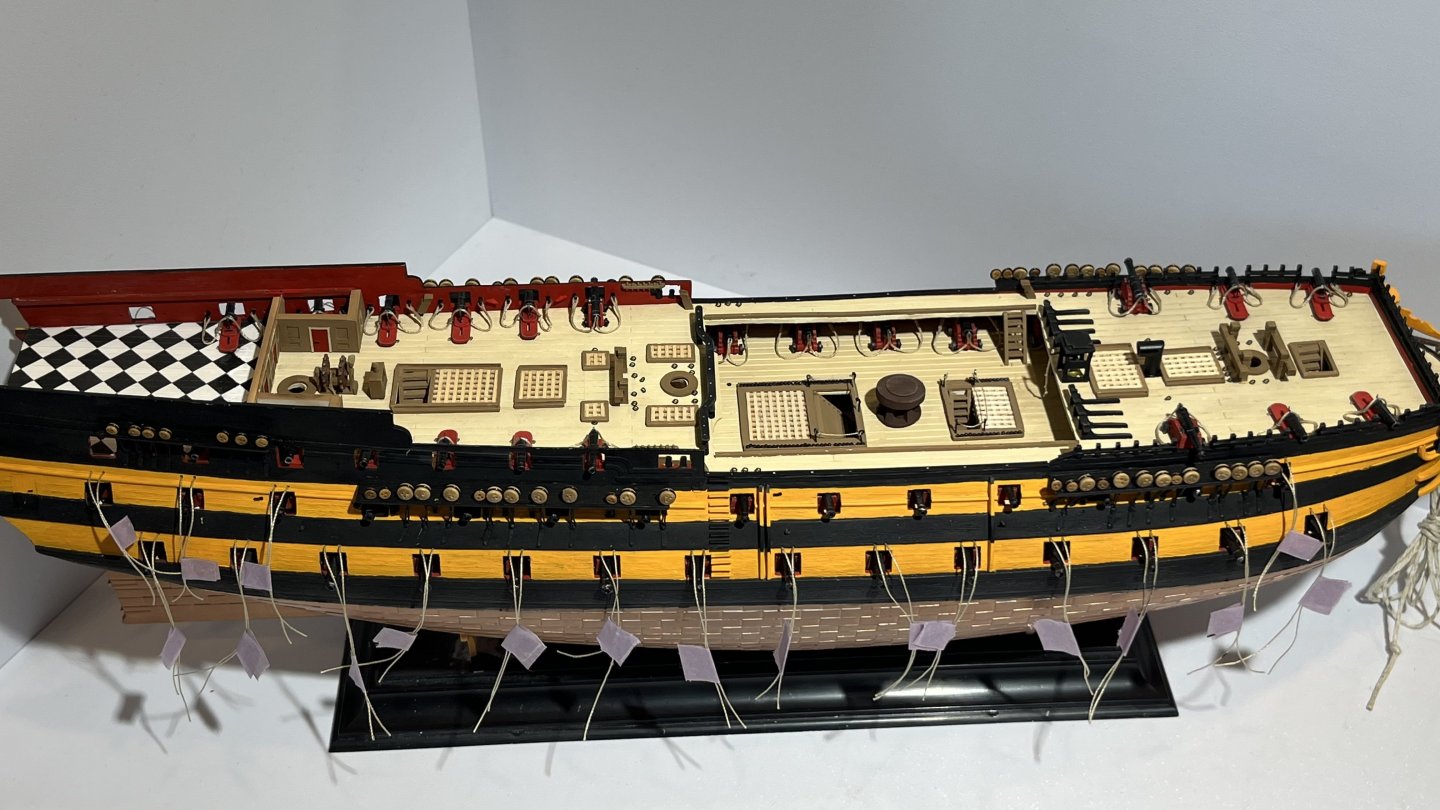
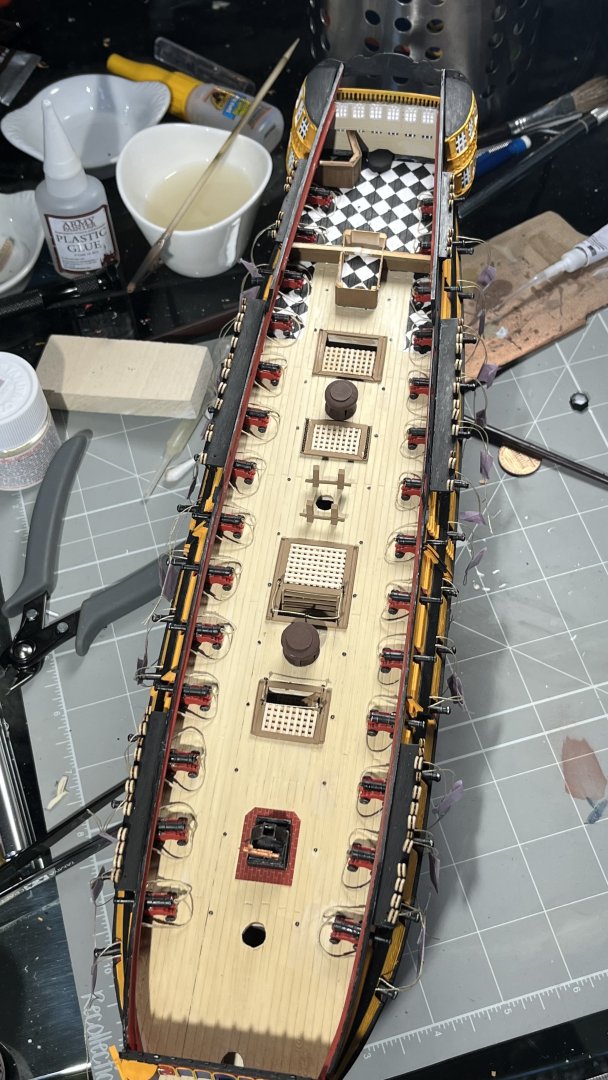
Wow it's been over two months of silence in this build log... sad! The good news is I believe @igorcap finally figured out a solution for the masts -- after many attempts at 3D printing, we settled for a hybrid wood/resin solution; where masts, top masts, and top gallant masts are from pearwood, and all other details and pieces (tops, spars, crows' nests, bowsprit, knees) are printed. Unfortunately, I have a move coming up irl, so need to take a break from the build until I can get a workstation set up again, fingers crossed later this fall. Regardless of when I can get back to it, I am very happy with the results thus far, and aside from the gun port lids and a bit of weathering/polish, I managed to complete the entire hull, decks, interior, guns, anchors, boats, galleries, channels, etc. in ~5 months / estimate 600 hours. Stay tuned!
- 24 replies
-
- 3
-
-
- HMS Vanguard
- Heller
- (and 2 more)
-
The pinrails are currently simply just glued onto the railing; it's easy enough to attach a support underneath if/as needed when there's tension from the rigging. I've had to take a bit of a break with the build but hope to pick it back up this fall.
-
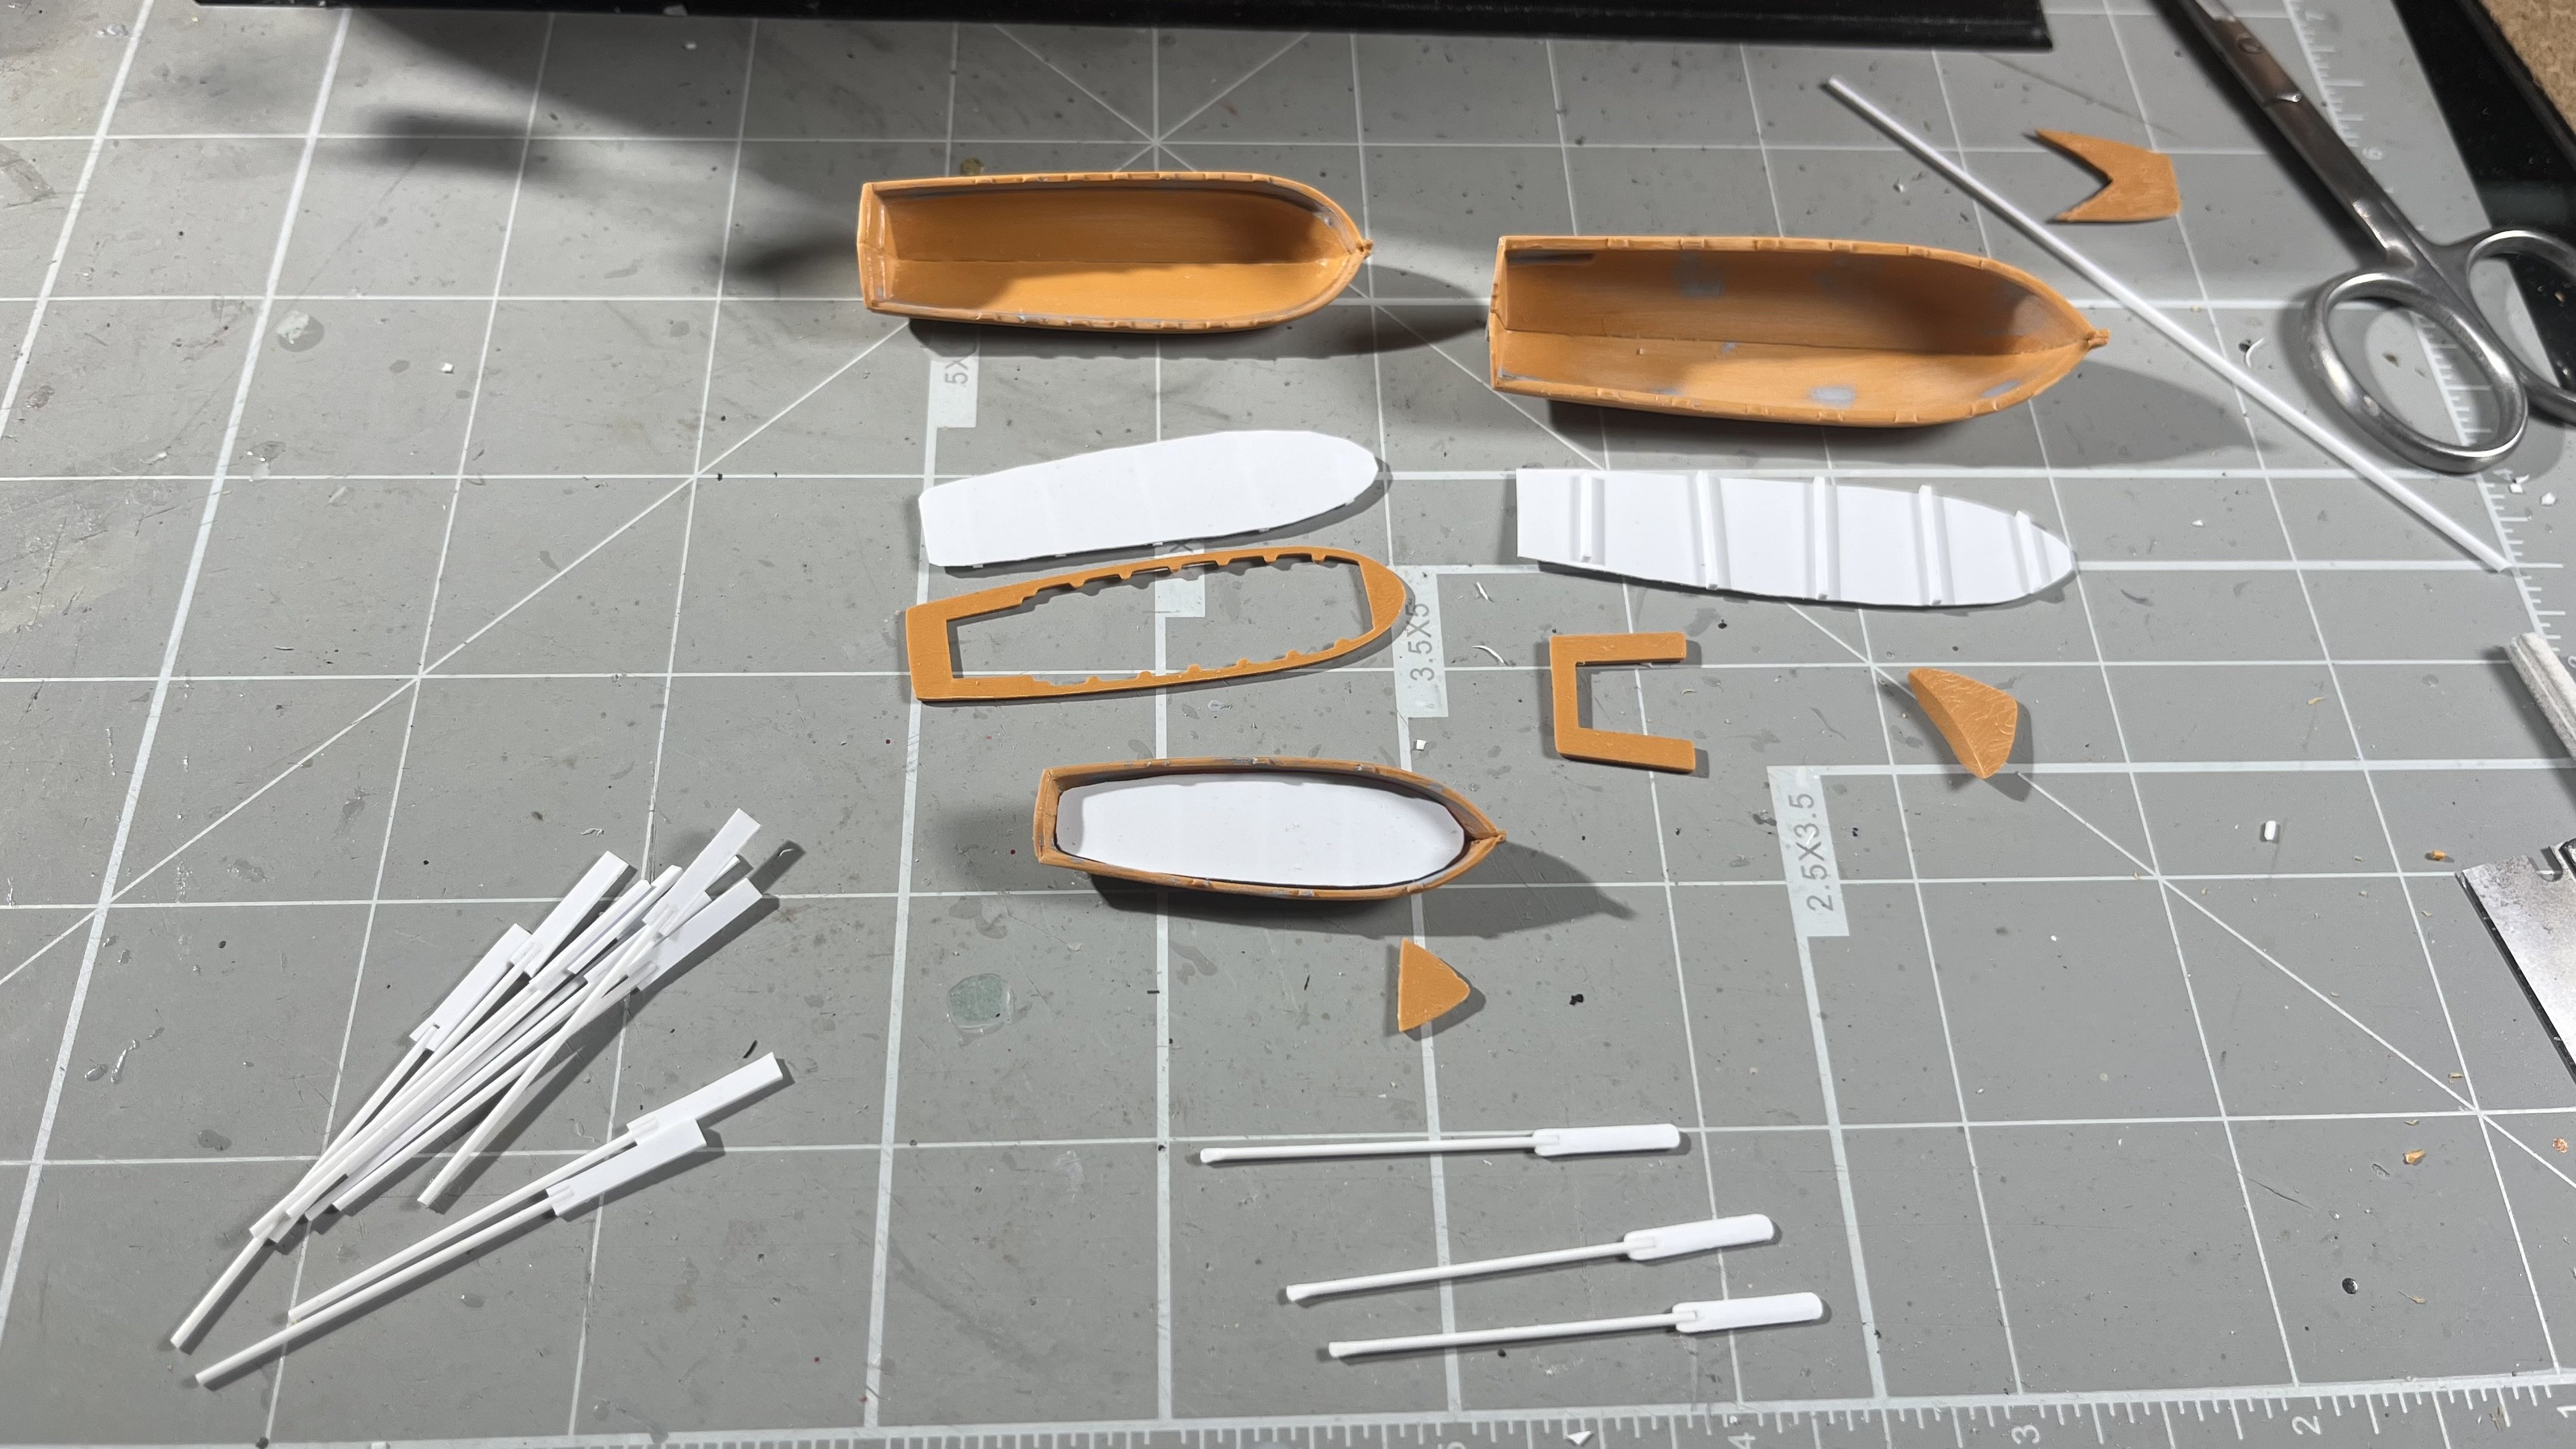
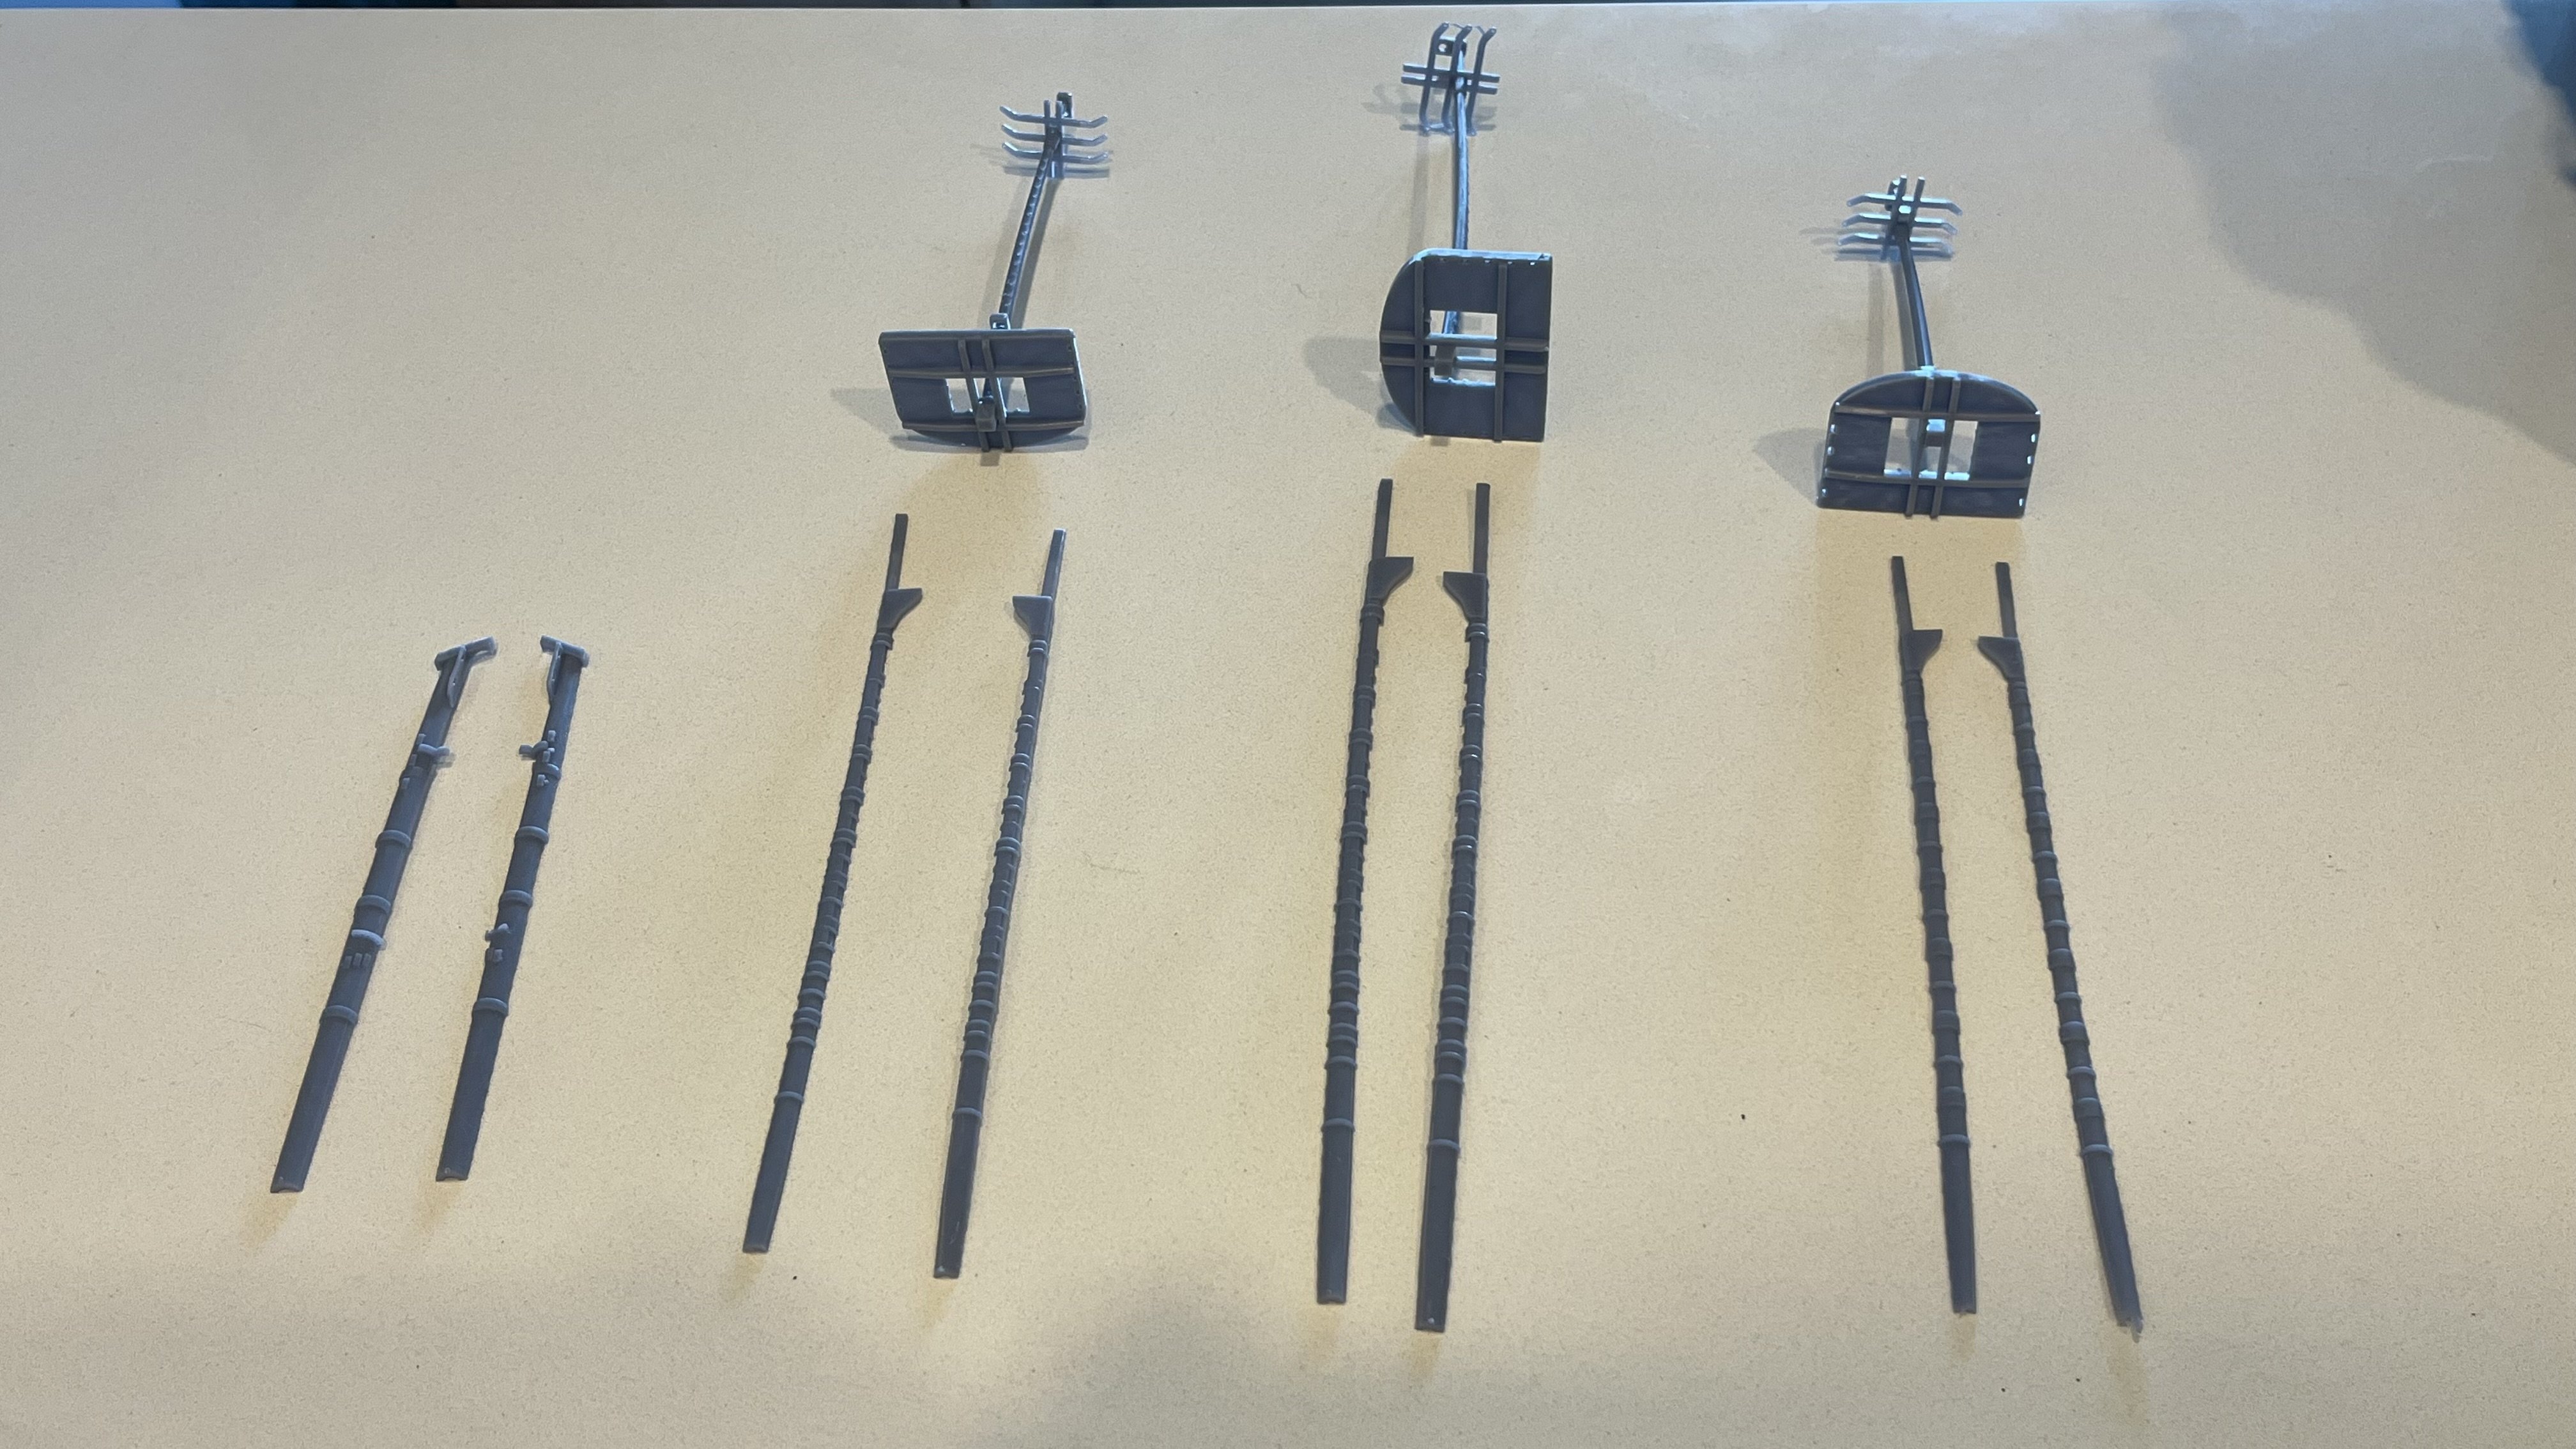
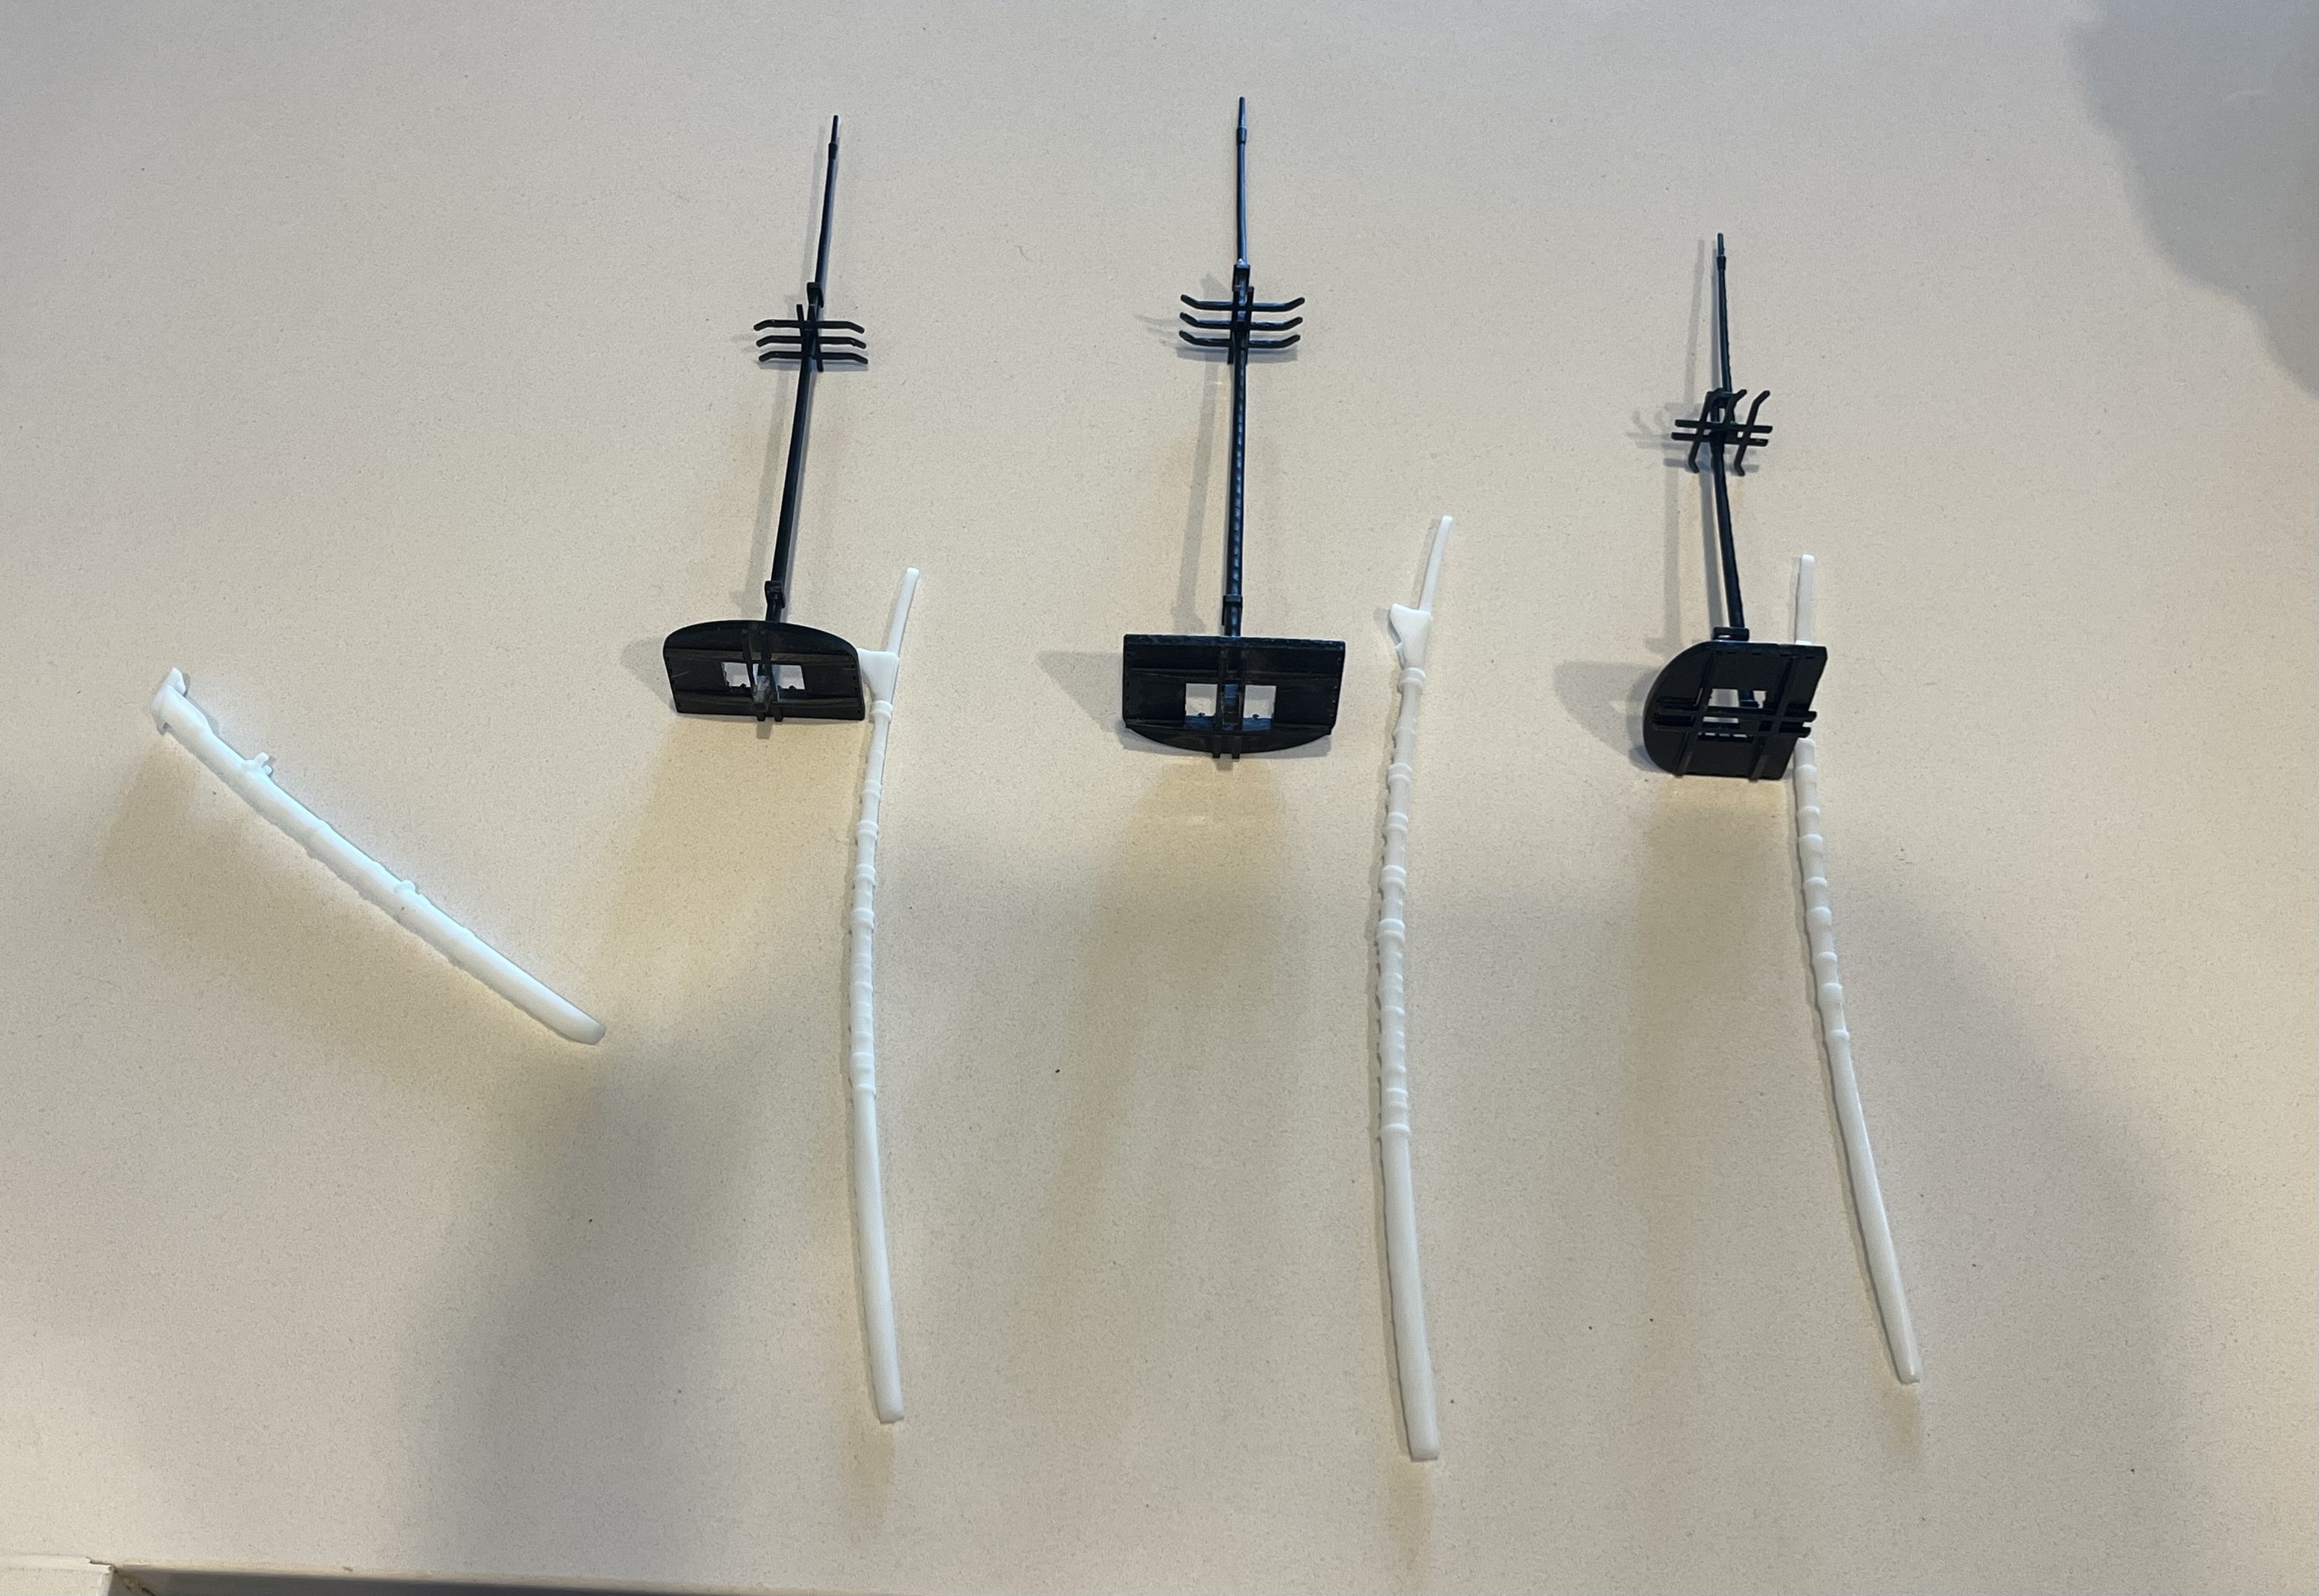
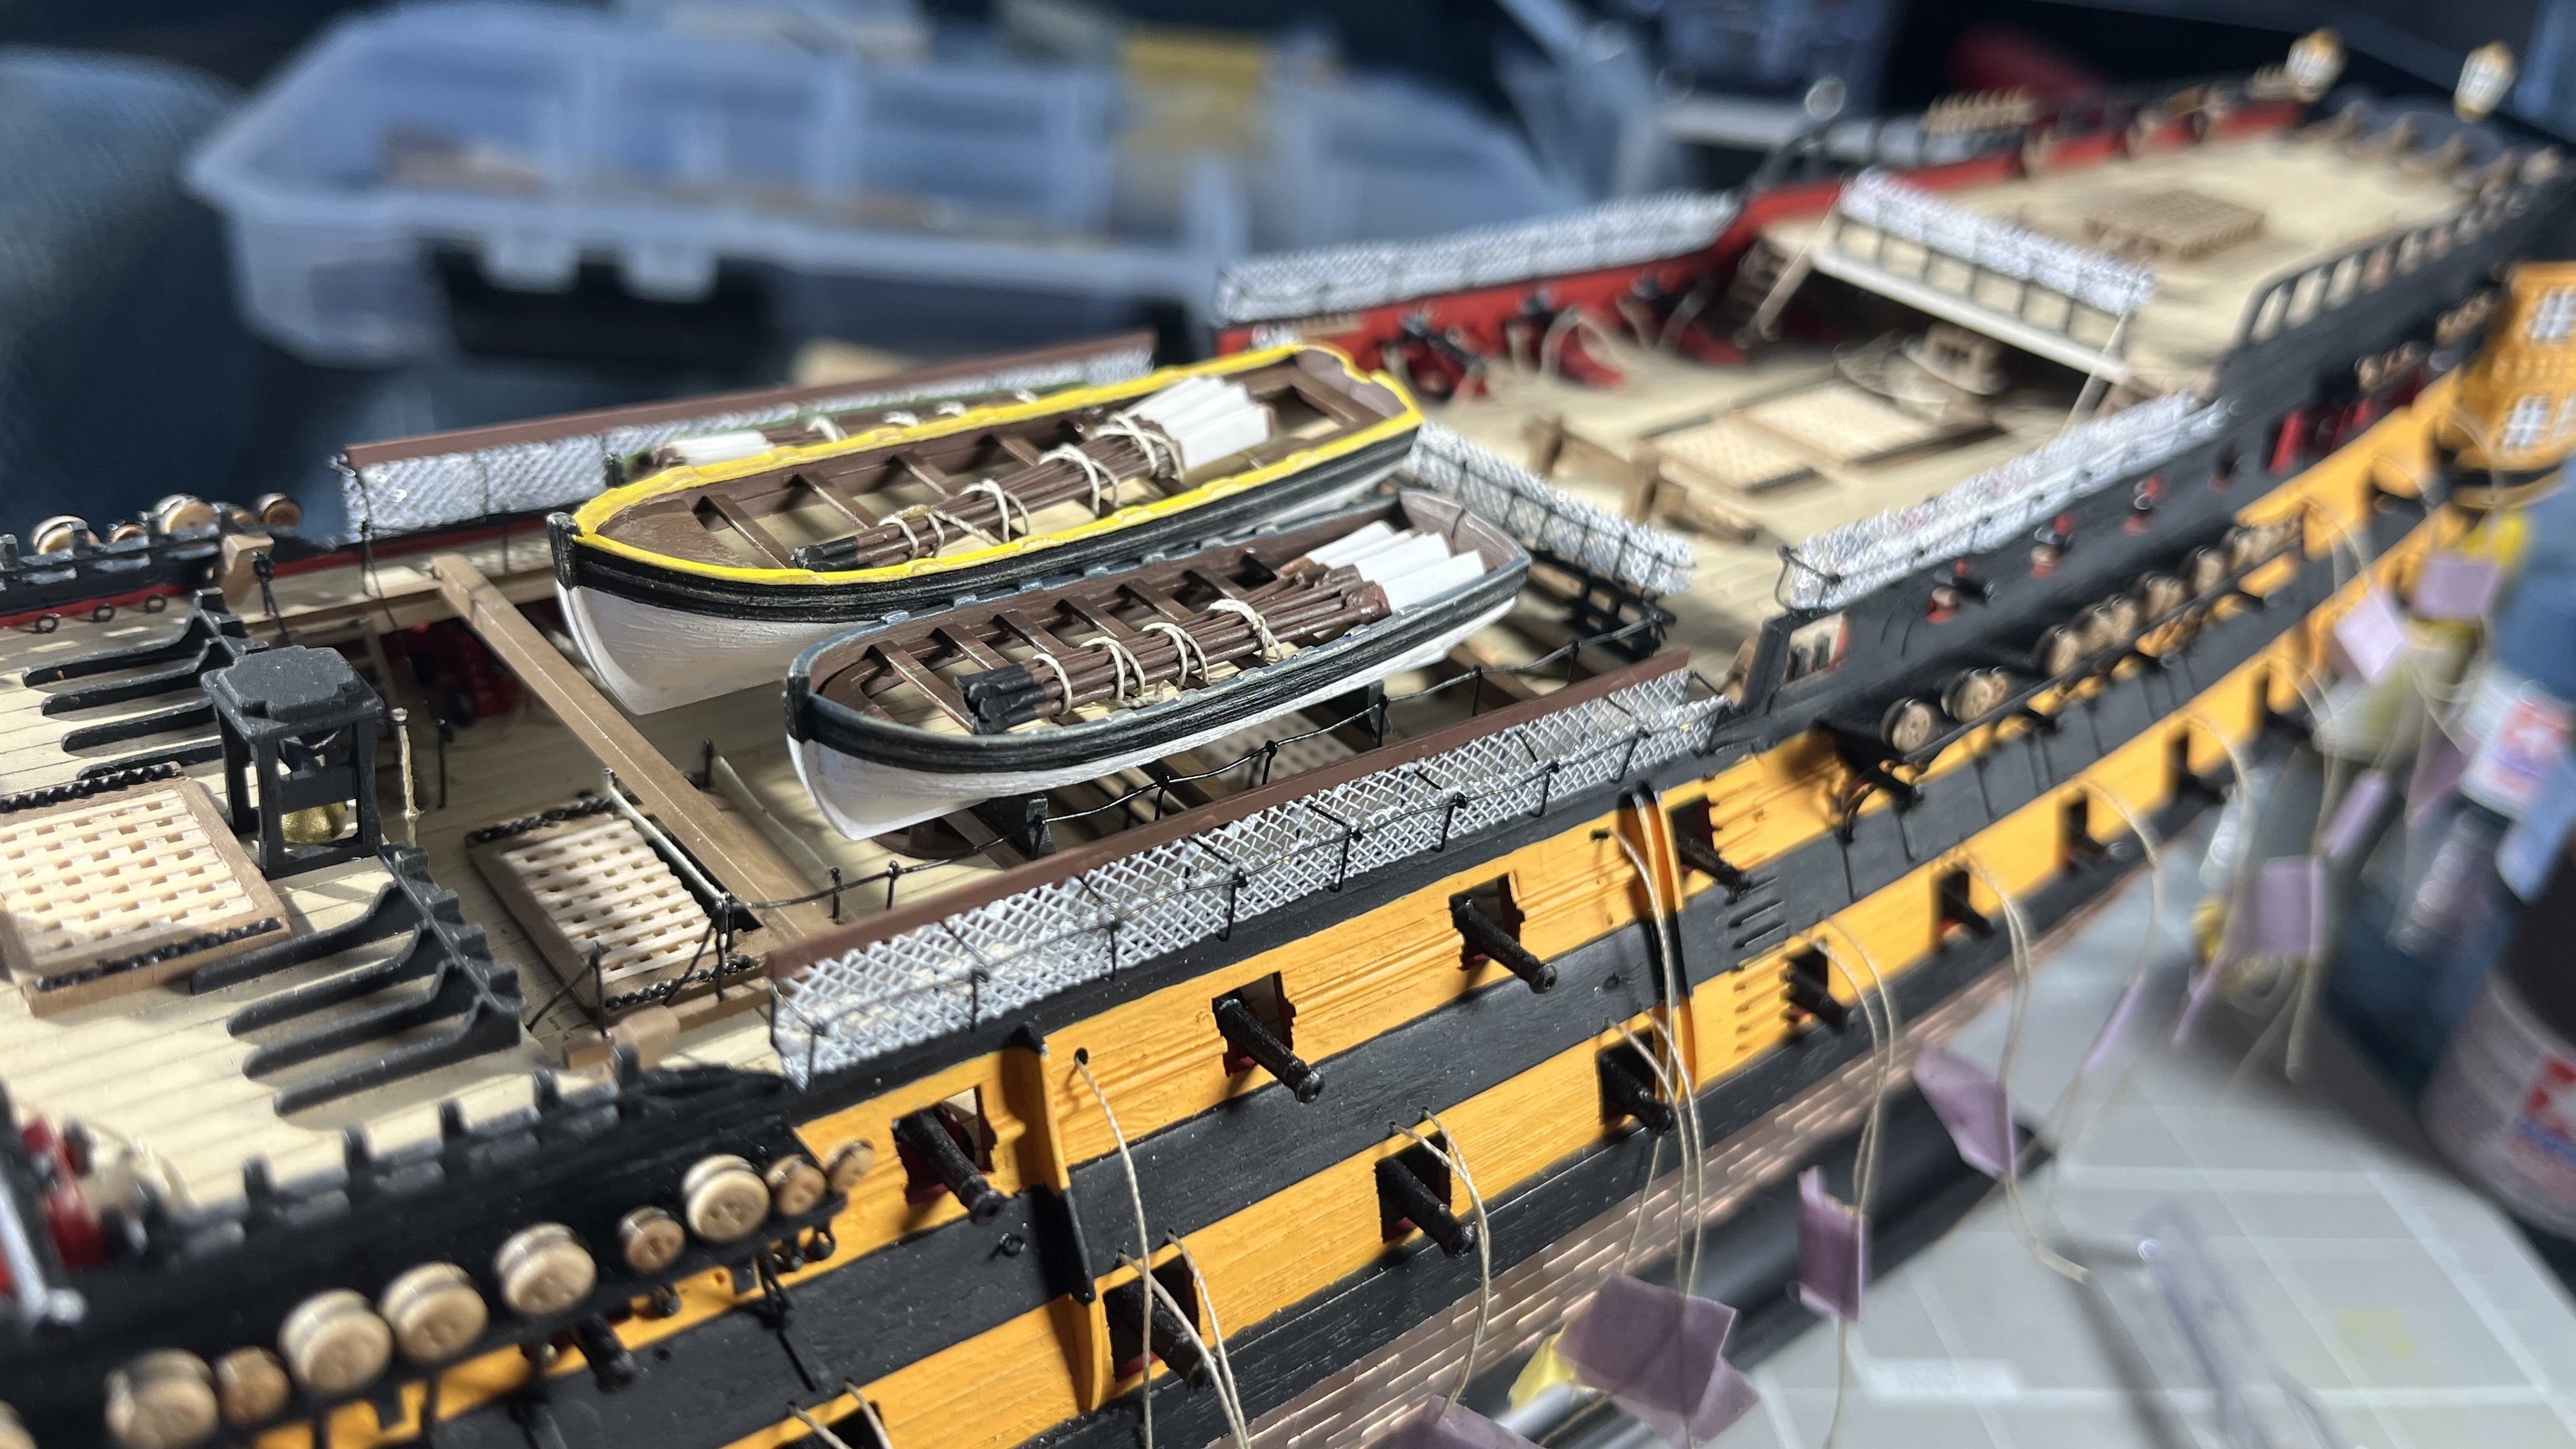
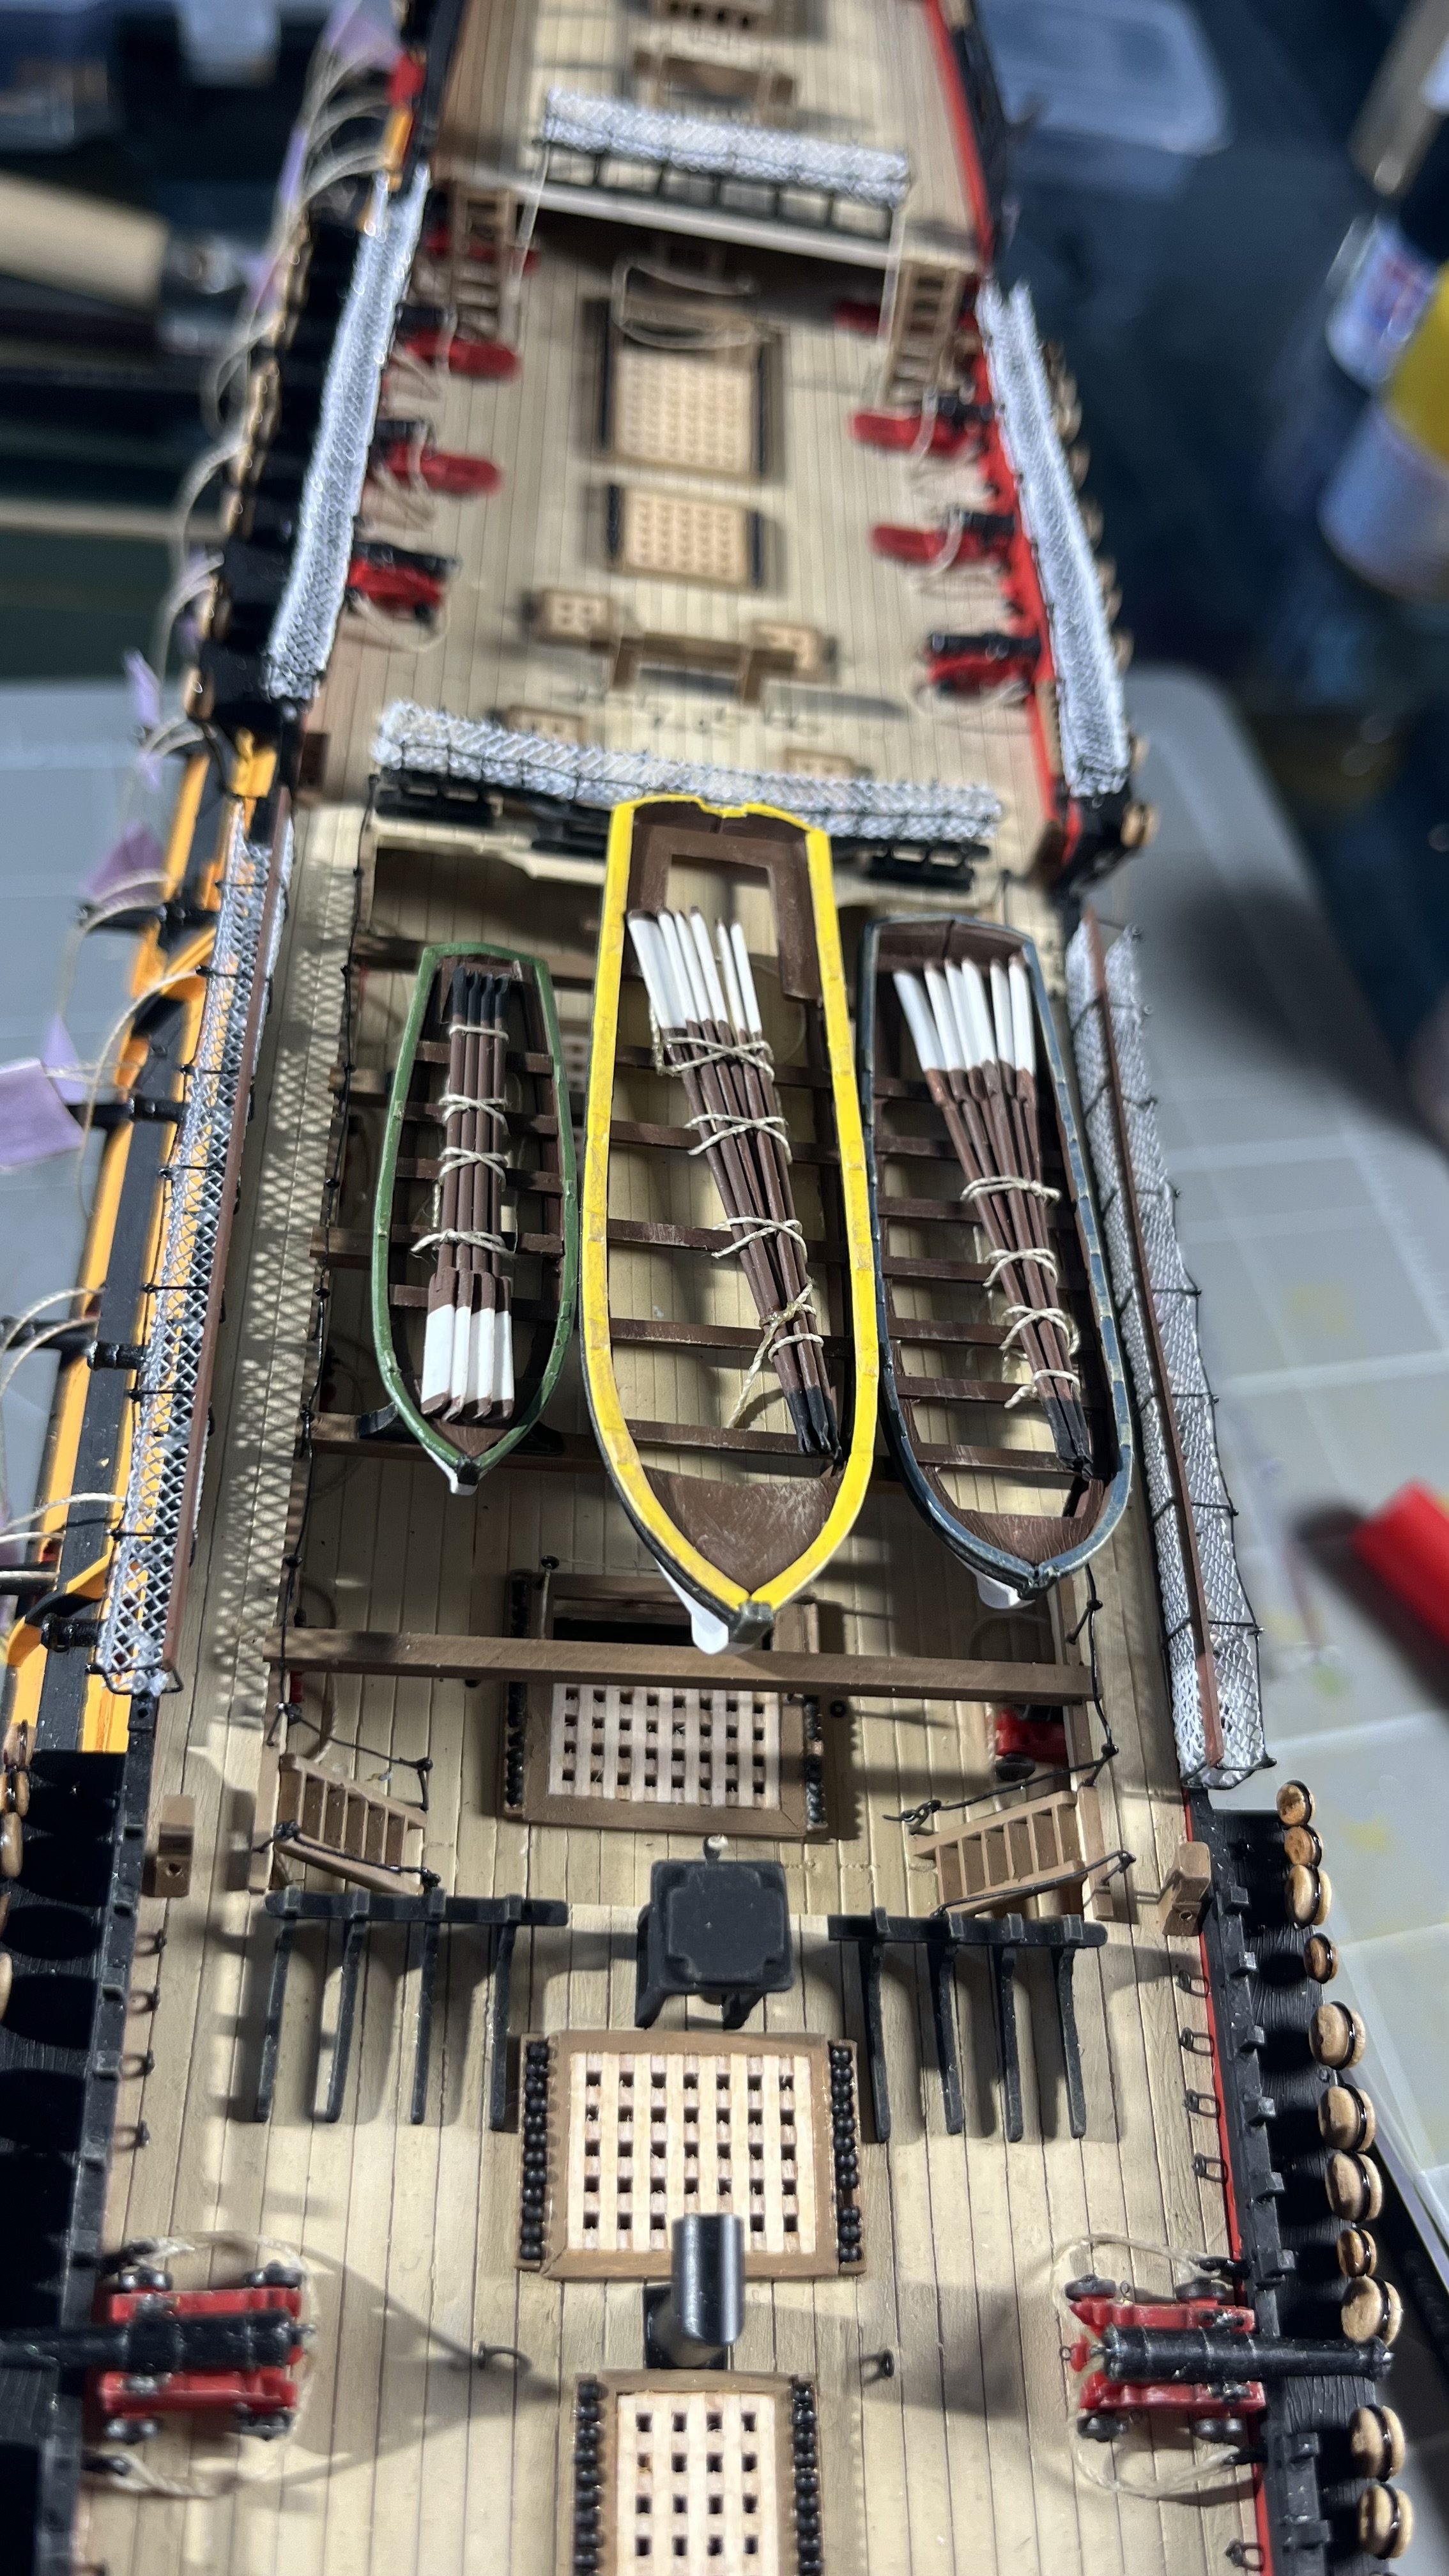
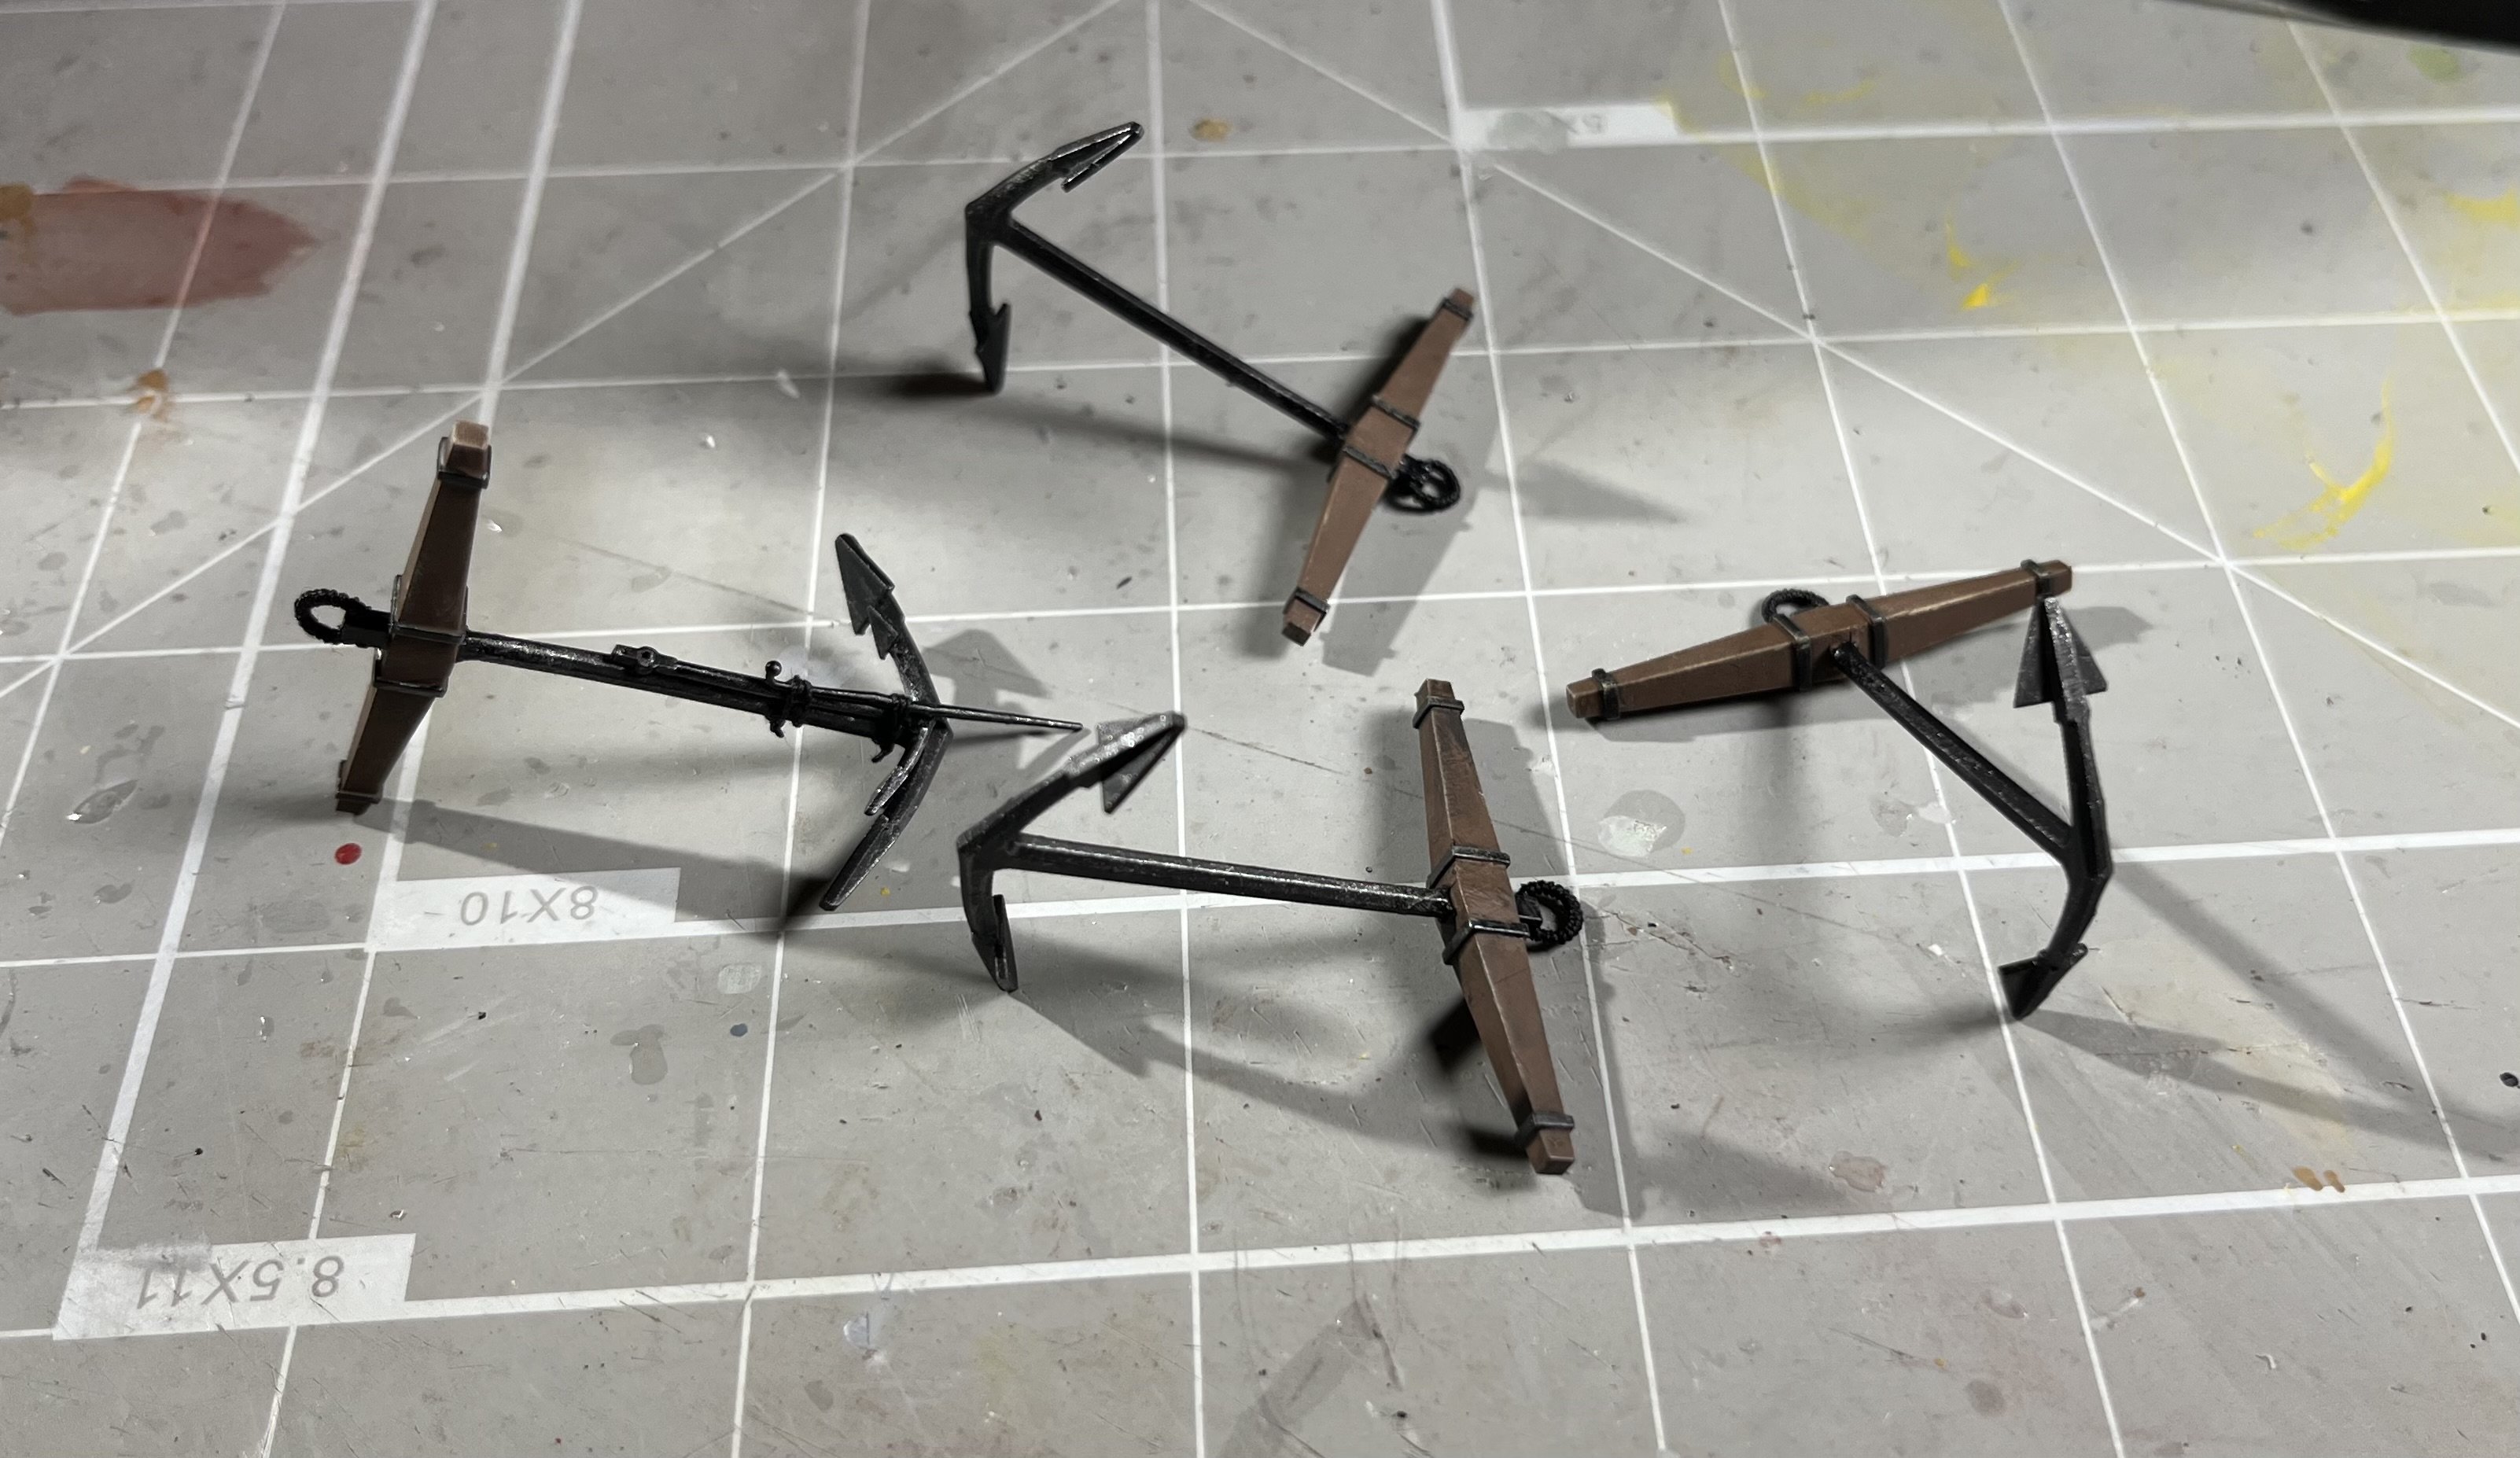
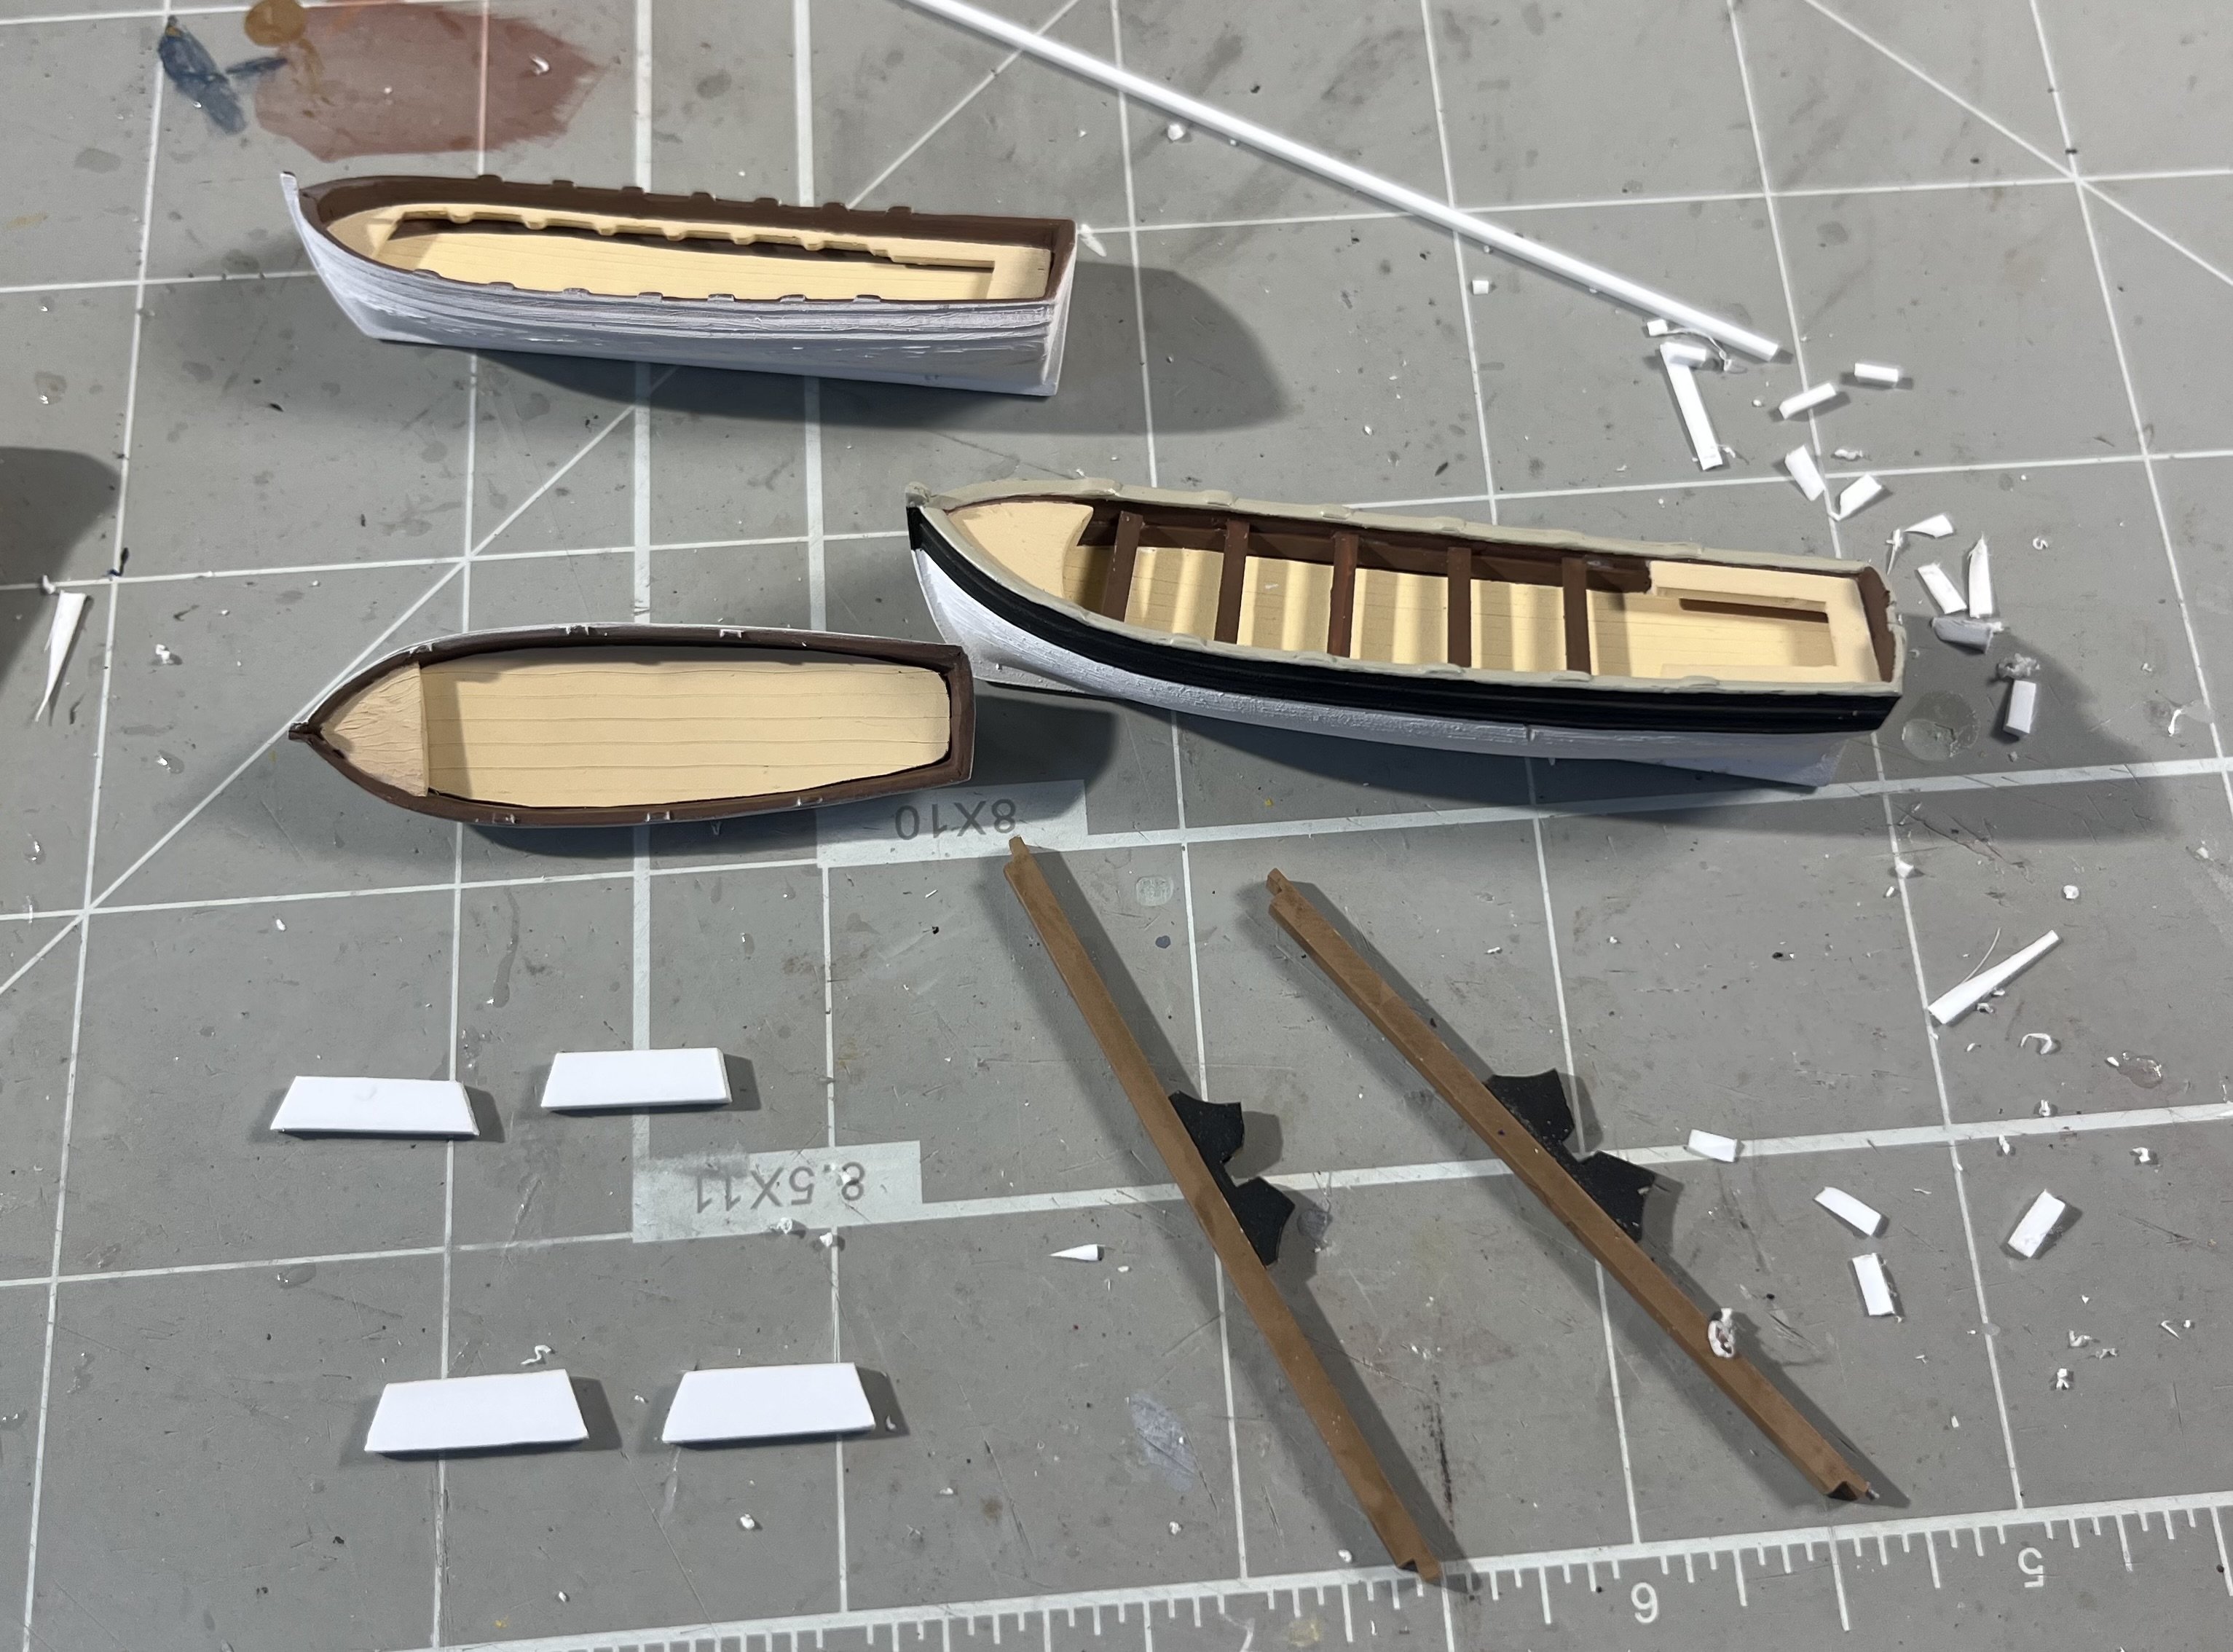
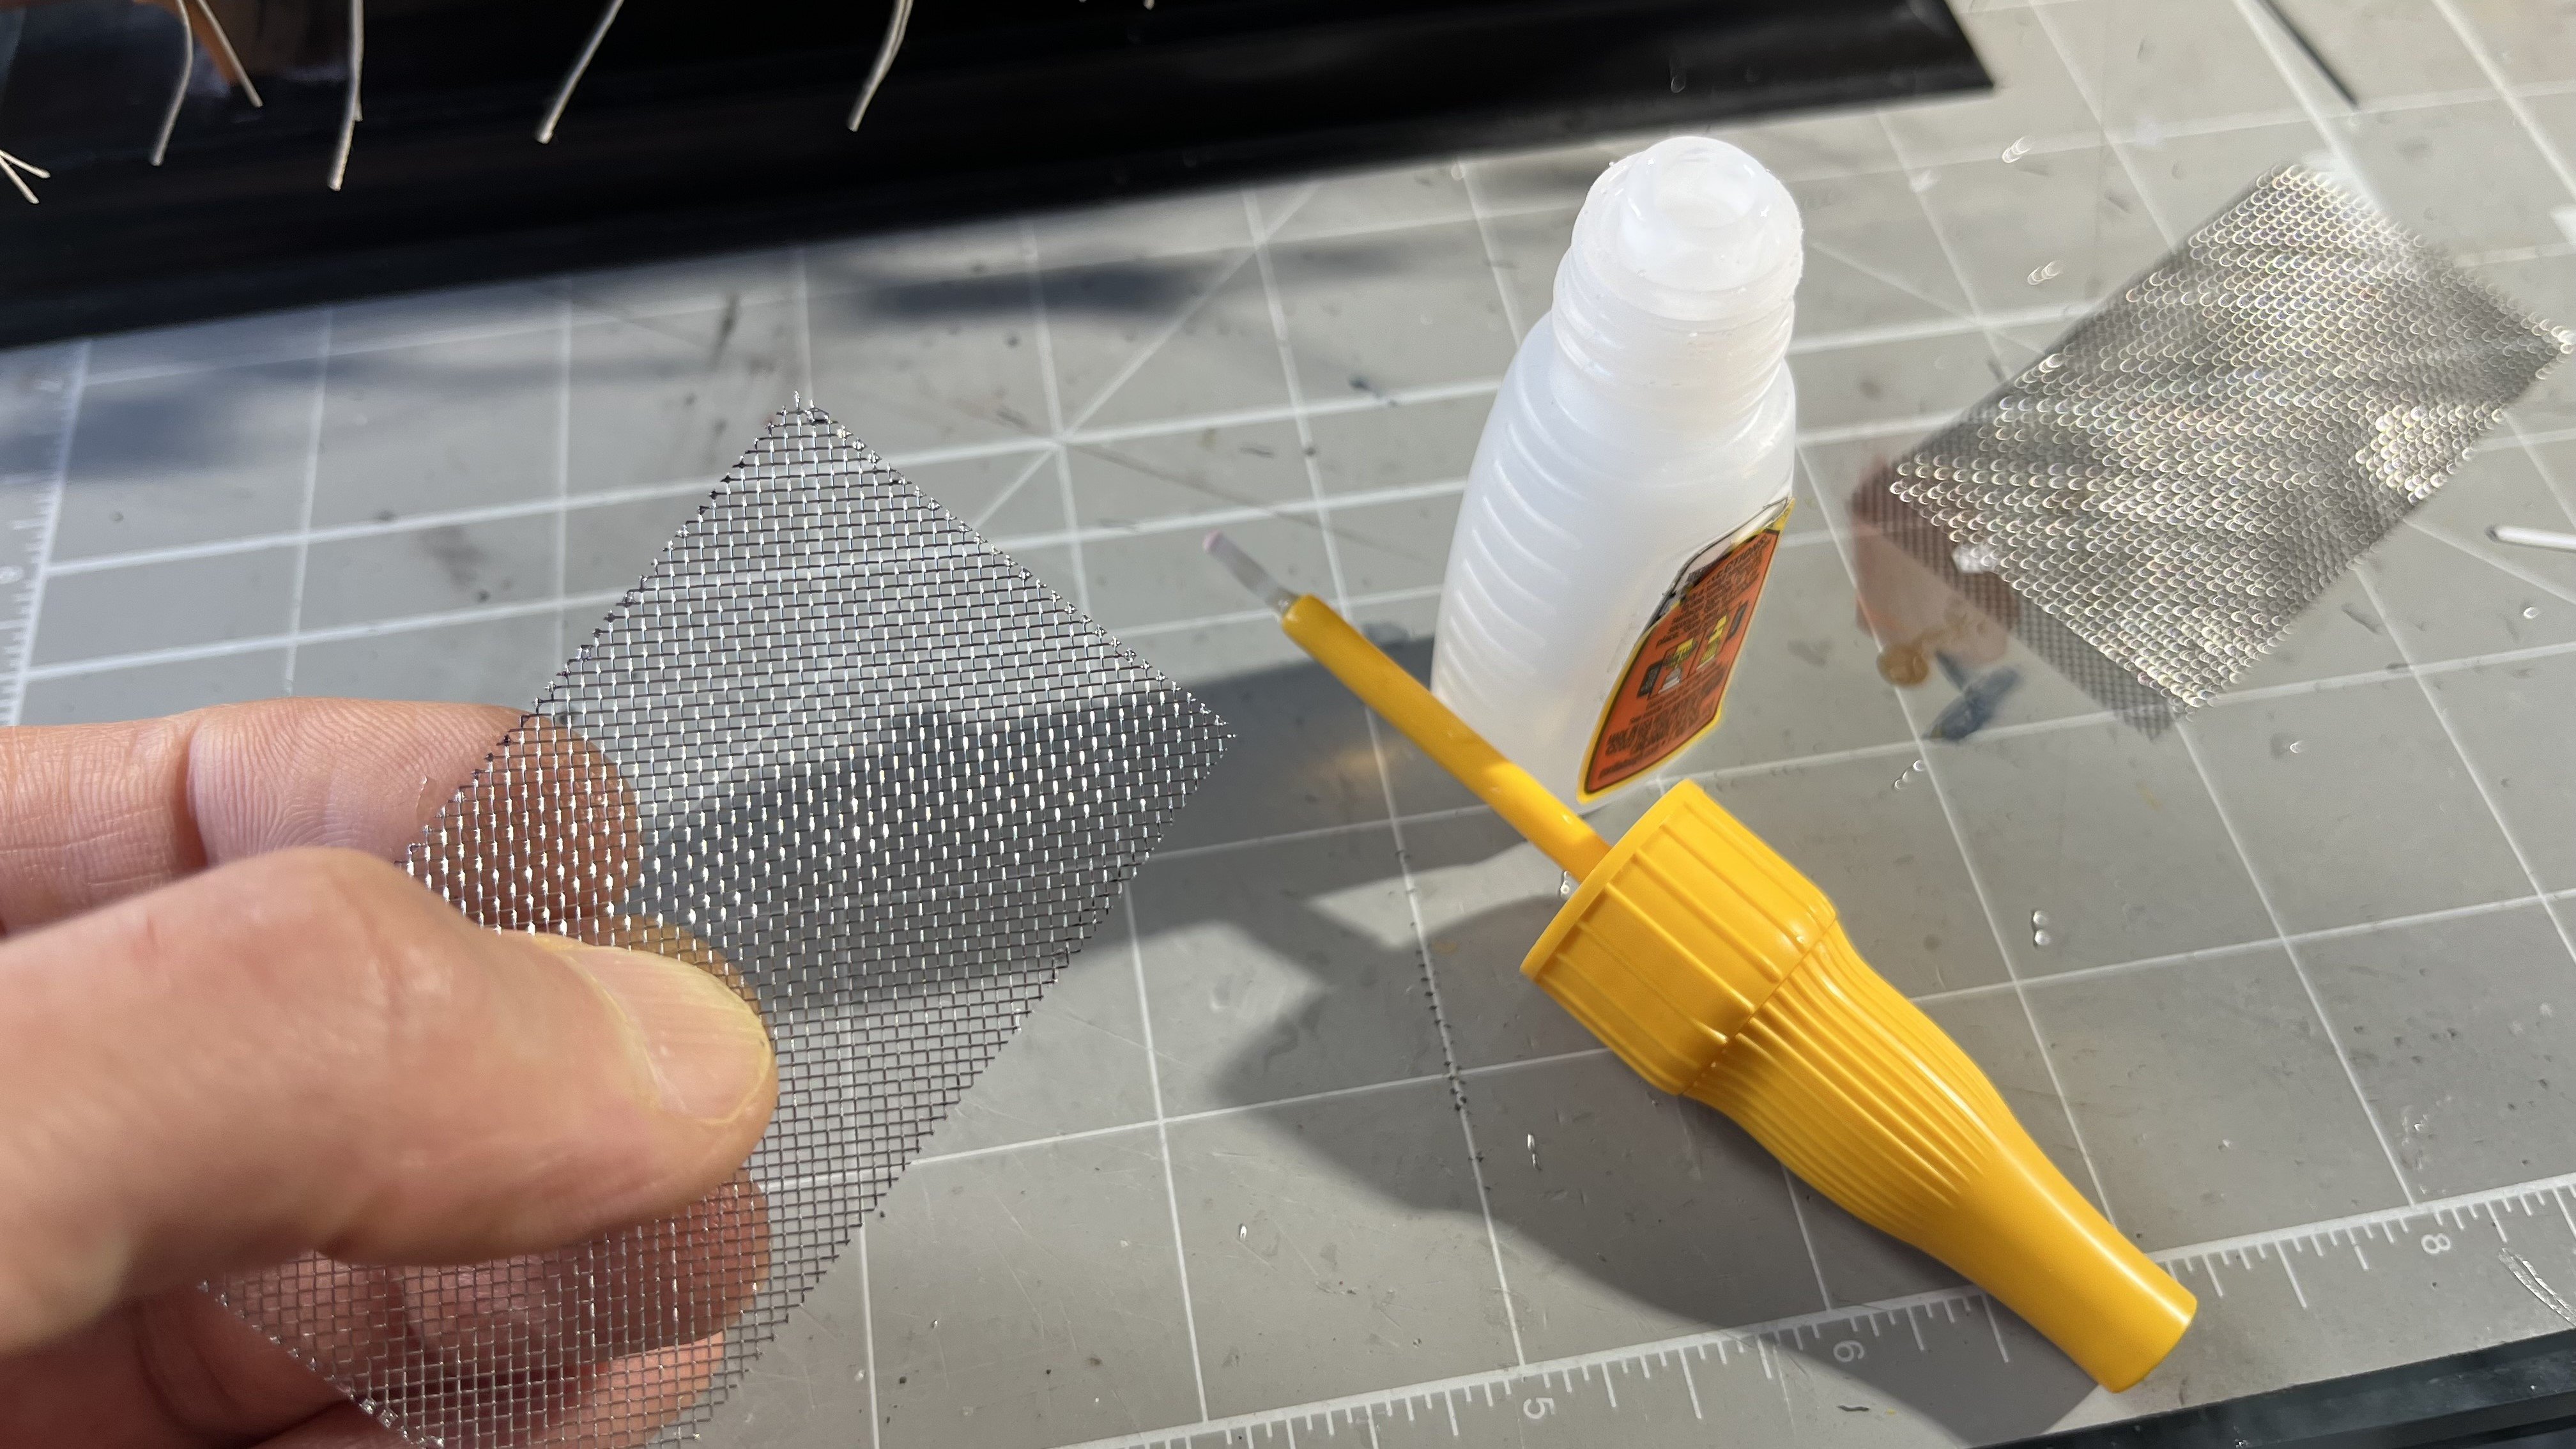
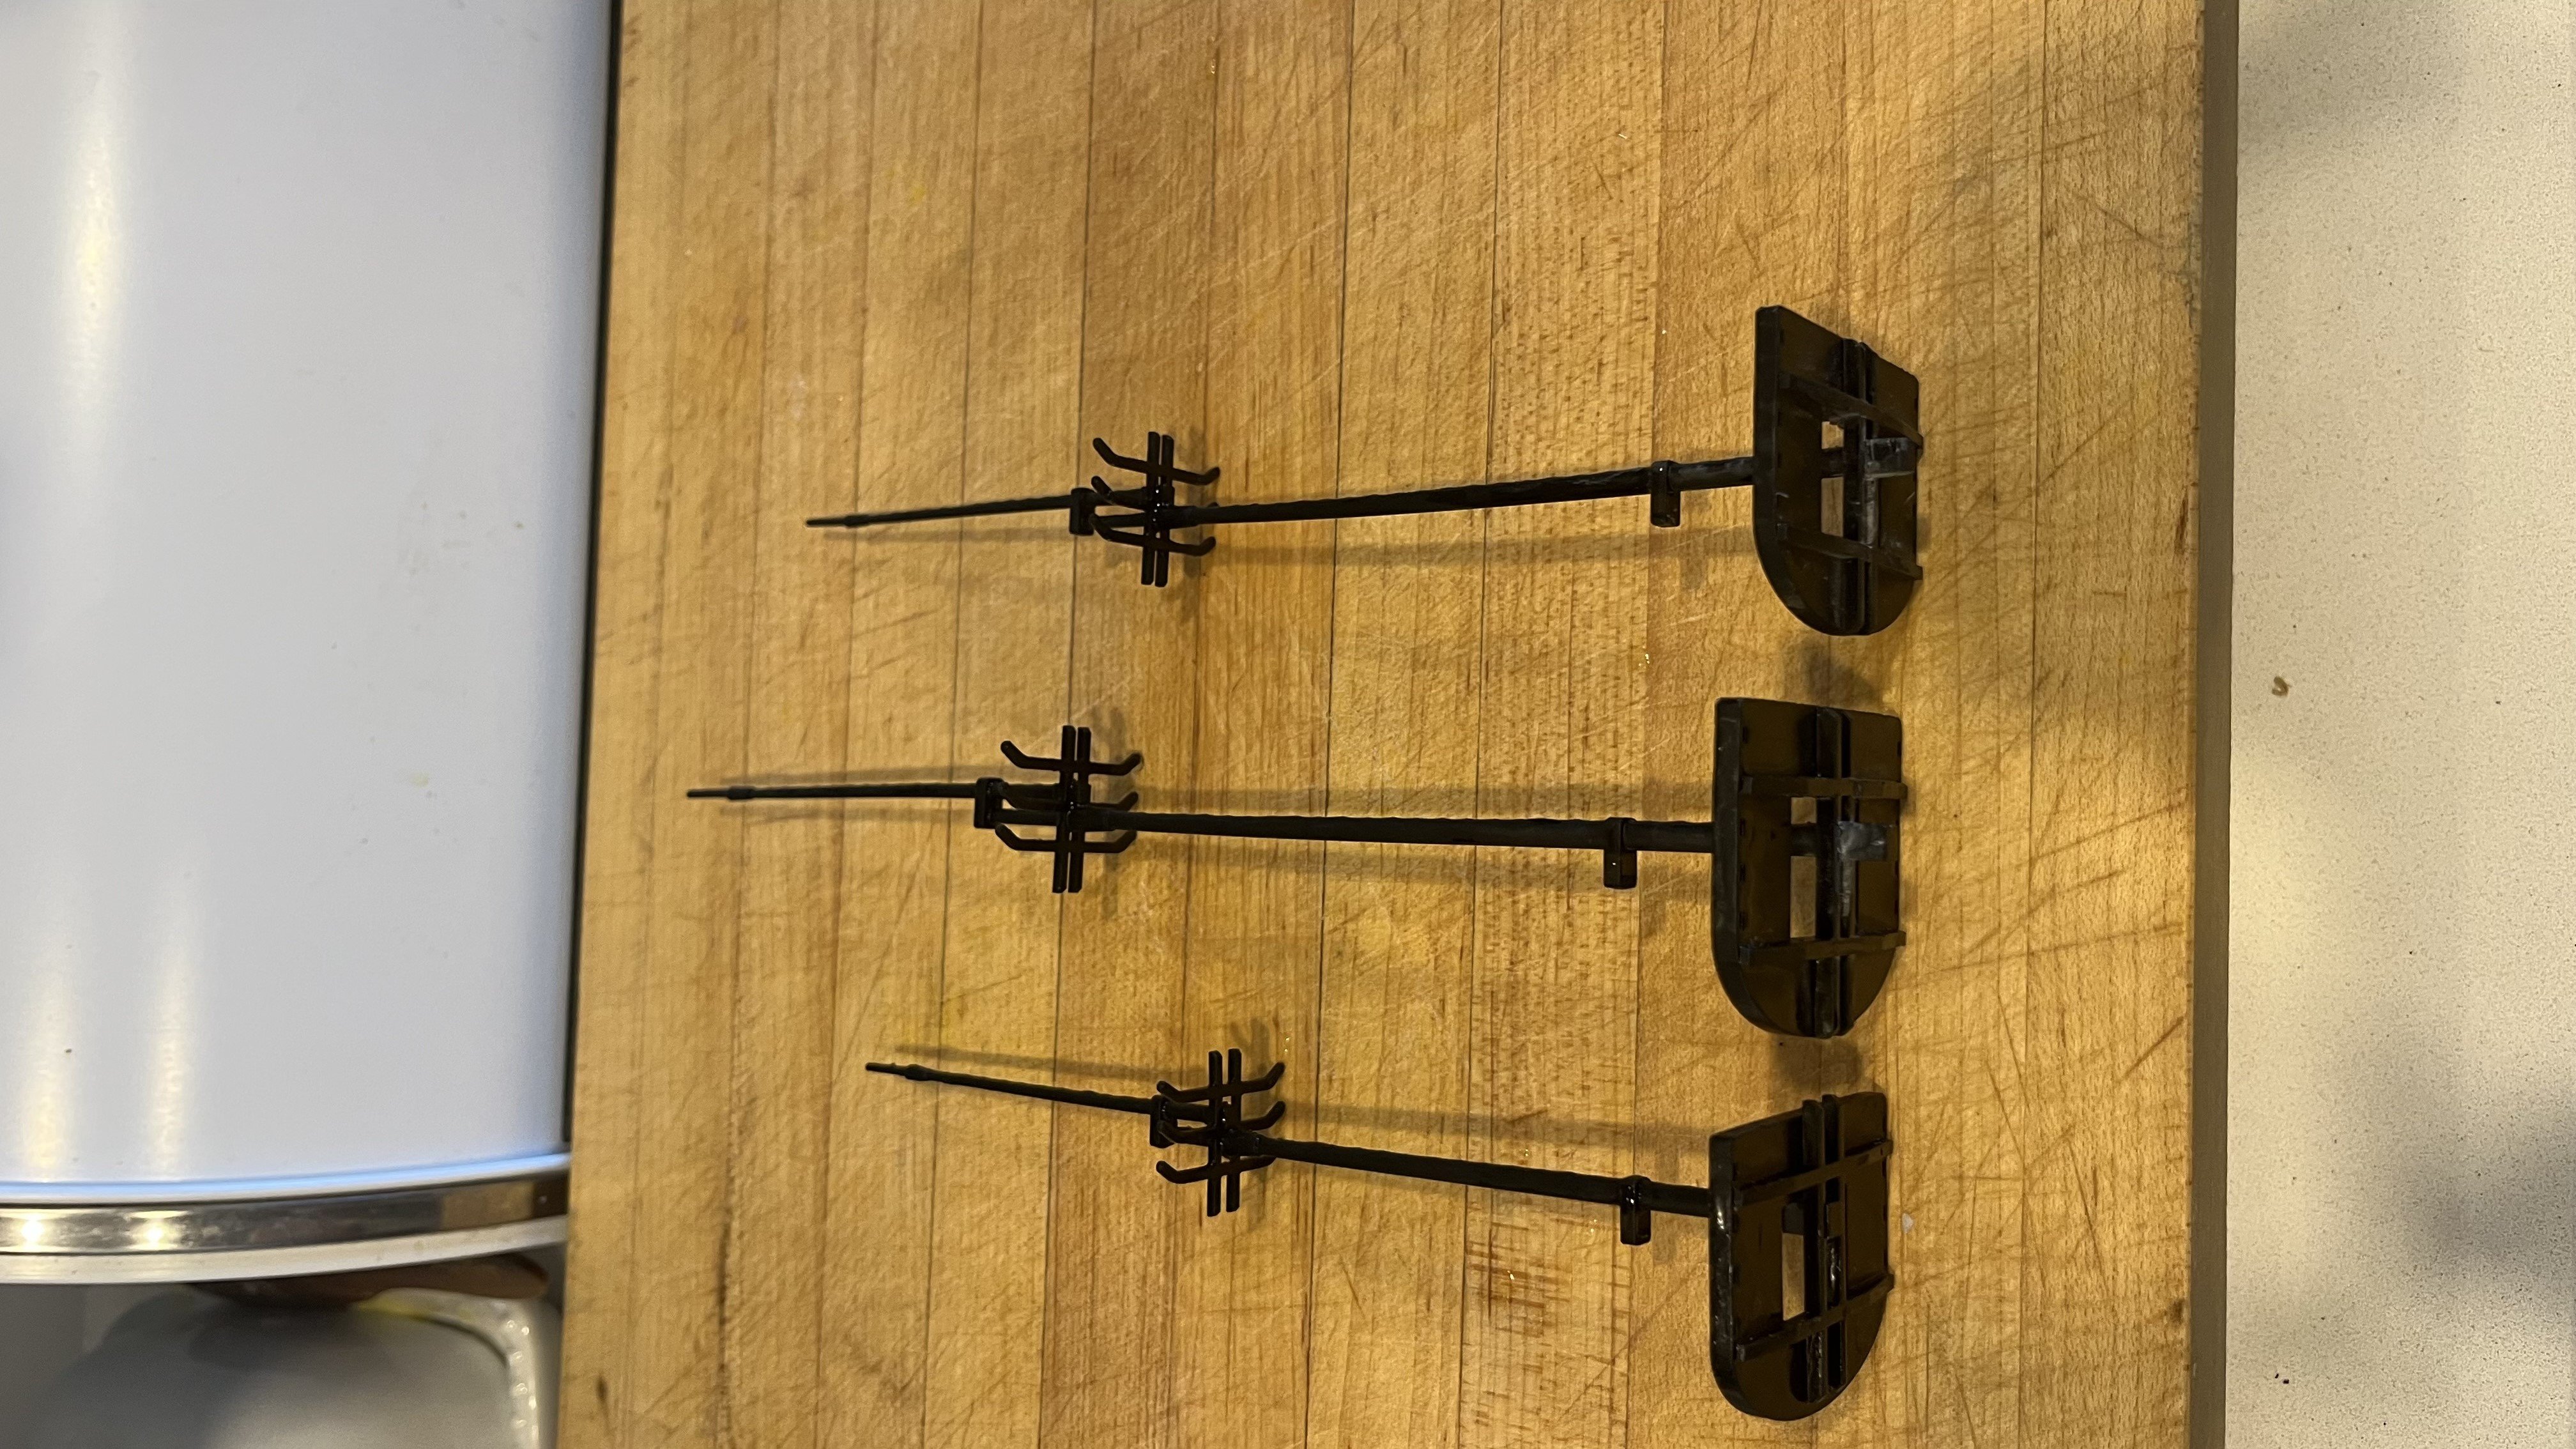
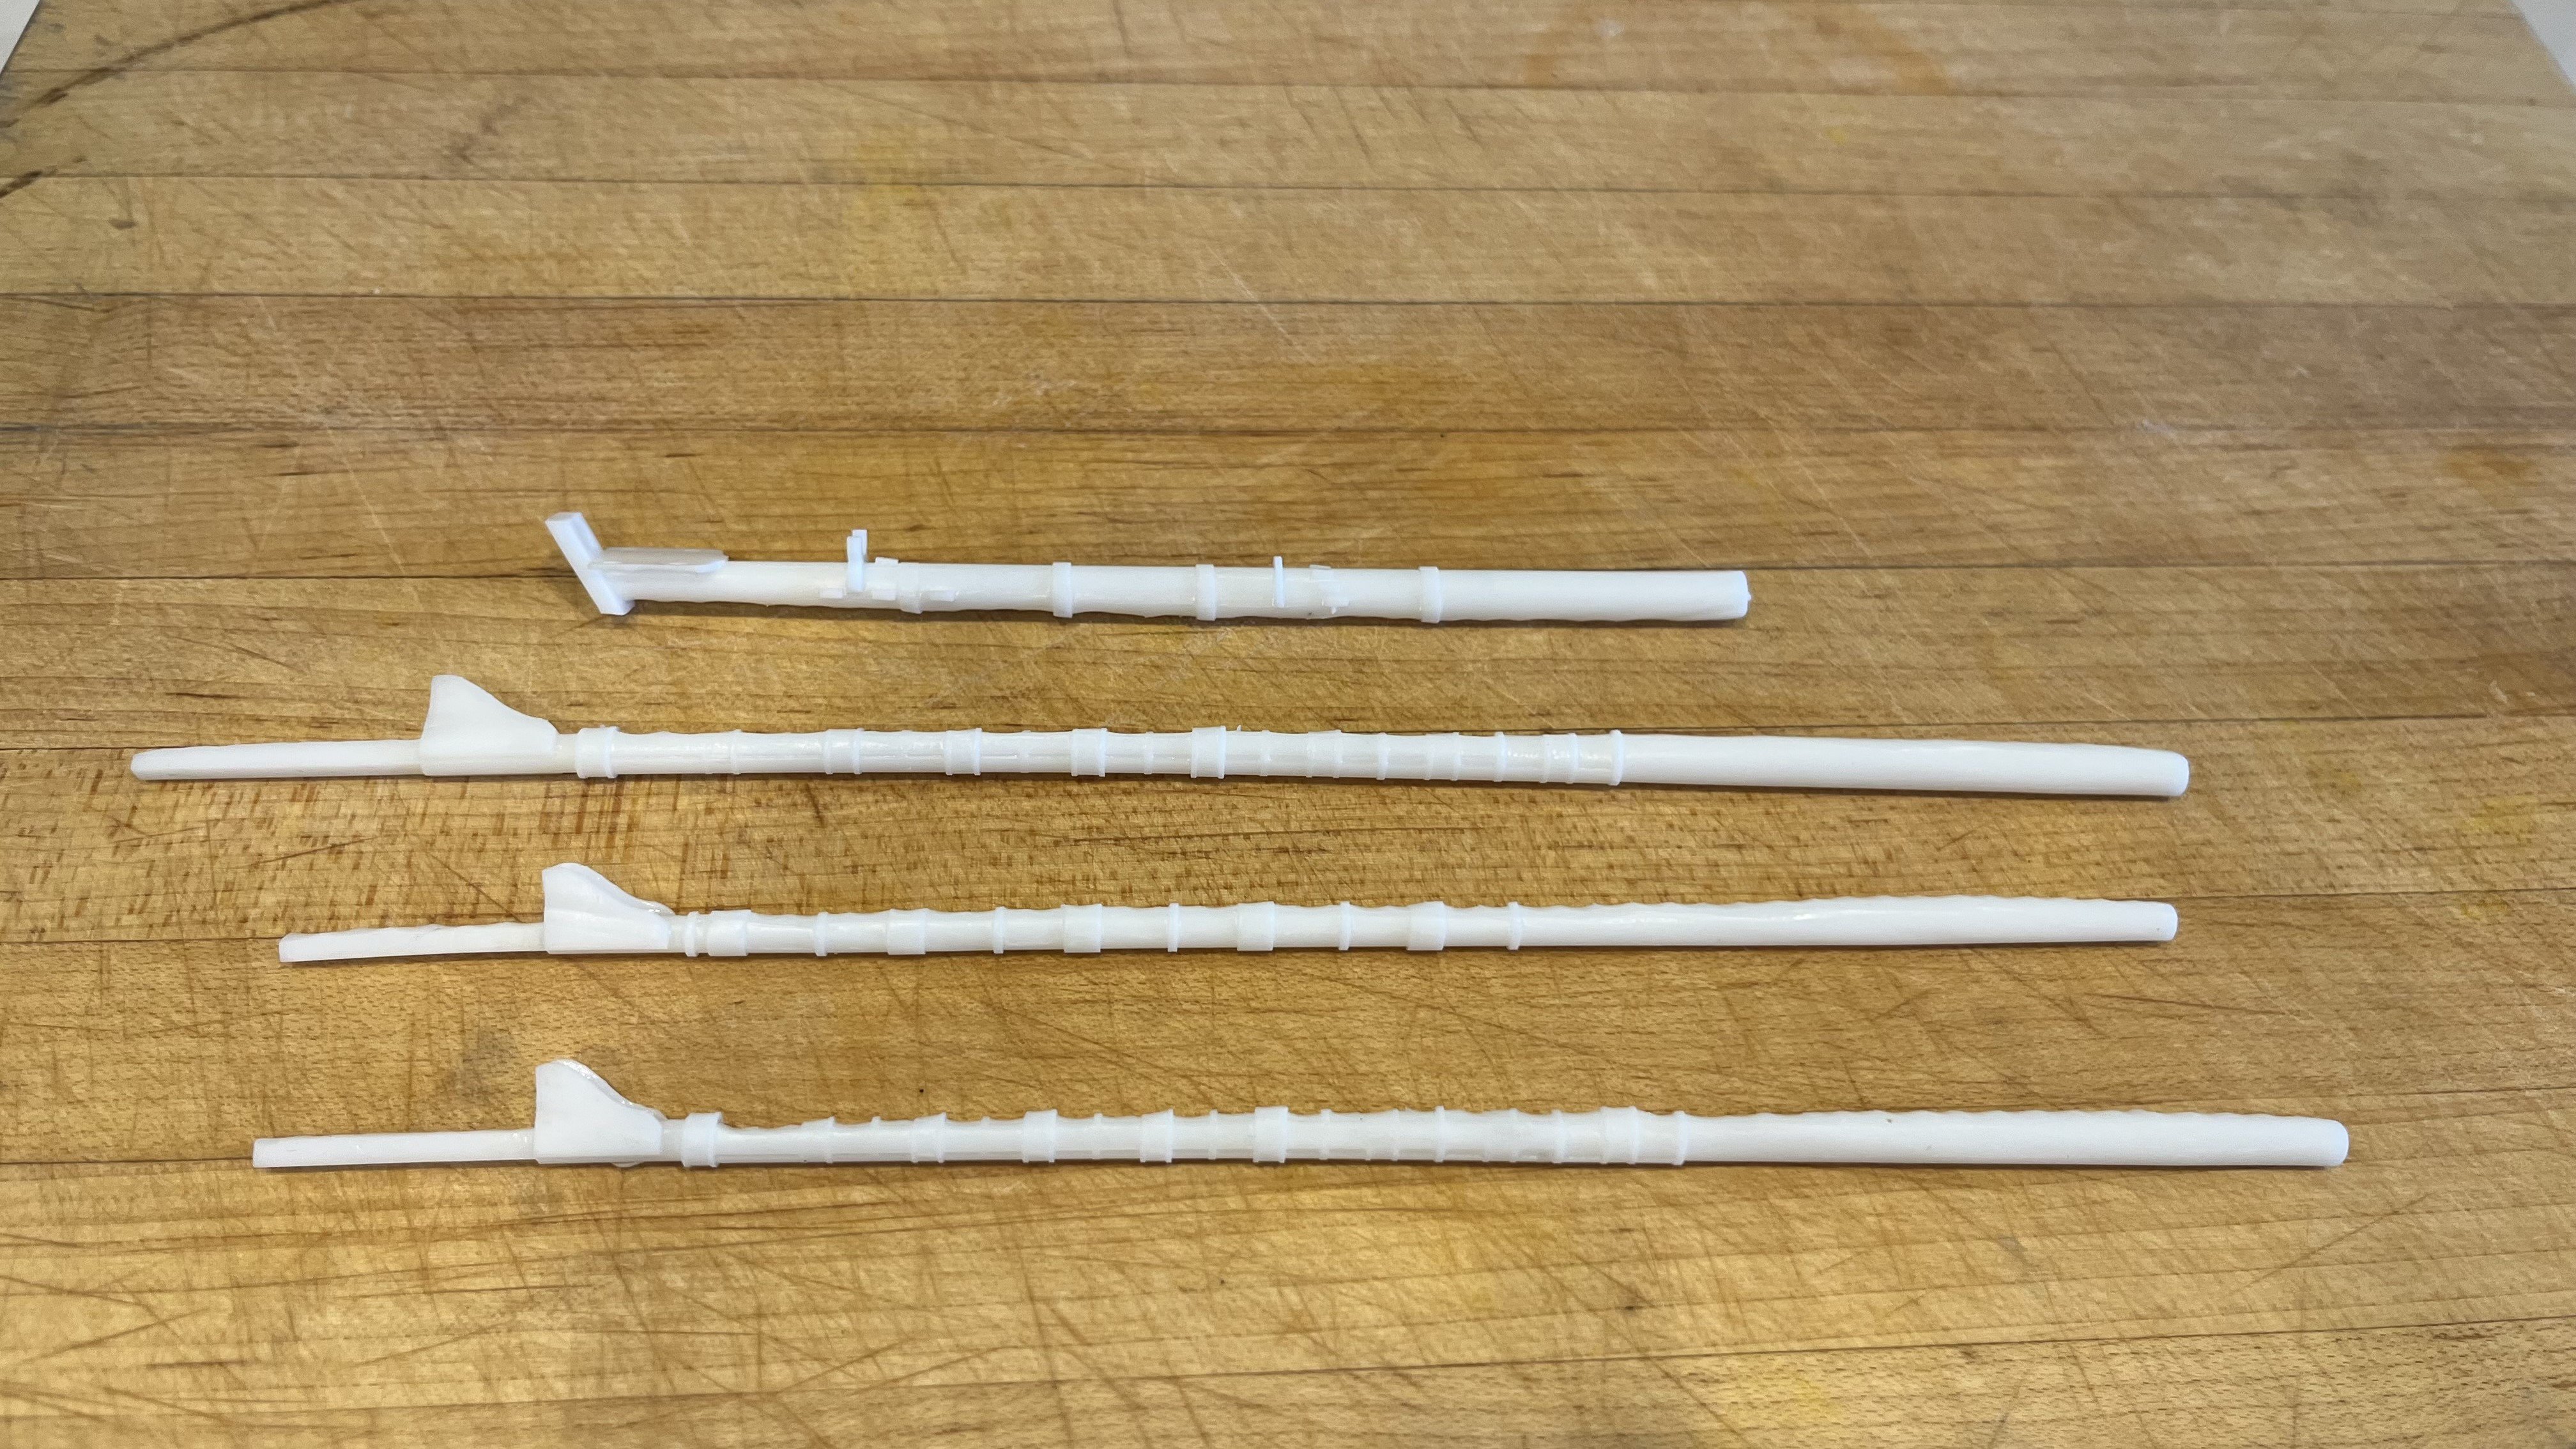
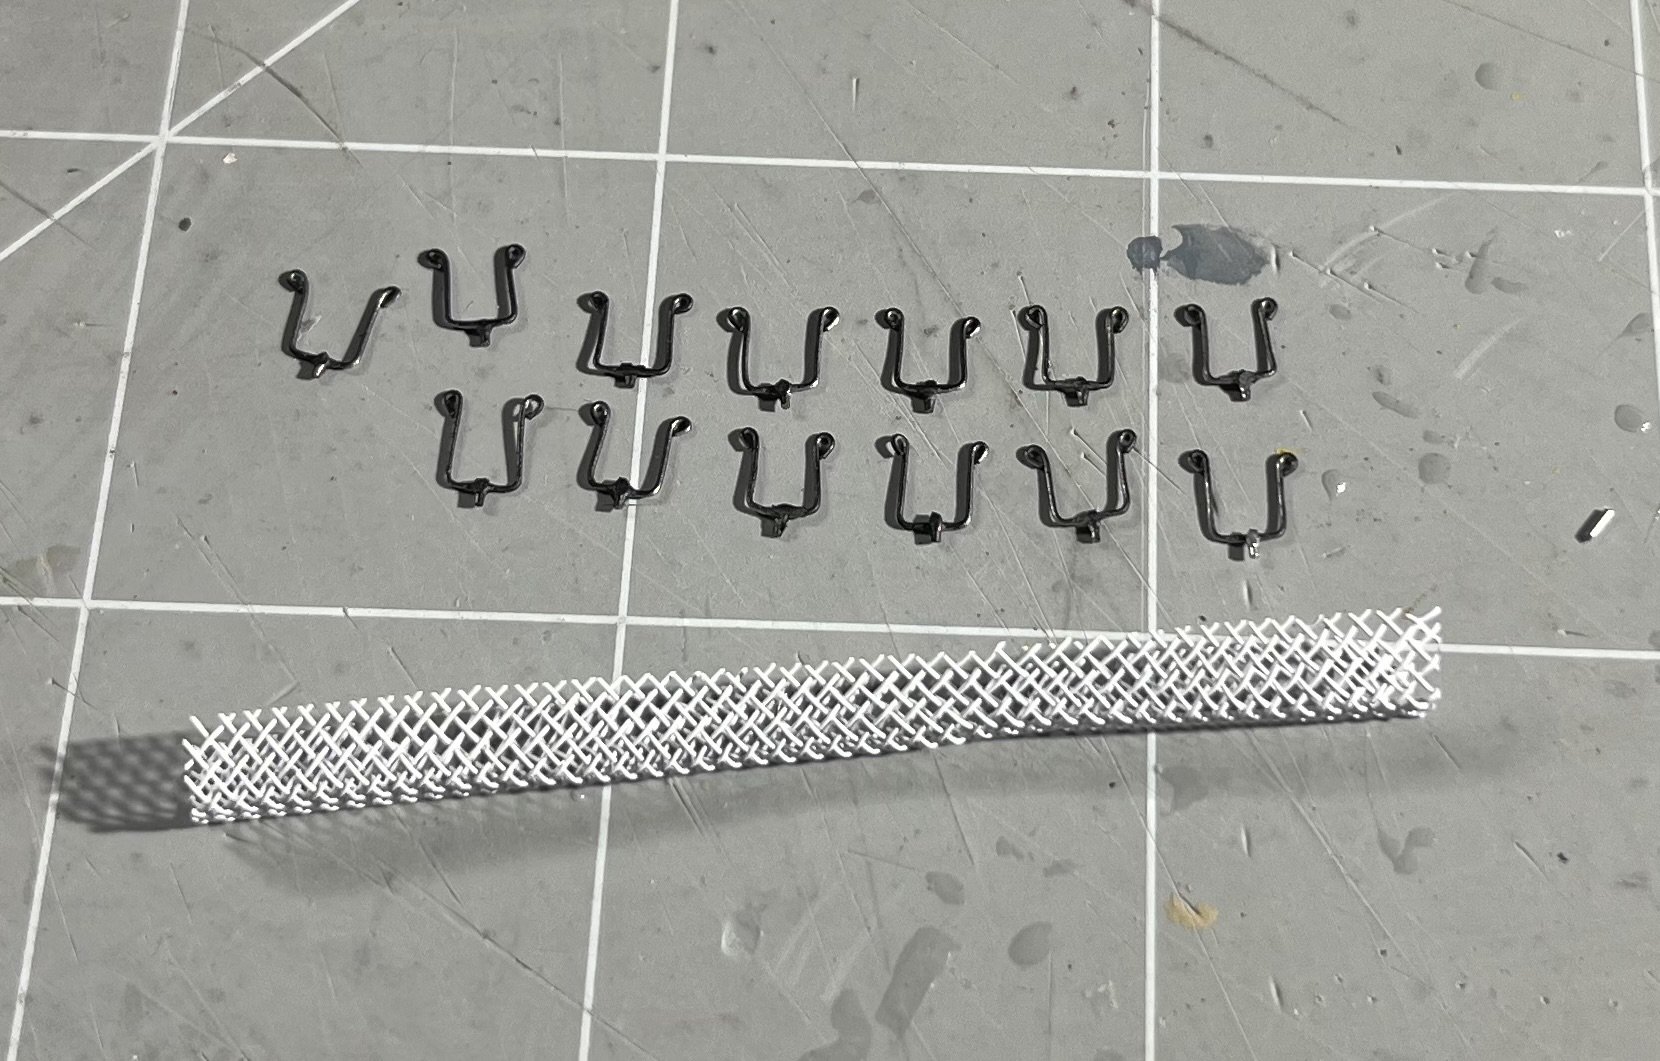
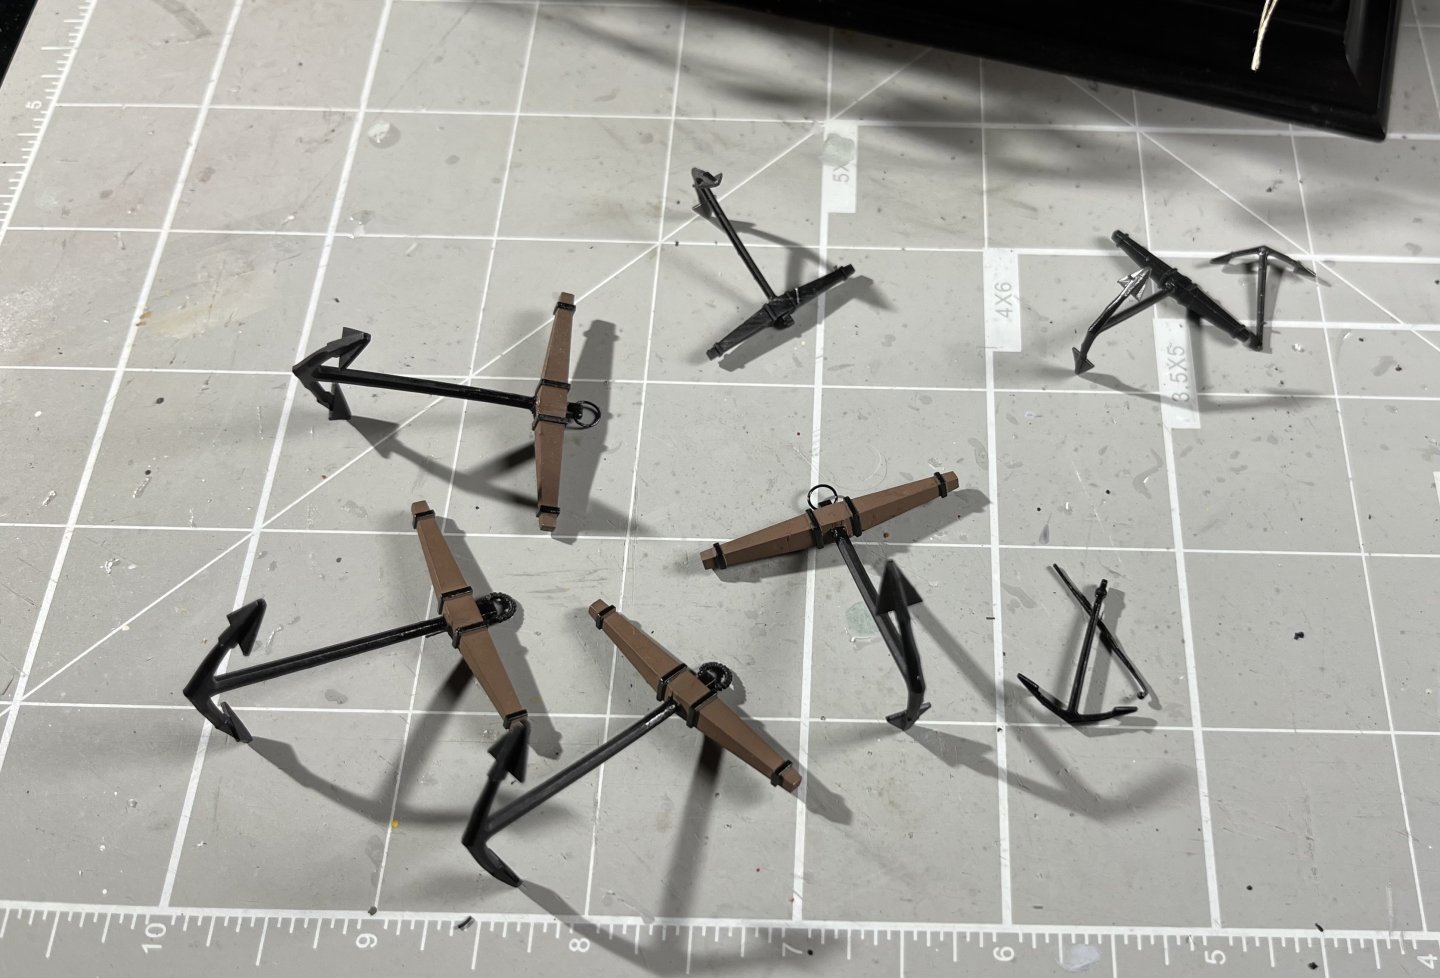
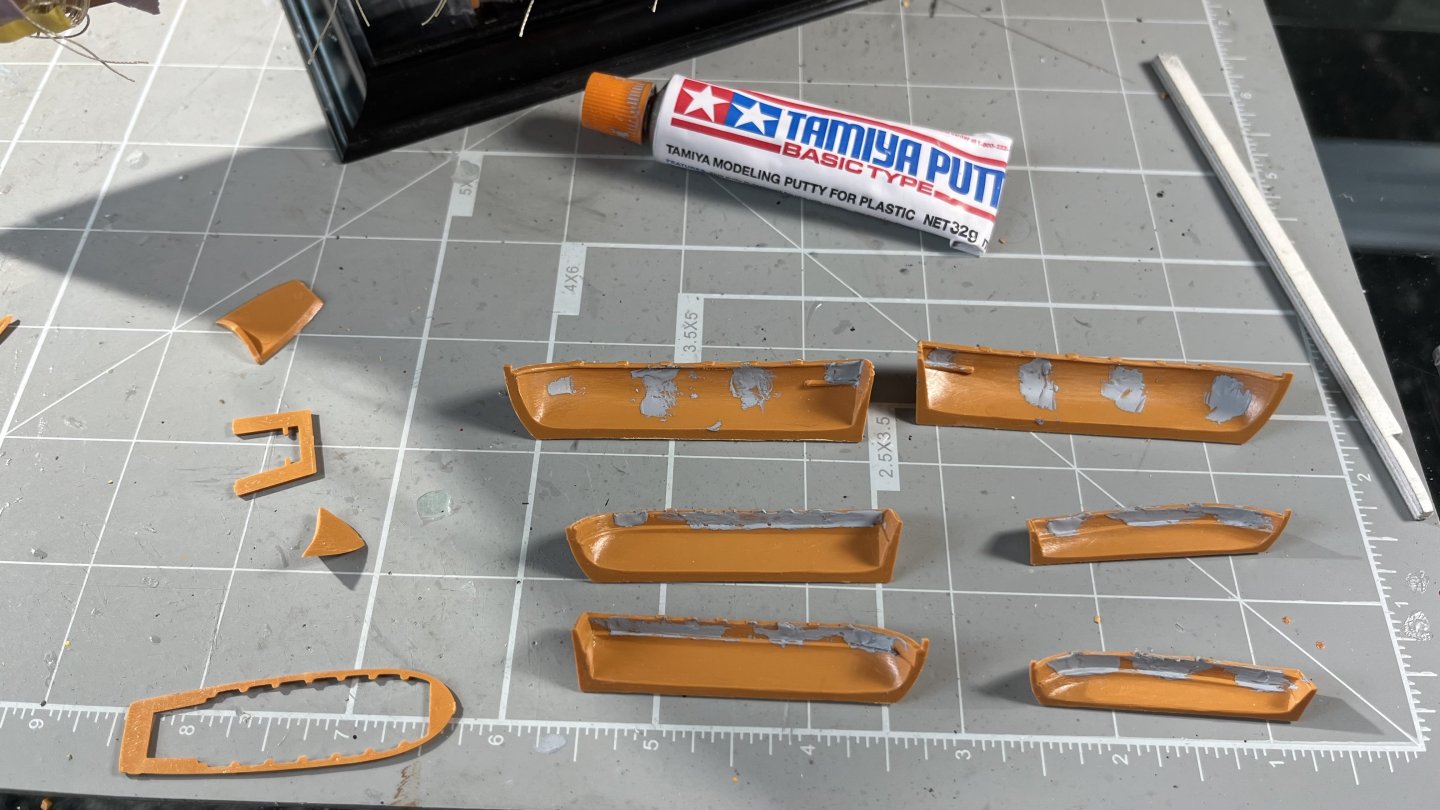
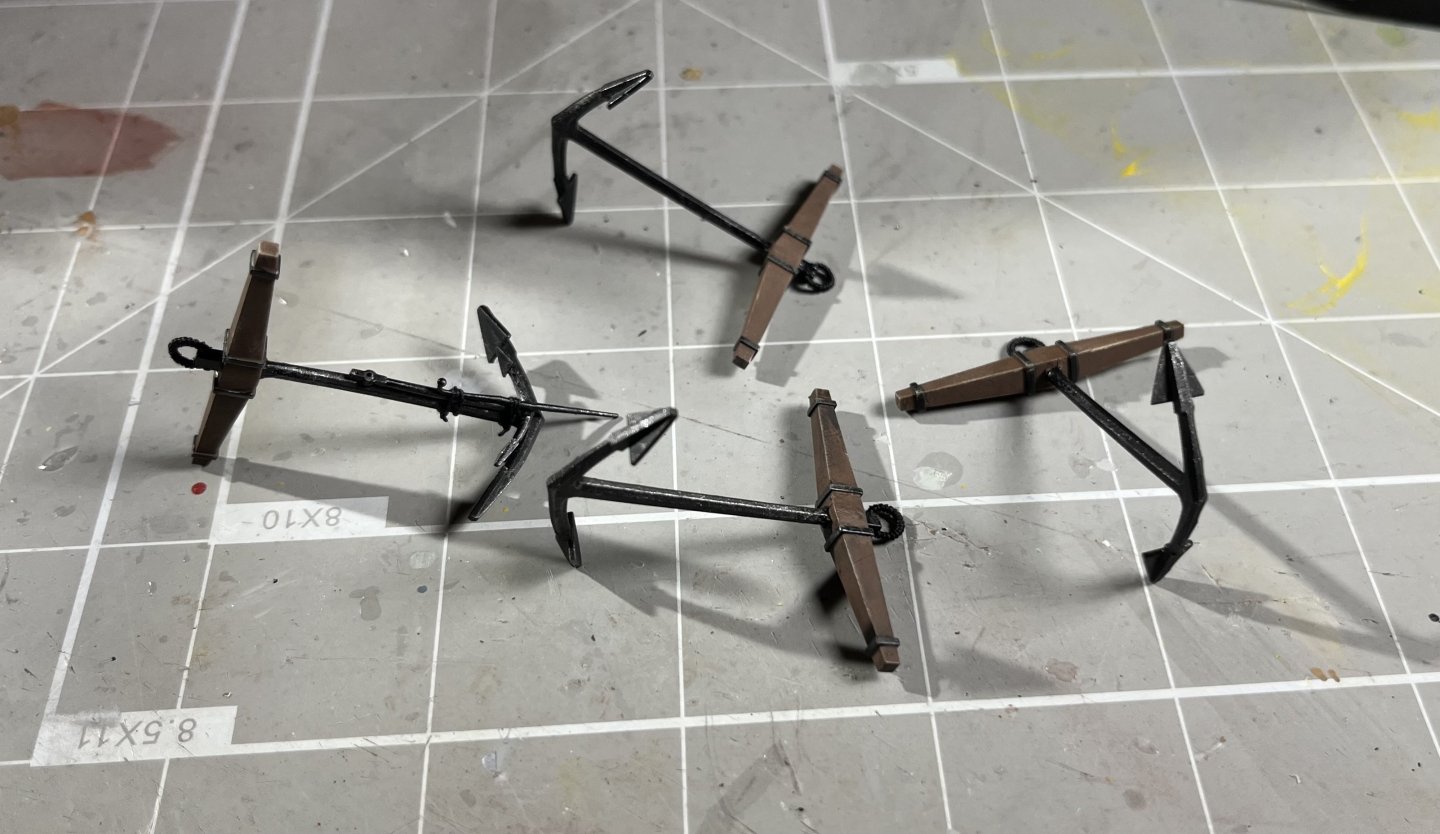
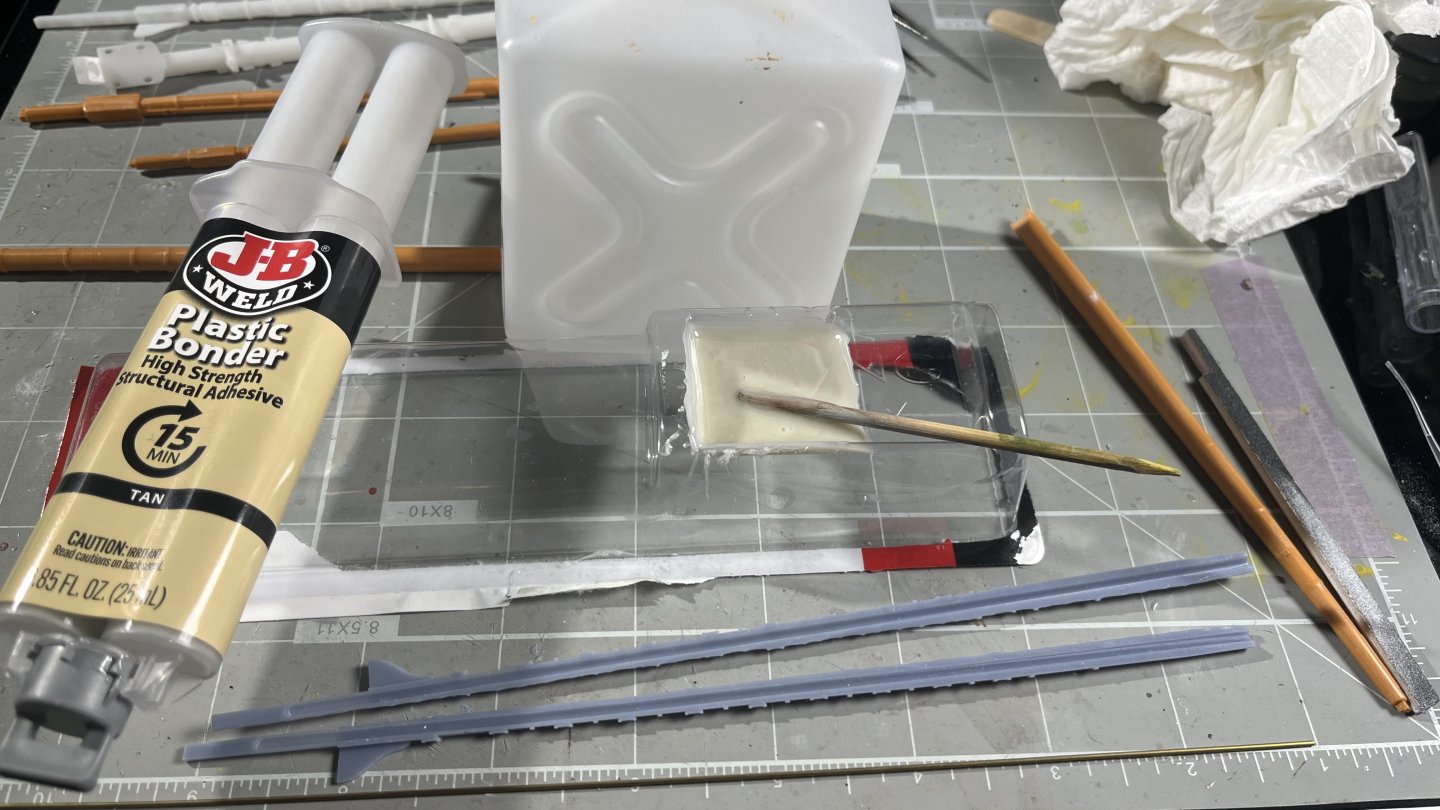
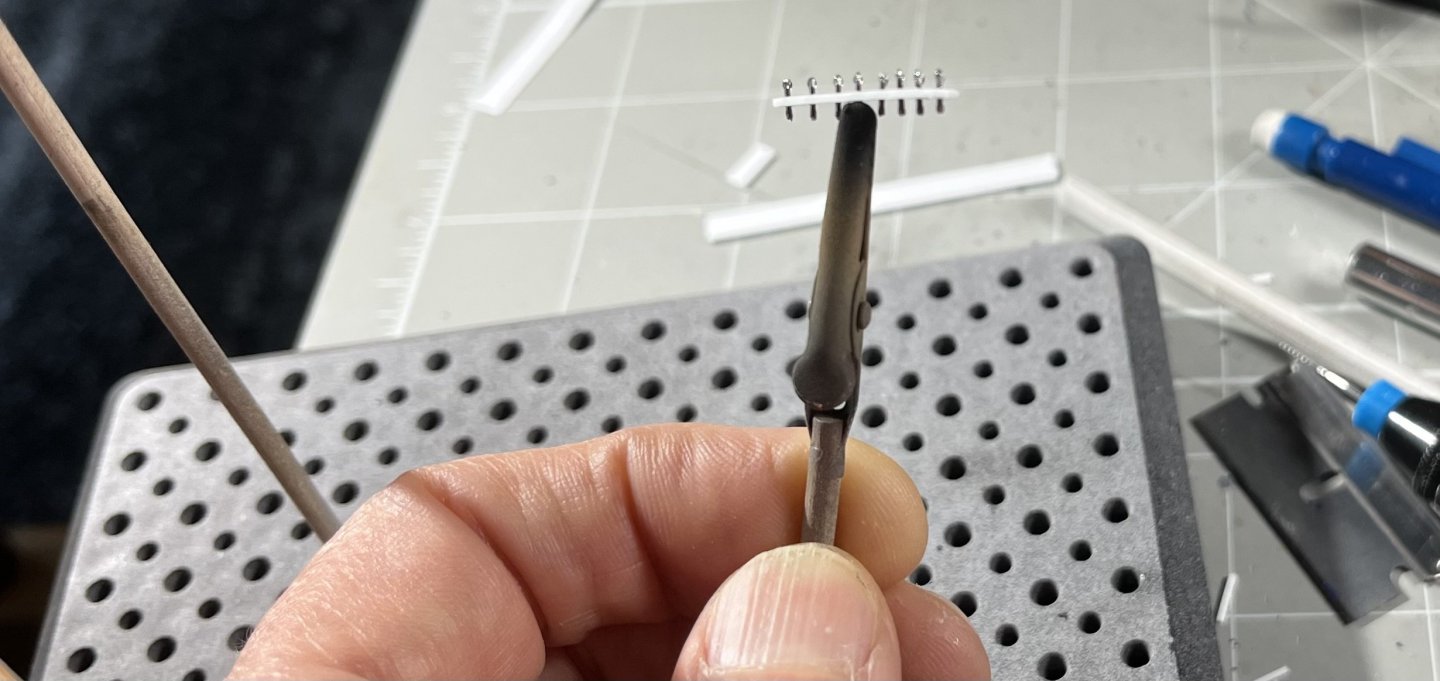
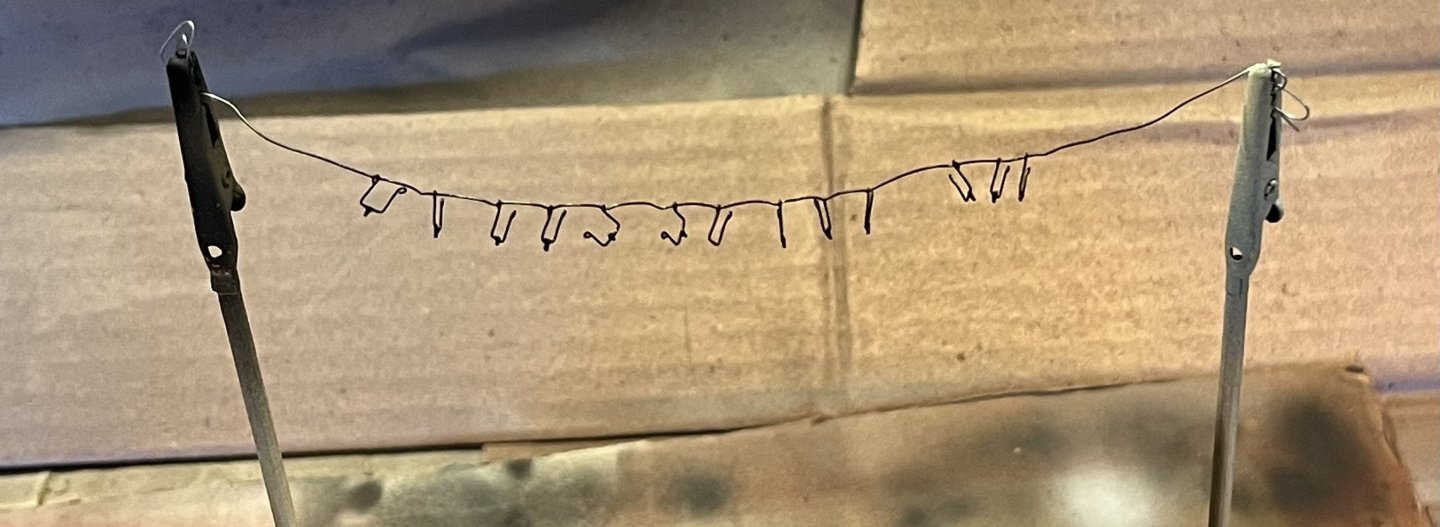
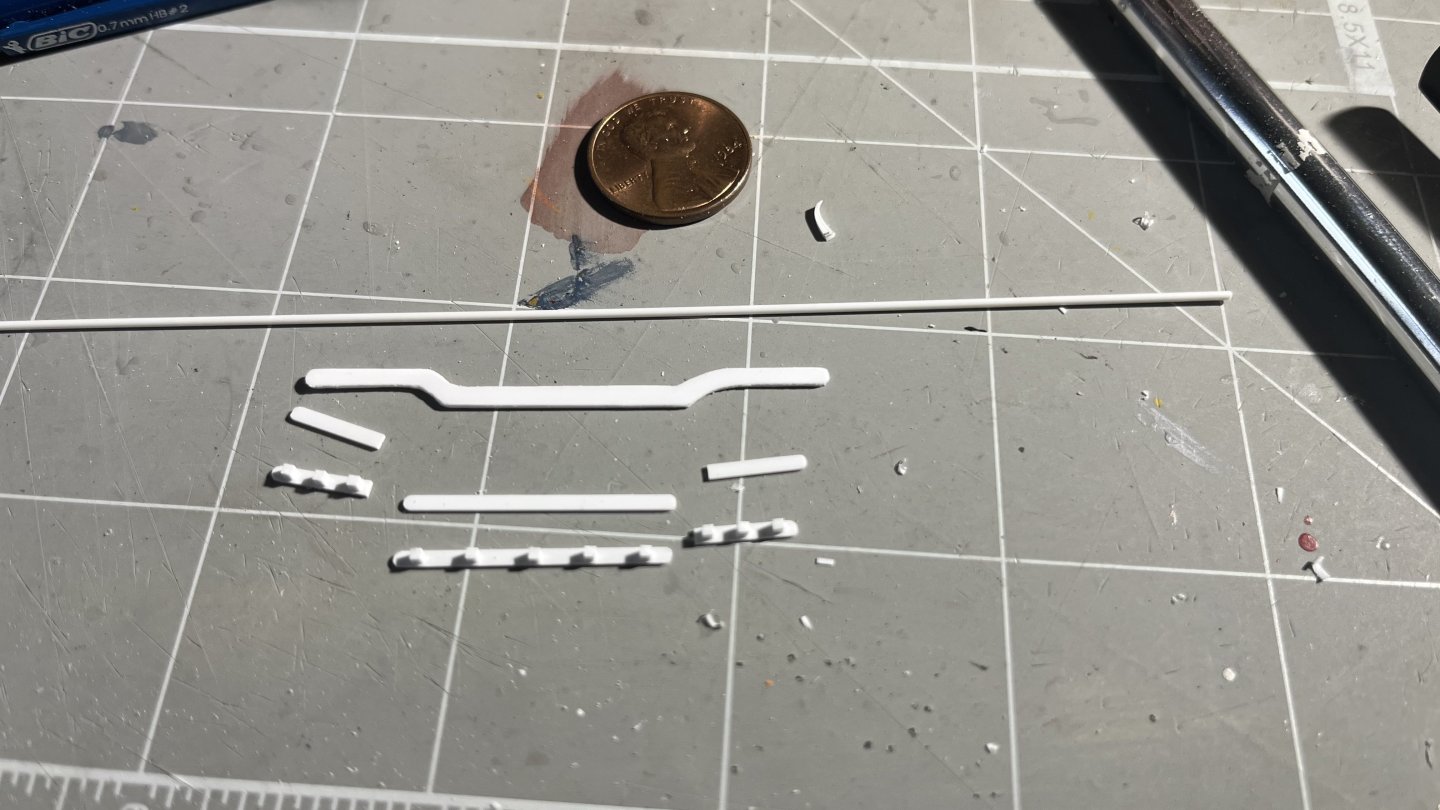
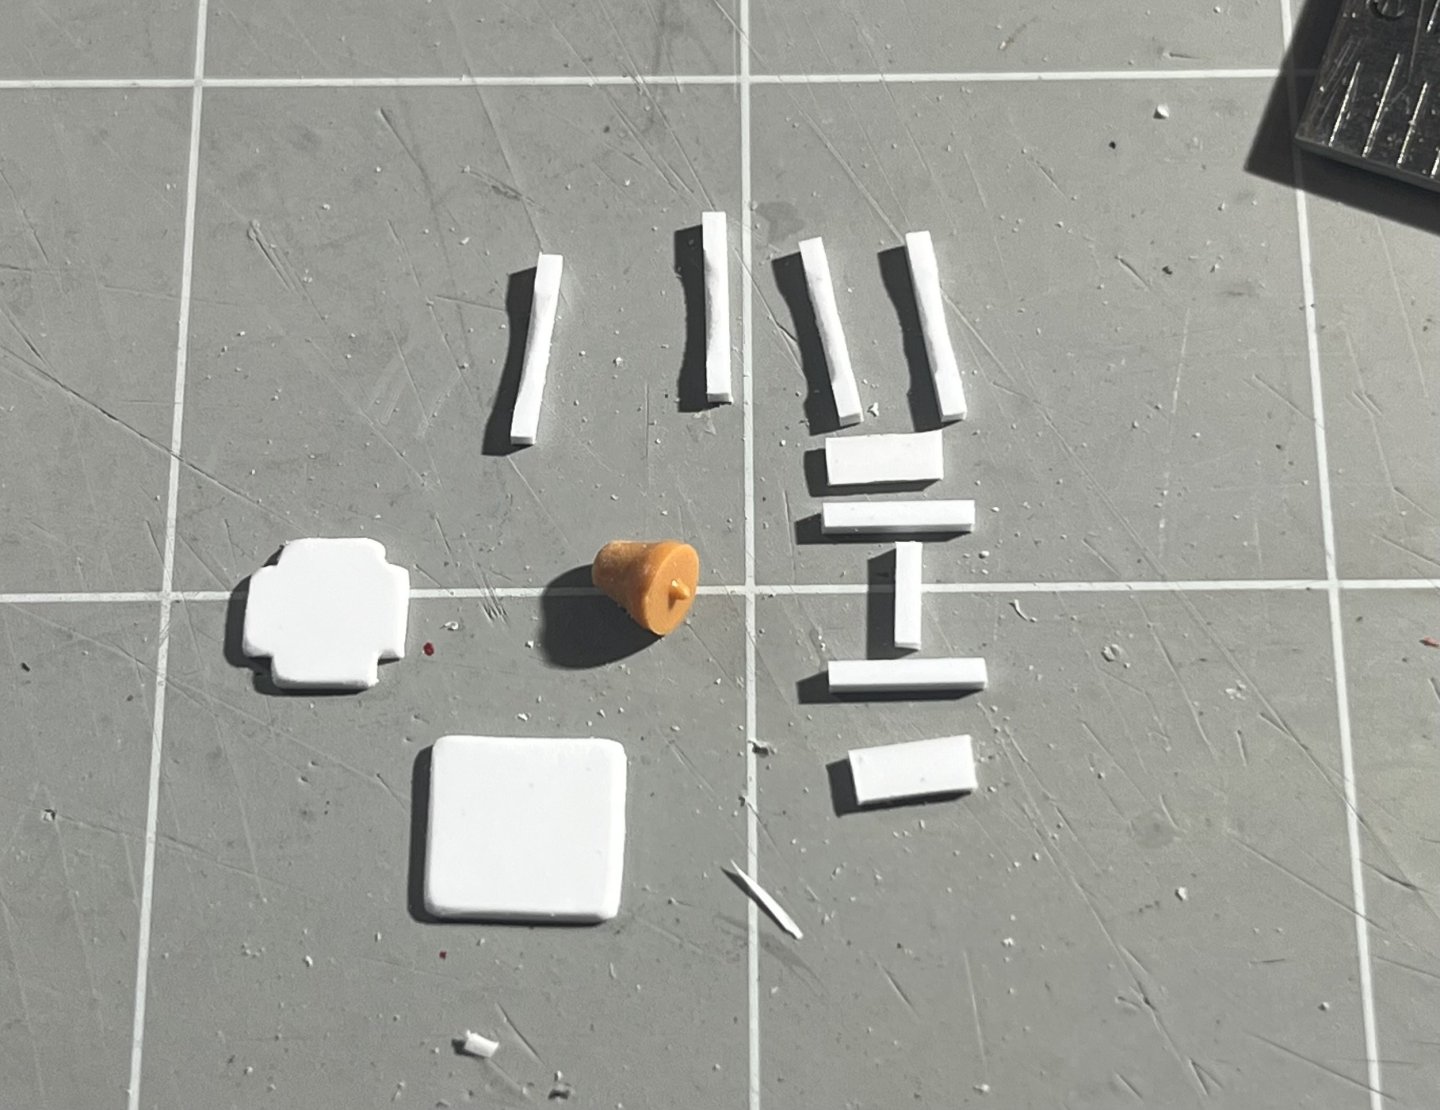
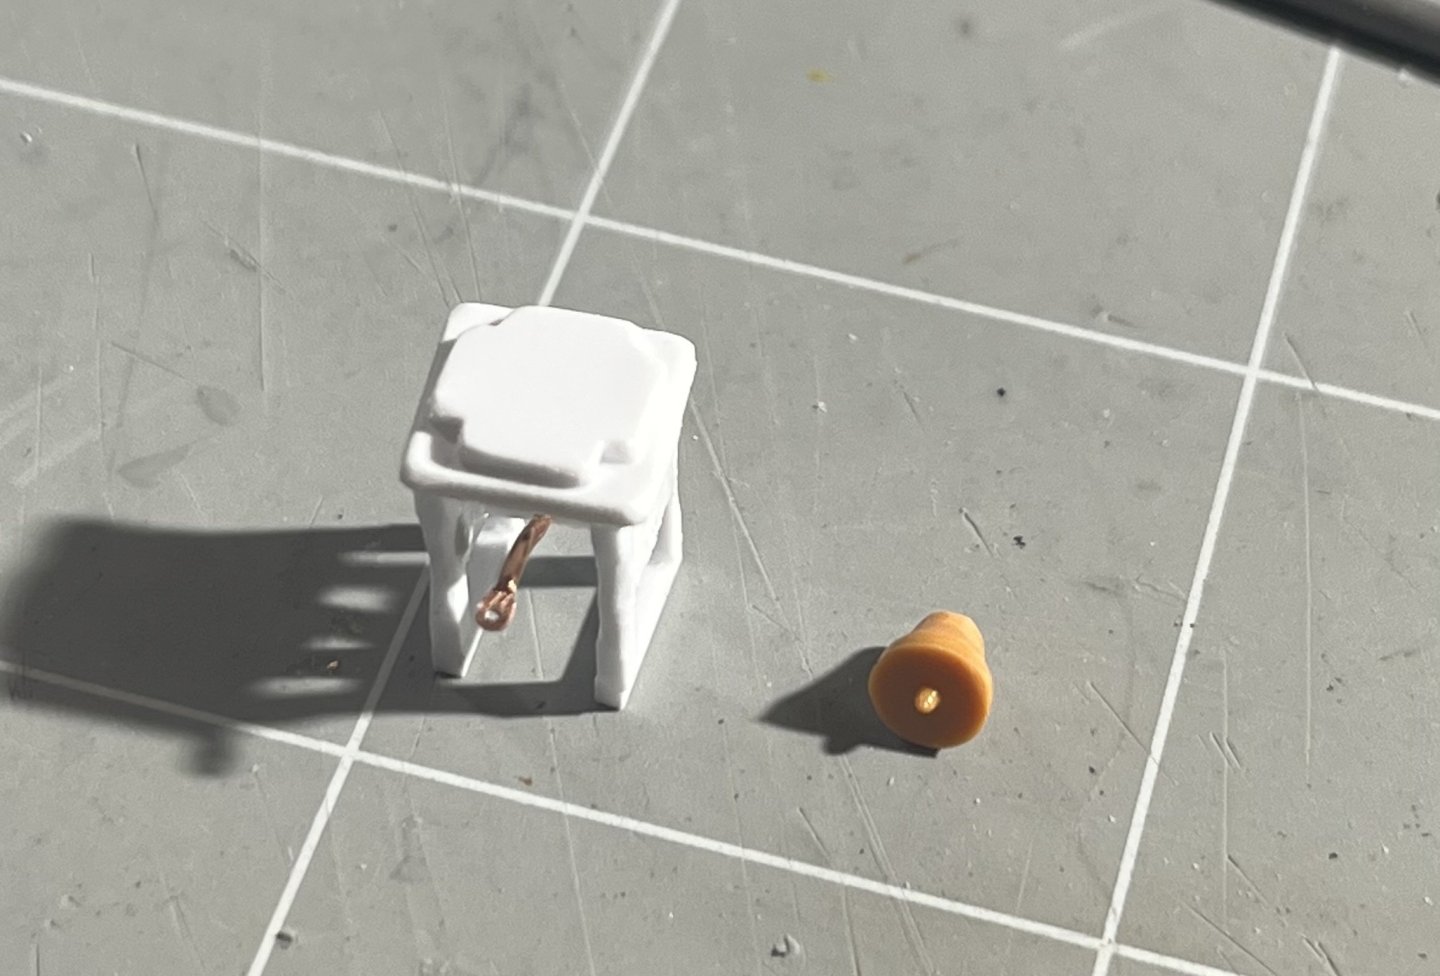
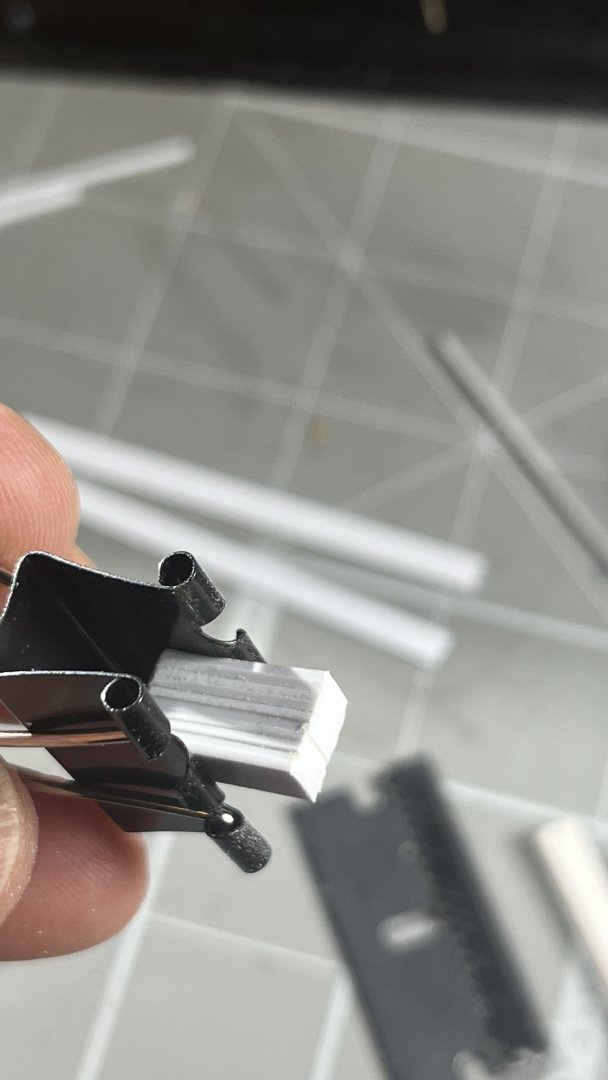
Worked on anchors and ship boats this week, just got the new set of 3D-printed masts also so will work on these next. Anchors were 3D-printed by @igorcap, look great when painted, washed, and dry brushed. Added loops wrapped with rope. Kedge anchor attached to one of the anchors. v1.0 set of 3D-printed masts looked great but warp/curve got worse over time. Thinner pieces -- yards and top masts -- worked great without warping. In v2.0 set, masts are split in two halves and hollow, allowing for a stabilizing/straightening metal rod to be inserted. Using a 1mm brass rod for the masts, and a 2mm copper tube for the bow sprit. Two-component, slow curing epoxy will expand to seal any gaps between two halves (I think/hope). As per Lavery, the Vanguard left England with four boats but lost one in the storm May 12, 1798. So, the three boats from the kit will have to suffice Aside from the hulls, a few more pieces can be reused. Started with prepping with plenty of filler for injection artifacts. Made oars and decks from plasticard. Assembled and painted, also made stands for the boat booms. Final assembly, with a light coat of umber wash and light beige dry brush, tied down oars. Still dry fitted, will wait with glueing anchors and boats in place until rigging is done.


- 24 replies
-
- 2
-
-
- HMS Vanguard
- Heller
- (and 2 more)
-
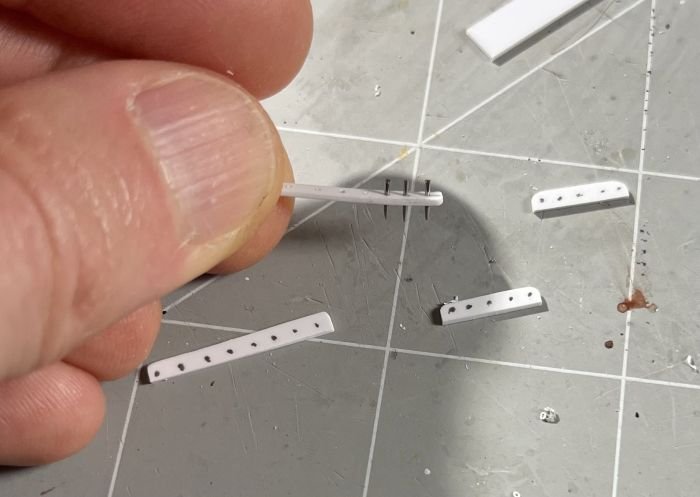
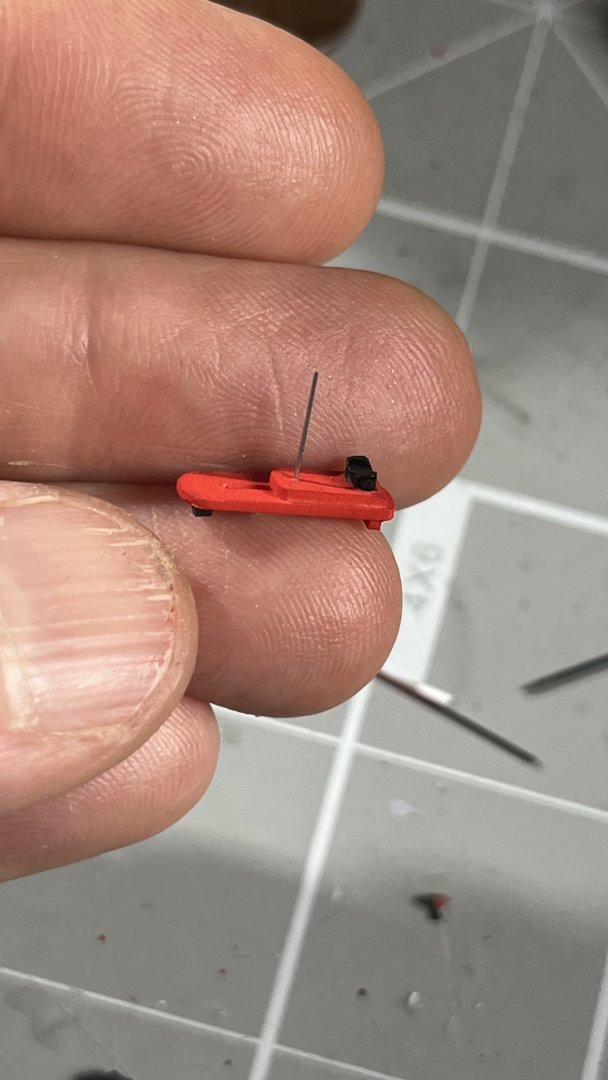
I ran into this problem too, made new pin rails in plasticard and belaying pins from cut off sewing pins, with a small dot of CA for the handle.

-
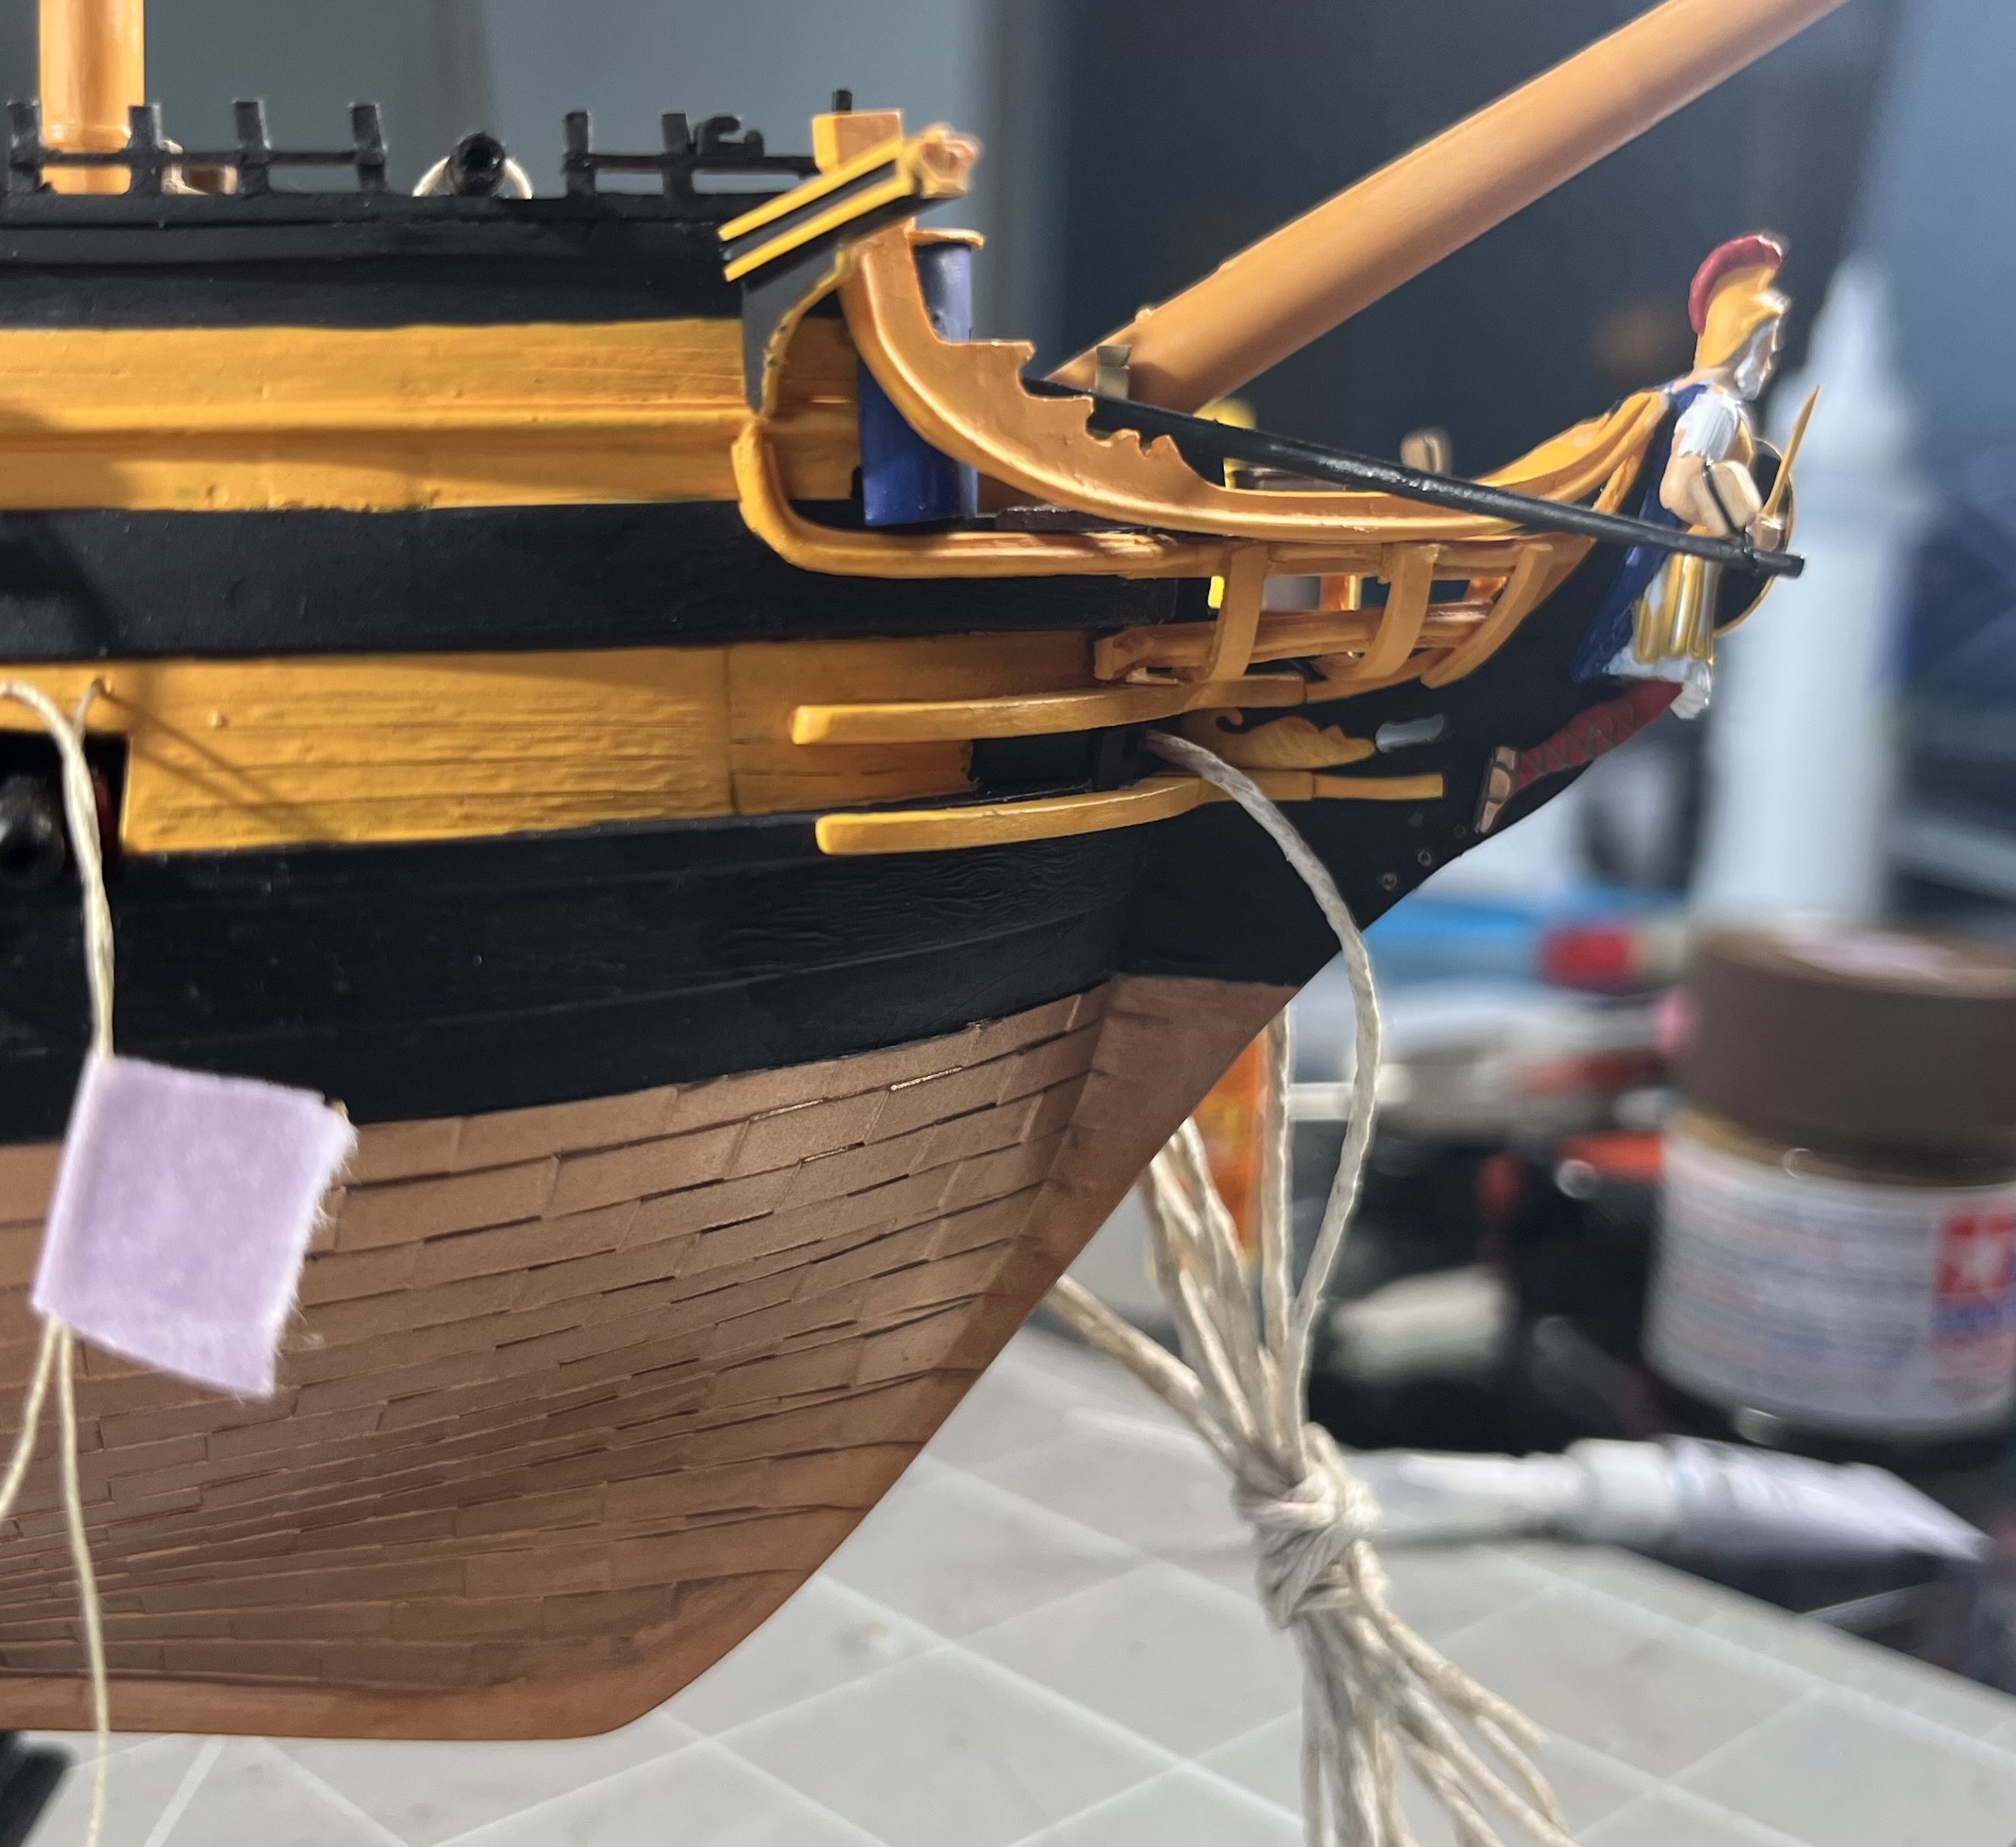
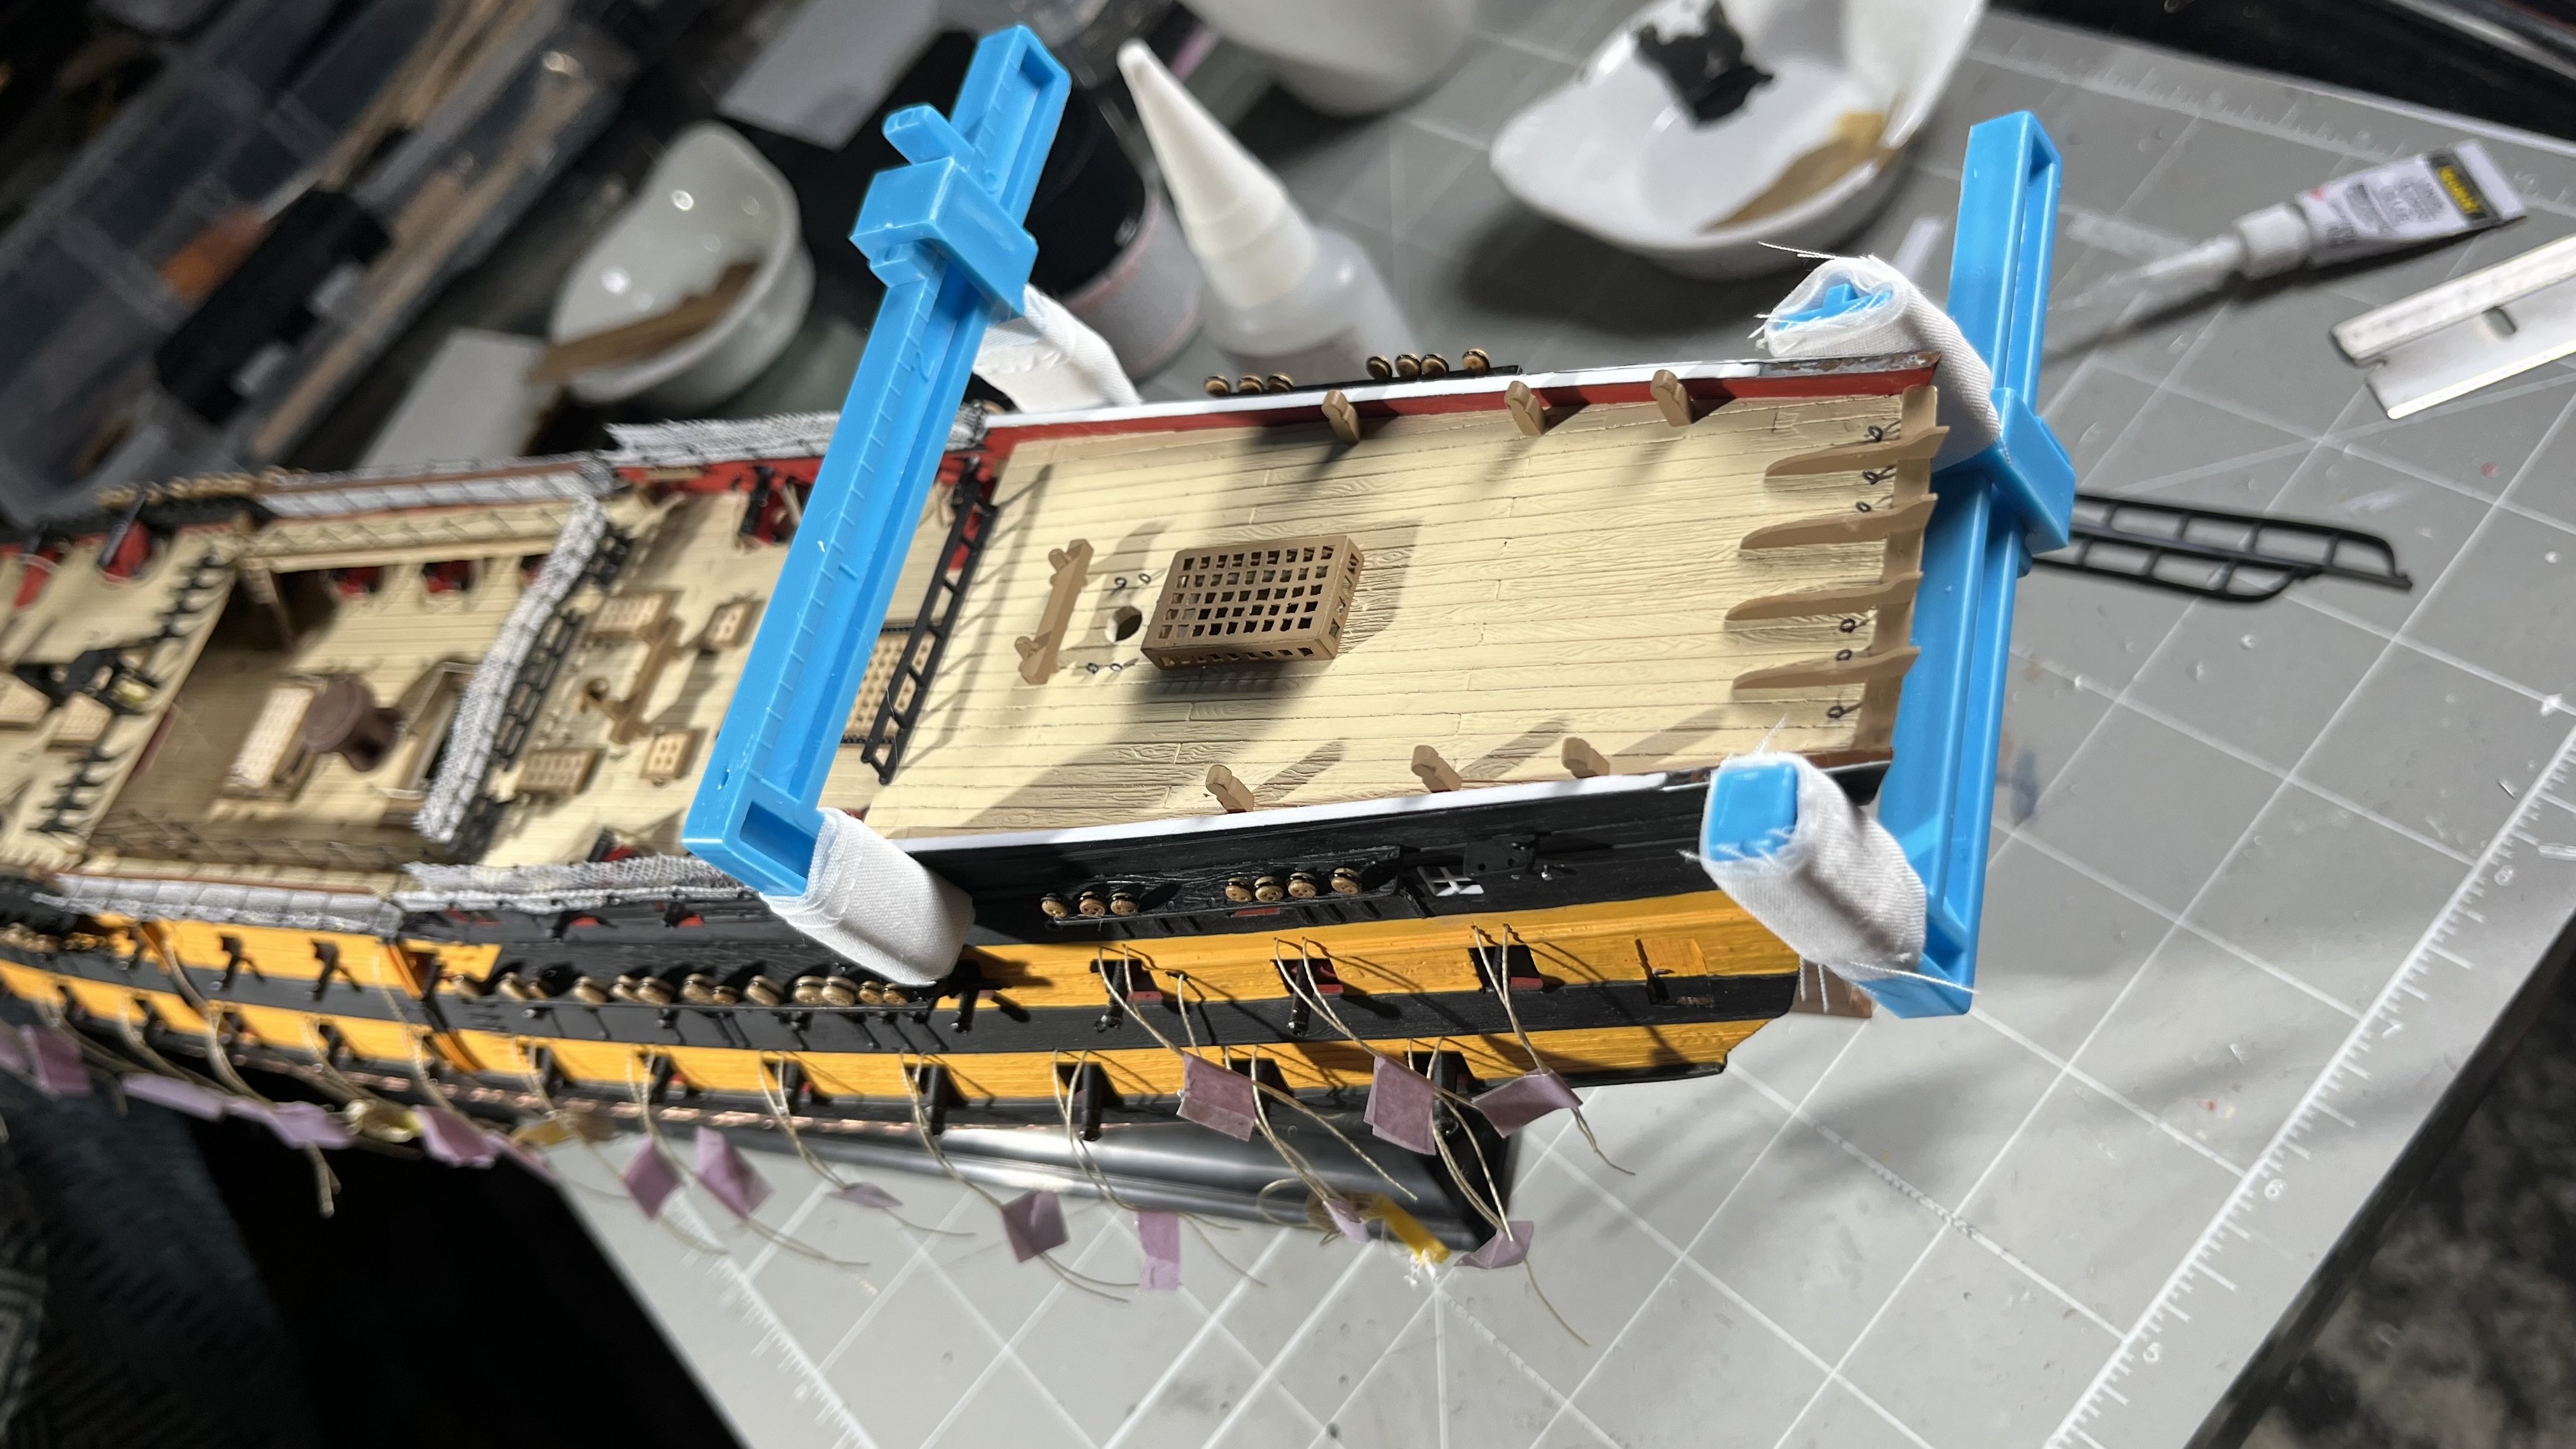
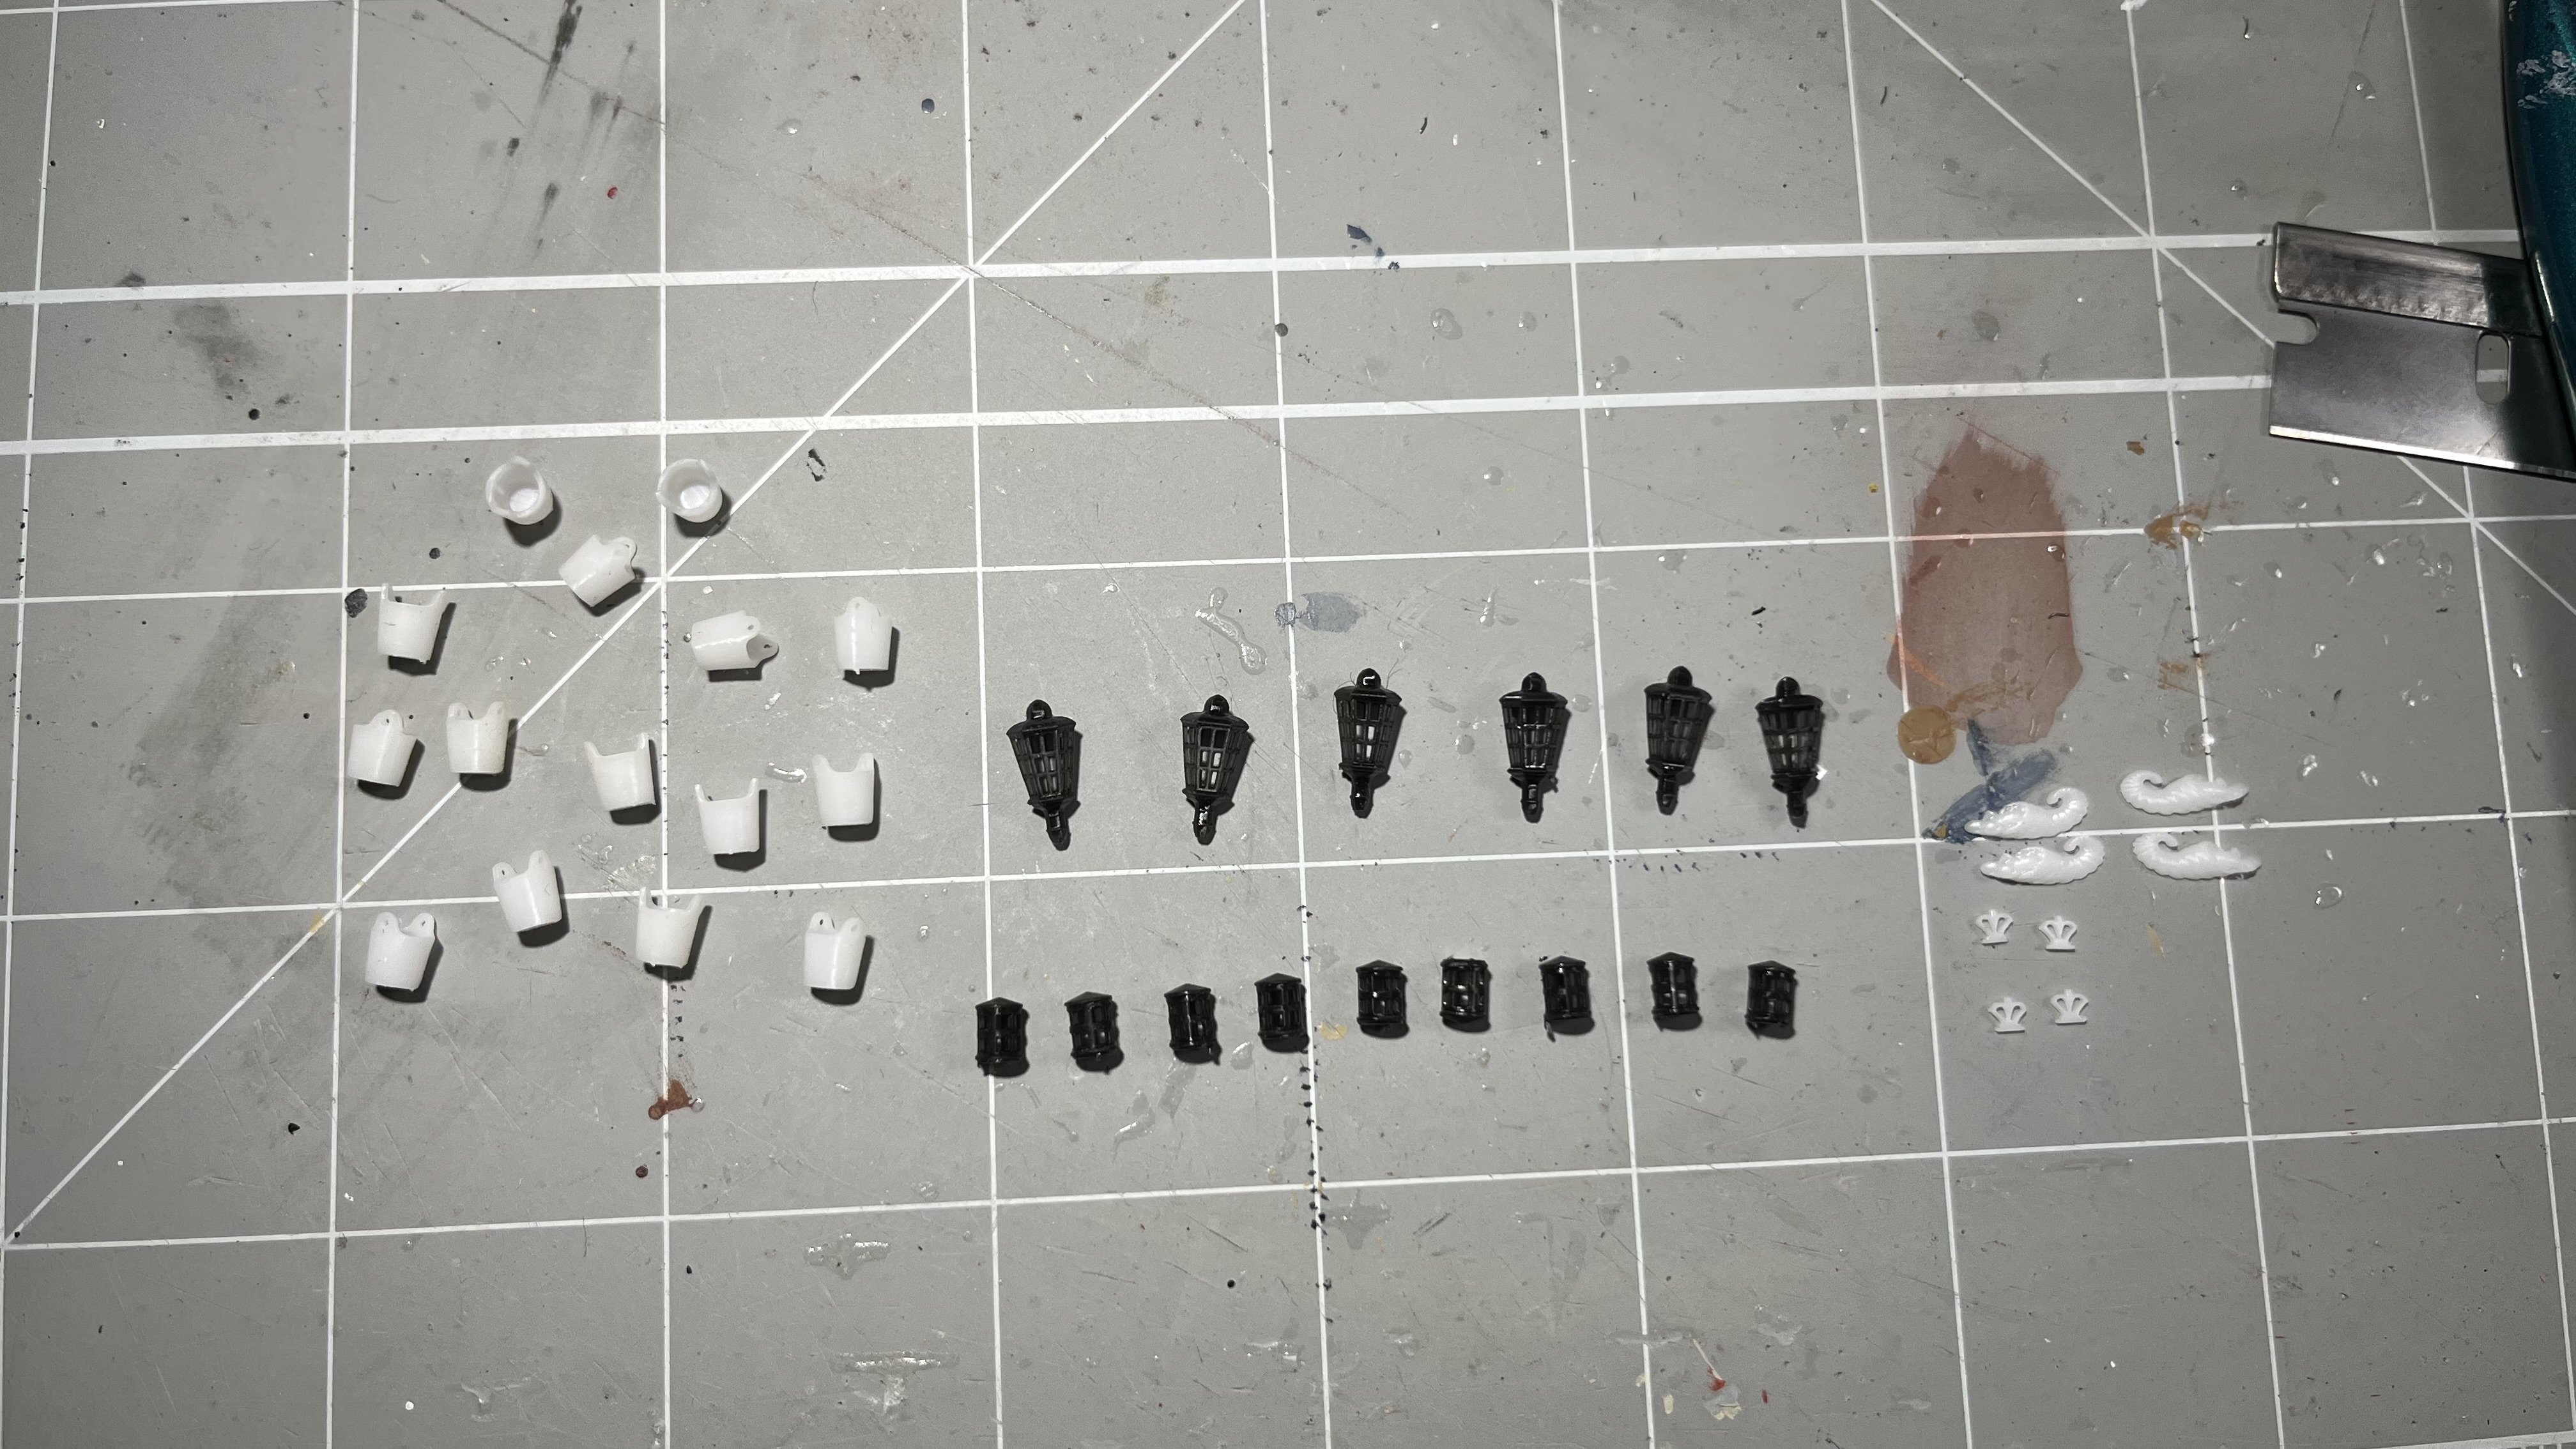
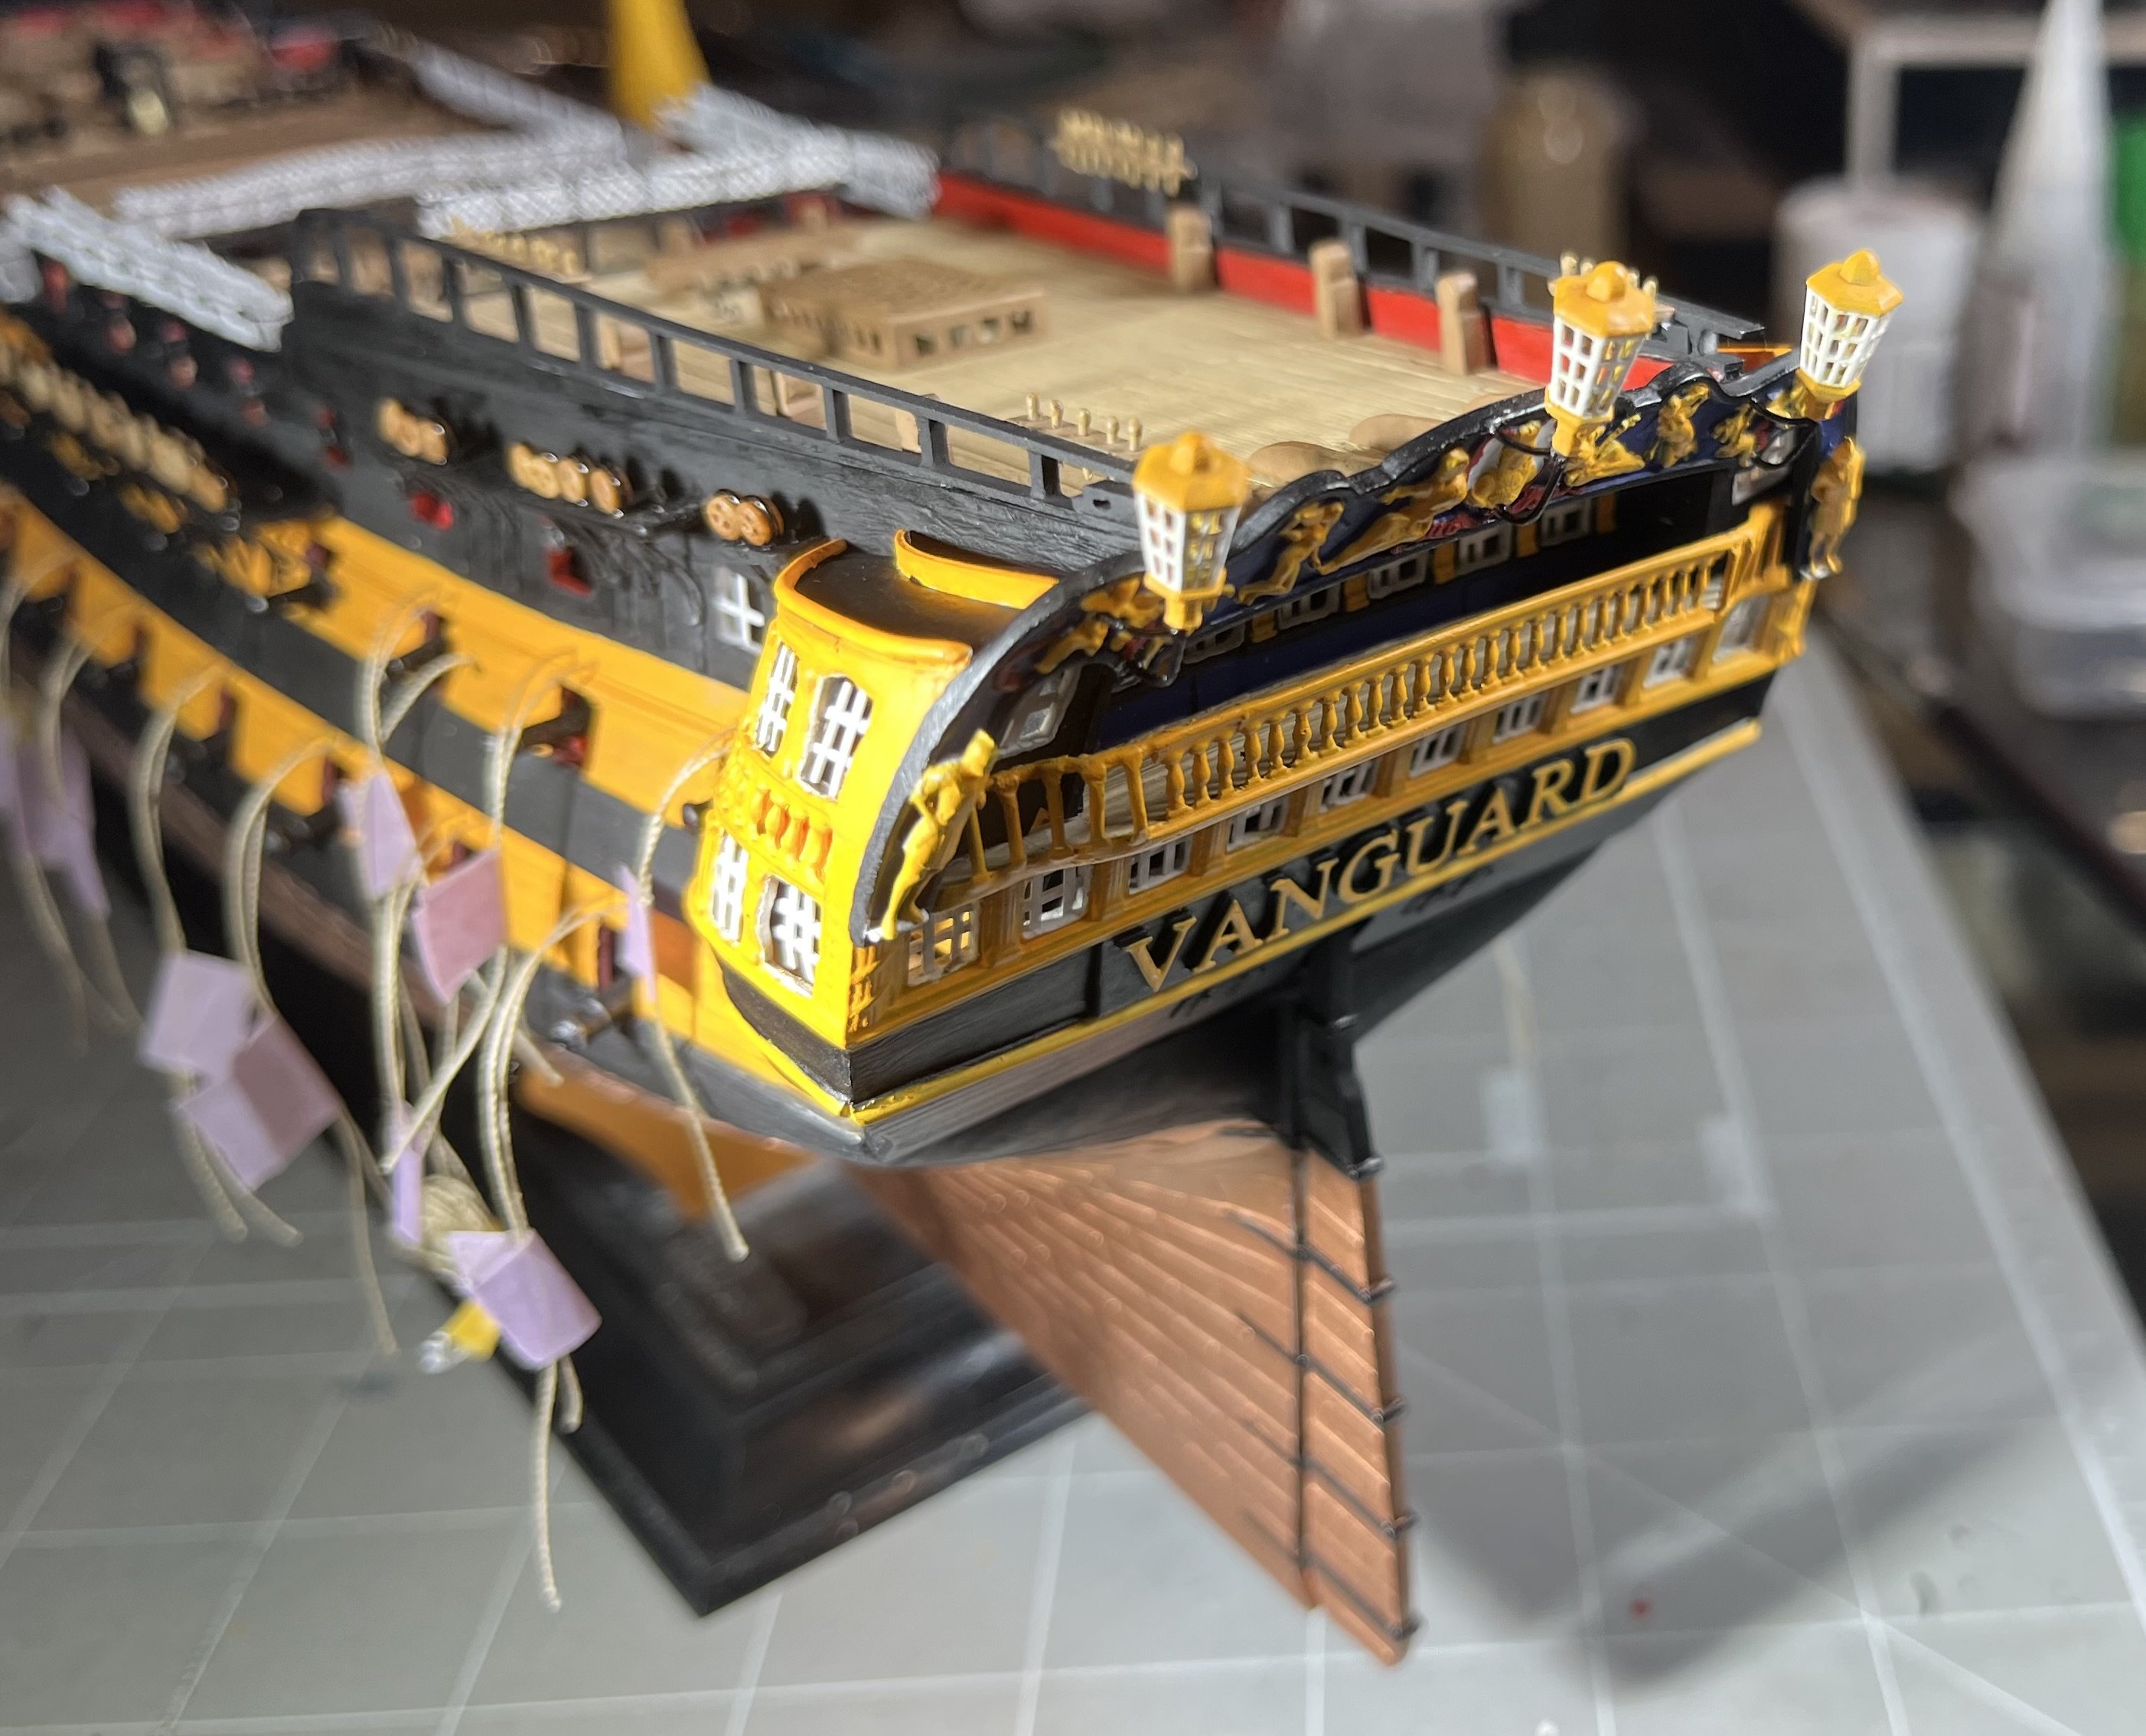
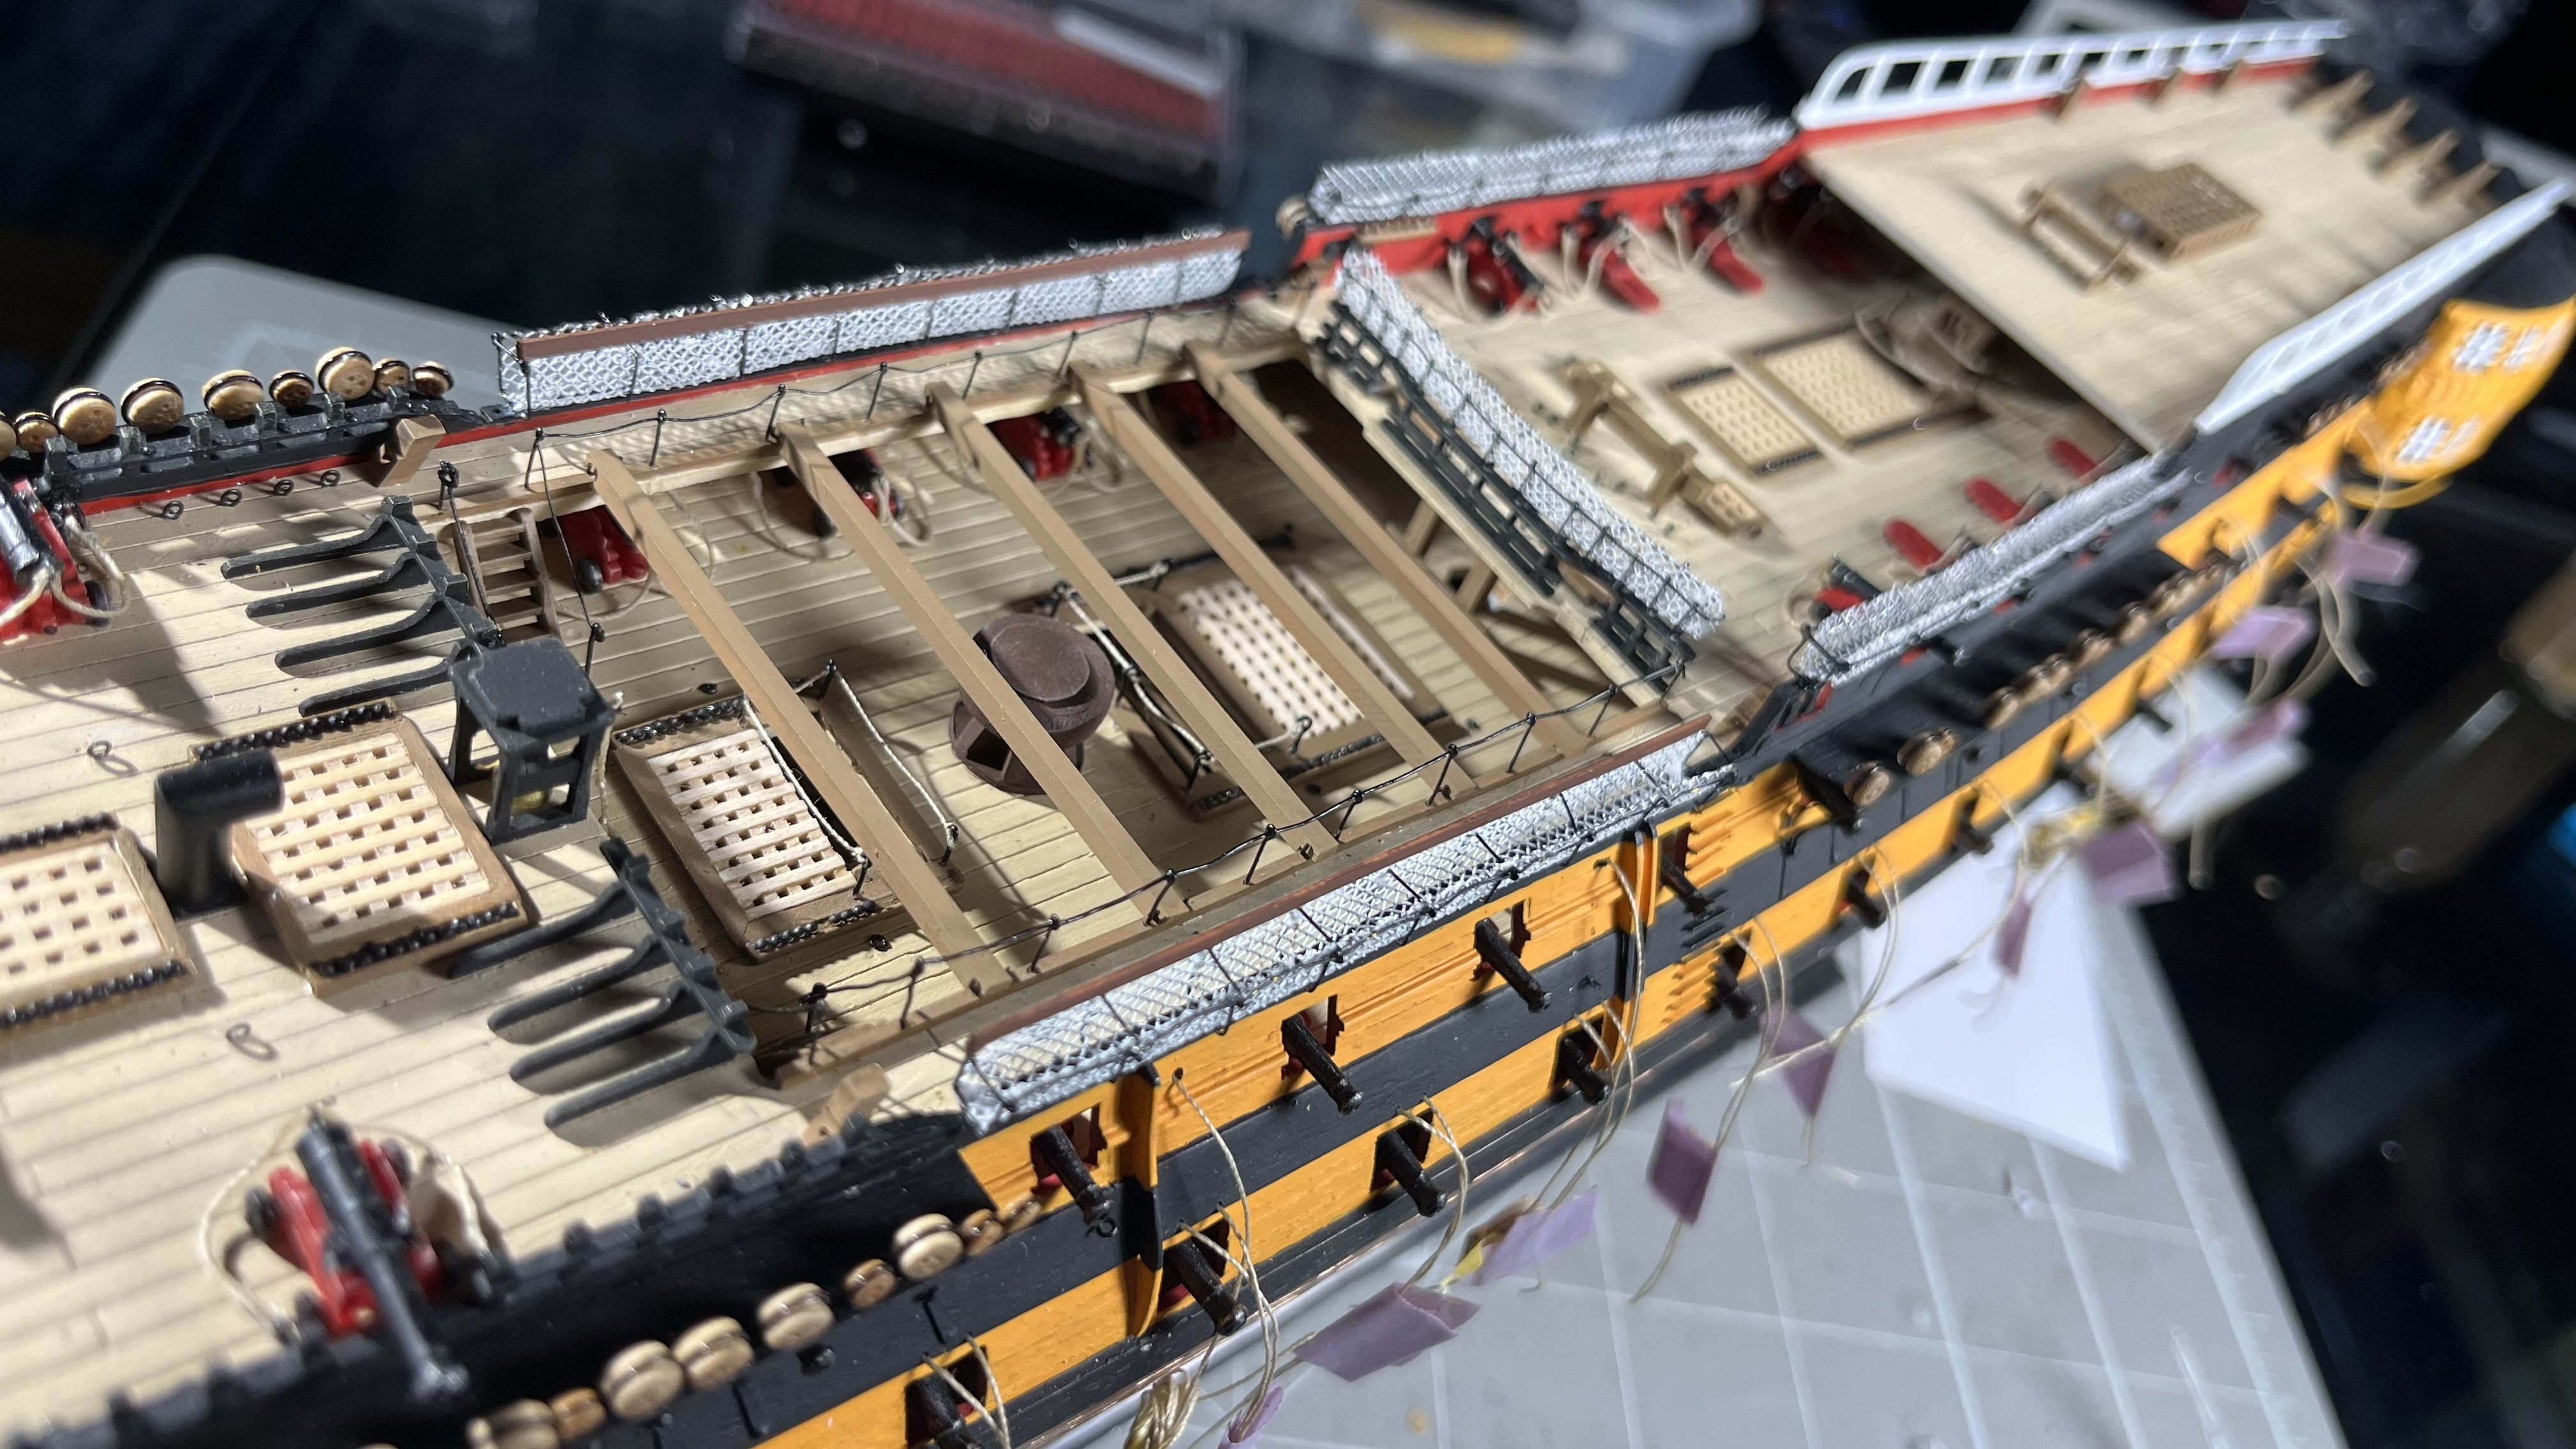
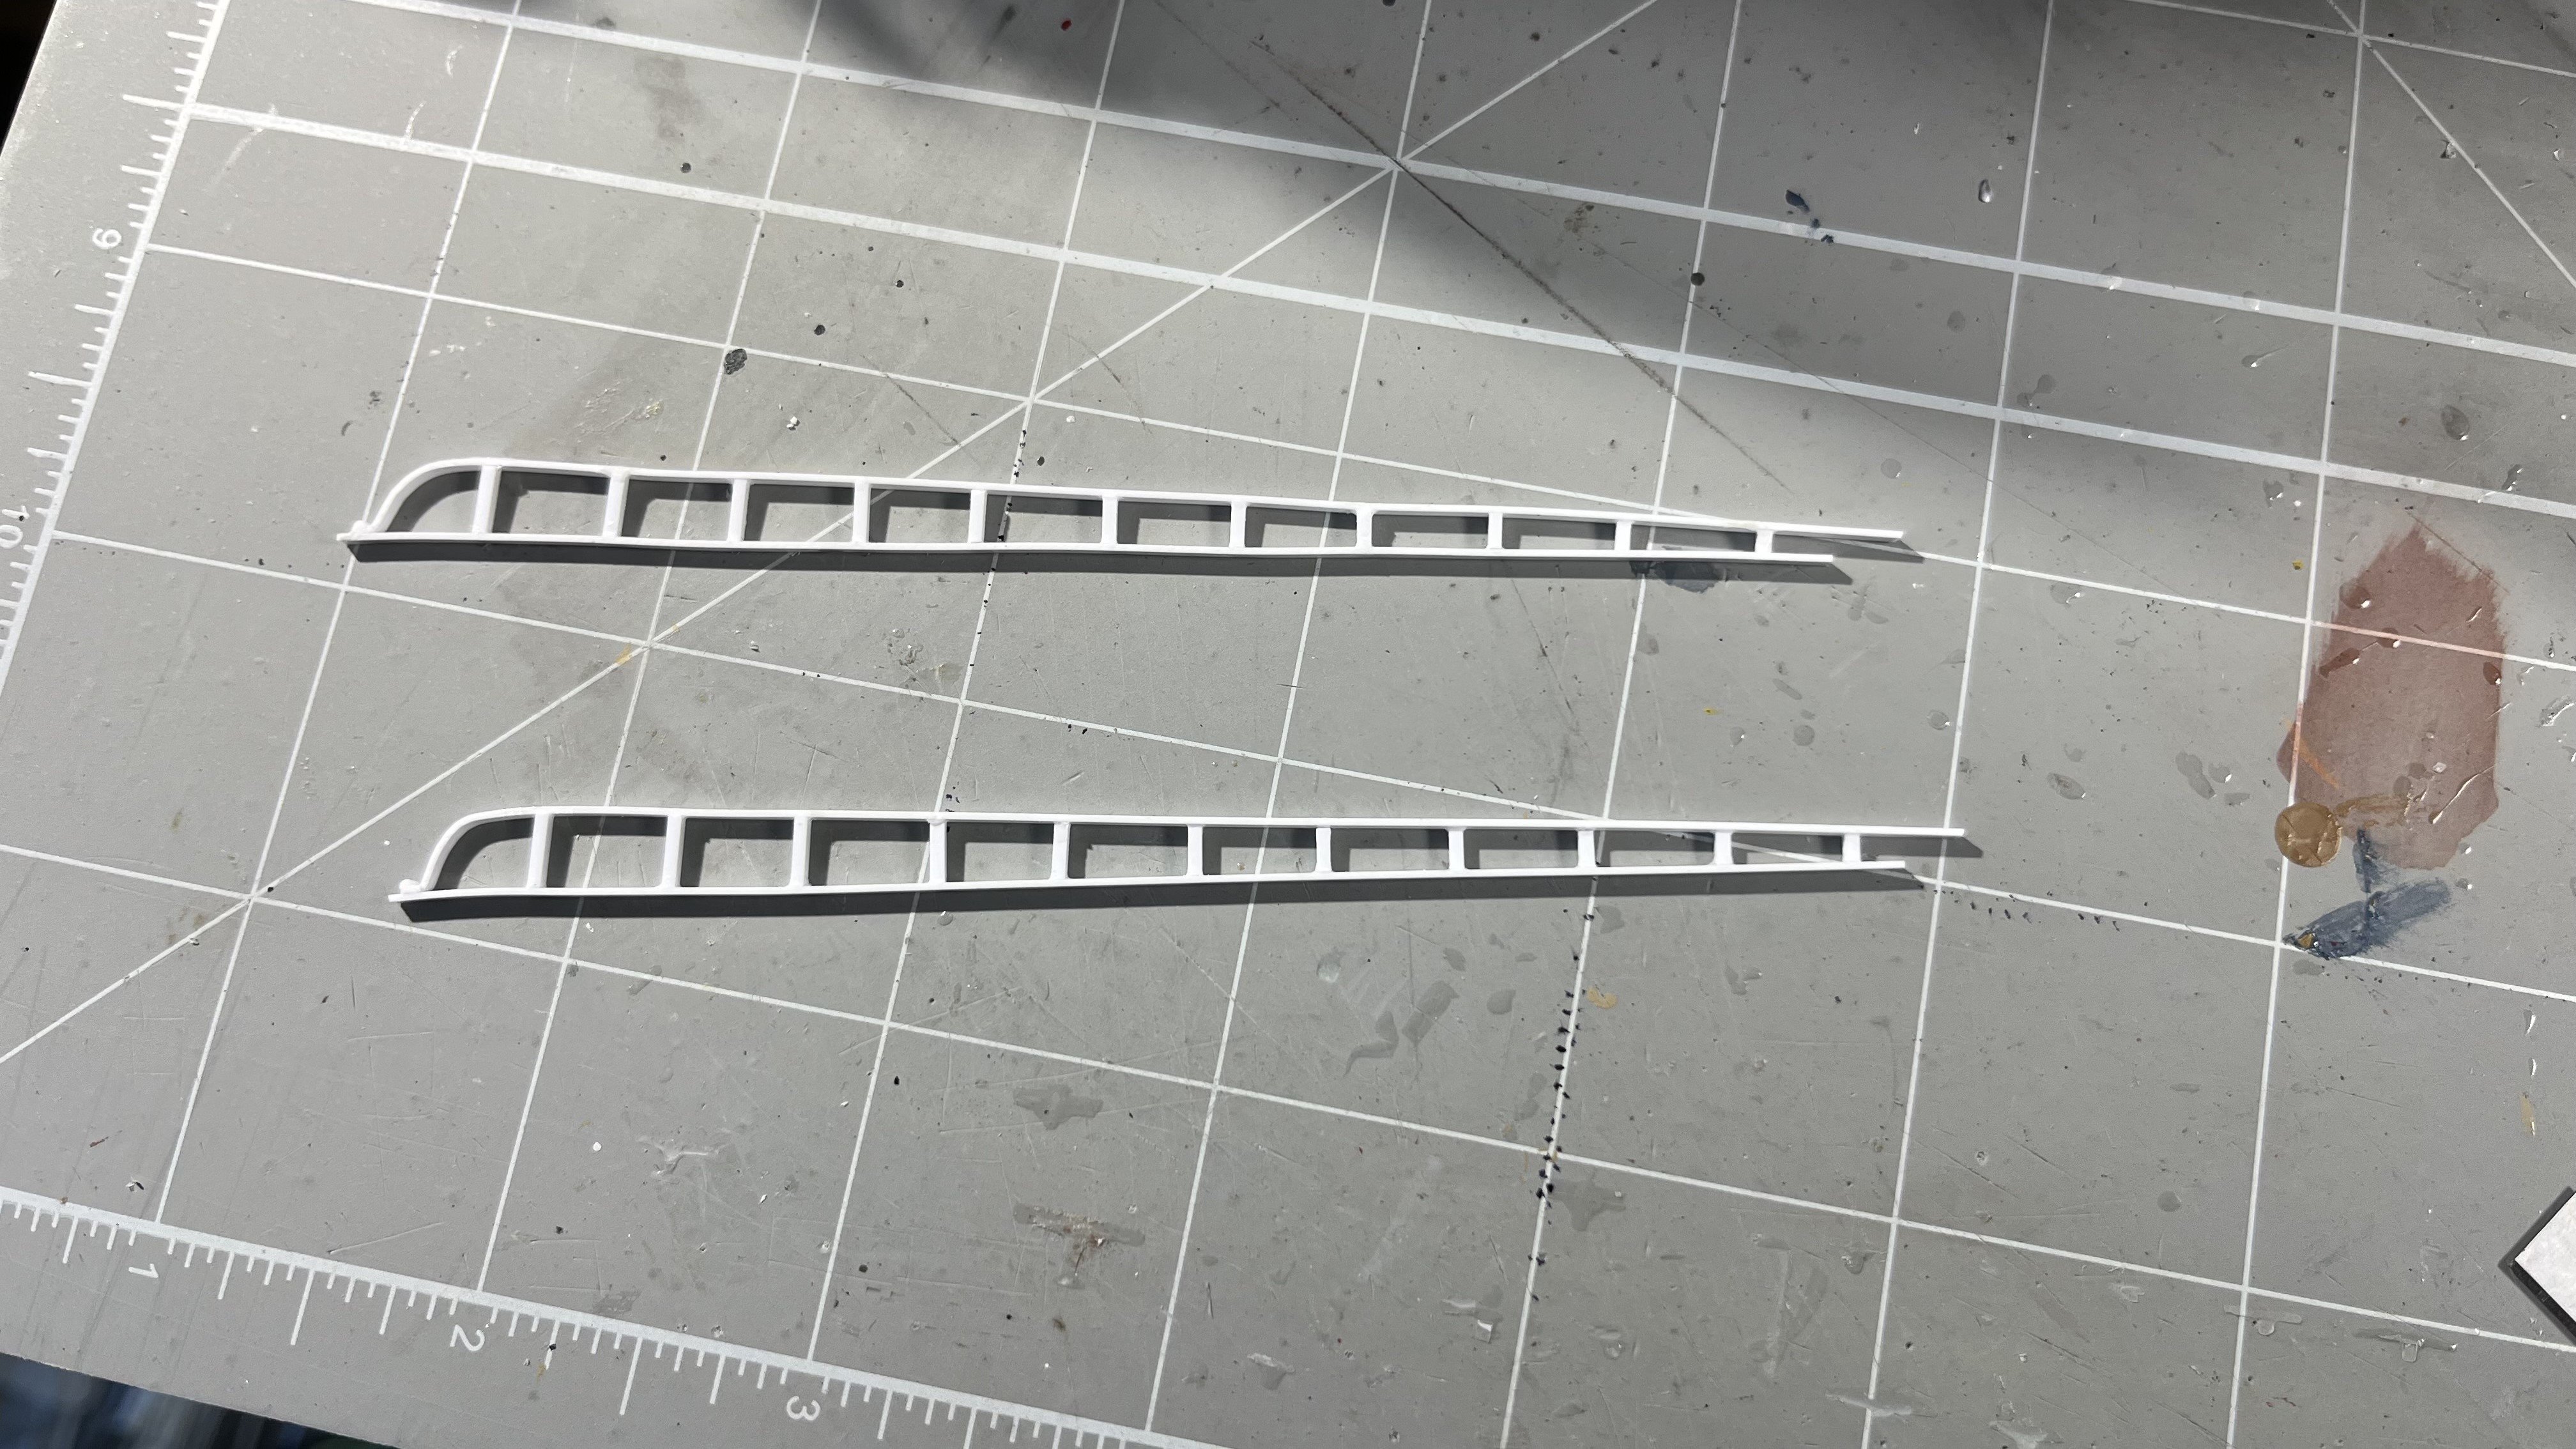
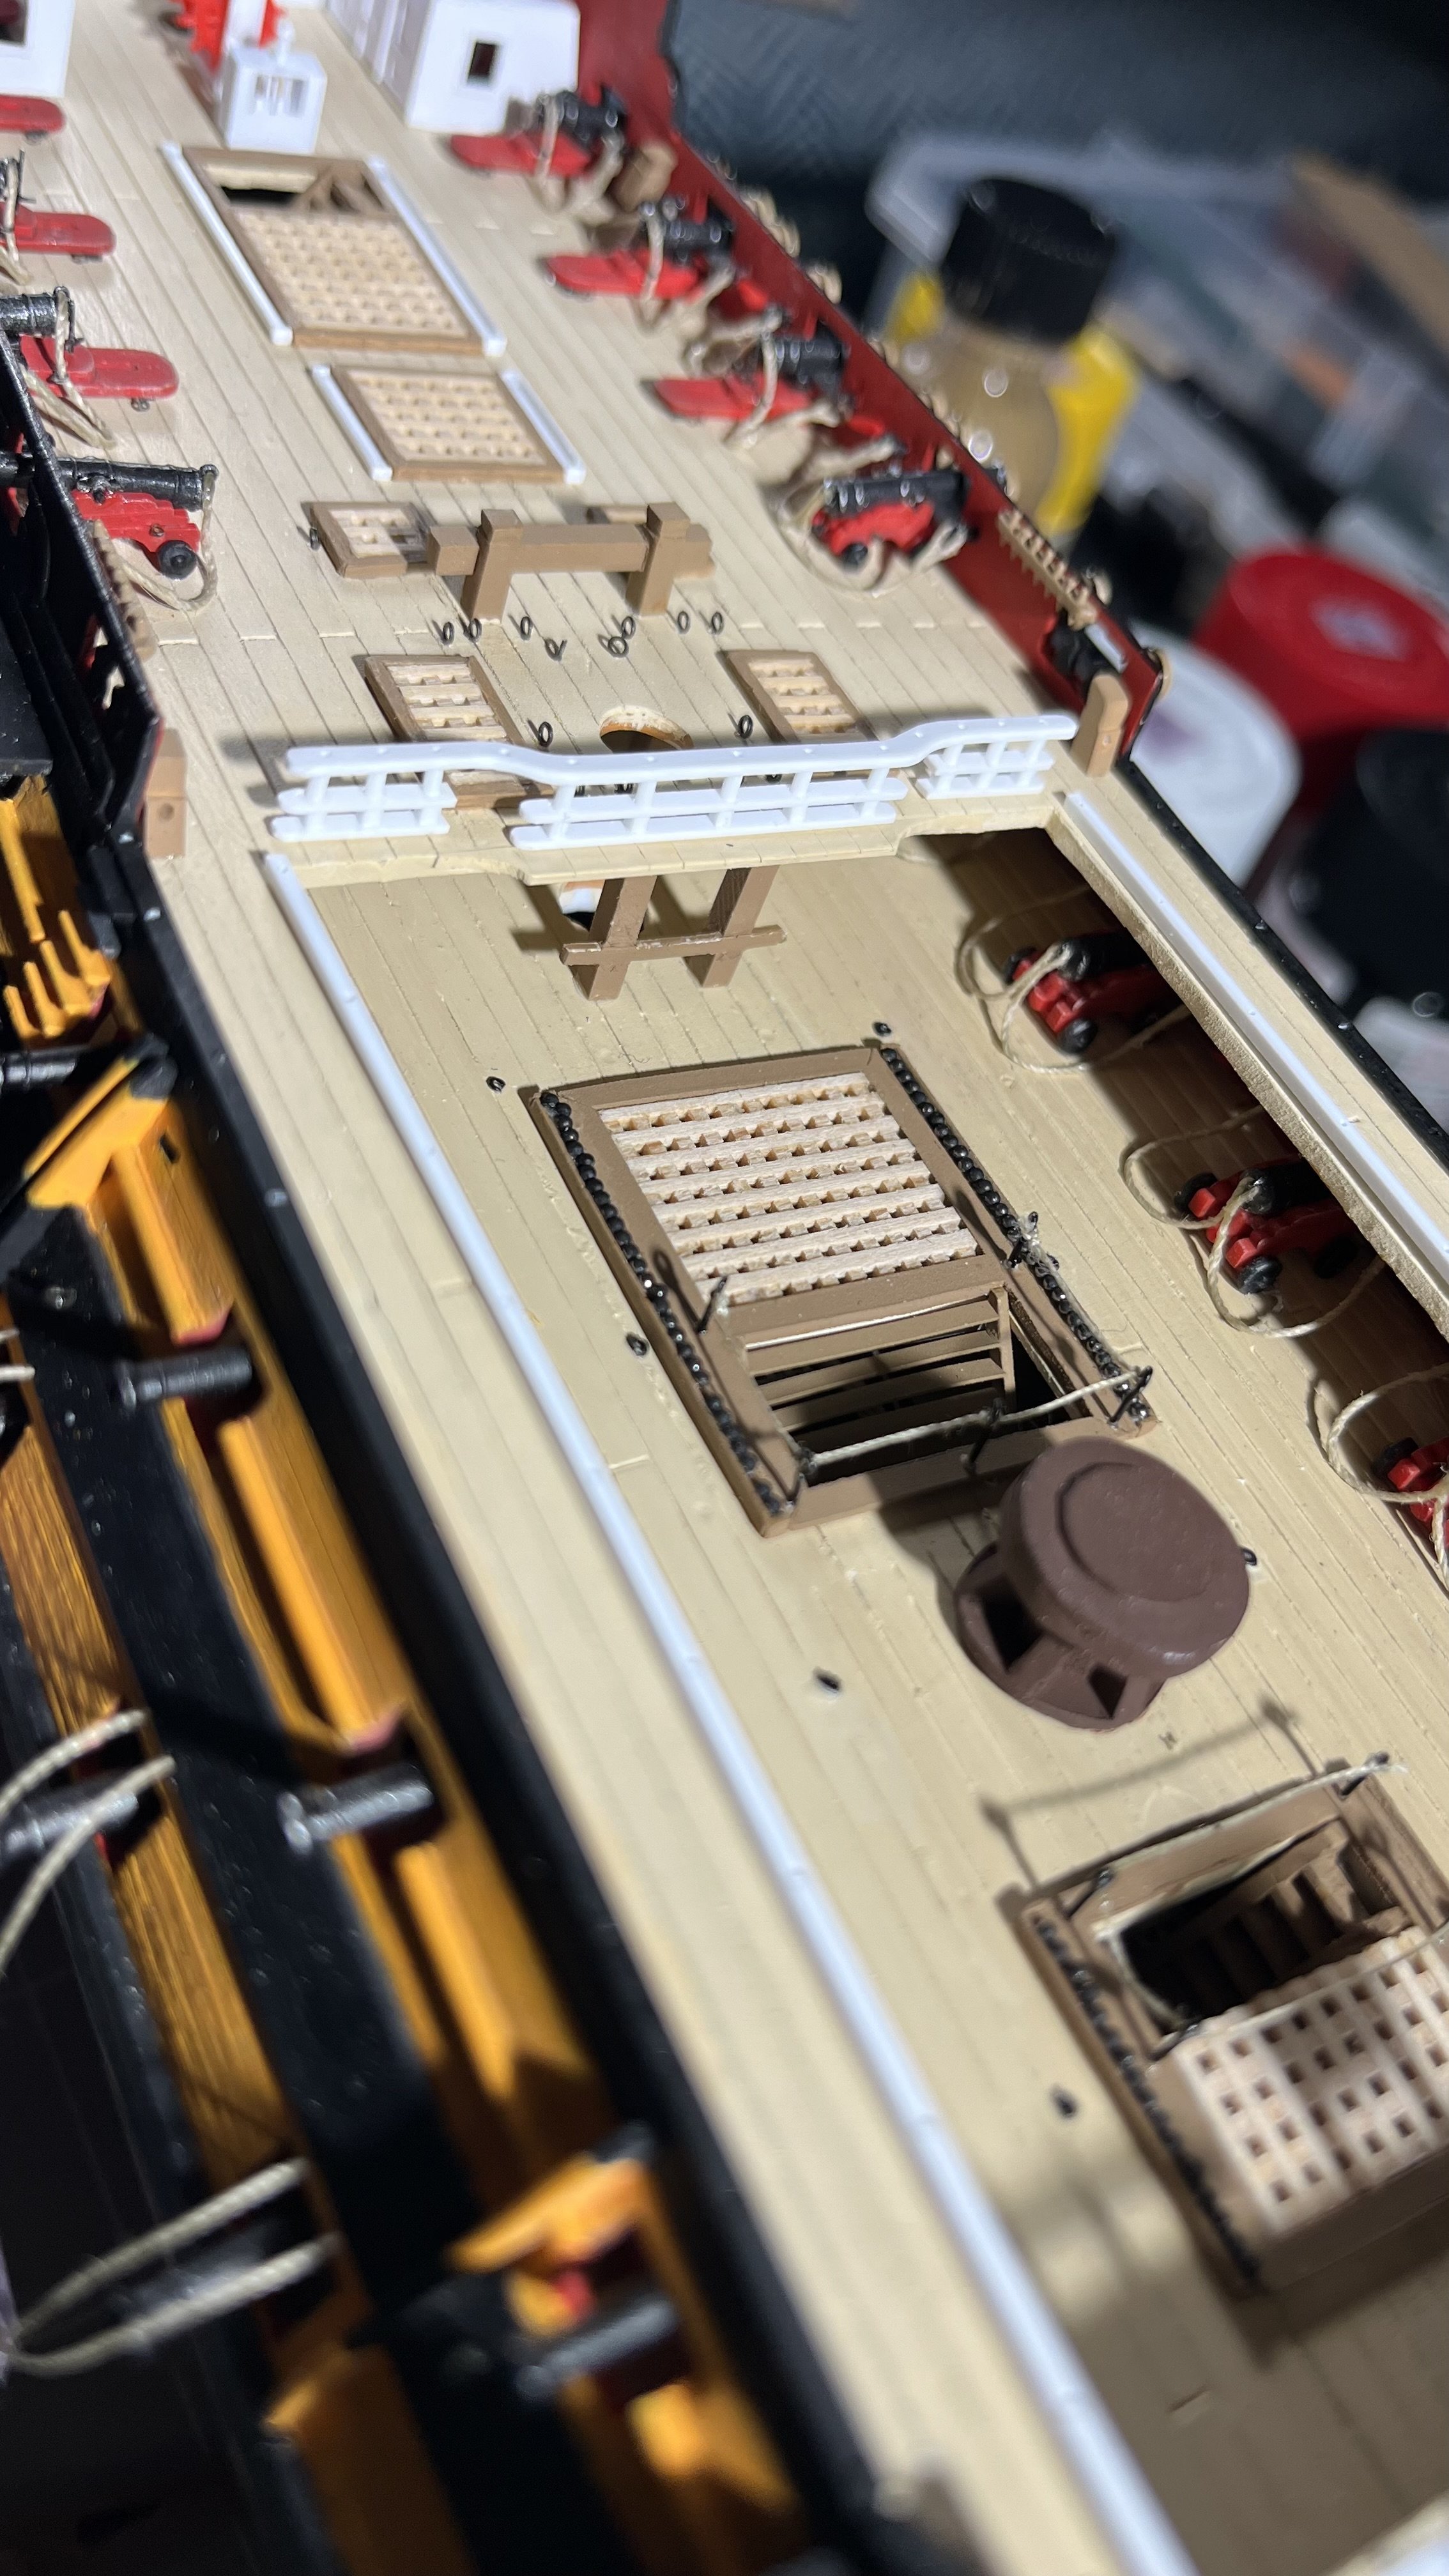
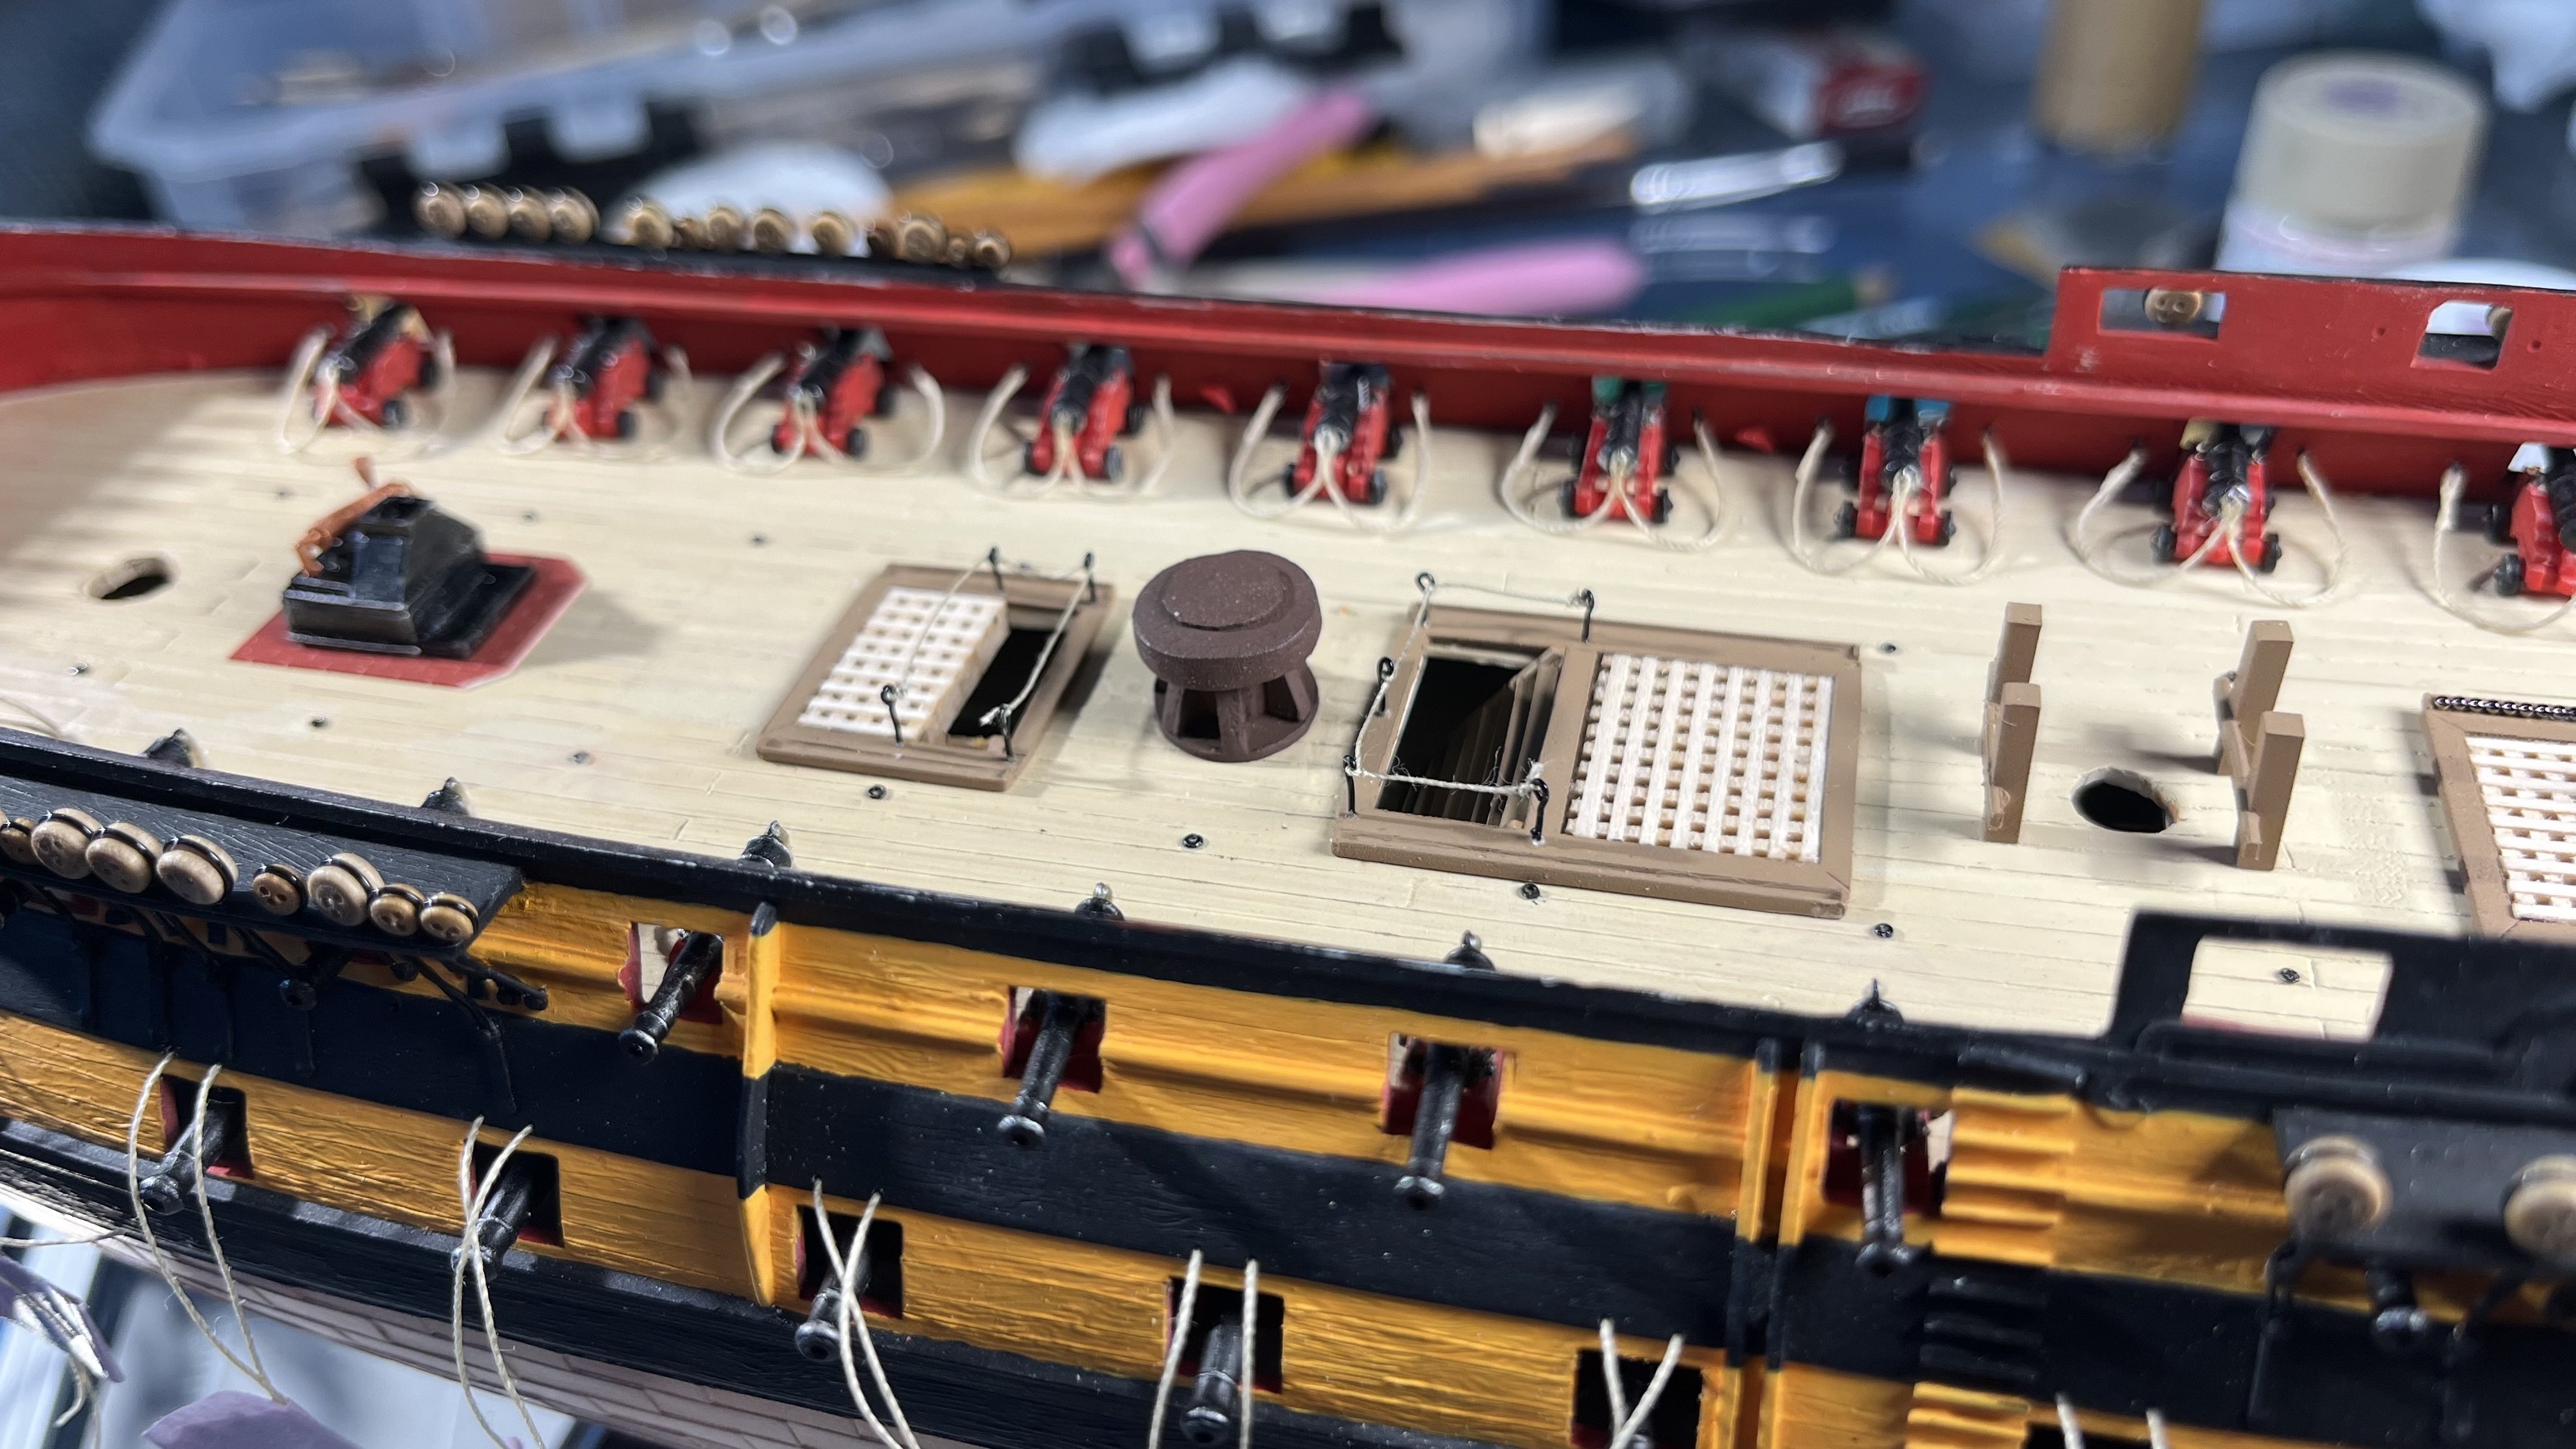
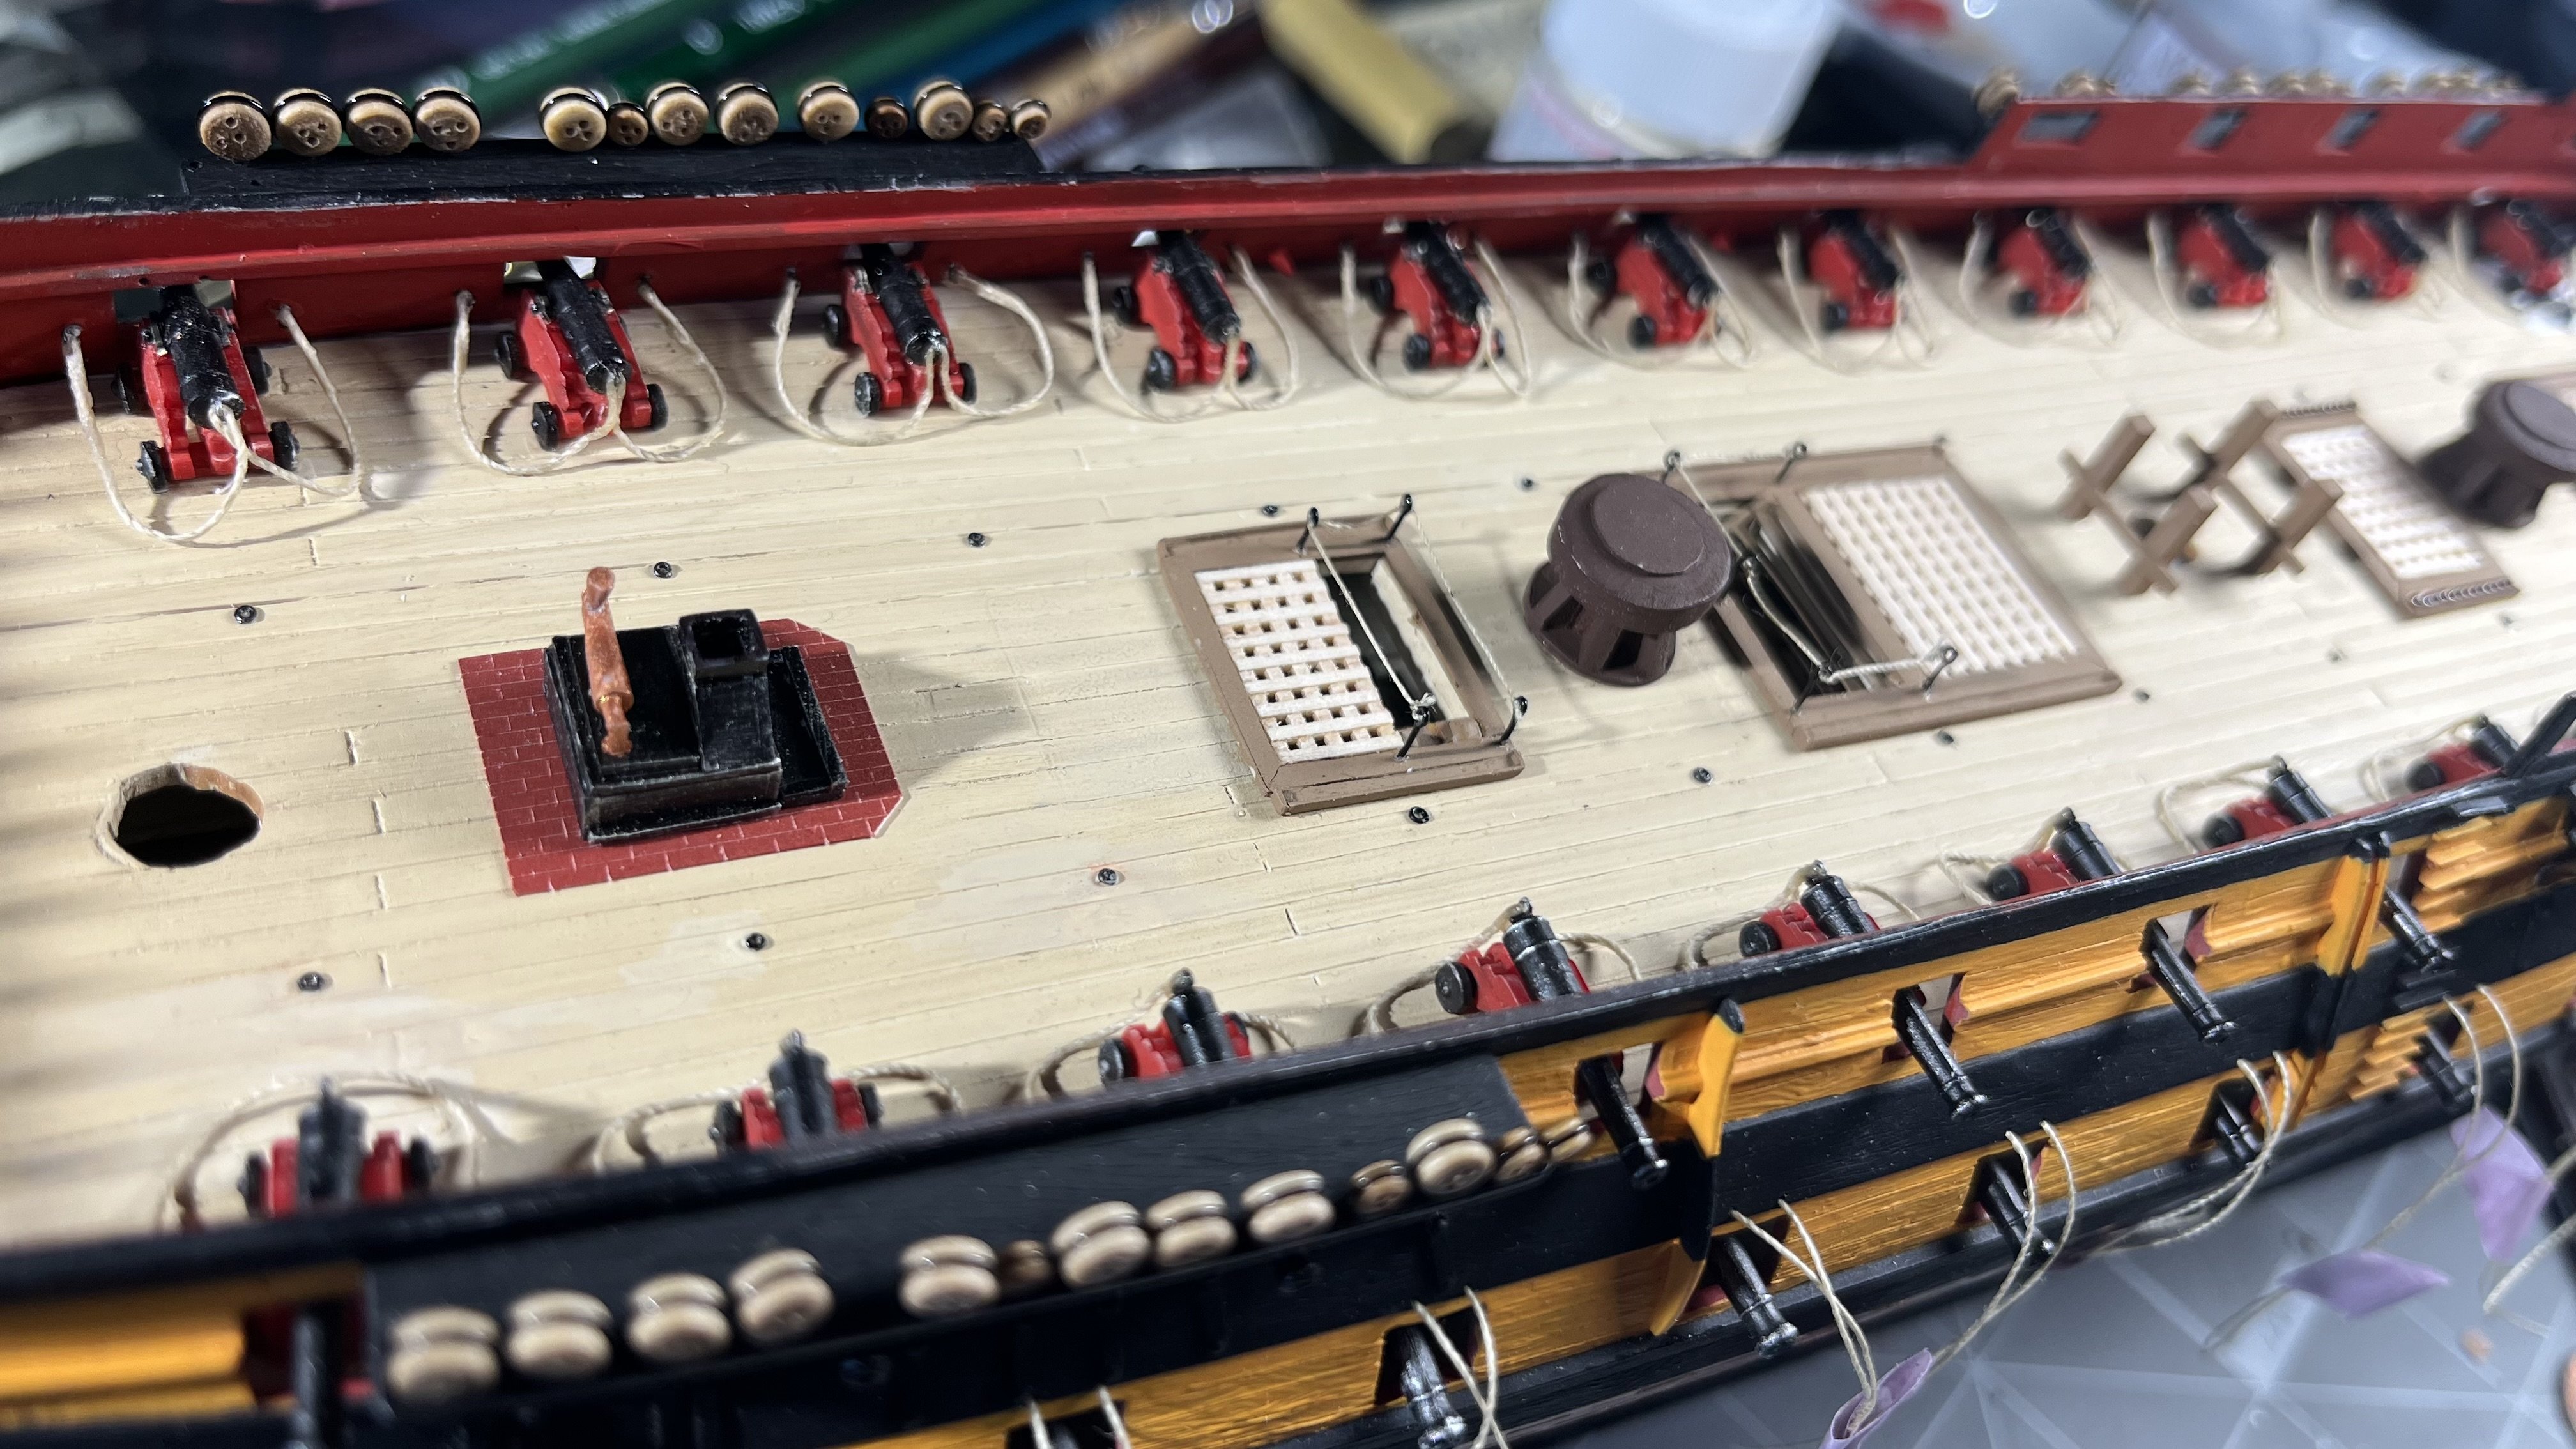
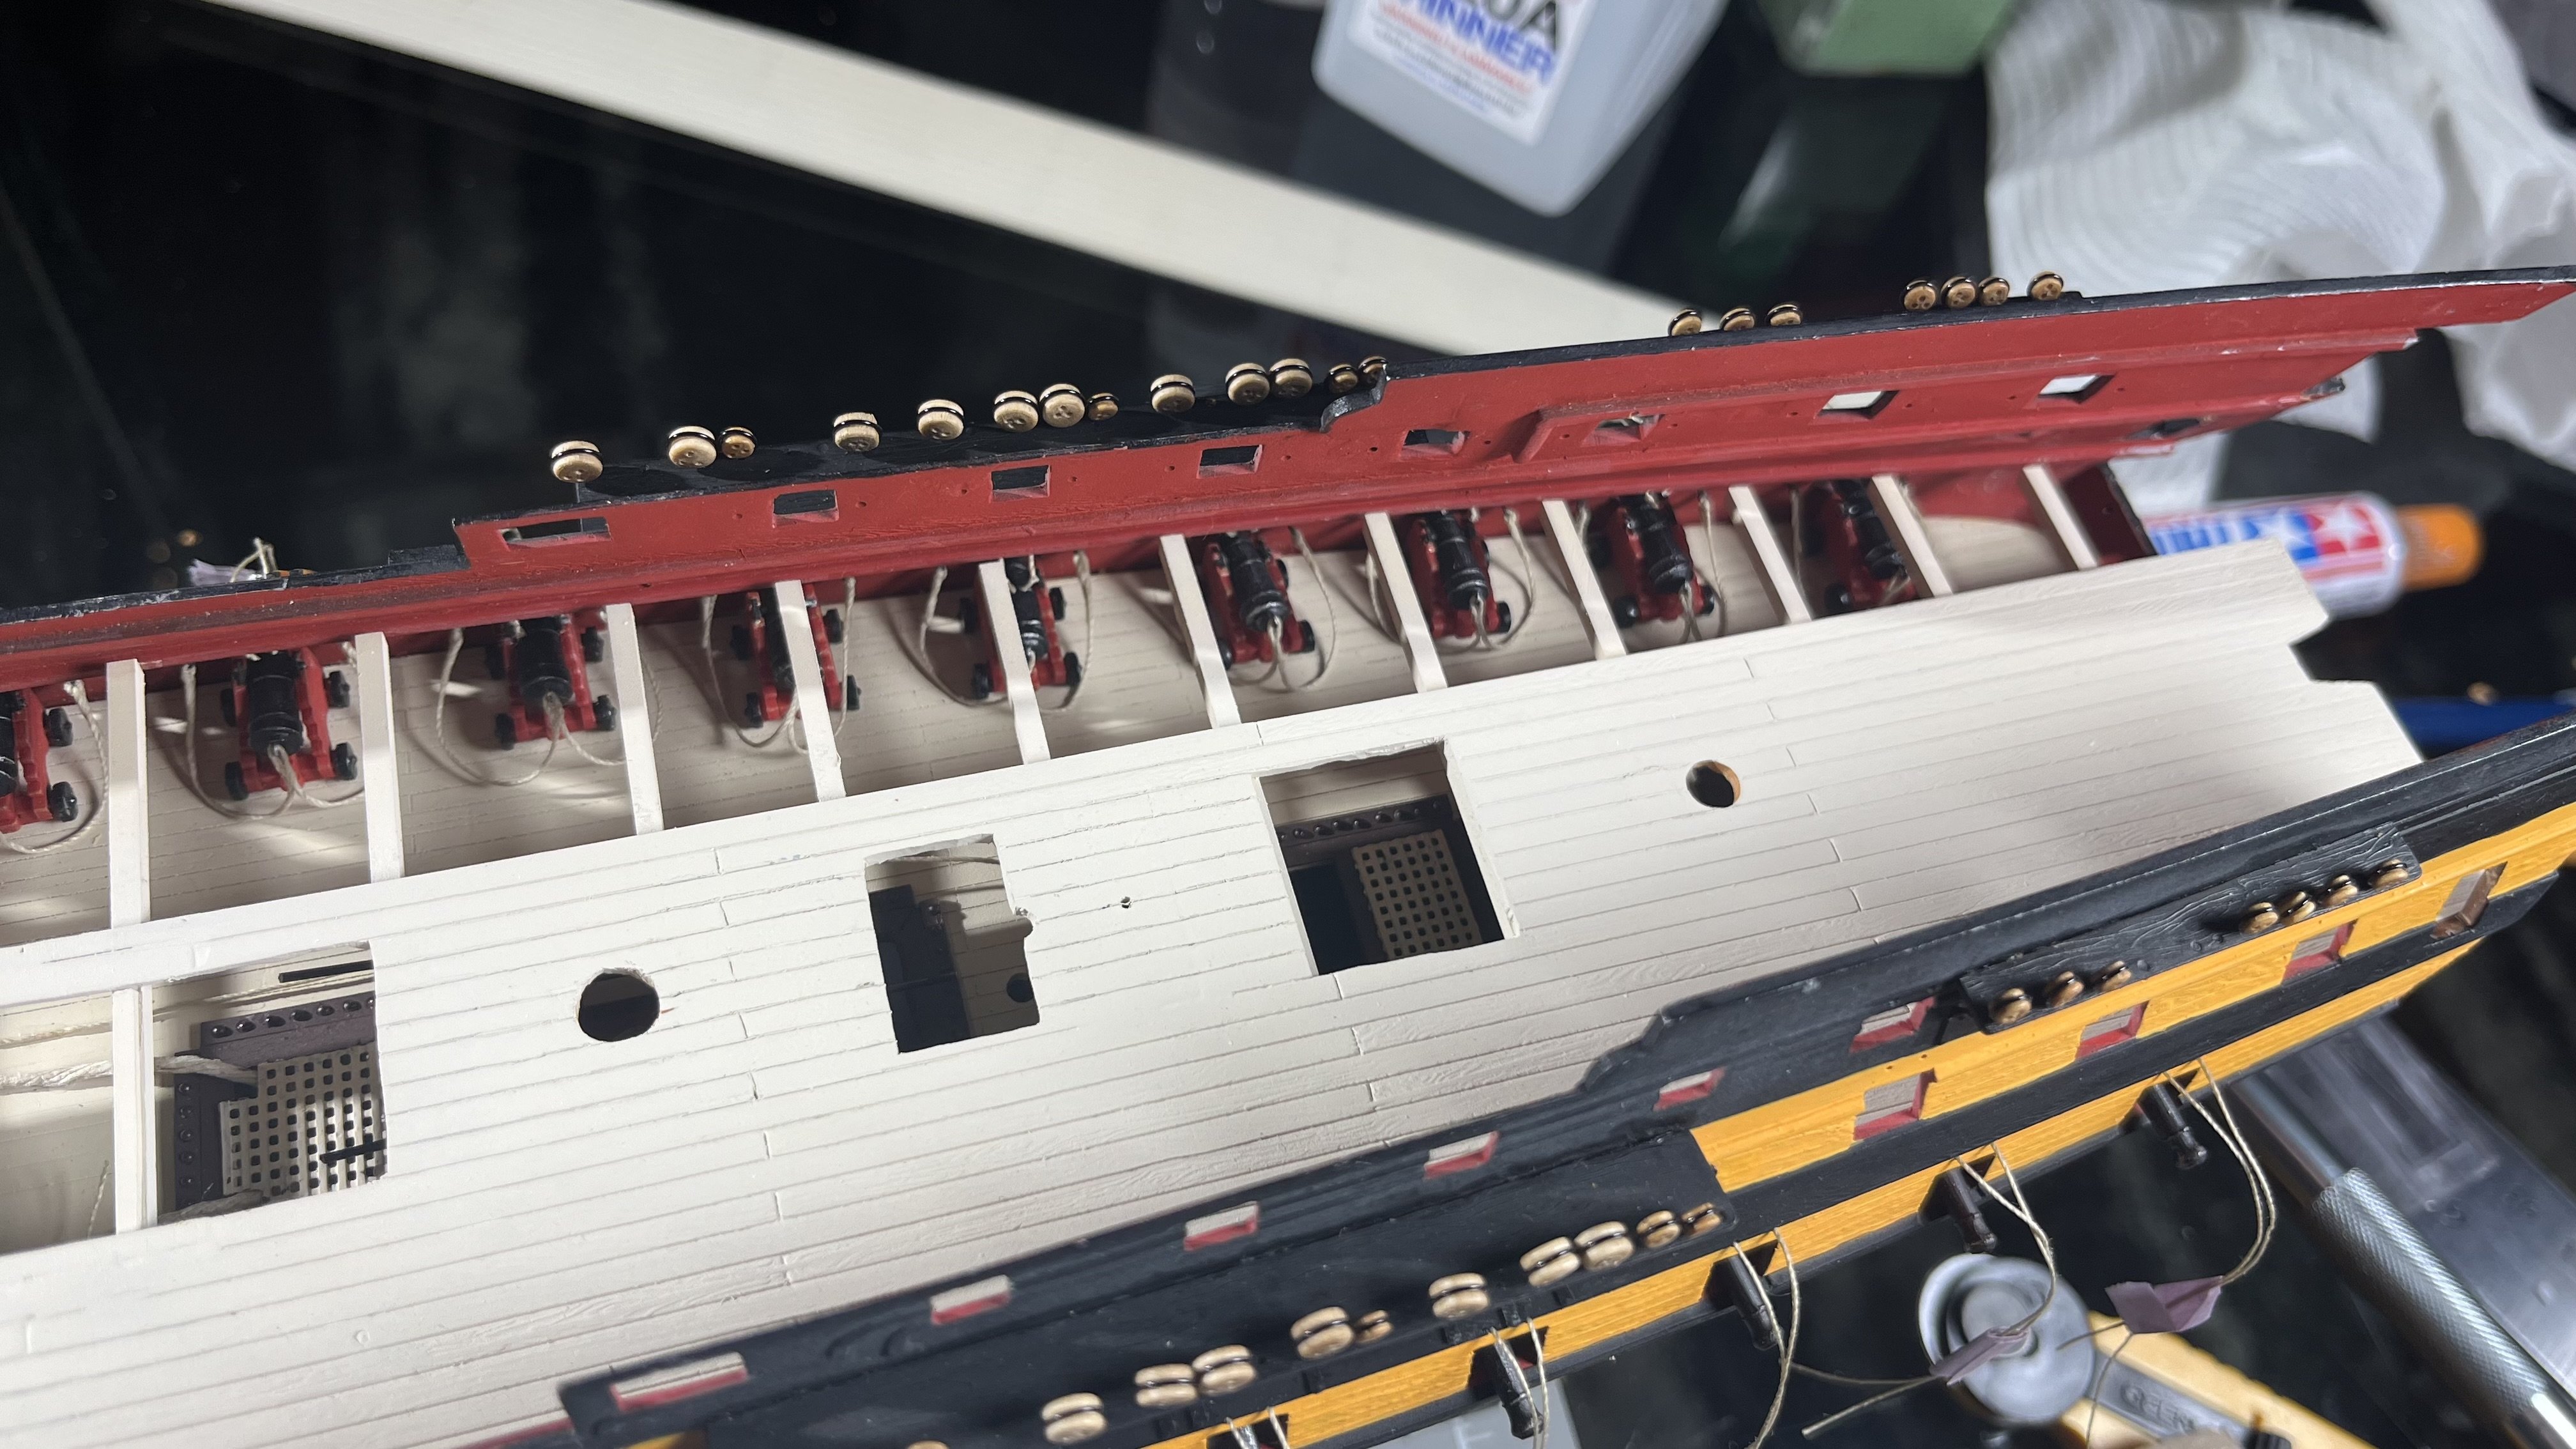
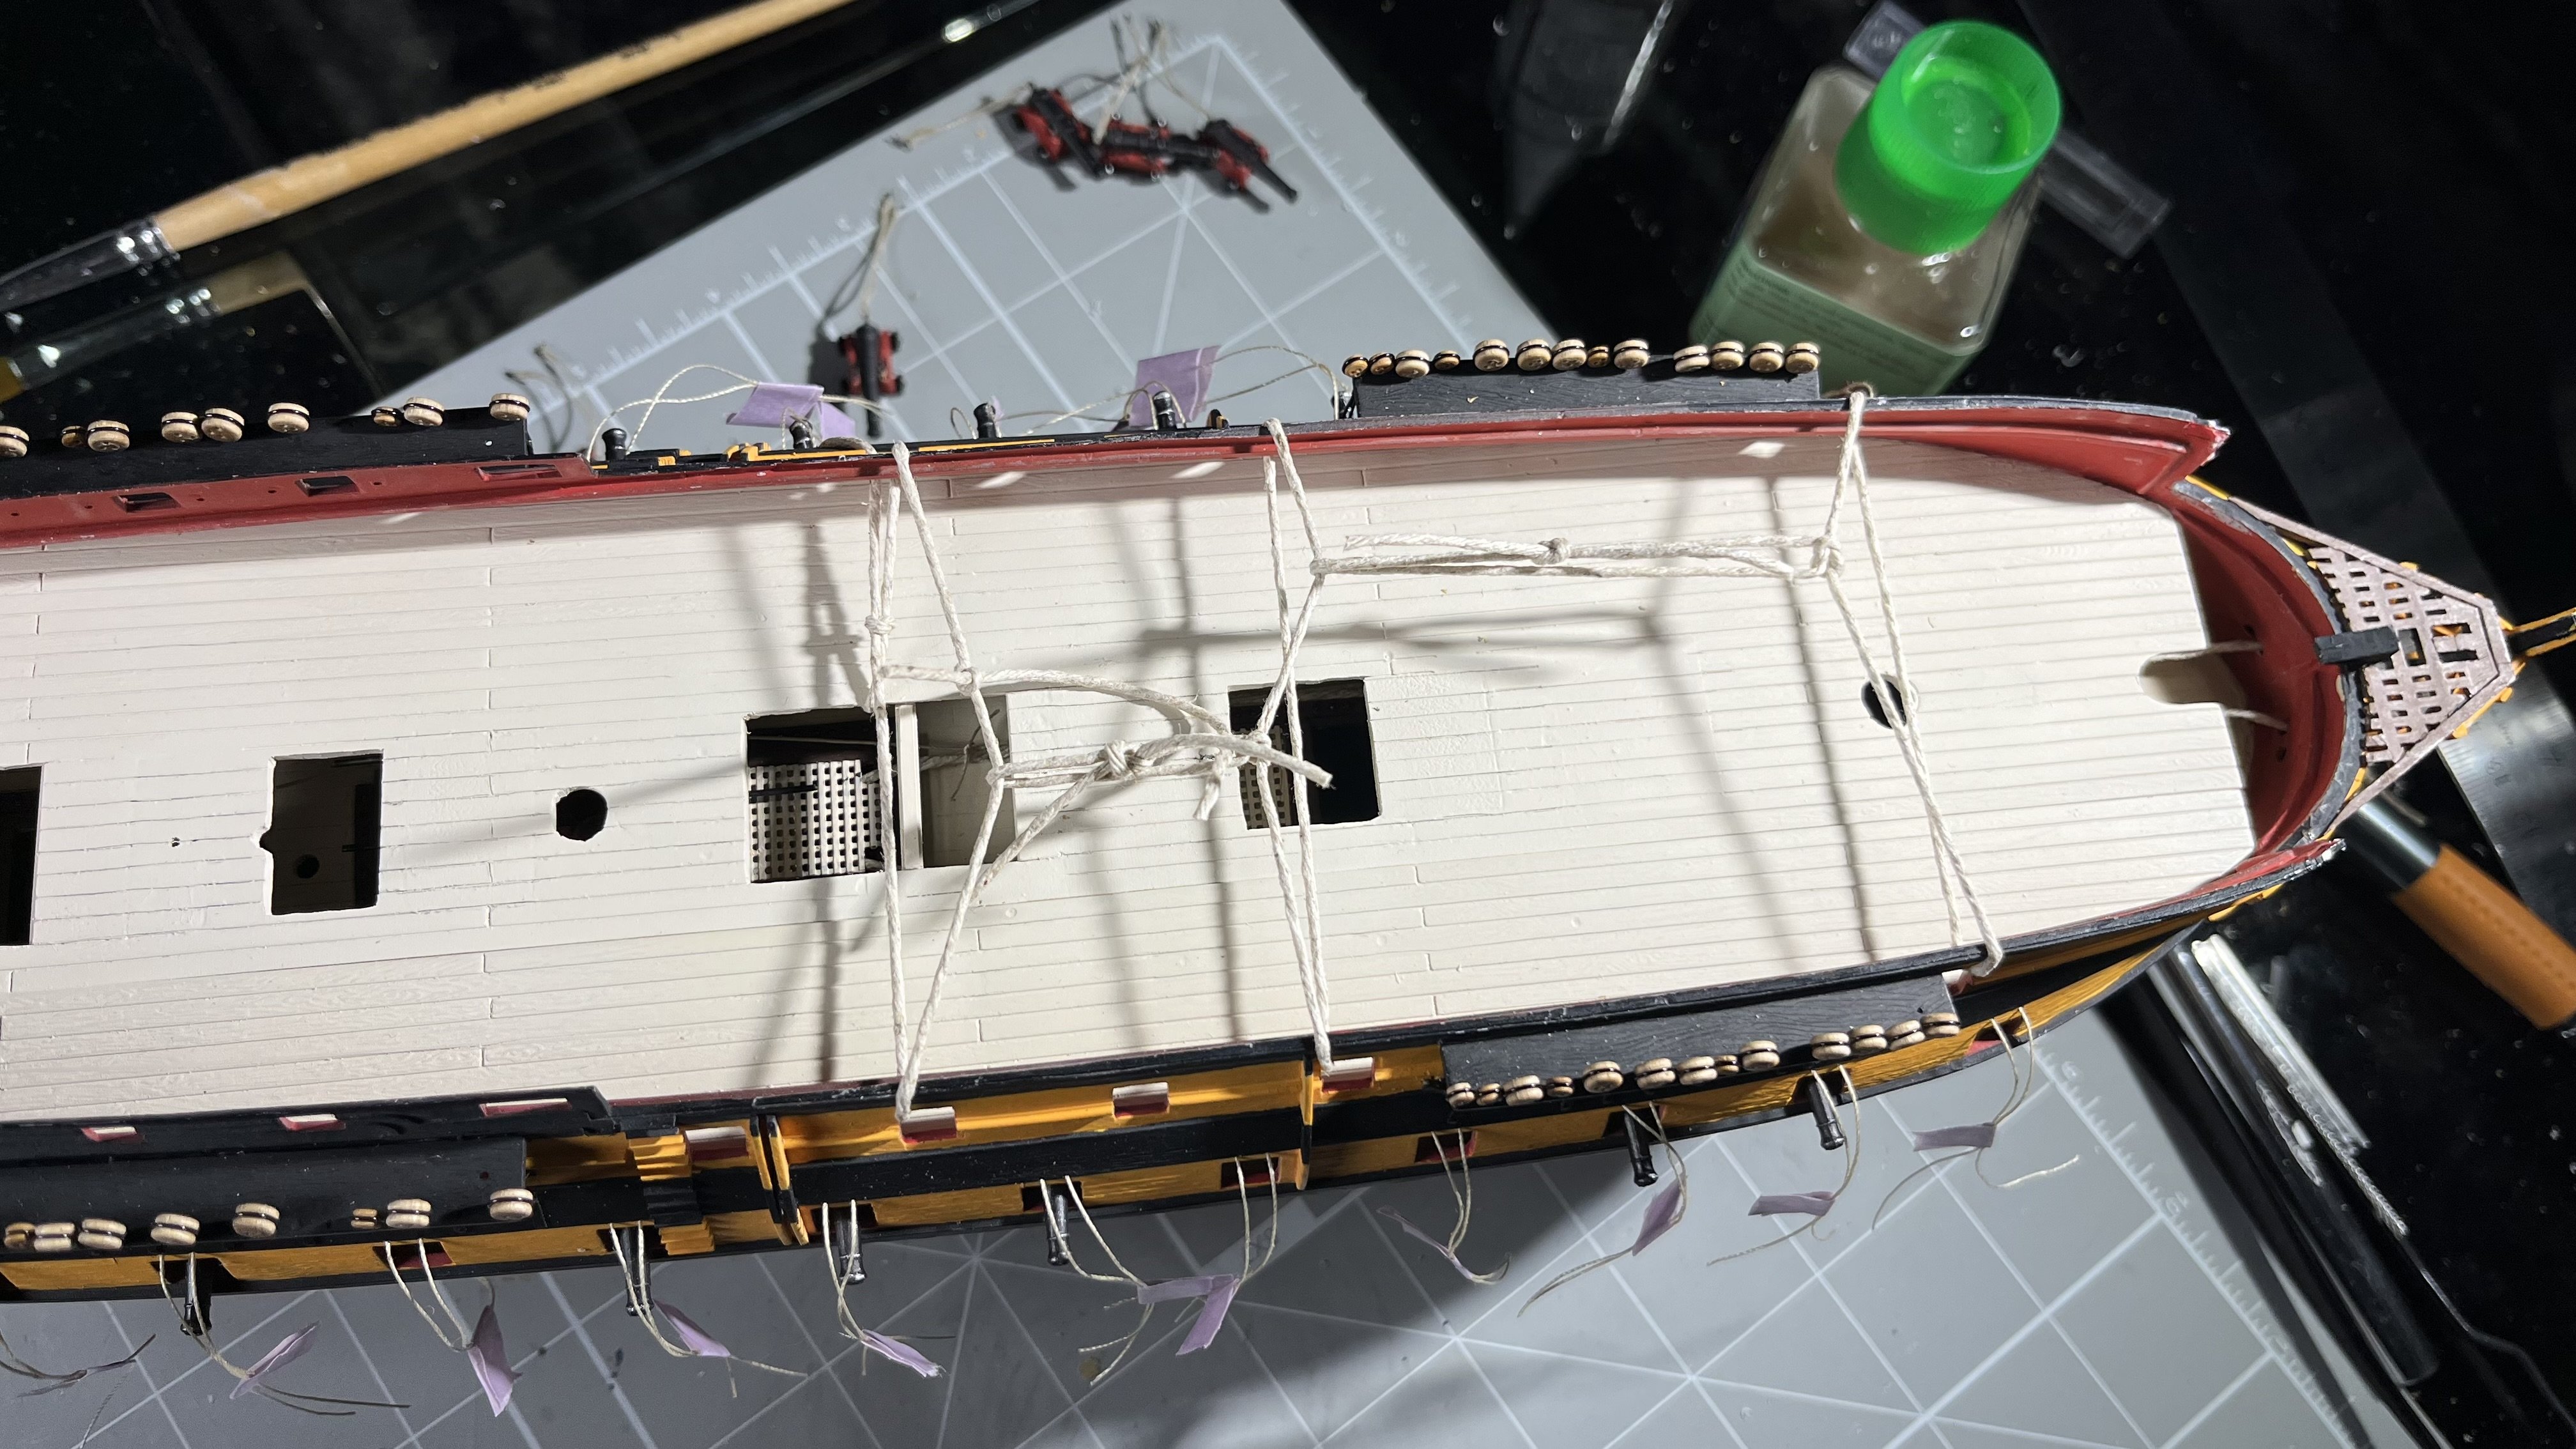
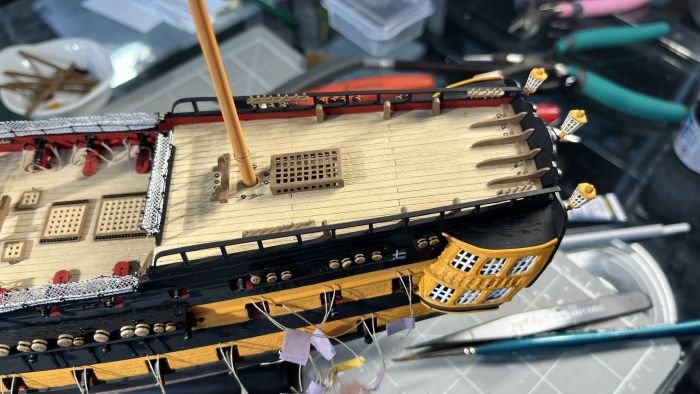
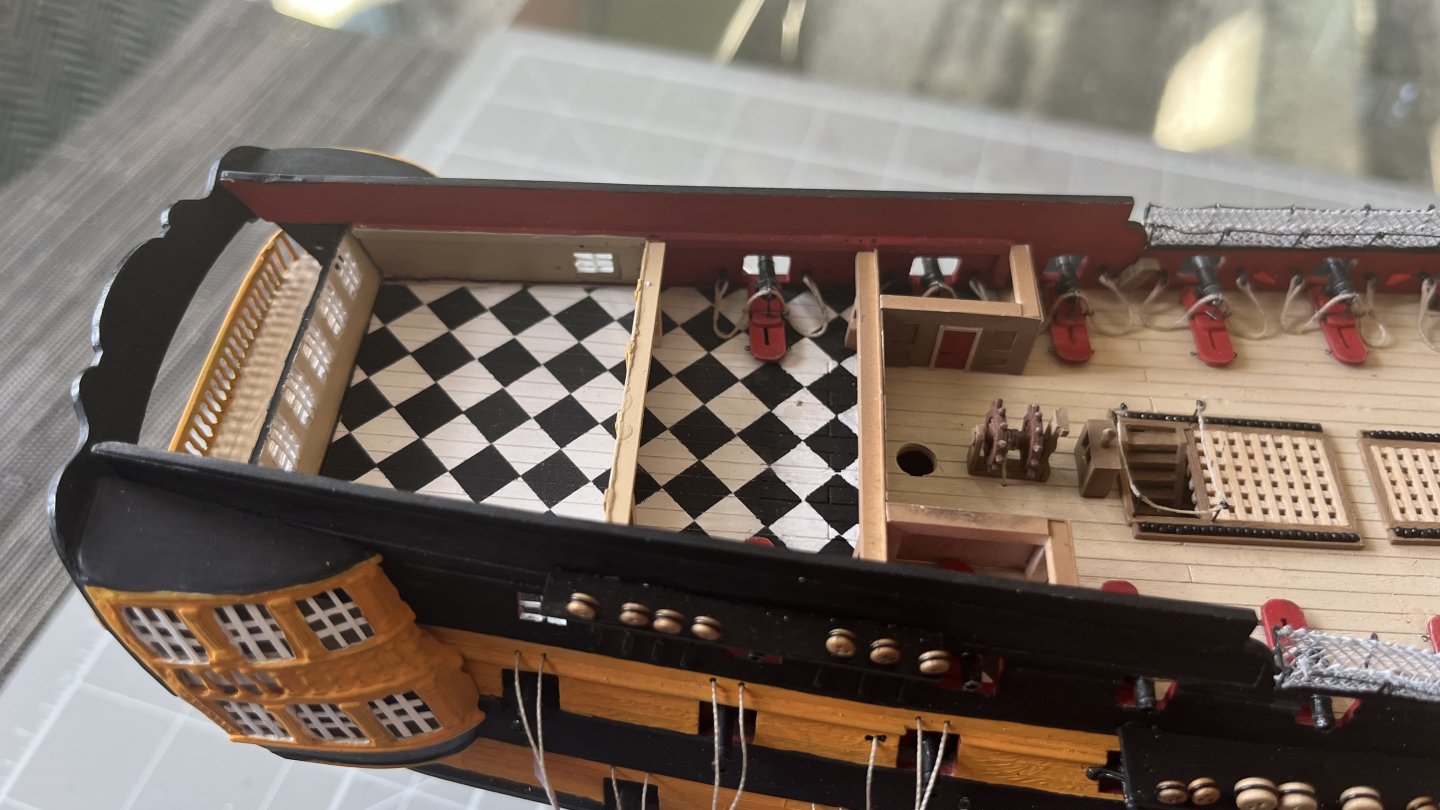
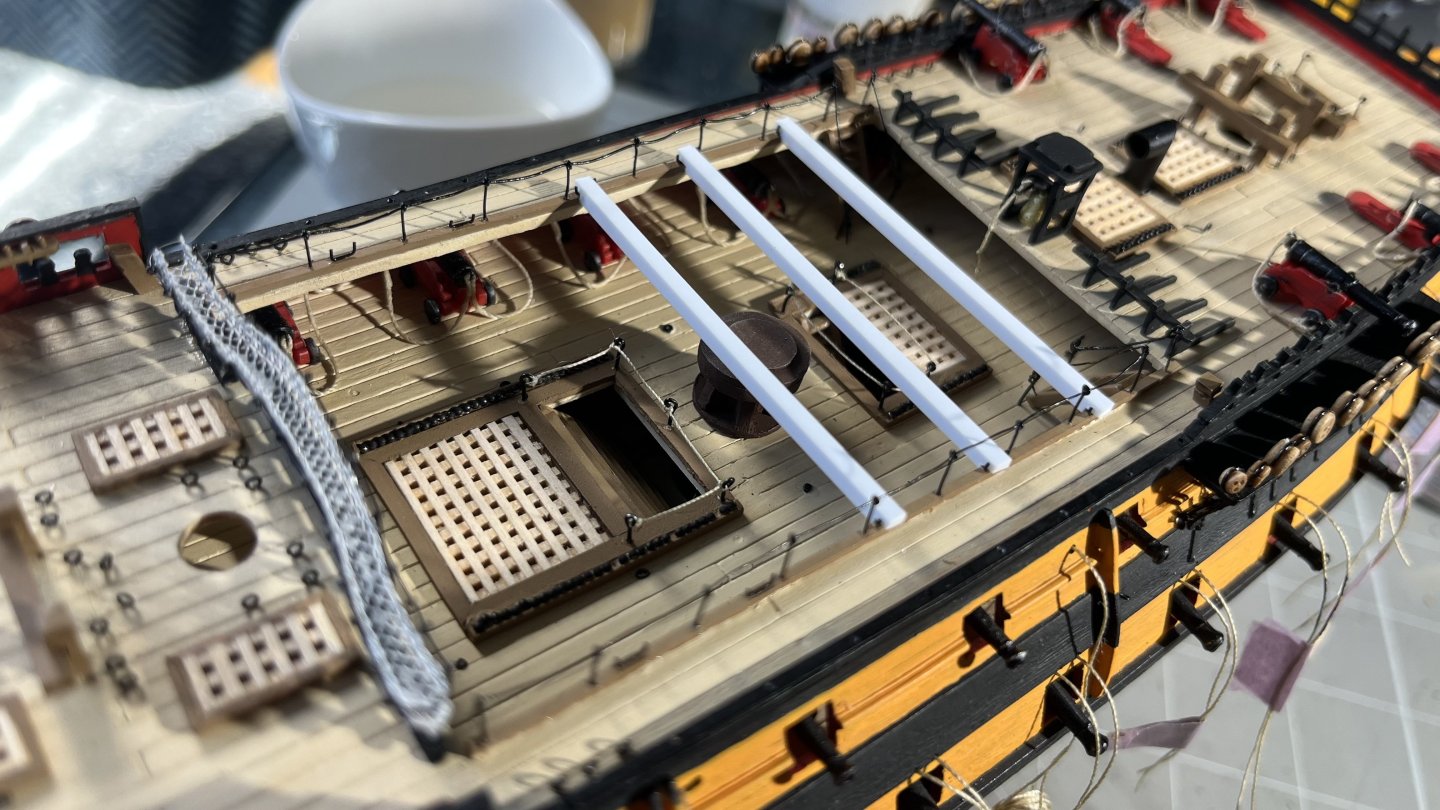
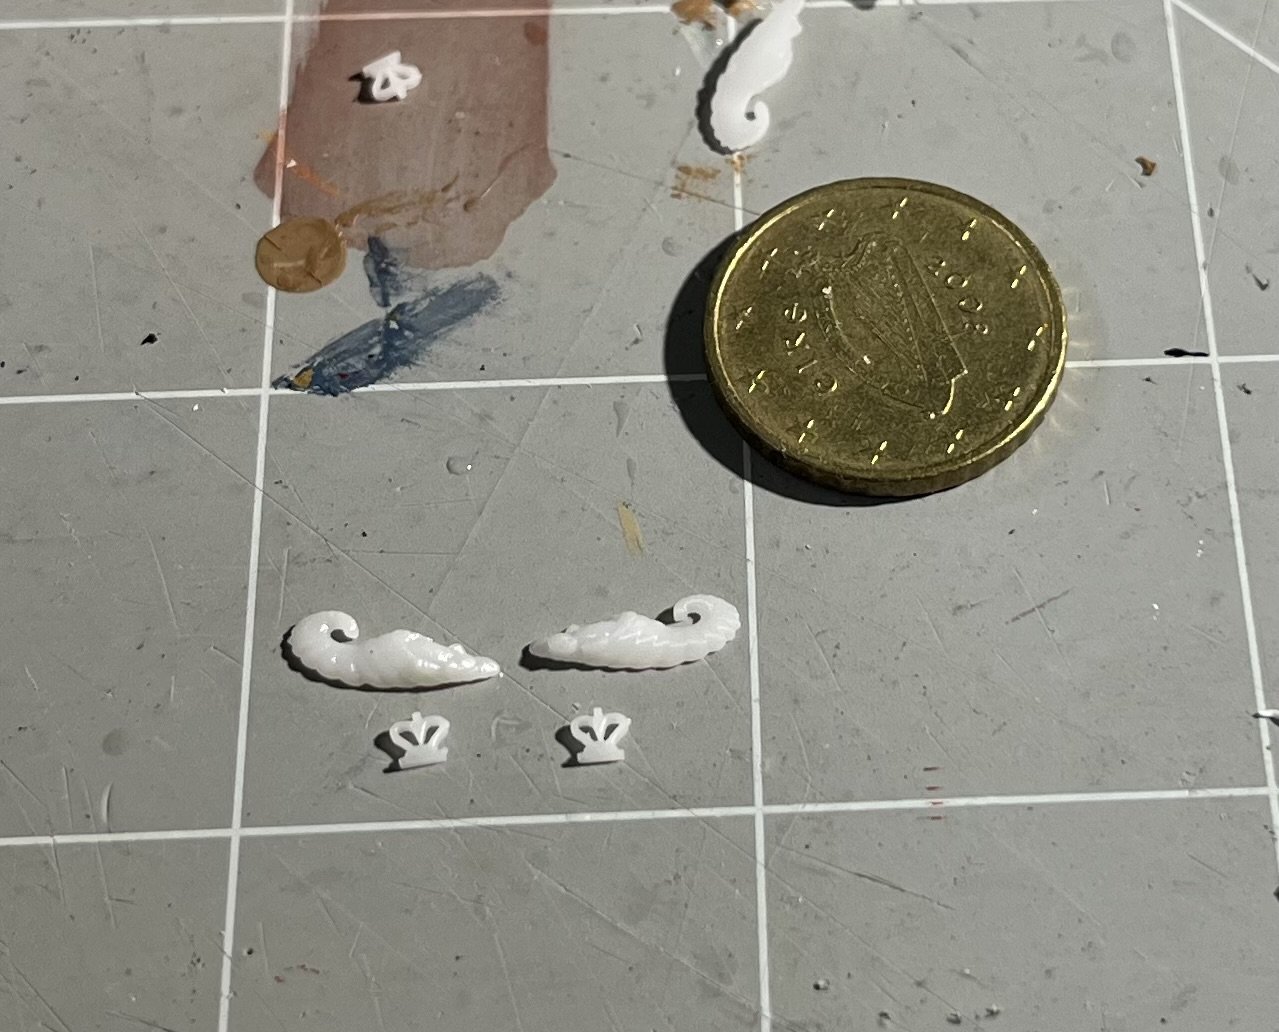
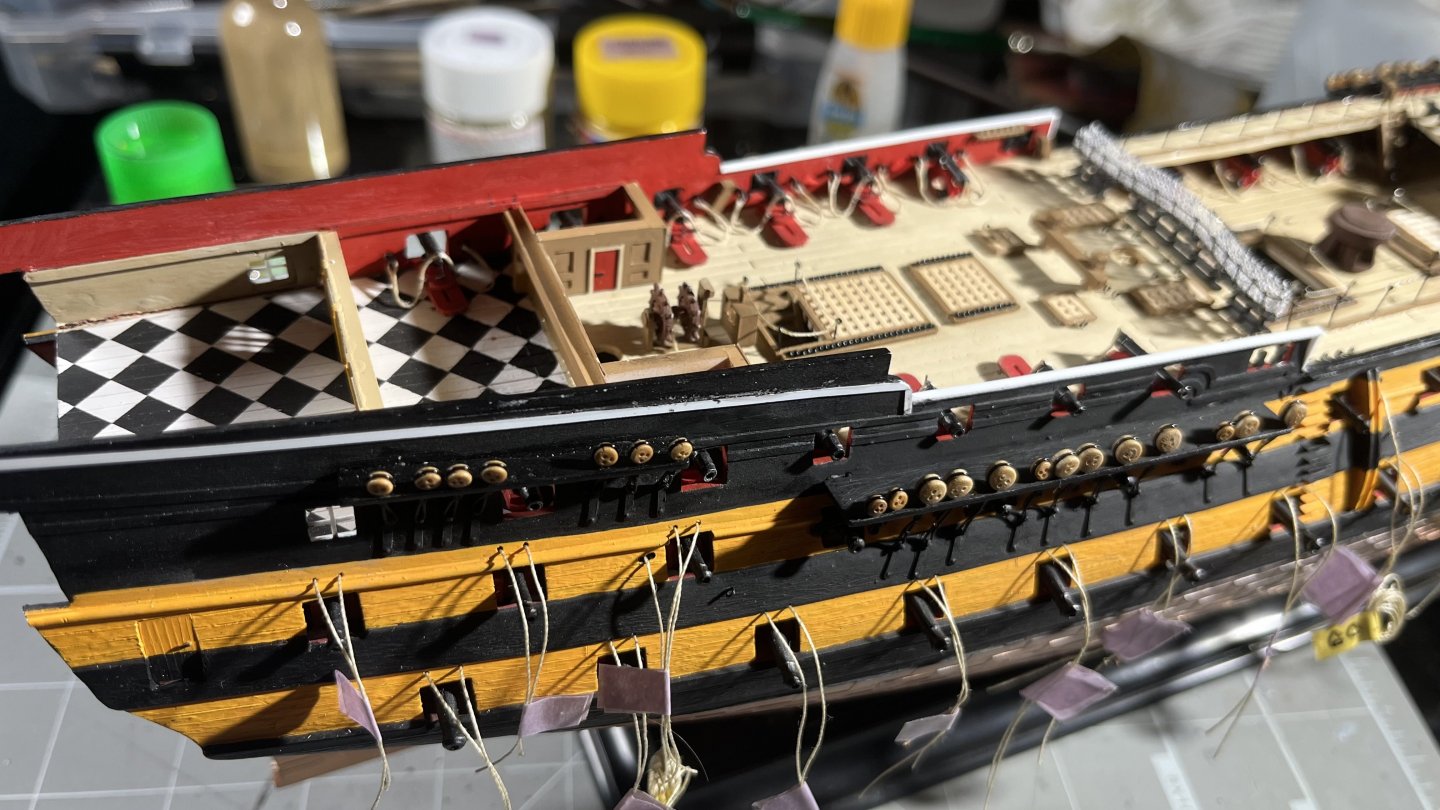
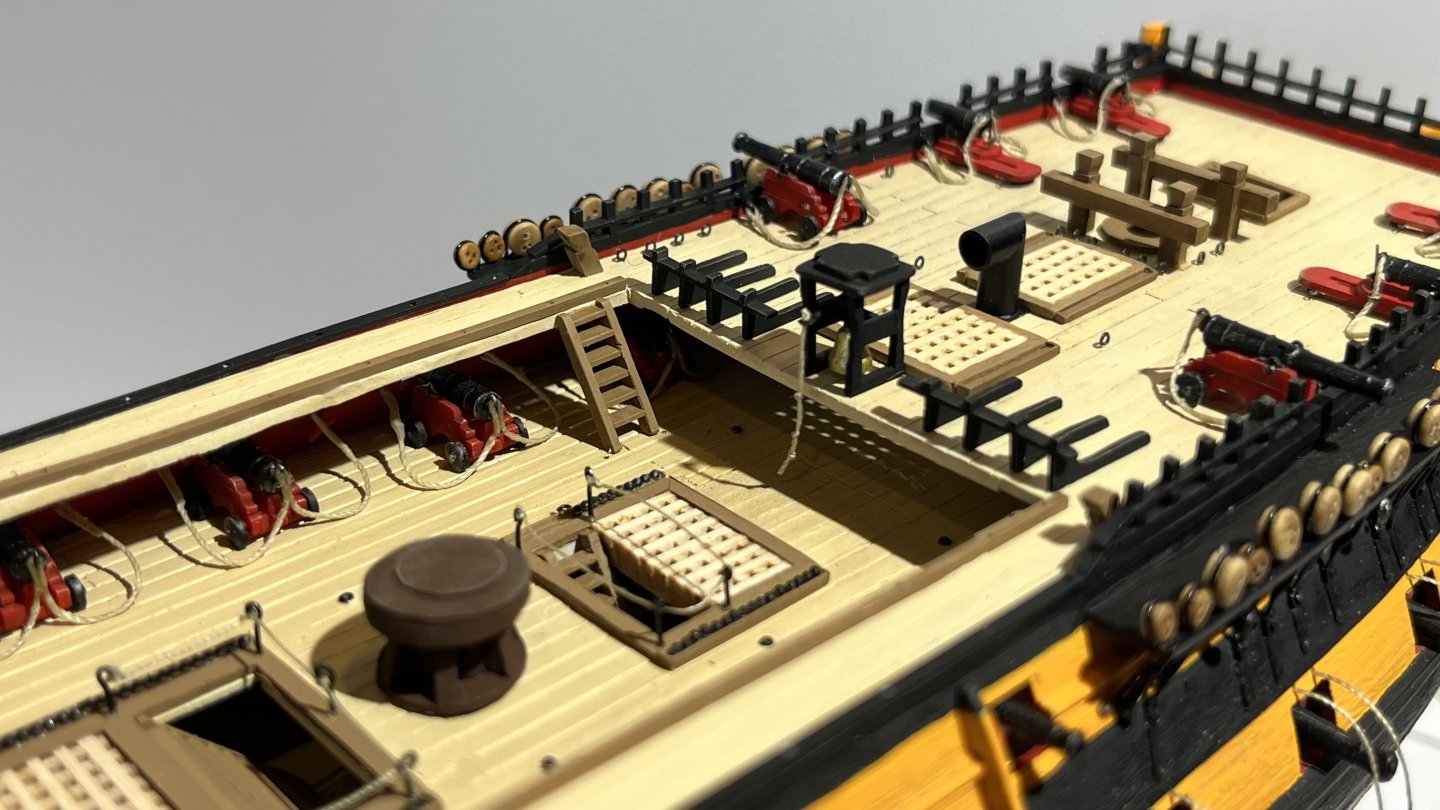
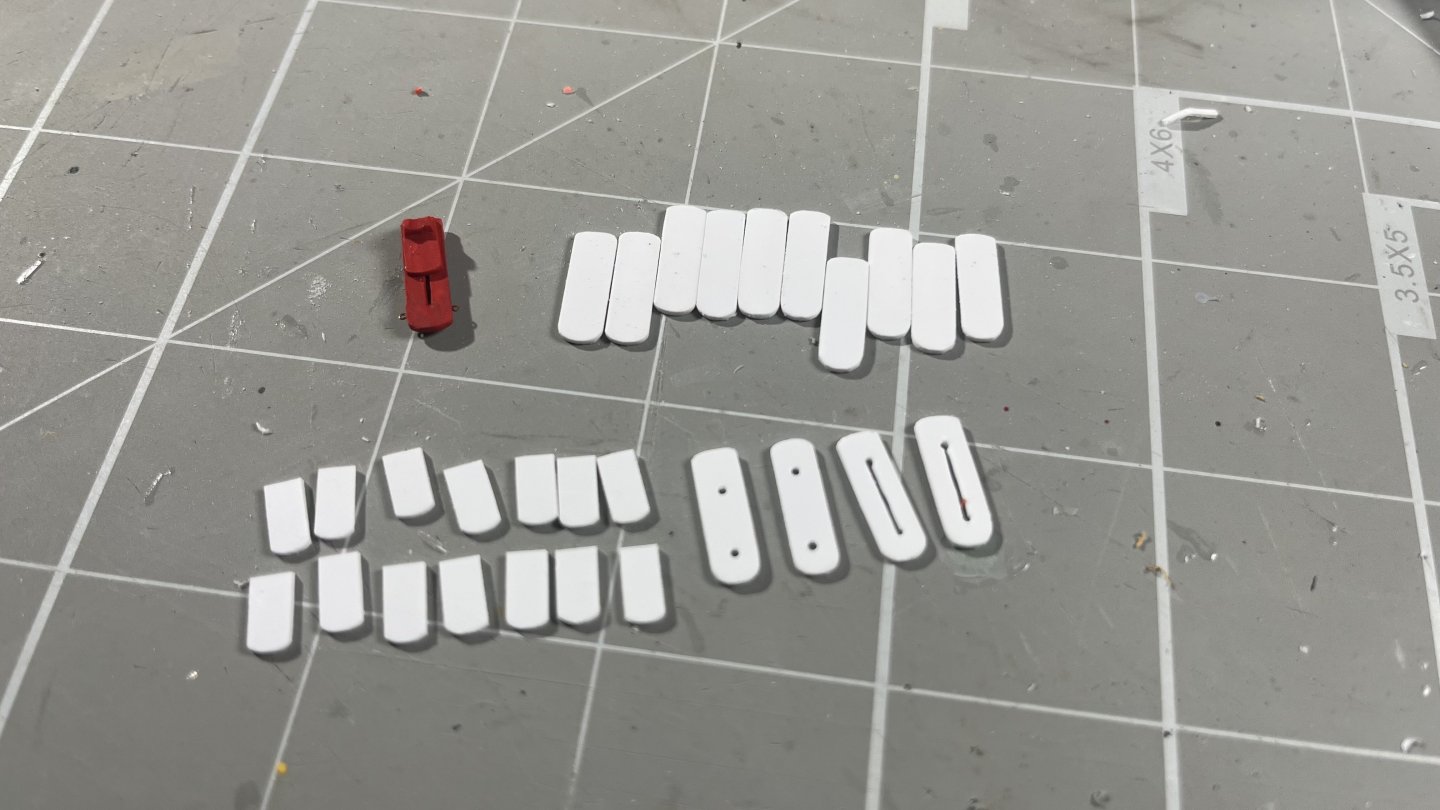
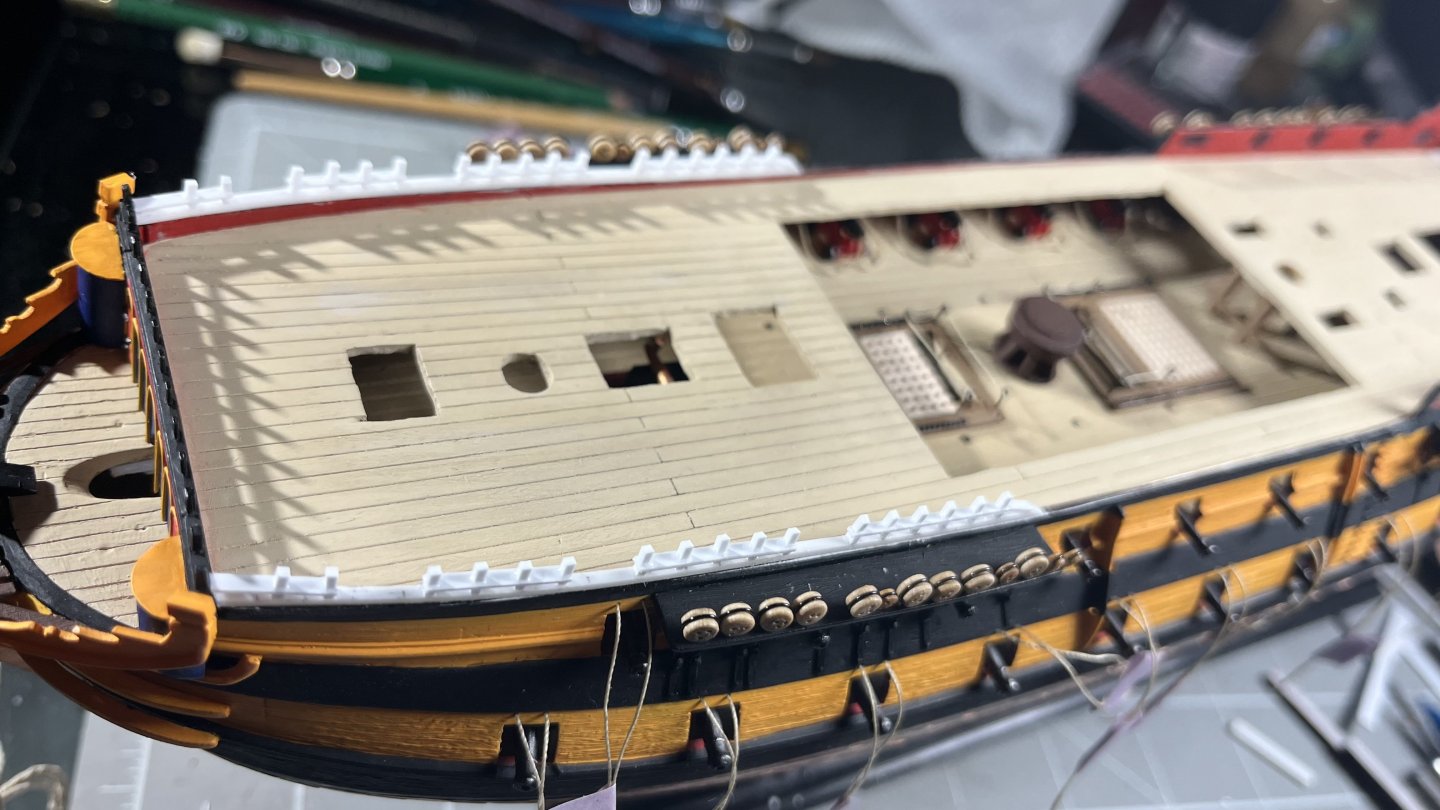
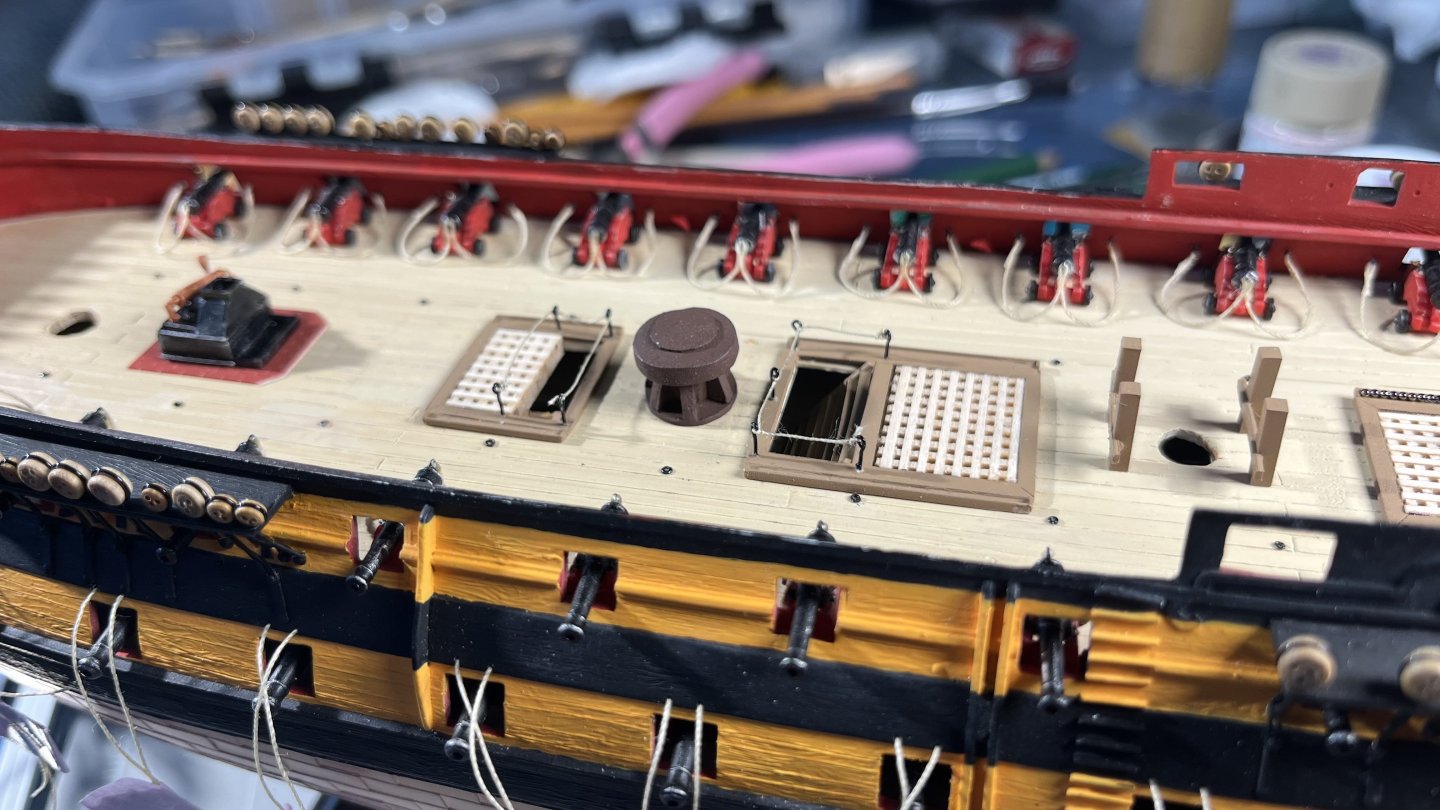
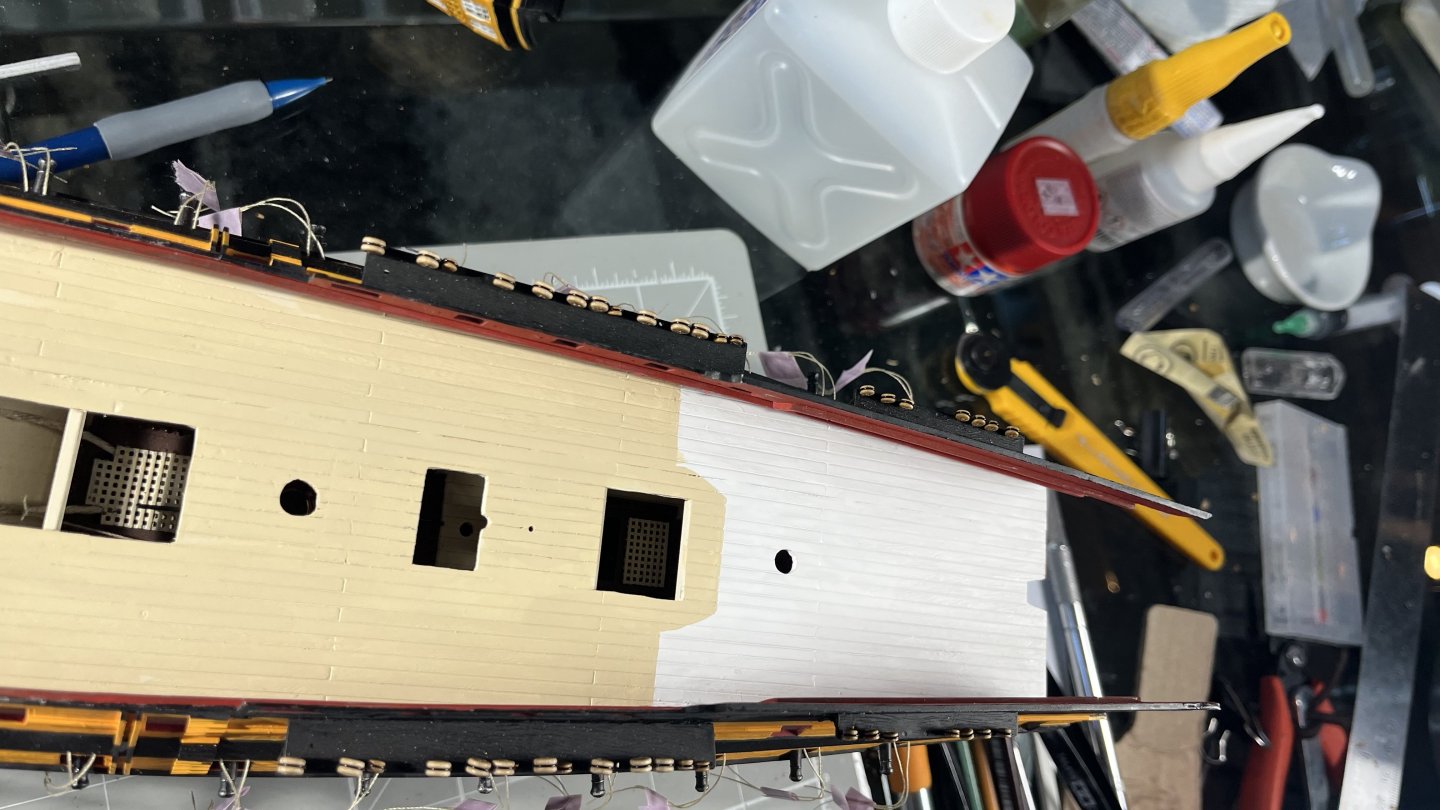
This week marked the four-month point of the build, and I'm a little over 500 hours in. It was also the week when I completed the hull! Well almost -- there are a few more eyebolts left to be attached to the hull (technically probably part of rigging?) and attaching the stun sail booms (also rigging, technically?) to the channels. Anchors need prepping and mounting, I haven't started the ships boats (technically, probably not "hull" either), and I'll do the gun port lids last. But other than this relatively short punch list, I'm really happy with the progress! Week started with glueing the poop deck in place, forever hiding all the interior details of the quarter deck... I needed to shave down the poop deck railing (using a small hobby planer), possibly I could have taken off another mm or two? Lanterns, fire buckets, trail board and cat heads 3D printed by @igorcap thankfully, he provided a double set as they're fairly brittle + required a bit of customization/experimentation, so great to have a few spare pieces for experimentation. On the quarterdeck, I used the belaying pins & rails from the kit, which didn't come out that great. They're too small to use for rigging at this scale, required a lot of cleanup, and don't extend far enough out from under the hammock nets. For the poop deck railing, I decided to scratch build from plasticard and sewing pins; with a dab of CA to make the handle. Lanterns painted and attached. Experimented a bit with placing decorative trim on the roof of the quarter galleries, eventually decided against it. May come back to this later. Added the little "mini channels" for the mizzen backstays, and eyebolts on all other channels. I spaced the stanchions for the handrails without making gaps for carronades, thought it would have looked weird and given her a "toothless" look with empty gun ports. (Decision to skip poop deck carronade discussed elsewhere in this and other threads.) Painted and attached the rudder chains, and topping lifts for the rear chase ports. I assume none were needed for the lower half? At some point, may get back to score the stern transom planking -- advice for others would be to do this before painting and assembling the hull... Quarter- and poop deck finalized with wash and highlights, with kit's masts dry fitted. Removed the trim from roof of quarter galleries, added hammock net for rail at break of poop deck; ladders, and hand rails. On other end of the ship, scratch built cat heads from a 2x2mm plasticard square profile, using 0.1mm x 0.2mm strips for decorative trim, and 3D printed crowns. I used the kit's sprit topsail yard cut in half for boomkins. Shaved off the tip to make a reverse cone shape, and inserted a piece of 24gauge copper wire in the other end for stability. @igorcap's horn-of-plenty trail board snuck in snugly between the cheeks. Figurehead and the kit's bowsprit dryfitted. All will eventually get a wash/highlight, but I've decided against any additional paint in the hair bracket. The single blocks at the tip of the boomkins were the smallest I could find from Amati, 1mm single blocks. They still look a smidge too large, and a little too square/blocky -- suggestions? Tumbler? Knightheads look a bit skinny, may make new ones. Still need to attach the boomkins stays, but my last 0.4mm drill bits broke so couldn't drill holes for the eyebolts 😕 I've gone through a total of ~50 of the 0.3-0.6mm drill bits now -- they break very easily when drilling through the kit's plastic. The feature to attach the rudder and stern with hobby magnets worked great, four for the stern, and two for the rudder (can you see them all?) It's possible to see along the entire length of the lower gun deck, but upper gun deck and quarter decks are blocked by bulkheads.


- 24 replies
-
- 1
-
-
- HMS Vanguard
- Heller
- (and 2 more)
-
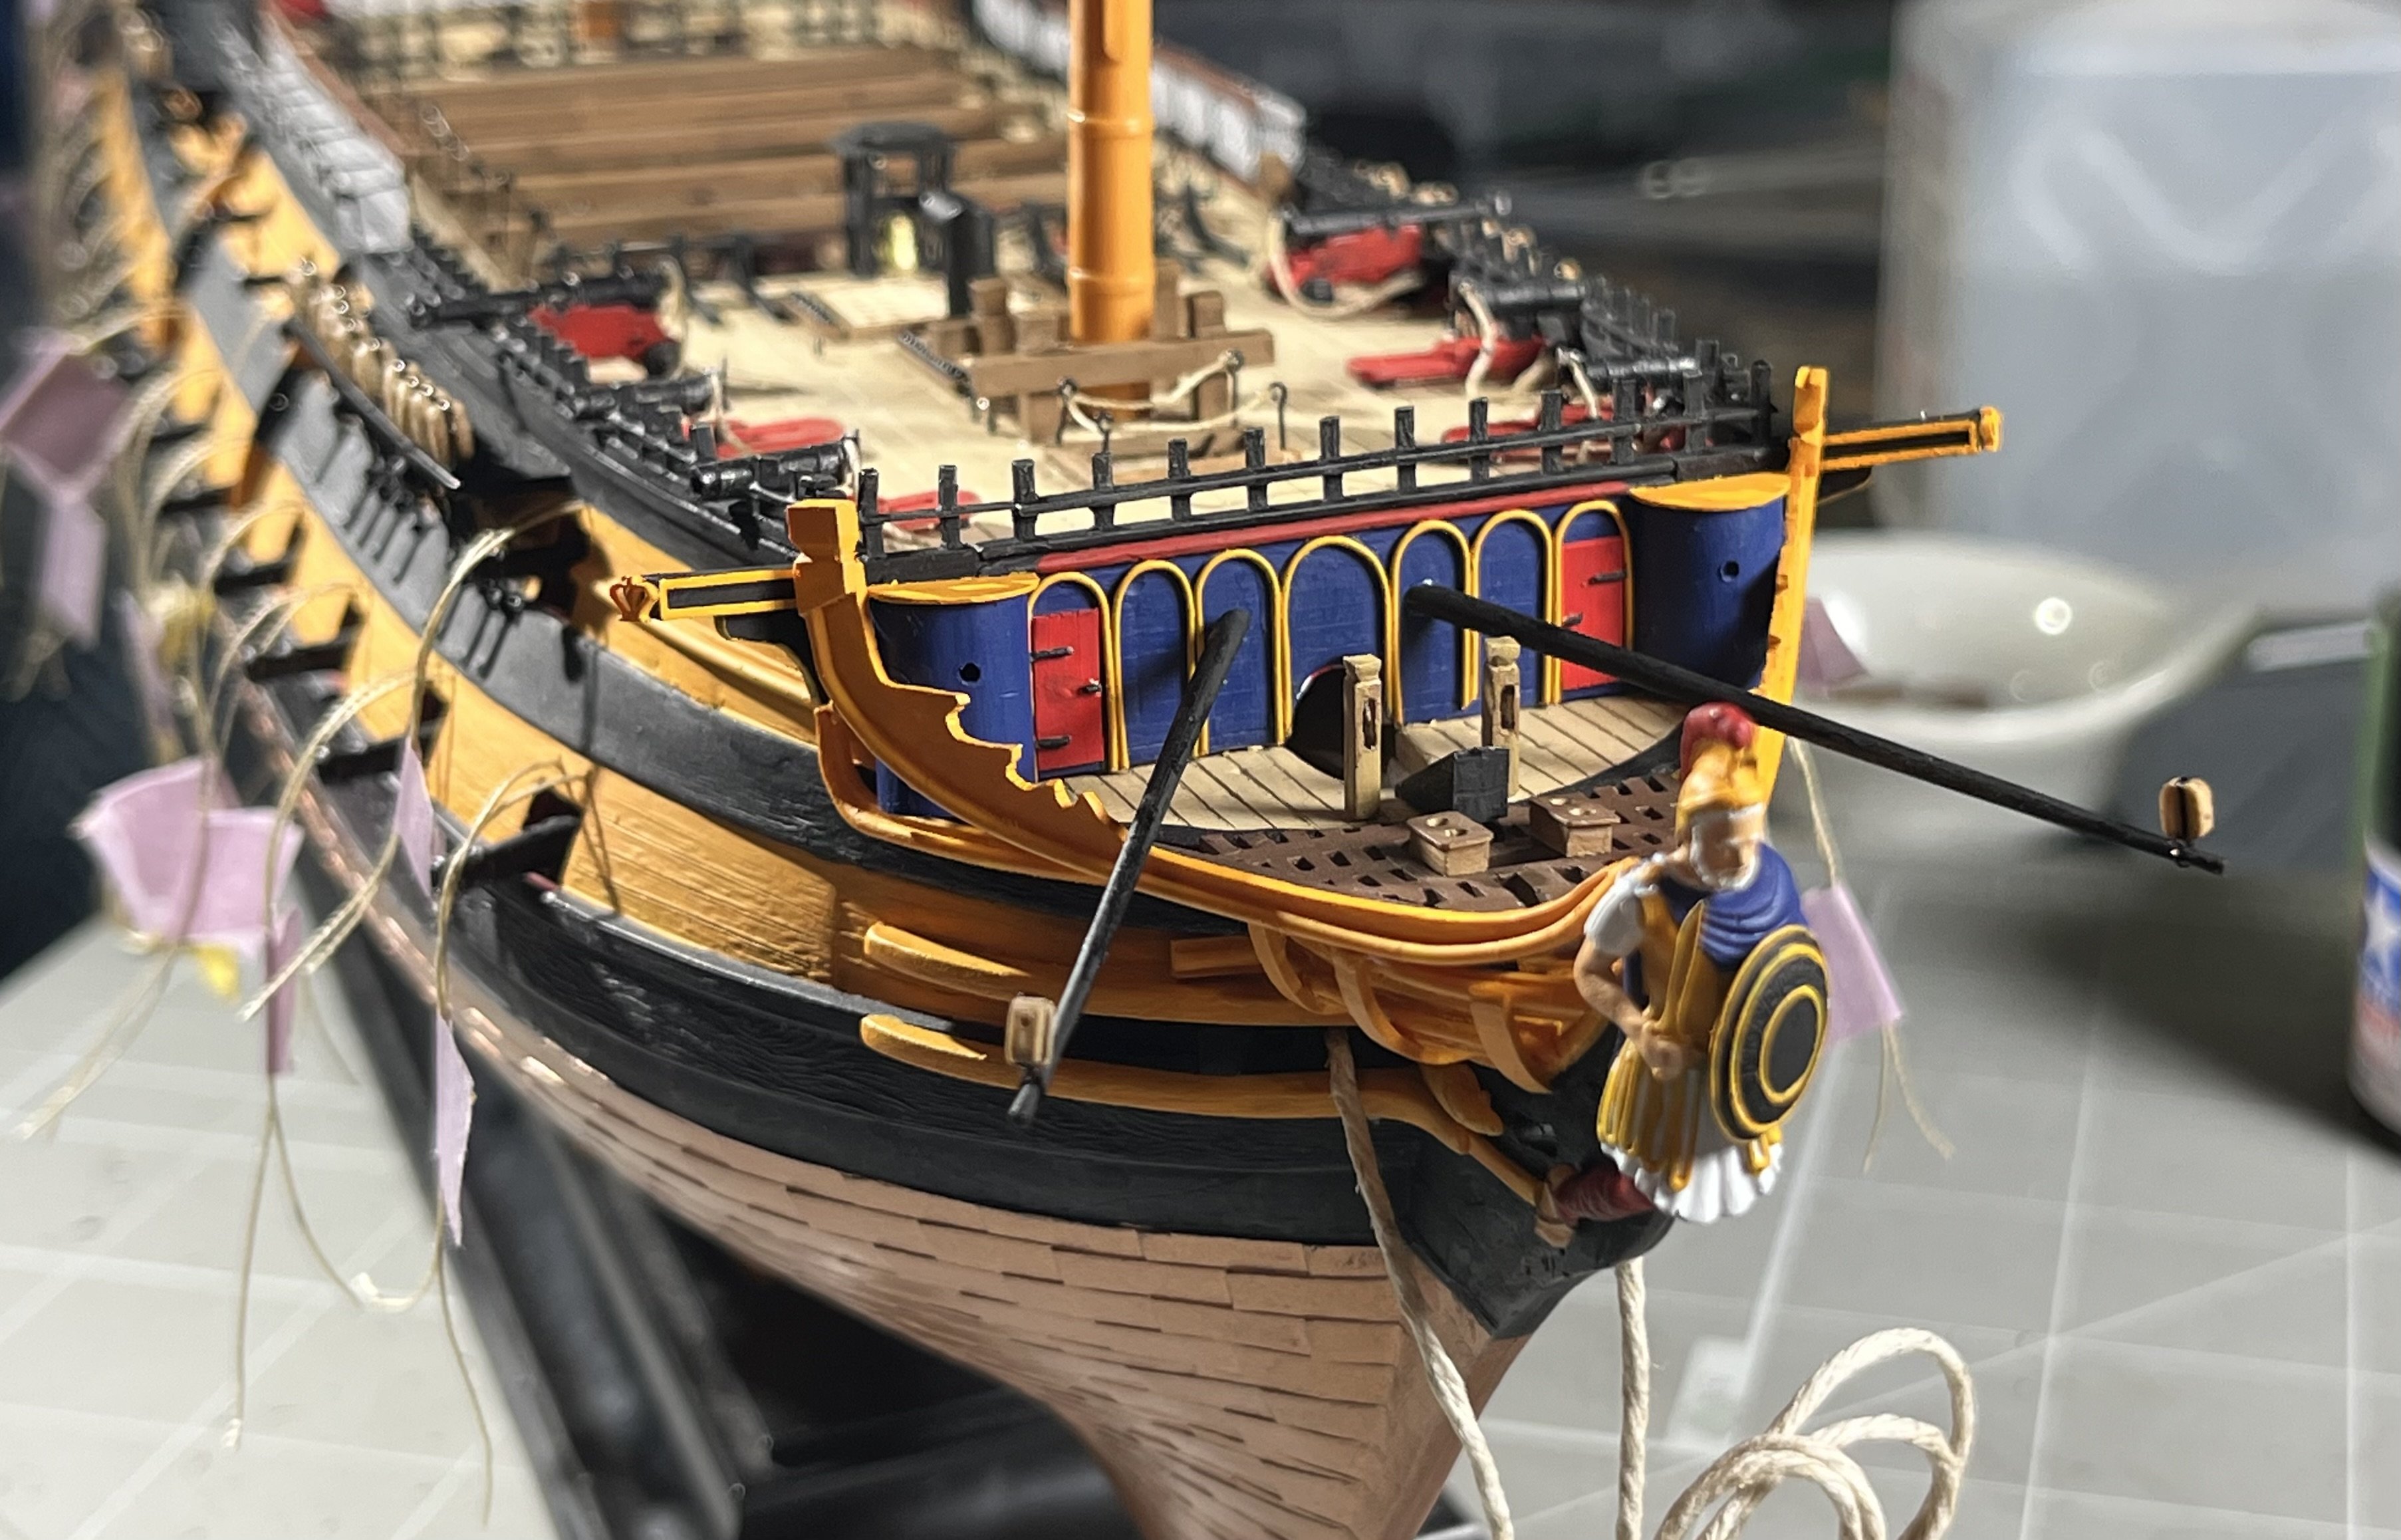
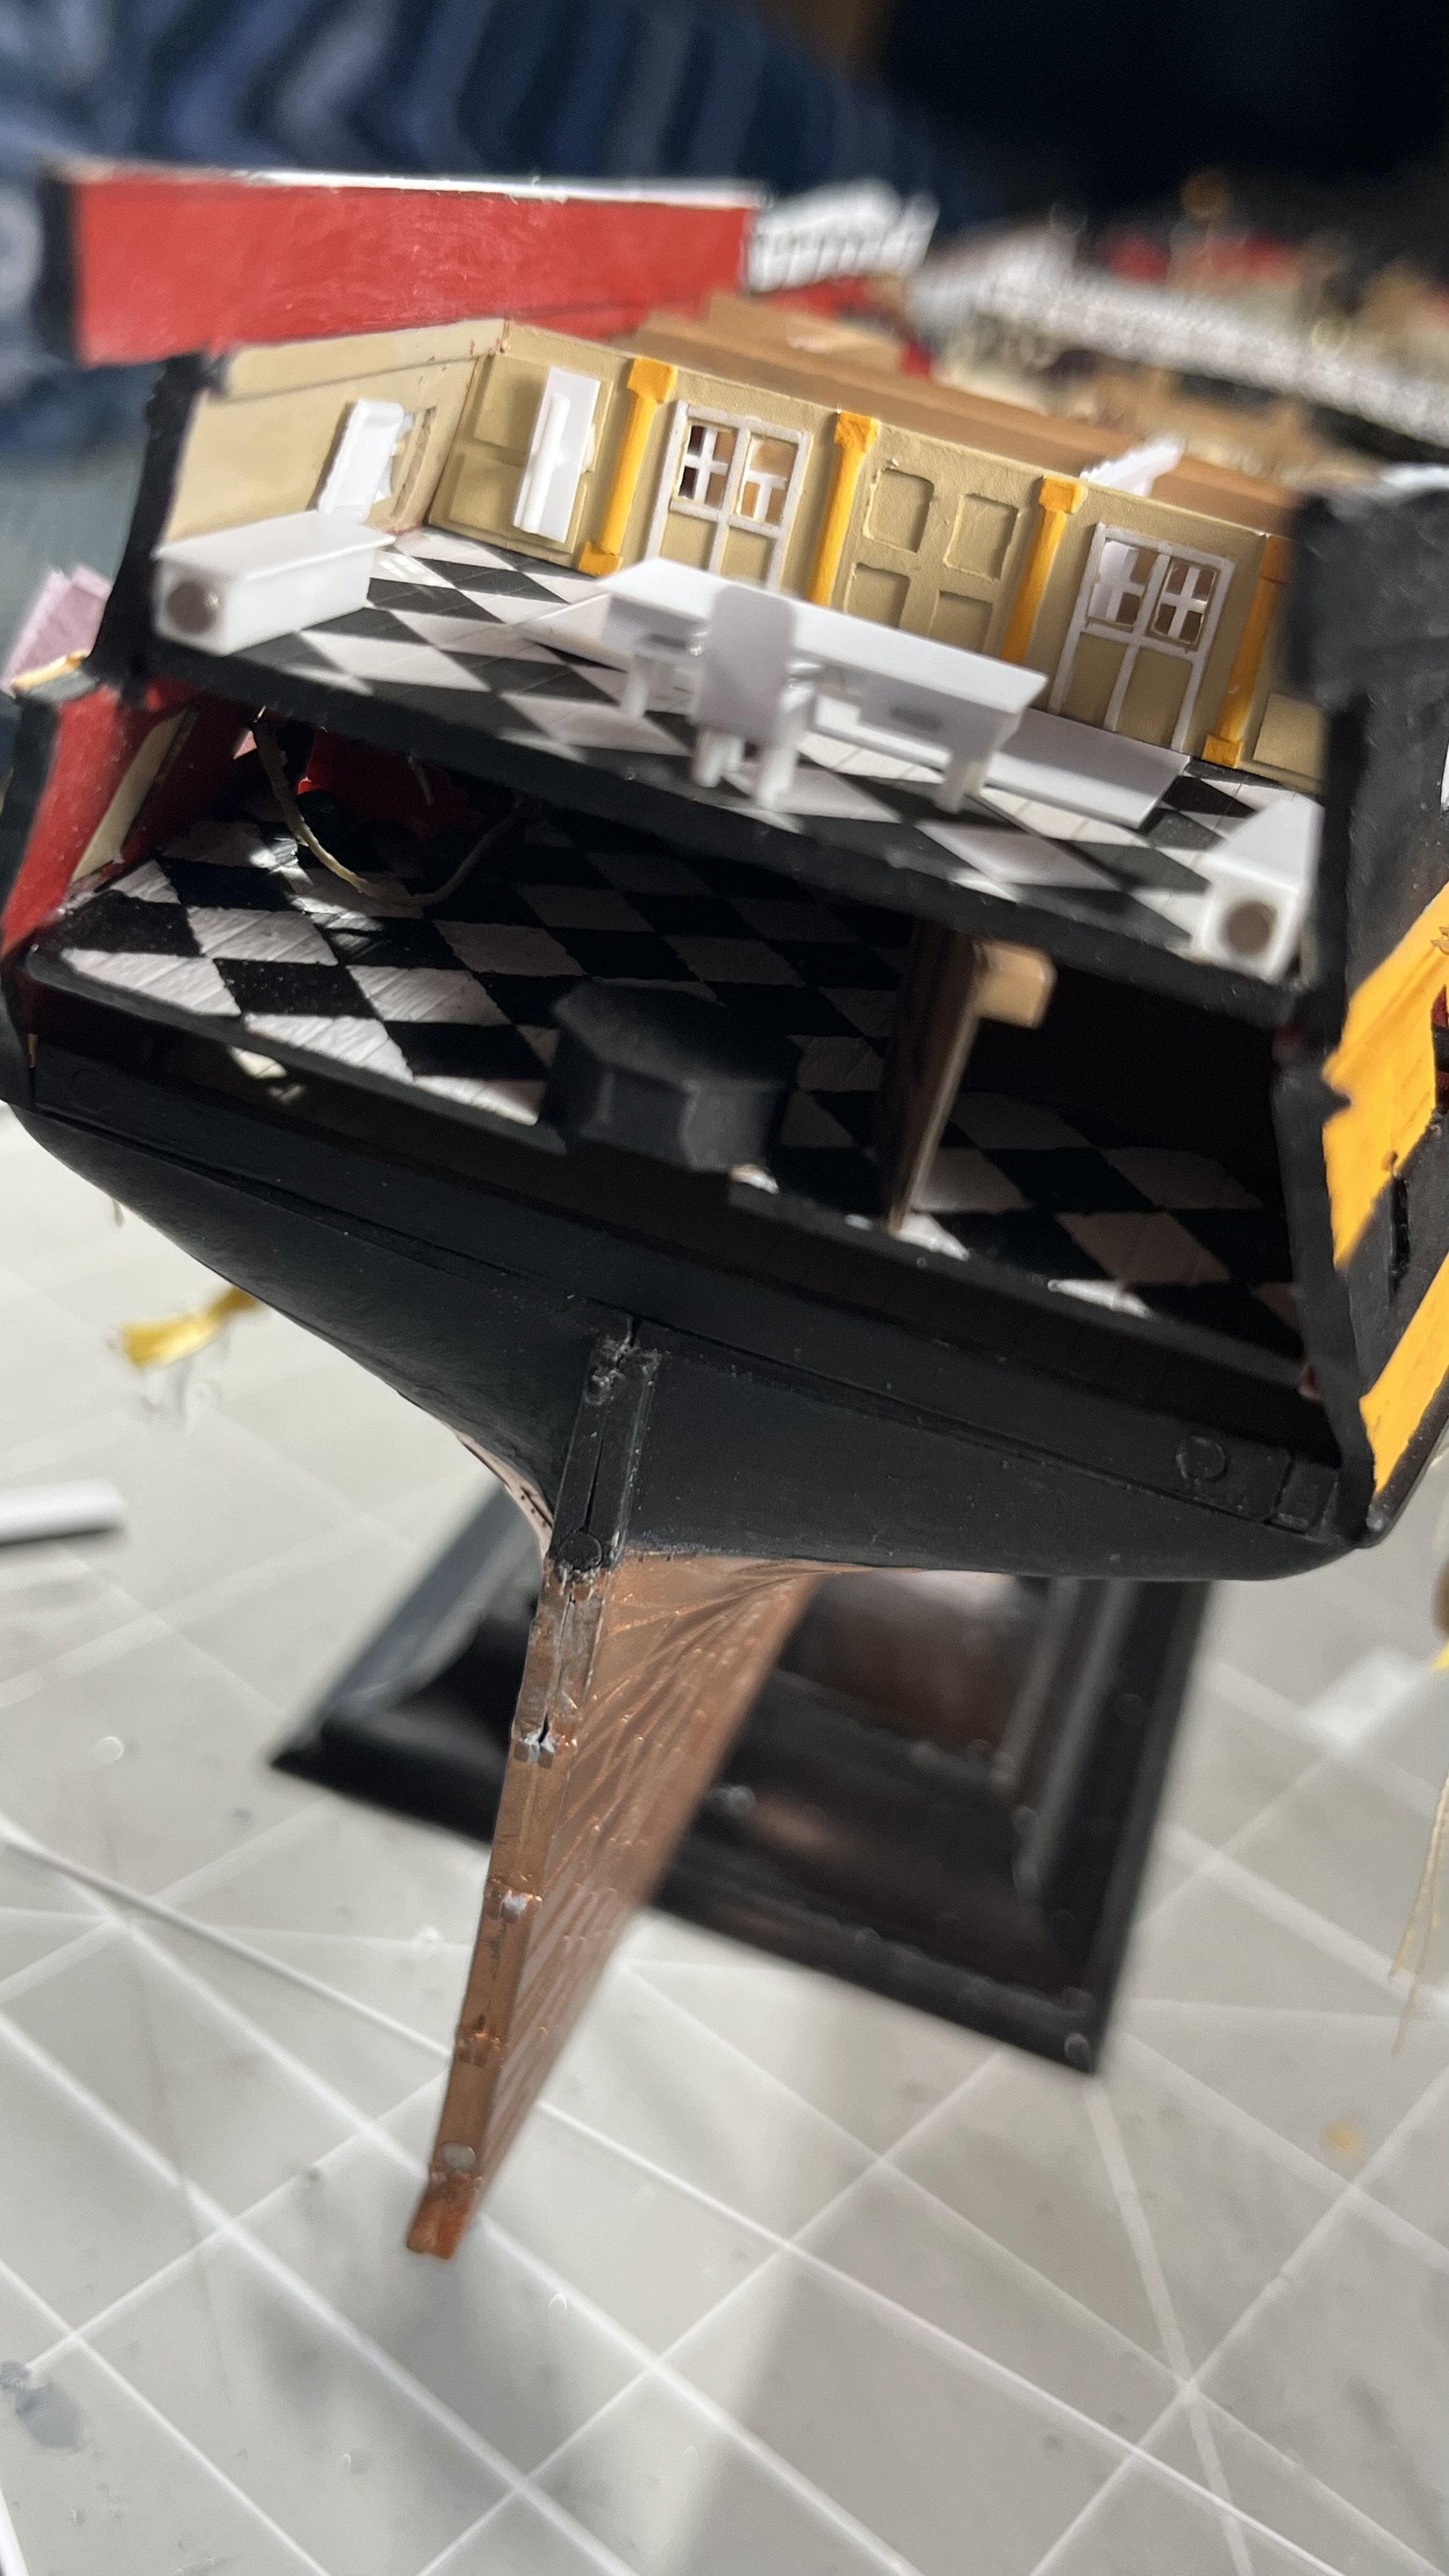
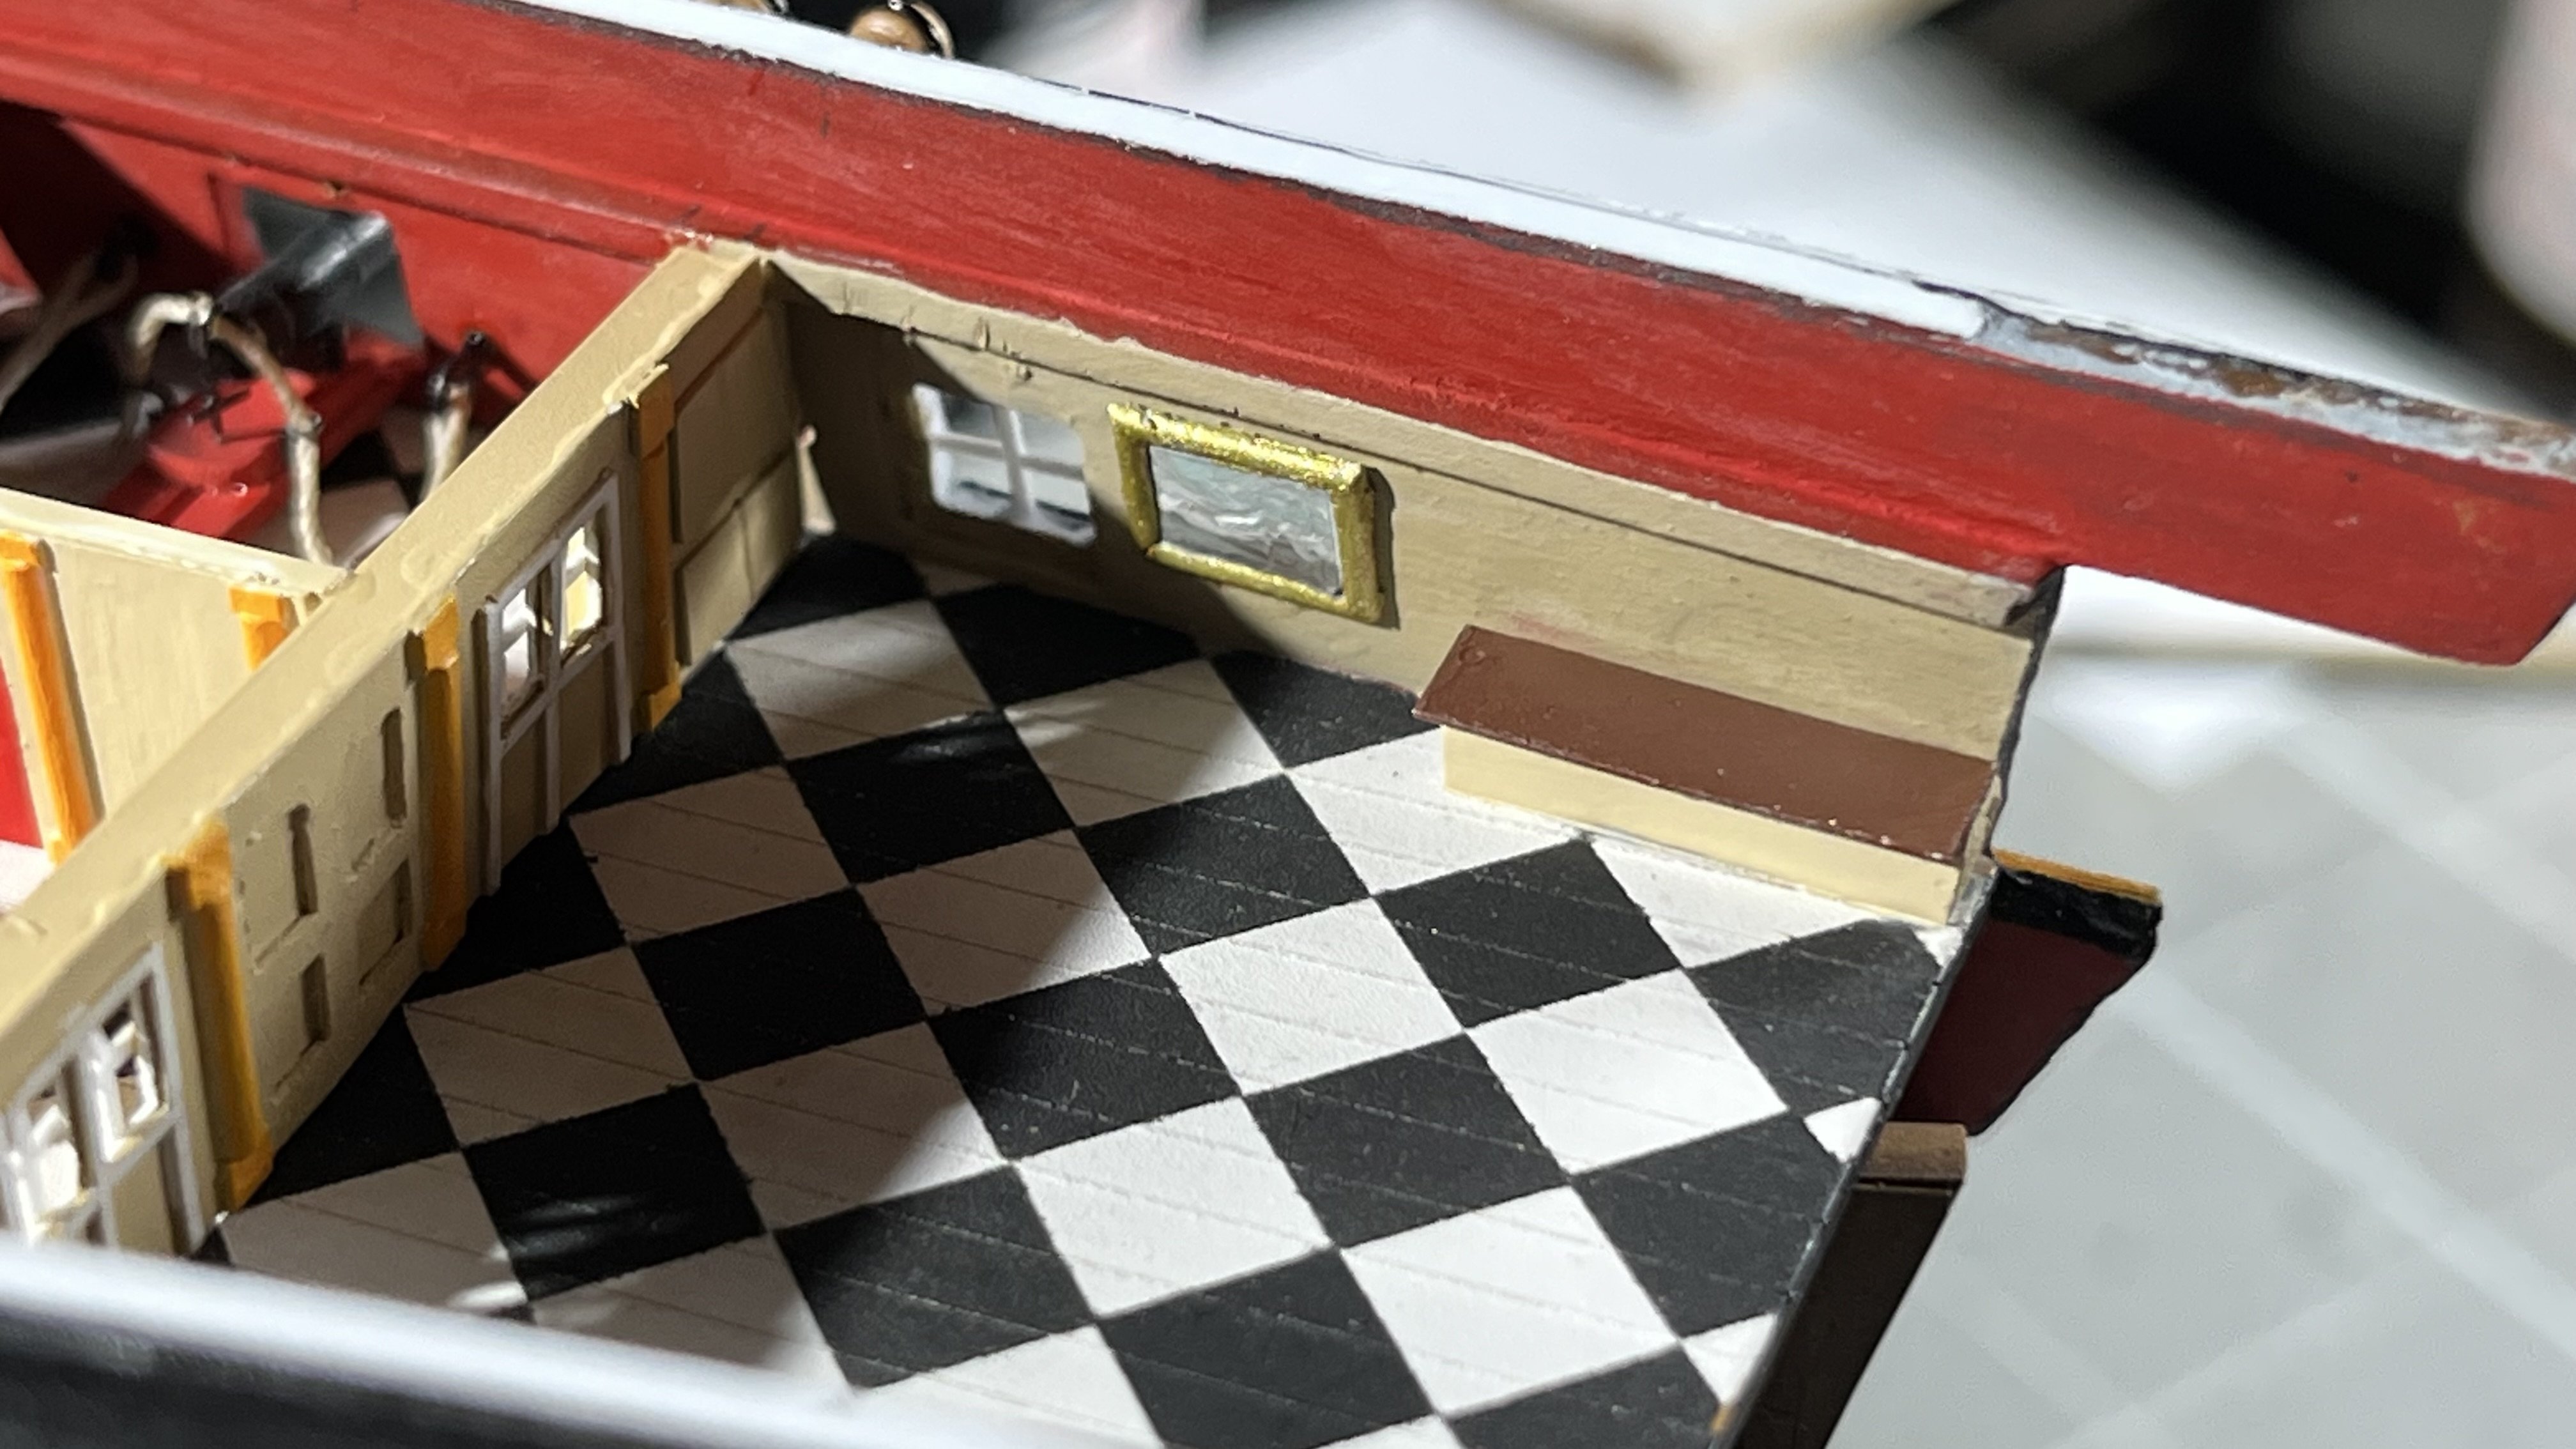
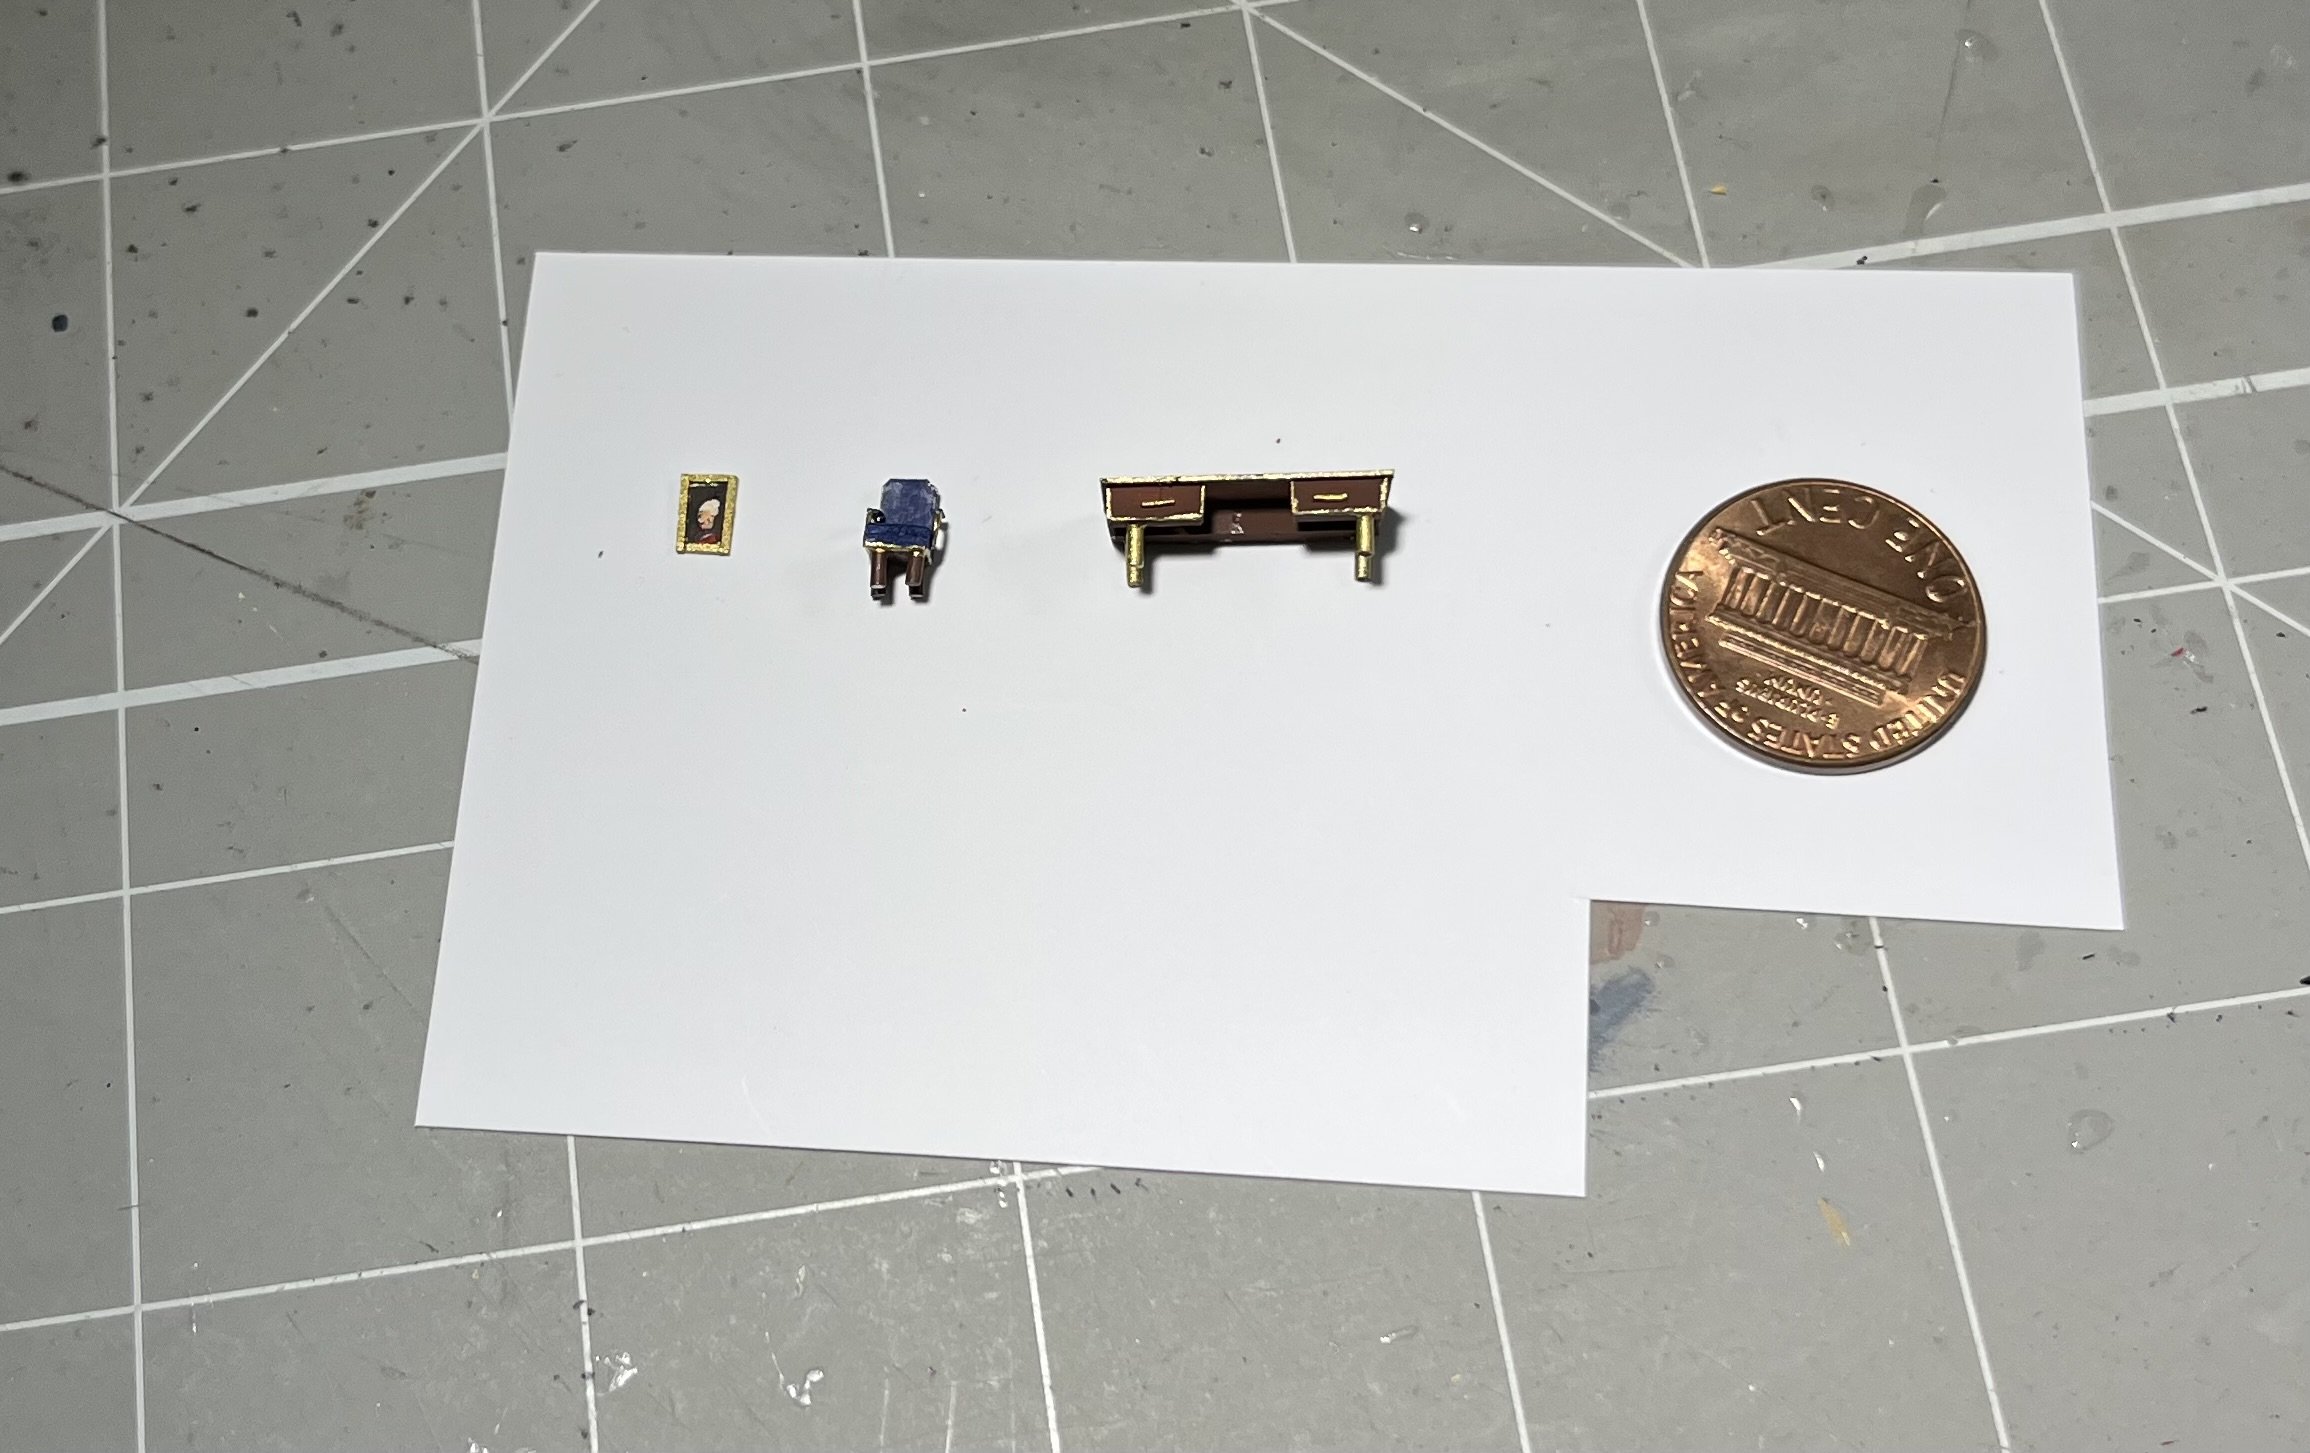
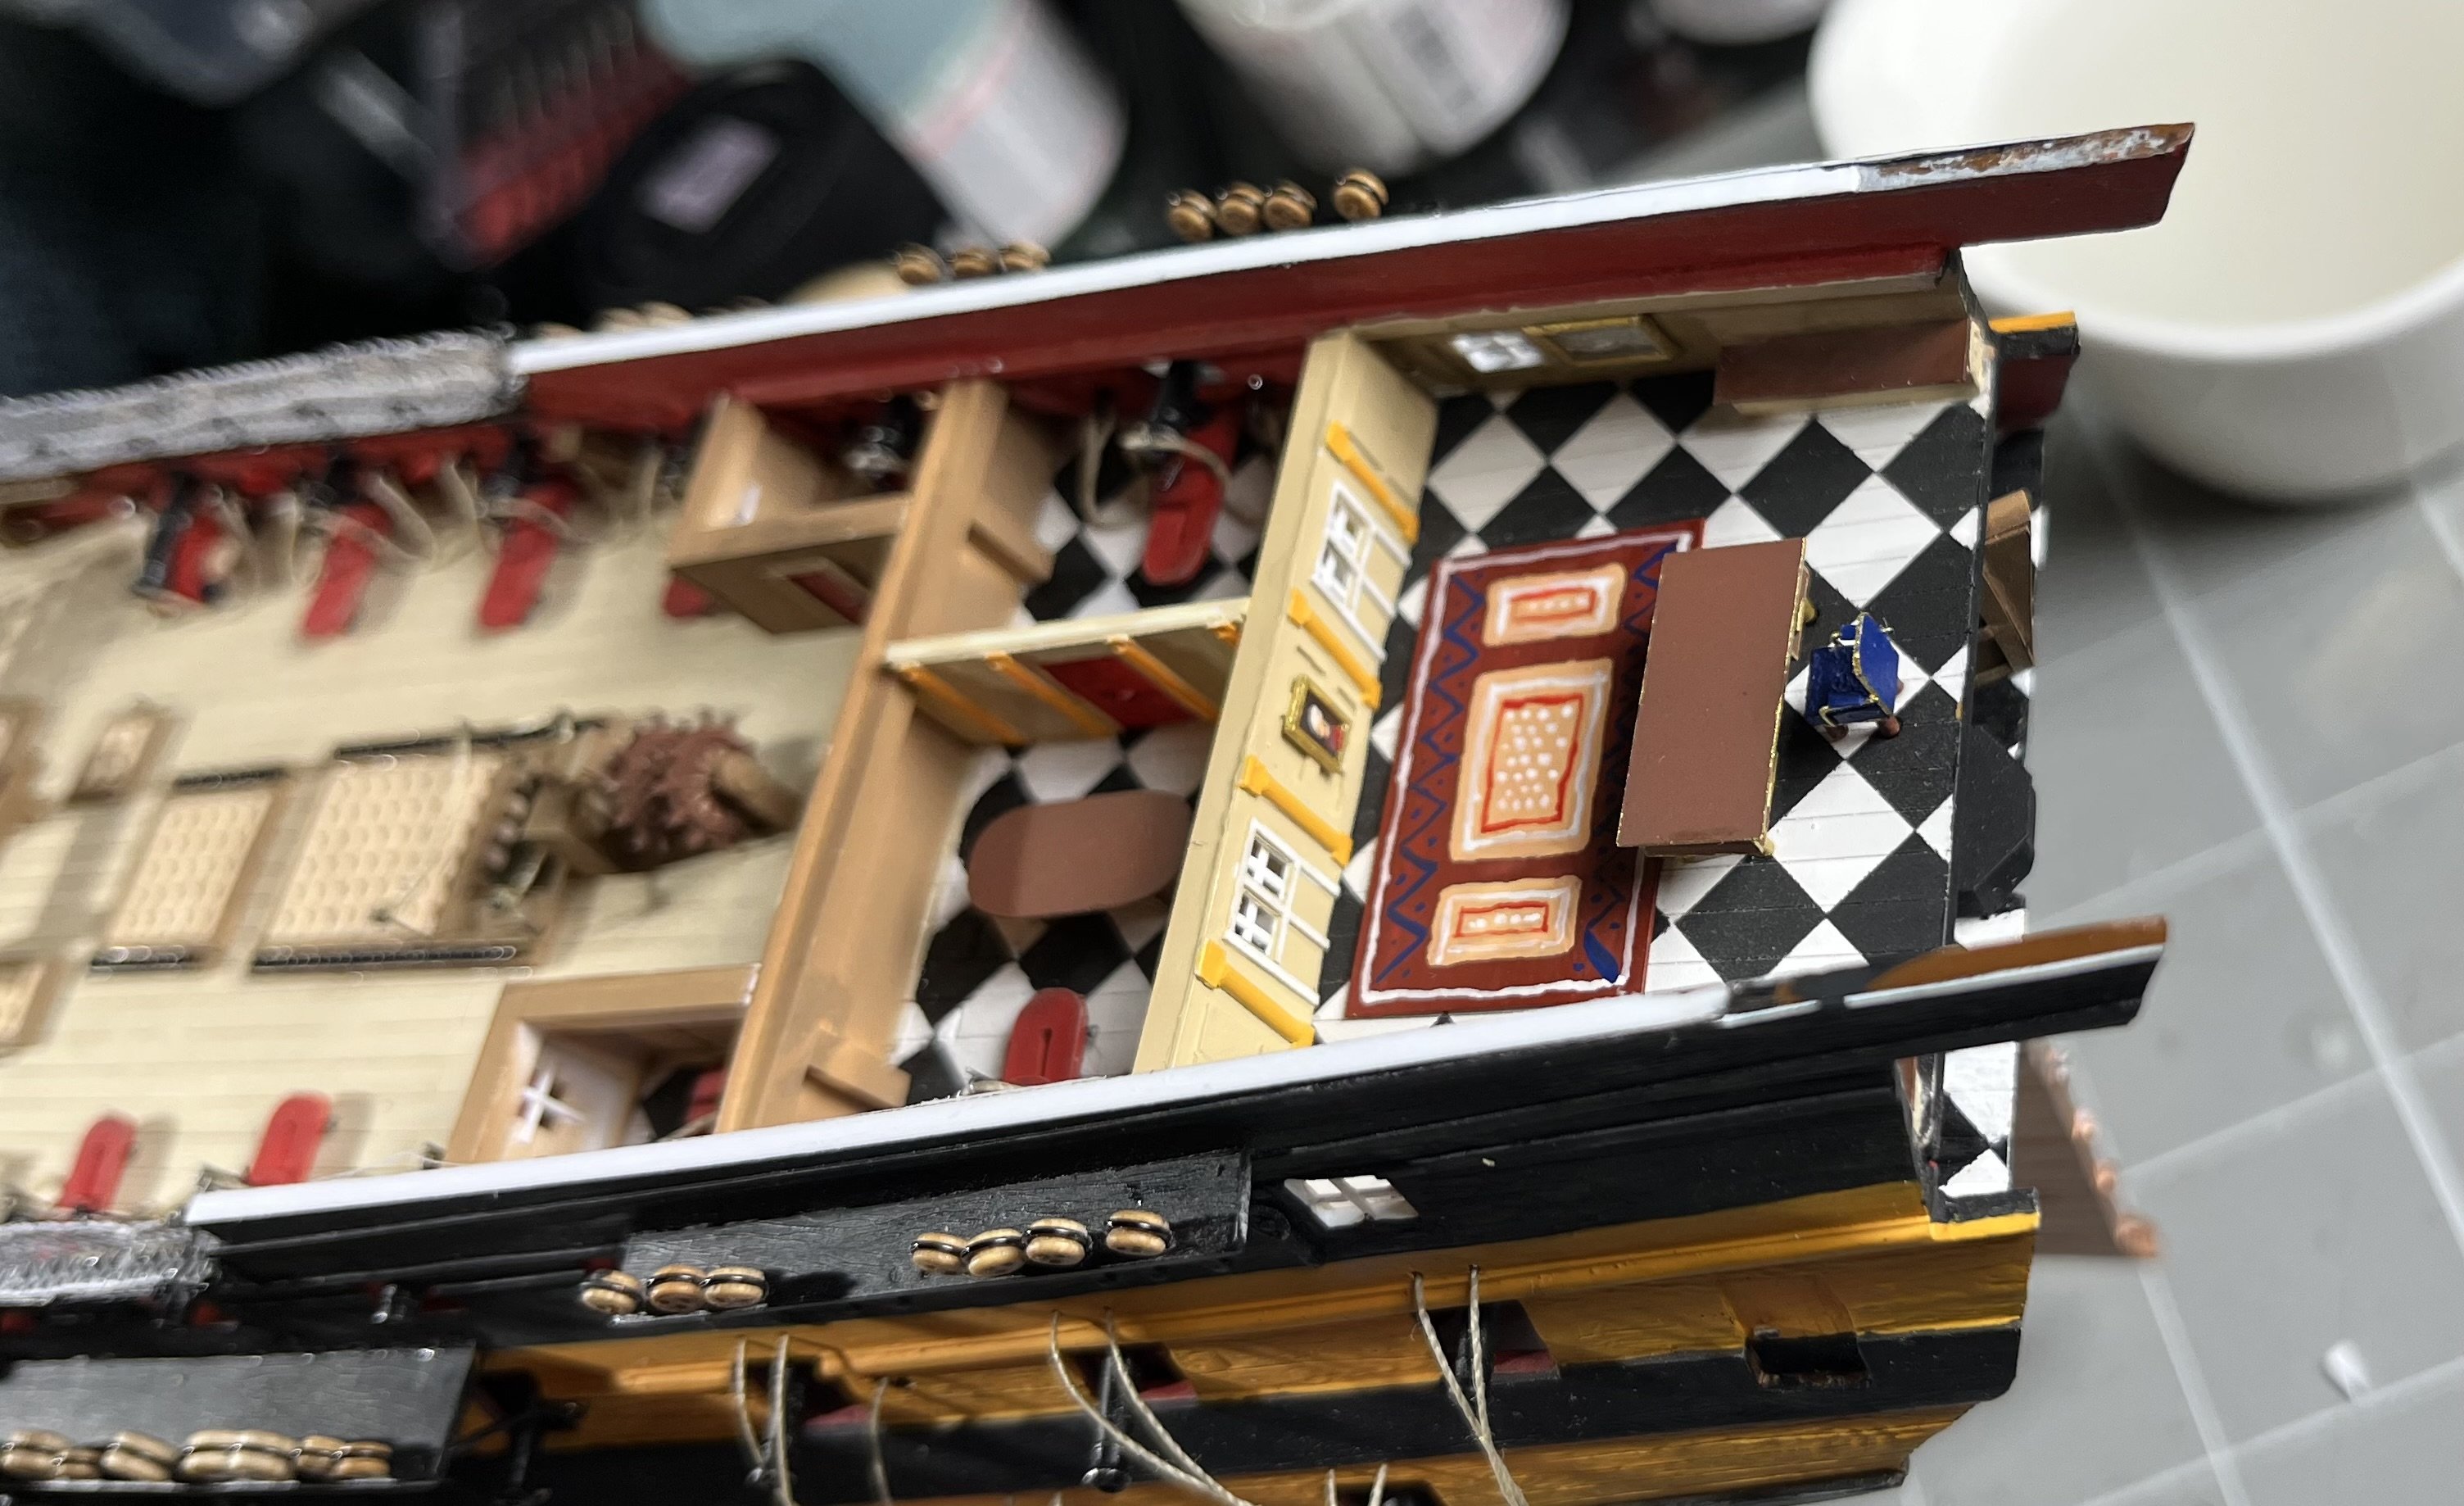
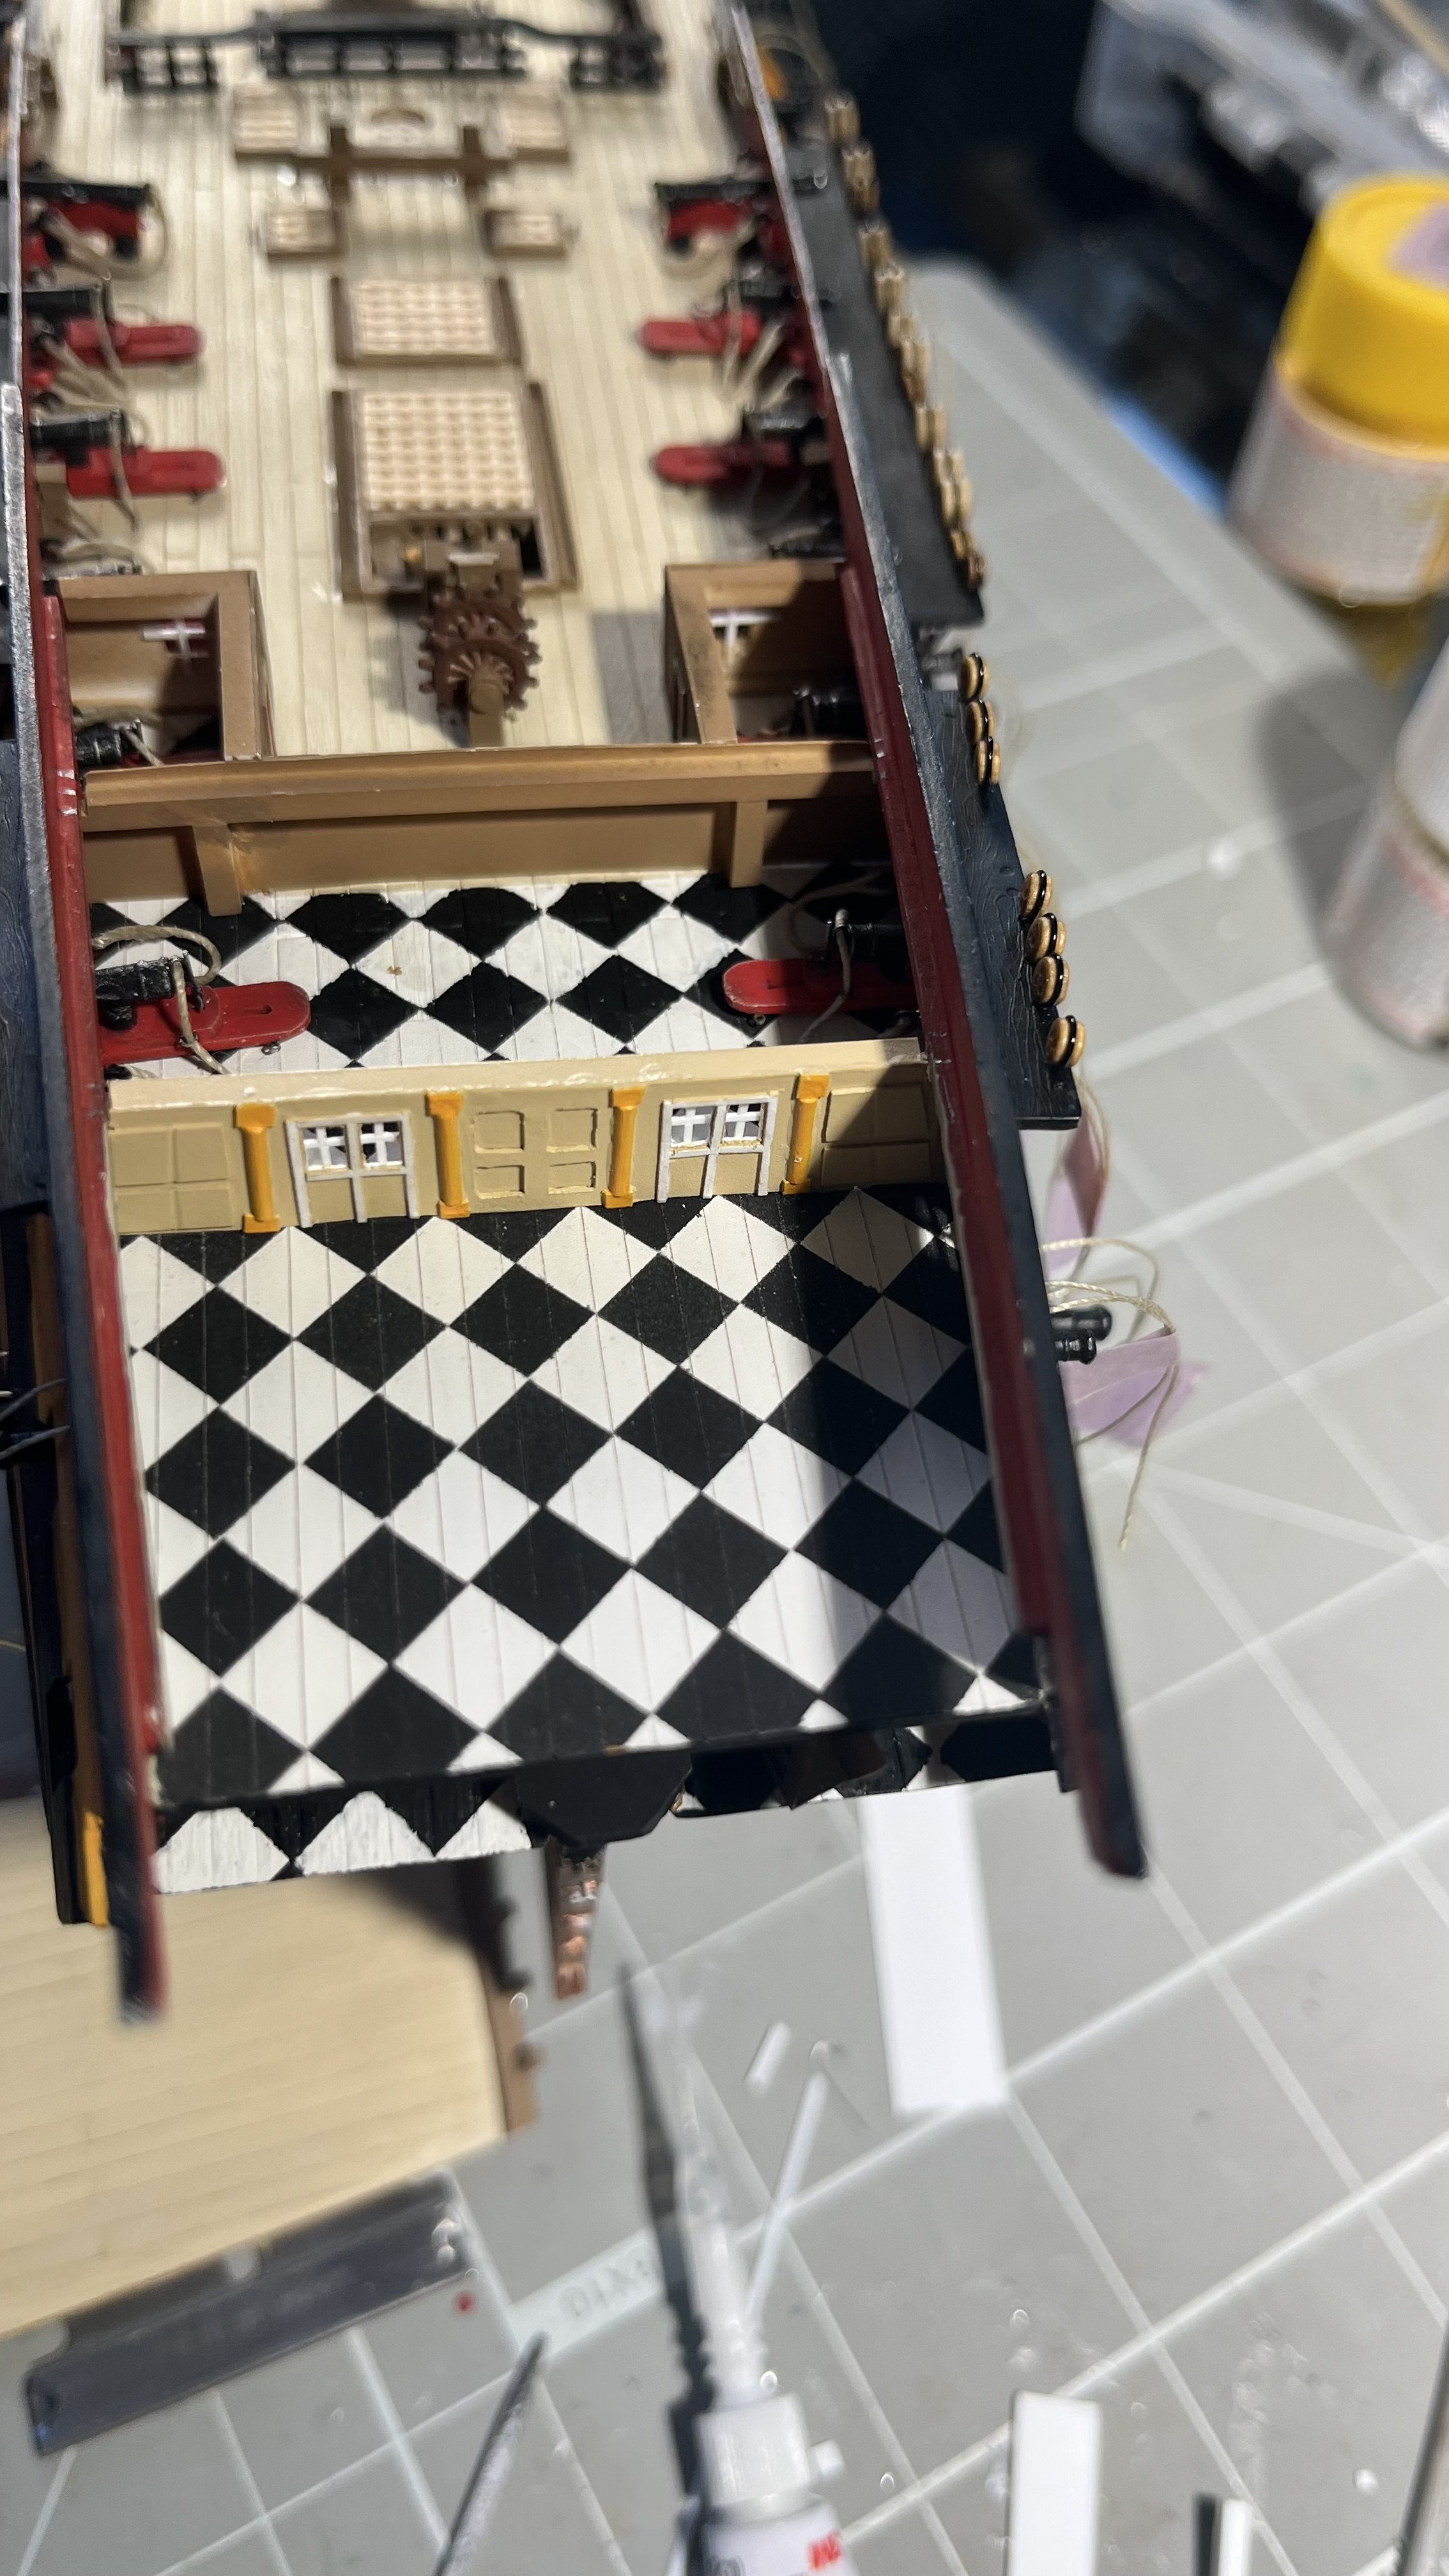
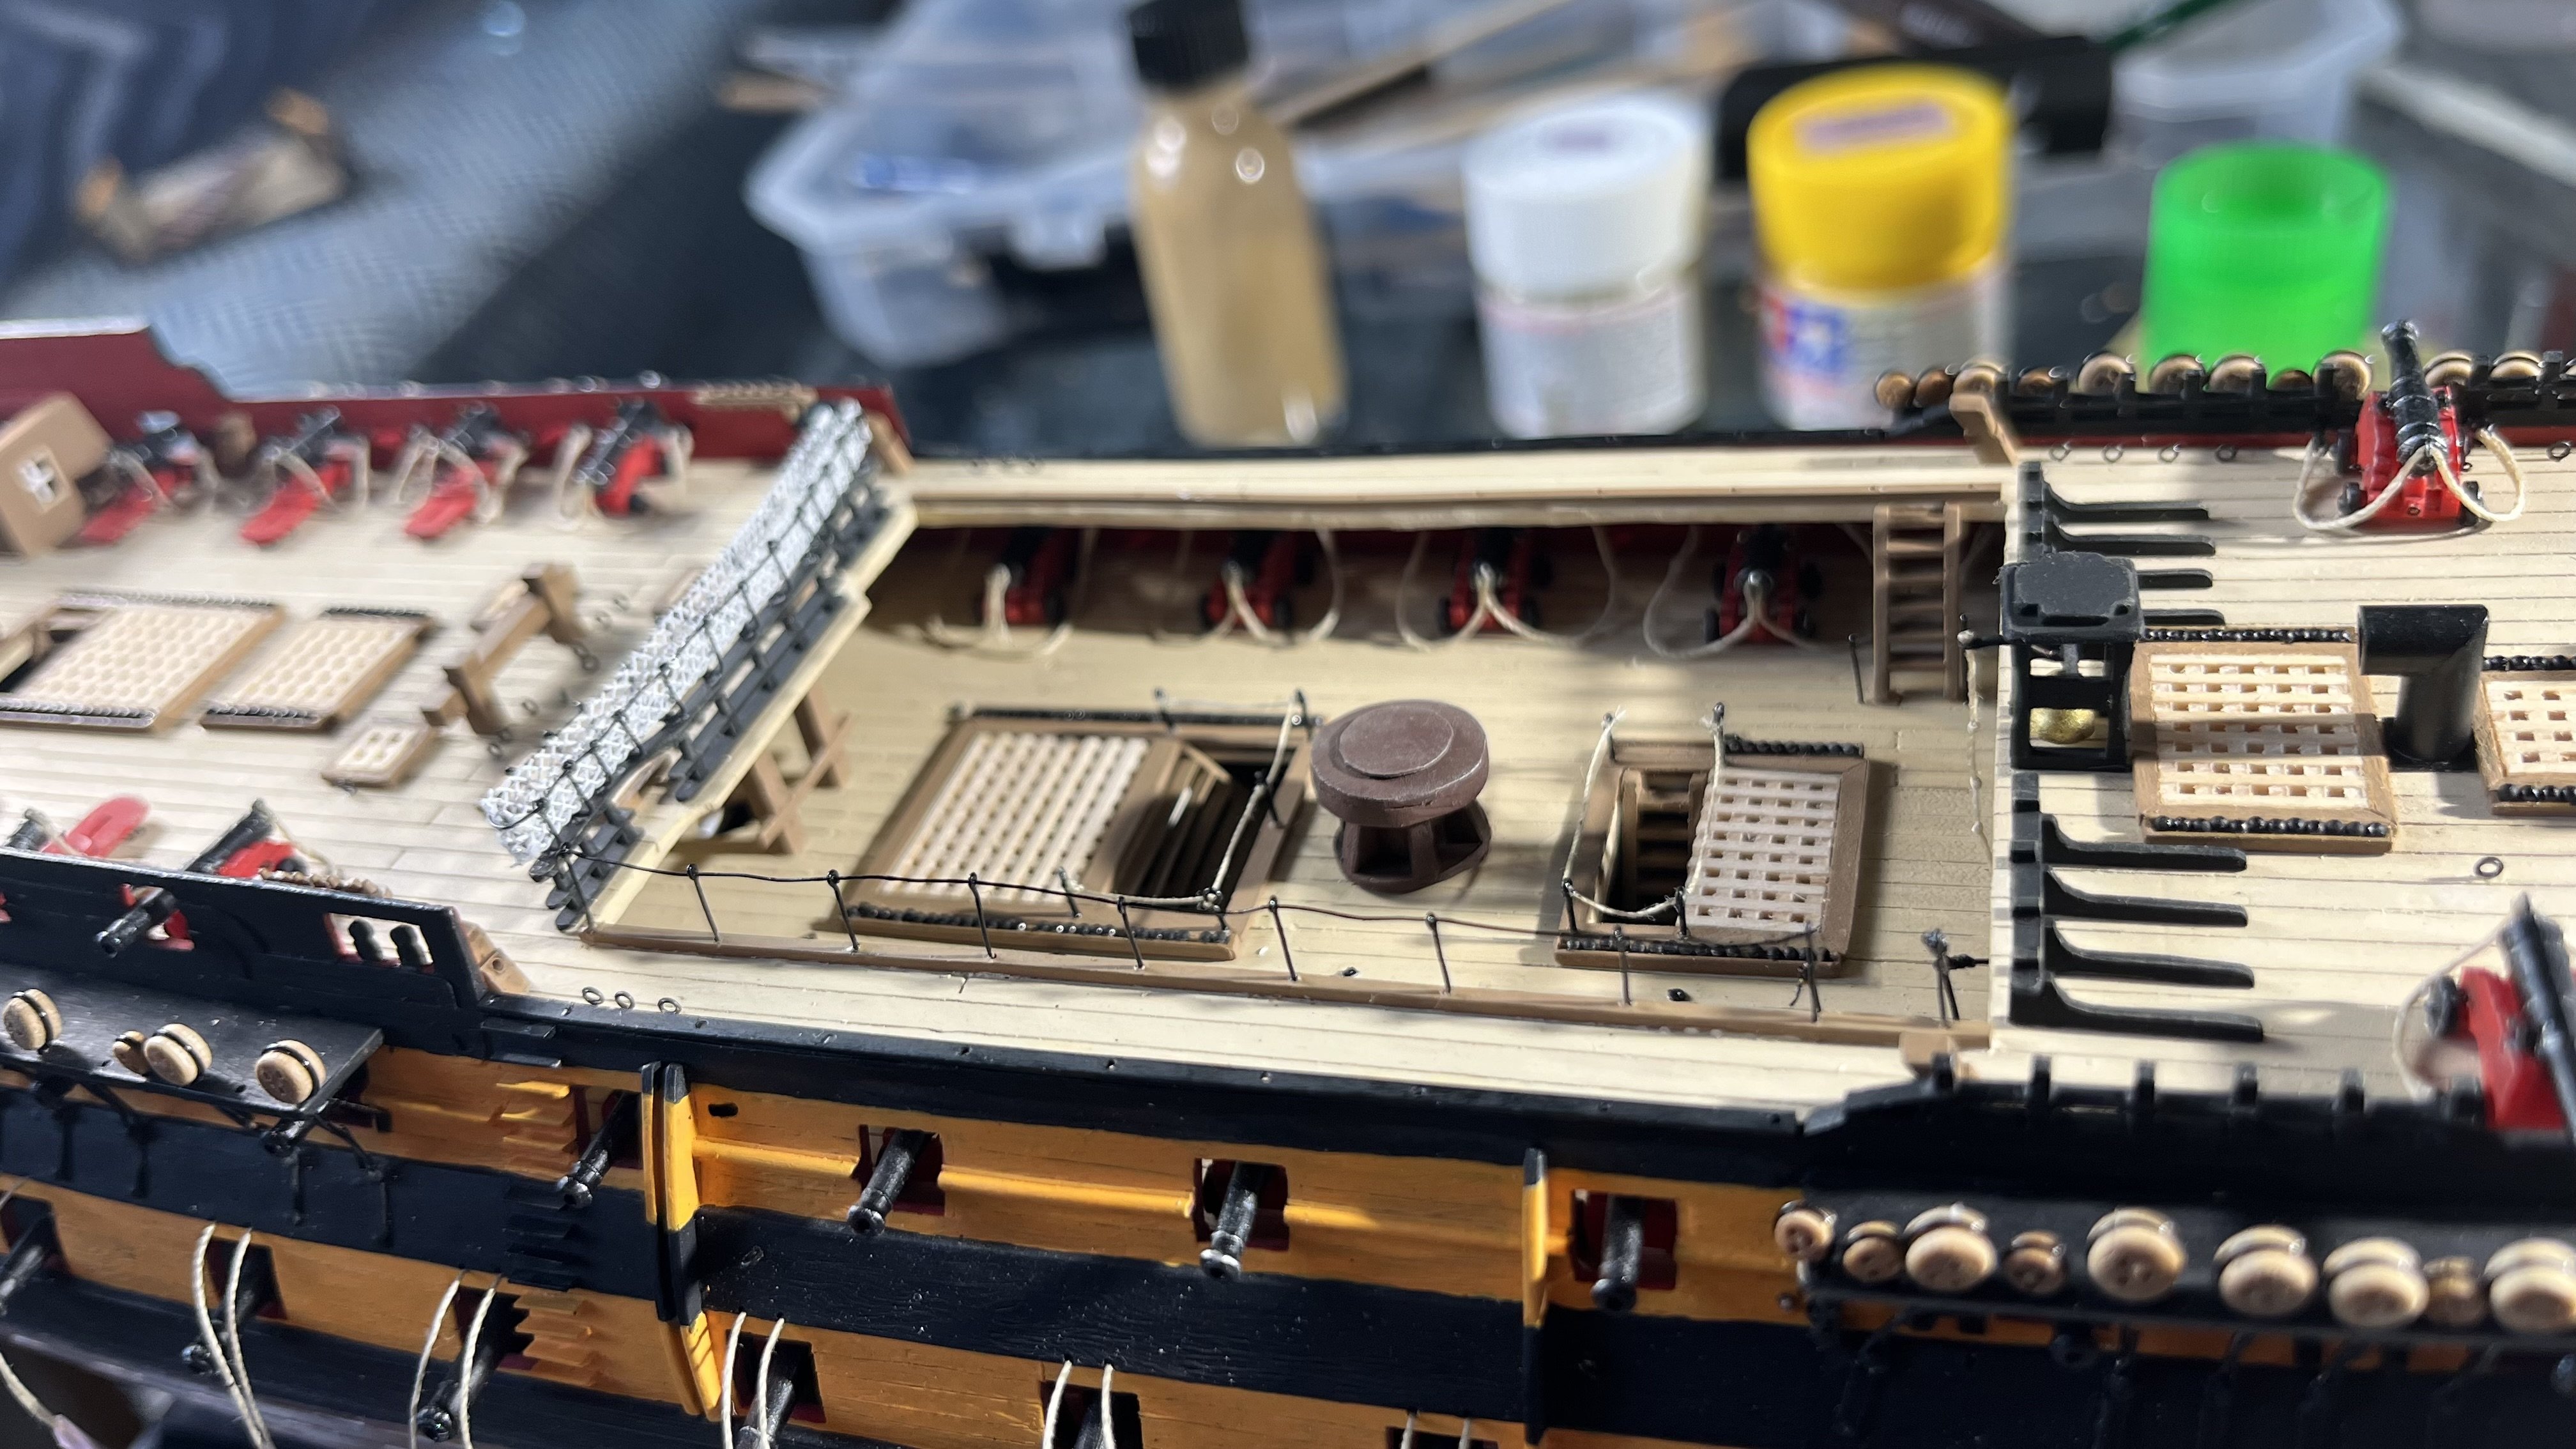
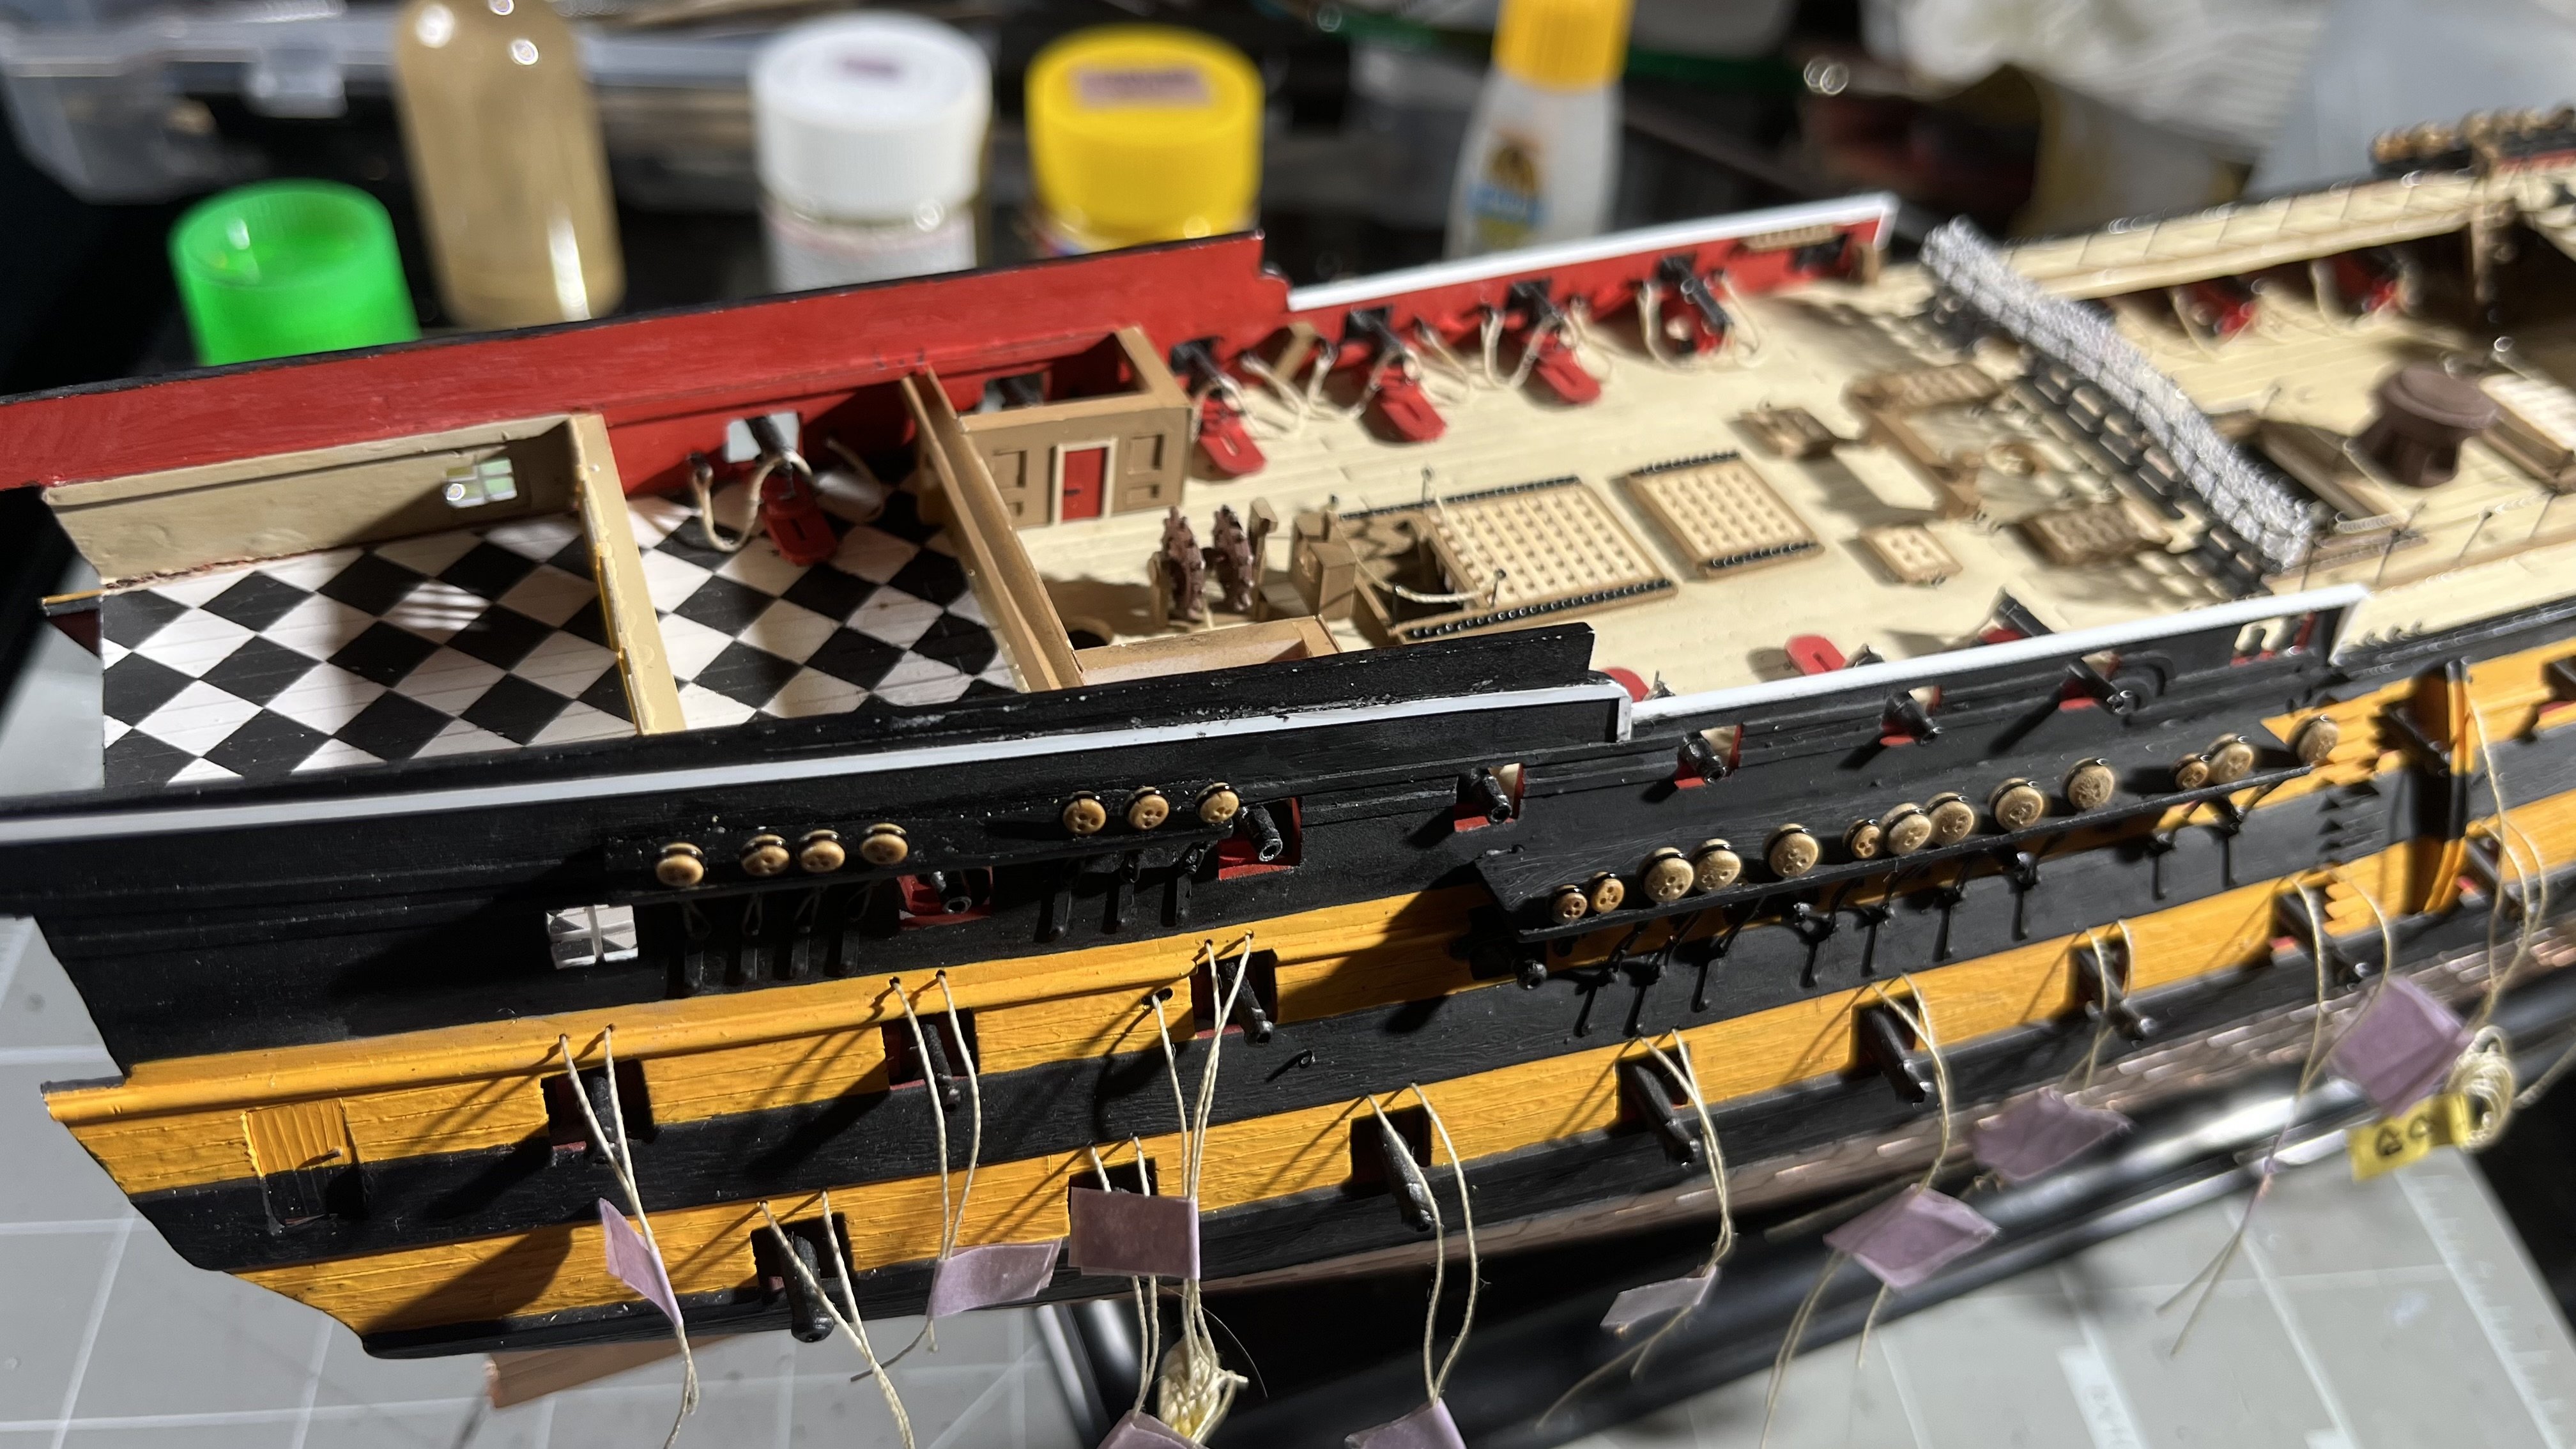
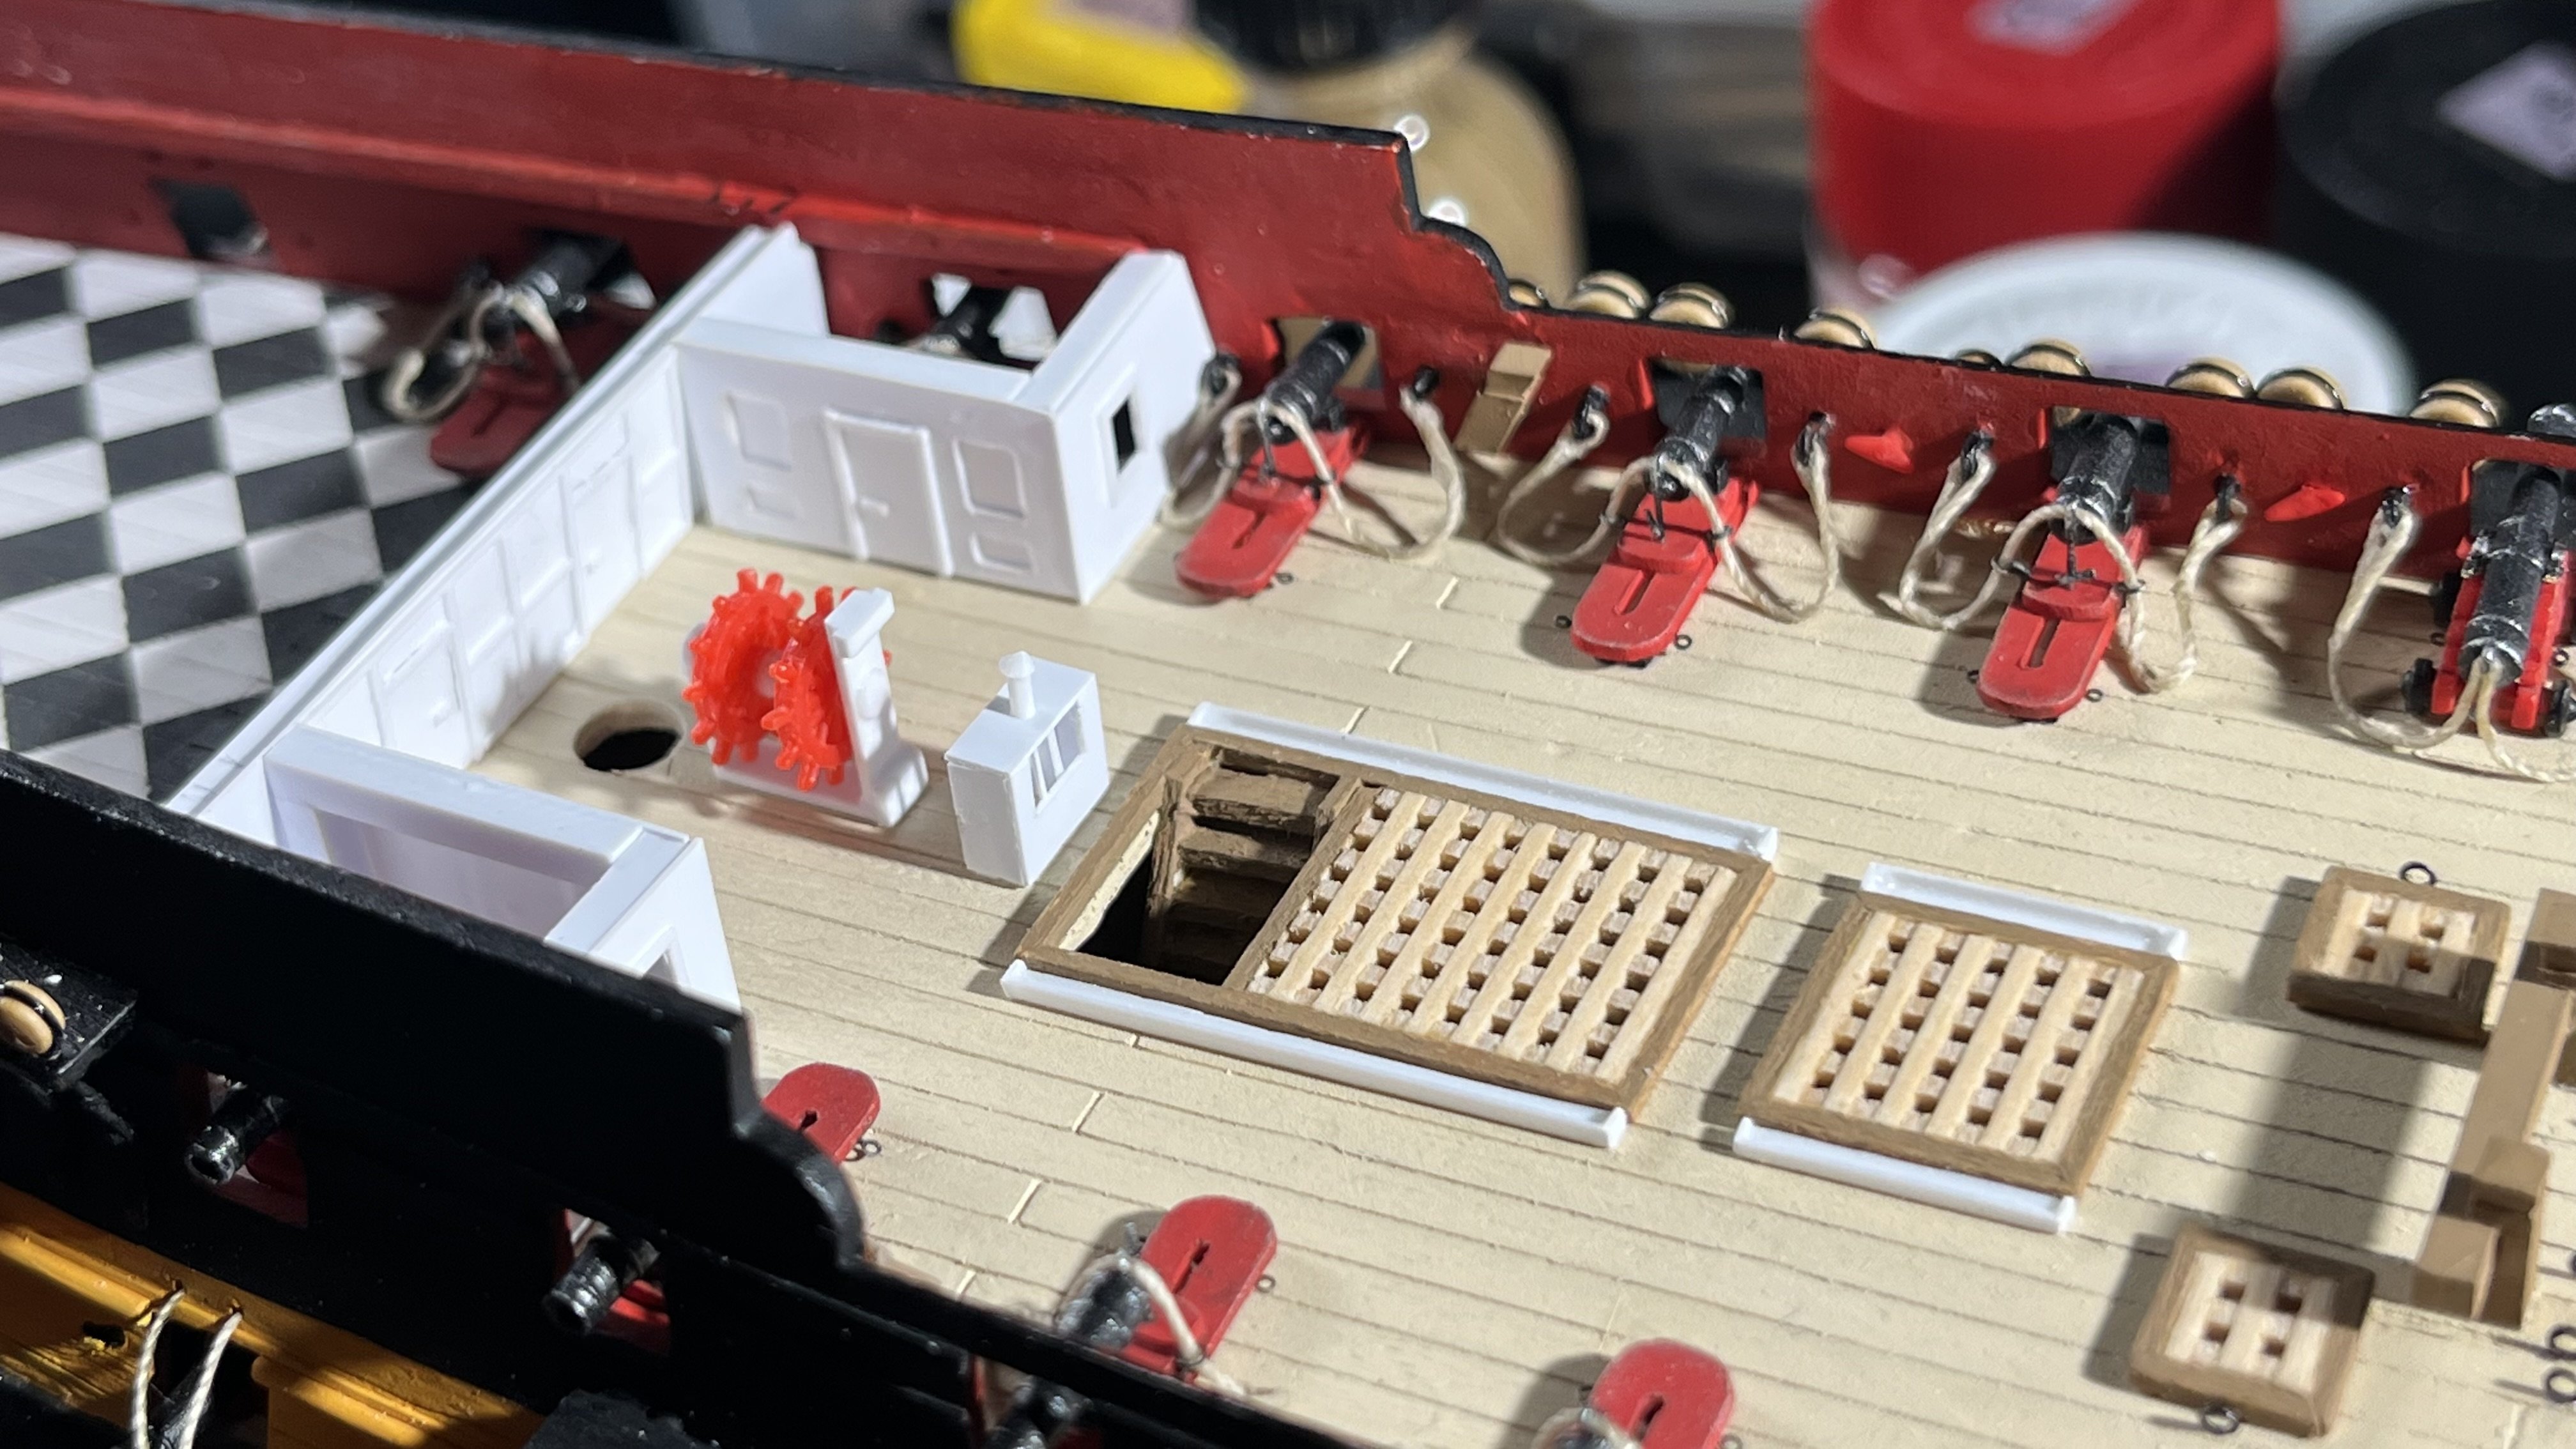
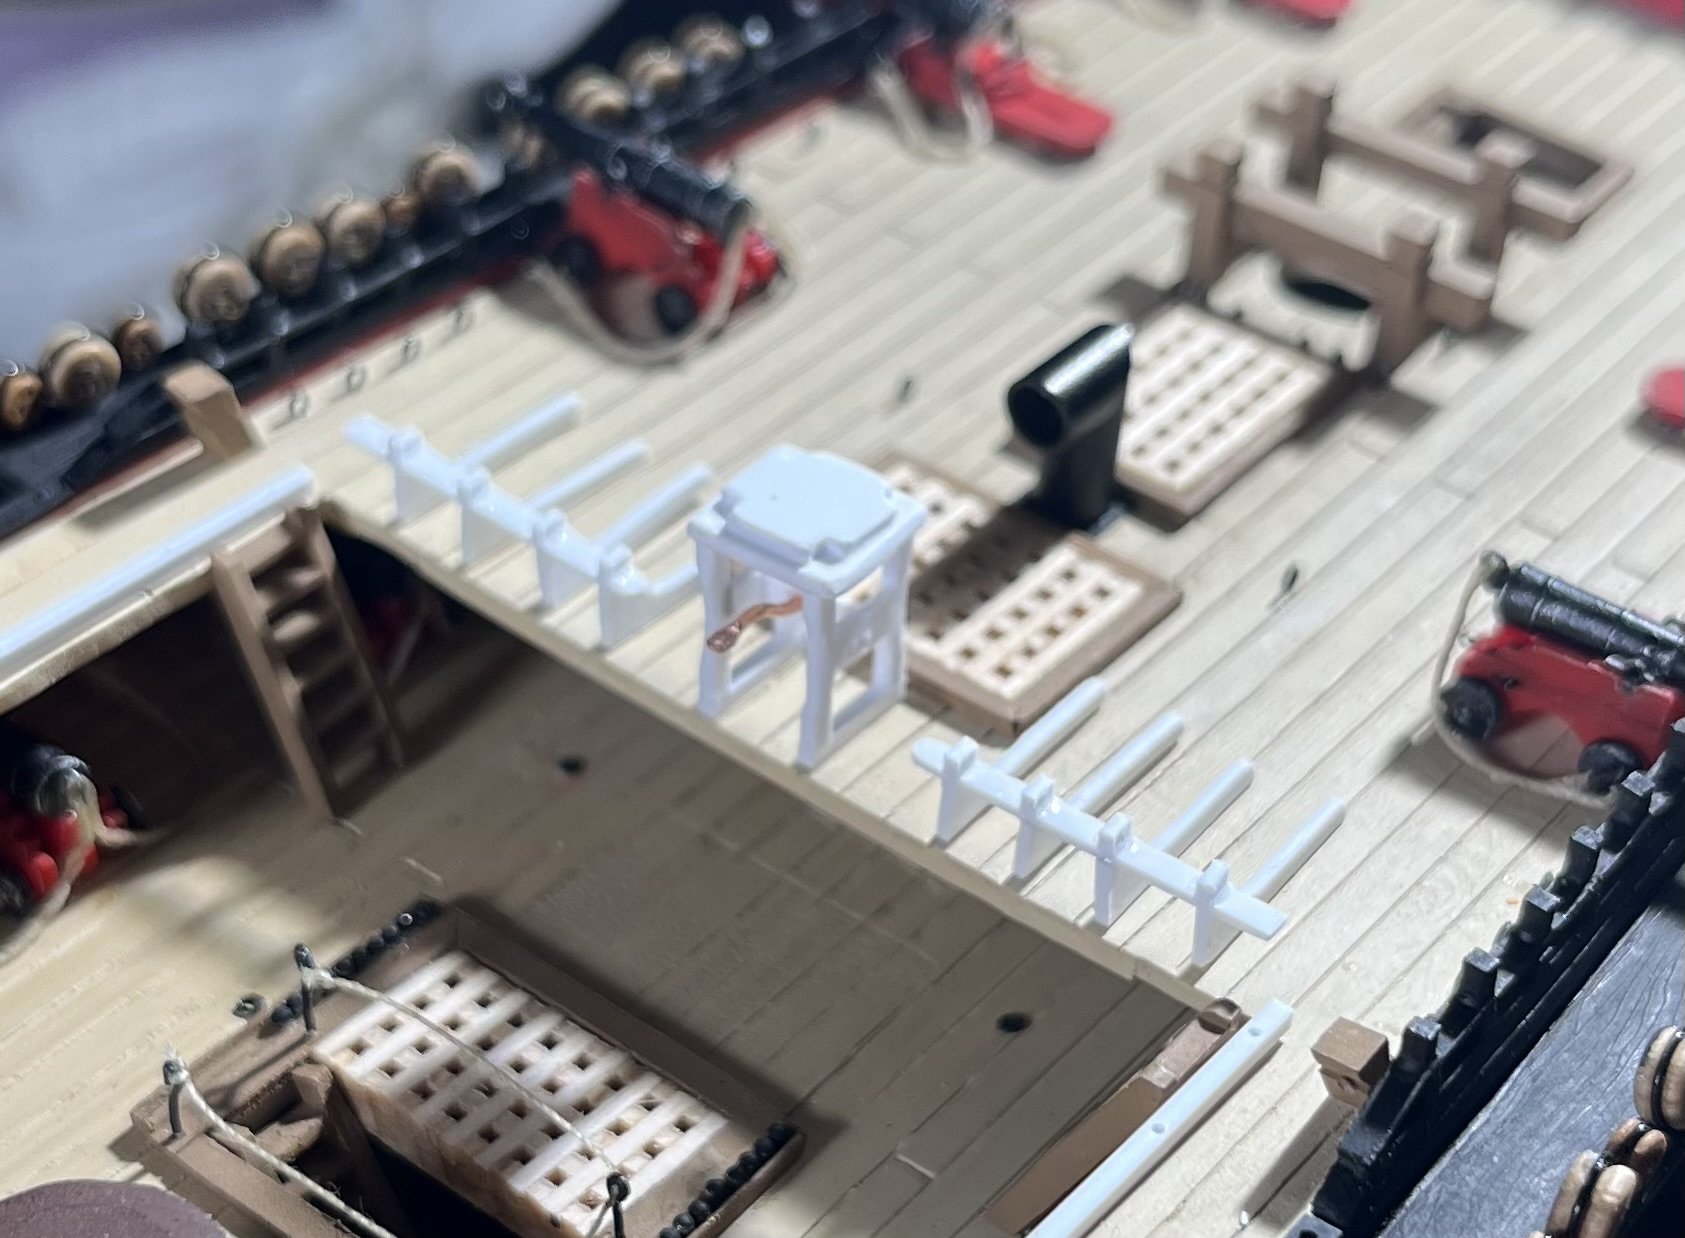
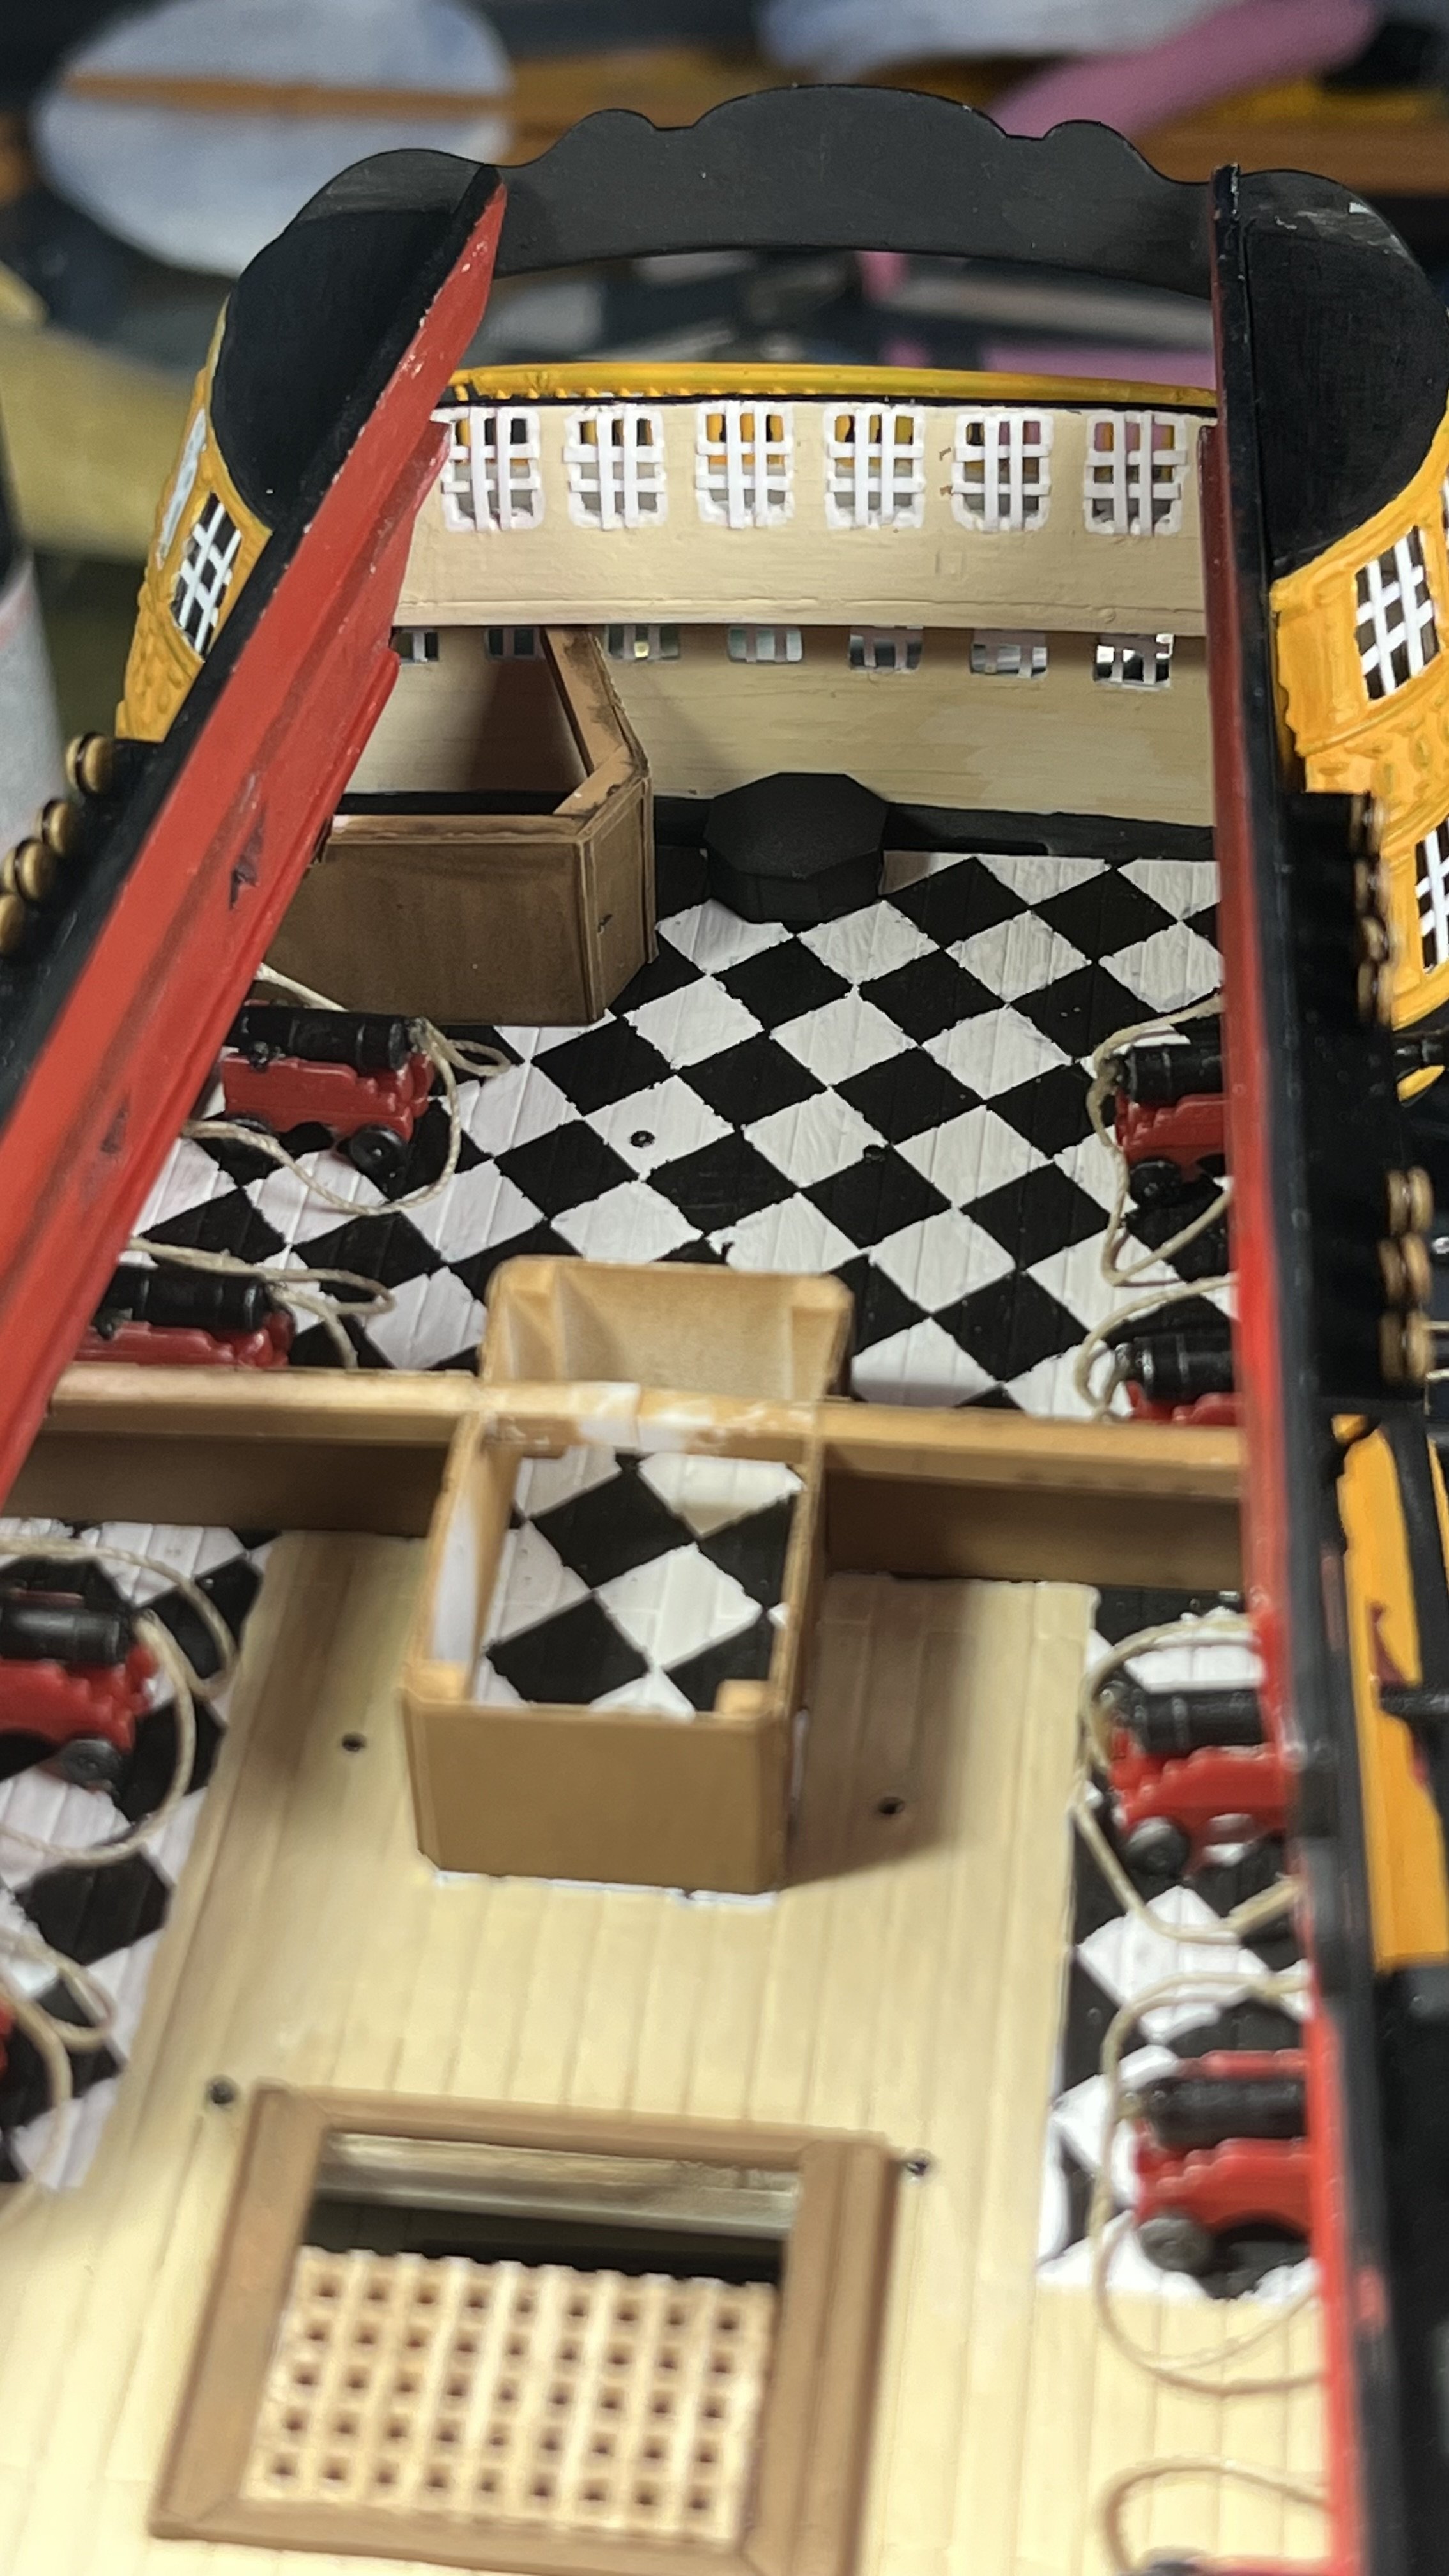
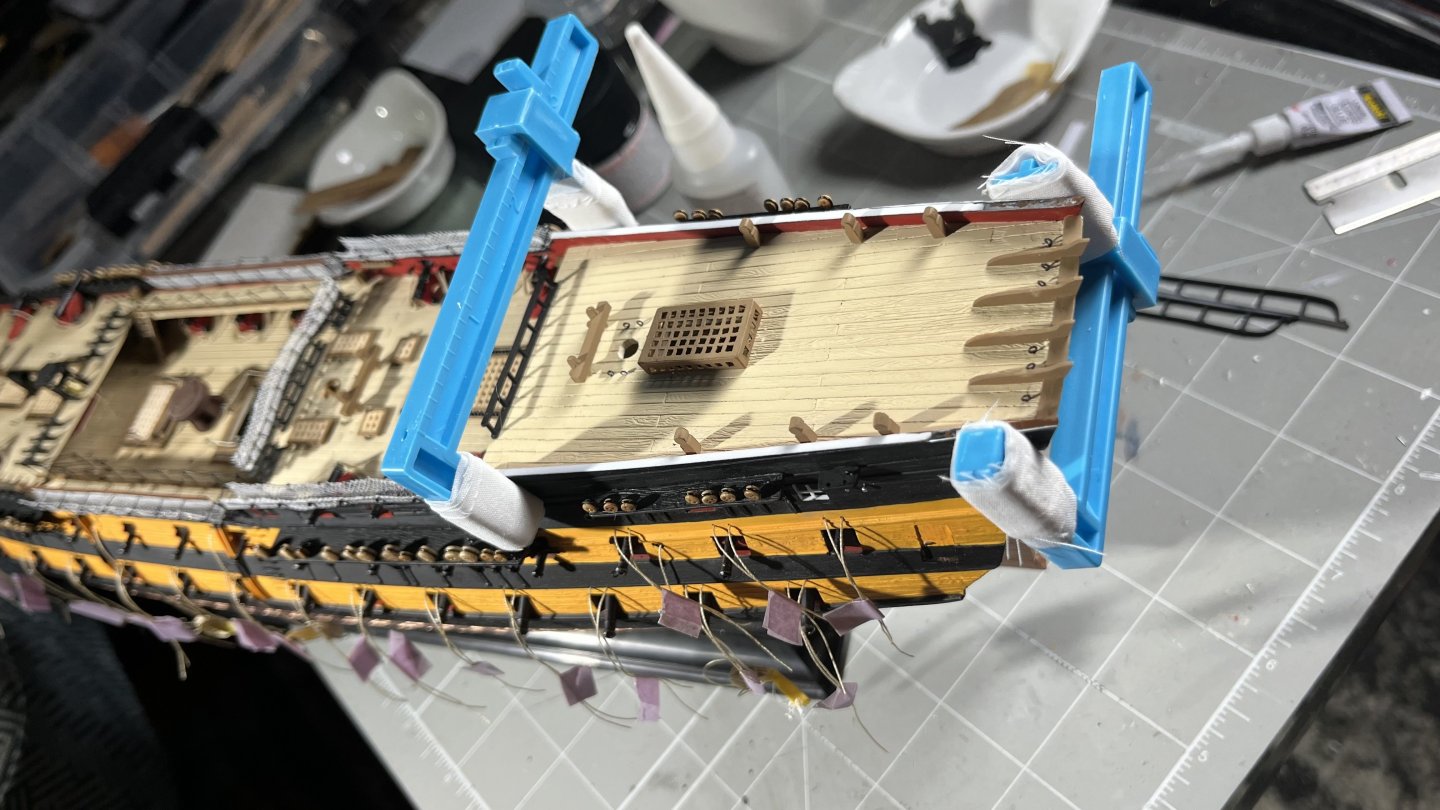
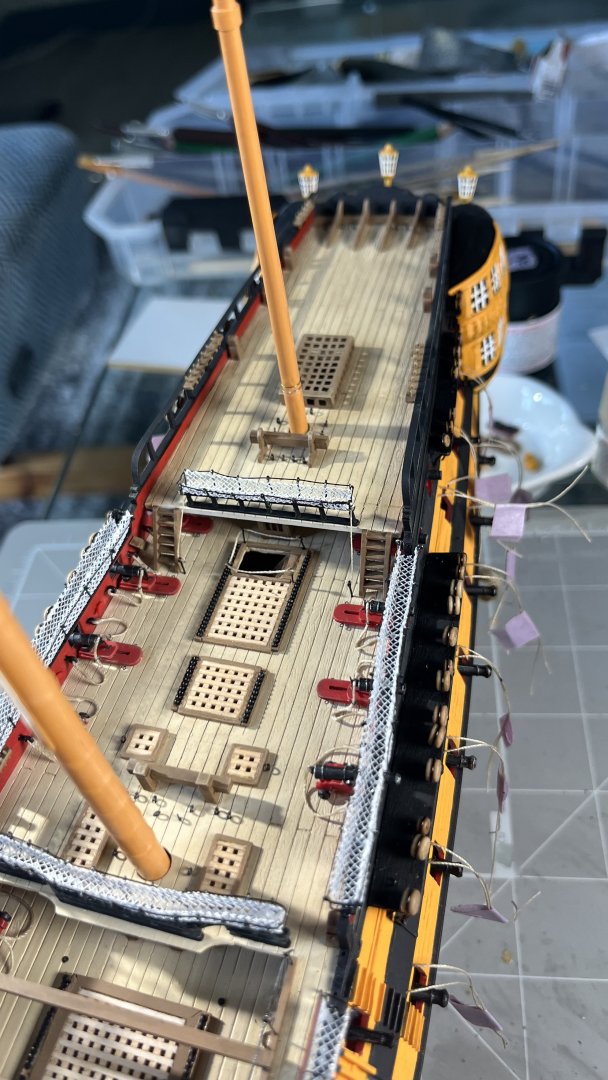
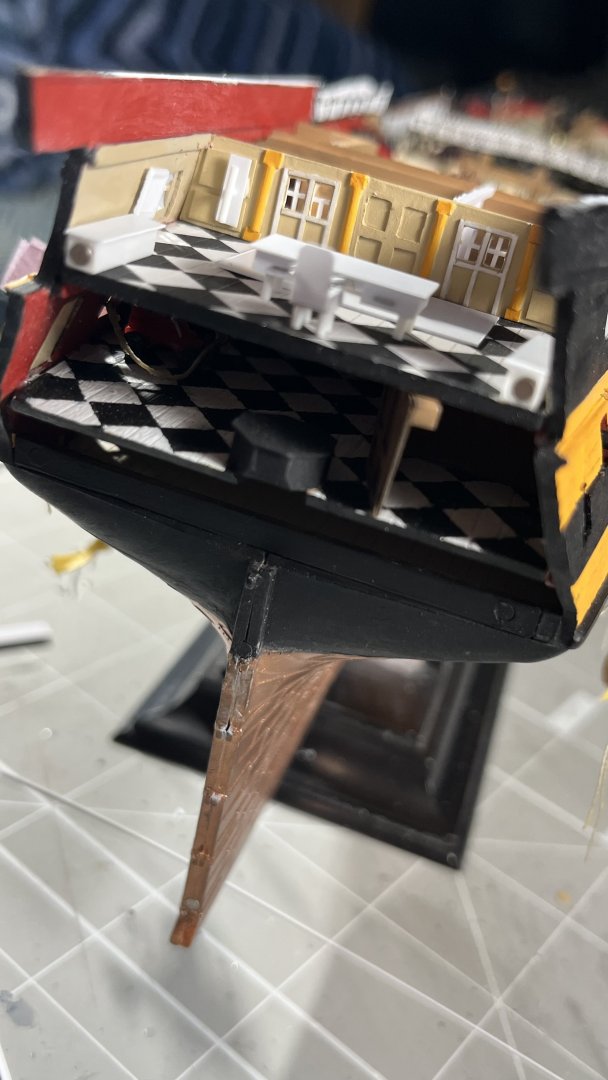
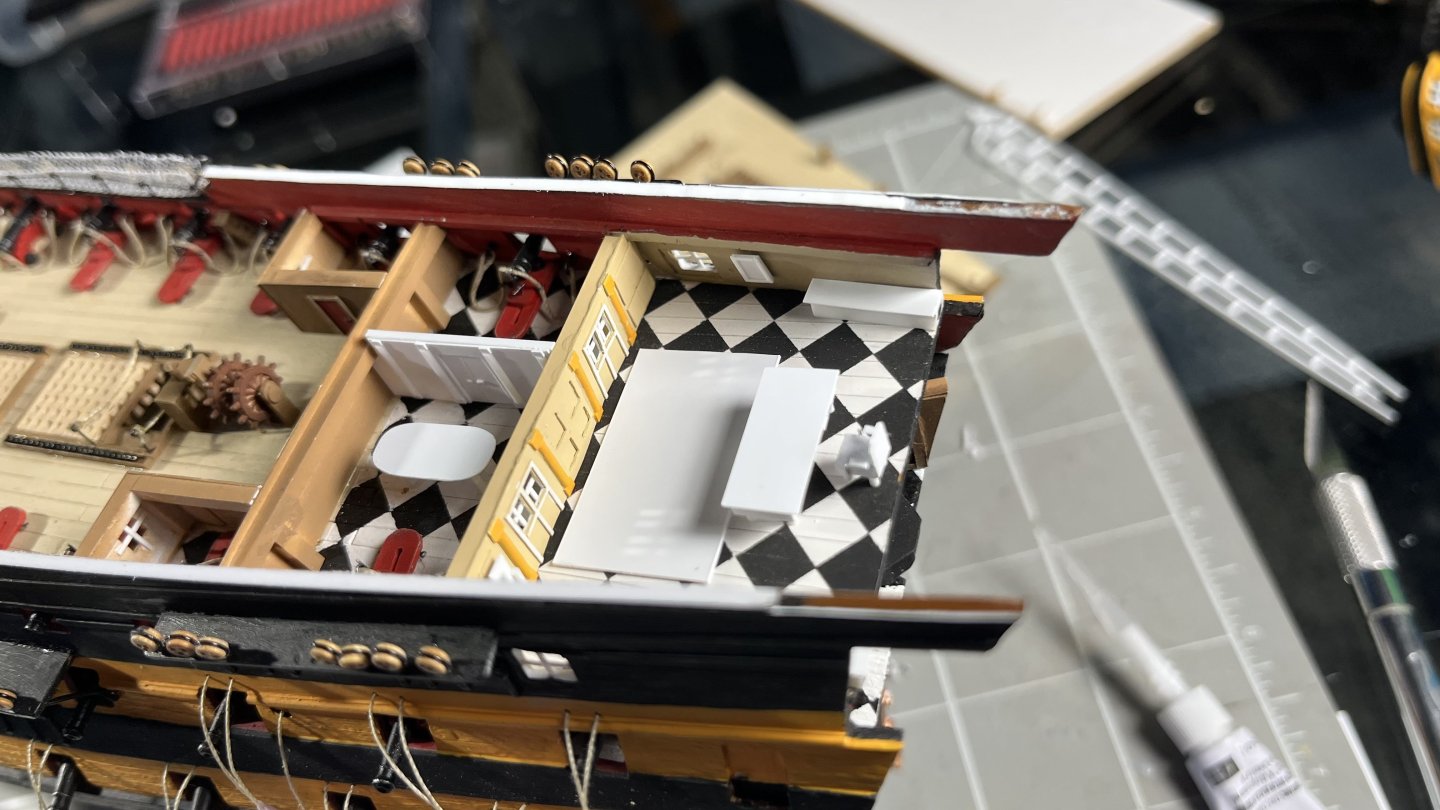
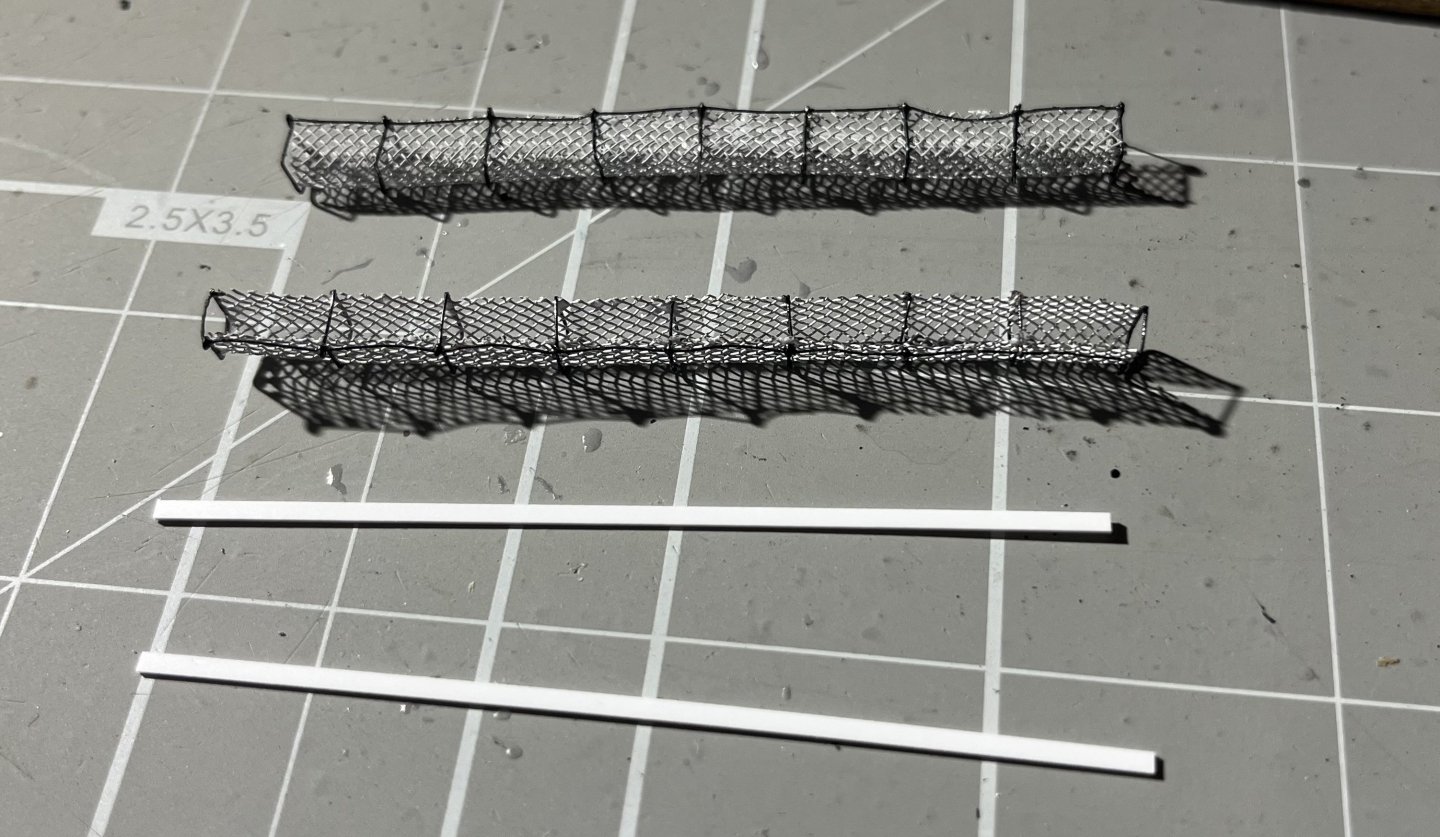
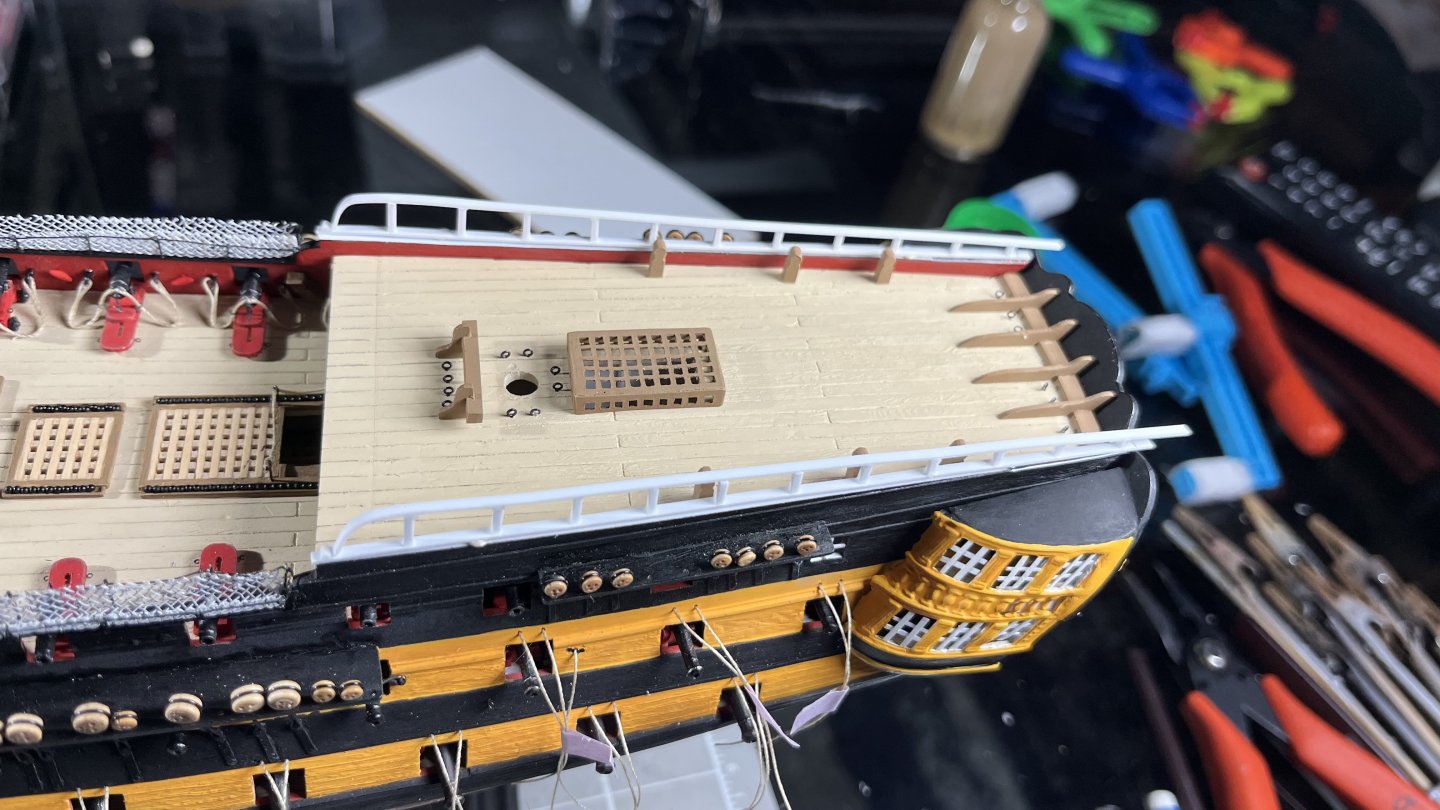
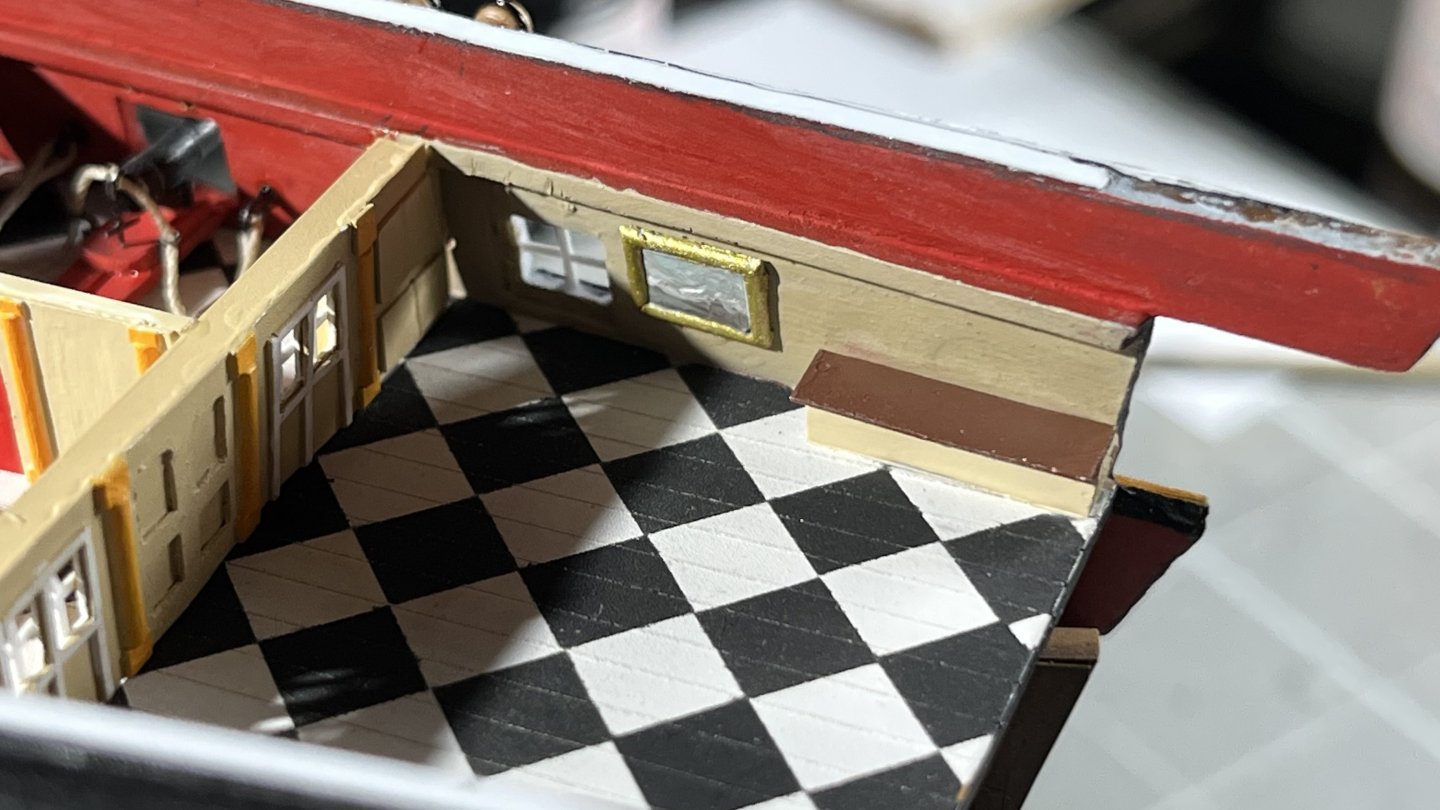
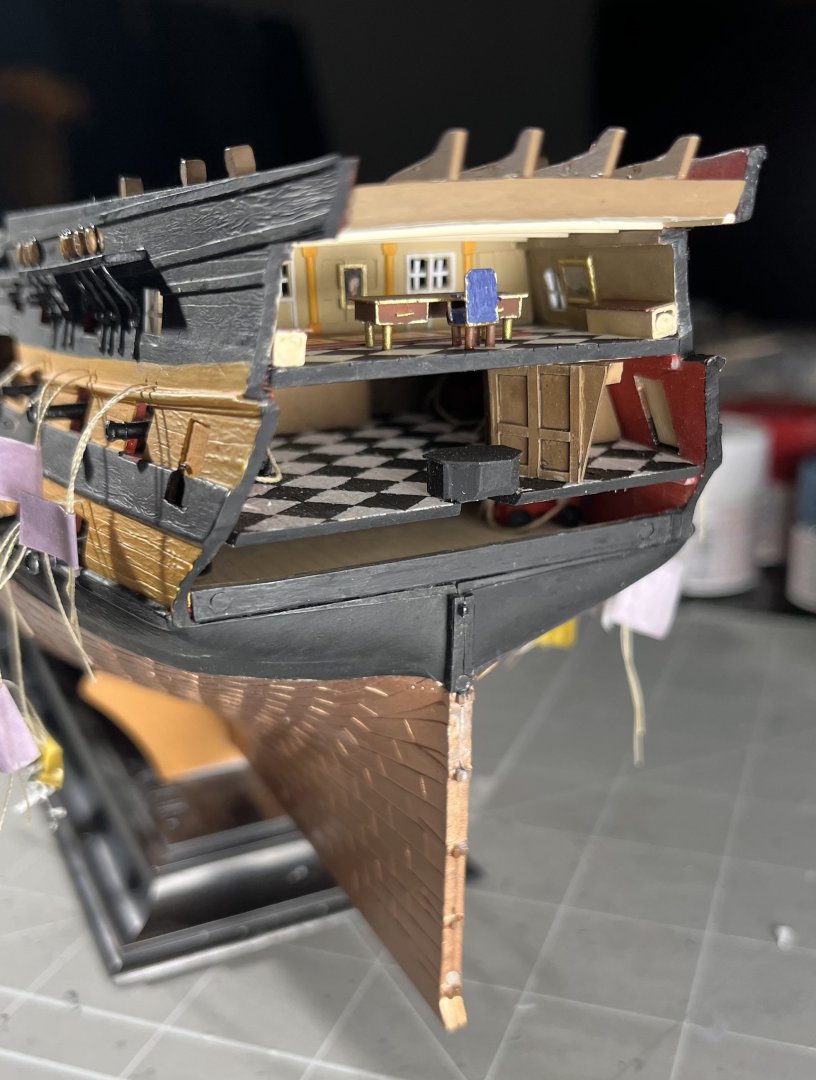
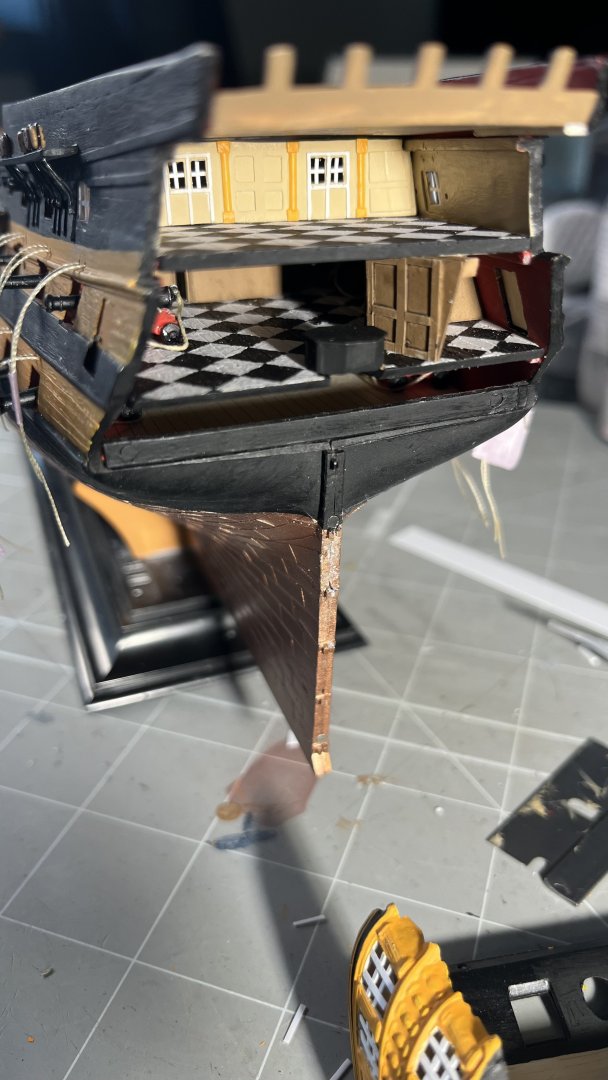
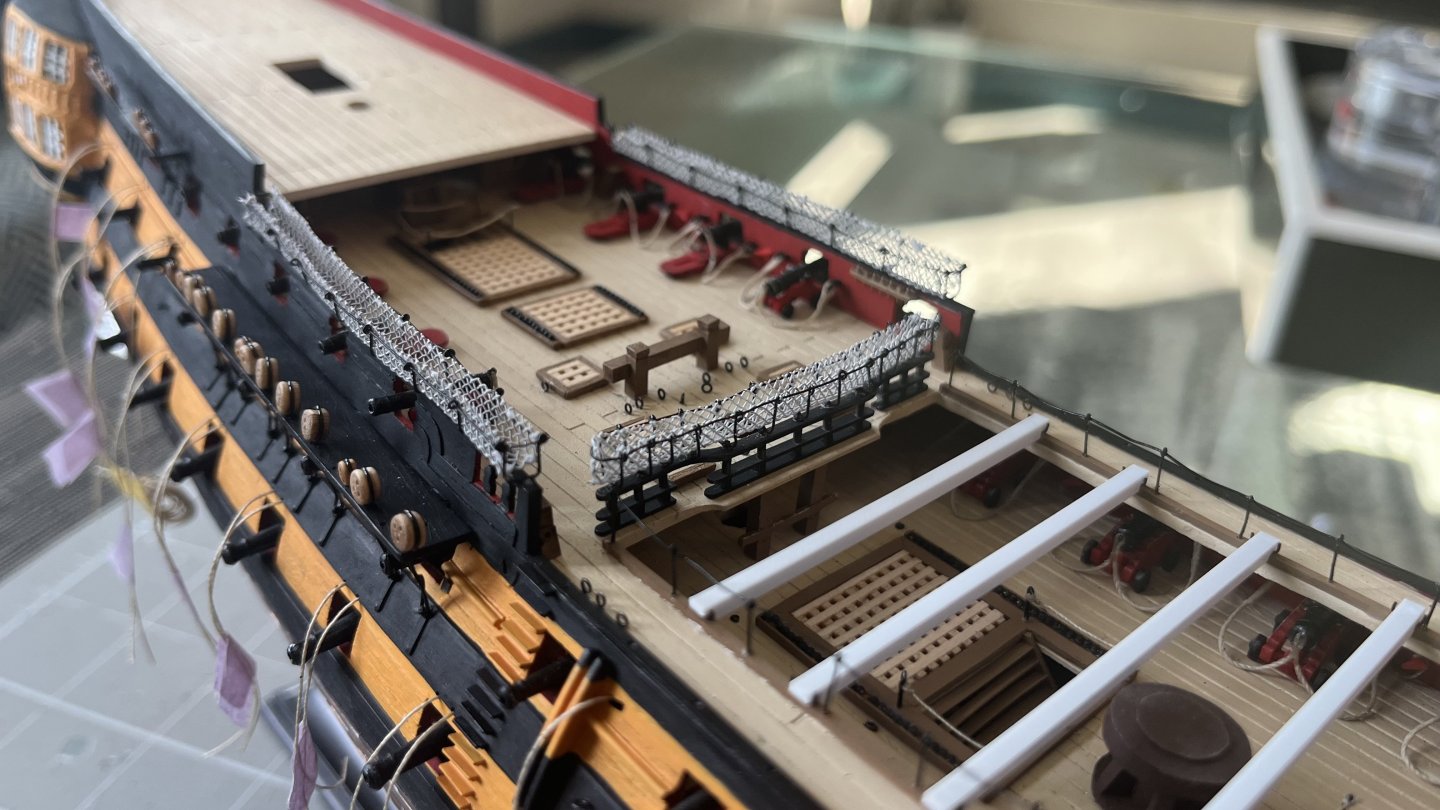
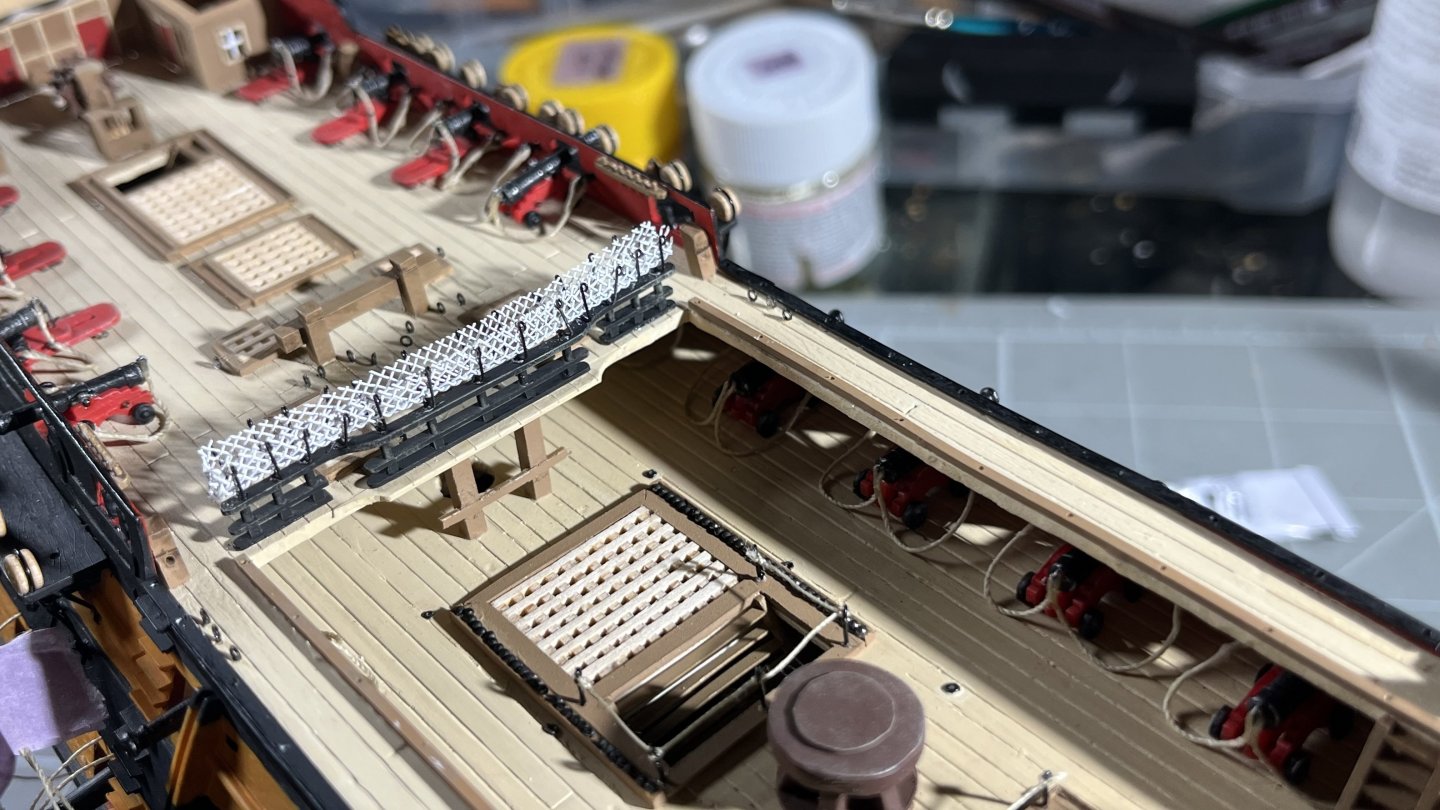
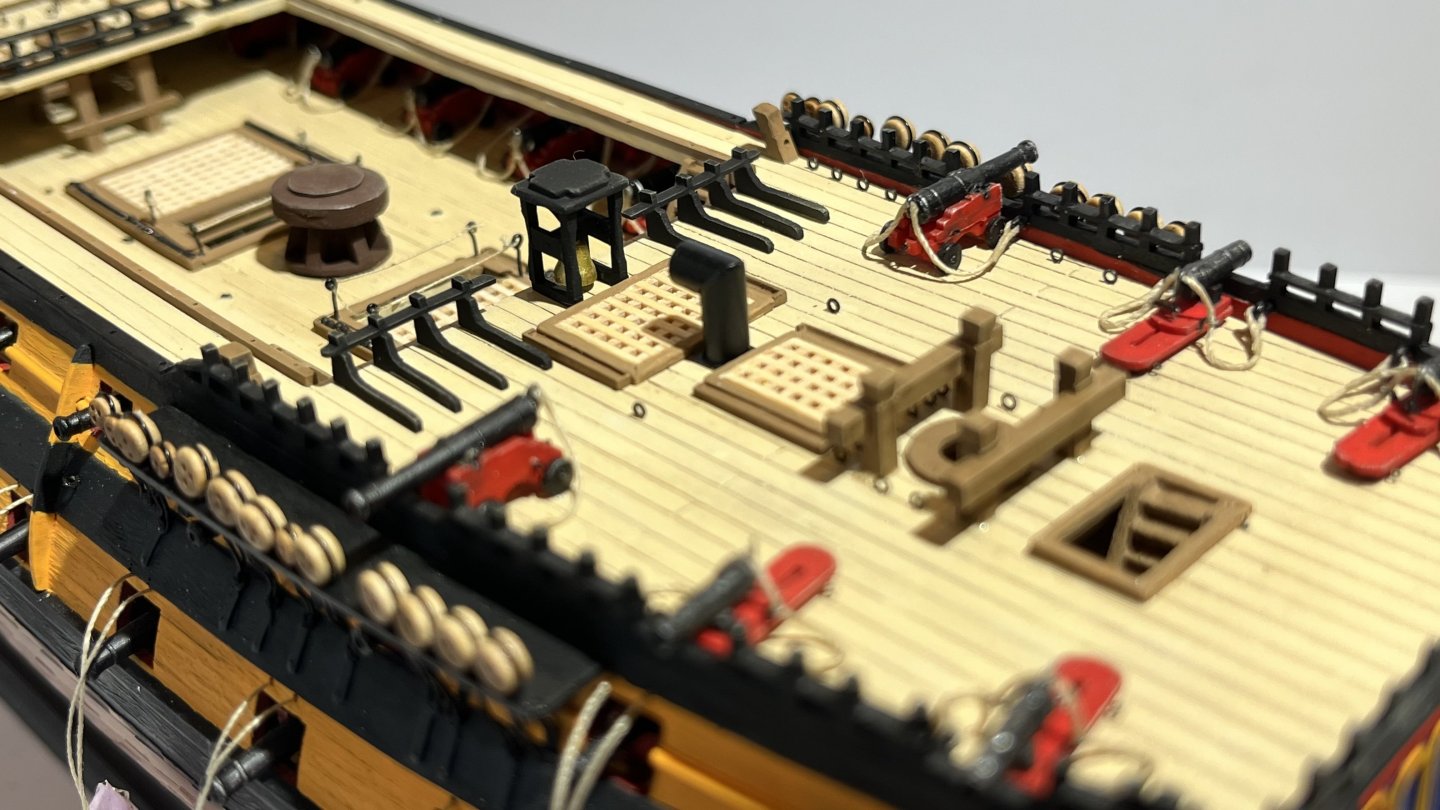
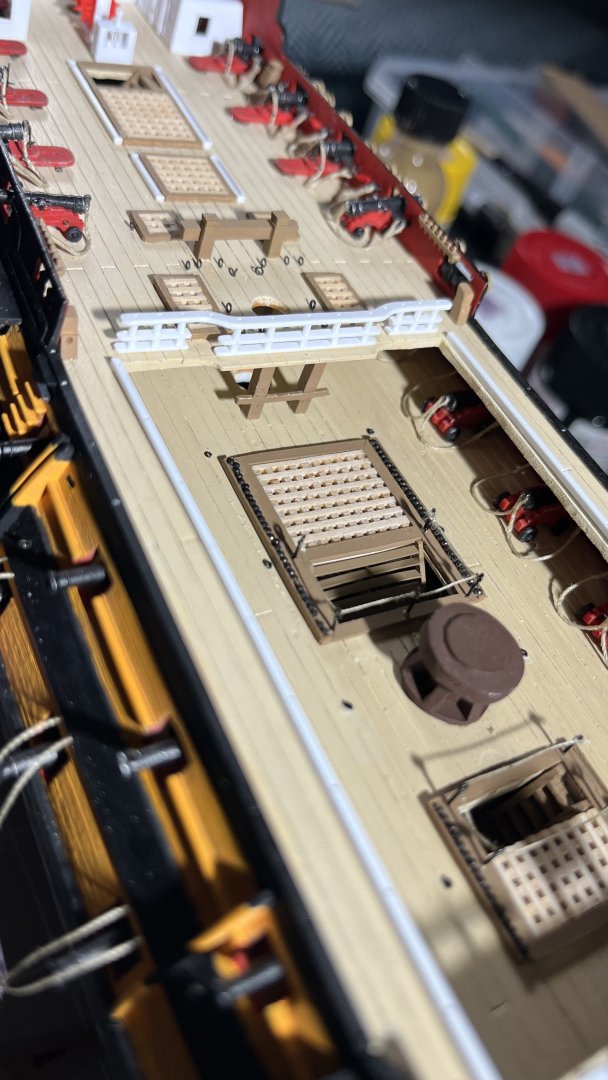
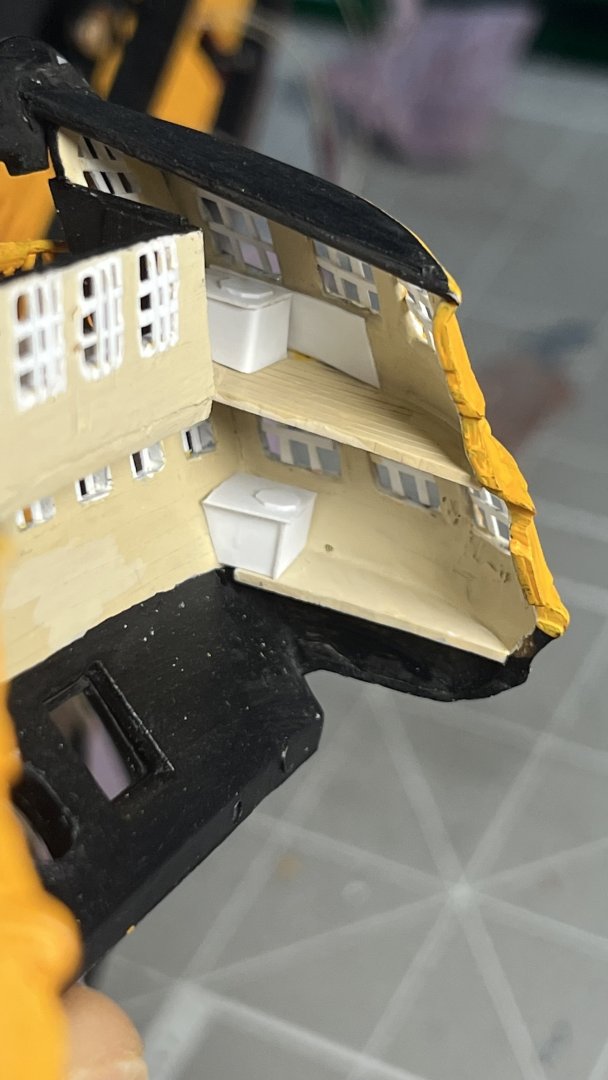
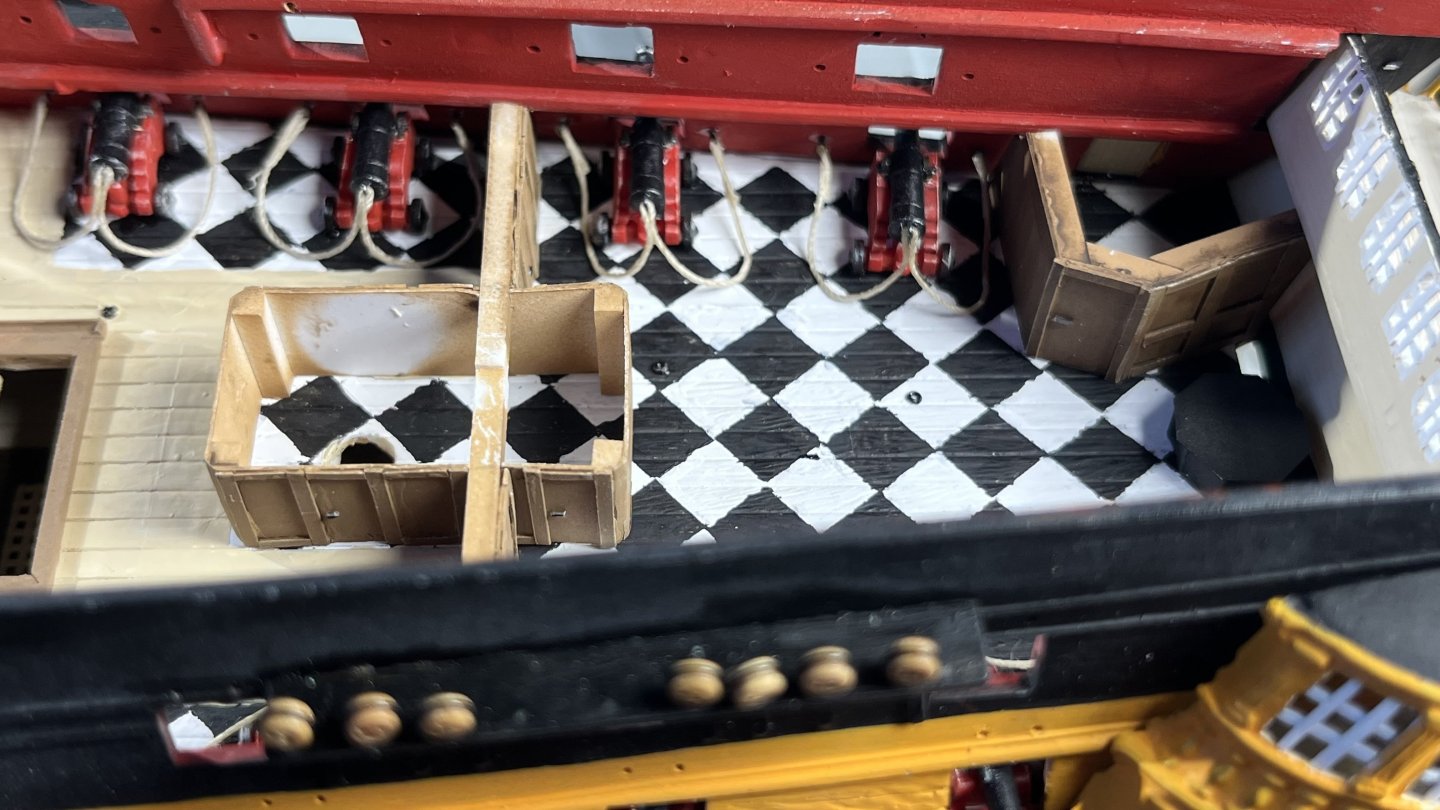
Work on quarterdeck, poop deck and waist fittings continued this week, the end of work on the hull is in sight! Trying an alternative approach for masts, stay tuned for update. Hammock nets for waist, incl. hand rail Gun port lids for stern chase guns Made skylight from 0.5mm plasticard. Cut out the windows rather than try to build a mesh from separate strips. Cut off the five standards in the kit piece and replaced with four from 1mm plasticard Belaying kevels and mizzen bitt Everything painted and assembled, added eye bolts. Poop deck looks kinda empty without carronades, no? WIP poop deck railings Done! Ended up spending another few hours fitting out the quarter deck... bulkhead between Nelson's sleeping cabin and the lobby; an oval table for lobby, rug, desk, chair, a couple paintings and sea chests for the great cabin. Wall mounted barometer in the back. Mounted magnets for stern in the end of the sea chests. And then of course... it will all be covered up when poop deck is glued in place 😕 Waist hammock nets and boat booms in place. Experimented a little with making the hammocks themselves out of white styrofoam packing chips, will need to think of something else. Some of the Great cabin furniture in place, incl. a genuine Turner in 1:150 That's a portrait of King George to the left. Surfaces look a bit flat without wash and highlights, will take care of that later. Not that anyone will ever notice the difference anyway though


- 24 replies
-
- 2
-
-
- HMS Vanguard
- Heller
- (and 2 more)
-
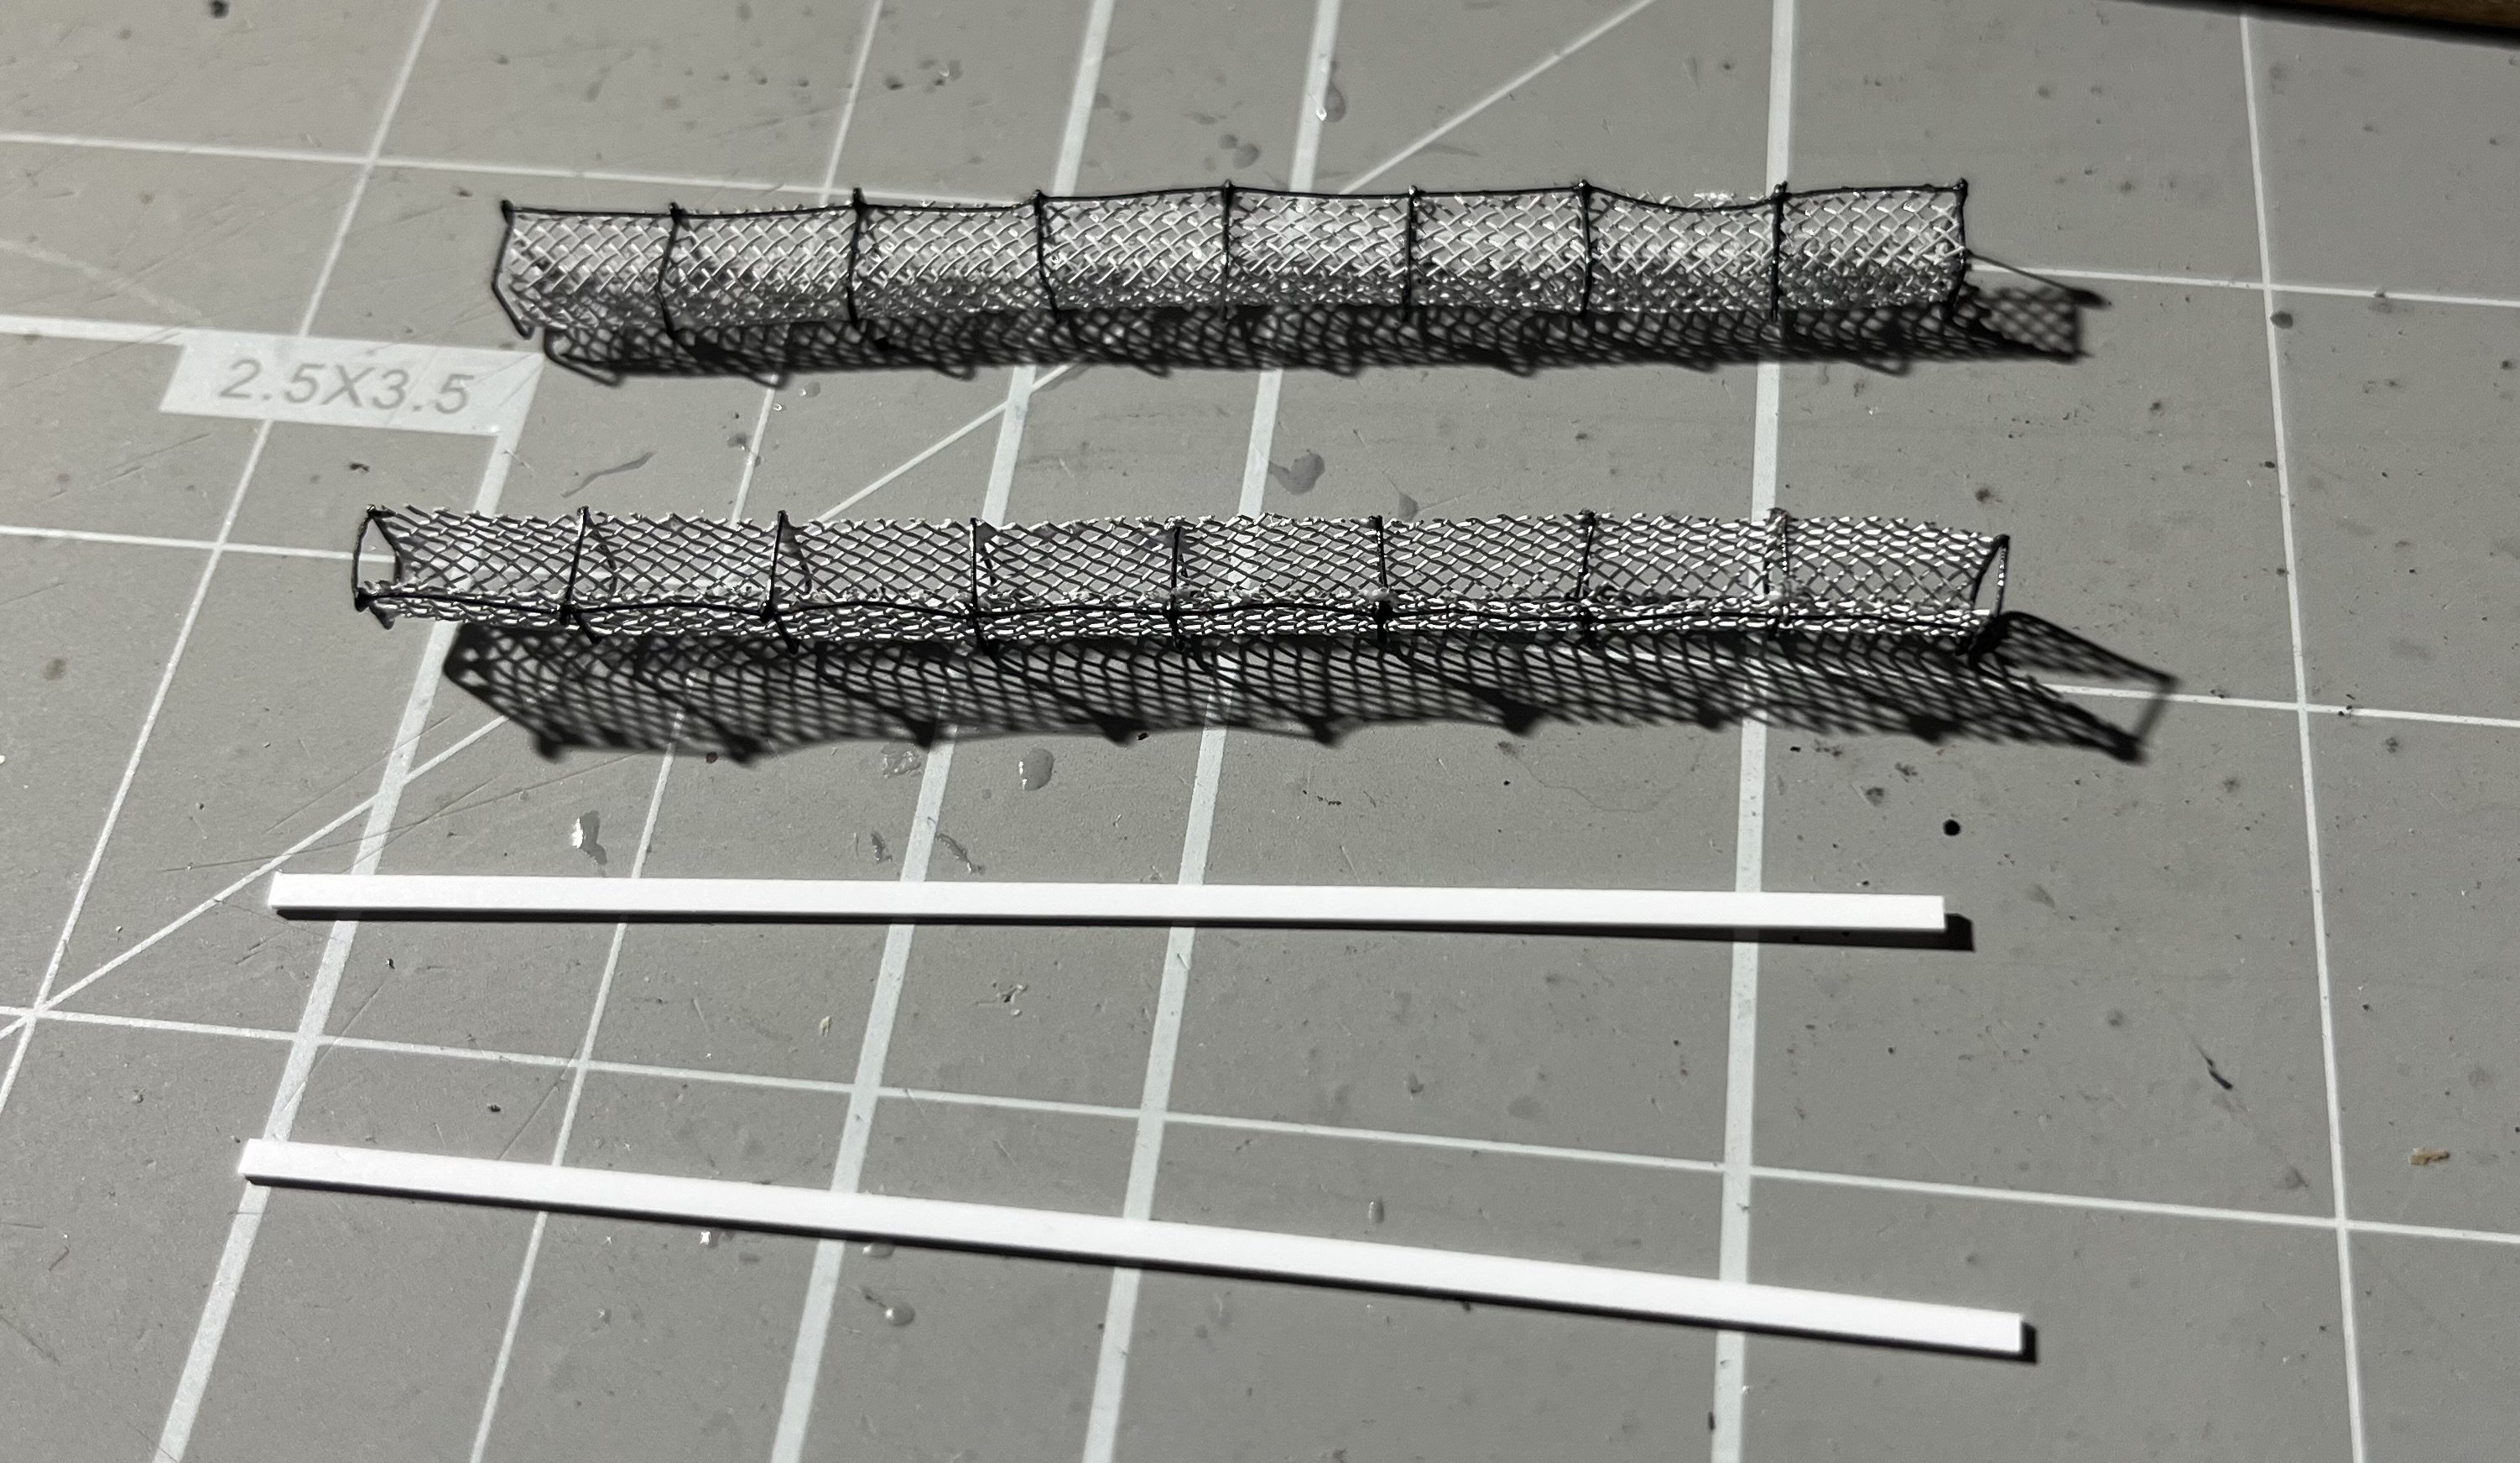
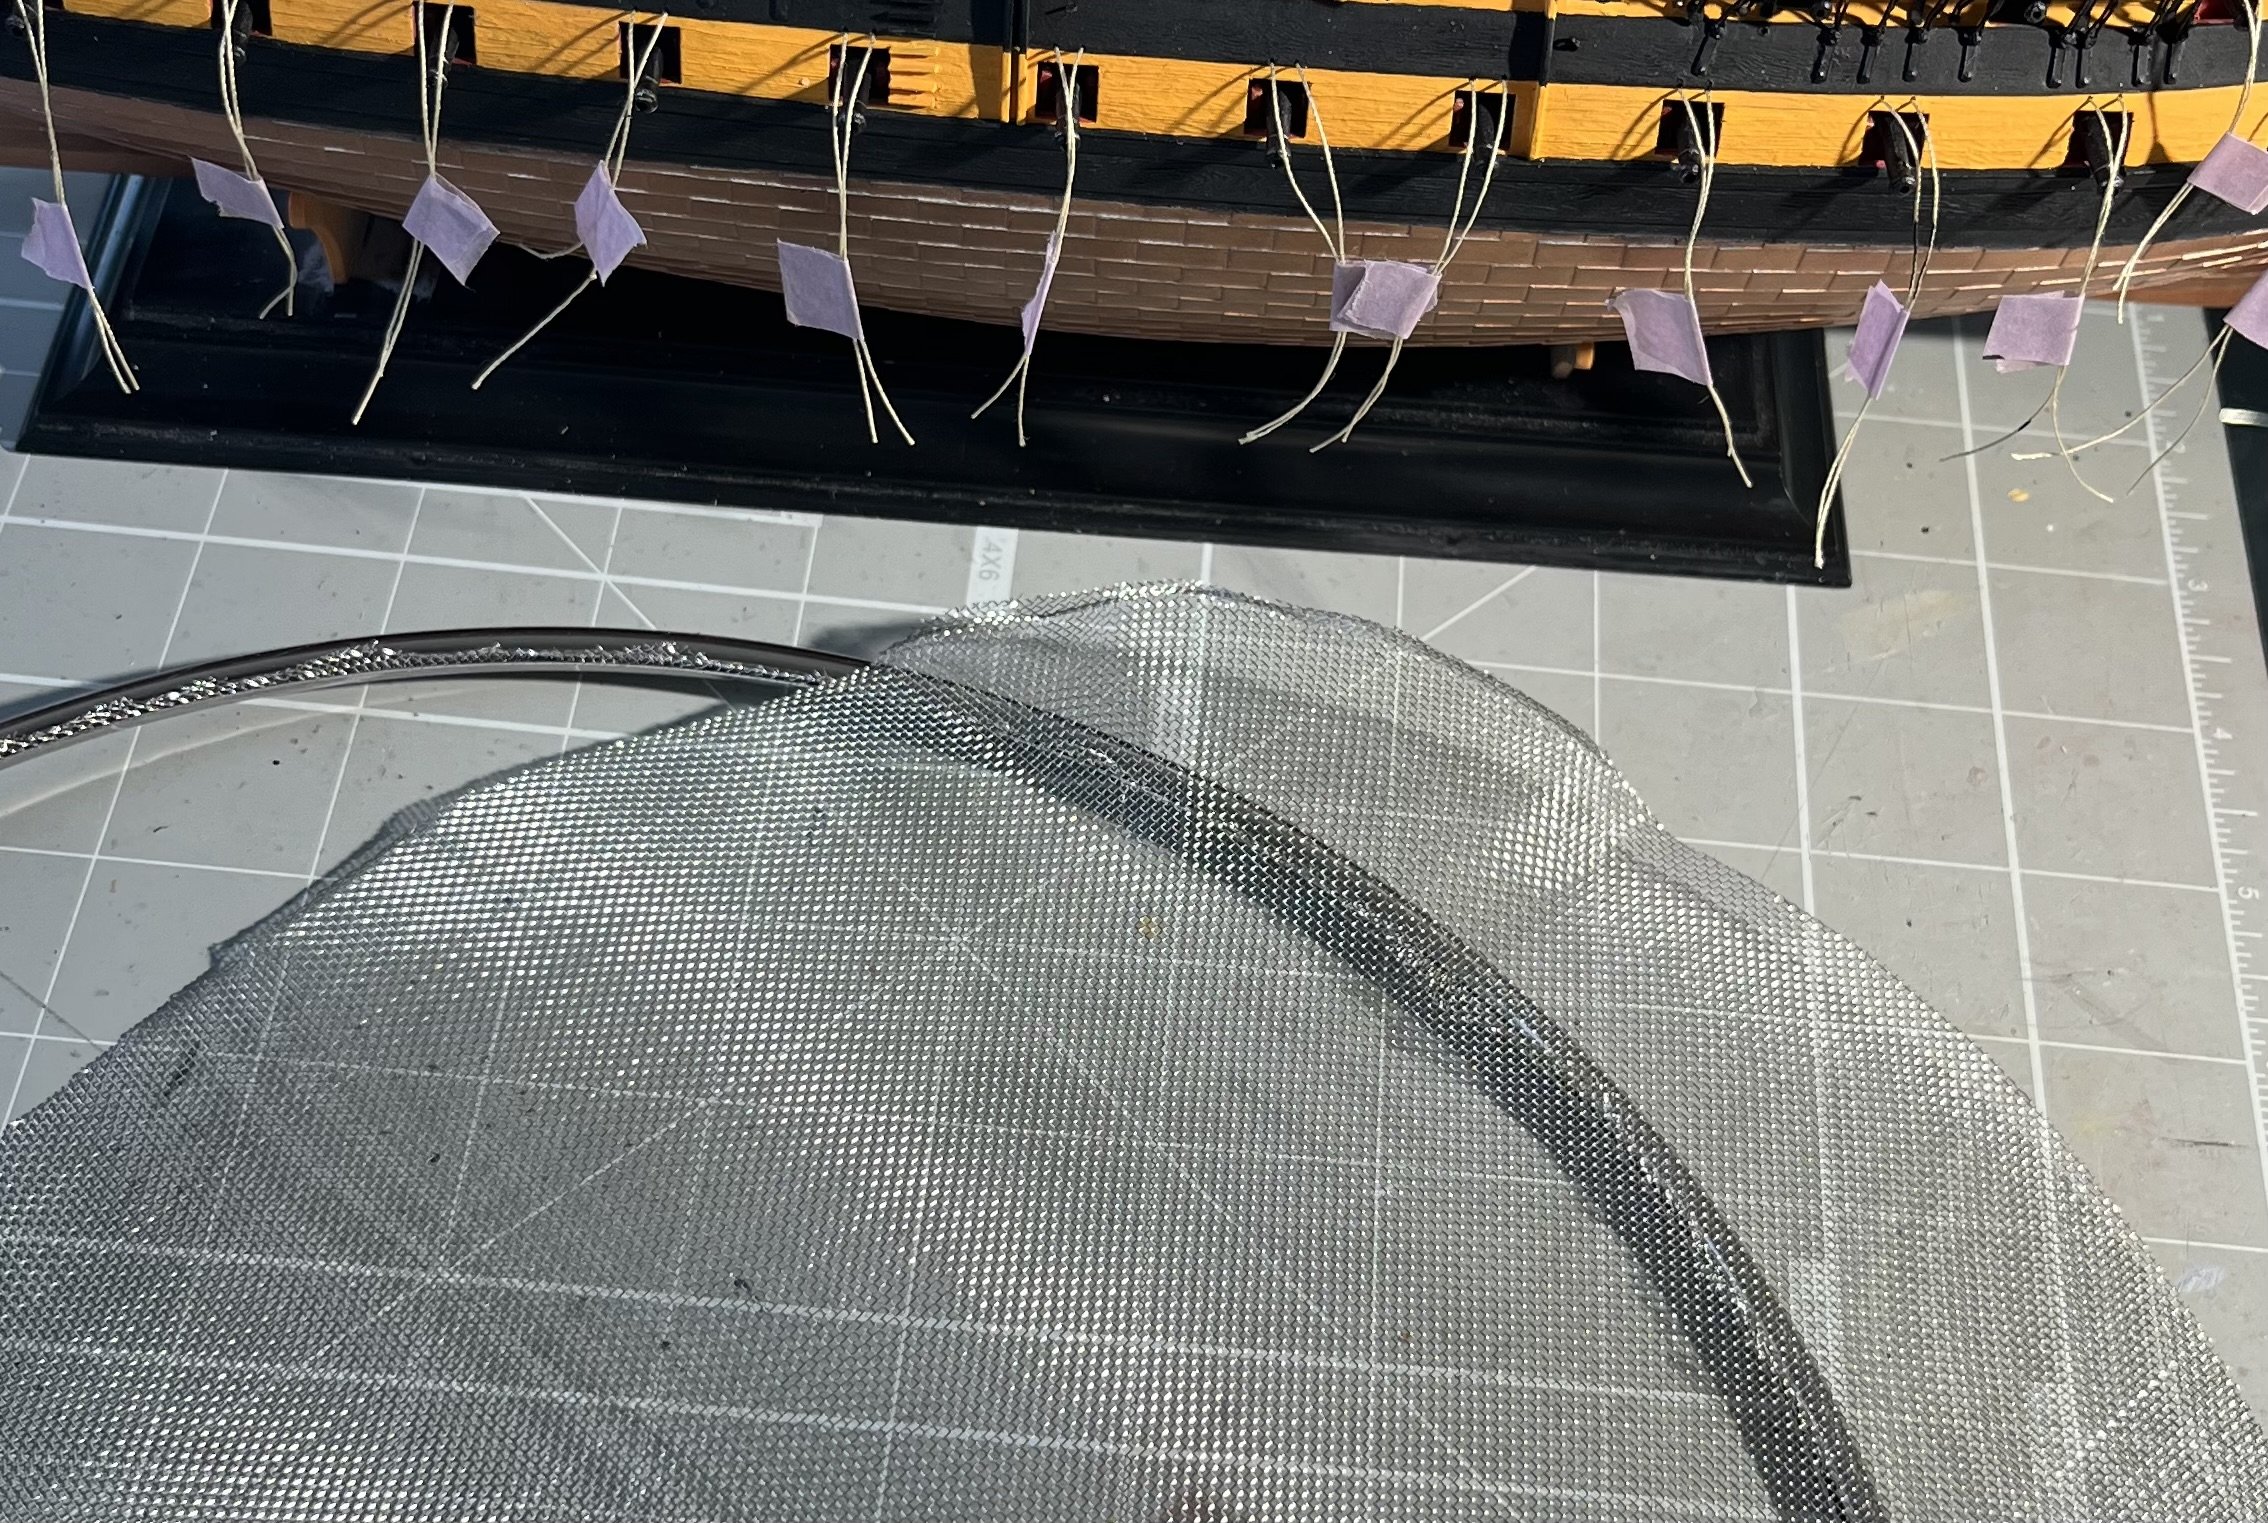
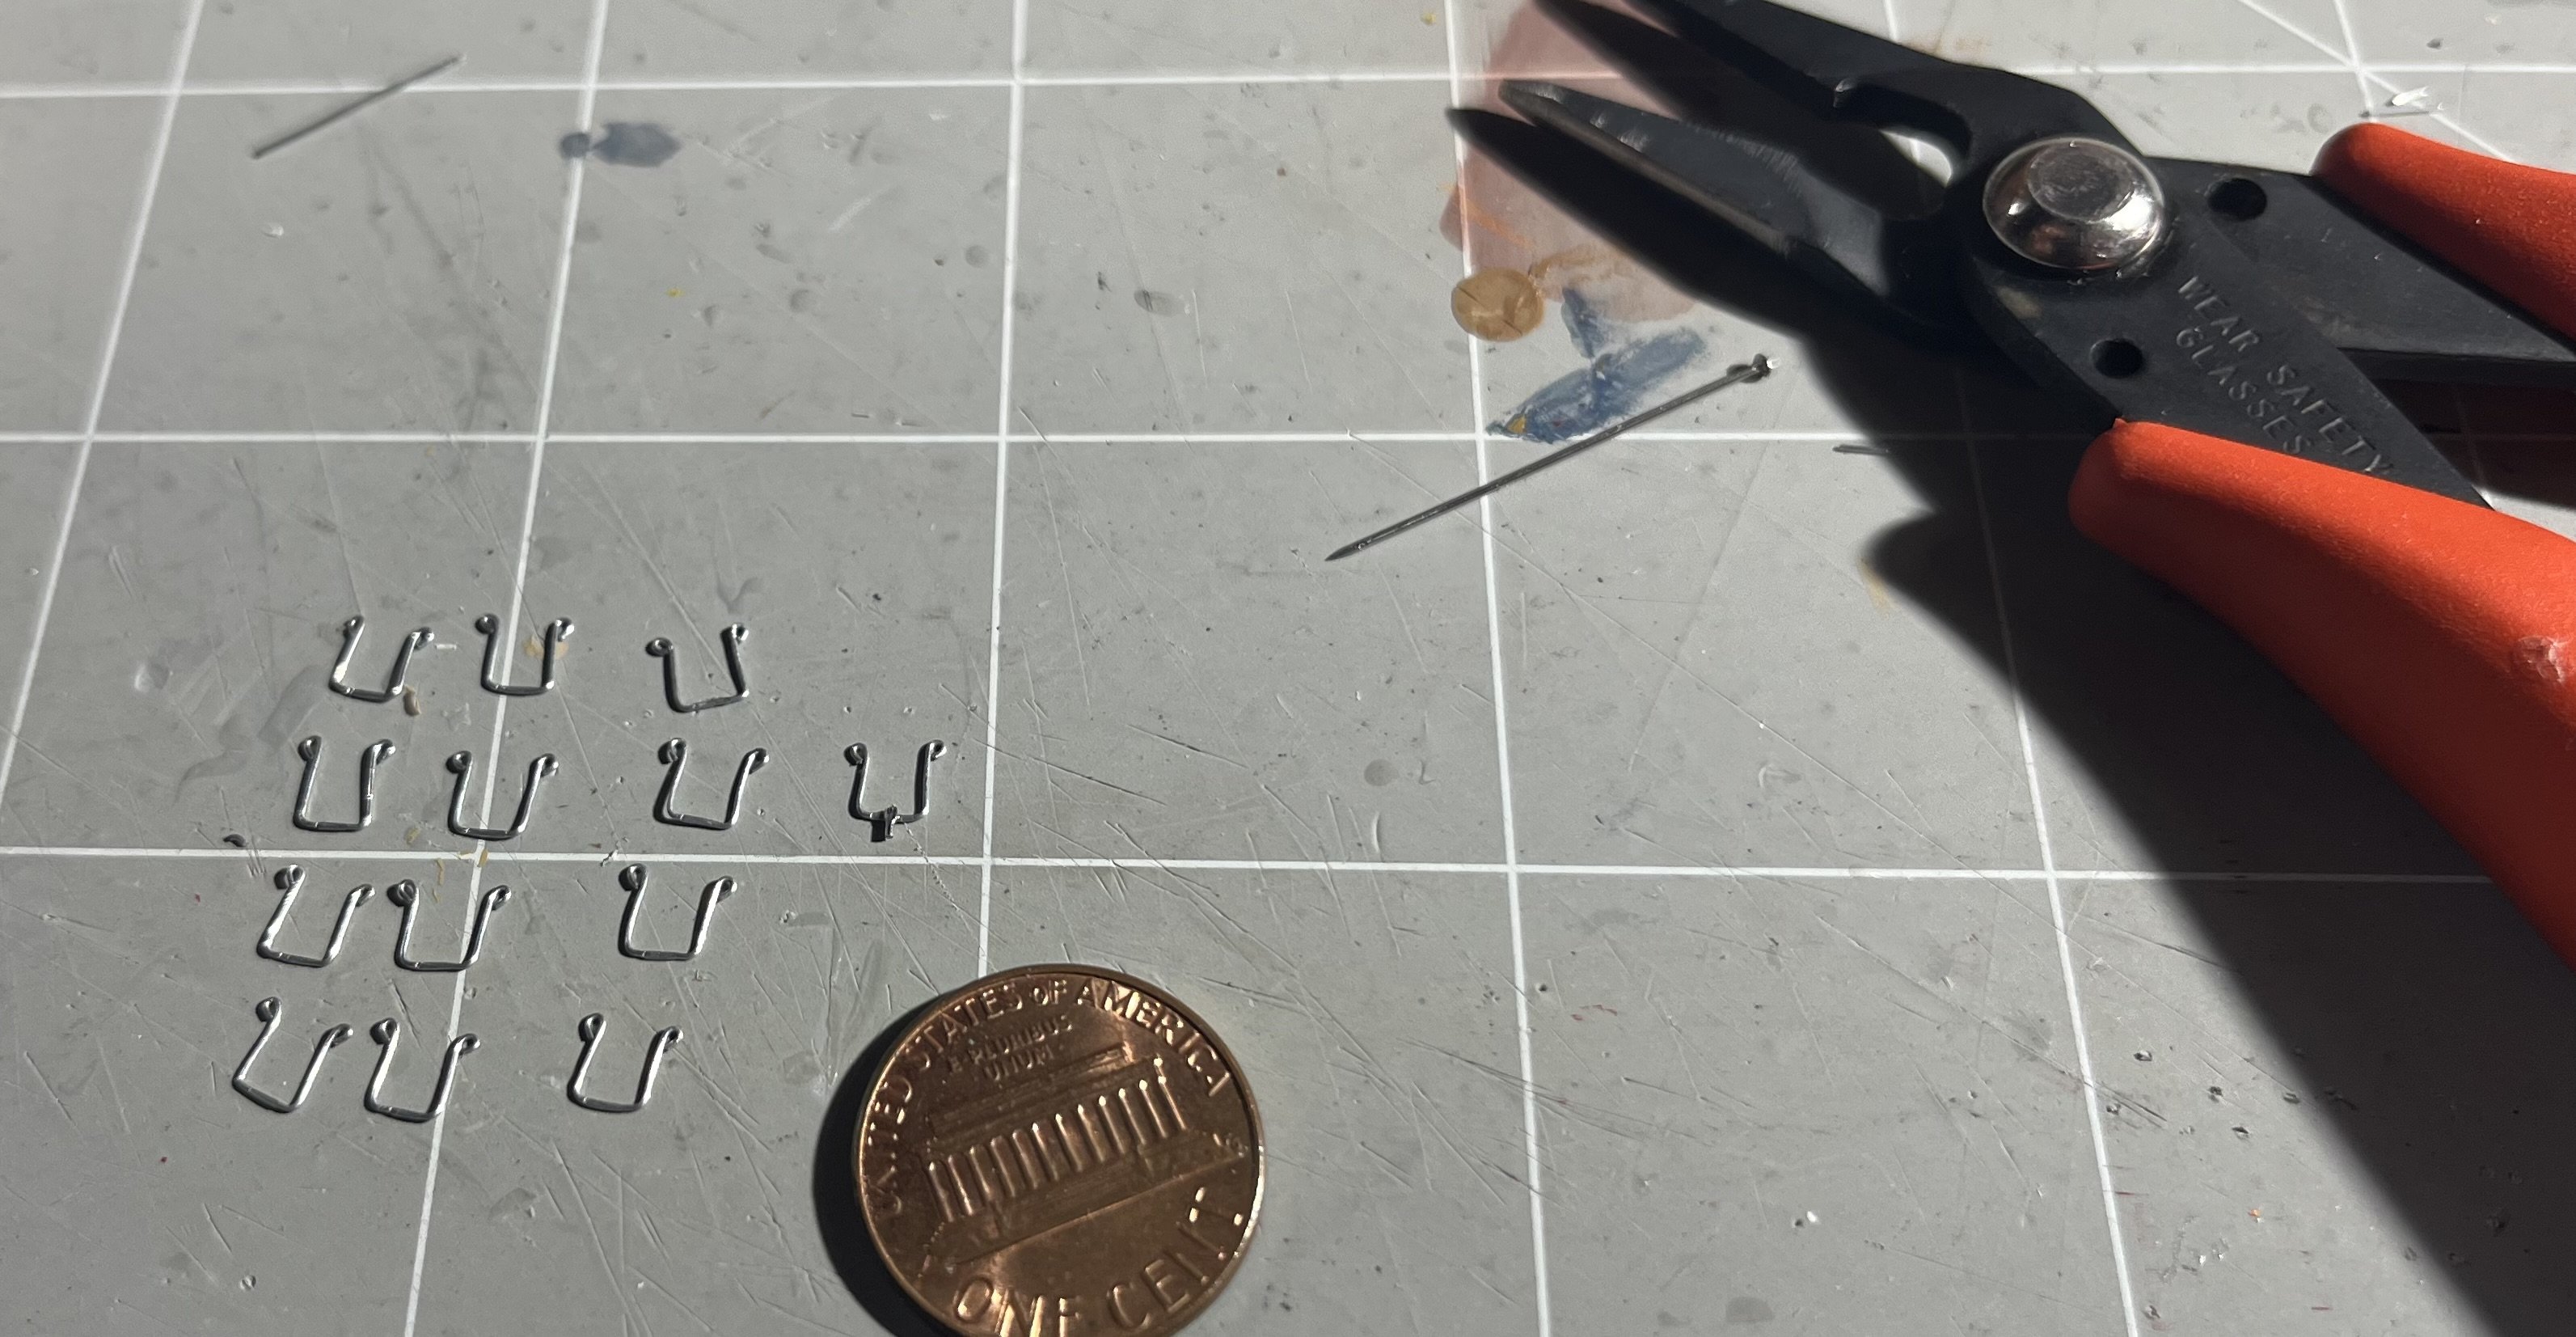
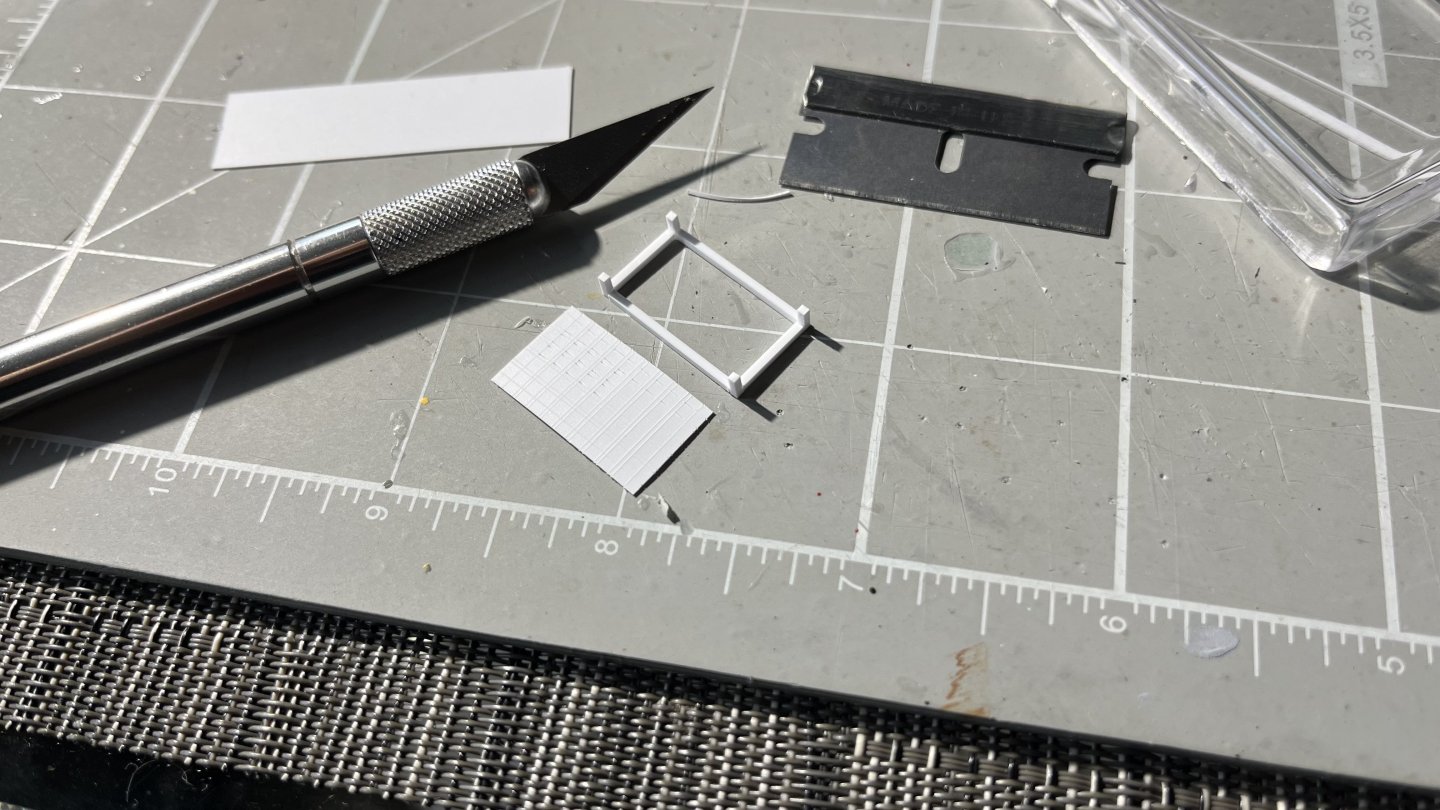
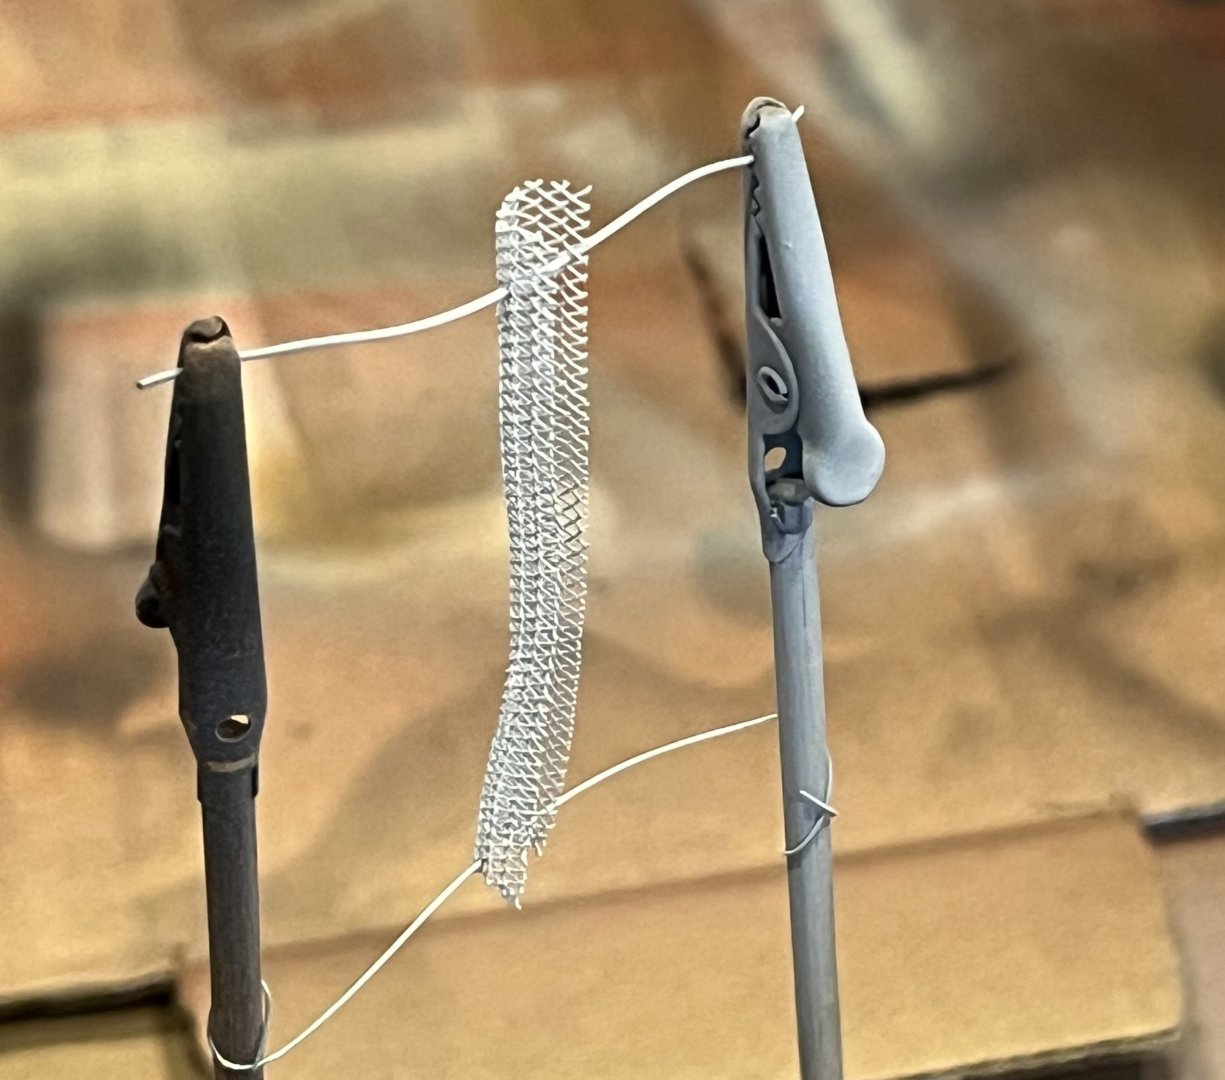
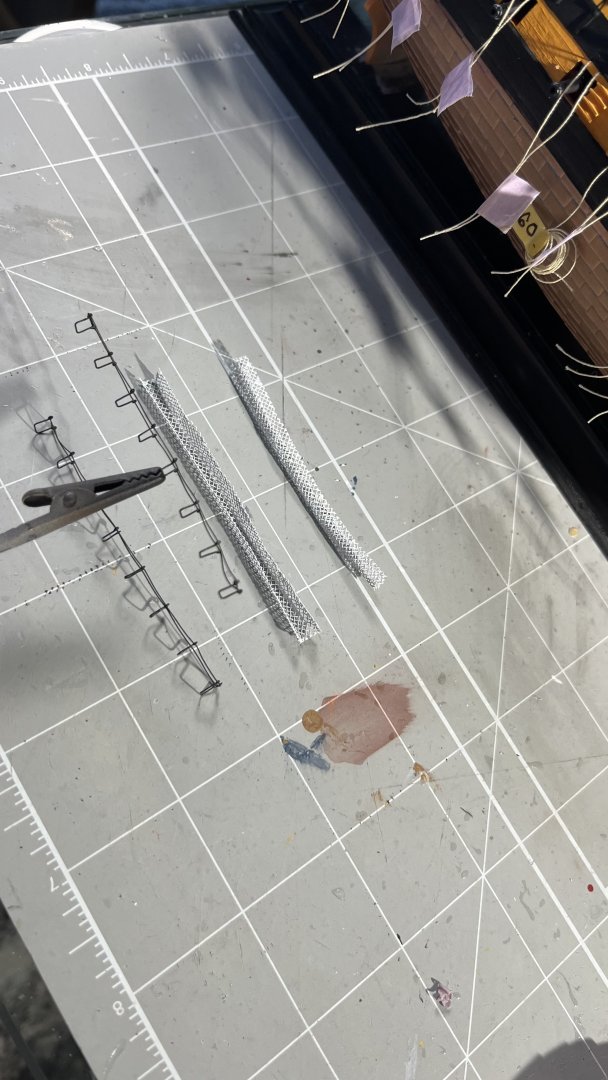
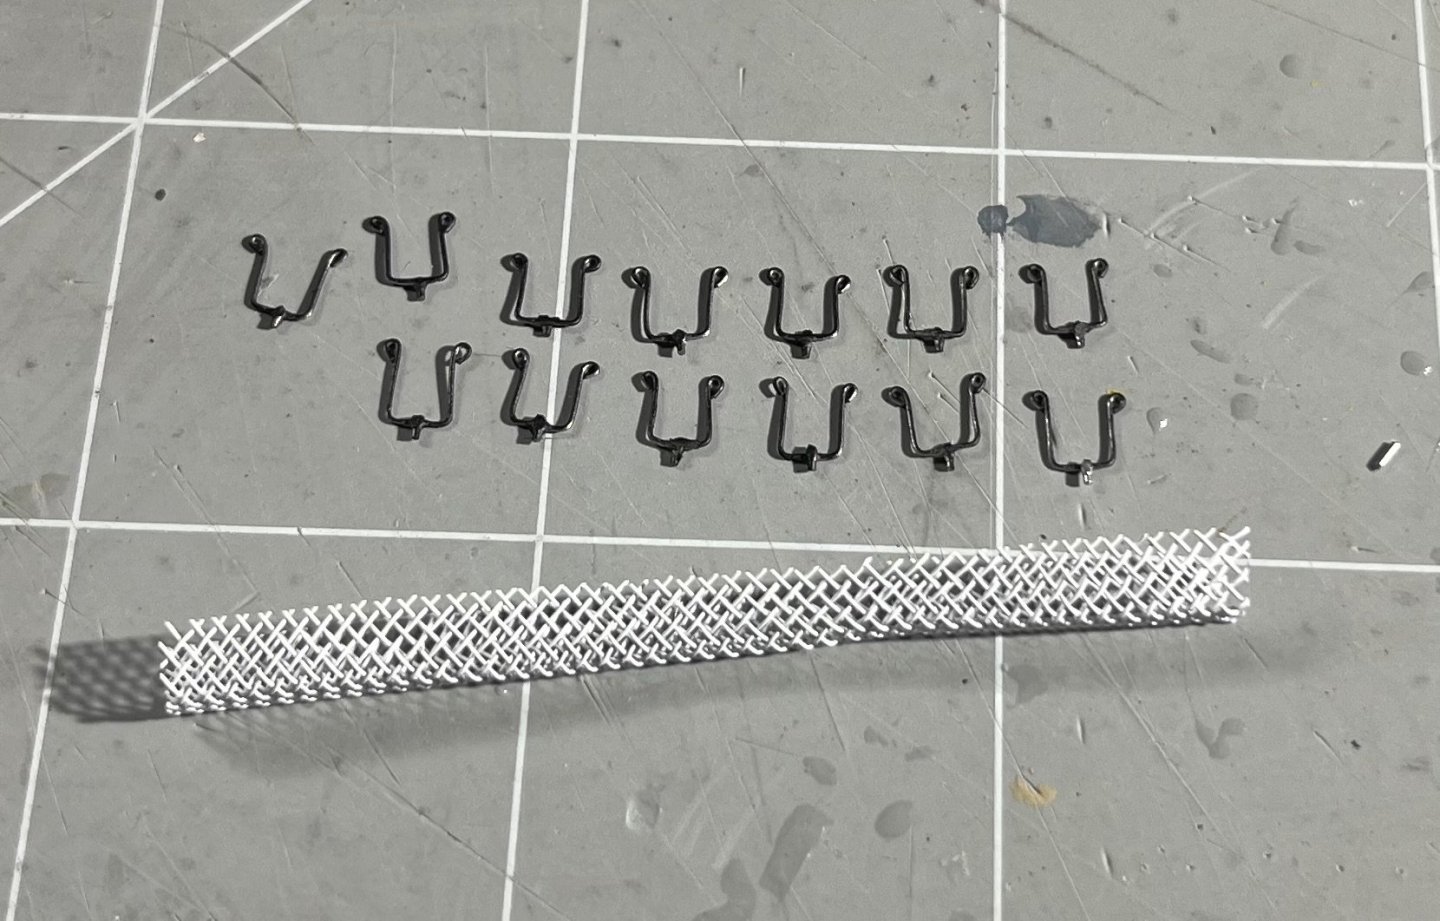
Another exciting week, continued fitting out forecastle and quarterdeck and also received first batch of 3D-printed masts and details from @igorcap! For hammock netting, found a $1.99 frying pan splatter guard at Marshall's: Cut out and sealed edges with CA: Crafted hammock cranes from 26gauge wire, flattened the base with pliers to get a surface for an anchor pin. These will go on the railing between waist and quarterdeck. Airbrushed Tamiya X-18 Black semi-gloss. Hammock netting airbrushed XF-2 White. Ready for assembly For the QD/Waist railing, I attached the cranes to the railing first, then pressed the netting in place, and finally inserted a 30gauge wire in the little loops at the top of the hammock cranes (not in this picture); which were then hand painted. It was quite fiddly, and both railing and cranes broke a few times and needed reassembling. I'll try a different approach for the next set of hammock nets... ... for the star/larboard QD railings, I instead assembled the netting, cranes and wire rail separately. I skipped the little anchor pins and simply glued onto railing. Final result with all QD hammock nets in place. 3D-printed masts and yards from @igorcap came out great! Scale, shape and detail is vastly superior to what's in the kit. The white resin material used for lower masts and bowsprit is quite rigid and way better than the material the kit uses, whereas the black ABS material used for top masts and topgallants (and yards) is slightly better. We'll do some more testing and iteration to confirm warping/bending/integrity won't be an issue when under tension from rigging, but very encouraging first pass. Igor also helped provide some additional details, e.g. cat heads and stem decorations; 1:150 lanterns, anchors, fire buckets, etc. Added a bulkhead for Nelson's cabin, still TBD if I furnish further. Any good suggestions for visual references for furniture? Desk, chair, rug, chests, pictures? Were QD bulkheads permanent or removed while clearing deck for battle? References I've seen mostly just say it's a mix; some stayed, some were taken below decks or stowed in the ship's boats, in tow. I know there should be doors from the great cabin to the quarter galleries (and from cabin to stern gallery), but would there also have been additional windows? The stern gallery/screen bulkhead is at a fairly sharp angle in the kit (as built), in Boudriot it's shown at a much lesser angle, and as per Bellona it should be upright / perpendicular to the deck -- which seems to make the most sense. (In general, Bellona is a great reference and I really wish I had had it earlier in my project.) Handrails around waist, tried both rope/thread and 30gauge wire and ultimately decided on wire for better integrity. When glued to stanchions (26gauge wire), it's not as fragile. Referenced Lavery's Bellona to add five boat booms, resting on top of and held in place with brackets. Also added QD handrails and a strake I realized I had forgotten. Nelson's and Hardy's cabins from aft. Since stern will be detachable, contemplating adding some furniture.


- 24 replies
-
- 3
-
-
- HMS Vanguard
- Heller
- (and 2 more)
-
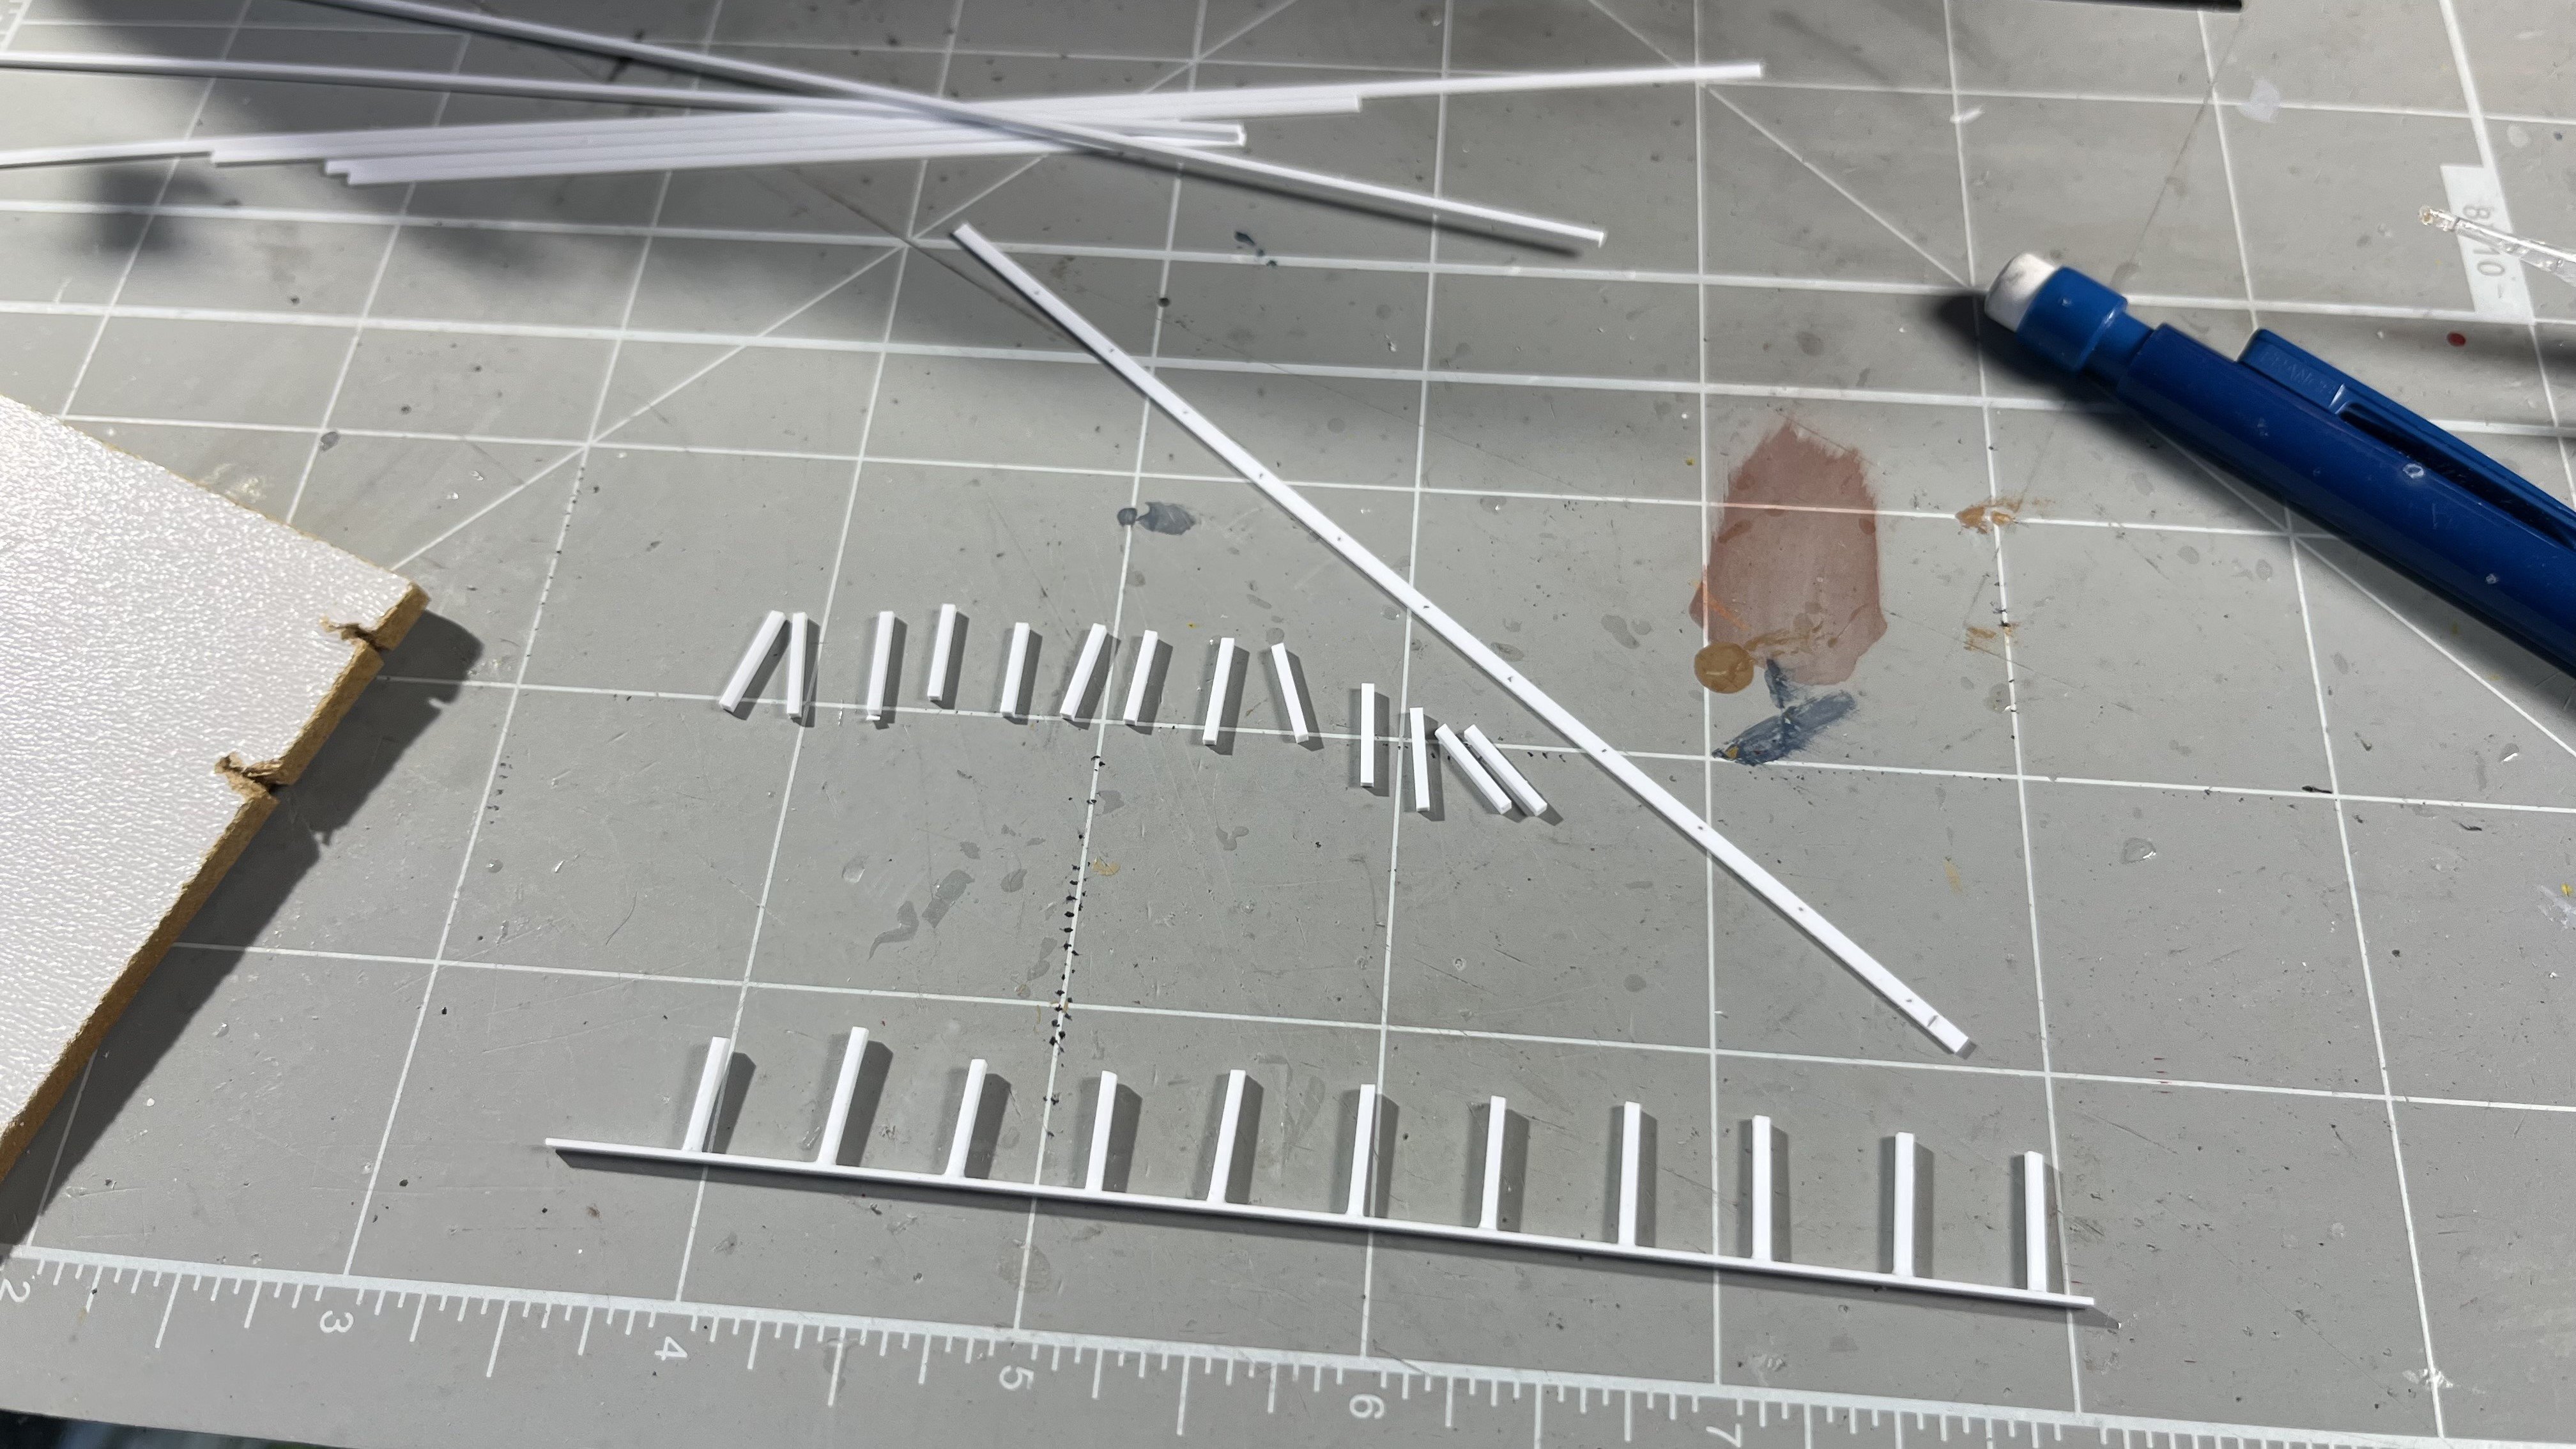
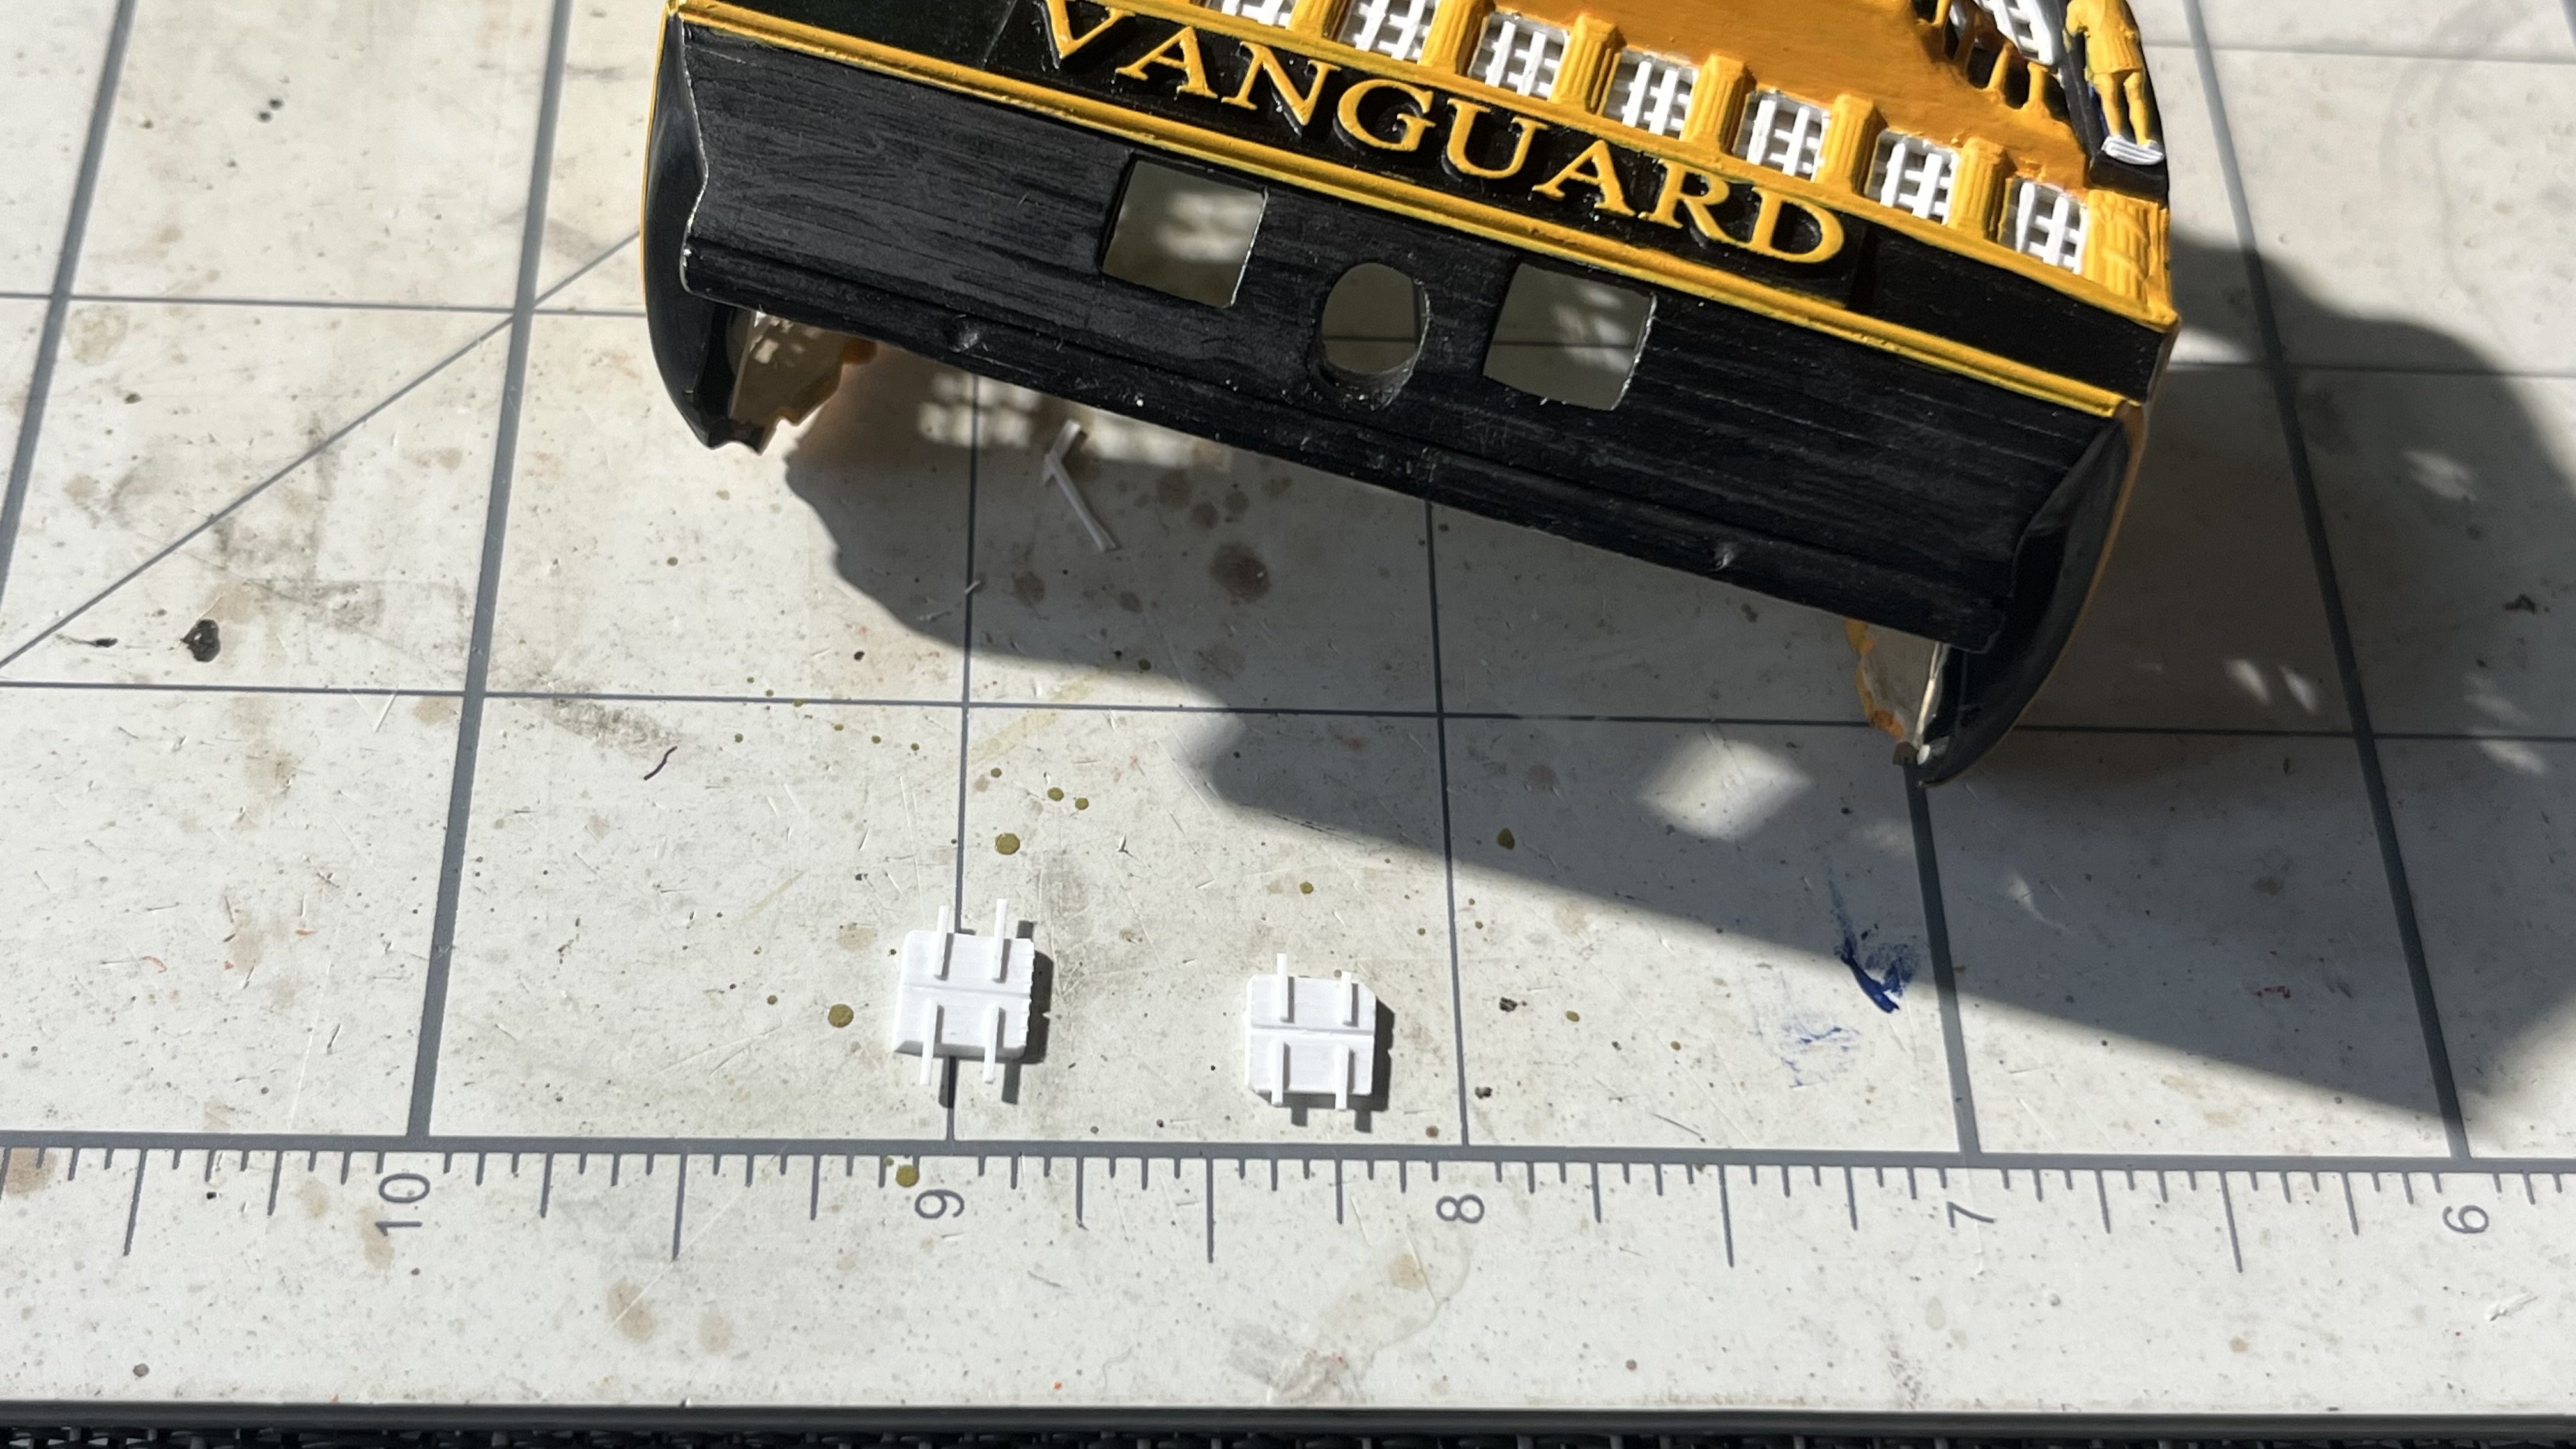
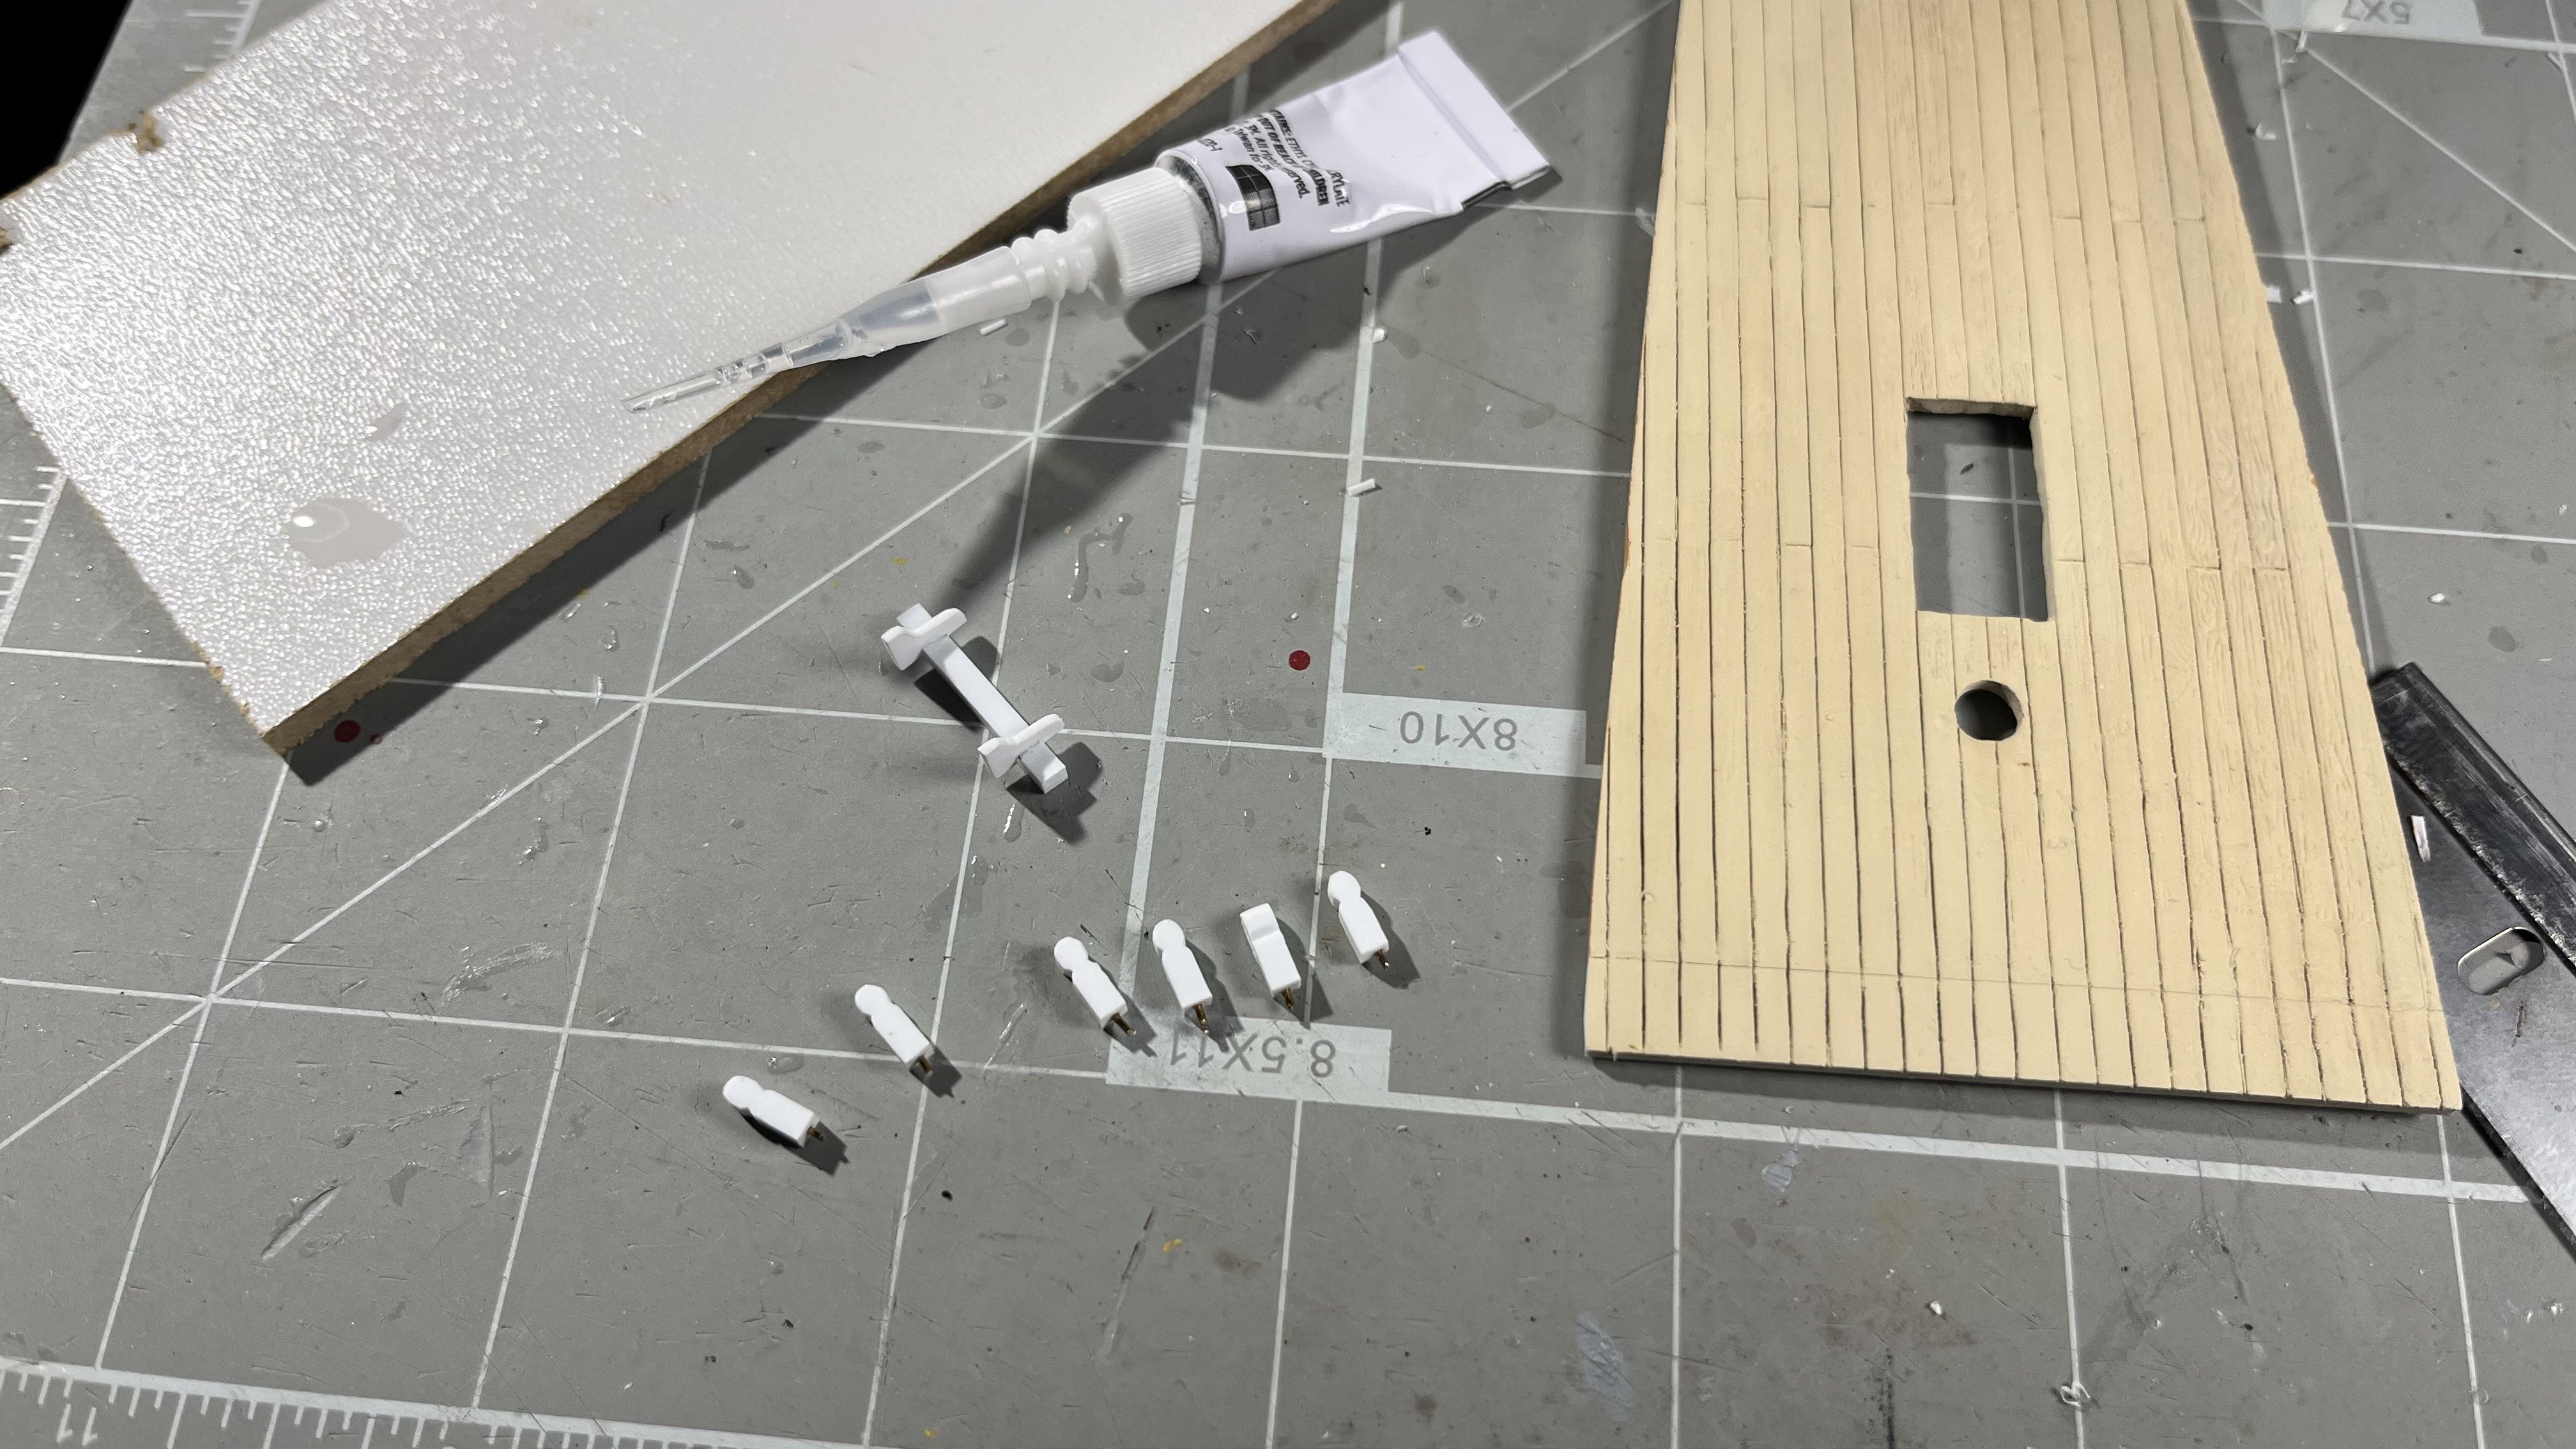
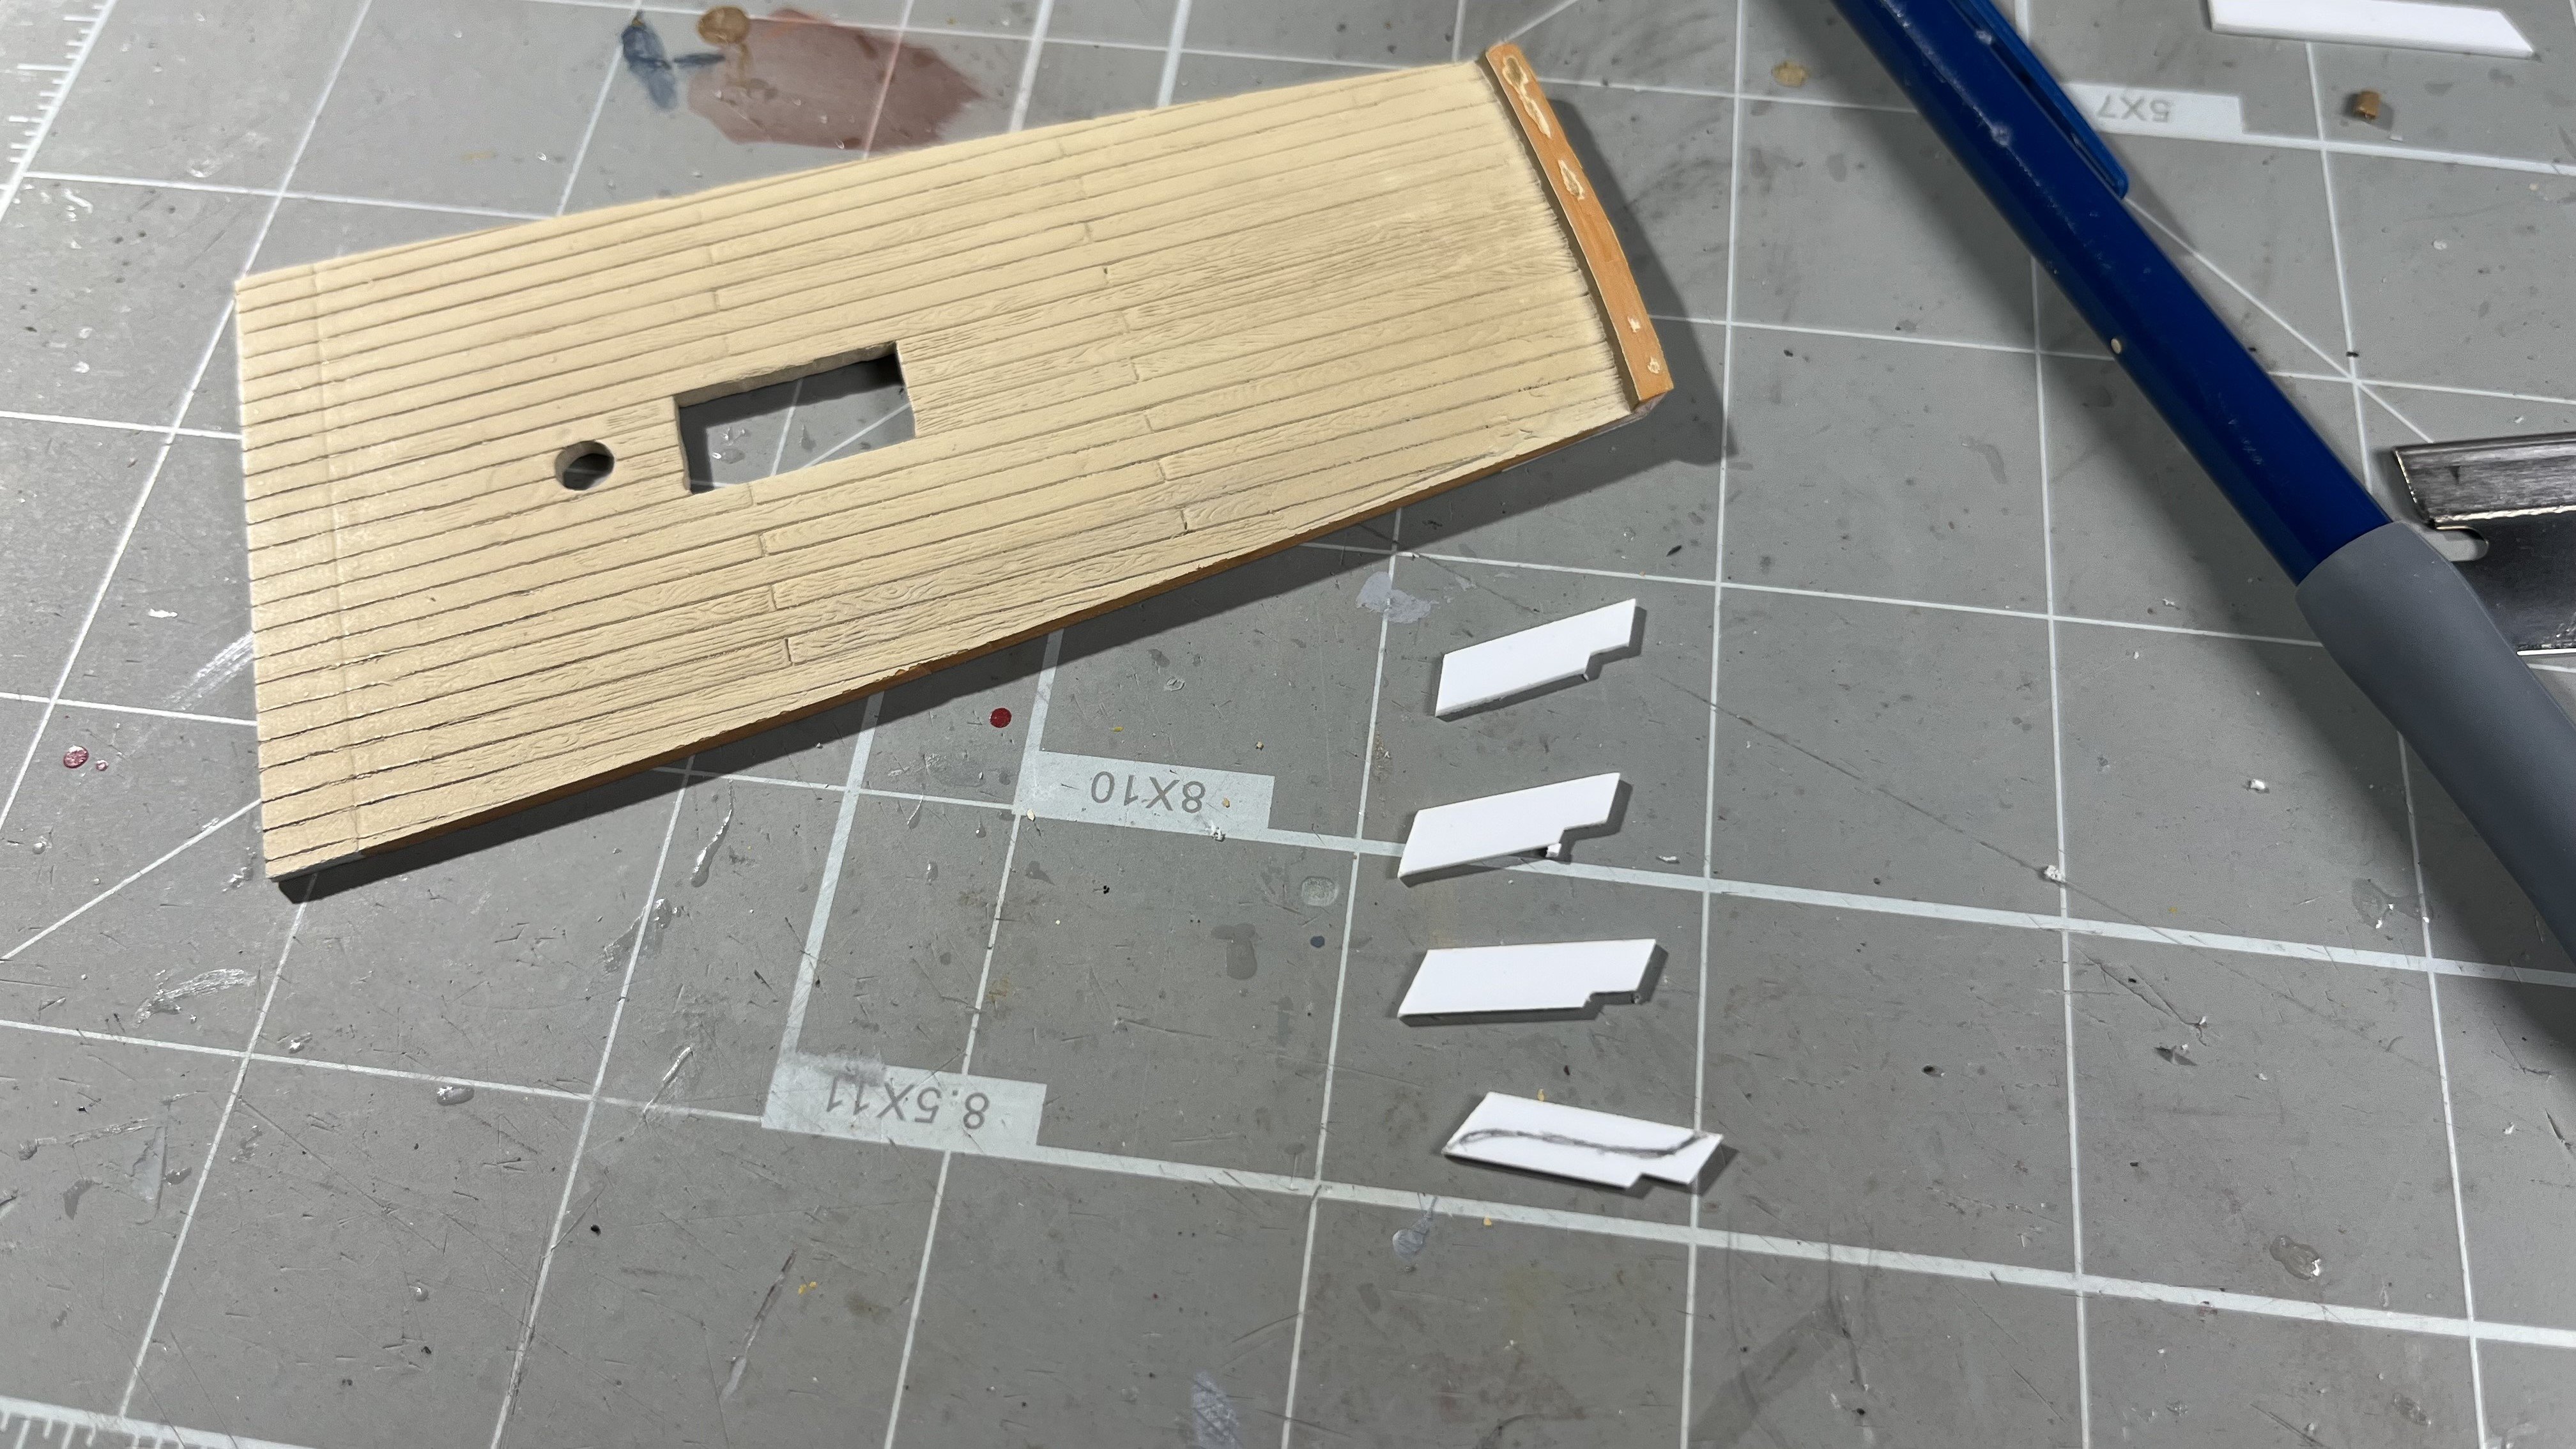
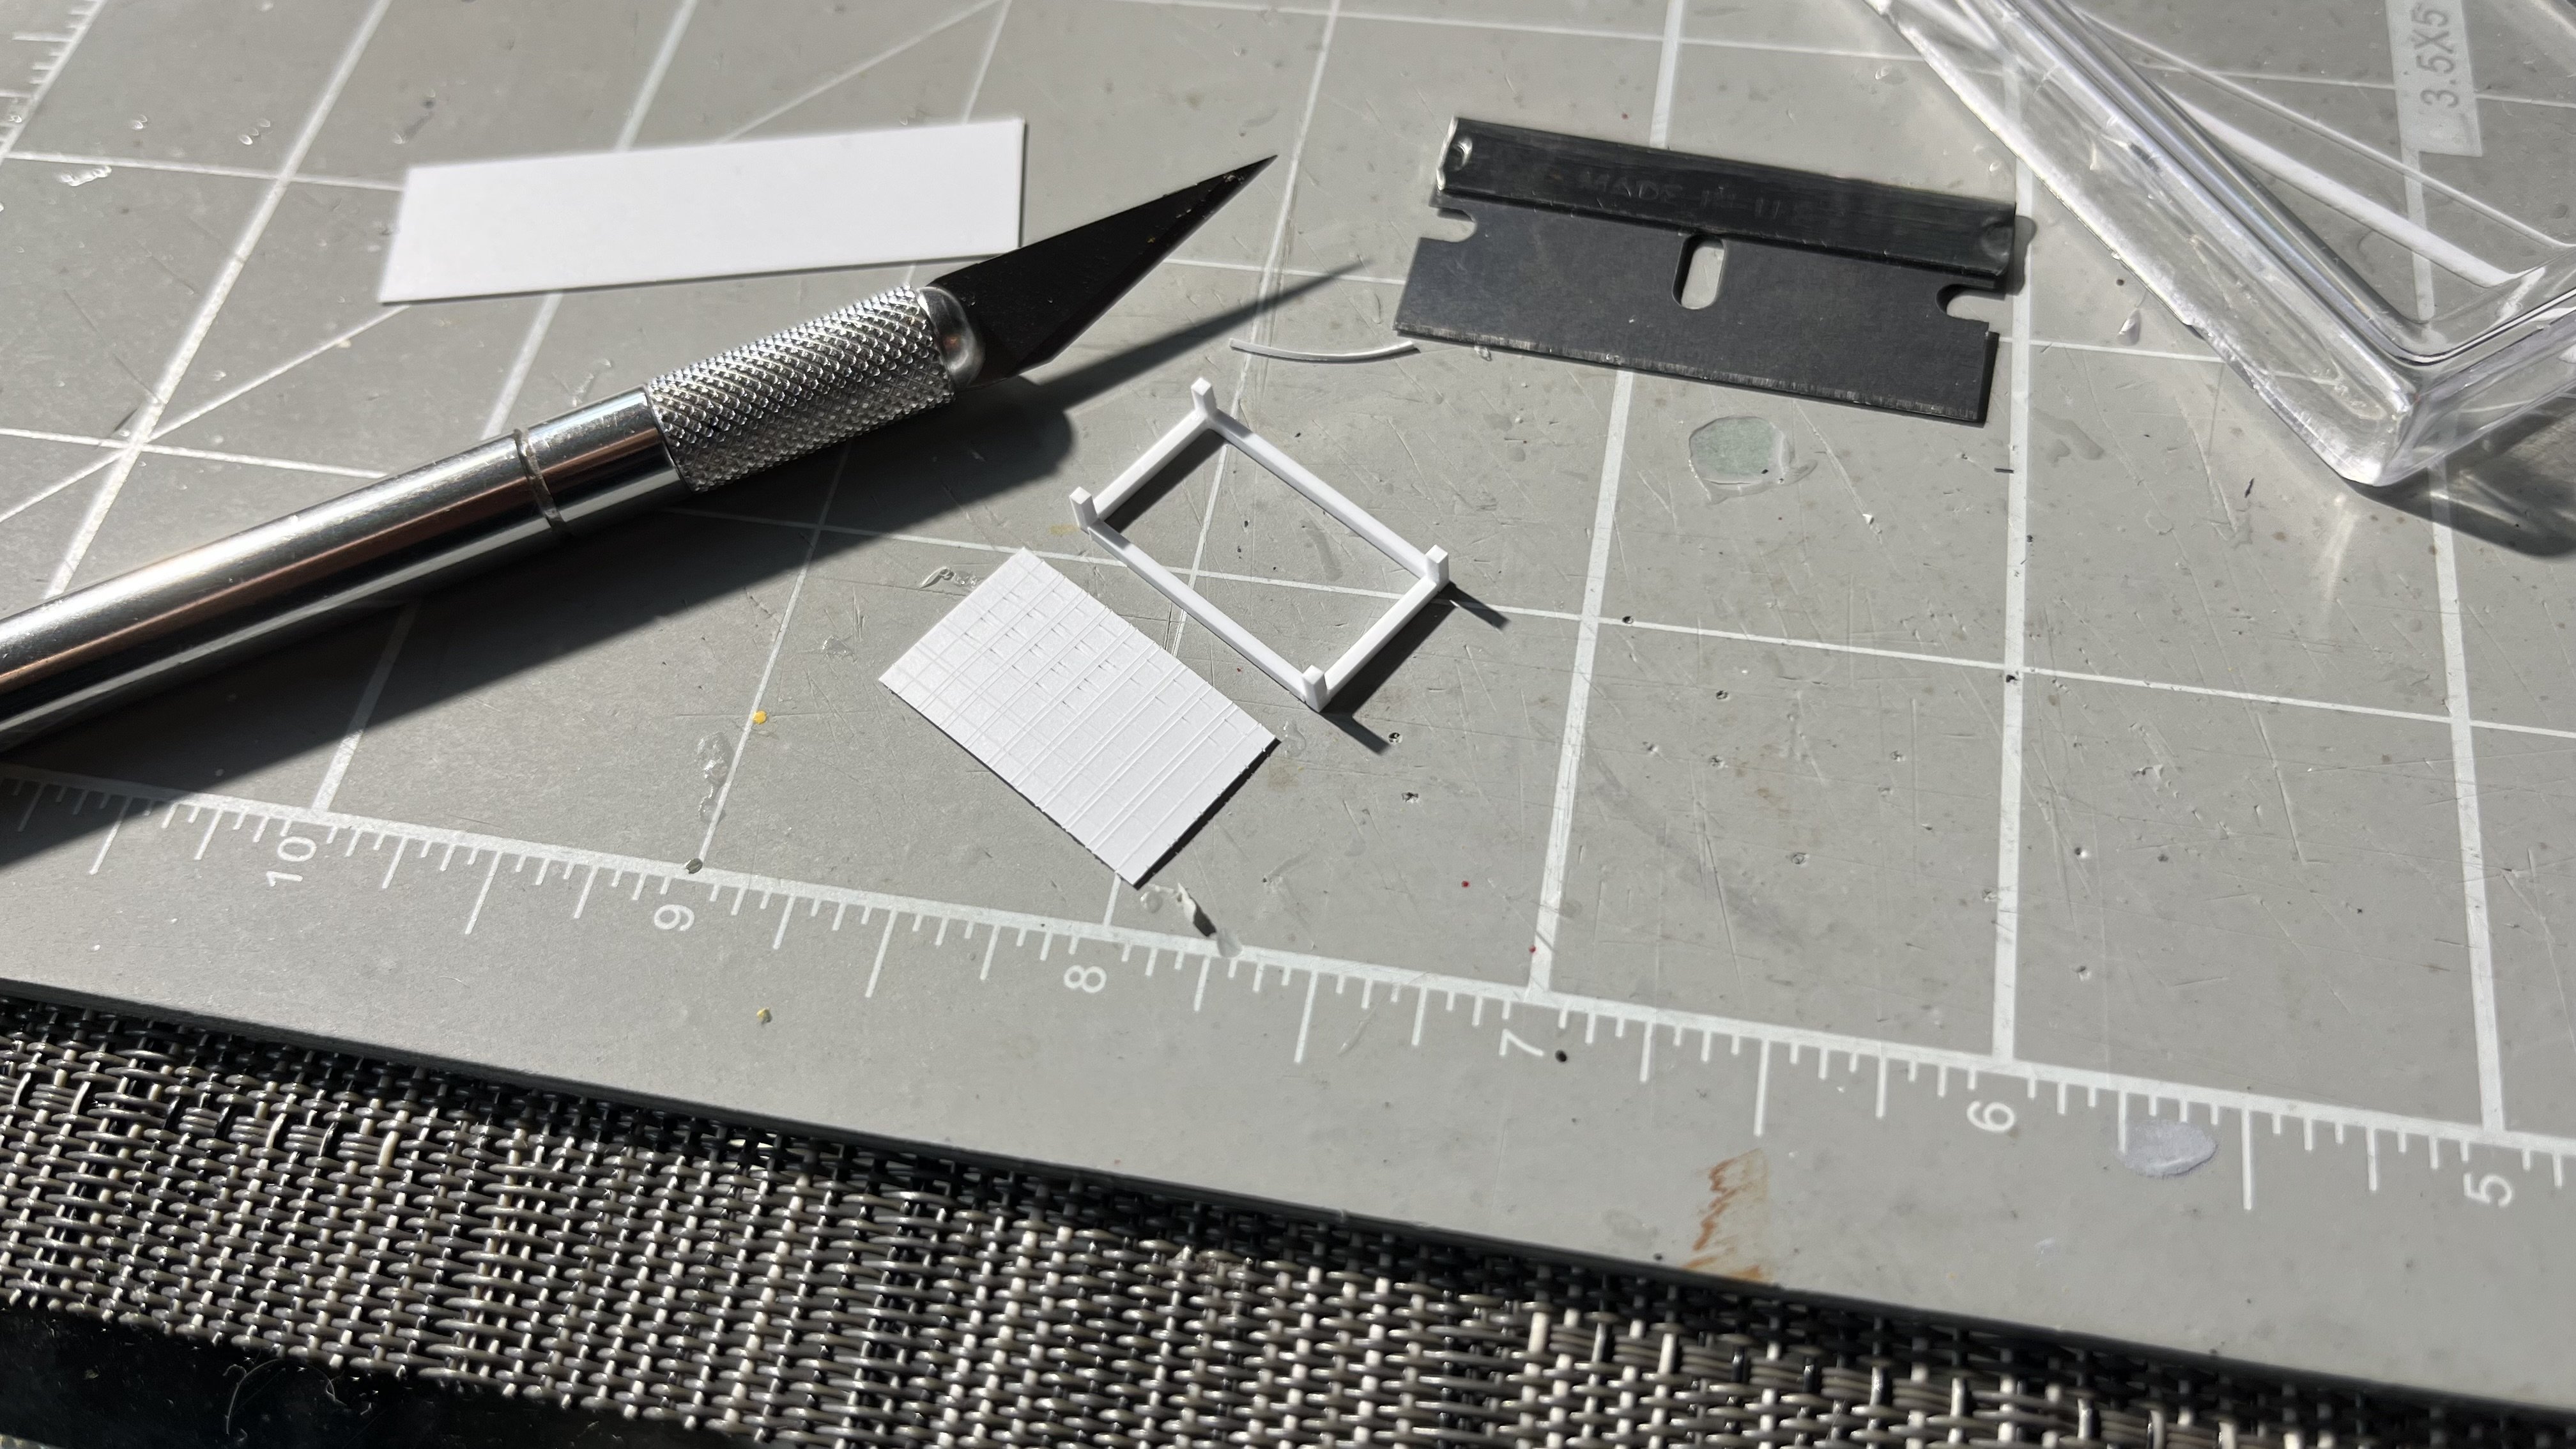
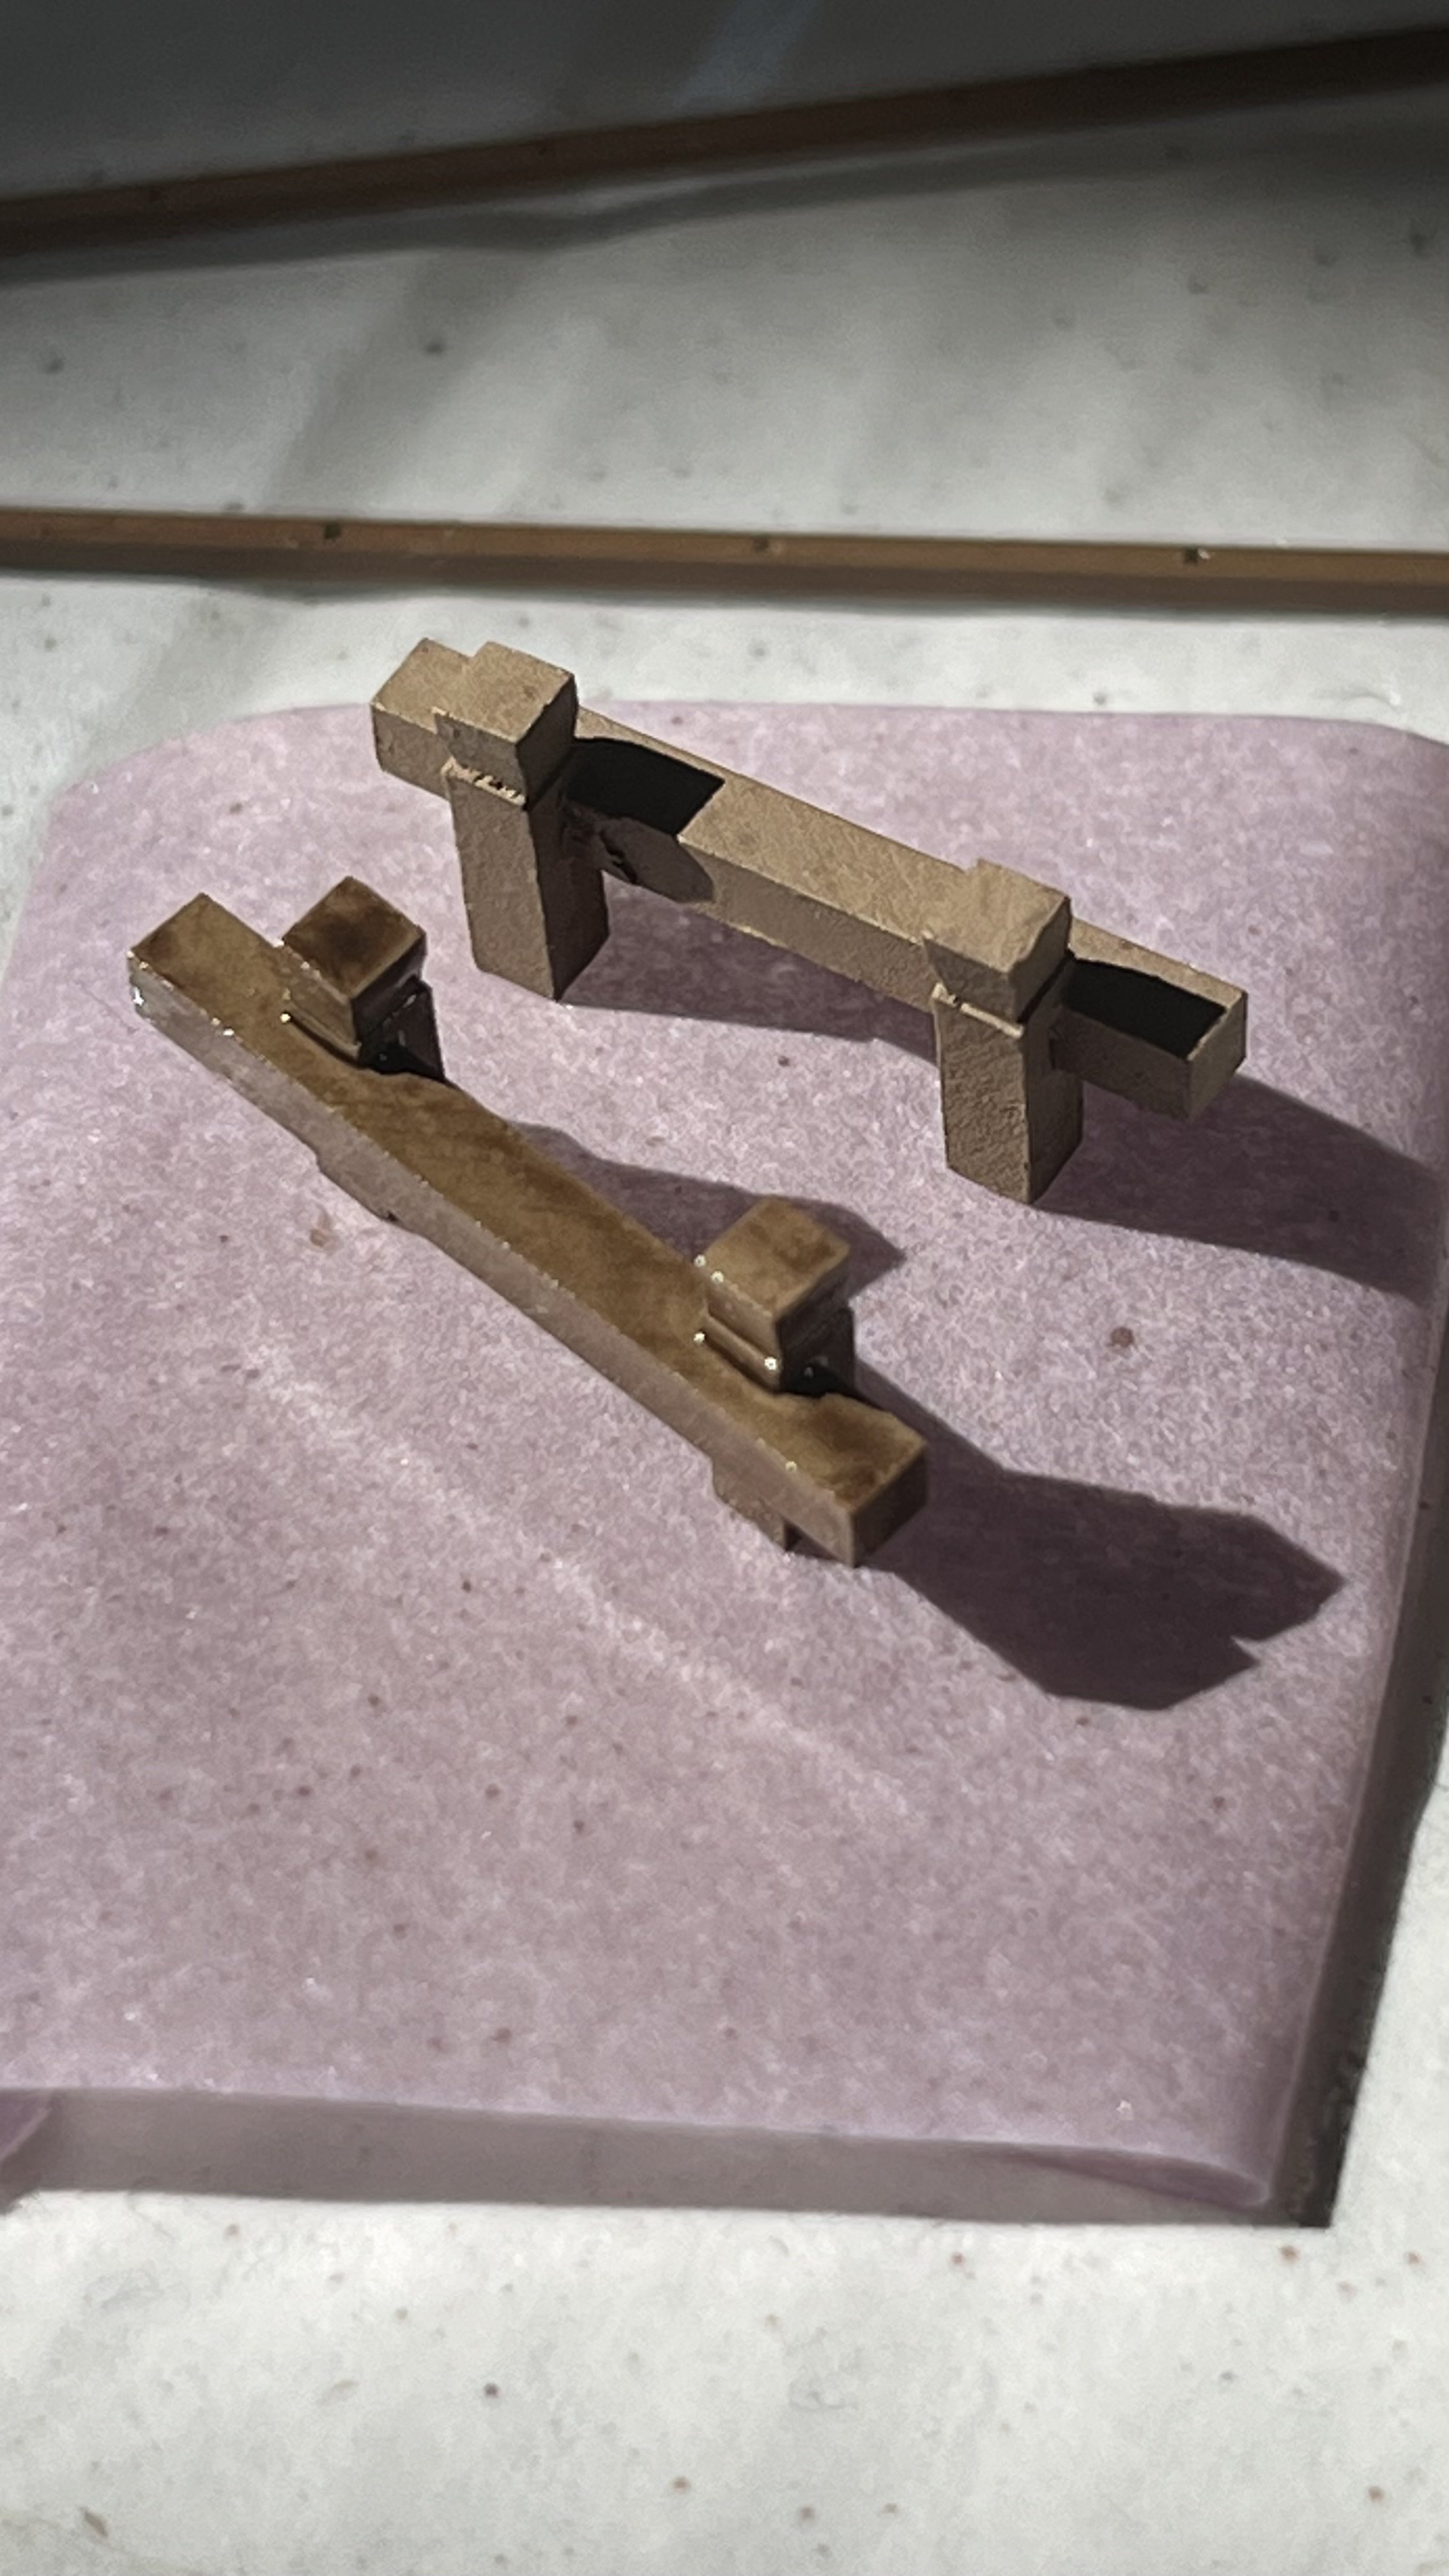
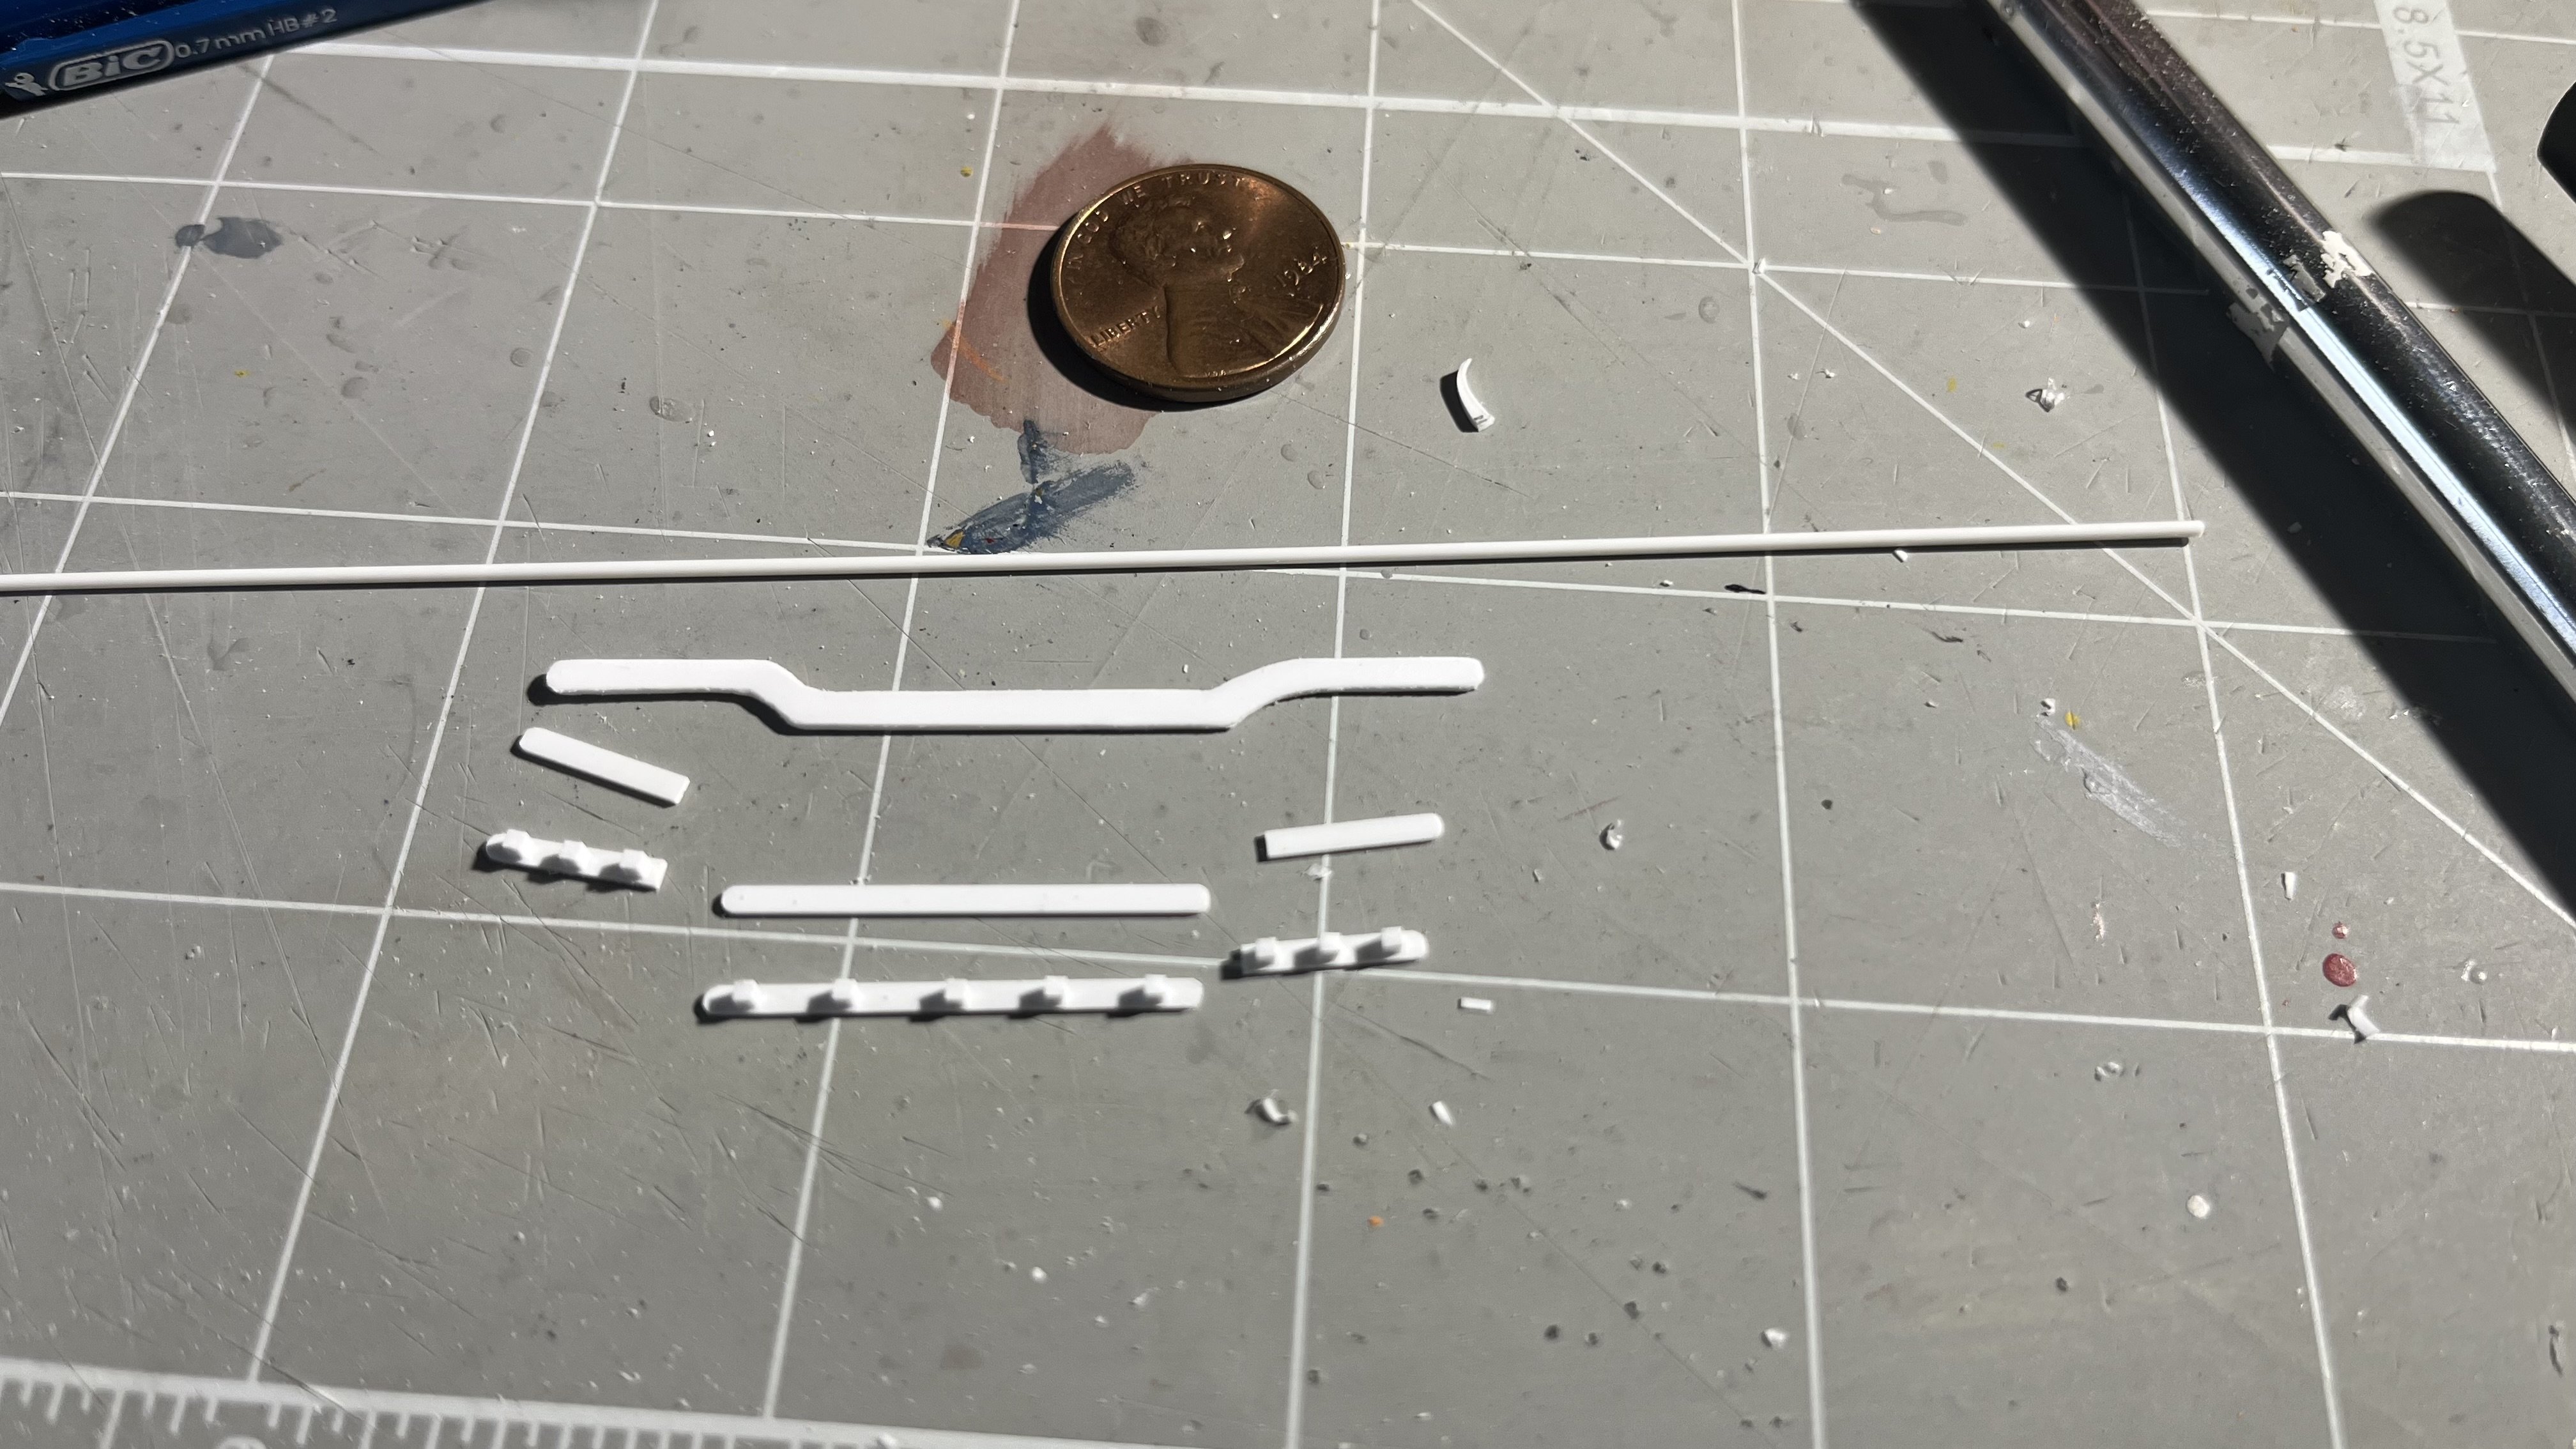
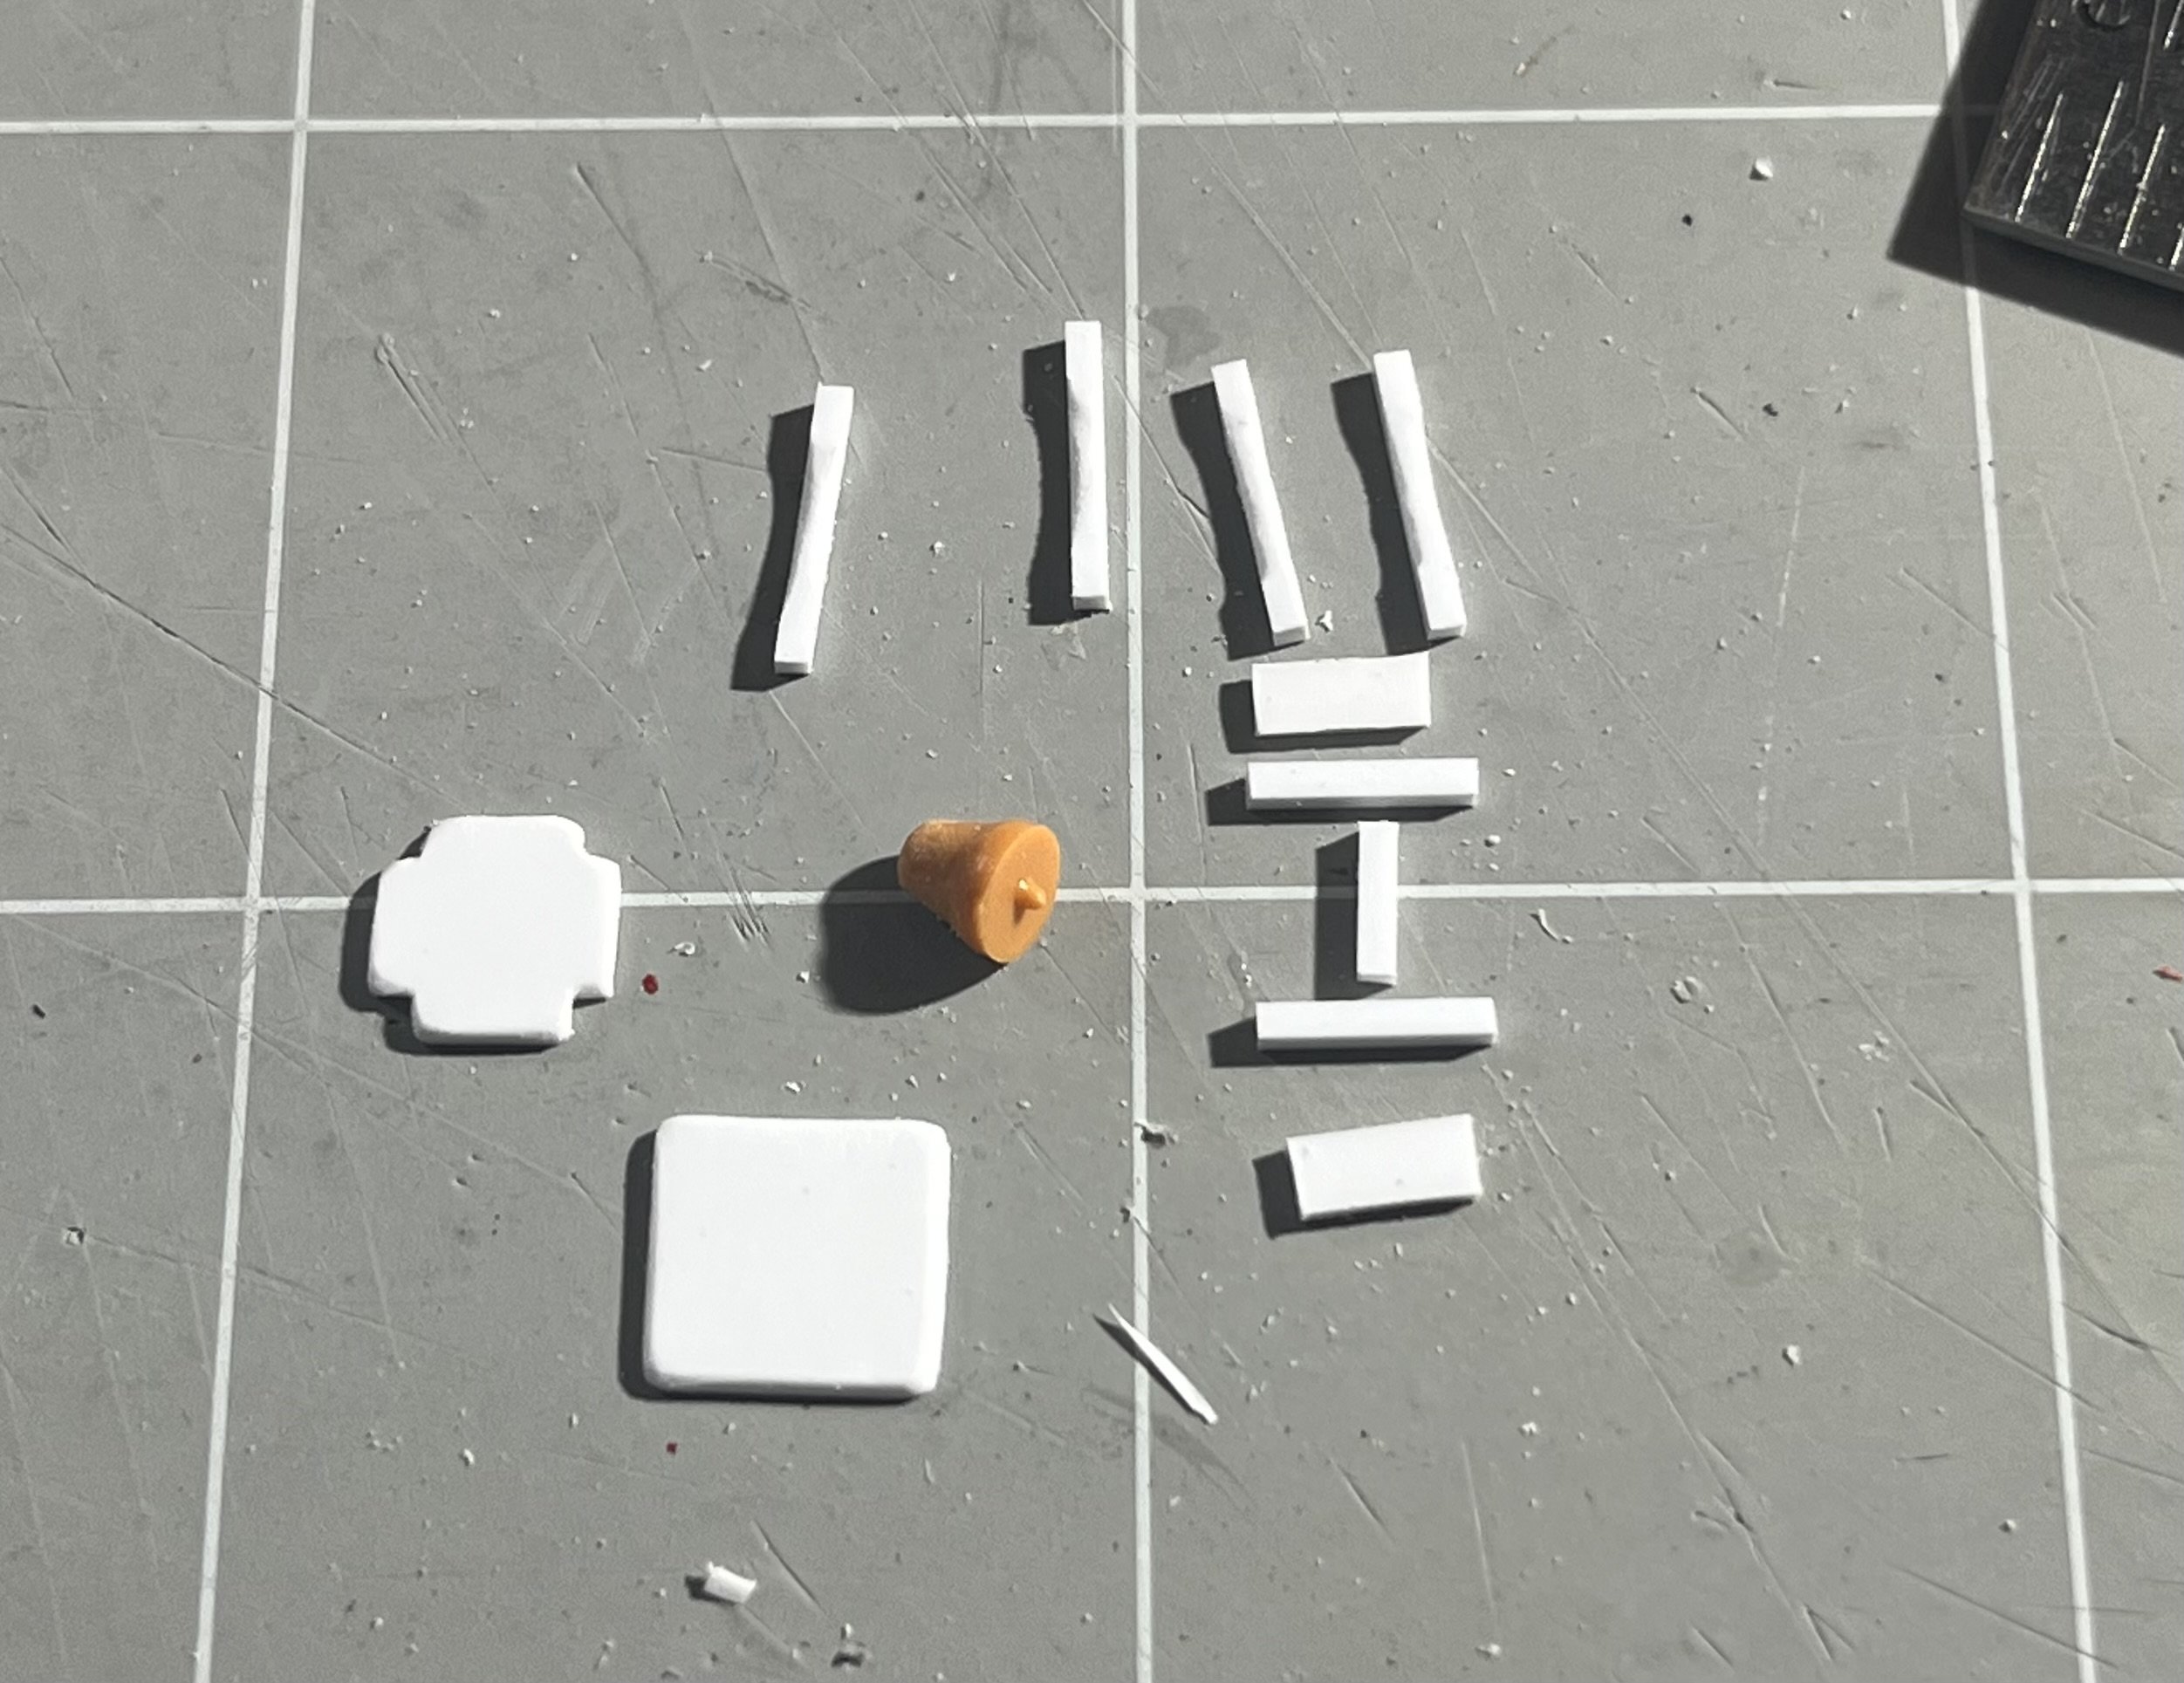
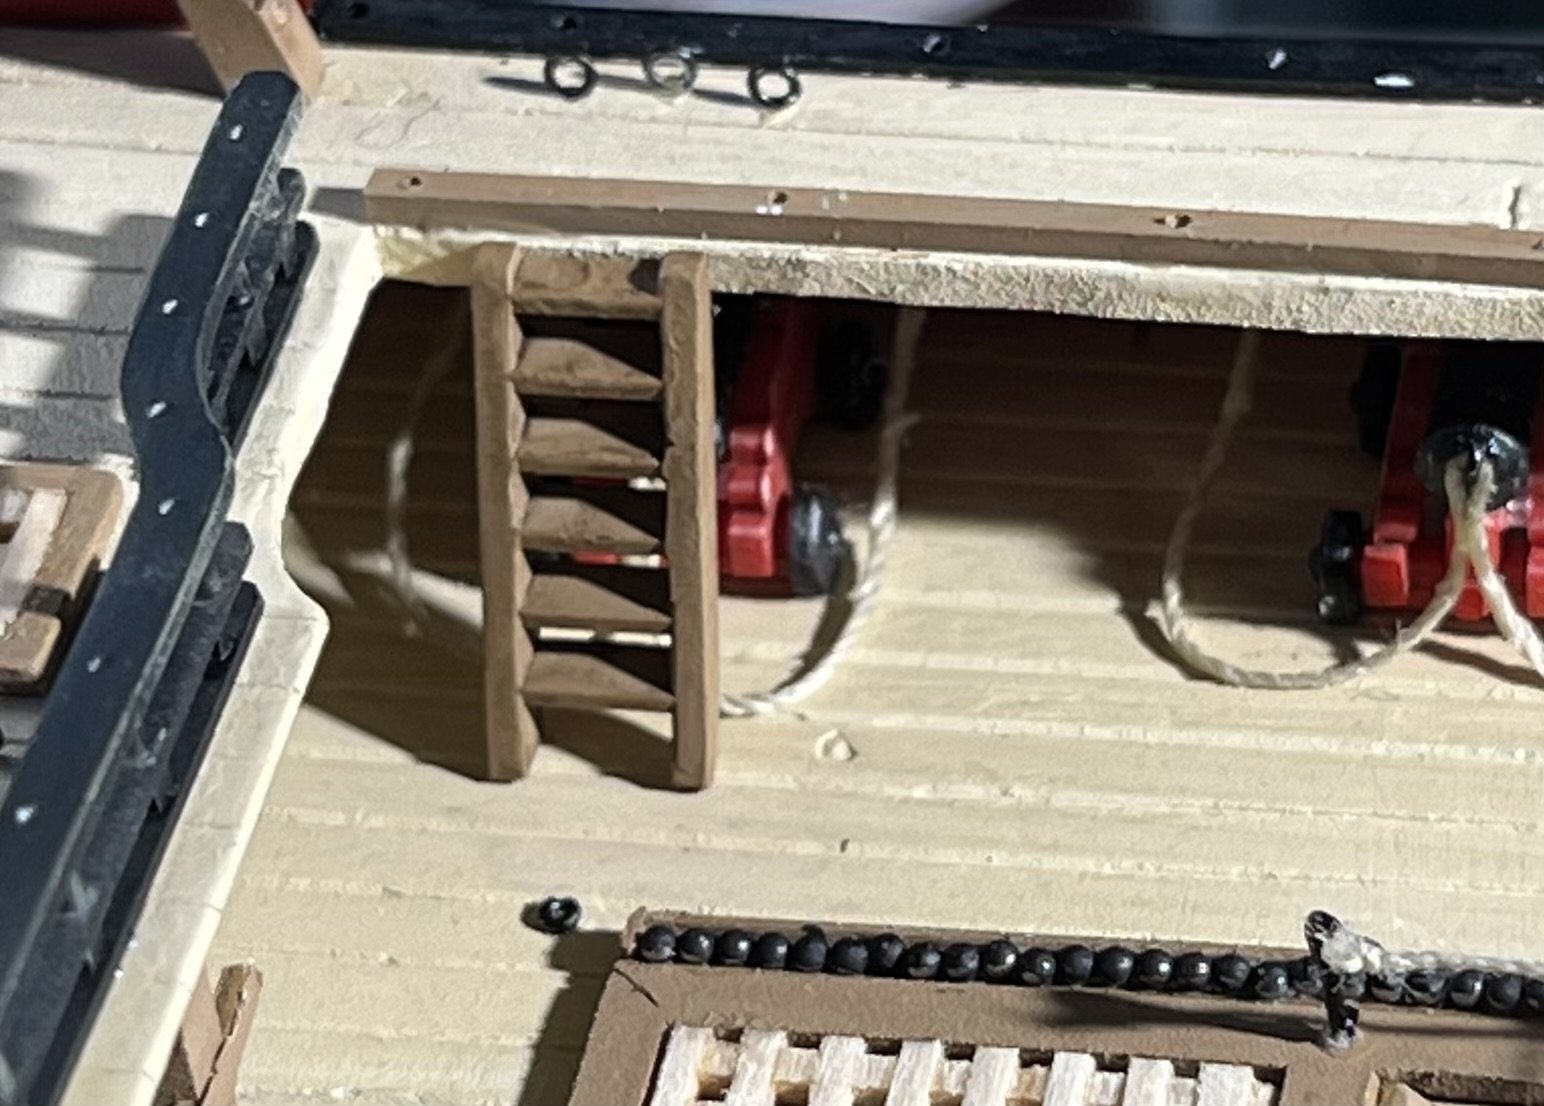
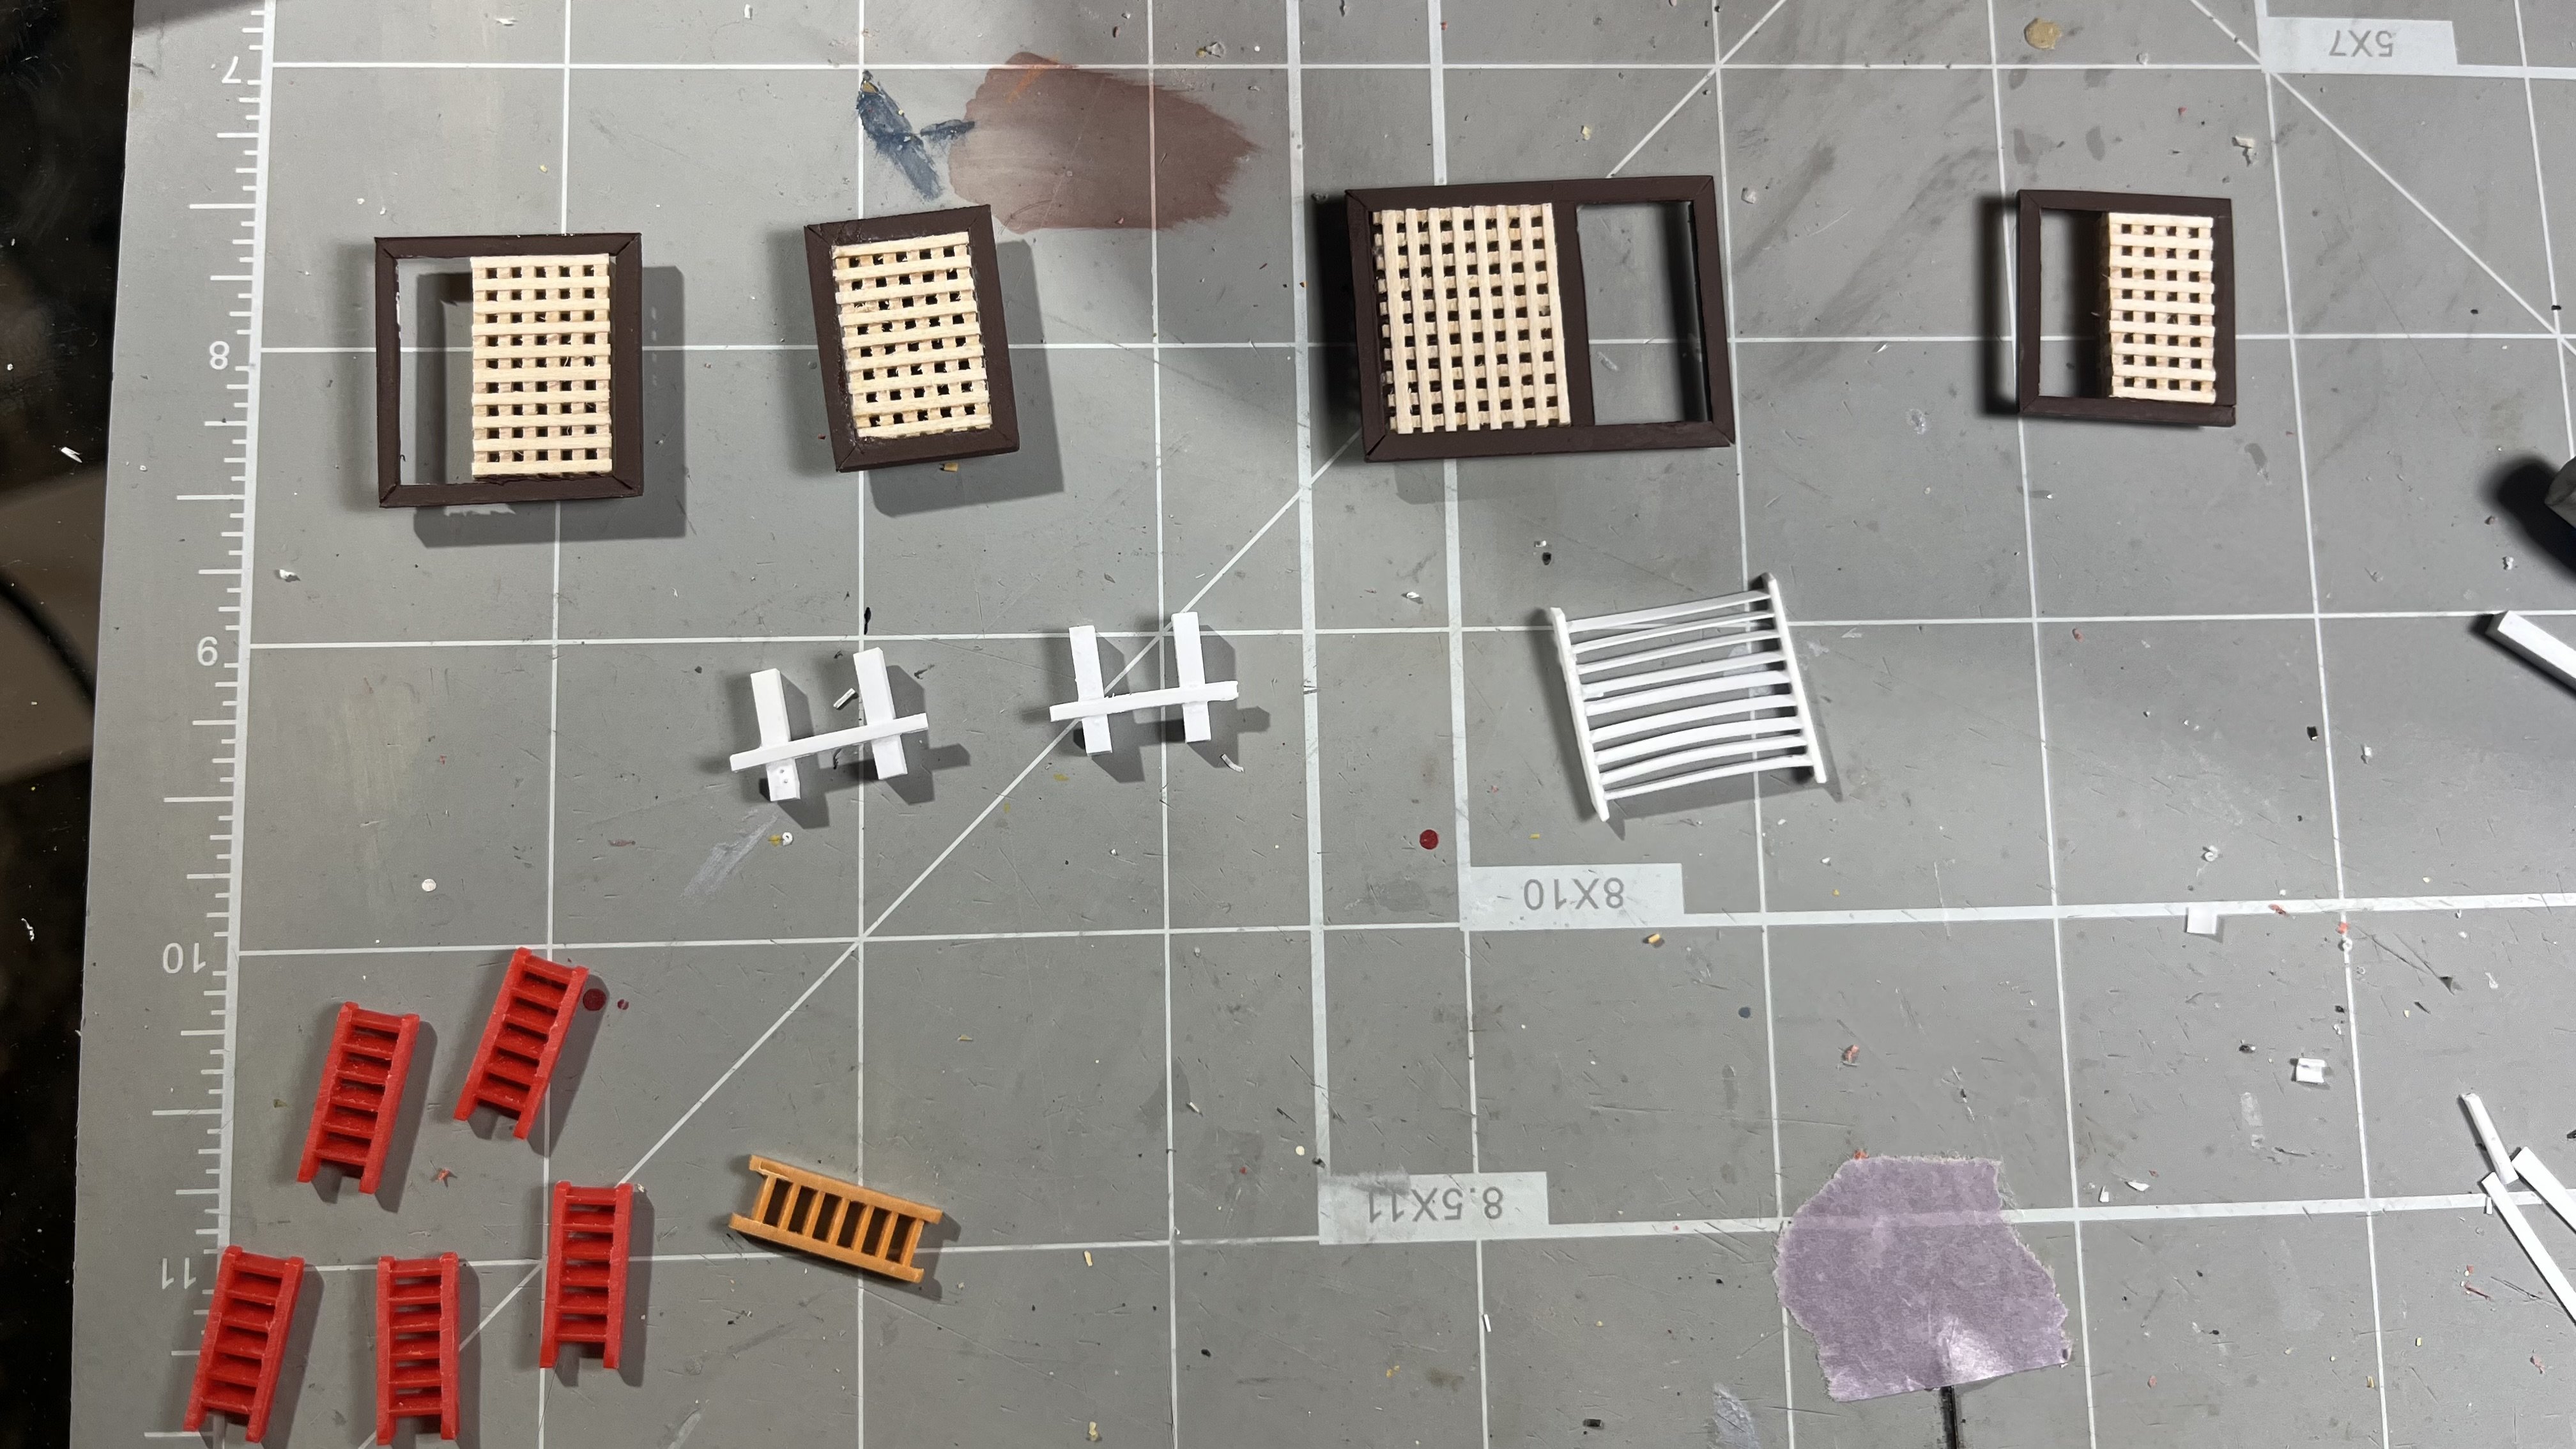
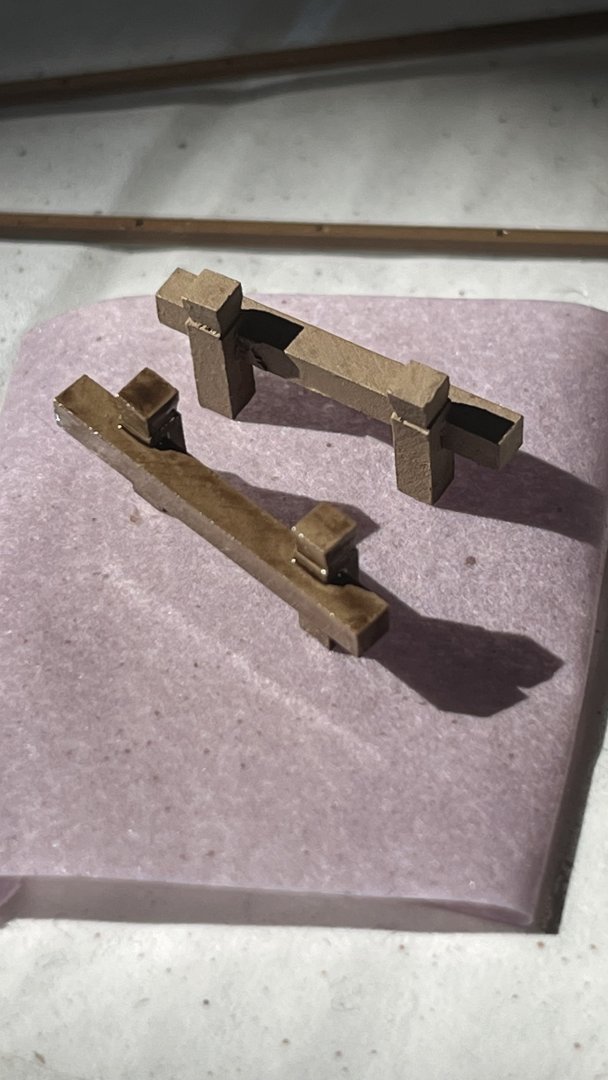
This has been a really fun week, where I learned a few more do's and don'ts of kit converting Don'ts: Start building without a *complete* plan Do's Pay really close attention to the location of guns. As I've found out the hard way, the rest of the ship is 100% constructed around the layout of the guns, which will influence just about *everything* else. Or put differently, if gun ports are off, the rest of the ship will be a bit off, too. I've covered above how converting a [French] 30-gun upper deck to a [British] 28-gun upper deck meant the gun ports will be a bit misaligned, but I didn't think more of it at the time. After all, it's not realistic anyway within the constraints of a kit conversion to start moving all the gun ports around. In retrospect, knowing now how important this was, I might have taken a different route. I've covered already how 30 => 28 ports has impacted location of channels, shrouds, masts, etc. One more revelation this week, perhaps not the most consequential but still... Yeah, this won't work: ... and this looks weird, too: So, I decided to move the ladders from gangways to upper deck to the front of the waist. The French 74s have four ladders, one in each corner of the waist, and Lavery's Bellona shows two in the front only (however coming down from the forecastle, not the gangways). So while not entirely historical, it doesn't appear as a complete fabrication either? For all model shipbuilding veterans and naval historians on here, these are blatantly obvious points, and I sometimes feel a bit embarrassed for admitting to the shortcuts taken in this project But hopefully someone else can learn from this in the future and avoid my mistakes. Anyway, it's been a fun week! More varied scratch building, as I focused away from guns to the rest of the fittings on forecastle and quarterdeck. Belfry made from plasticard, the bell from the kit, and a piece of copper wire for a bell arm. Steering wheels from kit. I ended up making the stanchions from plasticard instead of using the one in the kit: Quarter deck and forecastle railings were extra fun plasticard projects! Quarterdeck railing in progress: and forecastle railing and knees: Made the gratings out of wood; these were the smallest I could find from Amati, not to scale but looks so much better than metal and plastic alternatives I've seen elsewhere. Made the coamings out of wood strips for the forecastle/QD also, looks much better than the plasticard strips I used below deck. Quarterdeck: added steering wheel, binnacle, gratings, ladder, cleats, shot garlands, and poop bulkhead. I've taken some creative license and extended the clerk's and master's cabins forward. Forecastle dryfitted: Quarterdeck railing - quite happy how this came out: Foremast bitts -- before and after oil paint wash: QD and forecastle fittings nearly complete -- hammock netting and hatchway and ladder railings remain before moving on to the poop deck. TBD if I fit out Nelson's cabin also. Note revised location of ladder from gangway to upper deck. The obscenely oversized capstan was the very, very first thing I built, and now it's so solidly superglued into place it will never, ever come off (believe me I've tried). Fortunately, it'll eventually be hidden by the ship's boats. Everything's been given a light wash of umbre oil paint and a light beige dry brush, not as much for weathering, but just to bring out textures and contrasts a bit more. Had to order even more 1mm ball bearings to stock up the shot garlands... my third order now! Who knew they needed to have so many cannonballs handy! Word of the week: cavel cleat. I've also seen it as "kevel", e.g. in the Superbe kit instructions. Same origin as "gavel" (to bring a court to order), and in Swedish, we use the word "kavel" for rolling pin. It's not clear to me from the Victory/Amati Vanguard instructions what the rearmost cavel cleat is for; will I need to pull a thread through here before glueing on the poop deck (assume will be near impossible after it's on)? Once I have the masts, I'll figure out what to do with the mast collars (nylon washers from Home Depot). The current holes are likely a bit too large and gaps will need to be covered in some way.


-
Correct, in retrospect, I could/should have avoided this problem by scratch building the channels instead of using the ones from the kit. I think it looks okay though, and I learned something from it. Do you mean the ports should be larger for the carronades? I sized the gun ports based on pictures from build logs of the Victory/Amati model, before I found better references, and before I found Lavery’s book reference. 100% agreed! I wouldn't say I underestimated the amount or complexity of work in this conversion -- I was in blissful ignorance and didn't have any expectations at all! In hindsight, I'd possibly taken a different approach or attempted a different project, and definitely spent more time researching and planning. It's been a great learning experience both from a build/project planning process, building technique, and historical accuracy point of view, and I'm very thankful to the many contributors and advisors on this forum. (I'm glad I started with this plastic kit before sinking my teeth into a wooden build!) Great point -- agreed this kit could be used to recreate any Téméraire class 74, or RN prize, and be much closer to reality than my Vanguard conversion
- 24 replies
-
- 1
-
-
- HMS Vanguard
- Heller
- (and 2 more)
-
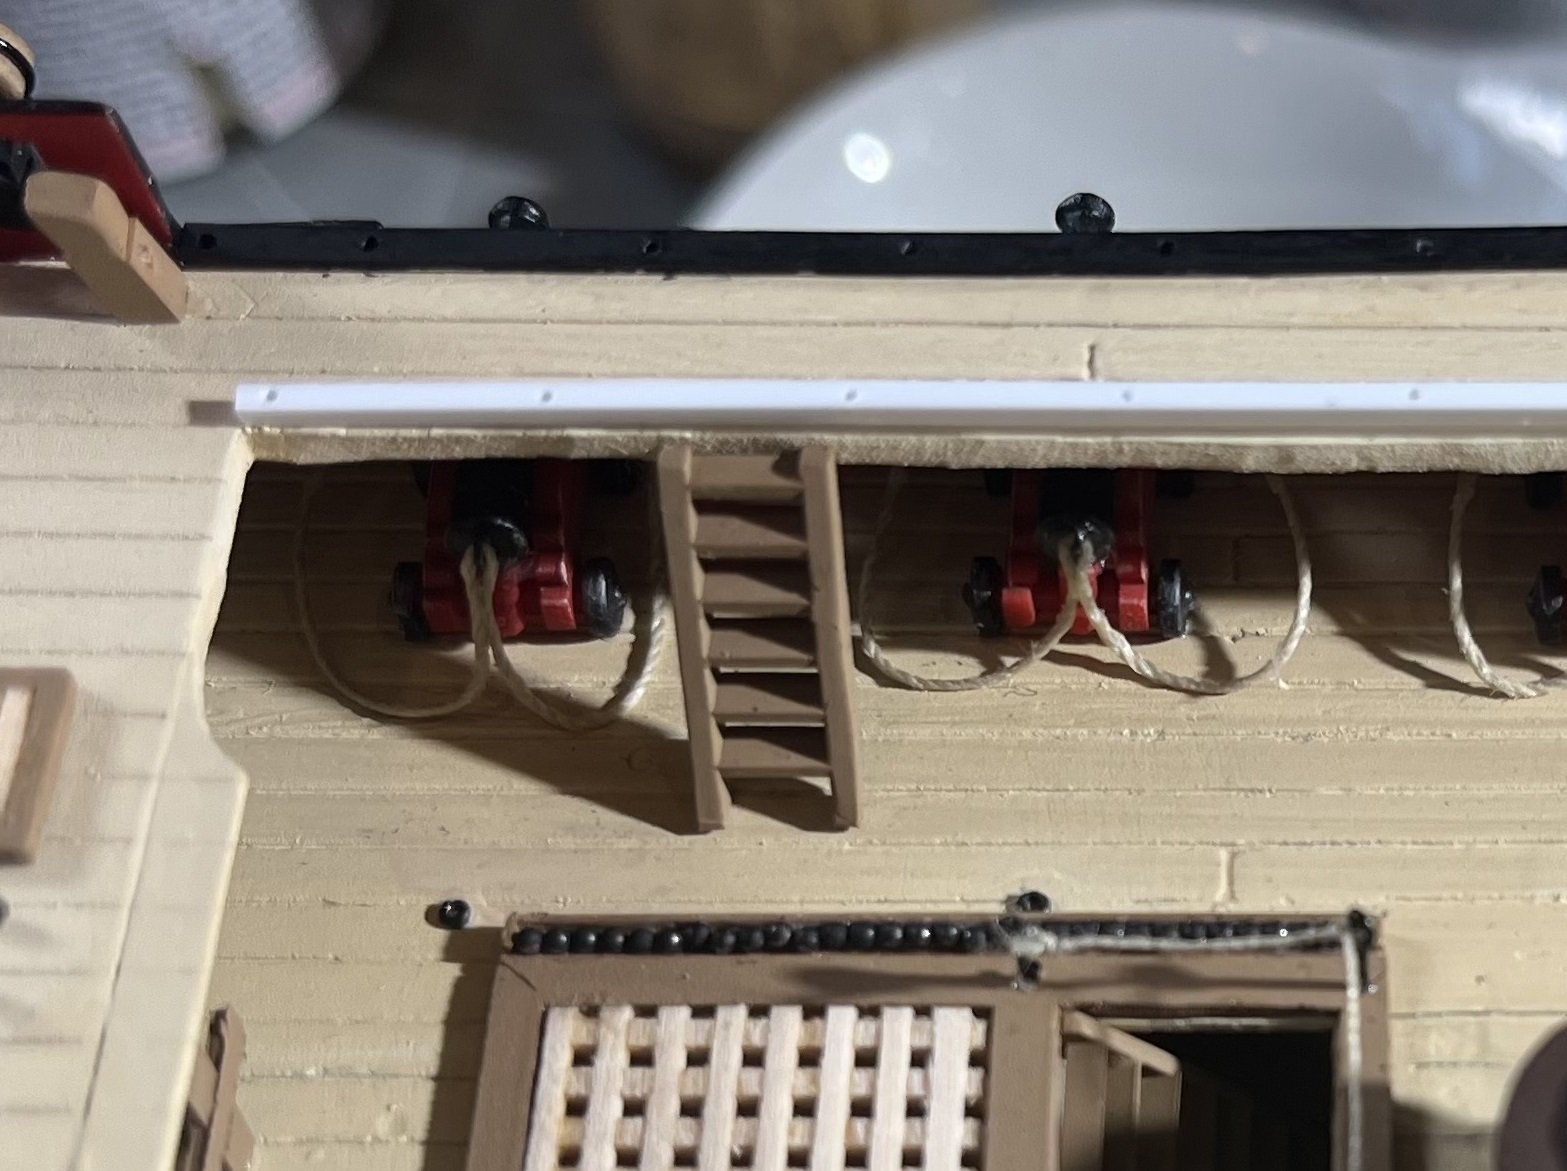
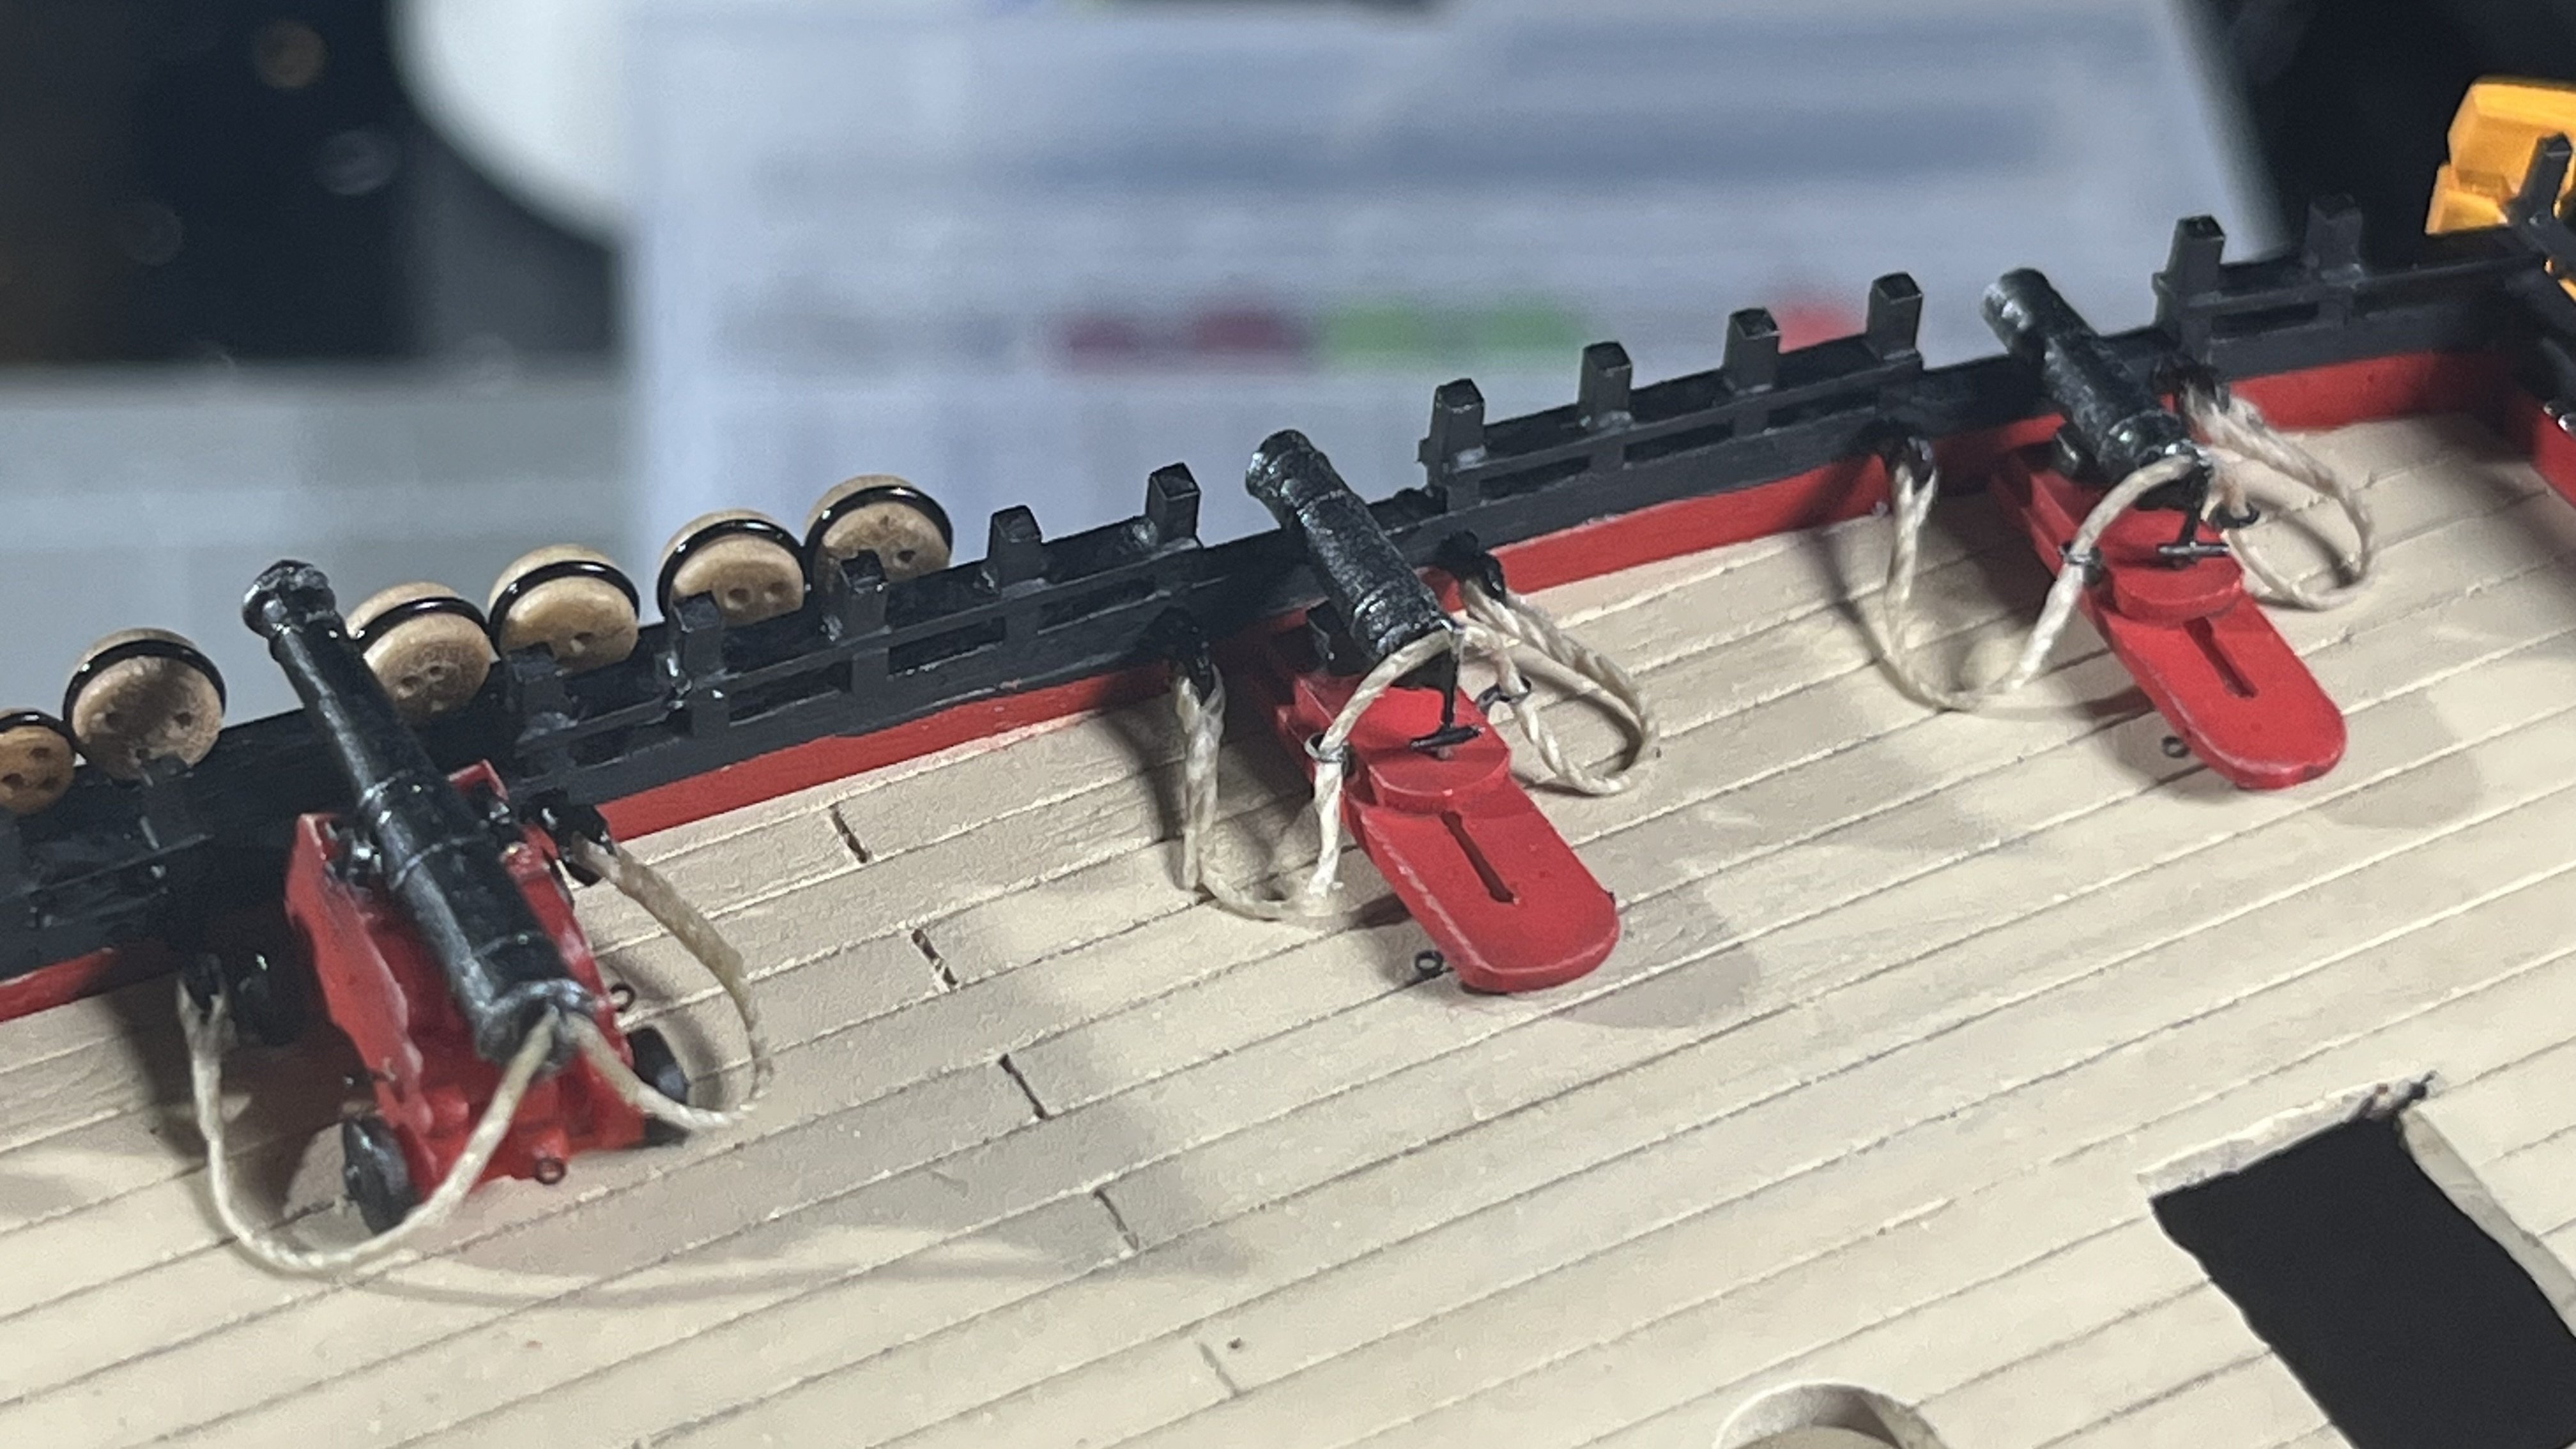
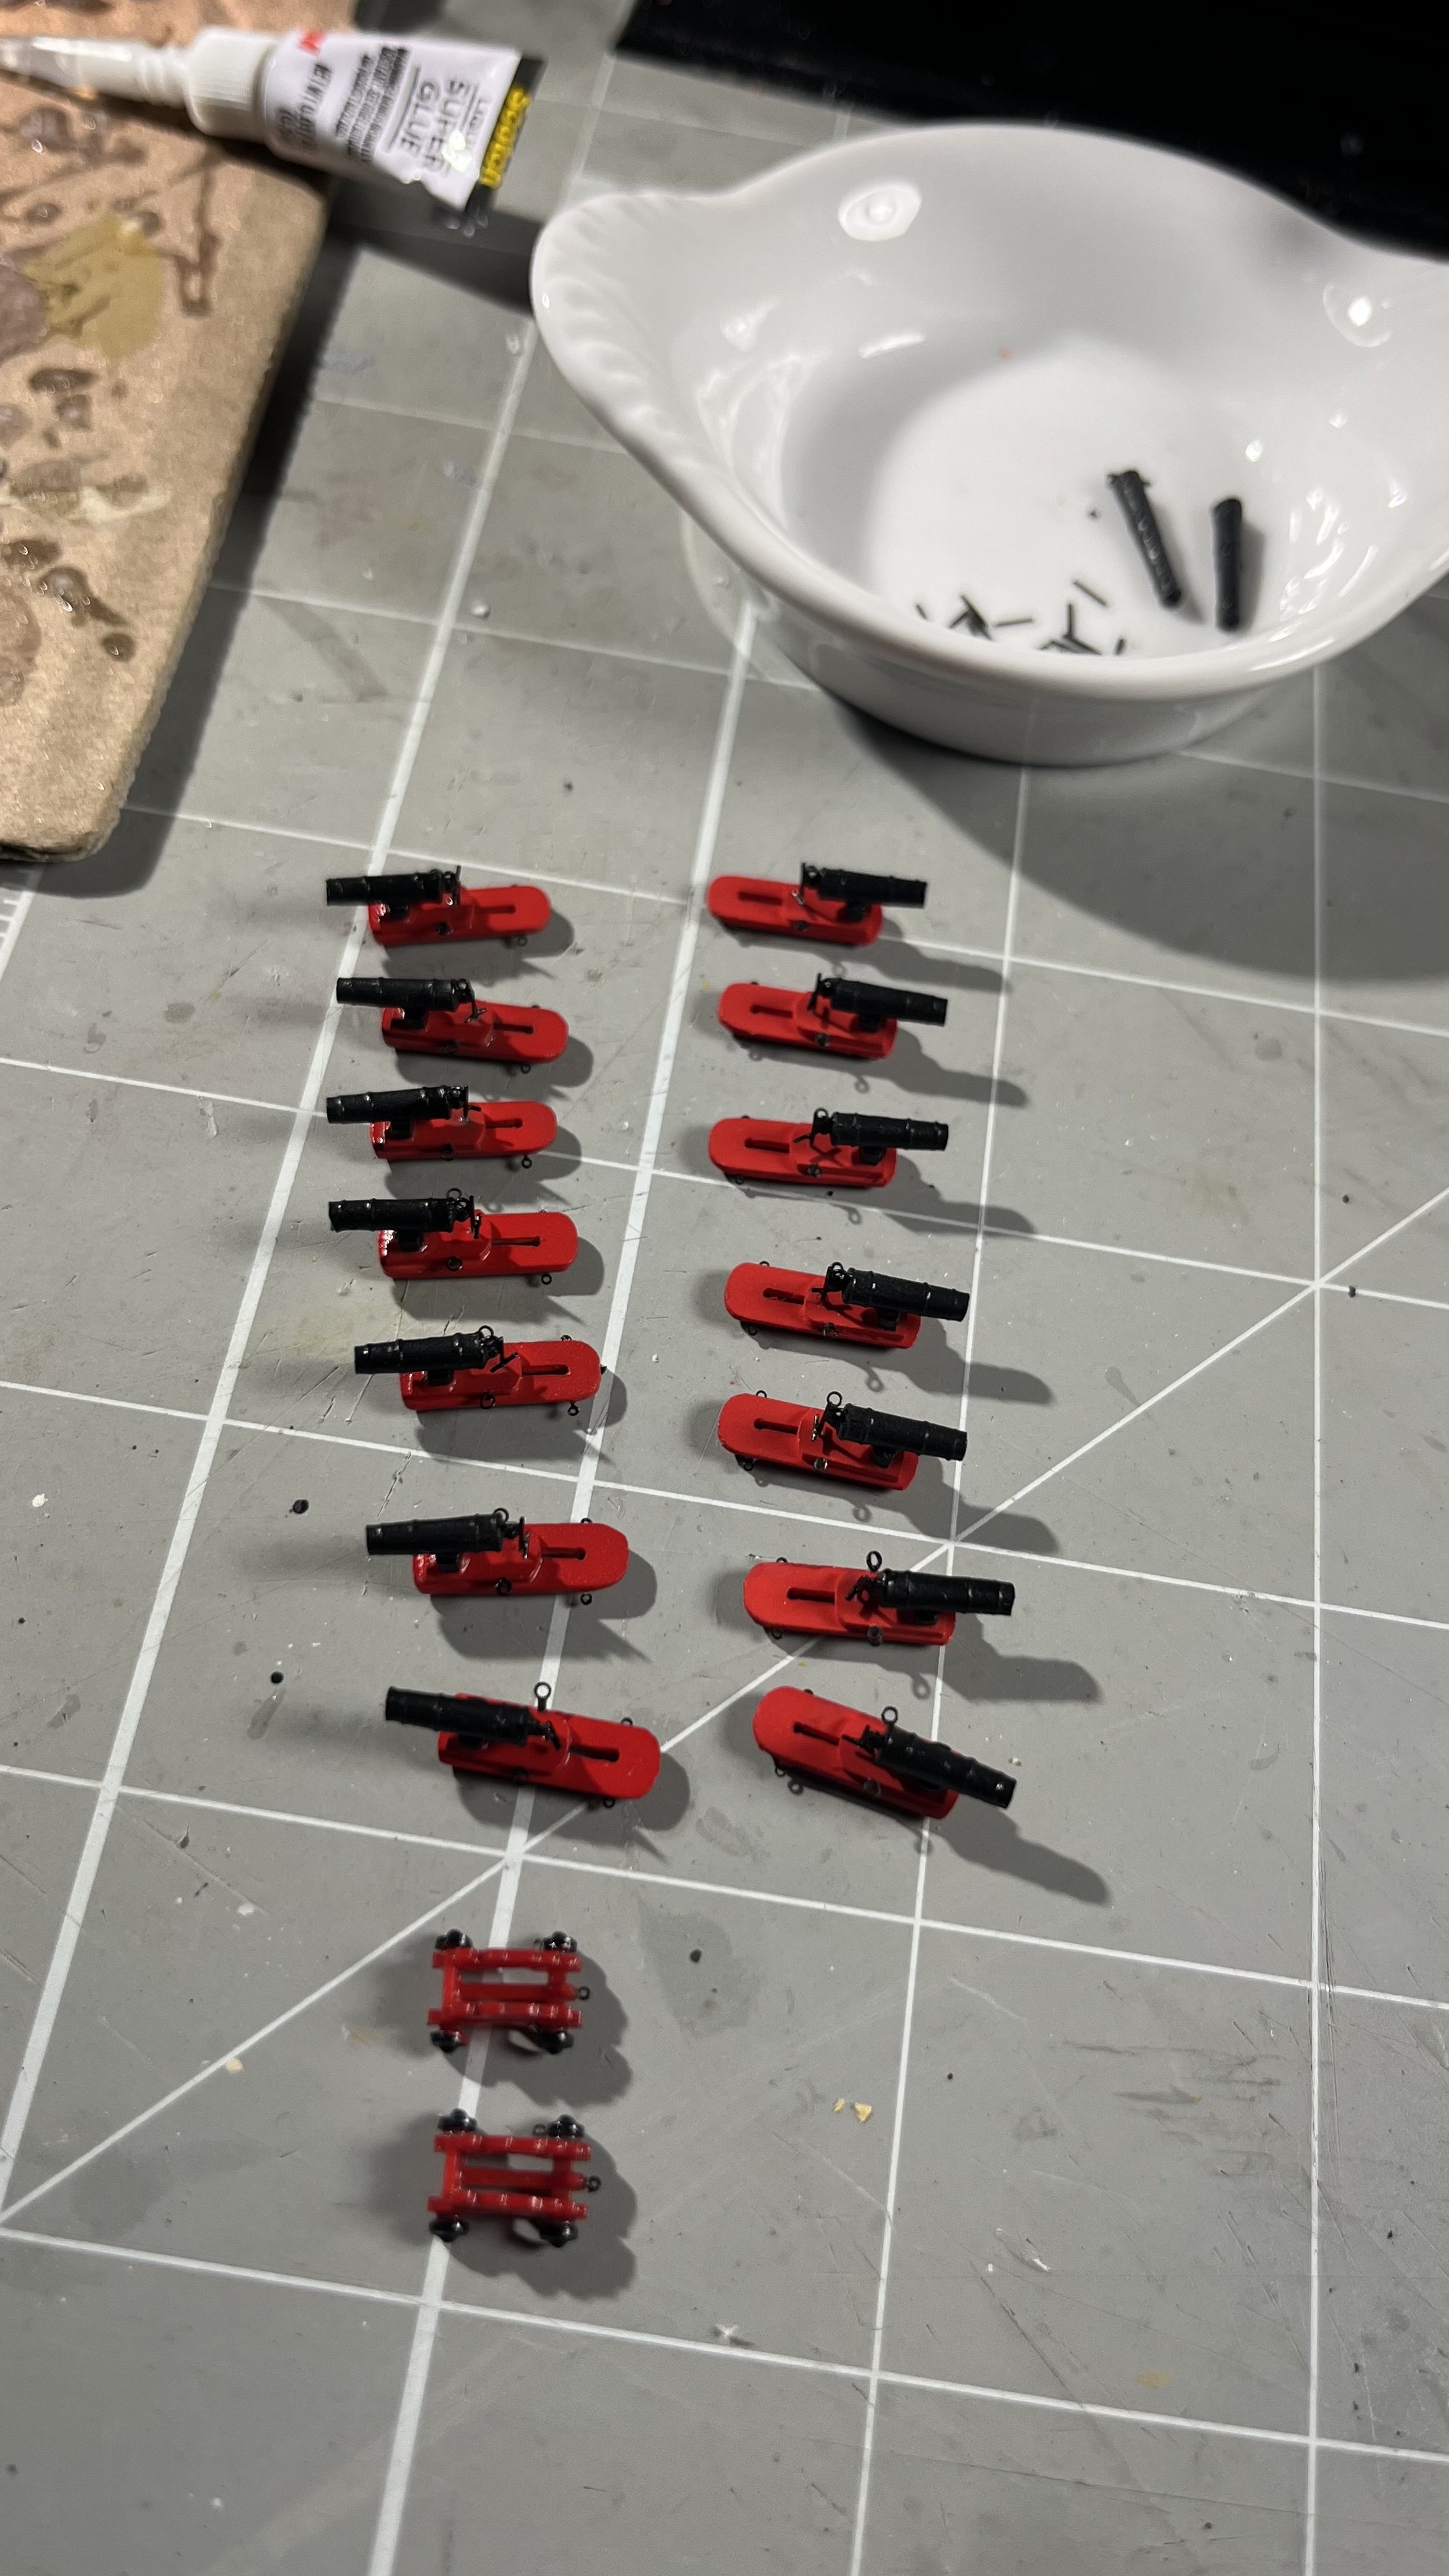
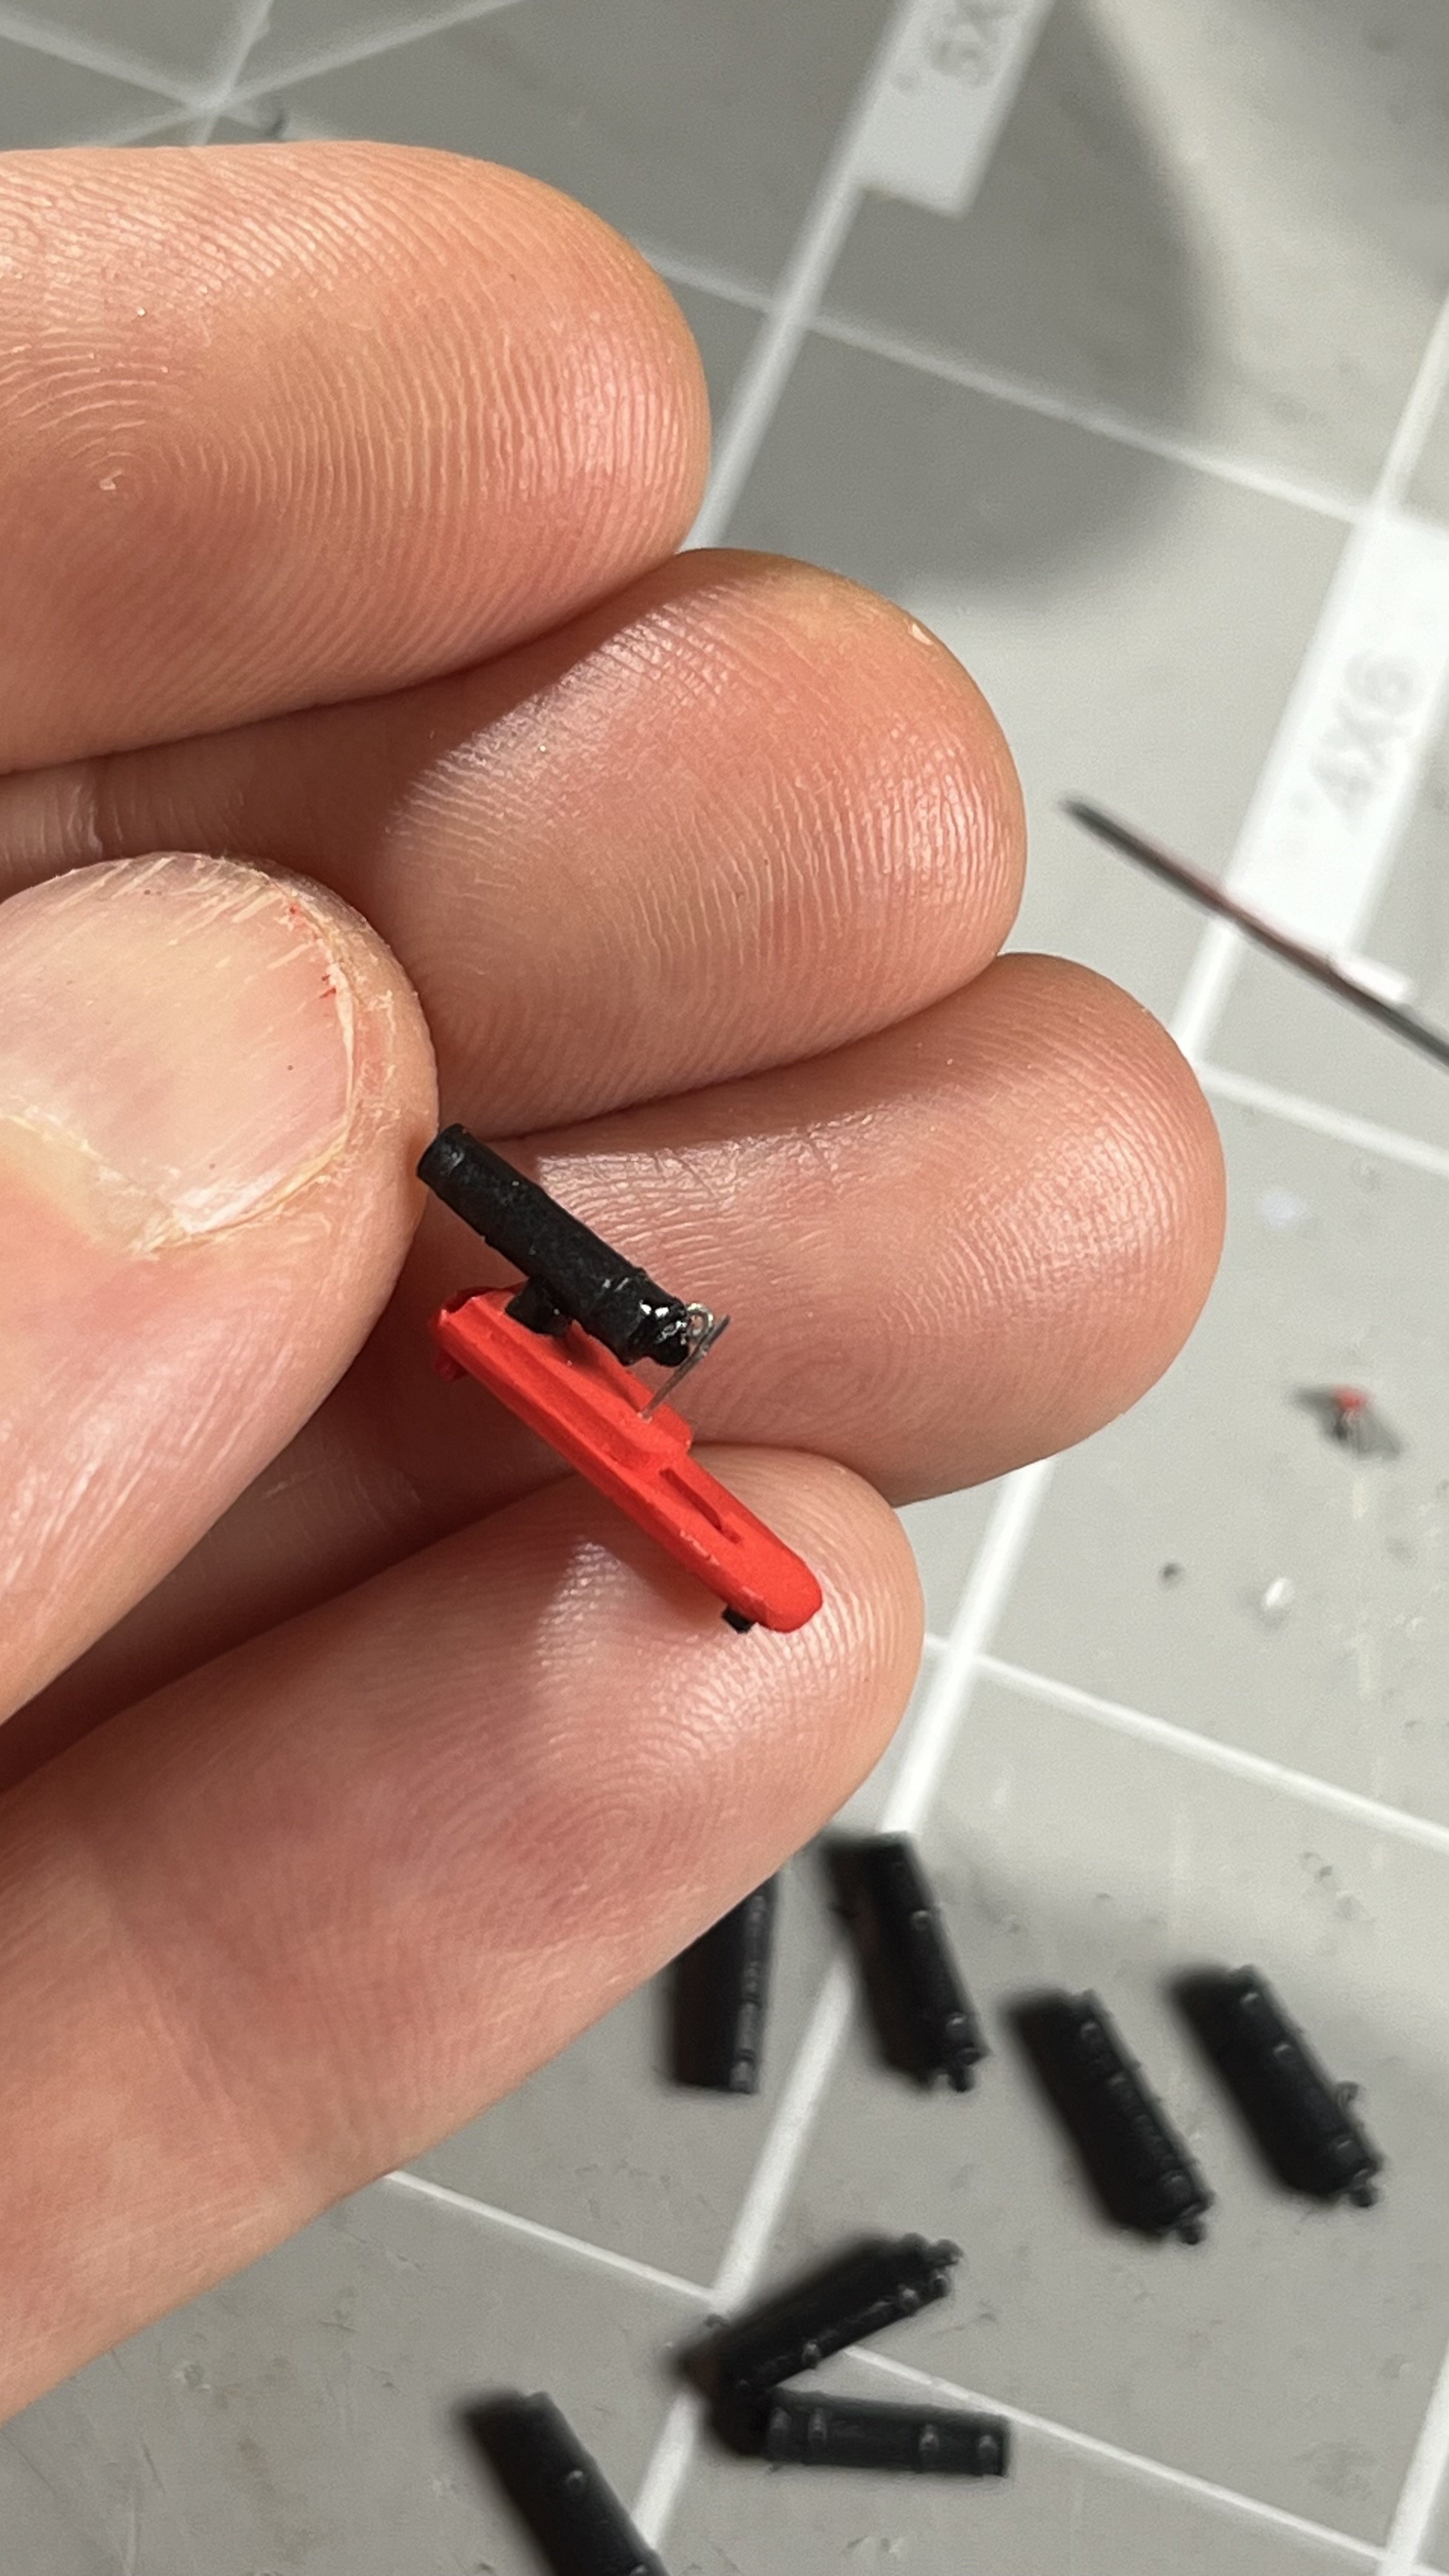
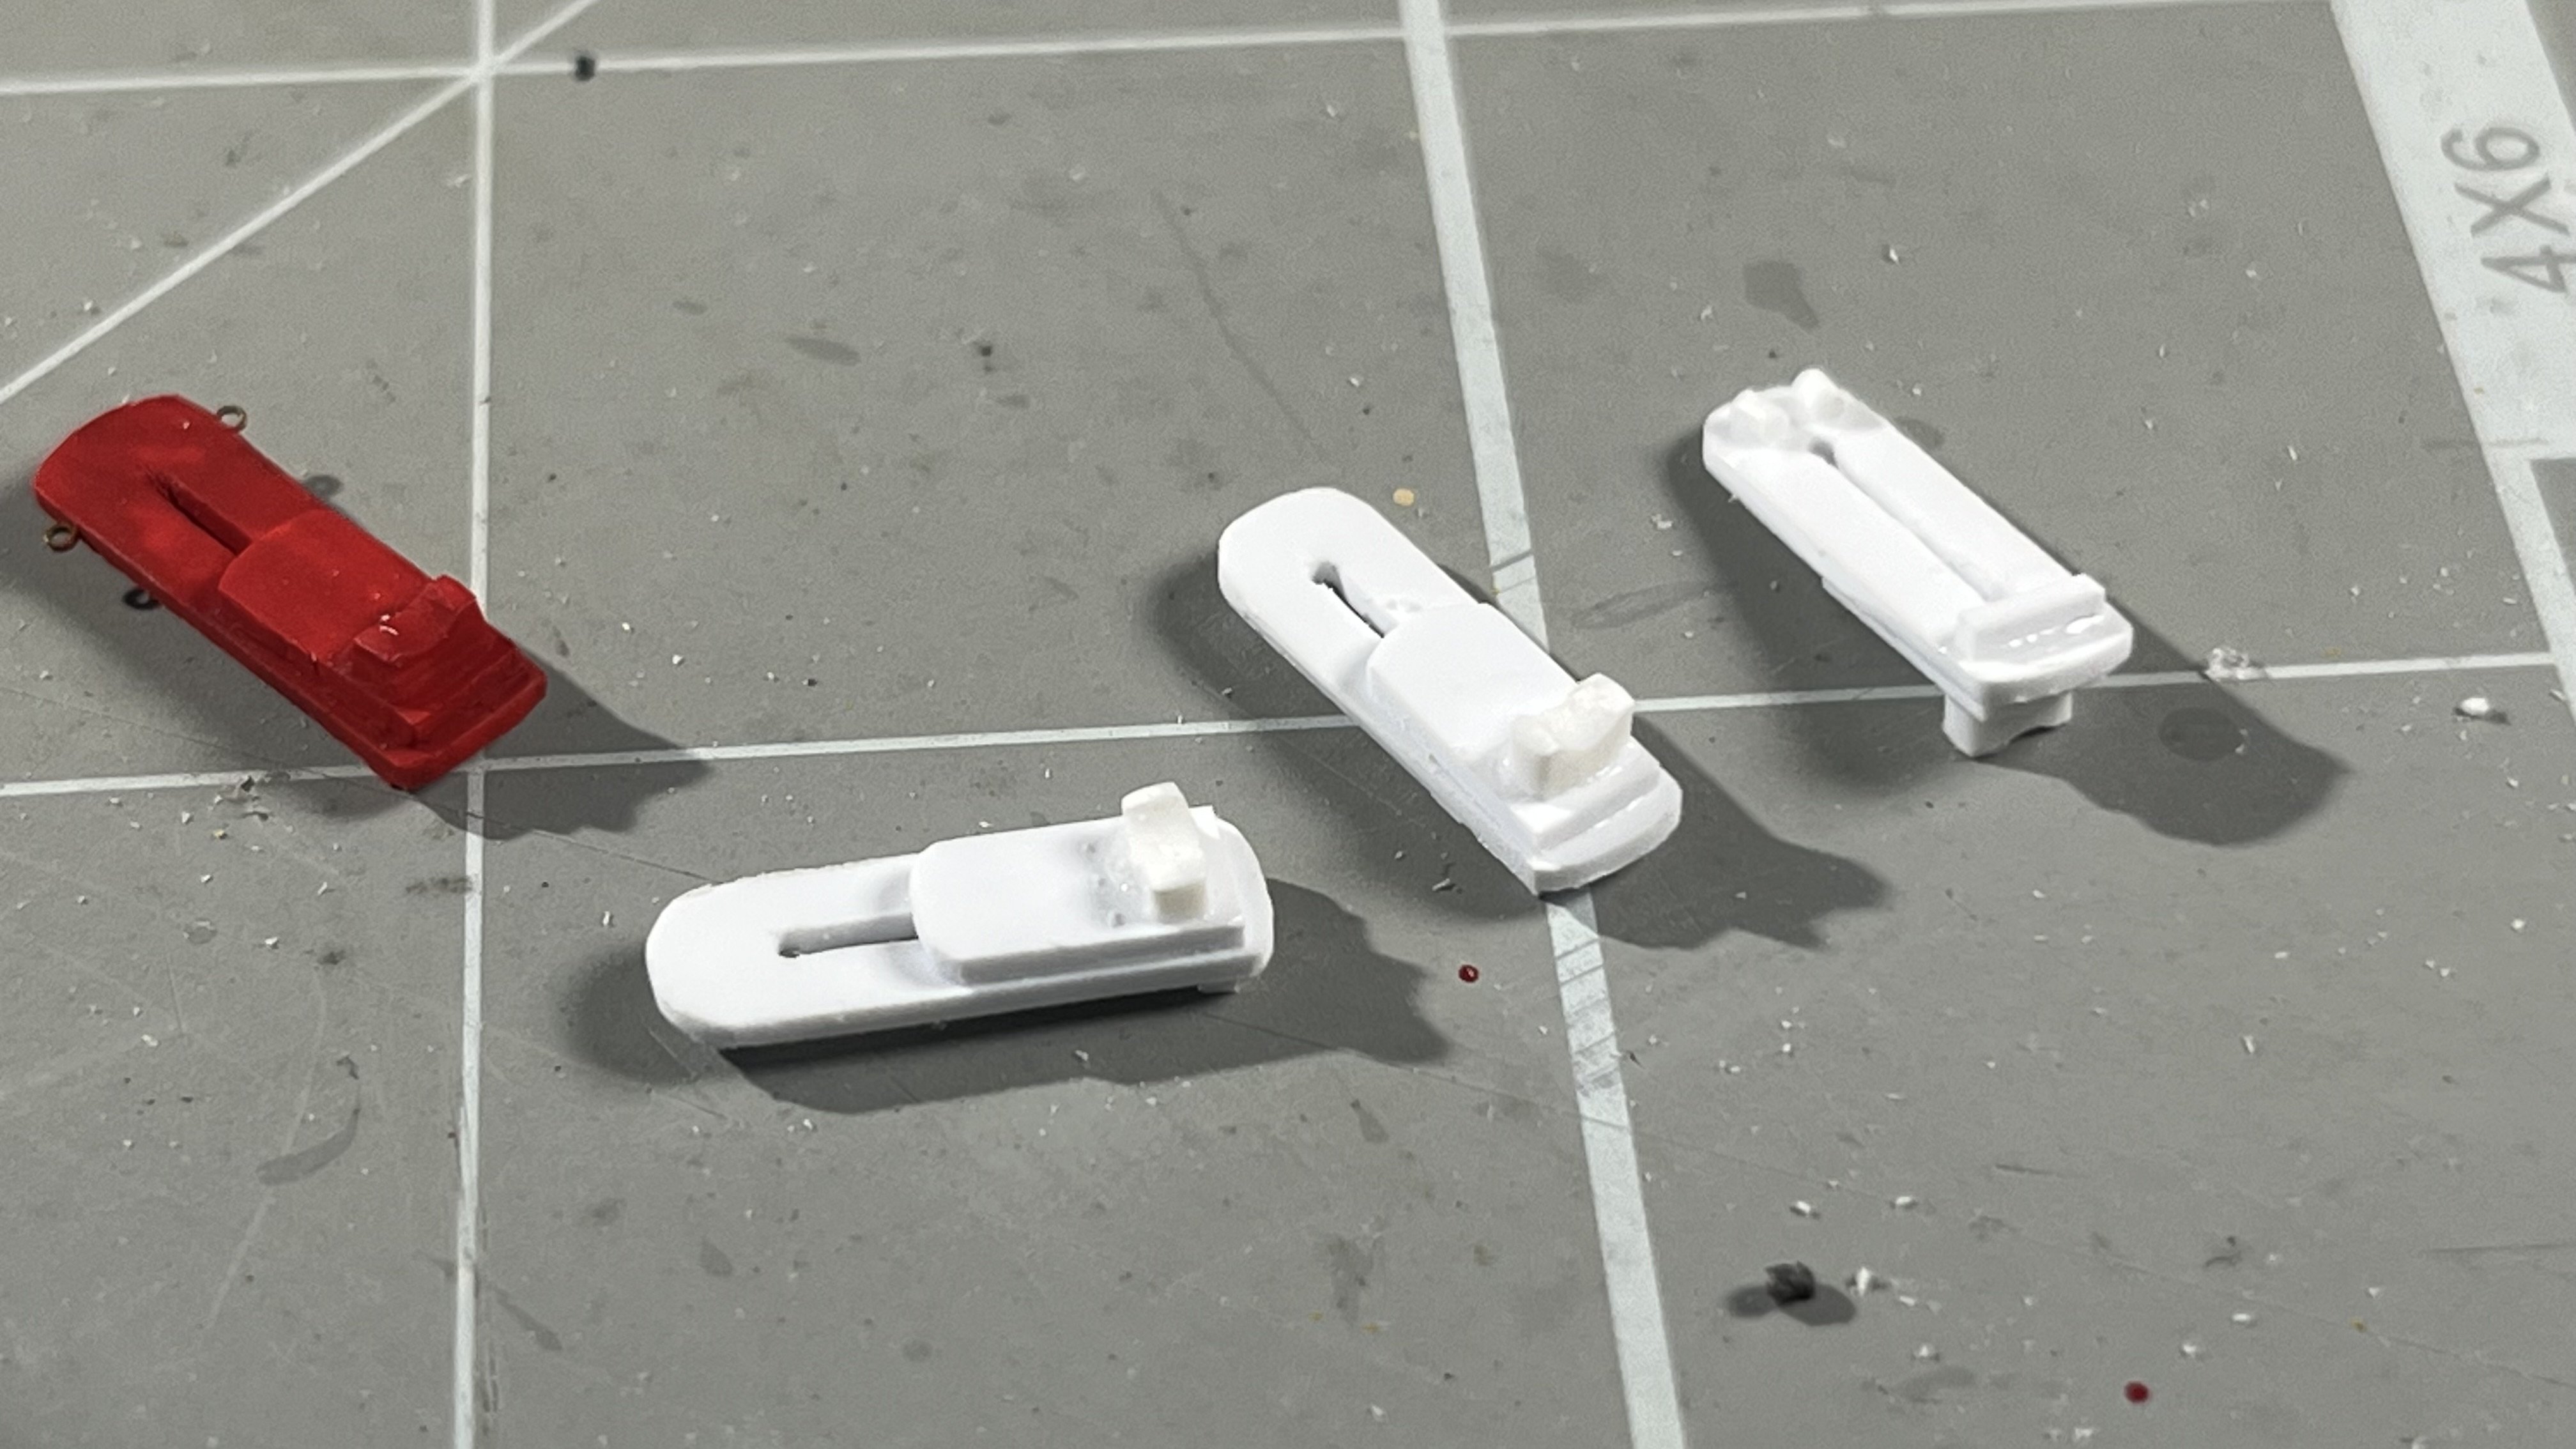
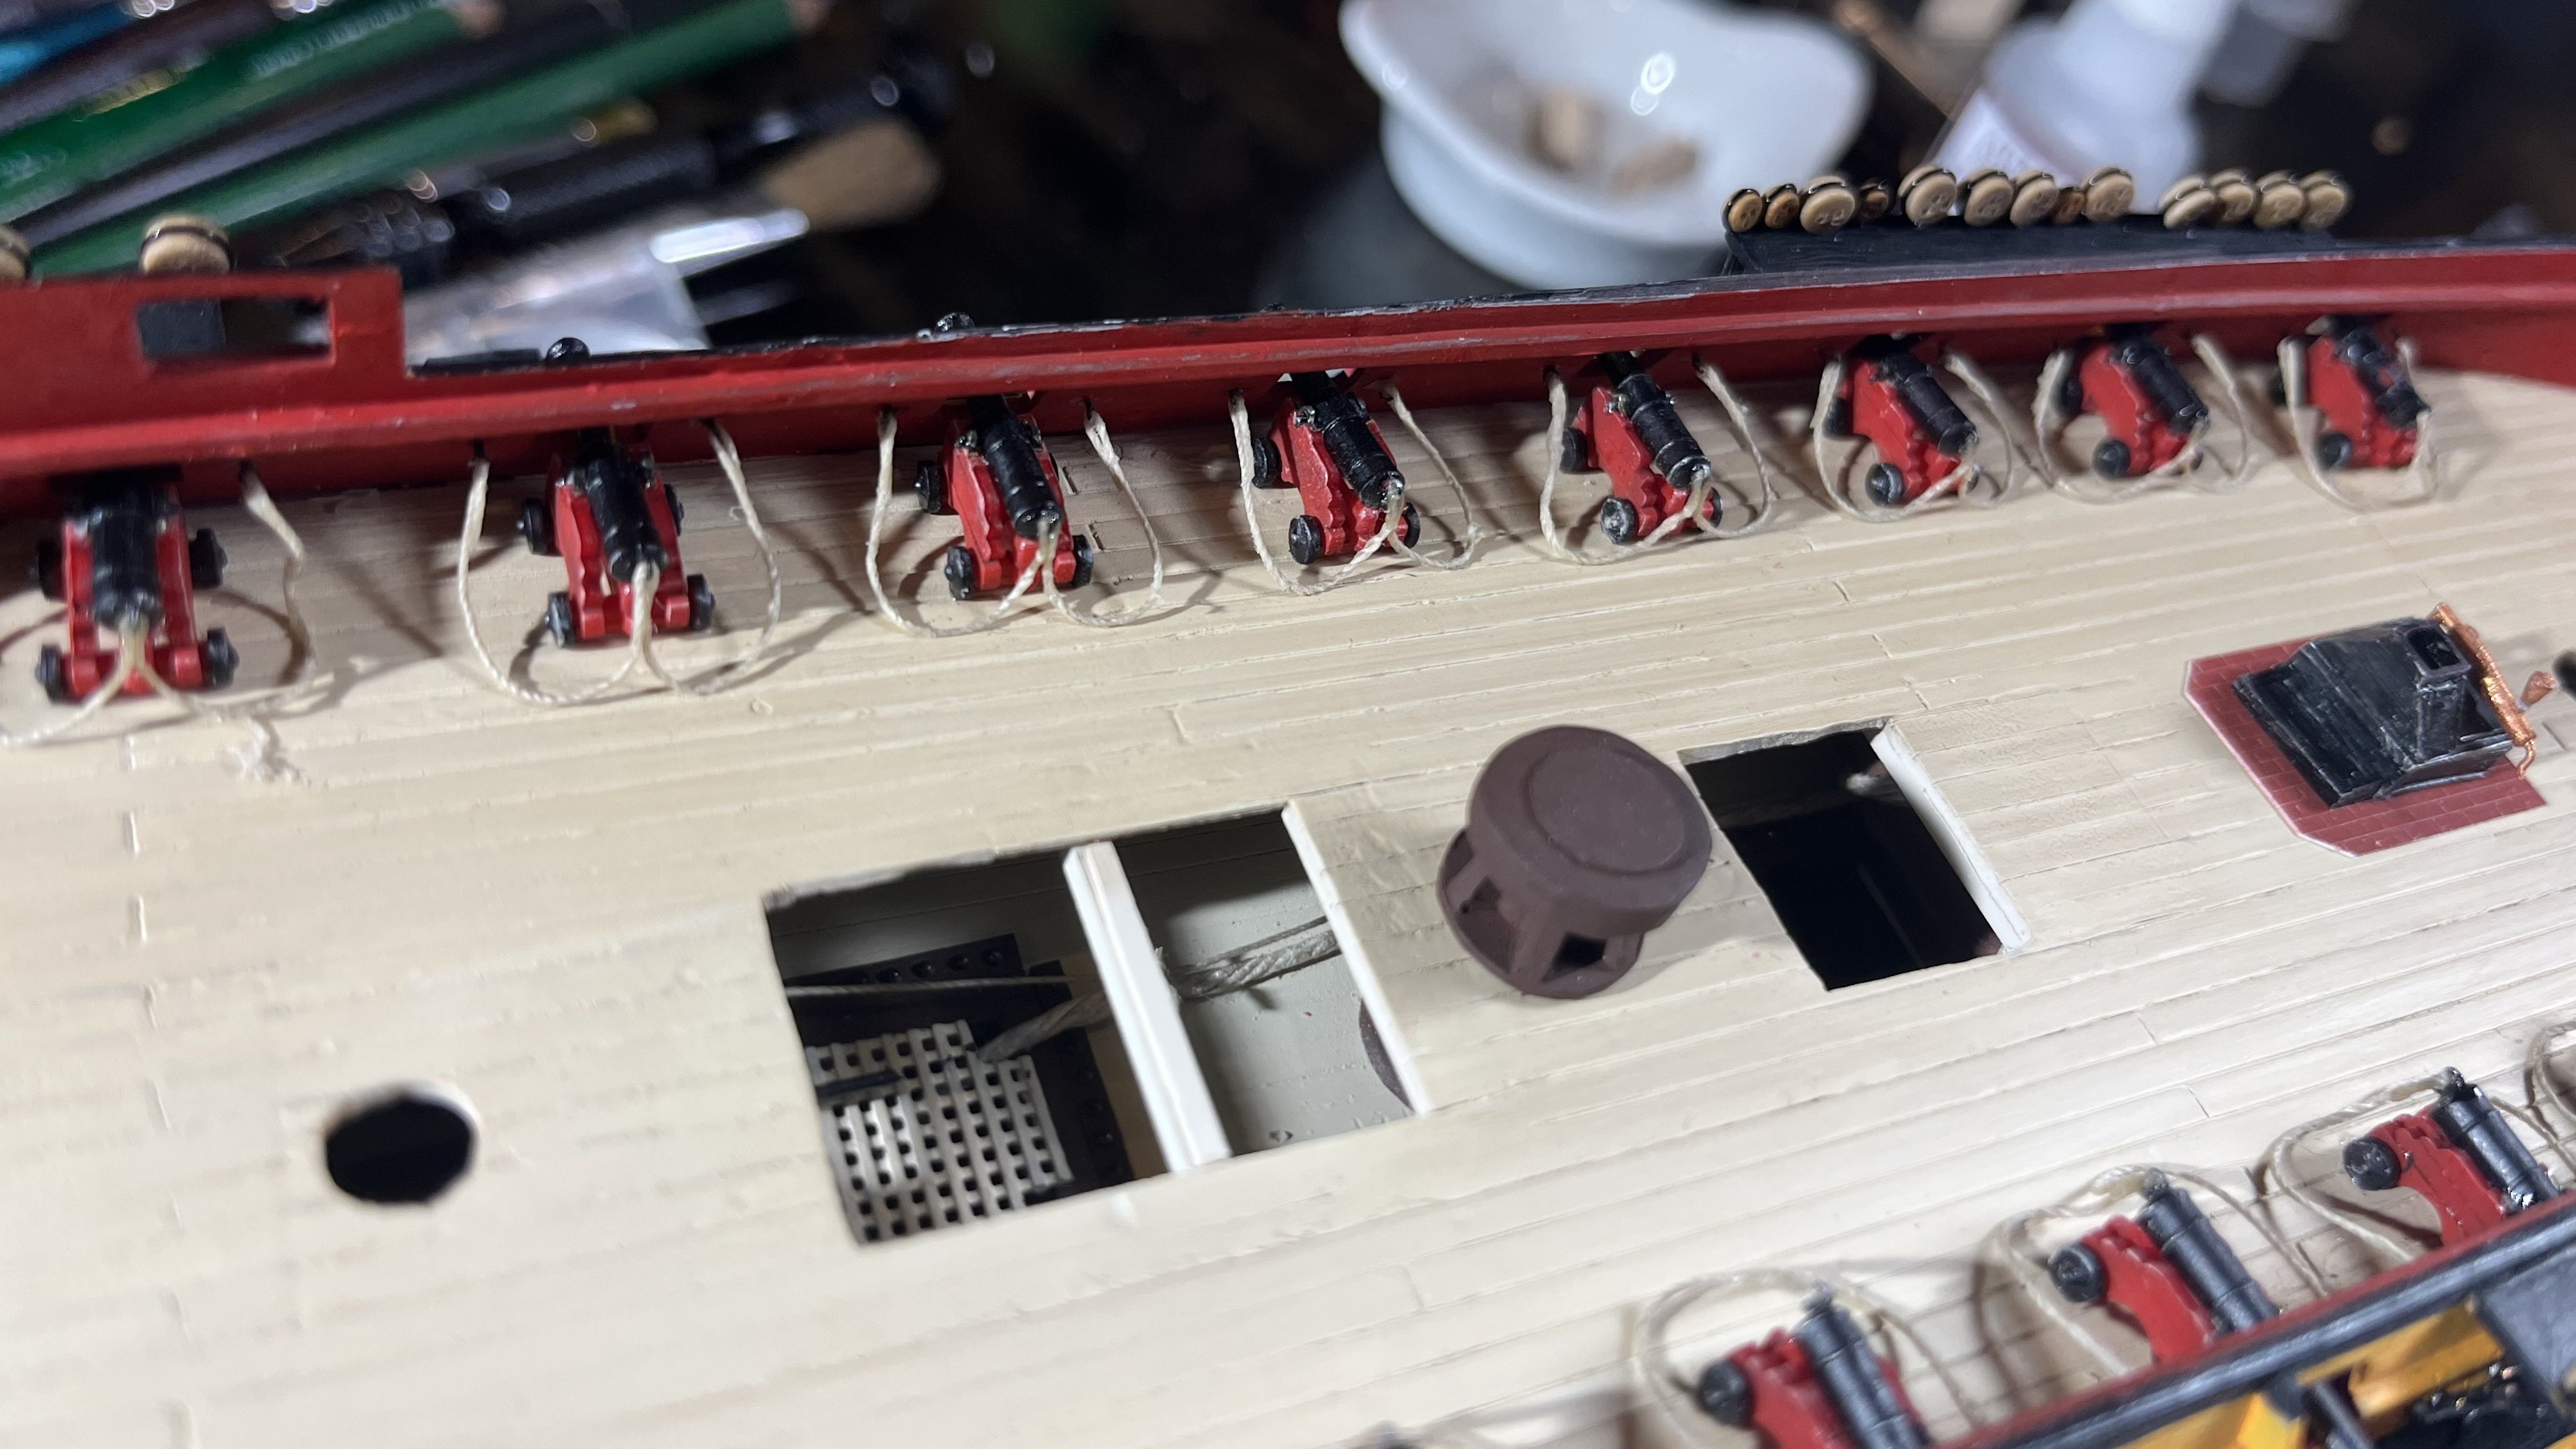
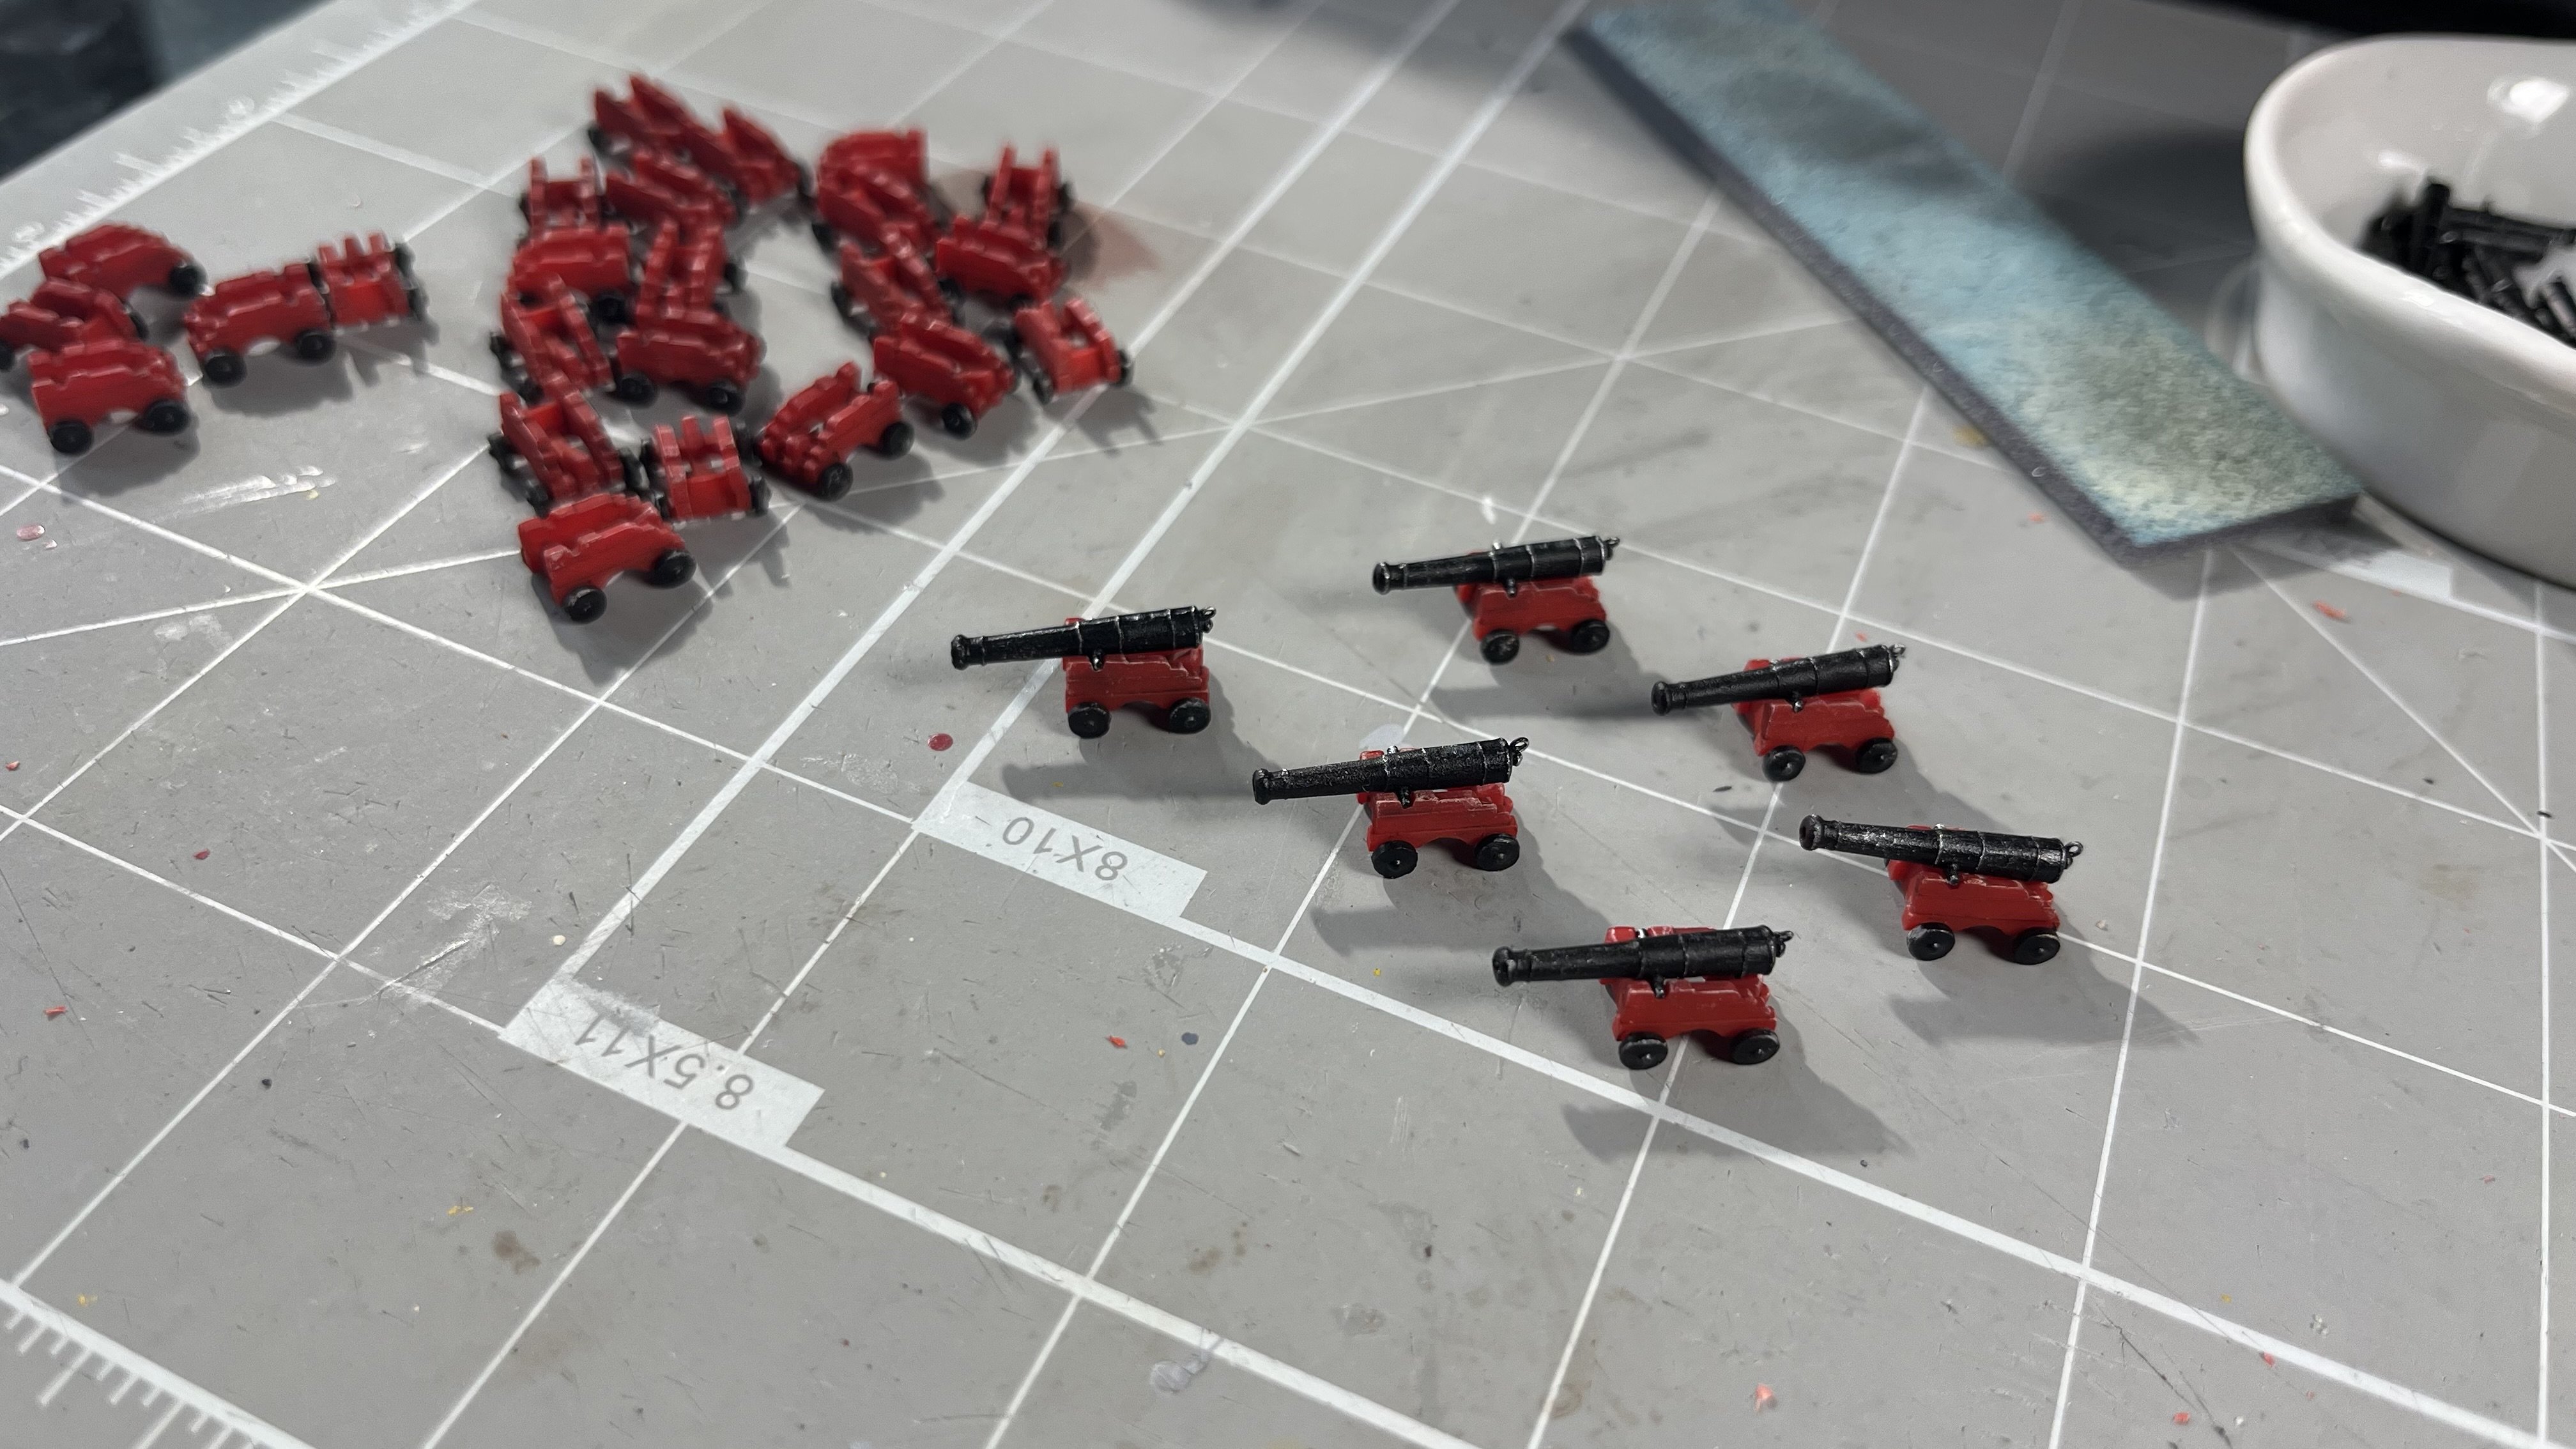
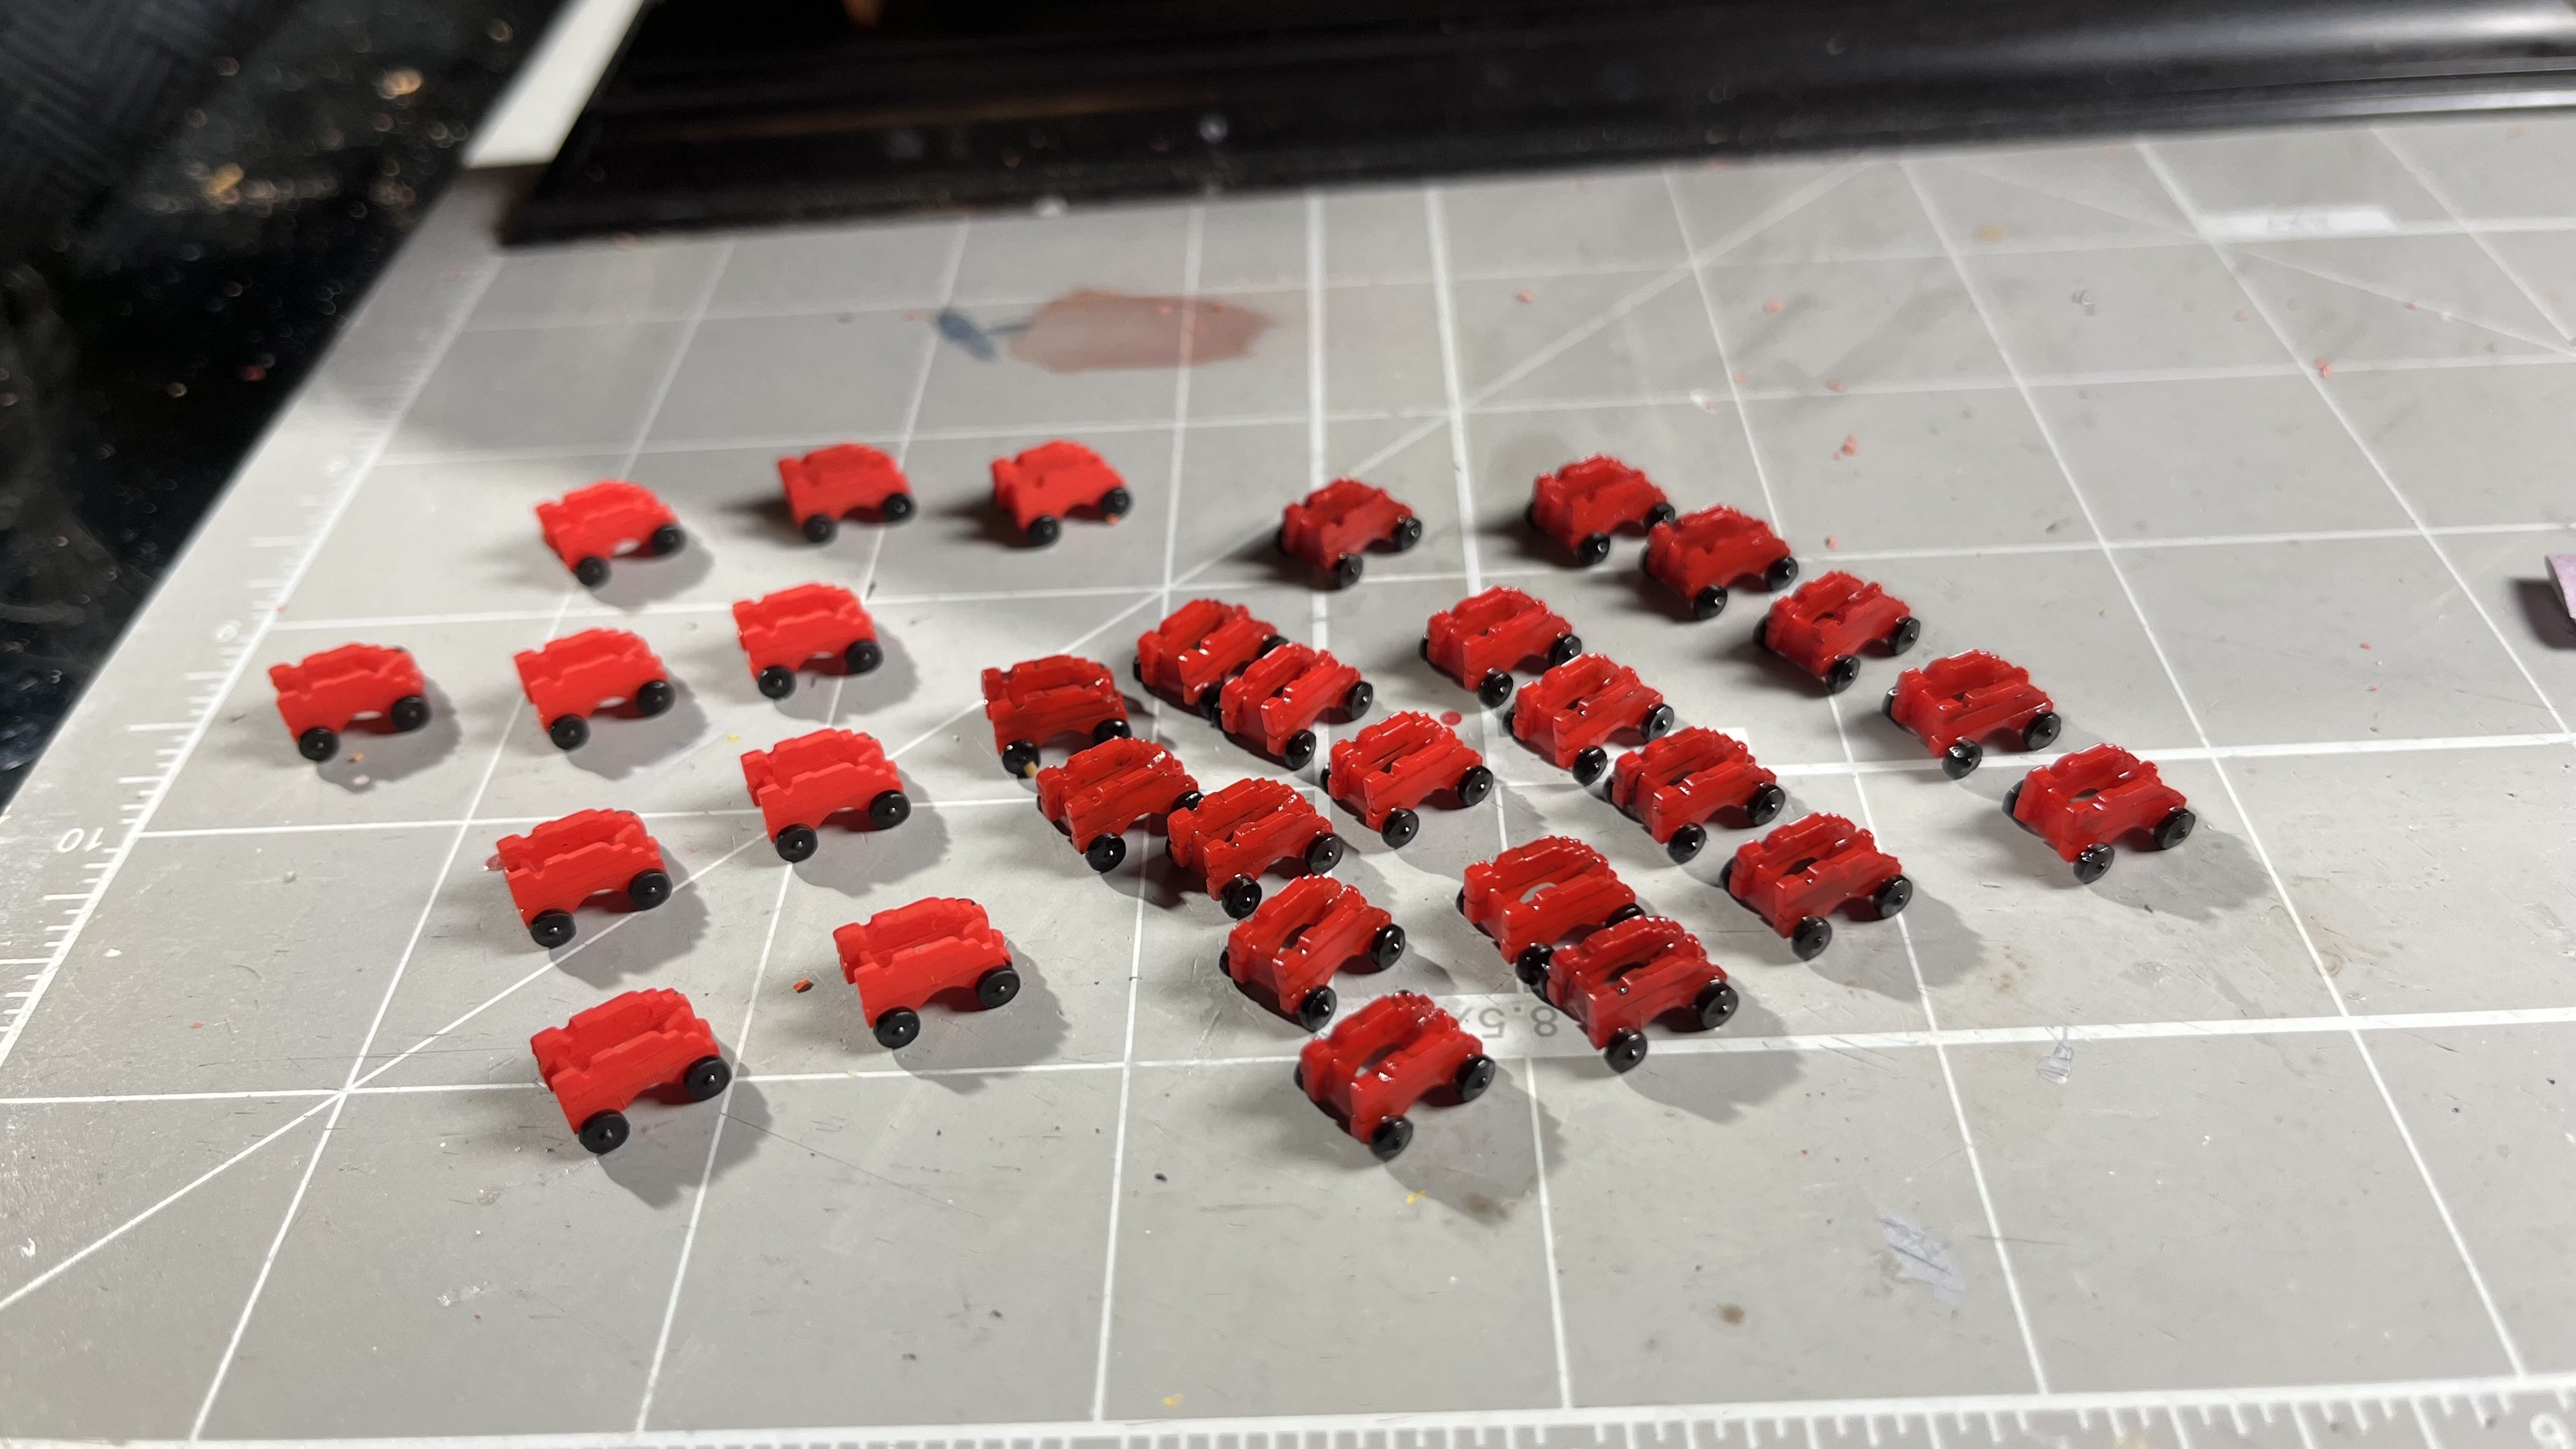
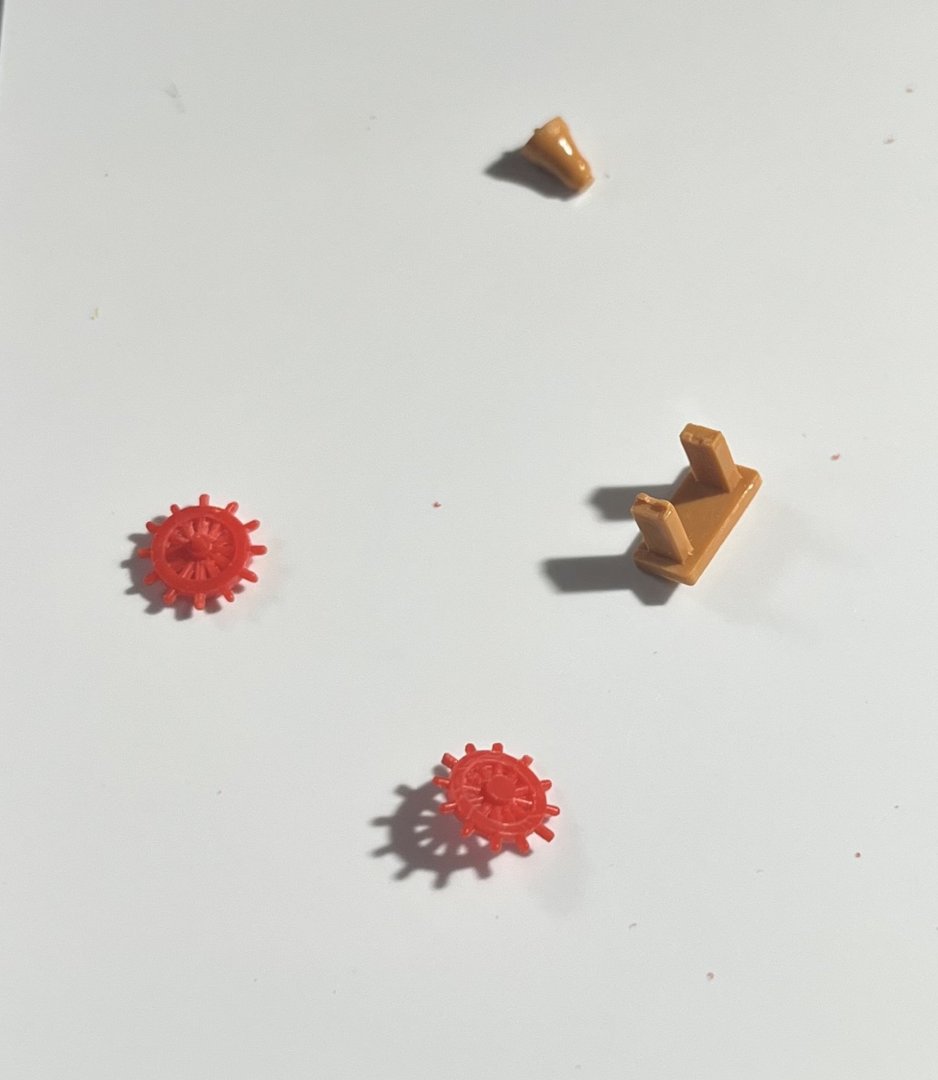
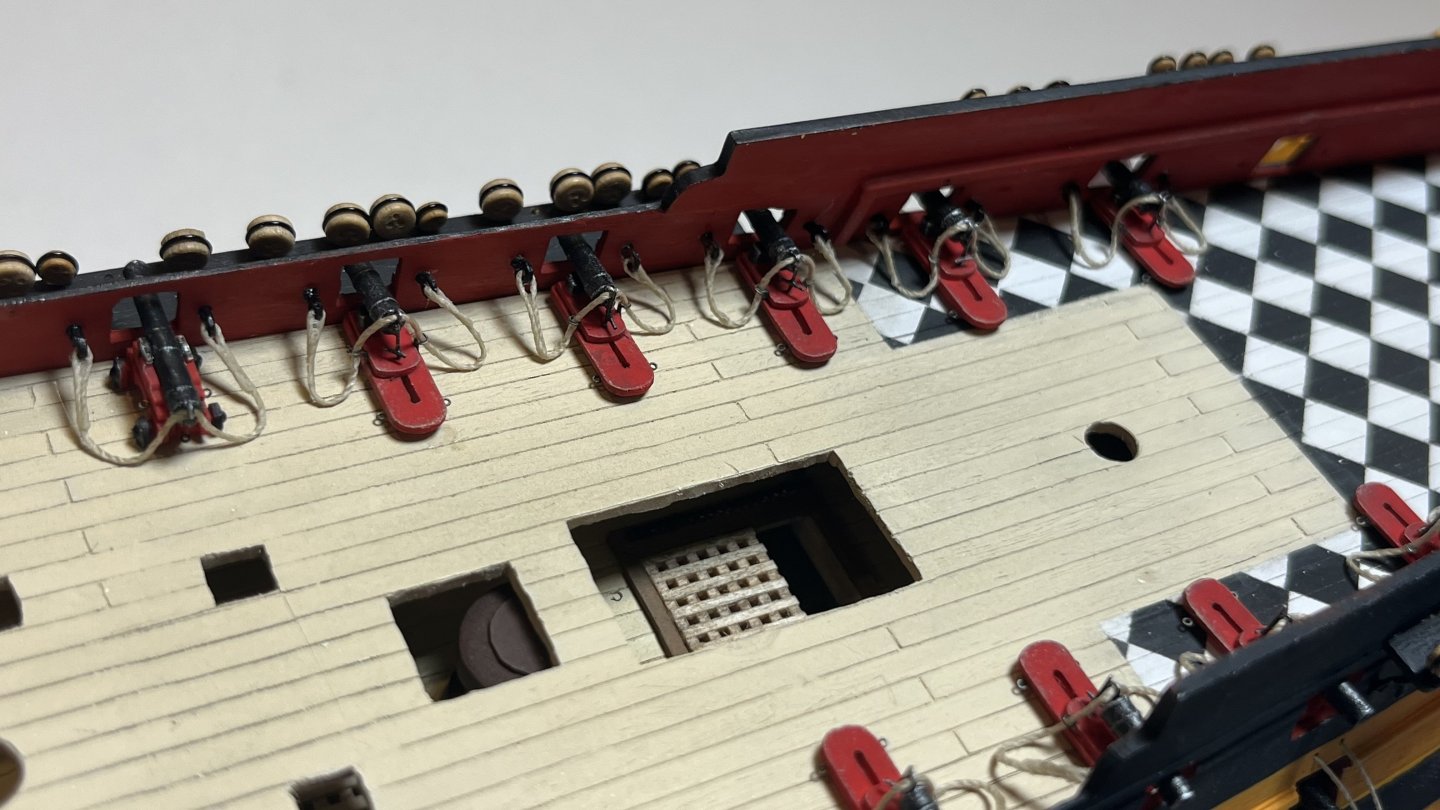
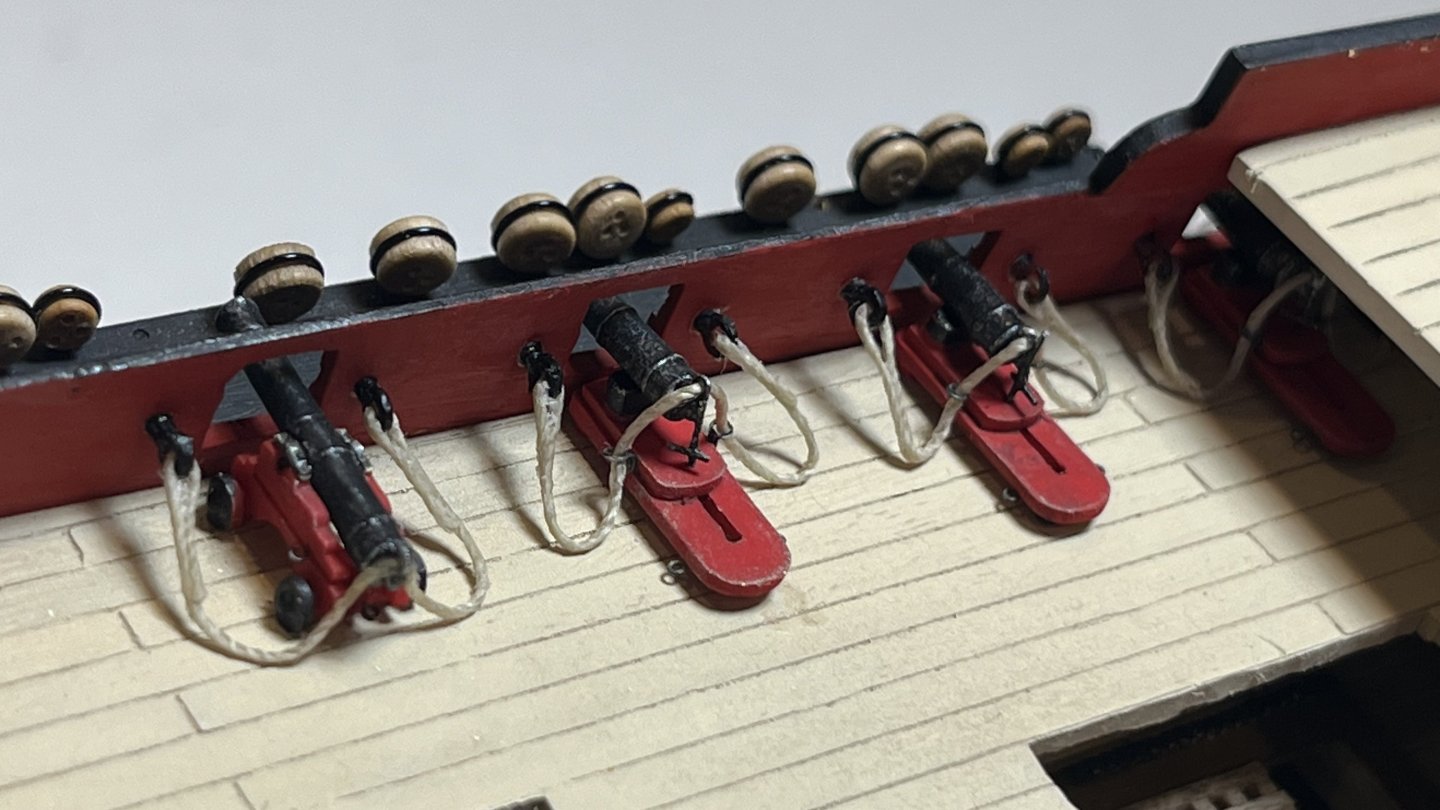
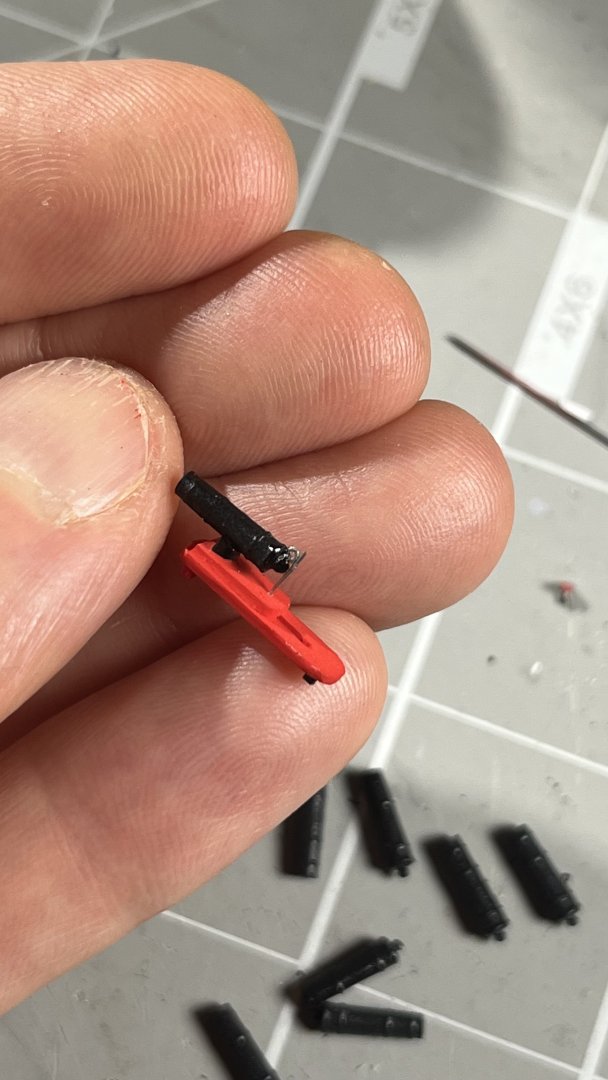
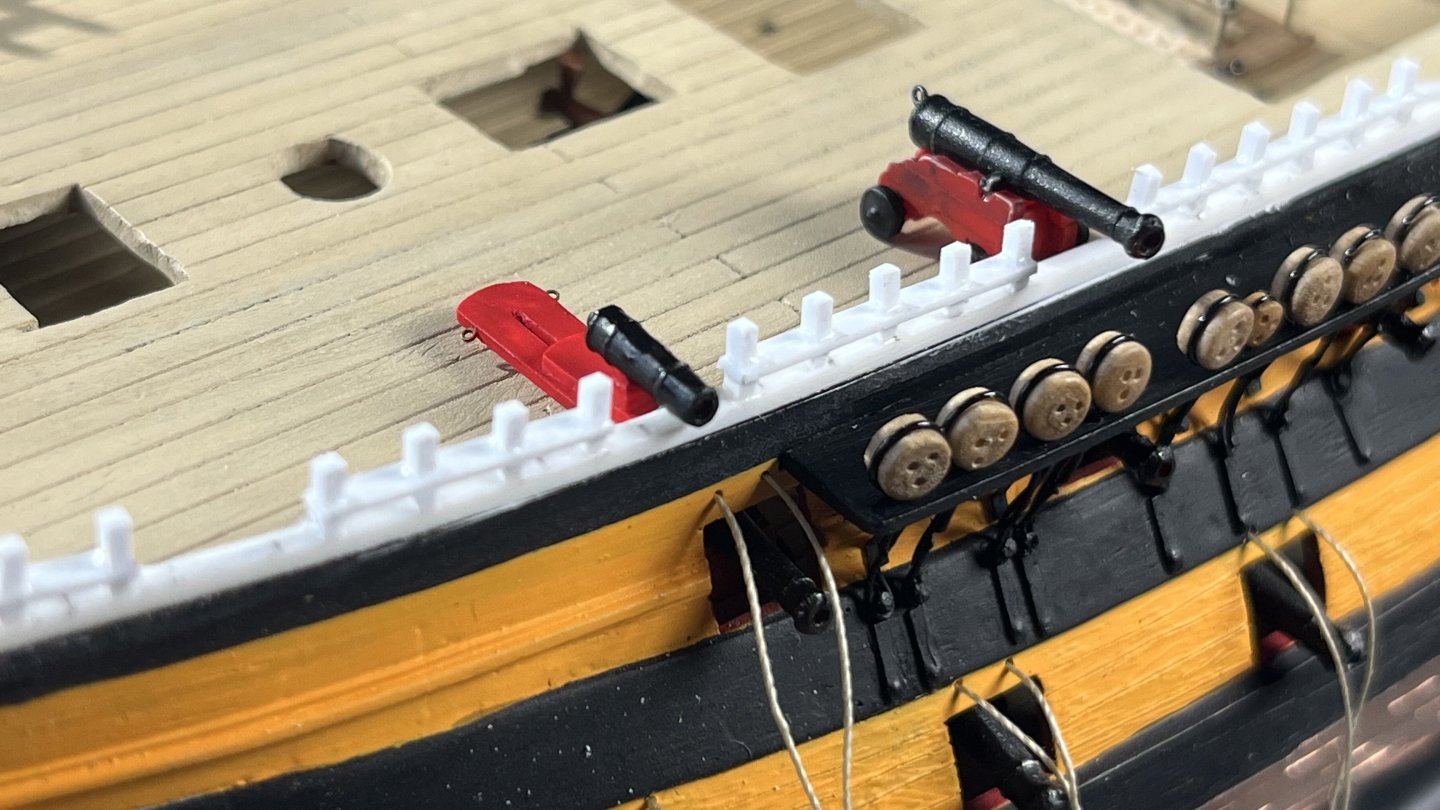
Worked on the quarterdeck and forecastle batteries this week. While not 100% properly to scale, and the location of some of the guns will cause a variety of issues, I'm quite happy with how it came out. Cut off the barrels of the 8-pounder guns in the kit to create short, stocky barrels. Drilled 0.9mm hole for the bore. Cut strips from 0.8mm plasticard, put them in a stack to sand round corners. Cut out longer pieces for the carriage, shorter for the slide, sanded down rounded corners. Drilled two holes in carriage and cut a groove for the slide. Added elevation pivot and chock from strips of plasticard, and wheels from plasticard rod. Left-hand carriage is assembled and hand painted, with eye bolts for the tackle. Used 28gauge metal rod for elevation thread. Added cascabel loop to barrel, and assembled on carriage against elevation thread with CA. Airbrushed all carriages red (XF-7) and barrels black (X-18), hand painted details (carriages, elevation threads, wheels, elevation pivots, eye bolts), and gave them a dark brown wash. Light drybrush of carriages (XF-57) and barrels (XF-16) before mounting on forecastle. 1mm Amati thread for breeching ropes, "spliced" with diluted textile glue. Breeching rope eye bolts are the plastic ones that came with the kit, a bit too large but I was concerned the small (0.9mm) Amati eye bolts (visible on the carriages) would be too small and flimsy. The "24-pound long gun" to the left is an 18-pound gun from the kit, left over from the upper deck battery. Starboard quarter deck battery. The "24-pounder" to the left is an (undersized...) 8-pounder from the kit, but I think looks okay next to the "24-pound" carronades. I suspect they're all a bit small, but space is at a premium here and with rigging, ladders, kevels, stanchions etc. this space will be incredibly cluttered once done. I haven't decided on gun tackle yet, but added eye bolts to the carriages anyway to have the option later. These carronades will probably blow the main shrouds to shreds if ever used in action 😕 As per Lavery's Nelson and the Nile, she's armed with ten carronades and two 24-pounders on the quarterdeck. I suppose it's anyone's guess which guns went where but I placed the 24-pounder to the fore, and left the aftmost gun port empty. I'm theorizing they might have done this, i.e. (1) moved one gun from quarterdeck to forecastle, and (2) used carronades rather than regular long guns, to create some extra space, since Vanguard was fitted to be a flagship?


- 24 replies
-
- 2
-
-
- HMS Vanguard
- Heller
- (and 2 more)
-
Been a busy week irl but started to make some progress on the quarter deck and forecastle, both of which are now firmly glued in place. stocked up shot garlands on upper deck added upper deck "topping lifts" (strings for gun lids) adjusted poop deck to fit added 4 x seats of ease in quarter galleries added forecastle railing started experimenting with scratch building carronades, using a cut-down barrel from the kit's 8-pounders I've been referencing Brian Lavery's Nelson and the Nile for the gun outfitting, it states Vanguard had two 24-pound guns and ten 24-pound carronades on the quarterdeck, and two 24-pound long guns and four 24-pound carronades on the forecastle. Since the kit itself doesn't have any 24-pounders--after fitting the gun deck and upper deck I have two 36-pounders, two 18-pounders, and twenty 8-pound guns left from the kit--I'll try and come up with some creative alternative... current thinking is to use the left-over 18-pounders as 24-pound long guns; use 8-pounders as 24-pounders, and scratch-build fourteen carronades using the barrels from the 8-pounders. At least that's where I'll start, I may end up trying some other alternatives. Forecastle railings from strips of Evergreen plasticard strips: railings 0.5mm x 1.5mm; timberheads 0.75x0.75mm. Made cut-out for 24-pound gun between shroud 4 and 5, and cut-outs for carronades in front of shrouds. Likely some creative license here as relates to exact size, placement and spacing, but I think the final result looks nice. It works around the challenge with the crowded foremast shrouds (how to sort out the main mast shrouds is a different matter... 😕 ) and occupies some of the empty space in front of the foremast (due to the kit's/Superbe's) longer hull). Scratch built carronade carriage from plasticard and used barrel from kit's 8-pounder. Perhaps looks a bit small? Next to it is a left-over 18-pounder from the upper deck; which will work as the 24-pound long gun. Will try building a few more carronades before deciding if I look into other options. Added some furniture to the quarter galleries--other ideas what these spaces were used for? Surely must have been used for storage, for...?
- 24 replies
-
- 5
-

-
-
- HMS Vanguard
- Heller
- (and 2 more)
-
There’s a discussion in another thread also but cross-posting for convenience: As Brian Lavery describes it in Nelson and the Nile (p.173): ”The situation was slightly complicated by the presence of carronades on some of the British ships. These were lighter and shorter than ordinary guns and fired an extraordinarily great weight of shot for the size of the gun. At this stage they were only issued at the request of individual captains and it is not clear how many were used at the Nile. Certainly the Goliath had carried two 12-pounder carronades on her forecastle in 1782 plus six 18-pounders on the poop, while the Leander had been equipped with two 24-pounders and six 18-pounders in 1793, bringing her total armament up to 58 guns; Bellerophon had at least two carronades on her poop, one of which was ‘broke to pieces’ in the battle and the Vanguard had ten 24-pounders on her quarterdeck and four on her forecastle.” So just like paint schemes, it appears the use of carronades was quite individual, not well documented, and subject to change with each fitting?
-
Nice, so… cannon in the fore red arrow, nothing at the blue arrow, and carronades at the rear red arrow and at the blue arrow?
-
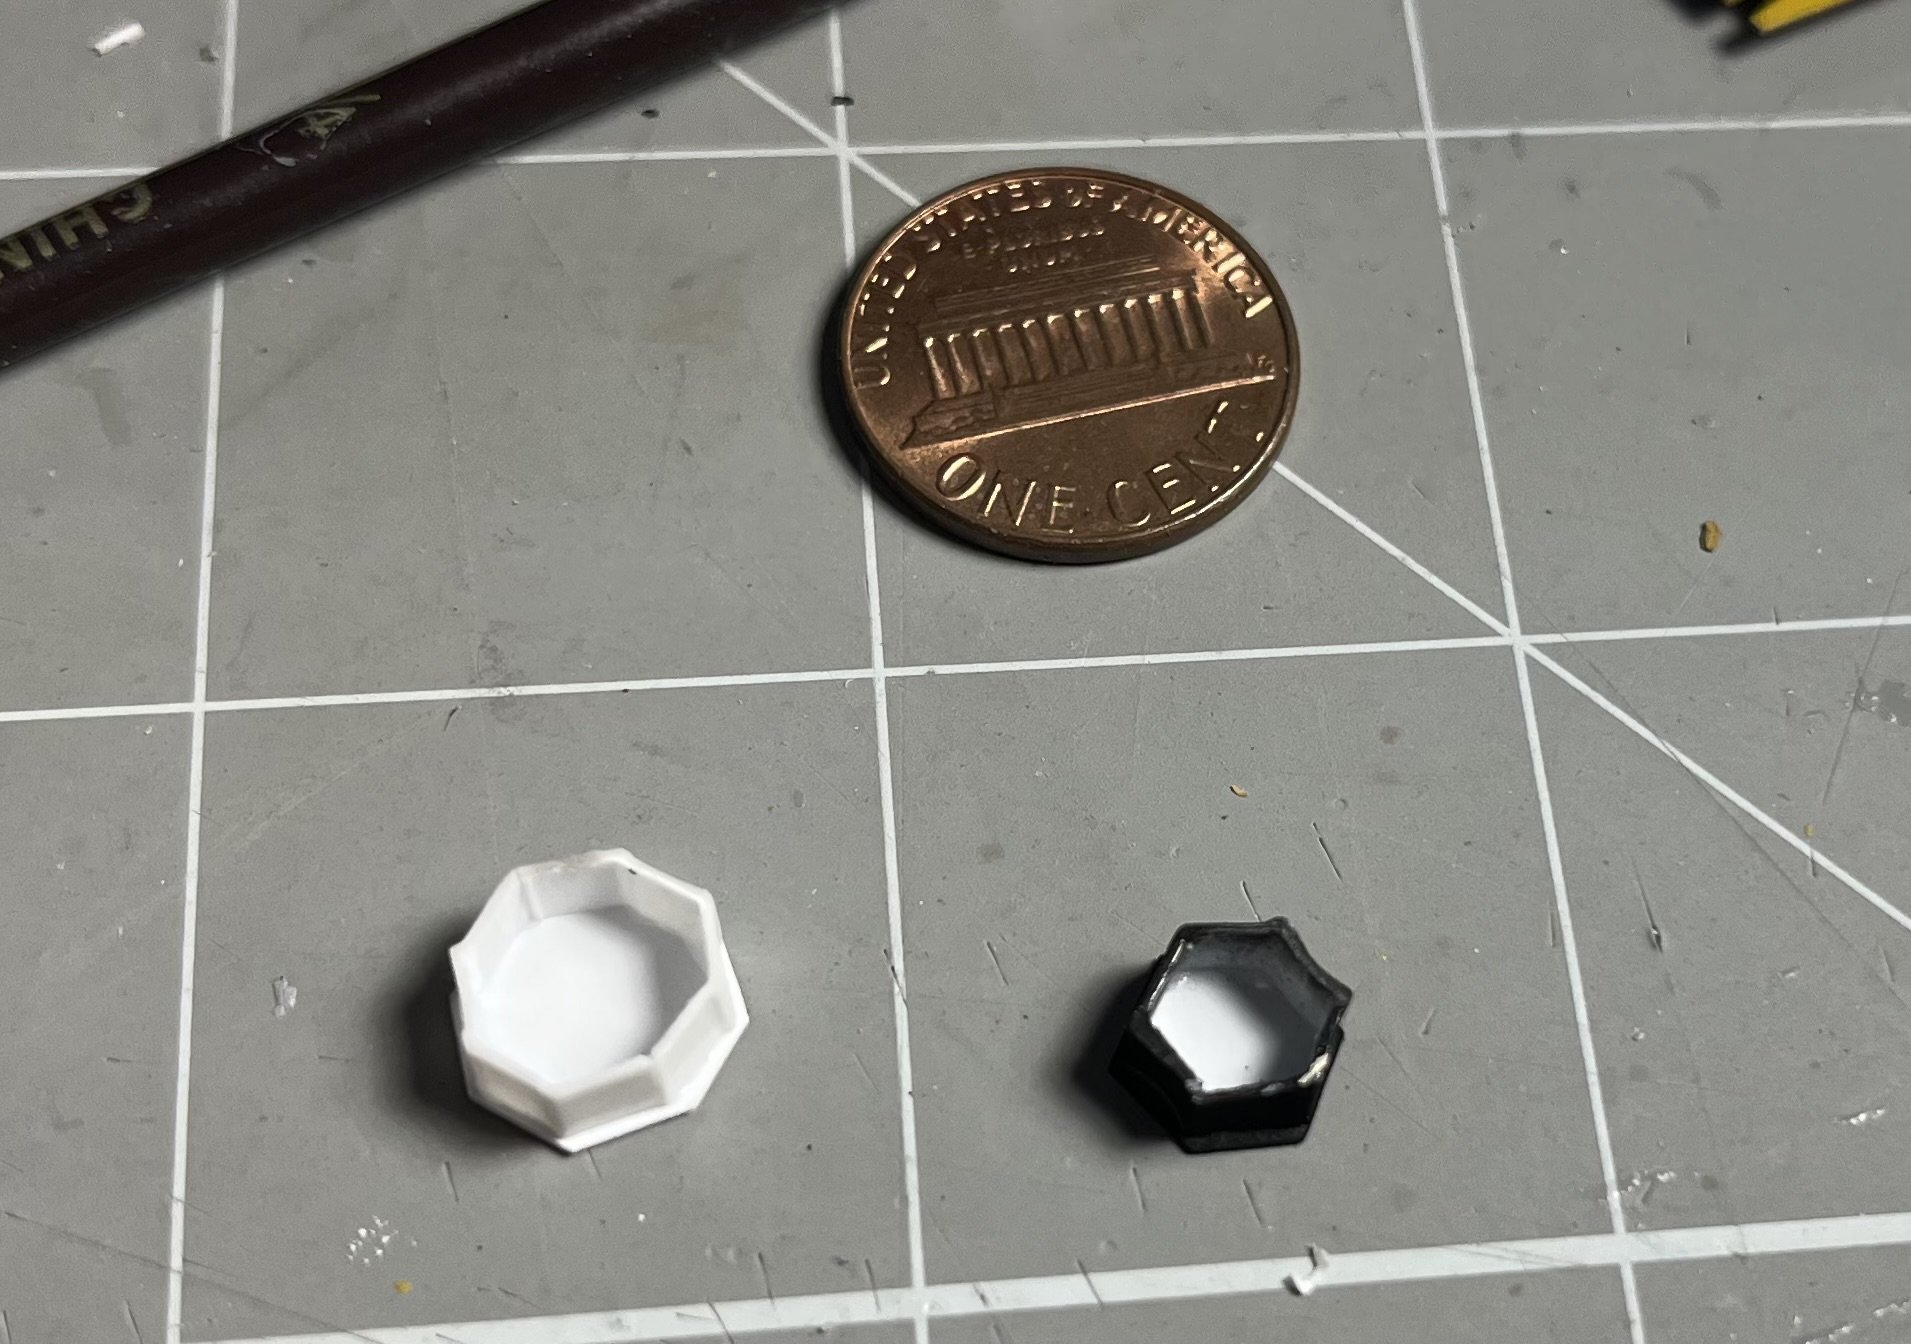
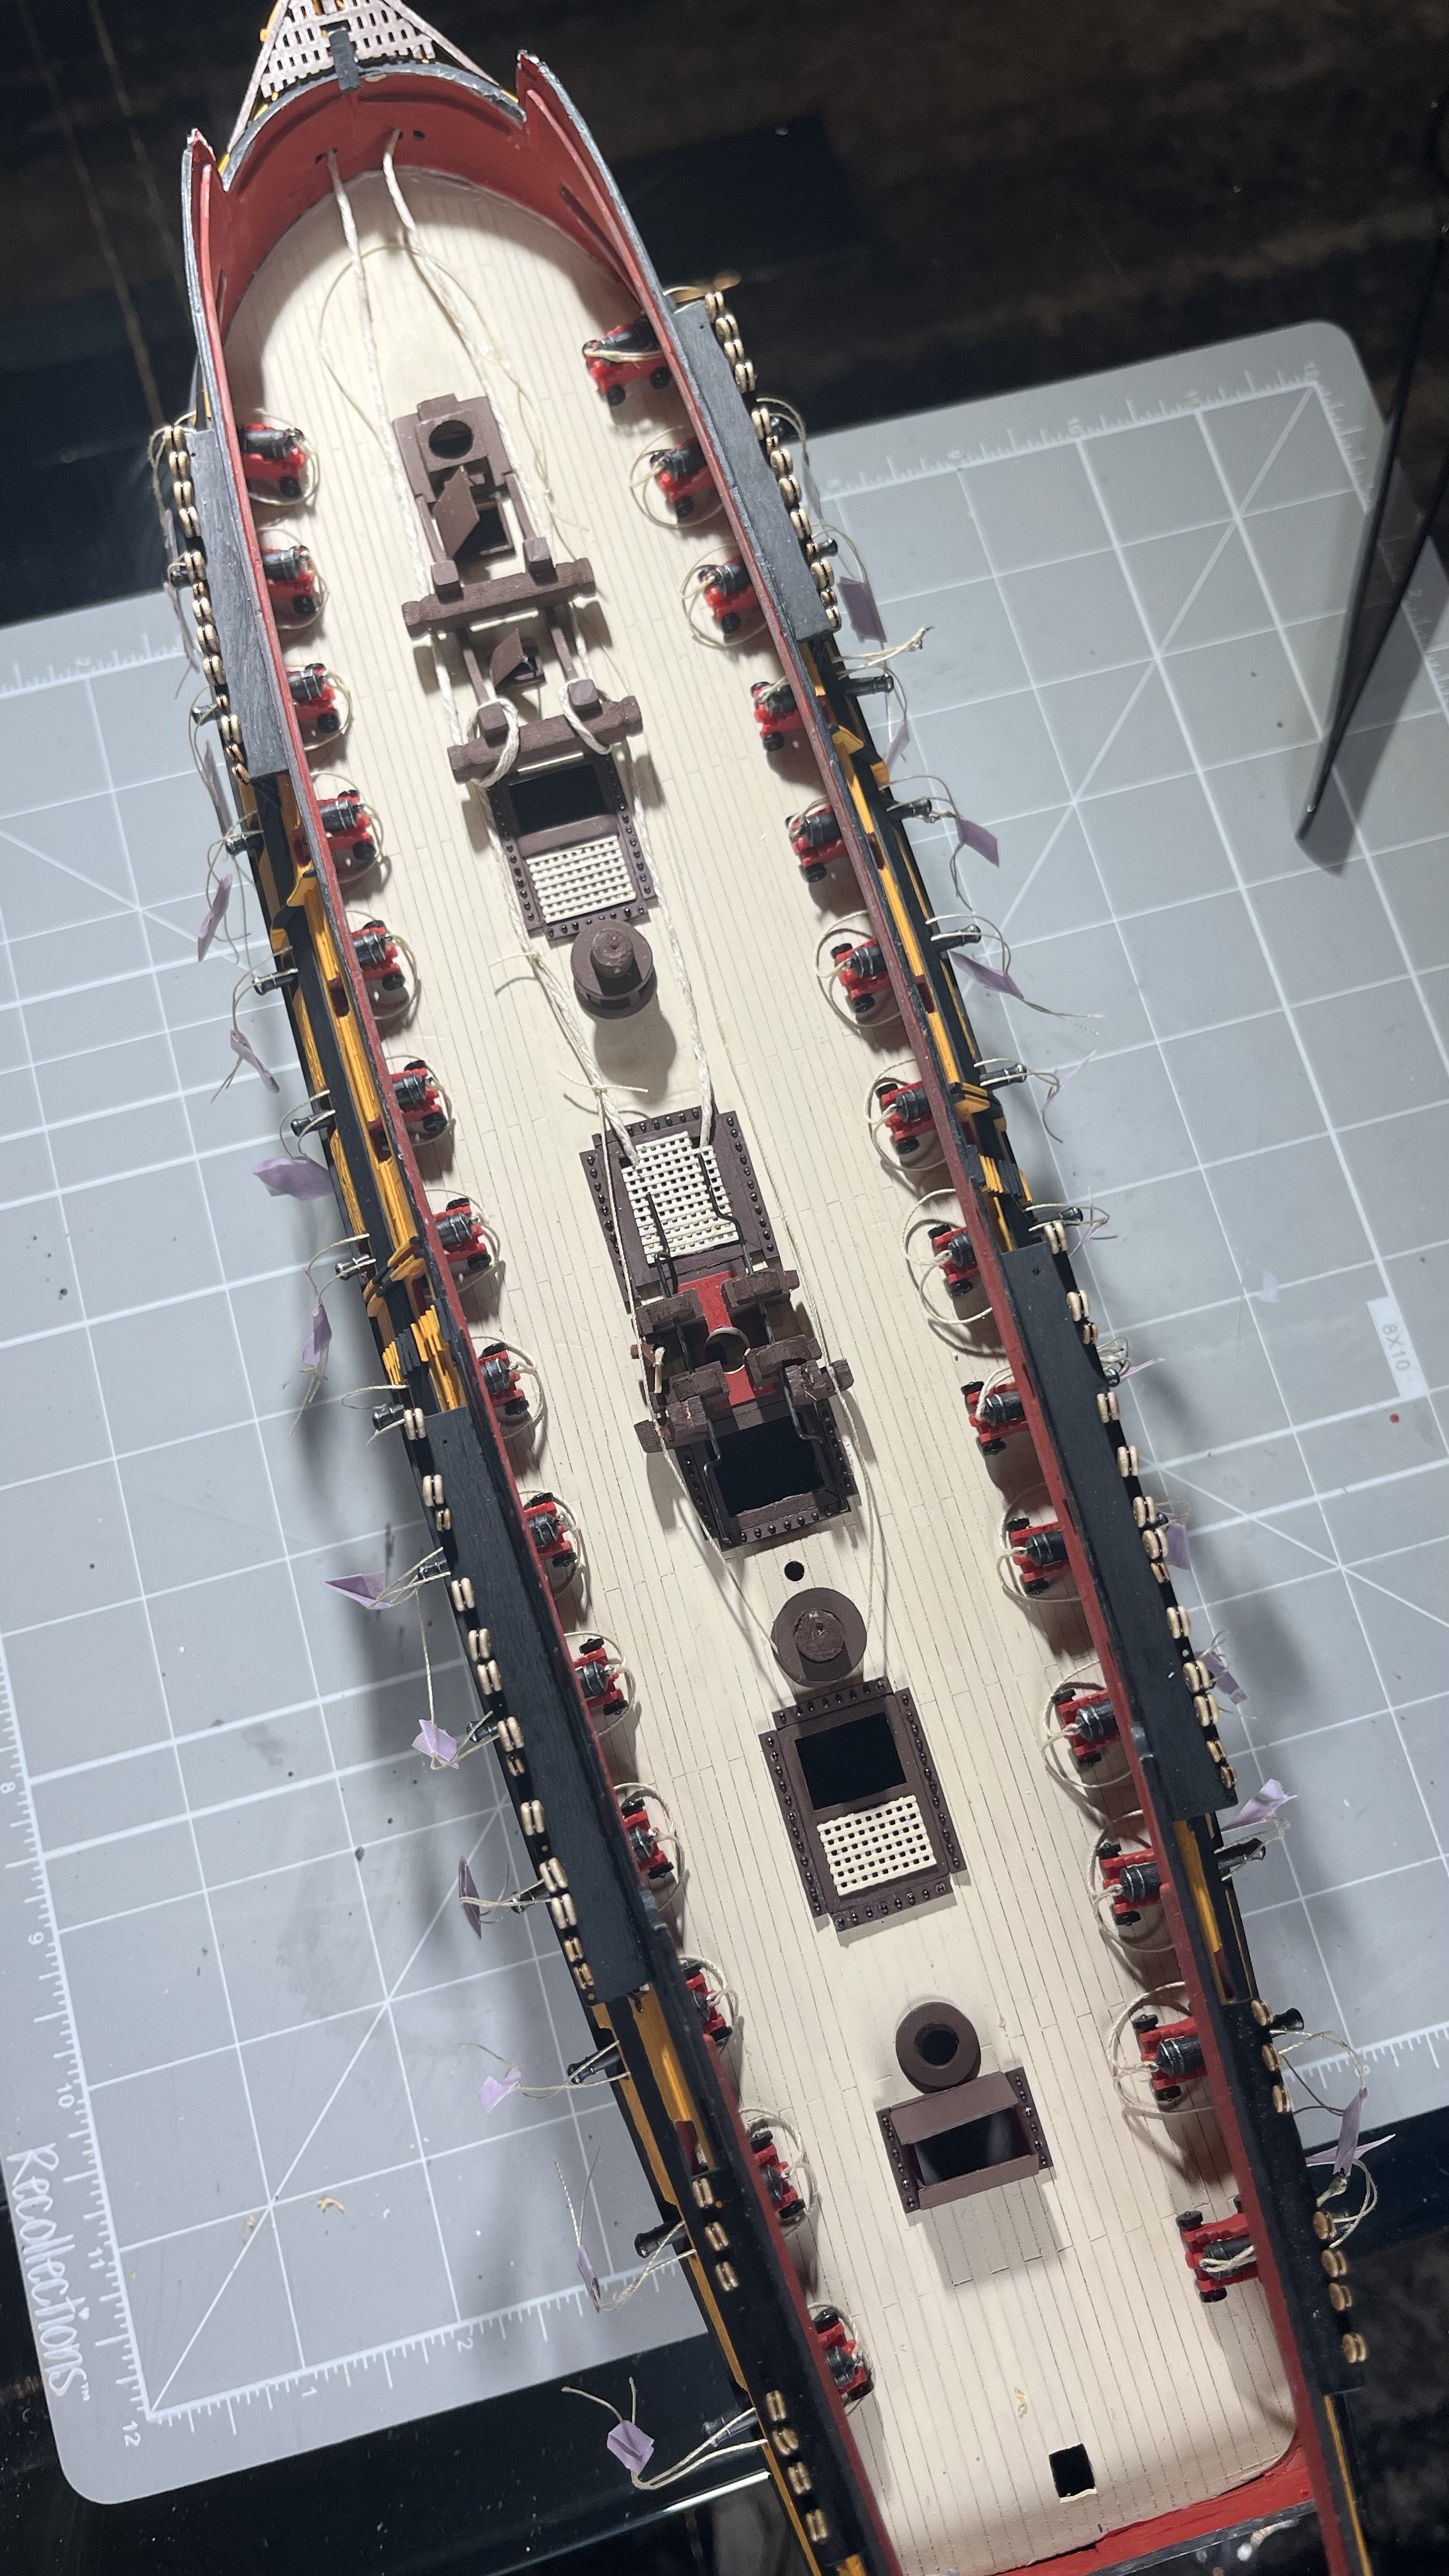
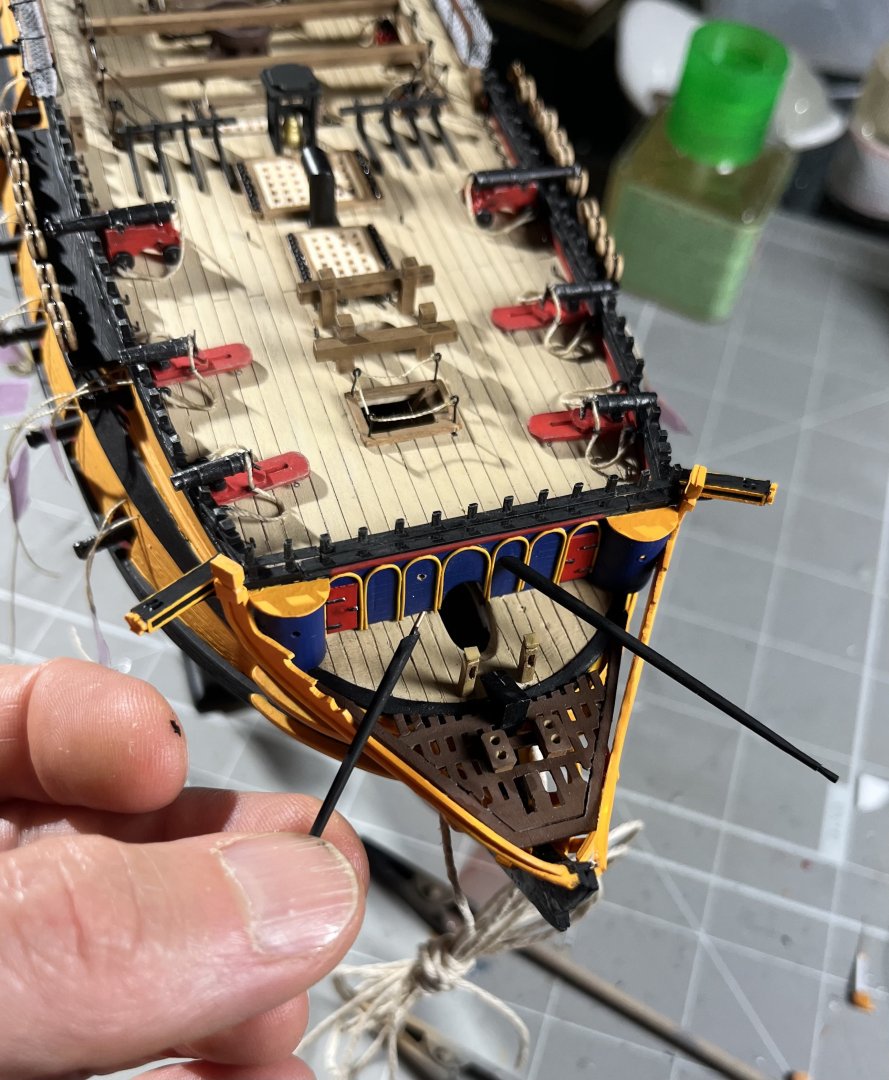
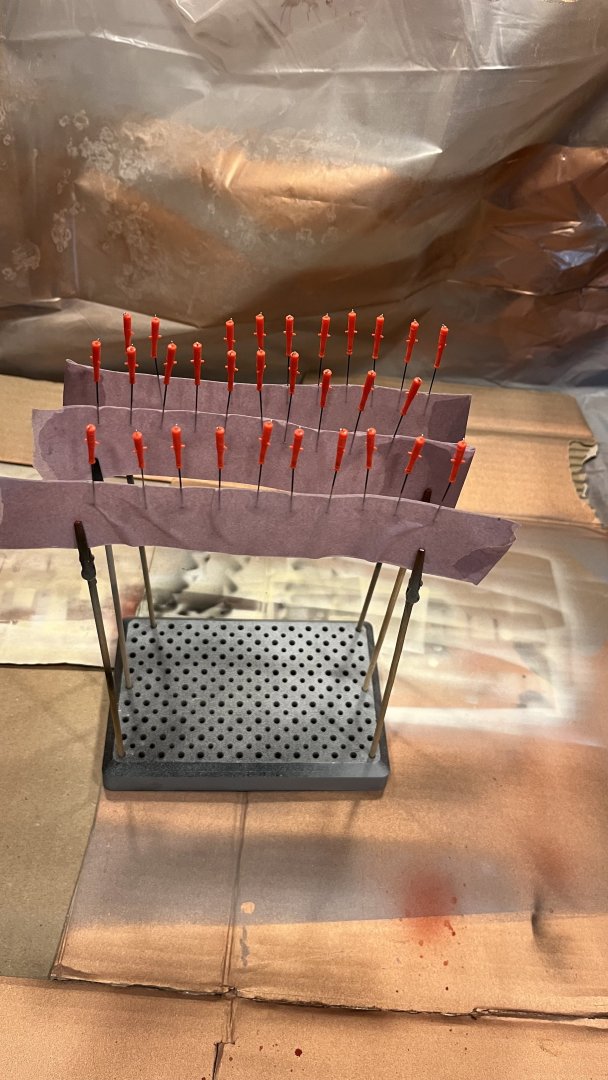
I’m thinking Benedict Cumberbatch or Jude Law would play Nelson in the movie version of the Mediterranean campaign and the Battle of the Nile, with Aidan Turner as Saumarez, and Pedro Pascal as Admiral Brueys. What a great movie! I visualize the 18-minute action sequence in the midst of the battle… the crew of the Alexander frantically hacking away at their anchor cables—twice—to get away from the burning L’Orient; her captain Commodore Casabianca jumping overboard with his 10-year old son, a midshipman, as he realizes the ship is beyond saving; Bellerophon, herself dismasted and drifting, picking up survivors, stripping off their own clothes to keep them warm; and finally… the blast… echoing off the Pyramids nine miles away; gunners aboard the Orion having the wind knocked out of them from the impact; tinders and shrapnel igniting top sails and shrouds all over the Aboukir Bay; the shock wave pushing nearby 2000-ton ships of the line hundreds of feet off course, tilting so violently from the shock they’re at risk of capsizing... Any movie producers out there? Aside from reading and dreaming, I’ve spent the week assembling the upper deck: 24 x 18-pounders, stove, capstans, hatches, shot garlands, ladders, rope railings, cleats, eye-bolts for the train tackles, wardroom bulkhead, rudder head, a cabin for lieutenant Galwey, and the captain’s and officer’s pantry. I ran out of cannon balls so had to order some more ball bearings (from McMaster-Carr), then I'll close it all up. Sniff. Like with the 32-pounders, cleaning up and trimming out the guns wasn’t particularly fun and I’m glad it’s done. Good news is they came out great and I’m really happy with the result (most of which no one will ever see anyway…). I got the full set of plans for the Amati/Victory Vanguard, as well as copies of Lavery’s The 74-Gun Ship Bellona and Nelson and the Nile. I should have started my project with this part, the additional research has certainly made me question a few of my design decisions, and I need to keep reminding myself I’m doing this (a) for fun, and (b) to learn! (If this build is confusing or offends any naval historians out there—sorry.) Hull size aside (see above), recreating Vanguard as she sailed into battle in Aboukir Bay (my original vision) raises a few questions how/if to recreate? Her entire foremast, and main- and mizzen top masts and up, were jury rigs I haven’t been able to find detailed documentation for, except that both Nelson and Captain Berry were quite pleased with the sailing abilities. The bowsprit had also been sistered/braced in multiple places. She may have had a mizzen yard (Whitcombe painting) instead of a driver gaff & boom (most/all other paintings, plans and models). Her cutter had been lost; and the remaining three boats would have either been in tow, possibly filled with furniture from the officers’ cabins, or hung from the stern or off the sides of the poop deck. She had four lanterns hanging either horizontally or vertically, either from the “mizzen [yard] peak” or the “mizzen mast”, lit either at the start of the battle, or only later as it got dark, or only when actually needed for identification—depending which source you choose to believe. She would have had a sheet cable pulled through one of the stern ports, some paintings show the last gun port of the broadside, some show out the stern chase port, with a spring presumably going another broadside port or chase gun port. Most sources state all RN ships flew white ensigns, although the sources provide a very inconsistent picture. Some show a blue flag (Nelson was Rear-Admiral of the Blue), some show blue pennants, some show blue ensigns, some show one or more Union Jacks, and I’ve seen two paintings with Vanguard flying a large blue and yellow flag, divided vertically, from the top of the main mast. Not sure what this is? & Cetera. Representing some of this but not all would give an inconsistent and confusing look, and I’m increasingly thinking the only way to get this right is to (a) make a full-on waterline diorama, including crew, full weathering, and full rigging, and (b) get a time machine and take some photographs. I’m not doing that 😊 … the complexity of time-travel aside, the hull size/dimensions “disqualifies” this project from being a historically accurate representation anyway. So… I’ve been going back and forth a bit what to do here. I even considered changing her to Spartiate or another French prize, like Admiral Beez—which however raises a whole host of other questions around to what extent French ships were “Royal Navified” when refitted for British service; presumably with the standard response it depended on which ship we’re talking about and the specific date, and… we’re back at the top of the rabbit hole, in analysis paralysis without any actual building happening. Current thinking is a “museum build” (on stand, with no weathering; just shading and highlights) as she would have looked leaving Chatham a few months earlier. It’s already been a really fun project and I’ve learned a ton, so—success! Finally, I’ve worked with @igorcap on a 3D-printed solution for the masts, using ABS plastic instead of resin. More to come! It's not a big deal to tidy up chaff and injection dots from 5 or 6 of these, but 74...? Ugh. Inserted a (heated) regular sewing pin into the bore holes to prep for air brushing (Tamiya X-18 Black semi-gloss). Carriages equally in need of cleaning up individually before airbrushing; attached to strip of masking tape. Tamiya XF-7 Red. Left ten carriages are airbrushed and wheels hand painted (X-18), twenty carriages to the right have a dark brown oil paint (Winsor & Newton Raw Umber) wash (Gamsol odorless mineral spirit) freshly applied. Sides are gently scored to represent planks. Final result with a dark brown wash, drybrushed high lights (carriages: XF-57 Buff, barrels: XF-18 Flat Aluminum), and cascabel loops (28 gauge wire) in place. The 18-pounders had to go with the "trunnions down" (not "up" as the kit instructions show; see more above). Assembled cannons are ready to get fitted with breeching ropes and cap squares. Some of the ladders from the kit can be reused, but scratch built others, as well as gratings and main mast bitts. Both batteries assembled and glued in place using CA. Added breeching ropes with eye bolts, excess metal from eye bolt was bent to form cap squares. I had built the galley stove a bit too big and had to cut off the bottom third. I read somewhere it sat on a foundation of bricks? Rudder head -- Lavery's Bellona (p.80) refers to a "hexagonal" rudder head, although all pictures show it being octagonal? Built both, the octagonal looks better. Upper deck finally assembled, a few more shot garlands to stock up before putting on quarter deck & forecastle. Eye bolts and rope railing staunchions made from 28 gauge wire; stove, main mast bitts, garlands, hatches, and ladder to gun deck from plasticard; capstans carved from wood; wooden gratings from Amati. Deck got a very light coating of same wash as gun carriages, just to bring out some of the texture. Built a cozy little cabin for lieutenant Galwey -- apologies to other officers and Master Clodd for not getting permanent cabins -- pantry, and wardroom bulkhead. Not the best working environment... esp. not during battle...


- 24 replies
-
- 5
-
-
- HMS Vanguard
- Heller
- (and 2 more)
-
Greetings from Boston & welcome aboard!
-
Build looks great! I went even more ambitious and trying to do a kit bash conversion to Vanguard, and I wish now I’d taken your approach instead. She looks fantastic. We have definitely found the same issues on the kit itself, a few head scratches for sure. What were you planning to do with spanker boom and gaff? I’m looking into 3D printed masts and yards.
-
Oops! Yes indeed, can happen to the best of us lol... If the math error / ten extra guns is the only mistake -- or if as vossiewulf suggests, the ten missing carronades were on the poop deck -- I think this makes sense. There appears to be three other exceptions: Two guns were moved from the quarter deck to the forecastle Ten quarter deck guns were substituted for carronades They used a version of the "all 24" scheme Lieste references I'd speculate the first two, possibly all three, could have been to create extra living space, as she was specifically fitted as Nelson's flagship [in the winter of 1797-1798]?
-
TL;DR: what armament would Vanguard have carried into battle at Aboukir Bay? Reopening this thread, hoping someone can help out... I'm working on a Vanguard conversion -- it's a bit of a beginner's project and nowhere near as historically accurate or well researched as most of the builds here, but I was hoping to get some of the basics right anyway, e.g. the number and placement of guns Whilst doing some research, I came across this passage in Brian Lavery's Nelson and the Nile [p.59]: By 4 March [1798] the ship [Vanguard] was fitted with her full complement of twenty-eight 32-pounders on the lower deck and the same number of 18-pounders on the upper deck. On her quarterdeck she had two conventional 24-pounder guns, with ten lighter, short range 24-pounder carronades. She had four 24-pounder carronades on her forecastle and two long guns, giving her a total armament of eighty-four guns, though she was still rated as a 74. I'm confused. This statement adds up to 62 guns and 12 carronades = 74 total -- so it appears there's something missing, would love some help clearing this up? @RMC's build shows 28 guns on the gun deck + 28 on the upper deck + 14 on the quarter deck + 4 on the forecastle + 6 carronades on the poop = total of 74 guns and 6 carronades. This seems consistent with the standard way of counting, the OP confirms this and also mentions two additional carronades on the forecastle, but I can't for the life of me reconcile any of this with the statement in Nelson and the Nile... help?
-
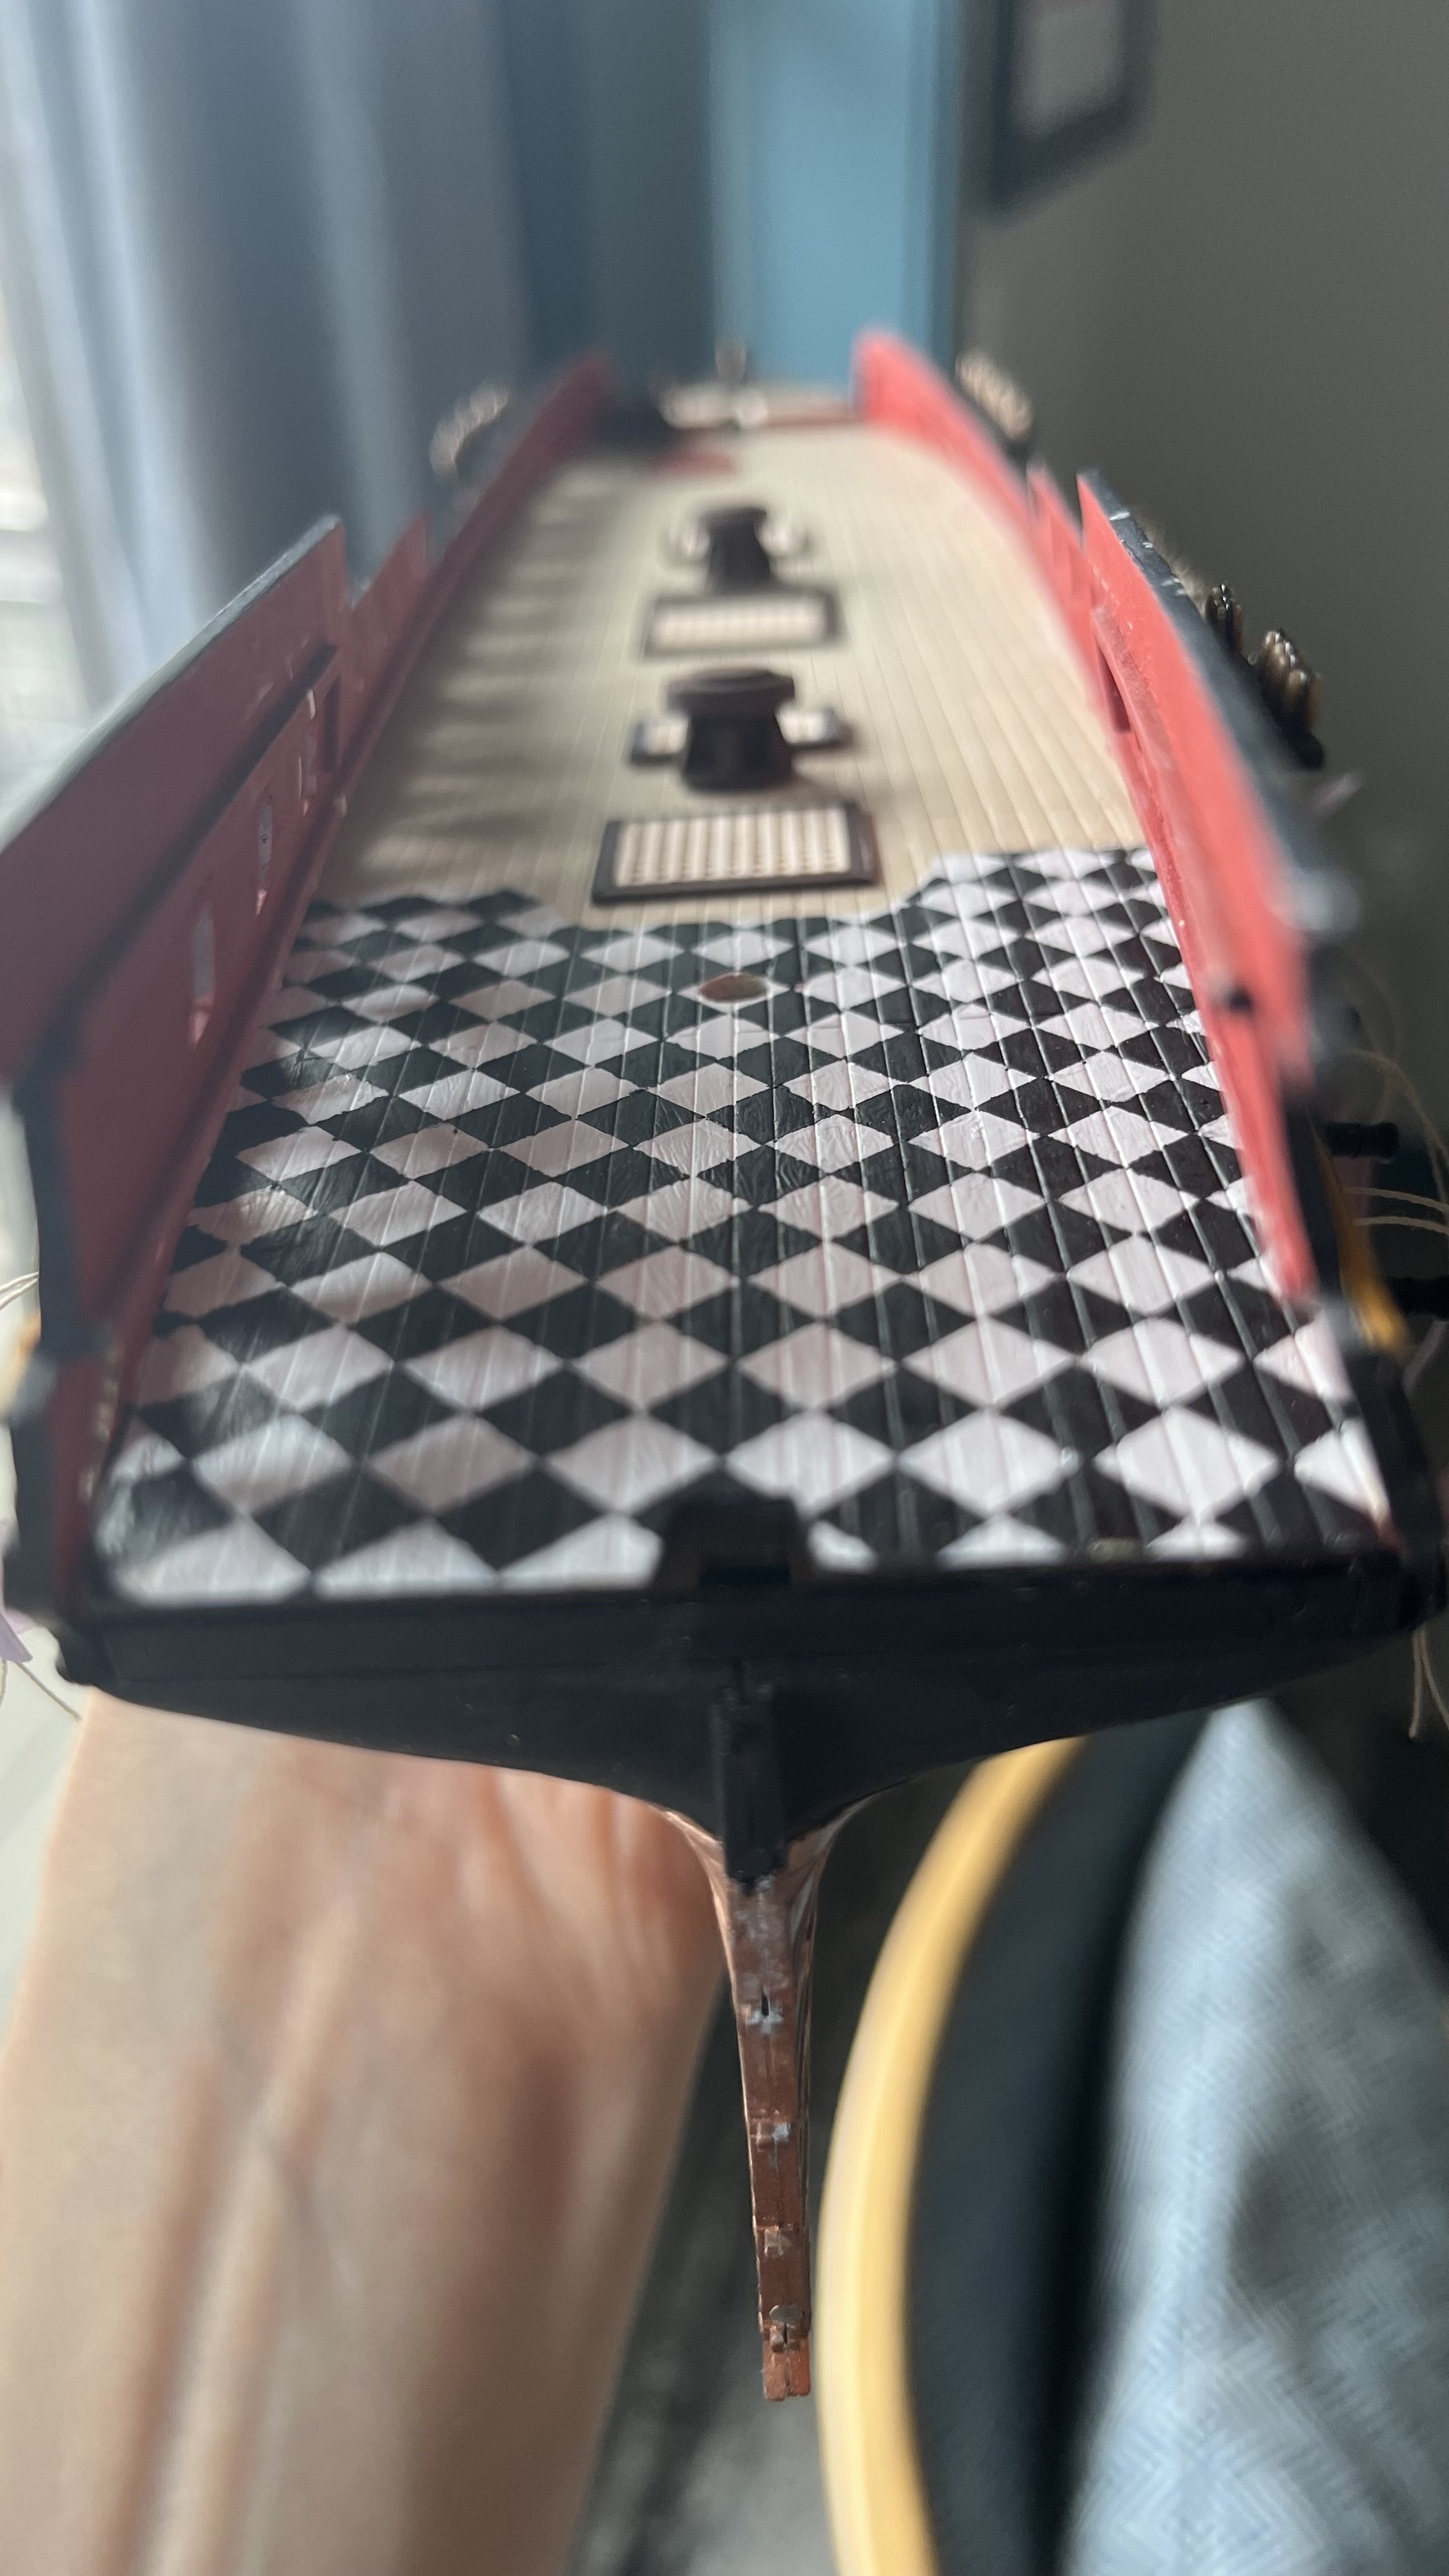
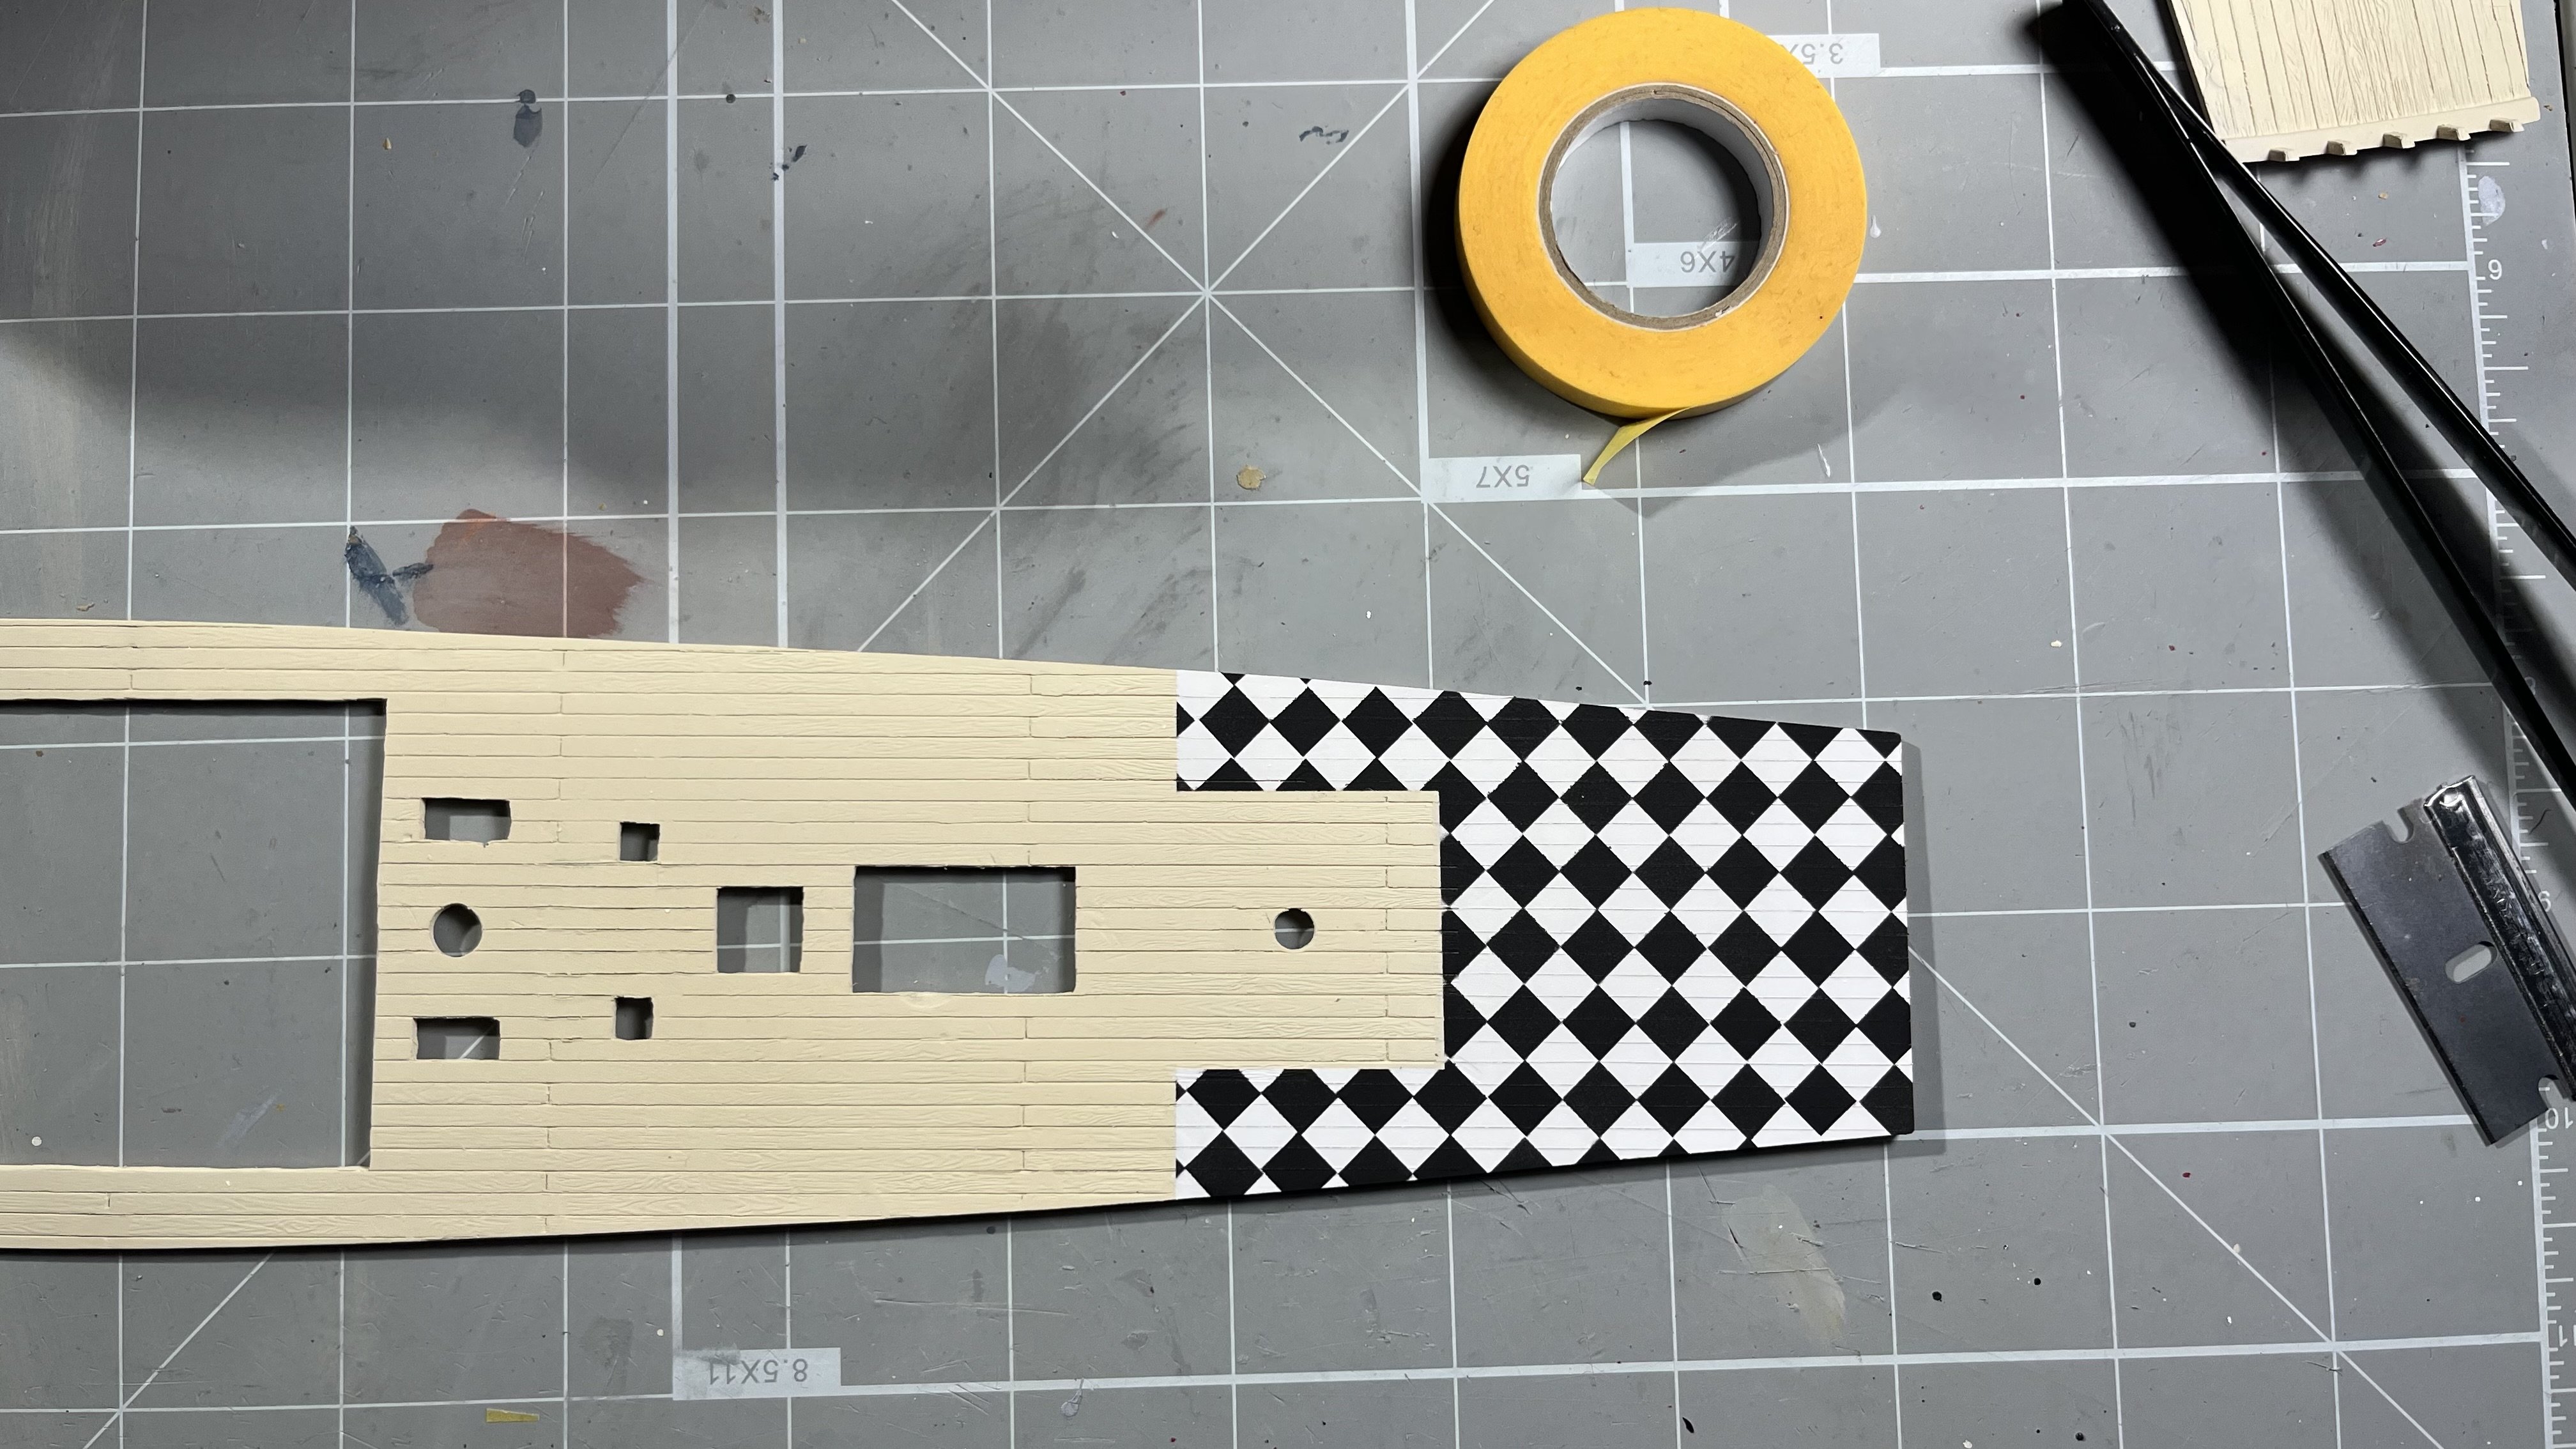
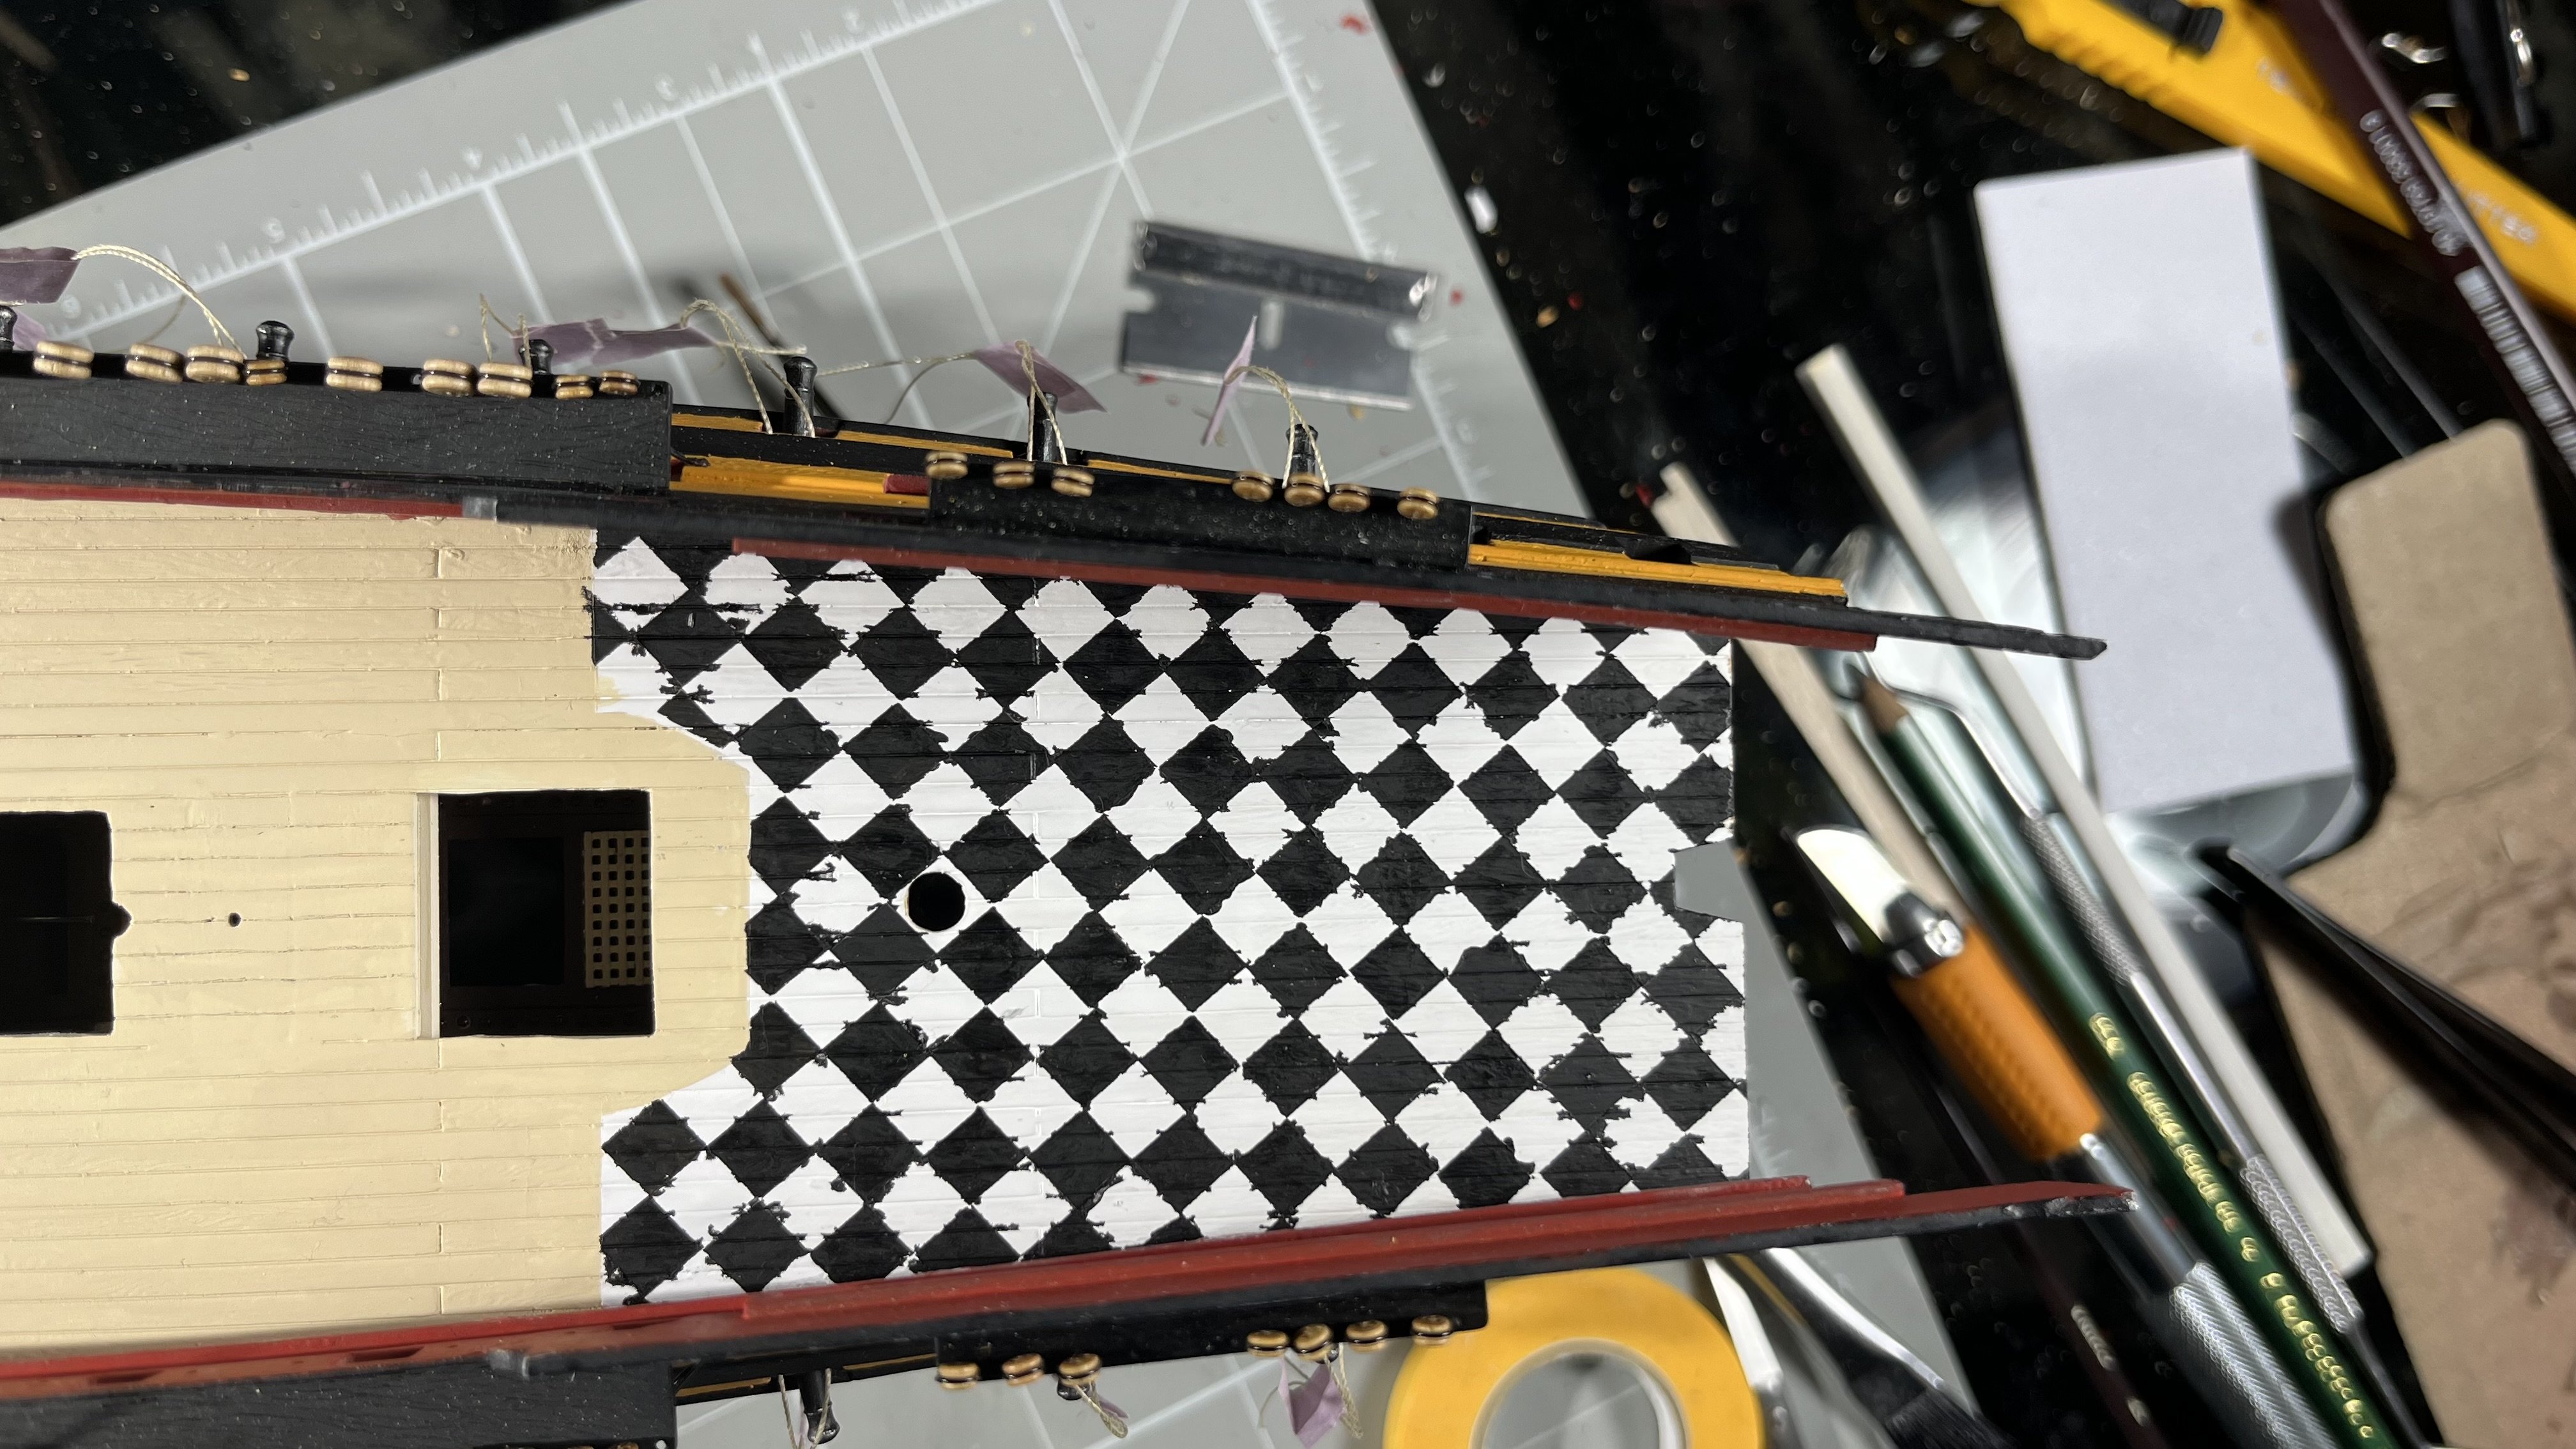
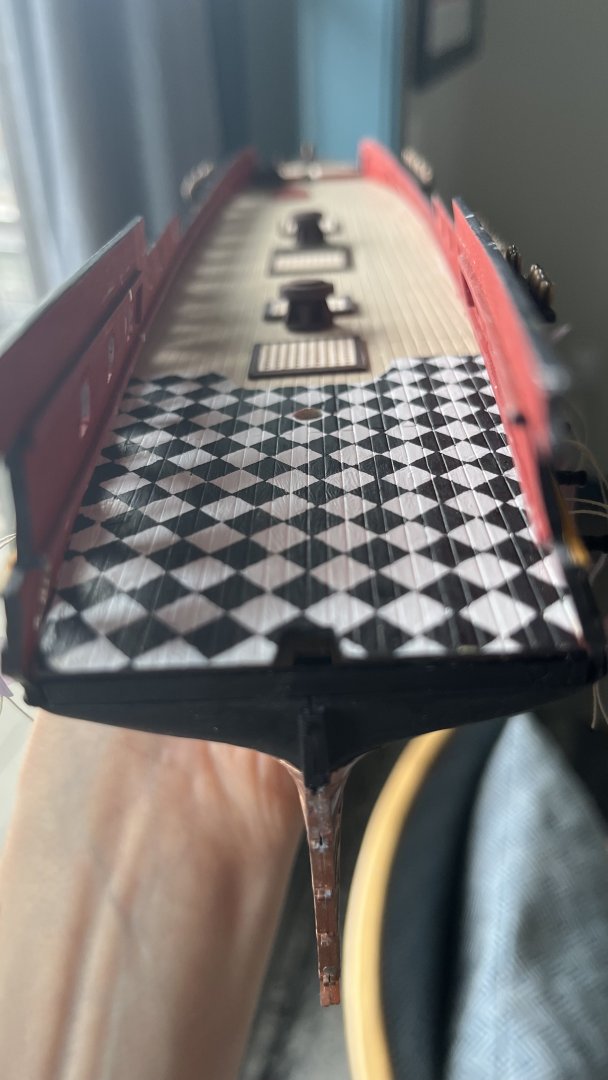
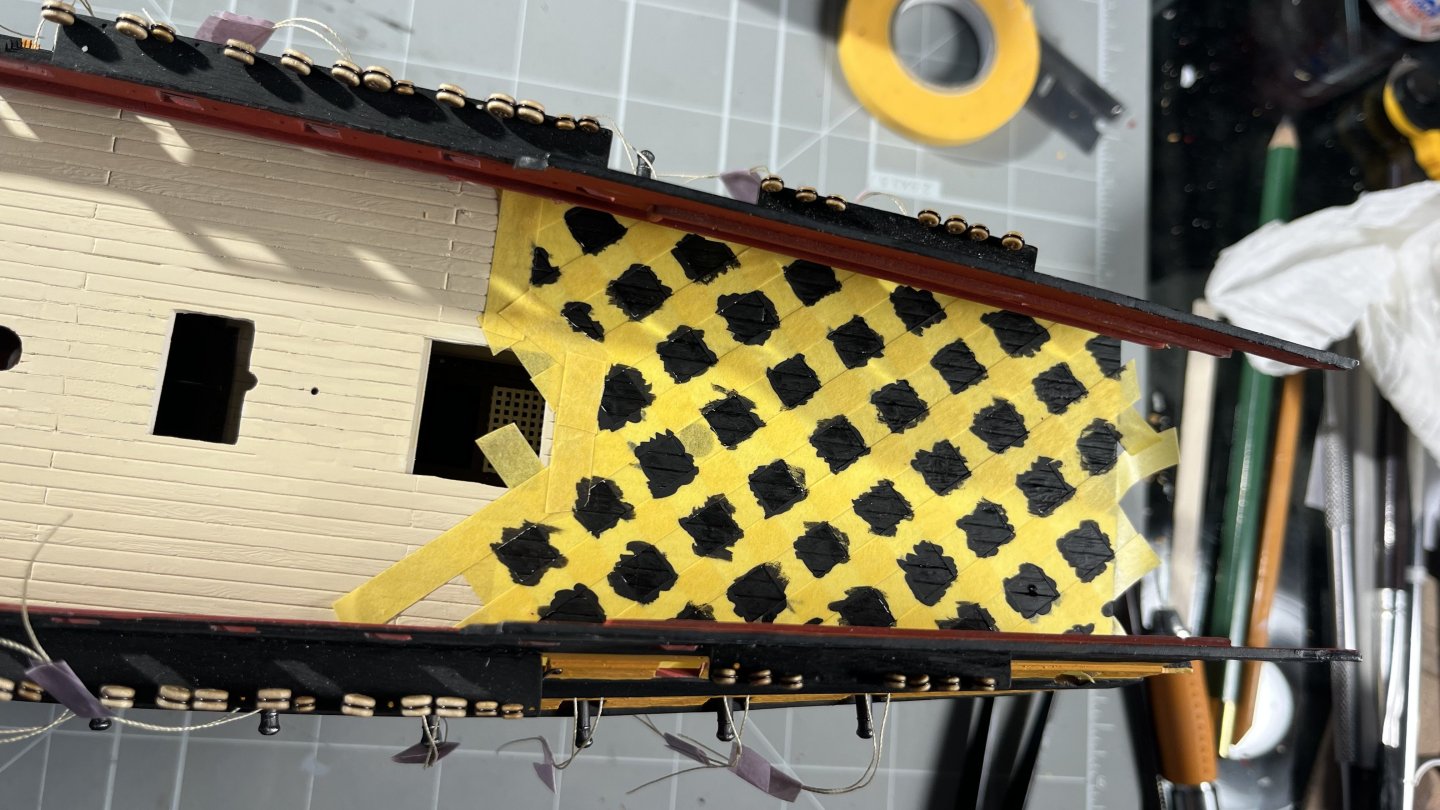
I spent much of this week going back to two other reference build logs, @RMC's Vanguard and @flyer's Bellerophon -- both incredibly inspirational, absolutely gorgeous, and terribly humbling I use my 1:150 scale as justification to not get even close in terms of detail and execution! I was happy to pick up a few new details -- e.g. a brick floor under the Brodie stove -- and noticed a few others a bit too late to incorporate in my own build, e.g. the design/size of the stern name plate. I'm increasingly realizing there are so many historical accuracy details I could have researched or respected more closely but didn't, out of enthusiasm to get going and make progress. I suspect this is a common dilemma for many builds -- with such fragmented access to historical reference material, you don't know what you don't know, where do you draw the line between research and execution? How do you ensure not letting perfect get in the way of good? I have a big decision to make soon -- whether to weather or not, and if so to what extent. An oil paint/mineral spirit wash on hull and deck will add texture and bring out details and generally looks great, but will require multiple gloss varnish coats prior, and multiple matte varnish coats after. Each application involves the risk of clogging, orange peeling, unwanted residue, uneven sheen, etc., and the risk is especially great when you airbrush on to a highly irregular shape (such as a deck between hull sides with holes in them), which makes the air / varnish droplets flow in irregular and unpredictable micro patterns. And it's incredibly hard impossible to reverse a poorly applied coat of varnish... I feel a bit insecure about my skills here. In meanwhile, I continued assembling the upper deck and prepped the quarter deck: Added all furniture and starboard side guns to gun deck Glued both parts of upper deck in place Cut/sanded/adjusted quarter deck to fit (almost 1/8" too wide out of the box) Cut off 1/8" of rear of upper deck, so that stern would fit properly Finished upper deck furniture (gratings, stove, capstans) Painted black/white diamond floor tile pattern in ward-room and captain's cabin I was contemplating building out compartments, dividers and furniture but ultimately decided against it -- after all this will be Vanguard readied for battle! Next steps: Clean up, paint, assemble, and customize upper deck 18-pound guns (been dreading this...) A few remaining upper deck furnishings (stairs, garlands, eye bolts for ships boats, etc.) Finish Brian Lavery's Nelson and the Nile Also ordered his The 74 Gun Ship Bellona Digest the build plans for Amati/Victory's Vanguard (also on order... realized way too late into this build I should have started with this!) Finalize specs and plans for masts and yards As mentioned in a few other build logs here, the out of the box pieces are too flimsy to support the tension from standing and running rigging. They might be okay for a simplified rigging configuration -- e.g. stays, shrouds, sheets and braces -- but I'd like to at least have the option to add a more complete rigging scheme Iirc, @Blue Ensign made new masts and yards out of wood, and @Admiral Beez added carbon fiber rods for additional stability -- both good ideas which I may get back to. Current thinking is making these as 3D prints, and currently exploring this route with @igorcap Finalize specs for a few other pieces to be 3D printed -- anchors, lanterns, admiral's barge, fire buckets, decorative trim pieces, etc. Gun deck with furniture and guns in place. Messenger rope is too thin and nippers in wrong place (I think?) but at least explains the concept. Once the upper deck is in place, this build log might be the only evidence this even exists... it's been fun to build though! Port piece of upper deck in place, waiting for the starboard piece. In retrospect, I wish I had (1) aligned the deck beams with the gun ports, and (2) then aligned the openings for gratings based on the position of the beams. Last third of upper deck in place, hull pressed together with "temporary rigging" while glue is curing overnight. Also wish I had painted (airbrushed) the wardroom floor before assembly -- had to hand paint instead. Masking using 6mm Tamiya tape -- looks like blueberry pie! Bleeding from hand-painting turned the wardroom floor into a Rohrschach test... ... but came out okay after some manual touching up Much better results when airbrushing -- no freehand touch-ups needed!


- 24 replies
-
- 4
-
-
- HMS Vanguard
- Heller
- (and 2 more)
-
Question, did she actually ever sail anywhere in this configuration? Thinking as eg USS Constitution does a turnaround in Boston Harbor at least once a year, to fire a salute on 4th July out by Castle Island/Fort Independence. I stumbled across this video the other day, made me think of this build log. Thoughts on accuracy?
-
Great responses thanks everyone, certainly given me better understanding and appreciation of the craft! I’m also thinking of course wood has a naturally beautiful texture and color that’s missing in plastic, which almost requires at least a light wash and dry brushed highlights just to get some texture to otherwise flat paint — not weathering per se.
-
Thanks -- had to look up IPMS, what an amazing resource! Great point about consistency, esp when dealing with many different materials... e.g. just such a seemingly simple effect as salt stains would look quite different on tarred hemp ropes, varnished oak, canvas sails, and painted iron. I often find weathered models a bit odd-looking when out of context, i.e. unless in a diorama setting, with crew/figures -- so the "untouched by human hands" principle makes sense to me.
-
Thanks Robert these are great insights! That's a great point about style/"flair" of individual modelers. Being fairly new to modeling, my approach thus far has been inconsistent, using each build as an opportunity to try (learn?) new modeling/finishing techniques, as well as to read up on history. I have come to feel less is typically more when it comes to weathering, and I'll use it in moderation on my current build. My two goals here were to (1) get back into sailing ships, and (2) to try a conversion/kitbashing project. In retrospect, I should have started with something less ambitious
-
Being relatively new to the forum and hobby I'm interested in getting perspectives from some of the forum veterans I'm more familiar with plastic kit modeling, where weathering is often an art in and by itself, and ranges the full spectrum from "museum builds" with no weathering at all, to dioramas where wear and tear, dings and dents, bullet holes, dirt, smoke, oil splatter, etc. can be 80-90% of the total effort. My impression is majority of wooden ship builds are "museum builds", with minimal (if any) weathering? Would you agree, and if so -- is this for a particular reason, or "just" tradition? General apprehension/reluctance to hide thousands of hours of painstaking labor under layers of dirt? Is it more of a size thing -- as most plastic kits are relatively small in comparison to most wooden ship builds? Is there a different approach for sails (which I often see with various levels of "staining"), rigging, hull, and copper plating? Is it more common (standard?) for waterline dioramas, but not for mounted builds? In the plastic build logs I've seen here there are quite a few examples of great weathering -- I think it can bring an extra dimension and so I'm curious if it's also common for wooden builds. I'm close to the point where I need to make this decision for my own (plastic) build, too -- so I'm interested in other folks' perspectives here.