Cast Off
-
Posts
15 -
Joined
-
Last visited
-
 Cast Off reacted to a post in a topic:
Some silkspan tips
Cast Off reacted to a post in a topic:
Some silkspan tips
-
 Drew Offshore reacted to a post in a topic:
Keel klamper alternative
Drew Offshore reacted to a post in a topic:
Keel klamper alternative
-
Cast Off reacted to a post in a topic:
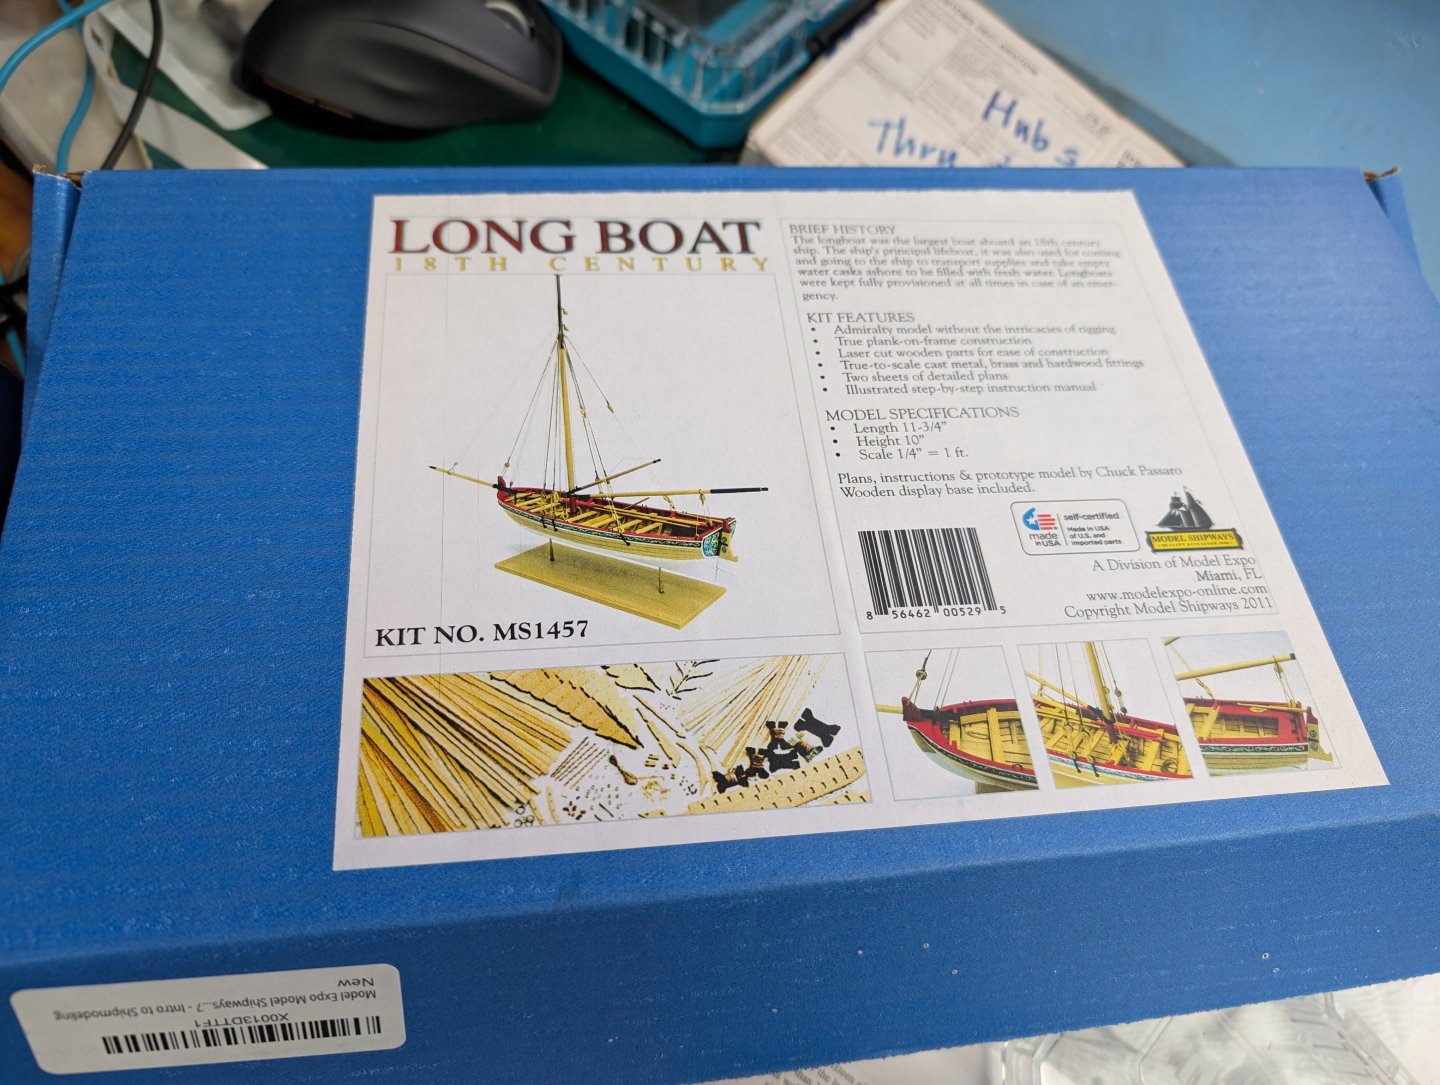
18th Century Longboat by Cast Off - Model Shipways - 1:48
-
Ha! I figured it out, at least for my post. I noticed that the extra pics at the end were uploaded, but NOT used in the text. When I deleted them from the Upload Gallery they went away. Thats an annoying bug.
-
Cast Off reacted to a post in a topic:
18th Century Longboat by Cast Off - Model Shipways - 1:48
-
Ryland Craze reacted to a post in a topic:
18th Century Longboat by Cast Off - Model Shipways - 1:48
-
palmerit reacted to a post in a topic:
18th Century Longboat by Cast Off - Model Shipways - 1:48
-
Anyone know why there are extra (large) pics at the end of my post? I did not include them, and after posting I went back and did an edit. I deleted them, they appeared to go away, I hit "Save" for my edit, yet they are still there. ?????
-
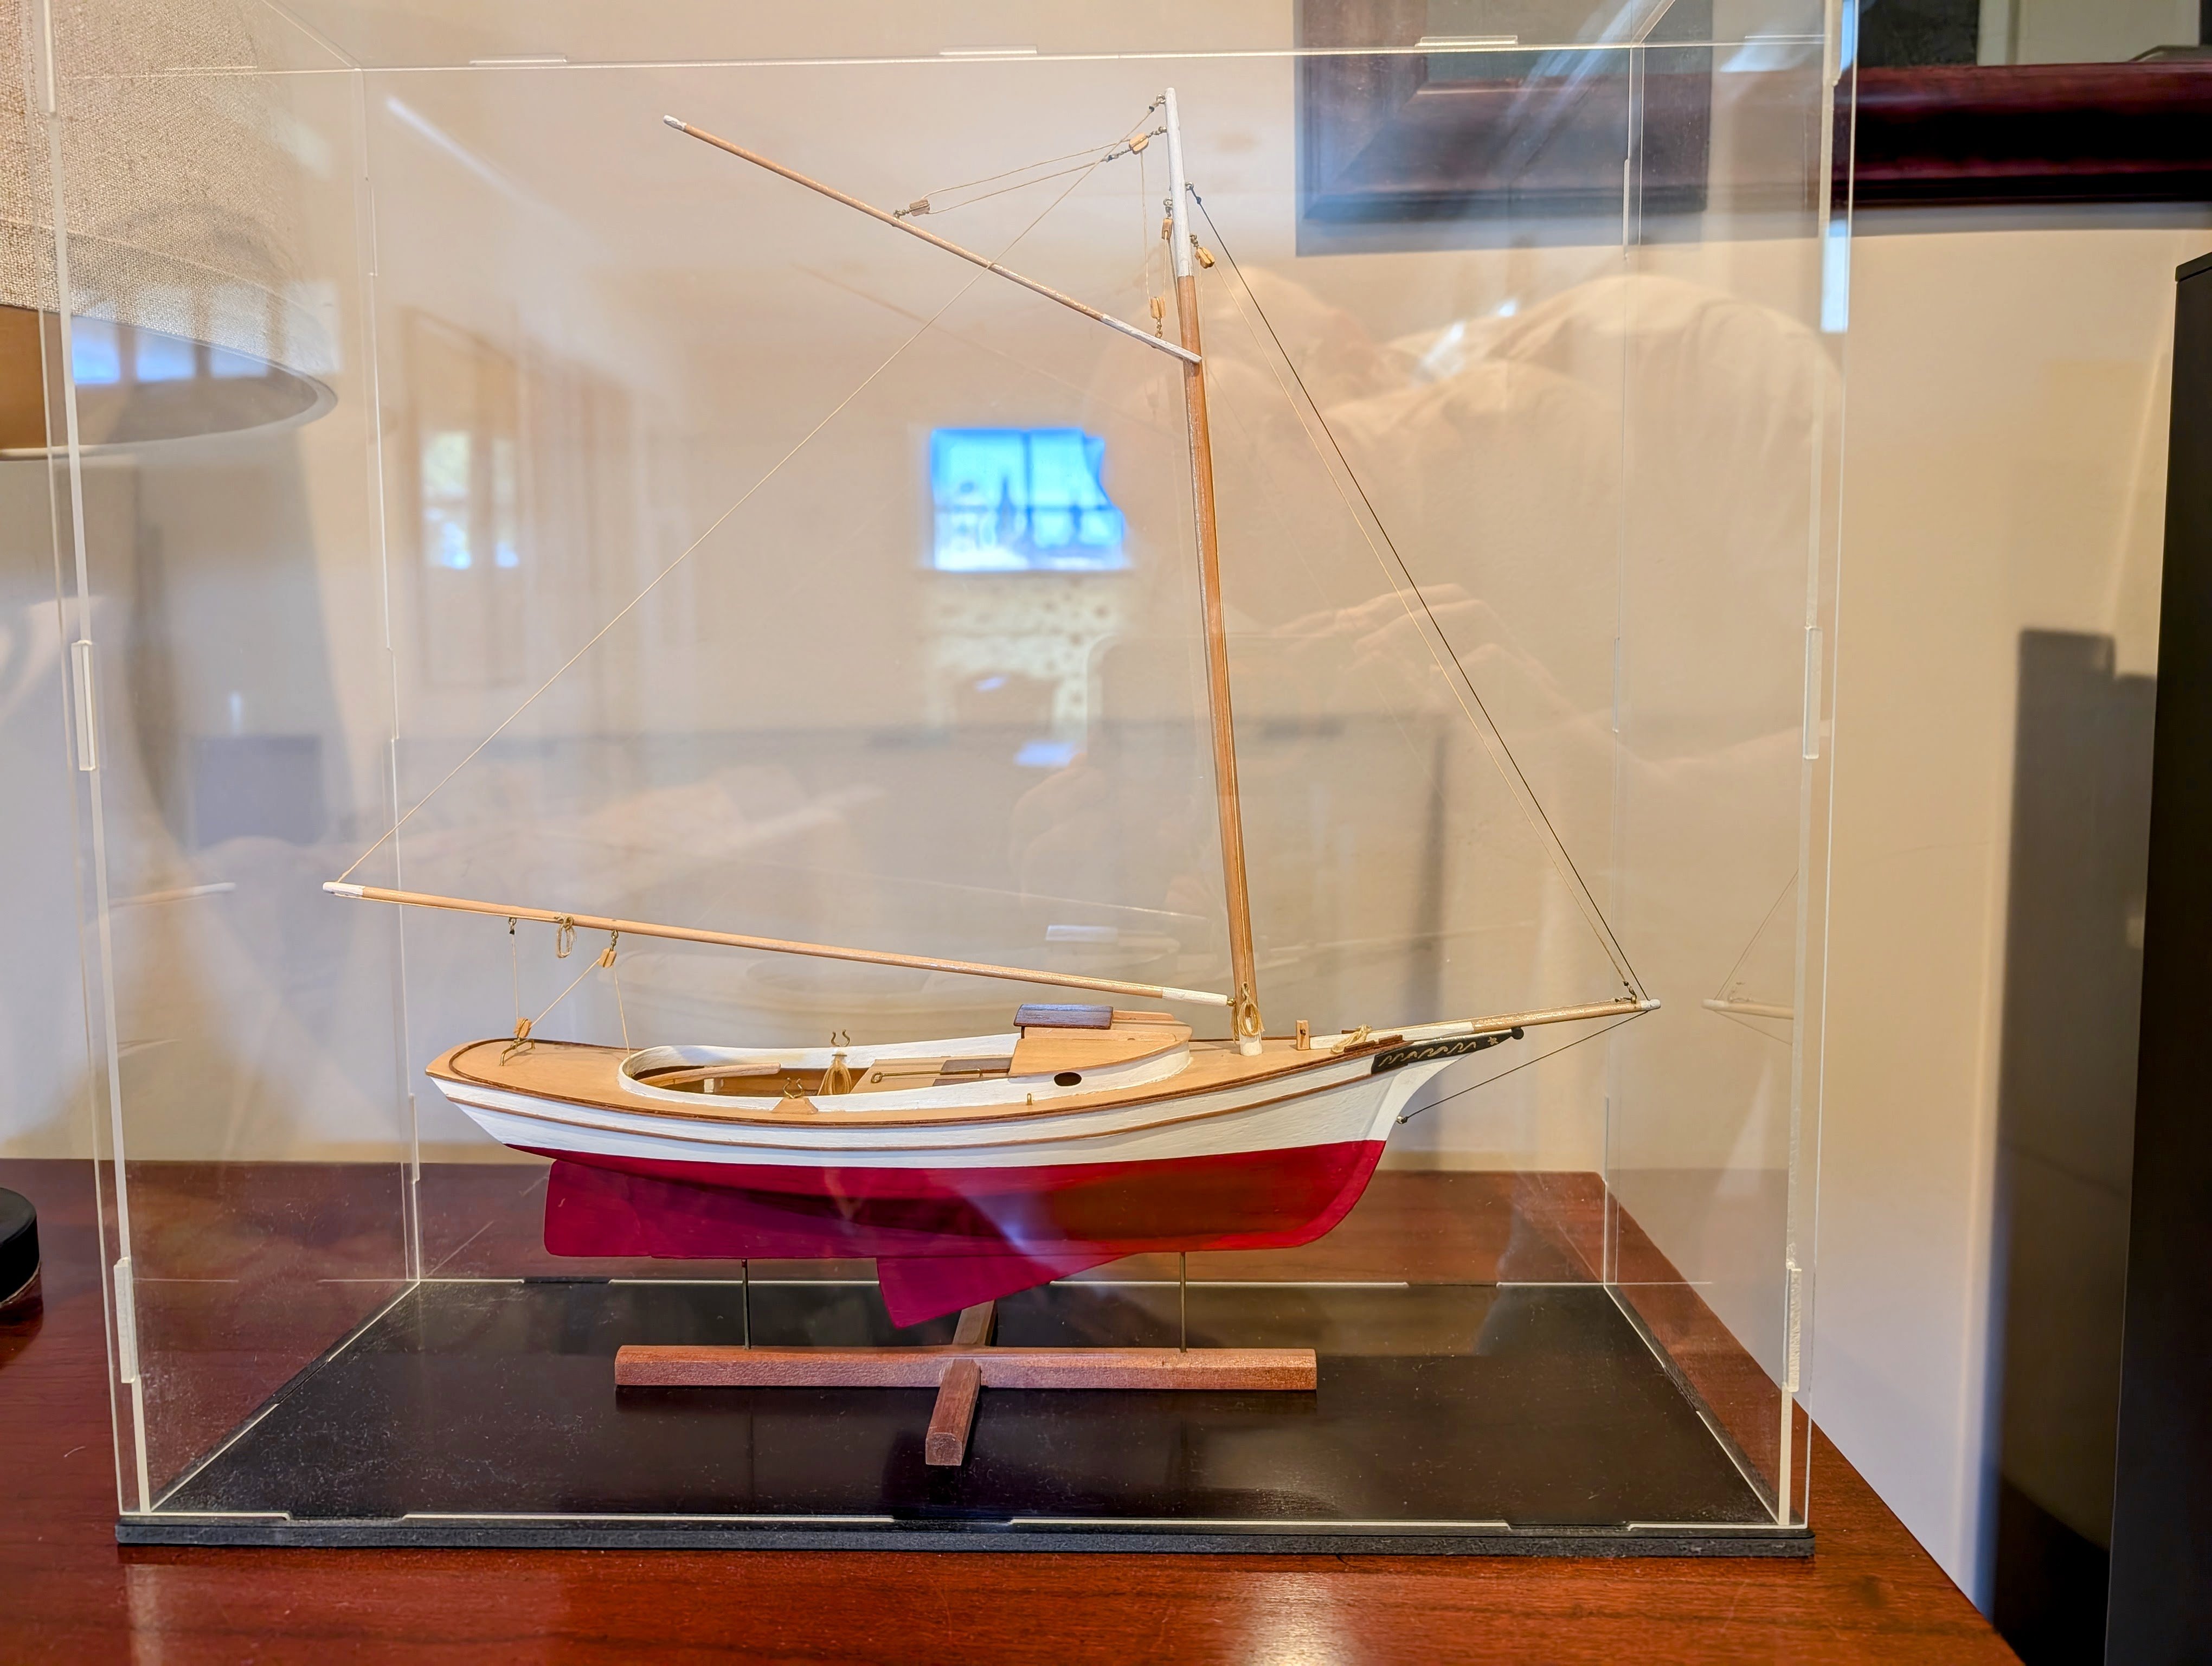
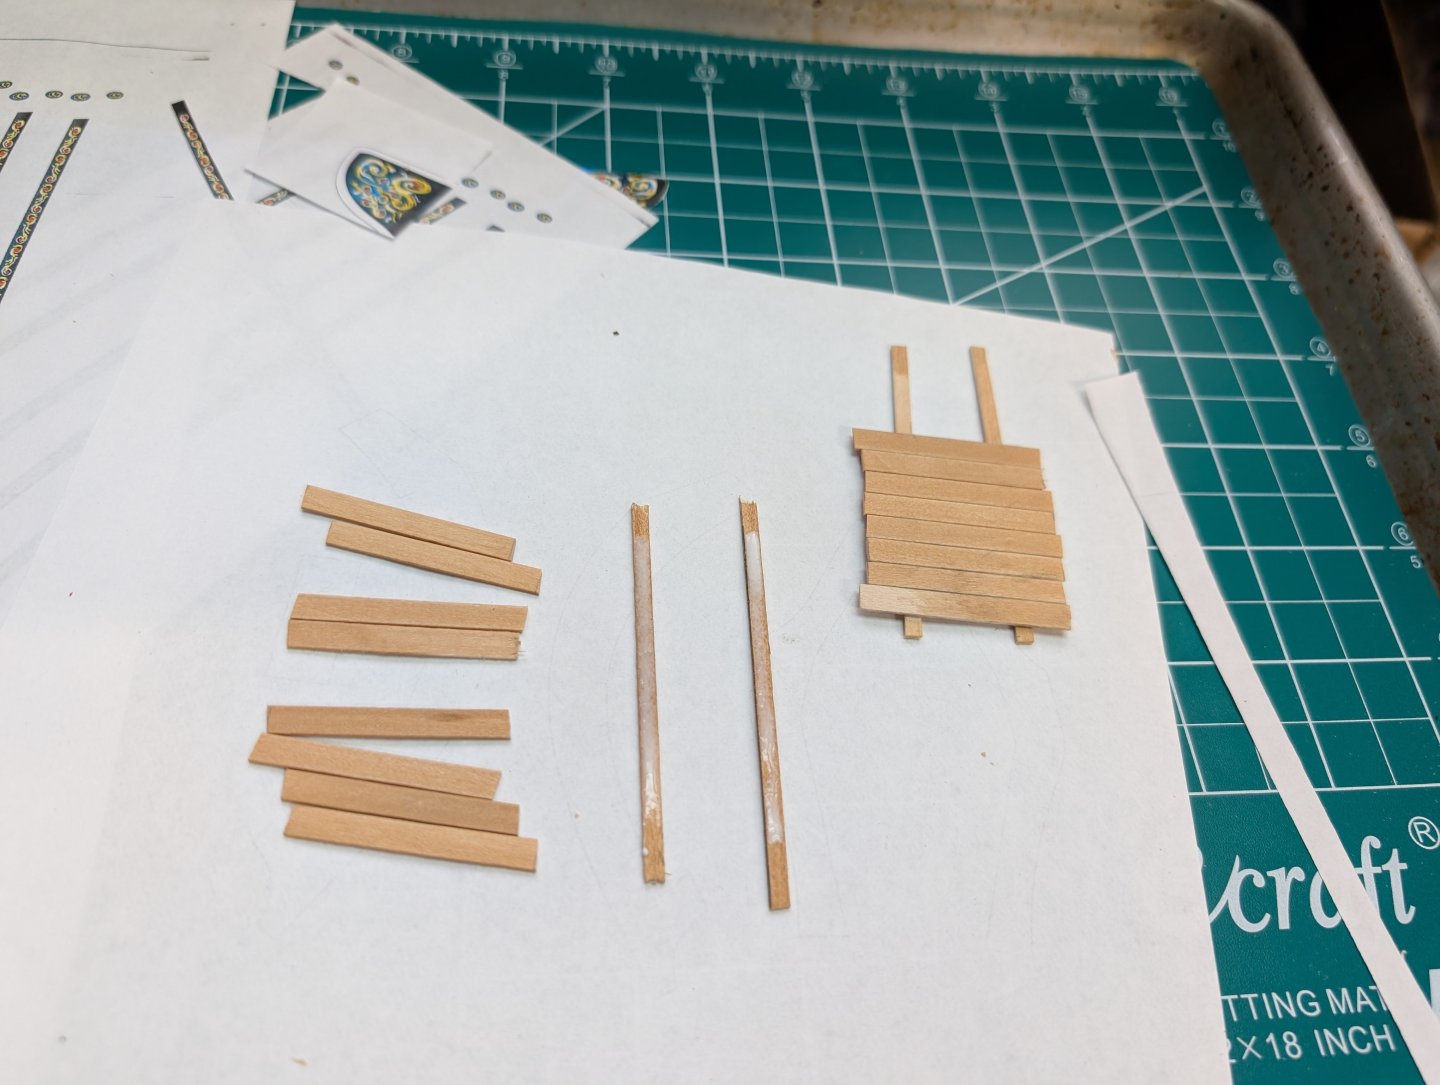
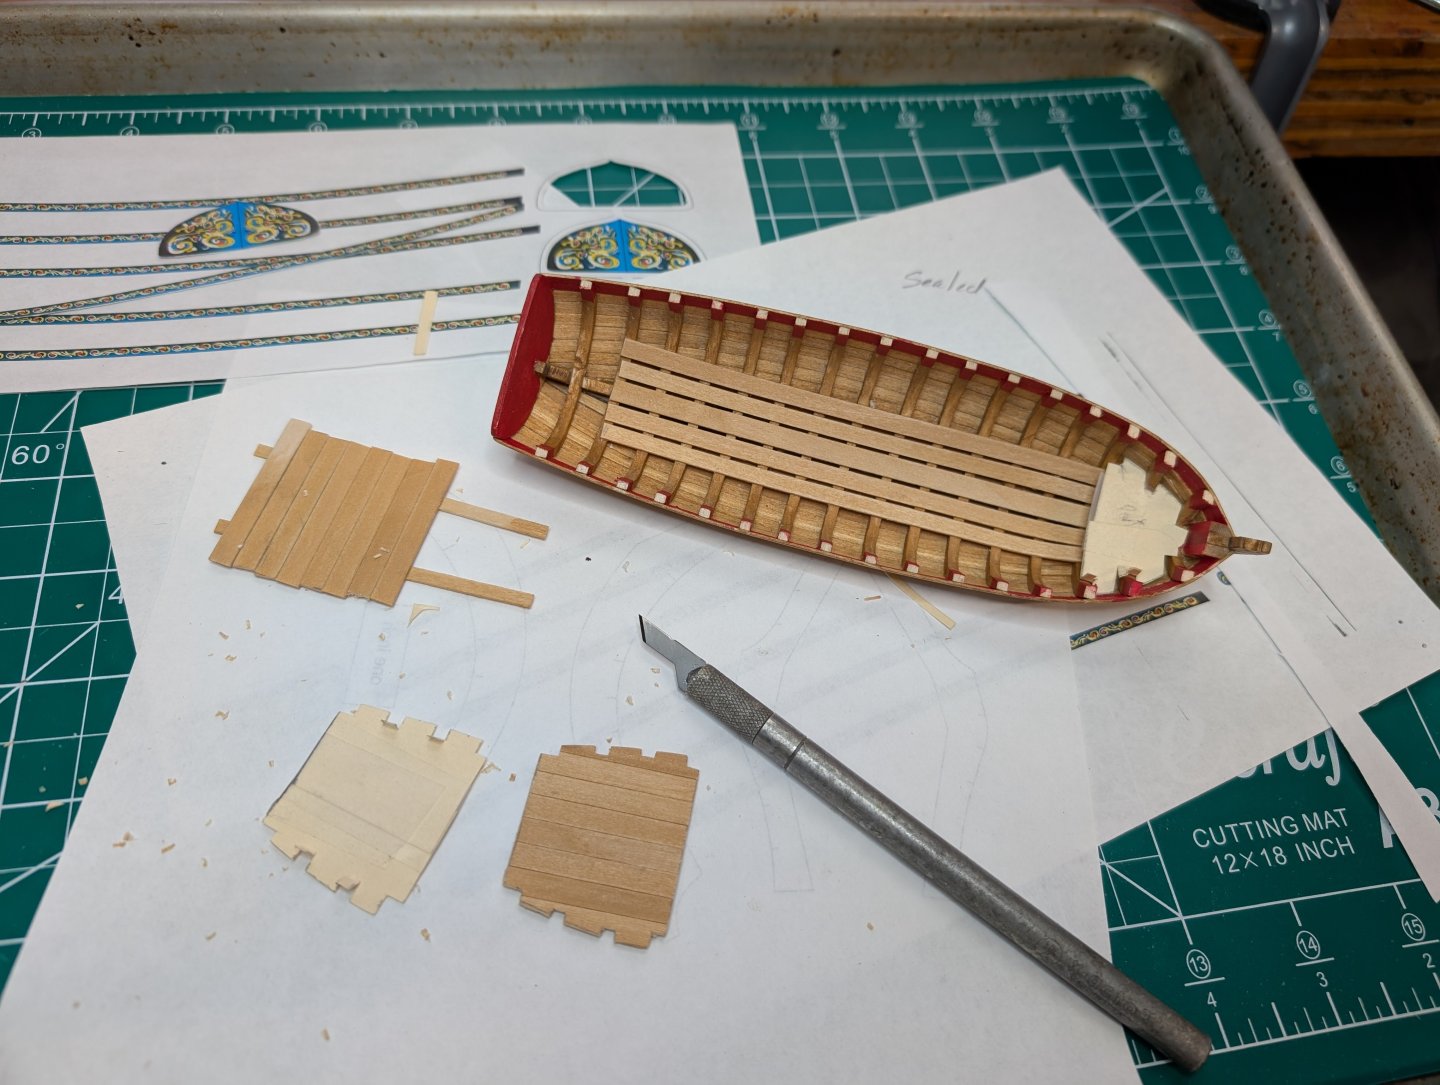
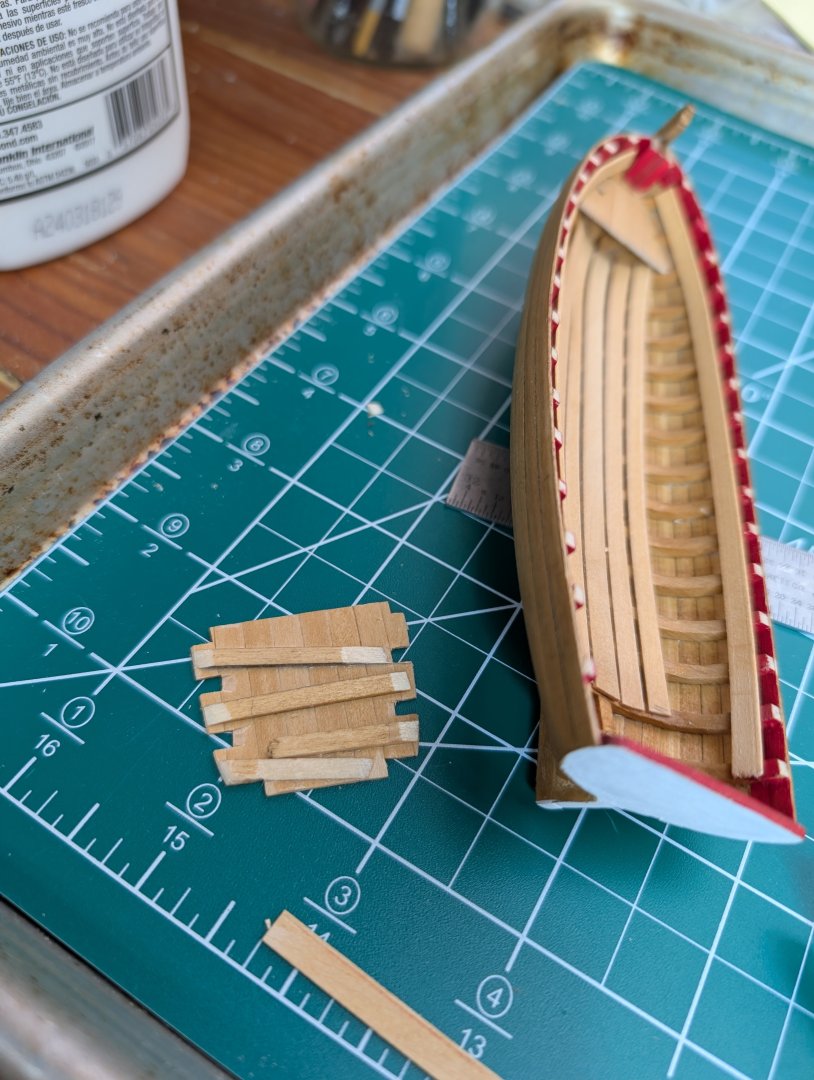
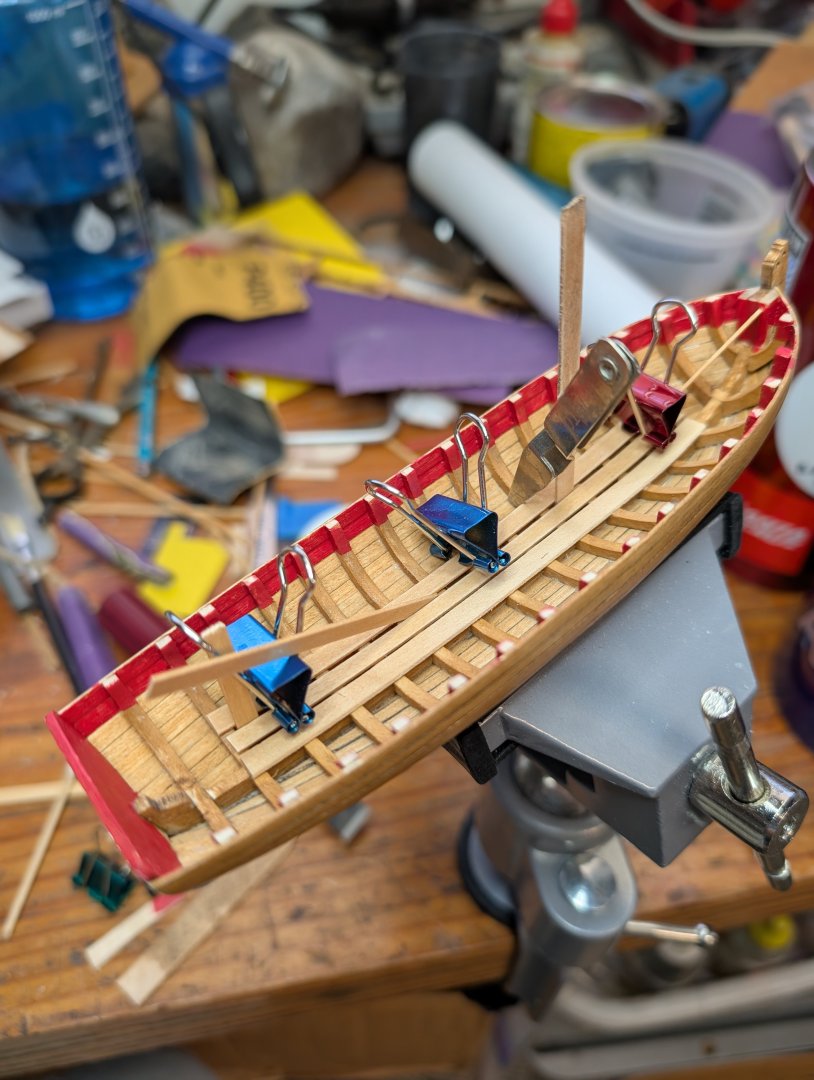
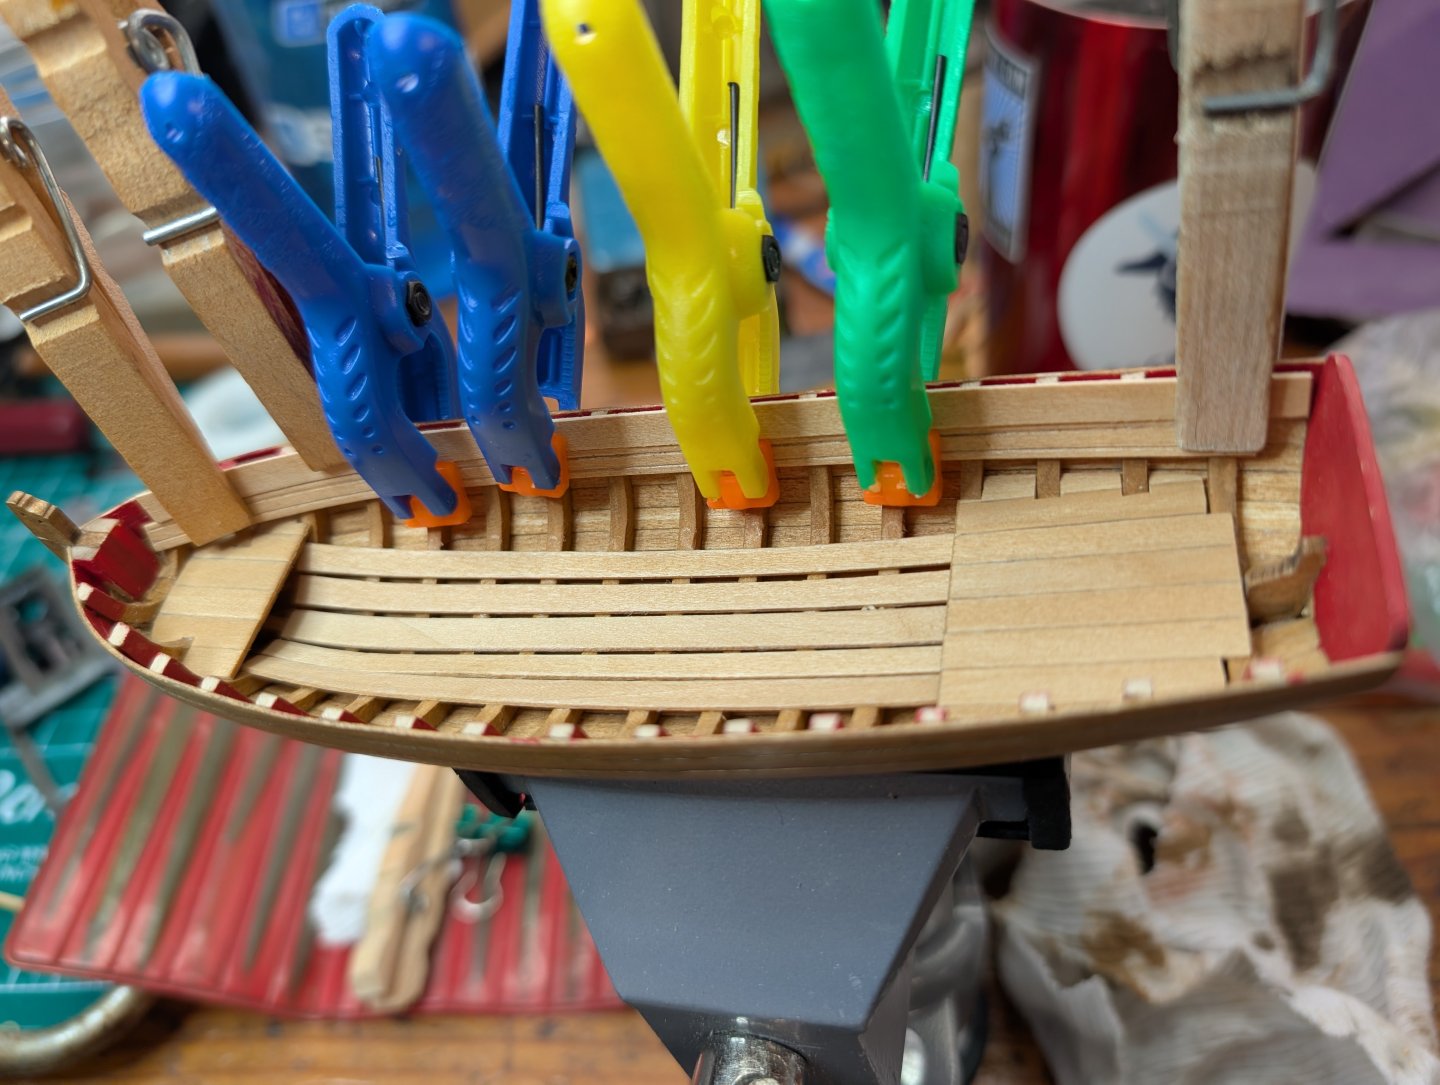
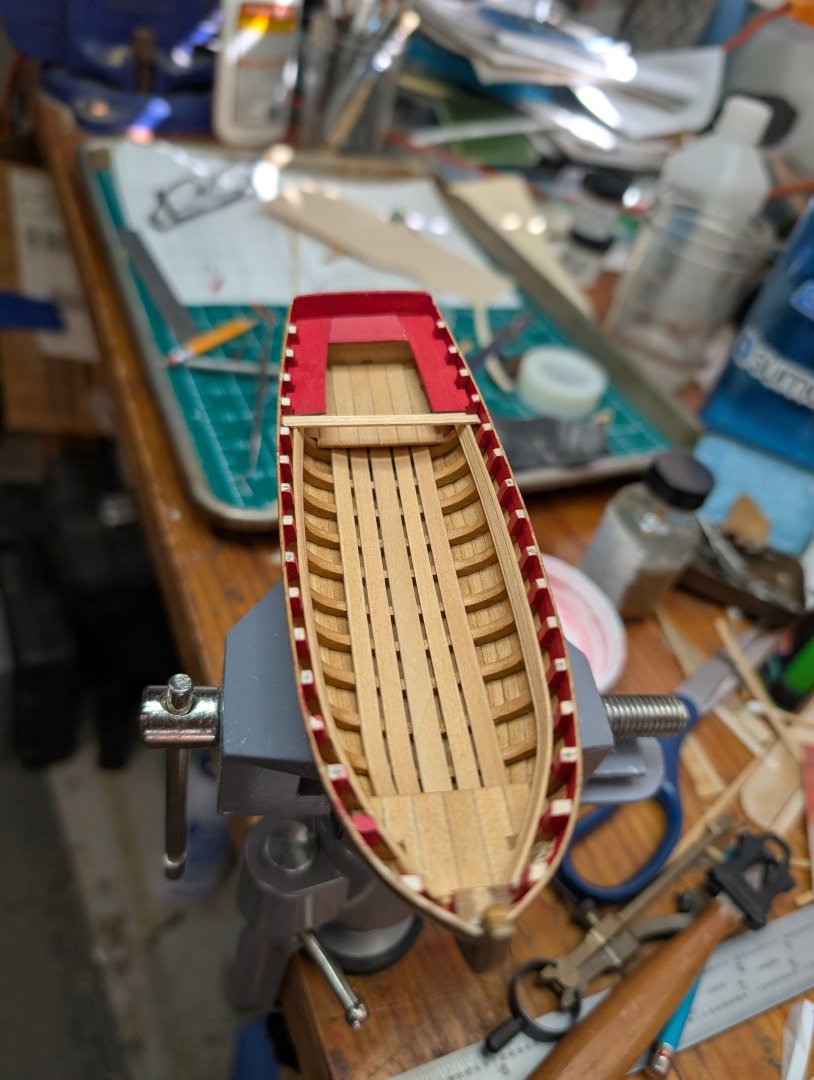
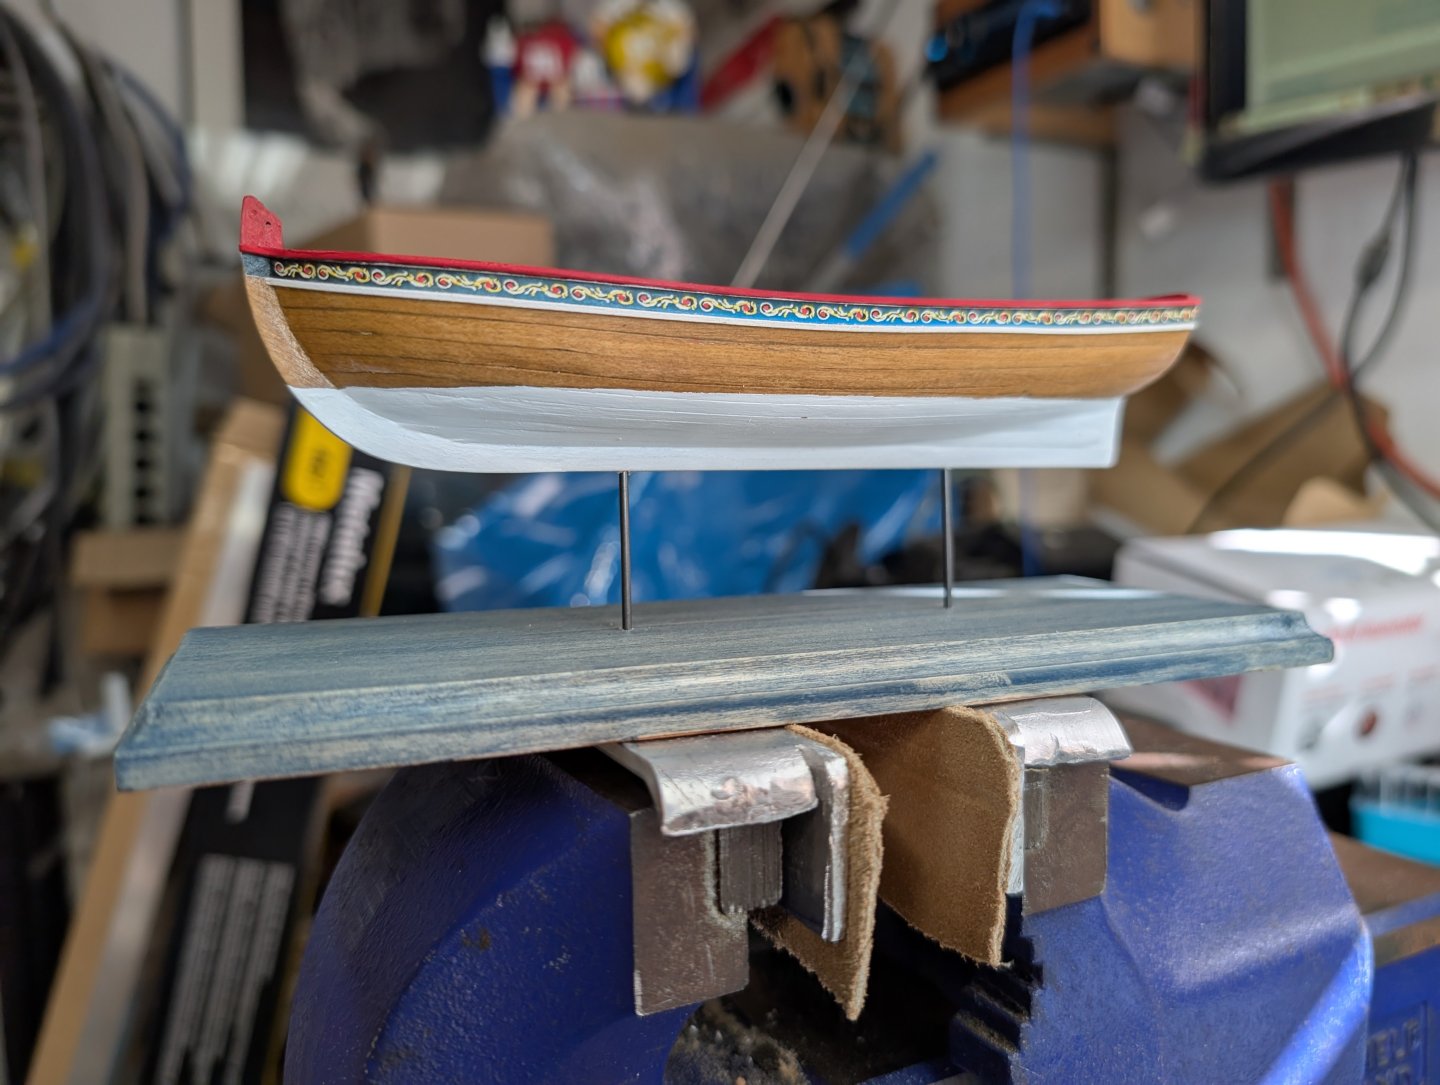
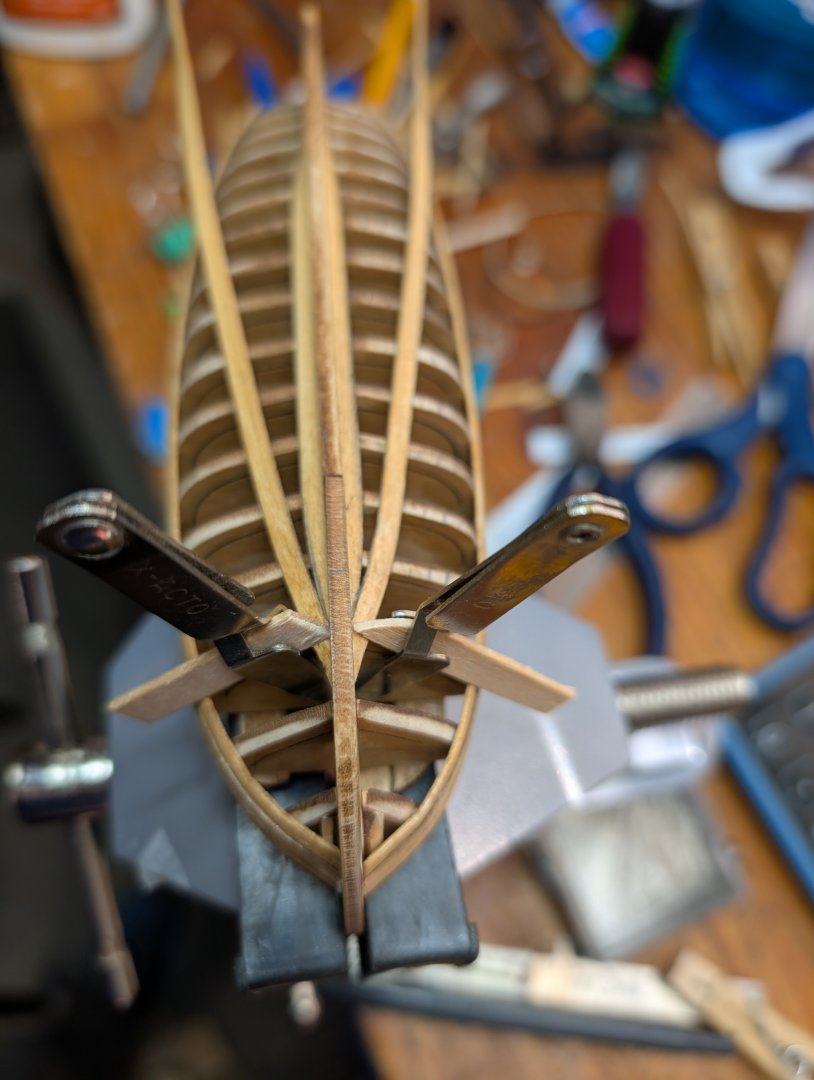
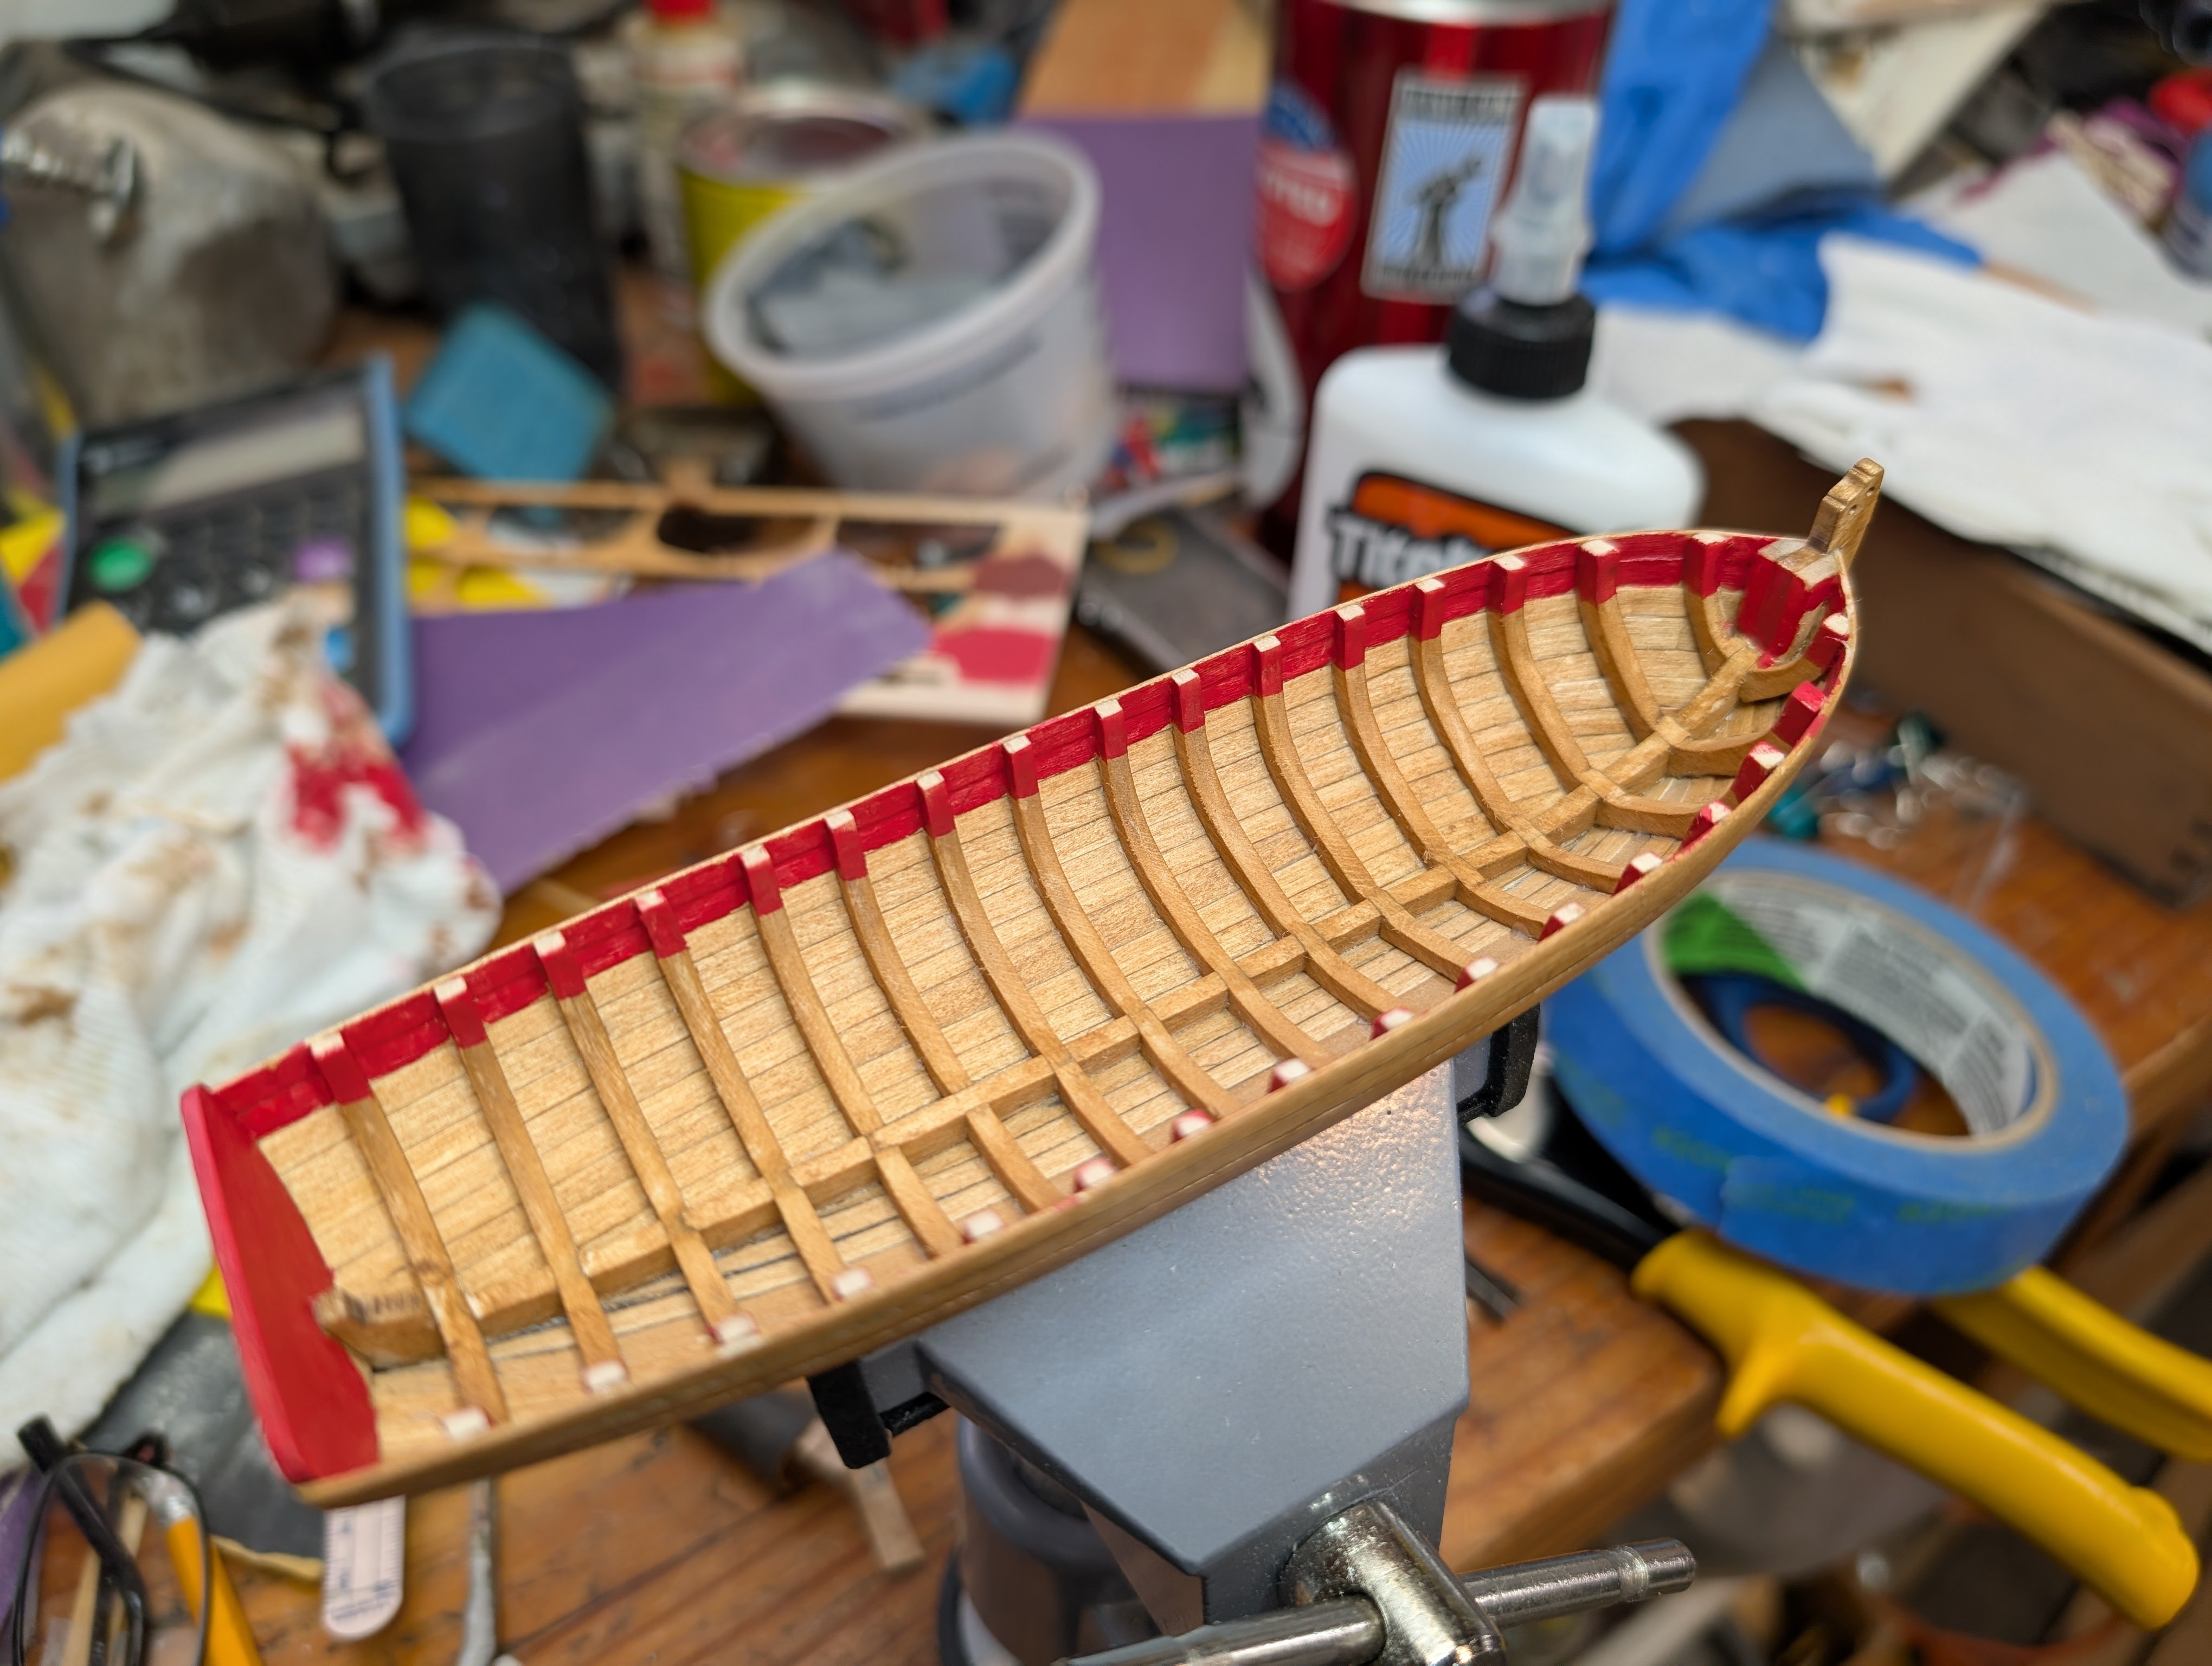
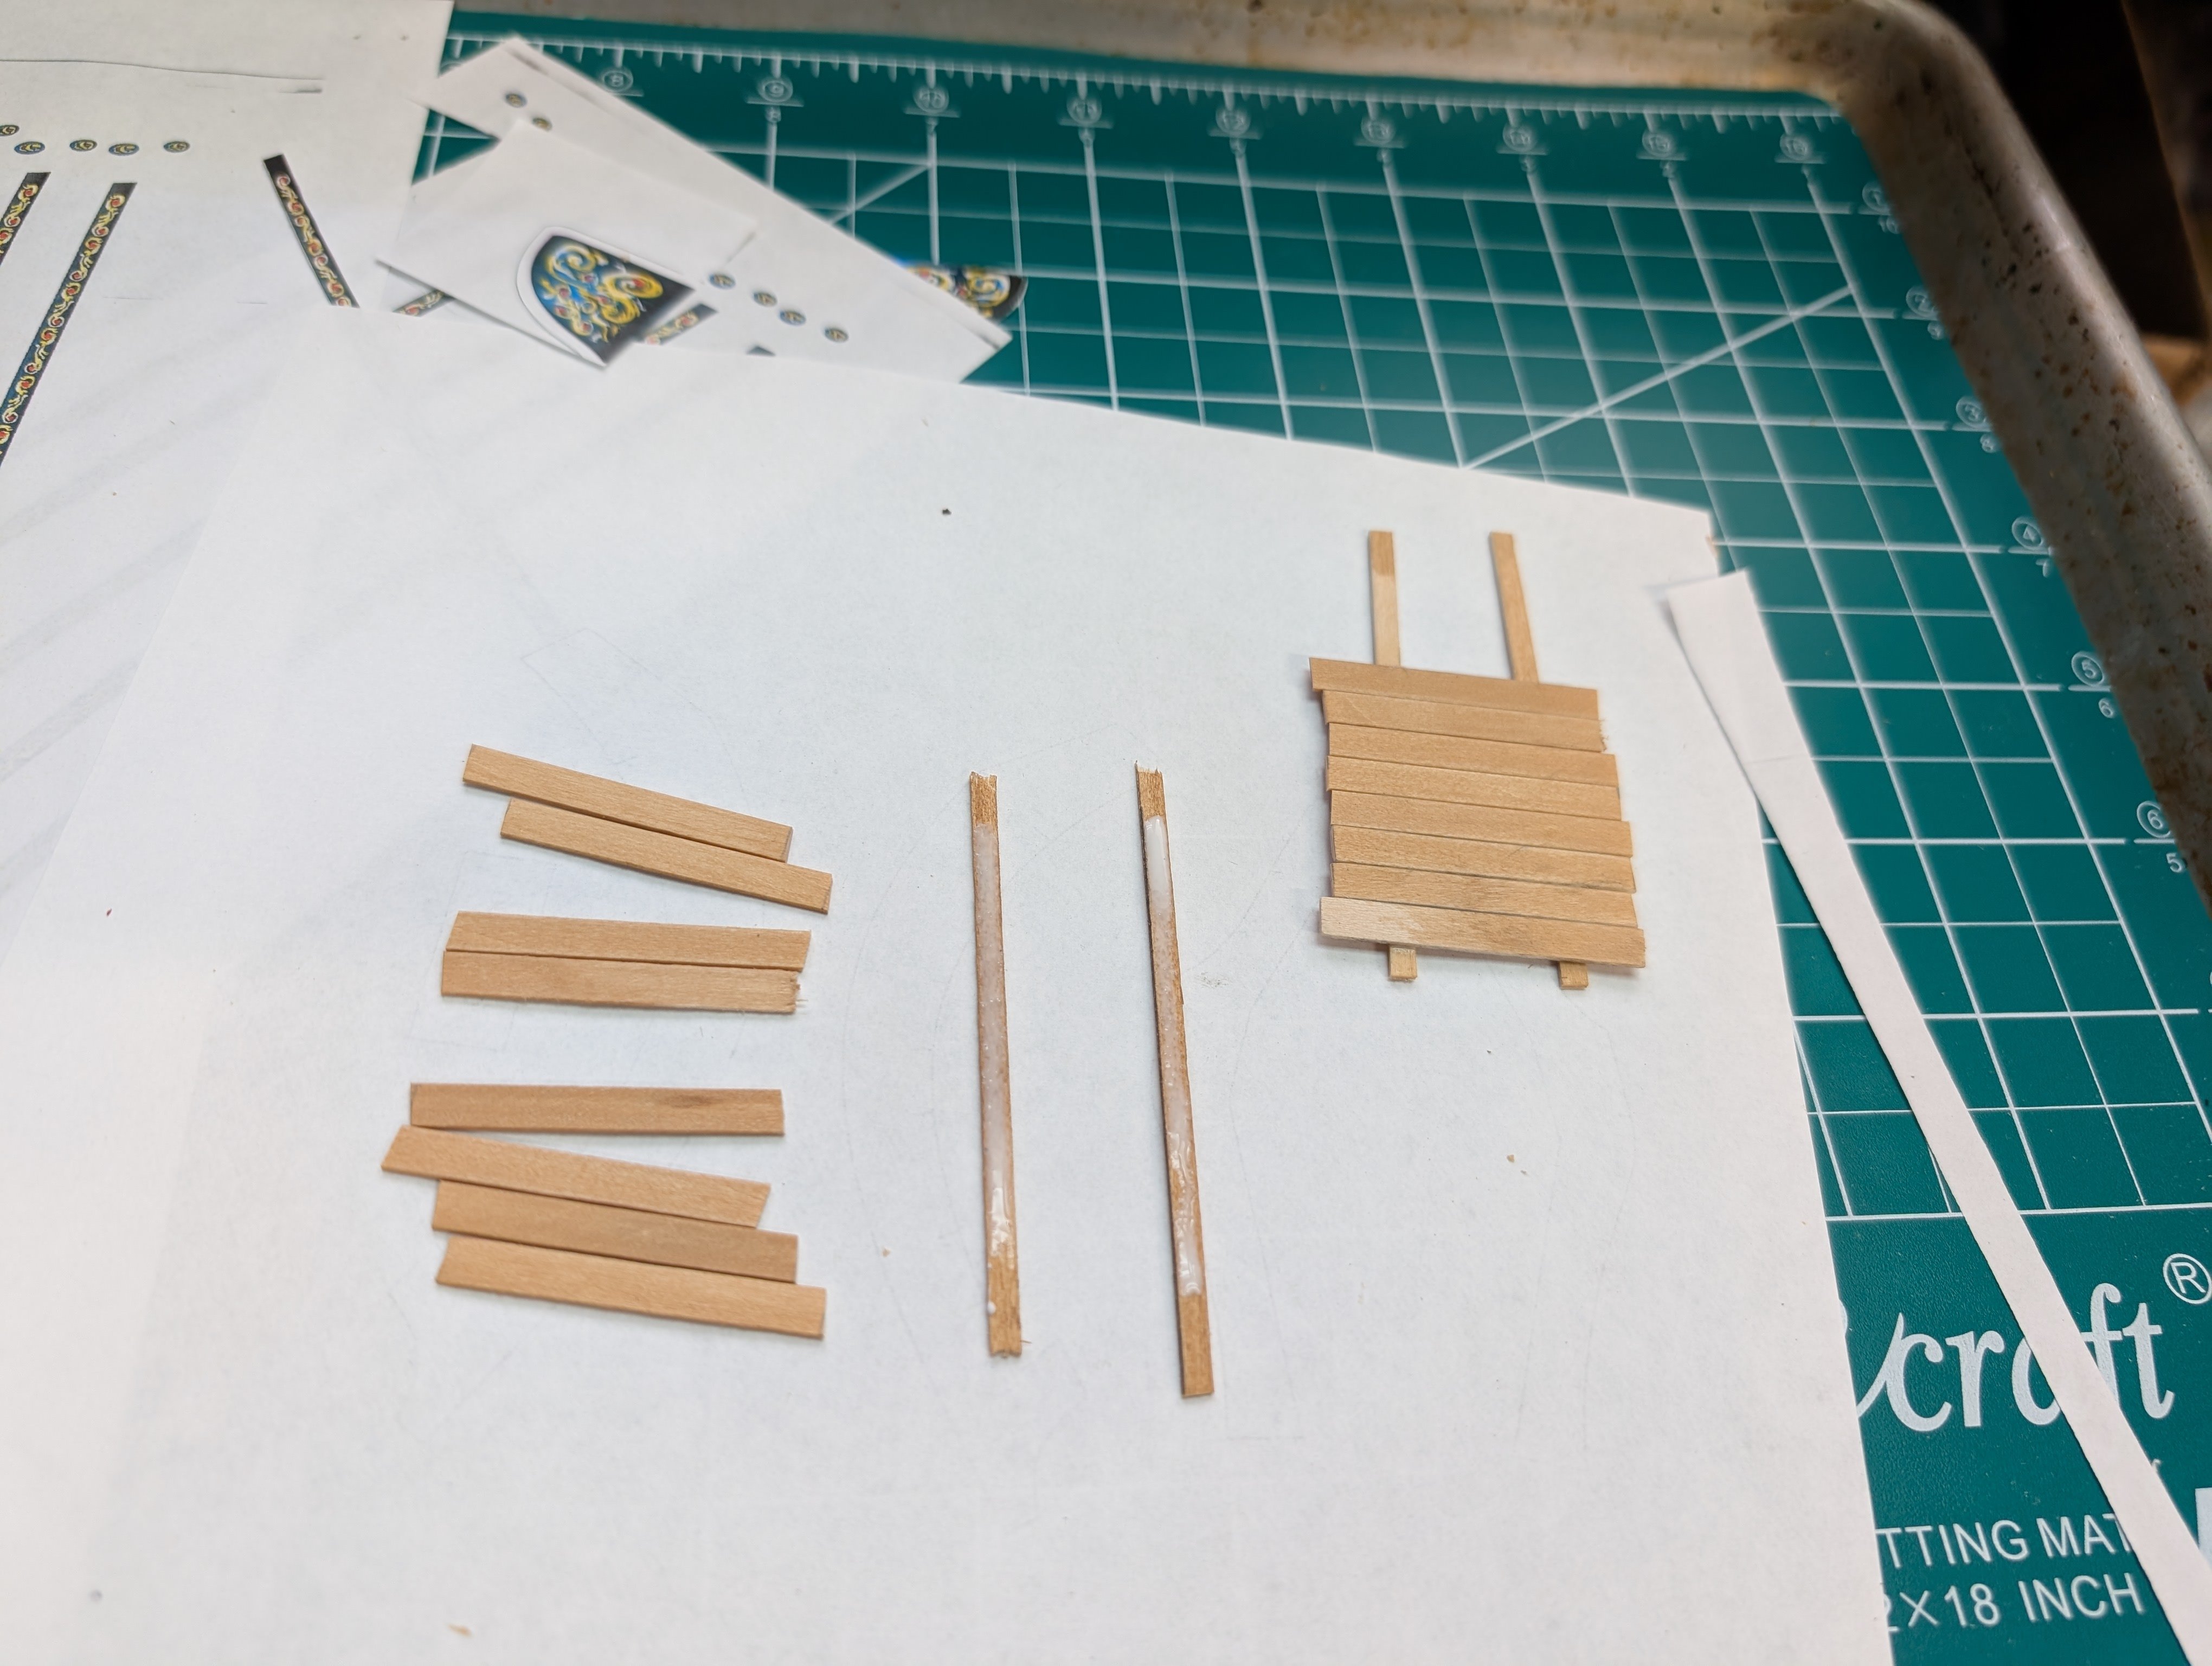
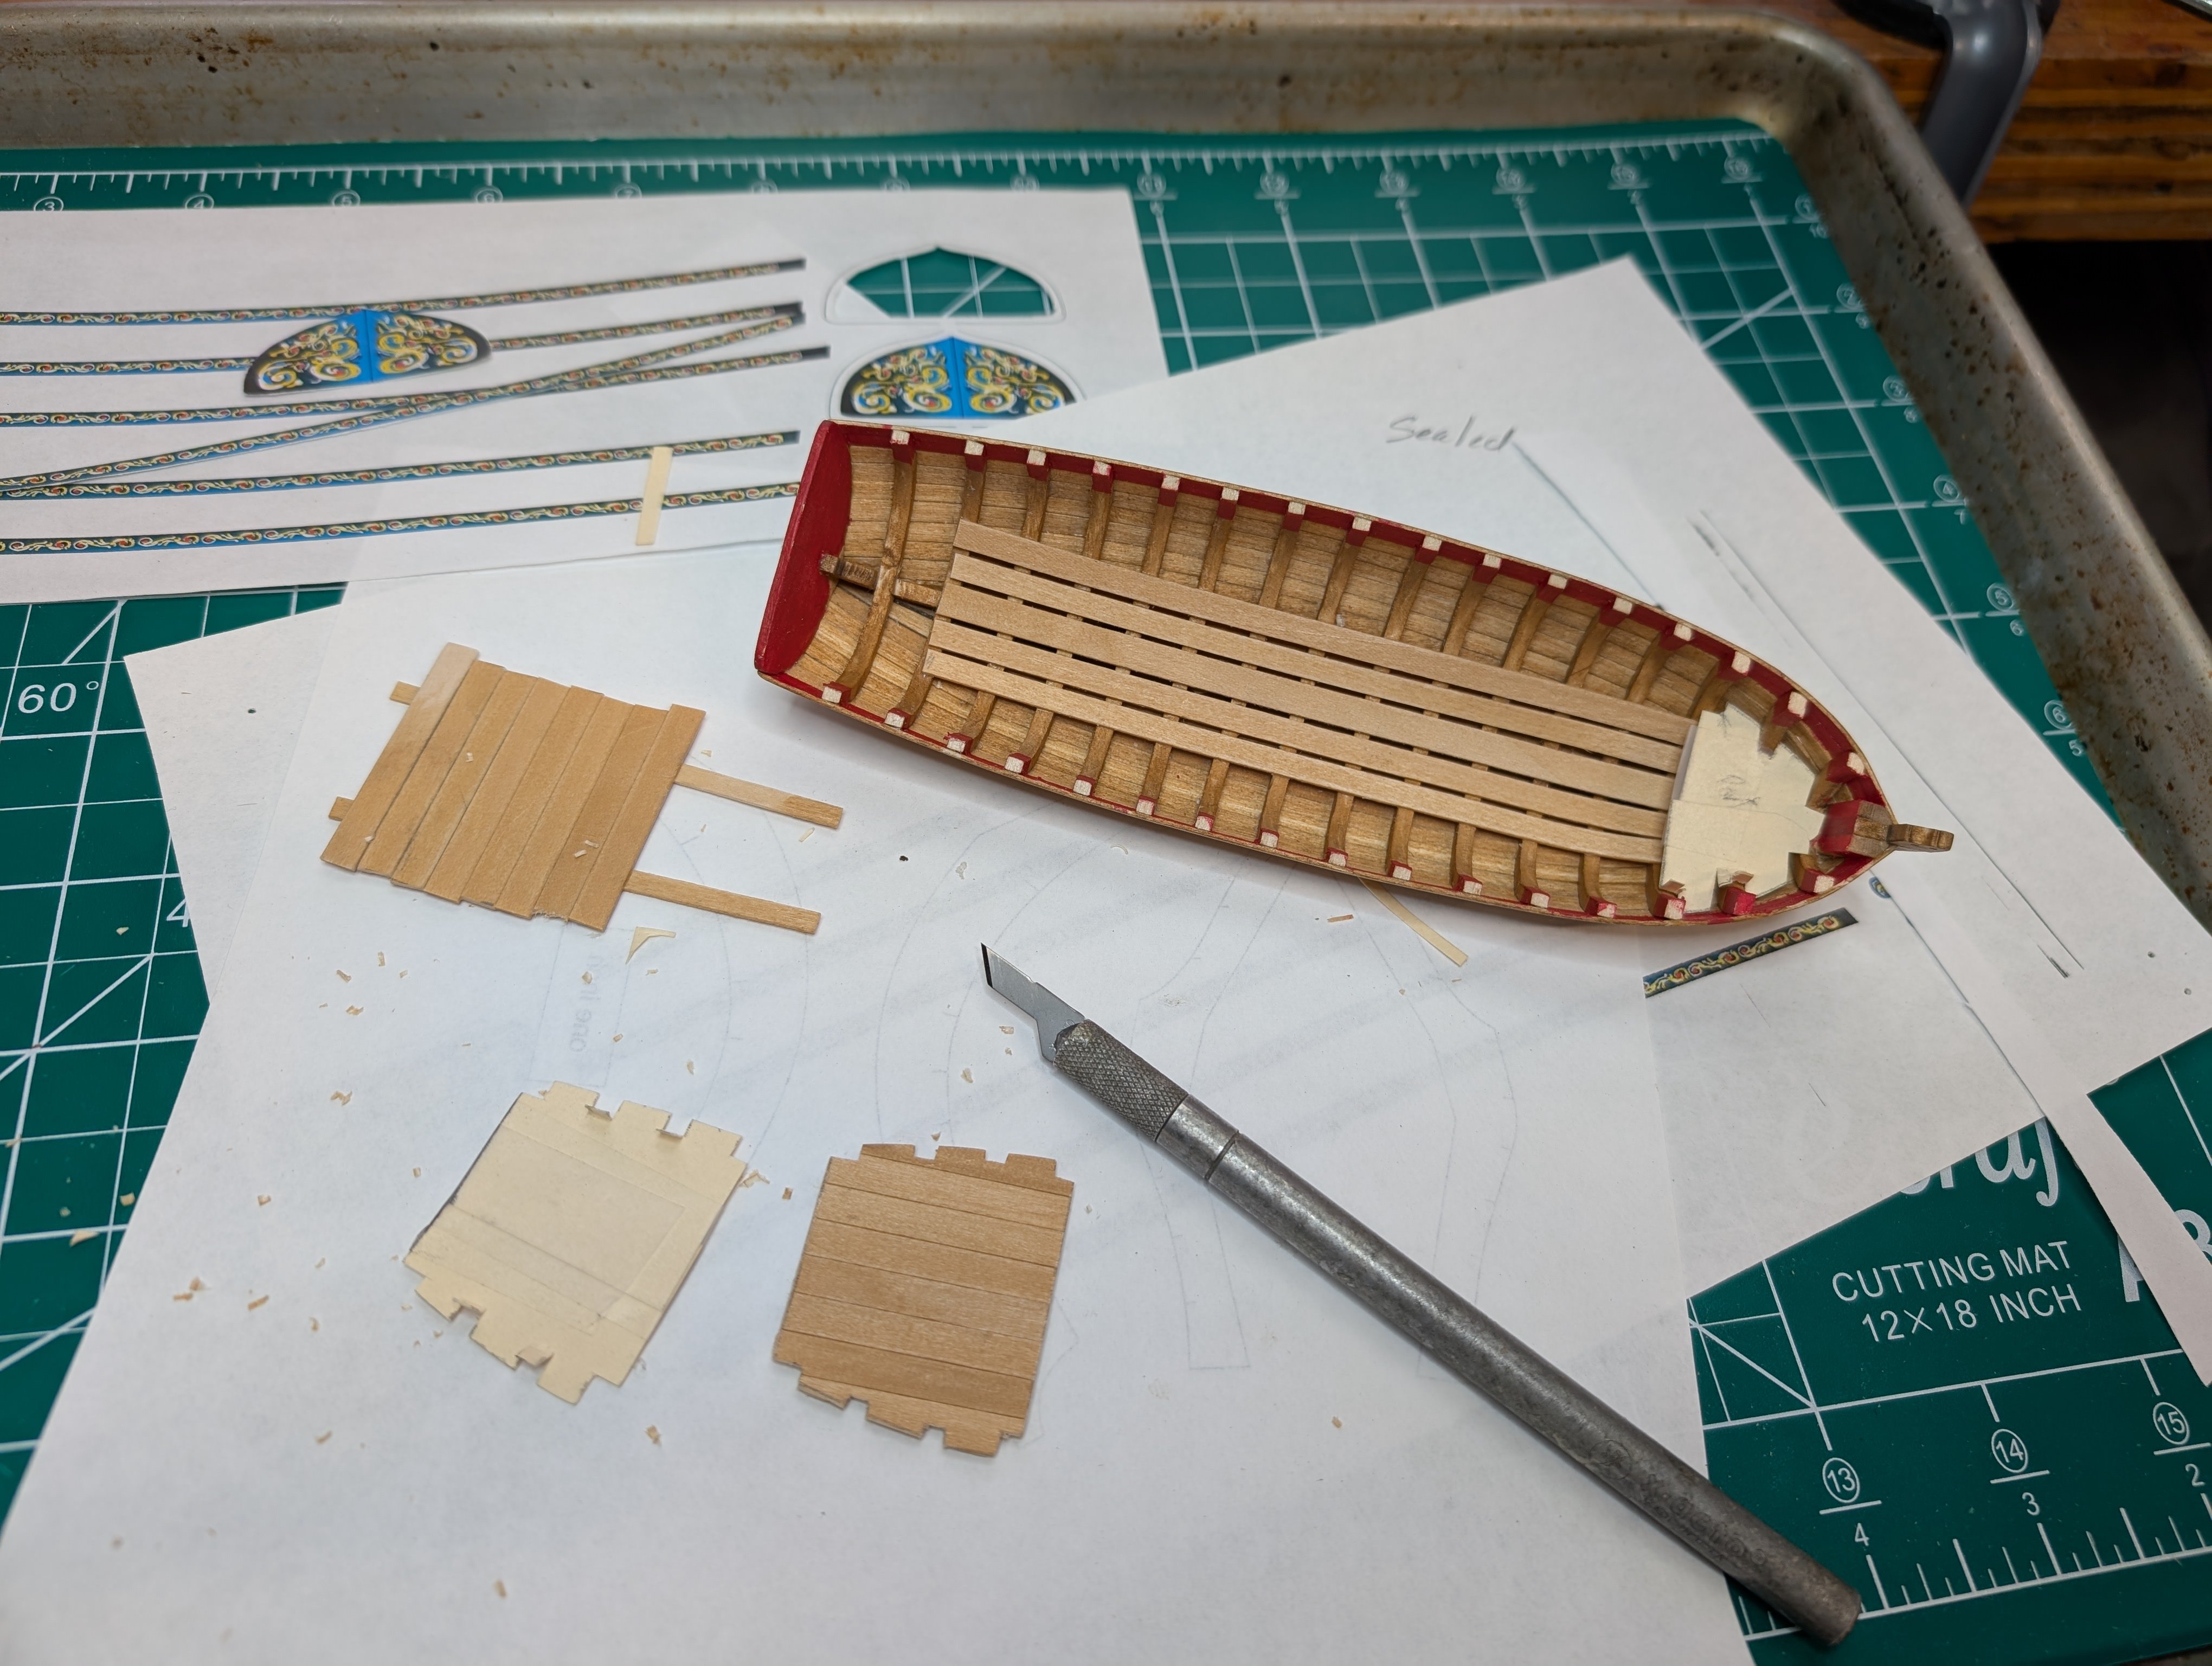
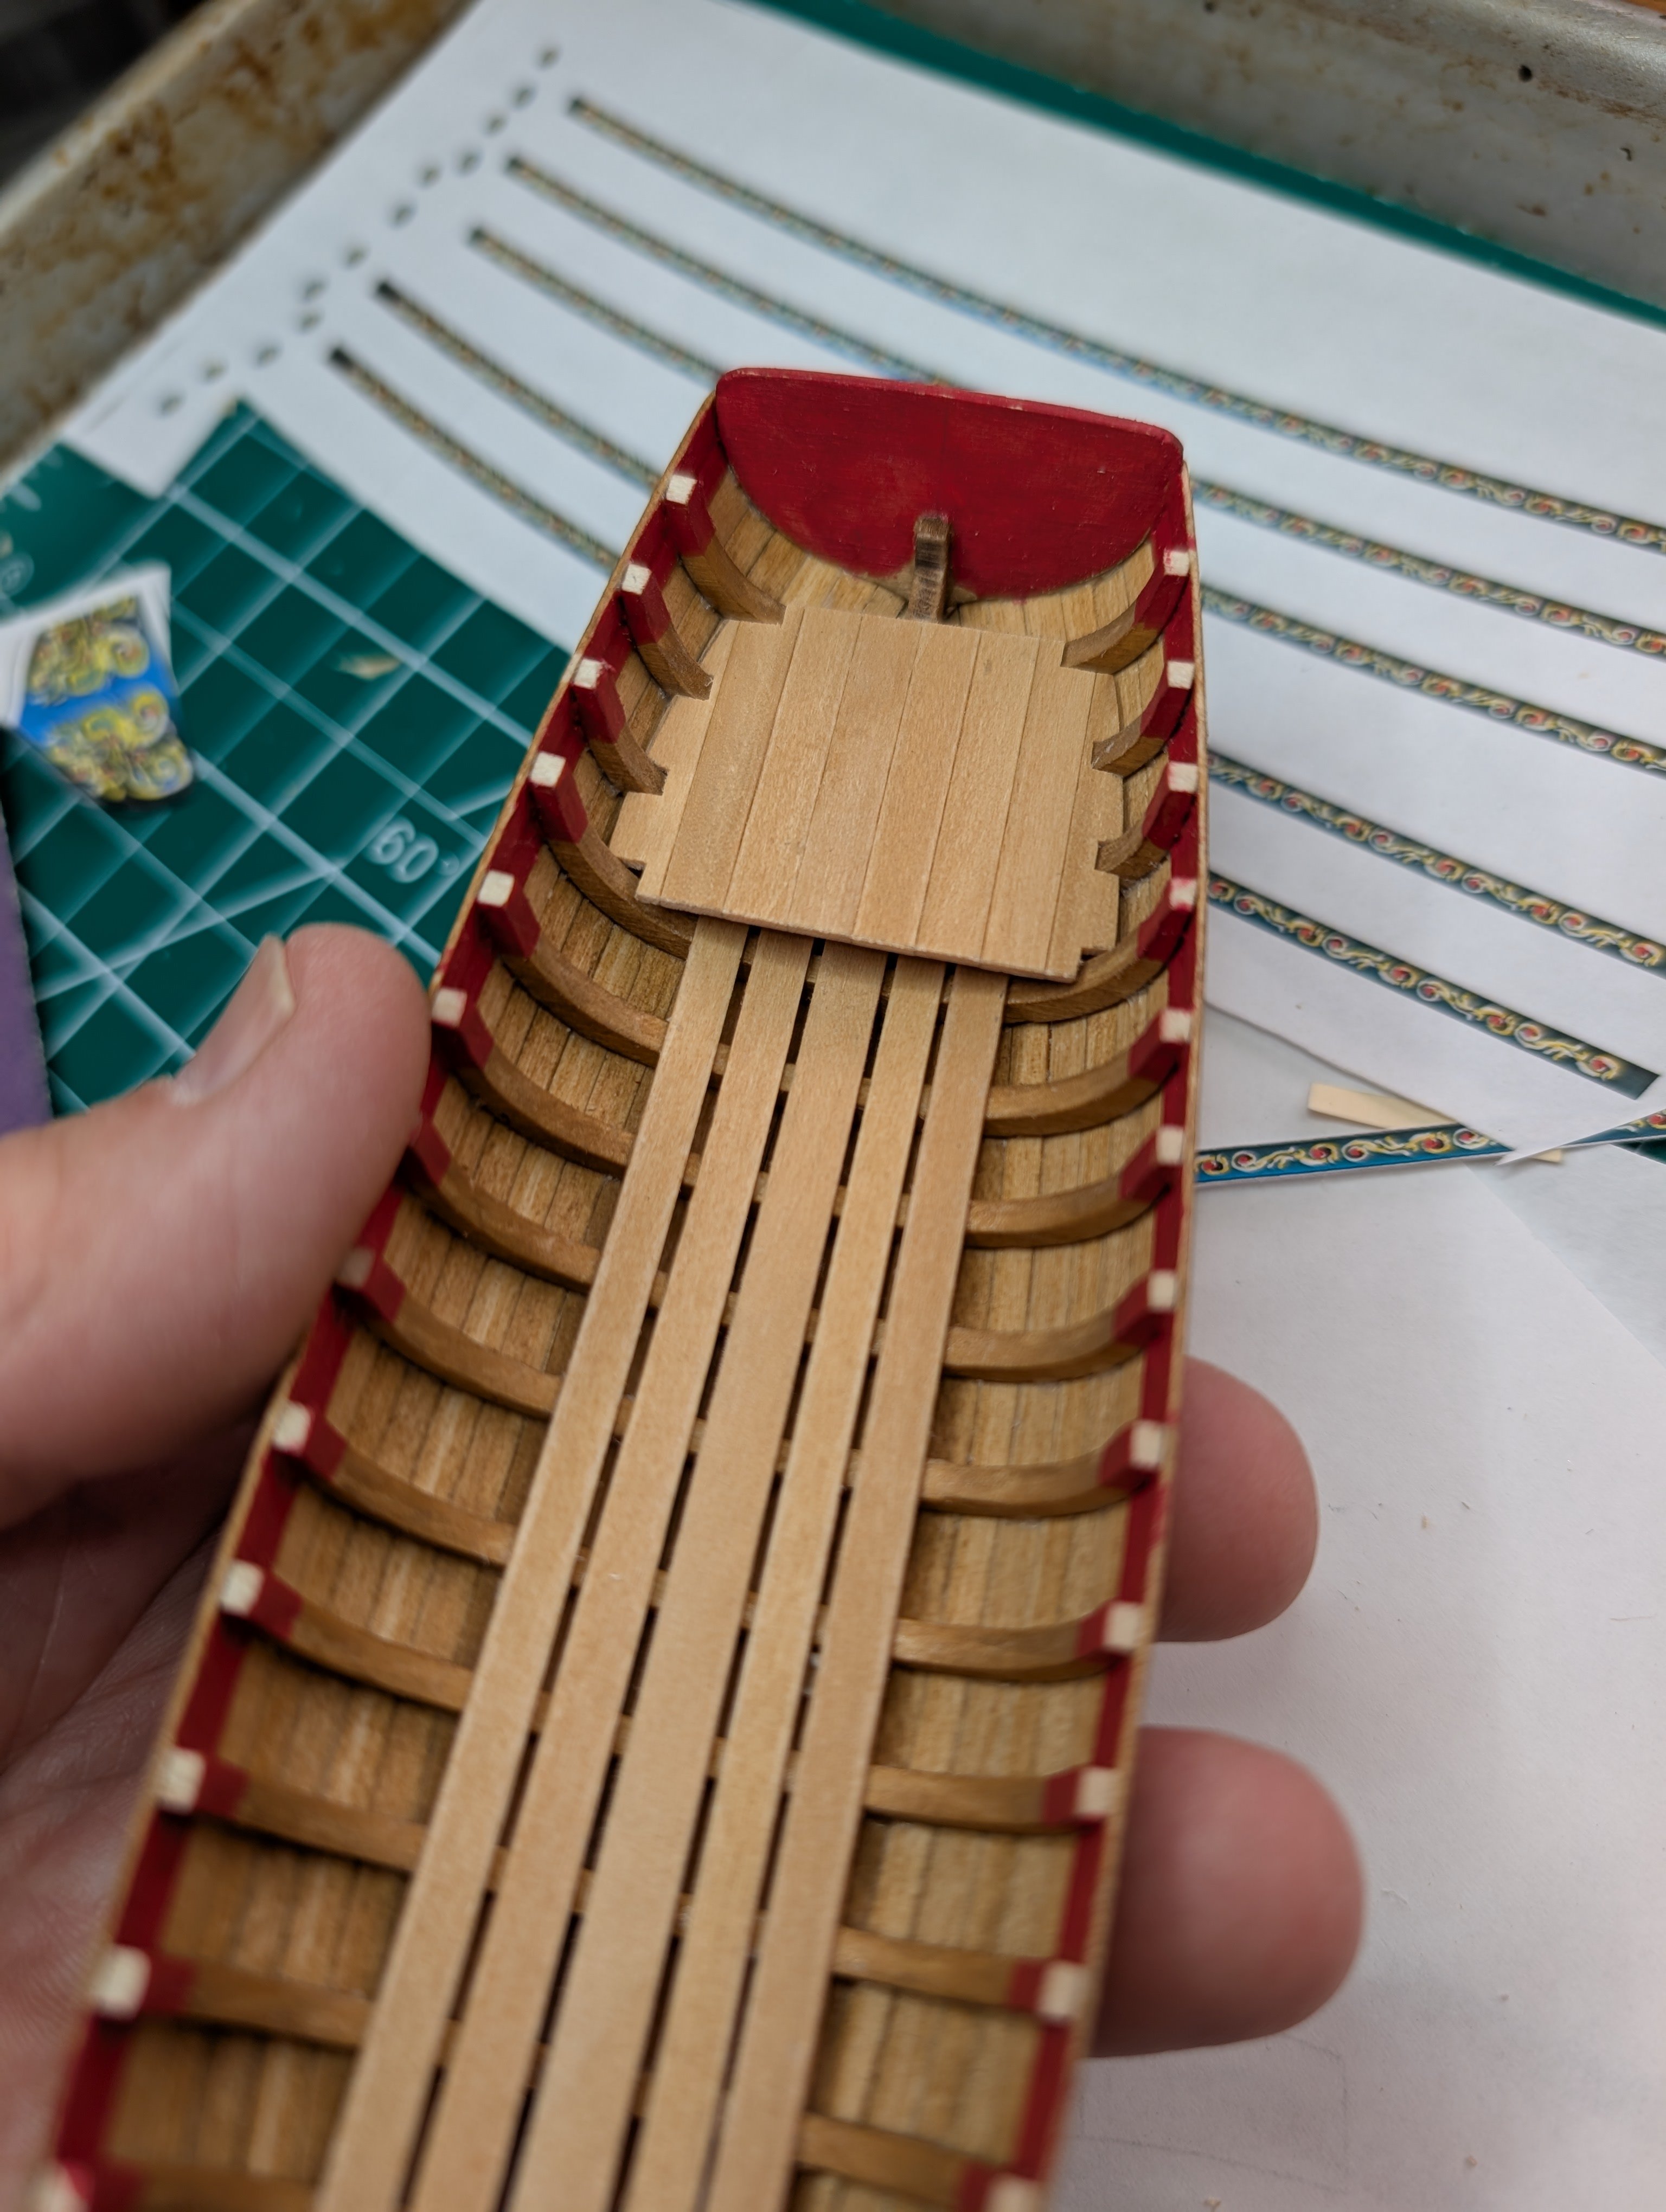
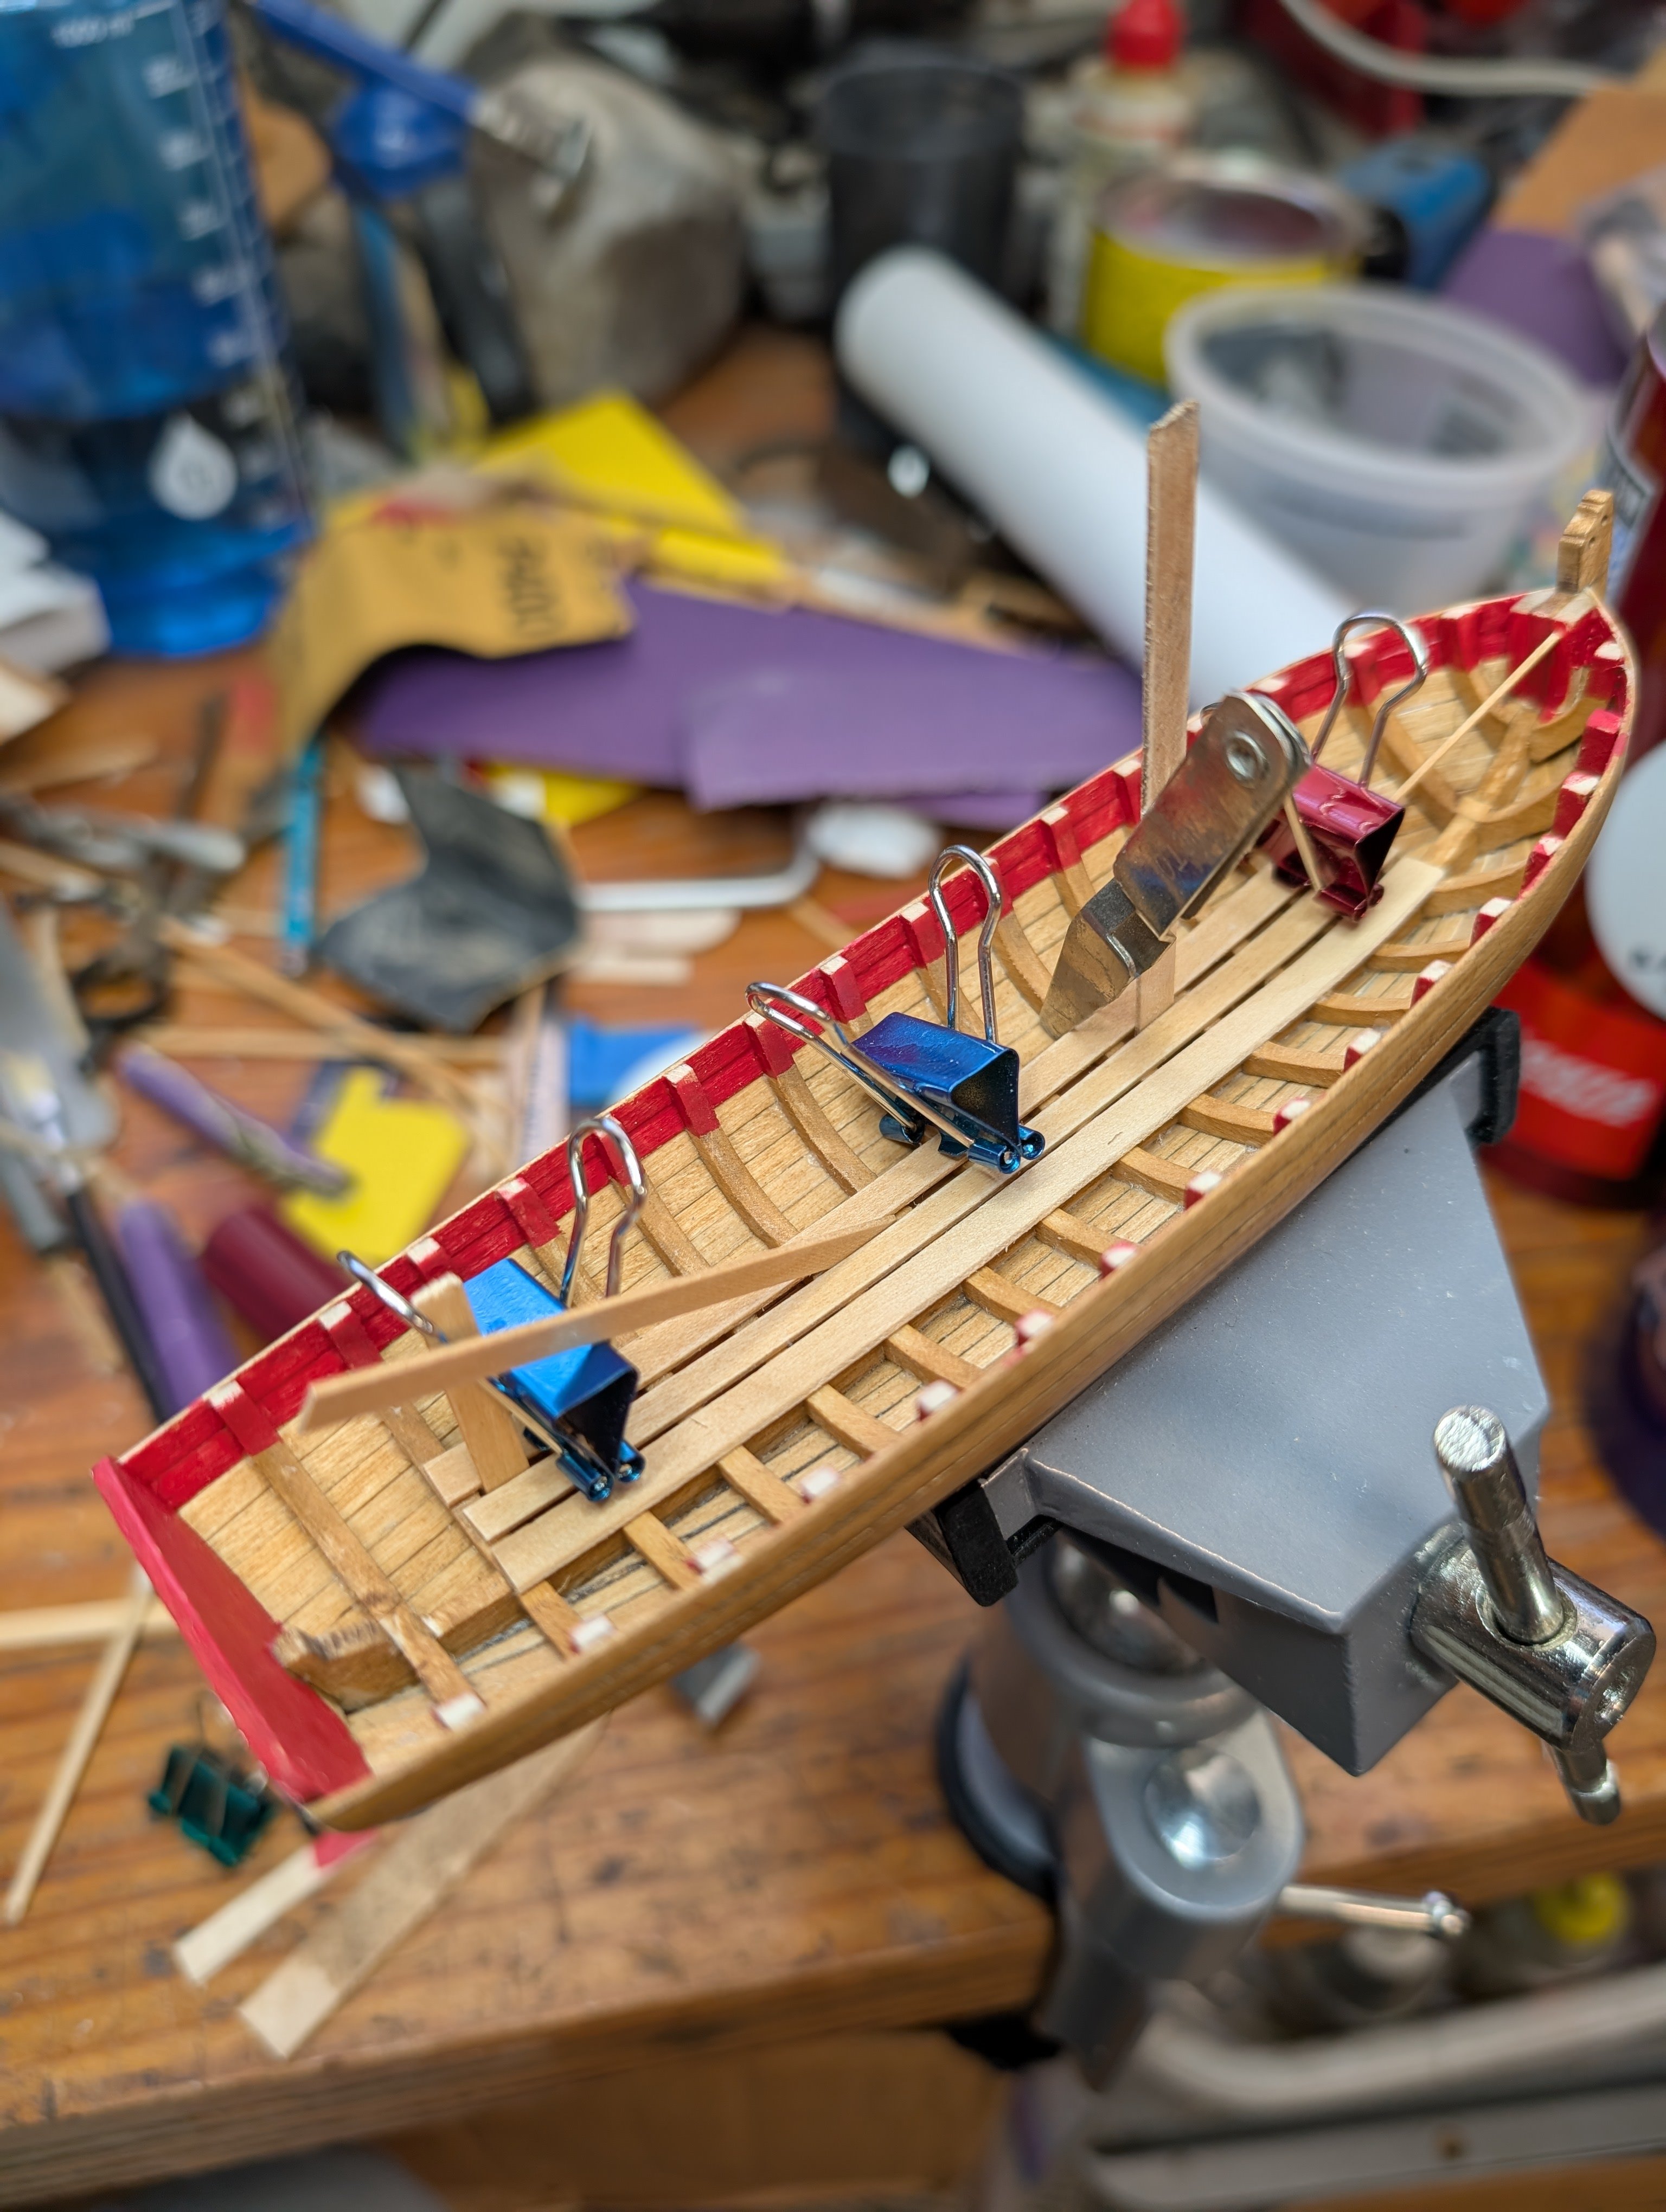
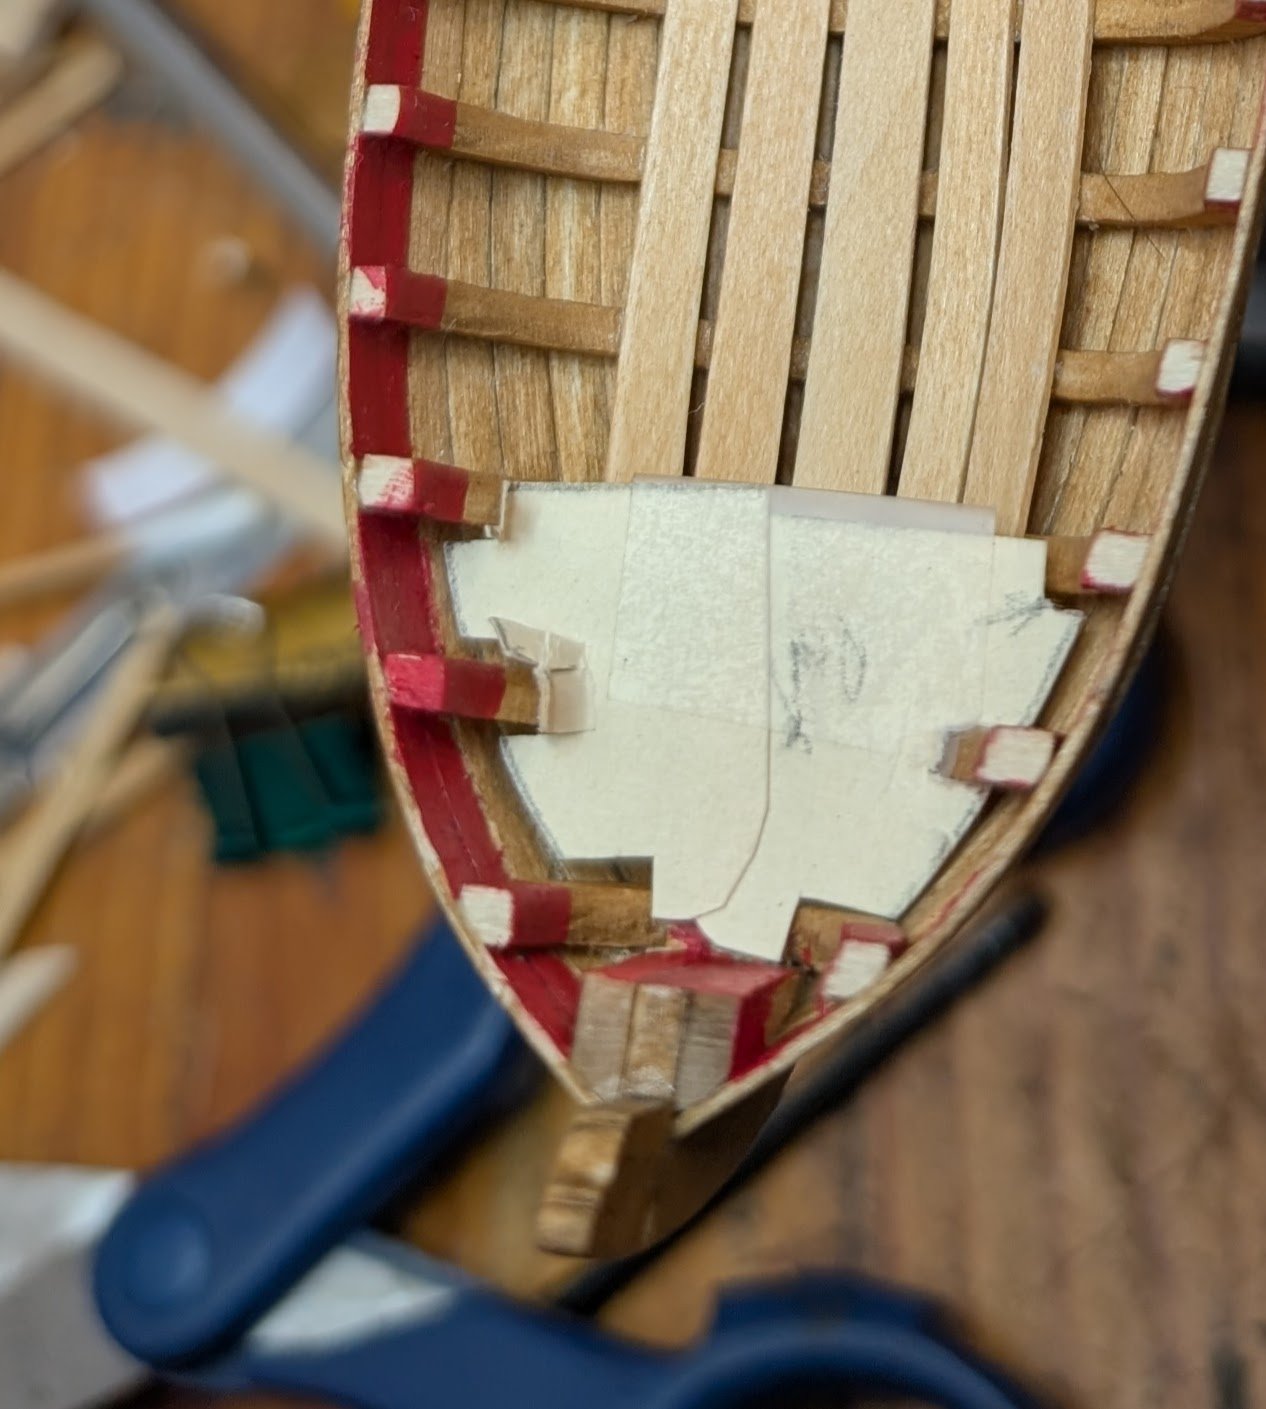
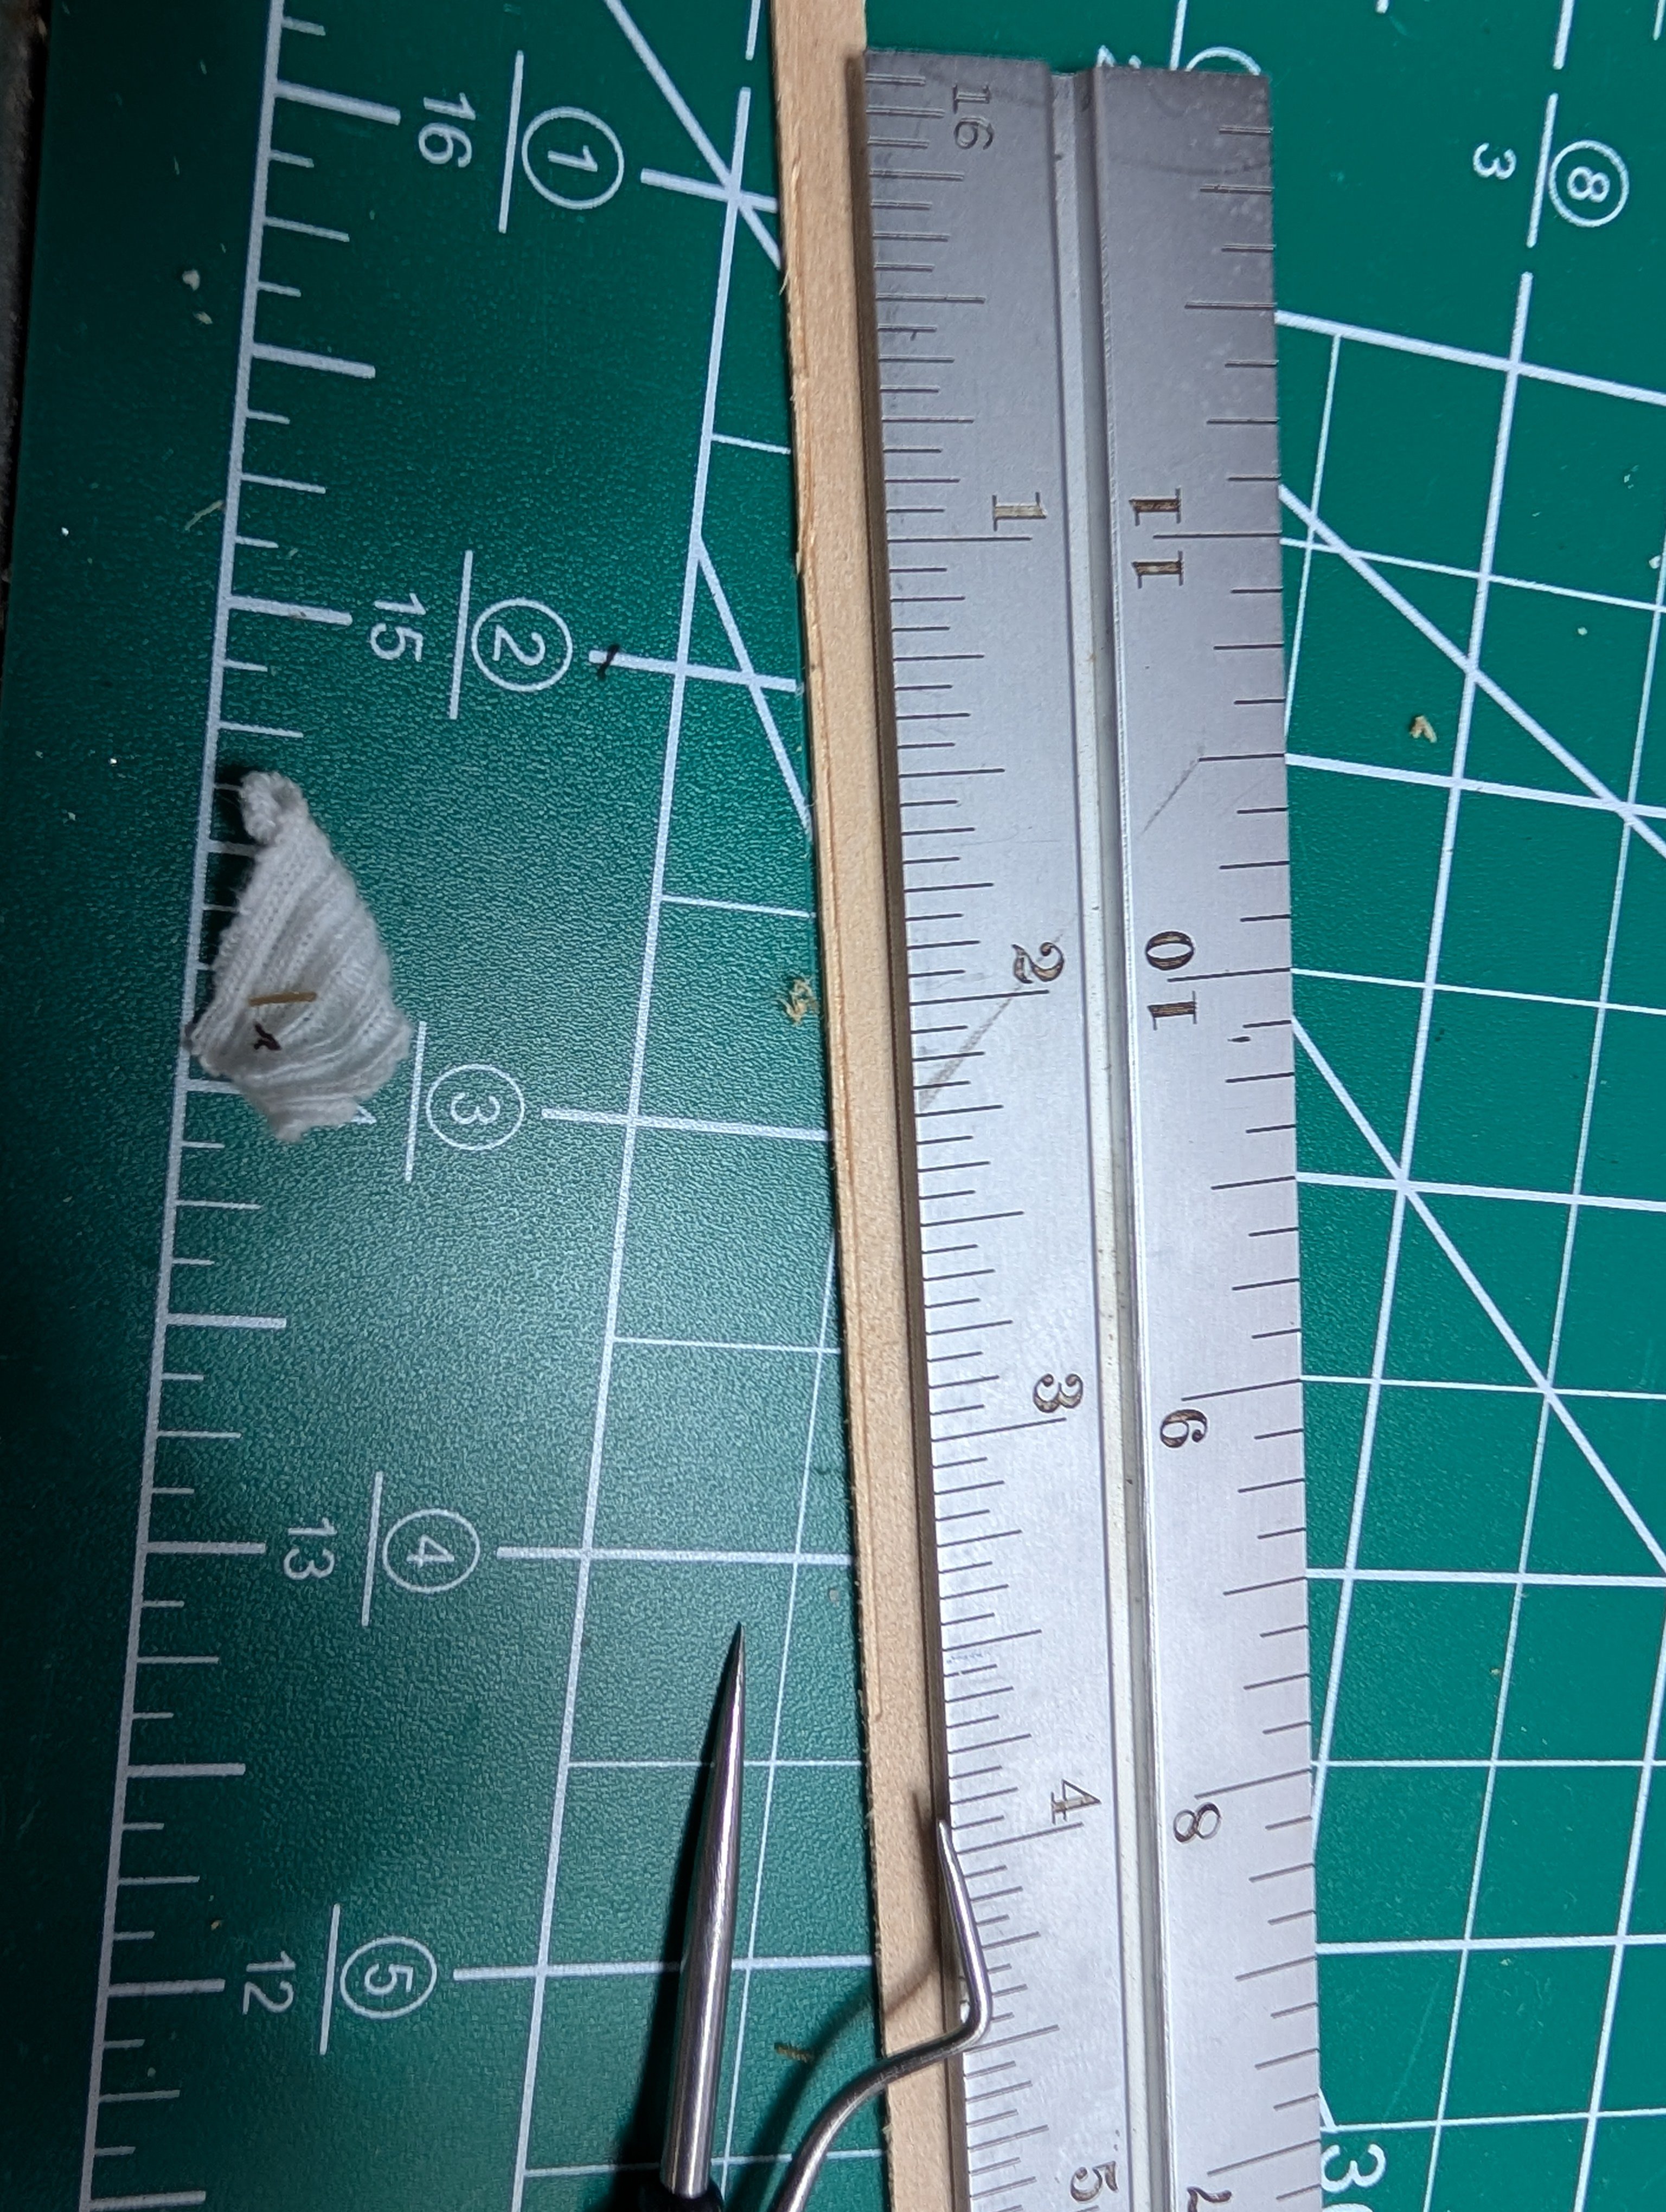
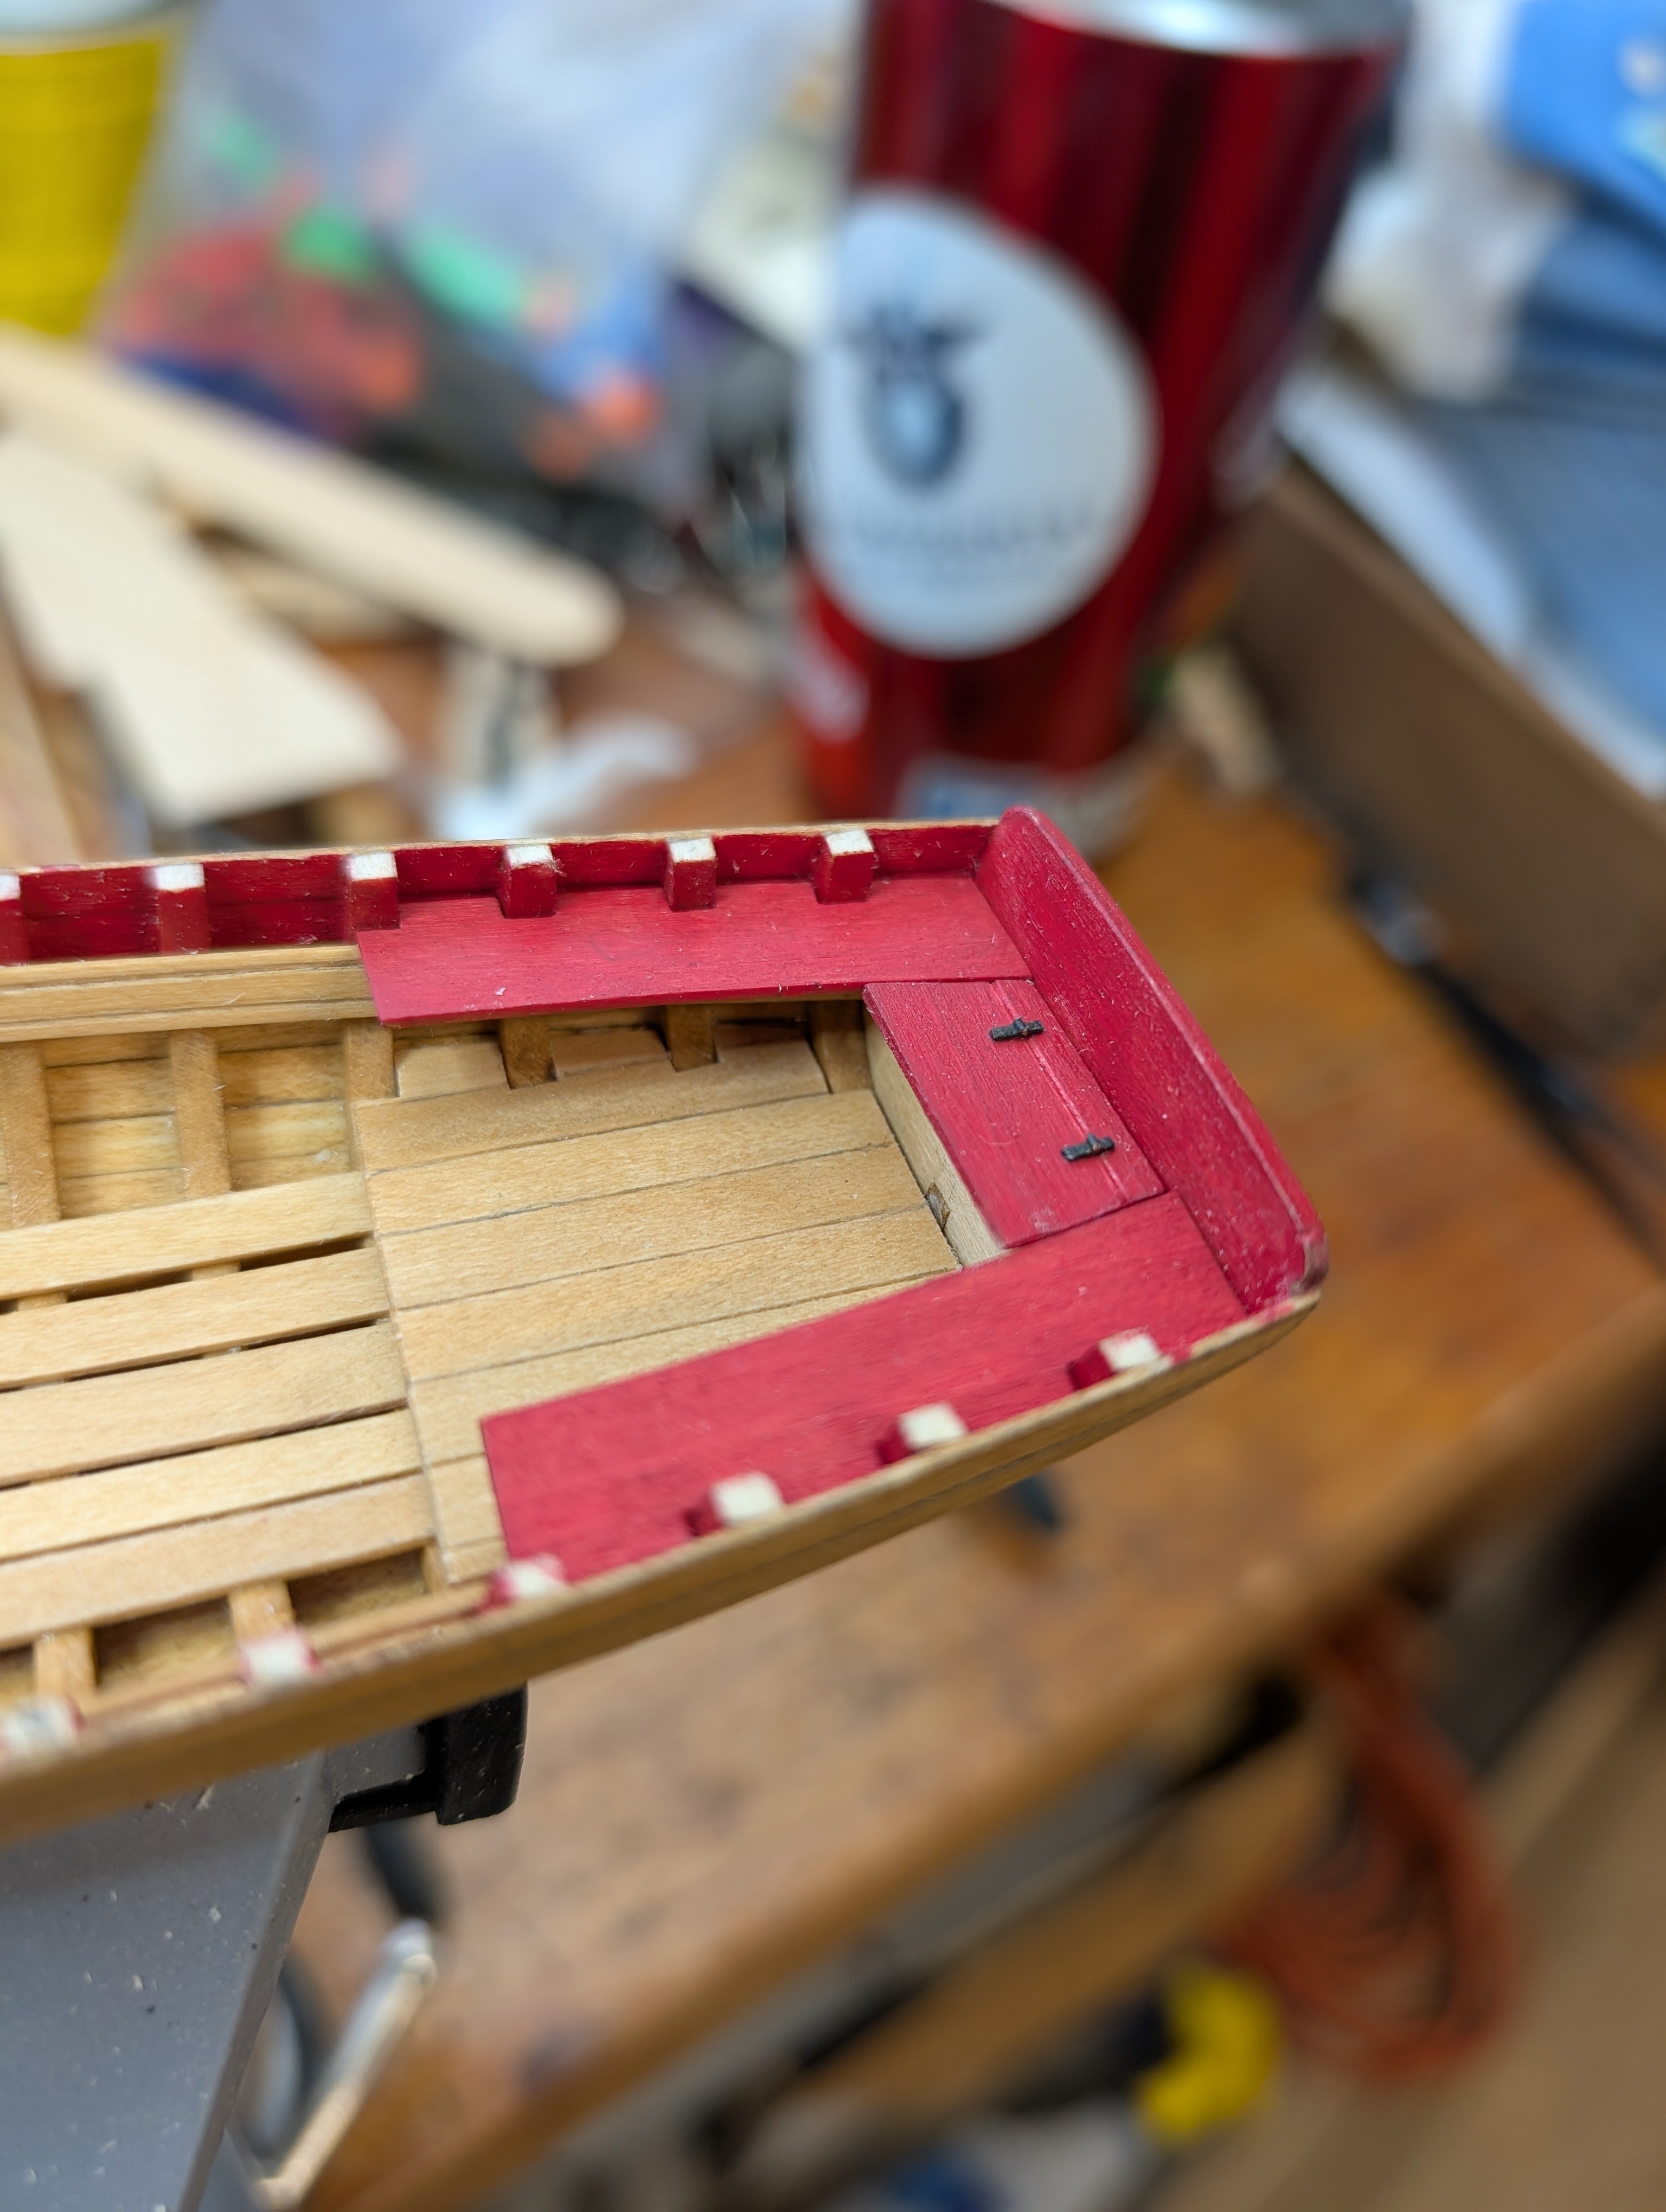
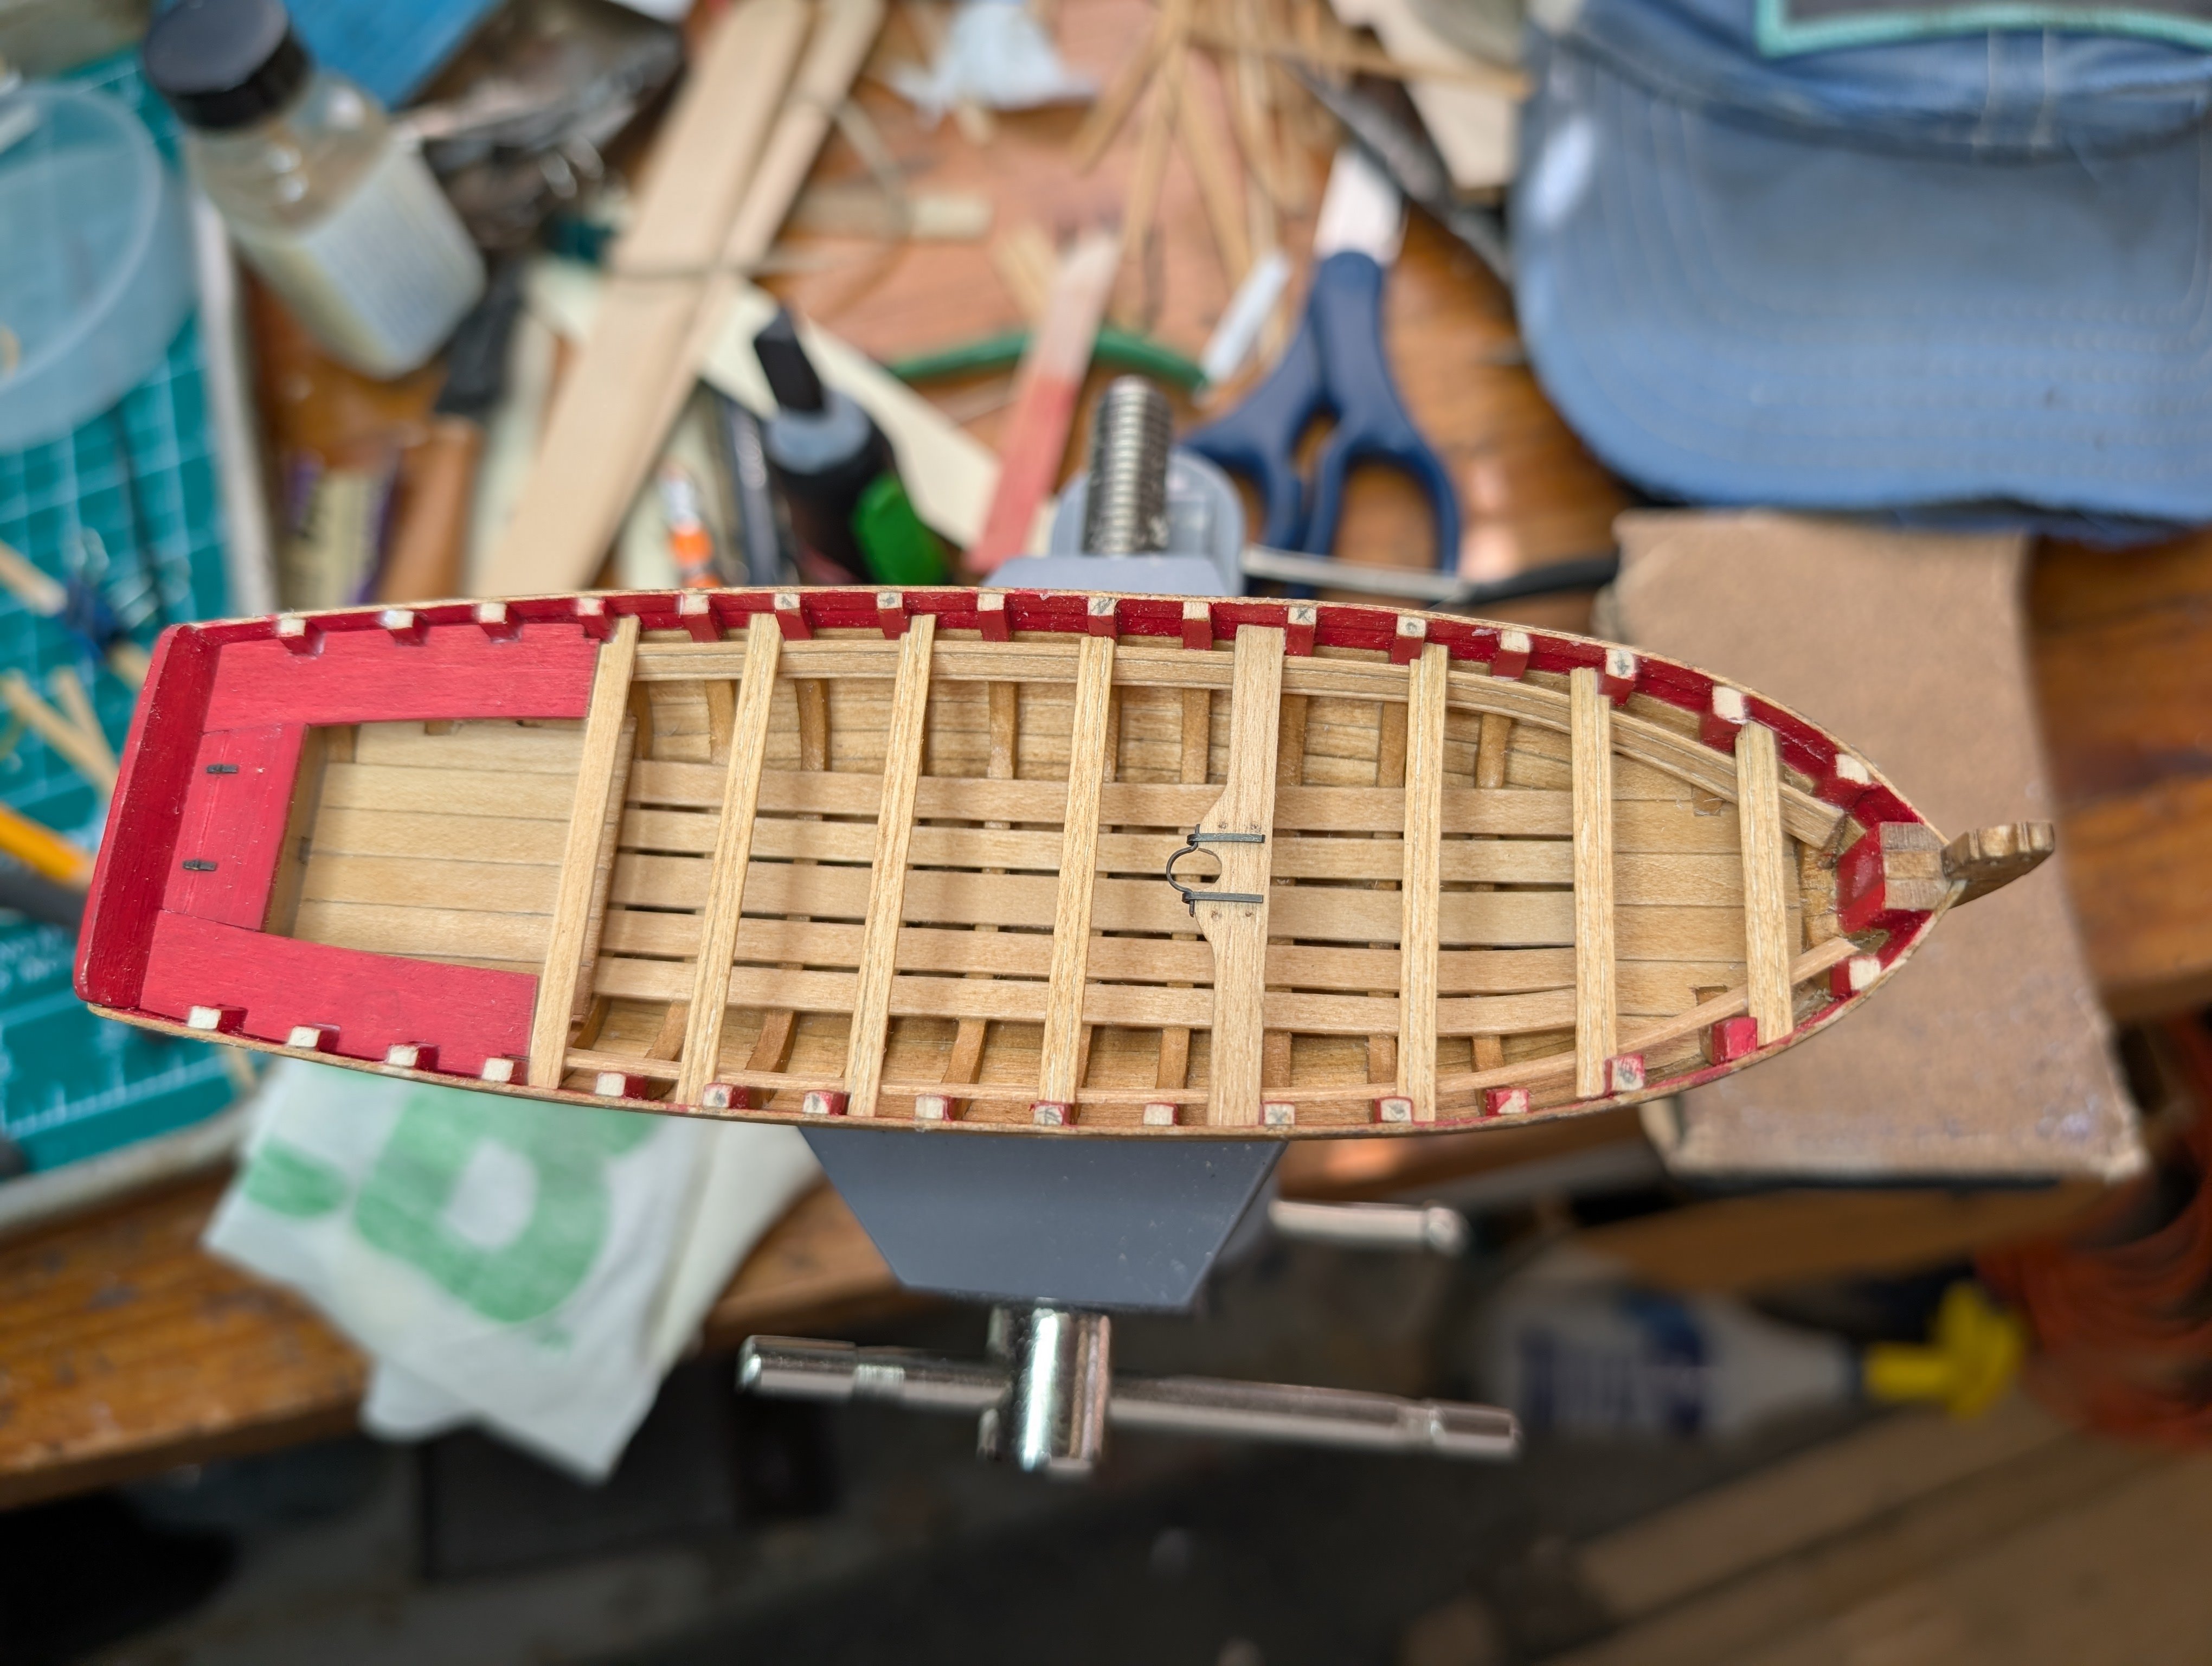
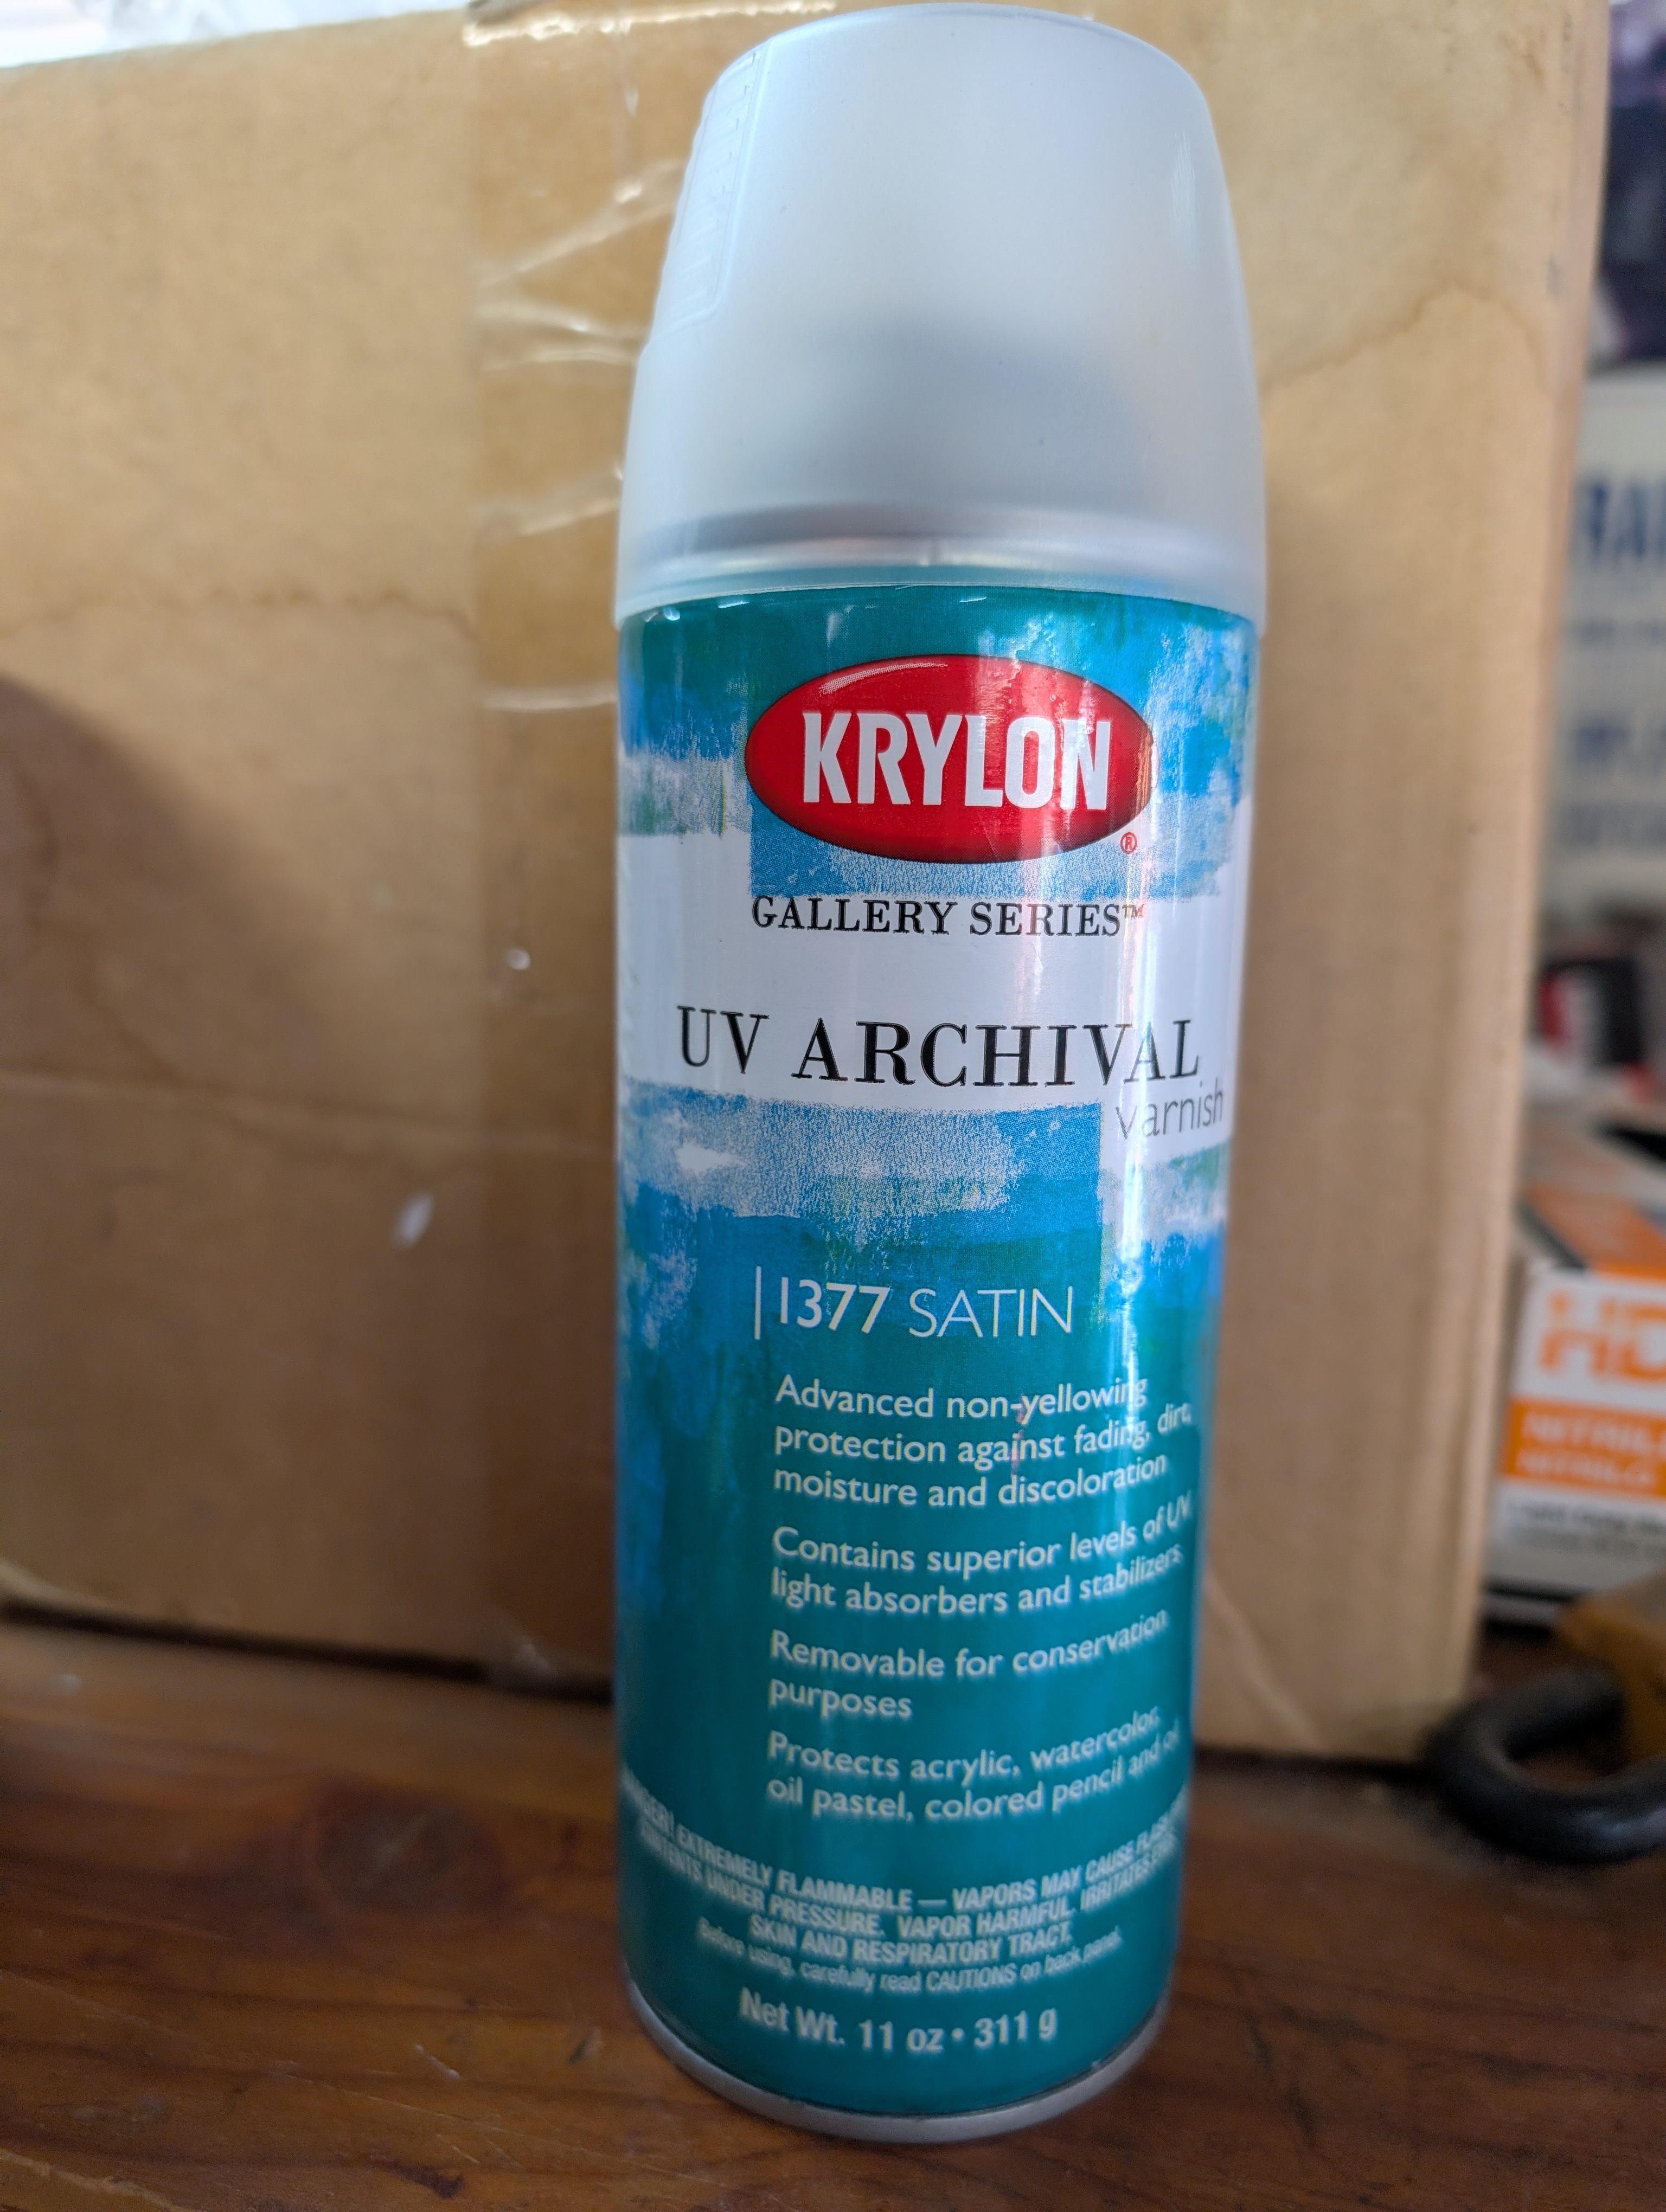
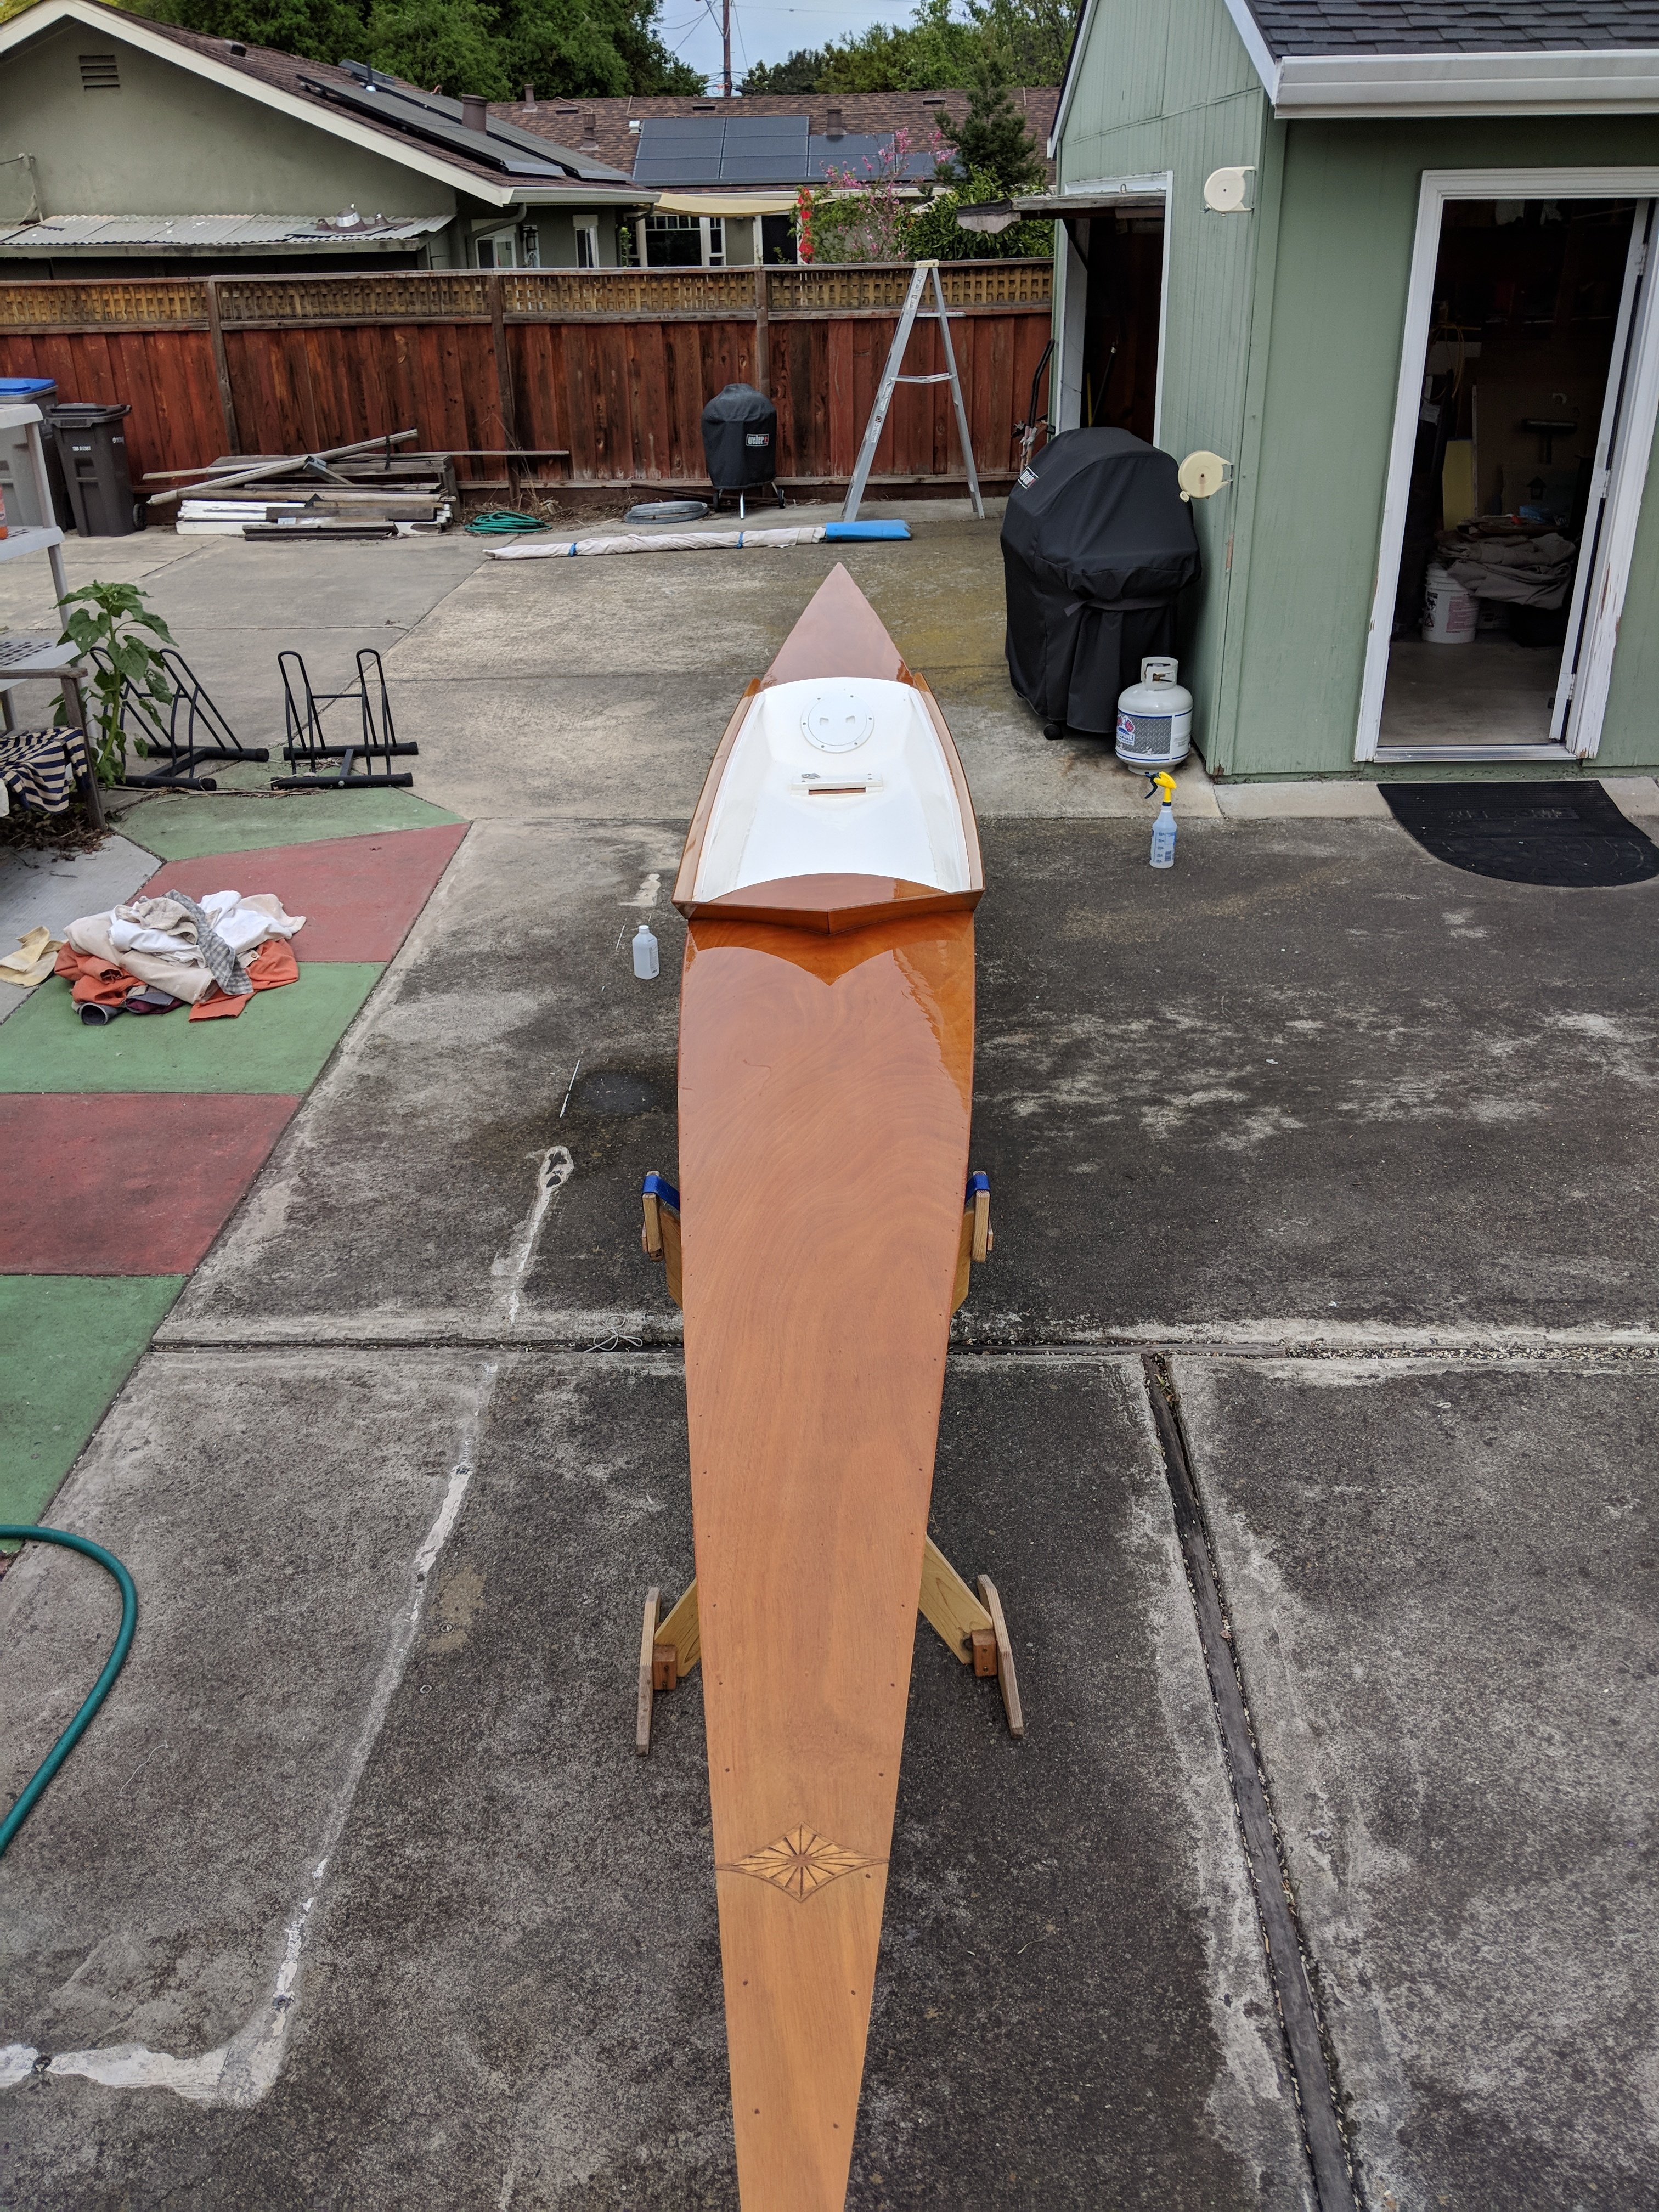
OK, interior build up. The instructions say to put on the caprail, the frieze and the molding strip before painting and before working on the interior. I know myself and I know I was going to have to be picking up and handling this hull a lot. Which meant I would most likely bang it, nick it and mess up all the exterior of the hull if I did it now 🙂 So, I did the inside of the hull first, and finished up the exterior of the hull afterwards. #1, Paint the inside 🙂 Easier than trying to paint after the cap rail is on. A note on painting. I bought the paint set for the kit. I have only used the red, black and white. They included primer, but I did not use it. The only thing I did was to thin out the paint. I like painting with thinner paint and doing two coats, or touch ups if needed. Probably thinned it about 25%, but not sure exactly. I just thin a bit, try a test piece, then adjust adding more water or paint. Note: for touch ups and small pieces I would sometimes just put a small blob from a small stir stick on the inside of an old small plastic bottle cap and add a few drops of water next to the blob. Then I would dab the brush between the water and paint. Made clean up very easy. Side note, I found this cheap, little vise on amazon and was helpful in this part of the build. https://www.amazon.com/dp/B08F5955K8 I did prep all the bits that go inside. Got all the planks out for the risers, floorboards, decks and thwarts and pre-stained them all. I realize part of the reason for doing this is also that I had limited time to work at one stretch. So, made sense to do all the staining, then walk away and let it dry. I wanted a lighter interior and found that diluting my English Oak Minwax with water gave me the tone I was looking for. I think the instructions suggest mixing two stains. I tried a few I had on hand but preferred the simpler diluted version. Next... Started by adding the little indent shown in the instructions for thwarts and risers. I simply "eye balled" were the detail should go and laid down a straight edge, roughly were I wanted the indent, and scribed a long line near the edge. I started with an awl, but that was too sharp and didn't show well. Then found a pick with a slightly blunt tip and that worked nicely. Seemed pretty easy and is a nice detail. When installing the floorboards I did moisten them slightly before laying down to help it follow the curves. Once you have one good floorboard down, and glued then adding the others is pretty easy using some scrap planking as a spacer. I was able to use the binder clips clamped to a frame on the side and pressing down the floorboard down while gluing. I thought fitting the fore and aft decks might be tricky, but I found using a small bit of card stock to make the template worked out well as described in the instructions. I made the template in two halves. I roughly cut out two oversize pieces, one for a left side one for right of both decks. Laying in the rough cut and putting pencil marks at the frames them slowly trimming back the insets for the frame made it easy to fit. Once each side was fit, then I put them in place and taped them together to form the template. You can see one side of this one is not done and needs adjusting, but the other side is ready: I made up the decks, and after gluing I did run a thin pencil at the joints to highlight it a bit. You'll notice in the next pics that I had to add an underside support, as well as taper and trim the supports holding the floor together because some of the initial supports either hit the sides of the boat or ended up right at a frame. Do glue in the floorboards before adding the risers 🙂 I found a piece of plank that was the correct width for the offset on the risers. So, was able to clamp that in place and then put the actual riser under it. No measuring needed! I built the rear seats and locker next. Pre-painted and fit the seats and locker in with the prepared thwart to adjust as needed. For the hinge details I used some thin brass strip and glued a tiny piece of brass wire across the top to mimic the actual hinge. Then dipped it in Jax. Not much to add on thwarts, cut to width and add some notches. The one thwart with the mast supports was just a bit tricky trying to get the look correct, and fitting the mast brace, but just took several rounds of trimming and fitting. Since none of the thwarts were glued yet I could get my fingers in the boat while fitting the mast thwart. I used Jax to blacken the brass pieces. I like the look of Jax better than paint. I used a heavy dilution of Jax's so the coating was slow to form. I found that if it forms to quick it becomes a crust and falls off. Later I read the instructions 🙂 and they recommended cleaning with vinegar then brushing on. That worked well for later bits of brass. Once the mast thwart was done I glued them all in. The caprail. Again I used some stiff poster board and made a couple templates as described in the instructions. The only tricky part was making sure the lengths were correct and that it met the stem and stern correctly. I made the bow section of both caprails meet behind the stem. I think the instructions use a filler piece at the bow joint. That would be easier to fit because you don't have to be so exact were they meet. Everything else is sanded into shape after it is installed. One tip I saw on the forum was to use wood strips to glue down the cap rail. I had some paint stirrers/tongue depressors which worked great with a couple rubber bands. Once glued on it just took a bit of sanding to get the final fit. I got all the knees ready next. Of course, pre-painted them 🙂 I don't know if I did something off, but when I tried to center the knees on the thwarts they did not line up on a frame member. So I glued little bits to the backs so they were butted next to a frame or supported by the sides of the boat. I didn't want to see little gaps behind the knees. There is one "knee" barely mentioned in the instructions for the bow. I think it is shown sitting under the caprail. this might properly be called a breasthook. If I recall, in the larger model it is flush with the caprail and that is how I installed it. That is similar to how an actual breasthook would be made. If I were to do this again I would re-work this section of my boat. I think that the bow section of my caprail is too wide, it comes aft a bit too far. Here's another point I struggled. Trying to make the windlass. After I made mine a saw a tip that I think should be *required* 🙂 . They poster said they ended up making theirs from a hardwood. That could be key, because the issue I had was trying to get the lines on the windlass to stay crisp. Everything I did just looked terrible. You can see that from a few of the attempts in the pic below. There were several others besides those!! I finally got one I thought was acceptable and went with it, though not completely happy with it. I also decided to add some details I saw in the larger model with braces, or supports at the sides of the windlass. I decided this after the thwarts were in. Would have been easier before they were installed. I blackened a little bit of wire and inserted it into 4 small holes in the corners of the support to make it look bolted or nailed on. Later, I did the same thing to my mast step. May not be realistic, but I liked the little visual detail. With the interior of the hull done I added the frieze, rub rail and bottom paint. For the paper friez I sprayed both sides with Krylon Satin Archival Varnish after I cut them out and fitted them. I wasn't sure if I wanted to add these at first. Thought it might look too fancy, and wasn't confident the paper image would work well. I was surprised! I really like the look and the paper strips went on very well. For the stern image I did make several copies at different scales to get one that fit well. The original size didn't look right to me. The side strips were perfect for the sides. The instructions also suggest painting the edge of the cap rail white. I knew my painting skills are not that precise so it is all red. I did, of course 🙂 pre-paint the 1/32 inch trim piece white before gluing it on. I marked the waterline and did two coats of white. It was close, but you can see not quite right. I did a little hand painting to smooth out the look and make it look level to the eye when turned upright. Here's a view after the touch up, but it also shows my lack of shear I mentioned at the start, and how the bow section is a bit flat 😞 I guess that's how we learn. I decided to go with a simple display stand. I played around with some tapered wood pedestals, but ended up simply with some brass rod that I blackened with some Jax. I stained the wood with Varathane "Worn Navy" that I had lying around from another project. I also sprayed the entire finished hull, inside and out, with two coats of the Krylon Archival varnish I used on the friezes. I can't attest to any long term benefits, but the marketing description on the can sounds like it is the right stuff to use 🙂 It looked heavy and wet when I first sprayed it and I panicked a bit!! But, it did dry nicely and left a nice matte/satin finish, even on the painted surfaces. I didn't want a heavy coat, or shiny finish. Next up spars and rigging!


.thumb.jpg.ca96c2e5da7c2d6ff0c2d2b0e9a4bc2f.jpg)
.thumb.jpg.133c26207f7e8e5ab3585defbb2a9e17.jpg)
.thumb.jpg.a92357874ed95bd2cac3950e10668263.jpg)
.thumb.jpg.c29a5563864c38bc0fbd0bab2f8c856d.jpg)
.thumb.jpg.84808718d902cdb91c03f04e9dc71d0f.jpg)
.thumb.jpg.41b96ad6278a9a6112c2b5ebb9bcfe7b.jpg)
.thumb.jpg.3a199b487b630833678b8c9266409155.jpg)
.thumb.jpg.6e80cf022746fdad7bb0bd68bbfaf393.jpg)

-
Ryland Craze reacted to a post in a topic:
18th Century Longboat by Cast Off - Model Shipways - 1:48
-
Russ2025 reacted to a post in a topic:
18th Century Longboat by Cast Off - Model Shipways - 1:48
-
cotrecerf reacted to a post in a topic:
18th Century Longboat by Cast Off - Model Shipways - 1:48
-
ccoyle reacted to a post in a topic:
18th Century Longboat by Cast Off - Model Shipways - 1:48
-
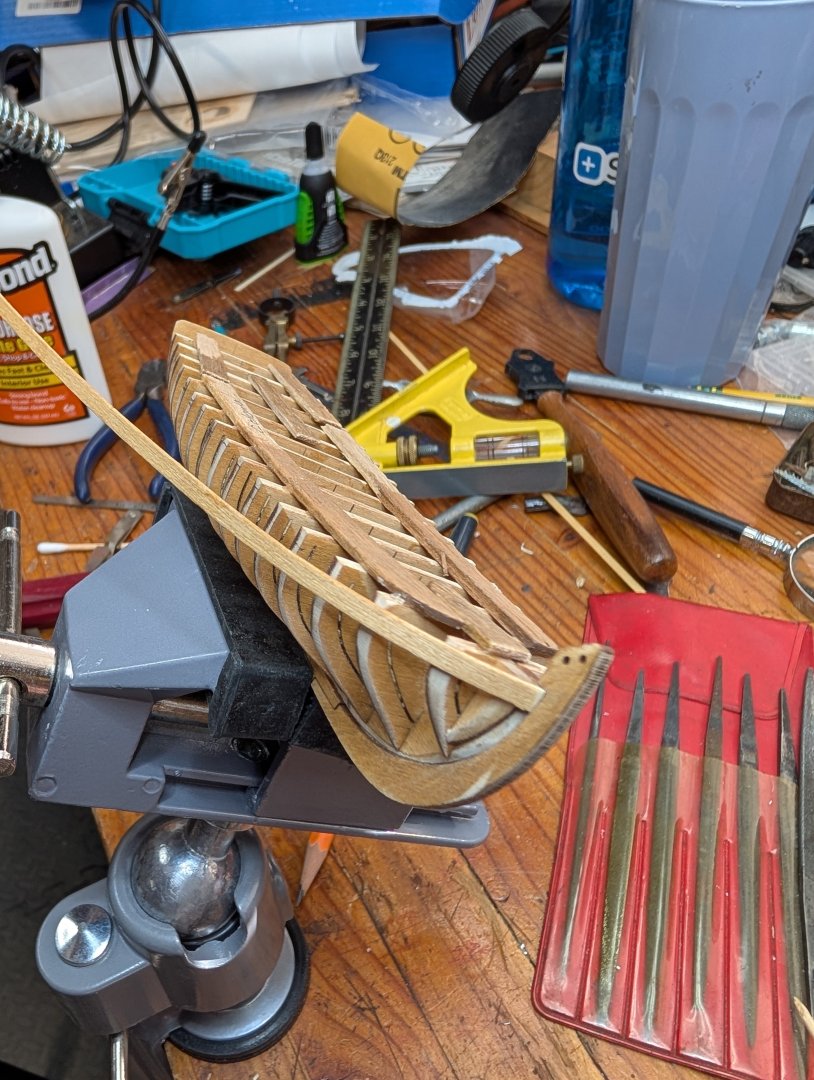
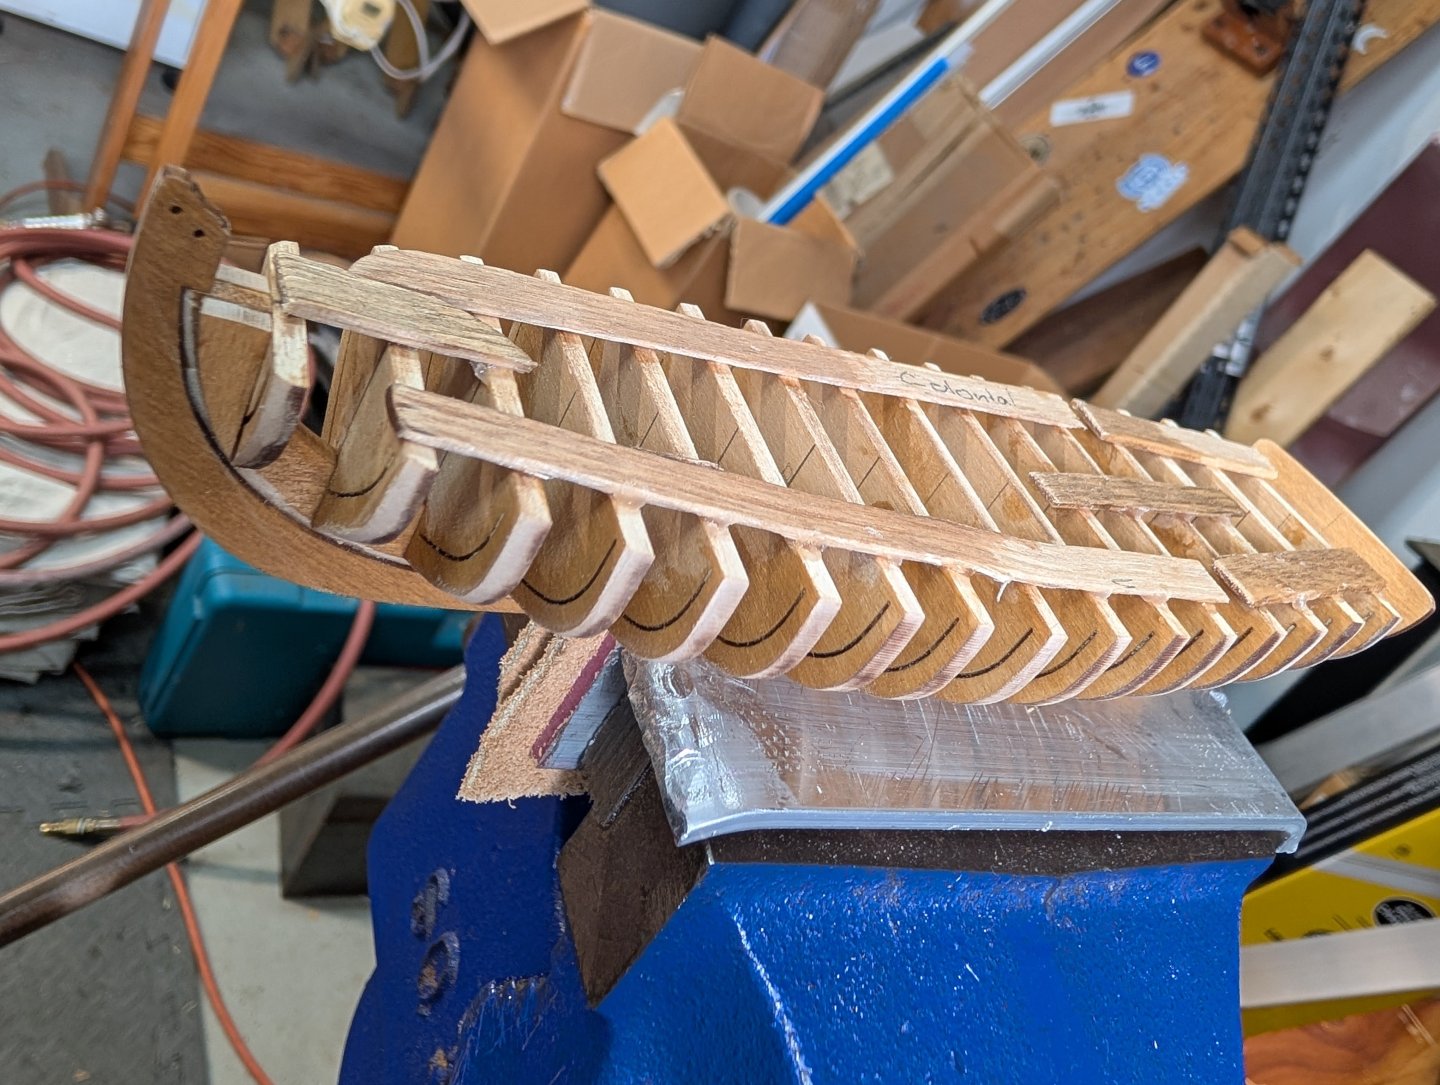
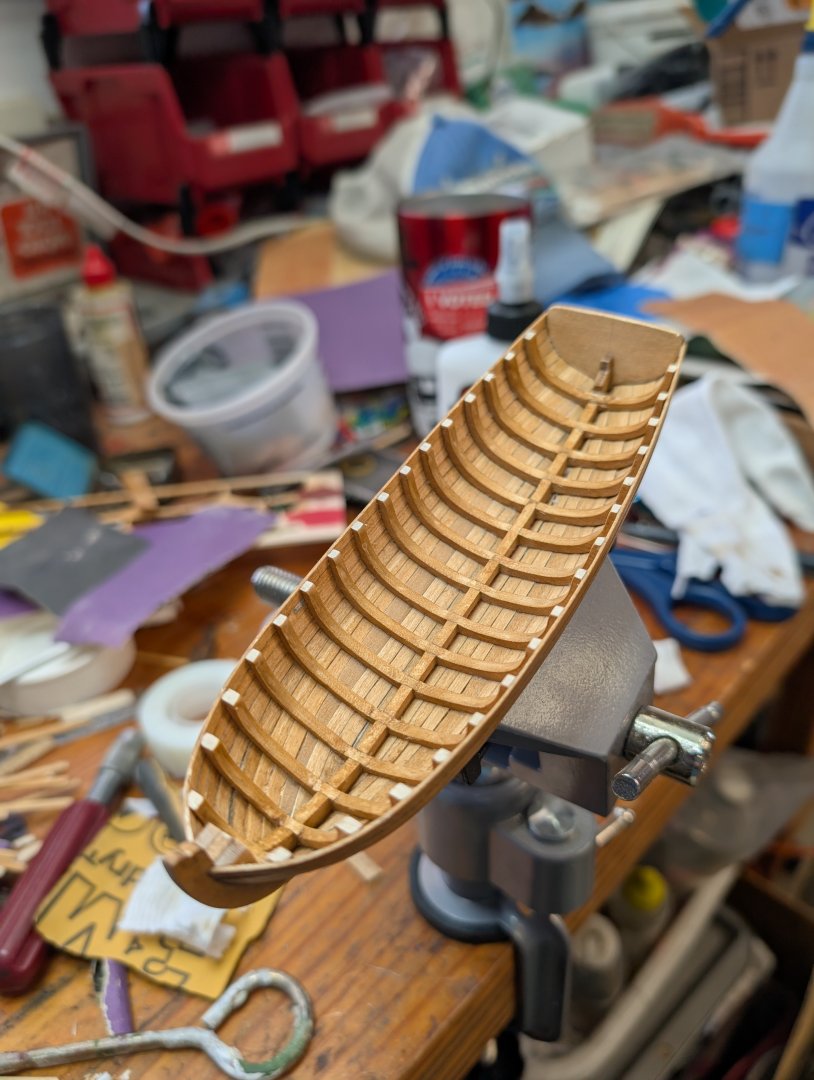
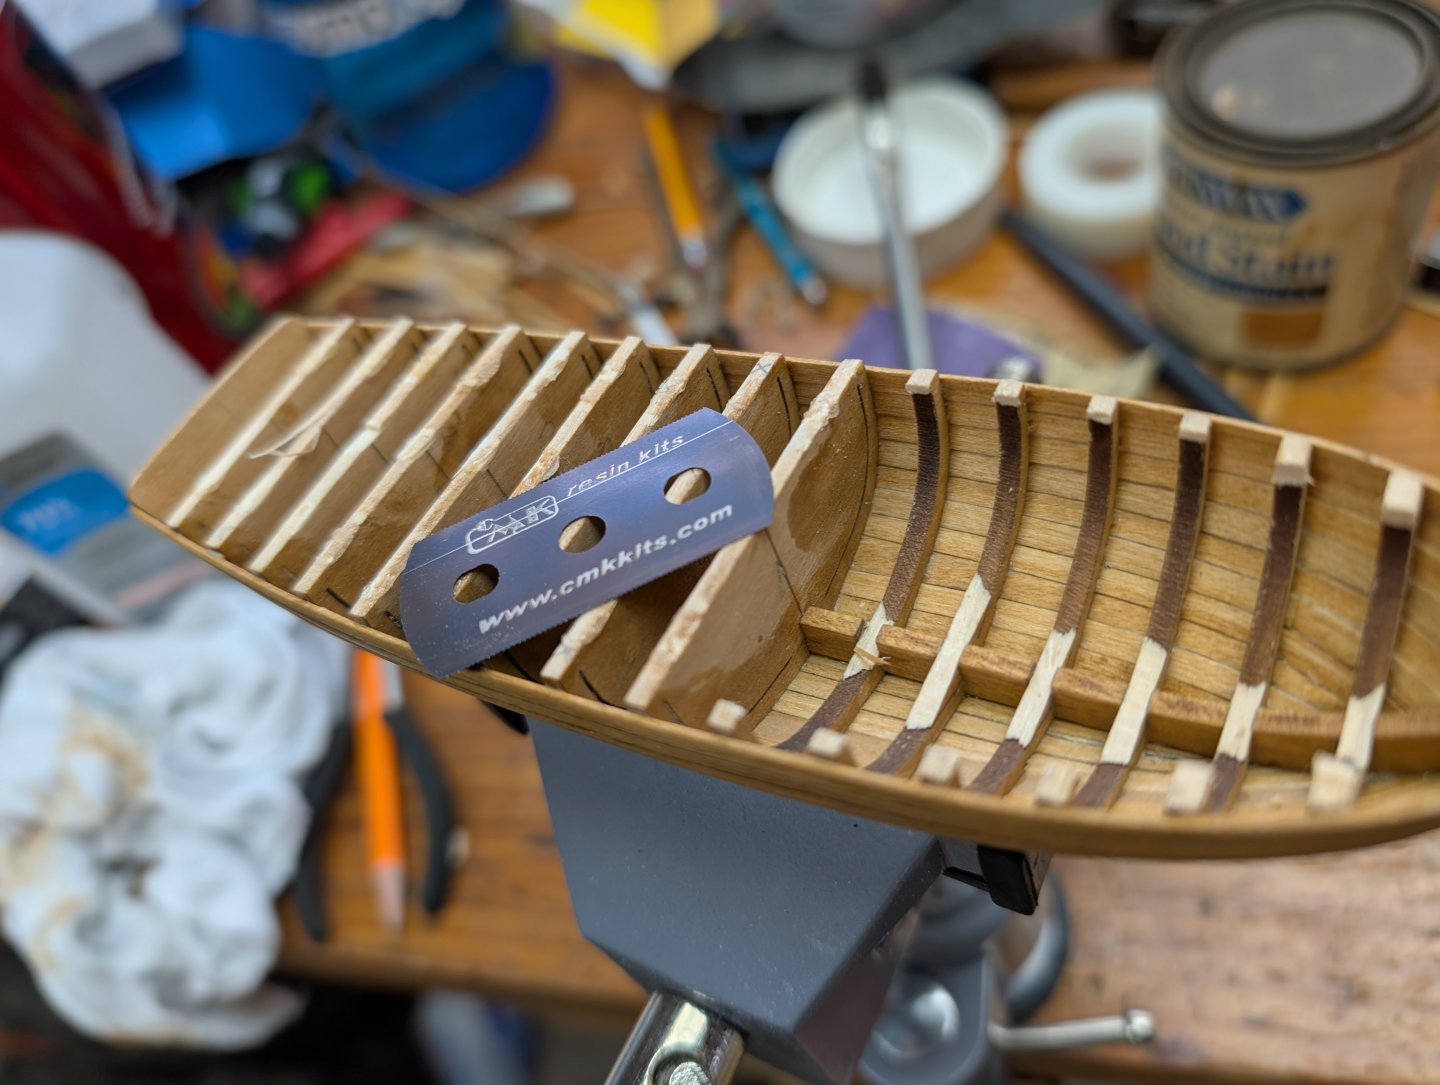
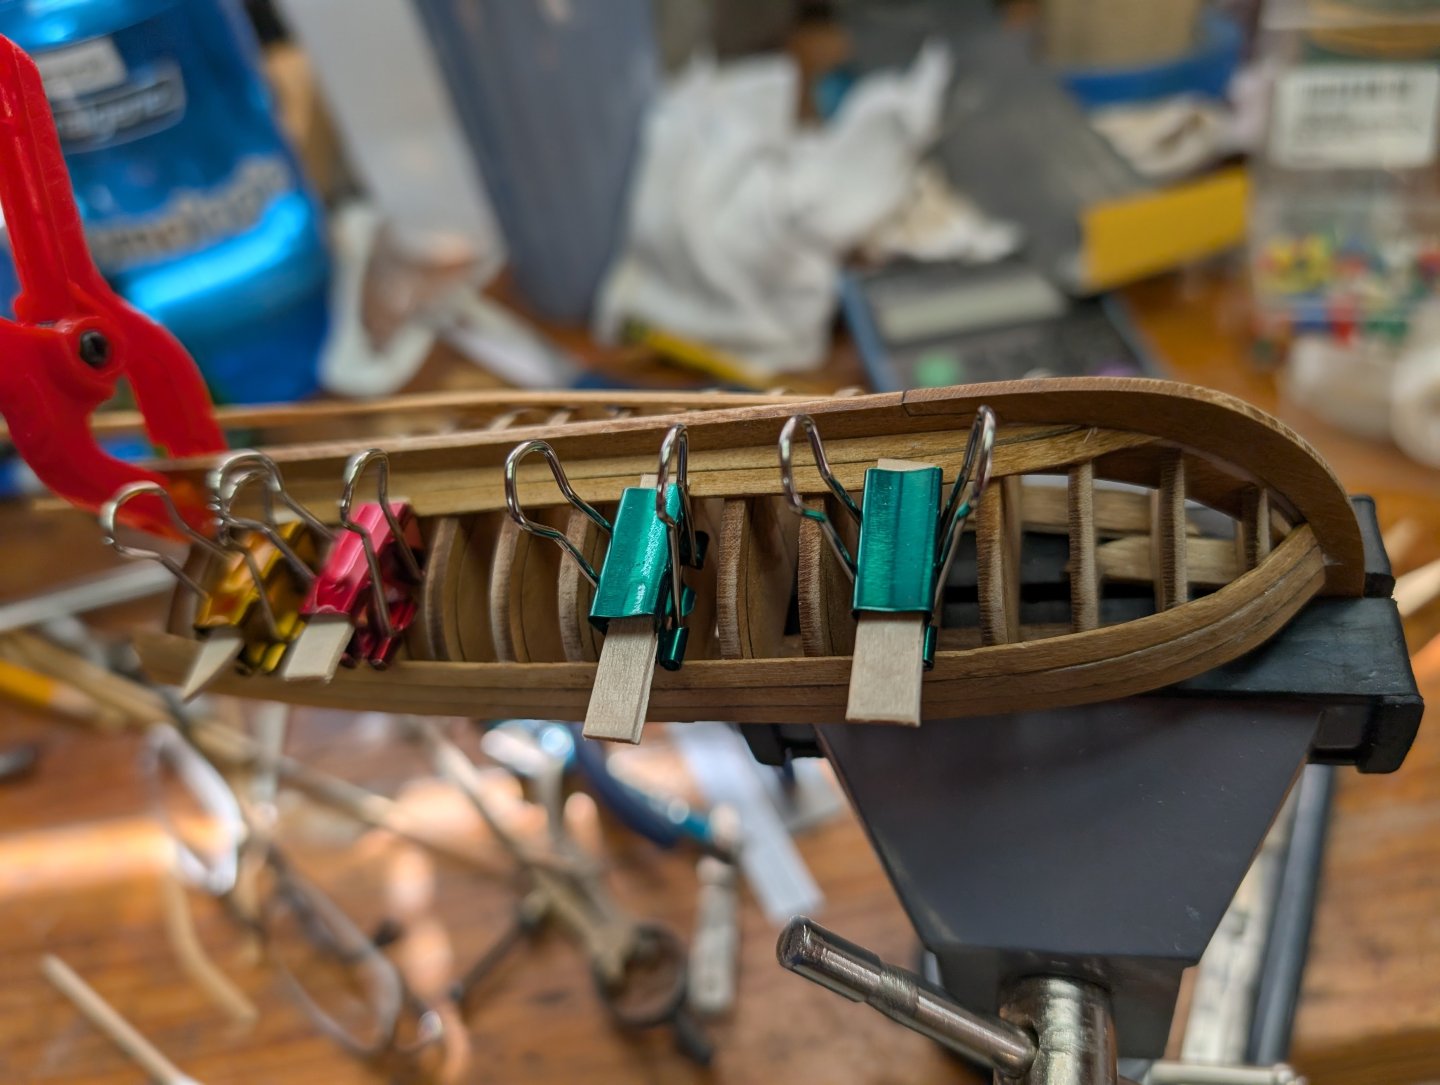
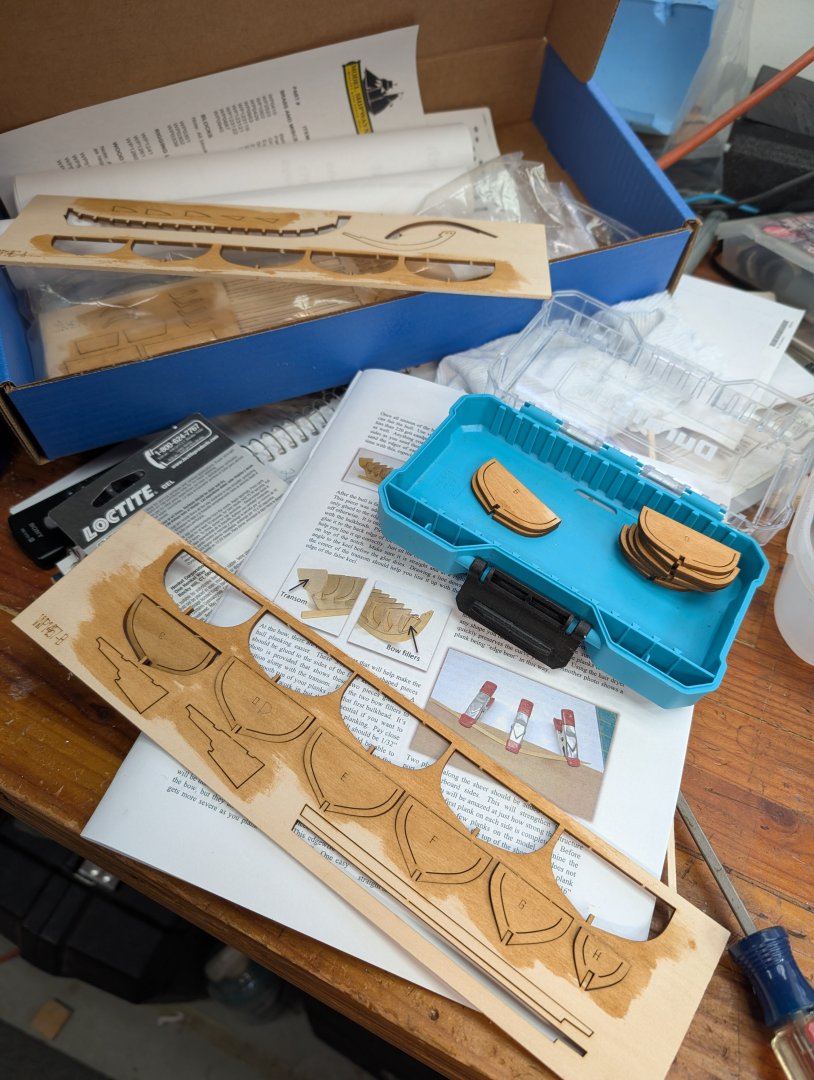
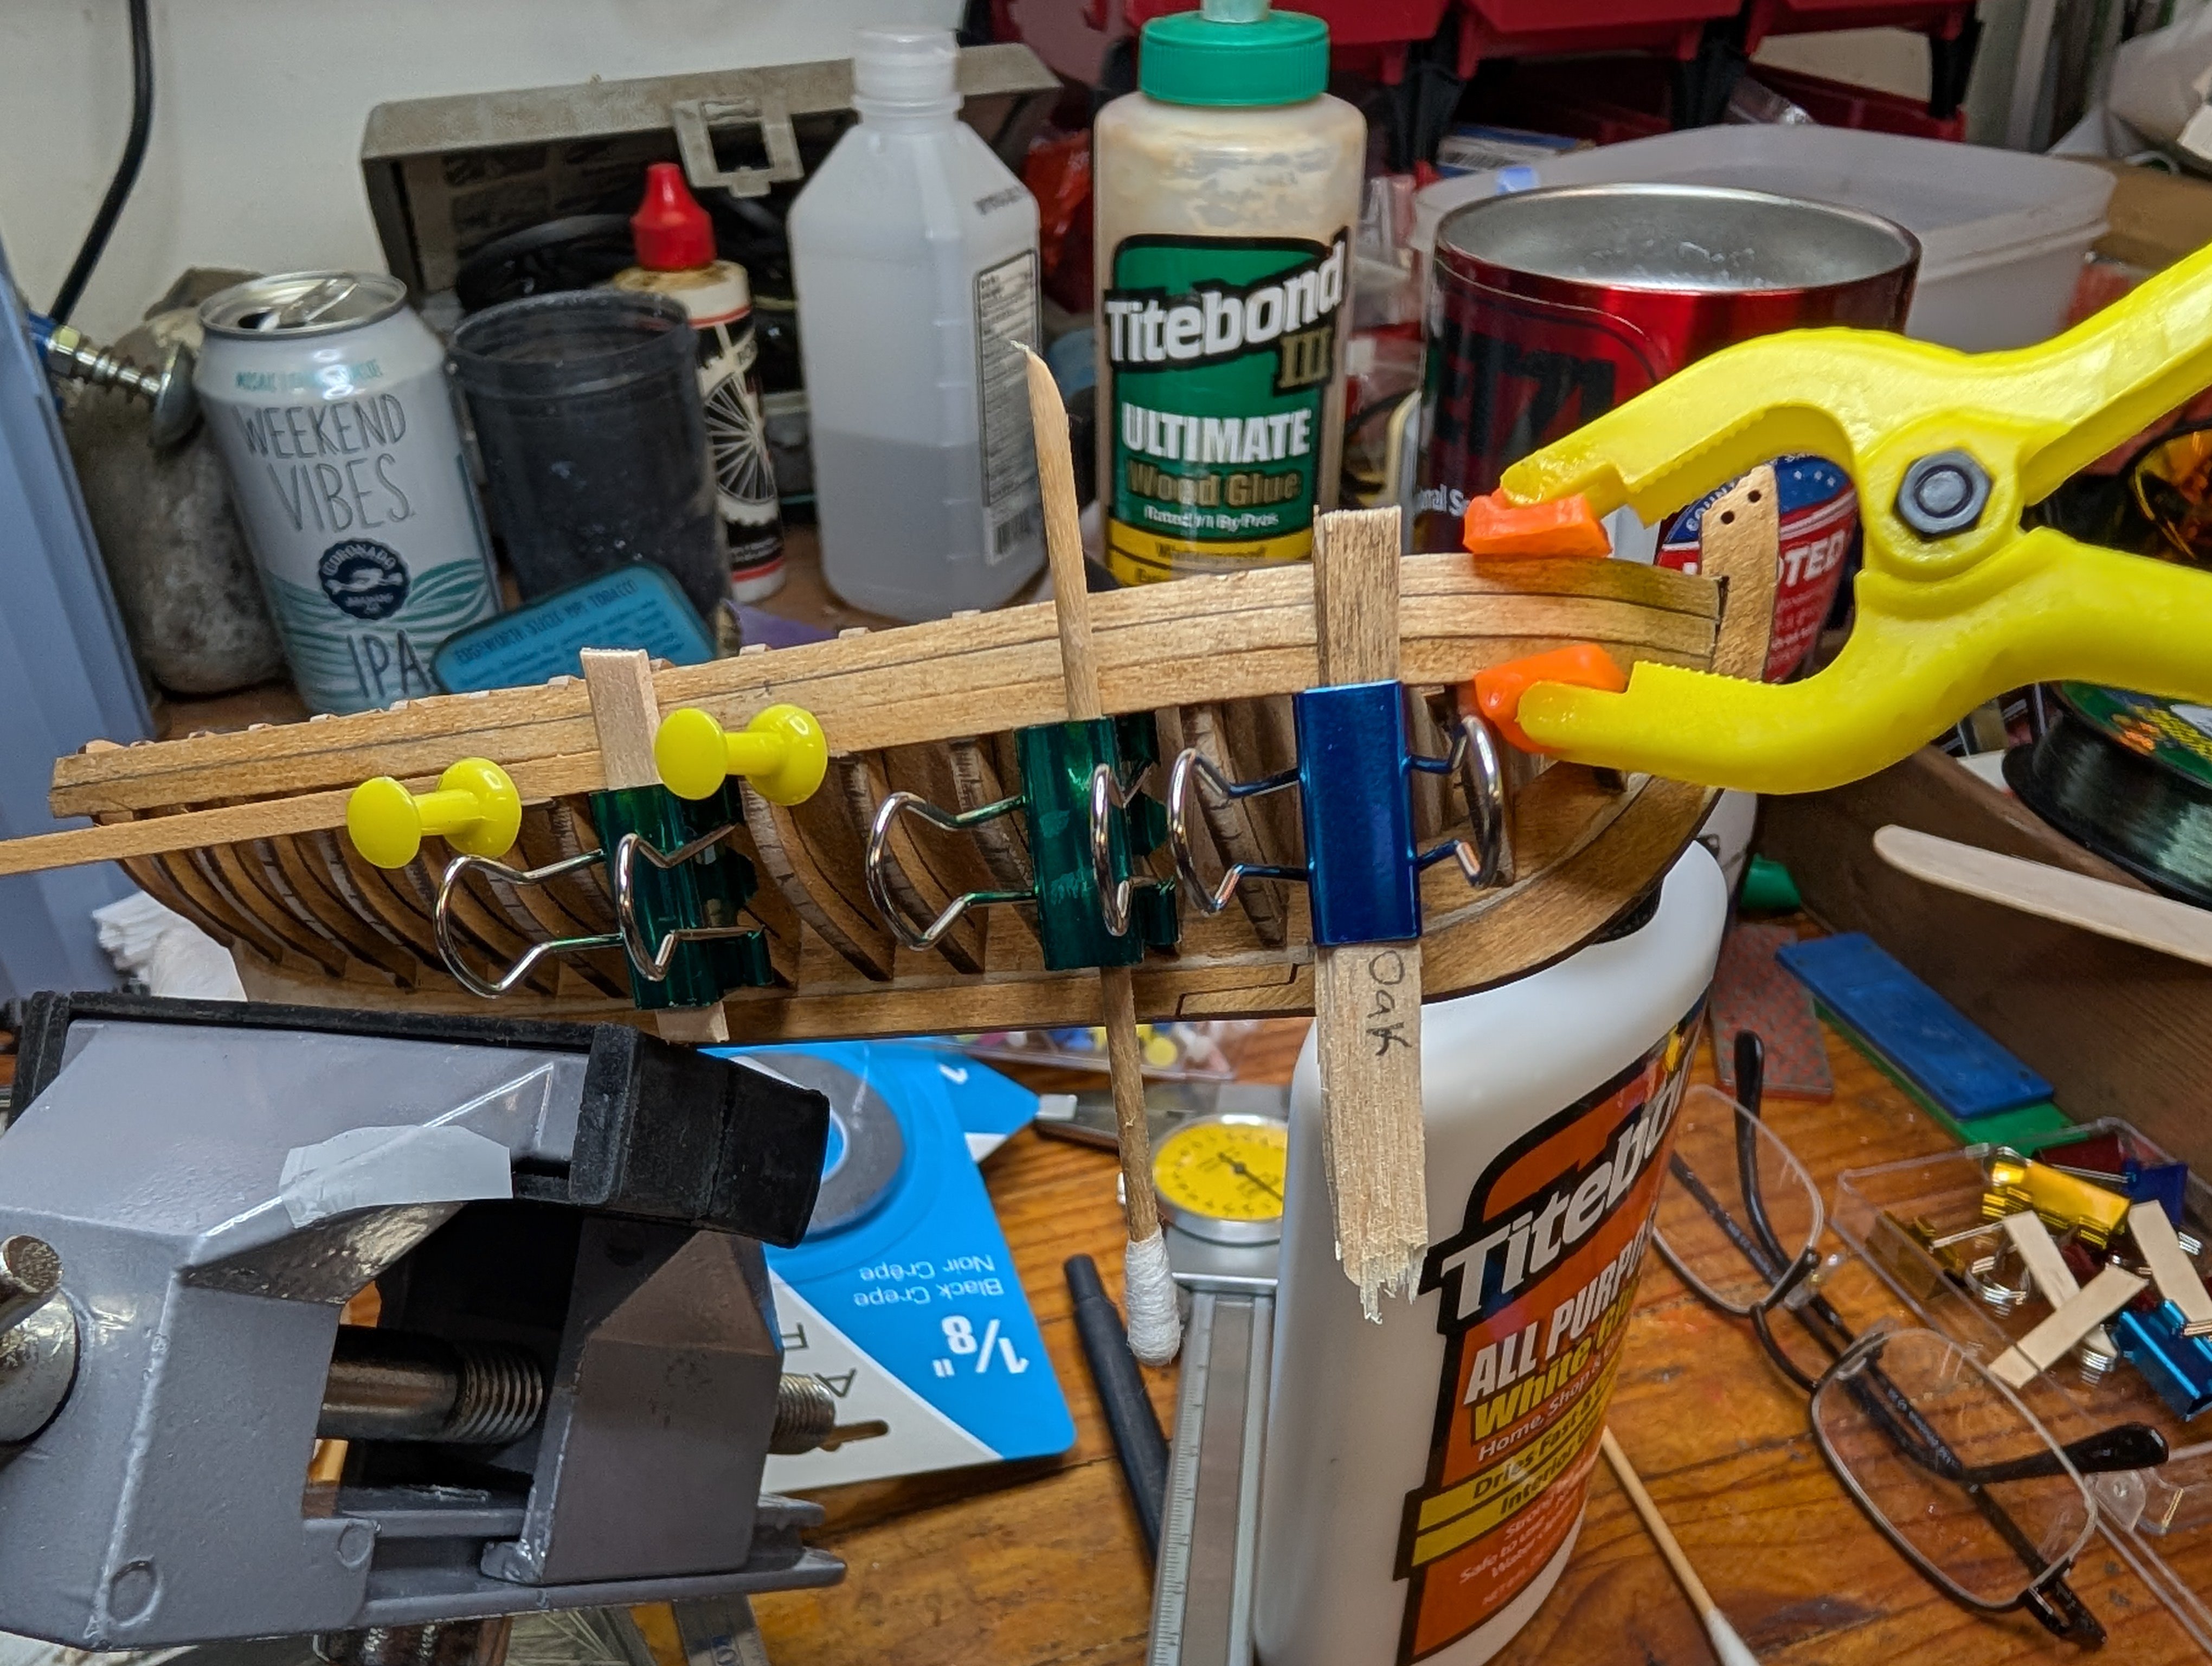
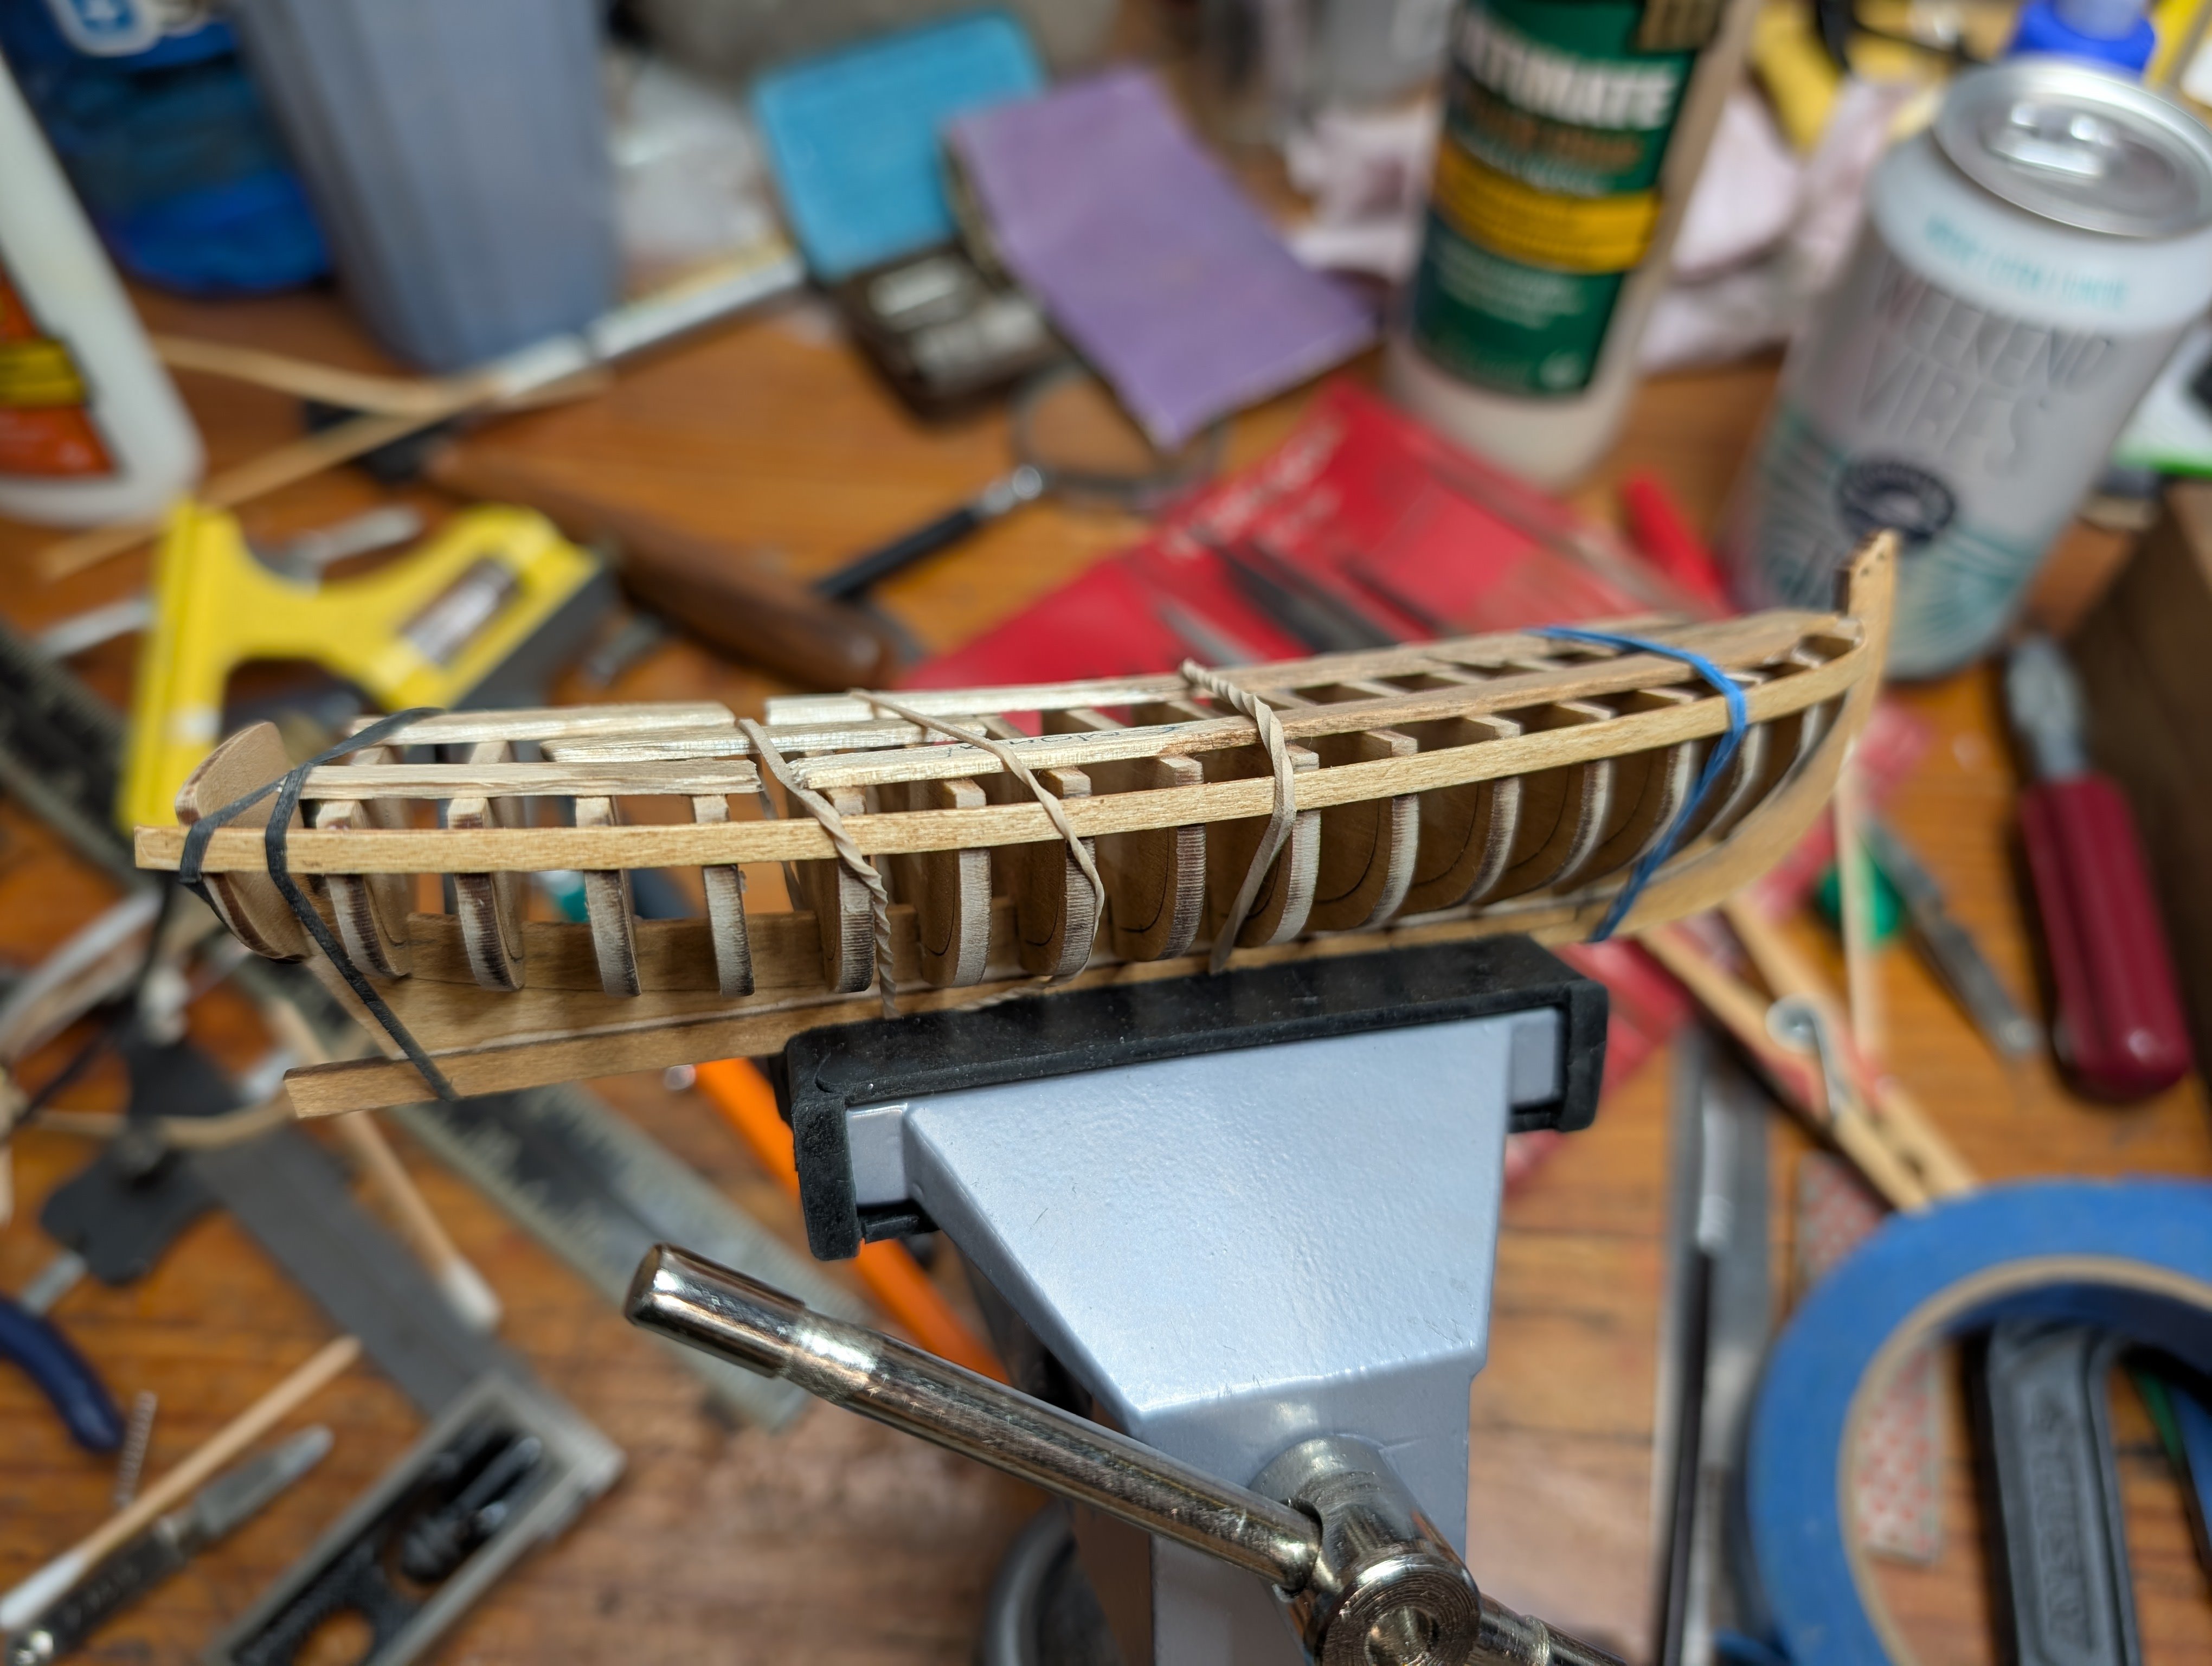
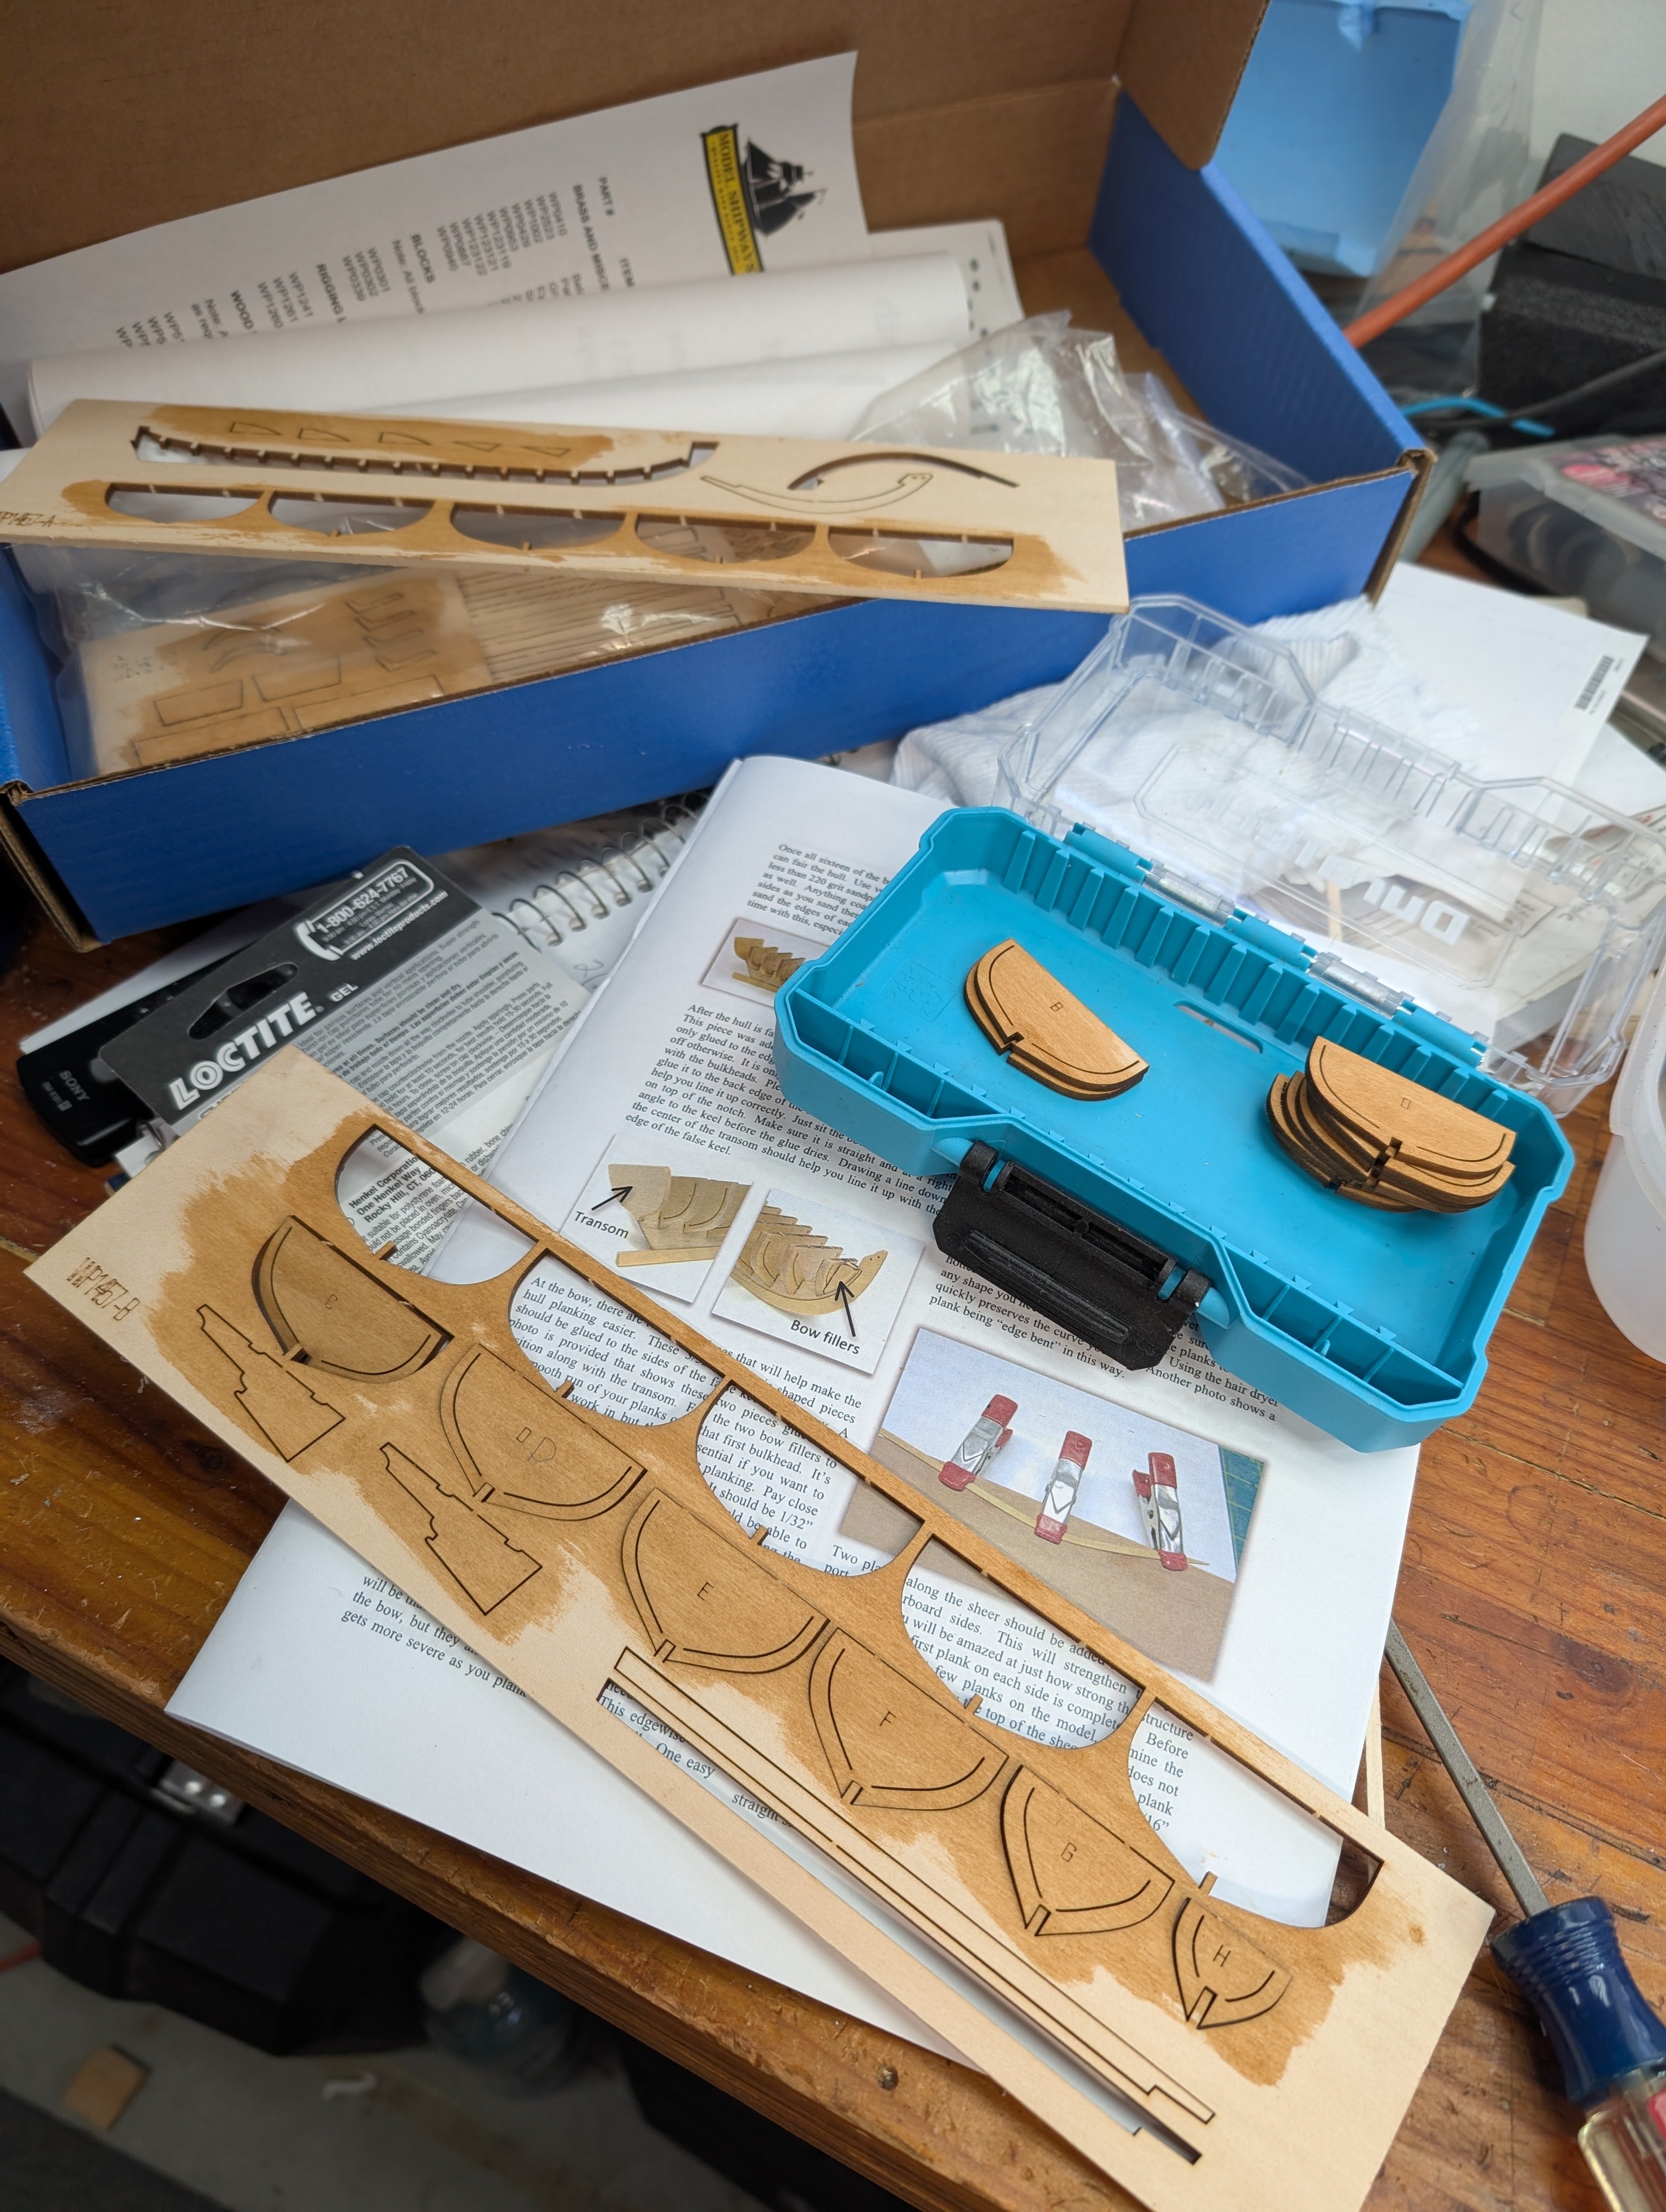
Yup, another longboat build log!! Actually, I have almost completed my build, but decided to do a build log anyway. I did not start one when I began the build because there were so many good ones out there and I did not feel that a beginners log would be very interesting. I changed my mind since the forum seems to encourage build logs, and as a beginner maybe the mistakes I made could help someone avoid them 🙂 So, this will not be a very detailed or expansive log as many of those particulars are covered by better builders and as I am almost finished I have limited photos to share as I did not intend to create a log. A couple general tips I would like to start with: - Read the entire instruction manual before you start. You don't have to understand it all, but at least scan it so you know the general steps. Why? Because many early steps will impact the build later on. An example, knowing that sections of the bow or stern will be covered by lockers let's you know you don't have to angst over a detail that will be hidden. The expert builders may disagree 😉 - For me, I found building a lot of pieces before assembly really helped. I built all/most of the thwarts, decks, lockers etc... before I ever glued anything in. I made all the standing rigging all at once, and had all blocks ready before adding any rigging. Sometimes seemed tedious, but I liked being able do a build session with everything ready. - Also, I tried to pre-paint and pre-stain everything BEFORE gluing them up. Even though some pieces would still be sanded or faired I only had to touch up places. I think the instructions do painting after the core of the internals are in, but it is so much easier to do before. That's also where knowing the next few steps let's you adapt. - I used a lot of CA glue, probably out of impatience, but it always showed glossy and discolored all the lines. Next time I'll use more diluted PVA glue. This seems to require a slower build, but results may be better. YMMV. - If you want to add a bit more detail to your build, take a look at the larger version of this model. I think it is called the "Armed Longboat". There are a few things slightly different. First of all, I really, really like this boat!! I saw discussion around debating if this is a "beginner" model or not. As a beginner, I do think this is a big step up, it is challenging but very doable, and approachable because it requires a lot of new skills, but is not overwhelming. For example, if you are struggling making a rope coil, you only have to get one or two right, not a hundred! The clarification I would advise is this is not a "Novice" build, but is a rewarding challenge for a "Beginner". I already think that I like these smaller boats, they don't seem as daunting as a years long project, I can pick it up and handle it to get into small, tight spaces, and maybe I like the tiny small scale work. Many thanks to Chuck, and shout out for some more small models like this 🙂 One thing I discovered with this model is I like rigging! I don't really like planking 🙂 Let's get started! Part 1: Framing Seemed pretty straightforward to get the frames straight, parallel and flat across the top. See other build logs. Do pay attention to the rabbet in the keel, this is were the edge of planks will fit in and help hold them and hide the edges. I kind of tested the rabbett by just laying the side of a straight plank in it. I Pre-stained the frames before gluing them up on the keel with Minwax water based English Oak, full strength. Here is one of my first mistakes. Impatience. I was very excited to get started and did not spend enough time on fairing the frames and REALLY paying attention to laying down that first plank. I don't think I have enough shear and it gets a bit flat at the bow. The shear is not smooth and I think this caused trouble for the rest of the planking. Regarding planking: none of my attempts to pre-bend the planks worked. I did not like this part of the build. It was very frustrating and I almost stopped right here. I tried heating, clamping, bending , steaming before mounting... Just about everything I could find online and I always ended up with a kink in some section of my planks. or the curve would bulge and gap. Also, trying to draw, or lay out plank lines, and plank calculations didn't work out well. So, I ended up using a brute force method by gluing the planks onto one or two frames at a time. I did this by wetting down the plank like a sponge, then massaging and twisting it into place. Ugh. I do NOT like planking. Fortunately I have lots of sandpaper, though this small boat has very thin planks. BTW, I was also worried I would run out of planks from the kit because I had ruined so many. Not so, the kit has lots of extras. So, I pushed through and assumed I would hide the mistakes somehow. Note: I did prestain all planks. I used Minwax water based English Oak, full strength. I don't have a lot of modelling tools, most beginners won't, so I adapted paper clips, rubber bands and modified clothes pins I saw in other build posts. Jamming a scrap stick under the large paper clips actually worked very well. Laying the first Garboard plank also felt tricky. I had no idea where it should end and this plank drives the bend and location of all planks above it. What worked for me was examining other post pictures and guessing 🙂 I ended up ending it at about the third frame in (see pic). The other tip is to give it a long taper and build the second plank at the same time to be sure it can follow that taper. After that I layed down all the planks from the top. I tried laying down tape for all the planks, but that didn't work well. I simply measured my remaining gap and divided by the width of the planks in the kit. I wanted to make sure that I would not have a 1 mm plank to fit in as the last plank. I turns out I may have, but there was a wider plank supplied in the kit (for floorboards I think) and I was able to use file and sand that oversize one as the last plank. Thank goodness that part was done! The instructions say to file the frame molds off the frame. I found this tiny saw online and got a couple. It worked well to separate the frames, and to trim them flush with the shear strake. https://micromark.com/products/special-hobby-ultra-smooth-saw-blades-package-of-5 I used a combination of dremel sanding bits and steel grinders to get rid of the laser char and smooth out the keel and frame junctions. The frames and planks were pre-stained so I only had to touch up the tops of the frames after sanding. If you zoom in on this pic you can see a plank that is slightly off color. That is the oversized plank I shaped to fit in as the last plank. You can see it is kind of wobbly, fat in the center and thin towards the ends. But it worked! I knew that its near the bottom, would be below the water line and painted, so in reality will never be seen. Next stop... Interior bits...
.thumb.jpg.115338a5013a7c0467b021ed3b5a64d6.jpg)


-
 Cast Off reacted to a post in a topic:
Medway Longboat 1742 1/2 inch scale by Jim Rogers
Cast Off reacted to a post in a topic:
Medway Longboat 1742 1/2 inch scale by Jim Rogers
-
Cast Off reacted to a post in a topic:
Rope Hanks Conquered!
-
For those in the San Francisco/San Jose area... I just saw that Spaulding Marine center is doing a lecture on the rigging of Freda and changes through the years. Not sure if this is the right forum section for this, but thought this might be of interest to some folks. https://www.spauldingcenter.org/current-offerings/p/freda/rigging "Step aboard the oldest sailing yacht on the West Coast and get an up-close look at what it takes to keep her sailing through the centuries. Join Courtney J. Andersen, master rigger for traditionally rigged vessels, and maritime historian, for a special seminar using Freda as a living case study. Freshly re-rigged under Courtney’s expertise, Freda offers the perfect backdrop to explore over a century of sailing tradition—and the craftsmanship it takes to preserve it." https://www.spauldingcenter.org/freda https://www.arqueschl.org/projects/freda/ "She was built in 1885 in Belvedere for local racing and yachting. Freda was completely restored by the Arques School of Traditional Boatbuilding in Sausalito. "

-
 Cast Off reacted to a post in a topic:
Belay Pins
Cast Off reacted to a post in a topic:
Belay Pins
-
Cast Off reacted to a post in a topic:
Belay Pins
-
The gunboat Philadelphia is being put on display at the Smithsonian during restoration. https://www.smithsonianmag.com/smart-news/watch-as-experts-preserve-a-249-year-old-gunboat-that-sank-during-the-american-revolution-180987220/ "In October 1776, a small American fleet clashed with British warships on Lake Champlain during the Battle of Valcour Island. One of the American ships, the Philadelphia, was badly damaged in the fighting and eventually sank to the bottom of the lake, where it remained until it was raised in 1935."
-
- 1
-
-
@ccoyle The Sassafras looks like a great boat!!! I understand the storage issue, I'm giving my Arctic Tern to my sister because we don't use it enough and it is taking up space. On the other hand... 🙂 Im looking at the Glen L 15 as my next 1:1 scale boat !!!!!! Wow, appreciate the link to the local modellers, great site and I really had no idea they existed.. It's a good site with many good links and general info for everyone.
-
Tips for making lines look loaded
Cast Off replied to Cast Off's topic in Masting, rigging and sails
Thanks, I have some minwax wipe on, water based poly. Would that be considered "organic solvent based" ?? what do you use? -
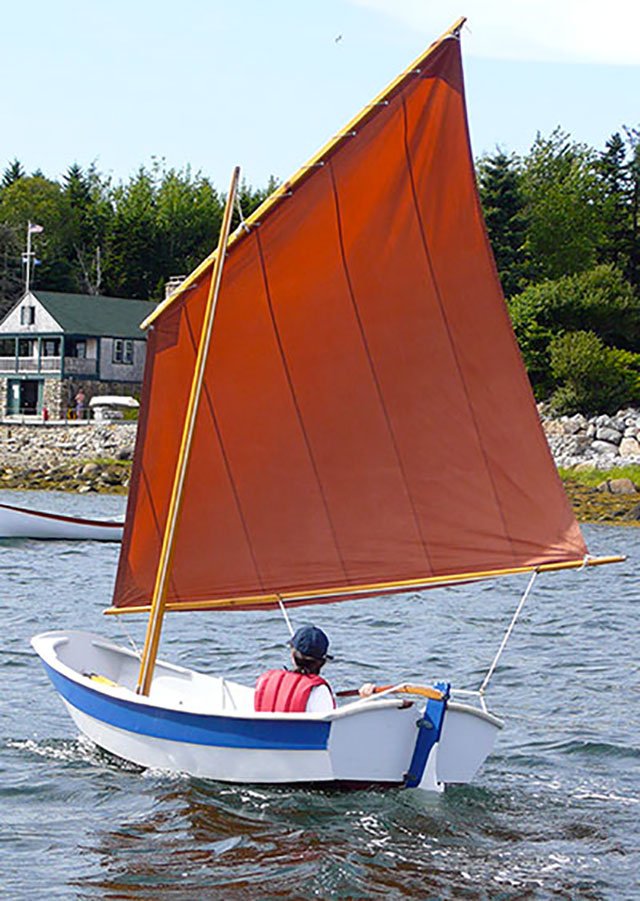
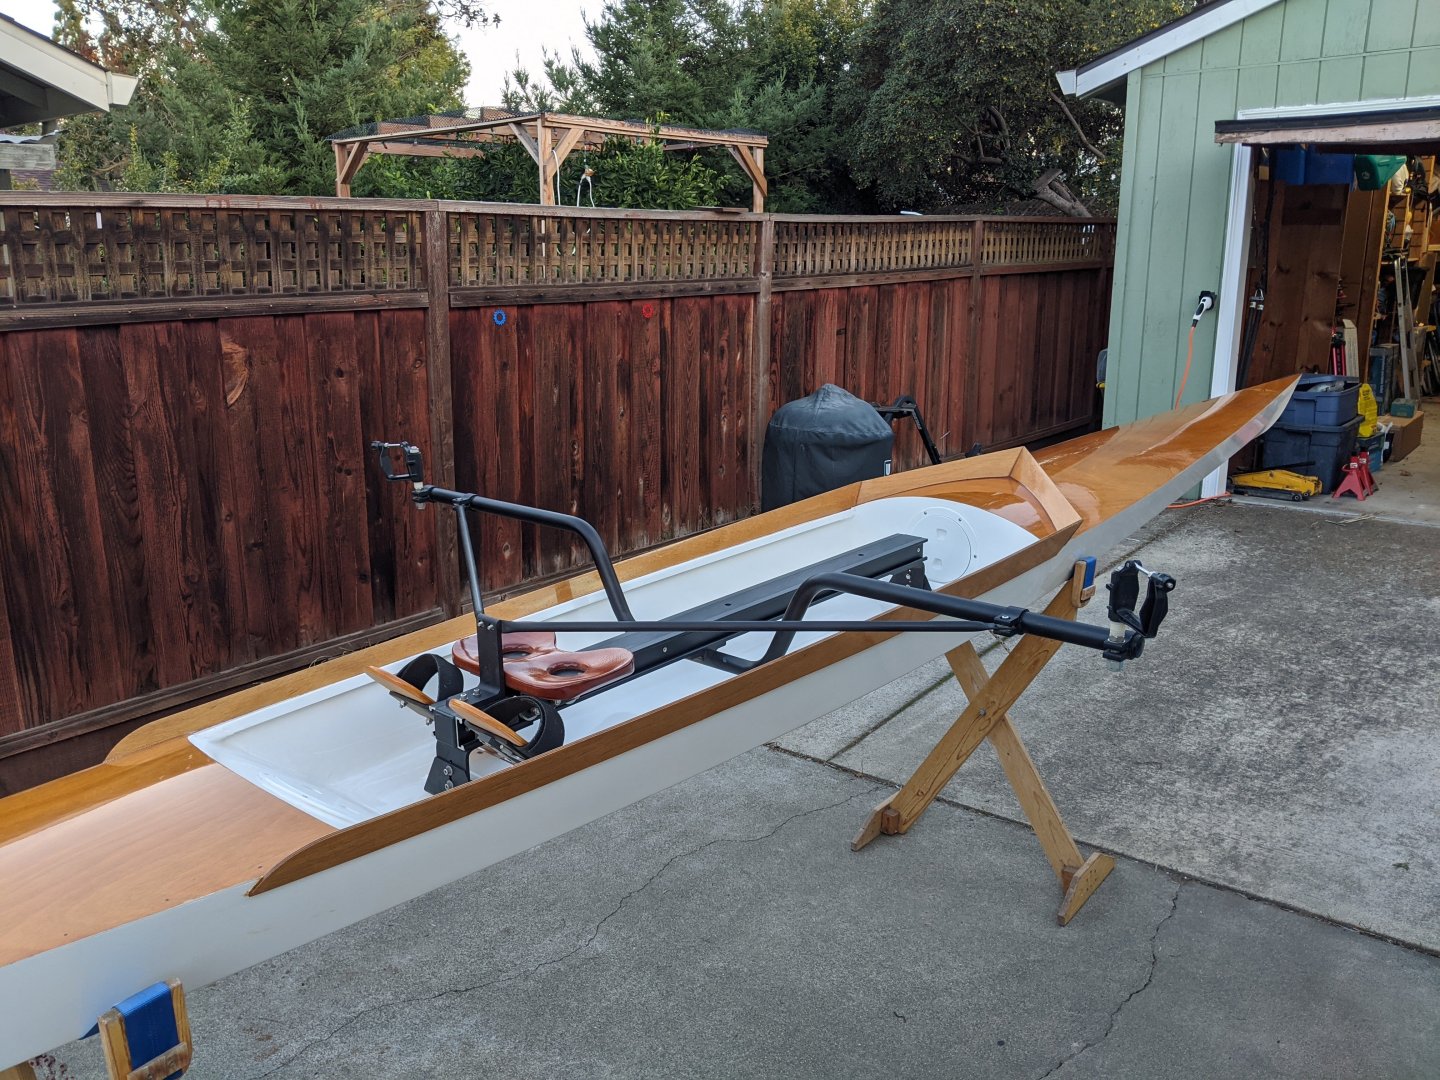
Hi, I have recently started the 18th Century Longboat 1:48 and in my search for info I found this incredible site. So, first thanks for being here and thanks for all the info you are sharing. I also wanted to introduce myself, since I now feel like I am going to post a LOT of questions 🙂 As a kid I built a lot of plastic models, mostly airplanes but I did do a 3 ft Revel (?) model of Old Ironsides. Always enjoyed doing those as a kid, but 30 or more years passed before I did another one 🙂 My wood ship model experience started with Model Shipways Seabright Dory. That was about 10 yrs ago. Chose that one as I was raised in NJ and it looked simple enough to tackle. It now lives in my cousins house which is on the Jersey shore, North of Atlantic CIty! Came out pretty well, and I now know that the lapstrake planking is much more forgiving than carvel planking! (no pics of that one) My second boat was the Model Shipways Muscongus Bay Lobster Smack. Looked like a good next step and wanted to tackle some rigging. Also, I picked that one as I had spent time up in that area and the history of sailing and seamanship from that area is very interesting. Now working on the Longboat. I liked the extra rigging involved, and that era of sailing is amazing. So also seemed like a good next step. I am finding it is a BIG step 😉 That is the current wood boat model experience. Other boat building experience: I also built a plywood Nutshell Pram from Wooden Boat plans, including the sailing rig, then built the CLC Boats Oxford Rowing shell from a kit (plywood precut) and finally built the Pygmy Boats Arctic Tern kayak from plans (bought sheet goods built glued scarf joints). Sailing/Boating Experience: You can see from above I like playing in the water 🙂 and have sailed, rowed and kayaked a bit. My wife wanted to do some bareboat charters and we are fortunate enough to live near San Francisco Bay so we took a whole series of sailing lessons at the Berkeley sailing school. I don't think they are around now, but they were very, very good and very serious!! Sailed a lot of J24's and similar boats in the Bay. Also sailed in Australia, ciastal California cruising and a bit down in Mexico. Not extensive experience, just casual but gave me a feel for "the life". When I lived in long beach a friend had a Pacific Seacraft, full keel Creelock 34. That's the boat I probably have the most experience with and I lived aboard her for a year or so on that boat. Certainly not a performance boat, but she was a joy to sail and had really pleasant motion, even in the roughest seas. That's general background! (pic Nutshell Pram pic from Wooden Boat website, the other pics are my boats. I couldn't find a way to resize these pics, or post as thumbnails. Hope they are not to obnoxious)

.thumb.JPG.fc8a10816dbd3f1665ad1aeb8bbebea7.JPG)

-
Tips for making lines look loaded
Cast Off replied to Cast Off's topic in Masting, rigging and sails
@popeye2sea Good point about the opposing lines... I was thinking I would have the boom vang slack, since it will be off to the side of the tiller, but if I made that taught it would tighten the topping lift. -
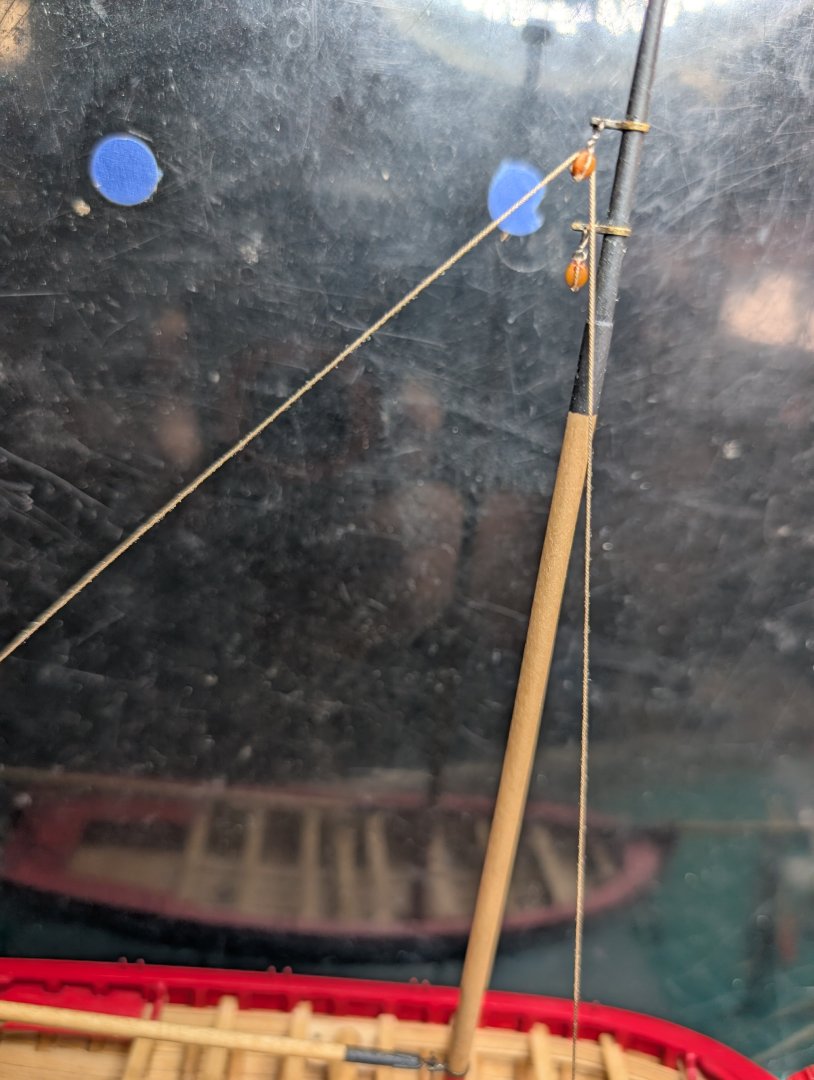
Hi, I fairly new to this and I am working on the Model Shipways 18th Century Longboat, 1:48. It's a really great little kit 🙂 I bought some upgraded lines and blocks from Chucks' Syren company and they are absolutely beautiful. Great detail in them. The first line I was rigging was the topping lift for the boom and the line hangs nicely, but there is no load or resistance in the topping lift to force it to be a nice taught line. I looked at a bunch of posts and it seemed like the technique is to make a 50-50 mix of white wood glue and coat the line under a bit of tension. I tried that and it seems like I lost a much of the definition in Chuck's nice ropes and a bit of fuzz was raised up. Have others seen this, and is there a better way to make a line appear to loaded, or even to artificially create some (permanent) sag? I tried to take a photo, but my phone didn't do close ups very well.
-
Keel klamper alternative
Cast Off replied to zamboknee's topic in Modeling tools and Workshop Equipment
Thanks, Toni. I saw in your signature block you had also built the longboat. I'm studying your build log now 🙂 Very nice build, and i'm already getting good tips on the planking!! -
Keel klamper alternative
Cast Off replied to zamboknee's topic in Modeling tools and Workshop Equipment
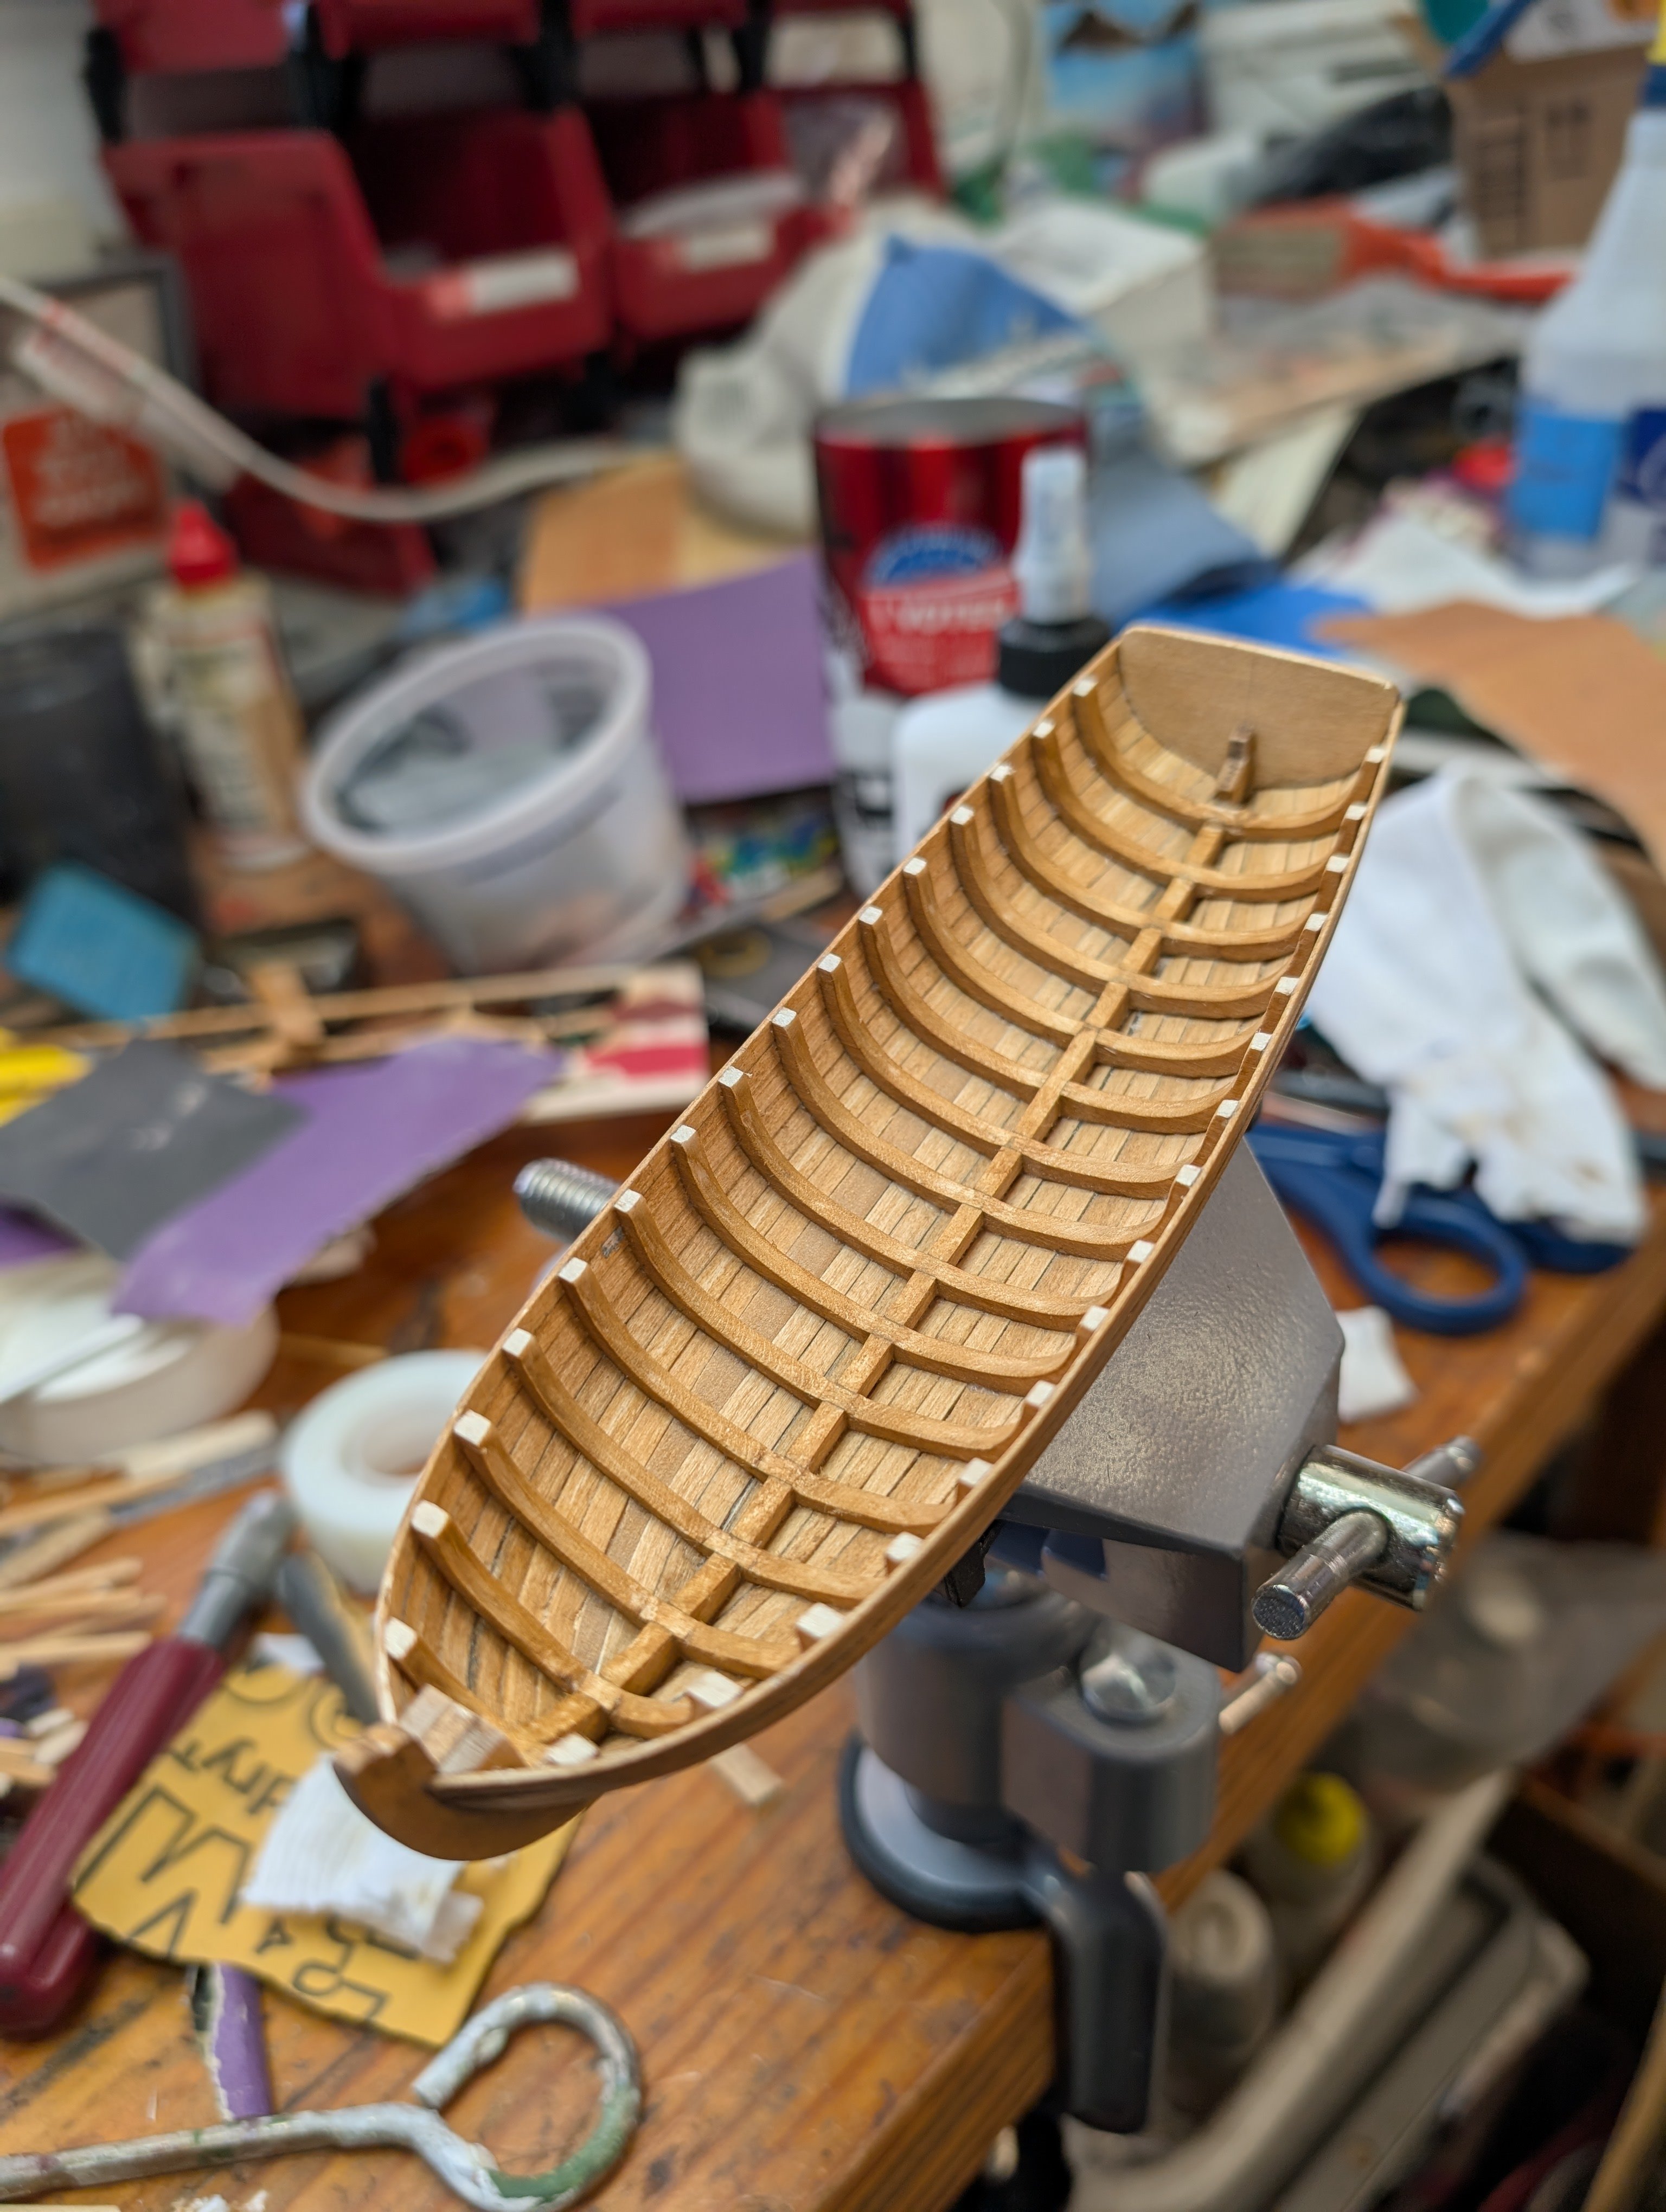
Hi, I know this is an old thread, but perhaps other new folks, like me may also be looking for clamps. I found this one on Amazon for $17 and so far is working for me. https://www.amazon.com/dp/B08F5955K8?th=1 Granted, I am working on a small model, the Model Shipways Longboat, so it's not a big hull. One caveat, the ball has some flashing on it that makes it rough. I dis-assembled it, filed and sanded it a bit smoother, put on some dry lube and it moves pretty well now... for $17 🙂 This is my first post. I want to thank everyone here for all their contributions. I am a bit overwhelmed right now seeing all the amazing, detailed work i'm seeing, and the willingness to share all the techniques. Beautiful stuff!!!!!!!!!!!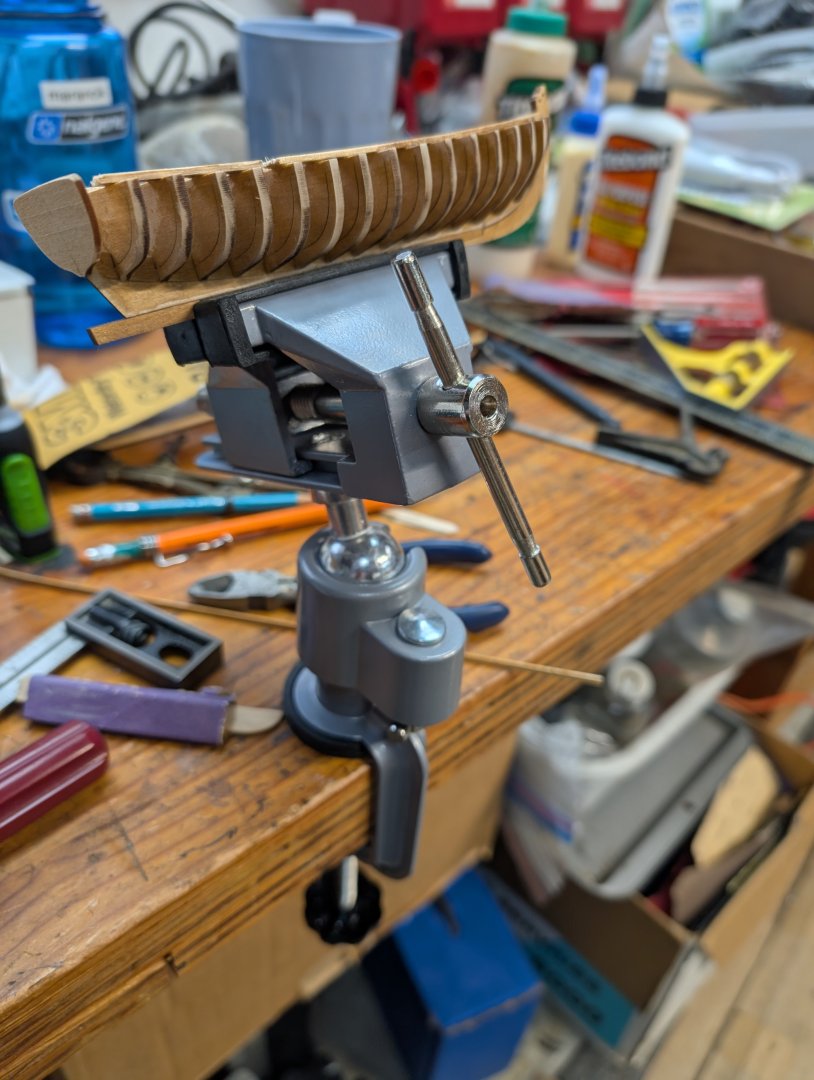


.jpg.83a6d9ee28ffae40232a08323ca3ac9c.jpg)
.jpg.135ba8a19c0160467b9d2f44142f0b91.jpg)
.jpg.6acc0275f8c89d3392e741cd038e1d55.jpg)
.jpg.99fc48a39933370c64dc4166d2882025.jpg)
.jpg.8b61ca34ed11d8e1054acd31bc34e117.jpg)
.jpg.d5a74e6b12c65e904a4934a9aab12759.jpg)
.jpg.042ebad78cde486092add1d0effb1235.jpg)
.jpg.143bb5b3269c54bcf88b47e7ce041b9d.jpg)


.jpg.a3d4a7a14bfd1e8ae8fe4765aab1f447.jpg)


.JPG.62fdf6d1086a67cfa9a370592d3b5f00.JPG)