


mobbsie
-
Posts
1,493 -
Joined
-
Last visited
Reputation Activity
-

 mobbsie got a reaction from coalman in Armed Launch by mobbsie - FINISHED - Panart - 1/16 - Small
Hello One and All,
It's been almost a year since I last visited my log and it's about time it was resurrected.
Life has it's ups and downs and unfortunately I have been on a bit of a down, without going into any detail I basically lost me mojo.
The boat has been completed and I will be posting the remainder of the progress pics very shortly.
Thanks to all who have enquired after my well being and showed concern, it's really very heart warming.
Watch this space guys.
mobbsie
-
mobbsie got a reaction from coalman in Armed Launch by mobbsie - FINISHED - Panart - 1/16 - Small
Hi Guys,
I'm back, I haven't been around lately for several reasons, the main reason being that through my own stupidity my Laptop crashed, I wont go into detail but suffice to say it stopped working.
Through the help of several friends I am now back on line and raring to go, I have at this stage got to thank Carl ( cog ) for all his help and assistance, it's down to you that I'm back ( you can get him later guys ). A big THANK YOU Carl, your a diamond.
A lot of progress has been made since my last post so I will be doing a few post in succession to try and catch up.
The hull with the mast a yard to the front, these were quite simple to build due mainly to there being no fiddly bits, all that I changed were the pulley wheels in the masthead,
The Hull with Mast and Yard in the fore.
The Mast Head, with the replaced pulleys.
This is the main fixing point for the Yard, 3mm Morope seized on with .75mm black thread.
Now for some Sail Making
The sail is made from a sheet of kit supplied Calico, this was first washed and ironed then cut diagonally from corner to corner, then I stained one piece with 4 teabags in boiling water, this was left for several hours until it got to the colour I wanted. When dry it was ironed again the edges were brushed with diluted PVA.
The Bolt-rope was made from 1mm Caldercraft rope, the lengths were measured and Becket's tied in.
the Bolt-rope was laid on the edge of the sail and the edge was then folded over the rope and again given a coat of PVA.
The bolt-rope is now fitted and the PVA has dried.
One of the three Becket's
The sail has now been marked up with pencil and is now ready to go to the seamstress.
The seamstress has done her job and a nice job at that. ( think I'll keep her on ).
Next up was to stretch the sail and fix it to the yard. The Becket's were tied using .5mm black thread. I then started to stitch fixing loops onto the sail.
With all the loops stitched on the sail was bent to the yard using .75mm black thread. The sail has now been completely bent to the mast and the Reev's also attached.
The completed sail.
That's it for now guys, a further update will follow very shortly.
Be Good
mobbsie
-
mobbsie got a reaction from coalman in Armed Launch by mobbsie - FINISHED - Panart - 1/16 - Small
Morning Gents,
Thank you all very much for your comments and for dropping in and thanks to all who hit the like button, all are very welcome and appreciated.
Piet and Brian welcome to the log guys, good to have you along.
I have an update guys which is pretty quick for me, just 17 days since my last one.
I think this is the correct time to apply a coat of W.O.P, the colour change is quite evident, the wood was also very thirsty.
The Port and Starboard stern benches have now been fitted, the holes are for a pair of Belaying Pins, elbows can also be seen and are waiting to be fitted to the stern.
Forard stringer elbows made and ready for fitting and the forard locker cover fitted, all the elbows are made from Lime planks and have had cut down flathead pins pre-fitted, the locker cover is made from 2x2mm lime strip and 1x5mm walnut planks.
Aft elbows have now been fitted along with the rudder cap and tiller bar also the Swivel Gun Pedestals, the pedestals are 6x6mm Walnut square stock, the pedestals had to be shaped to fit the hull and cut out made for the Capping Rail. The tiller was a lot of fun trying to bend to shape, no matter what I tried it creased at the bend, in the end I sanded out a lot of the crease and settled for that, it's not too bad really. The Rudder Cap is a 10x10mm Lime block and the Tiller Bar is a 5x5mm Lime Stock. Lime is not the best of woods to work with.
Next step was for the Benches, Mast Seat, Mast Head, and Bench Elbows. I cut the Benches from Swiss Pear Boards, the size is 5x15mm, a 10mm hole needed to be made for the Mast seat and Bracing pieces fitted either side of the bench. The Mast Head was cut from a piece of Lime square stock, reamed out and pulleys fitted, I changed the small brass pulleys and made a couple of wooden ones from 6mm dowel. The seat elbows are made from Lime stock but I wasn't happy with these and changed them to Swiss Pear.
Next was to dry fit the stern Capping Rail and fit it around the Rudder Post. The Capping Rail is made from Swiss Pear, shaped and the outer edge decoration cut into it, this was then treated with Ebonising Solutions until the right colour was reached. The stern side rails were given the same treatment. The capping rail elbows were cut from a 10x10mm block of Swiss Pear stock, using a template made from the plans the shape was cut and sanded. These have now been dry fitted.
We have now a big leap ahead, All the capping rails have been fitted and I decided to put a length of rope (1mm Caldercraft) along the length of the decoration, more as a rubbing rope. The benches have been fitted along with the elbows, (I hate elbows). The Mast seat has been fitted underneath the bench and columns fitted beneath each of the other remaining benches. I cut the rowlocks from 6x6mm Walnut stack and shaped using my drum sander, they were drilled and pins fitted, these were then glued to the aping rail. the two Fairleads were cut from 6x6mm Walnut square stock these were also glued to the capping rail.
I've reached the limit of this download gents so I will wait until my next update to post the rest.
I hope you enjoy this update and as usual all comments whether good or bad are always welcome.
Be Good
mobbsie
-
 mobbsie got a reaction from maddog33 in Armed Launch by mobbsie - FINISHED - Panart - 1/16 - Small
Hi Gents,
Here we are again with a long overdue update, I know work on the boat has slowed for reasons I will give later but this is bordering stupid. I can only say I'm being bone idol.
Right, thanks to all for your comments and for hitting the like button, I do appreciate you looking in.
I apologize for the jumpy nature of the photos but this is mainly due to a lot of the jobs on the boat being small and don't appear to be note worthy, before you know it a lot has been achieved and not a lot recorded.
The deck is made from Swiss Pine and really is just a framework for the Gratings and Boards. The deck boards are of 8m x 2m Red Heart, I made a guide frame so that I could sand the outer edges of the boards down to 1mm, these then sat flush inside the frame.
The Gratings are from the kit and not the best, they came up short and so a mish mash was fitted together, not great but acceptable.
The lower deck with completed boards and gratings, the anti slip bars are 2m x 2m Holly
The forward Bulkhead has now been planked but is still work in progress, the planks are 5m x 1m Walnut.
The second deck has been given the same treatment as the main deck and is dry fitted in position, the top deck has been planked using 5m x 1m Walnut planks.
The stern weather boards have been fitted and are made from 8m x 2m planks, these have been fixed to the 7m x 1m Walnut of the first planking. I have also started to fit the aft ribs which are 2m x 2m Lime strips, soaked then shaped.
All the decks have now been fixed, bulkheads planked and all ribs are in place. The Transom hatch has been made from a Lime frame and Walnut boards. the aft stringers are seen ready to be fitted.
Here the aft stringers are being glued in.
The Port side stringers are completed and have been pinned using cut down flat head pins.
I do have more progress to report and show but that will be for another post, I promise it wont be as long this next time.
Hope you enjoy them guys.
Be Good
mobbsie
-
mobbsie got a reaction from coalman in Armed Launch by mobbsie - FINISHED - Panart - 1/16 - Small
Hi Gents,
Thanks guys for the very nice comments and the likes.
I hope your sittin down coz I have another up-date. Wonders will never cease I hear you say.
A good bit of progress since my last post.
The rudder is made out of lasered plywood and no amount of staining was going to change it's look, so, I decided to cover it with veneer, this then meant that the keel would also need doing as well.
I found some veneer the right colour and completed that job without too hassle, surprising what a difference it makes, much better to the eye.
The Rubbing strips made from 2x3mm Lime were fitted and also the Slipways, these are made from 3.5x5mm Lime. The Slipways were also pinned using cut down flat head pins blackened with Antiquing Fluid.
The Transom was sanded down and shaped, still to need to sand the top to fit the Cap Rail.
The first coat of Poly was taken back and a second coat applied, the Poly is supposed to be a satin finish but when this coat had dried it looks more like a gloss, but hay ho, it's staying.
The entire inside hull has been sanded done to acceptable smoothness apart from the bulkheads, these will be done later prior to planking.
The middle and top deck should be covered with Lime planking but I changed this for Walnut, the top deck was a simple case of straight planks and presented no problem, the second deck is framed with Walnut, this deck has two sets of boards inside and so a bit extra work is required. A template was made from card and the frame marked up, the outer edges of the deck was laid with Walnut leaving a 2mm lip around the inner edges, this deck will have Redheart Boards. Both these decks needed a good bit of sanding.
The Main Deck is the same as the second deck, it's just a bit larger. I used Pear to line the outer edges and the internal division's with a square of Holly in the centre where the mast housing will be fitted. The internal divisions are still work in progress as are the boards and gratings.
So I now have some pics, hope you enjoy them.
The start of the veneering
There's a rudder in there somewhere, hopefully someone will be able to tell me what wood this is. I've forgotten. The grain is very much reduced once sanded and polyied
The almost completed outer hull
The Top and 2nd deck to be fixed and sanded in Walnut
The Main deck, still work in progress using Pear.
That's it Guys, not quite so long between posts and hopefully I'll post some more sooner.
All comments and remarks are welcomed.
Be Good
mobbsie
-
mobbsie got a reaction from coalman in Armed Launch by mobbsie - FINISHED - Panart - 1/16 - Small
Hi Gents,
Lawrence, glad you pulled up a chair mate, good to have you along.
Been a while since my last post and I feel really bad about it, apart from a bit of life getting in the way my only excuse is lethargy, or being just bone idol.
The main task of planking has taken most of the time with a slight diversion to make a few of the interior objects, Oars, Buckets, Gun Swabs - Reamers - Rammers and so-on.
The 3rd planking is now complete although this is still work in progress, I have to do a little filling between the planks but I'm quite pleased with the job so far.
I started by marking the hull off and then fitting the waterline, I used Holly for the waterline, its some left over from the Granado. I cut two 3 x 1.6mm lengths for the main line and two 1.6 x 1.0mm for the second line with a 3 x 1.0mm Pear strip between, this meant that the waterline stood proud by 0.6mm, this would come off during sanding so no worries.
I then started planking from the top down to the waterline, this was not a problem and none of the planks needed any special treatment. First mistake, when I put the waterline in I put all my markings for the planks out of kilter and so all the tick marks had to be redone, that's the reason for all the correction fluid. When I finally reached the waterline it was time to take a break from planking.
I started making some of the interior equipment shown here.
Planking continued after and this was soooo different, each and every plank required Spilling, I couldn't believe that bent planks would fit a straight line but they do. I found the planks I'd got were no good and so all the planks had to be cut from sheet material
Not all went well as you would expect and a few planks were ripped off and replaced and the hull was slowly taking shape amid a tirade of ungentle-manly language.
My next big challenge was Drop Planks, I needed to put in a couple of drop planks on each side and so a whole lot of reading took place with not a lot of answers.
Best way was to just get on with it, so with planks bent, cut and tapered on they went, not what I would call text book but certainly my version and the result wasn't too bad.
Towards the end of planking a little jiggery pokery was required and in many respects it was a case of taking the bull by the horns and going for it anyway its done with just the clean up left, and the Transom.
Next job for me is complete the Transom, fill between the hull planking, fit the stern boards which are Redheart and final sanding and coating with poly.
So that's me gents and your right up to date now, again sorry for the long gap between posts, I'll try and keep the long gap a bit shorter next time.
Be Good
mobbsie
-
mobbsie got a reaction from coalman in Armed Launch by mobbsie - FINISHED - Panart - 1/16 - Small
Hi Gents,
Thanks very much guys comments and likes are all appreciated.
Carl, By all means mate, pull up a pew. your always welcome here, I shall be using mikeaidanh's log as a reference quite a lot. His build is superb and definitely one to follow. One thing I do like about this kit is that there is a lot of scratch building to be done although the plan drawing leave a lot to be desired.
Frank, Cheers buddy, one more planking to go, she's triple planked. Final planking will be Pear when it arrives.
Wayne, Thanks mate for your confidence in my planking efforts, I am learning and the final planking will be better.
Ken, Thanks mate, If I were you I'd wait for me to finish the planking before hoping your turns out like mine, good luck with yours mate.
Mark, Thank you very much mate for sharing your wisdom. It does sound complicated but I'm beginning to get my head around the process and the mist is beginning to clear. we'll see.
Thanks Grant, stay tuned mate.
Thanks again guys.
Be Good
mobbsie
-
mobbsie got a reaction from coalman in Armed Launch by mobbsie - FINISHED - Panart - 1/16 - Small
Hi Gents,
It's been while since my last post and a lot has happened.
Thanks guys for all your comments and remarks and for hitting the like button, it means a lot.
I've completed my trails on the Ebonizer with mixed results and not all good. I put some Pear and Lime in the solution and gave it a 40hr soak to find out the depth of penetration, the results I admit are disappointing, penetration was no more than if it had been soaked for 2hrs, the surface area built up with stain and started to crystalize, when rubbed with a finger a dirty brown stain remained. Not a good result at all.
Best results came from soaking in Tea for approximately 2hrs, allow to dry then soak in the stain for a further 2hrs, allow this to dry and apply a Wipe on Poly to finish. All work that needs to be done must be before staining as the base wood will show through if done afterwards.
I do have a picture of the Sheer Rails after they have been treated, I'm happy with the results for these.
Next up is the update on the Launch.
Second planking is now complete, although this is a lot better than the first planking there is still a lot of room for improvement.
The planks are a lot tighter together due to bevelling the edges but I still had trouble with getting a smooth bend on each of the lower strakes around the bow section. Although the strakes were measured at the Bow, Midships and Stern there is some a lot more that can be done and so I've put myself on stand-by to do this properly, if anybody would like to pop round mine and give me a practical demonstration of how to do this please feel free, I have seen the tutorials so feel a little better but putting it into practice is a whole different ball-game.
The final planking will be Pear with the waterline in Holly, the top of the hull will have decorations on top of Red Heart, hopefully this will be a paint free zone but we will see, never say never.
The Pear has been ordered from C.M.B. but is still in tree trunk form and is waiting to be cut, I've ordered Strips and Sheets so hopefully will have all angles covered, I really must get a Thickness Sander, it will save me money in the end, I just need to persuade the boss.!!!!!!!!!!!!!
Sorry about the quality of the pics, I promise to do better next time round.
Half way through and not looking to bad
The 2nd planking is now complete, somehow a rogue plank has infiltrated.
So there we are guys, your up-to-date with where I am, Hopefully I will have an update sooner rather than later.
Be Good
mobbsie
-
mobbsie got a reaction from maddog33 in Armed Launch by mobbsie - FINISHED - Panart - 1/16 - Small
Hi Guys,
Well here we are, back on familiar ground with a kit build although there is an awful lot on this boat that needs to be scratched.
The Armed Launch was used by different navies during the 19th century, approx. 10 metres in length it was armed with different size guns, one large cannon at the bow and two small swivel guns at the stern.
These boats were used for coastal patrols or in escort services, they also demonstrated their wartime capabilities in surprise actions by attacking craft in trouble, anchored up or in the roads.
The model is triple planked with the first planking on full show on the inboard, this planking is Walnut, the second planking is for strength and is Lime, the last planking should be Walnut but I want to change this to Swiss Pear, I want a bare wood finish if possible and I want to keep the paint away from the main parts of the boat.
I started with the keel by cutting two 3mm rabbits, I'm not too sure if this was the right thing to do but it's done and so I have to make it work.
With the rabbits cut I dry fitted the bulkheads, the top 2/3rds will be removed when the planking is completed, these were then glued into place and the alignment deck put in position, this deck plays no part in the final boat, it's purely to keep the bulkheads square whilst planking.
I started the first planking (Walnut) and have so far got just about halfway and so it continues, care has to taken as this first layer is on full show apart from the bow section.
I hope all that follow this build will enjoy the trip and please feel free to offer any advice / comments along the way.
Some pictures
First up the obligatory kit shots
The Keel in my clamp showing a Rabbit
Bulkheads dry fitted
Bow block attached and alignment deck in place
The first three rows on both sides
Not very exciting at the moment is it.
I'm not right upto-date with the pictures but they would only be more of the same planking so that it for now, I will post again when I have more progress, that will be a bit slow due to the time of year and the Admirals just do jobs.
Please feel free to make any comments guys.
Be Good
mobbsie
-
 mobbsie got a reaction from popeye the sailor in Jolly Roger Pirate Ship by Kimberley - FINISHED - Lindberg - PLASTIC - 1:130
Morning Kimberley,
NO DUMB MODELS.
Some good sound advice there, the paint I use is both Revell's Aqua Colour and Admiralty, they are both water based paints and the clean up is very easy.
With regard to brushes I generally use Synthetic Hair Artist brushes, you can buy them in sets which have flat as well as round tips, they are also a soft brush, I find a hard brush tends to flick paint which is not desirable.
Good Luck
mobbsie
-
mobbsie got a reaction from popeye the sailor in 1949 Chris-Craft 19' Racing Runabout by gjdale - FINISHED -Dumas - 1:8 Scale - RADIO
Hi Grant,
Simply stunning mate.
Dan is right, take her to the Canberra show and recieve and accept the plaudits owed to you.
She really is a work of art.
mobbsie
-
 mobbsie got a reaction from Bishophobbies in HMS Agamemnon by mobbsie - FINISHED - Caldercraft / Jotika - 1/64
Hi Guys,
Well I have finally taken some pics of the case and will post them now.
Thank you one and all very much for your much appreciated support, comments, suggestion, remarks and help, not forgetting all those who hit the "like" button.
As you will see I had to pull the sideboard away from the wall by 5 inches, thinking that would be enough the said case was positioned by two burley friends of mine and guess what, it stuck out by a further 2 inches.
So there we are, these last few pics really do wrap this story up, hope you enjoyed the journey, hopefully I'll see you on the dark side, Popcorn is kindly supplied Sjors but you will need to bring your own torch.
Be Good
mobbsie
-
 mobbsie got a reaction from GrandpaPhil in HMS Agamemnon by mobbsie - FINISHED - Caldercraft / Jotika - 1/64
Hi Guys,
Well I have finally taken some pics of the case and will post them now.
Thank you one and all very much for your much appreciated support, comments, suggestion, remarks and help, not forgetting all those who hit the "like" button.
As you will see I had to pull the sideboard away from the wall by 5 inches, thinking that would be enough the said case was positioned by two burley friends of mine and guess what, it stuck out by a further 2 inches.
So there we are, these last few pics really do wrap this story up, hope you enjoyed the journey, hopefully I'll see you on the dark side, Popcorn is kindly supplied Sjors but you will need to bring your own torch.
Be Good
mobbsie
-
 mobbsie got a reaction from ccoyle in Armed Launch by mobbsie - FINISHED - Panart - 1/16 - Small
Hi Guys,
Back from the Hols this time and ready to finish this rather long winded log.
The next thing for me to ponder was the type of stand to put her on, I didn't want the kit stand as it seemed a bit chunky. I decided to make what I can only call "feet".
I cut a paper template and cut the feet from 6mm Swiss Pear, I quite like them as they are unobtrusive and they serve the purpose
The Bow "Foot" in place.
The stern "Foot" in place, I think they fit quite nicely and do not draw the eye.
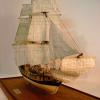
Only remains to put all the parts together and complete the rigging, the rigging was very simple and did not take long at all, various ropes were used such as Morope, Caldercraft and the local haberdashery shop. Unfortunately I didn't take enough pictures of the methods used and so there is a big jump.
The mast has been stepped and fully rigged
This rig is really simple, no Ratlines ( lovely )
Bow on, all the little bits have been placed inside, none are fixed.
I've just noticed the ensign, it's the Red Ensign (Red Duster) which is for the Merchant Navy, I will have to get a White Ensign.
The knots on the Yard are correct and quick release.
The final picture, it's done, I did enjoy building this boat and would recommend it to anyone.
I hope you enjoyed what turned out to something of a long journey and I thank you for your patience.
Next up will be HMS Pickle, I love the story behind this little boat.
Be Good
mobbsie
-
 mobbsie got a reaction from md1400cs in HMS Victory by gjdale - FINISHED - Mamoli - Scale 1:90
Grant,
Everything about this build is stunning, she's a real beaut mate, you have every reason to be proud. :dancetl6:
I cant afford champers mate but lets have a beer instead great set of pictures as well, they deserves another beer
I will follow your link for the Rocket and I look forward to working with you on the dark side. Thinking about that, if I build the port side you can do the starboard side and I'll send mine over to you for matching up.
I promise not to keep you waiting long ( honest )
Be Good
mobbsie
-
mobbsie got a reaction from GrandpaPhil in HM Schooner Pickle by mobbsie - Caldercraft - Scale 1:64 - Heritage Series
Hi Guys,
Thanks for the good words and the likes gents, most appreciated.
It's about time I gave an update and that will be happening very soon, I must admit to have taken a short break but I am back in the game now.
Gary, I will PM you and let you know my thoughts.
rony, When doing the planking I use "Push Pins", these have a shoulder on them which leans onto the plank and keeps them in place, to cement them, I first soak the planks for 10 - 15 minutes, wipe off any surplus water and then use a thick super glue gel, you have to be quick and accurate as the glue will set in seconds, it can also be a bit messy if you get it wrong. Hope that answers your question mate.
Denis, I promised you some better pictures of the deck with the lighter coloured treenails, hope these do the job mate.
OK, now for a quick update, second planking is now complete and as you will see it does look a little different, because below the waterline will be coppered I didn't want to use all my Swiss Pear and so used the kit Walnut to finish off.
As you can see I haven't put the stem or keel in yet, they were the next job to be done, unfortunately no pictures.
Coppering has started, and finished, I used the individual plates as supplied by Caldercraft, I like these plates and they are easy to work with, my one problem was that I didn't have a plan to work to and so it was a case of trial and error, believe me when I say there were a lot errors.
My next move was to lace a 2mm x 2mm strip along the top of the waterline, this was painted black prior to gluing on but that will be for the post.
That's it for now gents.
Be Good
mobbsie
-
 mobbsie got a reaction from CaptainSteve in Da Vinci Flying Machine by gjdale - FINISHED - Imagination Factory - Scale 1:6
Hi Grant,
At first I thought to myself Chinese Snow Shoes but now a little more progress has been made I've changed my mind, I'm now thinking along the lines of a means of assisting with Child Birth, I think it's the Leather Straps and the Stirrups that's doing it.
Your storage cabinet's look great mate, really nicely done. All you need to do now is to build somewhere to store the storage units, and don't forget the bike needs dusting.
Bet your glad I'm back aint ya.
Be Good my Friend
mobbsie
-
 mobbsie got a reaction from KeithAug in Harwich Bawley by mobbsie - FINISHED - 1/24 Scale - RESTORATION
Hi Gents,
Thanks for looking in gents and all your kind comments and remarks during this restoration.
This will be the final update on the restoration as she is now complete and has been taken down to the museum, I must say they are very pleased with her as am I.
The rigging was a bit of a mystery as there is no plan that I could find so it was a case of looking at as many photos and other builds of a similar ilk.
She came together very quickly in the end and before I realised it she was almost done and it really wasn't worth making two posts with what was left. I decided to carry on and finish her off.
There's no tech info to pass on so I will get straight into the pics and hope you enjoy them.
I wanted the sails to billow and so I soaked these ropes in white glue, the ruler is to add some tension and hold the sail out until the glue dries.
The main sail with some of the rigging, the Reg Number was put on using a Chinagraph pencil my Admiral uses in the garden, no bleed and it worked a treat I think.
A chain storage box was made up
The fittings have been placed in the hold
All the sails are now on and hopefully they look as if they are filled with air, I used a large fan and starch, sprayed the starch on in small amounts and let it dry by the fan, then add more starch and repeat until desired effect happens.
The Top Sail didn't take to well and proved a pointless task, it held for a while then dropped.
The Spritsails are clearly billowing
The shape of the Mainsail can be seen and it held it's shape.
And the final pic
So there we are, the finished boat. I have enjoyed doing this restoration as it has made a complete change in the subject which upto now has not been my thing, who knows where we go from here.
Be Good
mobbsie
-
mobbsie got a reaction from GrandpaPhil in Harwich Bawley by mobbsie - FINISHED - 1/24 Scale - RESTORATION
Hi Guys,
Another quick update on some progress, I'm a little cheesed off because I have some other pictures on my phone and for some reason I'm unable to access them.
They are mainly of the Margin Planks, so I'm afraid there will be a jump from Margin Plank template to half planking.
I have had a bit of bother finding a decent Veneer to use an after a couple of orders on line which proved totally useless I found a supplier about 7 miles up the road.
Speaking with Grant yesterday, he asked what veneers they were and I was unable to tell him, embarrassing really. I have since done a search on line and they are Cedar and Maple, I quite like the effect and so I hope you guys also like it.
Some Pics
Starboard side Margin Plank template
Stern Margin Plank
Bow Piece
Starboard Margin Plank
Starboard side planking, sorry about the big jump.
Starting the Port side planks
Once the planking is completed I will be experimenting with treenail colour and material.
So your right up to date now guys, I will post more as progress is made.
Be Good
mobbsie
-
mobbsie got a reaction from GrandpaPhil in Harwich Bawley by mobbsie - FINISHED - 1/24 Scale - RESTORATION
Hi Guys,
I've completed stripping down and on inspection I find that all is not well, there are several parts that are slightly out of true and will take a bit of thought when planking.
I haven't found out anything new and so have decided on a 4 plank stagger set at 30mm, thank you guys for investing time and effort in helping me out, I really appreciate your help.
I have started painting the Bulwarks, Hold, Accommodation Shack and the Hull, I have kept the same colour scheme for the upper works but changed the Hull from the drab grey that was to Red Primer ( Red Lead). I have also added a white line around.
The Hold was a sky blue which I could have kept but it was eating away at me and so I've changed it to what could only be described as sage.
The dye has been bought for the sails, they will be Terracotta, I borrowed an old pillow case from the Admiral which will make up the sails and my sister, (bless her) is going to make them up for me, I don't think she fully comprehends the amount of work that will be needed so I'm going to have to get her something special for taking them on.
So here are the pics guys.
Some of the little bits that were on board
You may be able to see the crackling effect on the paint
High levels of grime is all over the boat
I have removed the decking from the hold and will replace with planks
The benches around the tiller have been removed
I'm masking up the upper hull in readiness for painting
The new Hull colour
The hold has now been planked
The inboard paintwork has been started, white only at this stage.
The white line has been added
That's it for now guys, there will be more to follow very soon.
Be Good
mobbsie
-
mobbsie got a reaction from GrandpaPhil in Edme by mobbsie - FINISHED - 1/67 - RESTORATION - Thames Barge
Thanks Gents,
The Winch, I haven't gone into the research for this boat too much but I would have thought the winch would have been used for helping to furl the main sail which was quite a heavy construction, the crew being very scarce would have needed some sort of assistance, there may also have been a small crane fixed up for loading some cargoes.
Patrick, The mast base, I have knocked up a quick base just to show the parts used and how their put together, all from 1mm and 3mm ply with 8 round head pins, it took me longer to download and resize the pictures than to make it.
All the parts
Body of the base glued up
The base with pins in
Body and base together
Just the braces to fit
The finished item, the winch drums were taken from the old base
Hope that helps mate
Be Good
mobbsie
-
mobbsie got a reaction from GrandpaPhil in Edme by mobbsie - FINISHED - 1/67 - RESTORATION - Thames Barge
Hi Guys,
It's update time again, though not too much to see really.
Progress has been made with a full set of sails made up, this set is much better than the originals.
So with the sails made up we need something to hang them from. All the news parts were made up and then I hit a problem in that the base housing for the Main mast would not under any circumstances release from the old mast, a new base had to be made up.
All the blocks and rigging were placed and the Spanker fitted before being put on the boat, this has made life a whole lot easier. All that remained was for the shrouds / stays to be positioned.
There has been a lot of discussion lately on other logs regarding Life rings, Billings do life rings with a terrible plastic grab rope, I just cut the grab rope away and left it at that, without doing any research into the development of the life ring I'm sure grab ropes were introduced much later.
So some pictures, ( not many mind ).
The full set of sails
All the sticks are made and the new Main base is fitted
Spanker sail is attached
Fixed to the boat with the stays being put on the bottle screws
Port side life ring fitted to the stays, now to do the starboard side.
So that's it for now guys, any comments, good or bad are always welcome.
Be Good
mobbsie
-
mobbsie got a reaction from GrandpaPhil in Edme by mobbsie - FINISHED - 1/67 - RESTORATION - Thames Barge
Hi Guys,
This log is about the repair and improvement ( I hope ) of the Thames Barge Edme. Edme started out as the Barge Will Everard but was cut down and the boat was mostly a scratch build.
Damage occurred during pre-season cleaning and redecorating of the museum, she was dragged from a table by a dust sheet.
The damage is mostly to the Masts and Rigging and although annoying at the time it has allowed me to correct a few mistakes.
What has made me angry was the need to reduce the visual damage by bending a metal Cross Tree around the main mast, this particular piece could have been used again but not any more, as if that wasn't bad enough string was also wound around the mast and what appears to be about half a bottle of CA poured over the top.
Originally Edme didn't have a stand, she was just free standing but I have now made a stand for her which I hope compliments the boat.
The first series of pictures will show Edme pre damage and it will show evidence of my inexperience in boat building.
This is one of my major mistakes, The Edme only has 3 shrouds, here I have 4
Now we have a few pics of the damage, I'll let you make your own minds up on these.
The pictorial story goes a lame from here on, progress made wasn't fully documented and so will have some large gaps.
As stated most of the damage was with the masts and rigging so the old has been removed, the first thing I wanted to do was to make a stand for her.
Here I covered the hull with cling film and using modelling clay to give me a profile, the stand was started.
Using MDF the uprights were cut out and Beech laminate glued on, a few clamps, believe me there is an upright in there somewhere.
Both upright are now laminated, they just need to be cleaned up.
The completed stand, again the base is MDF with a Beech Laminate and double coated with POLY, the cradles were covered with the fibre part of Velcro, they were then drilled and dowel glued in place.
Edme now has a nice ? new stand
That's enough for now, I will post further updates shortly.
I do hope this all makes sense.
Be Good
mobbsie
-
mobbsie got a reaction from popeye the sailor in Da Vinci Flying Machine by gjdale - FINISHED - Imagination Factory - Scale 1:6
She looks to be an intriguing build Grant, gonna follow along for sure. You've made a good start mate and I like the look the Shellac gives the wood.
Be Good
mobbsie
-
mobbsie got a reaction from popeye the sailor in Bismarck by Channell - Trumpeter - 1/200 - PLASTIC
Hi Channel,
Just found your log, mind if I tag along for the ride.
She's looking pretty impressive, very well done.
mobbsie