

Roman
-
Posts
59 -
Joined
-
Last visited
Reputation Activity
-

 Roman reacted to Forlani daniel in Chebece 1750 by Forlani daniel - FINISHED - 1:48
Good morning and thank you all for the likes.
more photos.
Un Saluto.
-
Roman reacted to Forlani daniel in Chebece 1750 by Forlani daniel - FINISHED - 1:48
Good morning and thank you all, more photos....
Un Saluto.
-
Roman reacted to Forlani daniel in Chebece 1750 by Forlani daniel - FINISHED - 1:48
Good morning and thank you all for your likes, I will continue with more photos.
Un saluto.
-
Roman reacted to Forlani daniel in Chebece 1750 by Forlani daniel - FINISHED - 1:48
Hello and thank you all for the messages and likes.
More photos.
Un saluto.
-
Roman reacted to Forlani daniel in Chebece 1750 by Forlani daniel - FINISHED - 1:48
Hello and thank you all for the likes, more photos of the sculptures.
Un saluto.
-
Roman reacted to Forlani daniel in Chebece 1750 by Forlani daniel - FINISHED - 1:48
Good morning and thanks to all, some progress made
Un Saluto.
-
Roman reacted to dvm27 in Speedwell 1752 by dvm27 (Greg Herbert) - FINISHED - Ketch Rigged Sloop
It's been almost a year since my last update. The reason is that Speedwell has been landlocked in Canada since last November. My very talented collaborator David Antscherl had made and applied all the carvings and I was going to pick her up to rig her just when Covid struck and the border was closed. I have all the blocks, ropes, masts and spars ready but no model. I'm hoping to get her this summer but who knows at this point. At any rate here are some photos of her sporting her wonderful carvings.
-
Roman reacted to Forlani daniel in Chebece 1750 by Forlani daniel - FINISHED - 1:48
Good morning and thank you all, more pictures of the capes, next step I will start with the sculptures.
Un Saluto.
-
Roman reacted to Forlani daniel in Chebece 1750 by Forlani daniel - FINISHED - 1:48
Good morning and thanks to all for the likes, more photos....
Un saluto.
-
Roman reacted to Forlani daniel in Chebece 1750 by Forlani daniel - FINISHED - 1:48
Good morning and thanks to all, more photos....
I take this opportunity to wish everyone a Happy New Year.
Thanks Robert for the photo, very nice, in 1:72 scale it must have been quite a challenge.
Un saluto.
-
 Roman got a reaction from mtaylor in Mahonesa 1789 by a.sorolla - 1:32 - 34-gun frigate - monography by Adrián Sorolla, plans by F. Urtizberea
Good news, looking forward to this monograph. Saludos
-
Roman reacted to a.sorolla in Mahonesa 1789 by a.sorolla - 1:32 - 34-gun frigate - monography by Adrián Sorolla, plans by F. Urtizberea
Yes, the Spanish and French edition and the English edition are planned as soon as possible.
Adrián
-
Roman reacted to a.sorolla in Mahonesa 1789 by a.sorolla - 1:32 - 34-gun frigate - monography by Adrián Sorolla, plans by F. Urtizberea
Hi
I write to justify the lack of news on this subject. I spent many months preparing the monograph of this Spanish frigate, using the plans of Fermín Urtizberea.
I hope to have the texts completed in two months, by the publisher ANCRE, soon.
The monograph consists of 38 plans at 1:48, commented, and the inclusion of many 3D drawings to serve as a guide when making the model, as well as as as a historical part that introduces us into the era of its construction and its career.
I’m putting in excerpts from the monograph, the book that accompanies the plans.
I wish you a happy new year
Adrián Sorolla
-
Roman reacted to RJD in Chebece 1750 by Forlani daniel - FINISHED - 1:48
Daniel
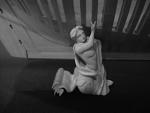
Found an old picture of my Xebec. Scale is 1:76 (5/32 inch = 1 foot). Solid hull of pine. Decorations and carvings are plaster of Paris.
Looking forward to you next photos.
Robert
-
Roman reacted to rlb in US Brig Oneida 1809 by rlb - The Lumberyard - 1:48 scale - POF - Lake Ontario Warship
Hello All!
It's been a while, about 6 months, since I've done any work on Oneida. I felt I botched some work, and it sapped my motivation completely. It's only in the last few days that I've felt ready to start (yet) again.
Back in June, after finishing the eagle carving, I made preparations to paint the ship's name on the transom. I wanted to actually paint the letters, not use a decal, or transfer letters. I knew I was going to have to turn the hull upside down to do this, so I wanted to do it now, before finishing anything else.
I experimented printing the name is some different fonts, and different sizes to arrive at something that looked about right.
Here is the printed name, taped to the transom with a small piece of white transfer paper underneath--
At this point, I nervously turned the hull upside down, hoping I wouldn't break or lose anything. I left the ship's boat lashed down, and removed anything that could be taken off easily. This photo is after I then "colored" the lettering with a sharp pencil, which transferred the letters onto the planking. You can barely see it there on the transom--
Here's a close-up. Not too pretty. But enough to give me a reasonable guide for painting--
I used some artist oil paint, and the finest brush I have, and did the best I could. It was not very good. I didn't even take a photo. For some reason, this completely deflated me. And, unfortunately, I gave up the ship. I turned it right side up, and left it alone.
Fast forward: I'm working from home due to Covid, don't get out much except to grocery shop, and when it was warmer, do some walking/hiking on the weekends. I finally got bored enough to look at the ship (actually I have looked at it often enough, but without any desire to do anything), and see if I could make some improvements to that attempt at painting the name.
I turned the hull upside down again-
And I set about with a knife to trim and scrape at the edges of the painted letters, trying to clean up the serifs, and the uneven thicknesses of the strokes. In this photo, all of the letters have already been given some work. It was worse before--
All the letters needed some surgery, but the ones that needed the most work were the "O", the "N", and the "D".
After cleaning this up, it looked better. Not as good as I would have liked, but enough better to accept. I also had to glue a transom molding that had become detached at one end, and I glued the eagle-
You can see a nasty gap in the transom planking. It was the first planking I had done on the whole ship, and it looks it. I think I can fill it with some darkened sawdust and glue.
Here she is back right side up--
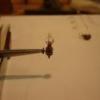
I've also continued working on the anchors. Here the wood anchor stock pieces are shaped, treenailed (for appearance only, for they should have been drilled through the companion piece also; but that would require a precision in which I have not the confidence), and carved out for the shank. I've cut a thin sliver of brass sheet for the iron bands that help hold it together-
All for now--Happy Holidays and Joyous New Year, if I don't post before then.
Ron
-
Roman reacted to Forlani daniel in Chebece 1750 by Forlani daniel - FINISHED - 1:48
Good morning and thanks to all, I take this opportunity to wish all the modelers of the forum Merry Christmas and Happy New Year.
Yes Robert, do you have any pictures of your xebec?
More photos.
Un Saluto.
-
Roman reacted to Forlani daniel in Chebece 1750 by Forlani daniel - FINISHED - 1:48
Good morning and thank you all for the likes, more photos....
Un Saluto.
-
Roman reacted to Matrim in HBMS Amphion 1798 by Matrim - 32 Gun 18pdr Frigate
Thanks guys. It is nice how you learn more the capabilities of the tools you are using with experimentation. I also like the Sherline because I am totally in control and I dont feel at risk (I always feel at risk when using the table saw which is a much scarier tool)
-
Roman reacted to BANYAN in Chebece 1750 by Forlani daniel - FINISHED - 1:48
Daniel, I don't comment in your log much anymore as I have run out of superlatives for your stunning workmanship and model. Seeing these regular updates is very inspirational and shows the level of quality and detail that can be achieved in a model.
Have a safe festive break.
Pat
-
Roman reacted to Forlani daniel in Chebece 1750 by Forlani daniel - FINISHED - 1:48
Good morning and thanks to all, some photos of the rudder....
Un Saluto.
-
 Roman got a reaction from druxey in Chebece 1750 by Forlani daniel - FINISHED - 1:48
Daniel, il tuo Sciabecco è magnifico e molto bello. Grazie per aver condiviso la tua arte. Bravo
Daniel, your Xebec is magnificent and beautiful. Thank you for sharing your art.
-
Roman reacted to Forlani daniel in Chebece 1750 by Forlani daniel - FINISHED - 1:48
Good morning and thank you all for your posts, I was very pleased with some pictures of the helm.
Un saluto.
-
 Roman got a reaction from Forlani daniel in Chebece 1750 by Forlani daniel - FINISHED - 1:48
Daniel, il tuo Sciabecco è magnifico e molto bello. Grazie per aver condiviso la tua arte. Bravo
Daniel, your Xebec is magnificent and beautiful. Thank you for sharing your art.
-
Roman got a reaction from mtaylor in Chebece 1750 by Forlani daniel - FINISHED - 1:48
Daniel, il tuo Sciabecco è magnifico e molto bello. Grazie per aver condiviso la tua arte. Bravo
Daniel, your Xebec is magnificent and beautiful. Thank you for sharing your art.
-
Roman reacted to Matrim in HBMS Amphion 1798 by Matrim - 32 Gun 18pdr Frigate
I'd like to put up a post with some work on something that isn't the keel. But this won't be it. Perhaps I should rename the log to ' Scratch building the Amphion's Keel..a lot'
As I said in my last update I was considering another try as I was not quite happy with the process and how close to actual size the pieces were. What follows will move to heights of detail to challenge even the most interested reader. So if you've had enough of the Keel then I recommend you await a future post (though there is a little historical paragraph at the very bottom).
One of my favourite sayings concerning WW2 and design was that English craftmanship consisted of making a round peg fit a square hole. German craftmanship consisted in making 30 different shaped pegs fit 30 identically different shaped holes perfectly and American craftmanship consisted of making a square peg fit a square hole 300 times a minute. It was used somewhere to describe the issues the various combatant states had with their design processes and vehicles in particular. With regard to this build I would prefer it to move closer to the American method so refined my 'process' to remove as many issue sources as possible.
Step 1 - Cut list 10 pieces to eventually represent keel parts 1-5 9.6*9.6mm, 4 pieces to eventually represent piece 6 9.6mm * 50mm
- I like to cut extra as I always lose something to a mistake and this way you don't have to recut with the large risk of not getting the size the same - something you can do if you are running the same batch through the thickness sander at the same time.
Step 2 - thickness the 10 pieces to 9mm * 9mm and the 4 larger pieces to 9mm depth only.
- At this point I check the edges of all cut pieces against a straight edge and mark them as A, B or C. A quality is the best B is useable and C is not.
Step 3 - In the previous post I had 'also' cut extra and had two pieces left over of the larger width. I cut the angle for the joint into one and then used that as the base for the angles into the next. I then scribbled some green and red ink over these two pieces which would function as my bases.
- this allows me to get an identical cut each time and whereas the previous method used 3 pieces of wood to get the cut piece high enough in the vice this just needed one thus increasing ease of use, stability, accuracy and reduced error possibility.
My two lovely blanks red and green
Step 4 - Using some of the scrap (2 pieces from Step 2 were found to be C class) I tried to cut the depth in the table saw and then used the pieces from Step 3 to cut the joints. If they did not match I re-adjusted the table saw blade height and repeated (cutting of the dodgy end) until I was happy.
- At this point you want the table saw height locked. Under no circumstances would you want to adjust the blade height or the distance to the cut guide. If you did then Step 4 would need to be replicated and you may not have enough wood and get that height wrong and the joints are cut wrong and you have to start again....
Step 5 - I used the table saw to cut the joint corner depth on one side of all the pieces (including the 50mm thick ones).
Step 6 - I then started with piece 1 and used the green blank to cut the joint on the mill. Once complete I wrote on the joint 1RG standing for piece 1 Right joint and Green blank
- I then took the next piece and cut it on the red blank, marked it 2LR for 2 Left Red after I had checked the fit was good. I then repeated this for one joint for all the 1-5 pieces.
- The reason only 1 side was done was that if a mistake was made and the joint did not fit then the other end can be cut down and restarted to match so it is a safety valve..
An action shot! of writing!
Step 7 - Not wanting to adjust the table saw setup I used the disc sander which also can keep cuts exactly at 90 degrees and shortened the next piece accordingly. I could then use the table saw to cut the opposing sides joint depth and then repeat the exercise for the opposing side joints.
Step 8 - I gummed a cut out section from my plans onto the piece. Now please remember this is the opposite side to the left joint table saw cut.
Step 9 - Now it was time to start on the much more complex piece 6. For this I started by cutting the upper side of the piece with the table saw being very careful to not go near the rising section (the saw naturally cuts deeper lower so you can accidentally cut into wood that should not be touched.
Step 10 - I used a scalpel to cut out the paper that covered the joint and then used the mill as before to cut the majority of the joint out to a depth of 4.5mm (one reason for the 9mm size is to make this cut easier) As long as the vice is set up properly you can also do the parallel section of the joint on the line.
Step 11 - Mills are wonderful things and I now loosened my vice and moved it about so I could do the same cut to the rising angle and the 2 other angles on the floor of the joint. When adjusting the vice I would just move the mill out of the way so I did not adjust its height (and thus get into potential issues when resetting).
Step 12 - The piece came out of the mill vice I used the scroll saw to cut the upper line (not close to the line itself - around 2mm off)
Step 13 - The piece then went back in the mill with some flat scrap under it and the mill was lowered over 9mm so I could do the same to the upper edge.
Step 14 - It was removed from the mill for the last time and the table saw was used to cut off the end piece
Step 15 - The disc sander handled the forward diagonal edge.
Step 15 - the piece was now placed back in the now straightened vice so its left most joint can be cut using the red blank from step 3. What's nice about this approach is that you can move the mill sideways and fit the other side whilst it is still in the vice to test the fit if you are nervous about it....
Below you can see piece 6 pre tidy up. It looks messier than it actual is but that, I suppose, is the power of cameras these days.
Step 16 - the corners and places were angles change all needed work with chisels to correct.
So there we have it. I like this approach as the mill is a huge amount of fun to use and it helps guarantee those right angle and exact depth cuts and thus helps counter my own lack of craftsman skills.
Next up I will be looking at gluing them together (I have the pieces from the previous post to be my test guinea pigs) and then once that is done thicknessing the top/bottom to size before blueing. The sides might wait until after the bolts are done - I plan on using wood as opposed to metal this time and am undecided on the order to do this currently. If I do it prior to thicknessing then the thicknessing will flatten - which I like the thought of...
Pieces almost ready to be glued the only piece that still needs cutting down is piece 1 which is still oversized so it can be cut to the correct key length once all pieces are glued and any incremental sizing errors in either direction make themselves known. (Pieces are not exactly over their drawing prints in case anyone was wondering)
Finally, she is indeed a lovely ship Frolick. It may interest any trivia followers out there that in the Aubrey Maturin book 'Treasons Harbour' O'Brian has some minor criticism of Hoste (I don't entirely disagree though I think my own opinion of him is more rooted in opportunity than O'Brian's and his has a ring of some of the complaints about Nelson in it). He then goes on to describe how a Lt Charles Fielding has escaped from French prison and hid all over Europe and had finally managed to get out on the Adriatic in a small boat which is then found by the Nymphe (one of his old ships). This is interesting because the actual officer was Donat Henchy O'Brien and the ship that found him, and the one in which he used to be on the roster of, was none other than my Amphion. He covers it in detail in his memoirs 'My Adventures during the late war'. Just another example of Mr O'Brians skill at continually re-purposing actual historical events to provide realism in his stories. You may find it curious why he did not attribute it accordingly and I think (guessing naturally) that Hoste was one of the minor sources for some of Aubrey's actions and as this book specifically mentions one of the re-purposed activities- when Hoste (then in the Bacchante) took Cattaro in 1813 - even involving a helpful Archbishop. This was detailed in an earlier Aubrey book ('The Ionian Mission' - here O'Brian even mentions Cattaro but as another location and shifts some of his combatant nationalities but not most of the events themselves) but in the current one O'Brian has Aubrey going to his fictional town version and meeting up with his fictional Pope/archbishop so I personally think he didn't want to draw so much direct attention to the Hoste and the Amphion which was best known under his command. Tying the actual O'Brien to the espionage and a wife was probably a major factor as well.
Anyway thanks for reading for anyone that got this far.