

42rocker
-
Posts
504 -
Joined
-
Last visited
Reputation Activity
-

 42rocker got a reaction from kruginmi in HMS Druid by Krug - FINISHED - 1:48 - Hahn
Very Nice. Well Done.
Later Tim
-
 42rocker got a reaction from Mirabell61 in HMS Warrior by StuartC - Billing Boats - 1:100 - started 1/1/2014
Stuart
Well going to jump in on this one and tell a little story and share a few pics. I"m not posting a few pics off the outsides of the complete ship, HMS Warrior. I will another day if you want.
Time 2004 my wife and I went to Paris, France and saw a lot of stuff. Next stop was London where we rented a car and headed South to Portsmouth. Made a large mistake. We were hungry. Saw a Little Chef and thought can't be that bad, well it turned the stomach bad, more on that later. Checked into our B&B on Portsmouth Point. Nice Place, nice people. Had a morning appointment to tour the inside on the HMS Victory one on one with a guide. Special extra cost, yes. At that time you could not take pics inside or on the HMS Victory. This one on one tour allowed it as long as they were personal use pics.
Ok, back to the HMS Warrior part. Got our folding bikes out of the car biked over to the docks and such. Took a few pics of the HMS Warrior and HMS Victory. Went to the shop saw the HMS Warrior model that William Mowell had made. Super nice to see after you have read and reviewed his book, "Building a Working Model Warship". Like the real thing, working steam engines and such. Really need to review the book. I have not read it in around ten years of course. Well we saw a fish and chips store and got some and sat down at the docks to eat and look at the ships, etc. Well got to be time to head back and on the way back my wife got sick. A "light" case of food poisoning, we think. She was sitting and throwing till around 3:00 in the morning. I started in around 2:00 in the morning. Of course this canceled the HMS Victory tour that was very important to me. After we got up later that day we toured the HMS Warrior where the diesel fumes did not set well. Finally did get to take a regular tour of the HMS Victory towards the end of the day. After which we drove up to London for a few days. Got to see a lot of great ship models there also.
Any rate on with the picture show. If this is to much in your build thread let me know and I'll take it down.
Later Tim
myself and the HMS Warrior model
Decks that they were working on
my wife and the decks and mast (she was still under the weather)
Mast
gun deck
-
 42rocker reacted to dewalt57 in H.M.S. Triton 1:48 scale cross section - FINISHED
Looks great Ray!! I have thought about doing the same as you have done by doing the rigging of ratlines, sails etc.... but at the size of my cross section.... I'm not sure if my room ceiling is high enough to allow it.... LOL
AL
-
42rocker reacted to mtaylor in H.M.S. Triton 1:48 scale cross section - FINISHED
Looking very good, Raymond. You don't have the rigging spiders???? If you did, you and Woody could sit back and watch them do the work.
-
42rocker reacted to ziled68 in H.M.S. Triton 1:48 scale cross section - FINISHED
Greetings to all,
Tim,
No spiders Buddy unless you mean me going at it like a Spider-Monkey on a banana. Actually, Woody and I are tag teaming the heck out of the ratlines.
Al,
I have to keep you on your toes Buddy now that you’ve literally brought out the “Big Guns”. LOL. Joking aside, from the very beginning of this build I had planned on making a cross section with mast and sails but I like the aspect of her without the sails. What do you think?
To All,
Now that I’ve completed all the shrouds (to include all of the ratlines) I turned my attention to the main yard. I first added the stirrups ensuring that they were ¾” from the spar and proceeded to add the footropes. As I was looking at the spar with footropes, I placed it upon the mast and visualized how it would be held in place via blocks and secured to the belaying pin when it finally slapped me in the face. I had the belaying pin rack but it was not drilled to accommodate the belaying pins. So I had a quick Pow-Wow with Woody and he suggested I use a drill bit on an Xacto and carefully twist the new hand powered drill until all the holes were made for the belaying pins. It worked like charm. I then worked on the triple blocks that are attached to the hooks on the head just above the top but below the cap. I then added the double blocks to the spar and also added the truss pendants. The following pictures will show you how she looks thus far.
-
42rocker reacted to ziled68 in H.M.S. Triton 1:48 scale cross section - FINISHED
Greetings to all,
Mark,
I did not know there was an option for "rigging spiders". They sound very exotic. LOL.
Hey Al,
Just a suggestion, but did you consider only rigging the main mast and main yard only up to the tressle tree and top. I saw a picture of it over on MSB and it looked pretty sharp. It had just enough detail to make her very interesting.
Christian,
I've used nothing but bass wood for my build with the exception of poplar dowels for the mast.
-
42rocker reacted to kruginmi in HMS Druid by Krug - FINISHED - 1:48 - Hahn
Okay, not trying to puff myself up but I am pretty proud of my capstan. I did join a couple of hobbies in the process, bringing in my pen making side business. The capstan is quite a few pieces most of which are cylindrical - not the easiest to construct well. So....I thought long and hard and came up with a way to do all the round pieces on the lathe, which is what it is used for. Both capstans will be made as one single piece.
I first cut blocks for the main axle as well as the component that holds the bars. Then I cut a 7mm hole through the centers of each. A brass tube will be glued in to this hole to provide structural rigidity (the pen side of things). I did alternate grain directions for looks, but also to allow the bar area to be cleared out eventually. All the pieces were then glued up, with the brass tube superglued in:
You can see in the drawings the targeted portions of the capstan to be turned on the lathe:
Then it is a 'simple' process of turning to the desired dimensions. Since I have that brass tube I can mount the component on a steel rod and use bushings to lock it in place. Very strong.
I drilled a hole in the base plate that the capstan fits down cleanly into. I then cut another baseplate for the quarterdeck and cut another corresponding hole. This plate needed to be split in half to fit around the tube and result was better than I expected:
I love it when a plan comes together. I will lathe a small cap piece to cover the hole on the top of the capstan and then cut the other components required against the axle. Very doable. Always happy when you come up with a plan and it actually works.
Stay Building My Friends,
Mark
-
42rocker reacted to Decoyman in Chaloupe Armee en Guerre by Decoyman - from the Delacroix plans
Thank you all again for your kind comments and likes. You made me feel inspired enough to find time to do a bit more!
I have made and fitted the first strake of planking either side of the keel. This is the first time I have attempted spiling of planking. So far it's OK... I have had to remake one strake through impatience, and the fit of each is not quite as perfect as I would like. The following photos show the garboard strakes being glued in place. I will post some more once I have several done.
The last photo shows the stern. You can see the ends of both strakes and the tick marks I put on the frames to define the widths of the planks. You can also see the stern planking, where I was a bit dim with the choice of wood! It's all cherry, but the first three planks are noticeably different in colour. I am hoping I can tone the variation down when I apply a finish.
In case anyone is wondering I emphasised the joints between planks by rubbing both edges with a 2B pencil before glueing them in position. I think it's reasonably subtle.
Another thing worth mentioning, since I don't remember finding this point made anywhere else, is how to measure the tick marks quickly and easily. Most people cut strips of paper to the length of the frame between the keel and the wale, which is what I did as well. However it is usually suggested that the next step is a diminishing grid: a 'fan' of lines drawn from a common point and with the other ends set out equally along a straight line. Sufficient line are drawn so that the number of gaps between lines is the same as the intended number of strakes of planking. The idea is that you lay your strip of paper across the grid at a position where the ends of the paper just touch the outermost parts of the fan. You then mark off along the strip the intersections between the lines of the fan and the edge of the strip. This gives you a strip subdivided equally by the number of strakes. It works fine, providing you keep your strip parallel to the line used originally to set out the fan ends. If you put the strip at an angle then the spacing will vary.
I prefer to use a simple sheet of lined paper - it can be graph paper with a square grid, but ordinary ruled notebook paper works just as well. You need to place your paper strip at an angle across the lines such that each end is exactly on a line and the number of spaces between the two lines at the ends of the strip equals the number of strakes. then mark off the intersections as before and the strip will be evenly divided. Both methods are similar, but my method is quicker, because you don't need to make the diminishing grid, and there is a little less opportunity for error.
Rob
-
42rocker reacted to Decoyman in Chaloupe Armee en Guerre by Decoyman - from the Delacroix plans
As you may have noticed I have not made any posts for a while. Pressure of work and now a new job have all made work on my chaloupe nigh on impossible, sadly. I do have some progress which I have not yet reported on and in which you might be interested.
Since my last post I have faired the frames as far as possible. Here are a couple of photos:
However at this stage I began to think something was wrong.... It took me a while, but after much fiddling trying to get the keel, stem and stern posts aligned to each other and square to the mould, I realised that the mould itself was not true. This photo shows the problem:
I think that the stack of MDF laminates was able to slide sideways at the point while the glue was still wet and I was tightening the clamps. I considered sanding the sides square, but concluded that this would only lead to a misshapen mould. So I made a new one, taking more care this time to ensure everything was aligned properly.
Here are the two moulds side-by-side. The differences are not obvious, but the second one is unquestionably more accurate.
Because I had not glued anything to anything else at this stage (with the exception of the floors and futtocks making up each individual frame) I was able to unpin everything from the old mould and re-fix it to the new one. Although the frames had been made over the old mould they fit the new one well enough, so in the end there was not much other than the mould to redo.
So now I was able to make proper forward progress with the transom. You can see the top piece in the picture with all the frames above. This pinned nicely to the back of the sternpost and square to the mould. The next step was to fix two pieces of thin (1.5 mm) ply, roughly profiled to the shape of half the transom, to each side of the stern post, tucked under the top piece. These were pinned in place until the glue was dry. The outer profile was sanded using a round sanding stick running across the last few frames. The outer surface of each side of the transom was boarded with 5 x 1 mm cherry and again the ends were sanded to the correct profile.
The final pieces of progress are the two wales. These needed spiling to the correct longitudinal shape and then profiling in section using a scraper filed into a piece of scrap brass. Once they were soaked and curved to the right plan form they could be glued in place. At this point the framework is strong enough to remove from the mould as you can see.
And that is nearly as far as I have got to date. I have made the two garboard strakes, but they are not finished yet or fitted. Hopefully I will get some more time soon!
Thanks for reading.
Rob
-
42rocker reacted to Decoyman in Chaloupe Armee en Guerre by Decoyman - from the Delacroix plans
Thanks for the support and the likes everyone!
I have cut the planking rebates in the side of the keel assembly. I used a couple of different scalpel blades: a small straight to cut the inside of the chase and a large curve-ended one to scrape it clean afterwards. Mostly however I used a small V-profile gouge with a very sharp edge. This cuts beautifully and I'm almost happy with the result. The only disappointment was that my very last cut was a wrong'un! I forgot to stop the rebate on the stem and ran it straight out the top. I haven't shown this in the photos below (still feeling slightly annoyed with myself…). My only thought so far is to cut the profile of the short section of extended rebate as neatly as possible and then piece-in a very small sliver of cherry. If anyone has a better idea I'd be pleased to hear it.
I have also made the last frame components. The crutches are over-deep so they can be sanded to shape once the frames are assembled.
Rob
-
42rocker reacted to mtaylor in Chaloupe Armee en Guerre by Decoyman - from the Delacroix plans
Rob,
In addition to varnish, I'd lay on several coats of a good paste wax. Or as Druxey said: cling film. I've seen them both ways here on MSW. I think Karl's "explosion" back on MSW 1.0 gave the builders a lot to think about on mold release.
-
42rocker reacted to d_yur in H.M.S. Triton 1773. 1:60. Yury
Hello! Thank you for your kind words about my work. Continued hope will not disappoint you. The past month has been spent on the production of frames. Now they are ready to everything except turning. Here are the latest pictures.
-
42rocker reacted to the learner in Triton 1/48 by The Learner
Still working on the temporary ribans, the gunports and will clean up the ends of the frames before I start internal works.
Guy
-
 42rocker got a reaction from HB17 in Le Gros Ventre - Gabare du Roi 1776 by cpt. Tom - 1/48 Scale
Tom
I also have the book and Plans.
Good Luck to you and will try to follow along.
Later Tim
-
42rocker reacted to dewalt57 in H.M.S. Triton (Cross Section) 1:18 Scale, started by AL
LOL!! I can just see powder in a wood cannon going off.... LOL Talk about splinters!!.... LOL Thanks Ray....I was hoping they would come out this good, but only did one this way, just in case it didn't work. I don't mind making one more but not 4 more of em.... LOL I still need to go thru my wire scraps and see if I have any #18 solid copper to make eyelets with, so many details to contend with on these cannons! I'm still debating with myself on how I'm going to make the cannon barrel pivot caps or what ever they are called, maybe alum or copper painted black, still thinking on it. But, Yes.... fun working on them!!!
AL
-
 42rocker got a reaction from ziled68 in H.M.S. Triton 1:48 scale cross section - FINISHED
Did you have a spider working for you on that rigging or what. Wow you work so fast. And it looks good also. Way to Go!!
Later Tim
-
42rocker reacted to ziled68 in H.M.S. Triton 1:48 scale cross section - FINISHED
Greetings to all,
During this Memorial Day weekend I’ve been working on my Triton and enjoying the heck out of it. This past Friday I finally received the blocks and deadeyes I’d ordered and decided to tackle the dead eyes. I have successfully added the deadeyes and installed the main mast shrouds with ratlines tying clove hitches every 5/16” to represent 15” in height. Upon completing the main shrouds I went ahead and installed the top shrouds with the exception of tying the ratlines due to the fact that my butt was starting to hurt from all the sitting. After I rest awhile, I’ll tackle the top shroud ratlines followed by the topgallant shrouds. The following photos will show you what I have thus far.
-
42rocker reacted to dewalt57 in H.M.S. Triton (Cross Section) 1:18 Scale, started by AL
The 1st. Cannon with color paint done!! I like it!!
A coat of Flat Black, followed by a coat of Clear Satin Poly-U gave me the effect I was after. Now.... to do it 3 more times!!
AL
-
42rocker reacted to dewalt57 in H.M.S. Triton (Cross Section) 1:18 Scale, started by AL
Thanks Tim!
Here's the 1st cannon in its primer coat, awaiting its color coat.
AL
-
42rocker reacted to ziled68 in H.M.S. Triton 1:48 scale cross section - FINISHED
Greetings to all,
Wouter,
Thanks for your comment about liking the way My Triton is coming along. Hopefully soon I’ll be on the sidelines admiring your Triton.
Tim,
I really appreciate your words. Out of everyone that has “Liked” and/or made comments on my forum, you are by far the most motivated person who actually looks forward to my updates. Once again, thank you.
Bindy,
I totally agree with you in that the mast and spars have significantly changed my Triton’s overall appearance. With the base I’ve made for her today, she stands at 29” high (736.6 mm). As for Woody, what can I say other than he wants to take our act out on the road. LOL.
To All,
While I was waiting for my deadeyes and blocks to arrive, I decided to finish the main topgallant yard which I was avoiding due to the fact that the components were much too small for my hands. Happily I can say that I was able to complete it. I also went ahead and painted the trestle trees and top plus the yards (with the exception of the stuns’l yards) black to give my Triton more personality. The following photos will show you how she looks.
-
42rocker reacted to dewalt57 in H.M.S. Triton (Cross Section) 1:18 Scale, started by AL
Got the carriages stained and a little bit more done.
AL
-
42rocker got a reaction from ziled68 in H.M.S. Triton 1:48 scale cross section - FINISHED
With speed and a song in your head you do such fast great work. Well Done.
Later Tim
-
42rocker reacted to cpt. Tom in Le Gros Ventre - Gabare du Roi 1776 by cpt. Tom - 1/48 Scale
Hi Folks,
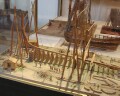
today I started my new Project and my first Scratch Build Log.
The "Gros Ventre" the Kings Gabare according to plans from Gérard Delacroix.
I want to build the ship with pear wood and I hope i can handle it
Here are my first steps:
threaded bars....I hope this is right
washers
nuts
and the Woodparts
Now I´m waiting for the plans, they are one the way to me.
Stay tuned
-
42rocker reacted to ziled68 in H.M.S. Triton 1:48 scale cross section - FINISHED
Greetings to all,
Many thanks to everyone who’s looked in on my build and have given me inspiration to constantly push myself into this great hobby.
Here’s a quick update on my Triton in order to keep everyone abreast on what is going on in my neck of the woods. When last I posted, I had incorporated the lower main mast with trestle tree and top. I have since then added the following items and I’ll tell you that this beast is getting quite large. I’ve added the top and topgallant mast along with its trestle tree; the main, topsail, and topgallant yards; and I’ve also incorporated the stud sail booms for each yard. I’ve lashed the main and topsail yards temporarily to the mast until the blocks and deadeyes I’ve ordered come in. Once they arrive I’ll start permanently lashing and securing items to its perspective area.
-
42rocker reacted to Jerry in HMS VICTORY by Jerry - FINISHED - Caldercraft - Scale 1:72 - 1805 version
Hera are some additional photos to go with the proceeding ones. I hope they are helpful.
Jerry