

42rocker
-
Posts
504 -
Joined
-
Last visited
Reputation Activity
-

 42rocker reacted to Ryland Craze in 18th Century Longboat by Ryland Craze - Model Shipways - 1:48
Thanks Chuck, Steve, B.E, John and Dave for your words of encouragement. I also appreciate the “Likes” and those that have looked in on my build log. I hope everyone has a Happy New Year and I look forward to finishing this model in the near future.
Over the past year, I have added the printed friezes and the molding strip. I still need to paint the edge of the cap rail and molding strip white, but will wait till I am almost finished handling the model. I painted the waterline using Badger White and was dissatisfied with the color. The white had a grey hue to it and I did not like it, so I painted over it using Model Master Acrylic flat white. I am real happy with this color as it looks good with the white in the printed friezes. I brushed the paint using Chuck’s technique of using water thin coats of paint.
Here is a stem view showing where the printed friezes meet at the stem. I used Model Master Enamel Dark Sea Blue to paint the forward edge of the stem. It was almost a perfect match for the printed friezes.
Here is a photo of the stern transom with the painted frieze. I first painted the transom flat white. Then I cut out the printed frieze. I did not use the printed white border since I had painted my transom white. I glued it onto the transom using slightly diluted white glue.
I also have made the oars and the main mast and have started on the rudder.
I have a little work to do on the interior and then I will move on to the metal work.
Thanks again for your support and I look forward to posting my progress.
-
42rocker reacted to DocBlake in 18th Century Longboat by Ryland Craze - Model Shipways - 1:48
There is always more than one way to skin a cat.
I build period furniture as a hobby also. 18th century cabinetry often had "pegged" mortise and tenon joints to strengthen construction. They were also frequently square instead of round. How to easily fit a square peg into a round hole? You could use a mortising machine with a drill and square chisel, but since furniture parts can be very large, many times the part wouldn't fit on the mortiser's work surface. I came up with an easy solution.
I took a 1/4" square piece of steel bar and grinded the bottom into a 1/4" diameter round. I left the bulk of the bar square. I drill a 1/4" hole where the peg will be and insert the rounded bottom into the hole. Than brings the squared "shoulders" of the bar right to the wood's surface. A couple of raps with a hammer and the round hole is now square. it has to be deep enough to hold a piece of peg material 1/4" square, so the steel bar is pretty deep into the wood and the fit is very tight. It takes a pair of pliers and some rapping with a hammer to free the bar. A 1/4" peg is glued into the hole and cut with a flush cutting saw when the glue dried. The result is a nice clean square peg in what was once a round hole. The pegs aren't really structural, but they look good. When I needed to make round holes square on the windlass, I used the same principle in miniature.
I've actually adapted a few techniques I use building full size furniture to model work. The principles are the same; only the scale is different!
-
42rocker reacted to Ryland Craze in 18th Century Longboat by Ryland Craze - Model Shipways - 1:48
Thanks everyone for the comments and Likes.
Dave, I started off using your method, but I had problems keeping the holes squared to the base. The reason I started with a small square file was that I could lay the flat side of the file on a scrap piece of planking and insert it into the hole on the windlass. This made the small square hole right angled to the base of the windlass. The windlass on the Longboat is made out of a square piece of wood, whereas your windlass tapers from the middle to the ends. My method would not work on your windlass. The file acted as a starter hole and it kept the impression of the nail square to the windlass stock. I hope this makes sense.
Your windlass looks great as well as your AVS. I have enjoyed following your build log and look forward to you completing it. I have a MS AVS that is begging me to finish it.
-
42rocker reacted to Ryland Craze in 18th Century Longboat by Ryland Craze - Model Shipways - 1:48
Thanks Chuck for your comments. Your work inspires all of us to try to do better with our builds.
Cathead, I really struggled with making my windlass. It took me three attempts until I finally made a windlass that I was satisfied with. I am going to try to explain how I made mine.
I made a jig by cutting some scrap wood at 45 degree angles and I placed my windlass in the "V" that was formed with the scrap wood.
I then used sanding sticks to shape the windlass being careful to keep it horizontal to the wood base.
Once I had the shape of the windlass, I made another jig to drill the holes in the windlass.
I used a #61 drill bit in my pin vise and would twist it several turns. Then I would keep rotating the windlass until I drilled all four sides of the windlass. The holes would eventually go all the way thru the windlass, meeting in the center of the windlass.
The windlass now has round holes. To get them square, I placed the windlass on a flat piece of wood. I then placed a piece of old planking material to use as a resting place for a small four sided file. I then pushed the file, with pressure against the wooden base, into the round holes in my windlass. It is important to keep the flat side of the file horizontal to the wood base. The flats of the windlass will lie naturally flat on the wood base.
The final step was to open up the hole to about .045 inch. I had taken a finishing nail and filed the point square and pushed it into the square hole made by my square file. I filed the corners of the nail so that it left a crisp square edge. Once I finished with the square holes, I placed a small bit of wood into the windlass hole to fill the interior of the hole so that you could not see all the way through the hole.
This was quite a challenge for me and I had many failed attempts trying other methods. I finally got thru this and am now able to continue on with the build. If you have any other questions, please do not hesitate to ask me.
-
42rocker reacted to Ryland Craze in 18th Century Longboat by Ryland Craze - Model Shipways - 1:48
I finished the interior ironwork. I definitely appreciate the work of the Longboat builders before me as I had trouble with the small locker hinges and ironwork due to my stubby fingers. I also had several pieces that mysteriously disappeared from the tip of my tweezers never to be found again.
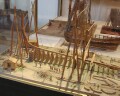
Here is a picture of the longboat with the thwarts installed. All that is left to do for the interior is to install the six knees on top of the thwarts and against the sides. I have also decided to redo my belaying pins.
-
42rocker reacted to Gaetan Bordeleau in 74-gun ship by Gaetan Bordeleau - 1:24
HI Empathry,
There is no obligation to use boxwood. I did some marquetry wit tagua nuts not sclupture. May be it could be good but tagua nuts are small.
There are other woods suited for sclupture in miniature. The idea is to get some hard wood or fruit wood or exotic wood. By opposition, if you wood use balsa, it would be useless; because you cannot add fine details. Boxwood can take fine details like fingers.
Sometimes I use boxwood. We have boxwood in Quebec, a typical tree is 2 feet high.
What is your future project?
Why would you not use boxwood?
-
42rocker reacted to empathry in 74-gun ship by Gaetan Bordeleau - 1:24
Hello Gaëtan ;
I do not know if I can speak French language with you ; anyway, I am myself working with Boudriot's books (l'Art du modélisme) and my future intention (project) is not to use boxwood for the sculptures (you indicated that you have no boxwood in Quebec), but tagua nut, which is also called vegetal-ivory.
https://en.wikipedia.org/wiki/Vegetable_ivory
What do you think of it so far ?
Good or bad idea ?
Cheers from Versailles (France) !
Empathry
-
42rocker reacted to Gaetan Bordeleau in 74-gun ship by Gaetan Bordeleau - 1:24
https://www.perceval-knives.co.uk/?view=product&lang=en_US&product_id=524
A never ending quest, a very affordable knife, or should I say a handle made for meteorite for only 35,000 euros
-
42rocker reacted to Gaetan Bordeleau in 74-gun ship by Gaetan Bordeleau - 1:24
As they say as usual this is quality.
https://www.paulsfinest.com/Sharpening-Stones-Canada/shapton-glass-stones-canada/#sortBy=r.rating&sortOrder=asc&mode=append
I ordered one from this Canadian site. I tried it and effectively it does the job in a more efficient way, faster than a water stone. It is called Shapman glass stone and the bottom of the stone is made of glass. So I ordered other for the finishing and I am sure that I will be happy with it. In fact, water stone are also effective but there is an aspect that I did not like about these, especially for the lowest grade. Before use you have to soak the water stone in the water for few minutes and, literally, you see bubbles coming out of the stone.
-
42rocker reacted to Gaetan Bordeleau in 74-gun ship by Gaetan Bordeleau - 1:24
Thank you Dan,
Why should I want to use a sharp blade? If I have to answer fast, I see 2 interrelated factors to get to a common goal:
first, a sharper blade is easier to control, this means yo can do precise cuts
second: the sharper the blade, the easier to cut, so less strength is needed to do the job. Not have to concentrate so much on the strength to use,
but more on producing a precise cut.
-
42rocker reacted to Gaetan Bordeleau in 74-gun ship by Gaetan Bordeleau - 1:24
Vossiewulf, I agree 100% with what you say.
This look like to be very easy to understand, but it is not. Exacto is the prefered knife of every beginner. As a beginner, how someone could conceive ''how much sharper a good knife is'' if he has never tried one. It is worth mentioning that the usual way to check if a knife is sharpened with a sheet of paper, it is not very conclusive because they all pass the test. In the second test, if you compare the result of the notches in the wood between the first and the last knife, you see a big difference; and the same strength was use with each one.
-
42rocker reacted to vossiewulf in 74-gun ship by Gaetan Bordeleau - 1:24
Welcome to my world, where I have to watch good people trying very hard to do good precise work with Xacto knives, it's like trying to mow your lawn after replacing the lawnmower blade with a butter knife.
If you want an amusing experiment, take an Xacto blade to a strop. You'll see you can quickly remove large amounts of metal just with the ultra fine grit of a strop. I don't think they even qualify as high carbon tool steel, they're probably Rc52 or somewhere close.
I try to lead as many as possible to a better solution but 1) most don't realize how much sharper a good knife is, and 2) think that sharpening is a long arduous task, whereas resharpening one of my knives takes me about 15 minutes once a month or so.
-
42rocker reacted to Gaetan Bordeleau in 74-gun ship by Gaetan Bordeleau - 1:24
You are right about the buffing wheel (the 2 to the left side) but during the process of sharpening a new blade, I need to use it even if it is 1 step forward, 2 steps back. If I try to give a mirror polish to the sides, it would take me 10 times more by hand. I also use a deburring wheel from 3M, the 2 middle ones in the photo and the biggest one performs a lot better than the smallest one. Additionally, I use the big one for buffing I use the front and the sides.
After that test, I strongly think that Exacto blade do not classify in the sharp knife category.
-
42rocker reacted to vossiewulf in 74-gun ship by Gaetan Bordeleau - 1:24
I don't have too much more to tell you, you understand all the factors now From here it's just refinements of the knives you have, and maybe purchasing or making some special purpose knives (like matched left/right single bevel knives).
With the Shapton Glass stones, yes they are very expensive for very high grits, but really who needs a 30,000 grit stone anyway? That level of fine polishing is best handled with a strop.
The other item WRT Shapton stones that is expensive is the special stone they make that is designed to flatten the Shapton Glass stones when necessary. Don't buy it. First, as I've said, they stay flat for a very long time. Second, even if you do need to flatten them, it can be done with a much less expensive diamond stone or even silicon carbide sandpaper taped to a flat surface.
I wouldn't recommend buffing wheels, it's very easy to round the edge that way. Actually it's quite hard to use one without rounding the edge to some degree. If you do use one, you need a very firm felt wheel, you need to have it rotating away from the blade edge, and you need a very fine touch- if you press down at all into the wheel it will begin to round your nice V-shaped edge.
Also, it looks to me like your test was accurate, that's pretty much the order I would have guessed for that knife collection. The thing you'll like about your PM-V11 blade is it will stay sharp for a comparatively long time, so besides performing best it will require resharpening the least.
-
-
42rocker reacted to vossiewulf in 74-gun ship by Gaetan Bordeleau - 1:24
They will probably have to add new categories to the spark test for powdered metals. They are not real alloys in the sense that the component metals were never mixed while fully melted, so they can be made up of metal ratios that would never be used in traditional alloying, and that's going to lead to odd spark test results.
In the case of PM-V11, it has a much more vanadium than is ever used in normal alloys, somehow that is yielding a spark test result that is similar to HSS.
Also now that you are going to be fully in the knife sharpening business, I suggest you look at Shapton Glass Stones. I have a large drawer overflowing with all types of sharpening stones- water stones, ceramics, diamond, if someone has made it I've tried it. The best by far in terms of both metal removal rate and stone flatness is the Shapton Glass. Water stones work very well, but they are 1) very messy and 2) very soft, they have to be constantly flattened to avoid a curved stone surface that will never sharpen a perfectly flat bevel.
I've been using my Shapton Glass stones for 6 or 7 years now and have yet to have to flatten them. They also remove metal faster than anything I've tried, including water stones. I use 1000/4000/8000 and finish with a strop, and I have a 220 grit stone for reshaping bevels.
-
42rocker reacted to Gaetan Bordeleau in 74-gun ship by Gaetan Bordeleau - 1:24
Moldings around pillars are cut at 45 degrees with my favorite knife, not with the saw.
-
42rocker reacted to Gaetan Bordeleau in 74-gun ship by Gaetan Bordeleau - 1:24
Glued most parts except the rail where the deck beams will rest. These rails must be still removable to be able to cut notches for the deck beams from the first deck later.
Half frames rest on these rails and to glue the half frames , a spacer is added under the rails so that the half frame can be glued somewhere.
Also the setup to take photos is now completed with a new tv. This way, it is very easy to observe very closely construction details photos
-
42rocker reacted to Gaetan Bordeleau in 74-gun ship by Gaetan Bordeleau - 1:24
Installation of reinforcement pieces. The easy way to assure parallelism between each one is to set a spacer.
2 of these have a double use: they will also receive the planking of the false and first deck.
Deck beams of the first deck will rest on a large plank on each side of the boat. Each frame will have 1 notch each side to sit them. The first deck is the one withe the greater span. For this reason, some of the frames will be made in 3 parts with taper notches. This is a great method to assemble beams. Probably with the weight of the parts only, it would be enough to fix the parts of the beam. I remember the first time I tried it, I was surprise how strong locking this mechanism is able to perform; the same way as a taper sleeve but because the parts are assembled in an arc additional lateral strengths comes to lock even in a stronger way the assembly.
Depending also from the needs, there will be beams from 1 part, example the first 2 in front. beams made from 2 parts will also be include in the first deck depending of the needs.
With the fabrication of the camera studio stand, it will be easy to insert a full frame camera inside. One of the advantage is that it is easy to set the camera parallel to the model. I will try to give access as much as possible inside. For this reason, deck and wall planking will be install only in essential circumstances. In a way there will be as less as possible longitudinal planks but more perpendicularly to the keel.
Parts are temporary fix until all the notches to receive the beams of the first deck are done.
I got an answer from Lee Valley and Veritas for the detail knife. Here is a part of the last paragraph: ''We also have some other design we are working on. In order to avoid any conflict your product submission will not be reviewed by our designers. SO, I can only hope they can produce a sharp knife with their wood plane blade. While this time, when I will want to have a sharper knife, I will regrind one of those blade in a V shape or may be I could do a knife blade from a half wood plane blade.
-
42rocker reacted to Gaetan Bordeleau in 74-gun ship by Gaetan Bordeleau - 1:24
2019, the beginning of the construction inside the model ship.
First part, planks to support the deck beams, very easy to position; the height in reference with the gun port openings is the same everywhere.
Followed by 7 inner frames.
Still other parts to do before to fix everything.
-
-
42rocker reacted to vossiewulf in 74-gun ship by Gaetan Bordeleau - 1:24
That will work if Ron won't help, but will be a fair amount of work to process it into what you want. On the up side, PM-V11 steel and you'd definitely feel like it was your personal knife.
Below is a piece of wenge wood planed down with my Lee Valley low-angle smoothing plane with a PM-V11 iron. I don't anticipate having a need to do better than this.
-
42rocker reacted to Gaetan Bordeleau in 74-gun ship by Gaetan Bordeleau - 1:24
http://www.leevalley.com/en/wood/page.aspx?p=42607&cat=1,69168,69174&ap=1
the beginning of the solution: PM-V11, 2 blades for $60.
-
42rocker reacted to vossiewulf in 74-gun ship by Gaetan Bordeleau - 1:24
Wow, that's disappointing, never had him say that before. Did he say why? Maybe a fairly minor change to the design would make it possible for him to make it for you? If he didn't explain, I would ask, I don't know of anyone good who is willing to do custom work like he does, and certainly not with the same quality of steel.
You can also work around his limitations by being willing to grind it down and shape it if needed yourself. That can be done reasonably safely to the temper of the steel by constantly dipping the blade in ice water and never letting it get more than warm under grinding. In one case I changed my mind about what I wanted, and took a blade he made and ground it quite a bit to change it to the new shape.
Let's figure out how to change your design so Ron can make it, and then you might need to invest a bit more time before you can put a handle on it.
And yes, I agree there is sharp and there is super sharp. When chip carving with the Hock knife, I can maintain super sharp for about 15 -30 minutes, after which I use the strop. I only do that a few times before returning to the 1000 grit stone to resharpen because strops, being soft, always start to round over the edge, and even the most subtle change in the bevel of the knife is noticeable to me when I'm carving.
-
42rocker reacted to Gaetan Bordeleau in 74-gun ship by Gaetan Bordeleau - 1:24
3 things:
Unfortunately, here is what Ron said:
"I hate to disappoint but we don't have a good way to make this for you. Sorry, no quote.''
Vossiewulf, I am sure you will agree: there are sharp knives but there is also extremely sharp knives
May be after Christmas I will write to a company to see if they would like to produce a good Standard Detail Knife which would be extremely sharp. Actually they do not really have any. I think that PM V11 steel would be a very good choice!