


Adrieke
-
Posts
1,625 -
Joined
-
Last visited
Reputation Activity
-

 Adrieke got a reaction from popeye the sailor in Half Moon by popeye the sailor - Billing Boats - 1:40 scale kit
just caught up with your build Popeye , she is looking great
-
 Adrieke reacted to popeye the sailor in Half Moon by popeye the sailor - Billing Boats - 1:40 scale kit
I went into the camera........yea, there were still a few in there. here is a close up of the nests.
horror show...........or no?
more work on the rails......progress on the top rails.
here is the center rails
the other side of the rudder is planked over.......now to wrap the outer edges to hide all the plys
the top rails are shaped and ready for stain. the center rails are next, and then I can make the final pair of curved rails.
I'll even need to bend a couple to run along the edge of the mid ship...from the bow to the stern. more to come.
-
Adrieke reacted to popeye the sailor in Half Moon by popeye the sailor - Billing Boats - 1:40 scale kit
the curve along the outside of the rails isn't a problem......what of the inside curve? a tiny triangle of material is cemented in place there, and will be sanded to a curved contour.
the paint work is done. I found that the paint stuck quite well.......I was able to mask it off with the scotch tape, pulling none of it off when removing it after wards.
more work done to the rudder, thickening it up
now I'll have to see what's still in the camera
-
Adrieke reacted to popeye the sailor in Half Moon by popeye the sailor - Billing Boats - 1:40 scale kit
yes.......this was inevitable......tried to stall it till I did a test on this, but I guess there's no better time to see if paint will stick to stain. the stain has been dried for quite some time on the hull. I began with the transom, setting the back drop for the decorations.
I have no flats in blue.........I'm working with what I have. I will be using a flat clear coat, I'm pretty sure that it will even everything out. the sides of the stern was next. I was having some trouble getting the Frog tape to stick, so I took to using scotch tape, which did a good job of it. any bleeding that occurred, will be covered by the rails, laid over the seams.
this color green closely matches the picture.......it's an old bottle of Testor's paint. the old label.....it doesn't even tell you what the color is. since it is hard to bend a plank strip sideways, I'm having to do a bit of assembly to the rails. the inclines have a rounded appearance, so I'll have to create curves rails to fit them. these are the top rails.
I haven't forgotten about the rudder........I began to plank one side, but I found that it will be too thin for the keel stem. I'll need to beef it up a bit.
the yellow is a model master color...British armor sand {something like that}...closely matches the color of the middle strip.
and then the blue again, which is a Billing's color...Mediterranean blue. I used the same color on the transom......don't be fooled by the light refraction.
for the fore deck's outer hull, the colors are reversed, and only the sand and blue.
-
 Adrieke got a reaction from tasmanian in Gorch Fock by Adrieke - OcCre - 1:95
thank you all for the comments
after a second session of filling and sanding this is how she looked :
then I spray painted a few layers :
this is now showing up a fair bit of errors so after the paint is completely dry I will start on fixing those up
I see a fair bit of work ahead of me before I am done with the hull
-
Adrieke reacted to popeye the sailor in Half Moon by popeye the sailor - Billing Boats - 1:40 scale kit
the starboard side was cemented in place......then I got busy with the port side
the stand was stained and felt was put on for the time being. when I clear coat it, I put some better stuff on.
both sides are on now
-
Adrieke reacted to popeye the sailor in Half Moon by popeye the sailor - Billing Boats - 1:40 scale kit
this session, the bow got some work done on it. the plug had been removed from under the grating frames, and the decoration was pressed into place. it fit tight enough, that I did add any glue.....I figure the clear coat will do the job for me.
the thin strip for the grating was stained and cut to shape
the trail boards are a bit different in the pictures. weighing it out, I chose to go with the kit supplied boards, encasing them in a frame of their own.
they need to be alter a little to fit well on the bow. working with the starboard side first, the inner side was stained. then the holes were covered with scotch tape, trimmed to fit and pressed in place. on the outer side, scotch tape was laid over it and the center was trimmed out.
it was then painted with Mediterranean blue........unfortunately, it's a gloss.........the clear coat is a flat, so I'm hoping it dulls it out
-
Adrieke reacted to popeye the sailor in Half Moon by popeye the sailor - Billing Boats - 1:40 scale kit
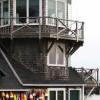
Holy cow! I just realized that I hadn't posted last Friday's pictures! basically, it was aimed at setting the mast collars so I could stain the masts. the mizzen has already been done.....once it's set in place, it won't move. to set the main and fore mast though, I had to come up with a pair of jigs for the proper rake.
it took a while to do......a lot of checking, at different angles.
from the bow, all of the masts are in line with each other.......I tried to take this as dead on as possible.
the main mast has almost the same rake as the mizzen mast........the fore mast has what I would call a negative rake.....leaning toward the bow. the jigs are quite simple, and once the masts were set, the collars were tacked with a touch of CA.
it only took a couple of minutes for the glue to set....I was able to pull the masts. the jigs were then broken apart to remove them from the masts. the collars were then glued from the bottoms, so that there weren't too many blotches. the masts were then stained with the dark walnut....and then done with the mahogany, for the reddish tone. I still need to do the other parts I've stained earlier.
the mizzen and bow spirit
I was hoping you could see better, how the nests came out......they are a bit blotchy. I figure that I'll touch them up before I give them the clear coat......I'll need to experiment a little.
-
Adrieke reacted to popeye the sailor in Half Moon by popeye the sailor - Billing Boats - 1:40 scale kit
with the exception of the bow spirit......the masts were dry fitted on the ship. they stood up proud, without too much prodding.......so I was able to get these pictures. why waste the moment!
-
Adrieke reacted to popeye the sailor in Half Moon by popeye the sailor - Billing Boats - 1:40 scale kit
with the fore and main masts somewhat completed, I looked at getting the mizzen mast squared away.
once the correct dowel was chosen for it, the adjustment of the rake, was the next step. using the bottom hole as the pivot, sanding at the front of the upper deck hole took place. there is a mast collar for the main and upper deck holes.....they were stained at this time.
I noticed that the main deck collar was a little lighter than the upper one.......I just ran a Q-tip with some mahogany stain over it, to darken it up. after the collars were cemented in place, a little more sanding needed to take place, for the mast to fit through.
a little more sanding was done......still needed a bit more. I got it to about 1mm, and will leave it as is.....as mentioned, if I go any more, it will be out of alignment with the main mast.
to sand out the mast hole, sand paper was cemented to smaller diameter dowels
the rest of the mast was assembled......the cross tree and upper section of the masting.
-
Adrieke reacted to popeye the sailor in Half Moon by popeye the sailor - Billing Boats - 1:40 scale kit
oh......it was so nice to work only in my smock again {actually it's a button - down shirt, but I have a habit of wiping my hands, and the mouth of the paint bottles on it}. I'm not a sloppy person.......I just look 'lived in' :D !
I made some good progress......the mast steps have been assembled. they still need to be sanded and cleaned up.......stained and {or} painted. I also took care of the Mizzen mast......it's not perfect, but if I went any further, the darn thing would be perpendicular to the deck.......and that just would NOT do
I started to assemble the fore mast......I have already whittled down the top part of the second section for the cross tree and cap for the final section.
how I whittled the top part down, was to score around the dowel with miter box and saw, and then shave it using an x-actor knife.
I took those photos, while I was assembling the main mast.
-
Adrieke reacted to popeye the sailor in Half Moon by popeye the sailor - Billing Boats - 1:40 scale kit
thanks Adam.......I actually did the rails separate, and put them on after. it worked out better that way {masking can be a real pain}
thanks for the good word !
thanks Lawrence.....been a bit of a break though......our furnace decided to crap out {a s-l-o-w, agonizing death}. we had a new one installed today........out with the oil and in with the Natural gas. I hope it saves me money! thanks for the good word!
thanks Frank.......there's a fine line between scratch and bash.....but I am having to scratch out a few parts. the crow's nests seemed to be the biggest problem.....a lot of the parts were missing in the kit. the main mast nest gave me some trouble, but I think I have it sorted out pretty well. now that the heat is back on....I assembled the fore and main mast. the second steps are just dry fitted at the moment, but I did that after I took these pictures. I hope to have more up soon. I'm not sure if I'm up to snuff with some of the other folks here, I favor chalking it up to "creative modeling"
I hope no one get nose bleeds easily........we're going to up
here is what the frame work under the nests looks like
thanks for the good word Frank! I'm still playing catch up here on the site.........I hope to see your fine build in the list!
-
Adrieke reacted to popeye the sailor in Half Moon by popeye the sailor - Billing Boats - 1:40 scale kit
I also need to get a move-on with the exterior hull work. I'm just going to go with the best looking scheme and be done with it the way I did the railings, will make it hard to follow the flow of the lines, but I will try to make it work. the first aspect was with the railings themselves.....the red and white striping. I took a bunch of thin mahogany......in different widths, and painted them white. I sorta goofed here when I masked off for the red........I should have cut the tape down and cut down on the length of the dashes.
yea........I used that crappy blue stuff! it didn't come out as good as I wanted it to......but it is salvageable, so I guess it's not a total loss. just as well.......I don't have much extra stripping left.
I tried a piece of it on the model.......touched up, it will look better
-
Adrieke reacted to popeye the sailor in Half Moon by popeye the sailor - Billing Boats - 1:40 scale kit
I'm kinda wondering, if this is also to denote port and starboard......something I've never seen before.
anyway......................................I mentioned the whittling I was doing on the masts. I needed to get the top capping down to the size that will fit into the nests. so, I cut into the mast with my miter box and saw, and cut away the excess....later sanded smooth.
now, I had mentioned perhaps making a new main mast nest, but I chose to repair the original one, only because it has the pre drilled holes.
later, I chose to rip off all of the upper railing and start over, adjusting the post in the area I started from, and the redo. I assembled the framework that the nests will be located on.
the fore mast nest was assembled to the mast......since that one turned out OK.
after the railing was finished on the main mast nest.....there was still an area on it that wasn't right. I am making the change yet again.
while I was working on that, I continued on other aspects, between drying times. the capstan is an assembly, consisting of a bunch of little pieces....most of them are missing. so I opted to use the parts that the nests would have been made up with. after making up a scratch base ring for the supplied capstan post, the railing parts were cemented around the base.
then, the bow spirit was assembled. it is not trimmed to size yet.
I had some smaller dowel to use, instead of the supplied dowel for the capstan bars. I added some brass banding to spruce it up a bit more.
I did the same for the pump, and stained other parts that can be readily assembled onto the ship. I'll lightly stain them with the mahogany stain to match them up with the rest of the ship.
-
Adrieke reacted to popeye the sailor in Half Moon by popeye the sailor - Billing Boats - 1:40 scale kit
you gotta use a screw driver to keep the tab in............ I see you don't drive the dish washer too much....huh? I told the admiral, she better look around for a newer model......this one is getting old!
I did some sanding on the main mast crow's nest...it looks OK.......but it still looks a bit off.
I figured that I would make the fore mast nest......if it comes out any better, I try to do something with the other one.
while this was drying, I dolled up the pump a little.
the first set of railings are on
then the top railings went on. of course I used the same method as the other one, so I added a little putty on the joints.
the fore mast nest looks a bit off too.........it's going to be close
now that the fore mast nest has been sanded........yea, it's a little off too. it looks better than the main mast nest though. not sure if i want to mess with the main mast nest and risk botching it up.......I'll have to think about it.
-
Adrieke reacted to popeye the sailor in Half Moon by popeye the sailor - Billing Boats - 1:40 scale kit
now.......for the main update. I began to assemble the pump
then I started to paint some of the decoration parts. I need to do some painting........before I do though, I want to look around some more, for more pictures. but, I think I'm only going to find the more 'up to date' version of this ship.
there are to be a couple of Sampson posts for the bow
these are the parts that I have for the crow's nests......I'm missing quite a few of the hoops
so, instead of using these parts, and having them look 'off', I am going to make the fore and main nests from scratch. I began with the posts.
this is the main mast nest........I soaked some strip stock to make the lower railings
the upper railing is going to be a bit wider. it will be sanded down after the nest is assembled, to give it a more rounded look to it.
I will use a little filler to close up the gaps....then, of course a little sanding to round it up and even out the appearance. it looks a little out of round at the moment.......I did it by eye .
still more to do on it......as well as assemble the fore nest. I may have to paint......I fear many glue blotches.........perhaps I can match the color.
-
Adrieke reacted to popeye the sailor in Half Moon by popeye the sailor - Billing Boats - 1:40 scale kit
I did find a small problem though......I put the masts in place, and found that the Mizzen mast interferes with the canopy. the holes for it give it too much rake. I can do a couple of things here.....since the holes for either of them are already punched out.....I either need to alter the axis of the Mizzen mast, or notch out the canopy. as it is, I feel there is too much rake on the mast.
as I think up a way to do this.....I settled on doing something else for the moment. the lantern for the stern is on this page, so I played with this. the lantern is made up of about six parts.....some of these parts are wood. you have the brass rod, brass bottom cap........then there is a wood base for the clear plastic lense part to sit on. two additional wood parts sit on the top, sandwiching the plastic piece in. I couldn't figure out or find the top piece, so I used a perrel bead.....worked just as well
I should have rounded off the bottom piece, but I didn't.........but I did do it to the two upper pieces. I painted these parts gold.
these pieces were glued together and then painted as a whole.....gold.
after the perrel was pushed on there, the end of the rod was snipped off and filed flat.....it too was painted.
-
 Adrieke got a reaction from Kevin in Gorch Fock by Adrieke - OcCre - 1:95
thank you for the comments
sorry I haven't been posting for awhile but I have taking a bit of a break from the online world
I have been slowly but steadily working on this build though
second planking is finished
I have applied a first layer of filler, mainly to seal most of the gaps between the planks and have sanded most of it smooth
after that I have added the last keel part and used some more filler to seal the gaps between that part and the hull
I will now finish the sanding and then check for bumps and such and apply more filler
this will then finally allow me to start the painting of the hull
-
 Adrieke got a reaction from Script in Gorch Fock by Adrieke - OcCre - 1:95
thank you for the comments
sorry I haven't been posting for awhile but I have taking a bit of a break from the online world
I have been slowly but steadily working on this build though
second planking is finished
I have applied a first layer of filler, mainly to seal most of the gaps between the planks and have sanded most of it smooth
after that I have added the last keel part and used some more filler to seal the gaps between that part and the hull
I will now finish the sanding and then check for bumps and such and apply more filler
this will then finally allow me to start the painting of the hull
-
 Adrieke got a reaction from themadchemist in Gorch Fock by Adrieke - OcCre - 1:95
thank you for the comments
sorry I haven't been posting for awhile but I have taking a bit of a break from the online world
I have been slowly but steadily working on this build though
second planking is finished
I have applied a first layer of filler, mainly to seal most of the gaps between the planks and have sanded most of it smooth
after that I have added the last keel part and used some more filler to seal the gaps between that part and the hull
I will now finish the sanding and then check for bumps and such and apply more filler
this will then finally allow me to start the painting of the hull
-
 Adrieke got a reaction from Piet in Gorch Fock by Adrieke - OcCre - 1:95
thank you for the comments
sorry I haven't been posting for awhile but I have taking a bit of a break from the online world
I have been slowly but steadily working on this build though
second planking is finished
I have applied a first layer of filler, mainly to seal most of the gaps between the planks and have sanded most of it smooth
after that I have added the last keel part and used some more filler to seal the gaps between that part and the hull
I will now finish the sanding and then check for bumps and such and apply more filler
this will then finally allow me to start the painting of the hull
-
Adrieke got a reaction from popeye the sailor in Gorch Fock by Adrieke - OcCre - 1:95
thank you for the comments
sorry I haven't been posting for awhile but I have taking a bit of a break from the online world
I have been slowly but steadily working on this build though
second planking is finished
I have applied a first layer of filler, mainly to seal most of the gaps between the planks and have sanded most of it smooth
after that I have added the last keel part and used some more filler to seal the gaps between that part and the hull
I will now finish the sanding and then check for bumps and such and apply more filler
this will then finally allow me to start the painting of the hull
-
 Adrieke got a reaction from edmay in Gorch Fock by Adrieke - OcCre - 1:95
thank you for the comments
sorry I haven't been posting for awhile but I have taking a bit of a break from the online world
I have been slowly but steadily working on this build though
second planking is finished
I have applied a first layer of filler, mainly to seal most of the gaps between the planks and have sanded most of it smooth
after that I have added the last keel part and used some more filler to seal the gaps between that part and the hull
I will now finish the sanding and then check for bumps and such and apply more filler
this will then finally allow me to start the painting of the hull
-
 Adrieke got a reaction from mtaylor in Gorch Fock by Adrieke - OcCre - 1:95
thank you for the comments
sorry I haven't been posting for awhile but I have taking a bit of a break from the online world
I have been slowly but steadily working on this build though
second planking is finished
I have applied a first layer of filler, mainly to seal most of the gaps between the planks and have sanded most of it smooth
after that I have added the last keel part and used some more filler to seal the gaps between that part and the hull
I will now finish the sanding and then check for bumps and such and apply more filler
this will then finally allow me to start the painting of the hull
-
 Adrieke got a reaction from Aussie048 in Gorch Fock by Adrieke - OcCre - 1:95
thank you for the comments
sorry I haven't been posting for awhile but I have taking a bit of a break from the online world
I have been slowly but steadily working on this build though
second planking is finished
I have applied a first layer of filler, mainly to seal most of the gaps between the planks and have sanded most of it smooth
after that I have added the last keel part and used some more filler to seal the gaps between that part and the hull
I will now finish the sanding and then check for bumps and such and apply more filler
this will then finally allow me to start the painting of the hull