

Jeronimo
-
Posts
716 -
Joined
-
Last visited
Reputation Activity
-


-
Jeronimo reacted to rekon54 in Le Fleuron 1729 by rekon54 - 1:24
hi photo of the particular ones of the first deck of battery
........
-
Jeronimo reacted to slagoon in Peterboro Canoe by slagoon - FINISHED - Midwest Products - 1:12
What happened next was pure beauty....
Thanks for watching this build! You guys are great.
I have my confidence back so I'll be working on the Harriet again now.
-
Jeronimo reacted to slagoon in Peterboro Canoe by slagoon - FINISHED - Midwest Products - 1:12
I made my oars during all this glue drying time
I also sanded (A LOT) and then got to the point where I added the support frames.
Don't worry, they are only sporadically distributed because I couldn't clamp to glue them any closer.
I finished adding them, then added the covers to the front and rear of the canoe
I added the little decorative strips to the top of the covers and clamped them with a magnet.
I also added the gunwales to the sides. Looks pretty slick all sanded.
I've also started working on my cherry flooring.
That's it for my updates so far but I'll get some more up before I go to work later this week.
Thanks for looking in!
-
Jeronimo reacted to JerryGreening in Bonhomme Richard by JerryGreening - 1:48 scale
Now for the part that had me sold on building this ship...the stern framing. Karl's (Jeronimo) stern framing was so smooth that it looked like a sculpture.
I guess it is worth mentioning that I scan the area of the drawings that I am working on. Then print them out on my computer. If you do this though be advise to check the print out against your drawing because many scanners do distort the image. I then cut out the area I am working on and afix it to the wood using scotch 77 spray adhesive.
-
Jeronimo reacted to JerryGreening in Bonhomme Richard by JerryGreening - 1:48 scale
the stern frames continued
-
Jeronimo reacted to JerryGreening in Bonhomme Richard by JerryGreening - 1:48 scale
Stern frames continued
-
Jeronimo reacted to JerryGreening in Bonhomme Richard by JerryGreening - 1:48 scale
Some more pictures of the stern framing
-
Jeronimo reacted to JerryGreening in Bonhomme Richard by JerryGreening - 1:48 scale
LOL...Thank you Harvey. I was just looking at your log.The jig is pretty simple to construct, basically it is a white MDF board with cleats attached either side of the keel. There is a triangular piece at the stern which is cut to match the angle of the stern post.
Now lett the framing begin!!!!
-
Jeronimo reacted to JerryGreening in Bonhomme Richard by JerryGreening - 1:48 scale
The next piece I chose to tackle is the the bow stem. This piece was the most difficult piece I had done at the time. I think it turned out quite well.
-

-

-
Jeronimo got a reaction from aviaamator in LE BONHOMME RICHARD by Jeronimo - FINISHED
Hi friends ,
Teil 2
Regards Karl
-
Jeronimo got a reaction from aviaamator in LE BONHOMME RICHARD by Jeronimo - FINISHED
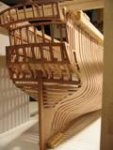
1st Construction stage - Stern part
posterior third of the ship with all the equipment and view of the interior the model
Karl
-

-
 Jeronimo got a reaction from Stoyne in LE BONHOMME RICHARD by Jeronimo - FINISHED
Hi friends ,
Teil 2
Regards Karl
-
Jeronimo got a reaction from JerryGreening in LE BONHOMME RICHARD by Jeronimo - FINISHED
Hello friends,
mounting of the gun ports.
Karl
T e i l 22
-
Jeronimo got a reaction from JerryGreening in LE BONHOMME RICHARD by Jeronimo - FINISHED
Hello friends.
Design, construction and mounting of ancher.
Karl
T e i l 21
-
 Jeronimo got a reaction from archjofo in LE BONHOMME RICHARD by Jeronimo - FINISHED
Hello Ken, (BareHook)
answer the question.
Karl
-
Jeronimo reacted to JerryGreening in Bonhomme Richard by JerryGreening - 1:48 scale
Moving on to the lower keel and towards the bow. I treenailed the keel pieces even though these will be covered over by frames later on. They are still visible from the bottom should I be crazy enough to turn the model over later on.
-
Jeronimo reacted to JerryGreening in Bonhomme Richard by JerryGreening - 1:48 scale
Starting at the stern. Here is the rudderpost and the deadwood above the keel. I had orginally planned to build this ship using oak for the frames. I had a lot of scrap oak at the time and it seemed like a good idea. I very quickly switched my choice of wood over to maple. For those of you new to this hobby Oak is awsome for full sized ships it is however a very lousy modeling wood, it is very grainy and very brittle. Don't use it - save it for the display board. You can see an oak version of the rudder post on the right side of the first two pictures
-
Jeronimo reacted to Alex M in HMS Sphynx 1775 by Alex M - Scale 1/48 - English 20-Gun Frigate
Hello,
Before I begin to install all guns, and work further with beams and knees for quarter deck, gun port lids must here. So the production of hinges, the lids itself are made earlier. I hope, the images are self explainable.
The installation of hinges and lid tackles.
After I have installed all lids, I have made blanks for channels, shaped them to right size and thickness, and installed them (only dry now).
To be continued
Alexander
-
Jeronimo reacted to Alex M in HMS Sphynx 1775 by Alex M - Scale 1/48 - English 20-Gun Frigate
Hello,
before I put the guns on their positions, I have decided to work around hull, especially the stern area und the bow. Here are few pictures of making the windows. The wood is Castello, the strips are 0,5x0,5mm and 0,5x0,8mm. For glazing I have used 0,3mm thick plastic from package, then glued framing with CA. The framing of stern windows was transfered to transparent paper, then the windows mullions are drafted on this transparent paper according to plan. Then I have glued white paper sheet to wood plate, and glued transparent paper over the first. So I have correct windows outline and right angles. Then placed clear plastic sheet over paper, and fixed them with tape.
Now the mullions. Horizontal mullions (0,5mm x 0,5 mm) are glued directly to plastic with CA glue. Then slots for vertical mullions are cut out with chisel, they are not halflapped, they go through horizontal down to plastic. This is showed in third picture. Then vertical mullions are glued on. then all was cut to right length according to drawing. Then outer frames (0,5mm x 0,8 mm) are glued, again directly to plastic. Then the windows are sand flush, the plastic was then cut out, and the window is ready.
The horizontal strips are glued first, then gaps for vertical strips are cut.
Vertical strips glued on, cut to right height, and outer framing gluing
overall view with outer frames. Also the sliding windows.
Close view after sanding
The frame for permanent window glued over additional sheet of plastic
Check how they fit. The windows need some cleaning, then coat of varnish will be added to simulate old glazing.
Preparing framing for galleries beginns
The shape of windows traced to transparent paper.
The windows for galleries are done in the same manner as before. The glazing is imitated by adding a coat of varnish, this give the irregular transparence like old glass. The battens between windows added separately. They will recieve mouldings later, and are hold at now by a little spot of glue.
All windows are dry fitted at now.
Here is how the wooden shindles are made, and ready cover for gallery
The planking of stern is completed. The arches are made from two strips of 0,6mm boxwood glued together.
Internal view with few beams of QD installed
To be continued
Alexander
-
 Jeronimo got a reaction from Wishmaster in LE BONHOMME RICHARD by Jeronimo - FINISHED
Hello friends,
mounting of the gun ports.
Karl
T e i l 22
-
 Jeronimo got a reaction from Luca in LE BONHOMME RICHARD by Jeronimo - FINISHED
Hello friends,
mounting of the gun ports.
Karl
T e i l 22