

Jeronimo
-
Posts
729 -
Joined
-
Last visited
Reputation Activity
-

 Jeronimo reacted to Gaetan Bordeleau in Le Fleuron by Gaetan Bordeleau - FINISHED - 1:24
New cherry stock, for new projects, must be American cherry some planks were 10’ X2’’ X 15’’. Next, a stick which is put between wood layers when the wood in the dryer, first time I saw this.
Planking on the first deck has begun. Planks will be glued later; I stopped to begin outside planking on 1 side.
When I began this build, I wanted to use only cherry, to obtain 1 wood color. After some thinking, I prefer more than 1 color because I do not like the one tone effect. Some dyes will be use and coppering will be the next stage. Although coppering is a big work, the look and the color surely make it worth to do it.
-
Jeronimo reacted to Gaetan Bordeleau in Le Fleuron by Gaetan Bordeleau - FINISHED - 1:24
First picture is a participation to encourage people to have a hobby. Few days ago I read a report concerning pictures on Internet. Here is a summary of my understanding. If I put new pictures on line today, these pictures become the property of the public domain. If I add a pseudonym on the picture side, it means nothing concerning intellectual property. Other statements like copyright expressing my will to appear as the author of the work of the mind should accompany the picture.
I saw Fiebing leather dye at the shoemaker store. Here is a comparison between ebony, leather dye and chinese ink. For the ink and dye, 1 layer to the left and 2 layers to the right. On this picture ebony look like charcoal. For what I see, black is black.
I began to do joinery for the first deck planking.
-
 Jeronimo got a reaction from aviaamator in LE BONHOMME RICHARD by Jeronimo - FINISHED
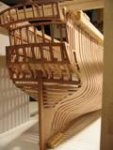
1st Construction stage - Stern part
posterior third of the ship with all the equipment and view of the interior the model
Karl
-
 Jeronimo got a reaction from JerryGreening in LE BONHOMME RICHARD by Jeronimo - FINISHED
The first Eleven Frames.
T e i l 27
-
 Jeronimo got a reaction from Hannerl in LE BONHOMME RICHARD by Jeronimo - FINISHED
The first Eleven Frames.
T e i l 27
-
Jeronimo reacted to Gaetan Bordeleau in Le Fleuron by Gaetan Bordeleau - FINISHED - 1:24
I noted since a certain time that something was wrong in the aft part. Not knowing what to do, I did not touch anything. Today, I wanted to identify the problem by putting the vertical laser line on the longitudinal axis to establish a center line. Then the center finding rule is placed over the center line and, for each side, the distance is taken from center to the side. A difference of .75 inch larger to starboard is noted. A correction of the top aft starboard frames which bends too much inside is required.
The picture shows how to move the starboard side only by taking support on the keel. The spacer will be left there until correct curvature of the frames.
Clamps are also use for 2 reasons, realign few frames and on the starboard side, it allows the whole set of frames to move together. Unfortunately all the work which was done in the aft parts had to be disassembled and scrapped.
-
Jeronimo reacted to Gaetan Bordeleau in Le Fleuron by Gaetan Bordeleau - FINISHED - 1:24
Gluing by fusion or capillarity
Welding is done by metal fusion. Temperature over 1500°C is necessary and, a heat source over 3000°C is required to reach it. Oxygen and acetylene can produce a temperature of 3100 °C but the price to be fully equipped for this type of welding with ‘’The Little Torch’’ use by the jewelers can easily reach over $1000. 45% silver solder can be use but the price of silver is very much surprising and can be quite expensive.
For the small parts that we use, option below $100 is possible. Brazing is done by capillarity and alloy temperature is lower than the one of brass. Butane micro torch can reach over 1000°C which is plenty sufficient to do the job. Silver bearing solder uses an alloy with silver and lower temperature is required (around 500°C). I do not think that this alloy does not produce toxic fume like cadmium as in photography and it is no lead product.
Pencil size torch will do the small jobs and a Blazer micro torch by example will do the big job as for this one. With that, an alloy like silver bearing lead free can be use with flux also lead free and some are water soluble.
To blacken brass I use product Gun Blue in few ounces bottle. For over 1 year it was not possible to buy it because no French instructions included for Quebec Province. I turned towards blackening metal for the industry and bought 1 pint which makes 1.25 gallons from http://www.caswellcanada.ca/shop/black-oxide/ , so I should have enough for a long time when I will receive it this week.
-
Jeronimo reacted to Gaetan Bordeleau in Le Fleuron by Gaetan Bordeleau - FINISHED - 1:24
After sharpening some knives, a lot of notches are done on the beams.
On the last picture, addition of an extension at both ends of the jointer.
-
Jeronimo reacted to Gaetan Bordeleau in Le Fleuron by Gaetan Bordeleau - FINISHED - 1:24
and the last group of 7
-
Jeronimo reacted to Gaetan Bordeleau in Le Fleuron by Gaetan Bordeleau - FINISHED - 1:24
second group
-
Jeronimo reacted to Gaetan Bordeleau in Le Fleuron by Gaetan Bordeleau - FINISHED - 1:24
Here is another selection of the french 74 guns.
first group of ten
-
Jeronimo reacted to Gaetan Bordeleau in Le Fleuron by Gaetan Bordeleau - FINISHED - 1:24
To change the last habit, 6 months in the hold of the Fleuron, the work moved outside to continue the planking on both sides.
First picture shows 1 side on wood and the other side with Tung oil.
There are 2 deepness levels as in the both colors of the second picture.
The third picture shows planking where 2 kinds of woods were used: pear and cherry wood. The grain pattern for the cherry is more presents and seems more accurate than pear which has much less grain pattern. I wanted to do try a comparison between these 2 woods and seeing this picture I prefer the use of cherry which is probably, just a matter of choice.
The last picture combines 2 views of the bow, the one to the right with few more details. To make sure the side walls won’t move, I preferred to redo now the basic bow wood framing.
-
Jeronimo reacted to Gaetan Bordeleau in Le Fleuron by Gaetan Bordeleau - FINISHED - 1:24
Thank you Mark,
Metal fitting installed completes the hold level. The model began 1 year ago, 6 months for the framing, 6 months for the hold.
-
Jeronimo reacted to gjdale in LE BONHOMME RICHARD by Jeronimo - FINISHED
I agree, this is one of the true masterpieces among some very high quality builds. Just wonderful to watch it come together.
-
Jeronimo reacted to modellbaumechaniker in LE BONHOMME RICHARD by Jeronimo - FINISHED
Wonderful work, Karl
regards Oli
-
 Jeronimo got a reaction from Luca in LE BONHOMME RICHARD by Jeronimo - FINISHED
The first Eleven Frames.
T e i l 27
-
Jeronimo got a reaction from JerryGreening in LE BONHOMME RICHARD by Jeronimo - FINISHED
Hello everyone for the kind words and comments.
These are the last pictures of the
LE BONHOMME RICHARD 1779 Part 2.
Regards Karl
T e i l 24
-
 Jeronimo got a reaction from Stockholm tar in LE BONHOMME RICHARD by Jeronimo - FINISHED
The first Eleven Frames.
T e i l 27
-
Jeronimo reacted to Remcohe in HMS Kingfisher 1770 by Remcohe - 1/48 - English 14-Gun Sloop - POF
Trying is the right word, and then comes hoping you've got it all in the right spot. Glad this was an easy fix, further down it would have been impossible...
Ed I now use a cup burr that works even better
Here the third platform is partially complete and the riding bitt's are test fitted, hard to see but they taper quite dramatically towards the bottom of the hull.
This is one of those jobs where I would like to have 6 extra hands ;-)
Remco
-
Jeronimo reacted to egen in HMS Euryalus by egen -
She grows!
In a work progress I made some mistakes because of which I changed a design a little.
As later I will correct some awful elements that everything would be smoothly and more beautifully.
-
Jeronimo reacted to egen in HMS Euryalus by egen -
I added a biting. There were some problems with installing them in their place, and it took me some time to disassemble the deck. They have studs on the bottom of the case and you need to install them now. Make sure that they are parallel to each other. I hope I did it
-
-
Jeronimo reacted to robbl in HMS Euryalus by egen -
In your picture, the 4th frame in from the left is short as I expect it to be.
Sorry, I didn't count the side counter piece before, my fault
Is the lower of your red lines a timber on the outside of the stern or a guide line?
Below the red line is the upper deck transom and above it is the seat, then the quarter deck transom and above that the "transom of the quarter deck'. Then the other smaller framing for the ports and around the helm port which look to be there on the left of your picture.
I did some rough transoms and put them where I think they'll be going here:
I don't have the shorter counter timbers in yet, and ignore the rubber band and wonky picture.
My dimension for the upper deck transom is only 8 1/2 inches broad (4.5mm) (book says 8 but plans say 8 1/2) and 5 inches (2.6mm) deep, and your upper deck transom looks bigger than that.
Yours looks to be 8 1/2 inches deep and perhaps 15" broad, which matches the upper deck beams?
Looking again at the upper deck plan in V2, the drawing of the stern seems to match yours better than mine.
So apart from my question about the dimension of that deck transom, and what the lower red line represents, the way you have it on the left of the picture (<-----) looks ok to me.
Cheers
Rob
-
Jeronimo reacted to egen in HMS Euryalus by egen -
Hello, All!
To understand the correct form of the stern and contertimbers, I made a 3D model of woods.
I'm not sure I understood correctly drawings. Really want to know the opinion of other builders.
To be install on the hull, I probably will do a new version, as there are very large gaps in the dovetail.
-