

SaturnV
-
Posts
167 -
Joined
-
Last visited
Content Type
Profiles
Forums
Gallery
Events
Posts posted by SaturnV
-
-
Hi all,
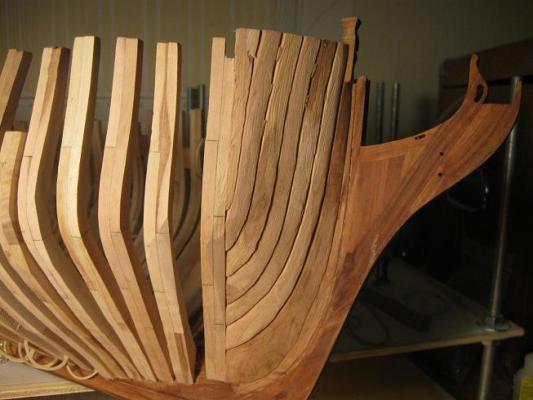
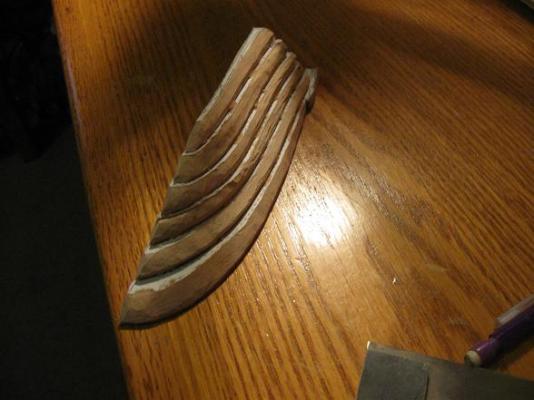
Made some more progress over the weekend. Got tired of watching Olympic Curling so I proceeded with the glueing up of the other hawse timbers. I got a little off track on the top of these but I can add and subtract materials as needed here because it will be planked both inside and out - no worries.

- fatih79, harvey1847, 42rocker and 4 others
-
 7
7
-
Thank you all for the nice comments. Lots of sanding and smoothing to go but it does have the basic shape.
Randall, after reviewing many documents, books, and websites I ended up using a long metal rod with sand paper around it to sand in the semicircle on the stem. I used one of the side profile drawings for the Triton and extended the line of the boom down to the keel (about 1/3 of the way back from the stem). At that point I knew where to place the metal rod tip on which frame so that when the rod rested on that frame and also on the stem I had the correct angle. I also did my best to check it with a protractor but that is difficult on the inside of the hull. After getting the angle correct on the metal rod I slid the sand paper back and forth along the rod and the stem to sand in the curve. The bollards I just held up to the curve on each side and marked the bottom of the curve onto the bollard so that they would match. There was still some fudging to do because when you start the sanding the metal rod is too high. As you sand the rod moves down and so adjustments have to be made. The hole is really still too small but this is on purpose so that the final installation of the boom can have some play in it in case of errors on my part. make sense??


Richard
-
Hello all,
Had a warm stint over the past weekend and so managed to do some rotary work on the hawse timbers which in turn allowed me to glue them in on the one side of the bow. They are only roughed in at the moment and still require quite a bit of sanding to finish them off. It is good to finally see some progress.
Richard
-
Looking excellent Daniel! I soooo want to catch up to you on my model. Cold weather is slowing me down here next to the Rockies.
Richard
-
Well there you go. Looks like cherry will work fine, just need extra soaking and encouragement. I used cherry wood that Model Expo supplied with the Bounty Launch kit and it hated to be bent. Maybe that was just that particular lot of wood.
Richard
-
Did work on the bollard timbers over the weekend. What a finicky, but fun, part to make!


- mtaylor and harvey1847
-
2
-
No skecth or pic available. I did find a definition online: A compass breast timber that crosses the hawse timbers above the edge of the ends of the upper deck planking and over the hawse holes.
I think it will look just like the other hooks in that area. I will try and take the shape from the deck framing plans and side view plans. Not a big deal. Just thought it would be easier and possibly more accurate if the actual drawing existed. Thanks for your offers of help guys.
Richard
-
It is item #8 on the Triton inboard bracing plan, just below the bowsprit hook which is #9......
Richard
-
I have found that cherry does not bend well. If you have not tried to bend it before then I would advise trying to do that first just to see if you can. Steam some up and let us know how it goes......
Richard
-
Anyone have the Hawse Hook drawing? I can't find it in the drawing download area and I don't have it saved previously....
Richard
-
Welcome to the Triton build Eric. I'm part Irish and I don't mind you being here.
Or maybe my ancestors weren't wanted either!Either way, we don't care where your from, we just love to have new members to the Triton build. We also like lots of pictures and it appears you have that part down pat. Best of luck with your build and keep the pictures coming.
Richard
-
Wang, great work on your model!
Guy, the stove is part of the plans - listed as "TritonStove.PDF".
Richard
On edit, I just looked for that sheet on this forum and do not see it in the list. I do have a copy however if the moderators want me to send them a copy.....
Richard
-
Hi Daniel. We are all fine - a little chilled but fine. The temp over the weekend was about -10 C so that was cold enough that I could not stay out there long with a dremmel tool trying to whittle away at the hawse timbers. Thats a good way to make a mistake.
Richard
-
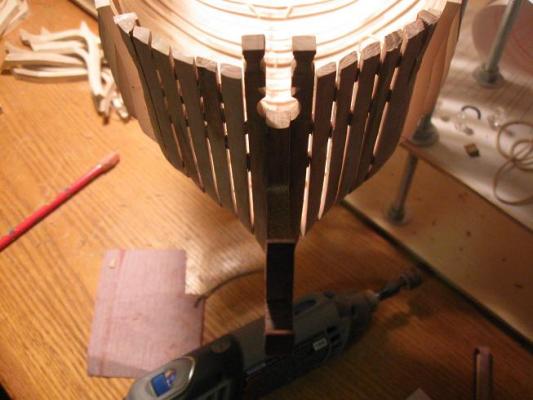
No work on the Triton this weekend due to cold weather. I can't sand the hawse timbers indoors because of the dust.
So in the meantime, here are some pictures of recent progress.
The fore cant frames set and the start of the hawse timbers - all done a week ago:
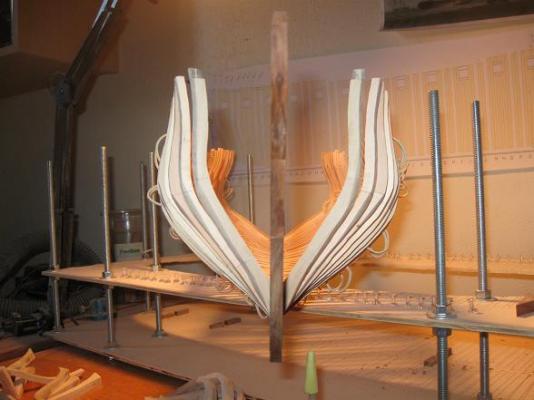
- mtaylor, Elmer Cornish and harvey1847
-
3
-
You are progressing rapidly Daniel! Nice work. I will be doing as you said - finish the hull before moving into the interior.
The construction of the hawse pieces creates a lot of flying sawdust so I have to do the sanding outside. However, it is going to be cold this weekend here in Colorado so I may put the Triton aside and build something else. I have a couple of small models that need building and this might be the time to do them. If not, I will work on the aft cant frames. They are sanded and ready to glue in place. Decisions, decisions.....
Richard
-
Hi all,
Worked on the first set of hawse timbers yesterday to close up the the remaining hole at the bow on the port side.
I had trepidations about making these parts so I put it off until there was nothing else I could do. Turned out, it was not that difficult. I used Daniels picture tutorial when needed to confirm I was doing the correct thing - thanks for posting the pictures Daniel.
I used rubber cement to glue the pieces togther so as to get an overall view of how the wood should be sanded. After a while the glue gave way but I had sanded off enough to get a good basic shape to the parts so now I will do each timber individually to finish them up. All in all not difficult and looks pretty good. I'll post pictures when they are done.
Richard
-
Congrats on making progress. Feels good doesn't it?
How about some pictures of a few frames.......
Richard
-
Thanks Daniel, that is what I was looking for - folks opinion on what to use and how to apply it. I will do some tests on scrap wood to see what it looks like before I go applying it to the real parts that I will use on the model.
And yes Mark, my hopes are to make some fiber optic lamps down in the holds to make everything visable.
thanks for the help,
Richard
-
I built the Pinco Genovese and it was a very nice kit. I got it off of ebay and it was missing quite a few pieces of the wood but it built up into a really nice model. The plans are very good and give you lots of options to improve the final product. I'm afraid though that if you don't like scratch building parts you may want to steer clear of these kits.
Richard
-
Listing a very high "retail" price and then having a "sale" price of a lot less makes the deal seem so much better, in turn getting people to buy the kit - "hey, I'm saving $2000 on this kit!" sort of thing. With that said though, the MS price is a really good price for this kit. The model is huge compared to others so in just the materials it would be worth the sale price.
Richard
-
I just found your build log Tom. Stupendous job!
Funny, all of the problems you had with the kit I had also. They are "erros in engineering" that sure wish MS would fix instead of continuing to sell the kits this way. I would give them a 5 star rating on this kit if it were not for the problems. But like most of us, you overcame and produced a wonderfull boat model. Congrats!
Richard
-
I have read that in the lower decks they would white wash the walls to help with lighting. I think it would also help the observer of the model see the details way down in the hull.
What would one do to "white wash" the lower deck walls? Of course it would be made of wood down there if it makes a difference on what to use.
Richard
-
Thank you all for the encouragement and thanks for stopping by to see my build log. Way more than I get at home.

Nothing really at this time to take pictures of. I used the oscilating spindle sander to sand down the inside and outside areas of the cant frames last night. That means the frames are squared off at the moment. Other than gluing them onto the keel and sanding in the curves I see no other way to get the curves correct. I'm thinking maybe I sand down the bottoms of them where they meet the deadwood prior to gluing because that transition point would be easy to screw up after they are glued in place. Again, I'm too afraid to do the upper curves off the model. Maybe I can temp pin them in place and brace them at the top???.........
Richard
-
Daniel, your changes are well worth the hassel in my opinion. The look is very good.
Your doing the part now that I can't wait to get to. The interior framing is my favorate part and thank you for sharing the PDF's. I will put them to good use when the time comes.
So, does the cat meow with an accent? I've always wondered that about foriegn pets......


SaturnV's 1:48 Full Framed Triton Build
in Build Logs for the Full Hull Version of HMS TRITON
Posted
Thanks Guy!
To be honest folks, I have been slacking on the model lately. I have been caught up in the Olympics the last couple of weeks and I have many many recorded hours of it to go. I did put spacers inbetween the bow cant frames over the weekend but that was all. Its probably going to be that way for the next couple of weeks as I finish out my backlog but I will get back into the model right after that. I promise....
Richard