

catopower
-
Posts
1,597 -
Joined
-
Last visited
Reputation Activity
-

 catopower reacted to Sceatha in Greek Galliot by Sceatha - 1/64 - Amati plans with modifications
So, I was lucky to find some really nice looking cherry wood and I did the planking with that, adding some walnut details:
Next came the internal structure. Deck were planked in Basswood.
The frames were too wide apart in the Amati plans (box 1 in the image below), so I decided to double their number (box 2 below):
Measuring from the deck, I cut the slots for the oars. As I have said above the plans show round oarholes, but the woodcut clearly show the oars rest on slots. The slots are necessarily longer towards the bow and stern, as the curve of the wale does not follow the curve of the deck, this can be seen in the woodcut, as the rowers towards bow and stern protrude above the wale less than the ones amidships.
Thanks all,
George
-
catopower reacted to Sceatha in Greek Galliot by Sceatha - 1/64 - Amati plans with modifications
Ευχαριστώ Bruce, welcome to the thread!
A few more words from the sources on the actual vessel type follows.
From a general interest research piece made for the municipality of Psara:
The ‘Galliot’ from Psara had been constructed on the island in the years before the Greek Independence War (1821) and is particularly mentioned in connection to the naval battle of Chesme, when the Russian fleet, under Alexei Orlov and admirals Spiridov and Elphinstone sailed from Psara, with pilots and fire ships from the island. Among them was the well known captain Ioannis Vamvakis from Psara.
[...]
The islander from Psara had 45 galliots at their disposal (Ioannis Vamvakis was owner and captain of one). With these galliots they blockaded the entire Turkish coast from from the Dardanelles to the coast of Syria. These galliots were light, fast and agile ships. They were used as pirate or merchant ships, in reconnaissance and as blockade runners. They were only rarely used as troop carriers or to tow larger ships. They had a length of 42m and a beam of 4.5m, displacing about 75 - 100 tons. They had a low sheer, a sharp and low bow and a raised stern. They had 16 - 26 sets of oars with one (rarely two) rowers per oar. They carried two or three masts with lateen sails and two or three cannon at the bow. They were manned by over 100 men.
The galliots from Psara that took place in the Russo-Turkish war (1768-1774) were smaller than the ones mentioned above (which were constructed after 1780), being about 23m at the keel, 16 sets of oars and carried about 80 warriors.
[...]
From an article in the Greek Navy Review (1946):
The galliot was a small, fast and agile vessel that evolved from the galleys, but much smaller.
[...]
During the 18th century and the introduction of tall ships in the navies of the Mediterranean, such a galliot with two guns at the bow, was usually carried aboard or dragged behind the larger ships, to be used in reconnaissance, invasions, liaison missions or to pull the ship when becalmed.
The British Mediterranean fleet under Nelson used such galliot extensively while the Turkish fleet used galliot in the "light armada".
Now, all written sources agree that galliots had at least 16 sets of oars, yet the only good enough depiction of such a ship that we have, and can be considered contemporary in any way, is the one posted above. Which clearly depicts 12 sets of oars. Truth is that most sources refer to earlier examples, going up to the 18th century. We know for a fact that the people of Psara continued to use galliots well into the 19th century and used the extensively during the Greek was of Independence, so the image could be of a ship that is more typical of a later pirate vessel.
In any case, sticking to the woodcut made by Kogevinas (based on a drawing from, 1827) is the way for me to go in this build, and all modifications to the Amati plans will be done towards that aim.
More to follow,
George
-
catopower reacted to Sceatha in Greek Galliot by Sceatha - 1/64 - Amati plans with modifications
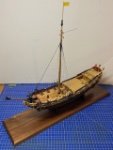
Just a quick update with a photo.
The hull is ready for planking, birch plywood filled in with bass wood (or lime as they call it around here).
Also the keel is ready in walnut.
-
catopower reacted to Sceatha in Greek Galliot by Sceatha - 1/64 - Amati plans with modifications
Time for a few words on the most prevalent modification I have made to Amati's plans. The image below shows the height of the bulwark, measured from the deck and the top of the rowing benches, according to Amati's plans.
Now this is the first thing that strikes me as wrong when looking at the woodcut:
In the woodcut the bulwark comes to well under the armpits of the rowers in the middle of the ship. If the height of the bulwark from the bench top was 64cm, as Amati suggests, only the top half of the head of a 170cm man would be visible (a somewhat tall/average man for that time in the Aegean islands). So the bulwark had to be lowered significantly.
I have no reason to question the 45-50cm suggested as the height of the rowing bench and so, after several tries and calculations (measuring my 168cm wife sitting on a 48cm chair) I concluded that the height of the bulwark, measured from the top of the benches should be about 30 cm in the real ship.
This means that about 5mm need to be "shaved off". In order to retain the general appearance of the ship (which I think Amati has captured beautifully) the 5mm need to be distributed among the lowering of the bulwark and the raising of the deck, as well as the lower part of the hull, so that the ship would sit low on the water, as in the woodcut.
This will also allow for another correction. Amati suggests the oars come out of holes on the sides. I did not like this even before looking at the woodcut, as such holes are not typical of traditional Greek oared vessels. The woodcuts clearly shows the oars are inserted into slots that cut into the bulwark.
It could be claimed that a higher bulwark would offer more protection for the rowers, but let's face it, this ship would be dead anyway if caught at it's beam by any amount of firepower. It's one of those vessels that have to either be going towards their enemies or away from them.
Luckily, Amati gets a very important thing correct. That is the fact that the bow to stern curve of the deck does not seem to follow the curve of the bulwarks. This is evident in the woodcut by the fact that rowers amidships protrude from the bulwark more than rowers towards the bow and especially towards the stern.
The above fix was manually worked into the plans of the frames and the false keel, which were then cut out of birch plywood.
More soon.
George
-
catopower reacted to allanyed in HMS Pegasus 1776 by Darius359au - Amati/Victory Models - 1/64
Your gratings look nice. One trick I went to years ago to be sure there are no openings against one or more of the head ledges or coamings is to finish the grating so it is a solid band on all four sides as close to the plan dimensions as possible, then make the surrounding timber of head ledges and coamings to fit the grating, not the other way around. Picture & a thousand words, etc. below
Allan
-
catopower reacted to Knocklouder in Viking Drakkar by Knocklouder - FINISHED - Amati - 1/50
This journey is almost over, just a few things left to do, but not sure of which way I like to display it. With oars stoed or in the water. So most likely just going to let it sit for awhile then come back and add some extra stuff.
I may just paint the background , some sky, birds, fish jumping 😀 penguins maybe.
I have to wait a bit to completely finish, but it only touch ups and a bit of paint, so almost finished. Finished enough for me to cleanup the shipyard and start another model.
Thanks for looking. Hope it was fun, I had a blast. Looking forward to The King of the Mississippi River Boat, looks like a lot of tinkering, neanderthals love to tinker lol
Bob M.
-
catopower reacted to Knocklouder in Viking Drakkar by Knocklouder - FINISHED - Amati - 1/50
Last night the First Mate and I discusse weather to display it with the oars stoed or on the water. We decided that if I don't have any crew rowing the boat, we should stoe them,it looks better. A few members agreed that they would look better with oarsmen. So I will look into getting them later. So I am going to mark this finished, but with the option to revisit later to tinker with it.
This is were she will sit for most part, I may move it around a bit.
Thank you all for your thoughts and advice on what I should do.
Thank you MSW/NRG, helping me learn how to build ships.
Thank you for all members who followed along and encouraged me along the way.
Thank you everyone. I just love modeling,
time to start another model today. lol
See you on the next build. Your very great full shipmate Knocklouder.
Bob M.
-
catopower reacted to schooner in ALFRED by schooner - BlueJacket Shipcrafters - scale 1/8" (1:96) - Continental Navy Frigate
Deadeyes and Chainplates
The deadeye/chainplate rigs consist of 3 or 4 parts (small deadeyes get 3). The kit provides Britannia metal deadeyes that come pre-stropped (thank goodness), the next part below them is the Mid-link, which are all the same size so it is easy to mass produce them by wrapping 24 gage wire 9 or 10 time around a dowel and then cutting them free and using pliers to bend them into more of an oval shape. The next part is the Toe Links, that took me the most time to make since for the large deadeyes they have to be custom fabricated out of wire so that the bottom of the last piece (the chainplate) can reach to or near the blackstrake which is the first strake above the wales. I was getting ready to fabricate the bottom pieces (the chainplates) I when was rooting around the bottom of the box and found the remnant of the PE fret and lo and behold there they were (the parts list does not break down the PE fret parts and when I inventoried the kit 2 years ago I had no idea what they were).
Here are the 4 parts, along with 2 pins from the BlueJacket catalog (F0040) that just fit inside the chainplate holes. I cut all but the top 1/4” off each pin so I would not have to drill as deep.
The orientation of the assemblies was determined by running a line from the mast top, across each deadeye and a pencil mark made on the hull just above the wales:
The wire was fabricated by bending around pins and then shaping using pliers:
Here’s the finished assemblies mounted on the model:
-
catopower reacted to schooner in ALFRED by schooner - BlueJacket Shipcrafters - scale 1/8" (1:96) - Continental Navy Frigate
Back to the Shipyard
So, after a six month diversion into the world of radio control while building the SEGUIN, followed by an extended road trip out to the West Coast, it’s finally time to get going again with the ALFRED.
Before starting on the masting and rigging I wanted to do 2 things.
First up was fixing the upper head rails. My first attempt left them pretty straight without any of the “swoop” normally seen on the headrails of period ships (swoop being my term for vertical curvature):
So I removed them (the lower headrails had to be left alone since they conform to the outer edge of the PE grating) and replaced them with the same mix of Brittania metal from BlueJacket faced with plastic channel pieces from Stripstyrene; I’m much happier with the re-do:
The other thing I wanted to do was to mount the model on its pedestals and display board because it would be a real nightmare trying to do it with all the masts and rigging in place. Since the masting and rigging should not require placing any serious pressure on the hull I think now is the time to do it:
Now I can put the hull on the shelf and work on the upper masts.
-
catopower reacted to schooner in ALFRED by schooner - BlueJacket Shipcrafters - scale 1/8" (1:96) - Continental Navy Frigate
Foot ropes and Burton Pendants
I’d originally planned (hoped) to use some very small eyebolts I have on hand for the foot rope stirrups (the vertical lines that hold up the inner portions of the foot ropes). Unfortunately at this scale the upper yards are too thin to withstand drilling with even a #74 bit so I had to go with thread. After some trial and error I finally settled on making the stirrups by starting with an overhand knot tied around a needle to form an eye and spot glued to hold it. The stirrup was then led down the aft side of the yard and tied off to the eye would be 2-3 scale feet below the bottom of the yard. The foot rope was then tied off and one end, threaded thru the stirrups and secured at the other end. Once fabricated the stirrups were weighted with some small clothespins and everything was brushed with diluted white glue to stiffen them.
Next up was what has got to be the easiest part of the whole rigging process - the Burton Pendants which were anchoring points for blocks when handling heavy loads on deck. Two bullseyes were seized at opposite ends of a piece of line, they are then looped over the crosstrees of the tops and upper shrouds. The Fore and Main masts get 4 lower ones and 2 upper, the Mizzen just gets 2 lower ones. The pendants will all get the white glue treatment to keep them hanging vertical.
Next up will be adding the lower shrouds to the masts.
-
catopower reacted to schooner in ALFRED by schooner - BlueJacket Shipcrafters - scale 1/8" (1:96) - Continental Navy Frigate
Rigging intentions and starting the lower shrouds
As I get ready to start the rigging I thought it might be a good time to explain my plan for going about it, always subject to change since my plans/intentions/assumptions are blissfully free of relevant experience, this being my first real rigging job.
Resources
The kit’s instructions contain a general discussion of how to go about the rigging but they assume a level of experience/knowledge that I don’t have. The rigging diagram is one sheet of plans that shows all the standing and some of the running rigging - it is a real spaghetti pile that I find hard to pick out individual lines from but it is useful for figuring out shroud lengths and deadeye spacing. The instructions do contain good info with regard to line sizes and the belaying diagram is fine.
I will be using a mix of kit-supplied Brittania metal blocks and wood ones from SYREN Ship Model Co. For rigging line I will be using a lot from SYREN with the sizes being the closest match available to the kit’s.
I’ll be using Lennarth Peterson’s Rigging Period Ship Models as my primary reference for what to rig. The book is based on the late 18th century Royal Navy Frigate HMS Melampus. It has almost NO text but is made up of a clear diagram for each rigging line. It has the advantage that they are arranged in a sequence that makes sense for rigging a model with minimal interference between new and previously-rigged lines. The book does not contain any information about line or block sizes nor are the diagrams to any consistent scale so dimensions are not useful. It does have diagrams of all sails and their rigging for those who want to go that far and it does have belaying diagrams although I will be using the kit instructions since ALFRED had a lot fewer belaying pins than MELAMPUS. The differences between ALFRED and MELAMPUS are mainly ones of subtraction; ALFRED did not have a spanker boom, martingales, boomkins, flying jib, spirit sail topsail yard or royal yards.
General plan of attack
This is going to be a challenging rigging job because of space constraints. To start with ALFRED was a small ship and at 1:96 (1/8”) scale there is little room to work on belaying rigging, for example there is less than one inch separating the aftermost deadeye on the main chains from the forward most on the mizzen chains. Because of this I plan on including all of the standing rigging but only those running rigging lines that are associated with controlling and securing the yards (i.e halyards/slings/jeers, lifts, and braces). I will also attempt to rig each mast as much as possible, including the upper shrouds and the yards, before stepping them so that I can secure the running rigging lines that are tied off around the mast bases and many of the stays before securing the shrouds.
Starting the lower shrouds
After dry fitting each mast in place I used a piece of line to determine the shroud length for each mast, leaving what I hope is enough extra to allow for seizing around the deadeyes. I held off attaching the topmasts so that I could make up the shrouds off the mast and then slip them over the masthead before the mast caps are installed. The shroud loops are secured with an unglued seizing that can be cinched up to the mast head and then brushed with diluted white glue.
All 16 shrouds were easy to make up in this manner and were added to the masts, alternating each pair, starboard to port and forward to aft. They are all labeled with a small piece of tape holding the pairs together.
-
catopower reacted to schooner in ALFRED by schooner - BlueJacket Shipcrafters - scale 1/8" (1:96) - Continental Navy Frigate
Almost all of the standing rigging has been added to the masts to include:
upper shrouds & ratlines lower shrouds backstays forestays and their mouses (mice?)
I’ll hold off adding the topgallant stays until later in the build because it would be very easy to snag one an break off a delicate topgallant mast
The brass rods that are sitting near the top of the topgallant mast are just placeholders - they keep me from accidentally covering up the topgallant yard sheaves.
Needing to take break from all the thread and tweezers I worked on a few minor items such as adding the stern lantern and ensign staff
Fabricating the anchors
Painting the gunport lids
Next up will adding the yards to the foremast
-
catopower reacted to schooner in ALFRED by schooner - BlueJacket Shipcrafters - scale 1/8" (1:96) - Continental Navy Frigate
Anchor Windlass
The instructions recommend leaving the anchor windless off until the rigging is completed but I thought that might be tough to do with having to wrap the anchor cables around it so I checked the belaying points for all the belaying pins and tackles in that area and decided it would be best to do it now.
I fabricated a few windless bars for the storage racks and then put the windlass and cables in place:
Fore top gallant yard
The halyard for the yard is just a line with an eye that turns it into a barrel hitch:
Here the halyard is in place and the parallel beads are strung:
The yard has been pinned to the mast, the parallels secured and the halyard has been run thru a “sheave” hole near the top of the mast and seized to a double block above a single block previously placed on the fighting top. The two blocks are reaved into a tackle, the bitter end will be belayed to one of the pintails on the main deck:
The last things to add are the yard lifts and a flag:
-
catopower reacted to schooner in ALFRED by schooner - BlueJacket Shipcrafters - scale 1/8" (1:96) - Continental Navy Frigate
Fore Topsail Yard
The yard was pinned to the mast and the parrel beads added just like the topgallant yard.
Instead of a simple halyard, as on the topgallant, there are two lines - the Halyard and the Tye, the are identical, just mirror images of each other on opposite sides of the mast. One of them is shown in the photo by the pink lines as it comes down from the crosstrees, passes thru a double block, back up thru a single block hanging from the cross trees and then down to just below and aft of the top where it terminates in a double block that will form the upper part of a tackle that will go on down to the outer edge of the main deck.
The other item are the lifts, one per side, one of them is shown by the blue lines on the photo. They come down from the crosstrees, thru a single block at the yard end, up thru a single block near the cross trees, down thru the lubber hole and down to a pinrail on the deck.
These lines look pretty sloppy because they are slack, they will look better when put under tension.
-
catopower reacted to schooner in ALFRED by schooner - BlueJacket Shipcrafters - scale 1/8" (1:96) - Continental Navy Frigate
Fore Yard
There is a lot of rigging to do in a small space in order to attach the fore yard (and the lower yards on all the masts).
There are 4 sets of rigging that do different things:
JEERS - 2 pairs of 3&4 sheeve blocks used to hoist the yard into position
SLING - 2 bulls eyes lashed together to support the weight of the yard when it is in position
TRUSSES - 2 heavy lines that loop around the yard and that are then passed thru thimbles (on their partner) behind the mast. They hold the yard to the mast and prevent it from pulling away under pressure of the fore sail
NAVE LINE - I don’t understand how this one works - it is a small line that has 2 thimbles that go around the truss lines and it seems to be a way to either tension the trusses or to counter act the downward pull of the tackles that tighten the trusses
Here is the yard with the sling, jeers, and truss lines pre-rigged on it:
Here is the Nave line that sits behind the mast, just under the to:
With the Fore Yard in place I’ve reached the limit of what I can reasonably rig to the mast prior to stepping it.
There are about 40 shrouds, stays and running rigging lines that will have to be secured to belaying pins, tackles and deadeyes once the mast is mounted.
I’ll be repeating all this for the other 2 masts and will post again when they are done.
-
catopower reacted to schooner in ALFRED by schooner - BlueJacket Shipcrafters - scale 1/8" (1:96) - Continental Navy Frigate
Fitting out the Gun Deck
Thanks to a suggestion from Nic, the owner of BlueJacket, I may have a solution on how to rig the small guns without spending the next 10 years doing it. I’ll explain it when I get to that point which is still a ways down the road.
In anticipation of rigging the guns their carriages have been fitted with eyebolts for the in and out-hauls (the breeching ringbolts will be added when the breeching lines are), as have the bulkheads and the decks. The carriages have all been pinned to the deck per the instruction’s recommendation.
Note from much further down the road: I recommend that when pinning the carriages that you also pin the gun barrels at the same time, using the same piece of brass rod. Although the barrels don't stick out through the gunports very far, there will be plenty of opportunity to push them off the carriages while working on the hull and decks. If I had done that at this point in the build it would have saved me a lot of aggravation later on.
Next up will be raising the bulwarks, adding the cap rail and the fancy rails. It will be good to deal with wood again after all this metal and wire.
-
catopower reacted to schooner in ALFRED by schooner - BlueJacket Shipcrafters - scale 1/8" (1:96) - Continental Navy Frigate
9 pounder guns
I’ve been busy on the model but not much to show for it, and with more aggravation than I deserve.
I’ve started to work on the 9 pounder guns for the gun deck. The kit provides nicely cast brittania barrels and carriages. Although there is minimal flash and seam marks on them their small size makes for some tedious filing and then I drilled out the barrel muzzles and holes in the carriages so they can be pinned to the deck per the instruction’s recommendations.
I then had to decide how much rigging to put on them given their size and the fact that even with some deck planking left off of the decks above them they will still be only indirectly viewable and in “shade” to boot.
I built a little gunport mockup to see how much line I would need for the breeching lines. I ordered some 2mm wood blocks from Model Expo, the smallest on the market. After a frustrating hour I was able to get the line thru ONE block! Sure, I could get thread thru there but that looks way under scale. I also need smaller wire than I have on hand to strop them so that’s on order. The little brown dot next to the penny in the below photo is one of the blocks. They do have 2 holes in them and grooves for the stropping. I decided having to do 80 of these for the in-haul tackles for 20 guns would be more fun than I am willing to put up with, particularly since the breech lines will largely cover them up anyway. I’ll probably try to use them on the 6 3 -pounder guns on the quarterdeck but not down on the gun deck.
Leaving off the in-haul tackles still means each carriage has to have 3 holes drilled in them (2 for the breech line guides and 1 for the out-haul tackle). So all of that is done. I wanted to put together the 120 ringbolt/split combinations needed but when I ordered more 3/32” split rings from Model Expo they sent me ones that were smaller and thicker than I previously received from them - too small to work for this. I sent them and e-mail & photo and they are going to look into it but I’ll have to make about 80 split rings myself (sigh).
My final problem is with the Postal Service. The instructions call for some sizes of wood that are not provided by the kit (I’ll let Bluejacket know which when I’m done) so I ordered it from them. Unfortunately my shipment made it most of the way thru the postal system and then disappeared. I’ll give the Post Office a few more days and then reorder the wood.
Good thing I’m in no hurry with this build.
-
catopower reacted to schooner in ALFRED by schooner - BlueJacket Shipcrafters - scale 1/8" (1:96) - Continental Navy Frigate
Thanks Nic! That's what I'll try to do.
-
catopower reacted to MrBlueJacket in ALFRED by schooner - BlueJacket Shipcrafters - scale 1/8" (1:96) - Continental Navy Frigate
If you're looking for ideas for a reveal, here's what we did for our display model:
-
catopower reacted to schooner in ALFRED by schooner - BlueJacket Shipcrafters - scale 1/8" (1:96) - Continental Navy Frigate
Gun Deck Planking
The ceiling planks are finished up and painted:
The instructions call for measuring the deck with dividers and using the measurements to lay out a template for cutting out the pre-scribed deck planking but I thought it would be easier to trace the gun deck from the plans, leave some extra around all sides and then test fit and trim as necessary:
The template worked well but given the tumblehome on the bulwarks I could not drop the sheet onto the deck - I had to cut it in half down the centerline. After a lot of test fitting and trimming of each half I ended up with a good fit - any minor gaps along the side will be covered by the water ways. Before I installed the deck I stained it with Old Master Fruitwood Gel Stain which Chuck Passaro is using on his HMS Winchelsea group build here on the site. It’s great stuff! Although the planking is bass wood there was no blotching, it went on easily. It’s initial color was a light, almost yellowish tan but after a couple of hours it darkened to more of an oak color and the plank seams are readily visible so I did not have to try to darken them with a pencil, which I’m sure would not have gone all that well. I glued the plank sheets down with 2-part epoxy to give me enough time for final adjustments before it set and, most importantly, to avoid any swelling of the wood which can come from the water in wood glues.
Next up will be adding details to the gun deck.
-
catopower reacted to schooner in ALFRED by schooner - BlueJacket Shipcrafters - scale 1/8" (1:96) - Continental Navy Frigate
Exterior hull planking done
You can get away without planking this hull at all but I thought it would be good practice for me since I have the MS kit of the SYREN on the shelf and that kit calls for some good planking skills.
While this kit is not a good choice for someone’s first build I do think it would be a good choice for a first planking job for the following reasons:
The hull will be completely painted so after priming and several coats of paint pretty much all of the plank seams and butts will be invisible - so will any learner’s mistakes - like mine Planking a solid hull is easier than a POB hull since you have plenty of glueing surface, don’t have to worry about fairing the bulkheads and you can terminate a plank anywhere you want The small size of the hull and the long lengths of supplied planking strips mean that you don’t have to cut most of the planks - they can run end to end The supplied planking is 2mm wide and .02” thick so it is very pliable, which allows you to get away with easy edge bending, no soaking or heating to bend it and no spilling to avoid twisting. One drawback to it is that it allows you to get away with things that thicker planks would not so the planking “experience” you get from this kit is not all that it could be. That said I was able to add some drop planks, stealers and practice tapering.
Next on my to do list is to reopen the gun ports and then plank the interior of the bulwarks (ceiling)
-
catopower reacted to schooner in ALFRED by schooner - BlueJacket Shipcrafters - scale 1/8" (1:96) - Continental Navy Frigate
More Hull Planking
Planking is coming along better than I thought it would since this is only my 2nd planking job and the last one was about 15 years ago.
The instructions call for making the Garboard planks from a template but that implies having some thing to copy, which there is not. I found some mahogany strips in my stash that are wider than the kit planks and just a little thicker so they will be noticeable even though they will be painted. I read up on various build logs an shaped them as best as possible.
I noticed on Chuck Passaro’s group build for the Winchelsea that ships of this period frequently had a drop plank at the head of both strakes below the wales so I made a couple out of the same strip material as the garboards, fitted them and then sanded them down so they are the same thickness as the rest of the planking.
I expected to have to taper the planks near the bow and add stealers near the stern but this hull shape is a little surprising. I’m going to have to taper both the bow and stern areas - I guess it is because being built as a merchant ship the ALFRED has a much deeper and broader “belly” since cargo capacity was more important than speed like it would be for a frigate.
-
catopower reacted to schooner in ALFRED by schooner - BlueJacket Shipcrafters - scale 1/8" (1:96) - Continental Navy Frigate
Bulwark planking
The planking from the wales up to the top of the bulwarks is completed. This section was very easy to plank and without the need to figure out butt locations each strake went on as a single plank.
Since I will be handling the hull a lot while planking the rest it I decided to hold off on reopening the gun ports - less chance of getting a plank end snagged on my clothes.
Next up I’m going to try to make a template for the garboard strake and then put those in place.
-
catopower reacted to schooner in ALFRED by schooner - BlueJacket Shipcrafters - scale 1/8" (1:96) - Continental Navy Frigate
Planking preps
There were a couple of things I needed to take care of before starting the planking.
I deepened the rabbets on the stem and sternpost so they will hold the plank ends. Using the gun ports as references I marked the location for the top of the wales and the height of the bulwarks to match the plans. For the hull I received, the bow area was right on, the waist needed to come down a little, 1/4” or less, and the aft most 2” needed to come up just a little - something I had already added and then ended up removing most of it.
The final item was something I have not done before. The instructions call for coating the hull with thin CA glue and then lightly sanding it to give a smooth surface for the planking that will also resist soaking up most of the planking glue. Since this is the first time I will try planking a solid hull it made sense to me so I did it.
Next up will be attaching the wales and then planking the bulwarks.
-
catopower reacted to schooner in ALFRED by schooner - BlueJacket Shipcrafters - scale 1/8" (1:96) - Continental Navy Frigate
Finishing up the gun ports
After filing 3 or 4 a day I finally finished all 20 gun ports.
I used my test cannon to confirm that the gun barrels were centered in the ports, they were - almost. There was still a small “shelf” of wood right at the base of the ports that I could not see or even feel with my finger but when I pushed the cannon right up to the bulwark it would rise on almost all the ports so I had to speed a fair amount of time using what amounts to a milling cutter on the Dremel slowly going over that area until the guns are all centered.
The next steps will be getting the hull ready for planking.