Check out our new MSW Sponsor Innocraftsman
×

juhu
-
Posts
267 -
Joined
-
Last visited
Content Type
Profiles
Forums
Gallery
Events
Everything posted by juhu
-
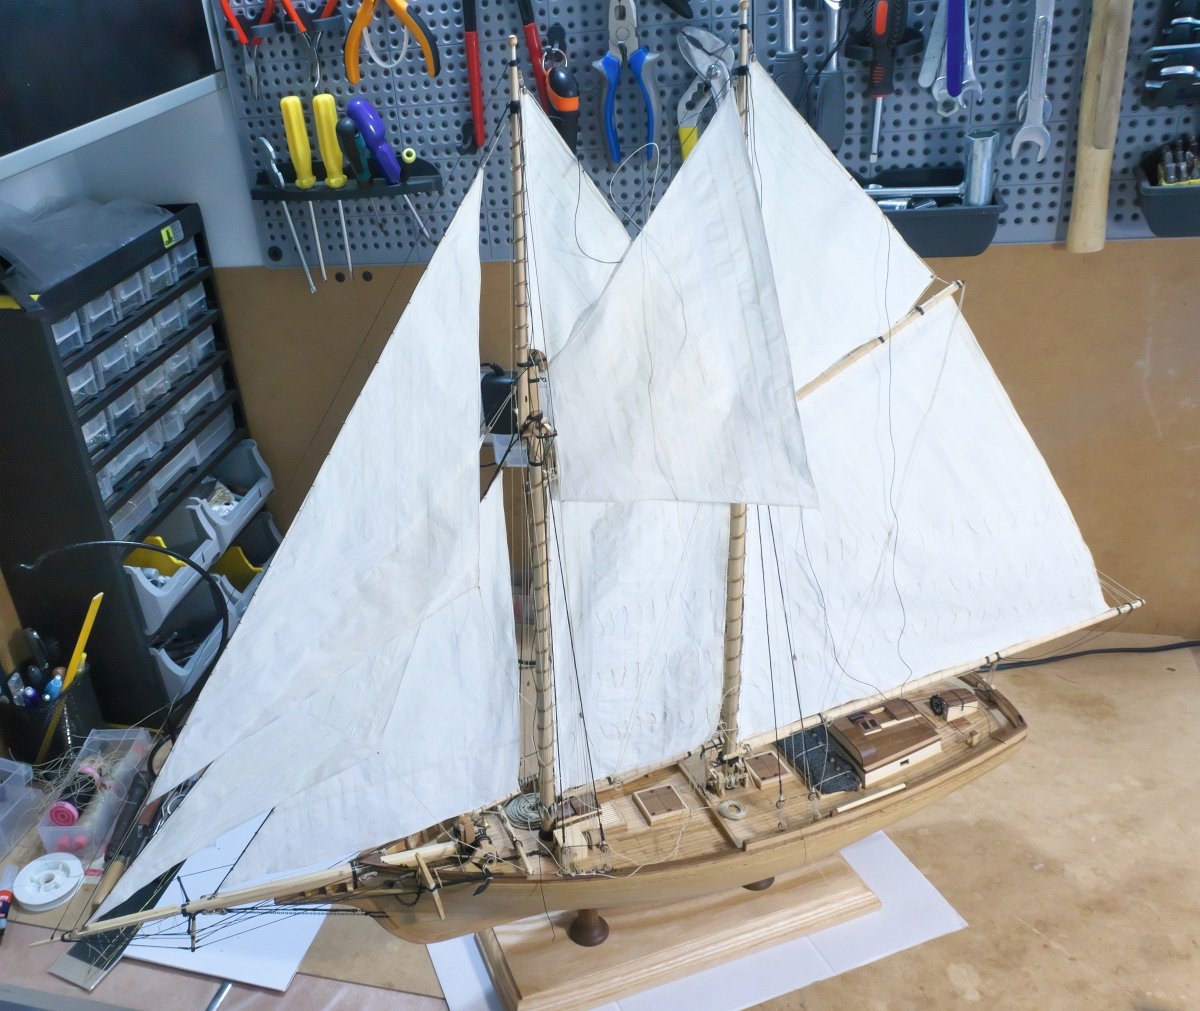
 Hello, another small update. Mackerel pocket booms done and started work on ratlines. Both tasks quite challenging for me, too many rigging obstacles in the way and those ratlines... too many of them even without any other obstacles.
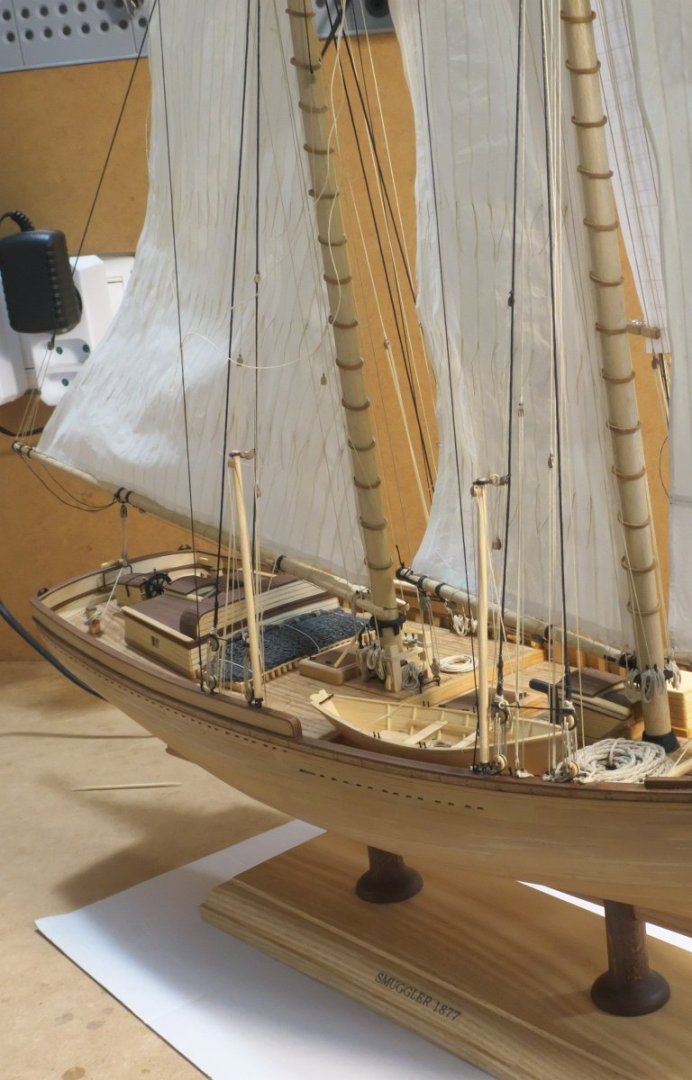
- 104 replies
-
- 5
-

-
- Bluejacket Shipcrafters
- smuggler
- (and 1 more)
-
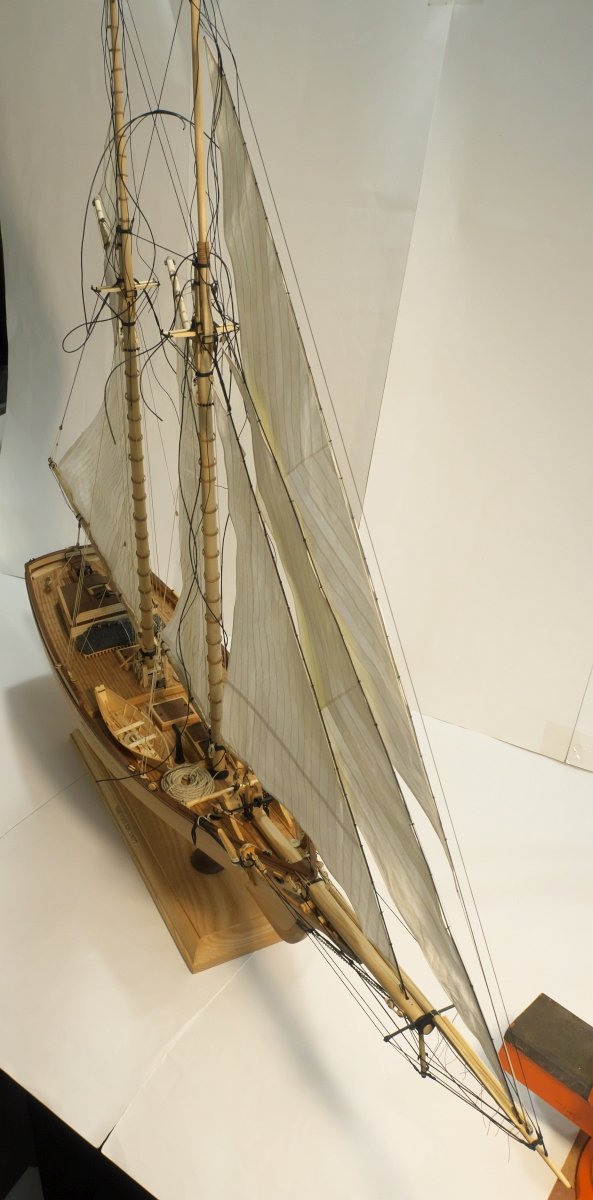
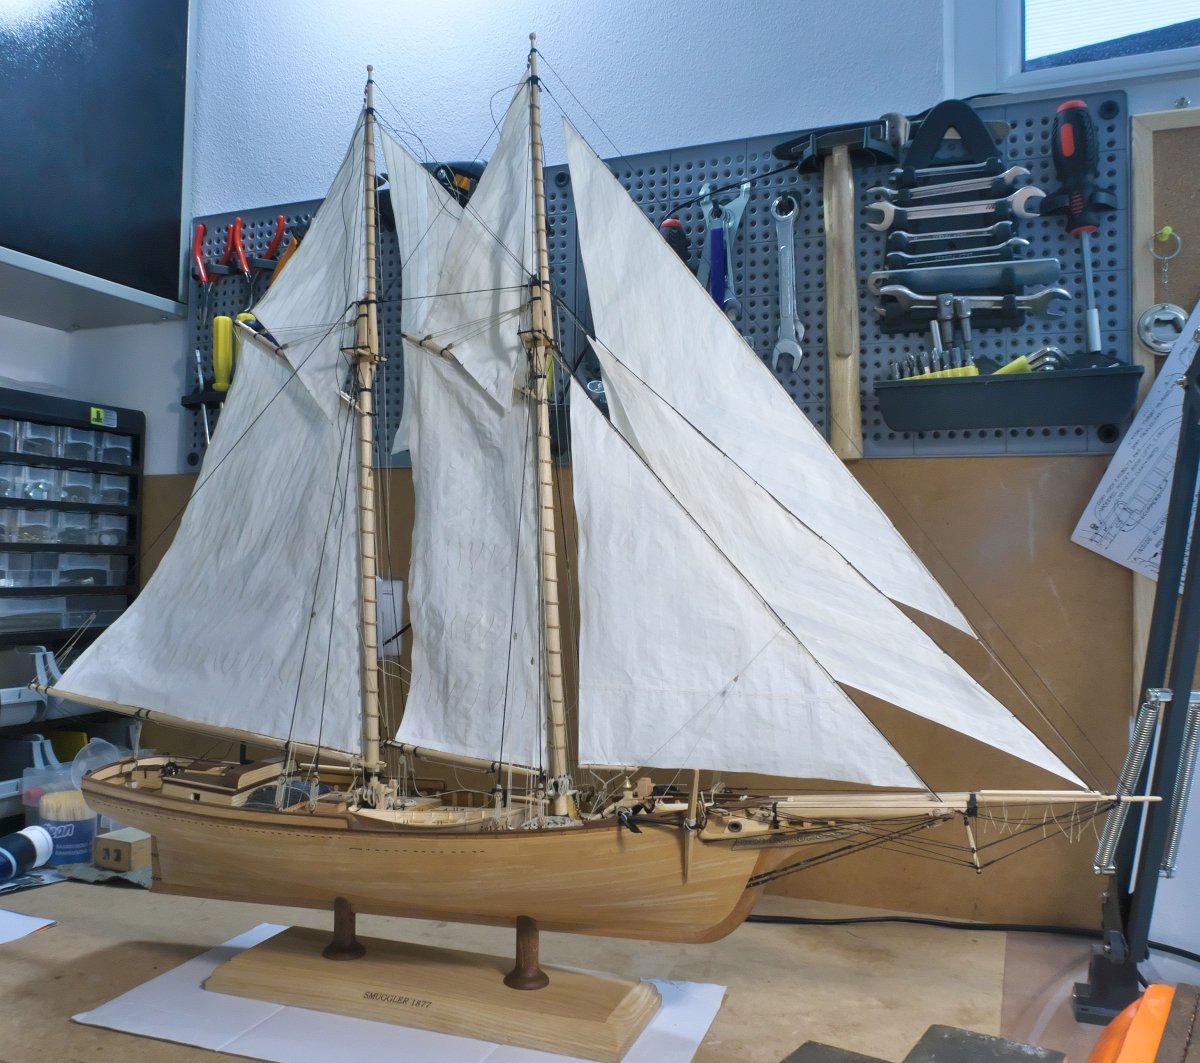
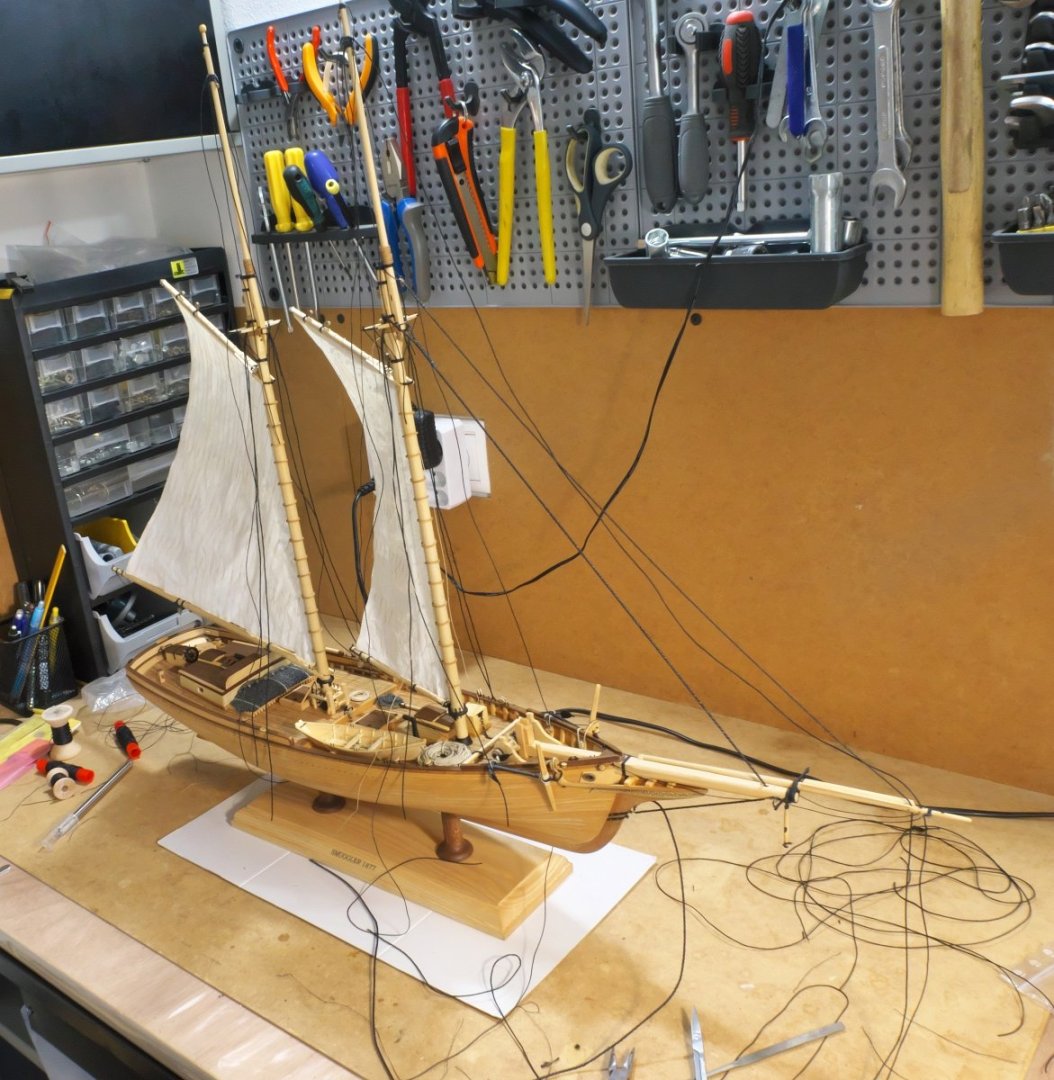
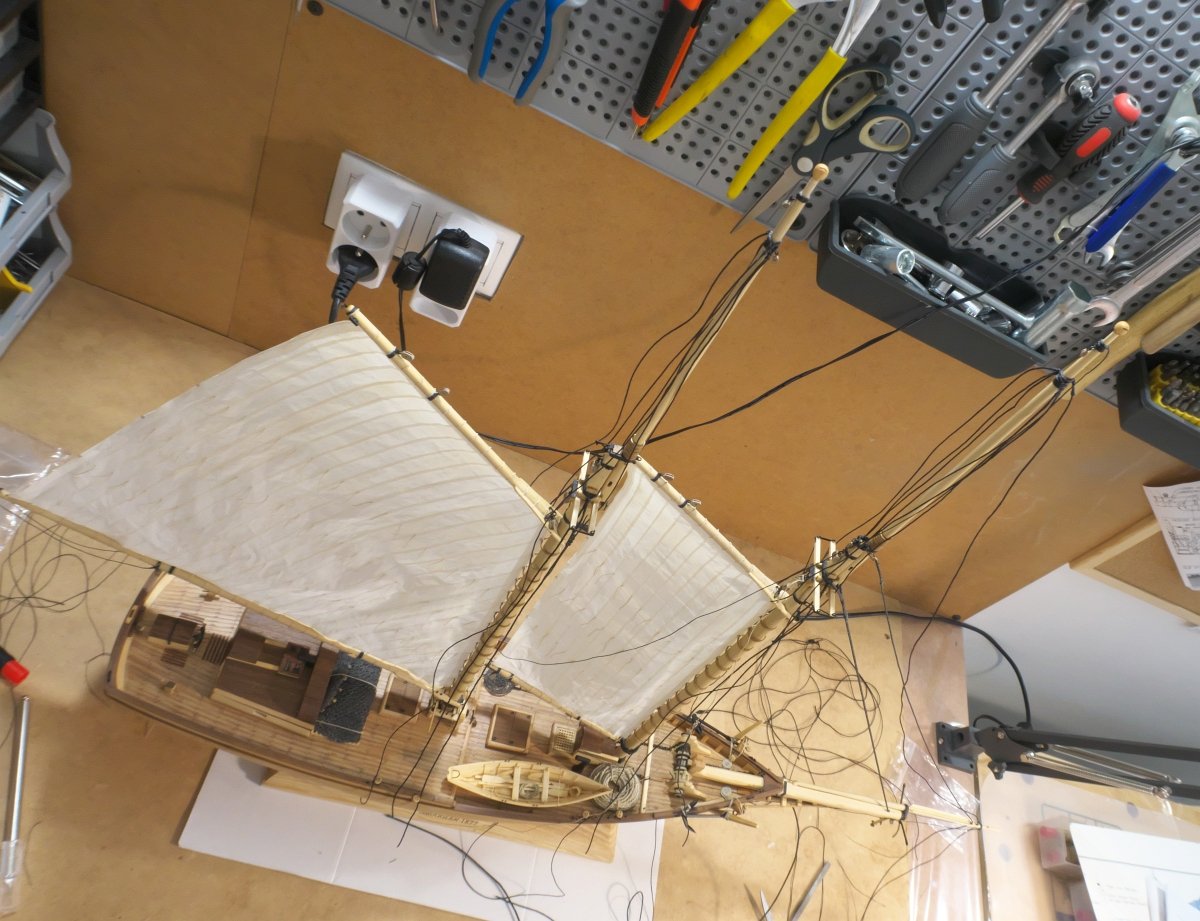
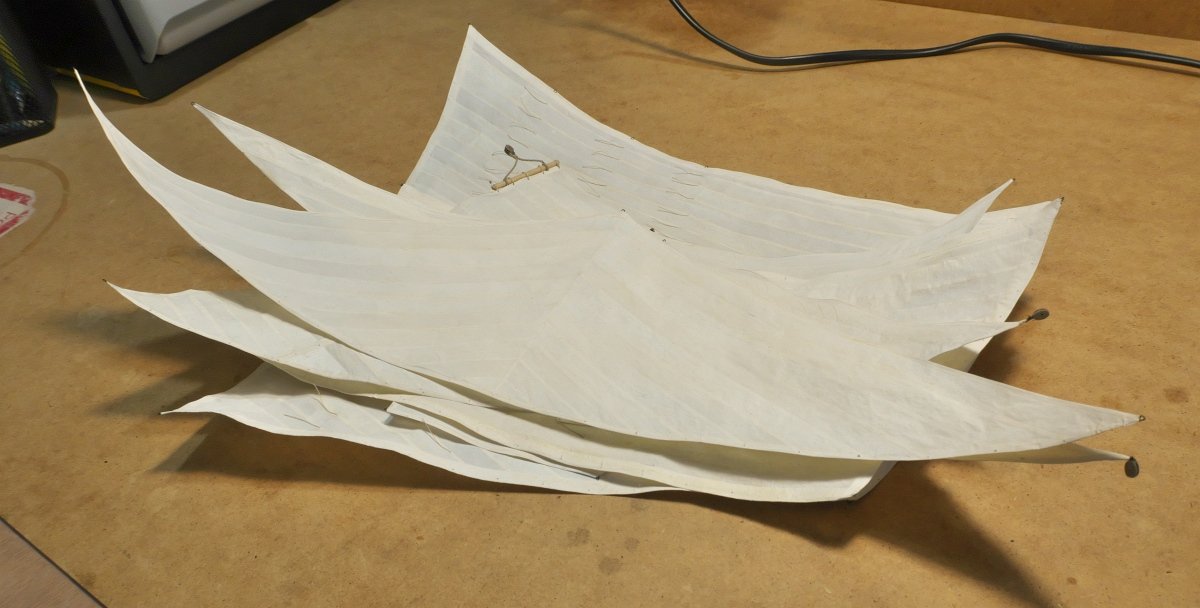
Hello, Thank you for all the kind words! Another small step forward. All the sails are up there, although not yet fully rigged - must finish some standing rigging work first. After that I guess only a bunch of details is missing: flags, dory lifts, mackerel booms etc. I have just realized I ran out of single blocks - the kit provides enough when building the ship without the sails, but obviously not enough if all the sails are to be set according to plan. I will try to modify some 3rd party blocks to resemble those from the kit as much as possible.
- 104 replies
-
- 7
-
-
- Bluejacket Shipcrafters
- smuggler
- (and 1 more)
-
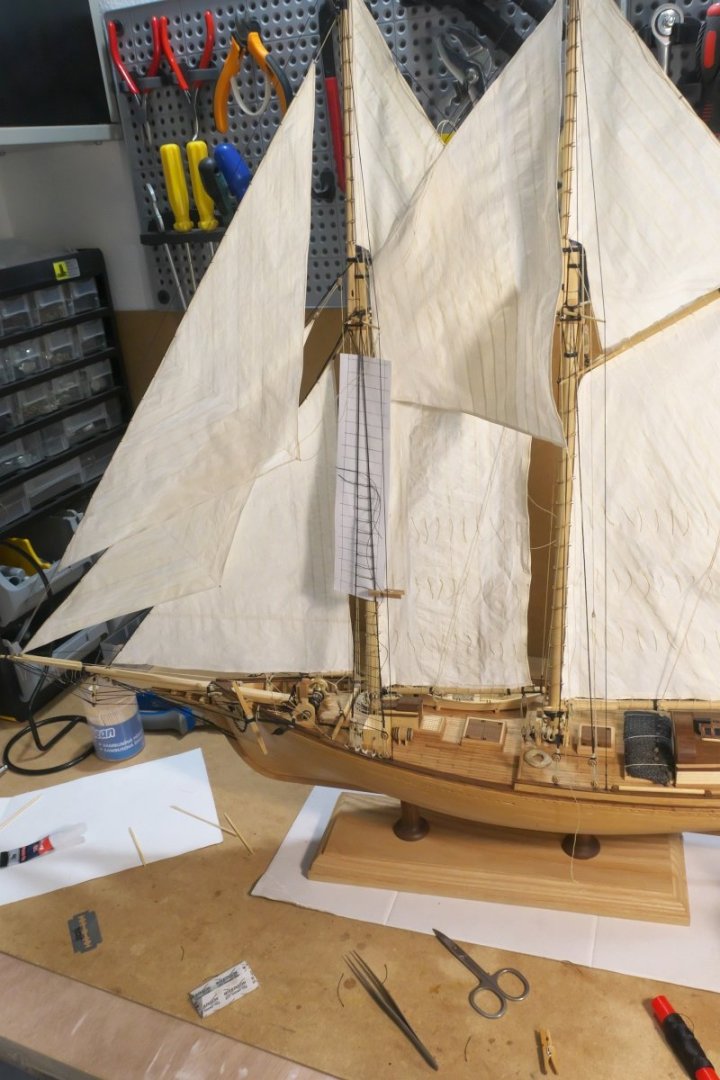
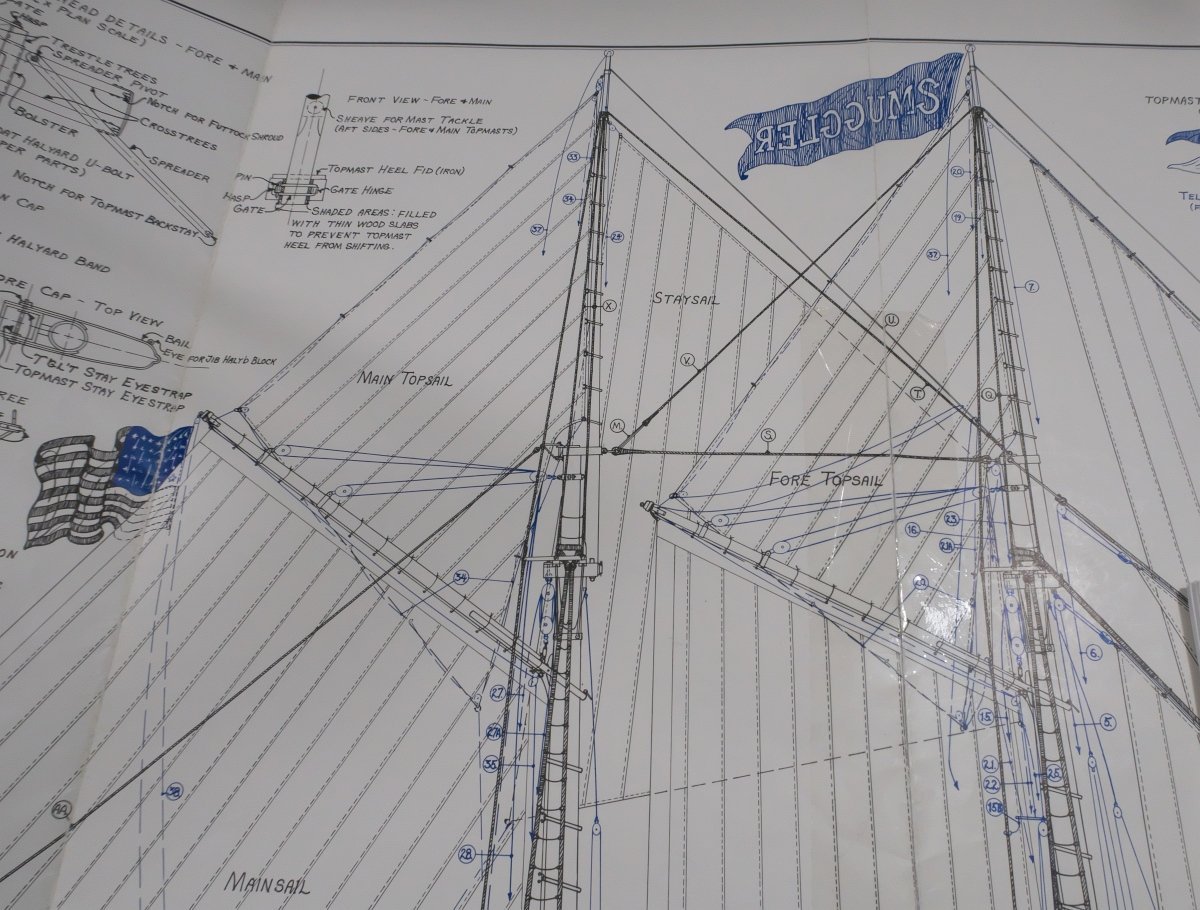
Hello, just a few quick photos to document current state. With sails being set the access to belaying pins etc. becomes more and more challenging....

- 104 replies
-
- 5
-
-
- Bluejacket Shipcrafters
- smuggler
- (and 1 more)
-
Jib Topsail downhaul / tack - running and attaching
juhu replied to juhu's topic in Masting, rigging and sails
Thanks a lot for all the ideas, double block installed. -
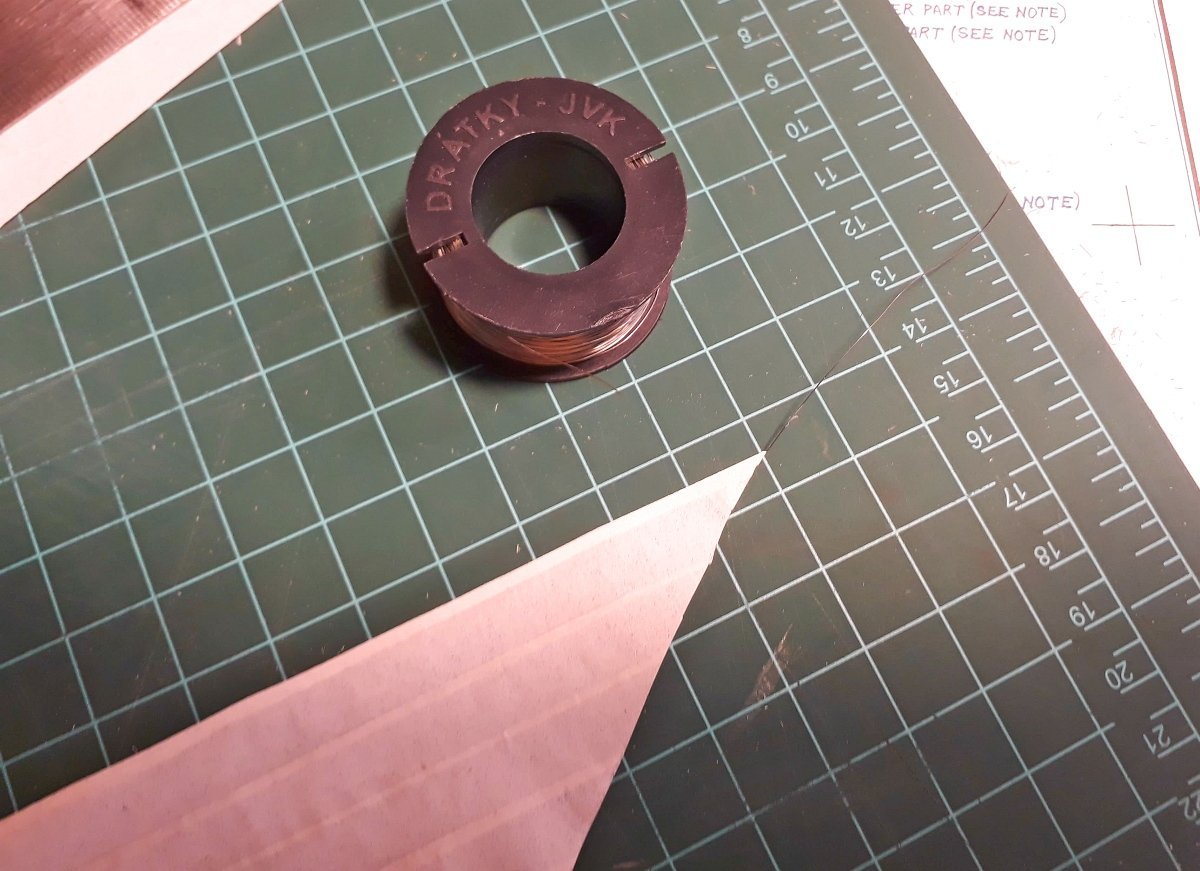
Hi allanyed, thanks for encouraging words. But here actually my attempt to make my own ropes was a step aside. Simply said, the result of my own made rope work so far is good to me i.e. for a very thick rope like anchor rope visible on the deck in the pics above. But when I tried to make thinner ropes, I found, that although the structure of such self made rope is superior to the kit or commercial supply, I felt that it simply does not match to scale and is too prominent. Something like heavy rivets or deep panel lines on some plastic kits - not everything can be scaled down from the original. So the standing rigging will be either kit supply or 3rd party ropes, but running rigging I replaced fully. The kit supply here was made of white-colored thread that would need to be tanned somehow or would be suitable for a modern yacht maybe. Still I wonder if I get help with this technical realization query - how shall I run the topsail rigging to have it historically correct or I will do it "somehow" with hope of not being very far from correctness. Edit: Ah, just have got an answer in rigging section, the community here is really great!
- 104 replies
-
- 1
-
-
- Bluejacket Shipcrafters
- smuggler
- (and 1 more)
-
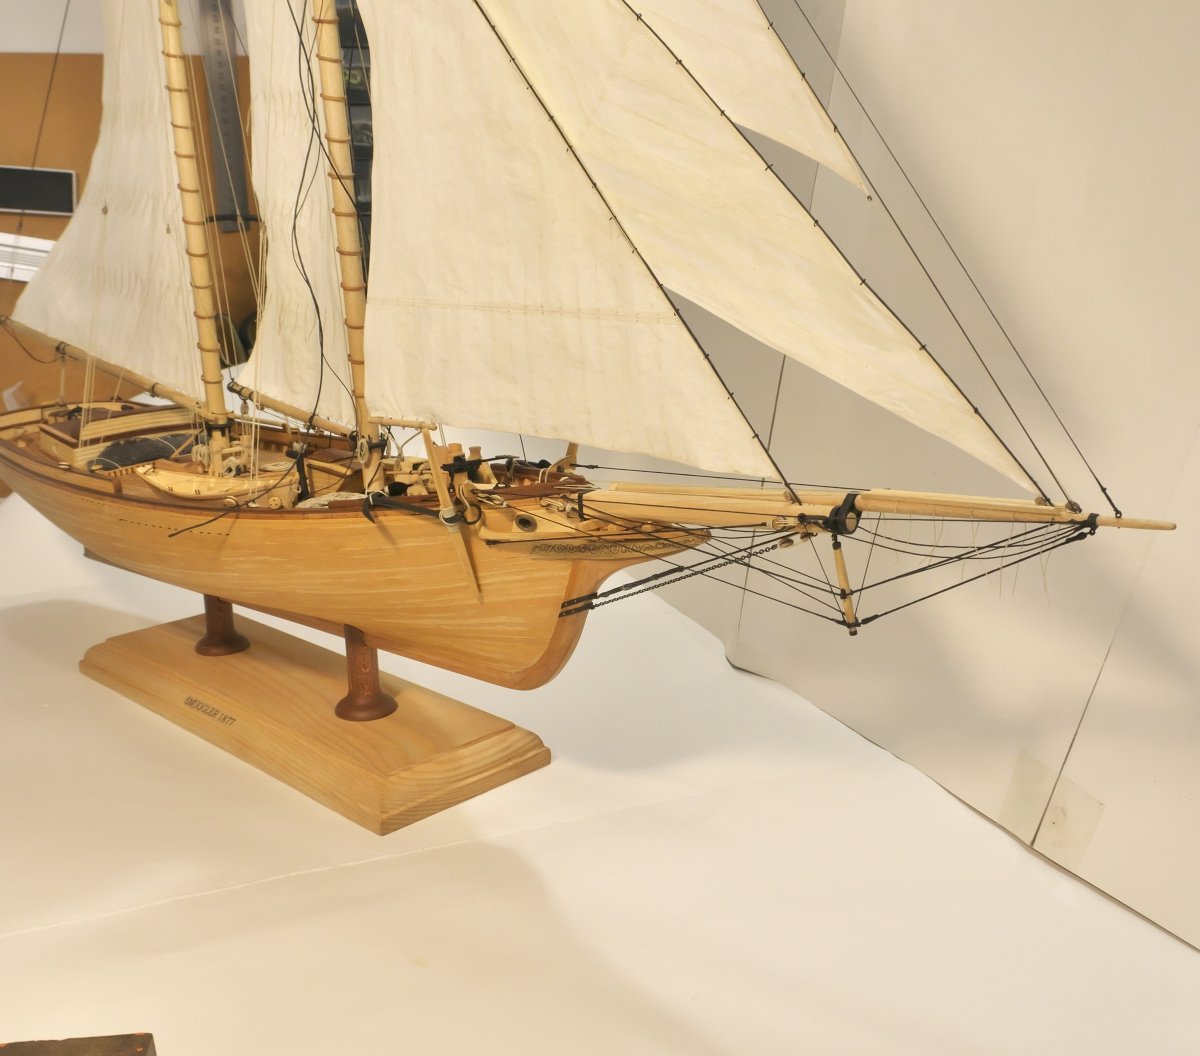
Hi all, thanks for all the likes. (I would rather not mention, that I torn off all the standing rigging, yes, I did it again , I did not like the result, the lines were too thick, self made ropes looking interesting, but I felt the rope structure is not OK for the scale then. Nevertheless, all is now reworked and bowsprit fully rigged with kit supplied threads, happy with the result and proceeding further) I would like now to ask for a help with one tiny technical detail, if you could help how to proceed, would be very helpfull I posted the full detailed question also here, thinking it may be useful in general. Thank you!
- 104 replies
-
- 1
-
-
- Bluejacket Shipcrafters
- smuggler
- (and 1 more)
-
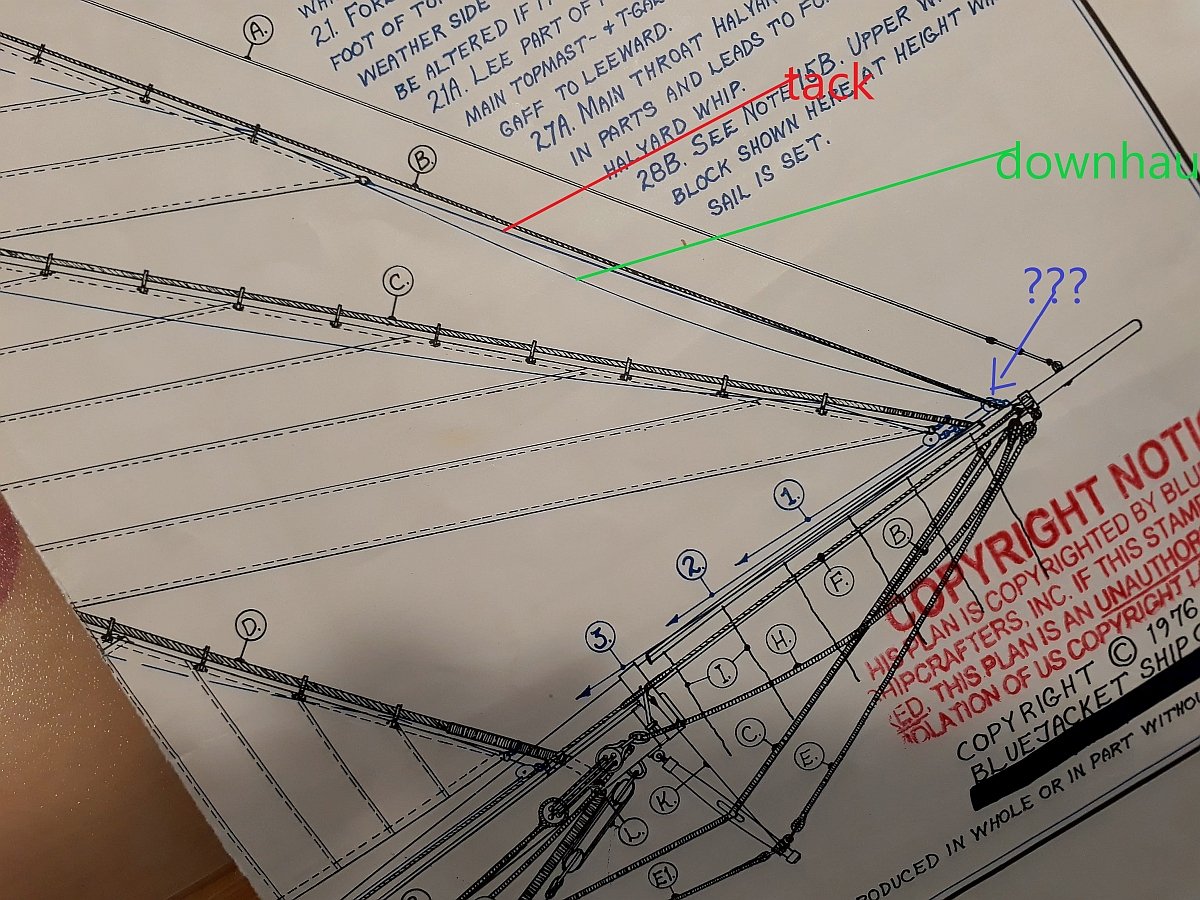
Good day again, am back with my BJ's Smuggler build and another question that may be interesting also in general, so posting it here and asking kindly for a help. I have studied kit instructions, Chapelle's American fishing schooners, Patersson's For and Aft rigging, but have not found the answer: As I understand, there are two lines concerned here, green downhaul, attached to the jib topsail top corner that would serve to pull the sail down and tack rope (red) that fixes to sail lower corner. According to kit instructions, both lines then travel aft to the bitts (In the pic above, you see them marked in circled nr. 1. and 3.). My question is, how is done the "fixing point" marked with blue questionmarks? For a downhaul, there would be a block naturally, but what about tackle? Was there another block or was the line somehow just put through some eyelet? Or shall I use a double block with one hole for downhaul, the other for a tack? As you see, the plan is not very clear here and written instructions says only that it is "self explaining" from the plan, which for me is not unfortunately. As you see, the jumbo and flying jib do not have this questions, since their lower corner is simply attached to the stay. Thank you for any ideas.
-
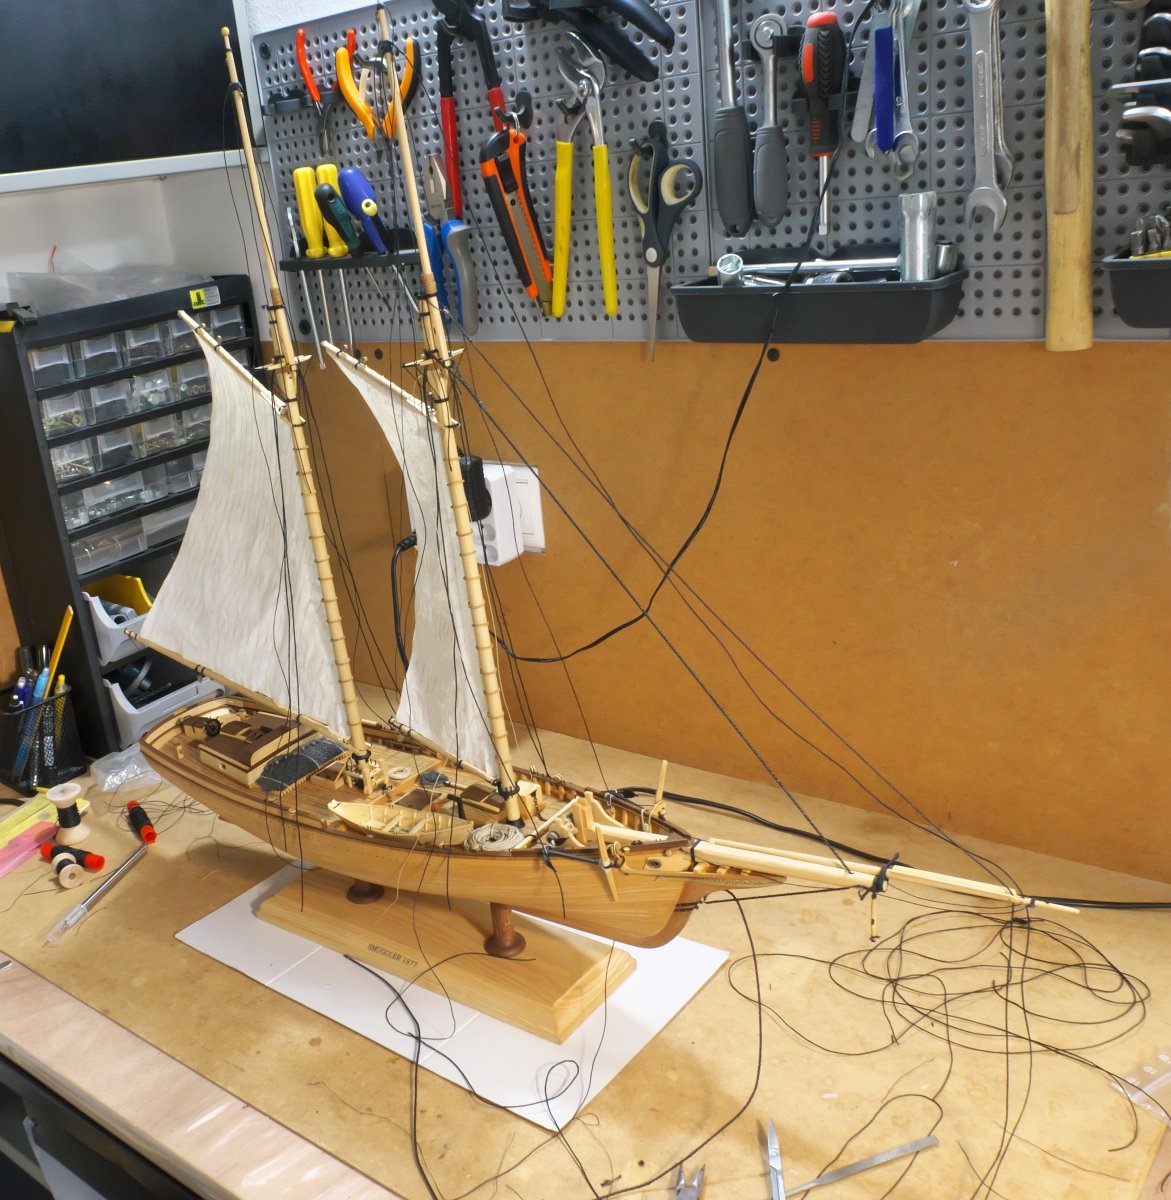
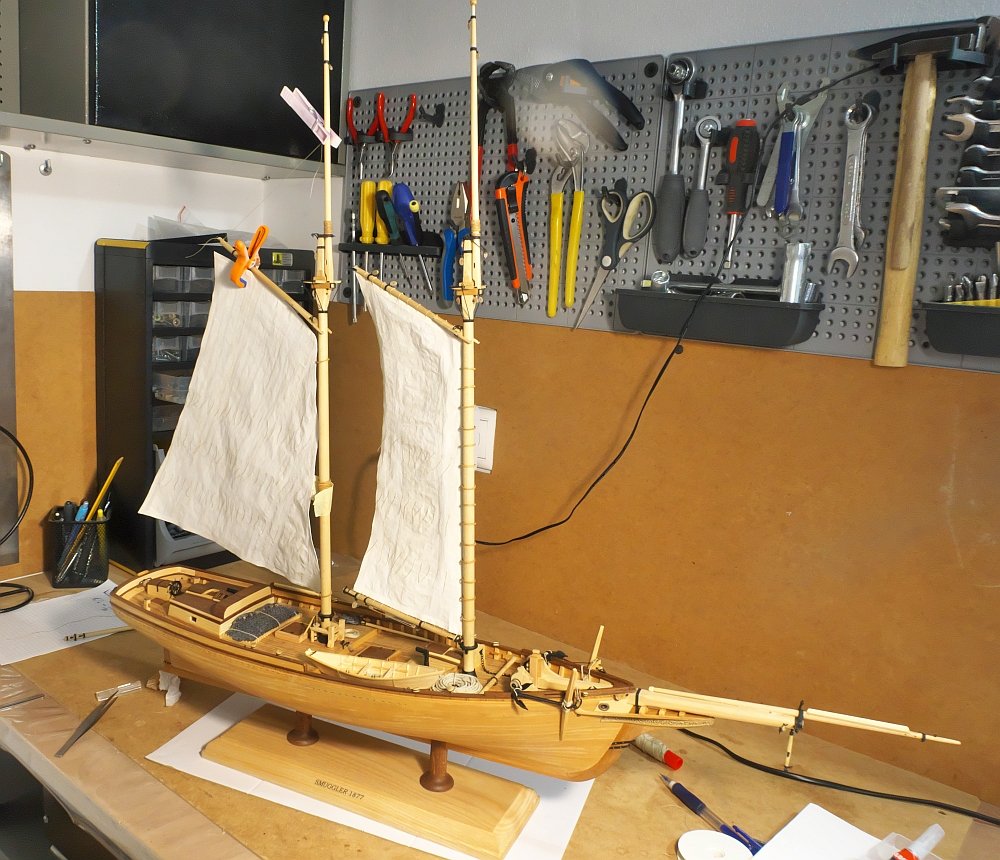
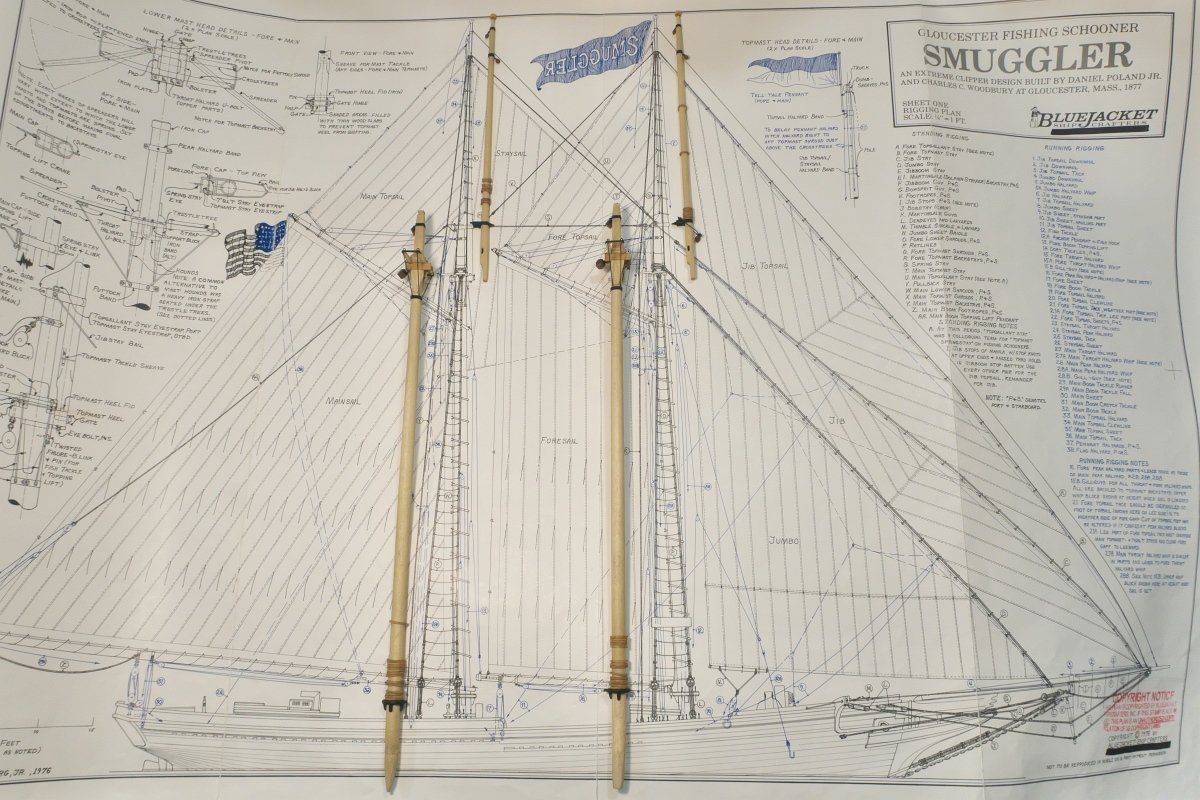
Hello, I have started with "upper floors" as promised. Rising the masts was not so difficult, more thoughts I spent on "workflow" for the sails and rigging: This is my first model and I did not want to attach something at the beginning, that would create nasty "accessibility" problem at the end. Will see only later, if something was not forgotten. Standing rigging was again quite a challenge for me. I have studied various Smuggler's builds and other models too, still was a bit reluctant when it came to a thread thickness. Seems like as many modellers, as many interpretations. Fortunately BlueJacket provides very detailed rigging size table, big kudos for that! However there are only 4 thread sizes for standing rigging included in the kit. I tried to make some reasonable approximation. When needed, used 3rd party threads and also made several ropes using the rope maker. But only when I felt it would make sense: on thicker threads like stays and main shrouds. One head scratching item for me was jumbo stay. It is the thickest part of standing rigging and even when I made it as closely to scale as possible, it looks well, quite prominently let's say. But it matches the plan scale instructions, hopefully the final result will not be too bad and oversized at the end...
- 104 replies
-
- 6
-
-
- Bluejacket Shipcrafters
- smuggler
- (and 1 more)
-
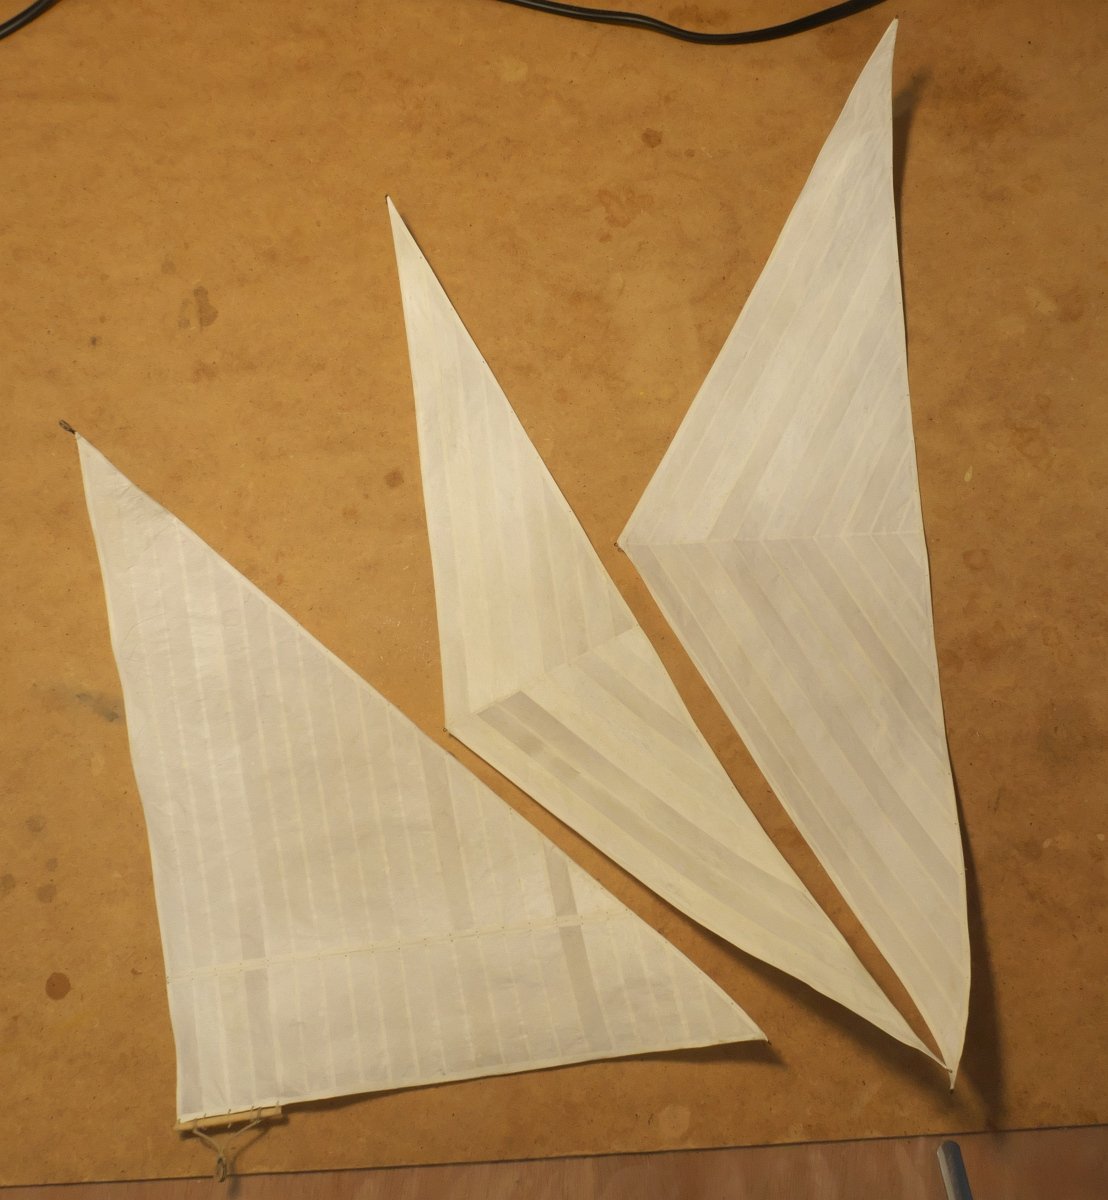
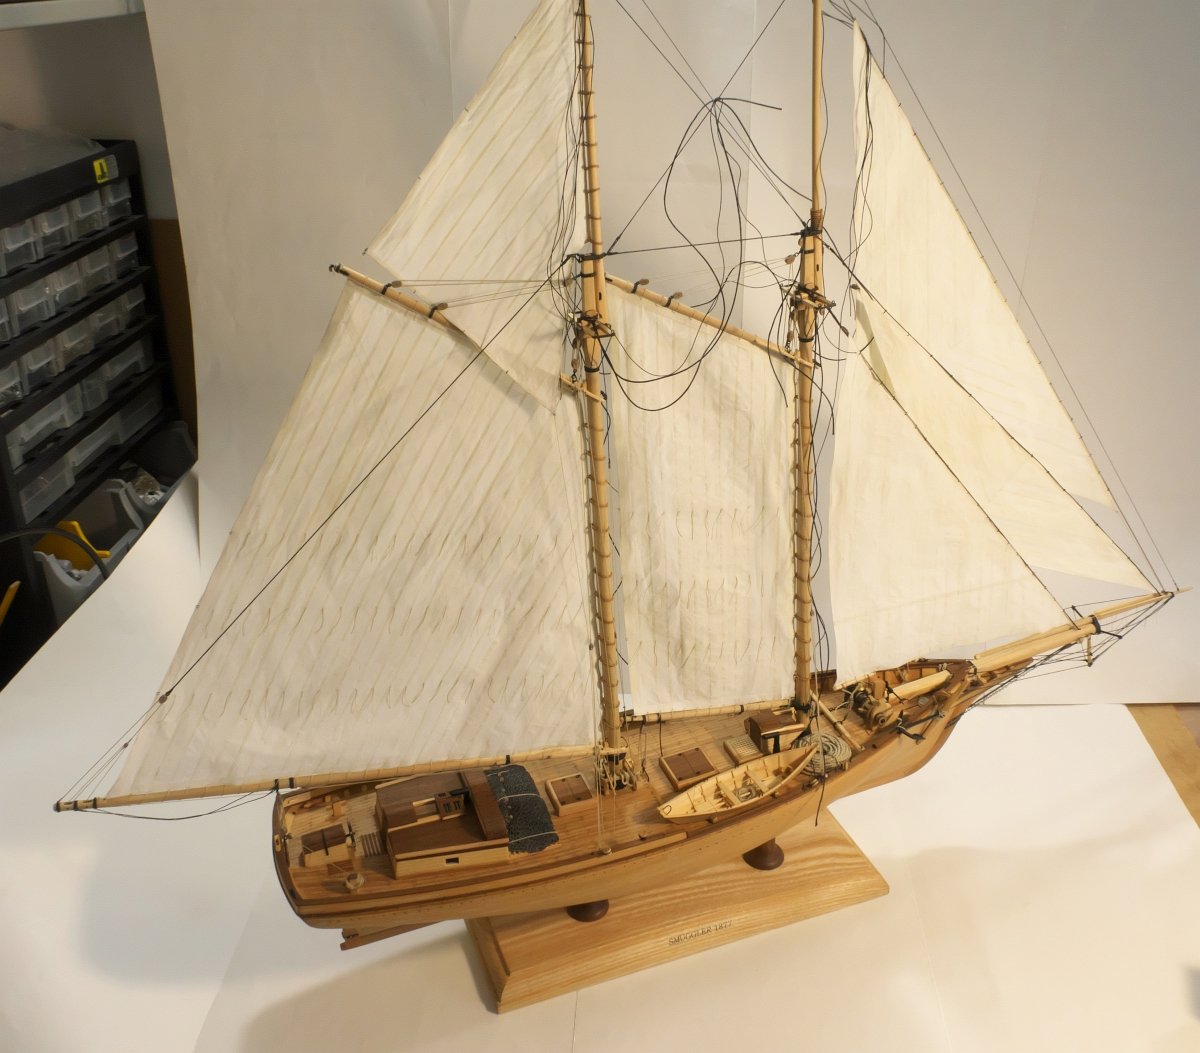
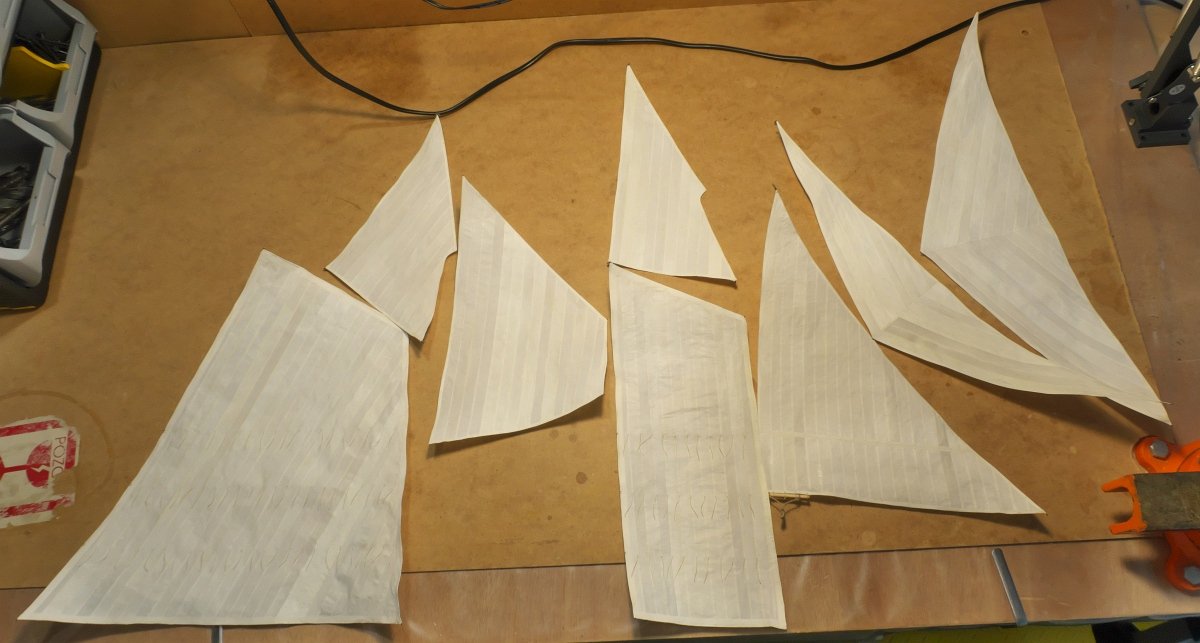
Greetings, am back again after a while. Had some accordion to tune and also sail making proved to be quite challenging work with very uncertain results for me. But here they are, done. Thanks to the wired lining and clear lacquer the sails preserve the desired bulged shape quite well. Weathered only very gently to achieve just off-white creamy shade. I guess I will make some ropes now and then carry on rising the masts etc....

- 104 replies
-
- 6
-
-

-
- Bluejacket Shipcrafters
- smuggler
- (and 1 more)
-
Thank you for the answer Nic. I think I will make it then somehow - probably leave it in the current state. In the meantime few more shots from the work in progress: Jib sail is being completed: Jib Topsail is being glued together: And main body done, well, actually its first half only: Ok, I will put the camera aside for a while and will come back once all the sails are done...

- 104 replies
-
- 3
-
-
- Bluejacket Shipcrafters
- smuggler
- (and 1 more)
-
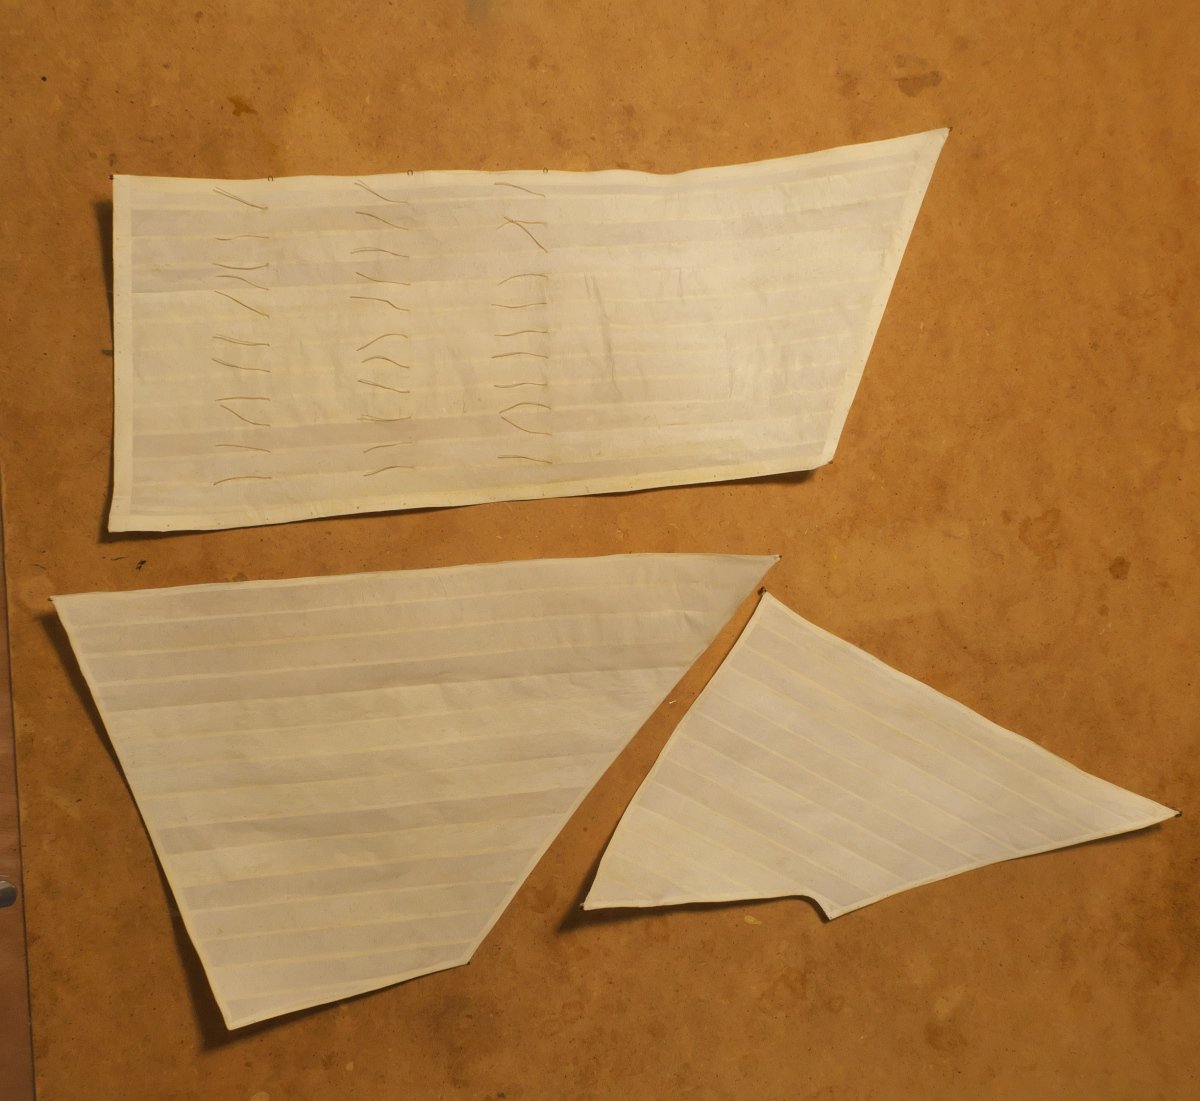
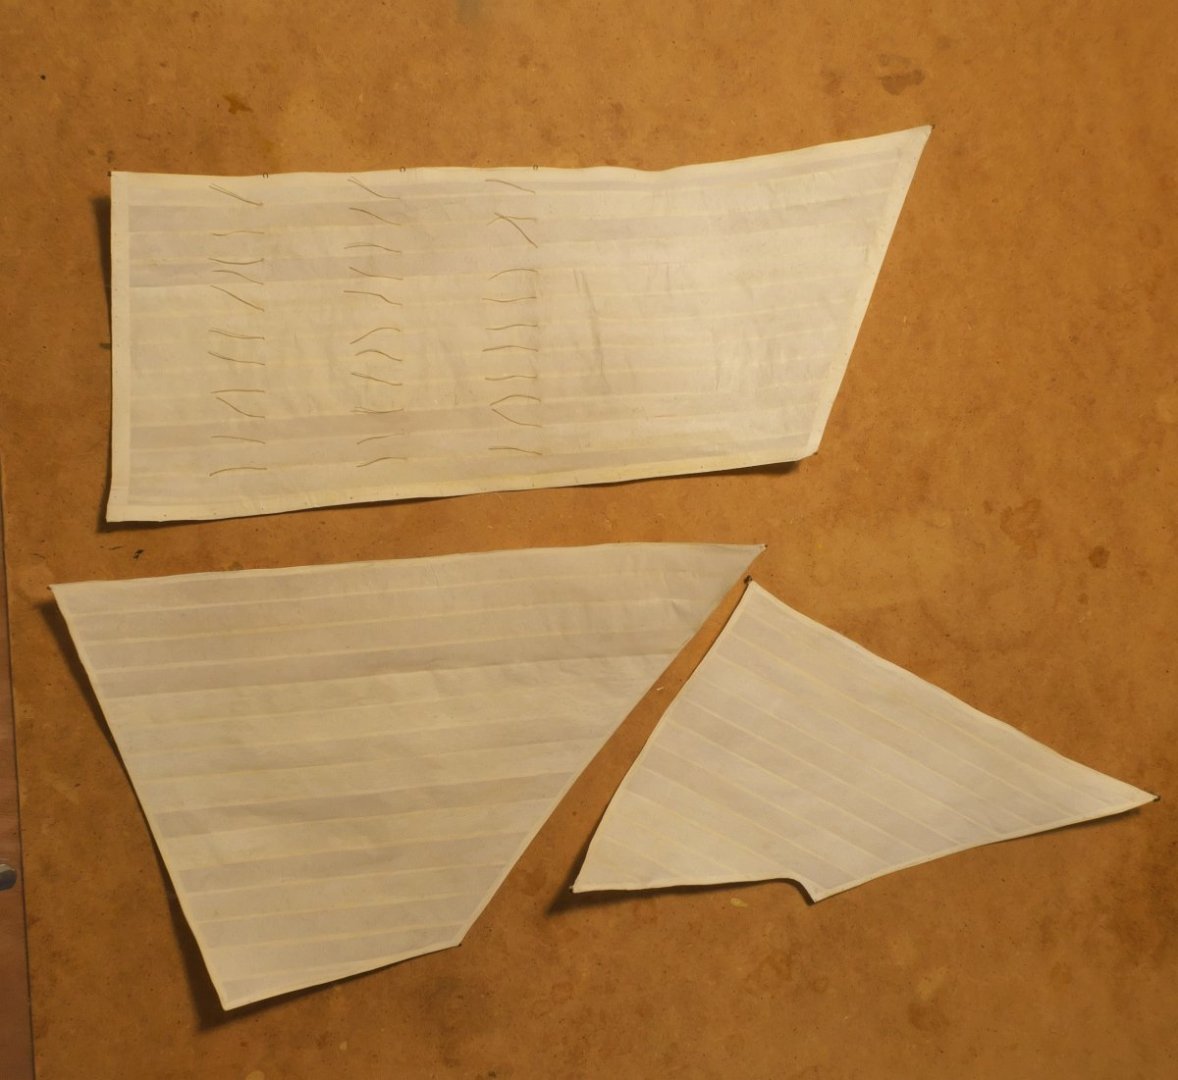
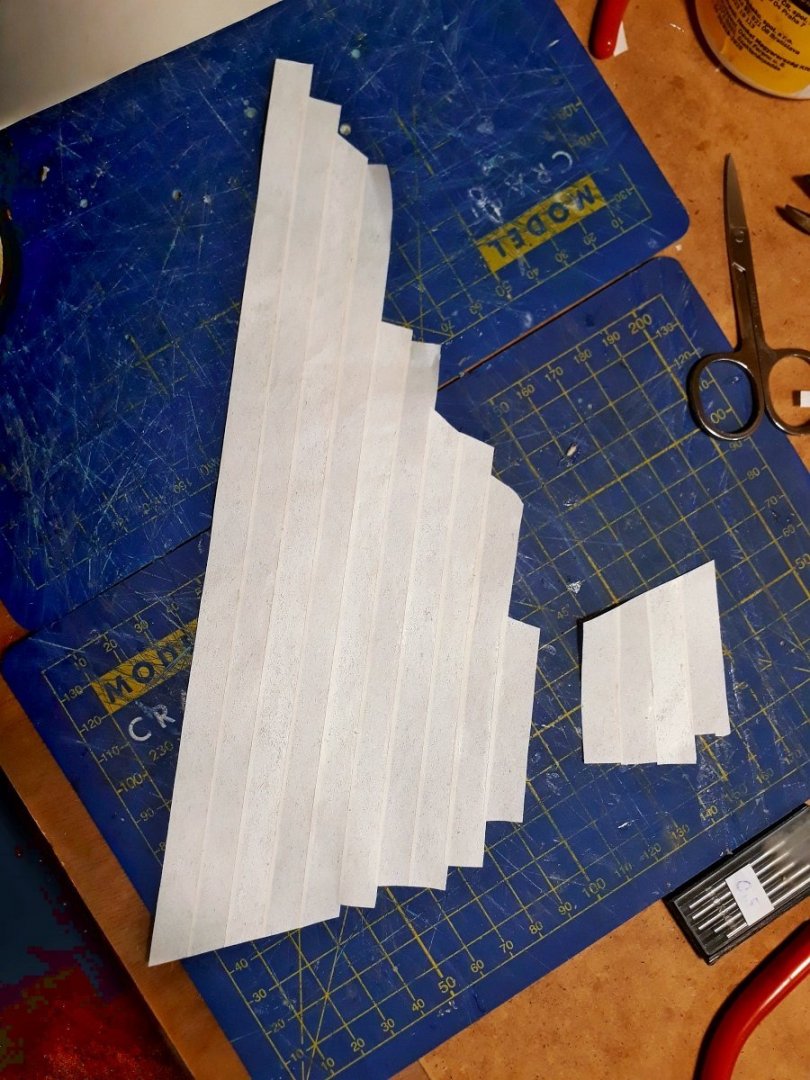
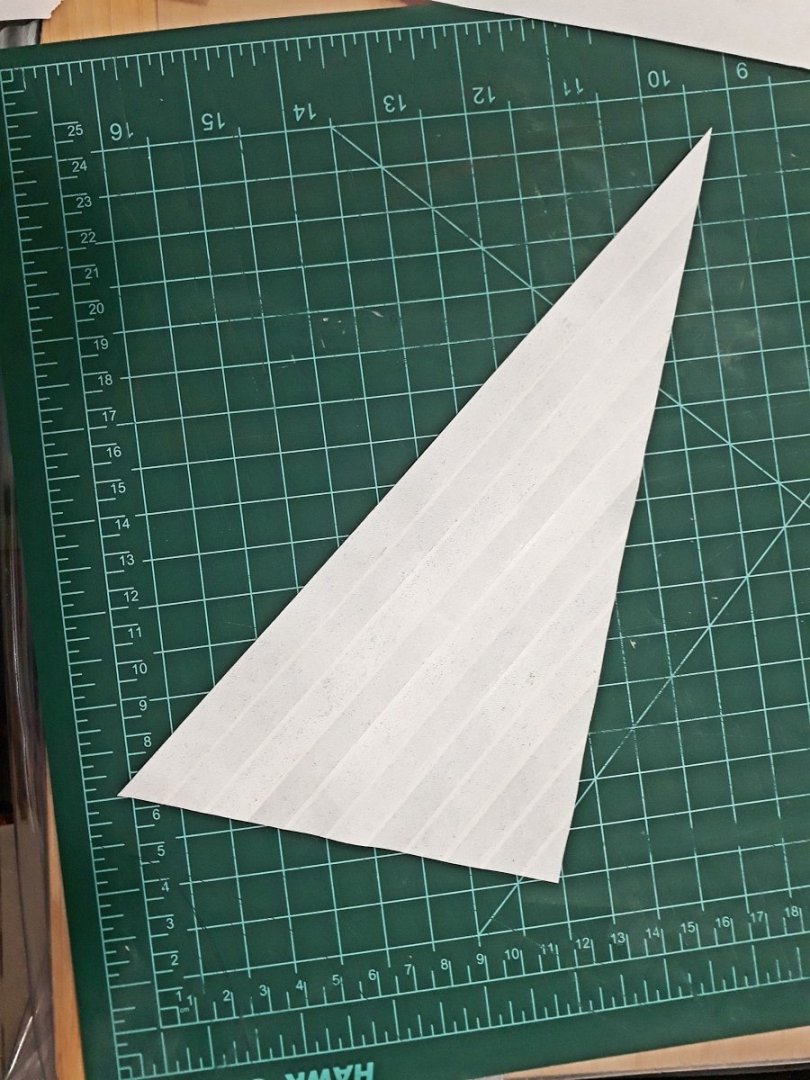
Thank you Allan for kind words. Although am not sure I deserve them. This project is my first wooden ship build and I still learn a lot. As you see I took many wrong paths and returning back to the right way was sometimes very frustrating. As for the sails, I made and scrapped two jibs trying to simulate the joins using pencil, but did not like the result. Eventually I took the inspiration from here, which is where the credit shall go for sure: I like the look of the sail, although I feel the panel overlap should be even narrower to fit the scale, but here I meet the limits as gluing paper strips together with so little attaching surface is tricky for me and also the final sail shall have some durability. Still it is not that much wide compared to plans, so I hope the final result will be fine. Now the sail is slightly weathered and matt-lacquered, will post pics later when more sails are available. Thank you all for all the support.
- 104 replies
-
- 3
-
-
- Bluejacket Shipcrafters
- smuggler
- (and 1 more)
-
Jumbo sail "construction" detail question
juhu replied to juhu's topic in Masting, rigging and sails
Thanks a lot for all the answers. I have contacted MrBlueJacket with the question. The post with pics for bonnet lacing is very informative and somehow it corresponds with Chappelle's American Fishing schooners book. It seems as I suspected that line of eyes for lacing should be much thicker, with smaller distances that anticipated in plans, at least it seems to me so. Also I have to ask myself if it makes sense to represent this lacing - rope structure is quite complicated in reality and it may easily result in overdone appearance. But I learnt here again very interesting things and thank you for that. -
Jumbo sail "construction" detail question
juhu replied to juhu's topic in Masting, rigging and sails
Thanks for the hint! I have found few notes on bonnet in Chappelle, p. 354 now. Although not very conclusive ( seems that exact lacing pattern is not known) still helps to understand a bit. -
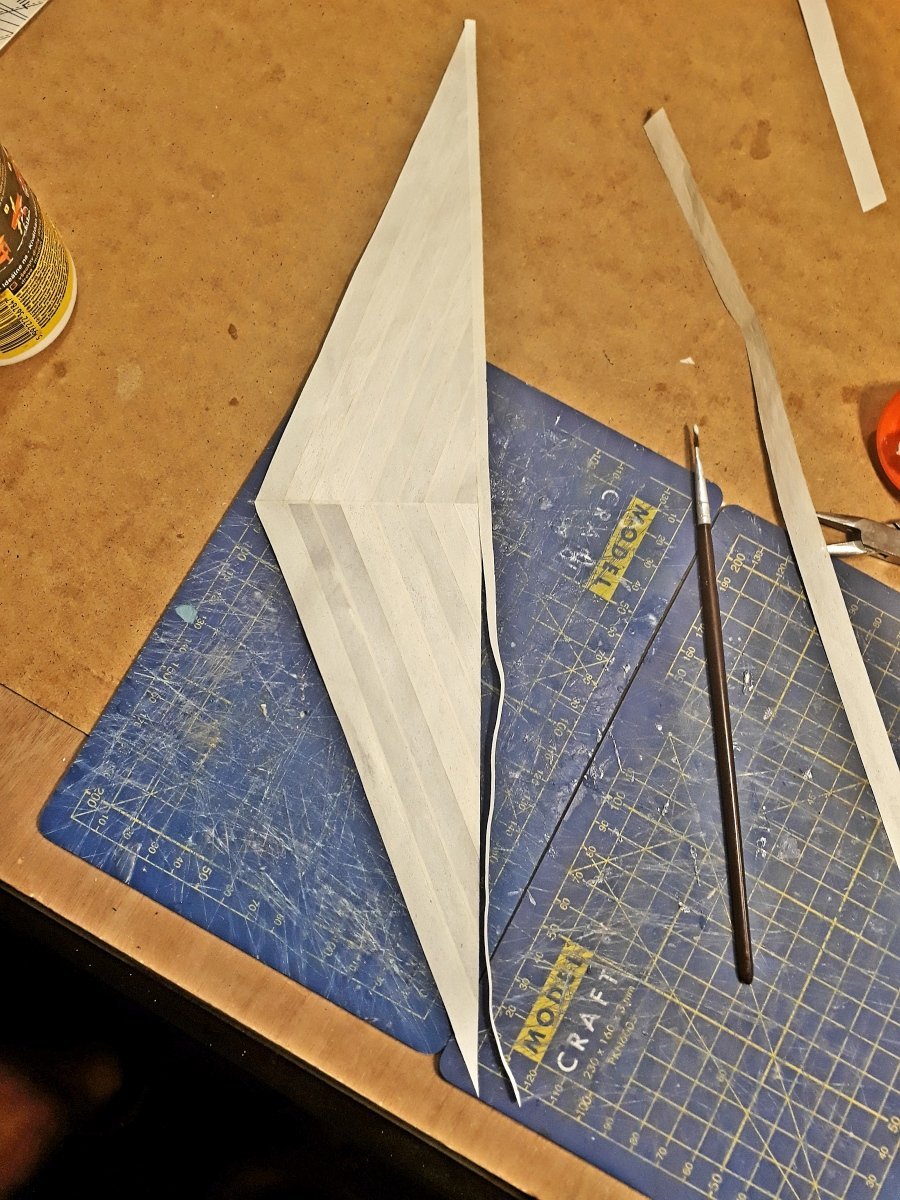
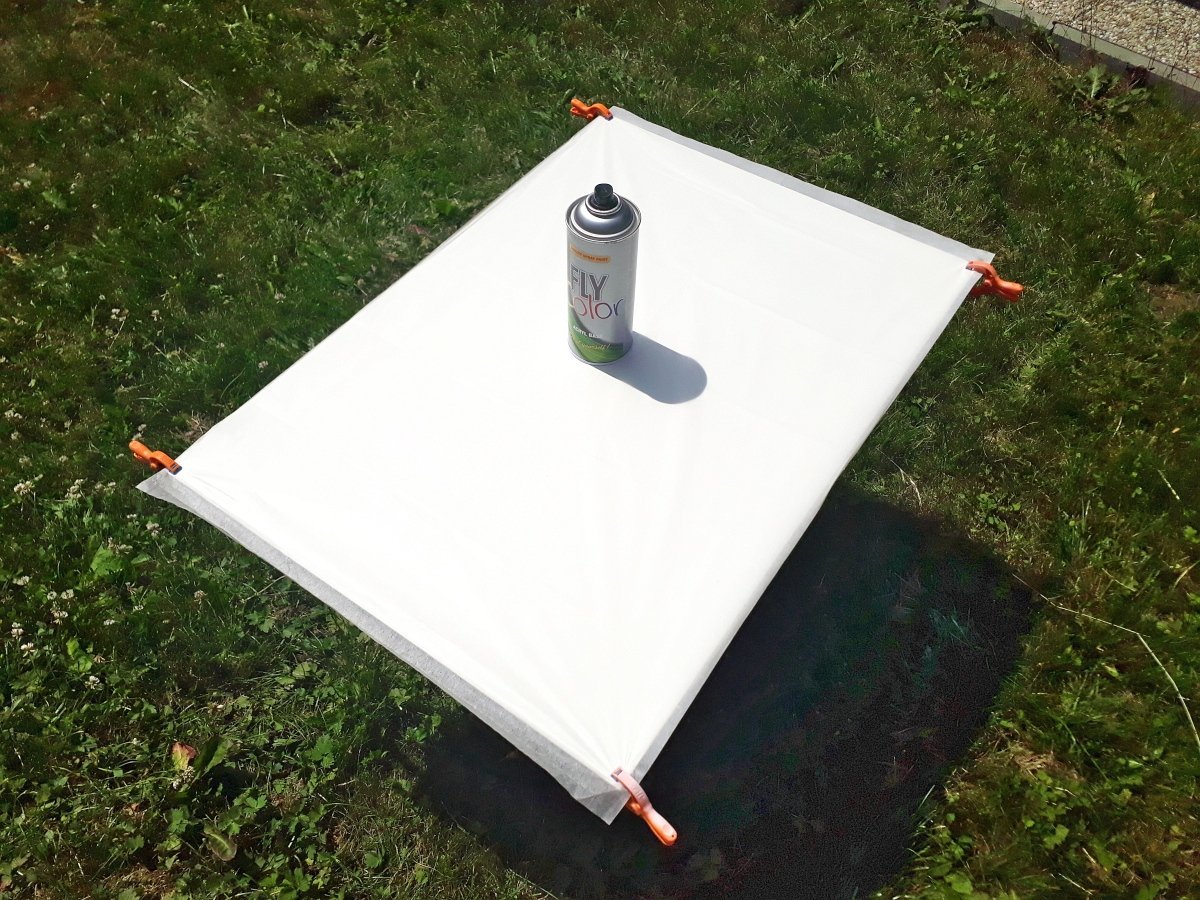
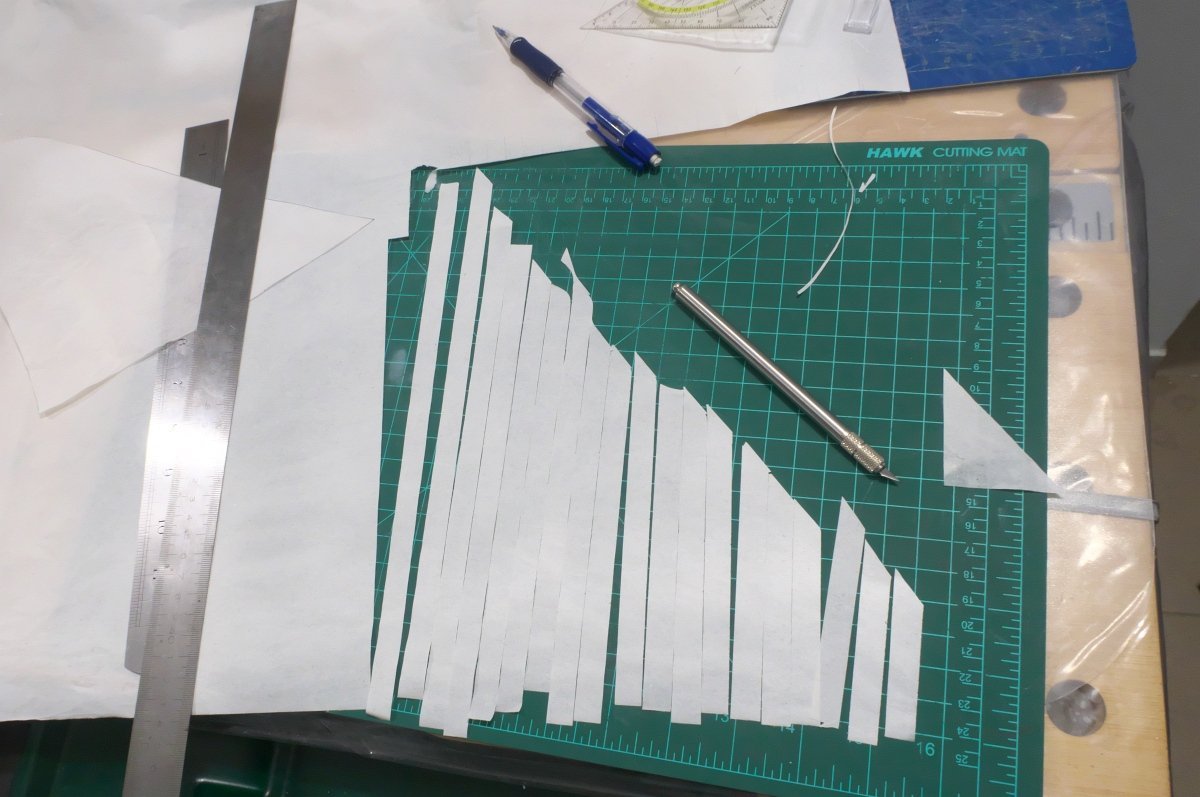
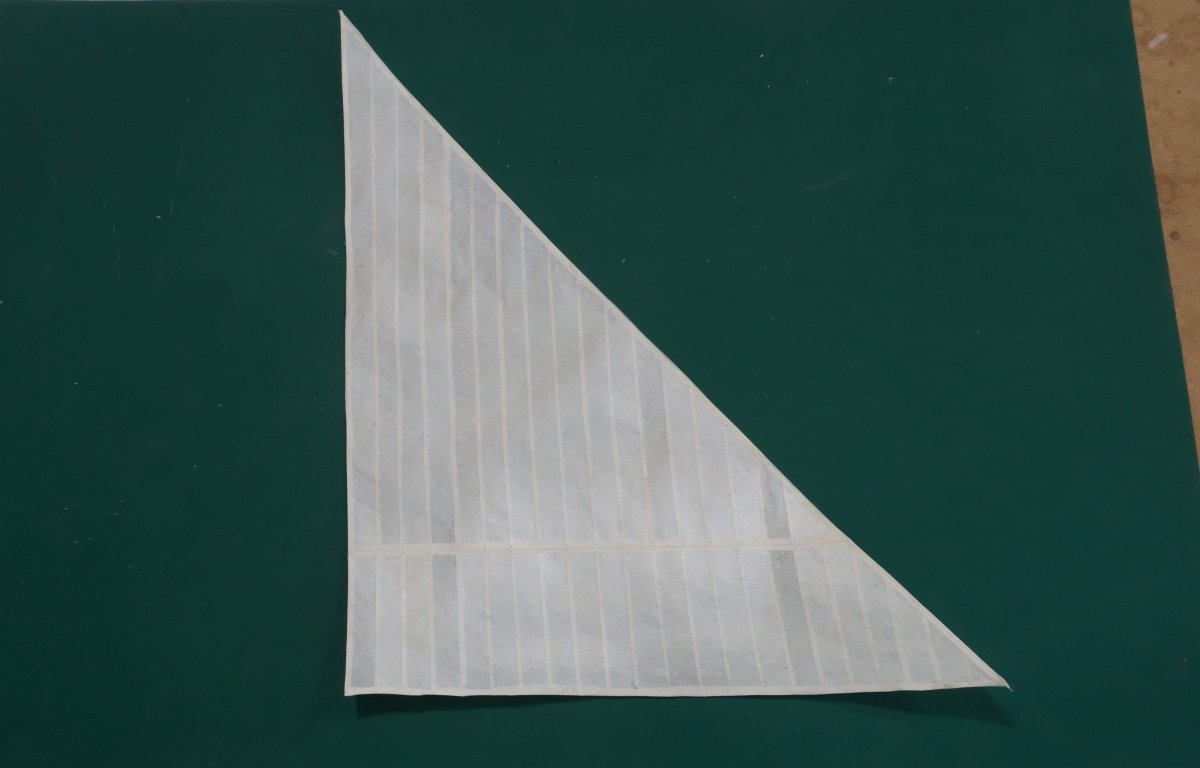
Hello working further on sail and elaborating little bit. The previous pic posted was not the right way at the end :-/. The color was too yellowish to my taste and also I could not get the surface smooth enough. So scrapped and took some spray can this time, sticking with white color. The spray creates much better looking surface and thanks to its opacity, the slight color variation does look quite convincing to me. After several attempts and with the hints from other thread I found here I started to build the jumbo sail from separate evenly cut strips. Tedious but rewarding at the end hopefully. Sail edges strengthened with very thin wire. Shall help with shaping and add some durability I hope. So far quite happy with the result? I came to one open point here though, if you could help, would be grateful. Thanks
- 104 replies
-
- 3
-
-
- Bluejacket Shipcrafters
- smuggler
- (and 1 more)
-
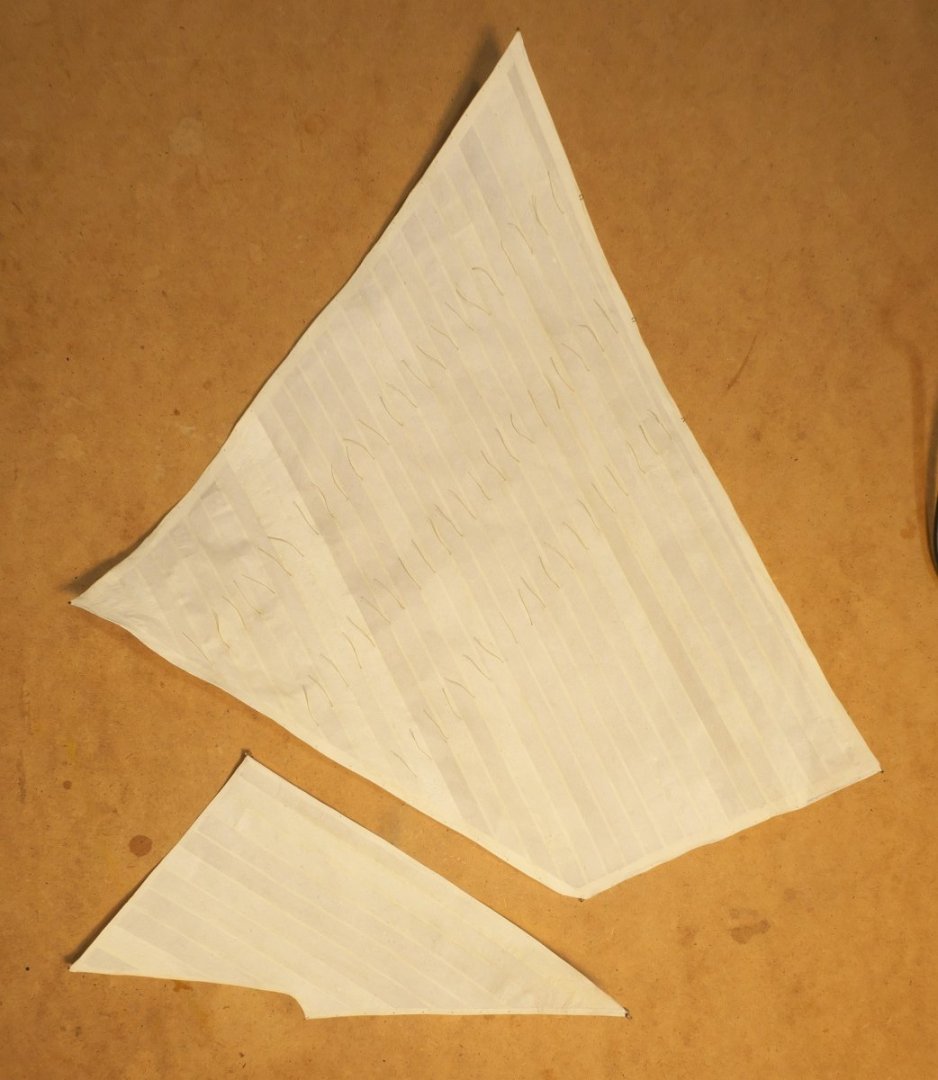
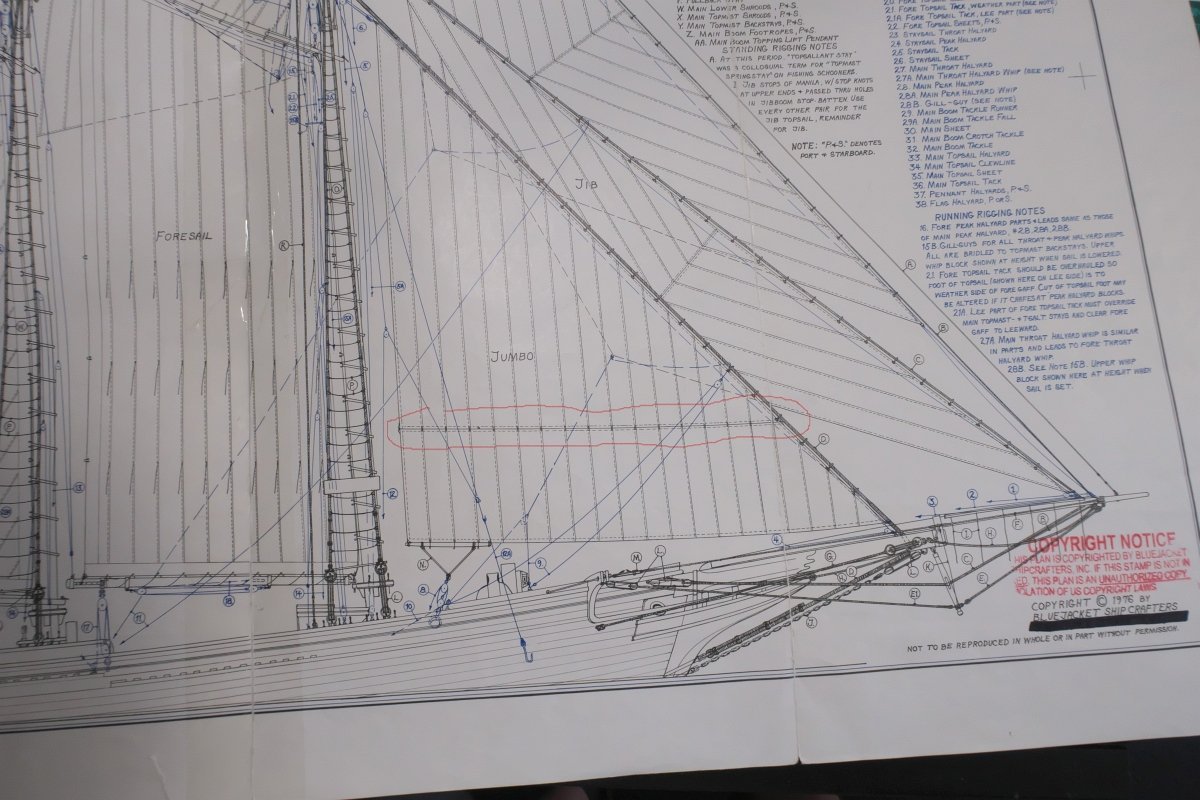
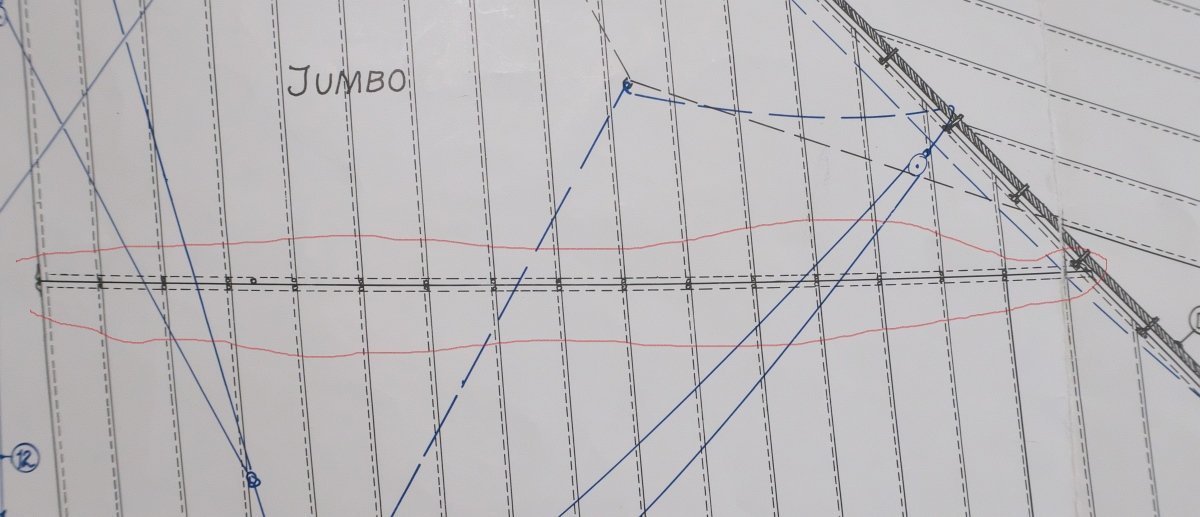
Hello, while dealing with jumbo sail preparation I came across this detail I cannot understand / resolve. It seems that the sail is like horizontally divided in 2 pieces. The marked line truly does not seem just like some strengthening canvas. I have not found this on any other model or googled picture. What would be the purpose? Even much larger main sail does not feature any necessity for being constructed like this. Then of course, if you check the second zoomed picture, you see that both parts of the sail have the line of eyes like if they were to be stitched together. But there is no rope, no metal pin, nothing that would be inserted in those eyes. Above all, at the aft edge of the sail, there seem to be like some another strange teardrop shaped things/hinges - purpose of whose also is not clear to me. If you have any ideas how this is supposed to work, whether I shall bind the sail part somehow together, which is not shown in the plans, or truly is ok to leave the eyes in the sail empty, any help is welcome!. Thank you.
-
Another very small step up. I have started to prepare sail cloth by coloring the tissue paper and following the web courses. As always, it looks much easier in the video than it really is, but lets see how it shows. I am trying to finish as much sub steps as possible before final assembly knowing that once all the masts and booms are placed, my whole work desk will be blocked with the model.
- 104 replies
-
- 5
-
-
- Bluejacket Shipcrafters
- smuggler
- (and 1 more)
-
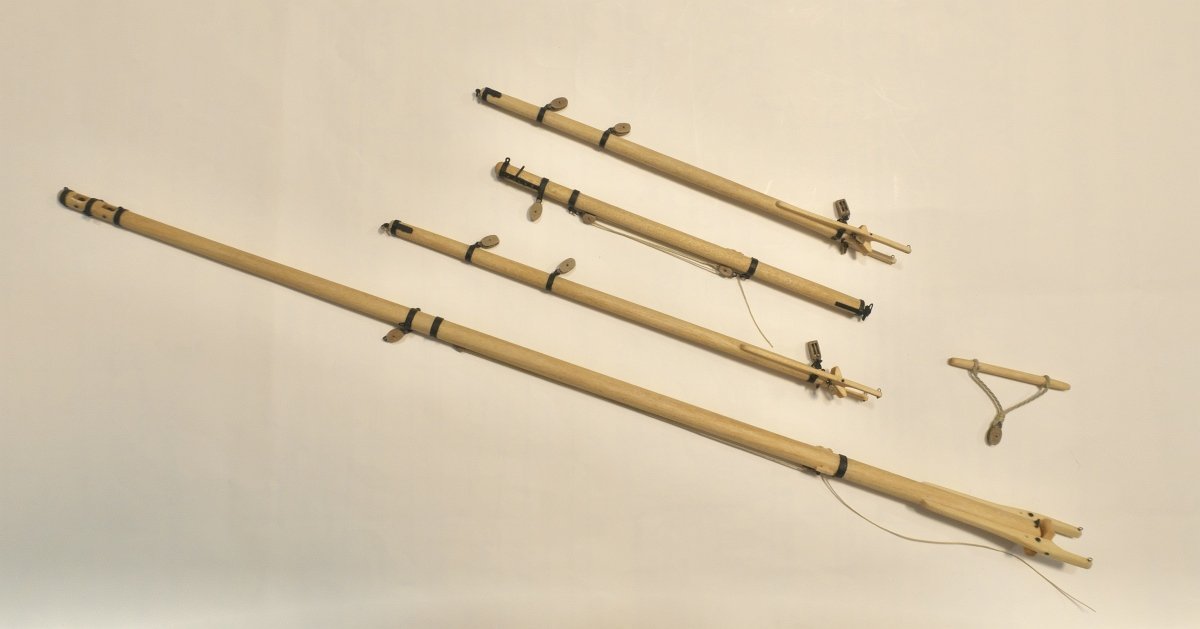
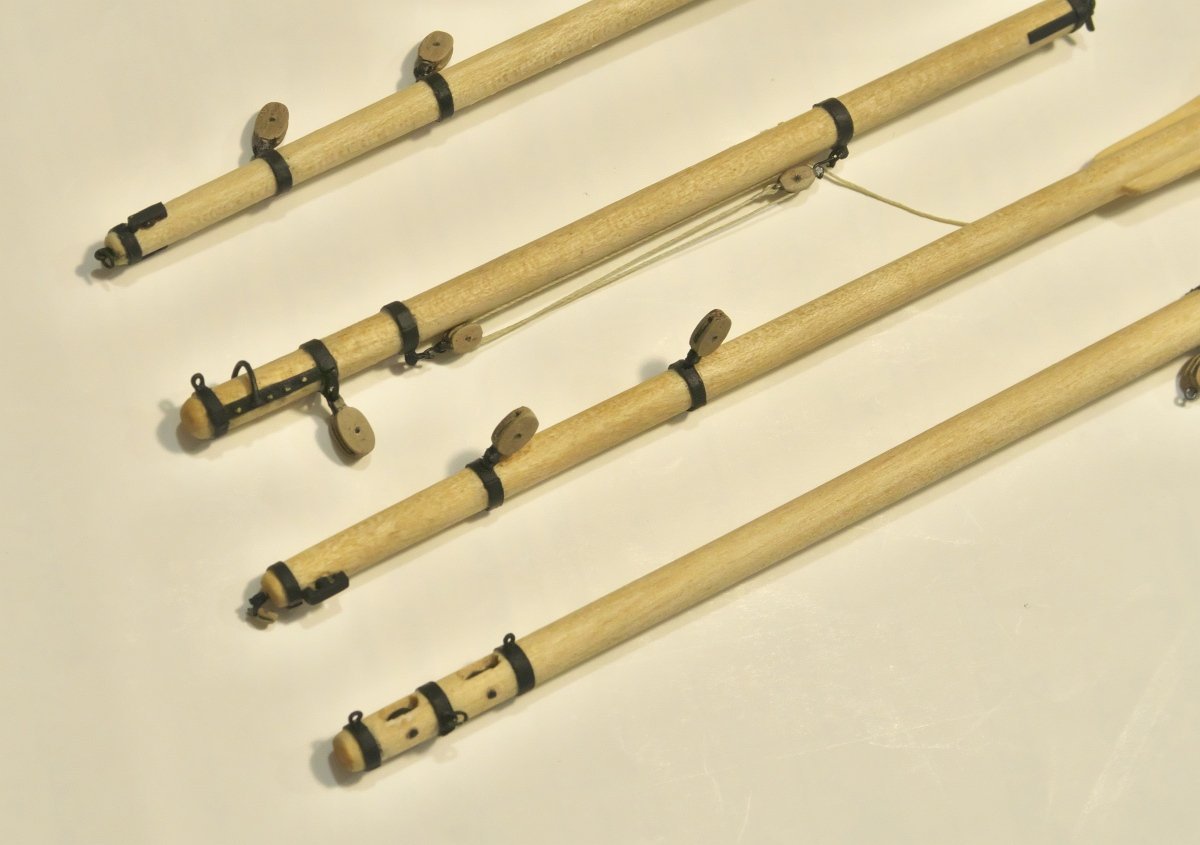
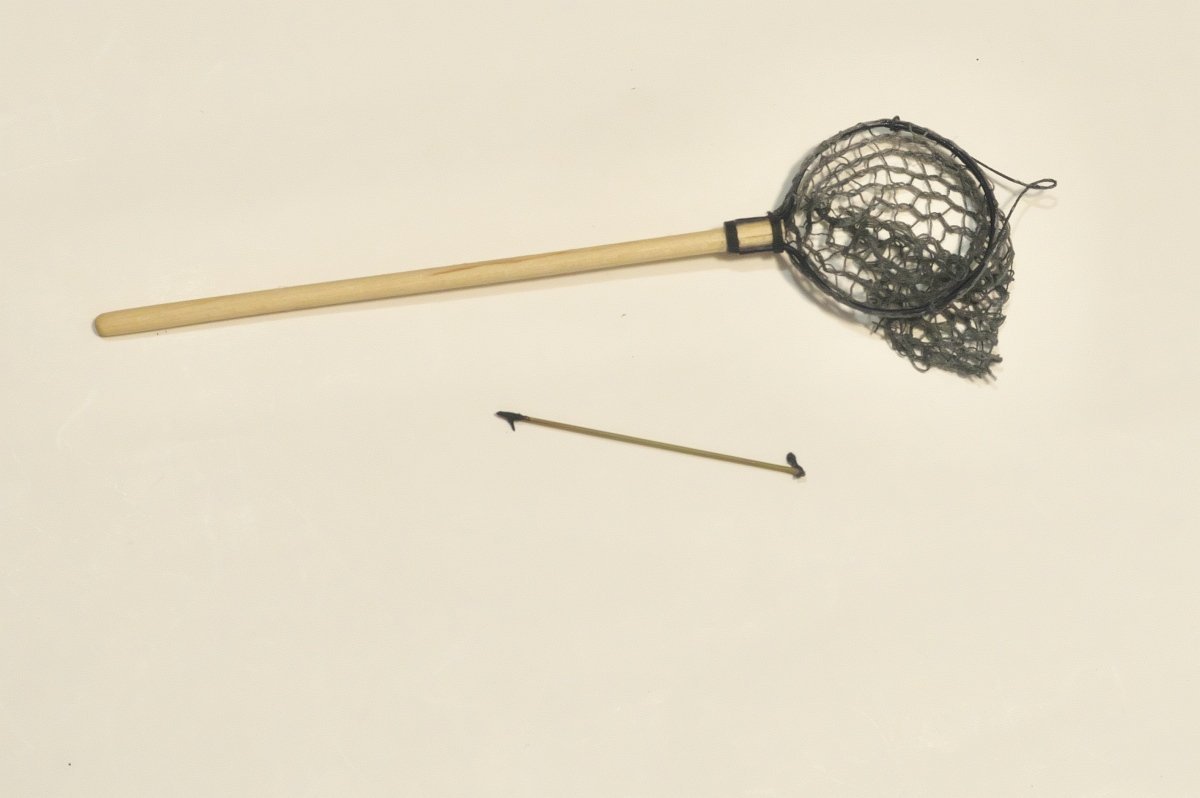
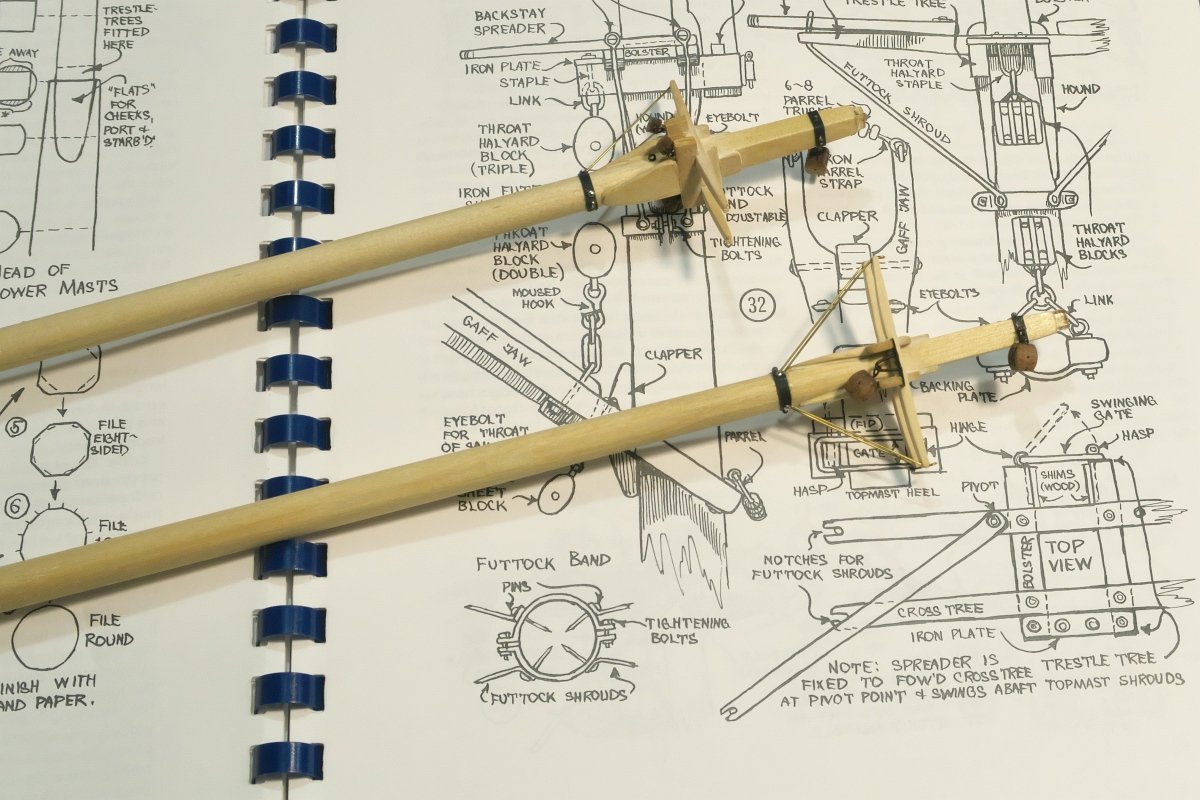
Greetings after a while. I have been working on booms and gaffs and they are considered as finished now. It took me a while. So many fiddly parts and work that I think will not be so visible at the end, just like plane cockpits in scale plastic kits.... And I have to add one big re-do to my list, that also costed me lot of time. I wanted to replace white metal blocks with the wooden parts. I found something so-so reasonable in size, but alas, found too late that simple shape-wise they do not look right. So rip them off, revert back to metal blocks from the kit, painting, weathering etc.... I have never been a fan of pretending something to be a wood, but here I must say that there was no other option and all the blocks from the kit represent the things very good with some paints and pencils on. My fault, not the first one, wish it be the last one? And some fishing equipment in addition: dip net and boat hook:
- 104 replies
-
- 4
-
-
- Bluejacket Shipcrafters
- smuggler
- (and 1 more)
-
Hi Phil, thank you again for replies. Now with all your hints, coming back to plans and instructions (and with the help of Mr. Chapelle too of course) I think I got the picture. Let's see, if I would be able to make it into realization! Regards Juraj
-
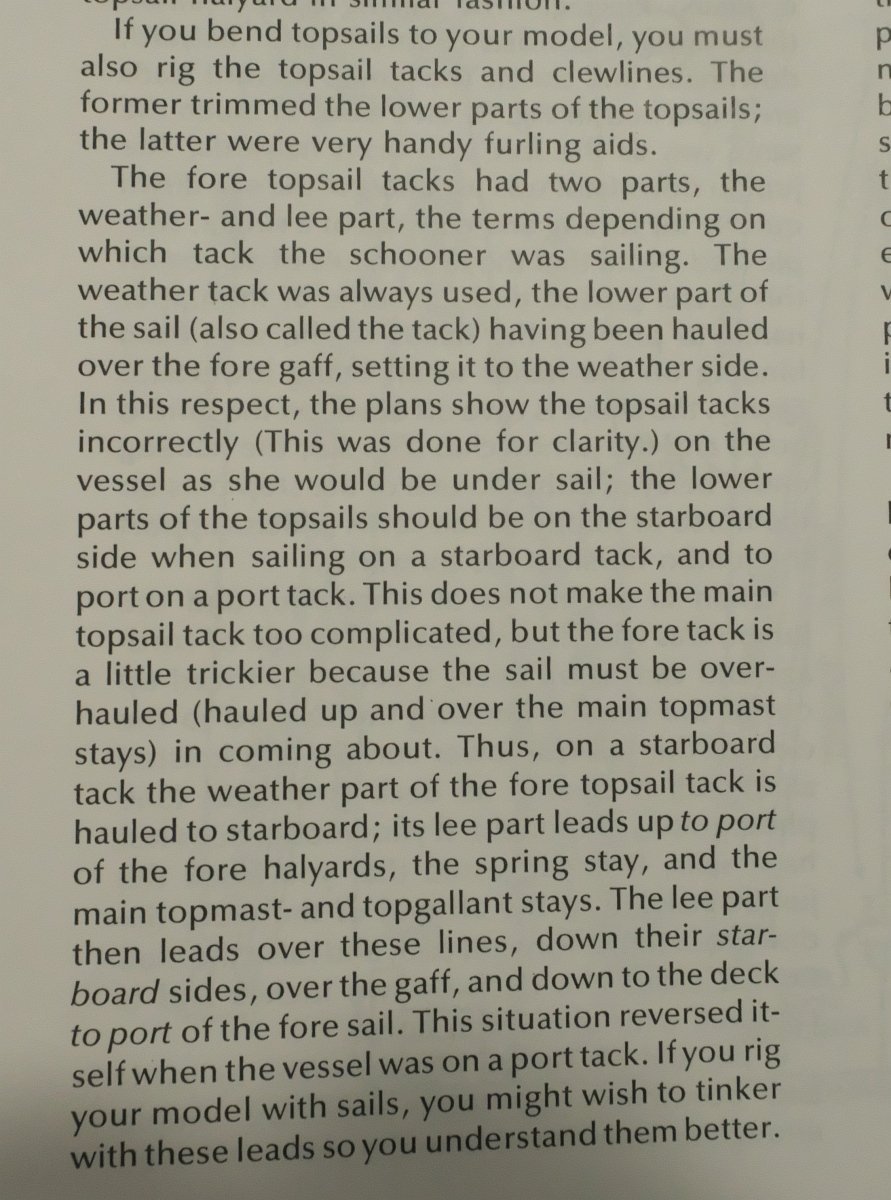
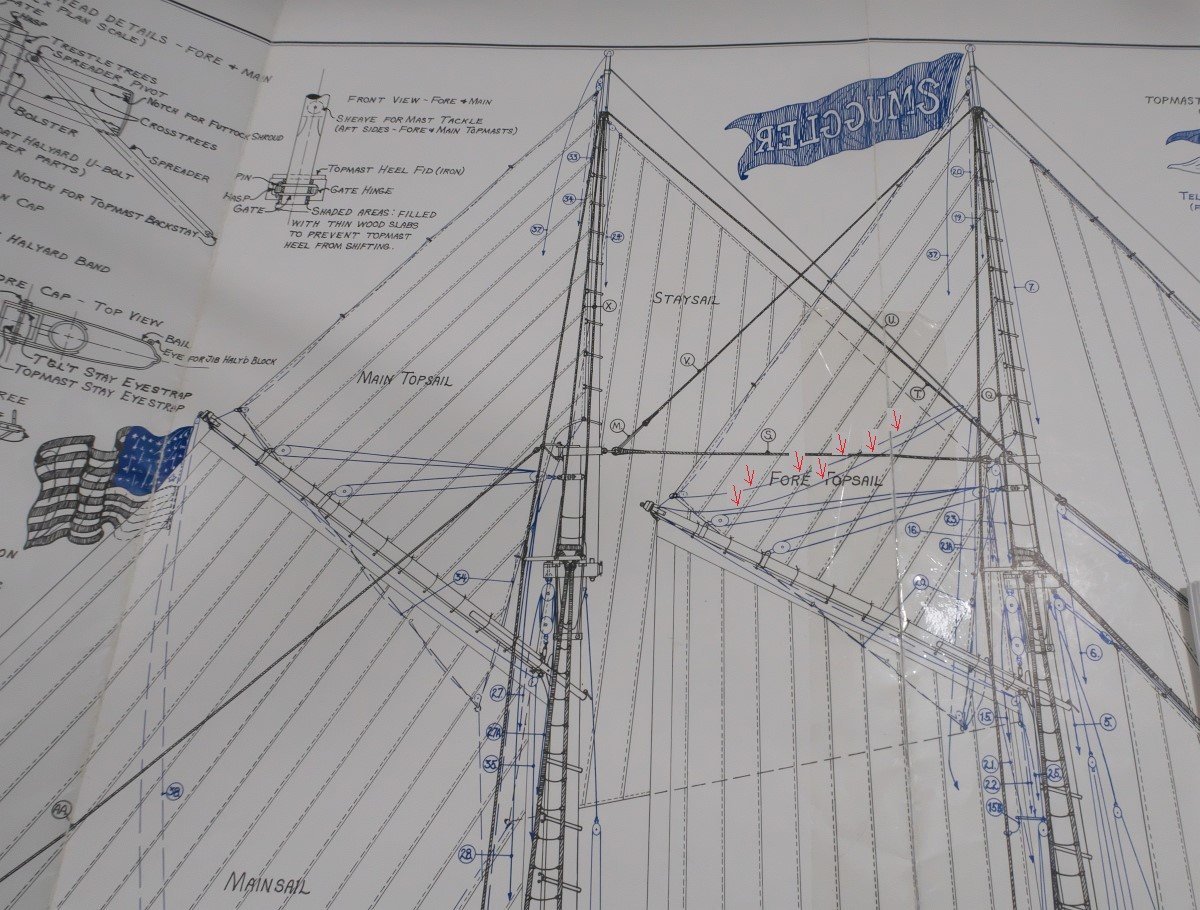
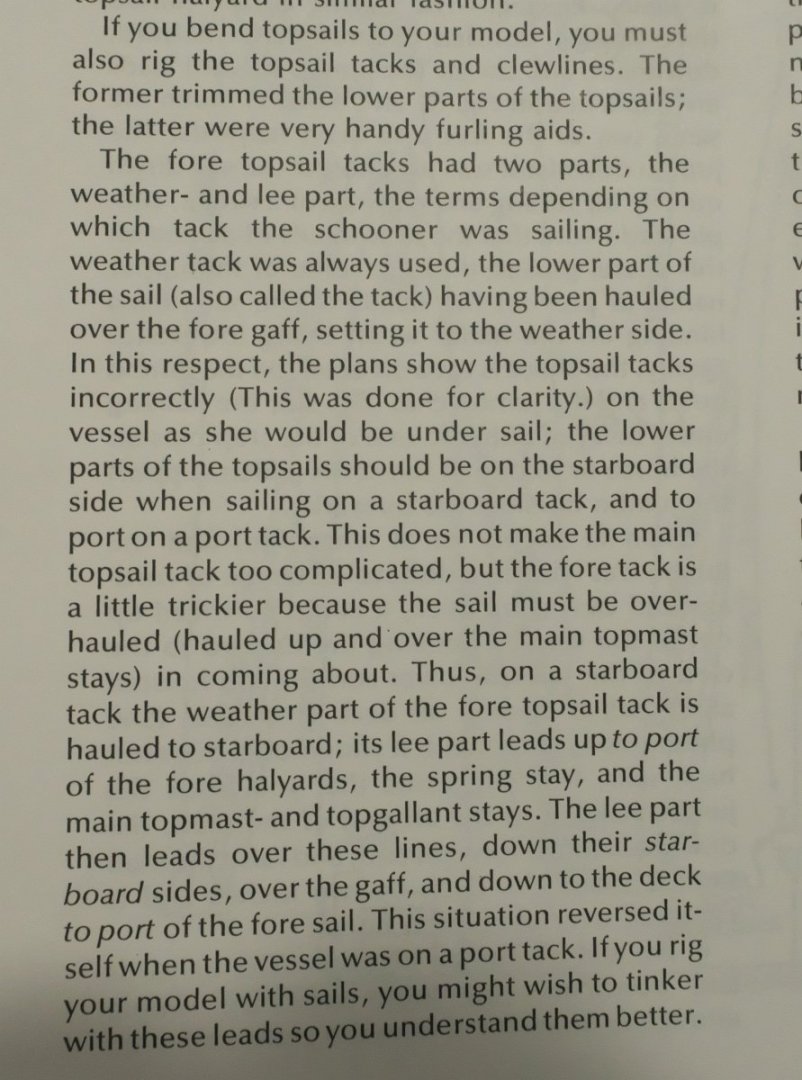
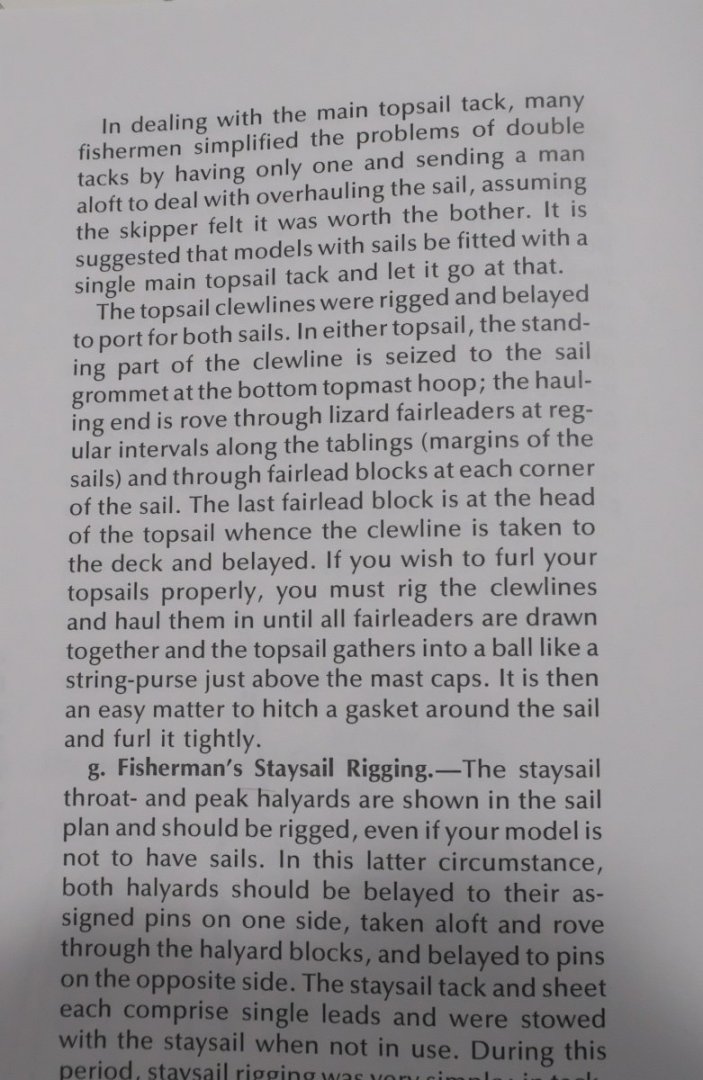
Thank you very much for your comments Phil, helped me a lot. I went through your very detailed thread and also looked into Chapelle's book. I have one and am using it for my build presented also here in dedicated thread, it has lot of valuable info, just sometimes I simply do not know, what to look for, which "keyword" to search. Yet some question still prevails, related mainly to fore topsail, which might not be so common configuration, but apparently used very often on fisherman of the era: 1. I understand now, that strange looking tack of the fore topsail hauled over the gaff to weather side would somehow relieve the stress on the mast, pushing part of the sail against the gaff. OK, but why this mechanism is supposed to be used only fore? Main topsail does not show the same feature and its configuration seems to be much simpler and nicely captured also in your thread. What was the practical reason? 2. If I make the simple fore set up with only one tack line, would the configuration of the fore and main topsail look identical, ok, maybe apart from that hanging fore topsail corner around the gaff ? 3. Why the last picture in my starting post does not show any stretched weather line for fore tack corner going straight to the deck? This seems to be very strange to me. Is that an error or do I not understand the mechanism? Simply I cannot see any line fixing the bottom corner of the fore topsail. 3. What is the name and the purpose of the line marked here? I guess, it is used only when turning the ship and hauling the fore topsail to the other side, so it does not make sense, if I would adopt the simpler solution with just one tack line and can be omitted? Thank you Juraj
-
Hi all, again am coming here to ask kindly for a help. This time with topsail rigging for my BJ's Smuggler kit. The kit provides very detailed instructions here and my question may seem as unnecessary, but the problem is that English is not my first language and even with the help of the web, translators and very limited sailing practice, I got lost in the description attached. I see, that topsail shall have somewhat put their bottom corners over the gaff to the weather site, but am not sure of all those explanation of overhauling the cleaves and also why there is something more complicated for the for topsail only.... By chance, could anybody provide some drawing of how shall be the sails rigged having the ship starboard as a weather side? From the plans (where as described below something is not actually correct) I am not 100% sure. Of course, no blame on kit instructions here, just my language maritime skills are not sufficient. (Hm, maybe will leave fore topsail furled after all, although here again am little bit lost how to tidy up all the lines and make realistic sail package, but for now the idea of the full sails still prevails) Thanks for help!
-
Thank you very much for help and confirmation!
-
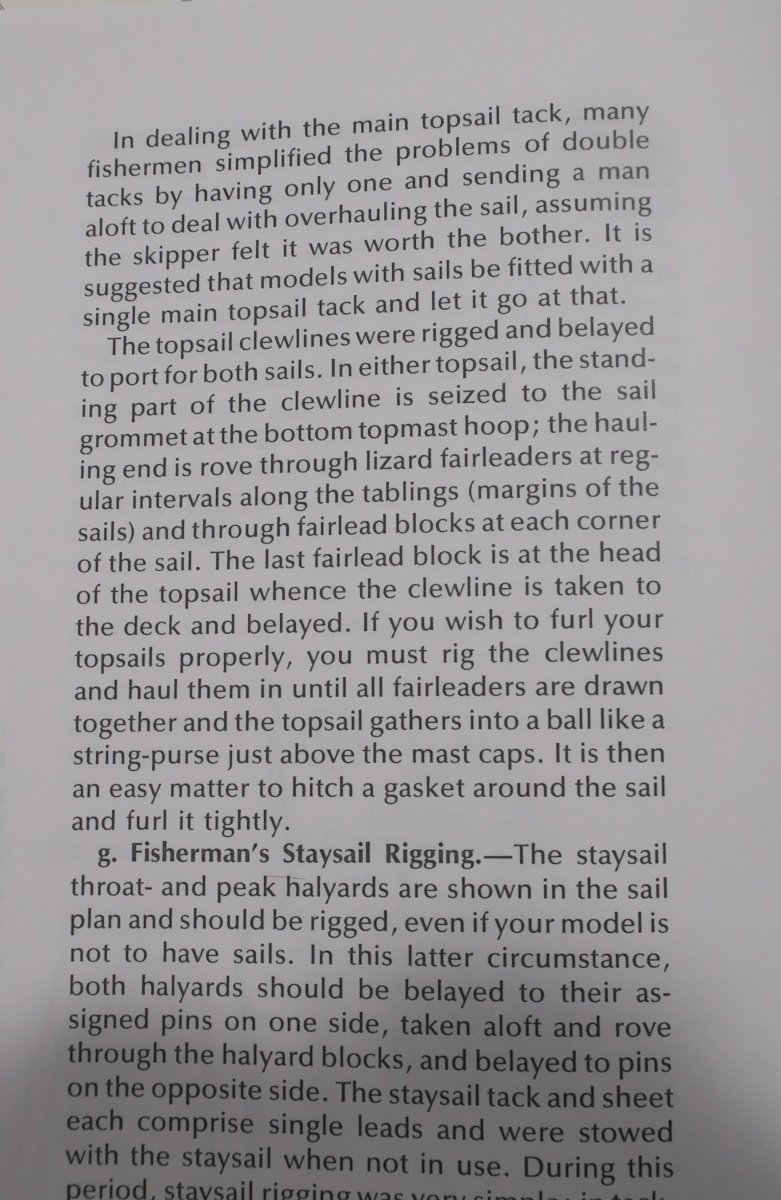
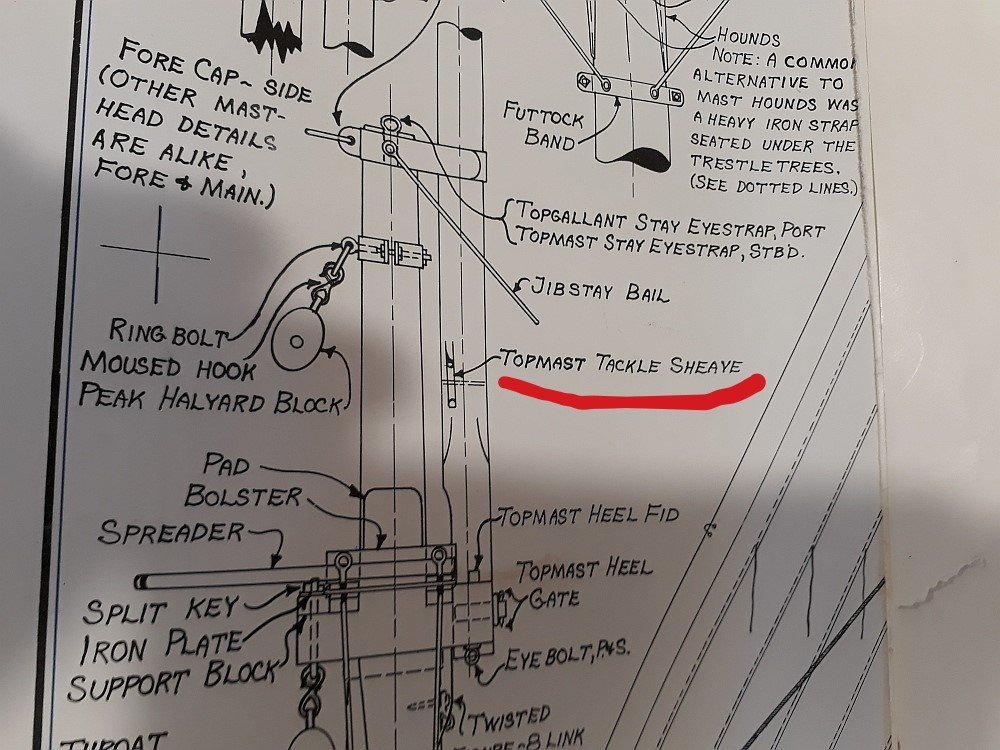
Greeting, am back again with a question that came to me and that I could not answer via search and research so far. Am still working on Gloucester fisherman "Smuggler" kit by BJ. While working on topmasts I noticed strange sheave, that looked as if having no real usage: Searching a bit I found the details of the same thing I believe in Petersson's "Fore-Aft Rigged" book: Reading also here through the topics, I understood the sheave and top rope was used to manipulate topmast, presumably for to replace or repair, simply to get it safely down to the deck. Now as seen in the first picture, the kit plan omits any eyes or system to attach the rope, what is present is only declared "topmast tackle sheave". And now comes the question: shall I only include these eyes, albeit unused, or the whole top rope mechanism as seen in the 2nd pic? Assuming it was used only for topmast maintenance, I can see it was in use not very often and as such may have been removed while sailing? My model will be displayed under sails, so is it more appropriate not to show it, or was it permanently deployed and shall be thus also modeled? Thank you in advance!

-
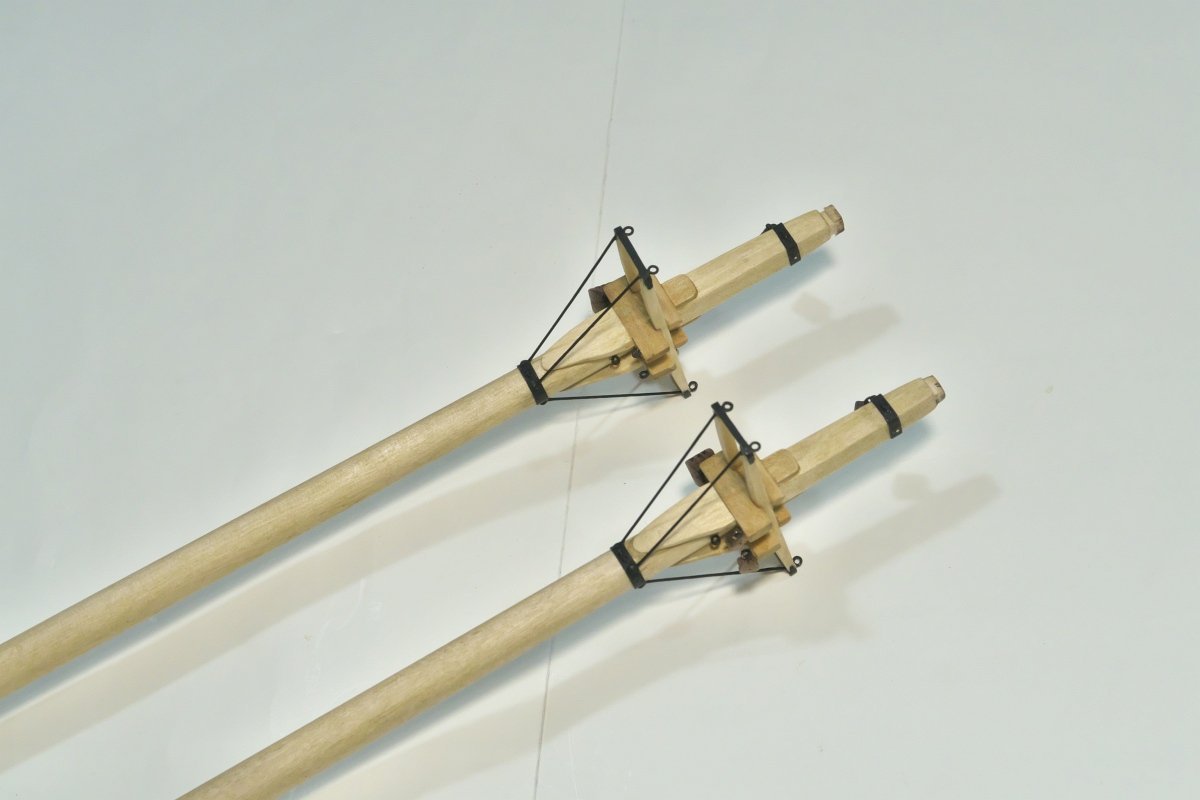
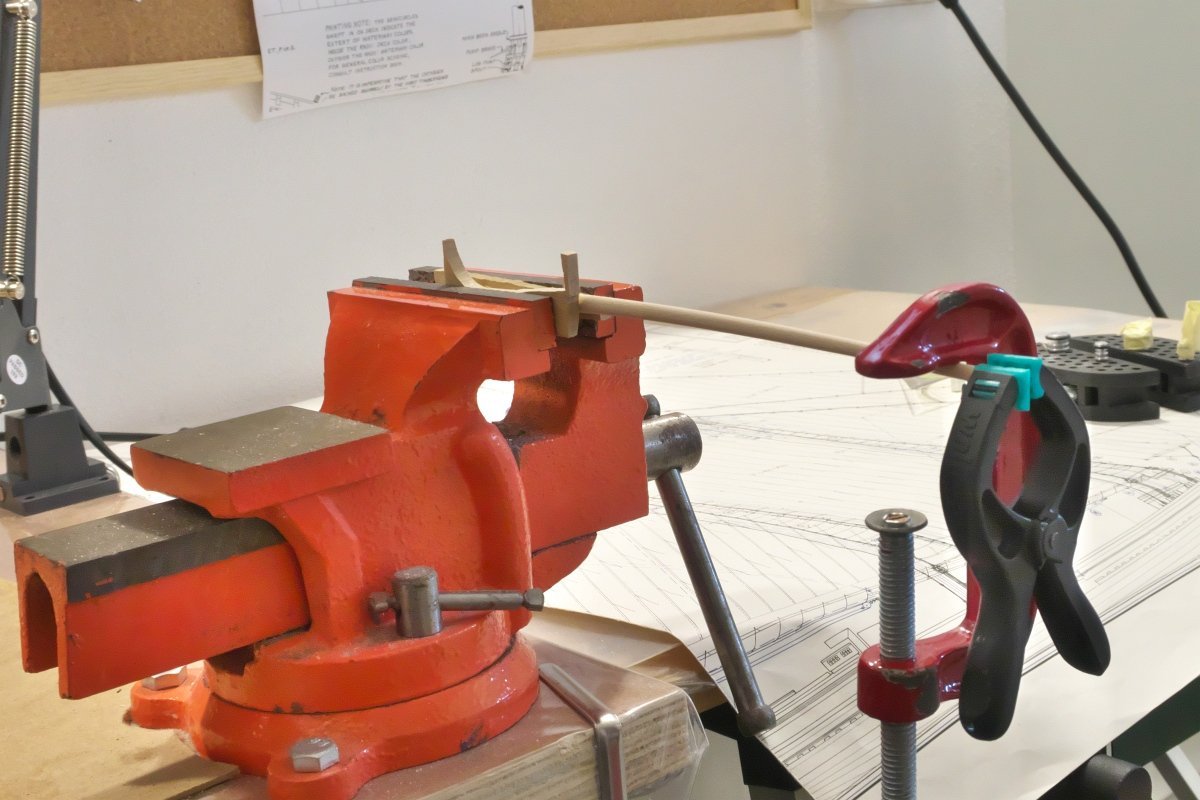
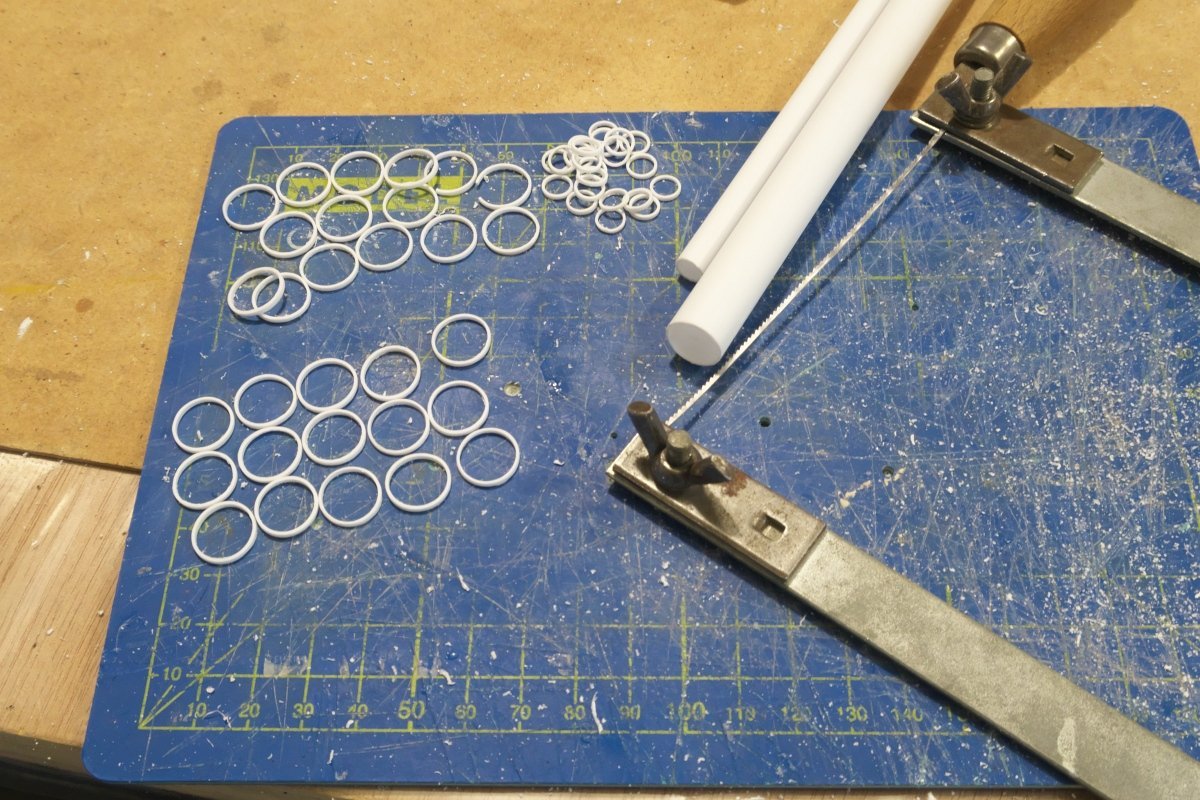
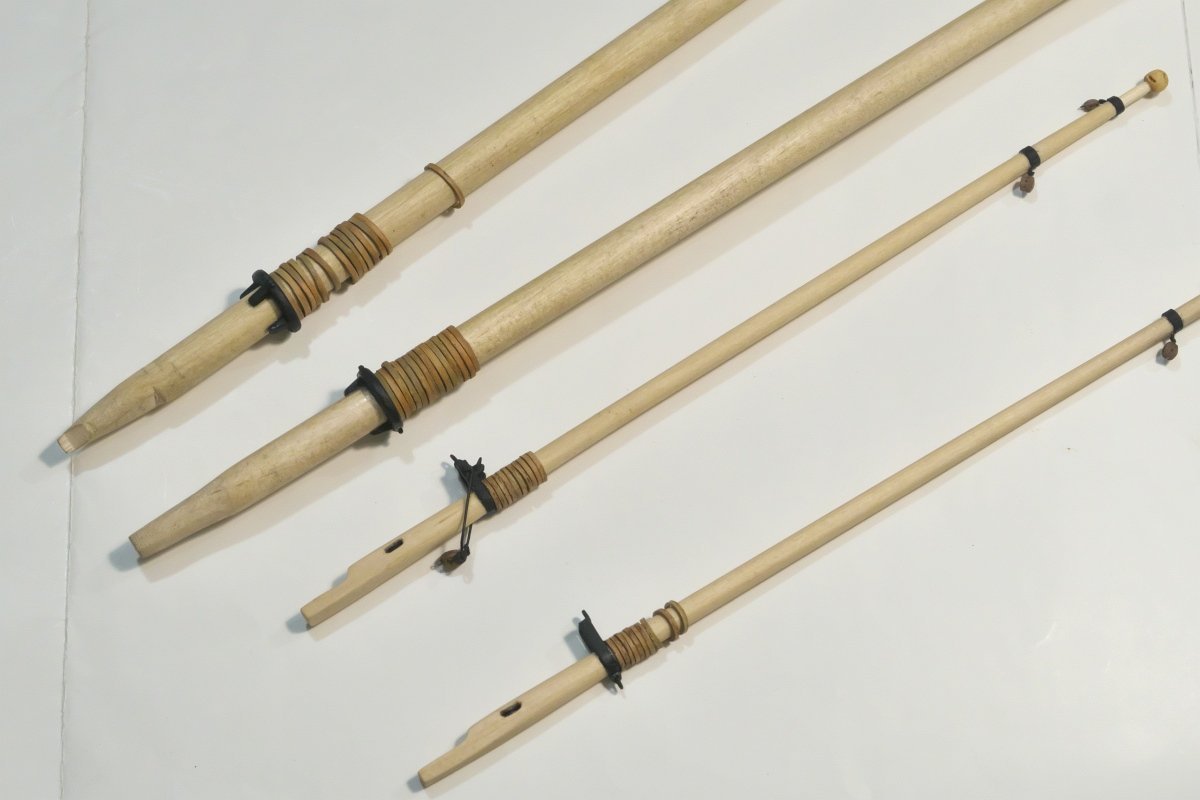
Hello, another update as promised. Some iron and paper work on lower masts... and finished: Topmasts follow, here the part is soaked and bent to resemble desired shape, simulating the rigging stress Mast hoops made from Evergreen profiles. I try to avoid the use of plastic as much as possible, but here I could not find anything better. And after some paint and use of weathering pencils, I like the result Completed masts, next will be back with booms...
- 104 replies
-
- 5
-
-
- Bluejacket Shipcrafters
- smuggler
- (and 1 more)
-
Thank you all for responses and confirmation. Yes, "preventer" is the term that was somewhere deep in my mind.
-
Mea culpa, should have looked better. There is a whole page in Chapelle's American fishing schooners dedicated to this topic. It confirmed my expectations - truly it is a guy for a boom to secure it, in plans presented in my first post the tackle is simply stored idle.