JPZ66
-
Posts
173 -
Joined
-
Last visited
Content Type
Profiles
Forums
Gallery
Events
Everything posted by JPZ66
-
Janos, If the goal is to reproduce your wonderful sculptures, why not look at ( though you probably have ), utilizing CNC routing ? Not the big heavy duty stuff, but the highly accurate 'engaving' type, benchtop machines, that have a very high level of fidelity ? A number of very nice tracing stylus fixtures and software exist to allow a trace to be done, generate a file and then cut it. By using a 4th ( rotary ) axis, you can develop very complex 3D shapes, and if more angles are needed, it could be run on a 5 axis machine, which will cut deep undercuts. Just a thought. For many of the things I currently do or am getting back into, reproduction is not my primary issue, as I make great use of molding and casting......whiich of course is another option for you. (Should you ever desire to have any of tour carving work molded and reproduced in cast resin, please don't hesitate to contact me, as I would be very happy to assist.) My primary interest in this technology as a whole, is in the area of accurately recreating scale models from full size subjects. And yes, I interpreted your previous post incorrectly, so my apology for that ! Cheers, Joe
-
Well, I am not surprised that you got that sort of answer from the local source..... I beg to differ however. This "gadget" is about a $25,000 tool, and there IS NO POST PROCESSING ..... I hear this 'post processing' argument all the time, and that was indeed the case a year ago... It is also one of the reasons I am quite interested in Creaforms product..... There is no post processing of the scan file needed. I also found this video, which demonstrates the scanning of a statuette, perhaps similar in size to what you have and wish to scan. I have worked with about a dozen scanners, and about a dozen 3D printers over the last 10-12 months, and I have watched marketing videos, read reviews and technical papers and conducted my own independant research on these technologies. This is not a gimmick, nor a toy. These are serious pieces of equipment. All I can say is that advances and improvements are made in these areas almost weekly, and if one does not stay current with industry developments then much is missed. I am not trying to be argumentative, but rather to share with you and all the readers here some of the newest and most interesting technology in the hope that it may help or find useful applications in the hobby we all love. - Joe
-
What level of accuracy are you looking for ? .002" resolution and .0012" accuracy is not accurate enough ? -Joe I have no connection to this company, but I do like their products, please take a look at the specs page for these two devices; http://www.creaform3d.com/en/metrology-solutions/products/portable-3d-scanner/technical-specifications-handyscan-3d
-
Janos, First off, I will say that these systems are not exactly inexpensive, however, I have found several scanning services where you can rent them or even hire a technician to perform scans for you. With that said.....YES, using Current Technology, you CAN get incredibly detailed scans...not just that, but SCANS THAT CAN GO DIRECTLY TO PRINT, without post scan processing work. Watch this video and pay close attention to the specs....this is here now...not tomorrow. Perhaps this is what you are looking for. -Joe
-
Well, First off, I agree - as I said before - currently, and for the forseeable future...none of this will replace the master artisan and the handcrafted skills in this arena. However, There are currently scanners on the market, such as models from Creaform, that can scan and require no post processing or clean up work...meaning you can go from scan directly to CNC or print operation. Next is the fact that, on the high end of 3d print technology, there are printers that can print multiple materials in the same print run at the same time. Wood filament is fairly new, and I would imagine, will only get better in time. Remember that once upon a time, very few people had inkjet or laser printers in their home and would have to go to a copy house to have their papers or newsletters printed.... Not so long ago either... But now you can easily publish things right in your home, that look every bit as good as professional printing did just 10-15 years ago. At the rate of advancement that this segment of technology is experiencing, it won't be that long before some form of 3D printer is as common in the home as a TV. Also, a few years ago, this technology and the materials that could be used was quite limited...not so today. You can 'print' various metal, wood, plastic, paper and even edible materials. Not to mention that you can scan a complex object and reverse engineer it and deconstruct it via the software. Variations and changes are a simple matter. It can be difficult to grasp the full implications. In the medical field, they have even successfully printed stem cells for tissue and organ replication. Before long, I imagine, people will be able to go online, download a file of their favorite subject and simply print it out. For you plastic model builders, dont be surprised when the day comes that instead of buying your model kit in a box, you will log onto, say, the Tamiya website, and simply download your kit and print the parts directly at home ! The technology is astounding and will become more and more viable and cost effective in the future. My feeling is that you can poo poo it if you want to, but it is here now and will only get better and much more user friendly as we go forward. Joe
-
Ok gang... How about 3D printing with WOOD ! -Joe Check this video out:
-
I agree Bob. It's all about using the proper tool for the proper application ! As skills and knowledge grow, so too the availability and choices of tools grows. Doesn't mean you need them all (tool junkies excepted), but it sure can be a time saver as well as making the results you are after much easier to acheive. Joe
-
This one has an overview of different types of torches.... Sorry it is a bit commercialized...Again, I am not connected to any manufacterers or products shown... Joe
-
You may want to check this video made by Paul Budzig. Paul is a Master Model Maker, and has a number of excellent videos posted on YouTube. He mostly builds scale model aircraft, cars and some armor, but the tutorials are applicable to many areas of model making / building. This particular tutorial is on soldering...... Joe
-
Check out a some videos for more on 3D printing.... .......Just sayin' ...! Joe
-
As to the size of 3D printed parts, we've already had a full sized car body (printed right here in Las Vegas) and there are dozens of examples of large scale objects being printed. Certainly not with machines available to us "Hobbyists", but they exist. Take a look at what China is working on, using laser sintered metal 3D print technology..... http://3dprint.com/733/chinas-huge-3d-printers-soon-able-to-print-automobile-sized-metal-objects/ This technology will only improve with time. IMHO, anyone in the business of prototypes or commercial modeling ( not Museum quality type work ) who is not already involved with some form of 3D printing, is well behind the curve and has some descisions to make if they want to stay viable. Joe
-
The sad part is that sooner or later the true craftsman will be a thing of the past....don't get me wrong, it will be appreciated for sure, but in the future, the average 'Joe' will see something he wants to have, download a pre-existing file, and print it out. Of course those models will NOT be masterpieces, but as the technology matures, I'm sure it will do much to satisfy the masses. Yes, laser sintering of metal has been around awhile, but certainly on the high end of $$$ at this point in time. One of the more fascinating 3D technologies that I have seen is a process where it is like a blend of inkjet and 3D, and the finished piece is printed in full color...not just simple red, blue, etc., you can do with additive printers now, but full spectrum color, precisely where you want it...such as a figure with full flesh tones on the skin portions and such. Pretty darned amazing ! Joe
-
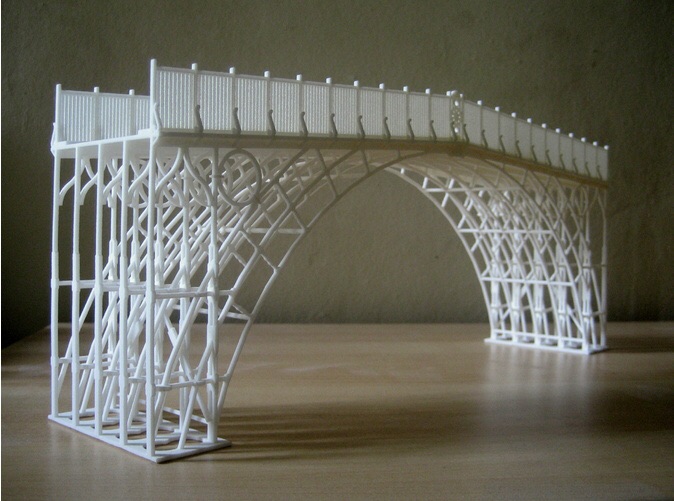
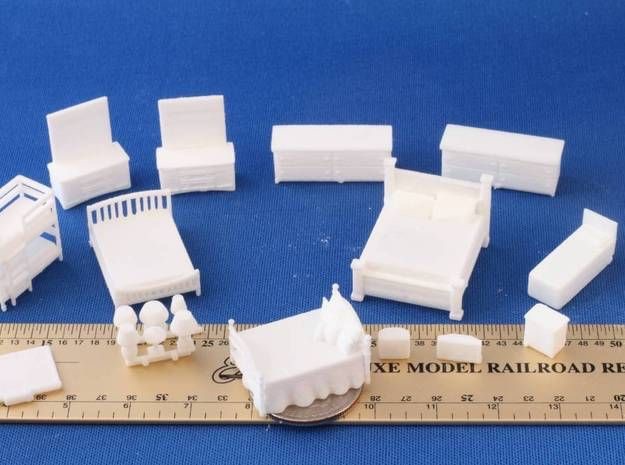
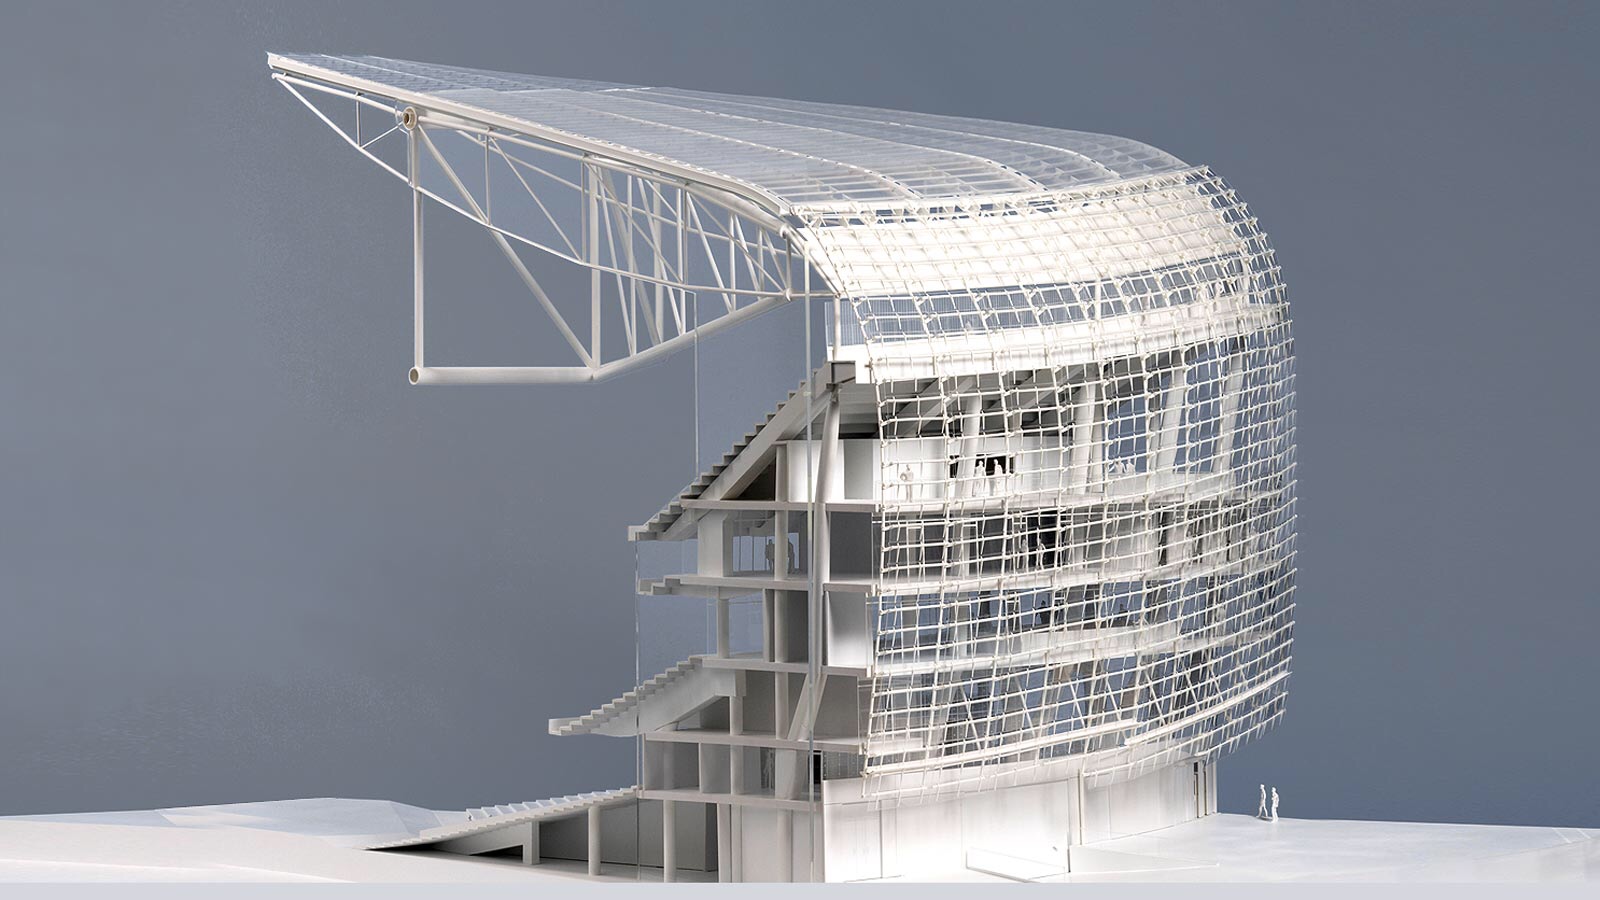
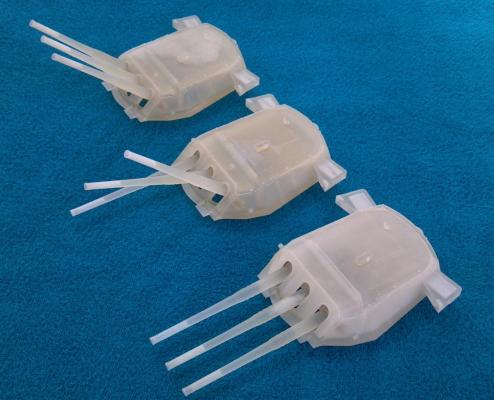
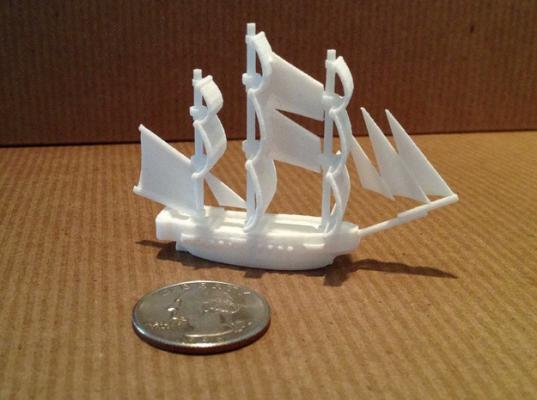
Here are some photos I scrounged off the web, that give a little sample of what a 3D printer can do....Note that the battleship gun turrets are printed in ONE piece, yet they are ARTICULATED ! - Joe


-
One possible solution for the problem of old decals is applying a clear coat over them, preferably a lacquer clear. Several light coats is best. Water slide decals are typically made by printing a clear base onto paper that has been treated with a water soluable release. This first print is seen as the clear carrier film that we try to trim away from the edge. The portion we want is then printed in color lacquer inks. This is typically the method used on these old decals. They dry out over time and become brittle. By putting several layers of clear over the top, you can essentially create a new carrier film that will hold it all together. Because these decals are typically made by screen printing process, the layers of clear and color are thicker then by spraying, which is why you would need to build up some thickness when spraying over top. Most of the volume is solvent and evaporates and will not appear to be overly thick. Another problem often encountered with old decals is yellowing. The clear base often yellows with time, but can often be bleached out by taping the decal sheet up in a window. Monitor them carefully so that only the clear gets bleached out and that the color portions do not fade. Of course if you may just need to color copy the sheet, clean up the artwork on the computer and print them onto commercially available water slide decal paper with your printer. These will not have the same level of durability, and should still be sealed with a clear coat, but it the method has been used for saving a project many times ! Joe
-
Something to keep in mind when you envision doing parts on a 3D printer. You can fill the entire print area with parts.... You take the original file to be used and you duplicate it so that you fill the entire X and Y axis... Say cannon barrels for example, printed on an SLA type printer... The barrels will be oriented vertically and you have 6" x 6" work area..... You can probably print 100 barrels at the same time ! ( 10 rows of 10 ). Yes it will take a while to do, but when it's done it's done. Of course you must weigh the factors of material cost and so forth. For very large quantities it may be cheaper to produce only a few, clean them up and then make a mold for casting them in resin. The other way to look at it is that you can fill the print area with many different parts and get them all done at the same time. It really is a fascinating technology, one that I am only beginning to grasp, but I can easily see the tremendous potential ! I do think that the equipment and processing will evolve a great deal over the next couple of years, as it seems that advancements are happening almost daily right now in the "hobbyist" section of the market. Joe
-
Actually, that's the beauty of a 3D printer...you CAN make a lantern...with the wick holder or candle inside ! I suggest you check out the SLA 3D printers, as they currently can't be matched for print quality or size of print area in the same price range. I was pretty blown away by the fully made, very intricate Eiffel Tower and the Rook with the internal staircase that I looked at first hand ! Again, I have no connection to them, other than gone and had a look at the machine and samples, but frankly, FSL ( Full Spectrum Laser ) looks like one of the best machines in the under $3000 price range that I have seen. I may well be buying their SLA 3D laser printer myself. Joe
-
I believe the best use for 3d printing is to use a bureau with a high quality printer for MASTERS...1 of each type of cannon that you need, and then use them to make molds and cast additional copies in resin. And there are places that will print one-offs...you will pay a bit more, but nowhere near the cost of having to print 5 of each item. By doing this, you only have to clean up one of each type, ensure it is the best it can be and then you can cast as many as you like for a relatively low cost per piece. If you are not trying to make mass quantities, there are ways and materials to mold and cast with that won't cost you a ton of money. Joe
-
Actually, yes... I have been looking into this myself. It turns out that there is a manufacturer right down the street. This is an SLA type 3D laser printer. Full Spectrum Laser has a machine that has a print area of 7"w x 7"l x 9" h. Currently this unit is priced at $ 2795 they will tell you that they only support their resin product, but the machine is typical and will work with any of the resins on the market that polymerize in the 395-410 Nm range. From what I have seen, the fidelity or finess of finished print of an SLA printer is far superior to any other type...at least in the below $5000 range of hobbyist or home type printers. On the other hand, if you are making your own files, you can use a service bureau and not buy any printer or deal with any of the maintenance or material issues. Right now, I'm on the fence about which way I want to go for these very reasons. The other advantage of using a printing service is that they are typically printing much nicer, higher resolution parts on very upscale printers...many of which cost in excess of $50,000. This would also mean that you would have far less post print finishing to do before using the parts. Either way, I can easily see that 3D printing technology is going to be a great tool. Of course, this is for those that are willing to accept non traditional materials and technologies for their miniature making. For fine museum quality scale model ships it may not be useful at all. It just can't replace the time honored craftsmanship of a true artist and the handcrafted parts of wood and brass that really make a scale model a piece of art. Joe
-

Looking for a CAD pro for a project....
JPZ66 replied to JPZ66's topic in CAD and 3D Modelling/Drafting Plans with Software
Rick, Thanks for the info. Now that I've pretty well finished with doctors and all of that, I am completing my move to Gig Harbor, WA. As soon as I am settled in, I will get back into this and be in touch with you ! Joe -
Looking for a CAD pro for a project....
JPZ66 replied to JPZ66's topic in CAD and 3D Modelling/Drafting Plans with Software
Thanks Ben I am waiting to hear from my museum client about the project...... Joe -
Looking for a CAD pro for a project....
JPZ66 replied to JPZ66's topic in CAD and 3D Modelling/Drafting Plans with Software
Hmmm....no CAD folks out there interested in a paid project ? I was really hoping to be able to work with someone who understands ship / boat hulls...... Joe -
Sherry, Try it and see what works best, but in my experience, using many different types of resin, the vaseline is highly likely to inhibit the cure if there is any noticeable quantity of it in the mold cavity...... See my post above about powder. If you do not wish to powder the mold, then I would suggest using the mfg'r recommended mold release spray. If you are talking about using vaseline over the master before pouring the rtv mold itself, then yes....vaseline or a thinned version of it works great so that the rtv silicone rubber does not stick to the master part. Be sure there is no porosity in the master either. Any sort of wood or other porous material used for the master part must be sealed and polished or buffed up to as nice a finish as you can get. The rtv rubber will capture the smallest flaw left on a master part, and be in the curd mold. When you later start casting parts, that flaw will be on each and every part. Even including such tiny flaws as brush marks or fingerprints. Having done casting and mold work in the past for many 'cottage industry' companies in the scale modeling community....cars, trains, boats, planes, figures and many other items, for such companies as The Laughing Whale / Blue Jacket, Copper State Models, Liberty, Squadron, Tom's Modelworks, Fisher Model and Pattern and more, both in resin production and pewter, I'd like to think I gained some decent understanding and experience with the materials and the processes Joe
-
Hi all, Fine talcum powder or cornstarch powder will get absorbed in the resin. It is very important to dust the molds prior to casting resin. I use either a beat up old paint brush to dust the mold cavity or an old sock filled with powder. After the initial dusting, lightly tap the mold halves to get rid of the excess. What you want is just a really light coating of powder on the mold cavity surfaces. Why is this important ? Surface tension. The Surface of a clean mold has a specific surface tension, and the resin has a surface tension. Without powder, the resin in the mold cavity behaves much like plain water on a waxed surface...it wants to bead up. In a resin casting that will likely mean areas of trapped air, creating voids in the casting. The powder serves to break the surface tension and allows the resin to flow smoothly against the mold surface. Also, I am getting ready to make some molds and do some test castings, which is all I need to do to finish up my tutorial (so I can provide pictures of the complete process) the text of the article is finished. If anyone wants the text only version right now, PM me and I will send you a copy. At any rate, if the molds are designed properly, your castings will likely come out 'ok' even without dusting the mold and depending on the complexity of the part, but I can assure you that dusting the mold first will make a great improvement in the final casting quality. Joe
-
Hi All, Not being a CAD person, I am looking for someone to turn builders drawings into proper CAD files, possibly for use in laser cutting or other CNC type work. This is all preliminary right now, but I would like to discuss it and get an idea of the associated cost for such work. If you are experienced with this type of thing and available for hire, please PM me if you are interested. The subject in question is pacific northwest style fishing trawler built in the 1920's. Joe
-
Using chisels for turning brass
JPZ66 replied to tkay11's topic in Modeling tools and Workshop Equipment
One other thought about grainy wood..... I have often used basswood or balsa when making a pattern for casting, as they are easily and quickly shaped. After I have them shaped right, I soak them down with CA glue and the sand and polish them. Sometimes it takes a few applications of the glue to get the fill and a solid surface. At that point they are almost hard as rocks, but they polish well. A coat of primer to inspect for flaws and a final buff and they are ready for mold making work. To avoid getting glue everywhere, I mount the parts on pins or rods so I don't actually have to hold or touch the part itself. I have also used this process to make masters for vacuum forming masters for things like aircraft canopies. I find it cheap and easy to make masters this way. Joe