
HOLIDAY DONATION DRIVE - SUPPORT MSW - DO YOUR PART TO KEEP THIS GREAT FORUM GOING! (89 donations so far out of 49,000 members - C'mon guys!)
×


JPZ66
-
Posts
173 -
Joined
-
Last visited
Content Type
Profiles
Forums
Gallery
Events
Everything posted by JPZ66
-
Is this the former USCGC Buoy Tender "Bittersweet", that was given to Estonia, c.1997 ?? Joe
-
I am heading out on a short vacation, so I am going to stay out of the game for a week. Joe
-

Anyone Use True Oil?
JPZ66 replied to Tyrnac's topic in Painting, finishing and weathering products and techniques
Now I know why I have had so many problems ! I have been using FALSE Oil !!!! All kidding aside, that is some great info and I really like the look of it- now I will get some for use on the next case I build Joe -
What timing...I just got home from work.... And you are correct sir ! Your go Kevin -Joe
-
Alright fans of sail.....here ya go......

-
Alright.....I think I have ID'd the class. The AS565 helicopter was the key.... Oaxaca class vessel of the Mexican Navy. Joe
-
Right you are Dave ! Canarias. ( I knew I should have picked a tougher subject! ) ....Your turn Joe
-
Kevin, As you mentioned, it's uniqueness made it pretty easy. Alright, here we go..... This shouldn't be too hard ;
-
Hi Kevin, Novgorod russian monitor, under construction..... c.1874 ish .... Joe
-
Epoxy putty is a great material to use for sculpting the main clothing, and lead foil is useful for straps and such. The putty can be mixed. rolled out, flattened, applied and sculpted to final shape. Work in layers - just as you would get dressed- it's not as hard as you might think. -Joe
- 625 replies
-
- 1
-

-
- bounty launch
- model shipways
- (and 1 more)
-
Hi Jay, Knowledge is key above all else really ...and experience I suppose. When it comes to something like carving, I tend to think like you do also....learn the skill and practice a lot....buy decent, but not neccessarily top of the line to start with, and then, if one enjoys what they are doing, perhaps upgrade to better tools. Some folks seem to have an inate skill with a tool like a chisel and develop a touch fairly quickly, others do not...for some it takes a long time to develop. But like anything, if you want to be a master at a particular skill, you must have the desire and perseverance to learn it and the patience to practice. I know very few artists or brain surgeons that became masters overnight ! I think for many, the decision to buy something like mini or micro chisels over making them is based a lot on the convenience of it. It takes even more knowledge and other tools to make a set ! As Sir Walter Raleigh once said...." The quality remains long after the price is forgotten ". A specialty cutting tool, like a plane or a chisel not only takes a certain skill to operate proficiently, but also to maintain it. However, in doing so, one is rewarded with beautiful, clean cuts and can acheive a desired level of finish much easier, and without the frustration that comes with an inferior tool. In the case of jewelry gravers, which are designed to cleanly cut or engrave metals, one must often hone and lap the cutting edge after only a few cuts...but that is the discipline it takes to acheive a high standard of finish. Also, any tool like a chisel or a graver, with an exposed cutting edge needs to be stored properly so that the cutting edge is not exposed to hard surfaces...mine all have their own individual slot in a drawer lined with soft felt. My father always told me to take care of my tools and equipment, and they will take care of you. BTW- I don't own any of those $75 chisels either, but I do hope my skills one day will justify their future purchase ! Cheers, Joe
-
Waitin' on you Kevin..... Need a new picture !!! Joe
-
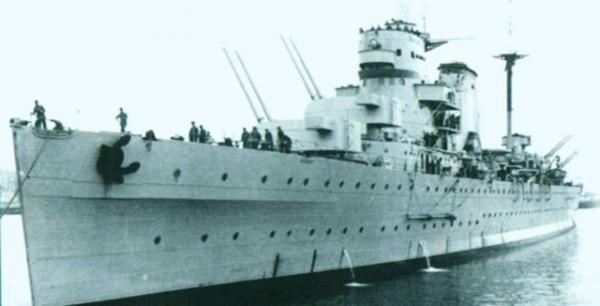
Ring the Ship's Bell ! .....we have a winner !!! Here is the wiki link: http://en.m.wikipedia.org/wiki/Italian_cruiser_Raimondo_Montecuccoli -Joe
-
Okay......here ya go....
-
Has anyone considered using jewelers hand gravers ? They come in a wide variety of profiles and can be quite narrow. They are had either in high speed or carbide steel. There are a number of shapes / styles available for the wood handle as well. They could well make carving in tight confines a lot easier. Could be used for moldings as well, but I think the razor blade with a cut profile works best and is most uniform for that. I would think that re-profiling (take care not to overheat) the back of the graver to yield a sharper blade angle might suit the job of wood cutting a bit better. I know I will experiment with this idea when I am moved and in my new shop..... For anyone curious now though, just look up " graver " and you can see what I mean. Joe
-
I look forward to your build ! You have a really cool concept in mind. For figures, I would suggest a search through ebay for 120mm figures or 1/16 figures. Much easier to convert than to sculpt entirely from scratch. Here is a link to a male nude that might be a good starting point to modify......http://www.ebay.com/itm/Verlinden-120mm-Academy-Figure-Male-752-/180538829031?pt=Model_Kit_US&hash=item2a08f3e8e7 Good luck with your project ! Joe
- 625 replies
-
- 1
-
-
- bounty launch
- model shipways
- (and 1 more)
-
HMS Neptune 1874 -Joe
-
I will echo others - a really beautiful build coming together ! The photo of the cage mast with the sky background looks as if it is the real thing ! Quite impressive ! Joe
-
I was trolling some forums of other hobbies, and ran across this home built vacuum hold down saw for ripping veru small pieces of wood. I am posting the link in case anyone is interested in the idea. I do think the concept has merit ! http://www.railroad-line.com/forum/topic.asp?TOPIC_ID=20046 It appears to work quite well. With a little bit of refinement, could likely be a great tool on the cheap ! - Joe
-
casting metal parts including cannon
JPZ66 replied to rtropp's topic in Metal Work, Soldering and Metal Fittings
Hi All, Just a quick update..... I have the resin casting article written up. I do not yet have photos edited into the article. I hope to have that done by mid-March. Work has me tied up right now, and then I will be on vacation the first week of March, so it will have to wait until I return. Chuck has previewed the text and given it a "Thumb's Up", so I think (hope) you all will enjoy it. -Joe -
PM sent.... Joe
-
For very small amounts of glue I simply use a small length of fine wire. The wire can be bent or shaped if I need to reach into tight quarters. If I need a bit more glue, I make a tiny loop at the end of the wire and apply the glue to it, then a quick touch right where I want it and it flows into the joint of the parts. The diameter of the wire or size of the small loop determine how much glue is transferred. - Joe
-
I think the argument for a darker color deck is reasonable...it's still fresh and not weathered out. Not sure that using real teak would be the way to go....would depend on the density and grain for scale purposes. I think that is always a trade off in scale models. We know something in real life was made of , say, oak, but it just doesn't scale down well if you really use oak in the model...so...we always have to find something tighter, that works and can be stained or colored to give the appearence of oak (in my example). Or, in this case of your submarine, fresh teak wood. The same is true of things like sails. And all of this has to be done for the scale we are working in. Some things that look great for 1/48 scale just won't work for 1/96 scale ! Anyhow, I think the O-19 is coming along really nicely, and looking great. Joe
-
Display case wood
JPZ66 replied to Senior ole salt's topic in Painting, finishing and weathering products and techniques
Looking good ! Very artistic. A weathered brass oval nameplate, engraved with info would go nicely in the space between the boat and the scrimshaw.... As for the sail, perhaps some washes of a thinned out watercolor paint...this way you can control the depth and tone of color. If you have excess material, you can try thinned out oil or acrylic as well. My inclination is a light full wash to impart a slightly yellowed look. Then a quick thin wash a bit darker to accent the stitching or seams. You can also use a slightly less thin paint for spot stains or other distressing. Experimentation on scrap is key ! Cheers, Joe
