Cristiano
-
Posts
423 -
Joined
-
Last visited
Content Type
Profiles
Forums
Gallery
Events
Everything posted by Cristiano
-
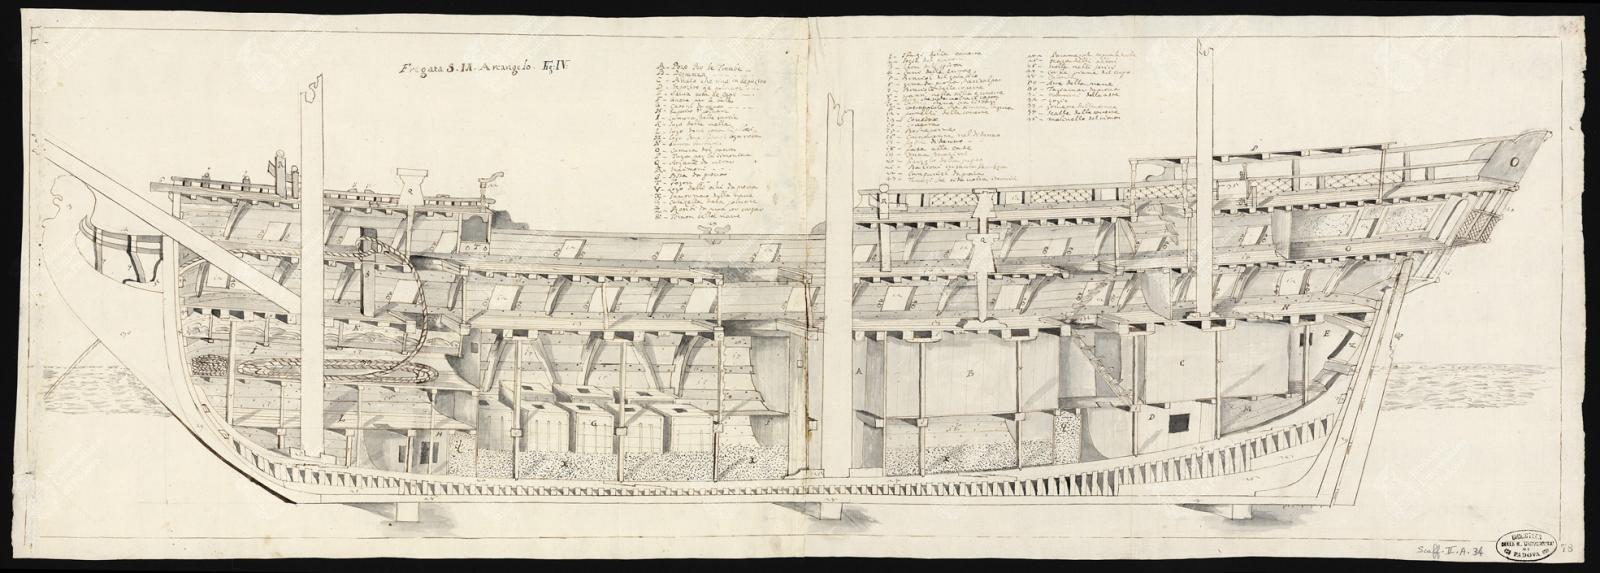
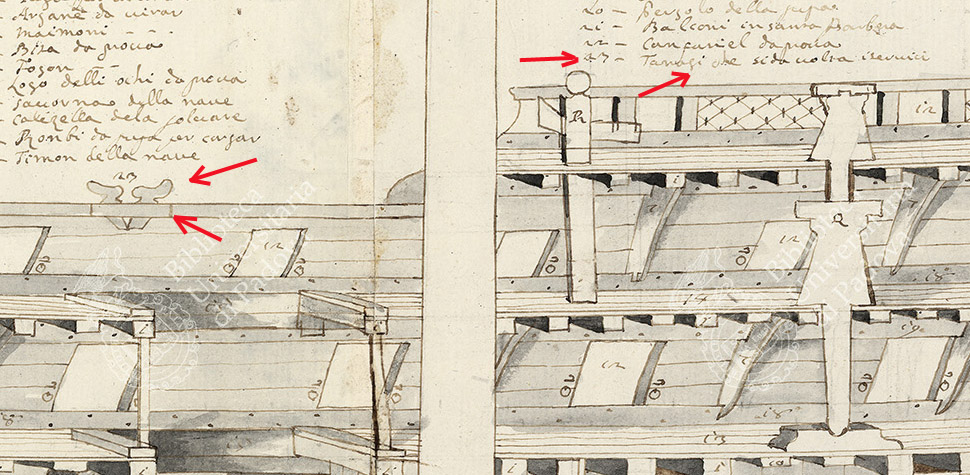
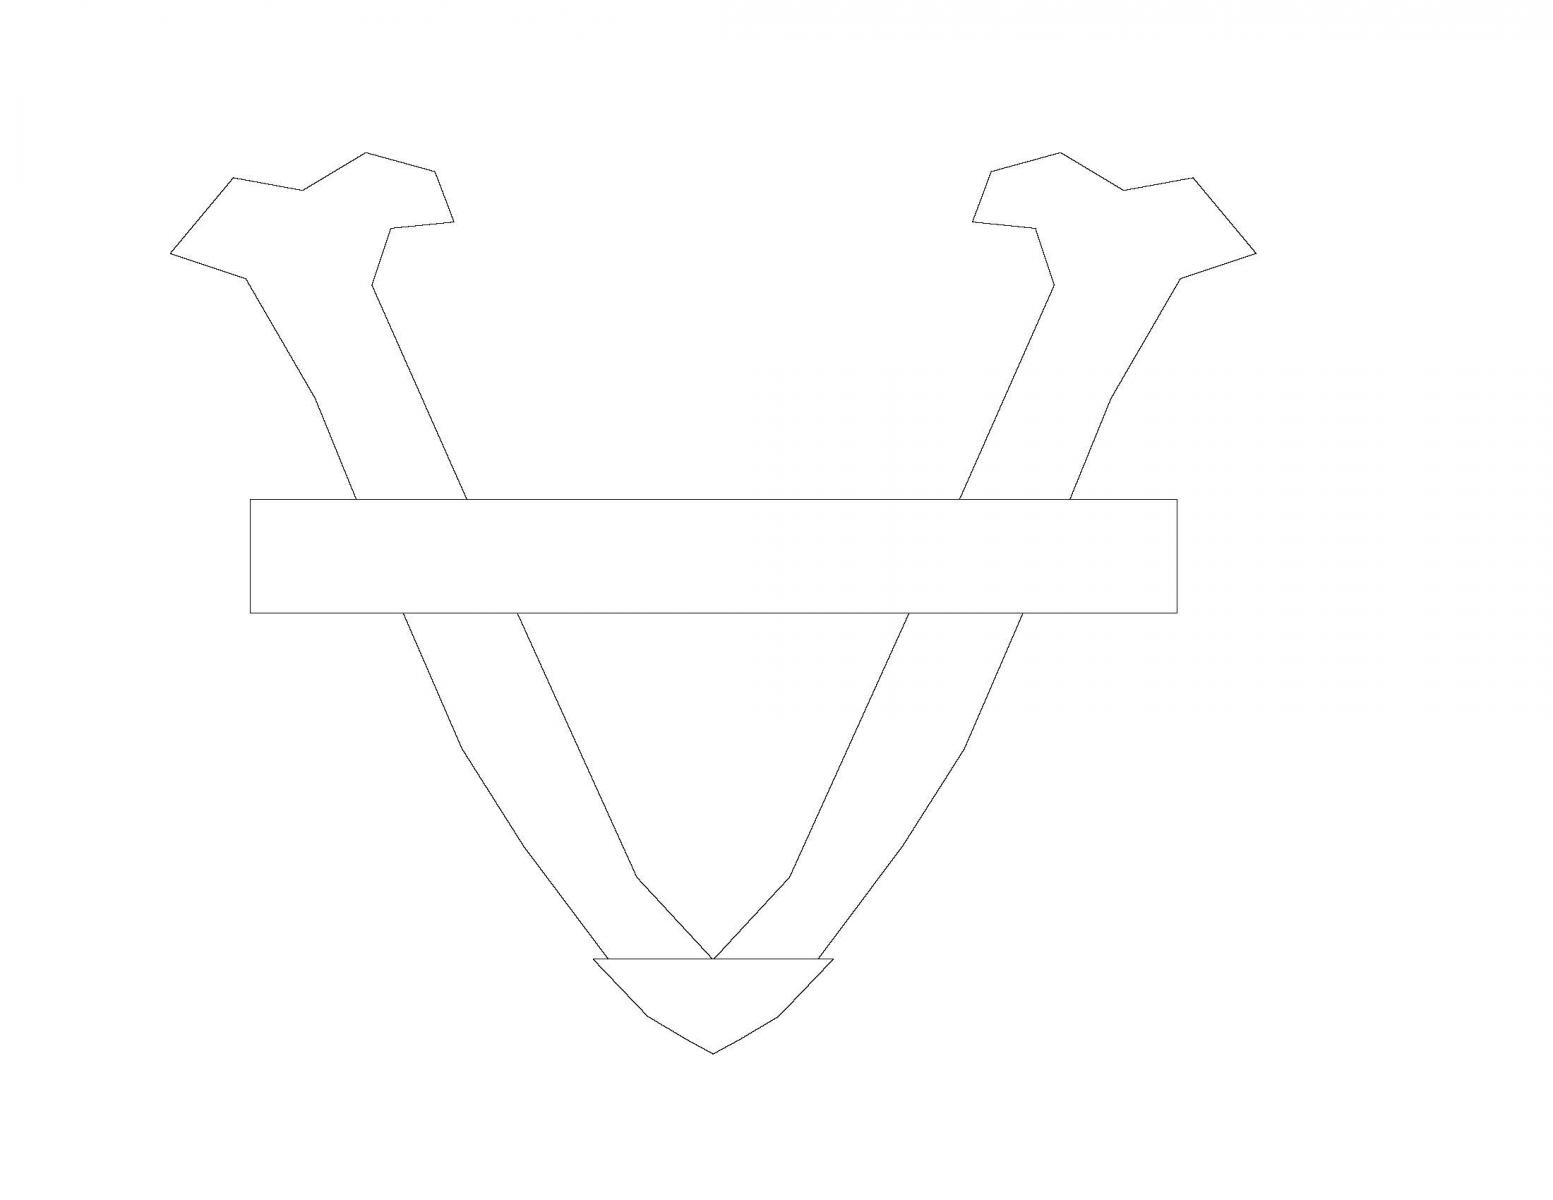
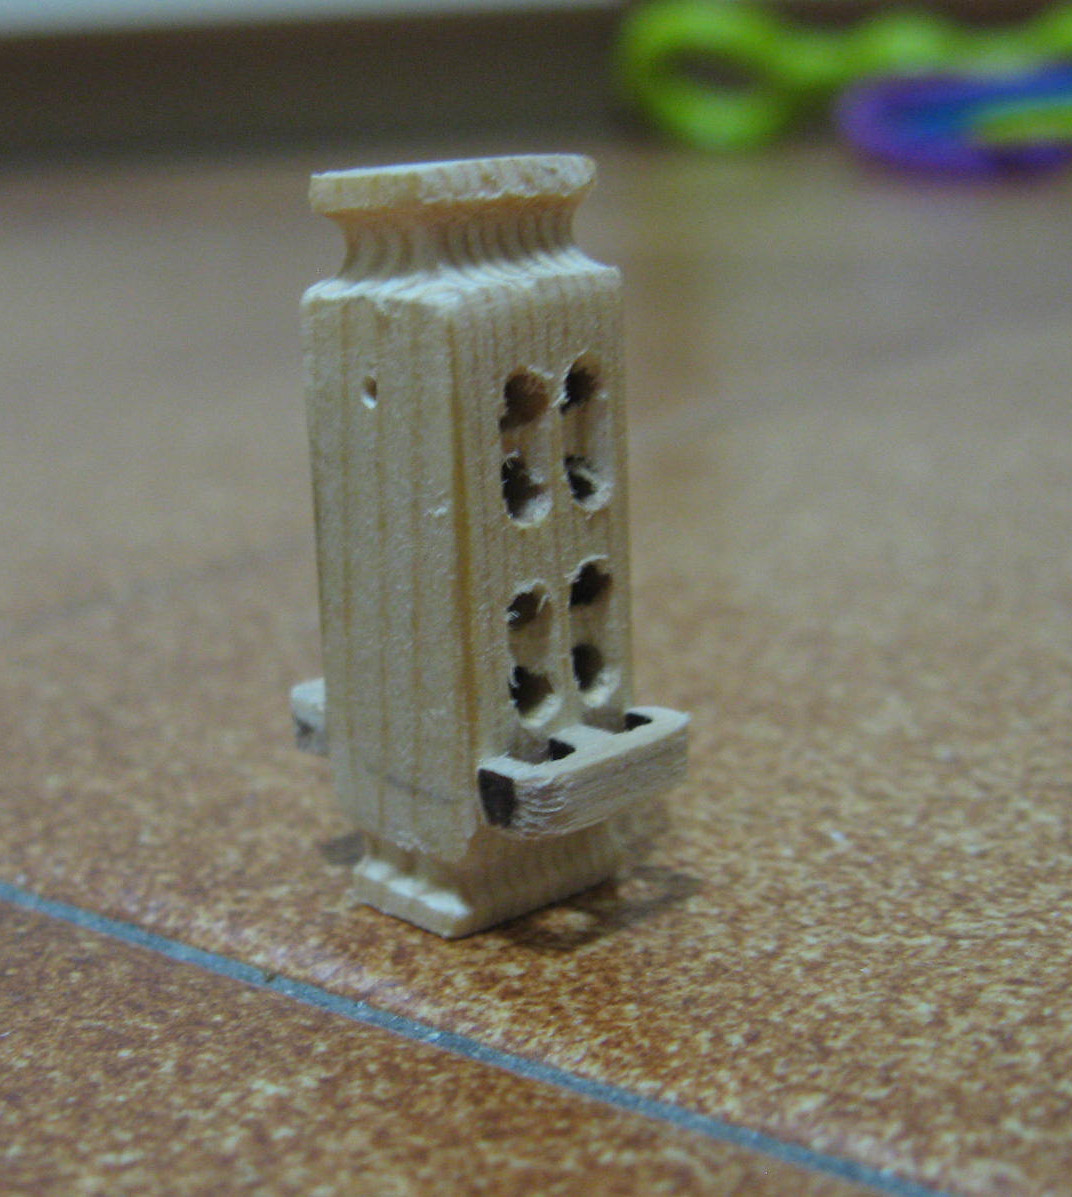
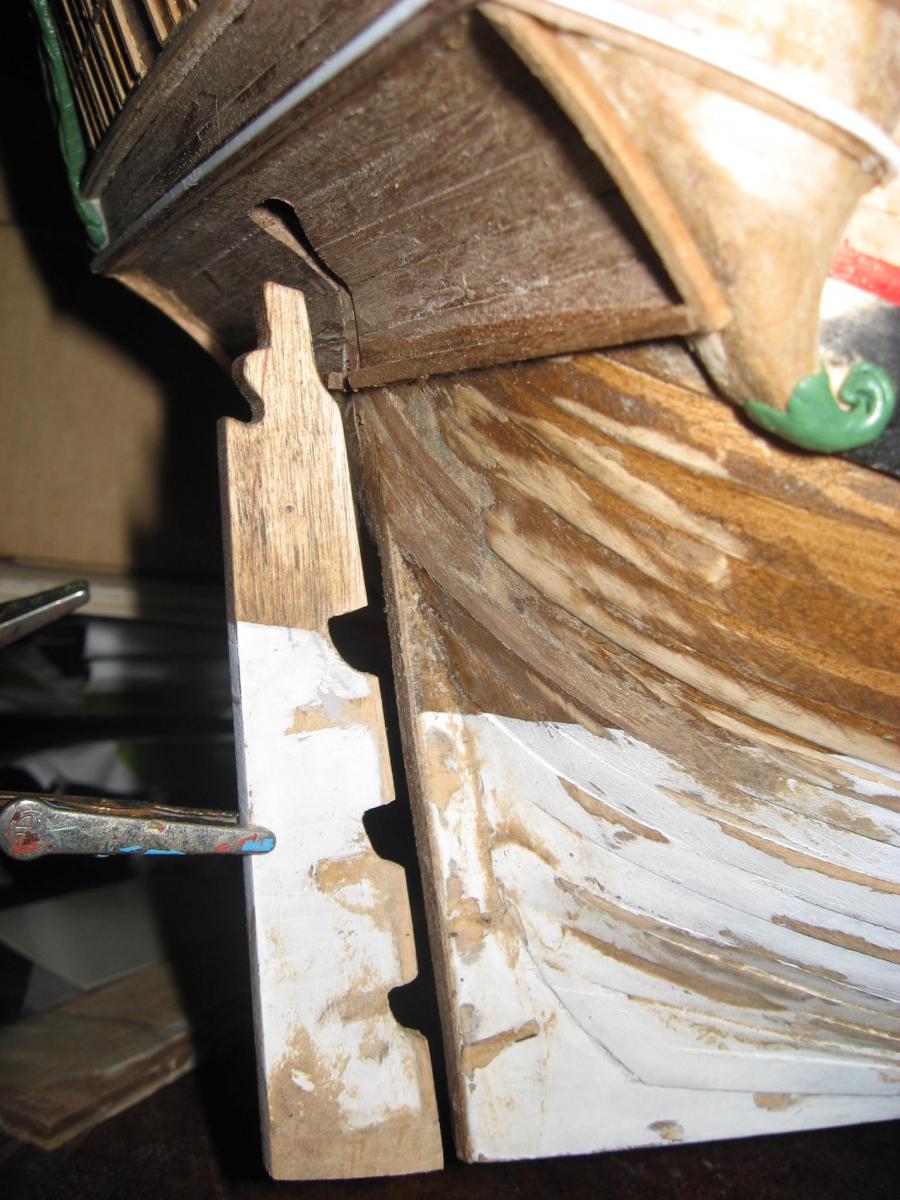
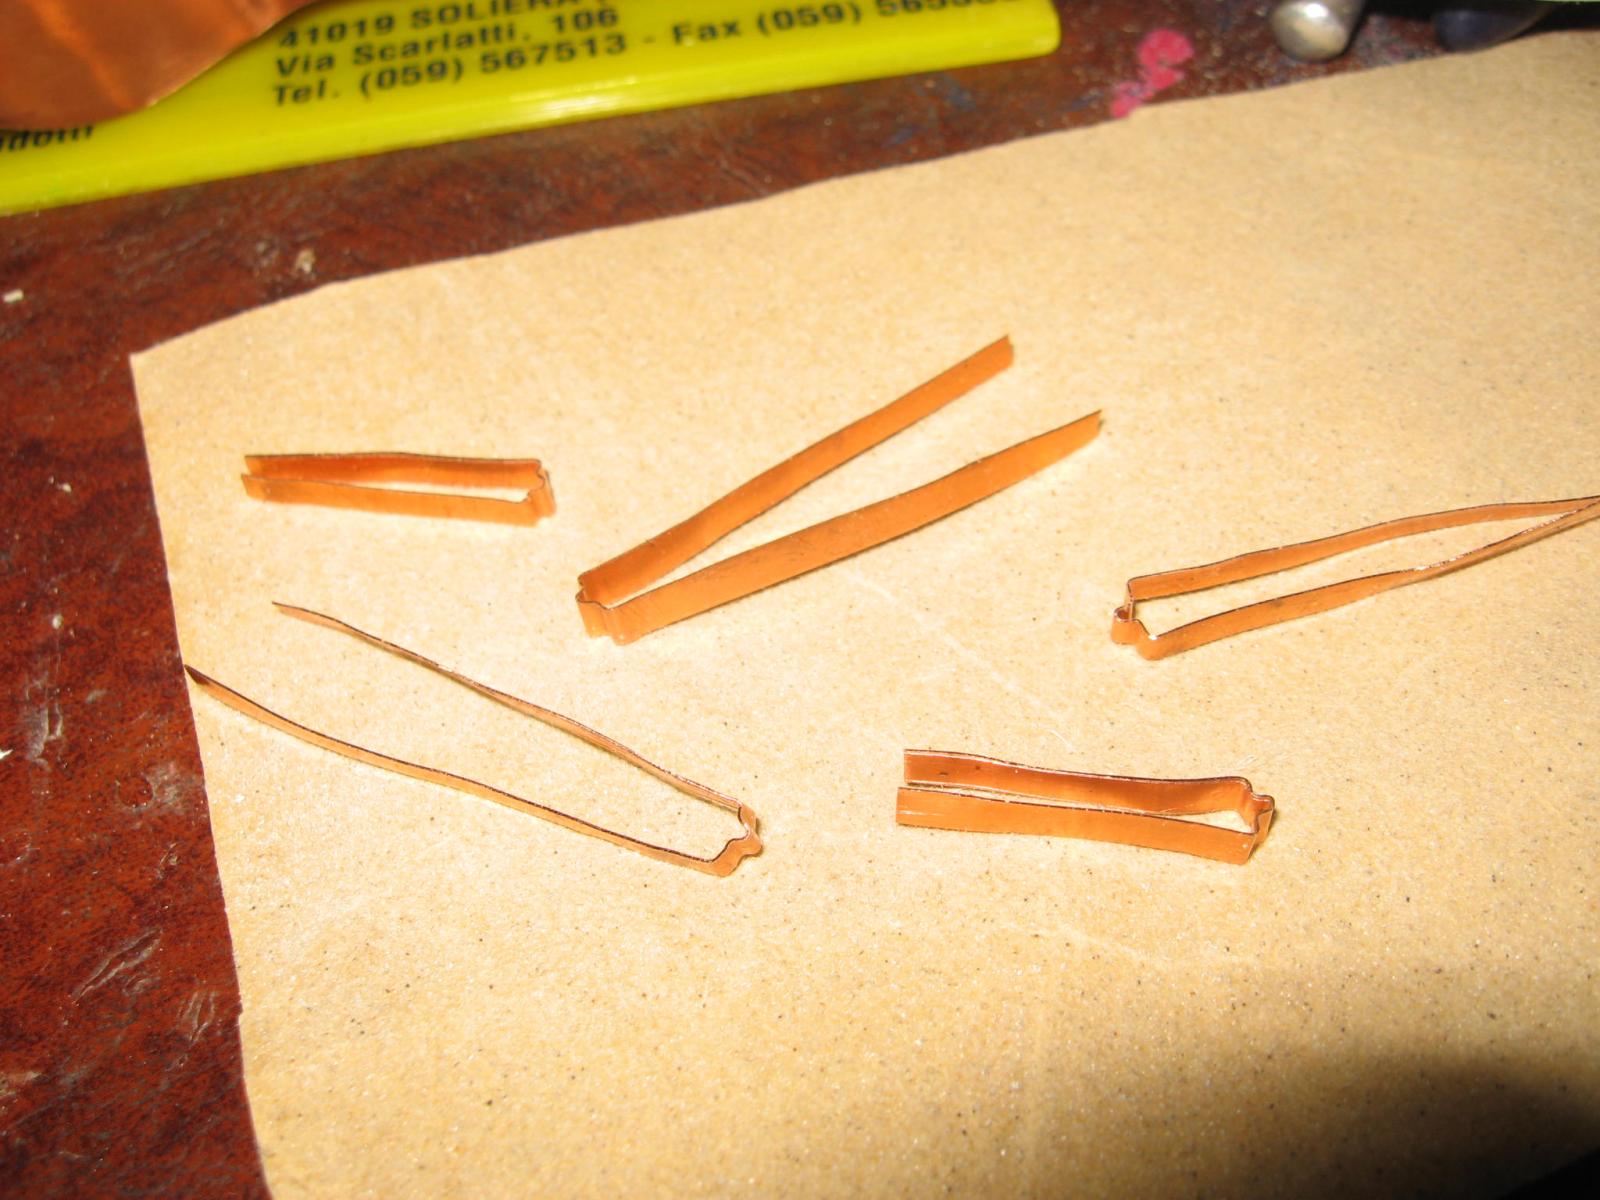
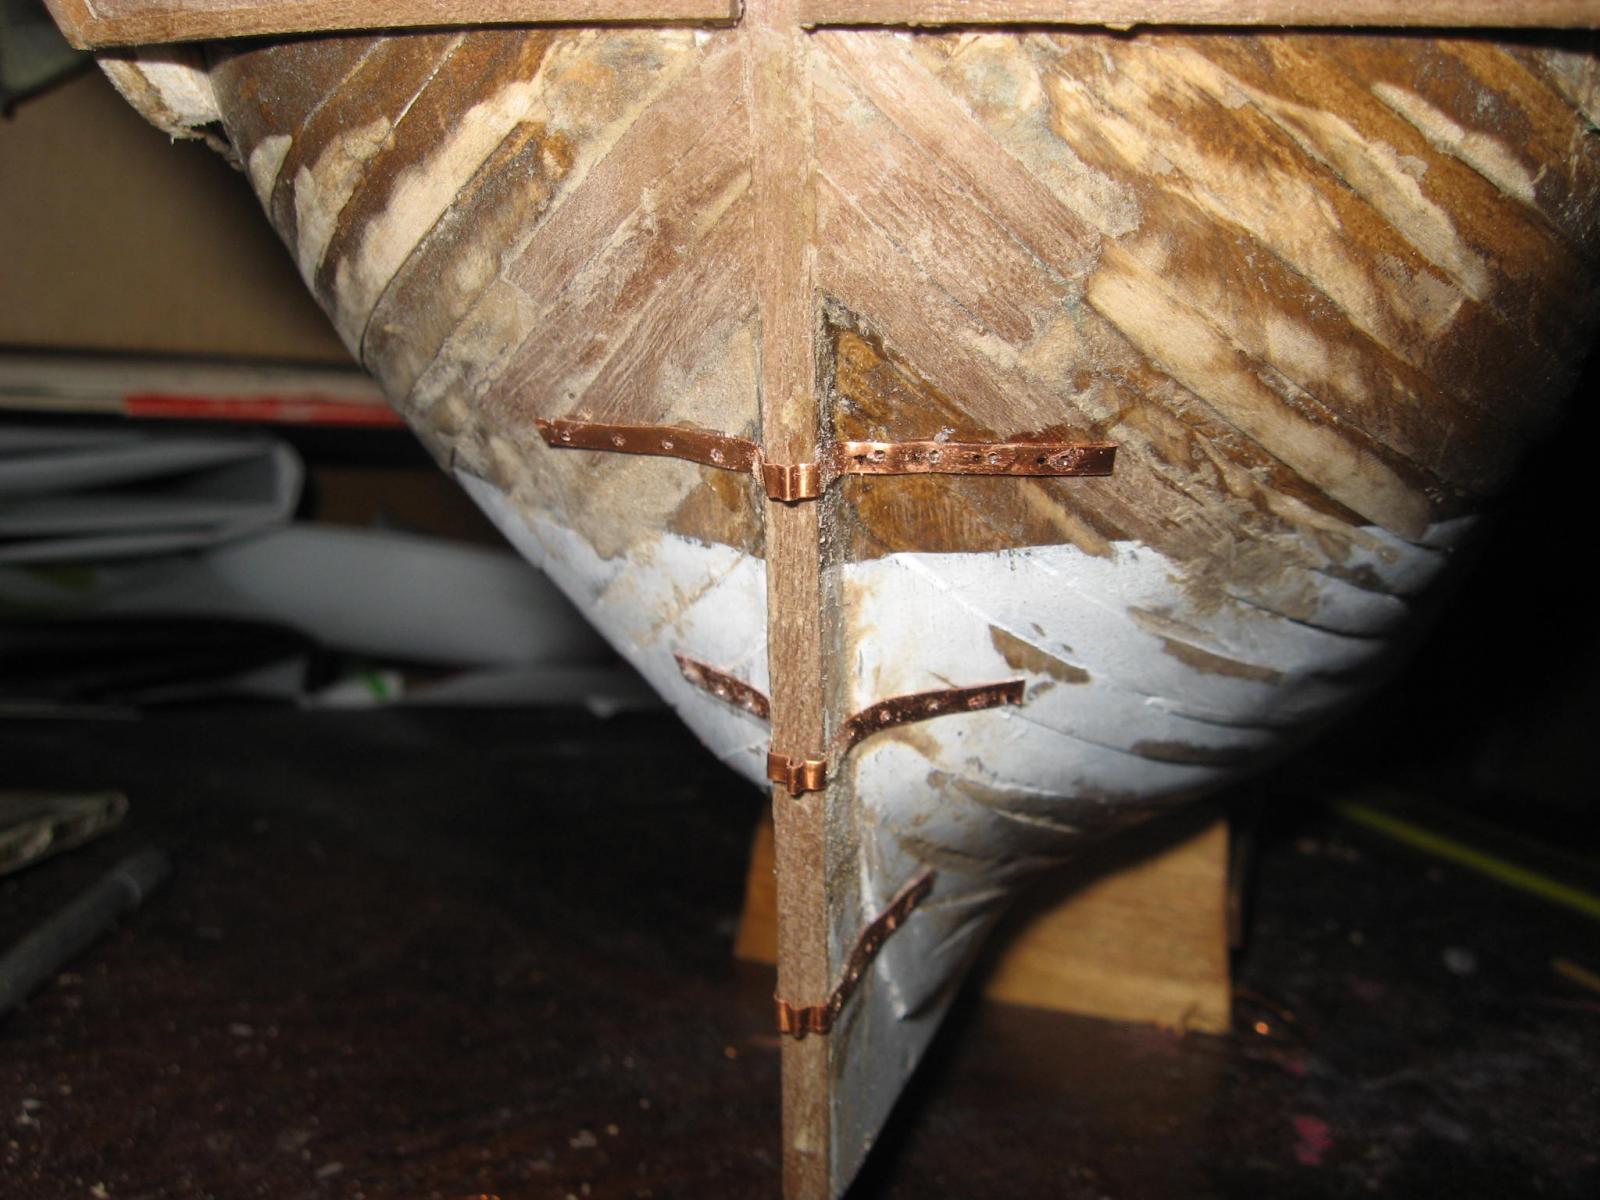
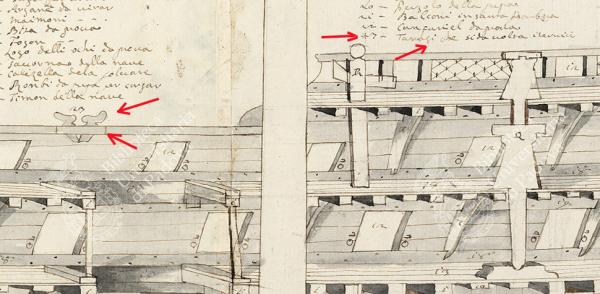
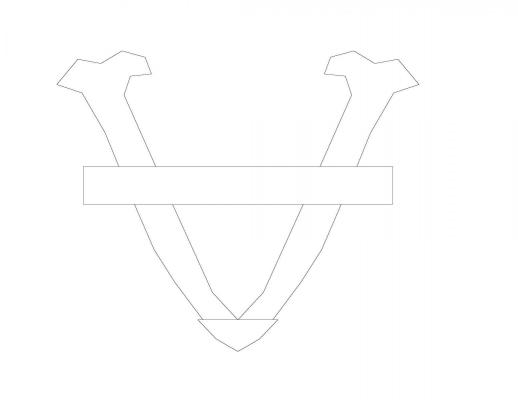
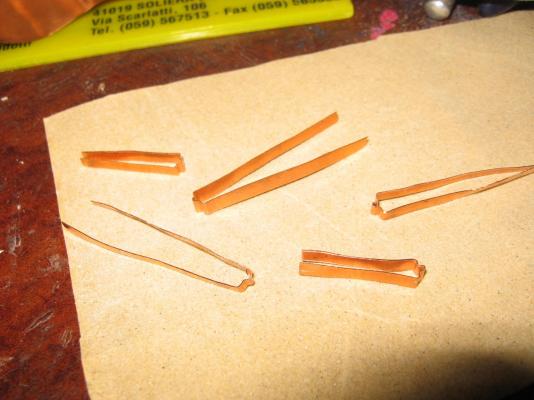
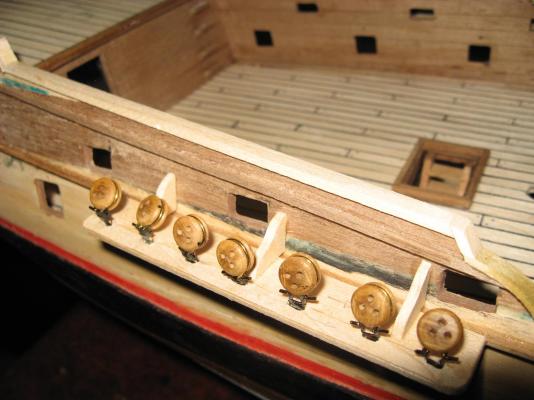
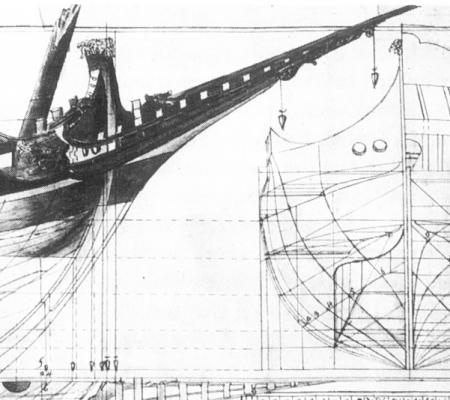
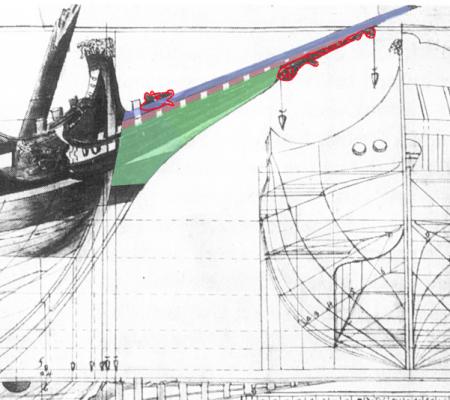
I solved the doubt related to the cleats that are placed between the cannons, and that are mandatory, in order to keep clean from ropes the cannon area. I found an original drawing of the "San Michele Arcangelo", which was a Venetian Ship dated 1749. In the attached photo can be seen the overall ship drawing and the detail where the cleat type is showed (se the red arrrows). Obviously they have drawn only one of them, since it was an example. Its description says "Tavogi (?) che si dà volta i servici" (the first word which is not clear is the venetian name of the cleats). It means "Tavogi (?) a cui si danno volta i servizi" and in English: "cleats where the rigging is tied" (but in a more technical way) in ancient Italian. So the cleats will be like the one in the drawing I made, which is the same present in some ships of the same period, including the Hermione replica. In the attached photos can be seen similar (just similar) cleats, present in the replicas of the ships "Batavia" and "Shtandart". I want to thank Fam (Andrea), which has given to me in PM more informations that are helpful to clarify the rigging and working of the foremast sail. Since we wrote in Italian (because we were not so familiar with English nautical terms) I will later make a small resume, since will be surely helpful for anyone interested in this kind of ships.

-
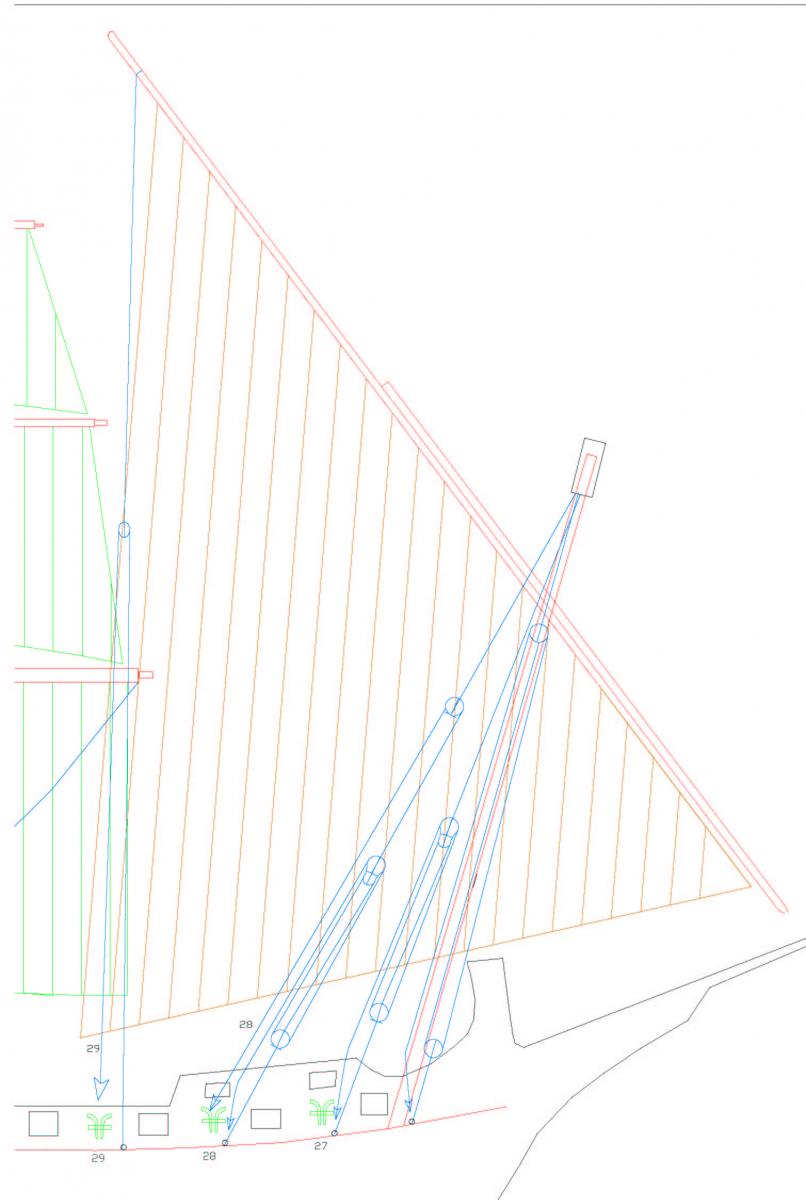
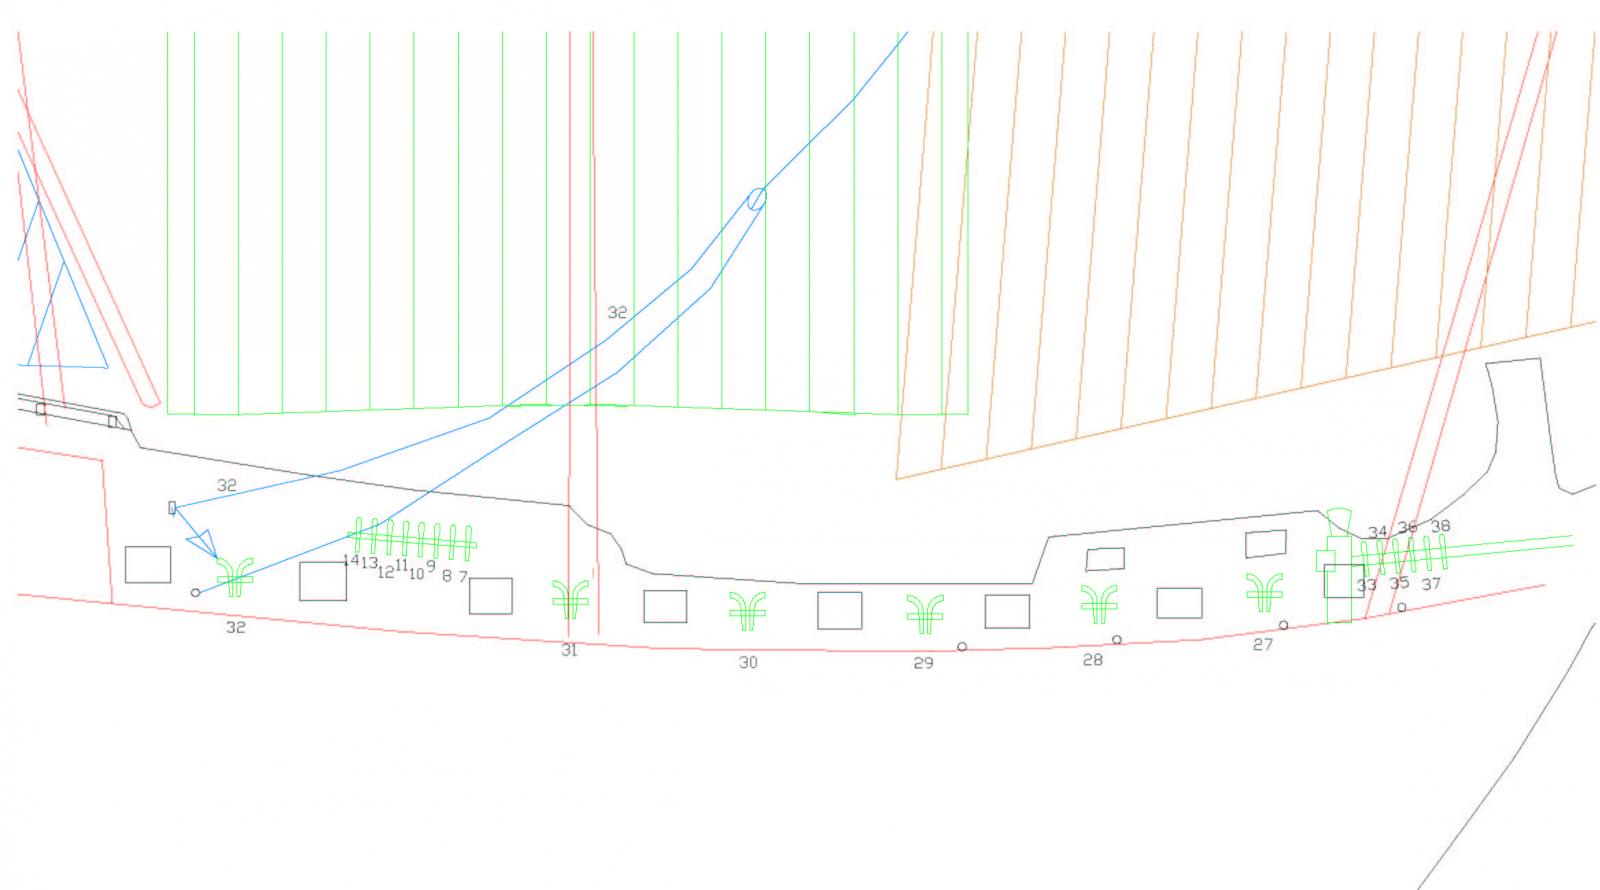
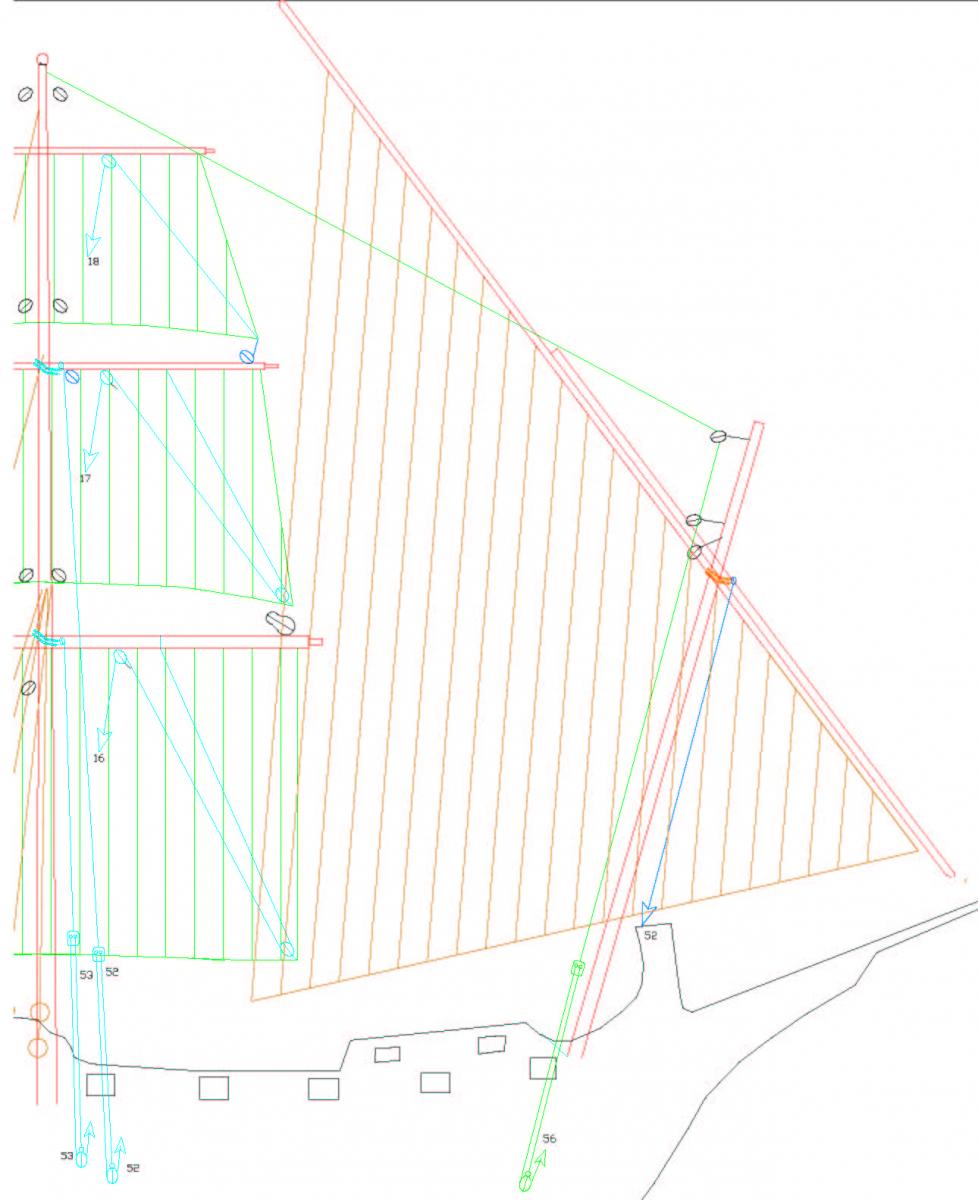
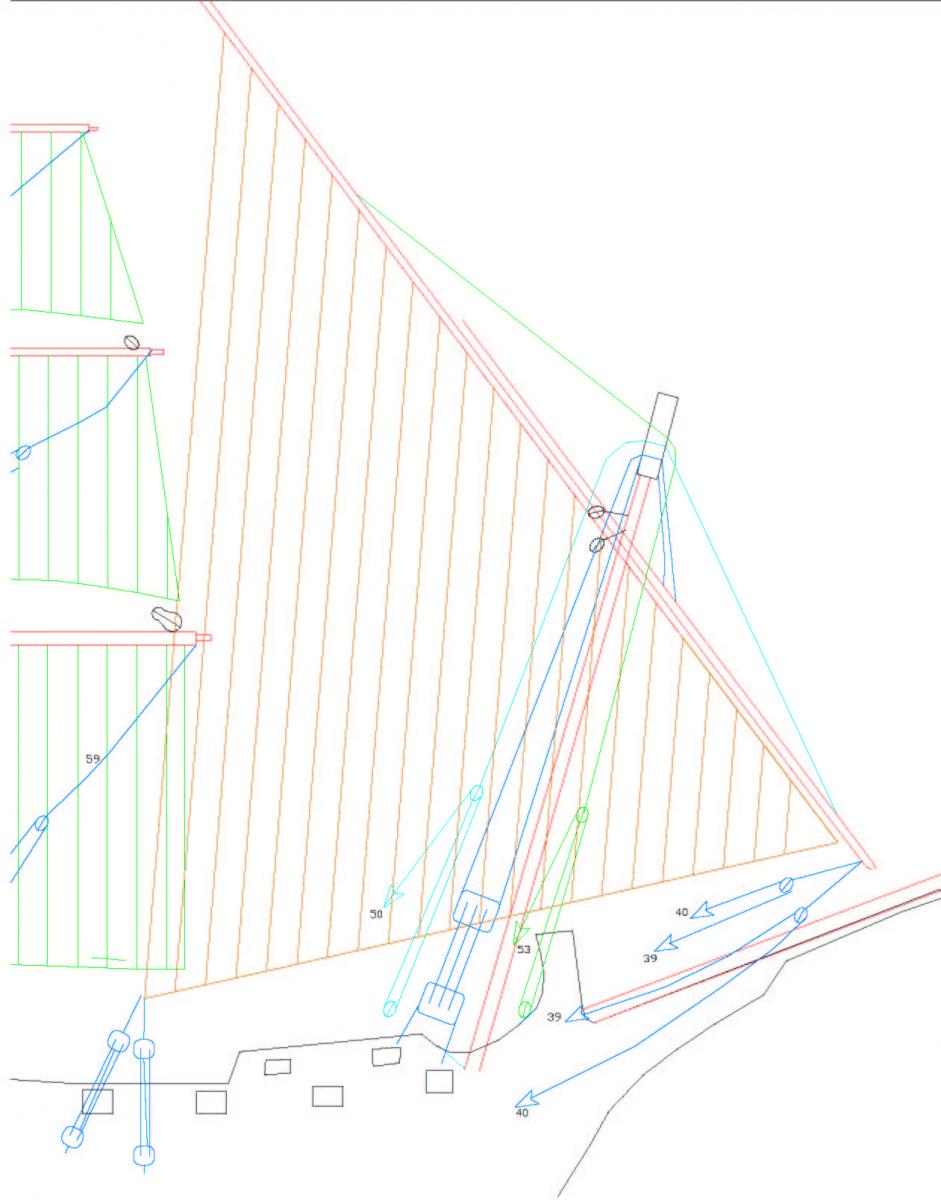
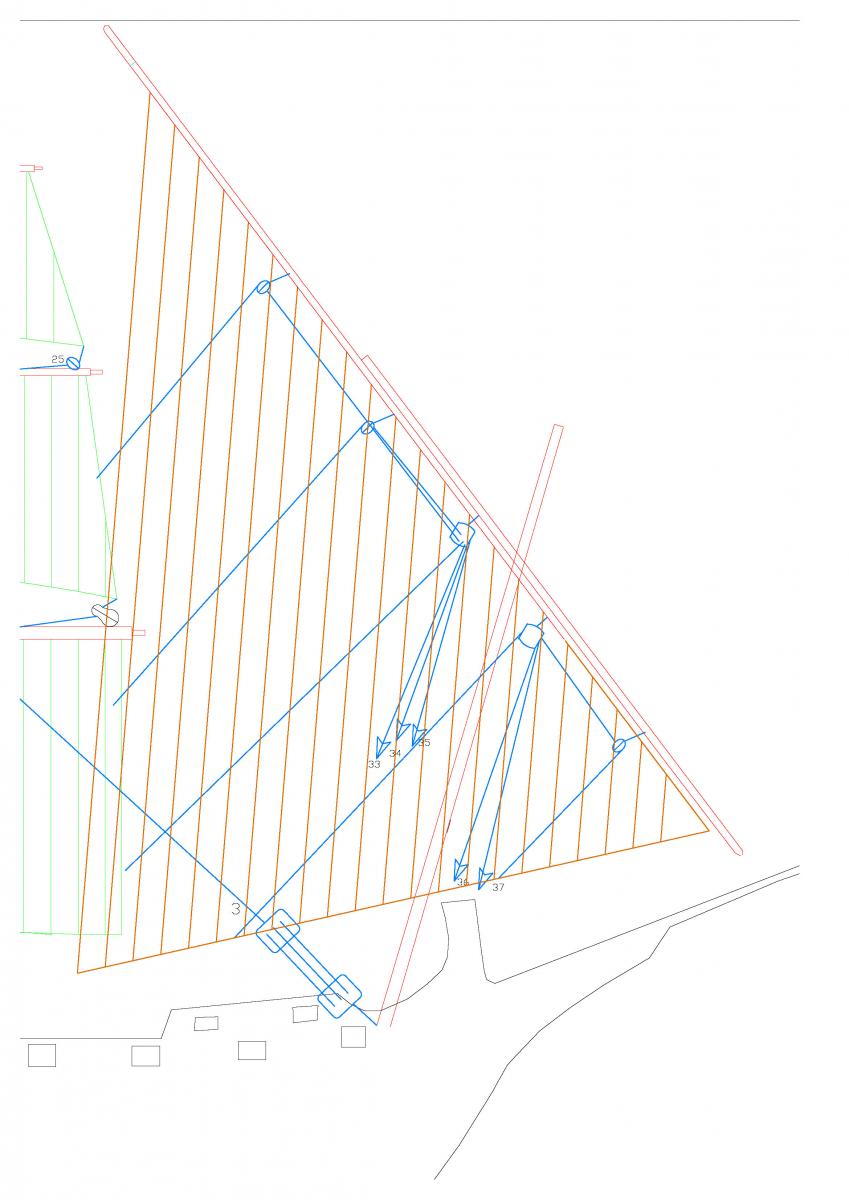
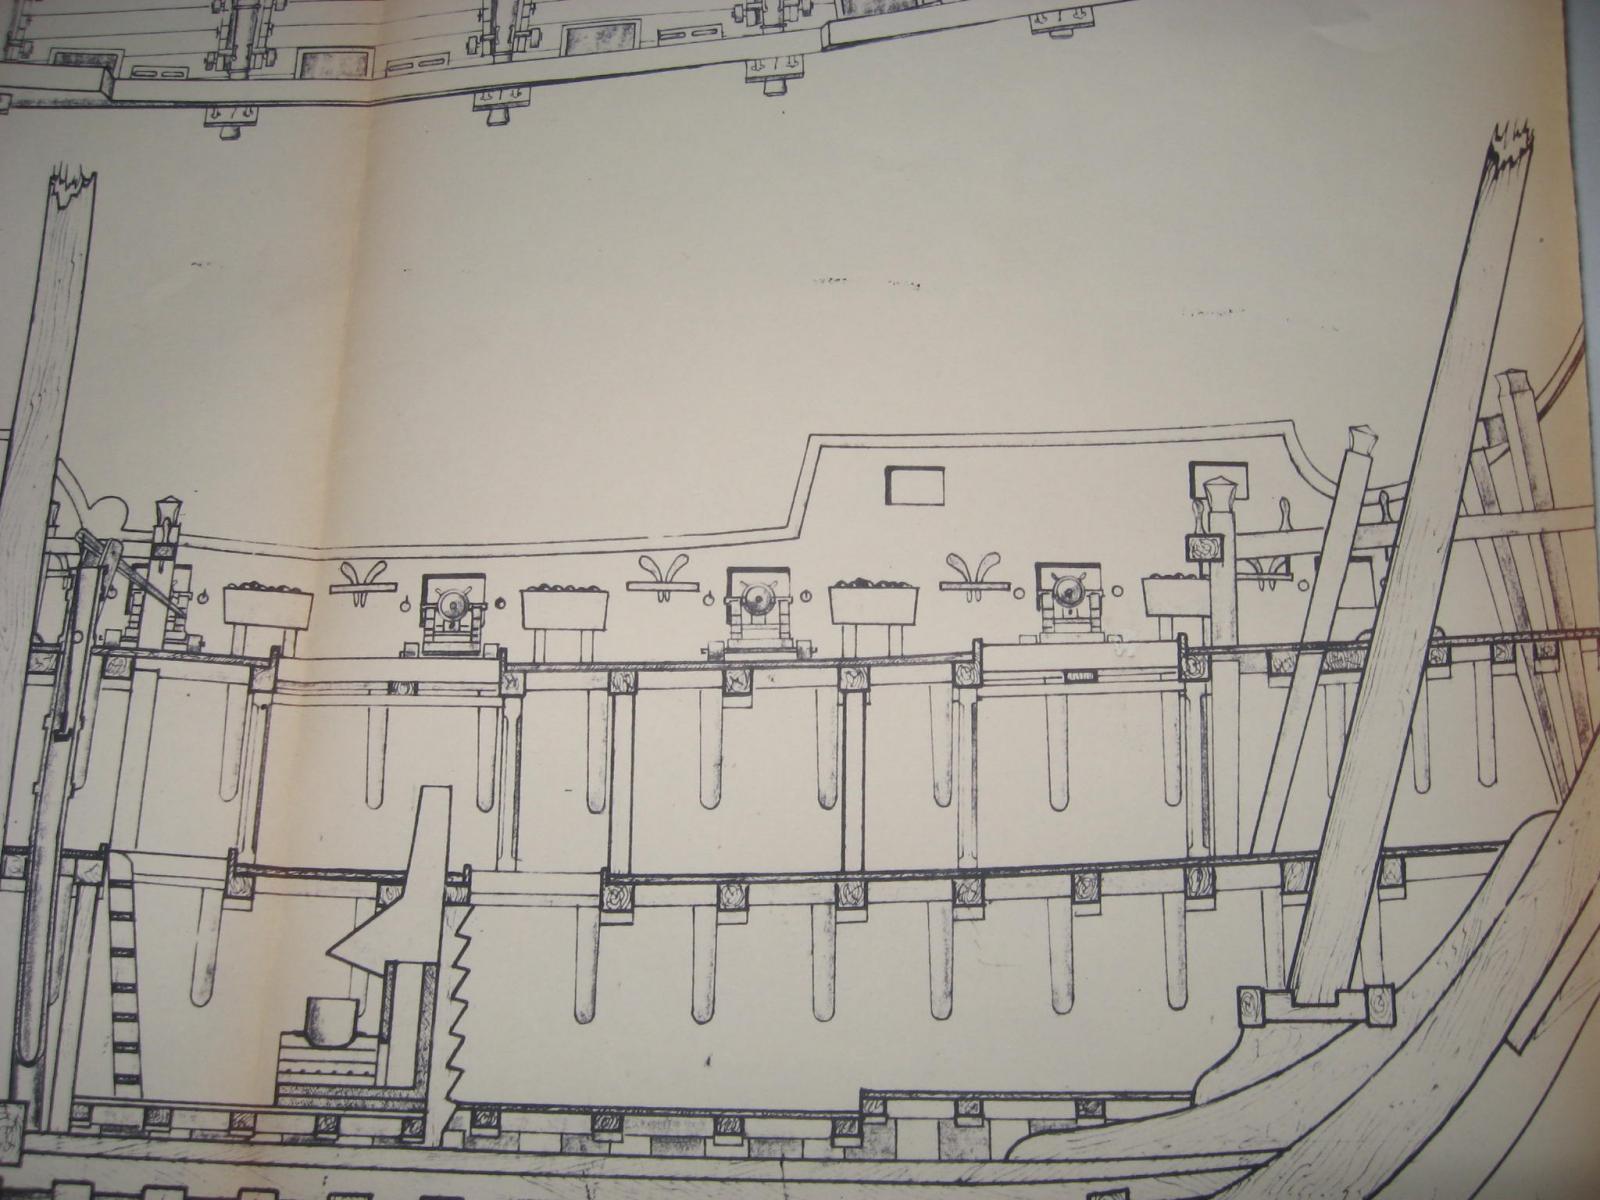
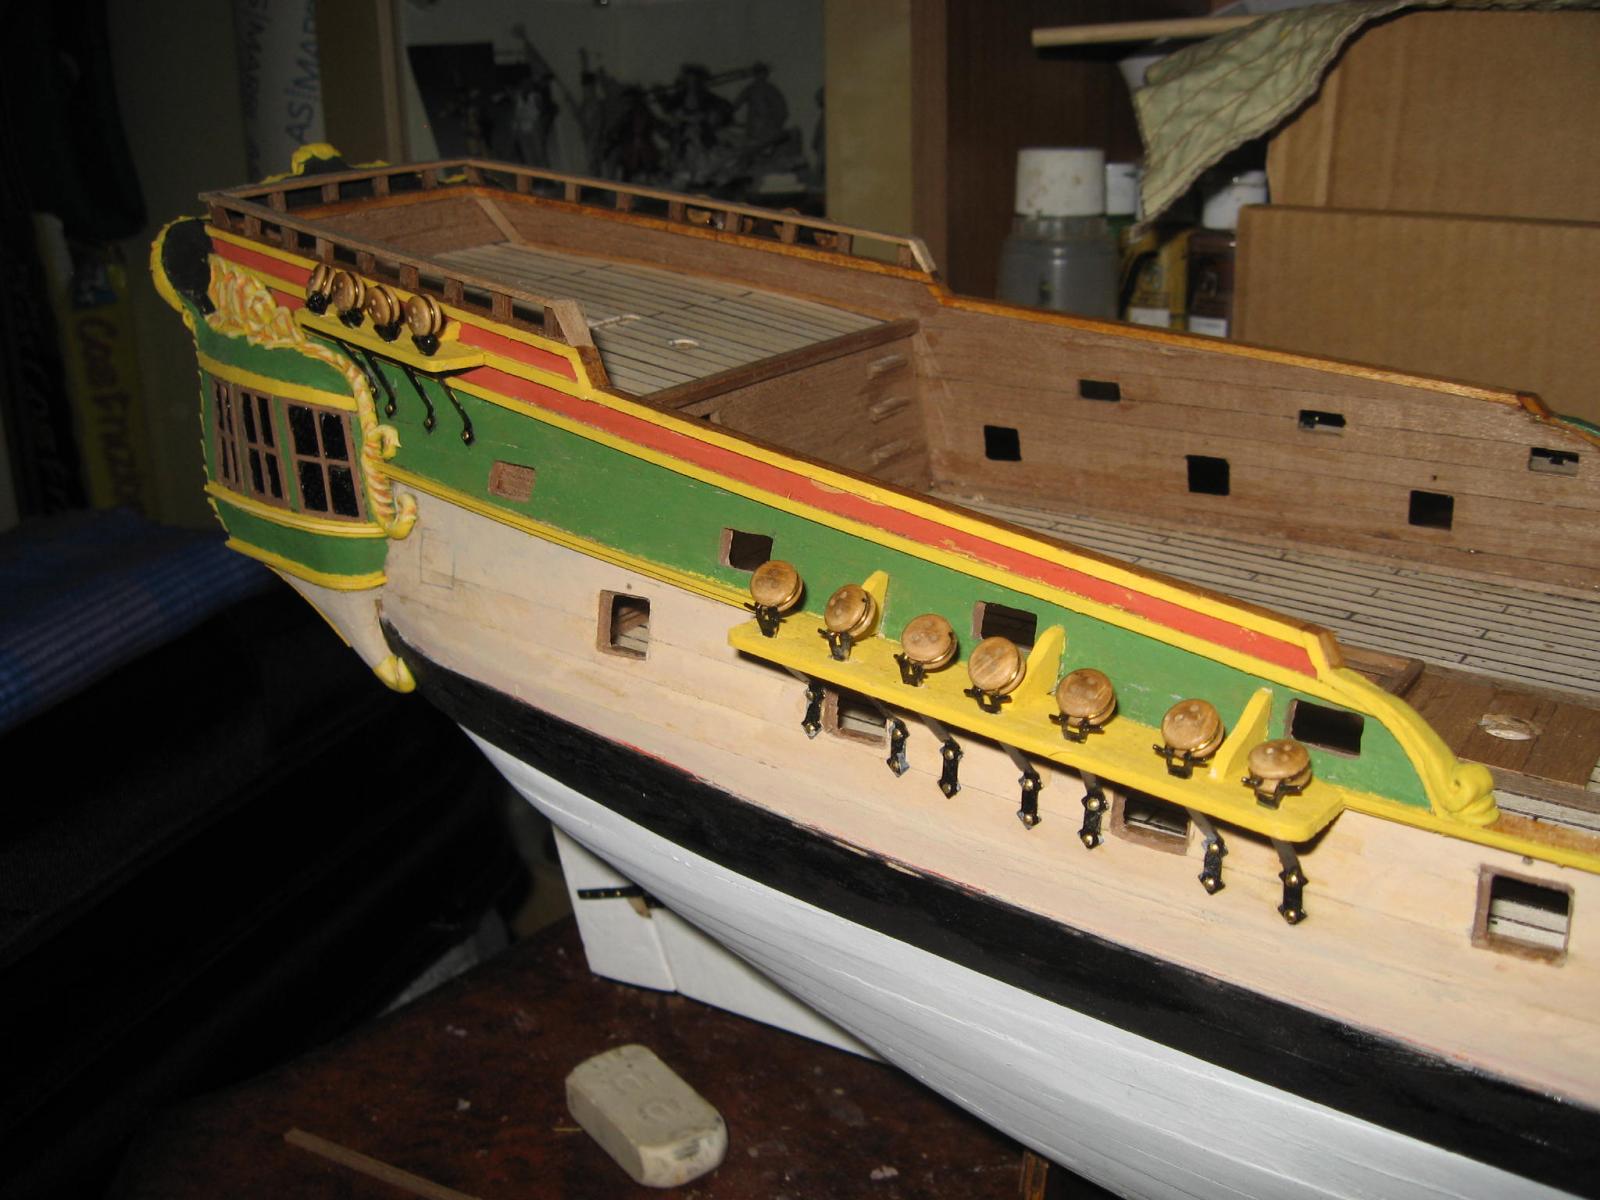
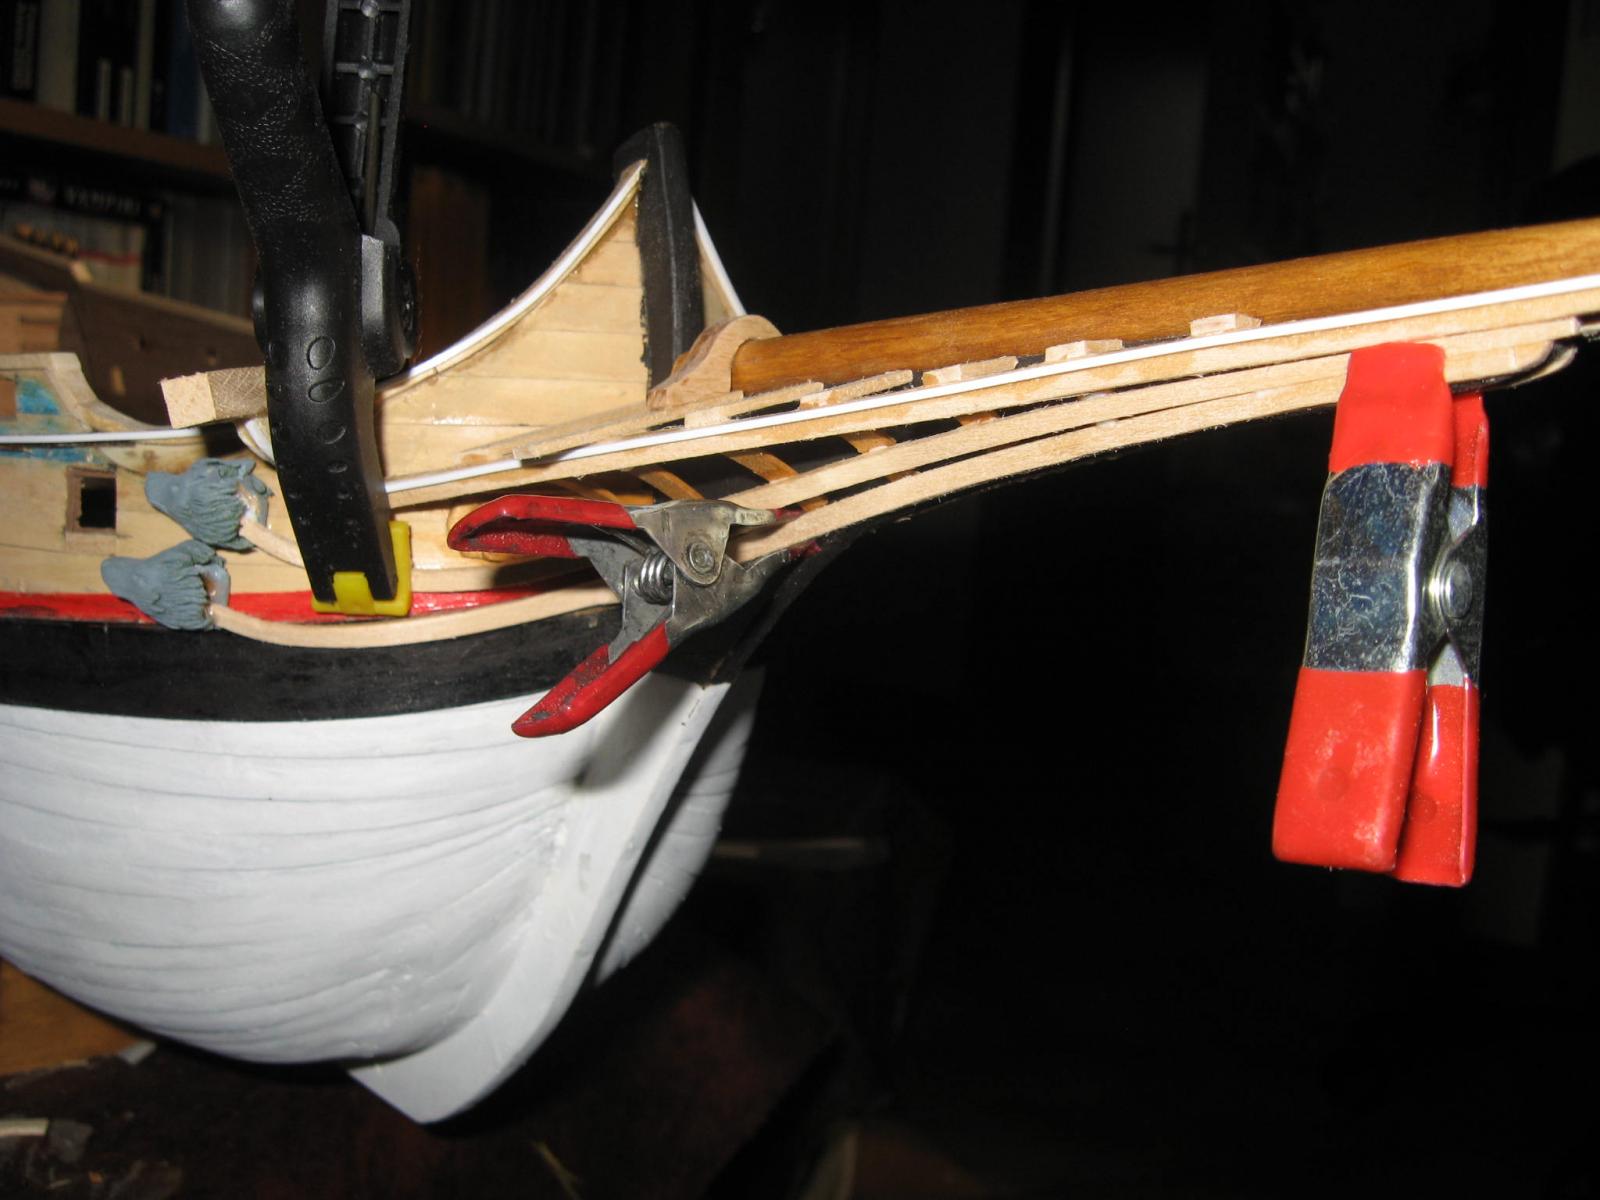
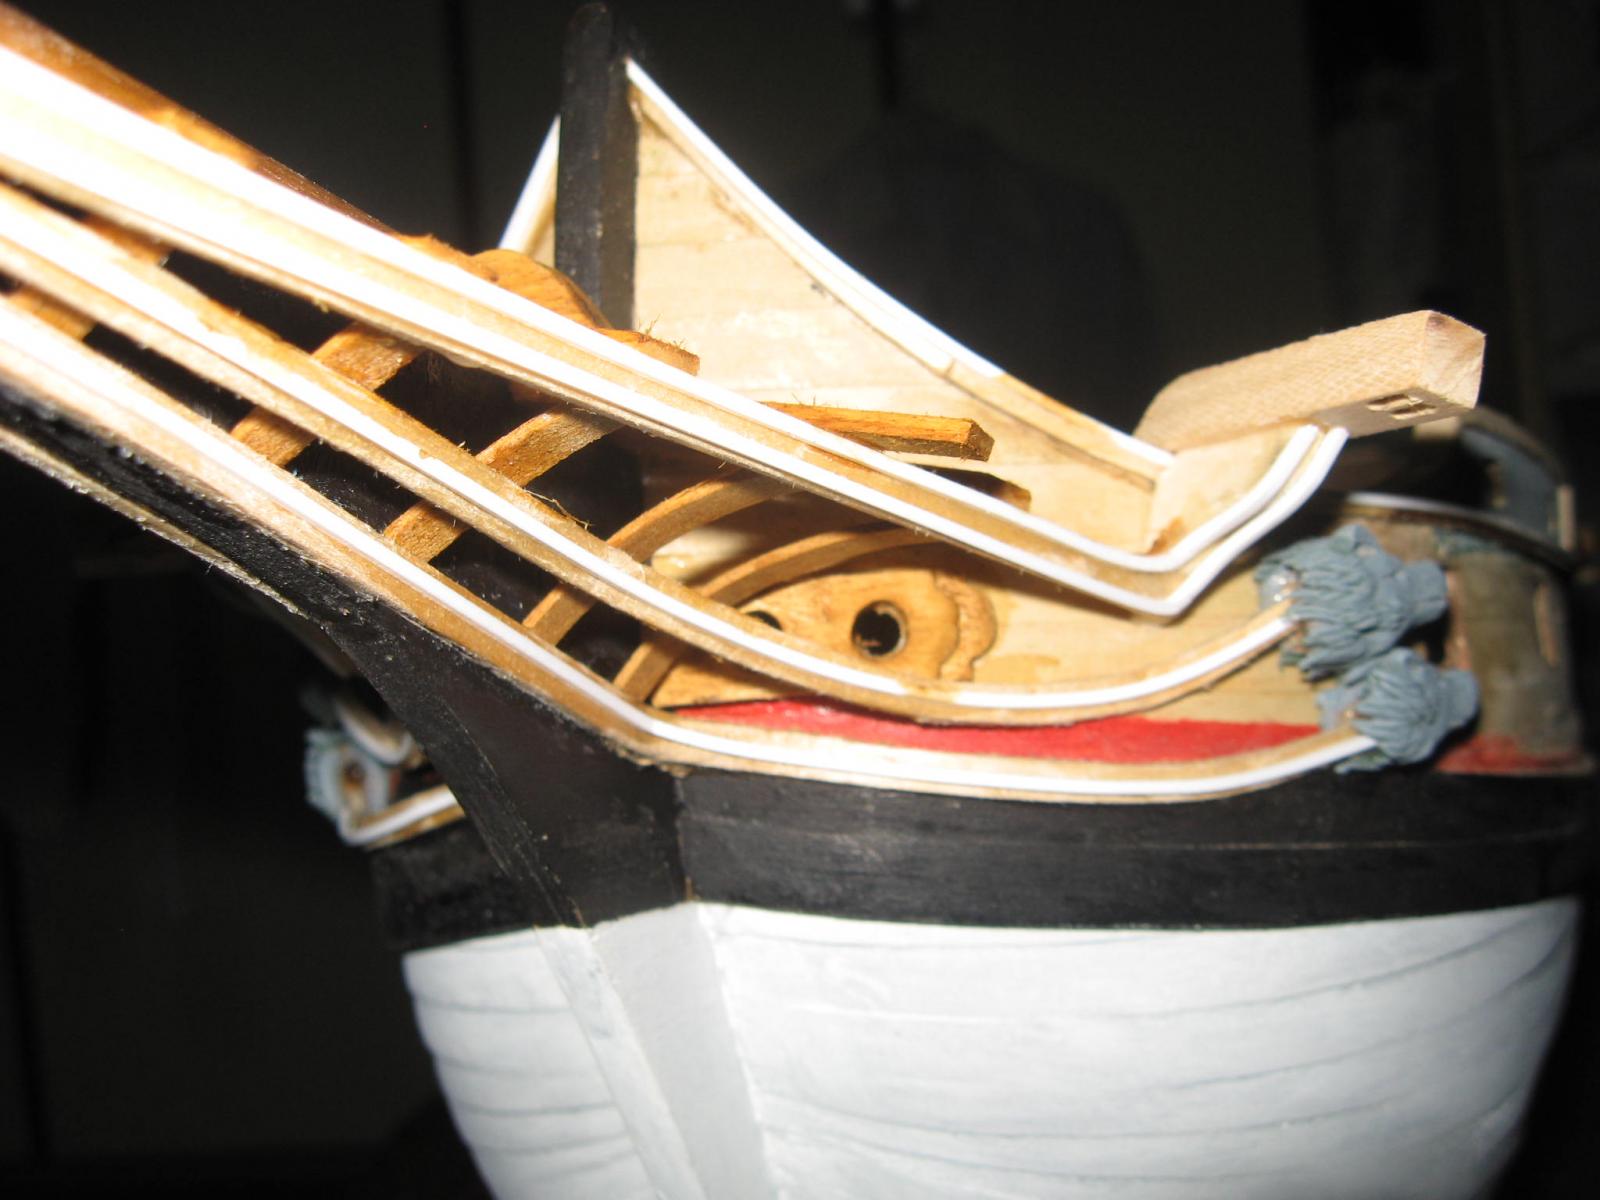
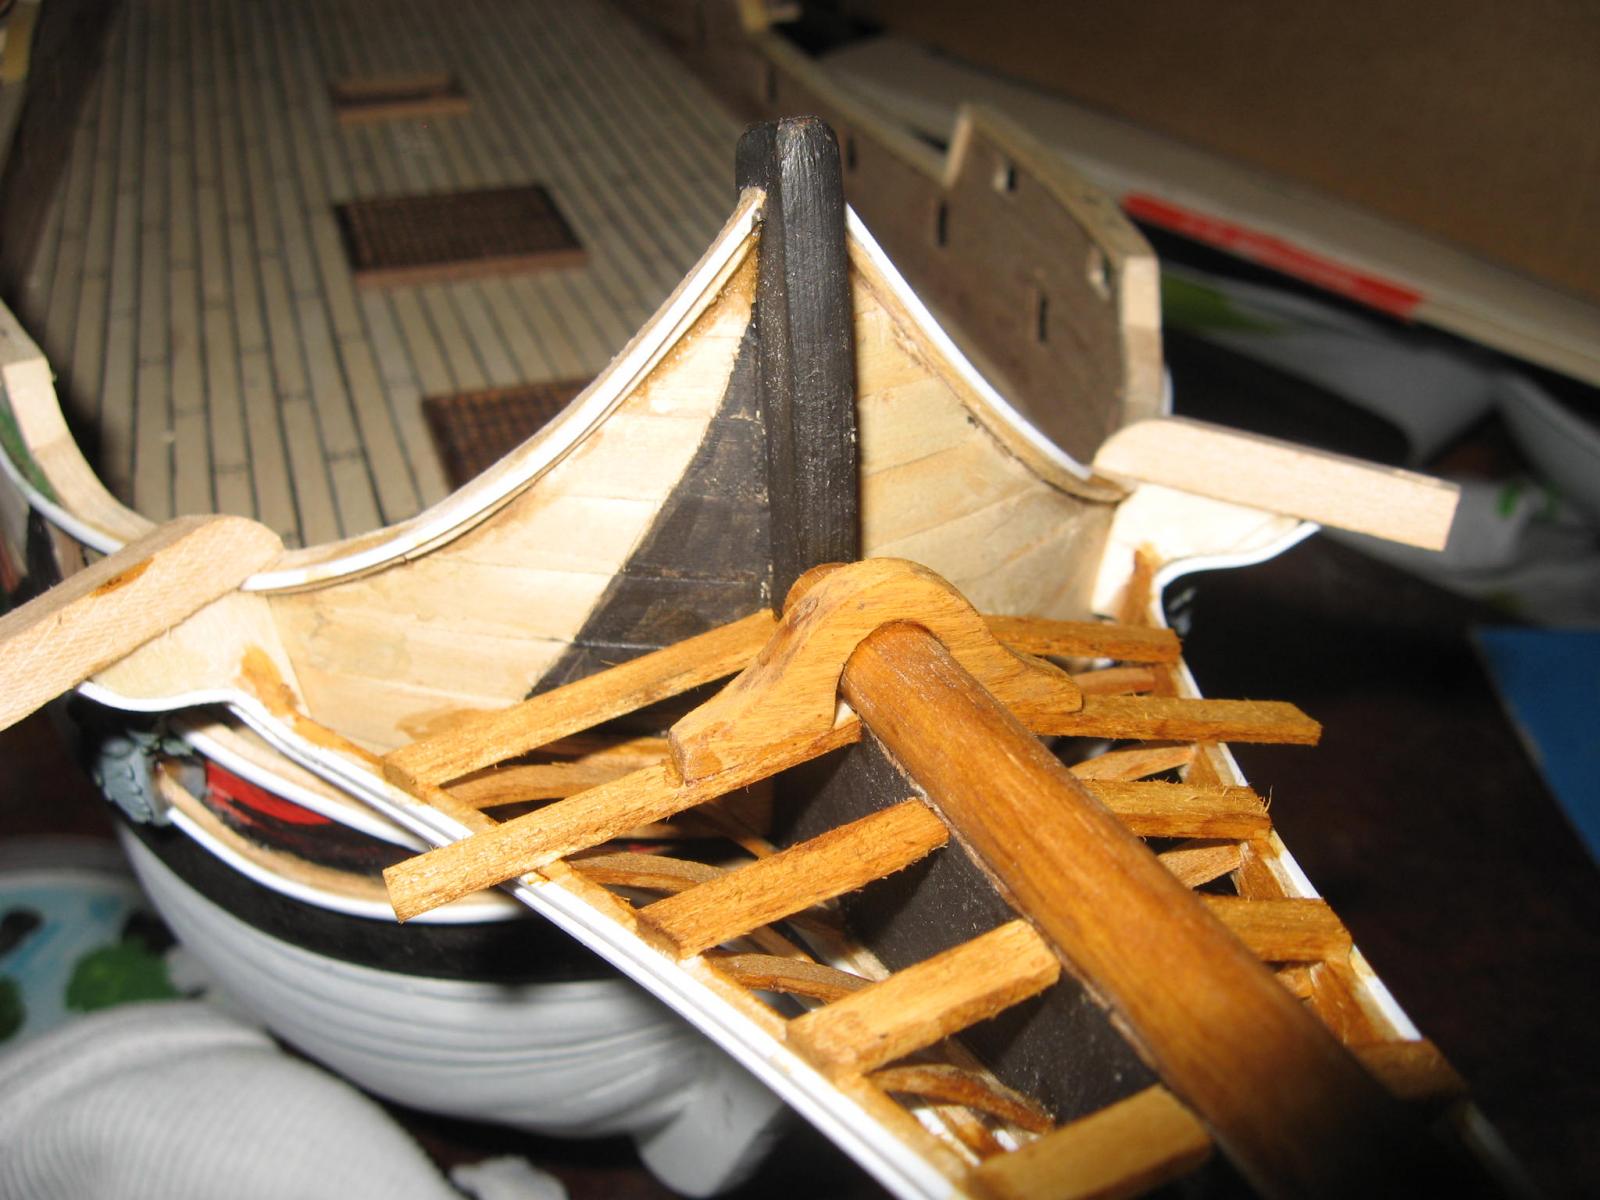
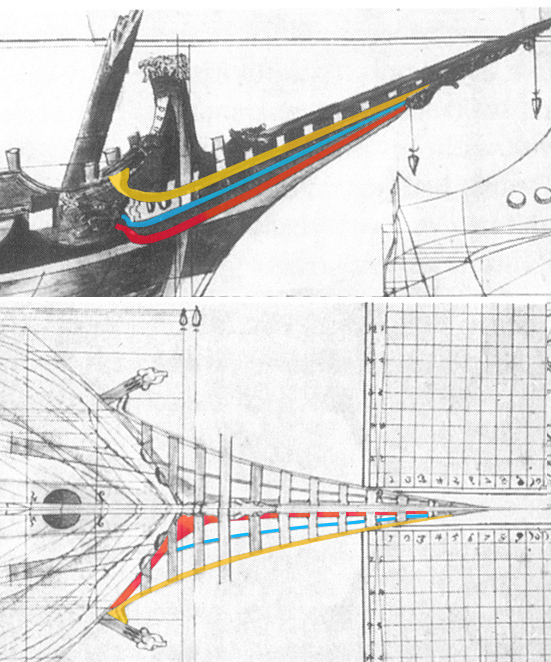
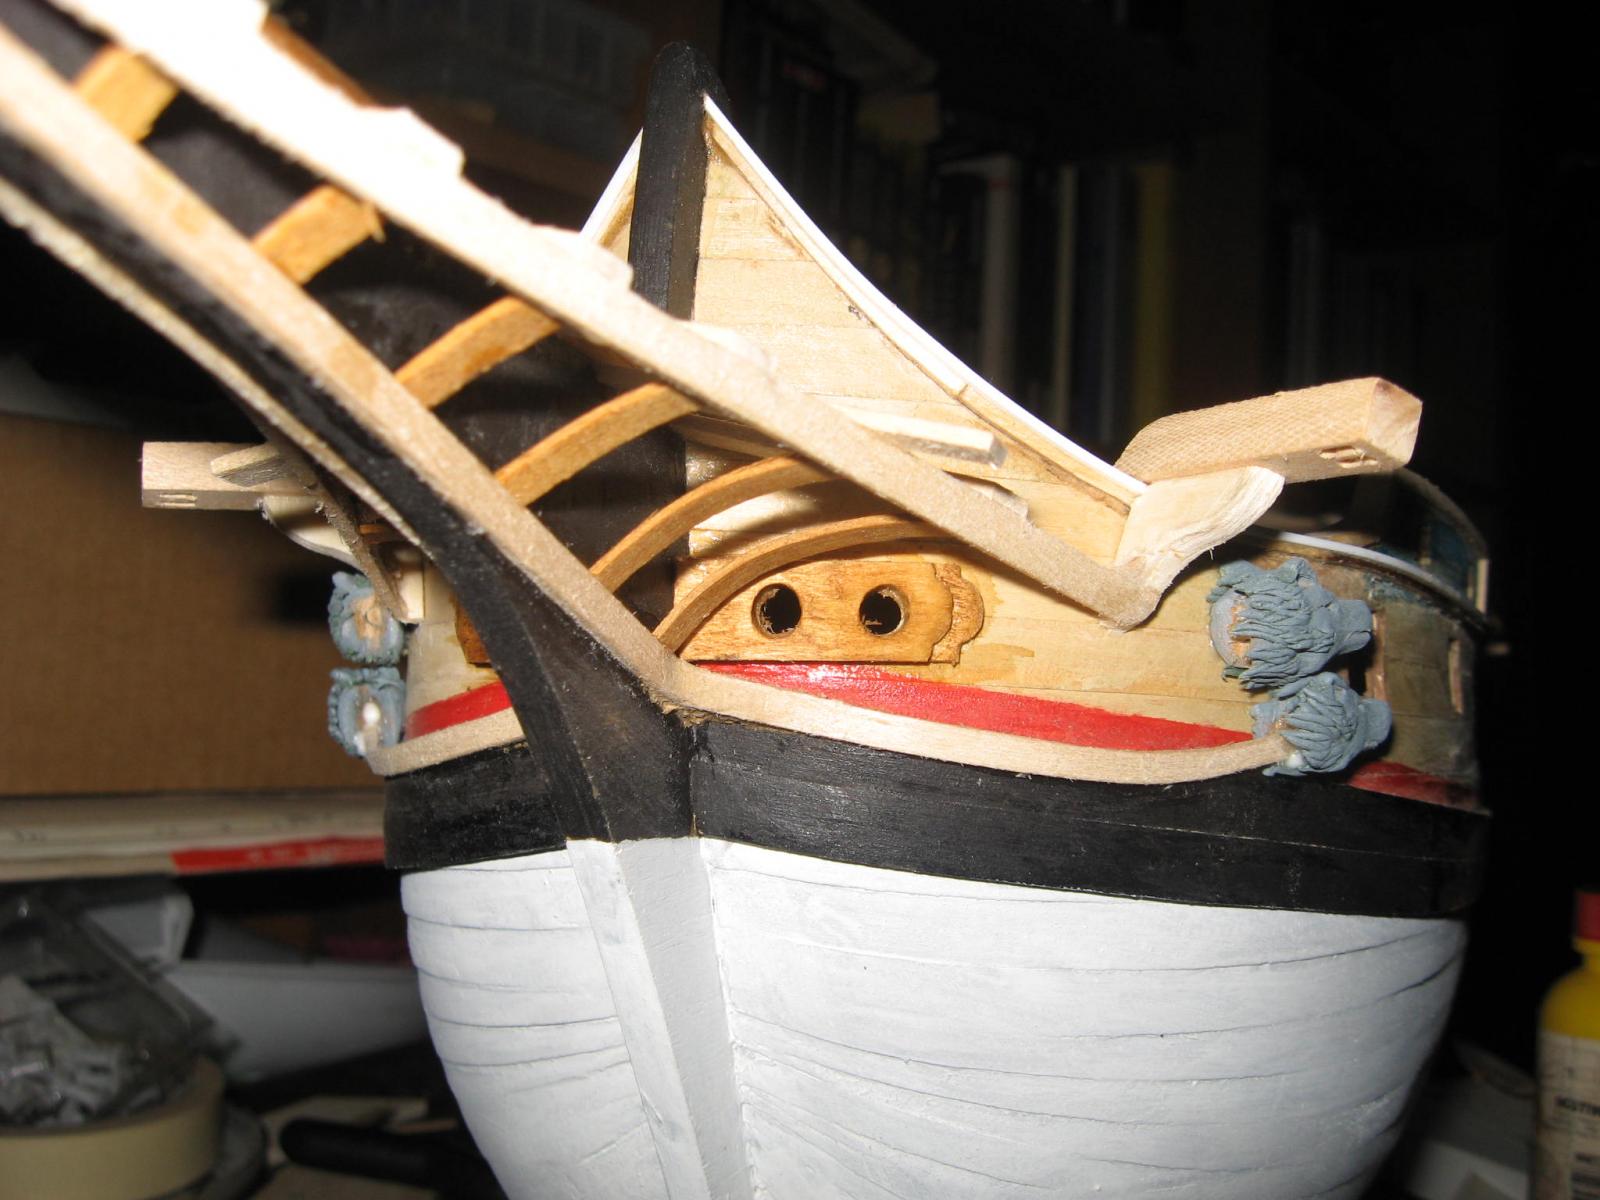
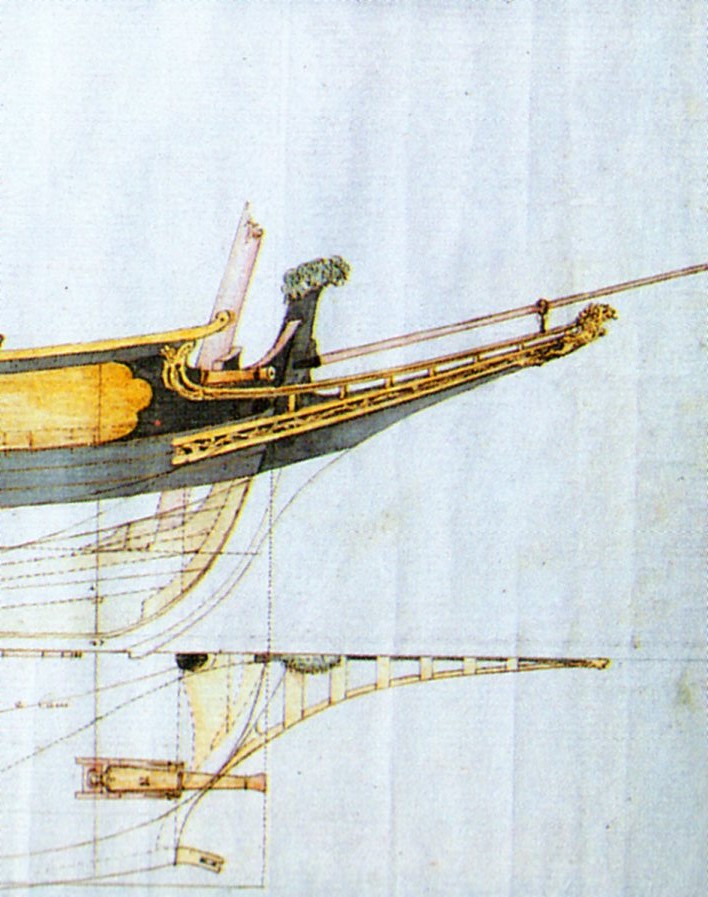
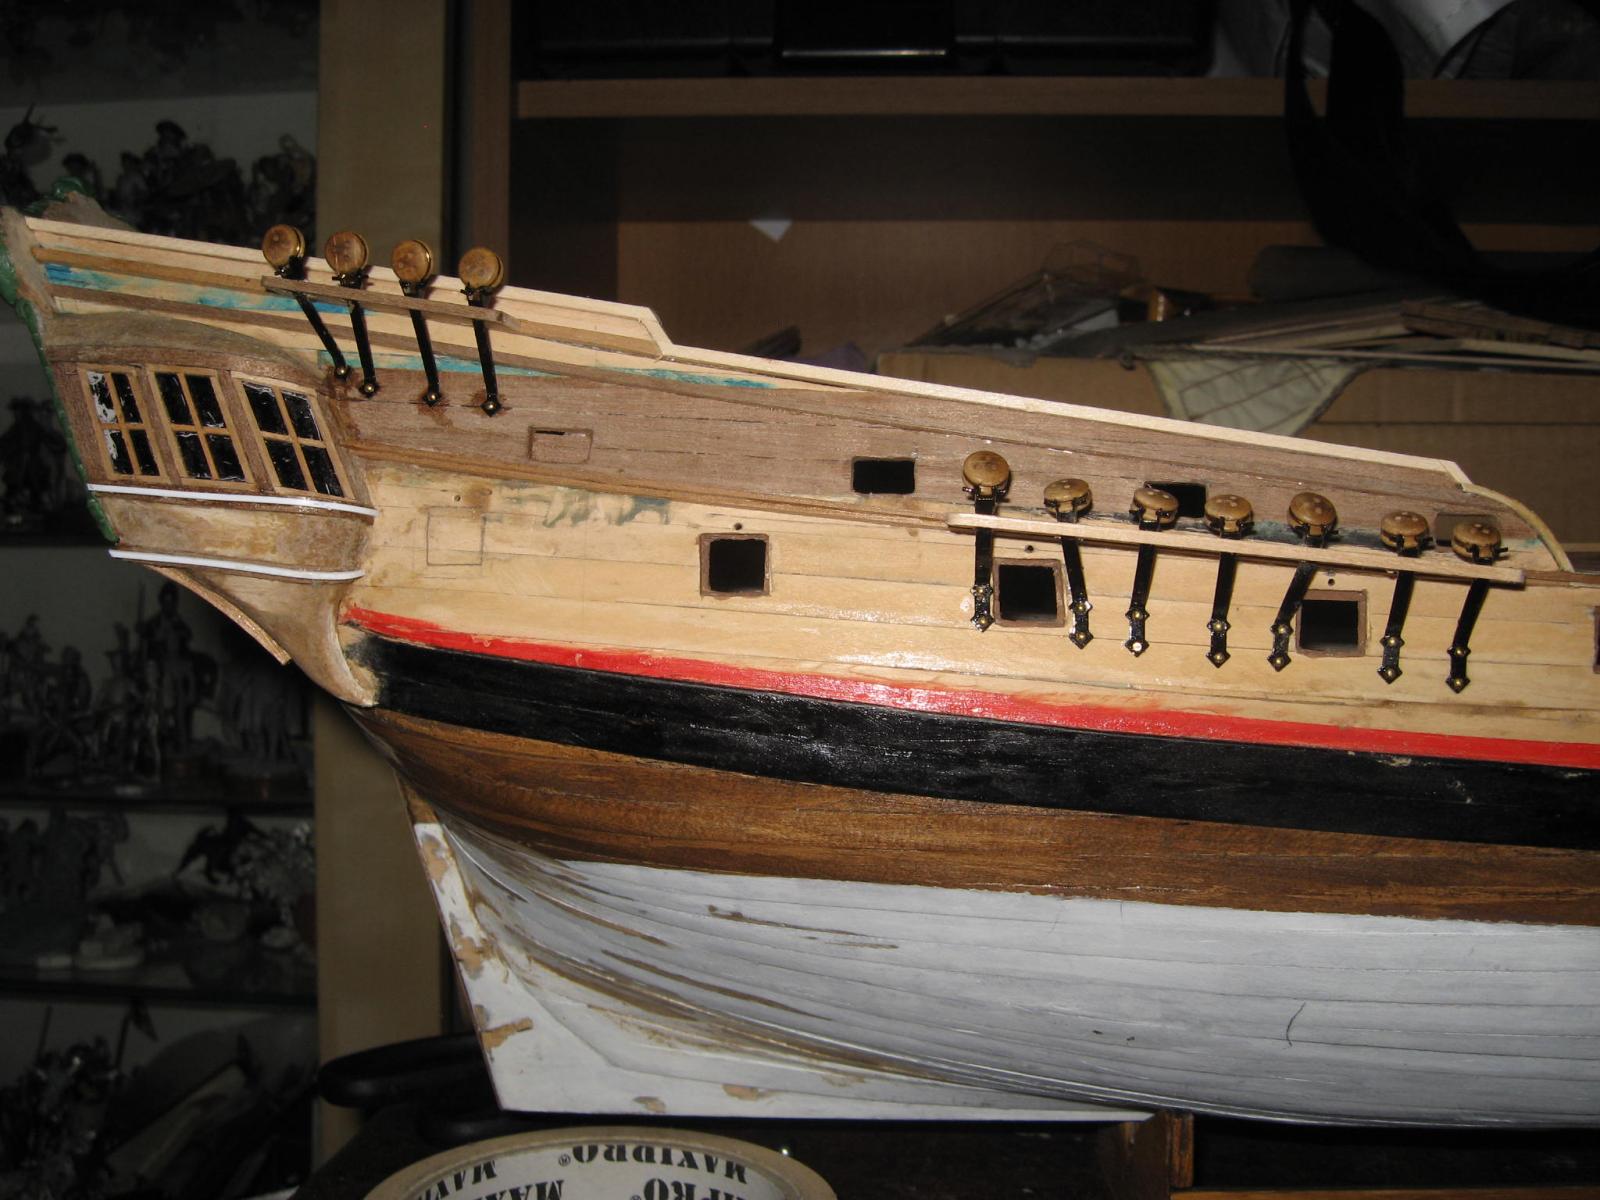
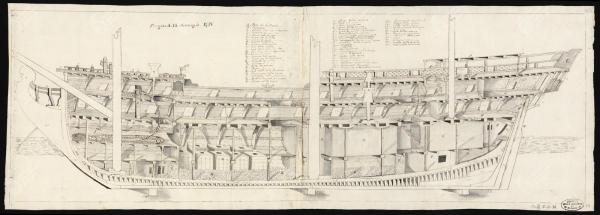
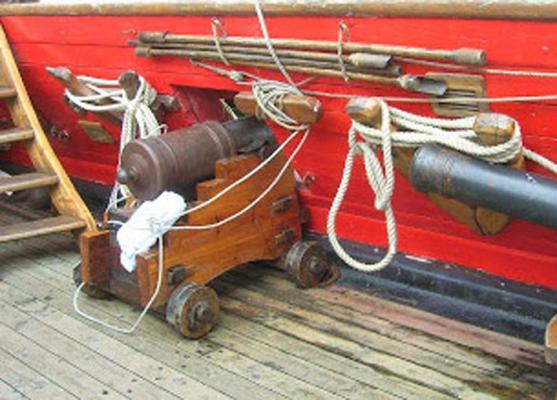
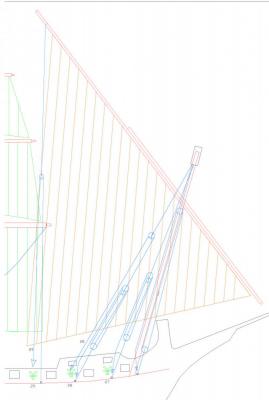
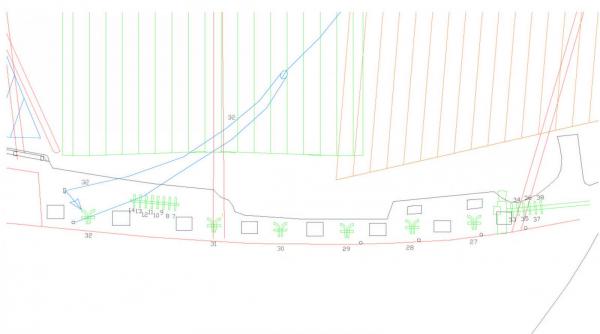
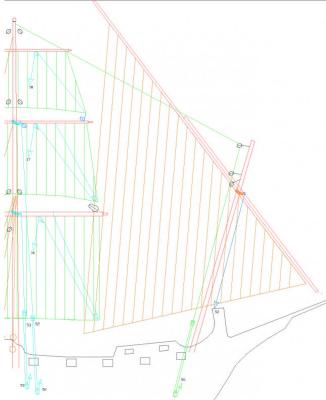
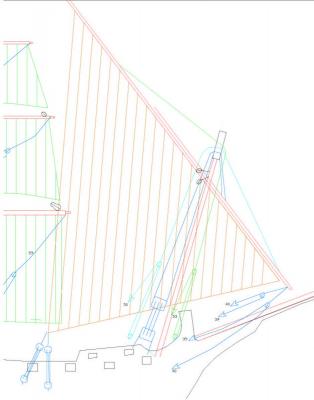
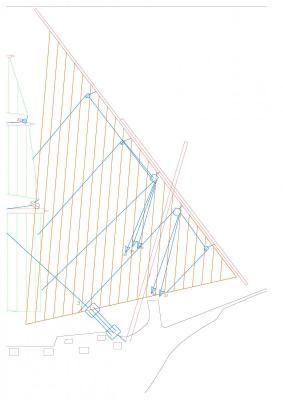
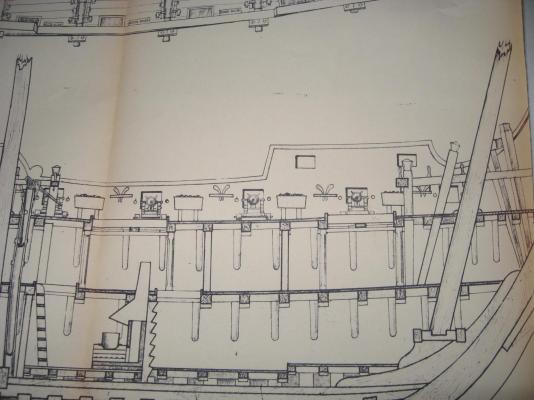
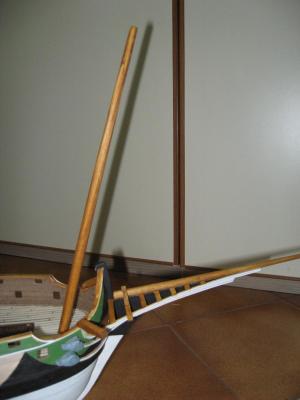
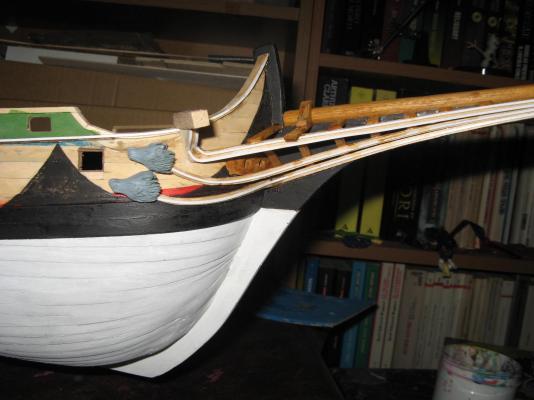
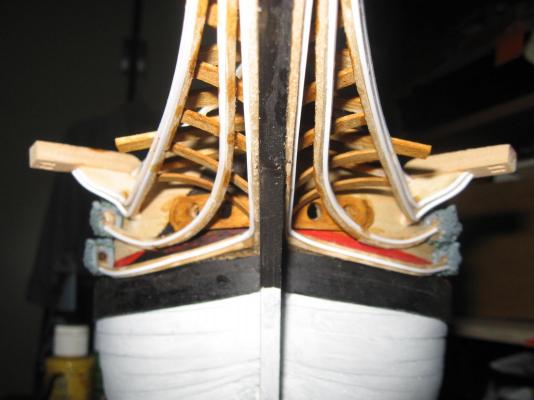
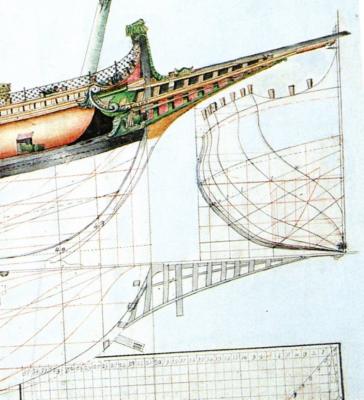
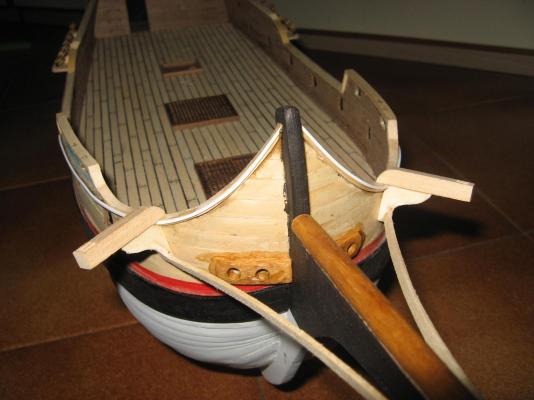
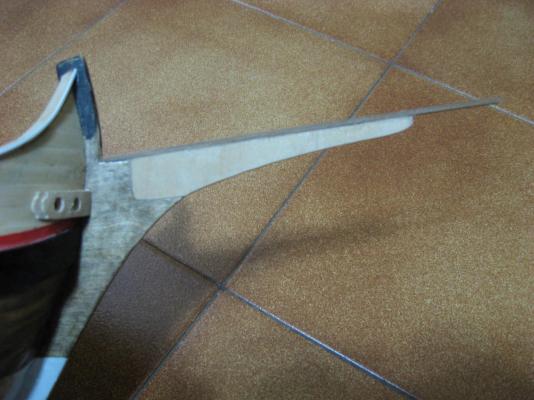
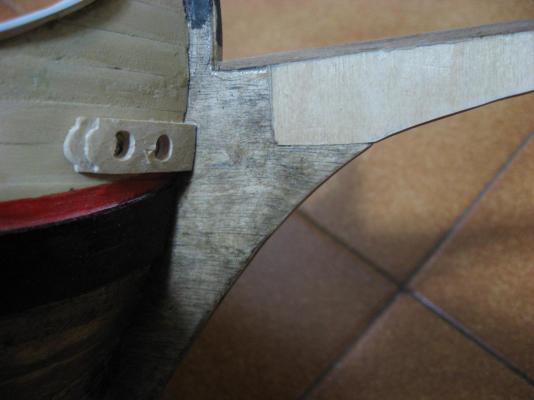
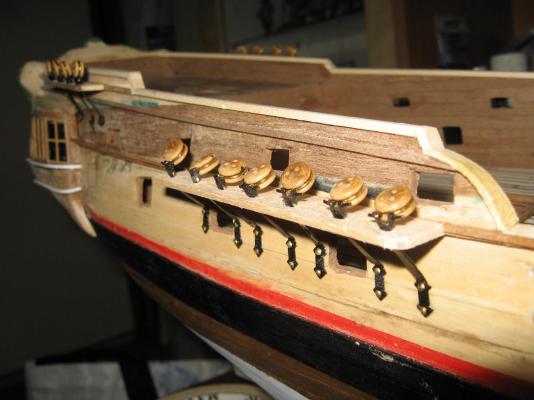
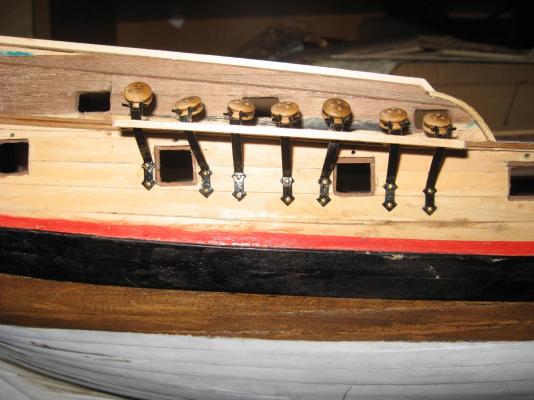
Now start the more complex part of the ship. I am studing the most correct rigging for this ship and this is not so an easy task. The foremast rigging evaluation has been completed. Well, all the rigging of the polacre has been completed, but that one has been refined better. The showed one is the MINIMUM rigging to be installed on the foremast. It includes running rigging coming from the main mast. Unfortunately I don't know if some additional rigging can be necessary, but for sure this is the minimum that MUST be present, considering the hystorical period. It is not present the rigging related to the bowsprit... I am still puzzled regarding the "Hollandaise type cleat" that has been drawn in the "purchased drawing" (showed in the photo). For sure some type of cleat must be present in those positions (between the cannon), since as it can be seen, some rigging must be secured there. Surely the standing rigging of the foremast, which is placed between at least three cannons. But I am not sure regarding the utilization by the Venetian Republic of this type of cleats. The "Hollandaise type cleat" (which is the one present in the "purchased drawing") has the benefit that the exceeding rope can be secured on it, so it doesn't make any interference with the cannon servicing. If the definition of this cleat type is wrong, please correct me! The normal type cleat doesn't permit this, so the gunners must service the cannon with a lot of ropes around them... In addition there is the problem of the shots racks of the cannons, but I consider them at the moment as a stright type, placed along the wall, instead of the box drawn in the "purchased drawings". All the above considerations are related to the needing of making the holes on the deck for securing the blocks or ring. That must be done NOW (unfortunately), at least for the foremast zone. But like in other past situations, I cannot think eternally around some doubts, so soon or later I will take a decision and proceed further.
-
Thank you Carl! Theoretically I added "tiny objects" in "small quantities" on the model, so I defined it a "small update".... Now the clear and rather defined part of the construction is almost ended and it starts a "muddy" and "foggy" section, since the original drawing informations ends here. I have defined at least the 90% of the standing and running rigging, but some details are still not yet defined and my work on the model will suffer for this. Before proceeding further I must make all the involved holes on the deck with the drill (for placing blocks, rings and so on), because if I make it in a later stage it can become very complicated. But I must know how many holes make and where make them, so I must define around 100% of the rigging of the ship. The above condition is not yet satisfied... In the next days I will clarify my project in terms of rigging, but I must prepare the drawings I made in a more "decent" way.
-
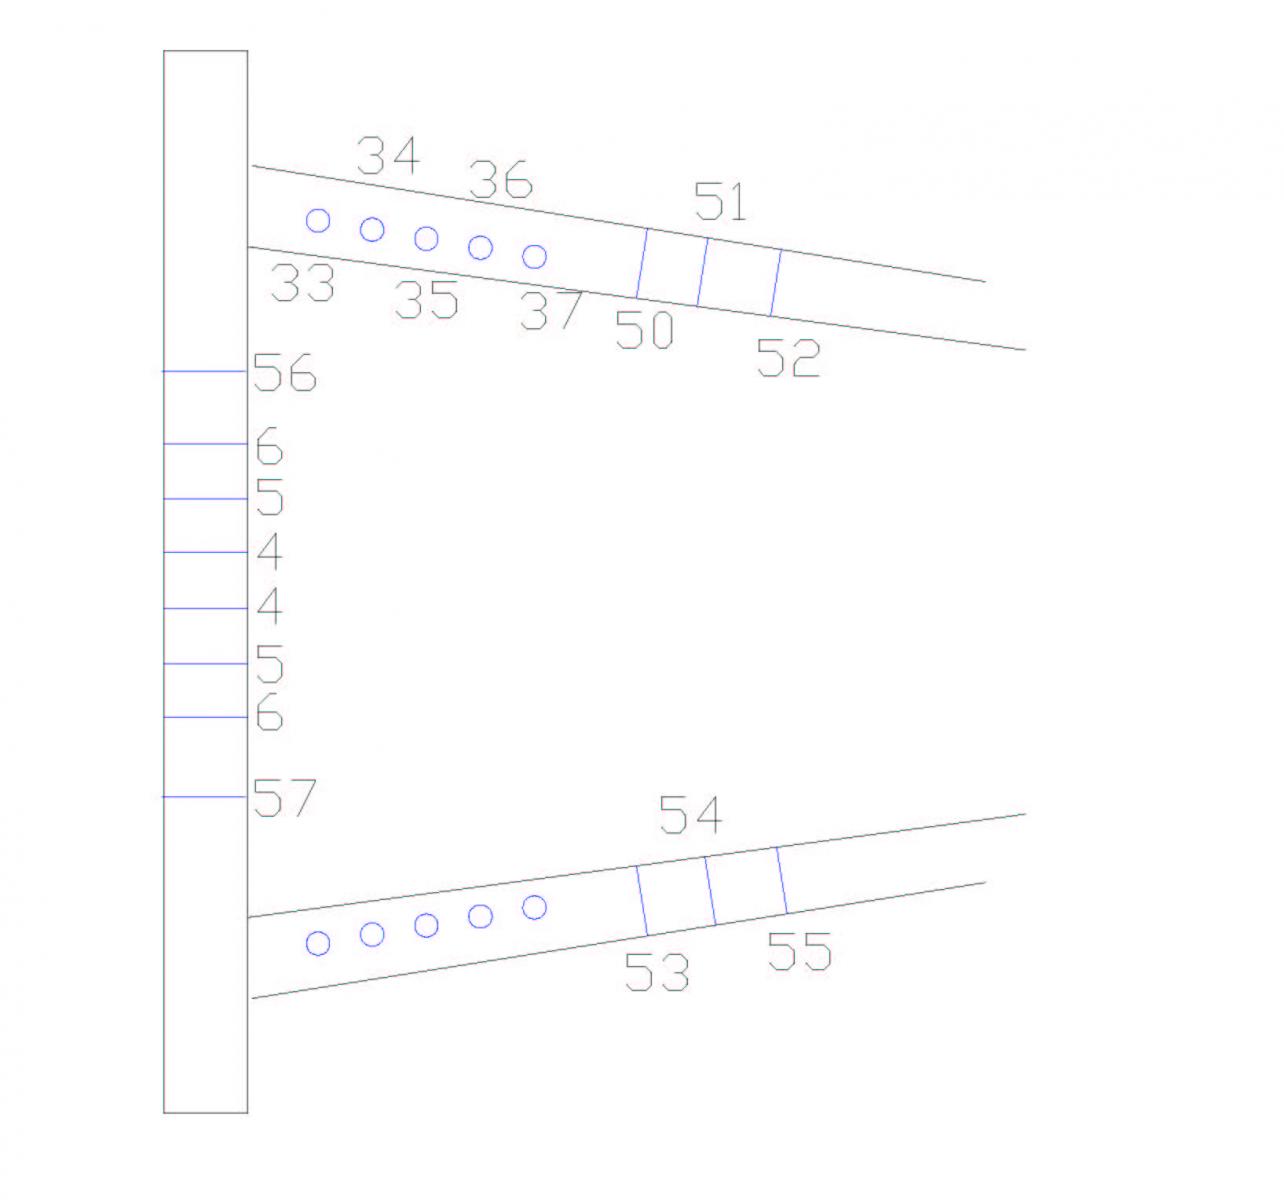
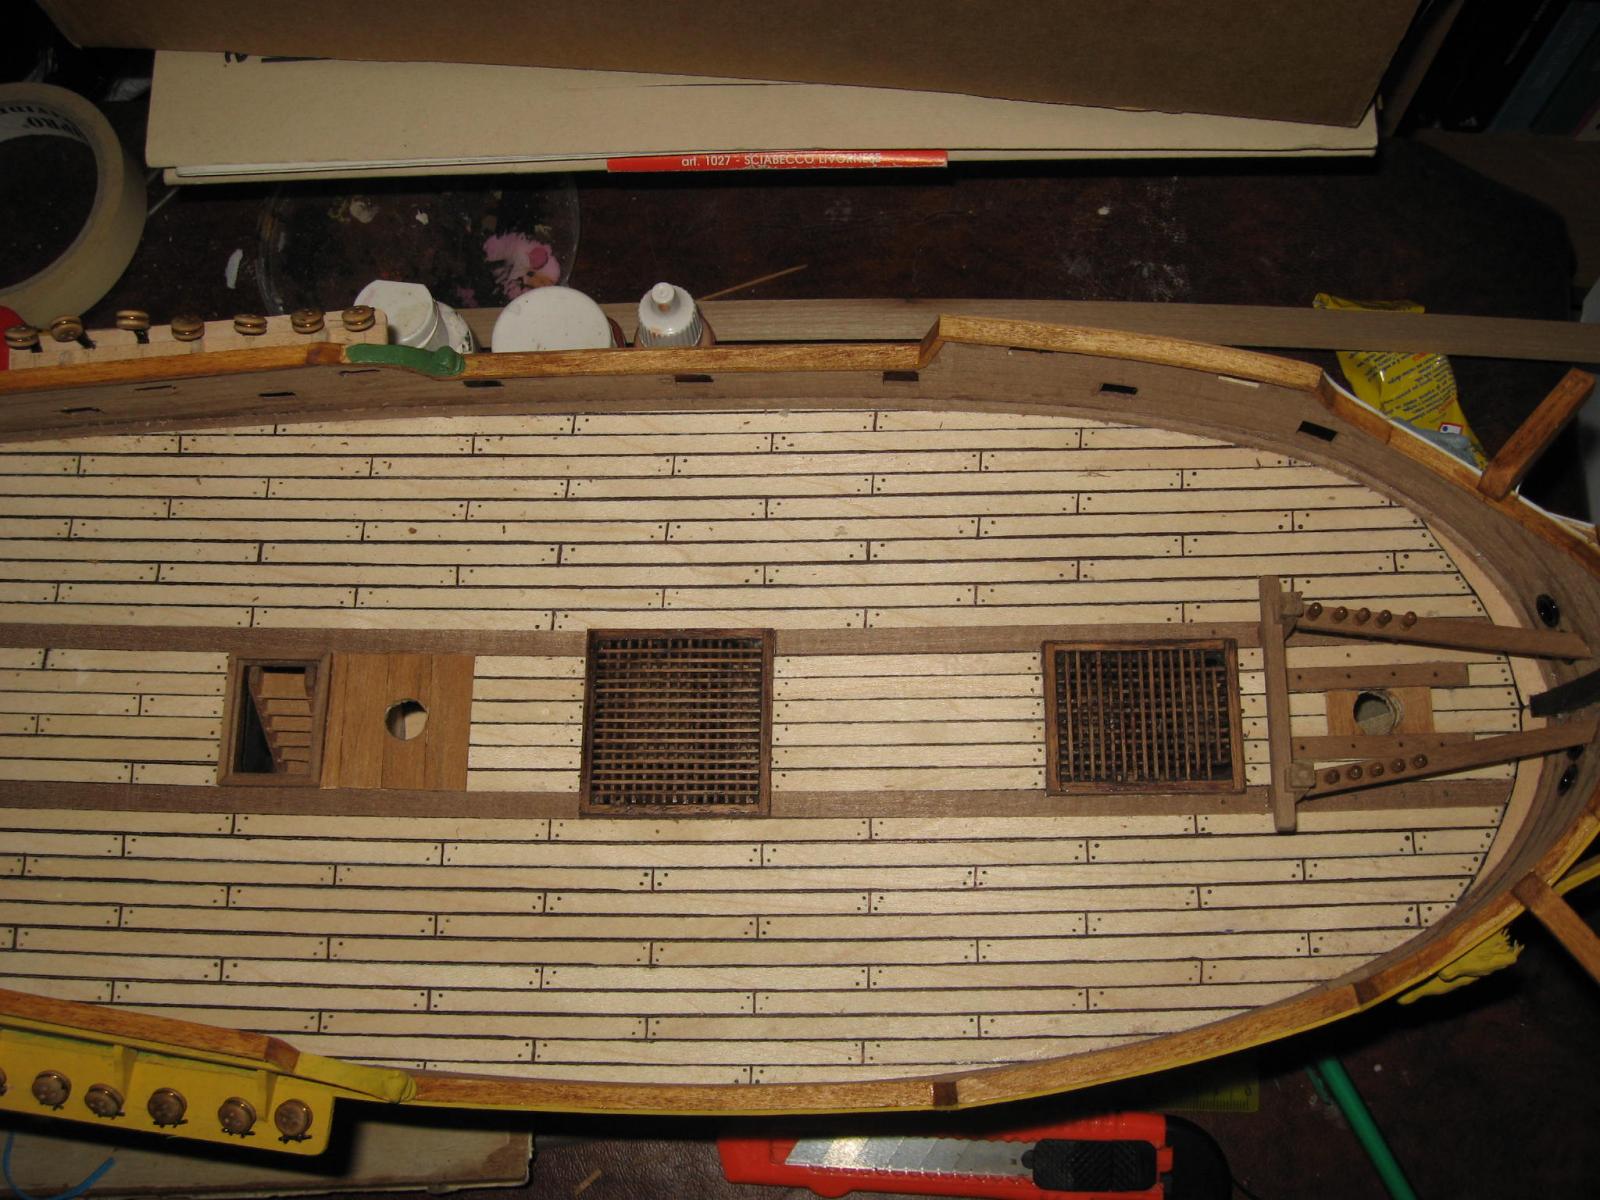
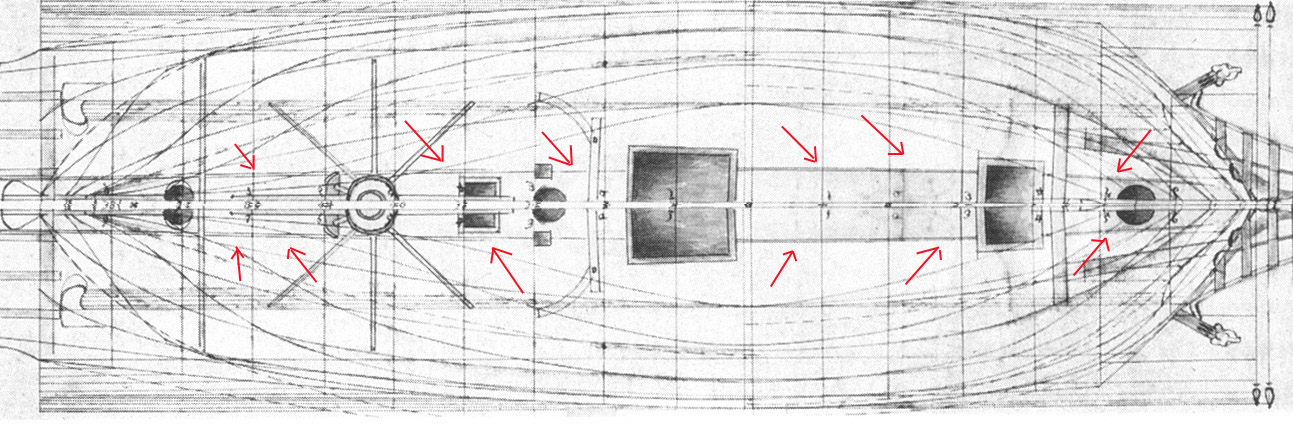
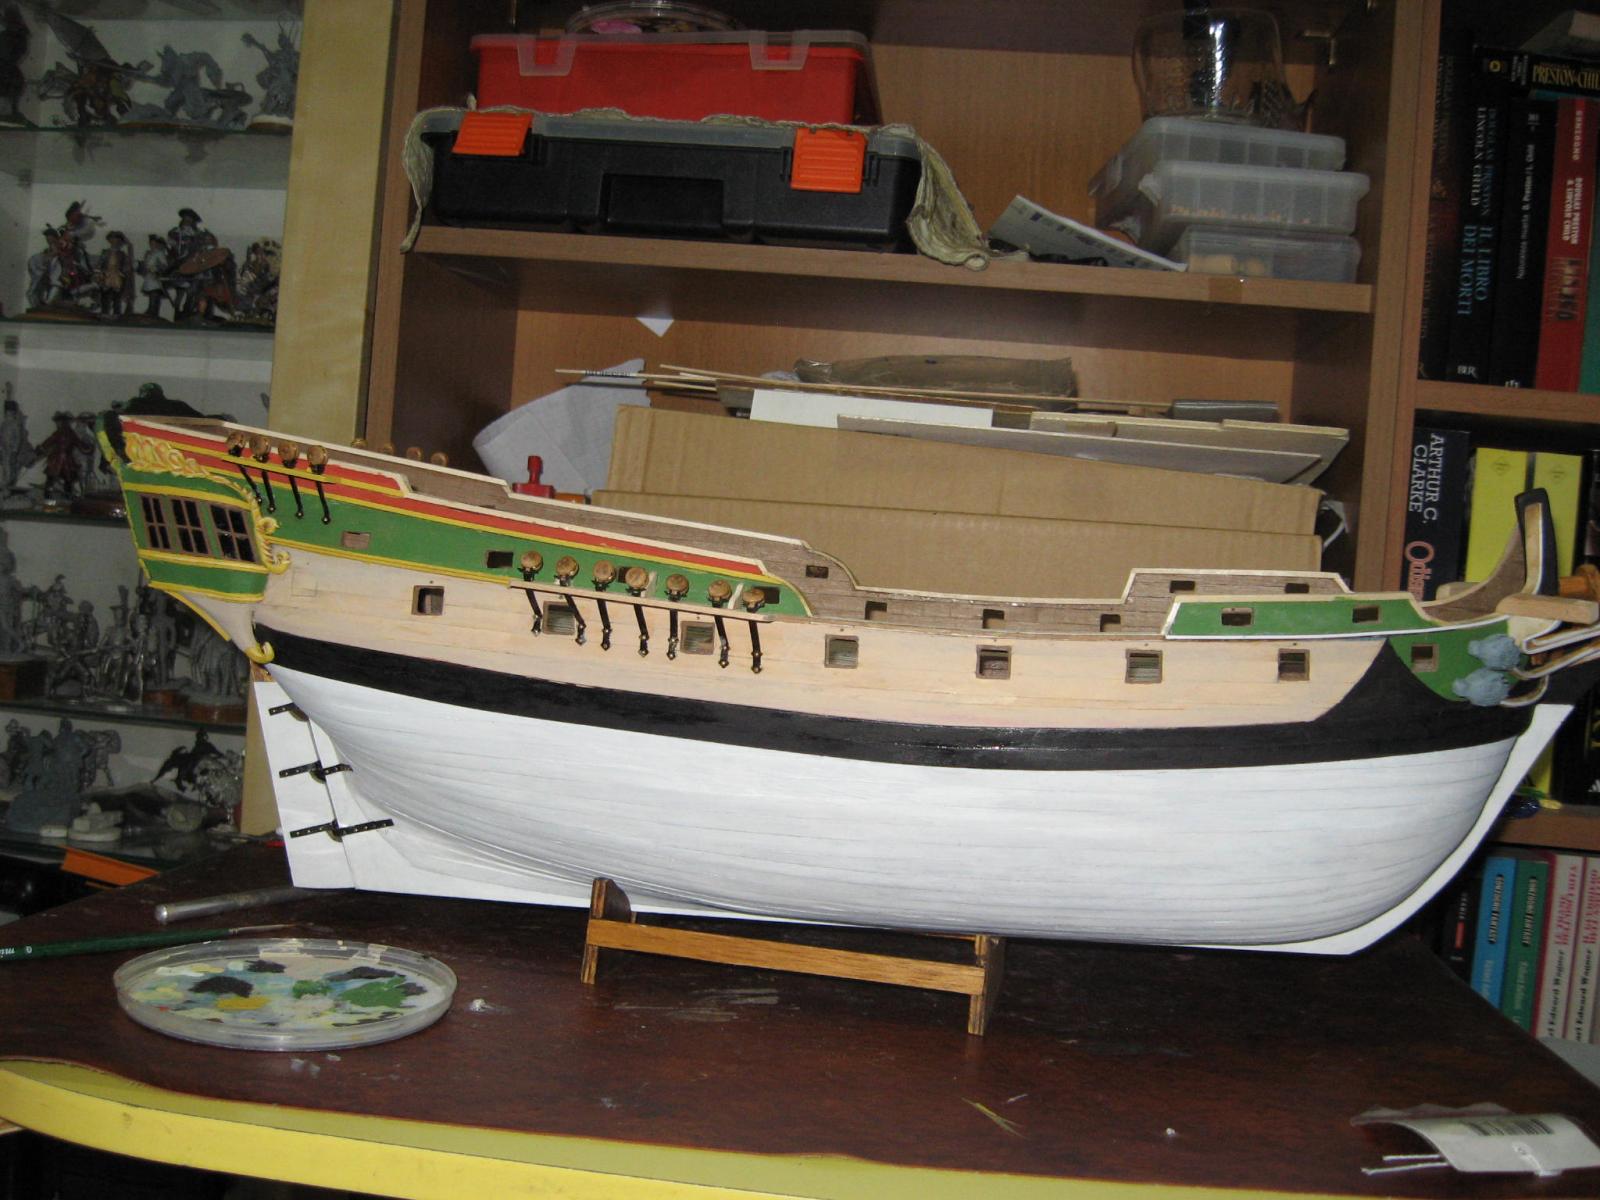
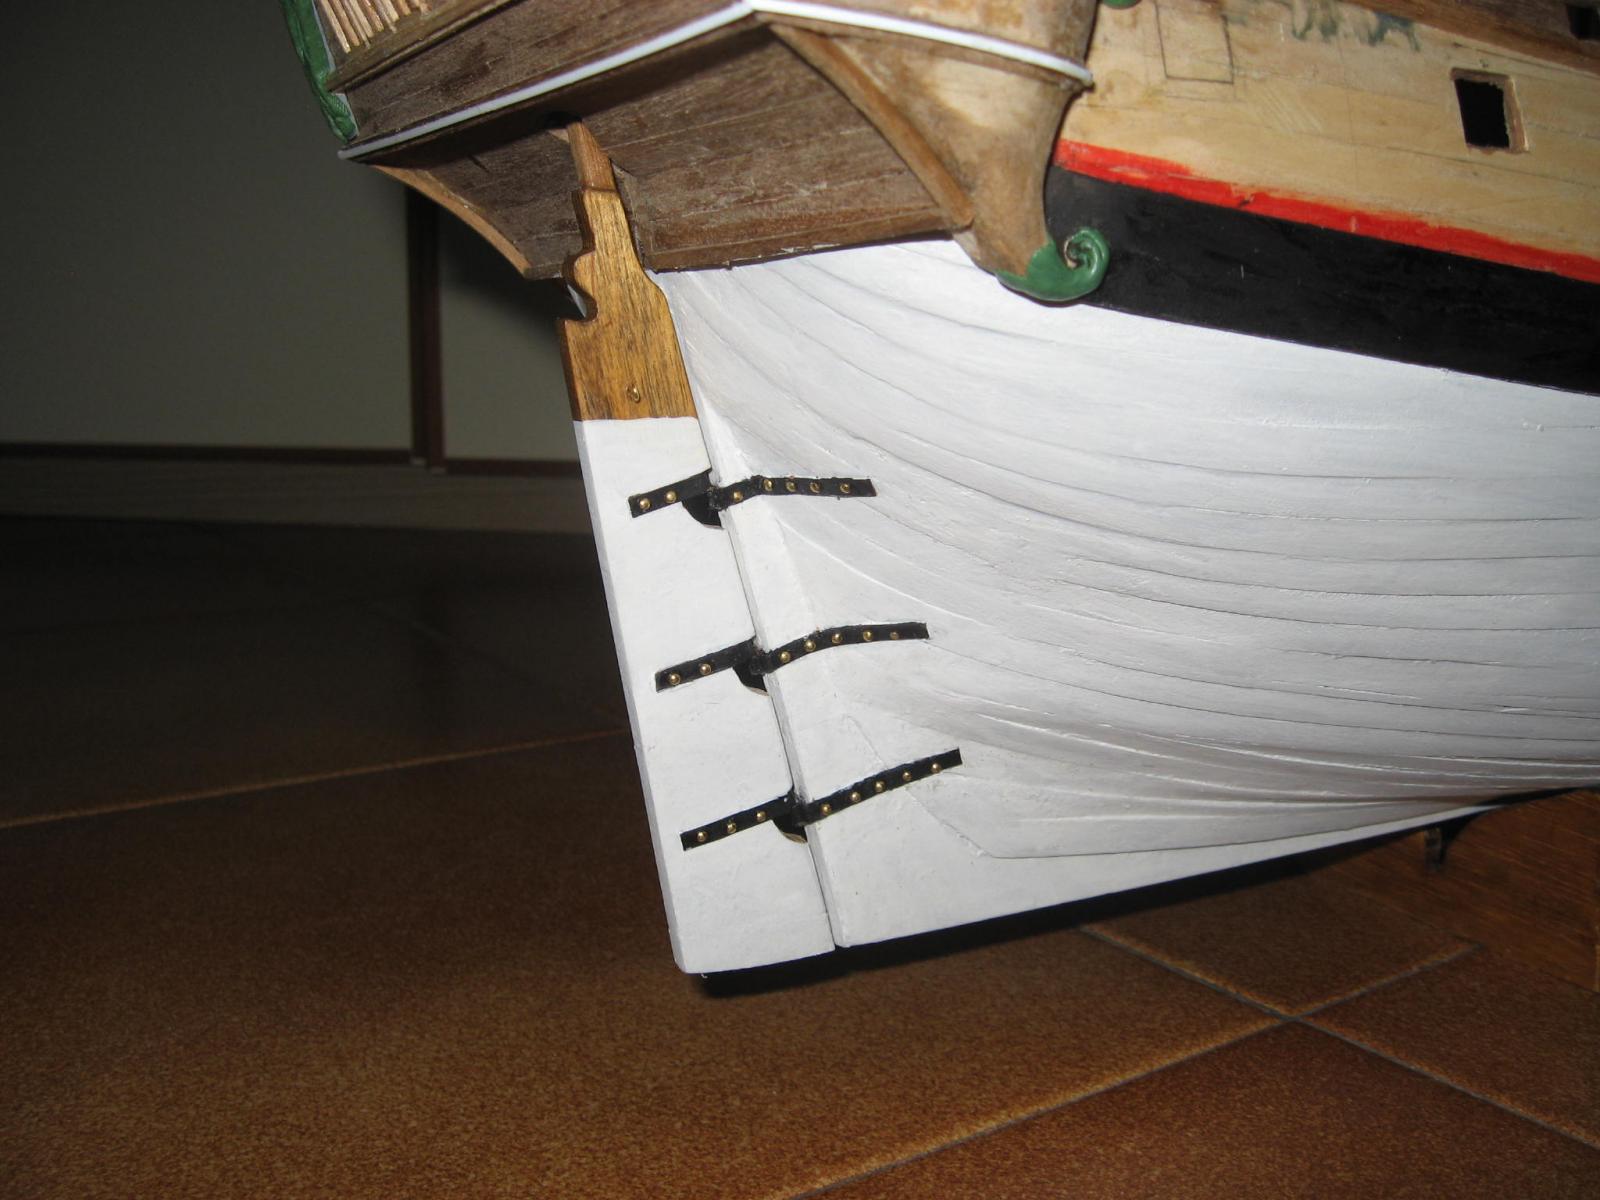
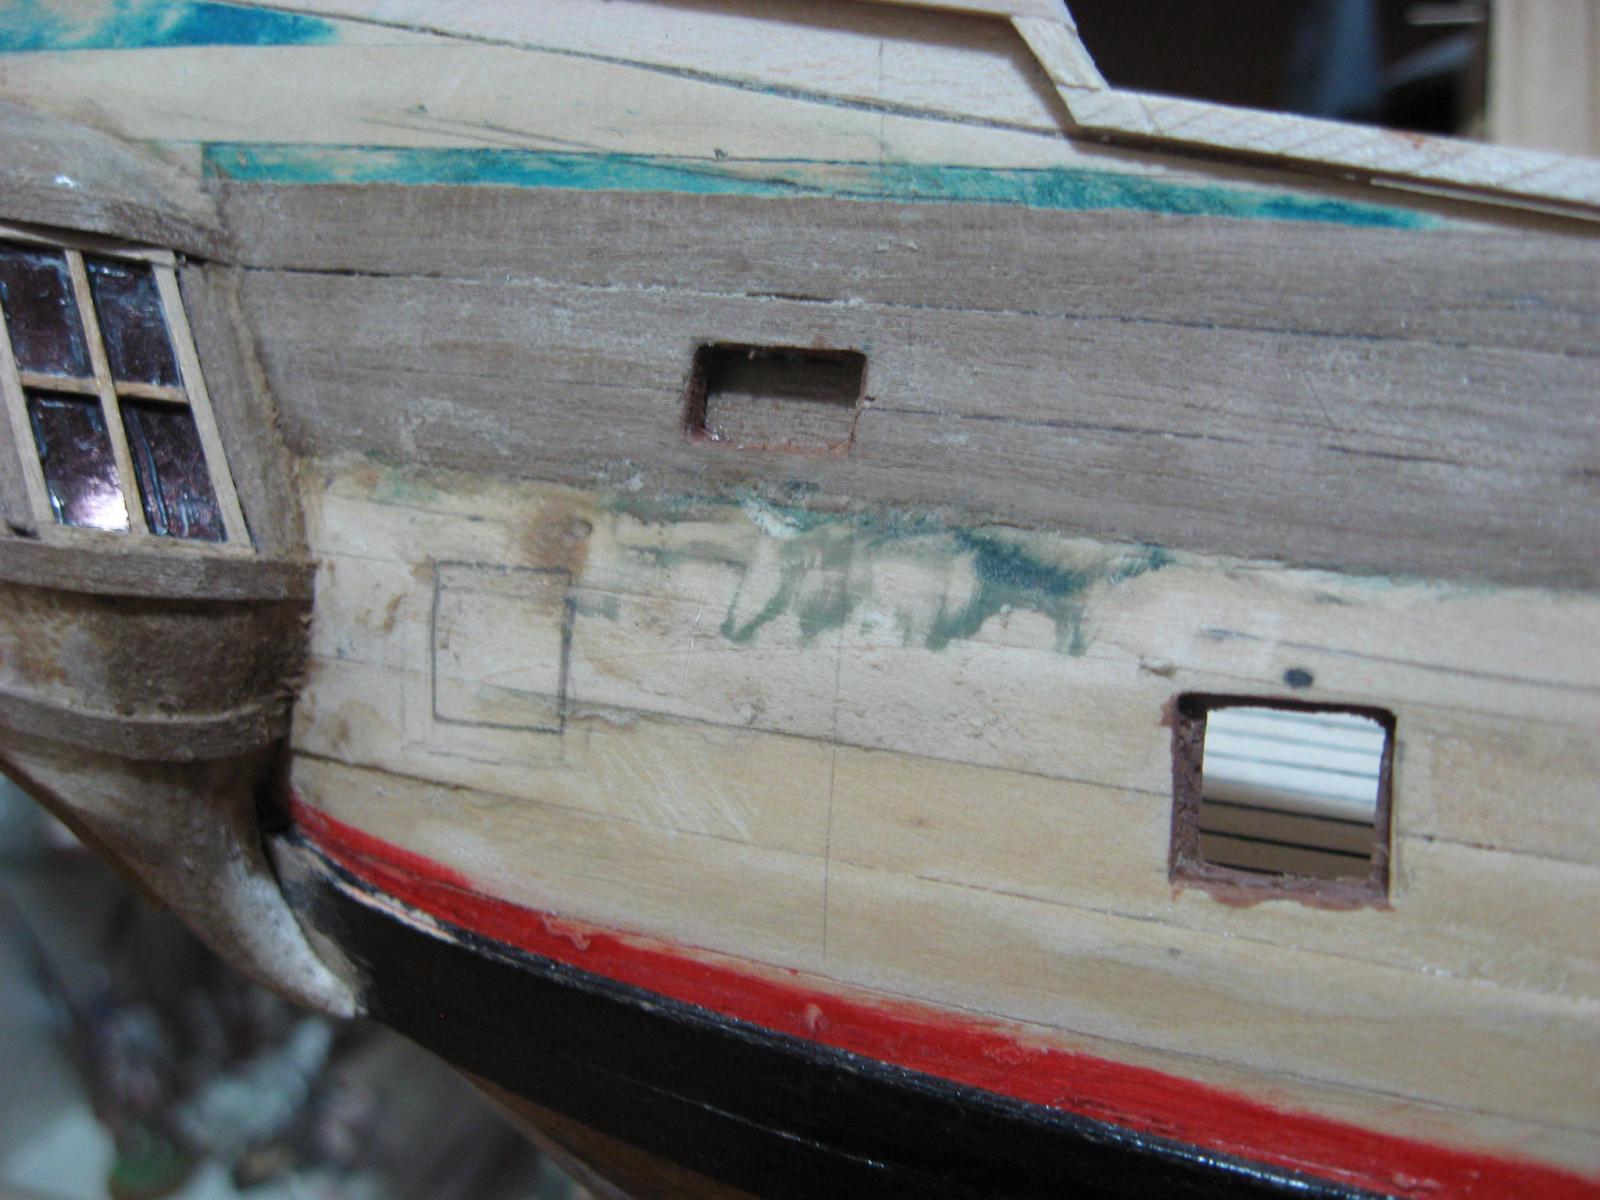
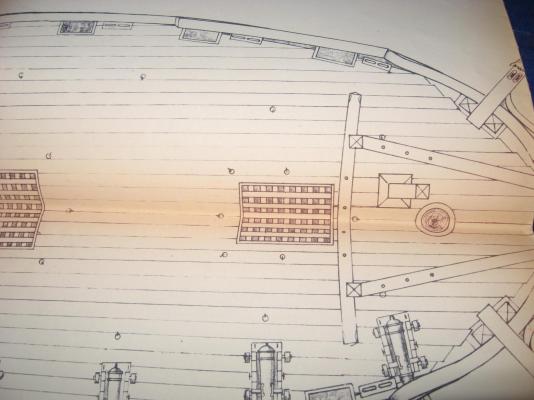
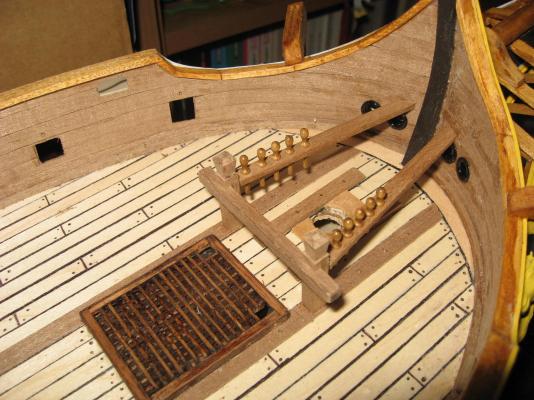
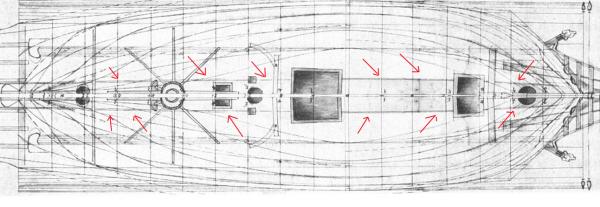
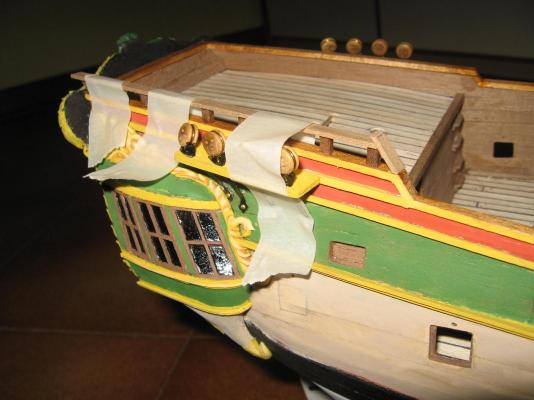
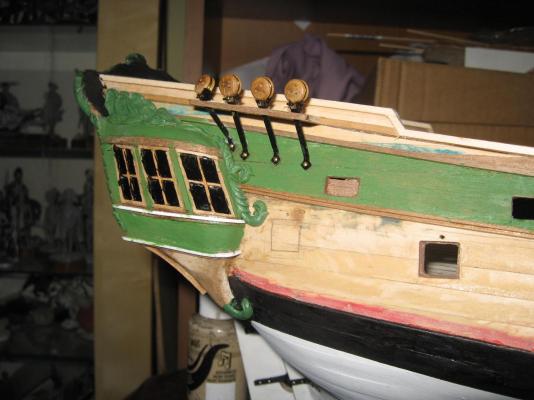
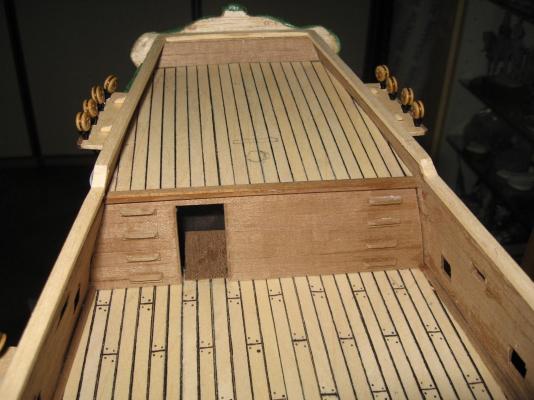
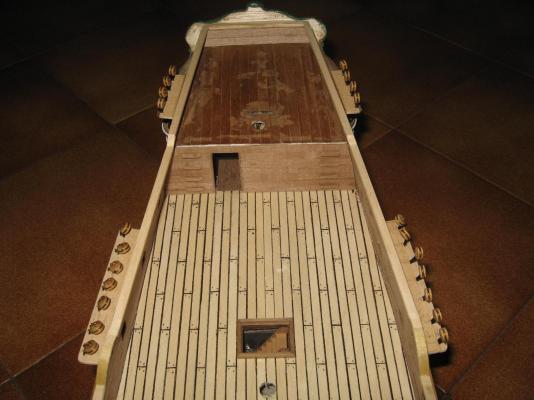
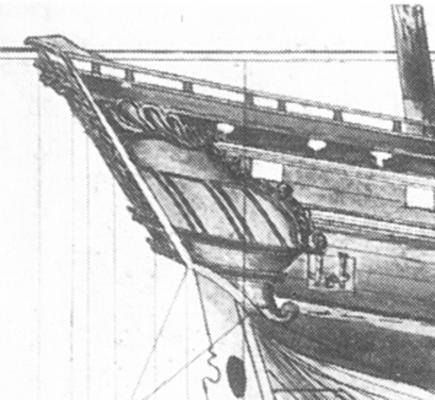
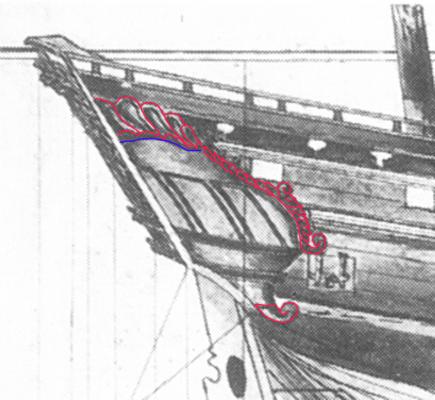
another small update As can be seen I am proceeding (very slowly) with the ship painting. In the meanwhile I finished the stern deck railing, which will be leaved with its natural color (maybe with some oil addition to exalt the walnut colour). I am starting to "fill" the main deck with its accessories. That is a rather complex part, since the informations are scarce and I must use other sources and books to complete it. I added the two main walnut strips that limit the central zone of the deck. There will be secured the rings for the cannons blocks. These strips are present (more or less) in the original drawing,too. I draw red arrows to show them better. They limit (in the drawing) a grey zone were probably a different and more reinforced planking is present, specifically near the main mast and foremast. I placed the foremast bitts and related belaying pins. I am still studing how to complete the deck accessories trying to be historically correct, but it is not so an easy task.


-
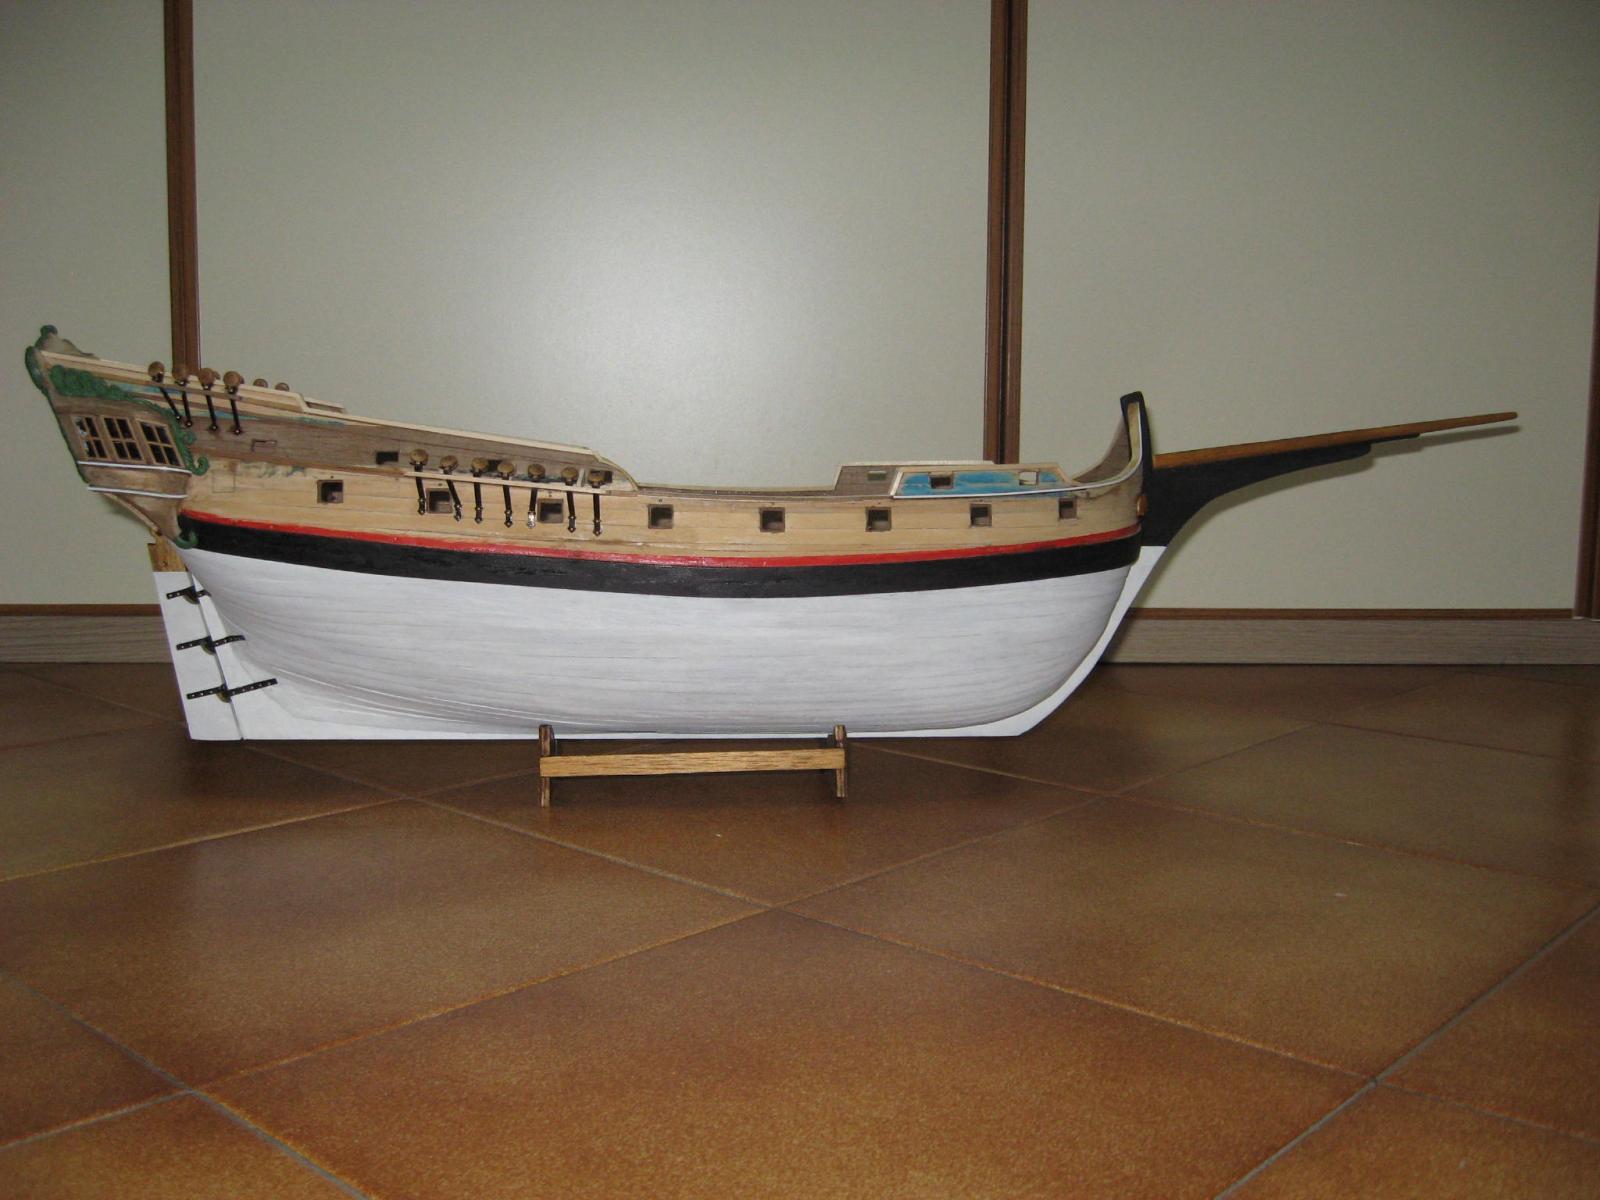
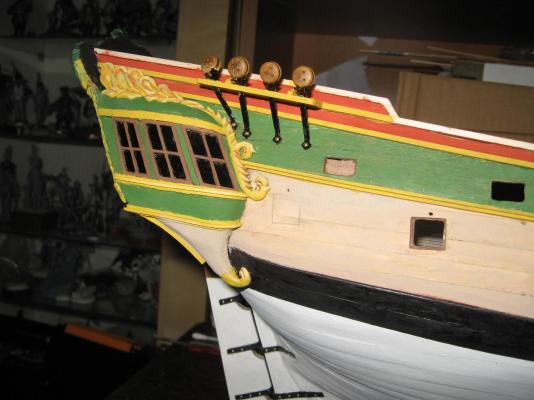
A small update: I nearly finished the painting process of the transom. I added the two ventilation ports near the rudder, too. It must be noted that the transom itself is not complete, it lack still many accessories and rigging, mainly related to the mizzen lateen sail. I reached the conclusion that painting the overall ship will take a lot of time!
-
Thank you Carl! I use this tape (the common paper tape used by painters) very often, since it provide a "delicate pressure" to the component to be glued and can be used in positions where the clamps cannot be placed. In addition, it doesn't generate any damage to the ship.
-
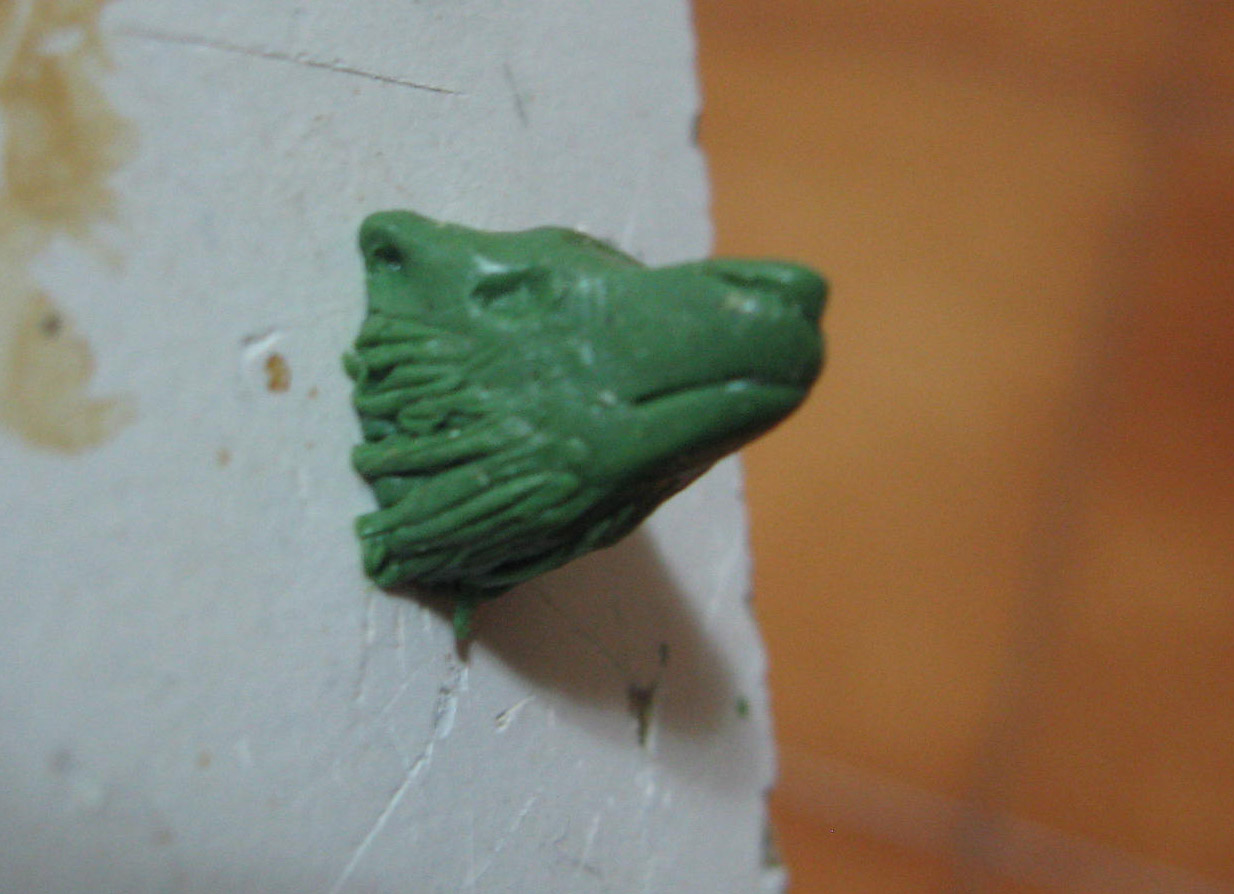
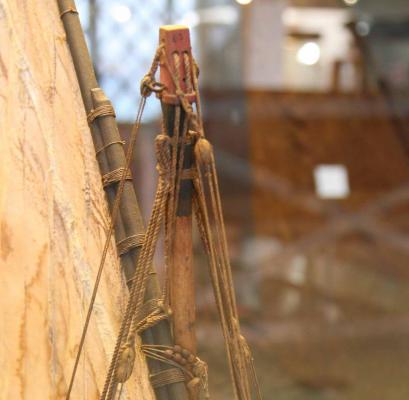
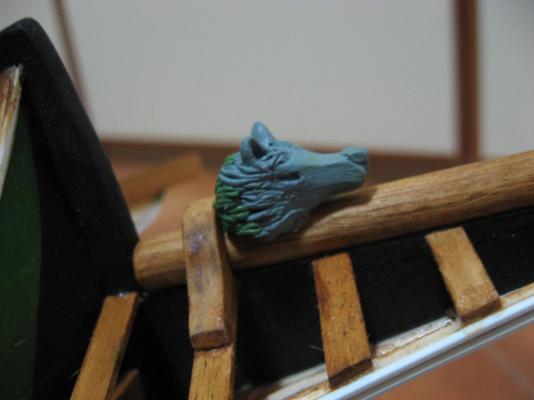
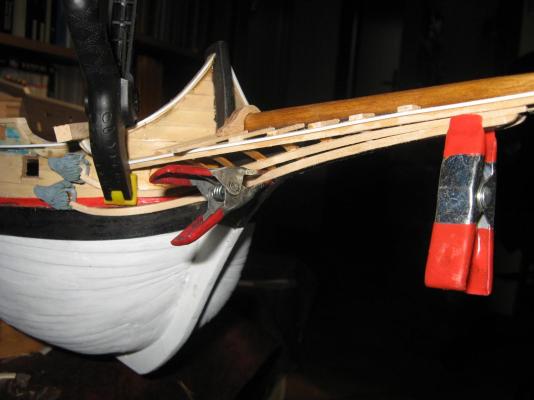
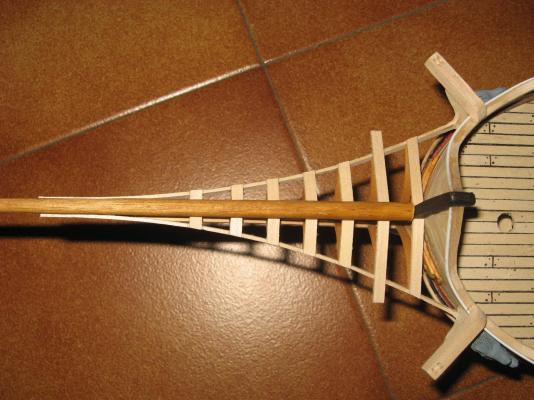
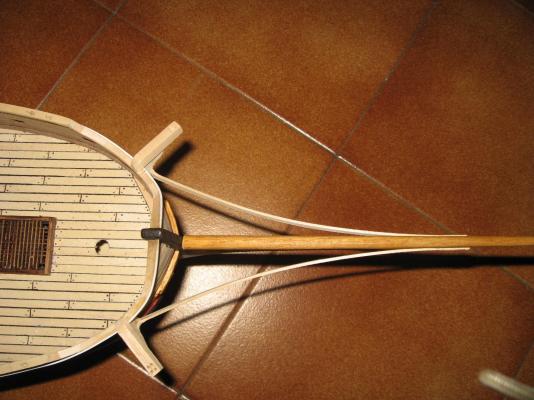
An update that apparently is a bit chaotic. I can make "noisy operations" around the model only on the weekend, so I must concentrate there all the crafting of components that involve the use of drill and saw, even if I will not use them immediately. This weekend I prepared the foremast, as can be seen by the photos, the lateen spar, composed by two pieces, and other details. In addition, the terminal part of the foremast. I don't know the English terms, technically this is an "albero a calcese" (like the one of the xebecs) and the "Cavatoia" is the terminal part is the one where the pulleys are installed. I prepared this terminal part (other photo),too. It resemble loosely the one that can be seen in a photo of an original model of Venetian galley (other photo). Since it is a model of at least 100 years before this polacre, I added the additional pulleys (holes here) for the additional regulation of the lateen spar. Later will be black painted. In the meanwhile I continued with the decorations. In the photo can be seen the small wolf's head for the cathead (the green one in the photo). In addition, I completed the modification of the other wolf head for the bowsprit, but I don't like it, so I don't know if I will install it (It appears misplaced, or not projected for this purpose). In the meanwhile I started the railing of the stern deck. Definetly a chaotic update!


-
It was a Company that made wood ship model kit probably in the late sixties and seventies years. So consider that the level of the kit can be disappointing for a new modeller, since are absent the laser pre-cut components and sometimes the metal cast accessories. In addition, the wood will be very old. The Companies: Augusto Carta, Tris Model, Aeropiccola has ceased to exist since many years. They belong to the "pioneer period" of the wood kit models. When those above Companies closed, some of their projects were purchased and used by Mantua and Corel, too (and upgraded).
-
Thank you Antony! Keep following, since we are just at half of this voyage, which will be rather long! To be onest the most tough part of this project is the one that is not seen... The informations available are very scarce and building something historically decent force me on doing a lot of research and generates a lot of doubts and headaches... Sometime the answer is obtained only in an indirect way...
-
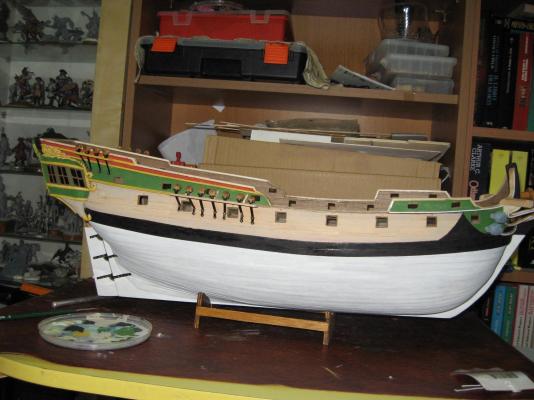
I am proceeding with the painting. It will take a lot of time to complete this step. in the photos can be seen the painting in progress. nothing that can be seen is finished, so many painting errors are still present. it is just a brief view of the colour scheme that will have the ship. I am puzzled by the colour of the sides of the ship (where the gunports are installed), which actually is just "light sand", but probably had a more yellow tonality. I have not yet find a solution, but probably it will remain as it is.

- 190 replies
-
- 10
-

-
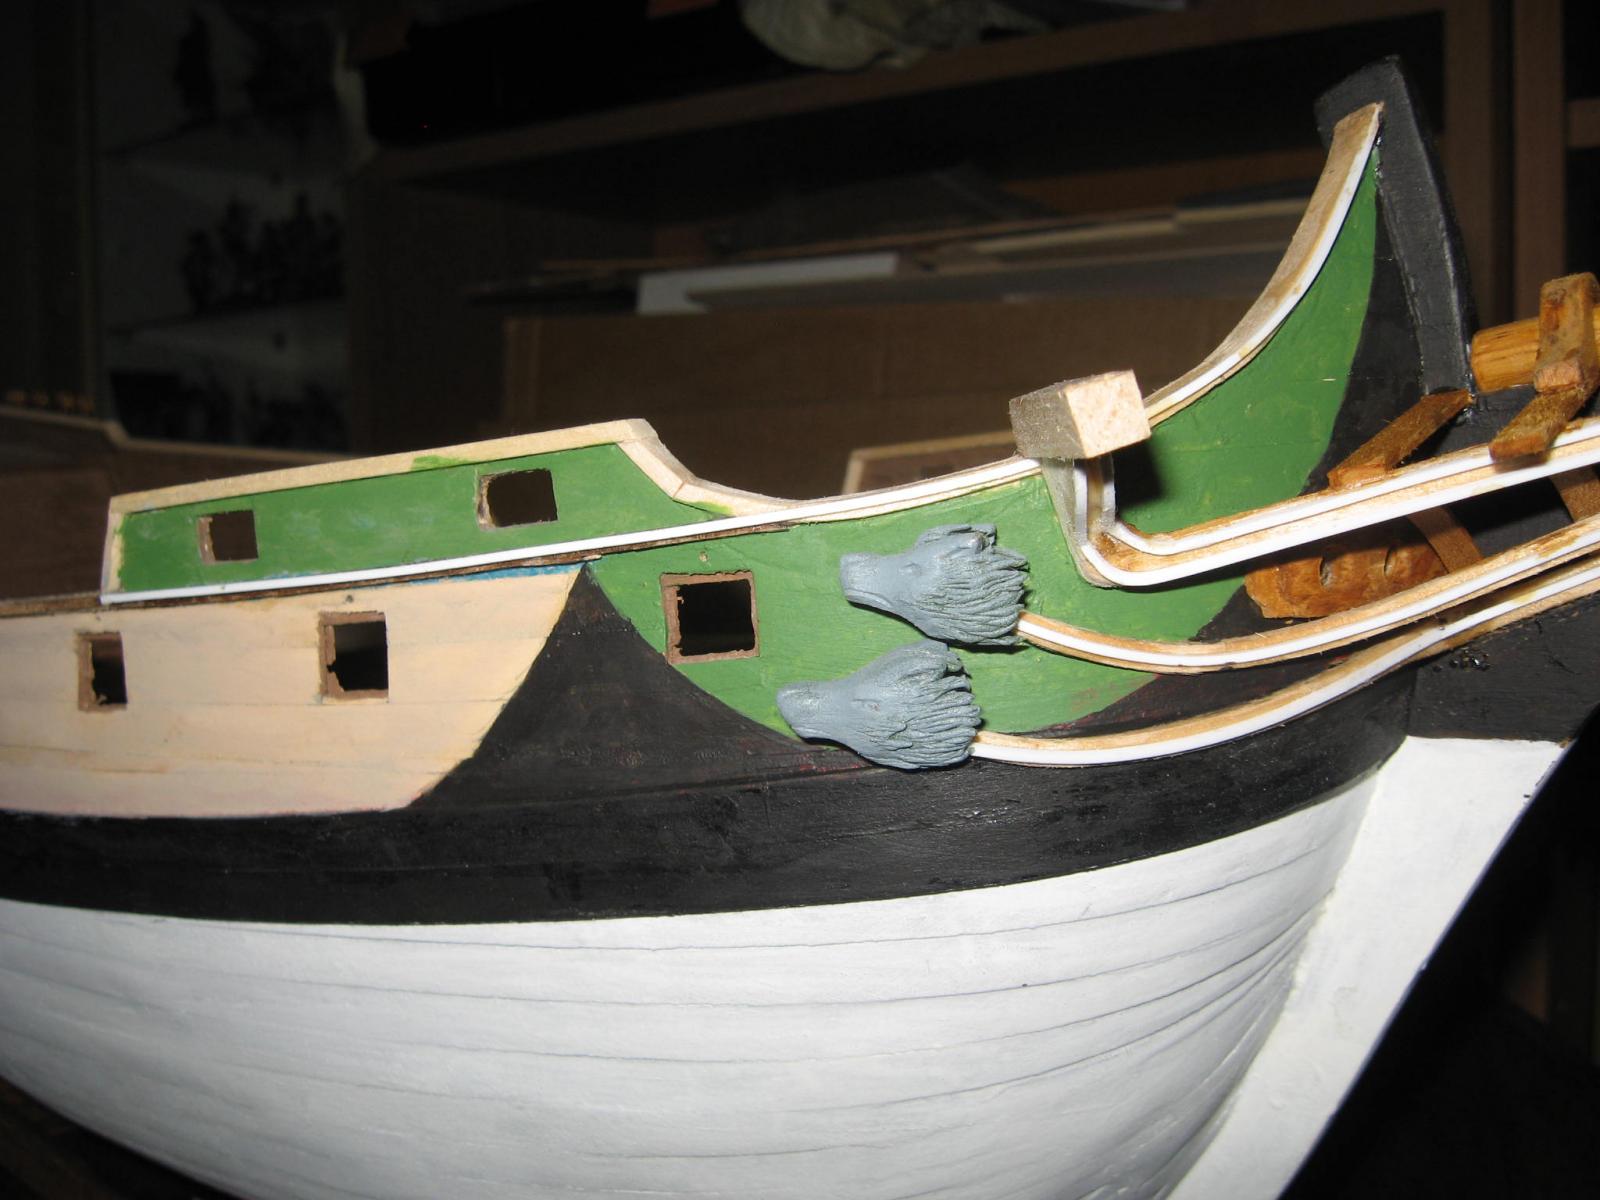
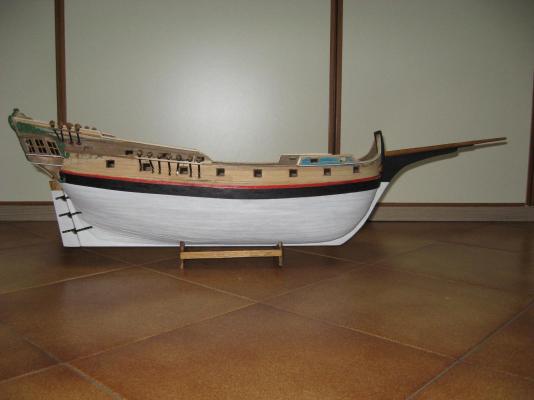
another update. I finally finished the rails of the bow. I finally find an "artistic way" to install the intermediate rail! It was not an easy task, since my main purpose was to preserve the rail function. as it can be in the photos, the four hawse holes for the anchor's cable are all not covered by the intermediate rail, as it should be. In addition, the intermediate rail "touch" the hull just below the holes, almost where it should be. If I see the rails laterally, the shape of the intermediate rail follow more or less the original drawing. Each rail is completed by a polystirene thin strip. Sorry again for the material choice, but since the rails will be painted and the bending are too much, I prefered an "Heretical approach". I decided to leave the upper part of the bow with "natural wood", not painted (but I added light walnut paint, to darken the wood). The bow is not finished, since there are more decorations to be added. This ship has a large quantity of decorations, despite the fact that it should be a "minor vessel". As it can be seen in the photo, I added the "wood block" that keep the bowsprit in position (where an additional wolf head should be theoretically installed). As happened before, I must absolutely stop everything now, since before doing something else I must paint at least some sections of the external hull. The quantity of decorations and accessories attached is raising too much and can create problems on painting it adeguately. As it can be seen in the photos, I starting to use the paint scheme common for Venetian "minor military vessels", which can be seen almost in all the drawings and painting I showed in this WIP, and is more clear in the "BEATA VERGINE" ship painting. This week will be dedicated to painting... At the end of this week, all the residual traces of the "old xebec" will be definetly erased and the WIP will become an ordinary wood ship model construction...


-
Thank you Omega! Knowing that my work is appreciated provide me more "fuel" to continue this model.
-
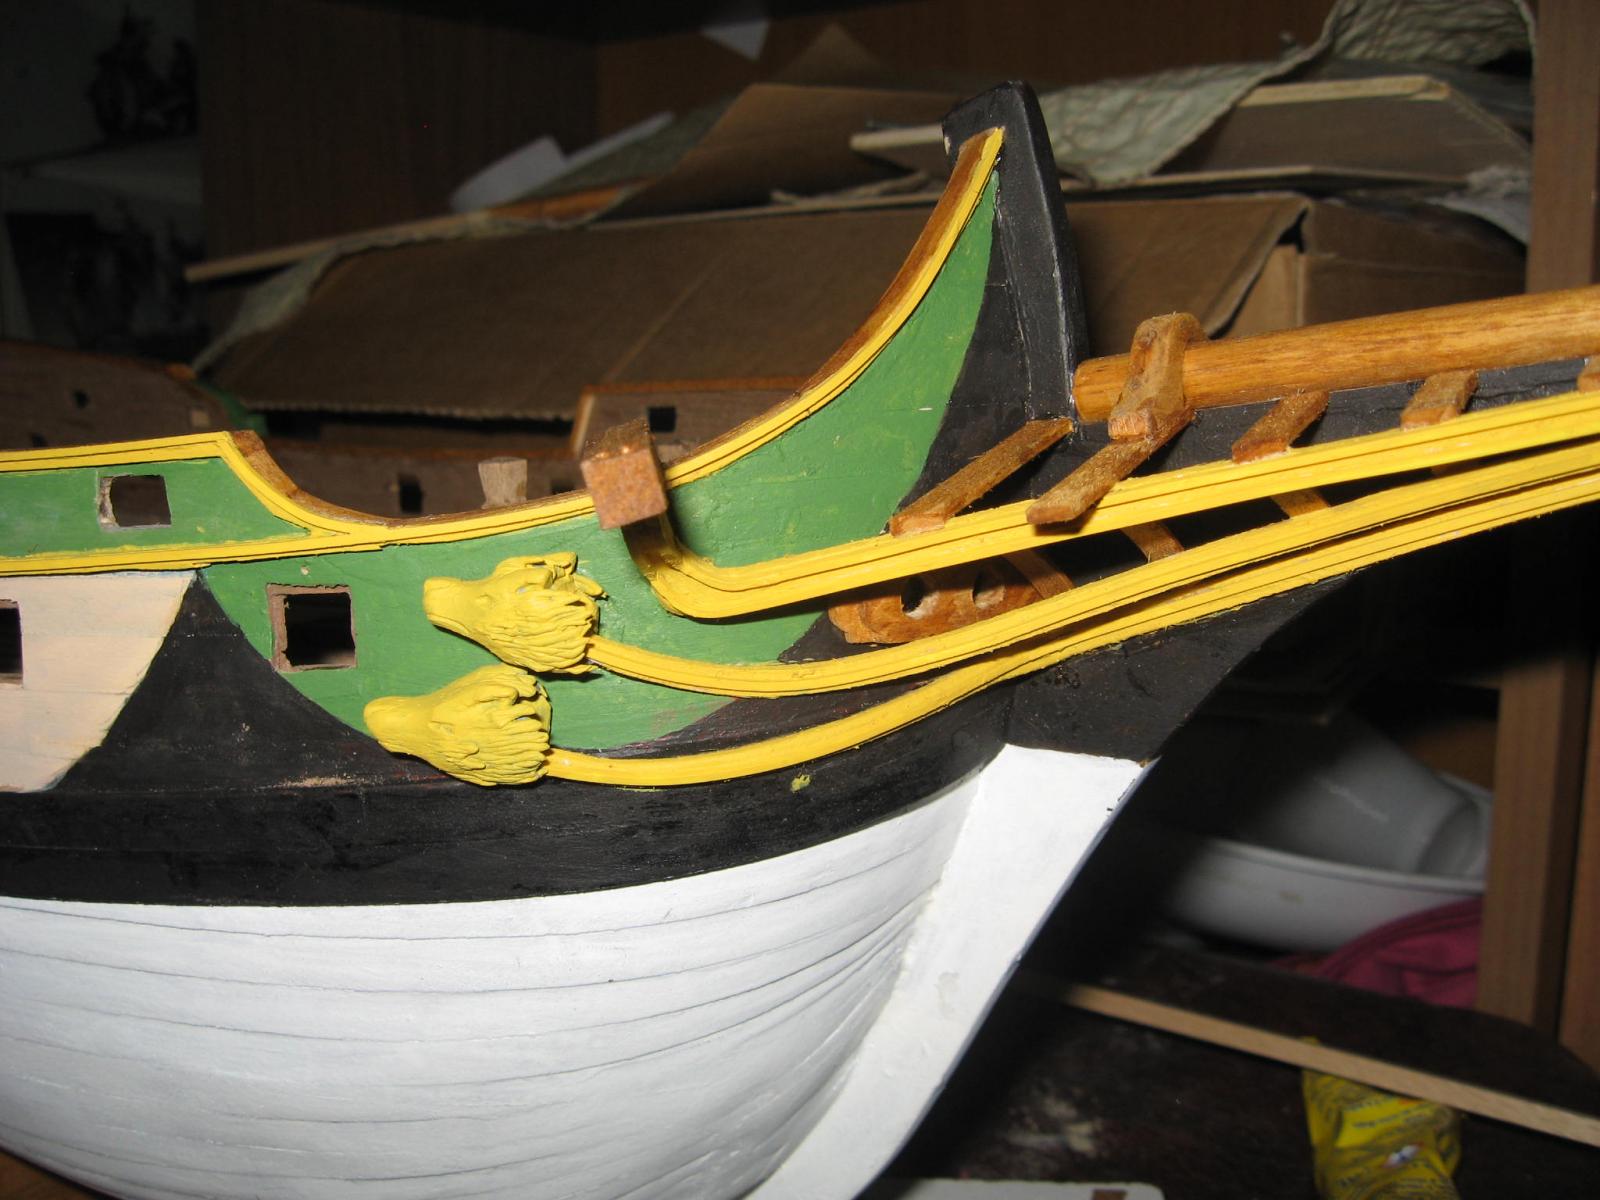
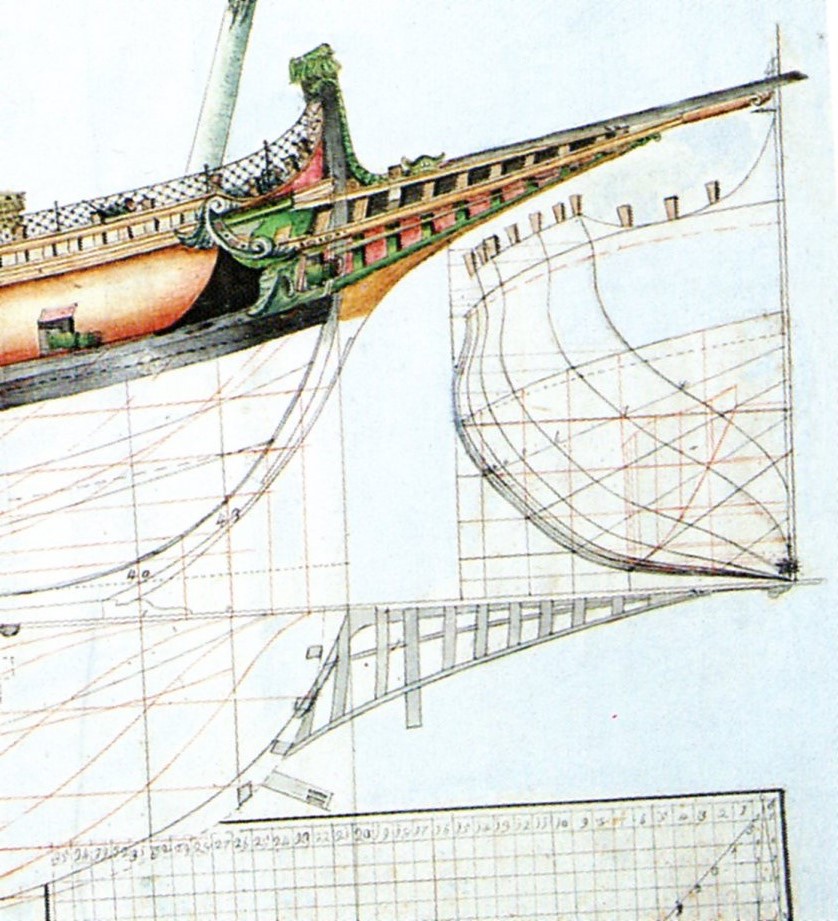
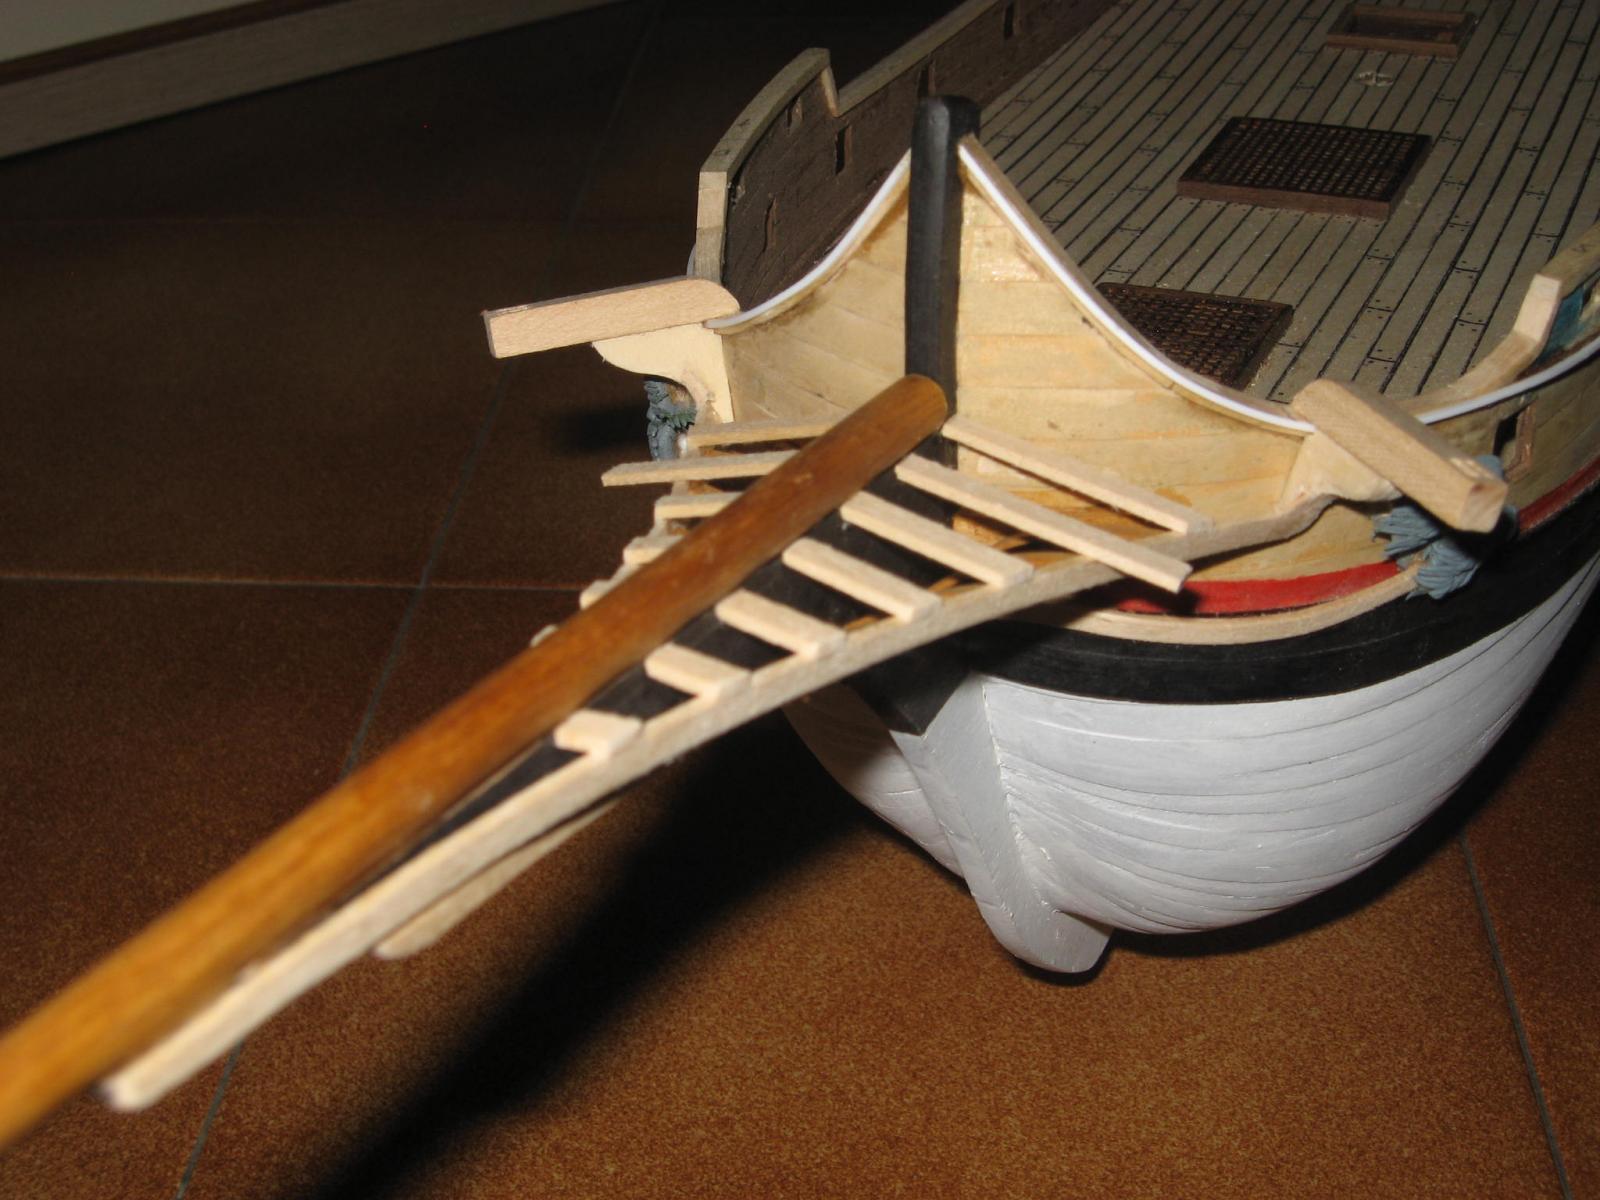
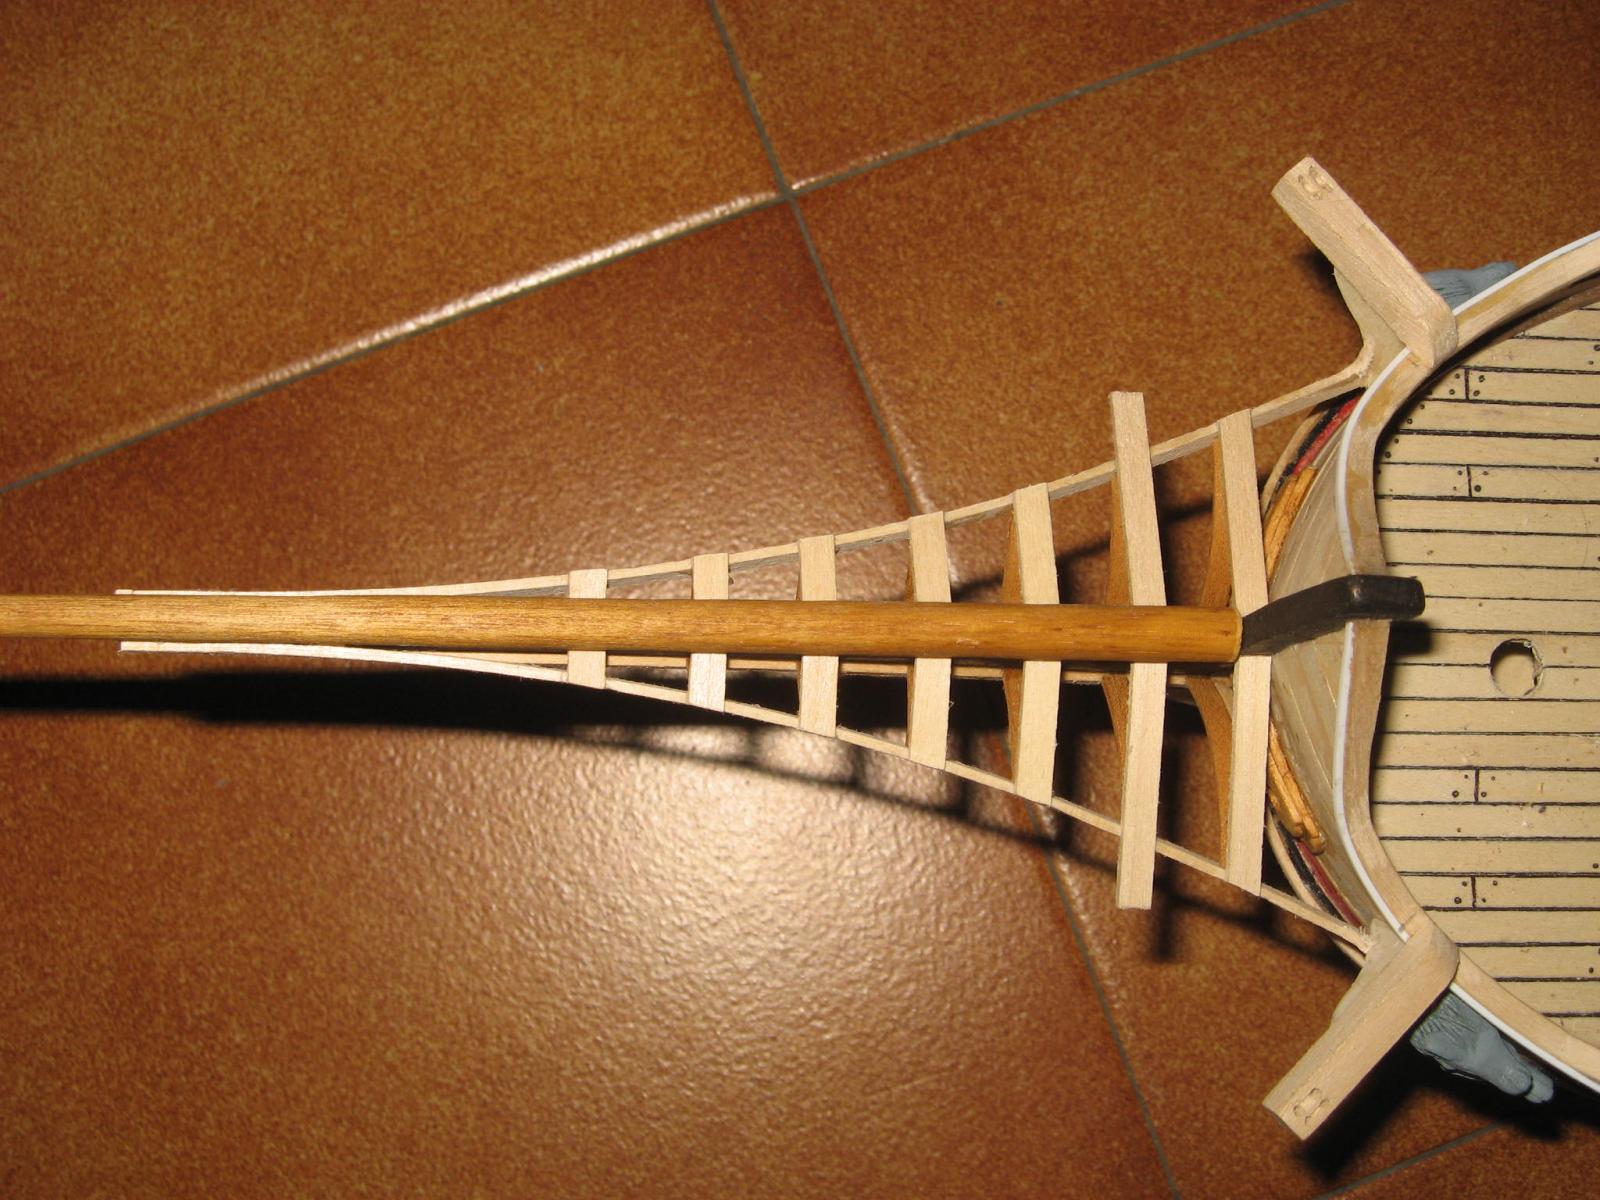
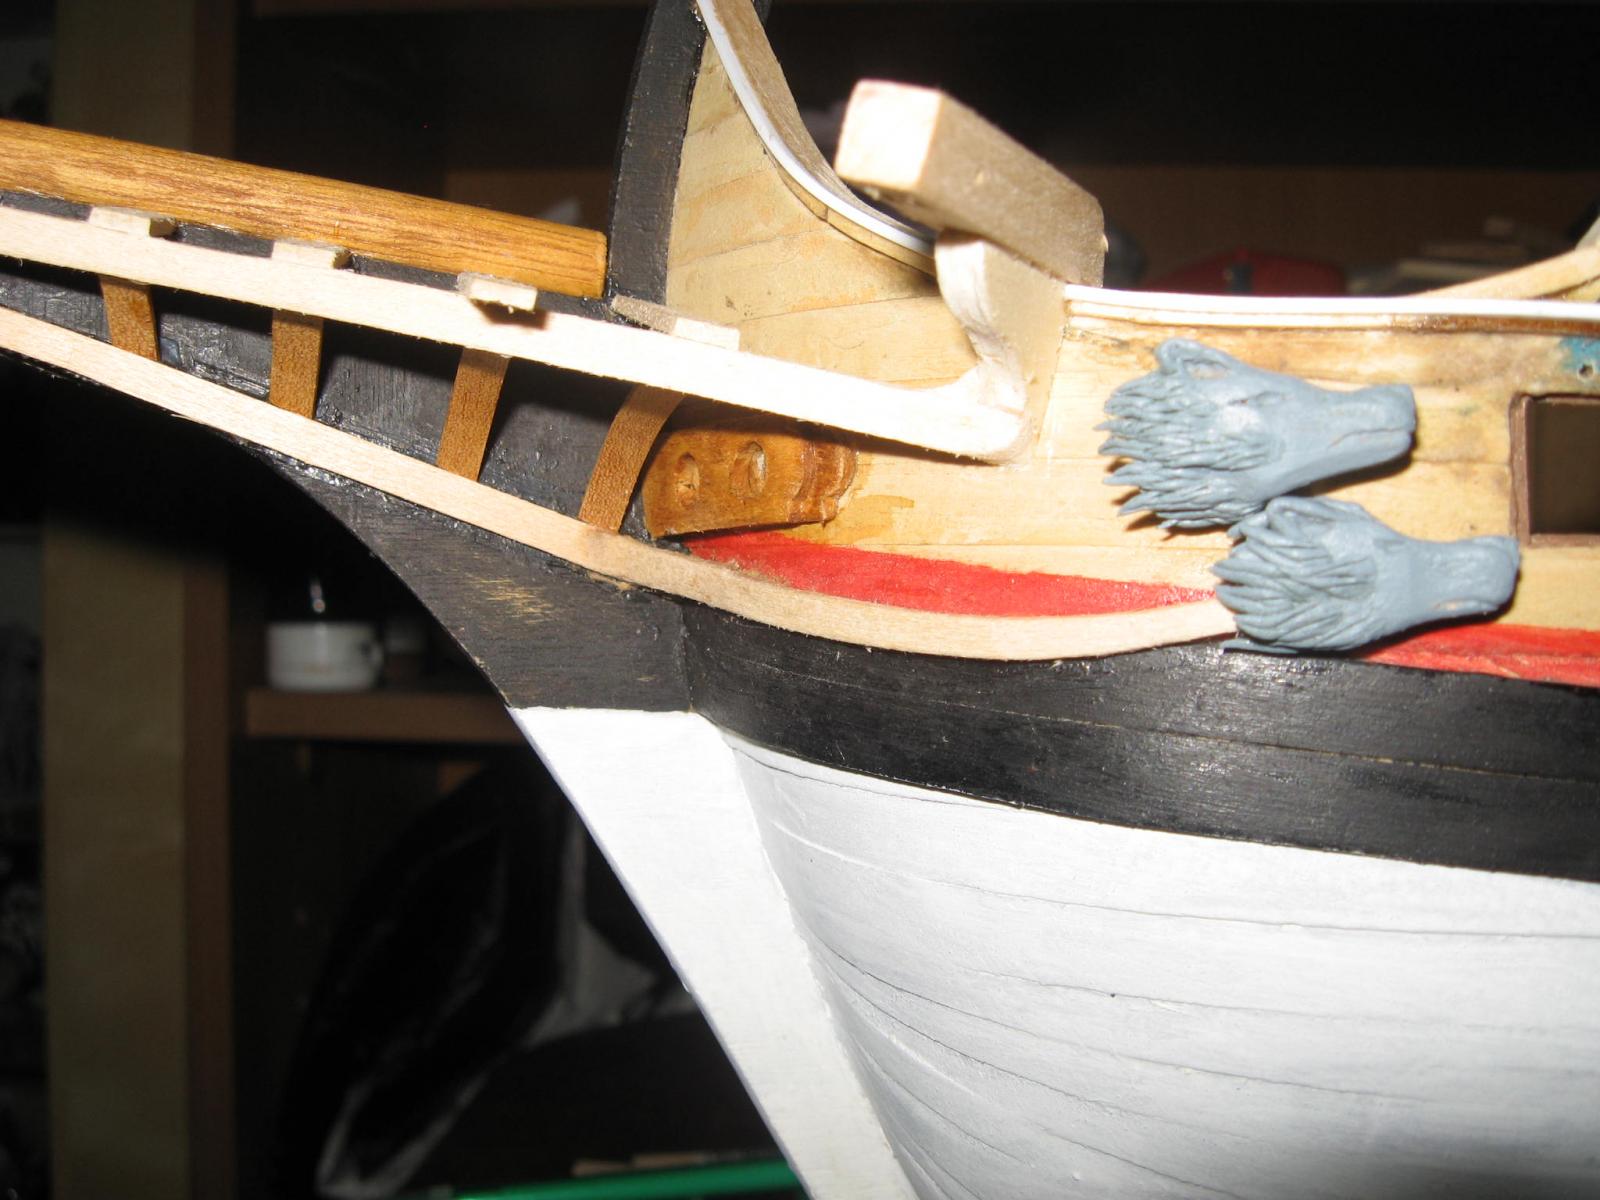
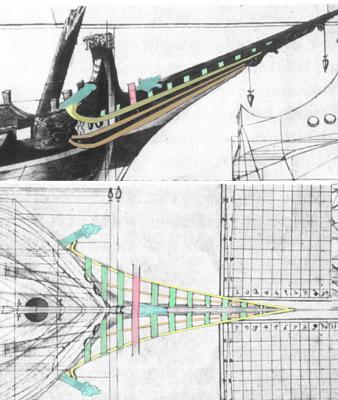
I am installing the rails and related accessories of the bow. It is not easy to understand the drawings, since this bow is a transition between the XVII century galleys/polacres and XVIII century ships, so the rails are disposed in a different way if compared with the previous century ones. in the attached file can be seen: the original drawing, where I coloured the three rails: upper (main one), intermediate and lower. in another contemporary drawing of a Venetian xebec, showed there, can be clearly see where the three rails end. The upper one ends in the cateye support (coloured yellow in the original drawing). The lower one reach the hull stright and continue following the hull (coloured red in the original drawing) the intermediate reach the hawse holes. In anycase the lower and upper rails are defined as a position. the intermediate rail will "artistically" reach the higher wolf's head. I am still study how to "artistically" reach the higher wolf's head, preserving the intermediate rail real support function.... in the attached photos can be seen the duty made at present on the bow. THERE ARE MISTAKES MADE IN THE MODEL BUILDING, since I adeguate the drawing at the present model, so not everything fits in the right position as in the drawing. But since I discover many construction details only working on them, sometimes it is not possible to make corrections, since it is too late. In anycase I am satisfied . Maybe it can be useful for the next one that want to start a similar project.... I installed the first four wolf's heads. the two wolf heads of the cateyes results too big and probably I will re-build new ones. But I can still use one of these for the wolf head which is installed on the bowsprit.


-
Thank you Crackers! I am happy that my WIP raised your attention! what attired me was the curiosity related to this unknow and forgotten design. In addition, the Venetian ships are not a common choice for modelling, so searching informations about them raise the thirst for knowledge... You are not alone! When wrote "The Broker", John Grisham gained 5 Kg during its period of novel writing in Bologna (and the quality of its novel suffered)
-
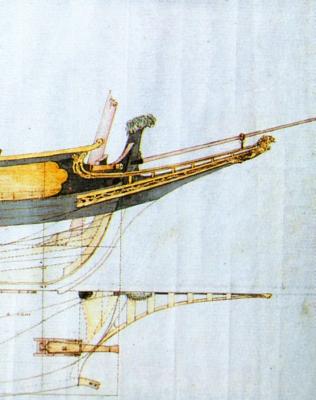
I won my laziness and I made the other side of the windows of the stern. In the photo can be seen the two sides compared. Well, are not hydentical, but...hey! it's an hand-made model! so they are good to me! Now I start to work around the bow, which is rather tricky. After evaluating various drawings of venetian ships, I arrived to the conclusion that mine is a TRUE VENETIAN SHIP of TRUE VENETIAN DEVELOPMENT. The Dalmatian origin tartane have a slighty different bow. This design instead is typical of many Venetian xebecs and galleys of late type. That give me a sense of relief, since the quantity of decorations is very high and is not common in the Dalmatian origin tartane, and that has always puzzled me. now it fit perfectly with the Venetian approach, were on some small ships the level of decoration was high. Now the presence of seven wolf heads is more understandable. I started placing the two catheads and the related main rails. The main rail was almost stright, without bends, since it must sustain the large part of the pressure and it must hold the staffs that keep the bowsprit tight against the keel (I know that my english is horrible! ) the main staff is pink colored in the drawing and the main rail is yellow coloured. Due to the lack of bends, it is rather difficoult to connect it in an artistically way to th cathead support. That is the best that I can do... But I still have not decorated it... The other two rails (lower ones, orange coloured) are typical of the venetian galleys of the same period. they can be seen in an original drawing of late XVIII century of a venetian "galeotta" (attached). I think that my polacre has the same lower rails, that ends with some additional bend that has the wolf's heads as extreme end-point. That will be another tormented chapter of this building...


-
Until now I built the model making various parts of the model in the same time. That means that now the model is full of incomplete sections. As an example, the decorations are only half made, the door of the cabin has not yet finished, the planking division is not finished, and so on. Now before proceeding further I need absolutely to finish the lower part of the hull, in order to have not anymore the necessity to rotate the model for working on it and risk to damage the accessories already installed. So I completed the rudder. I made the hinges using thin copper plate, since the commercial ones I had were not so realistic (useful for small boats). I attached finally the bowprit, but It is not yet finished. I painted white the hull, accordingly to the drawing. That helped a lot on covering the "corrections" I made on the old model.


-
Thank you Carl! In the past I used the green paste only for the Endeavour stern decoration. The models before the Endeavour were made only carving directly from wood. But here the quantity of decorations is high and I don't have enough patience/craftsmanship to make them all with wood. I am happy that my voyage is considered interesting, since me too I am enjoying that "archeological research" around this type of ship. Well, in this situation "archeological research" is the right term... I have discovered other precious informations regarding this type of ships: in the following link can be downloaded a file that is a research made recently in the Venetian archives. The abstract is the following: "Gente di mare della nazione bochese: tartans of Boka and the 1766 Venetian naval military intervention in Africa The main goal of this essay is to analyse the composition of the crew of five armed tartans of Boka that were recruited following the orders of the Venetian Senate in 1766, to participate in a military intervention against Tripoli pirates. The essay is based on archival sources kept in the Archivio di Stato di Venezia (the collection of the magistrates of the Venetian navy, Provveditori all’Armar). In the introduction, we summarize developmental components of seafaring in Boka Kotorska in the eighteenth century, discuss factors that enabled fast development of urban settlements in Boka, and emphasize the role of the residents of Boka in the Venetian navy. In the main part of the essay we analyse in detail all data relevant for the establishment and composition of tartans that were commanded by captains from Perast, Dobrota and Prčanj. We discuss the armament (especially artillery) of tartans, crew numbers, officer and midshipman ranks, specialized ship offices (physicians, scribes, procurement clerks, craftsmen, chaplains), native towns/villages of the crew (mostly in Boka) as well as their salaries. The final part of the article contains full transcriptions of crew registers of five tartans from Boka in 1766." below the link where the file can be downloaded: http://hrcak.srce.hr/index.php?show=clanak&id_clanak_jezik=172569〈=en Note: the pdf file in written in Croatian language, but can be EASILY TRANSLATED in English with Google translator simply with copy and paste of group of phrases (the article is not so long). Unfortunately, the Tartana / Polacre that I am building currently doesn't match with the ones described in the article, so for the moment it remains in the mists of history........
-
Thank you Mark! I appreciate that you...appreciate. Such an invasive use of "green paste" can generate mixed feelings on the observers, so not always this kind of way of proceeding is appreciated.
-
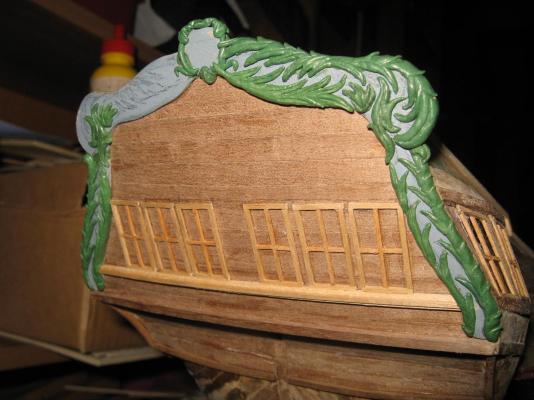
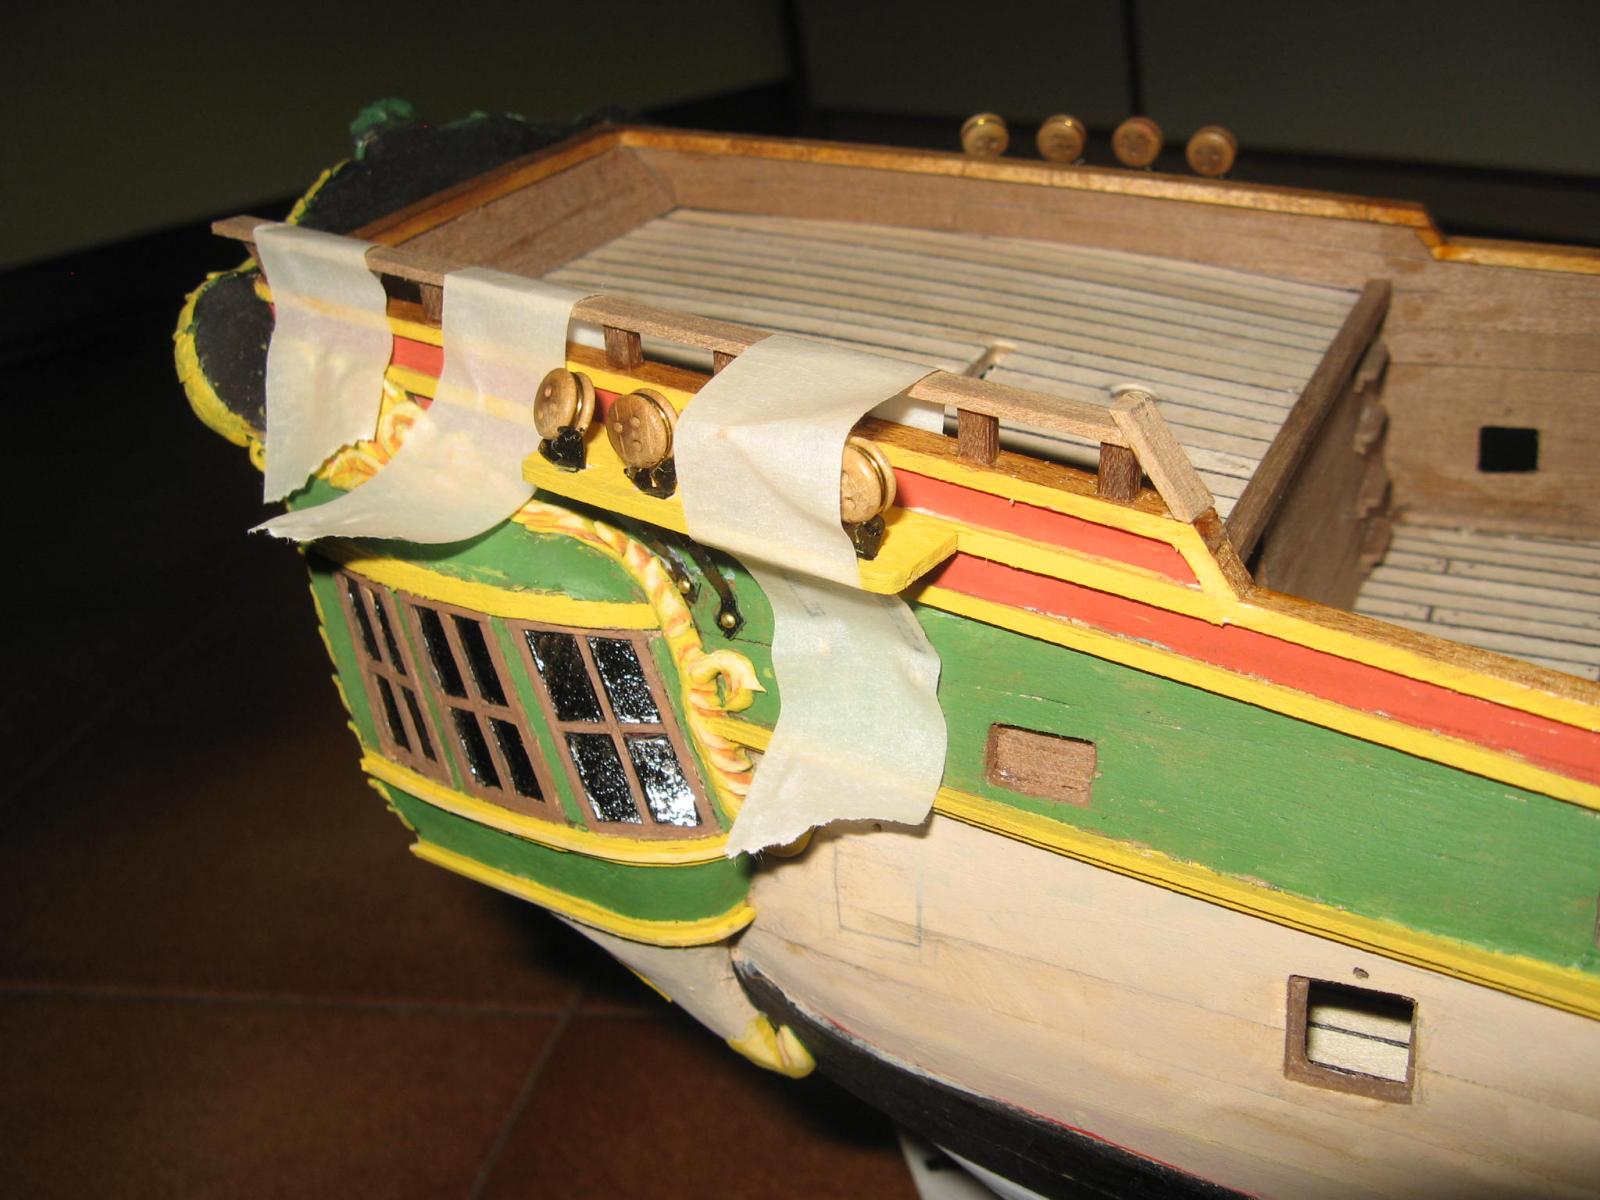
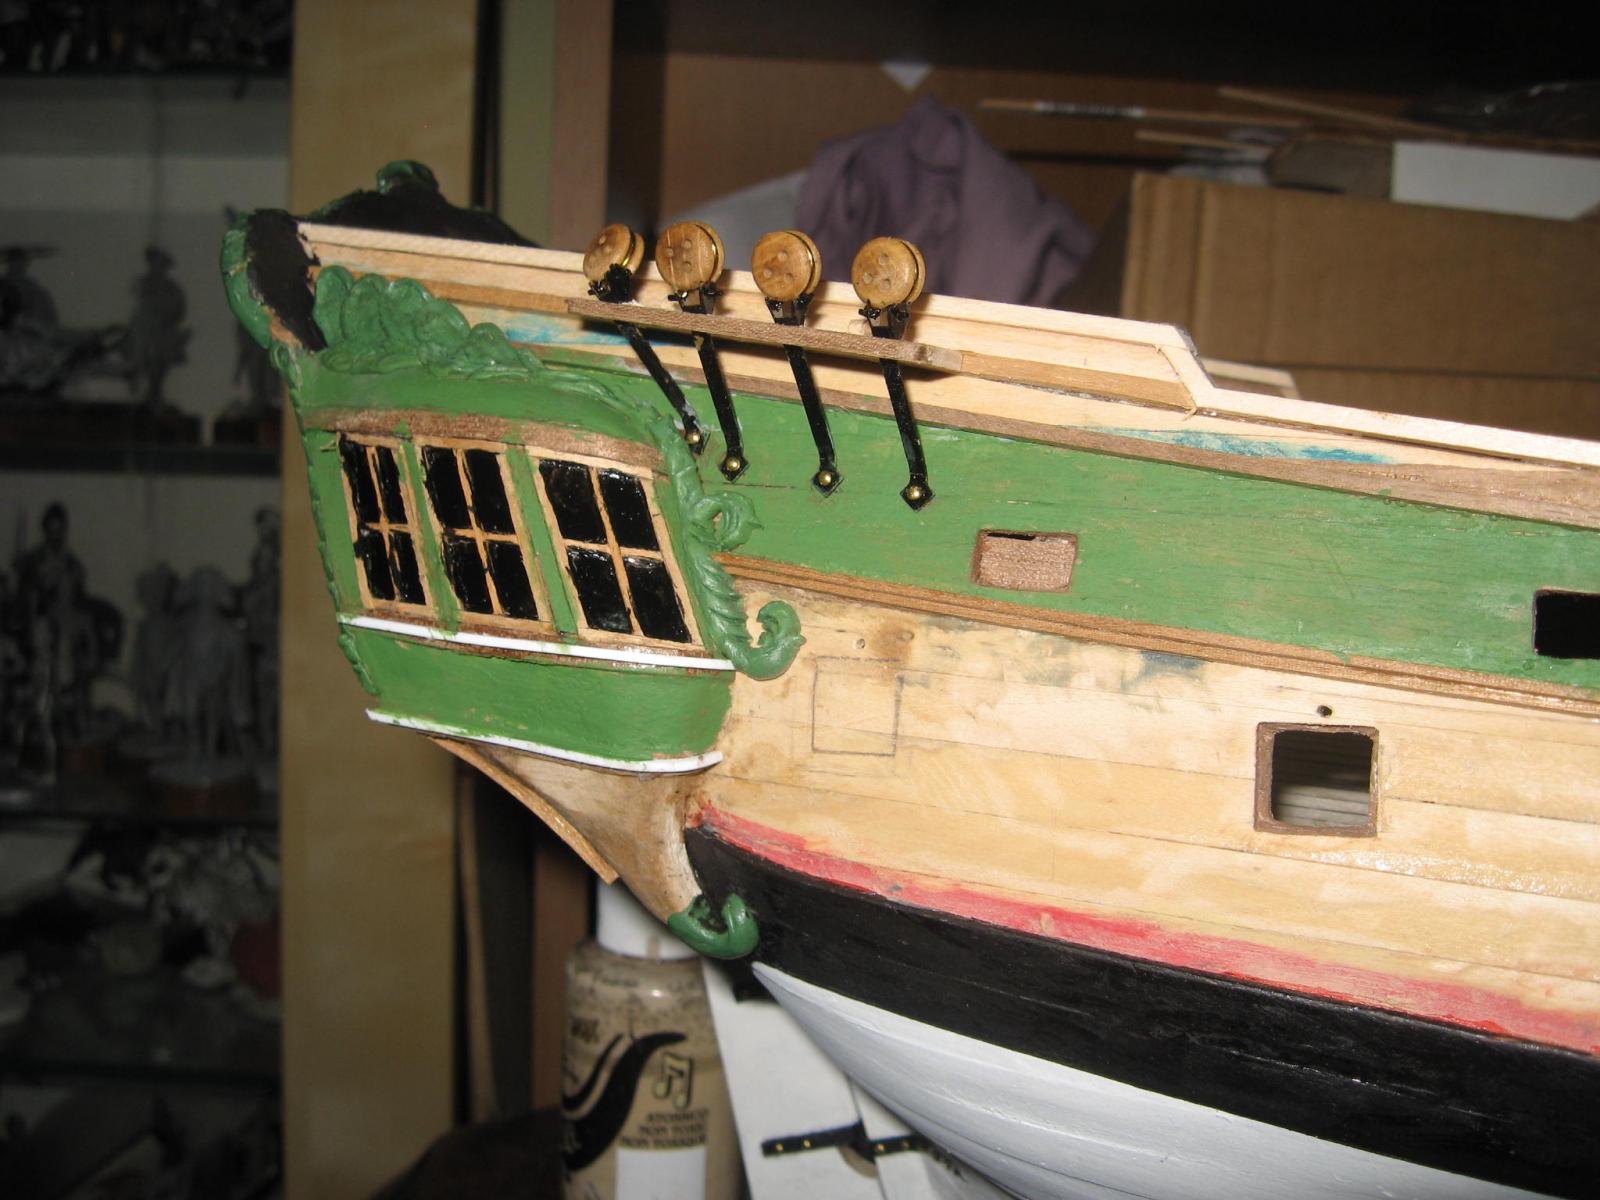
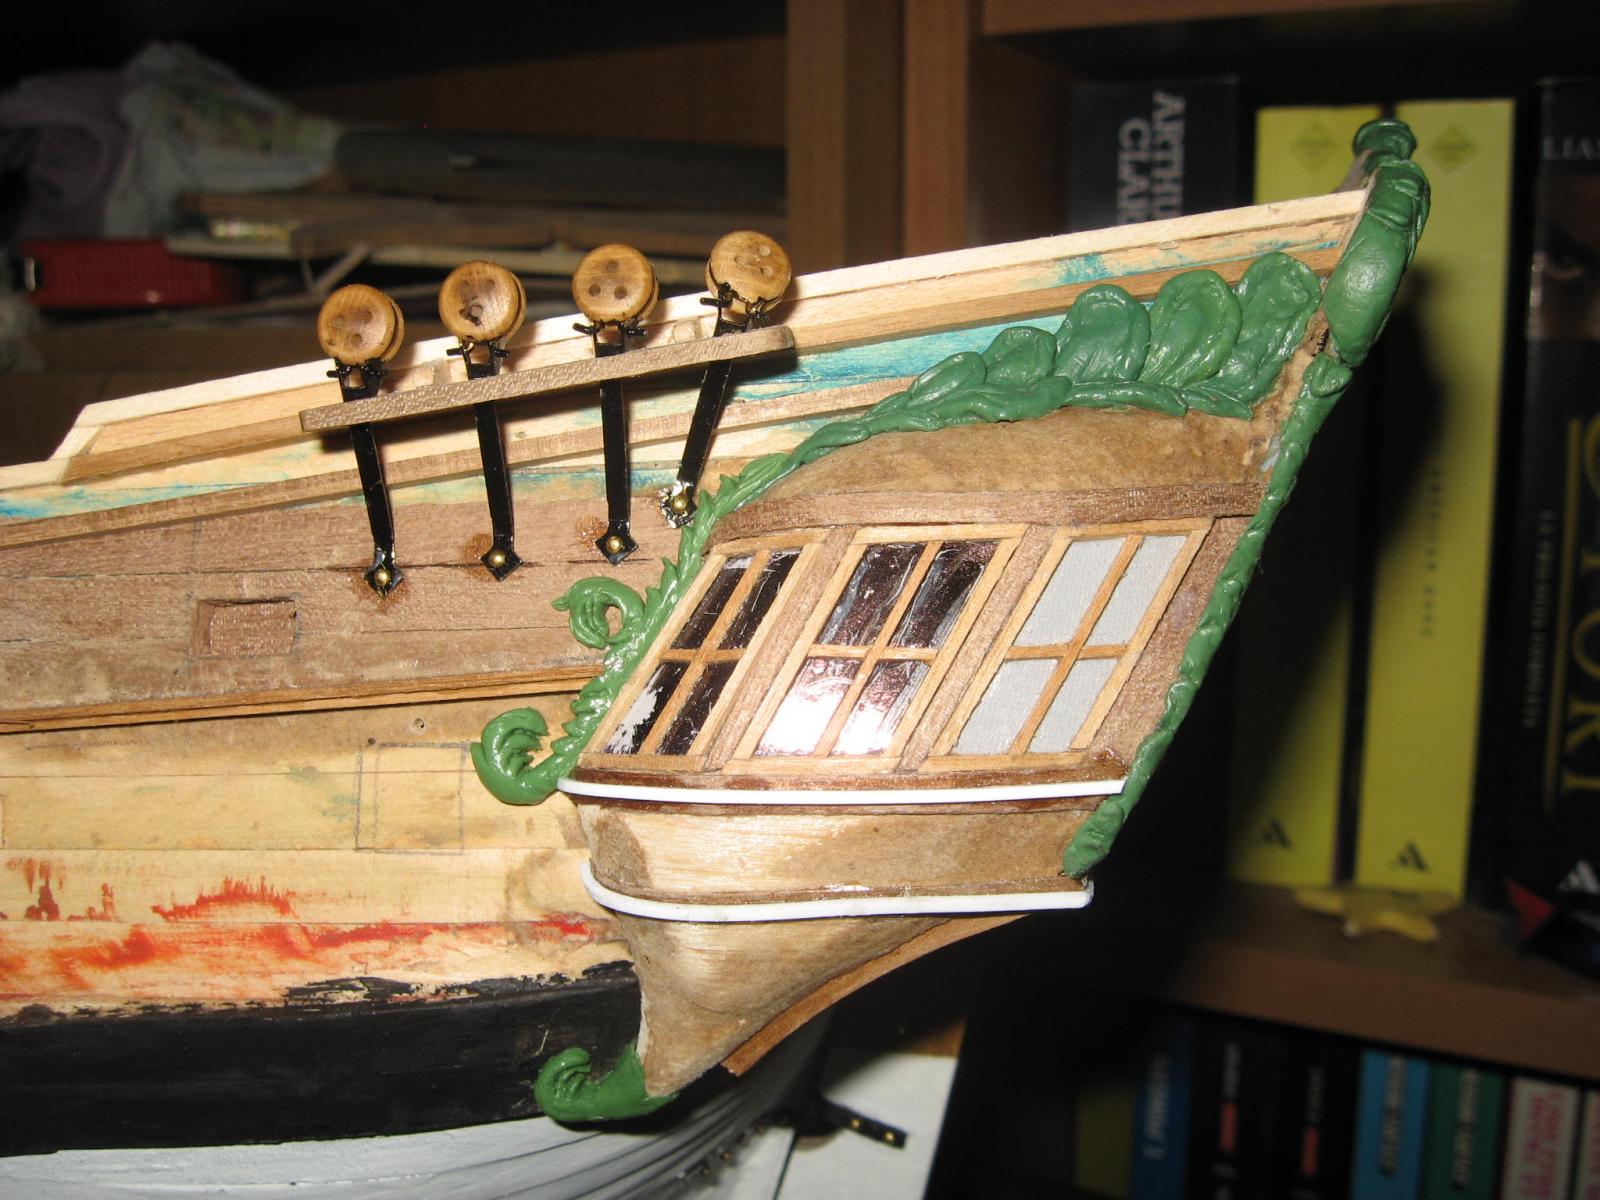
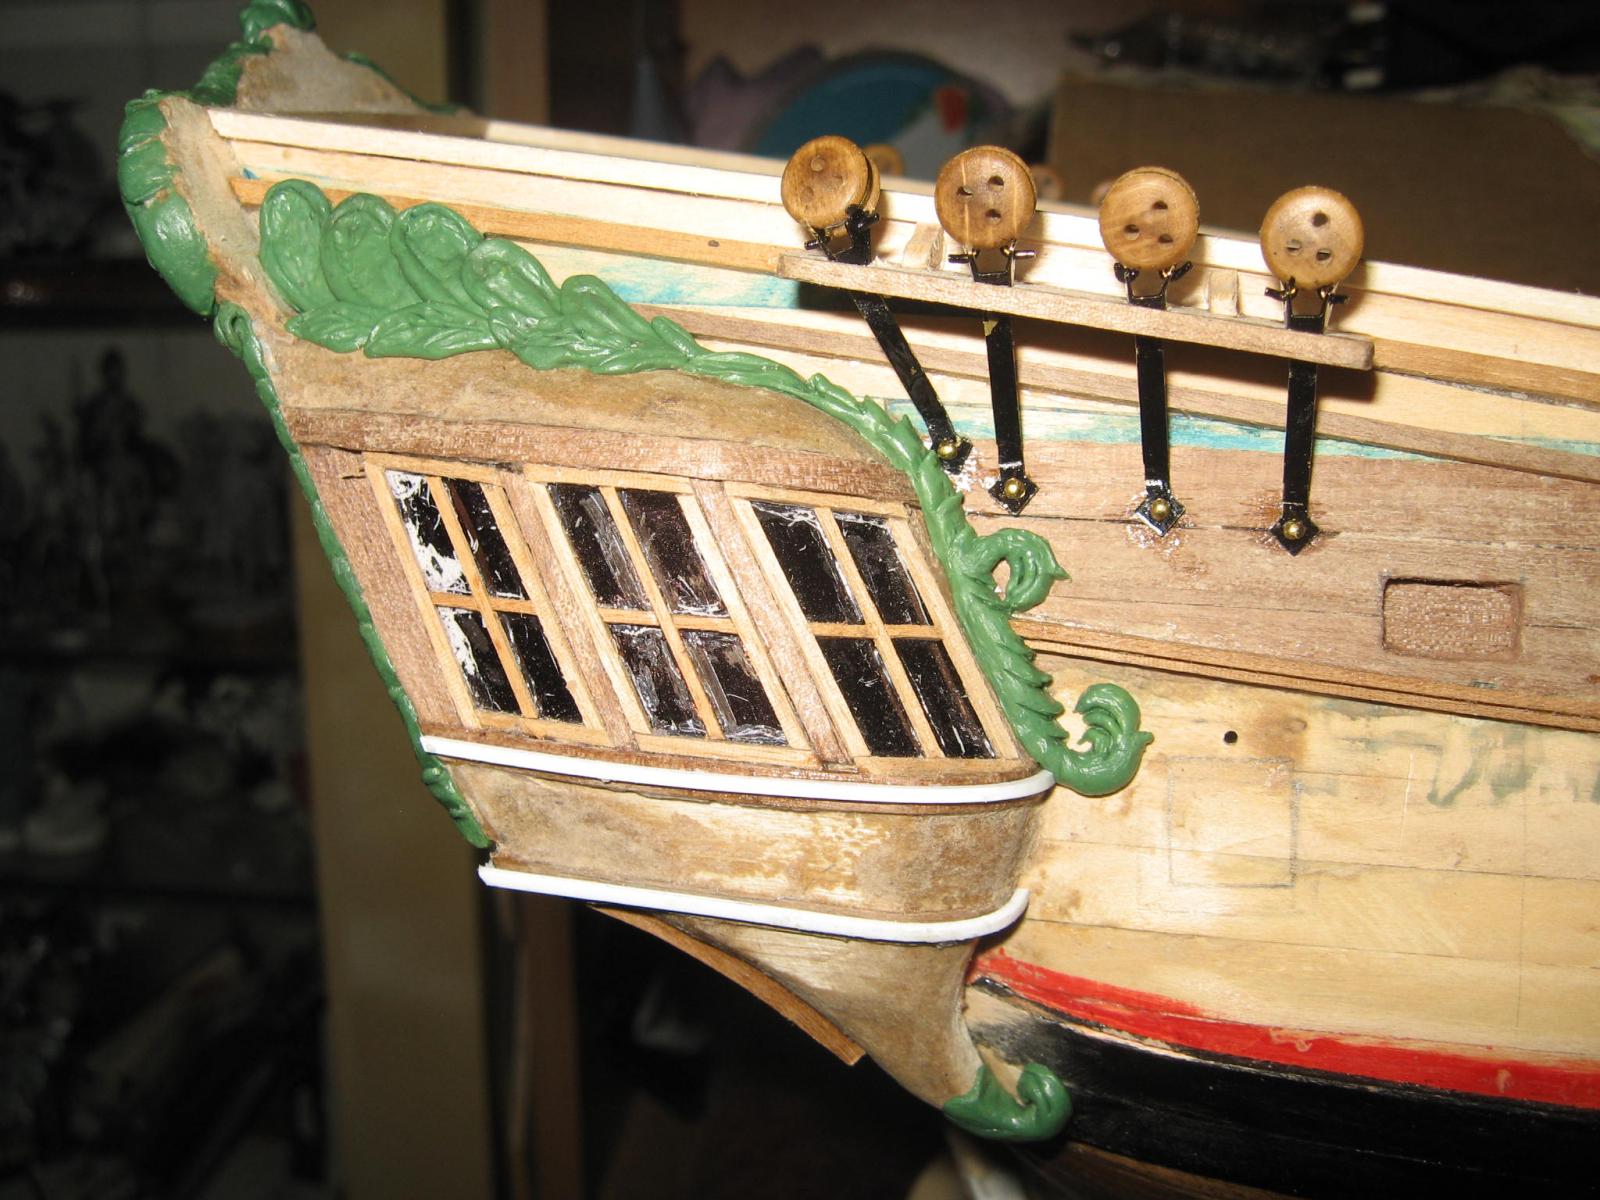
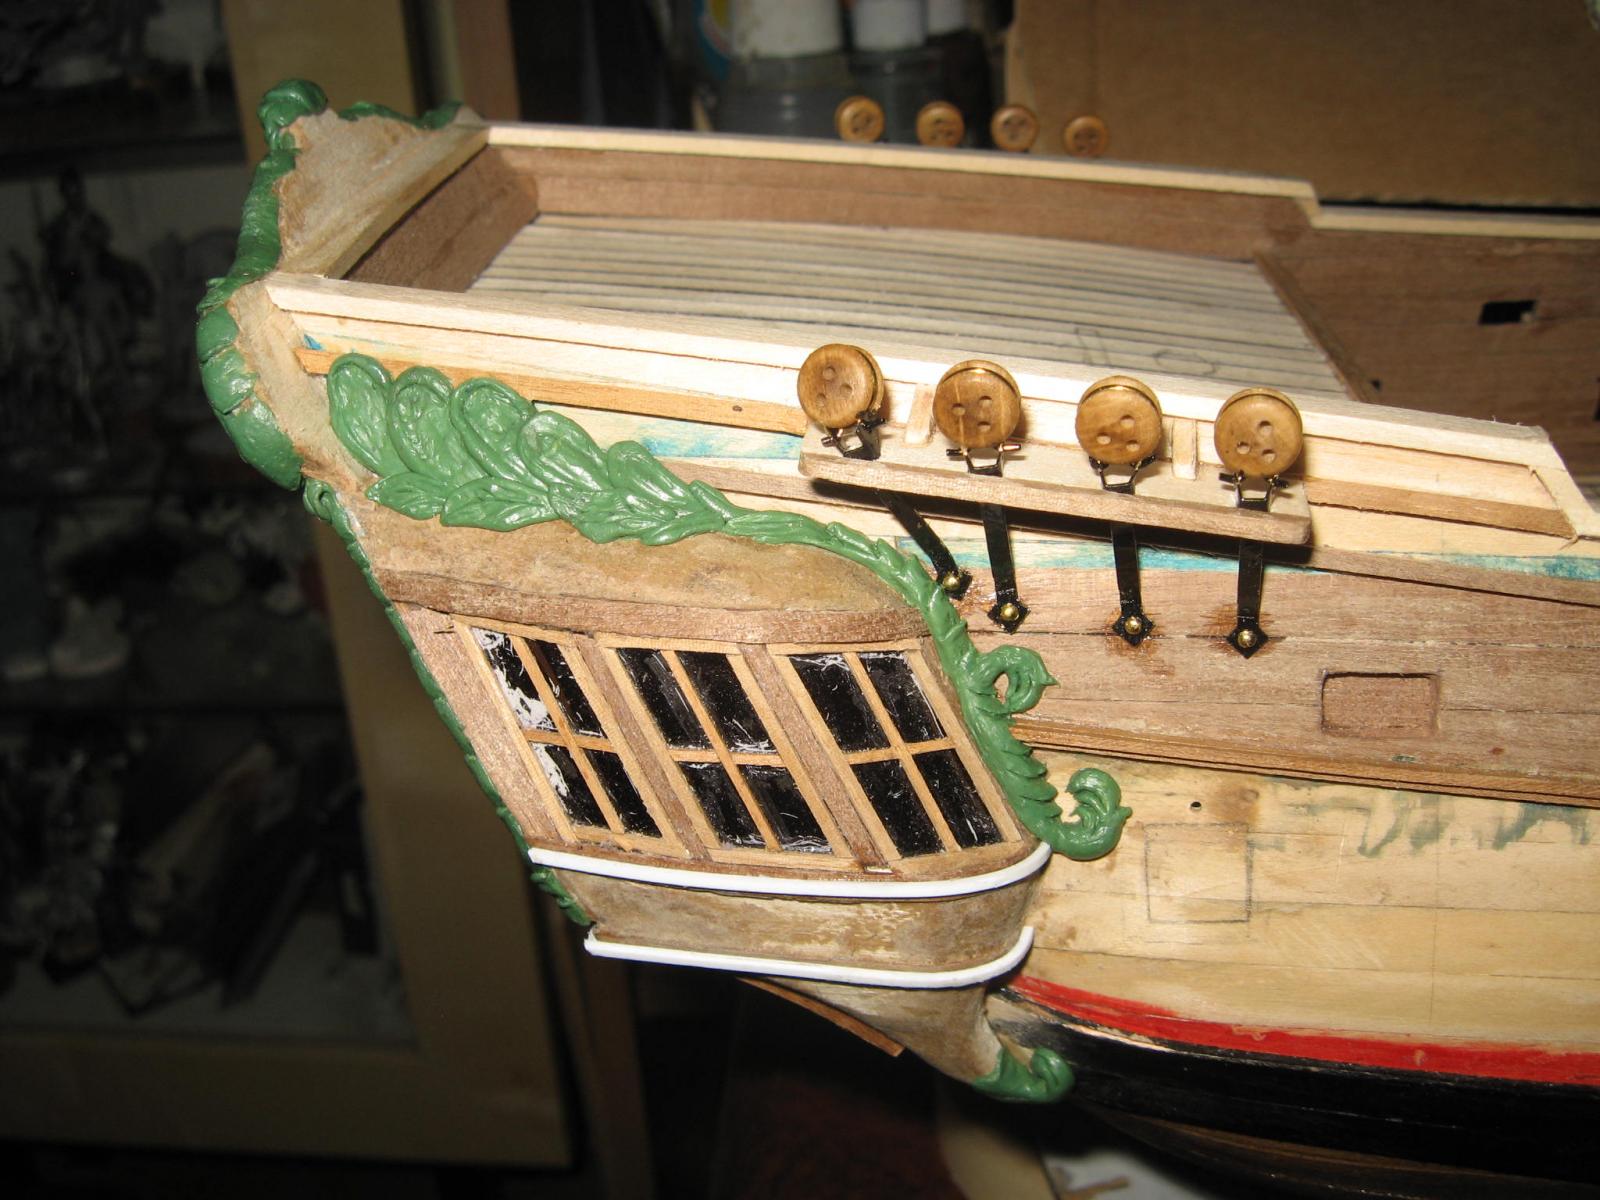
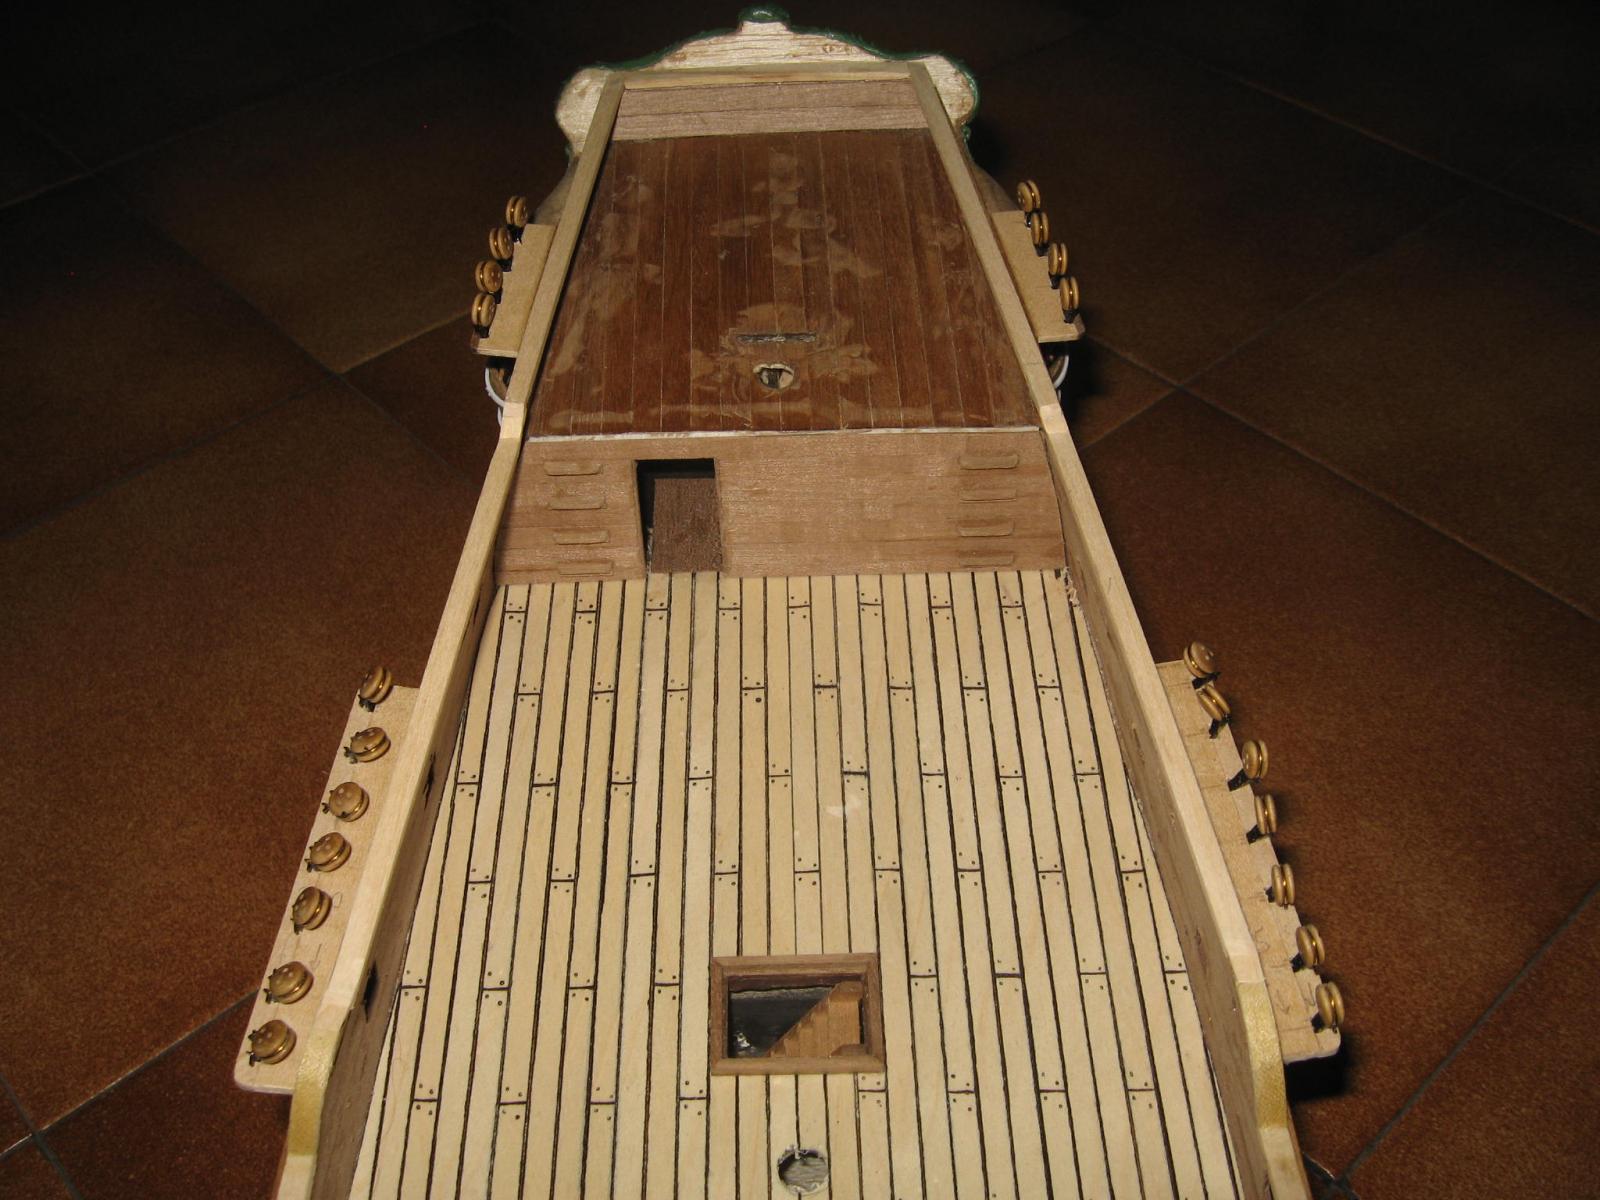
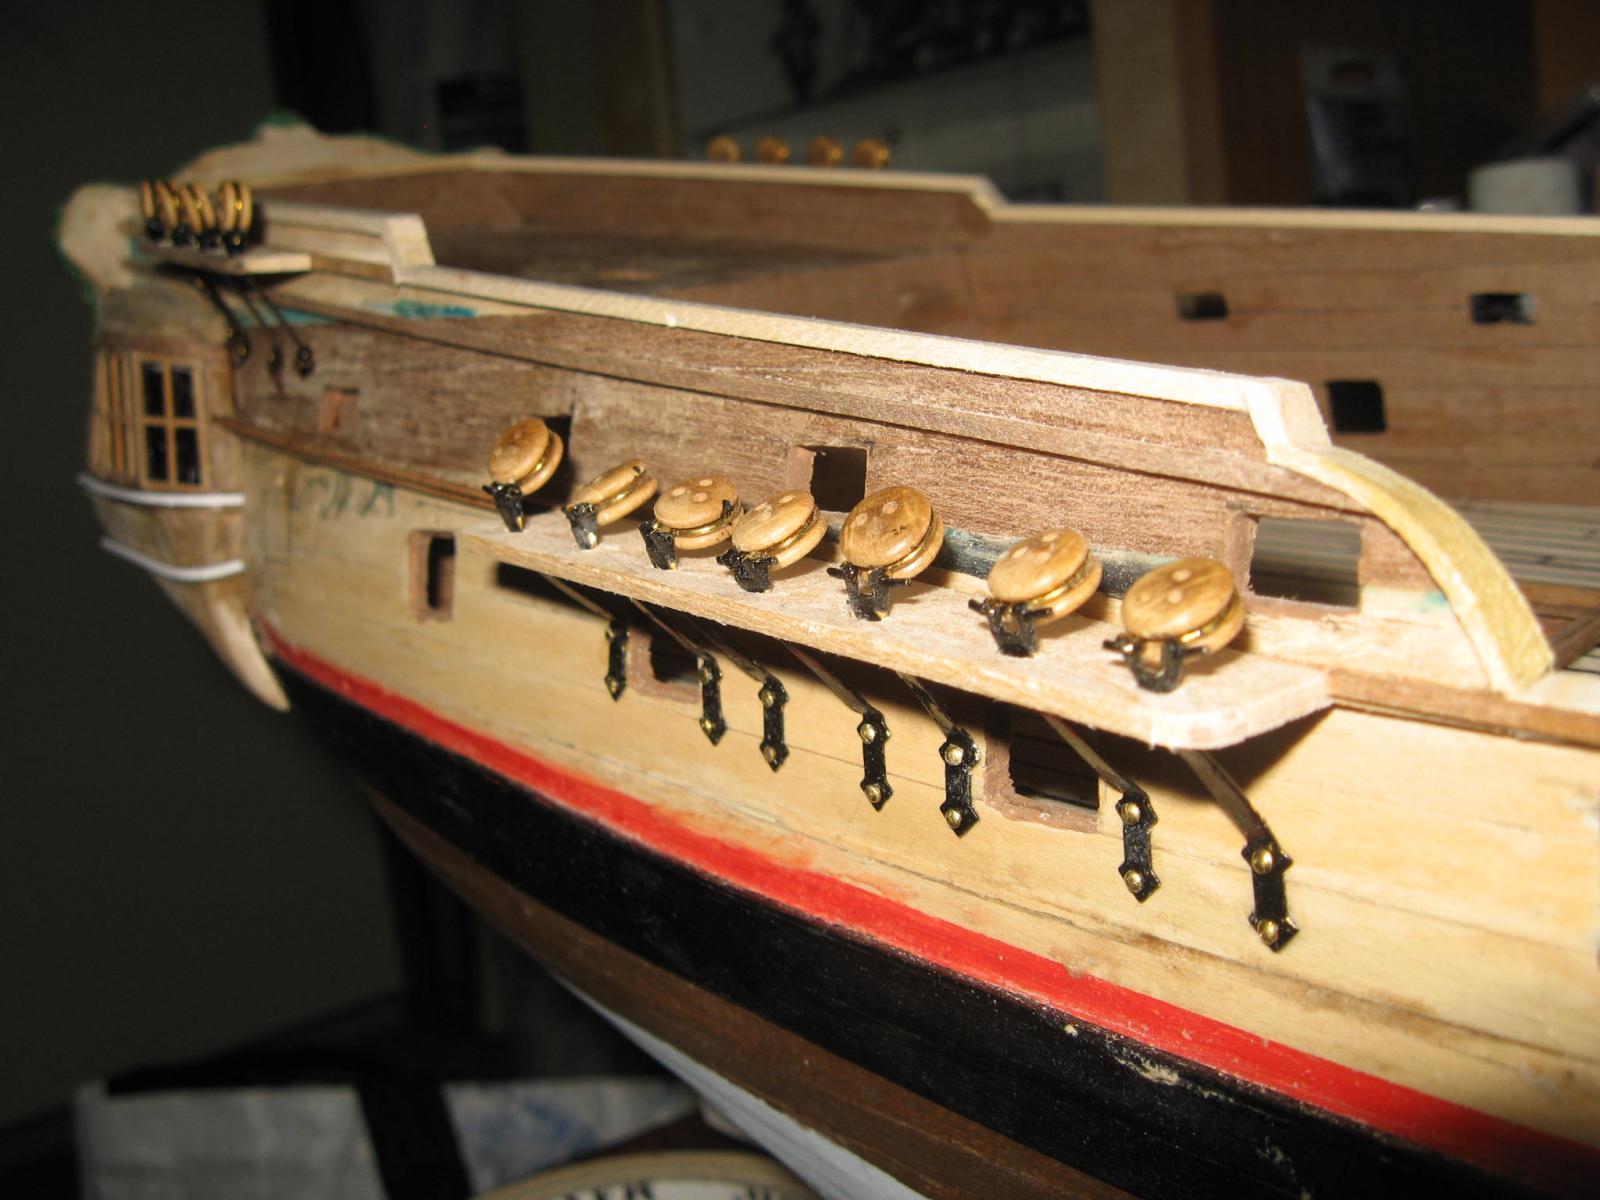
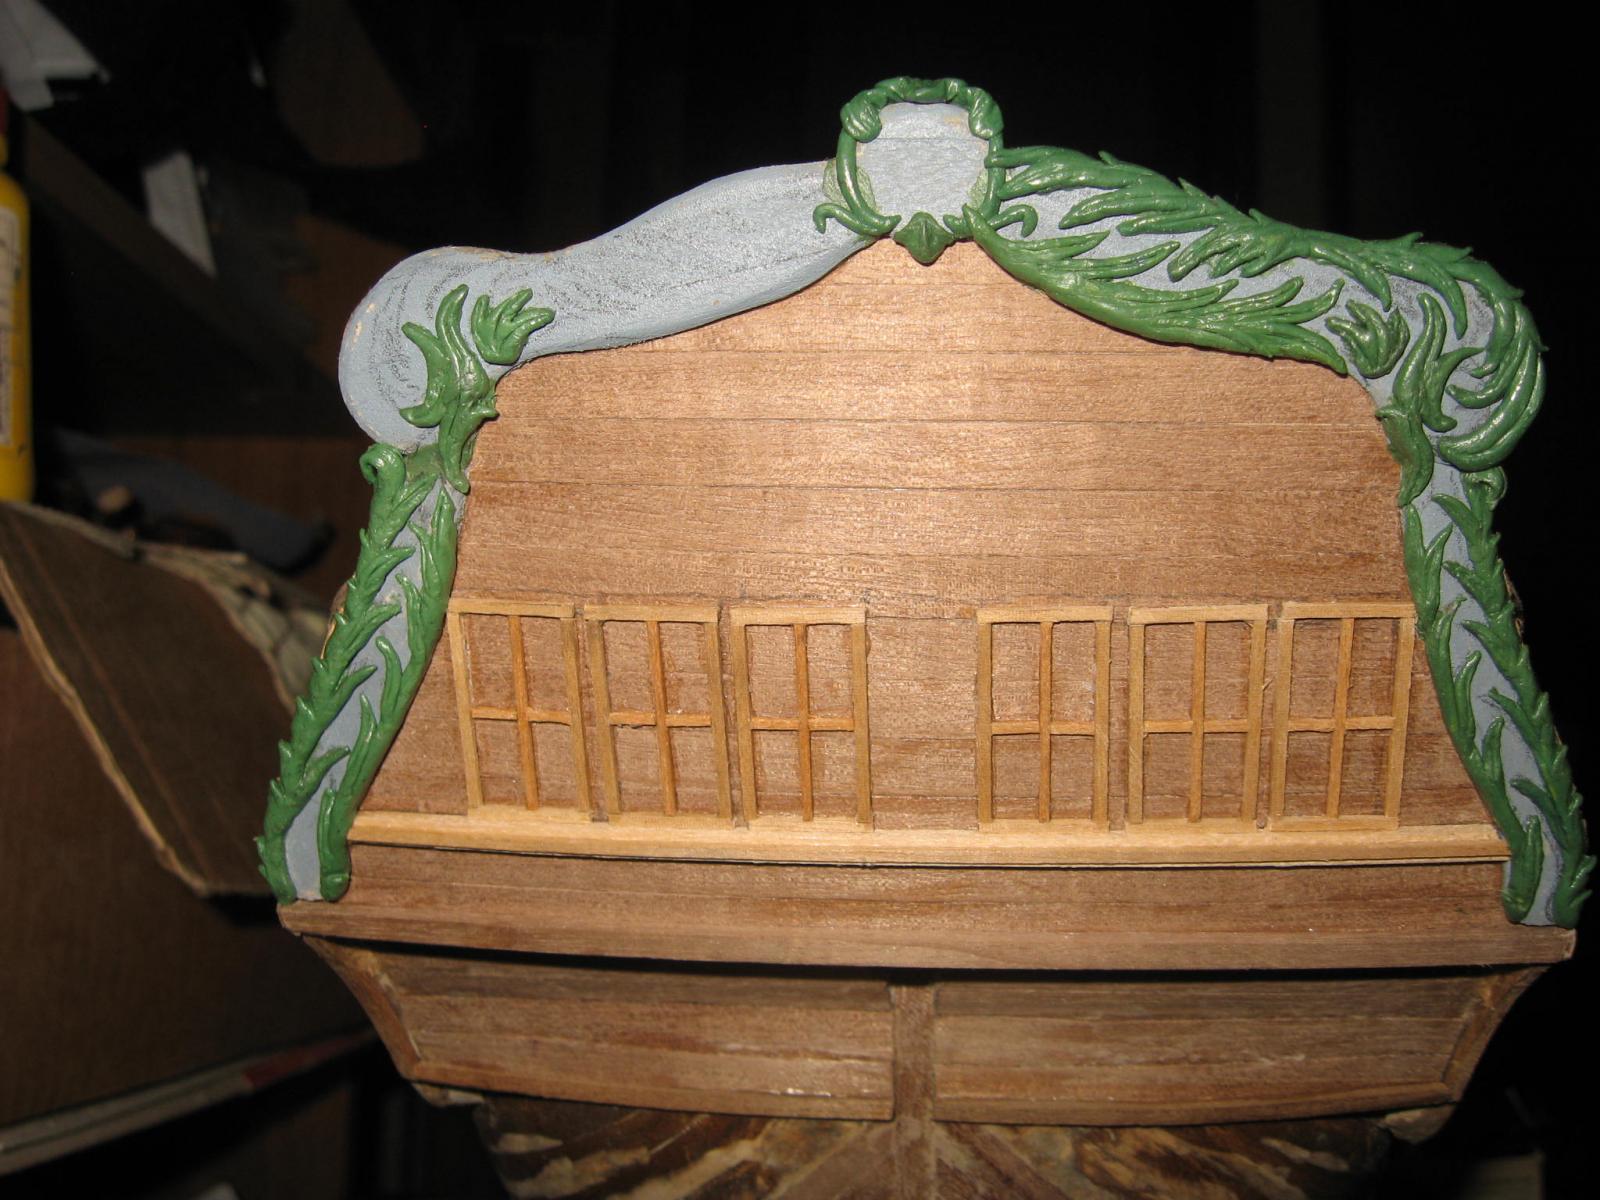
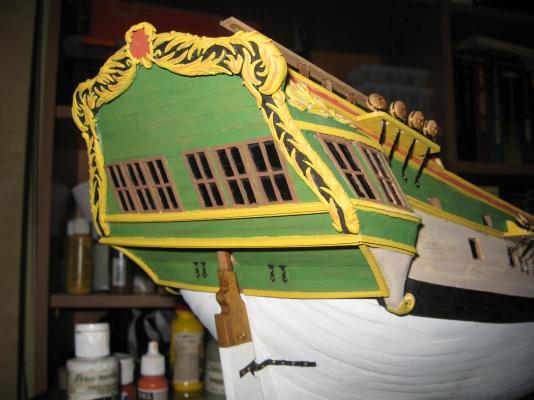
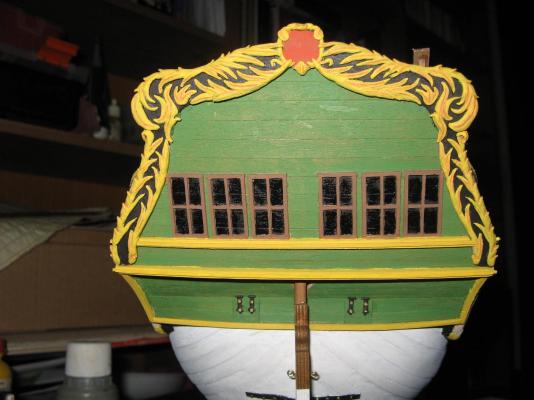
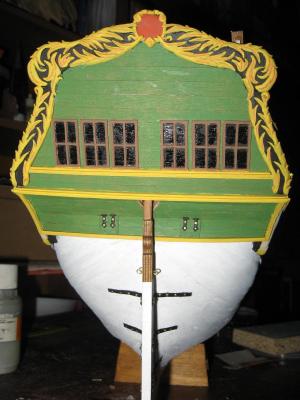
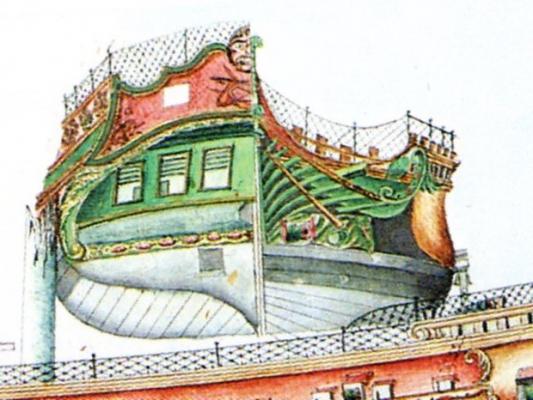
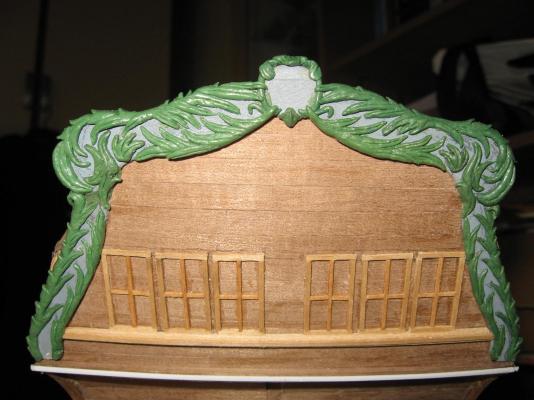
A substantial update: I completed the decorations of the right side of the stern. I am not completely satisfied, since I needed to combine the decorations of the original drawings with the "leafs type" decorations of the transom. But I am rather sure that the original drawing contain only a draft representation of the decorations, since the main purpose was to draw the ship hull and not its less important components. Now the task will be to make the left side hydentical to the right side... And this will be made when I will be...ready, since it is a rather boring duty. I have completed the stern deck, too. Now all the wounds of the decks have been cured!! The planking division of the stern deck has not yet be made. Oh, I added the staffs on the dead-eyes channels, too. In the meanwhile I am studying how to proceed for the running and standing rigging, since I have still some obscure point to be clarified. Nothing has yet still completely fixed on this project, since always new informations and evaluations contribute to change something.


- 190 replies
-
- 10
-
-
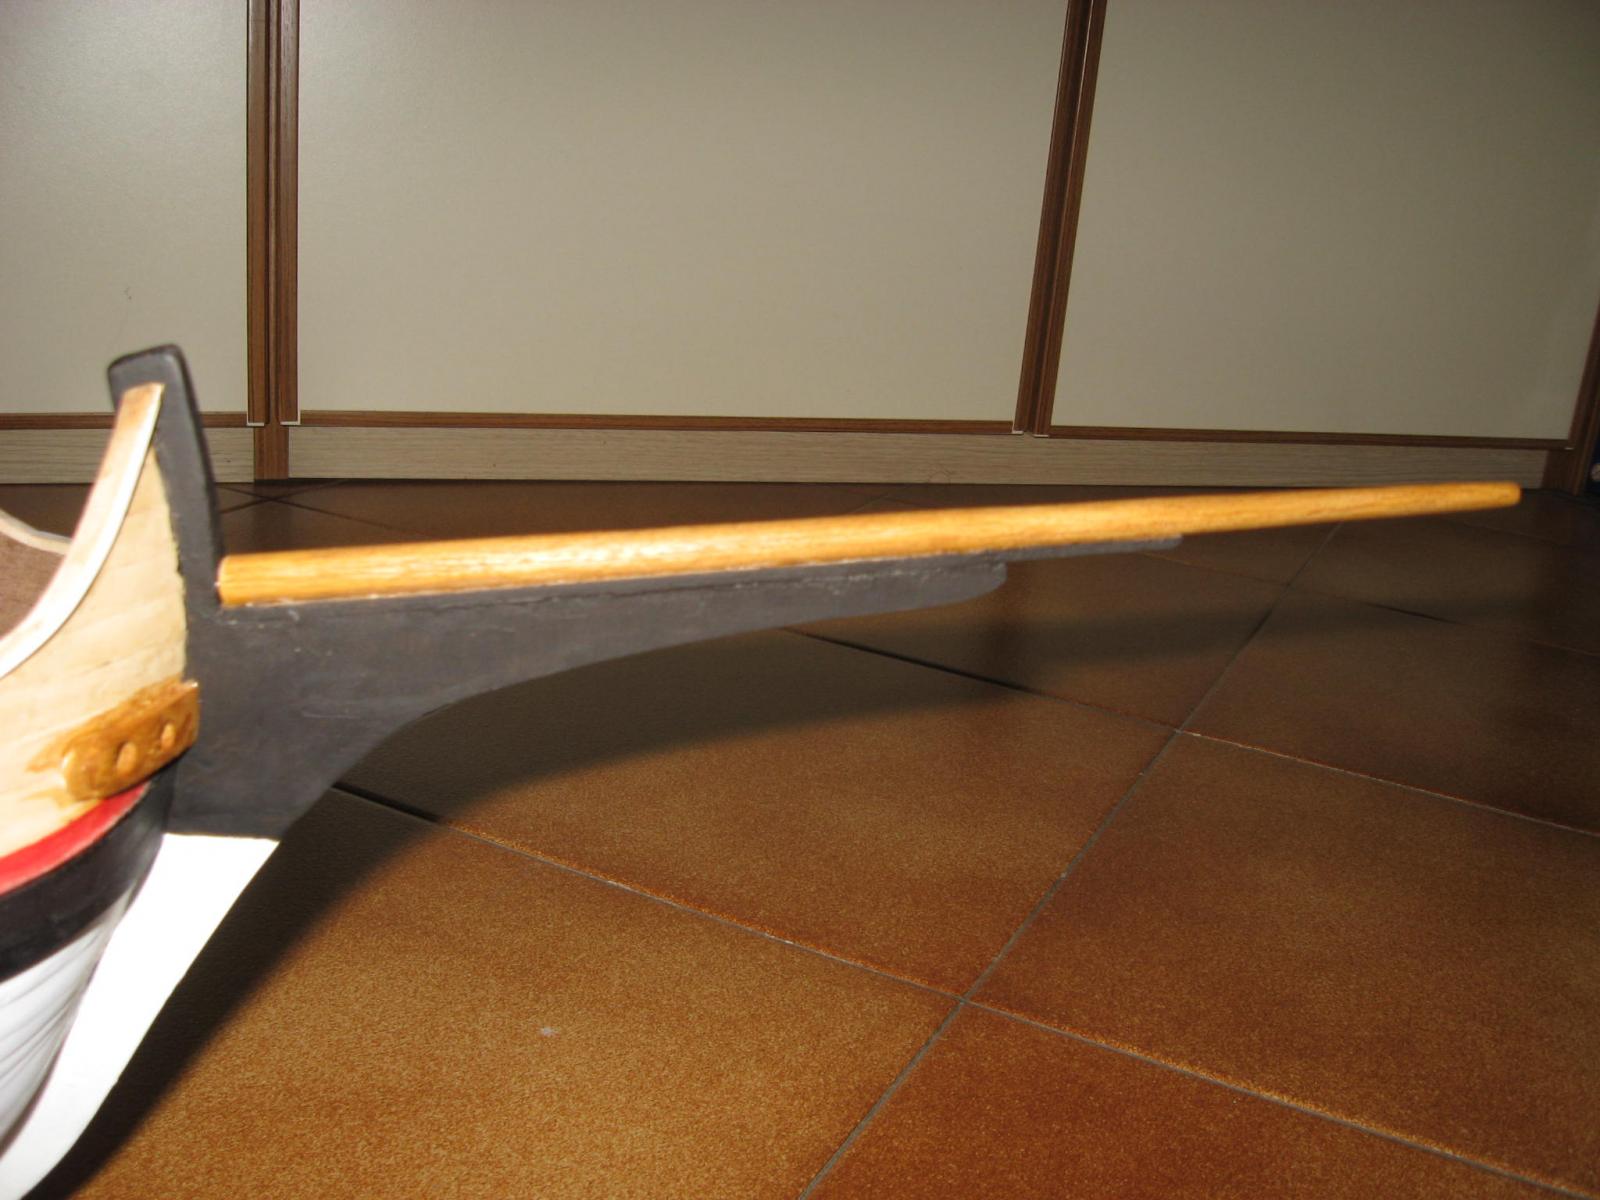
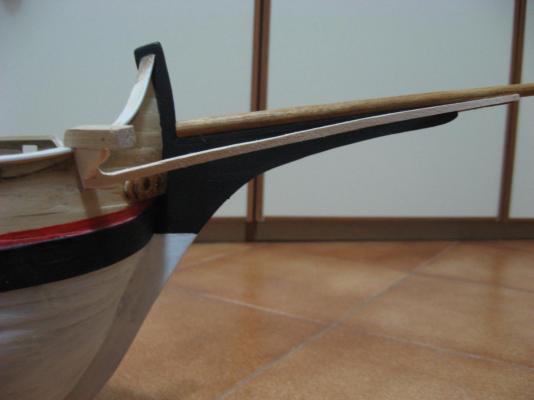
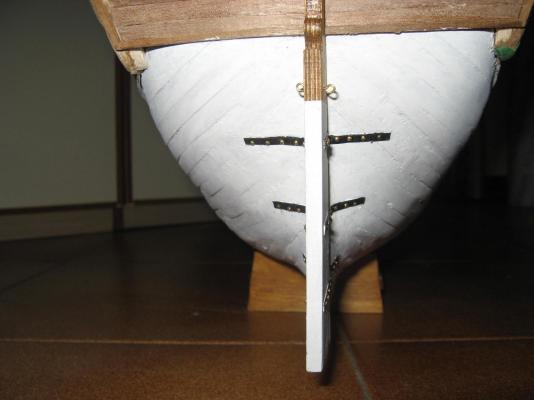
Another update: I have cut the old keel in the bow, since it was wrong either on size, slope, lenght... The new bow is as it can be seen in the photo. I added two pieces, the walnut one is the pink one in the drawing. The other one is the green one in the drawing. The cyan colored one is the effective bowsprit, which is not yet installed. Again I want to remark the fact that the external hull and related bow and stern will be completely painted, so nothing of this "HORRIBLE PATCHWORK" will be seen when the model will be finished. So use your fantasy at the moment to compensate this vision... I have not yet decided if install the wolf head in the bowsprit. All these wolf heads appears too much... With this one the number become seven! I changed a bit the slope of the bowsprit and its lenght, and now is much more like the ones in the various paintings. I am still not too convinced by some detail of the original drawing, including the inclination of the bowsprit, which can provide some interferences with the big latin sail of the foremast.
-
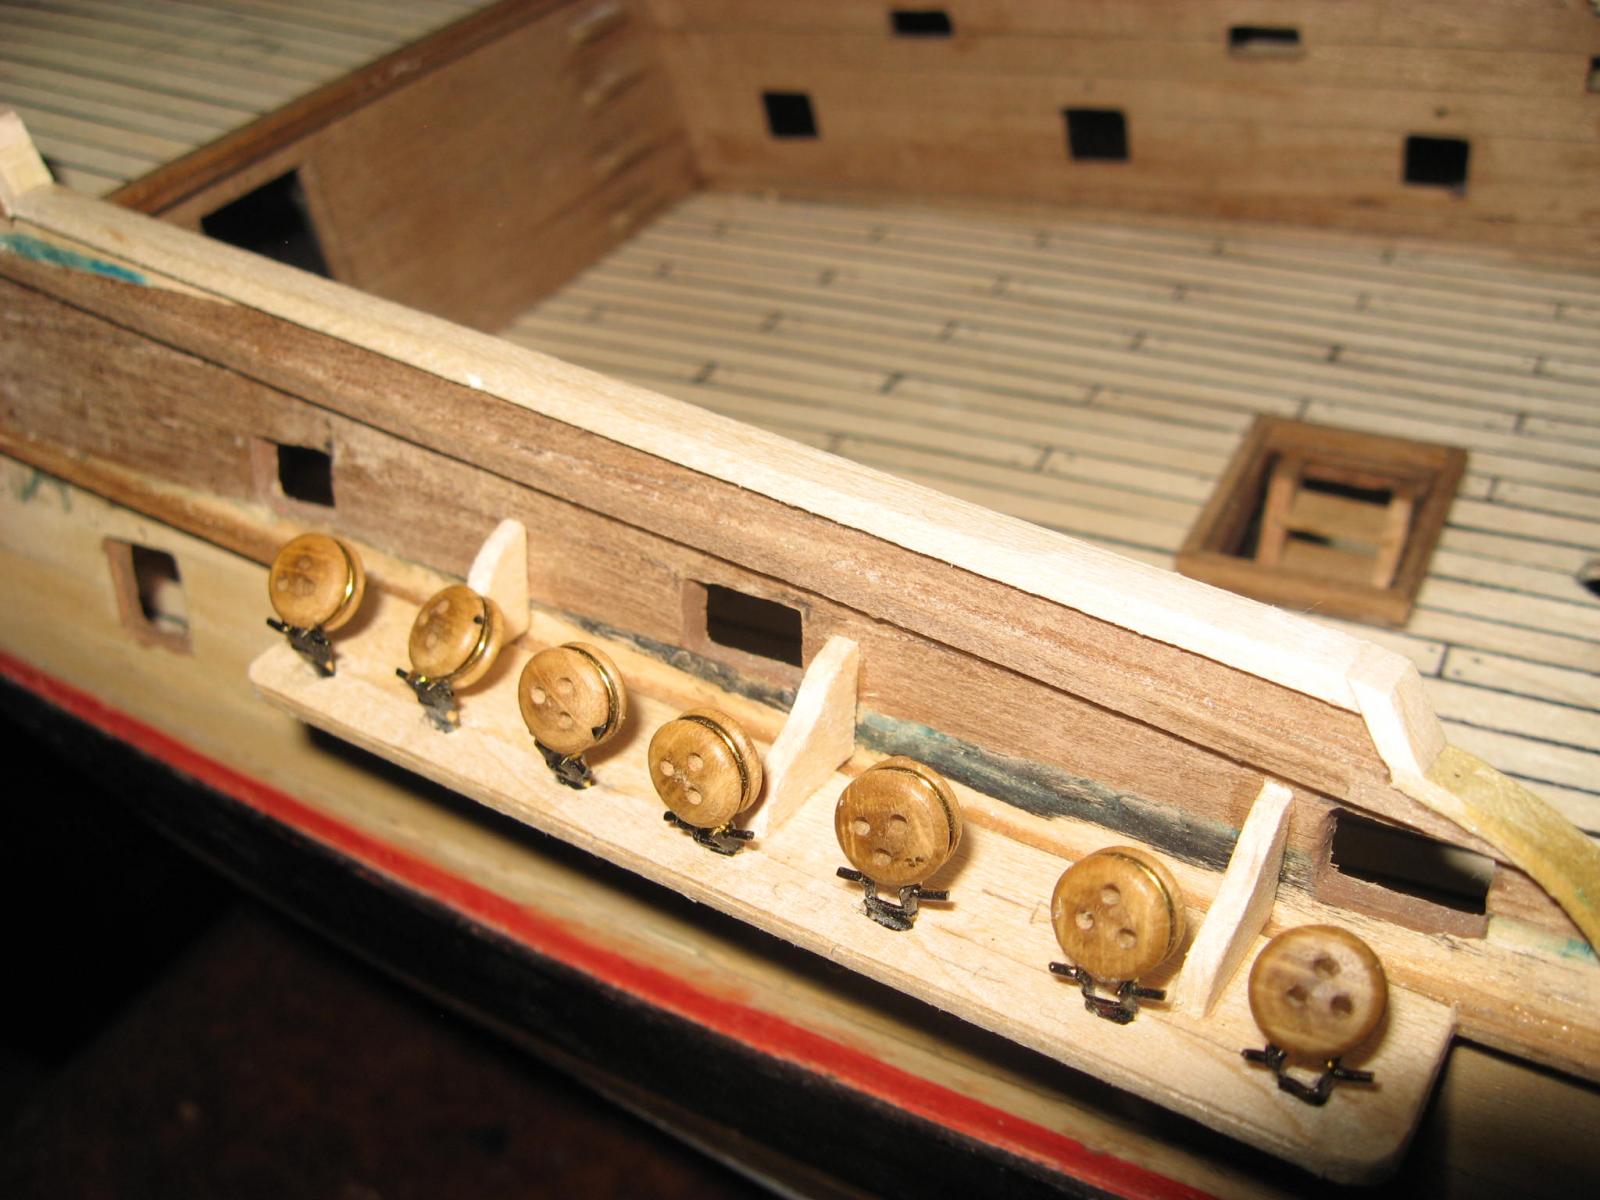
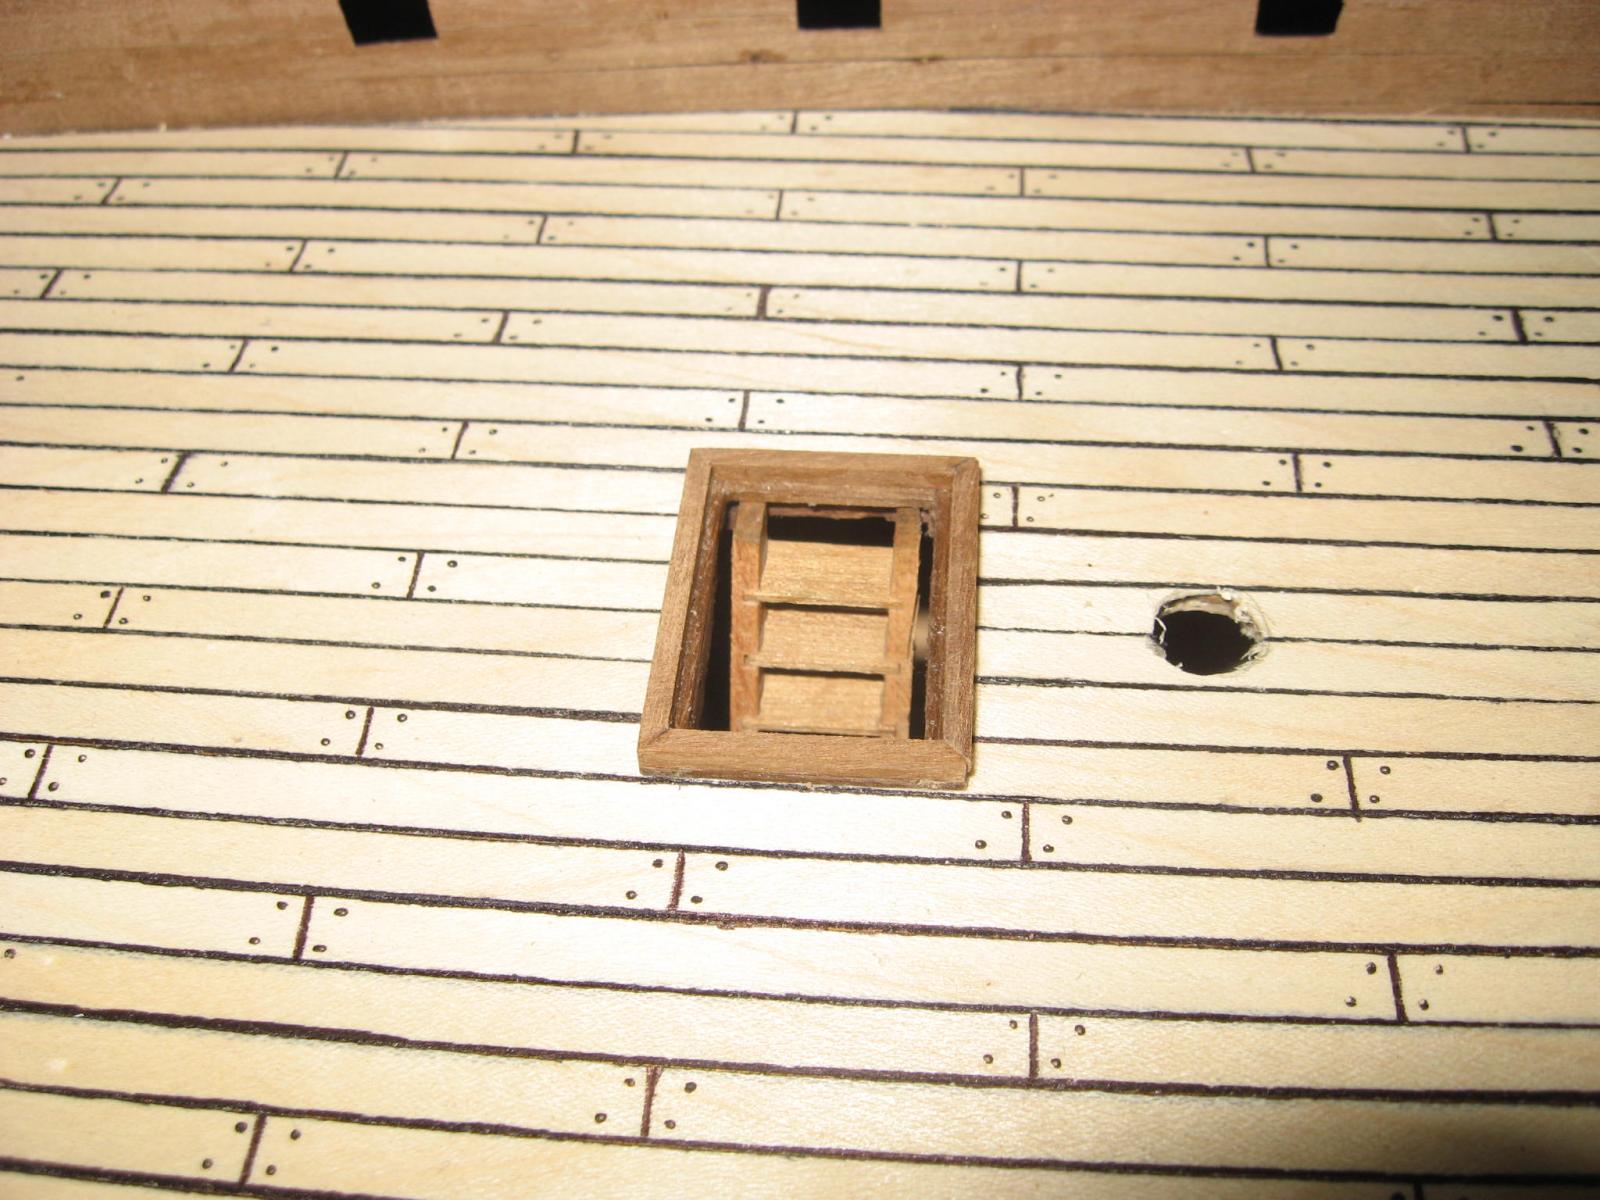
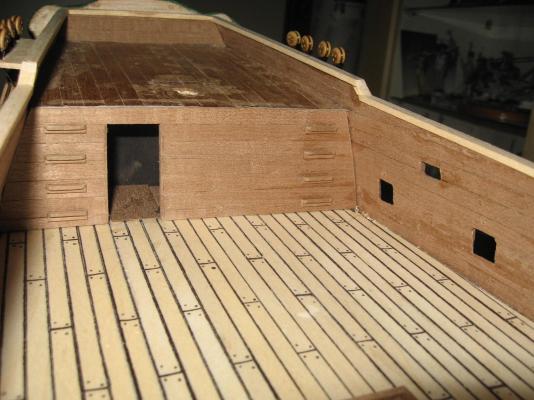
Another update: I finally installed the cabin's wall. The door has not yet be made, since I need to craft the metal parts (locking and other). In addition I installed the frame and ladder of the deck hatchway. My main purpose is to add all the components that are needed in order to have the possibily to understood the available space around the side windows of the stern. In that way I can finally start the related decorations. So I needed to install all the required dead eyes, too. As it can be seen in the photos, the chains of some of the dead eyes have been placed in an odd position, in order to leave free space for the cannon. But I saw that it was a rather common solution on small ships (even in the paintings already posted in my WIP). It must be said that there were not many solutions to arrange the dead-eyes, since the number of required dead-eyes and the gun ports positions are fixed. On some specific decoration I used a strip of polistirene (side windows of the stern), but the ship will be externally painted, so there will be no evidence of it (a bit of heretic approach... ).


-
Hello! interesting questions and WIP... Curieux can be really an adjective related to a person, since France has got many ships like the Capricieuse, Railleuse, Tapageuse, Gracieuse and so on. If you find the figureheads of the above mentioned ships, probably you will find a way to represent the Curieux. But generally I suggest to check if some ancient French term had a different meaning from now. As an example, Basque maybe two centuries ago represented something clearly identified, different from modern definition.
-
Questions about Magellan era Portuguese Carrack
Cristiano replied to Salty Sea Dog's topic in Nautical/Naval History
Hello Buck, don't take the jointery of the plans too much seriously, since it is almost surely fictious. Mamoli and Corel in many plans show an "apparent jointery" which is made using the provided walnut strips and that more or less is nice to the eye. I think that their purpose is to give to the model a more complete appearance using the provided material in the box. A more complex research must be done in order to provide a good answer to your doubts regarding keel structure of those type of ships. Maybe you should search in the web for the Cogs of the Anseatic League, the "Nave tonda" of the Venetian Republic or other type of ships of the same period. you should consider that the largest part of the material in the web can be find using the key words of the possible Country of origin of the type of ship. In anycase, as an example check this build log: http://modelshipworld.com/index.php/topic/4915-venetian-carrack-or-nave-tonda-by-woodrat/ -
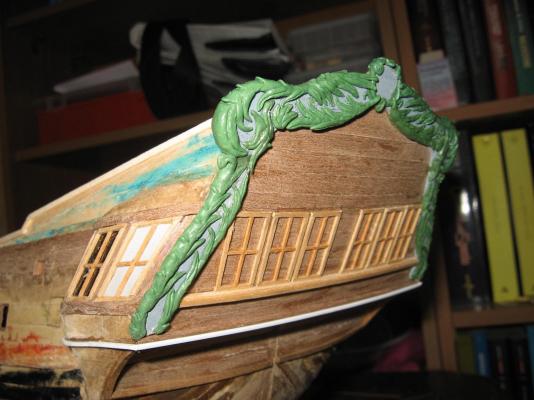
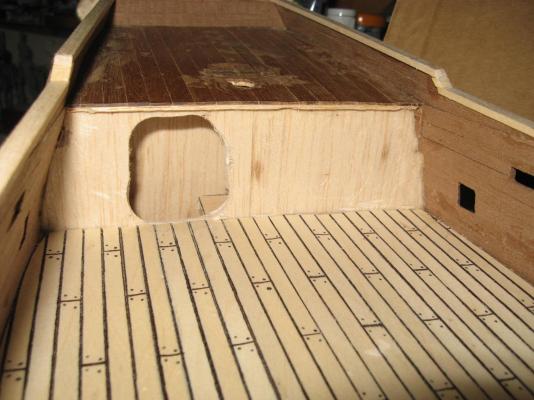
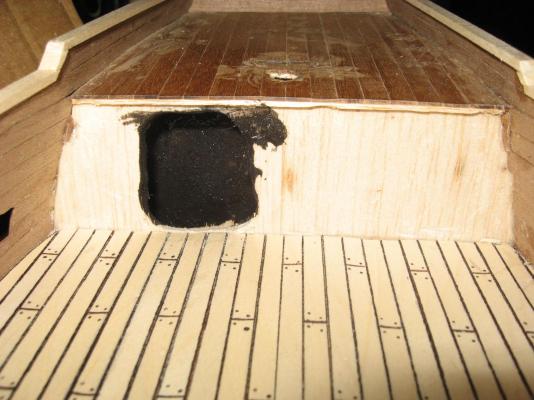
I completed the transom decoration! But I have not yet completed the stern decorations... I always considered the building of a ships a sequence of key points to be reached or steps to be accomplished. A key point is from my point of view a part of the model, that needs to be completed well, otherwise the entire model can be ruined. The transom decorations are a key point of this model to be made. Are not hydentical as I hoped, but for my sitting room will be good enough... Now many steps will be more easy. I decided that the door of the cabin will be partially open. So I dig an hole in the internal ship frame, then I painted the internal part of black. As it can be seen after positioning the wooden wall, the door access is perfectly "pitch black"... The wooden wall is just posed but not glued, since I will add steps on both sides (to give access to the upper deck) and the door, of course!
-
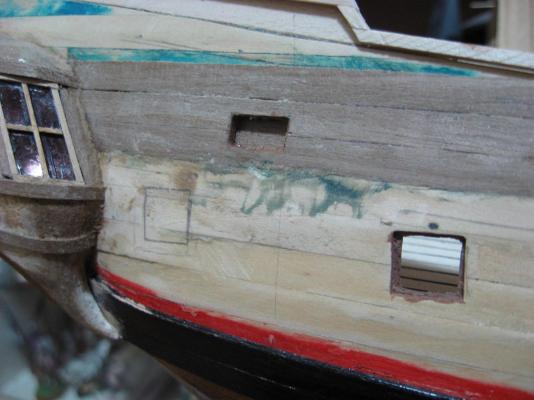
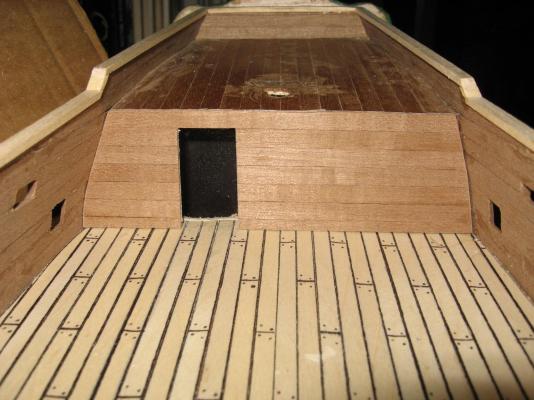
Another update I am proceeding with the transom decorations. this week-end I should finish them. I am not completely satified, but since I will not partecipate to any exposition, it will fit my purposes... In addition, I made the gunners windows in the cabin, as for the original drawings. Since I decided that the last gunport will be closed, so will be that window. So I placed a panel to cover it from inside, which can be one of the possible ways for closing such type of windows.