usedtosail
-
Posts
2,423 -
Joined
-
Last visited


.thumb.jpeg.fc5d633a7b34428fcf19419a73d56d55.jpeg)


-
 usedtosail reacted to a post in a topic:
HMS Surprise 1796 (prototype) by James H - Vanguard Models - 1:64
usedtosail reacted to a post in a topic:
HMS Surprise 1796 (prototype) by James H - Vanguard Models - 1:64
-
usedtosail reacted to a post in a topic:
HMS Beagle by vvvjames - OcCre - 1:60 - Second Build
-
mtbediz reacted to a post in a topic:
USS Constitution by GGibson - Model Shipways - 1:76.8
-
usedtosail reacted to a post in a topic:
USS Constitution by GGibson - Model Shipways - 1:76.8
-
usedtosail reacted to a post in a topic:
USS Constitution by GGibson - Model Shipways - 1:76.8
-
 Nice job Gregg. That is a big step to be out of the way.
 -
usedtosail reacted to a post in a topic:
HMS Beagle by vvvjames - OcCre - 1:60 - Second Build
-
usedtosail reacted to a post in a topic:
Muscongus Bay Lobster Smack by JacquesCousteau - Model Shipways - 1:32 - Rescaled and Modified
-
usedtosail reacted to a post in a topic:
Muscongus Bay Lobster Smack by JacquesCousteau - Model Shipways - 1:32 - Rescaled and Modified
-
usedtosail reacted to a post in a topic:
USS Constitution by Der Alte Rentner - Model Shipways - 1/76
-
usedtosail reacted to a post in a topic:
USS Constitution by g8rfan99 - BlueJacket Shipcrafters - 1/98
-
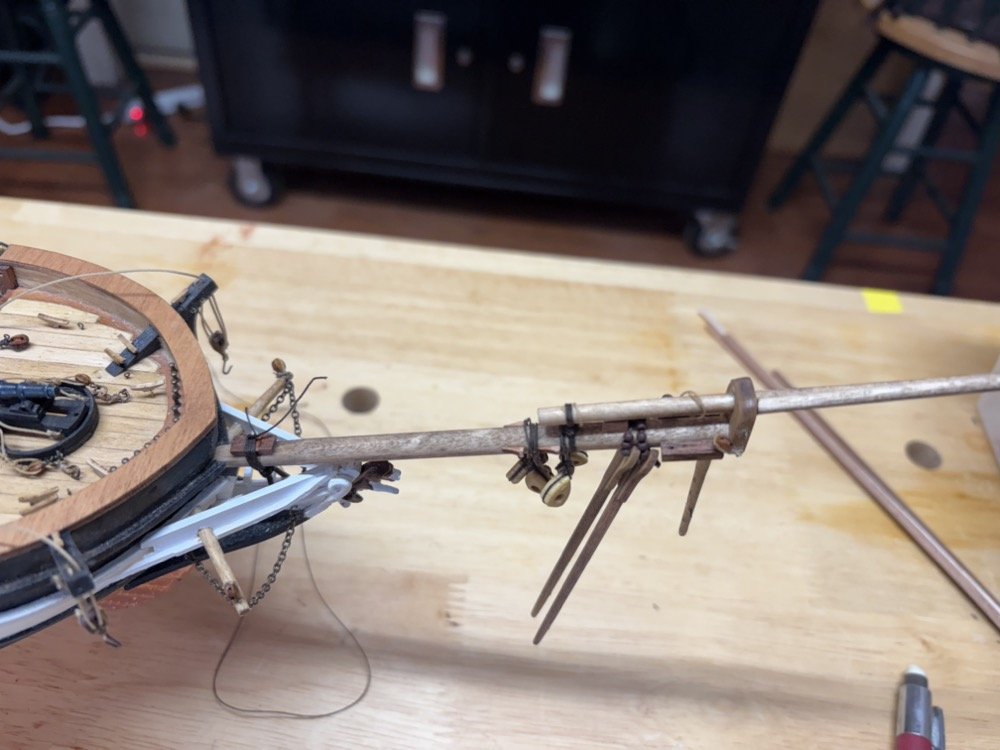
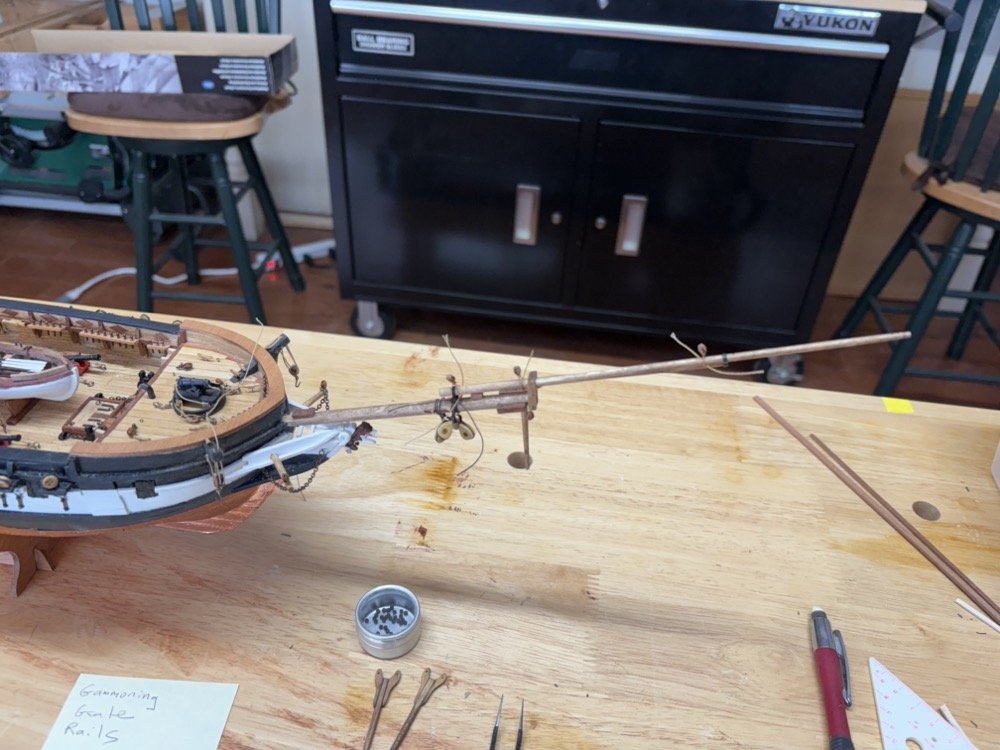
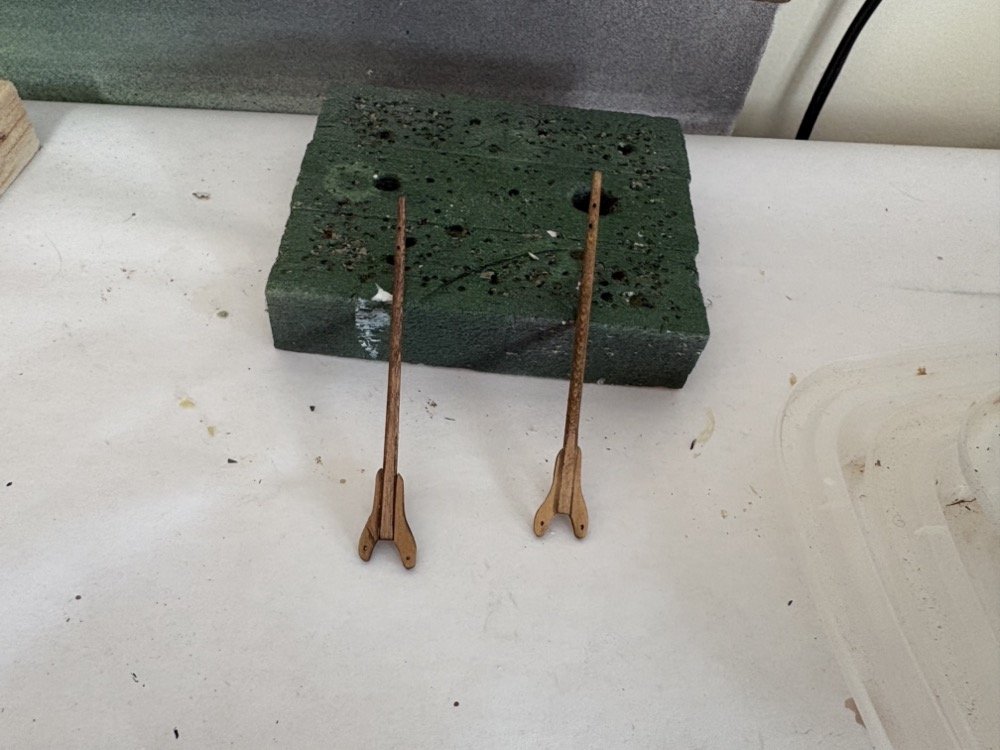
After the gammoning was added to the bow sprit, I was finally able to add the grate and top rails to the head area that I had made months ago. Then it was on to making the lower fore mast and top. I am using the kit supplied dowels for the mast, as I did for the bow sprit. They are very nice, surprisingly. I tapered the mast dowel and squared off the top to fit into the mast cap. I mounted the rotary table from the lathe on a vice and used it to rotate the dowel 90 degrees at a time while I used a large file to square it off. I then made two brackets from brass strip to hold the trysail mast. As I did for the jib boom cap, I made two loops and soldered them together to make a figure 8. I mixed up new batches of Sparex and Brass Black, and used them to blacken the brackets. I stained the mast dowels, marked off the locations of the bands between the brackets and used black paper strips to make the bands. I then slid the brackets on from the top and bottom, and slid the try sail mast into the brackets. I made the mast top using the supplied laser cut pieces, but I added rim pieces and planked between them, as shown in the AOS Beagle book. I also created an oval hole in the front of the top for the chain sling that will hold the fore yard. I also made the trysail gaff and stropped all the blocks I need for the lower fore mast. I have now started repeating this process for the lower main mast.
-
Good luck with that. If it helps I took a picture of the tops up close for you. My top looks like it is about 1/8" thick from the side.

- 1,354 replies
-
- 1
-

-
- constitution
- model shipways
- (and 1 more)
-
Wow Peter that as a while ago. Looking back at my notes I can tell you that I did not wrap any wood around the outside edges of the tops. The side and edge pieces I'm referring to lie flat on the top on the outside edges. The planks go in-between these edge pieces. I did the same on the bottom of the tops. All in all I am sure if I measured the thickness of the tops at the edges it would be thicker than 3/32".
-
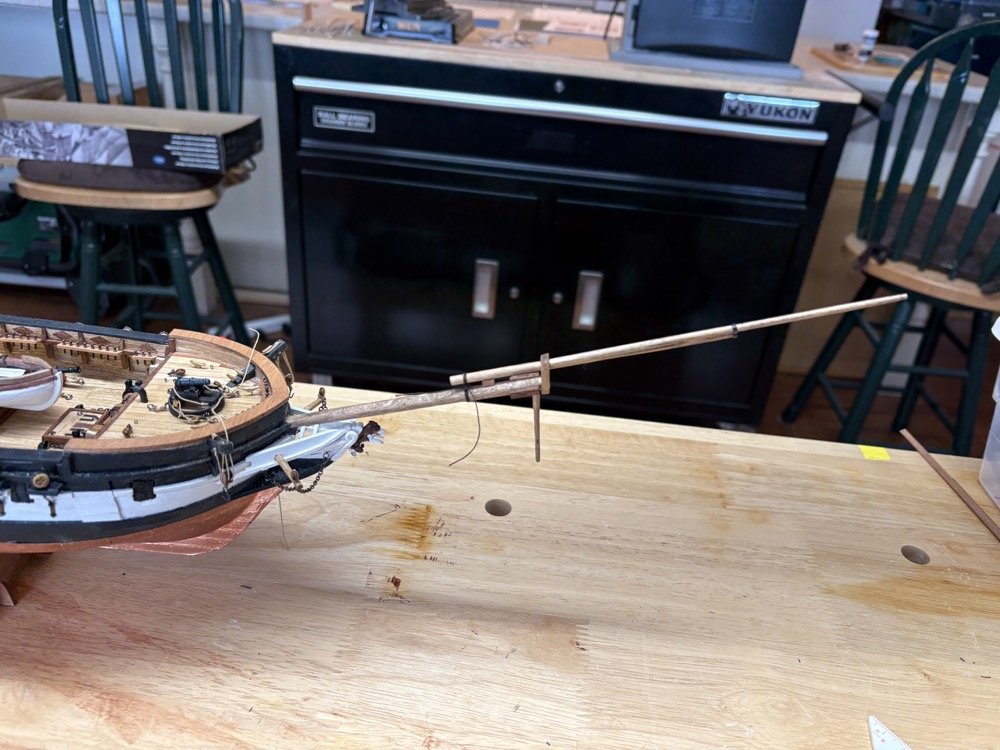
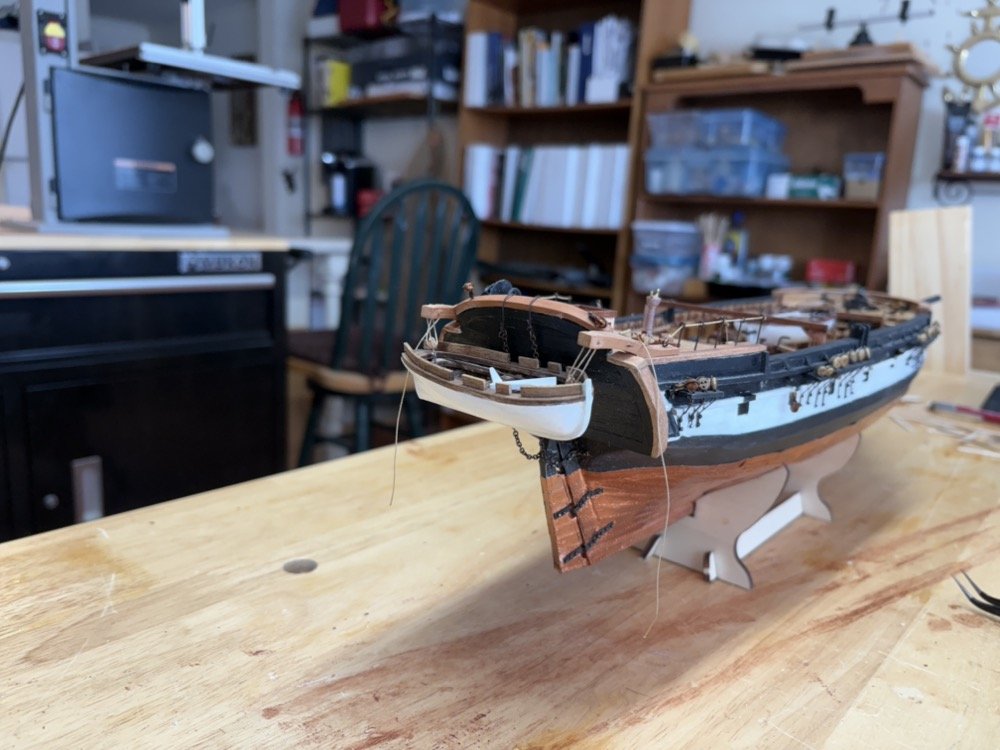
One last image of the bow sprit for now. I've added the spreaders, the open hearts and the gammoning. I can now finish up the head area and start making the fore mast.
-
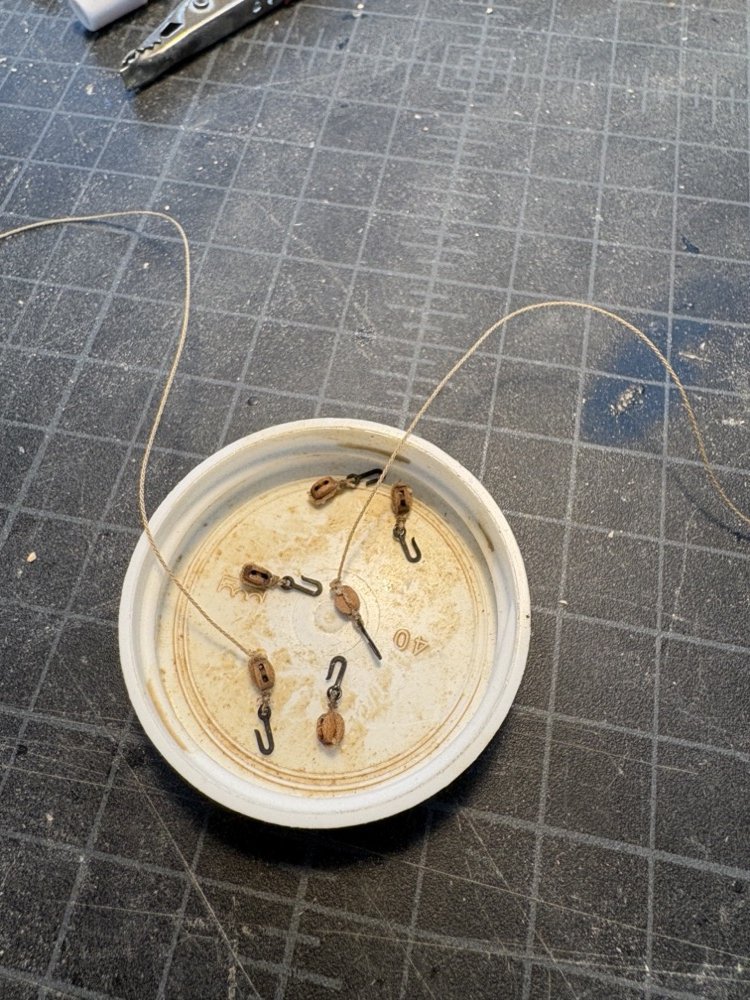
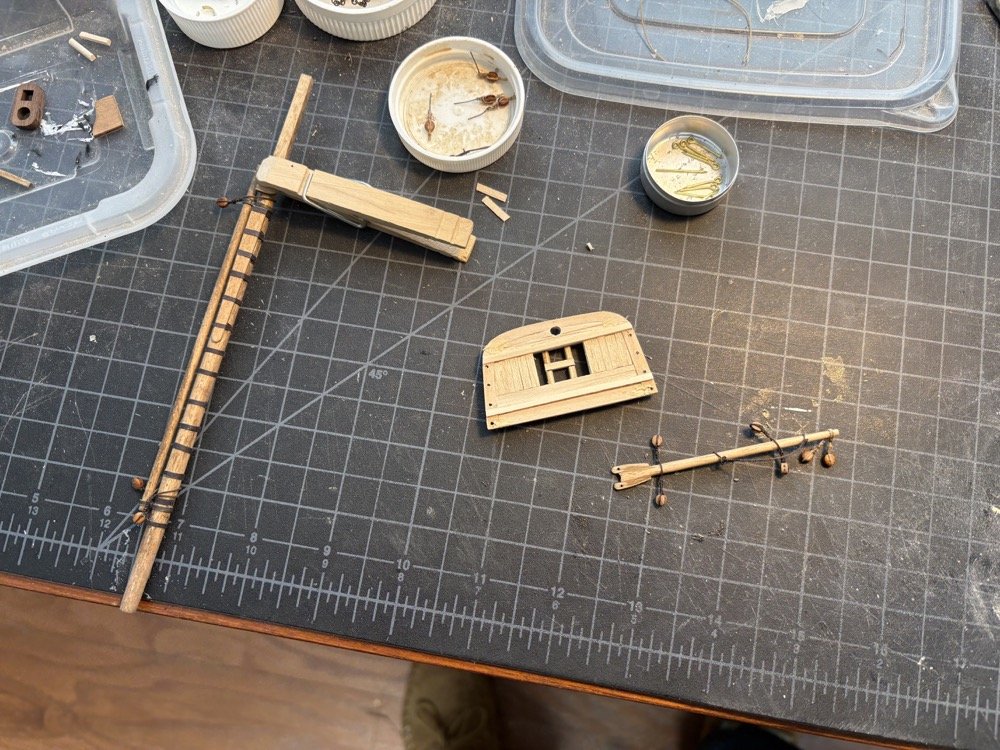
Some photos to go along with the narrative from yesterday. These are the spreaders with the jaws I made. These will be tied to the bow sprit with parrel beads. Here are the closed hearts and deadeyes that go around the bow sprit. BTW, the instructions show deadeyes on the bottom of the bow sprit in the diagram of the bow sprit, but closed hearts on the bottom in the photo on a different page, so I guess you have your choice. The open hearts I made are shown here too but I am still in the process of stropping them. Here the bow sprit sections put together with the bow sprit and jib boom caps. The dolphin striker is pinned to the underside of the bow sprit. I made the saddle that goes between the bow sprit and jib boom, and also notched the back of the jib boom and tied it to the bow sprit. The AOS book shows chain for this, not rope, but I didn't like the look of that. And here the bow sprit as I left it today. I glued the gammoning step back onto the bow sprit since the loops on the open hearts are big enough to fit over it. I added the blocks to the sides of the bow sprit cap and the blocks to the top of the bow sprit assembly. I will have to remove the bow sprit from the hull to add the open hearts, and then I will add the gammoning.
-
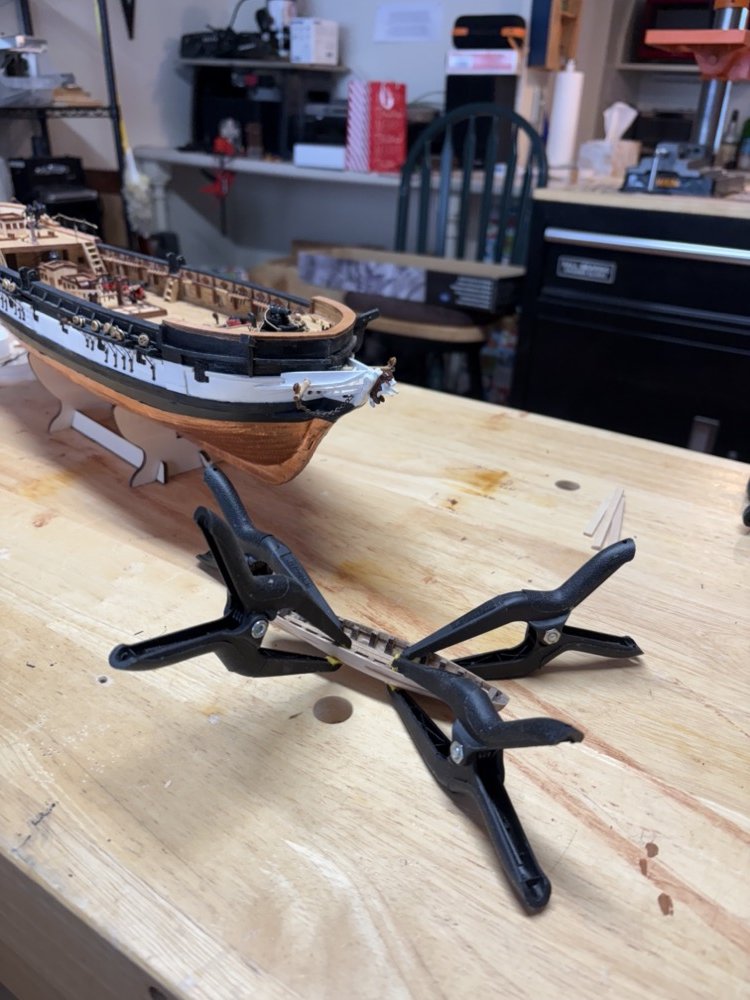
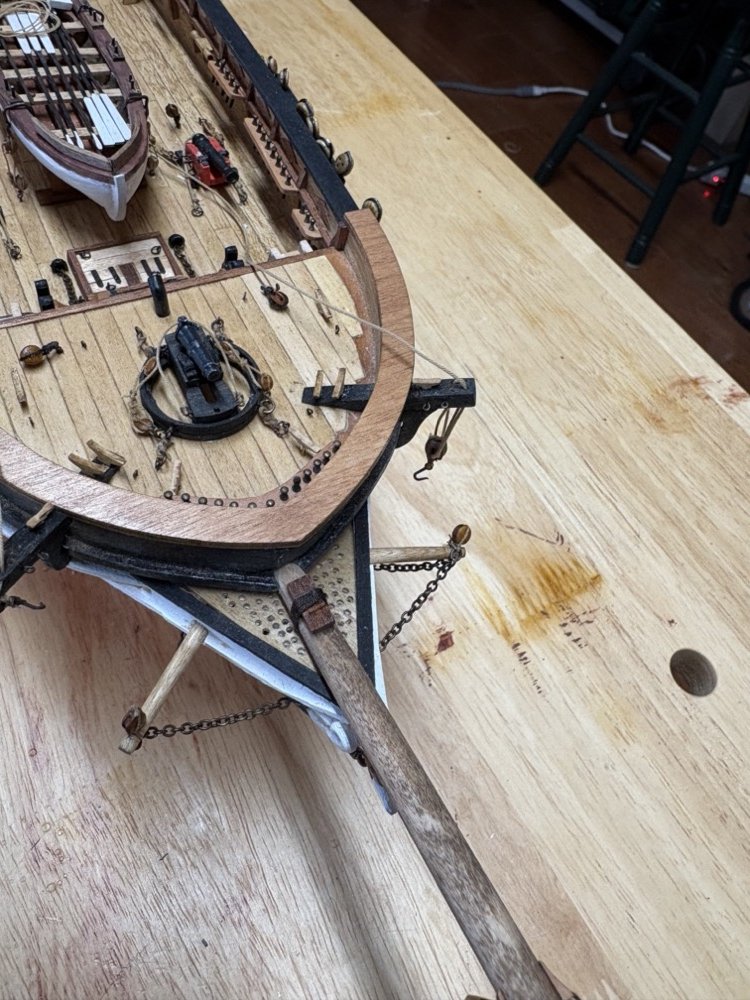
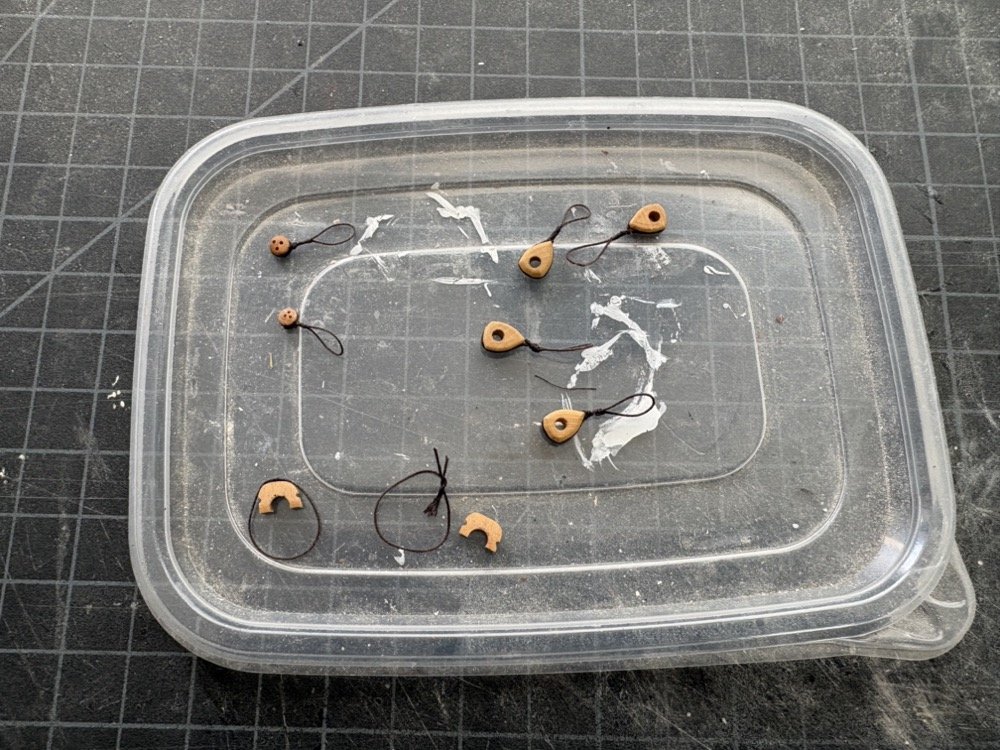
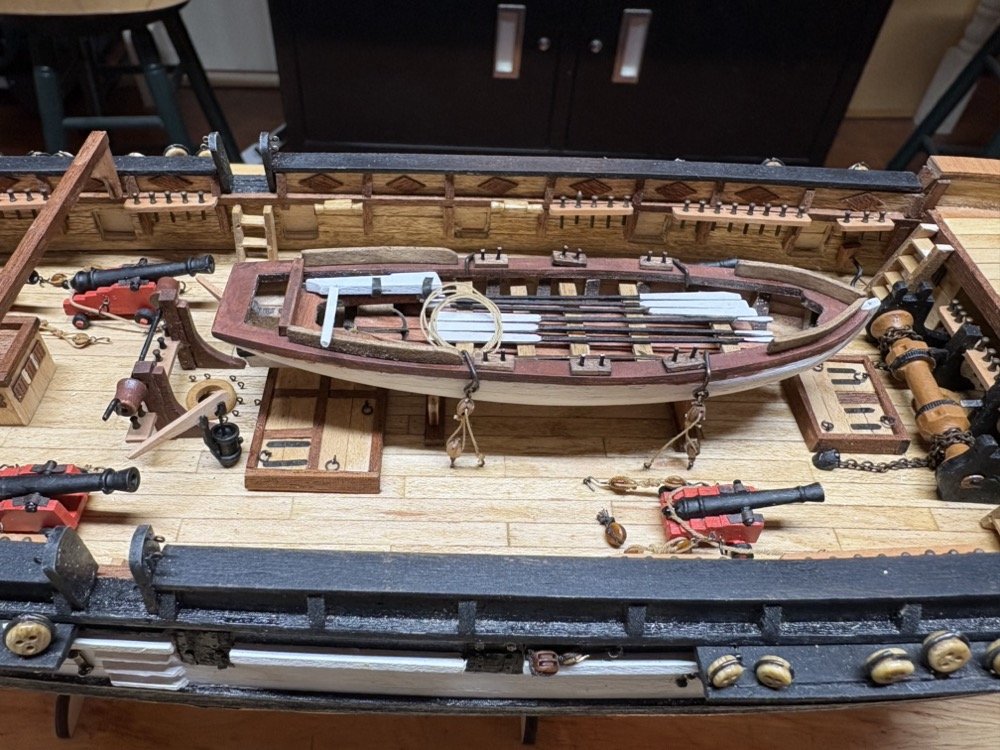
So I have finished with the pictorial instructions, with page M being the final page. This included the attachment of the side davits, whale boats and the anchors. The anchors and whale boats I am holding off until after the rigging, but I did glue the side davits on and added the guy lines and tackles for one of the whale boats. I had also made a new display stand early in the build, which I switched out with the working stand. So now it is onto the masts, spars, and rigging. I started with the bow sprit as the instructions show. I cut out and tapered the dowels for the bow sprit, jib boom and flying jib boom . There is a lot of room for improvement in the supplied fittings and instructions, which I will describe as I go along. The first is the bow sprit cap, which connects the bow sprit and the jib boom. The supplied laser cut cap has holes that go straight through, since it's laser cut. But the bow sprit is at around a 16 degree angle to horizontal. If used as is the cap would be at the 16 degree angle when it should be straight up and down. If you try filing the holes at the angle they get elongated and do not look right. Plus the top and bottom of the cap should be angled the same as the bow sprit. So after a few attempts I was able to make a new cap with angled holes from boxwood. I also made it a little wider than the supplied cap so I could attach the flying jib boom offset from the jib boom instead of directly on top of it, as it should be. The instructions also say to make the jib boom cap, which connects the other end of the jib boom with the flying jib boom, from supplied round brass rod. Instead I used flat brass stock which I worked into two rings that I soldered together and blackened, which looks more authentic. I'll have pictures of these and the rest of the bow sprit pieces in a future post. I have also been working on a procedure for stropping the hearts and deadeyes that go around the bow sprit. Speaking of hearts, the kit supplies all closed hearts, but the hearts on top of the bow sprit should be open hearts. I made two open hearts from boxwood which will be stropped in a loop of line. I want to strop the closed hearts and deadeyes with a loop that fits tightly onto the bow sprit. I came up with this method using the server machine which worked well. I had modified a couple of alligator clips to fit into the gears that normally the line to be served goes through. I use these when I need to serve short lengths of line. But I can also use them to hold other alligator clips as shown here. I start by making a loop of the stropping line by using a needle and poking the line through itself to make a splice. I then put this loop around the heart or deadeye with the splice just at the point of the heart and adjust the size of the loop so the resultant loop is the right size. This took a few trial and errors to get right but once I had the size I could easily repeat it. I then used a needle to thread the serving line through both sides of the loop at the point of the heart. I tie a slip knot in the serving line and pull it tight to close the loop, and fix it with some shellac (which I use to fix all my knots). This is how things look at this point. I then serve the line over the loop for about 10 turns which catches the two loose ends of the loop. I finally use a needle to push the serving line back through both sides of the loop and tie it off, then fix the whole serving with more shellac. At this point I can take it off the serving machine and let it dry. You will see the finished products on the bow sprit soon. One thing with this method is that I had to leave the gammoning seat off the bow sprit for now so I can slide these loops onto the bow sprit. Alternately I could have left the bees off the front of the bow sprit. Another improvement I made are the spreaders. The instructions show eyebolts in the inner ends of these that are somehow attached to other eye bolts in the side of the bow sprit. I guess you are supposed to link the two together, but that is never shown anywhere. But the spreaders shown in the AOS Beagle book have jaws that are tied around the bow sprit with parrels. So I made jaws from boxwood and glued them to the sides of the spreaders. I have given all the wood bow sprit pieces a coat of walnut stain so I can start assembling as soon as they dry.


-
Thanks Paul. I have made hammock cranes like the ones in the picture but I am waiting until the rigging is done to install them.
-
Thanks Peter. I am tying off the cat head line to a cleat on top of the cat head. You can see the cleat on the port side cat head in post #78.
-
Thank you Gregg. The white metal parts were primed with BIN primer than painted with Testors Flat Black enamel.
-
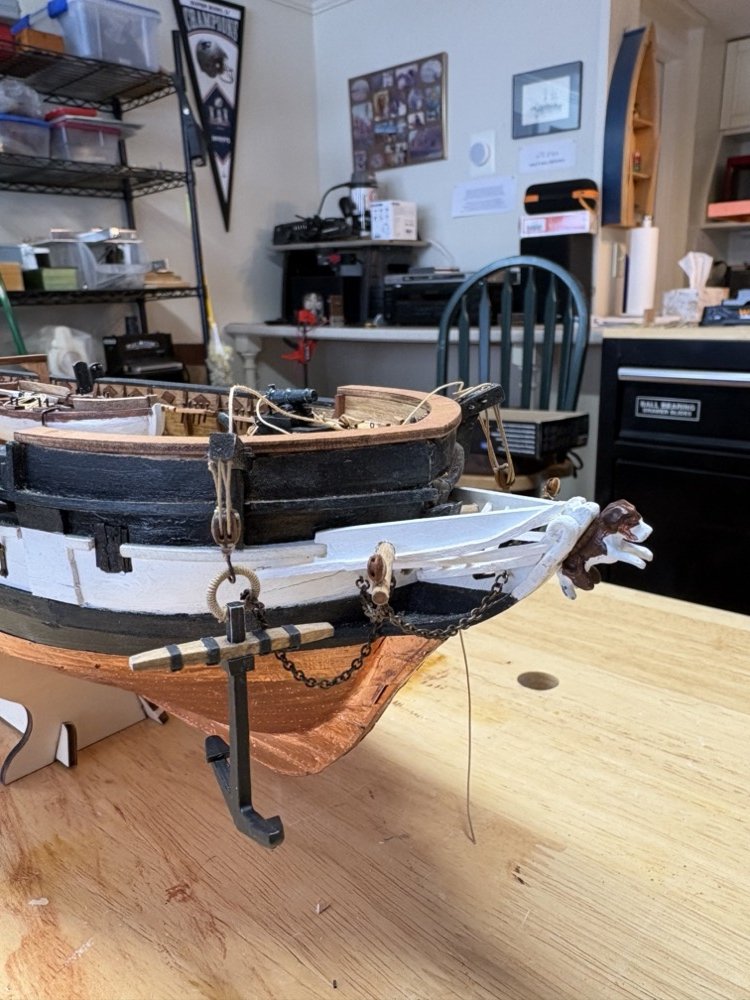
Here is how the bower anchors will look when I eventually install them. Just dry fit for now. I will wait until at least the bowsprit is installed or maybe when the rigging is completed.
-
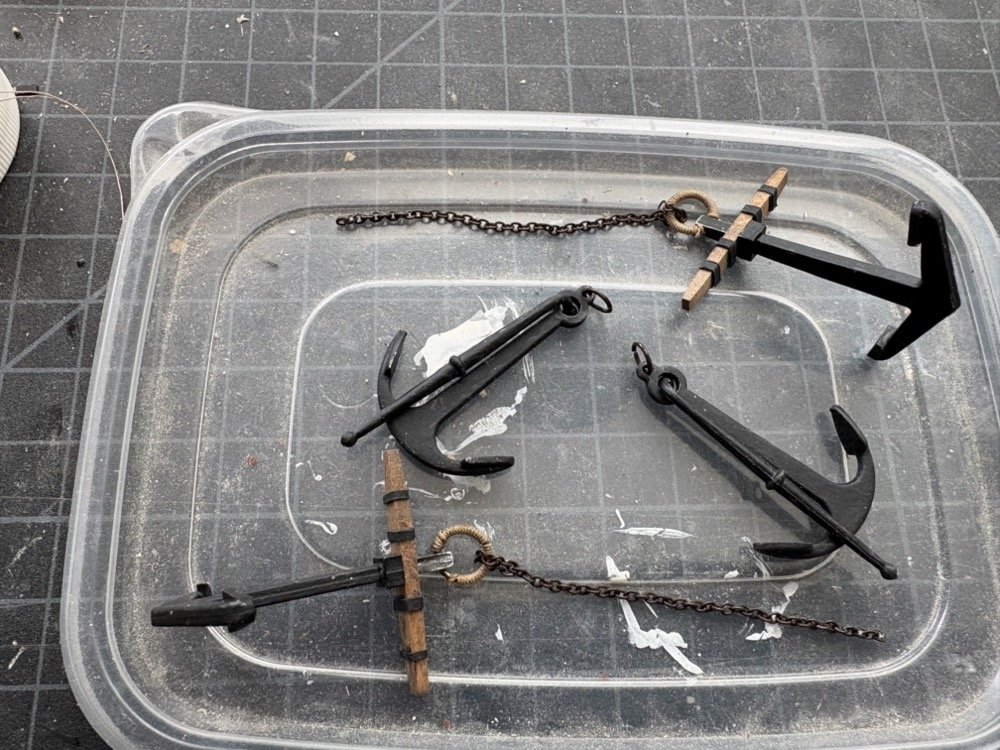
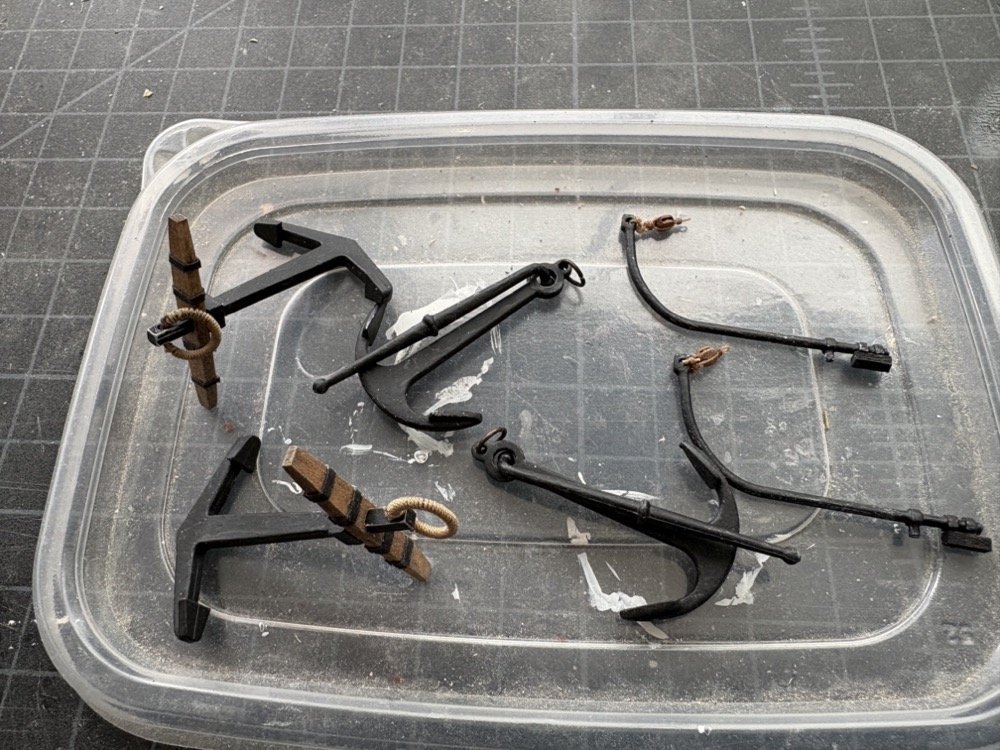
Thank you Peter. It has been very cold here for the last month or so, so I have had a lot of time in the shop. Some progress on the anchors and davits. I replaced the supplied white metal stocks on the bower anchors with wood stocks. I also added puddings to the rings. The stream anchors will be displayed as shown but chained to the fore channels after the rigging is done. I have managed to strop single blocks with beckets on each end, which are tied to the side davits. I also added a small block of wood to the bottoms of the side davits so I have more gluing surface to hold them to the hull. The two bower anchors will be displayed hanging from the cat heads. I have attached lengths of chain to each ring by wrapping the chains through the rings and using a small ring to hold the end of the chain to itself. I dipped the other ends into CA to stiffen them so that I can push them into the hawse holes from the outside and glue them in. That will also wait until at least after the bowsprit is installed. I have also started making the bowsprit but that's a tale for another day.
-
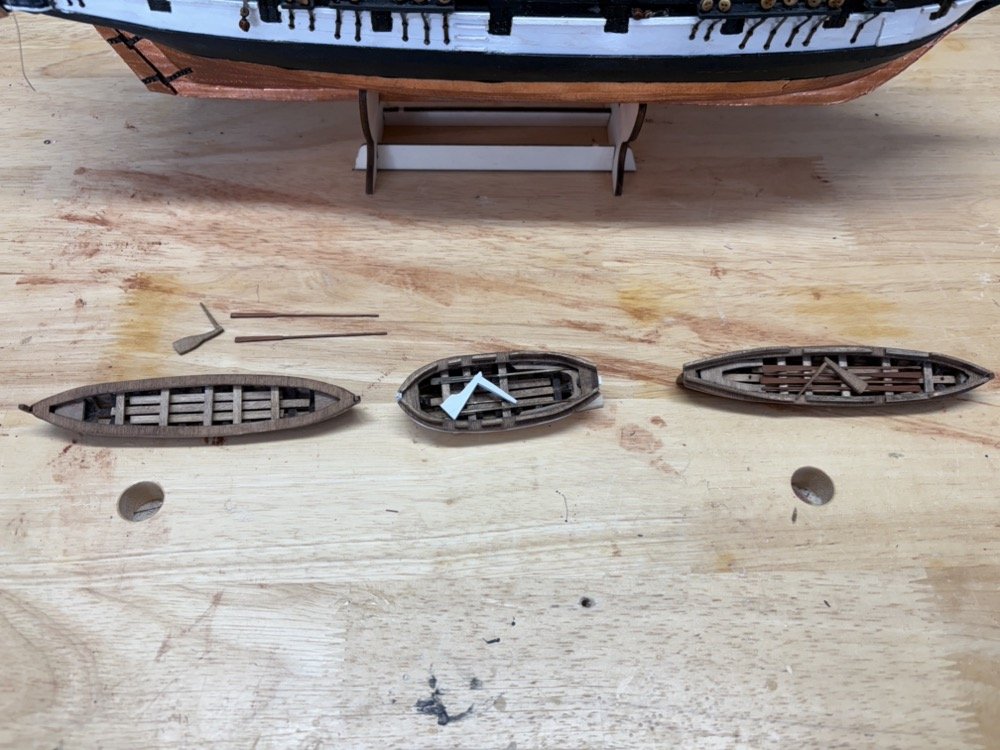
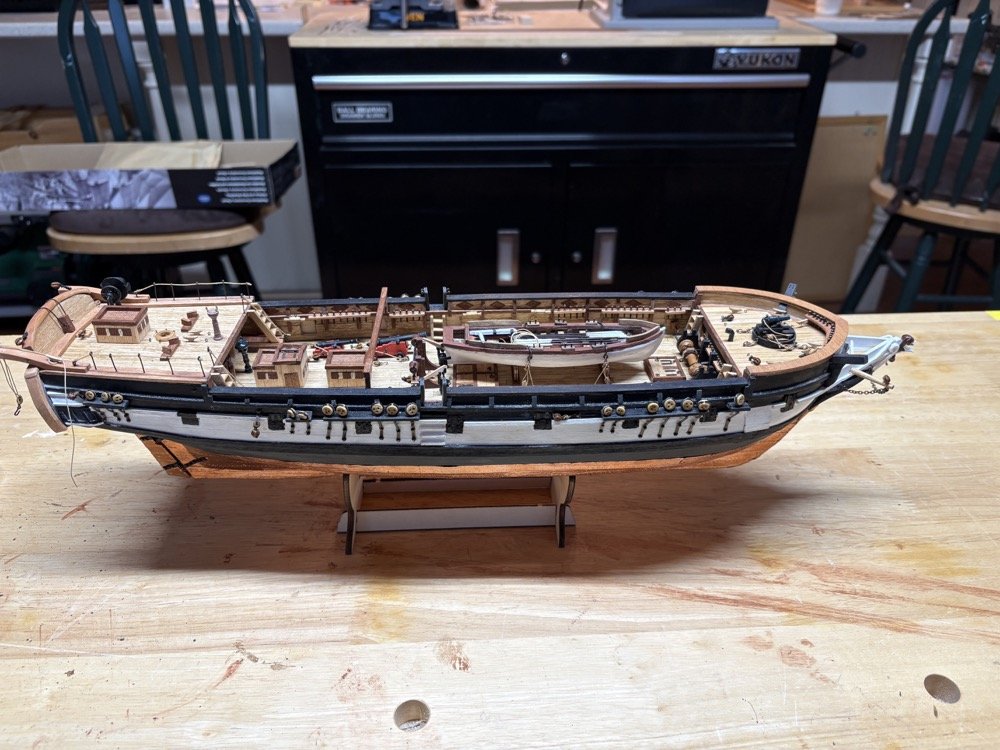
Thank you James. Yes I am getting close to making the masts. A few minor things to finish up first. I have completed the other three boats and have added the dinghy to the aft davits. I have placed the rudder and oars into the dinghy and long boat, which will be suspended from the starboard side davits after the rigging is completed. The whale boat will be placed upside down on the aft deck and boat beam, like this be tied to the beam. Again I will wait until the rigging is done to add it. The instructions for this kit show all the small boats with the rudders installed on the stern, but I have always shown them with the rudders detached and in the boats when stored right side up, which is what I have done here. I do have the rudder and oars for the whale boat but if since it will be upside down I will leave them off. This completes page L of the instructions. Only one page left before mast making, which includes installing the side davits, making and installing the anchors, and making the display stand. I plan to install the side davits, but will make the anchors but wait until after rigging to install them. I have already made the display stand.

-
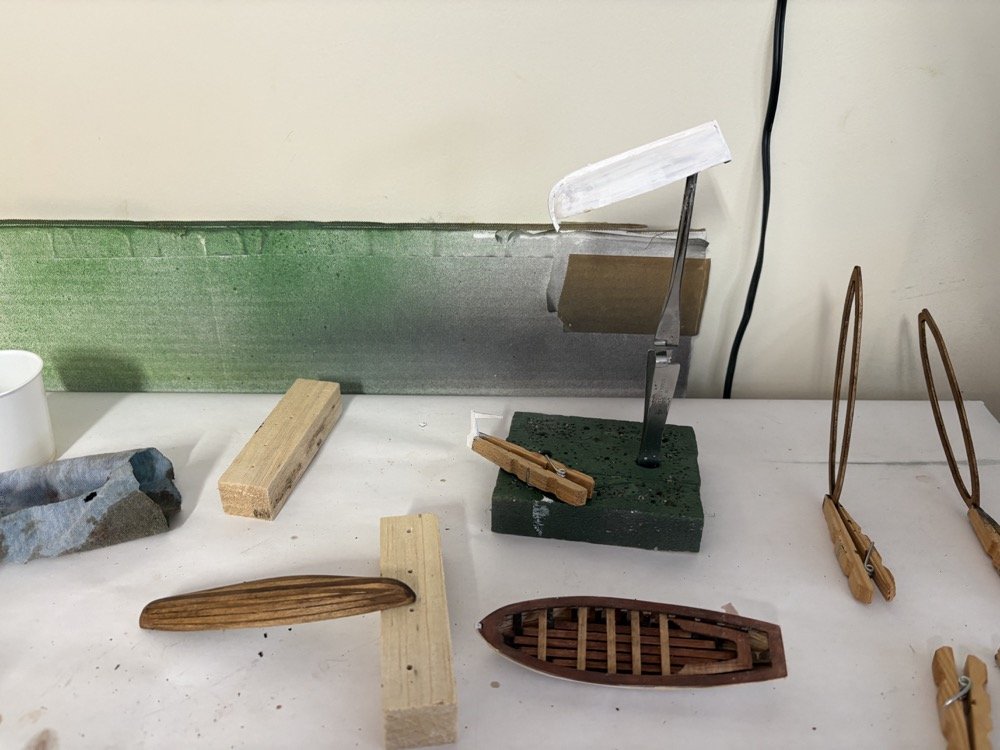
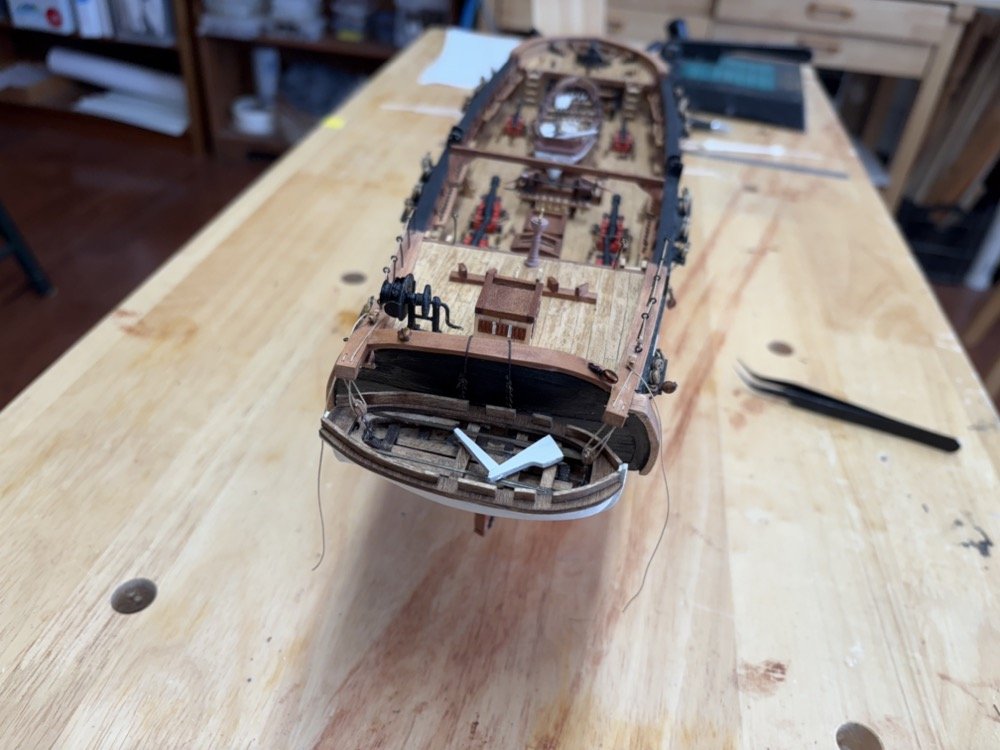
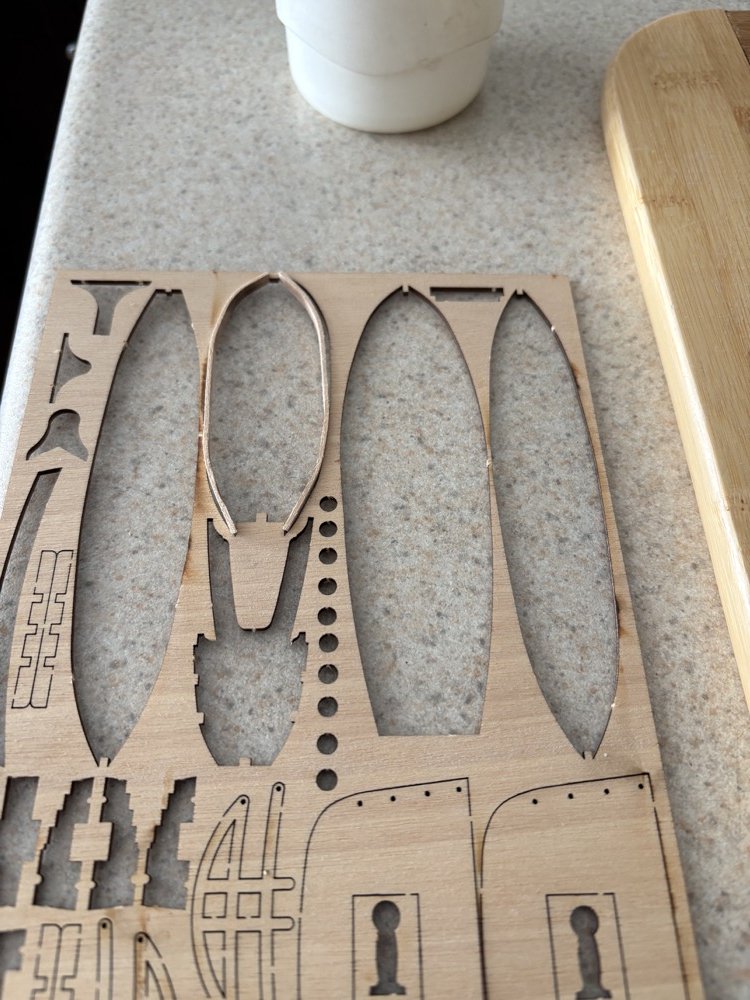
I have finished the cutter and installed it onto the deck. I added some oars, a boat hook and an anchor that I had left over from a previous Vanguard build. I also added the boat beam, which I am thinking I will use to hold one of the whale boats instead of having them on both side davits. I will wait to add them after the rigging so they won't be in the way. This completes page K of the instructions. The other three small boats are almost done. I have to add the splash guards to the dinghy, and used the laser cut out of the rail to bend them to shape. I'll cut the various pieces out of these bent strips to glue to the rail after I stain them. Here is an overall shot of the ship up to this point. Next up are the anchors and side davits. I am going to use the supplied white metal pieces, except for the two anchor stocks that are supposed to be made from wood. I will make these from some basswood strips with black paper bands. Happy New Year!

-
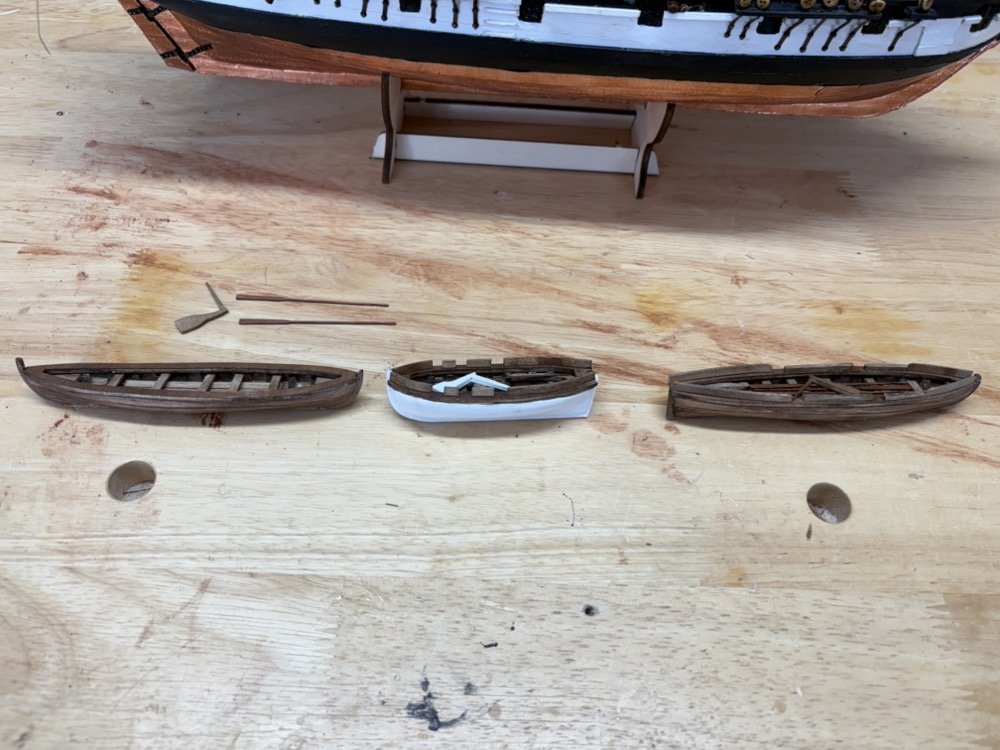
It has been too long since the last log entry so here is one that shows the state of the work since then. I am still working on all four small boats, with all of them planked and in various states of finishing. The cutter is furthest along with the interior finished and the rail added. Gluing these rails down onto the small hulls is somewhat problematic since there is a distinct curve in the top hull planks. I used medium CA and clamped using slide clamps and strips of wood, but still ended up with some gaps under the rail. I filled these with wood filler and am now in the process of sanding that off and touching up the paint on the hull and stain on the rail. The dinghy interior is finished and I have started painting the outside of the hull and the rudder white, just like the cutter. The other two boats are long and skinny. For these I am staining both the interior and exterior using walnut stain. Here is the whale boat with a coat of stain, which I really like how it came out. The floor boards are being glued down into the long boat and the figurehead is now attached to the stem. I used medium CA with a quick spray of accelerator to hold it in place, which worked very well. I also stropped some blocks with hooks to hold the three smaller boats to the aft and side davits. The two blocks with beckets and attached lines are for the dinghy on the aft davits. The other blocks without beckets will be used as lower blocks on the side davits. There will be blocks with beckets attached to the side davits for the top tackle blocks. These blocks are from Model Expo, which they call Beautiful Blocks. They are not quite as nice as the blocks from Syren, which I will also be using on this model, but these are 3.5mm which falls between the 3 and 4 mm blocks from Syren, giving me more size choices. Also, these were available when I needed them as the Syren blocks were sold out. The hooks are PE, left over from one of the Vanguard models. They are too big for the cannon rigging, so I made my own for those, but these seem really good to me to hold the boats. Once I have all the boats completed I'll post a picture of them all.