The Gimps Chimp
-
Posts
161 -
Joined
-
Last visited
1 Follower

Recent Profile Visitors
1,920 profile views


-
 The Gimps Chimp reacted to a post in a topic:
Mary Rose by Baker - scale 1/50 - "Your Noblest Shippe"
The Gimps Chimp reacted to a post in a topic:
Mary Rose by Baker - scale 1/50 - "Your Noblest Shippe"
-
The Gimps Chimp reacted to a post in a topic:
Revenge 1577 by Loracs - Amati - 1:64
-
The Gimps Chimp reacted to a post in a topic:
HMS Beagle by usedtosail - OcCre - 1:60
-
The Gimps Chimp reacted to a post in a topic:
HMS Beagle by usedtosail - OcCre - 1:60
-
The Gimps Chimp reacted to a post in a topic:
HMS Beagle by usedtosail - OcCre - 1:60
-
The Gimps Chimp reacted to a post in a topic:
HMS Granado by HardeeHarHar - Caldercraft - 1:64 - Bomb Vessel
-
The Gimps Chimp reacted to a post in a topic:
HMS Beagle by LucienL - OcCre - 1:60
-
The Gimps Chimp reacted to a post in a topic:
Endurance by Tomculb - OcCre - 1:70
-
The Gimps Chimp reacted to a post in a topic:
Endurance by Tomculb - OcCre - 1:70
-
The Gimps Chimp reacted to a post in a topic:
HMS Beagle by usedtosail - OcCre - 1:60
-
catopower reacted to a post in a topic:
HMS Beagle by The Gimps Chimp - FINISHED - OcCre - 1:60
-
catopower reacted to a post in a topic:
HMS Beagle by The Gimps Chimp - FINISHED - OcCre - 1:60
-
catopower reacted to a post in a topic:
HMS Beagle by The Gimps Chimp - FINISHED - OcCre - 1:60
-
catopower reacted to a post in a topic:
HMS Beagle by The Gimps Chimp - FINISHED - OcCre - 1:60
-
catopower reacted to a post in a topic:
HMS Beagle by The Gimps Chimp - FINISHED - OcCre - 1:60
-
catopower reacted to a post in a topic:
HMS Beagle by The Gimps Chimp - FINISHED - OcCre - 1:60
-
GrandpaPhil reacted to a post in a topic:
HMS Beagle by Capella - OcCre - 2nd build
-
 Hi Tom, Your ship is looking great, you're doing a fantastic job! Regarding the fuzzy thread which Occre supply with their kits, I think it's appalling and I refused to use it when building my Beagle. I was so disappointed with the supplied thread, I raised a question on the forum to which I had quite a few suggestions on how to resolve the issue: Unfortunately, I didn't find any of the suggestions really solved the problem to a quality to which I was happy with. As I explain in the link above, my solution was to 3D print a cheap ropewalk. This really solved the problem and provided me with the ability to make as much really high quality rope as I wanted at minimal cost. It's also a lot of fun to make the rope and I find it very therapeutic. So much so that I'm now looking into making a computer controlled ropewalk just for the fun of it. I know the thought of making a ropewalk will instantly put many people off but it really isn't that difficult at all, and the benefits are huge. Why spend hundreds of hours working on a model, making it as beautiful as you have, only to detract from the model by using the kit supplied thread? It's a no-brainer in my mind. Hope you find a good solution to the issue which suits you. Keep up the good work! Chimp
 -
Keith Black reacted to a post in a topic:
HMS Beagle by brunnels - OcCre - 1:60 - first build
-
 brunnels reacted to a post in a topic:
HMS Beagle by brunnels - OcCre - 1:60 - first build
brunnels reacted to a post in a topic:
HMS Beagle by brunnels - OcCre - 1:60 - first build
-
Congratulations on such a beautiful build!! I too have been a little shocked on the cost of display cases and are considering to build my own. I've just started following your next build. Looking forward to following your progress. Chimp
-
Looks like you could do with more filler. Be careful you don't sand too much and break through the wood. Chimp
-
I would say that's looking good! When it comes to sanding just be careful and don't be too aggressive. Chimp
-
I think the one I would try and follow is this one: http://modelshipworldforum.com/resources/Framing_and_Planking/plankingprojectbeginners.pdf To be honest, if you mess up the first planking it's not too much of an issue, as long as you can fill and sand to a smooth finish. However, it would make sense to try and master the skill if you can. The second planking in this kit is very thin and forgiving so as long as you can cut it to shape, it will fit and look okay. Again it would be better to try and master the skill but I think with this kit you can't go far wrong. Chimp.
-
How about mixing a new colour from those you have? When I did mine I went with a dark blue/green. I think I should have gone a little lighter though. Chimp
-
Build is looking good. Looking forward to following your progress Chimp
-
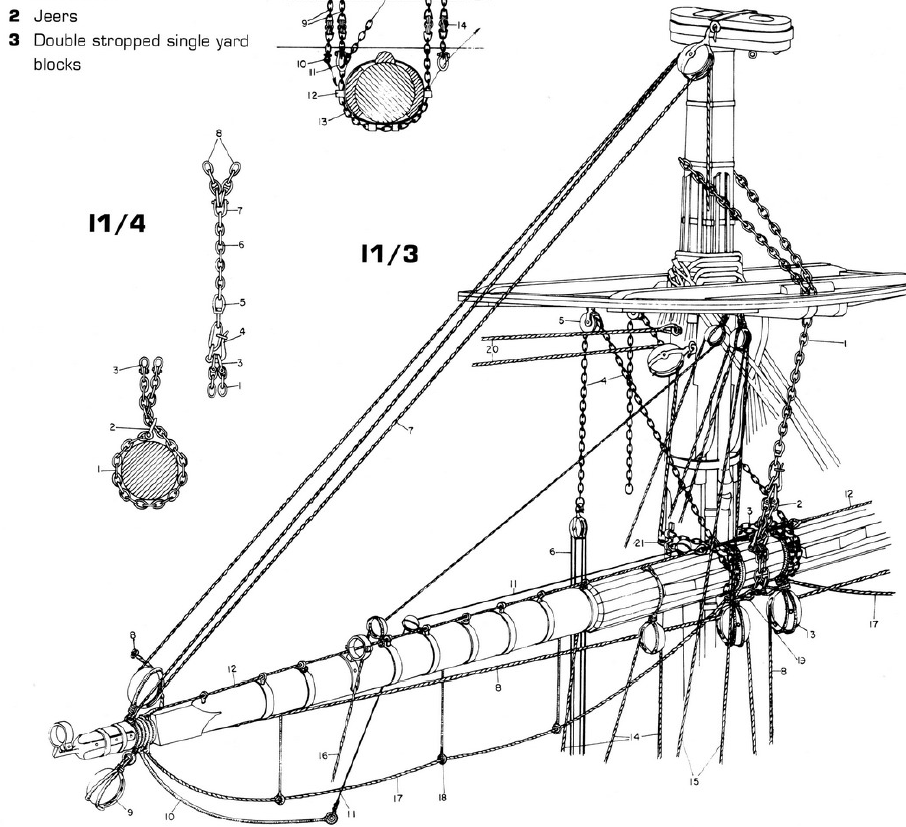
Hi Stauf, This is a difficult one to answer as everyone will have a different opinion. All models will differ from the actual ship they portray to some degree. Looking at the model from a distance I would say it's a reasonable representation of the real ship. The closer you get and the more detail you study it becomes clear there are inaccuracies. Some of these will be down to cost and some will be down to practicalities of modelling. One of the first items you come across in the build are the brass etched doors, which look okay but some people choose to make them more accurately from wood. The deck parts again are generally okay but maybe don't have the precision of detail. As already mentioned, the rigging of the cannons is massively oversimplified. Again these issues can be rectified during the build if you wish. I think the most inaccurate area are the masts and rigging which have again been over simplified. To be honest I can see why that is. Looking at the AOTS the rigging is very complex and I for one wouldn't have been able to finish the build if it was accurately modelled. In the AOTS there are many chains used whereas in the kit rope is used for everything. Here is a good example from my build: I'm not sure giving the accuracy of the model a percentage is meaningful but if pushed I would give it 90% to 95%. You also need to think about the marketing aspects of the supplier. I would say these kits are not at the high end of quality and are intended mainly for people to make and have an impressive model to display. If you want high accuracy you can spend the time and improve the 'Out of the box' product, or maybe even scratch build. I for one, used the kit as a learning experience and was happy that many aspects had been simplified, otherwise I would never have finished it. Having completed my build I was motivated to improve the quality of my workmanship on my next build. Had it been unfinished I wouldn't have considered tackling another ship. Chimp
-
Hi JFMJr, Not sure I fully understand your question when you say the brass wire is a poor fit. I presume you are referring to the 1.5mm brass pin (H5) which acts as a hinge pin for the rudder to rotate. When I fitted mine I crimped the metal band a little so the wire was a close fit. I also added a drop of CA to ensure it remained in place and didn't drop out. I'm struggling to see why/how it could be a poor fit. I guess you could make these pins from wood but I think that would be much harder and I can't see why or how they would be a better fit. If you are referring to fixing the metal band to the rudder then this is done using the metal pins (A). Chimp
-
Good to see you decided to start a build log. Looking at what you've done so far you shouldn't have too many problems with completing this build. I'm sure you'll get plenty of advice and support from everyone here. Regarding the nails, I don't think you'll need them from here. Looking forward to the rest of the build Chimp
-
Hi Sparkov, looking forward to seeing your progress Chimp
- 11 replies
-
- 2
-
-
- victory
- billing boats
- (and 1 more)
-
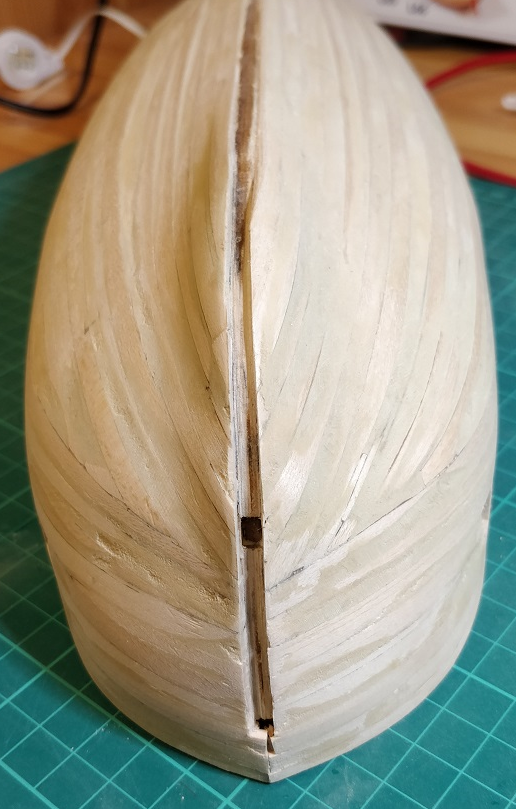
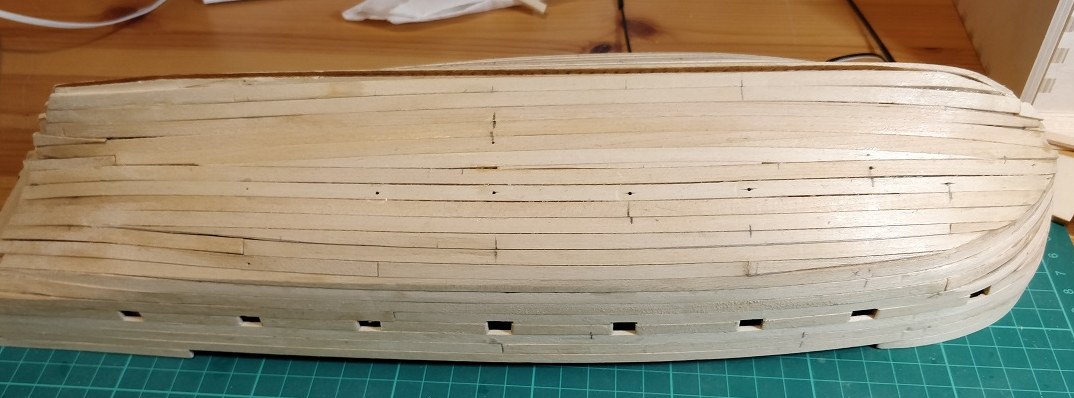
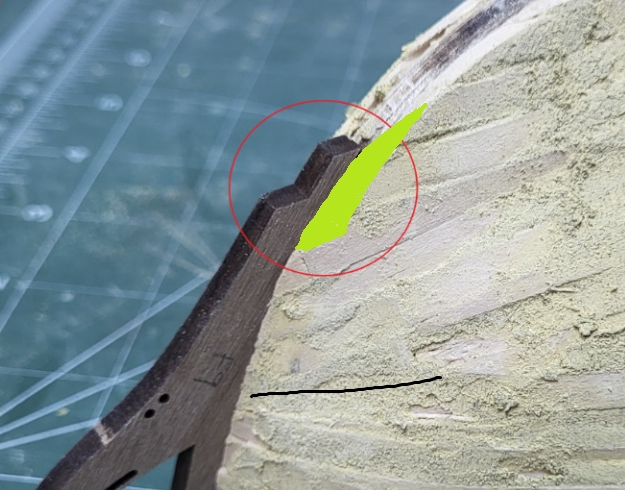
Hi Capella, Looking back at my build it looks like the keel was recessed at the bow but was then level (or even slightly proud) along the bottom. See photos: To be honest, I don't think it really matters as long as the keel is firmly attached to the false keel and the second planking is fitted up to it. The important issue is that the hull is smooth along it's length. So where I said about extending the first planking or using filler where it steps (where you circled), this needs to be smooth. You could build up the shorter planks with wood or filler, just a single piece of scrap wood is required: Or you could smooth down the longer planks to match the shorter ones. It doesn't really matter which way you choose Remember, the first planking is just a base for the second planking. It doesn't need to look nice but it's shape and profile is important. Chimp
-
Hi Capella, when I fitted my keel I can remember it was recessed into the planking at the bow. Looking at where you've circled the photo above you may need to extend the first planking a little (or use filler). Chimp
-
Have started the HMS Beagle a couple weeks ago. I ran across your build log. Will be very helpful!
- Show previous comments 2 more
-
-

Thanks for the wood sealer info. I will attempt to set up the build log.. Can use all the advice I can get! Really appreciate your help...Are you going to put sails on yours? I notice some do and some don't.
Again, Thanks
-
-
Hi Capella, It's great to see you back working on the Beagle. Your photos in your last post look very similar to my build. At this point I was worried that it didn't look very good and was concerned as to how well the second planking would sit and how it would look. As it turned out I had nothing to worry about, once it's filled and sanded it's all good. Just be careful when sanding you don't go too far and sand through to the inside . Patrick B has some useful advice above and I too had the intention of doing the second planking 'properly' However, I ended up not following any advice and just did my own thing and it ended up looking okay. This is a link to that stage in my build log: Have a look at posts #55 and #61 My intension is that on my next build (HMS Granado) I'll do the second planking 'properly' and follow the technique detailed in this document: plankingprojectbeginners.pdf Looking forward to seeing your build progress Chimp