


Moonbug
-
Posts
948 -
Joined
-
Last visited
Content Type
Profiles
Forums
Gallery
Events
Posts posted by Moonbug
-
-
While continuing both the process of planking the hull, as well as working with the foredeck I will take this opportunity to post a little history of the voyage based on Columbus' ship log. Most of this information is general knowledge of course, but worth repeating in this context.
Out of the three ships in Columbus' employ, the La Santa María de la Inmaculada Concepción (The Saint Mary of the Immaculate Conception) was by far his least favorite. Both the Pinta and Nina were Caravels, light and fast. While on the other hand, the Santa Maria was a Nao, more suited to hauling cargo and was short, fat, and slow. The Santa Maria was acquired (some say last minute) from Juan de la Cosa and only used as Columbus' flagship because it was by far the largest of the three vessels. She had a crew of about 50 men, as opposed to the approximately 18 crewmembers aboard the Pinta and Nina.
From The Ships of Christopher Columbus by Xavier Pastor
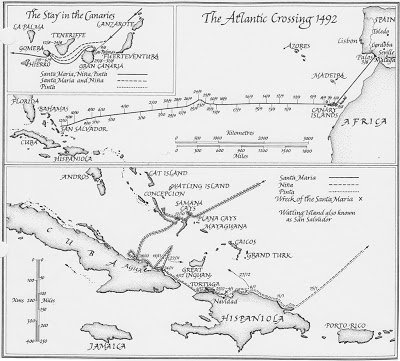
Christopher Columbus and his trio of ships sailed from the port of Palos, Huelva in Southern Spain on August 2nd following the coast of Spain then headed out to sea on August 3rd. The voyage got off to an auspicious start when the Pinta was damaged and sought repairs to her rudder at the Canary Islands. After a brief separation, the three vessels continued away from the Canaries across the Atlantic Ocean.
Although Columbus was the first European navigator to cross this region of the Atlantic, his perception of where he was, and where he actually was began to deviate in September of 1492. After travelling about 2400 miles (at an average of 4 knots), Columbus was under the impression he was in the waters of Cipango, what is now known as Japan.
The miscalculations where believed to have occurred in part due to both the difficult conditions and slow headway, as well as magnetic deviations in the ships needle. In any event, the fleet saw little progress travelling into adverse trade winds which wore on the morale of the crew.
According to Columbus' logs, on Saturday, September 20th 1492 the crew members saw a sea bird which rarely flies very far from a coast. Eleven days later, four more birds were seen together, and in another two days a flock of more than 40 birds was spotted. Amid growing fears by the crew spurred from the fact that they'd seen birds but no land, the crew began regularly seeing both birds and vegetation on October 11th. After seeing a light in the darkness Columbus wrote in his log "It was like a little candle which rose and fell," which is the first acknowledged sighting and description of the New World. Then, on October 12th, at 2:00 am, a crewmember named Juan Rodriguez Bermejo spotted land. That land was the coast of San Salvador, at the time called Guanahani by its inhabitants.
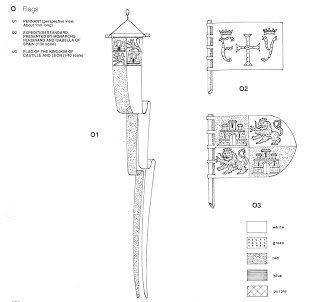
The flags of Christopher Columbus' fleet taken from The Ships of Christopher Columbus by Xavier Pastor
On October 14th, 1492, Columbus and the Captains of the Nina and Pinta (two brothers named Martin and Vincente Pinzon) landed on the beach carrying the expedition's green cross flag and took possession of the land in the name of the King and Queen of Spain.
After a number of short voyages between the islands and becoming separated from the Pinta, the Nina and Santa Maria crossed the Windward Passage to Hispaniolia. When the local Indians informed Columbus that there was gold in Tortuga and Cibao island, he headed that way thinking he had found his promise land. However at midnight, the night December 24th and morning of December 25th, 1492, while coasting in calm waters, the helm of the Santa Maria was taken by a young ship's boy who ran her aground on the coral reefs of the islands splitting the hull.
Notes taken from Columbus' log book and Written by Ferdinand Colon (Columbus' son):
"It pleased Our Lord that at midnight, while I lay in bed, with the ship in a dead calm and the sea as peaceful as the water in a cup, all went to sleep, leaving the tiller in charge of a boy. So it happened that the swells drove the ship very slowly onto one of those reefs, on which the waves broke with such a noise that they could be heard a long league away. Then the boy, feeling the rudder ground and hearing the noise, cried out; hearing him, I immediately arose, for I recognized before anyone else that we had run aground."
Rather than attempt to repair the ship, Columbus scuttled her and used the lumber and wreckage to create the for "Navidad" where he left a garrison of 39 men, gus, and supplies. He also left articles to barter and trade before he boarded the Nina to continue exploring.
After exploring for another two weeks, the Nina and the Pinta began their trip back to Spain in January of 1493.
- Salty Sea Dog, egkb and avsjerome2003
-
 3
3
-
I'm continuing work on the foredeck as I simultaneously planking the hull.
I got my hands on a book by Xavier Pastor called The Ships of Christopher Columbus. The book is part of a series called "Anatomy of a Ship".
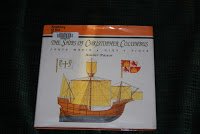
Pastor's book gives what I believe is the most comprehensive detail on the Santa Maria that is available and is full of valuable information as well as scaled images. Pastor's information is well researched, based on the actual notes of not only Chrisopher Columbus, but also his son.
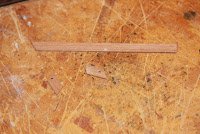
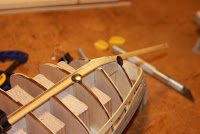
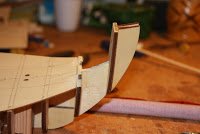
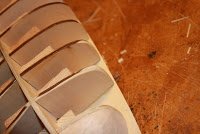
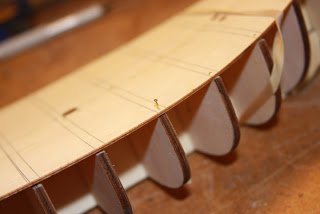
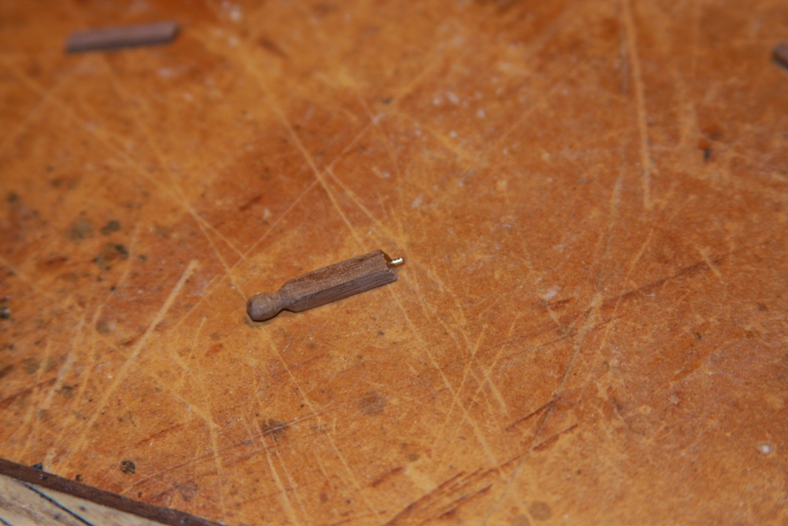
Anyway, back to the foredeck. I've been working on the stanchions and the railings for the foredeck. Each are made of walnut and are hand carved from a 3 mm x 3 mm strip for the corner stanchions and 2 mm X 2 mm strips for the middle stanchions and the railings.
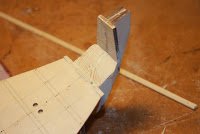
First, I sanded and carved the corner pieces. The bottoms are trimmed and mitered at a slight angle. The overall foredeck will be mounted at a slight angle on the front of the ship, so the stanchions must be angled to give the railings a look that is paralell to the waterline.
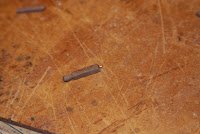
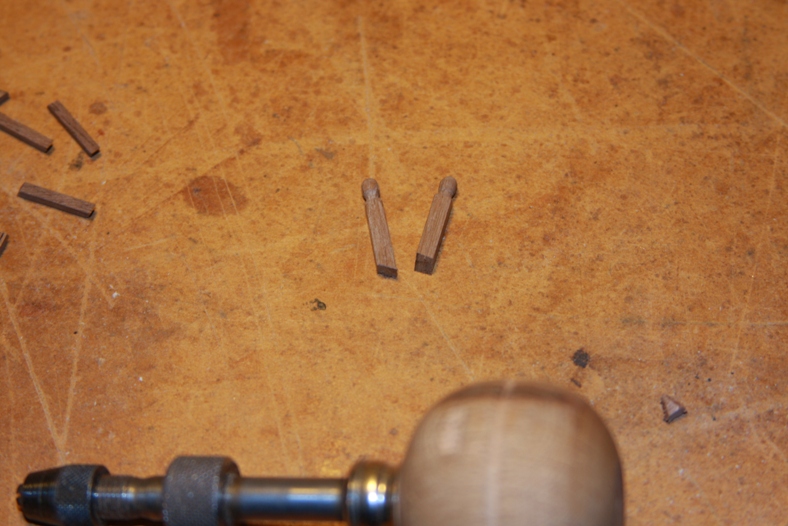
Simply gluing the stanchions will not old over time, so to strengthen their base, I drill a tiny hole into the bottom of the stanchions.

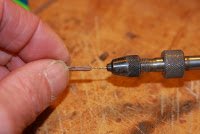
I insert and superglue sewing pin into the hole and clip off the excess. I then drill corresponding holes into the deck, and mount and glue the stanchions into place.
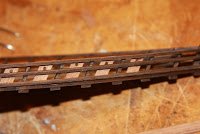
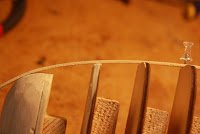
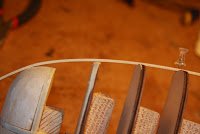
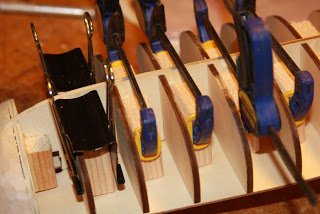
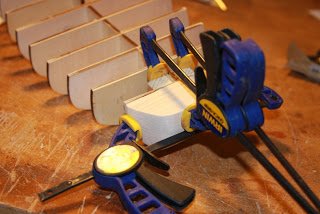
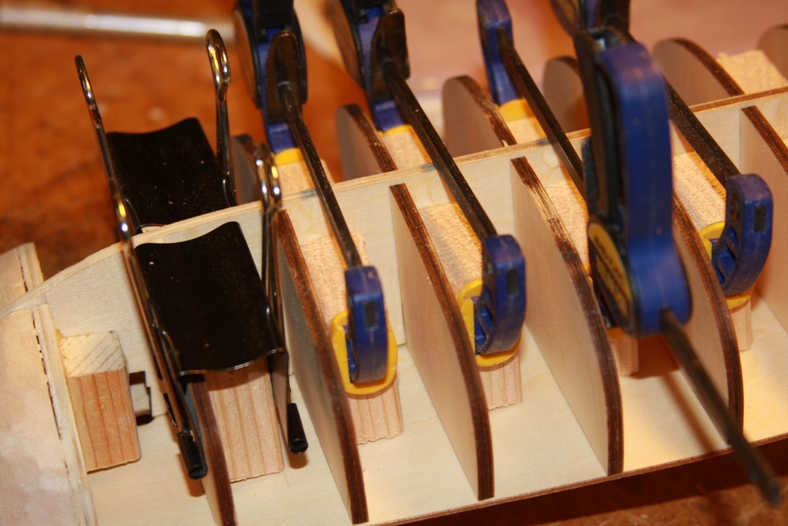
I then follow the same procedure for the railings. First I drill holes and glue the sewing pins in. Each railing is then measured, glued, and mounted along the stanchions using clamps to hold them into place until the glue dries completely. You can also see here that I've reinforced the bottom of the deck with strips of walnut as done with the original vessel.
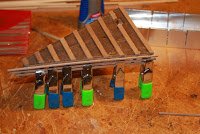
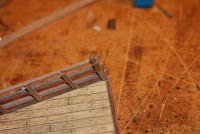
Each railing is "pinned" at its end and mitered for an even corner fit. After all the railings are mounted they are sanded very gently with 600 grain sandpaper to smooth out all the joints.

The railings will then all be stained with darker stain, then sanded once again with 600 to 1000 grain sandpaper to give them a weathered look. Next up, cutting and mounting the panes of wood that were in between each of the stanchions. You may also notice the carved figurehead that represents the larger front stanchion. This figure (most often a man or a patron saint) was believed to ward off evil and bad luck during a voyage. More on that later...
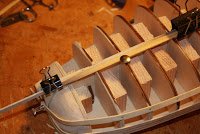
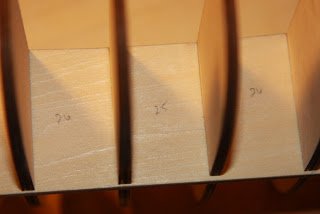
According to Pastor's book, there were also removable barriers between the stanchions. I've created these from some leftover mahogony I have lying around. I cut it to fit between the stanchions and drilled holes. I then stained the entire thing and coated it with Tung oil for protection and a deeper color.

- egkb, Salty Sea Dog and avsjerome2003
-
3
-
Planking the decks of the ship is one of the most important areas of the build. The deck is usually the first thing people notice, and any inaccuracies or mistakes are going to be picked out immediately.
The Santa Maria has a number of decks, three of which will be visible on the completed ship model. While I'm planking the hull, I also started work on planking the smallest of these decks, the fore deck. This will give me an opportunity to experiment with which pattern, color, and methods I want to use for the entire ship. If the smaller deck doesn't turn out the way I like, I can sand it down and re-do it without too much trouble.
Over the course of history, planks have been nailed down a wide variety of ways and there is no current documentation to display exactly how planks were placed in the 1400's. Therefore, I have researched as much as possible, and have determined what I consider the most likely planking pattern for the Santa Maria.
This drawing is from "Historic Ship Models" by Wolfram ZuMondfeld.
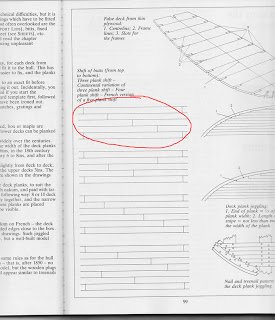
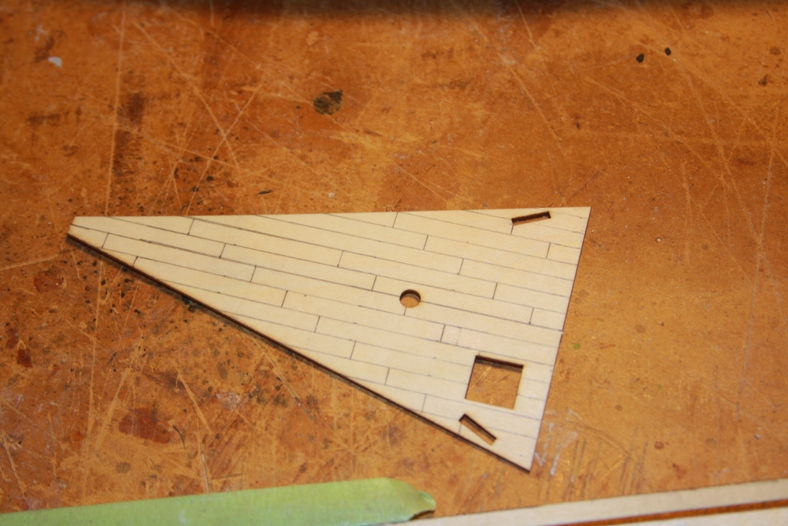
Based on what research I could find, plank boards from this era were almost always made from oak, and in the 1400's they would have almost certainly been about 12" wide with each plank approximately 12' long. Based on this, my guess is that a "three butt shift" would have been the probably pattern. This means that three planks would have separated each "butt" or where the two planks come together.

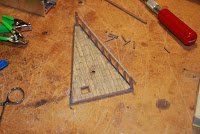
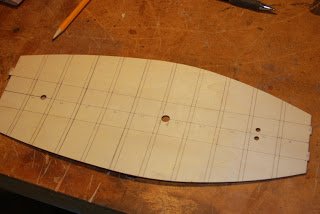
First, I measured and drew out the proposed pattern on the false deck. The ship's scale is 1/65, so if each plank was 12' long on the original, it needs to be about 42mm on my model.

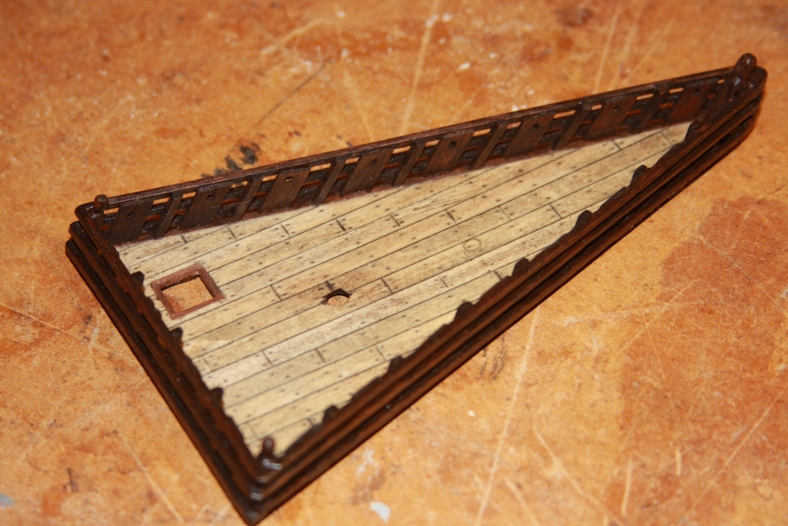
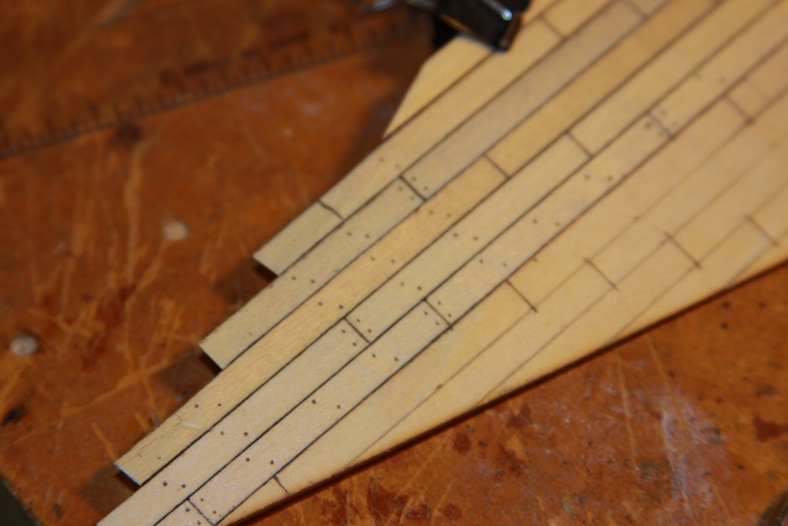
I then cut each plank and glue it down over the top of the drawn pattern. After gluing each plank down, I used a .5mm mechanical pencil to mark the trenails. The "tree nails" were small dowels used in place of what would presently be nails. This pattern was the likely trenail schematic for deck planks that were wider than 11 inches. My original plan was to drill tiny holes then fill them in, but I discovered that poking the hole with the mechanical pencil then breaking off a tiny bit of the lead into the hole worked very well.
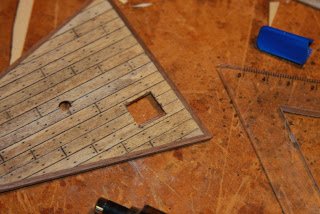
Once all the planks were laid, the deck is bordered with walnut. I sanded the deck thoroughly with 600 grain sandpaper and stained it with "weathered oak" color stain. When the stain dries it will require another sanding. To maintain the aged look of the deck, I will sand more toward the center of the deck where the sailors would have had more opportunity to scrub, while the edges that collected water and didn't receive as much attention would remain a little more worn and darkened.
There is much more work to be done on the foredeck including stanchions, railings, and a carved head beam that was used to ram other ships. More to come on the foredeck...
- egkb, maso, Salty Sea Dog and 1 other
-
4
-
Planking the hull is one of the most tedious tasks for me.
Although "actual" ships at the time were single planked on frames (see my San Juan Nepumuceno) this particular model will be "double planked." This method takes more time, but ends up being easier as it allows the builder to smooth out any inconsistencies before the second layer is added. Single planking must be done perfectly the first time around because all of the flaws will show.
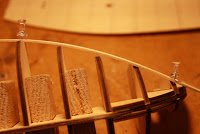
Each plank (a 1mm x 5mm x 110 mm strip) is soaked in water. The wet plank is formed to the hull and tacked in place with thumb tacks. The tacks do not go through the plank, but rather hold it in place with it's cap.
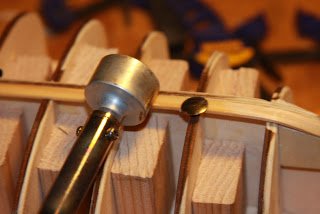
Then a hot plank bender (essentially a soldering iron with a round head) is run along the wood to steam it and heat it. The heat dries the wood and forms it into the shaped it's layed out in. After they are the proper shape, the planks are then glued and nailed into place.
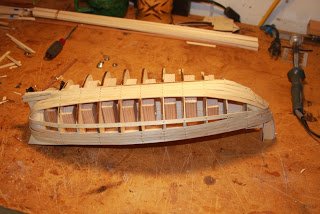
The planks are layered starting at the bulwarks (side of the ship that meets the deck) and the garboard plank (the plank that starts at the keel) and work their way toward the center. Each plank is done one at a time and must dry before the next plank is laid. The planks are then trimmed and adjusted in a variety of ways to ensure a good fit and that all gaps are covered.
There is much more planking to be done, and much more will be covered. Because planks are done one at a time and take a fair amount of time in between, I often work on other aspects of the ship at the same time. During the planking I will work on deck fittings, railings and decks... as you'll see in the next post.
- Salty Sea Dog, egkb and avsjerome2003
-
3
-
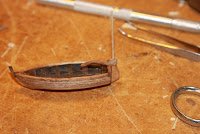
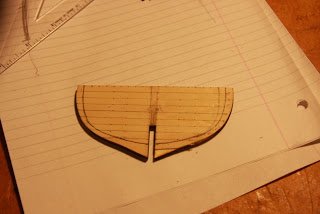
The "lifeboat" that came with this kit was a die cast pewter model that lacked any kind of detail. So I set about creating a suitable craft to go aboard the ship.
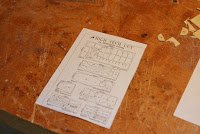
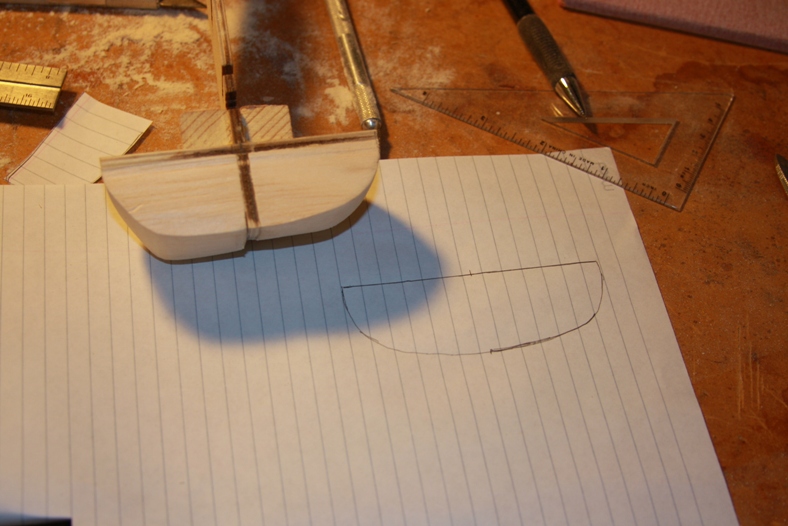
It occurred to me, that the lifeboats from the era were essentially the same shape as the overall vessel. I decided to take the diagram of the parts list that came with the kit and shrink it down on my copier. I could then cut out those pieces and use them to manufacture my little craft.
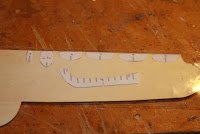
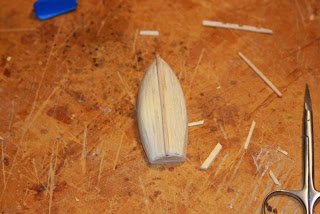
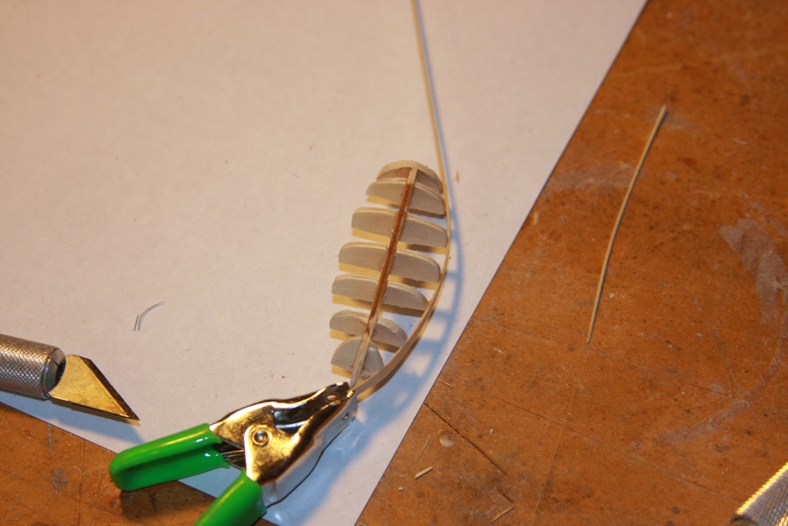
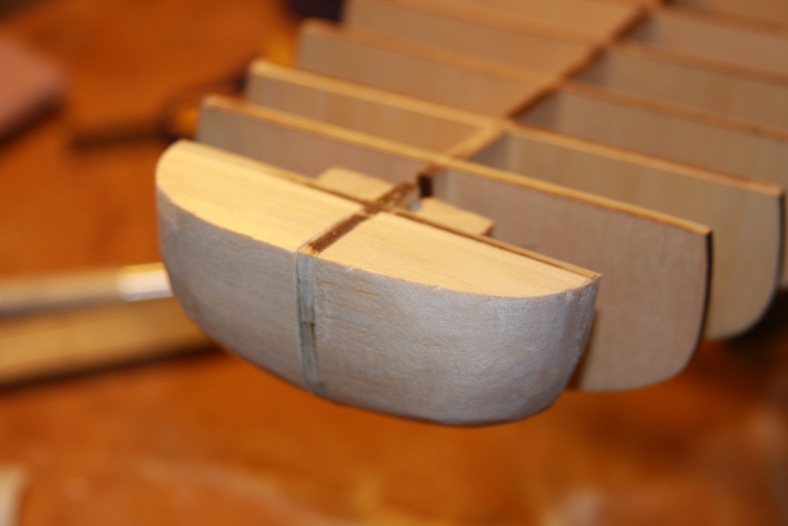
After cutting the pieces out and attaching the mini bulwarks to the keel I used thin spare wood to plank my tiny hull. I then took my dremel too with a rounded sander and shaved down the bulwarks and turn them into a proper frame.


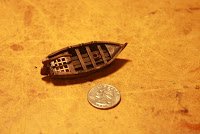
After the first layer of planking, I figured out that shaping the hull with a boat this tiny was extremely difficult. I decided to double plank. Although this is obviously twice as much work - it will give me an opportunity to even out the hull and make it look smoother.
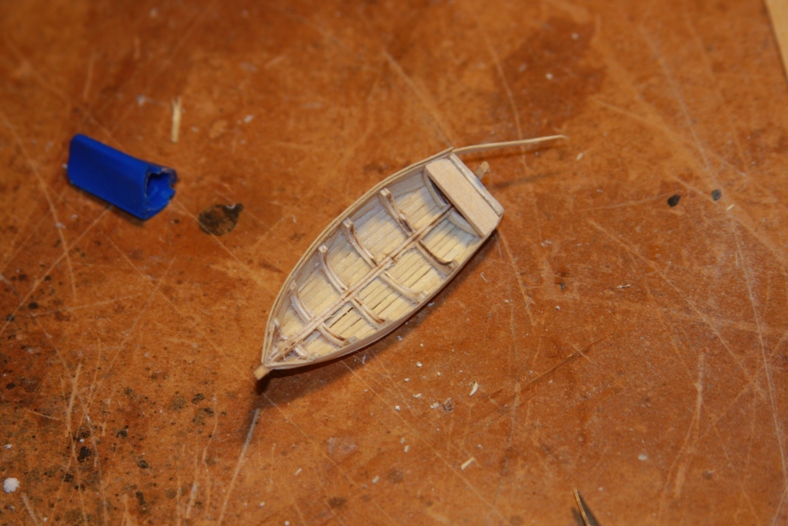
The other ships I have built have been very "clean" and often look as though then just came from the shipyard. This is the first time I will have attempted to "weather" and ship and make it look "antique" and "worn". This lifeboat gave me an opportunity to try out couple things out.
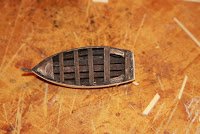
I gave the boat a base with a cherry stain, then covered it with a darker, almost ebony dark oak stain. Then I sanded it lightly with 600 grain sandpaper. I originally tried just the darker stain, but after sanding, too much of the light color wood came through.
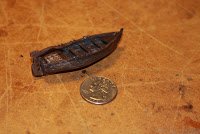
I will likely build one additional lifeboat as a long boat to accompany this smaller skiff. As a frame of reference for time, this small vessel took approximately 20 hours start to finish.
- russ, avsjerome2003, egkb and 1 other
-
4
-
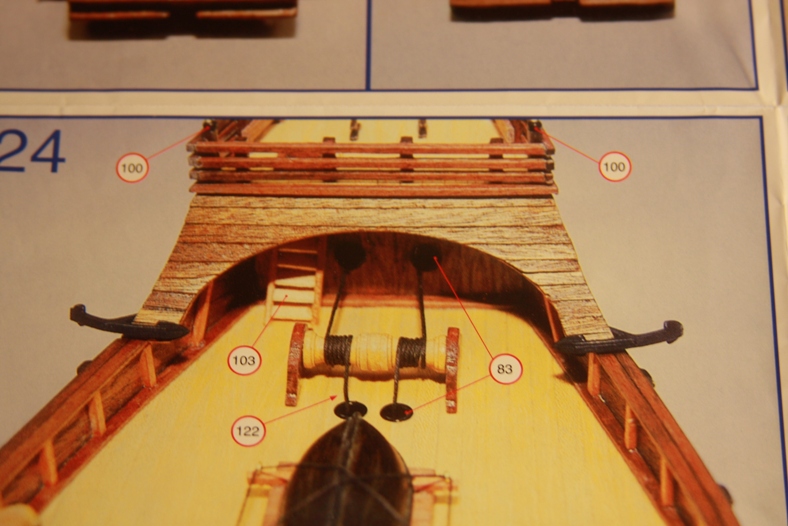
The instructions for this particular kit show the windlass (the gear that raises and lowers the anchors) running ropes through to holes in a forward wall and down to the anchors.


In actuality, this "forward" wall didn't actually exist. Instead, the windlass ran ropes to a head beam which then attached to the anchors. If the ship were actually built the way the above picture illustrates, then the crew would not have had any access to the foremast!
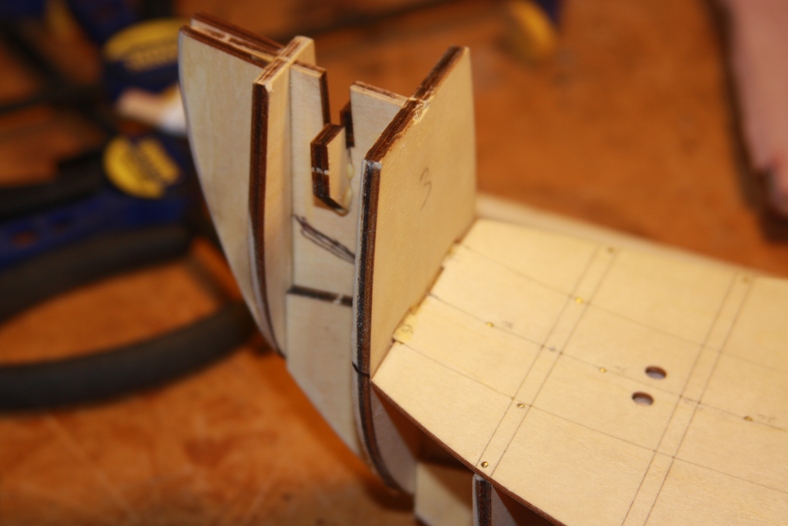
My task was remove this extra bulkhead and make the ship more accurate. I trimmed the forward bulkhead, then added to support blocks to accomodate where the foremast hole will be drilled.
I then measured and re-cut a false deck that included the previously missing area.
The next step will to begin planking both the hull and the decks.
- avsjerome2003 and egkb
-
2
-
The bulkheads serve as the bones of the ship and will provide the base for the hull's planking. The bulkheads are cut square, and therefore do not provide a solid fitting for the planks.
The bulkheads must then be sanded so that the planks have an even fitting along the bulkheads and provide a stronger, more seaworthy ship.
This ship will be "double planked", which means a think layer of planking will provide the base of the hull. A second layer of thinner, more decorative layer will then be added.
- avsjerome2003 and mtbediz
-
2
-
In Frank Mastini's book Ship Modeling Simplified he describes a method of aligning the keel and bulkeads by using a false deck as a guide. I adjusted this method and used it as the basis for steps I took to align the deck, keel, and bulkheads.
First, I measured the exact distance between all of the bulkhead "slots" in the keel.
I then took those distances (in milimeters) and translated them to the false deck. I drew guidelines along the false deck indicating where these bulkeads will fall if properly aligned. This provides a template to nail down the false deck to the bulkheads without "missing".
I tacked down the false deck along the centerline first, then aligned the end of each bulkhead to make sure it was exactly where it belonged, and nailed them down as well.
I pre-cut small blocks of wood to butt up against the bulkheads and the keel and to brace the ship and provide extra support for the hull.
Once the glue dries, the keel should be perfectly straight with each bulkhead perpendicular to the centerline. I'll then take the false deck off, do some sanding, then replace it permanenly.
- egkb, Salty Sea Dog and zoly99sask
-
3
-
This particular kit shows the Santa Maria as having a "square tuck stern" ...
...where the hull ends in what is essentially a 90 degree angle and is flat at it's rear where the rudder is. However, according to most Spanish ship history documentation, this style of stern didn't hit the seas until the transition to the "Galleon" style vessel in the early 1500's. That would have been 10 to 20 years after Columbus' voyage.
Ships prior to the turn of the 16th century were more likely built with a rounded tuck stern as seen in this image.
Instead of ending abruptly, the hull sweeps up toward the galley, the keel, and the rudder. It is more likely that the Santa Maria would have been built with this style of stern. Therefore, my first step toward this build will be to modify convert the stern from a square tuck to a round tuck.
The keel runs through the center of the ship and serves as what is essentially the main beam through the vessel. The "bulkeads" stem out from the keel and provide the framing for the ship. Later, the planking will be attached to these bulkeads and will form the hull of the ship. Step one is to shave off the 90 degree angle of the keel itself.

Then, the aft bulkheads need to be shaved down to accomodate the curve that occurs rather than the abrupt change of the square tuck. In this case I had to shave approximately 4 mm from each side of the aft bulkhead.
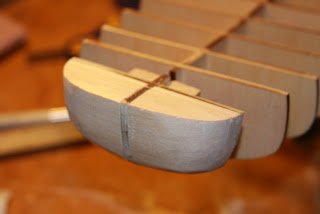
Later, when the hull is planked, each piece of the hull will need to be steamed and bent to complete the "sweep" toward the keel. To help ease that process, I filled in the stern with balsa wood.
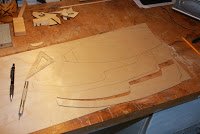
Then I began shaving down the balsa to the desired angle and curve needed to round out the stern. After getting the starboard side the way I wanted it, I created a paper template that I could attach so I could mirror the port side as closely as possible.

And here's what the new stern looks like rounded out.
The next set of steps will be to align the keel and make sure all the bulkeads are square.
- zoly99sask and avsjerome2003
-
2
-
Hello everyone. Please pardon my delayed return. Like many, the idea of re-creating ship build logs is a daunting task. However, I obviously miss the shared knowledge and camaraderie.
I'll do my best to both re-create my Santa Maria log as well as catch everyone up to speed on the Ship's progress. Please forgive some of the rudimentary comments, I have copied and pasted some of the progress posts from a Blog I also keep that is geared more toward those how are unfamiliar with ship builds.
Most people know that the ship "Santa Maria" or La Santa María de la Inmaculada Concepción was the flagship of Christopher Columbus' journey to the Americas. However, people may not realize that there is very little historical evidence regarding exactly what the "Santa Maria" looked like, or how it was built. There was little to no documentation regarding ship building in 1492, and this ship was scuttled and its lumber used for shelter not long after its initial voyage.
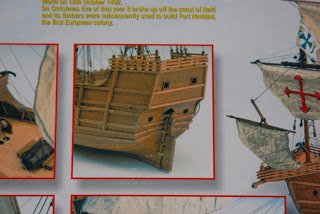
Interest in reconstructing the Santa María started in the 1890s for the 400th anniversary of Columbus's voyage. In an effort to reproduce history, the "Santa Maria" has suffered three major Spanish versions, the first timed with the 400th centennial anniversary of Columbus landing in the New World, the second, for the Expo Iboamerica of 1929 and the last, the New York World Fair, 1964
In 1892 the naval historian, Fernandez Duro, modelled the ship as a Nao - A carrack or nau was a three- or four-masted sailing ship developed in 15th century Western Europe for use in the Atlantic Ocean. It had a high rounded stern with large aftcastle, forecastle and bowsprit at the stem. It was first used by the Portuguese (its creators), and later by the Spanish, to explore and map the world. It was usually square-rigged on the foremast and mainmast and lateen-rigged on the mizzenmast. Unfortunately, Fernandez Duro made a fundamental error as result of an erroneous reading of Columbus's log. It was also criticized as being too ornamented for the period.
The second attempt to recreate the ship was by Julio Guillen Tato, known as the Guillen version. This reproduction for the Expo was controversially designed as a Caravel - a small, highly maneuverable ship developed in the 15th century by the Portuguese to explore along the West African coast and into the Atlantic Ocean. Caravels were much used by the Portuguese for the oceanic exploration voyages during the 15th and 16th centuries. Tato's reproduction sailed badly and ended up a wreck.
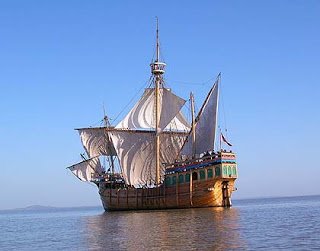
Director of the Maritime Museum of Barcelona, Spain, Martinez-Hidalgo returned the "Santa Maria" into her rightful class, as a Nao. He further refined his ideas for the 500th centennial celebration in 1992. The model I am building is from a kit by Atesania Latina, and will be based on this 1992 version which is considered by most ship historians to be the most accurate.
- Salty Sea Dog, bucknbarney, egkb and 1 other
-
4


Santa Maria by Moonbug - FINISHED - Artesania Latina - Bashed
in - Kit subjects built Up to and including 1500 AD
Posted · Edited by Moonbug
As I said, planking the hull is a complicated process and one that I have never particularly enjoyed. Each individual plank must be measure, damped, steamed to shape, placed, then glued. As the hull begins to close in, planks need to be trimmed and shaved down to taper properly. Since I am double planking this model, and the first layer of planking will not be seen, it may not seem to require the same level of precision that the outer layer will require.
However, the first layer of planking must still provide an even, smooth surface otherwise the thinner outer layer will appear bumpy and incorrect. The first layer of planking will be sanded until it's reasonably smooth then wood filler is applied to even out any inconsistencies.
The hull is sanded again with a variety of different sandpapers ranging from 100 to 600 grin sandpaper. When the hull is as smoothe as possible, I will add the keel and bulwarks and begin the second layer of planking.
The keel is added by gluing it and holding it in place with a variety of rubber bands and clamps. I then add another layer of filler to close all the gaps where the planks meeet the keel.
Then, still more sanding to make the hull as smooth as possible around all the edges and between all the planks. The smoother the first layer of planking is, the more even the second layer of planking will be.