


Moonbug
-
Posts
975 -
Joined
-
Last visited
Reputation Activity
-

 Moonbug got a reaction from PaddyO in HMS Pegasus 1776 by Moonbug - Amati Models - 1:64
The Jib Stay is a very straightforward bit and represents the last of the standing rigging. The stay starts on the traveller and is seized to the ring between the starboard side of the shackle and the hook. It then passes through the upper sheave on the starboard side cheek block on the the topmast head. There are a few options as to where the jib stay finishes depending one what works best and is an unimpeded fall of the line. Most rigs have it tied above one of the deadeyes, while others have it hooked to the shelf. I chose an eye ring that’s not being used as it ensured the aforementioned free fall of the line from the upper mast head.
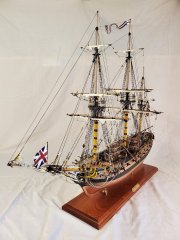
And with that - the standing rigging is complete!
-
 Moonbug got a reaction from Dave_E in HMS Pegasus 1776 by Moonbug - Amati Models - 1:64
The Jib Stay is a very straightforward bit and represents the last of the standing rigging. The stay starts on the traveller and is seized to the ring between the starboard side of the shackle and the hook. It then passes through the upper sheave on the starboard side cheek block on the the topmast head. There are a few options as to where the jib stay finishes depending one what works best and is an unimpeded fall of the line. Most rigs have it tied above one of the deadeyes, while others have it hooked to the shelf. I chose an eye ring that’s not being used as it ensured the aforementioned free fall of the line from the upper mast head.
And with that - the standing rigging is complete!
-
 Moonbug got a reaction from Barbossa in HMS Pegasus 1776 by Moonbug - Amati Models - 1:64
The Jib Stay is a very straightforward bit and represents the last of the standing rigging. The stay starts on the traveller and is seized to the ring between the starboard side of the shackle and the hook. It then passes through the upper sheave on the starboard side cheek block on the the topmast head. There are a few options as to where the jib stay finishes depending one what works best and is an unimpeded fall of the line. Most rigs have it tied above one of the deadeyes, while others have it hooked to the shelf. I chose an eye ring that’s not being used as it ensured the aforementioned free fall of the line from the upper mast head.
And with that - the standing rigging is complete!
-
Moonbug got a reaction from Dave_E in HMS Pegasus 1776 by Moonbug - Amati Models - 1:64
Short update - but the other thing I accomplished today were the jib boom horses. Nothing particularly complicated about them - they go over the end of the jib boom with and eye and loop, then have knots every 2' which translates to about 9.5mm at 1:64. I went with 10mm because it's easier. The aft end of the horses loops over the jib boom behind the cap and seizes to itself. I then use a liberal amount of diluted PVA to get the to hang and hold their form.
-
 Moonbug got a reaction from mugje in HMS Pegasus 1776 by Moonbug - Amati Models - 1:64
Short update - but the other thing I accomplished today were the jib boom horses. Nothing particularly complicated about them - they go over the end of the jib boom with and eye and loop, then have knots every 2' which translates to about 9.5mm at 1:64. I went with 10mm because it's easier. The aft end of the horses loops over the jib boom behind the cap and seizes to itself. I then use a liberal amount of diluted PVA to get the to hang and hold their form.
-
 Moonbug reacted to Knocklouder in HMS Pegasus 1776 by Moonbug - Amati Models - 1:64
An amazing job, Capt'n Bug .
Bob M.
-
 Moonbug got a reaction from brunnels in HMS Pegasus 1776 by Moonbug - Amati Models - 1:64
Short update - but the other thing I accomplished today were the jib boom horses. Nothing particularly complicated about them - they go over the end of the jib boom with and eye and loop, then have knots every 2' which translates to about 9.5mm at 1:64. I went with 10mm because it's easier. The aft end of the horses loops over the jib boom behind the cap and seizes to itself. I then use a liberal amount of diluted PVA to get the to hang and hold their form.
-
 Moonbug got a reaction from Knocklouder in HMS Pegasus 1776 by Moonbug - Amati Models - 1:64
Short update - but the other thing I accomplished today were the jib boom horses. Nothing particularly complicated about them - they go over the end of the jib boom with and eye and loop, then have knots every 2' which translates to about 9.5mm at 1:64. I went with 10mm because it's easier. The aft end of the horses loops over the jib boom behind the cap and seizes to itself. I then use a liberal amount of diluted PVA to get the to hang and hold their form.
-
 Moonbug got a reaction from mugje in HMS Pegasus 1776 by Moonbug - Amati Models - 1:64
Thanks a lot Bob, really appreciate it.
This little jib boom net is another often overlooked piece that is quite delicate and complicated - particularly at a 1:64 scale. I honestly looked around for bits throughout the shipyard and the house that would allow me to 'fake it' - but coming up empty handed, I went ahead an made the netting myself. It turned out to be quite fun - which I'm sure makes me a little nutty.
The net is made of two spreaders with horses run through them and the netting secured between the spreaders. While the horses run from the bowsprit cap back to the knightheads along the fore rail, the netting itself (at 1:64) is only 10mm wide by 20mm long. I used trimmed down bamboo tooth picks for the spreaders and run .30 mm line through them. Then I connected them to a simple jig that elevates everything and gives me a bit of room with which to tie the netting. Five pairs of my smallest line (150 Gutermann thread) are secured to one of the spreaders. I differed from the FFM guidance here by only connecting one spreader to start.
I used pins to prevent the horses from bending in our out - each set of knots tied to the horses is secured to the pins to keep them in place. I only tied each intersection in a half knot (anything else is too bulky) and then touched the half know with the tiniest bit of CA delivered with the pointy end of a straight pin. I try not to use CA on knots since it discolors everything, but right now you're looking at the bottom of the netting and the half knots will not be visible from above. This CA also has the added benefit of stiffening the lines for cutting later - which ended up being the most difficult part of the entire endeavor.
I worked my way down the netting toward my 20mm target changing where I start the knots depending on the row. On rows that attach to the horses I started on the ends to secure them to the pins and keep everything even, on the other rows I started in the middle to avoid tugging at the ends. Once I reached my target length, I secured the lines to the other spreader with a modified version of a half hitch. I'm not sure I could explain the knot again adequately, but it worked. Once again, tiny spots of CA secured them on the bottom of the netting.
After the netting was tied, I washed all the knots liberally with diluted PVA and let it dry overnight. The ends of the knots were cut with a brand new scalpel blade. This is vital - as the very sharpest instrument on hand was the only thing that would work adequately.
The net is secured to the bow with the fore end seized to the upper eye bolts on the bowsprit cap while the aft end is secured to the knightheads via a .10mm lanyard.
I know that one little gap looks funky - but that's the angle of the photo. It actually looks pretty normal with the naked eye.
-
Moonbug got a reaction from Barbossa in HMS Pegasus 1776 by Moonbug - Amati Models - 1:64
Short update - but the other thing I accomplished today were the jib boom horses. Nothing particularly complicated about them - they go over the end of the jib boom with and eye and loop, then have knots every 2' which translates to about 9.5mm at 1:64. I went with 10mm because it's easier. The aft end of the horses loops over the jib boom behind the cap and seizes to itself. I then use a liberal amount of diluted PVA to get the to hang and hold their form.
-
 Moonbug got a reaction from Techtonic in HMS Pegasus 1776 by Moonbug - Amati Models - 1:64
Short update - but the other thing I accomplished today were the jib boom horses. Nothing particularly complicated about them - they go over the end of the jib boom with and eye and loop, then have knots every 2' which translates to about 9.5mm at 1:64. I went with 10mm because it's easier. The aft end of the horses loops over the jib boom behind the cap and seizes to itself. I then use a liberal amount of diluted PVA to get the to hang and hold their form.
-
 Moonbug got a reaction from Thukydides in HMS Pegasus 1776 by Moonbug - Amati Models - 1:64
Short update - but the other thing I accomplished today were the jib boom horses. Nothing particularly complicated about them - they go over the end of the jib boom with and eye and loop, then have knots every 2' which translates to about 9.5mm at 1:64. I went with 10mm because it's easier. The aft end of the horses loops over the jib boom behind the cap and seizes to itself. I then use a liberal amount of diluted PVA to get the to hang and hold their form.
-
Moonbug got a reaction from Techtonic in HMS Pegasus 1776 by Moonbug - Amati Models - 1:64
Thanks a lot Bob, really appreciate it.
This little jib boom net is another often overlooked piece that is quite delicate and complicated - particularly at a 1:64 scale. I honestly looked around for bits throughout the shipyard and the house that would allow me to 'fake it' - but coming up empty handed, I went ahead an made the netting myself. It turned out to be quite fun - which I'm sure makes me a little nutty.
The net is made of two spreaders with horses run through them and the netting secured between the spreaders. While the horses run from the bowsprit cap back to the knightheads along the fore rail, the netting itself (at 1:64) is only 10mm wide by 20mm long. I used trimmed down bamboo tooth picks for the spreaders and run .30 mm line through them. Then I connected them to a simple jig that elevates everything and gives me a bit of room with which to tie the netting. Five pairs of my smallest line (150 Gutermann thread) are secured to one of the spreaders. I differed from the FFM guidance here by only connecting one spreader to start.
I used pins to prevent the horses from bending in our out - each set of knots tied to the horses is secured to the pins to keep them in place. I only tied each intersection in a half knot (anything else is too bulky) and then touched the half know with the tiniest bit of CA delivered with the pointy end of a straight pin. I try not to use CA on knots since it discolors everything, but right now you're looking at the bottom of the netting and the half knots will not be visible from above. This CA also has the added benefit of stiffening the lines for cutting later - which ended up being the most difficult part of the entire endeavor.
I worked my way down the netting toward my 20mm target changing where I start the knots depending on the row. On rows that attach to the horses I started on the ends to secure them to the pins and keep everything even, on the other rows I started in the middle to avoid tugging at the ends. Once I reached my target length, I secured the lines to the other spreader with a modified version of a half hitch. I'm not sure I could explain the knot again adequately, but it worked. Once again, tiny spots of CA secured them on the bottom of the netting.
After the netting was tied, I washed all the knots liberally with diluted PVA and let it dry overnight. The ends of the knots were cut with a brand new scalpel blade. This is vital - as the very sharpest instrument on hand was the only thing that would work adequately.
The net is secured to the bow with the fore end seized to the upper eye bolts on the bowsprit cap while the aft end is secured to the knightheads via a .10mm lanyard.
I know that one little gap looks funky - but that's the angle of the photo. It actually looks pretty normal with the naked eye.
-
 Moonbug got a reaction from gjdale in HMS Pegasus 1776 by Moonbug - Amati Models - 1:64
Thanks a lot Bob, really appreciate it.
This little jib boom net is another often overlooked piece that is quite delicate and complicated - particularly at a 1:64 scale. I honestly looked around for bits throughout the shipyard and the house that would allow me to 'fake it' - but coming up empty handed, I went ahead an made the netting myself. It turned out to be quite fun - which I'm sure makes me a little nutty.
The net is made of two spreaders with horses run through them and the netting secured between the spreaders. While the horses run from the bowsprit cap back to the knightheads along the fore rail, the netting itself (at 1:64) is only 10mm wide by 20mm long. I used trimmed down bamboo tooth picks for the spreaders and run .30 mm line through them. Then I connected them to a simple jig that elevates everything and gives me a bit of room with which to tie the netting. Five pairs of my smallest line (150 Gutermann thread) are secured to one of the spreaders. I differed from the FFM guidance here by only connecting one spreader to start.
I used pins to prevent the horses from bending in our out - each set of knots tied to the horses is secured to the pins to keep them in place. I only tied each intersection in a half knot (anything else is too bulky) and then touched the half know with the tiniest bit of CA delivered with the pointy end of a straight pin. I try not to use CA on knots since it discolors everything, but right now you're looking at the bottom of the netting and the half knots will not be visible from above. This CA also has the added benefit of stiffening the lines for cutting later - which ended up being the most difficult part of the entire endeavor.
I worked my way down the netting toward my 20mm target changing where I start the knots depending on the row. On rows that attach to the horses I started on the ends to secure them to the pins and keep everything even, on the other rows I started in the middle to avoid tugging at the ends. Once I reached my target length, I secured the lines to the other spreader with a modified version of a half hitch. I'm not sure I could explain the knot again adequately, but it worked. Once again, tiny spots of CA secured them on the bottom of the netting.
After the netting was tied, I washed all the knots liberally with diluted PVA and let it dry overnight. The ends of the knots were cut with a brand new scalpel blade. This is vital - as the very sharpest instrument on hand was the only thing that would work adequately.
The net is secured to the bow with the fore end seized to the upper eye bolts on the bowsprit cap while the aft end is secured to the knightheads via a .10mm lanyard.
I know that one little gap looks funky - but that's the angle of the photo. It actually looks pretty normal with the naked eye.
-
 Moonbug got a reaction from yvesvidal in HMS Pegasus 1776 by Moonbug - Amati Models - 1:64
The fore t'gallant stay runs from the top of the fore t'gallant mast down to the bowsprit and then seizes to the open heart of the fore preventer stay. A little bit unique, but quite interesting. Now, here's where I've deviated from the plans again. The FFM and others show two sets of thimbles around the end of the bowsprit- a pair together for the spritsail yard lifts, and three together for the t'gallant stay and the t'gallant bowlines. However, there is some evidence that a treble block was used instead of three thimbles. This is an option I first discovered from Dan Vadas as part of his Vulture build, and I really liked the look of it. Five thimbles on the bowsprit looks much too busy to me - so I went with the block / thimble combination.
The rest of the fore t'gallant stay is pretty straightforward; looped around the top and then runs through the treble block.
As mentioned, the end of the line is seized to the open collar of the foremast preventer stay with a lanyard.
-
Moonbug got a reaction from Barbossa in HMS Pegasus 1776 by Moonbug - Amati Models - 1:64
Thanks a lot Bob, really appreciate it.
This little jib boom net is another often overlooked piece that is quite delicate and complicated - particularly at a 1:64 scale. I honestly looked around for bits throughout the shipyard and the house that would allow me to 'fake it' - but coming up empty handed, I went ahead an made the netting myself. It turned out to be quite fun - which I'm sure makes me a little nutty.
The net is made of two spreaders with horses run through them and the netting secured between the spreaders. While the horses run from the bowsprit cap back to the knightheads along the fore rail, the netting itself (at 1:64) is only 10mm wide by 20mm long. I used trimmed down bamboo tooth picks for the spreaders and run .30 mm line through them. Then I connected them to a simple jig that elevates everything and gives me a bit of room with which to tie the netting. Five pairs of my smallest line (150 Gutermann thread) are secured to one of the spreaders. I differed from the FFM guidance here by only connecting one spreader to start.
I used pins to prevent the horses from bending in our out - each set of knots tied to the horses is secured to the pins to keep them in place. I only tied each intersection in a half knot (anything else is too bulky) and then touched the half know with the tiniest bit of CA delivered with the pointy end of a straight pin. I try not to use CA on knots since it discolors everything, but right now you're looking at the bottom of the netting and the half knots will not be visible from above. This CA also has the added benefit of stiffening the lines for cutting later - which ended up being the most difficult part of the entire endeavor.
I worked my way down the netting toward my 20mm target changing where I start the knots depending on the row. On rows that attach to the horses I started on the ends to secure them to the pins and keep everything even, on the other rows I started in the middle to avoid tugging at the ends. Once I reached my target length, I secured the lines to the other spreader with a modified version of a half hitch. I'm not sure I could explain the knot again adequately, but it worked. Once again, tiny spots of CA secured them on the bottom of the netting.
After the netting was tied, I washed all the knots liberally with diluted PVA and let it dry overnight. The ends of the knots were cut with a brand new scalpel blade. This is vital - as the very sharpest instrument on hand was the only thing that would work adequately.
The net is secured to the bow with the fore end seized to the upper eye bolts on the bowsprit cap while the aft end is secured to the knightheads via a .10mm lanyard.
I know that one little gap looks funky - but that's the angle of the photo. It actually looks pretty normal with the naked eye.
-
Moonbug got a reaction from Dave_E in HMS Pegasus 1776 by Moonbug - Amati Models - 1:64
Thanks a lot Bob, really appreciate it.
This little jib boom net is another often overlooked piece that is quite delicate and complicated - particularly at a 1:64 scale. I honestly looked around for bits throughout the shipyard and the house that would allow me to 'fake it' - but coming up empty handed, I went ahead an made the netting myself. It turned out to be quite fun - which I'm sure makes me a little nutty.
The net is made of two spreaders with horses run through them and the netting secured between the spreaders. While the horses run from the bowsprit cap back to the knightheads along the fore rail, the netting itself (at 1:64) is only 10mm wide by 20mm long. I used trimmed down bamboo tooth picks for the spreaders and run .30 mm line through them. Then I connected them to a simple jig that elevates everything and gives me a bit of room with which to tie the netting. Five pairs of my smallest line (150 Gutermann thread) are secured to one of the spreaders. I differed from the FFM guidance here by only connecting one spreader to start.
I used pins to prevent the horses from bending in our out - each set of knots tied to the horses is secured to the pins to keep them in place. I only tied each intersection in a half knot (anything else is too bulky) and then touched the half know with the tiniest bit of CA delivered with the pointy end of a straight pin. I try not to use CA on knots since it discolors everything, but right now you're looking at the bottom of the netting and the half knots will not be visible from above. This CA also has the added benefit of stiffening the lines for cutting later - which ended up being the most difficult part of the entire endeavor.
I worked my way down the netting toward my 20mm target changing where I start the knots depending on the row. On rows that attach to the horses I started on the ends to secure them to the pins and keep everything even, on the other rows I started in the middle to avoid tugging at the ends. Once I reached my target length, I secured the lines to the other spreader with a modified version of a half hitch. I'm not sure I could explain the knot again adequately, but it worked. Once again, tiny spots of CA secured them on the bottom of the netting.
After the netting was tied, I washed all the knots liberally with diluted PVA and let it dry overnight. The ends of the knots were cut with a brand new scalpel blade. This is vital - as the very sharpest instrument on hand was the only thing that would work adequately.
The net is secured to the bow with the fore end seized to the upper eye bolts on the bowsprit cap while the aft end is secured to the knightheads via a .10mm lanyard.
I know that one little gap looks funky - but that's the angle of the photo. It actually looks pretty normal with the naked eye.
-
 Moonbug got a reaction from wvdhee in HMS Pegasus 1776 by Moonbug - Amati Models - 1:64
Thanks a lot Bob, really appreciate it.
This little jib boom net is another often overlooked piece that is quite delicate and complicated - particularly at a 1:64 scale. I honestly looked around for bits throughout the shipyard and the house that would allow me to 'fake it' - but coming up empty handed, I went ahead an made the netting myself. It turned out to be quite fun - which I'm sure makes me a little nutty.
The net is made of two spreaders with horses run through them and the netting secured between the spreaders. While the horses run from the bowsprit cap back to the knightheads along the fore rail, the netting itself (at 1:64) is only 10mm wide by 20mm long. I used trimmed down bamboo tooth picks for the spreaders and run .30 mm line through them. Then I connected them to a simple jig that elevates everything and gives me a bit of room with which to tie the netting. Five pairs of my smallest line (150 Gutermann thread) are secured to one of the spreaders. I differed from the FFM guidance here by only connecting one spreader to start.
I used pins to prevent the horses from bending in our out - each set of knots tied to the horses is secured to the pins to keep them in place. I only tied each intersection in a half knot (anything else is too bulky) and then touched the half know with the tiniest bit of CA delivered with the pointy end of a straight pin. I try not to use CA on knots since it discolors everything, but right now you're looking at the bottom of the netting and the half knots will not be visible from above. This CA also has the added benefit of stiffening the lines for cutting later - which ended up being the most difficult part of the entire endeavor.
I worked my way down the netting toward my 20mm target changing where I start the knots depending on the row. On rows that attach to the horses I started on the ends to secure them to the pins and keep everything even, on the other rows I started in the middle to avoid tugging at the ends. Once I reached my target length, I secured the lines to the other spreader with a modified version of a half hitch. I'm not sure I could explain the knot again adequately, but it worked. Once again, tiny spots of CA secured them on the bottom of the netting.
After the netting was tied, I washed all the knots liberally with diluted PVA and let it dry overnight. The ends of the knots were cut with a brand new scalpel blade. This is vital - as the very sharpest instrument on hand was the only thing that would work adequately.
The net is secured to the bow with the fore end seized to the upper eye bolts on the bowsprit cap while the aft end is secured to the knightheads via a .10mm lanyard.
I know that one little gap looks funky - but that's the angle of the photo. It actually looks pretty normal with the naked eye.
-
 Moonbug got a reaction from BobG in HMS Pegasus 1776 by Moonbug - Amati Models - 1:64
Thanks a lot Bob, really appreciate it.
This little jib boom net is another often overlooked piece that is quite delicate and complicated - particularly at a 1:64 scale. I honestly looked around for bits throughout the shipyard and the house that would allow me to 'fake it' - but coming up empty handed, I went ahead an made the netting myself. It turned out to be quite fun - which I'm sure makes me a little nutty.
The net is made of two spreaders with horses run through them and the netting secured between the spreaders. While the horses run from the bowsprit cap back to the knightheads along the fore rail, the netting itself (at 1:64) is only 10mm wide by 20mm long. I used trimmed down bamboo tooth picks for the spreaders and run .30 mm line through them. Then I connected them to a simple jig that elevates everything and gives me a bit of room with which to tie the netting. Five pairs of my smallest line (150 Gutermann thread) are secured to one of the spreaders. I differed from the FFM guidance here by only connecting one spreader to start.
I used pins to prevent the horses from bending in our out - each set of knots tied to the horses is secured to the pins to keep them in place. I only tied each intersection in a half knot (anything else is too bulky) and then touched the half know with the tiniest bit of CA delivered with the pointy end of a straight pin. I try not to use CA on knots since it discolors everything, but right now you're looking at the bottom of the netting and the half knots will not be visible from above. This CA also has the added benefit of stiffening the lines for cutting later - which ended up being the most difficult part of the entire endeavor.
I worked my way down the netting toward my 20mm target changing where I start the knots depending on the row. On rows that attach to the horses I started on the ends to secure them to the pins and keep everything even, on the other rows I started in the middle to avoid tugging at the ends. Once I reached my target length, I secured the lines to the other spreader with a modified version of a half hitch. I'm not sure I could explain the knot again adequately, but it worked. Once again, tiny spots of CA secured them on the bottom of the netting.
After the netting was tied, I washed all the knots liberally with diluted PVA and let it dry overnight. The ends of the knots were cut with a brand new scalpel blade. This is vital - as the very sharpest instrument on hand was the only thing that would work adequately.
The net is secured to the bow with the fore end seized to the upper eye bolts on the bowsprit cap while the aft end is secured to the knightheads via a .10mm lanyard.
I know that one little gap looks funky - but that's the angle of the photo. It actually looks pretty normal with the naked eye.
-
Moonbug got a reaction from brunnels in HMS Pegasus 1776 by Moonbug - Amati Models - 1:64
Thanks a lot Bob, really appreciate it.
This little jib boom net is another often overlooked piece that is quite delicate and complicated - particularly at a 1:64 scale. I honestly looked around for bits throughout the shipyard and the house that would allow me to 'fake it' - but coming up empty handed, I went ahead an made the netting myself. It turned out to be quite fun - which I'm sure makes me a little nutty.
The net is made of two spreaders with horses run through them and the netting secured between the spreaders. While the horses run from the bowsprit cap back to the knightheads along the fore rail, the netting itself (at 1:64) is only 10mm wide by 20mm long. I used trimmed down bamboo tooth picks for the spreaders and run .30 mm line through them. Then I connected them to a simple jig that elevates everything and gives me a bit of room with which to tie the netting. Five pairs of my smallest line (150 Gutermann thread) are secured to one of the spreaders. I differed from the FFM guidance here by only connecting one spreader to start.
I used pins to prevent the horses from bending in our out - each set of knots tied to the horses is secured to the pins to keep them in place. I only tied each intersection in a half knot (anything else is too bulky) and then touched the half know with the tiniest bit of CA delivered with the pointy end of a straight pin. I try not to use CA on knots since it discolors everything, but right now you're looking at the bottom of the netting and the half knots will not be visible from above. This CA also has the added benefit of stiffening the lines for cutting later - which ended up being the most difficult part of the entire endeavor.
I worked my way down the netting toward my 20mm target changing where I start the knots depending on the row. On rows that attach to the horses I started on the ends to secure them to the pins and keep everything even, on the other rows I started in the middle to avoid tugging at the ends. Once I reached my target length, I secured the lines to the other spreader with a modified version of a half hitch. I'm not sure I could explain the knot again adequately, but it worked. Once again, tiny spots of CA secured them on the bottom of the netting.
After the netting was tied, I washed all the knots liberally with diluted PVA and let it dry overnight. The ends of the knots were cut with a brand new scalpel blade. This is vital - as the very sharpest instrument on hand was the only thing that would work adequately.
The net is secured to the bow with the fore end seized to the upper eye bolts on the bowsprit cap while the aft end is secured to the knightheads via a .10mm lanyard.
I know that one little gap looks funky - but that's the angle of the photo. It actually looks pretty normal with the naked eye.
-
Moonbug got a reaction from Dave_E in HMS Pegasus 1776 by Moonbug - Amati Models - 1:64
The fore t'gallant stay runs from the top of the fore t'gallant mast down to the bowsprit and then seizes to the open heart of the fore preventer stay. A little bit unique, but quite interesting. Now, here's where I've deviated from the plans again. The FFM and others show two sets of thimbles around the end of the bowsprit- a pair together for the spritsail yard lifts, and three together for the t'gallant stay and the t'gallant bowlines. However, there is some evidence that a treble block was used instead of three thimbles. This is an option I first discovered from Dan Vadas as part of his Vulture build, and I really liked the look of it. Five thimbles on the bowsprit looks much too busy to me - so I went with the block / thimble combination.
The rest of the fore t'gallant stay is pretty straightforward; looped around the top and then runs through the treble block.
As mentioned, the end of the line is seized to the open collar of the foremast preventer stay with a lanyard.
-
Moonbug got a reaction from brunnels in HMS Pegasus 1776 by Moonbug - Amati Models - 1:64
The fore t'gallant stay runs from the top of the fore t'gallant mast down to the bowsprit and then seizes to the open heart of the fore preventer stay. A little bit unique, but quite interesting. Now, here's where I've deviated from the plans again. The FFM and others show two sets of thimbles around the end of the bowsprit- a pair together for the spritsail yard lifts, and three together for the t'gallant stay and the t'gallant bowlines. However, there is some evidence that a treble block was used instead of three thimbles. This is an option I first discovered from Dan Vadas as part of his Vulture build, and I really liked the look of it. Five thimbles on the bowsprit looks much too busy to me - so I went with the block / thimble combination.
The rest of the fore t'gallant stay is pretty straightforward; looped around the top and then runs through the treble block.
As mentioned, the end of the line is seized to the open collar of the foremast preventer stay with a lanyard.
-
Moonbug got a reaction from mugje in HMS Pegasus 1776 by Moonbug - Amati Models - 1:64
The fore t'gallant stay runs from the top of the fore t'gallant mast down to the bowsprit and then seizes to the open heart of the fore preventer stay. A little bit unique, but quite interesting. Now, here's where I've deviated from the plans again. The FFM and others show two sets of thimbles around the end of the bowsprit- a pair together for the spritsail yard lifts, and three together for the t'gallant stay and the t'gallant bowlines. However, there is some evidence that a treble block was used instead of three thimbles. This is an option I first discovered from Dan Vadas as part of his Vulture build, and I really liked the look of it. Five thimbles on the bowsprit looks much too busy to me - so I went with the block / thimble combination.
The rest of the fore t'gallant stay is pretty straightforward; looped around the top and then runs through the treble block.
As mentioned, the end of the line is seized to the open collar of the foremast preventer stay with a lanyard.
-
Moonbug got a reaction from Barbossa in HMS Pegasus 1776 by Moonbug - Amati Models - 1:64
The fore t'gallant stay runs from the top of the fore t'gallant mast down to the bowsprit and then seizes to the open heart of the fore preventer stay. A little bit unique, but quite interesting. Now, here's where I've deviated from the plans again. The FFM and others show two sets of thimbles around the end of the bowsprit- a pair together for the spritsail yard lifts, and three together for the t'gallant stay and the t'gallant bowlines. However, there is some evidence that a treble block was used instead of three thimbles. This is an option I first discovered from Dan Vadas as part of his Vulture build, and I really liked the look of it. Five thimbles on the bowsprit looks much too busy to me - so I went with the block / thimble combination.
The rest of the fore t'gallant stay is pretty straightforward; looped around the top and then runs through the treble block.
As mentioned, the end of the line is seized to the open collar of the foremast preventer stay with a lanyard.
-
Moonbug got a reaction from wvdhee in HMS Pegasus 1776 by Moonbug - Amati Models - 1:64
The fore t'gallant stay runs from the top of the fore t'gallant mast down to the bowsprit and then seizes to the open heart of the fore preventer stay. A little bit unique, but quite interesting. Now, here's where I've deviated from the plans again. The FFM and others show two sets of thimbles around the end of the bowsprit- a pair together for the spritsail yard lifts, and three together for the t'gallant stay and the t'gallant bowlines. However, there is some evidence that a treble block was used instead of three thimbles. This is an option I first discovered from Dan Vadas as part of his Vulture build, and I really liked the look of it. Five thimbles on the bowsprit looks much too busy to me - so I went with the block / thimble combination.
The rest of the fore t'gallant stay is pretty straightforward; looped around the top and then runs through the treble block.
As mentioned, the end of the line is seized to the open collar of the foremast preventer stay with a lanyard.