HOLIDAY DONATION DRIVE - SUPPORT MSW - DO YOUR PART TO KEEP THIS GREAT FORUM GOING! (Only 66 donations so far out of 49,000 members - Can we at least get100? C'mon guys!)
×

MarisStella.hr
-
Posts
479 -
Joined
-
Last visited
Content Type
Profiles
Forums
Gallery
Events
Everything posted by MarisStella.hr
-
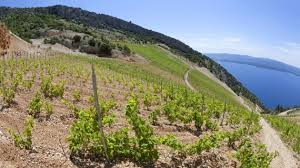
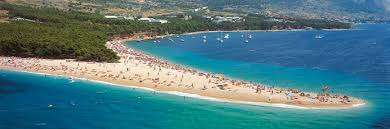
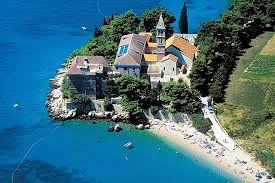
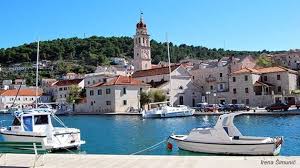
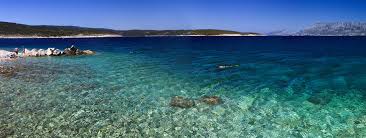
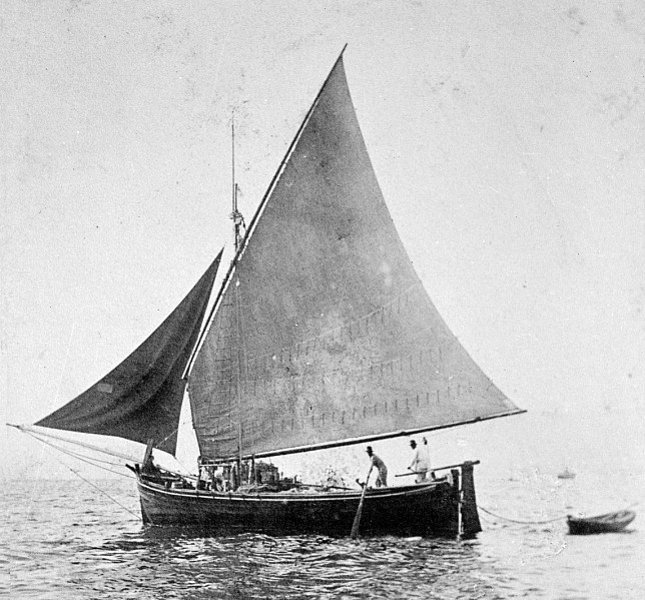
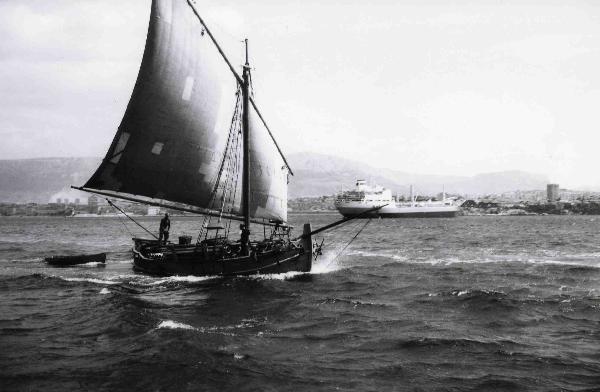
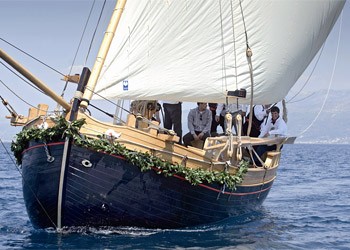
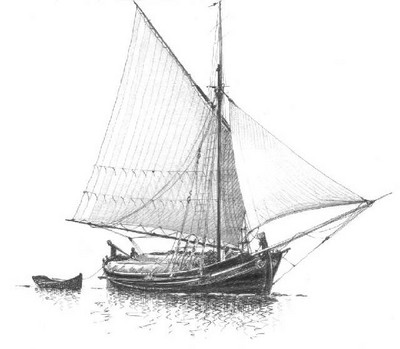
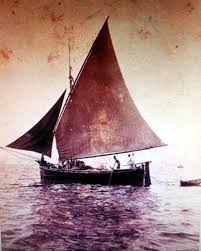
 Those are photos of the island of Brac , a very famous Croatian island… It is very important for Brazzera and this is why : So, here is some basic informations about Brazzera …. ( I believe many of you would rather look the photos below than reading this part of the text, but I just need to write it here ) Bracera (Brazzera) is a Croatian sailing cargo ship, whose hull is between 15 and 17 meters long, which appears already in the sixteenth century as a logical result of the evolution of the ship round, navis rotunda, an old cargo ship. Even in the fifteenth century, some types of ships differed from the other ships of Brac in the Adriatic and brought the name of type and markings of Bracana. …In the sixteenth century there was next to the Adriatic bragagnu from Chioggia, the braganja Brac. At first our fishermen called it ćozota and the other was called brazzera by the Italian fishermen of Chioggia and Venice, from which of the name bracera today. Not always has the same features of construction and narrowly defined purpose and is not exactly defined as the most recent bracera from the eighteenth century. The term bracera is found in Kotor along up to the entire eastern Adriatic coast, across the lagoon of Venice to Ancona. The first written record of this ship on the Croatian Adriatic comes from Venetian sources, brazier, 1556 and the first Croatian sources we learn that bore a similar name, bracijera in 1878. year. There is no solid source of origin of its name. Researchers have come to different conclusions. Some of them thought that his name came from the island of Brac, where it would be born, while others named after the main propulsion system, or rowing, from brachium, braccio, the arm muscles. Others thought that it was named to the purpose of small sailing boats as the gallery, speronera, manzera etc. Here, below, are some old photographs of Brazzera, so you can take a look at them :
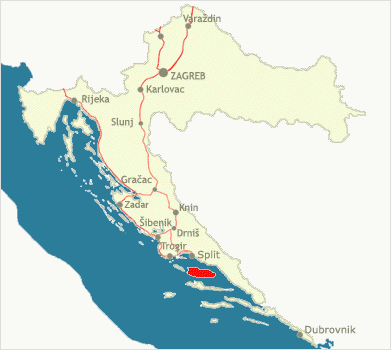
- 221 replies
-
- 12
-

-
Mr. Al, this looks fantastic !!!
-
Hi Bender, she turns out really good... I was wondering what do you do with those topgallant rails... Now I understand ... it's just fine, looks good ... Best regards, Zoran
-
Hi Nirvana, the Trupa is definitely a decorative simple model... she is designed for the beginners, but she is built by a very experienced modelers too, it is used for the gifts and decoration on the tables,commode and cupboards... ... yes, she is not a small model, she is 50cm long ... Kind regards, Zoran
-
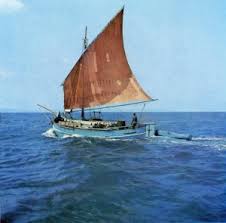
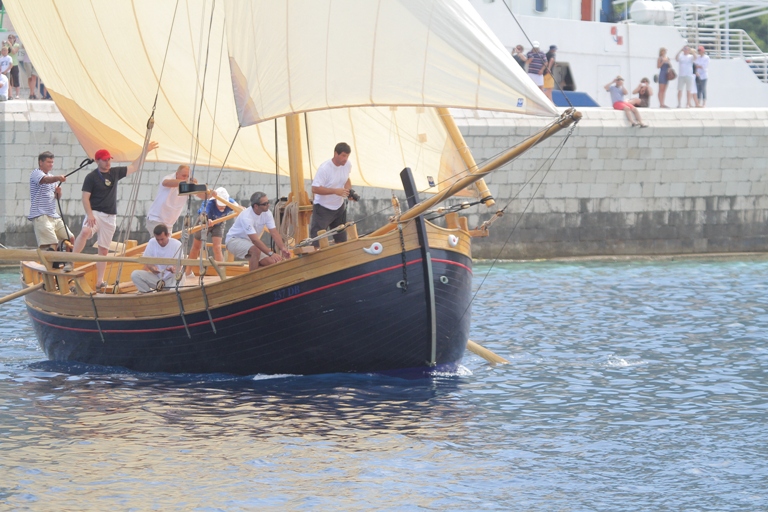
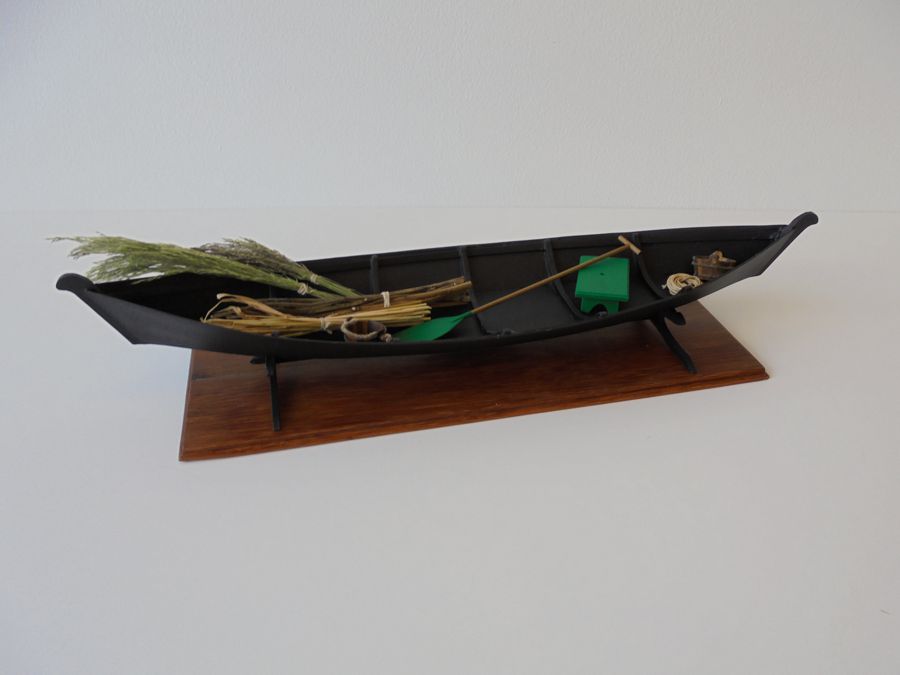
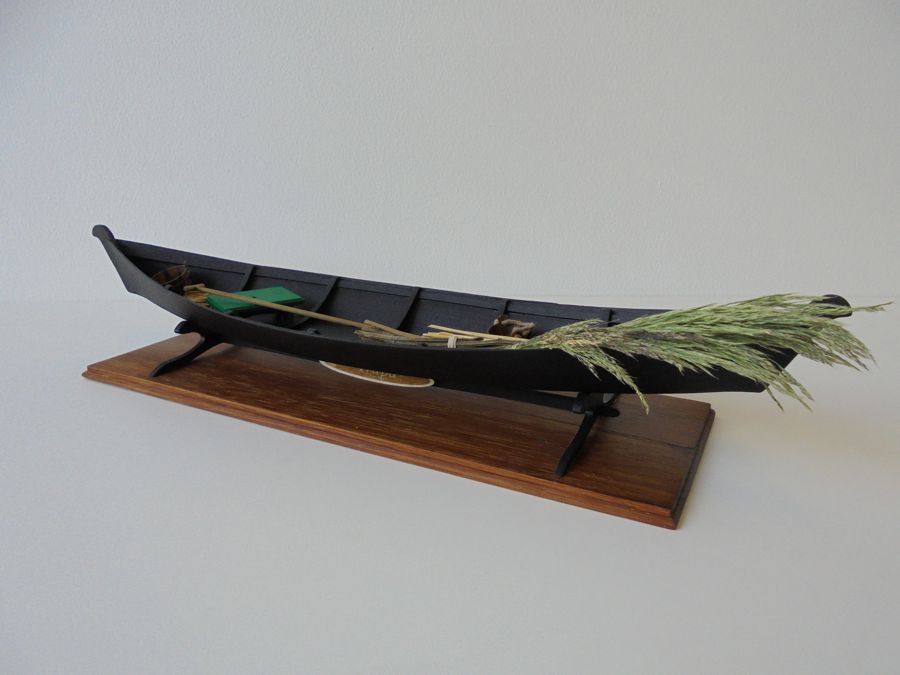
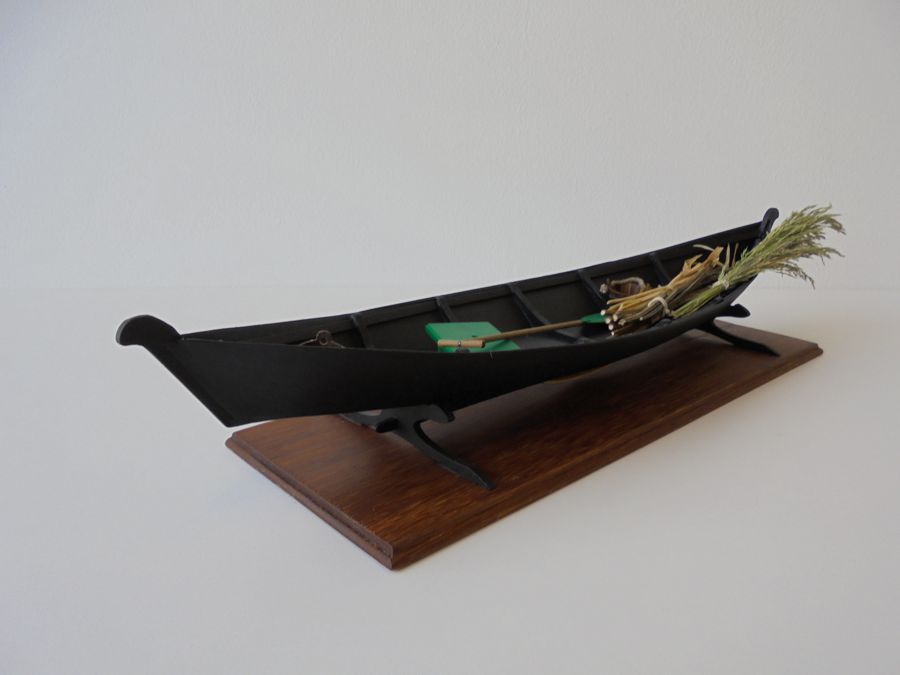
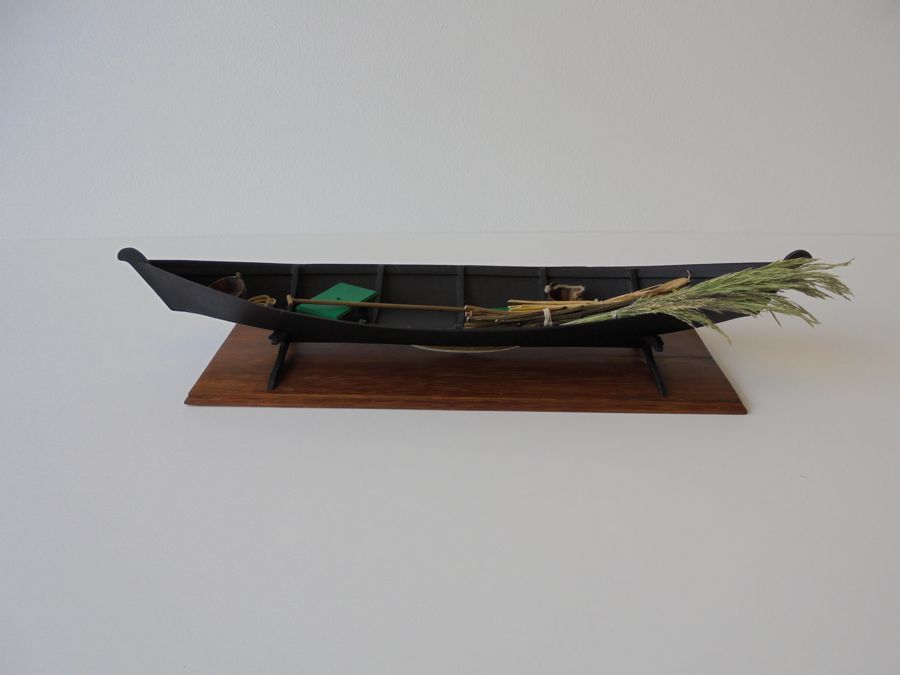
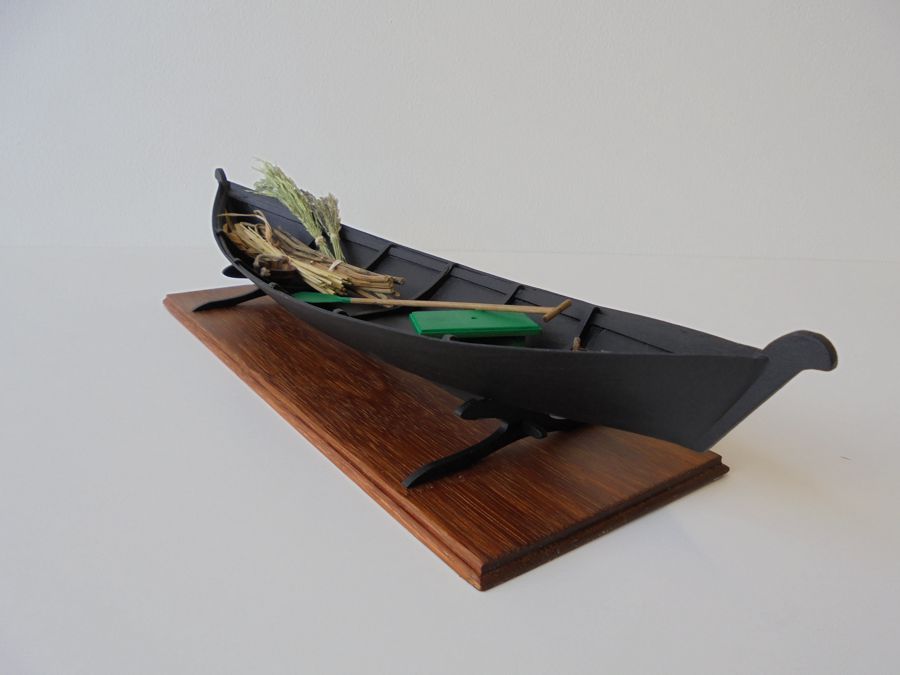
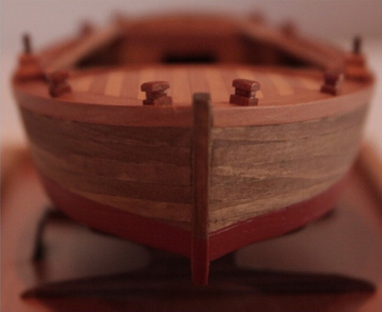
Dear Ladies and gentlemen, finally, after several days of thinking what to present next, I decided what to do : lets continue with the tradition… Lets compare something first : England has HMS Victory and Cutty Sark, America has USS Constitution… and there it is : Croatia has Brazzera and Trabaccolo …. There are many model versions of these two Croatian traditional vessels. Many ship modelers start building her skills to these two ladies… they could be found like practice for beginners, but as some very good works… MarisStella brought those models at intermediate forms, very typical , not going to any of many modulations available during centuries… no engines, just sails and oars … no cabins for tourists, just old fashion , original deck with the characteristic equipment that makes those two be exactly what they should be… In the beginning, there are some photos of the Brazzera and Trabaccolo, some paintings and old plans… All you should learn about them at these stage is that Brazzera has one mast and Trabaccolo has two of them … They have very similar hull. They are logical the sequence of development of the ‘round ship’ known as ‘navis rotunda’ : at the first it was Brazzera and then someone extended the hull in the middle, added some middle frames , added one mast more and get Trabaccolo … But this happened long, long time before… … before I say something else about Brazzera, take a look at those nice paintings first, please, they are quite old ones :

-
Dear readers, respected customers, thank you very much for visiting this site and for the likes ... Mark, Don, thank you for the nice comments ... ... And for all of you dear friends modelers, I am preparing a presentation of the next model now ... Sincerely yours, Zoran
-
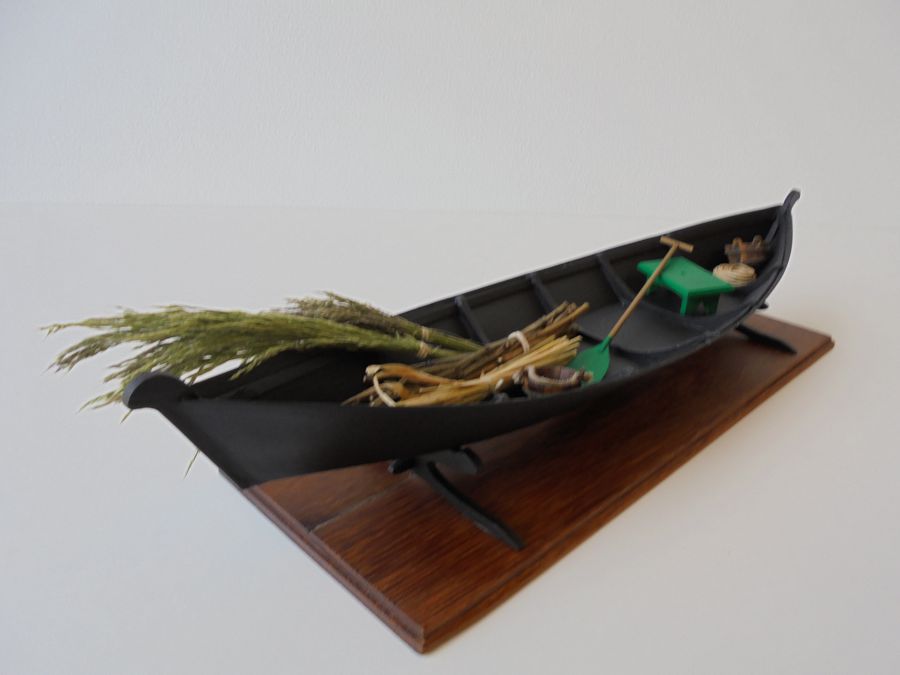
Respected Ladies and Gentlemen, in the meantime, we have done some new photos of the 'Trupa from the river Neretva' ... ... this is a typical example of what I've called the 'final touch' all the time ... So, I'm really glad that I could share those photos with you... Best regards, Zoran

- 221 replies
-
- 11
-
-
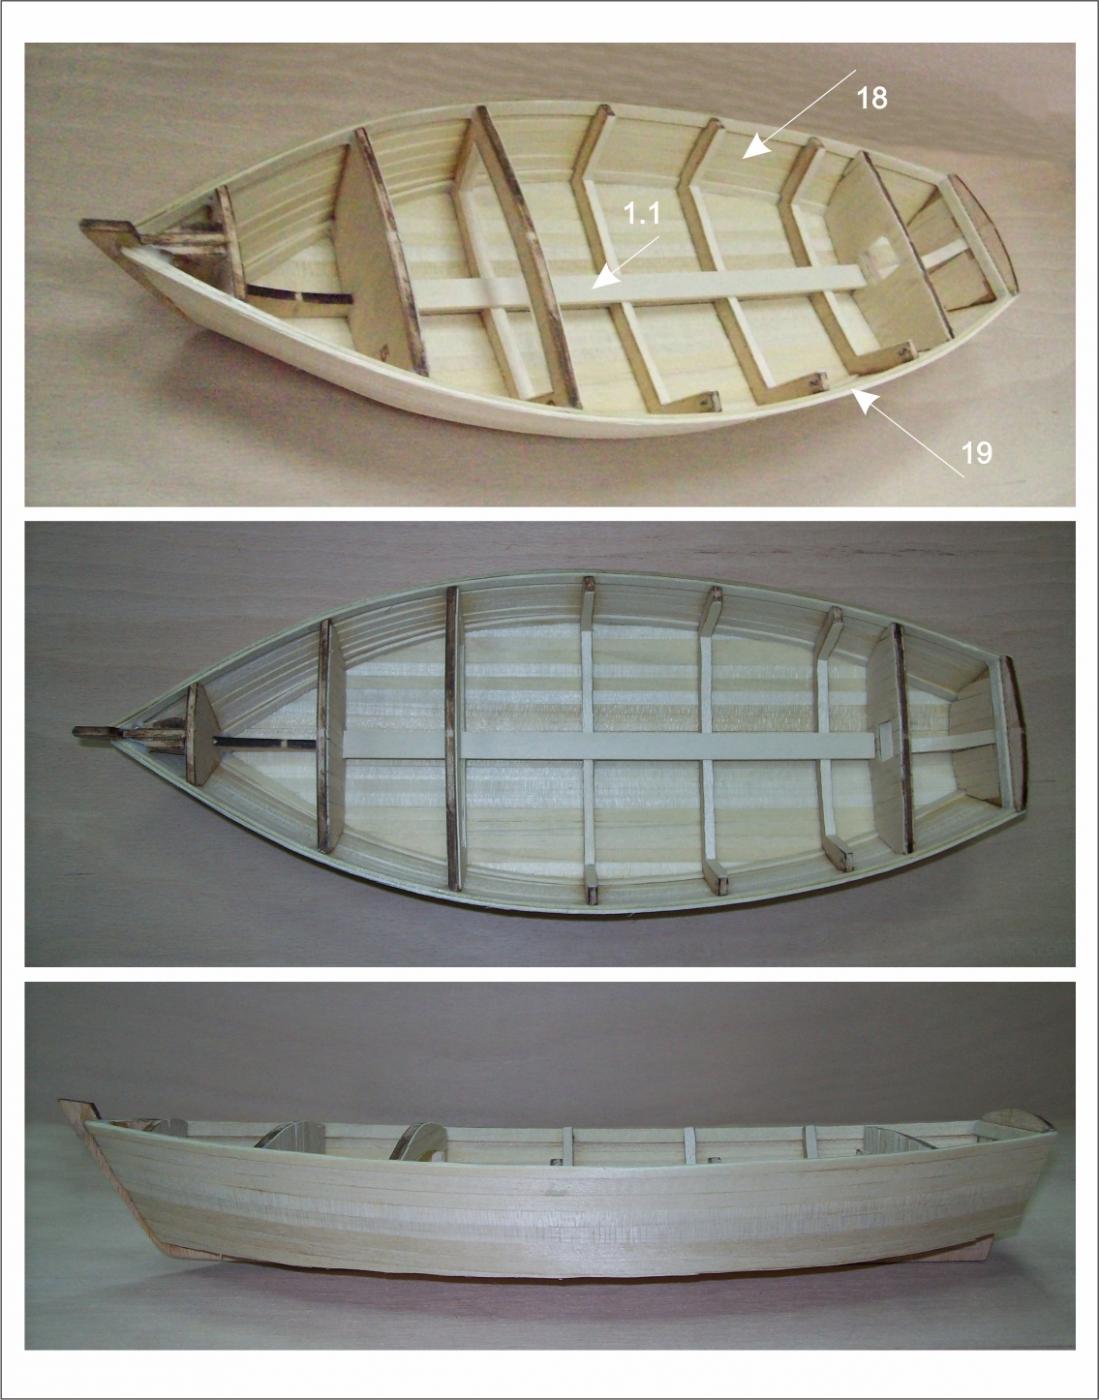
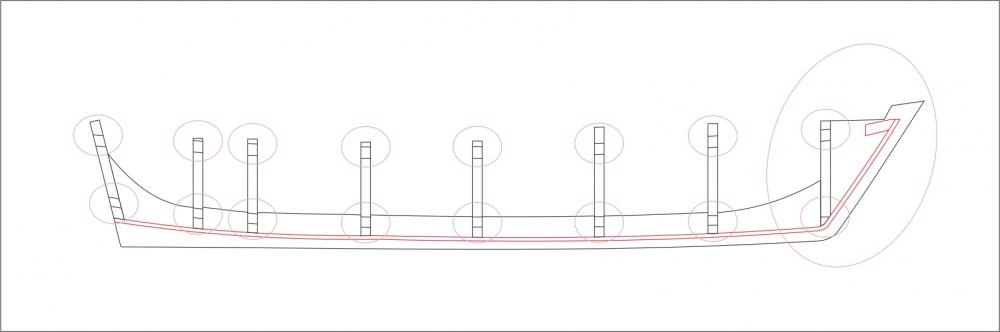
After completion of the Batelina the next step is the Beginner’s set Level 2 : Nina & Pinta… here you will learn even more skills including rigging. This kit is under construction right now... After Level 2 is level 3 which is the Santa Maria this will set you sailing to your first full sized ship!! So stay onboard for more!
-
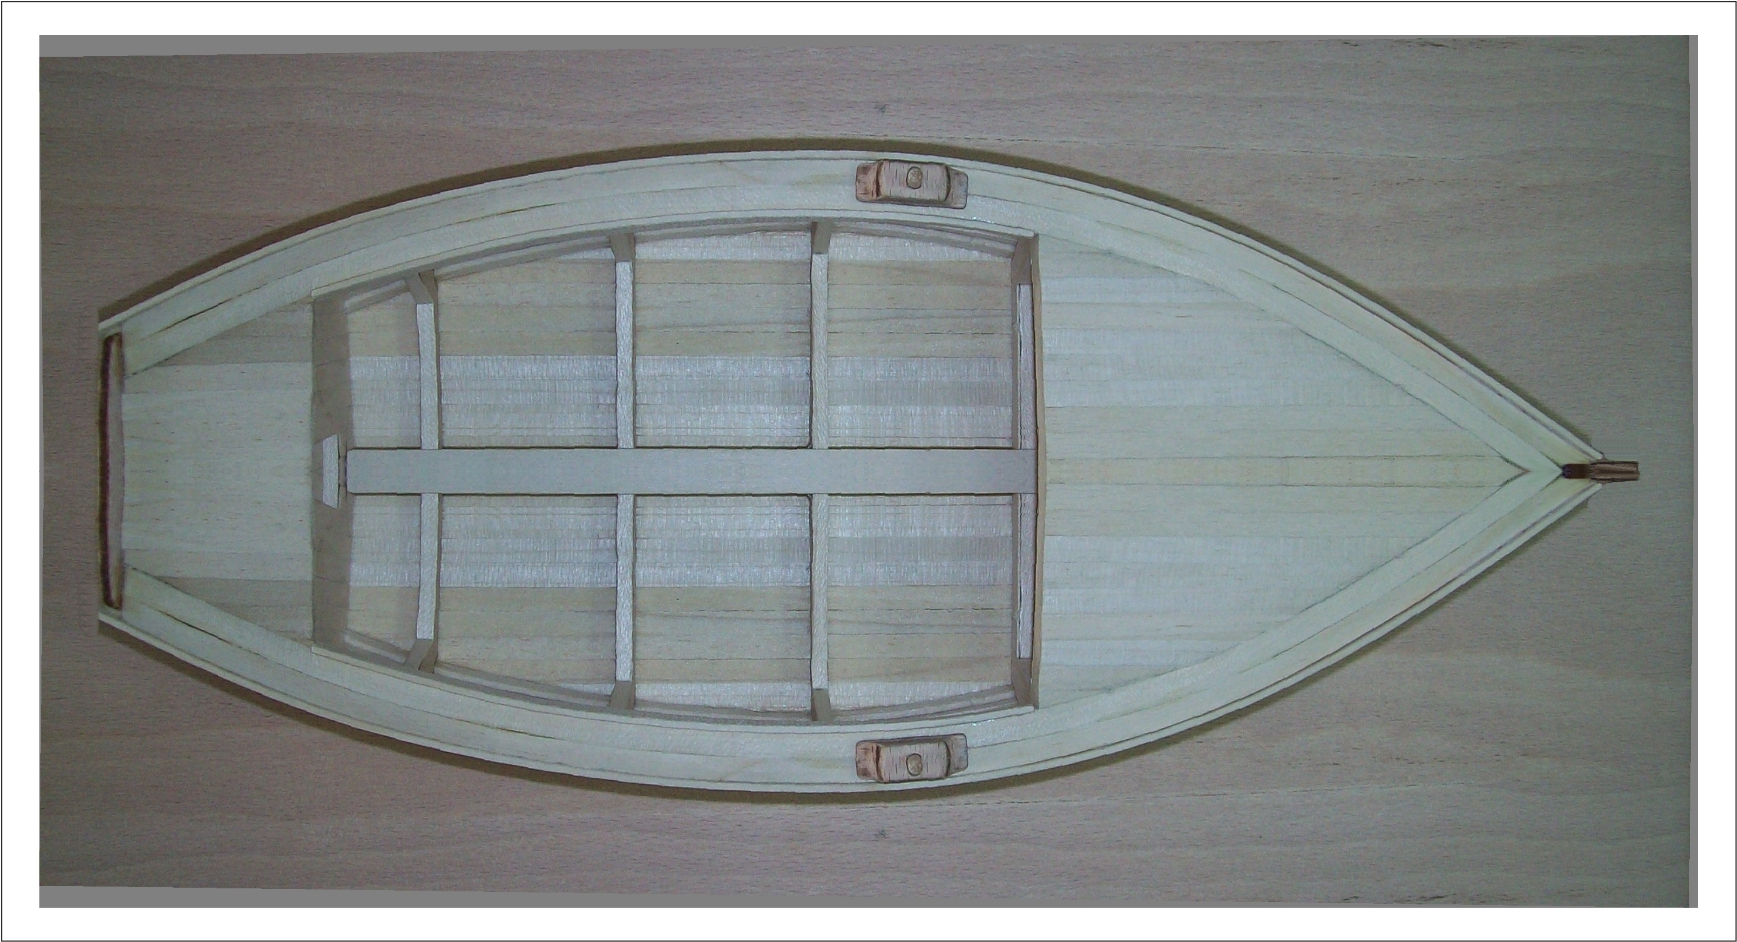
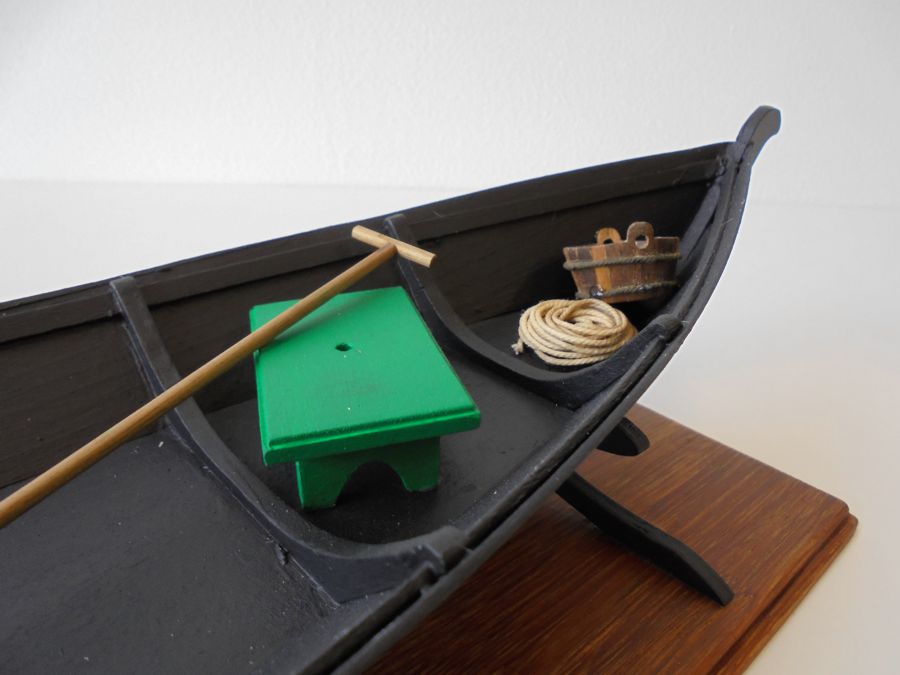
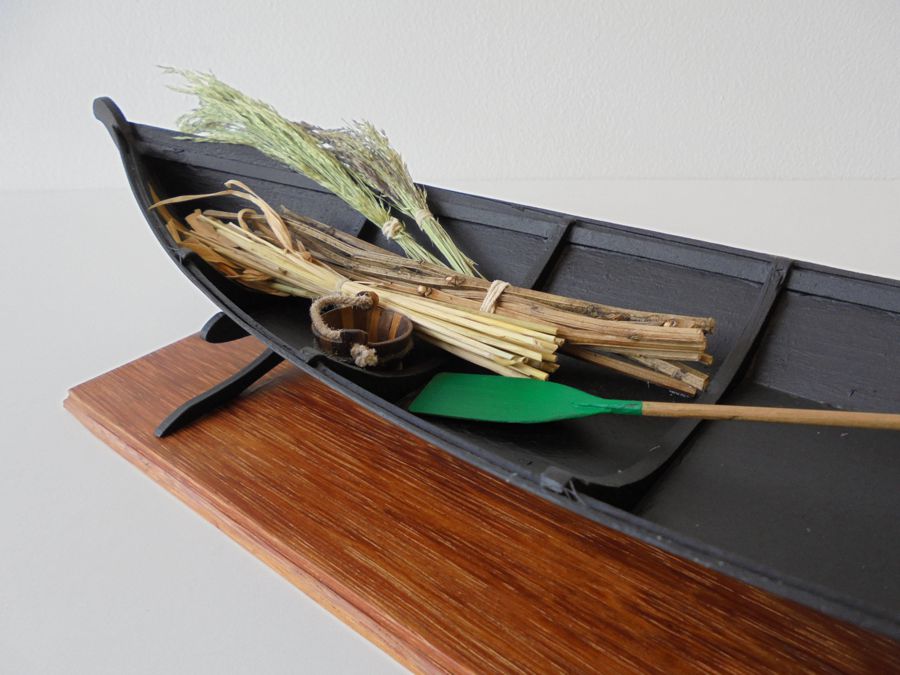
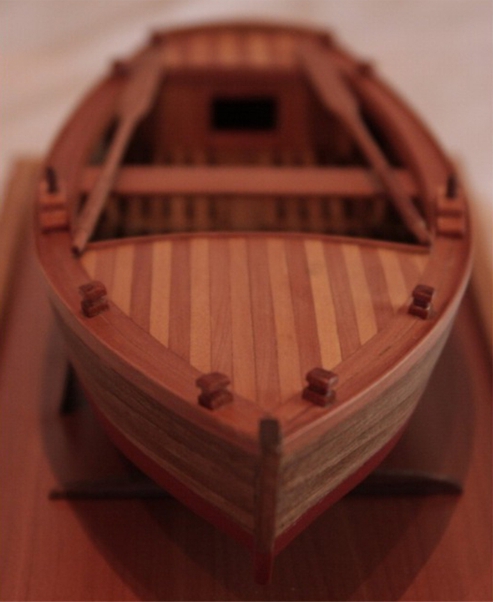
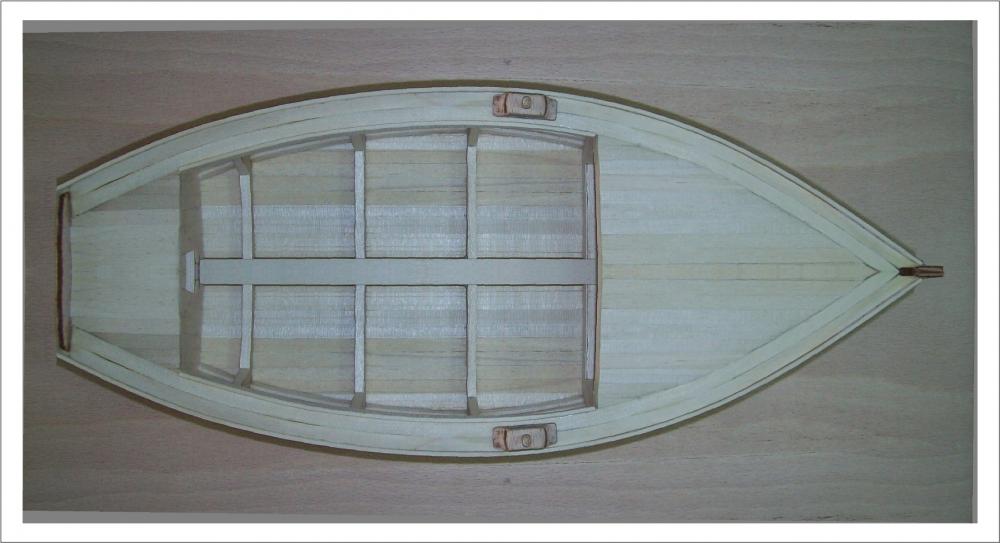
In the end, there is time for the ‘final touch’… this is very important. I have seen many ship models done beautifully, but some of them were much more beautiful than the others… Nice coloring, proper varnishing, cans, rolls of rope, fishing nets, rubber mats on the decks, lamps, lanterns, fishing gear, crates for fish ... and lots of similar things are nice to be seen on the model ... of course, they should be made well … and set to the model in the right way ... so this is the finish you should practice from the beginning…
-
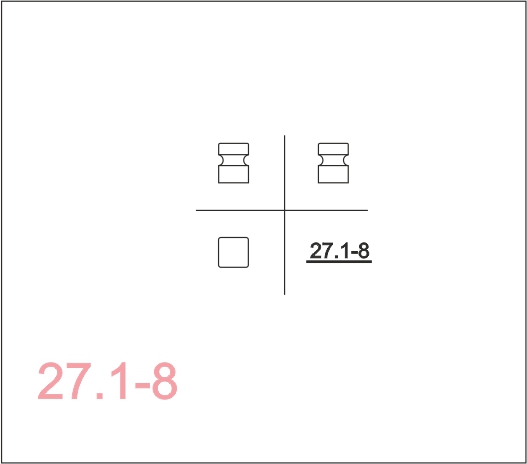
Put bitts 27.1-8 . Make them from 6x6mm lath. If you wish, color and varnish the bitts 27.1-8 , glue them on their places and your model is finished.
-
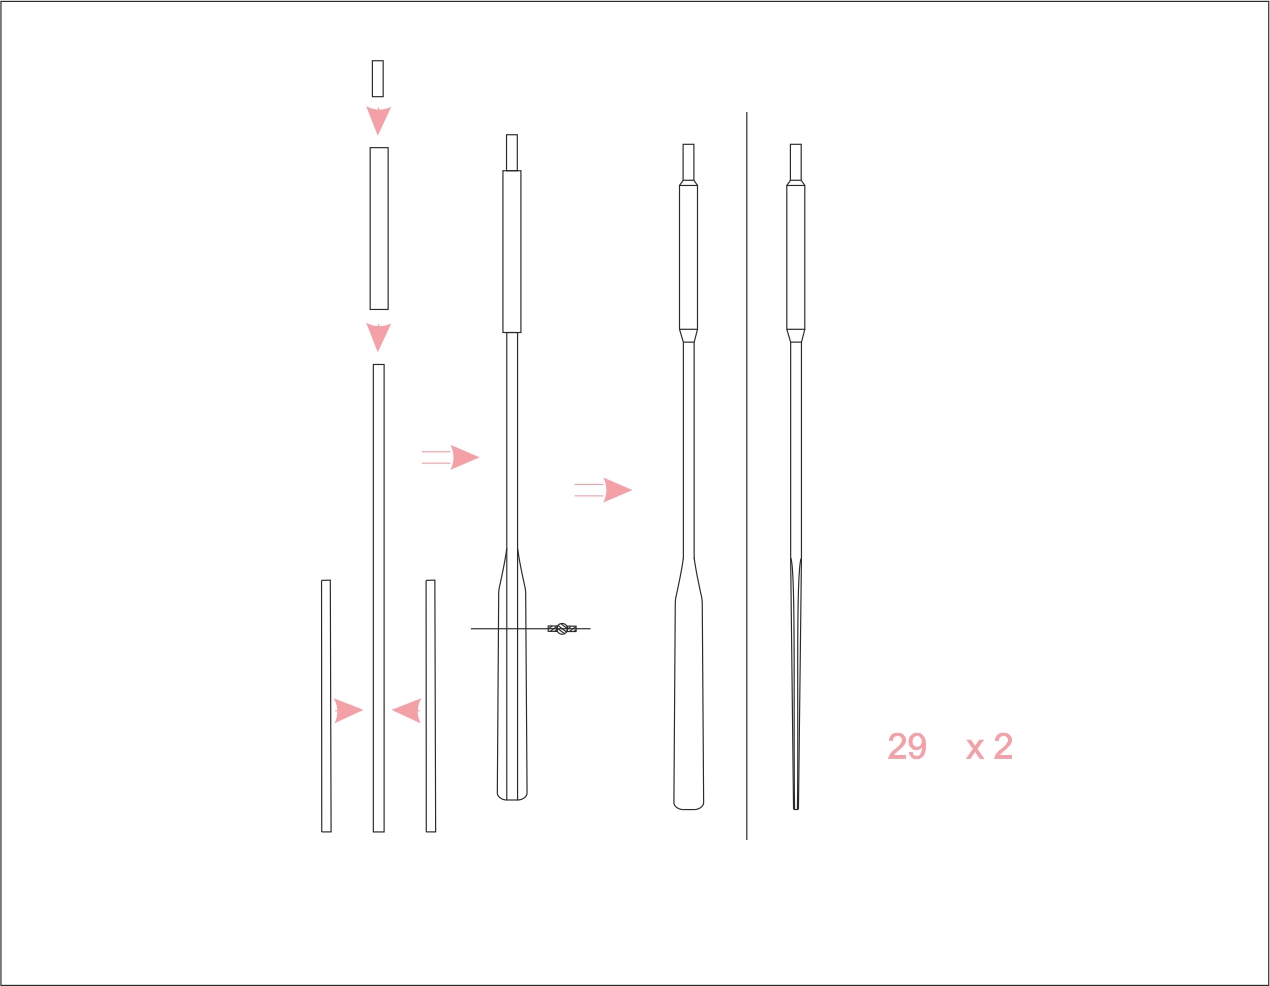
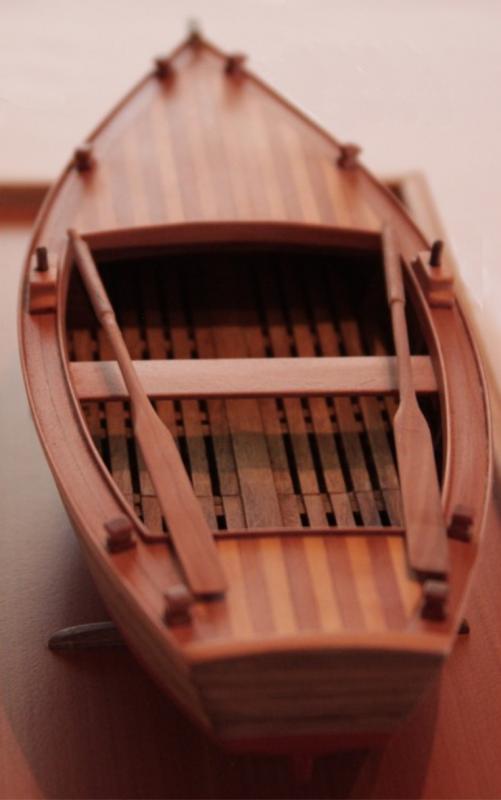
Construct the oars from elements made of round laths glued together. Construct the lower parts of oars, the blades, by gluing the 2,5x1,5mm laths to the round parts of the oar. Make the2,5x1,5mm laths of 5x1,5mm laths. Grind the blades until you get regular shape.

-
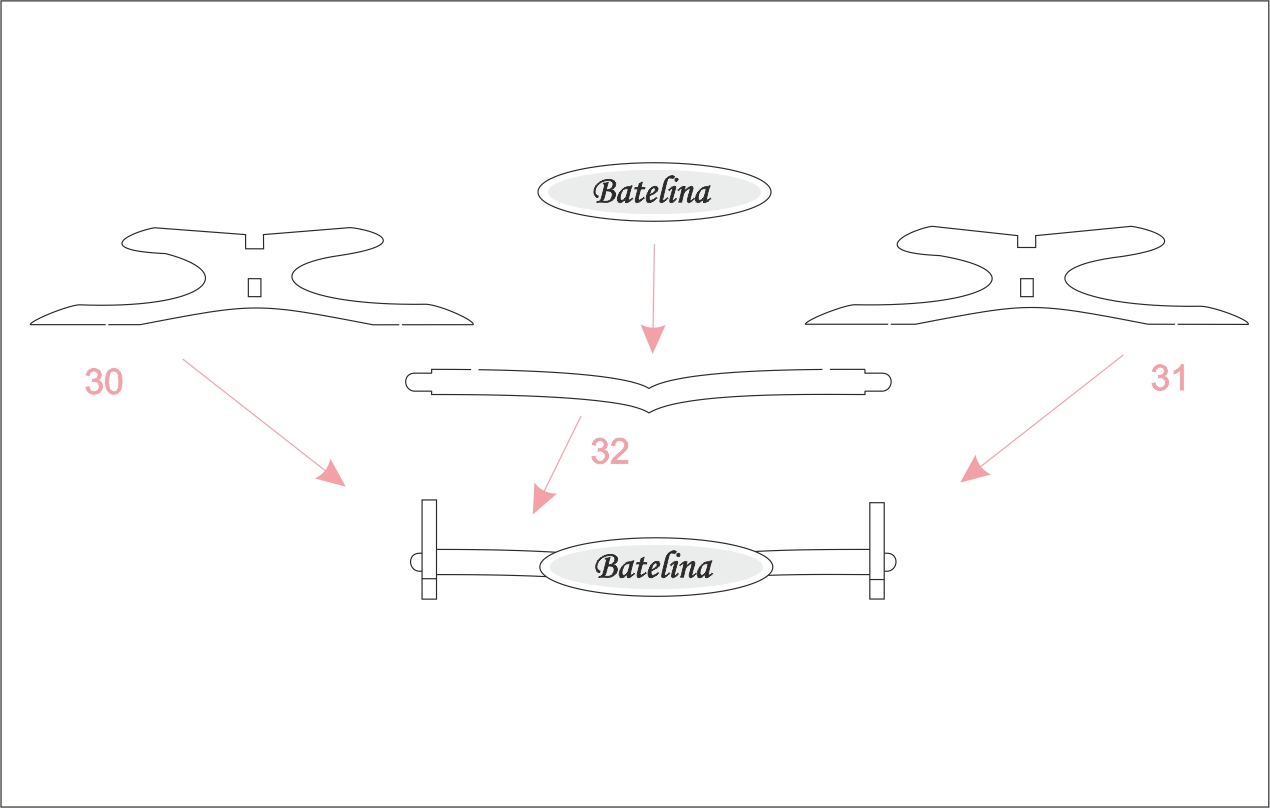
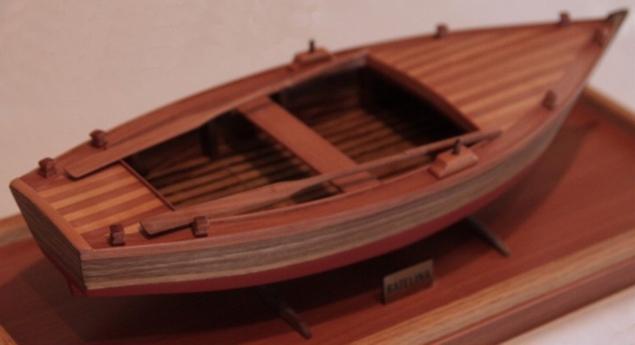
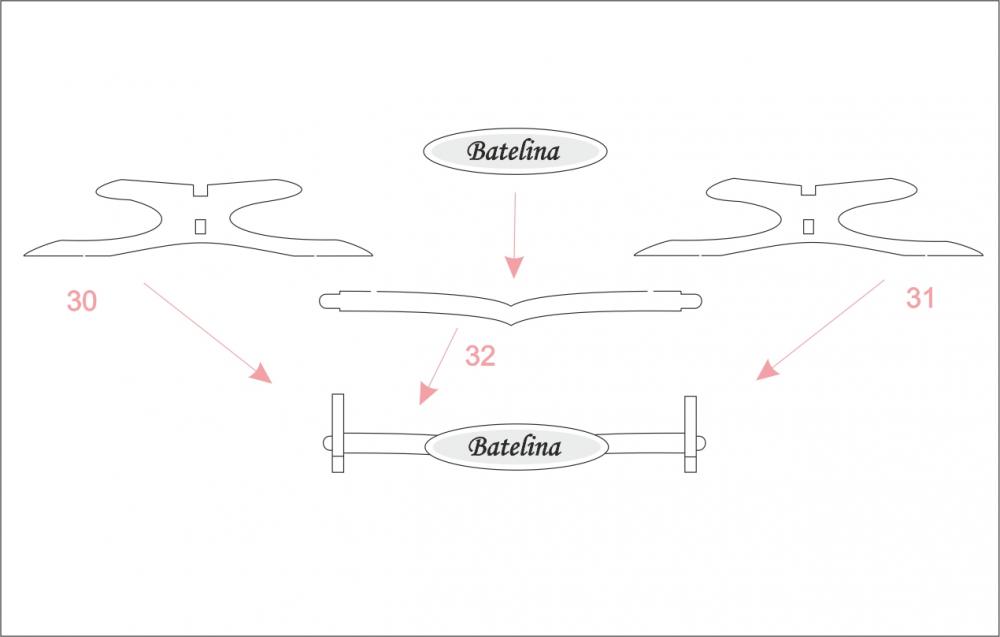
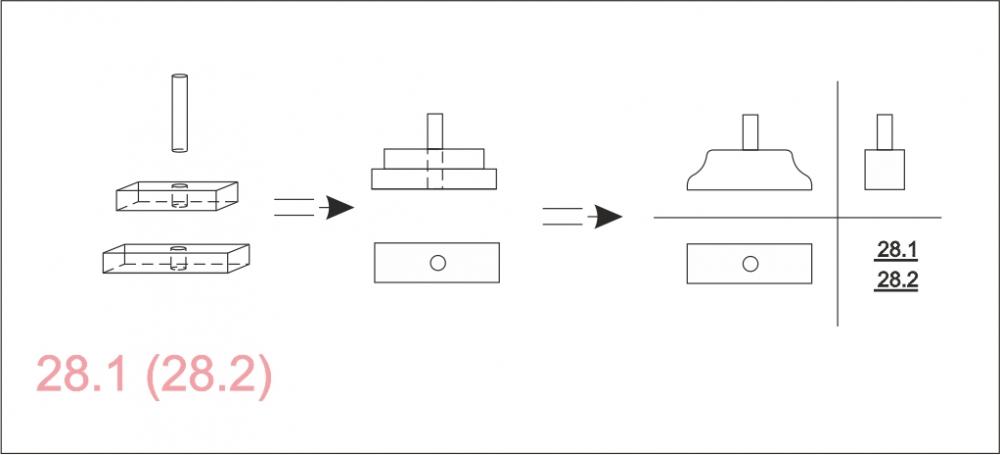
Construct the model’s stand, the pedestal, using elements 32, 31 and 30.
-
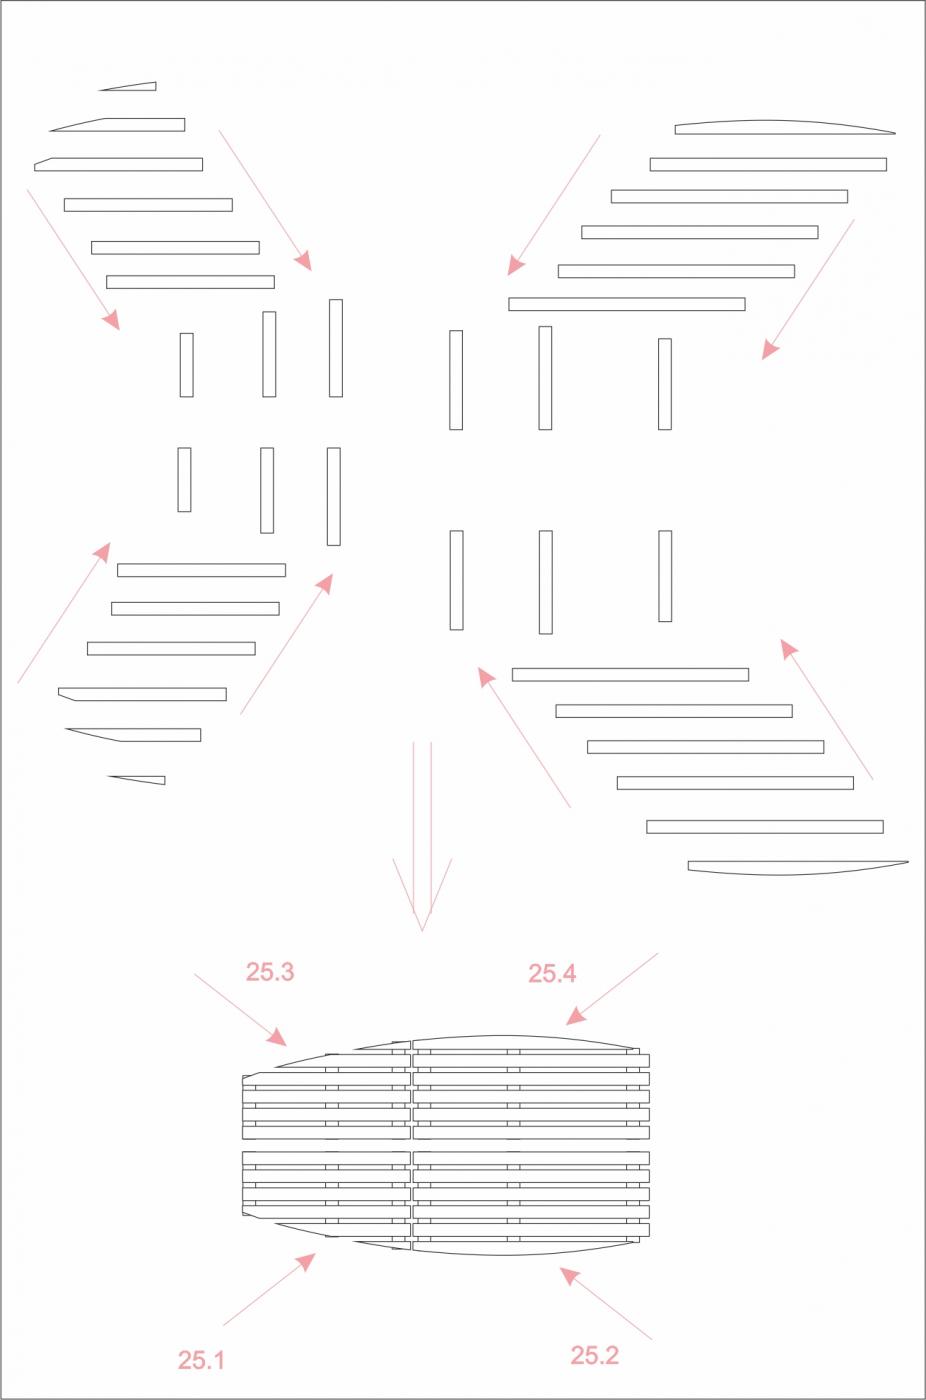
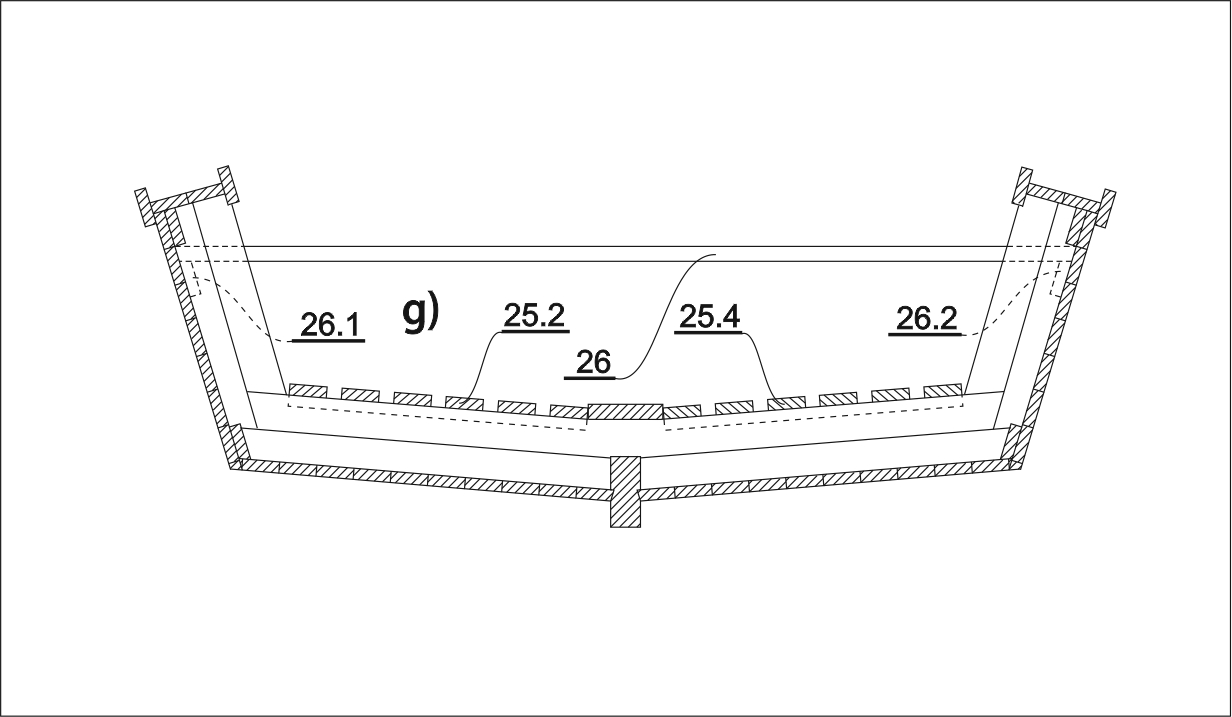
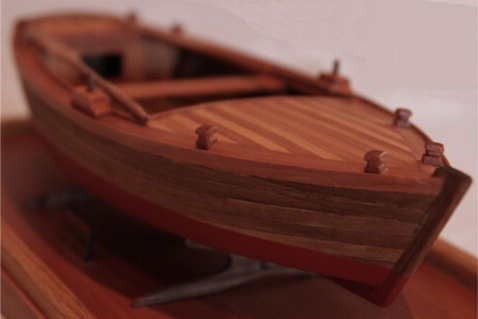
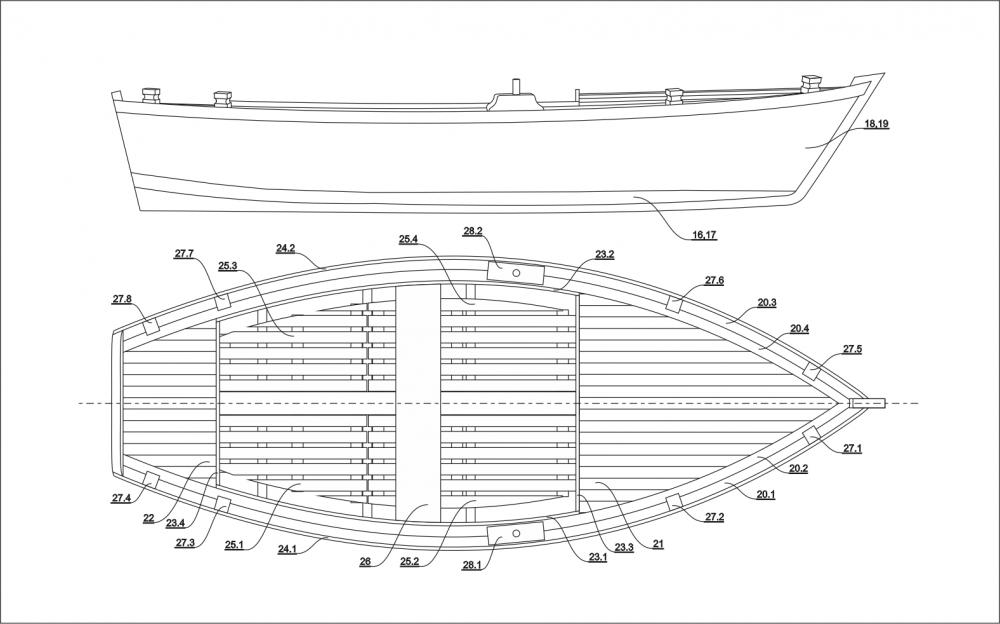
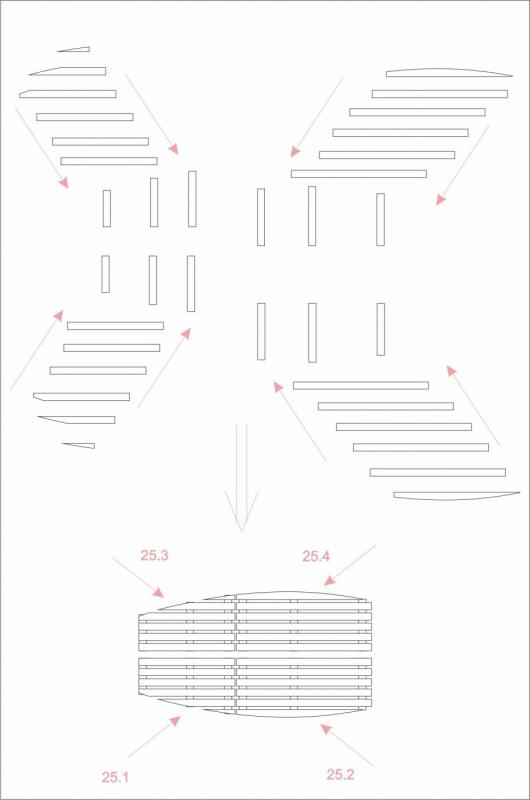
In order to make your model even more beautiful and if you do not intend to color it, you can plank the keel with 5x0,5mm laths. Do this horizontally. Construct gratings 25.1, 25.2, 25.3 and 25.4, following the drawing, as well as thwart (seat) 26, made from two glued 10x2mm laths. If you want to color the model, now is the time. You can also varnish it, using transparent varnish, but first you have to fill every hole in the planking using wood colored putty from the front side, grind and polish everything so the wood can be seen properly. Do the same with gratings 25.1-4, thwart (bench) 26, and later with the pedestal and oars. So, this process of the coloring and varnishing the model is always the same, so I will repeat it: Models of ships should be painted so it does not shine. Use acrylic paint and an acrylic colorless matt varnish. Here's the procedure: first polish a model with sandpaper. Then coated a mixture of 40% linseed oil and 60% thinner and immediately wipe with a cloth. When dry, paint it as desired and let everything dry completely. Re-sand and polish as needed and paint everything one more time. When everything is dry again, spray with colorless matte varnish on two occasions, between which is enough to wait twenty minutes. So you will get perfect colored model. Rarely it happens that, after painting with colorless matte varnish, on wood the appearance of tiny fibers that protrude and look ugly. If this happens, just re-polish the element and re-spray matte varnish. Fiber will disappear. Put the gratings and then glue the thwart and put two girders 26.1 and 26.2 (5x1,5mm lath) under it.

-
Hi Bender, looking at work so far, this will be a nice model ... I watch interested in it .... Regards, Zoran
-
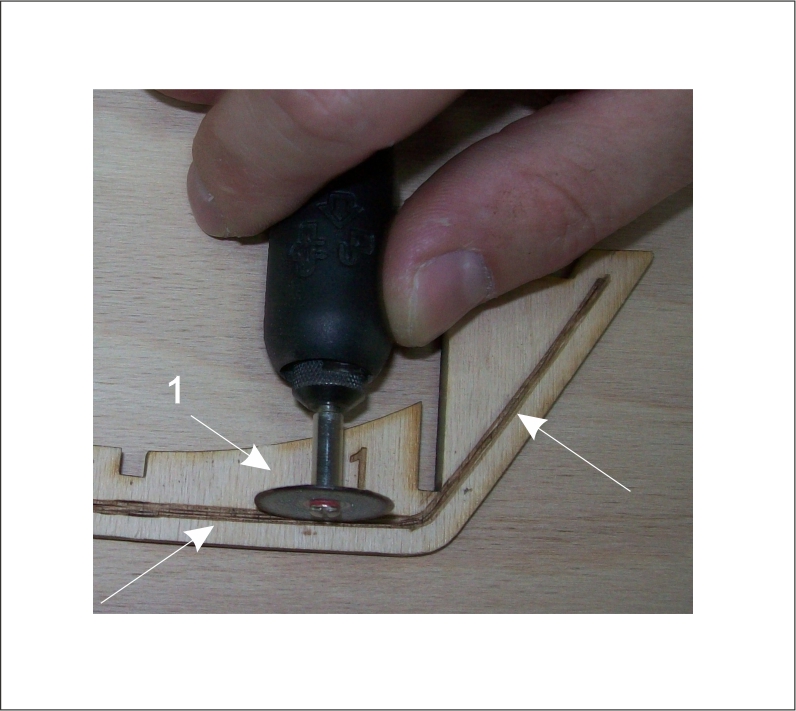
Put oar tholes 28.1 and 28.2. Make the oar tholes 28.1 and 28.2 from cut elements made from 4mm panel and 3mm round lath. Glue both parts of the oar tholes together and grind them until you get the final shape. Insert 3mm round lath into the hole. If you wish, color and varnish the oar tholes 28.1 and 28.2, glue them on their places.
-
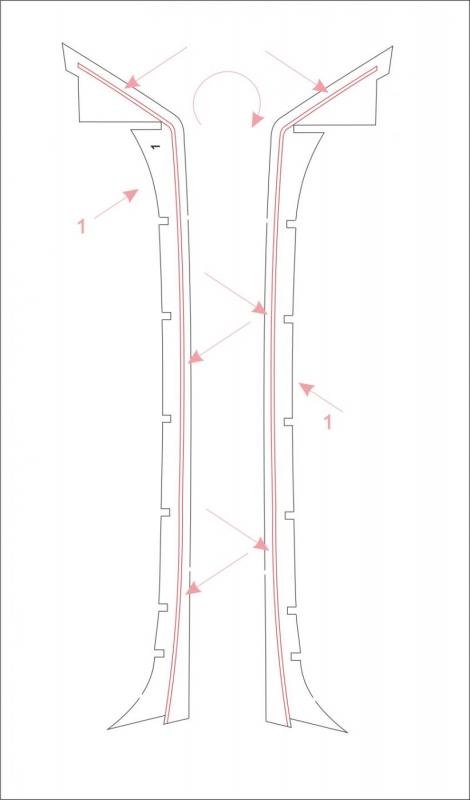
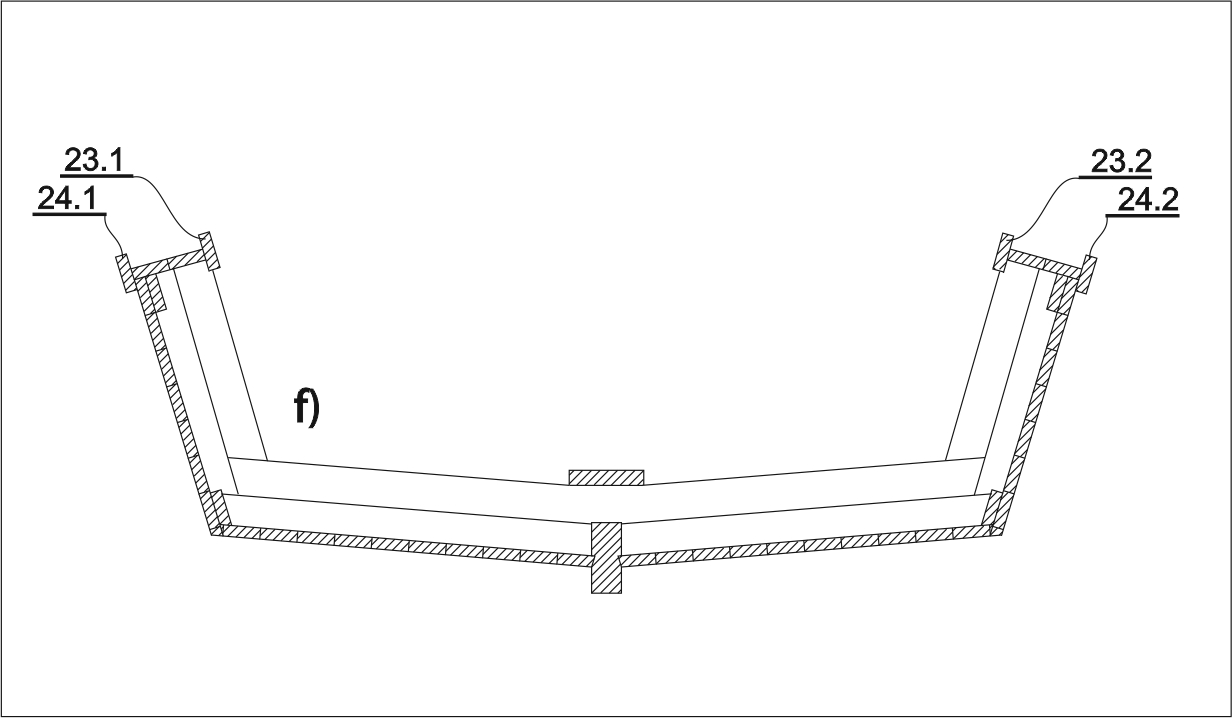
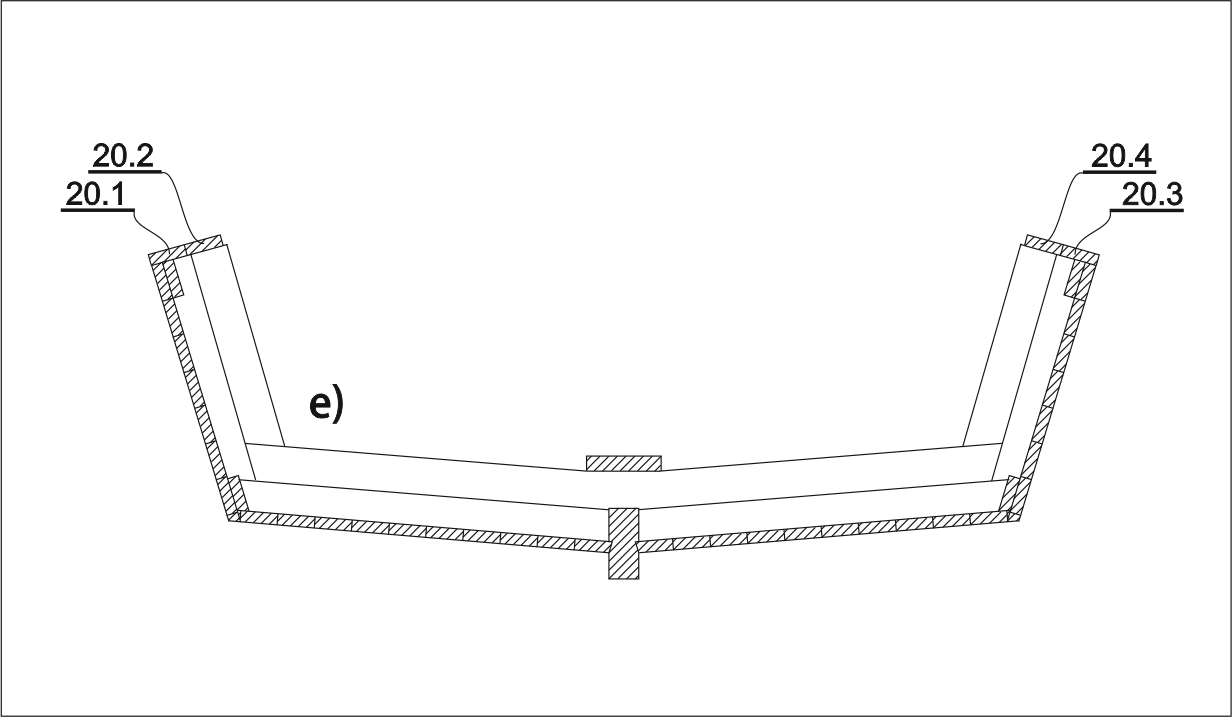
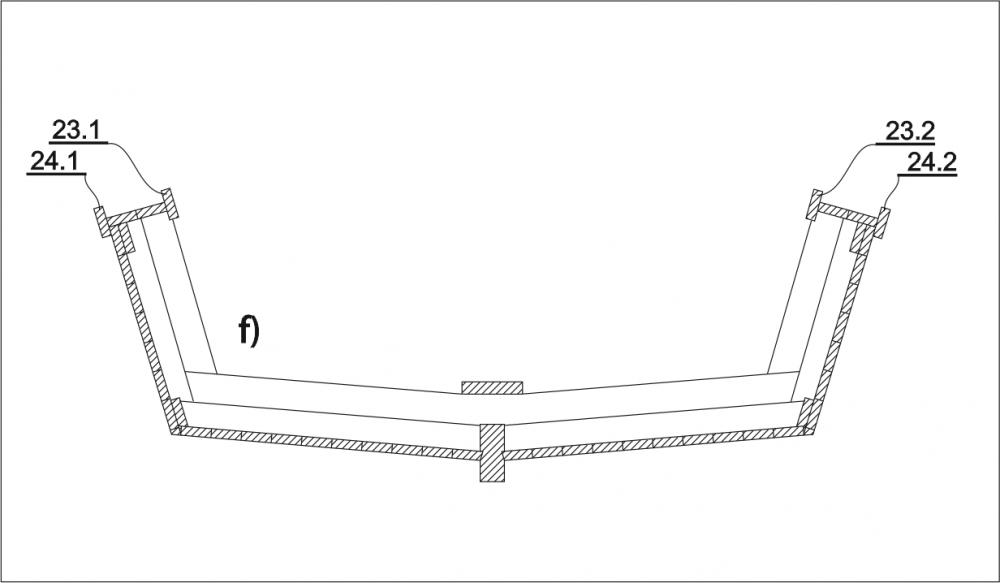
Continue decking bow 21 and stern 22. Always leave laths protruding a little bit towards the middle of the model, then, when you have finished decking, level them using scalpel and abrasive paper on a wooden block. If you have planked the frames with 5x0,5mm strips (laths) before, now you have to carve the upper part of the frames to make some place for the laths 23.1 and 23.2, so they could lie tightly to the sides of the rails 20.2 and 20.4. Glue laths 23.1 and 23.2 so that they protrude 2 mm above laths 20.2 and 20.4. Bend, cut and glue laths 23.3 and 23.4. Do the same with laths 24.1 and 24.2 which should also protrude 2 mm above laths 20.1 and 20.3. Work them on the stern.
-
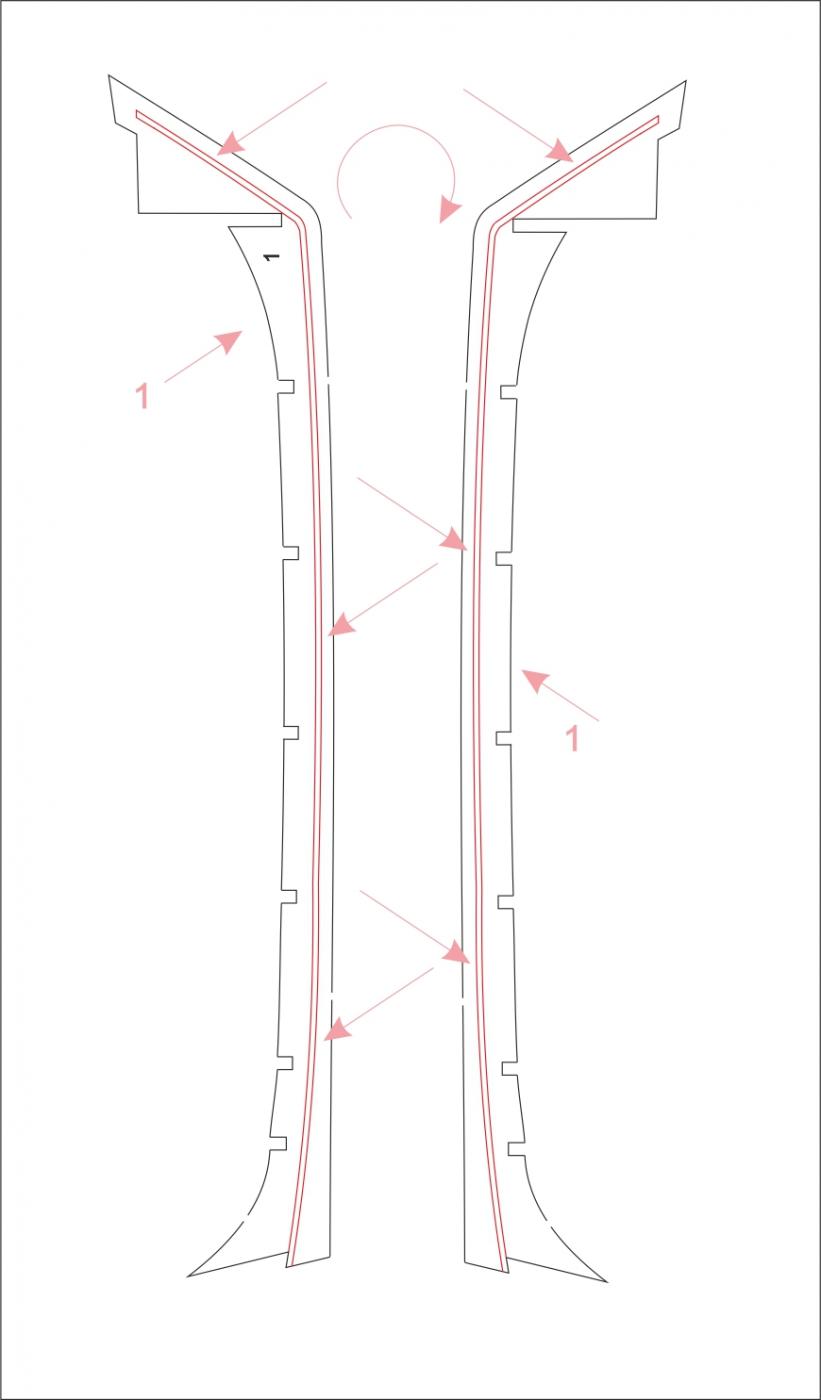
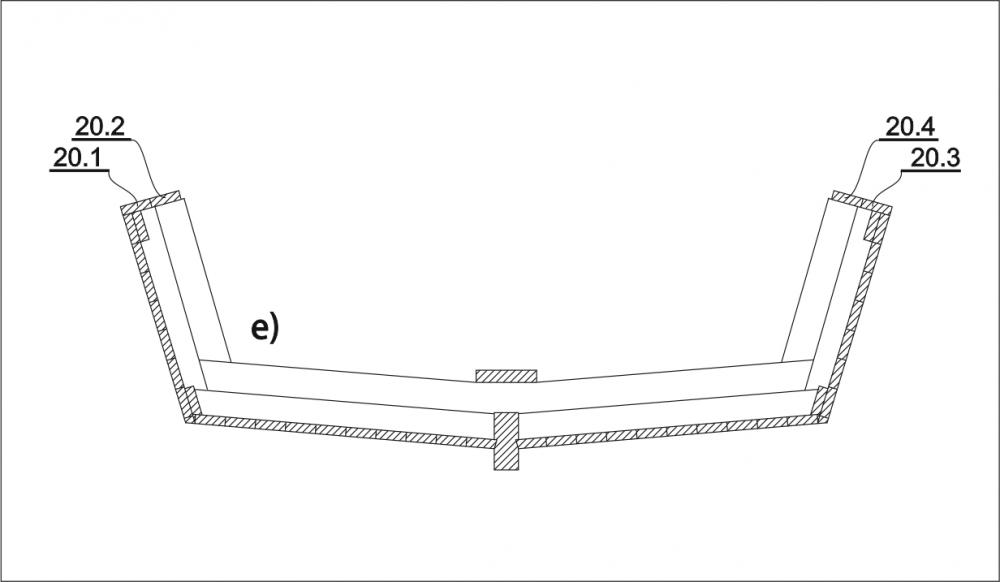
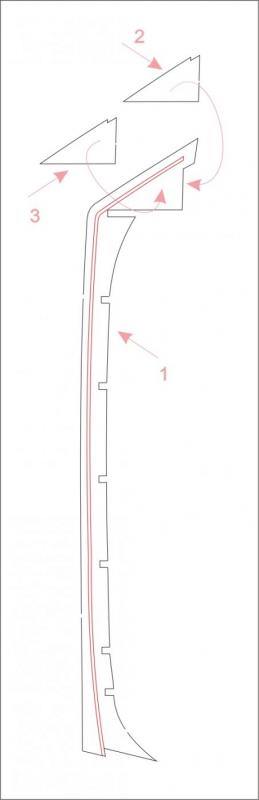
It is the time to deck the model. You use the same 5x1,5mm laths. Use the rest of the planks wherever you can. First, glue laths 20.1 and 20.3 to the edge and then laths 20.2 and 20.4 next to them, adjusting them well to the bow and stern. These laths are the rails of the model. Do not leave any holes between them. These four laths are not easy to bend in the required form. To do this, you need to soak them in water and then gradually shape and glue them on the place. This is not easy to succeed on the first try. All you have to do is to repeat this action of soaking and bending as much times as needed to form those laths into the required form. After you succeeded this and glued them to the model, sand their inner and outside edges to the form of the hull.
-
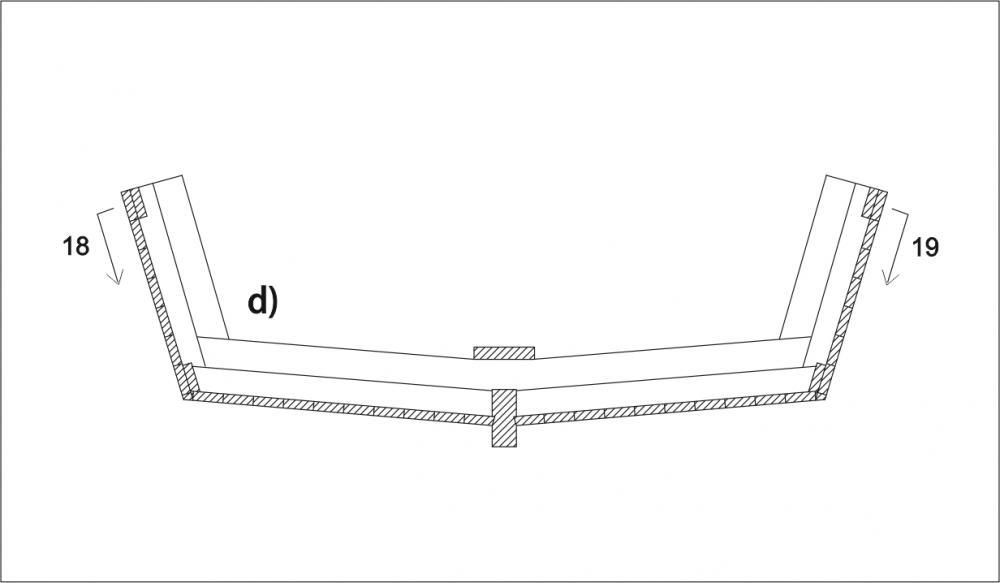
Now, plank the sides 18 and 19. First, glue the first lath on lath 14 or 15, so it protrudes 1 or 2 mm above it. Always adjust the inclination of the bow on a lath before gluing, then start gluing the lath from the bow to the stern … or glue a lath in the middle of the hull, then adjust the bow inclination and glue it towards the bow and stern. There should not be any holes left. To avoid gaps and holes between the laths, you could slightly sand the upper surface of the lath, so make it snuggle up to the upper one. All the laths should protrude outside transom 11. You will cut and work them when you are done planking, then you will grind all the protruding ends, including the upper part of the ones (1 or 2 mm) that you have left protruding above laths 14 and 15, using sand (abrasive) paper on a wooden block. During the stringing the laths (the planking strips) downward the hull construction, you will notice that the bow frame is higher than the middle frame is. According to this, a very simple way of planking, just fix another lath (the planking strip) to the bow. This way you will fil that space up. When the intarsia of the planking strips is finished, you can grind everything up using a peace of sharp straight glass for example, and some sand paper on a wooden block in the end. Finally, you need to get perfectly smooth and correctly shaped hull. … There is no words to describe this, you just need to do this… it is up to jour skills.
-
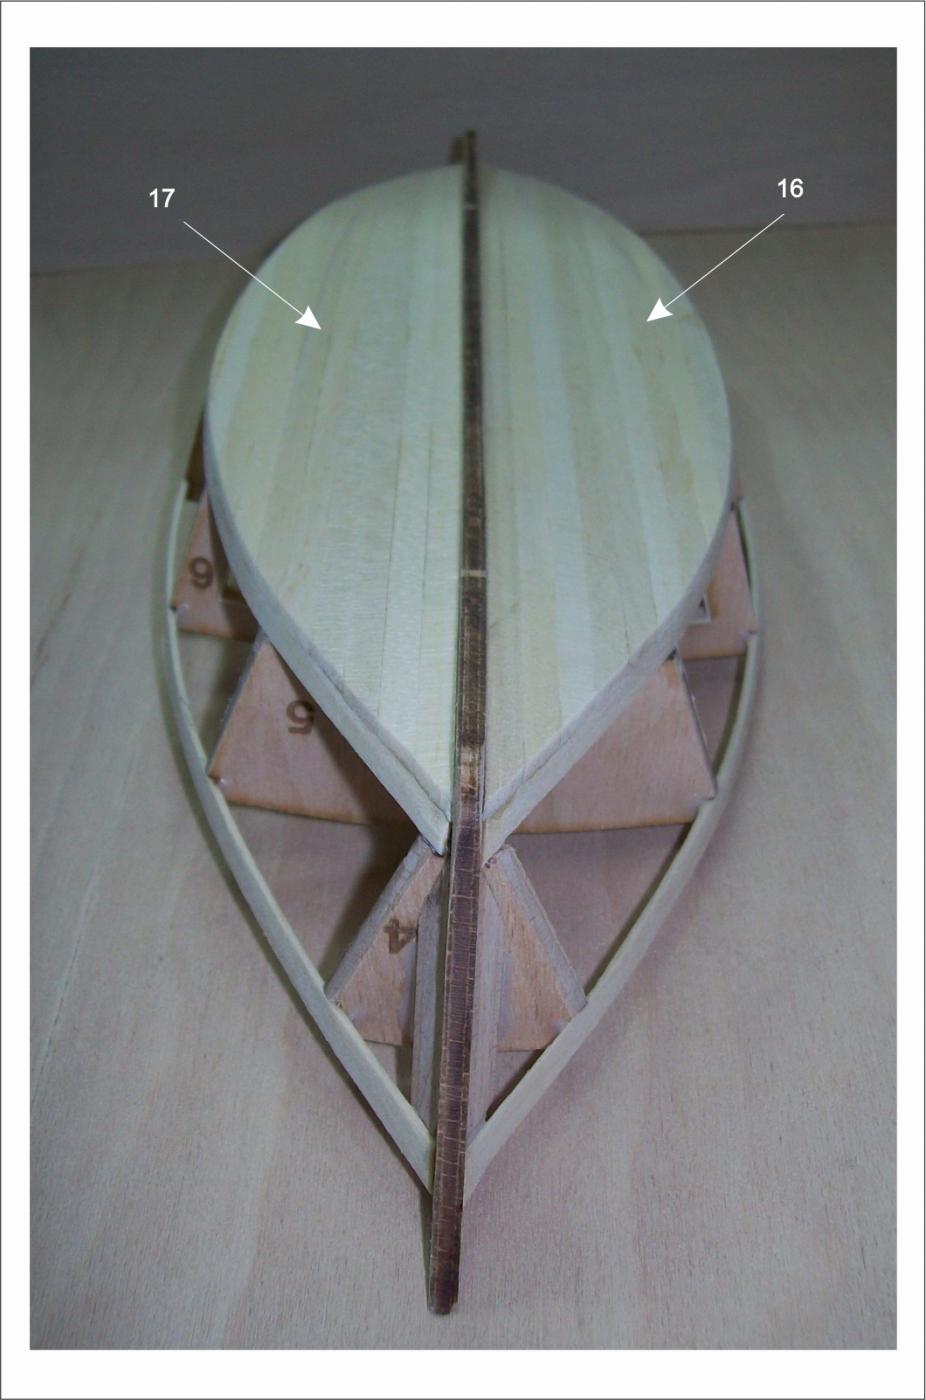
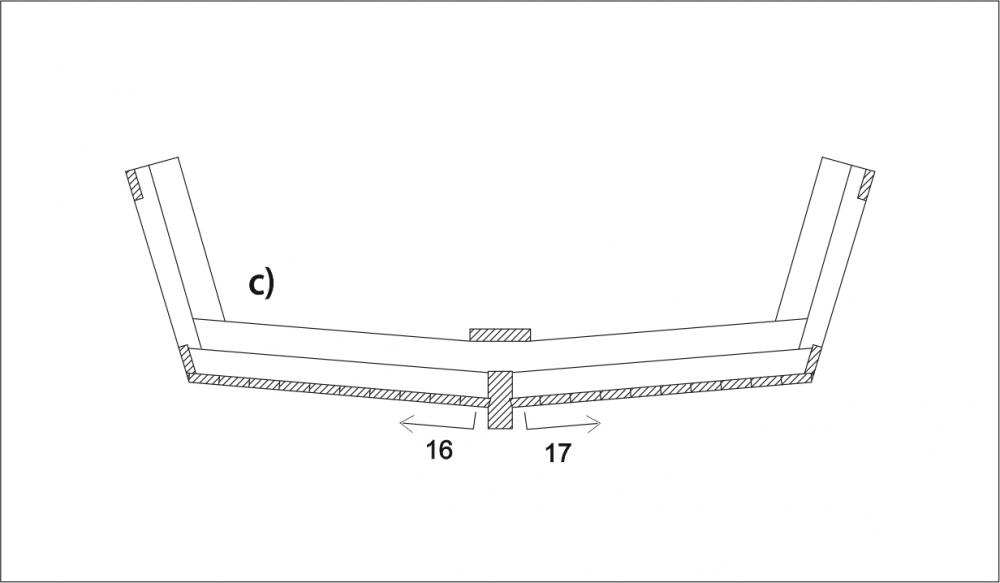
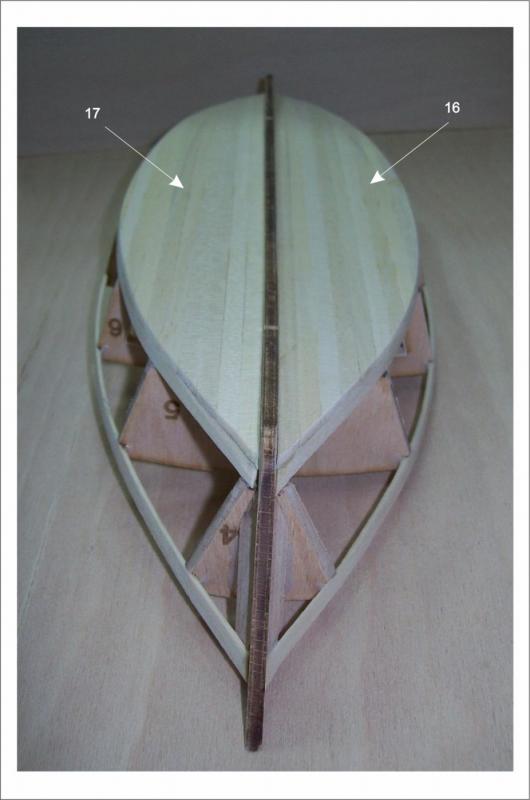
And now the interesting part : the hull planking. This model could be planked in a several ways, but as a beginner do the following : The planking is done with 5x1,5mm strips (laths). First, plank bottoms 16 and 17. Glue the first lath right next to the keel, by inserting its edge into a triangular corrugation, into the rabbet. Glue the next one right next to the first one and so on. Make sure that there are no holes left between them. Leave the laths protruding outside the bottom frame. After you have finished planking of the both sides of the bottom (16 and 17), work the bottom edges using a scalpel and sand (abrasive) paper on a wooden block. Trim and sand the bottom all the way to the laths 12 and 13, following the lines of the hull construction.
-
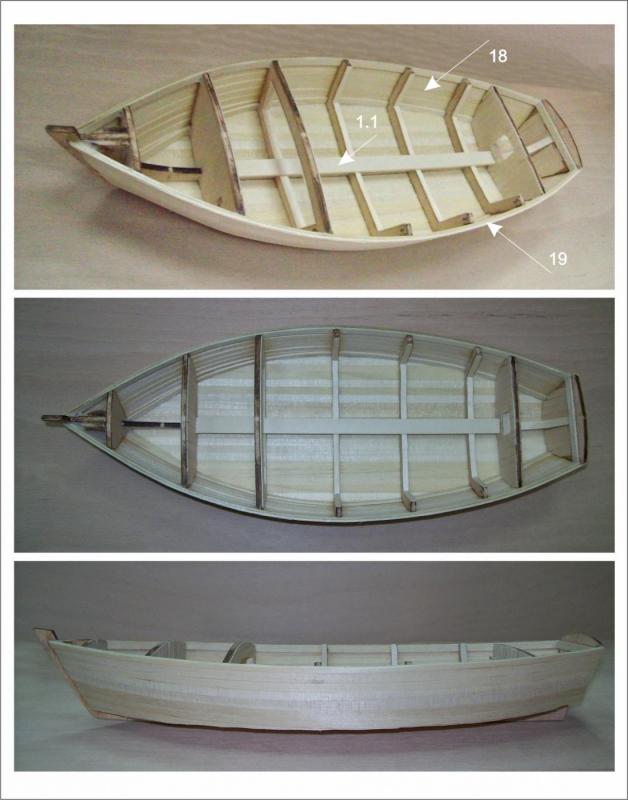
If you want your model look much more beautiful in the end, now is the perfect time for planking all the visible parts of the frames and exterior surfaces of the bulkheads 10 and 6, using 5x0,5mm strips (laths). This is not mandatory, but it will make the model much more beautiful. In the end it should be looking like the frames are made of solid wood, because the plywood will be covered, planked. Cut and glue carefully lath 1.1 (10x2 mm) precisely in the middle of the keel. This is the upper part of the keel, the keelson.
-
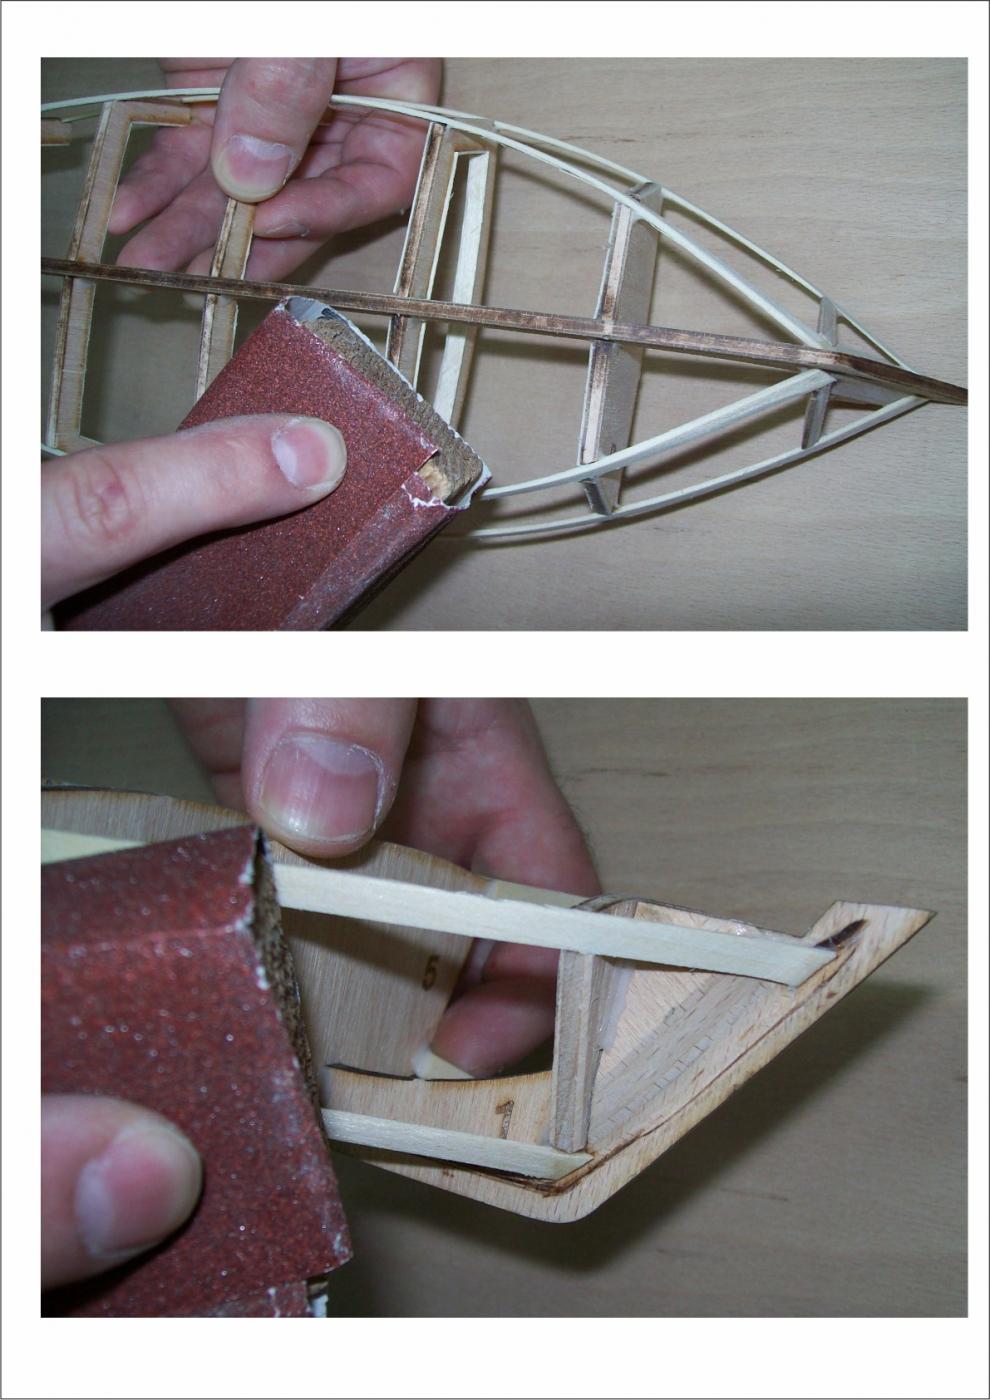
Now the construction of Batelina is finished and you can prepare it for the planking. This means you should grind it completely first: Grind lateral and lower sides of all the frames, so that the planking strips (coating laths) (5x1,5mm) lean uniformly on all of the edges, without leaving any holes, gaps. So, the edge surface of the frames askew by grinding them at the bow and stern to allow the proper fit the strips for planking as shown in the plan. Frames to bow askew so that their rear surface, they are facing the stern, leave untouched. The stern frames askew so that their front surfaces, the ones that are facing the bow, leave untouched. Once again we return to the complete formation of the hull. All the sand to get its proper curves. … In the other words, this was time to do famous and very important ‘fairing’. It is good to use some hand-held power tool for engraving at the first, and then some sand paper on the wooden block in the end… but if you had patient enough, you could do this using a sharp blade in the beginning and sand paper on the wooden block in the end.

-
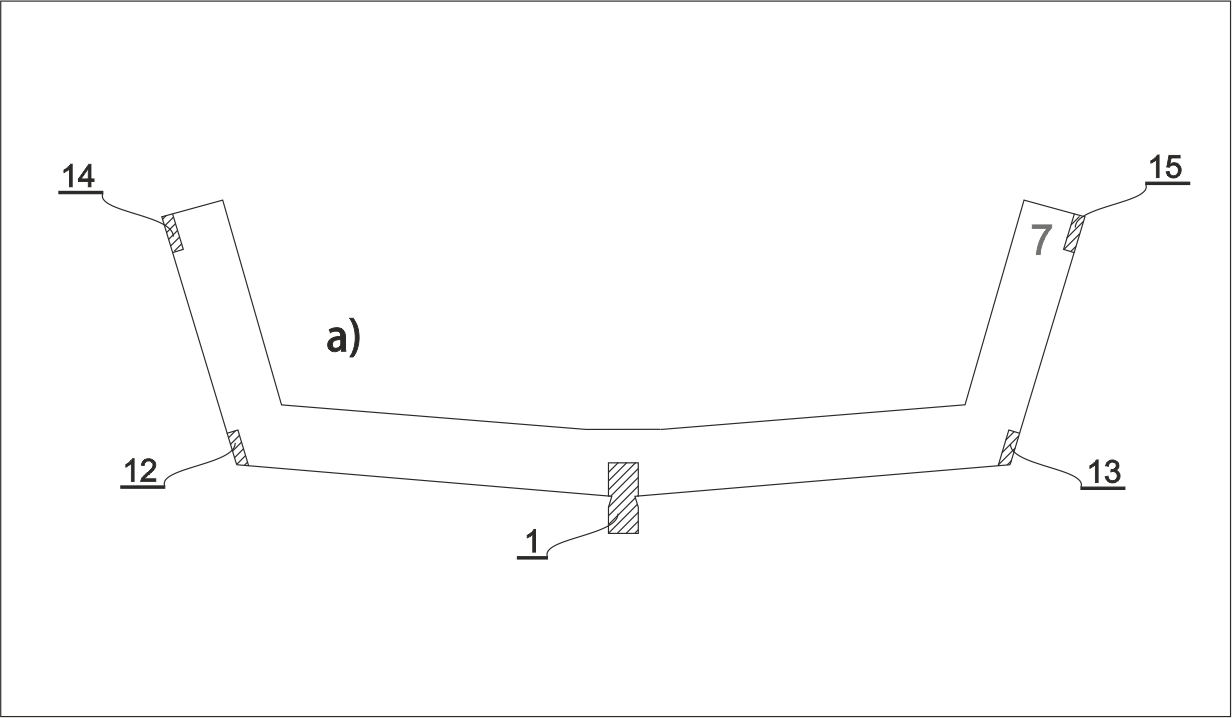
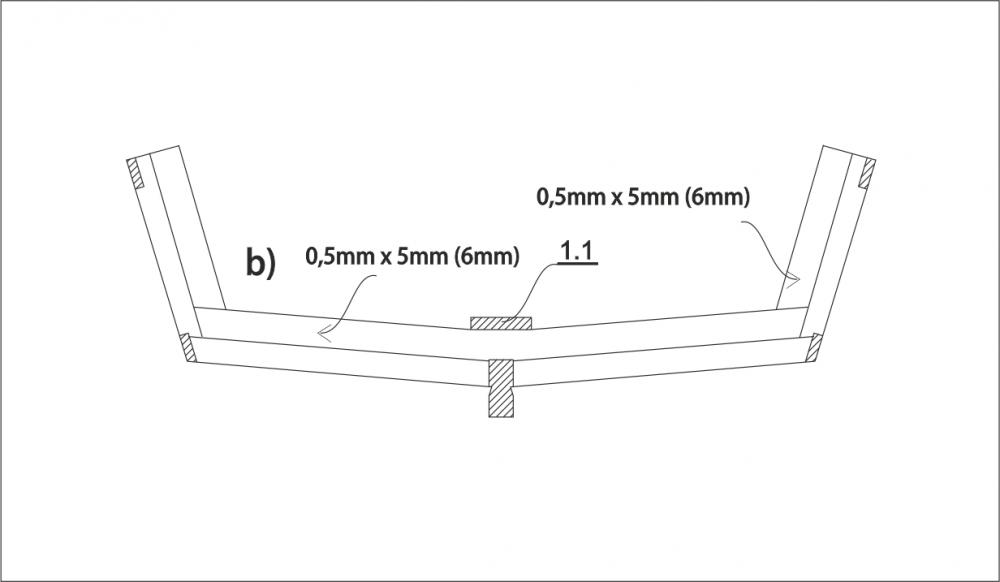
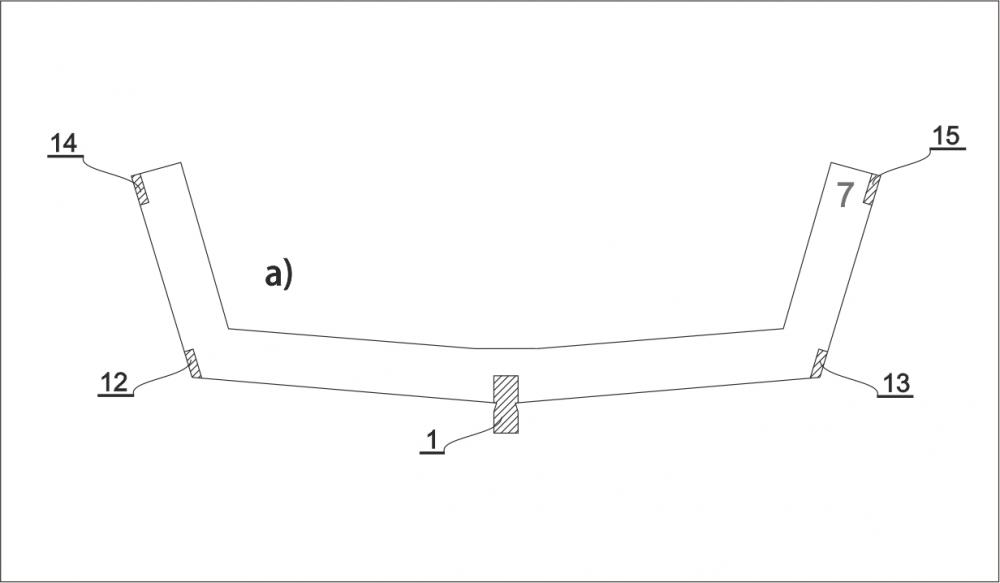
The construction is not finished yet. ... Please, do remember this : - to put the planking to the model, the construction must be very, but very strong, firmly put together. Nothing to the construction must not bend or be moving around. To get this, in this case, you need to put the laths 12, 13, 14 and 15. So, when the glue to the frames and keel get dried, adjust laths’ corrugations 12, 13, 14 and 15 on top and bottom of the frames and transom, so that the laths lie properly, without protruding from the corrugations. Do this carefully; cutting the parts of the corrugations (slots) that stay on the laths’ way to lie properly. You could use a sharp blade, as well as the electric engraved tool. Another very important thing if following : creating the model’s work stand : Create a work stand in which the model will hold while you build it. Use a flat board as a base, and two flat bars that attach to it, as a guide to the keel. It is good to make even the stem carrier and transom carrier , also of straight bars that attach to the lower, the horizontal bars. Complete stand for development models should be stable. Model must stand tightly. Must be set so that the keel and the posts are vertical to the base. The only way you will be able to work properly. But this model is so simple for complicated work stand, so you just place the model into a keel clamp which can be made from two straight laths, with a keel between them, all squeezed with a cramp. This is done in order to make the keel perfectly straight for the next phase: Adjust the front part of laths (5x1,5mm) 12, 13, 14 and 15. Their frontal part must be adjusted for be laid to the stem post, to the front of the construction. You should cut them to the sharp angle. When you make sure you cut them properly, glue them. First, glue the laths at the bow, by squeezing them with clamps, and when the glue is dry, glue them again in all the slots (grooves). They should protrude outside transom 11, and when the glue is dry, level them with its surface using a sharp blade. Level them with the transom 11 by sanding, using sand paper on the wooden block.


-
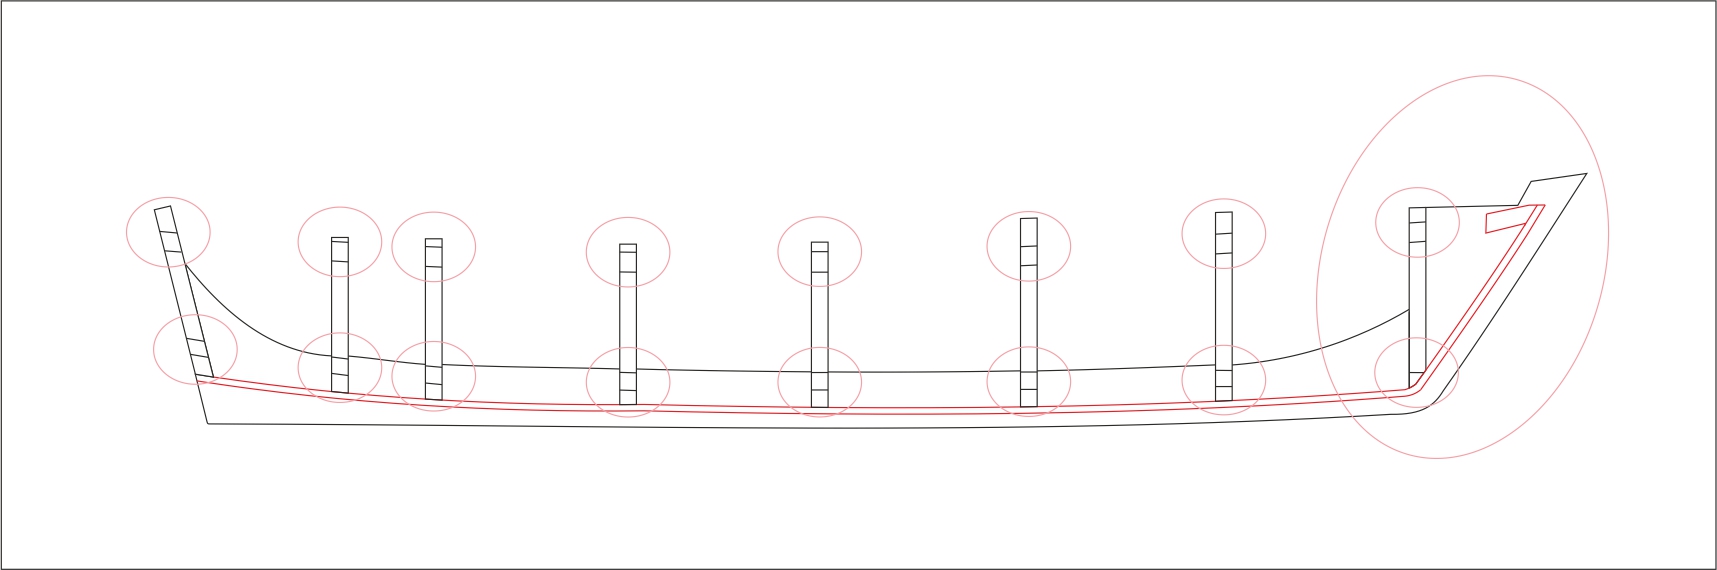
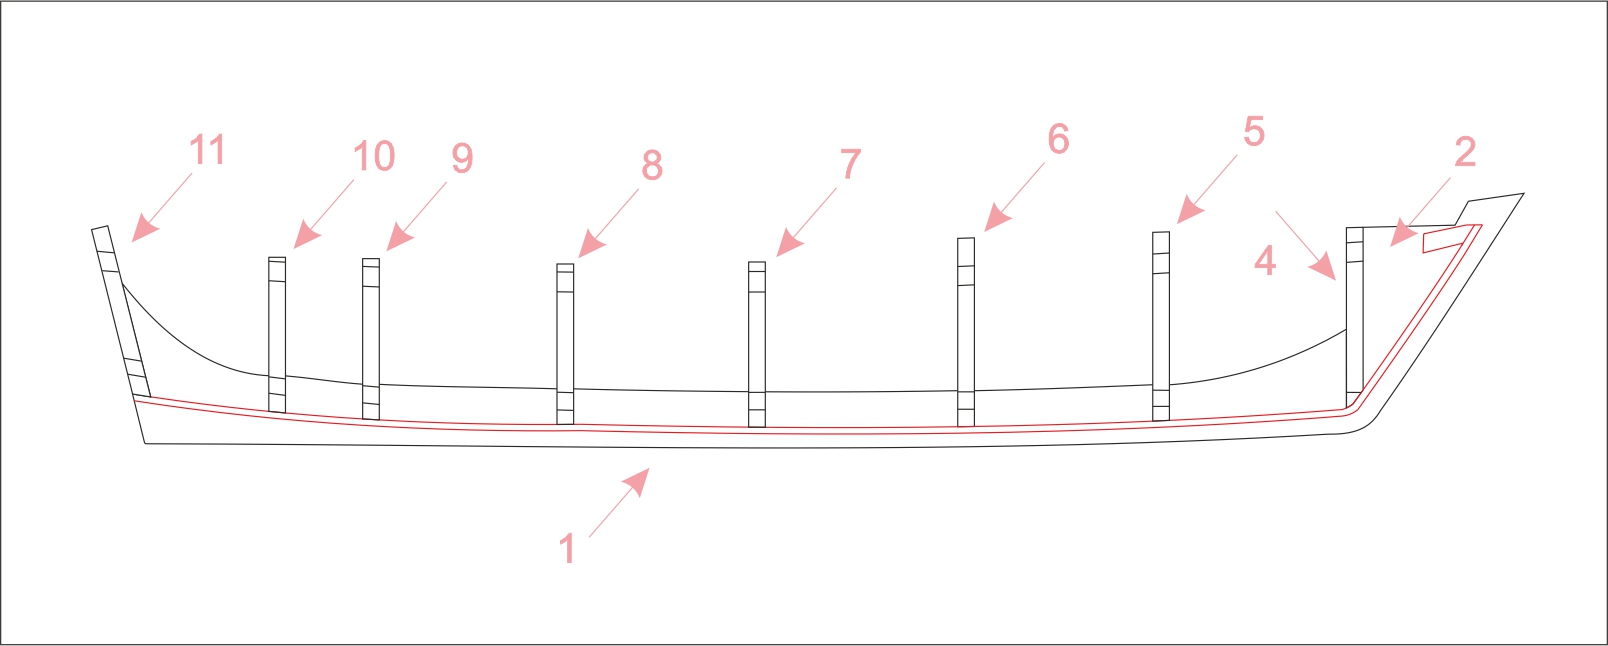
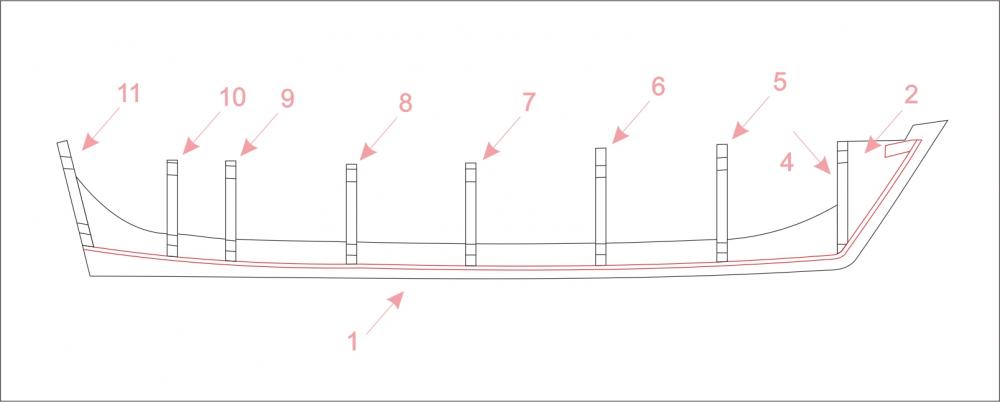
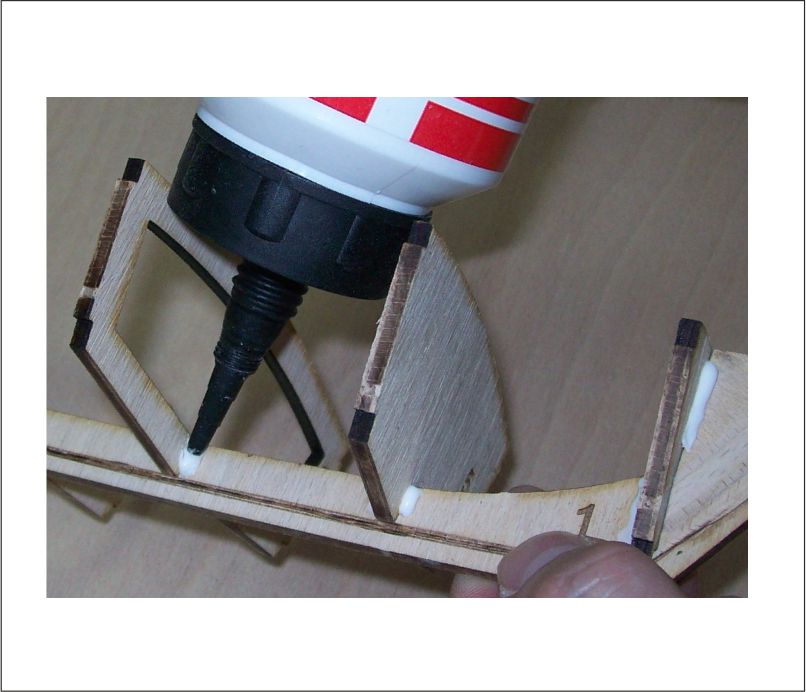
Once, you have finished the filler blocks 2 and 3, it is the time for setting the frames (4 to 10) to the keel 1 and the transom (11)… at the first you have to check out the slots on the keel 1 and those into the bottom of the frames 4-10 . They should be clean and squared. Do not grind them and do not clean the blacken areas onto them unless you notice they are not ok. What does it mean they are ok or what it mean they are not ok ? so it means this : this slots are ok if they are squared perfectly, with no any dirt or tiny fiber into them. This means they are perfect and you should not touch them. Other ways, this slots are not ok if they are not squared perfectly and if there is some dirt into them, or if there are some tiny fiber into them. Now you must clean them with a sharp blade and square them to become clean and squared perfectly. The other thing you must do before mounting those elements is to check the deepness of the slots. Compere the matching couples and check their deepness. Imagine how they will be looking like when mounted together. If you see they will match to each other you can approach to the other step : setting the elements together placing all the frames (4-10) into their corresponding corrugations. The first you will notice is that those matching slots are very tight. This is the way of the MarisStella producing way. To put the frames to the keel 1 you will need a light hammer. You need to knock the frames to the keel literally, using a light hammer. The process is finished when the lower surface of the slot on the frame is firmly touching the upper surface of the slot of the keel. Do not use any glue jet. When you have put all of the frames 4-10 to the keel 1, check-up the entirely construction necessarily. Use the draft all the time. The construction must be exactly the same as the drown one is. If not, it means you have mistaken somewhere. In this case you must check up all of the details until you find where the mistake is and you have to fix the problem. The construction must be exactly the same as the drown one is. When you make sure everything is all right, that the construction is absolutely the same as the drown one, apply the glue to the spots of the contact between the frames and the keel. Put some glue wherever the keel and the frames touch. You can use a brush for this purpose. Glue the transom 11 carefully to its place, to the back of the keel 1.
-
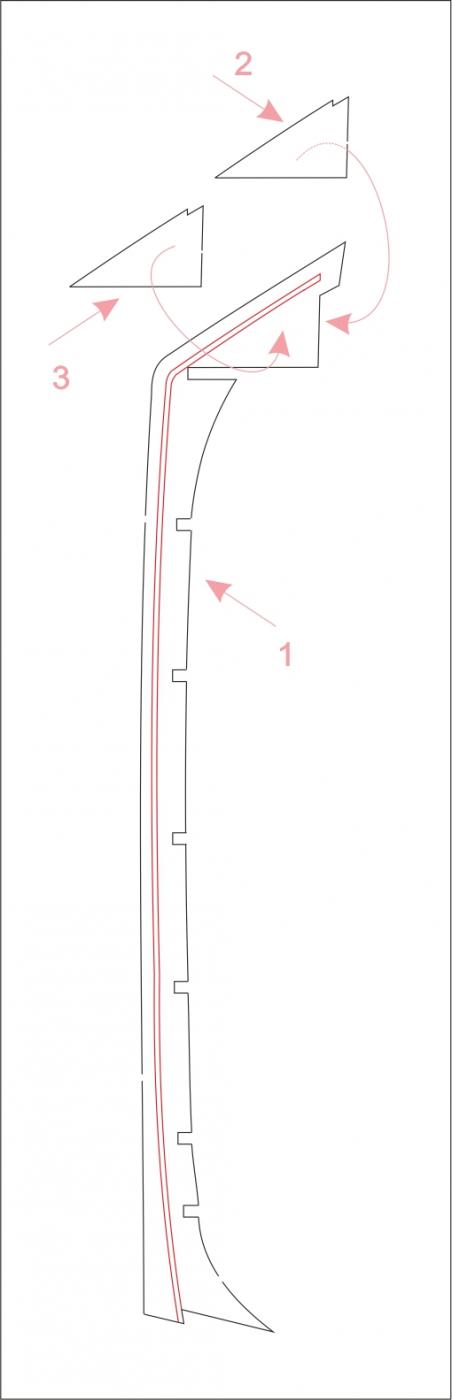
Now, separate the other elements and grind their burned edges. The elements 2 and 3 are the bow filler blocks and they have the task to make firmly base for gluing the planks to the bow. According to this, they must be formed to the required shape by cutting and grinding. Their shape must follow the shape of the ship lines and this is to be ‘felt’ out of the top plan drawing. Be very careful with doing this, the bow filler blocks are very important. They shape the bow and this must be done correctly. There are two ways to shape the filler blocks. The first one to glue the filler blocks to the post and shape them right to the place. The second way is to shape them when they are still separated from the post and to glue them when they are done… Of course, there is always right time to shape them afterwards, to trim them (or to grind them) to the perfect shape. So take the elements 2 and 3 and make the fillers blocks out of them. Glue them to the place, to the stem post, to the top of the bow, before or after shaping them, as you wish. The planking strips will lean at their grinded edges later and the bow will be shaped.
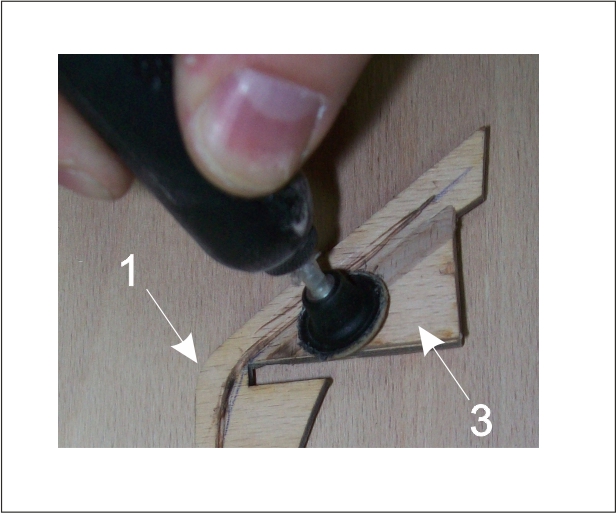
-
............................................................... ............................................................... Before I continue with this presentation, I must point out one very important thing. I almost forgot how old these photos actually were. They are nearly 10 years old. Material that we were using was a beech plywood . Beech is a very hard wood to process and laser needs a lot of power to cut it out. Because of this , the elements look messy and black, burned. In the meantime, we replaced the beech plywood with the poplar plywood . It has bright colors and it is soft wood, laser almost does not burn it at all. These elements now look very nice, clean and tidy. Furthermore, poplar is very soft wood and it is easy to work with... You will notice here the lime strips... In the meantime, we replaced it with walnut strips... We are just about to make the new build log, with new materials. After this important information, I would like to continue with the presentation of the Batelina build ... ............................................................... ............................................................... The construction of the ship could be described in a very simple way : there is a keel with the posts on its ends, and there are the frames attached to it… But in reality it is not so simple. This is the moment when it is not need to say anything more. It is quite enough for the beginning and we should do something about this lovely lady. At the first, separate the keel 1 (the element 1) from the plywood motherboard. Grind its burned edges. You will notice the engraved line on it. It is presenting the rabbet line. Now you have to draw it to the other side, where laser could not to engrave it. You have to do this very preciously. Use the drawing all the time. When you have done drawing, you have to do more heavier part : you have to carve the grove following this line. This grove, the rabbet line, should be triangular and it is used to set the planking into it, firmly to the keel. This way, to the real ships, the planking fits very stable to the keel and it is much easier to seal the connection between the planking and the keel. My recommendation for doing this is, always, the use of electric engravers.