HOLIDAY DONATION DRIVE - SUPPORT MSW - DO YOUR PART TO KEEP THIS GREAT FORUM GOING! (Only 66 donations so far out of 49,000 members - Can we at least get100? C'mon guys!)
×

MarisStella.hr
-
Posts
479 -
Joined
-
Last visited
Content Type
Profiles
Forums
Gallery
Events
Everything posted by MarisStella.hr
-
 'Trupa' is equipped with a small chair (the seat)and a paddle ( an oar). In the nature, the paddle is about 2 meters long ... Let's start with making of this two elements: The elements for making the seat are on the plywood motherboard. Those elements are the elements 11, 11.1, 11.2 and 11.3. Separate them from the plywood motherboard, and then polis the black, burned edges that the laser made during the cutting ... Glue the stretcher 11.3 to the legs 11.1 and 11.2 and then glue all together to the lower side of the top of the seat 11.
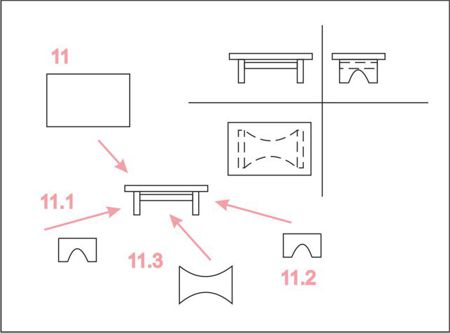
-
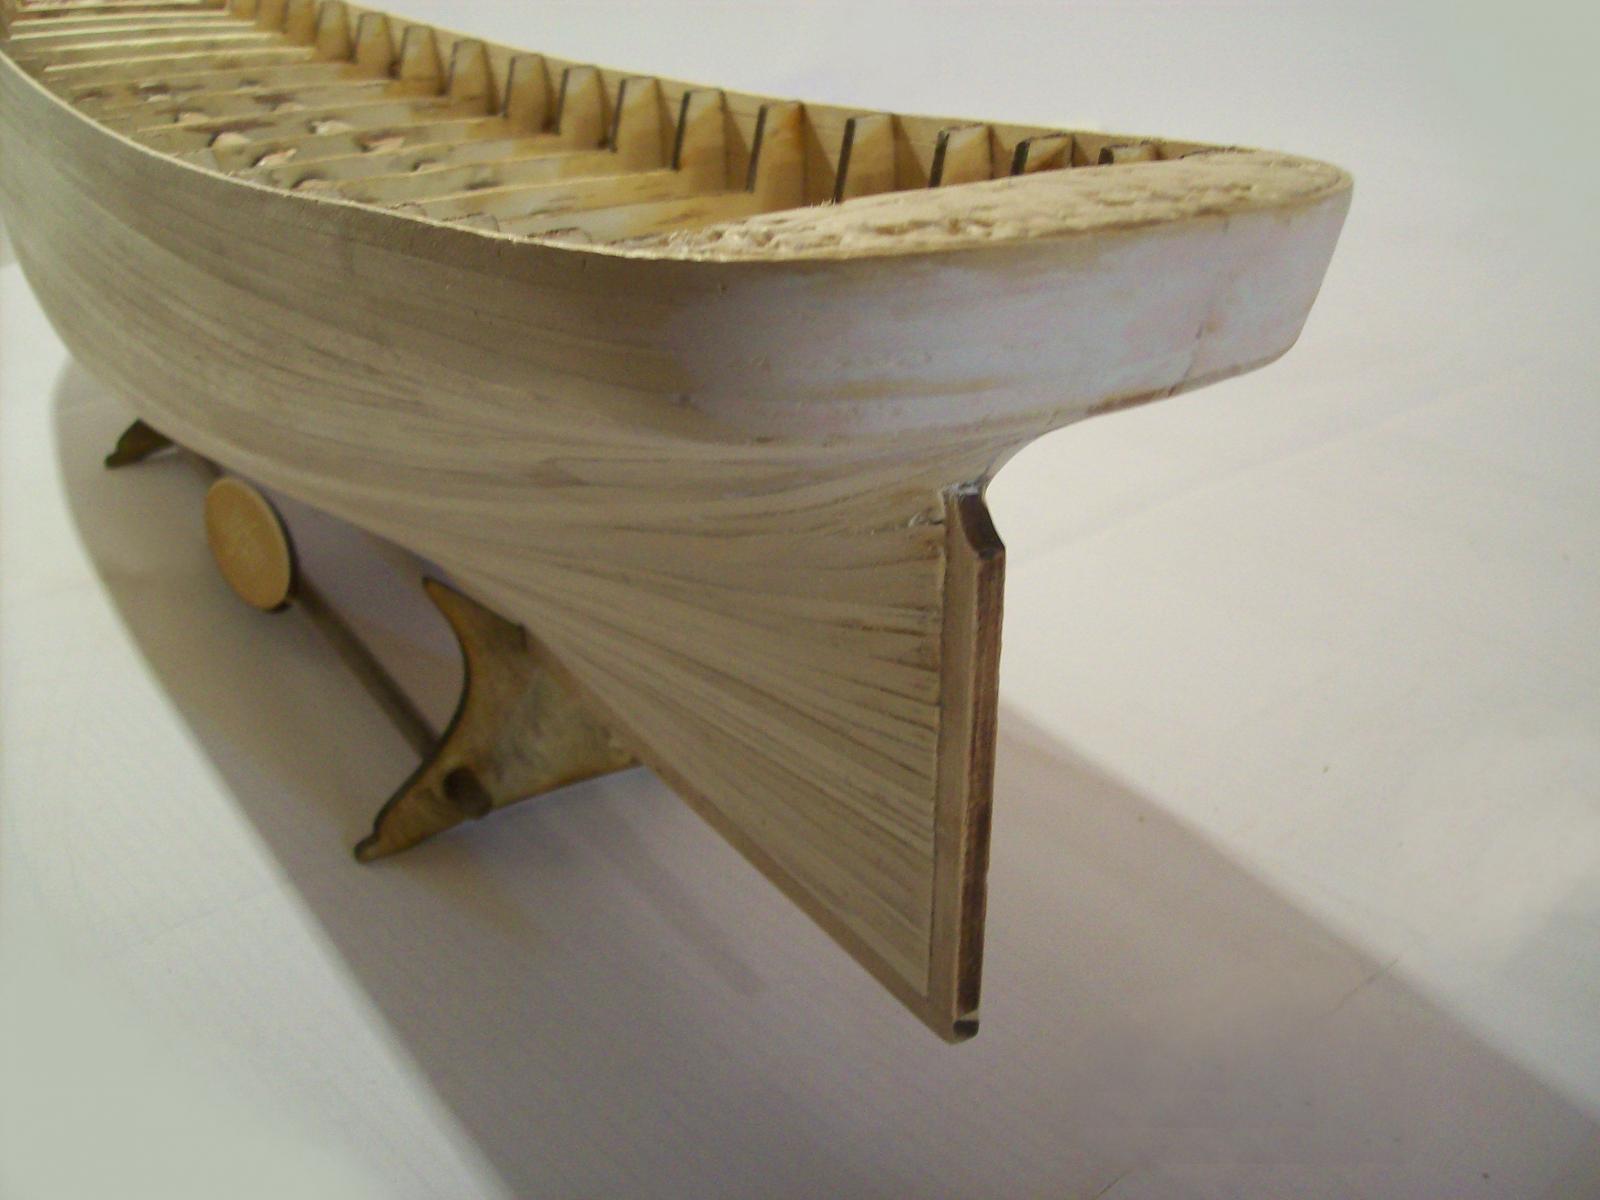
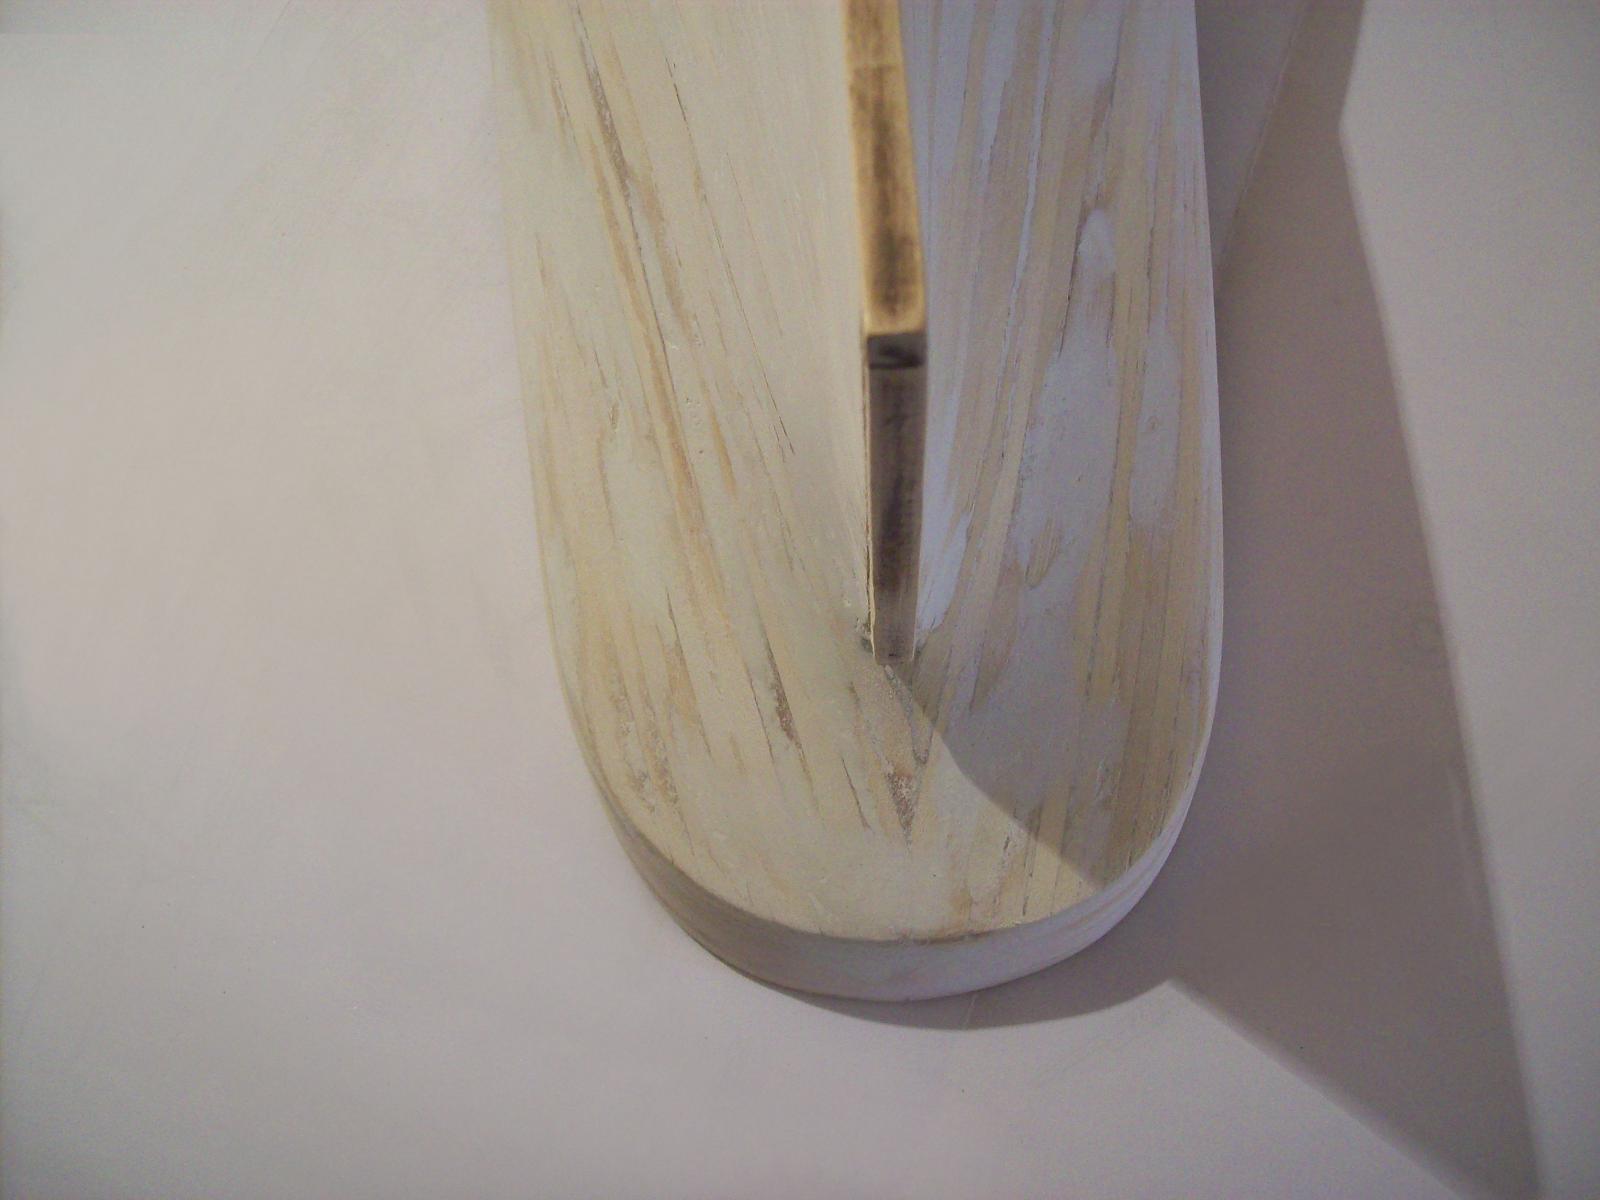
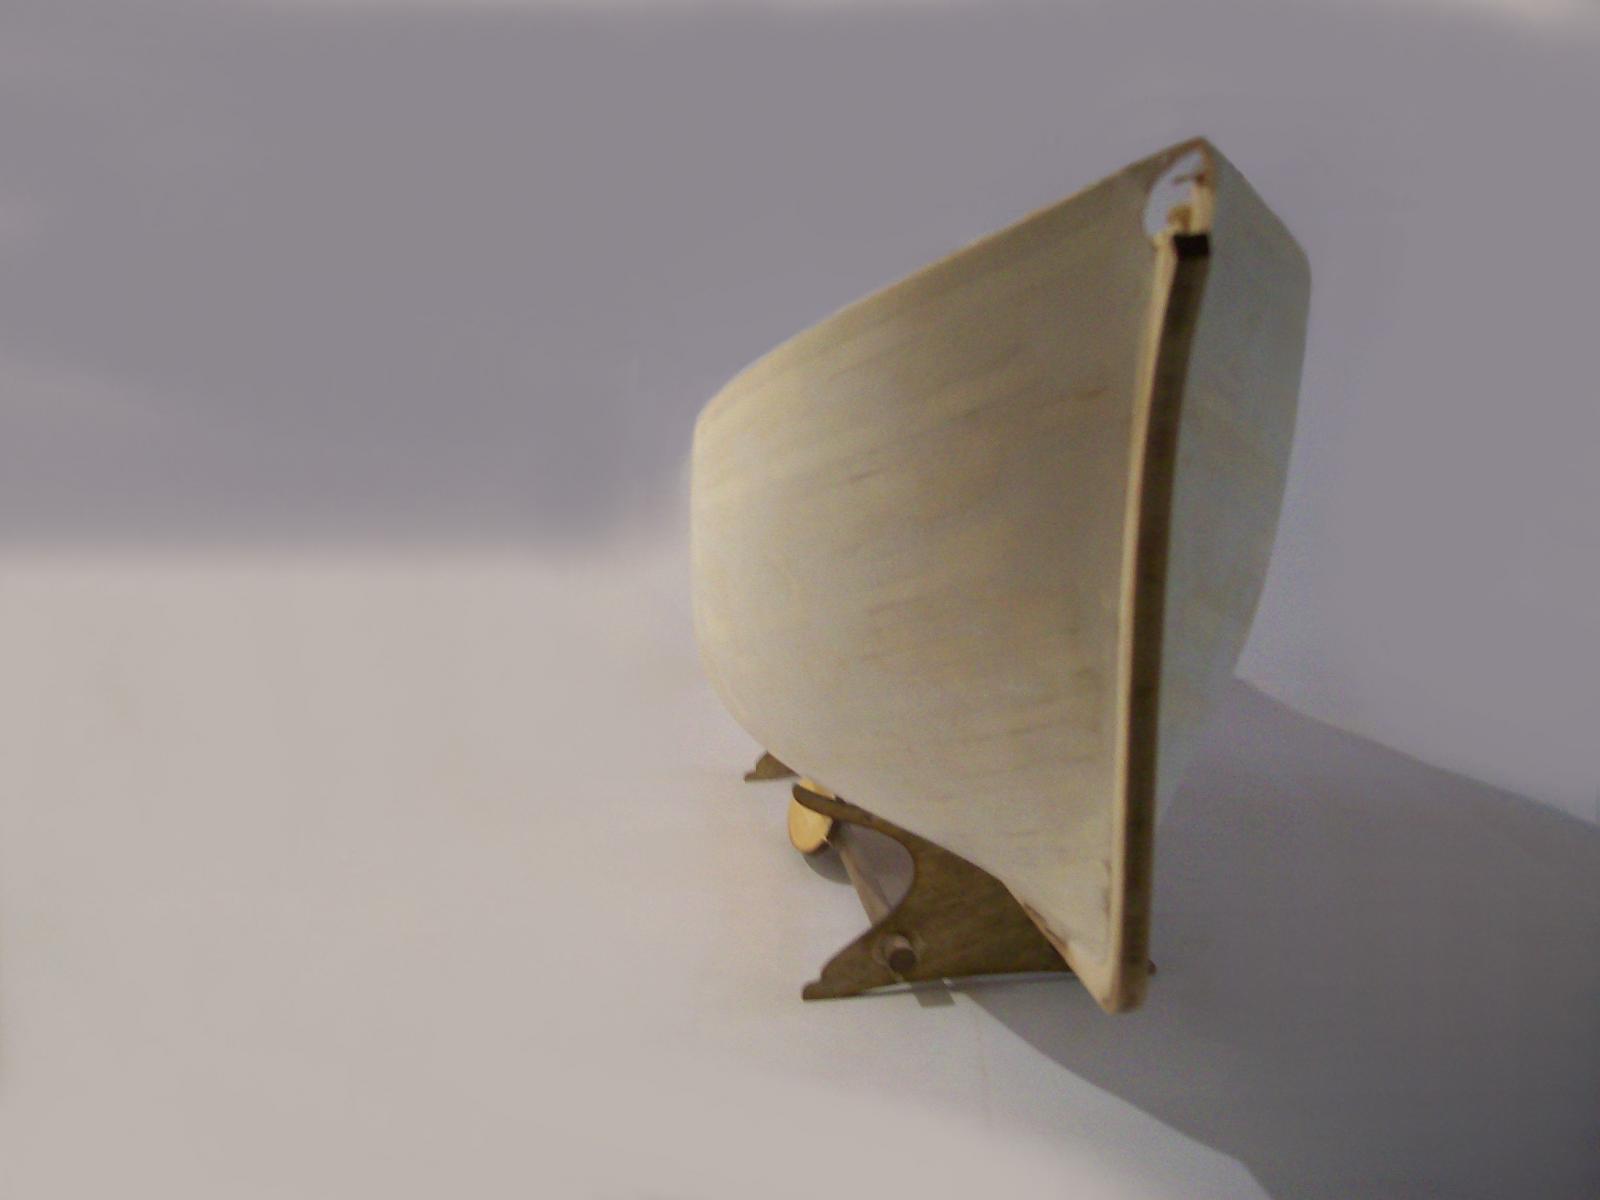
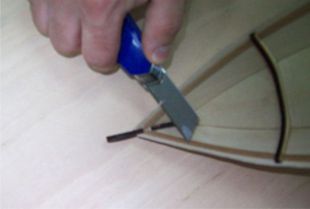
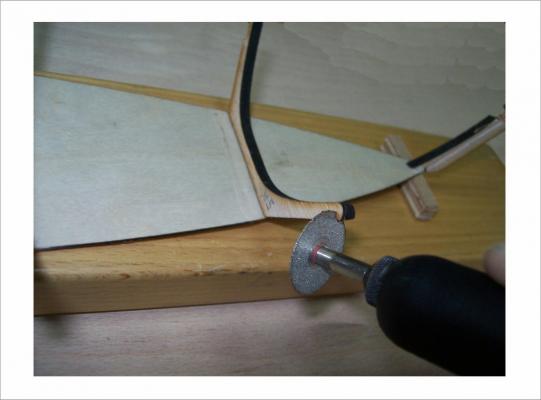
Hello everyone ... ... now I would like to say something about 'Trupa' again : … when the planking is pasted to the construction of the hull, at the both sides of 'Trupa', it is necessary to trim the planking properly : - The bottom should be cut at the level of the flat bottom 2. And then sanded using sandpaper on a wooden block. This is the easier part. - Then it comes the more difficult part : the top edge of the planking should be trimmed 4mm above the laths 9 and 9.1 ... to do this, use the scissors at the first, then a scalpel, and then adjust the top edge with a sandpaper on a wooden block … … Well, the hull of 'Trupa' is finished, but 'Trupa' is not finished yet …


-
Mr. Skip, this gentleman is obviously talented and a fast learner, and this was a few years ago ... I would have gladly published this photos, but I would first ask him for permission, those photographs are still his property... after this "Introduction to the ship modeling" I will be happy to continue with more complex matters, so that you will probably see this photos soon ... Zoran
-
Thanks Mr. Skip... I will try to send some of those I have to You later this afternoon ... I will use the personal messenger... Regards, Zoran
-
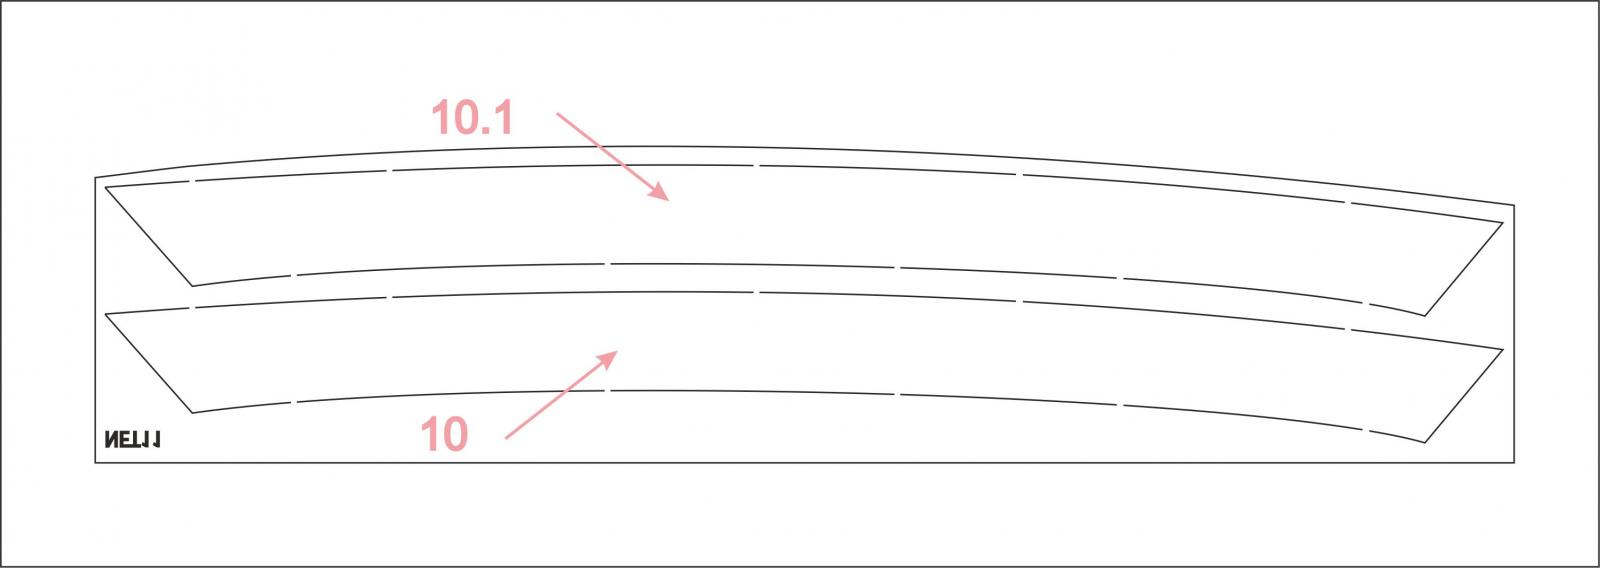
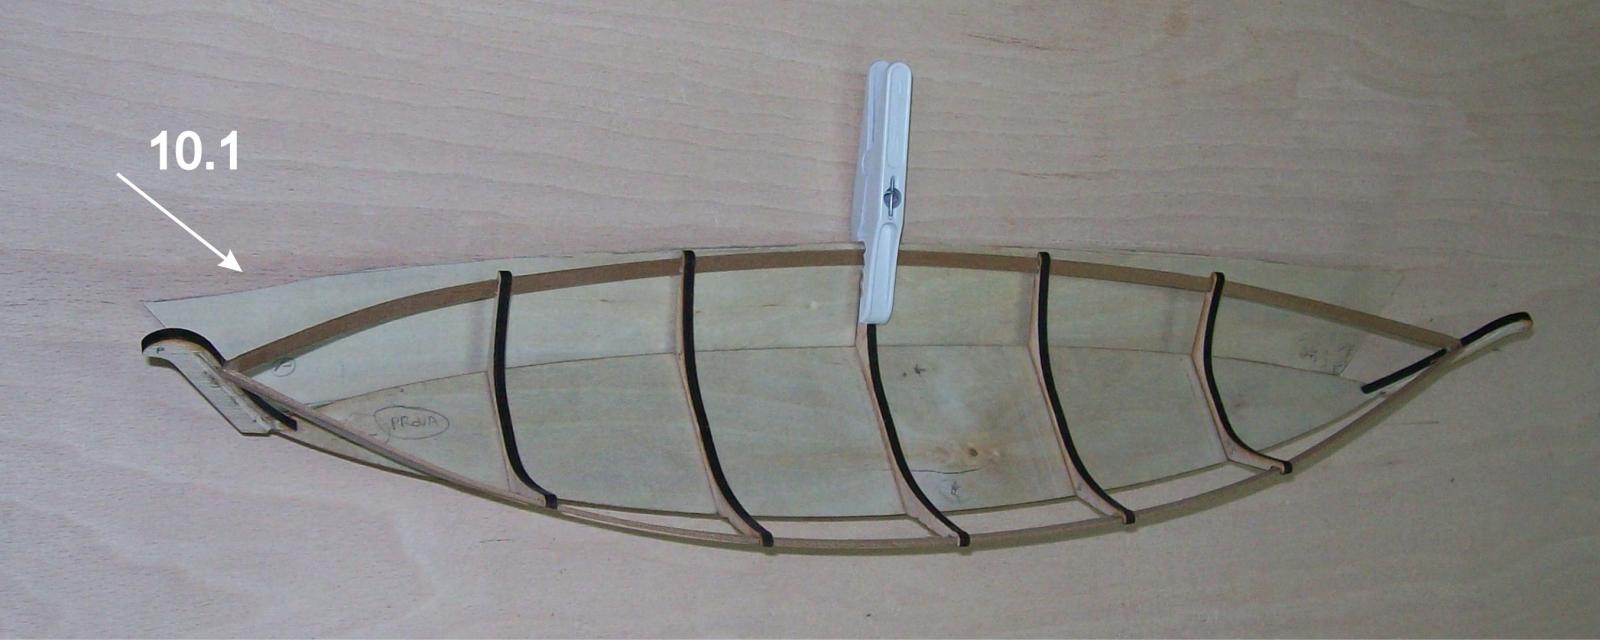
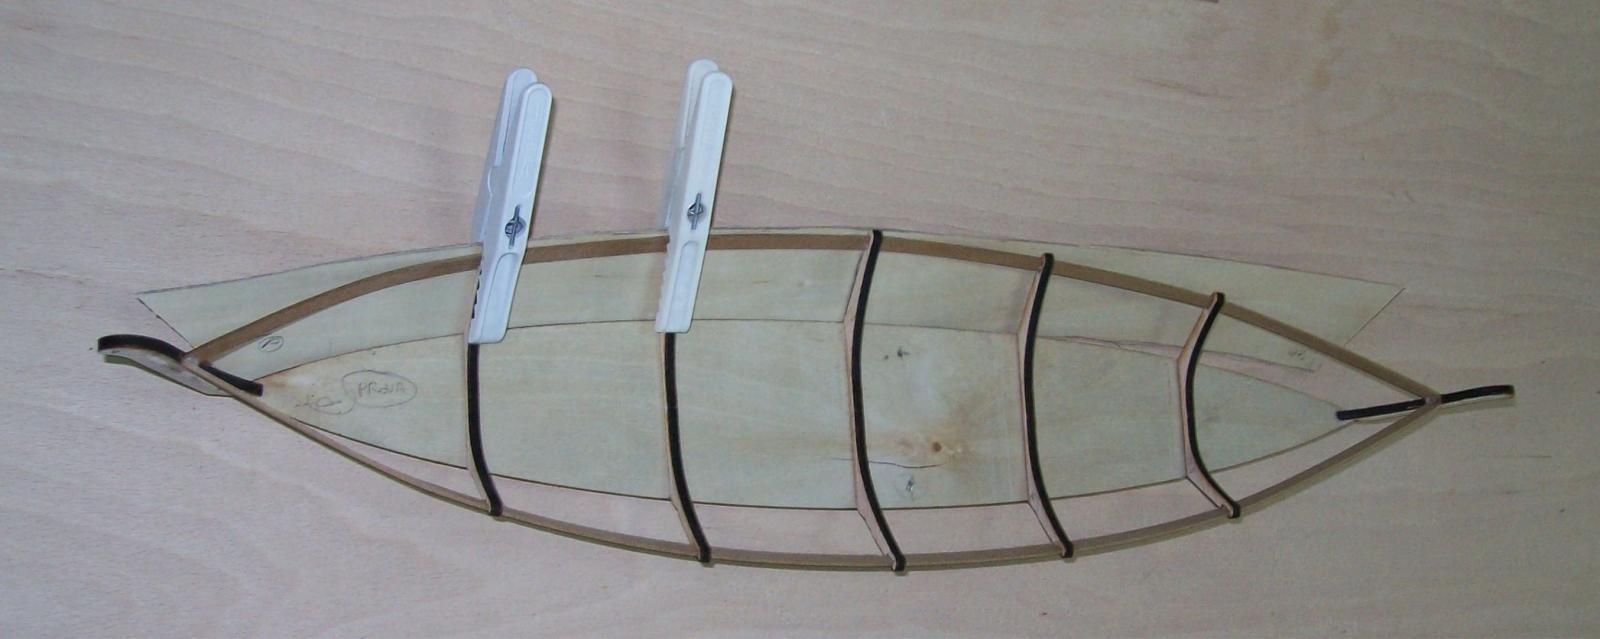
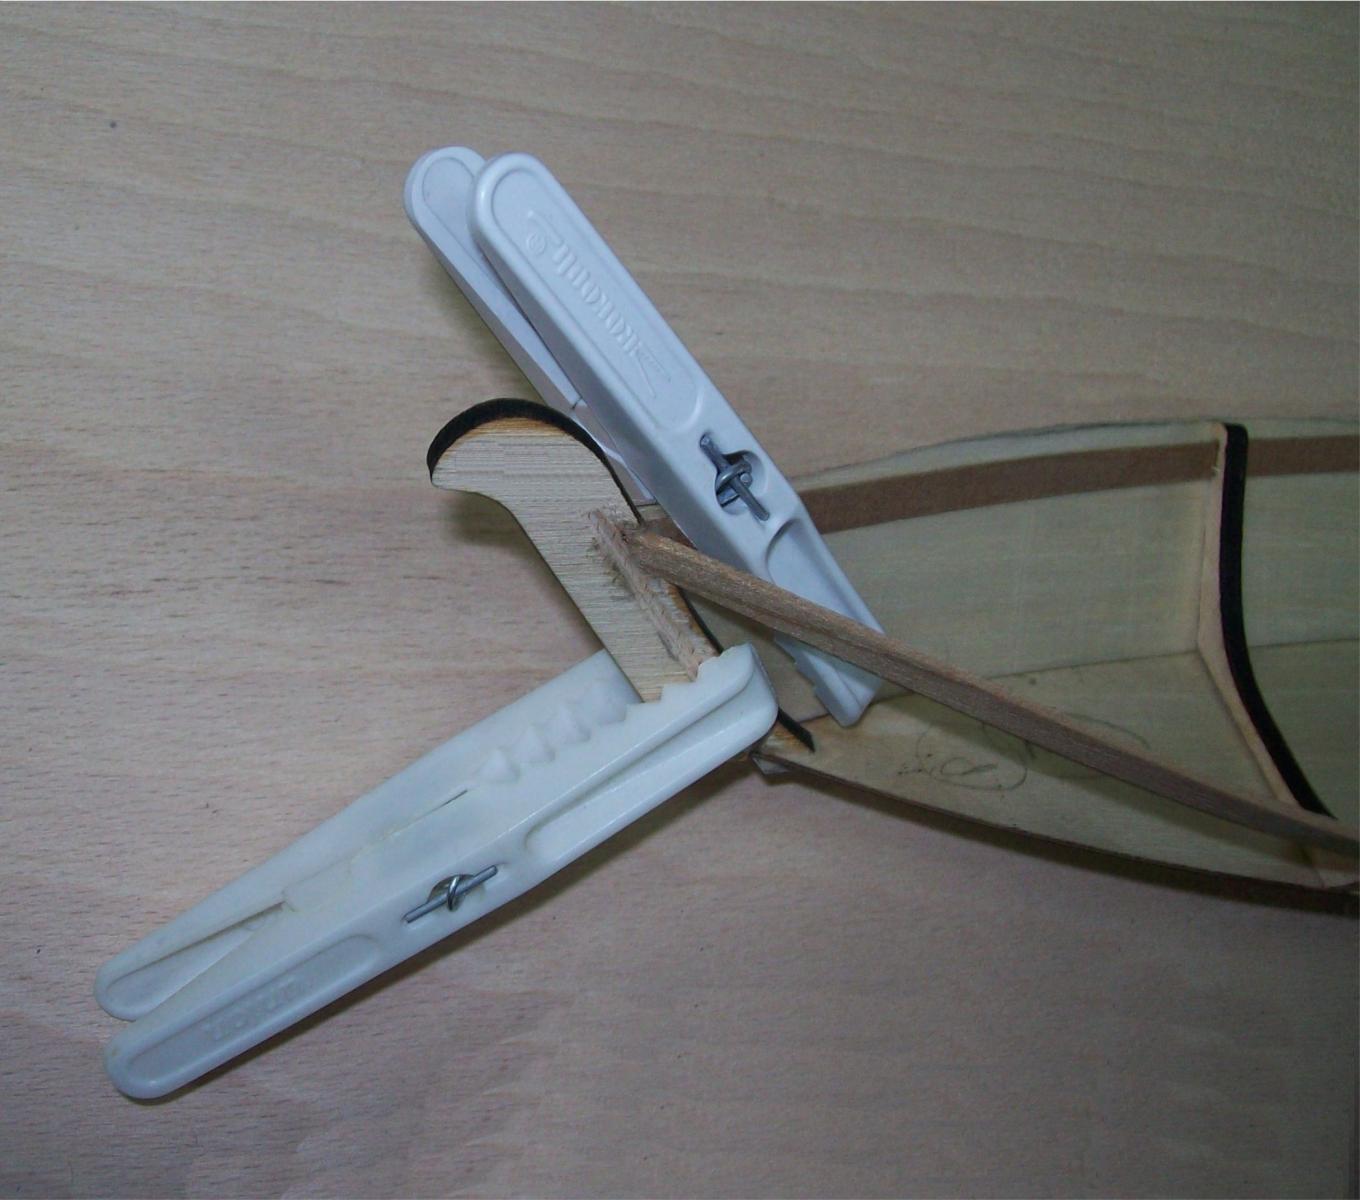
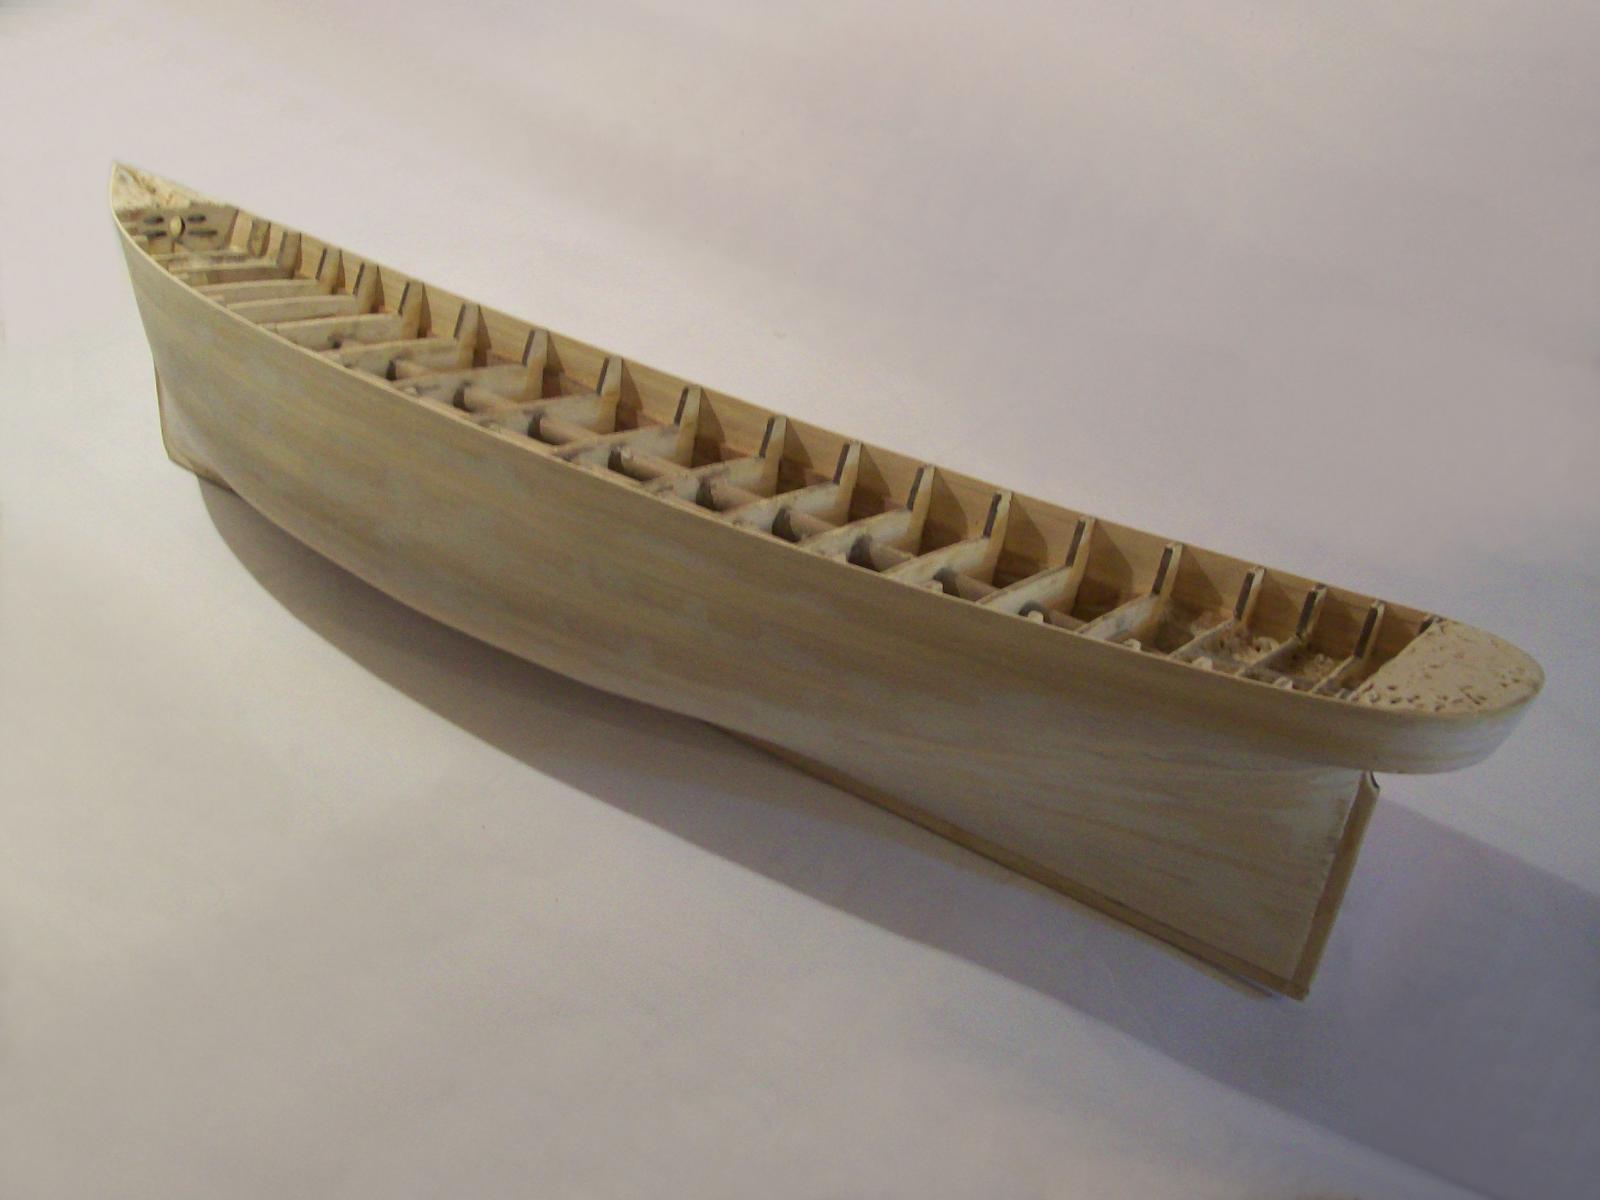
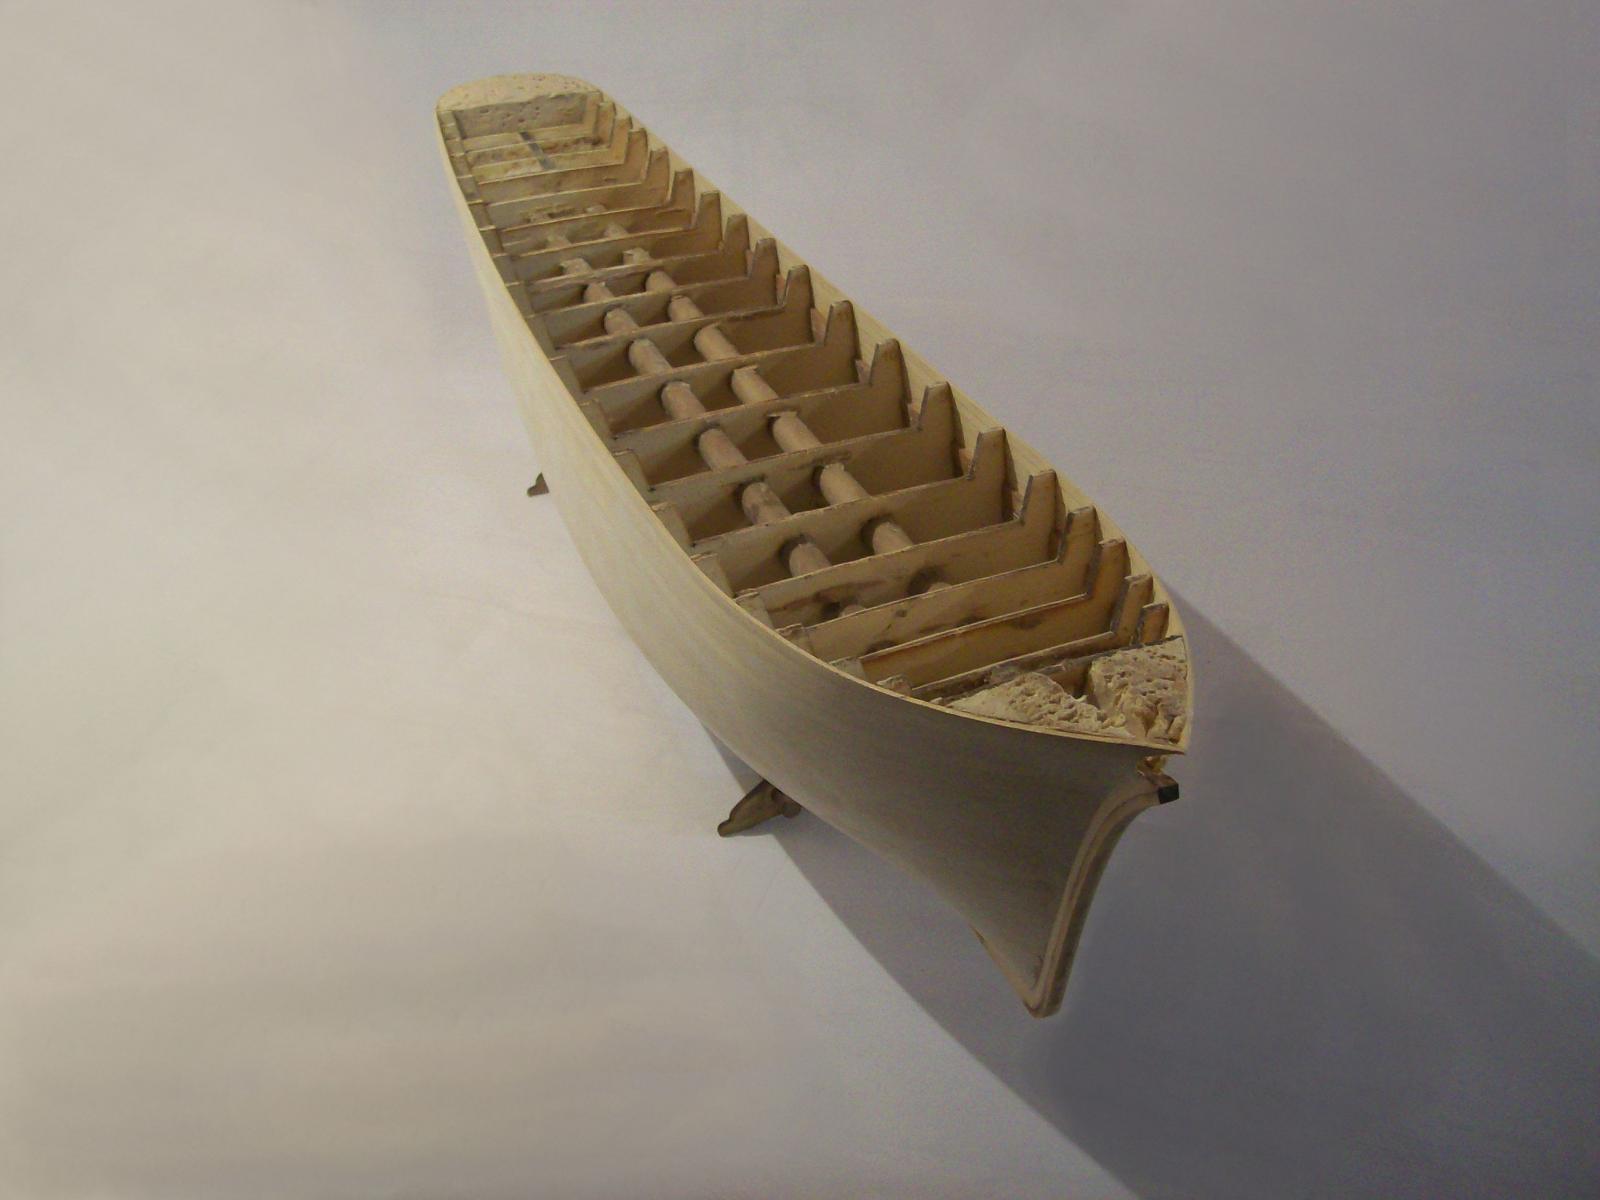
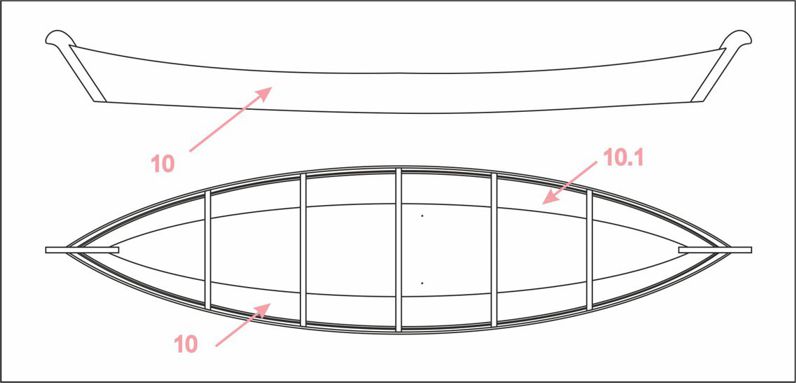
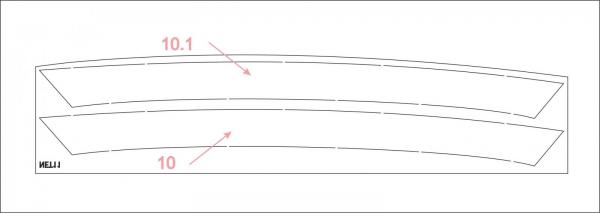
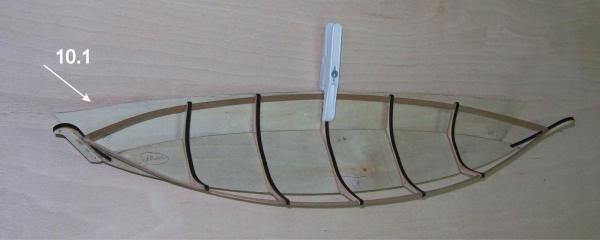
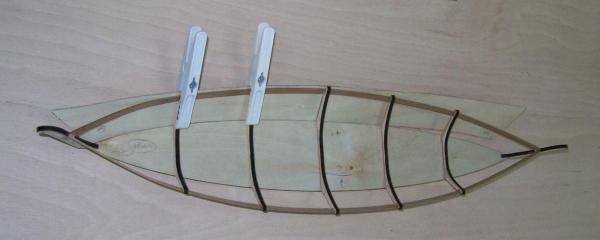
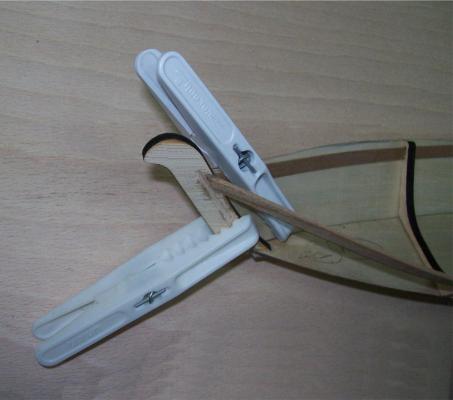
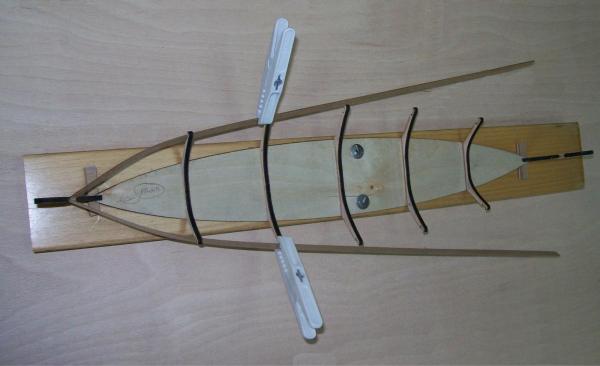
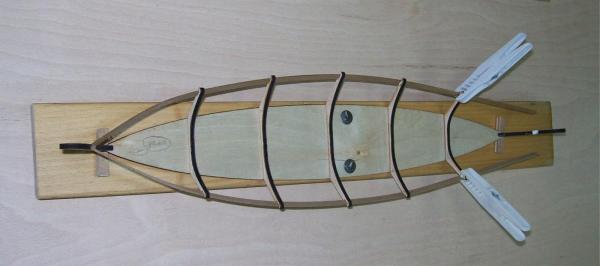
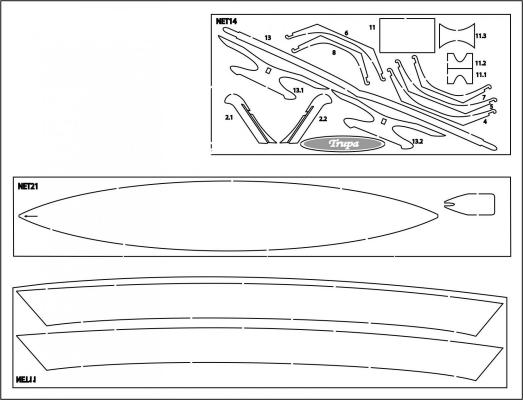
Hello dear ladies and gentlemen, dear friends, thank you very much for the likes, and comments ... Behold, I would like to continue with a boat from the river Neretva 'Trupa' : In the last post I described the completion of construction, it was strengthened with the laths 9 and 9.1 ... ... And now it's time to separate the construction of the base 1 ... You should only pull out the pins 3 and 3.1 carefully... The holes that are left will be filled with wood putty later... Once you checked the construction and its curves that you have done, check out the famous 'fairing', adjusting the edges of the frames once again... Sand those edges a little bit more if necessary ... Then, when you are convinced that the planking will lie perfectly on the frames, leaving no gaps to the flat bottom 2, let approach to the planking setting ... … The planking is placed on the veneer board 1mm thick ... It is carried out into two parts, 10 and 10.1.. One part is to be placed to the left side of the hull and the other part is to be placed to the right side of the hull ... …Separate the planking 10 and 10.1 from the veneer motherboard … … It is important to note here that the planking are larger than the sides of the construction ... This is so that it is easier to set them up ... You will cut them after their setting to the sides of the construction … … Approach to their setting : First check how this would be looking like ... The front part ( to the bow) and the rear part (to the stern) of each planking will have to be cut, trimmed, because the planking are longer than it is necessary ... The front part and the rear part of the planking must lie into the triangular corrugation, into the rabbet , after the trimming… … Glue the planking to the central frame of the construction, to the main frame. Tighten it with a plastic clamp ... When the glue is dry, glue the planking to the other frames ... When the glue is dry, trim the front part ( to the bow) and the rear part (to the stern) of the planking so it can lie properly into the rabbet ... Then glue it into the rabbet and tighten it with plastic clamps ... The following photos show this part of work:
-
Thanks Skip... If You want to, I could send to You a photos of this model done by an advanced beginner (I could say intermediate) modeller ... Regards, Zoran
-
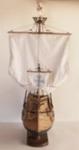
Dear gentlemen , Chris, thank You again, I will definitely continue with build logs here on MSW... Now I have prepared the final part of the boat from the river Neretva,'Trupa' ... then the other logs follow ... If You have any questions, please be free to ask, I will answer as fast as I can ... DonRobinson,it is so nice to hear from You so many beautiful words about Trabaccolo ... I would say that this is the second version, the modified version of her. The model that is made according to this project won a highly positioned silver medal at the state competition two years ago ... I have seen Your logs, so beautiful work Don. You put a lot of love into them, I follow those with pleasure ... Skip, yes, she is "Ragusian Carrack" indeed... The photo on the bottom row is displayed her in the phase of construction, but the photo above shows her completed ... This model, that You see in the picture, won the gold medal and the cup at the competition, in the category of national model ..... On this example You can see how important is the 'finishing touch'... perfectly arranged color and the appropriate type of varnish definitely always do the better look of the model... The figurehead is worked up in the meantime, the stern decoration is created the last ... Oh, it was so exciting to work with this project ... Now I have to prepare some photo etching files for the new project... Best regards, Zoran
-
Hi Saintly1019 ... of course, as a member of MSW you'll get them at the lower price (there, on our website, the prices are in Euros) ... you could use a currency that suits you, so, UK Pounds are OK ... ... I will send you a personal message for a minute ... Thank you for your interest Best regards, Zoran
-
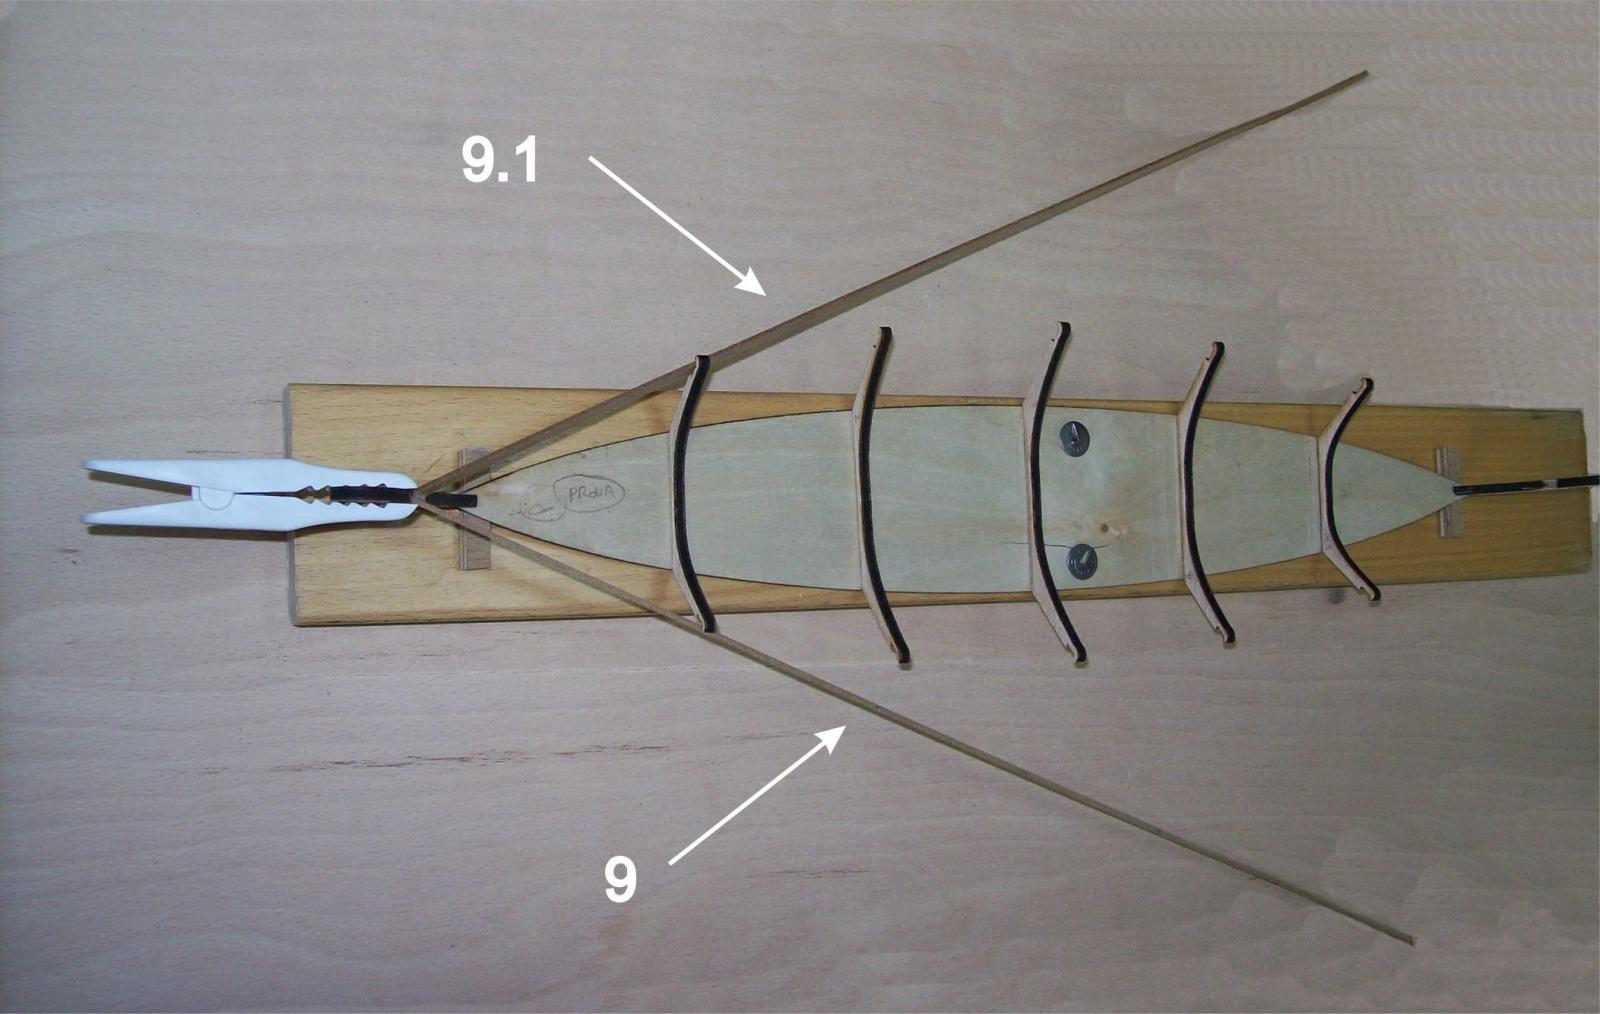
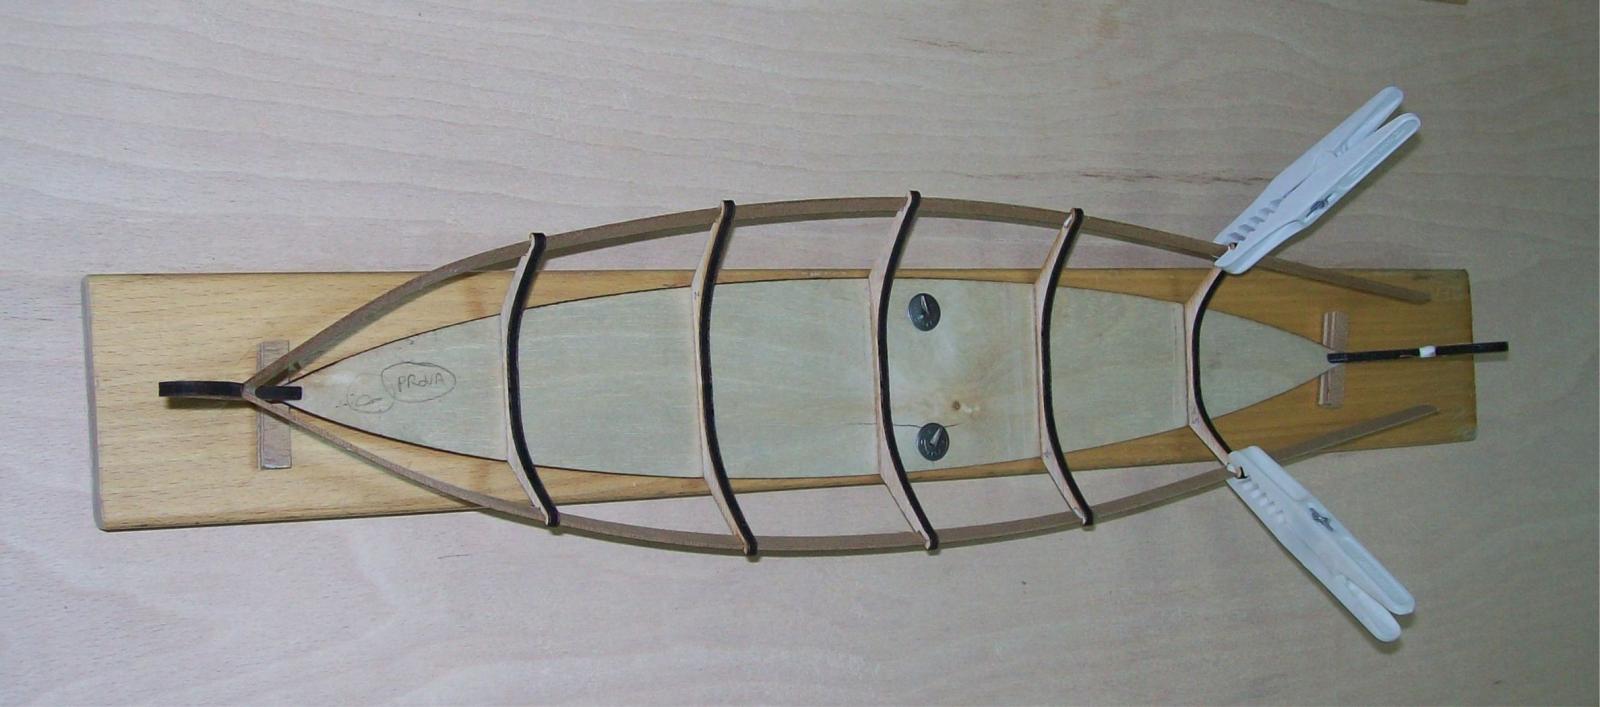
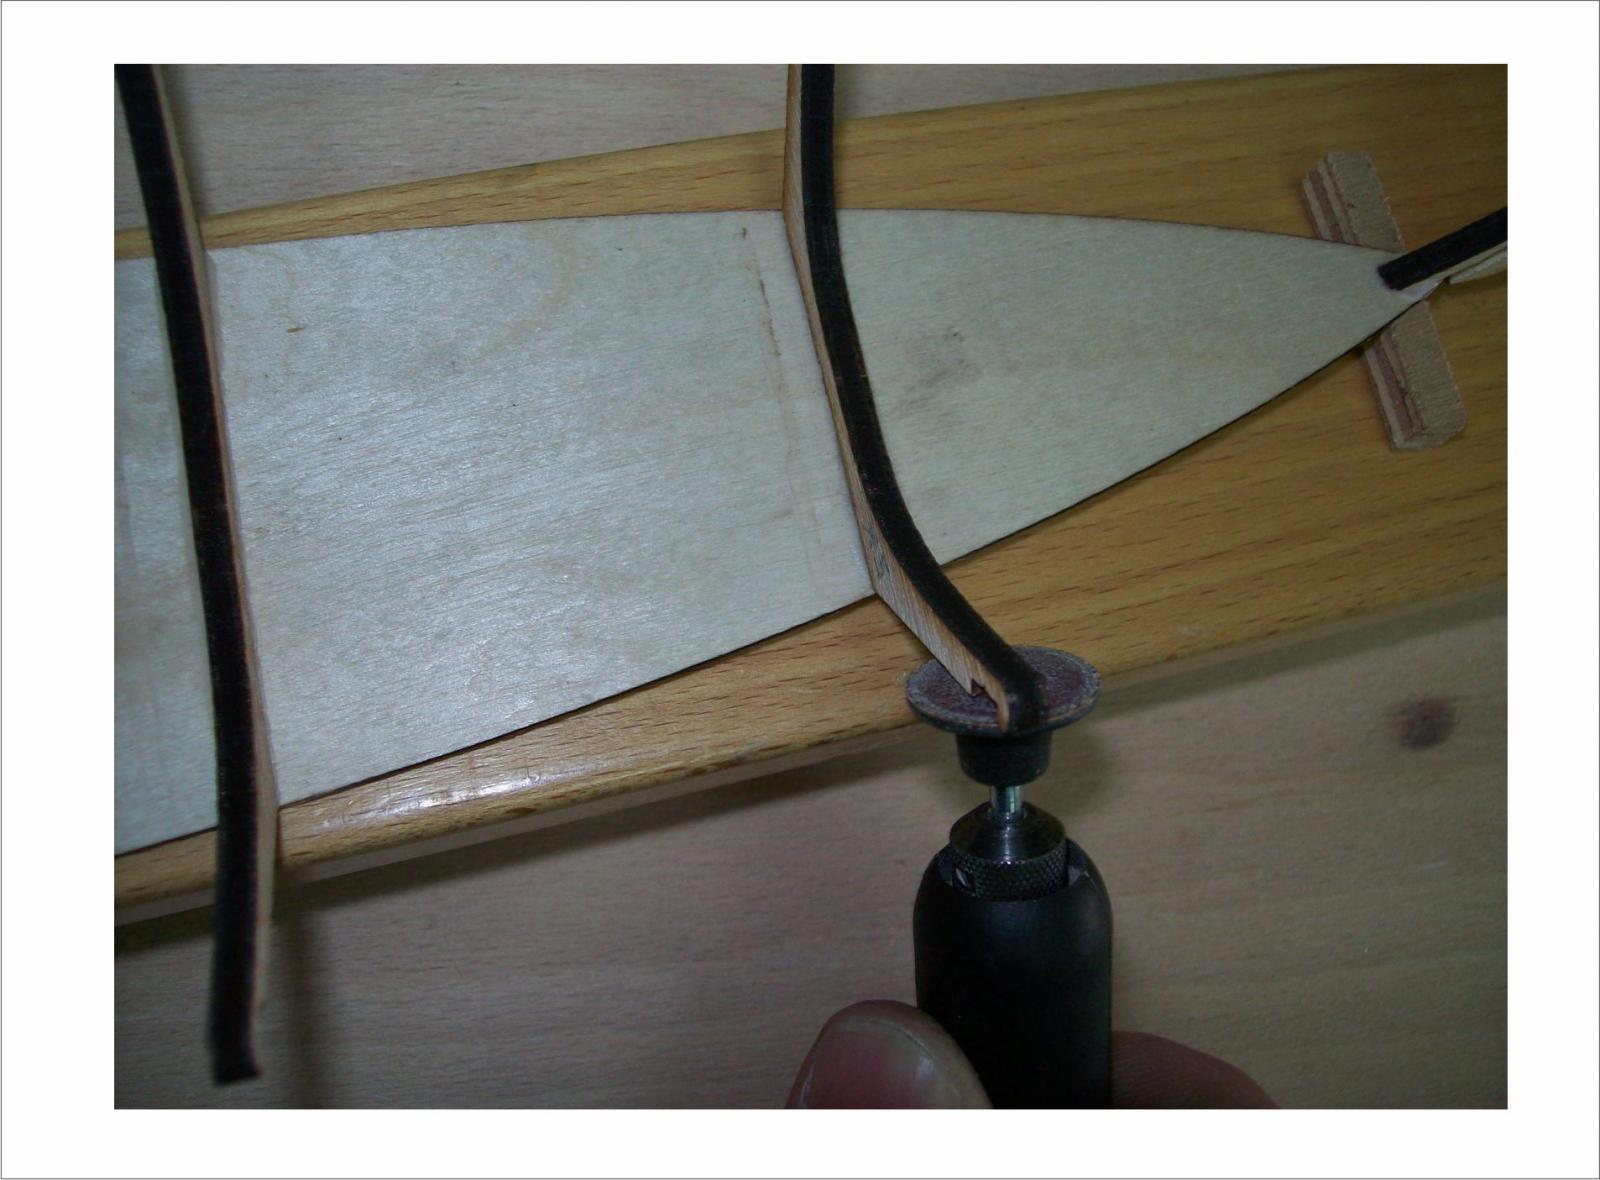
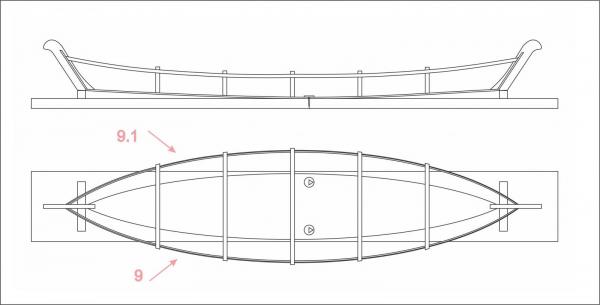
When you make sure that the outside of the frames is formed so that the planking will flow in a nice flowing curve of the hull shape, it is time for setting the laths 9 and 9.1. See the drawing above. These laths have the task to connect the stempost 2.1 , stern post 2.2 and all the frames ... so complete construction becomes solid and compact. To do this, you need to adjust corrugations for laths 9 and 9.1 on tips of the frames, so they fit and do not protrude out of the corrugations. You need to adjust the length of the laths, incline them on their ends and glue them. All the laths (strips) in the ship modeling which should be bent should be first soaked in water, so that their fibers become soft and flexible, and easier to bend the laths (strips), and this does not break. First, glue the laths on the bow, tightening them with clothespins (clamps), and when the glue is dry, glue them in all the grooves. All the tool that you need to do this is a hand-held power tool for engraving, scalpel and a pair of ordinary plastic clamps. Classical glue for wood will not paste the plastic clamps. If they were wooden clamps, they would be stuck to the model. The attached photos show these few steps :

-
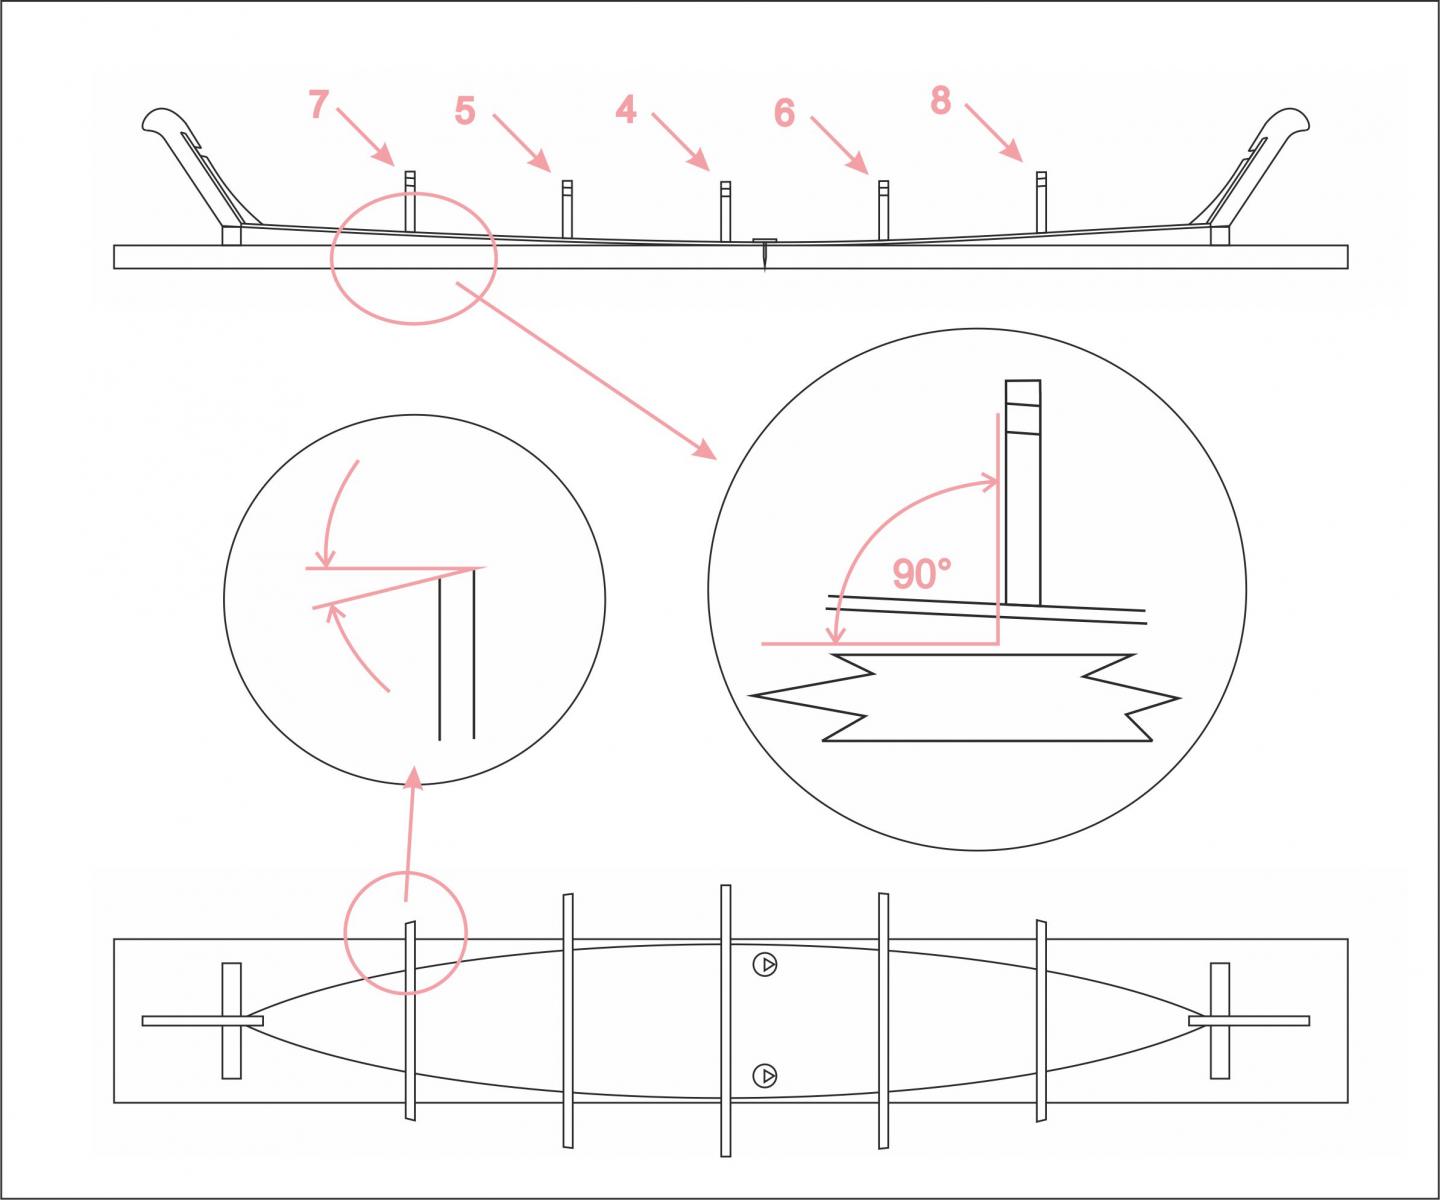
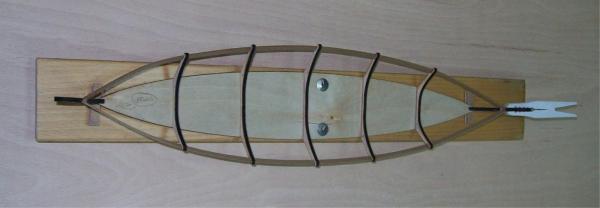
Now, when the bottom 2 is fixed to the base 1 (to the bearing plate) , it's time to set up the frames... At this unique model , it is unique that each frame must be strictly perpendicular to the base 1 ... to the base 1, not to the bottom 2 !!! ... The attached image shows this ... It means that each frame, its lower part, must be sanded individually ... When you create a flat, angled base of the frame, when the frame is perpendicular to the base 1, only then the frame should be glued to the bottom 2 . The exact place where the frame should be glued to the bottom 2 is marked on the draft, the top plan should be observed… and there must not be a mistake ... … This should be done with all of five frames … For doing this, it is the best to use a hand-held power tool for engraving … … When all the five frames are in place, and when the adhesive has dried, the most important step in the forming of the hull is following: grinding of the external walls of the frames ... The out side of the frames should be formed so that the planking flows in a nice flowing curve of the hull shape. When it is done right, it also gives the more gluing area to strengthen the planking… I will try to take out a basic rule: … grind sides of all the frames, in order to lean the planking uniformly, and to prevent the creation of holes on planking and bottom joints. First, the edge surface of the frames askew by grinding them at the bow and stern to allow proper fit of the planking as shown in the plan. Frames to bow askew so that their rear surface, they are facing the stern, leave untouched. The stern frames askew so that their front surfaces, the ones that are facing the bow, leave untouched. … This should be correct if the frame construction is made properly ... A hand-held power tool for engraving is the best to use …

-
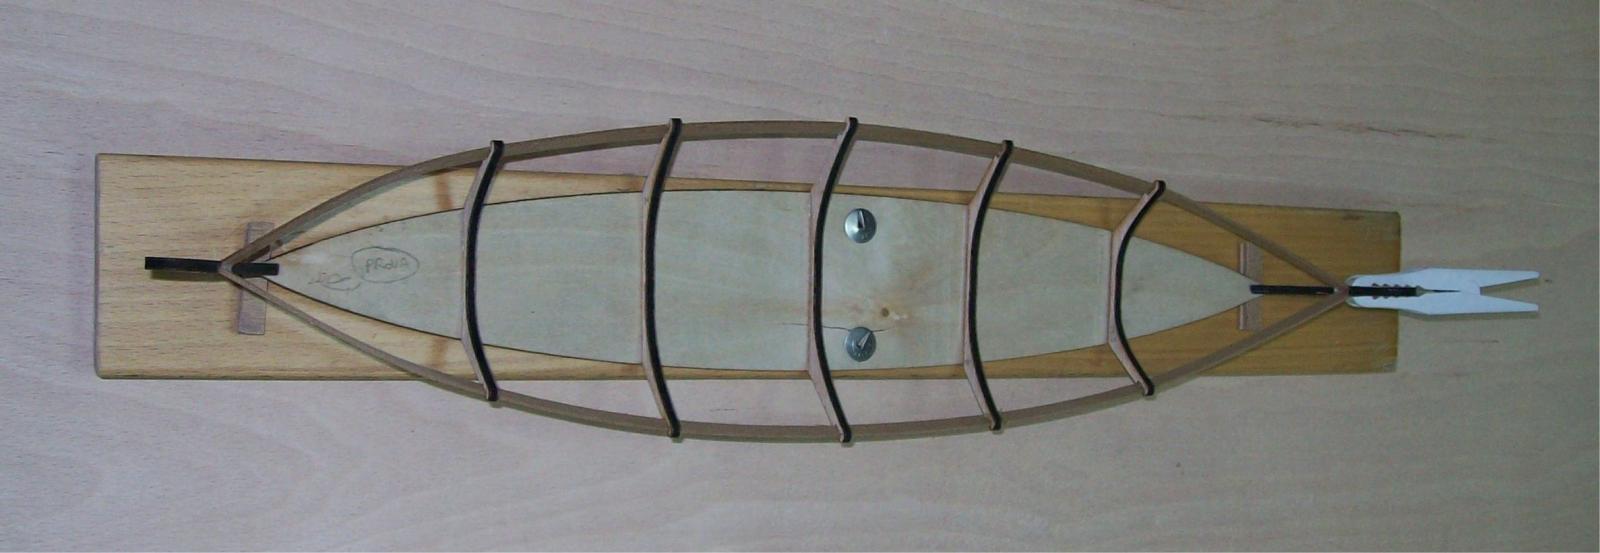
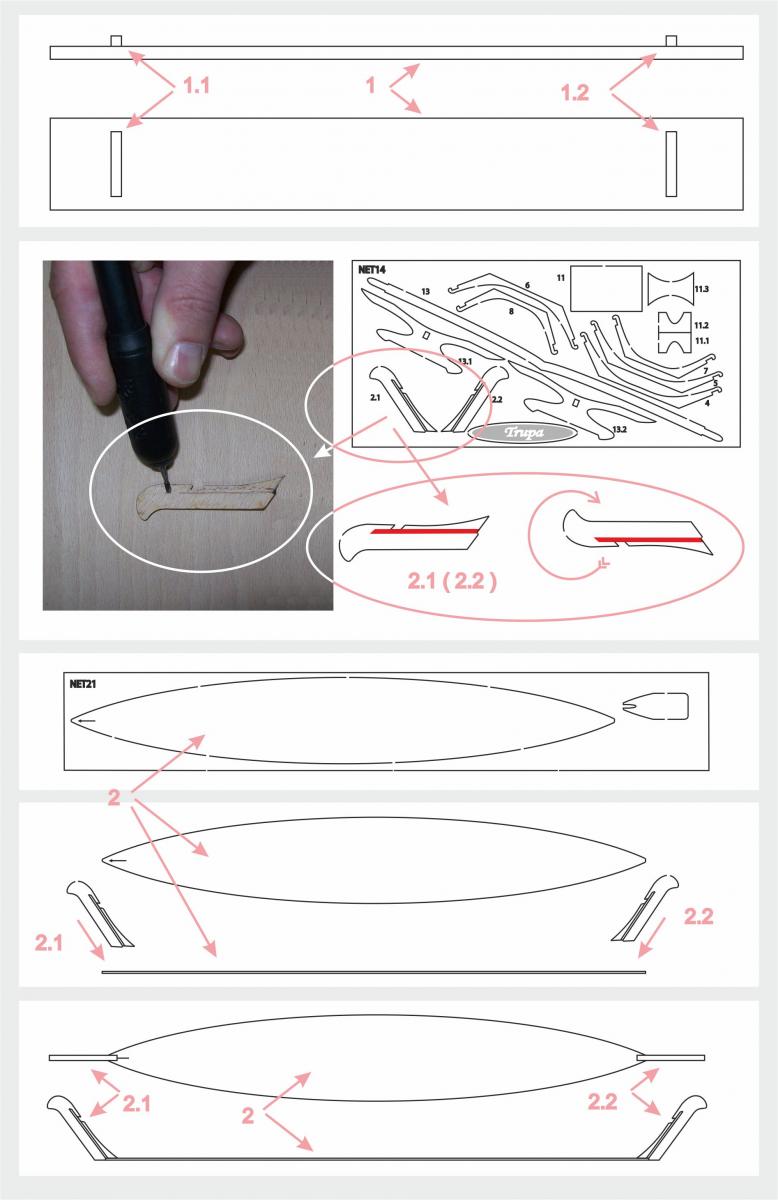
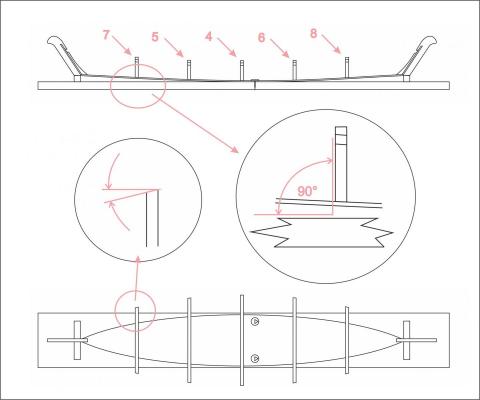
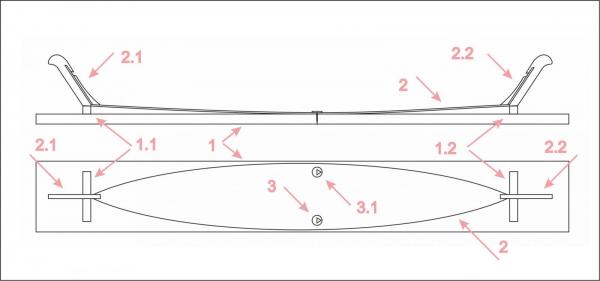
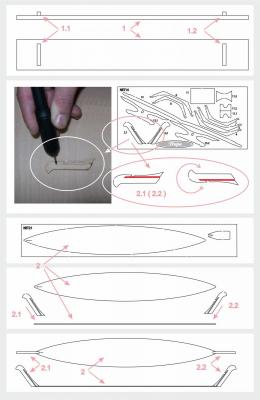
Once, when you have glued the stempost 2.1 and the stern post 2.2 of the trupa on the flat bottom 2 of the trupa, it's time for the bottom 2 shaping ... Now, it is necessary to set the bottom 2 to the prepared mold 1 ... The posts 2.1 and 2.2 should be placed onto the supporting laths 1.1 and 2.1 ... NOTE: no one part of the trupa should not be glued to any part of the mold 1 , not in any case, not at any spot ... Press the middle of the flat bottom 2 to the board of the mold 1 and knock it down to it with the pins 3 and 3.1 … The spots where the pins should be set are precisely marked on the draft… The following image shows this , and the adventure can begin ... :
-
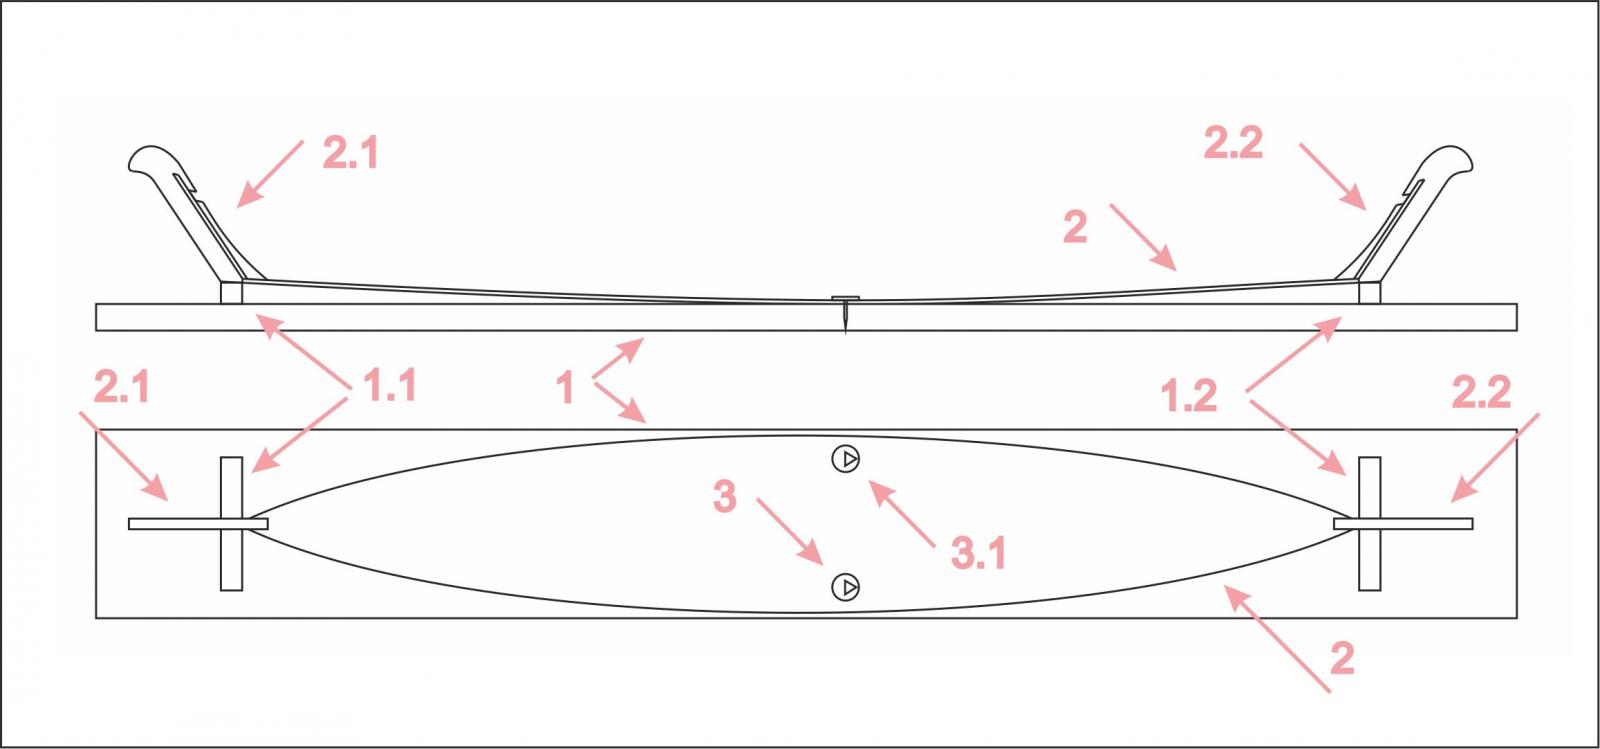
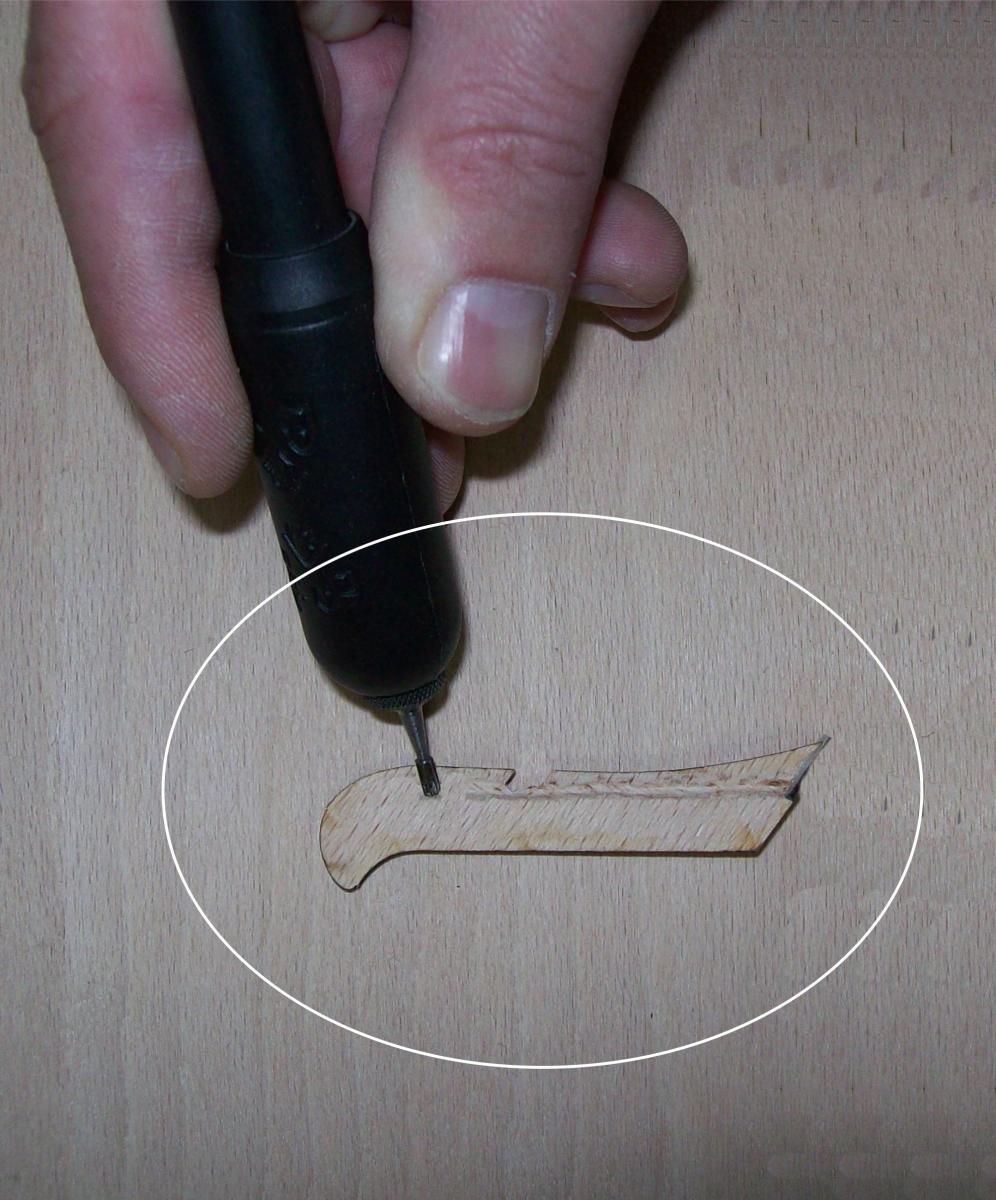
So, when you access the construction of some model, the first thing you need to do is to open the plan and instructions for building... You should look at the plan more times and then read the instructions ... It is good to look briefly first, and then several times with the understanding ... Only when you are sure you understand each step to create a model, you can approach its building ... When you do so, you can start ... Here , you will need a wooden board first ... This board , the bearing plate 1 , is heavy and it is not included in this kit … It should be rectangular, slightly larger than the bottom of the vessel is. On the bearing plate 1 you should fix supports 1.1 and 1.2 (made from 8x8 mm laths, 5cm long. Those laths are included in the kit, as well as everything else needed for the construction of this scale model ) … This is shown on the drawing attached, look at the top of the sheet. This is a kind of mold that you will need later to bend the bottom of the vessel properly ... Otherwise , whichever model you build, a work stand is required ... Each model requires a unique, characteristic work stand... It greatly facilitates the work and significantly raises the precision of model making … Here is the next step : … separate the stempost 2.1 and stern post 2.2 of the trupa from the mother board (the plywood panel). Grind the burned edges, so the trupa will look nicer. For those who do not know, the elements are cut off by a laser. Only small uncut parts hold them to the mother board. Those uncut pieces you need to cut with a sharp knife and separate the elements from the board... The next you should do is to mark the line where the planking lies, on the elements 2.1 and 2.2, on the side where it is not marked. Following those lines, carve a triangular corrugation, where the planking is going to lean afterwards. This is something that is called a rabbet … I strongly recommend the use of electric engravers for this purpose ... It is a tool that I recommend to use right from the start of ship modeling. It is very useful, easy to use, you can do a lot of different tasks with it and it is not expensive... When you made the triangular corrugation , the rabbet, on the elements 2.1 and 2.2, access the following step: … separate the bottom 2 of the trupa, and glue the stempost 2.1 and the stern post 2.2 of the trupa on it. It is made of 1 mm veneer. This is shown at the bottom of the sheet …

-
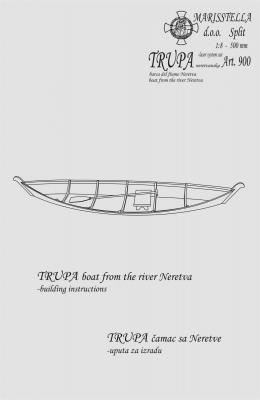
Let's start with modeling 'Trupa' Why is this boat so important for the start of modeling ? Because her hull has very simple lines, because there are just a few frames, because she has no keel, because her bottom is flat, because the bottom is made of a single piece of plank and because her each side is made of a single piece of plank too ... Briefly: this is a perfect example to explain certain basic operations that are constantly occurring in the ship modeling ... she is very easy to build … ... When you open the box of this simple kit, the first thing you'll notice is a photo of the boat and a book of instructions for building : ... There is a panel of plywood with the laser cut structural elements of 'Trupa' under them... At the bottom of the box, there are two sheets of 1mm thick veneer. The bottom of the vessel is placed on the first piece of it, …and the boat sides on the second one ... There is a bundle of two 1,5x5mm strips and round dowel ( diameter 3mm ) ...
-
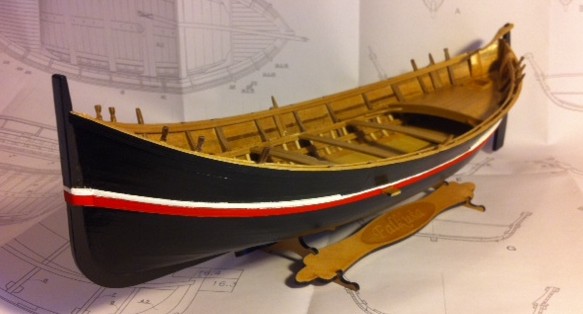
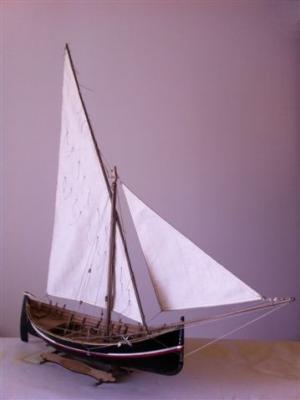
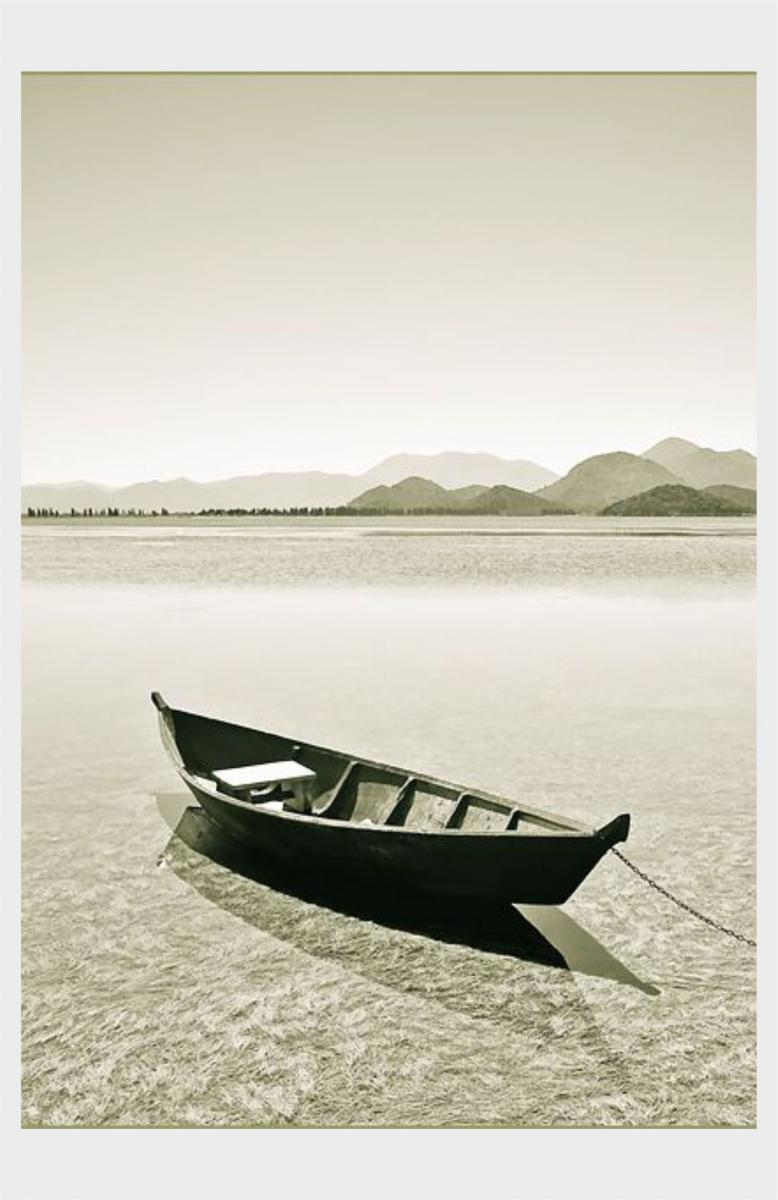
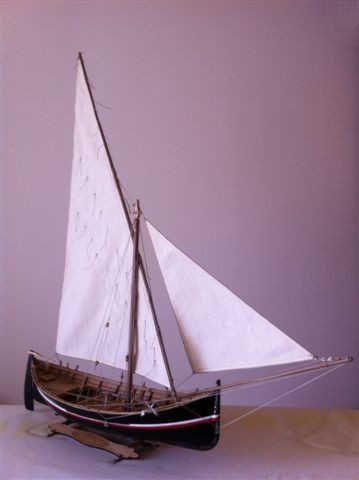
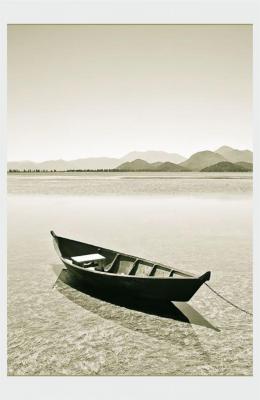
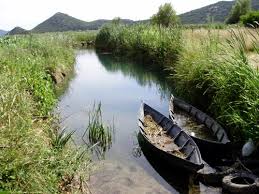
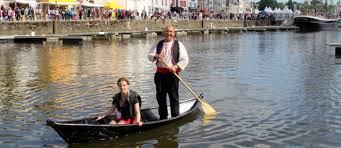
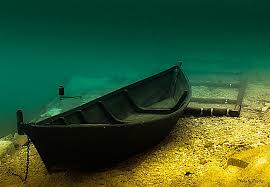
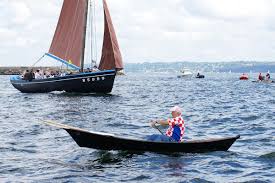
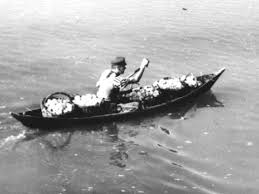
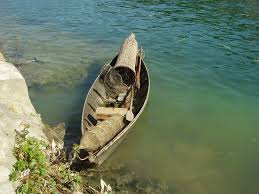
TRUPA – the 'Boat from the river Neretva' Brief history of 'Trupa' For the hundreds of years, until the early 1970s of the 20th Century, the 'Trupa' were the basic "personal" means of transportation of the Neretva River Delta (Valley), unlike the ships, which were a sort of "cargo" means of transportation. The name derives from the original form when they were simple hollowed "logs" (trunks), as well as many similar vessels around the world. Along the Croatian coast formerly known as the 'copula'. ('Trupa' means 'a log' or 'a trunk') The structure of the 'Trupa' 'Trupa', or 'Trupica' are about 4 meters long and about 0,60 meter wide, with a flat bottom, made of wooden planks, tarred. They serve the farmers of the Neretva delta to go to their fields surrounded by numerous marshy channels and backwaters of the Neretva . They use the 'Trupa' for the transportation of lower loads. In order to protect them from the sun, in the summer months, there is put some hay on her bottom. 'Trupa' is a lightweight boat, so two persons can transfer her by taking her to her ends. Usually, she is run by rowing, standing up, with one oar, rowing alternately on her both sides. Very rarely, she has had a small sail on the mast at the bow. The sail usually was square or trapezoid. Local farmers still use ships and these boats for the transport of products throughout the valley, through the channels, to the marketplaces by the Neretva River. Before I do a presentation about building the model, here are some photos of her, so you can see the basic features of her hull :


-
Respected Ladies and Gentlemen, now, I would like to show you The MARISSTELLA program for beginners ... The whole program is designed for the to total beginners, with no any experience… The program train the future modelers for the work on frames-bulkheads ... The program includes four models now. Sequentialy, according to the complexity of building and the degree of training of modelers, the models are arranged as follows: 'Boat from the river Neretva' 'Monotype Optimist' 'Batelina' the coastal Croatian boat and 'Santa Maria' … The first two models have no keel, they have only a few frames, therefore are ideal to start of this modeling school ... The third model has a keel, and it is a real beginning of the more serious work ... And at the end of this course, there is a real small sailing ship 'Santa Maria' , the ship of the famous explorer and sailor Christopher Columbus ... This model is simplified and easy to build ... Overall, after proper building of this four models, the modeler beginner is capable for making the more complex models ... The recommendation to anyone who intends to deal seriously with this hobby and work is: ' Please, do not skip any of these models, because, what you learn on them, it will follow you through the whole further work…' I will start from the beginning now. I will present these models to you one by one, I will use materials drawn from the building instructions and I will explain each step to you … So, let's get started :
-
Don, popeye, thanks a lot... continuation follows in this year, I hope ... the project has had some small mistakes, but we consider them important, we have done some further research and we were not calm until we got to the stable arguments ... Zoran
-
Dear Gentlemen, dear fans, friends, as , a few years ago, when I created this build log, I was not aware of the quality of this project, I published the photos that were not fully adapted to the seriousness of this work ... To make amends for this omission, please, let me refresh this log with new photos ... ... I have to tell you that we make 'Stefano' for competition now, and that the assembly kit will be on sale for a few weeks ... Special compliments to DonRobison who encouraged me to take this step ... Best regards, Zoran
-
Happy Easter to everyone
-
Donrobinson, coxswain, thank you very much for the compliments ... yes, of course, we intend to finish this model ... Just now I am finishing a metal plate with a photo engraving (etching) elements ... just because of an interesting information, there are 7 copper boards with the 234 plates for coppering the hull (1638 in total) ... I always put some extra material in to my projects, so it is easier to work to modelers ... We have had several changes of the project, due to research ... we have discussed many details of this reconstruction, it was not easy ... and finally we ended up ... another half of a month and I think that 'Stefano' will be on the stock, ready for sale ... We're working on the design of the box ... it will be a white box of 'forex' material, with old gold print on it ... it will be over 104 cm long, 22 cm wide and 10 cm high ... The plan contains 14 sheets 130cmx90cm ... Regards, Zoran
-
Hello all, it is Monday, March 14 !! Falkusa, Santa Maria, Ragusian Galley, Brazzera and Pasara are ready for sale now, including the rest of the assortment !! Right on time ... The gift of delivery costs is still valid ... Europe == 140.00 Eur and above ... the rest of the world == 200.00 Eur and above ... Regards, Zoran
-
Hello DocBlake, maybe I missed it, but could you tell me what kind of wood did you use to create the frames and the deck supporting beams ? Regards, Zoran
- 306 replies
-
- 3
-

-
- armed virginia sloop
- Patrick Henry
- (and 2 more)
-
Hello everyone, we expect Falkusa, Santa Maria, Ragusian Galley, Brazzera and Pasara to be ready for sale in the Monday, March 14... Regards, Zoran
-
Hello everyone, Falkusa of island of Vis... it is upgraded project now ... I am glad to announce a new series on the stock in a few days... Best regards... Zoran