


Rich_engr
-
Posts
322 -
Joined
-
Last visited
Content Type
Profiles
Forums
Gallery
Events
Everything posted by Rich_engr
-
 Yep- slow, but steady ahead~~ It took me about 3 years to finish planking just the hull, so I wouldn't worry about things taking some time. Besides, the patience shows in your work, and it looks great!!! Bob has a good point: most of the time is spent looking at plans, researching, and figuring things out. The small percentage of time is actual wood work. Plus, he has a nifty idea for those darn stern filler blocks!!!!!! But relax, be patient, and above all- have fun!!
 -
Lol!!! Sam, that's one FULL week of probably 14hr days... gonna take just a day to drag everything out so I can sweep the dirt, webs, and fur out... then deciding what can be tossed and what can be neatly organized... From my perspective, it's a rat hole of a mess. Oh, and then there's dragging two rooms' worth of crap down from the attic (mostly books, which aren't light)... Still moving ahead. Passed my pee test, did some of the required paperwork/background stuff... now just waiting on my interim approval and I'll be all set. Met with the realtor the other day and she's coming by to check out the house tomorrow (see what needs updating/replacing/painting, etc.) so we can have a more realistic game plan. I also have to get my car looked at to get it ready for the cross-country drive and maybe winter tires (haven't driven in real snow in a looooooong time). So it's going to be my ship+shop tools, some books, and clothes all packed into my Rav4... it'll definitely be an experience!! Next two weeks are gonna be super busy and are going to fly by~~~
-
Very good! Coming along really well!!
-
Tony- I agree with what Patrick said. For most, if not all builders, everyone has "what the heck? how do I___??" moments. But your work is excellent, so you shouldn't worry. I know framing and planking takes a good while, but it's well worth it if you're patient and believe in yourself (and your plan). Nice touch with the treenails- they really do make a difference. Maybe I'll try that on my next build. Awesome shop- you're definitely all set to tackle whatever gets thrown your way!!
-
Lol- that's funny how guys tend to do that with cars... and yet I don't know a darn thing about vehicles (other than where the gas, air, and maybe oil go)... Still, I can imagine seeing engine parts, grease and oil stains, and tools all over a bathroom or living room! But no such mess here- we spent the whole weekend cleaning, painting, etc. Only got about 3 rooms and 1 bathroom done (I pressure washed the entire outside of the house, patios, and fence). Still have to go through the other half of the house inside, plus I gotta tackle the garage and attic (which will take me a week- yeah, it's that bad)... 18 days until I head out!!
-
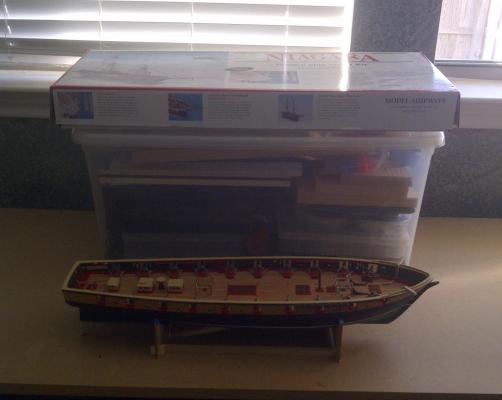
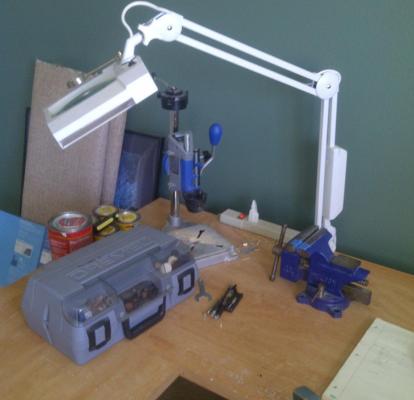
Ok... there will quite possibly be zero build updates for a while, since last night I packed up the shop. I fit most of my tools and parts into a plastic bin, and I have to find another one to fit the ship in. It's amazing how compact my shop is- all parts, paints, most wood (and scraps), power drill, tools (files, sand blocks, tweezers, all clamps, calipers, drafting sets, etc), and plans & books/notebooks all fit into a medium sized tub. The only remaining items are my lamp, Dremel & stand, and vise. Now if I could just get the rest of the house and garage as packed and clean in the next 3 weeks...
-
Glad I could help! Belt sander, disc sander, sand blaster- we use whatever is needed to get the job done, right? (Heck, even my cat can help trim down those "unsightly" horn timbers.)
-
Lol- thanks Sam! I remember when I was in my first two years of college living in the dorms- there was this one guy (my dorm was the crime-ridden ghetto) who was rebuilding a Harley in his dorm room, on the 2nd floor!!! Mind you, the rooms were small, and luckily he didn't have a roommate. The guy had parts, tools, oil pans, etc. all over the place. But alas, zero pets allowed in the room I found, which is fine for now (it's just me going for the time being). This was the cheapest place I could find (and literally next door to work), so it should be fine for now. If all of us were moving right now, it'd be impossible to find a place (apt or house) to rent that allows 3 dogs, 2 cats, 2 people, and can accommodate furnishings for a 4-bedroom house (otherwise we'd need about 2 storage units)... So yeah, too much crap to keep bringing along... whereas I usually live a rather spartan lifestyle (bed, laptop, coffee maker, some clothes and books... and my Niagara- that's all I need).
-
Yeah, the 3D curves were weird... at first I thought I had it figured out, then my brain choked and couldn't see how to do it exactly... so I just traced the curves/lines from the plans, then took the Dremel to take out the chunk of material in the middle to start, then just sanded the rest of the way in... Maybe our CAD guys can help with some 3D printing of filler blocks... but where's the fun in that?
-
For the plank widths for belts B-D, use the side view (with stern on one side and bow on the other)- just follow along to the bulkheads there (the dashed vertical lines) and measure the distance between the planks. Otherwise, if you use the full side view, what you're measuring is actually the arc-length of the plank, not its exact width. What I did was use the side views to get the full belt width, then divide by 8 (divide by 5 for belt D). But before trimming planks down to your exact width, always leave a little extra to fine tune it once in place. I'll check in with you later this evening- gotta do pee test and eQIP/paperwork stuff...
-
Bob- this place doesn't allow pets at all (no dogs, cats, fish, iguanas, nada). Still, I doubt there's much I can get done in a little room w/o my entire shop. There's not even a desk in there. Edwin- thank you! Yes, I do feel a lot of relief, but now the different stress of packing, moving, selling the house, etc. is starting to set in (but in a good way). Three and a half weeks to get everything set and ready to go!! lol~
-
Awesome!!! Great work on the planks- it's cool watching her take shape, especially where the planks bend at the stern. Seems like you got the hang of it now!
-
Yeah, the blocks they supplied for the stern fillers are way over-sized... I cut mine in half first (like, cut off what sticks out past bulkhead Q), then traced the lines and hit it pretty hard with the Dremel sanding drum. Then sanding & filing to get them down to their final shape. To help make sure they're both the same, try placing them side by side when sanding- use calipers or a good eye to check for symmetry. Same for the bow fillers. Also, make sure that the inside corners of the blocks are square so you get a good tight fit with the keel & bulkheads (also helps with making sure the port & starboard sides are the same).
-
Kevin- my build and especially the support from MSW is what helped keep my mind focused and (not as) stressed during this time. After ten to sixteen hour days searching for positions all over the place, working in the shop was a very welcomed break and de-stressor. But after the initial move, maybe I can get some small stuff done, like hull touch-ups and whatnot. I doubt the new landlord would like sawdust, glue, and paint all over the place...
-
Dying the planks? That sounds interesting... I know they soak up water very well, and Sharpies bleed pretty easily, so why not thinned paint? Might help with having to re-touch paint nicks later on...
-
Thanks guys! I just sent my acceptance this evening (unfortunately there wasn't any room to negotiate, but at least we tried). Still, I got a plan taking shape and should work out just fine. Sad thing is that I'll pack my shop up in about 2 weeks... (But all is coming with me!)
-
Nice shop!! You're definitely all set there! Love the pop of color from the clamps! And you have a TV??? Well, I have umm... I have bacon. Good work- just keep checking and re-re-rechecking the plans when fairing the hull.
-
Lol- dried mud on a tree trunk!!! I felt the same way with the paints at first- had to thin the heck out of them! Also, the paint job on my inner bulwarks/gunports didn't turn out as good because I used that @$#@@ awful primer!!! The outer hull, all deck pieces, guns, etc. do not have any primer on them. That stuff was like an oil slick and almost bled into the paint (even after being dry prior to painting). So from now on, I'm not using the primer at all... But yours looks really good- painting the inside was a pain (I masked the stringer, then did the red port frames free-hand). I only masked the waterline on the hull, and painted after planking was complete. She's looking good- keep going!!!
-
Edwin- that's fantastic news there! I hope all goes well for you!!! Like I said, I doubt there'll be much building going on- maybe the only "shop time" I'll get is just to pack everything up (my kit is coming with me, even if it's just me moving right now). But at least I pretty much accomplished what I wanted to when I was initially laid off- that is to complete the hull and deck fixtures, which I am about 90% done with (minus the hammock rails, catheads and some small stuff), so that's fine by me for now.
-
Ken, Due to potential clutter, I only installed the train tackle (attached to the lower carriage) and the breech lines. The gun tackle consists of a double block attached to the bulwarks, while the single block is attached to the gun. For making the hooks, I stropped the blocks with some wire and twisted the top (like a coat hanger), then bent the end into a hook (did not drill a hole and insert a hook). I have some pics on my log showing my stropping/hook process if that helps. The single blocks (on the gun) have the rope seized to them (when stropping the SB's, leave a little space on the inside for the line to be seized). Also, remember when stropping, the reeve holes are closest to the hook side. Hope this helps!!!
-
Ken- nice! It's good to take a break from the hull and make some of the deck fittings. Everything looks really good! Now that your winter down under is setting in you should have lots of time to make awesome progress!
-
Ah- Ken, I'll be moving to Virginia (working in Dahlgren). It's a position for Communications/electronic warfare engineering, which will be fascinating to learn more of and help develop the field. I'll find out more once I start (mid-Nov or so). Sounds super cool, right up my alley and what I want to learn and what I can bring to the table, and the area/region is gorgeous (trees, rivers, hills- gorgeous outside).
-
Thanks guys! It's funny, bc we actually had reservations tonight at this nice steakhouse/ranch (can I say super fresh and awesome steaks!)... Well, I got the offer after plans were made, so needless to say it was a nice surprise during a wine toast. So I'll probably be on the phone calling family, etc. this weekend, and gotta let them know by Tuesday if I accept/negotiate. And I doubt much building the next few weeks due to preparing to move, etc., but I'll dry to do some small stuff. You guys have been awesome for your support- it has definitely helped me throughout this tough time. Whether it's our builds or personal lives- MSW members are the best caliber of friends that really care! I thank all of you sincerely, and will never forget your support! So... once I get settled then some serious building will resume... but obviously I'll be checking in. Thanks guys!!!
-
UPDATE: I GOT THE JOB!!!!! Now to start negotiations!! I'd start in 5 weeks or so! YAYYYY!!!
-
I've heard everyone say good stuff about Morope- wherever you can get that... and Chuck's rope looks great. I haven't seen anything I like at Michaels, and I haven't checked out Hobby Lobby yet. I'm trying to find a good cost-effective solution, especially since I'll need a ton of it (replacing all that came with the kit, and also since I'll be turning my own diameters on the ropewalk, which means 3 x's the length). Sam, I'm not quite sure about the scale diameter of the cannon rigging, but I do know that for the breech lines I used 3 strands of the 021 line in the kit. The tackle lines were 3 strands of the 008 line. Last night I managed to cut slots in the catheads and add small sheaves (used super thin slices of the 1/8" dowel). I'm working on their fitting/shaping onto the hull.


