Rich_engr
-
Posts
322 -
Joined
-
Last visited
Content Type
Profiles
Forums
Gallery
Events
Everything posted by Rich_engr
-
 Bob- good idea doing a test fit. Yeah, it'll be interesting to get the correct angles since both masts have two different rakes (get my protractor). But it'll be a little while until I start the masts (will use square stock and make some kind of jig). (square dowel- umm???? oxymoron??) lol!!
 -
Good work Larry! You used the exact same table I made for the plank widths (both belt and plank widths) and butts (except mine has dots for the butts)! haha!! Planking looks good- it'll take a while and may get boring at times, but just push through it. You're getting the hang of it for sure! Just remember to give your back a rest now and then- even mine gets tight from hunching over for hours on end. Looking great!
-
Thanks Patrick! It seems logical that square stock would make more sense than round for making masts... but that'll be in a little while until I start that phase. Augie- thanks for the heads-up. I'll check out B.E's log. For an update, last night I painted and installed the galley pipe, fabricated and assembled the bilge pump (not installed yet), and assembled the lower chain plates with deadeyes. The Admiral is out of town for a week (or more), so I have the whole house to myself. (No beer and Cheetoes for me.... well, maybe just the beer. And bacon.) Other than the job hunt, which has been slow going lately (no new openings), I'm slowly prepping the house for sale & packing a few things up for when I do get a job (plan on being able to start wherever in a week after I actually get an offer). So it's a good time to really make some progress on the build- I plan on having all of the deck structures and fittings done and installed this week (maybe get to the channels as well). (just reminded me: chain plate tutorial!!!!)
-
WOW!!! Awesome!!!! Congrats on this major milestone!!!!! Finishing the hull planking is definitely worth a celebration!!! Looks really good- just some sanding and you're all set. Before you know it, you'll have the deck done and the hull painted. Great job! Keep it up!!
-
Bob- as some advice, I'd recommend not putting on the cap rail just yet... there's a bunch of stuff on the bulwarks that need to be installed (eyebolts, cleats, tiller rigging, pin rails, etc.), and it's a LOT easier without the extra overhang from the rail... Even without the rail installed, it was still a bit tricky getting all of the fittings in place. I ripped mine off a long time ago so I could have easier access. I'll install mine once all deck fittings are in place (probably in a few weeks). So twice 22? lol- still a youngin' (I'm just past being an eighteen-year-old twice myself, which probably explains why part of me feels young and the other part is an old fart~) Enjoy your weekend!!!
-
Bob- As I think about the masts & spars, I'm a bit intimidated/scared about getting the shapes correct (exact size octagons, chamfer, taper, & round), which I think will be my next biggest challenge. I think the hardest part will be making all portions come out even & symmetrical. Attaching the hardware & rigging actually looks easier to me! lol~ I somewhat tried to make the octagonal shapes in the mast slots along with the angled support inserts that are also octagons (hidden under the planking), but I'll definitely have to find a different method to produce the exact shape needed. Plus, I think working with round stock will be more of a pain to shape the mast sections, so I might go ahead and buy some square stock instead. I saw a post a while back in Masting & Rigging (by Garward I think) that showed a method for making square stock octagonal, which I might try.
-
She's looking good Larry- the paint removal looks ok (don't want the planks too thin). Gun ports look nice- framing will be fun. The bowsprit looks like it will make for an interesting and challenging project- I'm somewhat timid about starting my masts & spars... Regarding the planking, are you using a steam bender to shape the planks? I found the ME plank bender (soldering iron with a giant round head) to be my best friend when planking! (If you do have it, use a couple of scrap pieces to get a feel for steam bending- it's a lot of fun and you can do quite a bit with it.)
-
Patrick- glad the hand is healing, and from the sound of it, it looks like you'll be needing both hands in the future. But honestly, don't get discouraged- your ship IS gorgeous and an inspiration for all of us in the Niagara Club. (And we newbies wouldn't have caught on to the "mistakes" either.) Yes, don't model while angry or while in a strong emotional state- it's like drunk driving in the modeling world, which isn't cool. So relax, go easy on yourself (chalk this up to experience), go do some fishing or tend to other matters that'll help unwind the mind. Then get back to the rigging once you're more focused and have a solid plan. We have faith in you, and we're here if needed!!!!
-
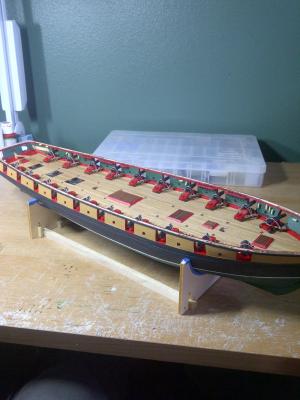
Larry- thank you for the compliment! Yours is turning out fine as well- perhaps this could be some motivation for ya~!! Here's my tentative process: Build all of the remaining deck structures (skylights, bilge, bell, etc). I already built and installed the forward fife rail last night, and plan on making the aft fife rail today. Complete some of the smaller details on the outside of the hull (steps, channels, rudder chains, eyebolts, etc.). Re-attach the caprail (had to strip it off early on due to the gun port heights and had to reinforce the bulwarks). Assemble the hammock rails, catheads, stairs, etc. Fabricate the bowsprit Fabricate the masts Fabricate the spars But as I review the drawings, this may change due to things forgotten or overlooked. I plan on doing as much work, fabrication, and rigging off of the ship as possible in order to make things easier! (wow- it's weird making a task list without mentioning the guns! lol!!!)
-
Adam- thank you!!! Although it's been very slow going (only took me four and a half years to get this far), it hasn't been too bad for my first build. I think the biggest hurdle is finding the rhythm and seeing the process. Now that the "monotony" is over, I can get into the real nitty-gritty~~~ Thanks for checking in and following along- this is also what helps make this fun and keep one's head in place!
-
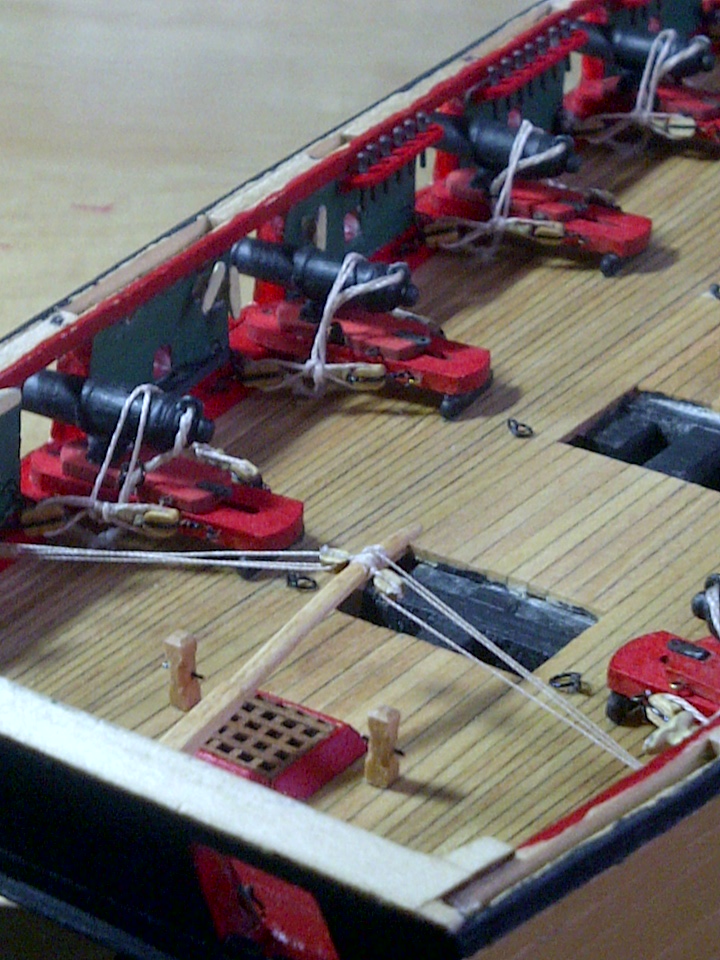
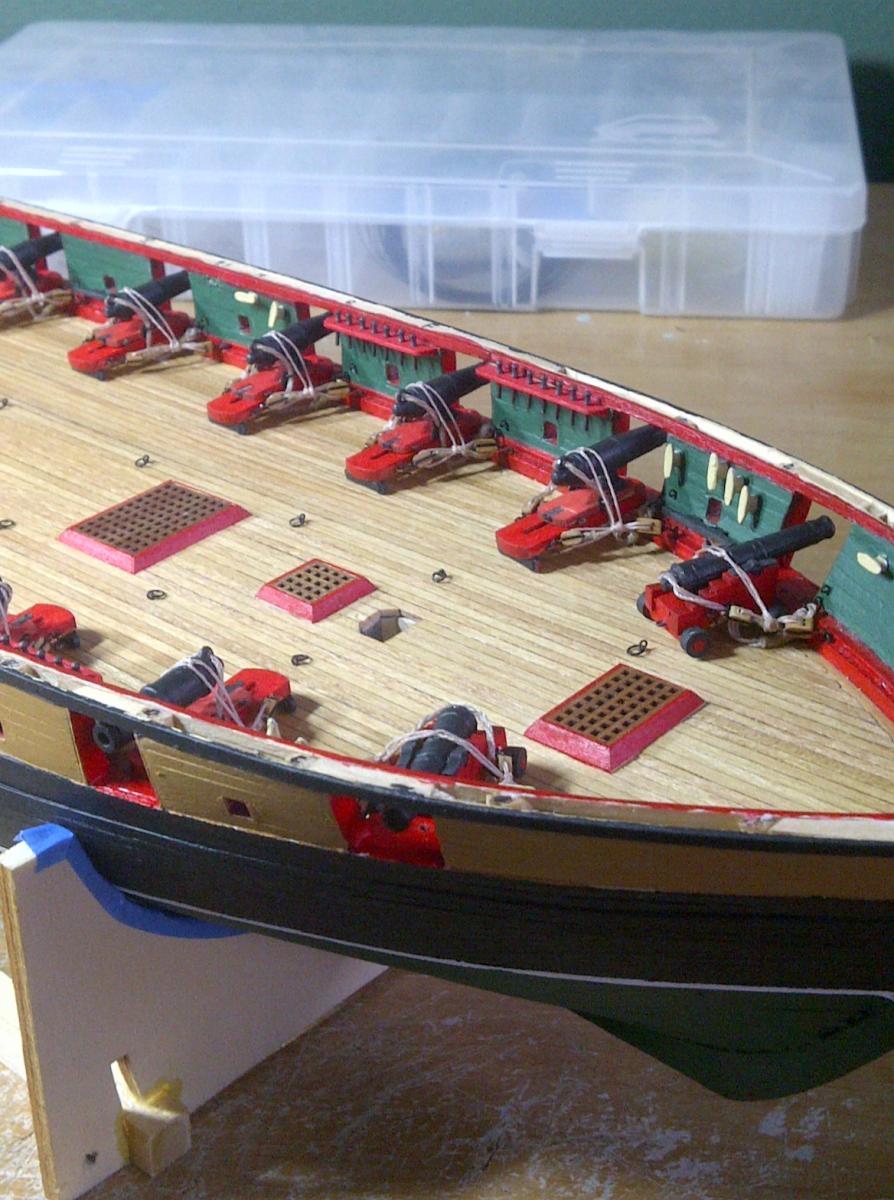
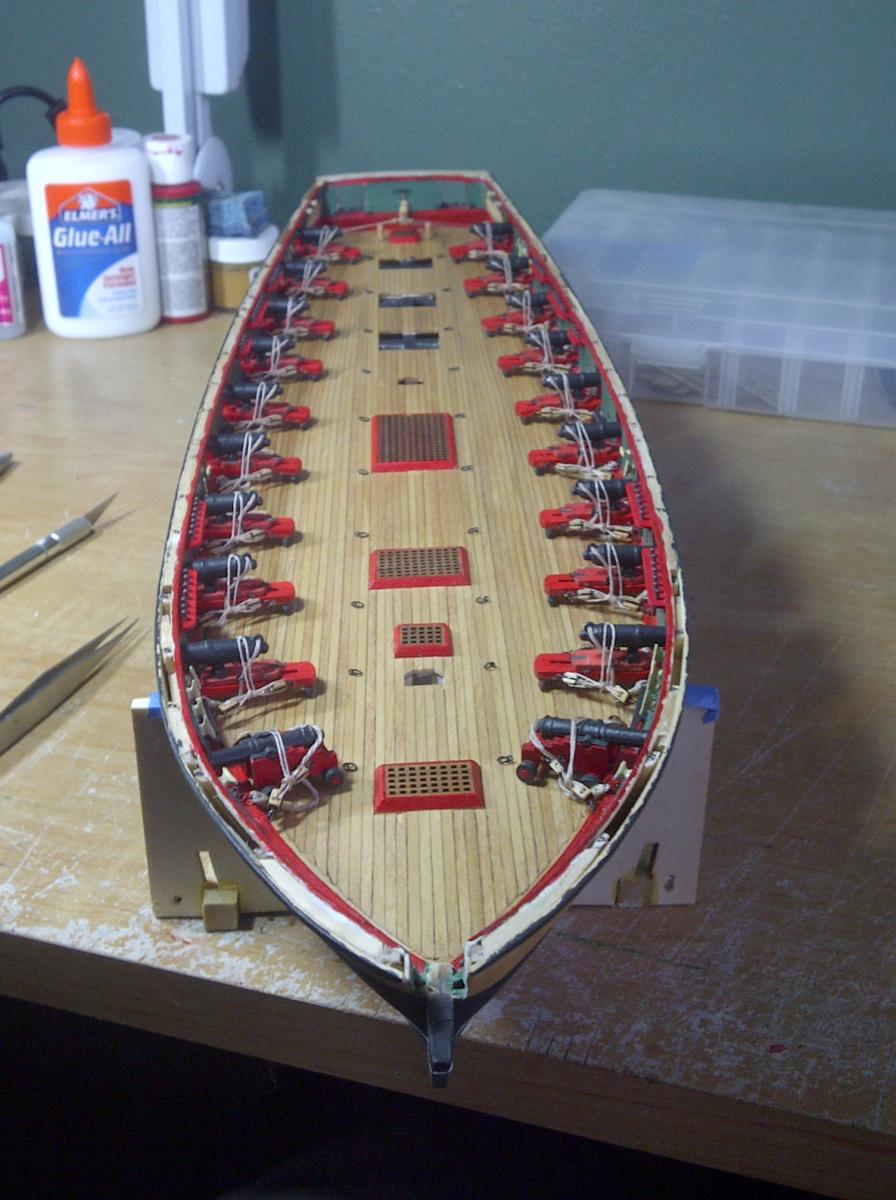
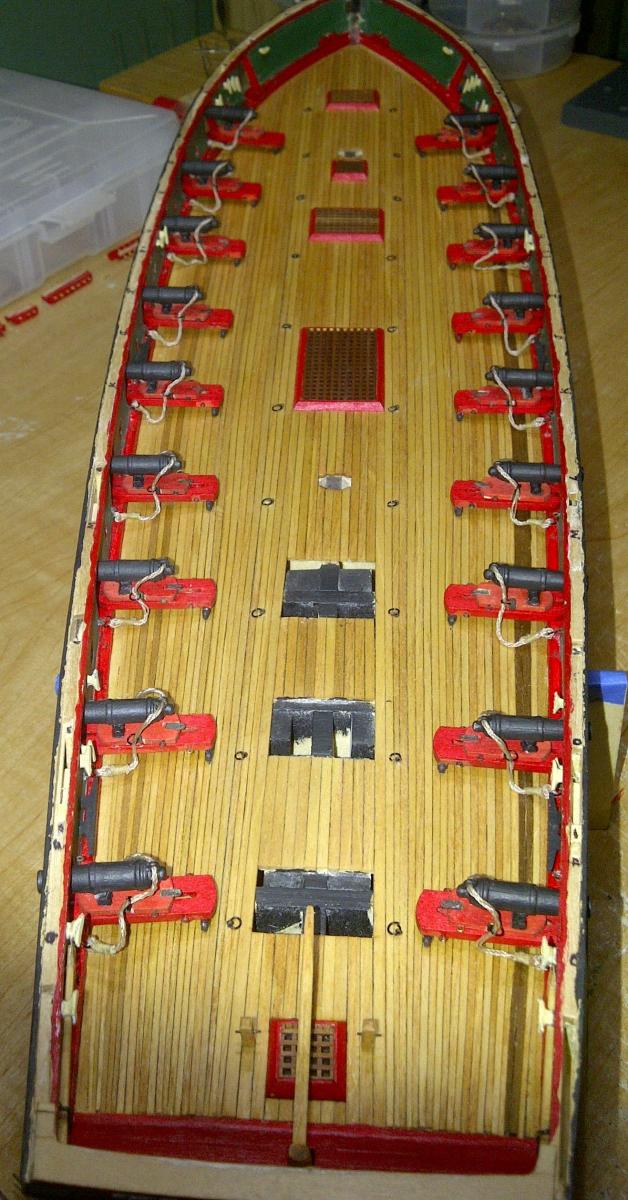
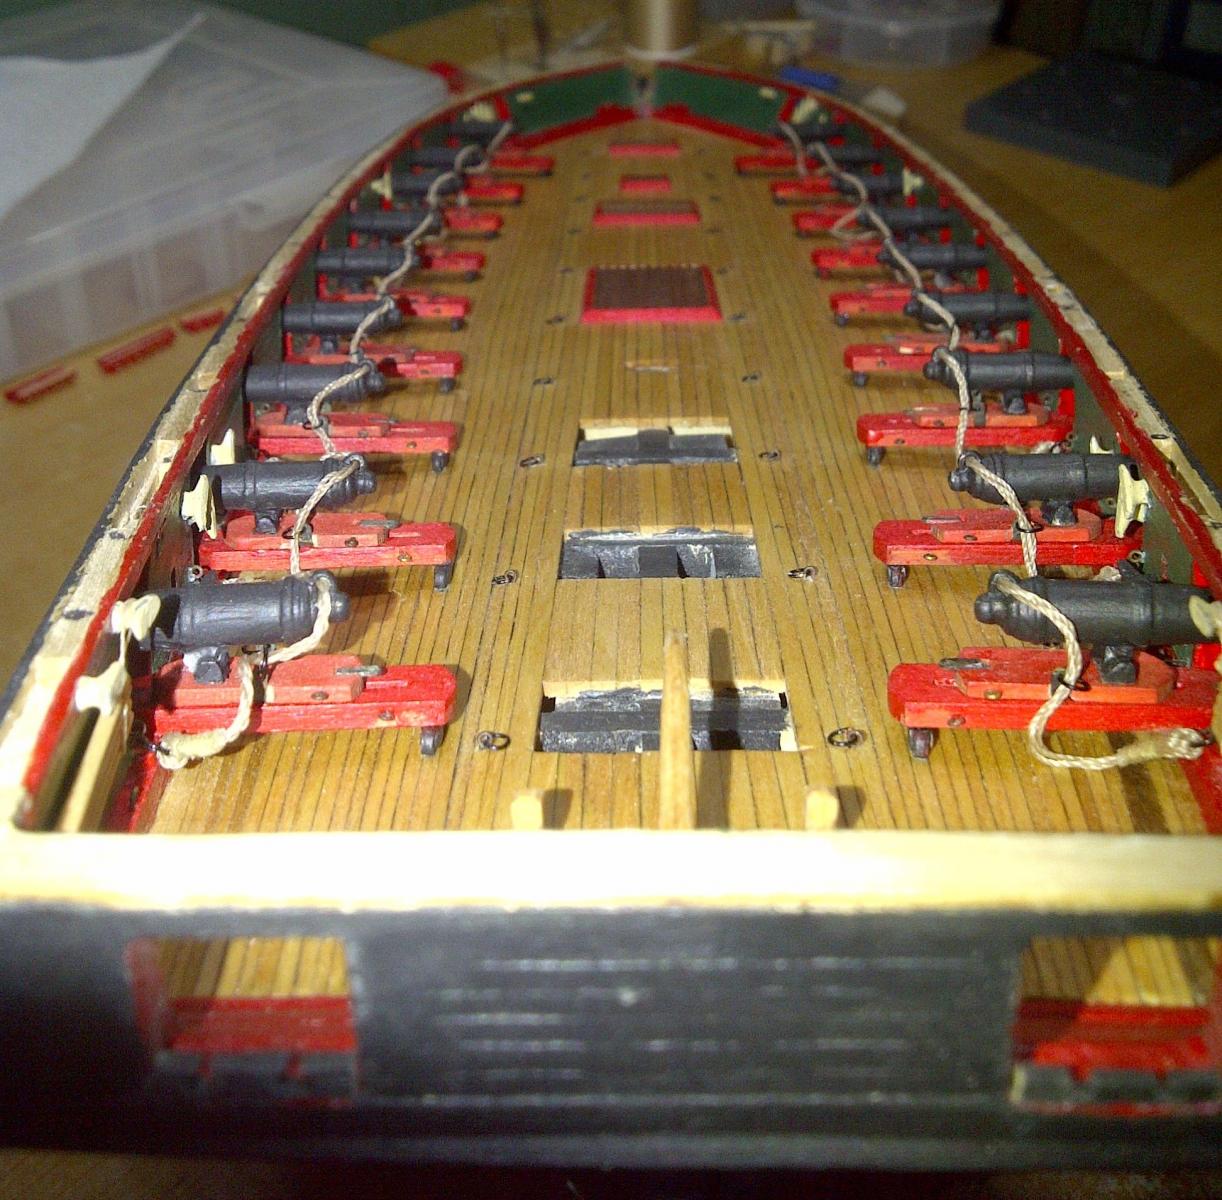
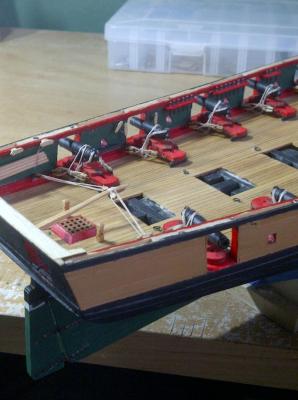
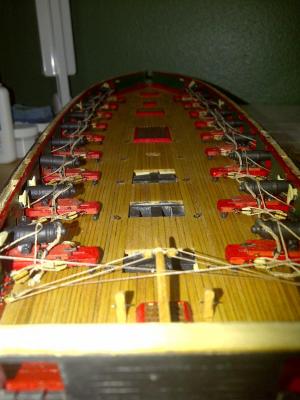
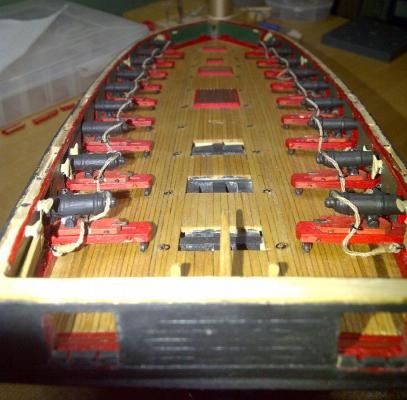
Here's some pics of the guns fully installed and rigged. Now it's back to double checking the plans to make sure I didn't miss anything- I want to have all of the inner bulwarks completed and all fittings installed before building & installing the deck houses. And after deck is 100% done, it's on to the channels (chainplates are done!), then masts & spars!!!!


-
Thank you!! I've been picking away here and there at a few things lately, but mostly want to get the long guns installed today/tomorrow, and document my chainplate tutorial. Once the long guns are installed I'll get some pics up. Had an actual phone interview today, which was nice considering it's been super quiet for over two months... so we'll see- could be a few days to weeks until I hear from them (the HR guy said their process is slow, and for me to just hang in there and be patient). Other than that, still looking around!
-
Long guns are about 95% done- they'll be installed tomorrow (after haircut and errands), thus completing her armament!
-
Ok... guns are all rigged, along with the tiller bar. I also installed the pinrails on the bulwarks. I've been making parts & assembling the two long guns- they'll be painted tomorrow. I took a bit of a break from the hunt today since nothing new was coming up... needed to clear my head, and at least I made some progress!
-
Here's the guns mostly rigged. I still have to trim the lines, but everything else is in place. I think I'm going to leave the inhaul tackle off, since that'll make the deck look really cluttered.


-
Sam- thank you! I hope your gf finds something really awesome as well! (I should have changed jobs 2-3 years ago when I had the chance- lol!) The carriages and guns are about 90% installed and rigged- should have them done tonight or tomorrow. The rigging went a LOT faster than I thought it would (hardest part was hooking the blocks onto the eyebolts in the deck.) I also have the pinrails ready to go (belaying pins are drying from being blackened as I type this). Which reminds me- I need to get some pics and detail my process for making the chain plates, which I'll put in the Masting & Rigging forum as well as here.
-
Lol- no worries on the English (I speak Pittsburghese, Texan, and regular lol!). Regarding the beam locations, honestly, I would have no idea where they would specifically be located- you could try to look through some contemporary sources/drawings, or even some of the modelling books describe the spacing (6-12 inches I think, depending on country, time period). The plans used for the reconstruction might be available somewhere (National Archives, US Naval Academy Museum, or even the Niagara Historic Society in Erie, PA). Still, for staggering the planks, you can stick to the 12-30ft lengths like what's called out in the assembly book, and follow the 1:3:1 rule and stagger the butts (see Framing & Planking forum). Don't forget that the hull is painted, so these details (or slight errors) may not be as visible. On the deck, in retrospect I think I could have gone with adding the butts and staggering them (I used single strips to cover the whole length, tapered from end-to-end). As for MS cert, unfortunately I have zero interest/experience in programming or computers (other than using MS office, etc). Even configuring the wireless router at home for the printer and laptops- that's a headache and PITA in my book! (I'd rather wire up a ceiling fan, install a walkway, or do yard work in 100 degrees...) But I've been reading/learning radar and stuff on my own just to keep the brain cells moving. But still pressing ahead with the job search- really the balls are in the employers' courts (110 apps). I truly think the trick to all of this is finding out who is actively hiring, as opposed to just having 300+ open positions and not hiring (just collecting resumes)... So looking at options and widening the net to get some hits.
-
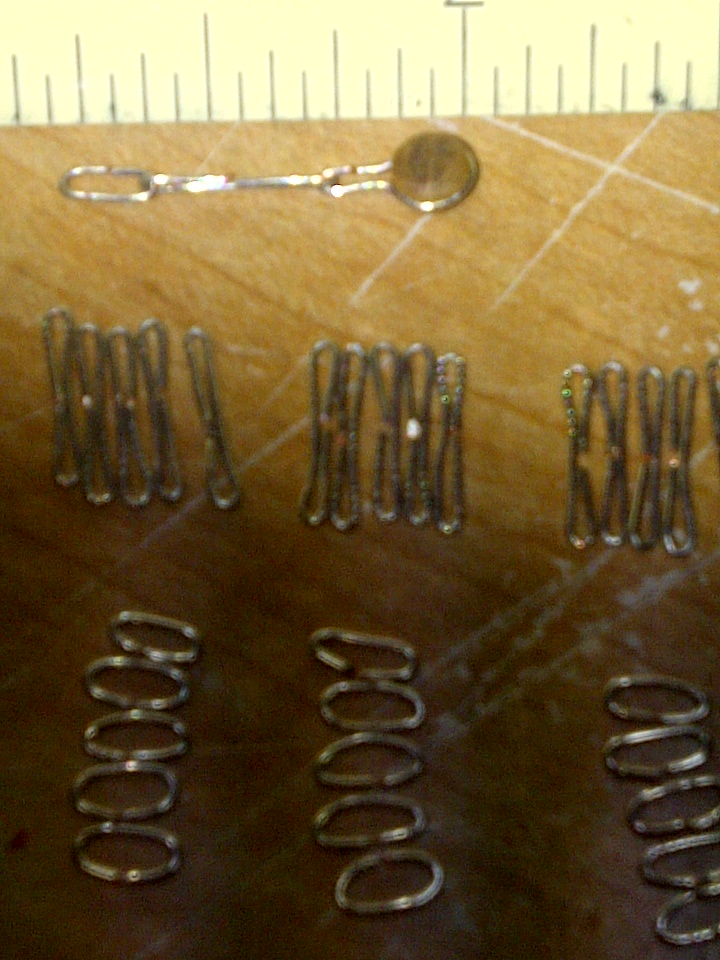
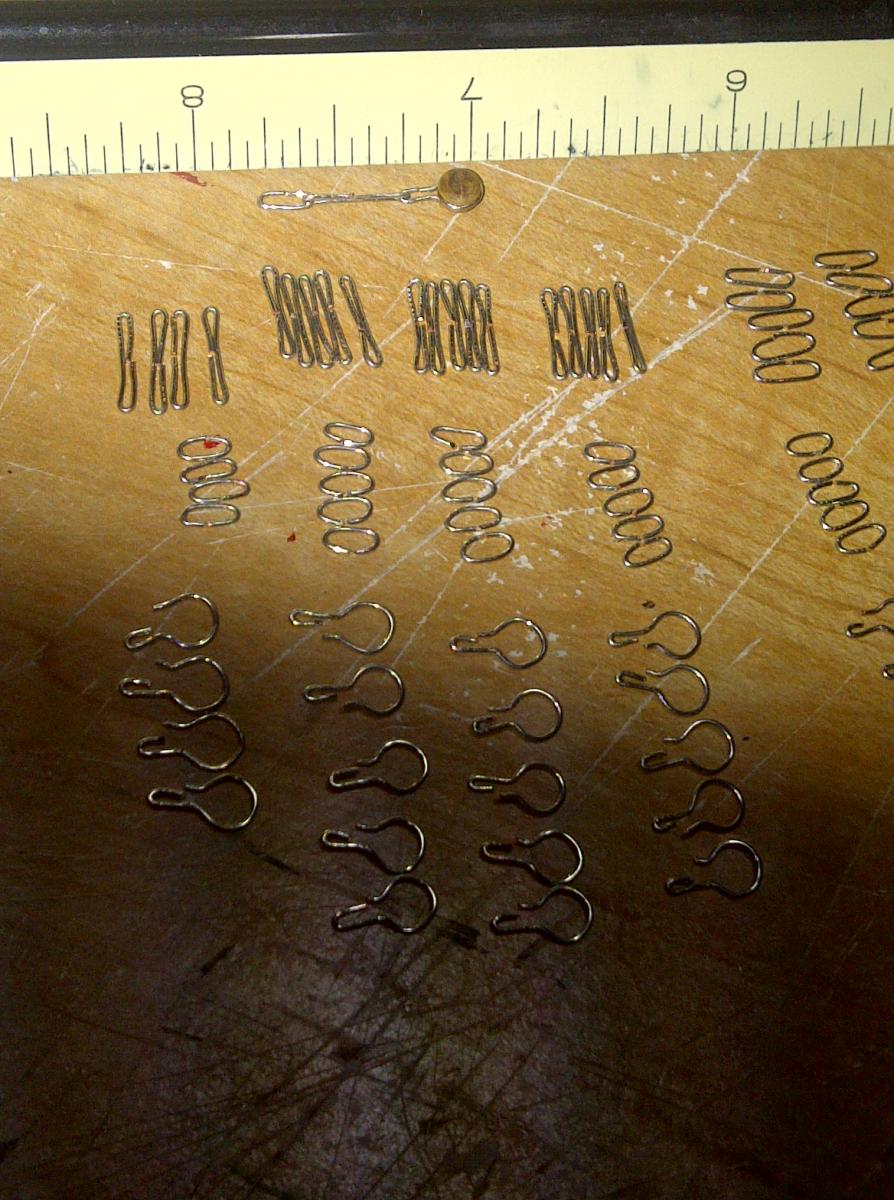
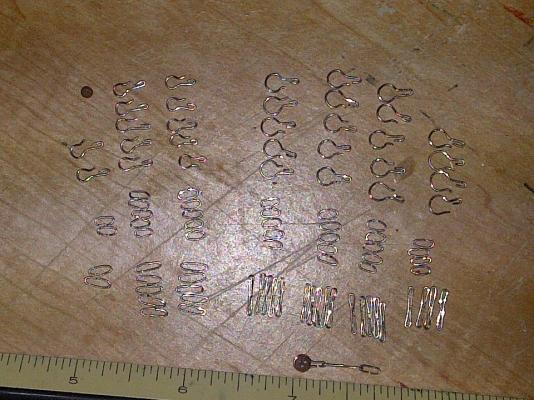
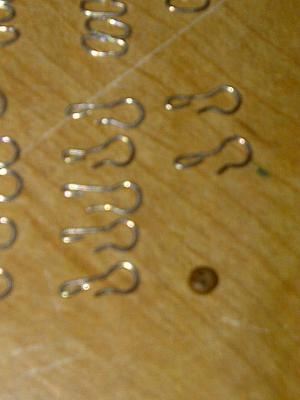
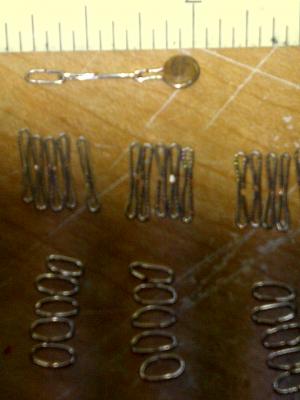
Joseph- of course I did! As for my process and jig, I'll get some pics and start a thread in the Masting & Rigging forum, since it was super easy, fast, and they were highly reproducible. It definitely took the "fear" out those really quick! (And it only took 3-4 hrs to come up with the jig and make all of them, so I'm fine with that!) But now that they're blackened (rather, my "off-rust" color), they'll go in a container so I don't lose them until I do the channels. Now it'll be back to final rigging of the guns.
-
Model Shipways Ropewalk
Rich_engr replied to cdogg's topic in Rope Making/Ropewalks's Discussions about Rope Making
Geoff- regarding the line to use, what brands/types would you recommend? I have a Michael's craft store here in town and have looked at their selection, but most seems too thick, fuzzy, or shiny.... right now I'm just using the nylon line that was came with my Niagara kit. Yes, the key with making one's own rope is to experiment and get a feel for how the rope turns out (no pun intended). -
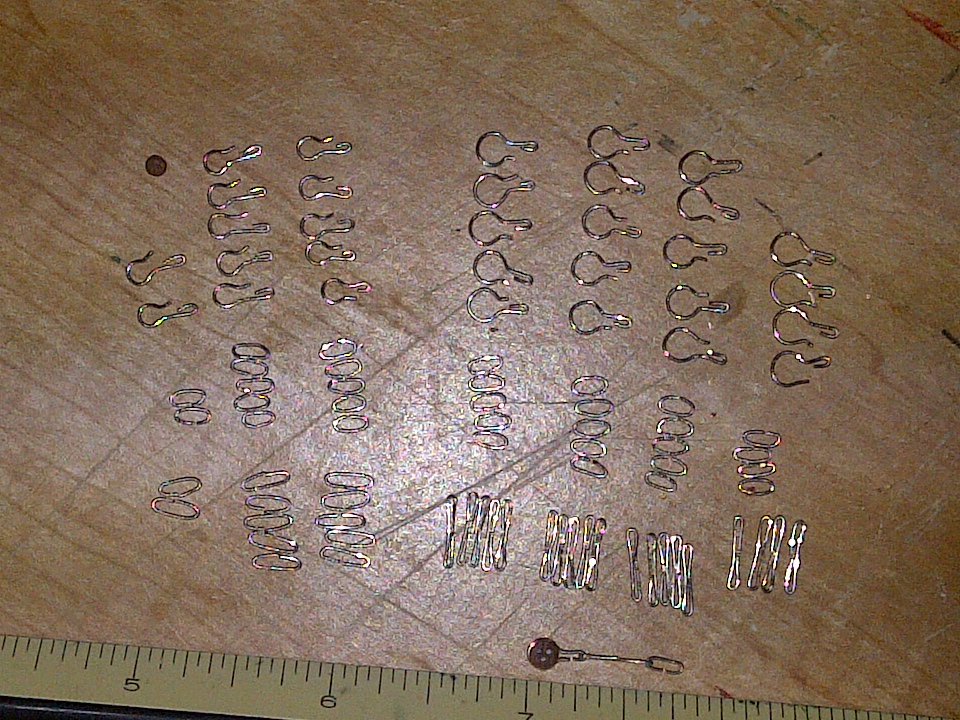
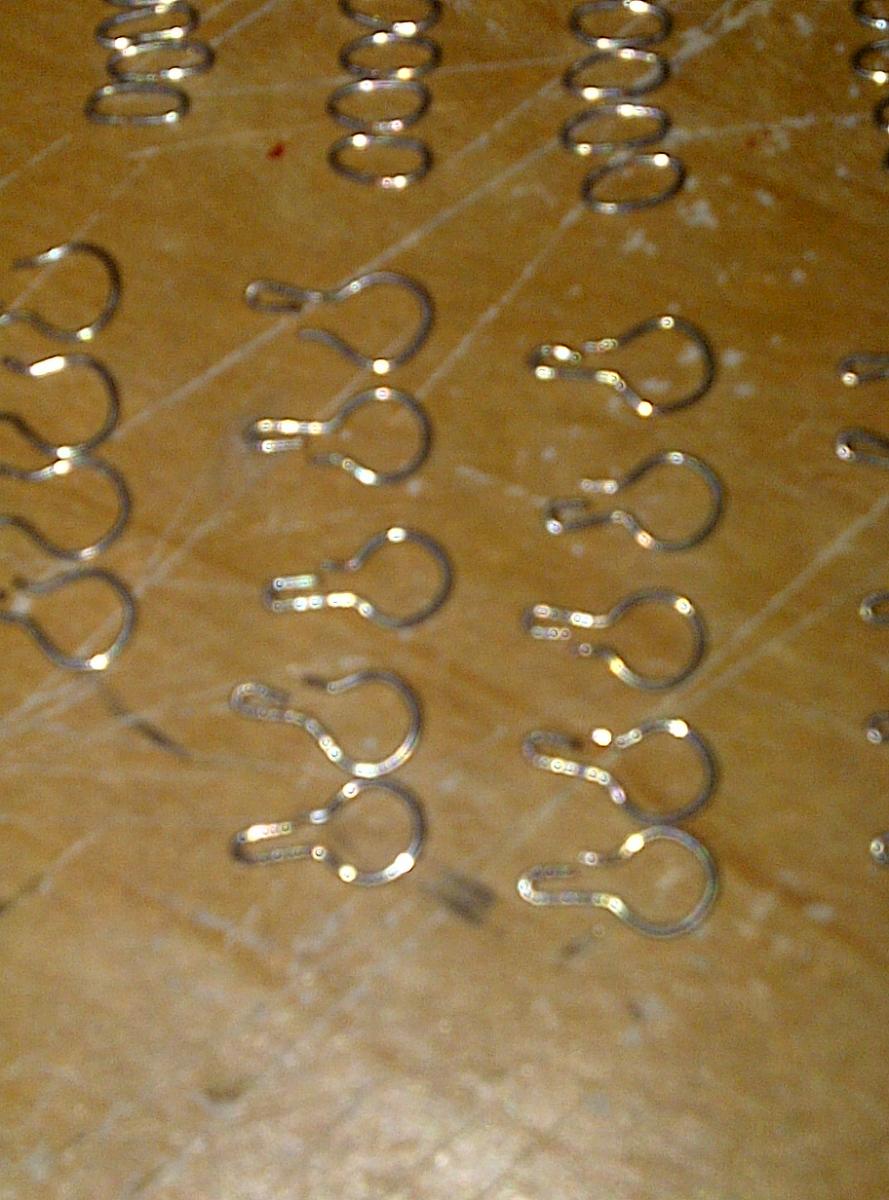
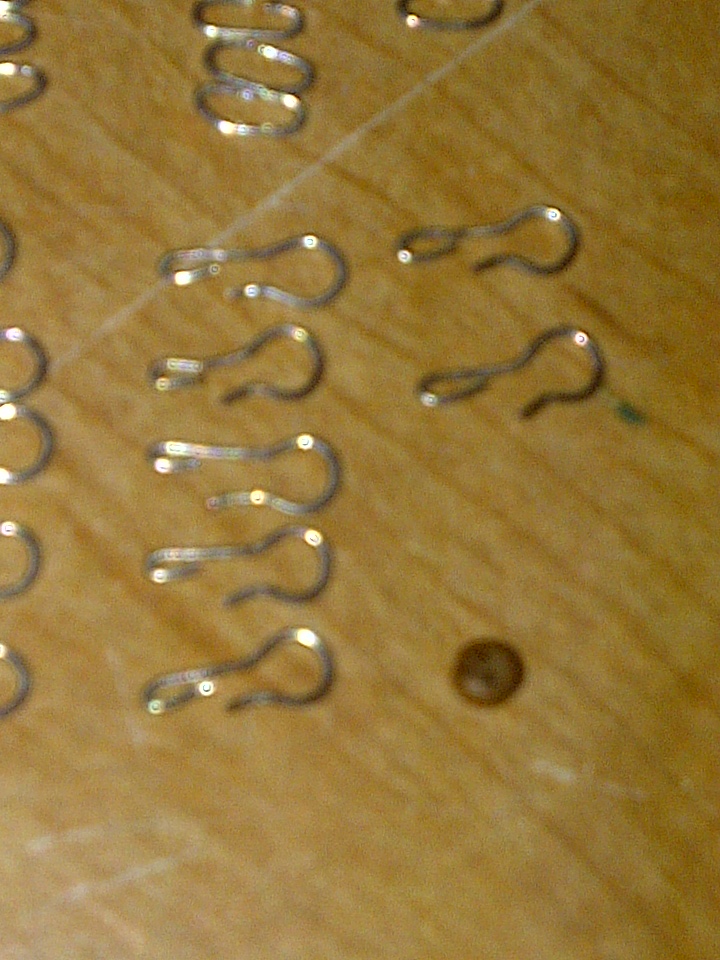
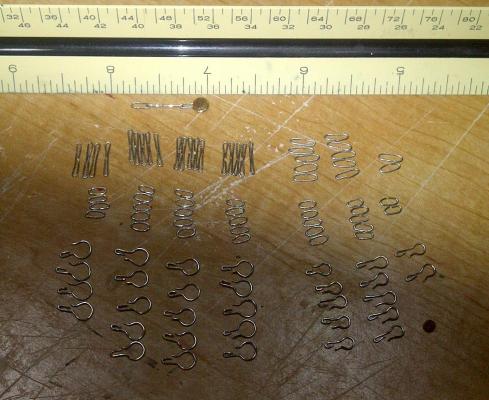
Here's proof of my bounty from the past two nights: chain plates!!! They were a LOT easier than I thought (just made a jig using some small drill bits stuck into a piece of wood so I could get the correct lengths each time). Now, just dunking them in the tank overnight. I only made the ones for the lower shrouds.


-
Thanks guys! The lines went a little easier than I thought, but although not quite what I was expecting, I think they turned out ok. Last night I decided to start making the chain plates- see if I could figure it out, and it's not too bad (made one complete set and all of the middle links). Today I'm going to try to dip some in the BI tank. But most of my focus is on the job hunt- 105 applications as of yesterday (I've sent out more apps in the past 2 weeks than I have in my entire life combined!). Hanging in there and hoping something pops up really soon, otherwise it's 3 retail jobs @ 100+hrs a week in order to pay the bills, which would mean no building for a long while (but I'll give it another 4-6 weeks before I go down the retail path)........ praying & praying!
-
Model Shipways Ropewalk
Rich_engr replied to cdogg's topic in Rope Making/Ropewalks's Discussions about Rope Making
I use mine to make my own ropes- works well if you practice a little. The two key things I found were that first you have to get equal tension on all 3 lines first (tighten/slacken them to make them all the same), then you have to unwind them enough with the gear head in order to give them the necessary resistance. What happens is that the final winding (with the plain round turning end) balances out the tension from the unwinding (from the gear head)- it's basically two forces cancelling each other out and need to be balanced so the rope doesn't unwind (or really coil back on itself and kink). But for starters, I'll make 6-8ft of rope at a time. I'll use the gear head and turn it about 30-40 turns (with the other end locked with the pin), then unlock and turn with an electric drill stuck into the head (turning 8 ft of rope by hand will take half a day). After my turns are complete, I'll drop a bit of CA on the ends to keep them from unravelling, then cut and remove the finished rope. It's pretty easy- just takes some practice and getting the feel of it- I'd recommend starting with about 2-3ft or so just to play with it first. (Also, if you want super tight turns, use a truck/bobbin that's cone-shaped to push the turns tight- I used a wine bottle cork and cut it into a cone, then stick that in one end of the rope and push it down the line as I turn). Hope this helps a little! There's some other posts on ropewalks that may be of help as well! Good luck! -
Looong delay- last night was the first time on the ship in over 3 weeks... but I did manage to get the breech lines set up, and started working on the tackle for the tiller bar. So now to continue with the remaining gun tackle when I have time (job hunt's been slooooow, unfortunately).

-
Sam- I'm going with the guns out. I'm still pondering as to how I want to secure the rigging though (maybe tied off and tucked under the carriage, but probably no coils). I was thinking of lashing the free ends of the tackle over the top of the guns, but that's how they're secured when stowed (not out, as I am doing)... so probably a little experimentation there... Btw, the guns ARE mounted to their carriages, and the breech lines are installed (but not glued/shaped into their final resting position). I still have some tests to do with diluted PVA (Elmer's glue) added to the breech lines for the proper sag and relaxed state, since mine are very springy and aren't affected by gravity! lol~ Hrm... maybe a teaser pic would be appropriate~~~~~
-
Ok... haven't updated in a while... Unfortunately, I haven't been in the shop in over a week, due to fixing some flower beds and redoing the front walkway (prepping the house for sale when that day comes). So, instead of installing gun tackle, I've been digging, leveling, and installing flagstone, brick, and slate... in 95 degrees... but luckily it's about 80% done, so we plan on having this finished over the weekend (after our neighbor's surprise birthday party/cookout of course!). Maybe next week I'll get back to the build as a break from the job hunt.