Sheerline
-
Posts
92 -
Joined
-
Last visited
Content Type
Profiles
Forums
Gallery
Events
Everything posted by Sheerline
-
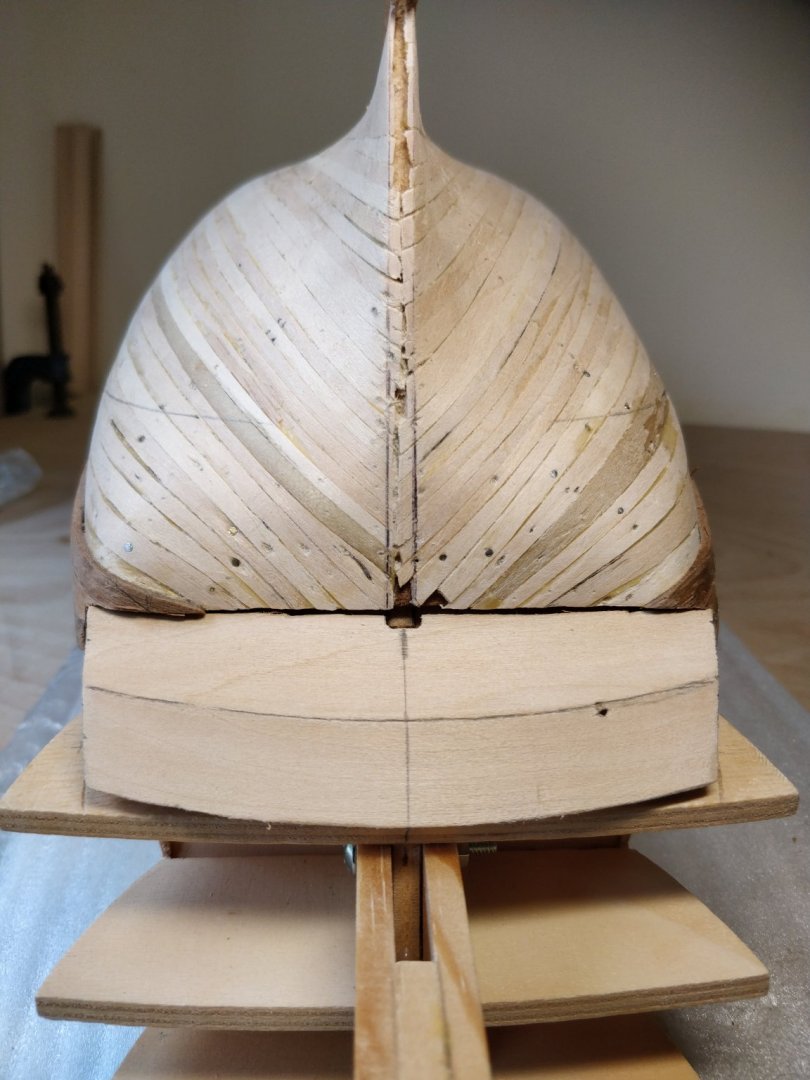
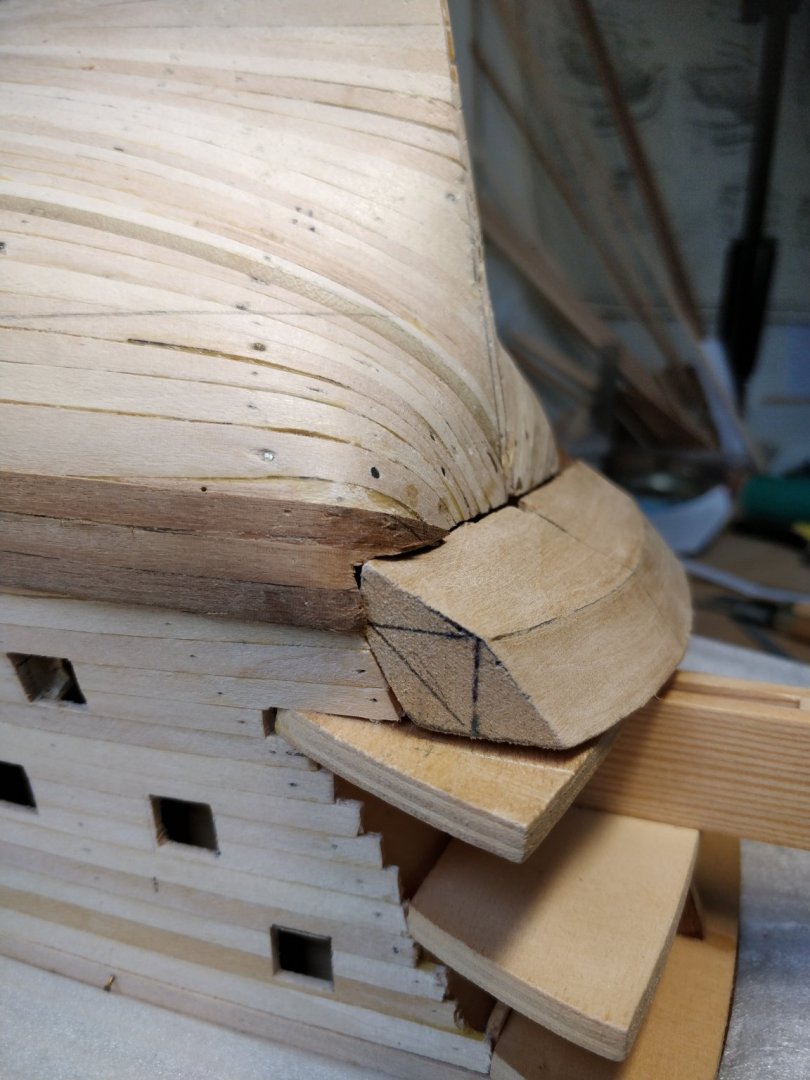
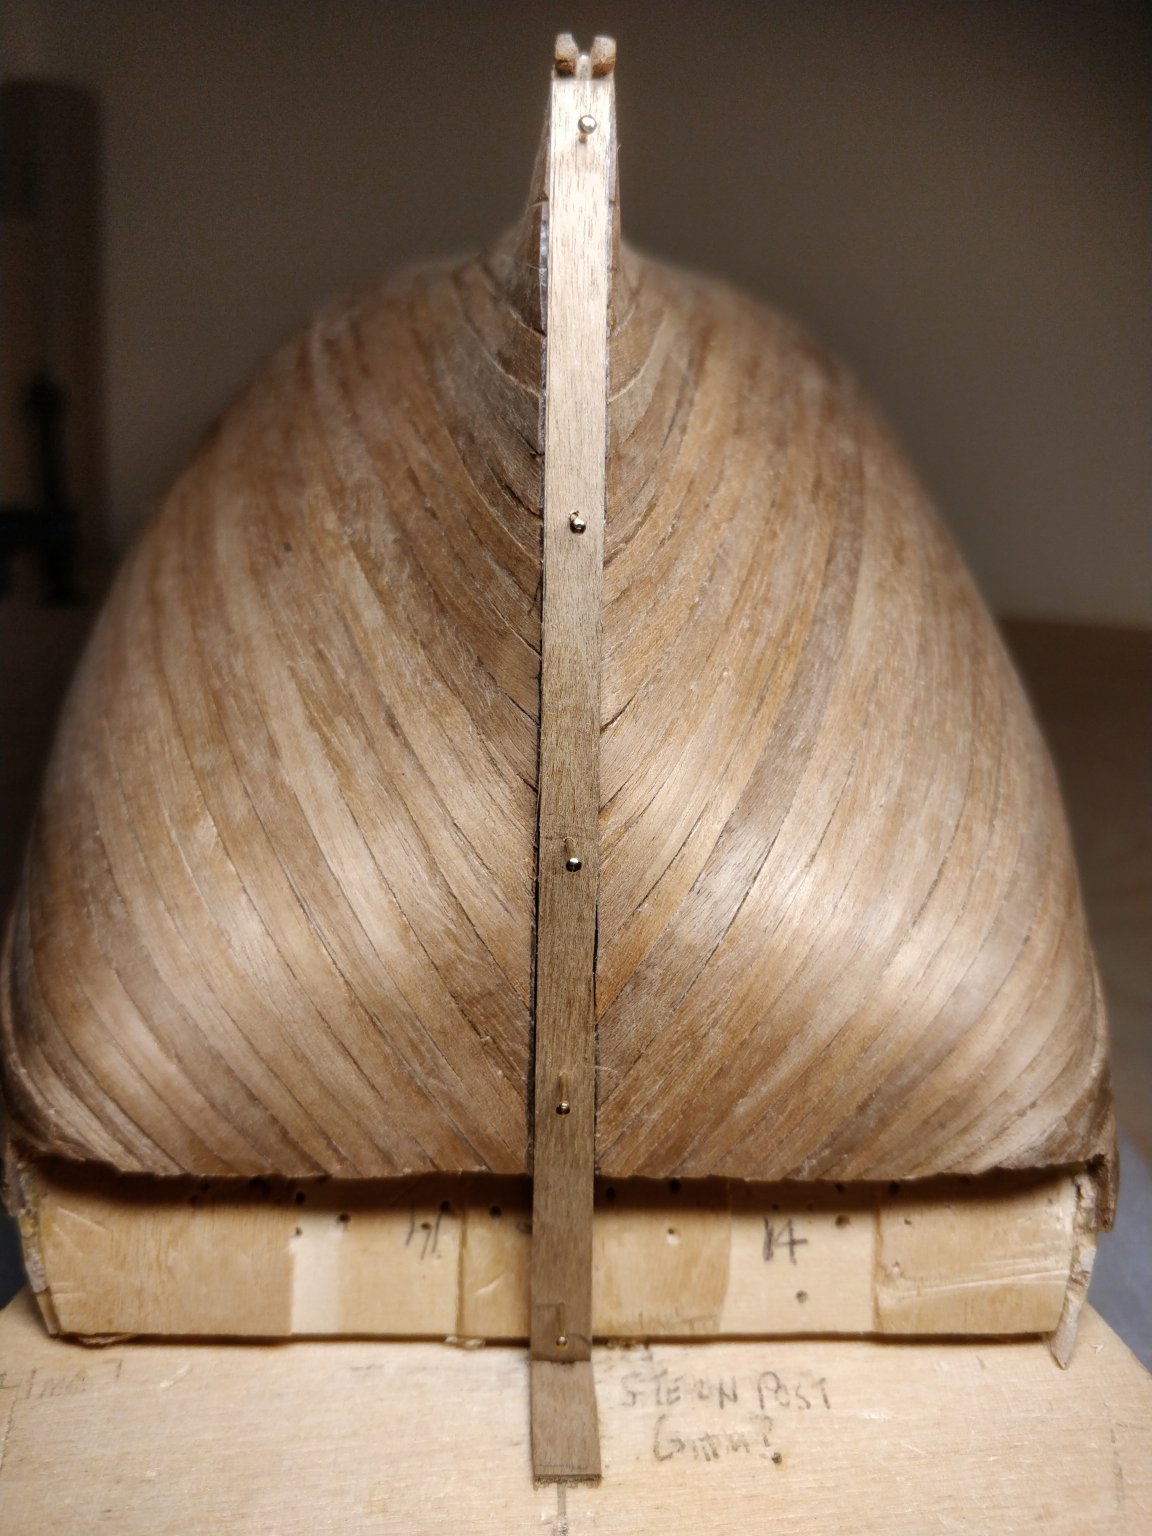
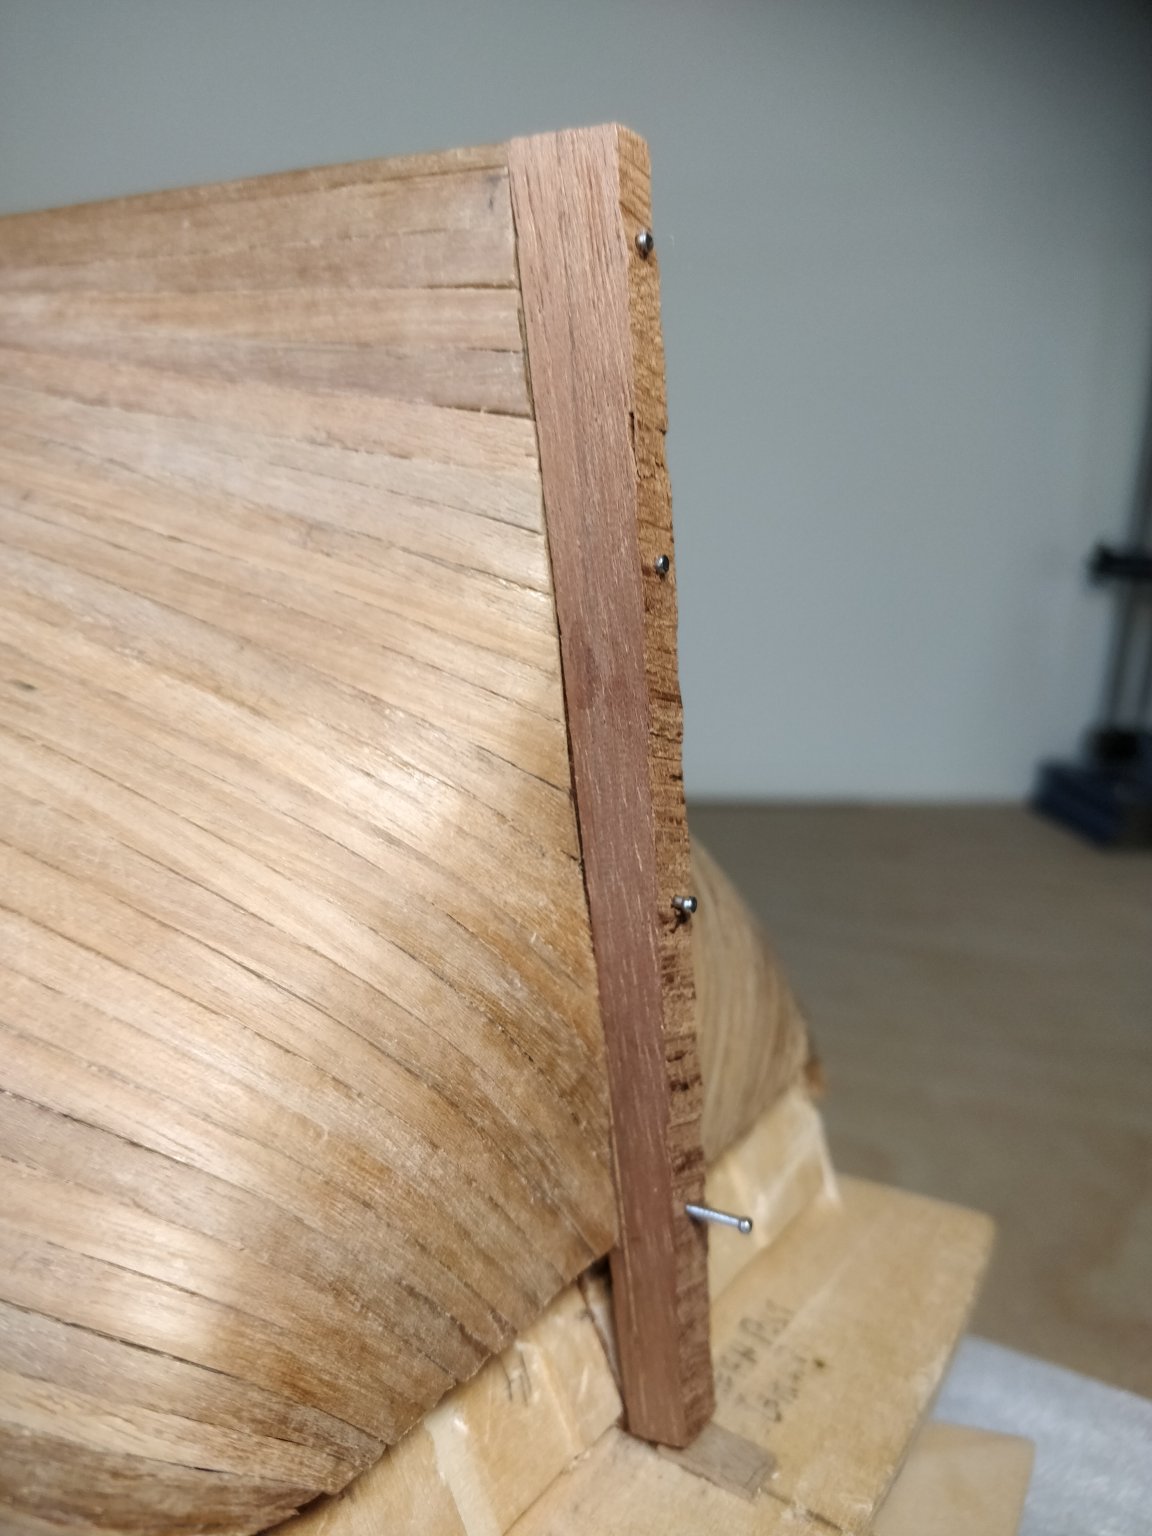
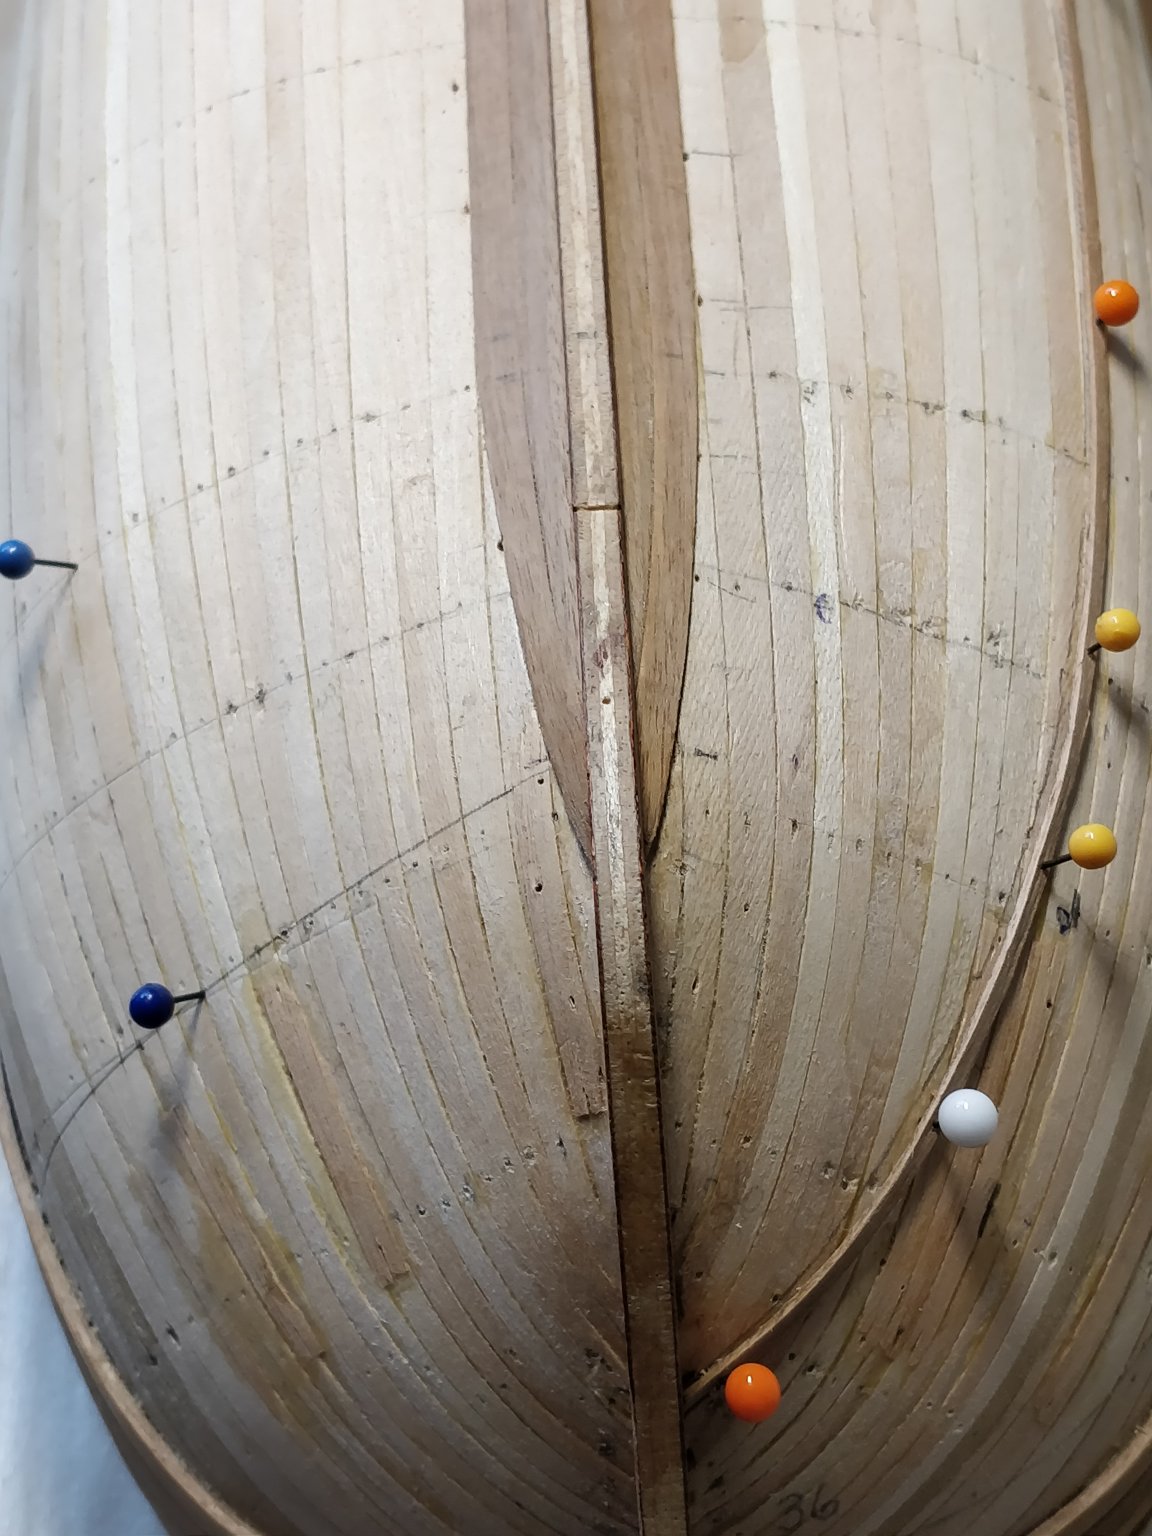
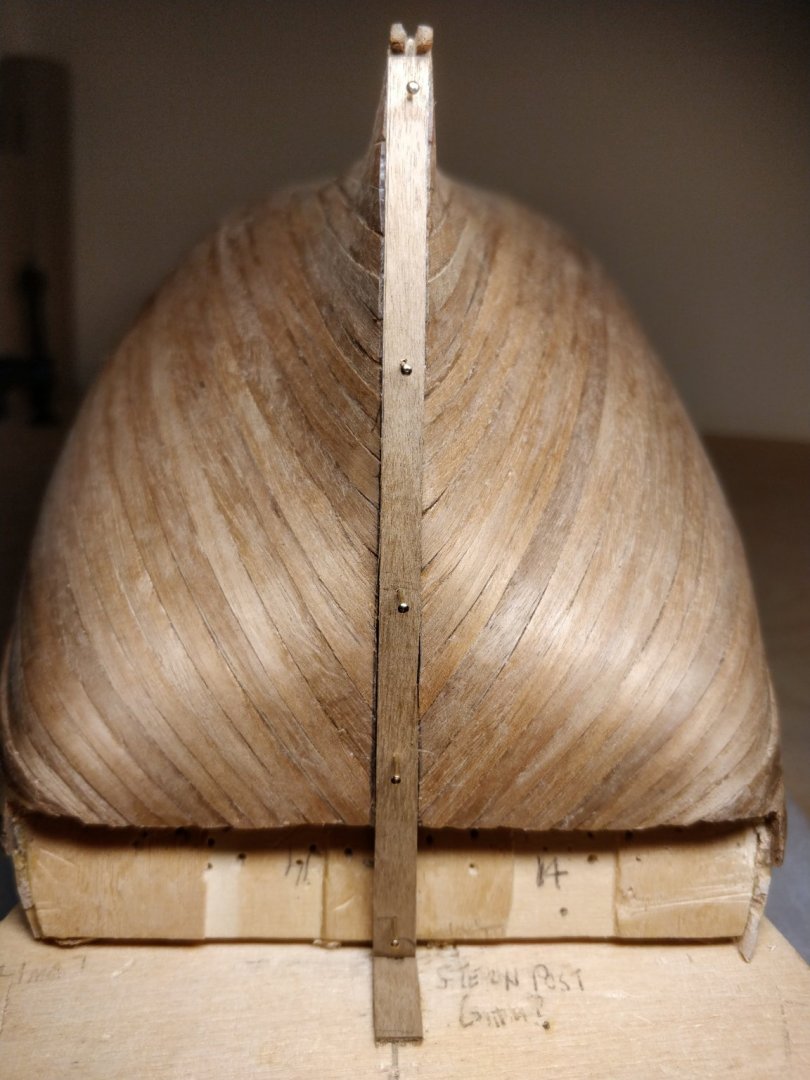
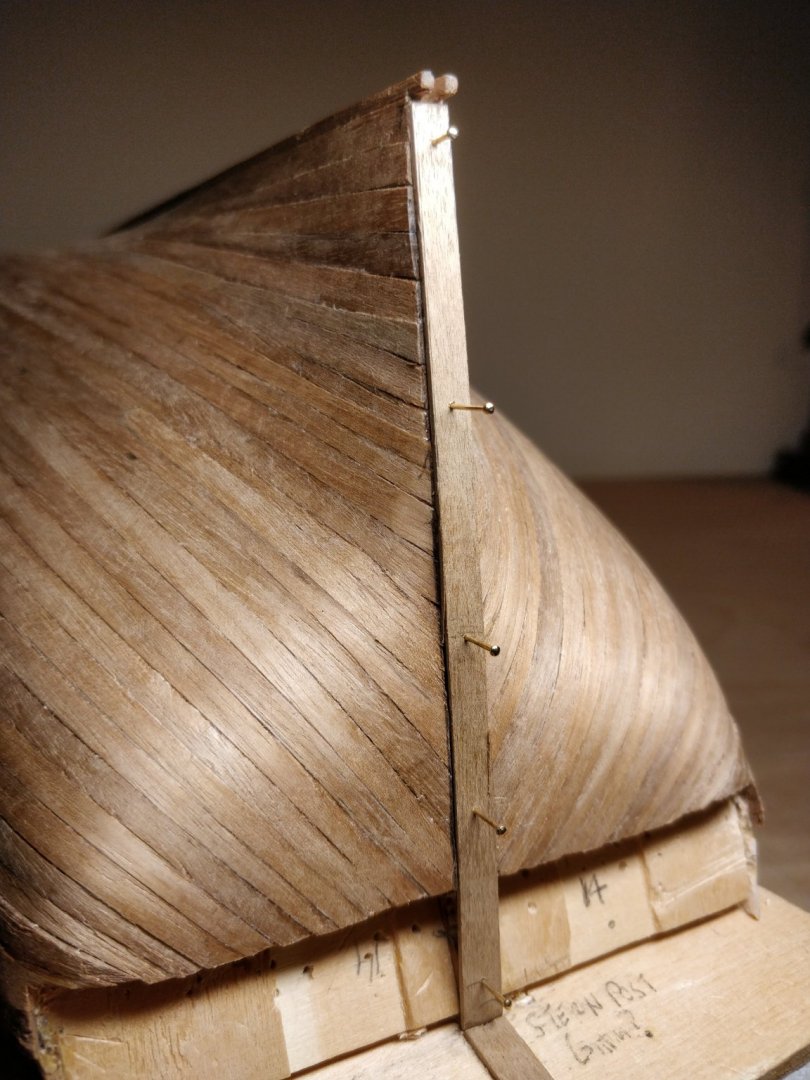
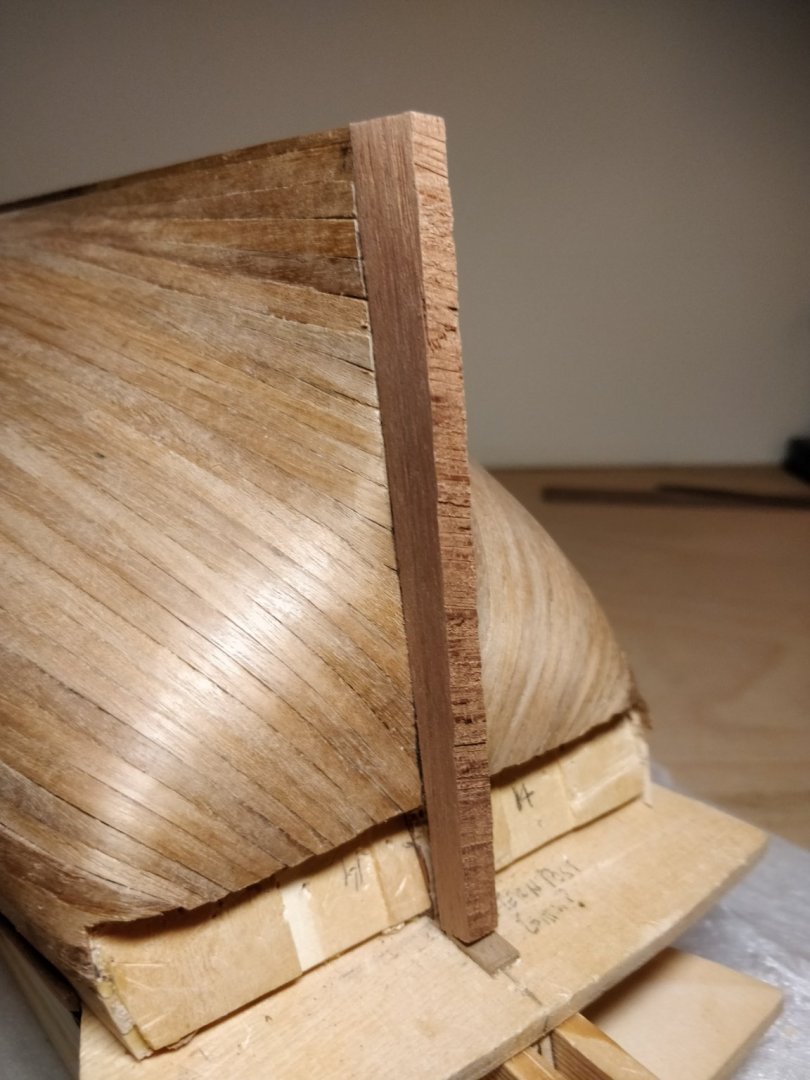
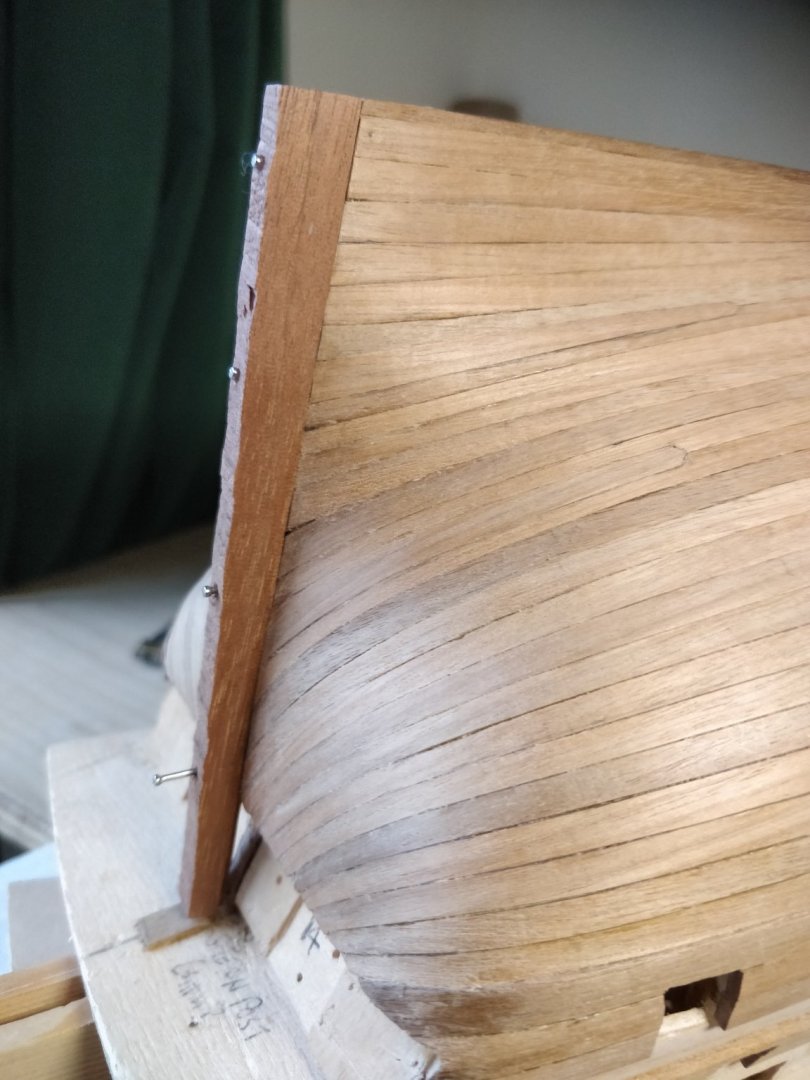
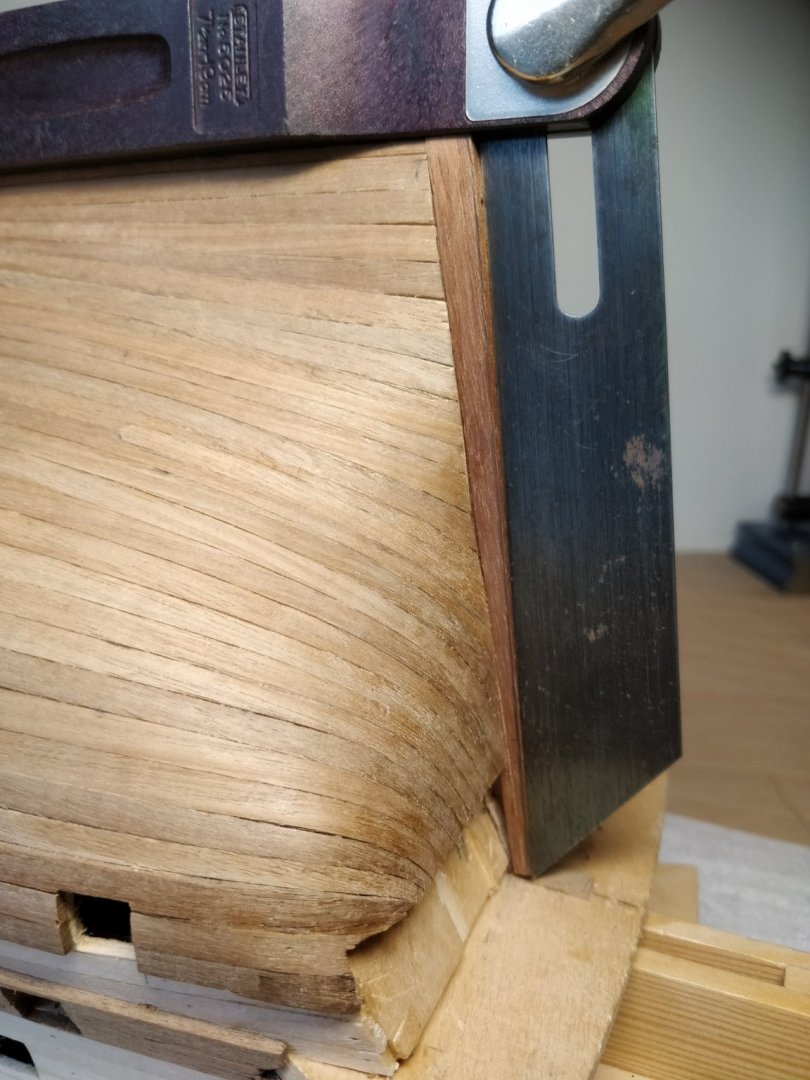
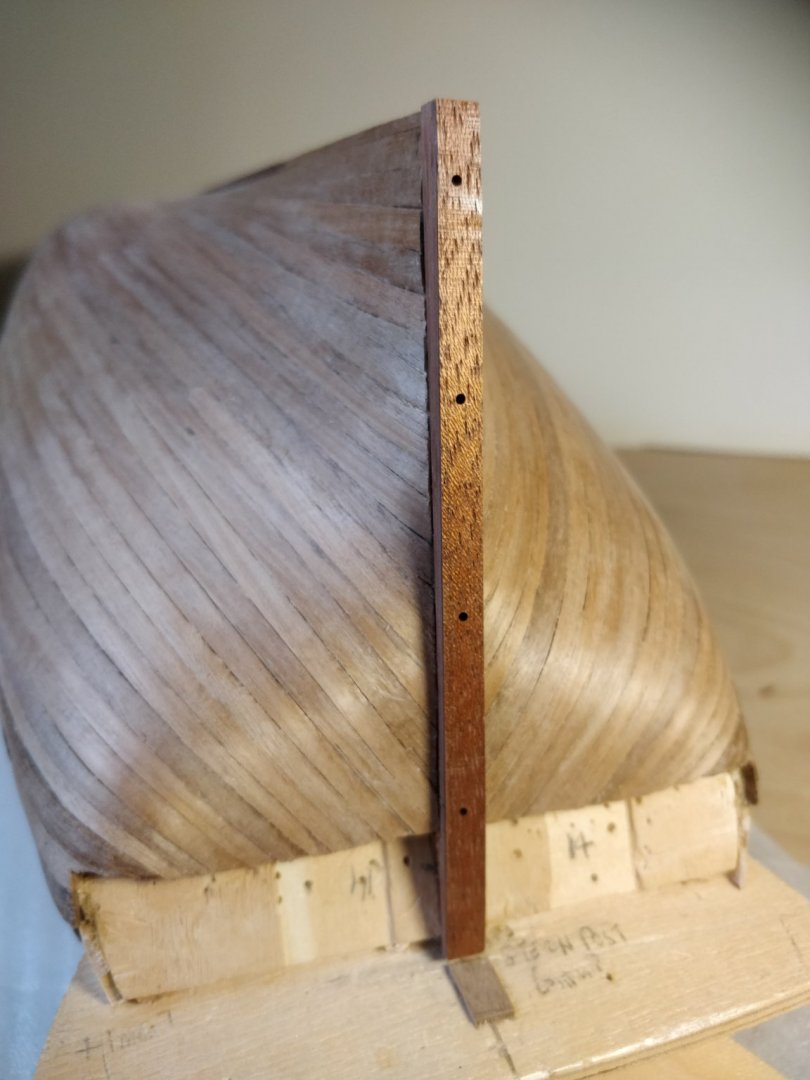
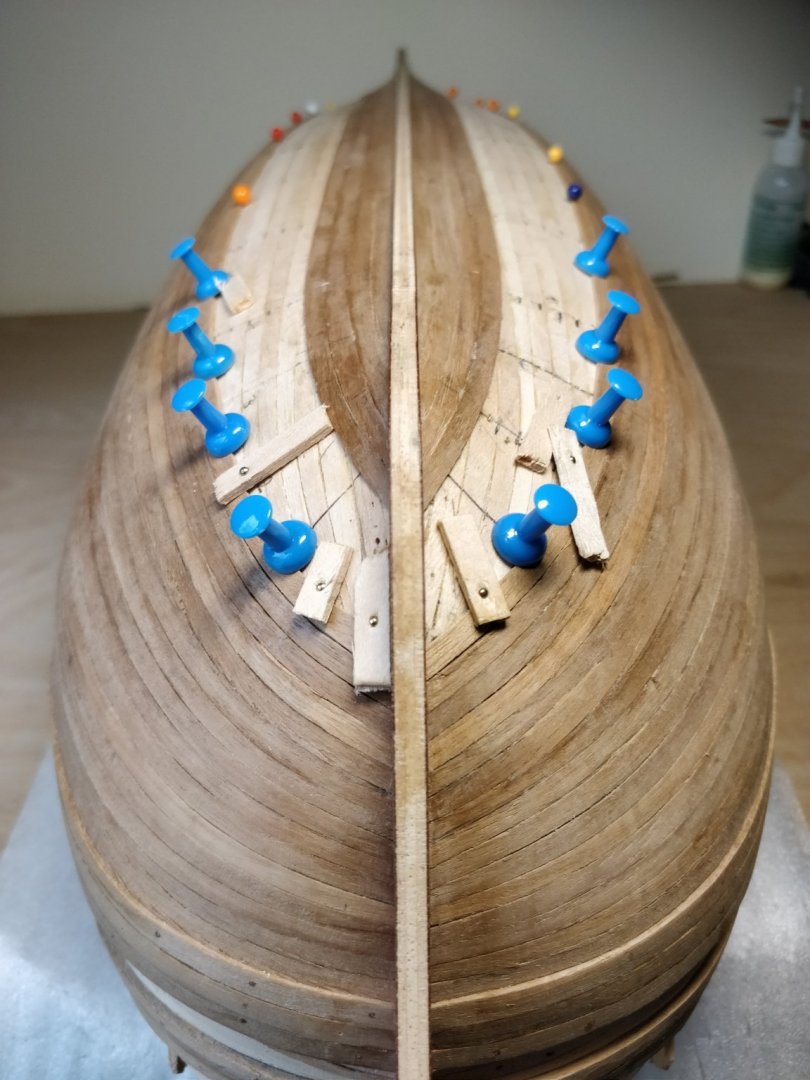
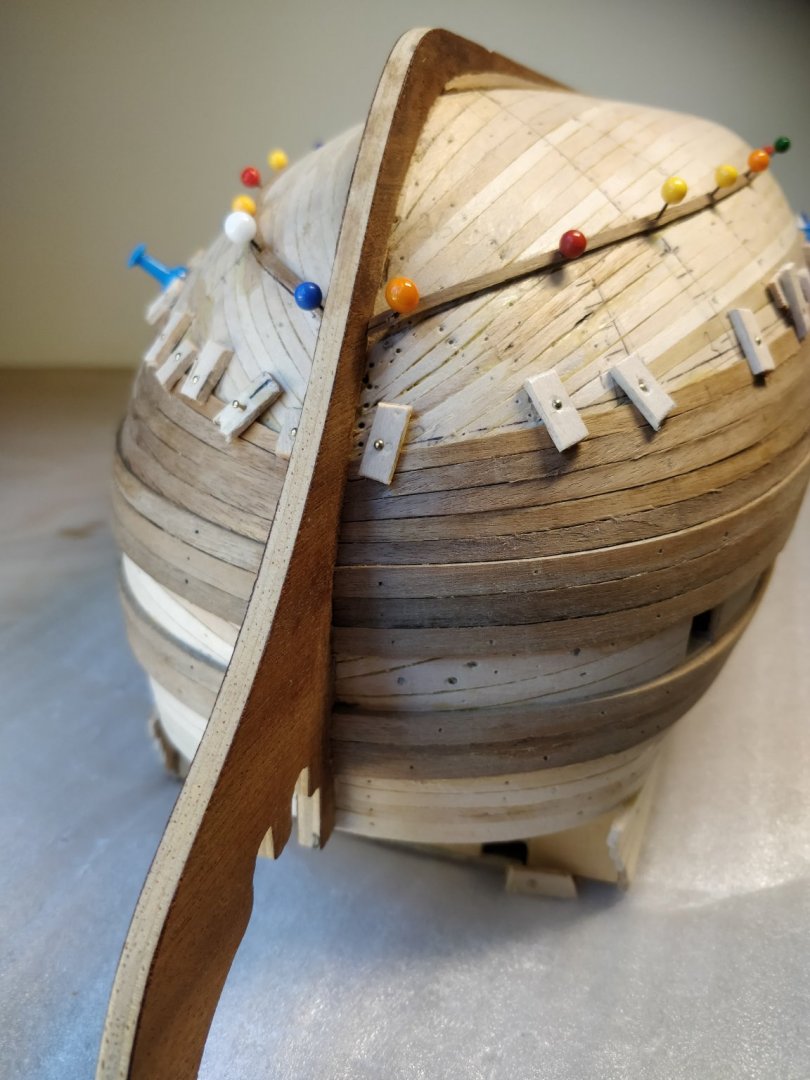
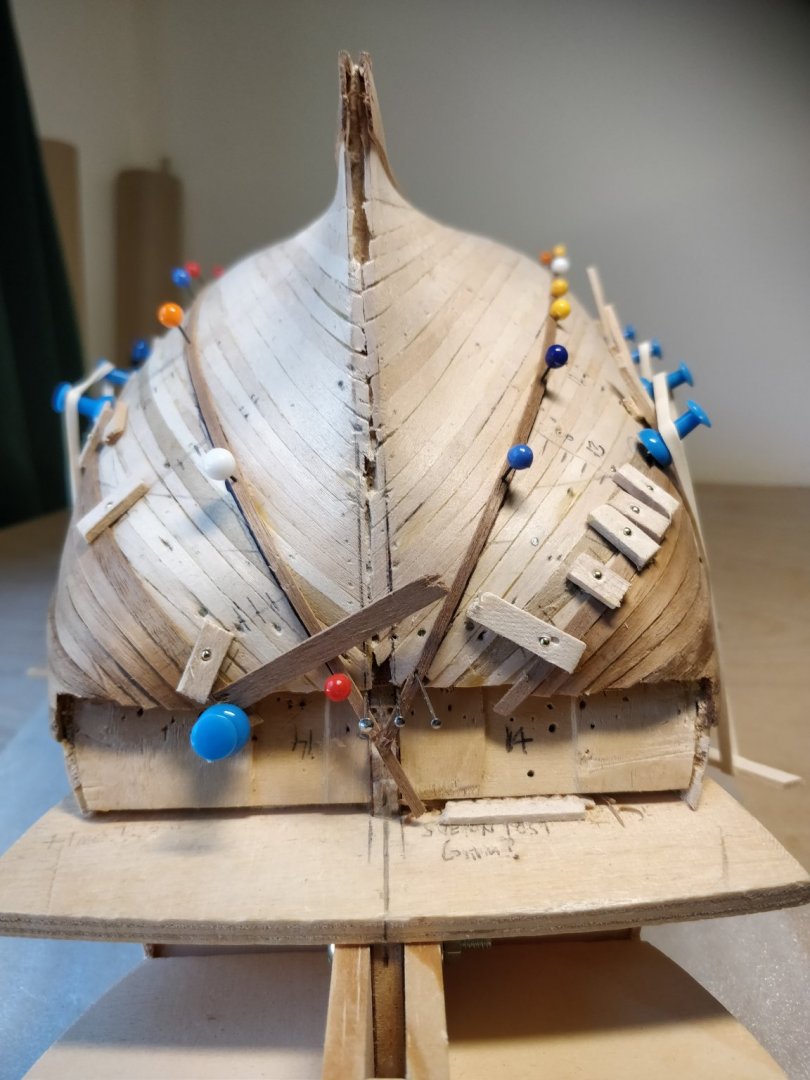
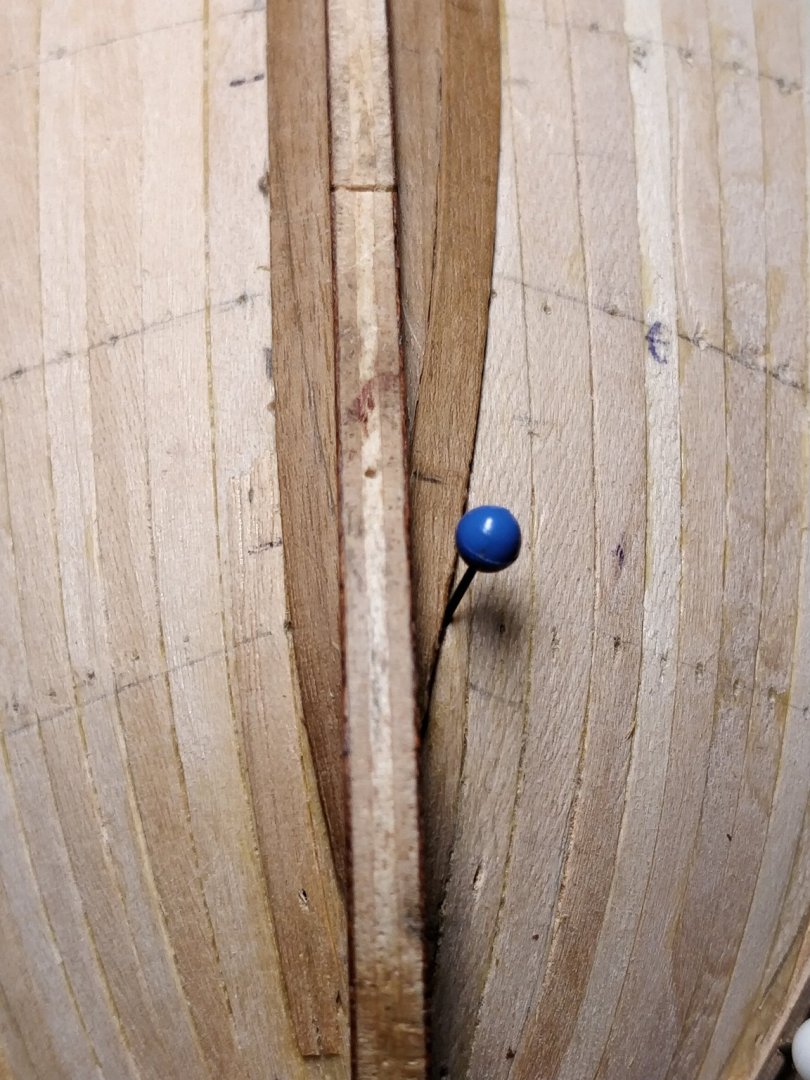
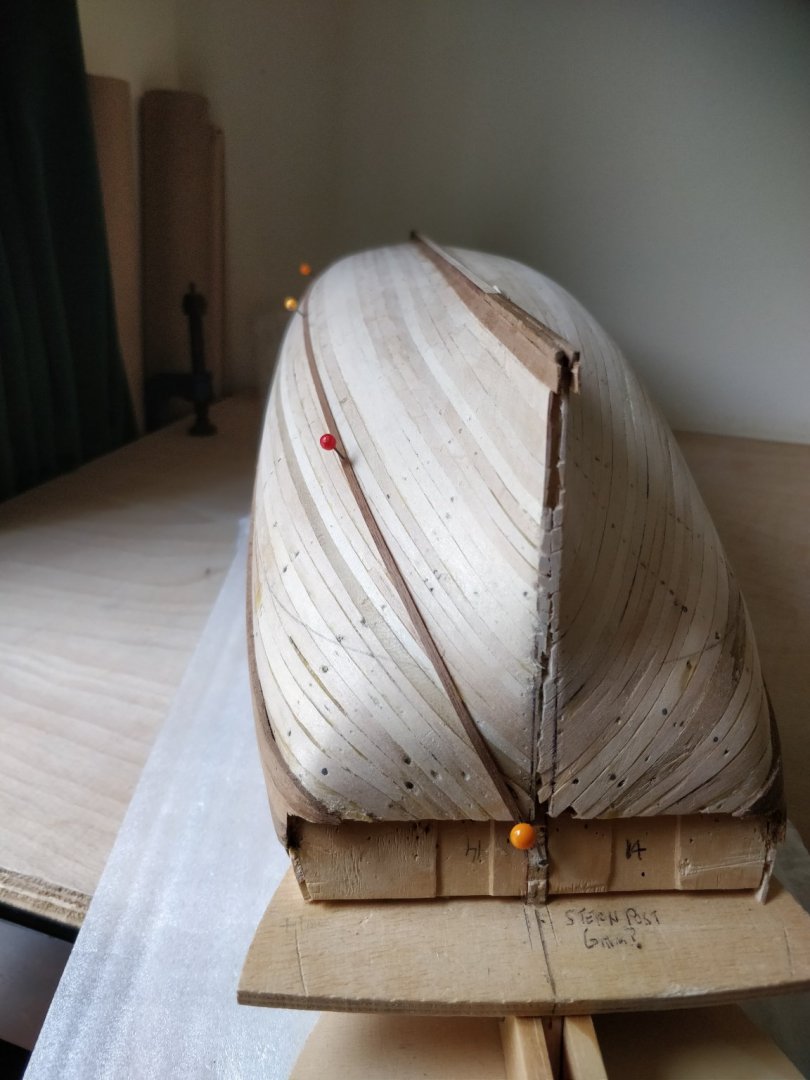
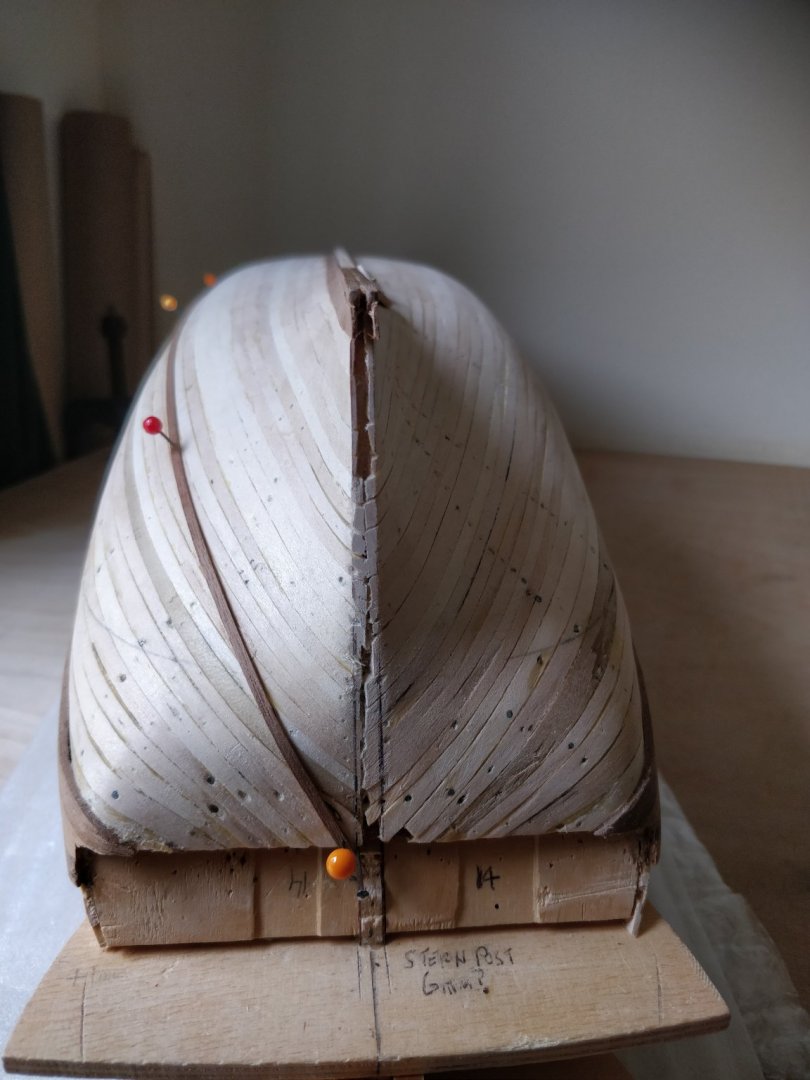
Hello again! I made a tapered template to shape the stern post and gently cut away at the stern planking using the same. This gave me a good impression of how things would mate up when the post was fitted. I had to thin just a couple of planks to make it look like they'd actually fitted into a rabbet..I drilled and pinned the post for extra security. I've fitted a 2mm false keel too to bring the model up out of the blocks a bit as the stern planks were pinching a bit. Apart from that I'm just beginning to plank between the gun ports before working further up the hull. I'm pleased that it's the right way up again, secure and off the bubble wrap! Some pics to follow. Happy New Year! 😁

-
Thank you both for the kind comments. A bit of scraping now and light sanding should do it. Looking forward to fitting the stern post next and anchoring it securely! Might get some shore leave in first! 😁🌈
-
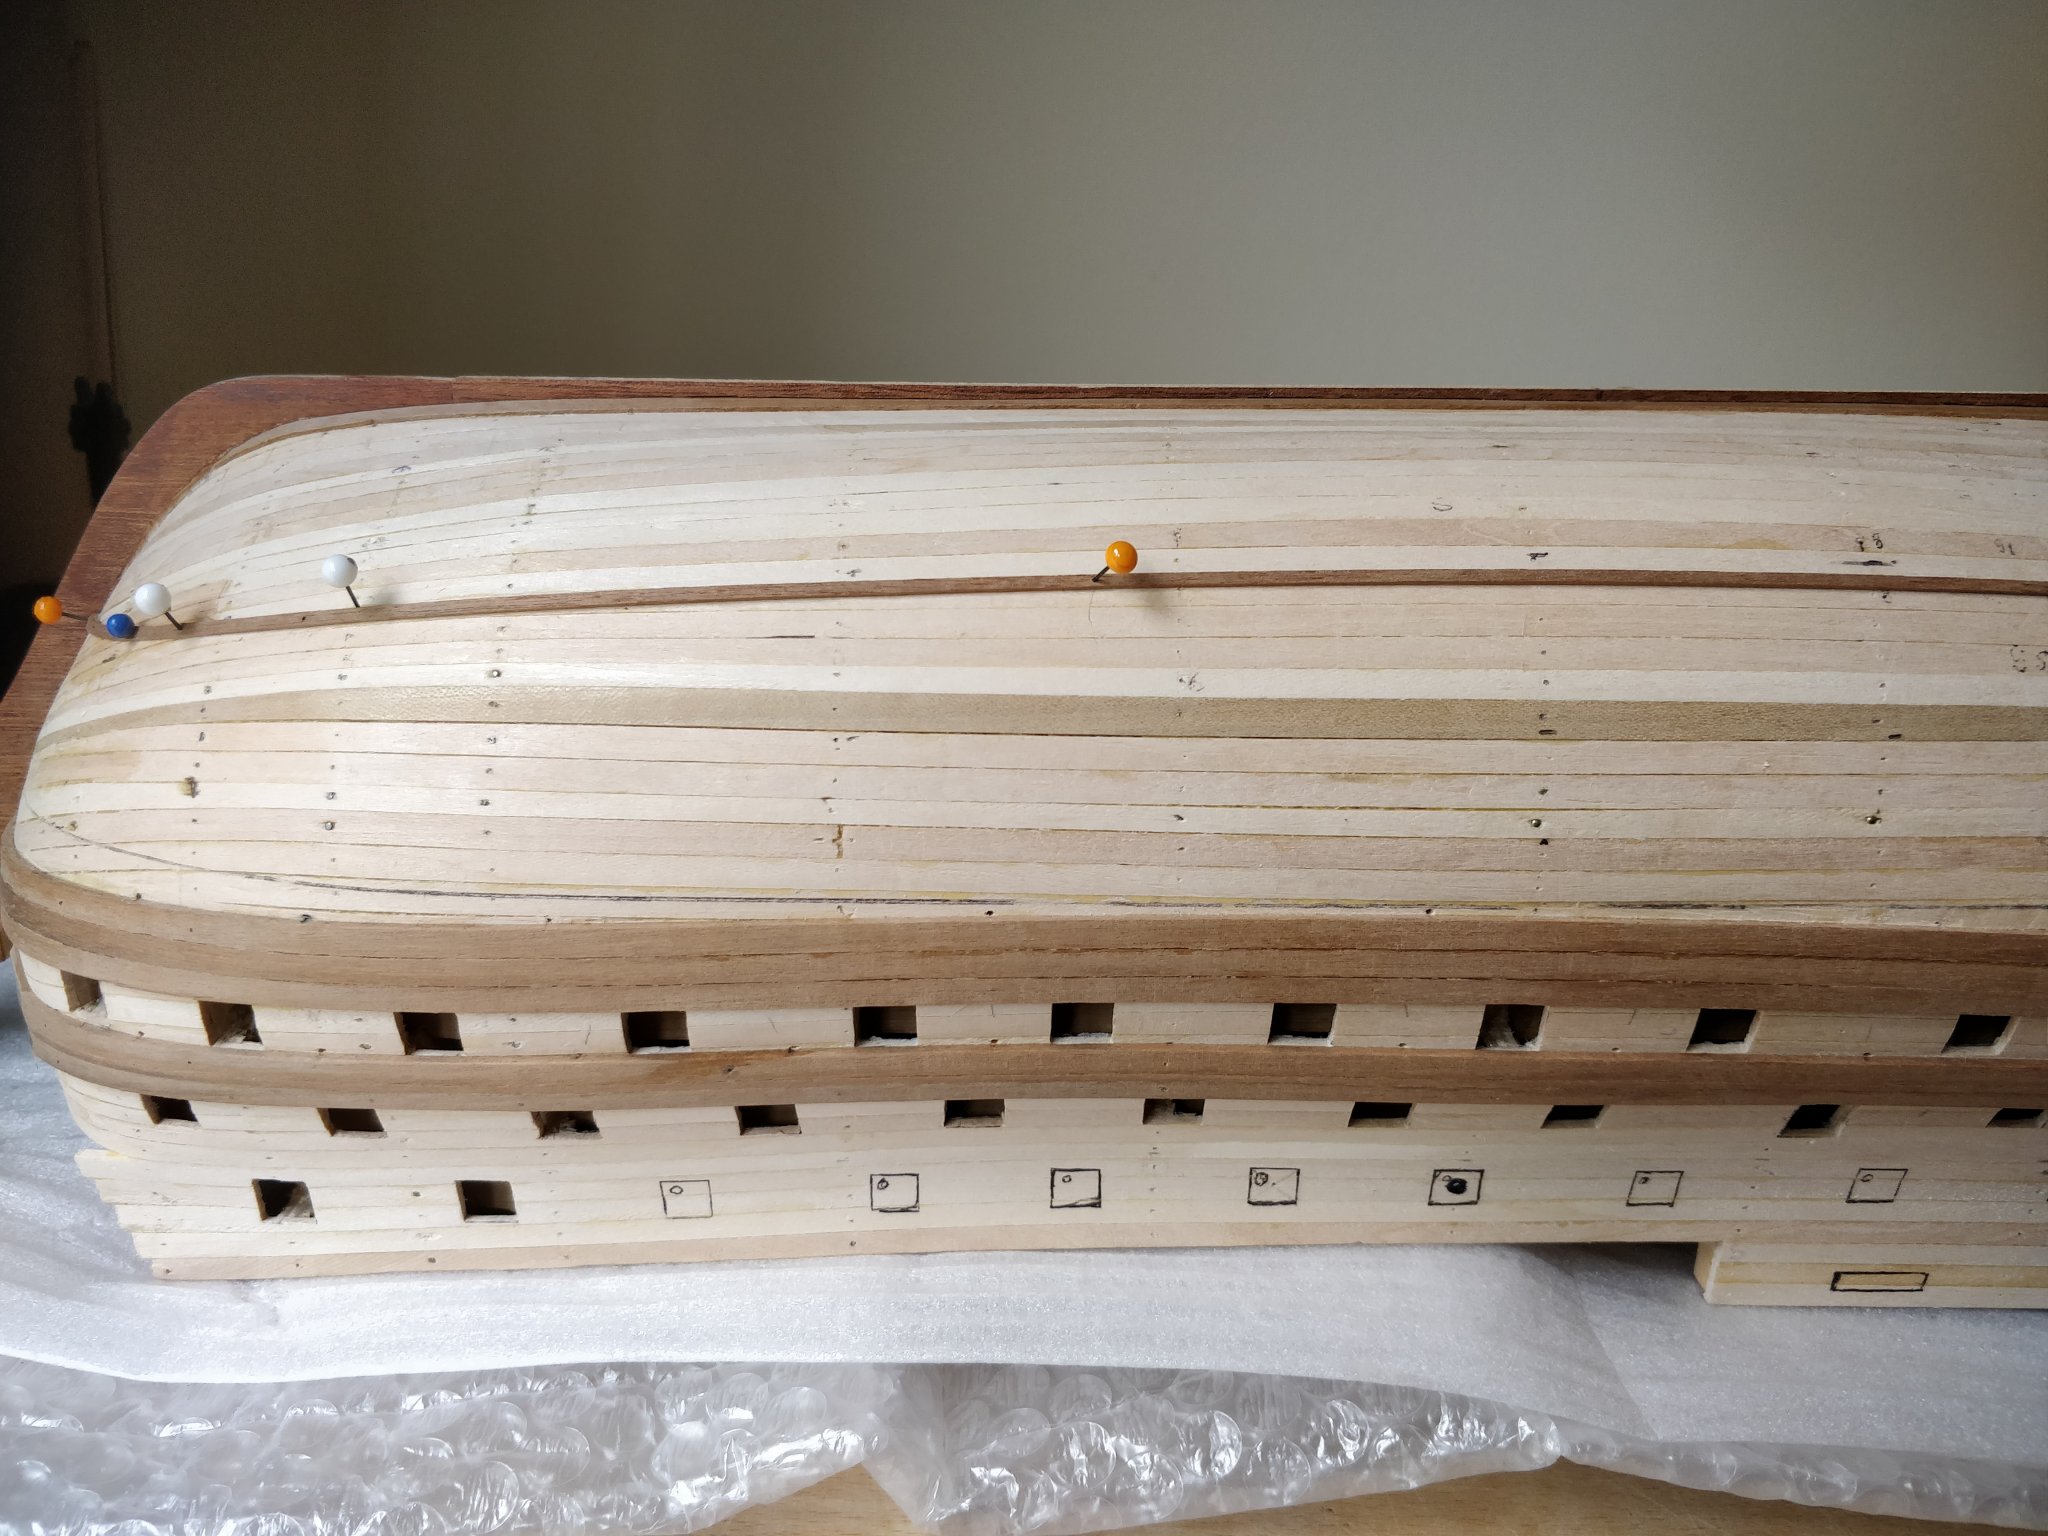
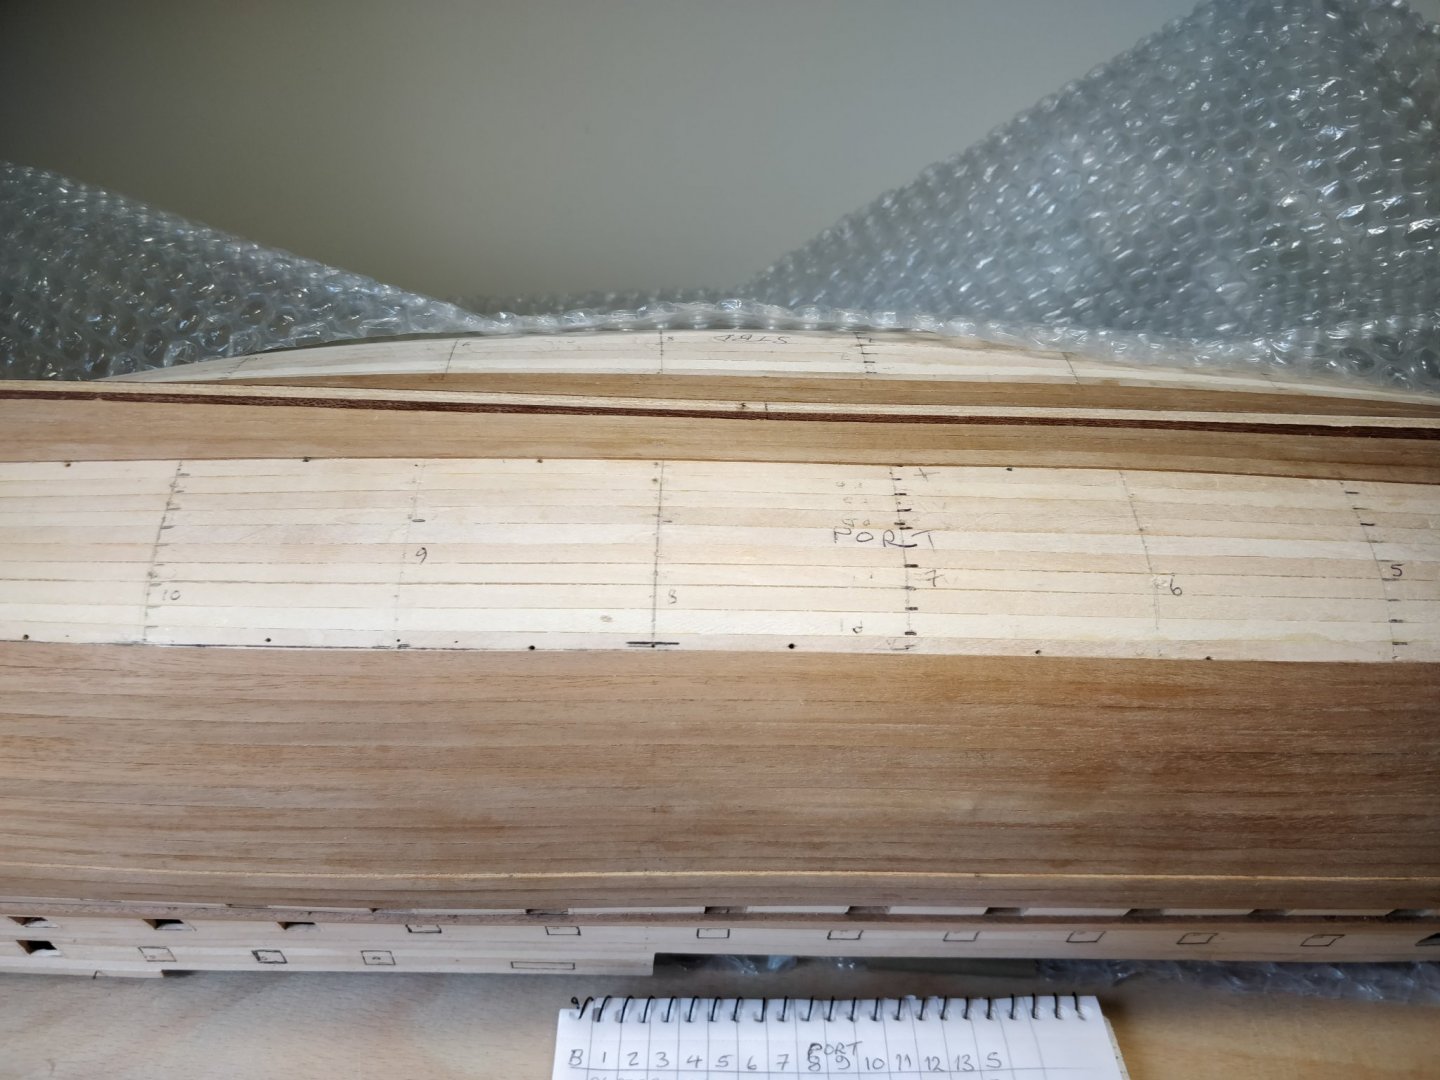
Hello again! Well, I'm working on the last two planks below the wale now to close up the bottom hull. I imagine the rest will be far easier above this level. Despite my concern about having to fit an excess of stealers at the stern I only fitted three in all so pleased about that. If I were to do it again I think I would divide the hull into more bands still to get a better idea of how the planks might fall. I've done quite a bit of edge bending especially at the bow which for the most part I got away with. The Walnut, especially at narrow widths didn't always take kindly to being bent this way. Not sure if I would fit the planks in one length in future but it excercised my patience! After bending I found it helpful to clamp the plank damp and leave it to dry thoroughly into an unstressed form. As I'm not pinning the planks I made sure they were edge glued well. I'm going to Matt varnish this section to help seal it and offer some protection for when it's the right way up again! That's probably all for this somewhat unusual year so I wish everyone a Happy Christmas and safe 2021. Thank you all for the helpful contributions.🌈🌲


-
Thank you Euginio! The struggle continues! Once I get planked up to the gunports things should get easier and the curves gentler. Good fortune with your build.😃
-
Hello again. Well after a few months of domestic chores and gardening etc. I've restarted work on the model. Planking continues albeit slowly but they are going on in one length. Had to think carefully about filling the stern area but happily not as many Steelers necessary as I'd imagined. It's been quite a learning process. I'm scraping the planks with a safety blade at the edge joints which seems to give a satisfactory finish. I will post next when closed up. Next job will be the sternpost to lock in the end of the planks.😃

-
Stealers
Sheerline replied to Sheerline's topic in Building, Framing, Planking and plating a ships hull and deck
Made I laugh that did Master! 😂- 23 replies
-
- 2
-

-
- hms victory
- corel
- (and 1 more)
-
Stealers
Sheerline replied to Sheerline's topic in Building, Framing, Planking and plating a ships hull and deck
Thanks Chuck. Well under way now so no turning back for me. The wood did get a bit feathery but stuck down in the end. I hand scraped the planks with a razor and things have blended in well. I'm hoping varnish will seal it well. Never thought of alternative woods, this stuff is only 1mm. thick and tends to give suddenly just when I think I've got the better of it. I'll take a look at other types should I live long enough to do another build! 😂 Meanwhile I've started to make a spiling template so hopefully that will help providing I can get matching sheet wood.👍- 23 replies
-
- 1
-
-
- hms victory
- corel
- (and 1 more)
-
Stealers
Sheerline replied to Sheerline's topic in Building, Framing, Planking and plating a ships hull and deck
Haha! 😂 Think my forbears must have sailed on the Mayflower! I'm 'cool' now having looked at the options and you've all been extremely helpful . Thank you.- 23 replies
-
- 1
-
-
- hms victory
- corel
- (and 1 more)
-
Stealers
Sheerline replied to Sheerline's topic in Building, Framing, Planking and plating a ships hull and deck
Thanks Gregory! I'm on it, cutting out a cardboard template at this time. Think it's going to need sharp blades and fine sandpaper when it comes to wood. Just now I had the thought of making a thin aluminium template for cutting the rest, leaving them a little wide for adjusting. I've worked out I'll need 12 X 6mm each side so it might help some. 🤔 I did use the edge bending for some of the planks at the fwd end but some feathered up and split even after a long soaking. They're only one mil thick and a bit cross grain. This kit is nearly 30 years old ! I occasionally get teased with the fact that it only took five years to build the real one!😂Thanks again..- 23 replies
-
- 2
-
-
- hms victory
- corel
- (and 1 more)
-
Stealers
Sheerline replied to Sheerline's topic in Building, Framing, Planking and plating a ships hull and deck
Thank you Spyglass! I'm taking a breather and looking at things afresh. I tend to gather all info and funnel it in to best practice that works for me so this site is invaluable. Time was I could fettle metal to within a few tenths but wood is my Achilles heel! I couldn't sleep at night if I knew what lurked under the waterline wasn't ship shape! Lol. Please check out my build log for future developments. My thanks to everyone for their input and support.😀- 23 replies
-
- 3
-
-
- hms victory
- corel
- (and 1 more)
-
Stealers
Sheerline replied to Sheerline's topic in Building, Framing, Planking and plating a ships hull and deck
Thank you Allan! The dark side would indeed be an adventure. I do admire those plank on frame models with such exquisite detail. I'm a little way off lifting and lofting yet though! For the moment the forests are safe..😀- 23 replies
-
- 2
-
-
- hms victory
- corel
- (and 1 more)
-
Stealers
Sheerline replied to Sheerline's topic in Building, Framing, Planking and plating a ships hull and deck
Thank you for reply. Certainly at the keel/prow the two planks look a little wide. Wale/prow downwards they're 3mm so far - approaching minimums. I'll be reappraising the layout when I've visited the tutorials but anticipate some carving of sheet along the way! It would be so easy to fit stealers but I hope to improve the appearance. My first build so lots of exponential learning along the way! Thank you all again.😀👍 Chris- 23 replies
-
- 2
-
-
- hms victory
- corel
- (and 1 more)
-
Stealers
Sheerline replied to Sheerline's topic in Building, Framing, Planking and plating a ships hull and deck
Thanks Druxey. I've checked them out and printed hard copy. Hopefully I can salvage things and make it look more realistic rather than representative. No experience is wasted I guess! 😀 Chris- 23 replies
-
- 3
-
-
- hms victory
- corel
- (and 1 more)
-
Stealers
Sheerline replied to Sheerline's topic in Building, Framing, Planking and plating a ships hull and deck
Thanks Allan. Think I might knock up some thin card templates and check out the spiling route before ordering sheet. I have been bevelling as things are pretty tight elsewhere. Think I tried to force over the planks too much at the turn and maybe it's sprung back. I know I had to fiddle these and carve out a bit here and there to ease them in. Learning as I go basically! Time to step back and reappraise . 😀 Chris.- 23 replies
-
- 1
-
-
- hms victory
- corel
- (and 1 more)
-
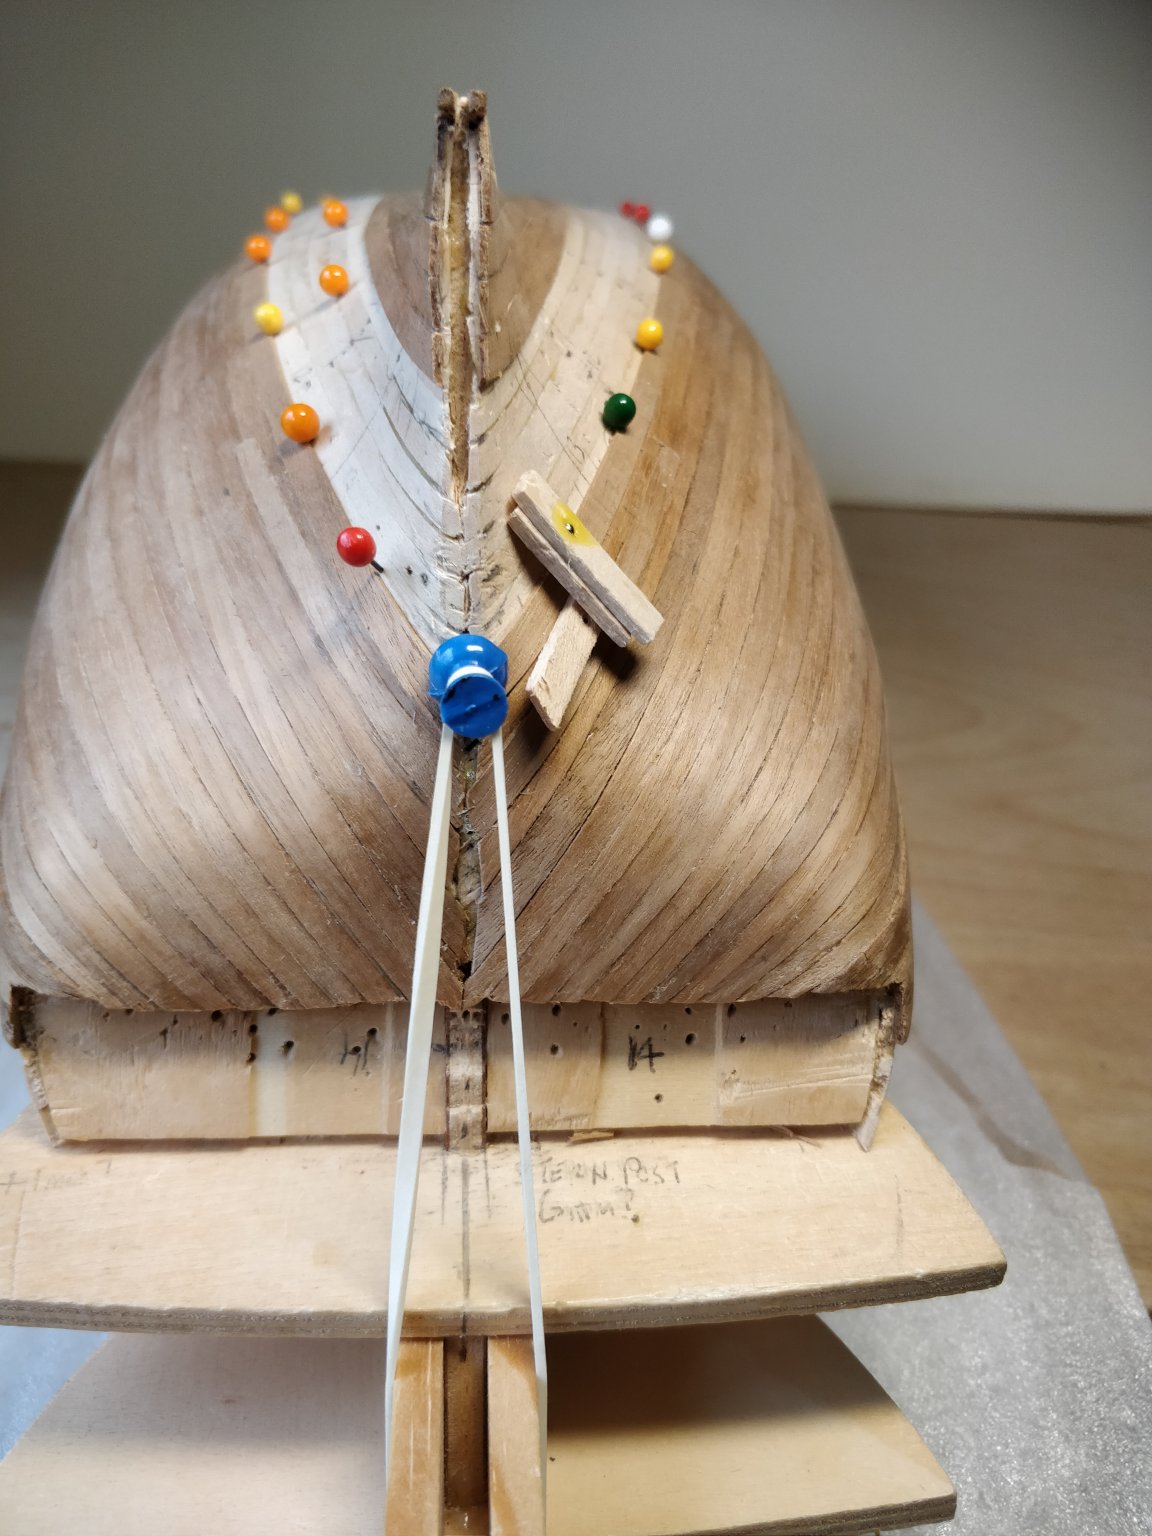
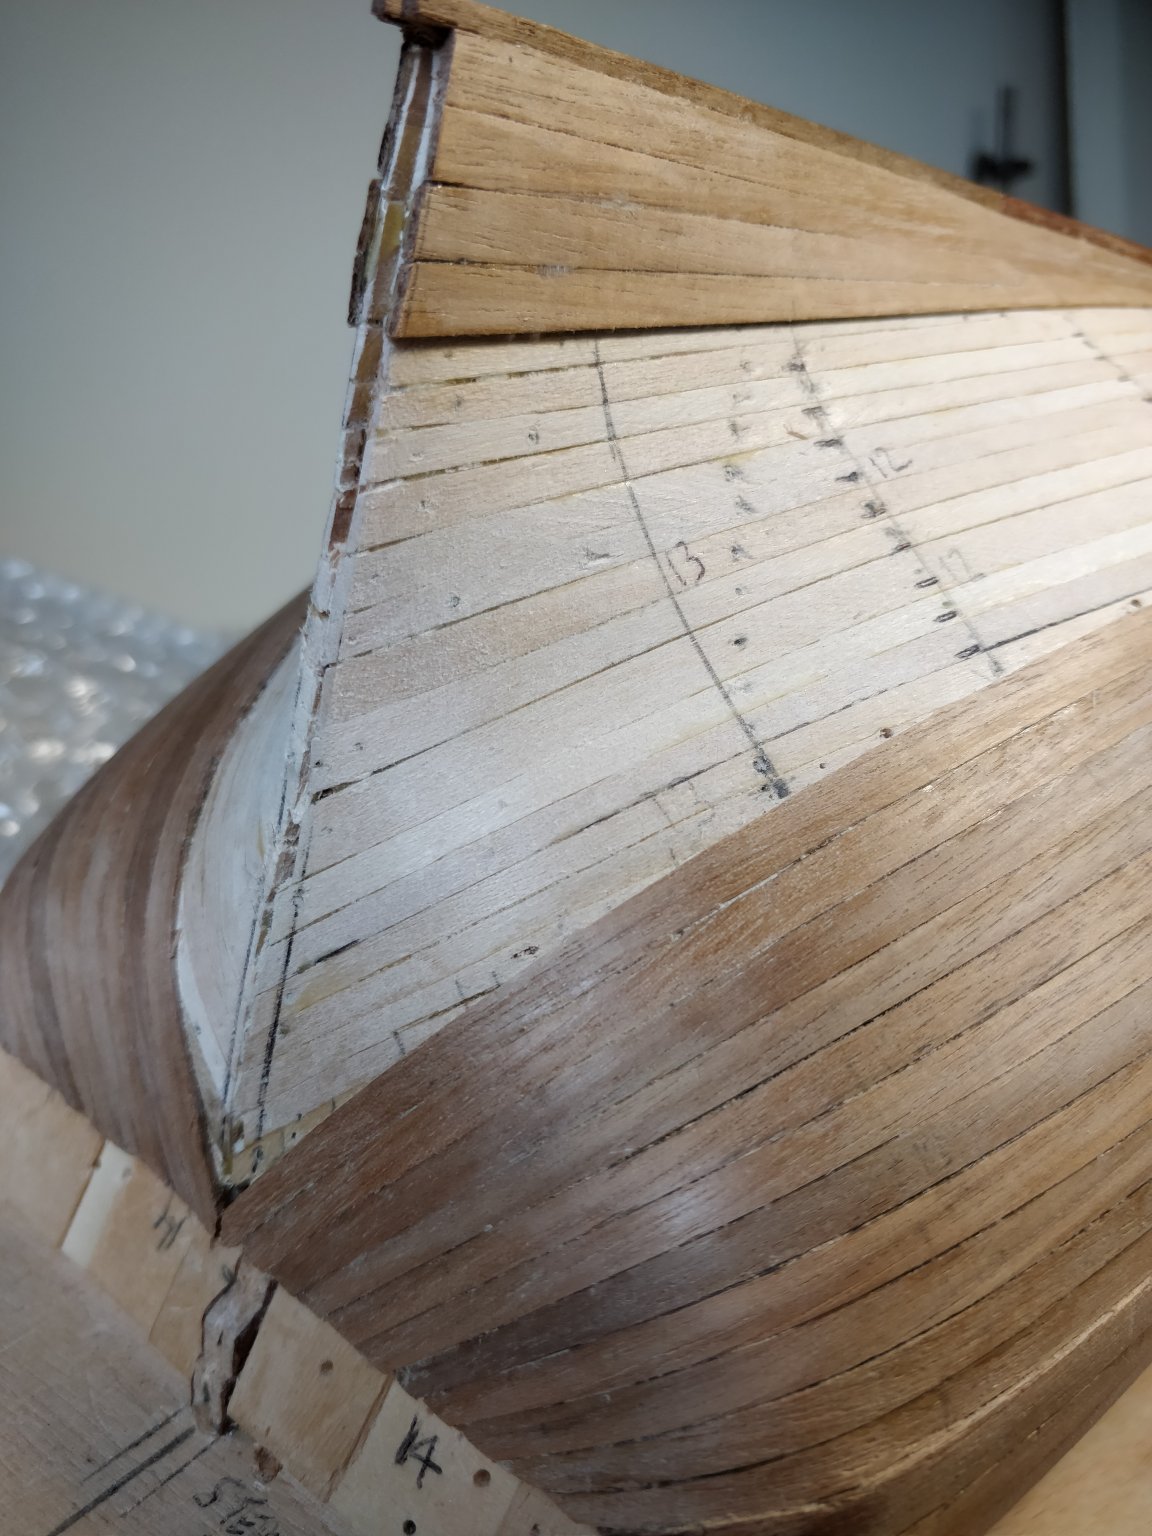
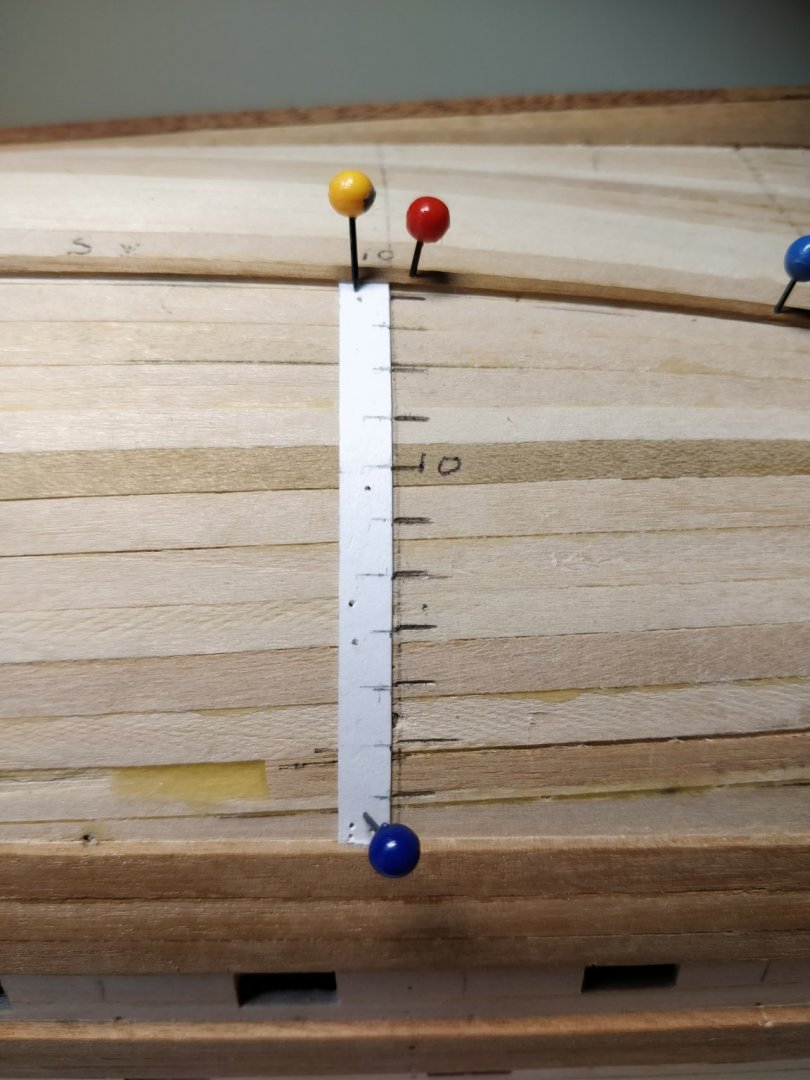
Hello again! I have started second planking but am undecided how to proceed beyond this point. Photos show that midships I need 10 more planks @5mm or a fraction less. At the stern post I have 70mm to fill. I'm minded to put in four stealers, probably half stealers so I don't cut into two adjacent planks. These would be quite short not going much further than frame 13 as marked. The only alternative I can see is to narrow the planks at midships and fan them out towards the stern to gain width. I would need to get more material to do this. I've already got one stealer above the garboard ( which I should have thickened) so I would have a total of 5 stealers at the stern. I would really like just to varnish finish otherwise wouldn't be asking. Is five stealers too many? Would it be better to buy sheet and spile them or would that make them look a bit wide compared to the rest? All opinion valued! 😀


- 23 replies
-
- 7
-
-
- hms victory
- corel
- (and 1 more)
-
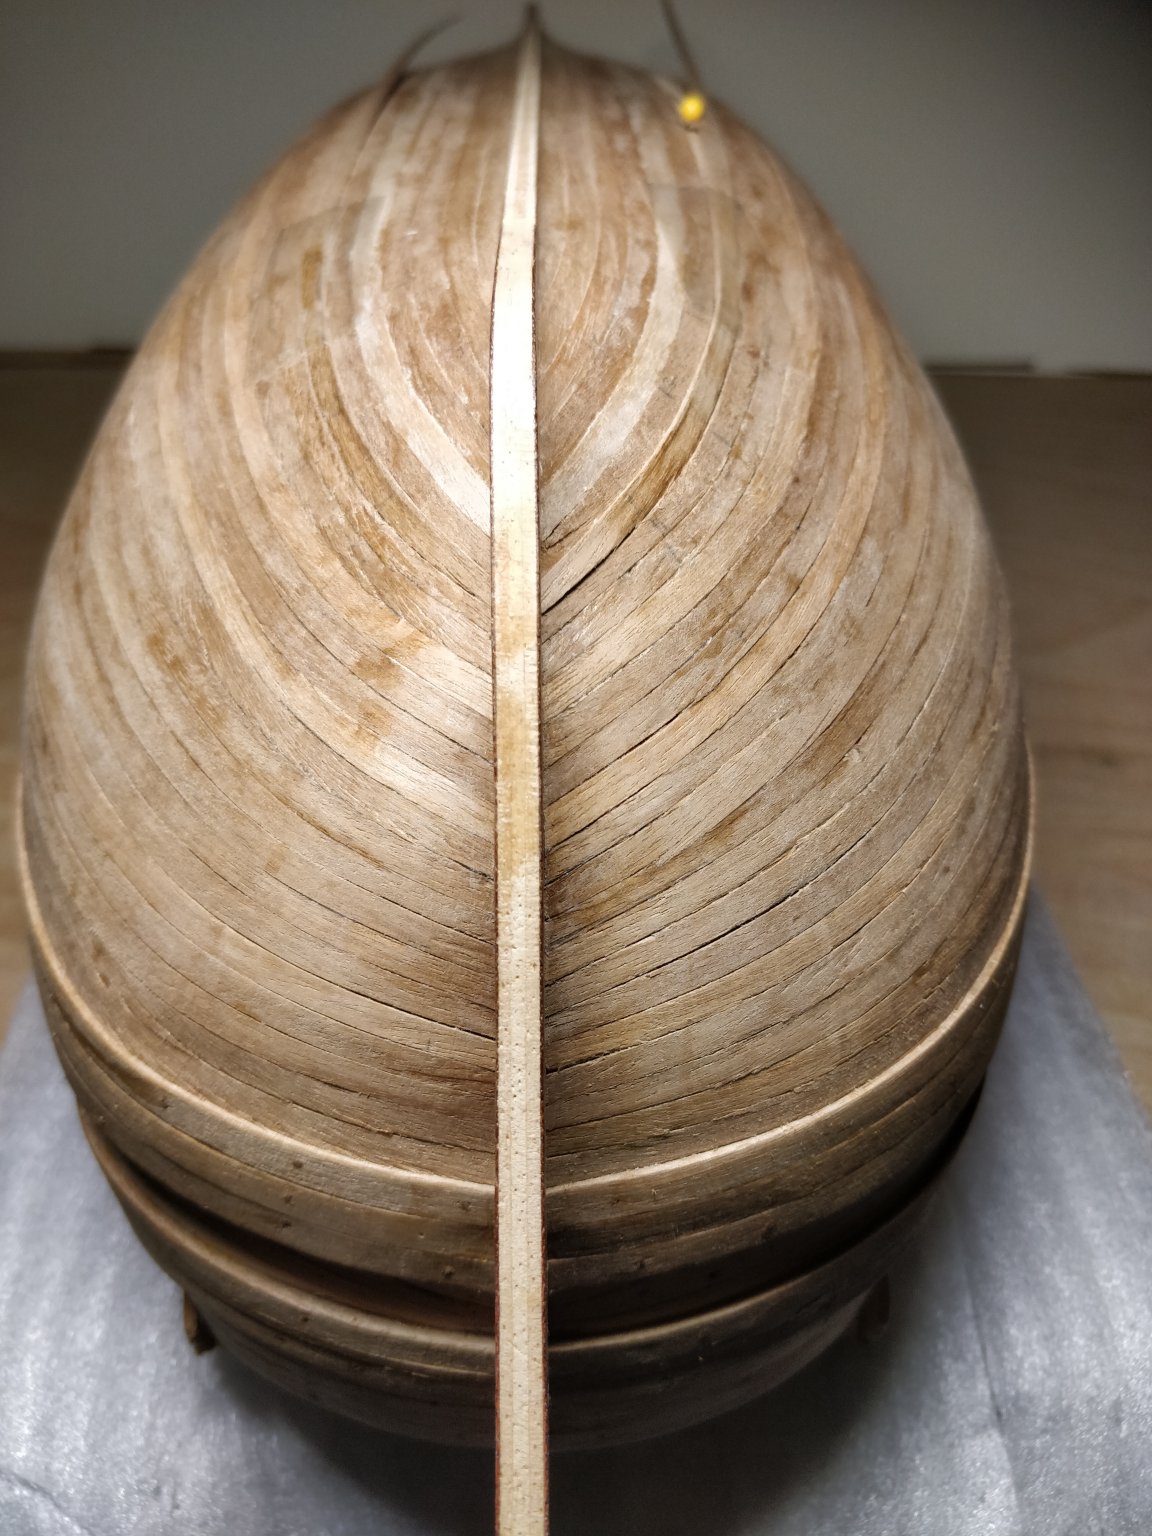
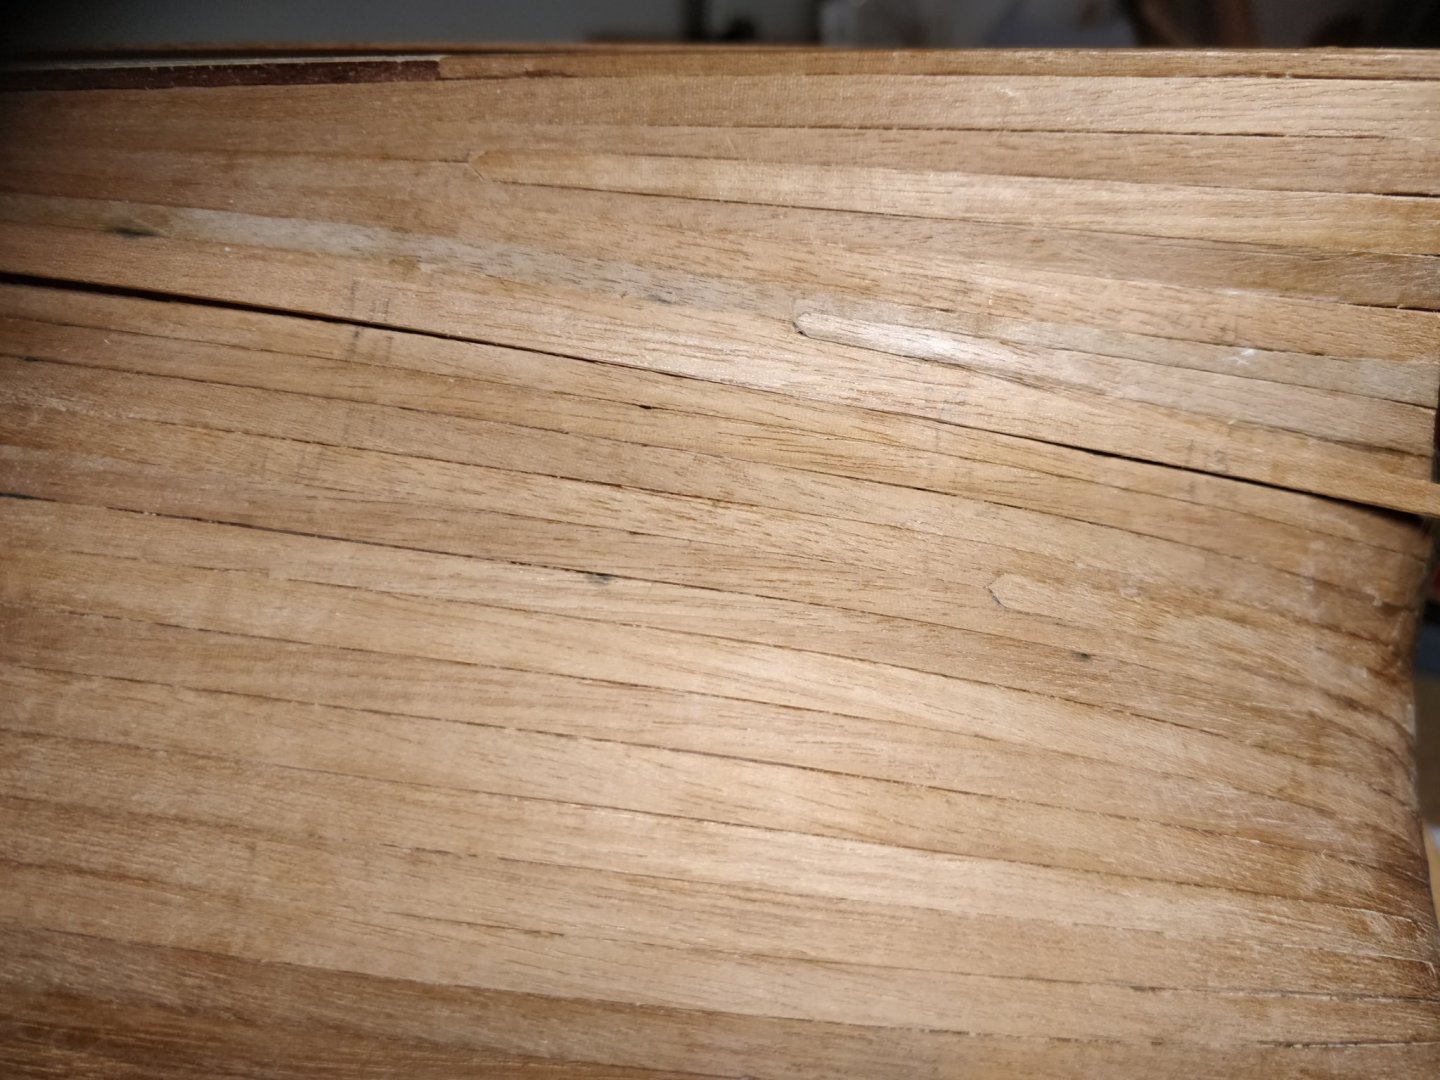
Just a small update to show progress so far. The second planking is going fairly well but taking longer than I imagined. The good news is that it looks better than the first! Quite a bit of the strip wood has an element of cross grain so I've had to be extremely careful with working it. Sometimes it's 'feathered' up a bit and I've had to select another piece. No doubt it will be used elsewhere less demanding..I am holding down at regular intervals to make sure it lies flat. The Aliphatic glue is good and sticks well but does dry a little quickly. I got into trouble trying to glue the whole plank in one go because by the time I'd clamped half way the rest was thickening up and tacky already. Now I glue half way, clamp and do the rest separately which seems to work well. The planks are going on in one length so with all the bending take a while to do but I think it's worth it. I don't intend to paint the hull but varnish it so I can see the wood. Still haven't worked out what mordant stuff is! In terms of time it's taking about a day to fit a plank port and stbd . Cutting, edge bending, curving at stern, fitting, wetting, clamping and waiting to dry before gluing. Seems I'm unable to post photos so will try another time. Stay safe.😀🌈
-
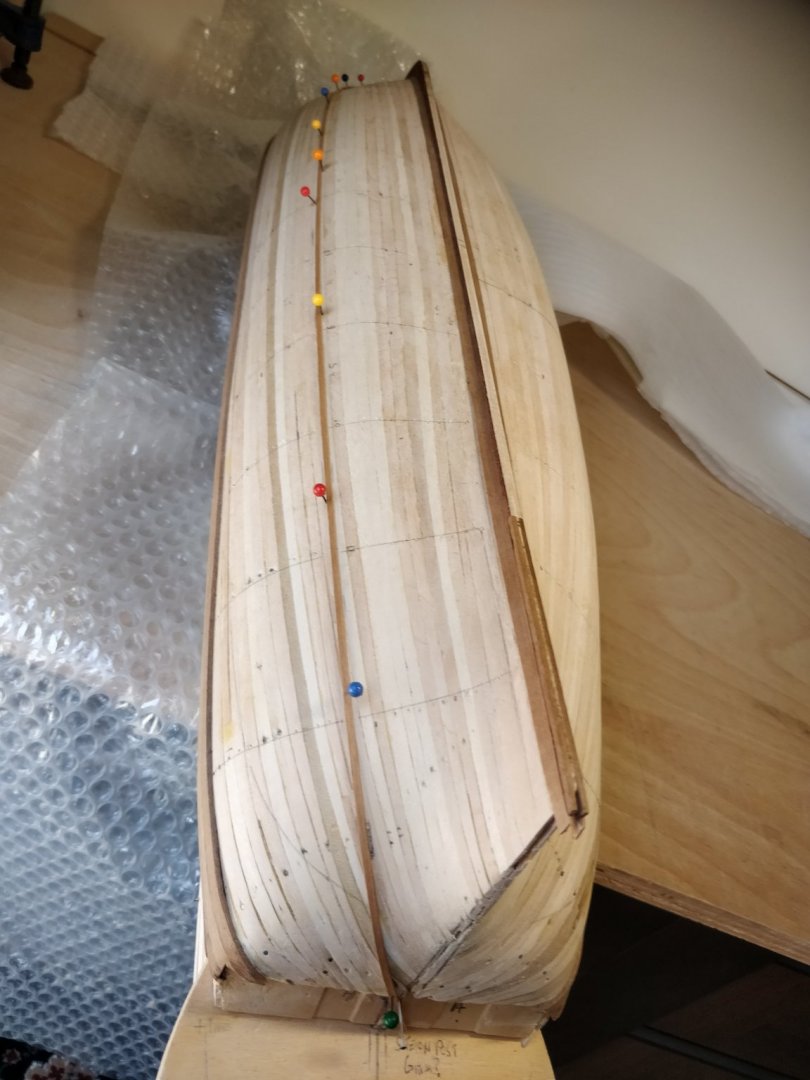
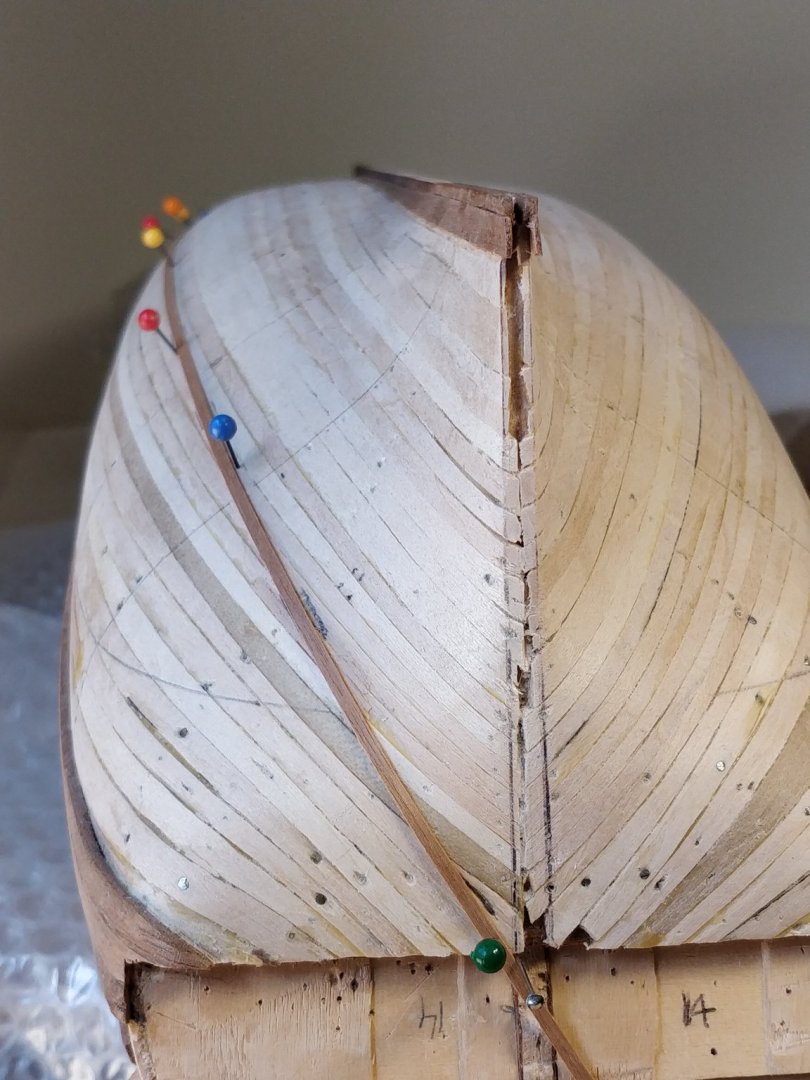
Started the lining out and tick strip marking. Lots of head scratching for a while but bit the bullet finally! I'm trying where possible to introduce the least stress in the planks, certainly above the bilge as they will be on show more. Sense I might have to spile a few down to the keel though, we'll see! Looking forward to glueing and then some varnish to protect the work. I'll probably go quiet for a while now as plenty to do tapering and probably some cussing! Stay safe everyone.👍🌈


-
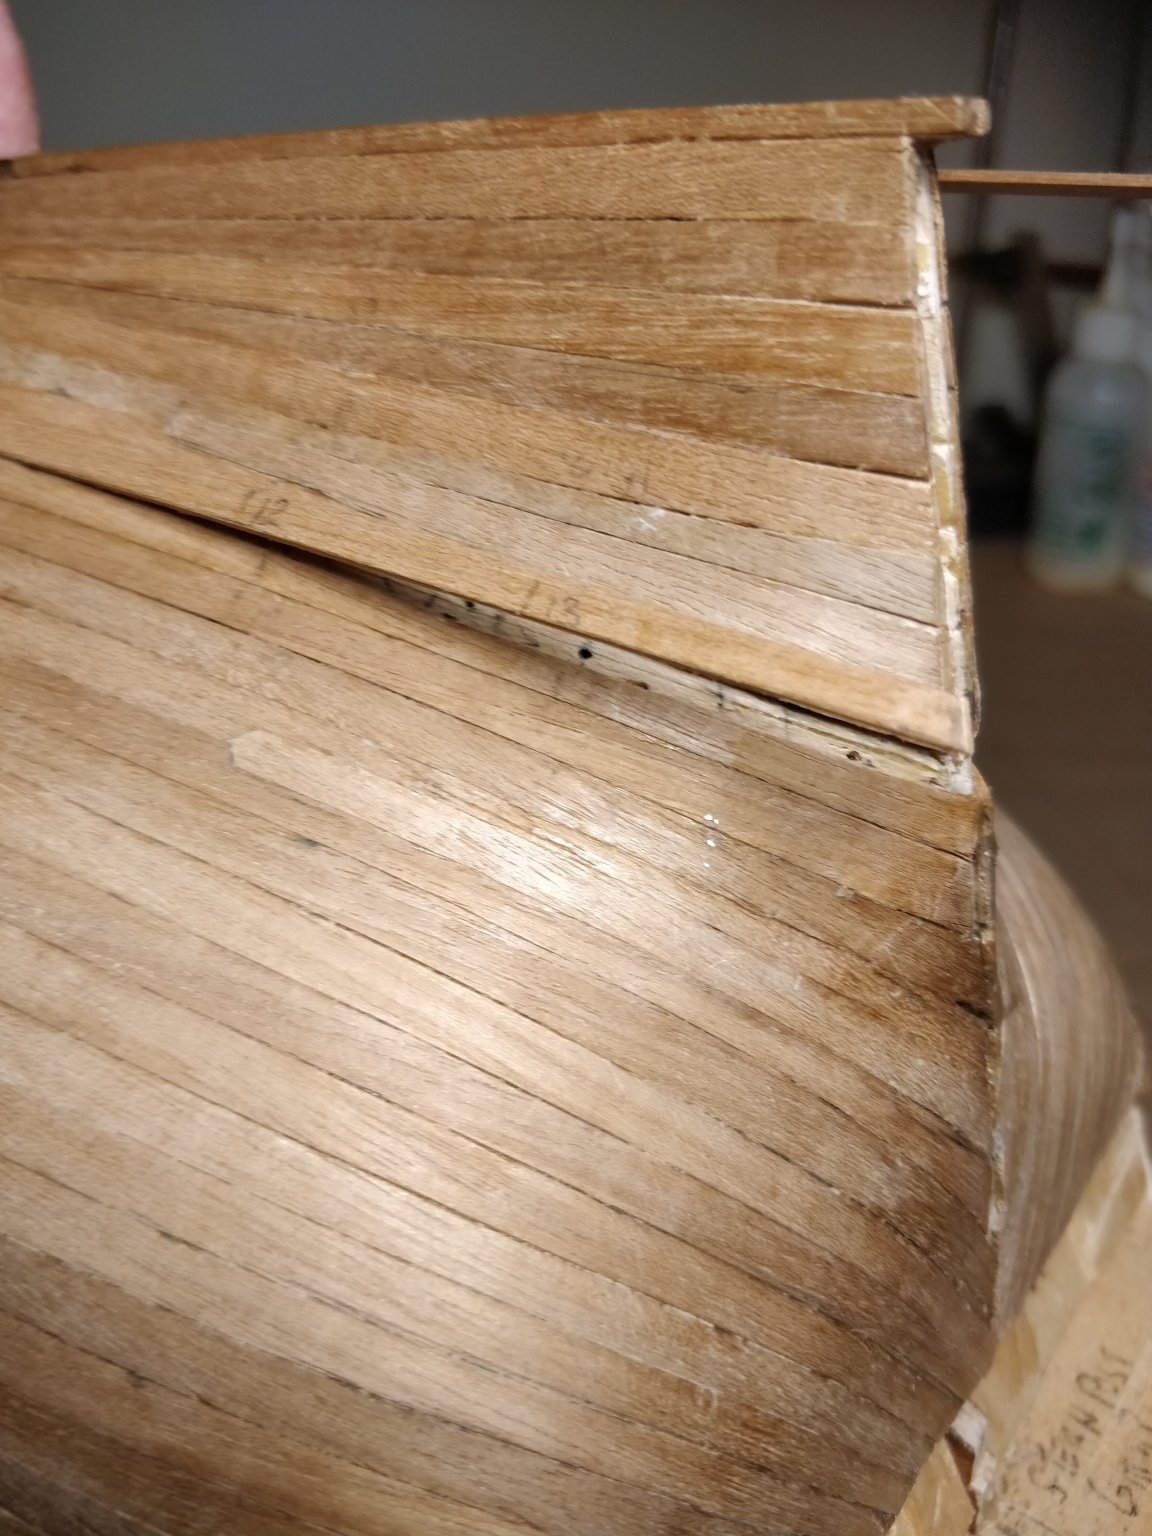
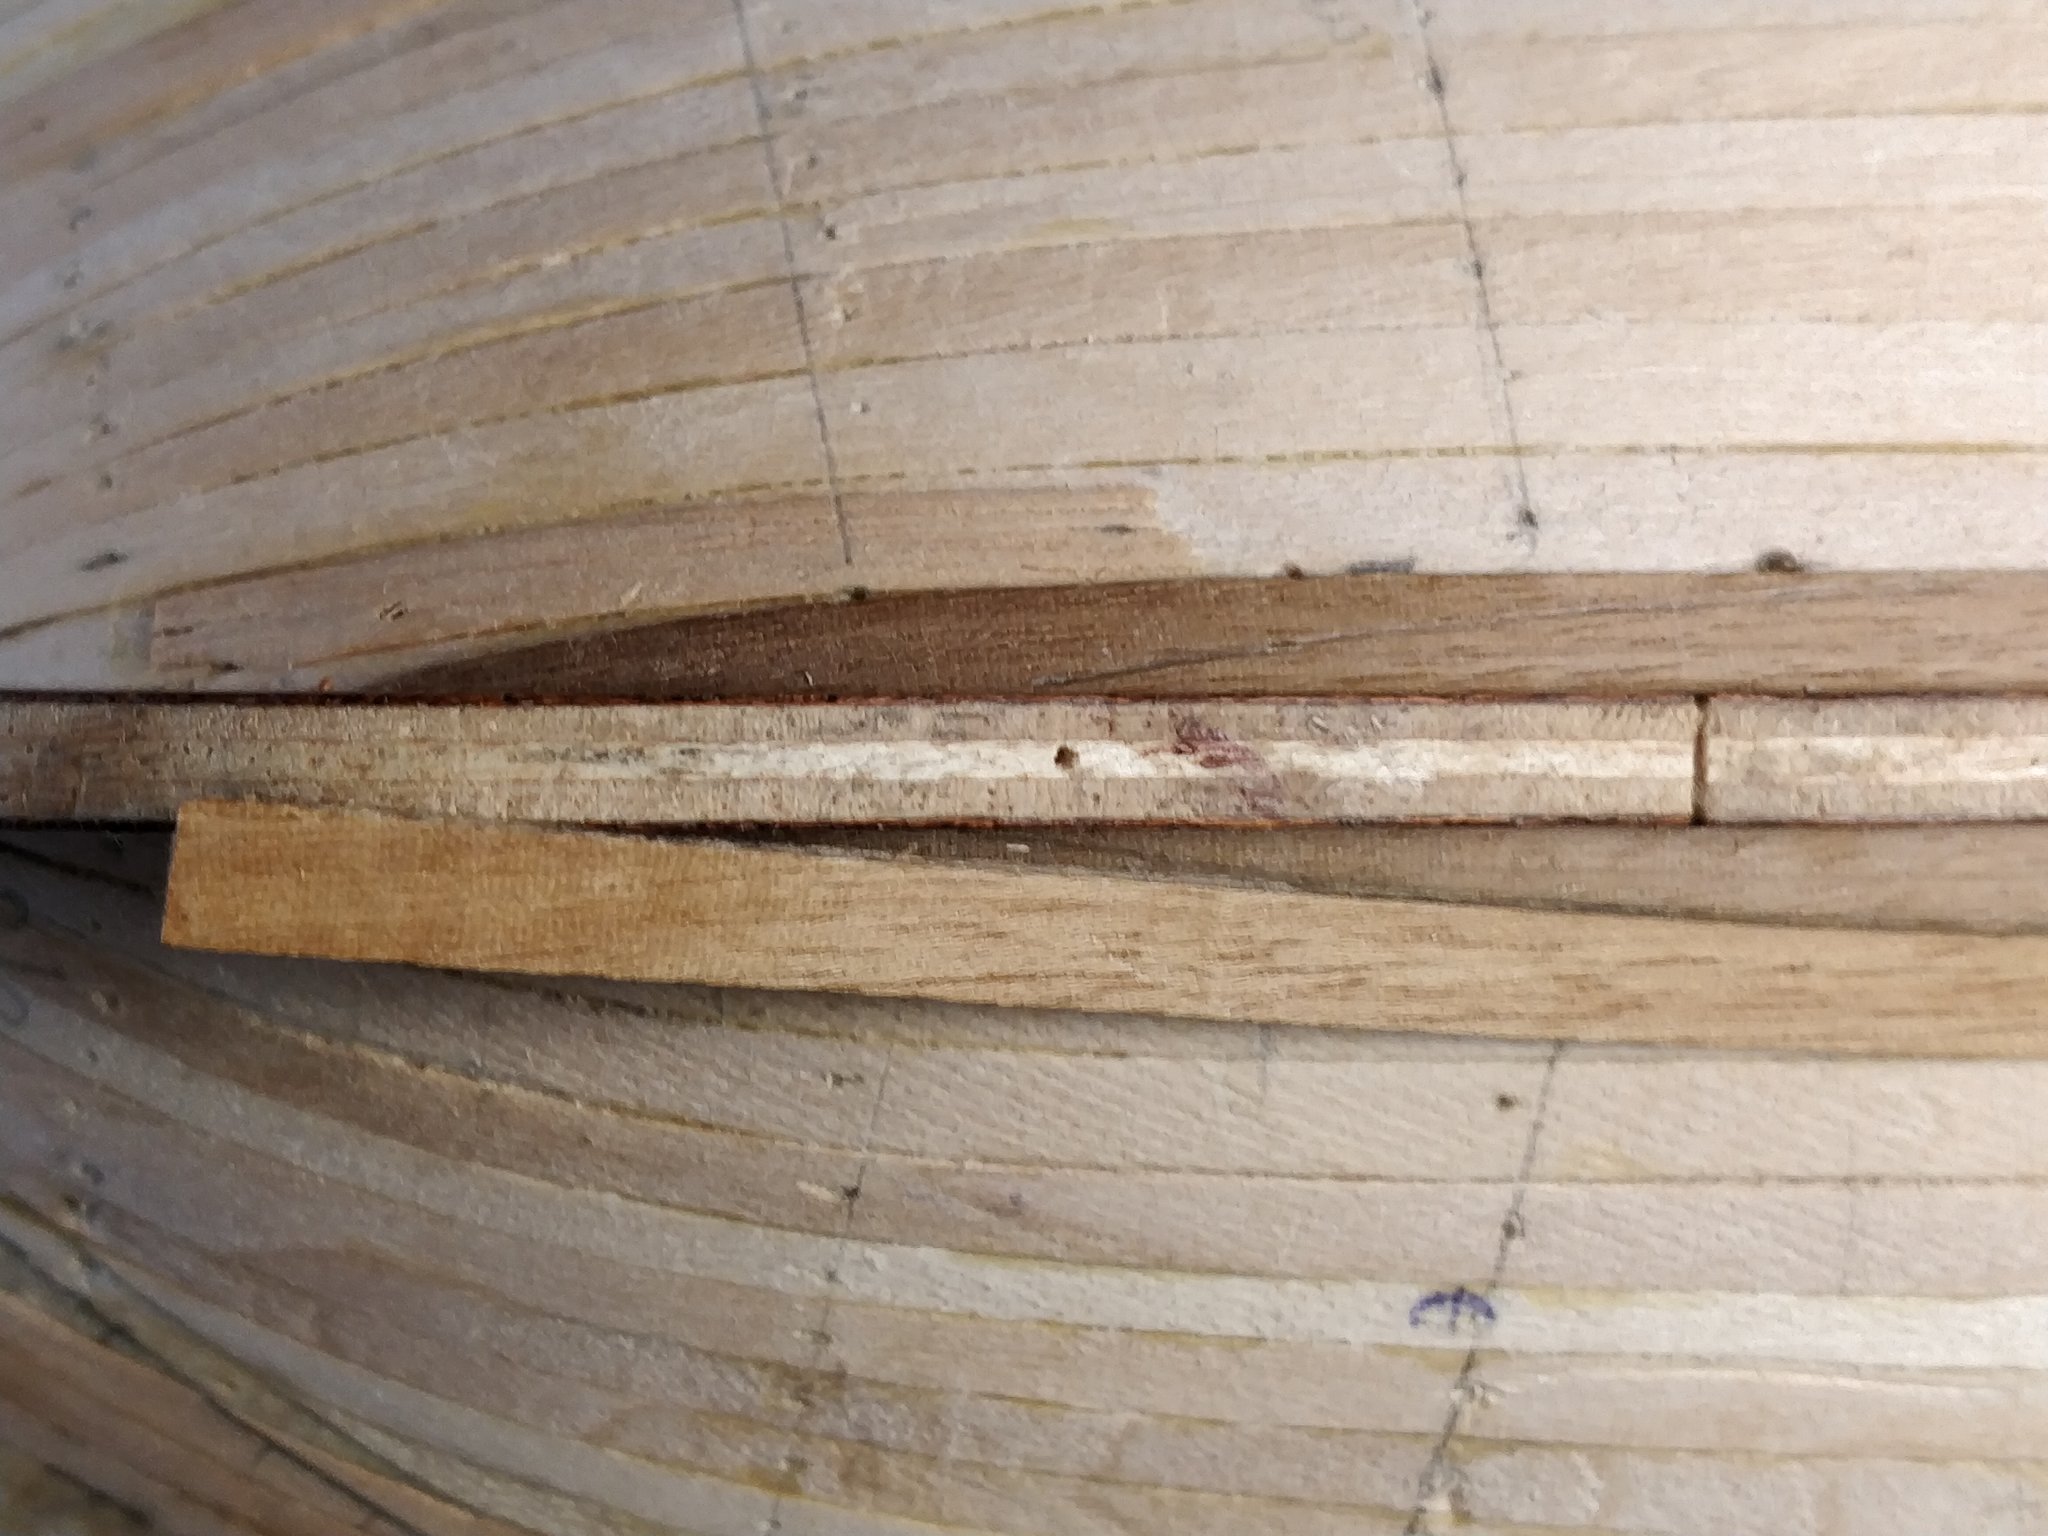
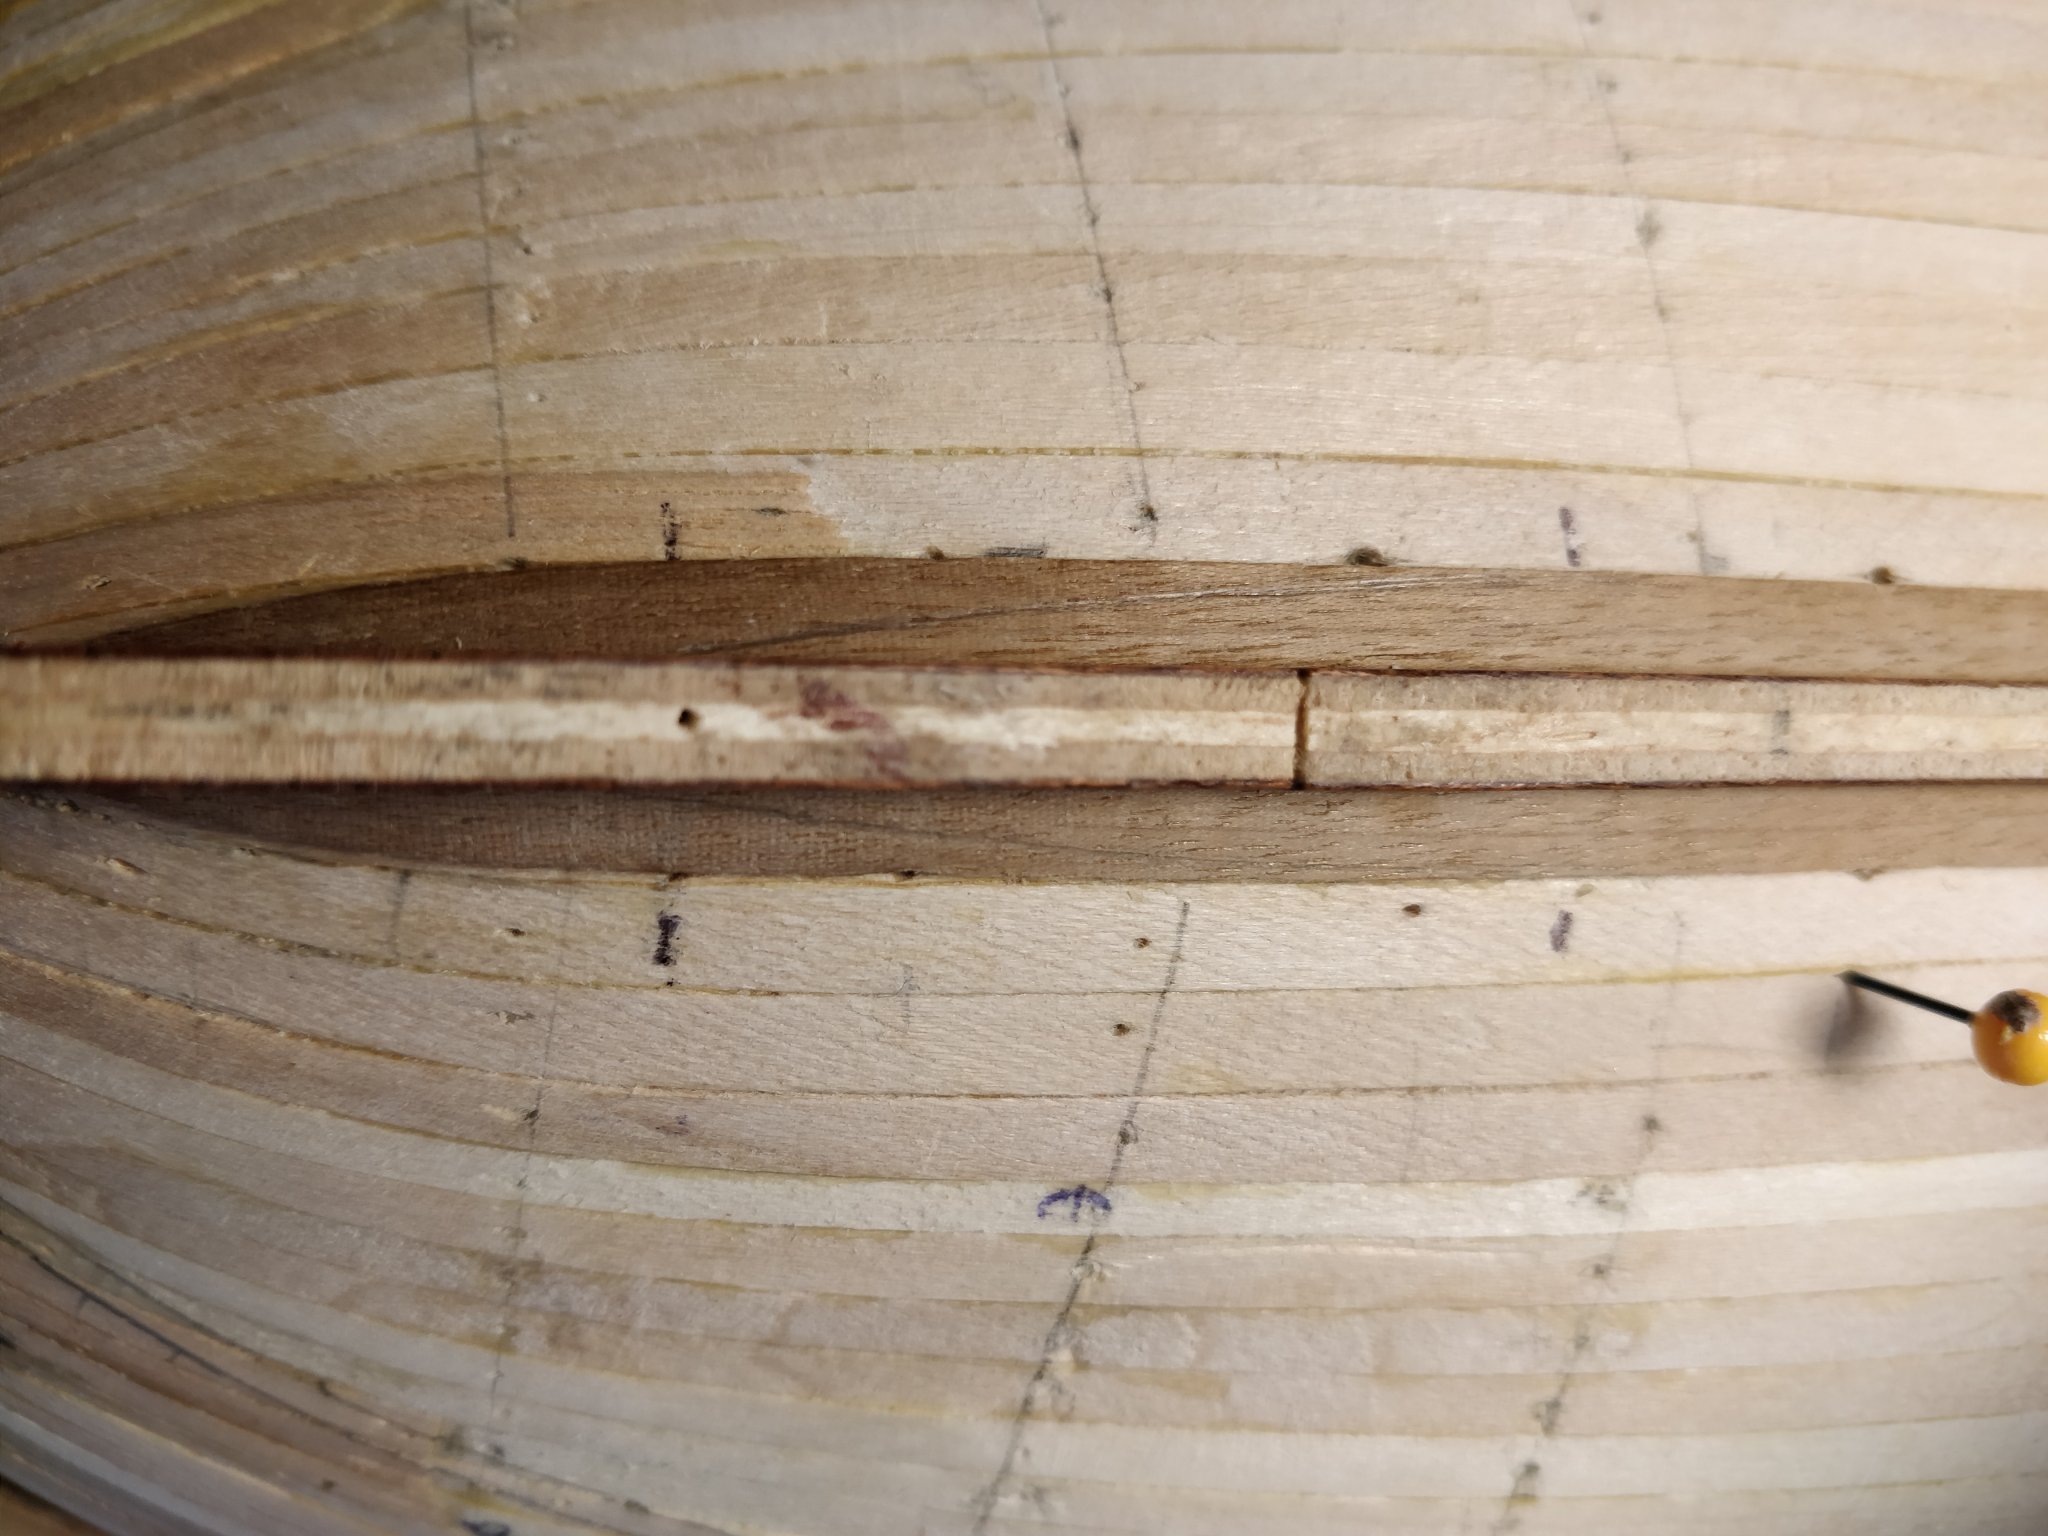
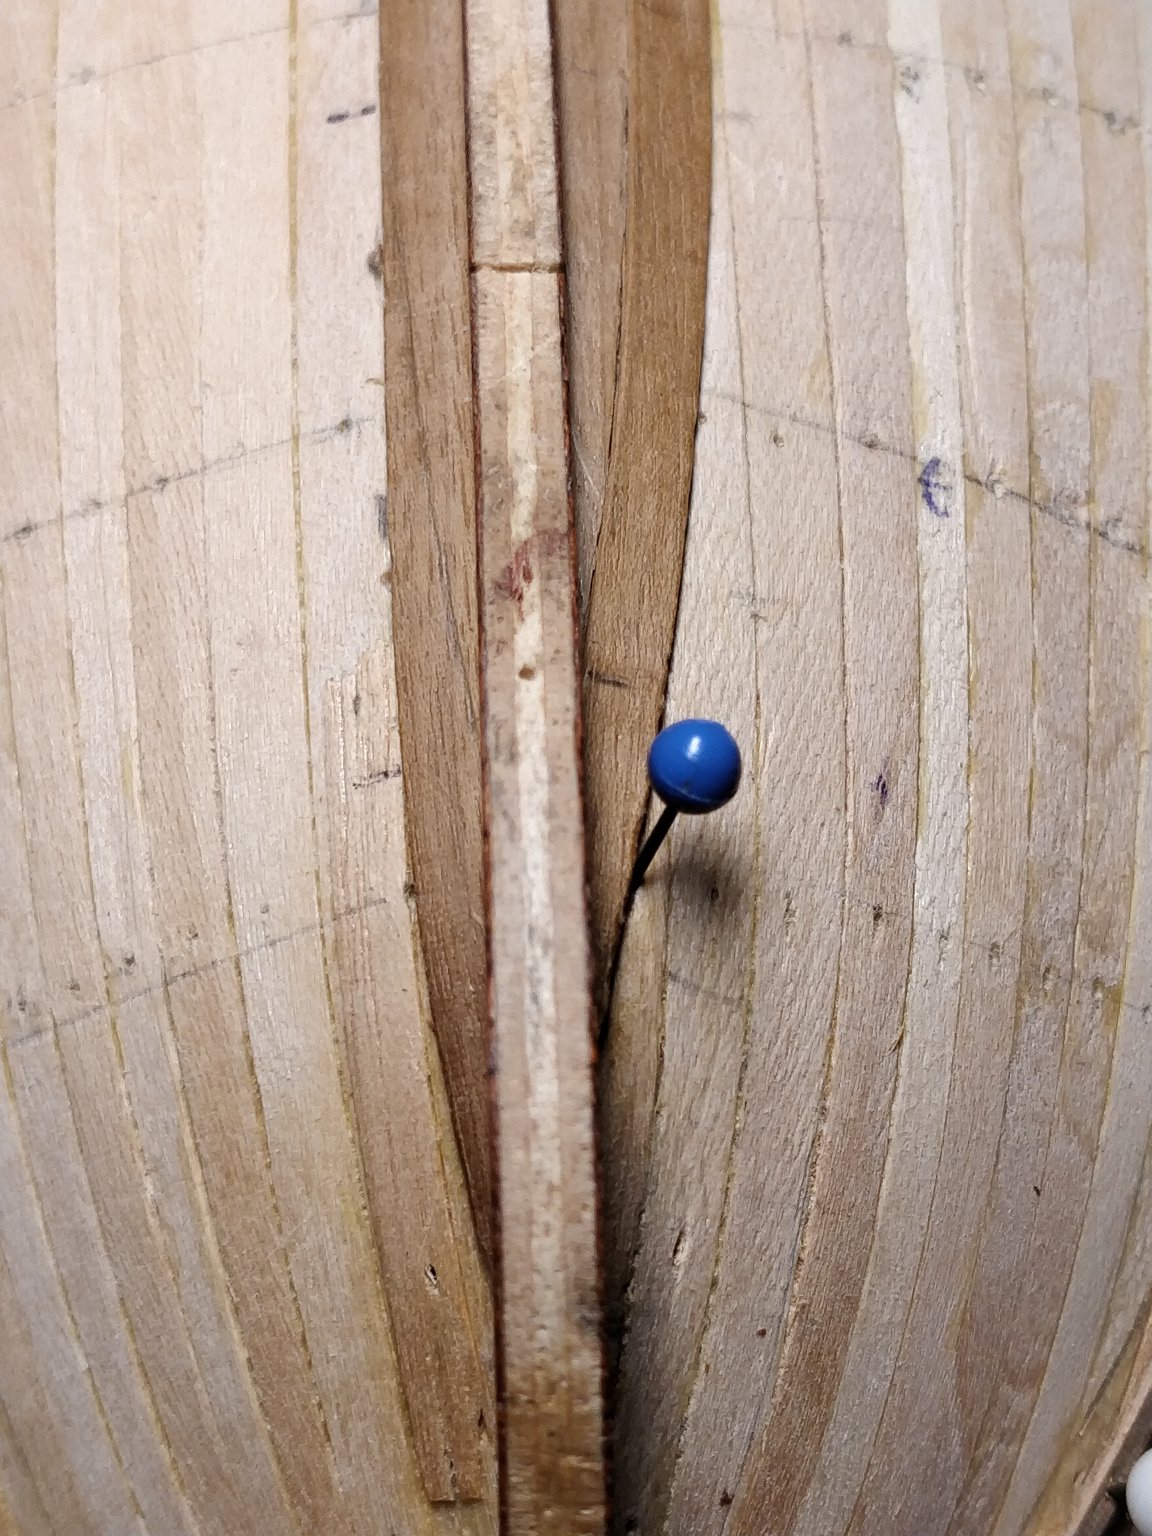
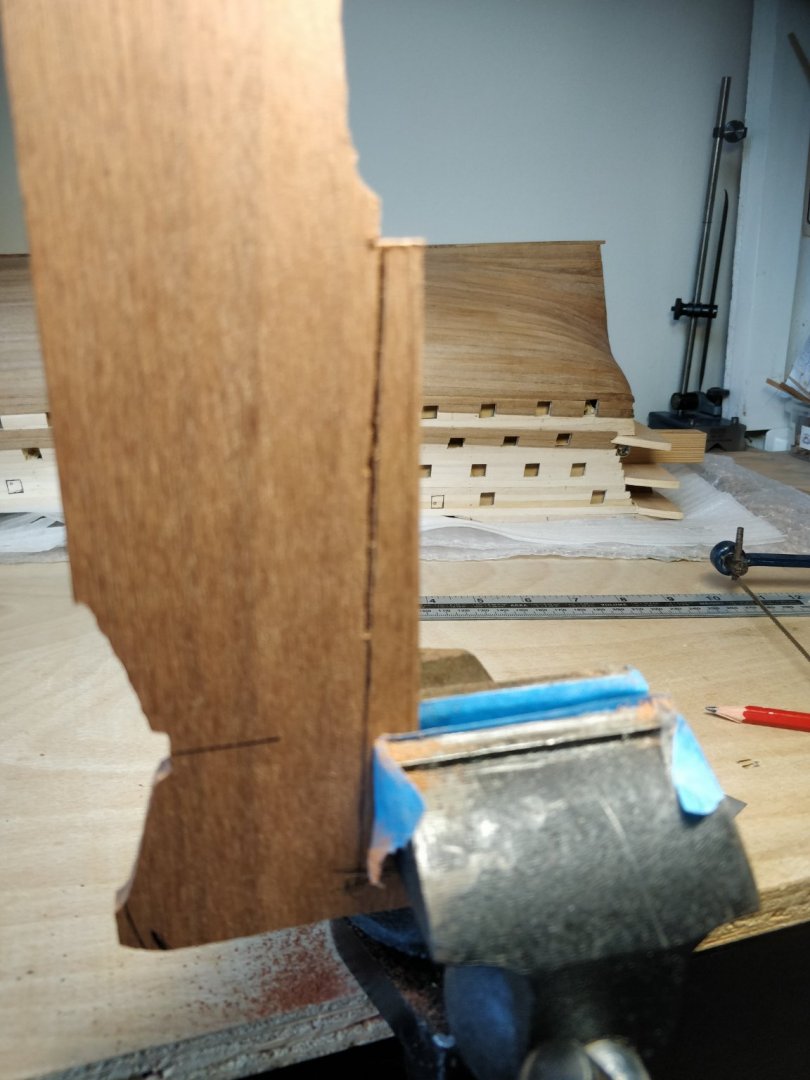
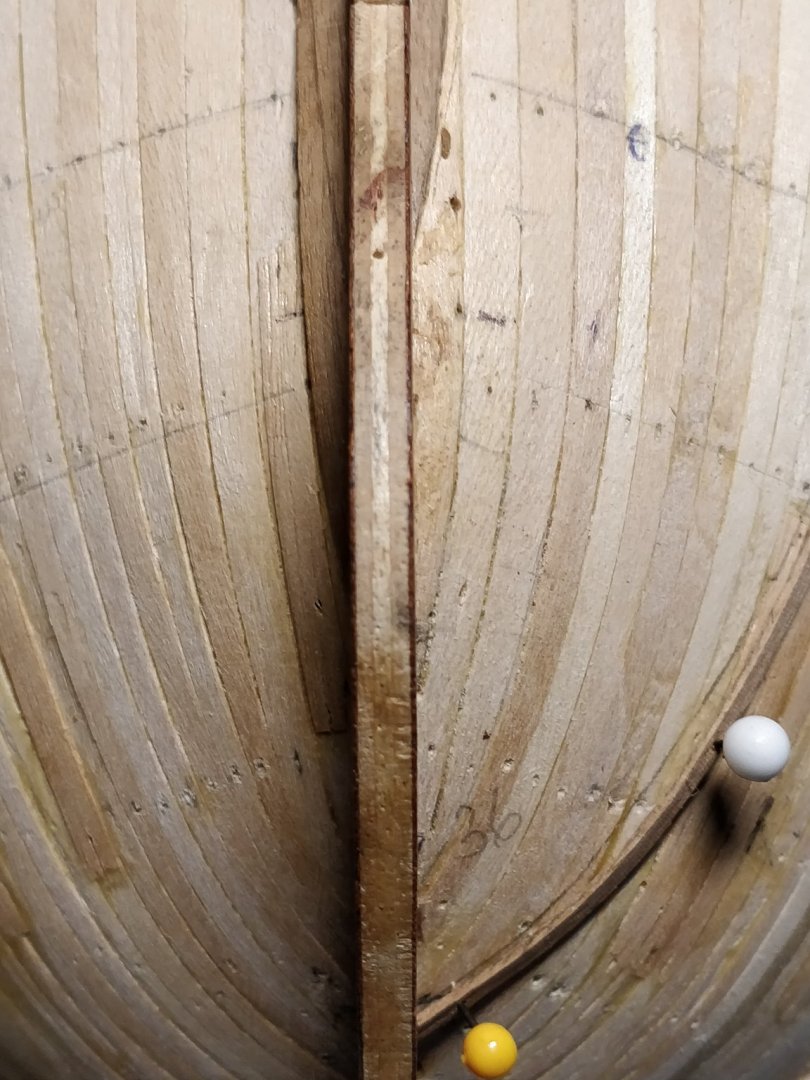
I've had to revisit the planking tutorials as I got into a pickle with the garboards I fitted. Although the ends were further back from the stem than the first planking apparently not far enough. Not wishing to rip them off and run the risk of damaging the rabbet and veneer again I've got for a workaround. I pared back the plank in a curve shape and fitted another alongside. This plank was edge bent slightly as shown in tutorials. A bit of fettling with sandpaper and it lays nicely. Think I've gained quite a bit which will give me more room to fit the remaining planks without having to narrow them excessively at the stem. Think I've managed to gain the equivalent room of a drop plank roughly. 😃 Caution will be needed as this same plank coincidentally will need a stern steeler fitted also. Hope photos show what I've done. Got to duplicate same on the other side. Sailing close to the wind as usual...


-
Planking help
Sheerline replied to Sheerline's topic in Building, Framing, Planking and plating a ships hull and deck
Thank you all for your advice and pointers. Think I need therefore to start with the garboard. The videos look amazing so will be studying them closely before proceeding. I need to step back for a time and take it all in. I really appreciate everyone taking the time to offer up their own experiences in such a kind way. 😃👍- 4 replies
-
- 5
-
-
- hms victory
- planking
- (and 1 more)
-
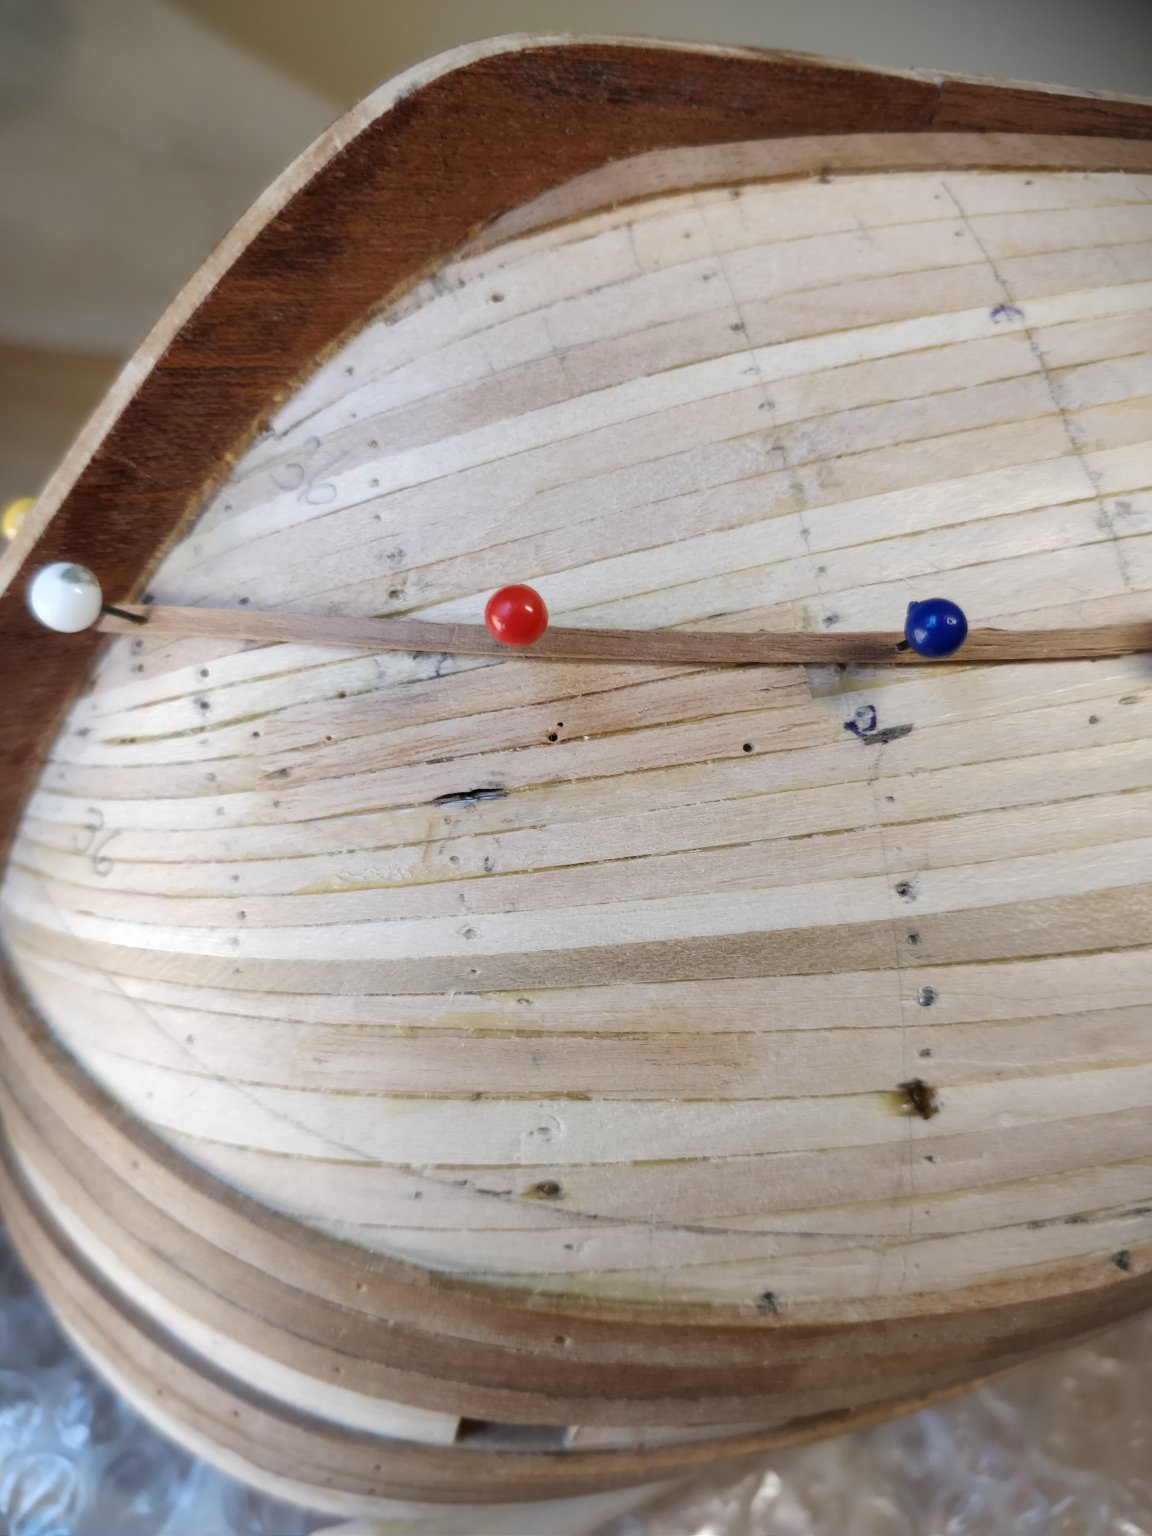
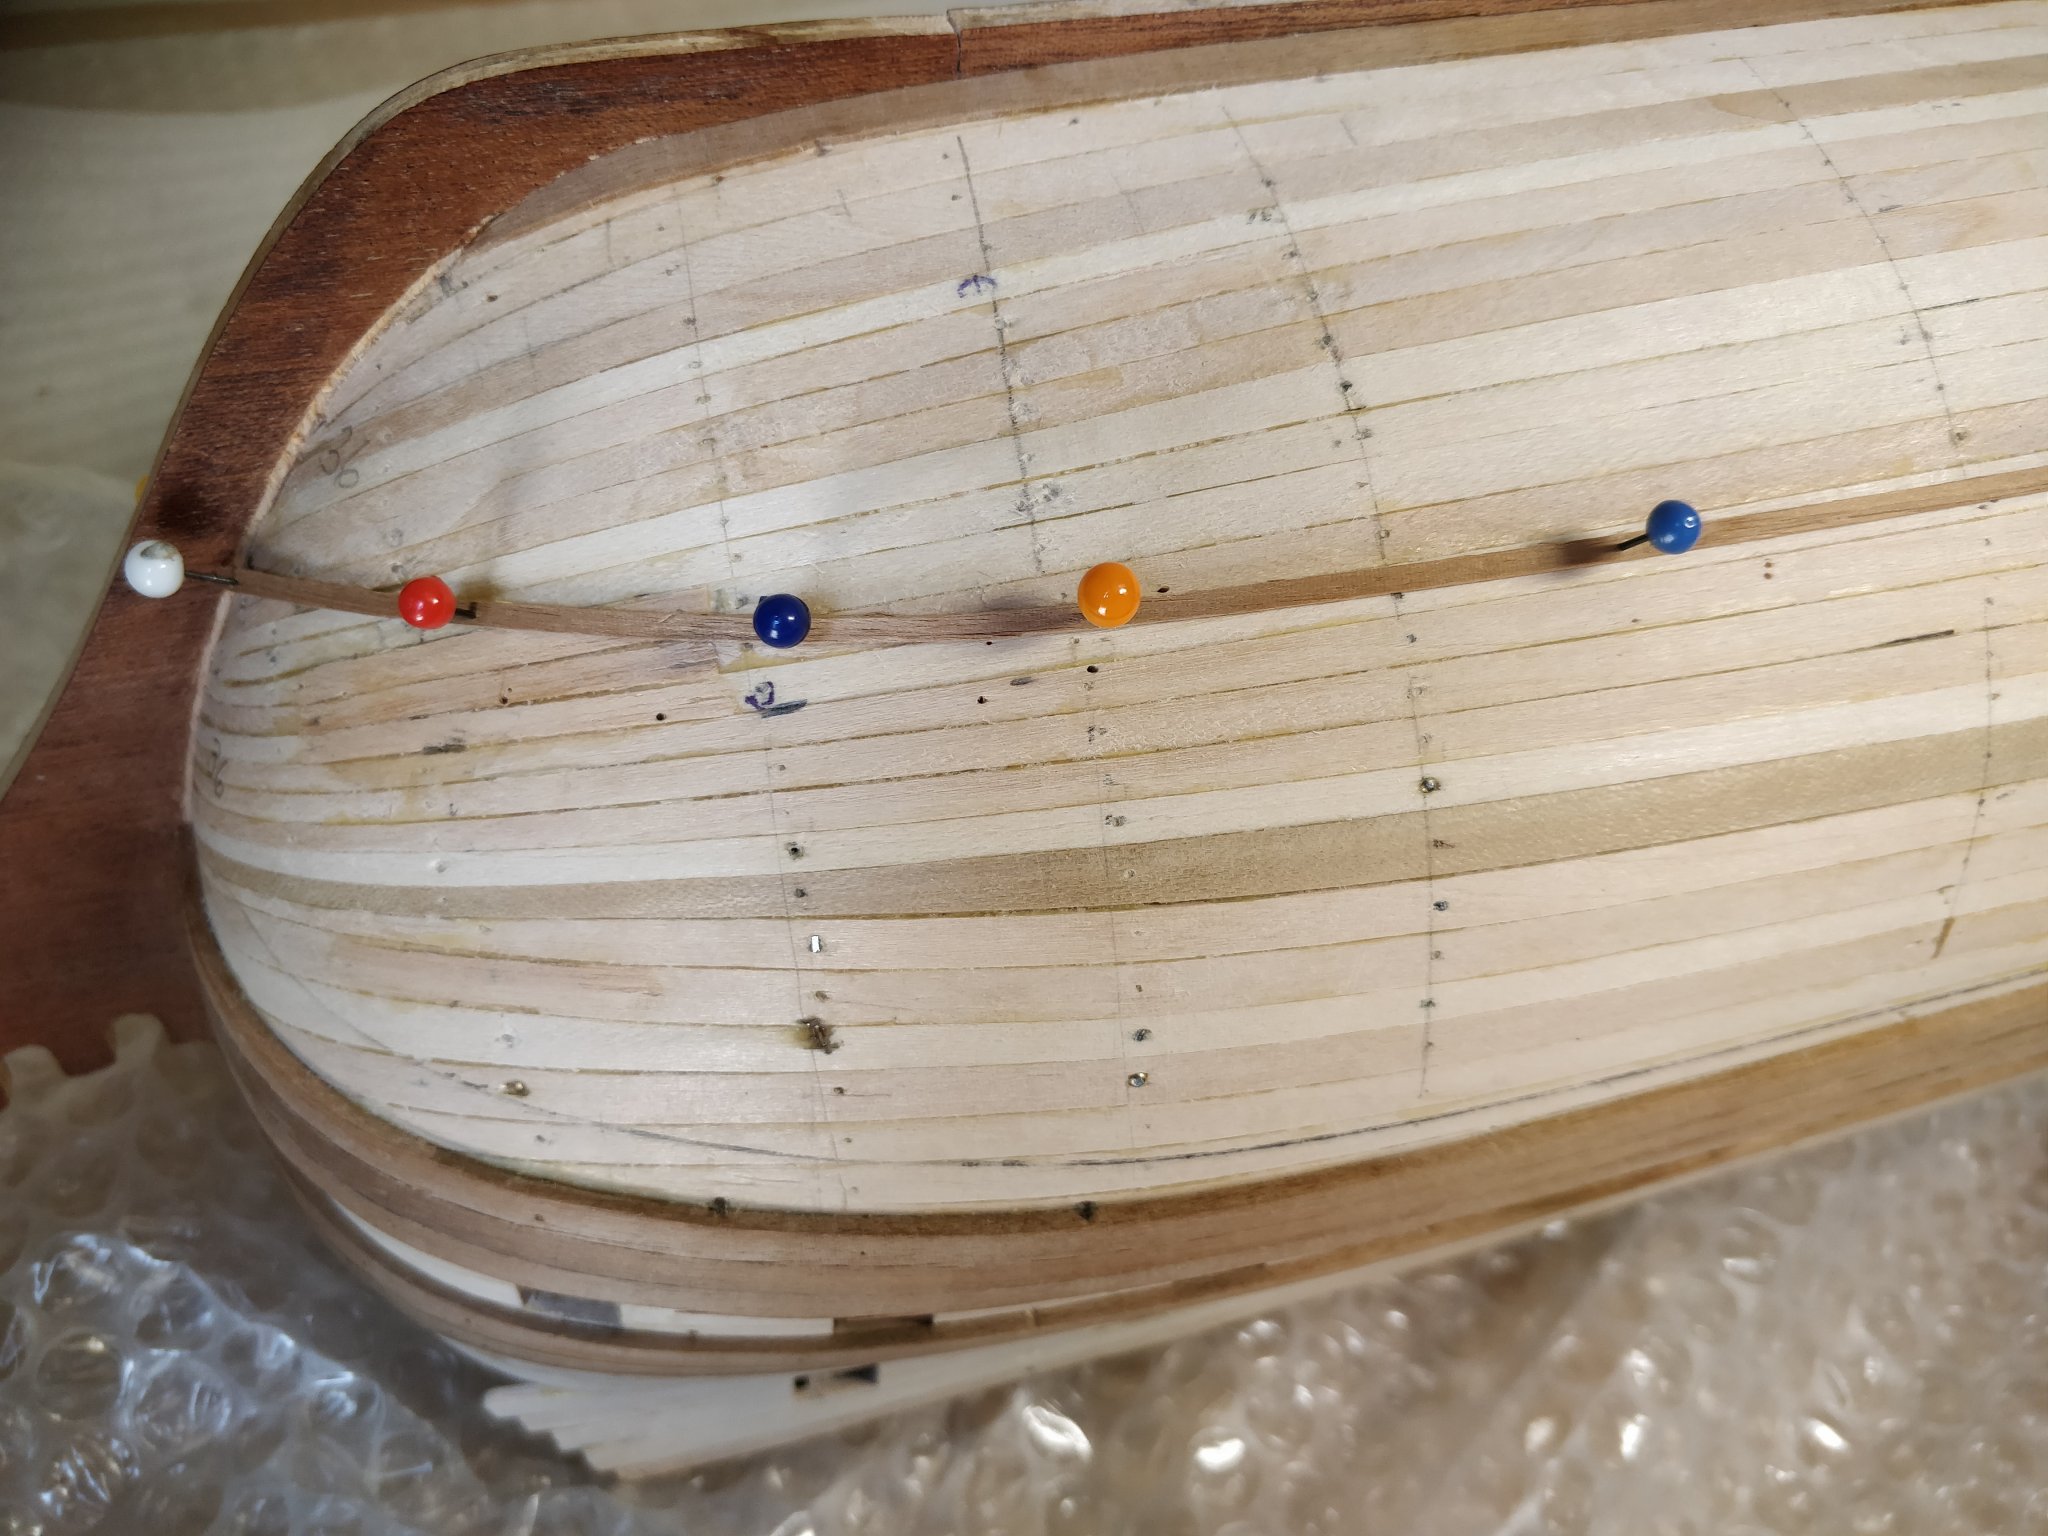
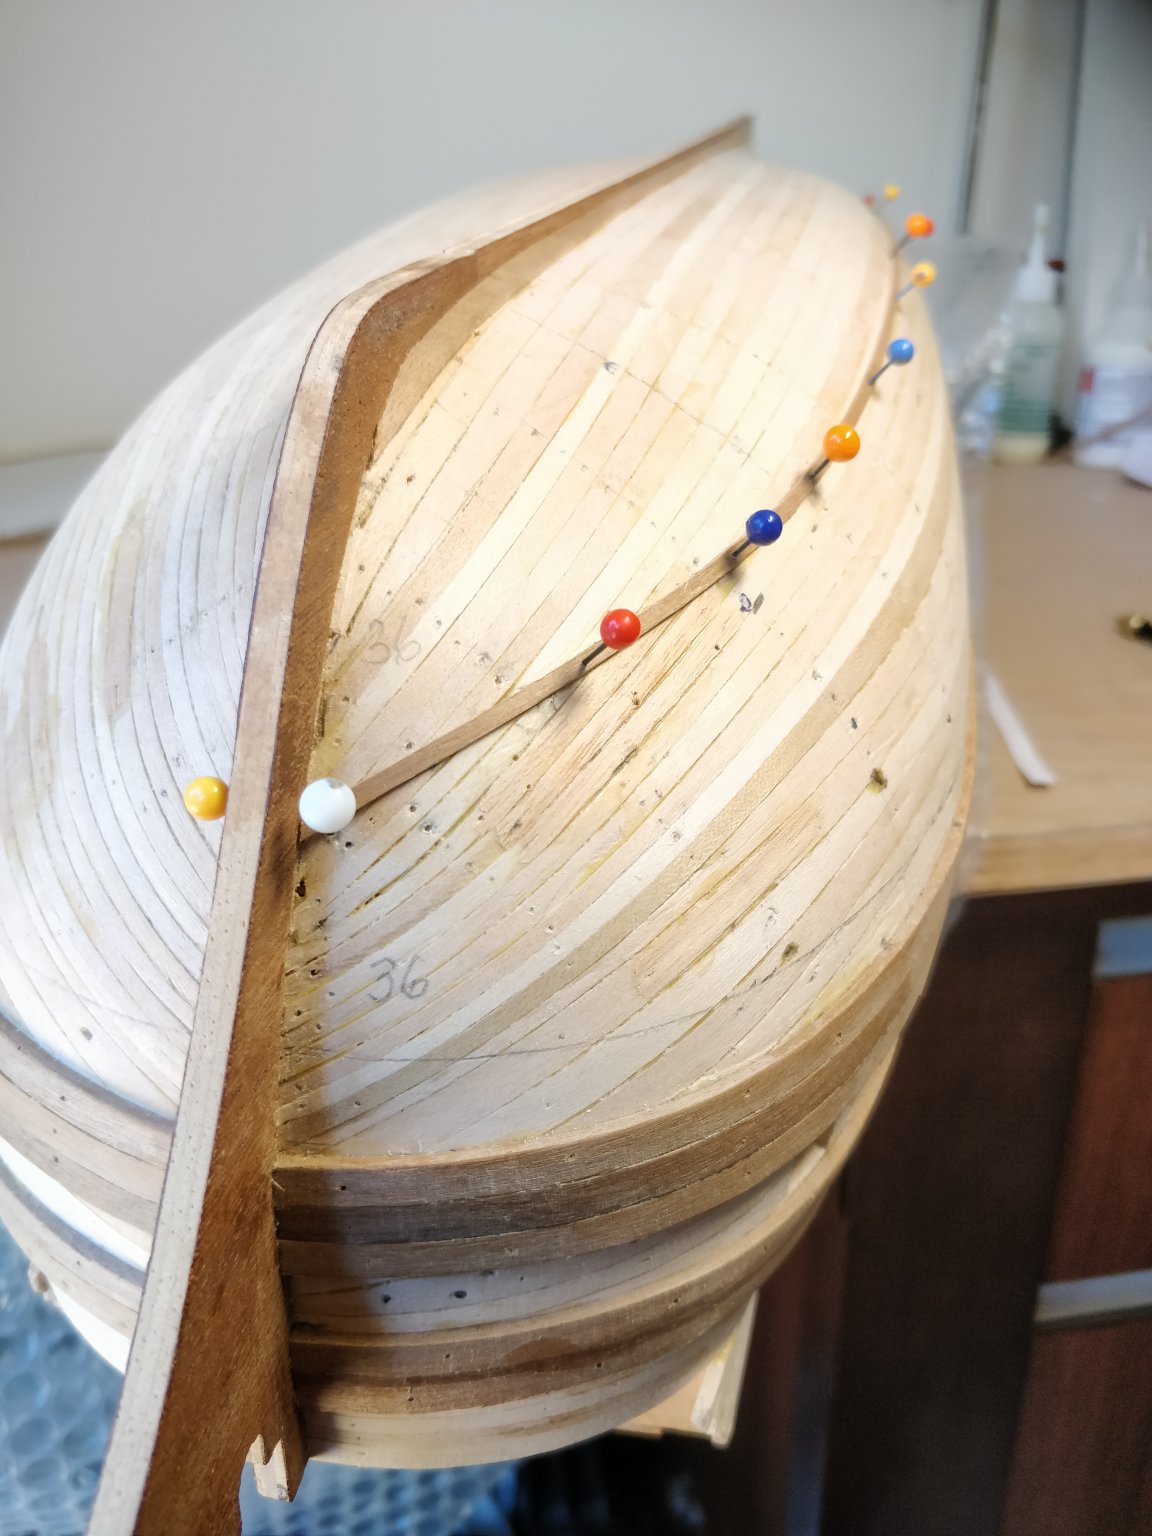
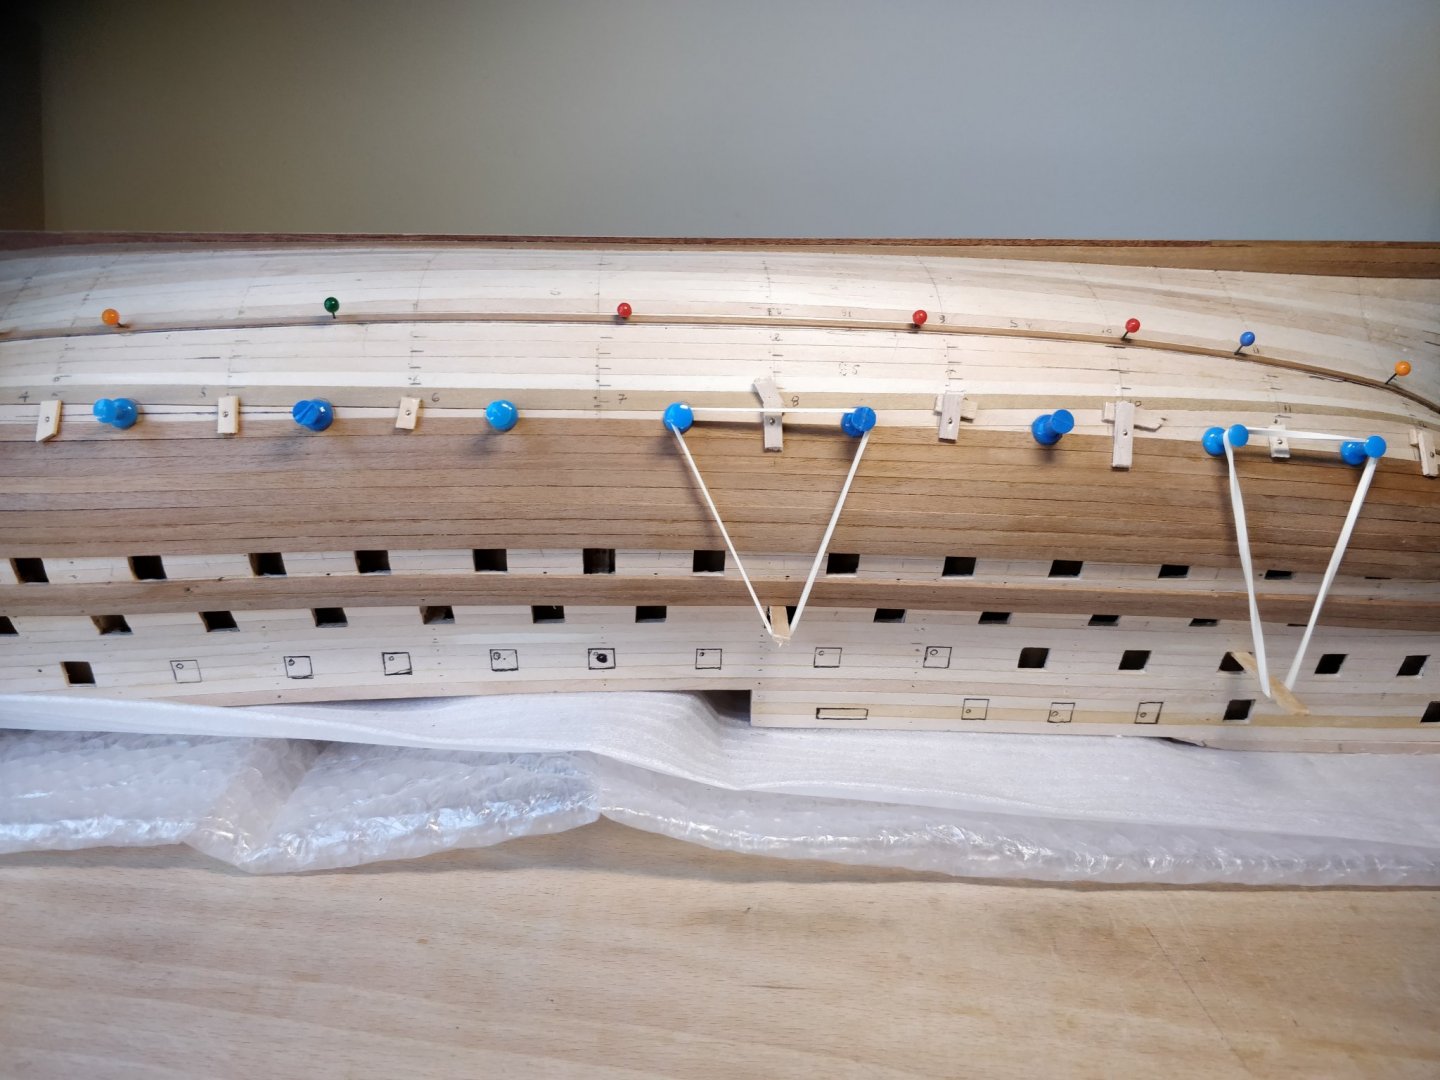
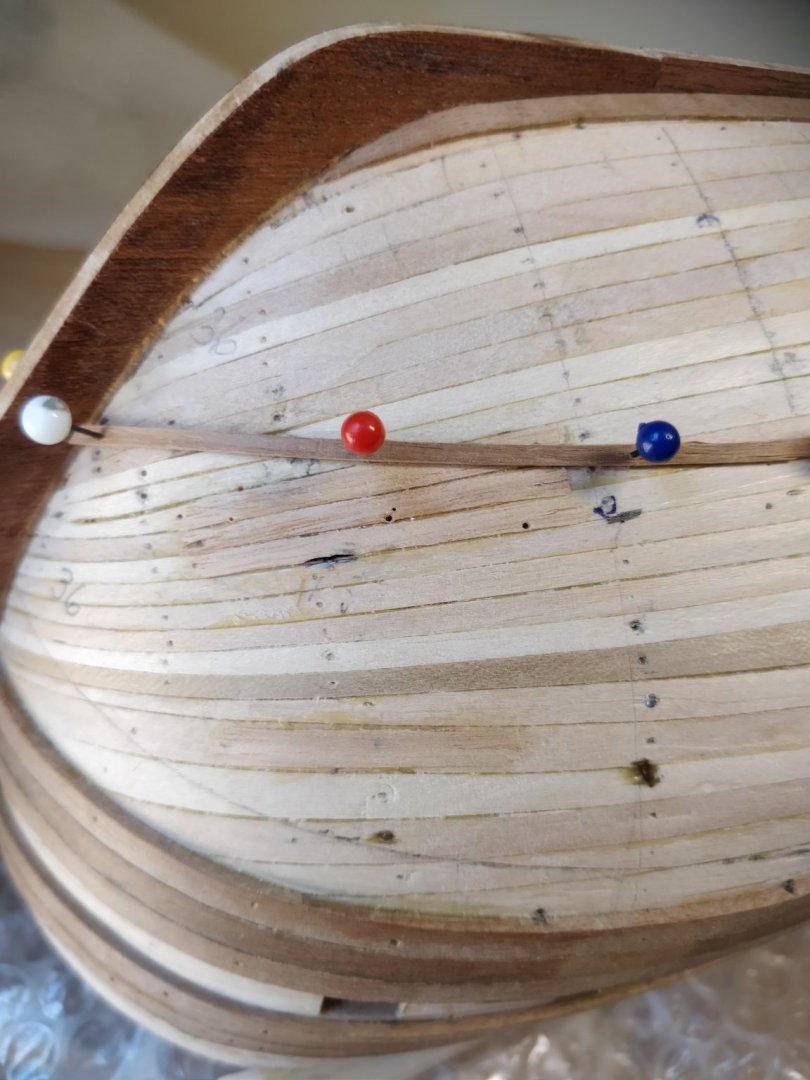
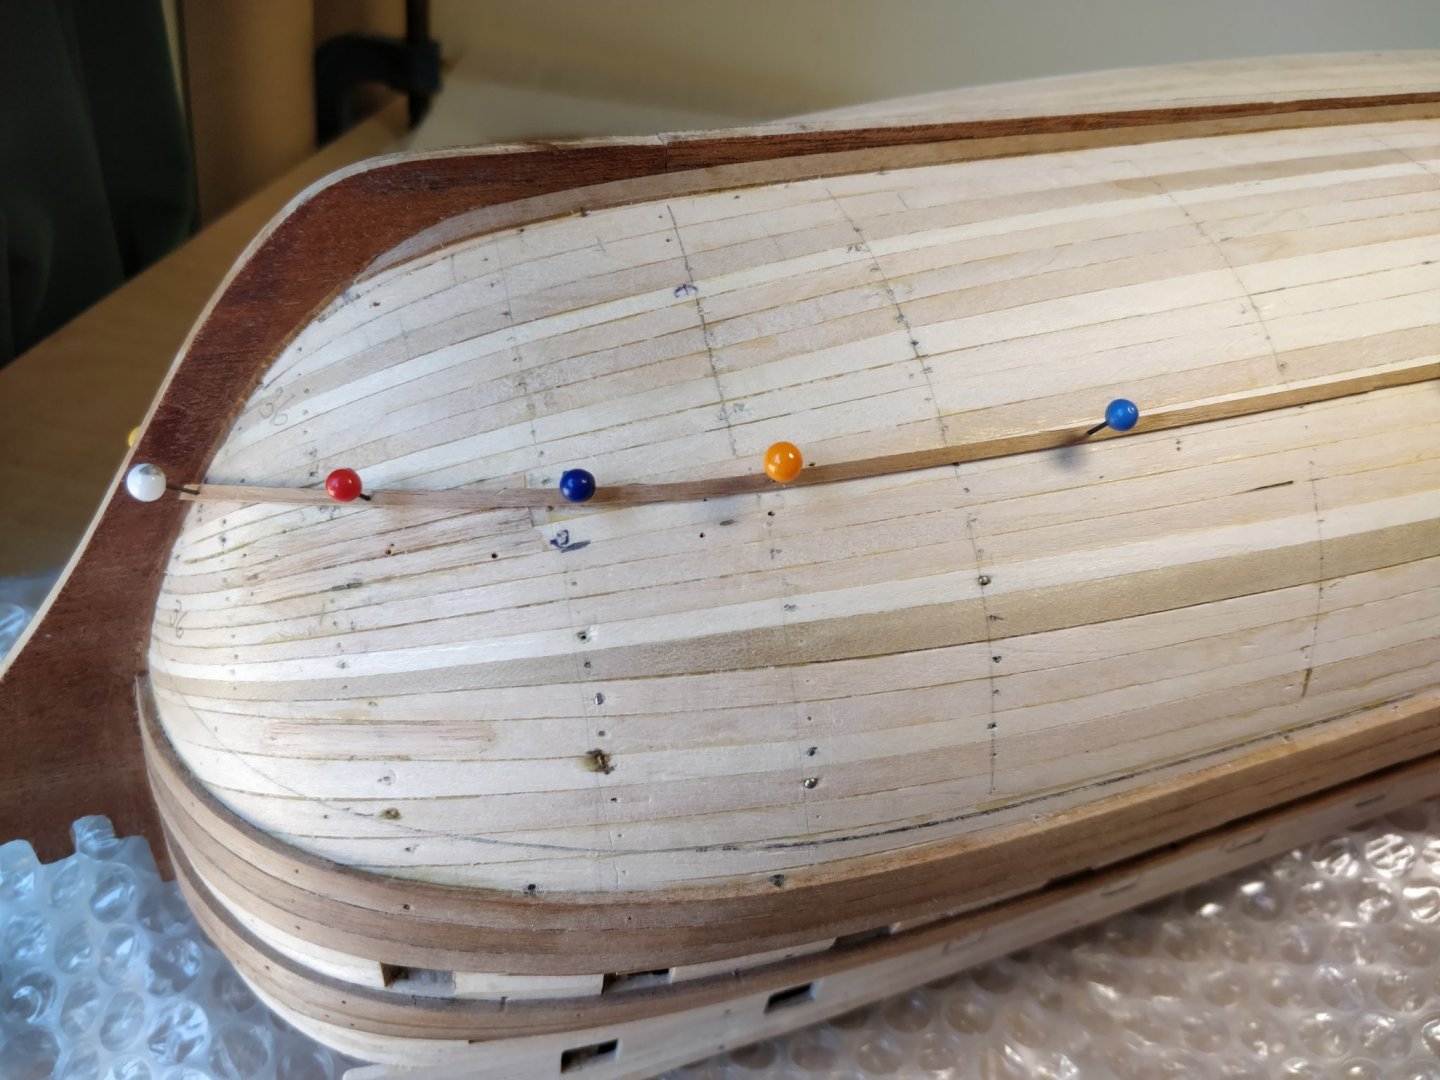
Hello! I am seeking help with my second planking having made a few errors on the first which I managed to get away with. It was touch and go trying to avoid crowding at the bow. I'm lining the hull with strakes to work out the best runs this time. I've read and think I understand the tutorials but still have a doubt at the bow section. Between the front tip of the garboard strake and the marking strake is 36mm (along the rabbet) but between the tip and red push pin is only 30mm. Should I fit a drop strake around this point I wonder? I tried wetting and bending a previous marker strake but the pull down on it made the run look a bit wobbly elsewhere back along the hull and it was a really tight bend. I know I will have to fit Steelers at the stern but the bow has confounded me for the moment. The two pen marks fwd show where the centre lines fall. I hope the photos give the idea. TIA.😃


-
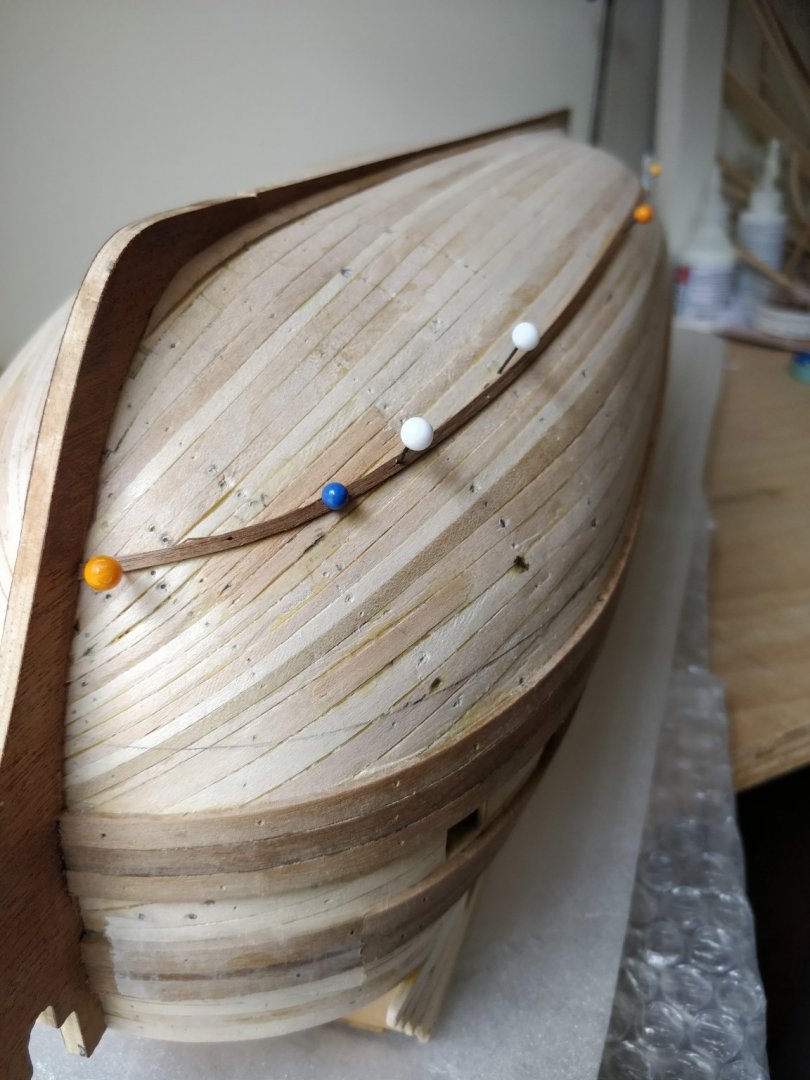
Got the main wale and the one above fitted now with a uniform gap between the two of 10mm. I used a pencil compass to strike the line using the topside of the main wale as a reference.Cosy for two planks..Got the garboard strake on too which was easier to do after the experience of first planking! Currently trying to line out the hull for planking but still a bit uncertain about the layout. I've read all the tutorials which helped and layed the strake in as near a natural flow as possible. However, at the bow I've had to wet it and bend it round a bit to avoid hooding of the planks and keep the bands equidistant. Not quite right at midships as the bottom band is wider around the bilge and keel. My gut feeling is I may have to spile some of these planks to get them to lay flat even at only one mil. thick. Looks like another order from the lumber mill! I'm just going outside - I may be some time...Stay safe everyone.🌈👍

-
Victory Corel
Sheerline replied to Sheerline's topic in Building, Framing, Planking and plating a ships hull and deck
PS. And there it was, staring me in the face all the time. Longridge p77 Quarter galleries hanging over four planks...Time to visit the optician me thinks! Thank you again for your assistance, much appreciated. Chris -
Victory Corel
Sheerline replied to Sheerline's topic in Building, Framing, Planking and plating a ships hull and deck
Thank you so much for this information Allan. It's a long standing first build but I'm keen to get it right. I'm sure that each kit is slightly different but the instructions on this one can be a bit vague and I think assumes previous knowledge.. I'm learning lots in the process though! I do have a build log on the go should you care to look. Thanks again.😀 -
I'm building Corel Victory and have scratch built the transom. Currently assessing fitting and was wondering if the bottom plank of the wale should ride up a bit more. Should I be cutting it back a bit to flare it? Any photo reference appreciated. Thanks,😀