


GuntherMT
-
Posts
2,213 -
Joined
-
Last visited
Content Type
Profiles
Forums
Gallery
Events
Posts posted by GuntherMT
-
-
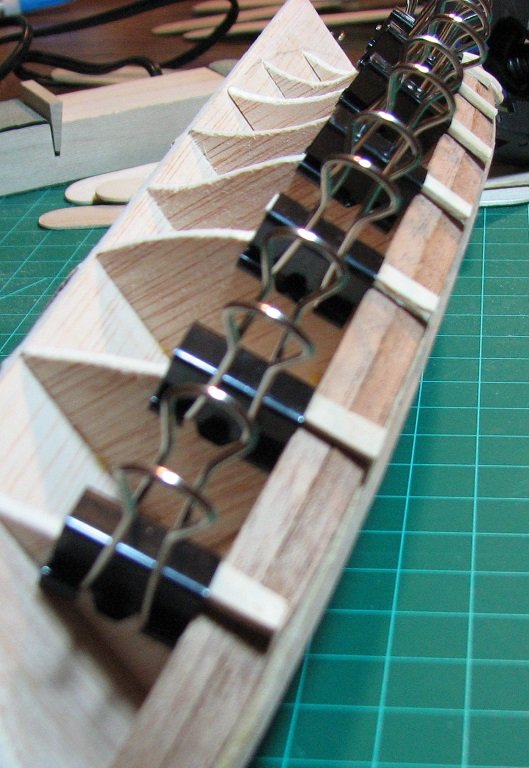
I'm brand new to this as well, but until one of the experts chimes in with a better solution, here is what I did for the first few planks (until I ran out of room on the bulkheads to use these).
I found these clamps - http://www.modelexpo-online.com/product.asp?ITEMNO=MX104 and I thought they were pretty neat, but between my impatience to progress, and being cheap, I used the concept of those clamps, and made my own ghetto version.
I took some small binder clips, and cut small pieces of craft sticks (the tongue depressor looking sticks) and chopped them up and glued them to the inside of the binder clips with super glue.
Here is what they look like in action, and they worked really good while the space on the bulkheads allowed them a good grip.
Carmen 1850 by GuntherMT - FINISHED - Constructo - Scale 1: 80 - pailebote (Schooner) - first wooden ship build
in - Kit build logs for subjects built from 1801 - 1850
Posted
In my introduction thread, numerous folks suggested that I do a build log, so this will not only be my first ever wooden ship, but also my first ever build log. Life is full of new things.
I've been getting the itch lately to get back into modeling, which is something I did with gusto when I was much younger. I did the typical plastic type models, everything from 1/35 scale cars, to 1/48 tanks, 1/72 aircraft, all the way to 1/700 scale ships (small!). My last modeling project was a super detailed 1/350 scale model of the German battleship Tirpitz, which was packed away into a box at about 20% completion when I was moving, and was never unpacked, although I still have it. That was about 25 years ago.
As I was looking at that model and trying to make a list in my head of all the stuff I would need to start up again, it occurred to me that since I was starting from scratch as far as materials and tools, that I didn't need to go back to plastic. Wooden models have always interested me, so I started looking around without too much seriousness, about what was available. I was astounded at the variety and detail of the kits I found on the web, so on Friday the 15th, after work, I set out to a hobby shop that I had found in the internet that had tons of ship models. The shop was a massive disappointment, with a terrible selection of plastic models and no wood stuff at all. So, my trek began, as I went from one hobby shop location to another (several found online weren't even there anymore). Eventually I decided to visit what was one of the best hobby shops in the valley (Phoenix) when I was younger, but was stupidly far away from both my home and my office. I ended up at Hobby Bench in the far north valley (some 50 miles from my house). Hobby Bench did not disappoint on selection, with 3 full shelves dedicated just to wooden ship models! There were probably 40 or so kits to choose from. Unfortunately nobody in the shop that evening had a clue about wooden ship modeling, so I just randomly picked the Carmen by Constructo as it looked nice, and didn't look super complicated or difficult as compared to the big square riggers, nor was it a simple one-piece hull model.
I bought the kit, a bunch of random stuff that I thought would be useful, and headed home, where I opened up the box and saw that there was certainly some assembly required!
Now that I had the kit, I was excited to begin, and being somewhat of an impatient person by nature anyway, I dug right in on Friday night at about 8:00 and started assembly. In retrospect, this was probably a bad idea, as I did not do many of the things that I've since read on articles and build logs about squaring up the keel and bulkheads, so my false keel & bulkhead assembly is not true.
The other very early mistake I made was with the stern blocks. The plans are fairly muddy for a complete newbie like myself, and I thought the blocks needed to be squared up against the bulkhead as seen here.
Unfortunately, the truth is that they should be aligned with the top of the false keel, not the bulkhead. This means that my poop deck will not have the correct angle, but I think that once it's complete, I'll probably be the only one that knows it's wrong, I guess time will tell.
This shows that the assembly is not square.
I stayed up was too late playing with my new project, and in the wee hours of Saturday morning, just before 4:00am, I had something that was at least shaped somewhat like a ship.
After some much needed sleep, I got up, and did some web time, found this site, got on Amazon and ordered some miscellaneous tools and a copy of Historic Ship Models by Wolfram zu Mondfeld. After lunch, I went back to work on the Carmen.
I started off with the shaping of the stem and stern, as the blocks were obviously not the correct shape. In this area the Constructo plans are seriously lacking, as there are no plans to layout the correct shaping of these pieces. I did my best guesses from the photographs and what seemed to make sense to me.
At this point my plan was to rough shape everything, then move forward and do more/final shaping when I reached a point in the model where other items would give me better reference points.
Continued next post, as I begin on the deck planking...