


GuntherMT
-
Posts
2,213 -
Joined
-
Last visited
Content Type
Profiles
Forums
Gallery
Events
Posts posted by GuntherMT
-
-
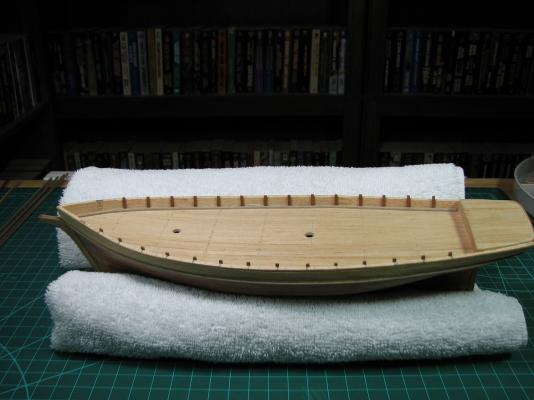
Time for the nightly update, today with a bonus side trip into redneck lamp repairs!
Blackie, I ended up using an X-acto blade to get the glue off of the brass, and just sanding the wood. Seemed to work ok, and I was (am) more than a little frustrated with the dumb rudder design so I'm not going to spend any more time on it right now. More later in this update.
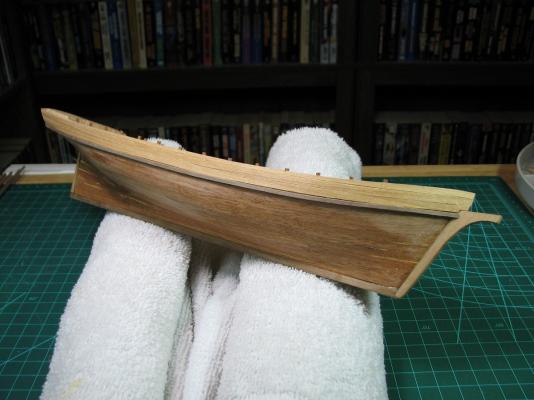
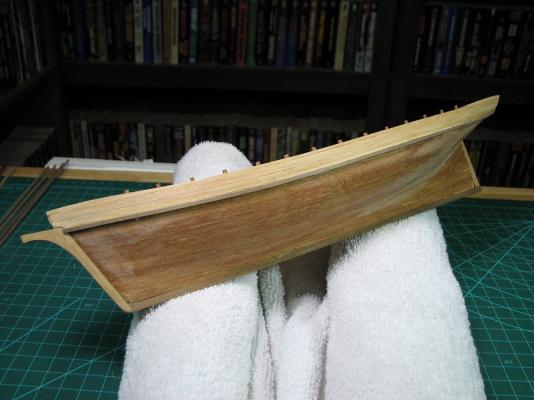
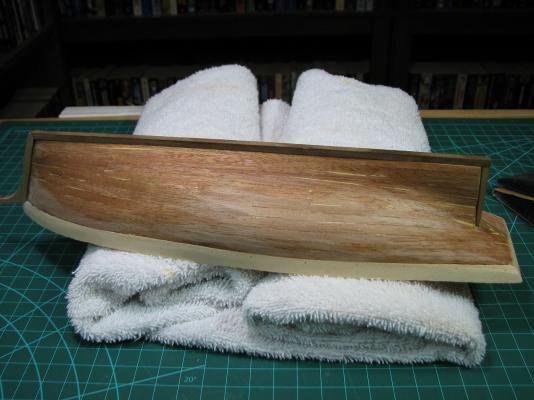
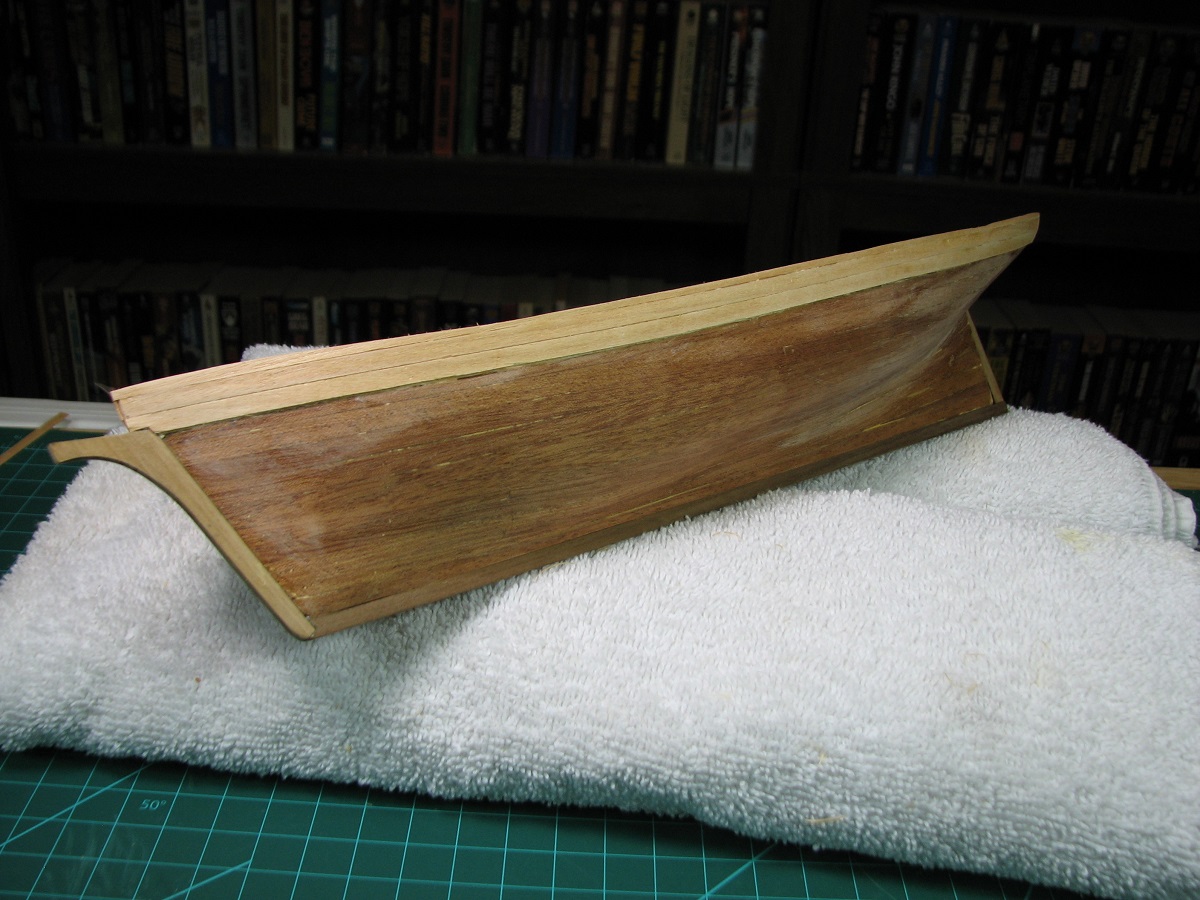
So yesterday I said that I had tried to tear out most of the putty-filler from the hull, and re-filled with sawdust/glue mix. The results were pretty good, although certainly not perfect.
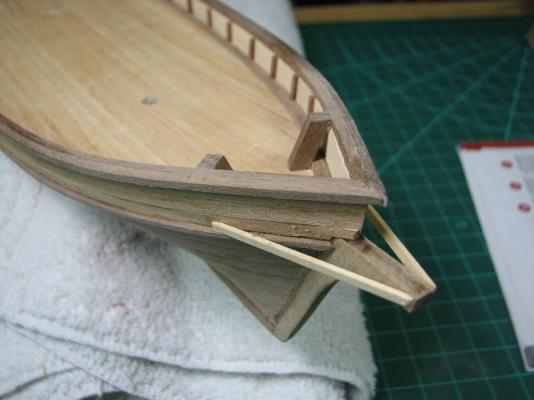
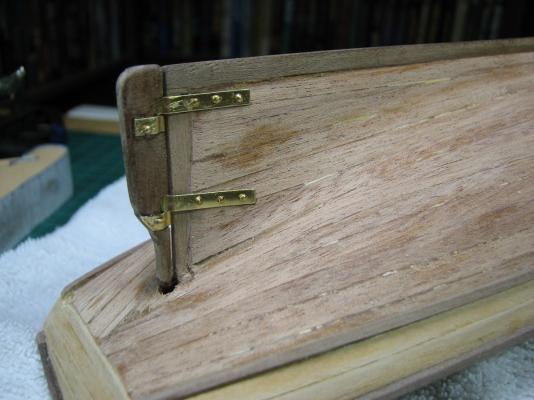
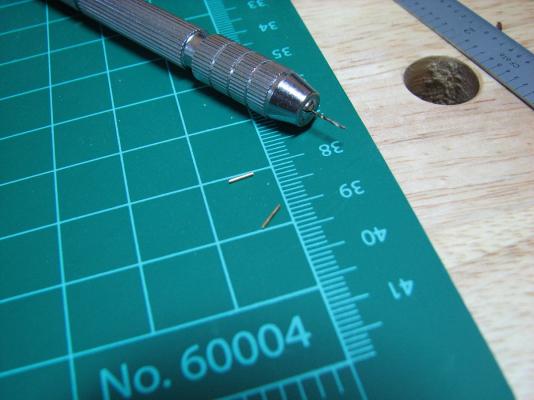
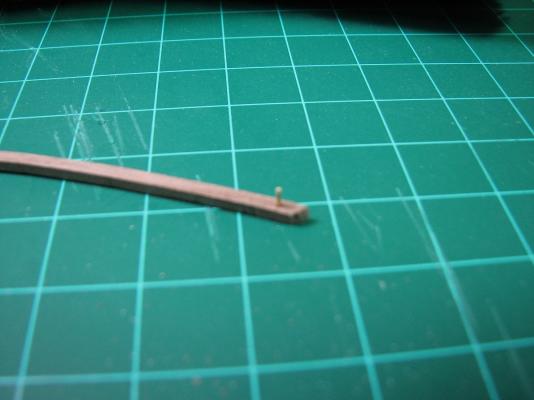
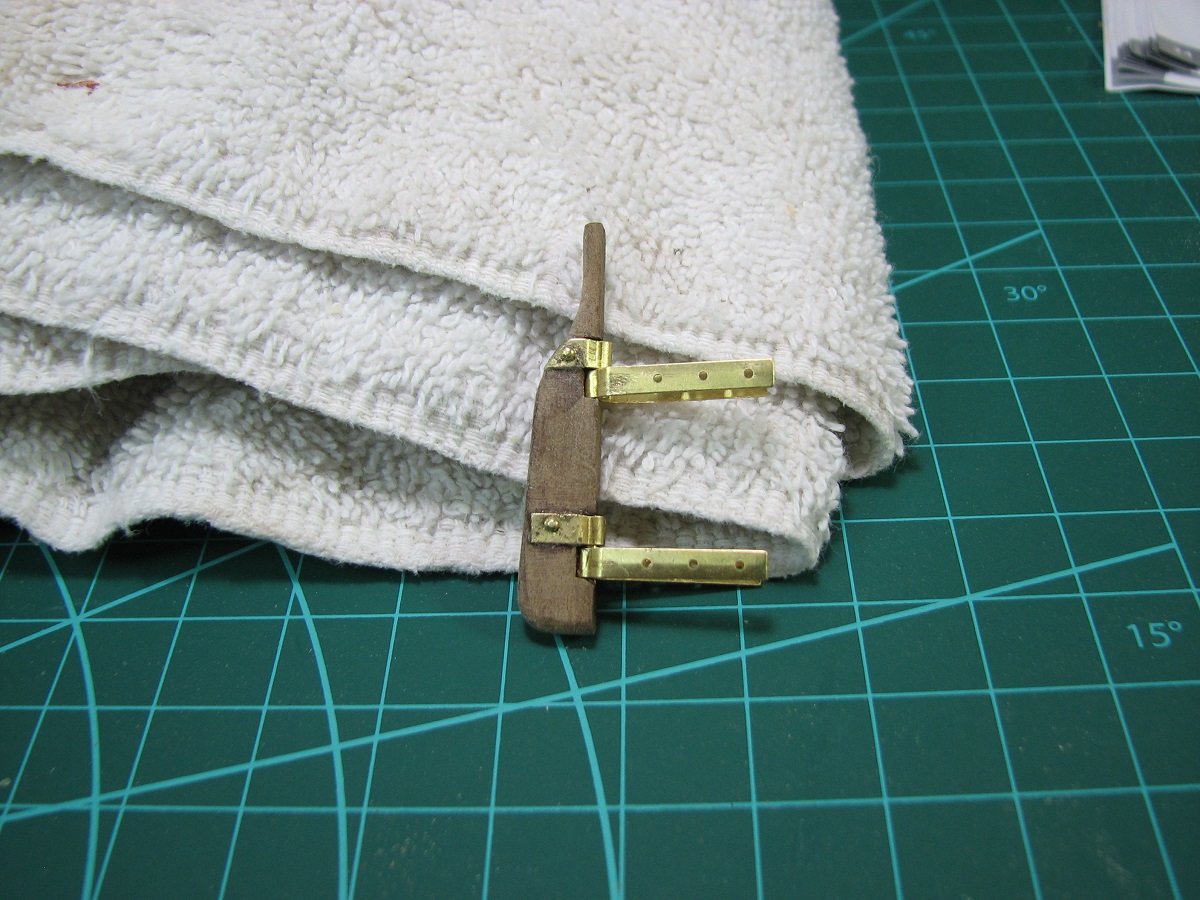
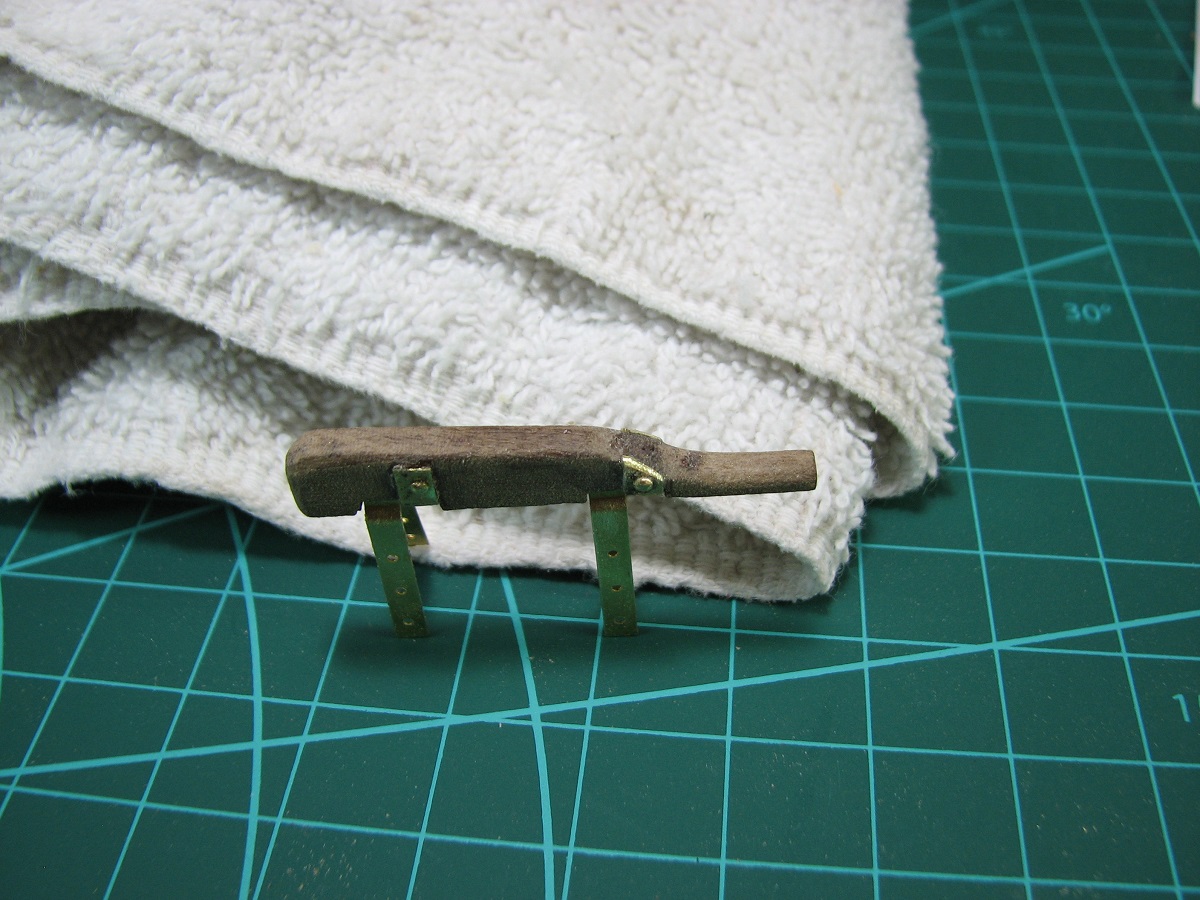
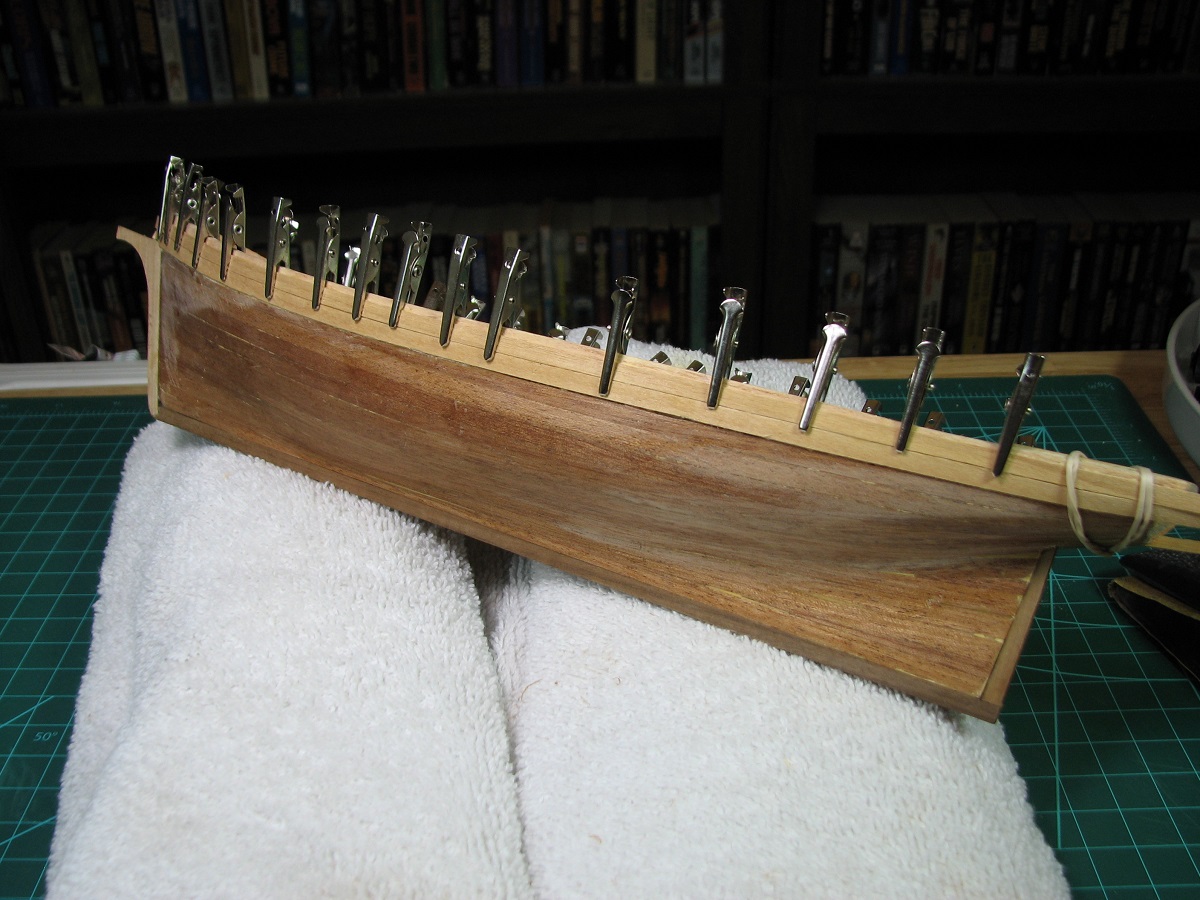
Rudder assembly from yesterday. Frustrating as heck, as there is not enough wood to do what the instructions show, and you are somehow supposed to attach the brass with the 'nails', which are the planking tacks that are 4x as long as the wood is thick. I also broke the bottom of the rudder off making the lower notch for the hinge. The chunk glued back in nicely, after I clamped it for a while. For attaching the hinges to the rudder, I used super glue, and on the top nail, tried to make it just long enough to go through and then hammer down the other side like a rivet. That didn't work very well at all. You can see how I made a huge mess with the super glue also.
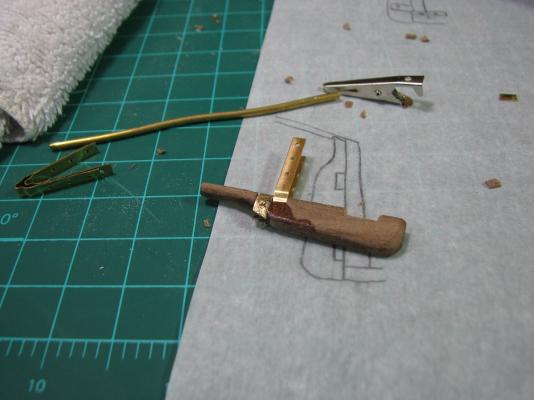
The lower hinge, I just cut the nails super short and they are basically decoration, and the brass is held by the superglue. I don't really care if the hinge is functional, it's a display model after all, not a R/C boat, but even after all my messy glue application, the hinges actually worked at this point.

Here you can see where I've filed down the brass on the top hinge since it was trimmed too large originally (picture with all the super glue mess above).

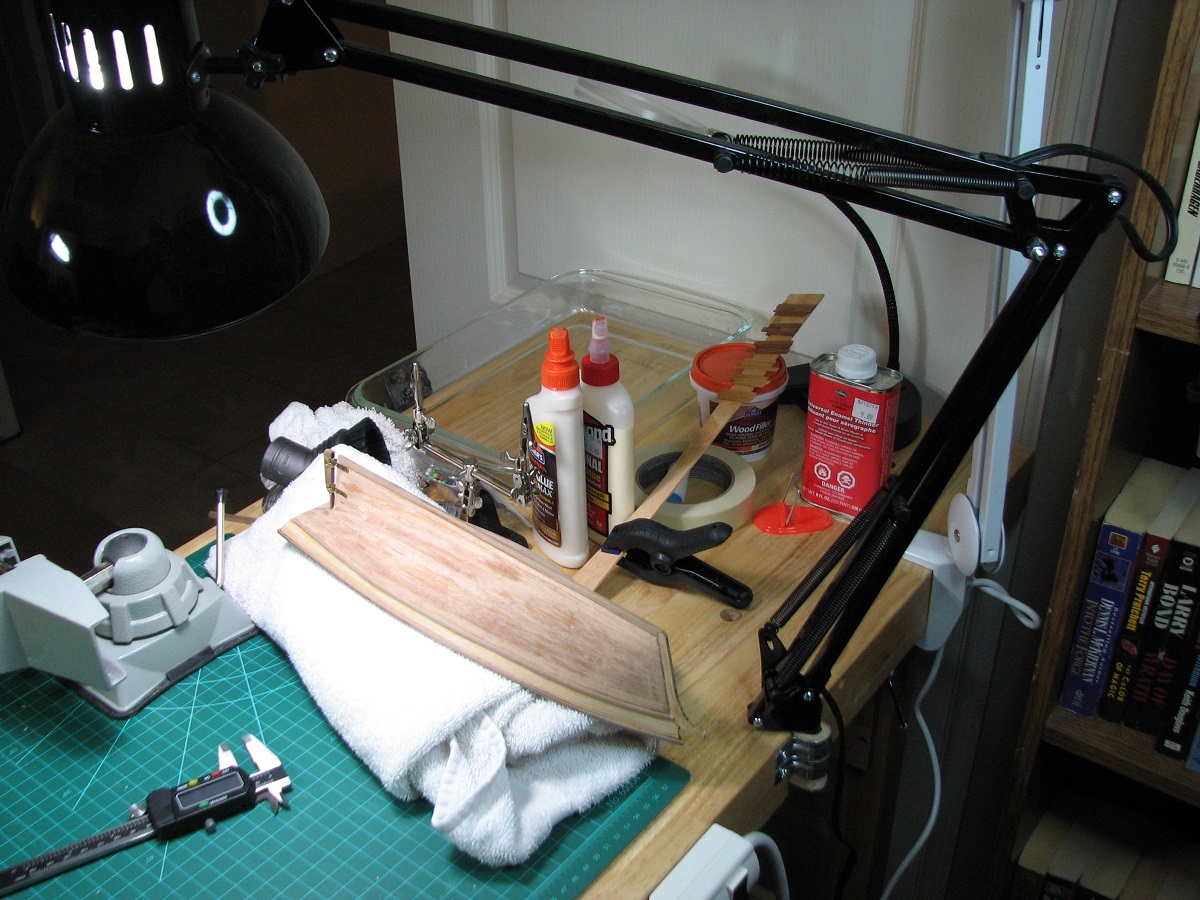
Next, I took my plank samples out and use three different finishes on them to test. I tested on both the deck and hull planking.
Ordered left to right (on both sets): Cabot satin spar varnish, Minwax Helmsman spar Urethane, Minwax Polyurethane.
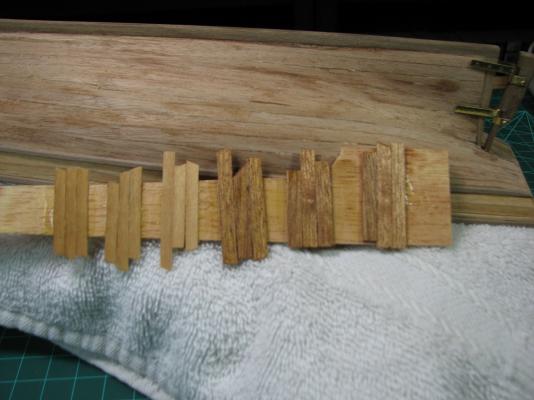
I decided based on the test to go with the Urethane finish.
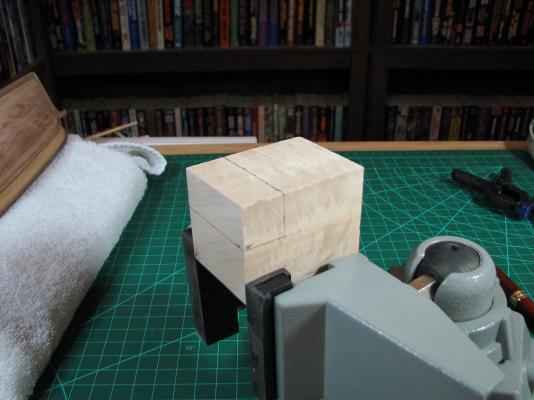
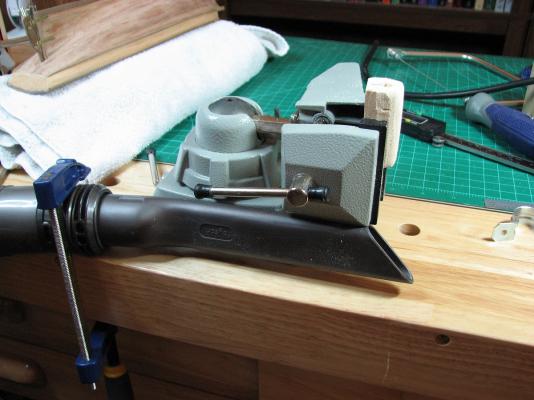
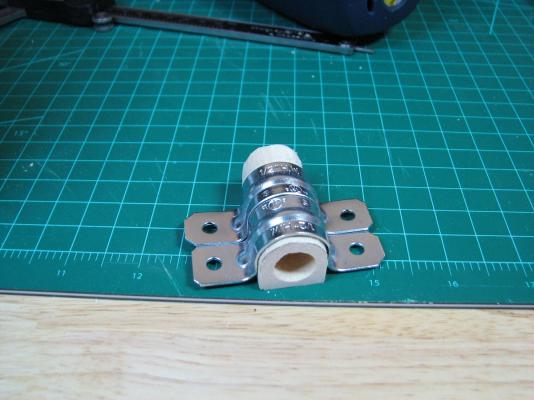
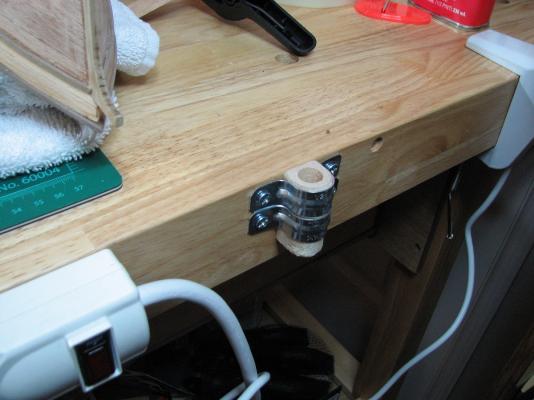
While the samples were drying, I headed out to the Lowes in town, to get some different clamps and some drills, and while I was there I decided to get some stuff to fix my dumb swing-arm lamp. This lamp is the best lighting I have at the work station, it's got a daylight LED bulb, but the provided clamp is just terrible crap. It won't hold the weight of the lamp unless it's clamped in place with a C-clamp, as well as a second clamp reinforcing the base itself where the lamp goes in.
Ship building stuff to the rescue, along with a couple of conduit clamps. Chunk of basswood I picked up at a hobby store the other day, dremel tool, various drills, and a bit of clamping for vacuum action. I destroyed the first attempt, as I went the wrong direction re: the wood grain, and the big drill caused it to shatter. Second attempt worked out pretty well.

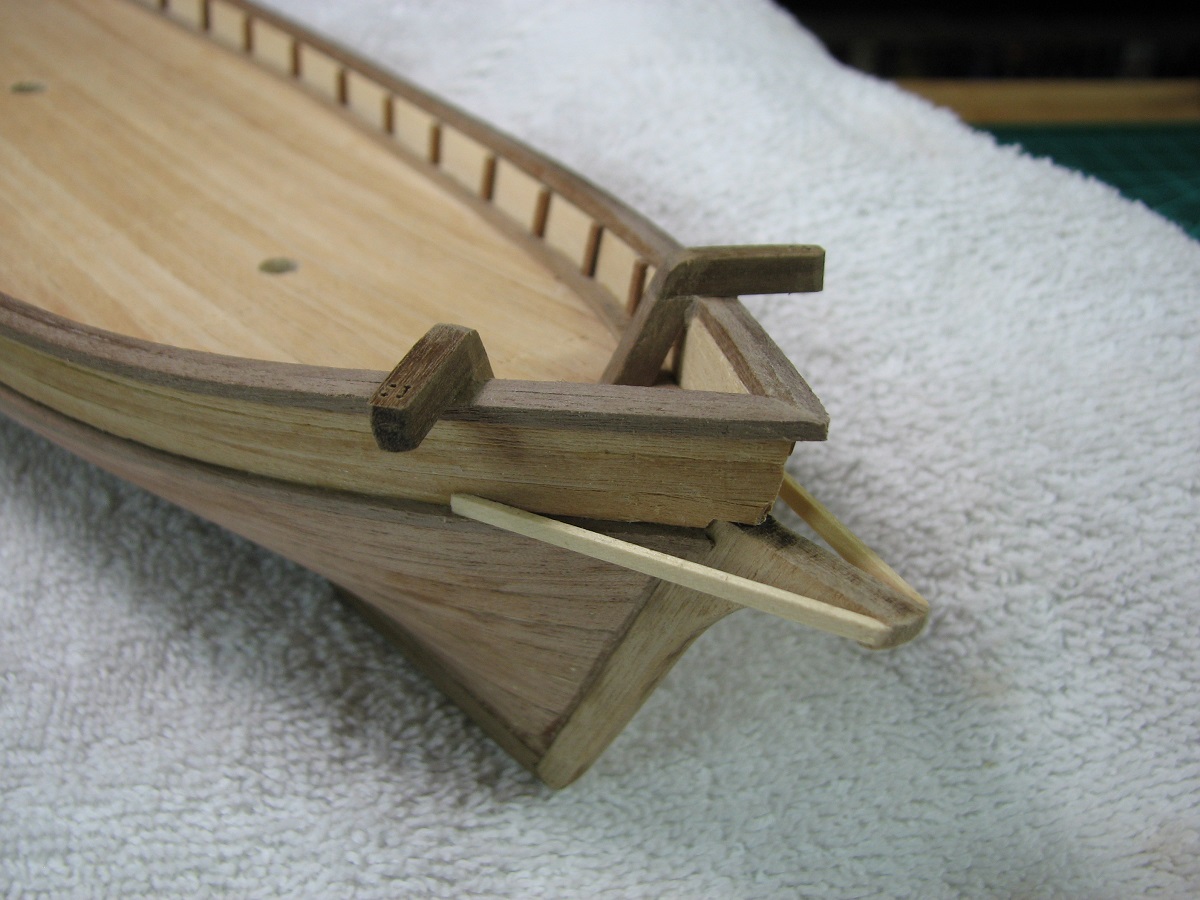
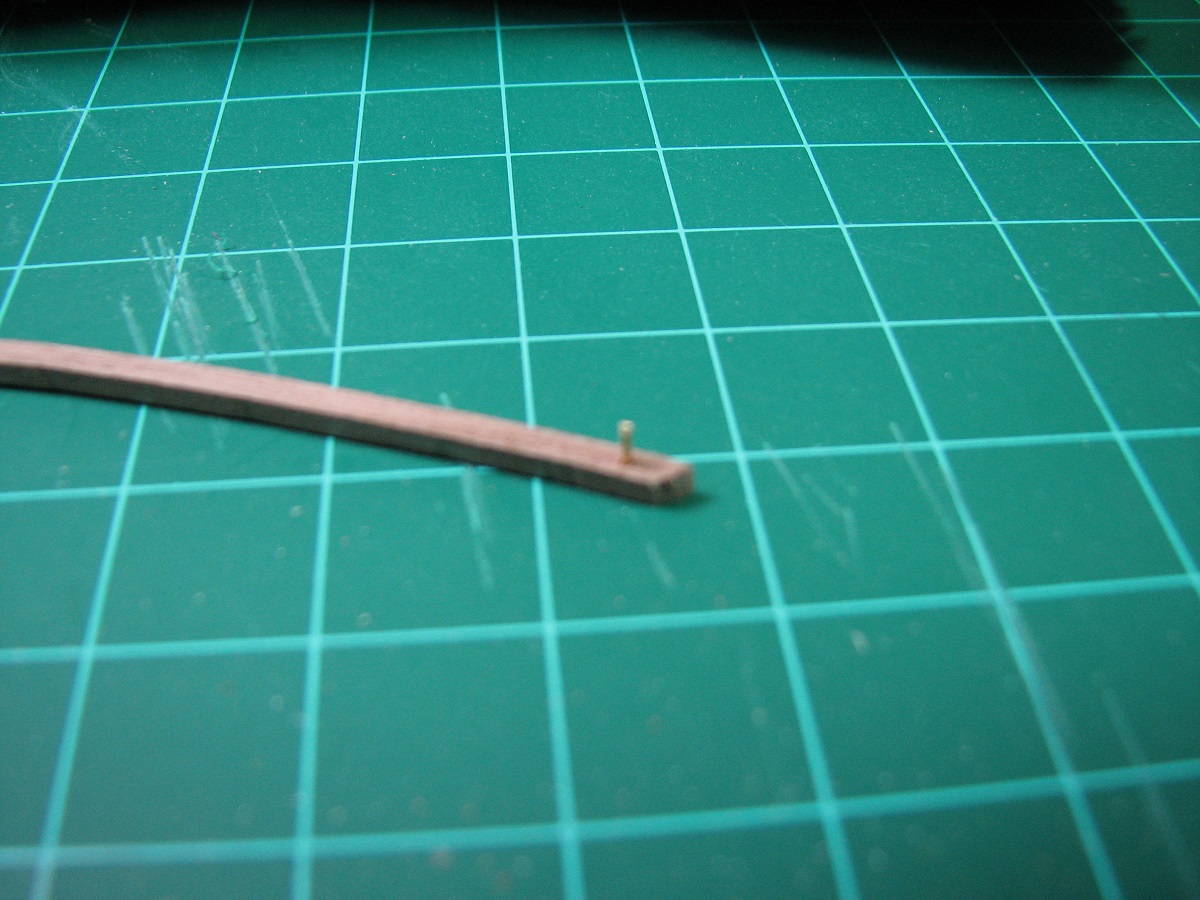
Back to the ship. I put in the bowsprit reinforcements, and the knightsheads. Then I made the davits. I have absolutely no clue how I'll actually get the rigging through these dumb little holes when that time comes. The instructions don't even tell you to drill these holes, let alone give you the size they should be. They just have a picture of the davits showing that the holes are there, and then later on have the rigging going through them. The rigging is "Small beige yarn", which isn't terribly helpful for sizing either. Using the calipers, the yarn seems to be around .025~.028, so I drilled .031 holes. I was afraid to go much larger given the tiny piece of wood I'm working with here (4mm x 4mm).

I ended up placing the davits twice, as I wasn't happy with the angle the first time. They aren't perfectly symmetrical to each other, even though I measured the points on the deck from the forward mast hole with the digital calipers 3x before setting the knightsheads. Oh well, I'll work on getting that better on the next build.
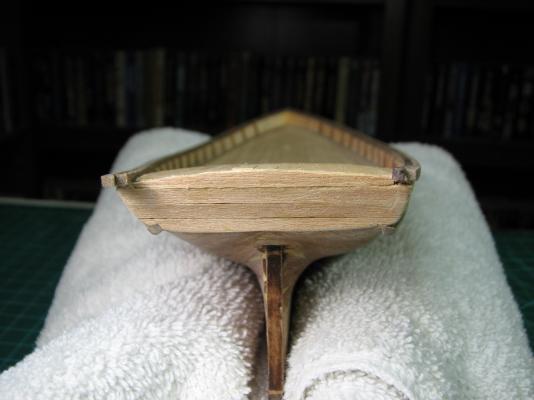
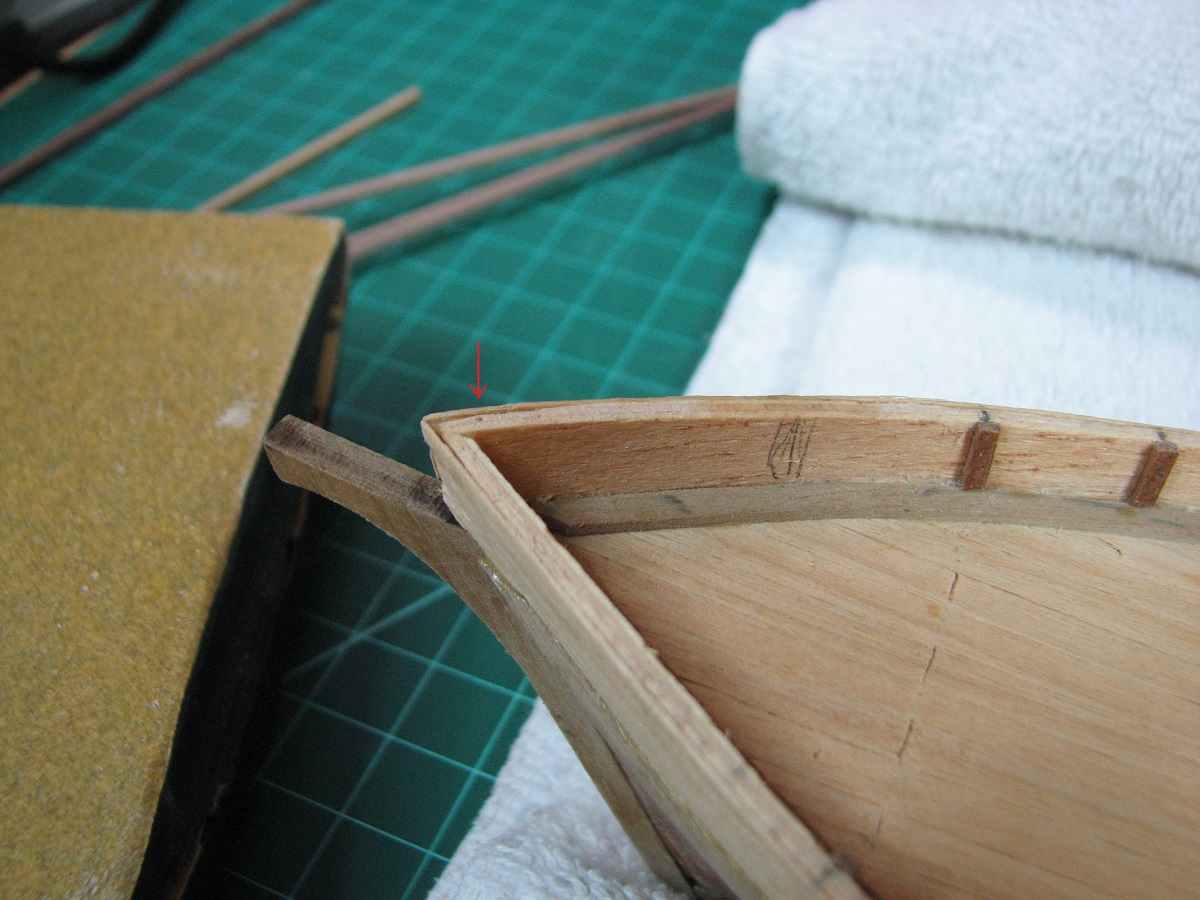
After drilling the hole in the transom for the rudder to go into, I discovered that it was too short to actually fit into the hole, so I tried for a couple hours to make an extension to the rudder work, but I just couldn't get any piece I made to stick. No idea what the deal is with the top of that rudder, but super glue, wood glue, and even 2 part epoxy failed to make anything stick well enough that it wouldn't come off with the slightest touch. I stuck the rudder in place with the extension on it eventually, but it fell off into the hole (it's captured there between the rudder and the keel) while I was mounting the rudder. Maybe I'll come back and try to do something with that later, but I'll probably just leave it since it won't be visible on the finished model without turning it upside down.
As with the rudder itself, there isn't enough depth to actually use the nails to mount the rudder as the instructions say, so it's held on with super-glue, and the nails are cut off very short and basically are decoration.
I've now coated everything with the first coating of Urethane, and I may take pictures and post them in a few hours when it's dry (4 hour dry before sanding on this product).
Until next time!
- themadchemist, Bindy and johncole
-
 3
3
-
Nice to see someone else picking up this kit!
On the aft wedges, the top should align with the false keel, not the front edge with the bulkhead. Hopefully doing it that way will keep you from ripping off your deck and refinishing it!
Make sure to add some blocks around the notches in the keel for the masts, so that you'll have an easier time setting your masts later than I am likely going to have.
Cheers!
-
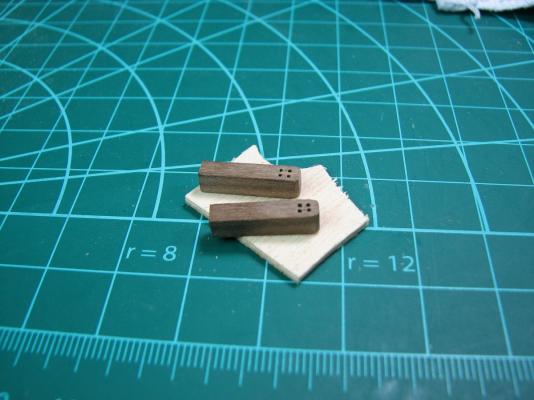
Ingenious switch / battery box combination. I like it!
-
Nice looking little ship. Nice work on it.
-
That's quite an amazing planking job, even if you hadn't posted that it was your first build I'd be impressed. Nice work!
-
So the next challenge. I figured I'd put the hinges on the rudder before bed, as it looked pretty simple. Stupid me.
I finally got it together, but the only way I can figure out to hold everything is with super glue, even though the instructions say to secure it with nails (there isn't enough wood there to put nails through without splitting the rudder, so the nail holes had to be pre-drilled, and not enough thickness for a nail to actually grip in any case).
So, while I have it all together now, I also have super glue all over both the rudder, and the brass hinges. How do I clean up the super glue?
-
Thank you John and Keith,
Beautiful little boat, I'm surprised there aren't more of these. It reminds me of a cross between the Swift and Scottish Maid.
For a first build your doing beautifully. Have you considered second planking her. It would cover your problems and give you the experience of plank narrowing and working with the thin second planking material. Although the thin second planking is actually sometimes harder to work with as edge sanding 0.8mm stock can be interesting at best.
I was surprised not to find any of these on the site when I searched as well. I sort of figured I'd be able to find pretty much any of the kits from Constructo, but I was wrong! I selected it off the shelf at the hobby shop based on liking the looks and it not being a square rigger (so simplified rigging), nothing 'informed'. I visited that shops other location today while I was out doing errands, and that location appears to have every kit made by both Constructo and Artesania Latina. I was quite surprised, since every other hobby shop I've been in has maybe one wooden model by Billings Boats, and nothing else (if they even have that).
I did consider a second planking, but I would need to source and order planks for that, and I'd like to do this one 'out of the box' since it's my first time, but it's always a possibility.
I did a 're-do' on the putty today. I spent far too long slowly picking out all of the yellow putty I could get to with an X-acto knife, and then I made a bunch of sawdust from extra bits of planking and a dremel with a sanding attachment. I added the sawdust to a 50/50 mix of water and white wood glue, and then I re-filled the hull with that. The result is much darker, and while it may still show when finished, I think it will look much better. I still have some sanding to do, and tomorrow I'm going to test a few different finishes that I've picked up and see what I think of them. I think I have enough small planking pieces left to get a decent idea of how each finish will look, and then decide which one to go with.
I've got the varnish, a urethane, and a polyurethane, all of them satin. I may get some tung oil to try my next project, but the only tung oil the local shop had said it was glossy, so I didn't get it.
I think I have some challenges with the masts in my future. I pulled the dowels for the masts out of the box and put them into the deck holes, and the slots in the keel don't provide any sort of guidance or support for the masts at all. If I had read anything about building these models before I closed up the hull, I would have installed some blocks on either side of the keel so that I could have then drilled them properly for the masts later. Instead, I'm going to be trying to figure out how to get the masts to stay at the correct angle with no lateral support, and very little if any angle guidance from the keel. Should be interesting, and I'd love to know if someone has an elegant solution that doesn't require disassembling the entire ship at this point.

-
-
I'll check the forum to find a template for the fan and see better how it works. I have seen it used but didn't pay enough attention to see how it works.
It can be found here - http://modelshipworldforum.com/ship-model-framing-and-planking-articles.php
-
Thanks Frank and Blackie!
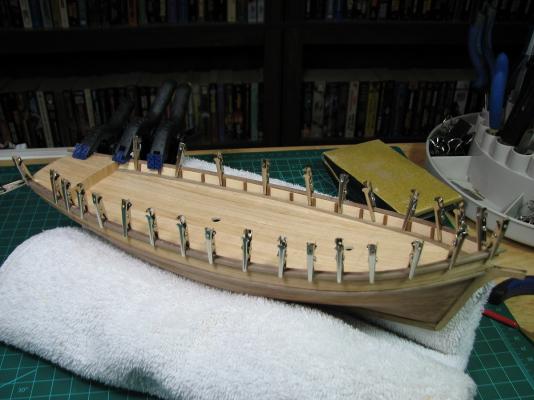
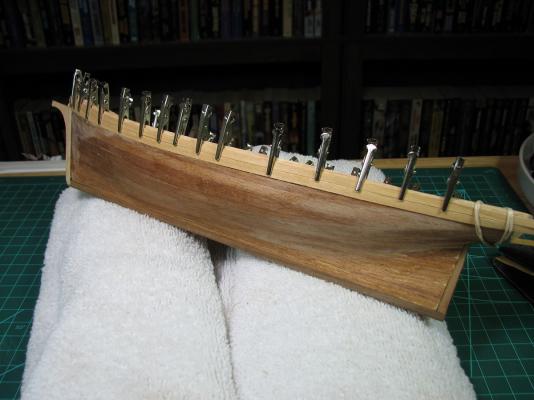
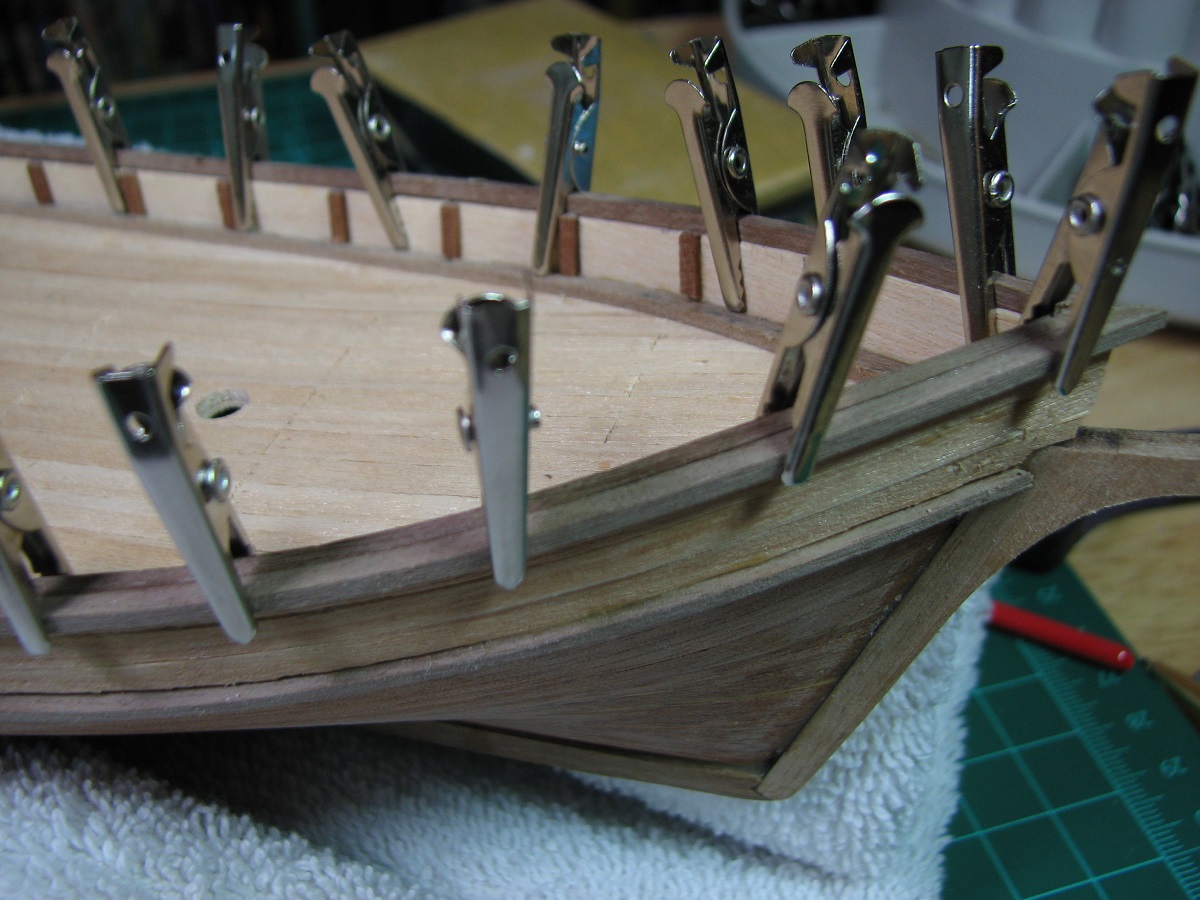
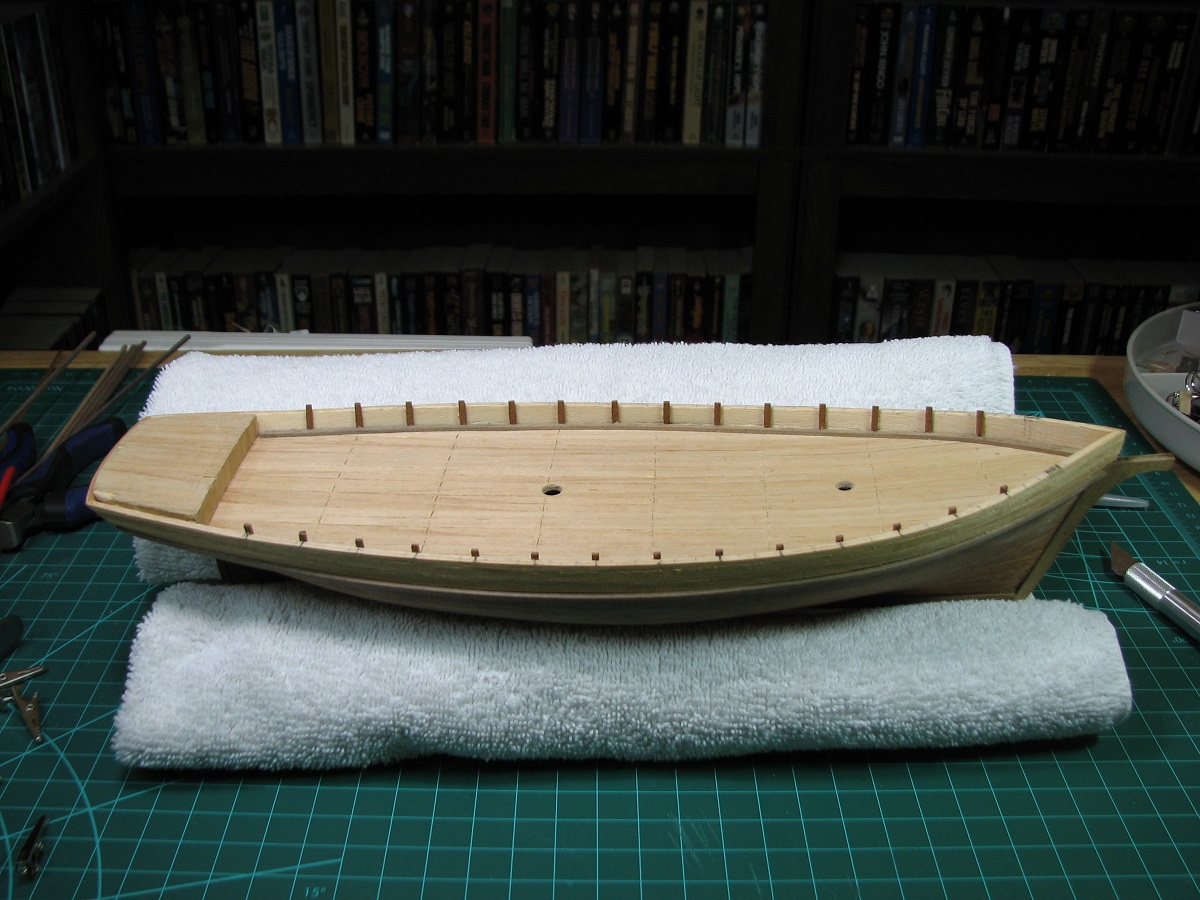
Onward to today's update. Started off by trimming the rough timbers on the bulwarks and sanding them even with the top of the bulwarks, then started working on the gallant rails. I've been having problems clamping stuff right at the tip of the bow, so I took a tip from someone else's build log (I think hipexec's Connie?) and decided to try to pin it.
I drilled a #71 hole in the bulwark and the gallant rail, cut the tip and head off of one of the brass planking nails, and cut it in half. Glued the tiny little pin into the gallant rail before placing it on the bulwark. Worked like a champ.

Used alligator clips mostly to hold the gallant rails in place while drying, but used some larger clamps back at the stern.
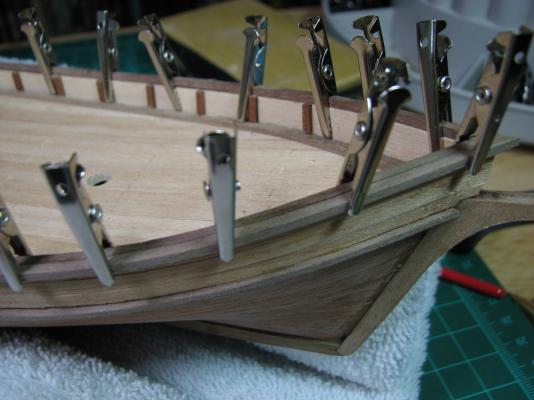
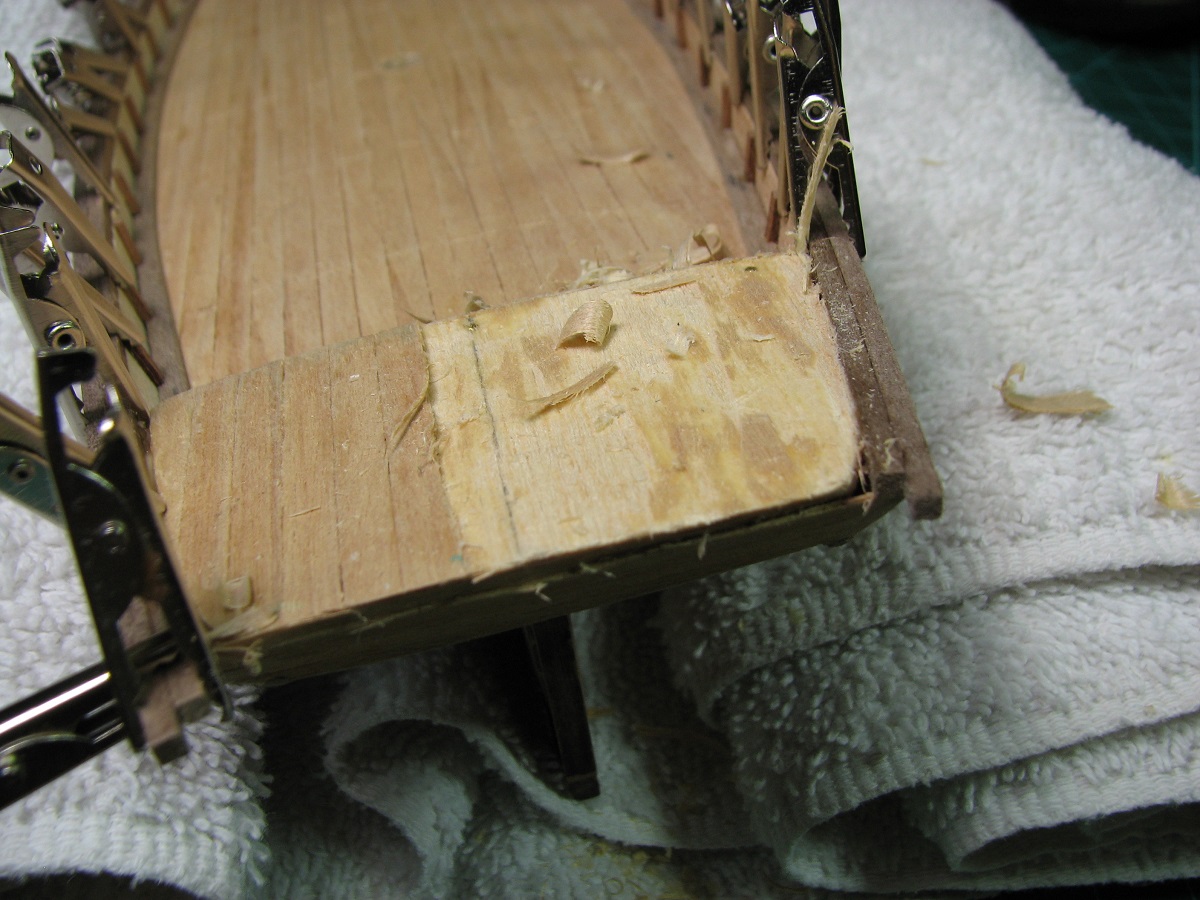
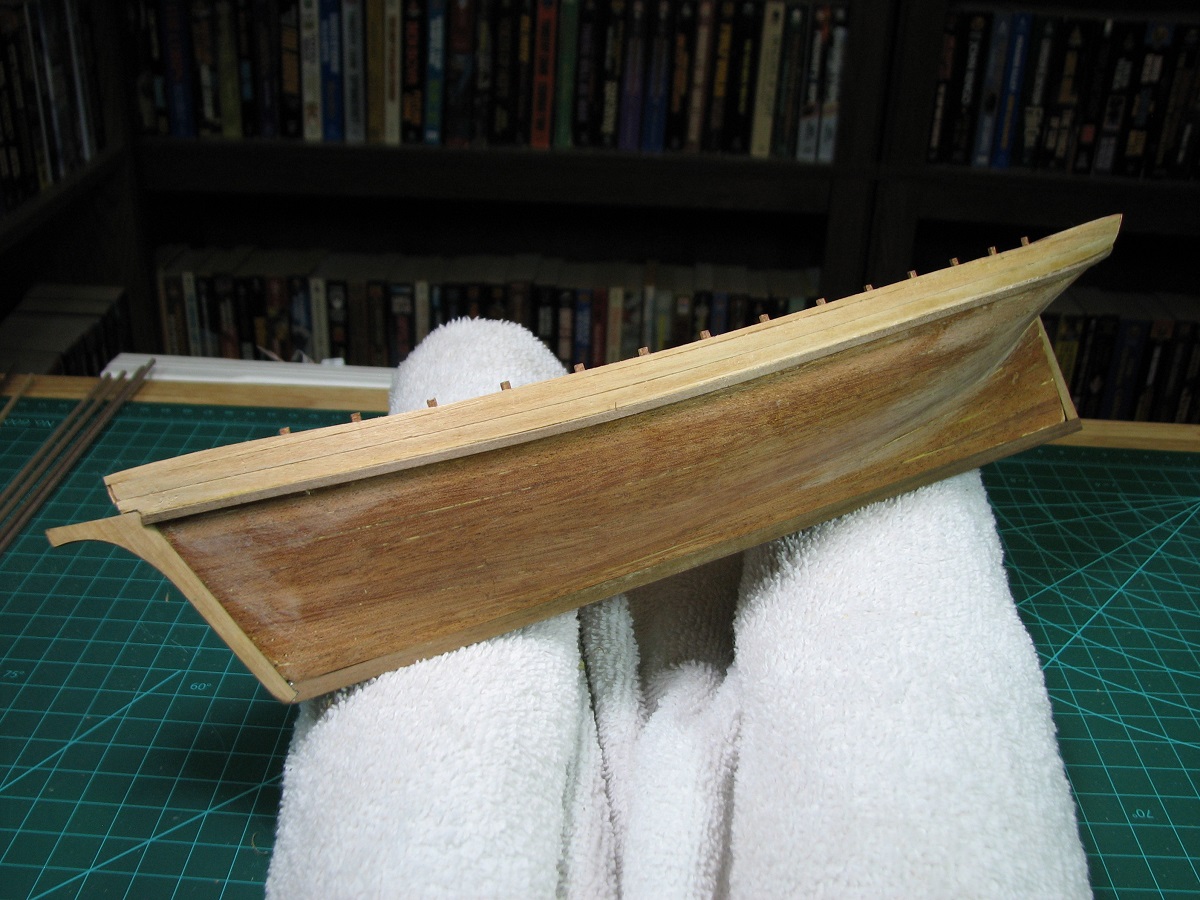
Before finishing the stern gallant rails, I decided I needed to do something about the poop deck damage. Also, as you can see from the pictures (sort of), my very early misplacement of the stern blocks (or the bad keel alignment) caused the deck to be out of alignment with the gallant rails. The port side is where it needs to be, with the gallant rail almost completely above the deck planking, but the starboard side is almost 2mm high, leaving the top of the gallant rail almost even with the deck.
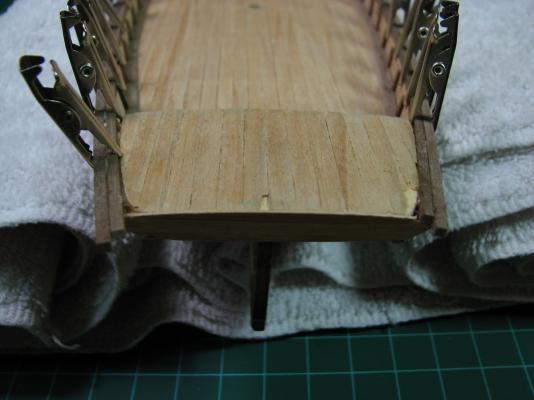
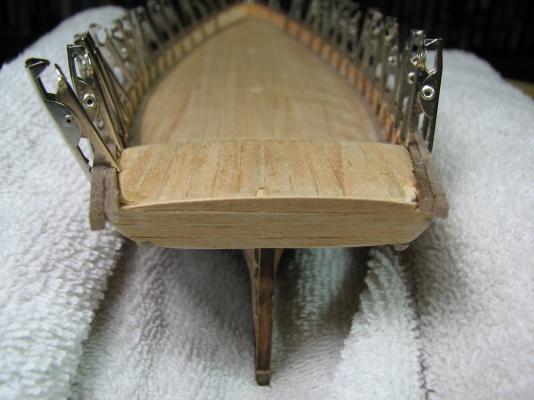
So, I decided to take my first foray into making a real repair to something I screwed up earlier. I used an X-acto chisel blade and removed the planking from 2/3 of the poop deck, and the top of the stern.
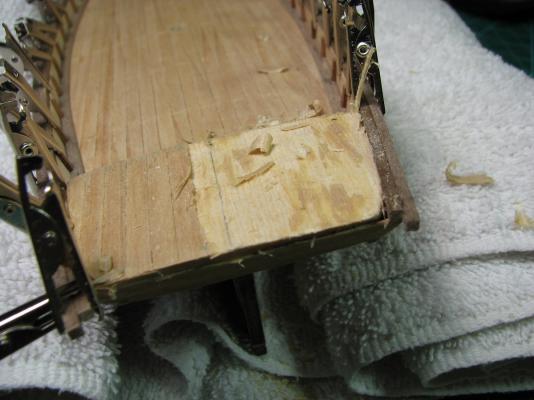
And then I carefully removed material from the false deck (and stern block, not sure if I got into it or not) until the port and starboard sides looked even to me.

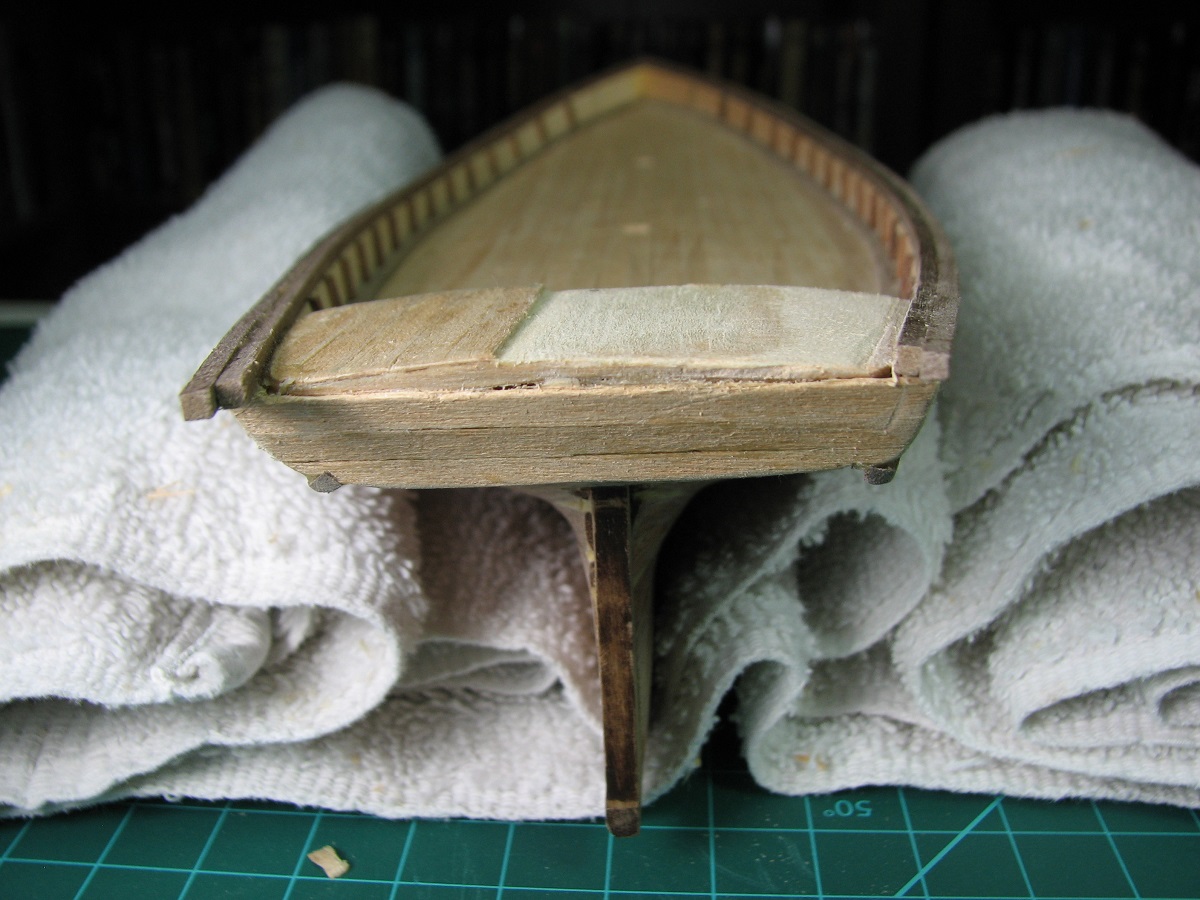
Crossing my fingers, I re-planked the poop deck and the stern.
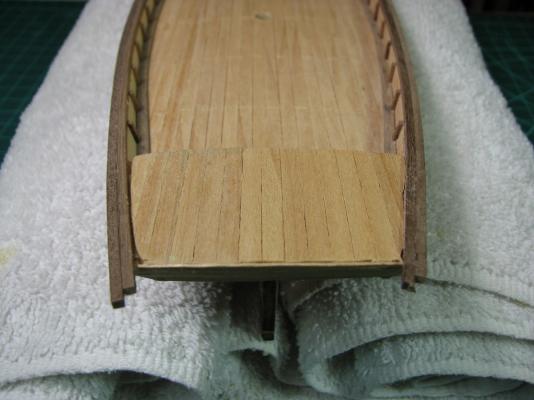
I'm more than happy with how that turned out, and the level, as you can see from the above picture, is almost exactly the same side to side now.
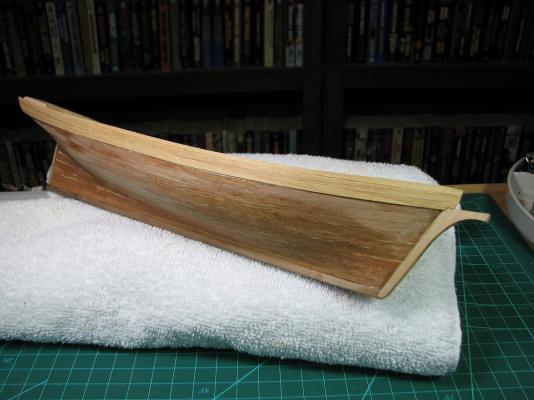
Added the stern gallant rail, trimmed the excess and sanded.


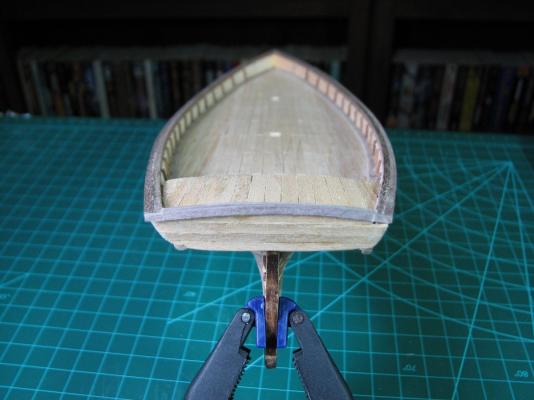
Pretty happy with my first 'real' rebuild of a messed up area (well, I guess I patched the hull once too), and the gallant rails came out quite well I think.
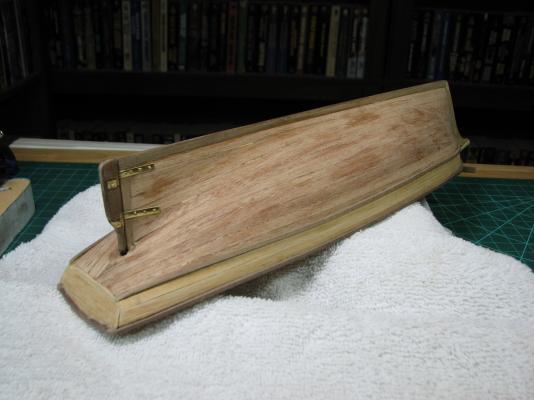
At this point the instructions say to add the rudder, the knightheads, and then varnish everything. I am going to have to decide now whether to attempt to do anything about the wood putty and go with varnish, or go with paint.
I also need to make a stand of some kind to hold the ship, or get one of those ship vices so I don't continue to damage things while I'm working on it with my dumb clumsy hands.
Do most people use regular varnish like the instructions say, or do they use something that is less smelly and cures faster?
- canoe21, themadchemist, WackoWolf and 1 other
-
4
-
That's some excellent workmanship Blackie, and many of the features of this model appear to be very similar to the Carmen that I am working on, so I'll be using your photo's for reference when I get stuck and need some inspiration. Thank you!
-
-
So this afternoon and evening have been pretty productive (what happened to the last 6 hours anyway? I seem to have forgotten dinner).
After I repaired the hole in the hull, the next thing on the agenda was planking the bulwarks and stern. I found a new use for alligator clamps!

Then on to the guard rails, where I found a new use for battery clamps (and lots of rubber bands).
Then I cut these little boards for the insides of the bulwarks. The instructions just call them 'rough timber', so I'm not really sure what the actual nautical terminology is for them. They'll be supporting the inside of the deck railing.
I had to remeasure the spacing for these little guys and remark them 4 times before I got the spacing where I was happy with it relative to the plans, and the spacing to the future location of the knightheads. Seems that 0.15 ~ 0.25 mm makes a fair bit of difference when it's multiplied by 14. Glad I bought that digital caliper!
During all the work on the hull, I often forgot to place something soft under the ship while I was working on it, and the result of that is some damage to the poop deck planking that I need to pull off and replace now.
The gap between the bulwark and the planking is caused by my very early mistake on the stern block placement and shaping, but it should be covered by the trim and railing later.

Still unsure on what to do with the hull, but I've read a bit today about using sawdust and white glue as filler to match the wood, so I'm considering using an X-acto knife to try to cut out the putty that shows up so well, and use that method to re-fill the hull and see how it looks and whether I can then get away with leaving it natural.
Tomorrow I'll trim the 'rough timber' and start forming the deck railing after work.
Oddball question about the forum etiquette. Is there a 'normal' number of pictures per post, and should I continue to use the forum attachment system, or host them off-site myself?
Thanks,
-
Thank you Michael,
The repair came out better than I expected, I'm not unhappy with it at all, given my complete lack of experience in woodworking. I think woodshop in the 8th grade was the last time I did anything beyond nailing unfinished planks together to make ramps type of wood working.
The repair is visible, but I imagine that once the model is finished and being displayed in an upright position, I'd be the only one to notice it even if I leave it natural instead of painting it.

Edit: It has actually been more than four days, as I started this on the evening of August 15th, I just didn't start the build log until later, as at the time I started I didn't know this site existed. Someone on another forum completely unrelated to the hobby gave me the link here.
Also, your Maria is awesome.
- canoe21 and themadchemist
-
2
-
Frank,
Knowing how difficult my bulwarks were to get put into place without planking (I did this last night), I can only imagine your pain trying to do it with them planked.
Best of luck, wish I had some useful suggestions, but other than what you are already doing, I've got nothing.
-
As a completely new person to this myself, I'm curious about why the planking was placed on the bulwarks prior to the bending/fitting step. I assume that is what the instructions say to do?
The ship I'm working on has the planking of the bulwarks done after attaching the bulwarks to the hull, which makes more sense to me due to the issues you are experiencing with the planks coming loose.
Looking good though, will follow along on this.
-
So I 'sunk' my boat last night. There was a spot on the hull where the putty looked bad and had a gap, so I decided I would try to redo that, and when I prodded it a bit, the entire piece of putty fell out, along with a bit of the wood plank. Turns out that plank was one that was sticking up too far at that point, and I had sanded it to almost nothing without realizing it. The wood was paper thin at that point.
So, I'm going to cut out that entire section of that plank to span bulkhead to bulkhead and replace it with a new piece of planking.
For the bulkheads, I ended up going with my #3 option, and it turned out much easier than expected. I was considering using a Dremel and sanding down the tops of the plank to the bottom of the deck, but I used a sharp X-acto knife, and working carefully and shaving just a razor thickness at a time, it was surprisingly easy to cut the planking down to the bottom of the deck in a fairly short period of time.
I mounted the bulwarks, then cut and mounted the keel, and they all came out quite nicely I think. Then of course, I punched a hole in the hull. Oops.
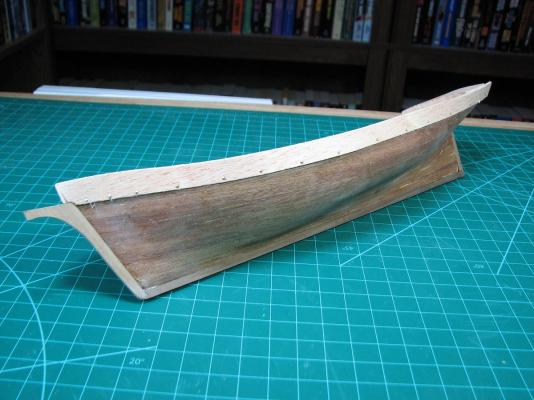
This is only partially filed back. I was initially thinking to just bevel the hole and make it fairly square and lay in a matching beveled patch, but now I think I'm going to extend it to the bulkheads on either side to completely replace that very thin plank in that area.
-
So, to bring this up to date.
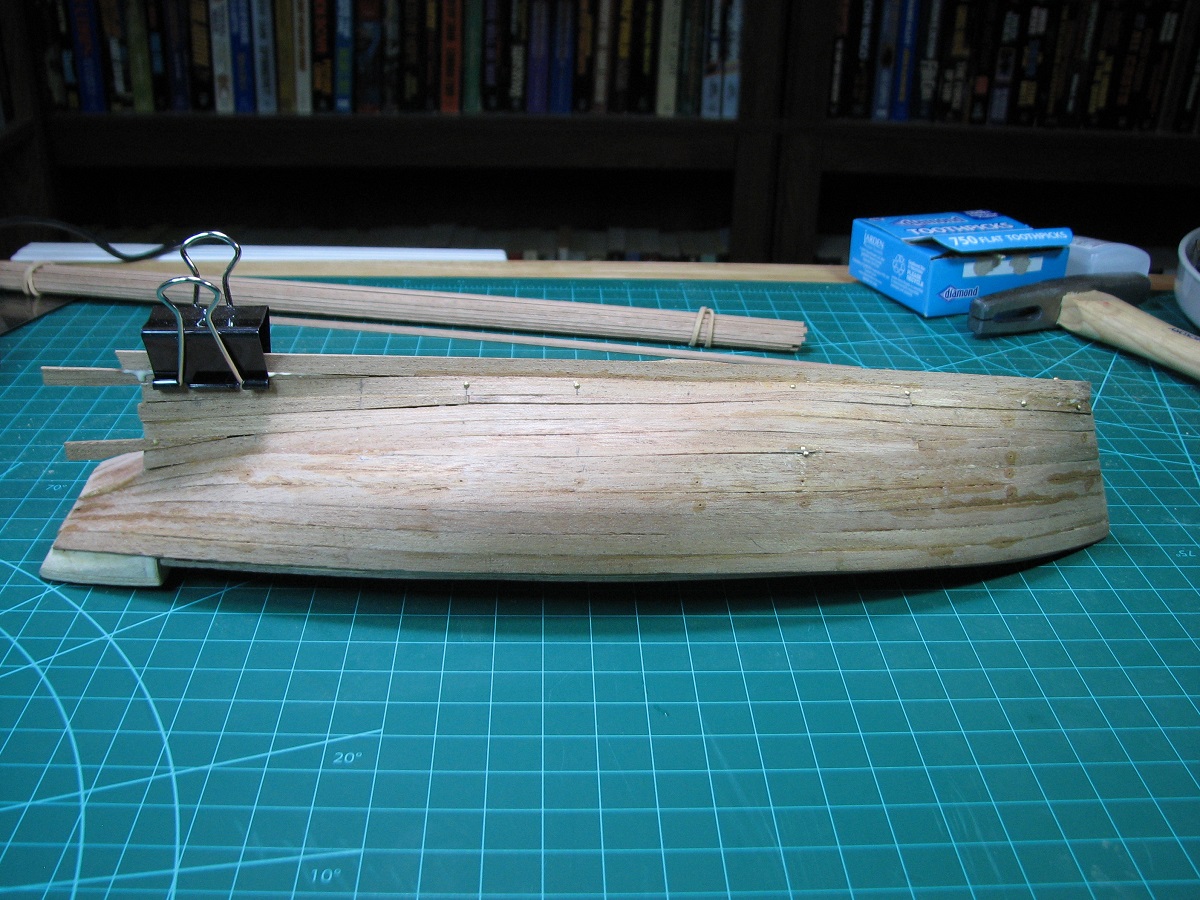
This was about the point where I realized that I should have been narrowing the planks at the stem starting with the second plank, due to how many more plank widths are needed in the middle of the hull vs. the stem and stern. Woops, not nearly enough space left to fix that. Another lesson learned.
I just 'faked' it as best I could, using inserts and stealers until I had it all closed up. Pretty ugly, but I certainly learned a lot of things not to do when planking. Hopefully other first time builders can learn from my mess.

I sanded it down, used some wood putty on the gaps I couldn't otherwise fix, and sanded again.

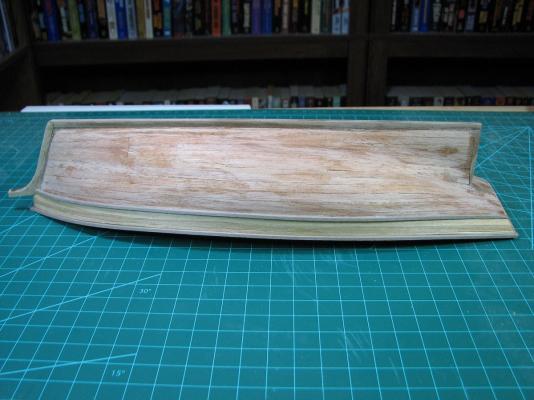
Figuring that there is no better time than the present to find out if it will work as natural wood, or will need to be painted, I went ahead and prepped it and varnished. Paint it is!

The wood putty I used shows up glaringly here as you can see. If it wasn't for that I think I'd go ahead and leave it natural, even with the planking blemishes, but I don't know of any way to make the putty issue go away other than sand it down and paint it.
From a hull/planking perspective, I wonder if a larger model wouldn't actually be easier. While it would be more time consuming, the larger number of planks, and their size relative to the hull size would make the bends less severe, and require less spiling on each plank to make everything work I would think.
The other solution of course would be to double plank it, but I think I'll just go with paint on this one, as the entire point of this project for me was to learn about the entire model ship building process, and to determine if it's something I want to take on as a long-term hobby. So far I'm certainly enjoying the process, and I think I'll just keep moving forward, blemishes and all and see where it takes me.
Tackling the poor alignment of the top plank vs. the deck line for the bulkheads is next.
- Bindy, themadchemist and coxswain
-
3
-
Thanks Ron.
I did search the site, and I don't find a single thread on the Carmen. Seems I picked an odd kit for my first experience. Not only no build logs, but I find out after the fact that a double plank on bulkhead is actually better for someone to start with instead of single plank on bulkhead, which is exactly the opposite of my assumption (made with no knowledge other than looking at boxes in a hobby store).
I've got all the planking done, and it's sort of ugly, but I think it may come out alright after a couple rounds of sanding and filling. I've already done a rough sanding and filling, will sand it down again today and see how things look. I may end up painting the hull instead of leaving it natural, depending on how things look. The lines of the hull itself look alright to me, but the planking is nothing like what I've seen in most of the logs here. I had to use too many odd stealers to make things come together due to my failure to properly measure and spile planks from the first one (I had to make up all the spiling adjustment in only half the planks).
-
As I'm nearing the completion of the planking, I need to consider the next problem.
When I began my first planking strip, I did not correctly interpret the pictures and instructions on how high up it should begin. The instructions say to leave the edge of the deck clear, but I only left a very narrow strip of the deck clear. The bulwark attaches to the deck edge, so I've unfortunately left myself with only a very narrow edge to attach the bulwark (actually mostly just the stringer).
As I see it, I basically have a few options:
1) Attach the bulwarks as-is, which will have the bulwarks attached somewhat precariously, and the bulwarks will be too high above the deck by about 2.5mm.
2) Attach the bulwarks without adjusting the planking, but trim the 2.5mm off of the bulwarks themselves, to leave it at the right height.
3) Trim the top of the plank down to the bottom edge of the deck, and mount the bulwarks properly.
I'd like to go with #3, but I'm not sure of the best approach to trimming the planking that is glued to the edge of the deck.
Would appreciate any suggestions that would be easier/faster than filing it down by hand which would be quite time consuming.
Thanks!
-
So, it's obviously far too late to use a different 'correct' procedure for planking on this model, but I'm curious about others opinions.
Specifically, all of the tutorials I've found on this site talk about lining out the hull and spiling planks, which requires cutting individual planks (or sections) out of wider material than the actual plank width.
Is there a planking system that works well that uses the kits supplied planks rather than doing it this way? I have had some success getting the lateral bends on the supplied planks by cutting part way through the planks with a very narrow saw, allowing them to flex more, but I haven't found any reference material yet on a decent way to plank using the provided wood.
Thanks for any feedback on this one, which could be quite useful for my next project down the road.
- Brian
-
Finished up the port side by setting the last stealer on this side of the hull. Bottom half of the other side still to go.
I screwed up how the planks were laid, so ended up having to do a lot of little filler planks in the middle, when that should have been happening at the ends, so it's a little rough, but I think most of it will fill and sand well and look ok when it's done.It's embarrassingly ugly compared to a lot of the 'first builds' posted here, but I'm not too disappointed with it, as I've never done any woodworking before, and I'm definitely learning a lot of lessons as I go.

That compound curve in the middle of this hull was quite a challenge for me, some of the bigger ships in the logs actually look like they have a lot simpler curvature, just a lot more of it.
- themadchemist, canoe21 and gonzz0
-
3
-
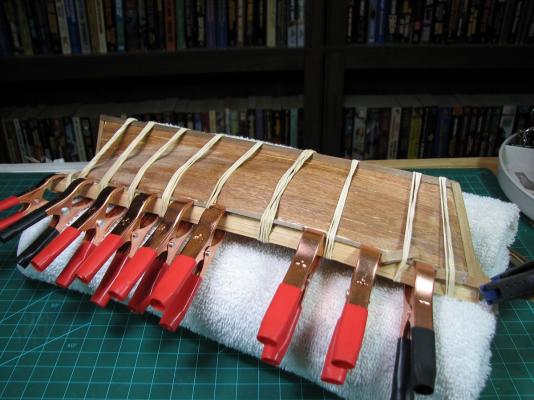
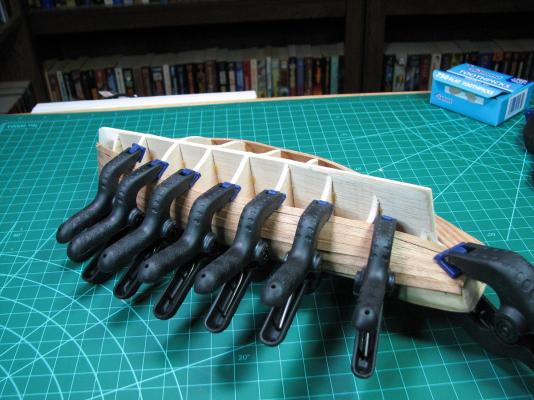
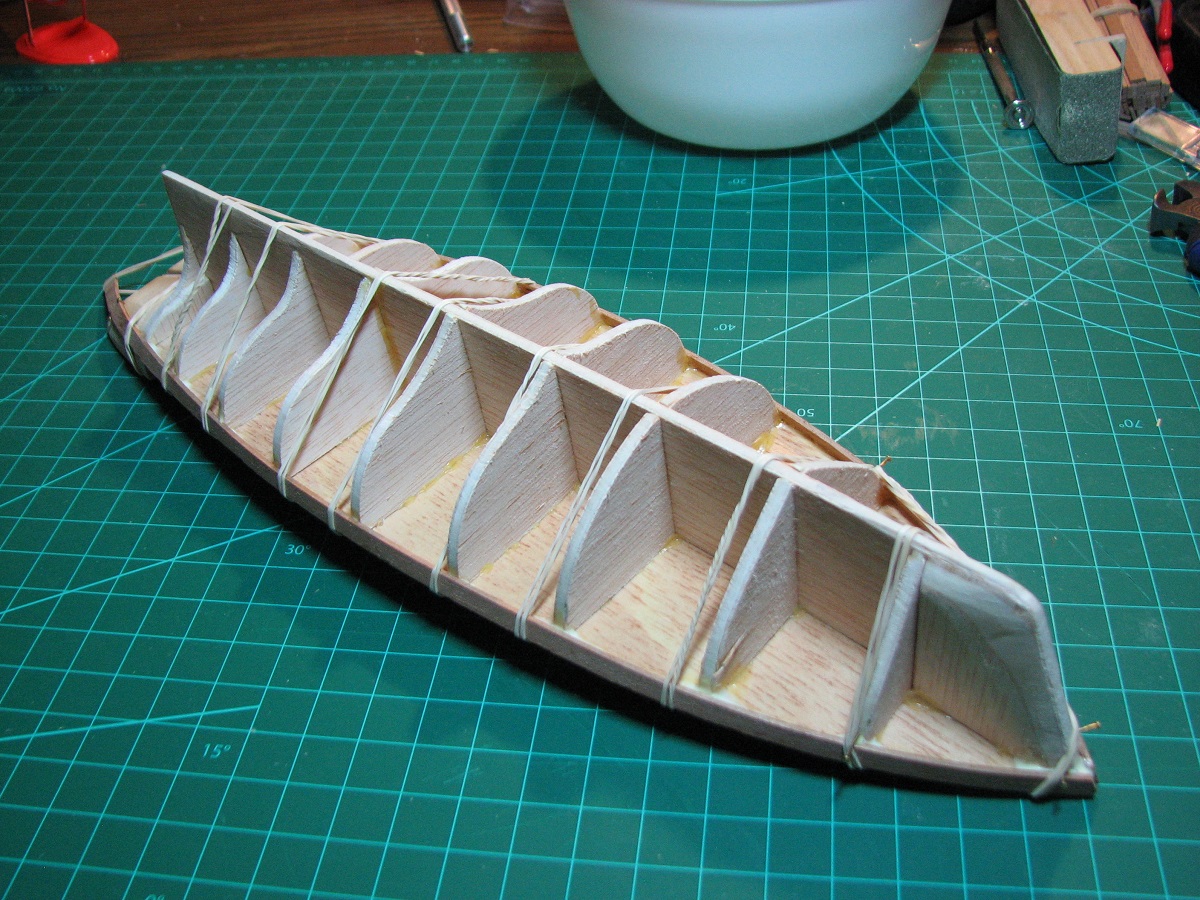
Sunday morning, I removed the clamps, and was amazed by how well the stringers kept their shape.

When I removed the final clamps, I discovered that the stringers were actually stuck to the deck, and had to pry them off with a small screwdriver. After they were unstuck, they did spring out a bit and not stay exactly shaped to the deck, but they were very close, and quite easy to hold in place with very little force, so I added glue, and clamped everything to dry.

After the stringers, the next item in the instructions is hull planking.
The forming method I've been using has been a combination of wetting and then holding over a soldering iron to dry while holding a bend, and sometimes clamping to the bulkheads and repeatedly wetting over time.
The first plank on either side went in quite well, but I managed to mess up the alignment against the deck on one-side. I'll have to make a small insert when I'm done to meet up with the bulwarks where I did this. The first plank I was able to do just fine using nothing but a bunch of rubber bands to hold them in place against the bulkheads to dry.
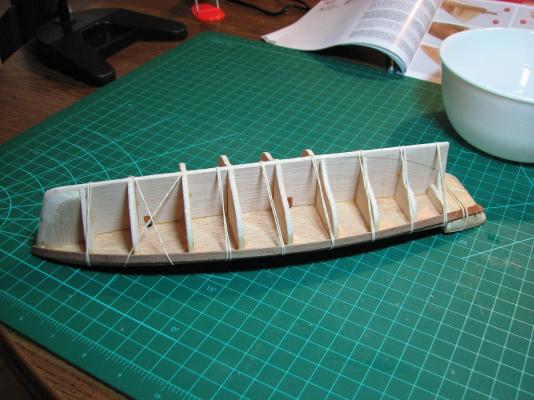

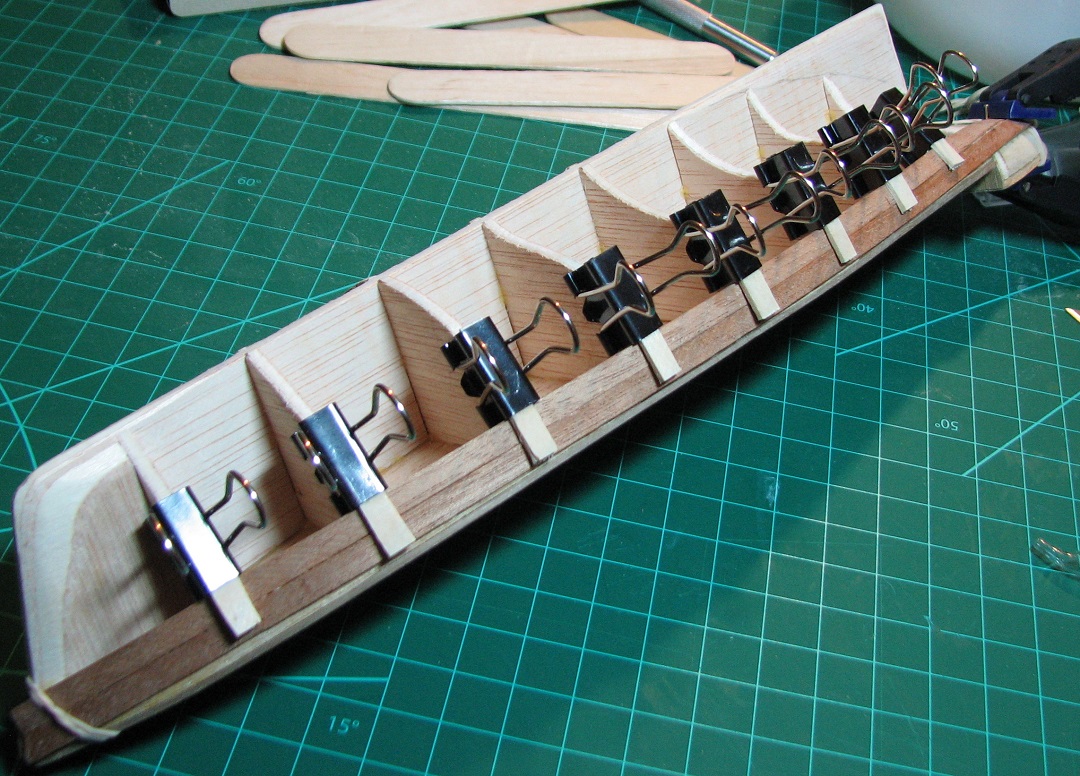
For the second plank on each side, I took a bunch of binder clips, and glued a small piece of craft stick cut to size with super glue, and made myself a set of ghetto 'plank clamps'. They worked pretty well for about 3 planks, until I started to run out of room on the bulkheads for the clips to grab onto.

I got four planks on each side by Wednesday, but with a meeting on Thursday night, and going out on Friday night, no progress was made on those days.
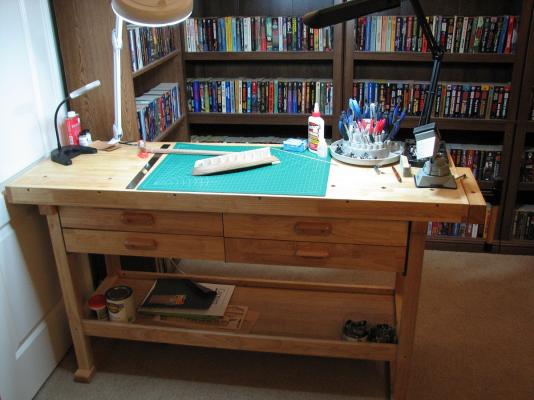
On Friday, my new work bench was delivered (up to this point I'd been occupying the kitchen table), so I stayed up late Friday night assembling it, and then moving everything to the new bench in my library/office (probably not the best choice of rooms, and eventually I'll clean out another room to turn into a work room).
Yesterday I continued to work on planking, but now that there isn't much room on the bulkheads for my little binder clips, I'm using all sorts of different clamps depending on what I can make work.
Today I've been continuing to work on planking, but now I'm starting to insert extra planks in the middle, and stealers at the stern.
And that brings the project up to current as of this morning.
- kiwiron, themadchemist, coxswain and 1 other
-
4
-
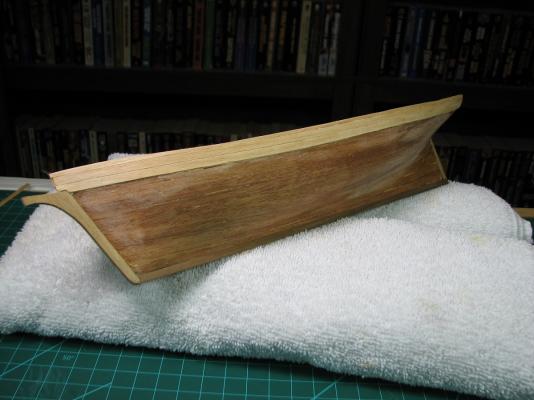
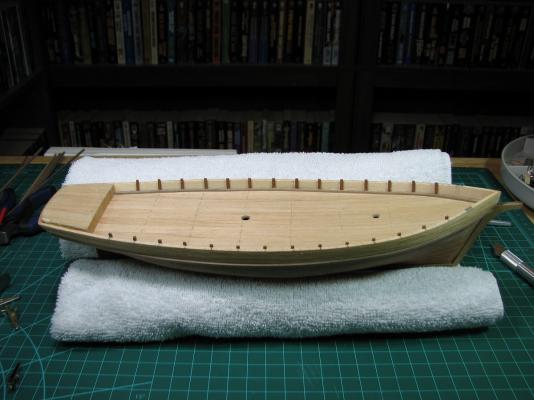
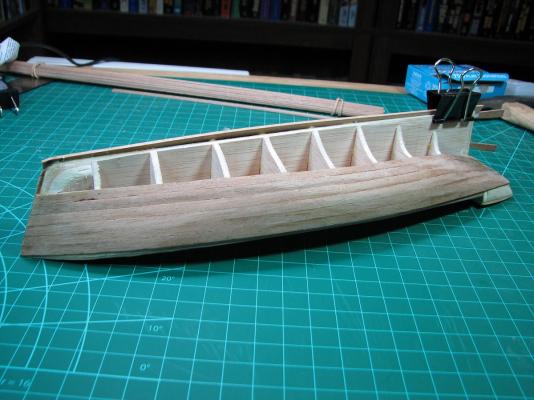
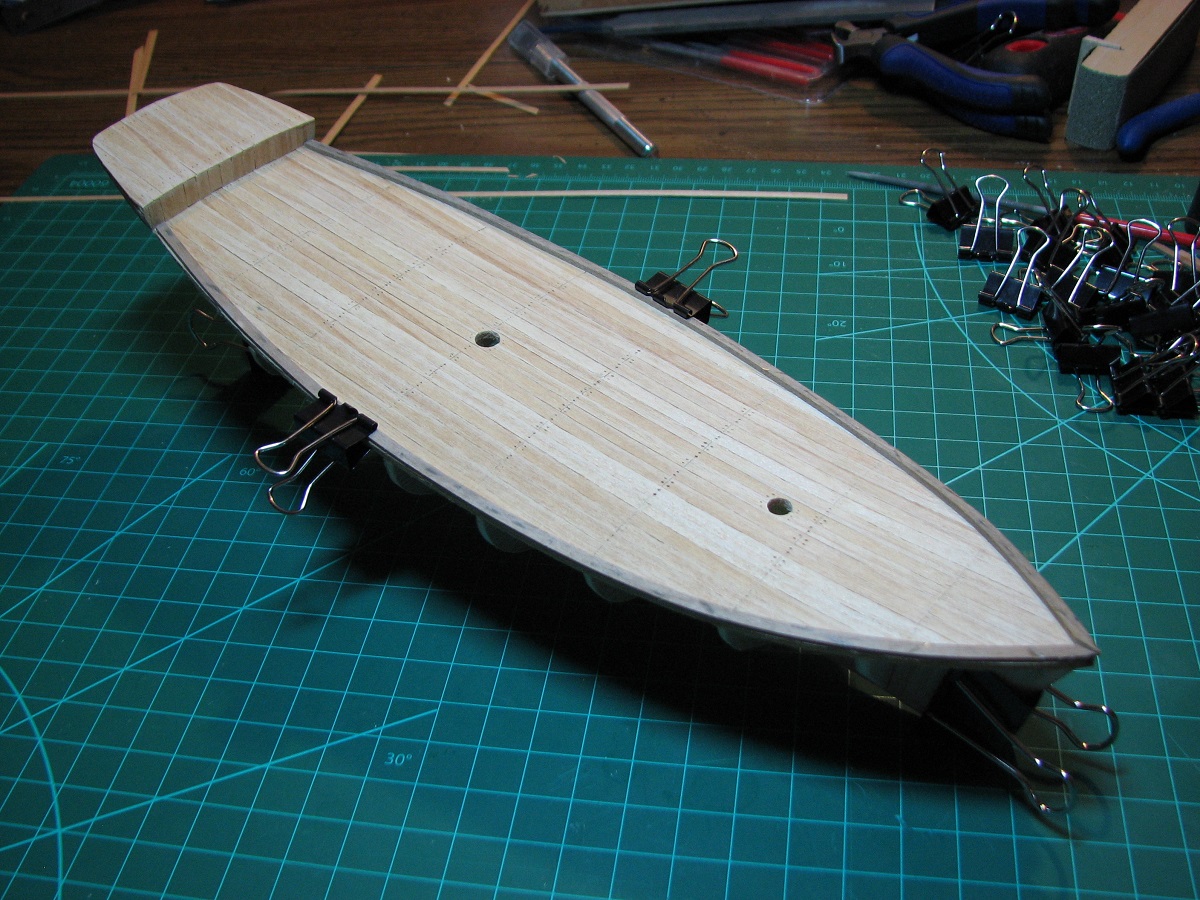
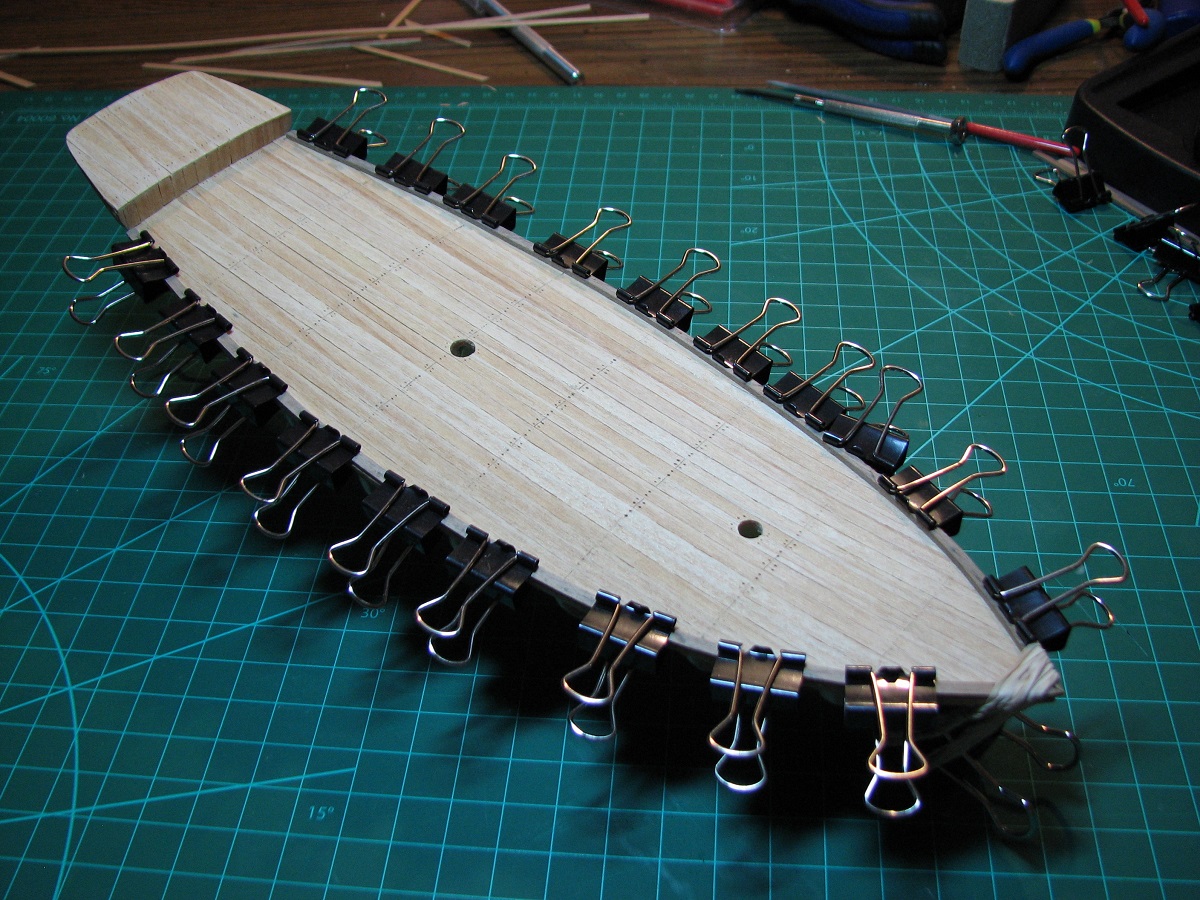
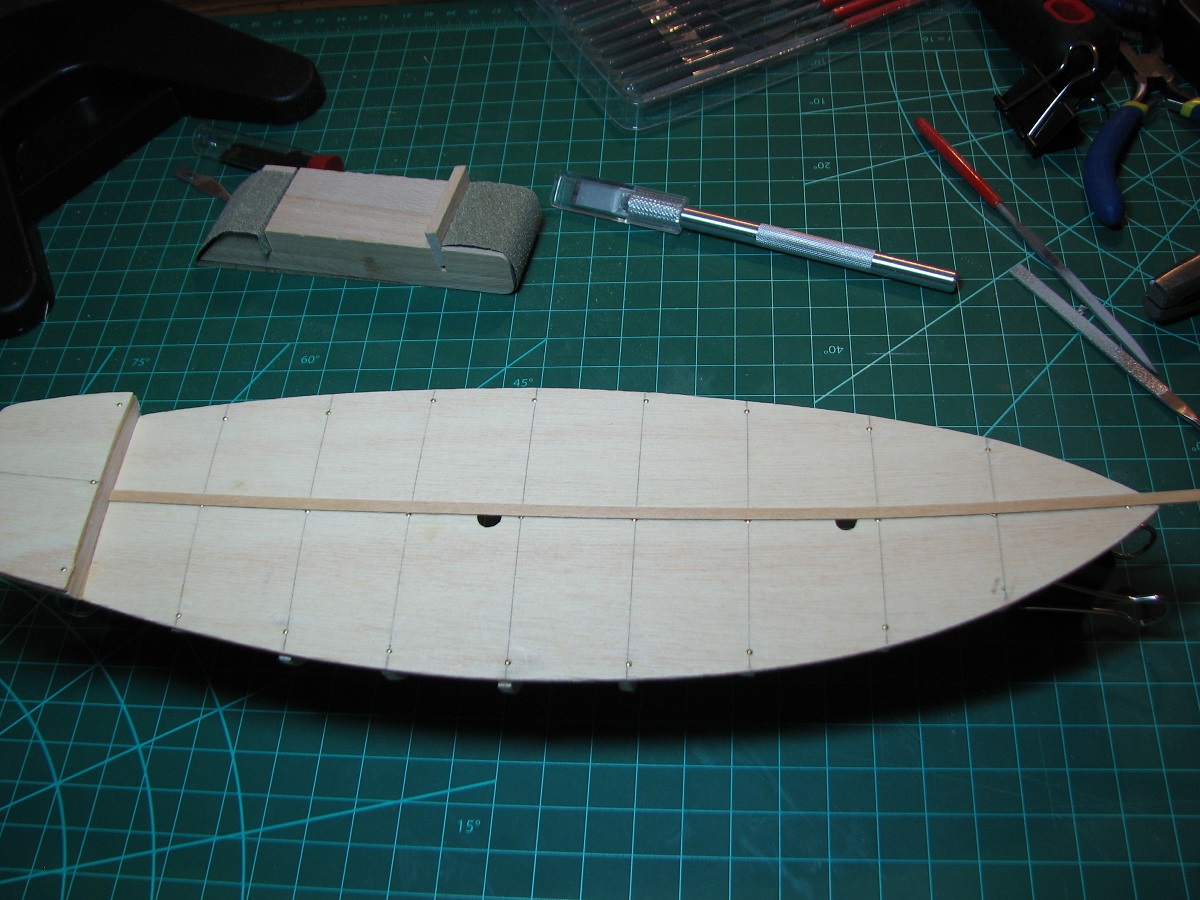
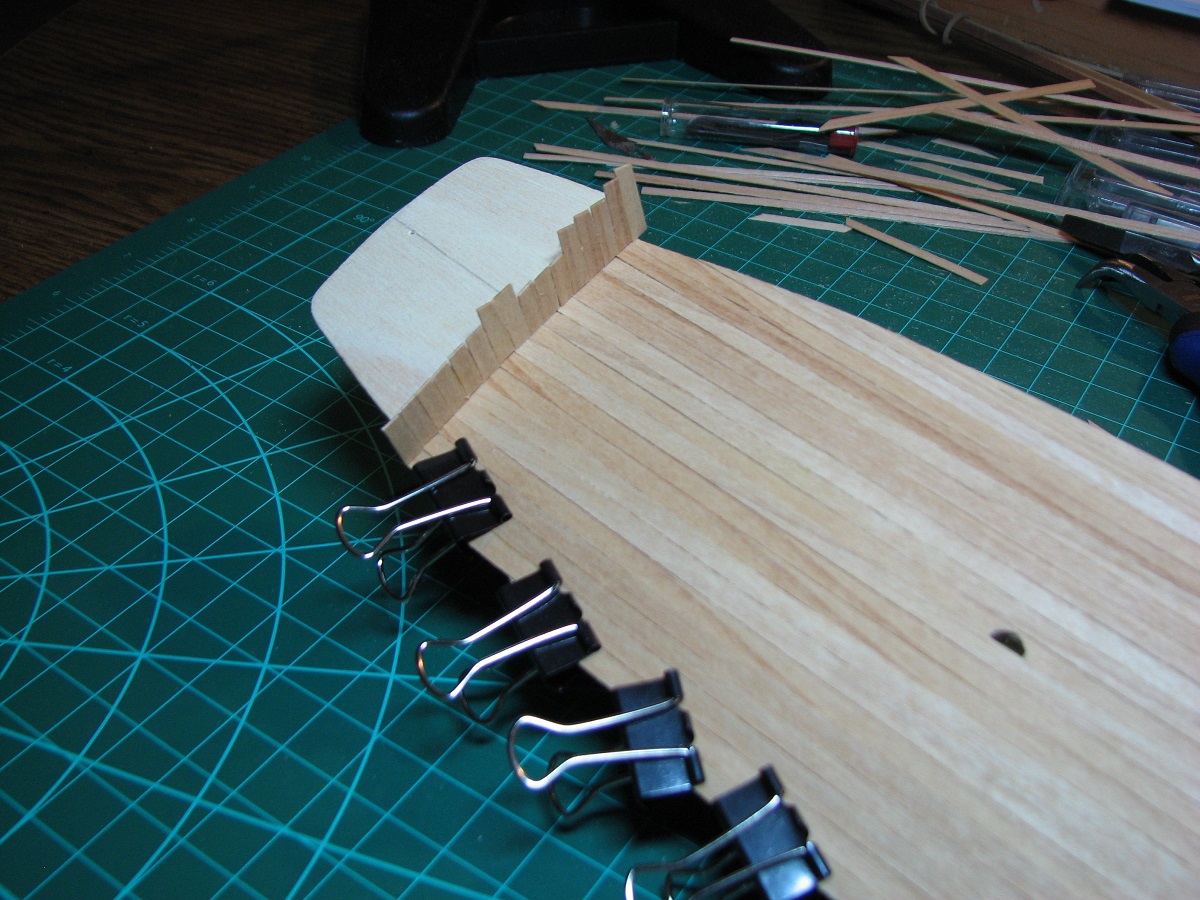
Once I had the basic shaping of the stem and stern complete, I began to work on the deck planking. In this area the combination of it being fairly simple, along with some very good pictures, meant that I really had no difficulty with the plans / instructions.
I began by laying down a single plank along the measured center-line of the main deck.

Then added planks until I had the entire port side planked. I clamped the edges to dry with the every handy binder clips from Staples that are 4 bucks for 80.
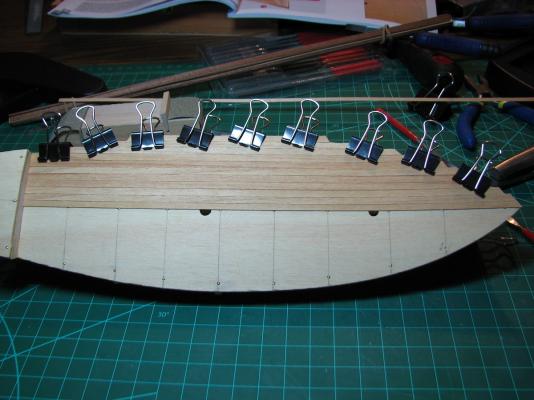
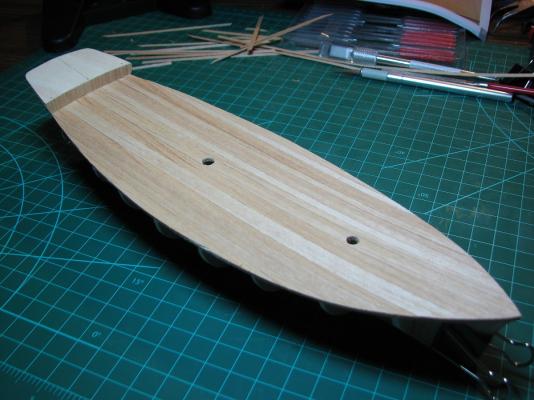
After it was dry I removed the clamps and trimmed. I then cut away the planking for the holes for the masts.
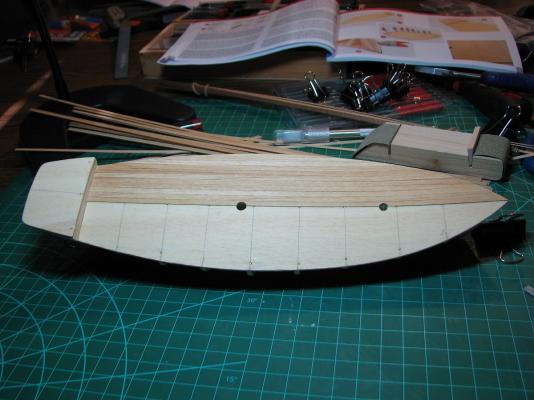
Next step was just to repeat the process for the starboard side.

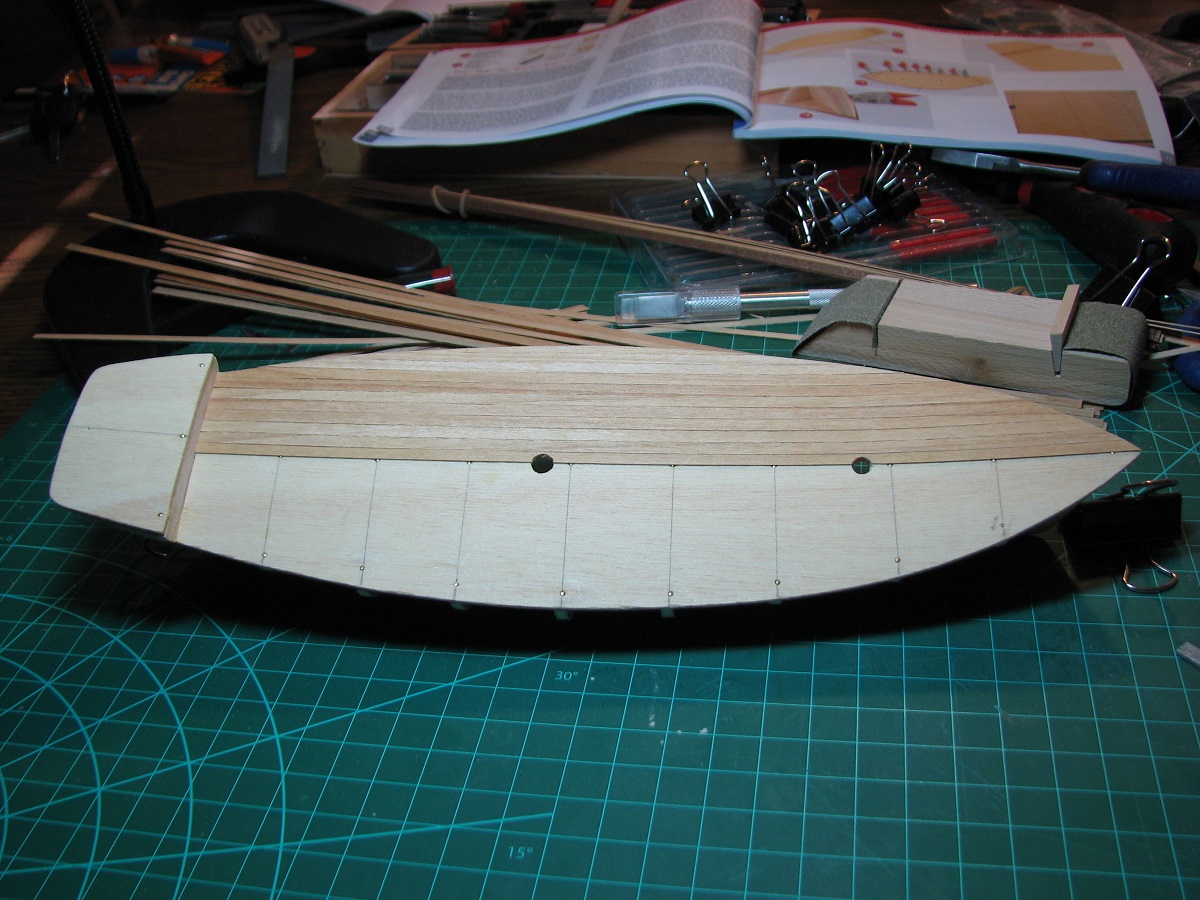
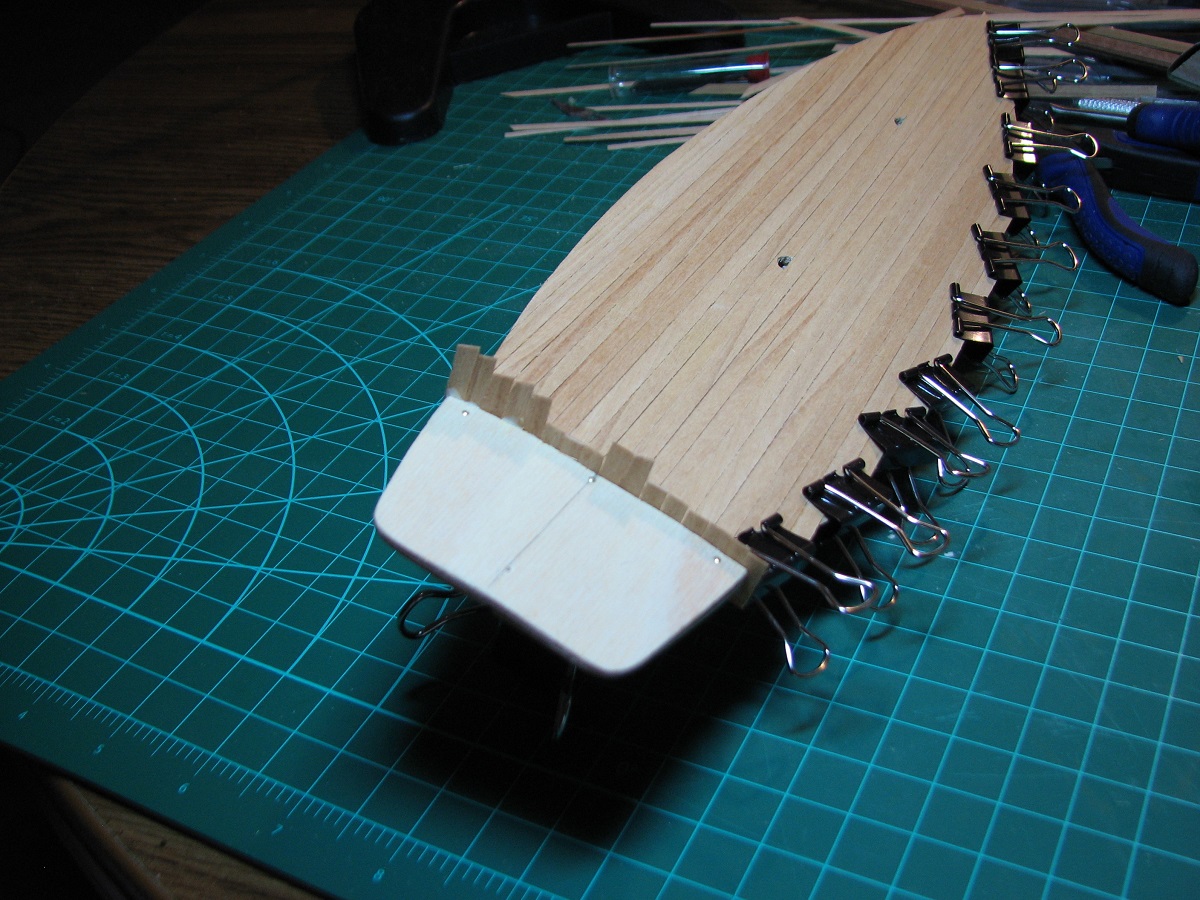
I then used some scraps to plank the 'step' from the main deck to the poop deck. The instructions say nothing at all about how this should be done, so I just looked at the pictures, and used up a bunch of the scrap from the main deck planking.


Seemed to work out just fine, but I did manage to get the vertical planks out of alignment with the main deck planks and had to trim some pieces on the port side to try to get them back into alignment. Again, visually I'll probably be the only one to notice this when it's done.
Trimmed the deck and step, and cleared the mast holes.
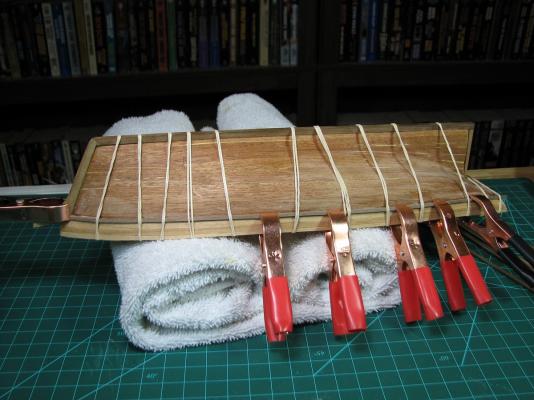
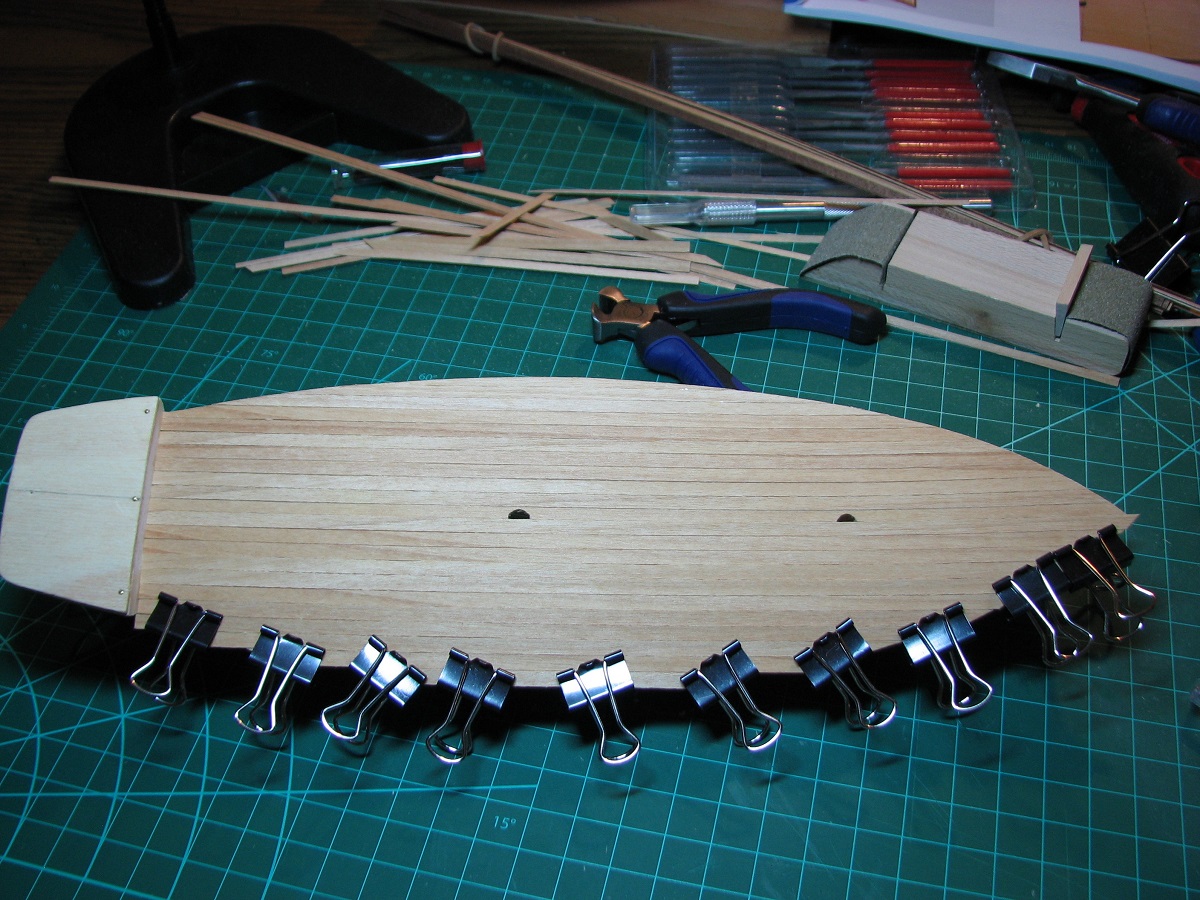
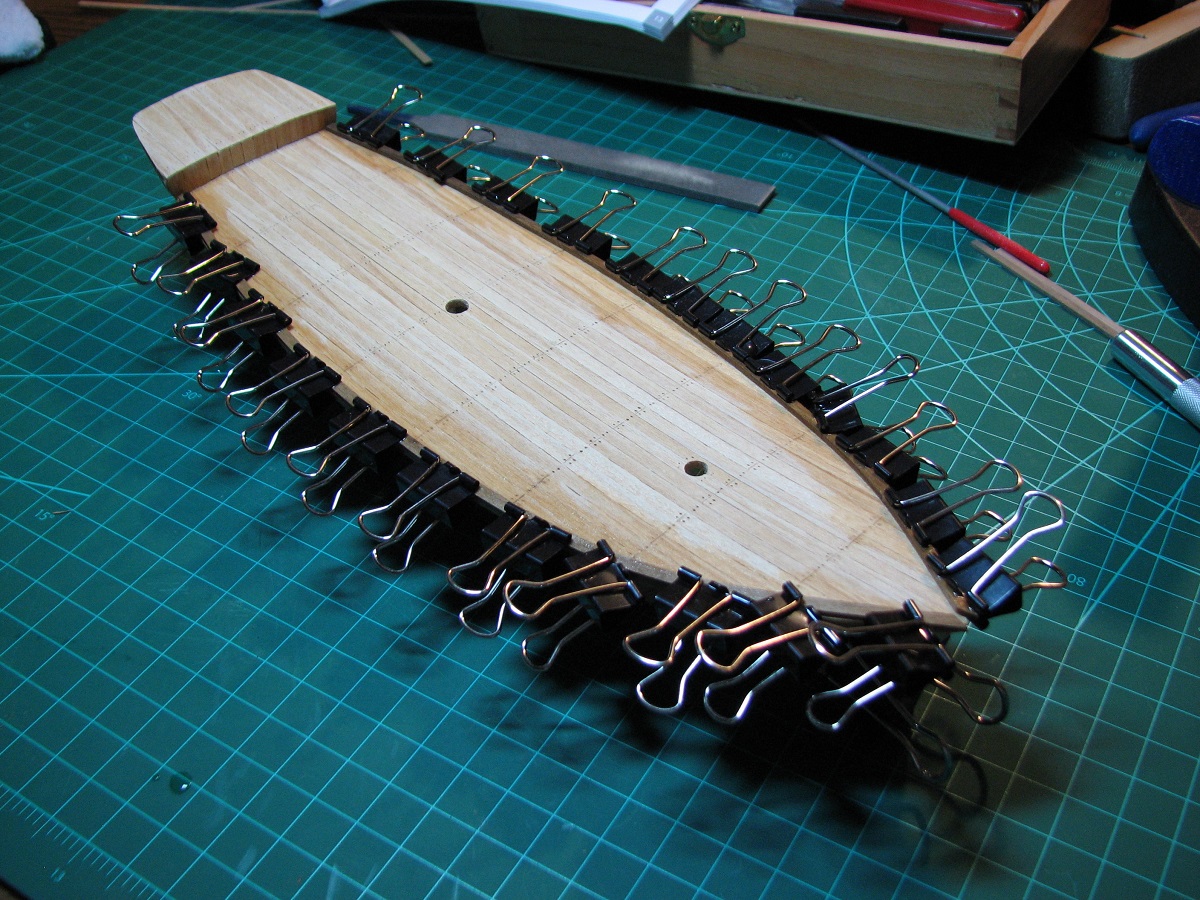
Repeated the main deck planking process for the poop deck and trimmed them, then used the method in the instructions to add the deck planking pattern via scribing the plank ends, and using a very small punch to make nail holes.
In this step my complete inability to do free-hand work well shows, as the nail holes are pretty random and misaligned compared to most of the pictures I see here.

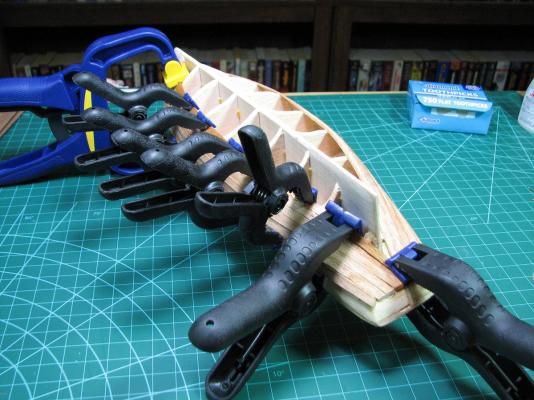
Next up was the stringers. My first experience with needing to bend wood in the kit. The stringers were quite a challenge fore me, as the wood used is very hard, and has to be bent against the wide section of the plank. I ended up soaking it for a long time, and then using all the worlds binder clips to hold it to the edge of the deck to shape it.

I was struggling with how to hold the ends in shape at the stem, when I found that a pair of flat bladed pliers would hold them well, but I really didn't want to spend the night holding pliers. I cheated and let a bunch of rubber bands take my place on the pliers, and it worked quite well!
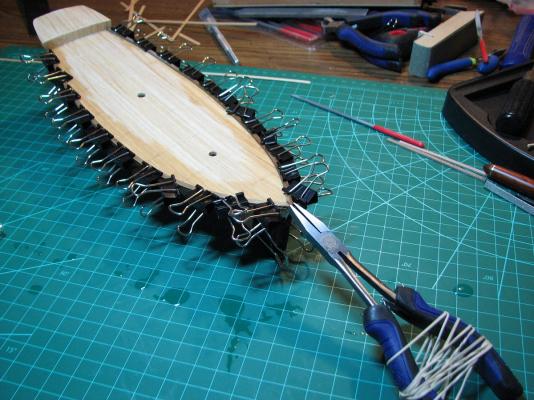
I used an eye-dropper to add water every 10 minutes or so for a few hours, and then went to bed to allow it to dry, and hopefully retain the shape.
Next up. Sunday!
- themadchemist, gonzz0, coxswain and 2 others
-
5


Puritan by johncole - Mamoli - 1/50 scale - 1885 America's Cup
in - Kit build logs for subjects built from 1851 - 1900
Posted
I really like that cradle you built. Looks like it provides great support.