


Thistle17
-
Posts
1,054 -
Joined
-
Last visited
Content Type
Profiles
Forums
Gallery
Events
Everything posted by Thistle17
-
 It is one and the same. I did not use the duct foil as it was a bit too thick in gauge. Be careful with the Bare Metal Foil it rips easily.
 -
Rob I just realized where you live. I used to live in Portsmouth RI and worked at Raytheon. At that time (Vietnam era) it was called Submarine Signal Division. I worked in electronics design of surface to sub surface sonar systems. At that time the destroyer fleet was stationed there and I got on base to play ball and dine at the officers club. I also worked on the sono-bouy program at General Dynamics in Rochester NY. Now that was long ago and far away but recently we visited Bristol. Love that town! I still chuckle about the time there, as we lived in a small apartment complex with 3 Navy families; an Annapolis grad, an enlisted "swabby" and a Great Lakes grad. It was a hoot. Joe
- 45 replies
-
- 3
-

-
- model shipways
- willie l bennett
- (and 1 more)
-
My grandson and I fastened the rub strips to the sides just this week. Again we used metal foil over styrene 1/2 round of appropriate scale. We used CA (20 second) glue to fasten to the sides sparingly. It took both of us to do it. The CA was applied to sections and then held in place. The results were quite satisfying.
-
I am following your posts with interest as you are breaking ground for my build of this model. In carving I find the following: a very sharp chisel, don't be afraid to saw some of the overhang off, if that is balsa or even bass I would use a sharp gouge to remove some of the excess and pare with a chisel as you approach the correct contours. Also when excavating remove the material starting at the bow and work aft. i hope these suggestions don't insult your intelligence. They are just basic methods for any carving. I really like your work.
- 45 replies
-
- 5
-
-
- model shipways
- willie l bennett
- (and 1 more)
-
I did not stain anything, rather just applied the top clear coat and let the mahogany do its thing. The strips are pretty uniform in color so the sides and deck came out quite well. If you want the deck planks lighter you may have to use different stock. I'd suggest you experiment, off model, with some different stains and stock. You may also try some of the Trans Tint dyes (using alcohol instead of water) to color the material. Don't use basswood.
-
Paul I used filler as I related earlier on the PVC substrate. The Evercoat 2 part filler and I backed up some joints on the inside of the hull with CA'd wood fillers. As for the planking when it was laid dow, whether it sprang loose or laid down correctly I did have to use filler. I used the colored filler you can buy at Home Depot (Elmer's or others) that comes in the squeeze tubes. It has a paste like consistency and will rub into the joints well. I used cherry colored filler. However I caution; it colors the surrounding planks if it gets away from you, and you will see the smear after clear coating the hull. I had to sand down the clear coat and then the planks to get it to blend. I'd suggest masking off the area you apply fill to.
-
Paul don't be discouraged by this stage of the results. I too felt as you do right now. This kit needs an upgrade in terms of manufacturing. You will begin to see a "different boat as you apply the planking so take heart. As for the planking take some extra care as you adhere the planks near the bow. I had a couple lift an edge as there is no good way to clamp them as you lay them down. I had to use low viscosity CA and hand pressure to "flatten" them down. A messy process and the seams soaked the CA. Lots of sanding to get past that.
-
I really like the sandable ease of EverCoat Rage. It is a 2 part filler and adheres to the PVC (roughen the PVC up though). It is used in auto body repair.
-
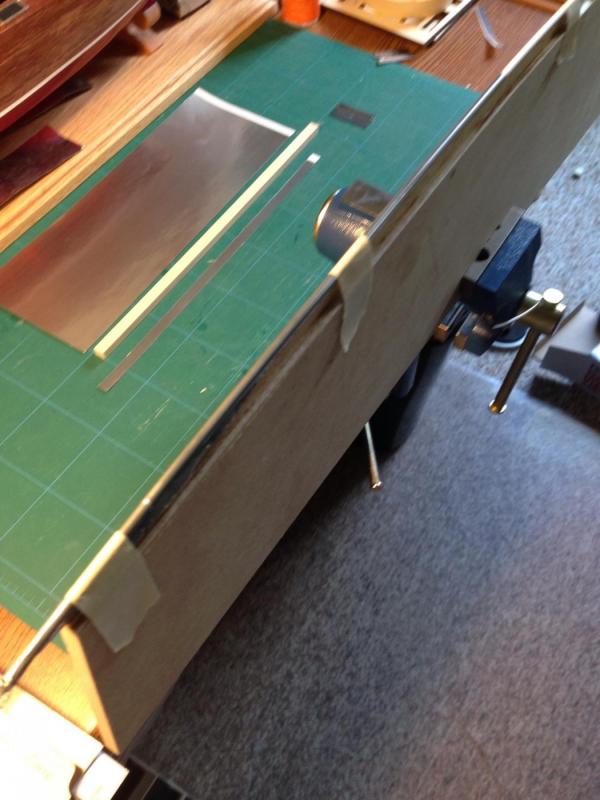
Paul here is the method I am using to metal foil the rub strip. In the vise is a 1/4" MDF scrap cut to the contour of the deck curve using the negative space material in the kit. If you look closely I created a 3/8" deep rabbet to reduce the contour (of the MDF) to match the width of the 1/2 round styrene I am using for the rub rail substrate.The substrate is temporarily taped to the form. In the background you will see an approximately 3/8 inch strip of the metal foil cut from the sheet. It is fairly easy to lay down centered and burnished smooth on the substarte. The next piece will slightly overlay the former strip and so on. Obviously it needs trimming but that can be done with a very sharp razor blade. Hope this helps..
-
If the chine run is fair and true I would keep going as you show and then bring the side panels down (up as in the picture) as far as they will go. Hopefully you will have an edge (of the side panels) proud of the underside panels and then you can sand flush with bottom. If there is not enough side panel depth to do so just fill with your glass compound and fair in. If you believe the bottom PVC panels are the true run then I would carefully sand the chine to conform and keep going as stated above. My guess is this is the more correct reference (i.e.the PVC panels).
-
Well here is a saga that ended well. The owner of the ship model kits previously referred to called and offered his kits up to the Military History Society of Rochester NY. In turn he will receive a write off for his taxes and we the Model Shipwright Guild of Western NY will work to find the kits a good home and hopefully raise funds for the museum in so doing. This was a win.win for all. It just shows this "band of brothers" that exists in the model ship building world.Indeed a great ending.
-
I am not exactly sure what you mean, but if I perceive what you are asking I will answer this way. You must sand the sides flush with the bottom. The planking will reach all the way to the chine and the bottom, as stated, in the Dumas directions does not get (or need planking). The same sanding advice goes for the deck and sides intersection. Pay attention to the bow as well for a nice smooth intersect and that it is as true in sweep as possible. One last thing the PVC clad as it nears the bow at the chine was not a smooth transition because of the twist it has to make. it required some fill (not much). Don't forget to rough up the clad material before CA ing the planking.
-
Paul, you will find some places where the fit isn't exact. Whether down the seam, amid ship, or at the chine or bow. What we had to do was ensure as good a fit as possible. Gluing in "fillers inside if we had an unreasonable gap and filling all seams that were not quite right with EverCoat 2 part compound (use the blue hardener) . It adheres great and sands well. It's par for the course with this kit. There is no way that all of the parts fit like we all wish they would.Its the nature of the kit. I have built all types of models and I found this one to be a challenge due to parts, multi media material, using the wrong CA glue (low viscosity version was overused), used auto body resin for the uppers top coat (had to be sanded off #!?$!!!!). Well you get the idea. And, oh yeah, i didn't look like a "cool" grandpa with my grandson at times.
-
Think of it this way. You are going to lay down a layer of PVC clad and the definition of the "lines" of the hull will be defined by the fit. So with careful sanding you need to get a good solid intersect of the sides and the bottom. I wish they would modernize this kit and laser etch the parts. This would help and avoid the problems I am sure many of us have run into.
-
Paul unfortunately I tossed the label wrapper for the servo but I do know it is a Traxxas water proof micro servo. https://www.amazon.com/Traxxas-2080-Micro-Waterproof-Servo/dp/B002BE8672 isa link for a similar unit on Amazon. i do not recall it coming with a bell crank so check your accessories before you order anything.
-
Paul it is pretty tight under the rear seat compartment. I had to drastically hollow out a channel on the underside of the seat cushion so that the bell crank attachment to the servo would move freely. The bell crank arm is almost vertical and this was to get the rudder to move fully left and right. This was with the micro servo so I am guessing that the larger size is going to give you trouble.
-
Paul I built this boat with my grandson over last fall and this winter. We are presently at a stage where we need to coat the upper body with a clear coat. It will be a pretty model for him and should be fun to use. Anyway I don't want to dismay you, rather I think alert you that the kit I bought for him had die cut bulk heads which were not very well made nor accurate. Use a batten to true them up. Secondly they were a bit on the thin side so we added 'beef" to some to get a good landing surface for the PVC substrate. The next problem I have never understood was that the PVC substrate elements did not conform well to the bulk head to yield a completely closed hull. The hull planking went fairly well without much fuss save the fact that some planks did not easily match up with the former applied plank. Some sanding and some fill was needed. I highly recommend that you outfit the engine compartment early on while you can get at things. Also the rudder compartment. You can remove the parts while building , but plan your mounts like battery, switches, ESC etc. One last thing we used the foil that came with the kit to cover the rub rails and cut-waters. It did not go well. I have seen one other method that applied the material after the rub rail was on the boat. For the life of me I cannot understand how he got it to lay well and trimmed. I gave up and have made an MDF contoured board to which I am pinning 1/2 round styrene to and coating it with the foil. BTW since I screwed up the original foil I purchased anew at the hobby shop. It was of thinner gauge and ripped easily. So I ended up using aluminum heating duct tape. It is more sturdy. Again a fun kit to build especially with my grandson. Good luck. Hope this helps..
-
John your point is well taken. We will proceed with caution even if he decides to donate the kits. I wrote the owner of the kits a letter and rationale for our proposal based on perspectives provided here, feedback from club members and my own continued watching on e-bay. I have not set any expectation of the owners agreement with the donation proposal. We will see what we will see!!!!!!
-
Thank you all for your sage advice. I took your feedback to a sub group of our membership and we unanimously decided not to make an offer to purchase the kits. We did however propose to the owner that he donate the kits to our benefactor, The Military History Society of Rochester, to help raise monies for the continuation of this great museum. The owner in turn would be able to write off the donation on this years tax returns as it is a not for profit entity.
-
Sorry mike no kit like that in the mix.
-
USS Frolic There is a MM Rattlesnake in the mix. I will remember your post. Right now the individual wants to release the whole lot. I meet with 3 other members tomorrow and will see what they have to say. If it were my call at this time there is a less than 50% chance we will make him an offer (and then will he accept). There is a possibility that within the group some of the MS kits would be picked up. So it is a mixed bag. Standby..
-
Thank you very much to those who responded. I must say you are a wise body out there. I think I knew this but it doesn't hurt to be reminded. His kitchen table was piled almost 2 feet high with these models and I may have seen them through e-bay dollar sign colored glasses.. And yes they were stored in his basement and I noticed even the stapled pages showed signs of rust so I am sure they were there awhile. I have been an NRG member for 35 years and I think this forum is the best thing to come down the "ways" in some time. I will say thank you again.
-
This topic may have been covered by others but I have been unable to find references here. If someone can point me to a thread I'd appreciate it. Anyway i had put a post in a local hobby shop to entice new members. I did get a response from a gentleman who had about 25 models still in boxes. Most were Marine Model and Model Ship Ways. There were 4 or 5 Italian kits. It struck me as an odd collection since there were 2 sets of duplicates. I recognized the boxes for the MM, they were yellow. Most boxes were in decent shape. The Model Ship Ways were of near recent vintage as they were the boxes prior to their current 'blue boxes" but not the ones of the 1980's. I am guessing the MM were of late 1970's vintage and into the 1980's. All are solid hull. They probably have lead fittings. I am guessing the Model Ship Ways are 1990's vintage as most have laser cut bulkheads. He desires to sell all as a package. So I am wondering what is the common offer profile in terms of cents on the dollar one would offer? I am thinking our club would buy them and resell to start a small treasury fund, not that we would be looking to make a killing. Anyone, any thoughts?
-
Can i live without a BYRNES TABLE SAW
Thistle17 replied to shihawk's topic in Modeling tools and Workshop Equipment
I have been a long time woodworker and of late returned to model building. In the 45 years of woodworking I have owned 2 large stationary saws and one contractor saw. The kept table saw is now 35 years old and has been a work horse for me. The contractor saw is a name brand that is an excellent field saw but it is used infrequently, yet it still comes in handy. In modeling I have owned/own 3 model saws. The latest is the Byrnes saw. The prior, the Preac,was recently sold. The Emco add on saw has never been used because of its limits. The Preac was a decent saw for its day but I found it too limiting and falling short of some basic capability. So what is the point you ask? Buy the best you can afford even if you have to be patient in purchase. Amortize the expense over your lifetime and its pretty cheap.Quality tools are lifetime investments and endure. If they find no practical use in the future they are easily sold and the quality ones don't stay on the market very long. My Preac was on Craig's one day. -
I have followed Chuck Passaro's method by making small sanding blocks that will span a minimum of 4 bulkheads. The blocks have a little handle (just a perpendicular block glued to the non sand paper side for ease of holding). He has also suggested making the sanding block itself have a slight contour (either concave or convex) to them. I then glue on, say 120 grit paper, and carefully sand. I then use 180 to finish off. Of course I have not mentioned the width of the sand blocks themselves. I made several of varying width given the scale and nature of the hull curvature. In regard to the bulkhead or frame rigidity I did add stiffeners to them so as not to break any. Even a temporary pinning of a batten or stiffener will help. Hope this helps.
