Thistle17
-
Posts
1,054 -
Joined
-
Last visited
Content Type
Profiles
Forums
Gallery
Events
Everything posted by Thistle17
-

Micro Drill Press
Thistle17 replied to michael mott's topic in Modeling tools and Workshop Equipment
Michael I was taken aback by this latest work of yours. Working in wood is one thing but to have a given talent and skill to work in metal is something many of us do not have. Your designs, as well, are truly an inspiration. Appreciate your sharing this with all. You set a very high bar!!!!! Joe -
Atlantis by Thistle17 - FINISHED - Robbe
Thistle17 replied to Thistle17's topic in RC Kits & Scratch building
I have decided that the deck should be re-planked with mahogany or a combination of mahogany and a lighter wood such as box wood. I think since most of the deck furniture is mahogany this will blend well. I'd like to try the Alaskan Cedar but it is a tad too yellow I think. Since one of my last posts I came across someone who had trouble gluing down planking with CA glue on ABS plastic. It was commented that the bond doesn't hold up. That is likely why I could lift some planks with a finger nail. I am tempted to try the new DAP "Rapid Fuse" 30 second adhesive. I will have to experiment before I commit to this method. While waiting for the planking material I have moved onto the deck furniture. It is all die cut ply. The curious thing about the parts sheets is that not all of the required parts are on the undisturbed sheets. Not to be outdone, the "plans" do not call them out either. The instruction book is of little help as well. I guess I have been spoiled by the current generation of plans and instructions from our US companies. They are relatively simple structures so I do not anticipate issues. I do perceive a challenge with the bulkwarks as they are missing. I plan to fashion them out of styrene pieces. The challenge is they have a fancy upper edge molding and a lower edge one a well that sits in the rabbett at the sheer line as seen in the picture above. -
Atlantis by Thistle17 - FINISHED - Robbe
Thistle17 replied to Thistle17's topic in RC Kits & Scratch building
Here is a view of the completely stripped down hull. The plastic units atop the hull are actually building forms that the cabin and hatch materials are fastened to. The smoke plastic becomes windows when the outer skin is applied. I am slowly getting through the inventory of parts supplied by the owner. Many of the deck fittings I find are missing. I will spend a good deal of time tracking down reasonable substitues for this 1:20 scale model. For example there are 28 stanchions, ships wheel, life boat, air vents and more missing.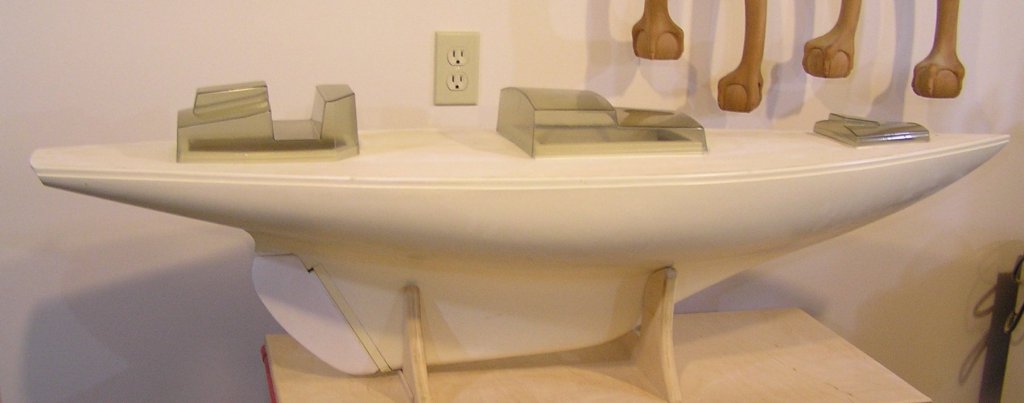
-
Atlantis by Thistle17 - FINISHED - Robbe
Thistle17 replied to Thistle17's topic in RC Kits & Scratch building
After 3 1/2 hours of "prying" deck planks up the hull is now ready for re-planking. Some planks were lifted with a finger nail, others came up with a sharp chisel and prying. The deck was sanded down with 120 grit sand paper to flatten the residual glue/wood. I believe CA glue was used but why it didn't work over the entire deck is somewhat mysterious. The original deck planks appear to have been pine. They came as an accessory package. They are 5 X 1.5 mm and 10 inches long. I am going to use some other material that is more dense and of the patina of boxwood. Oddly the directions do not suggest sealing the final deck surface, rather applying wax is recommended. That doesn't sound at all right to me for a RC model. I read on another web site that the total cost of this vessel if fully outfitted could cost as much as $1800. The base kit was $700 at the time (circa 2012) and "accessories" were priced in the $90 and up range. The wood deck kit for example was $90! I feel it was a crazy way to market this kit. One would get 'sucked in' to a big expense if they were not paying attention, -
Atlantis by Thistle17 - FINISHED - Robbe
Thistle17 replied to Thistle17's topic in RC Kits & Scratch building
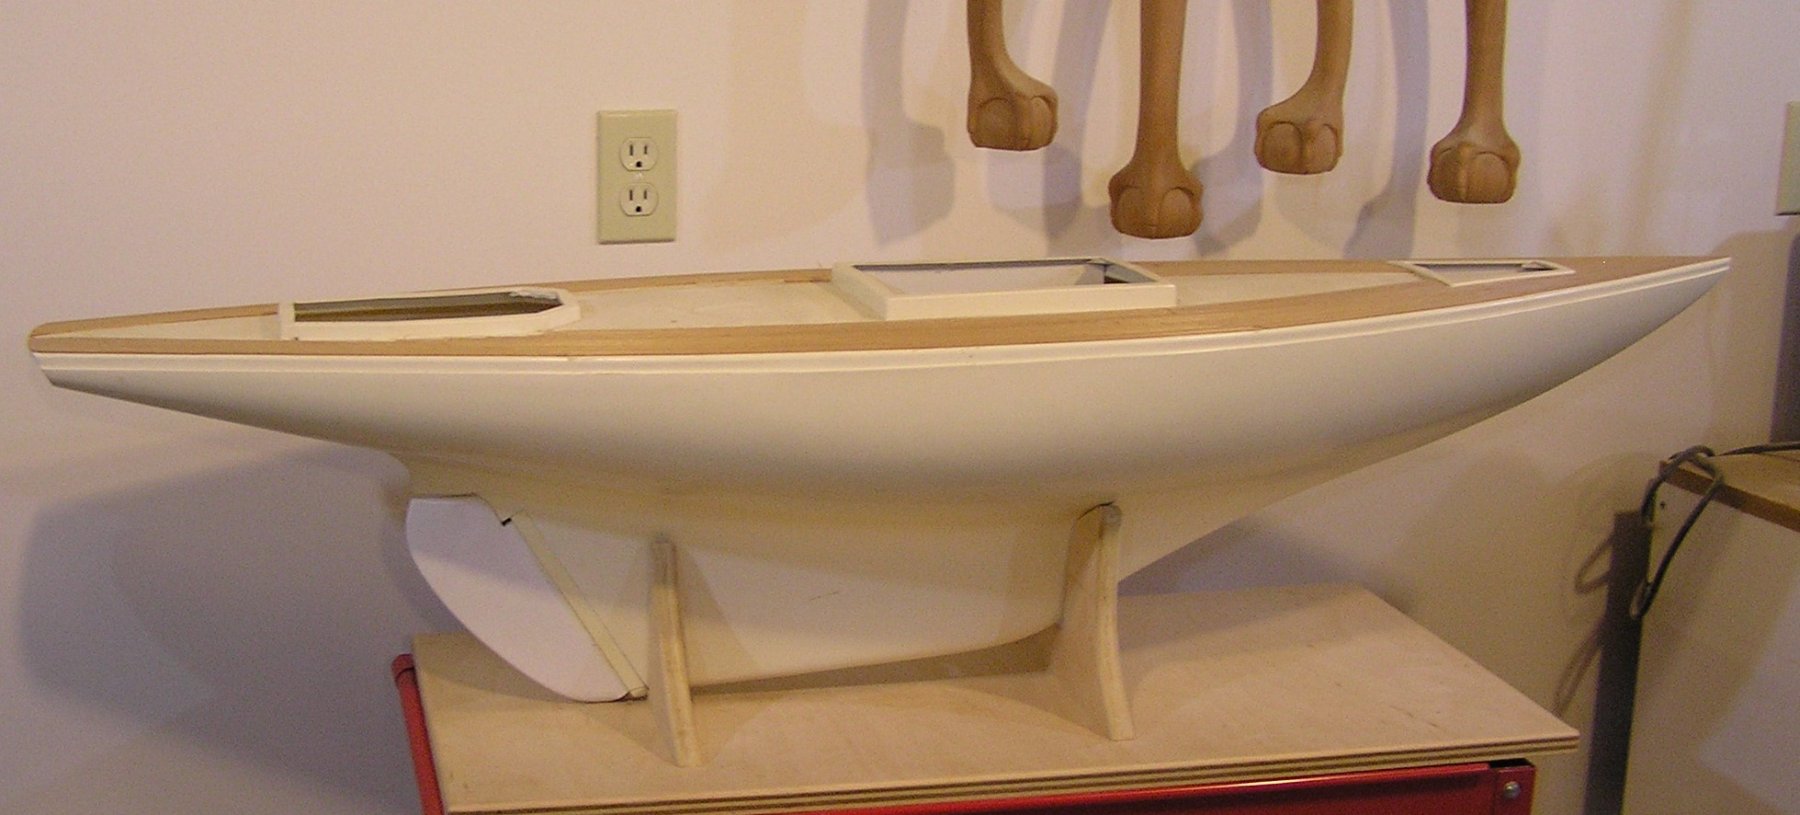
I have taken possession of the partially completed model (as of this post) and will begin a more detailed inventory of parts on hand and what is missing. Hopefully Krick Manufacturing will come through on the masts and we will see what else shakes out from their inventory as I progress. This thread will be periodically updated with progress. The boat model is 54 inches long at the deck level and 13 3/8 inches of beam. The masted height will be approximately 64 inches. The hull is of high impact molded plastic. The keel is weighted with what appears to be lead. At this stage the model weighs about 45 lbs! Of note on closer inspection it has no transom I will finish it off in mahogany most likely. The deck is partially planked and although there is some extra deck material it is not sufficient. Also some of the deck planking has lifted as the adhesive used has dried up. I am planning a strip down of the deck planking and I will begin anew. Below is a picture of the model as is. I have mounted it on a shop cart as it will necessarily have to be moved around due to it size and work access. The second picture is where I am headed. My client wishes the model to remain static so although there are some RC controls on board they will remain inactive. (Those dangling ball and claw legs in the background are for a distant project). Joe
1.JPG.e0d4887adfe0a3b05e4396a96f145990.JPG)
-
Sam thanks for answering. I have been tutored by a mutual friend and that is his method as well. If you are interested in selling the Floquil paints please let me know when you are coming to one of our next meetings. I' m stuck on a repair of a 1980's model that is begging for Roof Brown to paint a new rudder. If you have that I would be satisfied with just a bit. Joe
-
Chris I actually had both saws for a time. I did end up selling the Preac because I didn't find much use for it after the Byrnes saw. It just didn't match up in my estimation. Depth of cut, power, table size were among the limitations I found. Having said that I have often felt that 2 saws would be handy. Set ups on one can be held while the other is roughing out or doing complimentary elements as you suggest. Also if you need to switch blades that can be an advantage of two. Given that you have the two I think the answer is thinking ahead about the task and matching saw capabilities to complimentary or supportive tasks. Even in my full size shop I do not like to move either blade height or fence while in production of parts. If I had two saws I would use one for rough and one for finish milling given they are of the same capability. The other thing one runs into is sometimes is that mistakes can be corrected on the back up device while the other unit is onto something else. The one thing I would not do is mix like parts from one saw to the other. I realize this is a general response but it does "depend". Joe
-
Miniature Russian carving tools
Thistle17 replied to druxey's topic in Modeling tools and Workshop Equipment
May I have the information also. I am also concerned about SECURE payment method can you advise please? Thanks Joe -
Hands down outstanding!
-
Is it correct that when I am logged in and active my number shows to me only? Is that how it works?
-
Chuck my NRG # is showing up in public?????? Joe
-
Atlantis by Thistle17 - FINISHED - Robbe
Thistle17 replied to Thistle17's topic in RC Kits & Scratch building
I finally heard from Krick and they do have some spare parts. The masts are available but it proves to be a shipping problem due to their length. I have appealed to Ages of Sail to see if I can piggy back one of their ship ments. -
Erik: Were I you I would proceed as you have been it is such an excellent execution! Just a nudge, maybe if the fit your way gets to you, try the tape method to see where the plank needs work. Just A thought. I have begun planking my Cheerful at the wales after ripping my planks.That was a learning experience as well until I made a jig to do so. I have a long way to go in number(of strakes) and results compared to you. Nonetheless you give me a "target" to shoot for. Keep up your good works. Joe
-
I think you should turn it on. I am aware that servers can get clogged with "junk" because someone has decided not to finish the projec as I did. I abandoned my Unicorn thread because I lost heart in a kit that was not accurate and its vintage was 1980's. Simply it was not a good place to re-enter the hobby. I found I could only delete some posts of mine but others who commented I could not. (Pre S/W upgrade). Why not turn it on for a trial period and get feedback? Joe
-
Erik:I hesitate weighing in with such an august group but here goes...... This may help you given that you are infilling a strake area. Bob Filipowski gave me a tutorial that uses "scotch" type tape, the frosty kind, layered over the opening. He then rubs the tape at the edge of the upper and lower planks defining the opening. He carefully lays and removes the tape so as not to distort it. He then tapes it to card stock and cuts out the pattern. He then lays the pattern on stock and cuts it out. This leaves the fashioned piece a bit fat which then can be sanded to fit. Joe
-
I am quietly watching from the shadows Sam!!!!! One question did you thin the acrylics? I tried some last eve out of the tube and did not like the uneven cover. I have been a Floquil user in the past. Hard to walk away from those results. Have experimented with Model Master acrylics with the same results as my wife's arcrylics.. Joe
-
Model Shipway's Paints
Thistle17 replied to Worldway's topic in Painting, finishing and weathering products and techniques
I hope I am adding useful information to this mix. Here goes. I have yet to try these paints as I was a "committed" Floquil user for many years and had good results (spraying or brush) with them albeit the toxicity was a constant worry. When I returned to modeling recently I was disappointed to learn of the demise of the company. I turned to Model Master paints as an alternative and found them to be a reasonable substitute although I am still in the experimental stage. I did run across this chart on the web that correlates the 2 brands. It i MEhttp://www.microscale.com/Floquil Color Chart.pdfs . I have also been looking at Tru Color paints trucolorpaint.com which are supposed to be comparable to Floquil paints in propertiies if not color. I have tried to get a chart comparison from them but the last time I tried they never came through. Both MM and Tru Color are mixable to get any hue or color one is looking for. I solicit comments from others. -
Atlantis by Thistle17 - FINISHED - Robbe
Thistle17 replied to Thistle17's topic in RC Kits & Scratch building
Help from anyone out here! Has anyone had any success contacting Krick Models in Germany? They just don't seem to respond to any of my queries. -
Well as of yesterday all kits have been sold. Our feeble marketing attemps close to home netted sales of about 8 kits to members. The balance are being shipped to Model Expo answering their offer to buy old kits. Granted we didn't make a great deal for the museum but we did net around $500. I will terminate this thread on about a week.
-
Bill: I had a similar problem with fittings starting to powder. I went a bit farther than ambient air passive flow. I actually run a small pancake or muffin fan in my case. It sits below the case deck (as it is on stylized feet. It runs about 50 cfm and draws less than an amp. It is on a timer 6 on /6 off hours. I have been running in this mode for about 6 months now no deterioration.
-
the rabbet
Thistle17 replied to kier's topic in Building, Framing, Planking and plating a ships hull and deck
Here is some further thoughts from another corner. My answer would be the following with a bit of clarification. When you say "wide" I assume you mean the height from false keel or bulkhead former to the keel. If that is your question then I would submit the following: At the widest hull station the planks almost enter the keel rabbet in a perpendicular manner. So at that point the height of the rabbet should be a comfortable but not tight fit and as Pat says, whether one or two plank layers. When you get to the stern the planks are likely to approach the rabbet at a much sharper angle and the plank edge is technically fatter because of that angle. It also tends to rise higher in the rabbet. Certainly not to a great degree but nonetheless a bit fatter and at a higher approach.I tend to make the rabbet just a tad loose at midships (not sloppy), live with that along the keel, and coax it in at the stern. Sometimes if it is double planked you can hold the sub layer back a tad from the rabbet and slide the thinner top plank in, in an interference manner. Hope this helps. Experimentation is not a bad idea! -
I have a client that wishes her late husband's Atlantis R/C model be completed as a static model. Parts are missing and I have just learned Krick has bought out the Robbe business. Can anyone shed light on Krick's intentions to re-release the models and parts? Alternately, anyone out there have a kit or partial kit for sale? Thanks
-
Advice for planking
Thistle17 replied to Slowhand's topic in Building, Framing, Planking and plating a ships hull and deck
May I wade into this discussion and ask something that might be of common interest to the originator of this sub-segment? I am also of the opinion that after the wales install one might be inclined to work the Garboard next and continue as recommended since the Garboard is compartively hard to install as the last element. Now if I listen to the experts (not being sarcastic) it is recommended that the Garboard should not follow the "turn of the bow or stern" as this will cause problems in those areas later on. So here is where the question starts to emerge. Given the restraint that the Garboard is not a "lengthy" plank it will only partially infill the keel area. The next plank, the Broad strake will appraoch the "in fill" need but must begin to follow the turnof the bilge and will not remain parallel to the keel as advised (in some documented practices). It will still be fairly perpendicular amid ship but turn almost 90 degrees to it's outermost edge by the time it reaches the stern thereby the paralellism is sacrificed. Am I reading too much into the practice? -
At our last meeting we have decided on offering some kits for sale. After we ensure that the kits are complete we will alert MSW. Other kits we are planning on utilizing to mentor young folk and hopefully draw them away from those technology gadgets they seem to have grown as an appendage.
-
Rob This is something that just came to mind after which I will stop living in the past and stick to modeling. You may find this amusing. One of my last gasps at Raytheon was to work on a proposal to install a hydrophone array to improve torpedo test firing data collection. The preface to the RFQ related that during early days of WWII they used to fire the torpedoes off a stationary platform and have men in row boats down range,with lanterns, signal the torpedoes' passage. It worked poorly as you can imagine. In part because of the poor data collection methodology and also the torpedoes were of their own mind about the path they would take. It wasn't until,I believe, the Mark IV (?) came along that we had parity with Japanese weaponry. Boy were we in trouble early on.
- 45 replies
-
- 3
-

-
- model shipways
- willie l bennett
- (and 1 more)