
MORE HANDBOOKS ARE ON THEIR WAY! We will let you know when they get here.
×


KeithAug
-
Posts
3,867 -
Joined
-
Last visited
Reputation Activity
-

 KeithAug got a reaction from Tecko in Altair 1931 by KeithAug - FINISHED - Scale 1:32 - schooner
After an enforced break I have made a bit of progress.
The keel was laminated from .050 inch thick planks. Quite a tedious process because the keel has quite a full form. I don't think I will repeat this process on future builds where the keel is so full. The following series of photographs illustrate the process.
Holding the shape of the keel proved quite difficult and I found the best approach was to sand the planks to shape each time a layer was laid. This layer by layer approach allowed me to cut the next layer of planks to match the sanded form achieved on the previous layer.
The hull was then sanded firstly with 60 grit emery followed by 120 grit and finished with wire wool. I used white spirit to raise the nap before buffing with wire wool. I did this 3 times. The photographs show the hull still wet with white spirit.
Now ready for the first coat of poly (silk finish). I'm planning to thin to one part poly to one part white spirit and try wiping it on. I have not tried this before so its a bit of an experiment.
-
 KeithAug reacted to Julie Mo in Altair 1931 by KeithAug - FINISHED - Scale 1:32 - schooner
You may find yourself falling in love with lacquer, Keith. You can lay on 4-5 coats in a day, sometimes more. You don't need to sand until it needs flattening or smoothing. The solvent in the lacquer melts the new coat into the existing coat. And the finish can be stunning. I wet sand to smooth then buff with wet Micro Mesh from 1500 to 12000 and can get a glass finish. And repairing is a breeze because of the melting properties. Much easier than poly.
On the negative side, you do need good ventilation. You have to allow the solvent to gas out before sanding and buffing, usually about 7-10 days. And you can't put it on thick or it runs. One other thing, if you waxed the finish, all the wax must be removed before repairs or refits.
-
 KeithAug got a reaction from Nirvana in Altair 1931 by KeithAug - FINISHED - Scale 1:32 - schooner
Hello Julie
I have never tried lacquer but I must give it a go some time. Although its slow I am quite enjoying the process of applying the wipe on poly. The finish is very pleasing and I can always make progress on other stuff while I am waiting. I'm watching your build with interest and wait to see how your 2nd planking options develop?
-
KeithAug reacted to Julie Mo in Endeavour 1934 by Julie Mo - Amati - Scale 1:35 - America's Cup UK J-Class Challenger
The more things change, the more they stay the same... or something like that.
Working on the mahogany keel, I was suddenly struck with serious apprehension about painting the bottom.
I'm working at the centerboard section, building it up in layers.
After the glue dries, I trim the laminates.
My love of natural wood, I fear, won't allow me to paint over what I plan to be a very pretty mahogany keel. Now I'm wondering if maybe I mill some pieces of different toned wood to create the waterline and other detailing of the hull. I could mill Gabon ebony or maple or some other contrasting wood and use that instead of paint. I really hate painting over pretty woods.
-
 KeithAug got a reaction from KORTES in Altair 1931 by KeithAug - FINISHED - Scale 1:32 - schooner
Finishing the hull is proving to be quite slow going as the poly is taking ages to dry. I needed a distraction so I thought I'd make a bit of progress on the deck fittings starting with the jib boom foot. The plans for this item were inadequate.
I had a look round the internet and found another jib boom foot from a different Fairlie Yacht. This wasn't the same as on Altair but it gave some guidance.
The final bit of information was gathered from a 2 second clip of a You Tube video.
With this scant information I started to plan out the part.
.
I started the body of the foot by boring out a 1.75 long x 0.500 inch square bar which I then bolted to a round steel bar.
The steel bar was mounted in the mill vice and the half round section was formed by end milling along the length of the workpiece and then rotating it few degrees before repeating the cut. Multiple passes generated the half round (effectively the curve is generated from a series of flats).
The shaping of the foot was also done on the mill.
-
KeithAug got a reaction from KORTES in Altair 1931 by KeithAug - FINISHED - Scale 1:32 - schooner
I am doing one coat of poly a day. Now on coat 4.
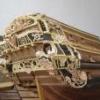
Meanwhile I have made a bit of progress on the winch.
The plan detail on the winch is basic and I also think its not very representative of the real thing.
Unfortunately the internet didn't come up with much additional information so I had to resort to a bit of intuition.
Because the winch is painted black I didn't have to bother much about the choice of materials so I used bits from my scrap box. One enhancement to the plan was the winch motor which now has a finned body - cut from a sprocket recovered from a dead printer. The fins do appear to be present on the original.
The winch has both rope and chain drives. I made these from hex section brass bar. The chain sprocket was simulated by drilling 6 radial holes using a centre drill and then filing a groove across the holes on the lathe (while rotating). The hex bar provided the reference surfaces for equi-spacing the radial holes.
The winch isn't anywhere near finished but its shaping up reasonably well.
-
 KeithAug got a reaction from cabrapente in Altair 1931 by KeithAug - FINISHED - Scale 1:32 - schooner
I am doing one coat of poly a day. Now on coat 4.
Meanwhile I have made a bit of progress on the winch.
The plan detail on the winch is basic and I also think its not very representative of the real thing.
Unfortunately the internet didn't come up with much additional information so I had to resort to a bit of intuition.
Because the winch is painted black I didn't have to bother much about the choice of materials so I used bits from my scrap box. One enhancement to the plan was the winch motor which now has a finned body - cut from a sprocket recovered from a dead printer. The fins do appear to be present on the original.
The winch has both rope and chain drives. I made these from hex section brass bar. The chain sprocket was simulated by drilling 6 radial holes using a centre drill and then filing a groove across the holes on the lathe (while rotating). The hex bar provided the reference surfaces for equi-spacing the radial holes.
The winch isn't anywhere near finished but its shaping up reasonably well.
-
KeithAug got a reaction from KORTES in Altair 1931 by KeithAug - FINISHED - Scale 1:32 - schooner
Having made the foot body I needed to mill / drill the base plate. This was made from .040 inch thick brass plate, thinned to .020inch where the body was to be attached.
The 2 parts were then soldered together.
Cleats have to be added to the sides of the foot and these were milled from 0.100 inch plate.
The whole foot unit with cleats, etc attached was polished.
-
KeithAug got a reaction from Tecko in Altair 1931 by KeithAug - FINISHED - Scale 1:32 - schooner
I am doing one coat of poly a day. Now on coat 4.
Meanwhile I have made a bit of progress on the winch.
The plan detail on the winch is basic and I also think its not very representative of the real thing.
Unfortunately the internet didn't come up with much additional information so I had to resort to a bit of intuition.
Because the winch is painted black I didn't have to bother much about the choice of materials so I used bits from my scrap box. One enhancement to the plan was the winch motor which now has a finned body - cut from a sprocket recovered from a dead printer. The fins do appear to be present on the original.
The winch has both rope and chain drives. I made these from hex section brass bar. The chain sprocket was simulated by drilling 6 radial holes using a centre drill and then filing a groove across the holes on the lathe (while rotating). The hex bar provided the reference surfaces for equi-spacing the radial holes.
The winch isn't anywhere near finished but its shaping up reasonably well.
-
KeithAug reacted to michael mott in Altair 1931 by KeithAug - FINISHED - Scale 1:32 - schooner
Keith a beautiful job on the foot. I also liked the clear step by step sequence of photographs of your construction method. I was surprised that such a large piece of bronze or brass was used on the original.
Michael
-
KeithAug got a reaction from cabrapente in Altair 1931 by KeithAug - FINISHED - Scale 1:32 - schooner
Having made the foot body I needed to mill / drill the base plate. This was made from .040 inch thick brass plate, thinned to .020inch where the body was to be attached.
The 2 parts were then soldered together.
Cleats have to be added to the sides of the foot and these were milled from 0.100 inch plate.
The whole foot unit with cleats, etc attached was polished.
-
KeithAug got a reaction from Nirvana in Altair 1931 by KeithAug - FINISHED - Scale 1:32 - schooner
Finishing the hull is proving to be quite slow going as the poly is taking ages to dry. I needed a distraction so I thought I'd make a bit of progress on the deck fittings starting with the jib boom foot. The plans for this item were inadequate.
I had a look round the internet and found another jib boom foot from a different Fairlie Yacht. This wasn't the same as on Altair but it gave some guidance.
The final bit of information was gathered from a 2 second clip of a You Tube video.
With this scant information I started to plan out the part.
.
I started the body of the foot by boring out a 1.75 long x 0.500 inch square bar which I then bolted to a round steel bar.
The steel bar was mounted in the mill vice and the half round section was formed by end milling along the length of the workpiece and then rotating it few degrees before repeating the cut. Multiple passes generated the half round (effectively the curve is generated from a series of flats).
The shaping of the foot was also done on the mill.
-
KeithAug reacted to tadheus in La Salamandre by tadheus - 1:24
Continuation.
The beginning of the relation is available at this address:
http://5500.forumact...ndre-1-24#66516
Regards, Pawel
-
KeithAug reacted to tadheus in La Salamandre by tadheus - 1:24
Continuation.
The beginning of the relation is available at this address:
http://5500.forumact...ndre-1-24#66516
Regards, Pawel
-
KeithAug got a reaction from Nirvana in Altair 1931 by KeithAug - FINISHED - Scale 1:32 - schooner
I am intrigued.
I am now on coat 3 of the hull wipe on poly and feel I need to share an interesting observation.
After sanding and wiping down the hull with white spirit I was ready to wipe on the 1st coat of satin finish poly.
The first coat went on and I left it to dry.
After 1 day the first coat was still slightly tacky so I left it.
After 2 days it was still very slightly tacky but I decided to apply a second coat - this went on well.
After another day the 2nd coat was still tacky so I left it.
After a further day it was still slightly tacky but decided to apply a third coat - this went on well.
After a further 8 hours the 3rd coat was perfectly dry.
Throughout the workshop was at 20 deg c (68 deg f) and at 70% humidity.
So in summary the first and second coats took over 48 hours "not" to dry and the third coat took 8 hour to fully dry. I have noticed similar situations in the past but never this extreme. It would be good to understand why this drying behaviour happens???????
-
KeithAug got a reaction from Nirvana in Altair 1931 by KeithAug - FINISHED - Scale 1:32 - schooner
Kirby / John
Thank you for your positive comments. I have started work on the winch so I should have more to post in a couple of days.
-
KeithAug got a reaction from Nirvana in Altair 1931 by KeithAug - FINISHED - Scale 1:32 - schooner
Michael / Julie
Thanks for the supportive comments and observations.
-
 KeithAug got a reaction from Eddie in Altair 1931 by KeithAug - FINISHED - Scale 1:32 - schooner
After an enforced break I have made a bit of progress.
The keel was laminated from .050 inch thick planks. Quite a tedious process because the keel has quite a full form. I don't think I will repeat this process on future builds where the keel is so full. The following series of photographs illustrate the process.
Holding the shape of the keel proved quite difficult and I found the best approach was to sand the planks to shape each time a layer was laid. This layer by layer approach allowed me to cut the next layer of planks to match the sanded form achieved on the previous layer.
The hull was then sanded firstly with 60 grit emery followed by 120 grit and finished with wire wool. I used white spirit to raise the nap before buffing with wire wool. I did this 3 times. The photographs show the hull still wet with white spirit.
Now ready for the first coat of poly (silk finish). I'm planning to thin to one part poly to one part white spirit and try wiping it on. I have not tried this before so its a bit of an experiment.
-
KeithAug got a reaction from KORTES in Altair 1931 by KeithAug - FINISHED - Scale 1:32 - schooner
For a while I have been thinking about giving Altair a nose and today was the big day. But first of all a photo of the real thing.
Also worth noting how the stem planks run along the keel.
I had already bored a 10mm hole through the "stub" nose and I needed the holes in the stub nose and the nose to align perfectly. So I took an off-cut of mahogany, cut the correct angle to mach the stub nose and bored a 10mm hole. the photo shows the block in place with a steel bar to give the hole alignment.
I then cut away the excess with a saw and disc sander and glued it in place.
The nose was then sanded to blend with the hull.
I also made a start on the keel planks and finished shaping the nose.
The hull is starting to look satisfyingly sleek.
-
 KeithAug got a reaction from aviaamator in Altair 1931 by KeithAug - FINISHED - Scale 1:32 - schooner
Having made the foot body I needed to mill / drill the base plate. This was made from .040 inch thick brass plate, thinned to .020inch where the body was to be attached.
The 2 parts were then soldered together.
Cleats have to be added to the sides of the foot and these were milled from 0.100 inch plate.
The whole foot unit with cleats, etc attached was polished.
-
KeithAug got a reaction from Tecko in Altair 1931 by KeithAug - FINISHED - Scale 1:32 - schooner
Keel and building board
A bit more progress fitted in around various DIY jobs. I transferred the keel shape to card that I the stuck to the ¼ inch ply before more jigsaw work. See Photos.
I made the building board from ¾ inch thick 6 inch wide MDF. For about 2/3 of the length of the hull the building board is double thickness with the stand off for the frames reduced in height to compensate (reducing plywood wastage). Using my router table I machined slots along the length of the MDF to facilitate:-
1. accurate alignment of the 2 boards
2. location of the frames along the center line
3. location of the board on the milling machine to cut slots for the frames at right angles to the center line.
The frame spacing was accurately measured from the plan and I used the digital read out on the mill to accurately set the positions for the frame sots. None of the frames were equally spaced which was a bit of a bind.
The photos should illustrate the process.
Finally I did a test assembly of the frames to give myself a feeling of progress.
Everything fitting together well and all right angles accurately made .......... feeling very content!
-
KeithAug got a reaction from Nirvana in Altair 1931 by KeithAug - FINISHED - Scale 1:32 - schooner
After an enforced break I have made a bit of progress.
The keel was laminated from .050 inch thick planks. Quite a tedious process because the keel has quite a full form. I don't think I will repeat this process on future builds where the keel is so full. The following series of photographs illustrate the process.
Holding the shape of the keel proved quite difficult and I found the best approach was to sand the planks to shape each time a layer was laid. This layer by layer approach allowed me to cut the next layer of planks to match the sanded form achieved on the previous layer.
The hull was then sanded firstly with 60 grit emery followed by 120 grit and finished with wire wool. I used white spirit to raise the nap before buffing with wire wool. I did this 3 times. The photographs show the hull still wet with white spirit.
Now ready for the first coat of poly (silk finish). I'm planning to thin to one part poly to one part white spirit and try wiping it on. I have not tried this before so its a bit of an experiment.
-
 KeithAug got a reaction from Mirabell61 in Altair 1931 by KeithAug - FINISHED - Scale 1:32 - schooner
Finishing the hull is proving to be quite slow going as the poly is taking ages to dry. I needed a distraction so I thought I'd make a bit of progress on the deck fittings starting with the jib boom foot. The plans for this item were inadequate.
I had a look round the internet and found another jib boom foot from a different Fairlie Yacht. This wasn't the same as on Altair but it gave some guidance.
The final bit of information was gathered from a 2 second clip of a You Tube video.
With this scant information I started to plan out the part.
.
I started the body of the foot by boring out a 1.75 long x 0.500 inch square bar which I then bolted to a round steel bar.
The steel bar was mounted in the mill vice and the half round section was formed by end milling along the length of the workpiece and then rotating it few degrees before repeating the cut. Multiple passes generated the half round (effectively the curve is generated from a series of flats).
The shaping of the foot was also done on the mill.
-
KeithAug got a reaction from Nirvana in Altair 1931 by KeithAug - FINISHED - Scale 1:32 - schooner
Having made the foot body I needed to mill / drill the base plate. This was made from .040 inch thick brass plate, thinned to .020inch where the body was to be attached.
The 2 parts were then soldered together.
Cleats have to be added to the sides of the foot and these were milled from 0.100 inch plate.
The whole foot unit with cleats, etc attached was polished.
-
KeithAug reacted to Jim Lad in Altair 1931 by KeithAug - FINISHED - Scale 1:32 - schooner
A very nice piece of metal working, Keith.
John