CDW
-
Posts
7,760 -
Joined
-
Last visited
Content Type
Profiles
Forums
Gallery
Events
Everything posted by CDW
-
You did a great job on your 51 Chevy Papa. Looks real sweet!
-
Last time I checked, the local raceway sold it, but not exactly sure of the octane being 120. It's not intended for the family daily driver, but the race cars. Here in Tampa, we have also United Speed Shop and I am pretty sure you can still buy high octane fuel from them for racing. I enjoyed seeing the flames shoot out from my exhaust pipes when I used to run Sunoco 105 octane fuel in my 1964 Triumph TR4A. A LONG time ago.
-

Honda RC166 Grand Prix Racer by CDW - FINISHED - Tamiya - 1/12
CDW replied to CDW's topic in Non-ship/categorised builds
Thanks for the kind words gentlemen. -
Pop is an expression that means, to catch the eye and/or to call attention to detail. Yes, to make the eyes wander is a great way to put it.
-
The photos look great. I can't even see the sink marks you described so they must be very small.
-
Outstanding. Small details carefully done as you've displayed here make all the difference in a finished model and help it "pop". Great work, Rob.
-
So sorry to see this happened. Take a break and come back to it when you feel like doing it. This is our hobby and it must remain fun to us, not like working a job. I for one will be here when you get back to it.
-
Alfa Romeo Spider Touring Gran Sport by CDW - Pocher - 1:8 Scale
CDW replied to CDW's topic in Non-ship/categorised builds
Yes indeed, the decals, spark plug boots will definitely be on the menu for me. I'm going to take a hard look at that steering wheel to see what I can come up with myself, first. It is a very prominent part of the car that will be seen, -
Looking really good! Bum deal about that leak in the loft. Home ownership is great, until it ain't.
-
Curtiss BF 2C-1 by CDW - FINISHED - Hasegawa - 1:32 scale
CDW replied to CDW's topic in Non-ship/categorised builds
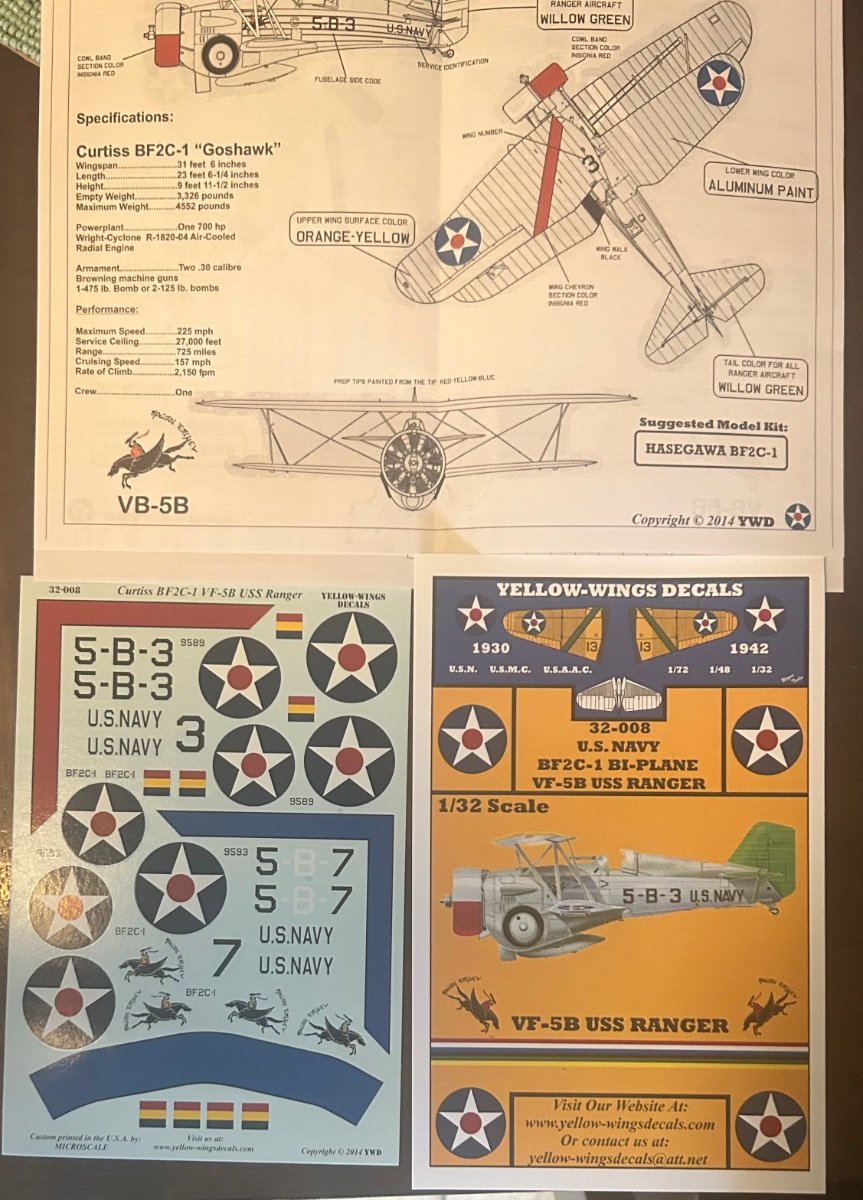
Ask and you shall receive. Got some Yellow Wings decals in the mail this afternoon.
- 93 replies
-
- 11
-

-
Curtiss BF 2C-1 by CDW - FINISHED - Hasegawa - 1:32 scale
CDW replied to CDW's topic in Non-ship/categorised builds
Meanwhile, I’ve had my kit stock decals taped to my kitchen window where it faces east and the morning sun. This has helped remove most but not all of the yellowing of the clear decal film. Along with a coat of Microscale liquid decal film there is a chance the old decals could be saved although my own personal experience has been rather low chances. Once that liquid film is applied and it dries, all the decals must be cut carefully around each and every one as they are all connected with the film.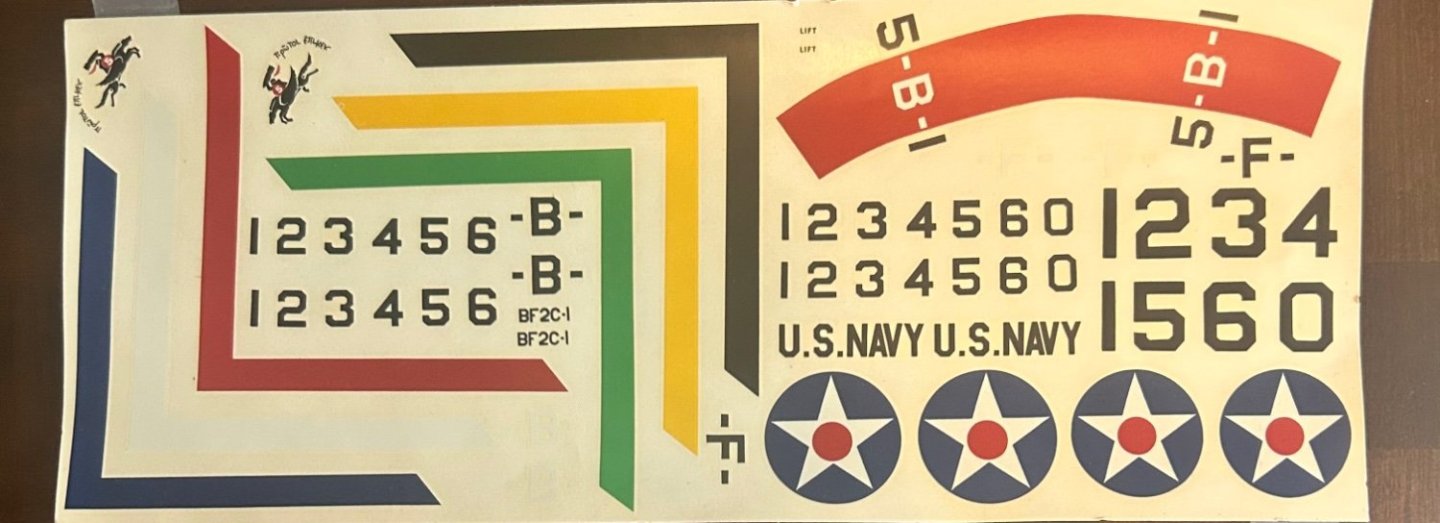
-
Curtiss BF 2C-1 by CDW - FINISHED - Hasegawa - 1:32 scale
CDW replied to CDW's topic in Non-ship/categorised builds
Update: Edit - Update Already!: Just got this email from Yellow Wings - Good News! "Hello Craig, YES, we're still in business and have been continuously since 2003 without interruption. Tell whoever is spreading those rumors that we're out of business. to check out our website. Your order was shipped out on 5/19/2023, you should have received it by now if not shortly. Thank you and best wishes, Wayne Tevlin Yellow-Wings Decals 10781 State Route 706 Montrose, PA 18801 U.S.A. 570-278-9776 yellow-wingsdecals.com yellow-wingsdecals@att.net" -
Alfa Romeo Spider Touring Gran Sport by CDW - Pocher - 1:8 Scale
CDW replied to CDW's topic in Non-ship/categorised builds
Which of Model Motorcars upgraded parts did you find most valuable/helpful? Right off from the start, the upgraded front axle/steering parts look interesting. The steering wheels also. But wow, $125 for one of those seems quite a steep price. It’s half what I paid for the entire kit. -
Grumman F4F-4 Wildcat by ccoyle - FINISHED - WAK - 1/33 - CARD
CDW replied to ccoyle's topic in Non-ship/categorised builds
Watching! Following, lots to learn from you here. Good stuff.- 150 replies
-
- 11
-
-
Alfa Romeo Spider Touring Gran Sport by CDW - Pocher - 1:8 Scale
CDW replied to CDW's topic in Non-ship/categorised builds
I was torn between this version and the version Jay Leno drives. Maybe I will buy that model too once I finish this one. -
Curtiss BF 2C-1 by CDW - FINISHED - Hasegawa - 1:32 scale
CDW replied to CDW's topic in Non-ship/categorised builds
Don’t know for sure but will find out soon. I have an order in with them. Their website remains open and seemingly functional. edit: look at the post above yours. As of last month they were operational. -
US 6” gun by RGL - FINISHED - Panzer Concepts
CDW replied to RGL's topic in Non-ship/categorised builds
Beautiful, Greg! Those figures add so much life to your finished pieces. Wouldn't be the same without them. While the movie was running, it looked like they were moving.- 235 replies
-
- 11
-
-

-

-
Curtiss BF 2C-1 by CDW - FINISHED - Hasegawa - 1:32 scale
CDW replied to CDW's topic in Non-ship/categorised builds
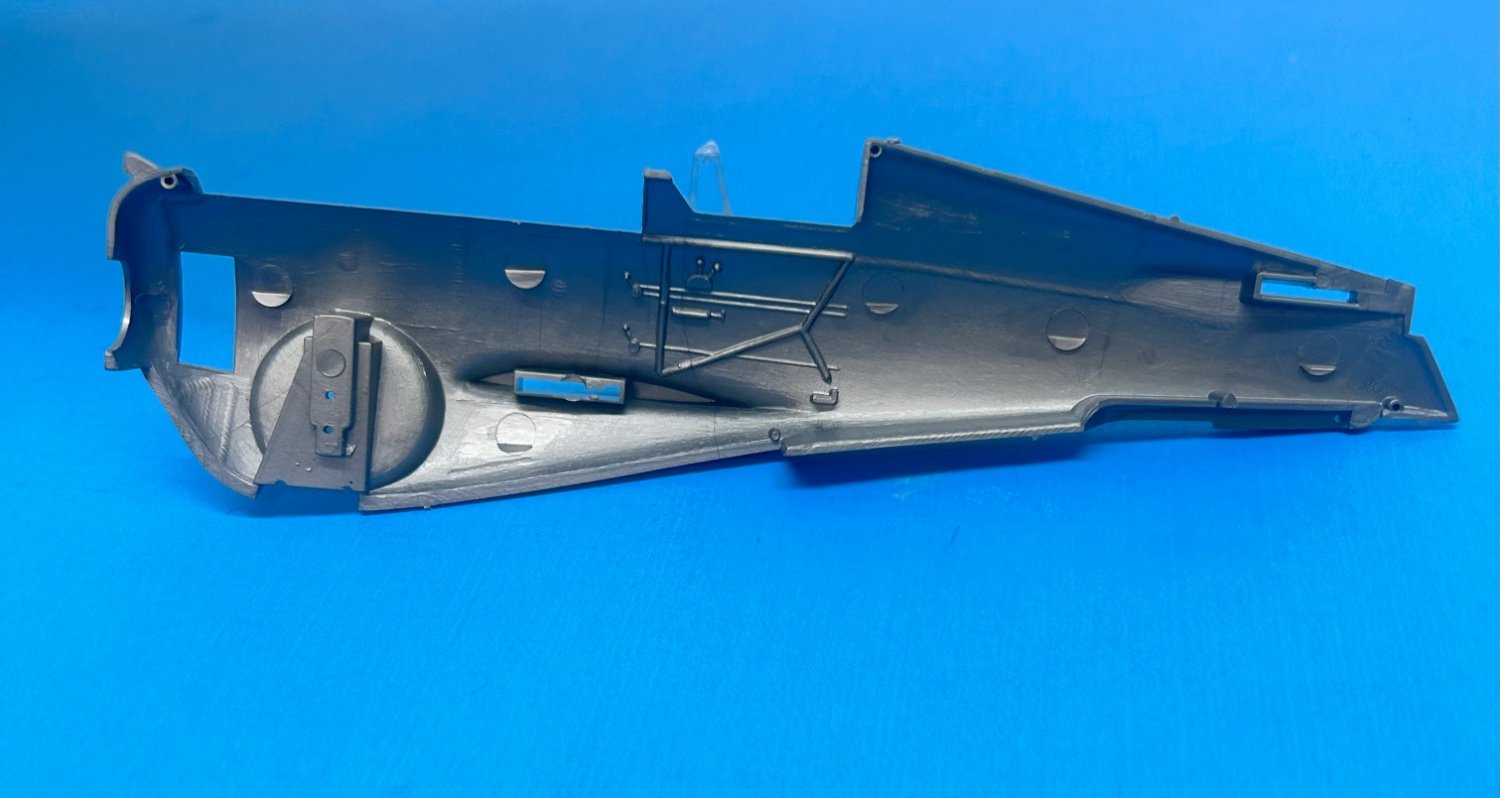
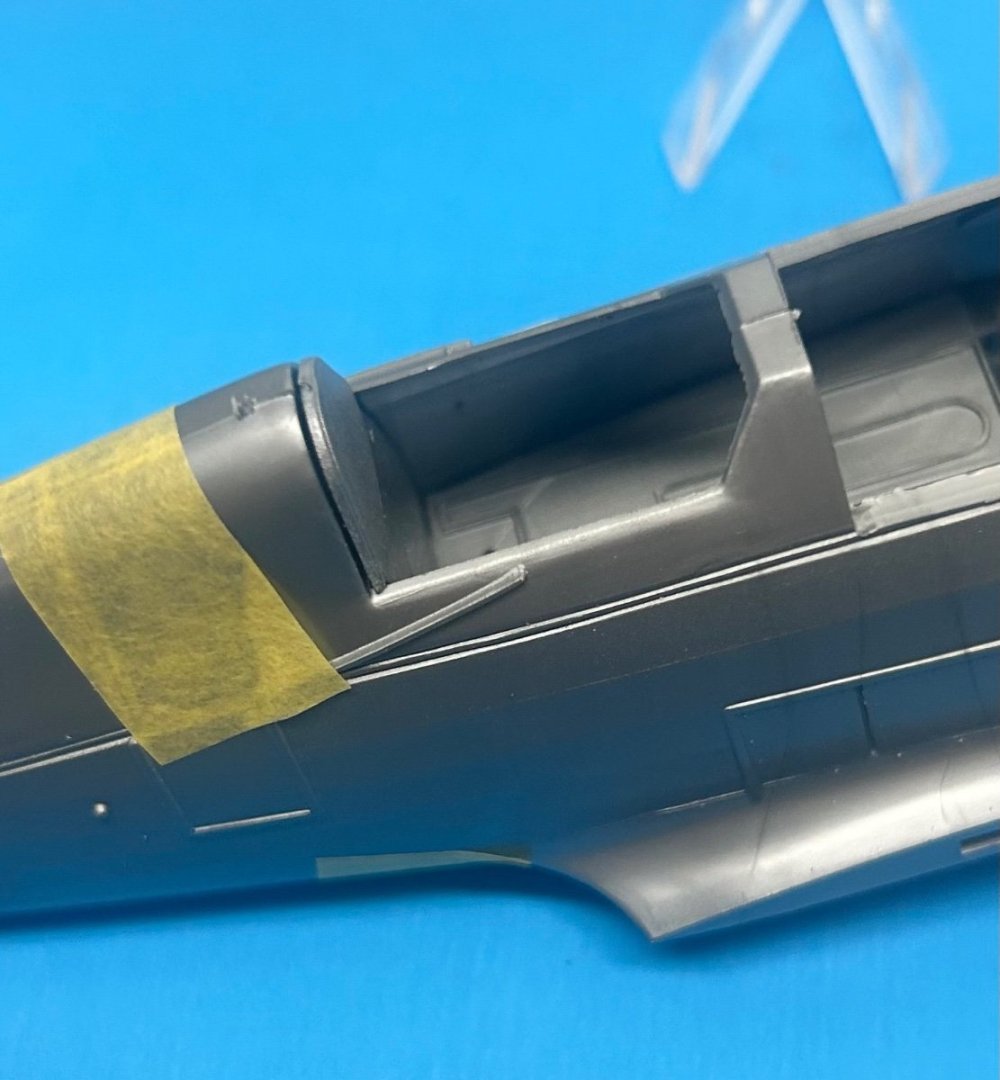
Don't know if it's the age of the kit or just the way plastic was made back then but the kit plastic seems very hard and brittle. I snapped one of the push rods so easily while cleaning them of flash. Got to be real gentle with this old girl or she is going to wind up in lots of fractured pieces but will glue them back together as needed. -
Alfa Romeo Spider Touring Gran Sport by CDW - Pocher - 1:8 Scale
CDW replied to CDW's topic in Non-ship/categorised builds
What a cool video. Man, that is one lucky dude right there, old Jay Leno. He's like a kid in a candy store with all those cars of his. That Alfa Romeo sounds just awesome! Next spare $500K I get, will have to seriously think about ordering one. 😄 Those tires though....look a little bit on the skinny side but hey, they are scale. Amazing how well Pocher captures all the look of the real car. -
Curtiss BF 2C-1 by CDW - FINISHED - Hasegawa - 1:32 scale
CDW replied to CDW's topic in Non-ship/categorised builds
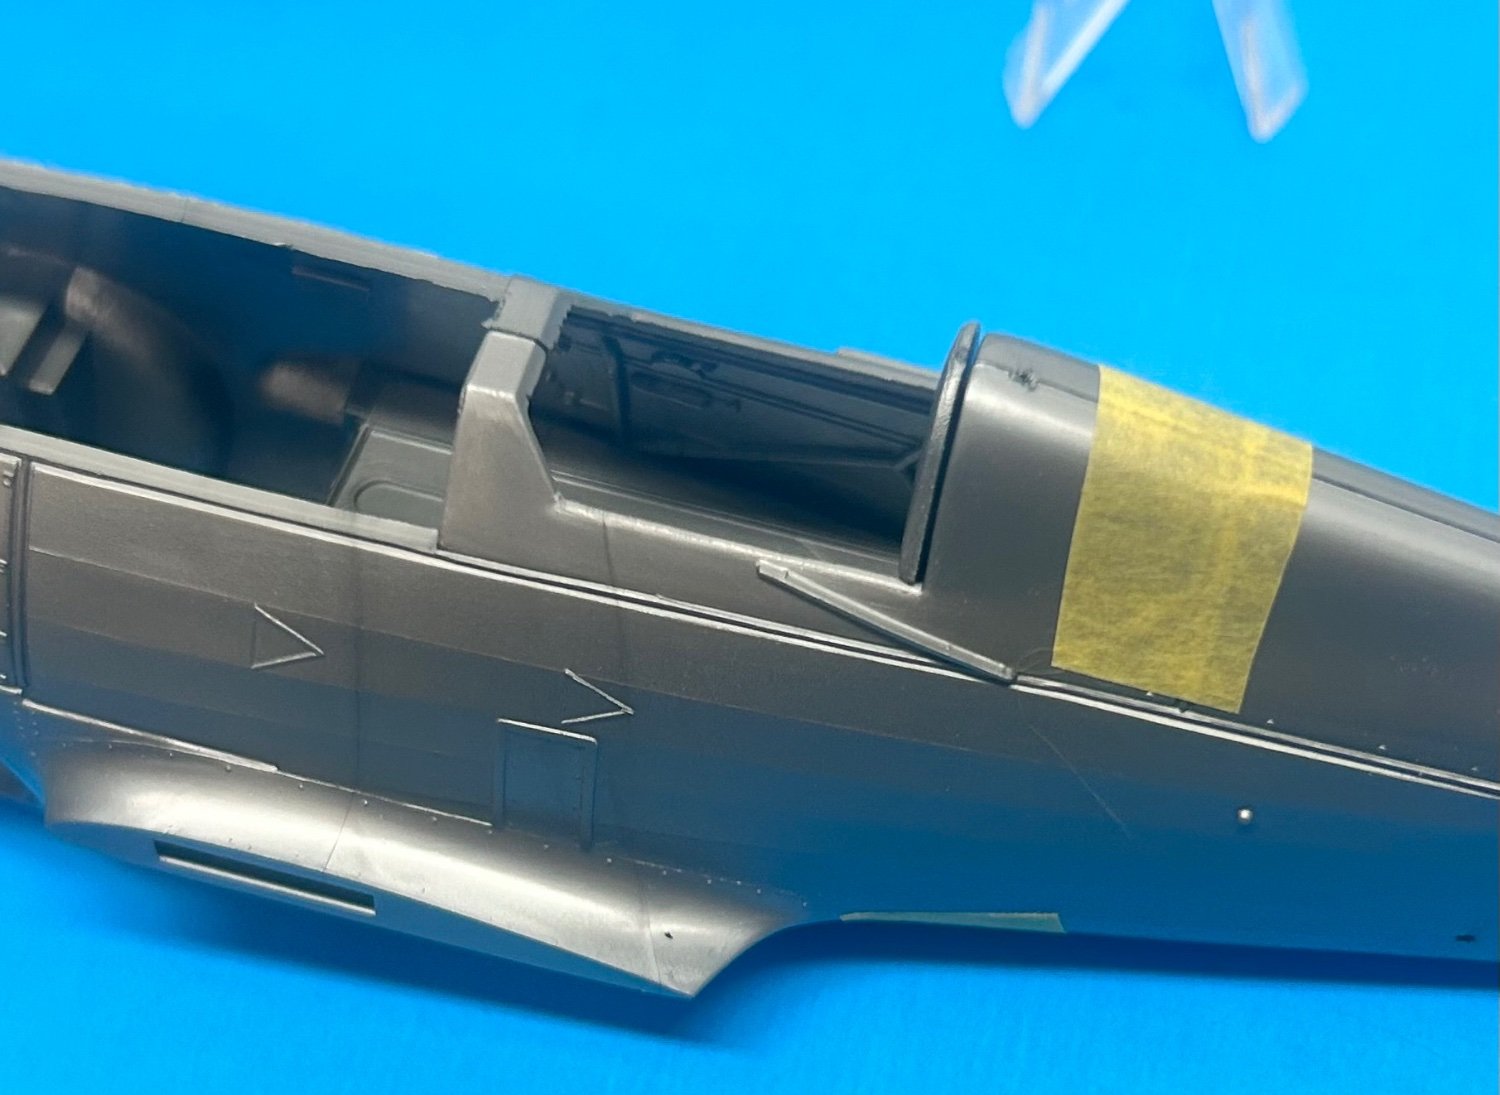
Look how weird this is. Hasegawa added some detail on one inside of a fuselage half and absolutely none on the other. The more I think about it, the less inclined I am to spend too much time trying to improve this old kit. I will probably be happier just taking care assembling it, giving it a decent paint job with a fresh set of decals and calling it a day. I have so many other projects I want to focus attention on.
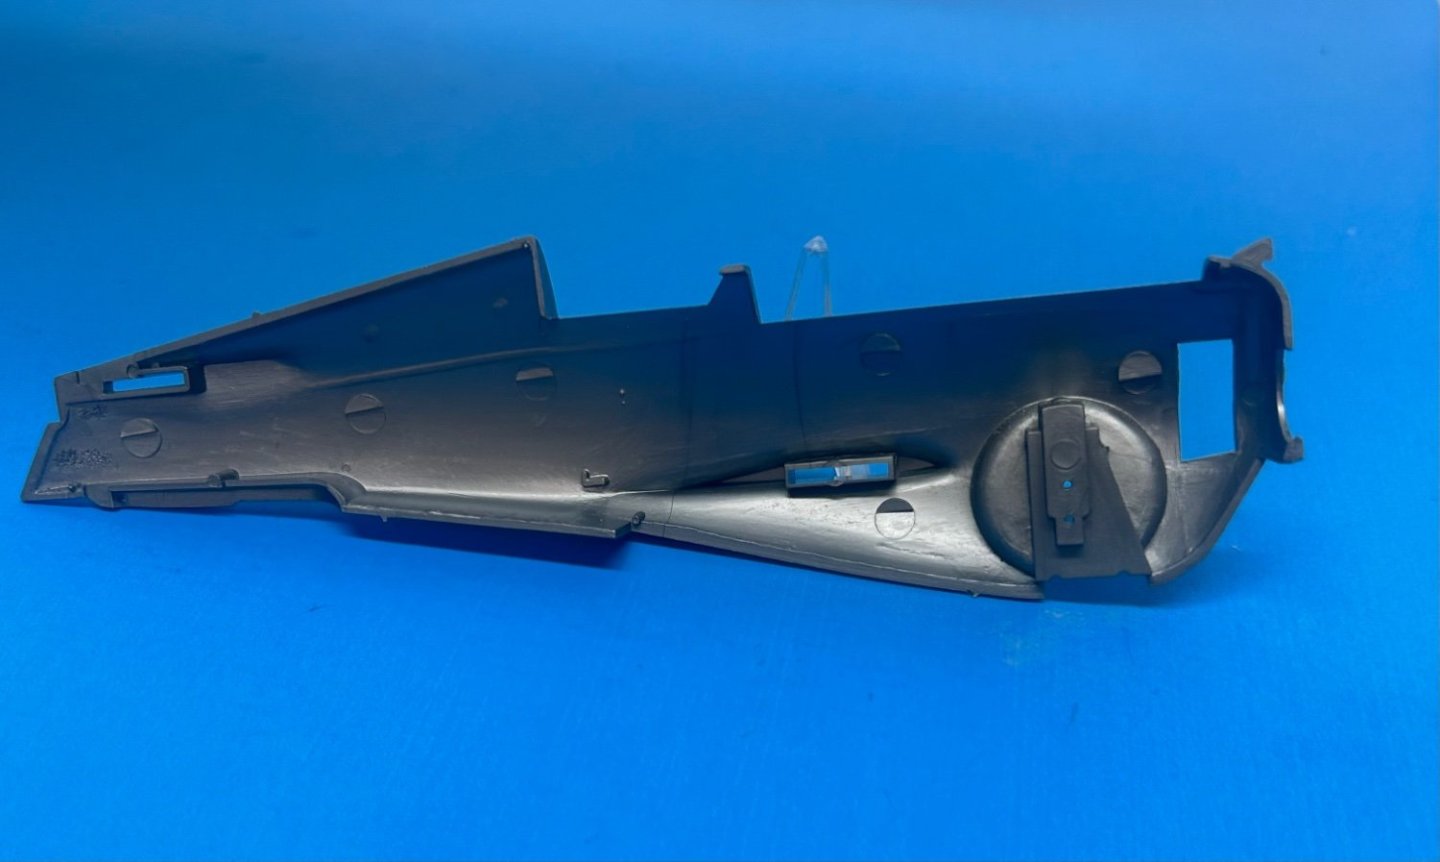

- 93 replies
-
- 13
-
-
Curtiss BF 2C-1 by CDW - FINISHED - Hasegawa - 1:32 scale
CDW replied to CDW's topic in Non-ship/categorised builds
Edit - Update Already!: Just got this email from Yellow Wings - Good News! "Hello Craig, YES, we're still in business and have been continuously since 2003 without interruption. Tell whoever is spreading those rumors that we're out of business. to check out our website. Your order was shipped out on 5/19/2023, you should have received it by now if not shortly. Thank you and best wishes, Wayne Tevlin Yellow-Wings Decals 10781 State Route 706 Montrose, PA 18801 U.S.A. 570-278-9776 yellow-wingsdecals.com yellow-wingsdecals@att.net" -
I think the ladder and chocks will make an interesting addition to the finished model. Well done!
-
Alfa Romeo Spider Touring Gran Sport by CDW - Pocher - 1:8 Scale
CDW replied to CDW's topic in Non-ship/categorised builds
Great collection! Love them all, particularly the Bugatti. Maybe the finest looking car ever made, in one man's opinion. The XKE is excellent too. -
Such a beautiful Bismarck. Wonderful. I admire your tenacity and the finished product. Completely outstanding.