CDW
-
Posts
7,755 -
Joined
-
Last visited
Content Type
Profiles
Forums
Gallery
Events
Everything posted by CDW
-

Curtiss BF 2C-1 by CDW - FINISHED - Hasegawa - 1:32 scale
CDW replied to CDW's topic in Non-ship/categorised builds
I used Mr Color orange yellow lacquer. -
What is our sister site?
-
Your build thread is turning out to be an excellent tutorial. I too have this kit waiting in my stash, so I am hanging on to every detail you are providing. It's not a shake and bake kit from what I see you going through.
-
Curtiss BF 2C-1 by CDW - FINISHED - Hasegawa - 1:32 scale
CDW replied to CDW's topic in Non-ship/categorised builds
I got the worst part out of the way by doing the yellow now. The rest of the wings are silver and easy to paint. A good light undercoat is a must for a yellow finish. Yellow is very transparent and does not cover well. Even then I had to lay this down real heavy to get a uniform color. Need to let it dry all day and tonight even though it’s lacquer. -
Curtiss BF 2C-1 by CDW - FINISHED - Hasegawa - 1:32 scale
CDW replied to CDW's topic in Non-ship/categorised builds
Yellow wings baby.
- 93 replies
-
- 17
-

-

-

-
Curtiss BF 2C-1 by CDW - FINISHED - Hasegawa - 1:32 scale
CDW replied to CDW's topic in Non-ship/categorised builds
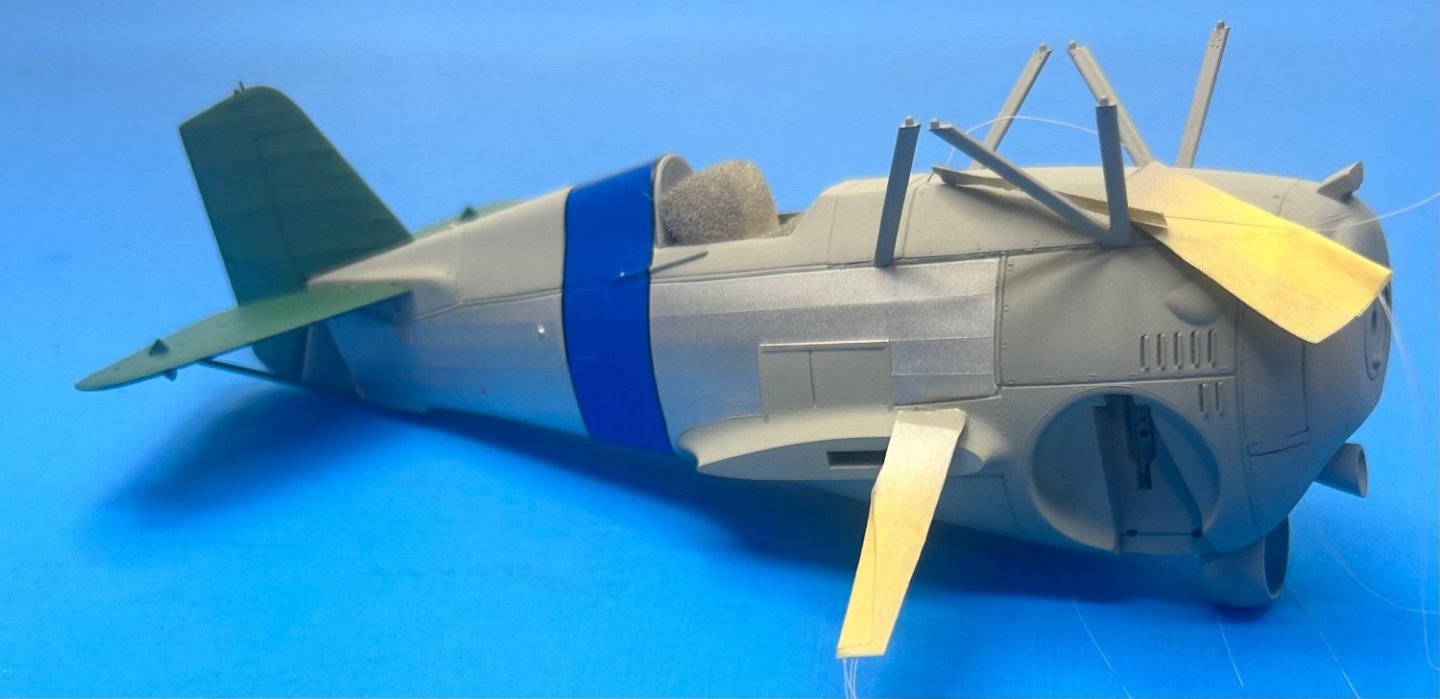
Continuing to add color. Wings are in the paint booth now. Maybe will wrap this little model up in the next few days assuming no major unseen circumstances take place. As a side note, I “refreshed” the original decals with Microscale liquid decal film. As is often the case with old decals, the decal paper adhesive was no good. No amount of rejuvenation seems to solve that issue, at least none that I have found. I would have preferred the red fuselage band included with the original decals. Had to resort to the blue band which comes with the Yellow Wings sheet as seen in the photos. A blue cowl will be done to match.
- 93 replies
-
- 12
-
-
She came out great Andrew. I like the addition of the boarding ladder. Looks real nice sitting side by side with the Desert Storm Buc.
-
Curtiss BF 2C-1 by CDW - FINISHED - Hasegawa - 1:32 scale
CDW replied to CDW's topic in Non-ship/categorised builds
Port side masked and painted silver. Let this dry while I start painting the wings and stabilizers next.
- 93 replies
-
- 16
-
-
-
Curtiss BF 2C-1 by CDW - FINISHED - Hasegawa - 1:32 scale
CDW replied to CDW's topic in Non-ship/categorised builds
Fits like a charm -
Curtiss BF 2C-1 by CDW - FINISHED - Hasegawa - 1:32 scale
CDW replied to CDW's topic in Non-ship/categorised builds
Silver is one of the more forgiving paint colors when masking. It almost never creeps under a mask. It feels good when you peel that mask off and it looks okay, like hey, I didn’t waste my time. 😬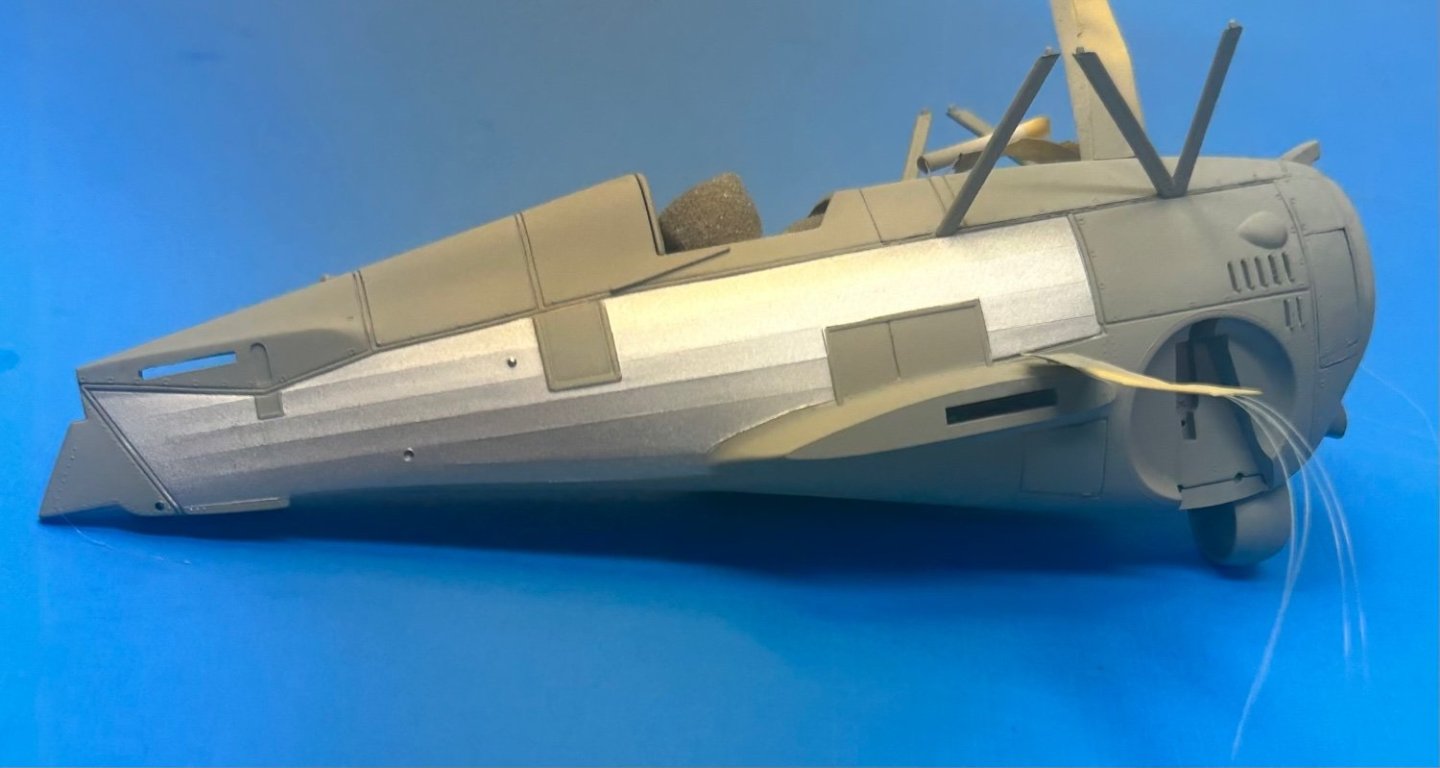
- 93 replies
-
- 14
-
-
-
Curtiss BF 2C-1 by CDW - FINISHED - Hasegawa - 1:32 scale
CDW replied to CDW's topic in Non-ship/categorised builds
I’m no fan of masking but it IS a very necessary part of finishing a good model. Just this one side of masking took more than an hour this morning. The silver paint is AK Xtreme Metal matte aluminum.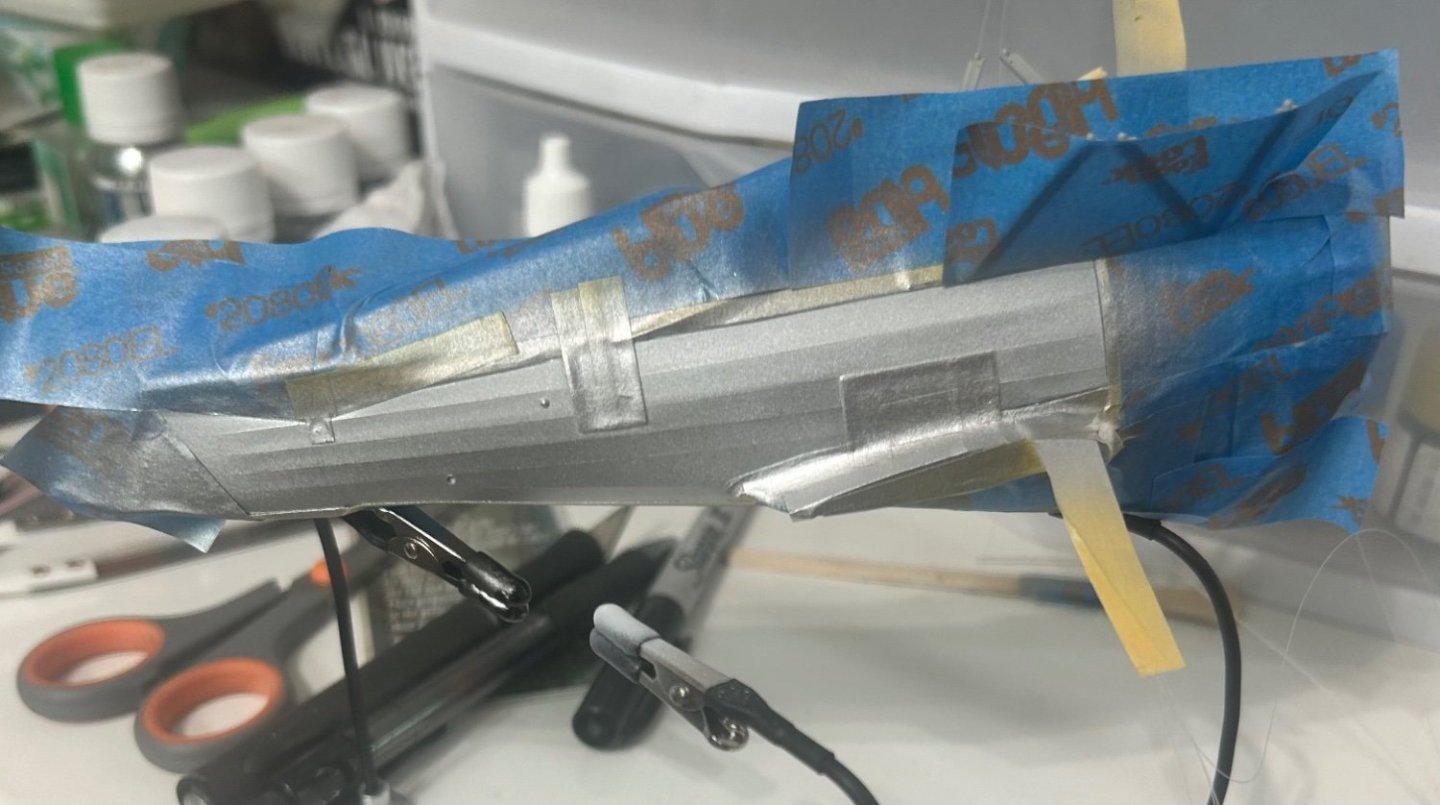
-
Honda RC166 Grand Prix Racer by CDW - FINISHED - Tamiya - 1/12
CDW replied to CDW's topic in Non-ship/categorised builds
Those look real nice Rob. -
Curtiss BF 2C-1 by CDW - FINISHED - Hasegawa - 1:32 scale
CDW replied to CDW's topic in Non-ship/categorised builds
First of the fuselage colors to go down is a light aircraft gray. Additional colors will be silver, red and green. A colorful bird, it’s part of what I like about the golden age aircraft. The color combinations. I wonder if this kit will ever be produced again. Get one now while you can. They sell for very small money on EBay, often $30 or less. Well worth it IMO.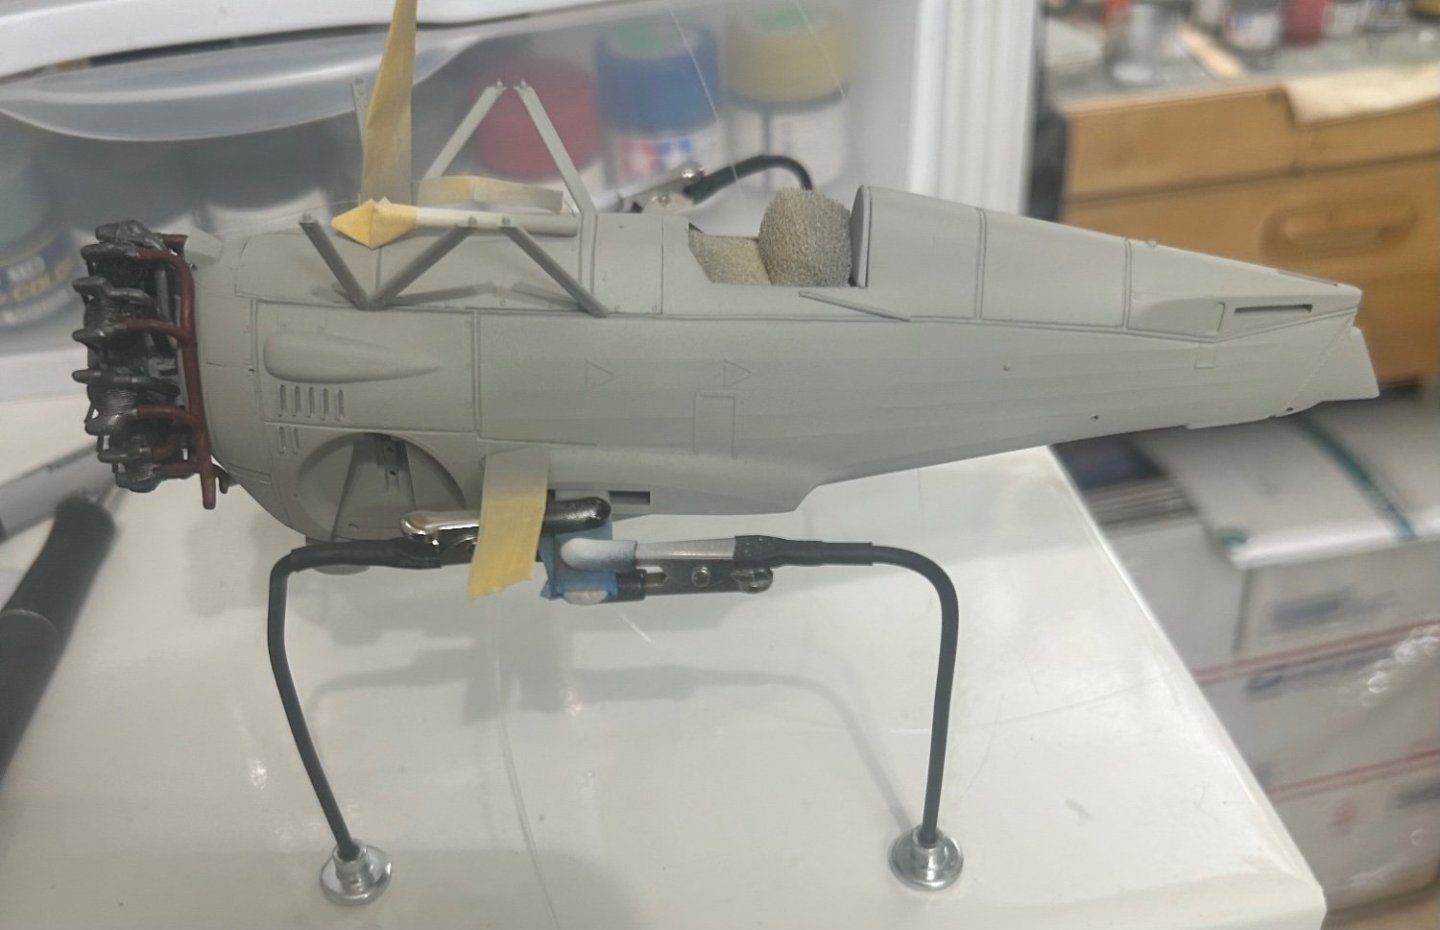
- 93 replies
-
- 13
-
-
Curtiss BF 2C-1 by CDW - FINISHED - Hasegawa - 1:32 scale
CDW replied to CDW's topic in Non-ship/categorised builds
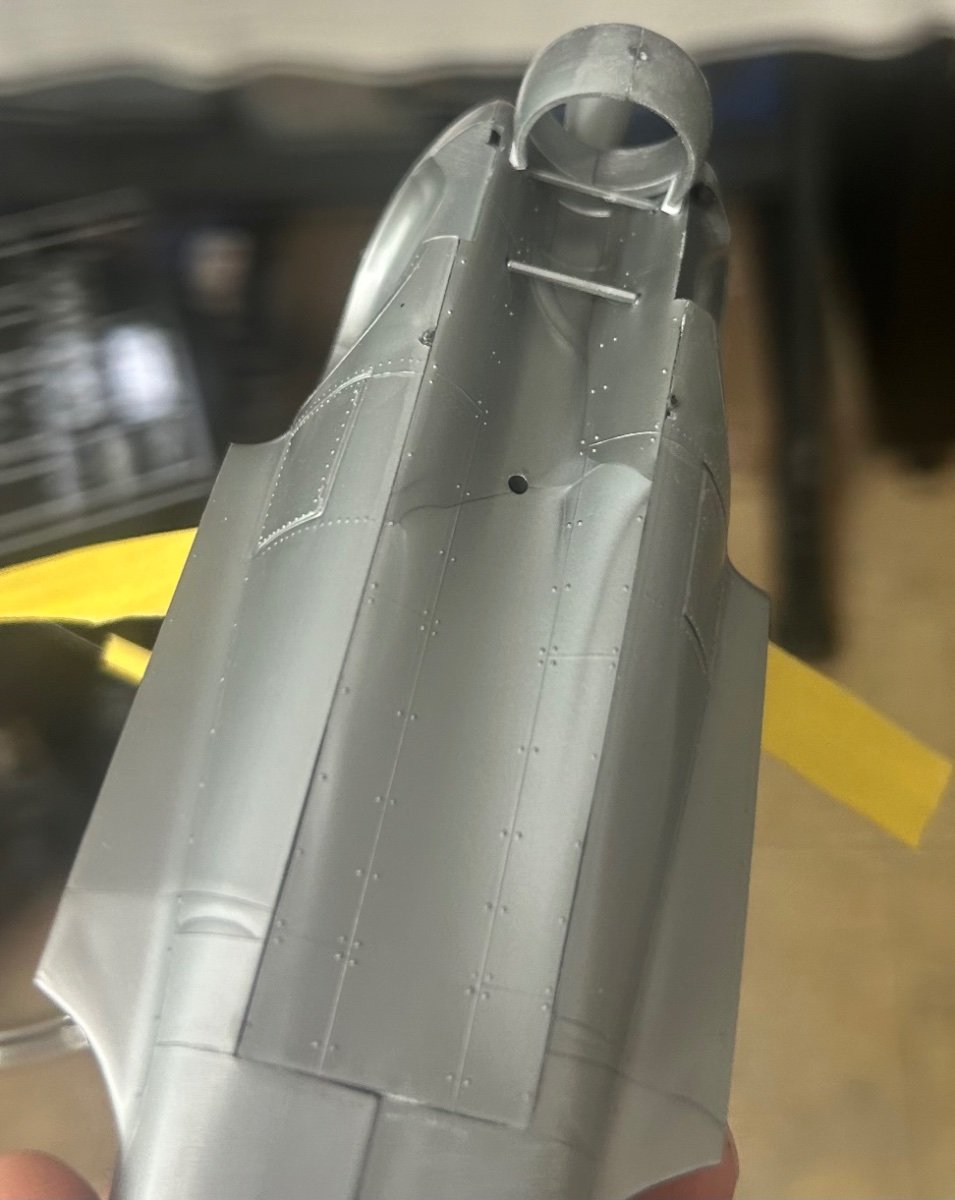
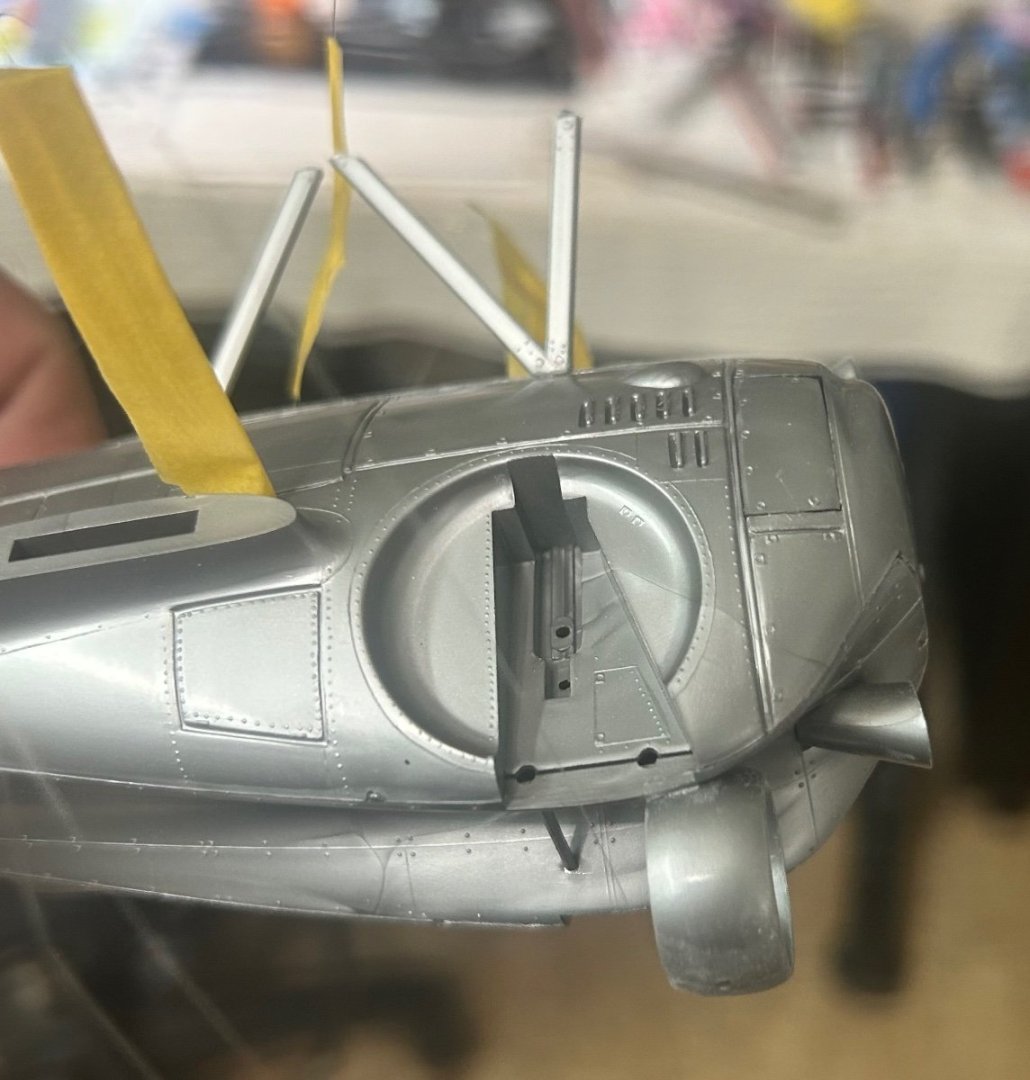
There are a few large gaps to fill on the fuselage where an upper and lower panel are positioned. These gaps are best filled with sheet styrene pieces then cut, trimmed and sanded rather than using putty. An aerodynamic ring located at the bottom of the fuselage requires some modification with scrap styrene in order to fit as intended against the bottom fuselage panel. No big deal any of this, just something to be aware of if you own this kit or are thinking of building one yourself.
- 93 replies
-
- 13
-
-
Curtiss BF 2C-1 by CDW - FINISHED - Hasegawa - 1:32 scale
CDW replied to CDW's topic in Non-ship/categorised builds
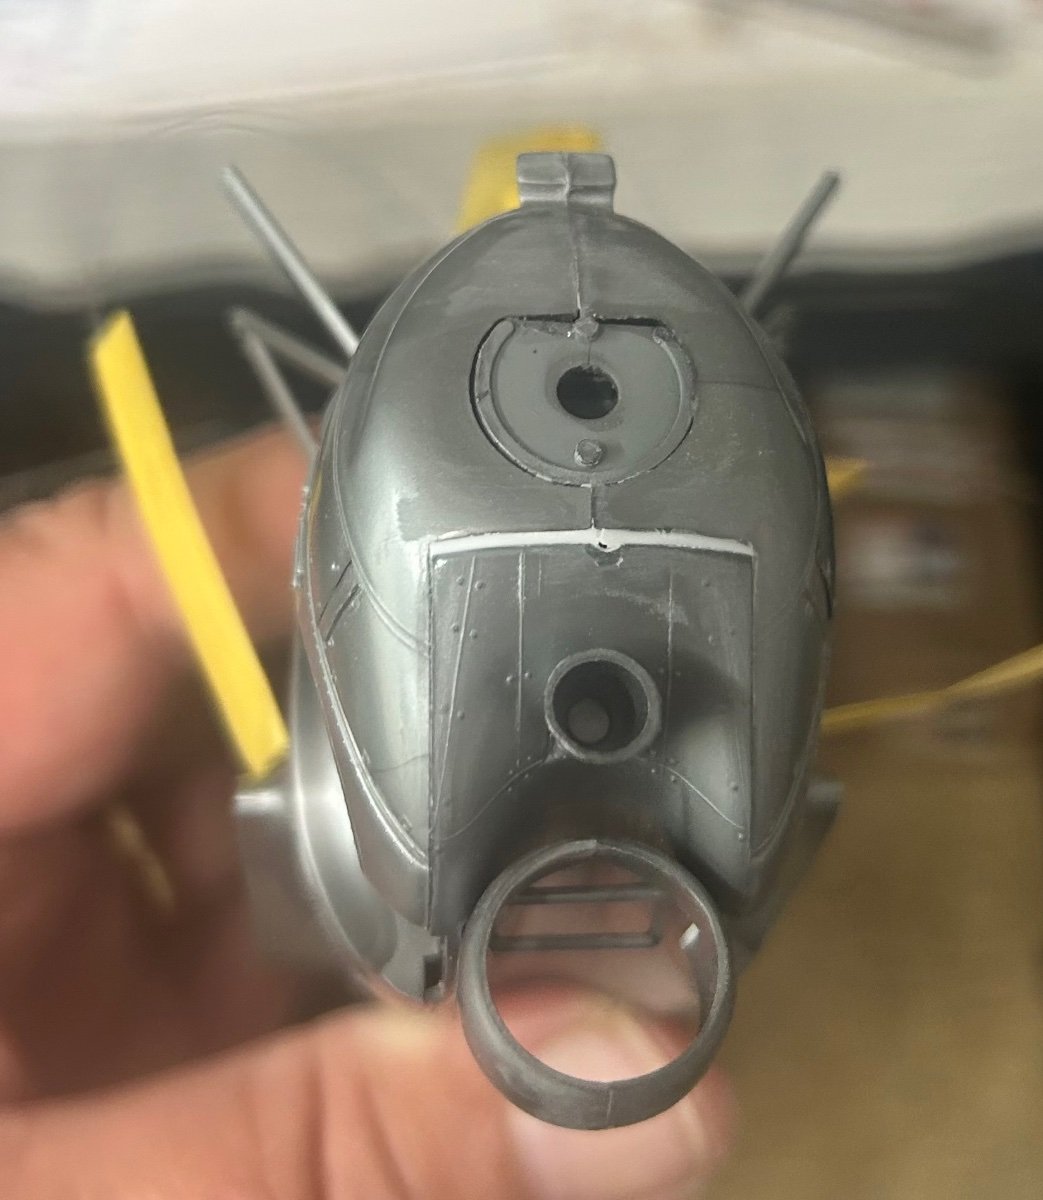
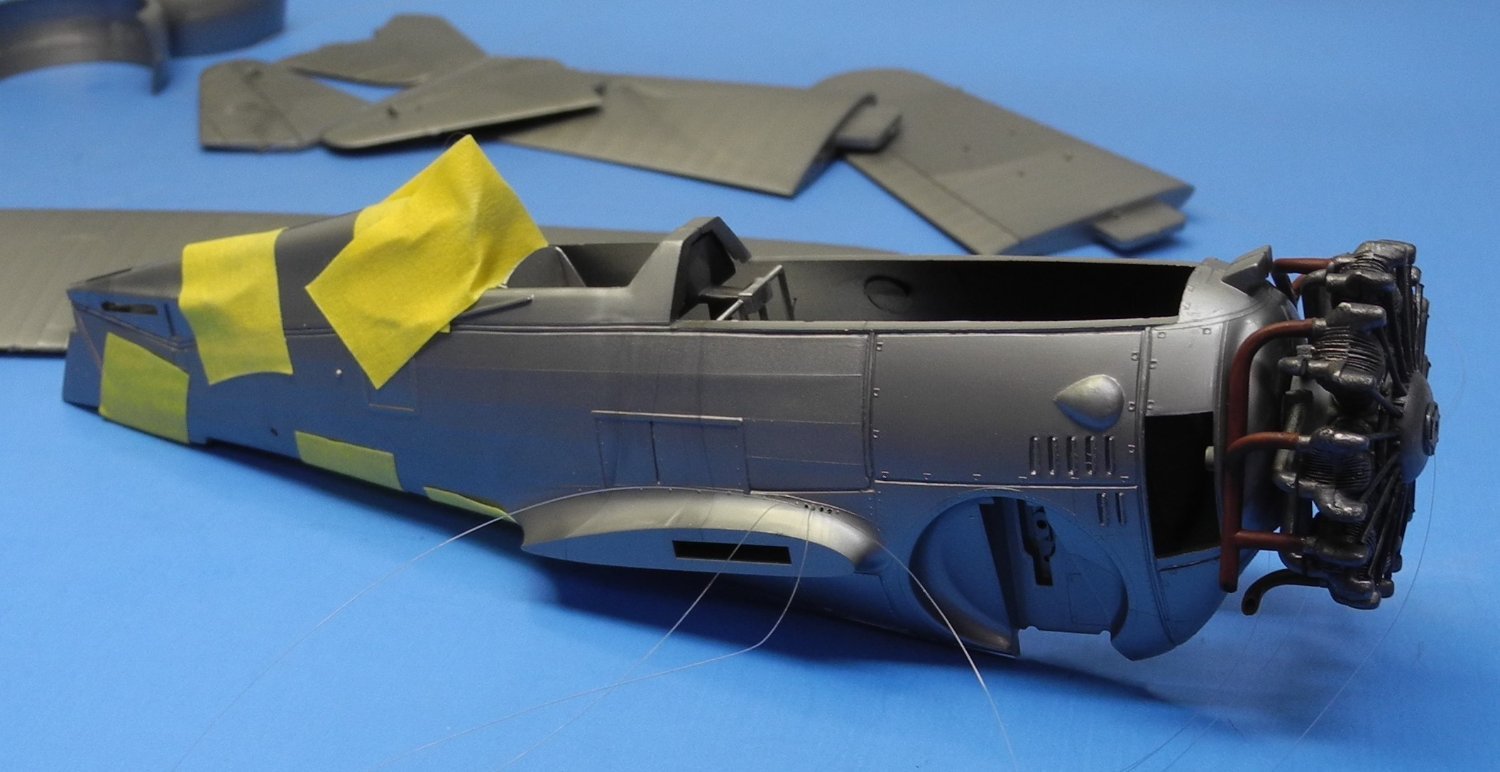
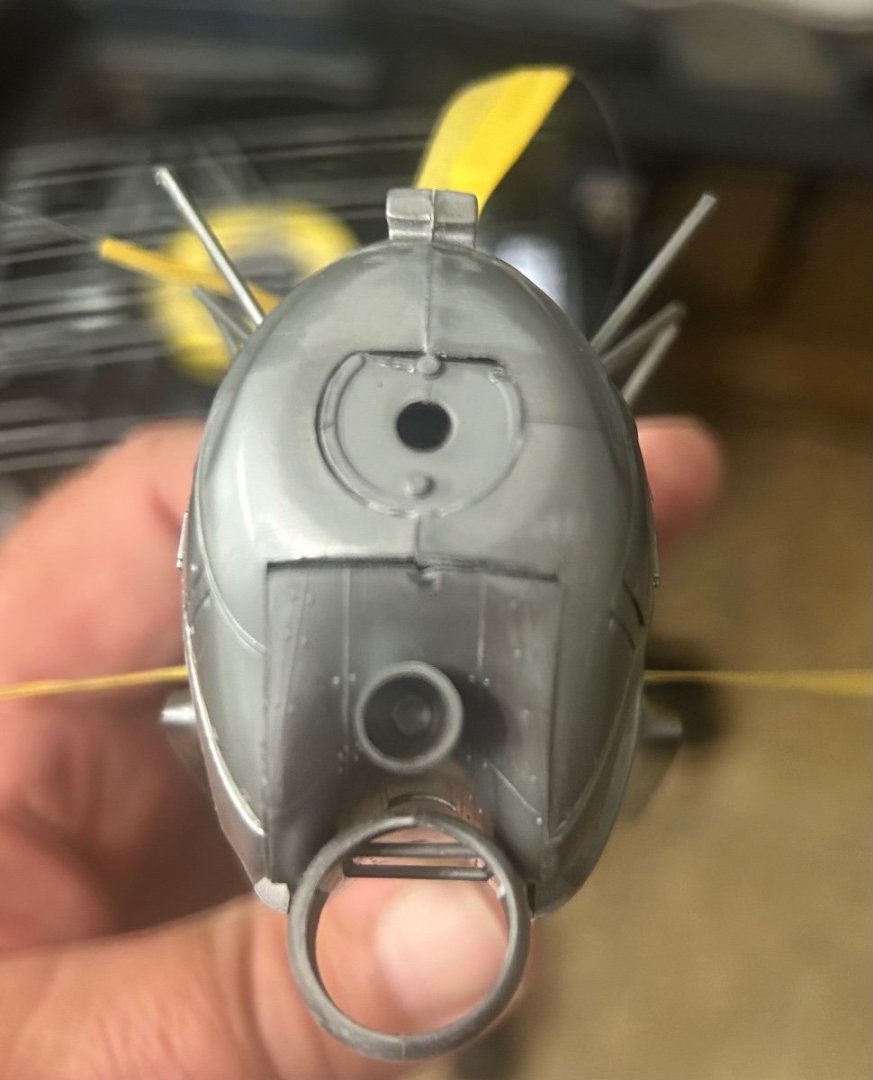
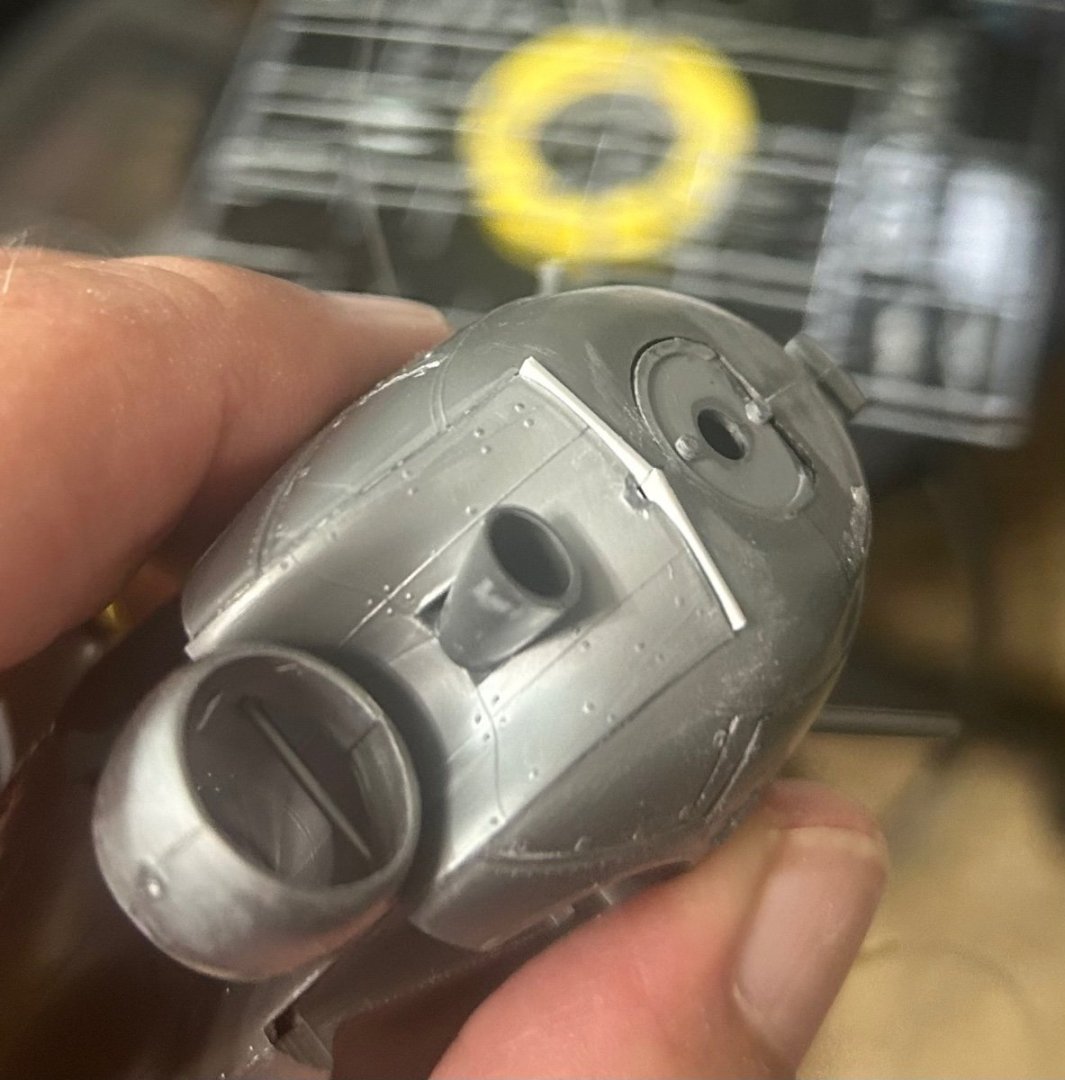
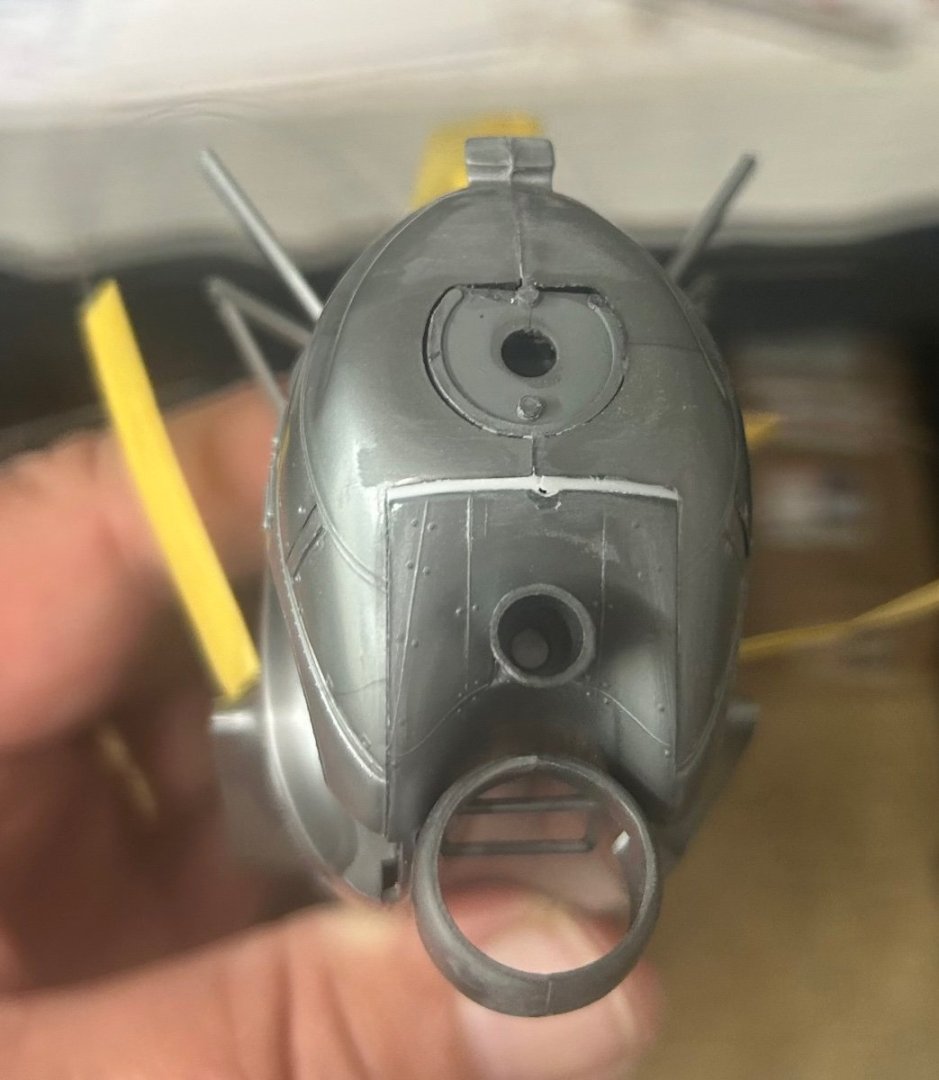
The cowl is just taped together right now. My intention is to paint inside the cowl pieces first, then assemble the cowl halves around the engine, cementing them together, then mask the engine and paint the outside of the cowl. It seems to me the cowl would have separated IRL around the cowl and probably in two pieces, upper and lower, just as it is molded on the model. Only difference is that the real thing would have had brackets the cowl pieces bolted/fastened to. The nice thing, the join itself will not need to be filled and sanded smooth to look realistic. The Yellow Wings decal markings show two different colors being used on the upper and lower cowl halves, not a single color as the Hasegawa markings have it. -
Curtiss BF 2C-1 by CDW - FINISHED - Hasegawa - 1:32 scale
CDW replied to CDW's topic in Non-ship/categorised builds
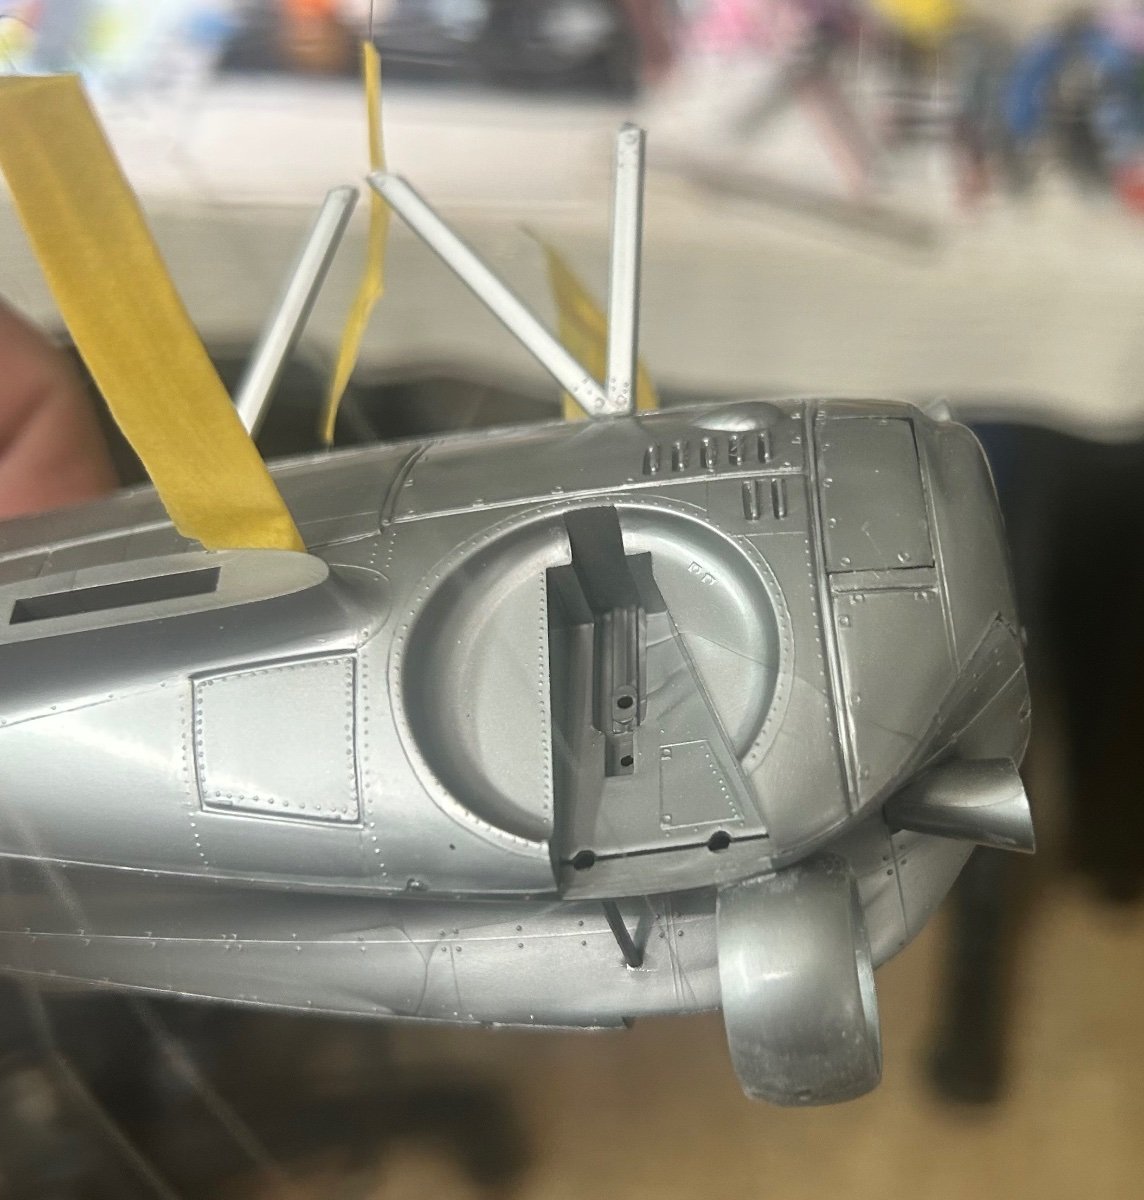
The cowl/nose ring is split into upper and lower halves. This arrangement must be glued in place around the engine because once it’s glued together, it will not fit over the engine. This becomes an awkward piece to paint. Additionally there is no support for the cowl as it just hangs over the radial engine cylinders.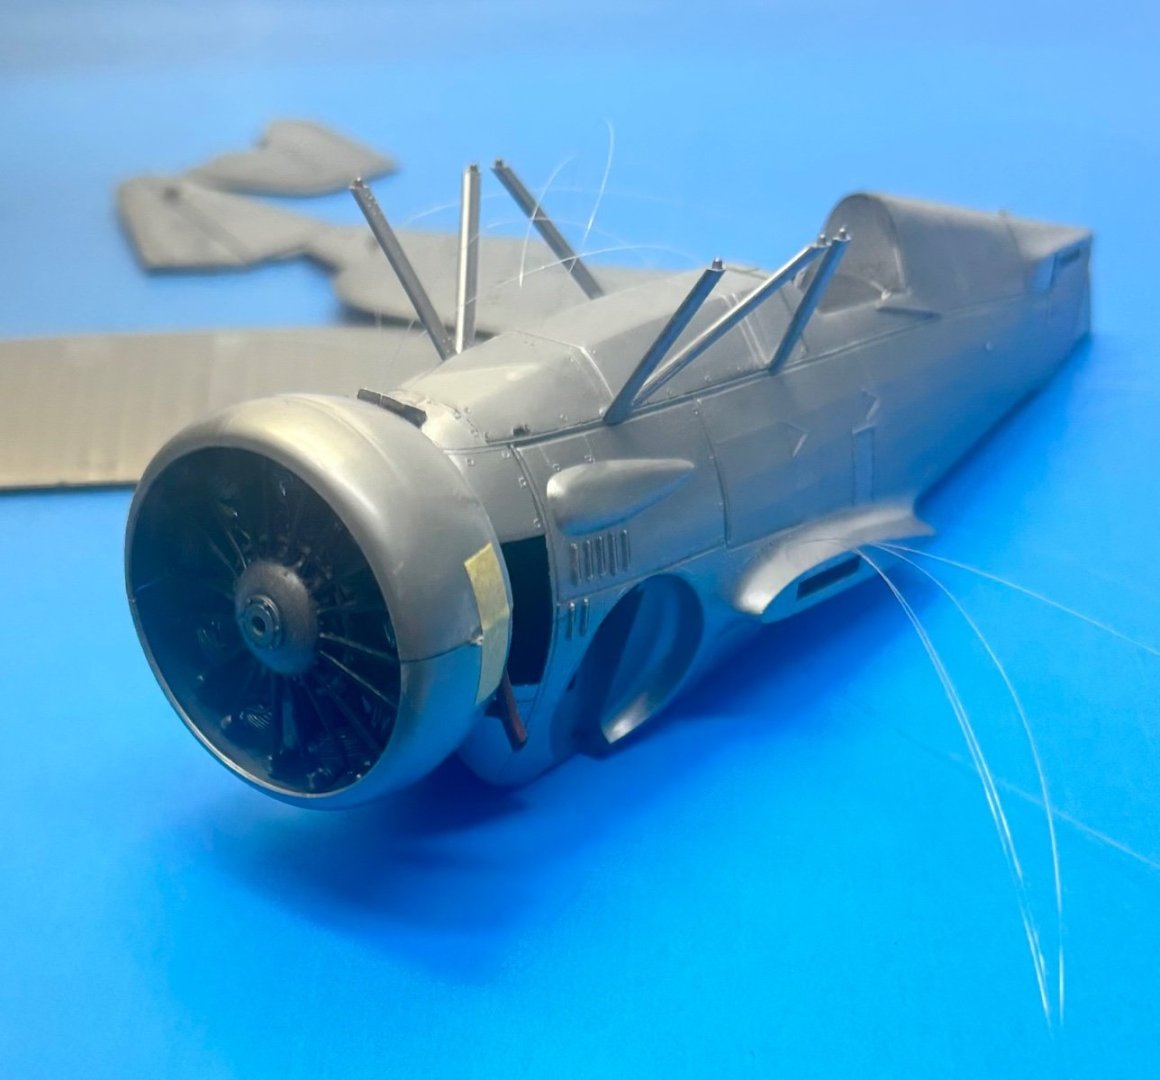
- 93 replies
-
- 12
-
-
Curtiss BF 2C-1 by CDW - FINISHED - Hasegawa - 1:32 scale
CDW replied to CDW's topic in Non-ship/categorised builds
It would be nice to see some modern kits produced of the in-between-the-wars US fighters and bombers in 1:32 scale. Probably wouldn't be a large market for those I'd guess. The old Hasegawa ones are not all that bad. Wonder if they still have the molds? -
Curtiss BF 2C-1 by CDW - FINISHED - Hasegawa - 1:32 scale
CDW replied to CDW's topic in Non-ship/categorised builds
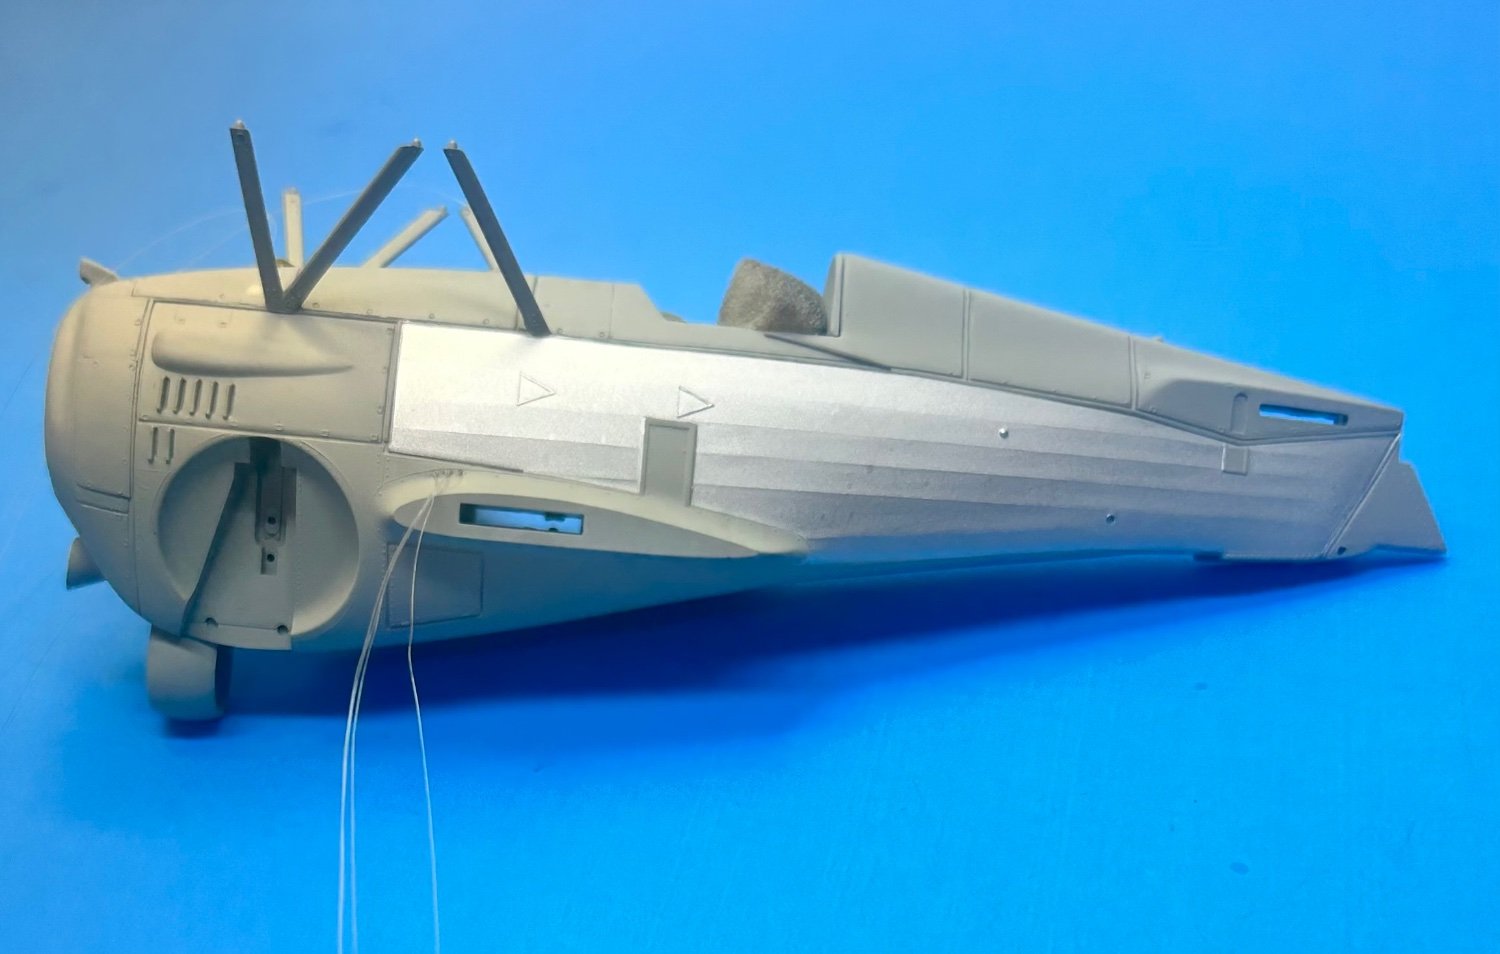
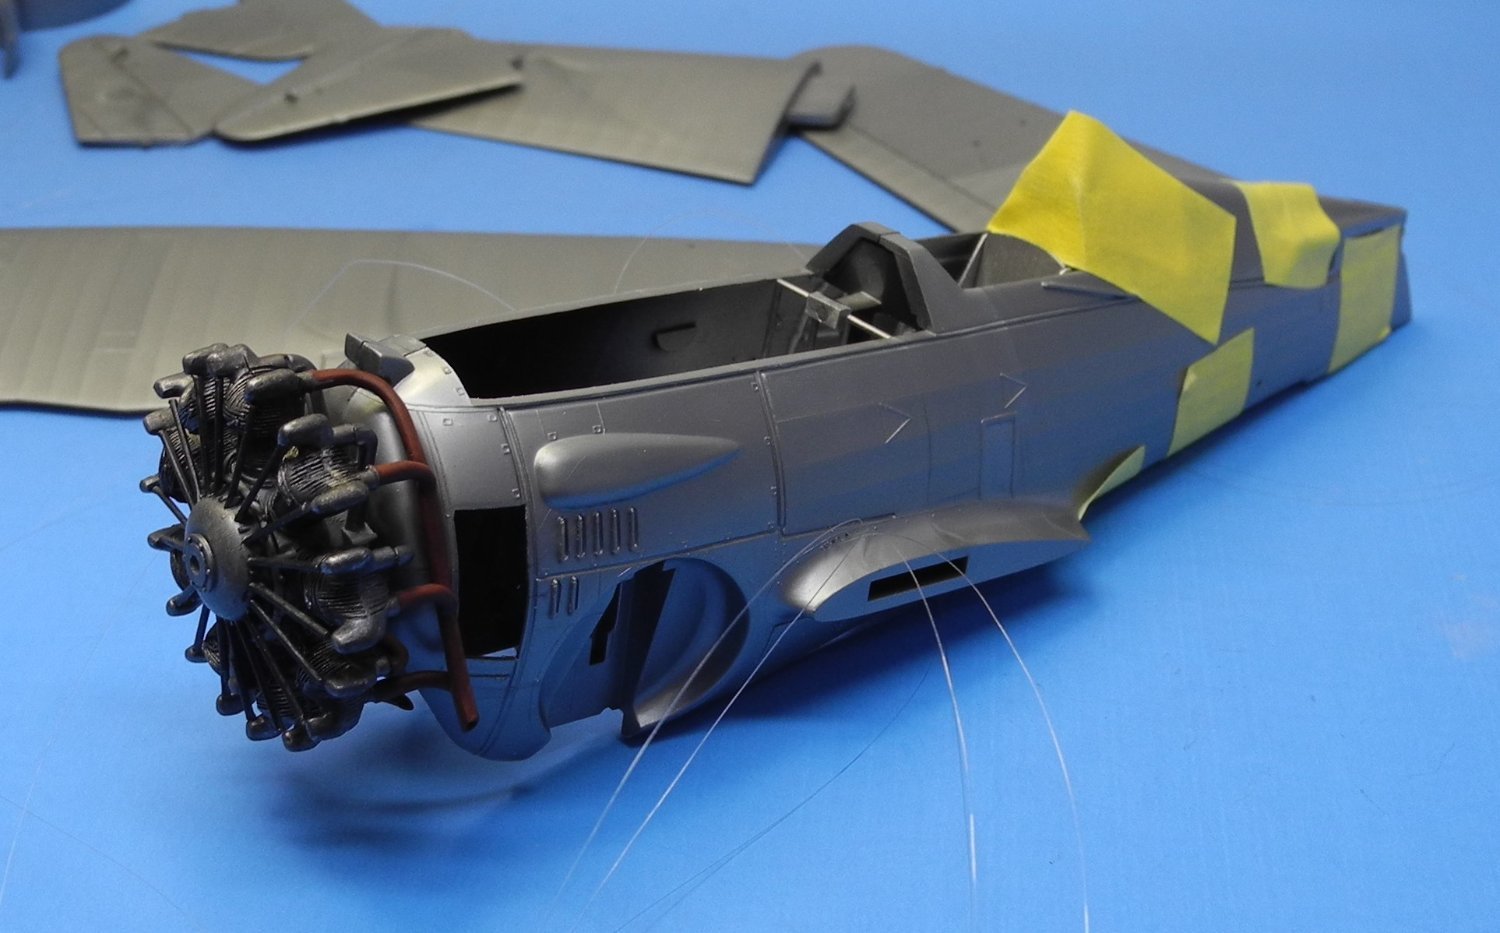
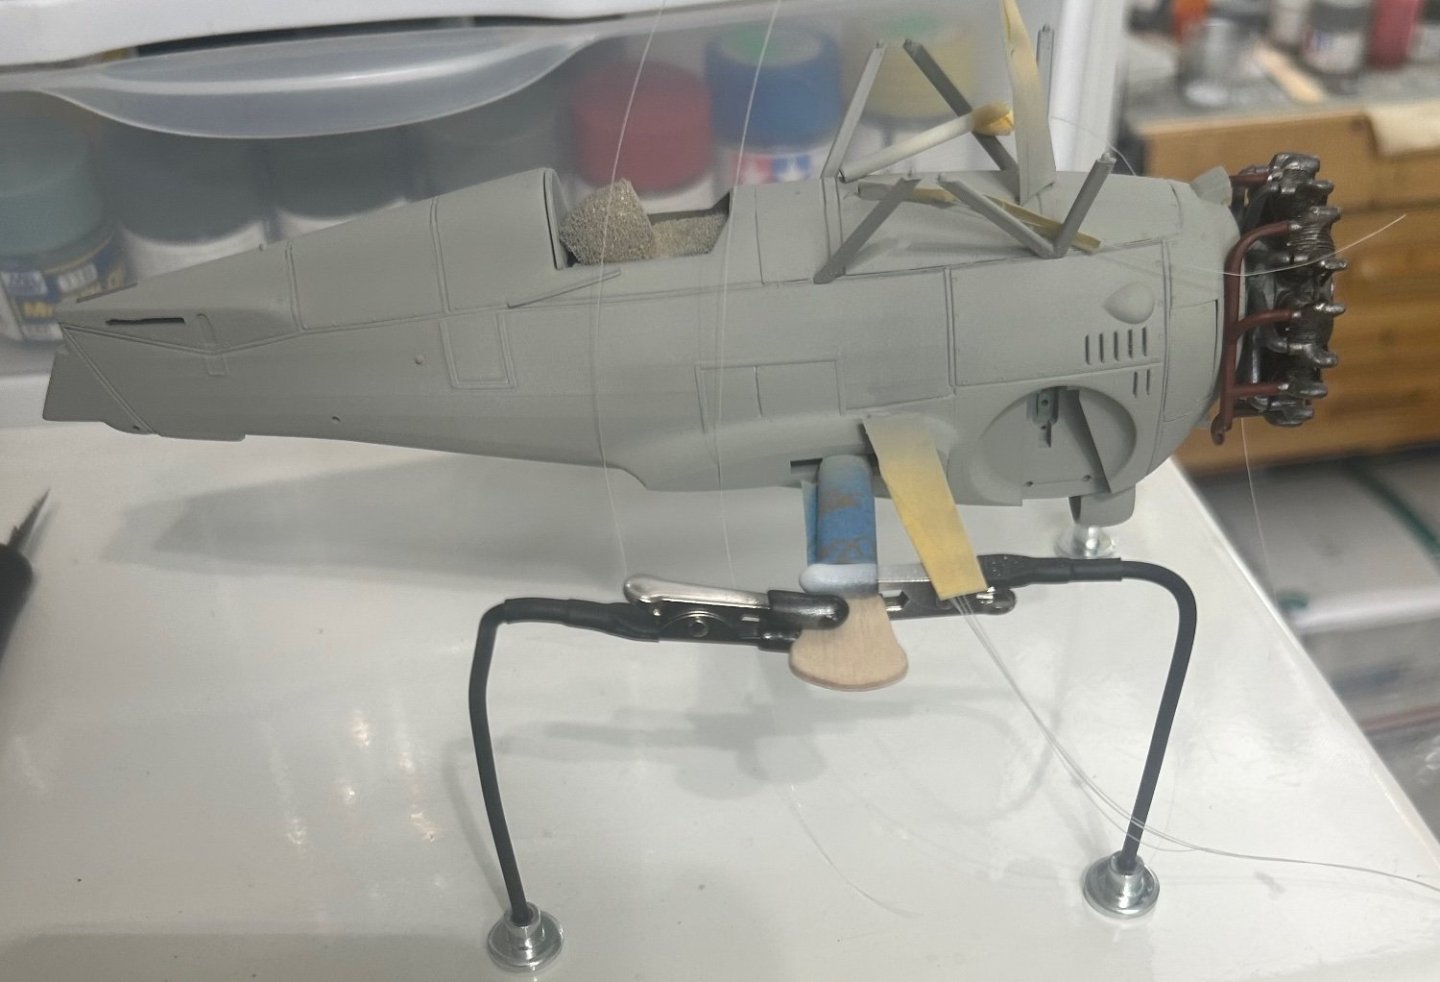
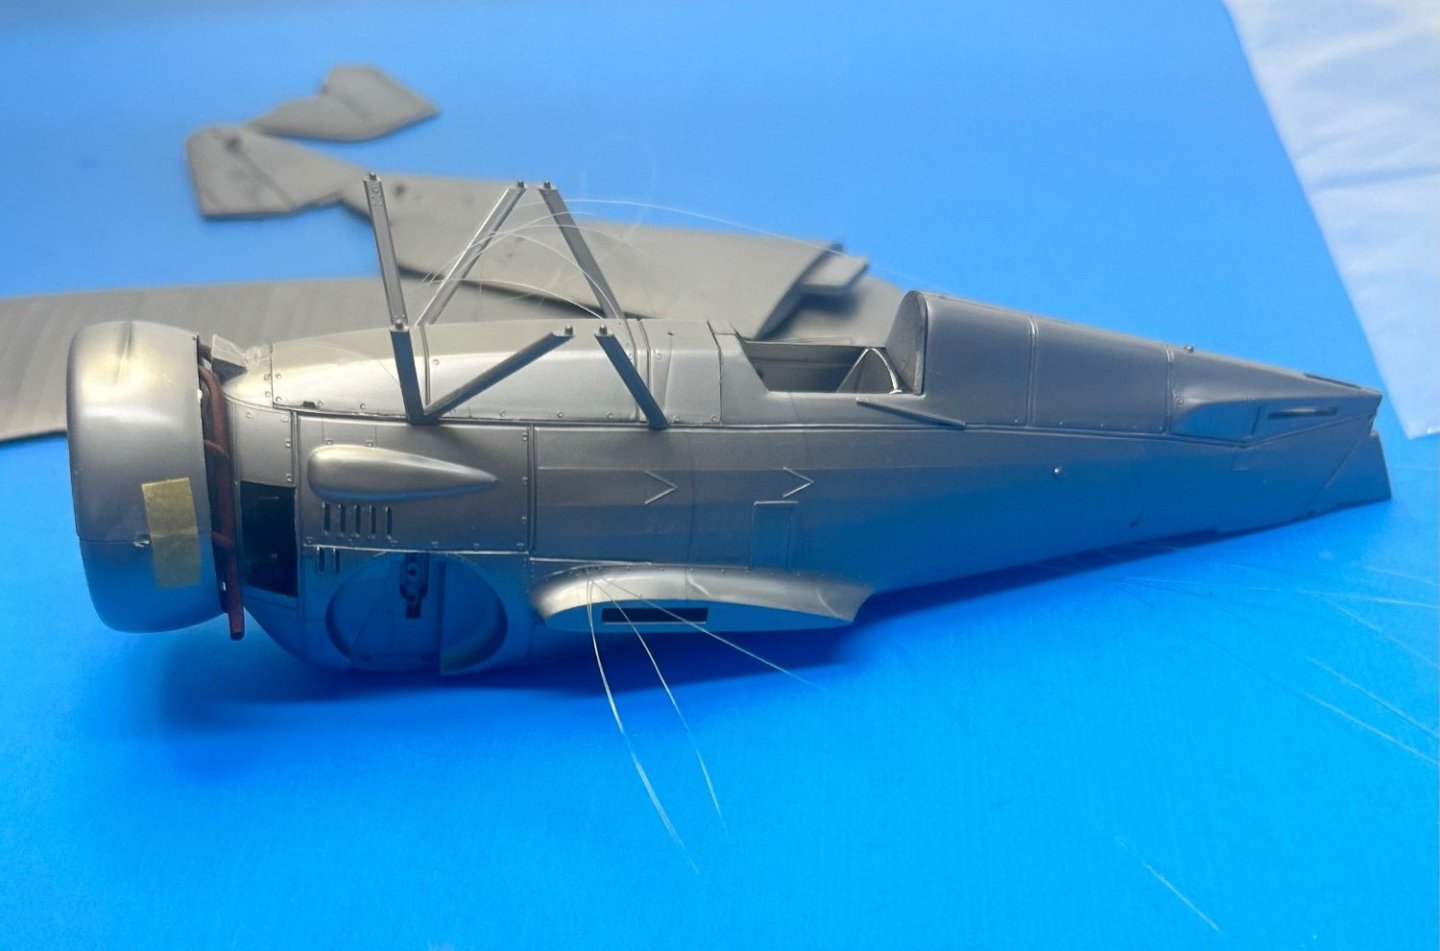
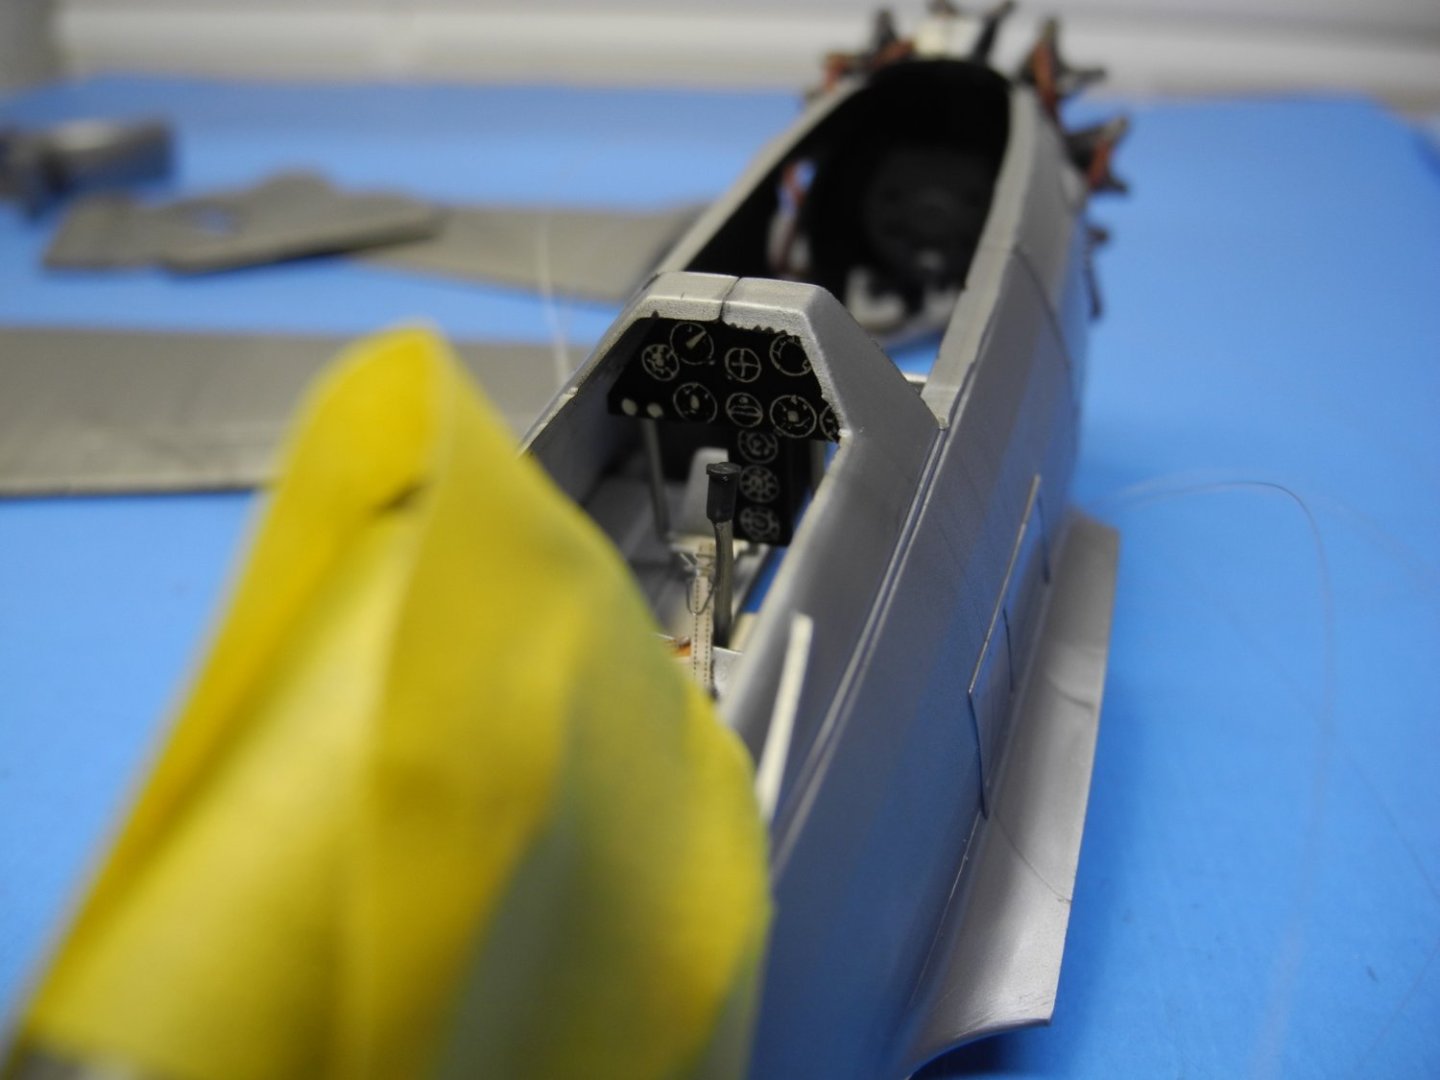
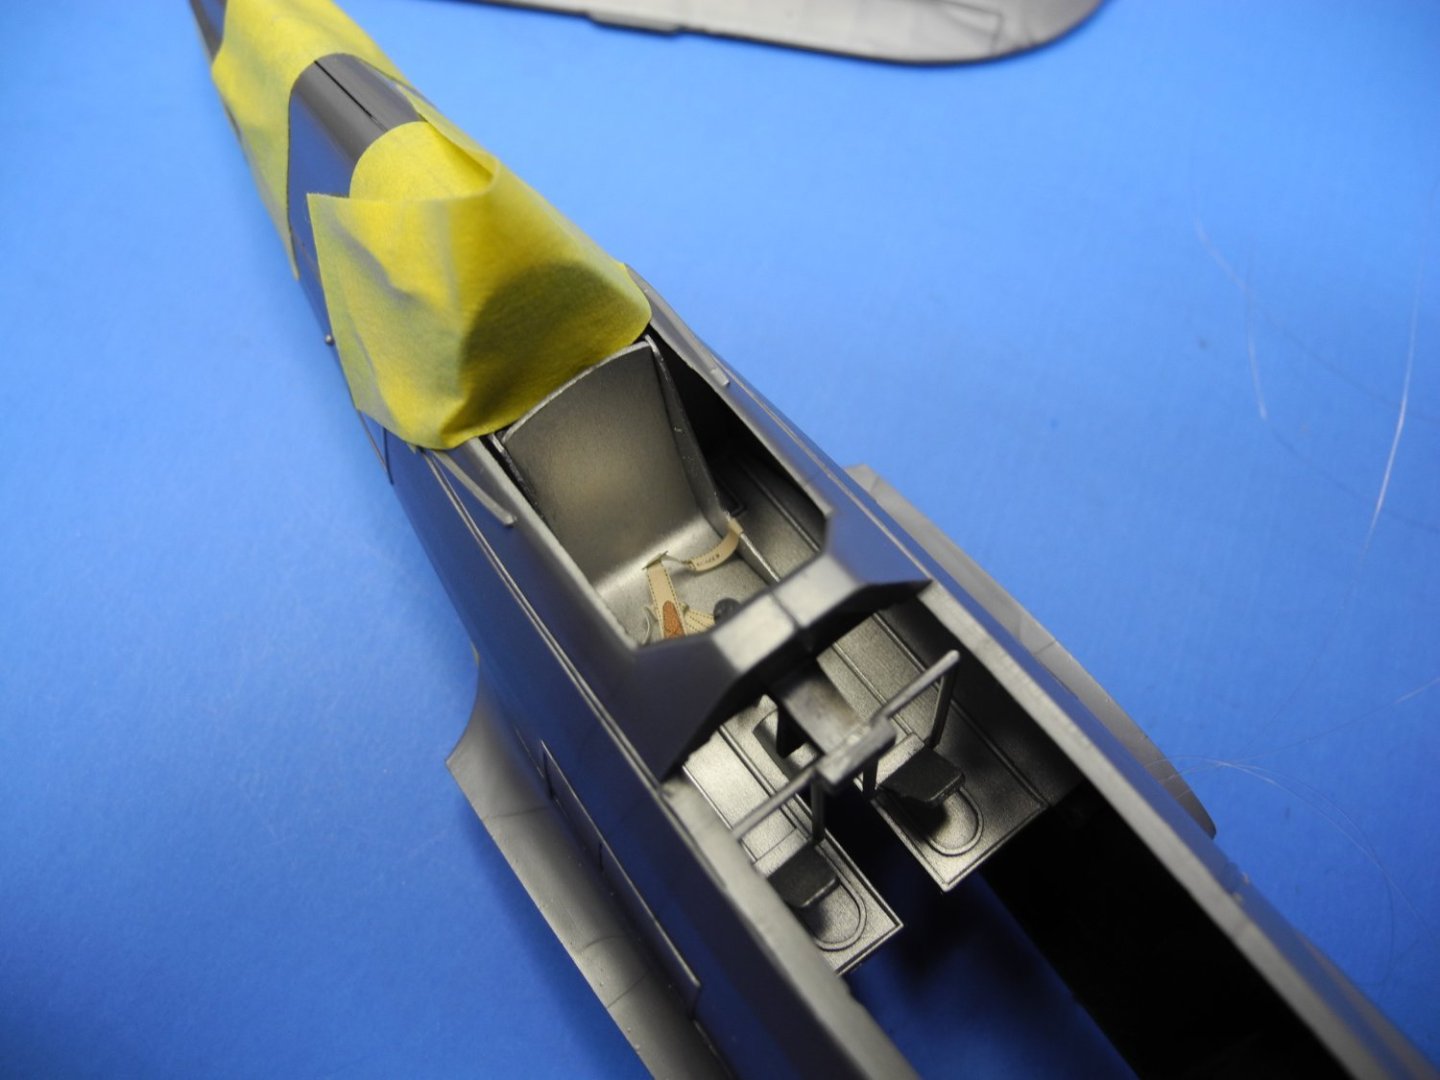
I drilled out all the holes for my rigging lines in the fuselage halves, wing halves, vertical and horizontal stabs. Glued in the rigging lines where appropriate in the fuselage and wing halves, then glued in the simple cockpit/instrument panel assemblies before gluing the fuselage halves together. That's where I stand right now, waiting for the fuselage halves to dry overnight. I chose the option of keeping the cockpit simple and not going overboard with trying to make the old proverbial silk purse from a sow's ear. I had some spare HGW fabric and photo etch lap belts along with a scratch built seat. The stock kit seat just looked so out of scale and clunky, I threw together a seat from sheet styrene. For the instrument panel, I just painted in the dials with a white gel pen after painting it black. All the rest of the cockpit is colored aluminum. In the photos, the radial engine is dry fitted in place as it needs to be removed before finishing and painting the fuselage. For the rigging, I chose to use 2lb test monofilament fishing line.

- 93 replies
-
- 14
-
-
You did a great job on your 51 Chevy Papa. Looks real sweet!
-
Last time I checked, the local raceway sold it, but not exactly sure of the octane being 120. It's not intended for the family daily driver, but the race cars. Here in Tampa, we have also United Speed Shop and I am pretty sure you can still buy high octane fuel from them for racing. I enjoyed seeing the flames shoot out from my exhaust pipes when I used to run Sunoco 105 octane fuel in my 1964 Triumph TR4A. A LONG time ago.
-
Honda RC166 Grand Prix Racer by CDW - FINISHED - Tamiya - 1/12
CDW replied to CDW's topic in Non-ship/categorised builds
Thanks for the kind words gentlemen. -
Pop is an expression that means, to catch the eye and/or to call attention to detail. Yes, to make the eyes wander is a great way to put it.
-
The photos look great. I can't even see the sink marks you described so they must be very small.