


Karinmutter
-
Posts
103 -
Joined
-
Last visited
Content Type
Profiles
Forums
Gallery
Events
Posts posted by Karinmutter
-
-
Finally I managed to start a building log. I have unfortunately already more than 2 years behind me, so it is too late for the early stages. I have not figured out how to make good pictures yet, so these pictures are kind of a test....


-
Hello Pierre,
Nice job on the planking, I know everyone does the bending differently. For me it worked best to put the planks for a few minutes in water and then use a plank bender from aeropiccola (I think they do not exist anymore) what is basically a soldering iron with a modified tip.
Good luck for the future and happy modelling!
Martin
-
Hello Chuck and mobbsie,
I guess I have to finally start a log. It will take some time, however. Because I will face probably more difficulties in creating a log than building the Agamemnon :-( , but I have the camera equipment here already . Unfortunately I completely left it to my former wife to use the camera and upload pictures. I think I will start by reading the instruction manual
 ...It is a Lumix panasonicDMC-FZ 30 by the way.
Have fun everybody,
Martin
-
Hello Mobbsie,
Thank you very much for your positive encouragement. Of course I will do my best, but sometimes I have that fear that I might get stuck somwhere and the mistake cannot be corrected. I have not reached such a point yet, but who knows...But you are right. It is probably counterproductive to indulge oneself in these thoughts.
Best wishes,
Martin
-
-
Hi Guys,
Thanks for the very kind words and for the likes, they really are very much appreciated.
Grant, Thanks mate but I still have a long journey ahead of me, don't forget you have approx. 19 years on me, I think after that time I would burn her.
Sherry, Thank you very much, fortunately it's a part of the build I enjoy but the fingers don't always do as their told so the air can change colour sometimes.
Patrick, From you mate that is a real compliment and very much appreciated.
Popeye, Thank you my friend, Yep the journey is just starting, there is still a long way to go.
Sjors, Thanks buddy, if your brave enough to bring your Aggy over go for it, but your gonna need a bigger set of luggage my friend.
Martin, Thank you for your kind words mate. I'm sure your Aggy looks great, we are always our own worst critics and that is as it should be, we don't learn or improve if we don't question what we are doing.
You should really start your build log my friend, it's a great source of information. Not only do you receive a lot of help but you may also be doing things that will be a benefit to other builders, it's a two way thing and it's great.
To answer your questions, the uprights for the lower deck ladders are just eyebolts, the uprights for the ladders to the upper gun deck and Poop deck are kit supplied. I moved the grating and ladder behind the oven because I didn't want to weaken the deck structure by cutting the beam, to me that seemed a bit drastic although I did consider it, I'm glad I didn't.
Hope that helps you to make your decision and please don't be afraid to ask if you have a problem or a question.
Thanks again guys.
Be Good
mobbsie
Hello Mobbsie,
Thx for the quick answer. I will most likely do it "your way" and leave the deck beam as it is. I had the same feeling that it might somehow weaken the structure...
Have a nice day,
Martin
-
Hello Mobbsie,
At first I want to congratulate you for the great job you were doing. I am still building the same ship, but it does not look half as good, although I put a lot of effort and devotion into it. And I am not exaggerating, believe me!!
May I ask you another question? I have been busy lately and have not found the time to create my own building log yet, but it is still something I want to do.
My question is : There is an opening on the main deck directly after the oven towards the stern . According to plans the ladder should be on the bow direction and the gratings on the stern direction. But unfortunately (plan error?) there is a deck beam where the ladder should be. Keith Julier in his book solved the problem by cutting away that part of the beam. You solved it by exchanging the sides (hatchway, grating). Both ways seem reasonable to me, I just wonder what to do myself now...By the way the ropes on the ladders look great! Did you bend a brass wire for the supporting elements?
Keep up the great work and happy modelling!
Martin (Karinmutter)
-
Hello Karin, hello Mobbsie,
You are at a point where precision counts,
The supplied template is very dangerous... don't use it too much.
In the longitudinal direction, there are no big problems, take a good reference line (by exemple the line passing at the beginning of the bulwalk of the quarter deck) and then, make your own template with a sheet of paper.
The main issue is to have the correct level. The knowledge of the decks helps and you can check taking into account the height of the guns, but I don't think it's precise enough.
There is only one good solution and one good tool that you can check easily against the plans.
It is this one:
I used it and obtained satisfactory results.
I made also templates I used for finishing the ports usinf a file.
The calliper sqare is also of daily use...
I hope this helps.
Now, Mobbsie is right, it should be better if you could start your own build log. It is not difficult to do.
Hello Pierre,
Thank you for answering. I will try my best
Karin
-
Hello Pierre / Karin
Karin, I would like to be able to help you and I think I can but I will not Hi-Jack Pierre's log to do it. This is not fair on Pierre.
If you start your own build log I will be most willing to help you.
mobbsie
Hello Mobbsie,
Thank you for the offer to help me. I wanted to start a building log long ago and I guess I will do it in the near future. Although I do not work with the immaculate precision of you or Pierre...
Karin
-
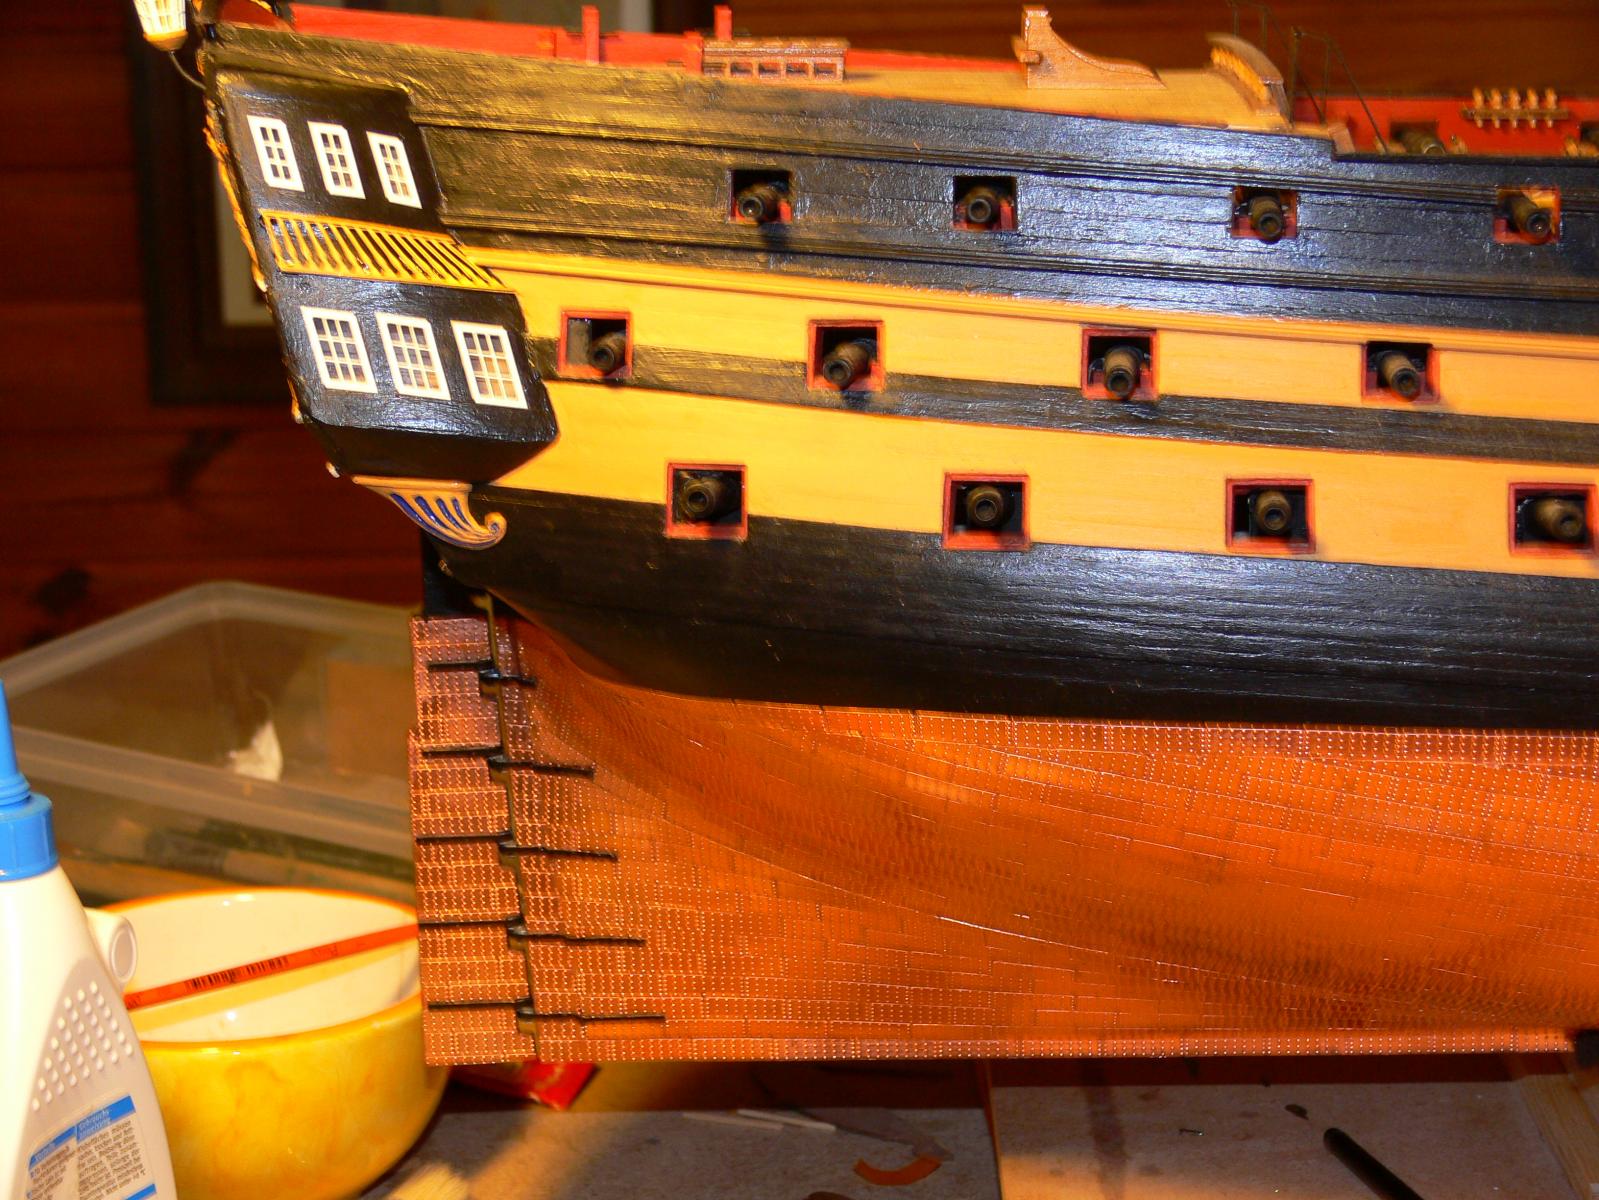
Hello Jean-Pierre,
I started drawing the gunports on the walls using the supplied template.
And I am not happy at all with the result.
No problem in the longitudinal direction, but, big discrepancies against the drawings in height.
I measured carefully. The upper deck level is correct: 180mm from the keel.
For the gunports I measure sometimes differences a big as 2 or 3 mm.
Hopefully, I still have the position of the two gundecks and I can check against the height of the port against a gun.
I am intended to rechck every level against the official drawings using that useful tool with a pencil to draw the waterlines.
Another "precision" work in sight before starting drilling the ports...
Mobbsie, I checked the masts and I dry fitted them again.
To avoid any problem in the lateral size you have seen that, at an early stage, I added small pieces of wood on the sides of the false keel.
In the side view, my foremast lies perpendicular to the keel, what's correct.
The mainmast and the mizzenmast have a certain rake (backwards). I measured it, and they have exactly the same, what's also correct. I have to add, that at the beginning of the construction I cared for and I slighty sanded the slots to be sure to achieve the result. Anyway, its important that the foremast should make a right angle with the keek ans that the two others have the same rake.
Here is a third crewmember I made. A kinf of petty officer watching the construction with the hands in the pockets...
I hope everything is fine. At what stage of the building are you right now? I started marking the gunports. Right now I have not encountered bigger problems. I followed the advice of Keith Julier in his book and created one template 17x15, the other 15x13 mms. However I noticed that the last gun-port in the upper row towards the stern fowls the bulkhead construction inside. I looked at the pland and they were according to it! I am afraid the inner construction becomes a bit unstable, if I just remove the part of the frame where it fowls. I wonder how you saved this problem
Greetings,
Karin
-
Hello Karin,
You are in a difficult situation indeed.
As you can see on my picture Nr 002 I bored holes of a diameter of 4mm through the keel. It's not easy to do because the keel is only 5mm wide.
You have to bore straight and at the right place.
It's, of course, not possible for you to install nuts.
If you read the instructions book supplied with the kit, you will see that they mention the boring of the keel at the stage where you are now, it means at the end of the first planking. Of course, without nuts.
May be that they mean the use of a sharp pointed screw (and not a screwed bar, as I did). But the fixation will not be so strong, and I think that the ship is rather heavy.
You could already start with the boring of 3mm holes. Check carefully the position first. You need three pedestrals and they are not perfectly centered.
If you can do it succesfully, without damaging the keel, go deeper. Select the right screw according to the pedestrals you have (if you don't have them, order them first and check then). If you are deep enough you can probably inject some araldite or equivalent to strenghten the assembly, and then, remake a bore with the final screw.
Anyway, the screws have to be removable for the continuation of the construction. You absolutely need the bottom of the keel as a reference line.
I hope this can help you.
Best regards
Pierre
Thank you again for your advice, Pierre. I am a bit afraid that I might cause some damage to the ship, because it is obviously a tedious and complicated task.I plan to order the pedestals first and then I will decide on what to do. If I don`t use them so what, at least I tried...By the way I assembled the stand meanwhile, padded it with felt. It works quite good. And I altered the first building board like you suggested, removing the front triangles. It works good, too.
Perhaps I will make some pictures later, although I have to admit that I like the look of your ship better than mine...
Greetings, Karin
-
Hello,
I am glad to be back on the new forum after a long silence.
I am a very very slow builder. I started my Aggie in 2010...
Here are somme pictures of some previous steps and the present situation.
I am making a first test to see if I can properly use the new features of the site. It seems it works.
You see here the way I installed (temporarly) the pedestals.
 003.jpg
Here, some planking on the main gun deck, in case they should be visible from above.
First half of the upper gundeck in position.
Planking of the upper gundeck completed.
The same varnished.
I stop now. This is a first test. More pictures are coming later.
I just finished the first plankig of the hull.
Hello,
I am glad to be back on the new forum after a long silence.
I am a very very slow builder. I started my Aggie in 2010...
Here are somme pictures of some previous steps and the present situation.
I am making a first test to see if I can properly use the new features of the site. It seems it works.
You see here the way I installed (temporarly) the pedestals.
003.jpgHere, some planking on the main gun deck, in case they should be visible from above.
First half of the upper gundeck in position.
Planking of the upper gundeck completed.
The same varnished.
I stop now. This is a first test. More pictures are coming later.
Hello Pierre,
it is me again - Karin
 ,
,I feel a little bit embarrassed, because I am always asking you questions. Actually this is not my first ship. About 10 years ago I built the "Santa Maria" an Amati kit. But I have forgotten a lot of things. Nevertheless I hope that someday I can give you a piece of advice that is useful for you...
To my actual problem: Too late I realized, that it was necessary to instal "nuts" in the main board of the hull , to have a connection with the pedestals. To my excuse: I found nothing in the building manual that told me that! I guess it is not possible to use pedestals anymore, because I have already finished the first planking..
Greetings from Germany!
-
Hello Karin,
I did two things.
First, I built the support supplied with the kit . It allows you to work on the ship relatively easily.
Second: I broke one end of the first stand. The ship is maintained by the keel but also by one end, either the stern either the bow.
Main advantage to use this, is that the ship doens't move too much when you are using it, but, mainly because you have a good and safe reference position.
And that will be very very useful later when you will position the gunports, or the waterline, or the wales. It allows to check anytime if your construction is correct against the drawings.
I have presently a little problem for sending pictures, but I do it as soon as I can.
Best regards,
Pierre
Thank you very much, your answer gives me a clue, what to do now. I had forgotten about the stand the kit provides...
-
I am definitely the slowiest builder in the world, but here are some progress.
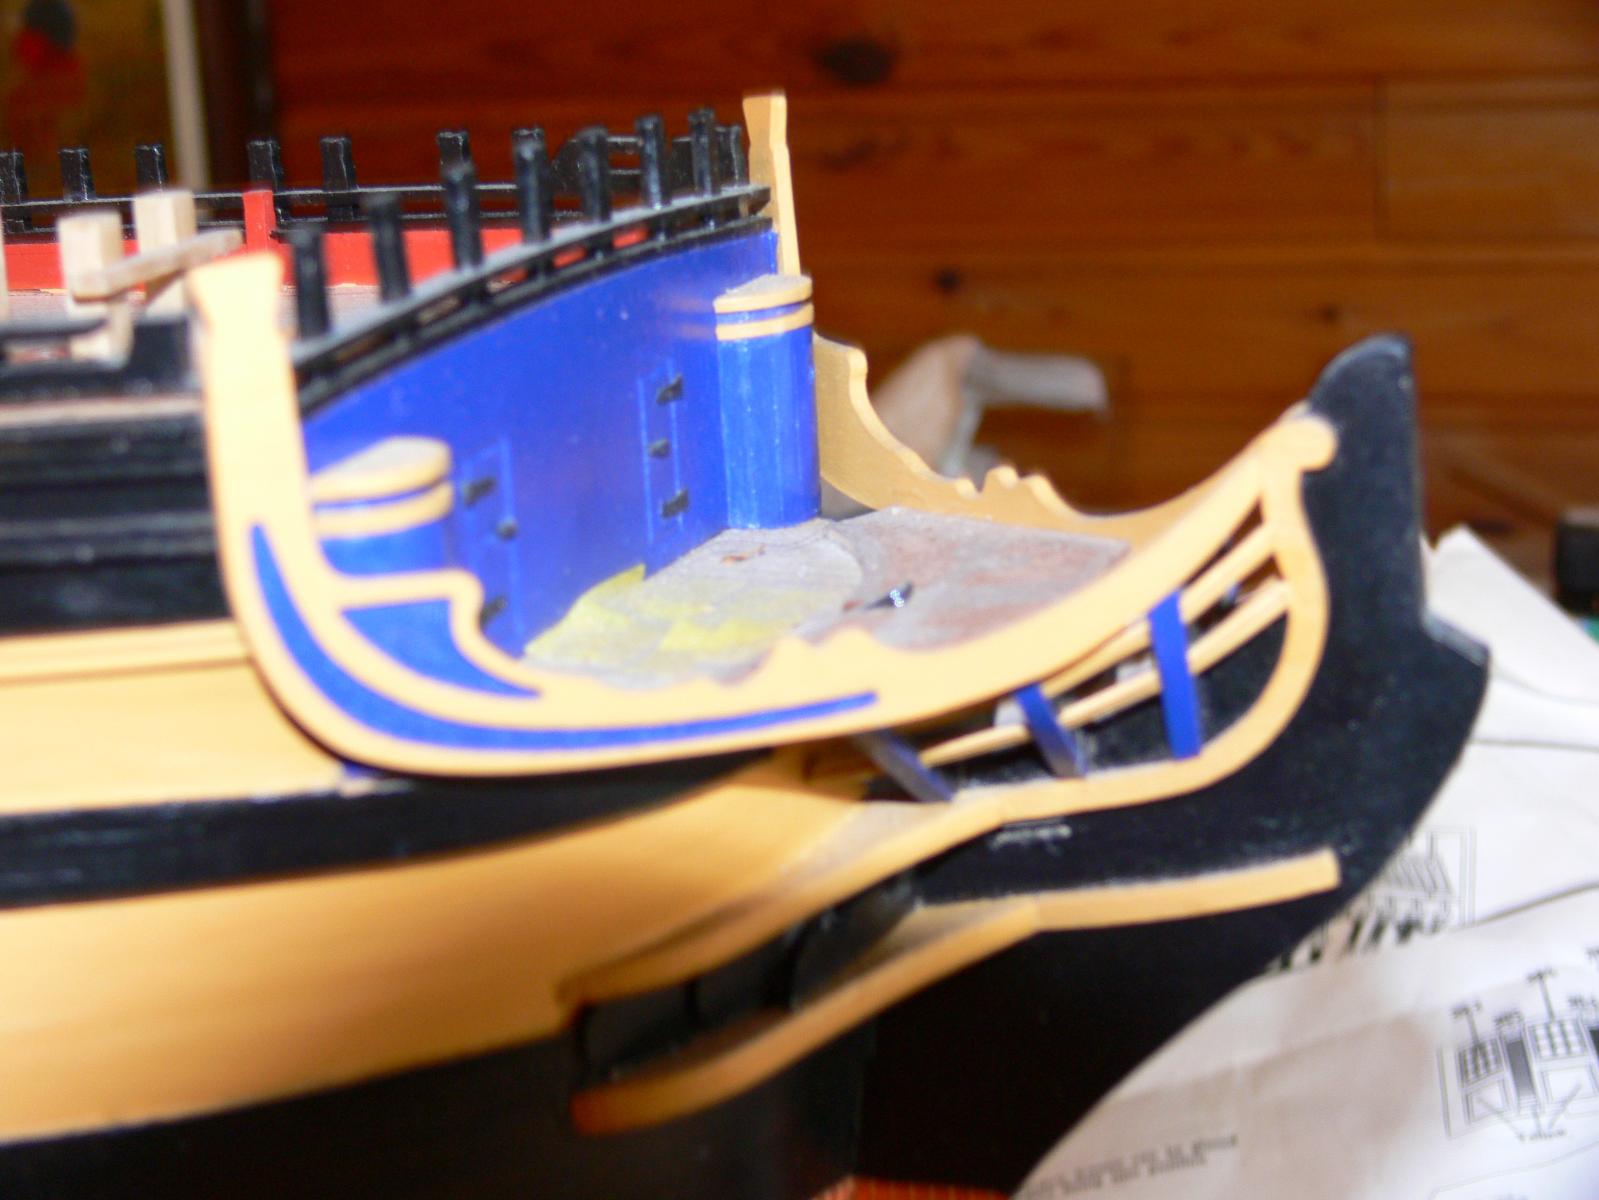
I planked the first curve at the stern counter. I leave the second one for later because parts 80 are protruding and should make the sanding of the hull more difficult. (But, I pinned temporarly the first part 80 to set the limits).
Then I coated completely the hull with diluted PVA.
Here is the present status, awaiting for the template to position the gunports.
This is the first sailor I made, about 25 years ago.
And here is the second. The photographies are not too good, but they are very small and I am obliged to use macros.
Pierre
Hello Pierre, I finally finished the first layer of the hull planking.I had planked mostly , when the ship was in an upside down position. I had created a simple stand for that task. When I wanted to turn the ship around again, I realized, that I could not use the previous stand, because the planking was in the way now...My question to you: Did you create a completely new building board, or did you alter the old one?
Best wishes, Karin
-
Hello Pierre,
I made a lot of progress with the first planking. It does not look as good as yours though... One question: Why didn`t you plank from the deck all the way down. I see in your Picture (28) that you started from the keel after planking the upper half. I wonder why you did this, has it to do with the run of the planks? I intended to go from deck level down to the keel, but now I have doubts.
Good luck for the future ,
Karin (helps Martin)
Thx for answering, it made everything a lot clearer. For some reason I could not see my first post, so I repeated it...
Greetings,
Karin
-
First planking nearly completed,
When I was not at home, I started other "small" activities, like the boats,
Here is the launch,
and, here all four boats.
I started also to make the guns. Here is a rig I made for the construction of the carriages.
This is the present status of my ship. First planking almost completed.
It still need some local corrections and then.... sanding.
Hello Pierre,
I made a lot of progress with the first planking. It does not look as good as yours though... One question: Why didn`t you plank from the deck all the way down. I see in your Picture (28) that you started from the keel after planking the upper half. I wonder why you did this, has it to do with the run of the planks? I intended to go from deck level down to the keel, but now I have doubts.
Good luck for the future ,
Karin (helps Martin)
-
First planking nearly completed,
When I was not at home, I started other "small" activities, like the boats,
Here is the launch,
and, here all four boats.
I started also to make the guns. Here is a rig I made for the construction of the carriages.
This is the present status of my ship. First planking almost completed.
It still need some local corrections and then.... sanding.
Hi Mobbsie,
Thank you for the advise. I am now finishing some details (filling small holes and stealers), after that I am intended to put a layer of diluted PVA and I shall follow your idea. I shall use the template, position the gunports and eventually make four holes per port. And, after that, sanding... Anyway, with the weather we have here, there is no chance to go outside for sanding, and I am not sure my wife should appreciate a big sanding operation inside...
Hello Karin,
I had also some difficulty with the second bulkhead. But, no question about, you have to align the top with the gundeck. The easiest way ins to make a dryfit, with the foremast and the bowsprit. Don't care too much about the bottom of the bulkhead. It becomes very thin and will, anyway, be affected by the preparation of the edges. By the way, putting a filling block (in balsa) is always a good idea, and the question of the bottom of the bulkhead is automatically solved.
Here are some pictures:
First, the dry fit with the foremast and the bowsprit in place.
Then, the filler block, the deck well in line on all the length and the sanding of the bottom of bulkhead Nr2.
The next picture shows more or less the same.
Next, a small useful trick. Add small pieces of scrap wood on both sides of the masts. They will so remain straight in any circumstances.
I should like to come back on something that Mobbsie pointed in his Log.
There is a little problem with bulkhead Nr4. I thnk it is necessary to "refill" it a little bit (not too much, less than 1 mm) below the "round" part. Otherwise a hollow appears in the hull. You can try to find the right thickness by checking with a flexible plank. If you encounter a "double curvature", it's wrong. The curvature has to evoluate smoothly and should never change of sense. The hollow is visible on the next picture. Try to avoid it taking care in advance (what I did'nt...)
The sailors are home-made. I started making them about 20 years ago, and from time to time I work to. They are now 12. A 13th is always waiting for painting and a 14th is still far to be finished. I will progressively let you meet all the band...
Pierre
Hello Pierre,
I made some progress with my first planking meanwhile. It does not look as good as yours, but o.k. for me. Looking at your pictures, I noticed a gap between the top and lower part of the planking. I intended to plank all the way down from deck level. It would be great, if you could tell me, why you have planked the bottom (starting from the keel I guess) after having planked the upper part. Has it something to do with the run of the planks?
Greetings,
Karin
-
First planking nearly completed,
When I was not at home, I started other "small" activities, like the boats,
Here is the launch,
and, here all four boats.
I started also to make the guns. Here is a rig I made for the construction of the carriages.
This is the present status of my ship. First planking almost completed.
It still need some local corrections and then.... sanding.
Hello Pierre,
I have meanwhile made some progress with the first planking. It does not look as perfect as yours, but o.k. for me. I noticed something however: You have this gap between the upper and the lower planking. I intended just to plank it all the way down from deck level, but now I have doubts. It would be great, if you could tell me why you started planking from the keel upward (I suppose) after having planked the upper half. Has it something to do with the run of the planks?
Greetings,
Karin
-
This picture makes it a lot clearer. Without you people it would be a lot harder for me to understand the instructions.
Thx, bye
Martin
-
Hello Pierre,
Just one more question, because I will put in parts 61 and 62 on soon: Did you paint everything black besides the engravings? It would be helpful, if they told you when to paint and how...
Martin
-
Hello Mobbsie,
Thank you, too, for the advice. I meanwhile found the "engravings" on sheet 4, so I am fine (for the moment...)
Martin
-
Hello Pierre,
I had a look at your model and it made everything clear. It looks great, by the way!
Don`t know how I had gotten the idea, that parts 61 and 62 are fixed temporarily , I guess I just did not read carefully enough

Thanks for helping,
Martin
-
Hello Pierre, Boris and Mobbsie,
Thanks for your descriptions of how you do things. Right now I am at the state where the first planking starts. I have to fix the walnut pieces temporarily. I wonder how I fix these two pieces (61 and 62) temporarily without damaging the walnut.,.Perhaps a very little drop of superglue and using a debonder later?
Mine have two little "engravings" at the wide side: A triangle and something like two squares. I wonder if this happened by coincidence or does it serve any purpose? I guess I will put it (the engraving) towards the inside of the ship. Does any of you "Aggie-builders" noticed the same in his/her kit?
I wished I would be better with the camera. My wife was the computer/picture expert, I was the builder. Since she left me, I have a problem...But I sti8ll have the equipment and I guess I will have to learn it, in order to upload some pictures.
Greetings,
Martin
-
Hello Pierre,
Thank you for answering. I guess you can do it either way. I personally tend to follow the main way, because I don`t trust myself enough to deviate from the description. This book seems to be a good recommendation. I will try to get a copy...
Greetings from Germany
Martin
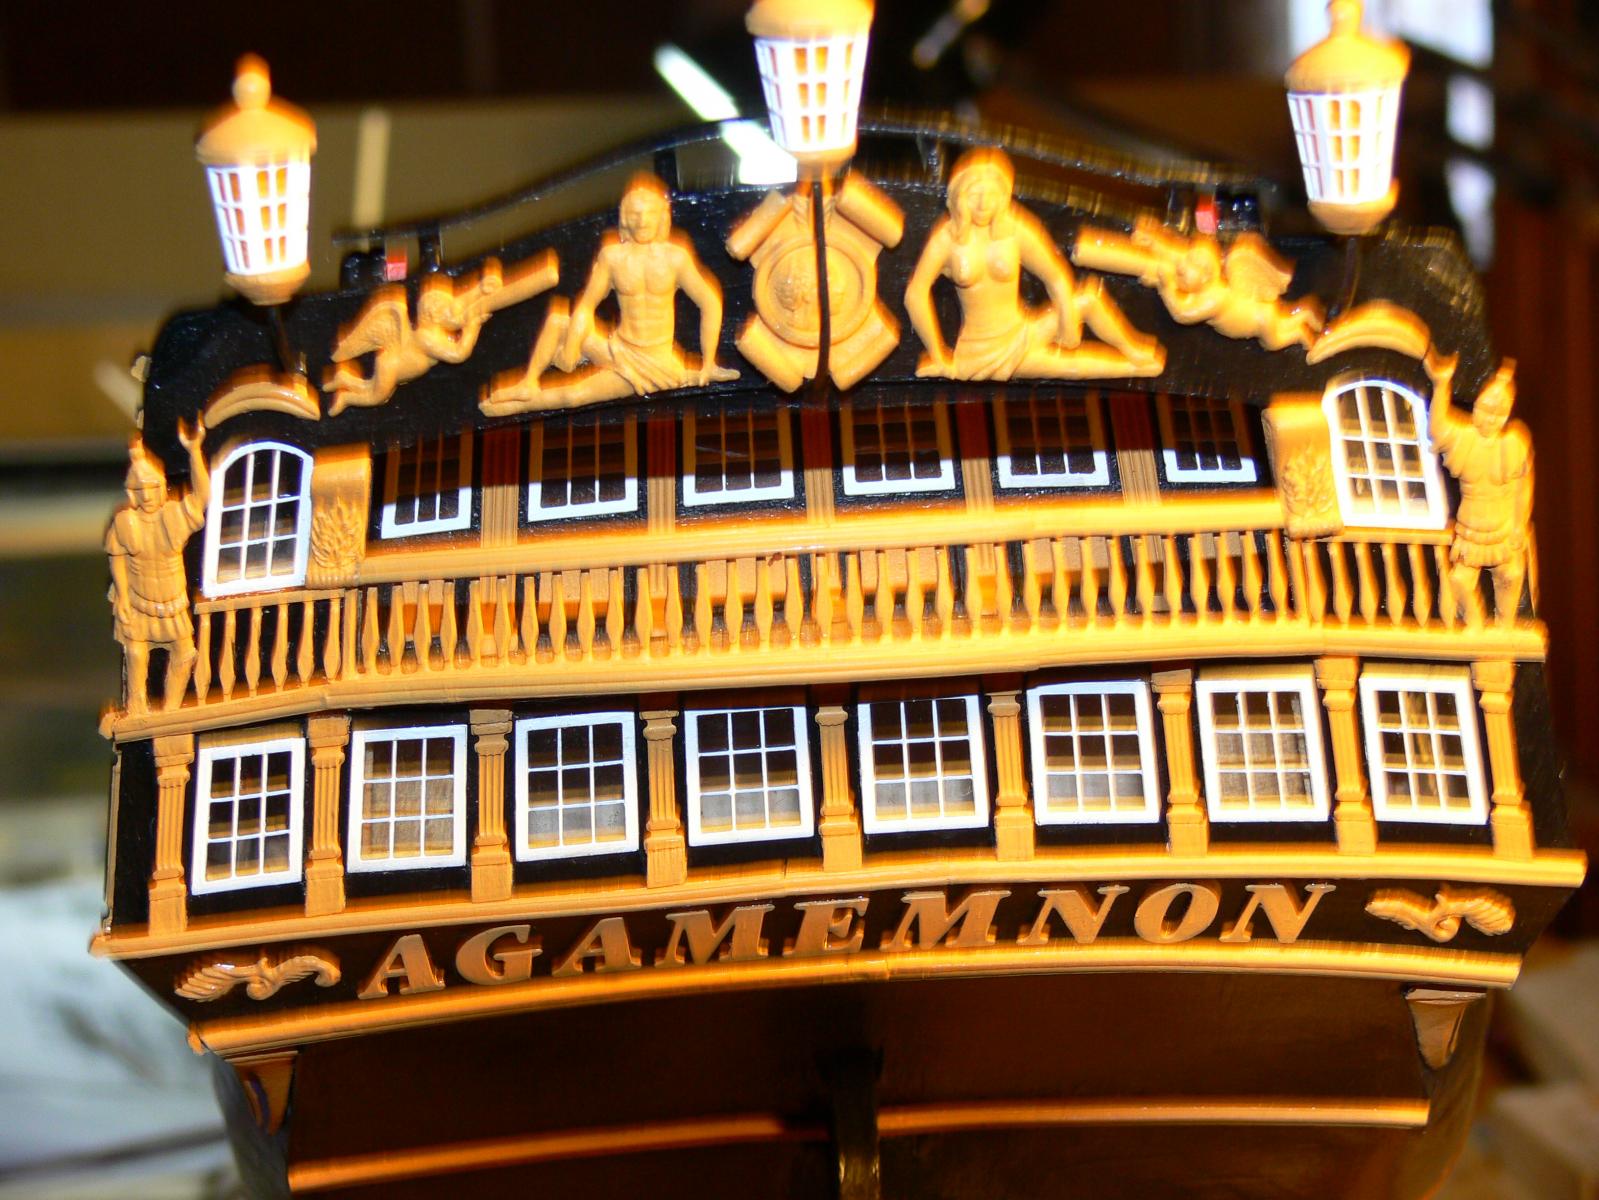

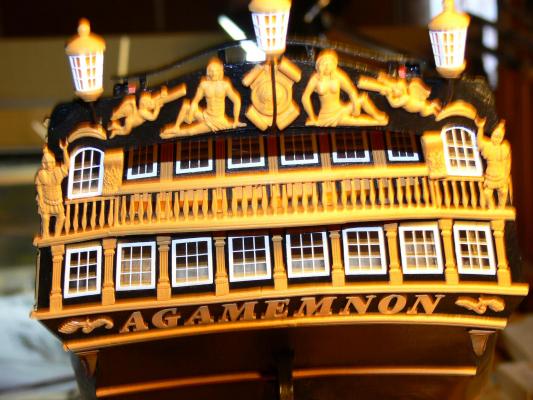
HMS AGAMEMNON by Karinmutter - FINISHED - Caldercraft - 1:64
in - Kit build logs for subjects built from 1751 - 1800
Posted
Thanks CPS and sygreen for the positive comments.
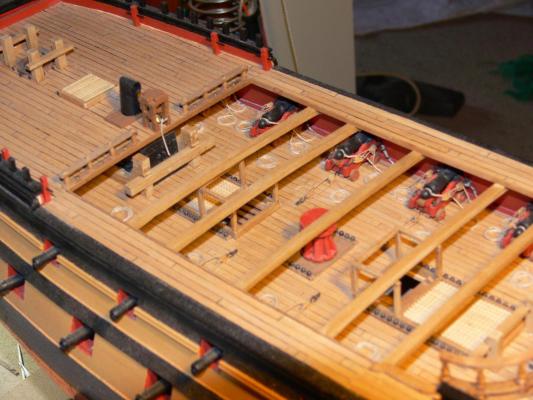
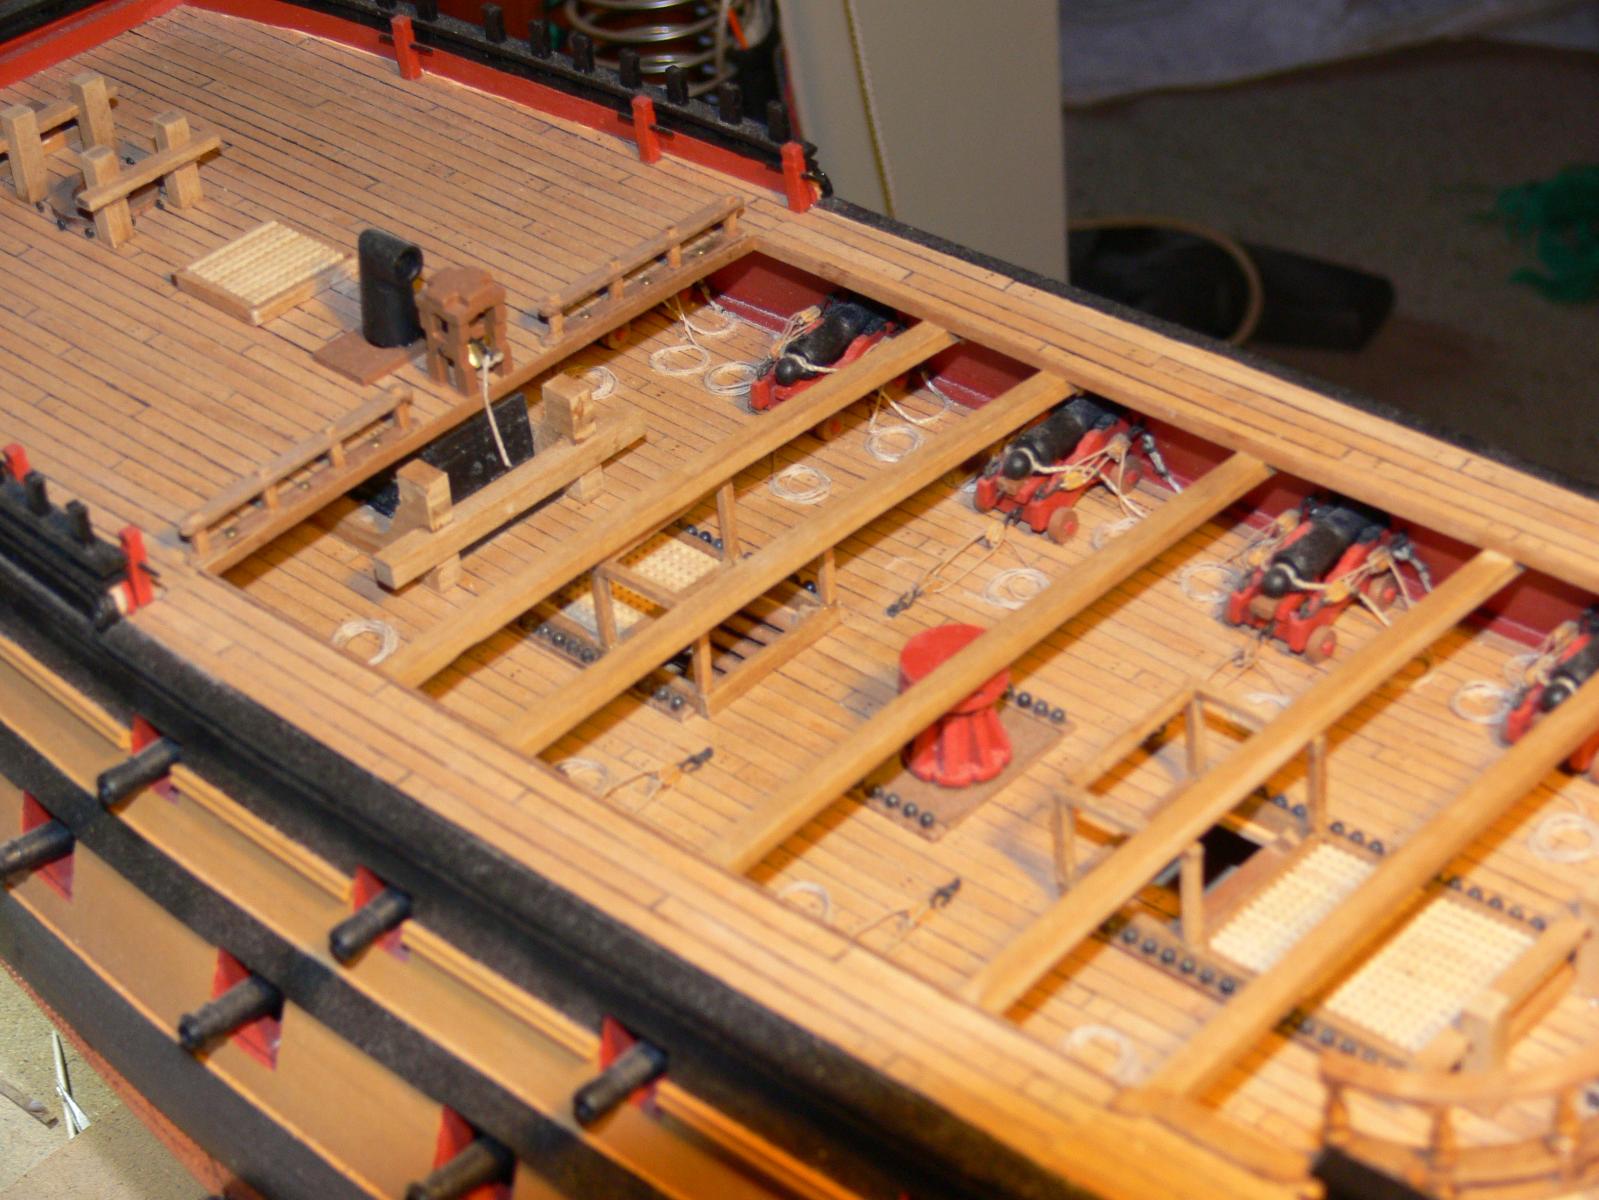
To sygreen: The kit was in a very good condition so I did not see the need to deviate from the plans. The only thing I made different were the deck planks: I created a simulated caulking with a black marker (you have to prepare the planks with pore filer that it does not go in too deep) and created two holes on each side with a little jig ( I will send a picture later) later I added a little bit of paint on the hole, that it is better visible.
I also rigged the cannons and changed the steering wheel . Apart from that i basically followed the original instructions.
Greetings from Germany
Martin