Brucealanevans
-
Posts
450 -
Joined
-
Last visited
Content Type
Profiles
Forums
Gallery
Events
Everything posted by Brucealanevans
-
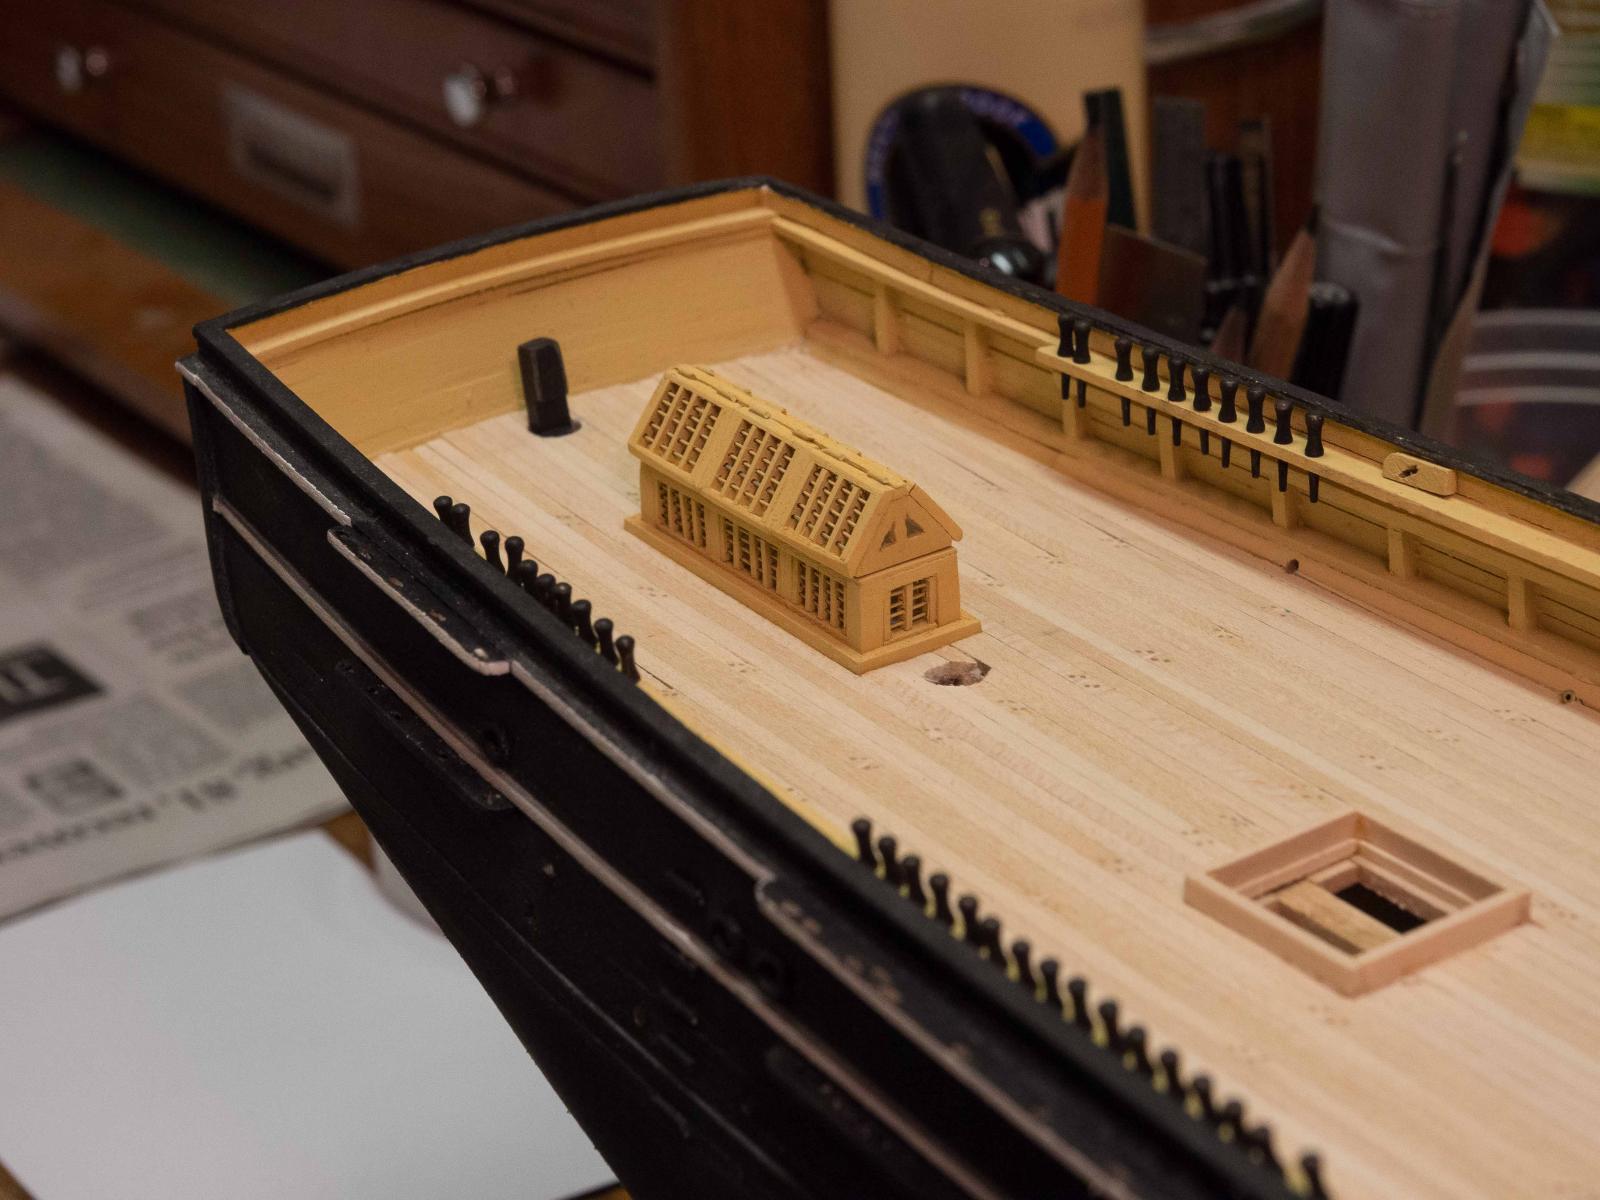
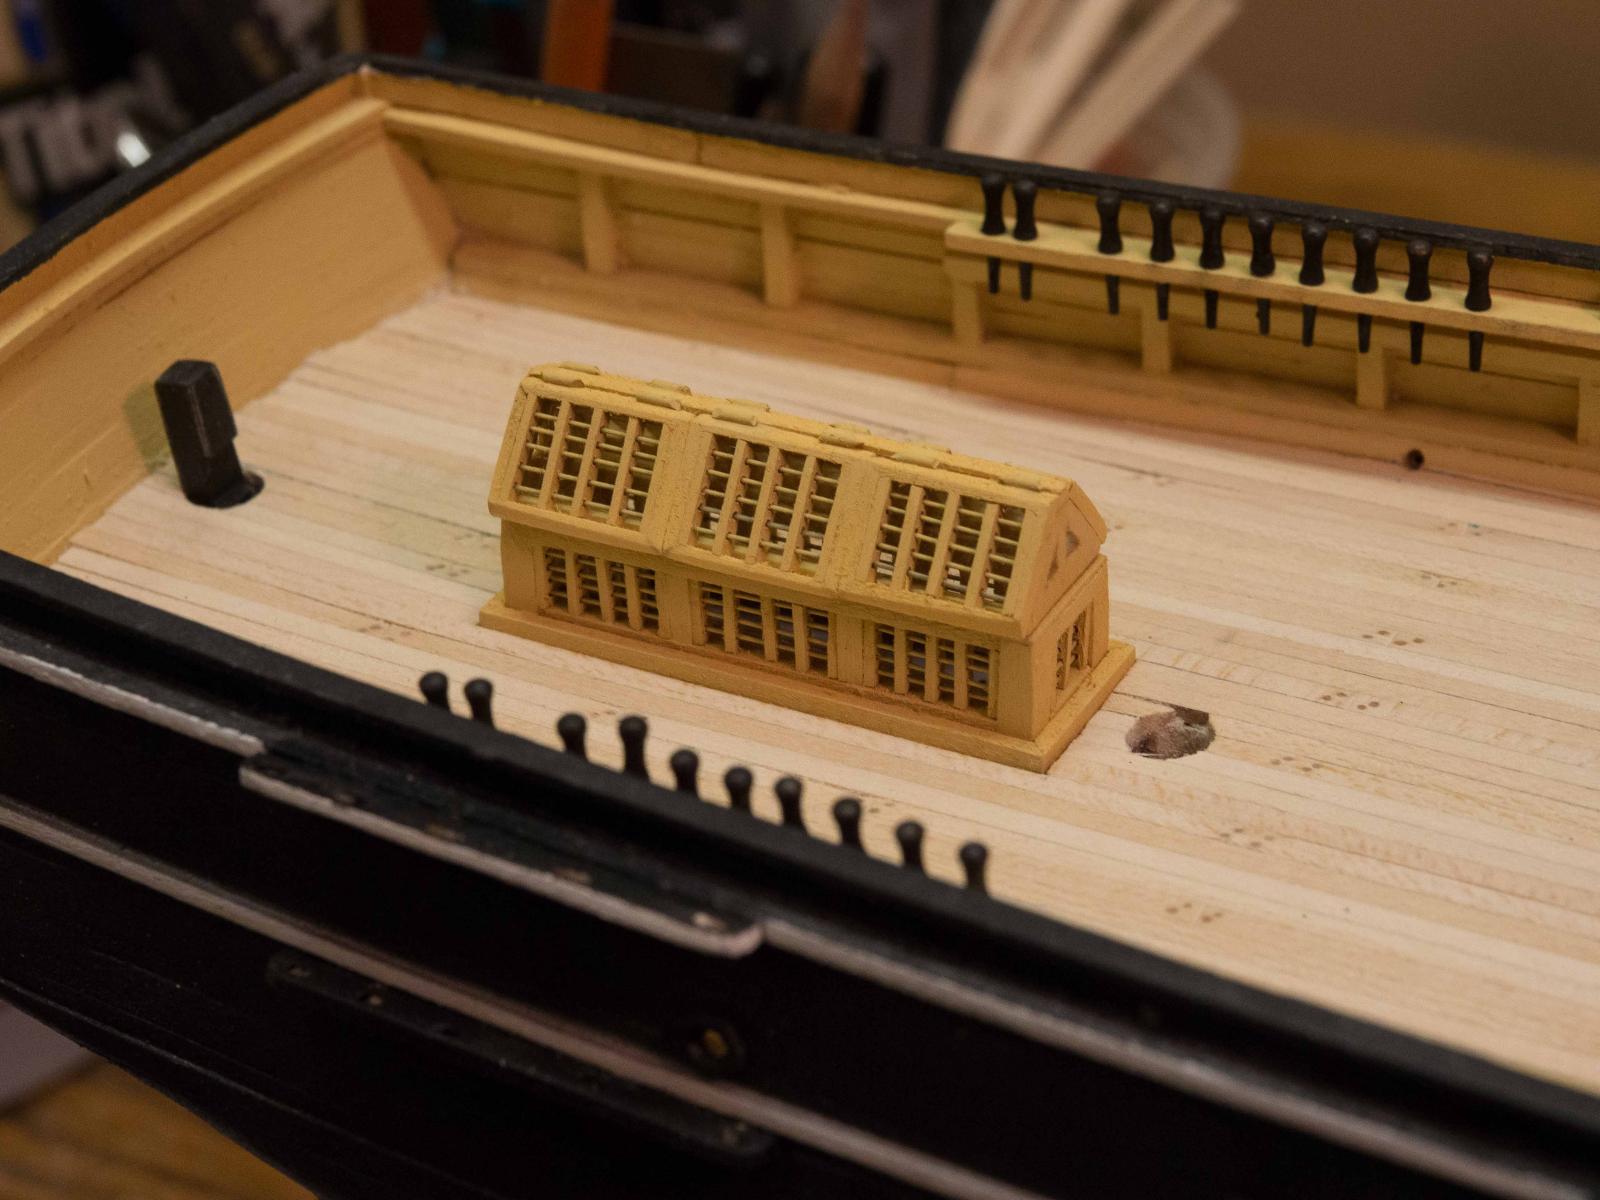
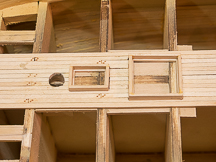
 So, here is the skylight in place. I'm relatively pleased with the result, although there's too much overhang of the top window panes - the coaming I put in place was thicker than it should have been so the base part was slightly smaller, and I didn't allow for that when I built the top from the plans. Overall tho, pleased with the result. 2 weeks of intermittent work. Next on to the next most fiddly bit - the tryworks. After a break.
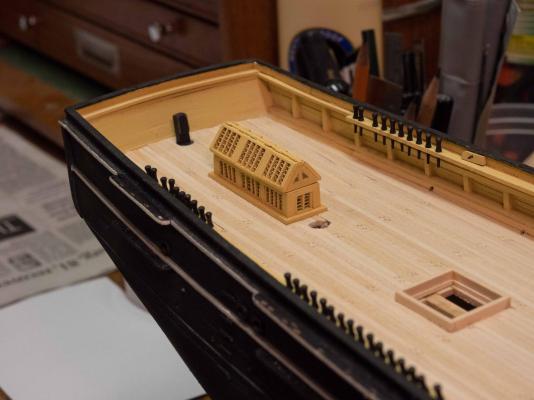

- 245 replies
-
- 6
-

-
- model shipways
- Finished
- (and 1 more)
-
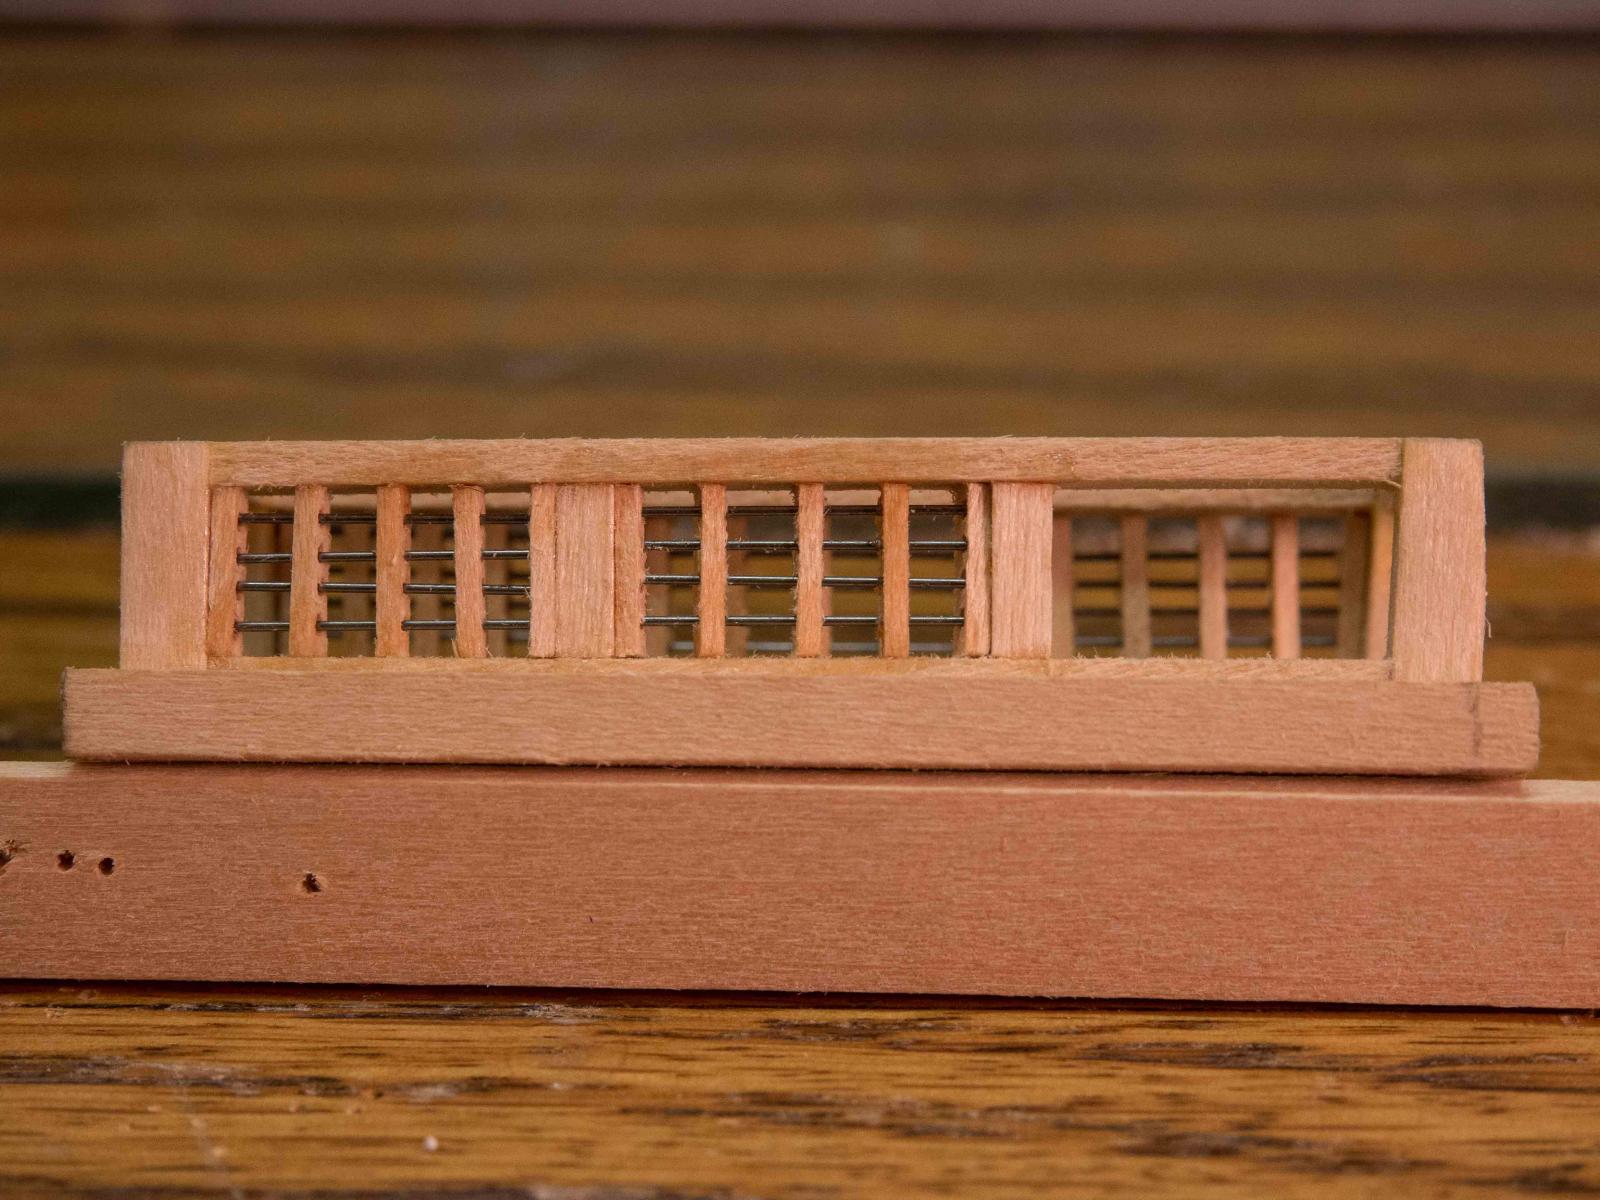
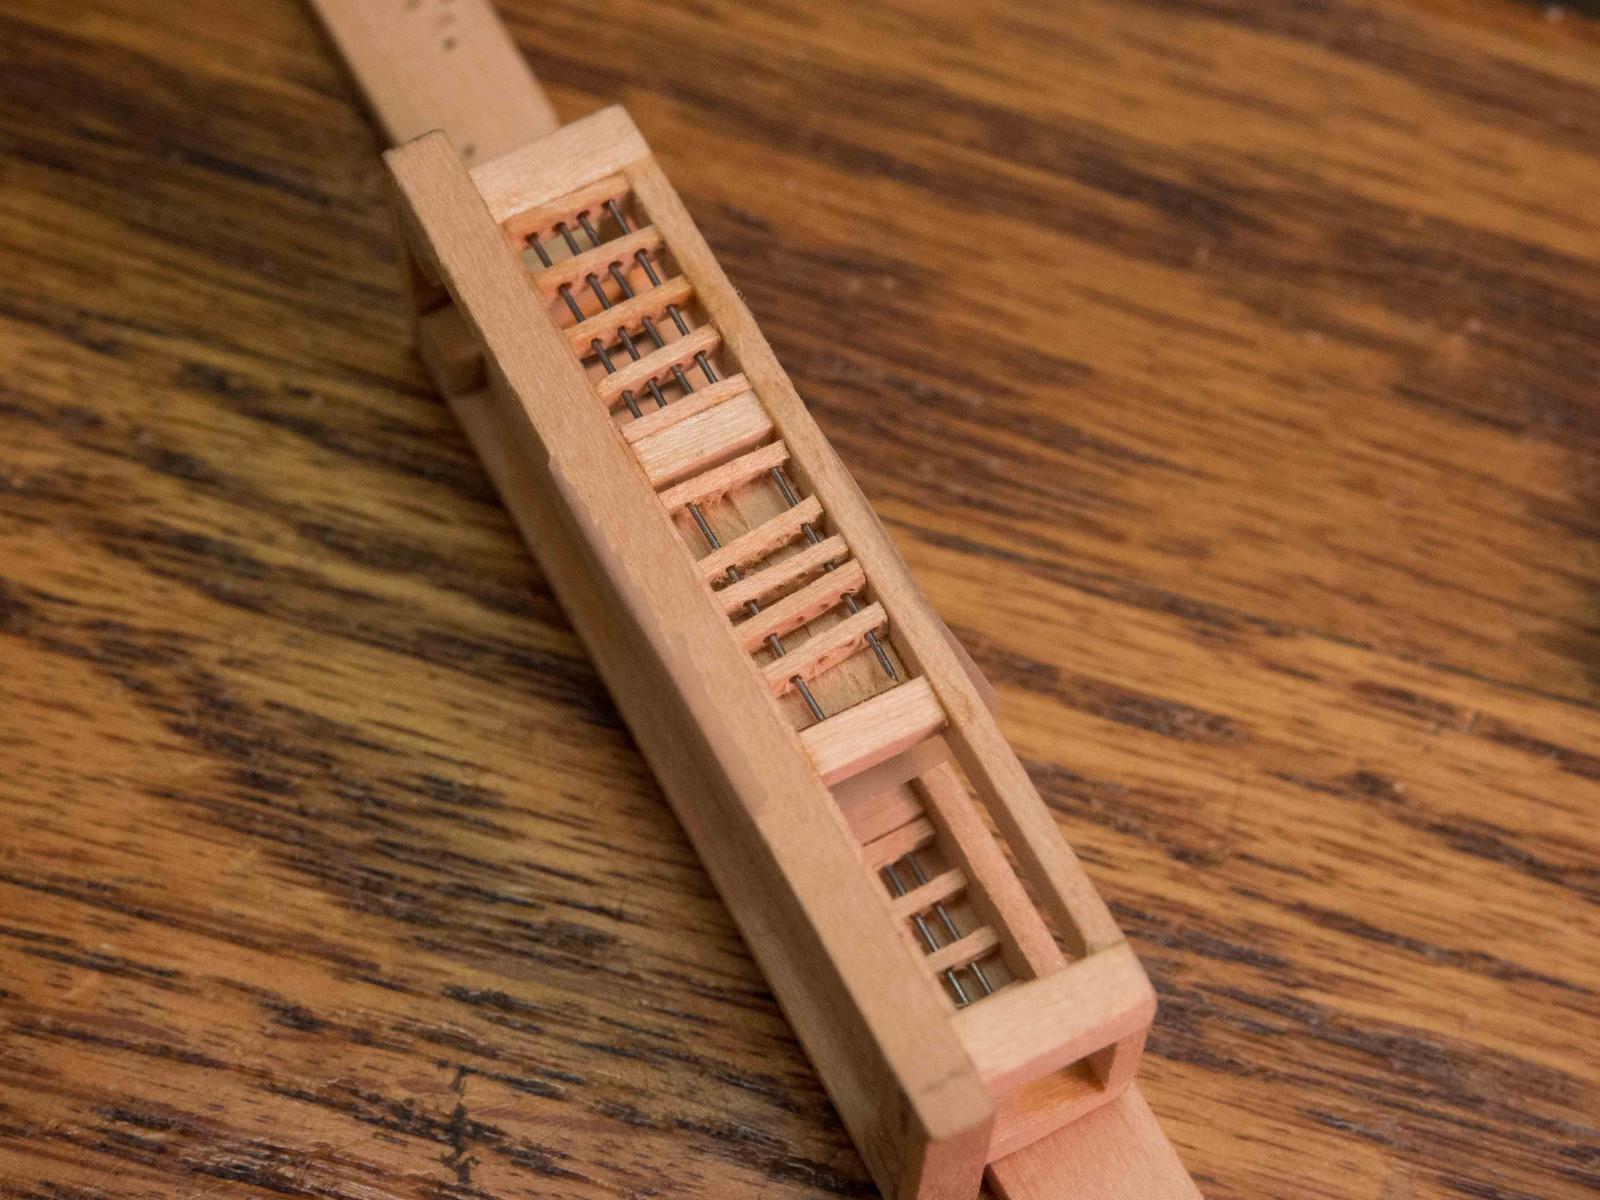
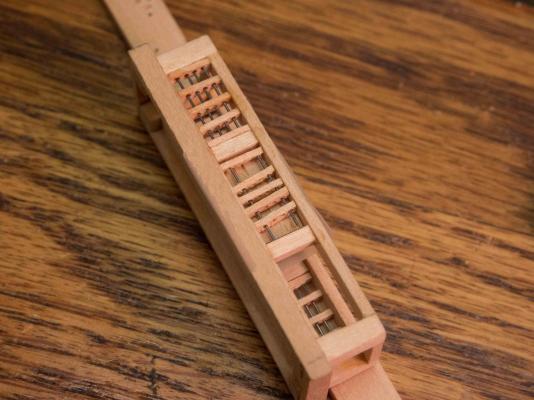
Once all the rods were in, gluing the end slats to the pillars fixes everything in place. After adjusting the position of the other slats, I fixed them in place with a drop of thin Zap at each joint. One more side window, and then the two small end windows to go. All the windows for the top are already done. Looking forward to painting, adding the "glass" and assembly this weekend, perhaps. This thing has been a real challenge to make - everything is so darn small! I hope with some sanding and a good paint job it will look the way I wanted it to.


- 245 replies
-
- 5
-
-
- model shipways
- Finished
- (and 1 more)
-
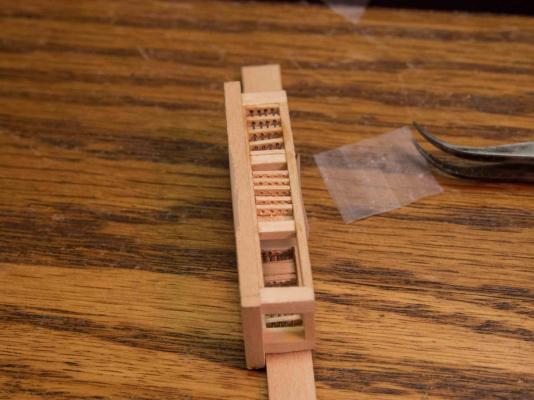
I put a piece of wood into the window to hold the work while I was adjusting. It had rapidly become clear that otherwise slats or rods would squirrel out and I couldn't finish one until I came up with this. Not necessary on the single panes for the top since those could rest on the table during construction. Then I lined up the slats, being careful to retain the orientation from the drilling in the jig. I decided to use very small diameter steel rod/wire rather than copper, because it was smaller, and wouldn't bend during adjustment. The perfectly straight rods give a better look, in my opinion. After cutting a piece slightly smaller than the distance between the pillars, I then would ease the rod through the same hole in successive slats. Trying to put all the rods through the holes and then dropping the assembly into place seemed like a better method, but it didn't work for me. The holes in the slats (smallest drill bit that my drill press would handle) didn't "hold" the rods, and they would inevitably slide out during the manuvering. After multiple tries I had to go to this method, which is maddenly tedious but I was usually able to succeed in one or two tries. Magnification helped to align the rods and the holes in successive slats. Very difficult, especially for someone who has an espresso addiction and two espresso machines in the kitchen. The slats could be moved around to allow a fine tweezer access to guide the rod to the next slat hole. One twitch and the whole thing flies out to begin again. It worked best to put the first and last rods in. Once they were all the way in and the rods could drop between the pillars, things were more stable for the following rods.
- 245 replies
-
- 3
-
-
- model shipways
- Finished
- (and 1 more)
-
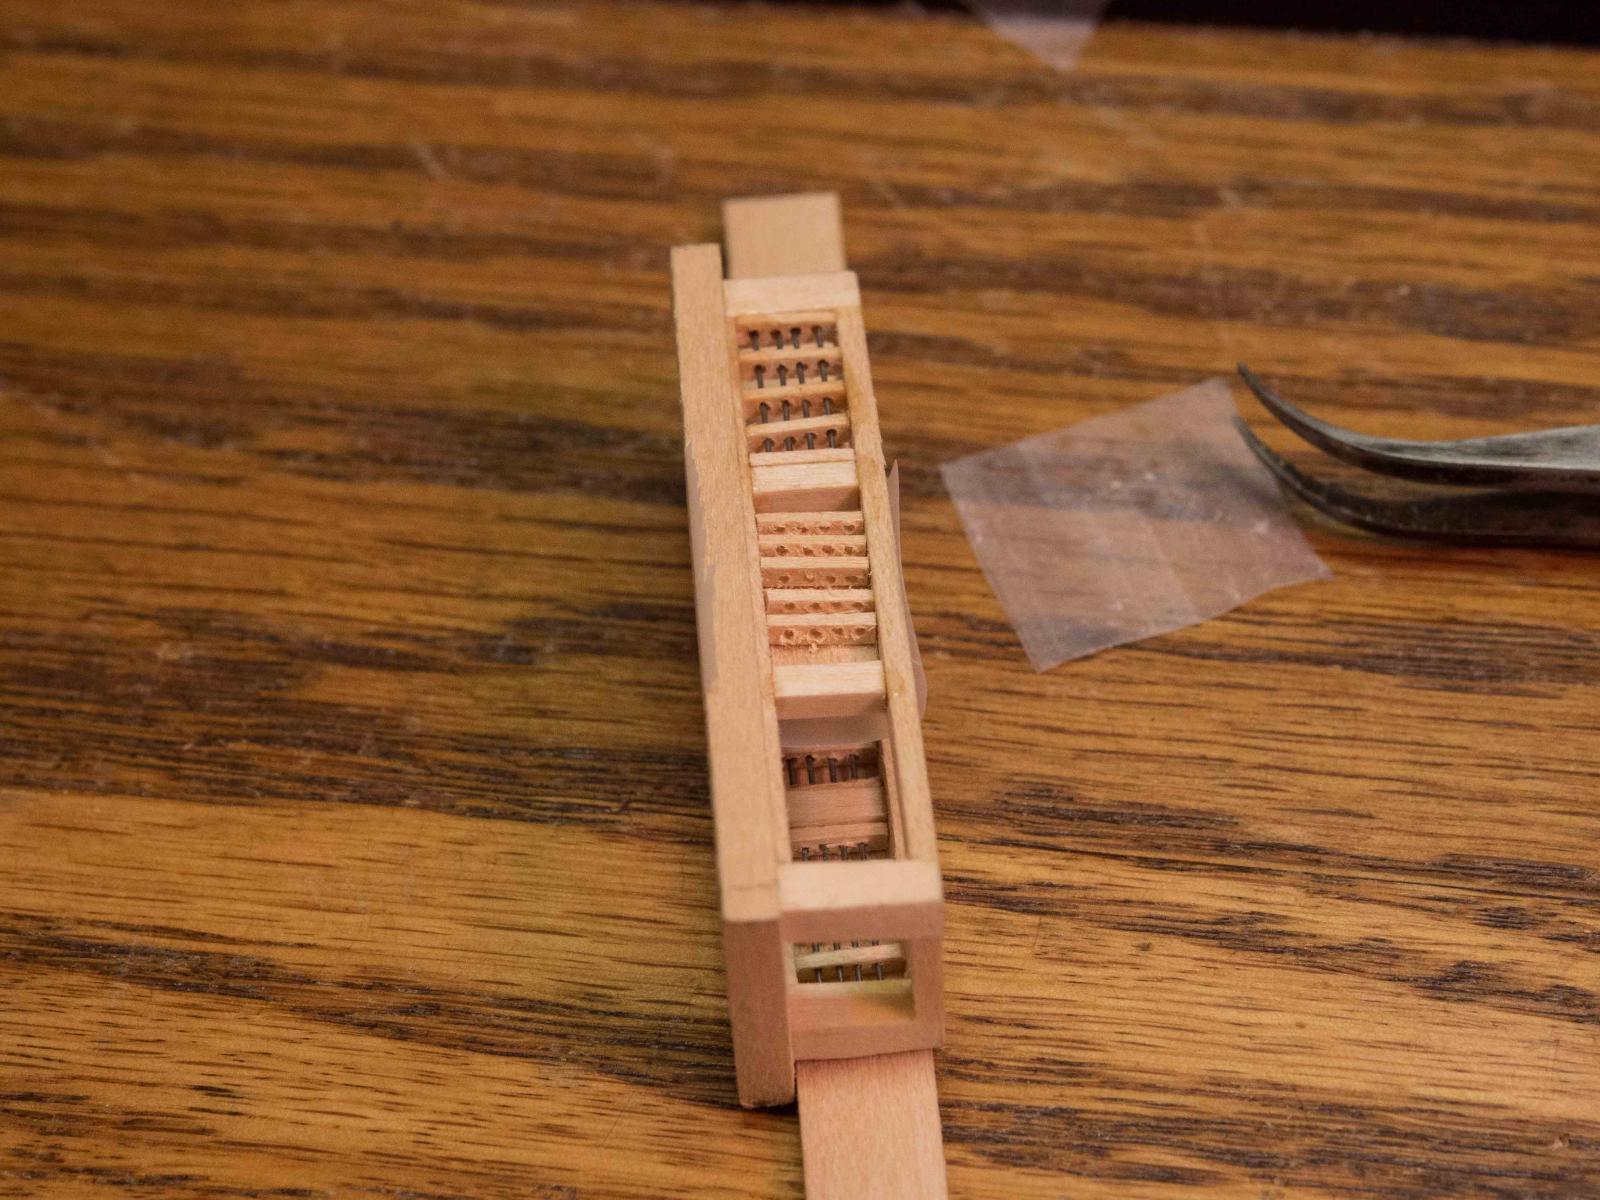
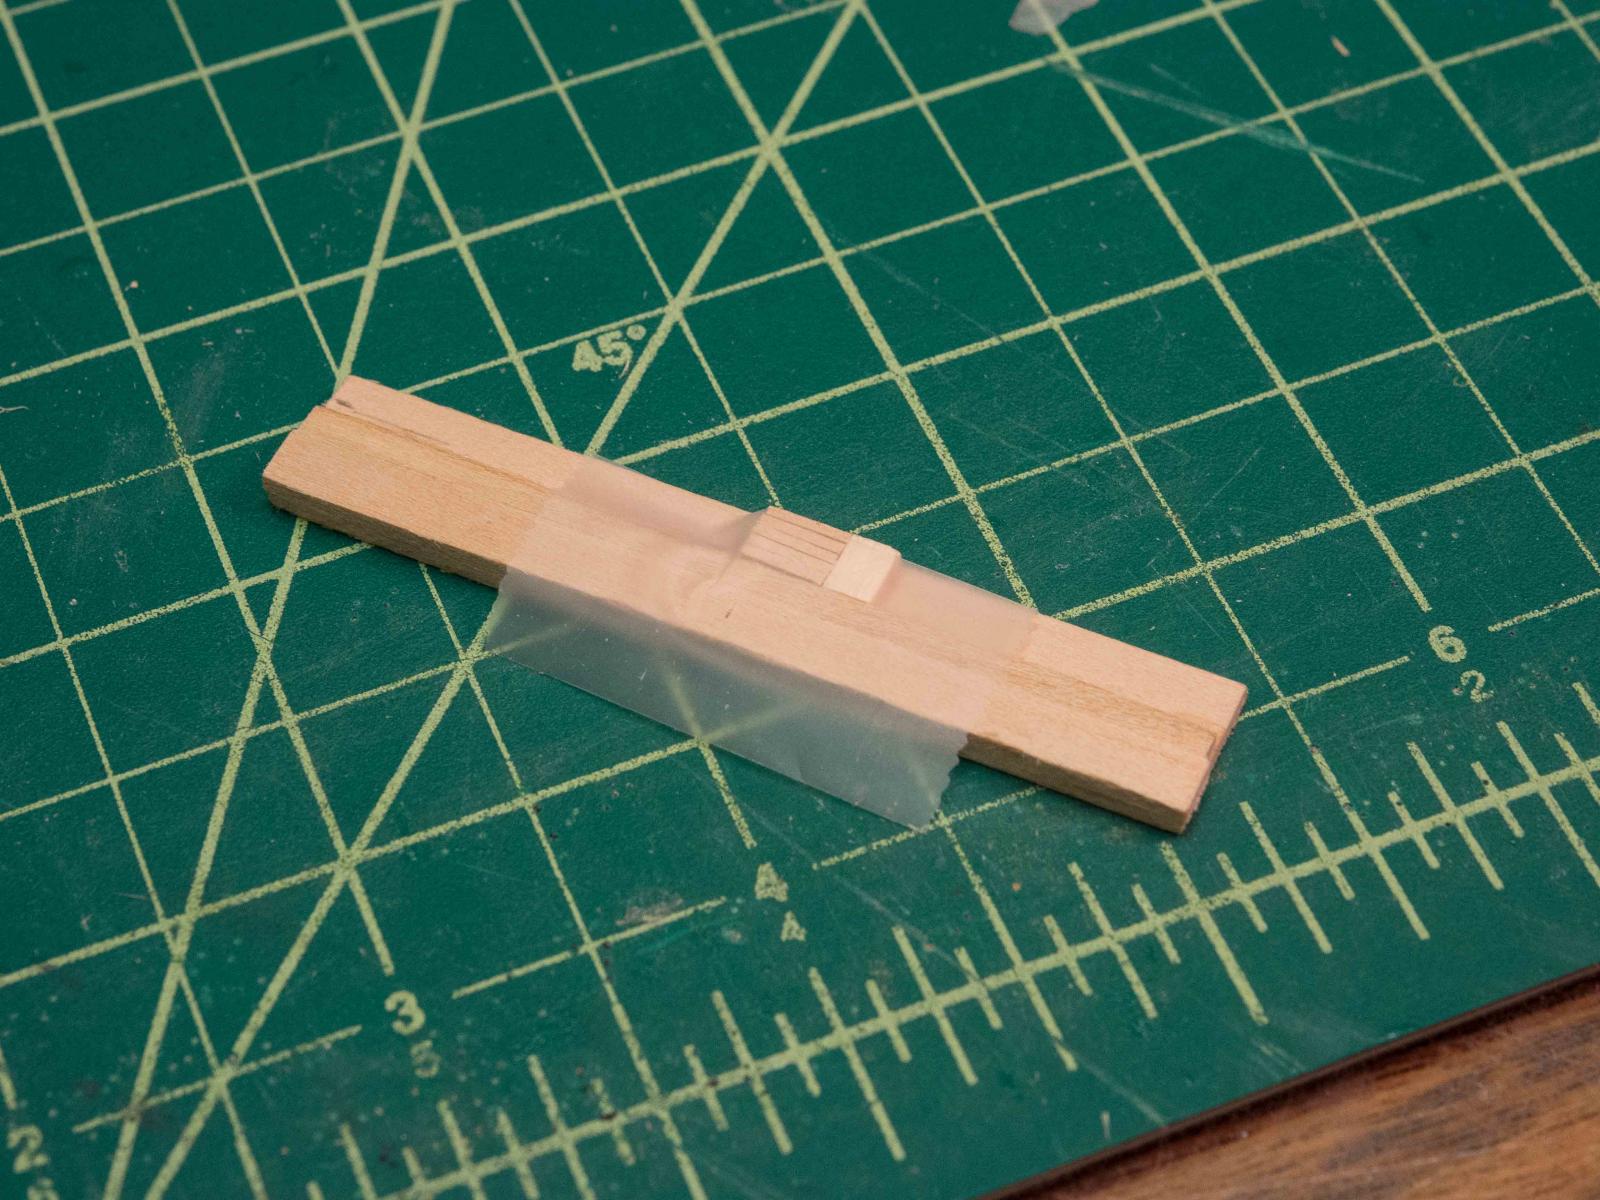
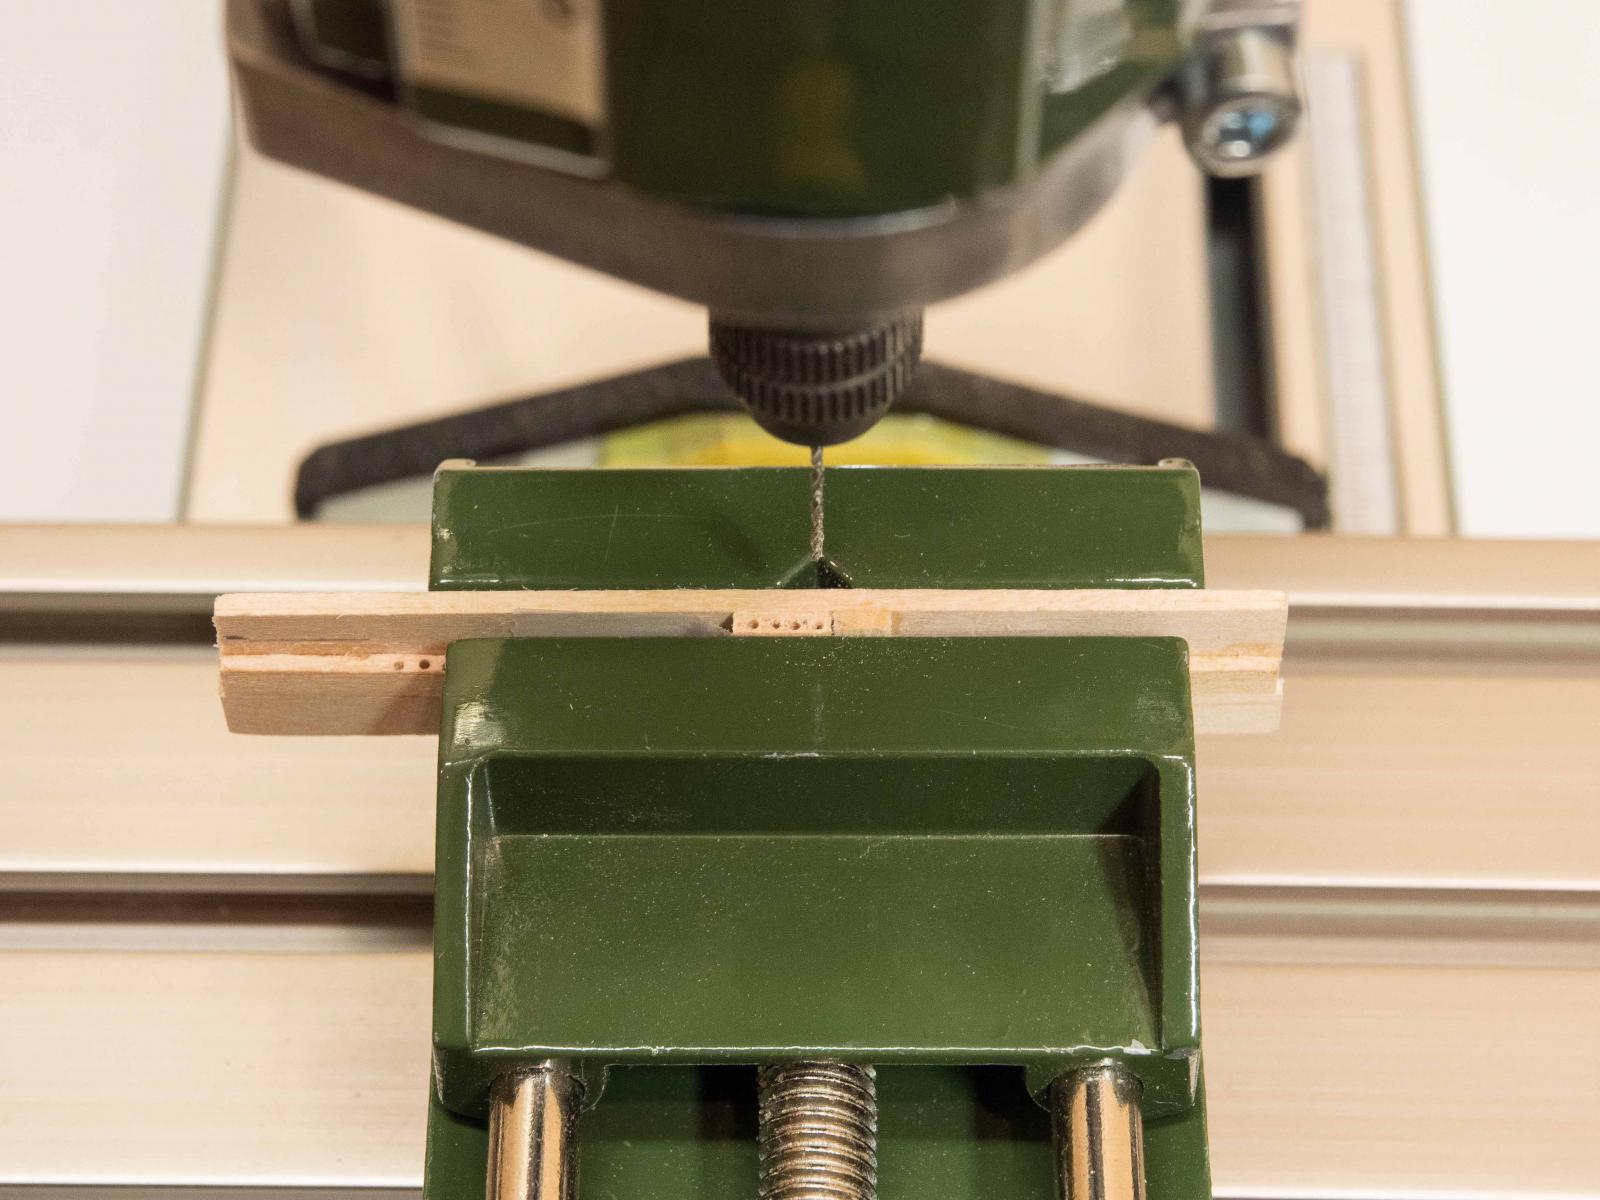
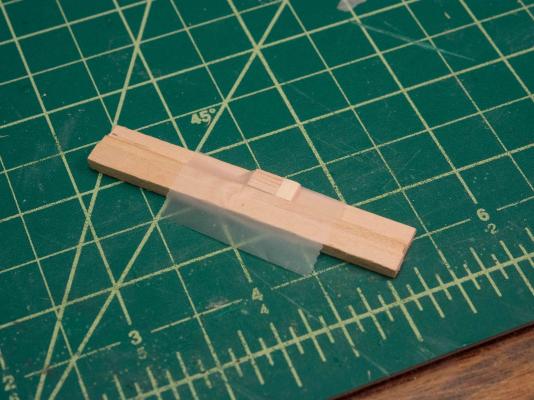
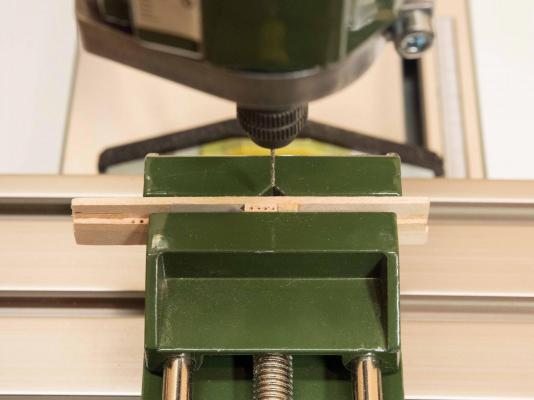
I made a simple jig to hold the five strips in alignment (reinforced with a piece of tape) that I could put into the x-y apparatus on my drill press. This allowed me to be certain the holes in each strip were in alignment and allowed me to drill cleaner, more well spaced holes than I was able to do with a twist drill.
- 245 replies
-
- 1
-
-
- model shipways
- Finished
- (and 1 more)
-
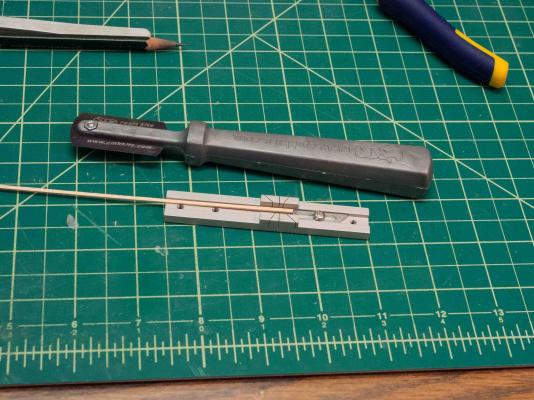
Starting on deck structures, and decided to start with the hardest: the skylight. Exactly as advertised - the toughest modeling I have done in my short wooden ship career. After a couple of days of frustration, I made an executive decision that 9 rods in the top panes and 5 in the side panes simply wasn't happening. The tiny basswood strips split every time. Finally developed a routine, which I'll illustrate with the following pictures. This "micro" cutting frame and saw, with an adjustable stop (Micro Mark) was very useful for, in this case, cutting 8 mm pieces from a 1/32 x 1/16 strip. For the side windows, I needed 5 of these.
-
The Hull has been declared "done" and mounted on a base. Will begin working on deck structures next. Plan to take my time and have the discipline to toss and start over if I'm not happy with anything. I've been working on this for a year and see no need to rush.


- 245 replies
-
- 7
-
-
- model shipways
- Finished
- (and 1 more)
-
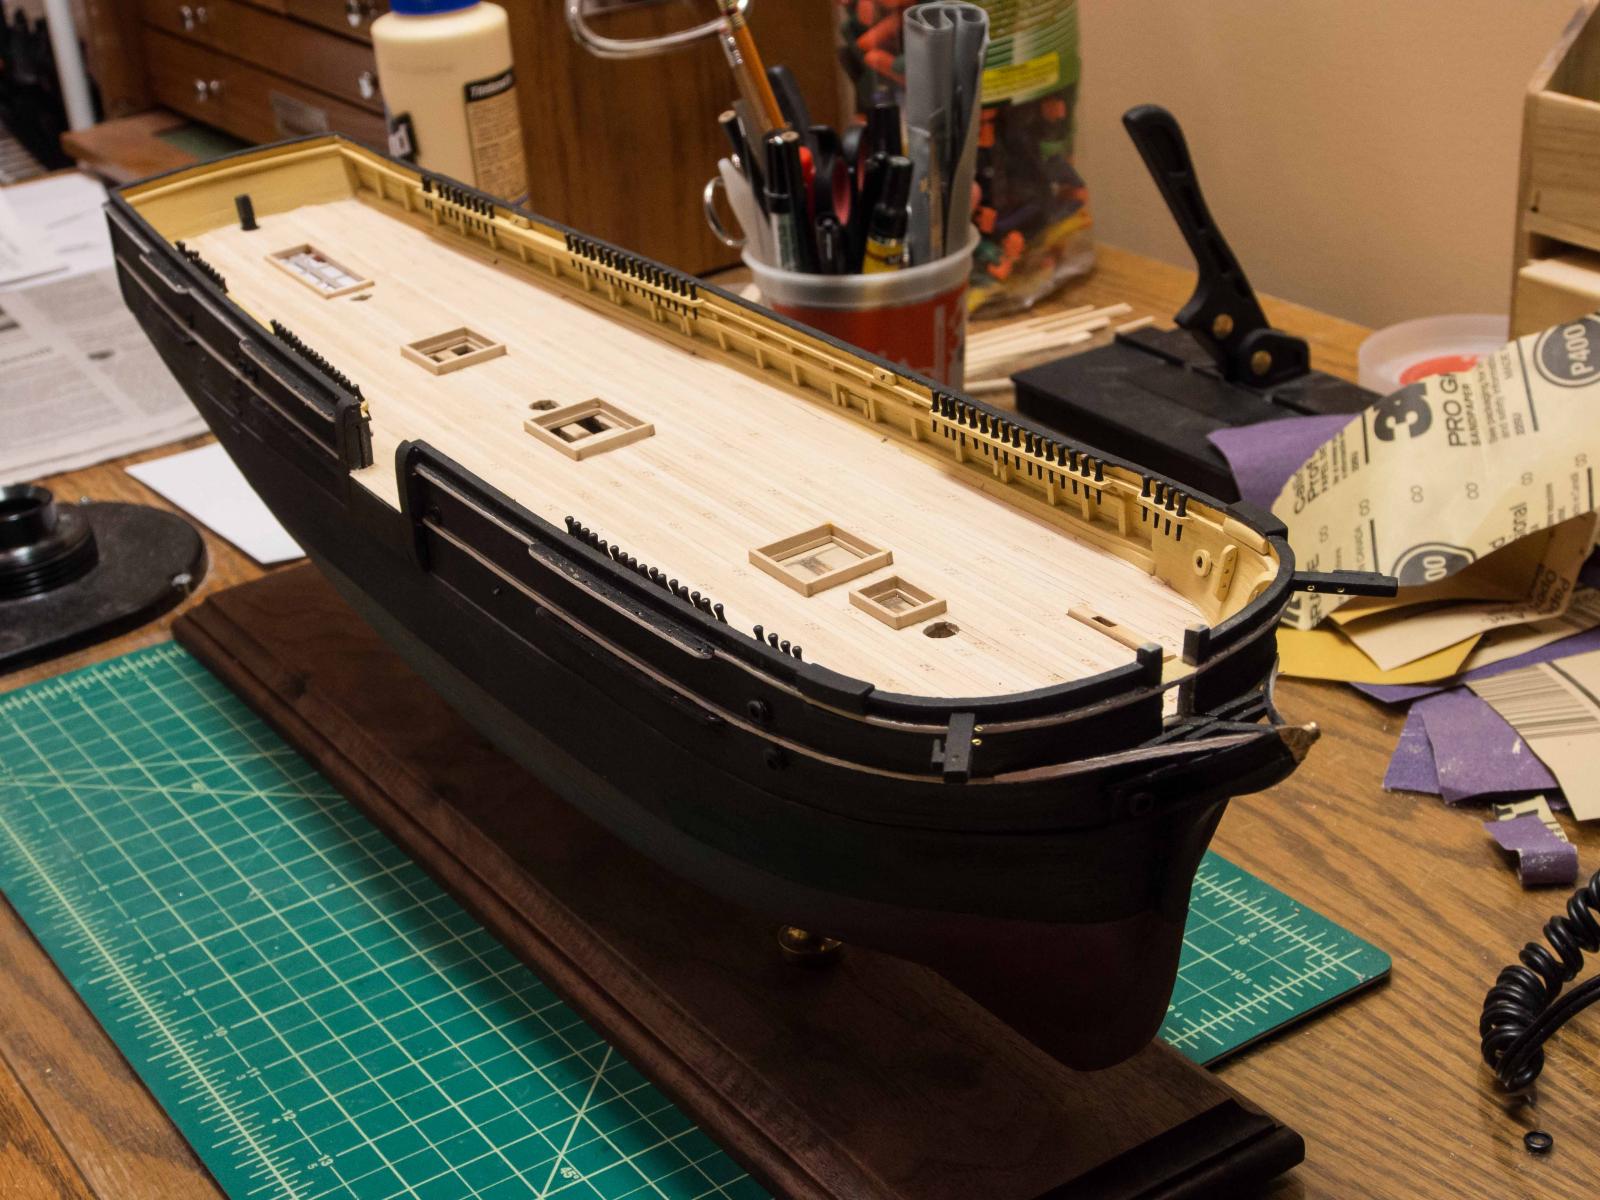
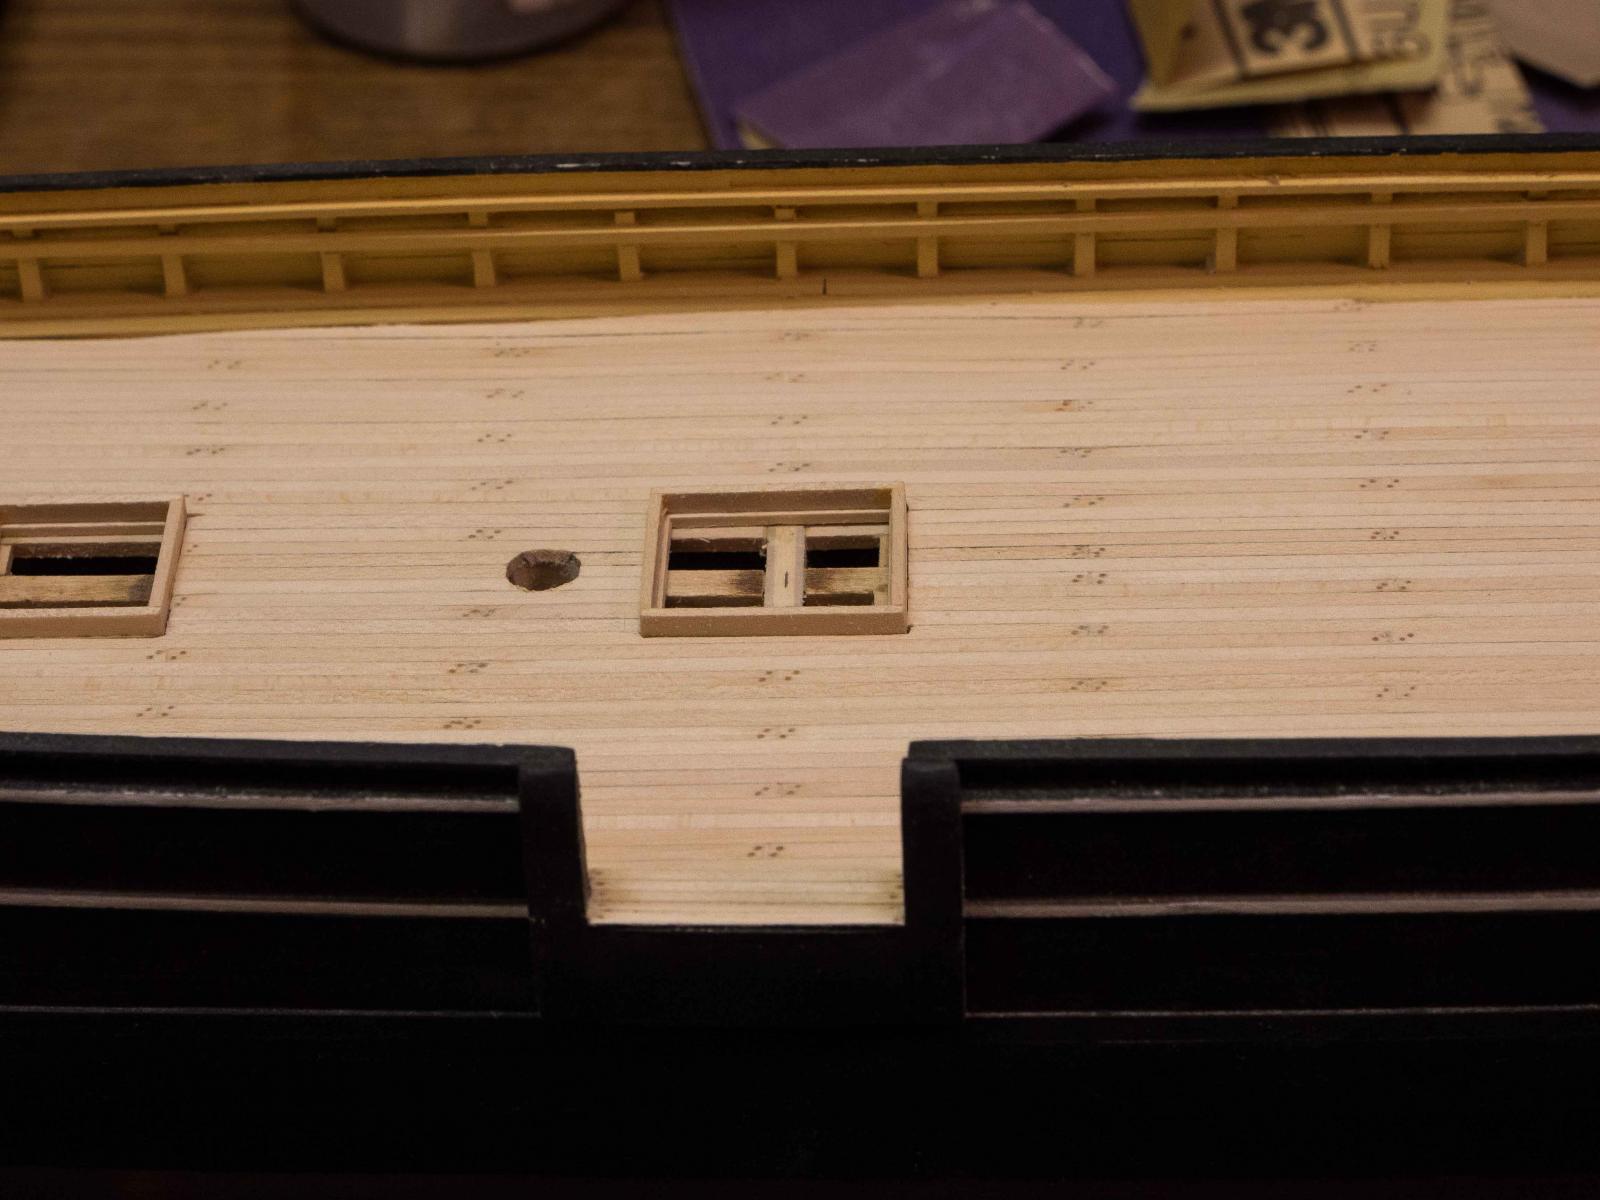
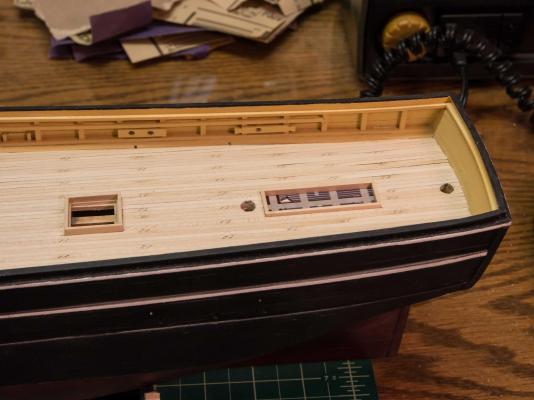
Getting pretty close to starting on all the deck furniture, but every time I look at the plans, I find some detail to add that's easier when the deck is clear. I did put in the 4 freeing ports (on the inside). One is visible on the far left side of the bulwark in the second picture. Haven't decided if I will make them visible on the outside with incised outlines and small hinges, but I suspect I will.

- 245 replies
-
- 4
-
-
- model shipways
- Finished
- (and 1 more)
-
Instead of painting the area black that will be under the skylight, I put in a "picture" from a 3d modeling program. Not much if any will be visible, but it was fun. I'm going to be using very thin rod/wire for the skylight so some of this, at least forward, may show. I'll probably mount a compass in the aft end of the skylight (on top of the virtual beams) as shown in photos of the vessel. Certainly won't show, but I'll know it's there. Put the scupper pipes in as well, just for fun.
- 245 replies
-
- 3
-
-
- model shipways
- Finished
- (and 1 more)
-
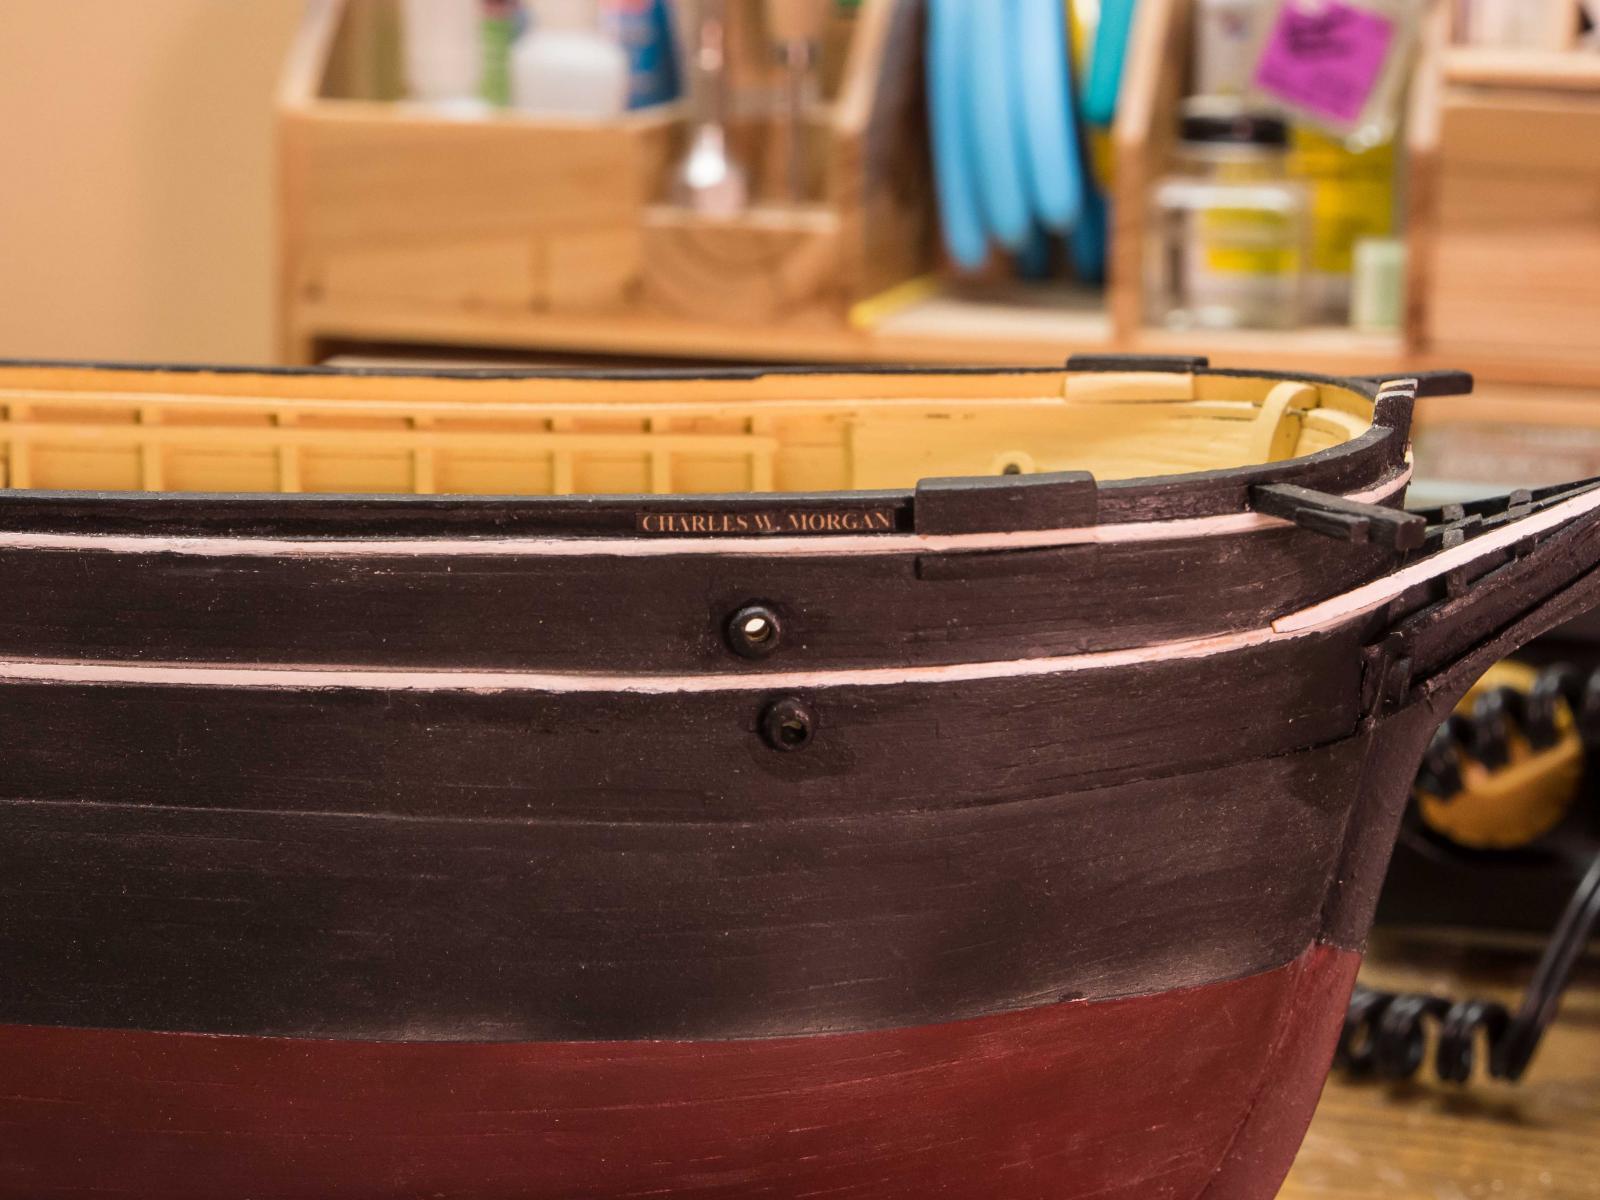
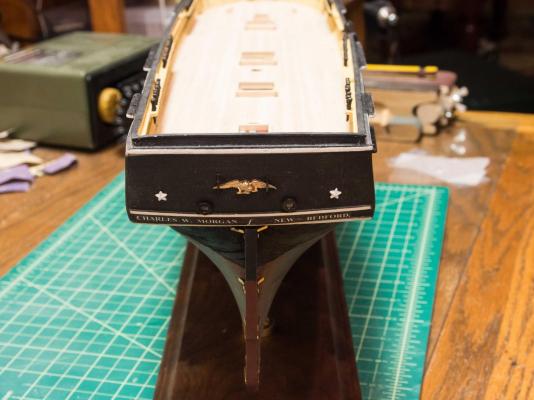
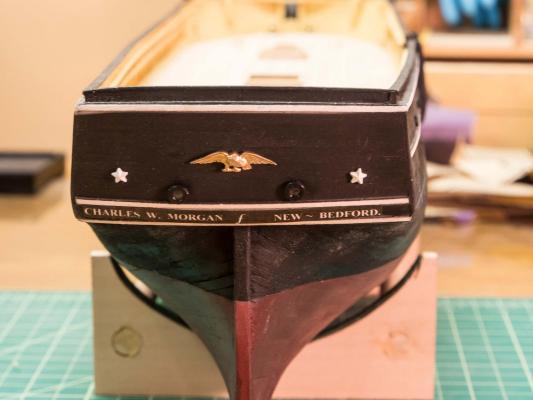
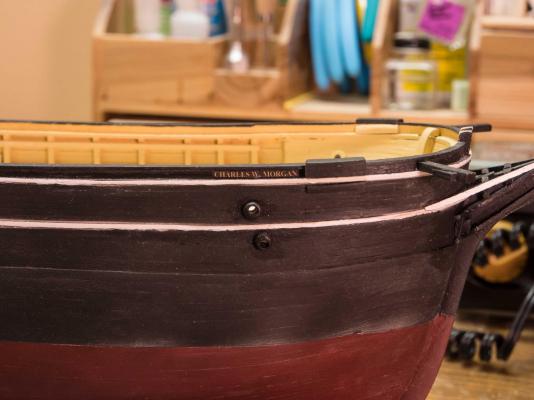
Thanks to John for technique for lettering, which I was worried about. Done in a black text block in Microsoft Word, then cut out and applied with decoupage glue and coated with 2 thin coats. I "glazed" the stern ports with a product from Micro Mark - a white viscous liquid that can be drawn across small windowed areas and dries clear. I ended up doing the 3 starboard and larboard ports the same way, but without the circular frame.
- 245 replies
-
- 4
-
-
- model shipways
- Finished
- (and 1 more)
-
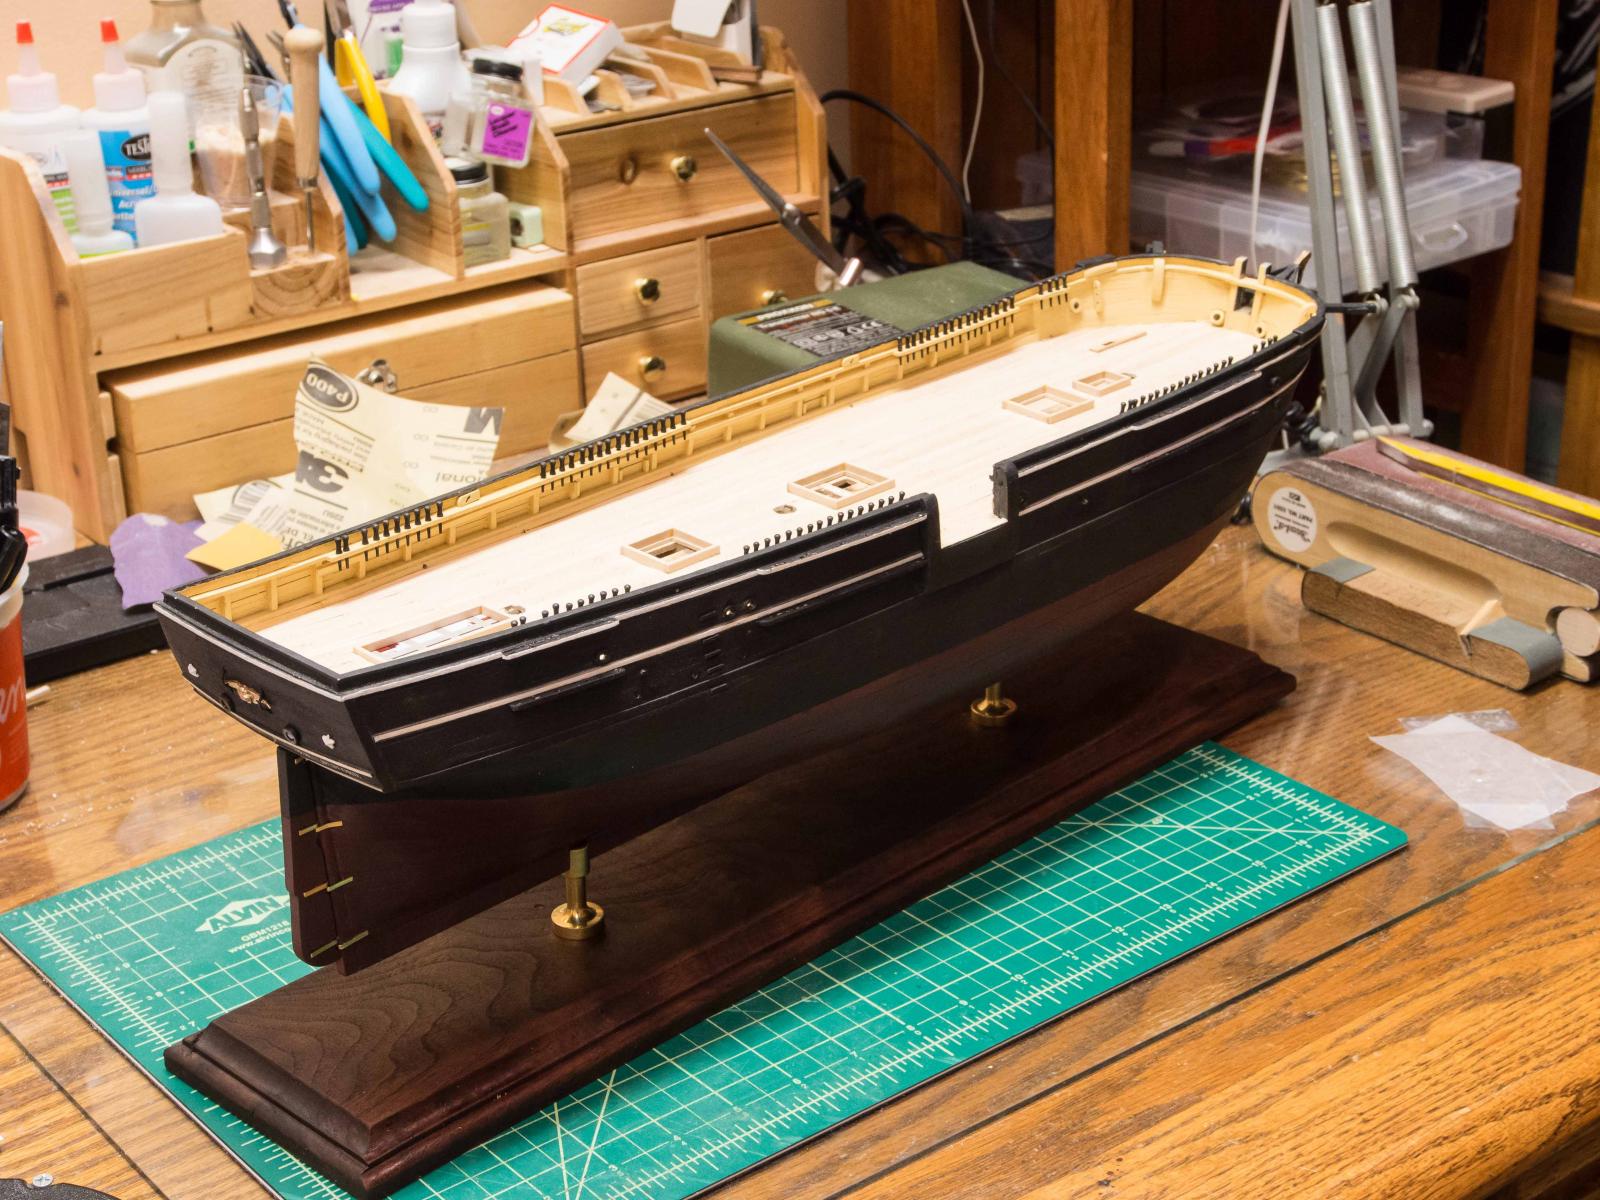
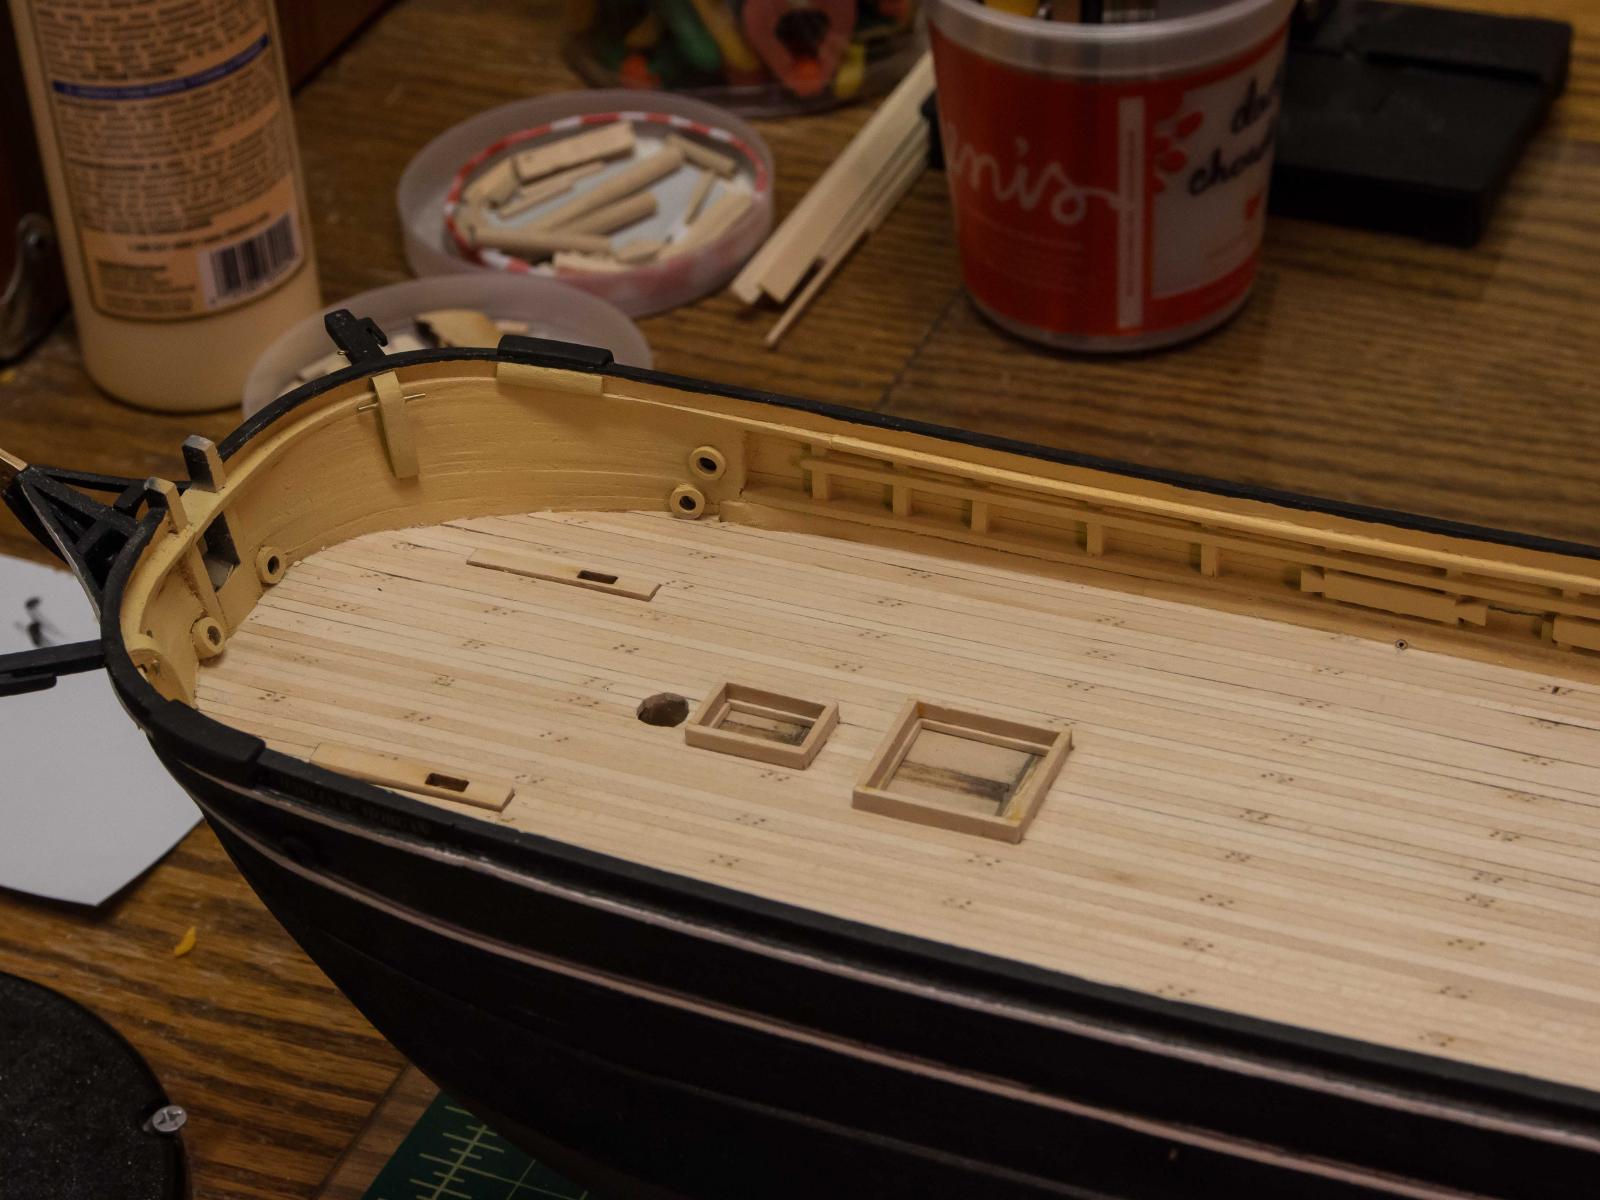
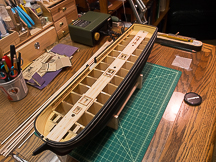
Fair amount of time to work in the shipyard the last couple of weeks, so I've made further progress on the hull. I did have what can only be described as a disaster trying drill holes to get the angled anchor chain pipes in place. I broke so much of the front end work I actually just cleaned up the shipyard and walked away, not at all sure I would be able to proceed. Had a brainstorm and went back and was able to do an acceptable repair over the next few hours, but I will not be able to actually feed the anchor chain through the chocks. So no anchor chain on deck, and anchors will be in stored position. The more I've thought about this, the better I feel about not having the chains running across the deck. At this point next need to add the sea steps and the pinrails - I think I'll wait with the channels until I have the hull permanently mounted since I'll have to rest it on its side to drill the keel holes for the mounting. Here's the overall look now.
- 245 replies
-
- 2
-
-
- model shipways
- Finished
- (and 1 more)
-
Ah, never mind. Apparently I bought a copy of the first edition which is out of print. The revised edition has more stuff including structural drawings. Ordered one from Mystic Seaport eBay site.
- 245 replies
-
- 1
-
-
- model shipways
- Finished
- (and 1 more)
-
Gary Are there several versions of this book? The page nuMbers you note for a picture of the mess table aft don't correspond to my paperback copy (mystic Seaport 1973) and in fact that picture doesn't appear anywhere in the book. No sail plan and no elevations. Should I be looking for a different edition?
-
I hate to order another copy in the hope that the inserts are in it. If you can send me a copy of the elevation illustration, that would be great. I PM'd you my address, in case you are able to. Have a good holiday. Bruce
- 245 replies
-
- 1
-
-
- model shipways
- Finished
- (and 1 more)
-
Hmm Got a paperback copy and there are no fold out drawings. Was this a feature of the hardcover version only? There are some available used, but don't want to get another copy of the same thing only.
-
Thanks much John - pictures are a great help! Didn't know about the book Gary- I immediately ordered a used copy through Amazon. I realize it probably won't make much difference especially with the beams blocking much of the view and the fact that only a part of the skylight is exposed at all, but I'm inclined to try just for the fun of it. The advantage of the approach is that the view can be artifically "lit" so that it shows up better. We'll see. Certainly I'll have to make certain I'm using brass rods to the proper scale. I agree that the skylight will be a heck of a fiddly project all by itself. The part of the model I'm dreading are the 5 whale boats that have their interiors exposed. After building the MS New Bedford Whaleboat the concept of duplicating them in a tiny scale is daunting. But I suspect I'm a long way from facing that so I'll just ignore it for now. I really like playing with 3d models and have made very detailed models of the Hunley submarine including the interior and all the workings and a large collection of Civil War Medical equipment (a whole other hobby).
- 245 replies
-
- 1
-
-
- model shipways
- Finished
- (and 1 more)
-
Help needed! I had a thought regarding the skylight. Rather than painting the area under the skylight black, I thought I might substitute an image of what is actually under the skylight. I would create this in a 3D modeling program (I'm pretty good with this program) and position the virtual "camera" to show an image from the point of view of the skylight, and apply this to the base/deck inside of the skylight. It might not show much but would be fun! I need some information on what exactly is under the skylight (the plans say the compass is located there, but what else and how is it laid out?) - anyone with pictures of the Morgan showing this especially desired. Can anyone help?
-
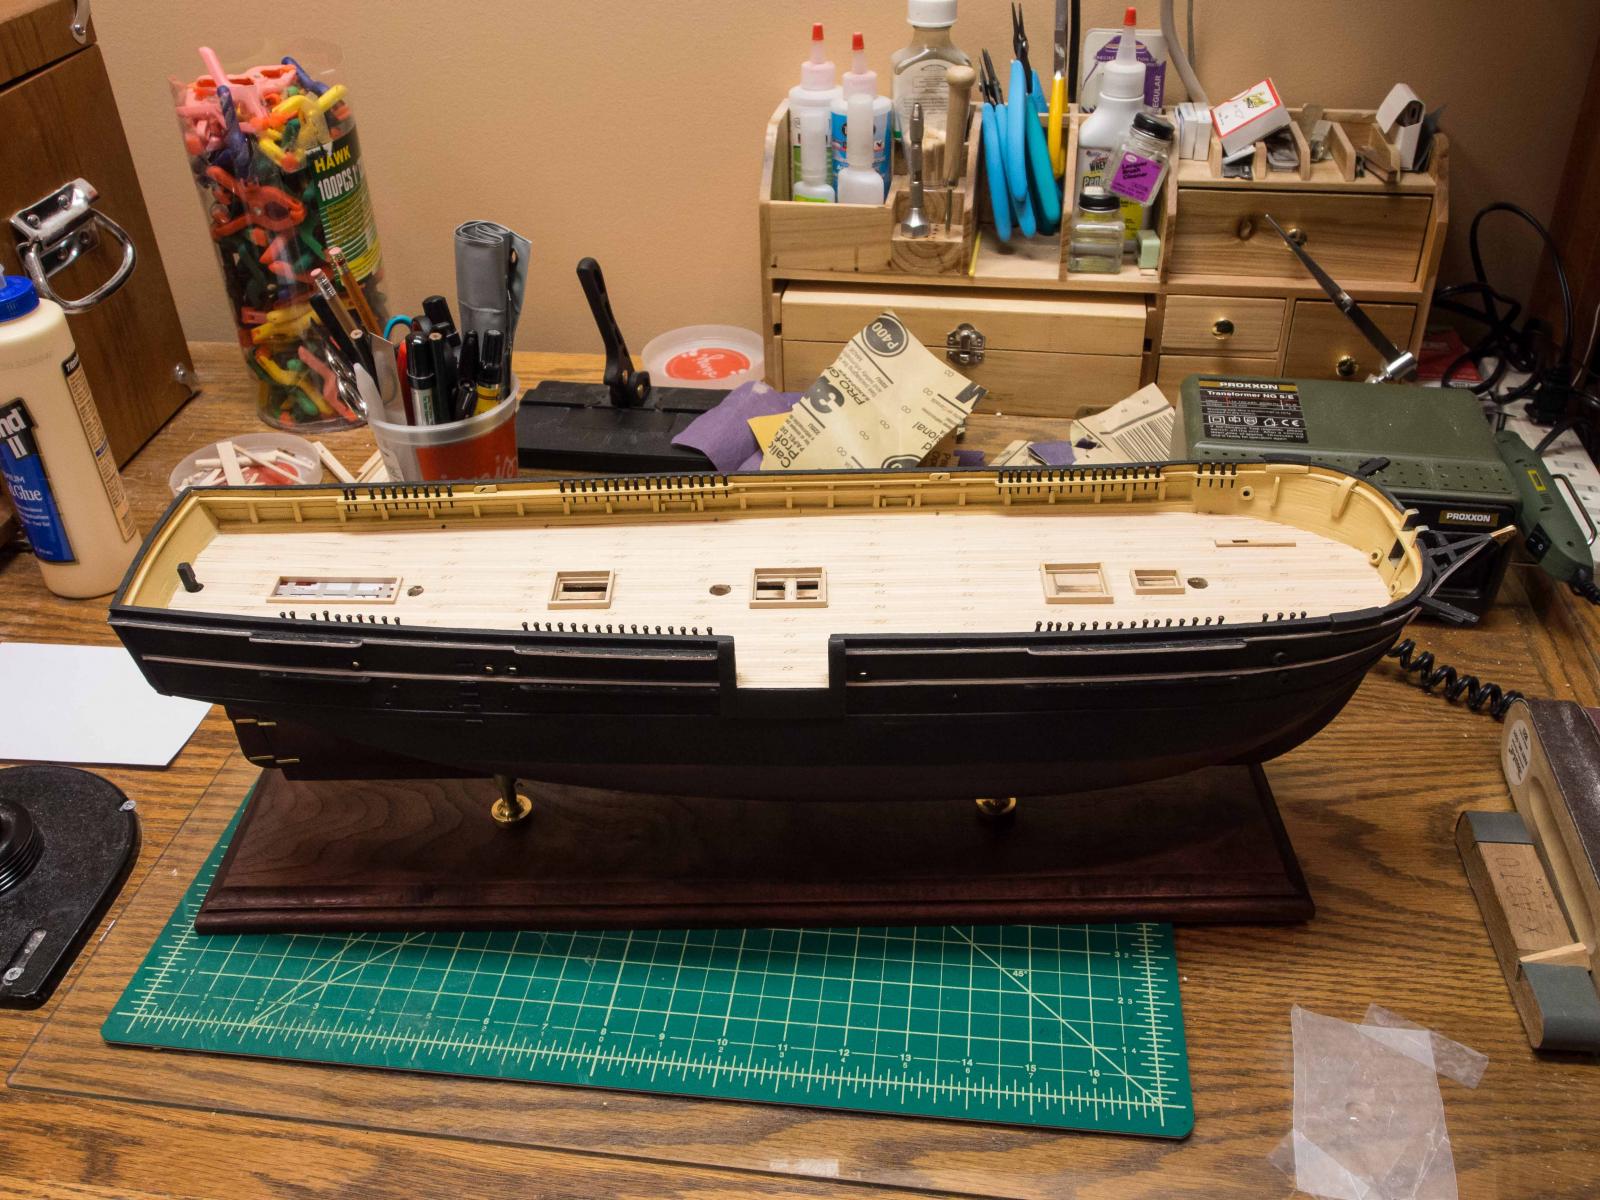
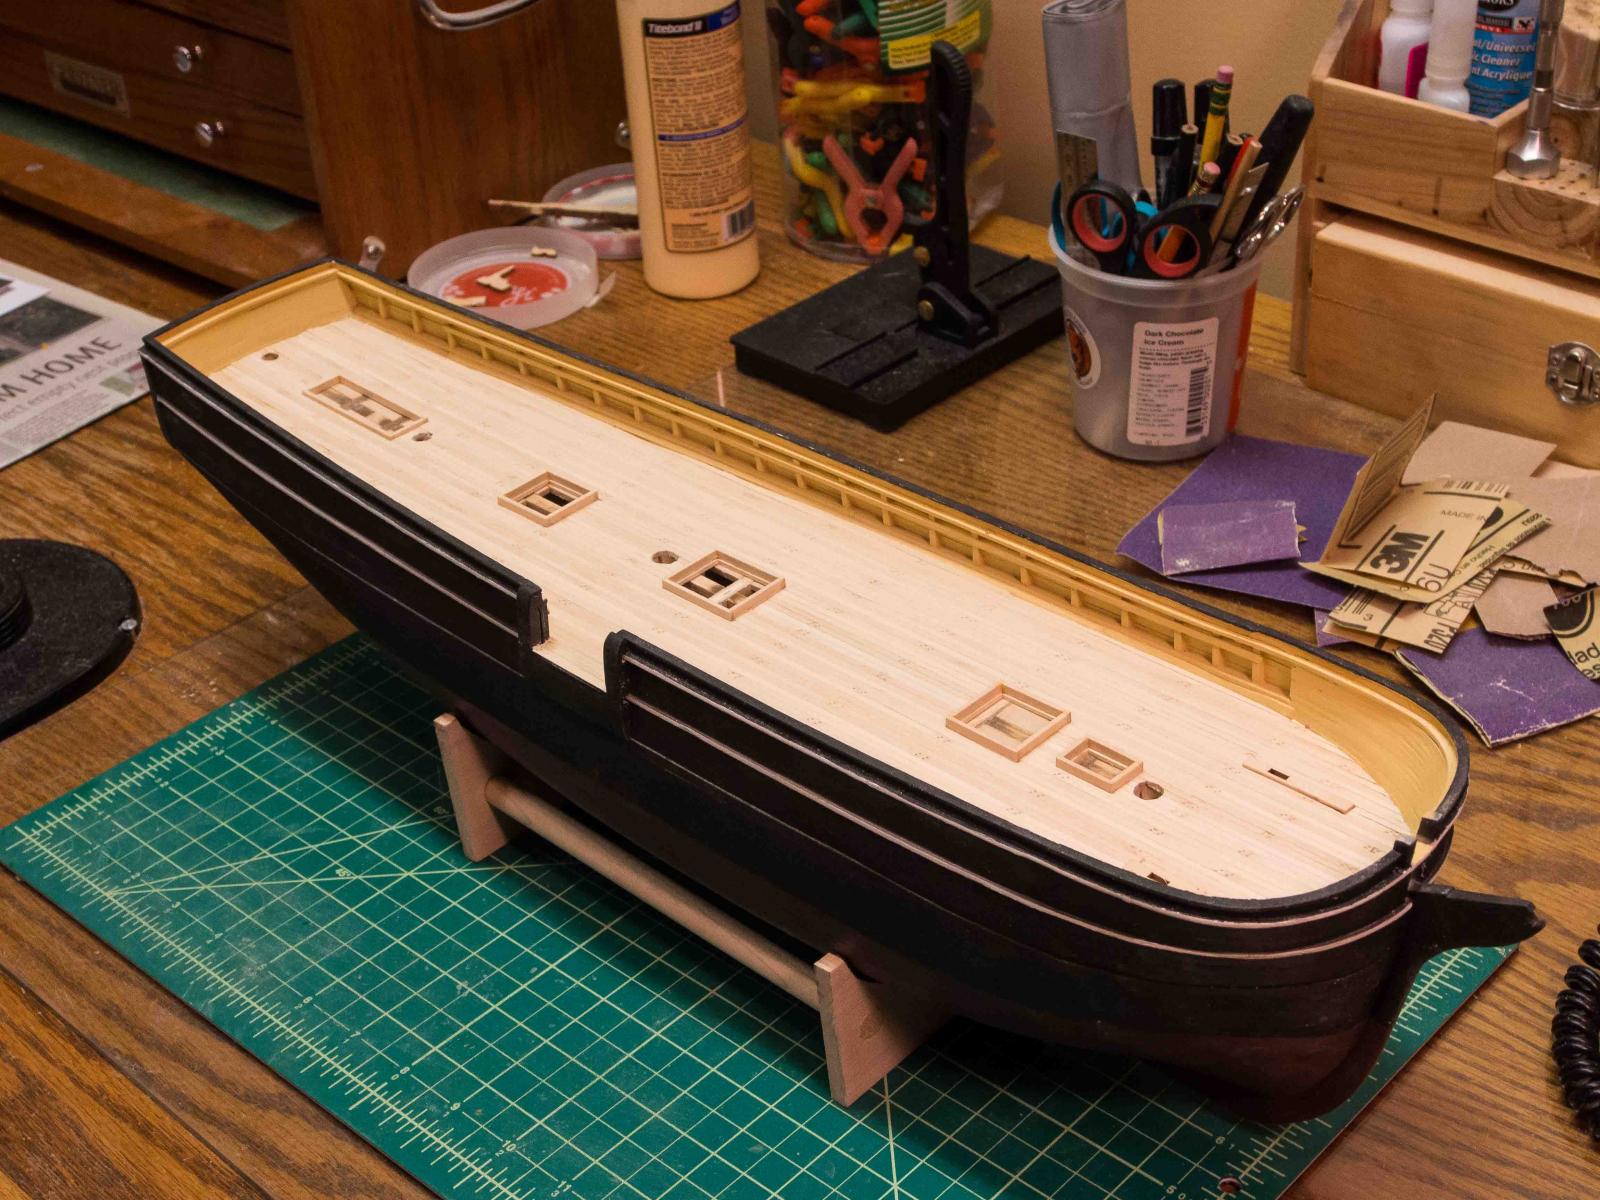
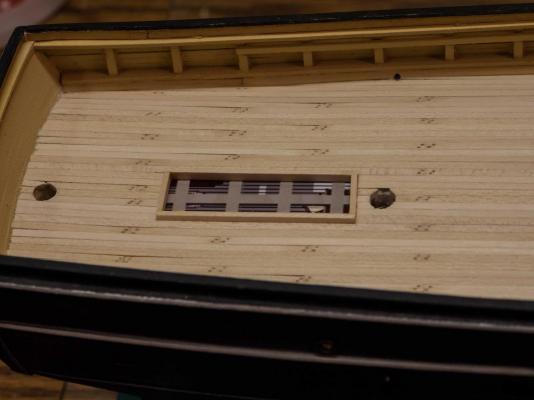
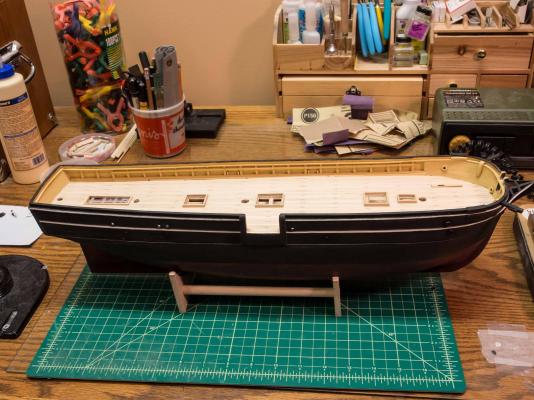
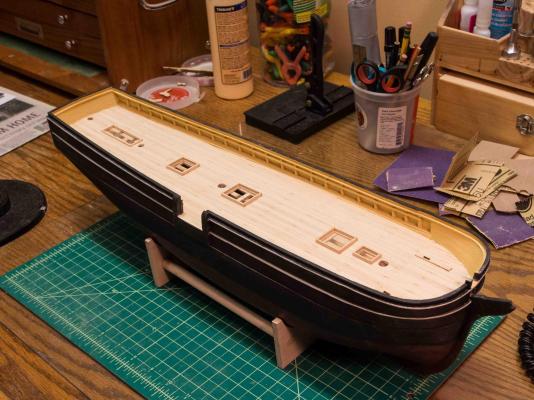
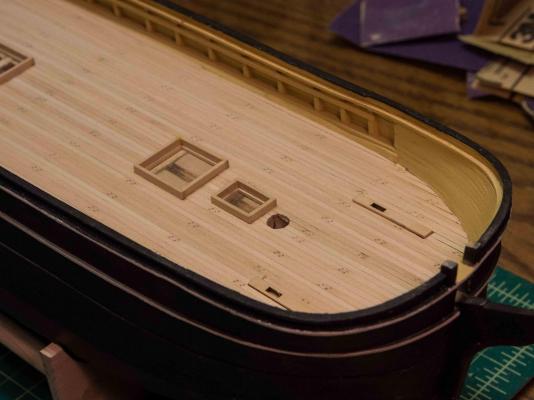
A bit more time to work the last week than I expected, so I finished laying the deck planking. Still a few raised edges to sand but basically done. I'm not into treenailing, so I simulated on each plank before gluing by drilling small holes and filling them with slightly contrasting wood filler. I'll not be staining the deck - probably just a matt clear finish. Now I'm consulting the plans and will be adding features that affect the hull and the inner bulwarks before beginning on the deck structures.
- 245 replies
-
- 9
-
-
- model shipways
- Finished
- (and 1 more)
-
When I finish the deck I'm going to add everything that installs on /drills through / or protrudes from the hull before I start on the deck structures. So much work to do. I think, when I get that far, that I'm going to go with furled sails using silkspan.
- 245 replies
-
- 2
-
-
- model shipways
- Finished
- (and 1 more)
-
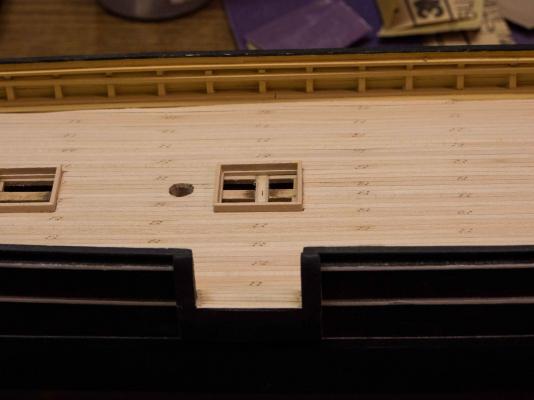
Begun the deck. Built the deck structure coamings and base for the skylight and decked around them. Removeable so I can stain them and build the deck structures on them and put them in place later.
- 245 replies
-
- 4
-
-
- model shipways
- Finished
- (and 1 more)
-
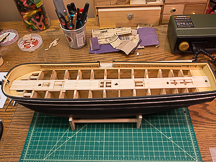
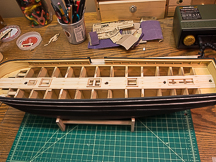
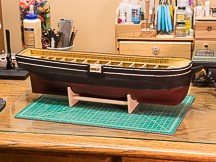
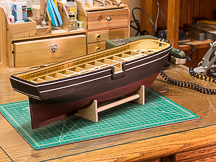
I've had a week with little IRL work and wife off on several travels, so I had more time than usual to work on the Morgan. Here is the current progress. Decided to paint at this stage since I prefer to use airbrush and since I plan to leave the deck unfinished (except for matt varnish). I didn't want to struggle with masking the deck off perfectly at a later stage while painting the interior bulwarks. It takes me a while to work up the courage to do the paint job to a good looking unfinished hull ever since I screwed up my first attempt at staining my New Bedford Whaleboat (MS). After that disaster I put it aside as a bad job until my wife urged me to sand it down and try again, which I did with advice from Chuck about progressively finer sanding and diluting the stains. Turned out OK. The airbrush was great for those interior bulwarks with all the stanchions - I didn't want to face that with a paintbrush and multiple coats. Went with the red hull as per the restoration rather than copper just because I prefer the look. Obviously some things will need to be added (channels, catheads, etc.) but I'd rather touch up later. Now on the the deck. Not really totally happy with the white striping - I find it hard to do exactly enough to stand up to close inspections. Looks good from this distance though! The hardest thing is to balance desire to do best work (if not perfect!) and OCD tendencies, which modeling brings out in me. Working now on the positions of all deck structures that require coamings so I can temporarily install the coamings before beginning the decking. Will post some larger/closer pictures once the deck is in place. Who knows when that will be? Looking at these posts, I see that I've been intermittently puttering away on this for 11 months already. This is turning into an expensive model - I've used up my holiday equity on a bunch of new equipment for the shipyard. I don't buy stuff till I need it, but my definition of need is a low bar and requires an understanding wife - which thankfully I have in spades.
- 245 replies
-
- 5
-
-
- model shipways
- Finished
- (and 1 more)
-
Yep, John, I have my eye on your site. Also, lusting after some of the tools, especially the small Proxxon sander. Will undoubtably be adding to the shipyard at some point soon, as well as a resisitance soldering unit. All set up with a dedicated shipyard including a tool bench in the lower level, so it's easy to work some, then leave things in place when real life work intrudes until another interval of leisure appears. If I had to take everything down between work sessions I'd never make any progress. Some time today, so I'll work on some finer finishing of the hull.
- 245 replies
-
- 1
-
-
- model shipways
- Finished
- (and 1 more)
-
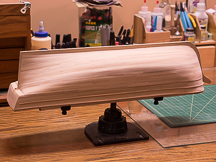
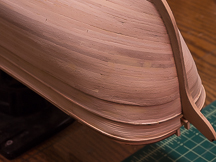
I don't plan on double planking. I think I'd only do that if I were planning on staining rather than painting. This is the most complicated planking job I've done and I'm reasonably pleased with it. Only a few spots need filler and none are major - mostly small cracks where two planks didn't snuggle up just right for a short distance. I've gotten pretty handy with the proportional dividers and at spiling and tapering planks. A sanding drum on a Dremel in a fixed stand (I use a drill press attachment) works great to rough trim the planks to measurement lines, with sandpaper finishing to fit. Each plank is a project! 8+ months of intermittent work to get to this point. Some trouble at the stem and bow because I didn't take enough trouble with the filler blocks - not enough smooth taper leading to bulges. Won't make that mistake again. Trying to decide whether to paint inside and out before installing deck, after adding the stern fashion piece and trim pieces. I want to use my airbrush and the deck will be left natural and would be hard to mask effectively and accurately. Still some time before I have to decide.
- 245 replies
-
- 1
-
-
- model shipways
- Finished
- (and 1 more)
-
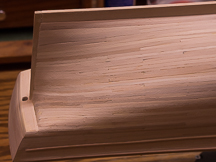
So I've finally finished the planking and a rough sanding. Some work on filler for cracks, etc. yet to go.
- 245 replies
-
- 11
-
-
- model shipways
- Finished
- (and 1 more)
-
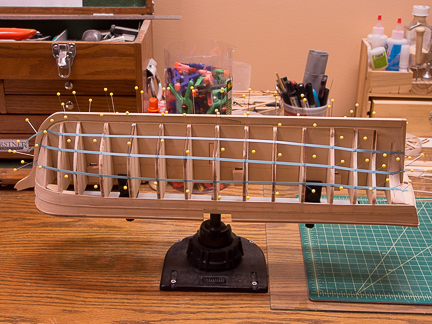
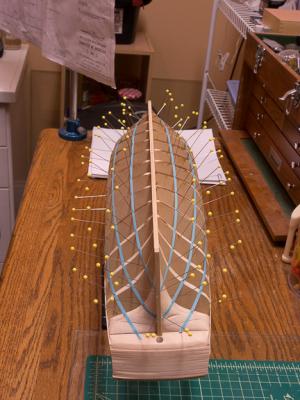
No, I'm going to paint it so I think I'll just go with the single planking. Speaking of which, here it is with provisional planking bands marked out with artist's tape. Still adjusting, then will mark the lines on the bulkheads and remove the pins and tape.
- 245 replies
-
- 7
-
-
- model shipways
- Finished
- (and 1 more)