HOLIDAY DONATION DRIVE - SUPPORT MSW - DO YOUR PART TO KEEP THIS GREAT FORUM GOING! (Only 13 donations so far - C'mon guys!)
×


Brucealanevans
-
Posts
450 -
Joined
-
Last visited
Content Type
Profiles
Forums
Gallery
Events
Everything posted by Brucealanevans
-
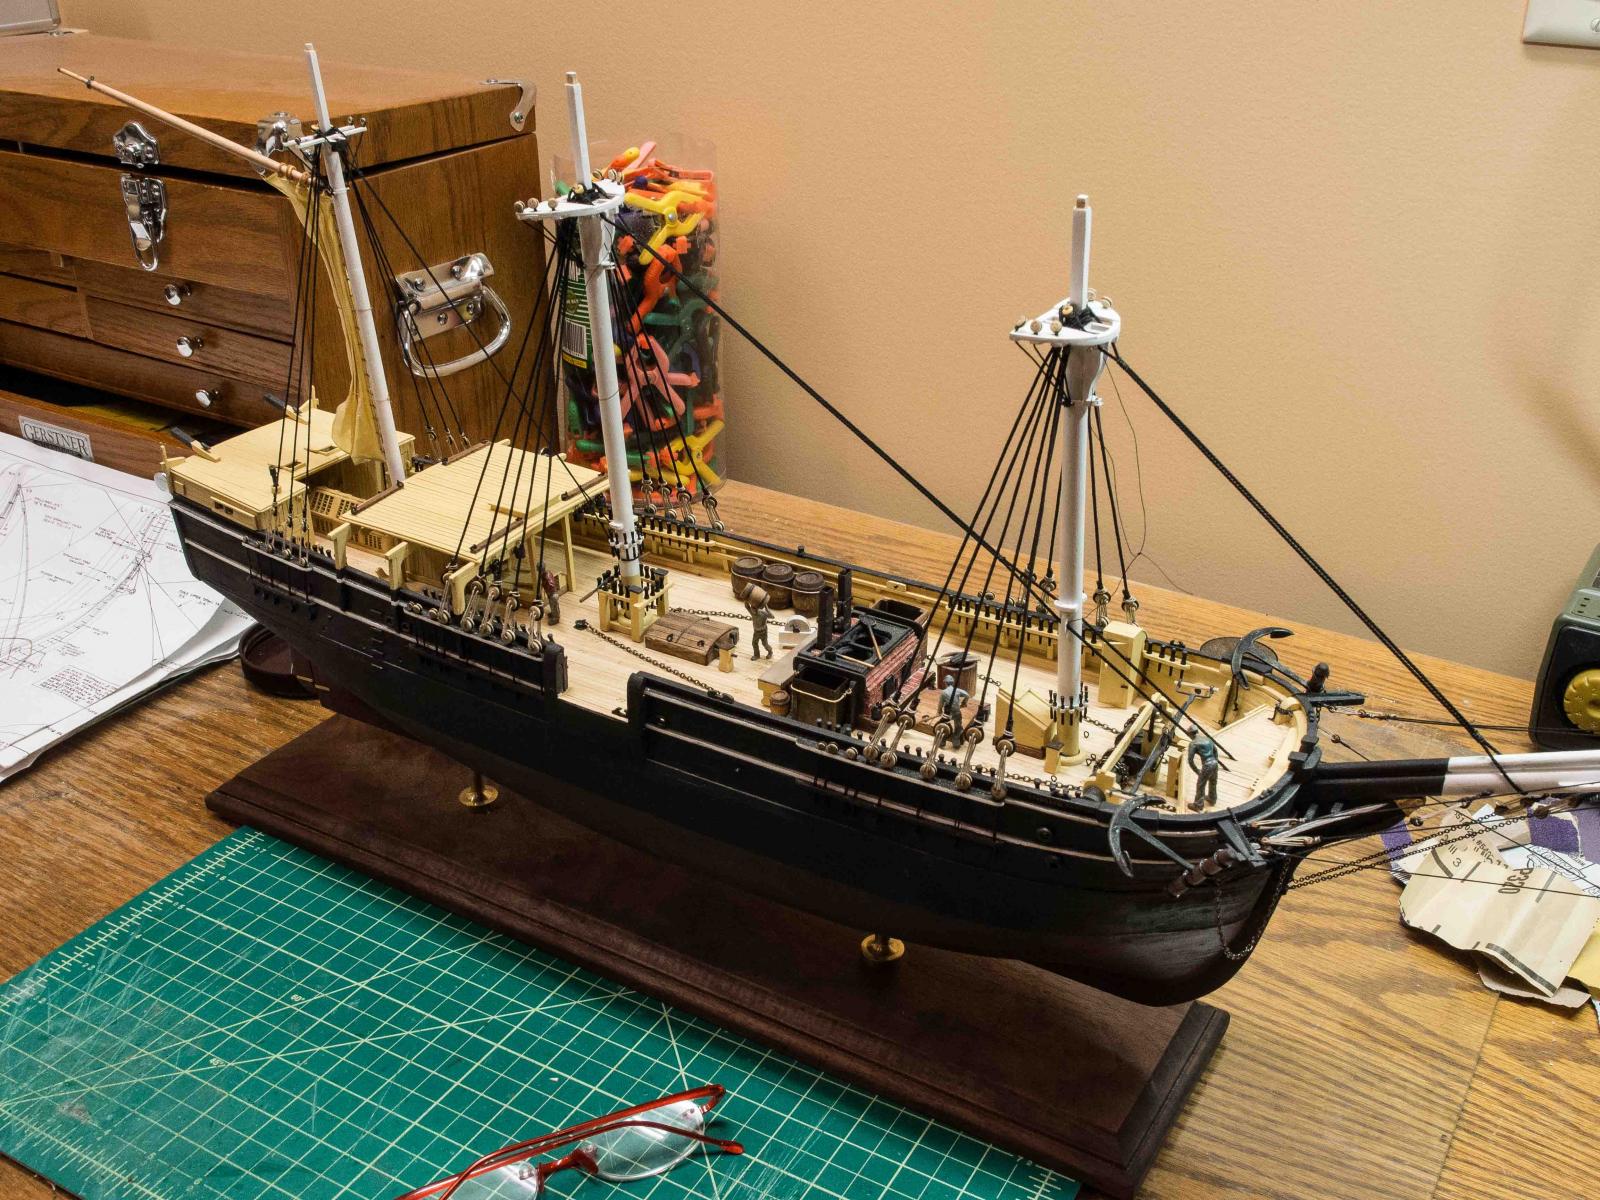
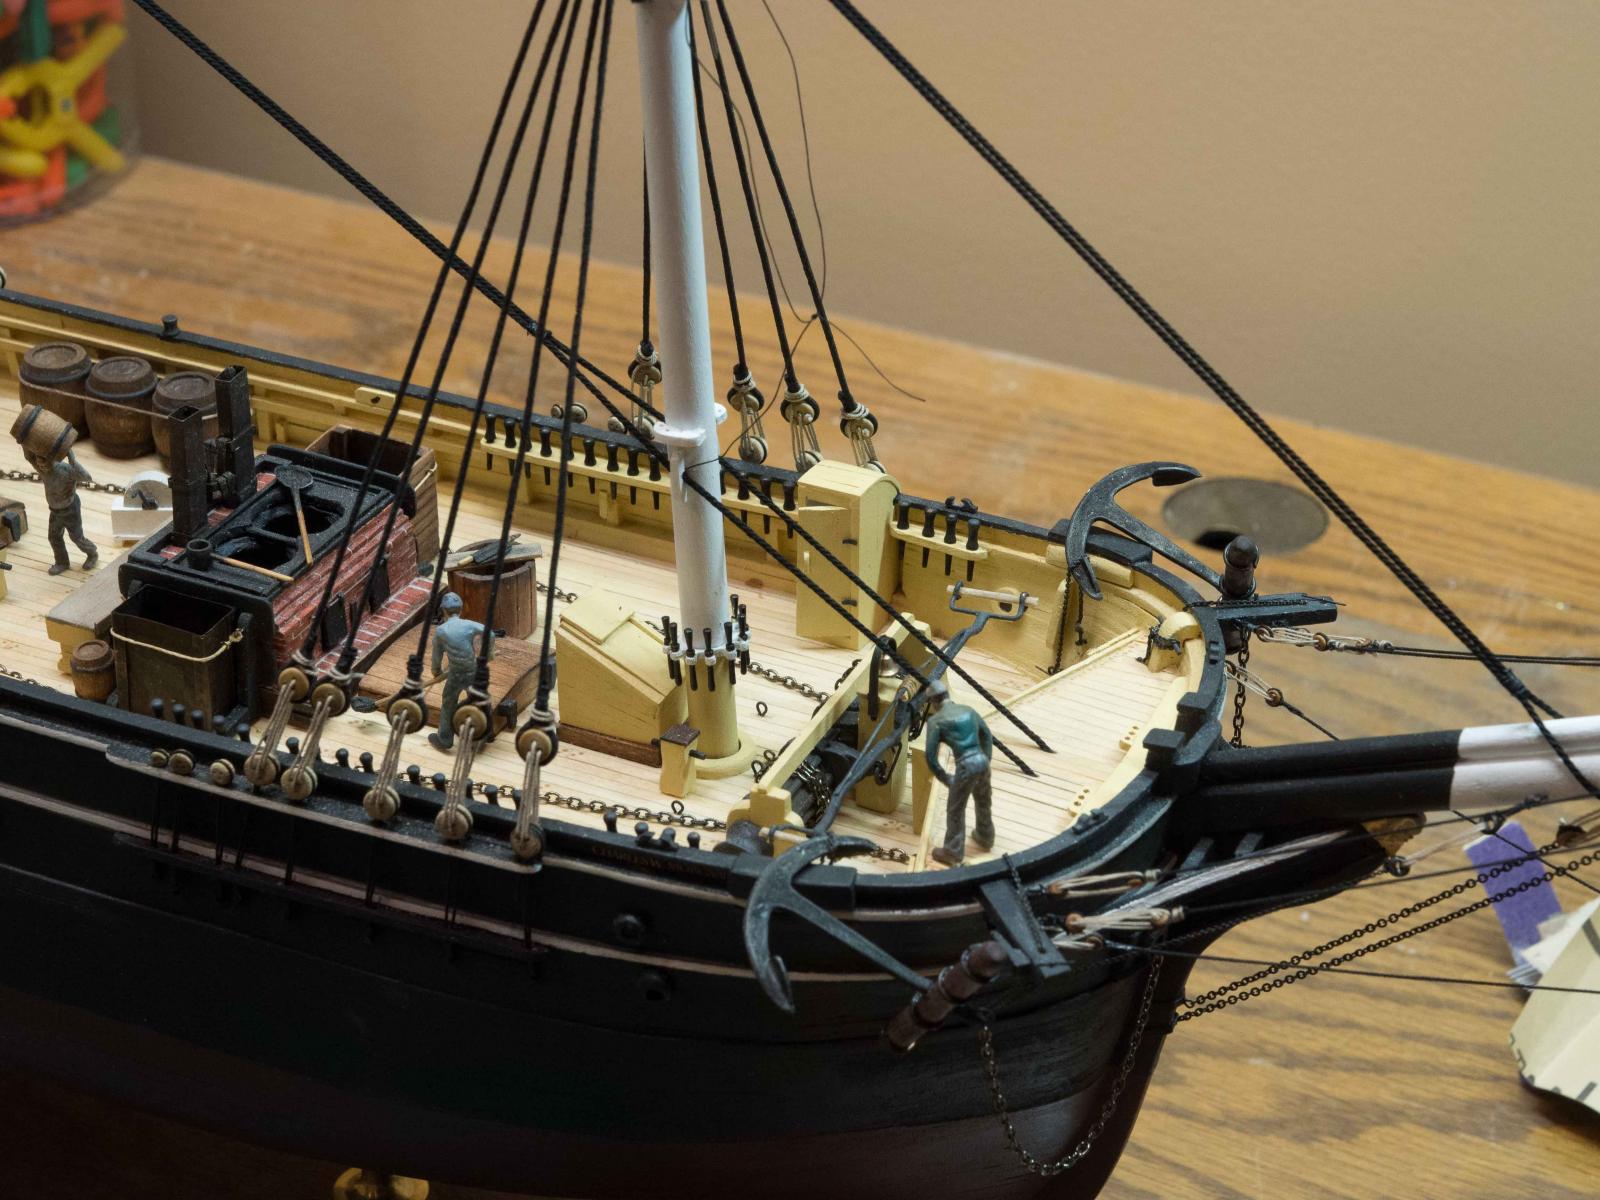
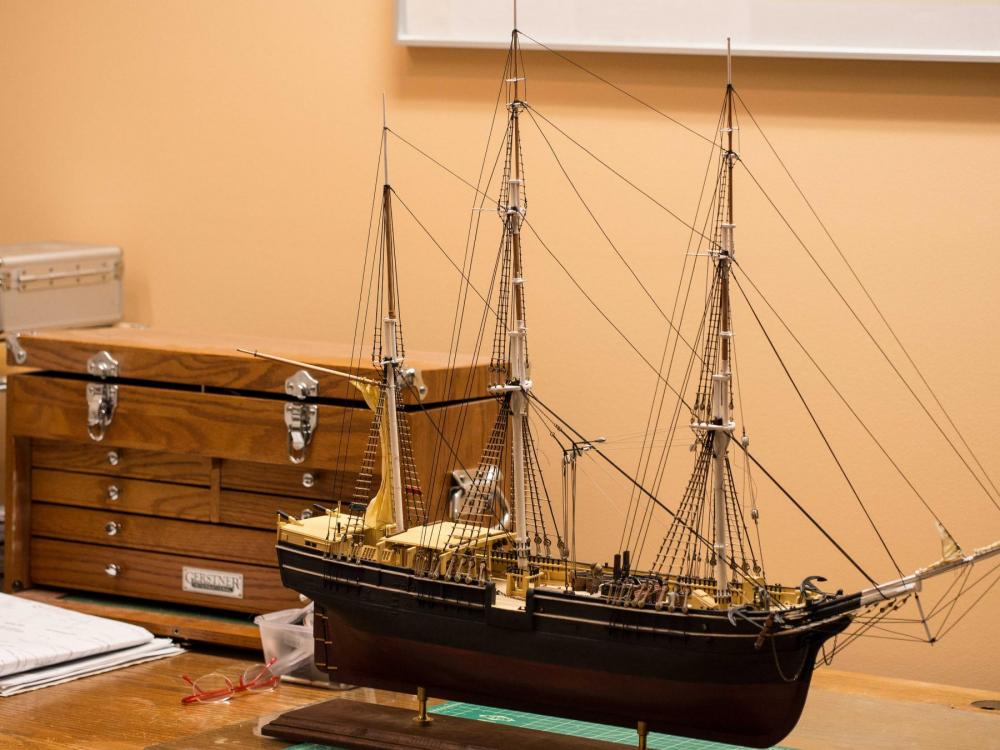
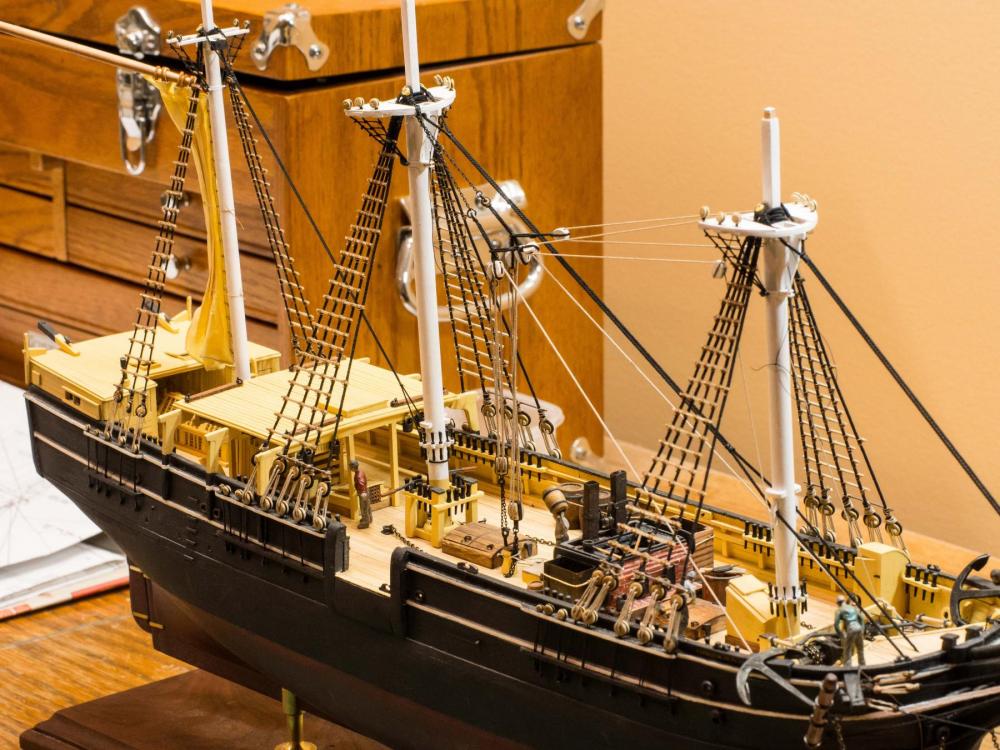
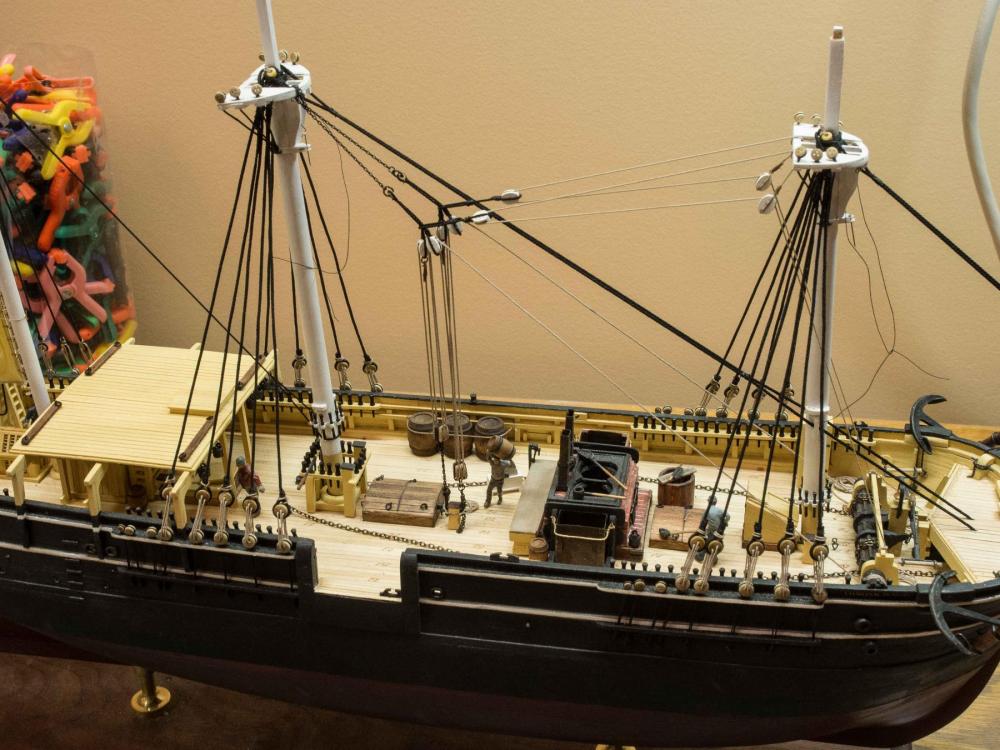
 OK, so the whaleboat stations are a lot more work than I was anticipating. I've finished the aft port station, and have the approach figured out, so hopefully the rest will go more quickly. The cut-outs, painting, and crane construction are all done for the other 2 port stations. I've used black laser cut rigging hooks from Syren for the boat hooks. Drilling 2 sets of 3 adjacent holes in the 1/8" ends of the davits to simulate 3 sheaves was fun. The hinges for the cranes were done with 2 eyebolts in the crane edge and 2 right angle steel wire "pintles" in the lashing posts, with more steel wire used to make the rigid supports to hold the cranes perpendicular to the hull. Although he's looking away at the moment the captain is keeping an eye on things!
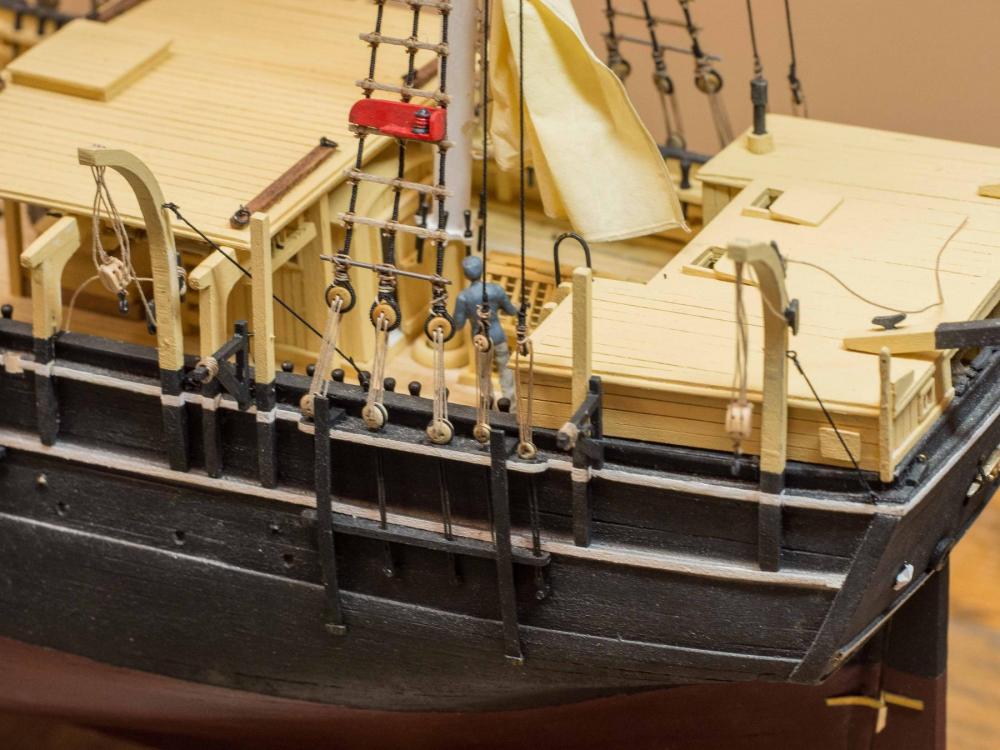
- 245 replies
-
- 6
-

-
- model shipways
- Finished
- (and 1 more)
-
I will order the day it's released, or pre-order when-if that option exists. Looks fascinating and filled with new skills to learn! Bruce
- 269 replies
-
- 7
-
-
- Queen Anne Barge
- Syren Ship Model Company
- (and 1 more)
-
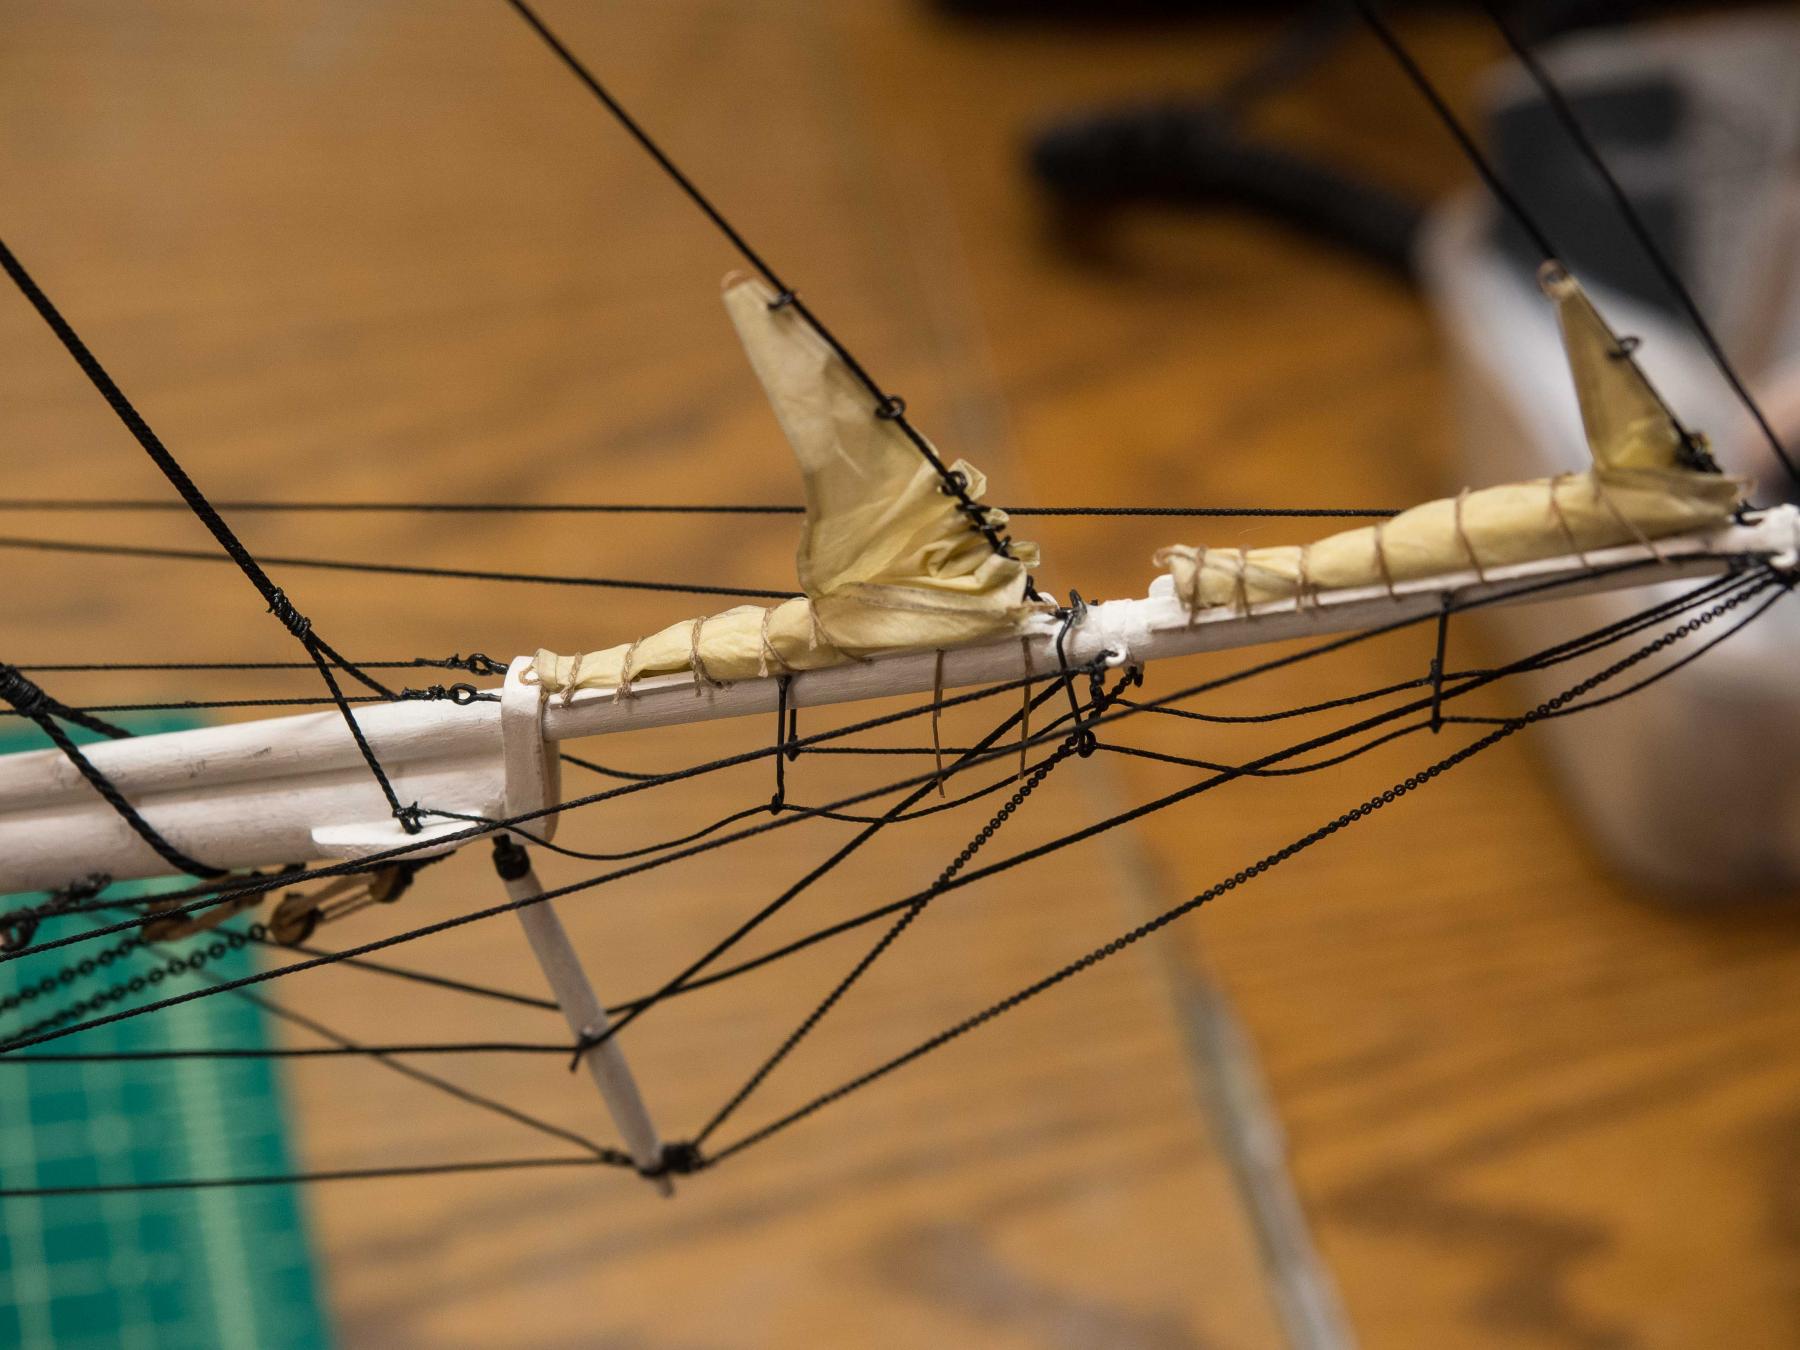
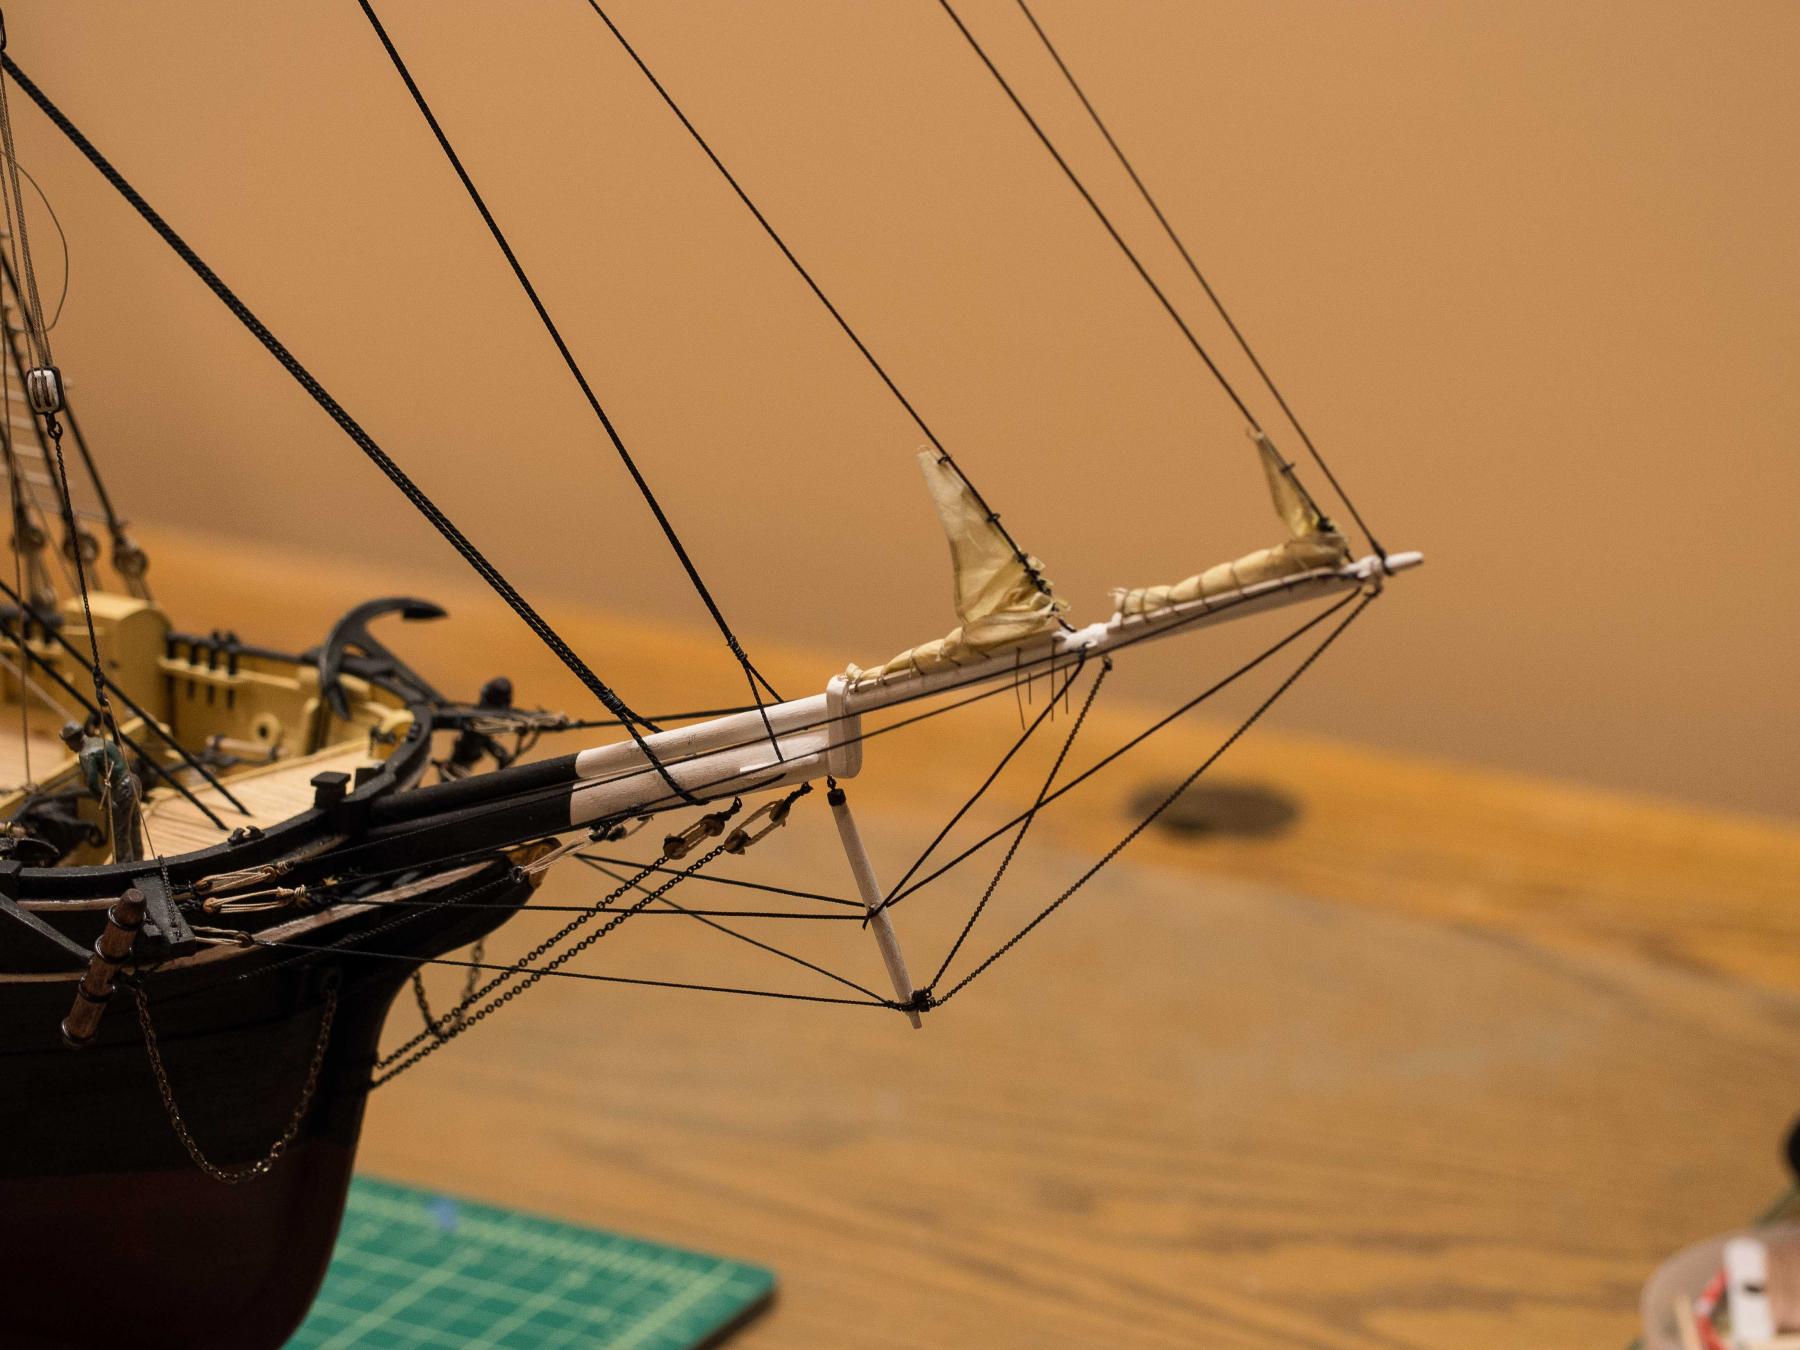
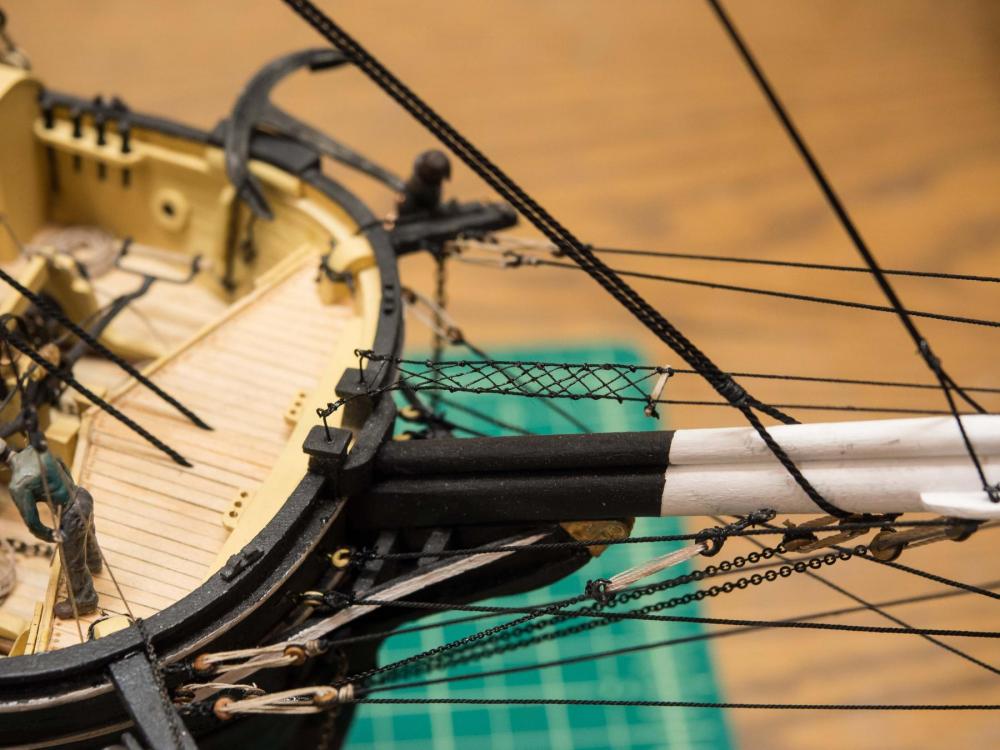
Minor sidestep to add the foot ropes and netting to the bowsprit. The foot ropes (at least the stirrups) should have been added prior to all the other rigging that gets in the way. I had to use steel wire for the stirrups for ease of mounting thru all the existing rigging. Looks ok except for the size of the "eye". Now work on the davits.

- 245 replies
-
- 8
-
-
- model shipways
- Finished
- (and 1 more)
-
Looks great!
-
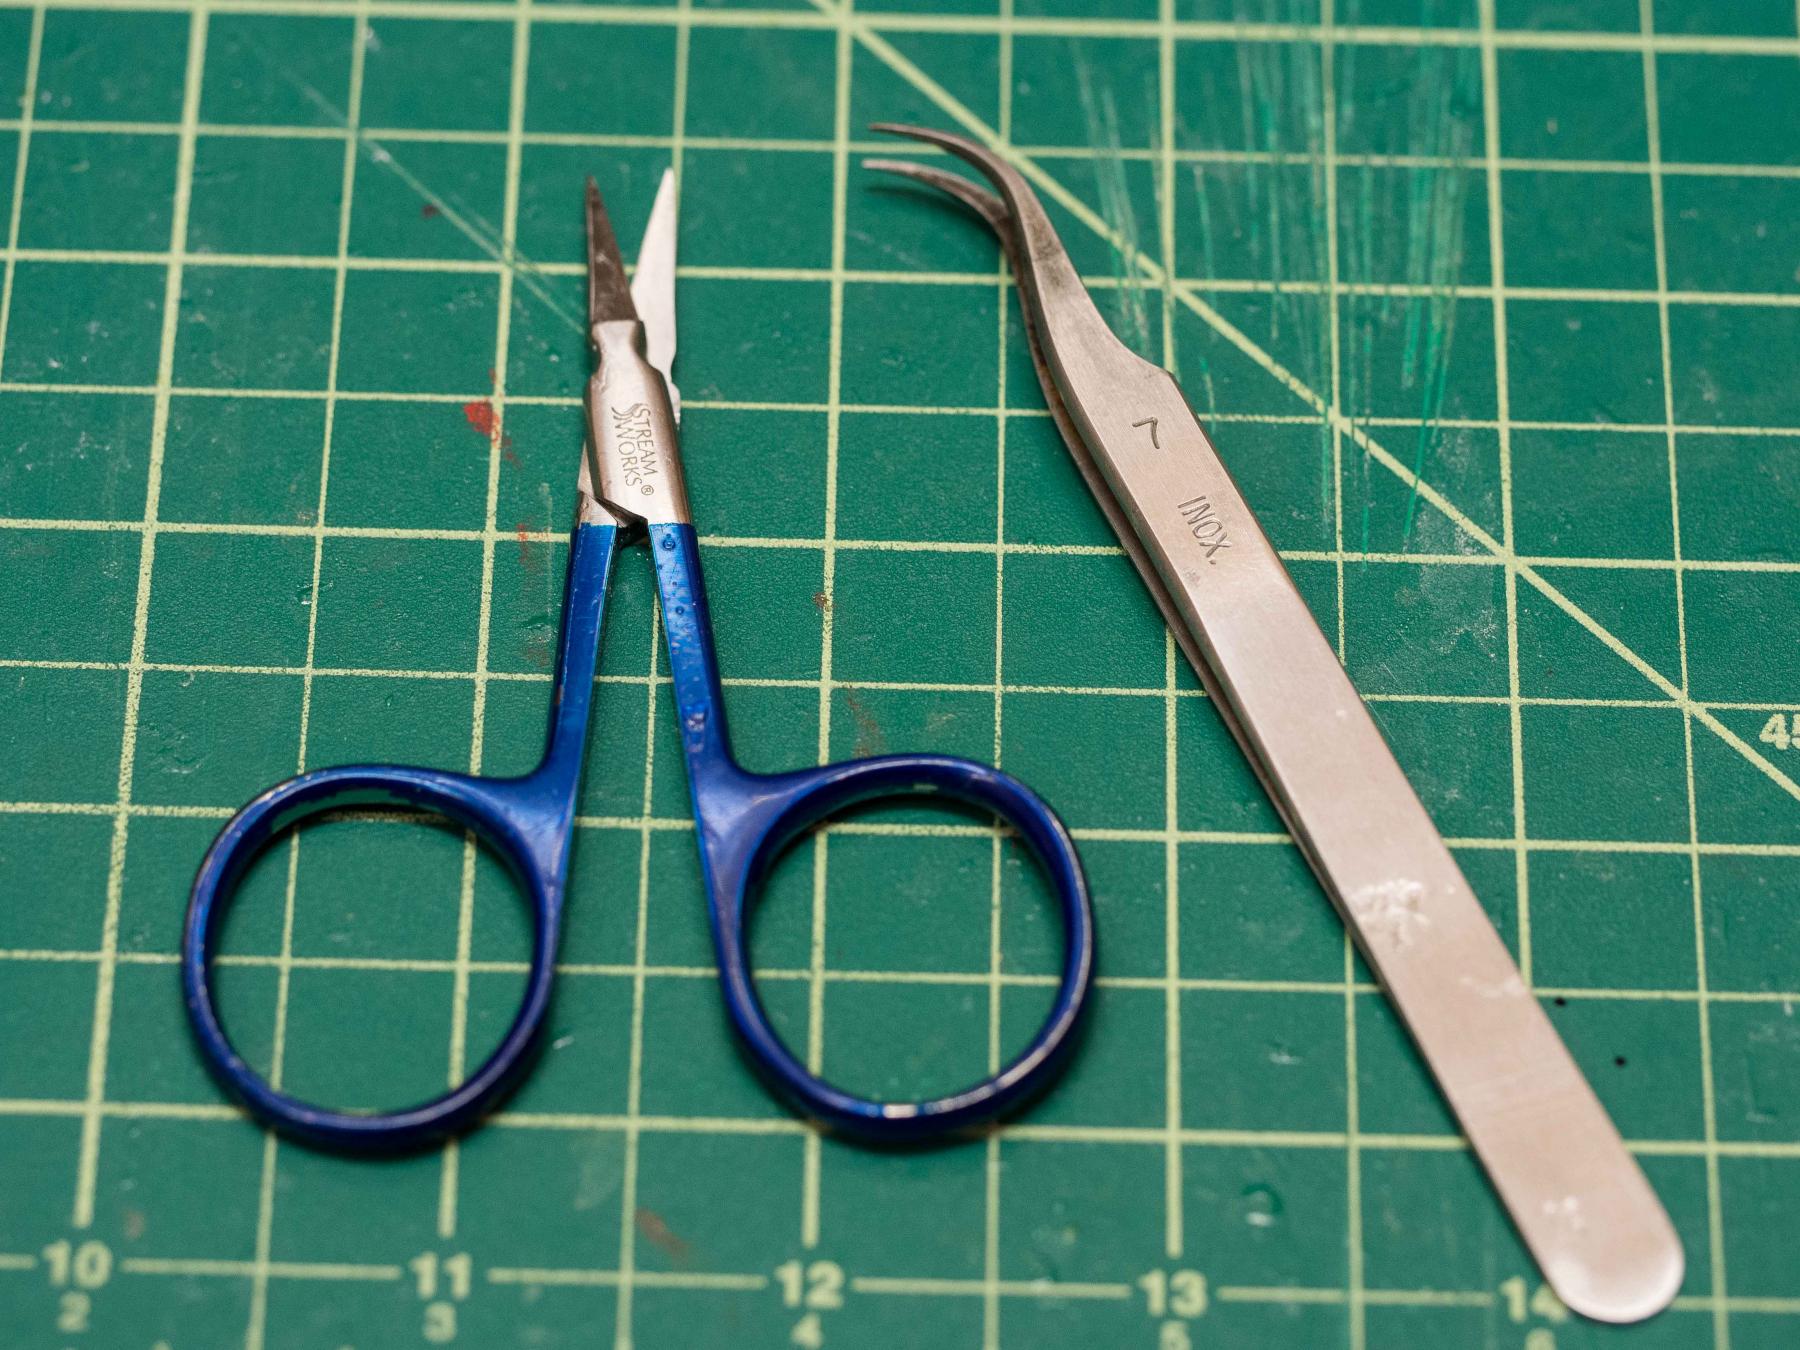
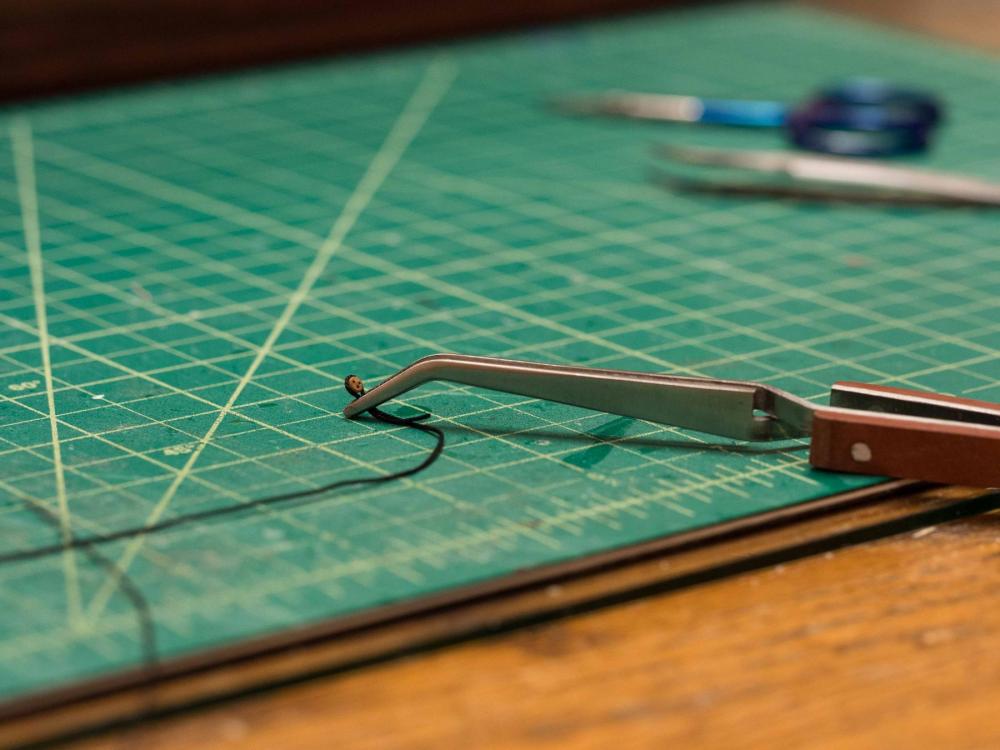
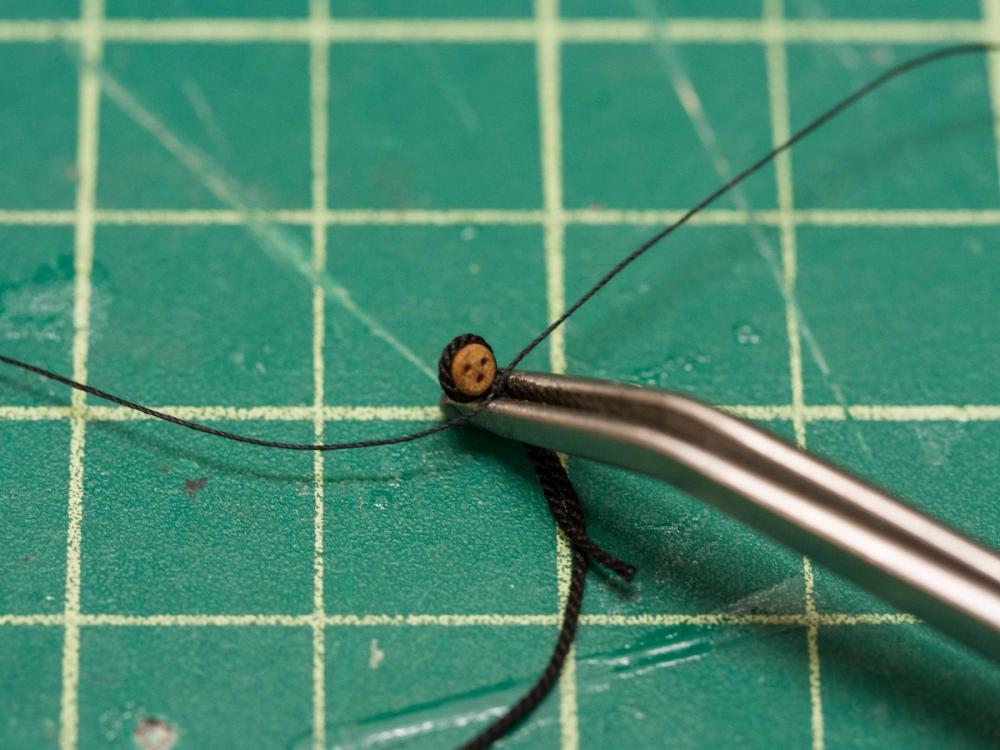
Big day - finished the standing rigging on the Morgan. Not perfect, learned as I went along. Put the furled jibs (decided to skip the fore staysails) on as they fasten by rings to the foremast stays. Three tools illustrated. The scissors is expensive but great: cuts any line no matter how fine, and so close to the knot as your trembling hands can manage. I like the reach it gives too. I've tried a number of scissors including the supposed operative spring scissors - all of them frequently push the line at an angle between the blades, especially with a fine line. I tried a very good nail clipper but it was too hard for me to work in close quarters. The illustrated tweezer is my "go to" - perfect tips allow picking up tiny thread, and the curve is great for tying knots or positioning. The wooden handled spring clamp (meant for resistance soldering - holding work) is great for holding line around a deadeye or bullseye to allow it to be tied off. Once tied I stiffen the doubled line near the deadeye with a bit of CA and seize by hand - quick and easy. Next on to the whaleboat stations, but I think a few days working on other projects I've been ignoring to reach this Morgan threshold the last few weeks.


- 245 replies
-
- 10
-
-
- model shipways
- Finished
- (and 1 more)
-
Chuck This way of bending planks using hair dryer is new to me. Any details on setting up a bending station? Preparing for my next build
- 269 replies
-
- 1
-
-
- Queen Anne Barge
- Syren Ship Model Company
- (and 1 more)
-
I'm so taken with this I've acquired the Caldecraft Grenado and the AOTS book and added it to my "to do" shelf. Retired now and finishing the standing rigging on my Morgan and thinking about the next build - Grenado? Confederacy? Gunboat Philadelphia ? Hope I'm around long enough to do them all. (And I have my eye on Chuck's royal barge ) Your build has been an inspiration and challenge to my gradually increasing but "miles to go" abilities. So many boats, so little time and display space. Congrats - she looks great!
-
Tiny clips to hold lines
Brucealanevans replied to Brucealanevans's topic in Masting, rigging and sails
Yes, I have those and use them - I have found them heavy enough to sag some lines, and I have to get my fingers right next to the place to be clamped and they require significant force to open. They have a place and I use them alot, but I've found these electrical clips better for holding doubled-back rigging lines taut while tying them off, and easier to place. A matter of preference, obviously. I'm glad to have found them. -
Tiny clips to hold lines
Brucealanevans replied to Brucealanevans's topic in Masting, rigging and sails
1+ on these. "Electrical test clips"I bought a small collection and they work great! Very light so don't cause the line to sag. Hold very strongly. With the pointy tips great for reaching into complex or hard to reach confined spaces since the actuator is remote. Model shops should sell these! Absolutely the perfect tool for this use. Just what I wanted and needed. Great to have this forum to get thoughtful answers to questions like this. -
Thanks If I finish the Morgan by the end of the year I think I will take on the Confederacy. It's calling to me from its box, pointing out that it won't need a huge (as in high) case like the table-case on its way here for the Morgan.
- 245 replies
-
- 1
-
-
- model shipways
- Finished
- (and 1 more)
-
As I work on the rigging on my C W Morgan build, I find I would like to be able to clip 2 lines together preparatory to seizing them. For instance , running a stay through an eyebolt and clipping it back on itself to hold the tension while tying the initial hitch for seizing. All of the "mini clips" I have are too big and heavy and cause the line to sag losing tension. Without three hands it's difficult at best. Does anyone know of truly mini mini clips, or have a technique to suggest?
-
One thing I continuously learn is that despite our best intentions our eyes are constantly drawn to the things that can (should) have been done better. Note the most aft shroud/deadeye on the mainmast above that was too close to the forward "roof" support to line up without twisting, as just one example. Also a hurried and to my current standard not acceptable job of mounting the rudder and its hinges and supports. I just hope with each subsequent build, if I'm around long enough, to build to a higher and higher standard - I'm comfortable just competing with myself rather that some of the true craftsmen on this forum! The Confederacy is waiting on my "to build" shelf just waiting for my expertise to justify it. Will probably do the gunboat Philadelphia first when I finish the Morgan. Fully retire in 2 weeks (!) one of which is vacation, so plan on spending a few hours nearly every morning in the shipyard, so hope to finish the Morgan this year.
- 245 replies
-
- 1
-
-
- model shipways
- Finished
- (and 1 more)
-
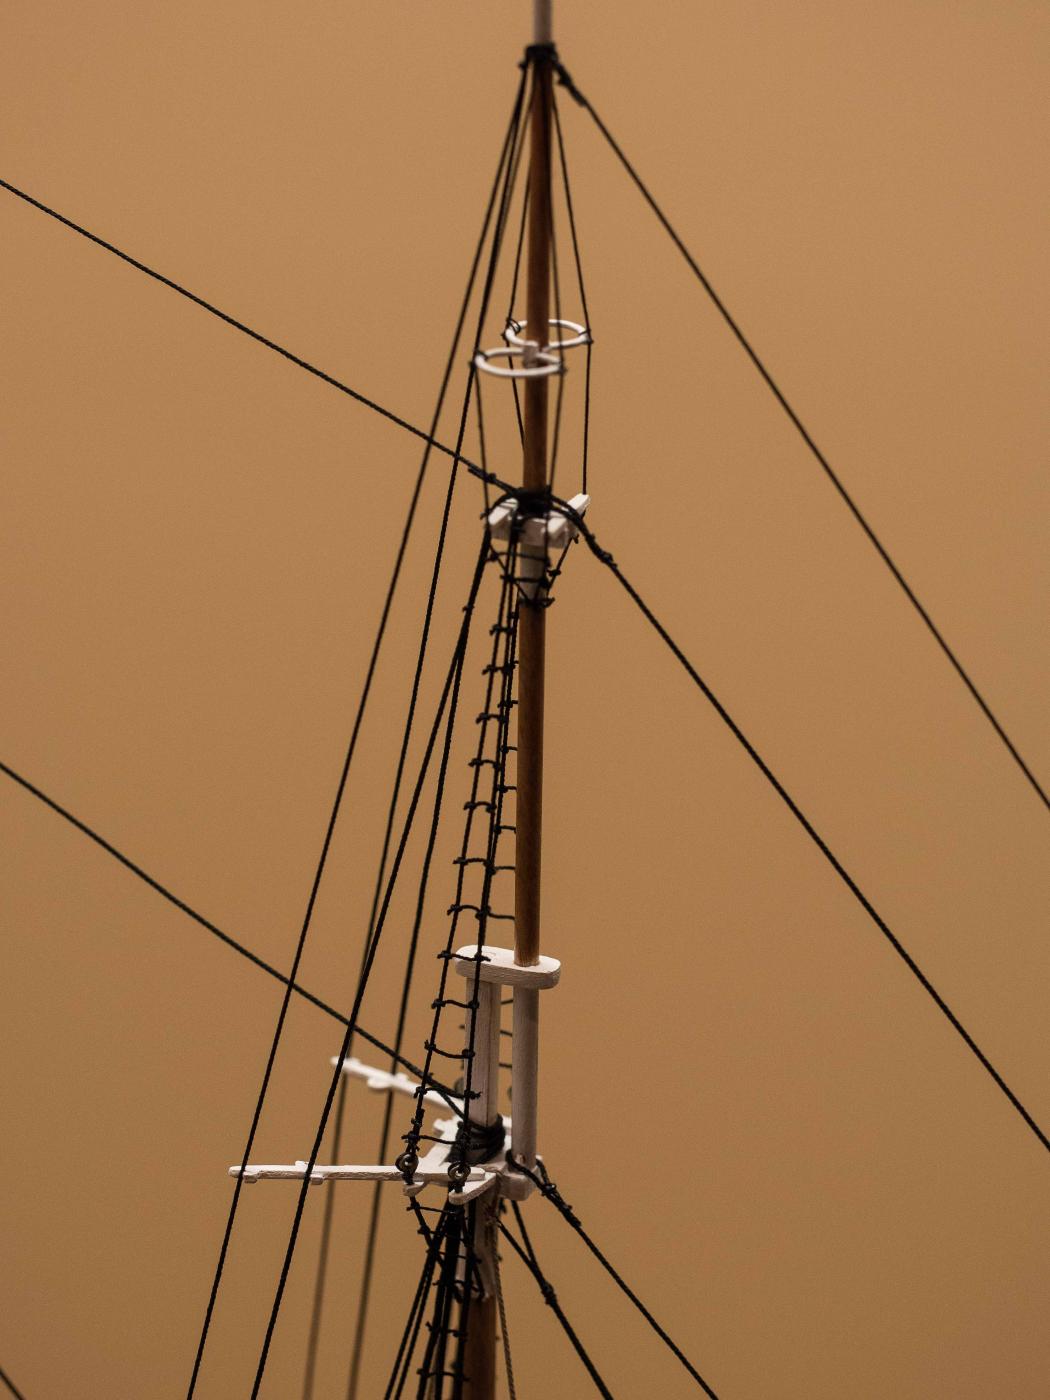
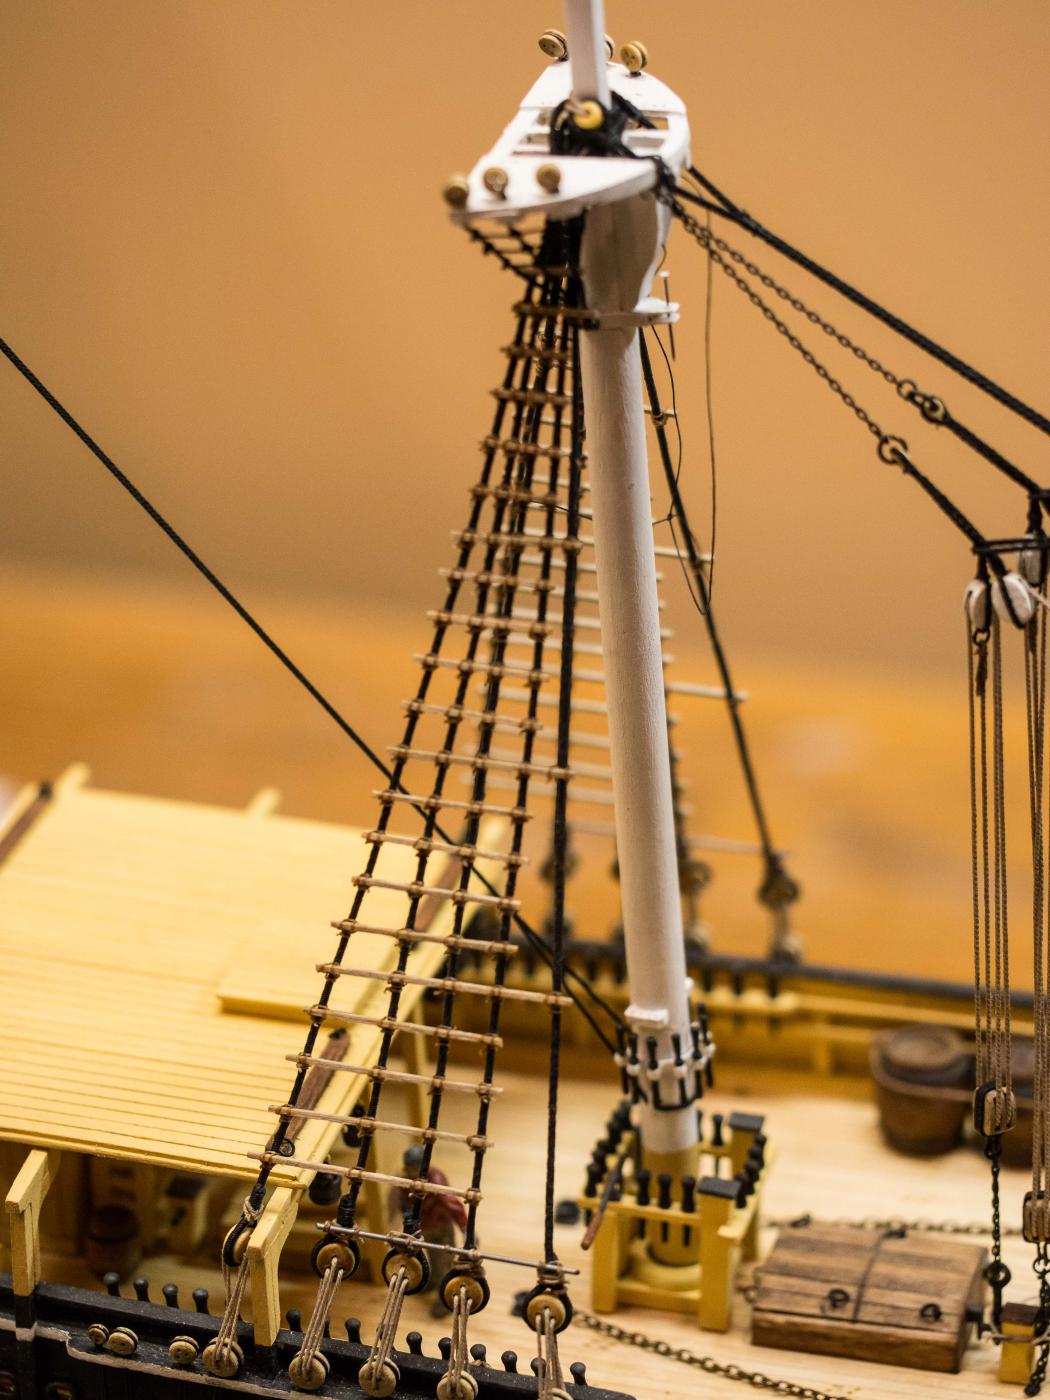
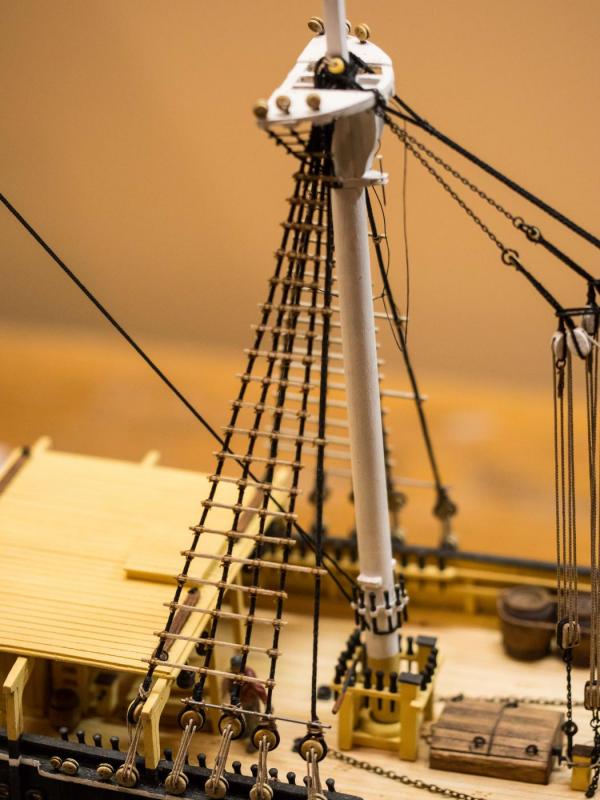
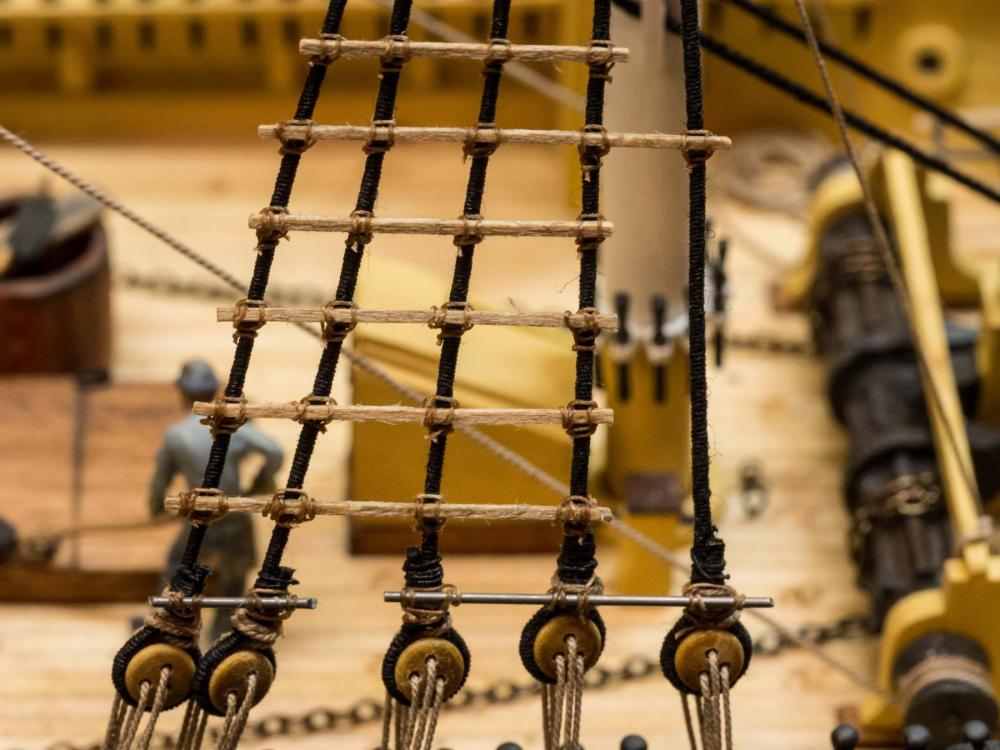
I just finished the ratboards for the first level of the masts. Dozens of boards and hundreds of knots. A tedious job I had to break up to an hour or so a day, so took a long time. I also inexplicably installed the main shroud ratboards on one side with the "free" shroud aft rather than forward - of course I didn't notice until I was putting the LAST on one. After some bad words, I had a long job picking off the securely knotted and glued ratboards without ruining the shrouds which would have been VERY difficult to replace. At any rate finally done. Looks OK but looking at the close up picture below a bit untidy. Still looking way up at perfection! Never pays to look too close. Thanks for the likes and kind words. After a few days break will start on the next level of masting. Back to another tedious job - serving the lines for shrouds.


- 245 replies
-
- 10
-
-
- model shipways
- Finished
- (and 1 more)
-
Ha! I hate to think of building this without your blog.
- 245 replies
-
- 1
-
-
- model shipways
- Finished
- (and 1 more)
-
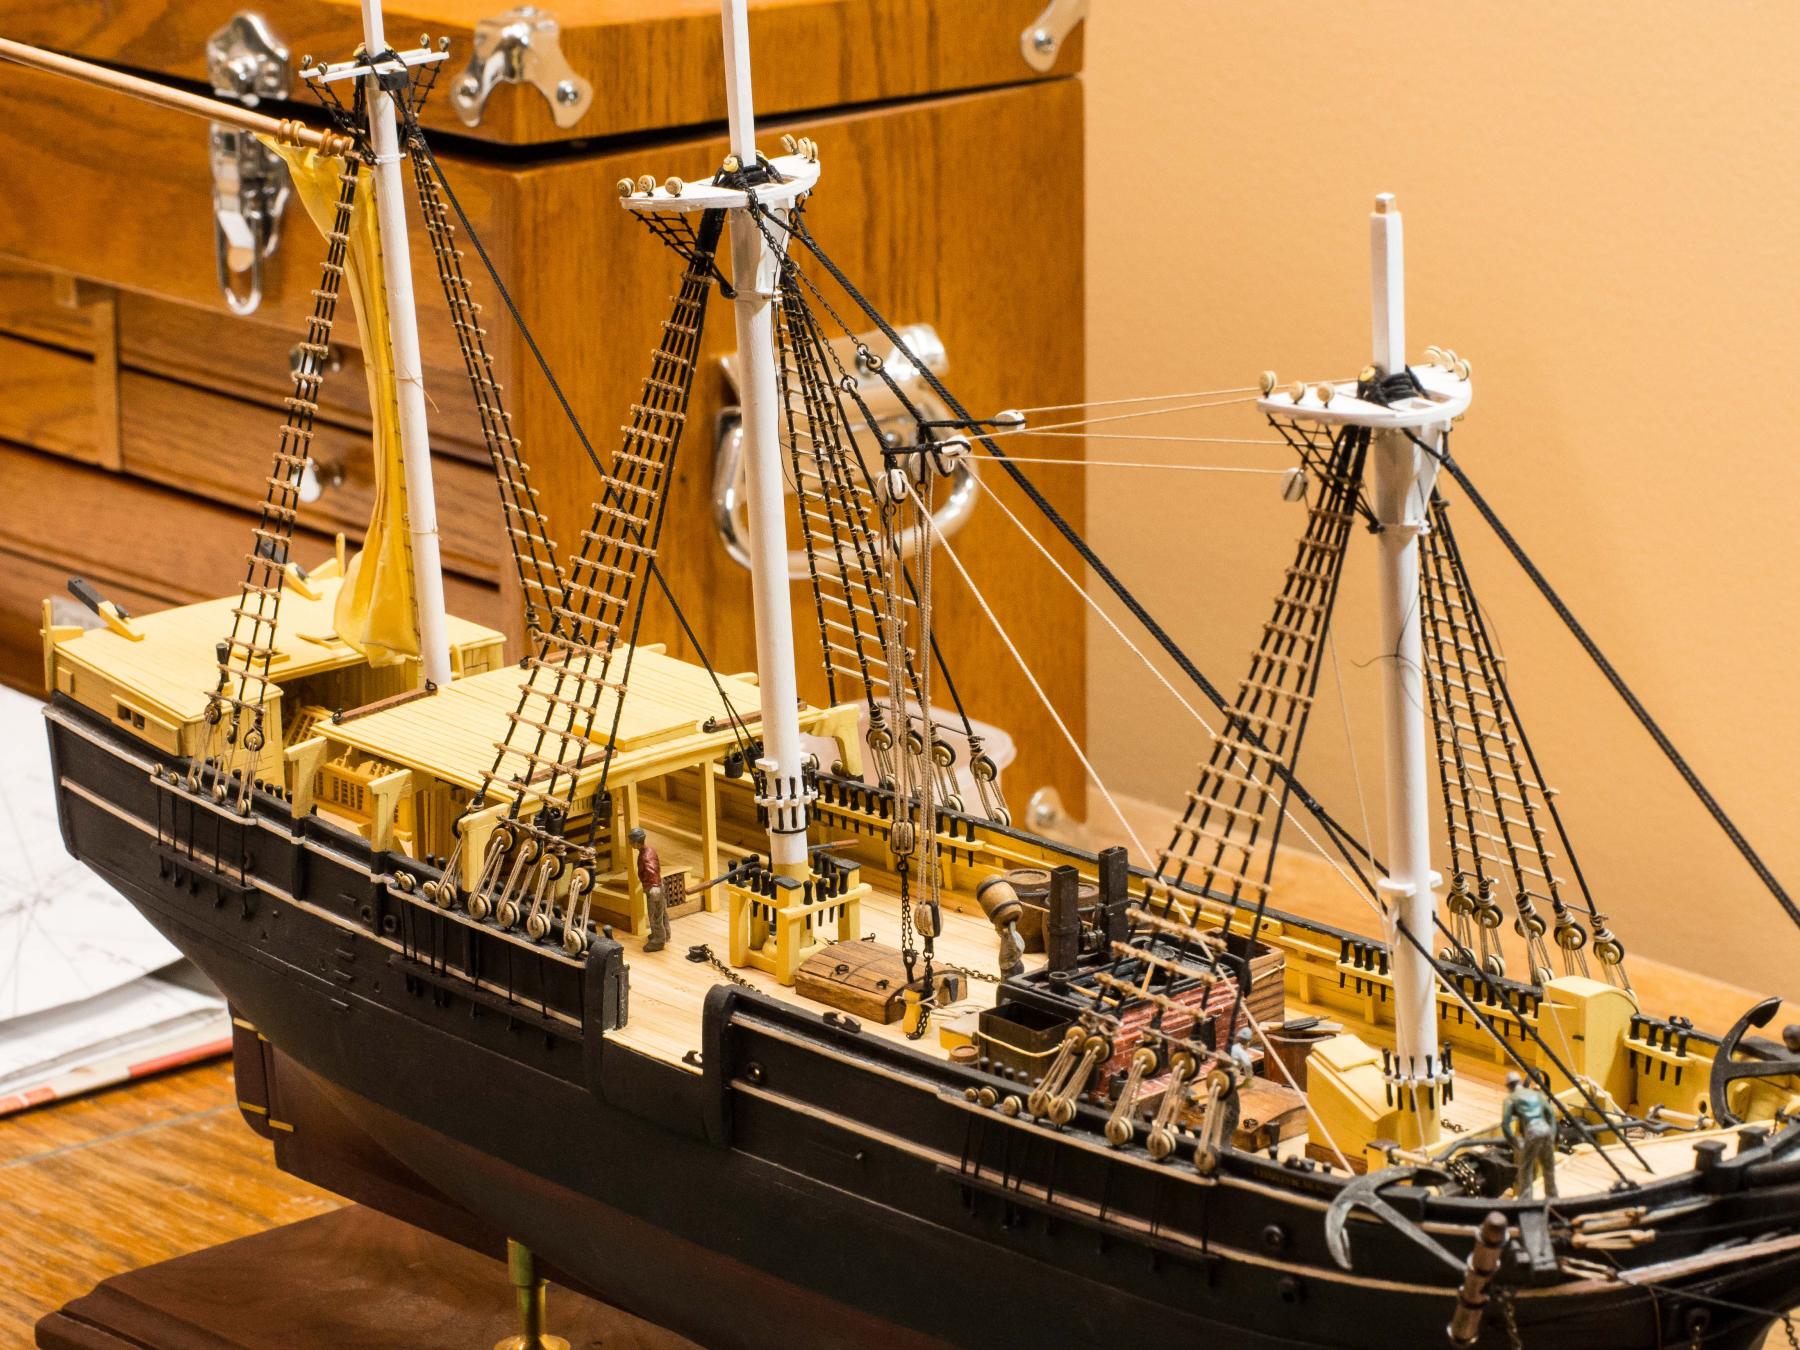
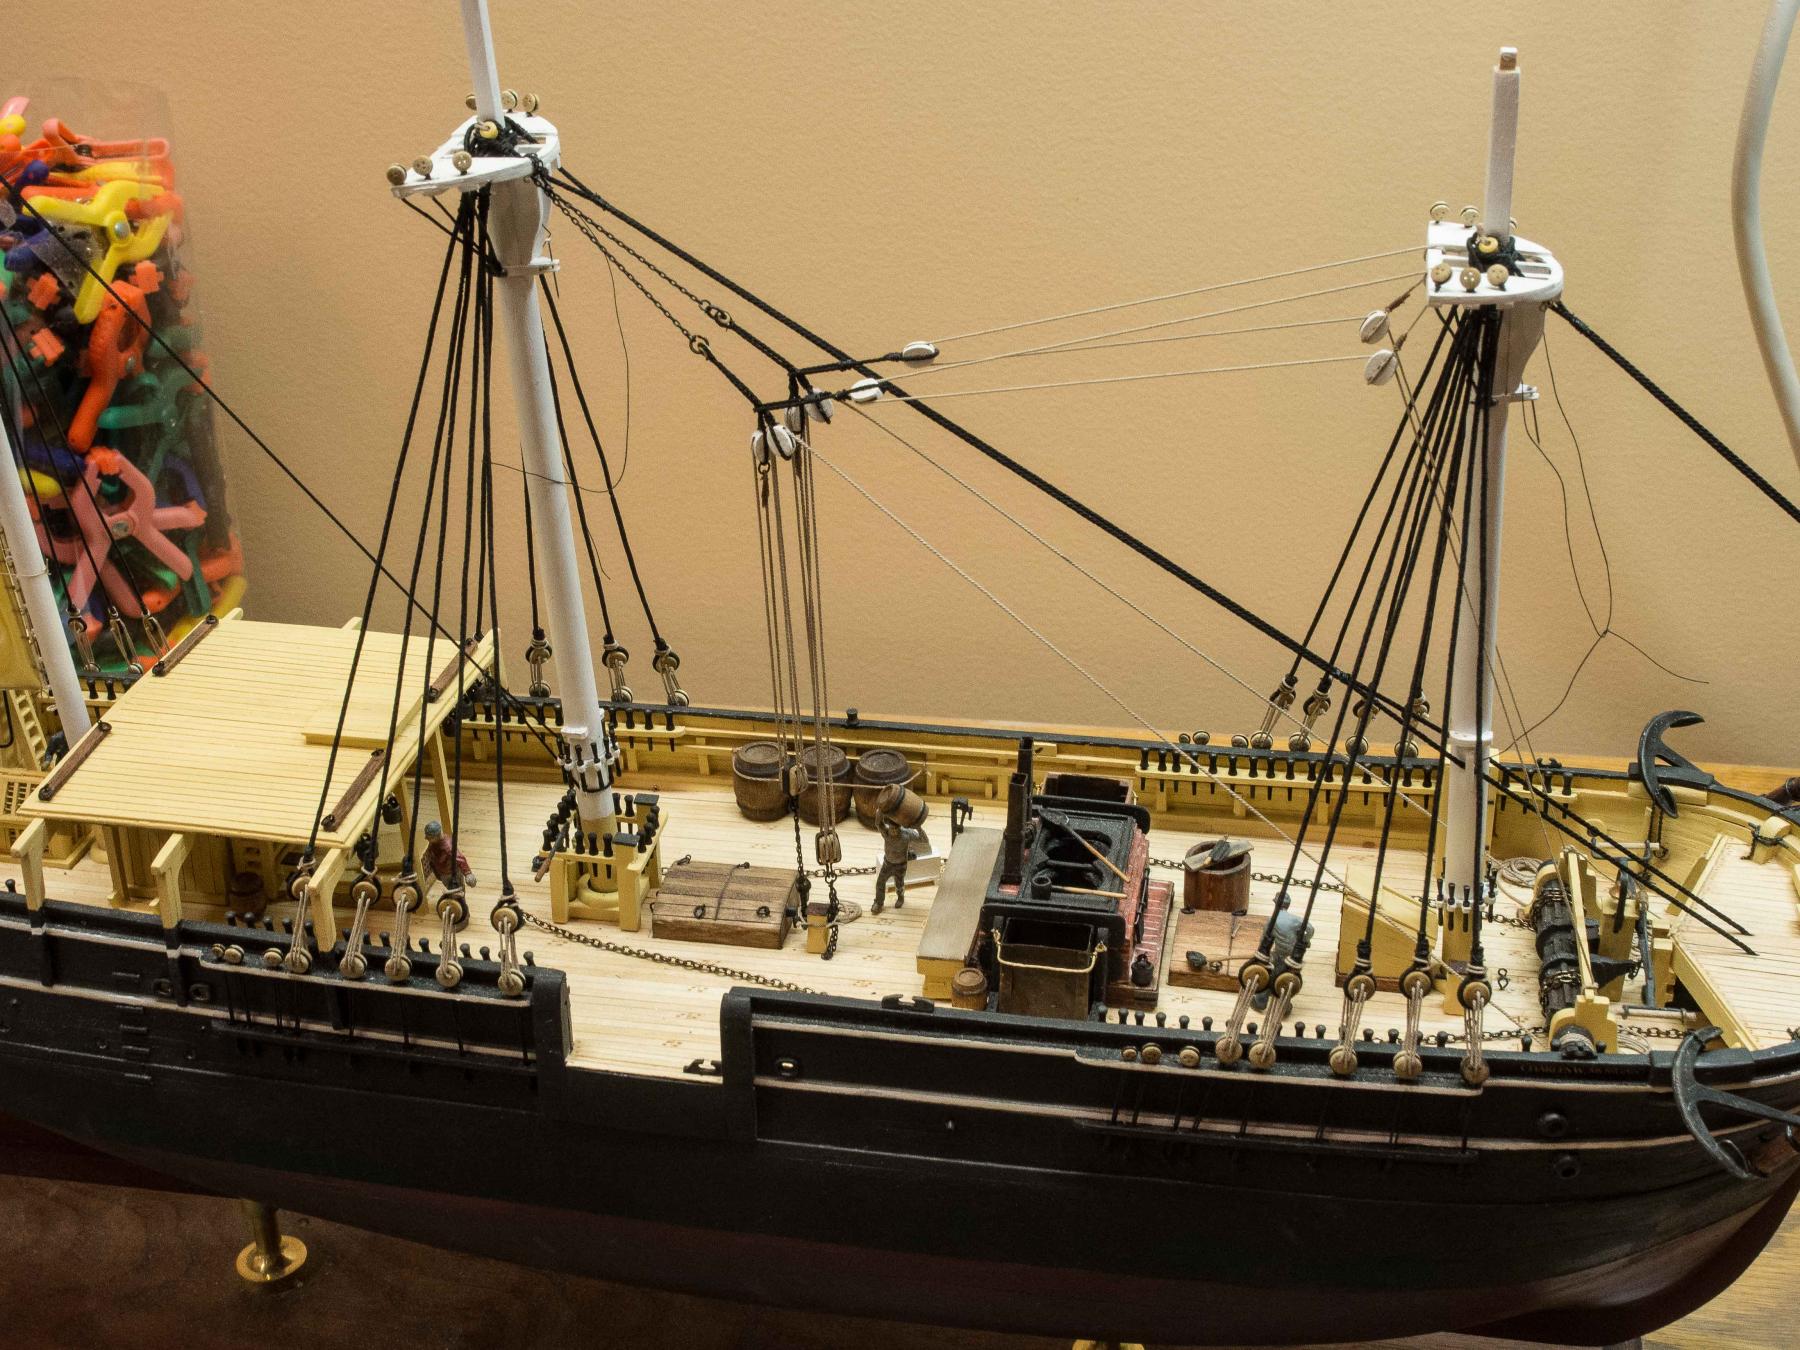
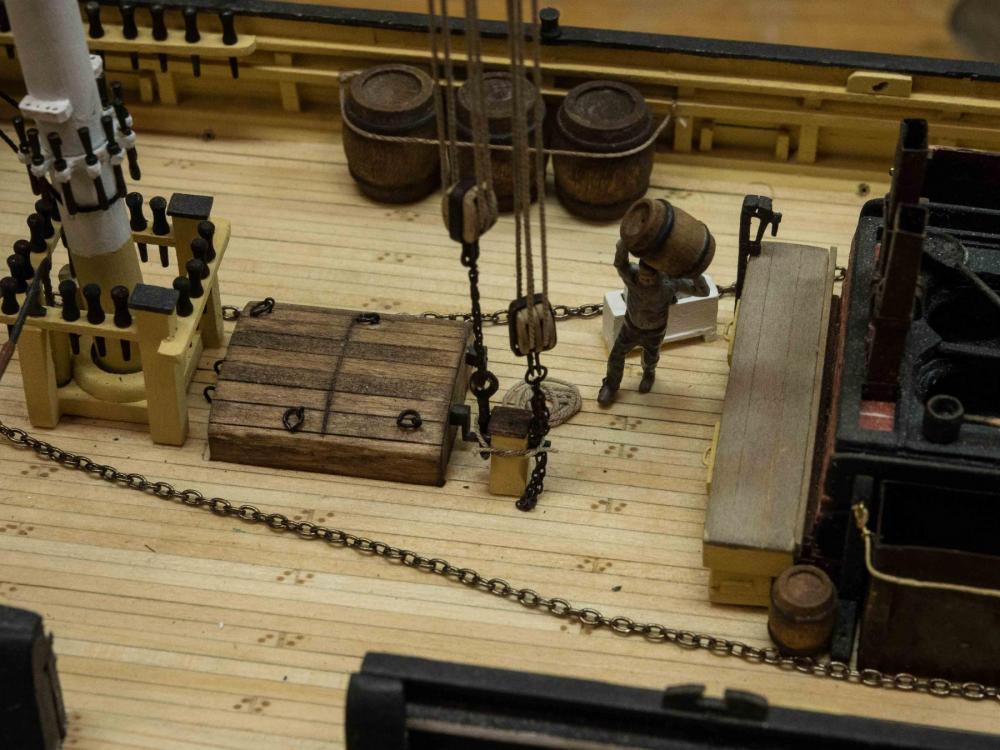
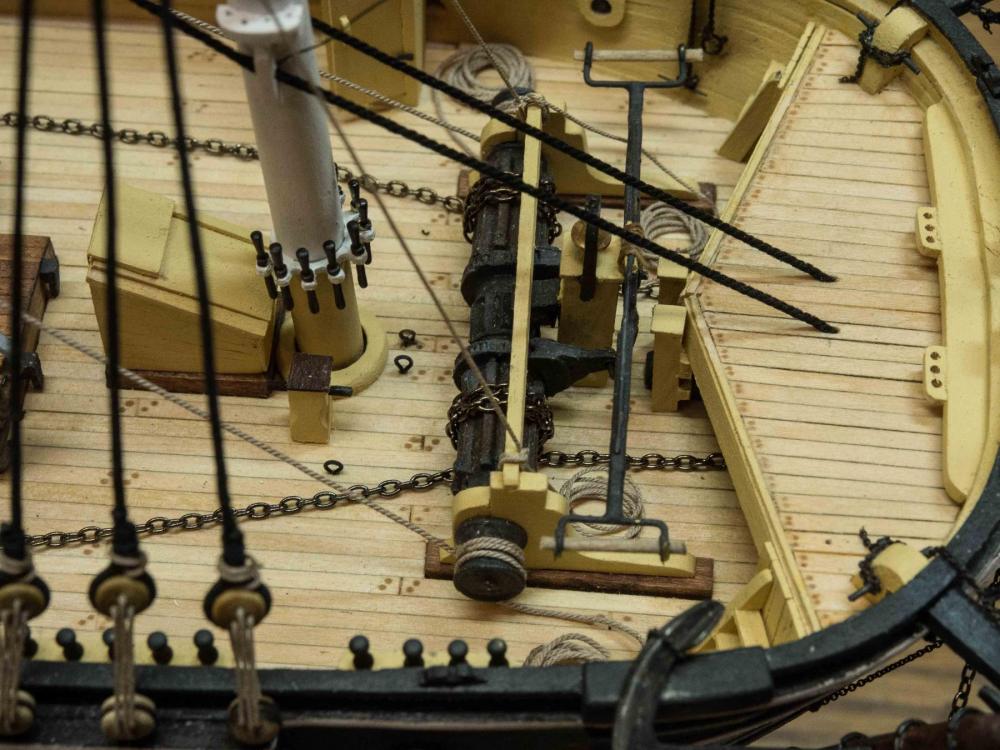
Several days of work to produce the bits of the blubber tackle and mount/rig it all. Anyone building this model is strongly advised to get high quality blocks for this bit, especially the two large double blocks that hold the hooks. It's front and center when you look at her, so it should look its best. I used Syren Shipyard block sets from Chuck - they look great! Thanks for the "likes" (I know the anchor chains and the blubber tackle lines shouldn't both be hooked up to the windlass at the same time, but I took the liberty for visual effect anyway!)

- 245 replies
-
- 9
-
-
- model shipways
- Finished
- (and 1 more)
-
Thanks.. Your experience has been a great boon. Modelshipways ahould consider adding your site contents as a supplement instruction book!
- 245 replies
-
- 1
-
-
- model shipways
- Finished
- (and 1 more)
-
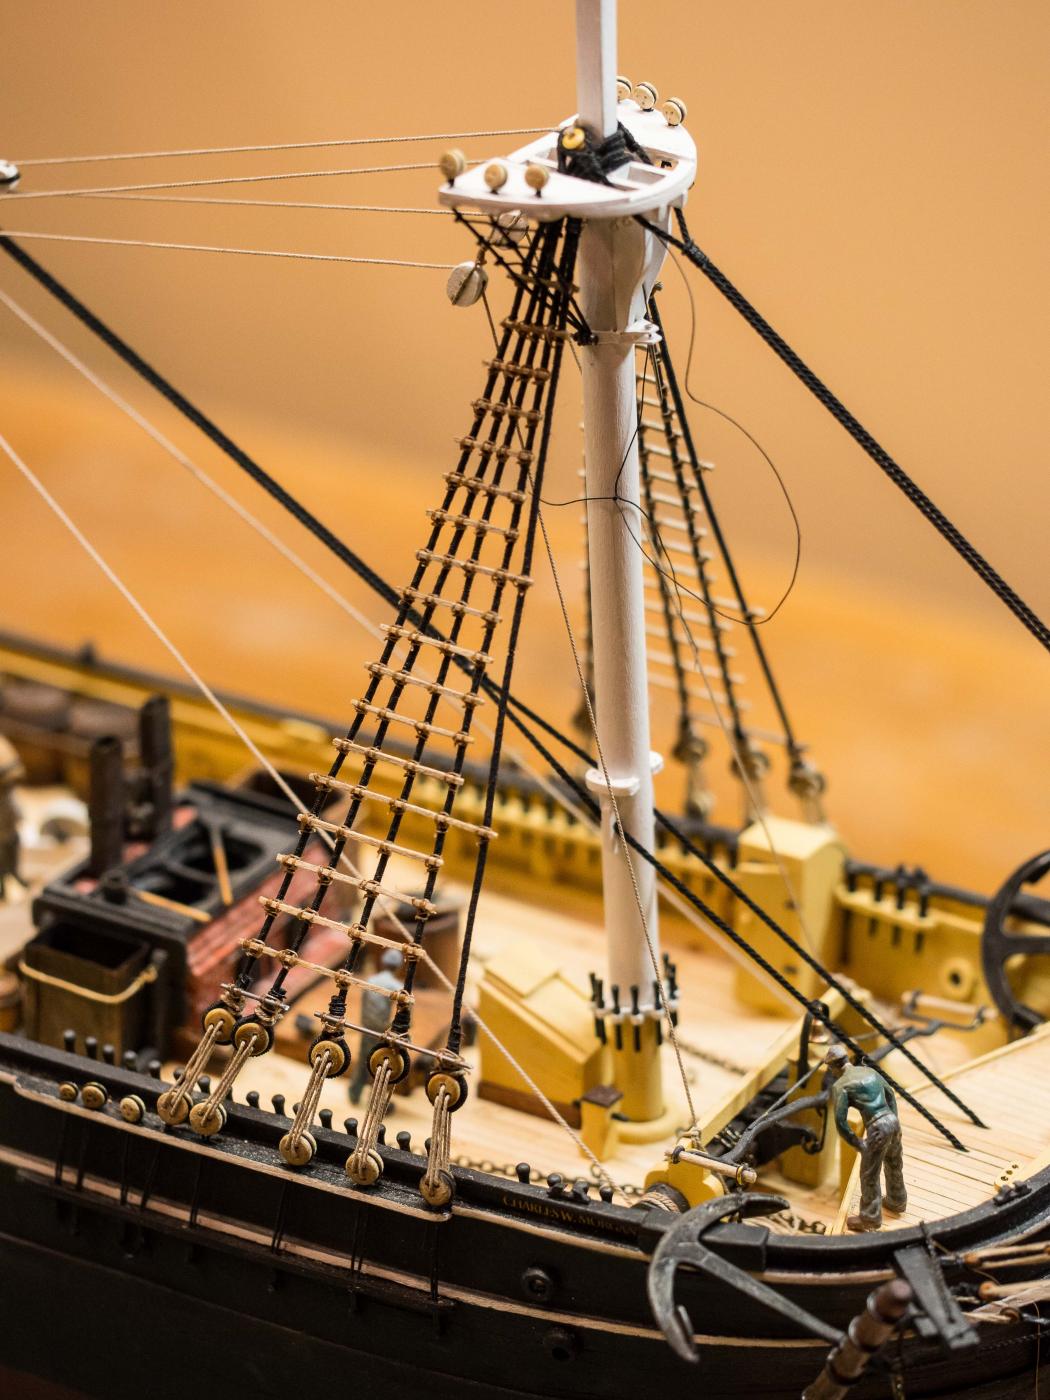
So I've been working on the shrouds for the lower level masts. Serving those lines was a real patience-practice, and after serving they were stiff and a bit of a pain to work with. For the "full size" deadeyes for the fore and main mast shrouds, I made a couple simple jigs from a piece of scrap wood and four fine metal wire pieces to hold the two deadeyes the correct distance apart while I determined the length of the end without a deadeye attached. This worked pretty well. For the mizzen and its smaller deadeyes, I just eyeballed it with acceptable results. I think next, as per John's advice on his website, I'll make and mount the various bits of cutting in tackle, before I continue with the standing rigging. As always, my eyes always go immediately to what I could have done better! Here's what it looks like now:


- 245 replies
-
- 9
-
-
- model shipways
- Finished
- (and 1 more)
-
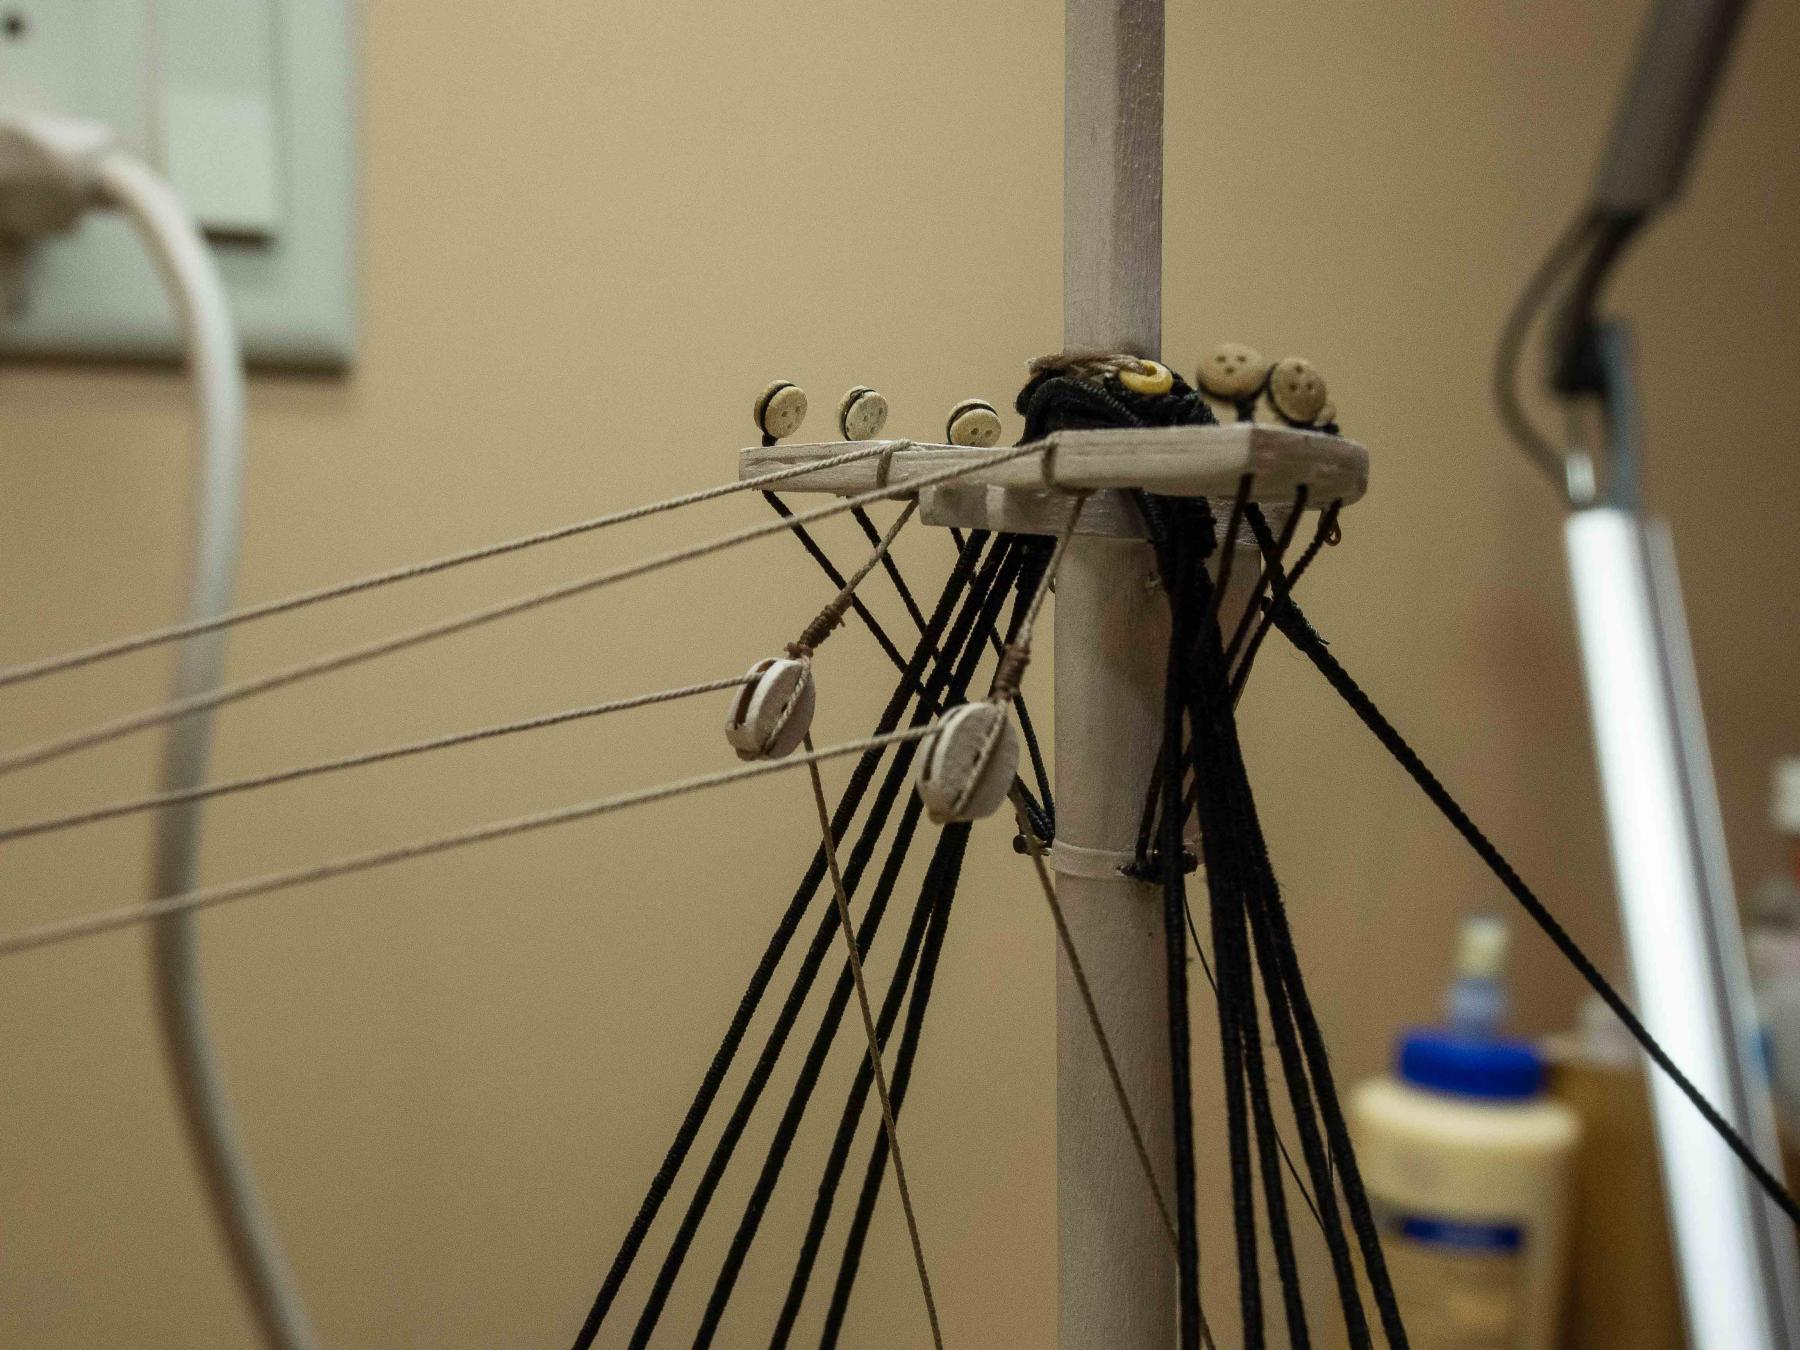
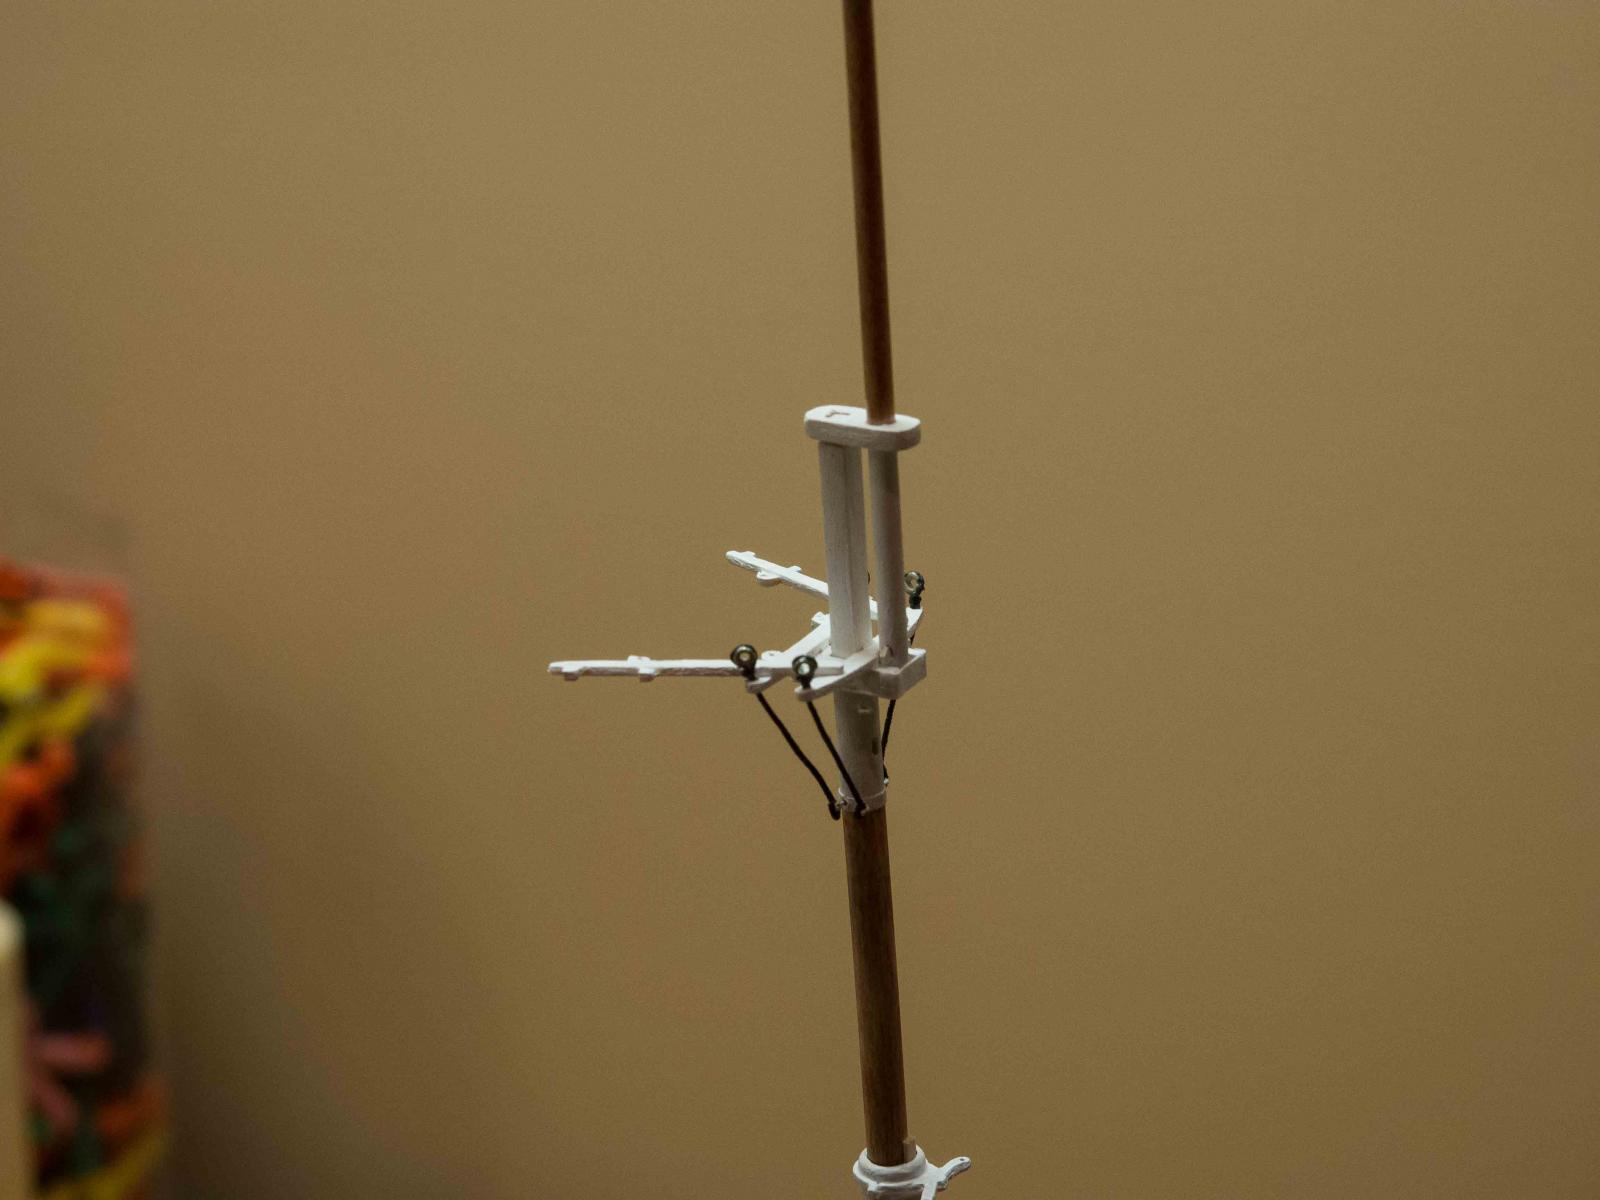
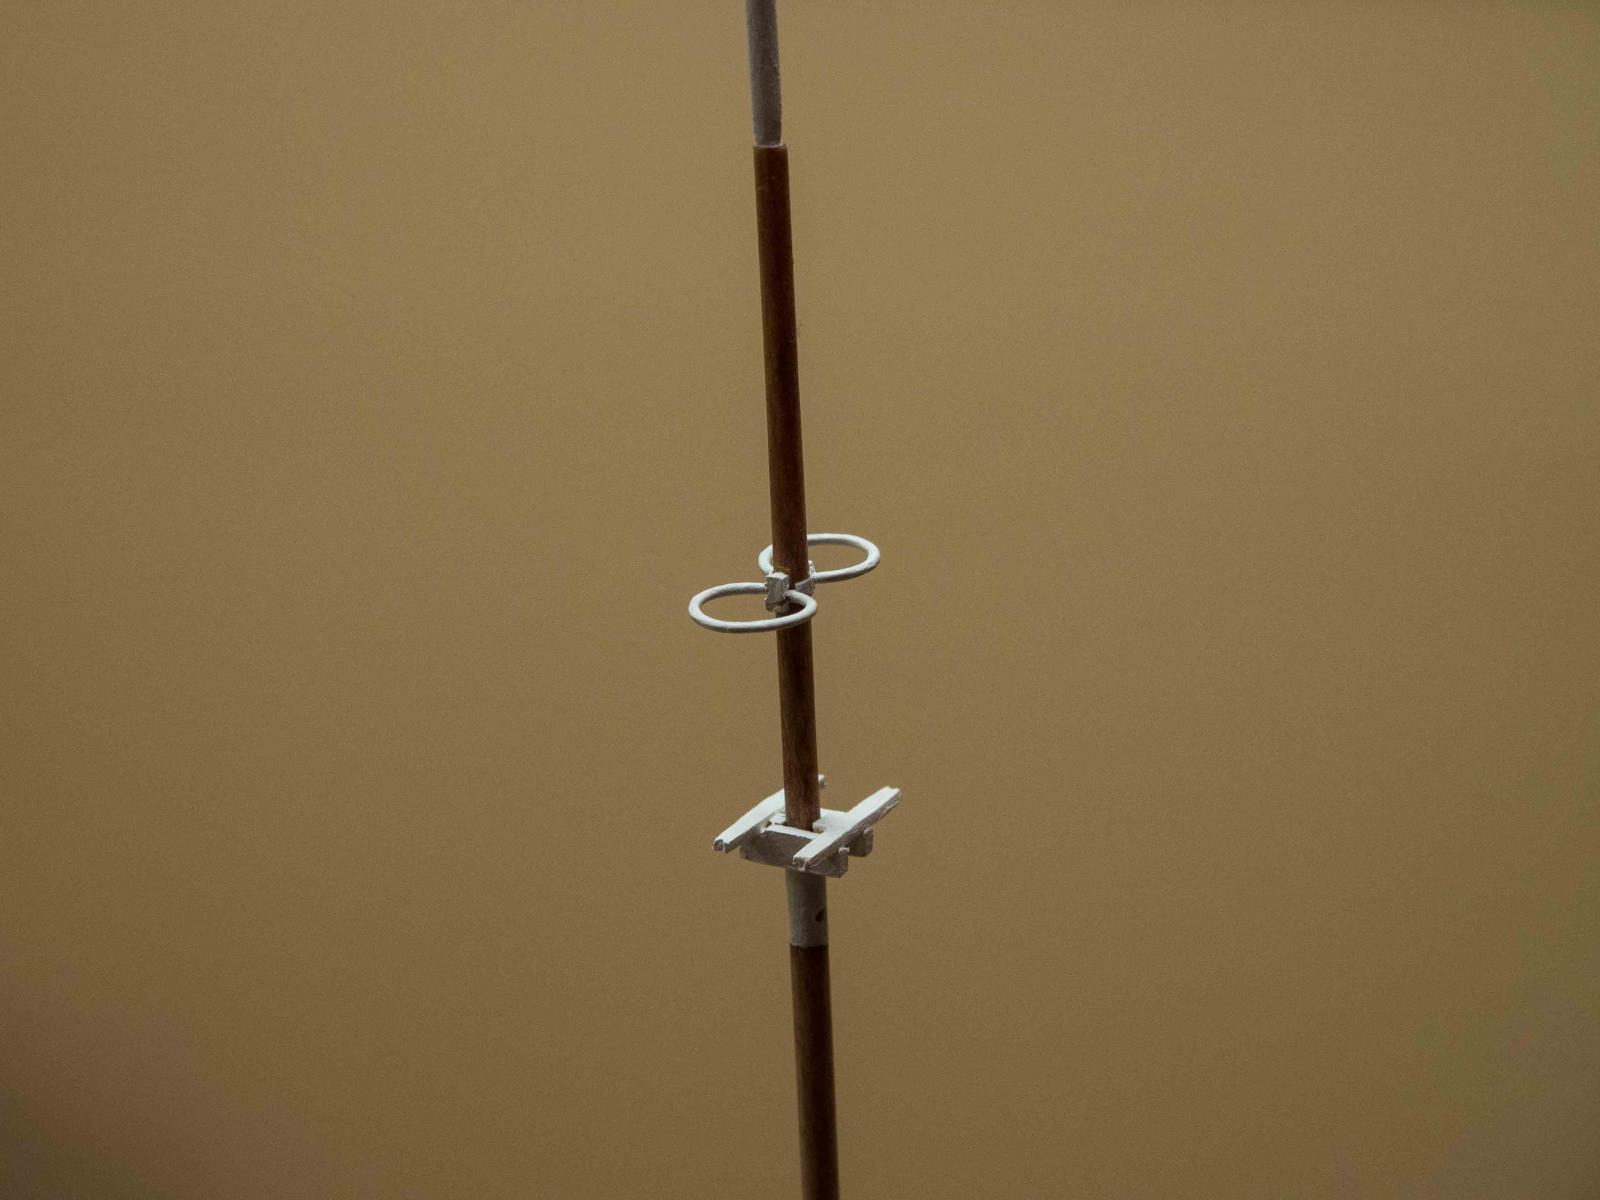
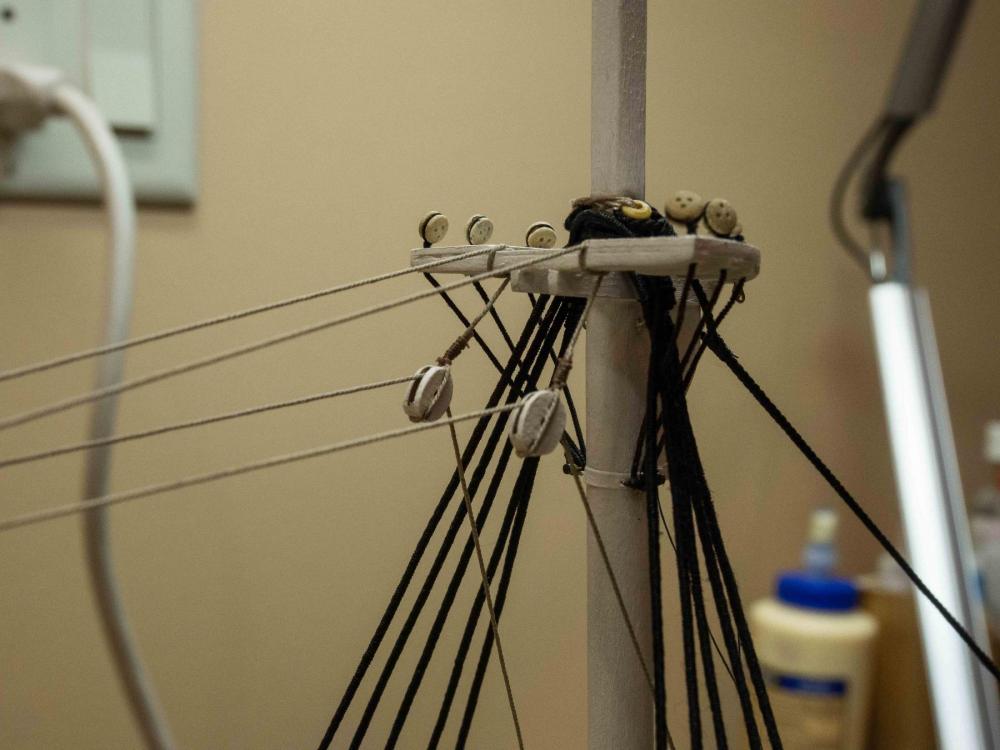
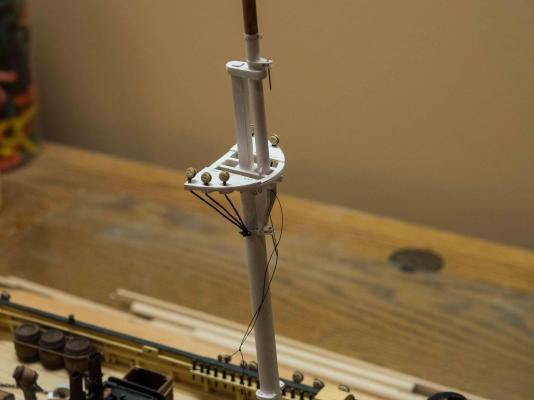
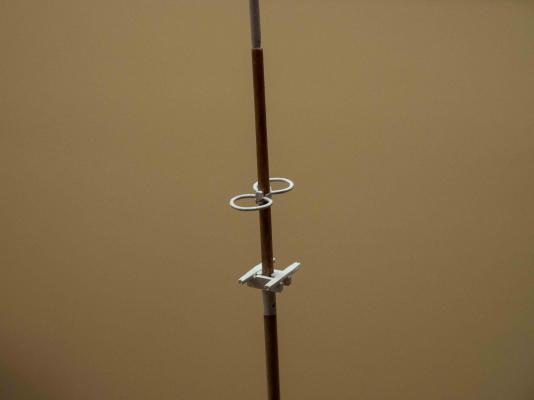
I've reached a milestone, with the masts completed. I haven't glued the sections together but all the construction is done and the platforms/crosstrees attached. I did remember to put the parrels on the fore and main topmast before fastening the crosstrees - thanks for the heads up on that John - I would have missed it too! Scratched my head for quite a while about how to do the lookout rings and have them robust enough in the attachment to the very small diameter mast section to survive the coming months of construction. I made rings of copper wire by wrapping around a mandrel and cutting at the overlap. I glued the opposing ends into a very small piece of wood - thin side to side and several mm high - drilled thru to accept the ends, and used accelerator on the CA glue. Then I milled a slot into the mast side to side - John, the proxxon x-y table and drill press can do almost anything - and by fussing with sandpaper and file convinced the piece of wood to enter firmly into the slot, one on each side, with liberal dab of Tightbond inside. A bit of card on either side to give the appearance of a band. I used an enamel for metal on the copper rings. As long as what you are painting is either black or white and you don't mind waiting 24 hours for it to be really dry, it works much better than the water-soluble paints. Quite durable once its dry and no rubbing off. I'm pleased with the appearance, and the attachment is very firm and should stand up to having lines attached. Now it's time to contemplate the shrouds.


- 245 replies
-
- 4
-
-
- model shipways
- Finished
- (and 1 more)
-
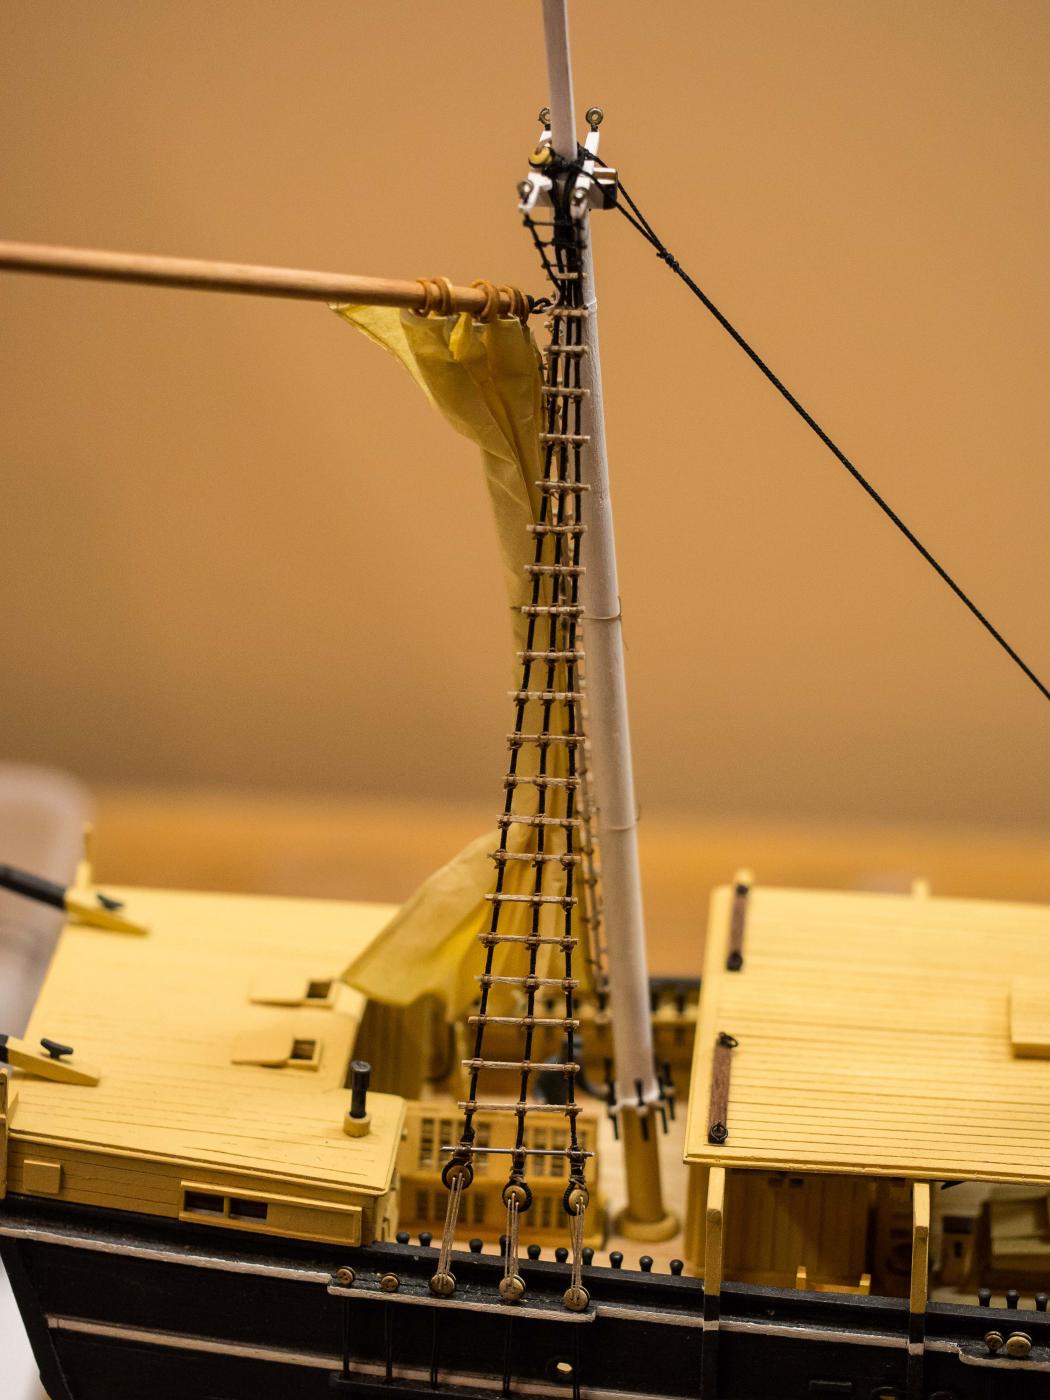
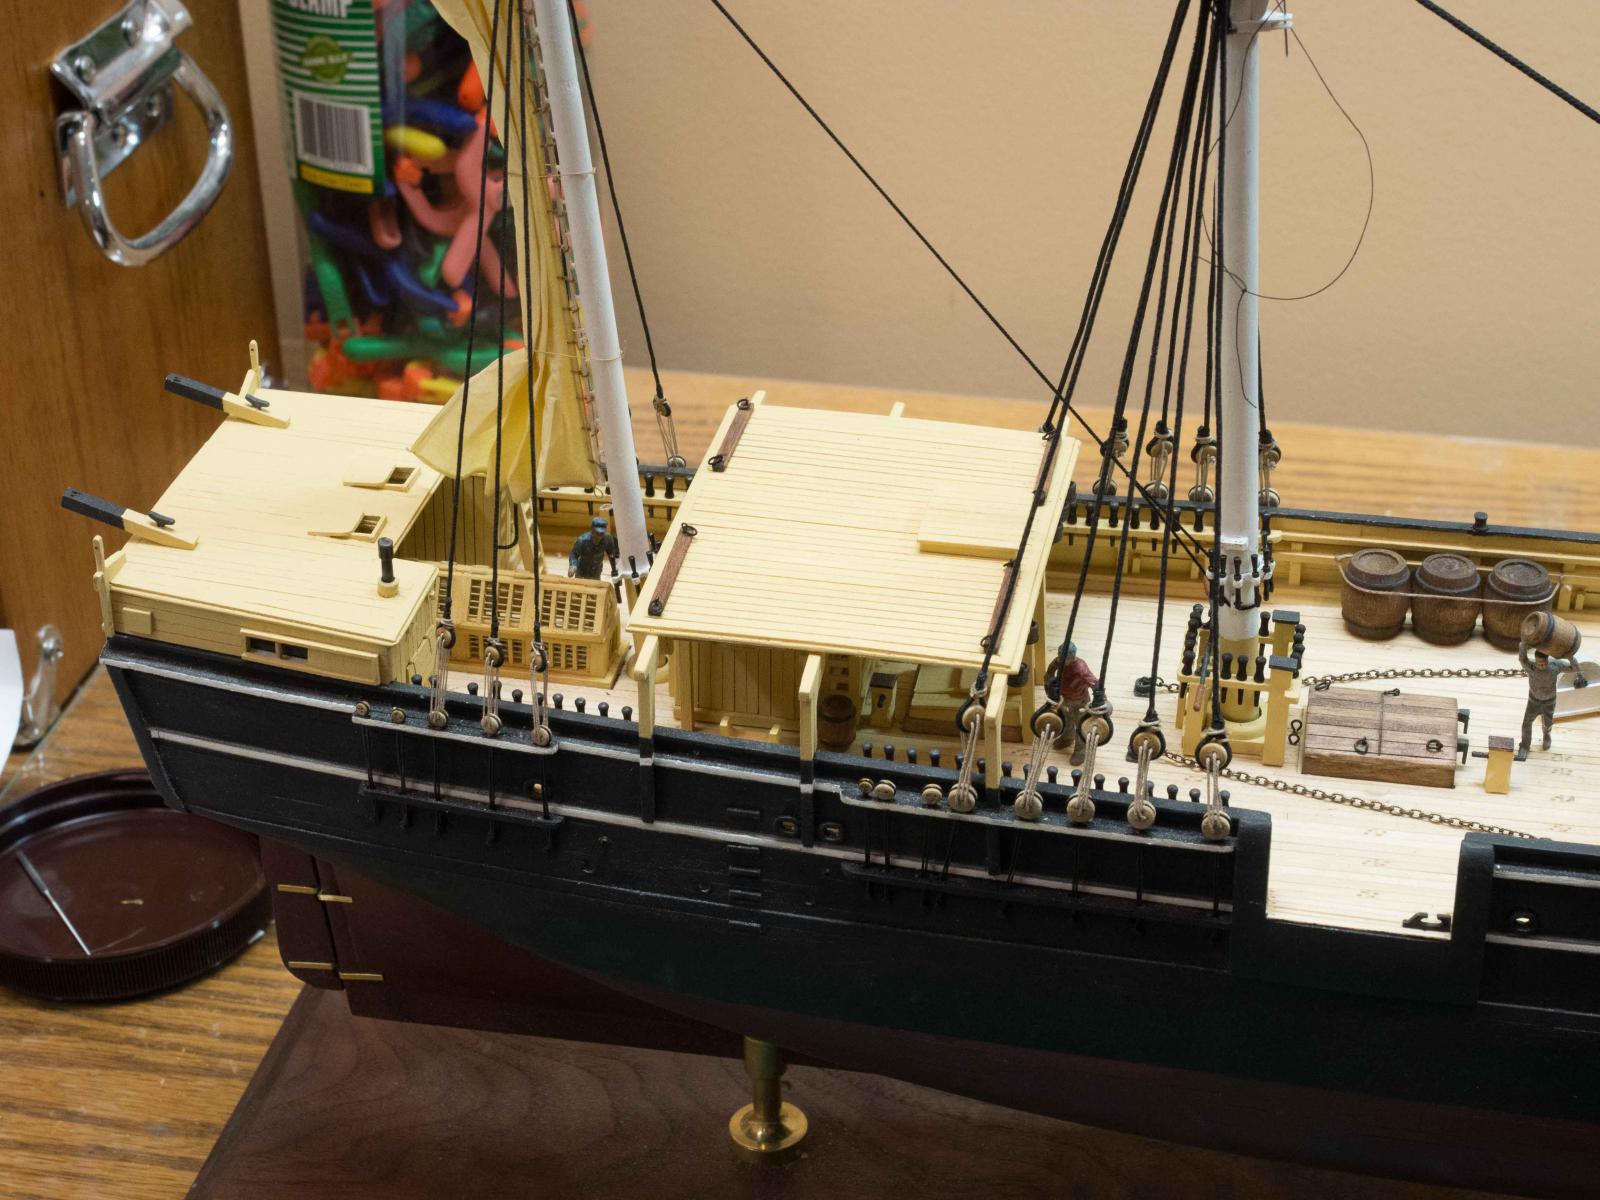
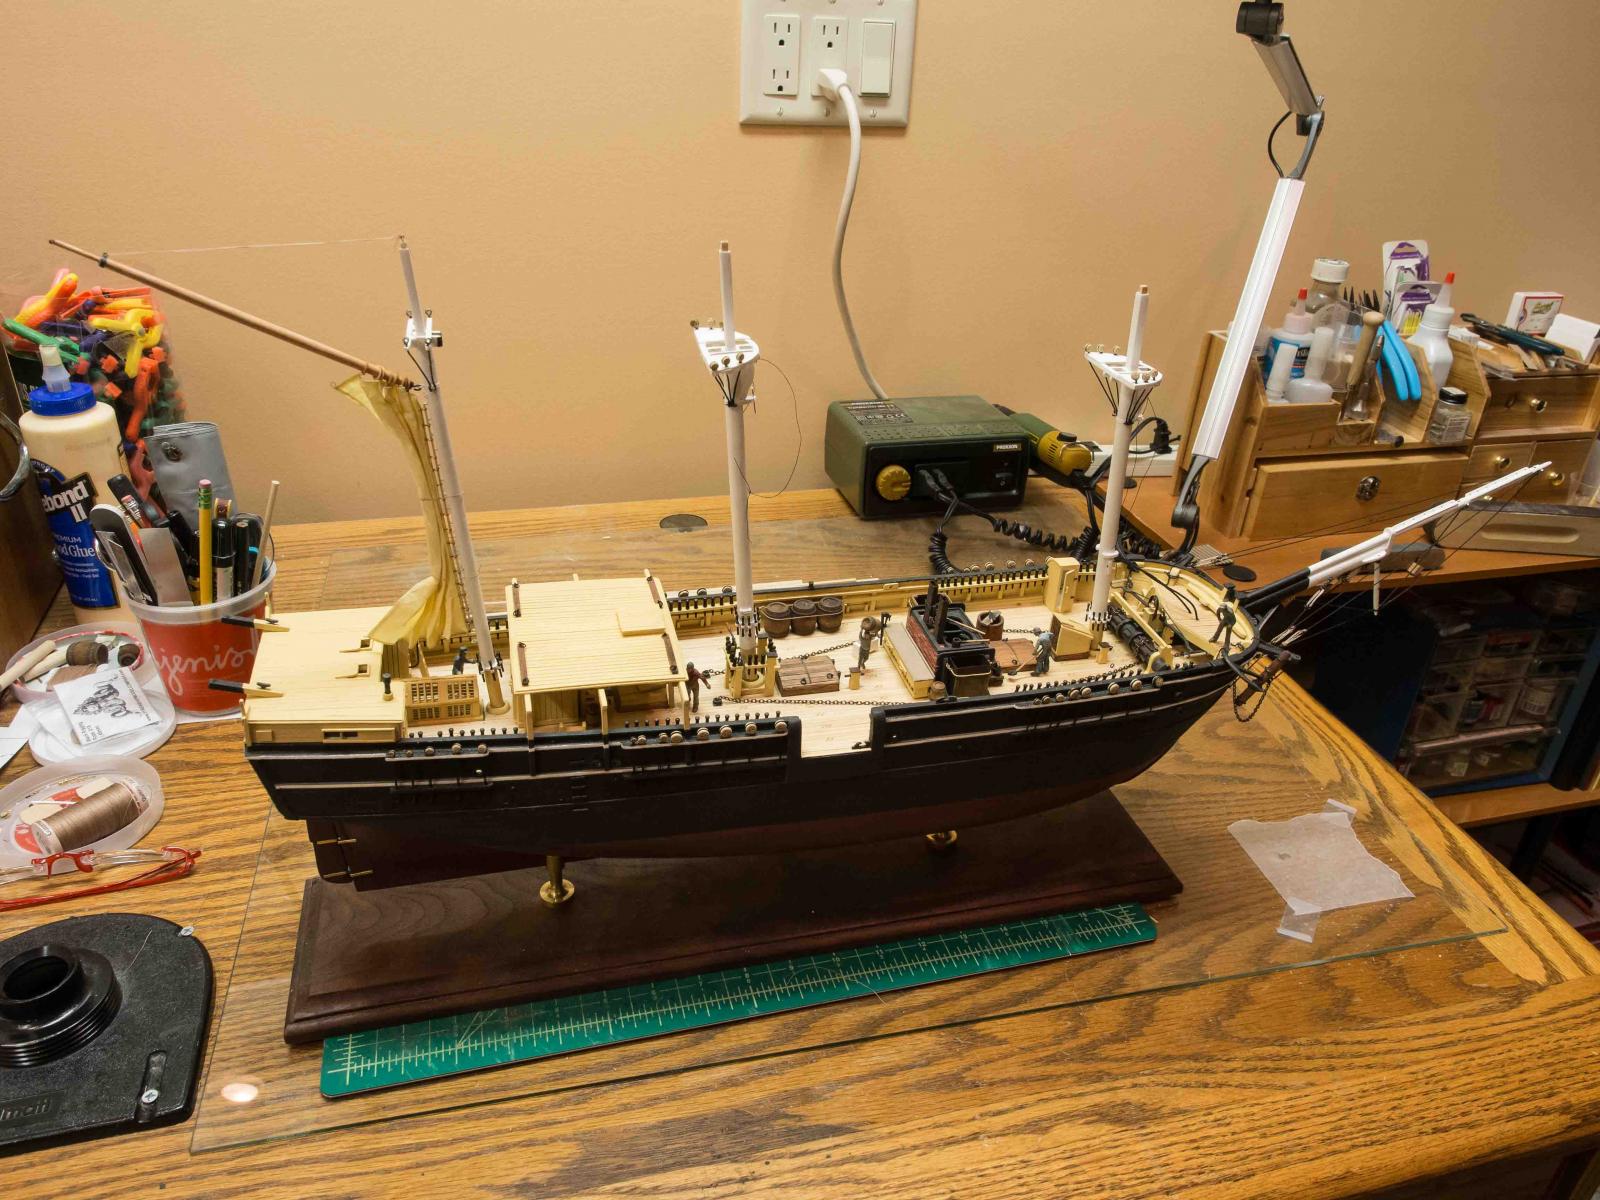
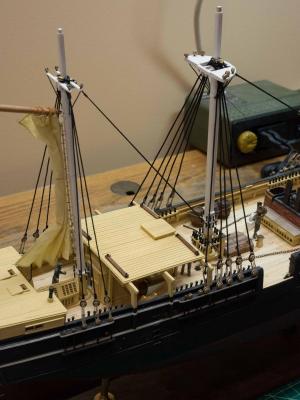
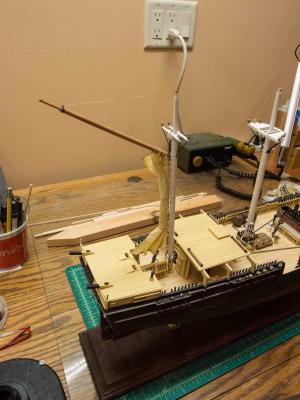
I'm semi-retired (50% for a few months) and got diverted to other (non-model) projects for a while, while I pondered what to do about the masts. I'm putting furled sails on the Morgan, but the mizzen posed a problem because the jackstay runs along the mast, and I didn't think I'd be able to mount the sail once the mast was in place, to say nothing of the shrouds. At any rate, I've added the sail which necessitated making the gaff boom for the hoops, and (temporarily) hoisting it up. The sail is meant to be retracted but not tightly furled. I'll still work on the sail a bit to get more natural folds. So here's the current state. Not sure if I'm going to start on the lower shrouds now or build the masts up first.

- 245 replies
-
- 8
-
-
- model shipways
- Finished
- (and 1 more)
-
John, congratulations on a great finish to a spectacular model. Your experience and careful documenting thereof has been of great help to me as I plod along working intermittently on the Morgan. Got diverted finishing up a software project, but will be getting back to work shortly and referencing your build log frequently. Looking forward to your next (? RV friendly) build.
- 2,250 replies
-
- 3
-
-
- model shipways
- Charles W Morgan
- (and 1 more)
-
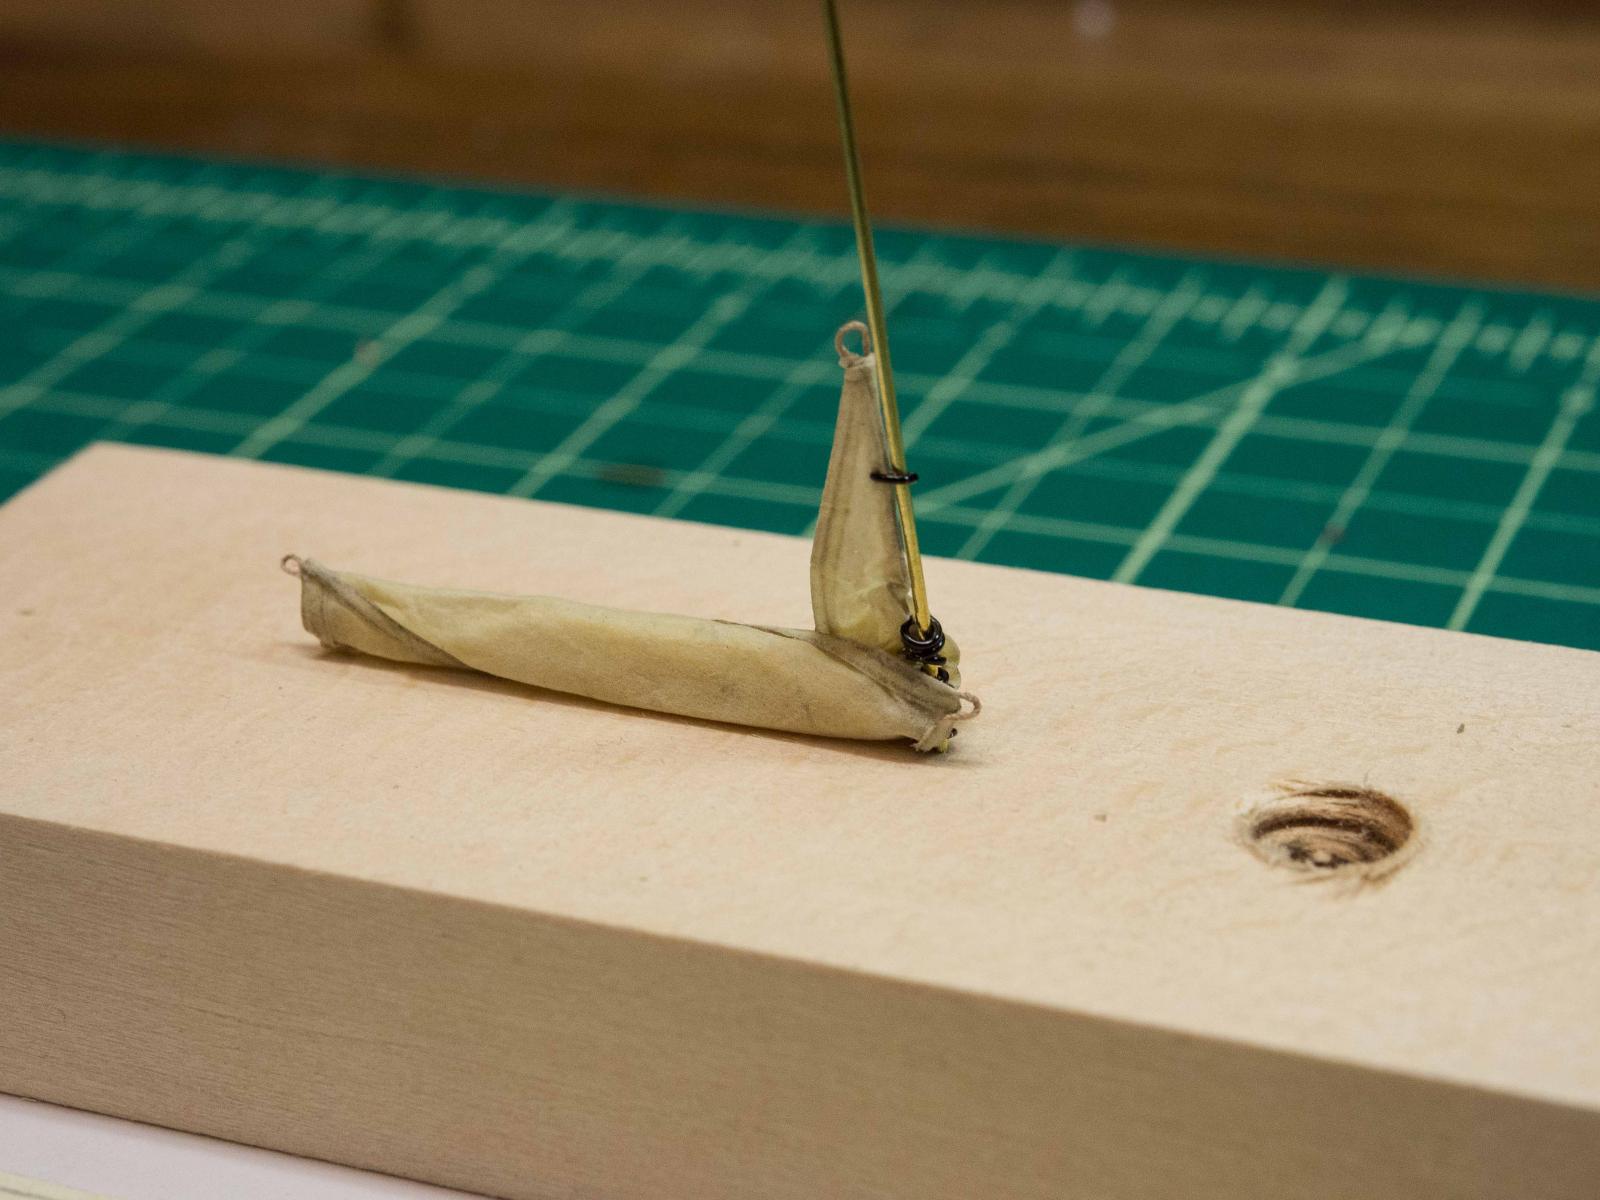
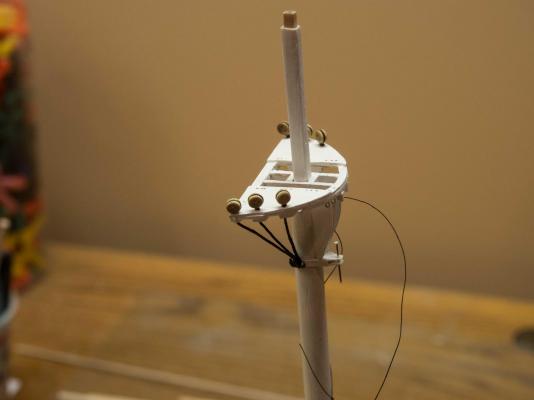
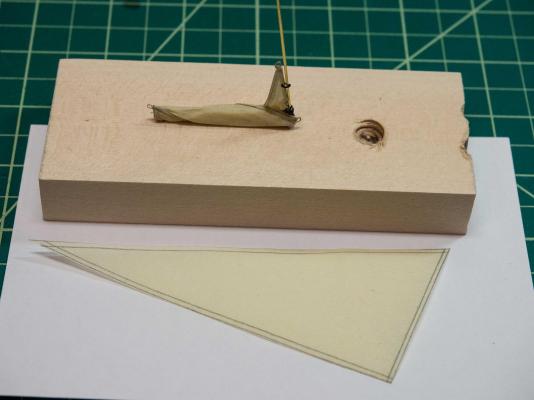
At a bit of a standstill waiting for replacement mast dowels (don't ask how I could mistake rounded for squared from the plans). I realized if I wanted to have furled sails on the model, I'd need to figure out the jibs prior to rigging the forestays. So I started researching on this site and experimenting. Made (cut down) jibs from two thicknesses of silkspan painted with white glue/a bit of ochre paint/water after drawing the seams on one of the inside surfaces of the sandwich. The seams don't show well in the pictures, but they're appropriately understated but visible if you look. If I decide to have some of the sails only partially furled they should look good Then after drying, turned a small seam with thread inside drawn out a the corners for attachment. Added rings (there are 10 of them) made from black coated copper wire and mounted the whole on a block with a copper rod thru the rings to keep things aligned while I re-wetted and folded the sail. I'm reasonably pleased with this - the package should be smaller once it's bound down. Probably about half the diameter it is at present. I'll finish the other and mount them when I do the forestays. I think just the two. Suspect the spanker/gaff at the mizzen might be more of a challenge. I've made a decision to go with sails (furled) so I guess I also will be acquiring yet another display case. We're going to run out of room to put ships if I'm not careful, but given the speed with which I'm working not likely to be a problem.

- 245 replies
-
- 6
-
-
- model shipways
- Finished
- (and 1 more)
-
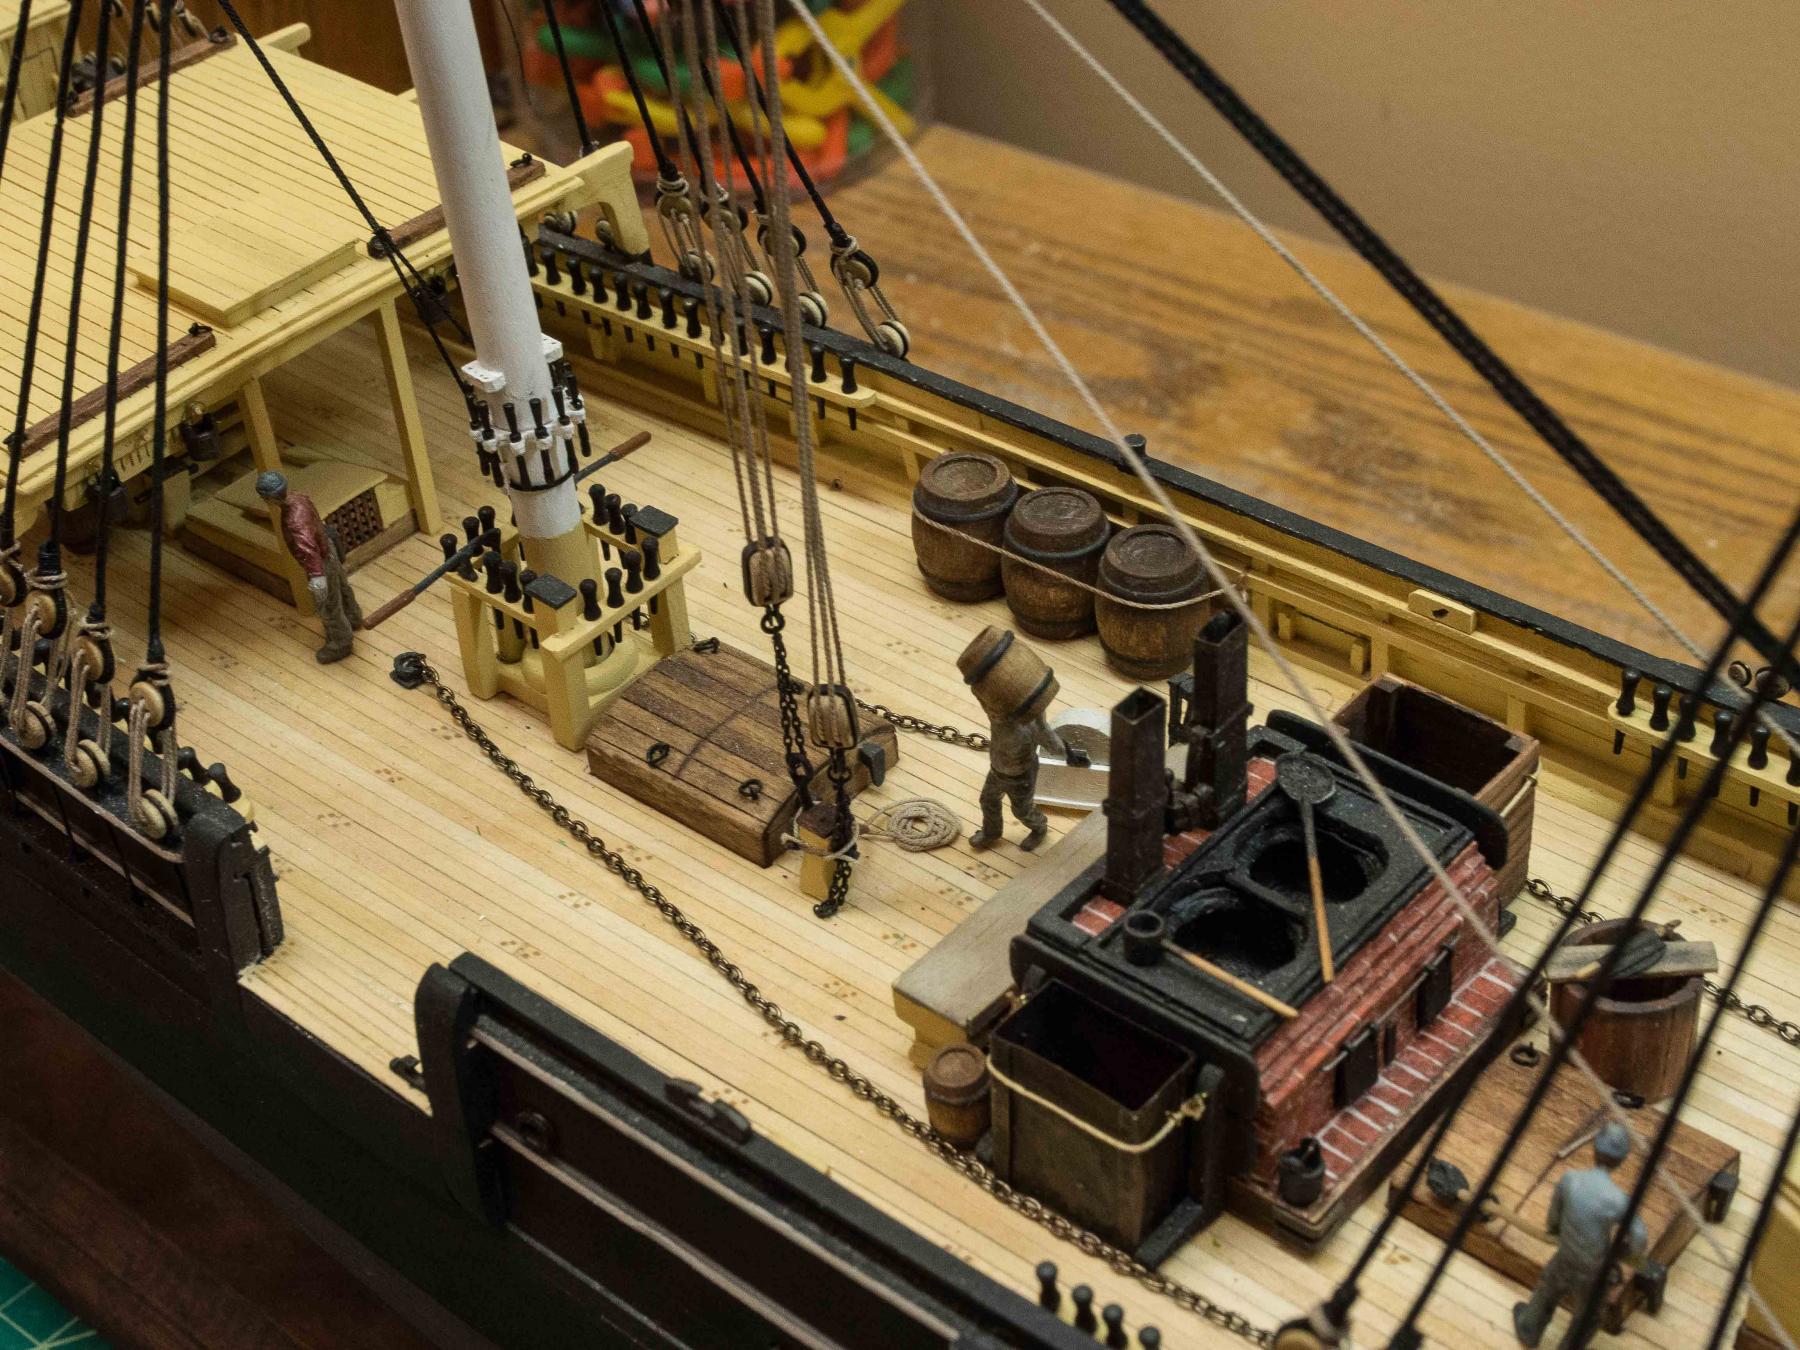
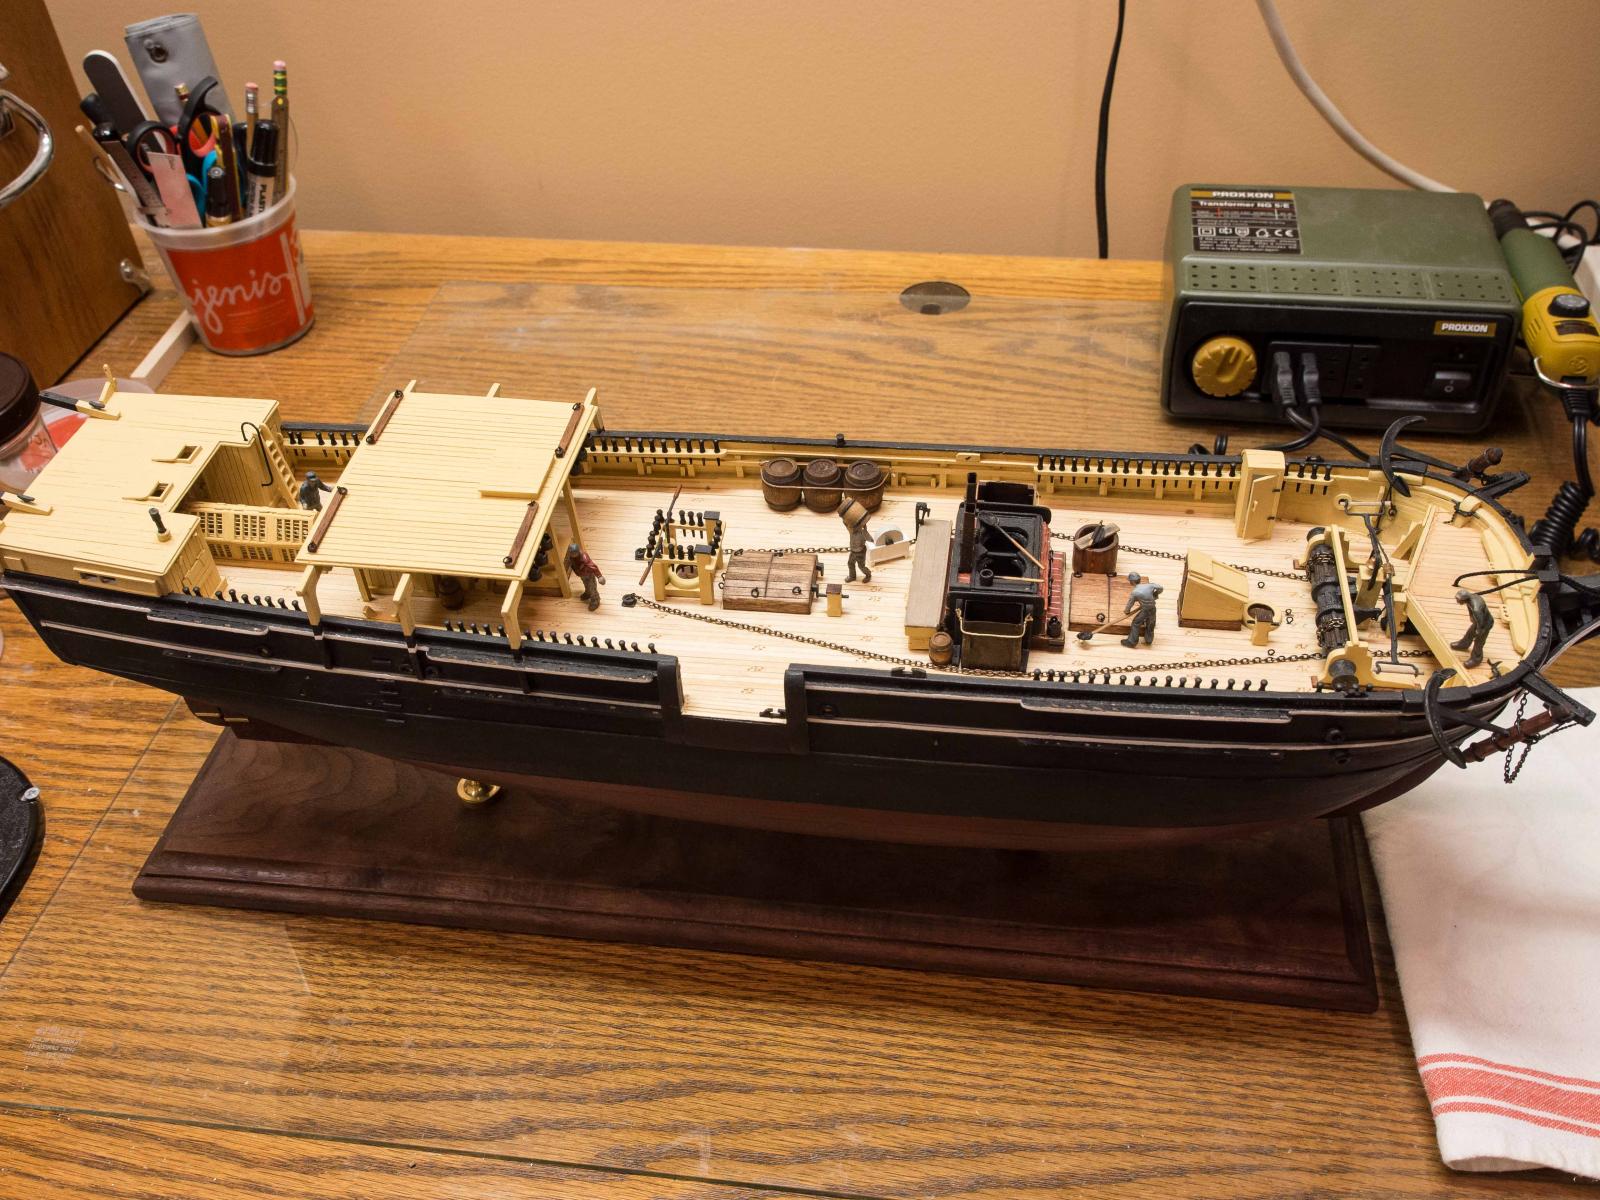
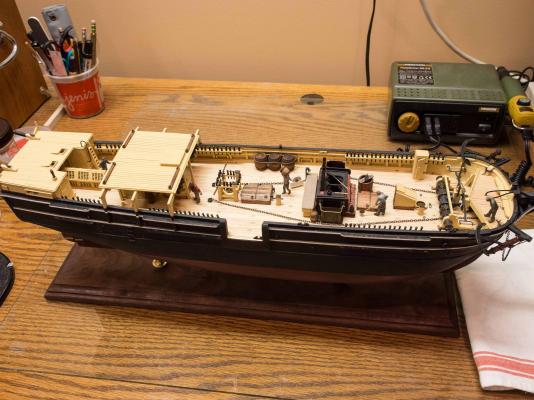
The figures are S scale. These were meant for railroad layouts. No uniforms necessary on the Morgan!
-
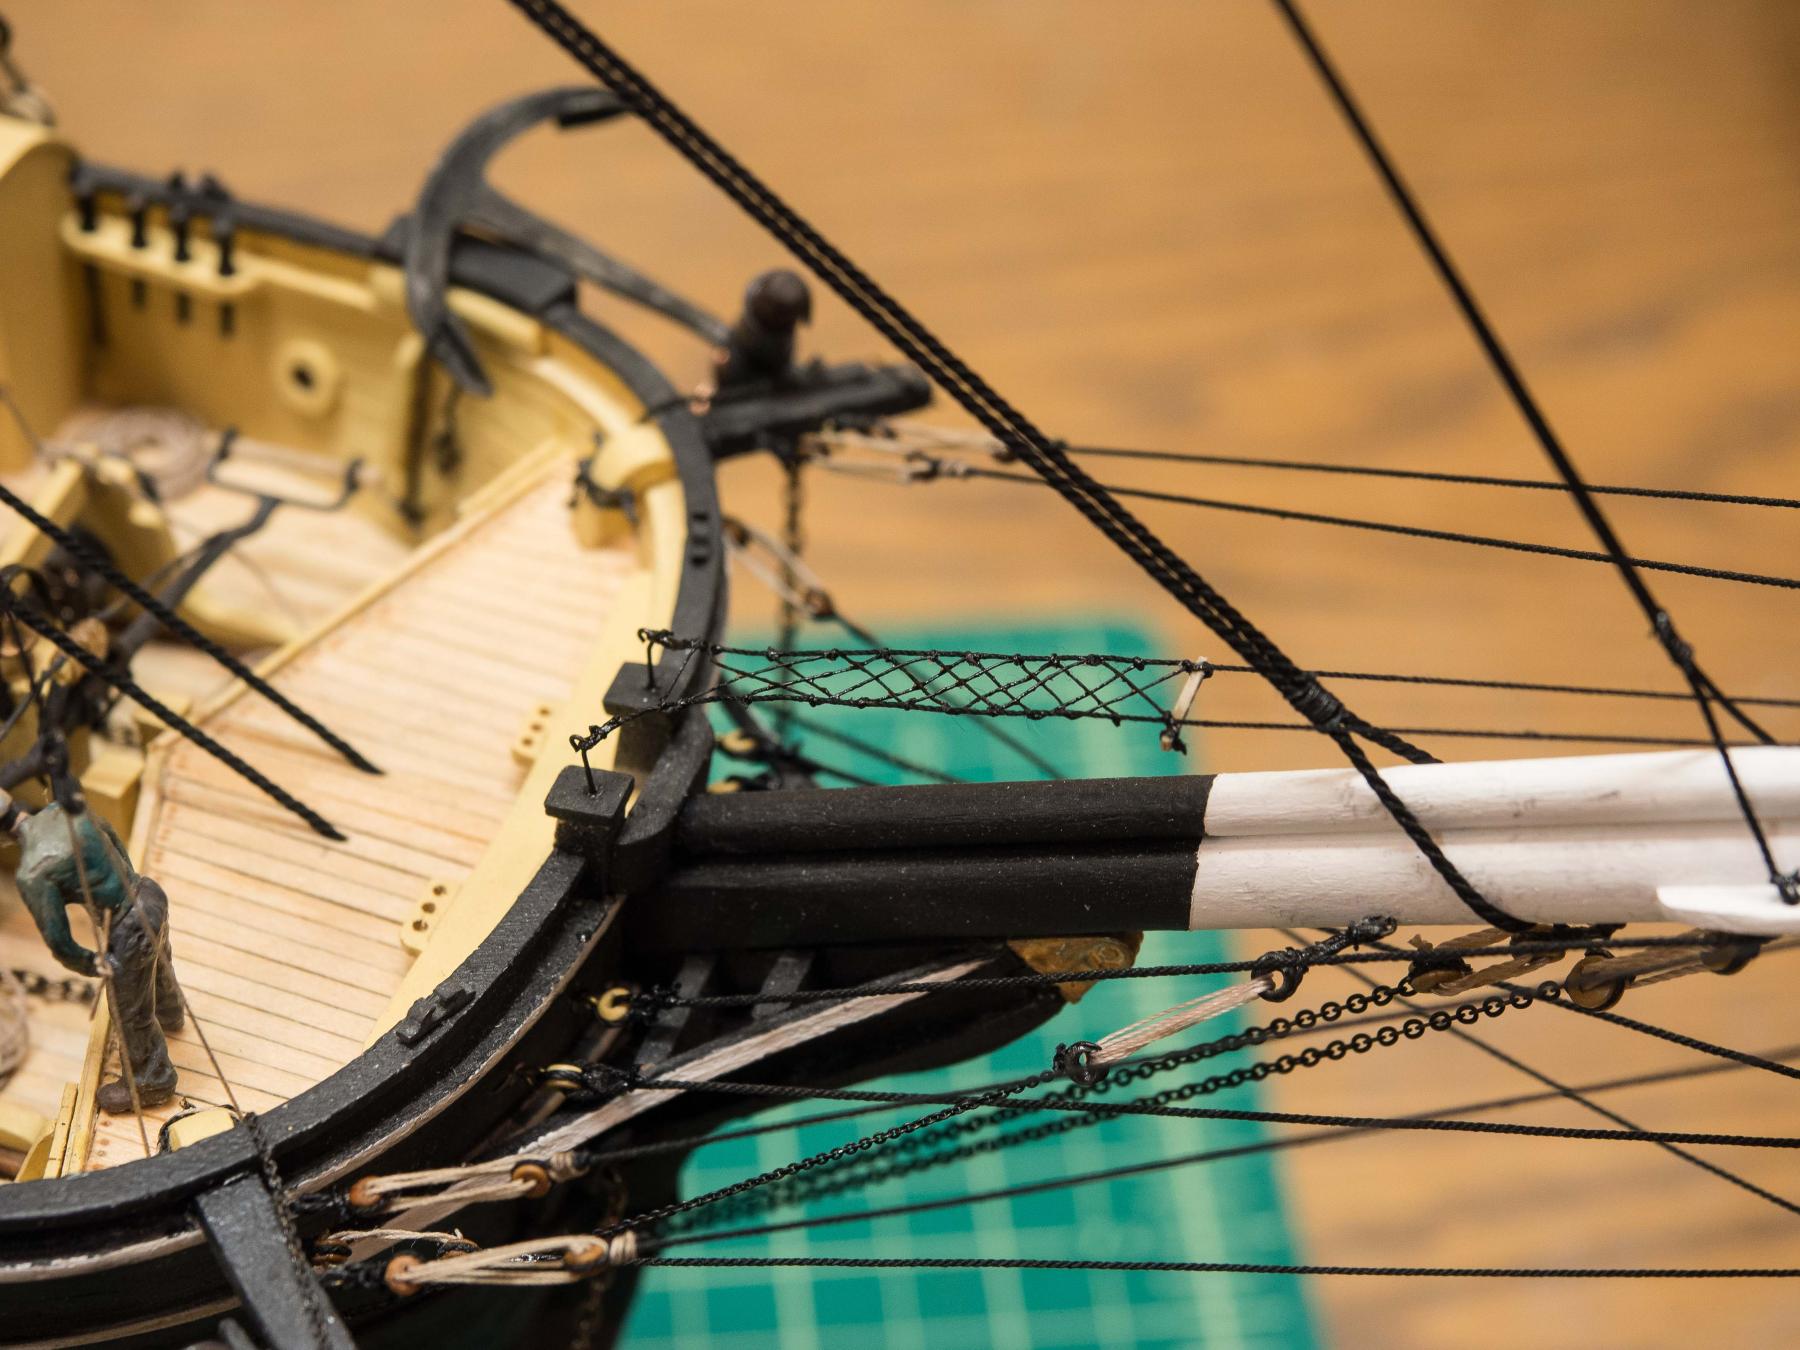
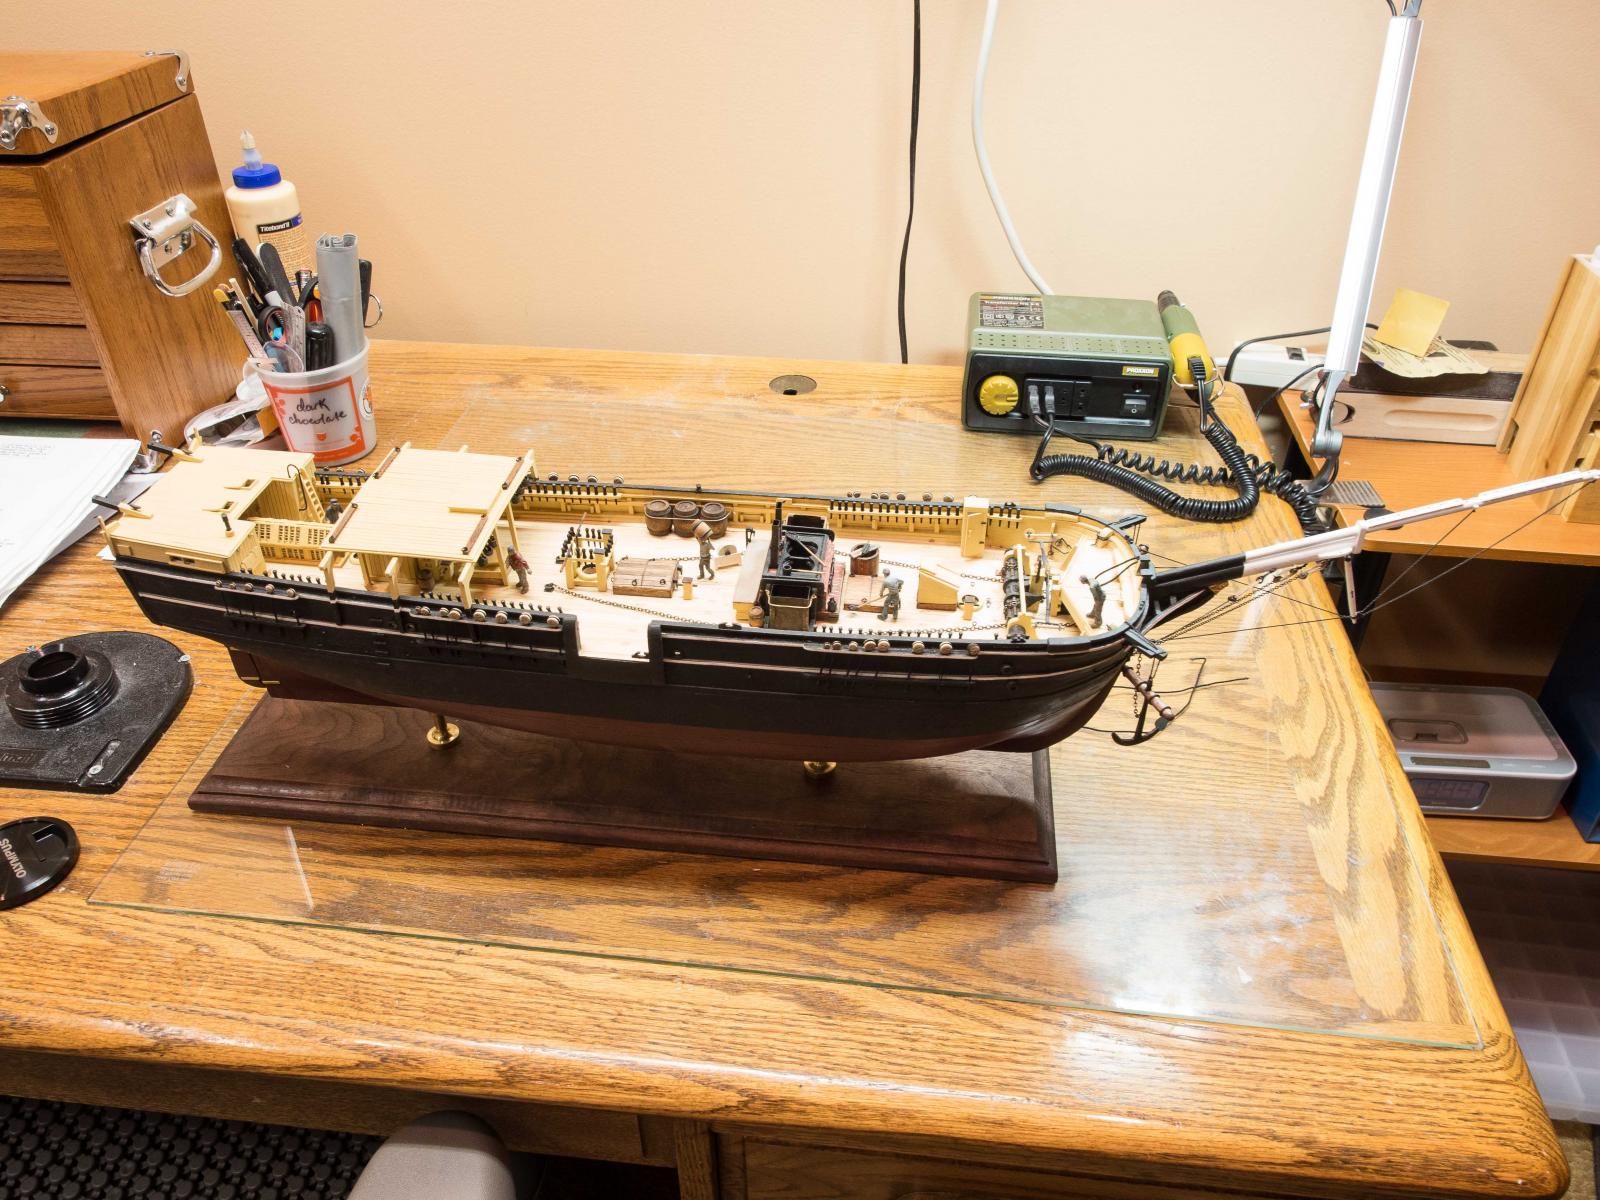
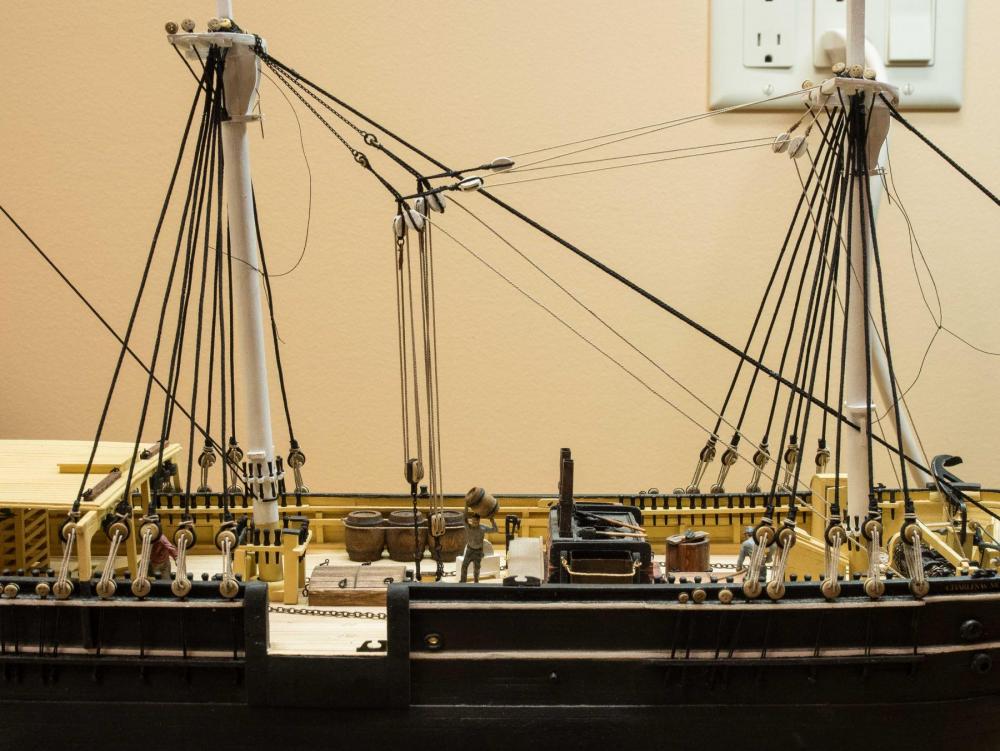
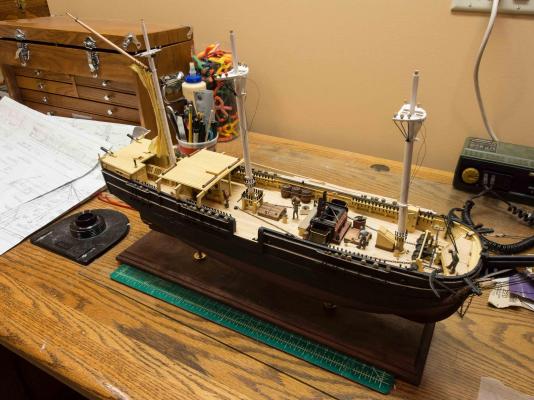
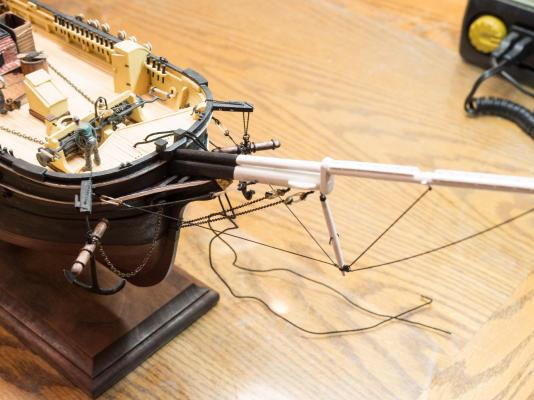
Back at work intermittenly in the shipyard for a few weeks. Put the chainplates/deadeyes in place and constructed and rigged up the bowsprit and boom to the extent that can be done prior to getting the masts in place for the forestays. It's been a bit of a setback for me. After the Bedford Whaleboat and Picket Boat #1 I've gotten acceptably good at scale woodwork, but given that those models - my first wooden builds - had only minimal rigging, I'm back as a beginner again. So with each bit I do, I'm figuring out the best approach. That leads to rigging four lines, and then looking at the first and seeing only how I could have done it better. Anyway, here's the current state of the build. Ready to begin working on the masts.

- 245 replies
-
- 7
-
-
- model shipways
- Finished
- (and 1 more)
-
Where did you get the larger draw plate John? I'm back at work in the shipyard now. Going half time at the end of December so will have even more time then. I have the deadeyes/chainplates on, and finished the bowsprit boom last night ready for painting. Next will be rigging it before moving on to the masts. Starting to think about furled sails now - it occurs to me that the mizzen fore/aft sail would be easier to attach to the jackstay on the mast prior to mounting the mast! I'll probably take a diversion to play with my silkspan suppy and faux masts/yards to help decide if I'm going to go that route. I love your boats!
- 2,250 replies
-
- 3
-
-
- model shipways
- Charles W Morgan
- (and 1 more)
-
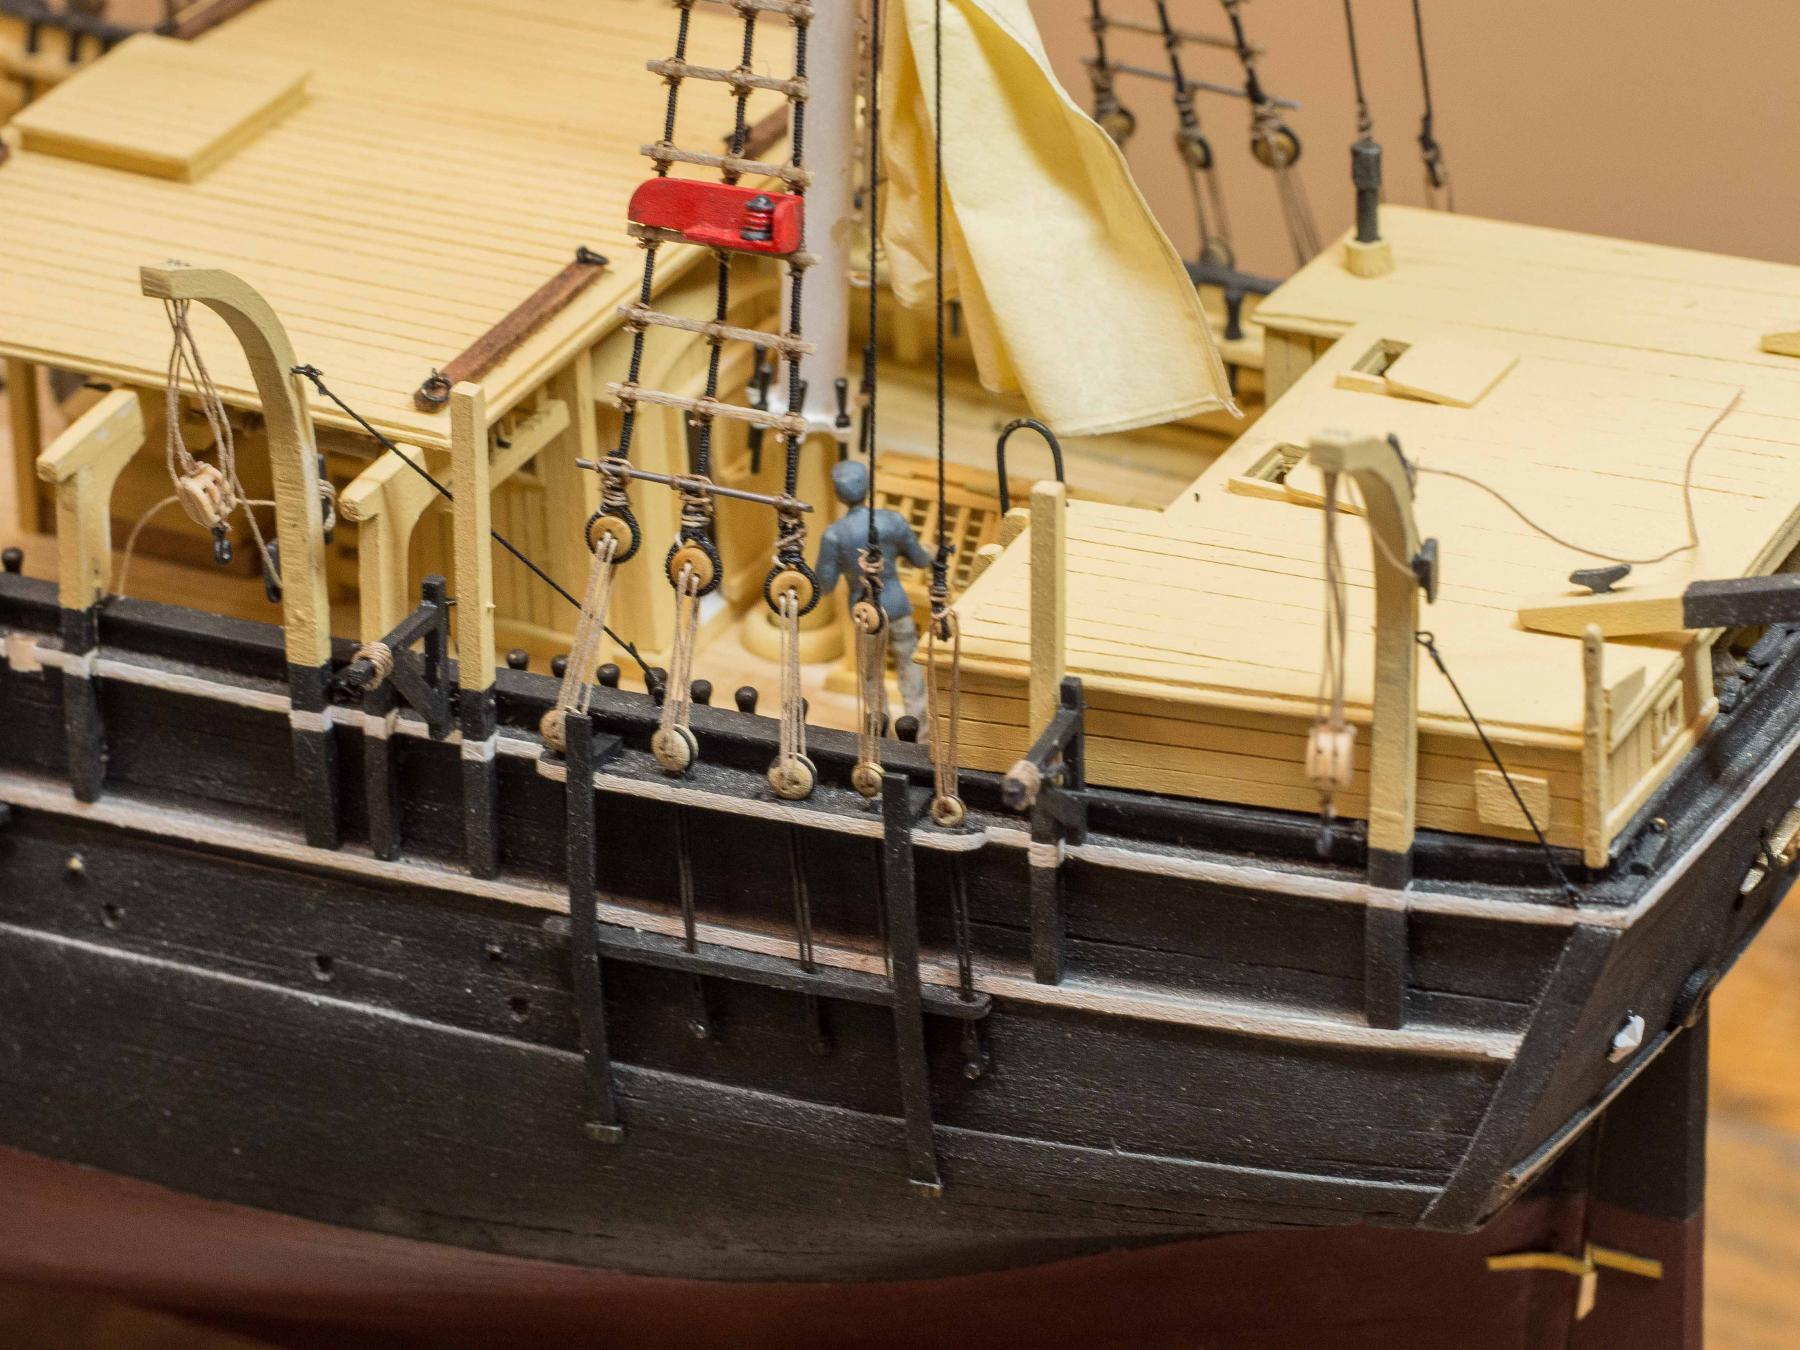
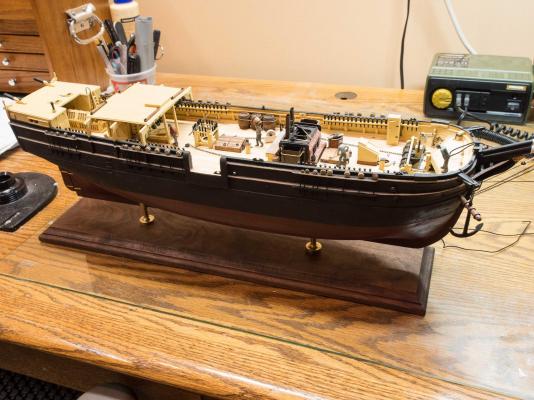
Some crew now on board . . . They're not cemented in case they get in the way later.
- 245 replies
-
- 4
-
-
- model shipways
- Finished
- (and 1 more)