chuckthedragon
-
Posts
16 -
Joined
-
Last visited


-
 chuckthedragon reacted to a post in a topic:
ALFRED by schooner - BlueJacket Shipcrafters - scale 1/8" (1:96) - Continental Navy Frigate
chuckthedragon reacted to a post in a topic:
ALFRED by schooner - BlueJacket Shipcrafters - scale 1/8" (1:96) - Continental Navy Frigate
-
chuckthedragon reacted to a post in a topic:
ALFRED by schooner - BlueJacket Shipcrafters - scale 1/8" (1:96) - Continental Navy Frigate
-
chuckthedragon reacted to a post in a topic:
ALFRED by schooner - BlueJacket Shipcrafters - scale 1/8" (1:96) - Continental Navy Frigate
-
chuckthedragon reacted to a post in a topic:
ALFRED by schooner - BlueJacket Shipcrafters - scale 1/8" (1:96) - Continental Navy Frigate
-
chuckthedragon reacted to a post in a topic:
ALFRED by schooner - BlueJacket Shipcrafters - scale 1/8" (1:96) - Continental Navy Frigate
-
chuckthedragon reacted to a post in a topic:
ALFRED by schooner - BlueJacket Shipcrafters - scale 1/8" (1:96) - Continental Navy Frigate
-
chuckthedragon reacted to a post in a topic:
ALFRED by schooner - BlueJacket Shipcrafters - scale 1/8" (1:96) - Continental Navy Frigate
-
 chuckthedragon reacted to a post in a topic:
ALFRED by schooner - BlueJacket Shipcrafters - scale 1/8" (1:96) - Continental Navy Frigate
chuckthedragon reacted to a post in a topic:
ALFRED by schooner - BlueJacket Shipcrafters - scale 1/8" (1:96) - Continental Navy Frigate
-
chuckthedragon reacted to a post in a topic:
ALFRED by schooner - BlueJacket Shipcrafters - scale 1/8" (1:96) - Continental Navy Frigate
-
chuckthedragon reacted to a post in a topic:
ALFRED by schooner - BlueJacket Shipcrafters - scale 1/8" (1:96) - Continental Navy Frigate
-
schooner reacted to a post in a topic:
ALFRED by schooner - BlueJacket Shipcrafters - scale 1/8" (1:96) - Continental Navy Frigate
-
schooner reacted to a post in a topic:
Fair American by JLong - Model Shipways - 1:48
-
Dave_E reacted to a post in a topic:
Fair American by JLong - Model Shipways - 1:48
-
Dave_E reacted to a post in a topic:
Fair American by JLong - Model Shipways - 1:48
-
Dave_E reacted to a post in a topic:
Fair American by JLong - Model Shipways - 1:48
-
 Nice work with the sails Jason. Hope you're watching carefully - the sewing part I mean Keep up the great work!
 -
Jason you're doing a great job! For your first ship you're really going all in. Good on you! Couple of thoughts, though you're probably well beyond this. I don't know how you are stropping your blocks, but some black thread works wonders. I use a thicker black thread and attach thread to the blocks with Gorilla gel CA. Also, again probably too late, consider getting some aftermarket blocks from Syren or Model Shipways. You've done such great work that the blocks that came with the kit don't do you justice.
-
Jason! Don't know how I missed all of your progress! Your solution to the chain problem looks great!
-
Canute reacted to a post in a topic:
USCG Harriet Lane by _SalD_ - Model Shipways - 1:96
-
 _SalD_ reacted to a post in a topic:
USCG Harriet Lane by _SalD_ - Model Shipways - 1:96
_SalD_ reacted to a post in a topic:
USCG Harriet Lane by _SalD_ - Model Shipways - 1:96
-
Nice! Really excellent solution and execution, Sal!
-
Canute reacted to a post in a topic:
USCG Harriet Lane by _SalD_ - Model Shipways - 1:96
-
_SalD_ reacted to a post in a topic:
USCG Harriet Lane by _SalD_ - Model Shipways - 1:96
-
Your Harriet Lane is really masterful. I was glad to spot your build log before I started my kit. I'm going to copper her bottom based on your example. I'm going to build her armed as she was in late 1862 just before her capture at the Battle of Galveston, with a X inch Dahlgren on a pivot forward of the foremast and a 30lbr Parrott gun on her fore deck. I look forward to watching your progress!
-
JLong reacted to a post in a topic:
Fair American by JLong - Model Shipways - 1:48
-
Good for you on the sails! As my Admiral always says, go big or go home! I forgot to mention the pin racks you added to the main gallows and the bits - they will be very handy indeed. I really wish I had thought to add them. Great idea!
-
Jason! She's looking great! I'm excited for you! Depending on how much rigging you'll do, consider adding the shroud cleats suggested in the rigging plans. Given all of the lines that you have to belay, having the extra belaying points greatly helps avoid belaying more than one line to a pin. Keep up the very excellent work!
-
Thanks for the compliments, Jason! I finally go to a point where I thought my planking could tolerate the naked light of day. As to your masting problem, the bottom of the mast passes through and rests on nothing. The fid passes through the fid hole and the fid rests on the trestletrees.
-
Jason! Hope all's moving ahead (flank speed preferably) on your Fair American build. Please post some news!😉
-
Jim! Enjoying your progress. I too thought to solve the problem of the cramped space for the aftermost guns. When I built the FA the first time in the late 90's I ended up leaving the aftermost guns off the ship. I tried to take advantage of the logs of more expert modelers and move the cabin bulkhead back a bit and respace the guns. I wish I had moved the bulkhead farther aft. I never did think of the headroom problem for the cabin guns - great catch! Looking forward to pictures of your revision to the stern of the Wendy Kay!
-
I meant to say that I admire your efforts to make replacements for the cast parts that come with the kit. That inspired me to do the same thing. It also inspired me to check for mini-kits of things my "workshop" is not equipped to fabricate. I learned about Chuck Passaro Syren Ship Model Company from the forum and got the ships wheel and stern lantern kit for 1:48 scale. Great kits and excellent instructions.
-
Good morning! I hear you about the frustration on the chains! Mine came out a bit uneven, but I could live with it. I'm working on moving pictures from my phone to my computer. I thought I would be able to post some and hour ago, but I sent myself full sized images which my computer refused to download. I have since gone back and sent usable reduced sized images. Which look like they finally made it through the interweb! She absolutely loved it! Her sisters are all jealous!


-
chuckthedragon changed their profile photo
-
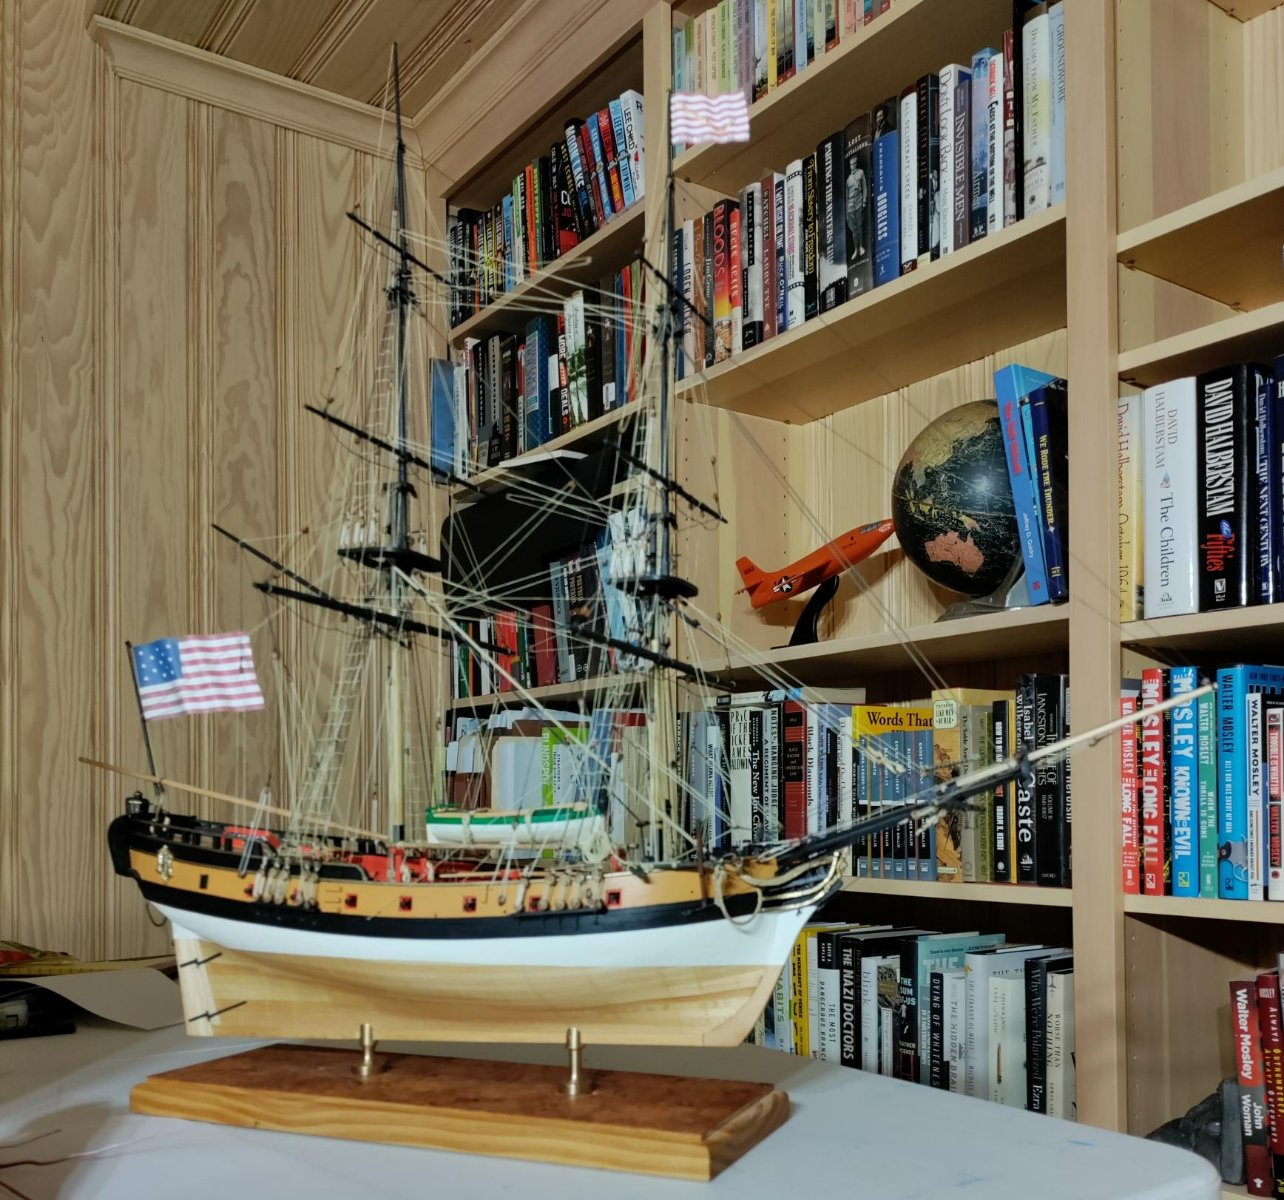
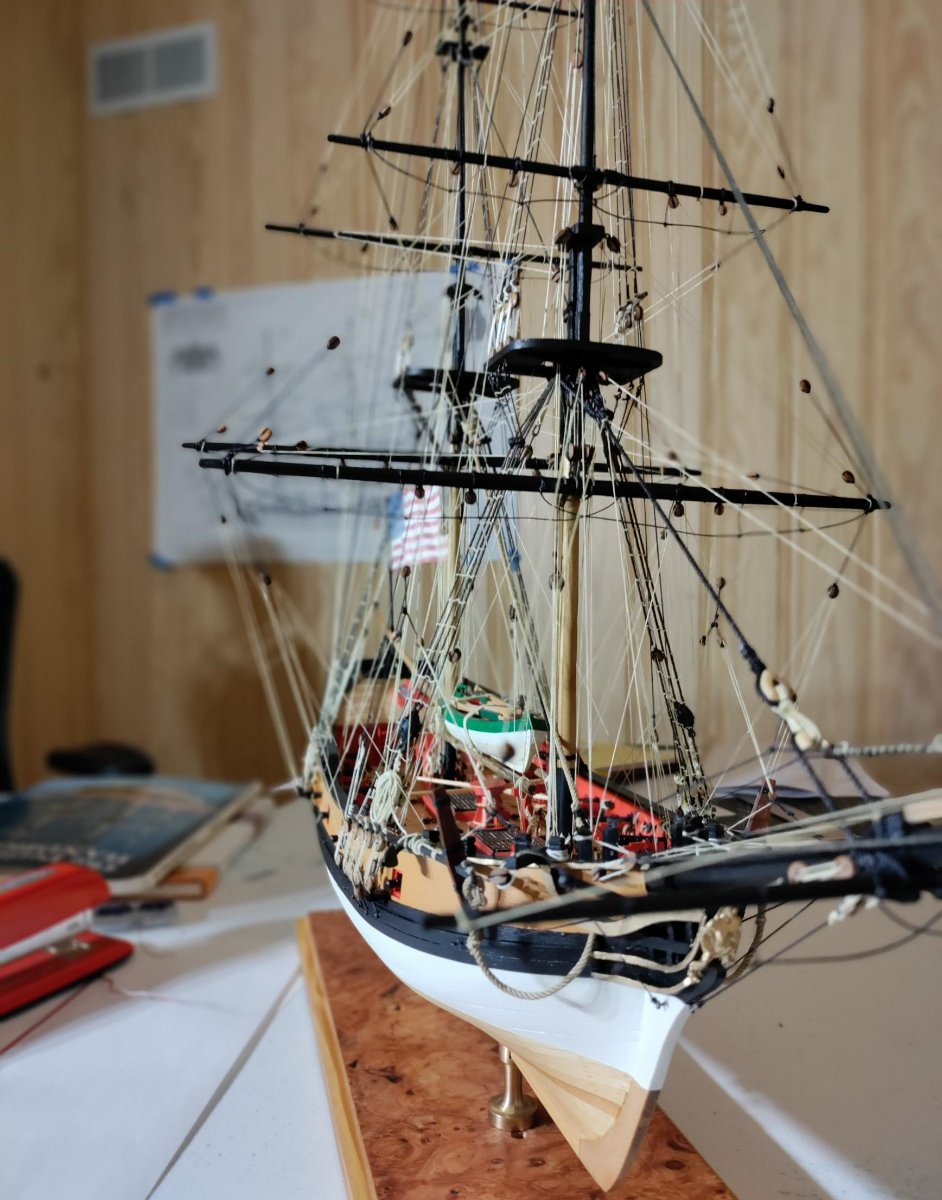
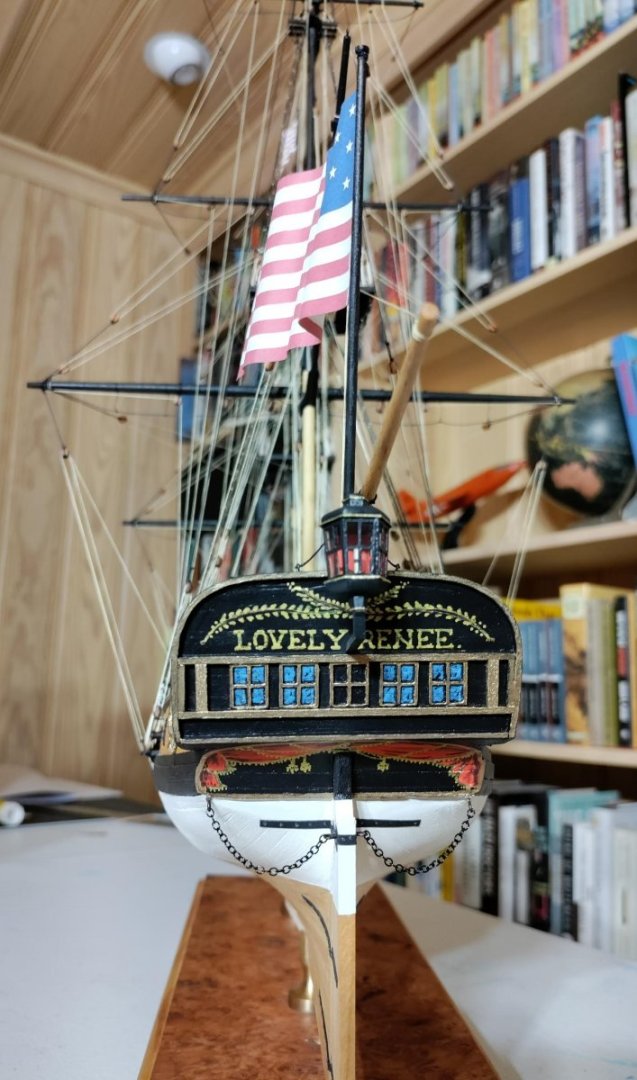
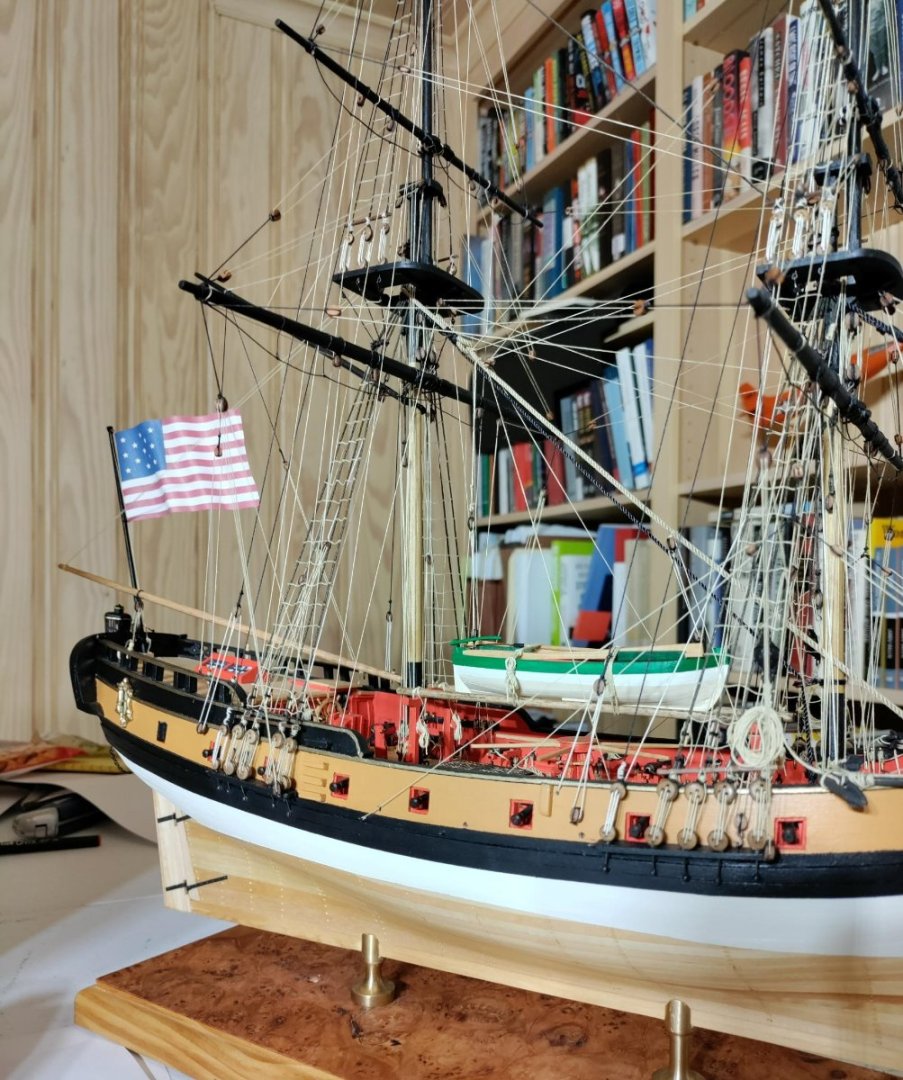
Glad to see your post! After asking about the deadeye problem last summer, I got frustrated and let my Fair American sit for a bit. Thank you for the reply you sent. I apologize for ghosting. I solved the problem by using 24-gauge dark annealed steel wire and my best effort to make the chains a unform length. I was trying to make something that didn't look too clunky. I need to take some pictures on my phone and migrate them to the computer so that I can post them. To make a long story short, I picked back up this winter and recently completed the build. She's been rechristened the Lovely Renee, for my wife. That way I get house room😉. I'm excited to see your progress - really like the contrasting wood on your tops. Since you are about to start the rigging phase soon (fingers crossed) you might get yourself some needle threaders - they work wonders getting the line through the blocks.
-
Dear Jason, enjoying your work and your progress! I hope you'll post more soon. I'm building the Fair American too. Actually, this is my second time on the project. I built my first over about three years between 2000 and 2003. When I finally got it done, I could not believe that I had done it - I hope you experience the same awe and pleasure at what you can accomplish. Of course, things change over time and ModelExpo made some changes to the kit that I'm a bit puzzled by. In particular, they have the deadeyes being stropped with wire and the chains made of wire as well, but they did not revise the instructions to show the process. How are you managing it?