


Hubac's Historian
-
Posts
2,997 -
Joined
-
Last visited
Reputation Activity
-

 Hubac's Historian got a reaction from EJ_L in Soleil Royal by Hubac's Historian - Heller - An Extensive Modification and Partial Scratch-Build
Thank you, EJ, Dan and Cedric for your thoughtful and well-reasoned responses to the problem at hand. I have to say that I am leaning toward correcting that particular flaw because I think it will bother me, down the road, especially since I will have made a mold to cast the port enhancements. Two molds, actually, because the lower enhancement is mounted separately to the wales. If I'm going to go to that degree of trouble, I might as well make these ports all they can be.
Speaking to your last post, EJ, I do have a pretty good idea about where I will draw the line, but it is a slippery slope, man! The thing about this build is that 98% of what I'm proposing, I've never actually attempted before. Prior to this, all of my model making has been strictly by the numbers, as seen on the box. With this build, though, I'll be learning to make moulds for resin castings, how to do a realistic, weathered paint job, how to do a realistic waterline model in a gel sea, how to build up ornament with a variety of media, including styrene sheet and extrusions, wire, polymer clay and anything else I dig up that I think will produce a good scale effect.
The whole thing about making bow and stern extension castings of the existing hull parts so that I can make the ship wider and longer may all just add up to a spectacular fail. I think it will work though. I expect to make a few castings that I have to throw away. But, ultimately, I think I will find a way to make it work and produce a good result.
It is my experience with designing and making Art Nouveau furniture that has given me confidence and emboldened me to play with ideas, even when the techniques involved are, initially, beyond my skill set.
Following are a pair of door pulls I made for a small wall cupboard, a few years ago. They are direct copies of a well-known pattern by the Danish silversmith Georg Jensen. My father owns a pair of cuff links in this pattern, and I realized one day, when I couldn't find pull hardware that fit the style and ornamental theme of the cabinet, that this Jensen pattern was perfect for adapting to a recessed pull:
This was the first of two pulls. It measures about 2 1/2" in diameter, and is carved from bubinga. When I carved this first one, I was stationed for two weeks on our "emergency truck". Driving between jobs, through the somewhat paved streets of our outer boroughs, and sitting in the passenger seat of a bouncy old cargo van - I carved this first pull using a small assortment of knives and a few gouges, with the work double-stuck to a square of masonite. That was nothing more than white-knuckle determination and patience. Afterwards, I felt that if I could do that, I could probably do anything I set my mind to.
the following cornice frieze, for the same cabinet, was carved on a table in my home and it seemed to take FOREVER. But I was committed to the process, and managed a layered relief in what is only a shy 3/33":
This project with SR is right in line wih the cabinet or any of the other ornamental things I've made. Once I have a clear enough idea that I can draw something, I have confidence that I can make it happen. Eventually, and through trial and error.
For me, the process of making something has become almost as exciting as the result. Almost every night I try to do something. Last night, I watched a video of Doris applying medium density cyano to a small sheet of acetate for her Royal Caroline lanterns. She had such an ingenious method and technique for applying the glue exactly where needed, without making any mess at all.
The night before, I was drawing in these small mouldings for the cap rail stiles, which I sometimes see on the Arsenal models; the effect is of a framed, recessed panel of ebony, on each protruding rail frame, just beneath the rail itself. It's a dynomite looking detail, but for me it also serves the purpose of visually shortening these rail timbers, which I think the Heller kit has moulded out of scale. They are too tall.
Small steps. Incremental progress, eventually adding up to a thing. I spent almost 2 years on that cabinet. I expect to spend anywhere from 3-5, actually building this SR. It's all process, for me, baby!
-
Hubac's Historian got a reaction from EJ_L in Soleil Royal by Hubac's Historian - Heller - An Extensive Modification and Partial Scratch-Build
Cedric, I remember well all of the filing and filling of injection mould cavities and sprues on my first SR. I am also mindfull of the fact that these kit bullwarks are too thin. Just as I created the impression of depth on the lower port opennings, I may "plank" the interior surfaces of these bulwarks to improve their detail and sense of heft.
-
Hubac's Historian got a reaction from EJ_L in Soleil Royal by Hubac's Historian - Heller - An Extensive Modification and Partial Scratch-Build
The issue I can see with plumbing the legs only (assuming, also, that you are going to try and preserve the sill) is that you will have to do a fair amount of finessing to join your new moulding stiles to the remaining arched header, and you will have quite a bit of tricky work in the corners, where the stiles meet the sill. If the molding around the port were a simple, flat raised molding - that would be relatively easy to add to and subtract from. Unfortunately, it is not: in cross-section, it is an astragal with thin flat edges and a half-round center.
Even if you go that route of plumbing the sides and rejoining with the sill and header - at best you are left with a parallellogram shaped port.
If it's to be done at all, I think it is better to recreate the raised port frame altogether with the upper port enhancement attached. Another incentive for doing this is the fact that the aft-most port on the main deck battery is overlayed by the kit quarter gallery, such that the port moulding is cast into the quarter gallery plate and not the upper bulwark, itself.
because the new quarter galleries I am making land just aft of this port openning, I would have had to construct a framework anyway. The existing frames can't simply be excised from the QG plate because the carry the same coved profile as the QG plate, as it fares inboard back to the hull.
The idea of 3-D printing has some appeal. Thanks to Vossiewulf, I now have some idea what the 3-D modeling component that something like that entails. But I'm not sure about taking that on. That seems like steep learning curve stuff.
In any case, there is time yet to think on this.
-
 Hubac's Historian reacted to ken3335 in Royal William by ken3335 - FINISHED - Euromodel - Scale 1:72
Hi, Just a small update showing my progress with the second planking.
So far it's going as I hoped that it would, the gun port method is working well and I'm quite pleased at how it's going. I have just arrived at the point where I must taper the planks at the bow, I really will have to give it a bit more thought than I first intended. I've roughly marked where the wales will go and I think that I'll be able to arrange it so as to hide the transition from straight planks to upward swept planks behind them. I'll divide the hull into sections of about five planks and try to taper the planks evenly between each section. As basic as that sounds at least it's a plan, as I intend to paint the lower hull I think that it will look ok.
Here's a couple more pictures of Liverpool.
Ken.
-
Hubac's Historian reacted to ken3335 in Royal William by ken3335 - FINISHED - Euromodel - Scale 1:72
Hello again. Thanks for your likes and comments.
Just in case you were wondering, I much prefer building boats to aircraft.
The good news for me is that I've finally finished filing out all the window frames. This was my most hated modelling job that I have ever done. I started out doing half hour sessions then quickly reduced the time spent on them, I ended up doing just 5min sessions, I eventually couldn't bear the thought of even picking them up, Grrrr! I shall never again complain about doing ratlines.
On to more pleasant aspects. I cleaned up the hull ready for the second planking, I sealed and painted the area around the gun ports as this will now be a finished surface. I shaped the stem to fit the hull, and fitted a couple of dowels for attaching it later, these will determine the exact location and add strength to the joint. I saw this idea on one of your logs and thought that it made sense. Once in place I was able to determine the correct angle for the bowsprit, I drilled out the 10mm hole for it. I am not going to fit the stem, keel or sternpost until after the planking is complete. I have temporarily attached a ply strip the same size as the keel to give me the correct width to butt up to, when the planking is finished I'll remove it and hopefully slot the keel into its place. At the bow I'll cut a slot in the planks and fit the stem into that. I know that this doesn't seem to be the normal way of doing it but I fancy that it might work quite well for me.
The purists out there will probably wring your hands when I say that I have no planking plan or sequence that I am going to adhere to I'll just put one plank down and work it out from there one plank at a time. My aim is to have neat good tight joins with no unseemly gaps between the planks and hopefully a reasonable flow. I will fit the planks exactly between the ports leaving the appropriate recess so that there will be no need for trimming later. I intend to paint the lower hull when finished.
To that end I started with the first un tapered plank and fitted it just above the middle gun deck ports, this formed a neat top to the ports and seemed to me a good place to start, I am working both upwards and downwards from here.
On Thursday I'm going into hospital for what is now just a routine operation, I'll be back home within a week so no worries but it means a short building break. The good news is, no housework, shopping or gardening for a couple of weeks, I'm thinking lots of modelling time with my wife bringing me loads of tea and cake. I think that this might be a good time to buy stuff that I would like whilst the sympathy lasts. Any ideas.
Ken
-
Hubac's Historian reacted to ken3335 in Royal William by ken3335 - FINISHED - Euromodel - Scale 1:72
Hello again.
Here's my next update.
When I started this build I was told that due to the nature of this kit no two builds would be the same, well true to form here's another version.
As you are aware I am not concerned with historical build accuracy, I just want to end up with a nice looking ship that resembles the Royal William, I just want to use the materials that I have available and to simplify the build as much as I can so to that end here's my version of the bow facia.
First I copied the plan version on to 0.5 ply then cut it to shape, I intended to build it off the model to be added later. I cut a length if 12mm dowel and halved it to be used for the roundhouses, I glued them into place along with the top casting and painted them. I wasn't going to use turned columns for the decor but I didn't want to leave the casting as plain as it was so I decided to bead across the top. I have a selection of shot weights used for fishing, I got these for canon balls on a previous build, these were ideal as they came in many different sizes, they are split for attaching to fishing line so were easily halved. I painted them gold and glued them into place, I think that they worked quite well. The upright pillars were made from 2x3mm walnut strip with the centre groove filed out, they were painted and fitted into place. I just glued on leftover deck planking to simulate the doors and used brass nails for the handles, I thought adding hinges would crowd the space so omitted them.
I cut into the ply to make the gunports and prised them open a little to give them more definition before adding some hinges and rope. I painted some plastic strips and added them to the bottom of the facia to give it a finished look.
Although it doesn't look like it I did use Bills, Marks and Petes' images as a guide, it was knowing how it should finally look that lets you adapt it to how you want your build to appear without creating problems for yourself. So thanks guys.
Ken
-
Hubac's Historian reacted to CédricL in Soleil Royal by Hubac's Historian - Heller - An Extensive Modification and Partial Scratch-Build
That could goes to a better rendition of the ship !
An idea I had when I was still thinking to improve Le Soleil Royal with a 16 guns lower row (what needed to realign all of them) was simply to cut the raised framework of the gunports and replace them onto a new plastic card. All the molded carvings (repetitive) could be of printed in 3D or made in resin ?
This will also improve your model because the inner sides of those upper bulwarks is quite terrible with the ejections pins marks and absence of a inner planking engraving, and they are also a little too short on breadth (I mean here taking the inner and outer planking plus the size of the upperframe).
Just my two cents.
Do it. Labor omnia vincit
-
Hubac's Historian reacted to shipmodel in Soleil Royal by Hubac's Historian - Heller - An Extensive Modification and Partial Scratch-Build
Maybe you could try the easier method of straightening the gunport sides on one or two ports. If you don't like the look, you can either backfill to the original configuration, or go with the insane amount of work needed to replace all of the surrounds.
If you have truly lost your mind and decide to go the replacement route, you could consider 3-D printing for the surrounds. You could make up one in the computer, then copy it multiple times and attach them to each other with sprues to form a sheet which can be printed by Shapeways or other inexpensive service.
In either case, I will be watching with interest.
Dan
-
 Hubac's Historian got a reaction from shipmodel in Soleil Royal by Hubac's Historian - Heller - An Extensive Modification and Partial Scratch-Build
Hi Dan,
In turning it over, in my mind, I suppose the easiest way to correct this error and produce a seamless result would be to scrape away the raised port framework around each port. Then, make a mold for new resin castings that match the profile of what you just scraped away, but with the upper port enhancement moulded in (instead of it being a separate, more fragile casting). Then you could re-position the new frames so that they are vertical over the old skewed opennings, and glue them in place. It seems likely that the necessary adjustment is so small that one could simply backfill any resulting voids with Squadron putty, and then file flush with the port openning.
I'm not sure it bothers me enough to go to the effort (which is considerable), but then Dan - you have planted a seed, and you know how that goes!
-
Hubac's Historian got a reaction from EJ_L in Soleil Royal by Hubac's Historian - Heller - An Extensive Modification and Partial Scratch-Build
I have to make the port enhancment mould, anyway, so maybe...
-
Hubac's Historian got a reaction from EJ_L in Soleil Royal by Hubac's Historian - Heller - An Extensive Modification and Partial Scratch-Build
Hi Dan,
In turning it over, in my mind, I suppose the easiest way to correct this error and produce a seamless result would be to scrape away the raised port framework around each port. Then, make a mold for new resin castings that match the profile of what you just scraped away, but with the upper port enhancement moulded in (instead of it being a separate, more fragile casting). Then you could re-position the new frames so that they are vertical over the old skewed opennings, and glue them in place. It seems likely that the necessary adjustment is so small that one could simply backfill any resulting voids with Squadron putty, and then file flush with the port openning.
I'm not sure it bothers me enough to go to the effort (which is considerable), but then Dan - you have planted a seed, and you know how that goes!
-
Hubac's Historian reacted to shipmodel in Soleil Royal by Hubac's Historian - Heller - An Extensive Modification and Partial Scratch-Build
Hi Marc -
I think the fact that several of us have noticed the tipped gunports on the Heller casting means that they are eye-catching elements and should be adjusted if it can be done without too much work. Looking at your drawing carefully it seems that the tipping is more apparent than real. Here is how I would go about changing the model and the drawings:
For the model, not much work is needed. Even the sides of the aftmost gunport need to be shifted only about 2 degrees.
All of the others are closer to vertical and need less adjustment. The insides of the port can be modified with a needle file. It may be that only doing the verticals would be enough to change the look of the piece. Doing something physical on the model might make a nice change from all the drafting.
As for the drawing, I do not know the program that you are using, but check to see if there is some 'rotate' or 'skew' function that you can apply to a selected portion of your drawing. The Photoshop Elements program that I use has several. Here I have simply taken a square outline of the gunport and rotated it to vertical. The second has the gunport skewed, which leaves the sill tipped.
The program also lets me more carefully select just the gunport by using the 'lasso' function, but that is a much more time consuming process.
If your program does not allow you to do this, I could do it for you if you send me a JPEG file of your entire hull.
Dan
-
Hubac's Historian reacted to G. Delacroix in 74-gun ship by Gaetan Bordeleau - 1:24
Well let's try to be concise:
Arsenal modeling is a discipline of naval modeling, the oldest and most demanding. This activity consists of replicating to scale down the design and construction of old ships. This reproduction must be as faithful as possible in the making of the parts which constitute the framework, the arrangements of the decks, the equipment and the decoration of the original ship. The construction of the masts, the rigging and the sails are not imperative, it is a question of personal preferences. In France this activity was practiced in the arsenals of the king since the XVIIth century, Jean Boudriot "awakened" this practice in the Seventies and the name has remained and is still used today. The different parts must be perfectly conform to the original parts, their assembly also. Bolts, nails and treenails should be reproduced as far as possible. If a keel has four parts, these four parts must be represented and assembled as true with scarph, bold et nails. No facility, modern materials or artifacts of manufacture are allowed in the traditional arsenal modeling unlike some models makers who make superb models but out of established conventions (absence of framework, sculpture in series (even metal), artillery in resin , etc.). For the enthusiasts who are often very cultured on the subject, these models are not part of the true model of arsenal. The arsenal models are based on monographs or personal studies which are the representation of the real ships, they are not plans of model. These books are the result of advanced knowledge of the naval architecture in general and the ship concerned in particular (era, builder, place of construction, peculiarities, etc.). It is often a long-term process that requires a great deal of research. Many regard it as a noble activity, close to art by the skill he asks. GD I do not know if the automatic translation will reflect the meaning of my talking... -
Hubac's Historian got a reaction from EJ_L in La Reine by CedricL - Heller - PLASTIC - 104 guns French first rate - modified Soleil Royal kit
Cedric - you are off and running now! I'm so glad to see the project posted here, now, as well as LaRoyal. What you are doing presents really a number of interesting challenges, so I am really looking forward to following along.
-
 Hubac's Historian got a reaction from CédricL in La Reine by CedricL - Heller - PLASTIC - 104 guns French first rate - modified Soleil Royal kit
Cedric - you are off and running now! I'm so glad to see the project posted here, now, as well as LaRoyal. What you are doing presents really a number of interesting challenges, so I am really looking forward to following along.
-
Hubac's Historian reacted to CédricL in La Reine by CedricL - Heller - PLASTIC - 104 guns French first rate - modified Soleil Royal kit
HELLER : La Reine…an attempt
The title says all…it’s only an attempt !
This idea came to my mind about two years ago when I had the chance to find à Soleil Royal for 50 euros on a second hand site. I built my first one in the late eighties, direct from the box ; and a second one a little later (unfortunately destroyed during a home-moving), and still another one is still lying around in the bottom of my garage. I thought, that I could, on this latest attempt, go a step further with details and correct the many faults that I was unaware of in my earlier attempts.
I spent, thus, more than a year collecting sources about the first Soleil Royal and discovered also that the ship was, in fact, quite different from the one beautifully carved by Jean-Baptiste Tanneron in 1839 (model of the Musée de la Marine – Paris).
In fine, I found the document above. After further researches, I discovered that this ship, the « Royal Duc » - who’s name was changed in 1671 to « La Reine » was nearly a sister-ship of Le Soleil Royal, with the immense advantage of being drawn by Willem Van de Velde the Elder in 1673.
Keeping in mind that reliable sources of information an drawings of the first Soleil Royal virtually do not exist anymore, and using these known drawings as my basis, I changed my idea and decided to convert the Heller kit into La Reine.
To give you an idea of the future build, I roughly drew on Autocad both profiles of the ships :
Le Soleil Royal, Heller version :
La Reine, redrawn from J.C. Lemineur’s book :
Both superimposed for comparaison ; to the same lenght for the Heller kit. In fact, my model of La Reine will be slightly overscaled in comparaison of the announced 1/100 scale (more near the 1/90) :
You’ll better see now the problems to solve :
The stem must be changed, the forward bulkhead must be extended down to the first deck, on which the bowsprit mast was placed. It is a caracteristic of the french vessels built before 1690 to have the bowsprit mast anchored to the first deck. This is a feature that so many captains will criticize that, following the La Hogue disaster in 1692, new vessels will have their bowsprit placed on the second deck.
A new figurehead and bow timbers must be made from scratch, only with the help of Van de Velde rough sketch…
The distribution of the gunports is completely different. It is a specific caracteristic of La Reine, and of the first Soleil Royal, to have 16 gunports on the lower battery. They were the only French vessels with such an arrangement of gunports on the first battery at that time. The third battery was less armed in order to have place for the officers quarters, and the poopdeck of La Reine was left unarmed, a substantive difference to Le Soleil Royal.
The position of the masts must be slightly modified, with the understanding that their dimensions and those of the yards were proportional to those of the hull.
All the poop and side galeries must be fully scratch-build, but in this case, the drawings of Van de Velde and Desclouzeaux are truly of great help.
-
 Hubac's Historian got a reaction from vossiewulf in SS Michelangelo 1962 by shipmodel - FINISHED - 1/350 scale
Hey Dan,
Sometimes I take for granted that I can just see the Michelangelo at our meetings, but I've really enjoyed reading through this log, so far. There have been a number of ingenious solutions to vexing problems. I'll be following along. She's really shaping up beautifully, Dan!
-
Hubac's Historian got a reaction from EJ_L in Soleil Royal by Hubac's Historian - Heller - An Extensive Modification and Partial Scratch-Build
And to answer your question: Between the lower wales, these are scupper ports. You can sometimes see, in VDV portraits, these sleave or sock-like attachments on the lowest scupper ports. I'm pretty sure that the Batavia replica, in Lelystad, carries them. My presumption is that these sleaves prevent in-flow of water on the lowest battery, in rough and rolling seas. I have never seen them above the lowest deck. It seems to me that Fimo is an ideal medium for creating these.
-
Hubac's Historian got a reaction from EJ_L in Soleil Royal by Hubac's Historian - Heller - An Extensive Modification and Partial Scratch-Build
Thank you, Cedric!
The frieze will be built up. First, I will tack-glue this layout to a sheet of .020 styrene, so that I can cut out the lattice-grid.
That grid will then be cut down into manageable segments - perhaps on mitered corners, where one would expect to see joints - and then glued to the upper bulwark pieces that have been scraped free of the stock ribbon strakes and ornaments that would interfere with the new layout.
I'm thinking about bending annealed wire to the shapes of the frieze layout, and then glueing a shaped wire segment to the centerline of all of the frieze lattice segments. This will give some shape and dimension to the lattice and crevices for the mild distress wash to collect.
the fleur-de-lis, shells, folliate diamonds and lattice scrolls are just big enough that I can carve masters and make uniform resin castings of them. There are so many of each and they must be consistent for the finished effect to look as intended.
Each casting will have it's back sanded flat and then glued to the frieze, just as you might decorate a Christmas tree. The lattice scrolls will probably have to be cut into the frieze lattice because they appear half-on and half-off the lattice.
Color-wise, lately, I'm thinking that I might go with a lighter blue for the upper bulwark pieces - reserving the deep ultra-marine blue for select sections of the stern and tafferal. Also, I am leaning towards painting the frieze lattice and sheer railings in yellow ochre, and using gold only for the frieze ornaments and figurative reliefs and carvings of the stern and quarters. My thought, there, is that the gold would pop more and be more visually impactfull.
-
 Hubac's Historian got a reaction from aviaamator in Soleil Royal by Hubac's Historian - Heller - An Extensive Modification and Partial Scratch-Build
This has been quite a busy and productive holiday weekend. I have completed the ornamental frieze layout. While there are still issues with overlapping elements, generally, I am very happy with the spacing and size of the individual elements. She is starting to look like what I intend for this project.
Here are a few pictures:
A detail closeup that shows the added octagonal port:
-
Hubac's Historian reacted to CédricL in Soleil Royal by Hubac's Historian - Heller - An Extensive Modification and Partial Scratch-Build
Hello Marc,
Really a nice work !
Have you yet an idea how to proceed to build that Framework ?
In my case, I really envisage to ask a czech manufacturer to make a fret of fleur de lys at a small scale (1 to 3 mm heigth, things I really can't do).
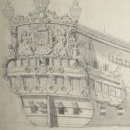
Just a question what are those things drawed between the lower wales on the second pictures ?
-
Hubac's Historian reacted to DORIS in HMS ROYAL KATHERINE 1664 by Doris - 1/55 - CARD
During the weekend I made wooden finish of the hull using foil stripes. Later, it will be modificated with darker colours and of course I will create treenails and pins in wooden planks as well.
-
Hubac's Historian got a reaction from EJ_L in Soleil Royal by Hubac's Historian - Heller - An Extensive Modification and Partial Scratch-Build
Well, when you consider that my plans are merely a scale layout for the ornamentation - I'm really not that far ahead of you. Someday, I will create a propper lines plan from the main frame, fore and aft. However, because I have no intention of re-molding the plastic hull, frame shapes are not necessary right now.
I will say that I am eagerly awaiting the release of the Lemineur/Tusset monographie on Le St. Phillipe. Although this was one of the early ships of the Second Marine, I suspect that the shape of the main frame would not have differed dramatically from that of SR. I believe the main difference would be the development of the hull, aft of the mainframe, as it resolves into the stern framework. An accurate model of SR1, must incorporate the pre-1673 stern framework, just as Michel and Niko have done with their models.
Bon Appetite!
-
Hubac's Historian got a reaction from EJ_L in Soleil Royal by Hubac's Historian - Heller - An Extensive Modification and Partial Scratch-Build
I also remember reading, somewhere, that SR was rushed into service before the re-build was complete. Not sure where I saw that either, but may have been Andrew Peters's book Ship Decoration.
Cedric, how complete are you going to make your plans? I will certainly draw up to the main tops, with the shrouds in place, because I have to figure out their new positioning. I think I will also draw in the topmasts and spars because, that too will he made from scratch and I want to be sure that I get the scale of it right.
Although I will also be building new decks, I don't think I will draw them - the exception will be the new deck railings, which will have some ornamental motif that needs to be worked out to scale.
Please let me know if you find that passage about SR's re-fit. I'd like to see it, if possible.
Despite the spotty forecast, we also had a nice day, here, in New York. I went to my daughter's school "field day" and we had a great time!
-
Hubac's Historian reacted to CédricL in Soleil Royal by Hubac's Historian - Heller - An Extensive Modification and Partial Scratch-Build
Well, it will dépends on the help I can obtain to have a correct hull shape first.
Things like the angle of the keel from waterline, the main frame and how to develop her (his or her ?) in both directions fore and aft, also I presume that the sheer of the first deck on Heller's kit is far too pronouced to the bow. I remember reading somewhere that the correct sheer was 2 lines per feet (or one feet divided by 60). So there is still a lot of work before speaking of "plans". The heigths of the gunports was dependant of the sheer of the decks.
Also I wait the return of Mr Saunier from his week-end to discuss about the dimensions given in the document of L'Anonyme du Havre de Grâce.
If the first part depict a first rate wich is without doubt Le Soleil Royal, I'm still asking what could be the second part of a first rate of 2000 tons.
Except La Reine and le Royal Dauphin, I did not see such ships at that time.
As you can see, plenty of questions to resolve before going further with my plans.
Re-reading my previous post, I don't know if I should have said "miles away from me" or "miles ahead from me", wich seems more correct !
Have a nice day then, time for supper here.