HOLIDAY DONATION DRIVE - SUPPORT MSW - DO YOUR PART TO KEEP THIS GREAT FORUM GOING!
×


Heronguy
-
Posts
863 -
Joined
-
Last visited
Content Type
Profiles
Forums
Gallery
Events
Everything posted by Heronguy
-
 Thanks Professor, I welcome ideas from you all and if by chance any idea I mention is useful then I'm pleased to share it! Google translate is pretty cool but hardly spot on when it comes to specialized terminology. Not usually as funny as Monty Python though - but then again its all in the delivery! Thanks Scott. I'm looking forward to working more on this model as I get its little sister moved along a bit further!
 -
I won't be replacing the parts on this build but for my bigger bluenose I may have to acquire some better ones
-
Very neatly done Scott!
-
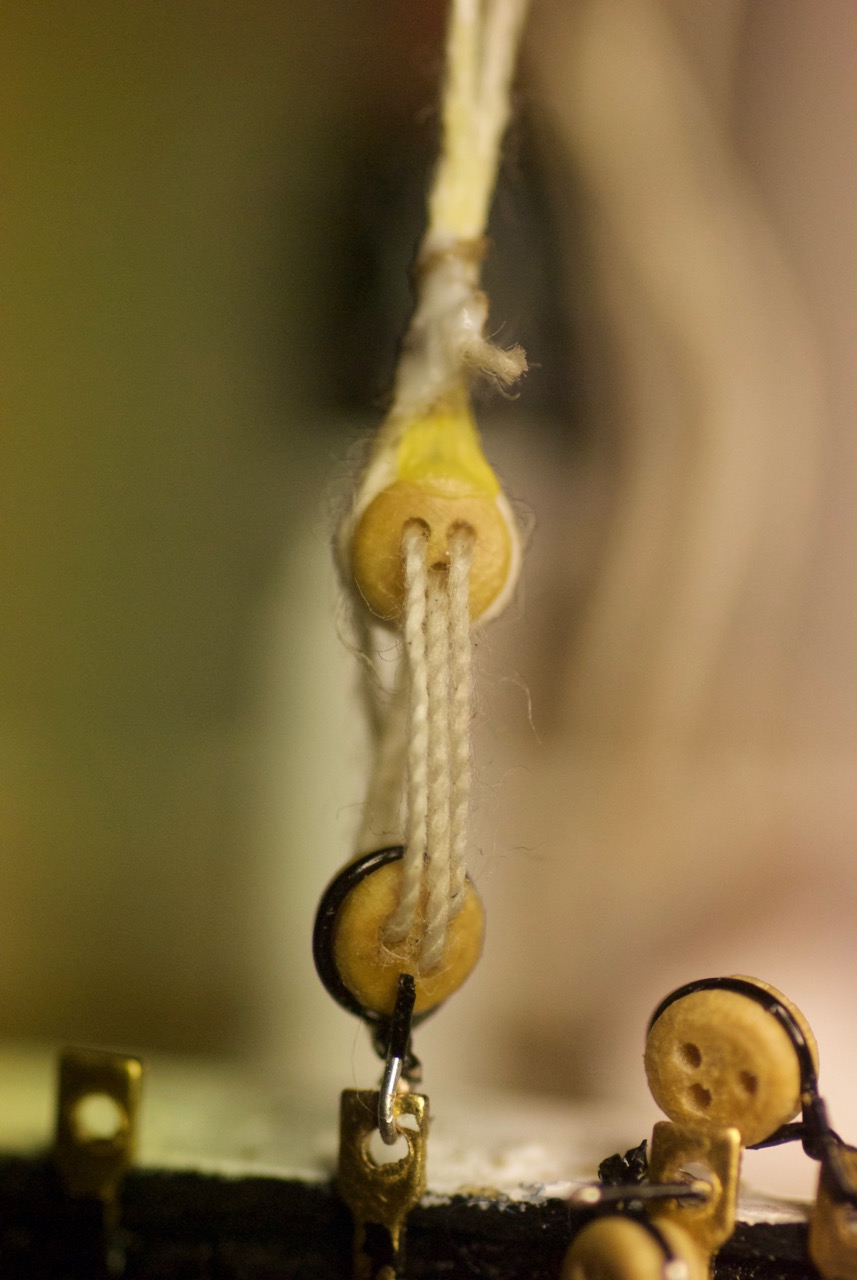
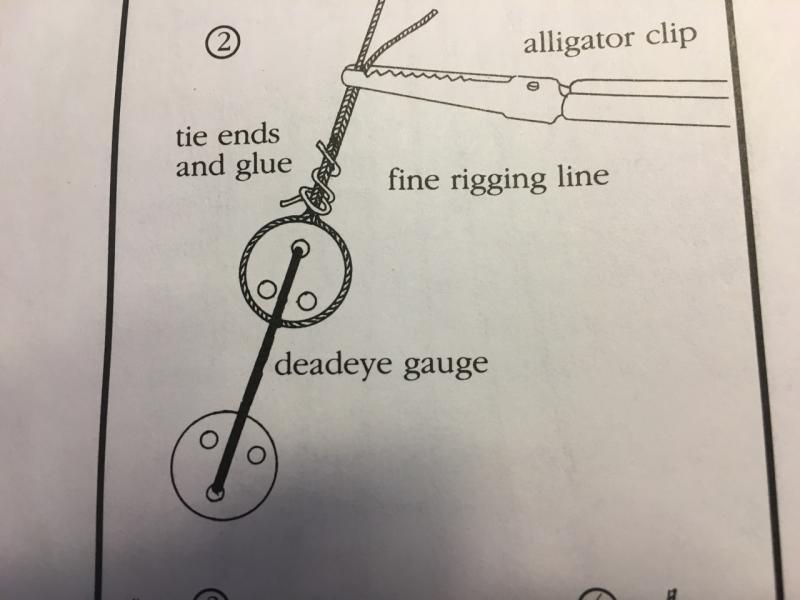
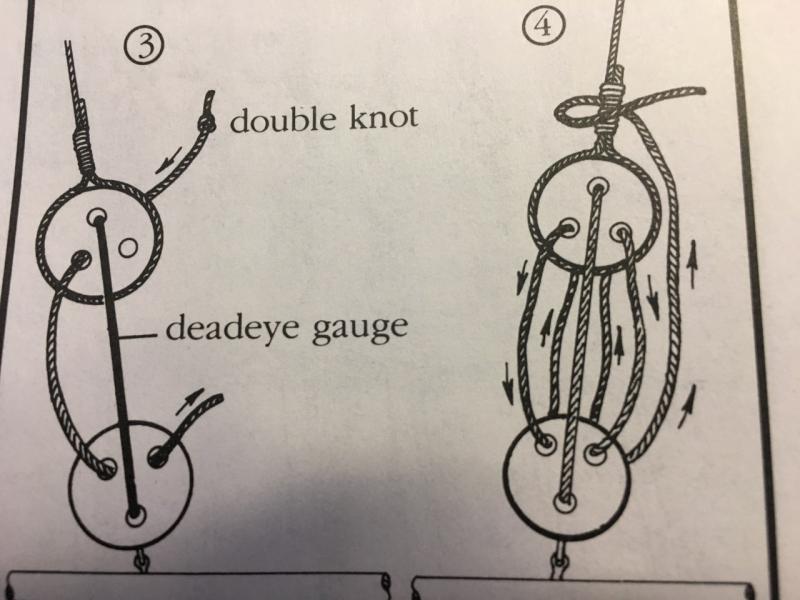
(oops forgot the image) Please, nobody breath on it! (It is a tad loose - maybe I will go back to it later) I think this attempt will do as my 1st successful deadeye rigging. Surely it only gets easier from now on. Besides practice (all day!) I think having a meal and another espresso to calm my nerves was the real key to progress. On to the starboard shroud.

- 93 replies
-
- 4
-

-
- billing boats
- bluenose ii
- (and 1 more)
-
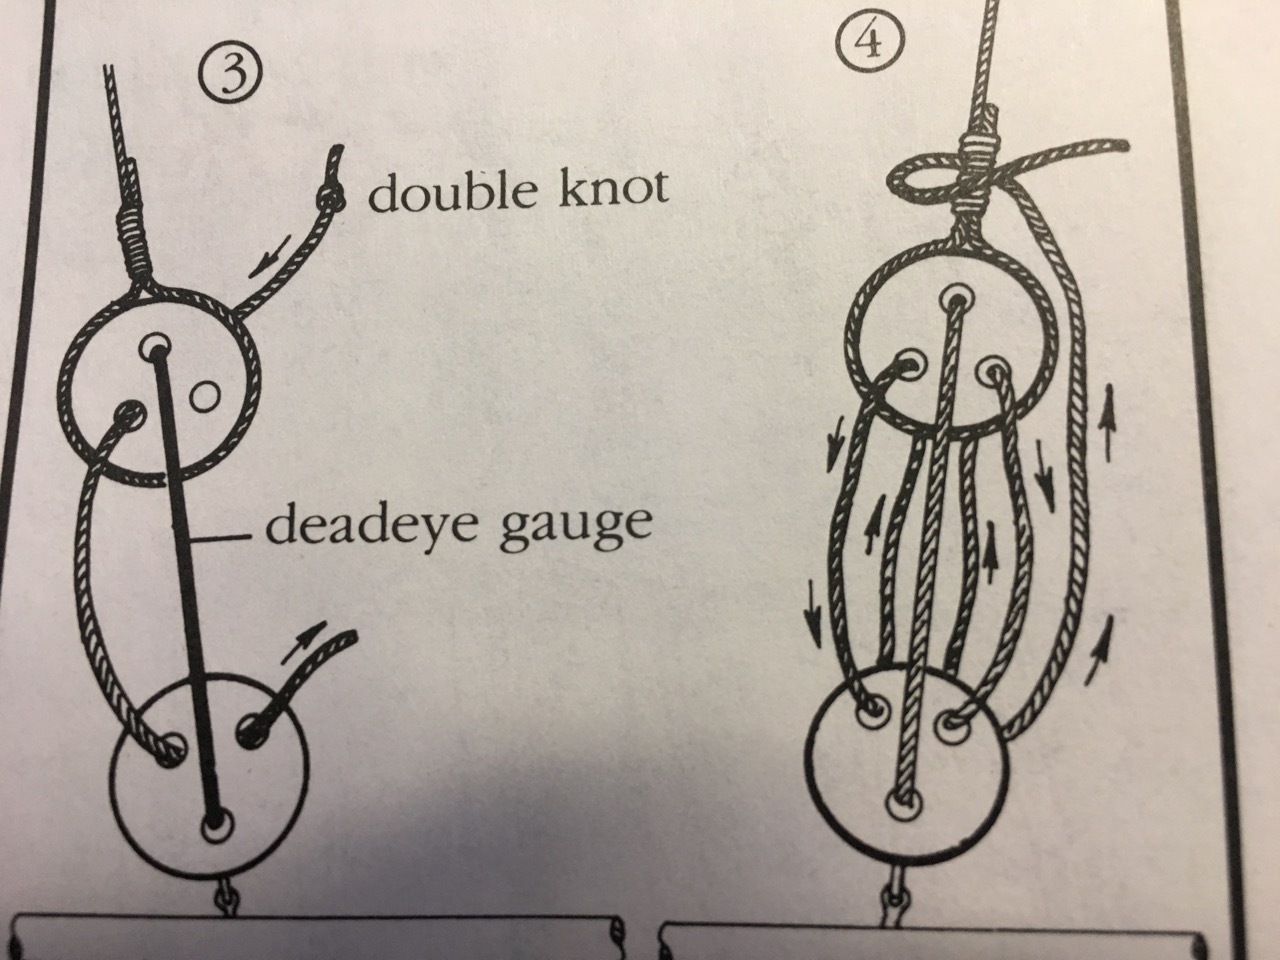
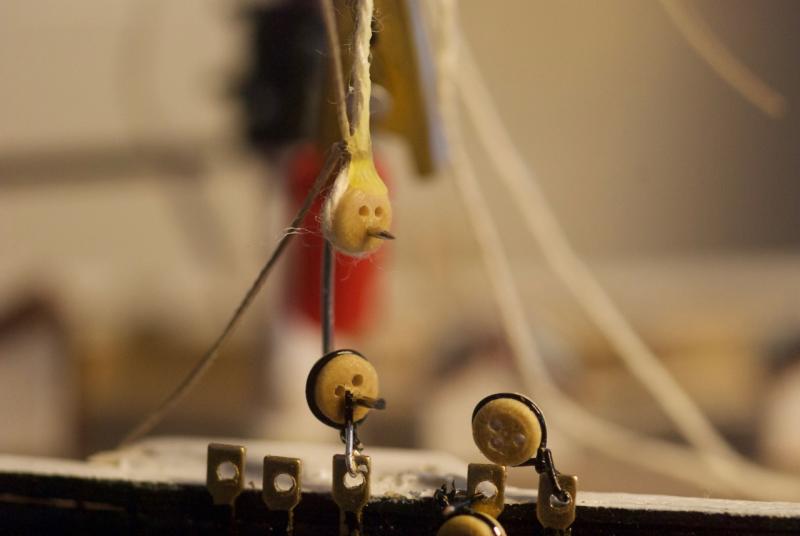
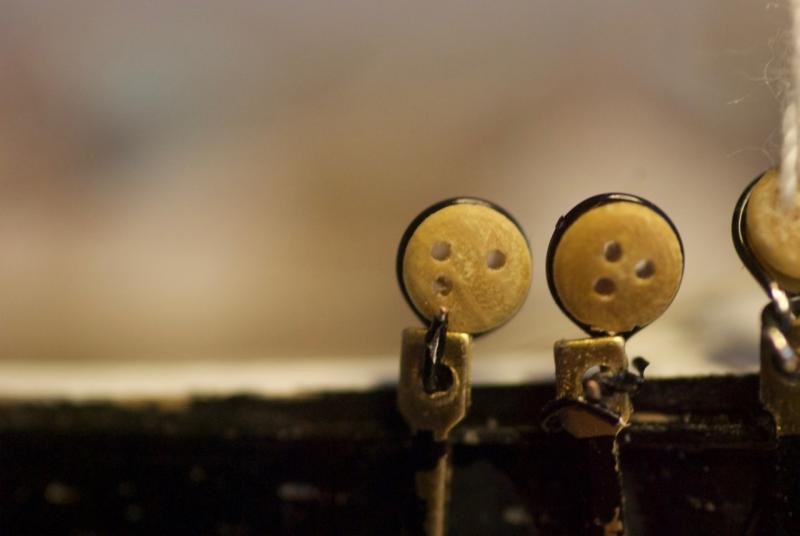
You're correct Derek - the figure (Fig 63 in Ship Modeling Simplified by Frank Mastini) only makes sense if you ignore the Step 3 diagram. Peter's above is correct as far as I'm concerned. I'm staring at the wok through magnifiers and using hemostat and tweezers from Lee Valley to wrangle the lines. It is pretty frustrating work but each failure seems to be getting me closer to a limited form of success. I'm really looking forward to the next build with its "huge" deadeyes!!!! You'll do great - you've shown that you can tackle problems and find workable solutions that look good.
-
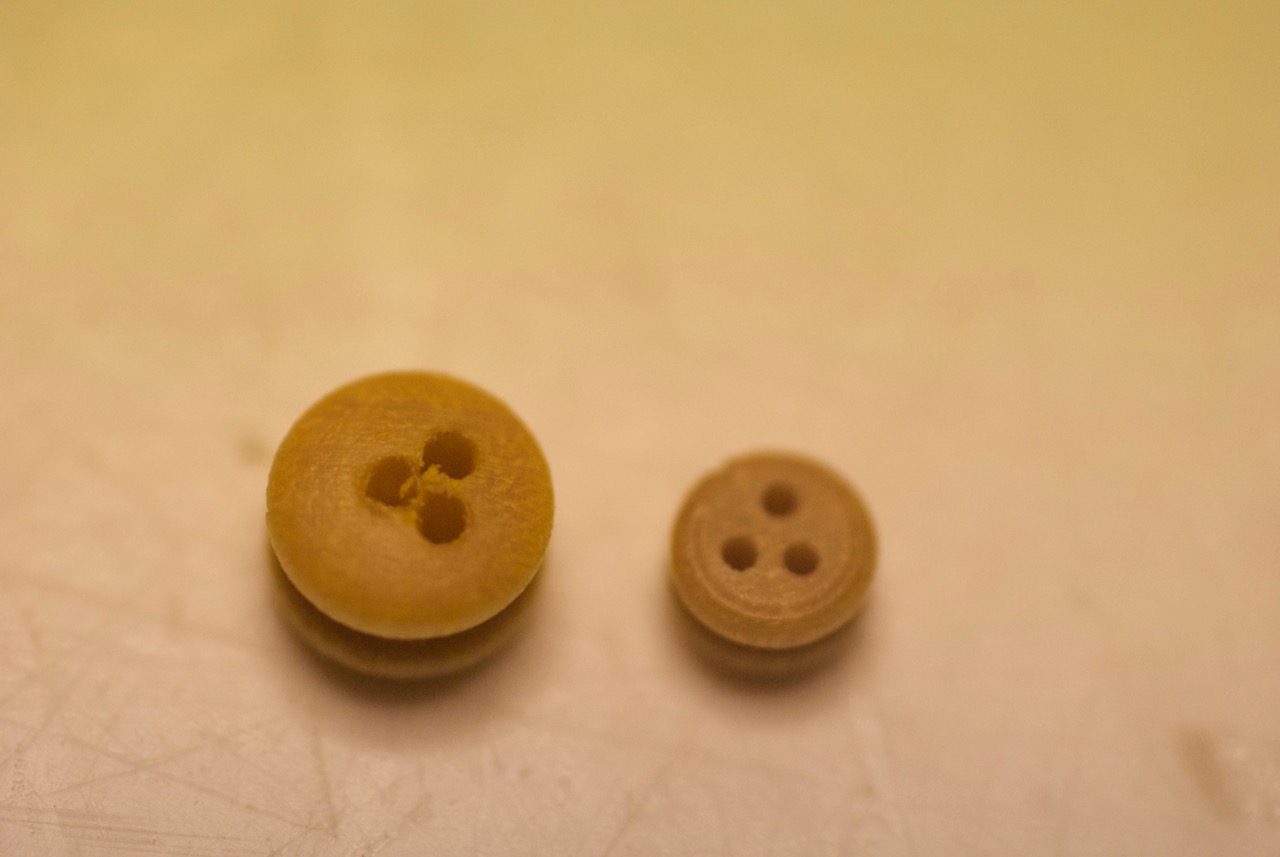
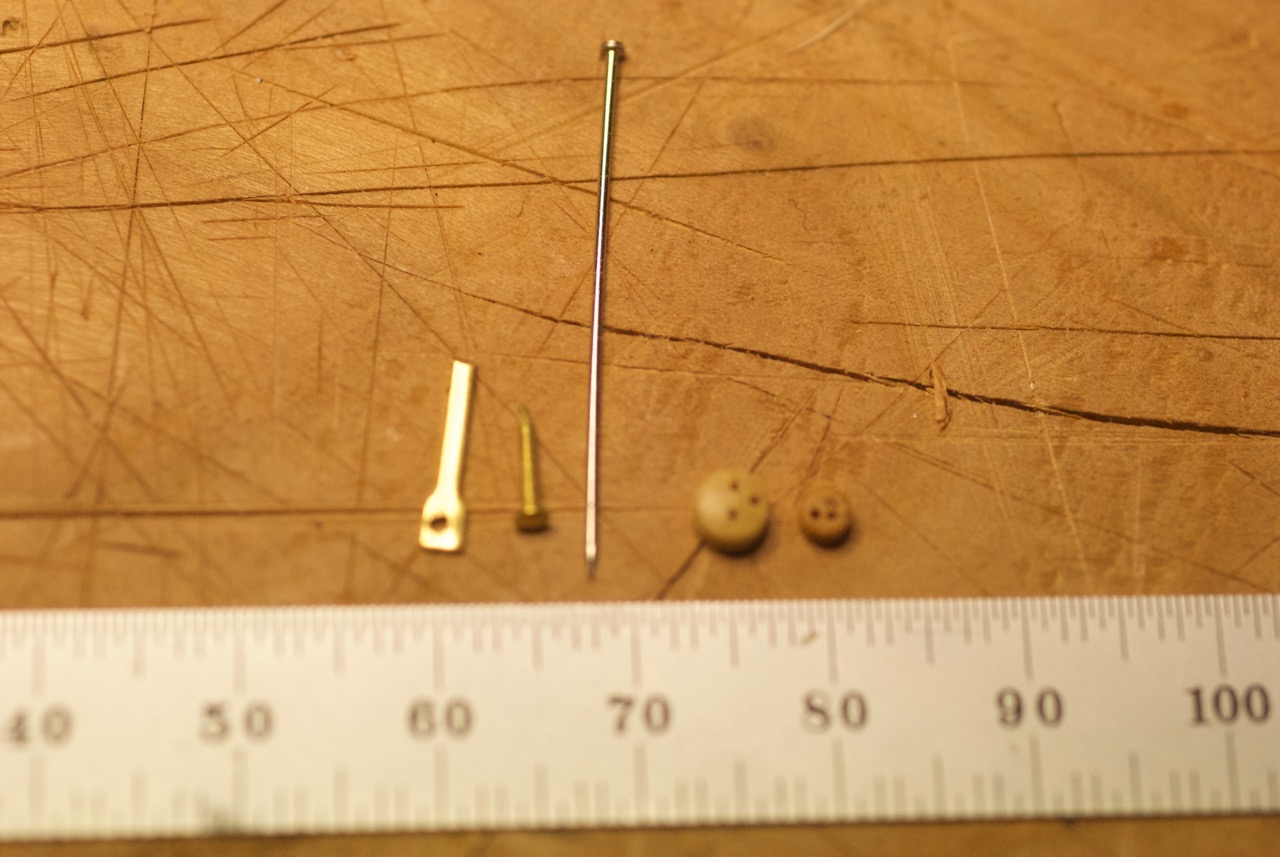
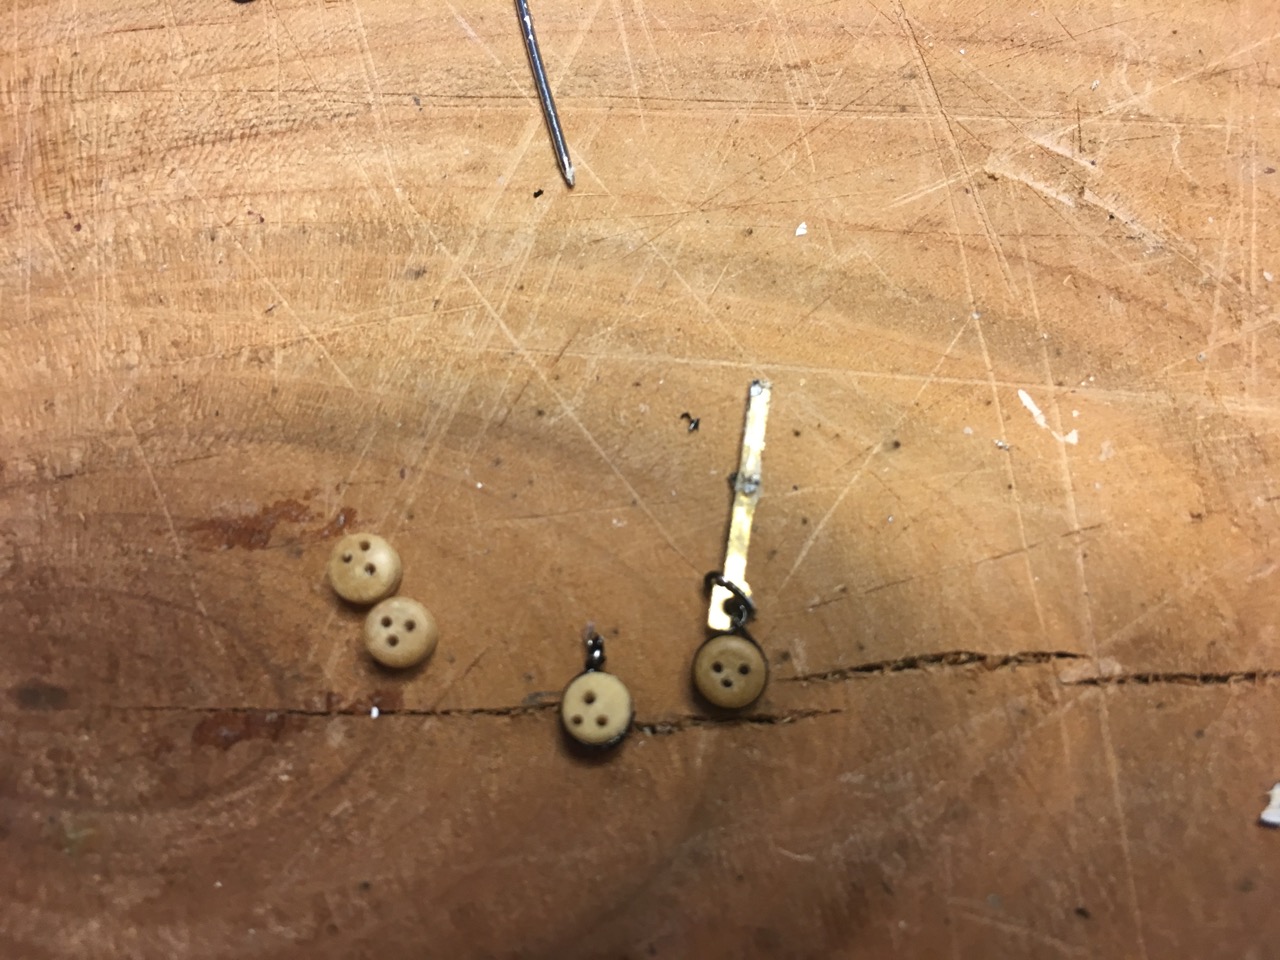
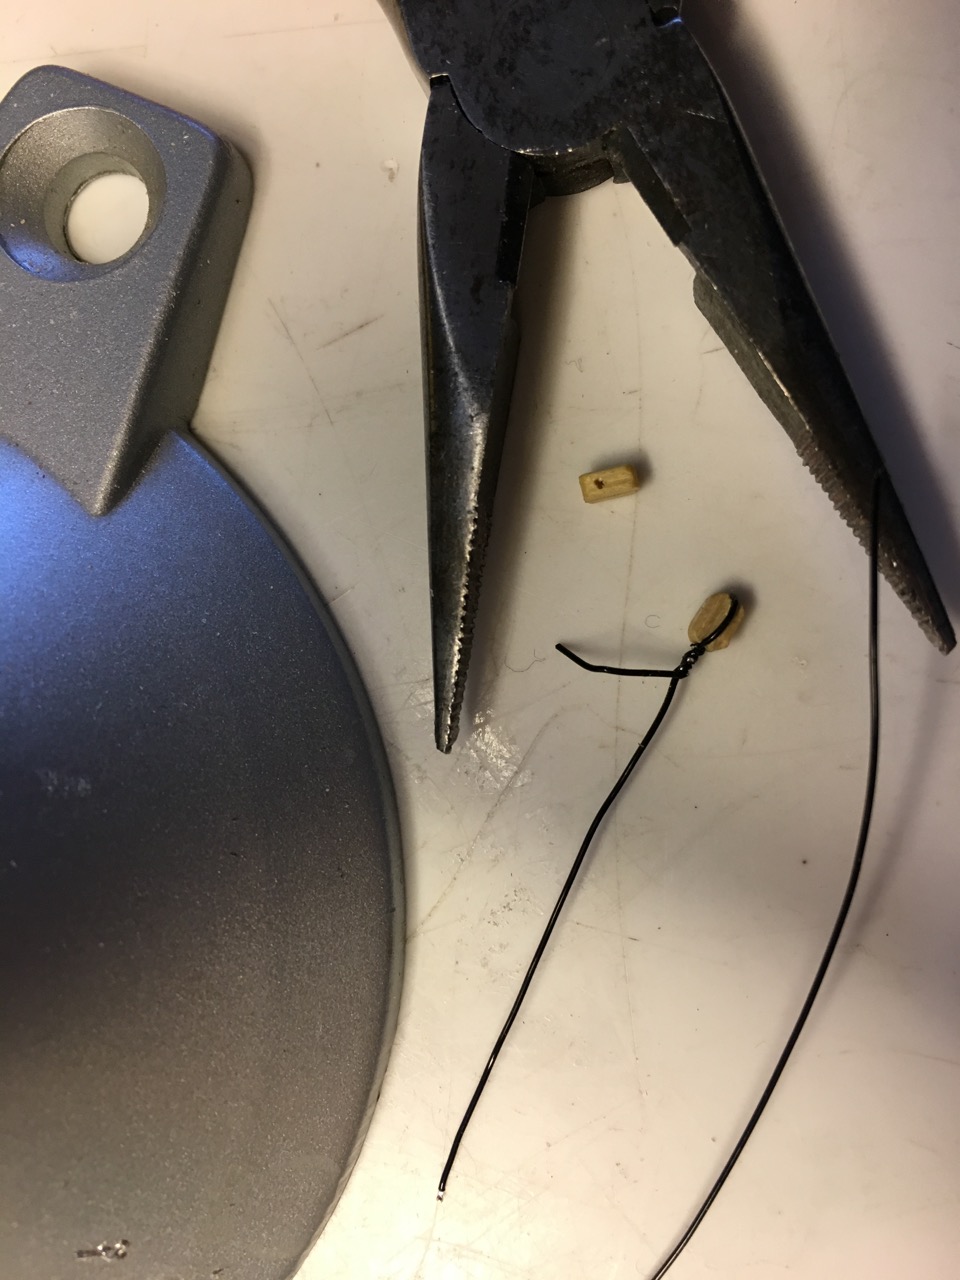
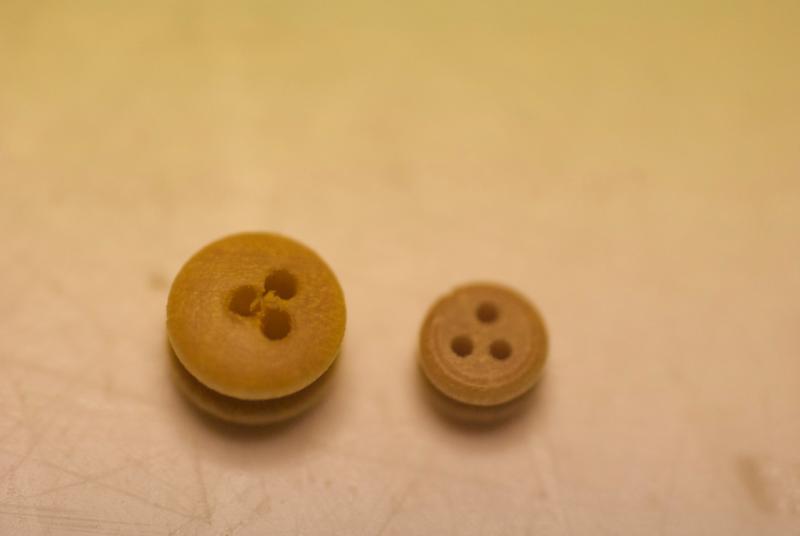
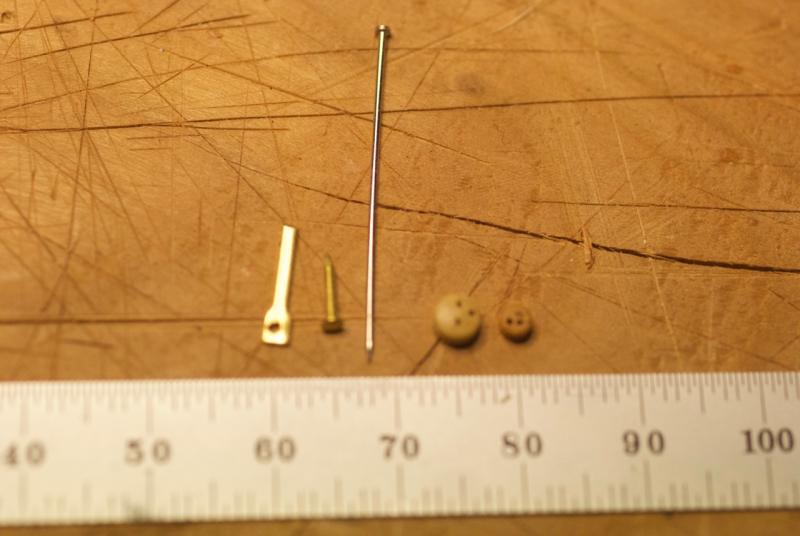
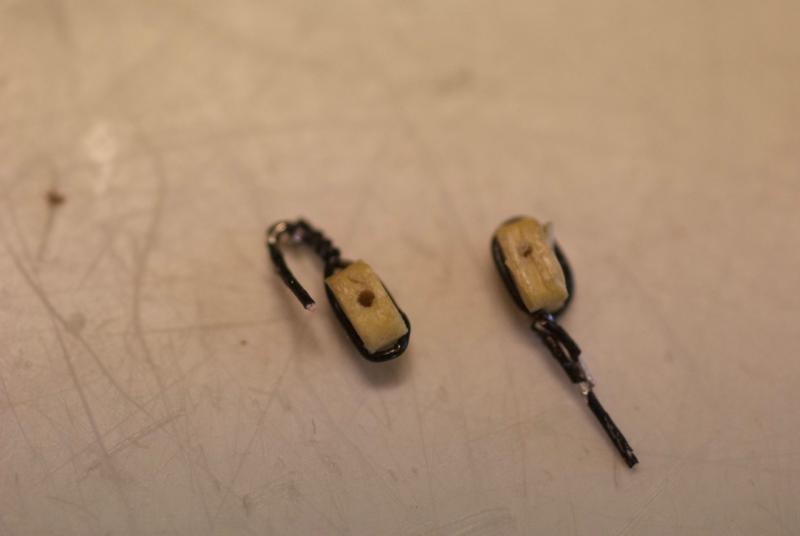
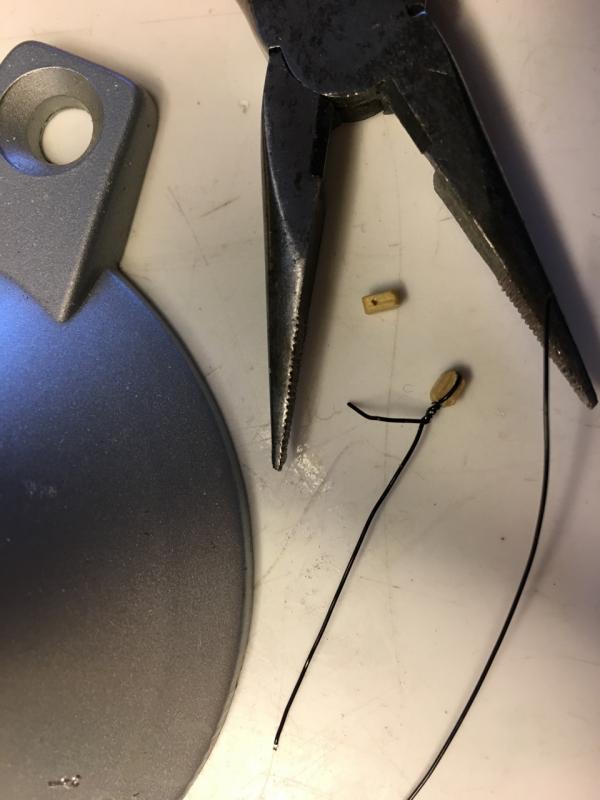
Scott and Peter, Just to give you an idea of the scale of these (infernal) little parts: on the left is the chainplate and beside it is the brass nail (not enough in the kit to attach all the chainplates and way out of scale for the job). In the middle is a normal straight pin for comparison. The two deadeyes are from the kit. My current struggle is with the larger of the two. I have no idea what I'll do with the small one!!!! On the left is a deadeye from my 1:72 Bluenose II kit while the one on the right is the one from this (scale 1:100) kit - the larger of the two I showed above.
-
Peter, Great jig - when I have a bit larger scale kit I will give it a try too! Thanks.
-
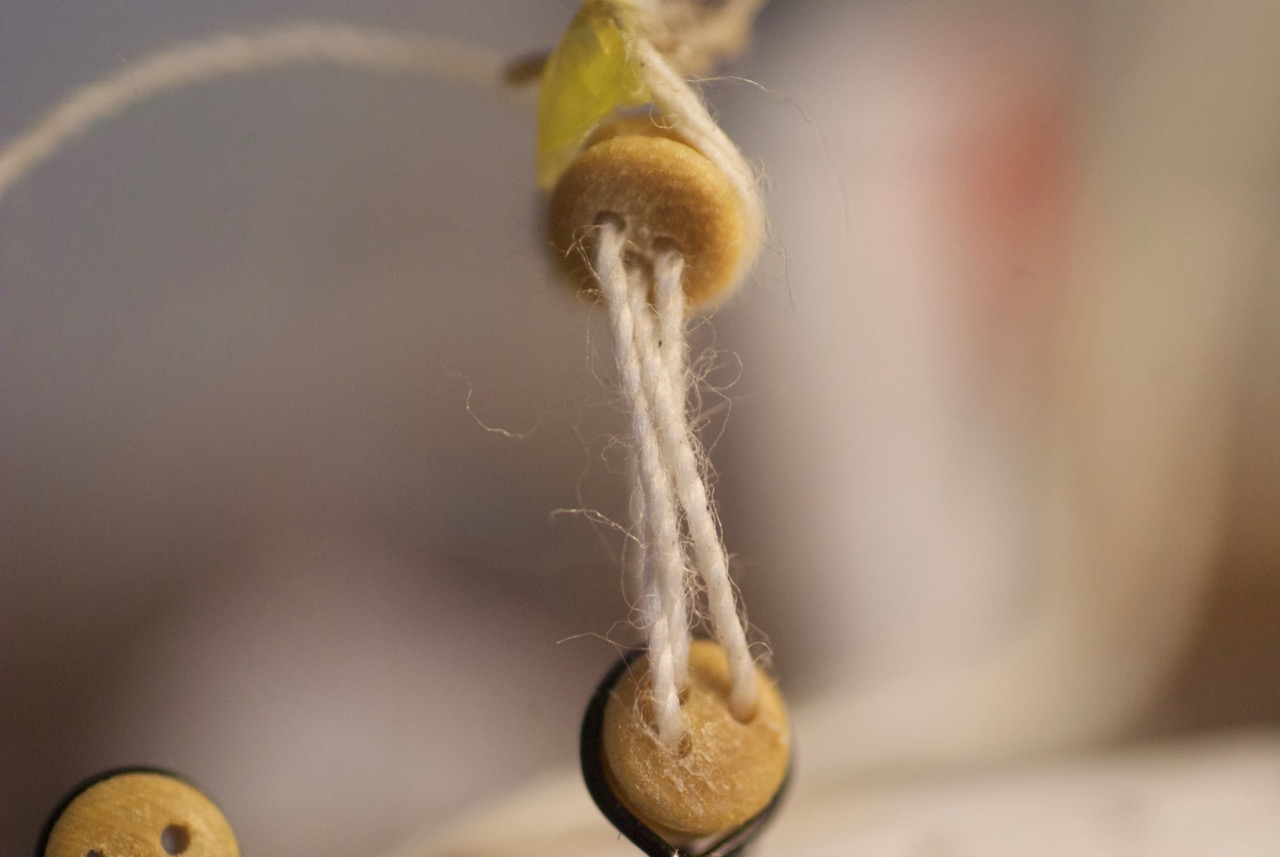
Thank you Scott. I'm trying out your ideas - glue drying on the lower deadeyes jus now before I re-rig. I've put some beeswax on the line. I've got some diluted white pva glue at the ready. The counter twist suggestion would not have occurred to me!
-
Let's see how we can develop some skill with deadeyes!! (This may sound a little like I'm venting so feel free to skip this post!) **** Venting starts It looks really easy - four simple steps and the shroud will be rigged! So far ok I guess - took a while to get here. Drat - the chain plate glue broke. Try again Well I don't like the glue, trying to seize with thread and just how am I supposed to get the lanyard straight!!!! Venting over **** How to you get the orientation of the deadeyes set so the threading of the lanyard is "organized nicely" - especially when these tiny deadeyes are somewhat randomly drilled. How to deal with the ugly glue bumps? Is sewing thread suitable for seizing a line?


- 93 replies
-
- 3
-
-
- billing boats
- bluenose ii
- (and 1 more)
-
Looking awesome. Justifiably proud I'll wager! I like the idea of sails on board even if the conventional wisdom is suggests otherwise. Good for you!
-
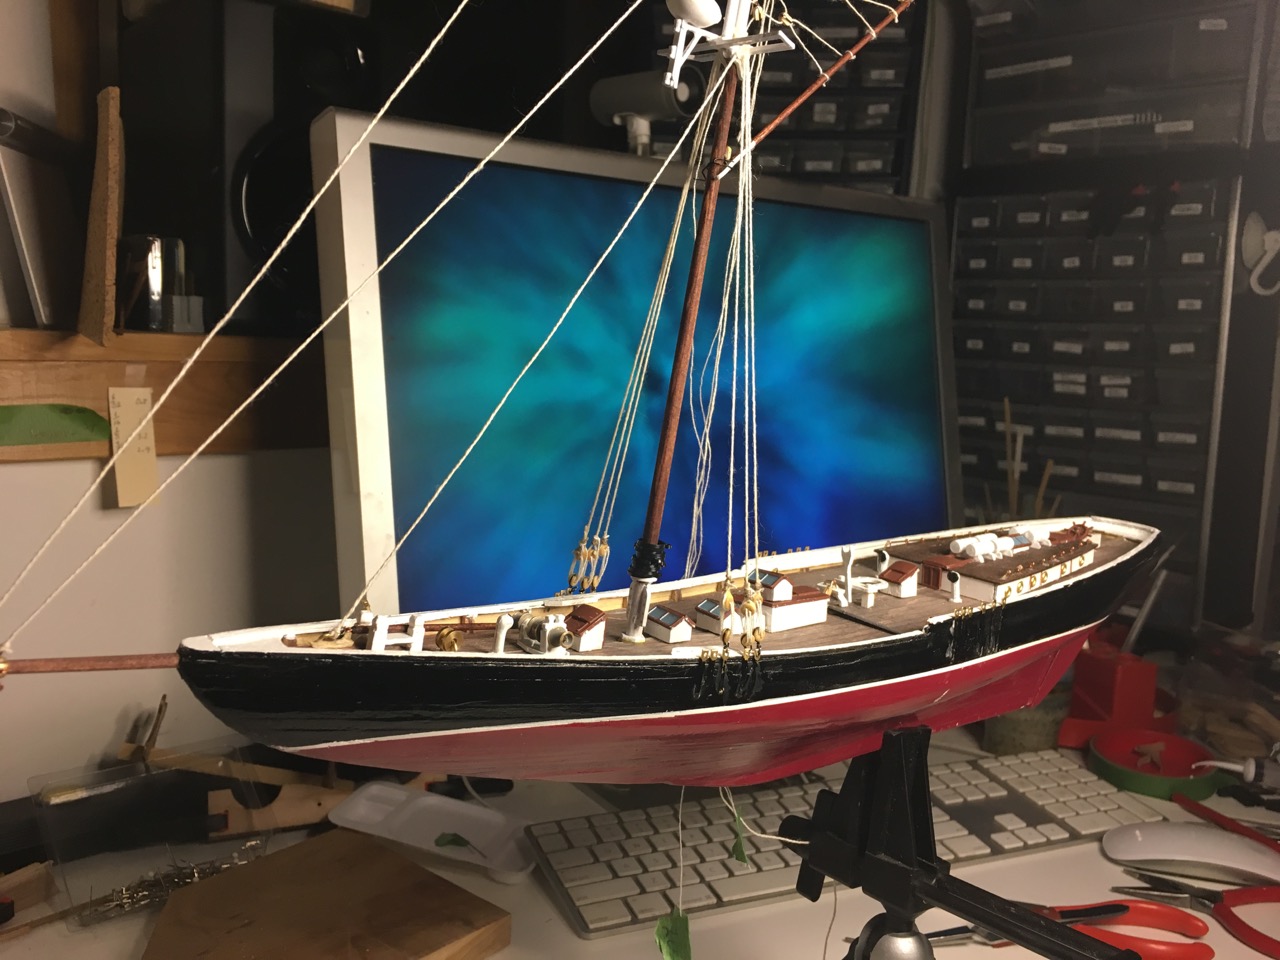
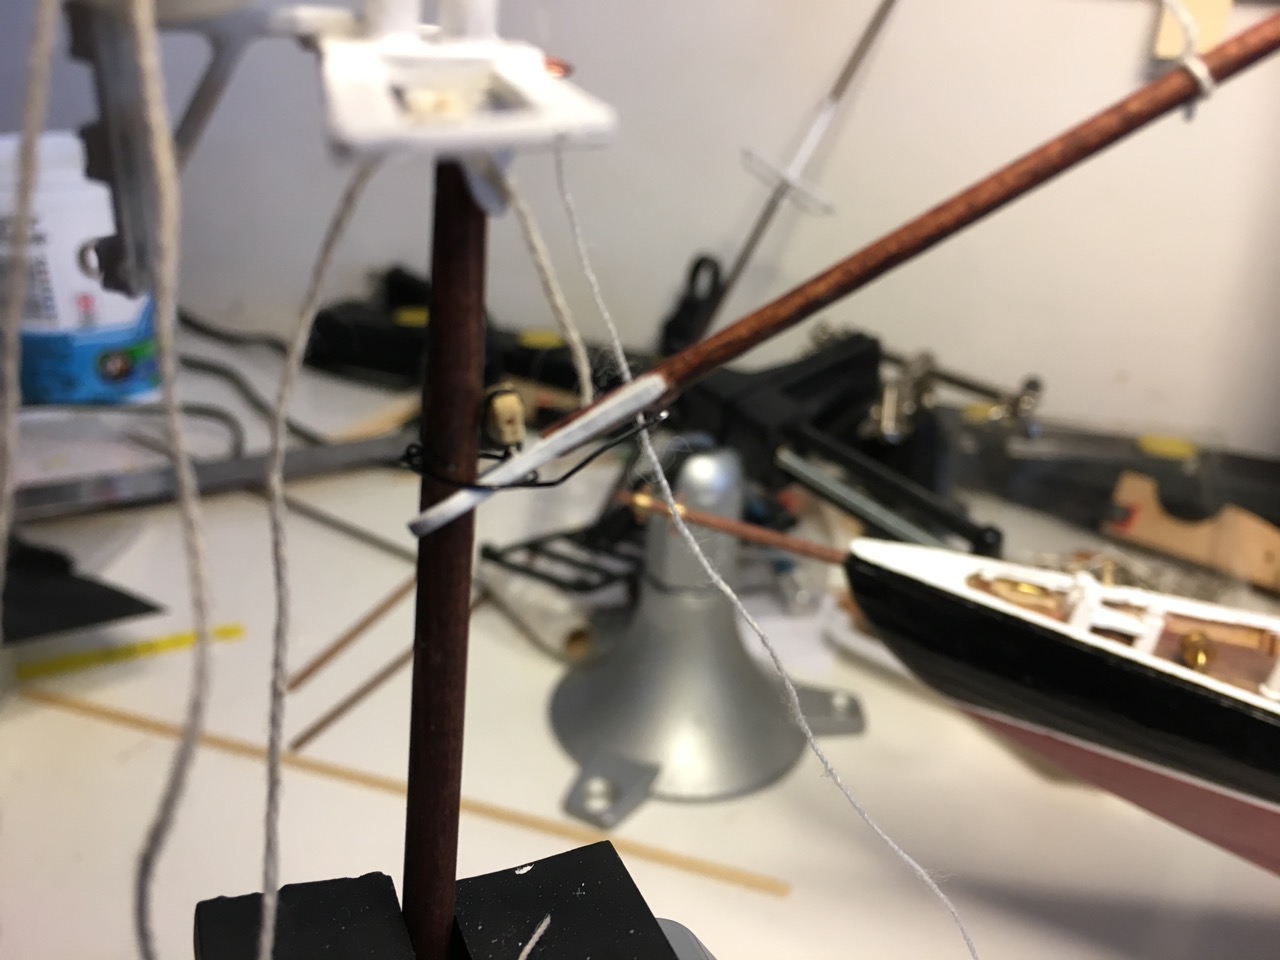
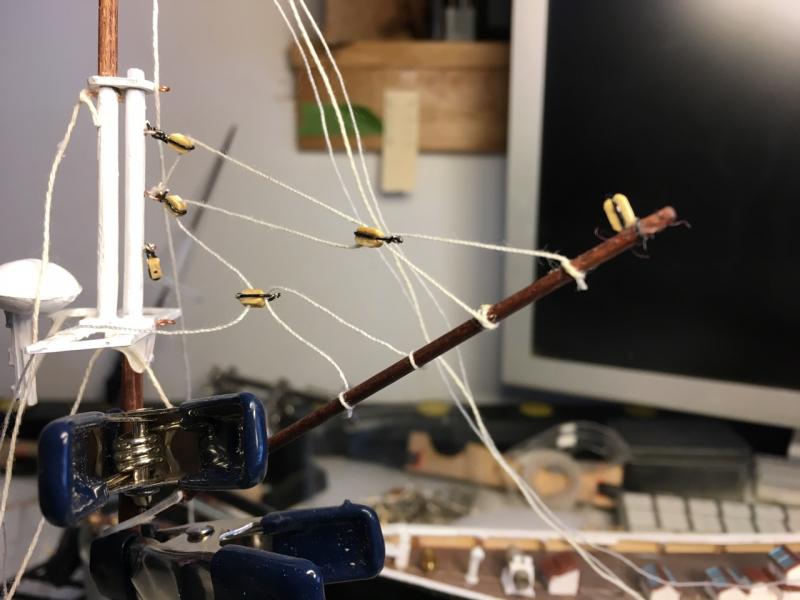
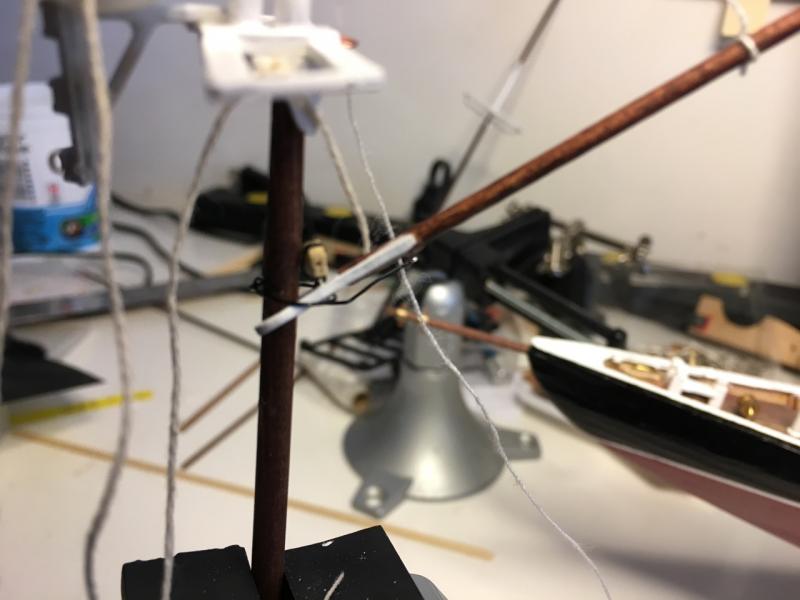
Going to tension them. Currently following Frank Mastini's dictum to assemble as much rigging as possible before I step the masts onto the ship. The pictures shown have the foremast clamped in a vice. The halyard for the gaff is just dangling. I think I'll mount the mast through the deck before I ring the shrouds though.
- 93 replies
-
- 3
-
-
- billing boats
- bluenose ii
- (and 1 more)
-
Thanks Peter, Yes, I know that is the usual way. This kit does not provide for that attachment. I may try to glue a strap around it eventually. Here is a comparison in size with the part from a 1:75 scale Bluenose II kit from AL.

- 93 replies
-
- 2
-
-
- billing boats
- bluenose ii
- (and 1 more)
-
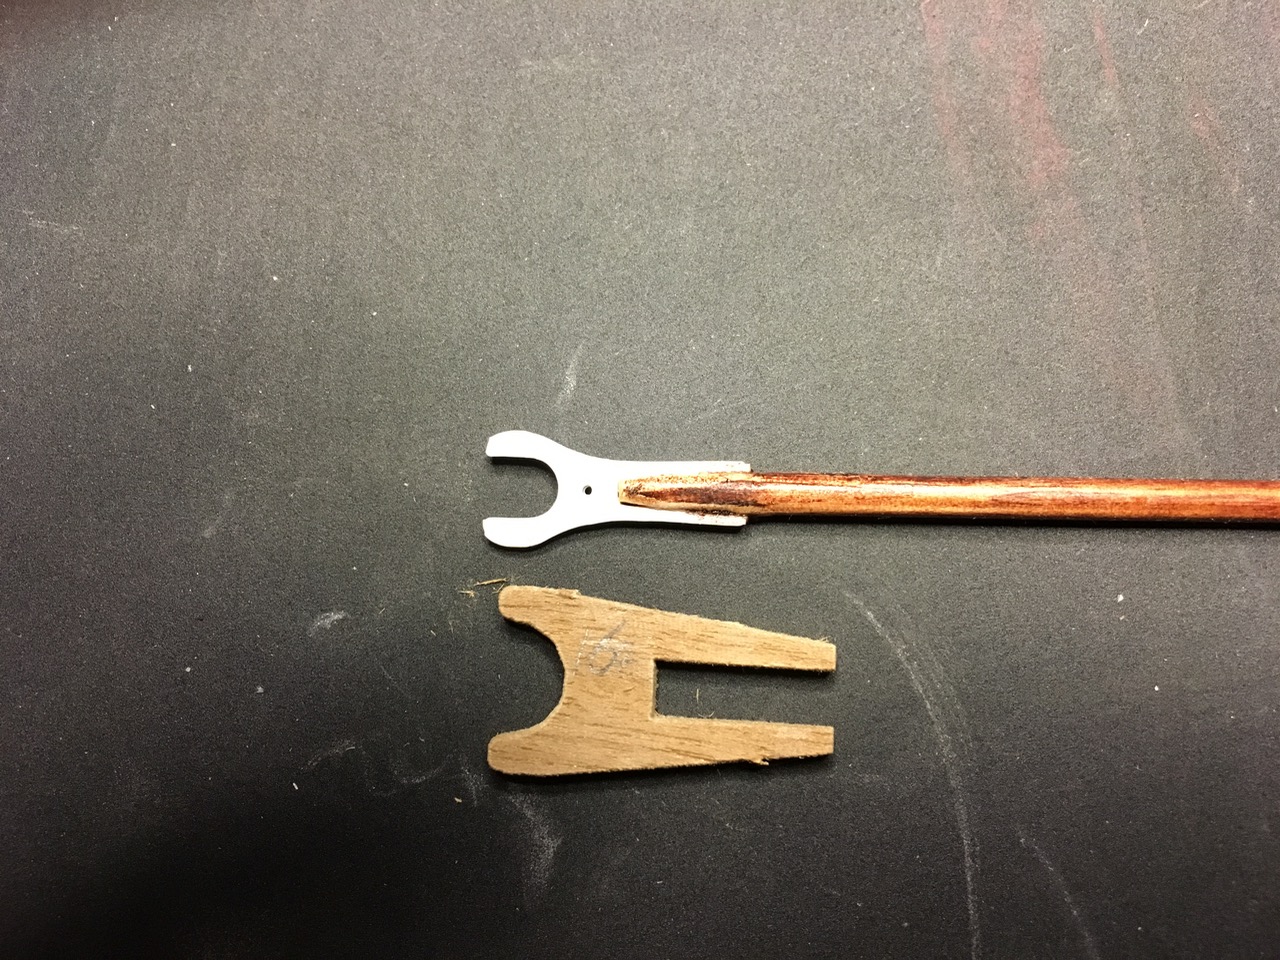
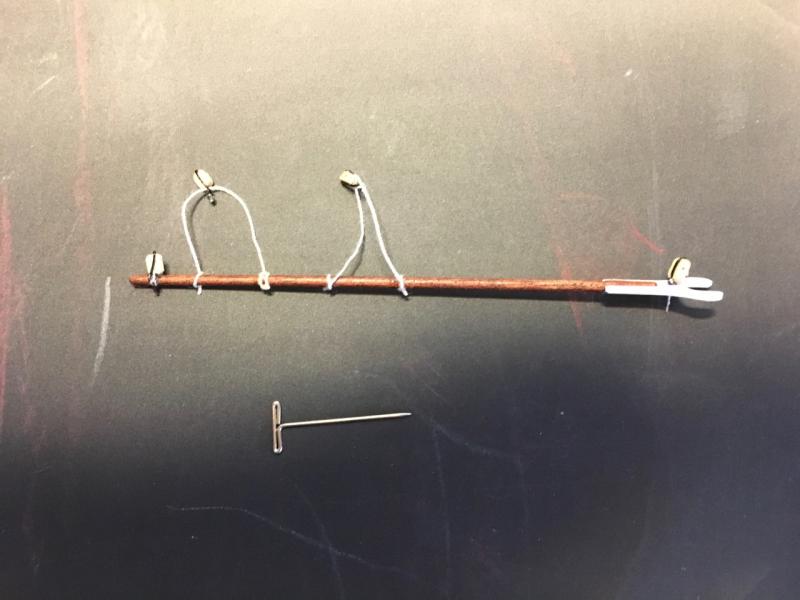
I'm making my 1st tentative steps at the rigging. Part of the challenge with this 1:100 scale kit is the size of the blocks and deadeyes. My first successful attempts at stropping the blocks: Working on the foremast required my 1st gaff. Seemed to go without any major gaffes. The throat that that holds the gaff to the spar doesn't have any barrels to hold it on so I've temporarily wired it onto the mast. I presume at the end of the day (i.e when the model is done) I'll have to glue it to the mast?
- 93 replies
-
- 6
-
-
- billing boats
- bluenose ii
- (and 1 more)
-
It's my escape valve Derek! When little Bluenose rigging has me baffled I can go back to trying to put the bulwarks on big Bluenose. When that glue doesn't hold because I can't clamp it properly I head back to Krabby to add another strake to the hull or cut out another piece from the parts sheet. Round and round between the builds - seems like it progress is really slow compared with yours on the Mare! Now I've got 2-1/2 kits on the shelf - I'm tempted to crack them open so I'll be back at the "easy" (i.e. familiar) parts of the process. But if you saw my work area you'd understand why that would be really foolhardy. I'll finish one of these before I start another (I keep telling myself that!) Are you looking forward to starting your Bluenose??? Doug
-
Thanks both of you. I'm discovering lots of things I'll benefit from going forward. Learning a bit about the tools and the material, I'm gaining new respect for wood - previously I mostly burn the stuff to keep warm or fight with 2x4's to try to get some little building hammered together. Also learning about glue - when it holds and when it doesn't and how much of mess it it makes if you use too much! Files and sandpaper solve a bunch of problems. I'm pretty sure that wood filler will be playing a bigger part in my life too! All in all I'm having fun. Doug
-
I'm here to learn patience - ommmmm - (I'll still hope for daylight soon though!) Doug
- 130 replies
-
- 1
-
-
- mare nostrum
- artesania latina
- (and 1 more)
-
Steve, Are you just going to tease us with that or are you going to let us know????? Doug
- 130 replies
-
- 1
-
-
- mare nostrum
- artesania latina
- (and 1 more)
-
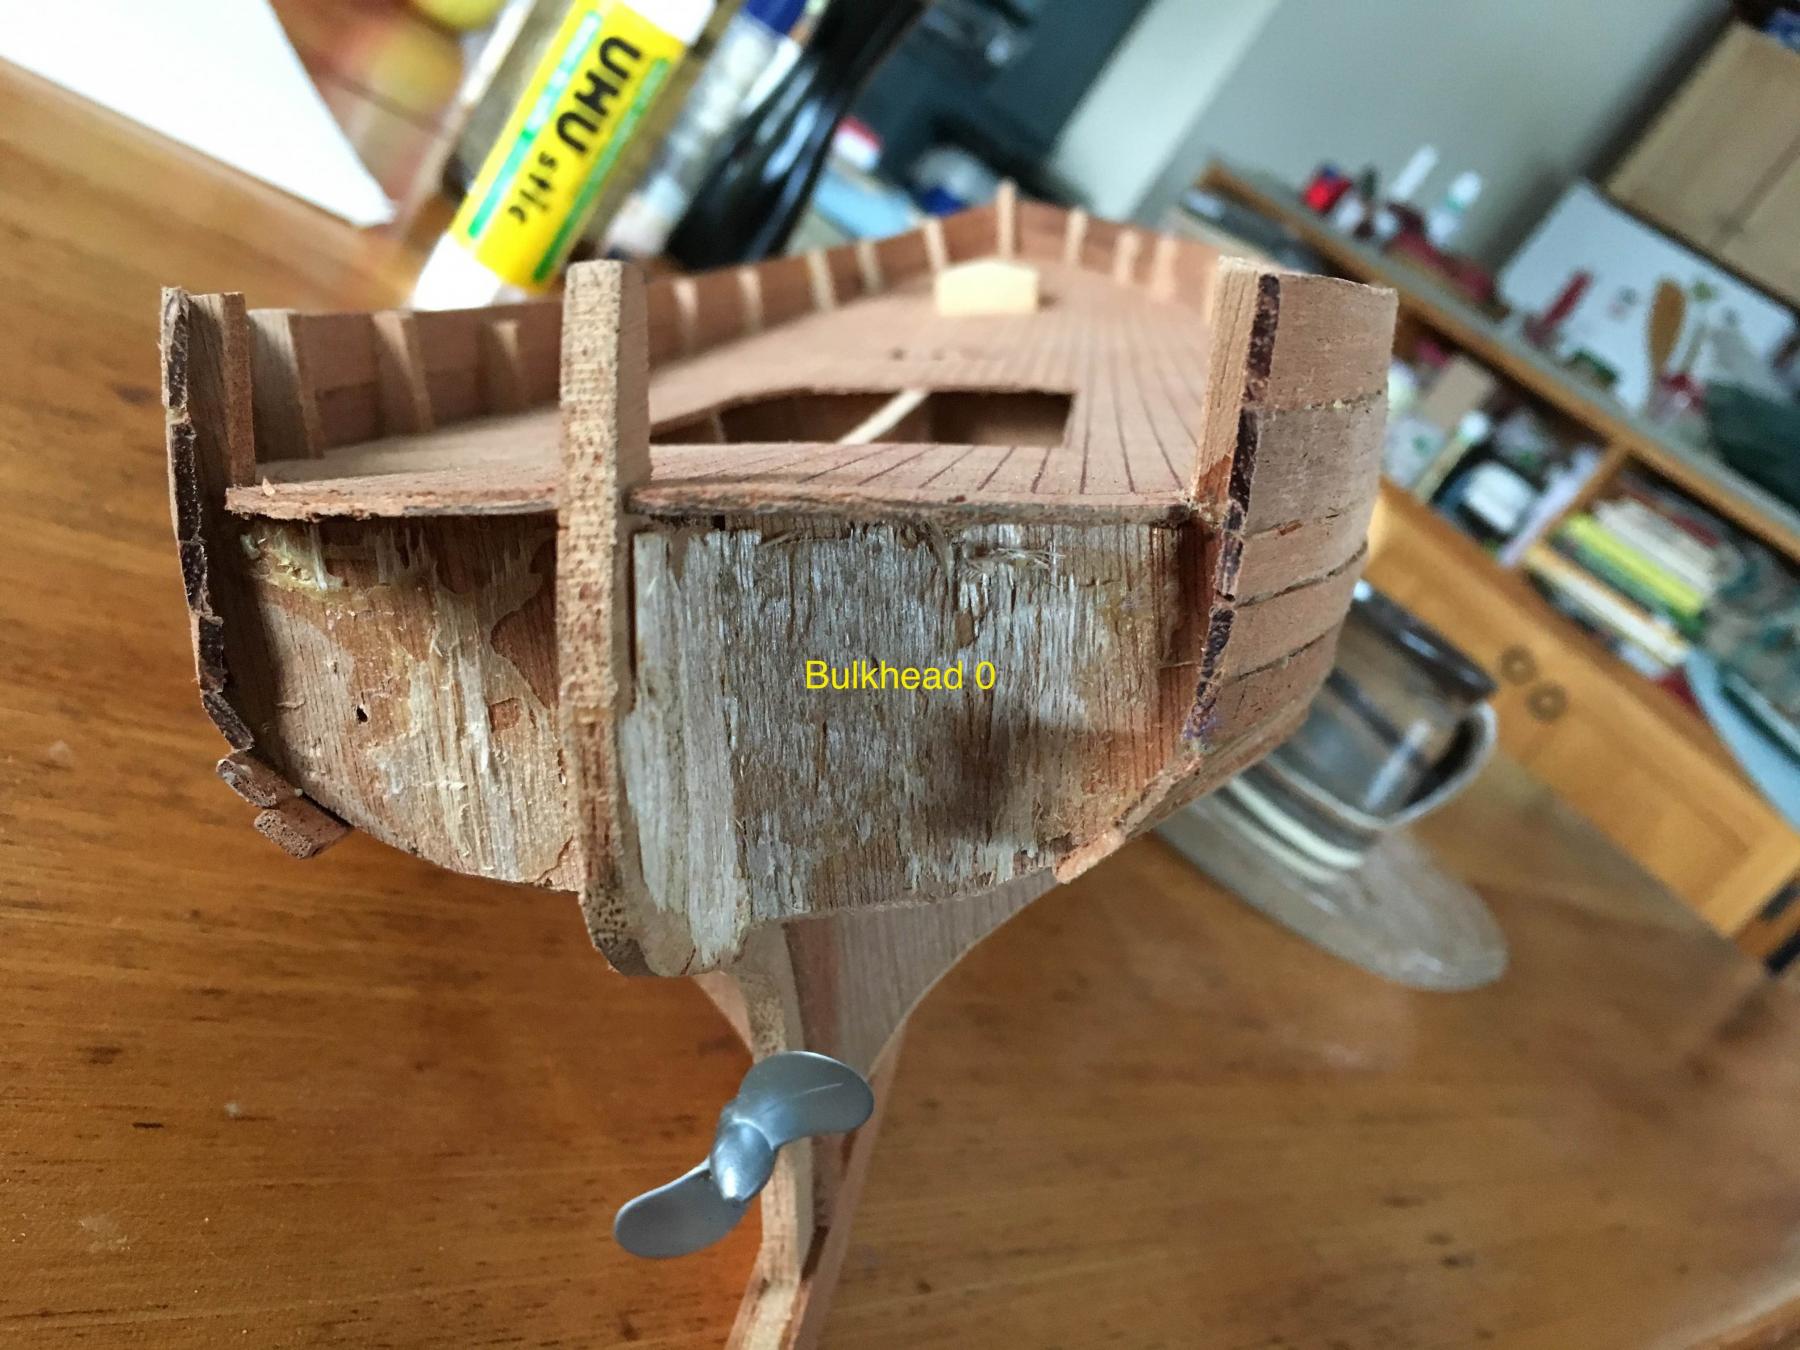
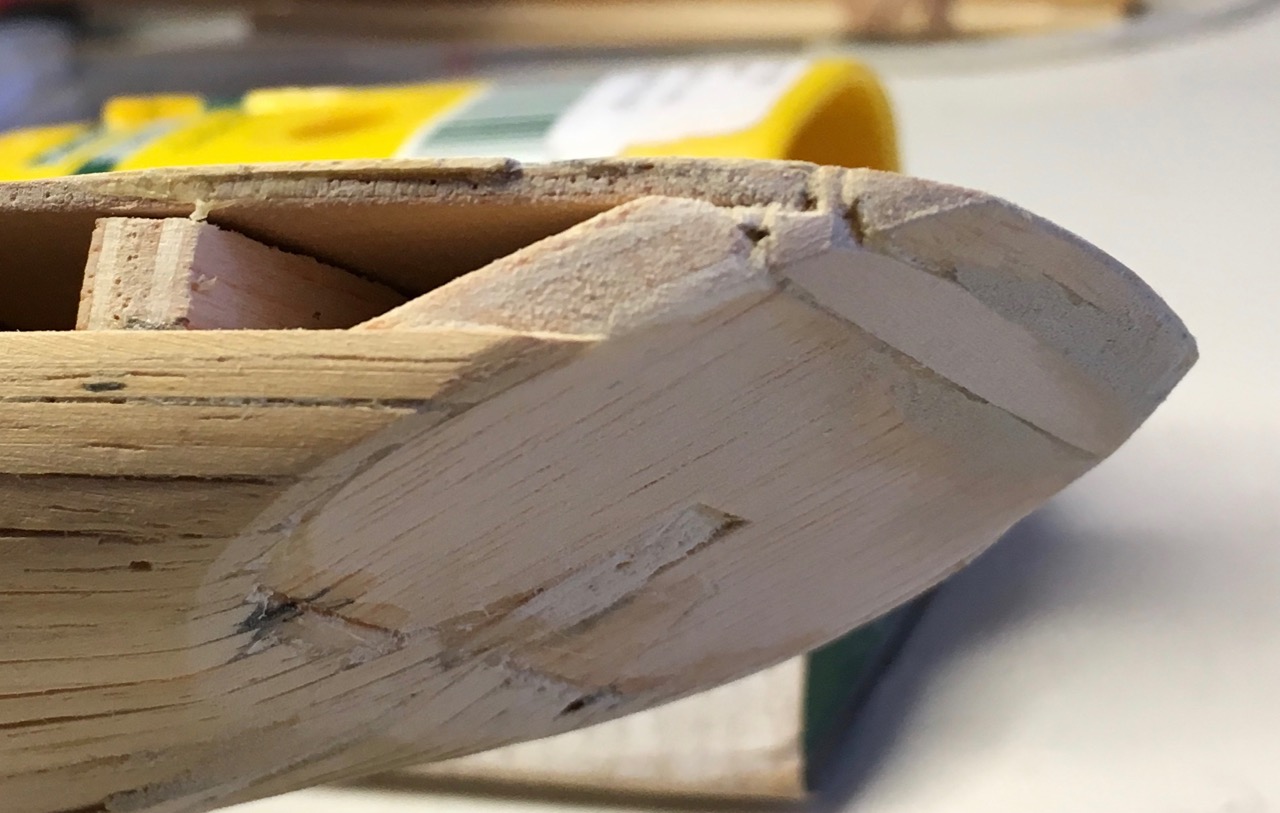
Popeye, I am using the original wood from the kit. I knew when I saw the kit offered that it wouldn't be laser cut or even punched out but I thought if I do one kit like this I'll appreciate the newer kits even more! One difference with my kit and the current Cux version (I downloaded BB instructions for reference) is in the handling of the stern. The bulkheads stop at #0. Below deck level the stern is to be formed by shaping a wooden block on each side of the stern post. are no planks that wrap around the stern below deck level. The top 2 planks (above deck) were supposed to meet at the stern post (my slip up). I'm Currently expecting to cut the stern blocks in slices and laminate them together (this decision came after I had tried to carve the blocks that were supplied with the kit - they were like little bits of concrete - slight exaggeration) I was expecting to make the top 2 stern planks a single piece from the port bulkhead around the stern post to the starboard bulkhead. Since it is above deck and visible I'll try to share the last bulkhead between the above deck hull planks and the stern planks by


-
Hello popeye, Thanks for the encouragement and the pointed to build logs. One of my early goofs was the bulwarks at the rear. When I discovered my slip-up with the stern filler blocks I thought I did't need to take any strakes around so cut the top two planks. I've been thinking of a fix - I'll try to scarf the stern plans onto the existing planks. That way both can have a good connection to the last bulkhead. The stern piece will of course have to be bent into a circle but my limited experience with plank bending has been relatively successful so far. I'll read you logs and reconsider if necessary. You have lots of experience with Billing Boats. Any reason in particular that you selected them - they had the ships you were attracted to? I'll look forward to your advice. Doug
-
Hi Pat, I'm not too worried - I was just fishing for alternatives. I'm still hopeful I'll get good at this modelling stuff. I'd be really happy to have an experience like you just described! In the meantime I'm enjoying the journey (even if I do get a bit frustrated with it occasionally). Doug
-
Nice idea. Thanks very much - I'm going to try that! Doug
-
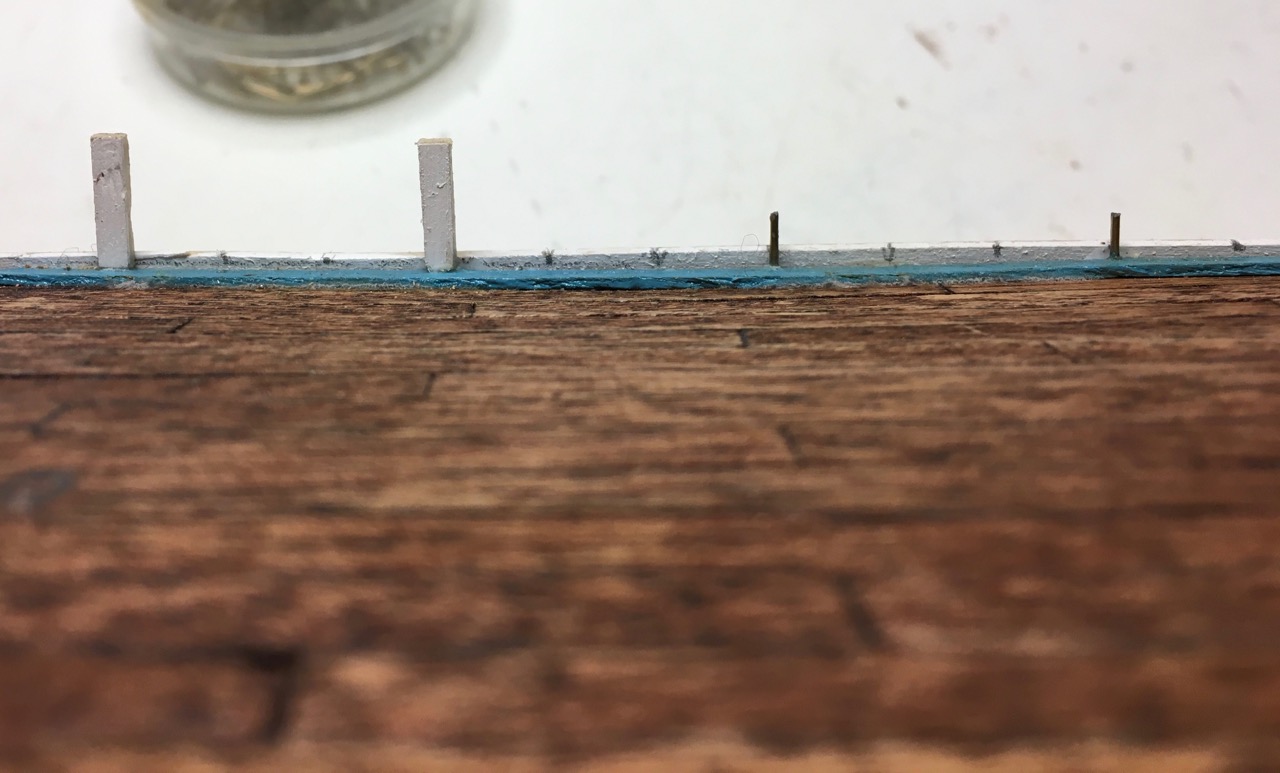
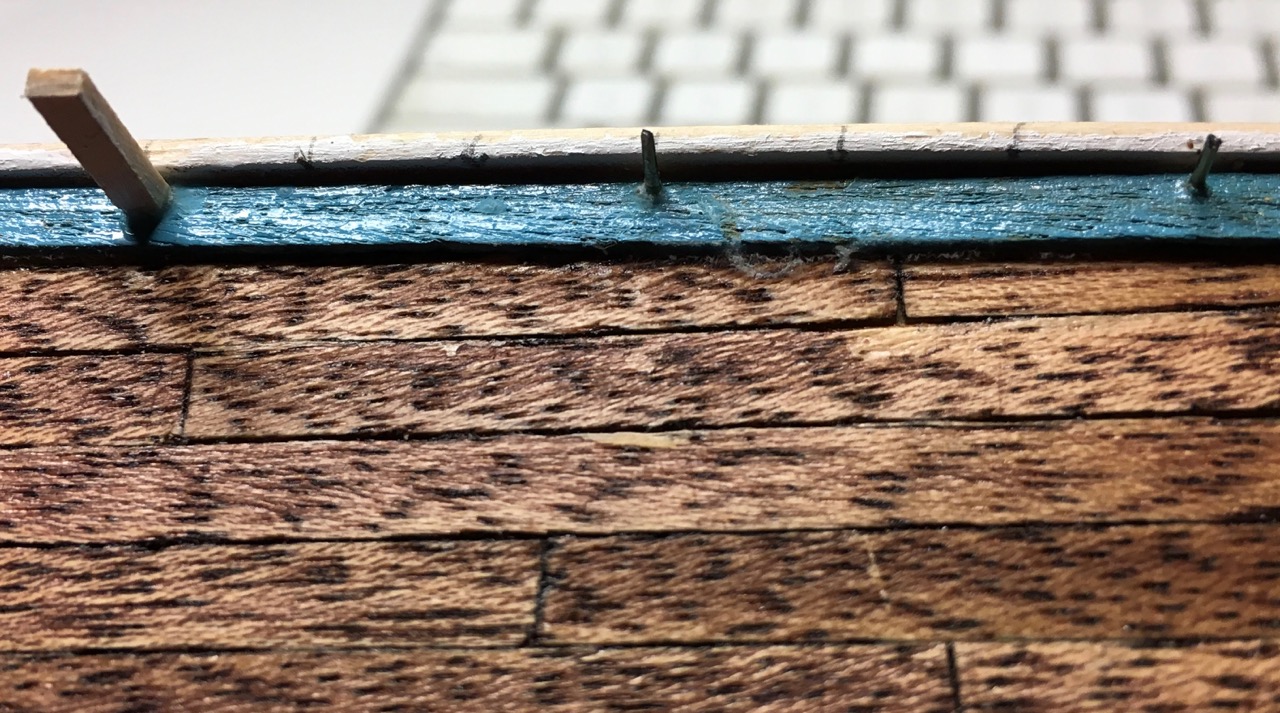
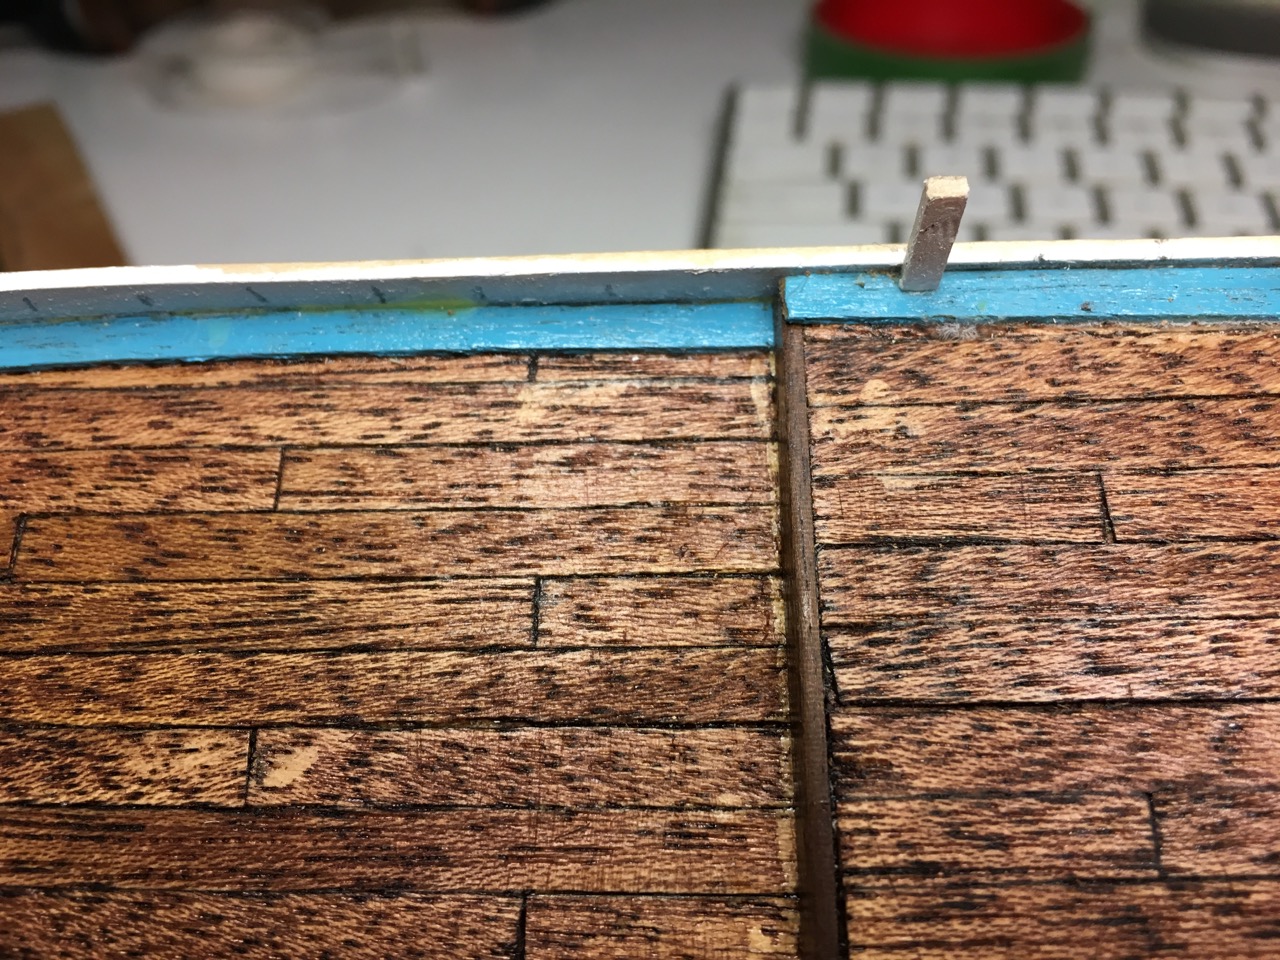
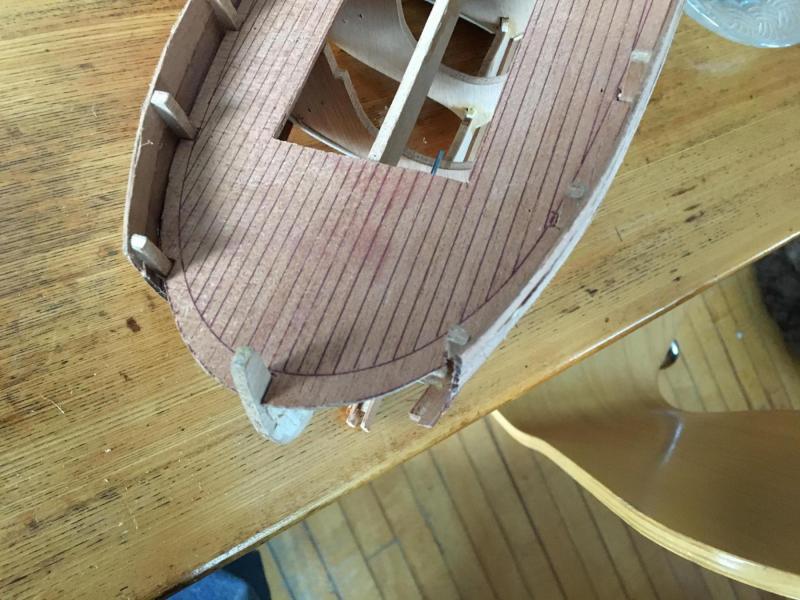
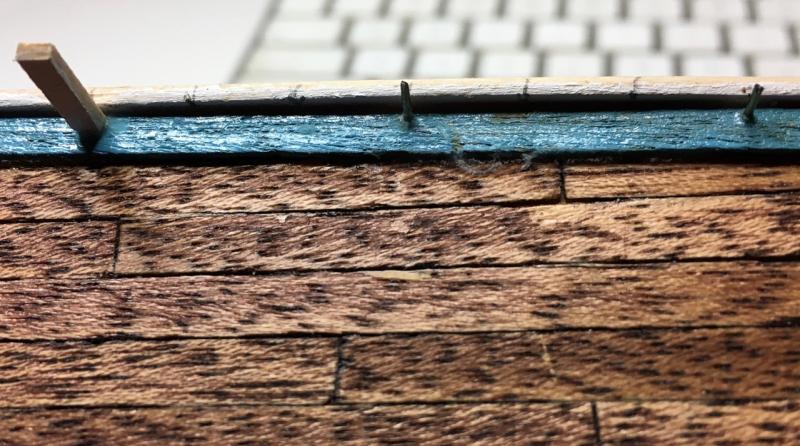
Finally back to paying some attention to this build. As mentioned earlier I'm generally intending to follow John H. Earl's suggestions for modifying the AL kit. However my 1st deviation was in the planking and waterways. Rather that install the waterways 1st and plank at the same level as suggested, I wimped out and planked first then added waterways on top (like the AL instruction suggest). John's mods to the deck involved cutting the supplied planks in half lengthwise, and laying them in a curved pattern (on the afterdeck) to more closely replicate the real ship. My attempt to split the deck planking lengthwise was less than satisfactory so I took the different path. It turns out there are consequences (one of the lessons I keep learning). In this case the consequence became evident when adding the bulwarks. John's mod replaces the supplied plywood with a spiled strip of basswood. This is required to fit the transom mod: The new bulwark is constructed from the basswood strip (about 2 planks wide) and then a stack of 1/16" square strips. There is plenty of overlap on the foredeck for attaching stanchions to the 1st bulwark stripped hence to support the stack of 1/16" strips. However there wasn't much overlap left because of the elevated waterway mention above - the consequence! In order to attach some stanchions I glued some pins into the deck, drilled holes in the bottom of the stanchions, and glued the stanchions to the deck. They provide a solid base for the rest of the bulwark. Consequence avoided!


-
Thanks. I looked at it on Amazon. I'll add it to the library wish list! Doug