


Michael G
-
Posts
47 -
Joined
-
Last visited
Content Type
Profiles
Forums
Gallery
Events
Posts posted by Michael G
-
-
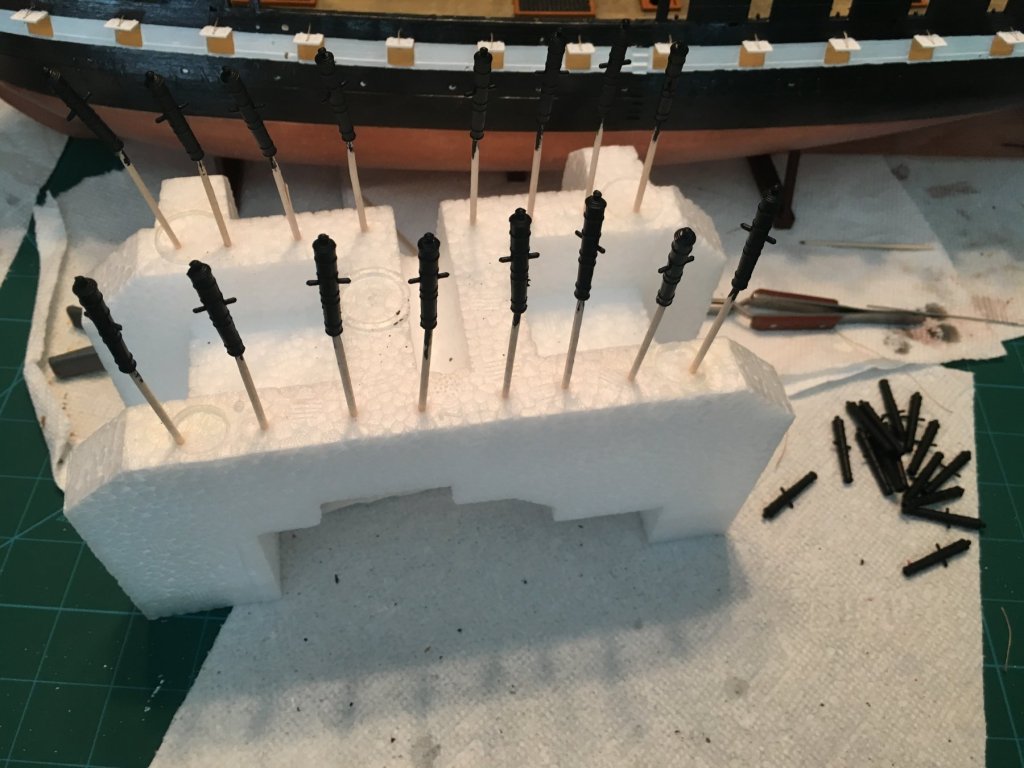
Found a "Terra Cotta" color at Michael's (can't remember the brand...not with me at the moment) that is about as close as I'll likely get for the gun carriages. I keep thinking it's too pink, but then I look at the pictures, and I've looked at the Google Maps tour (didn't realize when I saw that before that you can go to all the decks!), and they do have a pink tinge to them. I've realized after painting a couple that these are going to be tedious to boot. That smooth plastic just allows the paint to be brushed right off of it. I think I'll go over all of them still attached to the plastic molding with a couple coats of white primer, then paint them, slowly, the terra cotta color.

-
On 5/29/2017 at 7:02 AM, Alex1201 said:
I am going to leave out those 2 front cannons as well.
I am working on my deck painting as the next challenge. I like the color of yours!
Thanks. I used a 4 different browns, dark to light and did the lightest top coat mixed with water (trying to cut back on the brush strokes - may do that on the top two coats for the spar deck). I had no idea what I was doing, but I am totally pleased with how it turned out. I'm hoping the putty on the seams works out on the top deck...recreating the exact same color is unlikely, but the gun deck is barely visible at that point.
Anyway, cannons are all painted (wife did not understand why I needed to paint the black cannons black
") ). Gonna go see if I can find that burnt sienna paint for the carriages next.
). Gonna go see if I can find that burnt sienna paint for the carriages next.
- popeye the sailor, John Allen and jud
-
 3
3
-
2 minutes ago, Tallshiptragic said:
Connie gun

What do you think...a brown with a tinge of red? Maybe orange. I'm gonna toy with some color combos, but I don't have anything at the moment that resembles that 😩
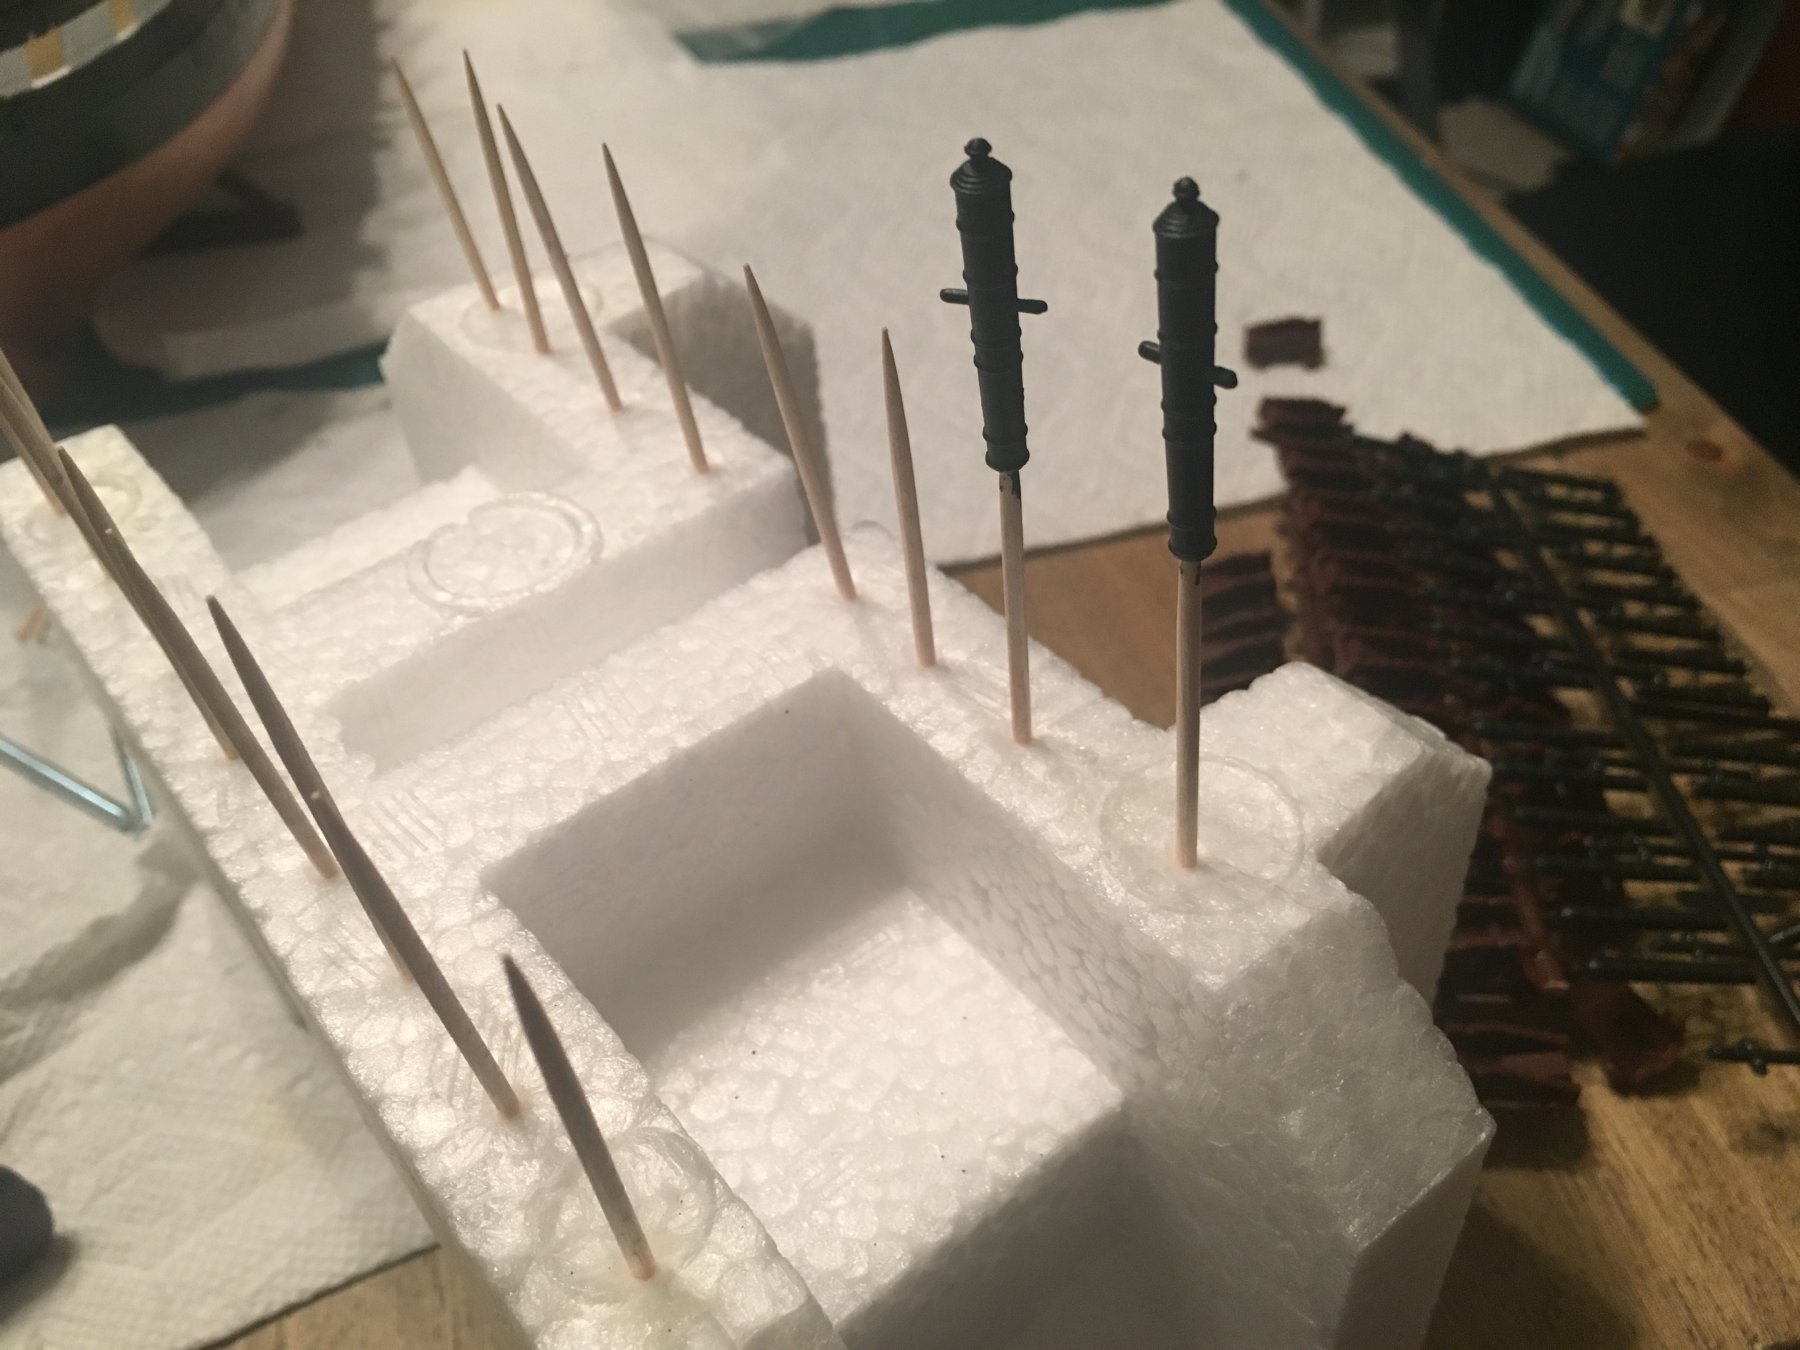
I saw another build log it were somebody said the wheels on these things looked like they were assembled by a drunk monkey, and I could not agree more! Guess I will start by shaving and trimming off all the erroneous plastic.
-
For you guys who have built this model, any tips on the color or color mix for the cannon...carriage? Is that what it's called? The base with the wheels? Anyway, I assume revell intended for the plastic to be the right color, but it doesn't look right unpainted in my opinion.
-
1 hour ago, Alex1201 said:
I have decided to leave my front ones closed. One, it makes perfect sense that under sail it would be closed. Two, I note that in the painting on the box mine came with, it is shown closed. (although there are many differences in that image like split covers painted red!) Three, I downloaded the current instructions from Revell, and the front page also shows a rendering with them closed.
Of course this was after much debating about whether to put them on at all!
For cannon color, i am testing today mixing a semi - gloss of off-black. Gloss+flat+gray. Don't know if that will work.
So many decisions! After reading all these wonderful inspiring logs, and fretting for too long about how much detail to add /change/remove, I have decided to stick to the kit instructions with minor tweaks and use all the parts supplied, even the little men and the sails. The next one (?) I would like to go crazy with handmade furled sails, adding crafted parts, etc. This first build (since an abandoned attempt in college long ago) i am going to "keep it simple."
I am going to set up my build log soon. You are ahead of me.
I hadn't noticed the closed one on the picture of the box! I'll go with that then. You just putting that cannon in an inboard position then? You'll have to let me know when you start your log.
1 hour ago, S.Coleman said:Looks absolutely stunning. Well done.
I do suppose all the masts are plastic. I have read before that the plastic masts do bend alot. Some others have replaced the plastic with wooden masts. But it's your call. Keep up the good work.
I've seen that issue with the masts. Prior to this one I built the 1/150 Revell USS United States. That was my first ship. The masts are noticeably bent. I am hoping these ones are a little sturdier, but we will see. I don't see myself going with anything beyond the out-of-the-box parts at this point. Maybe after a few more years of experience I will make an attempt at that. Some of the build logs I have seen can be rather intimidating!
Thanks all for the kind words and encouragement! I have no doubt those will come in handy when I get to some of the more difficult and frustrating steps 😄
-
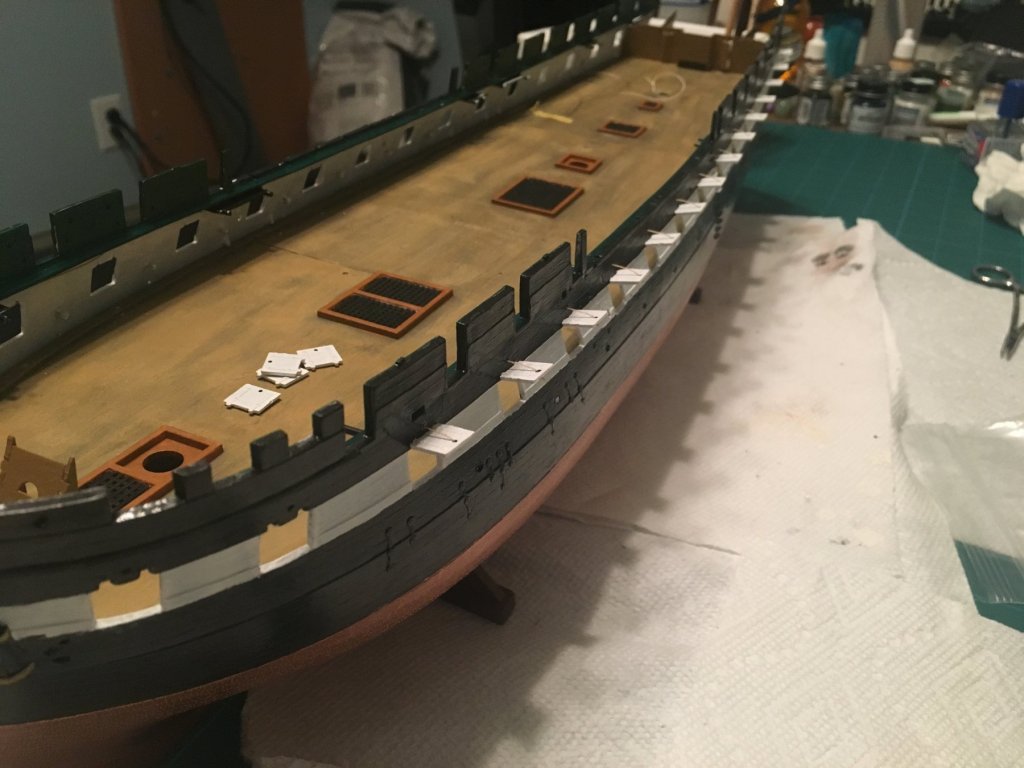
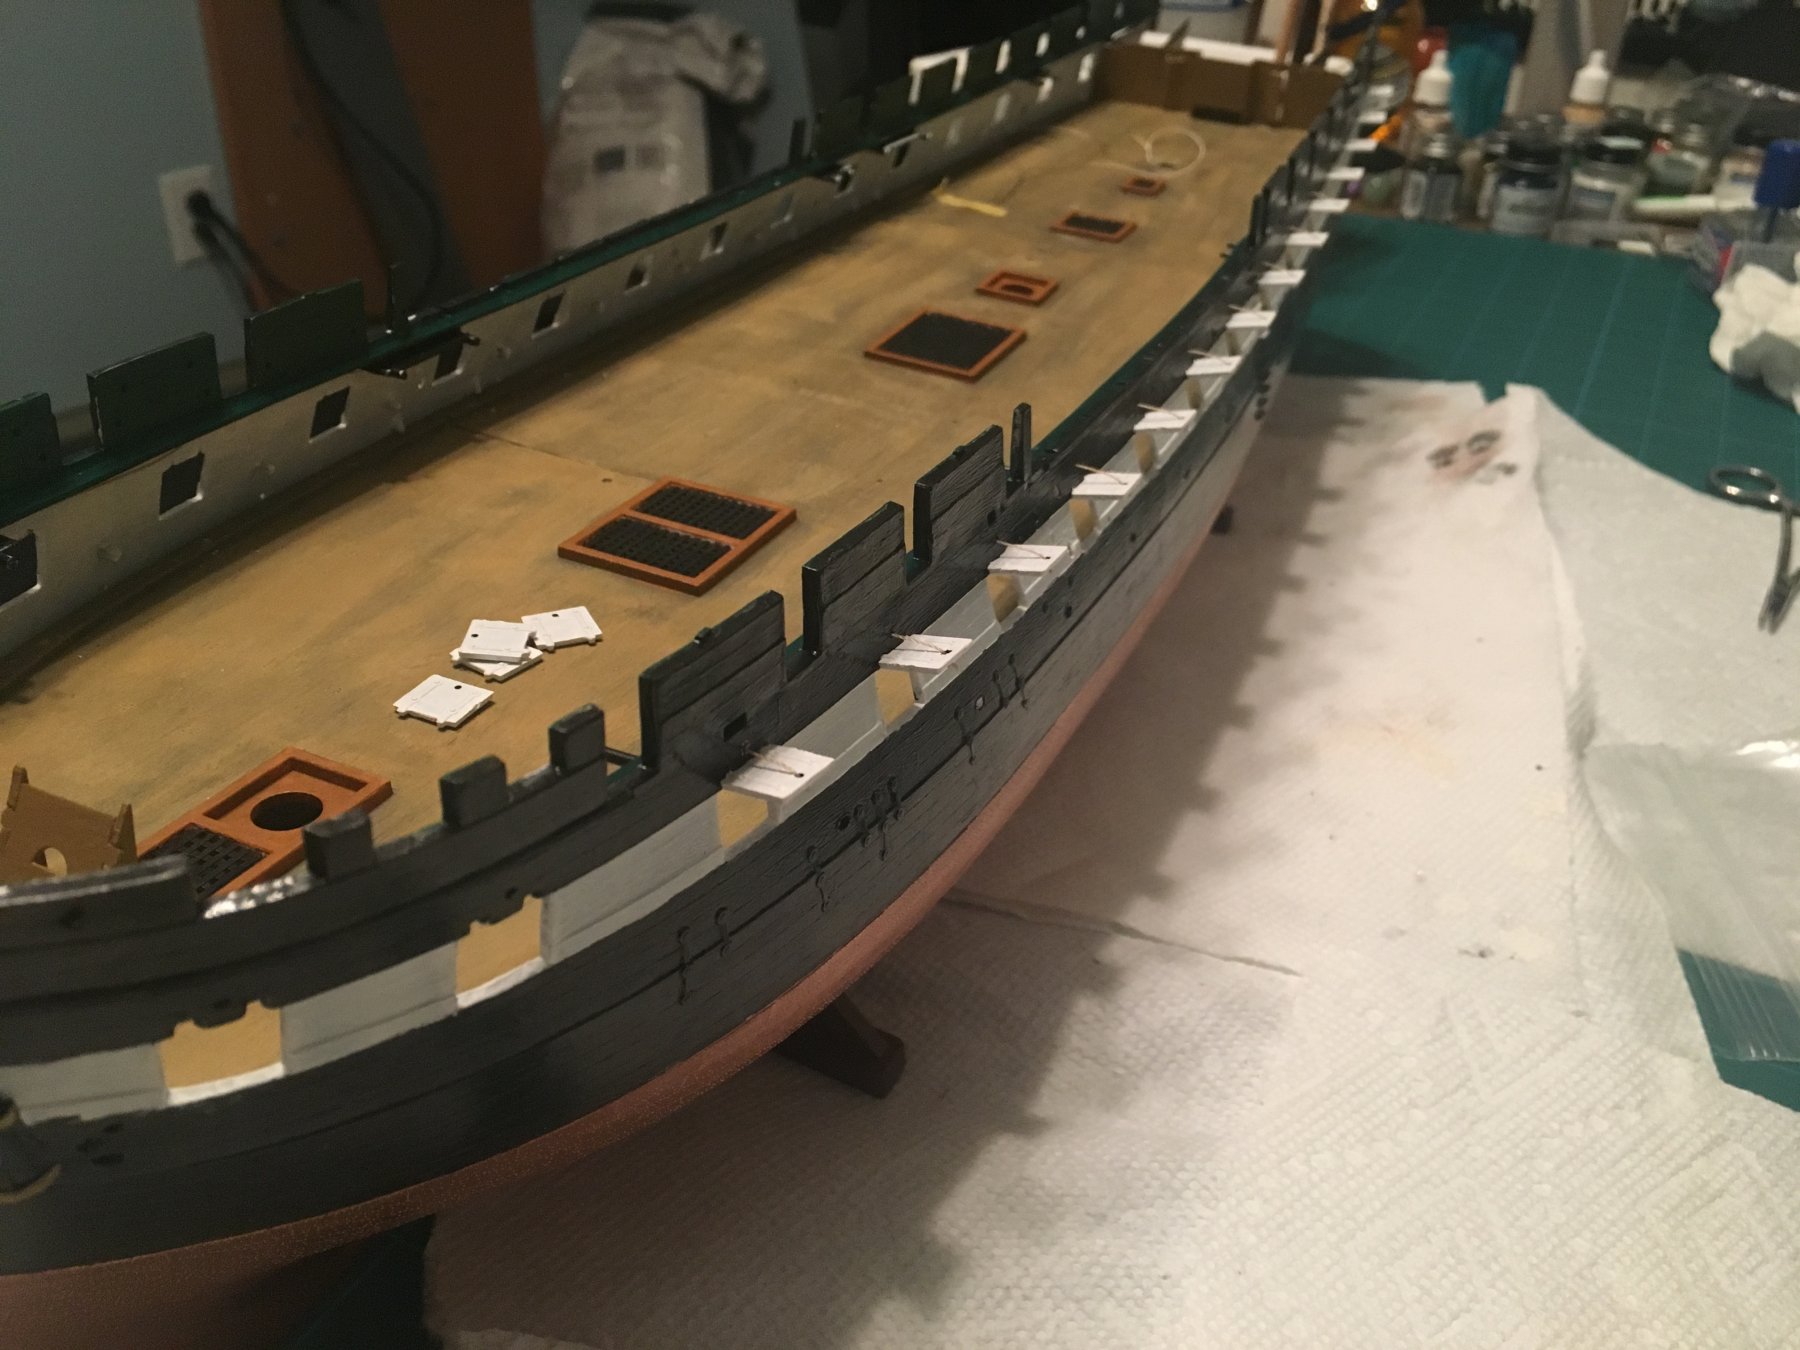
All but the 4 front gun port covers installed! I haven't decided whether or not to open or close the front ones per popeye's comment. Any other input there?
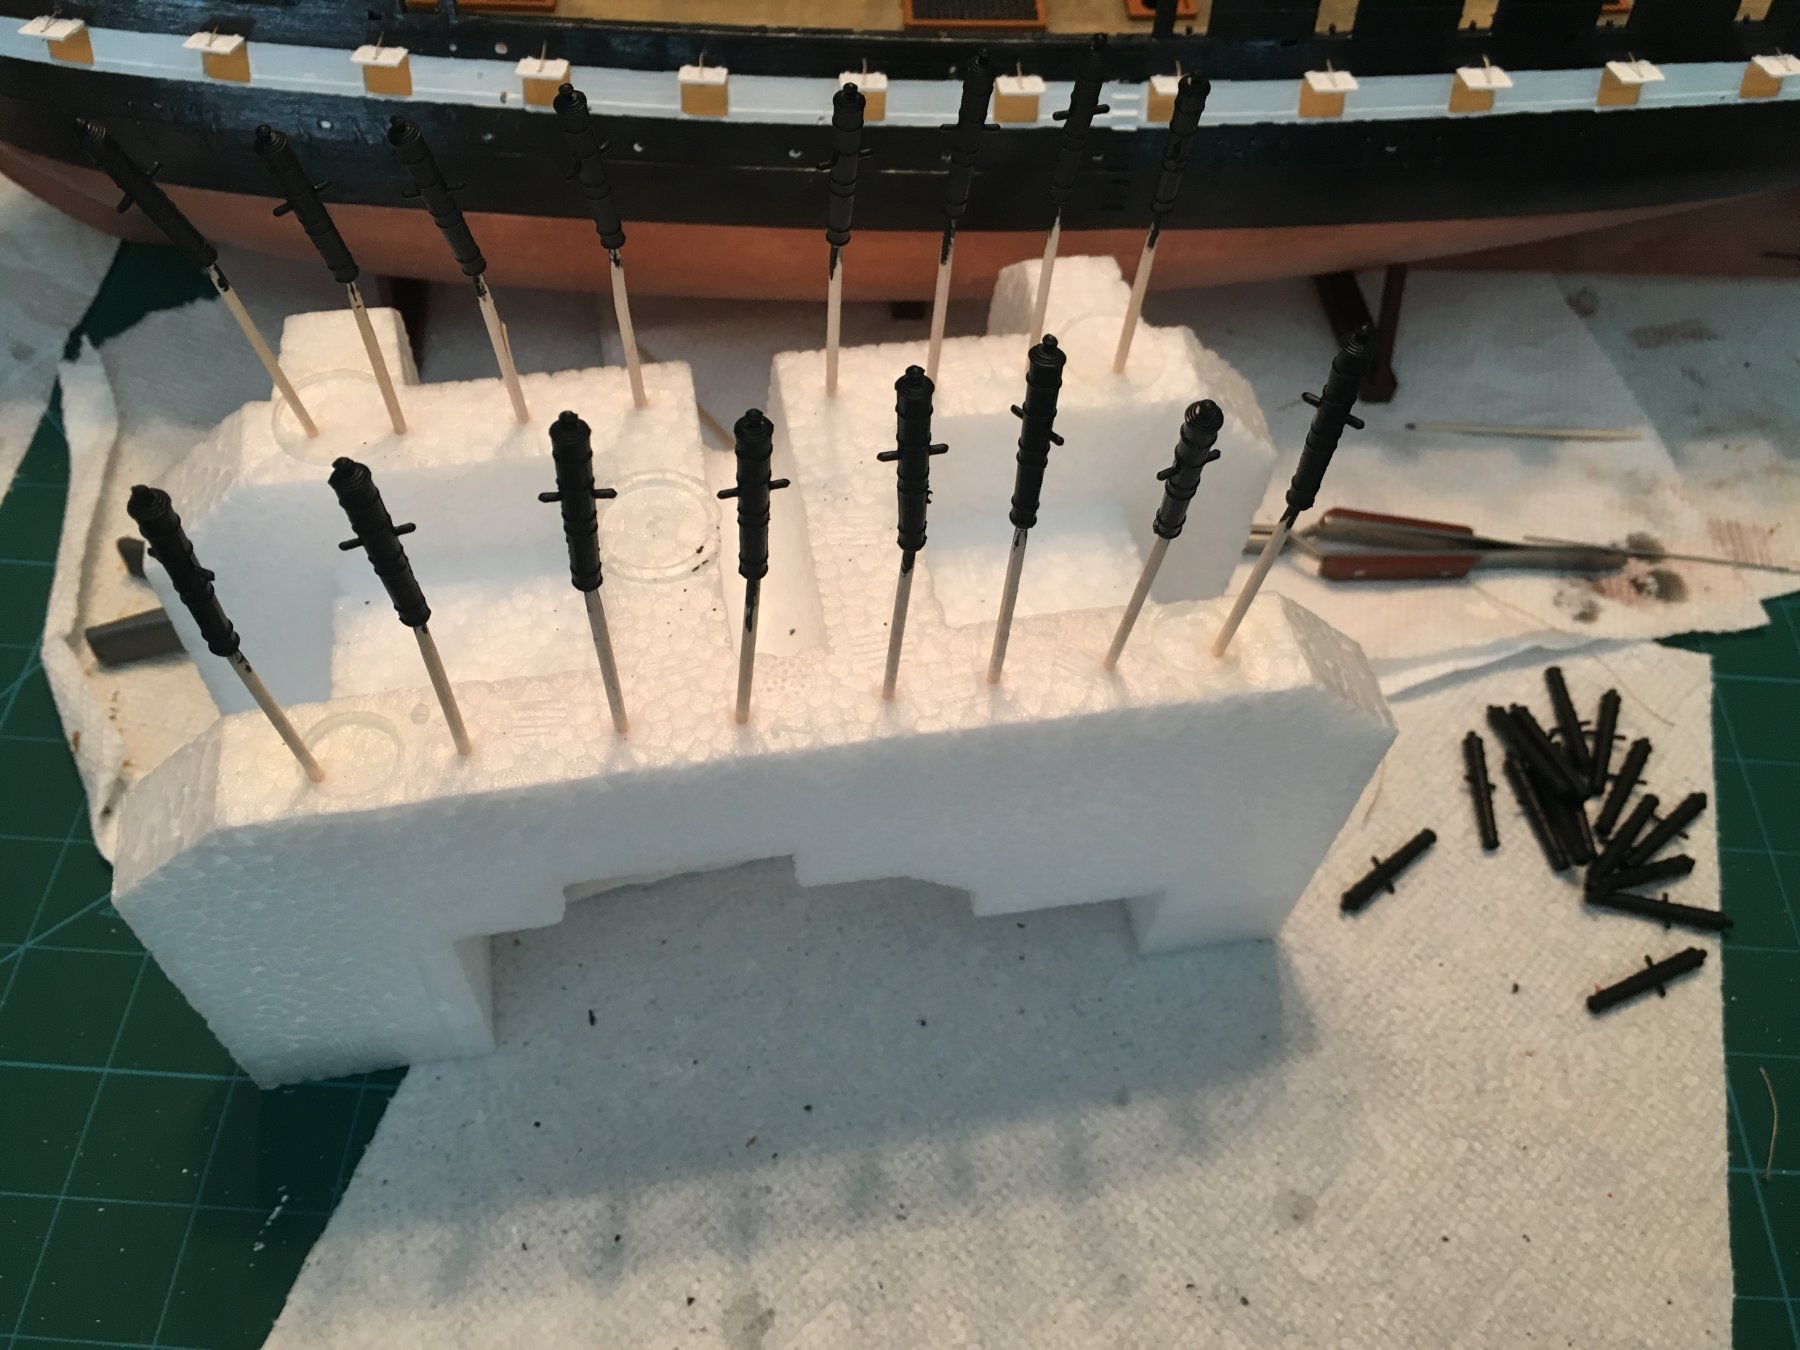
Starting on the cannons. I know it is a negligible difference, but I am painting the cannons a flat black. I think it looks better. I have seen this technique of sticking them on toothpicks and Styrofoam elsewhere. Great idea! It helps you be able to glue them together evenly and then paint them.


-
11 hours ago, popeye the sailor said:
they can be a pain. when I did my Connie and the first United states, I cemented them all in place, then did the rigging part. I don't have any pictures of the Connie.....it was for my mother. they kept it by a wood stove......................yea....you guessed it. after many repair jobs and burnt holes in the sails, it was ready for scrap. here's a picture of the United States though....it'll give you an idea of how large this model is. I have the studding sails on her too, which really adds to her width.
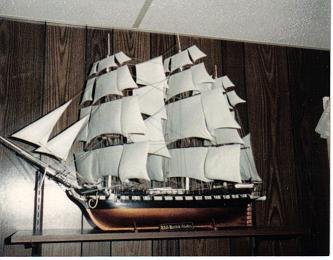
the galley quarters looks really nice........as I mentioned earlier, it's not supplied in the U.S. kit.....but I intend to put it in. don't know why.....it won't hinder anything. check out other Connie builds...there are several here on the site. you may notice {and I hope someone will chime in and confirm this} that the bridle port {the one closest to the bow stem} doesn't have a cannon in it. it can either be closed up or left without a gun port lid {I'd close it up....personal taste}. it would only be used in extreme emergency......mostly it was used as a port to access weighing in the anchor.
you'll notice in this picture......there is a cannon in it. it was built back in the 90's.......long before I came here and learned all this wonderful stuff!
") I'm a land lubber......what did I know!
I'm a land lubber......what did I know! 
Thanks for that info. Your old ship looks great, makes me excited to finish this sucker! I will check that out and possibly leave a couple of those ports closed. I'm glad I started from the back!
-
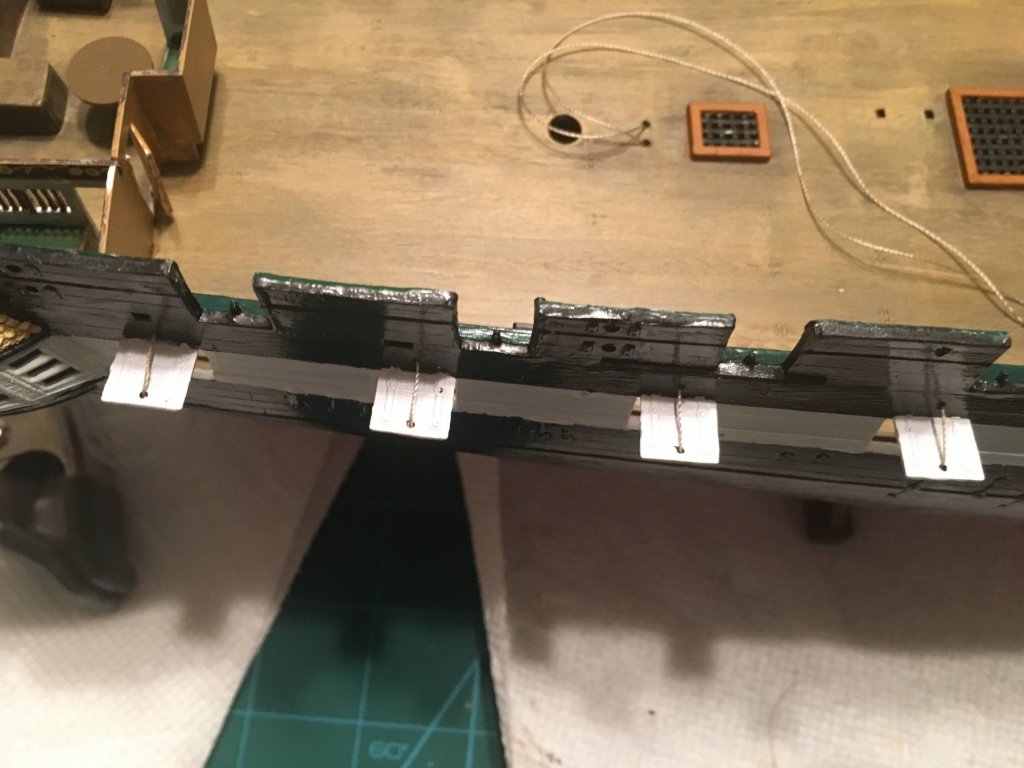
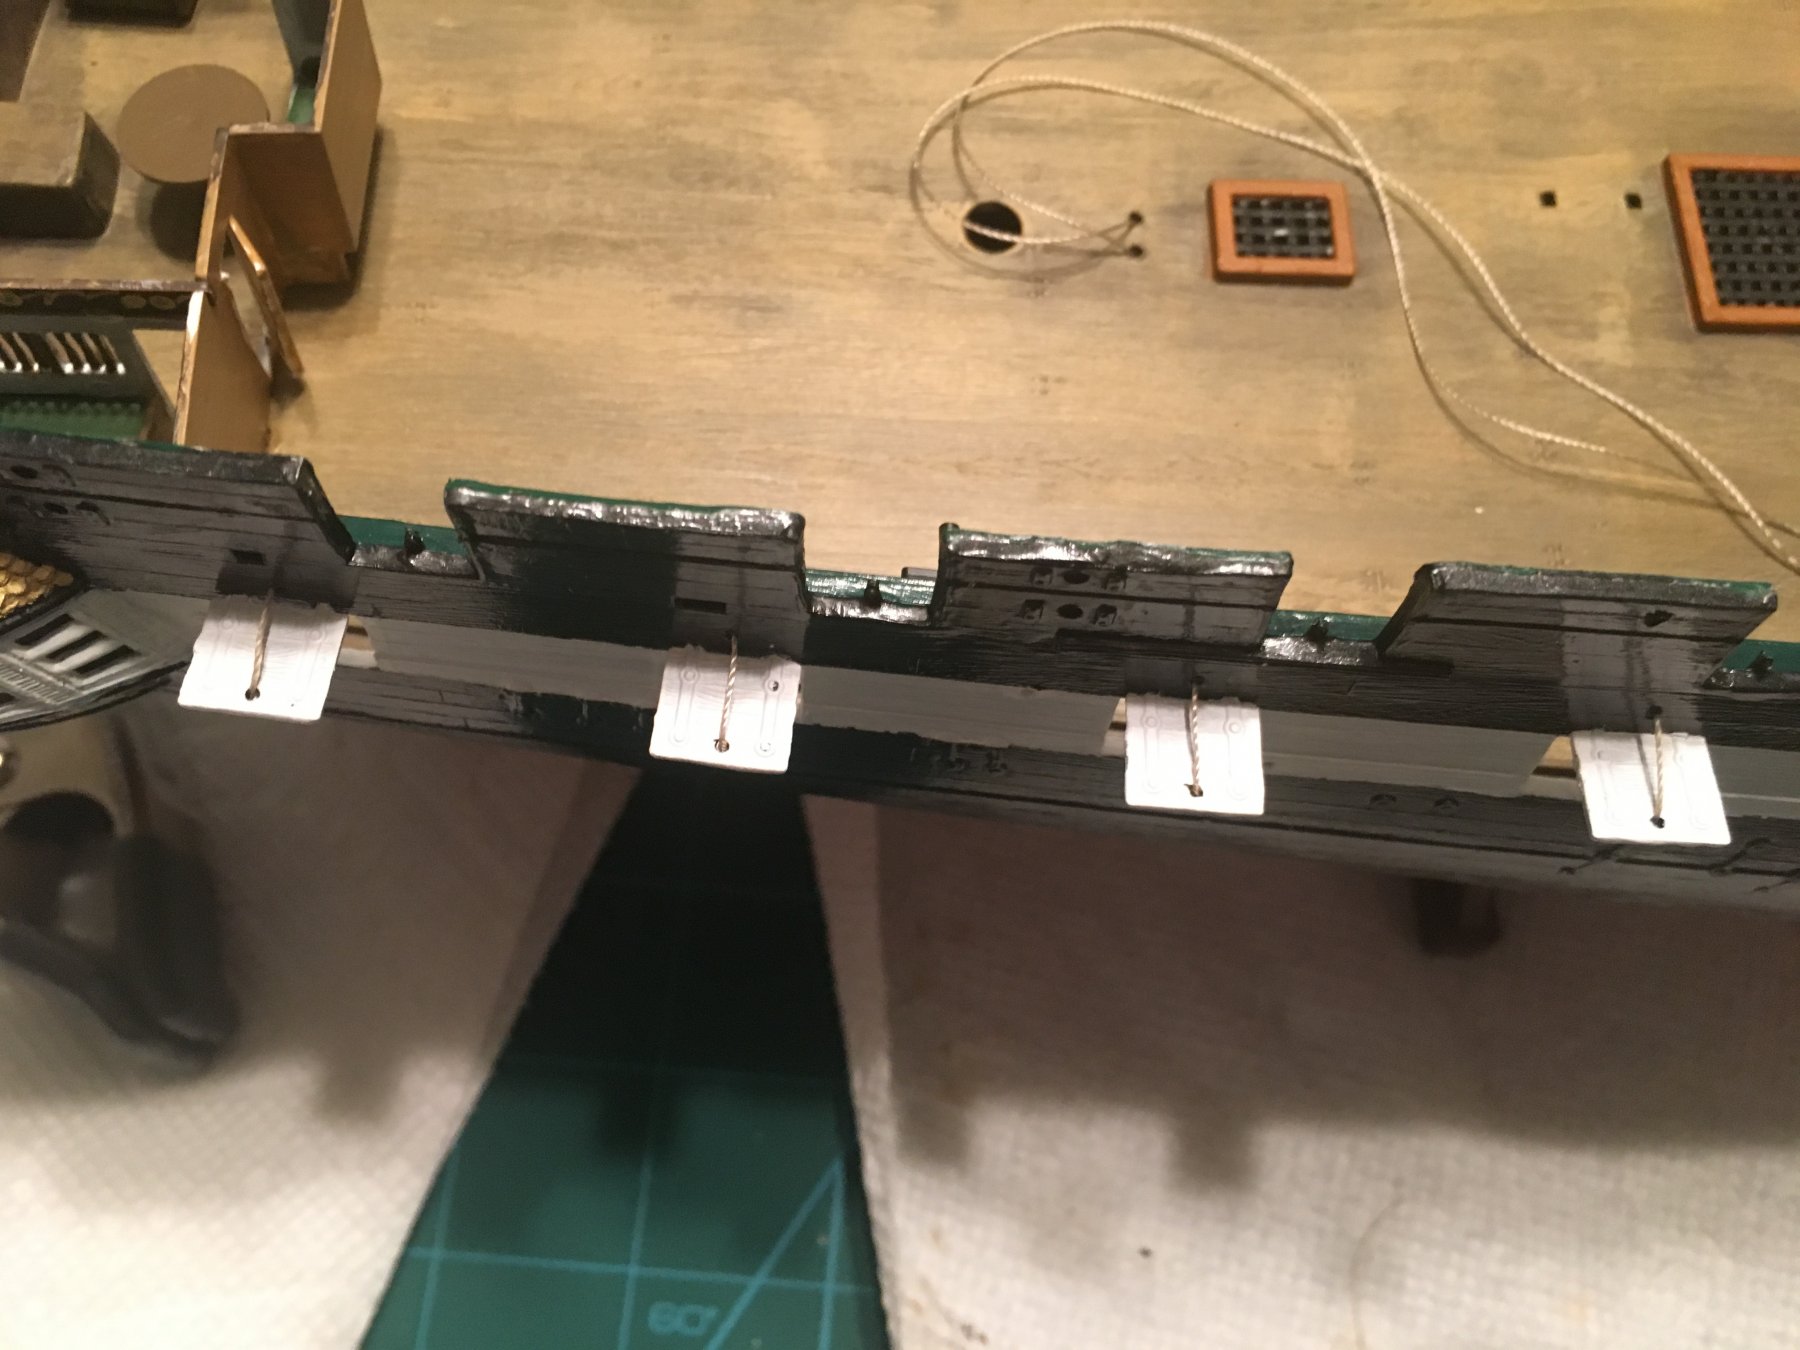
Damn...these gun port covers. Don't underestimate them! About an hour and fifteen minutes got me 4 installed covers. I do think the pace will pick up a bit, but this is slow going for sure! I am probably being a bit overly anal and picky, but I want this thing to look good.


-
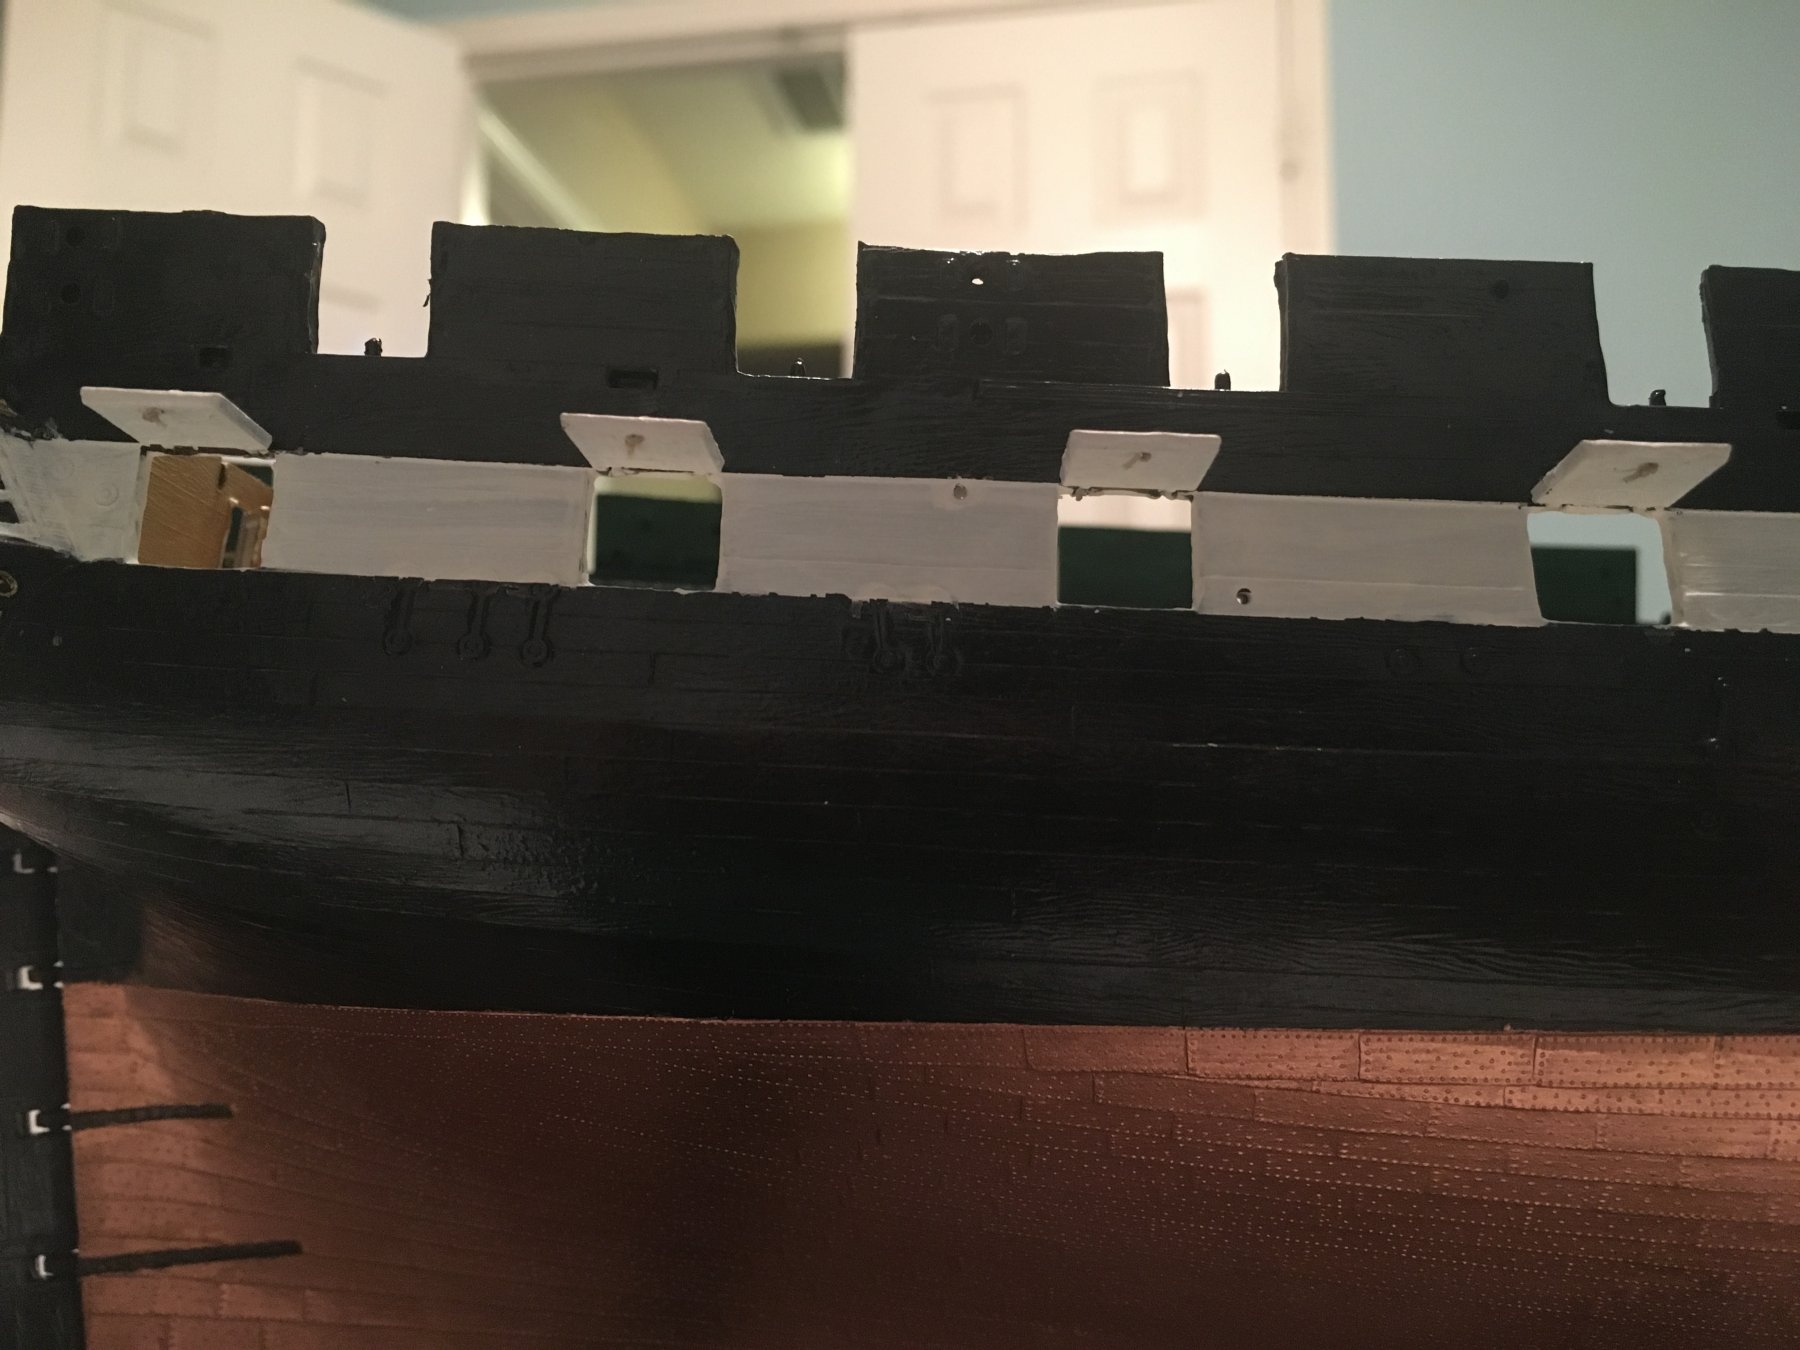
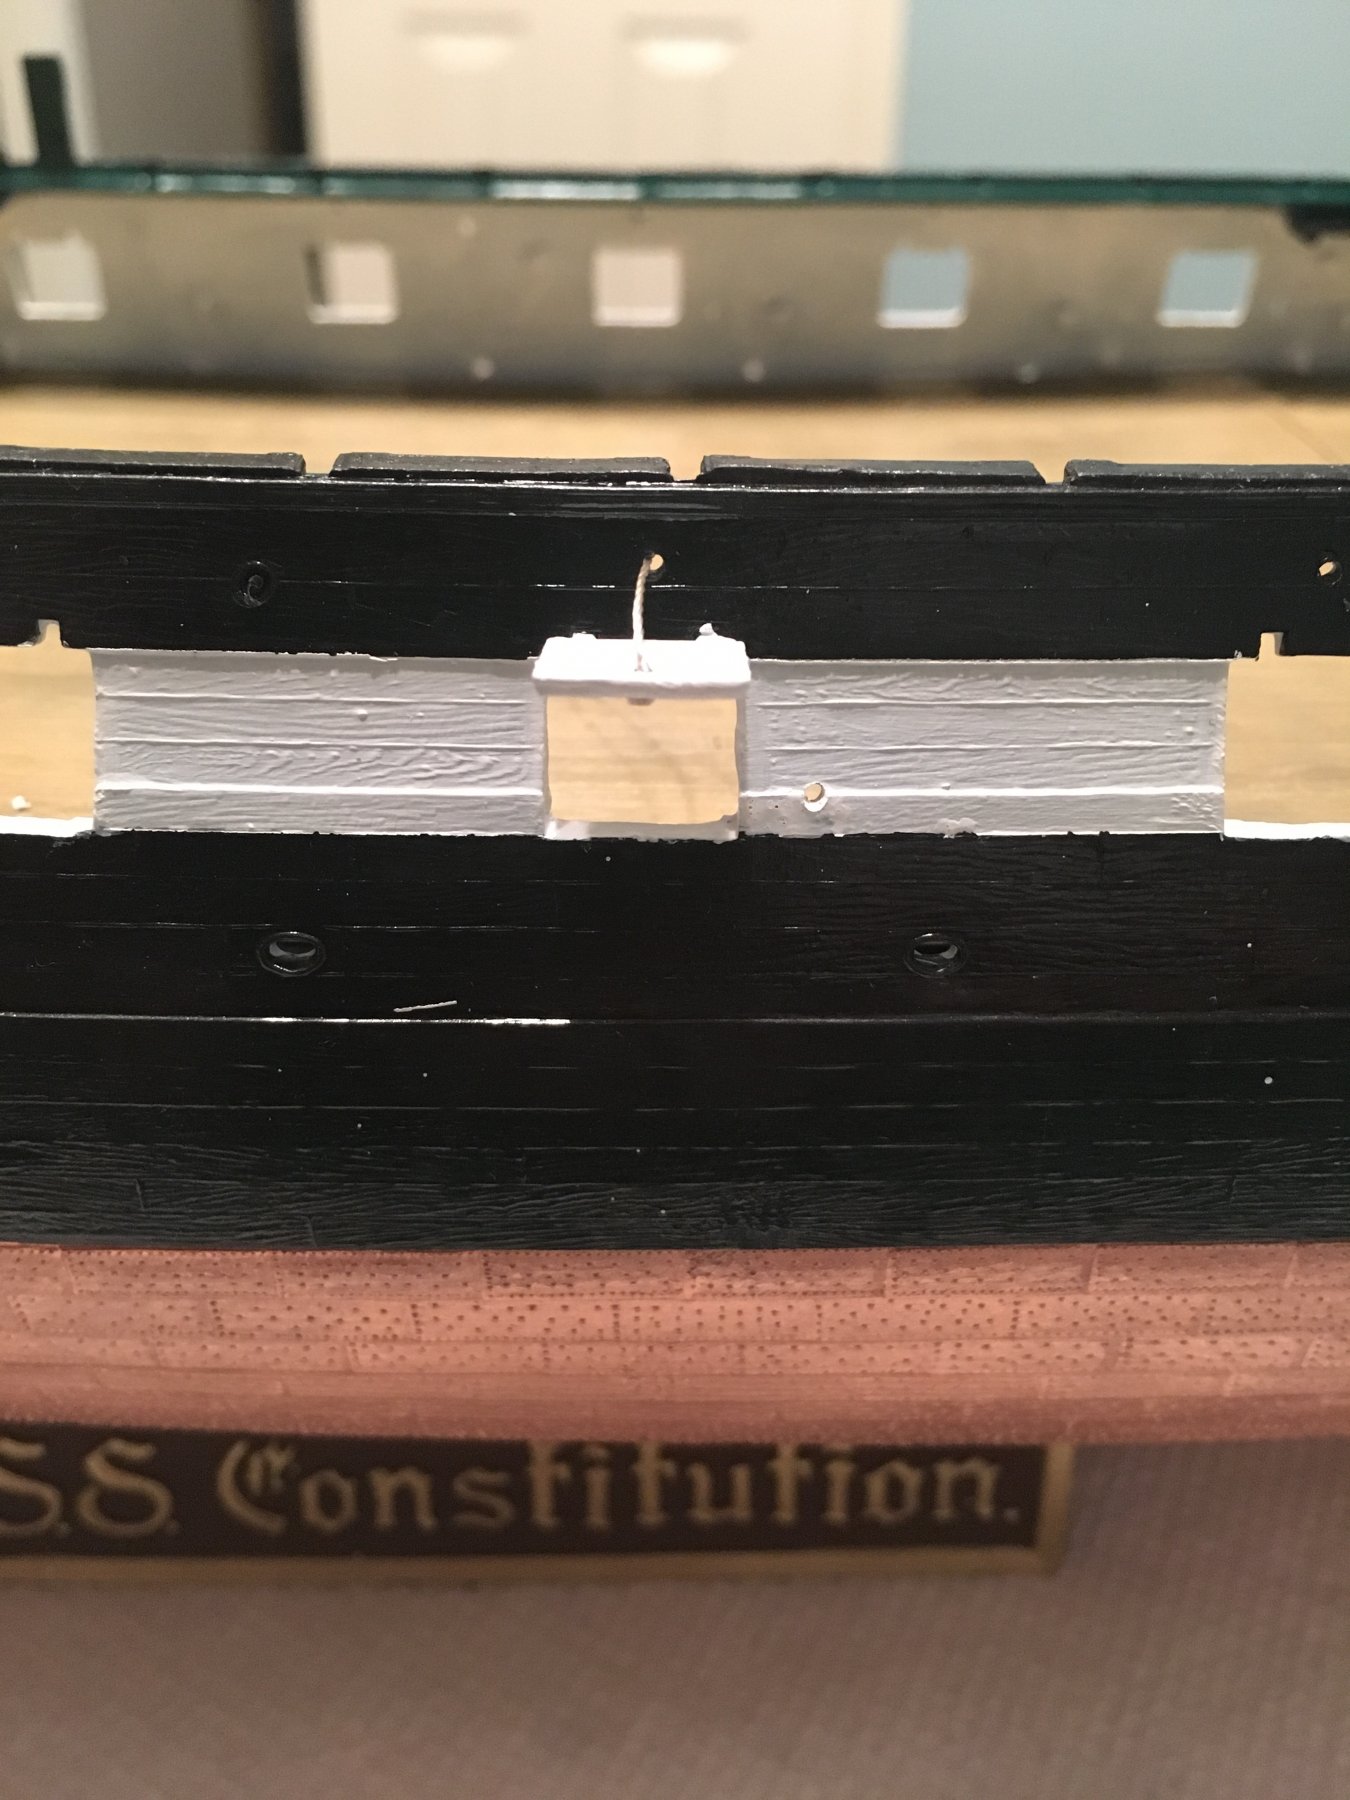
Progress slow the past few days. Painted and repainted and repainted the gun port covers, had to hit the inside of the port holes with some white paint a couple times, and now ready to put them on. Going with open and ready position.
Anybody who's done this build knows that the hinge nubs don't quite fit on just about any of them. So there will be a lot of tiny edge shaving and paint touch up I think. I tested one here but haven't fully tied or glued it yet.


- jud and popeye the sailor
-
2
-
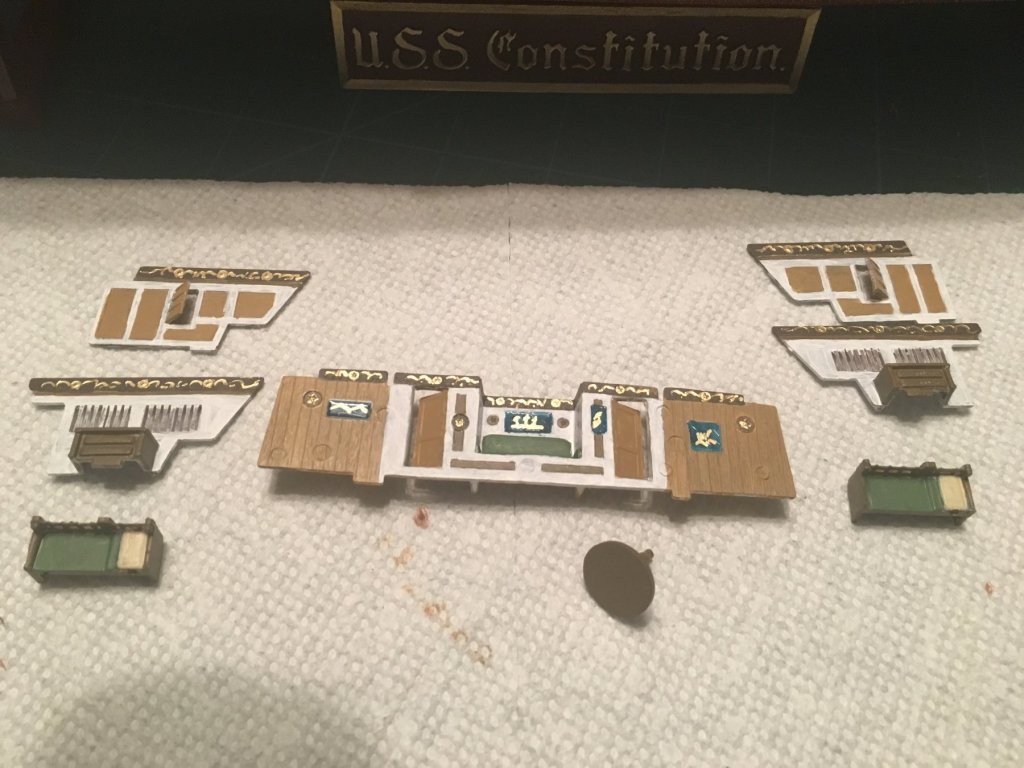
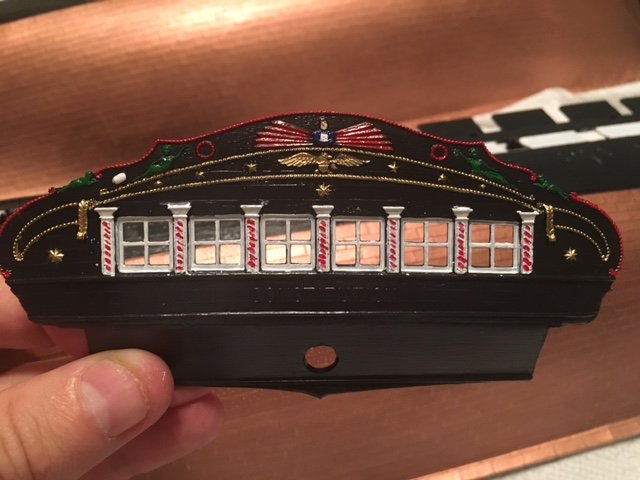
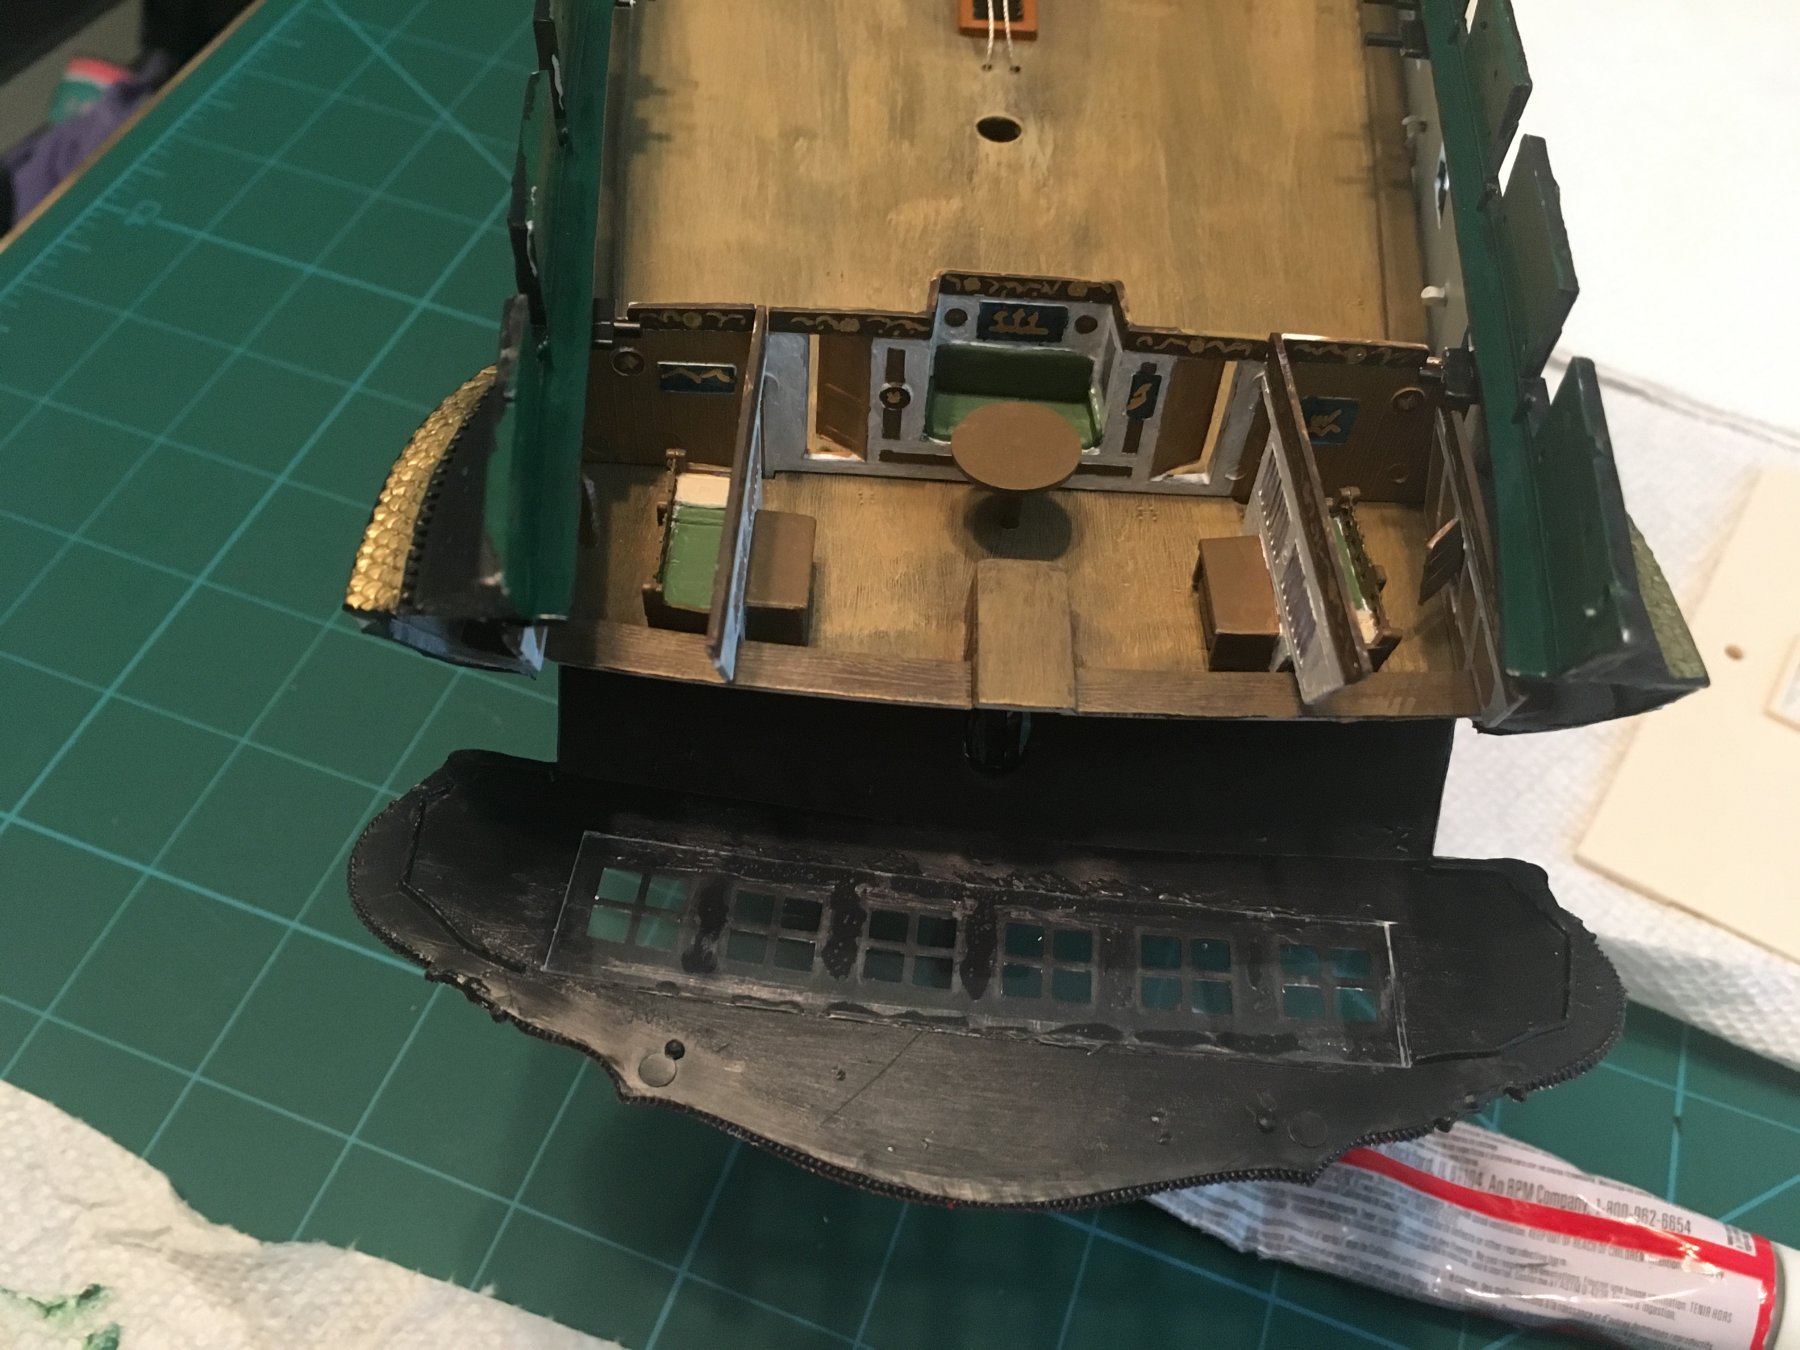
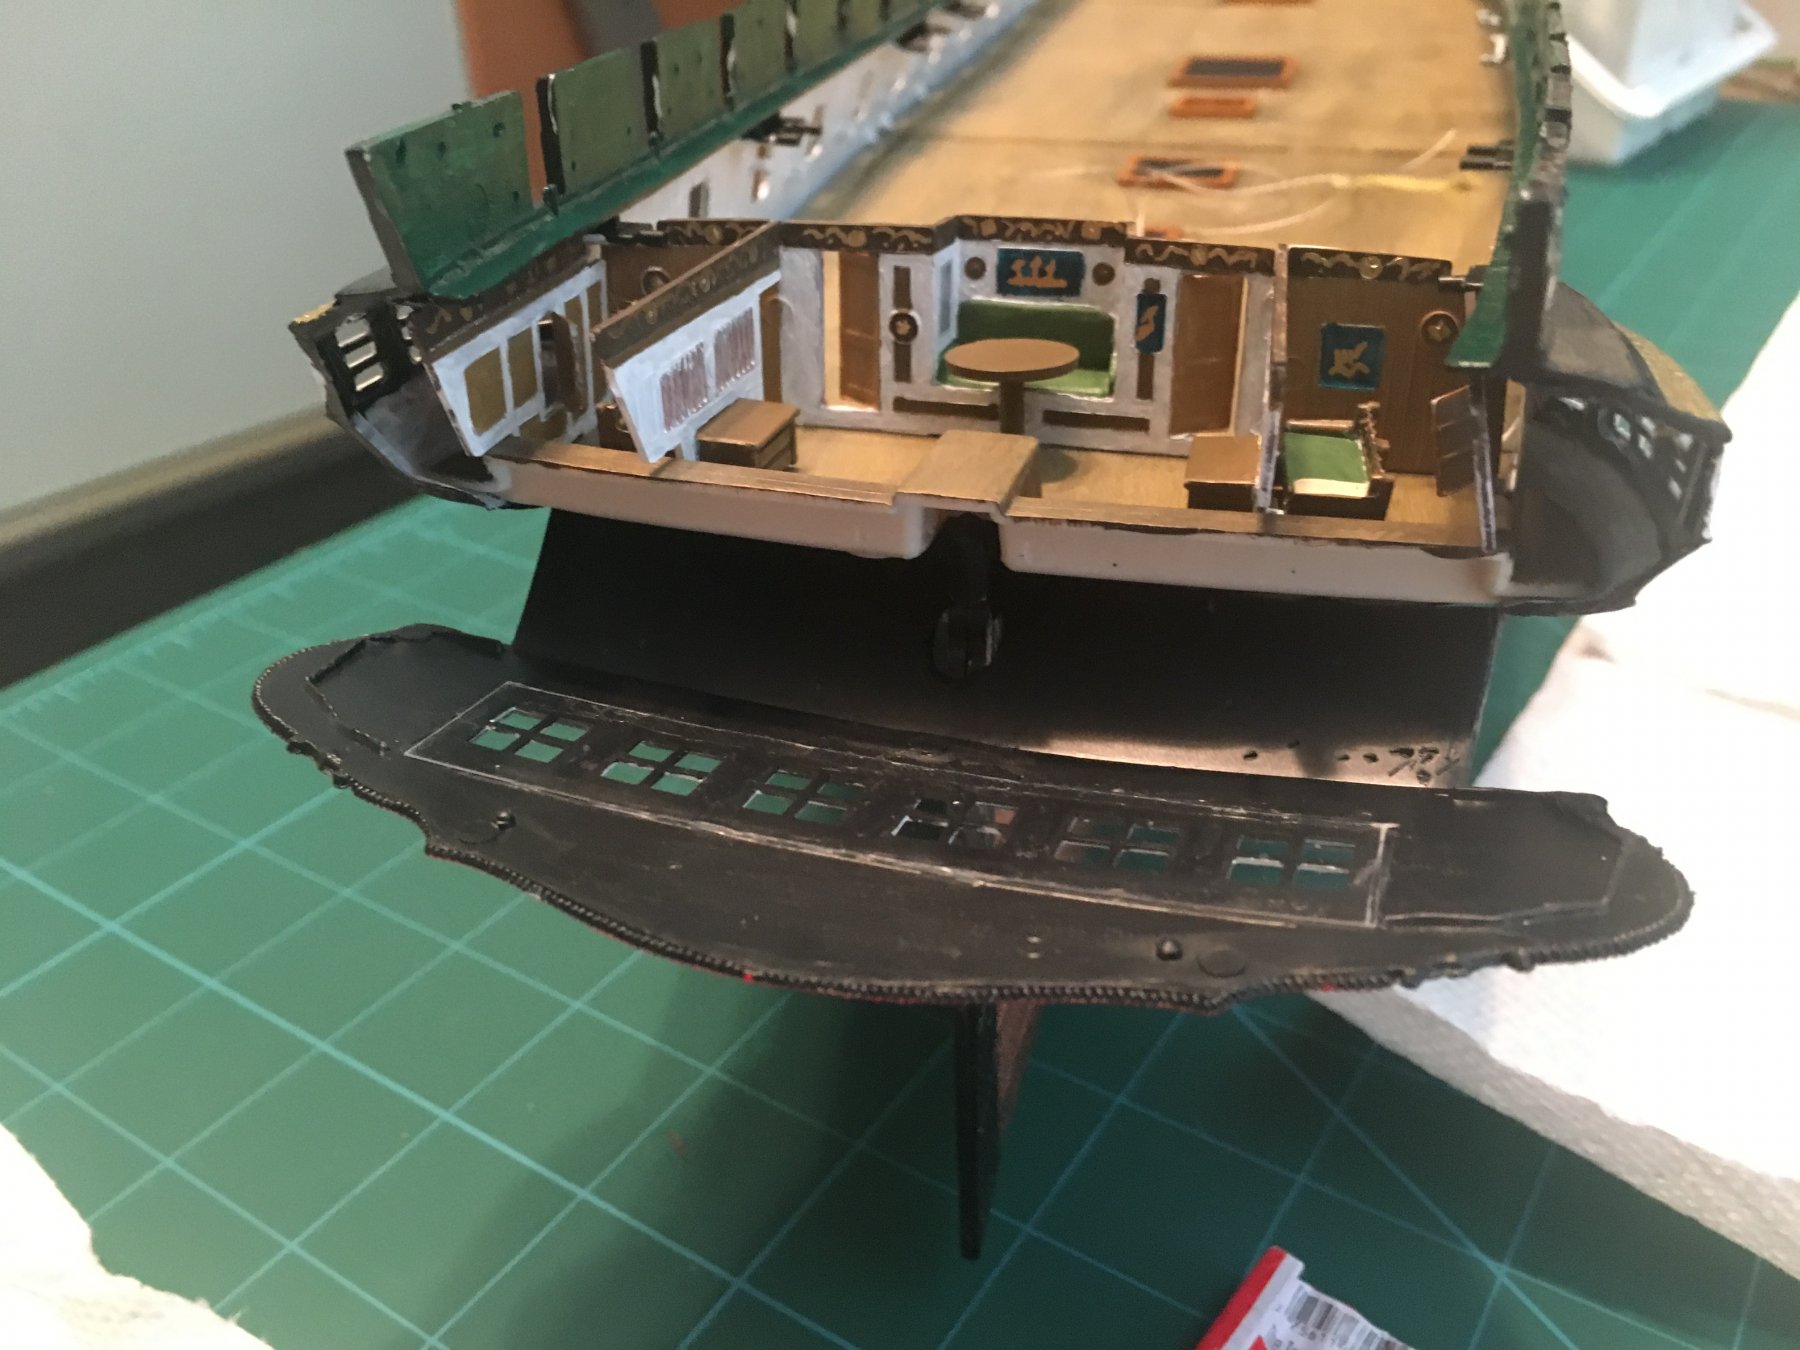
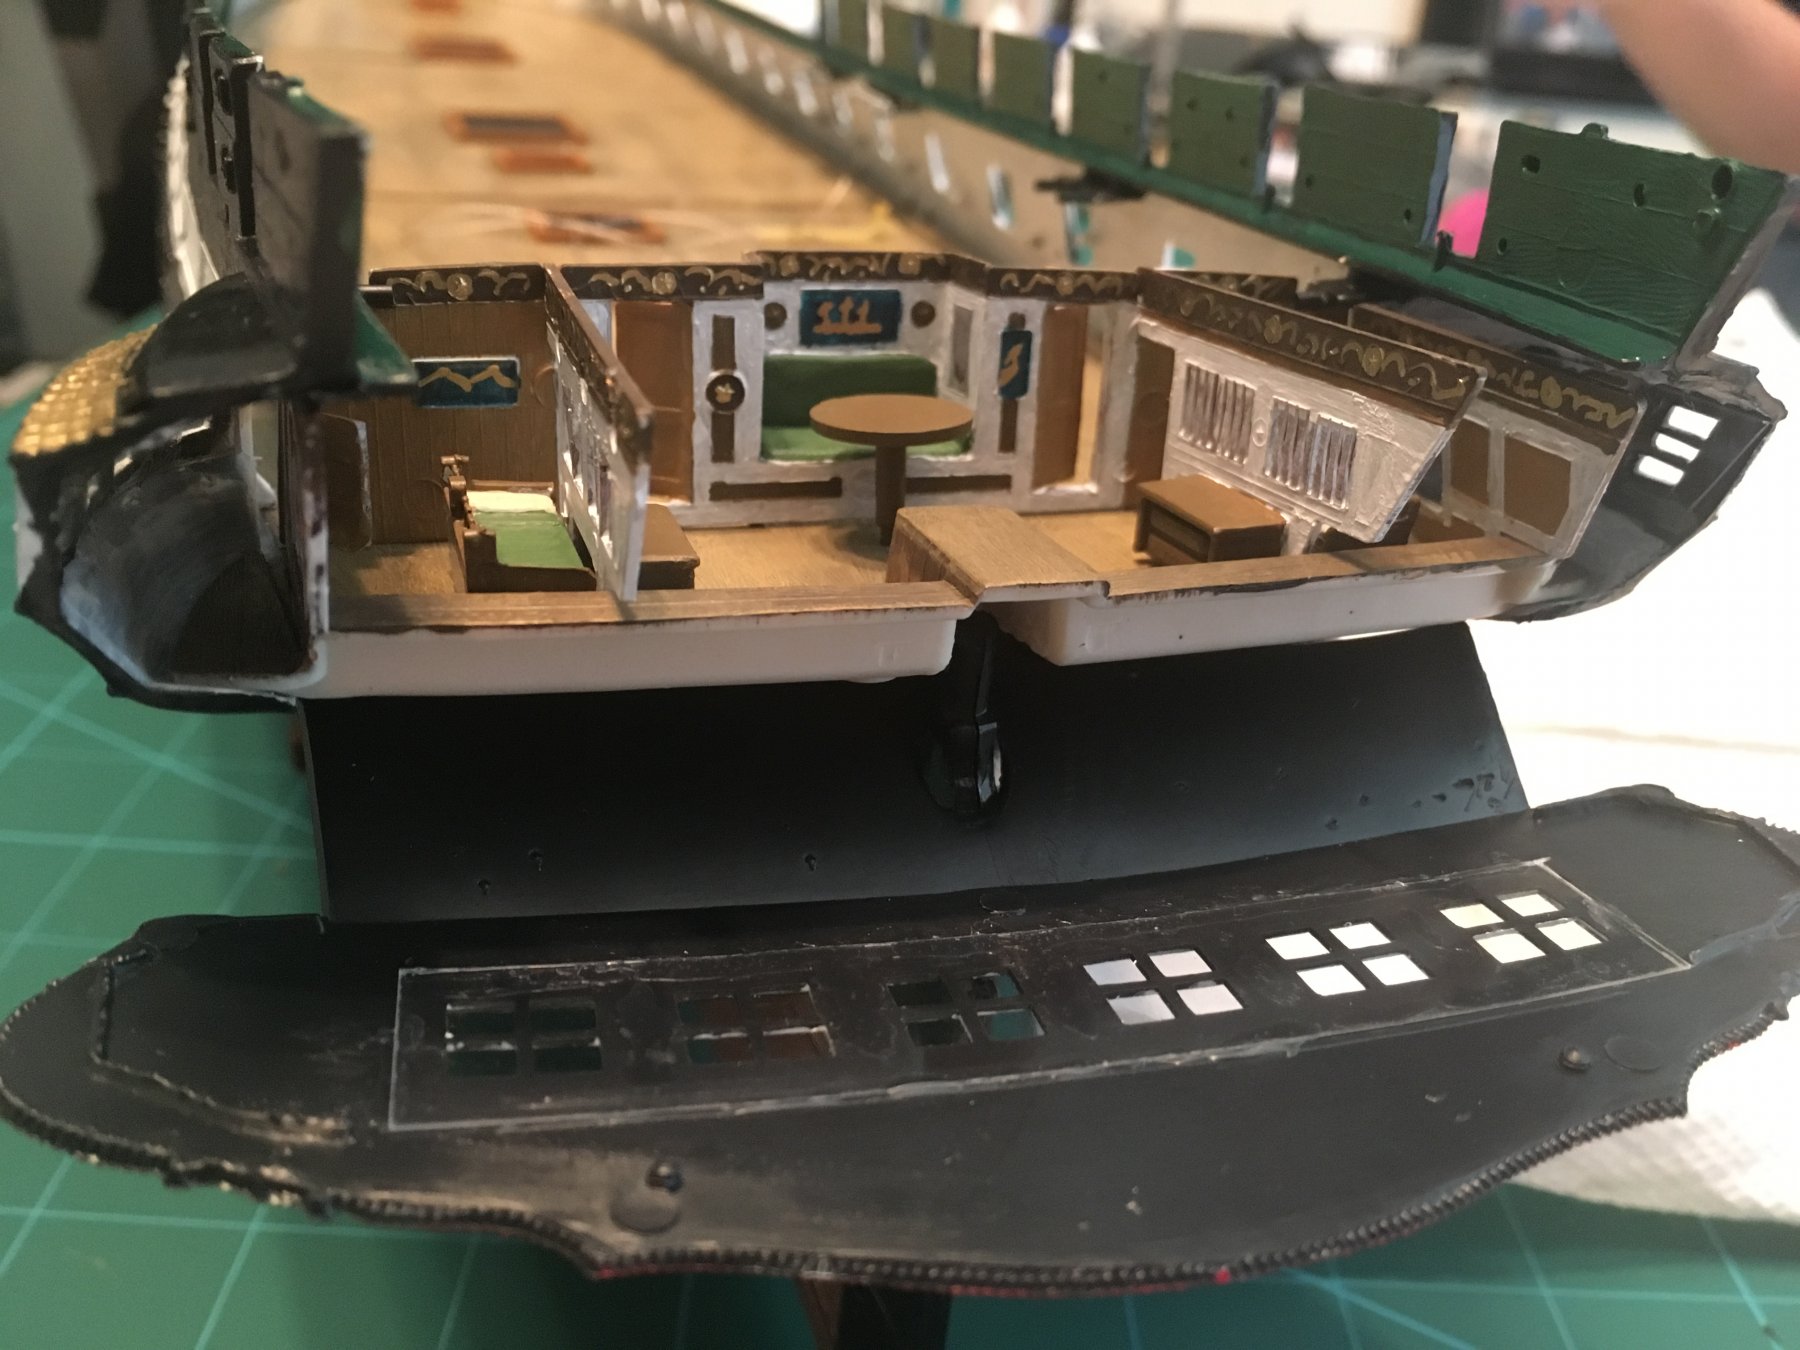
Few more cabin pics, not yet glued. In all my perusing of build logs I have not seen many pictures of the cabin. I think some sprucing up here really can add some character to the ship. I'll end up putting a couple little men in here as well.
Tallshiptragic, I am going to try some putty, a minimal amount, with some super light sanding with your suggestion of re scribing the lines. You think just an exacto? I have seen the wood planking, and it looks great, but I'd like to see what I can do with out any add-ons.


- popeye the sailor, docidle, jud and 1 other
-
4
-
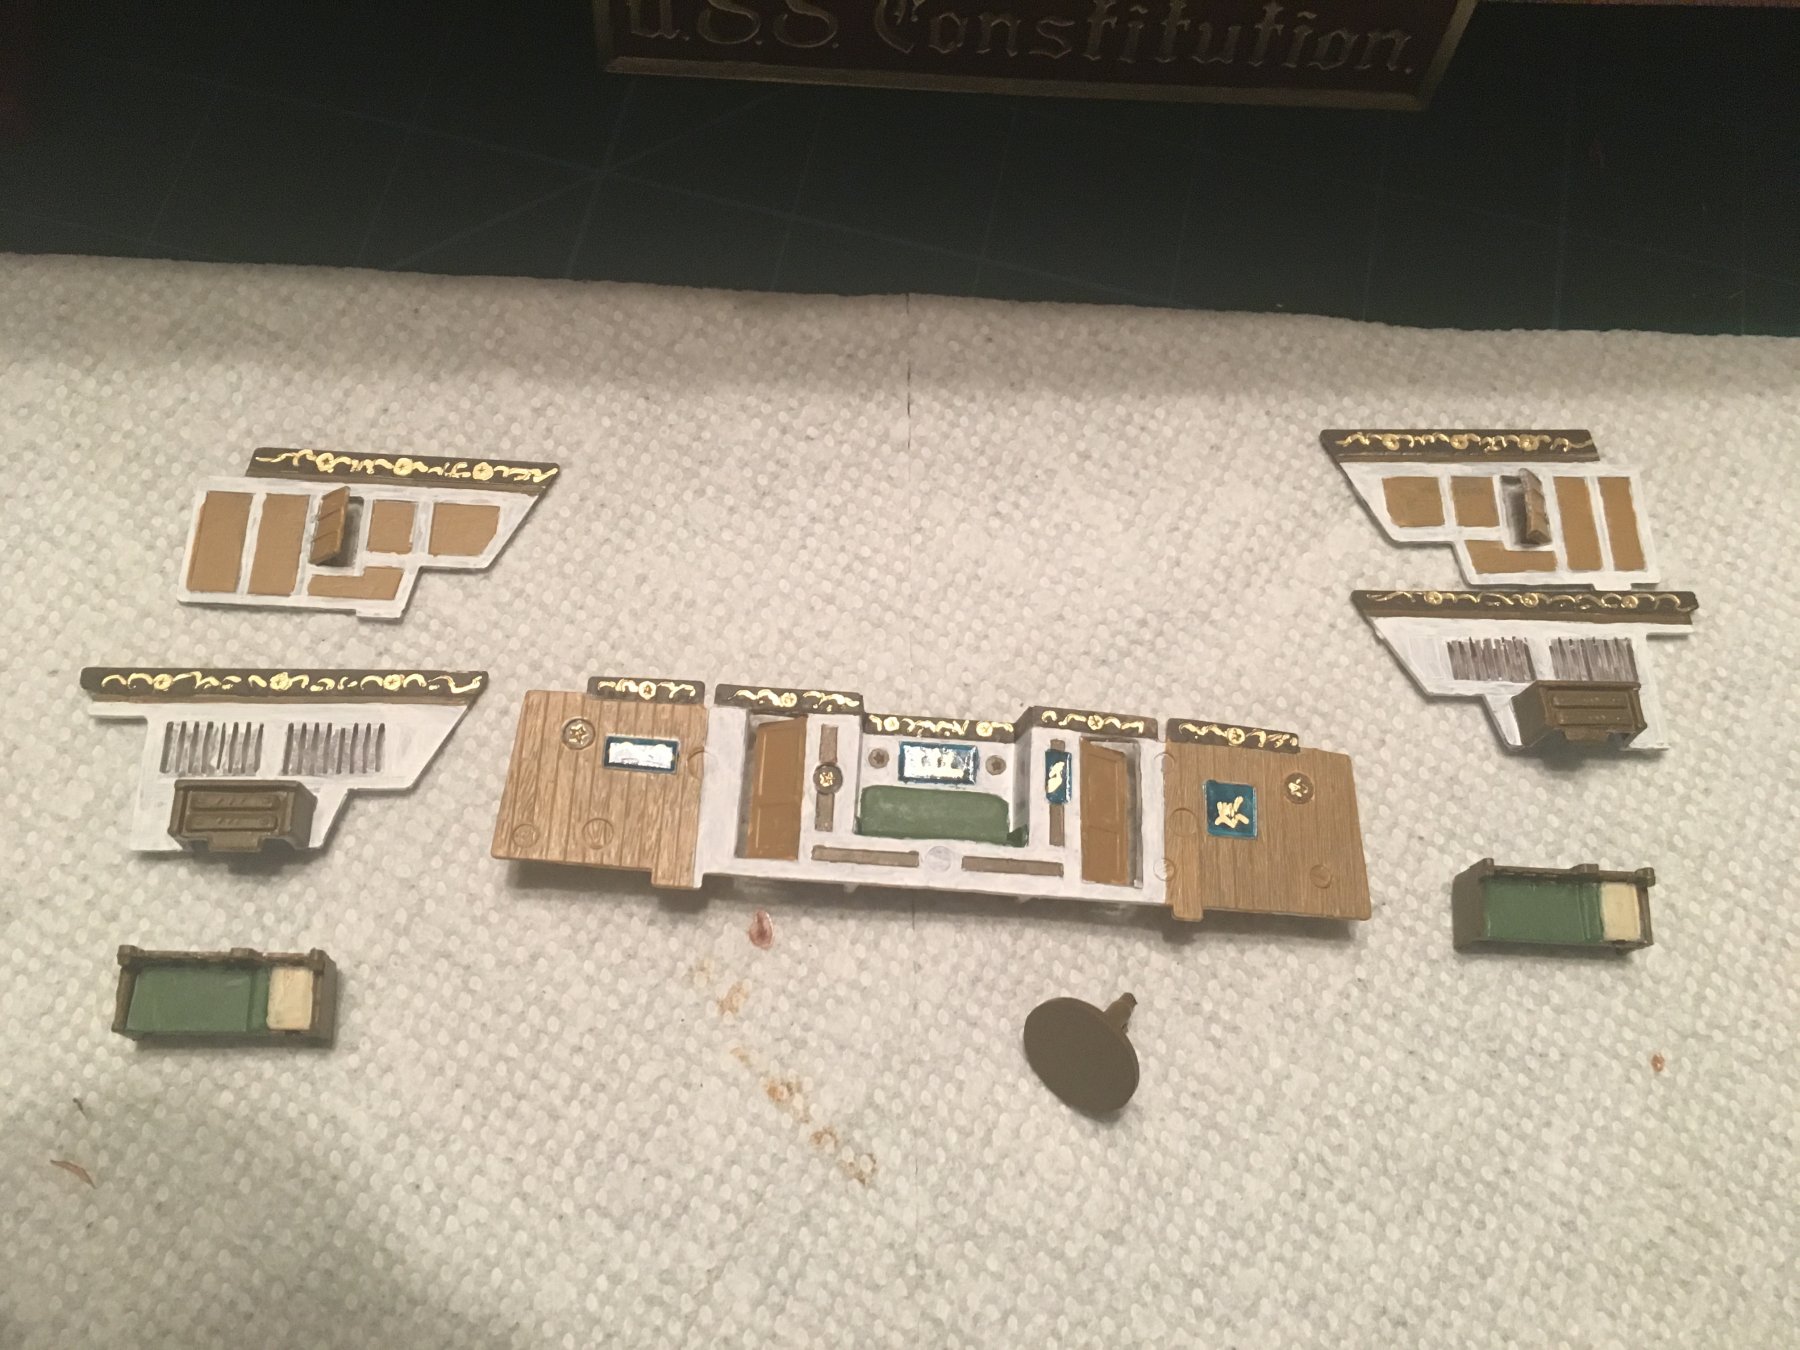
Cabin interior! I know these are barely visible once installed, but it didn't feel right to paint them just white. Very happy with the results.

- Alex1201, Tallshiptragic, S.Coleman and 3 others
-
6
-
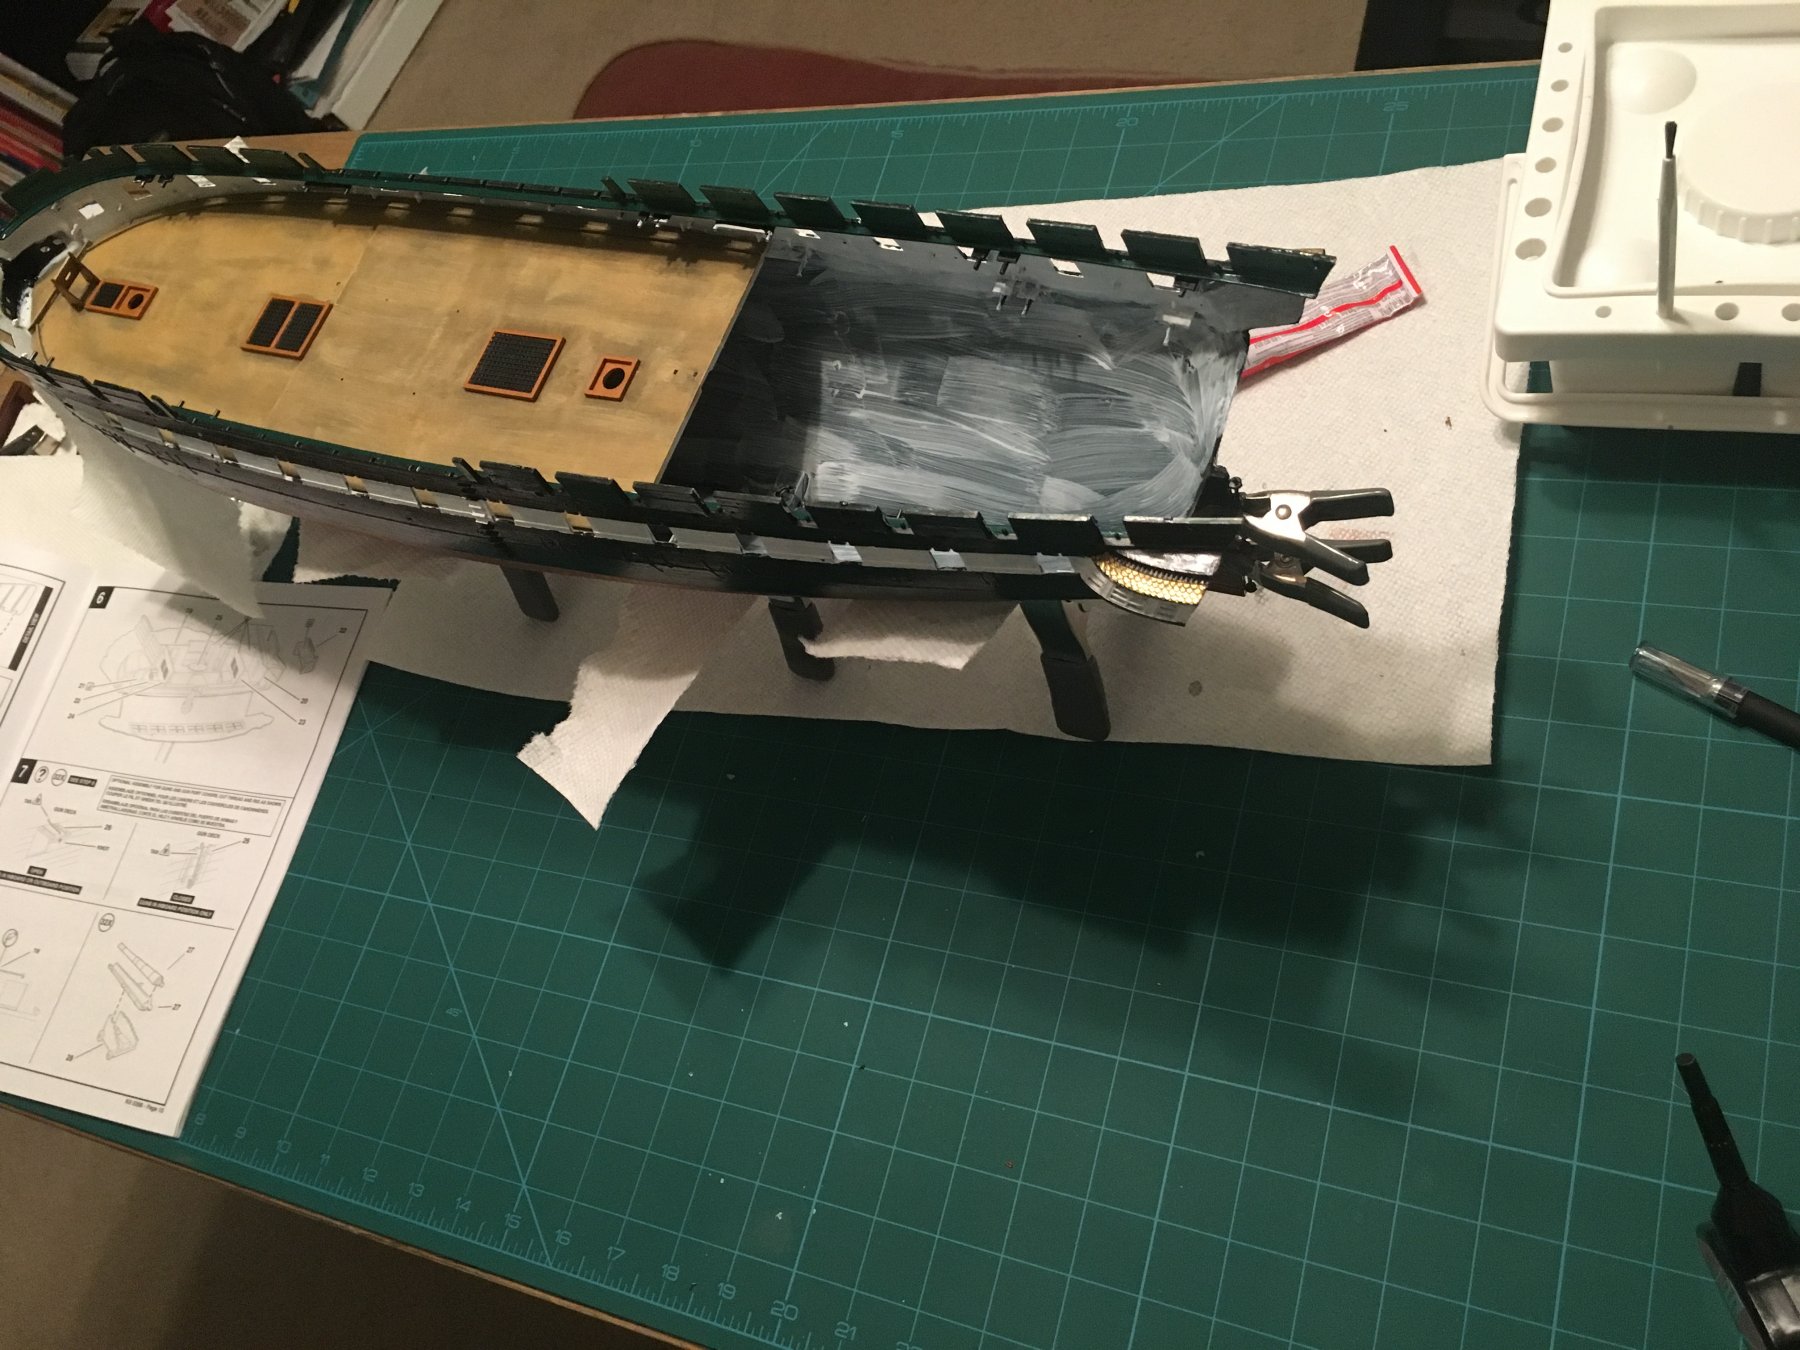
Putty. Going to attempt to hide the spar deck seams. Tamiya? Perfect Plastic Putty? Testors? I'm leaning towards the basic/white Tamiya. What I want to avoid is messing up the built in wood grain texture on the plastic, and I'm afraid sanding will do just that. Thoughts?
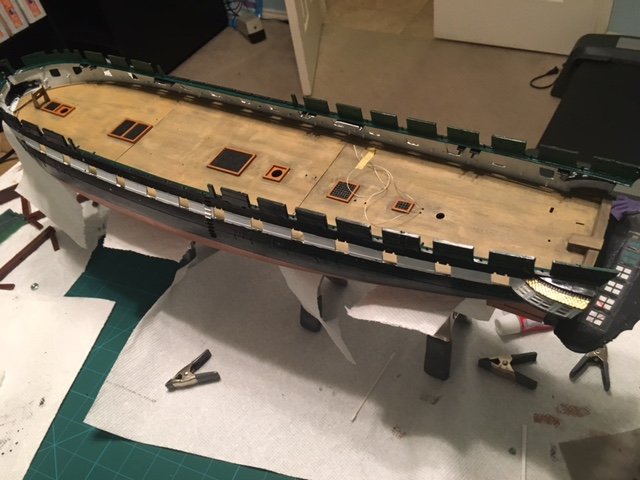
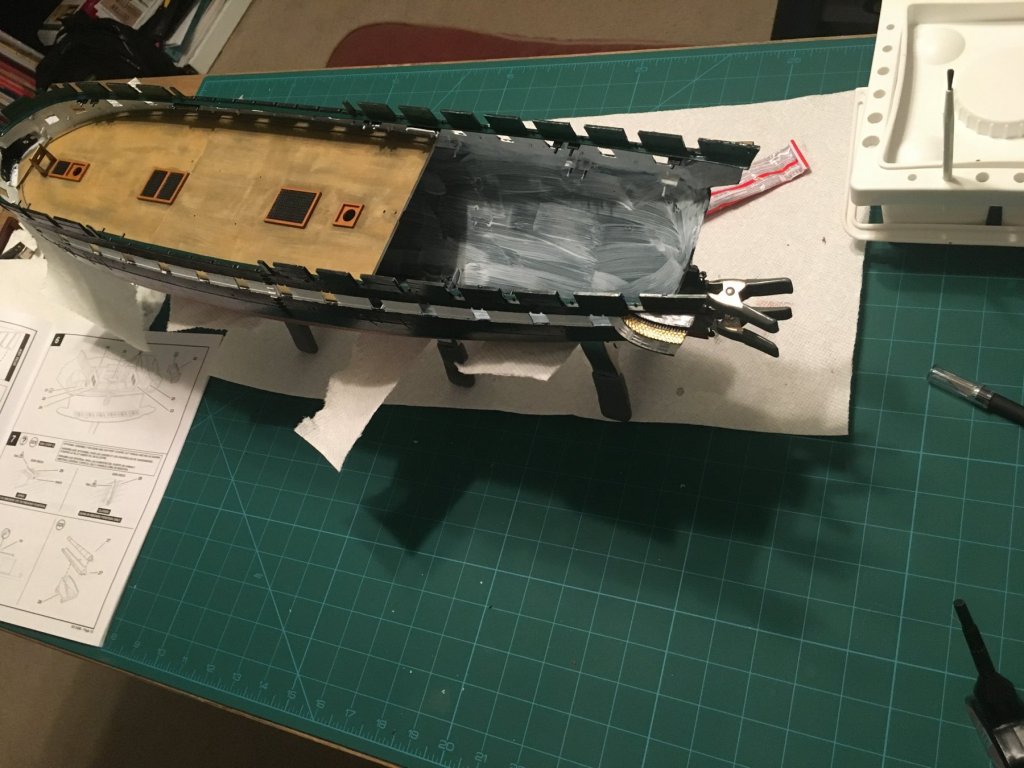
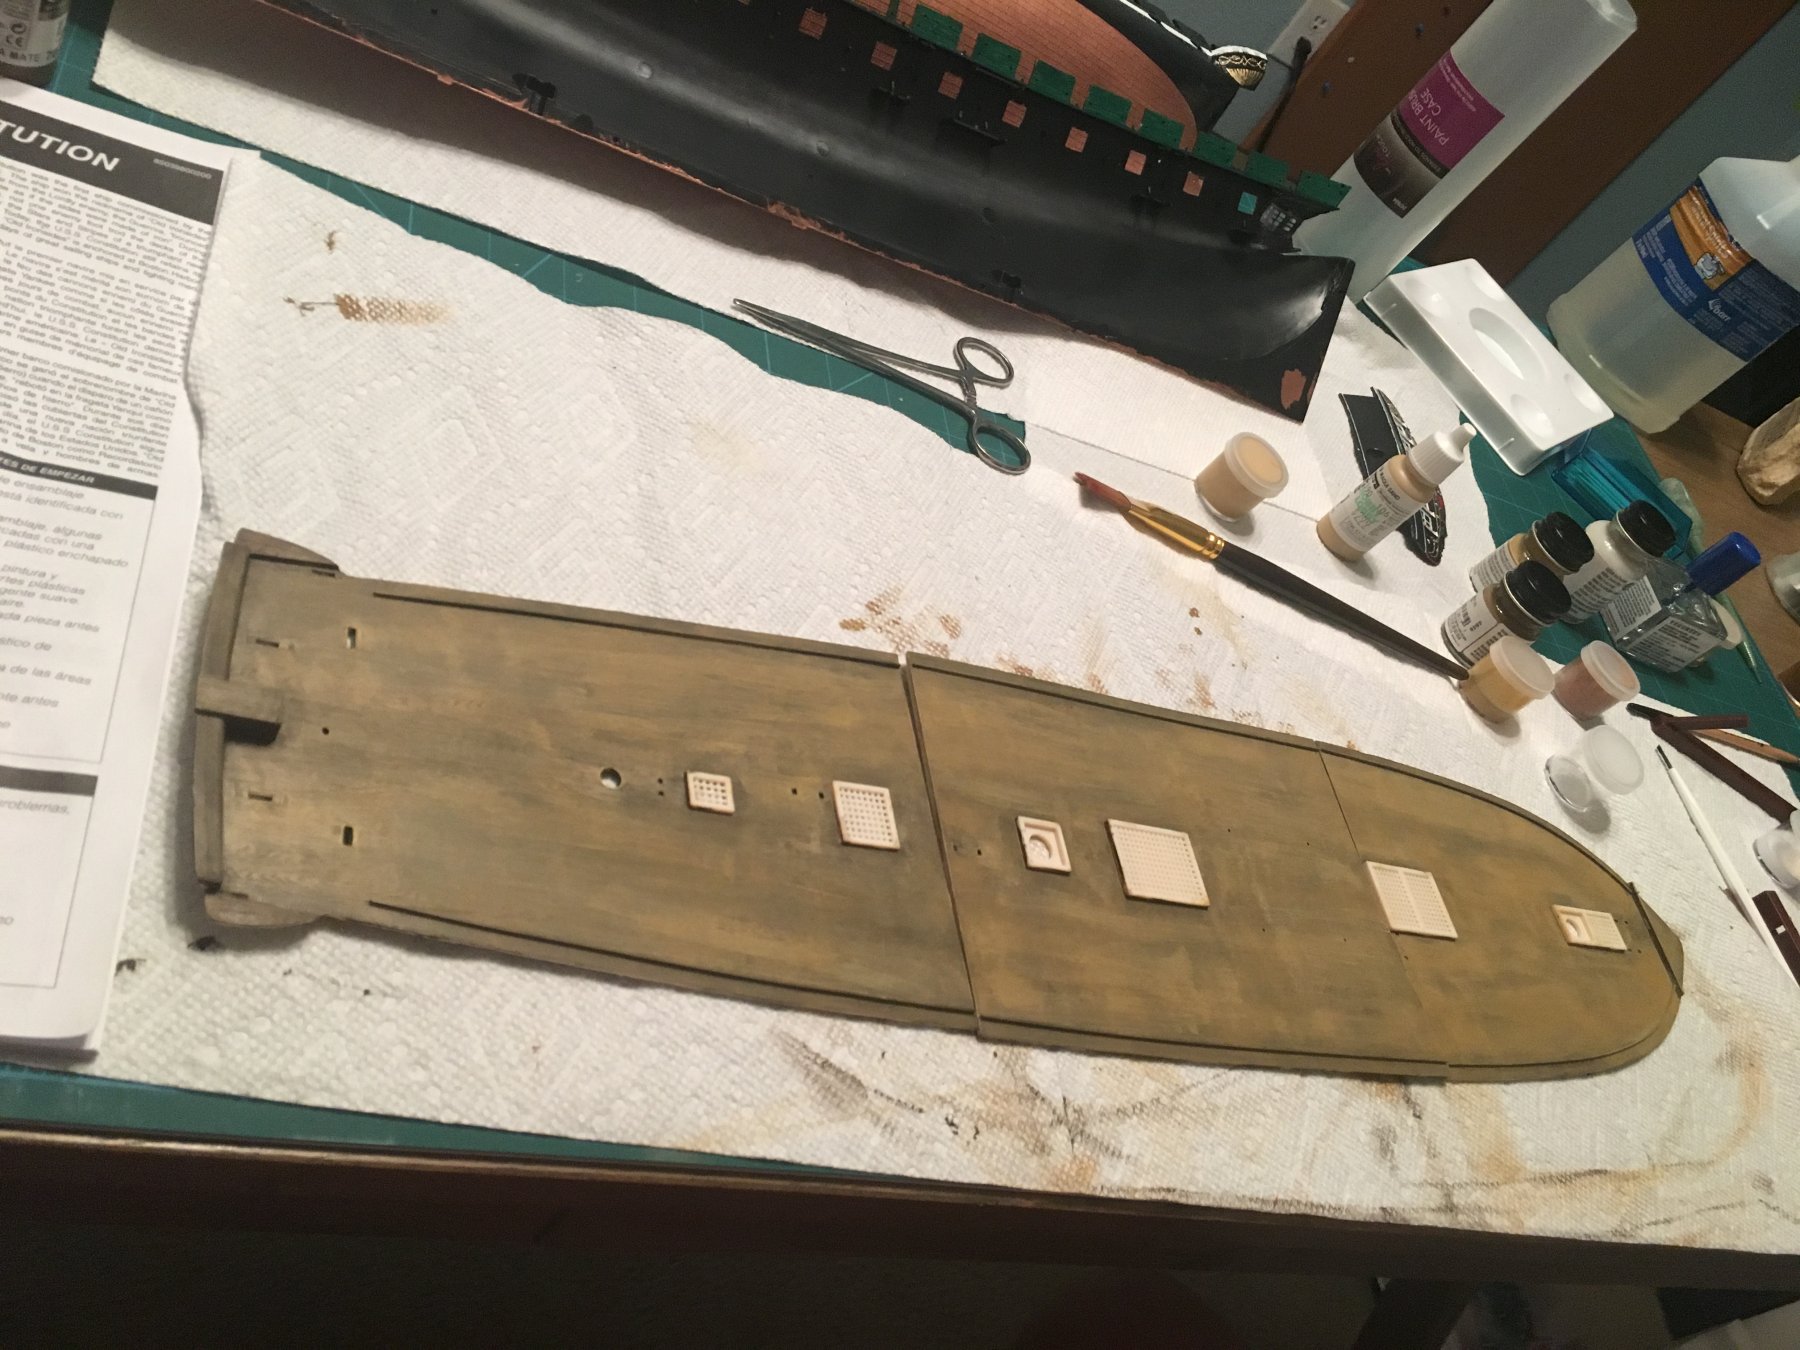
Few pics with the 3rd piece of the deck in place.
-
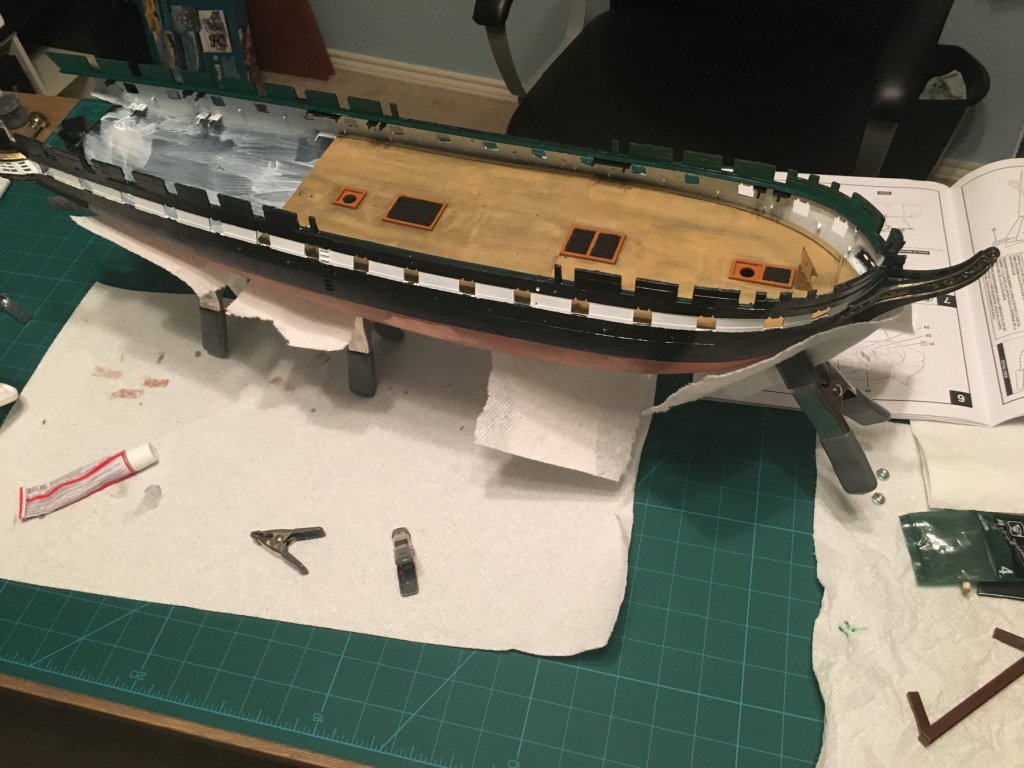
Update. Not much, but I've glued the hull together and snapped in 2/3 of the gun deck. Man, that seam sucks, but it won't be visible. Definitely gonna try some putty or something for the spar deck.
Need to touch up a few spots where I touched the hull with glue because the glue tube broke in my other hand that I was paying no attention to and I smeared it around. Fun.
I do like my wood effort. Will duplicate it but a tad darker on top, and hopefully a few less obvious strokes.
Til next time!

-
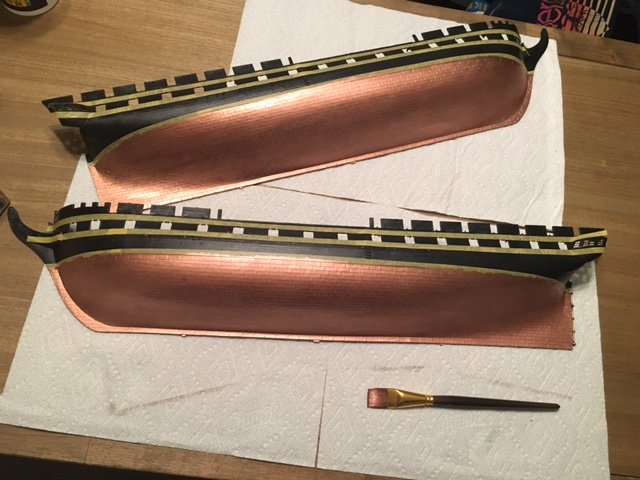
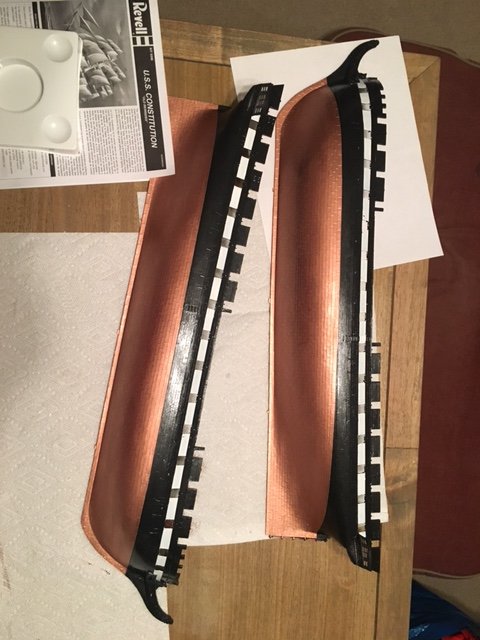
Well... the top coat (I called it laquer, not sure what's appropriate) is a win/lose. It gave me a coating that seems to keep the copper from rubbing off, but in the process of brushing a light coat managed to rub off just enough to be noticeable, to me at least. I guess acrylic doesn't care for Sigh...that's it for tonight. Also gold trimmed the little stand with the ship name and threw a quick primer coat on the inside of the hull. So no pictures.
-
5 minutes ago, Jim Rogers said:
I have glued actual wood strips to plastic ship decks and they looked great, also covers up that unsightly seam.
I'm wondering how bad that seam is going to be... I've seen several people do what you've done, and I considered it, but decided to just roll with it as is. I've seen people sand it, but I don't want to kill the wood grain look in the plastic, and I've seen people use putty. Which I may try for the spar deck. Apparently a laser cut wood deck replacement is available for sale out there as well. My wife made an offhanded comment last night to me that this little model has gotten rather costly rather quickly when she noticed how many additional tools and paints I was surrounded by
 so I have to be a bit cost-conscious. Such is life
- jud and popeye the sailor
-
2
-
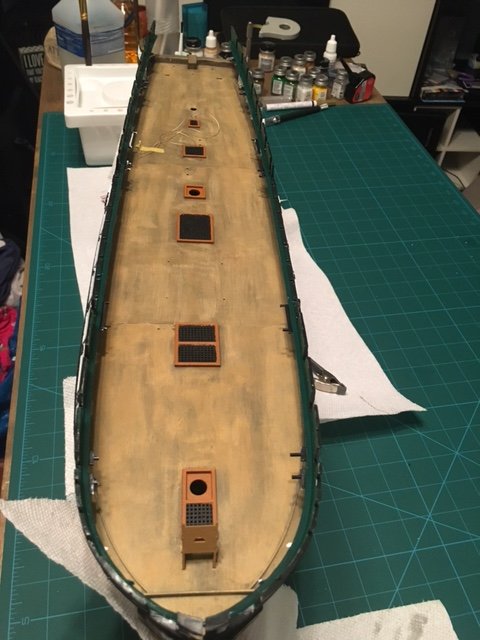
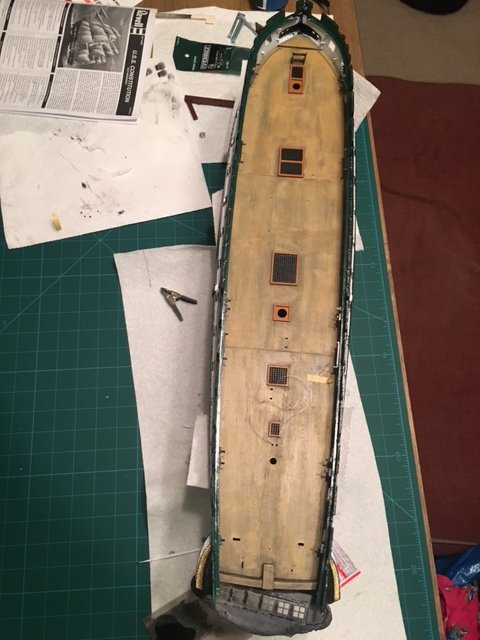
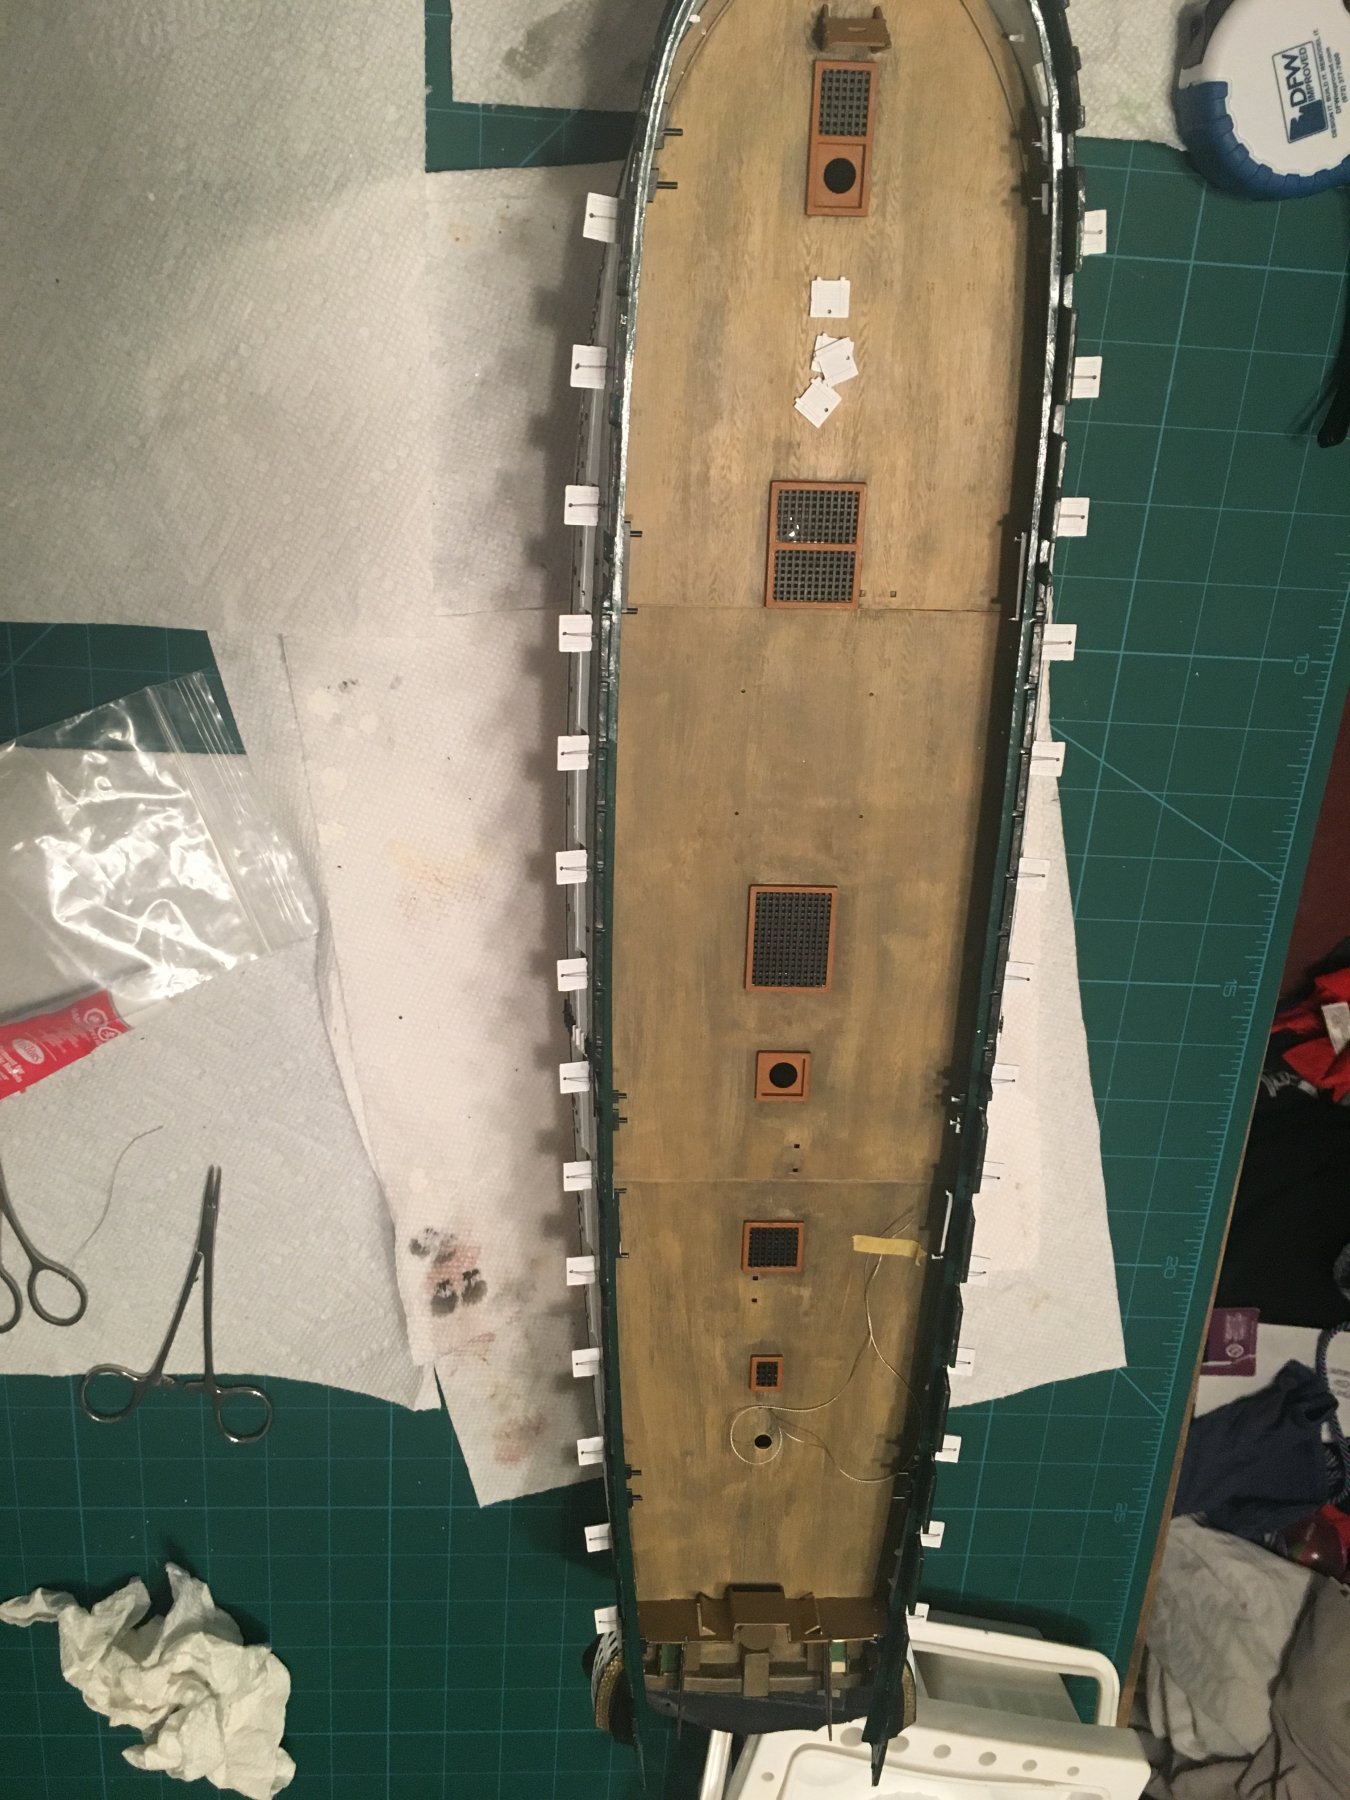
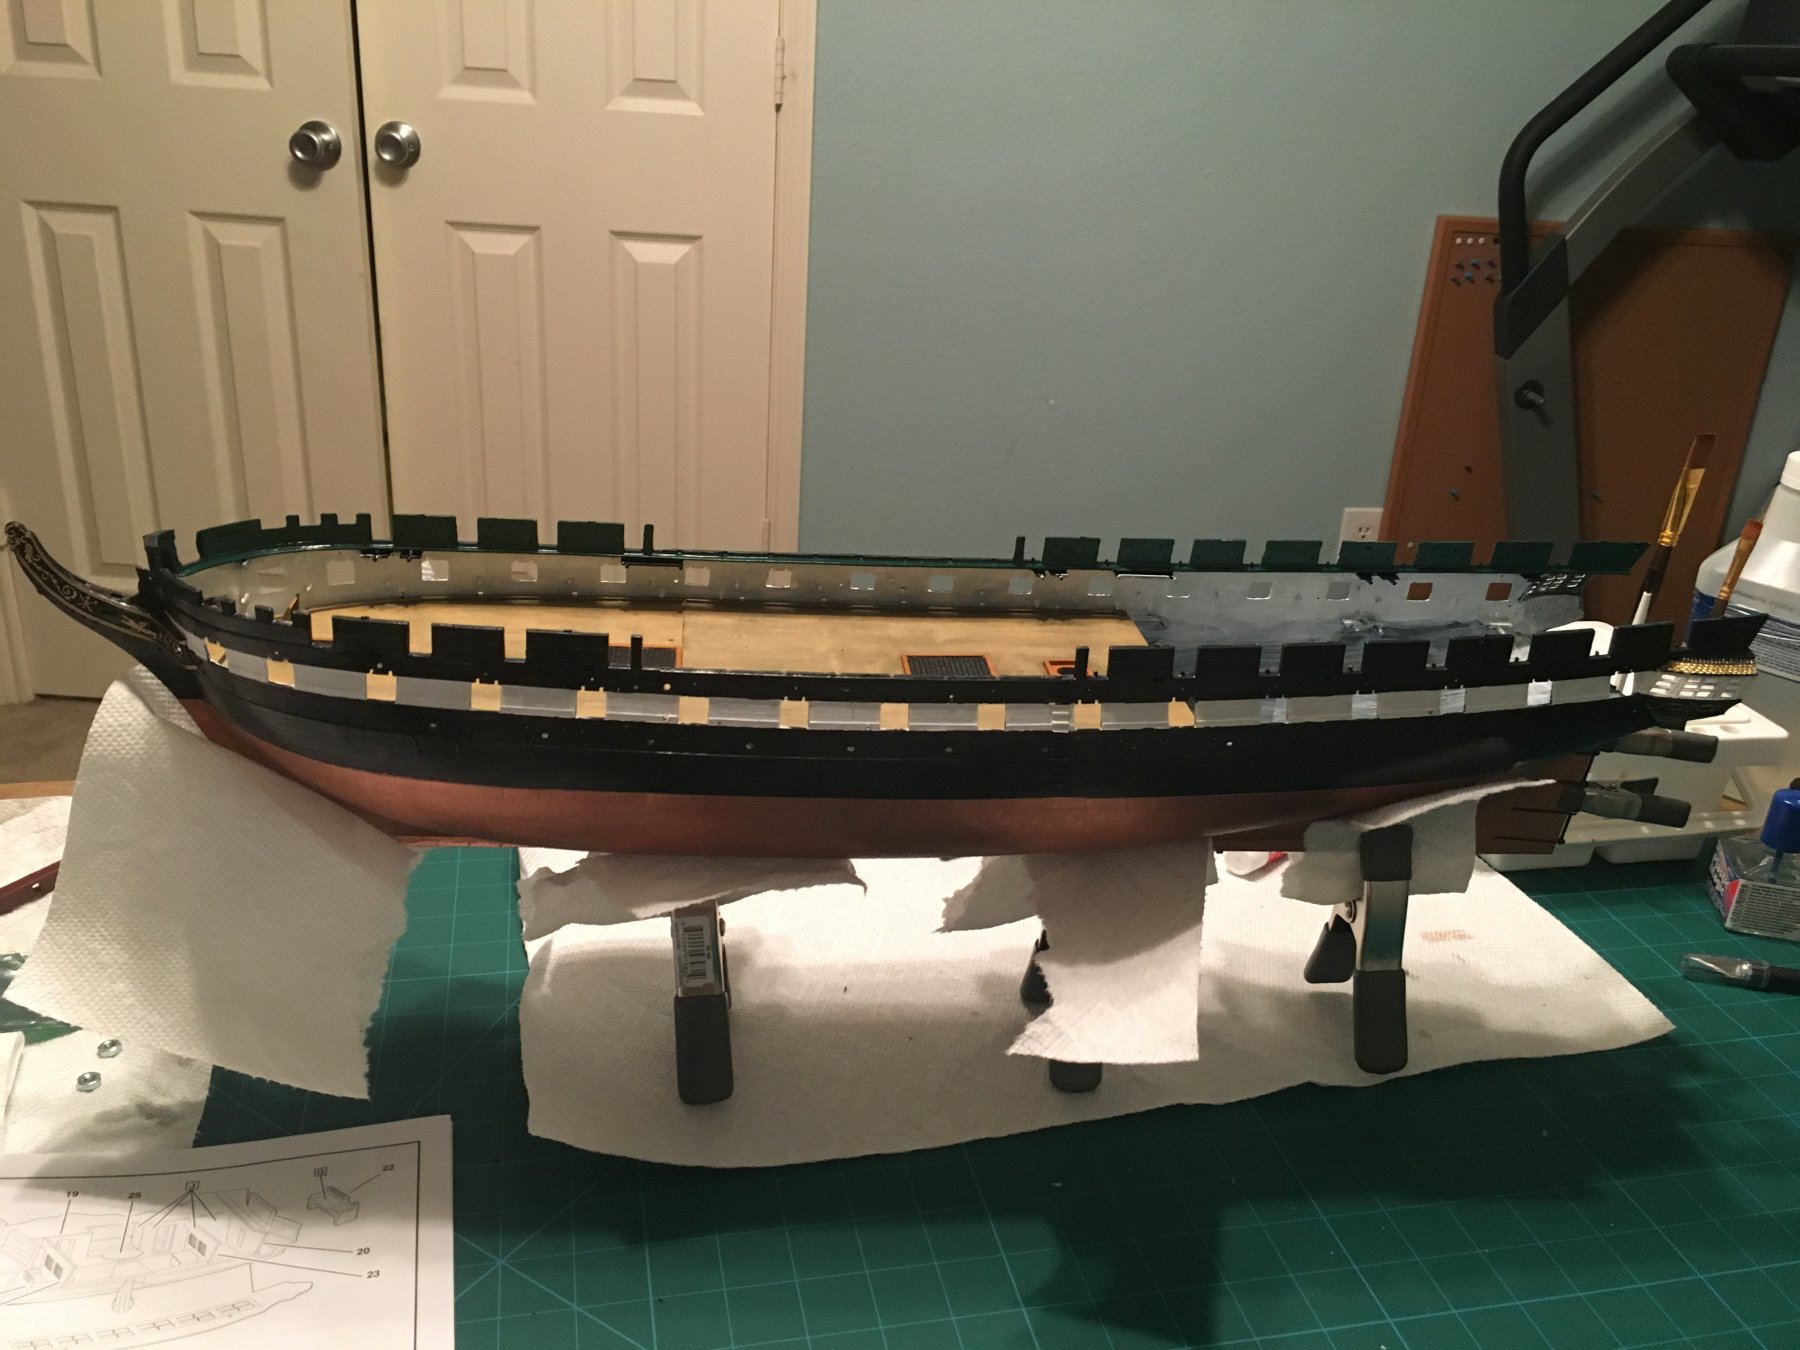
Final wood look. I like it, but it's not what I want. Make perfect sense? Fortunately this is largely invisible since it's the gun deck. I think I have a good idea of how to do the spar deck now. My biggest issue is what Popeye mentioned, the brush strokes. They got really bad when I did a lighter coat on top, so I went over that again with a slightly darker, but warm, "wood" wash of about 50% water. That helped, but not enough.
Before I glue the hull halves together, anybody used the little spaces seemingly for nuts for mounting? I guess I'll stick a couple in, but I've seen nothing about anybody using them, and there's nothing in the manual. Curious if anyone has actually done anything with those.
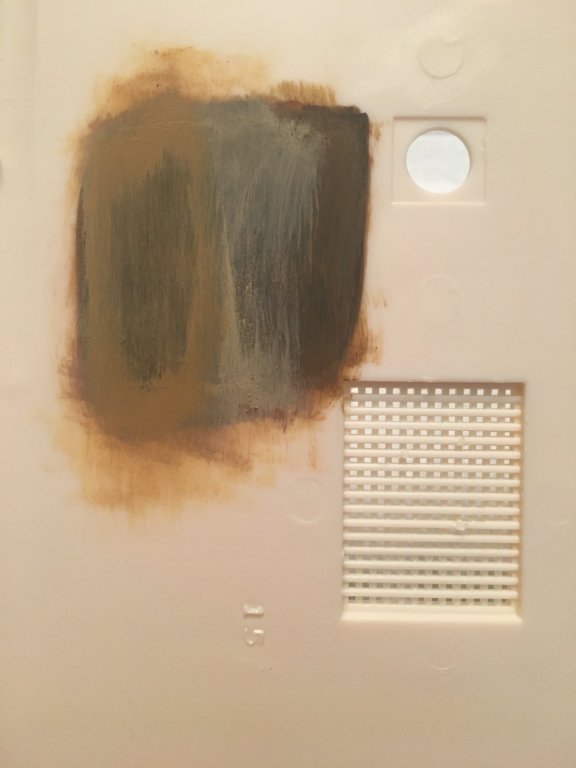
Oh, and I mentioned the bulwarks color. I failed to take a pic of that specifically, but you can see it in the second one below. Turned out nicely I think. Ended up mixing a teal with bits of a couple other greens.


- Fright, docidle, popeye the sailor and 2 others
-
5
-
1 hour ago, popeye the sailor said:
if that is Testor's copper......you can use a flat lacquer on it. I use the small spray cans, and I've done it with my airbrush. I'm not too sure with acrylic......you could try a test piece to see. the deck looks good, but try long strokes with the brush...with the grain. you don't want it to look cloudy. good for you to desire to jump back into the fray........ nothing like it in the world to build the creative side. there are many logs here.......I'm sure you'll get many ideas from them
")
I am using acrylic. I felt like the semi gloss killed the metallic sheen, but I may use it. Debating between that and grabbing a gloss.
The brush strokes are what are killing me on this. I lightened it up a bit and they just show like crazy. I am going to try a couple watered down washes with the darker browns to see if I can go over it and recover that. Thanks for all the input guys!
-
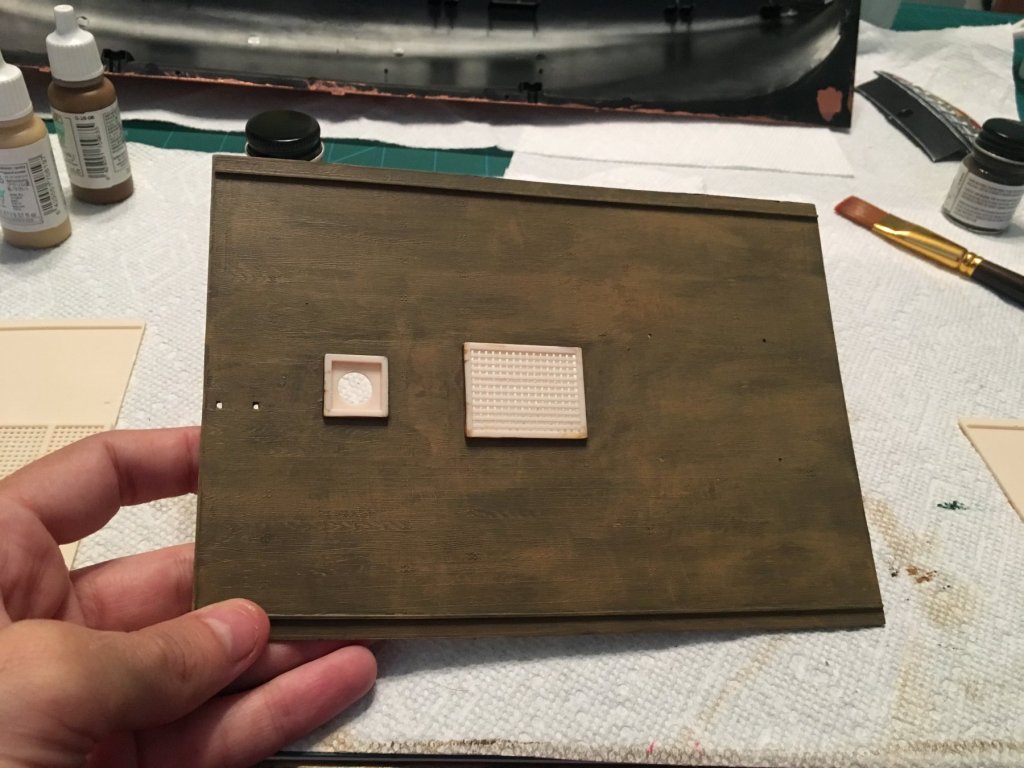
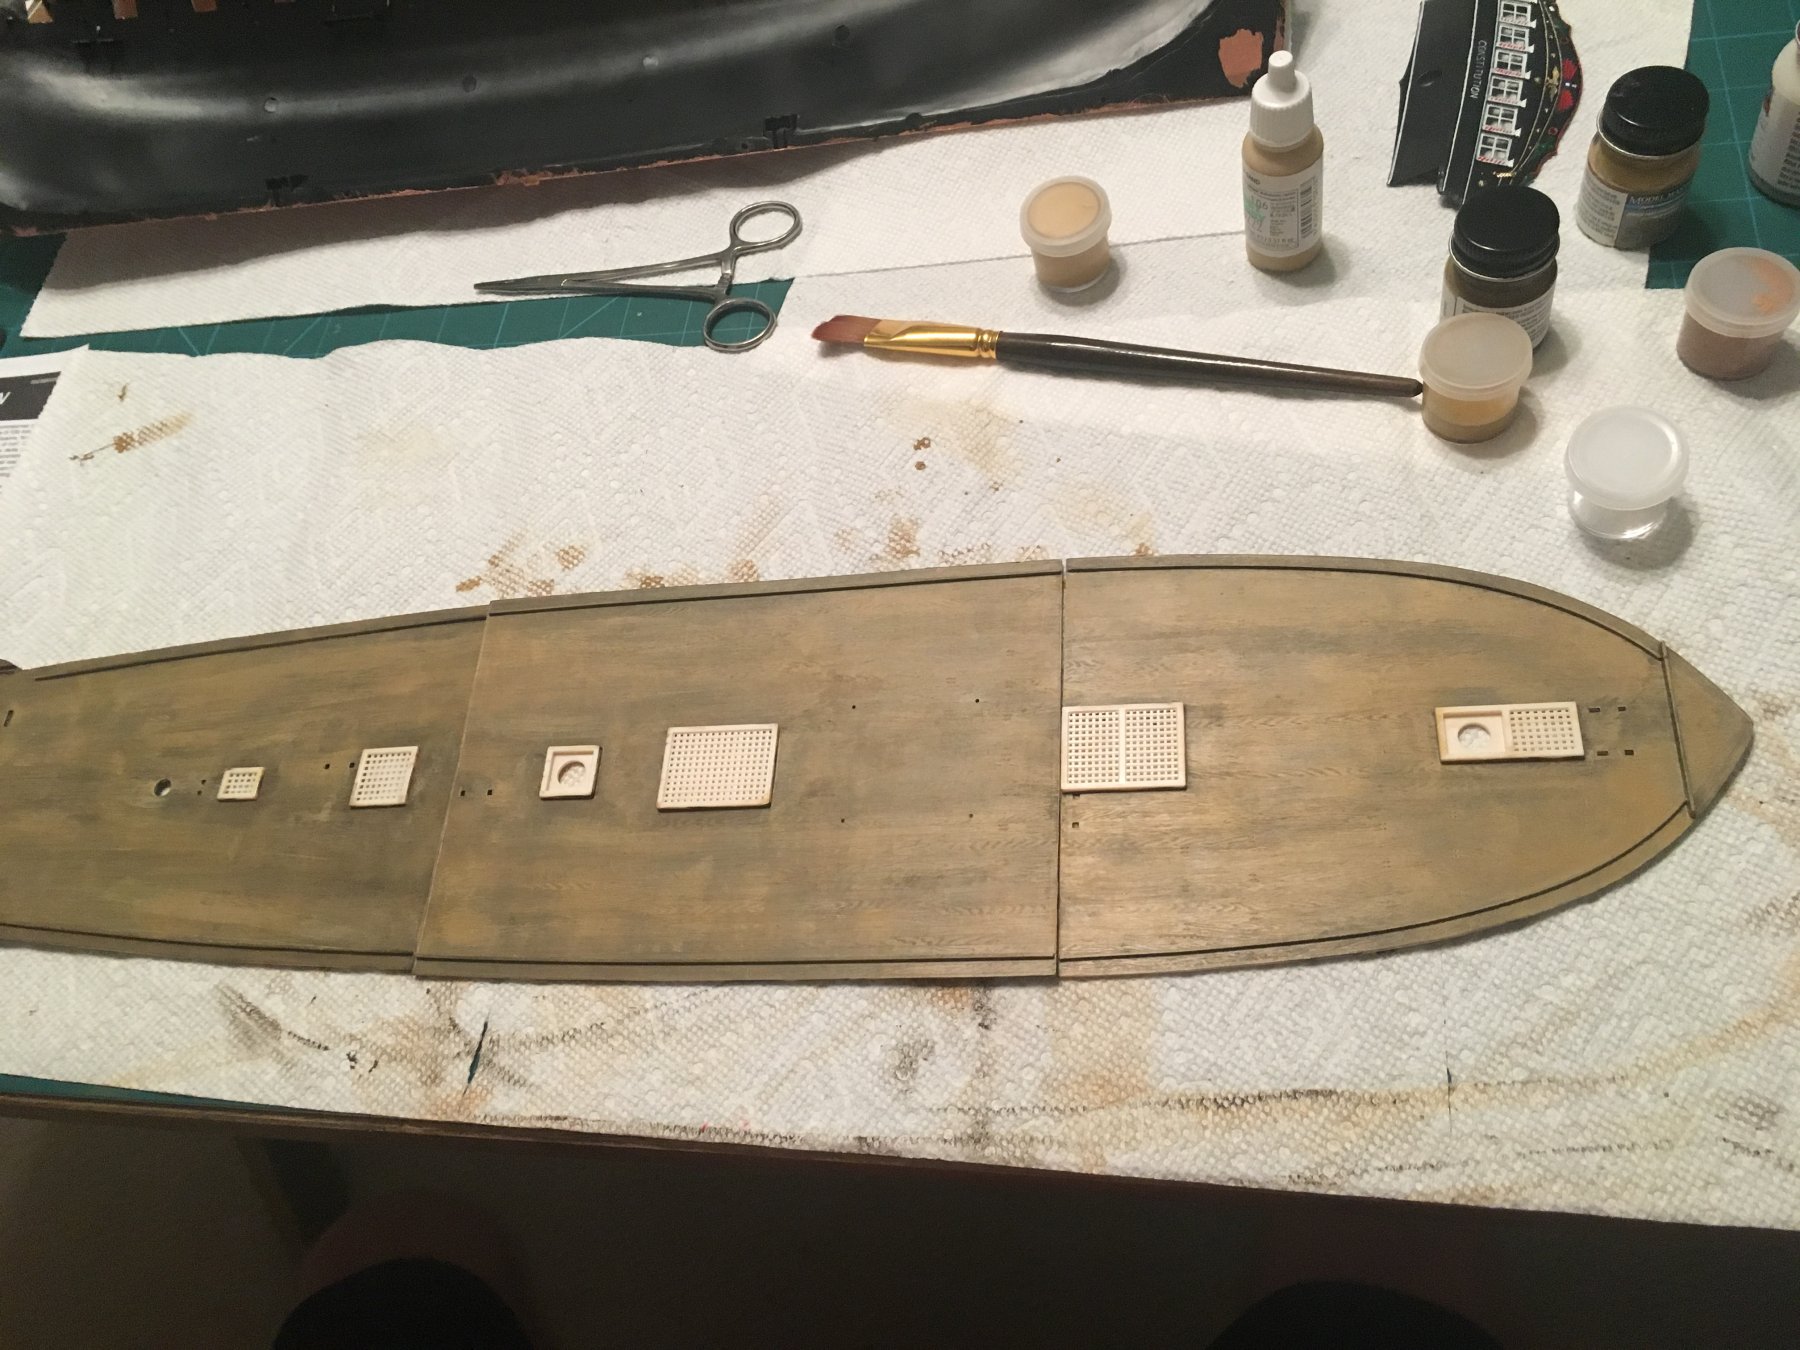
Jud, thanks for the input! With that I think I'll go with a bit less weathered. I had already started on my "practice" deck, or the gun deck 😄. Thoughts? I hope it's not too "worn" looking. What I did is a double coat of a dark brown, called Roof Brown Flat, and then I did a light almost dry brush of a slightly lighter color called Dark Earth, followed by another almost dry brush with a lighter color called Wood. I like it, but hope it's not too worn.

- jud, docidle, popeye the sailor and 1 other
-
4
-
Oh, and one other thing. Has anybody bothered with some kind of lacquer on the hull? Handling the copper just rubs it off super quick. Even trying to handle it not too much it still ends up rubbing off super quick. I was thinking of a gloss lacquer. I grabbed a semi gloss and it dulls the metallic showing too much. Any input appreciated.
-
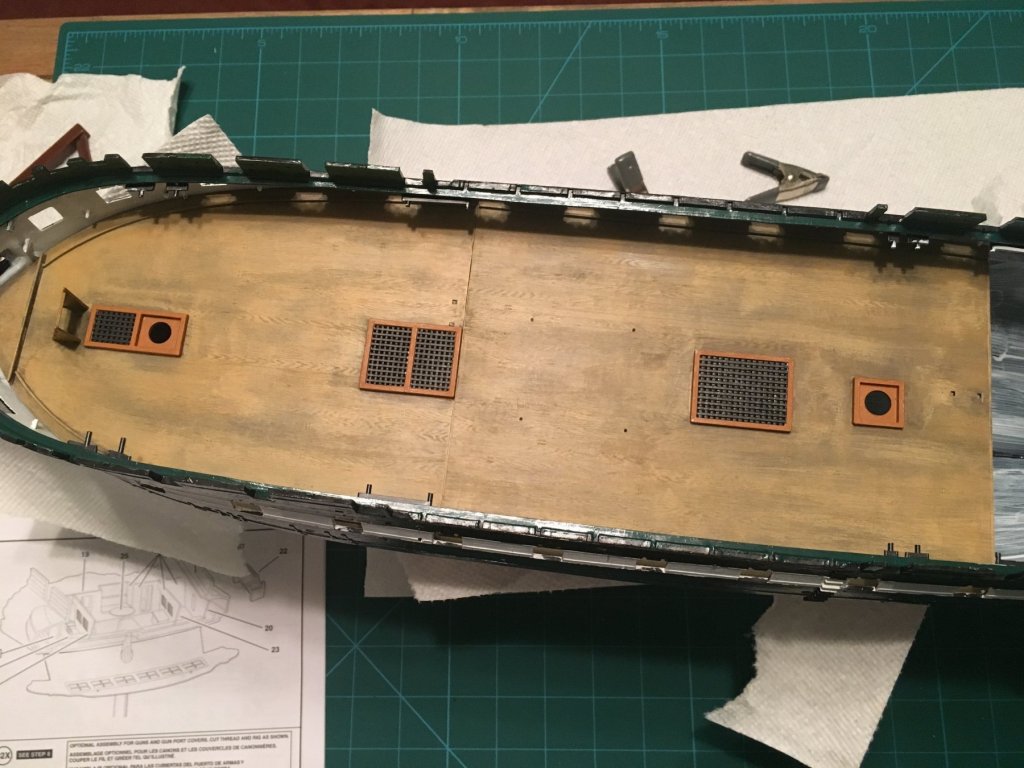
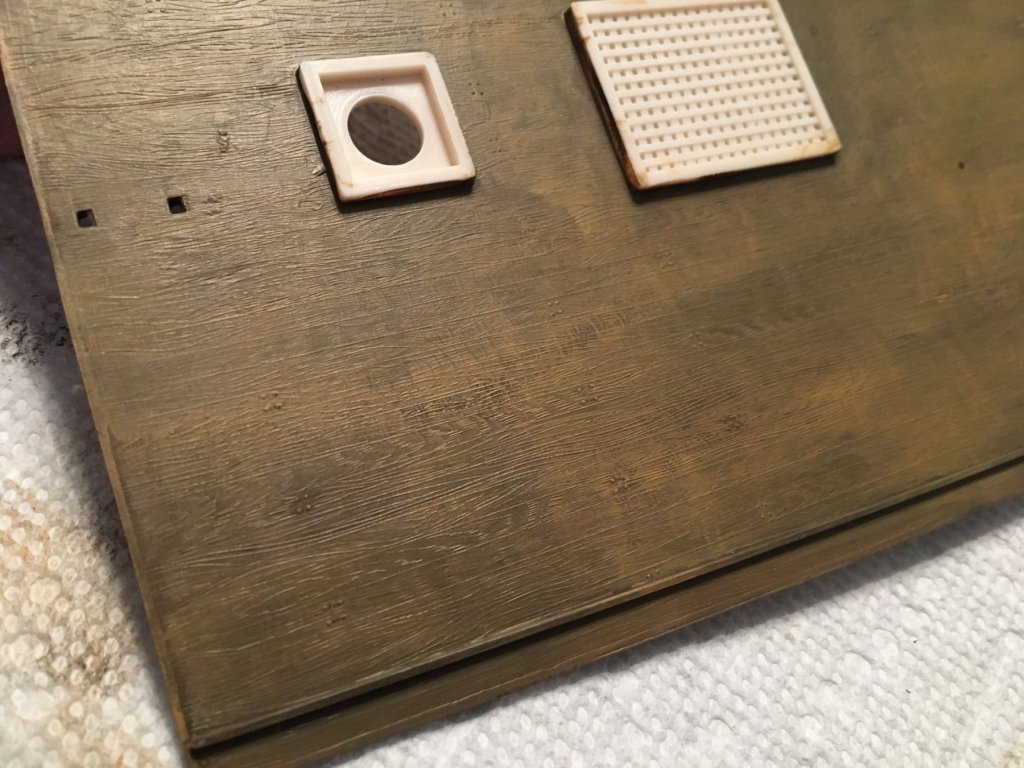
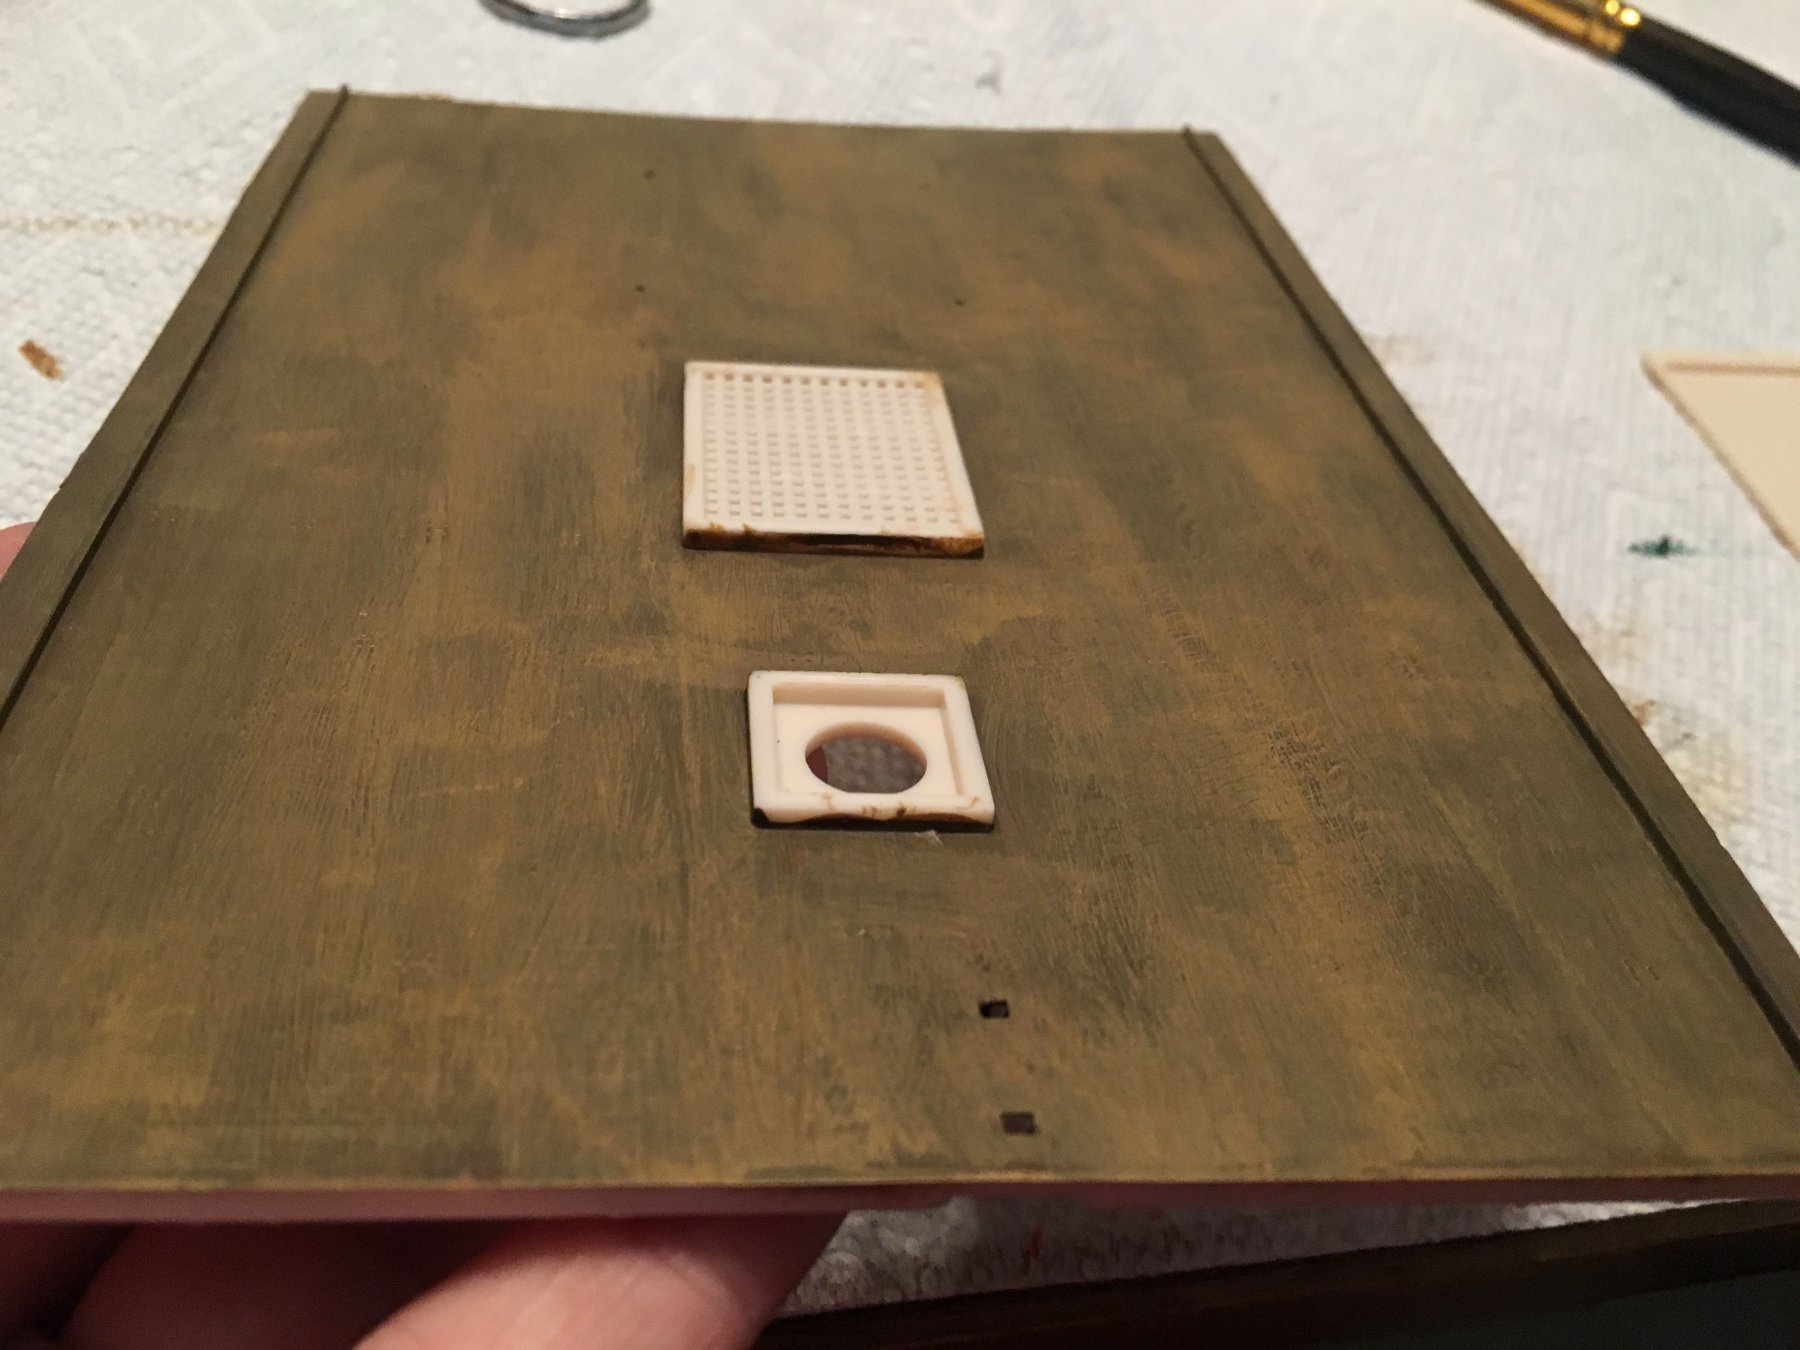
Not sure if anyone is following yet, but I've got a question to pose. I've been tinkering with a wood deck look. The actual ship seems to be a darker wood, despite revell wanting a straight tan. I'm working on the underside of the gun deck for practice
Here is an effort with 3 shadings. I think I like the middle stripe. Opinions?
-
I have never done this (a build log) before, but from what I've seen, one of the best ways to get advice is to have a build log as a forum for discussion! I have in the past built model cars, but I recently, after a good 20 of years of nothing, decided to get back into it, and then I decided to try my hand at a ship! I built the 1/150 scale Revell USS United States. And I absolutely loved it! I have now decided (perhaps foolishly) to tackle the 1/96 USS Constitution by Revell.
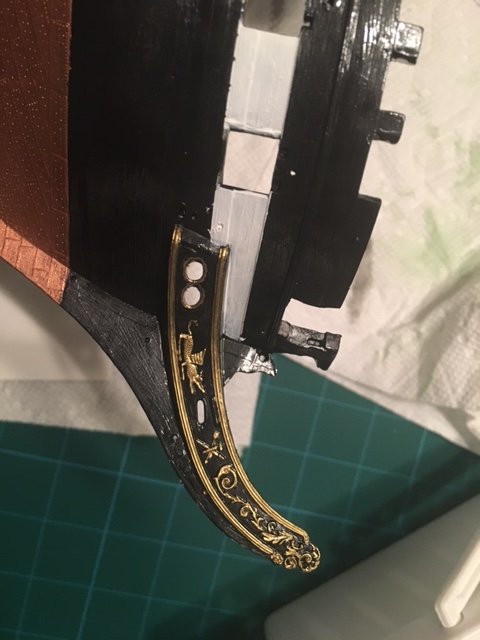
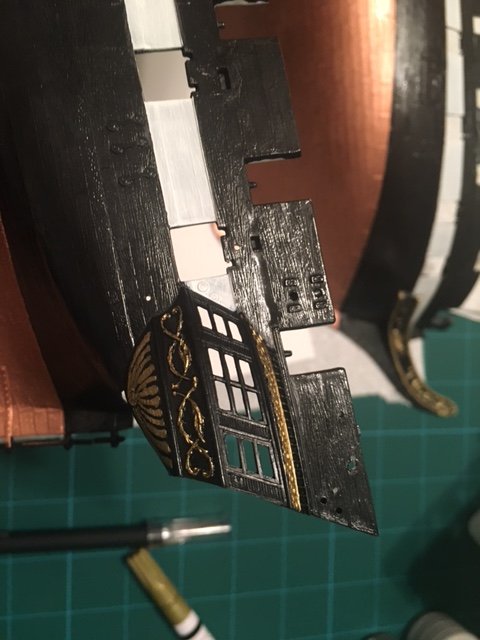
So I dove in earlier this week from the beginning, painting the hull. I have that mostly complete, still needing to paint the interior, and I've hit the detail areas on the bow and stern as well as on the cabin. Here are my pictures so far. I used a paint pen from Hobby Lobby for the gold and some of the white for the small detail, but a small brush and a toothpick for the other small parts.What I struggled with was the bulwarks color. I have decided to go with a darkish green, similar to what is on the current real life ship. I don't know why Revell wants it white, but I'm rebelling! I have been unable to mix a satisfactory green, so I'm buying some paint today.
I am very nervous about this ship build because it's a hefty task for someone like me with very little to no experience. Also super excited. Hopefully the community here will be as awesome as it appears to be!My next task once the hull is complete is going to be an attempt at creating a weathered wood look on the deck. I have seen some vague references to doing this, but I am going with trial and error. If anybody has any input, please let me know! What I've done is grabbed varying colors of brown from light to dark, and I'm going to try to layer them.
To be continued!


USS Constitution by Michael G - Revell - Scale 1:96 - PLASTIC - Newbie Build!
in - Kit build logs for subjects built from 1751 - 1800
Posted
Great! I'm on my phone and can't figure out how to follow yours... what am I missing?
I plan to have an update in the next week or so here. Working the gun carriages still As I mentioned early on I'm trying not to get too absorbed in this that I neglect my family 😄